


Forest Model DL-01 (9078/9079) LED Light Operator’s Guide
Aordable Excellence + Designer Friendly®
Squeaking Light Arm
• Lubricate post socket with grease.
Light Does Not Turn On
• Make sure electric power cord for the power supply is correctly plugged in.
• If still inoperable, unplug power cord and check condition of fuse.
• If the problem is not solved, contact our Technical Service Department. Tel: (800) 423-3555
• Follow steps for “Cleaning Front Shield & Reector”.
• If light remains dim, call our Technical Serv ice Department. Tel: (800) 423-3555
Light Intensity is Considerably Dimmed
Troubleshooting
MULTI-PURPOSE GREASE
Light
1
3
2
4
SET
SCREW
Light
Or
Sooner
Later
1
4
3
2
SET
SCREW
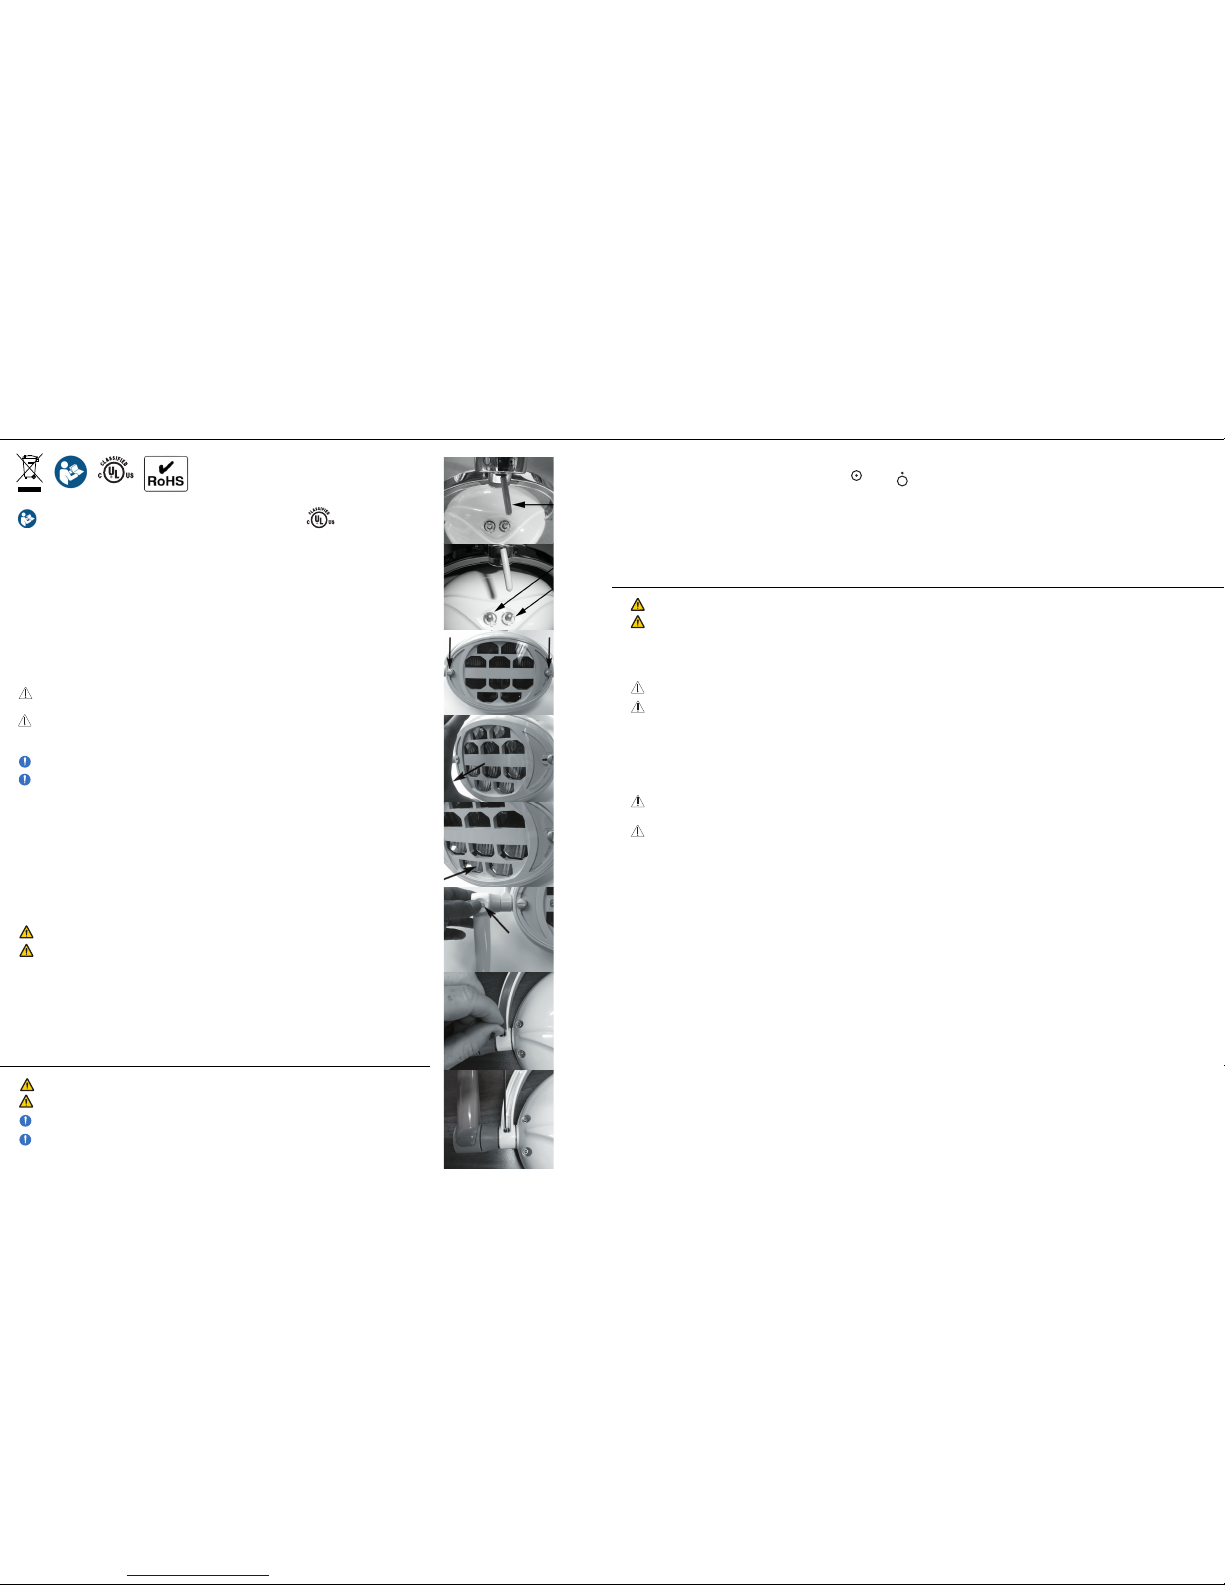
Light Auto On/Off Adjustment (Figure 1)
(contact your service technician)
Deactivating Auto On/Off (Figure 2)
(contact your service technician)
1. Remove ex arm end caps screws (.05” Hex). Remove end caps.
2. Remove the four screws securing the ex arm cover (1/16” Hex).
3. Slide the cover down the ex arm.
4. Loosen the two set screws securing the On/O switch block (3/32” Hex).
5. Slide block away from light for later on activation or toward light for
sooner activation.
6. Reverse steps to complete.
1. Refer to steps 1 - 3 (light auto On/O adjustment).
2. Locate block next to auto On/O switch inside arm.
3. Loosen and remove (2) screws - 5/64” Hex.
4. Remove block (automatic On/O - deactivated).
5. To reactivate the auto On/O simply reinstall block.
Figure 2. Deactivating On/Off
Figure 1. On/Off Adjustment
CAUTION: Verify set screw is securely tightened to avoid end cap detachment.
MISE EN GARDE: Vérier que la vis de serrage est bien serrée pour éviter que le chapeau ne se détache.
Maintenance and Cleaning/Disinfection (continued)
3.8.19 0097-510 Rev. C 4 of 4
Conformity Assessment:
Medical Device Directive Annex VII
DTE Oregon, Inc.
Address 6200 ne cherry drive hillsboro oregon 97124 USA
Phone 800 . 423 . 3555 503 . 640 . 3012 | Fax 503 . 693 . 9715 | Digital sales@forestdental.com forestdental.com
Forest Dental Equipment
• Position light for oral cavity illumination using handles for focal length and direction.
• Turning On. Toggle switch (Figure A) le. = On = O
• Automatic On/O. Li light ex arm above and below 0˚.
(To deactivate contact your service technician.)
• Adjusting light intensity. Use knob (Figure B) to adjust intensity.
• Adjusting color temperature. Use knob (Figure C) to adjust color temperature.
Removing & Replacing Front Shield
CAUTION: Never touch the LED reectors or lamps. If necessary, clean only with low pressure air.
MISE EN GARDE: Ne touchez jamais les réecteurs ou les lumières LED. Si nécessaire, nettoyer uniquement avec de l’air à basse pression.
1. Turn the 1/4 turn fasteners on front of shield clockwise. (Figure D)
2. Pull shield out with fasteners. See (Figure E)
3. Reverse to reinstall. See (Figure F)
Removing & Sterilizing Handles
1. Press in the locking tab. (Figure G)
2. To completely unhook, wiggle and pull handle outward while
pressing in locking tab.
3. Autoclave @ 250° F (121° C) for 10 minutes or 273° F (134° C)
for 4 minutes.
4. Reverse steps 1 and 2 to reinstall.
Cleaning Front Shield & Reflector
17UJ
A
B
C
D
E
F
G
H
I
CAUTION: Abrasive or detergent materials such as alcohol, trichloroethylene, gasoline (petrol), turpentine or the like should not be used on any part of
the light.
MISE EN GARDE: Les matériaux ou détergents abrasifs comme l’alcool, le trichloréthylène, l’essence, la térébenthine et toute autre substance semblable ne
devraient pas être utilisés sur aucune partie de la lampe.
1. Remove front shield. (Figures D & E)
2. Cle an the front shield with a so cloth moistened with mild soapy water. Using chemical disinfectants can damage components. e front
shield is not autoclaveable.
3. If needed, clean reector with low pressure air only.
LED Light
Operating Light
Light Friction Adjustment Screw
1. Looking at the front of the light, remove the right side decorative trim from the back of the light by pulling it up with your ngers. is
will reveal the fric tion adjustment screw. (Figure H)
2. Using a 1.5mm hex wrench adjust the set screw clockwise to create more tension for the light head and counter clockwise to loosen. (Figure I)
2 of 4
3 of 4
Maintenance and Cleaning/Disinfection
Figure
WARNING: To avoid personal injury, ensure the dental light is o before proceeding with the following steps.
AVERTISSEMENT: Pour éviter les blessures, s’assurer que la lampe dentaire est éteinte avant d’eectuer les étapes suivantes.
Refer to Forest Operatory Equipment Asepsis Operator’s Guide for infection control procedures.
Input Voltage 16/18 VAC
Light Source 10 LEDs (1 W Each)
Spot Size 2.75in - 5.5in (70mm X 140mm)
Light Intensity, Lux (Adjustable) 8,000 - 35,000
Color Temperature 4,200 - 6,000K
Protection against electrical dangers Class 1 device, IPXO
Power Supply/Transformer Continuous Duty
UL CERTIFIED Product, SAFETY evaluated to ES60601-1
CAUTION: Federal law restricts this device to sale by or on the order of a dental practitioner licensed
by the law of the State in which he/she practices to use or order the use of the device.
MISE EN GARDE: Selon les lois fédérales, cet appareil ne peut être vendu que par un (ou à la demande
d’un) dentiste praticien autorisé par les législations de l’état dans lequel il ou elle exerce à utiliser ou
ordonner l’utilisation de cet appareil.
NOTE: Refer to Service Manual and Installation Instructions for complete technical descriptions.
REMARQUE: Consulter le manuel d’entretien et les instructions d’installation pour obtenir la
description technique complète.
Technical Description/Specifications
Indications for Use/Intended Use e dental operatory light is a light source intended to
illuminate the oral cavity of dental patients for better visibility by a dental practitioner during diagnostic
and therapeutic treatment in a clinical environment. ere are no contraindications for this product.
WARNING: Only the specied power supplies are to be used for safe operation of the dental light.
AVERTISSEMENT: Seules les alimentations spéciées doivent être utilisées pour un fonctionnement
sécuritaire de la lampe dentaire.
Powertronix Power Supply AA-119298-ME (230/115 VAC, 244W, 50/60 Hz), AA119296-ME (230/115
VAC, 100W, 50/60 Hz) and Transformer AA-132400-ME (230/115 VAC, 100W, 50/60 Hz).
Refer to light installation instruction for locating power supply/transformer away from the vicinity of
water sources.
Refer to Forest General Information Operator’s Guide
for Glossary of Symbols, Terms, EMC/Electrical Safety
Declaration and User Guidance.
Accessories and Detachable/Replacement Parts
1. Power Supply/Transformer
2. Front Shield
3. Handles
WARNING: Do not stare into beam of light when light is on.
AVERTISSEMENT: Ne pas regarder directement le faisceau de lumière lorsque l’éclairage est en marche.
NOTE: Color temperature is subjective and varies between operators.
REMARQUE: La couleur de température est subjective et varie selon les utilisateurs.
Operating Light (continued)
Expected Service Life With proper maintenance and service, Forest Dental products are
designed for a dened “service life” under normal use (based on approximately 50 patients per
week) of 5 years from the date of manufacture, with the exception of serviceable components. Some
components may become obsolete due to changes in technology or due to product improvements
and may necessitate product updates or upgrades. At the end of the dened service life, all products
require examination by a trained service technician prior to continued use. Following this, additional
examinations are required every 5 years.
17UJ
 Loading...