

Page 1
Camera Specification
Maintenance
Start Using Wearing Method
Package Include
Resolution Ratio: 1080P/30FPS 720P/30FPS
Video Format: .MP4 (H.264 Codec)
Sensor: CMOS
Dept of Field: 0.8 Meter - Infinite
Angle of Lens (Opposite Angle): 87°
Pixel: 8 Megapixel
Microphone: Built-in Microphone
USB: Micro-USB
External Memory: Micro SD, SDHC MAX Memory 32 GB
Compatibility: Windows 7 or above/MAC OSX10.5 or above
Size: 176.5X174.8X27mm (Belt not include)
Weight: 97g
Power Supply: Built-in Lithium Battery, 1160 mAh
Shooting Time: Continuous 180 Minutes of HD Video Shooting after Full-charged
Thanks for Purchasing the
Customer Service & Support:
• Please visit our website for the latest software, user support, product
information and shared videos.
• If you have any issue or suggestion, please send an e-mail to our customer
support team: [email protected]
To enjoy our warranty services, please register your product on our website
www.foream.com
Camera
Please charge the camera before the first use of it.
Charge the Camera
• Take out the camera and the Micro-USB cable.
• Connect the USB cable to computer to start charging the camera;
• During charging, if the battery is not fully charged, the battery indicator lamp blinks green
twice successively; but if the battery is fully charged, the indicator lamp keeps green lighted
on.
Install Micro SD Card
• Open the USB lid on Micro SD card slot;
• Insert a Micro SD/SDHC card with Class 6 or higher (max memory of 32 GB) in the
direction of sign on the camera and push the lid until it is closed.
• Put on the USB slot protection cover.
• Do not apply or remove the Micro SD card during the camera is switched on.
Use the Camera
• Be sure the battery is fully charged and Micro SD card is inserted before using the
camera.
• Press and hold the power/mode button for a while to turn on the camera.
• When the camera is on, press the power/mode button once to convert its shooting mode.
• The shooting modes include Video, Photo, and Timelapse shooting mode;
• After choosing the video shooting mode, press the shooting button to start recording or
shooting. Press it again to stop.
• When the Photo mode is chosen, press the shooting button once to take photo.
Use WIFI
When the camera starts up but doesn’t start recording or shooting, press WIFI button once
to turn on or off WIFI.
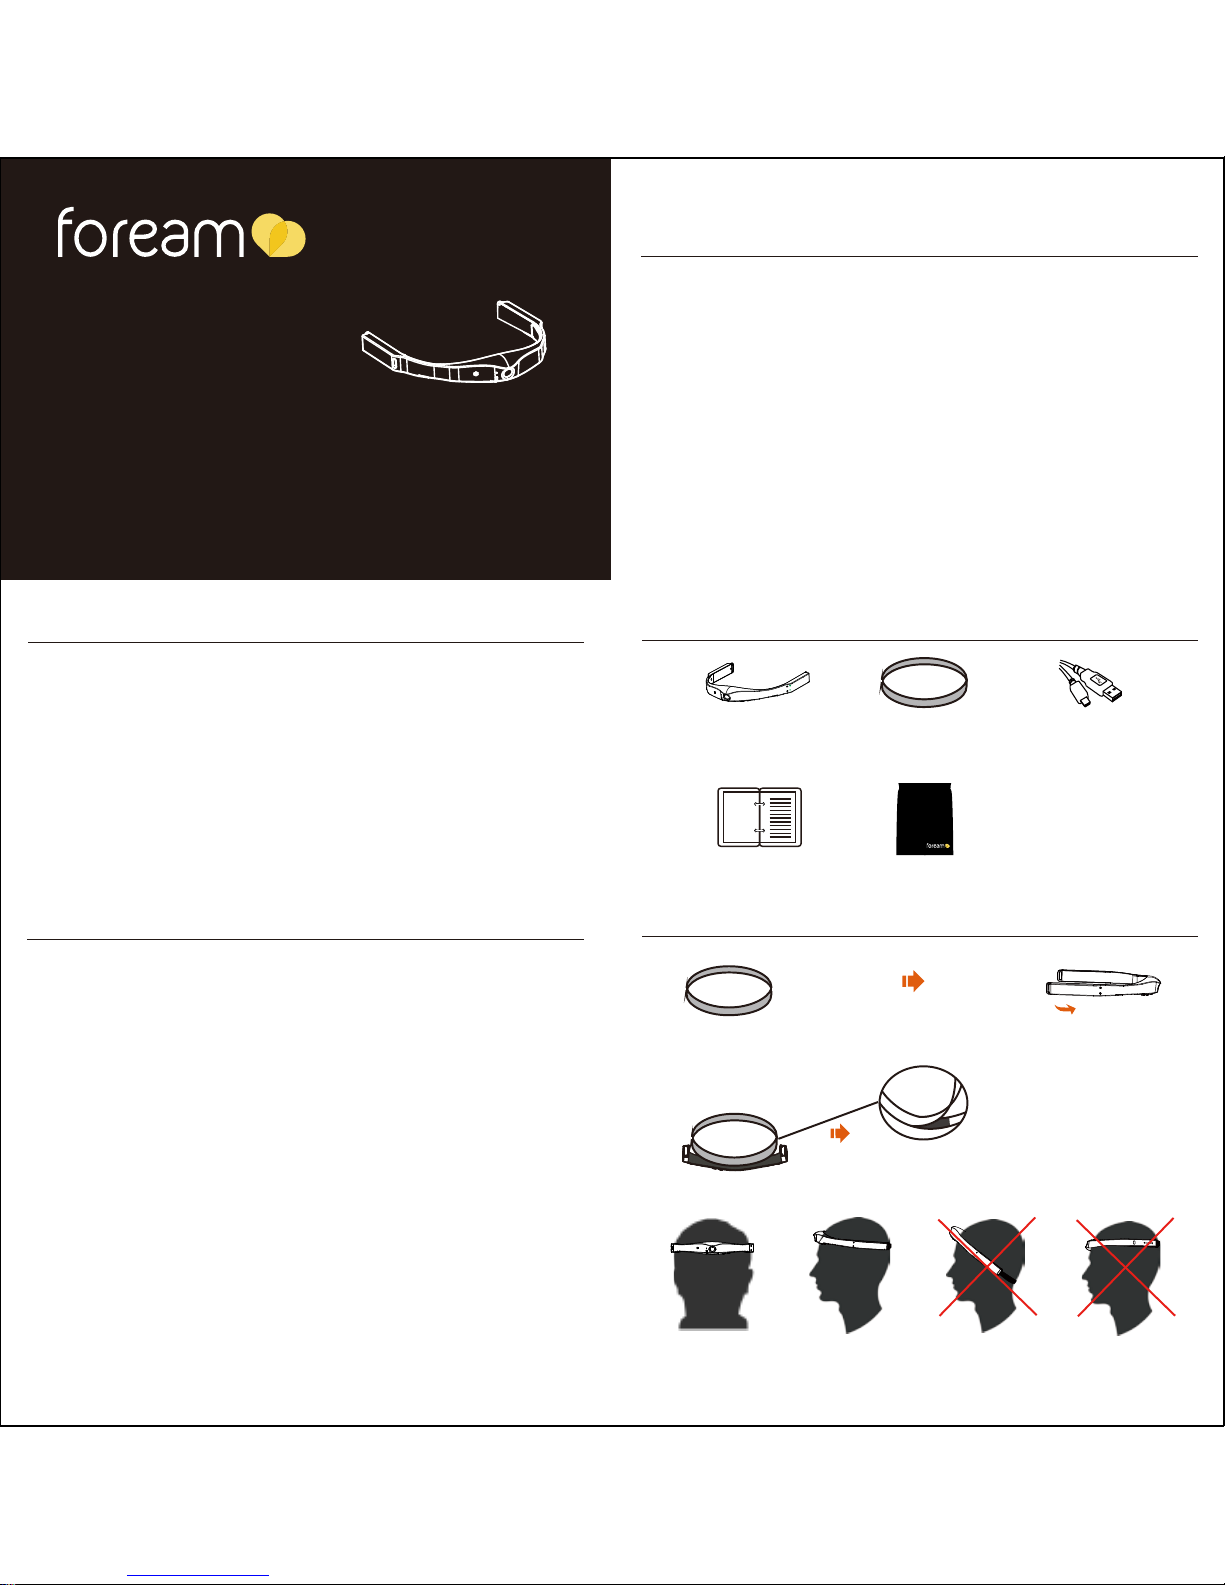
Camera
Micro USB CableMagic Stripe
Camera
Lens in Middle, Correct
USB Facing Bottom, Correct
Not Balance, Wrong USB Facing Up, Wrong
Magic Stripe Position
Positioning
User Manual
User Manual Camera Bag
Magic Stripe
Version: X1-CHI-EN-v1001
Foream X1 wearable sport camera
Page 2
E
F
H
I
Connect to Camera
About Your Camera
Software Updates
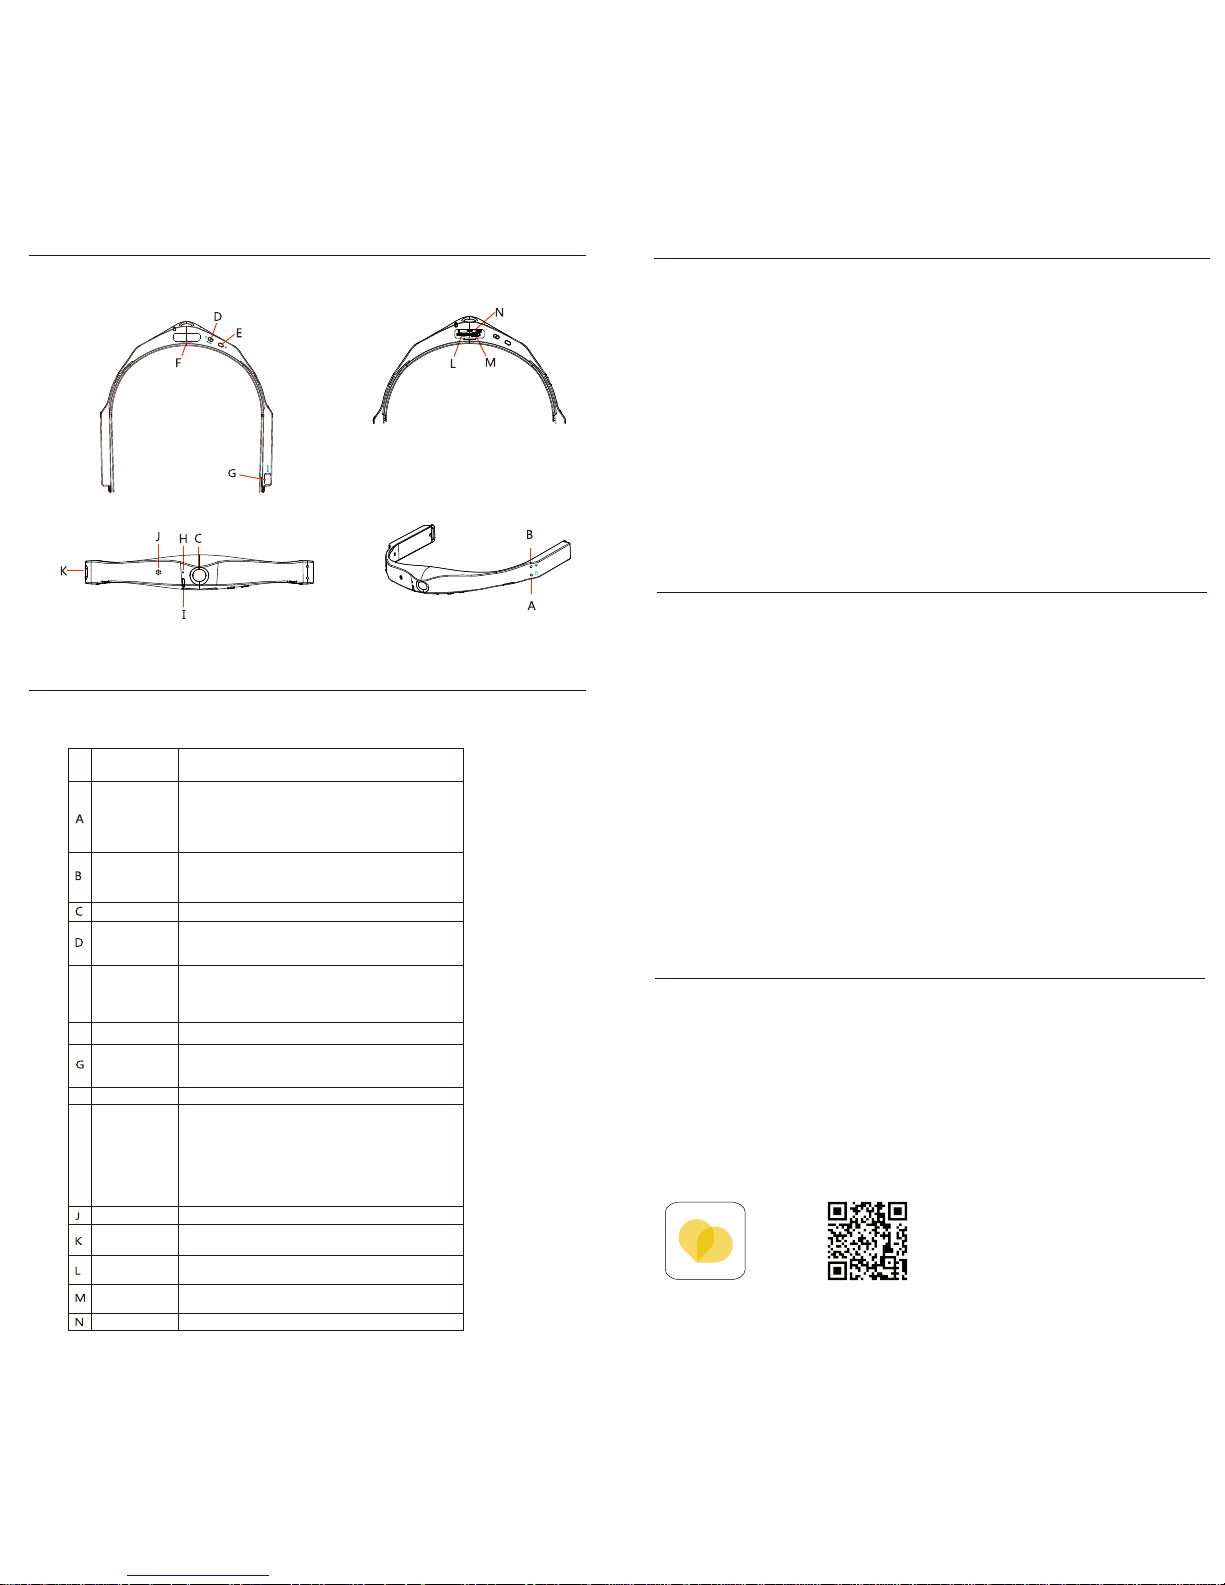
Functions
WiFi
Connect to MAC
1. When you connect the camera to MAC with (provided) USB cable, the green light is lit
on the camera.
2. The files in the camera can be opened automatically, but if not, please open Finder.
3. The Camera may be regarded as an external device, which you can double-click to
open.
4. Open the DCIM folder to browse your files.
Connect to Windows PC
1. When you connect the camera to PC with (provided) USB cable, the green light is lit
on the camera
2. The files in the camera can be opened automatically, but if not, open “my computer”;
3. The camera may be regarded as a removable disk, which you can double-click to
open.
4. Open the DCIM folder to browse your files.
Please download the latest version of the software on the
Foream’s website and copy X1.bin file to a formatted micro SD
card;
Insert a micro SD card into the camera and turn on the camera,
and the status indicator lamp will be lit pink. The camera will
restart automatically when update is completed.
To check if the software is successfully updated, turn on the
camera and WIFI. Connect the camera to mobile phone and open
Foream mobile application. In the Setting Menu, you can see its
latest updated version.
Functions Introduction
Battery
Indicator
Lamp
When the battery is charged 0%, no light on;
When the battery is charged 0-25%, it will be blinking green;
When the battery is charged 25-100%, it will be lit green;
During its charging, the indicator lamp will blink green twice
successively
WIFI Indicator
Lamp
When WIFI is off, no light on;
When you turn on or off WIFI, it will be blinking red;
When WIFI is on, it will be lit red.
Lens
Power/Mode
Button
Press and hold for 2 seconds to turn on or off the camera;
when the camera is on, press the button once to switch the
Video, Photo and Time Shifting shooting mode.
WIFI Button
When the camera is on and WIFI is already registered, press
and hold WIFI button for two seconds to switch the AP/Cloud
modes. The WIFI will close automatically if the Cloud mode
connection fails.
USB Lid
Include charging port, Micro SD slot, and reset button
DC Power
Plug Lid
5V power port and Microphone/Speaker slot
Microphone
Status
Indicator
Lamp
When the camera is in the Video mode, it will lit red; while the
video is recording, it will blink red;
When the camera is in the Photo mode, it will lit blue; while the
photo shooting, it will blink blue once;
When the camera is in the Timelapse shooting mode, it will lit
yellow; and whenever you take a photo, then the yellow light
will blink once; When updating the software, it will blink pink.
Loudspeaker
Shooting
Button
When the camera is on, press shooting button once to start or
stop shooting.
MicroSD Card
Slot
Micro-USB
Interface
Standard charging port. Standard computer transfer connector.
Reset Button
Mobile Phone WIFI
Connect Live
Broadcasting Auto
Cloud Synchonisation
Publish to Community
Video Editing
Turn On/Off
When camera is on, press WiFi button once to turn on WiFi,
and then select “X1” in your mobile device WiFi setting menu.
Please launch web browser in the mobile phone to visit www.foream.com,
or scan below QR code to download “foream connect”.
Prompt:
WiFi initial password is " foreamx1".When WiFi activated, Shooting button and Mode button will
be no function, need to use mobile phone to operate, if manual operation of the camera is needed,
please press WiFi key once to turn off WiFi.
Page 3
FCC Warning:
Any Changes or modifications not expressly approved by the party responsible for compliance
could void the user’s authority to operate the equipment.
This device complies with part 15 of the FCC Rules. Operation is subject to the following two
conditions: (1) This device may not cause harmful interference, and (2) this device must
accept any interference received, including interference that may cause undesired operation.
Note: This equipment has been tested and found to comply with the limits for a Class B digital
device, pursuant to part 15 of the FCC Rules. These limits are designed to provide
reasonable protection against harmful interference in a residential installation. This
equipment generates, uses and can radiate radio frequency energy and, if not installed and
used in accordance with the instructions, may cause harmful interference to radio
communications. However, there is no guarantee that interference will not occur in a
particular installation. If this equipment does cause harmful interference to radio or television
reception, which can be determined by turning the equipment off and on, the user is
encouraged to try to correct the interference by one or more of the following measures:
—Reorient or relocate the receiving antenna.
—Increase the separation between the equipment and receiver.
—Connect the equipment into an outlet on a circuit different from that to which the receiver is
connected.
—Consult the dealer or an experienced radio/TV technician for help.
 Loading...