

This Quick Reference Guide is not intended to
replace your vehicle Owner’s Manual which
contains more detailed information concerning
the features of your vehicle, as well as important
safety warnings designed to help reduce the risk of
injury to you and your passengers. Please read your
entire Owner’s Manual carefully as you begin
learning about your new vehicle and refer to the
appropriate chapters when questions arise. All
information contained in this Quick Reference
Guide was accurate at the time of duplication.
We reserve the right to change features, operation
and/or functionality of any vehicle specification at
any time. Your Ford dealer is the best source for
the most current information. For detailed
operating and safety information, please consult
your Owner’s Manual.
United States
Ford Customer Relationship Center
1-800-392-3673 (FORD)
(TDD for the hearing impaired: 1-800-232-5952)
fordowner.com
fordowner.com (U. S.)
ford.ca (Ca nad a)
LEARN MORE ABOUT
YOUR NEW VEHICLE
To put QR tags to work for you, use your
mobile phone’s browser or app store link to
download a QR tag reader. Then follow the
directions to sc an the QR tag and see your
vehicle’s features come to life.
Canada
Ford Customer Relationship Centre
1-800-565-3673 (FORD)
ford.ca
January 2014 • First Printing
Quick Reference Guide • SUPER DUTY
Litho in U.S.A. • FC3J 19G217 AA
2015
WARNING: Driving while distracted can result in loss of vehicle control, crash and injury.
We strongly recommend that you use extreme caution when using any device that may take
your focus o the road. Your primary responsibility is the safe operation of your vehicle. We
recommend against the use of any hand-held device while driving and encourage the use of
voice-operated systems when possible. Make sure you are aware of all applicable local laws
that may aect the use of electronic devices while driving.
QUICK REFERENCE GUIDE
COMMONLY USED VOICE COMMANDS
SYNC.® Say the Word. Touch the voice button on the right-hand side of your steering wheel and then say:
Basic Commands
• What can I say?
• List of commands
• Main menu
• Previous
• Next
• Go back
• Exit
• Help
• Pair my phone
Phone
• Phone list of commands
— Dial
— Call <name> on cell/at home/at work
— Call voicemail
— Do not disturb
— Listen to text messages
(phone-dependent feature)
Some services may not be available in your area.
Refer to your Owner’s Manual, visit the website
or call the toll-free number for more information.
Entertainment
• Audio list of commands:
You can also get detailed lists of
commands for radio, USB, Bluetooth®
audio, SiriusXM and SD card
• Radio
— <On/O>
— FM <87.9-107.9>
— FM preset <#>
• CD
—Play track <1-512>
— Shue <On/O>
• USB
— Play song <name>
— Play album <name>
• SiriusXM
— <channel name>
— Preset <#>
Climate*
• Climate control list of commands
— Climate <On/O>
— Climate my temperature
— Climate temperature
For U.S. customers: visit SyncMyRide.com
or call 1-800-392-3673 (select Option 1 or 2
for language, then Option 3).
Navigation*
• Navigation list of commands
— Destination street address
<number, name, city>
— Destination home
— Navigation voice <On/O>
— Navigation voice volume
<increase/decrease>
— Repeat instruction
— Show <map/north-up/heading-up/3D>
• Travel Link list of commands
— Trac
— Weather
— Movie listings
— Fuel prices
— Sports <headlines/scores/schedule>
*Available only with MyFord Touch
If you are having trouble with any voice
commands, ask “What can I say?” or
touch the MyFord Touch icon for a list.
For Canadian customers: visit SyncMyRide.ca
or call 1-800-565-3673 (select Option 1
or 2 for language, then Option 3).
TABLE OF CONTENTS
4 – 5 INSTRUMENT PANEL
6 – 7 SYNC
8 – 13 SYNC WITH MYFORD TOUCH
14 – 15 COMFORT & CONVENIENCE
16 – 17 FUNCTION
18 – 19 ESSENTIAL INFORMATION
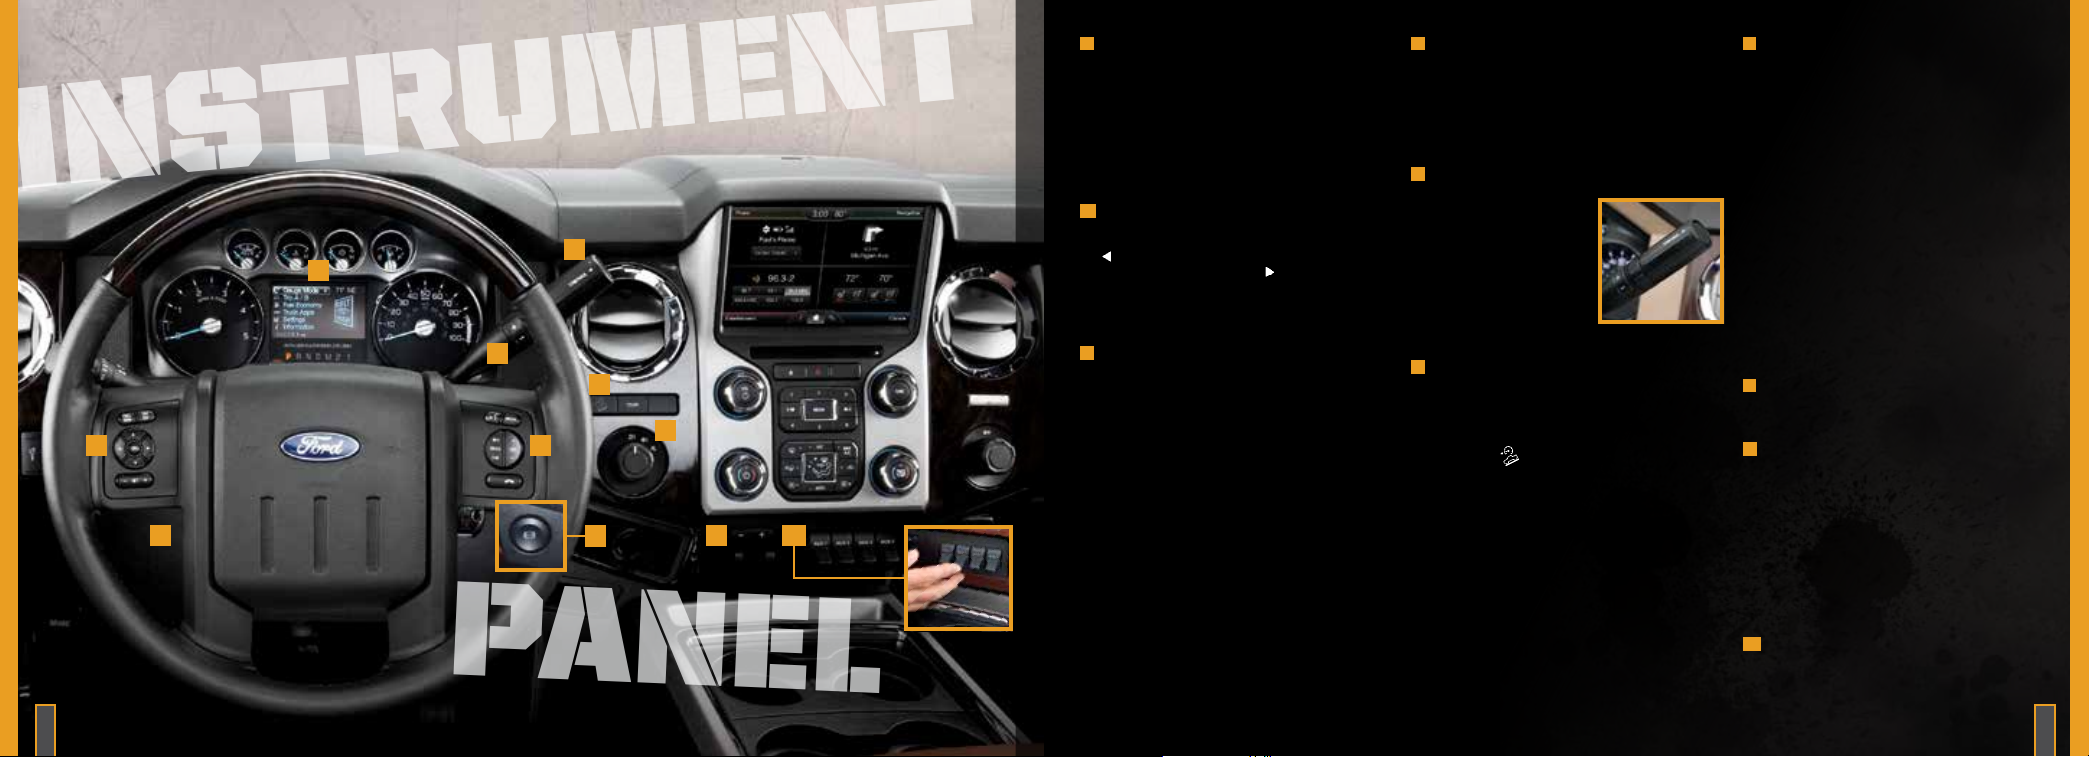
INSTRUMENT
1
PANEL
STEERING WHEEL CONTROLS*
Use the controls to adjust frequently accessed features.
Press Set + or Set –, RSM and OFF to set and adjust
the cruise control speed*.
Use the le-hand controls to scroll through and make
selections from within your information display. Use the
right-hand controls to adjust audio volume and media
selection, and to activate voice controls*.
2
POWER-ADJUSTABLE PEDALS*
5
3
4
6
1
2
1
8
7
9
10
4 5
Located on the le side of the steering column, press
the
arrow to move the accelerator and brake pedals
farther away from you; press the
pedals closer.
Note: Adjust the pedals only when the vehicle is
in park (P).
3
INFORMATION DISPLAY*
You can monitor vehicle systems, receive alerts, and
program and configure certain vehicle features. Use your
steering wheel controls to scroll, make selections and
adjustments that will appear in the information display
within the instrument cluster.
Gauge Mode displays features such as transmission
temperature and compass data. Diesel-specific
information includes engine oil temperature and
exhaust filter information.
Trip A and B include trip distance, trip time, fuel used
and average fuel economy.
Fuel economy also provides instant fuel economy, fuel
history in select increments and saves your last five resets.
Truck apps* include details about trailers and
o-road features.
Settings menu delivers a variety of features such as
Driver Assist, Vehicle, Language, Units and more. Refer
to your Owner’s Manual for more information.
arrow to move the
4
SELECTSHIFT AUTOMATIC®
TRANSMISSION*
Change gears without a clutch. Put the gearshi into
manual (M) and press + to upshi and – to downshi.
To lock gears, put the gearshi lever into overdrive (D)
and press – to lock out the gears. Only the available
gears will be displayed. Press + to unlock the gears.
5
TOW/HAUL MODE
Activate tow/haul to eliminate
excessive transmission shiing
when traveling on a grade.
To switch on tow/haul, press
the button on the end of the
gearshi lever. The TOW HAUL
indicator light will light in the
information display. Refer to
the Towing section of your
Owner’s Manual for more details.
6
HILL DESCENT CONTROL
While traveling at low speeds (between 2 mph
[3 km/h] and 12 mph [20 km/h]), activate to help
maintain vehicle speed while descending steep grades
in a variety of road conditions. To use, press the hill
descent button
a tone will sound.
To increase descent speed, press the accelerator pedal
until the desired speed is reached.
To decrease speed, press the brake pedal until the
desired speed is reached.
Note: Hill descent control requires a cooling down
interval aer sustained use. The amount of time that
the feature can remain active before cooling varies with
conditions. The system will provide a warning in the
information display and sound a tone when the system
is about to disengage for cooling. At this time, manually
apply the brakes as needed to maintain descent speed.
. A light will show in the cluster and
7
ELECTRONIC SHIFT-ON-THE-FLY
4X4 SYSTEM
Rotate the knob and shi from 2WD to 4x4 High or Low:
2H (2WD) provides power to the rear wheels only. This
is appropriate for street and highway driving, providing
optimal smoothness and fuel economy at high speeds.
4H (4WD HIGH) provides extra traction, such as
driving in snow or on icy roads, or for o-road situations.
This mode is not intended for use on dry pavement.
4L (4WD LOW) uses extra gearing to provide
maximum power to all four wheels at reduced speeds.
It is intended only for o-road applications, such as
driving in deep sand or on steep grades, or while pulling
heavy objects.
Note: Do not use 4H or 4L on dry, hard-surfaced roads.
Doing so can produce extra noise and increase tire wear.
For more complete details, refer to the Four-Wheel Drive
chapter of your Owner’s Manual.
8
DIESEL ENGINE BRAKING FEATURE*
See page 19 of this guide or your Owner’s Manual for
more details.
9
TRAILER BRAKE CONTROLLER*
When used properly, the trailer brake controller assists
in smooth and eective trailer braking by powering the
trailer’s electric or electric-over-hydraulic brakes with a
proportional output based on the towing vehicle’s brake
pressure. You can adjust the amount of initial trailer
brake output by selecting one of three settings through
the message center. Use the GAIN adjustment buttons
to increase or decrease the braking feature’s power
output to the trailer. Refer to the Towing section of your
Owner’s Manual for more details.
10
UPFITTER SWITCHES*
The four switches can be customized to control
additional functions, with 8, 12 or 20 amps of
electrical battery power.
*
*IF EQUIPPED

SYNC
®
GETTING STARTED WITH YOUR SYNC SYSTEM
SYNC is a hands-free, voice recognition system used for entertainment,
information and communication. SYNC. Say the Word.
BEFORE YOU GET STARTED
1. Set up your owner account at SyncMyRide.com (U.S.) or
SyncMyRide.ca (Canada). Register by following the on-screen
instructions and then learn about the services that are available to you.
2. SYNC uses a wireless connection called
your phone. Turn Bluetooth mode on in your phone’s menu options. This lets
your phone find SYNC. For more details on setting up your phone with SYNC,
visit SyncMyRide.com (U.S.) or SyncMyRide.ca (Canada), or your phone
manufacturer’s website.
PAIRING YOUR PHONE WITH SYNC
Pair your phone to use the many features
of SYNC:
1. Make sure that your vehicle is in park (P)
and both your ignition and radio are
switched on.
2. Press the phone button
display indicates no phone is paired, press OK.
3. When Find SYNC appears in the display, press OK.
4. Put your phone into Bluetooth discovery mode. Refer to your phone’s user
guide, if necessary.
5. When prompted on your phone’s display, enter the six-digit PIN provided by
SYNC in the radio display.
6. The display indicates when the pairing is successful.
Note: The system may prompt you to:
• Set your phone as the primary/favorite (the primary phone will
receive messages and voicemail).
• Download your phone book (this is required to use the full set of
voice commands).
• Turn on 911 Assist
6
®
. When the
.
Bluetooth® to communicate with
WHY DO YOU NEED A SYNC OWNER ACCOUNT?
A SYNC owner account allows you to receive the latest soware updates that
add new places, directions and information; and if you have questions, you’ll
get free customer support. Visit the website or call the toll-free number to set
up your account. See the inside front cover of this guide for more information.
COMMONLY USED VOICE COMMANDS.
SYNC. SAY THE WORD.
Every time you want to give SYNC a voice command, you must first press the
voice button
commands, say “What can I say?”.
USING YOUR PHONE WITH SYNC
Note: You can download your phone book to make phone calls
with voice commands by name.
MAKING A PHONE CALL
Use SYNC to make a phone call to anyone
in your phone book by pressing the voice
button
voice command.
For example, you could say “Call Jake
Smith at home”. When the system
confirms the number, say “Dial” to
initiate the call automatically or say
the phone number.
ANSWERING INCOMING CALLS
Whenever you have an incoming call, you will be able to see the name and
number of the person calling in your display. Press the phone button to answer
an incoming call. You can hang up at any time by pressing and holding the
phone button
. When prompted, speak your voice command. For a list of voice
. When prompted, give a
.
USING SYNC TO ACCESS DIGITAL MEDIA
Your vehicle includes a concealed SYNC media hub. The multiple inputs allow
you to plug in your USB media devices such as phones and MP3 players, and use
SYNC to play all of your favorite music.
Note: SYNC indexes all of your music. The more music that is stored on your
device, the longer it takes SYNC to index.
USING VOICE COMMANDS TO PLAY MUSIC
1. Plug your media player into your USB port.
2. Press the voice button
up by saying a voice command.
3. You will hear the command repeated back to you and the selected
item will play.
. When prompted, say “USB” and then follow
APPLINK
SYNC AppLink allows you voice access
to select mobile applications that you
already have or can download to your
Android™, BlackBerry
apps available include Pandora Internet
Radio®, Stitcher Smart Radio™, Open Beak
(BlackBerry exclusive), iHeartRadio, Slacker,
NPR News, SYNC Destinations and more.
Note: AppLink is not available with
MyFord Touch systems.
™*
®
or iPhone®. Current
USING SYNC APPLINK
1. Create your app account and personalize your app settings, if required.
2. Download the latest mobile app through your smartphone’s marketplace.
3. Switch on your ignition.
4. Pair the phone to a SYNC AppLink vehicle. If your phone is already paired to
the vehicle, it connects automatically when you enter.
5. To access and use apps through SYNC with your iPhone, you must also
connect the Apple
and BlackBerry connect wirelessly using SYNC AppLink.
6. Now you’re ready to voice-access the app by pressing the voice button and
saying “mobile apps” and then the name of the app you want.
For more information on SYNC, please visit the website or use the toll-free
number. See the inside front cover of this guide for details.
®
-provided USB cable and start the application. Android
*IF EQUIPPED
7

SYNC
®
WITH MYFORD TOUCH
®*
GET IN TOUCH USING YOUR
FOUR-CORNER TOUCHSCREEN
GENERAL TIPS
• Press the home icon at any time to return to your
home screen.
• For additional support, refer to your Owner’s Manual,
visit the website or call the toll-free number. See the
inside front cover of this guide for more information.
A REVOLUTIONARY WAY TO CONNECT WITH YOUR TRUCK.
GETTING STARTED, UNDERSTANDING
SYNC WITH MYFORD TOUCH
Use the four-corner, four-color touchscreen to explore and interact with your vehicle. The
touchscreen works the same way as traditional controls, knobs and buttons do. Press the
various corners on your touchscreen to personalize the many features and settings of your
vehicle all in one place. The system provides easy interaction with your cellular phone,
multimedia entertainment, climate controls and navigation system*.
*IF EQUIPPED
8 9
GETTING STARTED WITH YOUR SYNC SYSTEM
SYNC is a hands-free, voice recognition system used for entertainment,
information and communication. SYNC. Say the Word.
BEFORE YOU GET STARTED
1. Set up your owner account at SyncMyRide.com (U.S.) or SyncMyRide.ca
(Canada). Register by following the on-screen instructions, and then learn
about the complimentary services that are available to you.
2. SYNC uses a wireless connection called
your phone. Turn Bluetooth mode on in your phone’s menu options. This lets
your phone find SYNC. For more details on setting up your phone with SYNC,
visit SyncMyRide.com (U.S.) or SyncMyRide.ca (Canada), or your phone
manufacturer’s website.
PAIRING YOUR PHONE THROUGH THE TOUCHSCREEN
Pair your phone to use
the many features
of SYNC:
1. Make sure that your
vehicle is in park (P)
and both your ignition
and radio are
switched on.
2. Touch Add Phone in
the upper le corner of
the touchscreen. Find SYNC appears on the screen and instructs
you to begin the pairing process from your device.
3. Make sure that Bluetooth is set to On and that your cellular phone is
in the proper mode. See your phone’s manual, if necessary.
Note: Select SYNC and a six-digit PIN appears on your device.
4. If prompted to enter a PIN on your device, it does not support Secure
Simple Pairing. To pair, enter the PIN displayed on the touchscreen.
Skip the next step.
Bluetooth® to communicate with
5. When prompted on your phone’s display, confirm that the PIN provided by
SYNC matches the PIN displayed on your cellular phone.
6. The display indicates when the pairing is successful.
Note: The system may prompt you to:
• Set your phone as the primary/favorite
(the primary phone will receive messages and voicemail).
• Download your phone book (this is required to use the full set of
voice commands).
• Turn on 911 Assist
in the event of an accident (feature must be turned on prior to the event).
TIPS
• Make sure you accept the request from SYNC to access your phone.
• To pair subsequent phones, please refer to Pairing Subsequent Phones
in the SYNC chapter of your Owner’s Manual.
• If you are experiencing pairing problems, refer to your Owner’s Manual.
®
. The system automatically connects with a 911 operator

SYNC
®
WITH MYFORD TOUCH
®*
PHONE
Voice-control your phone for hands-free
calling with your phone securely put away.
With SYNC, you won’t even need to know
the phone number. Just say the name of
the person you want from your contacts.
Your phone connects you with many
other features :
• Automatically connect with a 911 Operator
in the event of an accident (system must be
switched on prior to event).
• Transfer calls seamlessly from SYNC to your
phone as you get in or out of your vehicle.
SET UP YOUR
IN-CASE-OF-EMERGENCY CONTACTS
You can add contacts from your phone book for simple
one-touch access on the touchscreen aer a 911 Assist
event. You can save up to two contacts on the 911 Assist
screen by scrolling through your menu choices and
selecting the following information:
• Touch Settings, then Phone and 911 Assist.
• Touch Edit to add contacts from your phone book.
NAVIGATION
Get started with your navigation system by pressing
®
the upper-right, green corner. The available,
voice-activated navigation system includes:
• SiriusXM Trac
• SiriusXM Travel Link
• GPS (Global Positioning System) technology
• 3-D mapping
• Turn-by-turn navigation
Some features may require activation. Refer to the
MyFord Touch chapter of your Owner’s Manual for
complete details.
*
SET A DESTINATION
Set a destination through your touchscreen by using
a street address, a city center, a place on the map or
a Point of Interest (POI). The easiest way, however,
is by voice.
1. Push the voice button
“Destination street address”.
2. The system will ask you to say the full address
and will display an example on-screen.
3. You can then speak the address naturally, such as:
“One two three Main Street, Anytown”.
You can also use the touchscreen to enter a
destination and narrow your choices by city or street
as you type.
You can choose from up to three dierent types
of routes:
• Fastest: Uses the fastest moving
roads possible.
• Shortest: Uses the shortest distance possible.
• Eco (EcoRoute): Uses the most
fuel-ecient route.
. When prompted, say
SAVE A FAVORITE
When you find a specific address or a point of
interest (POI) that you’d like to store within the
system, you can save it to your Favorites.
Using the touchscreen, press Save to Favorites.
When you want to view that destination again, you
can press Favorites to retrieve your stored locations.
Note: Some features, such as Point of Interest (POI)
ratings and the ability to type in a destination, are
not available while the vehicle is moving. For more
complete information, see the MyFord Touch chapter
in your Owner’s Manual.
TIPS
• Save your favorite locations by
touching Save to Favorites.
• Change your map views from
Heading Up, North Up or 3D.
10 11
*IF EQUIPPED
*IF EQUIPPED

SYNC
®
WITH MYFORD TOUCH
®*
CLIMATE
SYNC with MyFord Touch controls the temperature, airflow direction, fan speed, and
activates other climate features like heated front seats* for you and your passenger. To
use voice commands to operate climate, say a voice command like “Climate temperature
72 degrees” and MyFord Touch will make that adjustment.
SET YOUR MYTEMP
• Touch the lower-right, blue Climate corner on
the touchscreen.
• Set your exact, desired temperature using
the red or blue arrows.
• Press and hold the MyTemp button until the
background goes solid.
SET YOUR PASSENGER’S TEMPERATURE
• Touch Dual to
switch on the
passenger side
temperature control.
• Touch + or – to adjust the temperature.
ADJUST CLIMATE CONTROLLED
FRONT SEATS
• Touch the heated or cooled
seat icon to control the
seat temperature.
• More light bars indicate a higher setting.
To operate the heated feature, press
the various settings and o.
To operate the cooled feature, press
the various settings and o.
*
to cycle through
to cycle through
ENTERTAINMENT
No matter how you store your music, SYNC makes
it yours to enjoy when you’re behind the wheel.
Press the lower-le, red corner of the touchscreen.
From here, you can easily go between AM/FM,
SiriusXM, and other media sources.
SET YOUR RADIO PRESETS
• Touch the Entertainment corner on
the touchscreen.
• Touch FM.
• Touch Direct Tune.
• Enter the desired station and touch Enter.
• Touch Presets and then touch and hold one of the
memory preset buttons to save it. You will hear a
brief mute and the sound will return when the station
is saved.
BRING IN YOUR OWN MUSIC
Plug in your USB media devices, such as phones and MP3 players, and use SYNC to play all of your
favorite music through a variety of devices, including:
• USB
• Bluetooth
• SD card
• Audio in
Refer to your Owner’s Manual, visit the website or call the toll-free number. See the inside front cover of
this guide for more information.
USING SYNC TO ACCESS DIGITAL MEDIA
In vehicles equipped with MyFord Touch, the media hub is in the center console (as shown below).
Plug in your USB media devices such as phones and MP3 players and use SYNC to play all of your
favorite music.
USING VOICE COMMANDS TO PLAY MUSIC
1. Plug your media player into your USB outlet.
2. Press the voice button
a voice command.
MEDIA HUB
®
the system automatically attempts to connect to that device at every ignition cycle.
streaming: Connect, disconnect, add or delete, even set a device as your favorite so that
. When prompted, say “USB”, then follow-up by saying
12
*IF EQUIPPED
13

COMFORT & CONVENIENCE
MYKEY®
MyKey allows you to program certain driving restrictions in order to promote
good driving habits. You can program things such as speed restrictions, limited
volume levels. For complete information, refer to the MyKey chapter in your
Owner’s Manual.
MEMORY FEATURE
The memory function allows a “one touch” recall of personalized memory
features (i.e. the positions of the driver seat, power mirrors and adjustable
pedals). Use the memory controls, located on the driver’s door
to program and then recall memory positions.
To program position 1, move the memory features to the desired positions, and
then press and hold button 1
to set the second position using button 2
recall your set memory positions.
*IF EQUIPPED
*
,
until you hear a tone. Use this same procedure
. You can now use these controls to
REMOTE ENTRY SYSTEM WITH REMOTE START
PRESS
to unlock the driver’s door.
PRESS
within three seconds to
unlock all of the doors. The
turn signals will flash.
PRESS
to lock all the doors. The
turn signals will flash.
PRESS
within three seconds to
confirm all the doors are
closed and locked. The
horn will sound and the
turn signals will flash if all
of the doors are closed.
PRESS
PRESS
CAR FINDER: PRESS
and the turn signals will flash. We recommend using this method to locate your
vehicle, rather than using the panic alarm.
REMOTE START: PRESS
within three seconds. The exterior lamps will flash twice. The horn will sound if
the system fails to start.
ONCE
TWICE
ONCE
TWICE
to activate the panic alarm when the ignition is o.
AGAIN or switch on the ignition to deactivate the panic alarm.
TWICE within three seconds. The horn will sound
to lock all the doors, then PRESS TWICE
*
MOONROOF
Use the one-touch, express
opening and closing feature
to control your moonroof.
To open, press and release
the SLIDE control. The
moonroof will stop short of
the fully opened position to
help reduce wind noise or
rumbling. To fully open the
moonroof, press and release
the SLIDE control again.
To close, pull and release
the SLIDE control. Press
and release the TILT control
to vent the moonroof. Pull
and hold the TILT control to
close the moonroof. You can
pull the sliding shade open
or closed manually when the moonroof is closed.
HEATED REAR SEATS
The rear seat heat controls are located on the rear
door armrest. To operate the heated seats, push
the indicated side of the control for maximum or
minimum heat. Push again to deactivate.
*
*
TILTING HEAD RESTRAINTS
The front head restraints
may have a tilting feature
for extra comfort. To tilt
the head restraint, adjust
the seatback to an upright
driving or riding position.
Pivot the head restraint
forward toward your head
to the desired position.
Aer the head restraint
reaches the forwardmost tilt position, pivot it
forward again to return it
to the upright position.
CENTER CONSOLE
Your vehicle may be equipped with a variety of console features.
These include:
• Locking storage compartment with hanging file folder supports and room
for a laptop computer, binder or book; removable false bottom tray for
accessing the hidden storage compartment; and storage on the passenger
side of the console bin.
• One 12-volt power point inside the storage compartment and one on
the rear of the console; and a 110-volt AC power point outlet on the rear
of the console.
*
*
*IF EQUIPPED
1514

FUNCTION
ADVANCETRAC® WITH
ROLL STABILITY CONTROL™ (RSC®)
The system helps you keep control of your vehicle when on a slippery surface. The
electronic stability control portion of the system helps your vehicle avoid skids
and lateral slides. Roll stability control helps your vehicle avoid a vehicle rollover.
The traction control system helps your vehicle avoid drive wheel spin and a loss of
traction. Press the control to turn portions of the system o.
Control chapter in your Owner’s Manual for more details.
ELECTRONIC LOCKING
DIFFERENTIAL
With the system engaged, the rear axle
temporarily locks, allowing both rear
wheels to turn at the same speed. The
function helps to provide additional
traction on slippery or o-road surfaces.
TO SWITCH ON THE FEATURE
• In 4x4 vehicles with an electronic shi
4WD system, pull the 4WD control
knob toward you.
• In 2WD vehicles and vehicles equipped with a manual shi 4WD system,
switch the control knob from OFF to ON.
• The indicator light
feature is active.
Note: Electronic locking dierential should not be used on dry surfaces.
*IF EQUIPPED
16
*
appears in the information display when the
*
Refer to your Stability
REAR VIEW
CAMERA SYSTEM
Located on the tailgate, this camera
provides a video image of the area
behind the vehicle. During operation,
lines appear in the display that
represent your vehicle’s path and
proximity to objects behind the
vehicle. The display will automatically
appear in the navigation system
screen* or in the auto-dimming
interior mirror whenever the vehicle is
in reverse (R) and uses colors (green,
yellow and red) to alert you of your
proximity to objects.
Note: Visibility aids do not replace
the need to watch where the vehicle is
moving. Refer to your Owner’s Manual for safety information, more details
and limitations.
*
ONE-TOUCH UP OR DOWN (FRONT WINDOWS)
This feature automatically opens or closes the window. Press or li the switch
fully and release it. The window will open or close. Press or li the switch again
to stop the window.
Note: The window motor may disable temporarily if passengers cycle the
windows up and down repeatedly. This helps prevent damage to the motor.
Normal operation will resume once the motor cools.
REVERSE SENSING SYSTEM
The system is only active when the transmission is in reverse (R), it warns the
driver of obstacles within a certain range of the rear bumper area. It sounds
a warning tone if there is an object behind the vehicle. The tone will sound
continuously when the object is less than 12 inches (30 centimeters) away.
The system is not eective when the vehicle is traveling above 3 mph
(5 km/h) and may not detect certain angular or moving objects.
Note: Visibility aids do not replace the need to watch where the vehicle is
moving. Refer to your Owner’s Manual for safety information, more details
and limitations.
FUEL-EFFICIENT TRANSMISSION
Your vehicle has been designed to improve fuel economy by reducing
fuel usage while coasting or decelerating. This may be perceived as a light
to medium braking sensation when removing your foot from the
accelerator pedal.
*
*
SOS POST-CRASH ALERT SYSTEM™
*
The SOS Post-Crash Alert System provides audible and visual alarms in the
event of a crash which causes the deployment of airbags or the activation
of the safety belt pretensioners. The turn signals will flash and the horn will
sound. To deactivate the system, press the hazard flasher control, or you
can press the panic alarm on your remote transmitter.
*IF EQUIPPED
17

ESSENTIAL INFORMATION
DIESEL FUEL RECOMMENDATIONS
Ford recommends that you use only the diesel fuels that meet either the ASTM
D975 diesel or the ASTM D7467 B6-B20 biodiesel industry specifications. Outside
of North America, use fuels meeting EN590 or equivalent local market standard.
Diesel fuel is adjusted seasonally for colder temperatures. For best results at
temperatures below 20°F (-7°C), it is recommended to use a diesel fuel that has
been seasonally adjusted for the weather.
DIESEL PARTICULATE FILTER SYSTEM
The system helps reduce carbon emissions, and requires the completion of periodic
drives to clean it. The information display will prompt you to complete an operatorcommanded regeneration procedure. Failure to comply with the required cleaning
procedure maintenance can result in damage to the diesel particulate filter system
that may not be covered under your warranty. See your Diesel Supplement for
more information.
*IF EQUIPPED
DIESEL EXHAUST FLUID LEVEL
To help reduce emission levels from the exhaust of the diesel engine, your vehicle
is equipped with a selective catalytic reduction system that relies upon diesel
exhaust fluid to operate properly. The selective catalytic reduction system
automatically injects diesel exhaust fluid into the exhaust system to enable proper
selective catalytic reduction system function. Make sure that you check your
vehicle’s diesel exhaust fluid level during the oil change service interval, but certain
conditions or driving styles, such as trailer towing or fast rates of acceleration, will
require the refilling of the diesel exhaust fluid tank more oen. See the scheduled
maintenance information in your Diesel Supplement for more information.
FUEL TYPE/TANK CAPACITY/FLEX FUEL*
Depending on your vehicle, your fuel tank size varies based on body style
and/or engine configuration. Refer to the Capacities and Specifications section
in your Owner’s Manual for more details.
Flex fuel vehicles have a yellow ring around the top of the fuel filler inlet (tube)
and can use either regular unleaded fuel or E85 ethanol fuel.
It is best not to alternate repeatedly between gasoline and E85. If you do switch
fuels, it is recommended that you add as much fuel as possible—at least half a
tank. Do not add less than 5 gallons (18.9 liters) when refueling. You should drive
the vehicle immediately aer refueling for at least 5 miles (8 km) to allow the
vehicle to adapt to the change in ethanol concentration. If you exclusively use
E85 fuel, it is recommended to fill the fuel tank with regular unleaded gasoline
at each scheduled oil change.
If you do not have a flex fuel vehicle, then only use “Regular” unleaded gasoline
with an octane rating of 87. Do not use E85 fuels, because your vehicle was not
designed to run on fuels with more than 15% ethanol.
BRAKE OVER ACCELERATOR FEATURE
In the event that the accelerator pedal becomes stuck or entrapped, apply
steady and firm pressure to the brake pedal to slow the vehicle and reduce
engine power. See your Owner’s Manual for complete details.
DIESEL ENGINE
BRAKING FEATURE
In diesel-equipped vehicles, you can
use this feature along with the
Tow/Haul mode. When active, the
engine braking feature helps to increase
engine braking at higher engine speeds,
providing better grade descent control
with less brake and transmission wear
and tear. Press
panel to switch the system on and o.
on the instrument
ADDITIONAL TRAILER TOWING FEATURES
For more details, see the Towing section of your Owner’s Manual.
*
*
TIRE PRESSURE MONITORING SYSTEM
Your vehicle has been equipped with a system that displays a low tire pressure
warning light when one or more of your tires are significantly under-inflated.
If this happens, stop and check your tires as soon as possible. Inflate them to the
proper pressure. Refer to the Wheels and Tires chapter in your Owner’s Manual
for more information.
LOCATION OF SPARE TIRE AND TOOLS
If your vehicle is equipped with a spare tire, jack and associated tools, refer to the
following table for their locations:
Tool Location
Spare tire (pick-up trucks only) Under the vehicle, just forward of the
Jack Regular cab and Crew Cab:
Jack handle, lug wrench, lug wrench
extension (only available on Dual
Rear Wheel vehicles) and wheel chock
(only available on Single Rear Wheel
vehicles equipped with a
diesel engine)
Key and spare tire lock In the glove box.
For complete details on how to change your tire, refer to the Wheels and Tires
chapter in your Owner’s Manual.
rear bumper.
fastened to the floor pan behind
rear-most seat on passenger side.
SuperCab: under the rear bench seat
on the passenger side.
Regular cab: fastened to the floor
behind the driver seat.
SuperCab: fastened to the floor under
the rear seat .
Crew Cab: fastened to the floor behind
the rear seat on the driver side.
*
ROADSIDE ASSISTANCE
Your new Ford Super Duty comes with the assurance and support of 24-hour
emergency roadside assistance. To receive roadside assistance in the United States,
call 1-800-241-3673. In Canada, call 1-800-665-2006.
*IF EQUIPPED
1918
 Loading...