

Page 1

Page 2
Page 3

Table of Contents
Introduction ....................................................1
Instrumentation .............................................. 7
Electronic Sound Systems ......................... 21
Controls and Features ................................ 47
Seating and Safety Restraints .................. 89
Starting ......................................................... 125
Driving ......................................................... 133
Roadside Emergencies .............................. 155
Maintenance and Care ............................. 183
Capacities and Specifications ................. 237
Reporting Safety Defects
(U.S. Only) .................................................. 243
Customer Assistance ................................. 245
Accessories .................................................. 257
Quick Index ................................................ 265
Index ............................................................. 275
Service Station Information .................... 292
Page 4

Introductory Information
At Ford Motor Company, excellence is the continuous
commitment to achieve the best result possible. It is dedication
to learning what you want, determination to develop the right
concept, and execution of that concept with care, precision, and
attention to detail. In short, excellence means being the standard
by which others are judged.
Our Guiding Principles
■ Quality comes first. For your satisfaction, the quality of our
products and services must be our number one priority.
■ You are the focus of everything we do. Our work must be
done with you in mind, providing better products and
services than our competition.
■ Continuous improvement is essential to our success. We
must strive for excellence in everything we do: in our
products — in their safety and value — and in our services,
our human relations, our competitiveness, and our
profitability.
■ Employee involvement is our way of life. We are a team.
We must treat one another with trust and respect.
■ Dealers and suppliers are our partners. We must maintain
mutually beneficial relationships with dealers, suppliers, and
our other business associates.
■ Integrity is never compromised. Our conduct worldwide
must be pursued in a manner that is socially responsible and
commands respect for its integrity and for its positive
contributions to society.
1
Page 5

Congratulations on the purchase of your new vehicle. This
guide has information about the equipment and the options for
your new vehicle. You may not have bought all of the options
available to you. If you do not know which information applies
to your vehicle, talk to your dealer.
This guide describes equipment and gives specifications for
equipment that was in effect when this guide was approved for
printing. Ford may discontinue models or change specifications
or design without any notice and without incurring obligation.
NOTES and WARNINGS
NOTES give you additional information about the subject
matter you are referencing.
WARNINGS remind you to be especially careful in those areas
where carelessness can cause damage to your vehicle or
personal injury to yourself, your passengers or other people.
Please read all WARNINGS carefully.
RWARNING
Finding Information in This Guide
After you have read this guide once, you will probably return
to it when you have a specific question or need additional
information. To help you find specific information quickly, you
can use the Quick Index, Table of Contents, or the Index.
The Quick Index at the end of the book provides a page
number following each item which indicates where detailed
information can be found.
2
Page 6

Introductory Information
To use the Index, turn to the back of the book and search in the
alphabetical listing for the word that best describes the
information you need. If the word you chose is not listed, think
of other related words and look them up. We have designed the
Index so that you can find information under a technical term.
Canadian Owners — French Version
French Owner Guides can be obtained from your dealer or by
writing to Ford Motor Company of Canada, Limited, Service
Publications, P.O. Box 1580, Station B, Mississauga, Ontario L4Y
4G3.
Booklet
The Maintenance Schedule and Record booklet lists the services
that are most important for keeping your vehicle in good
condition. A record log is also provided to help you keep track
of all services performed.
Your vehicle is covered by three types of warranties: Basic
Vehicle Warranty, Extended Warranties on certain parts, and
Emissions Warranties.
Read your Warranty Information Booklet carefully to find out
about your vehicle’s warranties and your basic rights and
responsibilities.
If you lose your Warranty Information Booklet, you can get a new
one free of charge. Contact any Ford or Lincoln-Mercury dealer,
or refer to the addresses and phone numbers on the first page
of this owner guide.
3
Page 7

Buying a Ford Extended Service Plan
If you bought your vehicle in the U.S., you can buy a Ford
Extended Service Plan for your vehicle. This optional contract
provides service protection for a longer period of time than the
basic warranty that comes with your vehicle.
You do not have to buy this option when you buy your vehicle.
However, your option to purchase the Ford Extended Service
Plan runs out after 18 months or 18,000 miles. See your dealer
for more details about the Ford Extended Service Plan.
If you purchased a Canadian vehicle and did not take
advantage of the Ford Extended Service Plan at the time of
purchase, you may still be eligible. See your dealer for the
details.
VEHICLES
As with other vehicles of this type, failure to operate this
vehicle correctly may result in loss of control or an accident. Be
sure to read the Additional Special Driving Instructions for Utility
Vehicles in this book and the special supplement included with
four-wheel drive vehicles entitled 4-Wheeling with Ford.
Although this special supplement is primarily directed to
four-wheel drive vehicle operators, these principles of safe
driving also apply to operators of the two-wheel drive Explorer.
Even though you may not select a 4WD or AWD option for
your Explorer, many of its operating characteristics are similar
to those of a four-wheel drive vehicle. For this reason, Ford
urges you to read and understand the contents of the 4-Wheeling
with Ford supplement.
4
Page 8

Introductory Information
RWARNING
Do not use this vehicle as an ambulance.
Your new vehicle goes through an adjustment or break-in
period during the first 1,000 miles (1,600 km) that you drive it.
During the break-in period, you need to pay careful attention to
how you drive your vehicle.
■ Avoid sudden stops. Because your vehicle has new brake
linings, you should take these steps:
— Watch traffic carefully so that you can anticipate when to
stop.
— Begin braking well in advance.
— Apply the brakes gradually.
The break-in period for new brake linings lasts for 100 miles
(160 km) of city driving or 1,000 miles (1,600 km) of
highway driving.
■ Wheel lug nuts must be retightened to proper torque
specifications at 500 miles/800 km of new vehicle operation.
Proper torque specifications are provided in this guide. Also
retighten to proper torque specification at 500 miles/800 km
after any wheel change or any other time the wheel lug nuts
have been loosened.
■ Use only the type of engine oil that Ford recommends. See
Engine oil recommendations in the Index. Do not use special
“break-in” oils.
5
Page 9

Some vehicles are equipped with a Powertrain Control Module
that limits engine speeds with a cut-out mode to promote
durability.
Pollen, bird droppings and tree sap can damage the paint,
especially in hot weather. Wash your vehicle as often as
necessary to keep it clean.
Take similar precautions if your vehicle is exposed to chemical
industrial fallout.
Paint damage resulting from fallout is not related to a defect in
paint materials or workmanship and therefore is not covered by
warranty. Ford, however, believes that continual improvement
in customer satisfaction is a high priority. For this reason, Ford
has authorized its dealers to repair, at no charge to the owner,
the surfaces of new vehicles damaged by environmental fallout
within 12 months or 12,000 miles (20,000 km) of purchase,
whichever comes first. Customers may be required to bring their
vehicle in for inspection by a Ford representative.
Washing and Polishing Your Vehicle
Wash the outside of your vehicle, including the underside, with
a mild detergent.
DO NOT:
■ Wash your vehicle with hot water
■ Wash your vehicle while it sits in direct sunlight
■ Wash your vehicle while the body is hot
Polish your vehicle to remove harmful deposits and protect the
finish.
6
Page 10

Introductory Information
Cleaning Chrome and Aluminum Parts
Wash chrome and aluminum parts with a mild detergent. Do
not use steel wool, abrasive cleaners, fuel or strong detergents.
Cleaning Plastic Parts
Some of your vehicle’s exterior trim parts are plastic. Clean with
a tar and road oil remover if necessary. Use a vinyl cleaner for
routine cleaning.
Do not clean plastic parts with thinners, solvents or
petroleum-based cleaners.
If you have your vehicle rustproofed, remove oversprayed
rustproofing with a tar and road oil remover. If rustproofing is
not removed from plastic and rubber parts, it can cause
deterioration.
Because your vehicle’s side mouldings are painted in lacquer, do
not use thinners or solvents to clean them.
7
Page 11

Instrumentation
The instrument panel (dashboard) on your
vehicle is divided into several different sections.
The illustrations on the following pages show
the major parts of the instrument panel that are
described in this chapter. Some items shown
may not be on all vehicles.
In your vehicle, the warning lights and gauges
are grouped together on the instrument panel.
We call this grouping an instrument cluster.
7
Page 12

Instrument cluster
8
Page 13

Warning light locations on the instrument cluster
9
Page 14

The instrument cluster on the Probe GT model is
similar to the one shown. The two exceptions
are: the speedometer on the GT model shows
140 mph (225 km/h) and it has a 7,000 rpm
red-line tachometer.
GT model speedometer and tachometer
The following warning lights and gauges are on
the cluster. All of the warning lights and gauges
alert you to possible problems with your vehicle.
The following sections detail what each of these
indicators means.
10
Page 15
Safety Belt Warning Light and Chime
This warning light and chime remind you to
fasten your safety belt. If you do not fasten your
safety belt before the ignition is turned to ON,
the chime will sound for 4 to 8 seconds and the
warning light will illuminate for 1 to 2 minutes,
or until the safety belt is fastened. If you fasten
the safety belt before the ignition is turned to
ON, neither the light nor chime will activate.
Safety belt light
Air Bag Readiness Light
This light illuminates for six seconds when the
ignition is turned to the ON position. If the light
fails to illuminate, continues to flash, remains on,
or if a series of five beeps is heard, have the
system serviced as soon as possible.
Air bag readiness light
11
Page 16

RWARNING
If any of these things happen, even
intermittently, have the air bag system
serviced at your Ford or Lincoln-Mercury
dealer immediately.
Brake System Warning Light
Your vehicle has a divided brake system. If one
part isn’t working, the other part can still work
and stop you. For good braking, though, you
need both systems working well. If the warning
light illuminates, there could be a problem. Have
your brake system inspected right away.
This light should illuminate as you start the
vehicle. If it doesn’t illuminate then, have it
fixed so it will be ready to warn you if there’s a
problem.
Brake system and parking brake light
This light illuminates briefly when you turn the
ignition key to START. It normally goes off
shortly after the engine starts and you release
the parking brake, but it may stay on for up to
60 seconds. If the light stays on for longer than
60 seconds or comes on after you have fully
released the parking brake, have the hydraulic
brake system serviced.
12
Page 17

This light will also illuminate if the parking
brake does not release fully. If it does stay on
after the parking brake is fully released, it
means there may be a brake problem. Pull off
the road and stop carefully. You may notice that
the pedal is harder to push, the pedal may go
closer to the floor, or it may take longer to stop
the vehicle. Try the brakes again after you have
stopped.
RWARNING
The BRAKE light indicates that the brakes
may not be working properly. Have the
brakes checked immediately.
Anti-Lock Brake System Warning Light
When the ignition switch is turned to the ON
position, the anti-lock brake system warning
light will illuminate. When the engine is started,
the anti-lock brake system control unit will
determine if all components of the system are
operating correctly. The warning light could
remain on for two to four seconds.
The anti-lock brake system warning light
RWARNING
If the anti-lock brake system warning
light remains on or comes on while
driving, have the braking system checked
by a qualified service technician as soon
as possible.
13
Page 18

NOTE: If a fault occurs in the anti-lock
system, and the brake warning light is
not lit, the anti-lock system is disabled
but normal brake function remains
operational.
NOTE: If your vehicle must be jump-started
because of a low battery, the Anti-Lock
Brake System warning light could
remain on. This is due to low battery
voltage and does not indicate a
malfunction in the system. Under these
circumstances, you should drive your
vehicle only after the battery has had
time to charge and the light has gone
out.
The Low Fuel Light
This light illuminates when fuel level in your
tank has reached approximately 2-3 gallons (7-10
liters).
Low fuel light
14
Page 19

High Beam Light
This light illuminates when the headlamps are
turned to high beam or when you flash the
lights.
High beam light
Check Engine Warning Light
This light illuminates when the electronic engine
control system is not working properly. This is
the computer that controls the operating
conditions of the engine.
Check engine warning light
This light illuminates briefly when you turn the
ignition to the ON position, but should turn off
when the engine starts. If the light does not
come on when you turn the ignition to the ON
position or if it comes on and stays on when
you are driving, have your vehicle serviced as
soon as possible. This indicates a possible
problem with one of the engine’s emission
control systems. You do not need to have your
vehicle towed in.
15
Page 20

If the light flashes briefly while you are driving,
it means that the condition is no longer present.
O/D OFF Light (If equipped)
This light tells you that the overdrive off (O/D
OFF) button on the shift selector has been
pushed. When the light is on, the transaxle will
not shift into overdrive. Depressing the button
on the shift selector again will return the vehicle
to “overdrive on” mode. The transaxle will be in
the “overdrive on” mode when the vehicle is
started even if the O/D OFF mode was selected
when the vehicle was last shut off. Refer to the
Driving chapter for more information.
If the light does not illuminate when the O/D
OFF button is pressed, or if the light flashes
when you are driving, have your vehicle
serviced at the first opportunity. If this condition
persists, damage could occur to the transaxle.
Overdrive OFF light
Fuel Gauge
The fuel gauge displays approximately how
much fuel you have in the fuel tank.
The ignition must be turned off while putting
fuel in the tank in order to get a correct fuel
gauge reading after the ignition is turned on.
16
Page 21

The fuel gauge indicator may vary slightly while
the vehicle is in motion. This is the result of fuel
movement within the tank. You can get a more
accurate reading with the vehicle on smooth,
level ground.
Charging System Gauge
This gauge tells you your battery’s voltage when
you turn your ignition key to ON. When you
start your engine, the pointer should move to
the NORMAL range if you are not operating
any electrical accessories. (If electrical accessories
are operating and the engine is not running, the
pointer may move into the red area).
If the pointer moves into the red area when no
electrical accessories are operating, have the
vehicle’s electrical system checked.
Engine Oil Pressure Gauge
The gauge needle should stay in the NORMAL
range (indicating normal engine oil pressure). If
the needle drops below the NORMAL range into
the low range, there is a loss of oil pressure.
If this happens:
1. Pull off the road as soon as safely possible.
2. Shut off the engine immediately or severe
engine damage could result.
3. Check the oil level when the vehicle is on
level ground.
4. Add only as much oil as the engine needs
before you drive the vehicle again. Do not
overfill the oil reservoir. For more
information, see Adding engine oil in the
Index.
17
Page 22

Engine Coolant Temperature Gauge
This gauge indicates the temperature of the
engine coolant, not the coolant level. If the
coolant is not at its proper level or mixture, the
gauge indication will not be accurate.
The pointer usually moves from C (cold) into
the NORMAL band as your vehicle warms up.
Under most driving conditions, the pointer
should stay in the NORMAL band. If you are
driving in heavy traffic or on an extended grade
in hot weather, the pointer may reach to the top
of the NORMAL band.
If, under any circumstances, the pointer moves
above the NORMAL band, the engine is
overheating and continued operation may cause
engine damage.
If your engine overheats:
1. Pull off the road as soon as it is safely
possible.
2. Shut off the engine immediately or severe
engine damage could result.
3. Let the engine cool.
4. Check the coolant level following the
instructions on checking and adding coolant
to your engine. (See Engine coolant in the
Index.) If you do not follow these
instructions, you or others could be injured.
For instructions on checking and adding coolant
to your engine, see Engine coolant in the Index. If
you do not follow these instructions, you or
others could be injured.
18
Page 23

5. Refer to Adding Engine Coolant in the
Maintenance and Care chapter. Add as much
coolant as your engine needs. If the engine
continues to overheat, have the cooling
system serviced.
Speedometer
The speedometer tells you how many miles
(kilometers) per hour your vehicle is moving.
Odometer
The odometer tells you the total number of miles
(kilometers) your vehicle has been driven.
Trip Odometer
Use the trip odometer to track your mileage.
Simply set the trip odometer to zero by pressing
the reset button.
Tachometer
The tachometer indicates approximate engine
revolutions per minute, and is located on the
right-hand side of the instrument cluster. The
tachometer pointer may move slightly when the
key is placed in the ACC or ON position, with
the engine off. This pointer movement is normal,
and will not affect the accuracy of the
tachometer once the engine is running.
19
Page 24

21
Compact Disc Radio
Electronic Sound Systems
Page 25

The Compact Disc Radio combines the Electronic
Stereo Radio with the Ford Compact Disc Player.
Using the Controls on Your New Radio/CD
Player
Most of the features of this unit work for both
radio and CD operation, depending on which
mode the unit is in. Also, some of the buttons
control several different functions, so be sure to
read all of the operating instructions carefully.
How to turn the radio on and off
Press the “POWER” button to turn the radio on.
Press it again to turn it off.
How to adjust the volume
Press the (R/S) side of the “VOL” button to
increase/decrease the volume. Bars illuminate in
the display to show the relative volume level.
NOTE: If the volume level is set above a
certain listening level when the
ignition switch is turned off, when the
ignition switch is turned back on, the
volume will come back to a “nominal”
listening level. However, if the radio
power is turned off, the volume will
remain in the position it was set at
when radio power was switched off.
Selecting the AM or FM frequency band
Push the “AM/FM” button to select the desired
frequency band. When in the radio mode,
pushing the button more than once will alternate
between AM, FM1 and FM2. These functions are
used with the station memory buttons described
under How to tune radio stations.
22
Page 26

How to tune radio stations
There are four ways for you to tune in a
particular station. You can manually locate the
station using the “SCAN/TUNE” button,
“SEEK” the station, “SCAN” to the station or
select the station by using the memory buttons,
which you can set to any desired frequency.
These four methods are described below.
Using the “SCAN/TUNE” button to manually
❑
tune
You can change the frequency up or down
one increment at a time (FM changes in
increments of 200kHz; AM changes in
increments of 10kHz) by first pressing the
“SCAN/TUNE” button twice (display shows
“TUNE”), then — within approximately five
seconds —pressing and releasing either the
top (b) or bottom (a) half of the “SEEK”
button. To change frequencies quickly, press
and hold down either the top or bottom half
of the “SEEK” button.
Manual tuning adjusts your radio to any
allowable broadcast frequency, whether or
not a station is present on that frequency.
(See All About Radio Frequencies in this
section.)
Using the “SEEK” function
❑
This feature on your radio allows you to
automatically select listenable stations up or
down the frequency band. Press the top (a)
half of the “SEEK” button to select the next
listenable station up the frequency band.
Press the bottom (b) half of the button to
select the next listenable station down the
frequency band. By pressing and holding the
button, listenable stations can be passed over
to reach the desired station.
23
Page 27

Using the “SCAN/TUNE” button to scan
❑
radio stations
Pressing the “SCAN/TUNE” button once
enters the scan mode (display will indicate
“SCN”). Pushing the top (a) half of the
“SEEK” button will begin the scan mode up
the frequency band, stopping on each
listenable station for approximately five
seconds. Pushing the bottom (b) half of the
“SEEK” button will begin the scan mode
down the frequency band, again stopping on
each listenable station for approximately five
seconds.
To stop the scan mode on the presently
sampled station, press the “SCAN/TUNE”
button again.
Setting the Station Memory Preset buttons
❑
Your radio is equipped with 5 station
memory buttons. These buttons can be used
to select up to 5 preset AM stations and 10
FM stations (5 in FM1 and 5 in FM2). Follow
the easy steps below to set these buttons to
the desired frequencies.
1. Select a band, then select a frequency.
2. Press one of the memory preset buttons and
hold the button until the sound returns. That
station is now held in memory on that
button.
3. Follow the two steps above for each station
memory preset button you want to set.
NOTE: If the vehicle’s battery is disconnected,
the clock and station memory preset
buttons will need to be reset.
24
Page 28

Using the Automatic Memory Load feature
❑
You can activate the Auto Memory Load
feature by pressing and holding the “AUTO
PRESET” button for approximately three
seconds. Auto Memory Load sets all memory
buttons in AM, FM1 and FM2 sequentially by
seeking out the first five strong stations for
the respective band and storing them in
memory buttons 1-5. (FM2 will store the
second set of strong stations from the FM
band.)
With Auto Memory Store, you can continually
set strong stations into your memory buttons
without losing your existing memory presets,
which is especially helpful while traveling. Your
radio will automatically set your memory
buttons to the strong local stations so you don’t
have to continually manually tune to existing
stations.
Activate Auto Memory Store by pushing the
“AUTO PRESET” button once. Your radio will
set the first five strong stations of the band you
are in (AM, FM1 or FM2) into the memory
buttons. The display will show “AUTO,” then
run through the frequencies, stopping
momentarily on the stations being set into the
memory buttons. The radio is now in the
“AUTO” mode and the display will show
“AUTO” each time a preset is activated.
NOTE: If there are fewer than five strong
stations in the frequency band, the
remaining unfilled buttons will store
the last strong station detected on the
band.
After all stations have been filled, the radio will
begin playing the station stored on memory
button 1.
25
Page 29

To deactivate the Auto Memory Store mode and
return to the manually-set memory button
stations (or those stations set using Auto
Memory Load), simply push the “AUTO
PRESET” button. Display will show “AUTO”
then “OFF.” The next time Auto Memory Store
is activated on that band, the radio will store the
next set of five strong stations.
Using the “AUDIO” button to adjust the
tone balance and speaker output
Increasing or decreasing bass response
❑
Push the “AUDIO” button repeatedly until
the display reads “BASS.” Push the “+” side
of the “VOL” button to increase bass (more
“lows”), and push the “-” side to decrease
bass (less “lows”).
Increasing or decreasing treble response
❑
Push the “AUDIO” button repeatedly until
the display reads “TREB.” Push the “+” side
of the “VOL” button to increase treble (more
“highs”), and push the “-” side to decrease
treble (less “highs”).
Adjusting speaker balance
❑
Balance control allows you to adjust the
sound distribution between the right and left
speakers. Push the “AUDIO” button
repeatedly until the display reads “BAL.”
Push the “+” side of the “VOL” button to
shift the sound to the right speakers, and
push the “-” side to shift the sound to the
left speakers.
26
Page 30

Adjusting speaker fader
❑
Fade control allows you to adjust the sound
distribution between the front and rear
speakers. Push the “AUDIO” button
repeatedly until the display reads “FADE.”
Push the “+” side of the “VOL” button to
shift the sound to the front speakers, and
push the “-” side to shift the sound to the
rear speakers.
NOTE: Illuminated bars in the display show
relative levels of bass and treble and
positions of speaker balance and fader
functions after adjustments are made,
then revert to volume level set.
Clock operation
When in the radio mode, push the “CLOCK”
button to switch from radio frequency to clock.
Only the clock numerals will be displayed in the
clock mode — there is no A.M./P.M. indication.
When in the clock mode, the time will be
displayed until the button is pushed again.
However, if you retune the radio while it is in
the clock mode, the new radio frequency will be
displayed for approximately ten seconds and
then change back to clock.
When in the CD mode, push the “CLOCK”
button to change the display from elapsed time
mode to track number mode to clock mode. If
the CD track selection is changed when you are
in the clock or elapsed time mode, the new track
number will be displayed for approximately ten
seconds and then revert back to the previous
mode.
27
Page 31

To set the clock, simultaneously press the
“CLOCK” button and either the bottom (b) half
of the “SEEK” button to set hours, or the top
(a) half of the “SEEK” button to set minutes.
Using the Controls on Your New Compact
Disc Player
Your new Ford Compact Disc Player is capable
of playing 12 cm or 8 cm discs, without an
adapter. The player operates when the power is
on and a disc is inserted (label side up). Handle
the disc by its edge only. (Be sure to read and
follow all of the care and cleaning instructions
under How To Take Care of and Clean Your CD
Player and Discs.)
NOTE: If after you insert a disc, the disc is
ejected and “ERROR” begins scrolling
in the display, remove the disc and
reinsert it right side up (label side up).
The digital display on your CD player will
either show the track (selection) number or the
elapsed time. (The display mode can be selected
by pressing the “CLOCK” button.) Indicators for
play (a), stop (X) and compression on (“C”)
are also in the display. (These features are
described later.)
Once a disc is inserted, operation of the CD
player will override that of the radio.
NOTE: The volume, bass, treble, balance and
fader controls on the radio are also
used with the CD player. Refer to
earlier operating instructions on these
controls.
28
Page 32

How to insert a disc and begin play
Insert one disc, label side up into the disc
opening. When inserted, the disc automatically
loads into the unit and play starts at the
beginning of the first track (selection).
When the disc reaches the end, the disc player
automatically returns to the beginning of the
disc and resumes playing.
NOTE: Once a disc is inserted, the disc
opening is secured to prevent the
accidental insertion of a second disc.
NOTE: The CD player has heat protection
circuitry to protect the laser diode. If
the temperature of the player reaches
167˚F (75˚C), the heat detection circuit
will shut off the player and “TOO
HOT” will scroll in the display for
approximately five seconds (radio will
resume playing). When the temperature
returns to normal operating range, the
CD player will again be operational.
How to stop and restart the CD player
When a disc is loaded, the unit automatically
enters the play mode and the play indicator (a)
illuminates. To stop temporarily, press the
“PLAY/STOP” button or the “AM/FM” button.
The stop indicator (X) in the display illuminates
and operation returns to the radio mode. To
resume CD play, press the “PLAY/STOP”
button once again.
NOTE: If the ignition key is turned OFF
during play and then is set to the ON
or ACCESSORY position, the CD
player will resume playing in the mode
it was in when ignition was turned off.
29
Page 33

Using the “SEEK” feature
The “SEEK” feature allows you to quickly find a
particular selection on the disc.
Press the bottom (b) half of the “SEEK” button
once to repeat the current playing selection.
Press the top (a) half of the “SEEK” button to
advance to the next selection.
Pressing and holding the bottom (b) or top (a)
half of the “SEEK” button will scroll backward
and forward respectively through the tracks.
How to fast forward or reverse your CD
player
To quickly search for a particular point in a
selection, press the “FF” button (to fast forward)
or the “REV” button (to reverse). While either
button is pressed, the disc goes forward or
backward at two different speeds depending on
how long the button is held down. (Pressing
either button for more than three seconds will
speed up the process.) Release the button at the
desired point (found by watching the elapsed
playing time in the display or by listening to the
sound during fast forward or reverse). When
you have reached the beginning of track 1, the
CD player will begin playing.
When you have reached the end of the disc by
keeping the fast forward button pressed, the
display will show “END” and the player will go
into pause mode. Push the “PLAY/STOP”
button to begin playing the first track of the
disc, press the “REV” button to back up from
the end of the disc, or use the “SEEK” function
to locate a desired track.
30
Page 34

Using the “SCAN” function
Press the “SCAN/TUNE” button to enter the
scan mode. Once in the scan mode, press the top
(b) or bottom (a) half of the “SEEK” button to
scan forward or reverse, respectively. The CD
player will begin scanning the disc, stopping on
each listenable track for approximately an
eight-second sampling. This continues until you
press the “SCAN/TUNE” button a second time.
How to eject the disc
Push the “EJECT” button to stop play, eject the
disc and resume radio operation of your audio
system.
NOTE: You can eject the disc while the radio
power and/or ignition is on or off.
How To Take Care of and Clean Your CD
Player and Discs
To ensure the continued performance of your
Ford Compact Disc Player, carefully read the
following precautions:
Always handle the disc by its edge. Never
❑
touch the playing surface.
Before playing, inspect the disc for any
❑
contamination. If needed, clean the disc with
an approved disc cleaner, such as the
DiscwasherH Compact Disc Cleaner or the
Allsop 3H Compact Disc Cleaner, by wiping
from the center out to the edges. Do not use
a circular motion to clean.
Do not clean discs with solvents such as
❑
benzine, thinner, commercially available
cleaners or antistatic spray intended for
analog records.
31
Page 35

Do not expose the disc to direct sunlight or
❑
heat sources such as defroster and floor
heating ducts. Do not leave any discs in a
parked car in direct sunlight where there may
be a considerable rise in temperature or
damage may result.
After playing, store the disc in its case.
❑
If a disc has already been inserted, do not try
❑
to insert another disc. Doing so may damage
the disc player.
Do not insert anything other than a disc into
❑
the disc player.
NOTE: The use of optical instruments with
this product will increase eye hazard as
the laser beam used in this compact
disc player is harmful to the eyes. Do
not attempt to disassemble the case.
Refer servicing to qualified personnel
only.
Common Operating Conditions of Your
CD Player
The following information is designed to help
you recognize typical situations that could be
mistakenly interpreted as mechanical
malfunctions of the disc player.
A disc is already loaded.
❑
The disc is inserted with the label surface
❑
downward.
The disc is dusty or defective.
❑
The player’s internal temperature is above
❑
140˚F (60˚C). Allow the player to cool off
before operating.
32
Page 36

Different manufacturers of compact discs may
❑
produce discs with different dimensions or
tolerances, some of which may not be within
industry standards or in accordance with the
CD format. Because of this, a new disc that is
free of dust and scratches could be defective
and may not play on your Ford Compact
Disc Player.
If play does not begin after the CD button is
pushed:
The radio is not on.
❑
The unit is in the stop mode.
❑
Moisture may have condensed on the lenses
❑
within the unit. If this occurs, remove the
disc and wait approximately an hour until the
moisture evaporates.
If the sound skips:
Badly scratched discs or extremely rough
❑
roads will cause the sound to skip. Skipping
will not damage the disc player or scratch the
discs.
33
Page 37
34
Electronic Stereo Radio
Cassette Radios
Page 38
35
Electronic Stereo Radio with Cassette
Page 39

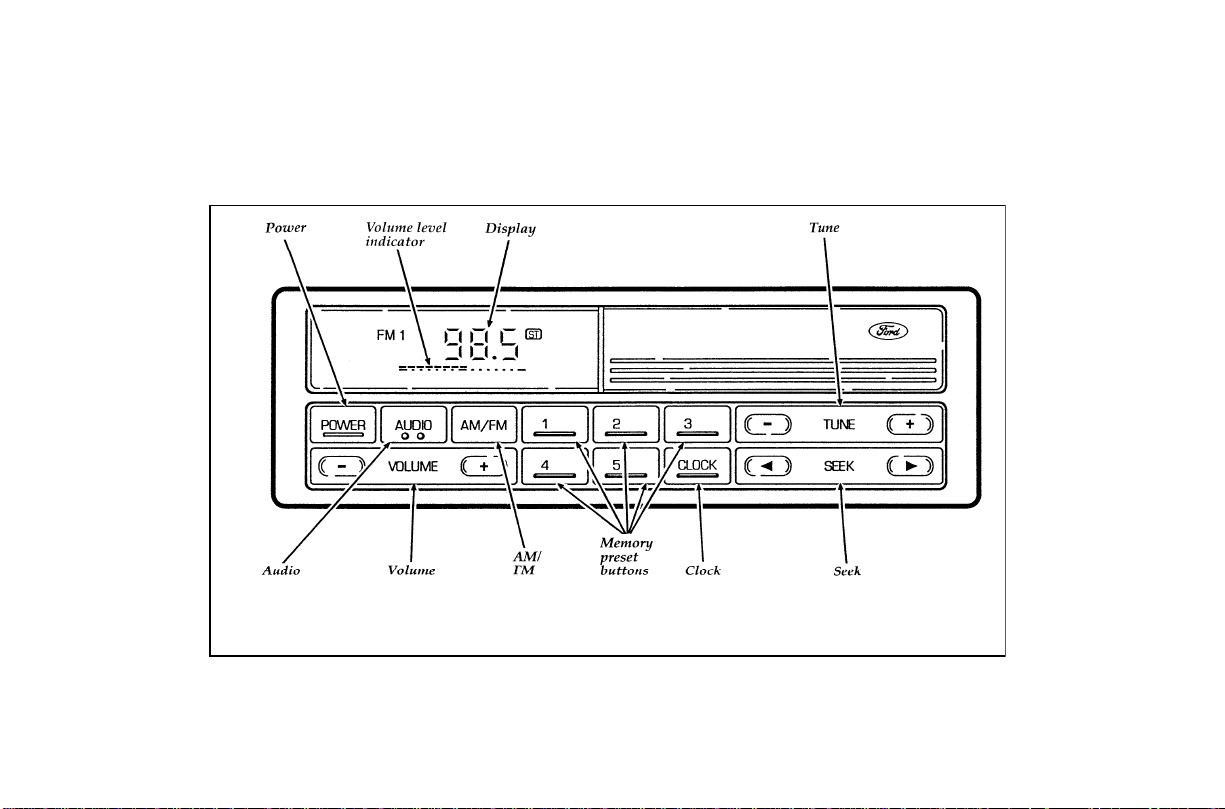
Using the Controls on Your New Radio
How to turn the radio on and adjust the
volume
Press the “POWER” button to turn the radio on.
Press it again to turn it off.
Press the right (+) side of the “VOLUME”
button to increase the volume. Press the left (S)
side of the button to decrease the volume.
Illuminated bars in the display show the relative
volume level.
NOTE: If the volume level is set above a
certain listening level when the
ignition switch is turned off, when the
ignition switch is turned back on, the
volume will come back to a “nominal”
listening level. However, if the radio
power is turned off, the volume will
remain in the position it was set at
when radio power was switched off.
Selecting the AM or FM frequency band
Push the “AM/FM” button to select the desired
frequency band. Pushing the button more than
once will alternate between AM, FM1 and FM2.
These functions are used with the station
memory buttons described under How to tune
radio stations.
How to tune radio stations (Stereo Radio)
There are three ways for you to tune in to a
particular station. You can manually locate the
station by using the “TUNE” button, “SEEK” the
station or select the station by using the memory
preset buttons, which you can set to any desired
frequency.
36
Page 40

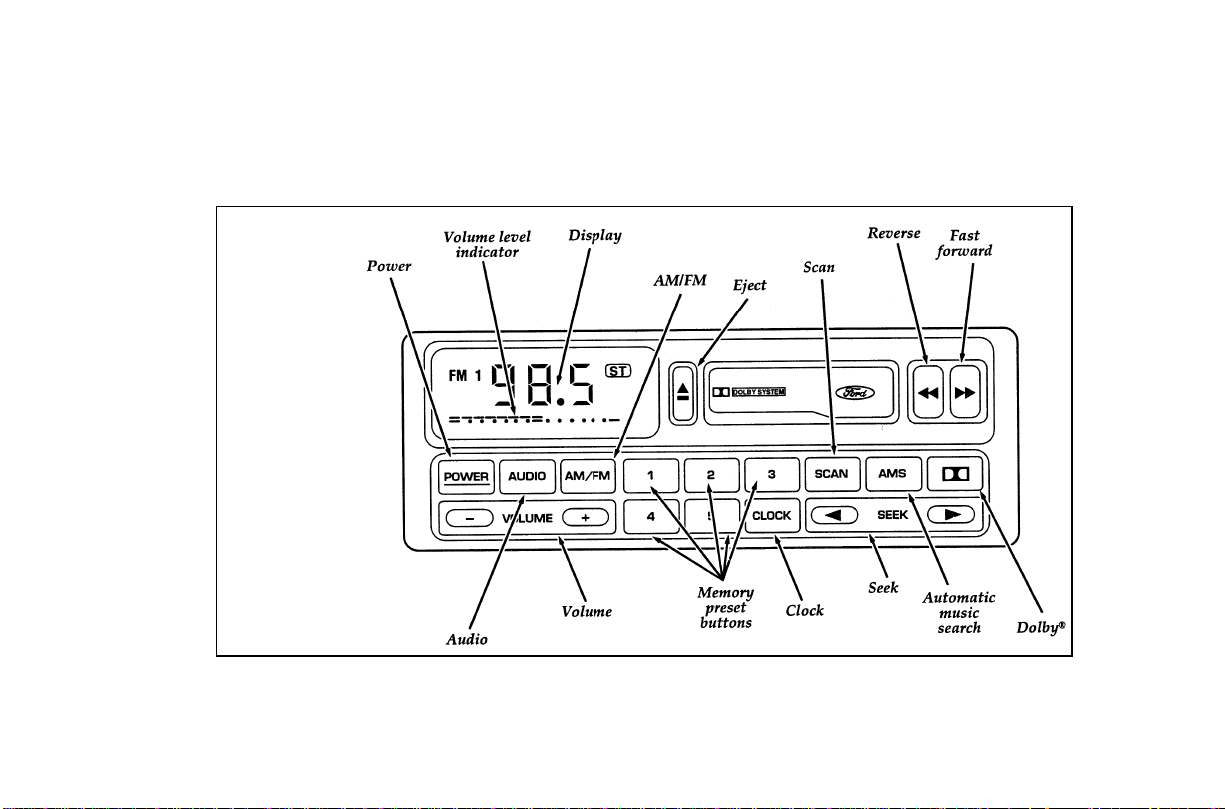
How to tune radio stations (Stereo Cassette
Radio)
There are four ways for you to tune in to a
particular station. You can manually locate the
station by using Automatic Music Search
“AMS”, “SEEK” the station, “SCAN” to the
station or select the station by using the memory
buttons, which you can set to any desired
frequency.
Using the “TUNE” function (Stereo Radio)
❑
You can change the frequency up or down
one increment at a time by pressing and
releasing either the right (+) or left (S) side
of the “TUNE” button. To change frequencies
quickly, press and hold down either the right
or left side of the “TUNE” button.
Manual tuning adjusts your radio to any
allowable broadcast frequency, whether or
not a station is present on that frequency.
(See All About Radio Frequencies in this
section.)
Using the “AMS” function to manually tune
❑
your radio (Stereo Cassette Radio)
You can change the frequency up or down
one increment at a time by first pressing the
“AMS” button (display shows “TUNE”) then
within approximately five seconds pressing
and releasing either the rightaor left
side of the “SEEK” button. To change
frequencies quickly, press and hold down
either the right or left side of the “SEEK”
button.
b
37
Page 41

Using the “SEEK” function
❑
This feature on your radio allows you to
automatically select listenable stations up or
down the frequency band. Press the right
side of the “SEEK” button to select the next
listenable station up the frequency band.
Press the leftbside of the button to select
the next listenable station down the
frequency band. By holding the button down,
listenable stations can be passed over to reach
the desired station.
Using the “SCAN” function (Stereo Cassette
❑
Radio)
Press the “SCAN” button to enter the scan
mode. The radio will begin scanning up the
frequency band, stopping on each listenable
station for approximately a five-second
sampling. This continues until you press the
“SCAN” button a second time.
Setting the Station Memory Preset buttons
❑
Your radio is equipped with 5 station
memory buttons. These buttons can be used
to select up to 5 preset AM stations and 10
preset FM stations (5 in FM1 and 5 in FM2).
a
Follow the easy steps below to set these buttons
to the desired frequencies:
1. Select a band, then select a frequency.
2. Press one of the memory preset buttons and
hold the button until the sound returns. That
station is now held in memory on that
button.
3. Follow the two steps above for each station
memory preset button you want to set.
38
Page 42

NOTE: If the vehicle’s battery is disconnected,
the clock and station memory preset
buttons will need to be reset.
Adjusting the tone balance and speaker
output of your radio
Increasing or decreasing bass response
❑
Push the “AUDIO” button repeatedly until
the display reads “BASS.” Push the right (+)
side of the “VOLUME” button to increase
bass (more “lows”), and push the left (S)
side to decrease bass (less “lows”).
Increasing or decreasing treble response
❑
Push the “AUDIO” button repeatedly until
the display reads “TREB.” Push the right (+)
side of the “VOLUME” button to increase the
treble (more “highs”), and push the left (S)
side to decrease treble (less “highs”).
Speaker features and operation
Adjusting speaker balance
❑
Balance control allows you to adjust the
sound distribution between the right and left
speakers. Push the “AUDIO” button
repeatedly until the display reads “BAL.”
Push the right (+) side of the “VOLUME”
button to shift the sound to the right
speakers, and push the left (S) side to shift
the sound to the left speakers.
39
Page 43

Adjusting speaker fader
❑
Fade control allows you to adjust the sound
distribution between the front and rear
speakers. Push the “AUDIO” button
repeatedly until the display reads “FADE.”
Push the right (+) side of the “VOLUME”
button to shift the sound to the front
speakers, and push the left (S) side to shift
the sound to the rear speakers.
NOTE: Illuminated bars in the display show
relative levels of bass and treble and
positions of speaker balance and fader
functions after adjustments are made,
then revert to volume level set.
Using the Controls of Your Cassette Tape
Player (If equipped)
How to insert a tape
Insert a cassette (with the open edge to the
right) firmly into the tape door opening, making
sure the cassette is completely in and “seated.”
NOTE: A cassette tape can be loaded with the
ignition on whether or not the radio
power is on. Inserting a cassette tape
with the radio power off will turn the
audio system on. After the cassette is
ejected, radio play will return.
How to locate a desired track on the tape
NOTE: The tape track or side number
indicated in the display does not
necessarily correspond to the tape track
or side number on the cassette label. It
is used only to indicate when the tape
mechanism reverses tracks.
40
Page 44

Using the Automatic Music Search (“AMS”)
❑
function with cassette tape player
Press and hold the “AMS” button (“AMS” will
appear in the display). Then, push the left
button to rewind to the beginning of the current
selection or press the right
forward to the beginning of the next selection.
Fast forwarding the tape
❑
Push the right
the tape.
Rewinding the tape
❑
Push the left
How to change the side of the tape being
❑
played
The alternate track (other side) of the tape
can be selected at any time by pushing both
fast-wind buttons (
same time. The number in the display will
alternate between 1 and 2.
How to eject the tape
To stop the tape and eject the cassette, press the
eject (i) button. The radio will resume playing.
h
button to fast forward
g
button to rewind the tape.
h
button to fast
g
and
g
) at the
h
Using the DolbyH B noise reduction feature
NOTE: Noise reduction system manufactured
under license from Dolby Labs
Licensing Corporation. “Dolby” and
double-D symbol are trademarks of
Dolby Laboratories Licensing
Corporation.
Push station memory button 3 to activate DolbyH
B Noise Reduction.
41
Page 45

Tips on Caring for the Cassette Player and
Tapes
In order to keep your cassette tape player
performing the way it was meant to, read and
follow these simple precautions:
Using a Ford or equivalent cassette cleaning
❑
cartridge to clean the tape player head after
10-12 hours of play will help maintain the
best playback sound and proper tape
operation.
Only cassettes that are 90 minutes long or
❑
less should be used. Tapes longer than 90
minutes are thinner and subject to breakage
or may jam the tape player mechanism.
Protect cassettes from exposure to direct
❑
sunlight, high humidity and extreme heat or
cold. If they are exposed to extreme
conditions, allow them to reach a moderate
temperature before playing.
If a tape is loose inside the cassette, tighten it
❑
before playing by putting your finger or a
pencil into one of the holes and turning the
hub until the tape is tight.
Loose labels on cassette tapes can become
❑
lodged in the mechanism. Remove any loose
label material before inserting a cassette.
Do not leave a tape in the cassette tape
❑
player when not in use. High heat in the
vehicle can cause the cassette to warp.
42
Page 46

Clock Operation
How to view the clock mode
Press the “CLOCK” button to alternate the
frequency and time in the display. In the clock
mode, pressing any radio function will
automatically display the radio frequency for
approximately ten seconds before changing back
to the clock mode.
How to set the clock
1. Turn the radio on.
2. Press and hold in the “CLOCK” button.
Press the “SEEK” button left (b) to advance
the hours and right (a) to advance the
minutes.
NOTE: The clock displays 12-hour time with
no AM/PM indications.
Radio Antenna
The radio antenna is mounted on the rear
passenger side quarter panel of the vehicle. It is
a fixed mast antenna and cannot be retracted.
Common Radio Reception Conditions
Several conditions prevent FM reception from
being completely clear and noise-free, such as
the following:
1. Distance/Strength
The strength of the FM signal is directly related
to the distance the signal must travel. The
listenable range of an average FM signal is
approximately 25 miles (40 kilometers). Beyond
this distance, the radio is operating in a fringe
area and the signal becomes weaker.
43
Page 47

2. Terrain
The terrain (hilly, mountainous, tall buildings) of
the area over which the signal travels may
prevent the FM signal from being noise-free.
Repeated pops and hisses which are heard
during an otherwise clear broadcast can occur
near the station because of the “line of sight”
characteristic of FM radio waves.
If there is a building or large structure between
the antenna and station, some of the signal
“bends” around the building, but certain spots
receive almost no signal. Moving out of the
“shadow” of the structure will allow the station
to return to normal.
When the radio waves are reflected off objects or
structures, the reflected signal cancels the normal
signal, causing the antenna to pick up noise and
distortion. Cancellation effects are most
prominent in metropolitan areas, but also can
become quite severe in hilly terrain and
depressed roadways.
To minimize these conditions, a stereo/mono
blend circuit has been incorporated into this
system. This feature automatically switches a
weak stereo signal to a clearer monaural signal,
which improves the quality of reception.
Several sources of static are normal conditions
on AM frequencies. These can be caused by
power lines, electric fences, traffic lights and
thunderstorms.
Another reception phenomenon is Strong Signal
Capture and Overload. This can occur when
listening to a weak station and when passing
another broadcast tower. The close station may
capture the more distant station, although the
44
Page 48

displayed frequency does not change. While
passing the tower, the station may switch back
and forth a few times before returning to the
original station.
When several broadcast towers are present
(common in metropolitan areas), several stations
may overload the receiver, resulting in
considerable station changing, mixing and
distortion.
Automatic gain control circuitry for both AM
and FM bands has been incorporated into this
system to reduce strong signal capture and
overload.
The Federal Communications Commission (FCC)
and the Canadian Radio Telecommunications
Commission (CRTC) establish the frequencies
that AM and FM radio stations may use for
their broadcasts. The allowable frequencies are,
AM: 530, 540...1600, 1610 kHz in 10 kHz steps;
FM: 87.9, 88.1...107.7, 107.9 MHz in 0.2 MHz
steps.
Not all frequencies will be assigned to a given
area. This radio will tune to each of these
frequencies using manual tune and no fine
tuning is necessary as radio stations may not use
other frequencies.
Some FM radio stations advertise a
“rounded-off” frequency which is not the
frequency they actually broadcast on. For
example, a radio station that is assigned a
frequency of 98.7 MHz may call itself “Radio 99”
even though 99.0 MHz is not an allowable FM
broadcast frequency.
45
Page 49

Information
Warranty
❑
Your sound system is warranted for three years
or 36,000 miles (60,000 kilometers), whichever
comes first. Consult your vehicle warranty
booklet for further information. Ask your dealer
for a copy of this limited warranty.
Service
❑
At Ford, we stand behind our audio systems
with a comprehensive service and repair
program. If anything should go wrong with
your Ford audio system, return to your dealer
for service. There is a nationwide network of
qualified Ford authorized repair centers to assist
you.
46
Page 50

Controls and Features
Your vehicle has a variety of features designed
for your comfort, convenience and safety. Read
this chapter to find out about standard and
optional features.
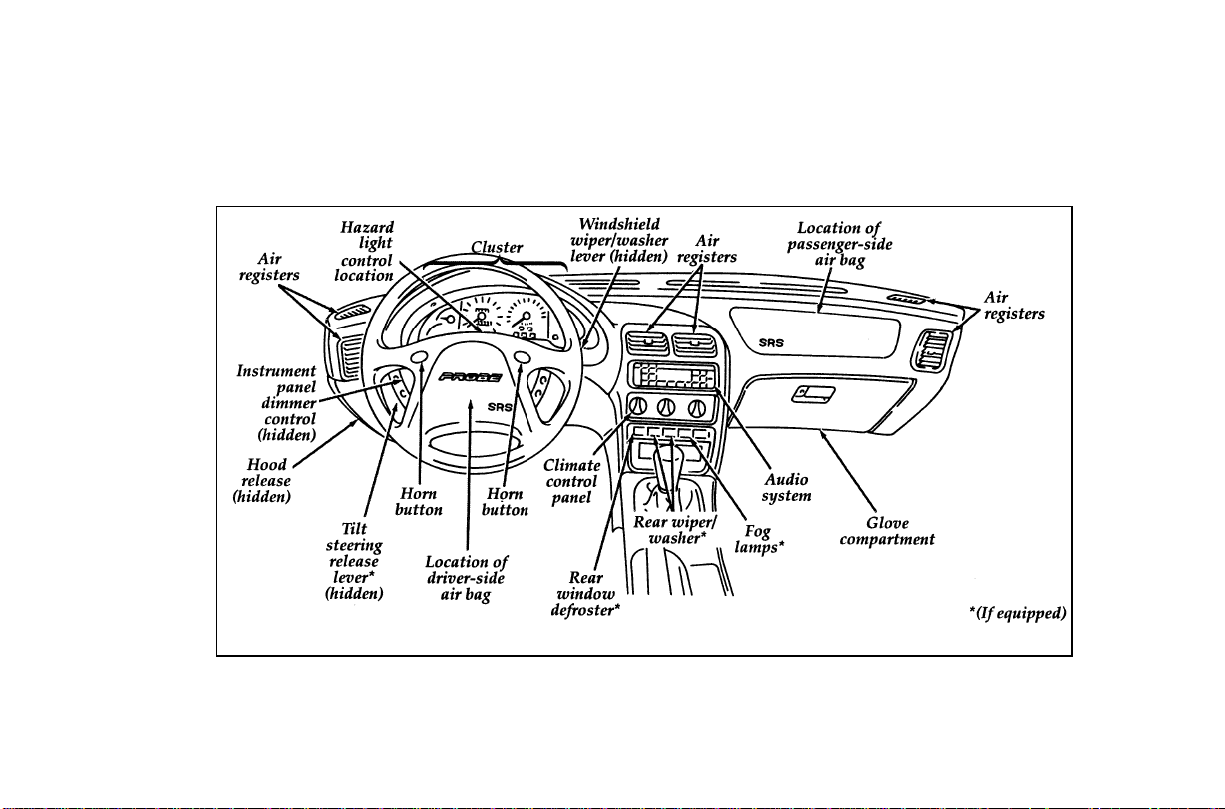
The main controls for the climate control system,
clock, and radio are on the instrument panel.
47
Page 51
48
Instrument panel
Page 52
NOTE: Any cleaner or polish that increases the
gloss (shine) of the upper part of the
instrument panel should be avoided.
The dull finish in this area is to help
protect the driver from undesirable
windshield reflection.
Heating Only System (Without Air
Conditioning)
Function selection
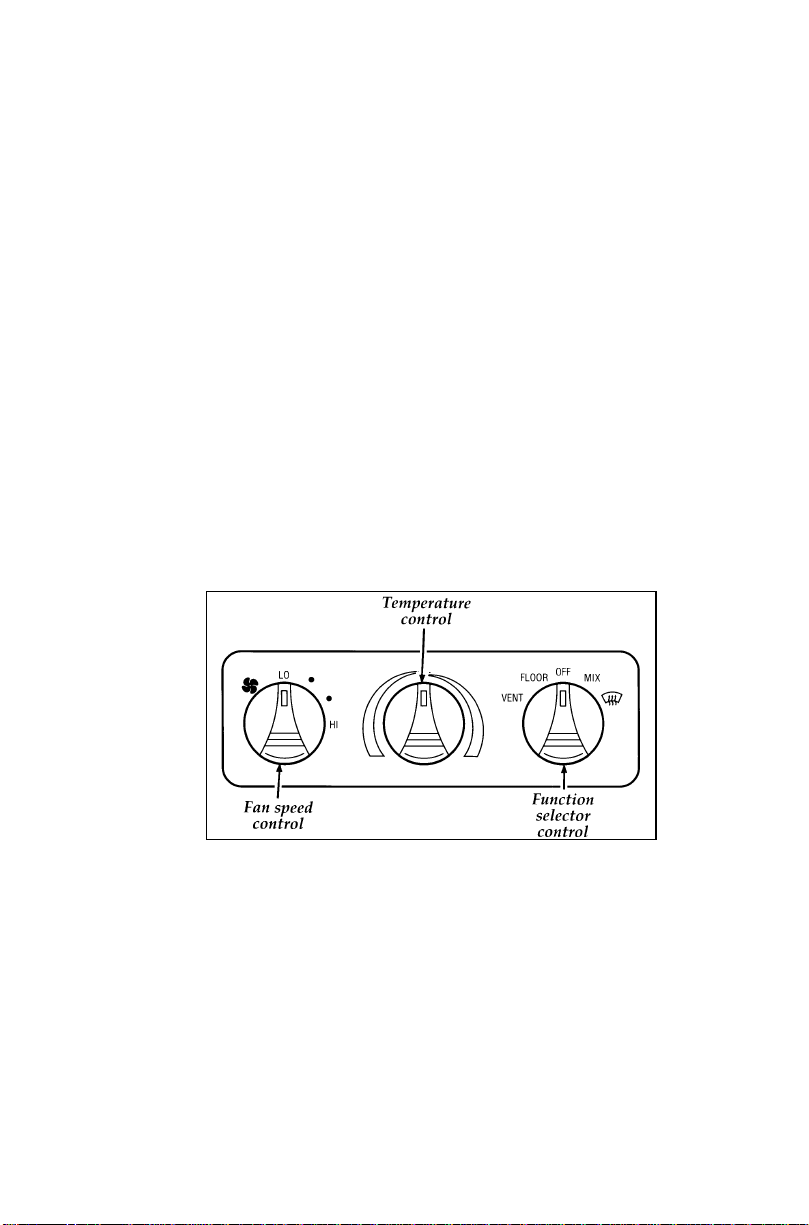
The heater in your vehicle has three controls
used for air direction, temperature and fan
speed. The function selector control lets you
direct heated or unheated air through the
instrument panel registers, or down to the floor.
It also allows you to vent your vehicle with
outside air.
Heating only system control panel
Turning the function selector control all the way
to the right (V) directs air to defroster vents
and the side window defoggers only.
With the function selector control in the MIX
position, air is directed out the defrosters, side
defoggers and the floor heater outlets.
49
Page 53

The FLOOR position directs air out the floor
outlets and the side window defoggers.
Ventilate your vehicle with outside air by
choosing the VENT position.
Temperature control
The air temperature can be adjusted by moving
the marker on the temperature control to the red
area for warm air, or to the blue area for
unheated air. The air will become warmer or
cooler depending on how far the control is
turned.
Fan speed control
Fan speed can be controlled by turning the
control from LO to HI.
Turning On the Heat
To heat the inside of your vehicle:
1. Turn the function selector control to FLOOR.
through the floor registers, and a little air is
also directed at the windshield and side
windows to help prevent fogging.
2. Turn the temperature control all the way to
the right in the red area, or to the desired
temperature.
3. Set the fan at the desired speed.
50
Page 54

Defrosting the Windshield and Side
Windows
1. Turn the function selector control to the
defrost position.
When V is selected, air is directed to the
windshield and side windows.
2. Turn the temperature control to the desired
temperature.
3. Set the fan at the desired speed.
Heating and Defrosting at the Same Time
1. Set the function selector control to MIX.
2. Set the temperature and fan speed as
desired.
Ventilating Your Vehicle With Outside Air
On mild days, you may want to ventilate your
vehicle with outside air. To open the vents:
1. Turn the function selector control to VENT.
the panel registers.
2. Turn the temperature control to the desired
temperature.
3. Set theH(fan speed) as desired.
51
Page 55

Tips for controlling the temperature in your
vehicle
To vary the temperature inside your vehicle,
❑
move the temperature selector toward the red
area for warmer air and toward the blue area
for cooler air.
If you drive with the fan off and the
❑
windows closed, the windows may fog up.
To prevent fogging:
1. Set the function selector control to VENT,
MIX, FLOOR or the V position.
2. Set the desired temperature.
3. Set theH(fan speed) to the desired
position.
Do not put objects under the front seats that
❑
will interfere with the flow of air to the back
seats.
Remove any snow, ice, or leaves from the
❑
area below the windshield on the outside of
your vehicle. They could block the air intake.
52
Page 56
Air Conditioning System (If equipped)
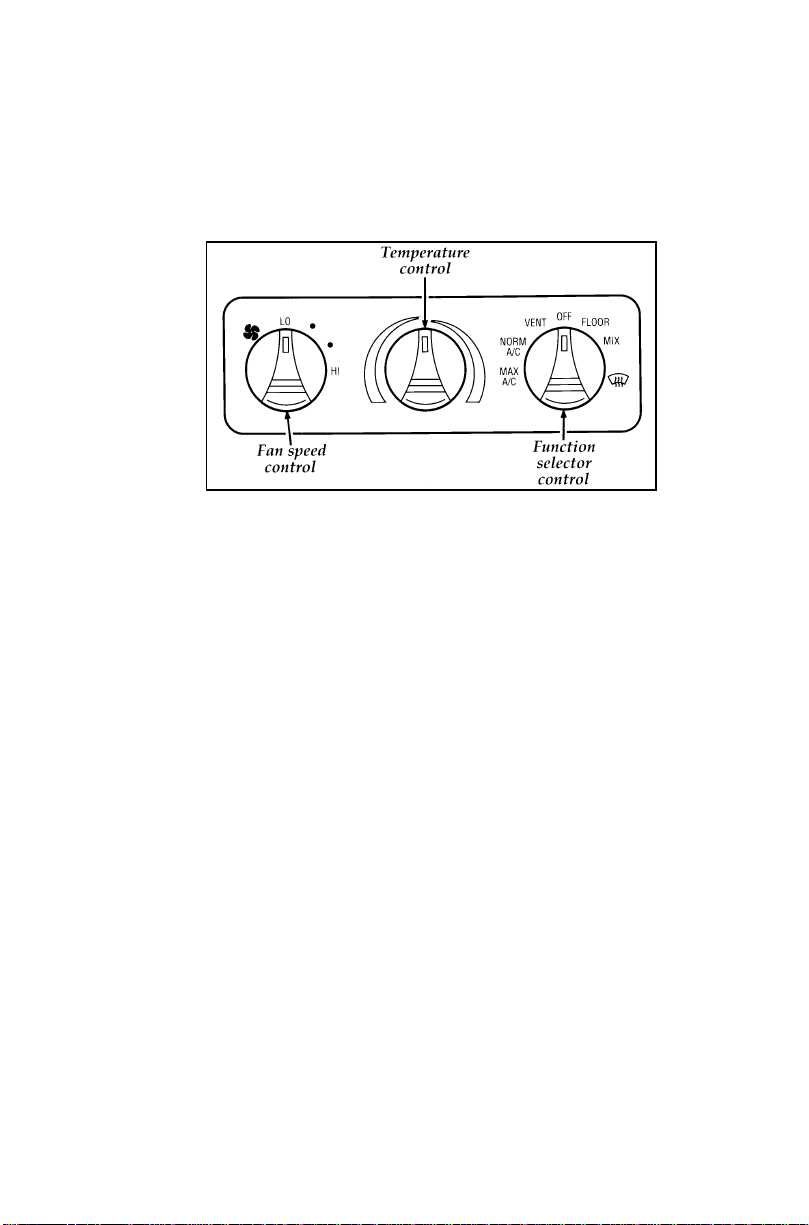
Operate the air conditioning by using the climate
controls on the center of the instrument panel.
Air conditioning controls
Sometimes you may notice slight engine surging
if you have the air conditioner on. This is
normal, as the system is designed to cycle the
compressor on and off to maintain desired
cooling. The reduced compressor operation
should benefit fuel economy.
On some vehicles with air conditioning,
wide-open throttle acceleration will temporarily
cut off the air conditioning.
Since the air conditioner removes a lot of
moisture from the air during operation, it is
normal for water to drip on the pavement under
the air conditioner drain after you have stopped
the vehicle.
Action for heating and windshield defrosting are
identical for cars equipped with either the
Heating Only System or the Heating and Air
Conditioning System. For instructions about these
functions, see the previous section, Heating Only
System. For instructions about using the air
conditioning, see the following sections.
53
Page 57

If the inside of your vehicle is very warm, drive
for a few minutes with the windows down. This
forces most of the hot, stale air out of the
vehicle and helps the air conditioning cool the
vehicle faster.
MAX A/C
When MAX A/C is selected, cooled interior air
is recirculated through the system. This position
is more efficient than NORM A/C.
To cool your vehicle quickly in warm weather:
1. Turn the function selector control to MAX
A/C.
2. Turn the temperature control to the blue
(cool) area.
3. Set the fan at the desired speed.
Because MAX A/C uses recirculated air, MAX is
usually more efficient than NORM A/C. You
can switch to outside air NORM A/C at any
time, especially after the vehicle has cooled
down.
You may notice a slight odor when using the
MAX A/C position. This is normal. If the odor
becomes annoying, switch the function selector
to NORM A/C.
To provide the most quiet operation when using
MAX A/C, reduce the fan speed after a
comfortable temperature has been reached.
NORM A/C
When maximum air conditioning is not needed,
you can use the NORM A/C position to cool
your vehicle with outside air. Cooling your
vehicle this way brings in outside air and is
quieter, but it is less efficient.
54
Page 58

To cool your vehicle using outside air:
1. Turn the function selector control to NORM
A/C.
2. Turn the temperature control all the way to
left to the blue (cool) area.
3. Set the fan at the desired speed.
In mild weather, setting the function selector
control in the VENT position will add cool air to
your vehicle without using the air conditioning.
You will get better fuel economy without using
the air conditioning.
Engine Idle Speed Control System
Genuine Ford air conditioning (either
factory-installed or dealer-installed) has an
engine idle speed control system that
compensates for engine speed loss that may
occur when the air conditioning compressor is
running. This idle speed control holds the engine
idle essentially constant, regardless of whether
the air conditioning system is on or off.
NOTE: Whenever service to the air
conditioning system is required, make
sure the service facility uses a
refrigerant recycling system. These
systems will capture the refrigerant for
reuse. Releasing certain refrigerants
into the atmosphere is hazardous to the
environment.
55
Page 59
Rear Window Defroster (If equipped)
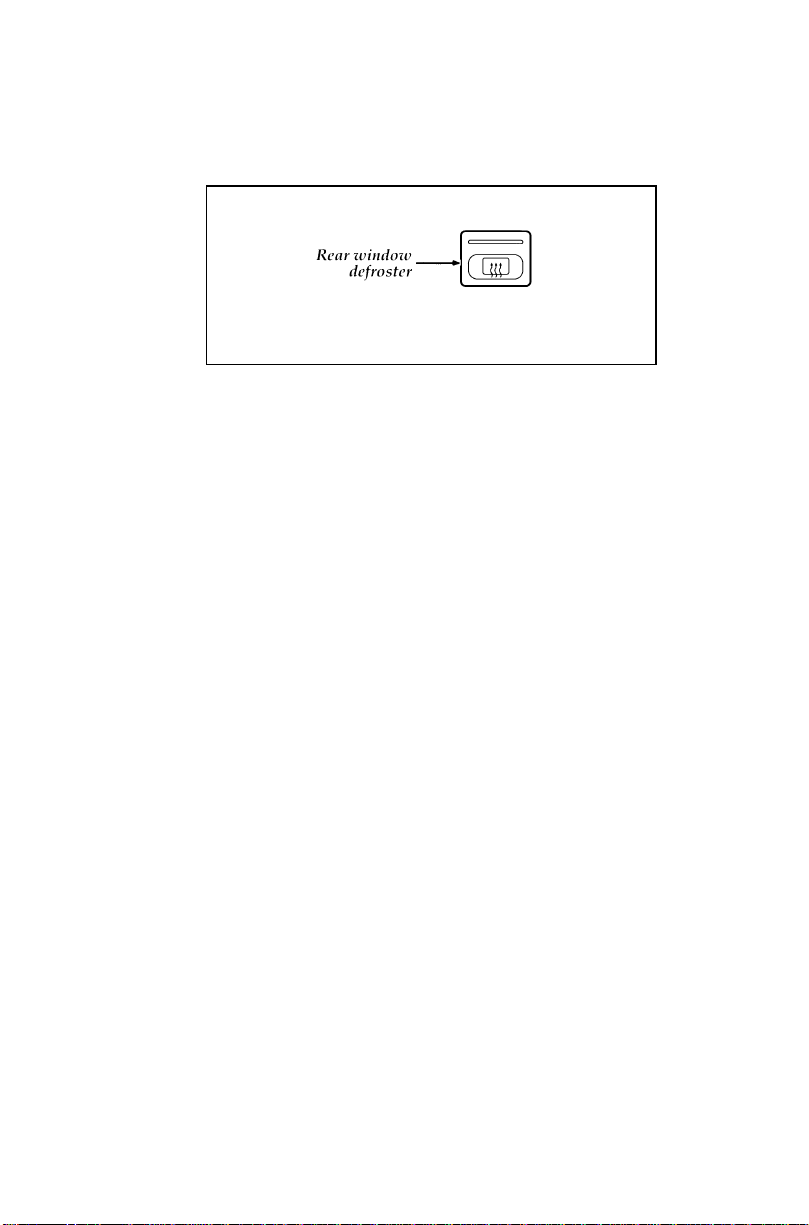
Rear window defroster button
The defroster for the rear window clears frost,
fog, or thin ice from both the inside and outside
of the rear window. The rear window defroster
button is located on the lower right of the
instrument panel below the climate control
panel. This button is also used to activate your
heated power mirrors (if equipped).
To defrost the rear window:
1. Clear any snow and/or ice from the rear
window.
2. Get in your vehicle and start the engine.
3. Press the rear defrost button. The indicator
light turns on.
The defroster turns off automatically after 15 to
25 minutes. If the window is not clear, turn on
the defroster again. It will also automatically
shut off any time the engine is shut off.
NOTE: Never use sharp instruments or
window cleaners with abrasives to
clean the inside of your rear window.
If you do, you may damage the heating
elements that are bonded to the inside
of the rear window and cause damage
to the rear window defroster.
56
Page 60
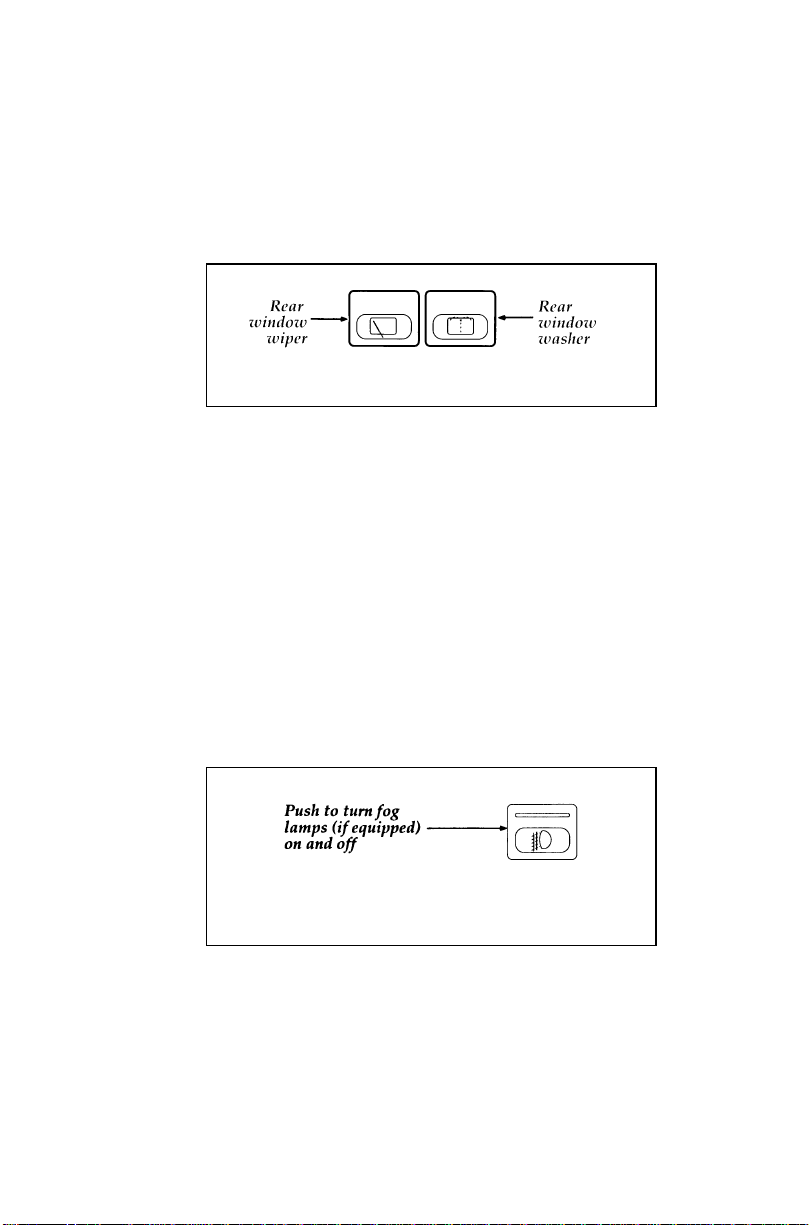
Rear Window Wiper and Washer
The rear window wiper and washer buttons are
located on the instrument panel below the
climate control panel.
To operate the rear wiper, push the rear window
wiper button. Push the button a second time to
turn the wiper off. To operate the rear washer,
push and hold the rear window washer button
in. The washer will spray until the button is
released.
Fog Lamps (If equipped)
The fog lamps only operate when the headlamps
are on low beam. To activate fog lamps, push
the button on the control panel below the
climate controls. An indicator light on the button
will illuminate. Push the button again to turn
the fog lamps off.
Fog lamp button
57
Page 61
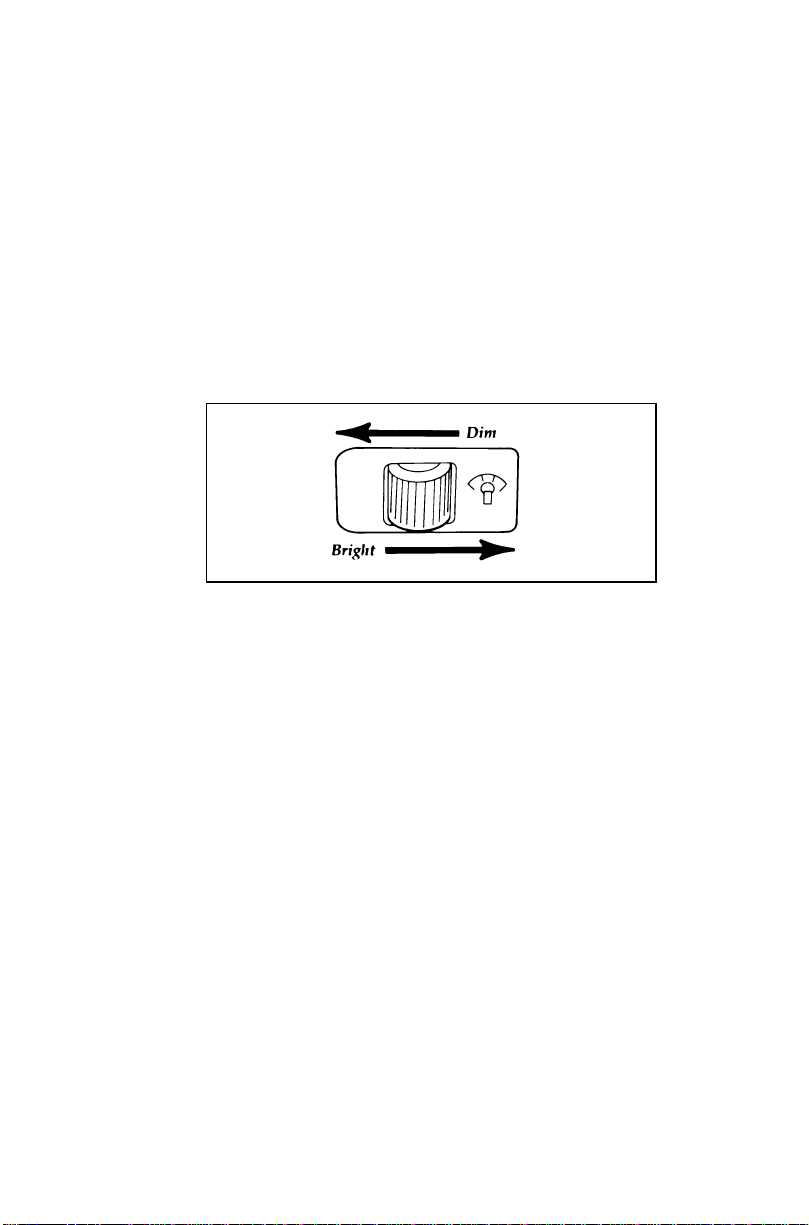
Lighting Up the Interior and Instrument
Panel
With the parking lamps or headlamps on, the
brightness of the instrument panel lighting can
be adjusted.
To brighten or dim the instrument panel
lighting, rotate the dimmer control thumbwheel
as desired.
Dimmer control thumbwheel
The dimmer control thumbwheel is located to
the left of the steering wheel on the instrument
panel.
Dome Lamp
The dome lamp illuminates whenever one of the
front doors is opened and turns off
automatically when the doors are closed. You
may turn the dome lamp on and off while the
doors are closed by using the ON/OFF switch
located on the interior/map lamp control panel.
58
Page 62
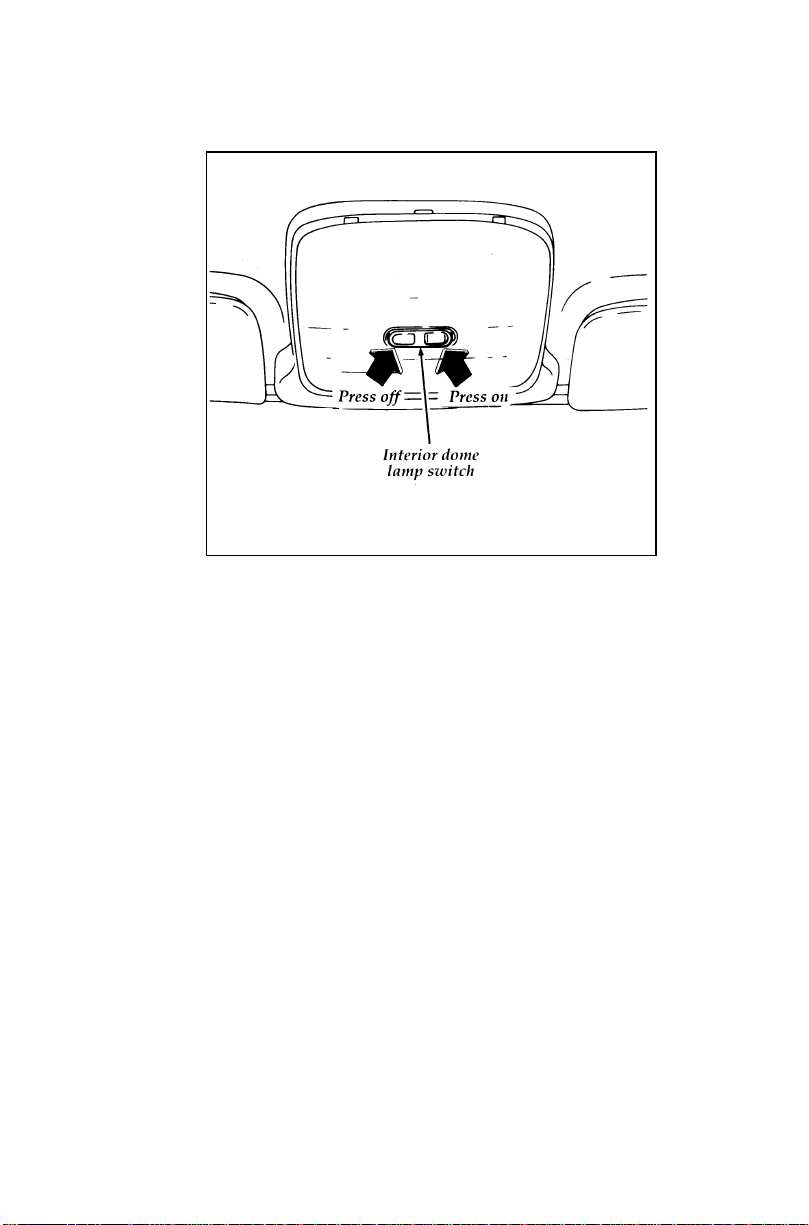
Interior/map lamp control panel
Map lamps (if equipped)
The map lamps can be turned on by using the
interior/map lamp control panel located between
the sun visors.
There are two map lamps, one for the driver
and one for the passenger. To turn on the map
lamp, push the button that is next to the lamp.
Push the buttons again to turn the map lamps
off.
59
Page 63
For information about the radio in your vehicle,
refer to the Electronic Sound Systems chapter in
this Owner Guide.
Radios
The electronic radios have a built-in clock. For
complete operating instructions, refer to the
Electronic Sound Systems chapter in this Owner
Guide.
60
Page 64

Understanding the Positions of the Ignition
Ignition lock cylinder
LOCK locks the steering wheel. It also locks the
gearshift lever in P (Park) (automatic transaxle).
LOCK is the only position that allows you to
remove the key. The LOCK feature helps to
protect your vehicle from theft.
To remove the key if you have a manual
transaxle, push the key in while turning it to the
LOCK position.
If your key is stuck in the LOCK position and
will not turn, move your steering wheel left or
right until the key turns freely.
ACC (Accessory) allows some of your vehicle’s
electrical accessories to operate while the engine
is not running.
ON allows you to test your vehicle’s warning
lights (except the brake system warning light) to
make sure they work before you start the
engine. The key returns to the ON position once
the engine is started and remains in this position
while the engine runs.
61
Page 65
START cranks the engine. Release the key once
the engine starts so that you do not damage the
starter. The key should return to ON when you
release it. The START position also allows you
to test the brake warning light.
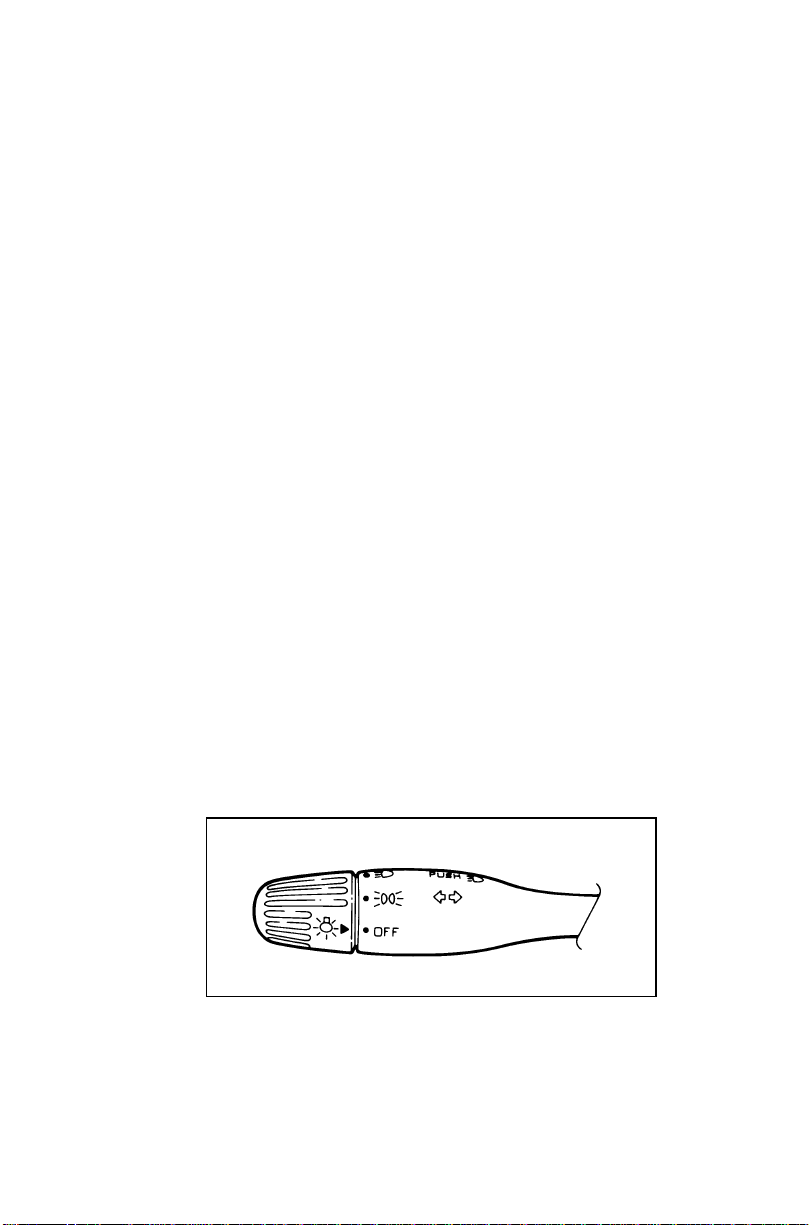
You can use the turn signal lever on the left side
of the steering column to:
operate the headlamps and parking lamps
❑
operate the turn signals and cornering lamps
❑
turn the high beams on/off
❑
flash the lamps
❑
Headlamps and Parking Lamps
To turn the parking lamps or headlamps on,
twist the knob at the end of the turn signal
lever.
FIRST STOP — Turning the knob to the first
stop (g) will turn on the the license plate
lamps, parking lamps, side marker lamps, tail
lamps and instrument panel lamps.
SECOND STOP — Turning the knob to the
second stop (B) will turn on the headlamps,
license plate lamps, parking lamps, side marker
lamps, tail lamps, and instrument panel lamps.
Headlamp control
62
Page 66
DaytimeRunningLightSystem
(Canadianvehiclesonly)
InCanada,thelightsilluminateduringdaytime
operation.TheDaytimeRunningLightsystem
(DRL)automaticallyilluminateswhenthe
ignitionswitchisturnedtotheONposition.The
daytimerunninglightsareswitchedoffunder
thefollowingconditions:
whentheheadlampsareswitchedon
❑
whentheparkingbrakeisapplied
❑
whentheflash-to-passsystemisused
❑
WARNING
TheDaytimeRunningLight(DRL)system
willnotilluminatethetaillampsand
parkinglamps.Turnonyourheadlamps
atdusk.Failuretodosomayresultina
collision.
RaisingtheHeadlampsManually
Ifthepowerheadlampdoorsystembecomes
inoperative,yourvehiclehasamanualretractor
systemthatallowsyoutoraisetheheadlamps
manually(theheadlampswillnotturnon).The
retractorsarelocatedunderthehoodandbehind
eachheadlamp.Removethecapandturnthe
knob.Eachheadlampmustberaisedseparately.
Beforeusingthemanualretractorstoraiseyour
headlamps,theRETRAfusemustberemoved.
63
Page 67
Openthemainfusepanel.Refertothe
underhoodfusepanelinServicingYourProbe
laterinthisownerguide.PulltheRETRA(20A)
fusestraightout.
Inspecttheremovedfuse.Ifitisblown,replace
itwithanewoneofthesamerating.Ifitisn’t
blownorifanewfusedoesnotsolvethe
problem,removeitandoperatetheheadlamp
manually.
WARNING
AlwaysremovetheRETRA(20A)fuse
beforemanuallyoperatingaheadlamp
retractororattemptingtoremoveanything
fromtheheadlamp.Failuretoremovethe
RETRAfusecouldcauseinjurytoahand
orfingers.
WARNING
WhenreinstallingtheRETRAfuse,make
surenothingisneartheheadlamp
retractor.Itmaymovesuddenlywhilethe
fuseisbeinginserted,causinginjuryto
handsandfingers.
64
Page 68
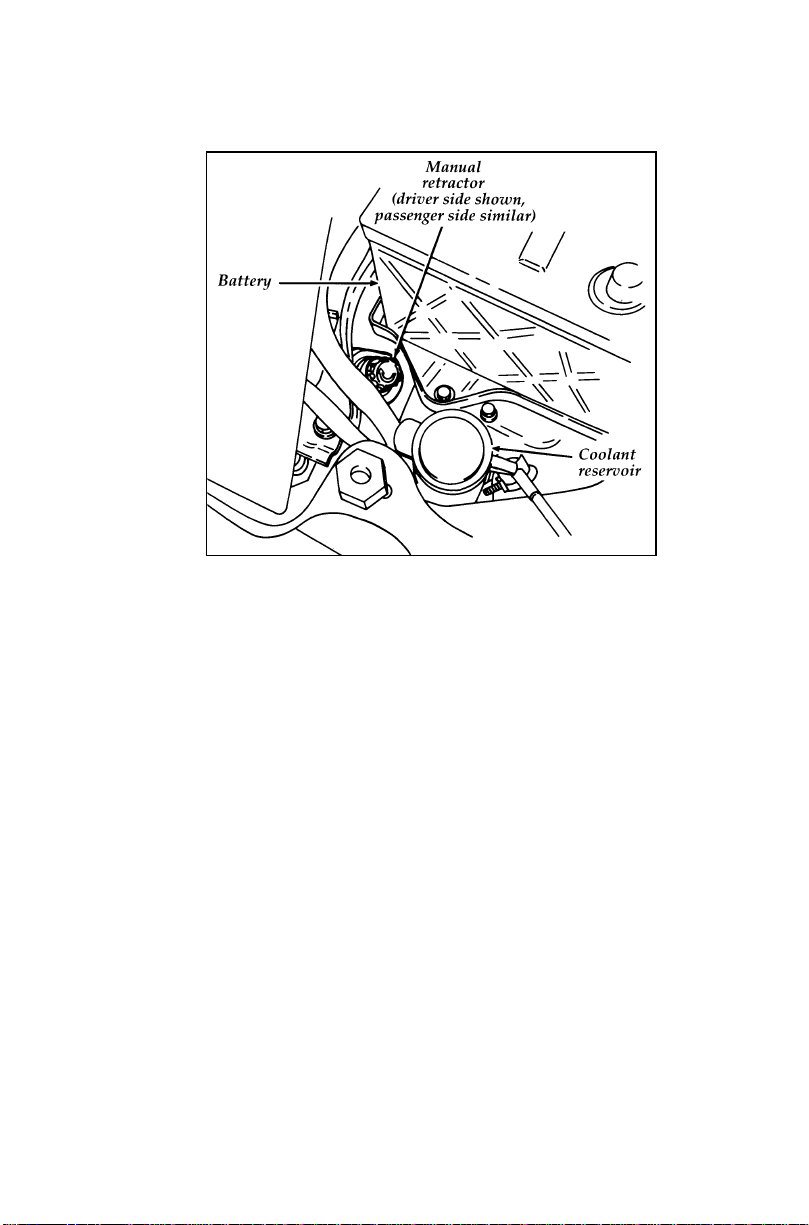
Manual headlamp retractors located behind the headlamps
High Beams and Flashing the Lamps
To turn on the high beams, turn the headlamp
control knob to the headlamp ON position and
push the turn signal lever away from you until
it latches. When the high beams are ON, the
high beam indicator light on the instrument
panel comes on.
To turn off the high beams, pull the lever
toward you until it latches. The high beam
indicator light turns off.
65
Page 69
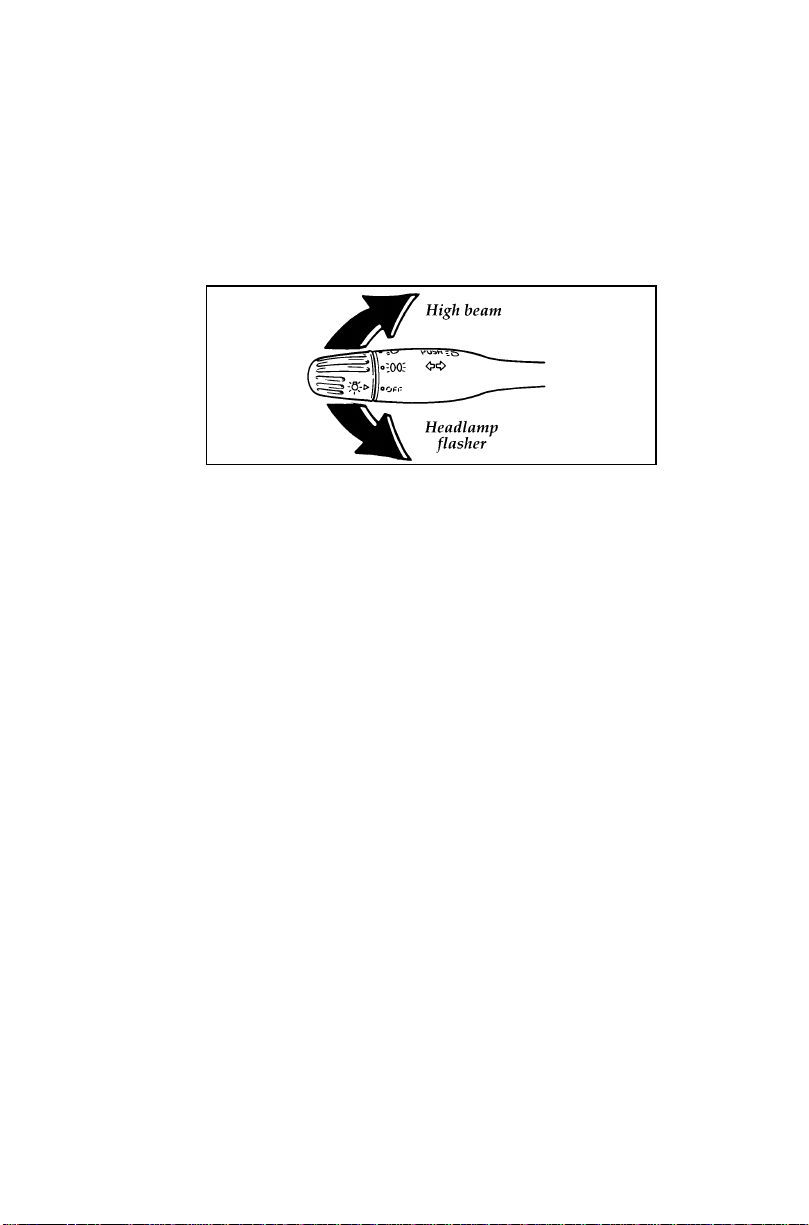
Flashing the Lights
To flash the headlamps, pull the lever toward
you for a moment and then release it. The
headlamps will flash whether the headlamp
knob is in the on or off position.
Highbeam and flash-to-pass operation
If the headlamps are retracted when you pull
the lever toward you, they will pop up and
flash.
66
Page 70
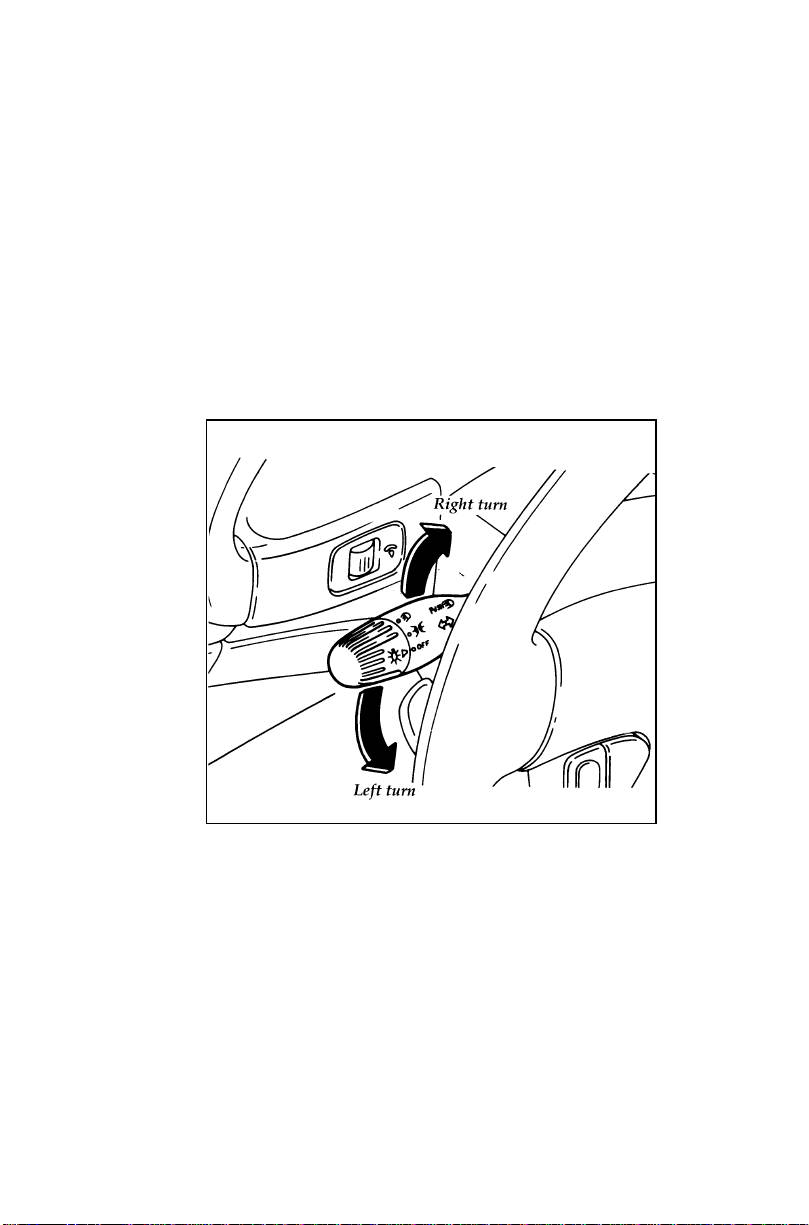
Turn Signals
Move the lever up to signal a right turn. Move
it down to signal a left turn. The corresponding
indicator light in the instrument cluster will
flash.
If the turn signal stays on after you turn, move
the lever back to the center (OFF) position.
For lane changes, move the lever far enough to
signal but not to latch. The lever will return to
the off position when you release it.
Turn signal
67
Page 71
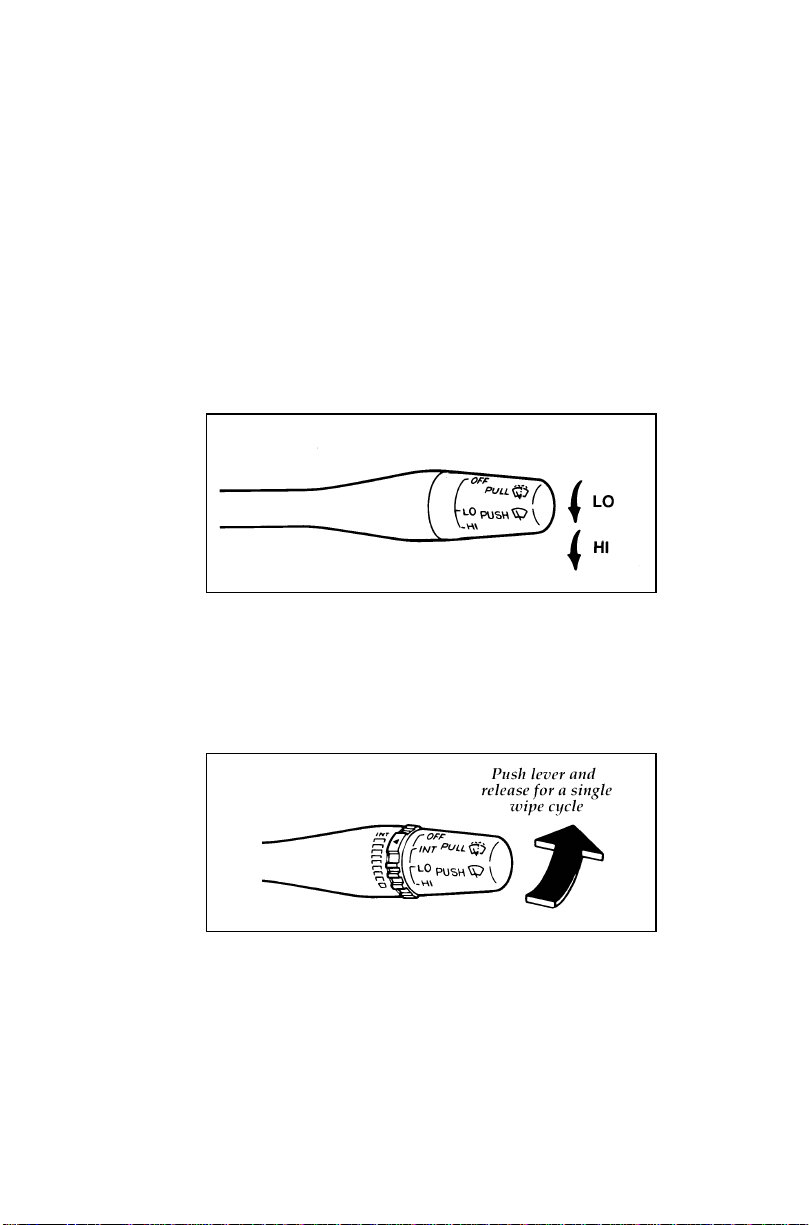
To operate the windshield wipers and washers,
make sure your ignition key is turned to the ON
position.
The windshield wipers have two speeds. To
operate the wipers, pull down the lever on the
right side of your steering column. The first
position is LO (Low) and the second position is
HI (High). To turn the wipers off, return the
lever to the uppermost position.
Windshield wiper control
ONE-TOUCH WIPER CONTROL (If equipped)
— For one wiping cycle, push the lever away
from you and release it with the lever in the
OFF or interval position. The ignition switch
must be in the ON position for this operation.
One touch wiper control
68
Page 72
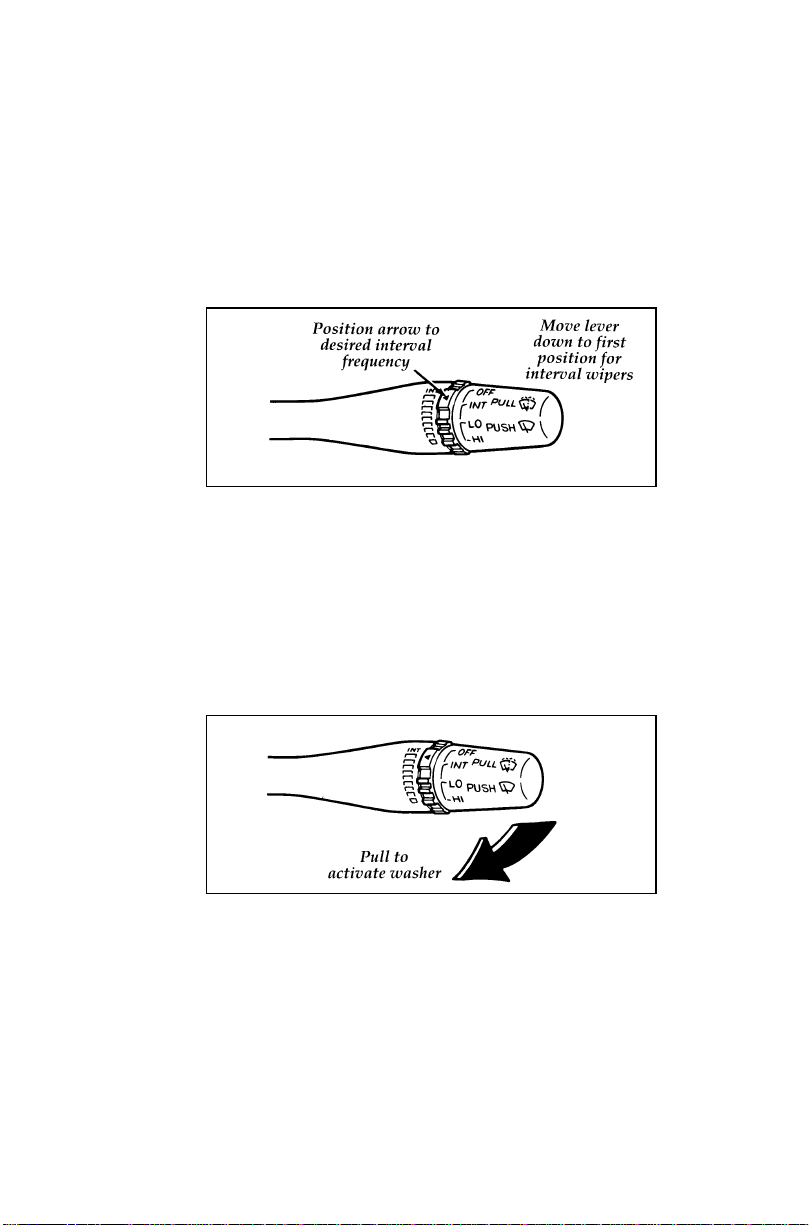
Interval Wipers (If equipped)
In addition to two speed wipers, your vehicle
may have wipers that you can set to operate at
varying intervals. For example, you can set the
interval so they wipe less often when it drizzles
and more often in heavier rain.
Variable interval wiper control
To set the interval wipers, pull the lever down
to the first position. Turn the ring on the lever
to the frequency of wiper operation you desire.
Windshield Washer
To clean the windshield, pull the wiper lever
toward you. Washer fluid sprays until the lever
is released.
Windshield washer/control
69
Page 73
Ifthewasherdoesnotwork,checkthewasher
fluidlevelvisuallyandfillifneeded.See
ServicingYourProbelaterinthisownerguide.If
thereisfluidinthereservoir,andyourwasher
doesn’twork,consultyourFordor
Lincoln-Mercurydealer.
Donottrytocleanthewindshieldwhenthe
washerfluidcontainerisemptyoractivatethe
washersatanytimeformorethan15seconds
continuously.Thiscoulddamagethewasher
pumpsystem.
WARNING
Alwayswarmupthewindshieldwiththe
defrosterbeforeyouusethewasherfluid.
Infreezingweather,thewashersolution
mayfreezeonthewindshieldandobscure
yourvision.
70
Page 74
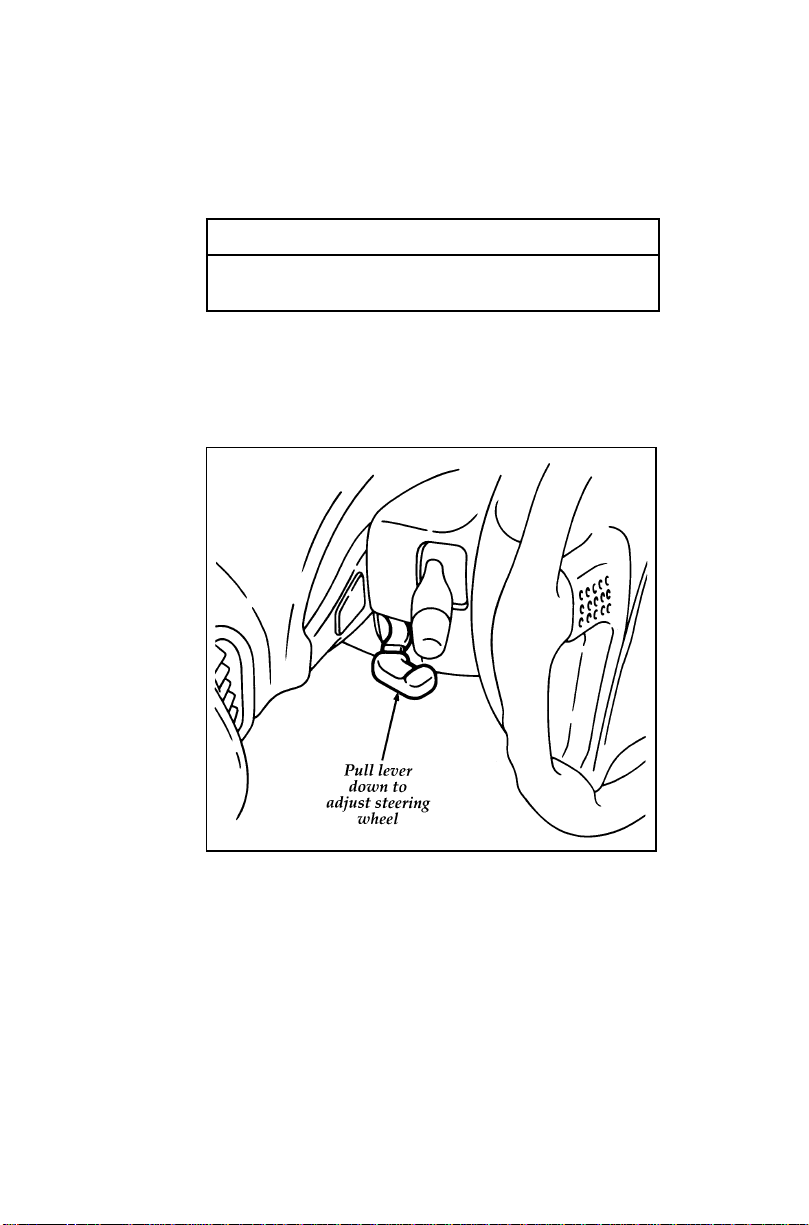
(Ifequipped)
WARNING
Neveradjustthesteeringwheelwhenthe
vehicleismoving.
Tochangethepositionofthesteering
column/wheel,pullthereleaseleveronthe
columntowardyou.Tipthesteeringwheelto
thedesiredposition.Releasethelevertolockthe
steeringwheelinplace.
Tiltsteeringcolumn
71
Page 75
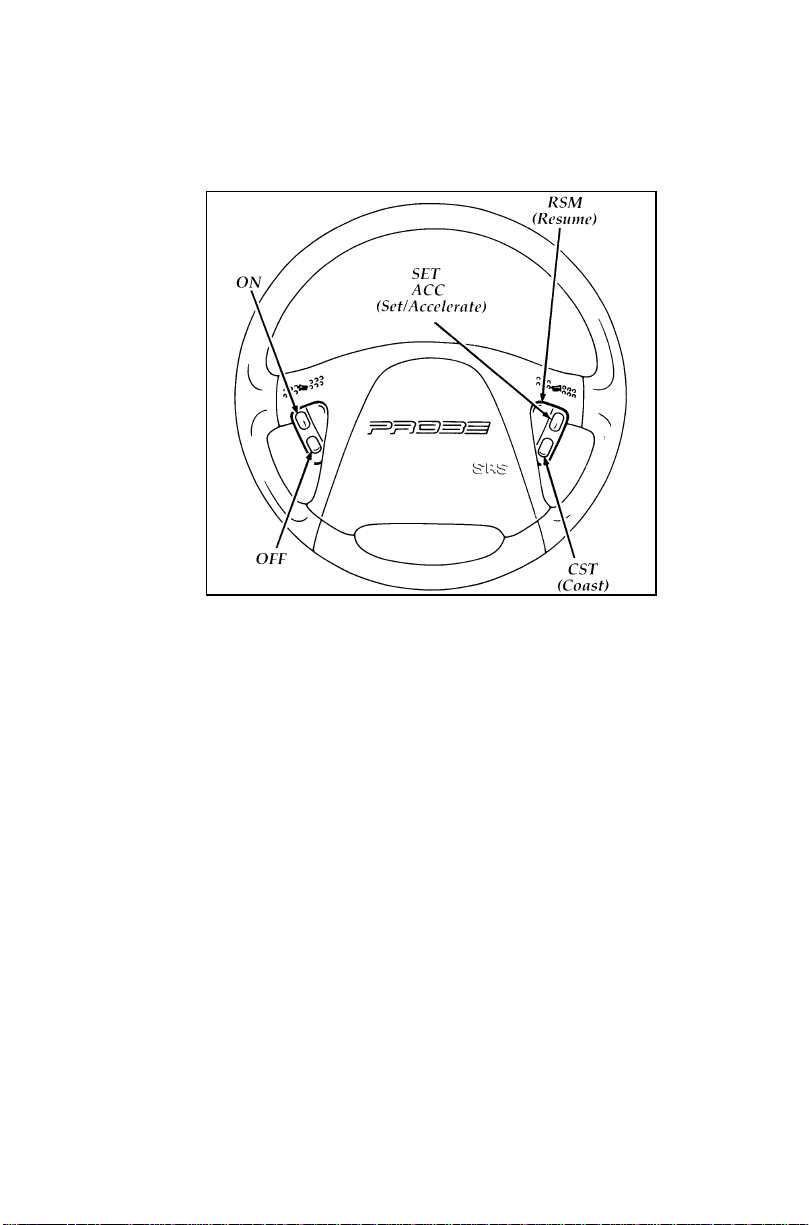
Speed control switches on the steering wheel
To Turn Speed Control Off
Press OFF, or
Turn off the vehicle ignition.
Once speed control is switched off, the
previously programmed set speed will be erased.
To Turn Speed Control On
Press ON
To Set a Speed
Press SET ACC. For speed control to operate,
the speed control must be ON and the vehicle
speed must be greater than 30 mph (48 km/h).
If you drive up or down a steep hill, your
vehicle speed may vary slower or faster than the
set speed. This is normal.
72
Page 76
Speedcontrolcannotreducethevehiclespeedif
itincreasesabovethesetspeedonadownhill.If
yourvehiclespeedisfasterthanthesetspeed
whiledrivingonadownhillinj(Overdrive),
youmaywanttoshifttothenextlowergearto
reduceyourvehicle’sspeed.
WARNING
Tokeepyourvehicleundercontrol,do
notusespeedcontrolinheavytrafficor
onroadsthatarewinding,slippery,or
unpaved.
ToSetaHigherSpeed
PressandholdSETACC.Releasetheswitch
whenthedesiredvehiclespeedisreached,or
PressandreleaseSETACC.Eachpresswill
increasethesetspeedby1mph(1.6km/h)
(2.0Lwithautomatictransmissiononly),or
Acceleratewithyouracceleratorpedal,then
pressSETACC.
Youmayacceleratewiththeacceleratorpedalat
anytimeduringspeedcontrolusage.Releasing
theacceleratorpedalwillreturnyourvehicle
speedtothepreviouslyprogrammedsetspeed.
ToSetaLowerSetSpeed
PressandholdCST.Releasetheswitchwhenthe
desiredvehiclespeedisreached,or
PressandreleaseCST.Eachpresswilldecrease
thesetspeedby1mph(1.6km/h)(2.0Lwith
automatictransmissiononly),or
Depressthebrakepedal.Whenthedesired
vehiclespeedisreached,pressSETACC.
73
Page 77

To Disengage Speed Control
Depress the brake pedal, or
Depress the clutch pedal (if equipped).
Disengaging the speed control will not erase the
previously programmed set speed.
To Return to a Set Speed
Press RSM. For RSM to operate, the vehicle
speed must be faster than 30 mph (48 km/h).
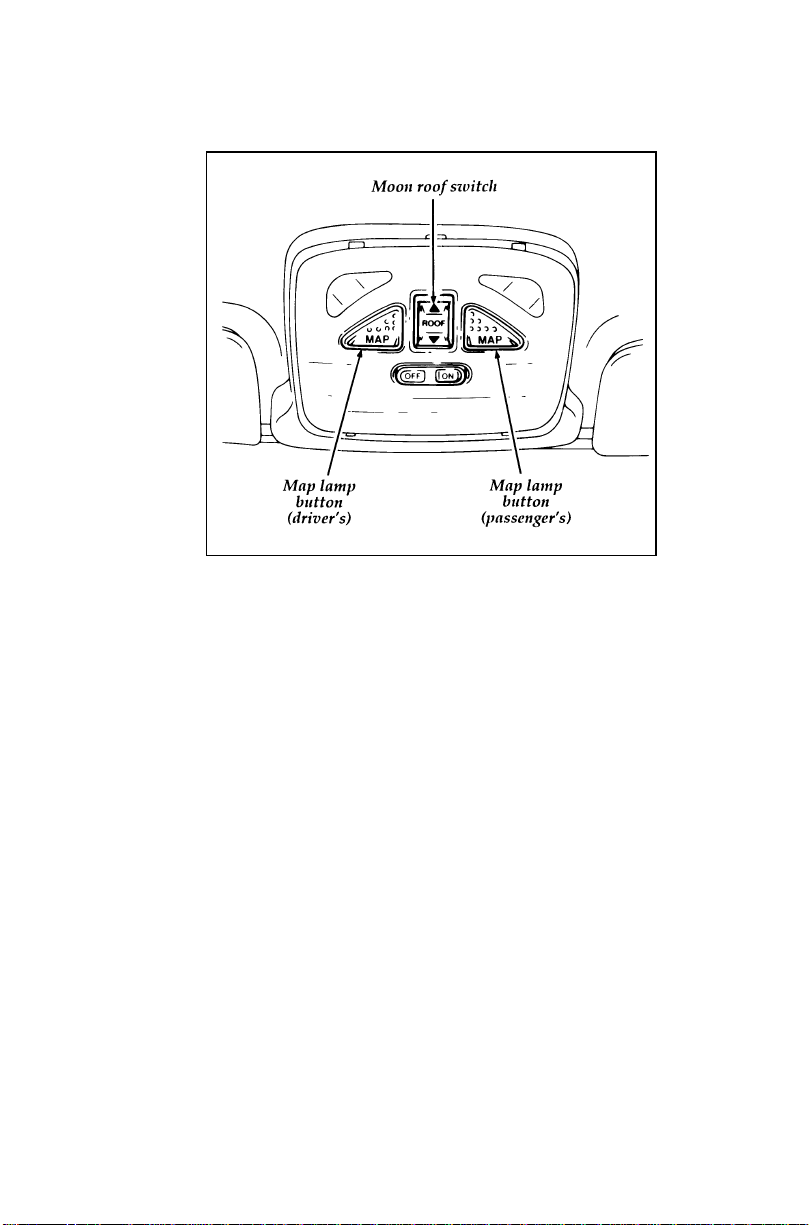
The control switch for the sliding moon roof is
on the interior/map lamp control panel located
above the windshield and between the sun
visors. The ignition must be in the ON position
for the moon roof to be operational.
To open the sliding moon roof to the vent
position, push the recessed part of the moon
roof switch until the back of the moon roof tilts
into the vent position. You must release the
switch after opening the vent before pressing it
again to slide the moon roof open. To close,
push the other side of the switch until the moon
roof sets back into place.
74
Page 78
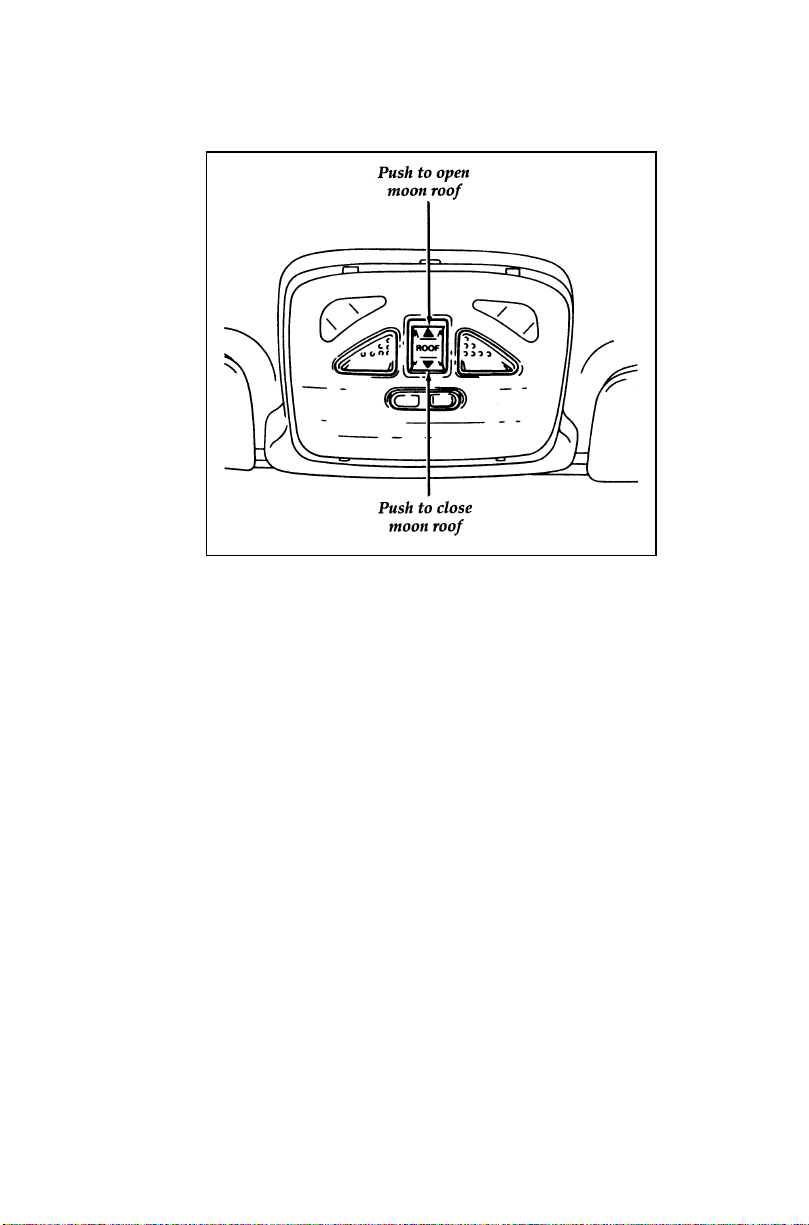
Sliding moon roof control switch
Press the switch until the moon roof is opened
to the desired position. When you release the
switch, the moon roof will stop sliding open. To
close the moon roof, press the other side of the
switch and hold it until the roof is closed to the
desired position.
75
Page 79
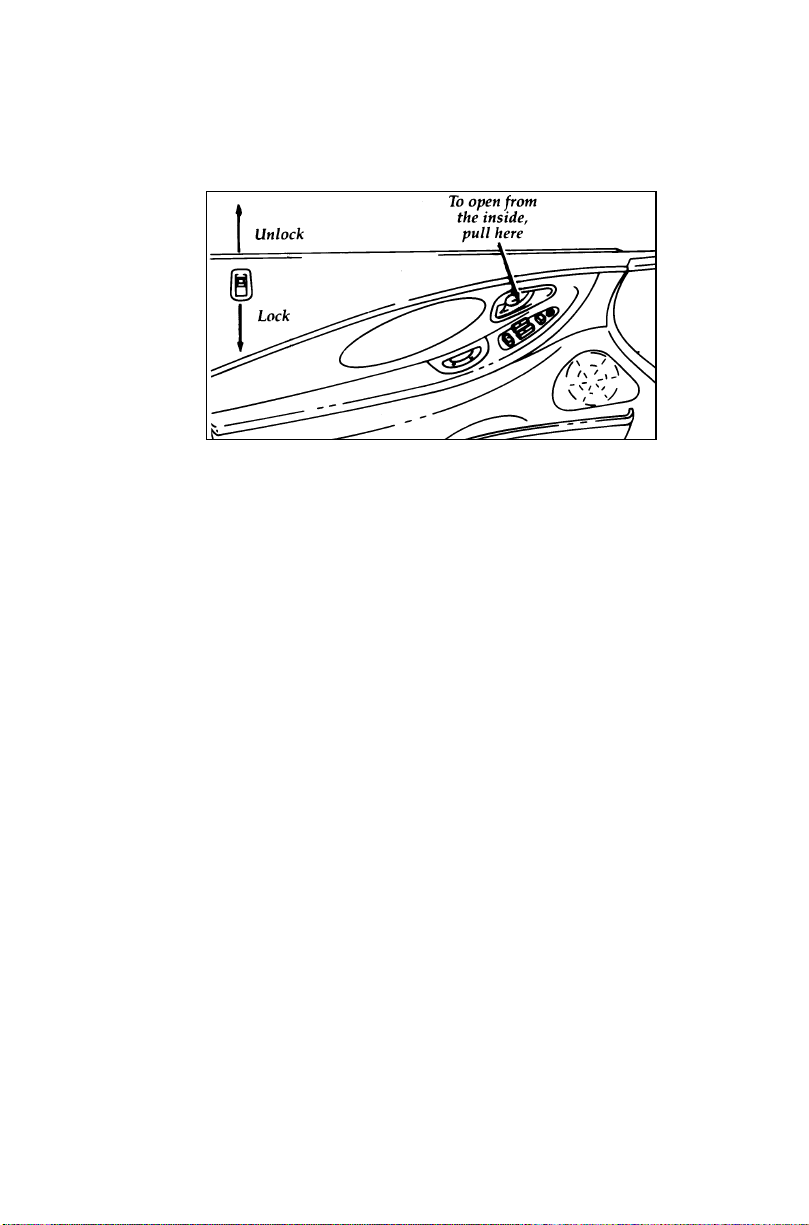
The inside of the door
If you close the door with the lock button
depressed, the door will remain locked.
Power Door Locks (If equipped)
If your vehicle has power door locks, the
controls to lock the doors are below the inside
door handles on each door. When you close the
doors after you set the door locks, the doors
remain locked. If the power mechanism ever
fails, the manual door locks will override the
power controls.
NOTE: Vehicles equipped with power locks
have a safety feature which allows you
to unlock one or both front doors from
either door key lock cylinder. To
unlock the driver’s or passenger door
only, insert the key in the door lock
cylinder and turn to the left
(counterclockwise) to the first position.
To unlock the other door at the same
time, simply continue turning the key
to the left to the second position. Both
doors are locked by turning the key to
the right (clockwise).
76
Page 80
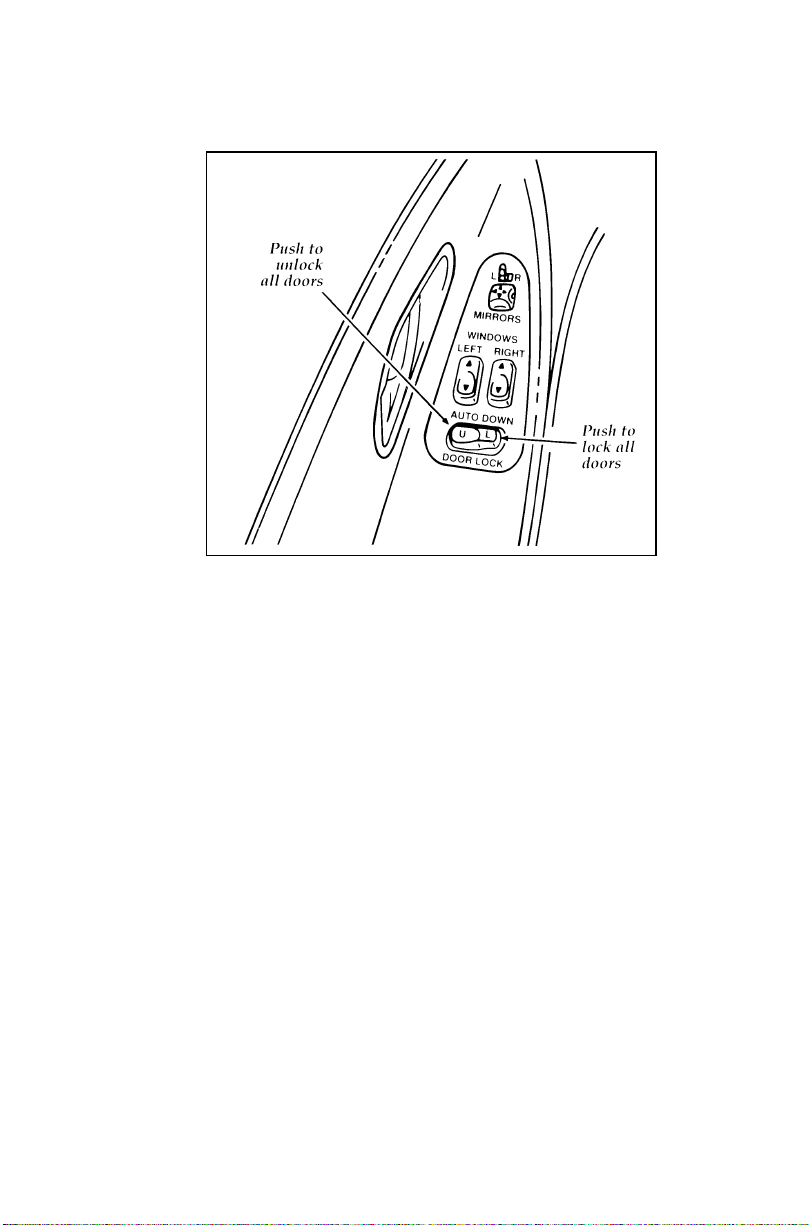
Power locks on the driver’s door
Using the Power Windows (If equipped)
Each door has a power control that opens and
closes the window on that door. The driver’s
door has a master control panel that operates
both windows.
To use your power windows, your ignition
switch must be placed in the ON position. Press
the recessed end of the power window switch to
lower a window, press the raised end of the
switch to raise a window.
NOTE: Your vehicle is equipped with a “one
touch down” feature. This feature
allows the driver to fully open the
driver’s window by firmly pressing the
switch and then releasing. The switch
will release when the window has
fully opened.
77
Page 81
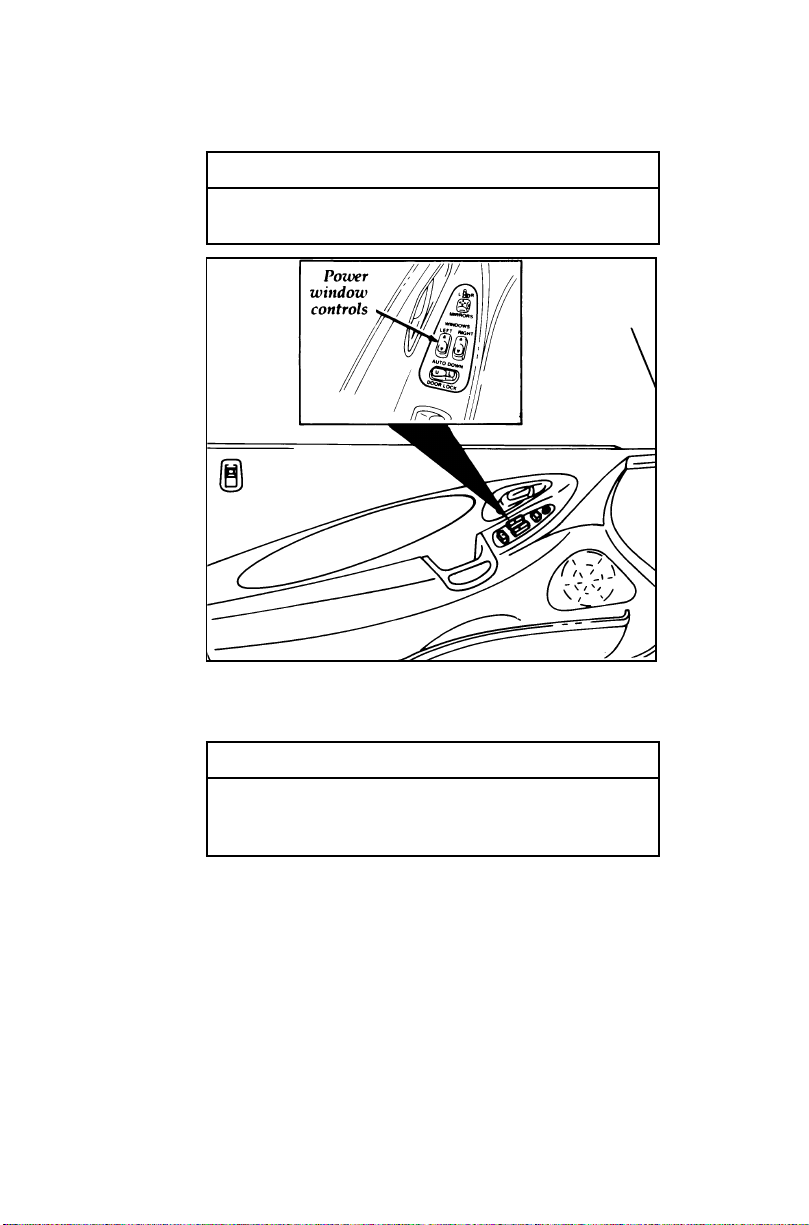
WARNING
Donotletchildrenplaywiththepower
windows.
Masterwindowcontrolonthedriver’sdoor
WARNING
Therightsideviewmirrormakesobjects
appearsmallerandfartherawaythanthey
actuallyare.
78
Page 82
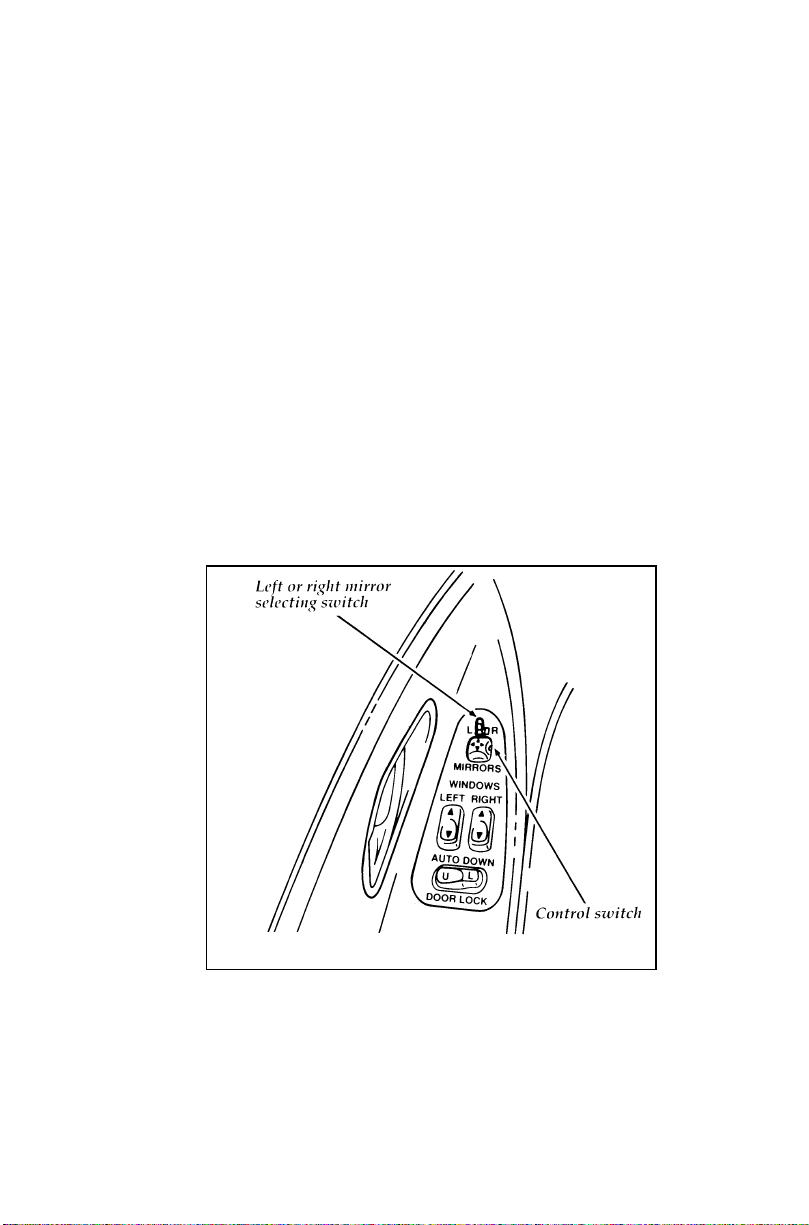
Dual-Electric Remote Control Mirrors
(If equipped)
Dual-electric remote control mirrors are
collapsible. The mirror heads can be folded
rearward to prevent damage when using an
automatic car wash.
To adjust the side mirrors:
1. Locate the control switch in the power
control panel on the driver’s door.
2. Select the right or left mirror by moving the
selector switch right or left.
3. Push the control switch in the direction you
want to move the mirror.
4. Return the selector switch to the middle OFF
position to keep the mirror in place.
Dual-electric side mirror control switches
79
Page 83
Afully-equippedconsoleonyourvehiclewill
includethefollowingitems:
ashtrayandlighter
❑
parkingbrakelever
❑
cupholderorstoragecompartmentwith
❑
cupholder
Yourvehiclemayhaveseveralsmallstorage
compartments:
aglovecompartmentthatlocksandunlocks
❑
usingtheignitionkey
twomappocketsonthedoorpanels(if
❑
equipped)
storagecompartmentbelowtheclimate
❑
controls
astoragebininthecenterconsole
❑
WARNING
Donotputobjectsontheledgebetween
thebackseatandtherearwindow,as
theycanbecomedangerousprojectilesand
injuresomeone.
80
Page 84
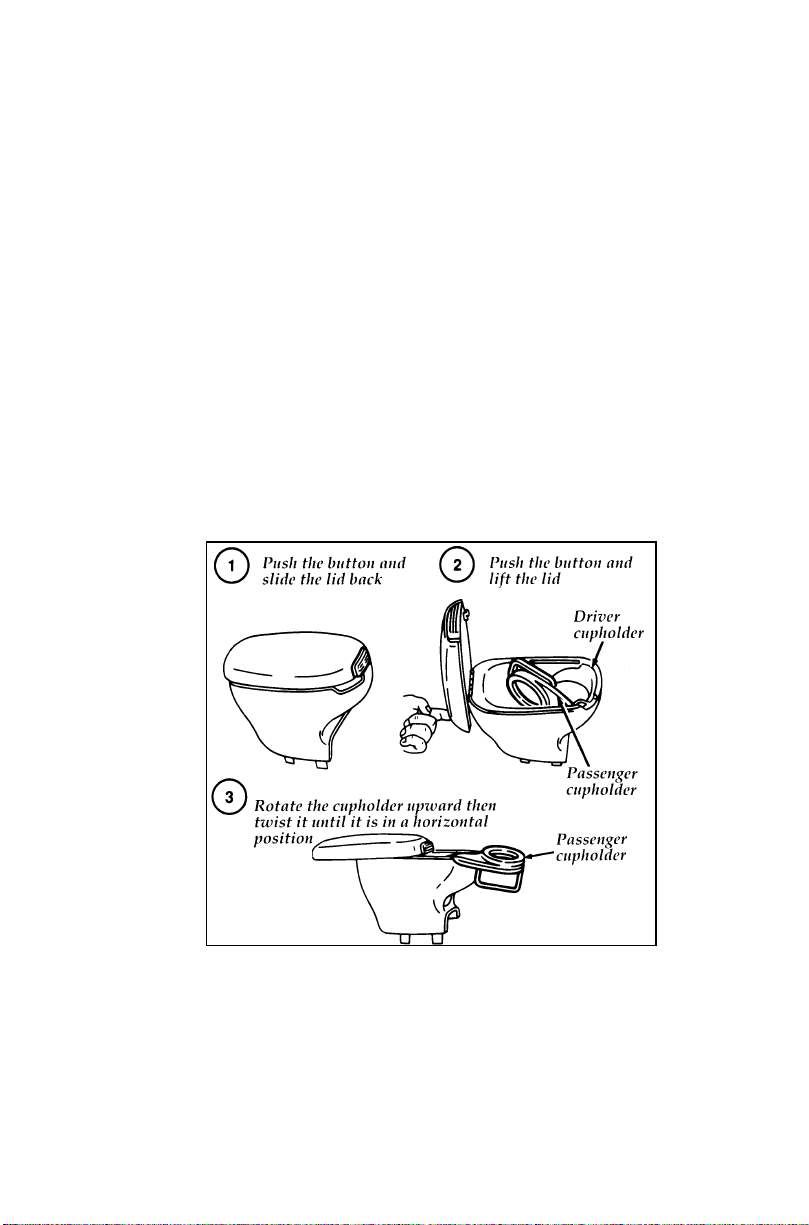
Center Console Storage (If equipped)
To open the center console storage bin, push the
button and slide the lid back. When it is back as
far as it will go, push the button and lift the lid.
Cupholders
The cupholders are located inside the center
console storage bin. The driver cupholder is
integrated in the storage bin. To use the
passenger cupholder, rotate it upward then twist
the cupholder until it is in a horizontal position.
When the passenger cupholder is not in use,
twist it back to the vertical position and rotate it
into the storage bin.
NOTE: Do not place heavy objects in the
cupholders.
Using the cupholders
81
Page 85
OpeningandClosingtheHatchback
Toopenthehatchbackfromtheoutside:
1. Putthekeyintothelocklocatedontheright
side,inthetaillampjustabovethebumper.
2. Turnthekeytotherighttounlock.
3. Removethekeybeforeyouclosethe
hatchback.
NOTE:Whenthehatchisunlockedthecargo
lampwillilluminate.
4. Usingbothhands,shutthehatchback
completely.Donotslamit.
5. Pulluponthehatchbacktomakesureitis
securelylatched.
Topreventprematurewearordamagetothe
hatchbackliftcylindersandattachinghardware,
thehatchbackmustbefullyclosedbeforeyou
driveyourvehicle.
WARNING
Ifyoudrivewiththehatchbacklidopen,
youwilldrawdangerousexhaustfumes
intoyourvehicle.
Ifyoumustdrivelikethis,keeptheventsopen
sooutsideaircomesintothevehicle.
82
Page 86
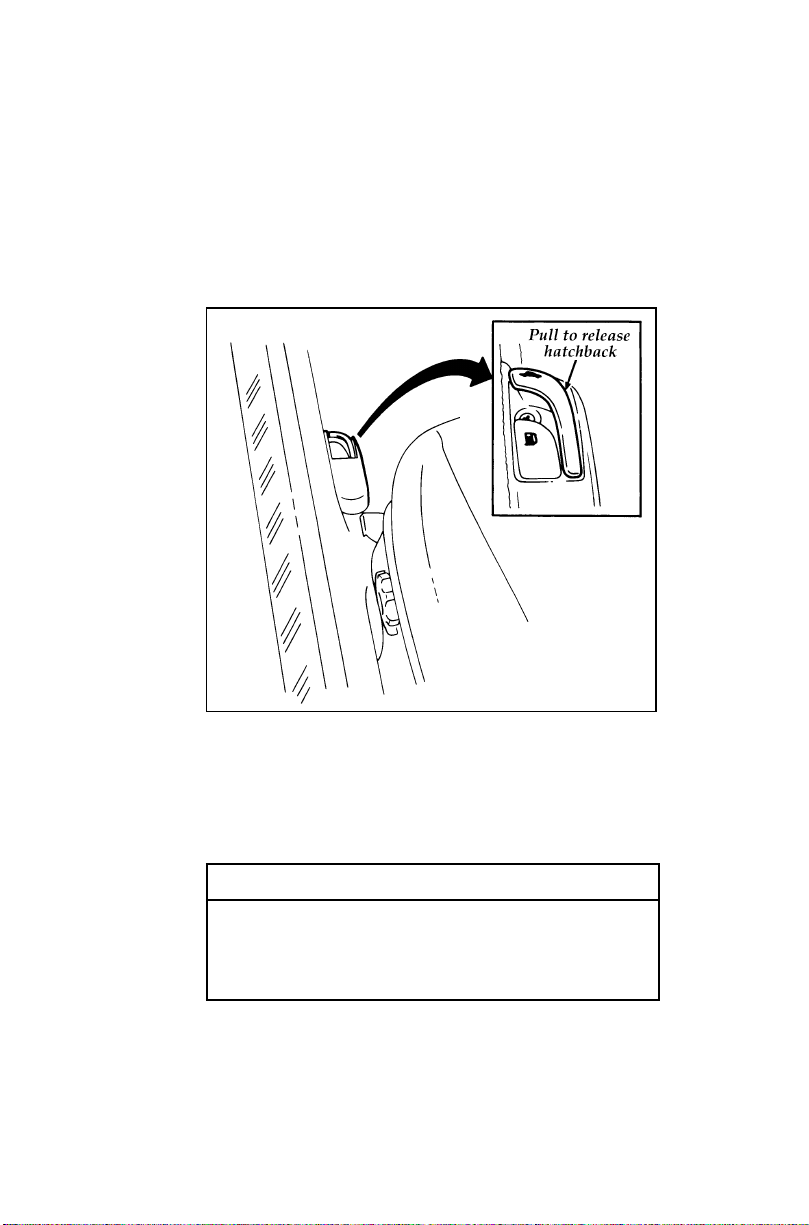
UsingtheRemoteControlforthe
Hatchback
Toreleasethehatchbackfrominsidethevehicle,
simplypullupontheremotereleaselever,
whichislocatedinfrontofthedriver’sseat,
nearthedoor.
Remotecontrolforthehatchback
UsingtheLuggageCompartmentCover
Thiscoverletsyouconcealcargointheluggage
compartment.Thecoverwillliftautomatically
whenthehatchbacklidisopened.
WARNING
Donotputobjectsontheledgebetween
thebackseatandtherearwindow,as
theycanbecomedangerousprojectilesand
injuresomeone.
83
Page 87
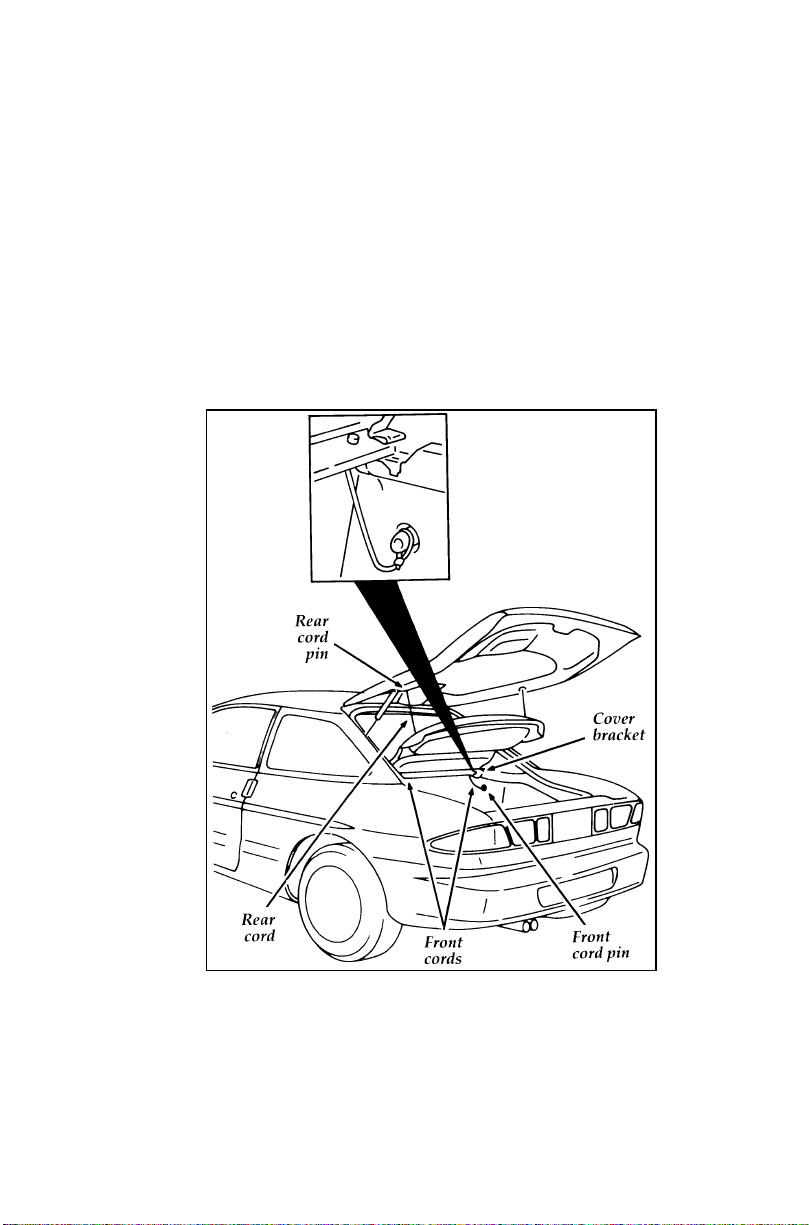
To remove the luggage compartment cover:
1. Raise the hatchback to the fully open
position.
2. Standing outside the vehicle, unfasten the lift
cords from the hatchback lid.
3. Disconnect the two front package tray lift
cords from the lower trunk side trim.
4. Lower the cover and slide it rearward to
disengage it from the sockets and remove it.
The luggage compartment and cover
84
Page 88
WARNING
Thecovermaycauseinjuryinasudden
stoporaccidentifitisnotsecurely
installed.
Toinstalltheluggagecompartmentcover:
1. Raisethehatchbacktothefullyopen
position.
2. Fromoutsidethevehicle,positionthecover
initssockets.
3. Attachtheliftcordstothehatchbacklid.
4. Connectthetwofrontluggagecompartment
coverliftcordstothelowertrunksidetrim.
5. Closethehatchback.
WARNING
Donotpushdownontheluggage
compartmentcoverwhentheliftcordsare
attachedtotheopenhatchbacklid.This
couldcausethehatchbacklidtoclose
unexpectedly.
RemoteKeylessEntrySystem
(Ifequipped)
Yourvehiclemaybeequippedwitharemote
keylessentrysystem.Thisoptionwillallowyou
toopenyourvehicleusingaremotetransmitter
fromdistancesofupto33feet(10meters)away.
Theremotefeaturewilloperateonlywhenthe
ignitionisintheOFFposition.
Thetransmittercanunlockthedriver’sdoor,
unlockalldoors,lockalldoors,oractivatethe
vehicle’shornandhazardwarninglampsforthe
panicalarmfeature.
85
Page 89
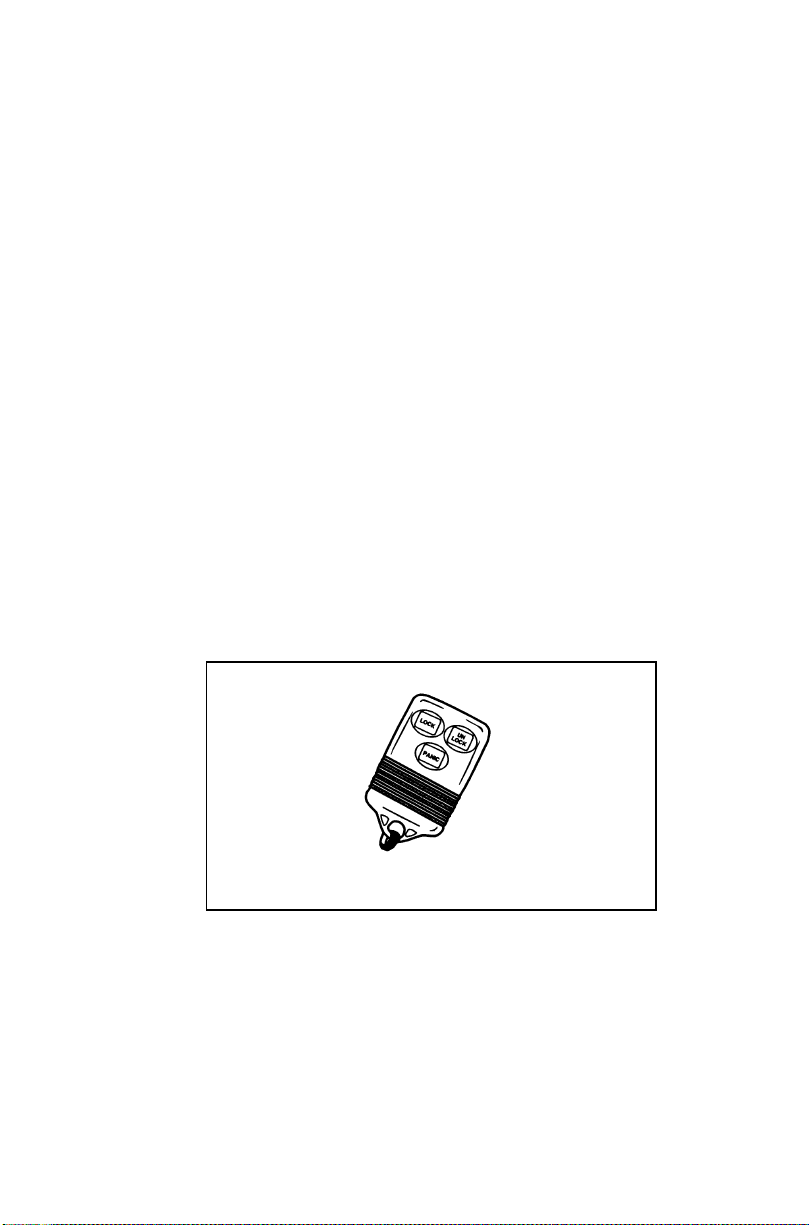
By pressing the UNLOCK button on the
transmitter once, you can unlock the driver side
door. Pressing the UNLOCK button a second
time within five seconds of unlocking the
driver’s door will unlock the other doors.
You can lock all your vehicle doors by pressing
the LOCK button. If you press the LOCK button
a second time within five (5) seconds, the horn
will sound briefly to verify that the doors have
been locked.
When the PANIC button is pressed, the horn
will sound and the hazard warning lamps will
flash. This will continue for up to approximately
two minutes and 45 seconds unless it is turned
off by pressing the PANIC button a second time.
The panic mode can also be cancelled by turning
the ignition key to ON or ACC.
Up to four transmitters can be programmed for
your vehicle. Your vehicle comes with two
transmitters. Additional transmitters can be
ordered from your dealer.
Remote keyless entry transmitter
86
Page 90
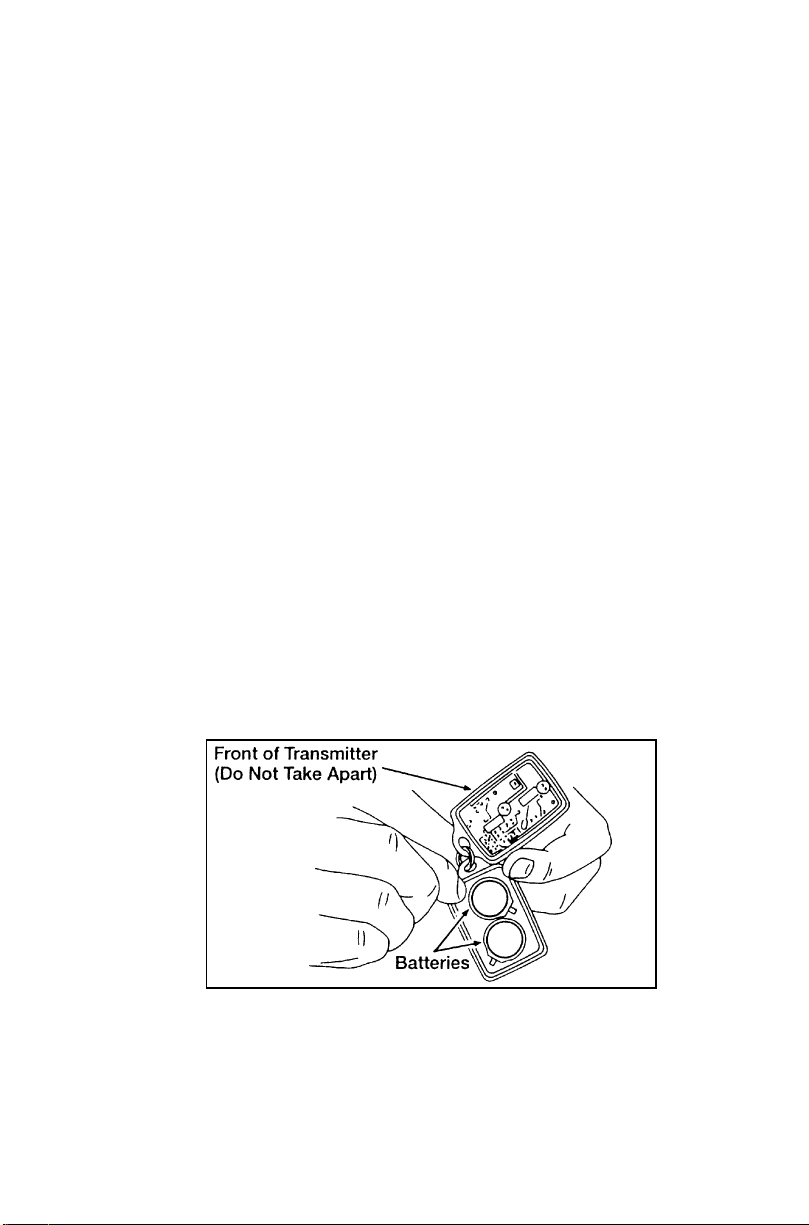
The remote keyless entry system is equipped
with an illuminated entry system.
When the system is activated, the dome lamp
will illuminate and will stay lit for
approximately 25 seconds. The dome lamp will
shut off when the doors are closed.
Replacing the Batteries
The remote entry transmitter is powered by two
coin type three-volt lithium 1616
batteries (included) that should last for several
years of normal use. If you notice a significant
decrease in operating range, the batteries should
be replaced. Replacement batteries can be
purchased at most pharmacies, watch stores or
at your Ford or Lincoln-Mercury dealer.
NOTE: The operating range of the remote
entry system can also be affected by
weather conditions (such as very cold
temperatures) or structures around the
vehicle (buildings, other vehicles, radio
and TV towers, etc.). Typical operating
range will allow you to be up to 33
feet (10 meters) away from your
vehicle.
Opening the remote transmitter
87
Page 91
The transmitter can be snapped apart to replace
the batteries by twisting a thin coin between the
two halves of the transmitter. DO NOT TAKE
THE FRONT PART OF THE TRANSMITTER
APART. Carefully remove the old batteries.
When installing the new batteries, be sure to
place the positive (+) side down as marked.
Snap the two halves back together.
Replacement/additional transmitters
In the event a transmitter is lost, return the
remaining transmitter(s) to your dealer for
reprogramming of your remote entry system.
This is necessary to prevent unauthorized use of
the lost transmitter.
Additional transmitters may be purchased from
your dealer (remote entry system will work with
up to four transmitters). Follow the same
programming procedure as above.
All transmitters must be programmed (or
reprogrammed) at the same time. If the
programming mode is entered and the
transmitters are not programmed (or
reprogrammed) at the same time, they will not
operate with the system.
88
Page 92
Seating and Safety
Restraints
RWARNING
Never adjust the driver’s seat or seatback
when the vehicle is moving.
RWARNING
Always drive and ride with your seatback
upright and the lap belt snug and low
across the hips.
RWARNING
Children should always ride with the
seatback in the fully upright position.
Head Restraints
Head restraints help protect your head and neck
in a collision. The head restraints on your
vehicle are not adjustable.
Manual Seat Adjustments
You can move the front seats forward or
backward or tilt the back of the seat forward or
backward. The driver’s seat also has controls for
lumbar support (if equipped) and side bolster
support (if equipped).
89
Page 93
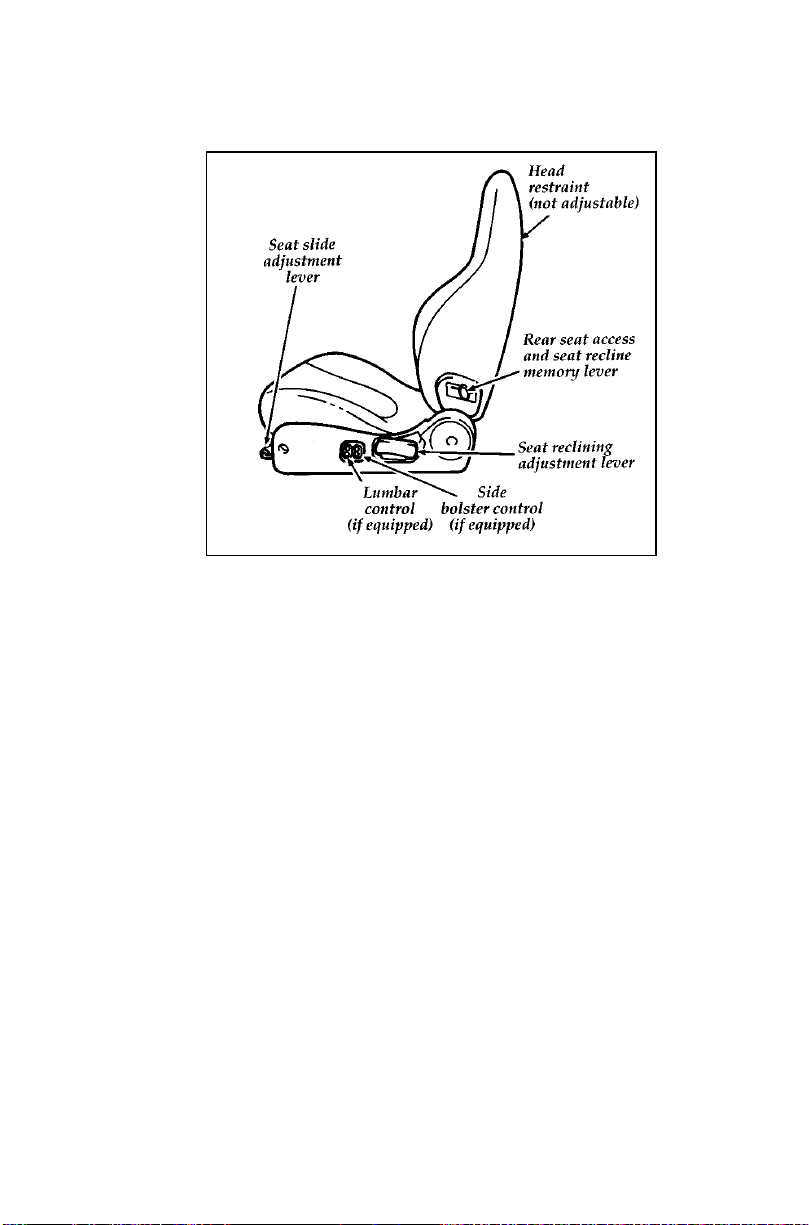
90
Page 94
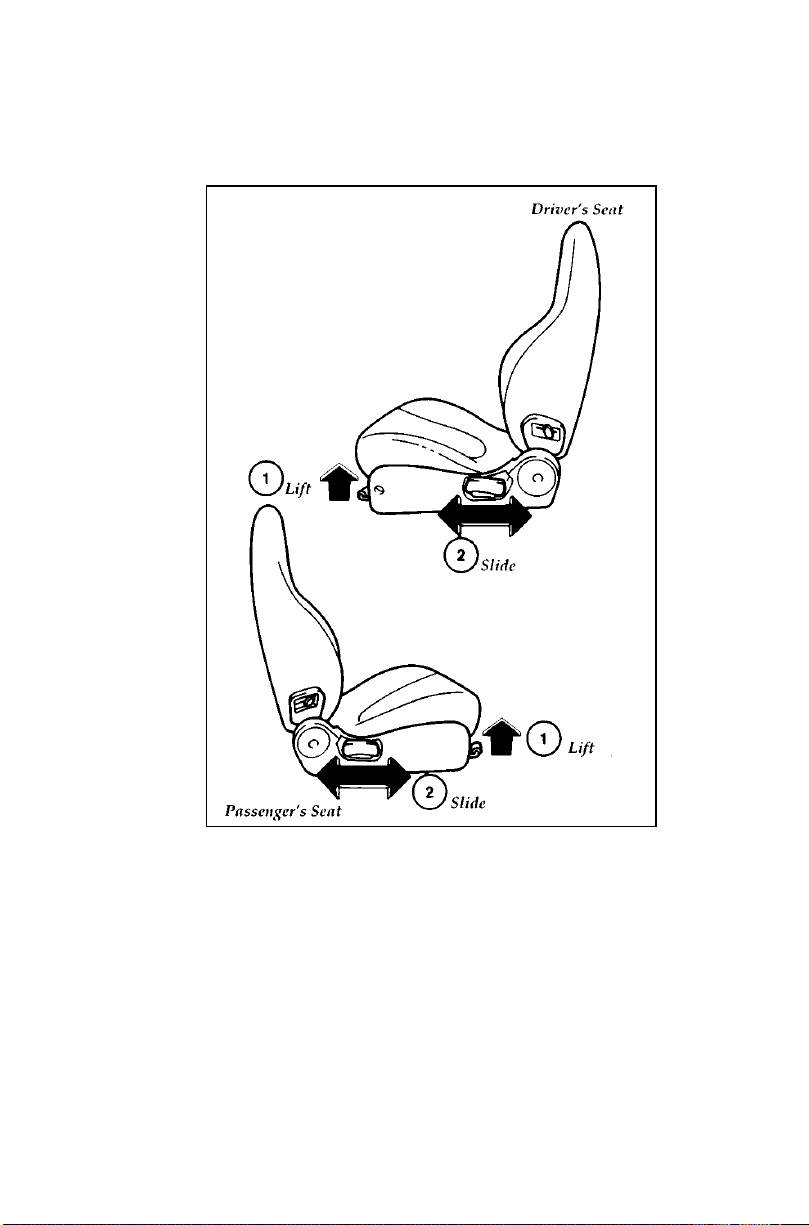
Tomovetheseatforwardorbackward:
Manualseatcontrolsforfrontseats
91
Page 95
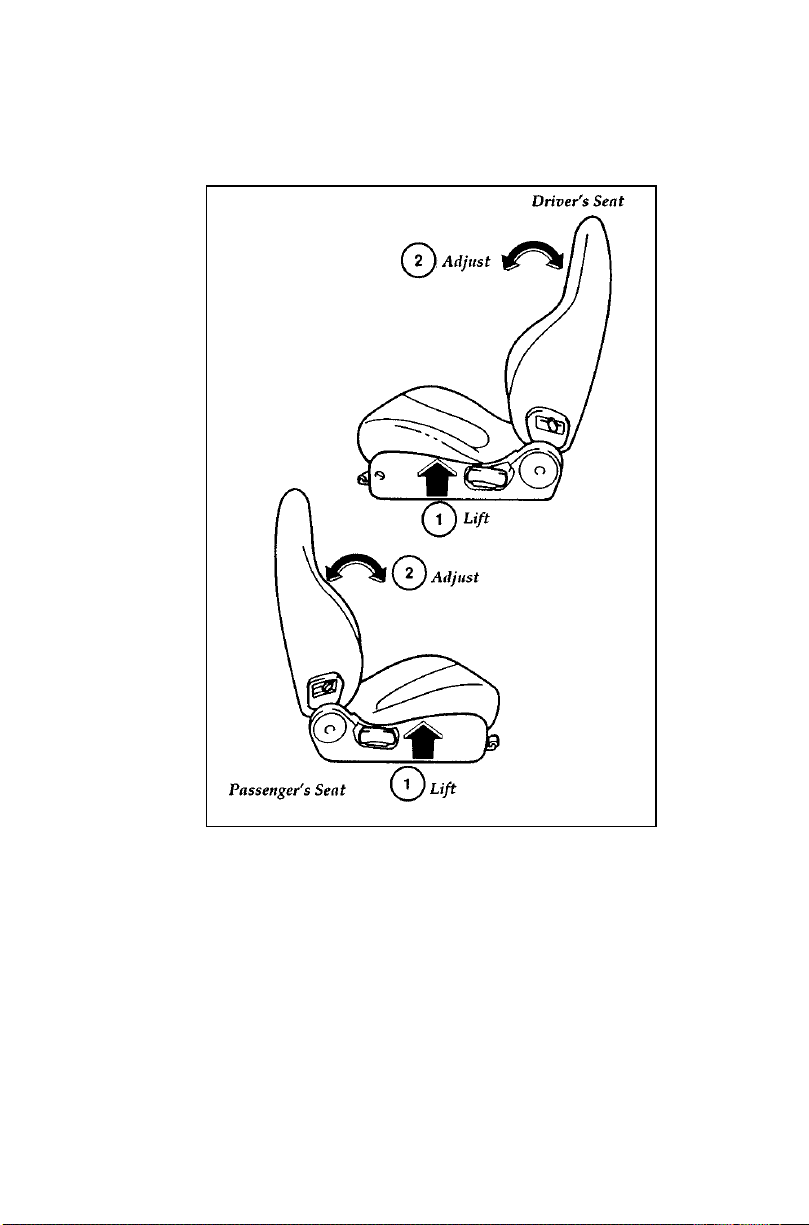
Toreclinetheseatback:
92
Page 96
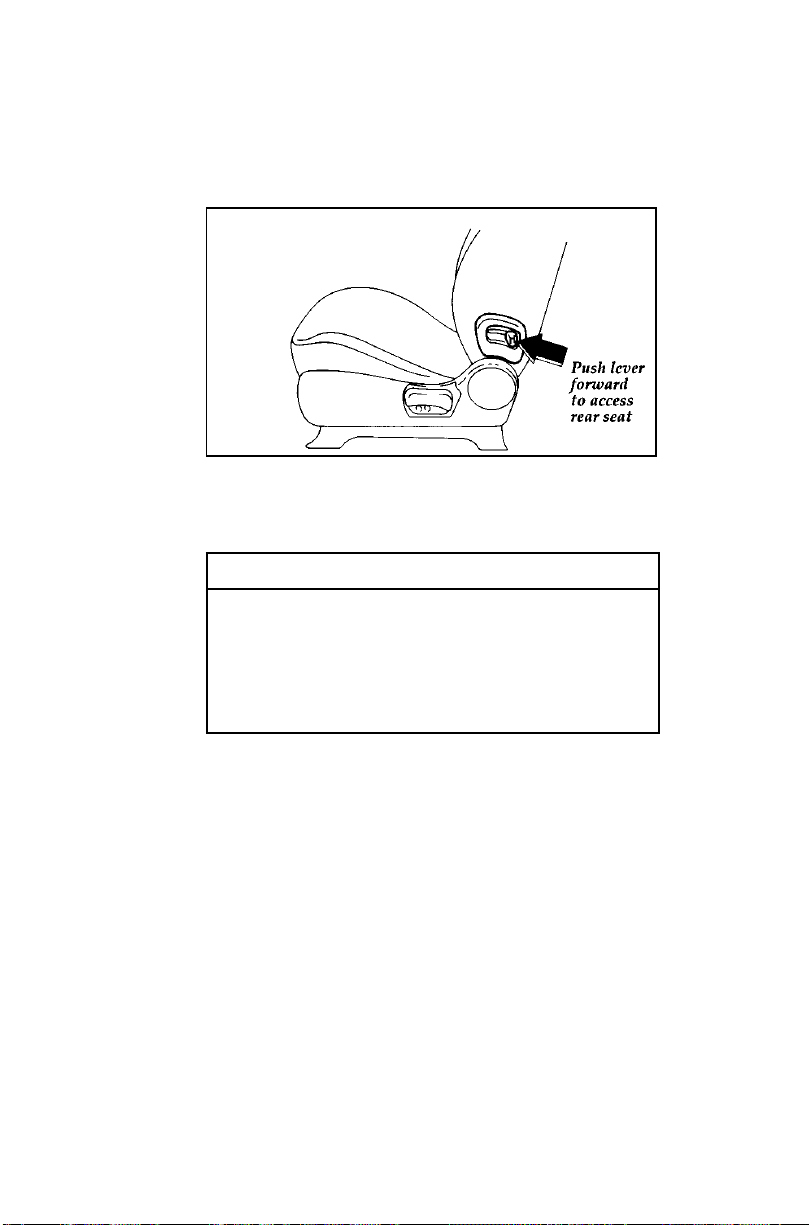
To gain access to the rear seat on the driver’s or
passenger’s side:
Seatback release lever for rear seat access
The seatback will return to its set reclined
position when pushed back.
RWARNING
Check to see that the seat and seatback
are latched securely in position. Keep
floor area free of objects that would
prevent proper seat engagement. Never
attempt to adjust the seat while the
vehicle is in motion.
93
Page 97
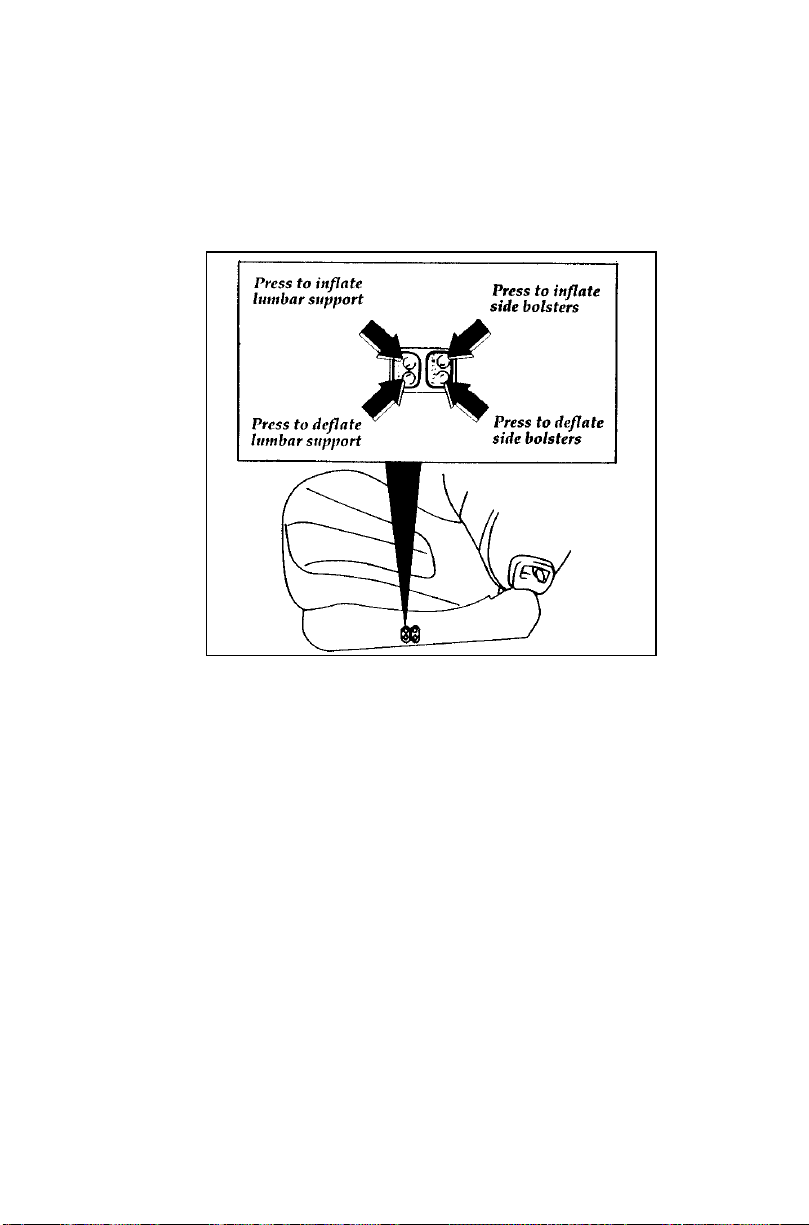
To inflate the driver’s seatback lumbar
support (if equipped) for lower back support, or
to inflate the driver’s seatback side bolster
supports (if equipped):
94
Page 98
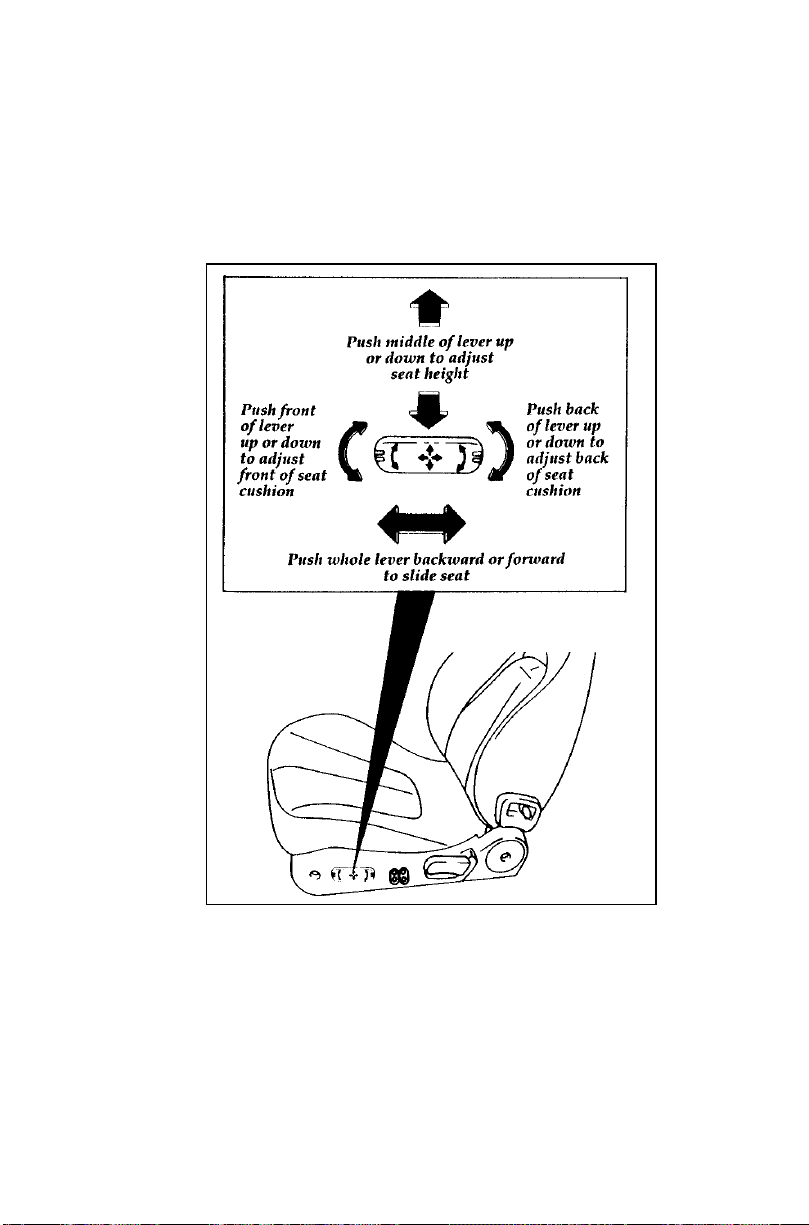
Six-WayPowerSeatAdjustment
(ifequipped)
Thesix-waypowerseatcontrolleverislocated
ontheoutermostsideofthedriver’sseat.
95
Page 99

Your seat cushion power adjust lever is operated
by a motor. To avoid damage to the motor, you
should avoid operating this feature for an
extended period of time. You should also avoid
using the six-way power adjust lever
continuously with the engine stopped. This
could run down the battery.
Use the lever to make only one adjustment at a
time.
Using the Split-Folding Rear Seat
Your vehicle is equipped with split-folding rear
seats. One or both rear seatbacks can be folded
down to provide additional cargo space.
NOTE: When folding down the rear seatback,
the seat belt tongue should be hanging
on the hook of the lower, side trim
panel, near the edge of the side of the
seat cushion.
96
Page 100
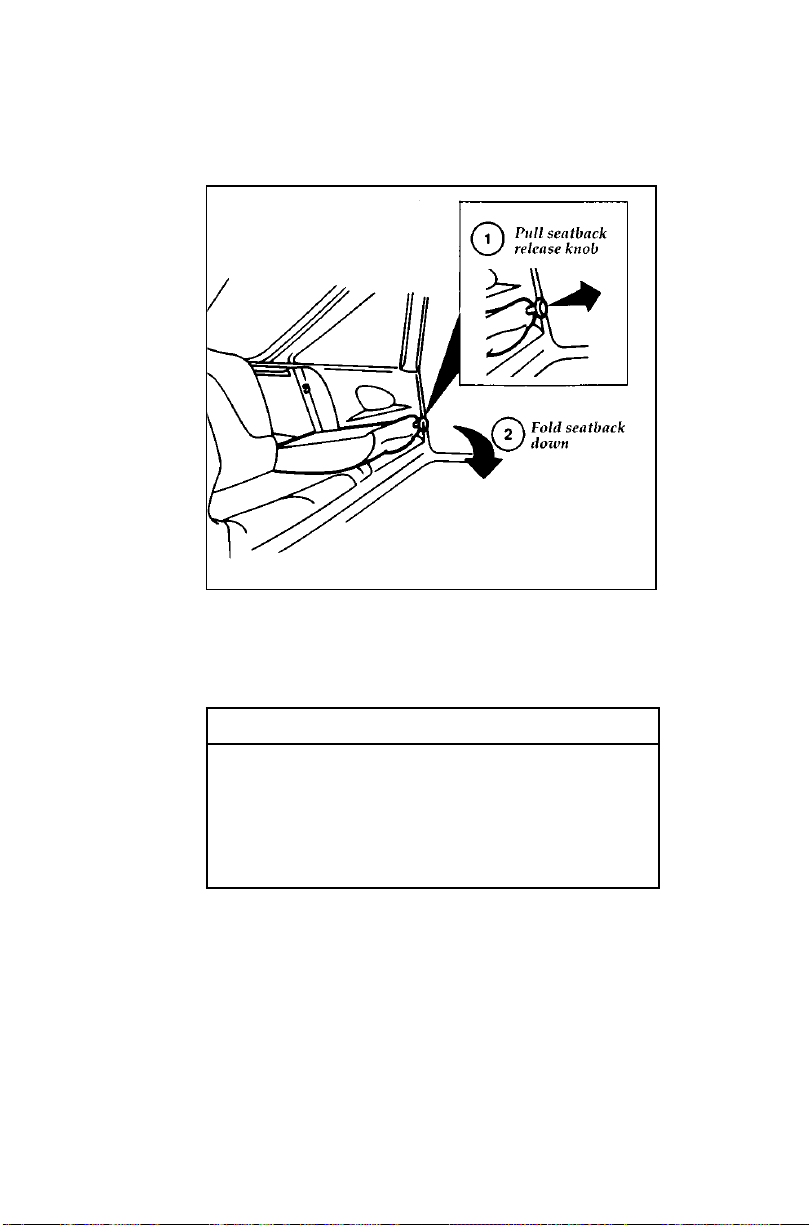
To lower the rear seatback:
To raise the seatback, lift the seatback rearward
until it latches. Make sure the seatback is locked
in position by pushing it forward and backward.
RWARNING
Check to see that the seat and seatback
are latched securely in position. Keep
floor area free of objects that would
prevent proper seat engagement. Never
attempt to adjust the seat while the
vehicle is in motion.
97
 Loading...