

Page 1
SECTION 205-04: Fron t Drive Halfshafts 1999 Contour/Mystiqu e Workshop Manual
Page
1
of 51999 Contour/Mystique Workshop Manual
11/1/2010
http://www.fordtechservice.dealerconnection.com/pubs/content/~WSXP/~MUS~LEN/20/
...
REMOVAL AND INSTAL LATION
Procedure revision date: 09/14/2001
Halfshaft LH
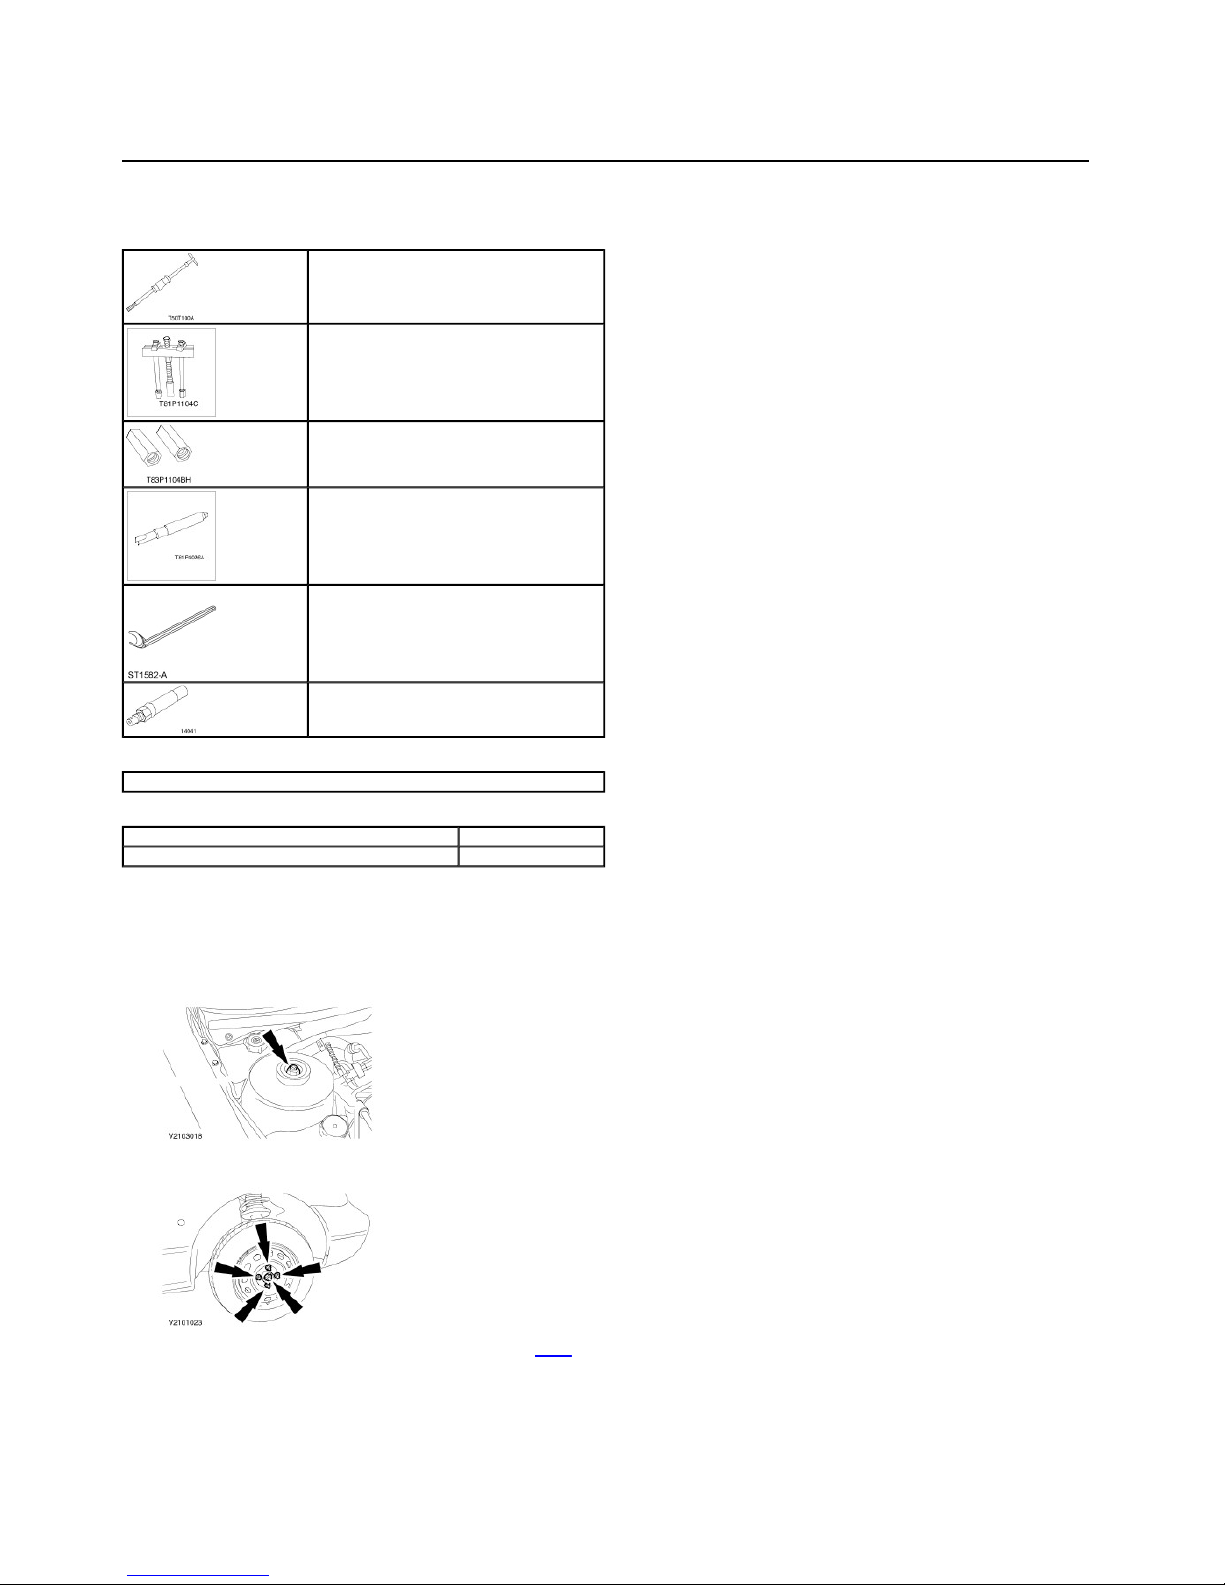
Special Tool(s)
Slide Hammer
100-001 (T50T100A)
Remover/Installer, Front Hub
204-069 (T81P1104C)
Remover, Hub (Metric Stud)
204-085 (T83P1104BH)
Remover, Halfshaft
205-164 (T81P4026A)
Remover, Halfshaft
205-241 (T86P3514A)
Installer, Halfshaft
205-379 (T97P1175A)
General Equipment
Plug for transaxle opening
Material
Manual transmission fluid WSD-M2C200-C
MERCON® Multi-purpose automatic transmission fluid MERCON® XT-2-QDX
Removal
All Vehicles
1. NOTE: Use an Allen key to stop the piston rod from turning.
Loosen the left-hand suspensi on strut locknut five turns (right-hand side shown).
2. Loosen the halfshaft stub nut a nd the front left-hand wheel nuts (right-hand side shown).
3. Raise and support the vehicle. For additional information, refer to Section 100-02.
4. Remove the left-hand front wheel and remove the axle driveshaft stub nut.
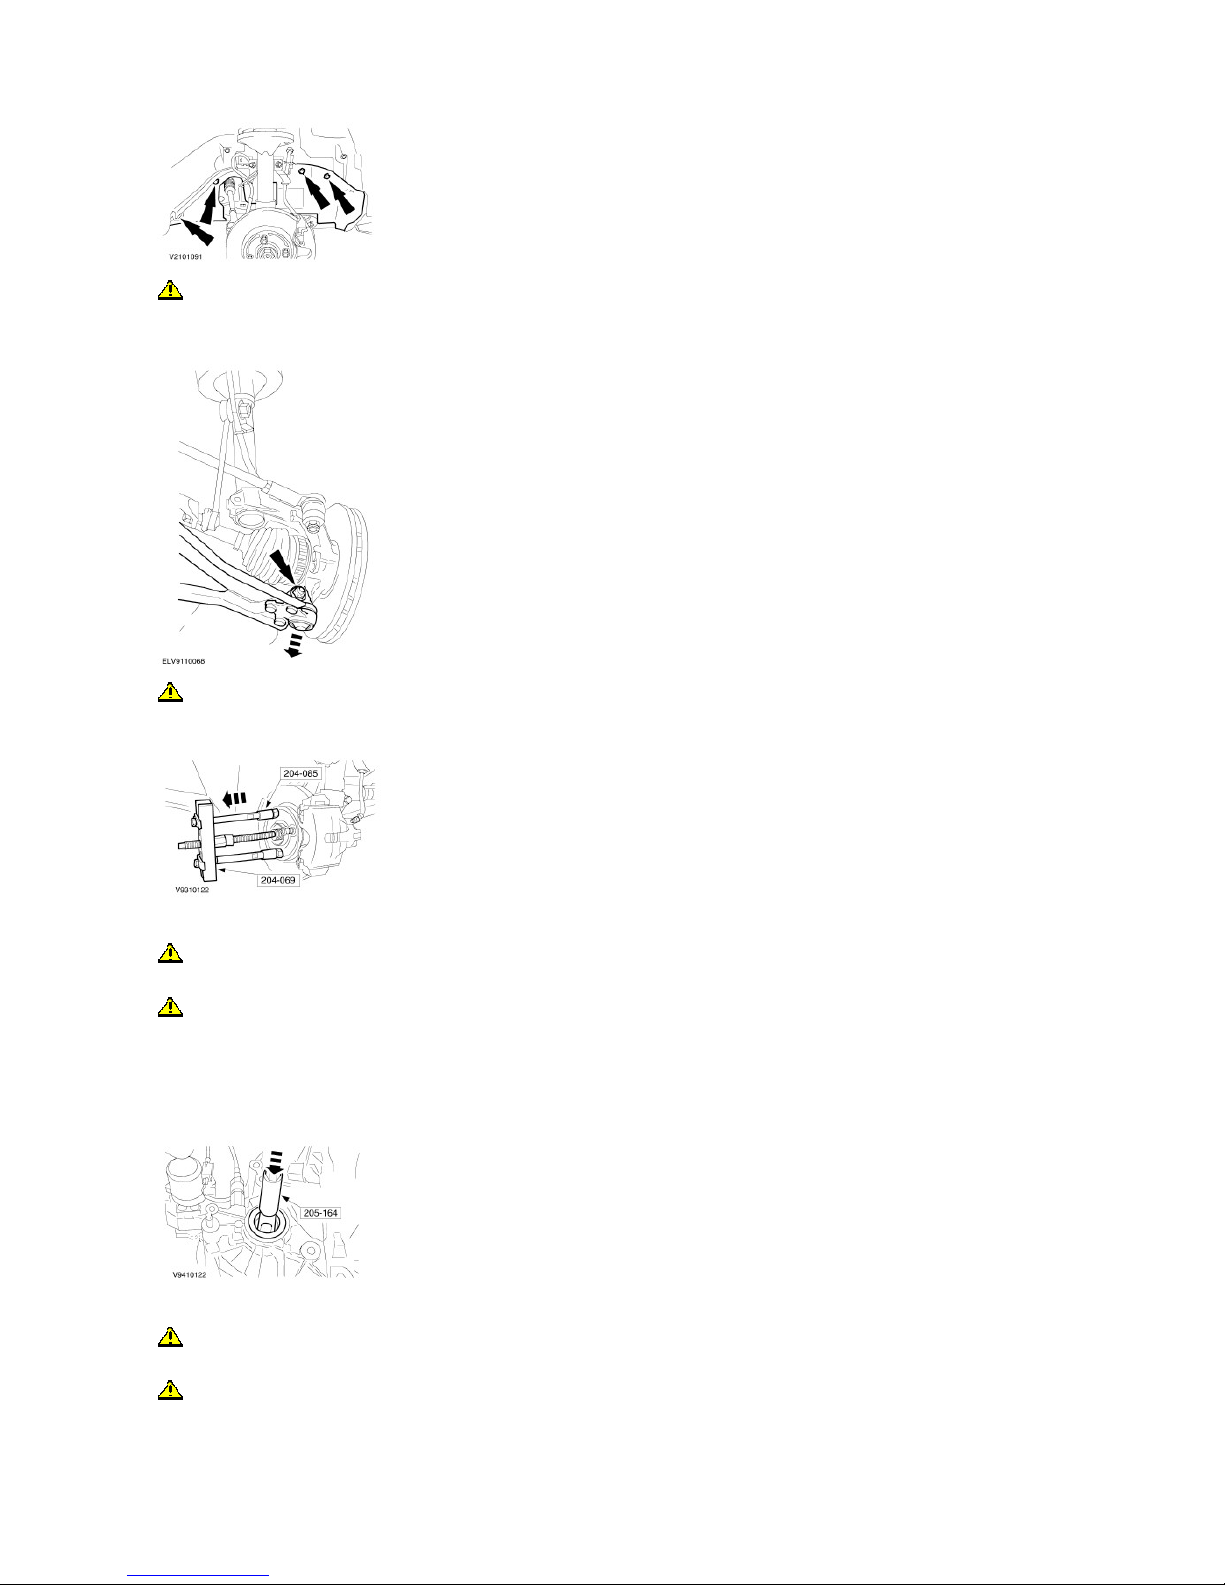
5. Remove the fender splash shields (right-hand side shown).
Page 2
NOTE:
Page
2
of 51999 Contour/Mystique Workshop Manual
11/1/2010
http://www.fordtechservice.dealerconnection.com/pubs/content/~WSXP/~MUS~LEN/20/
...
6. CAUTION: Do not damage the boot and ABS sensor ring
Disconnect the left-hand suspension (right-hand side shown).
Disconnect the ABS wiring harness bracket from the strut.
7. CAUTION: To avoid to damag e halfshaft joints and boots, do not bend the inner halfsh aft joint by more than 18 degre es, the outer one by not more than 45 degrees.
Using the special tools, disconnect the left-hand halfshaft from the hub (right-hand side sho wn).
Vehicles with manual transaxle
8. CAUTION: To avoid to damag e the halfshaft joints and boo ts, do not bend the inner halfshaft joint by more than 18 d egrees, the outer one by not more than 45
degrees.
CAUTION: Do not damage the oil seal.
NOTE: Disconnect the left-hand halfshaft only, if the intermediate shaft has already been re moved.
NOTE: Oil escapes.
Using the special tool, disconnect the left-hand halfshaft.
Close the transaxle opening with a Plug for transaxle opening.
All Vehicles
9. CAUTION: To avoid to damag e the halfshaft joints and boo ts, do not bend the inner halfshaft joint by more than 18 d egrees, the outer one by not more than 45
degrees.
CAUTION: Do not damage the oil seal.
Collect escaping oil. Close off the transaxle opening with a Plug.
Page 3
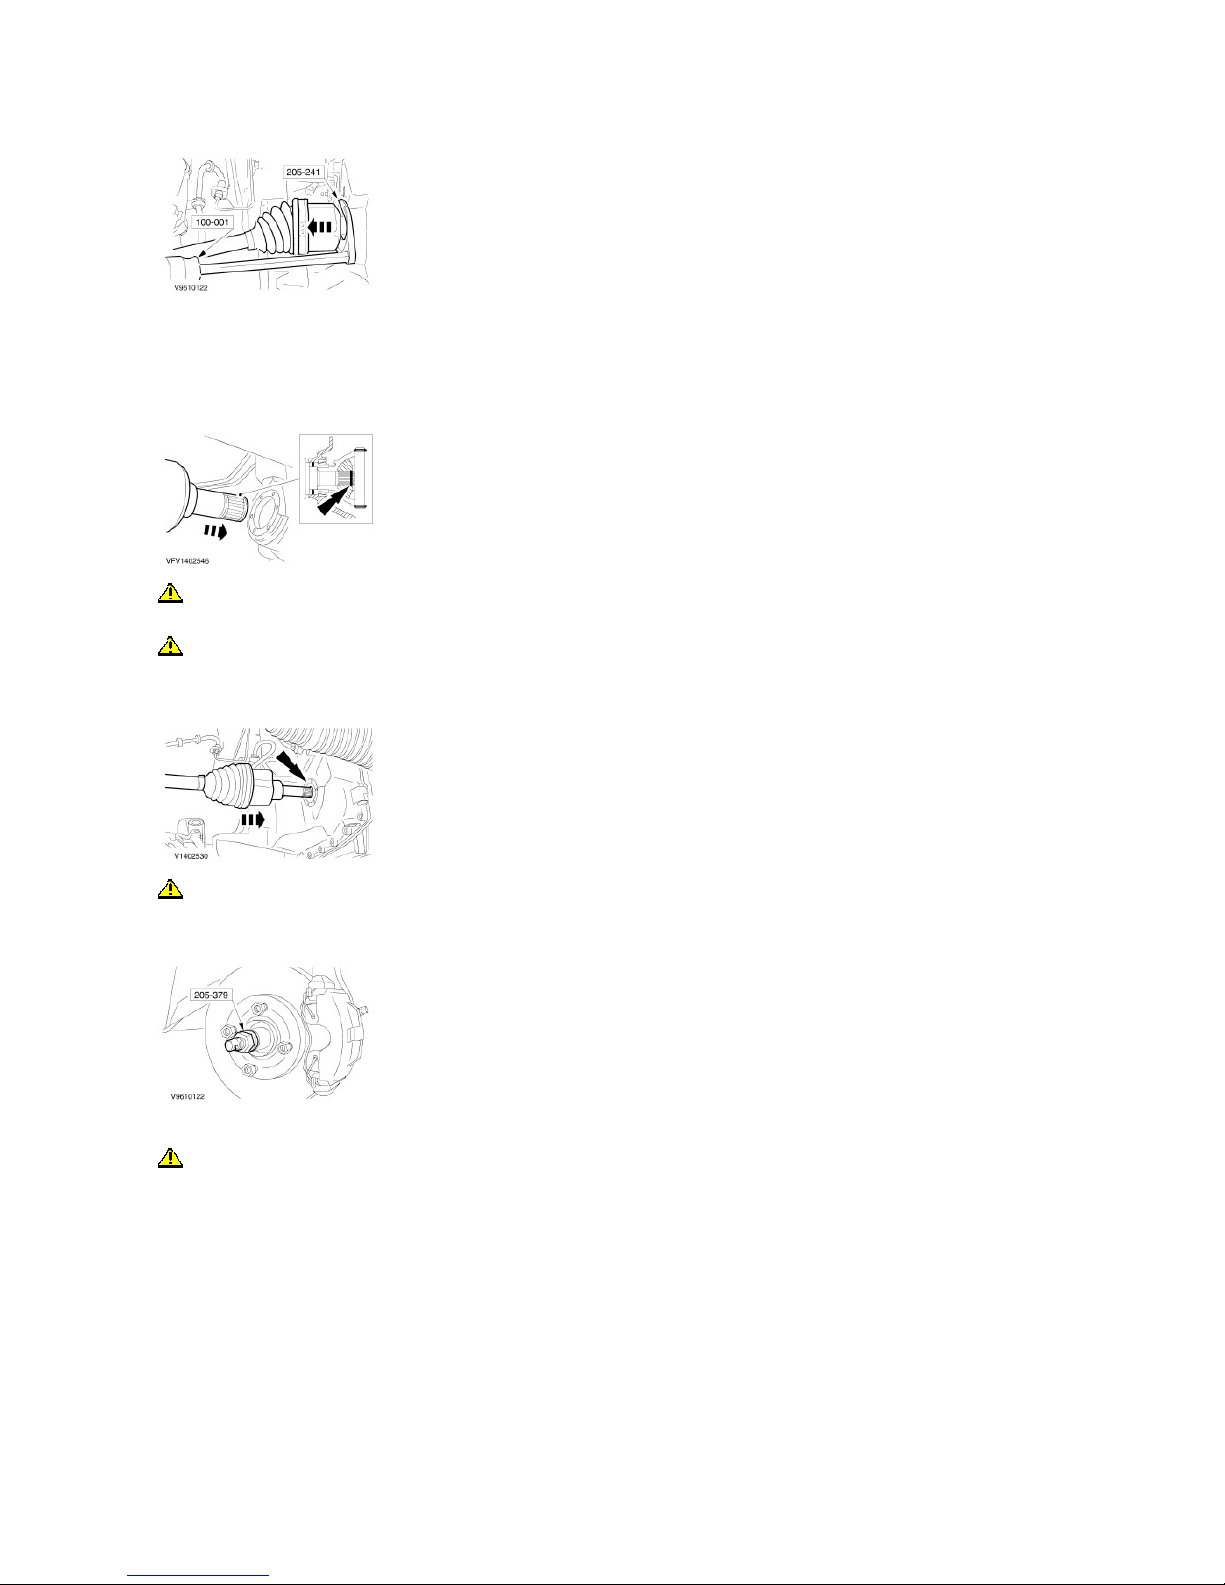
Using the special tool, remove the left-hand halfshaft (vehicle with manual transaxle shown).
Page
3
of 51999 Contour/Mystique Workshop Manual
11/1/2010
http://www.fordtechservice.dealerconnection.com/pubs/content/~WSXP/~MUS~LEN/20/
...
Installation
All Vehicles
1. NOTE: Renew self-locking nuts and snap-rings.
Halfshaft location.
2. CAUTION: To avoid to damag e the halfshaft joints and boo ts, do not bend the inner halfshaft joint by more than 18 d egrees, the outer one by not more than 45
degrees.
CAUTION: Do not damage the oil seal.
Install the LH halfshaft.
Check that the snap ring enga ges correctly.
3. CAUTION: To avoid to damag e the halfshaft joints and boo ts, do not bend the inner halfhalft joint by more than 18 deg rees, the outer one by not more than 45
degrees.
Using the special tool, install the halfshaft to the hub.
4. Install the halfshaft stub nut.
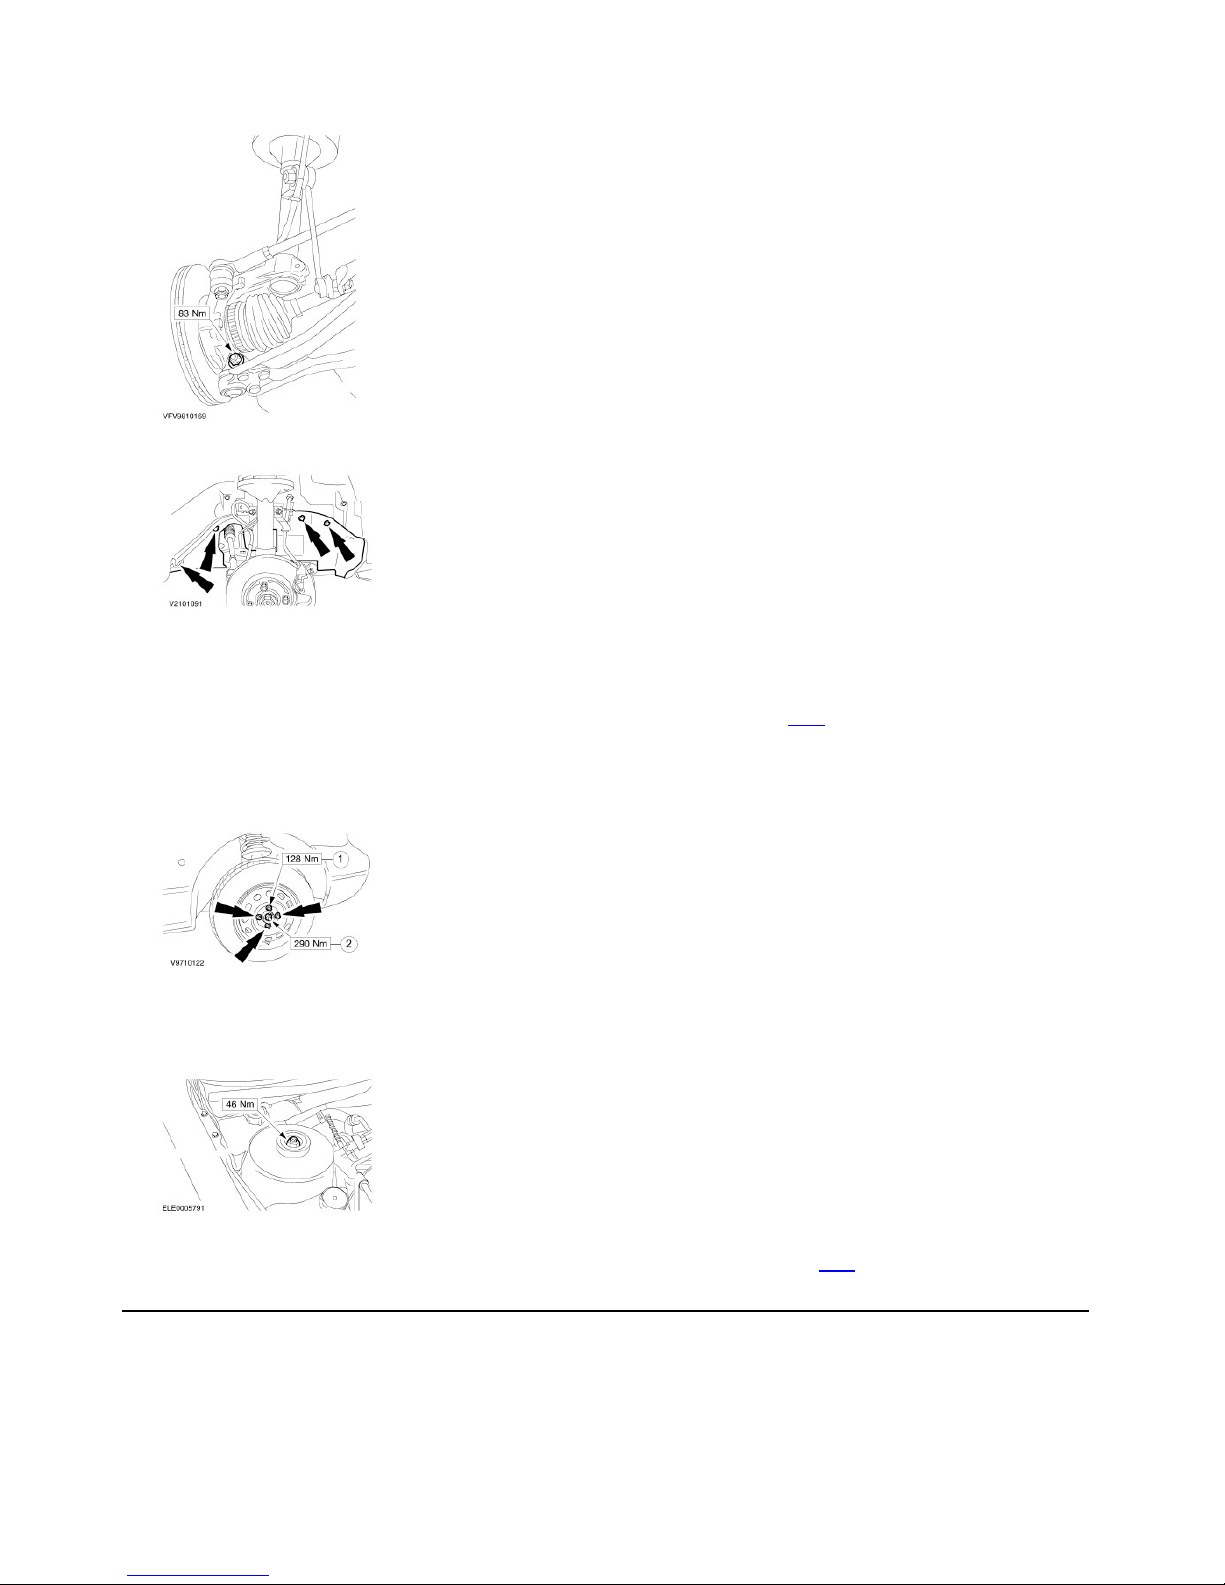
5. CAUTION: Do not damage boot and ABS sensor ring.
Install the left-hand suspension.
Attach the ABS wiring harness bracket to the strut.
Page 4
Page
4
of 51999 Contour/Mystique Workshop Manual
11/1/2010
http://www.fordtechservice.dealerconnection.com/pubs/content/~WSXP/~MUS~LEN/20/
...
6. Install the fender splash shields (right-hand side shown).
7. Install the left-hand front wheel.
Vehicles with manual transaxle
8. NOTE: The fill level is 0-5 mm below the lower edge of the fill er hole.
Check the transmission fluid level and fill with Merkur manual t ransmission fluid. For addition al information, refer to Section 308-03.
All Vehicles
9. Lower the vehicle, tighten the left-hand front wheel nuts (righ t-hand side shown).
1. Wheel nuts
2. Hub nut
10. Tighten the left-hand suspe nsion strut locknut (right-hand s ide shown).
Use an Allen key as back-stop.
Tighten finger-tight using ring spanner.
Tighten to torque specification using torque wrench.
Vehicles with automatic tran saxle
11. Fill the automatic transaxle with MERCON Multi-purpose a utomatic transmission fluid. For additional information, refer to Section 307-01.
Page 5

Page
5
of 51999 Contour/Mystique Workshop Manual
11/1/2010
http://www.fordtechservice.dealerconnection.com/pubs/content/~WSXP/~MUS~LEN/20/
...
 Loading...