

Page 1
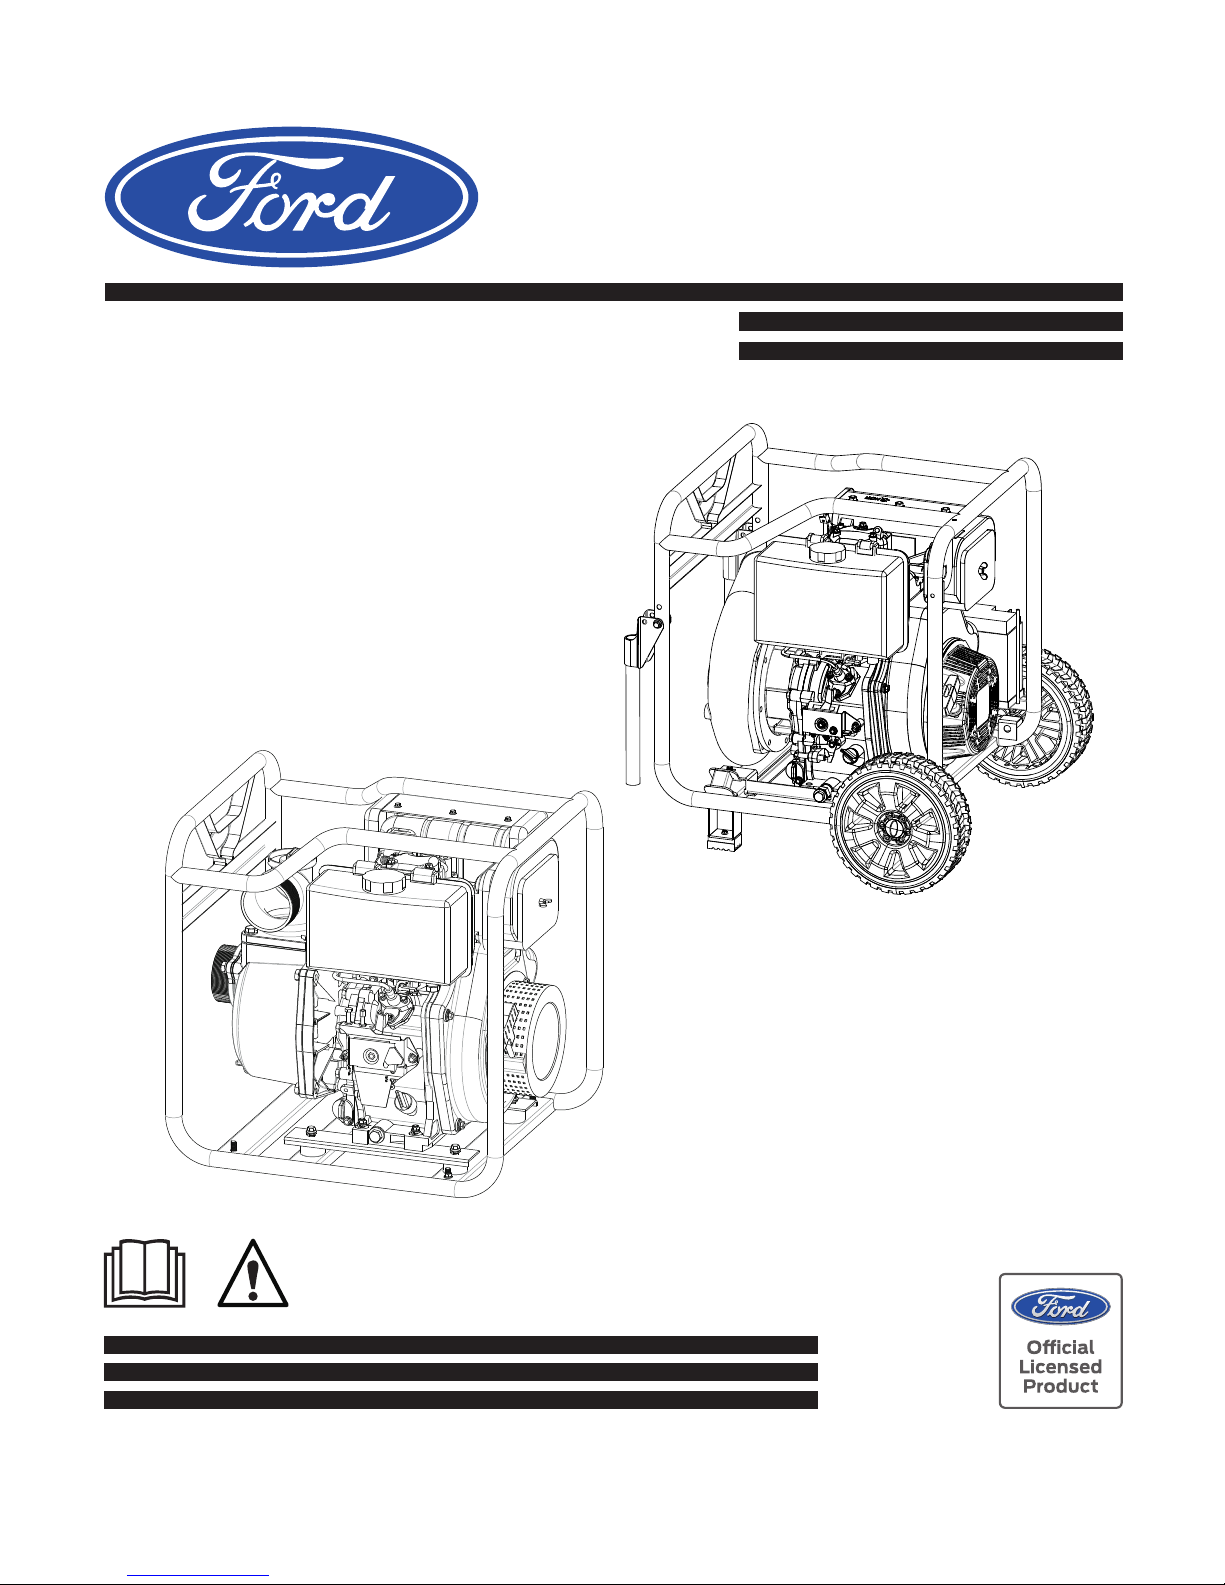
Diesel Water Pump
OPERATOR’S MANUAL
MODEL#: FPXD30E
FPXD40E
FPXD30H
Page 2

INFORMATION
TABLE OF CONTENTS
Introduction ...............................................................................................................................
3
Safety Rules ...............................................................................................................................
4
Safety Symbols .................................................................................................................
4
Safety Instructions . ...........................................................................................................
4
Water Pump Features . ................................................................................................................
7
Assembly .................................................................................................................................
8
Packing List . ...................................................................................................................
8
Unpacking .......................................................................................................................
8
Suction Hose Installation . .................................................................................................
8
Discharge Hose Installation . ...............................................................................................
9
Adding Oil and Fuel . .........................................................................................................
9
Operation ..................................................................................................................................
10
Pre Operation Check List . .................................................................................................
10
Priming the Water Pump . ..................................................................................................
10
How to Start Water Pump . ..............................................................................................
12
How to Stop Water Pump ...................................................................................................
12
Draing Pump Chamber . ....................................................................................................
12
Maintenance . .............................................................................................................................
13
Pre Operation Steps . .........................................................................................................
13
After Each Use . .............................................................................................................
13
Recommended Mai ntenance Schedule .
............................................................................
13
Changing Oil . ..................................................................................................................
14
Cleaning Air Filter . ..........................................................................................................
15
......................................................................................................................................
16
Troubleshooting .........................................................................................................................
18
Modifications .............................................................................................................................
19
.
SAVE THIS MANUAL FOR FUTURE REFERENCE
This manual contains important information regarding safety, operation, and maintenance.
Storage
Page 3
3
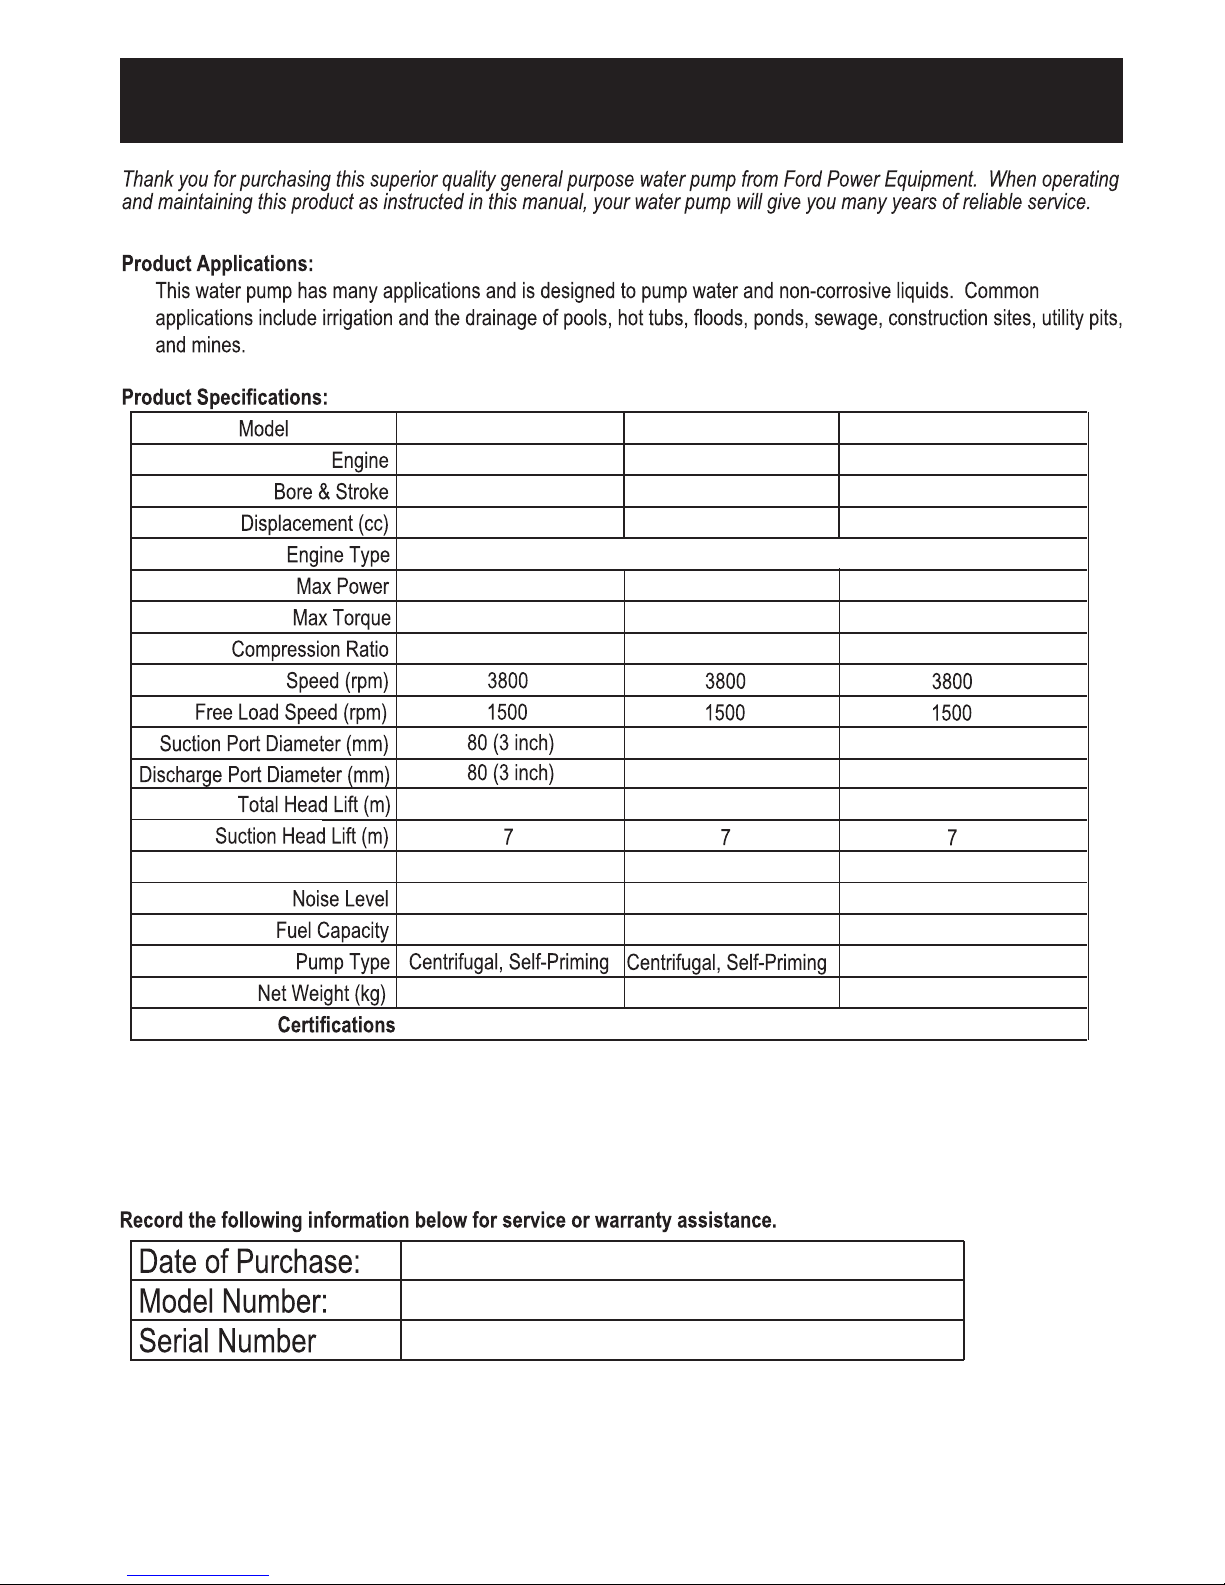
INTRODUCTION
FPXD30E
178FA
78mm×64mm
305
4. 0kW/3600 rpm
20:1
58
30
≤85dB(A) 7m
3.5L
Vertical Cylinder, 4 Stroke,Air Cooled
13.2N.m
58
FPXD40E
186FA
86mm×72mm
418
6.3kW/3600 rpm
19:1
96
30
≤85dB(A) 7m
5.5L
20.3N.m
75
100(4 inch)
100(4 inch)
Discharge Capacity (m³/h)
FPXD30H
192FA
92mm×75mm
499
8.2kW/3600 rpm
19:1
42
90
≤
85dB(A) 7m
5
.5L
26.8N.m
75
80(
3 inch)
80(3 inch)
Centrifugal,Non Self-Priming
Page 4
4
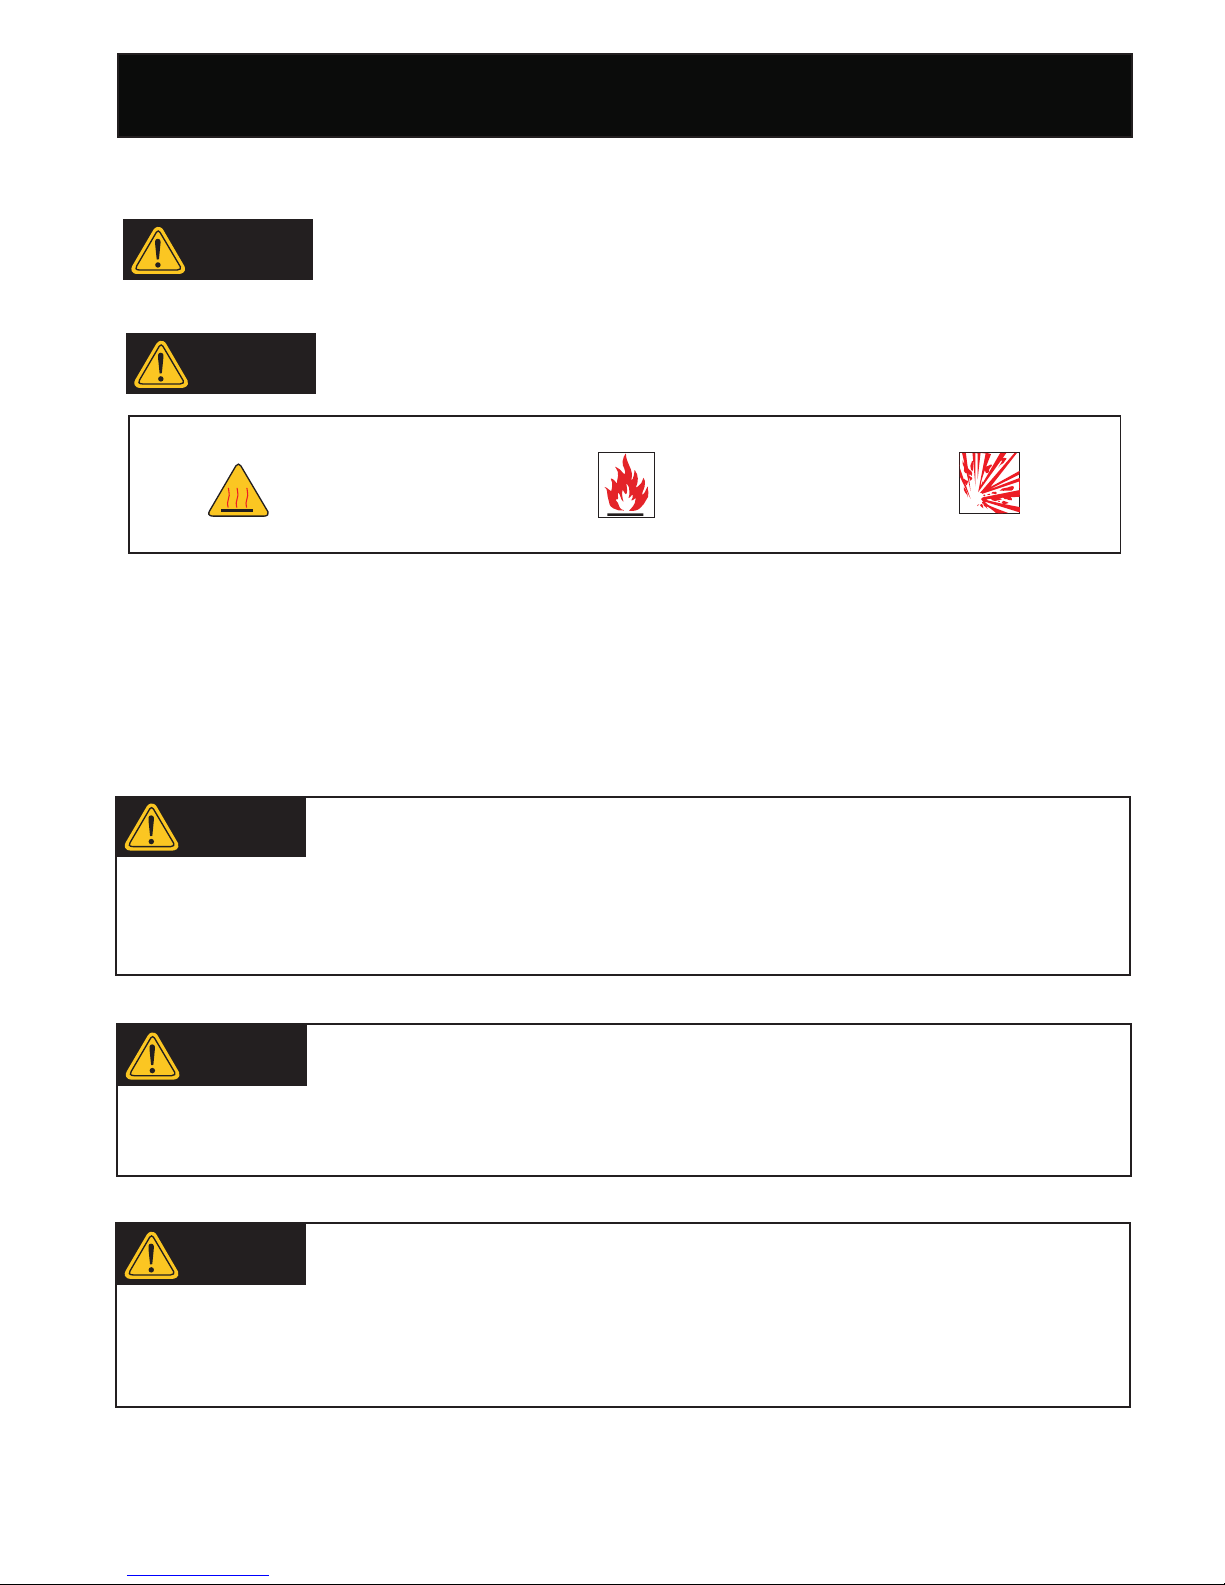
Indicates a potentially hazardous situation which could result in serious injury or death if not
avoided.
Risk of fire
Risk of explosion
Hot surface
WARNING!
Most accidents can be prevented by following the instructions in this manual. However, the manufacturer
cannot anticipate every possible hazardous circumstance that the user may encounter. Therefore, the Warnings
in this manual, on tags, and on affixed decals are not all-inclusive. To avoid accidents, the user must understand
and following all manual instructions and use common sense.
Safety Symbols
Read and understand this manual in its entirety before operating this water pump.
WARNING!
Safety Instructions
SAFETY RULES
• Do not use pump to pump water to be consumed by humans or animals.
• Do not pump flammable liquids such as diesel or engine oil which could cause an explosion or flames.
• Do not pump sea water, chemical solutions, or any other fluids that could corrode or damage the pump.
WARNING!
Only use this pump to pump water not intended for consumption
• Do not bypass any safety device. Moving parts are covered with guards. Make sure all protective covers are in place.
• Inspect hoses and connections making sure they are secure before starting engine.
• Use only recommended accessories to avoid damage to this unit.
• Never transport or make adjustments to this unit while it is running.
Only use this unit as it is intended or serious injury or death could result.
• Improper use of this water pump could result in serious injury or death.
• Know how to stop this pump quickly in case of an emergency.
• Never leave the pump running while unattended to for any reason.
• Keep children and pets away from the pump when it is running.
Indicates a potentially hazardous situation which could result in damage to equipment or property.
CAUTION!
WARNING!
WARNING!
WARNING!
Page 5
5
SAFETY
• Carbon monoxide gas is a poisonous, odorless gas that can cause headache, confusion, fatigue, nausea, fainting,
sickness, seizures, or death. If you start to experience any of these symptoms, IMMEDIATELY get fresh air and seek
medical attention.
• Never use indoors, in a covered area, or in a confined space, even if doors and windows are open.
• Keep exhaust from this unit from entering a confined area through windows, doors, vents, or other openings.
• When working in areas where vapors could be inhaled, use a respirator mask according to all of its instructions.
Do not operate indoors or in a confined space preventing dangerous carbon monoxide gas
from dissipating.
• The fuel and its vapors used to power this unit are highly flammable and could explode resulting in serious injury or
death. Always refuel outdoors in a well ventilated area with the engine off and the pump on a level surface.
• Never overfill fuel tank. If fuel spills, move the unit at least 30 feet away from the spill and wipe up any remaining fuel
on the unit before starting the engine.
• Never smoke while operating or fueling this unit.
• Never operate or store this unit near an open flame, heat, or any other ignition source.
• Keep engine free of grass, leaves, or grease which are flammable.
• When adding or draining fuel, unit should be turned off for at least 2 minutes to cool before removing fuel cap. If unit
has been running the fuel cap is under pressure, remove slowly. To keep fuel from spilling, secure unit so it cannot tip
while opperating or transporting.
• When transporting unit, make sure the fuel tank is empty with the fuel shutof
f valve
turned to the "OFF" position.
• Keep pump at least 3 feet (1 meter) away from equipment , outlets, or buildings.
WARNING!
Keep engine away from sparks and flammables.
• Improper treatment of water pump can damage the unit and shorten it’s life.
• Always repair this unit as specified in this manual. If you have any questions contact your dealer or consult a qualified
service center.
• Never modify governed speed.
• Use caution around the muffler and other engine parts as they can be extremely hot.
• Allow hot components to cool before touching.
WARNING!
Never operate this unit if there are any broken or missing parts and only use Ford
Equipment replacement parts specifically designed for this unit.
Avoid contacting hot areas of this unit
SAFETY RULES
WARNING!
WARNING!
WARNING!
WARNING!
Page 6
6
SAFETY
SAFETY RULES
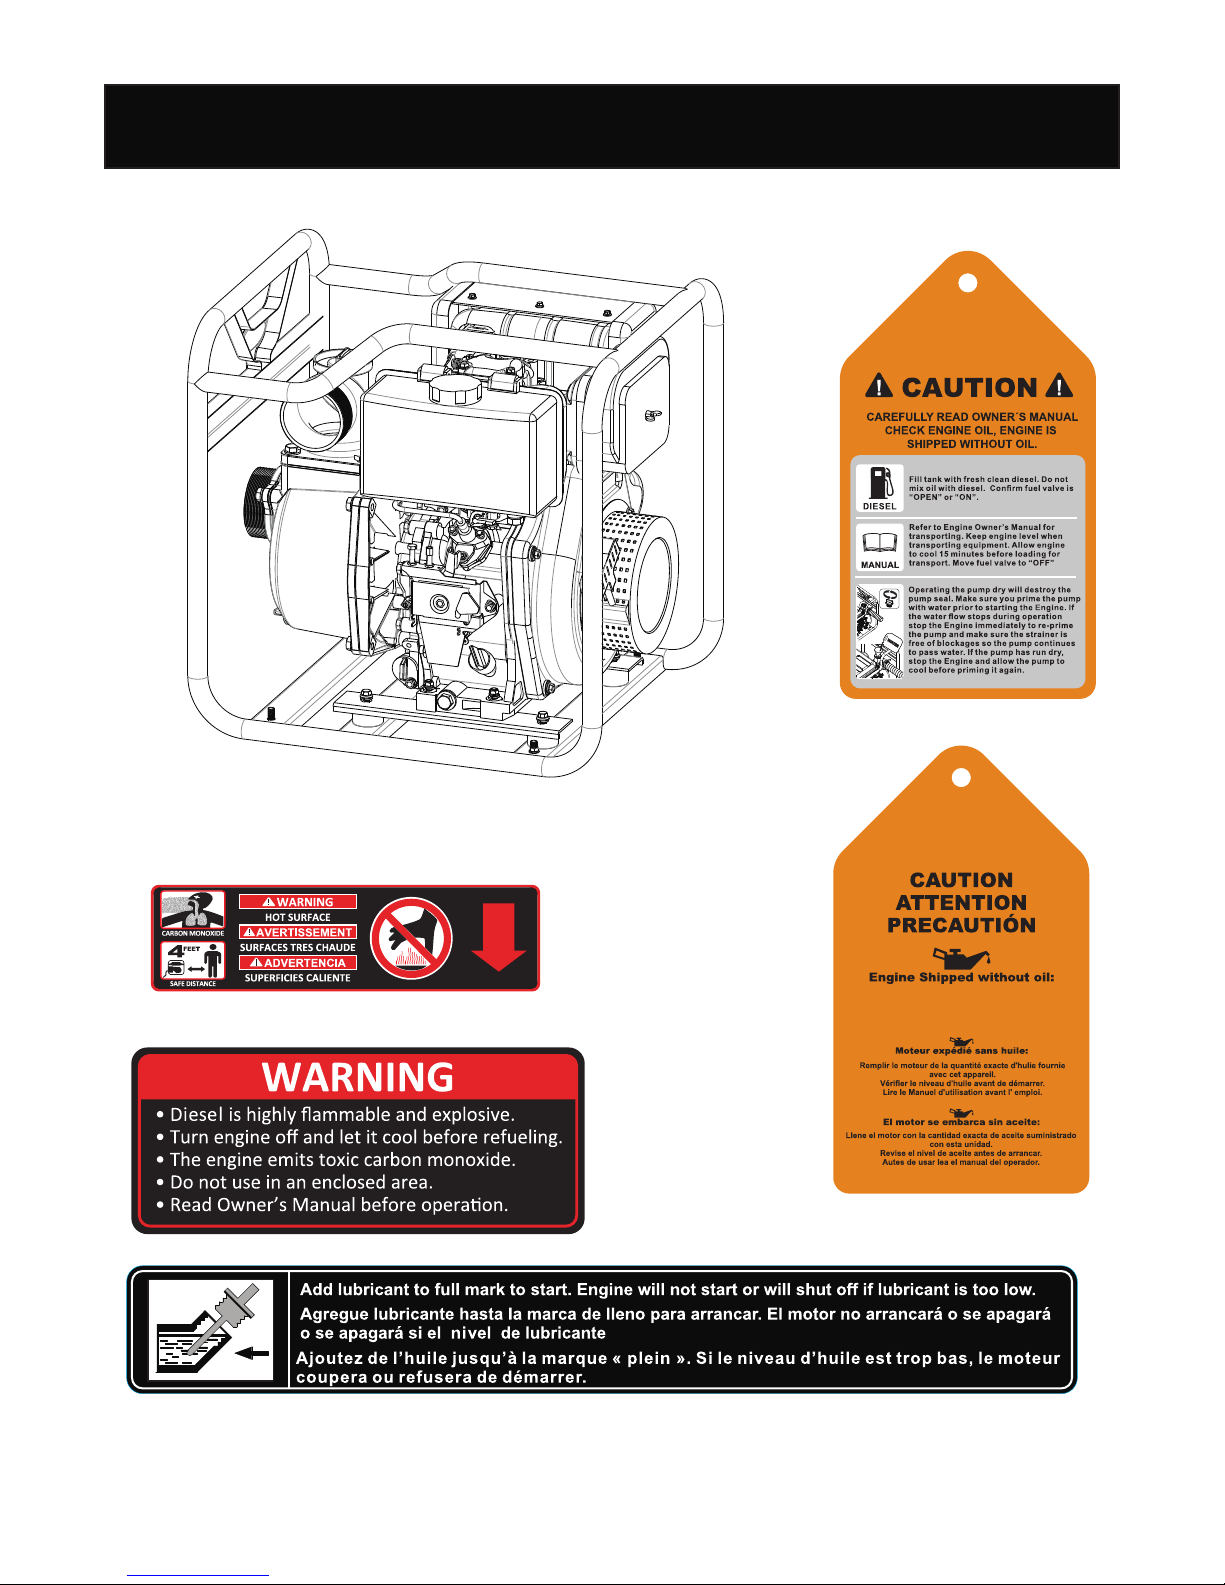
Fill e ngine w ith exa ct amou nt of oil s uppli ed with t his uni t.
Alwa ys chec k oil lev el befo re star ting
Read O perat or’s Ma nual be fore Us ing
(USE C D 15W40 )
Page 7
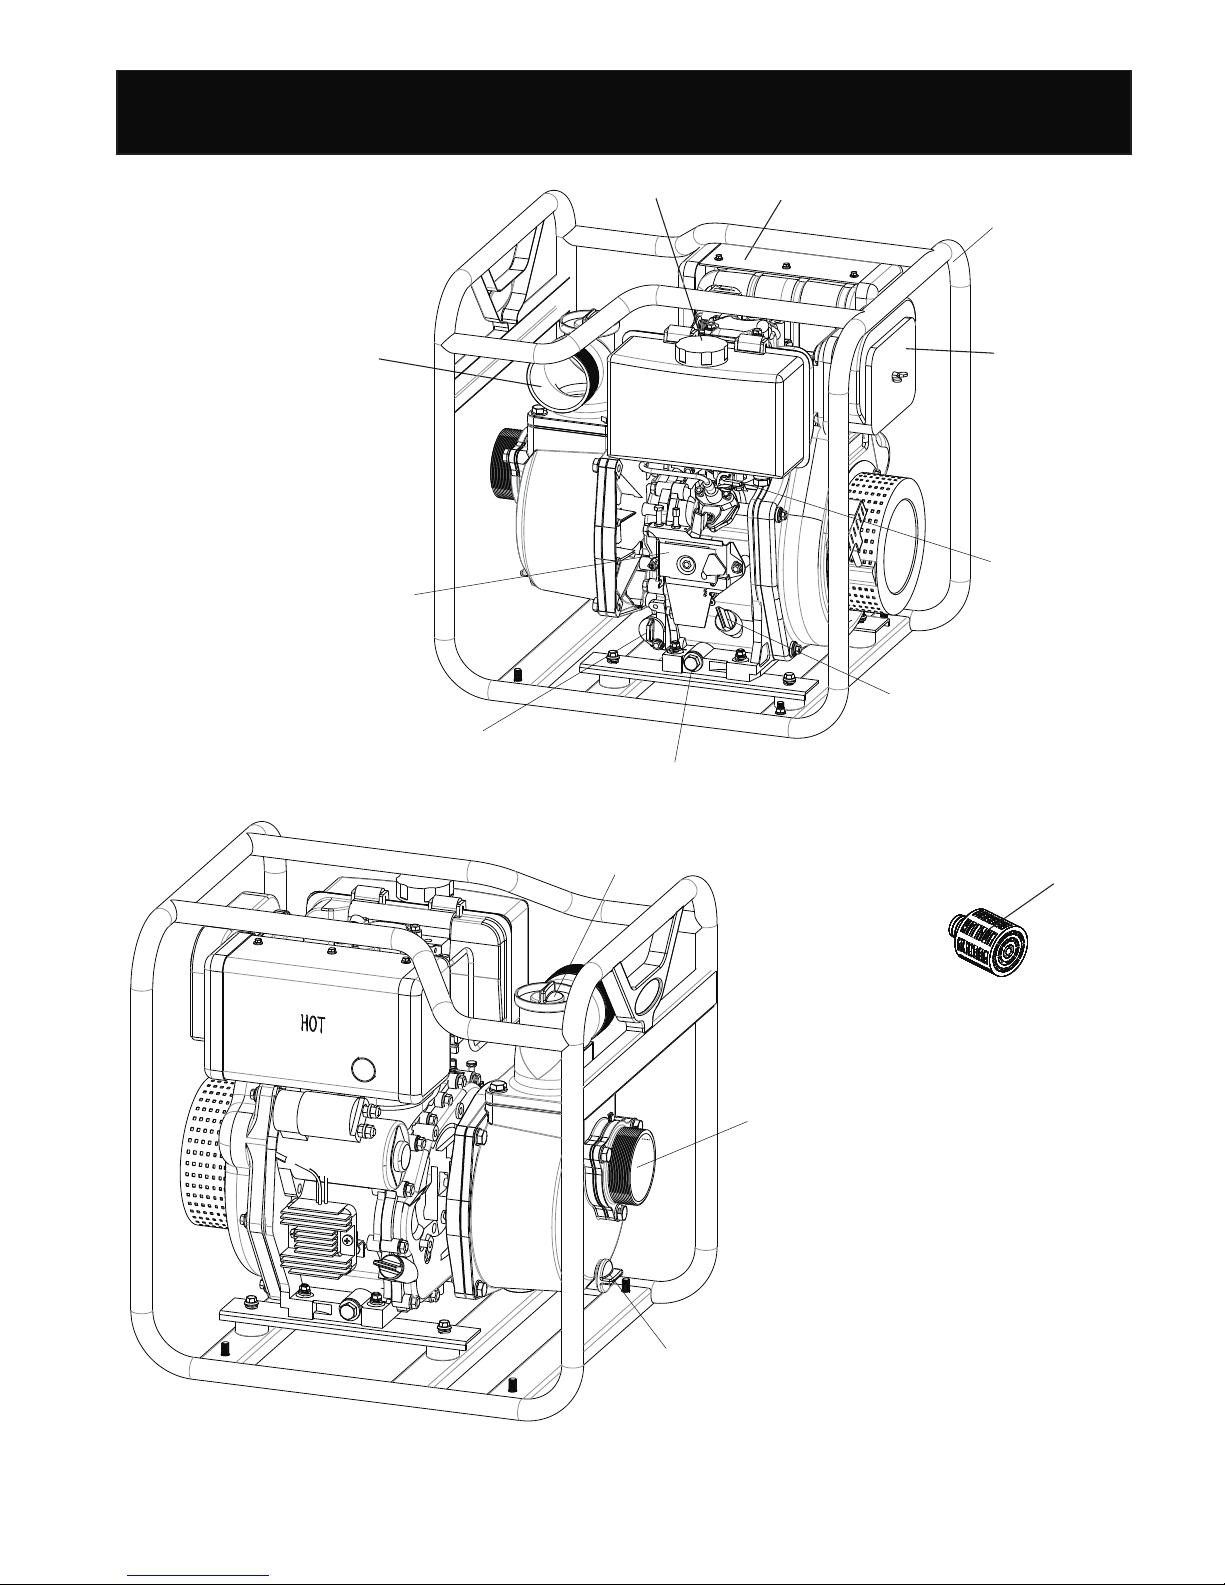
STRAINER
7
WATER PUMP FEATURES
FRAME
MUFFLER
PUMP DRAIN CAP
SUCTION PORT
DISCHARGE PORT
FUEL FILL CAP
PRIMING WATER
FILLER CAP
AIR FILTER
FUEL SWITCH
ENGINE ON/OFF SWITCH
OIL DRAIN PLUG
OIL FILLER
CAP/DIPSTICK
OIL FILTER
Page 8
8
ASSEMBLY
Operator’s manual and product registration card
Fresh water pump
Do not operate this pump if any of the parts are damaged or missing until the part
Minimum hose size:FPXD30E=3in.(80mm)
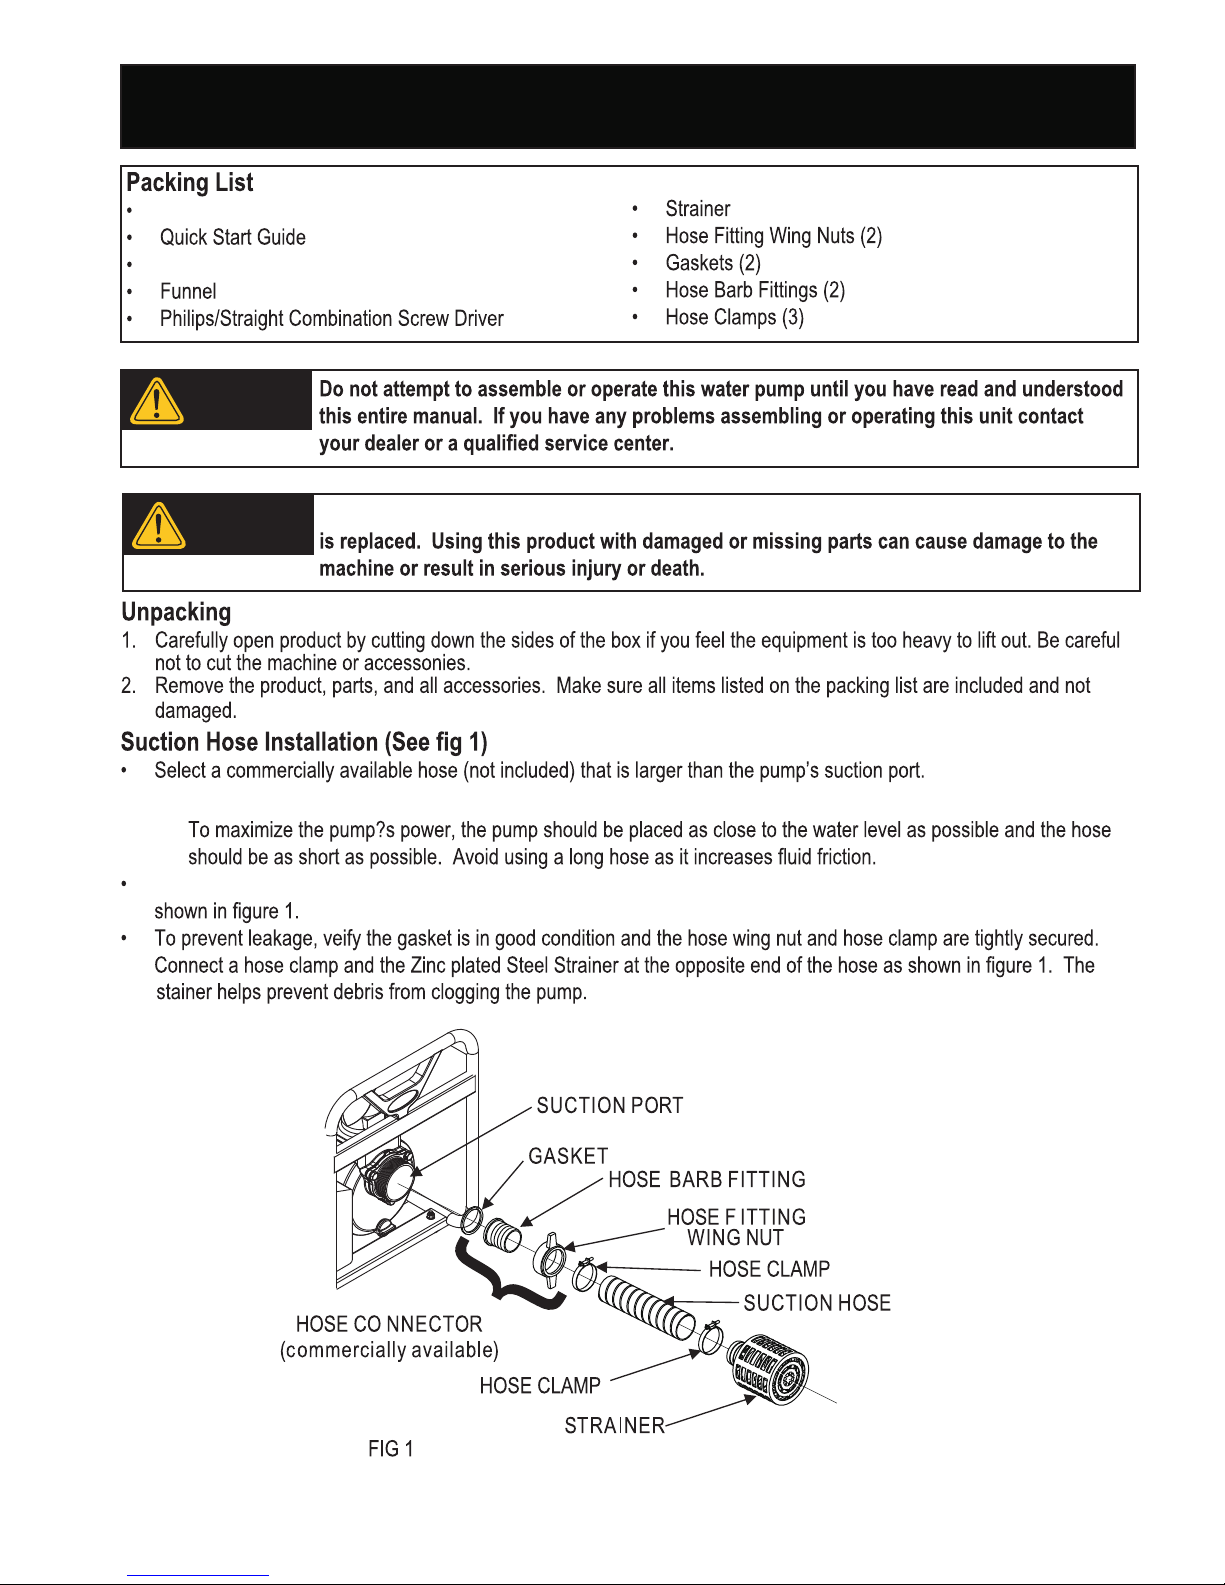
At the pump’s Suction Port connect the gasket, hose barb fitting,hose wing nut,hose clamp,and suction hose as
WARNING!
WARNING!
Minimum hose size:FPXD40E=4in.(100mm)
Page 9
9
ASSEMBLY
Minimum hose size:FPXD30E=3in.(80mm)
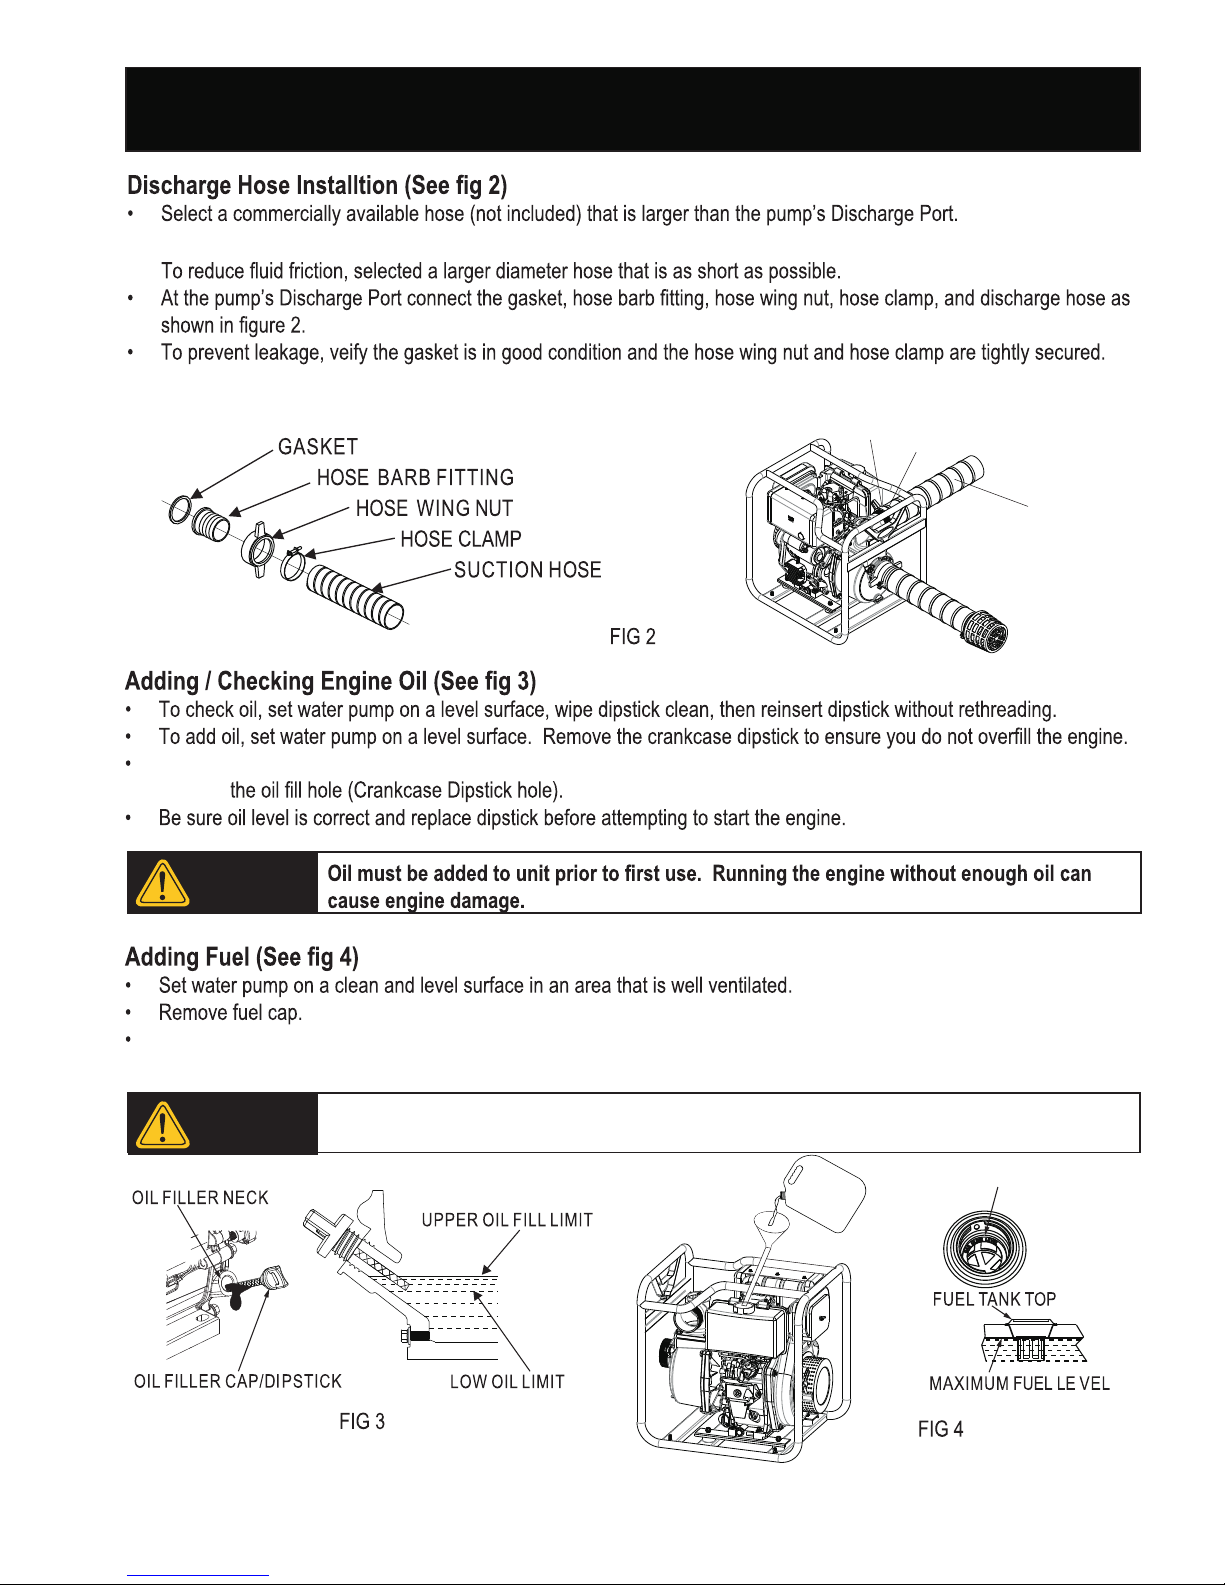
Carefully add 1100ml of 4-Cycle engine Oil (SAE CD 10W-40) to empty reservoir until oil reaches
Insert a funnel into the fuel tank and carefully pour fresh, diese,the tank until fuel level reaches 1/2 inches below the
top of the neck.
To avoid spillage, do not overfill fuel tank as diesel expands. Never use diesel that is
stale, contaminated or mixed (oil/diesel). Keep water and dirt from entering fuel tank.
DIESEL LEVEL
dies
el
HOSE CONNECTOR
HOSE CLAMP
DISCHARGE HOSE
CAUTION!
CAUTION!
Minimum hose size:FPXD40E=4in.(100mm)
the outer
edge of
Page 10
Improper use of this pump could result in serious injury or death.
Know how to stop this pump quickly in case of an emergency.
Never leave the pump running while unattended to for any reason.
Keep children and pets away from the pump when it is running.
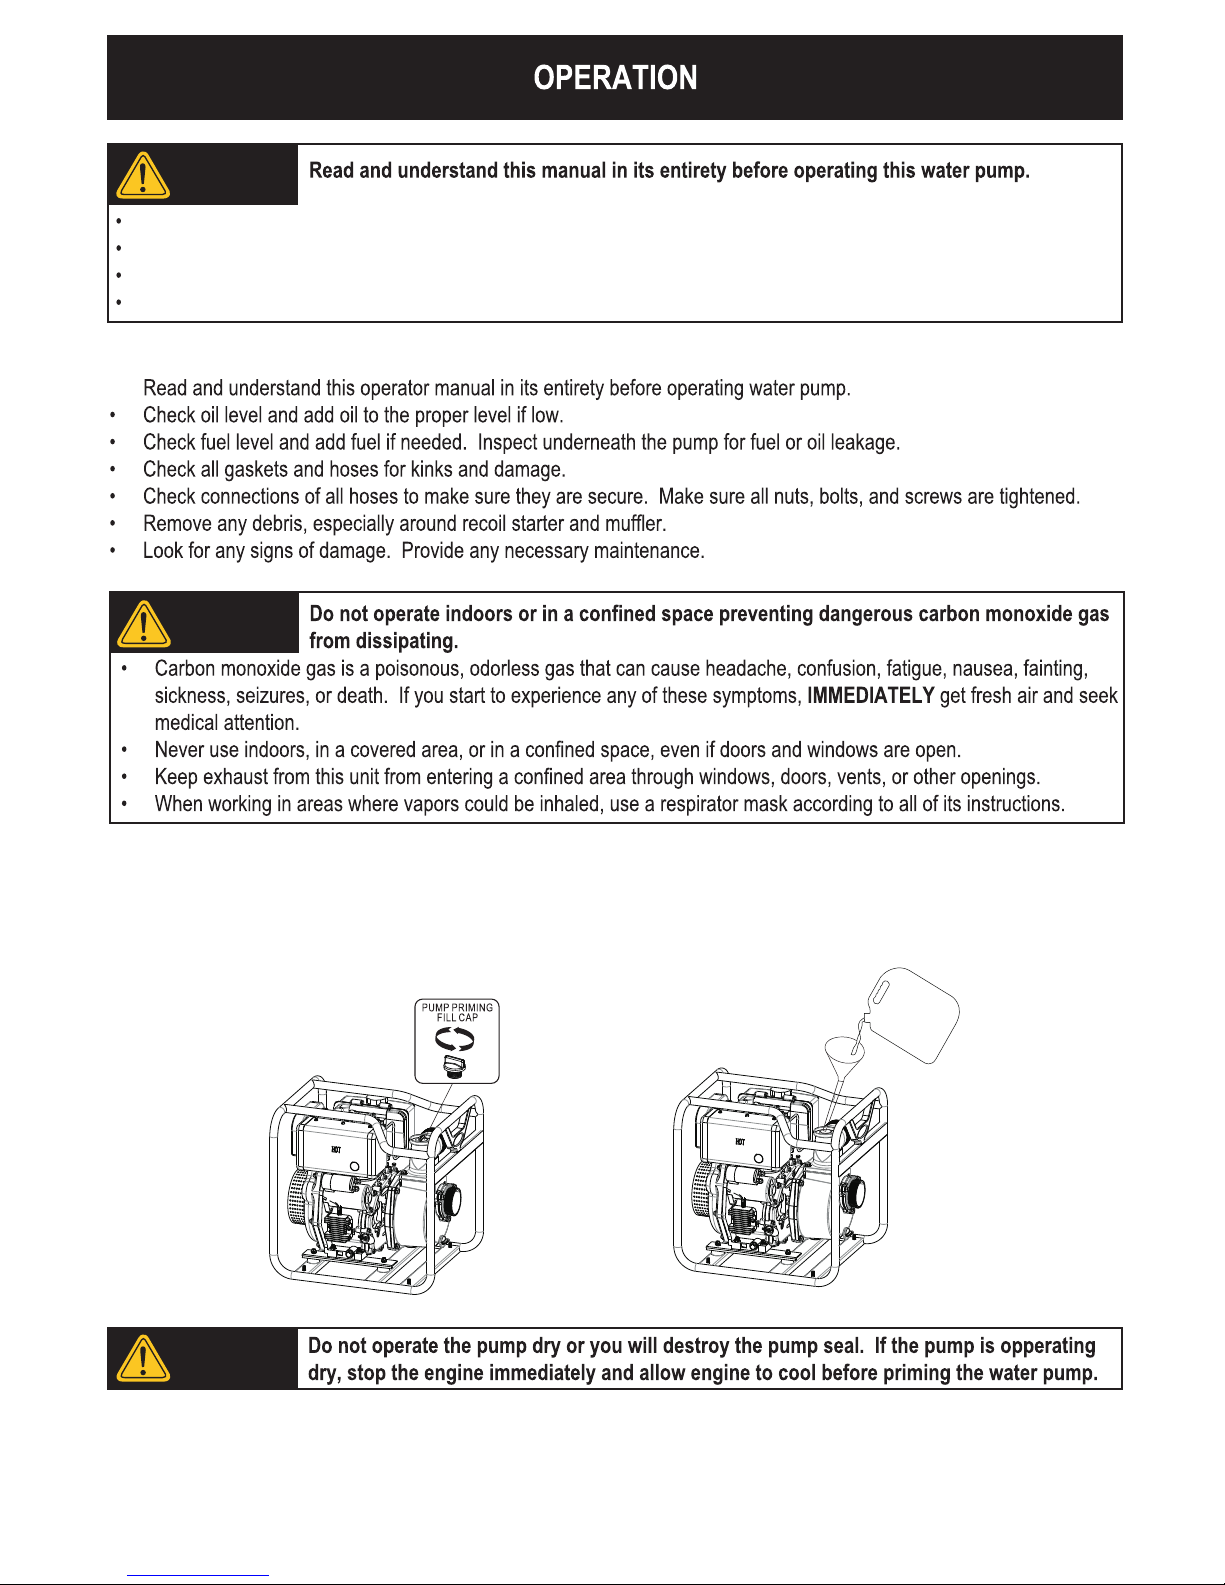
Priming the Trash Pump (See FIG 5)
The trash pump must be primed prior to starting the engine.
• Remove the filler cap from the pump chamber.
• Add water to the pump chamber until it is completely full.
• Reinstall filler cap, secure tightly.
10
Pre-Operation Check List
FIG 5-A
FIG 5-B
W
A
TER
WARNING!
WARNING!
CAUTION!
Page 11
11
OPERATION
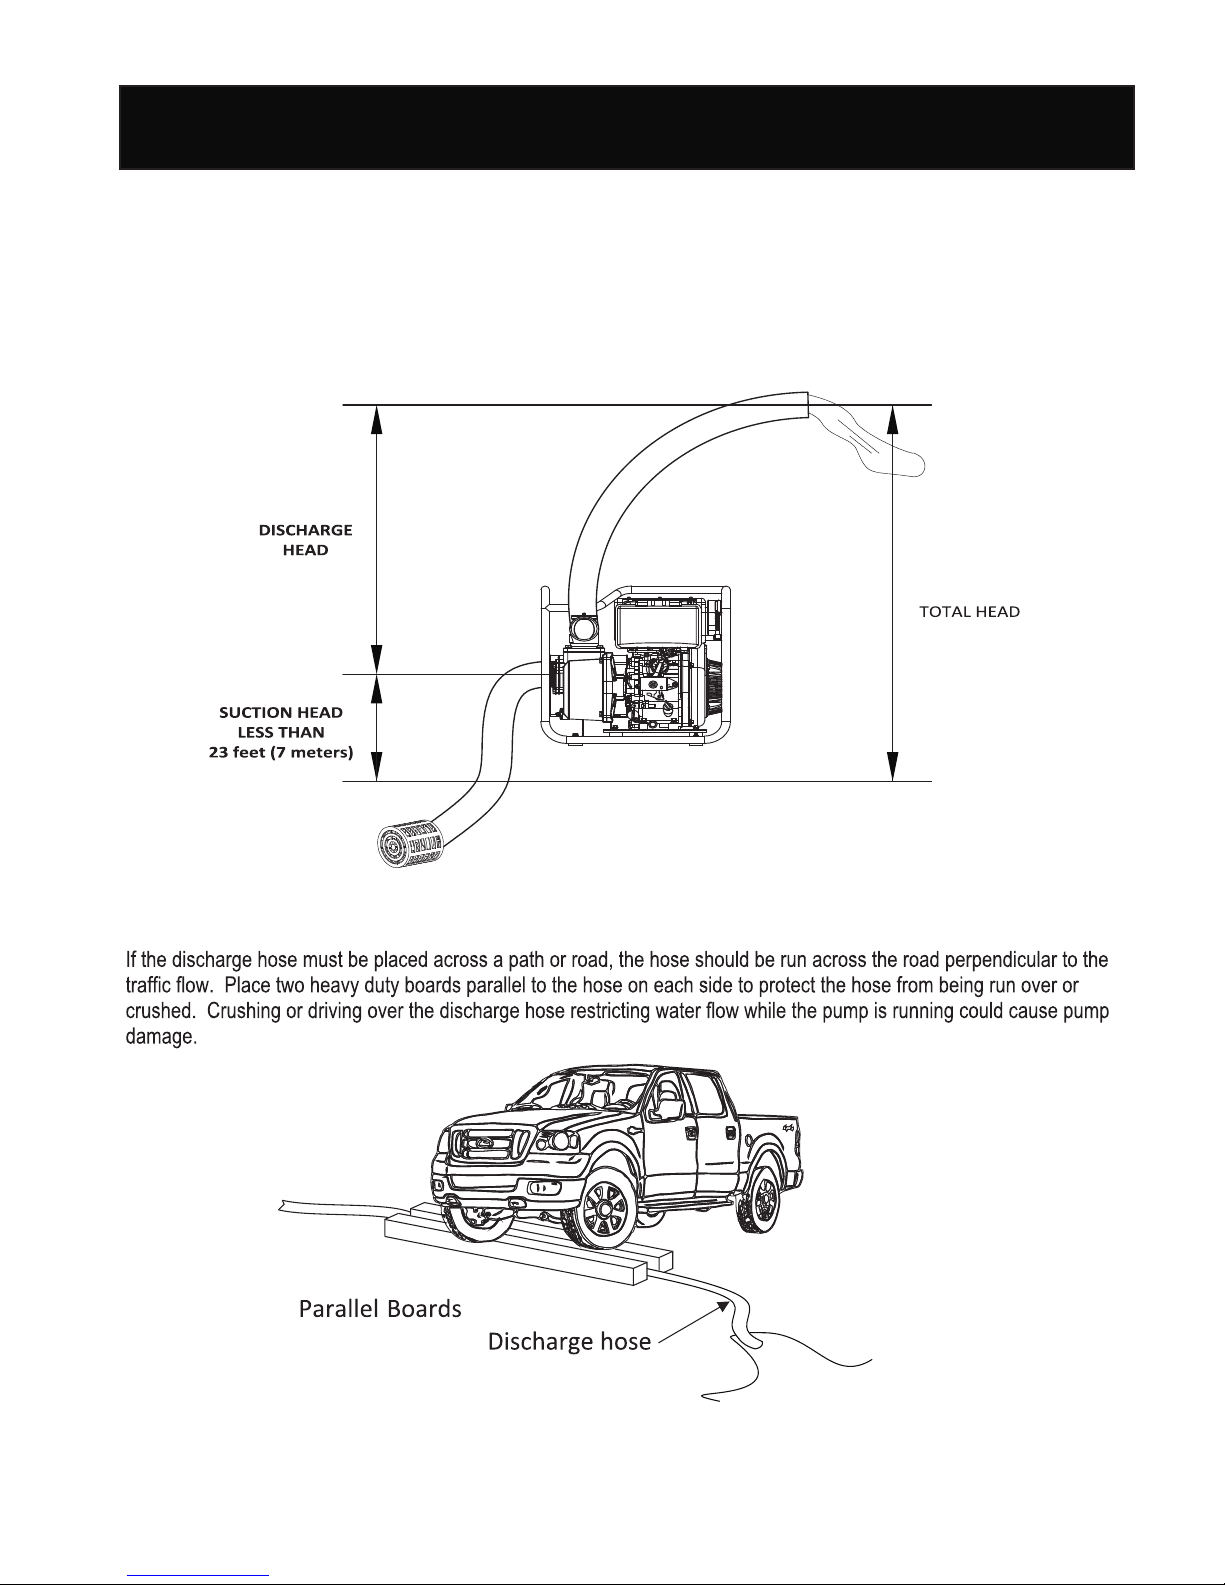
Placing the Trash Pump (See FIG 6)
To maximize the pump’s power, the pump should be placed as close to the water level as possible and the hose should be
as short as possible.
• As hose length increases, pump output decreases.
• The Total Head is the total pumping height. As Total Head increases the pump’s output decreases.
• The Discharge Head capacity is greater than the Suction Head capacity. Therefore, the Suction Head should always be
shorter than the Discharge Head.
Protect the Discharge Hose from Hazards (See FIG 7)
FIG 6
FIG 7
Page 12
12
OPERATION
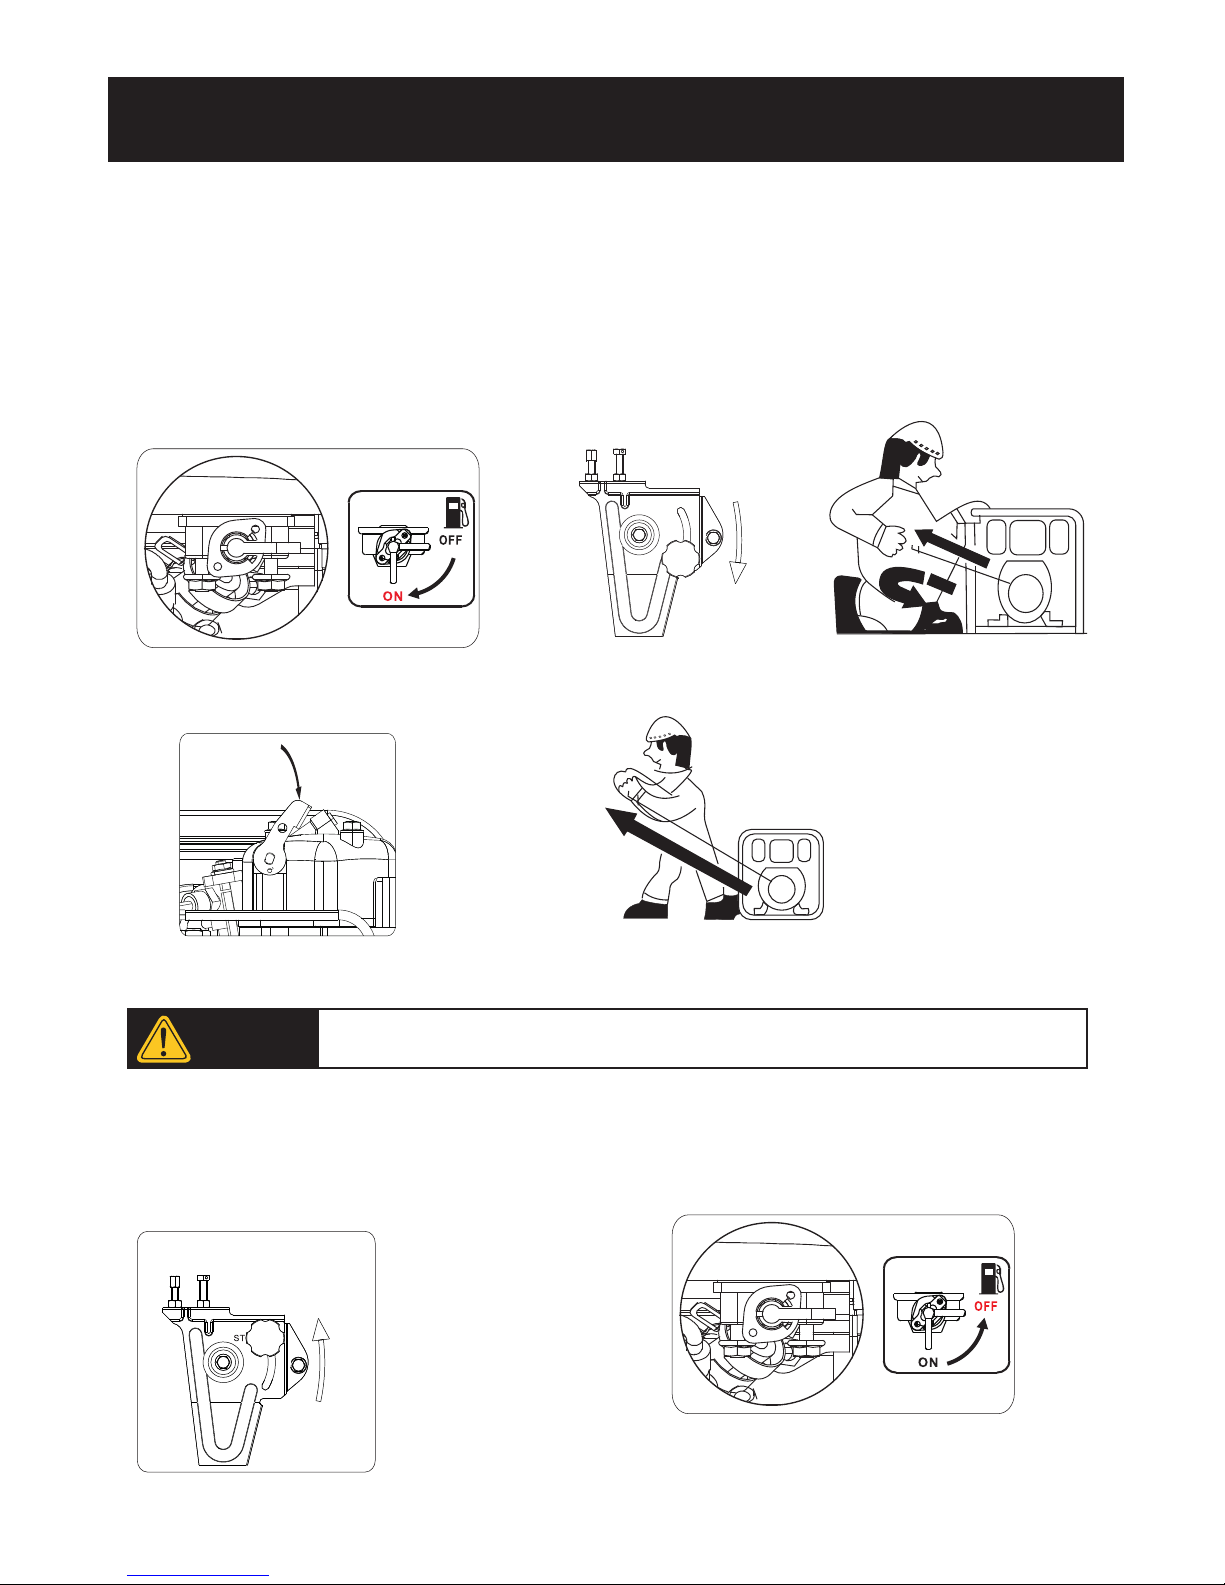
Starting Water pump (See FIG
8A-8E)
FIG 8-A FIG 8-B
Push down the valve, it is in the horizontal position, hands off.(Fig 8-D)
• Place water pump on a level surface near the water level. Keep the pump at least 3 feet away from walls or equipment.
• Prime water pump. (see page 10)
• Turn fuel valve to the ON position.(Fig 8-A)
• Turn the engine STOP/START switch to the “START” position.(Fig8-B)
• Pull the handle slowly until can't pull it, then move it to original position, and loosen.(Fig 8-C)
•
Must be twice
FIG 8-C
Push
FIG 8-D
Pull the rope by two hands quickly and emphatically.(Fig 8-E)
•
If can’t start the diesel engine, please try again.
Started
FIG 8-E
CAUTION!
Stopping Water Pump (See FIG 9A-B)
• Turn the engine STOP/START switch to the “STOP” position.(Fig 9-A)
• Turn the fuel valve to the “OFF” position.(Fig 9-B)
• After use drain the pump chamber.
FIG 9-A
ENGINE.SW.
FIG 9-B
STOP
START
START
ST OP
Page 13
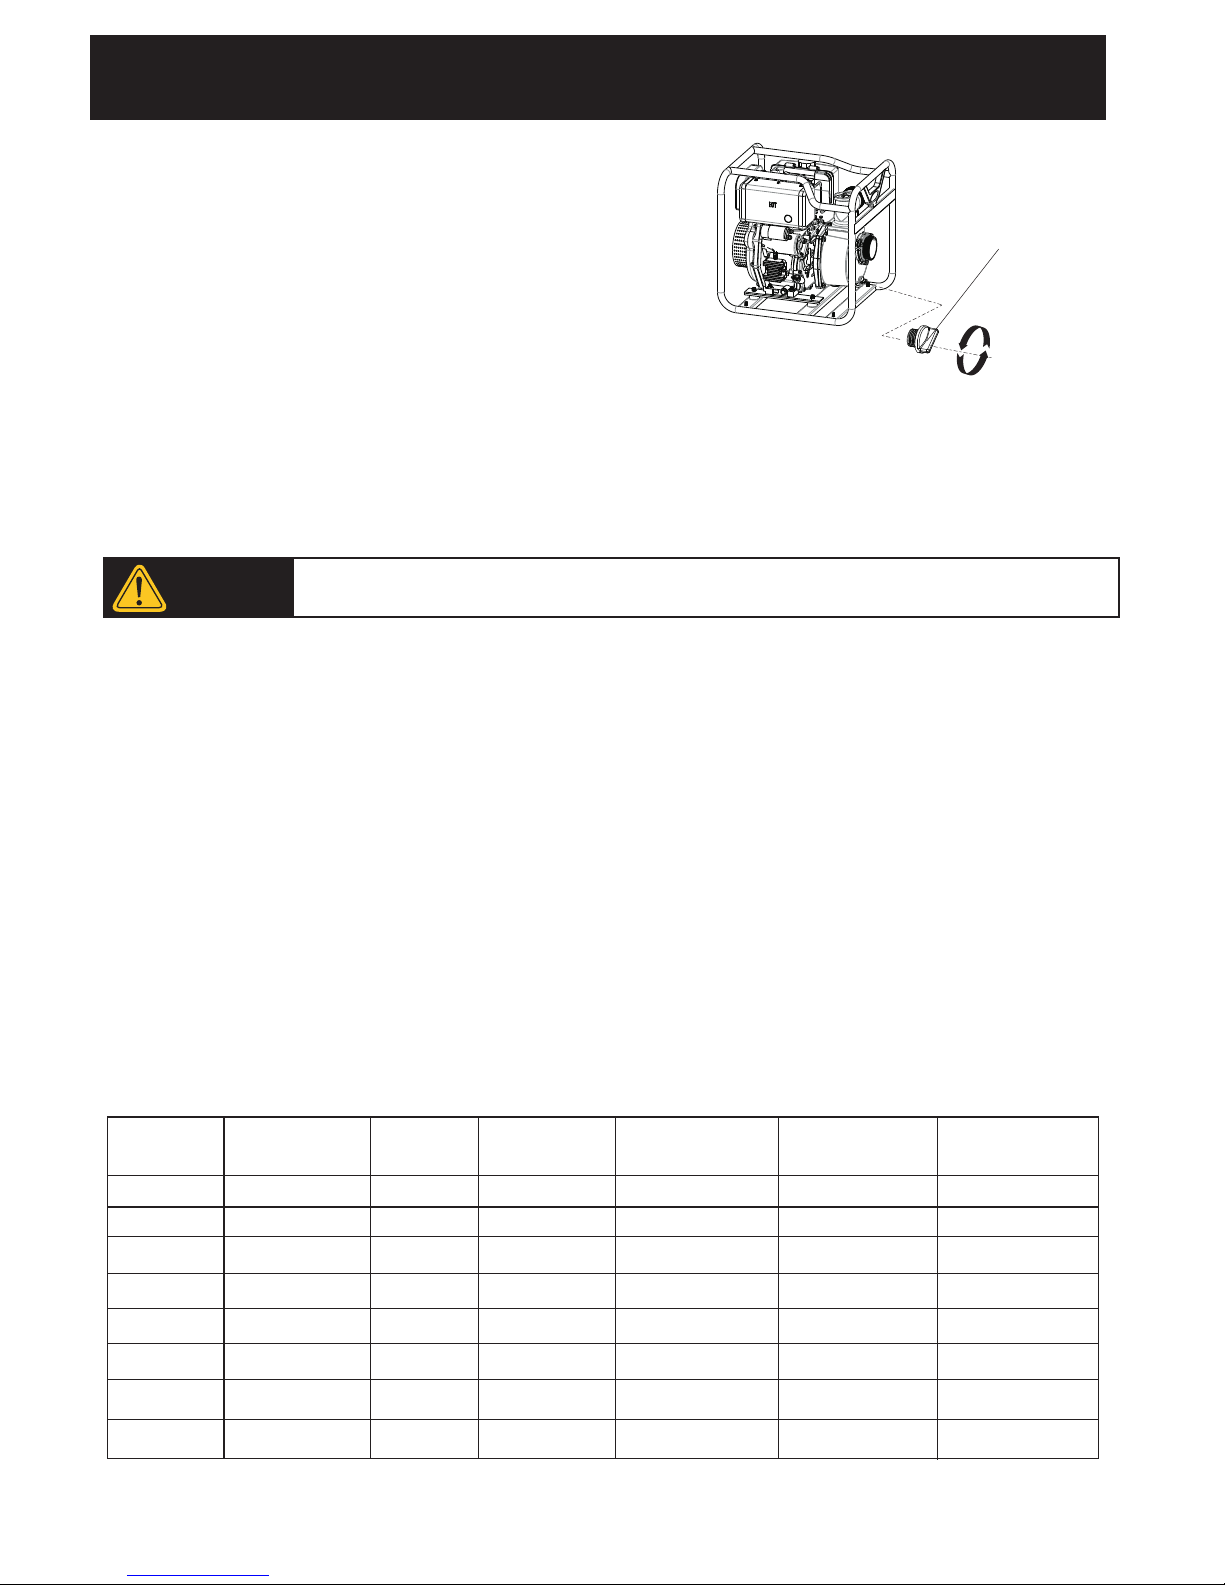
PUMP DRAIN PLUG
(CLEAN OUT PORT)
13
OPERATION
Draining Pump Chamber (See Fig
• Remove Drain Plug and drain Pump Chamber.
• Remove Filler Cap and flush Pump Chamber with clean, fresh water.
• Let Pump Chamber drain again.
• Reinstall Filler Cap.
• Reinstall Drain Plug.
FIG 10
This section of the manual includes a maintenance schedule, routine inspection procedures, and basic maintenance
procedures using basic hand tools. Some complex service procedures require special tools and are best handled by a
qualified service technition. Regular maintenance will extend the life of this water pump and improve its performance.
The warranty does not cover items that result from operator negligence, misuse, or abuse. To receive full value from the
warranty, operator must maintain the water pump as instructed in this manual, including proper storage.
Before inspecting or servicing this machine, make sure the engine is off and no parts are
moving.
WARNING!
Pre-operation Steps
Before starting the engine, perform the following pre-operation steps:
• Check engine oil level and the fuel tank level.
• Make sure the air filter is clean. Remove any debris that has collected on the water pump.
• Check all gaskets and hoses for kinks and damage. Make sure all hose connections are secure.
• Provide any necessary maintenance.
• Inspect the work area for hazards.
Remove Debris
• Clean any debris that has collected around or behind the muffler, recoil starter, and controls.
• Use a damp cloth to wipe exterior surfaces. If dirt is caked on, use a soft bristle brush.
After Each Use
Follow the following procedure after each use:
• Shut off engine.
• Drain Pump Chamber
• Store unit in a clean and dry area.
13
Re comm end ed Mai nte nanc e Sch edu l e
Engine Oi l
Air Filte r
Fuel Filt er
Oil Filte r
Fuel Tank
Check Lev el
Replace
Check
Clean
Replace
Replace
Clean
Each Use
O
O
Every Mon th or
Each 20 Hrs
Every 3 Mon th or
Each 50 Hrs
Every 6 Mon th or
Each 100 Hr s
Every 12 Mo nth or
Each 300 Hr s
O(First U se)
O
O
O
O
O
Verify Fuel Level
10)
Page 14
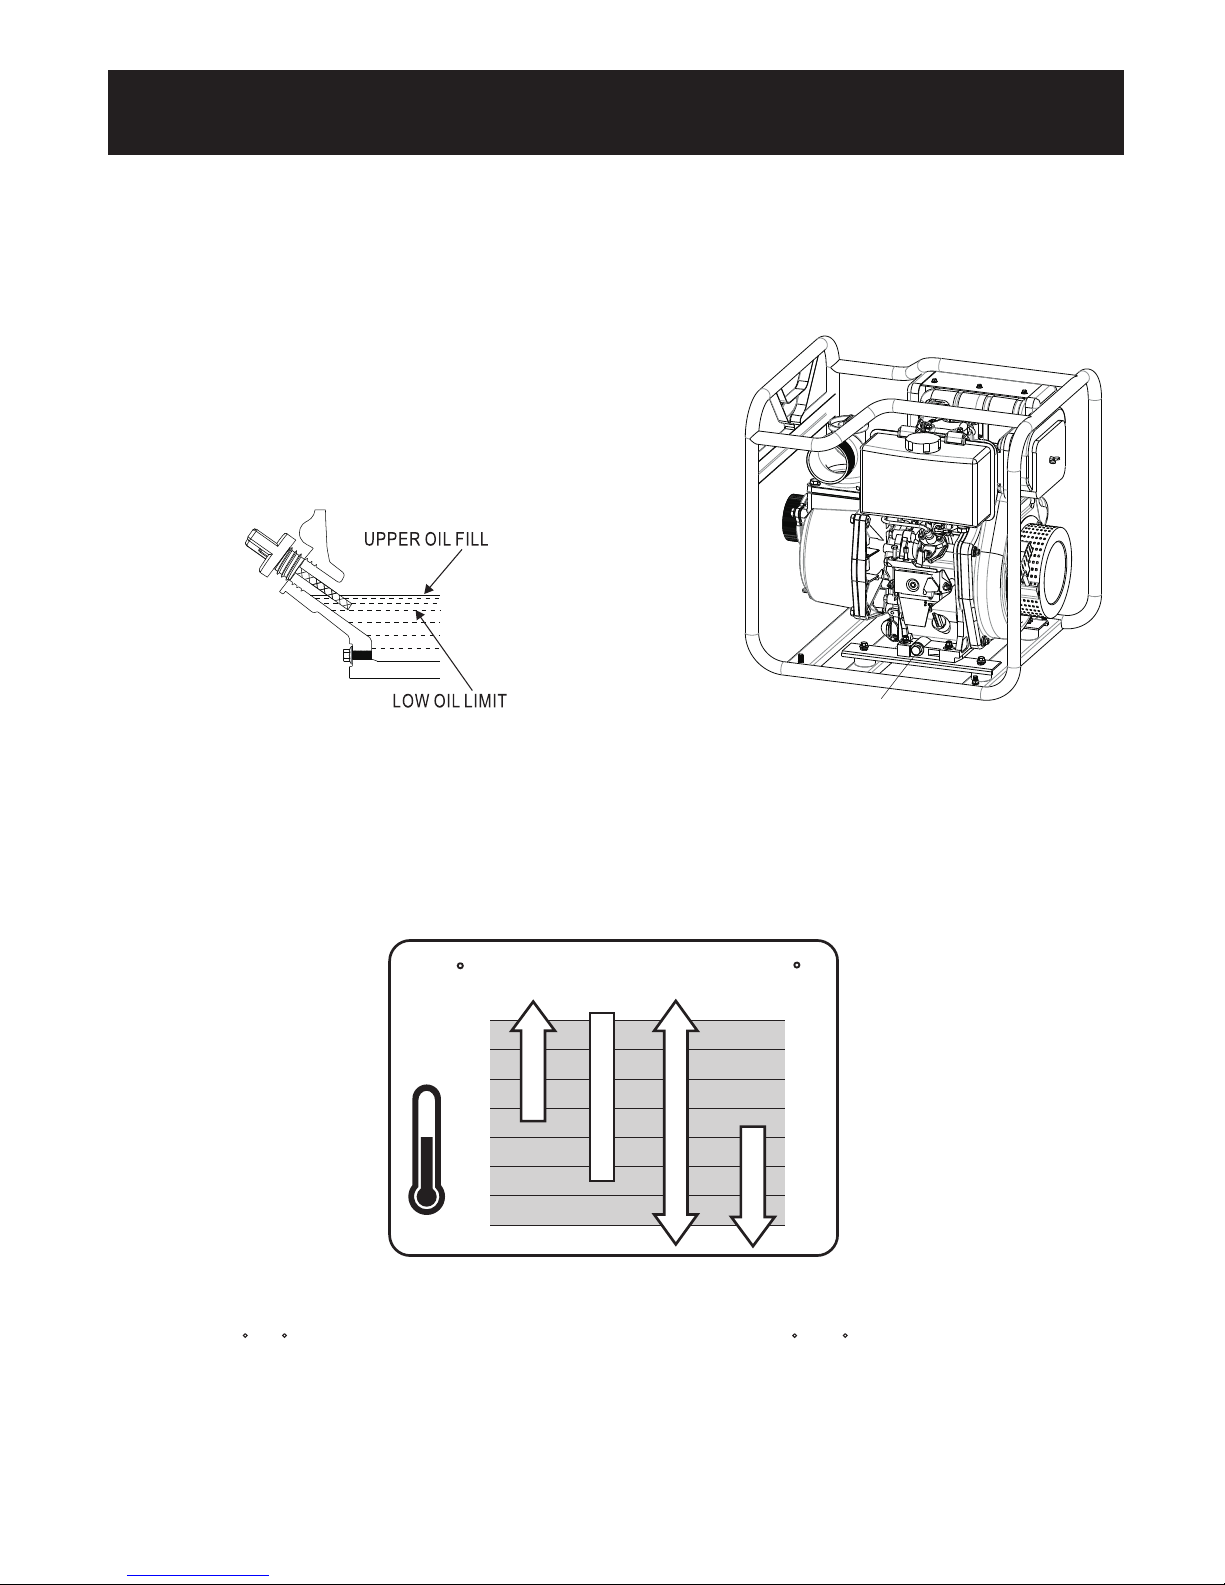
Engine Oil Recommendations (See Fig 12)
• Use SAE 15W-40 for general use. Other viscosities may be used based on the average temperature chart as shown.
MAINTENANCE
Changing Engine Oil (See Fig 11)
Engine oil will drain better if the engine is still warm, but not hot.
• Shut off engine.
• Clean the area around the oil fill cap / dipstick to keep out debris then remove oil fill cap / dipstick.
• Place an oil pan on the ground to catch oil. Remove oil plug and completly empty out the oil from the crankcase.
• Once oil is completely drained, replace oil plug and refill with new oil as instructed earlier in this manual under Adding /
Checking Oil (See pg 9 ).
• Reinstall oil fill cap / dipstick.
FIG 11
FIG 12
-22
-4
14
32
50
68
86
104
-30
-20
-10
0
10
20
30
40
SAE40
10W
-40
**
Synthetic 5W-40
5W
-40
C
F
Note: *Below 40 F (4 C) the use of SAE 40 will result in hard starting.** Above 80 F( 27 C) the use of
SEA 15W-40 may cause increased oil consumption. Check oil level more frequently.
14
DRAIN PLUG
Page 15
15
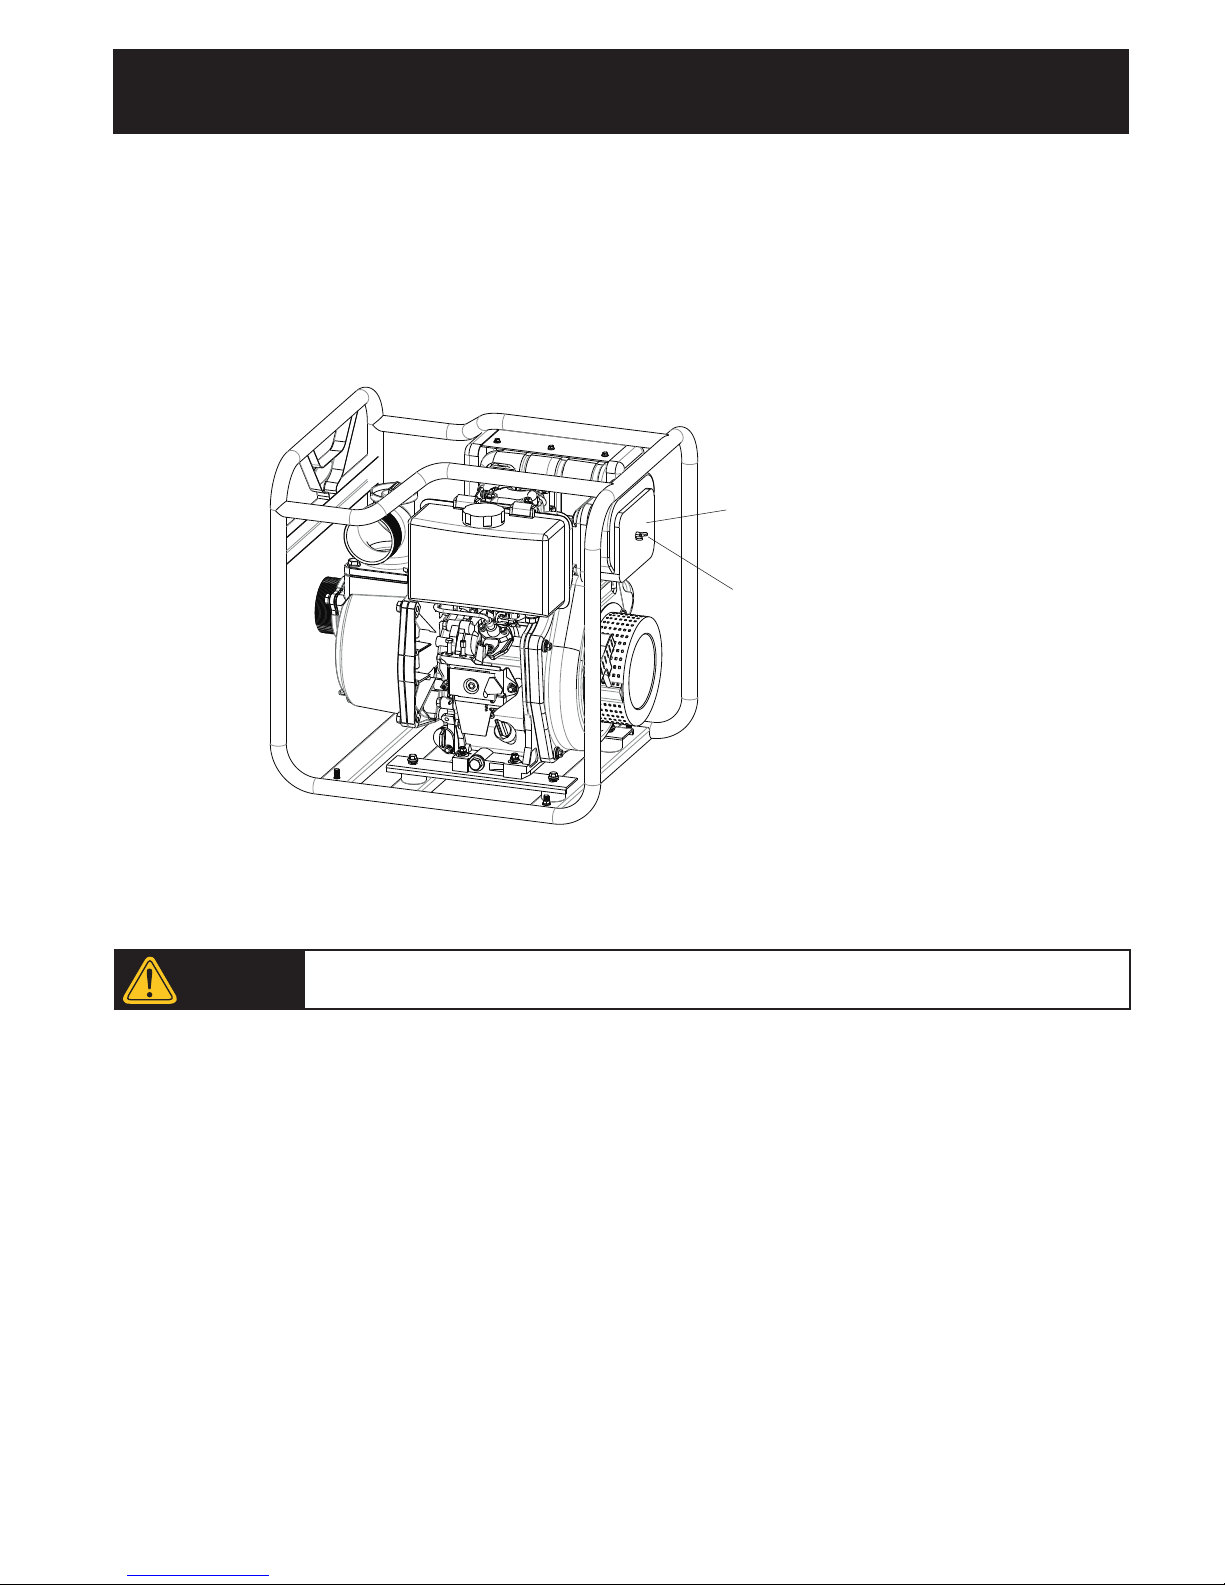
Air Cleaner (See Fig 13)
A dirty air filter will reduce the life span of the engine, make starting the engine difficult, and reduce the unit’s performance.
If operating pump in dusty conditions, clean air filter more frequently then specified in the maintenance schedule.
• To clean, remove the air filter cover.
• Carefully pull the air
filter
out by lifting up along the edges.
• Remove dirt from filter by tapping on it or having it blown out.
• Wipe air filter base and cover with a damp rag. Be careful that dirt does not enter air duct leading to the car buretor.
• Reinstall air filter so that it seals and replace air filter cover.
MAINTENANCE
FIG 13
Operating Pump without an air filter or with a damaged air filter can cause dirt to enter the
engine, causing rapid engine wear. This type of damage is not covered by the warranty.
Air Filter
Air Filter Nut
CAUTION!
Page 16
16
If pump has been running, allow engine to cool for at least 30 minutes before taking the steps
mentioned below to avoid damage to pump.
CAUTION!
Storing Trash Pump
Proper storage prevents the development of rust and corrosion which affects the pumps performance and appearance.
Proper storage also makes it easier to start the engine when using the pump again. If storing water pump for 30 days or
more follow the below procedures:
STORAGE
Fuel Stabilizer
• For short term storage (30-90 days) add a fuel stabilizer to the diesel to keep diesel from going stale and to prevent
gum deposits from forming on the carburetor. Run engine for about 10 minutes to circulate the fuel stabilizer.
• If fuel stabliizer is not used, drain fuel tank and fuel injection pump assembly (See pg.17
).
Clean Pump
• If pump has been running, allow engine to cool to avoid damage to engine.
• Hand wash pump and engine. Keep water from areas difficult to dry, from controls, and from muffler or air cleaner
openings. Avoid using a garden hose or pressure washer as it could cause water to enter the air filter or muffler and can
damage the cylinder and filter.
• Wipe dry all accessible surfaces to prevent rust.
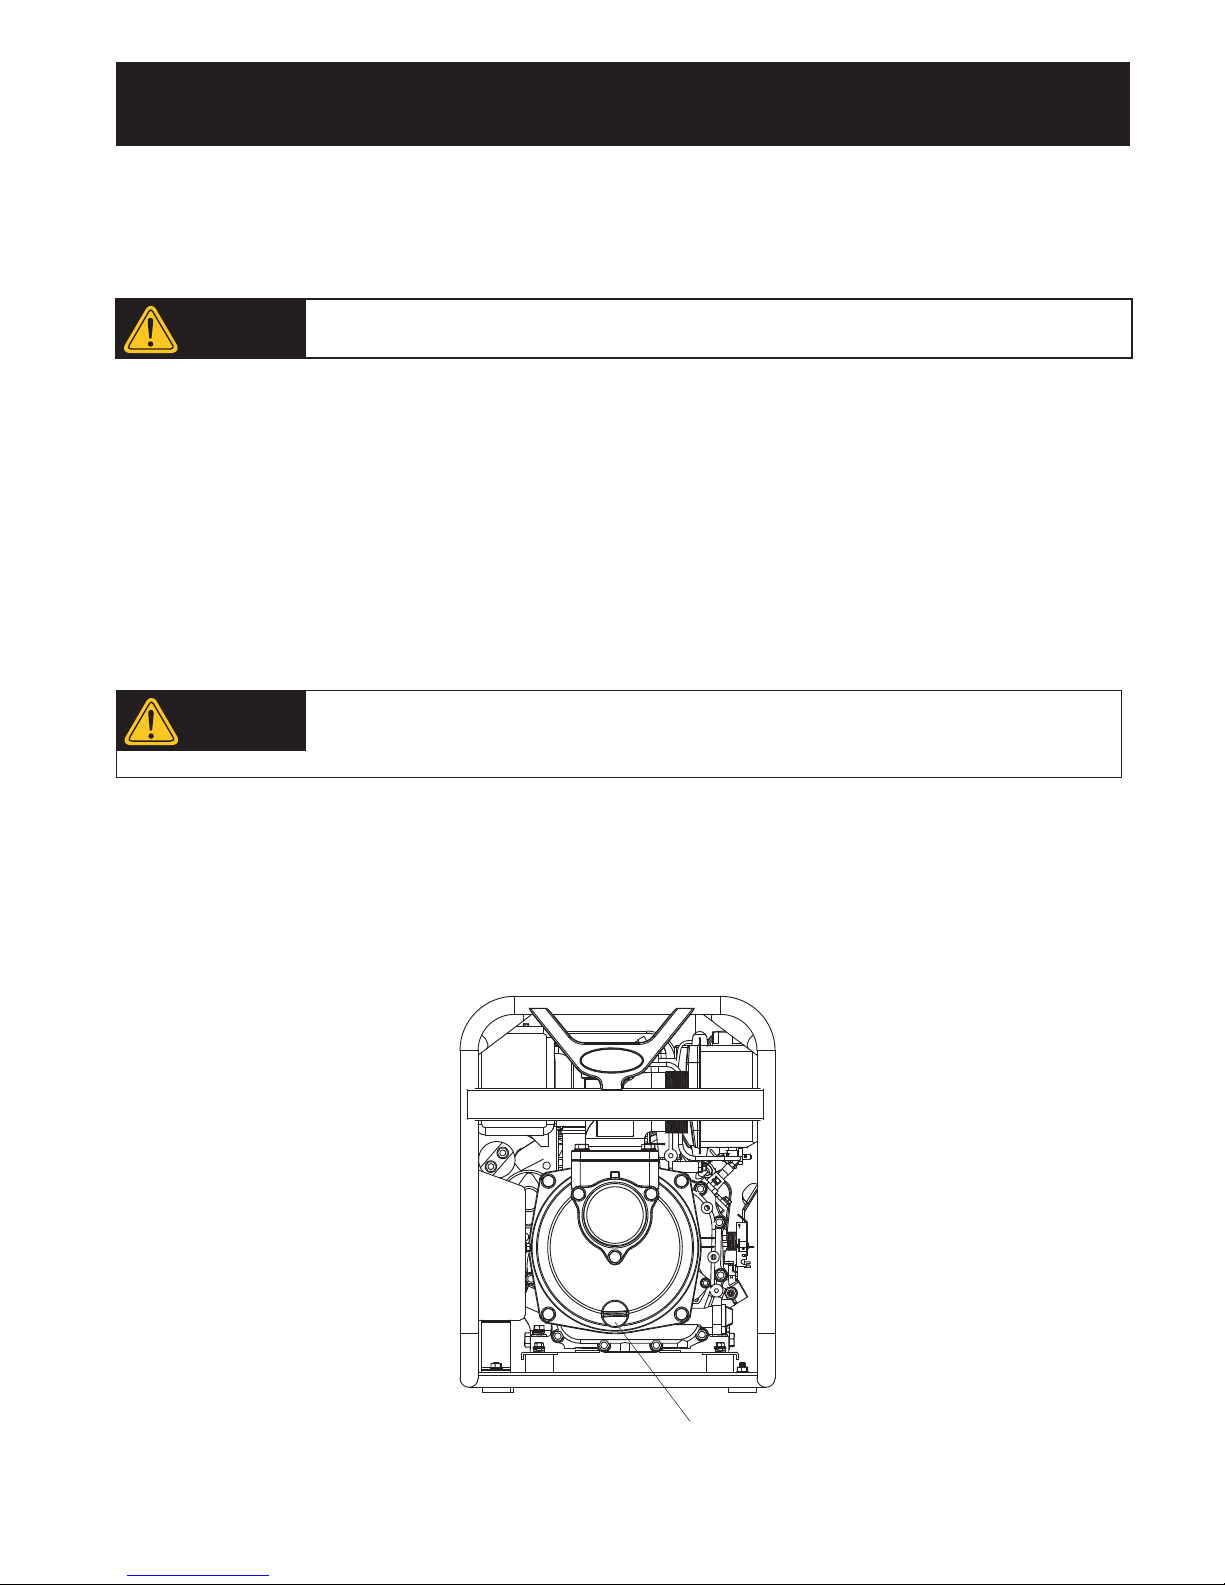
Flush Pump (See Fig 14)
• Place the pump outdoors on a level surface.
• Fill the pump with fresh, clean water and start the engine. Let pump run several minutes to allow the external water to
evaporate.
• Once the engine is warm, turn engine off and allow it to cool.
• Remove Drain Plug and flush pump with fresh, clean water.
• Let water drain from the pump chamber then reinstall Drain Plug.
Warranty does not cover engine damage caused by failing to properly store pump. Diesel can
deteriorate in months. Failure to drain fuel or use a fuel stabilizer may require you to service or
replace the Fuel pump or other fuel system components.
WARNING!
PUMP DRAIN PLUG
(CLEAN OUT PORT)
Fig 1
4
CAUTION!
WARNING!
Page 17
17
Lubricate Pump
Coat areas of pump that might rust, such as areas with damaged paint, with a light film of oil.
Use a silicone spary lubricant and lightly lubricate controls.
STORAGE
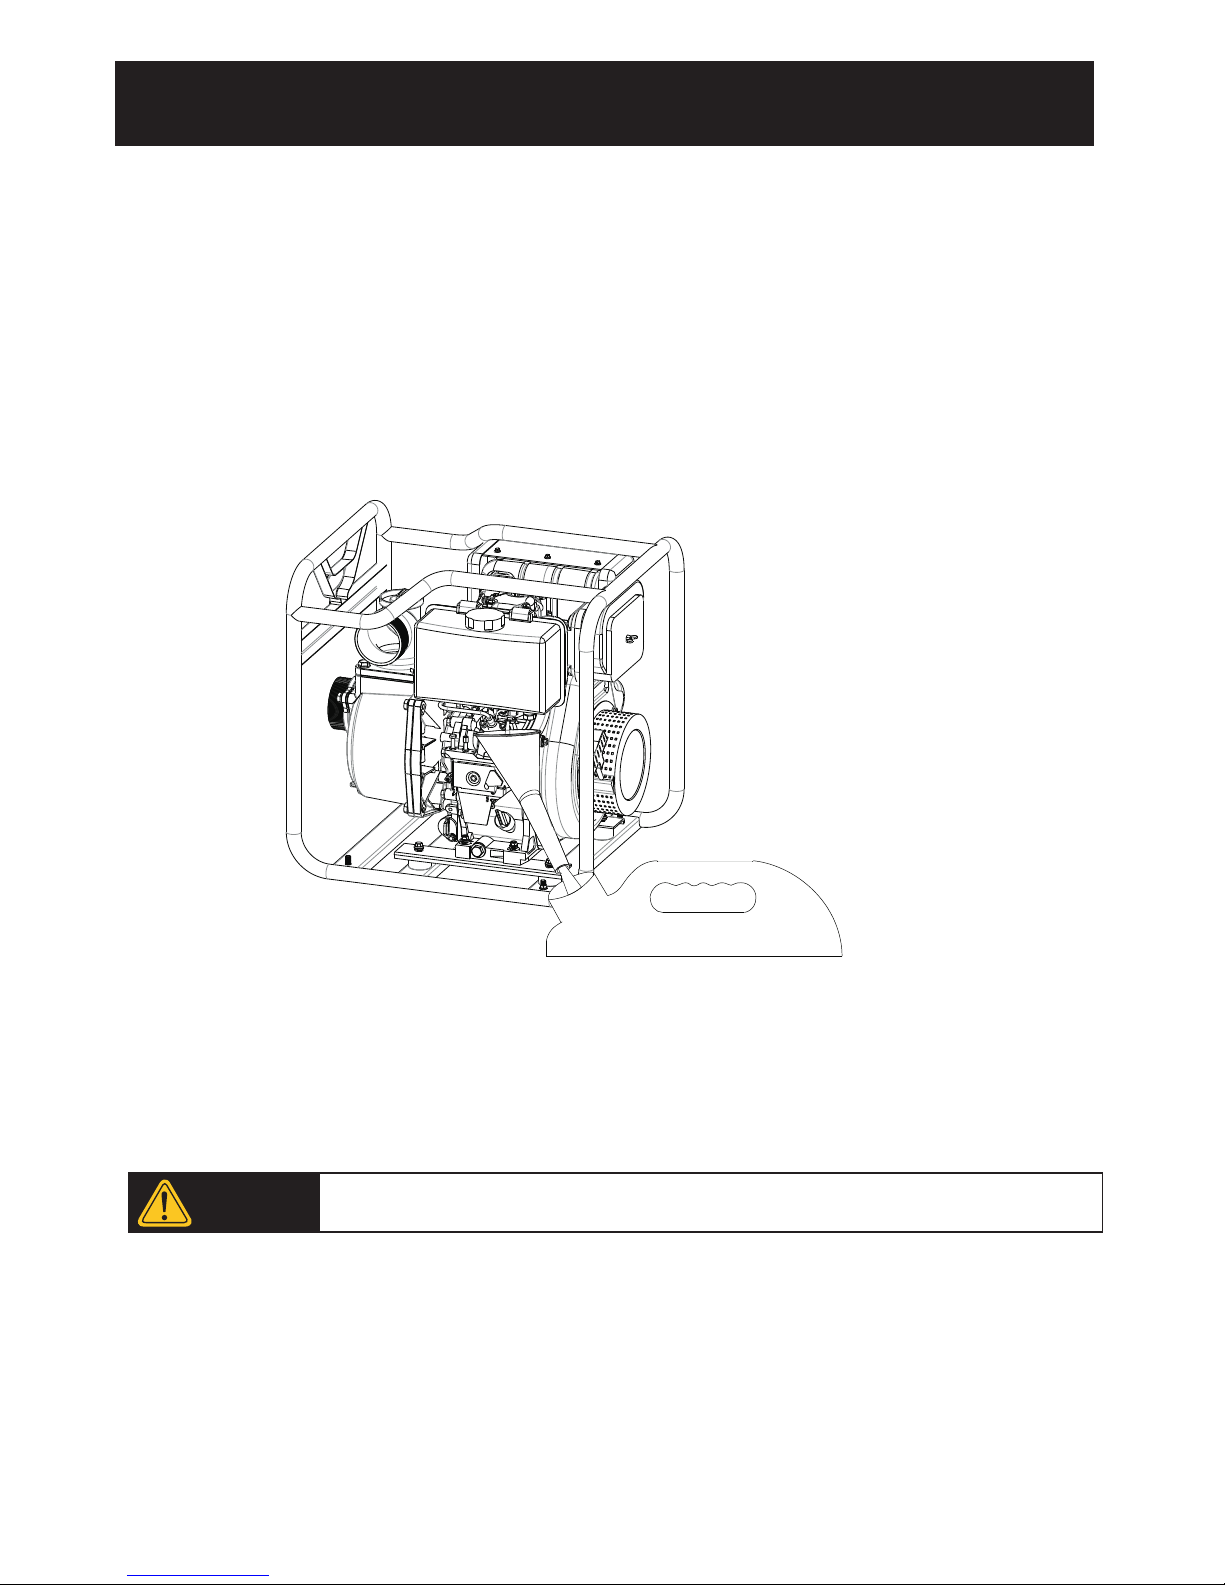
Drain Fuel Tank and Fuel injection pump assembly
• For long term storage (over 90 days) drain fuel from fuel tank and fuel injection pump assembly.
•
•
•
Turn the fuel valve to the “off” position.
Place a funnel underneath the fuel valve to catch fuel as it drains into a bucket. Turn the
fuel valve to the “on” position and allow all fuel to drain. (Fig 15)
Turn the fuel valve to the “off” position.
Replace the inline fuel filter.
Store the drained fuel in a suitable place.
•
•
•
Storage Location
• If pump is stored with diesel, store pump in a well-ventilated area away from anything that operates with an open
flame . To prevent leakage, store pump on a level surface with the Fuel Valve lever in the
“OFF”
position.
• To prevent rust, avoid storing pump in areas with high humidity.
• To protect from dust, cover with a tarp or plastic sheet.
Storage cover could be flammable. Let engine cool before covering pump.
Remove from Storage
See pg 10 Pre-Operation Checklist
Transporting Pump
• Turn the fuel valve to the “OFF” postion.
• To prevent fuel leakage, keep pump level while transporting.
WARNING!
Fig 15
Page 18
18
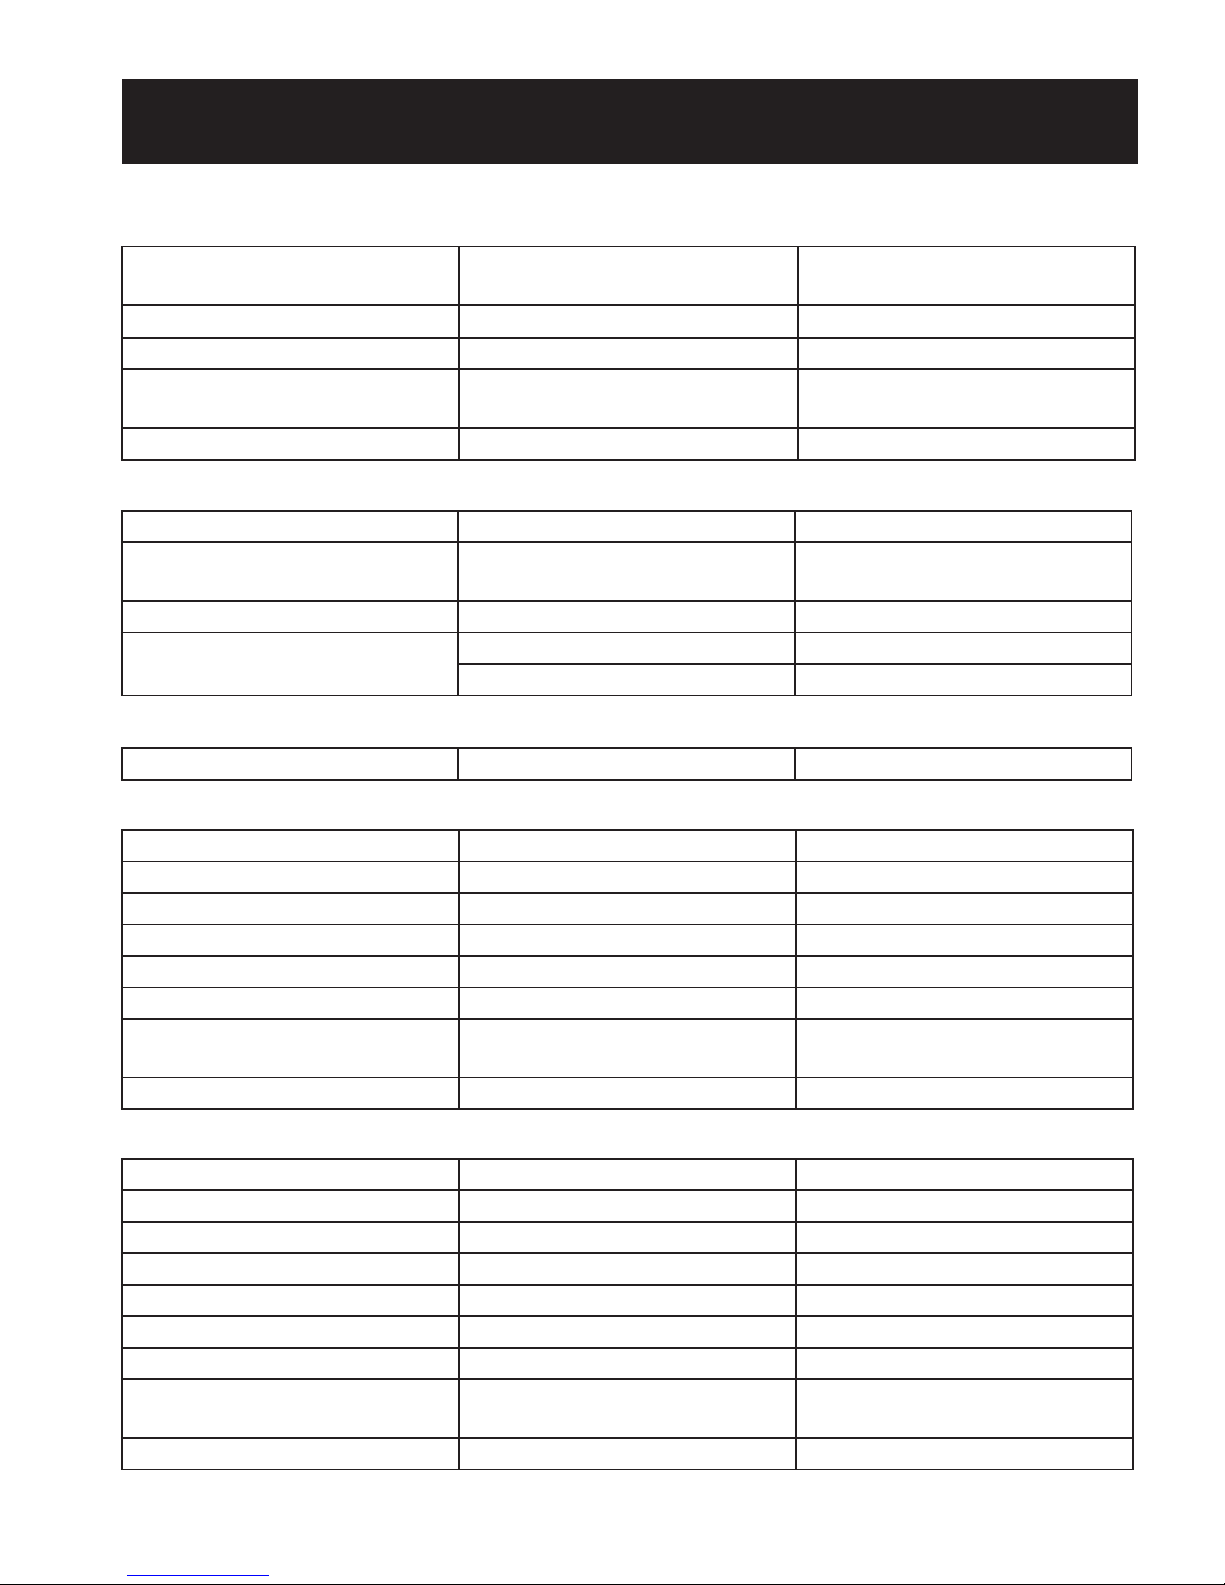
Engine Does Not Start
Check controls Engine OFF/ON switch is in the “OFF”
position
Turn Engine OFF/ON switch to the
“ON”
position
Fuel valve in “OFF” position Turn Fuel valve to “ON” position
Check fuel Out of fuel Fill fuel tank
Stale fuel or water in fuel Drain fuel tank and fuel injection pump
assembly.
Replace with fresh fuel.
Check Engine Oil Engine oil low Add engine oil
PROBLEM CAUSE SOLUTION
TROUBLESHOOTING
Check air filter Air filter is dirty Clean air filter
Check Fuel Stale fuel or water in fuel Drain fuel tank and fuel injection pump
assembly.
Replace with fresh fuel.
Check Fuel filter Clogged fuel filter Replace fuel filter
Contact service center Fuel pump malfunction Contact service center
Valve stuck Contact service center
Engine Lacks Power
Check fuel Out of fuel Fill fuel tank
Engine Quits During Operation
Check Pump Chamber Pump was not primed Prime pump
Hose is kinked or damaged Unkink hose, replace damaged hose
Strainer is clogged Remove debris to unclog strainer
Strainer is not submerged underwater Completely submerge strainer
Gasket is damaged Replace Gasket
Wing nut and hose clamp are loose Tighten wing nut and hose clamp
Measure Suction & Discharge Head Head distance is excessive Relocate pump and / or hoses to
shorten head.
Check Engine Engine Lacks Power See Engine Lacks Power
No Pump Output
Check Suction Hose Hose is too long or diameter to small Replace hose
Hose is kinked or damaged Unkink hose, replace damaged hose
Strainer is clogged Remove debris to unclog strainer
Gasket is damaged Replace Gasket
Wing nut and hose clamp are loose Tighten wing nut and hose clamp
Check Discharge Hose Hose is too long or diameter to small Replace hose
Hose is kinked or damaged Unkink hose, replace damaged hose
Measure Suction & Discharge Head Head distance is excessive Relocate pump and / or hoses to
shorten head.
Check Engine Engine Lacks Power
See Engine Lacks Power
Low Pump Output
Page 19
19
MODIFICATIONS
Damage to fuel system caused by the use of oxygenated fuels is not covered under the
warranty
• Improper treatment of trash pump can damage the unit and shorten it’s life.
• Always repair this unit as specified in this manual. If you have any questions contact your dealer or consult a qualified
service center.
• Never modify governed speed.
WARNING!
Never operate this unit if there are any broken or missing parts and only use Ford
replacement parts specifically designed for this unit.
WARNING!
WARNING!
 Loading...