

Page 1
LEARN HOW TO USE SYNC
IN YOUR VEHICLE
SYNC is a voice-activated technology personalized by you. It is
a hands-free, voice recognition system used for entertainment,
information and communication.
owner.ford.com
This Quick Reference Guide is not intended to replace your vehicle
Owner’s Manual which contains more detailed information
concerning the features of your vehicle, as well as important
safety warnings designed to help reduce the risk of injury to you
and your passengers. Please read your entire Owner’s Manual
carefully as you begin learning about your new vehicle and refer to
the appropriate sections when questions arise.
All information contained in this Quick Reference Guide was
accurate at the time of duplication. We reserve the right to
change features, operation and/or functionality of any vehicle
specification at any time. Your Ford dealer is the best source for
the most current information. For detailed operating and safety
information, please consult your Owner’s Manual.
owner.ford.com
ford.ca
LEARN MORE ABOUT
YOUR NEW VEHICLE
Scan the country-appropriate QR code
with your smartphone (make sure you
have a scanner app installed) and you
can access even more information
about your vehicle.
GM5J 19G217 CA
August 2015 • First Printing
Quick Reference Guide
Quick Reference Guide
Focus Electric • Litho in U.S.A.
United States
Ford Customer Relationship Center
1-800-392-3673 (FORD)
(TDD for the hearing impaired: 1-800-232-5952)
owner.ford.com
@FordService
Canada
Ford Customer Relationship Centre
1-800-565-3673 (FORD)
ford.ca
@FordServiceCA
Page 2

Table of Contents
SYNC® 3 Commonly Used Voice Commands
*if equipped
3
4–5
6–7
8–12
13
14
15
Commonly Used Voice Commands
Smart Start
Instrument Panel
SYNC 3
Convenience
Essential Information
Function
WARNING: Driving while distracted can result in loss of
vehicle control, crash and injury. We strongly recommend
that you use extreme caution when using any device
that may take your focus off the road. Your primary
responsibility is the safe operation of your vehicle. We
recommend against the use of any hand-held device
while driving and encourage the use of voice-operated
systems when possible. Make sure you are aware of
all applicable local laws that may affect the use of
electronic devices while driving.
Pull the voice control
Basic Commands
• Main menu
• Go back
• Cancel
• List of commands
• Next page
• Previous page
• Help
Some services may not be available in your area. For more complete information on SYNC, refer to your SYNC Supplement, visit the
website or call the toll-free number. For U.S. customers, visit owner.ford.com or call 1-800-392-3673 (select Option 1 or 2 for language,
then Option 3). For Canadian customers, visit SyncMyRide.ca or call 1-800-565-3673 (select Option 1 or 2 for language, then Option 3).
on the steering wheel, and then say:
Audio
• AM <530-1710>
• FM <87.9-107.9>
• CD
• USB
• Bluetooth audio
• Sirius <0-233>
• <Sirius channel name>
Navigation*
• Navigation list
of commands
• Destination <home/
previous destination>
• Find <POI/an address/
intersection>
• Show <turn list/
map/destination>
• Where am I?
• SiriusXM Trac
and Travel Link list
of commands
- Show <trac/weather
map/5 day forecast/
fuel prices>
- Help
Phone
• Phone list of commands
• Pair phone
• Call <name>
• Call <name> <on cell/at
home/at work>
• Dial <number>
• Listen to messages
• Listen to text
message <number>
• Reply to message
Apps
• List mobile apps
• Find new apps
3
Page 3

Smart Start
10 QUICK TIPS
4. SMARTGAUGE® WITH ECOGUIDE
Use your 5-way controls located on your steering wheel
to interact. You can choose and confirm settings and
messages, control many of the SYNC 3 functions,
1. CHARGE PORT DOOR AND LIGHT RING
The charge port is on the front le fender. Press the
indentation on the charge port door to open it. To close,
press and hold the indentation until the door rotates and
closes. The light ring indicates the approximate charge
status of your high-voltage battery system
as it charges.
2. CHARGE OPTIONS
Focus Electric comes equipped with
a 120V convenience charge cord. Ford
recommends upgrading to the optional
240V charging station for faster, more
ecient charging. Use of an available, Ford-branded 240V
home charging station takes approximately 3.6 hours to
fully charge an empty battery. In addition, you can charge
your Focus Electric anywhere you find a 120V/240V charge
station. Every charge station uses the same connector.
3. PUSH BUTTON SILENT START SWITCH
To start your Focus Electric, press the brake pedal and
press the START STOP control on the instrument panel.
The green indicator light lets you know that your
Focus Electric is ready to drive.
4 5
and change how you view your Focus Electric
vehicle information.
5. RANGE SCREENS
Choose several ways to view vehicle range. Enter a
destination and range view to learn if you have enough
plug-in power to get there. The various screens can also
show miles or kilometers per charge, distance until your
plug-in power depletes and an evaluation of economical
driving habits. The visual cues of butterflies in the right
cluster lets you know your range surplus: more butterflies
equal greater surplus.
6. BRAKE COACH
Aer your vehicle comes to a stop,
this screen automatically appears
in your display. It coaches you
to maximize the amount of
energy returned through the
regenerative braking system.
The percentage displayed
indicates the regenerative
braking eciency.
7. MOBILE APP FOR YOUR SMARTPHONE
View your vehicle’s charging information on a computer or
other Web-accessible mobile device, smartphone or from
your vehicle by downloading your free MyFord Mobile app
for your phone. Visit myfordmobile.com and enhance your
charging experience with these key features and more:
• Text Alert: Receive text messages on your phone
that notify you of your vehicle’s charging status and
other functionality.
• Find a Charging Station: Locate charging stations
when you are on the go so you can recharge while you
are out.
8. CABIN CONDITIONING
Get the most miles out of every charge by letting the
interior of your Focus Electric warm up or cool down while
you still have it plugged in and charging. Use MyFord
Mobile to set the cabin temperature and departure time
before you leave.
Note: Extreme outside temperatures or 120V charging may reduce
cabin conditioning eectiveness.
9. TRIP PLANNER
Locate the best routes to your destination based on charge
levels and available charging stations. Aer you input your
destination, MyFord Mobile interfaces with the vehicle to
provide the confidence to always know how far you can go,
and the most economical way of getting there.
10. VALUE CHARGING
MyFord Mobile gives Focus Electric drivers a unique
“set it and forget it” charging feature. The app lets you
know when the cheapest rates are available
and allows you to set your vehicle’s
charging time accordingly.
Contact your utility
company to learn if
regular charging during
non-peak times
requires a rate
plan change.
Page 4
CRUISE CONTROL
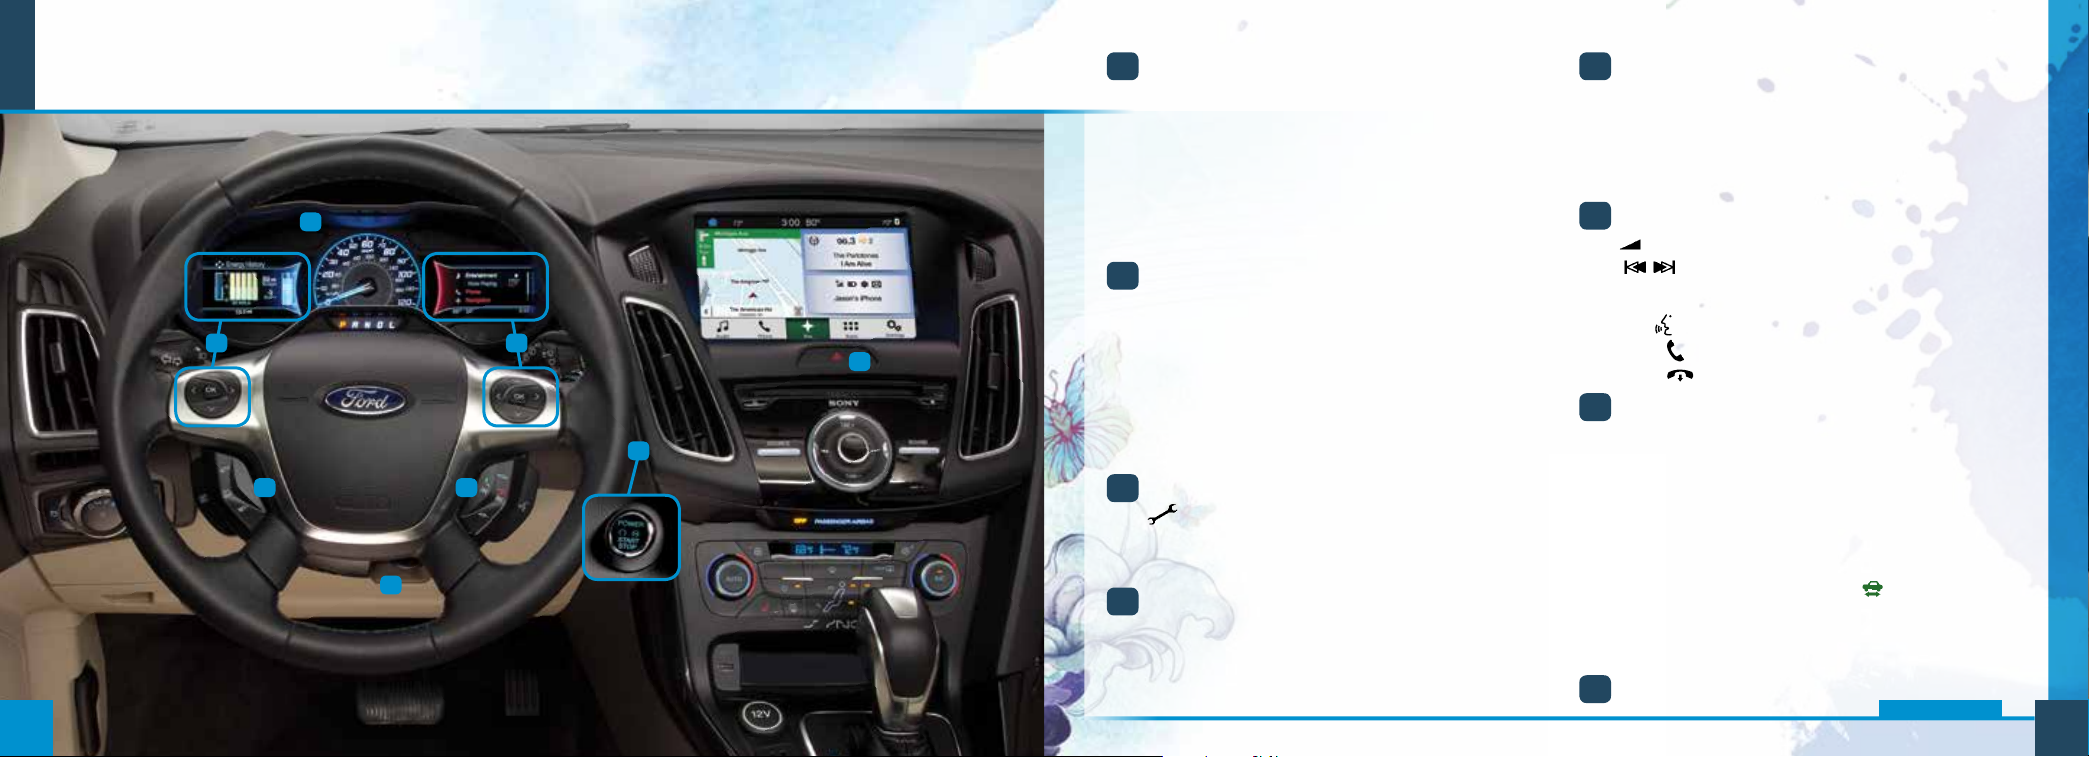
1
Instrument Panel
3
2 5
7
1
4
6 7
6
8
To Set Your Cruise Control Speed
A. Press and release ON.
B. Drive to the desired speed.
C. Press and release SET+, then take your foot o
the accelerator.
Aer you set your speed, you can adjust your
cruise speed by pressing and releasing SET +/–.
To disable, press and release OFF.
LEFT VEHICLE INFORMATION DISPLAY
2
Provides specific information about various
systems on your vehicle including the status of your
high-voltage battery and the other unique features
of your electric vehicle.
Use the le-hand, 5-way controls located on the
steering wheel to choose and confirm settings
and messages. Refer to the Instrument Cluster
and Information Displays chapters of your Owner’s
Manual for more information.
POWERTRAIN FAULT LIGHT
3
Lights when your vehicle detects a powertrain
or high-voltage charge system fault. If the indicator
stays on or continues to come on, contact your
authorized dealer as soon as possible.
TILT/TELESCOPE STEERING COLUMN
4
Unlock the steering wheel by pulling the lever down.
Adjust the steering wheel to the desired position.
Push the lever up to lock the steering wheel in place.
RIGHT VEHICLE INFORMATION DISPLAY
5
Displays information about Entertainment, Phone,
Navigation* and Surplus. Use the right hand 5-way
controls located on your steering wheel to scroll
through, highlight and make minor adjustments
within a selected menu. Refer to the SYNC
Supplement for more information.
MEDIA STEERING WHEEL CONTROLS
6
Press + to increase or – to decrease volume levels.
Press the right or le arrows to hear the
next or previous saved radio station, CD track or
MP3 choice.
Pull
to access voice recognition.
Press
Press
PUSH BUTTON SWITCH AND
7
to answer an incoming phone call.
to end a phone call and exit phone mode.
READY TO DRIVE
Note: Your intelligent access transmitter must be inside
the vehicle to put the vehicle in “Ready to Drive” mode. The
keyless warning alert sounds when you open the driver’s
door and your vehicle is in RUN.
Allows you to go into “Ready to Drive” mode by
pressing the START STOP control while fully
pressing down on the brake pedal. A green
“Ready to Drive” indicator light appears in the
instrument cluster aer you start the vehicle. This
lets you know that the vehicle is turned on and
ready for driving. Press the START STOP control
again to switch the vehicle o.
HAZARD CONTROL
8
*if equipped
Page 5
SYNC® 3
SYNC. Say the Word.
Before You Get Started
Pair your phone with SYNC 3 (see the Pairing Your Phone
with SYNC 3 section in this guide for instructions on how to
do this).
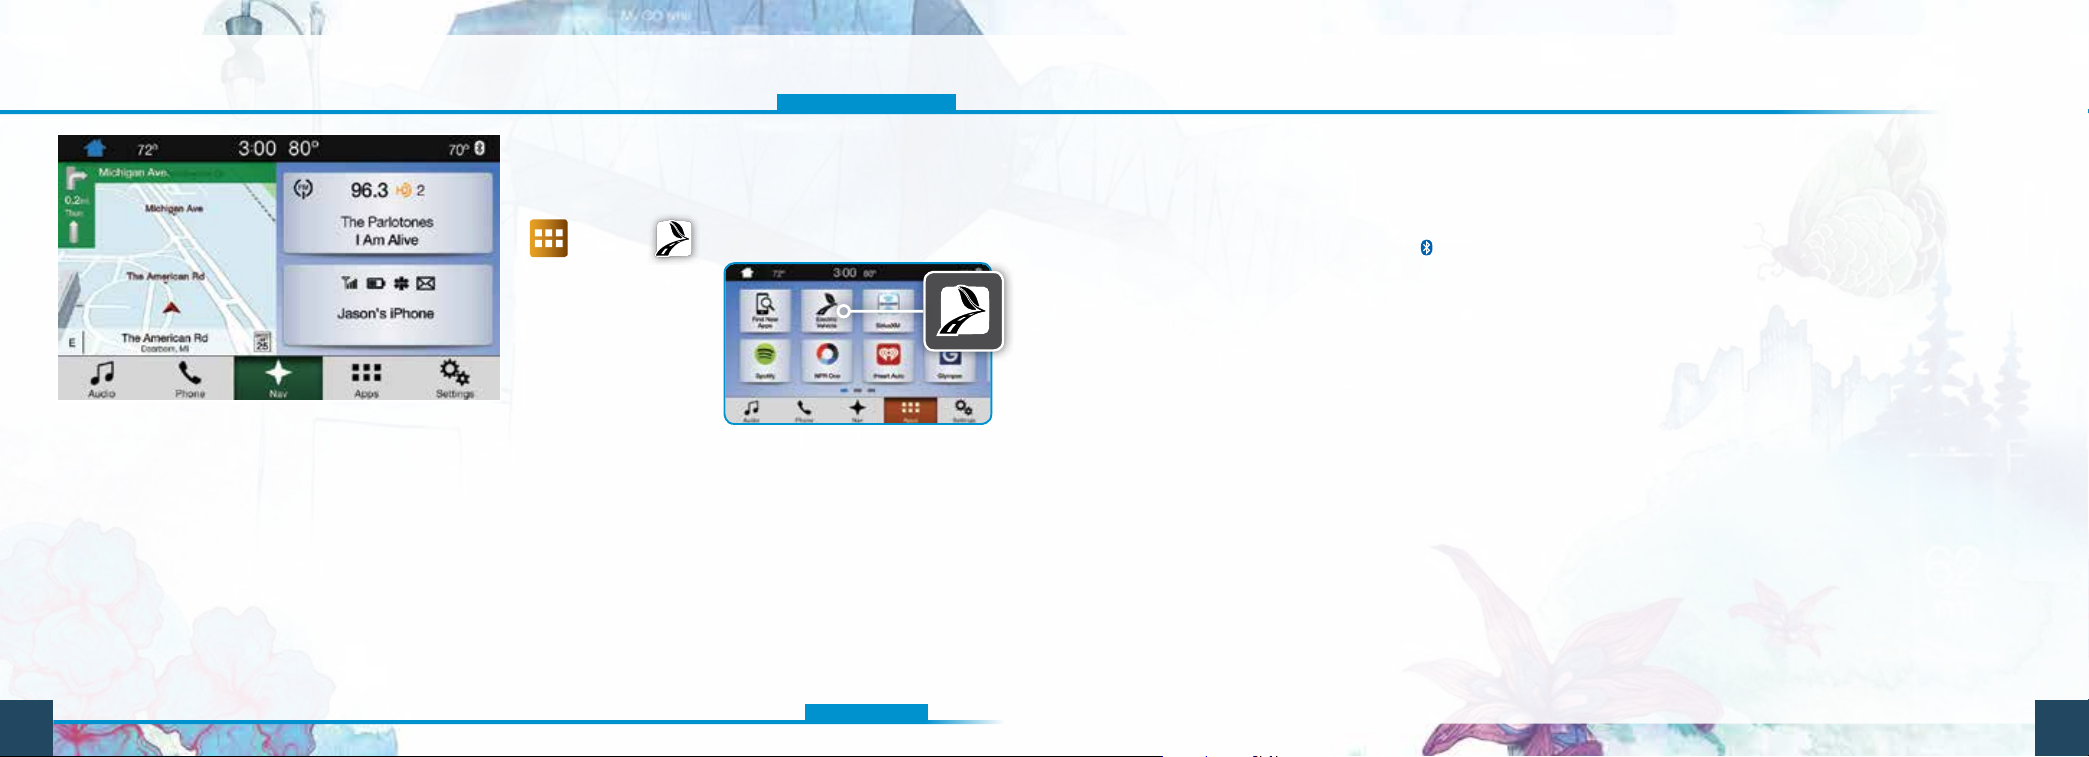
APPS > EV INFO
Press the Apps icon
and then the Electric
Vehicle “road and leaf”
icon to access your
Power Flow Status and
Charge Settings.
• The Power Flow
Status displays how
your vehicle uses its
Use the touchscreen to explore and interact
with your vehicle. The screen works the same
way as traditional controls, knobs and buttons
do. Press the various icons on your touchscreen
to personalize the many features and settings
of your vehicle. The system provides easy
interaction with your cellular phone, multimedia
entertainment, navigation system* and apps.
8 9
power at any moment.
• The Charge Settings screen lets you schedule charging, GO
times and cabin conditioning times, as well as view charge
status and more. Four other selections include:
- My GO Time summary
- Charge status and actual times
- Charge profile and mode
- Estimated charge time limits
*if equipped
CREATE YOUR ACCOUNT
1. Set up your owner account at owner.ford.com (U.S.) or
SyncMyRide.ca (Canada). Register by following the
on-screen instructions. Aer registering, you can learn
about the services available to you.
2. SYNC uses a wireless connection called
communicate with your phone. Switch Bluetooth mode
on in your phone’s menu options. This lets your phone
find SYNC.
3. You can also enjoy free customer service. For more
details on setting up your account, visit owner.ford.com
(U.S.) or SyncMyRide.ca (Canada).
WHY DO YOU NEED A SYNC OWNER ACCOUNT?
A SYNC owner account allows you to receive the latest
soware updates, and if you have questions, you get free
customer support. Some services may not be available in
your area. Create your account by visiting the website or
calling the toll-free number for more information.
See page 3 of this guide for details.
Bluetooth® to
PAIRING YOUR PHONE WITH SYNC 3
Make sure your vehicle is in park (P), and your ignition
and radio are switched on. Also, enable your phone’s
Bluetooth feature to let SYNC 3 discover your phone.
For more info, visit owner.ford.com (U.S.) or
SyncMyRide.ca (Canada).
1. Touch Add Phone on your touchscreen. Find SYNC
appears on the screen, and instructs you to begin the
pairing process from your device.
2. Select SYNC and a six-digit PIN appears on your device.
If the system prompts you to enter a PIN on your device,
enter the PIN displayed on the touchscreen, and then skip
the next step.
3. When prompted on your phone’s display, confirm that the
PIN provided by SYNC matches the PIN displayed on your
cellular phone.
4. The display indicates when the pairing is successful.
The System May Prompt You to
• Set your phone as the primary or favorite (the primary
phone receives messages and voicemail).
• Download your phone book (required to use the full set
of voice commands).
• Turn on 911 Assist
®
.
Page 6
Tips
• Make sure you accept the request from SYNC to access
your phone.
• To pair subsequent phones, please refer to your
SYNC Supplement.
• If you are experiencing pairing problems, try performing
a clean pairing by deleting your services from SYNC and
deleting the SYNC connection from your phone, and then
repeating the process.
PHONE
Aer pairing your phone, you can access more phonedependent features:
• Recent call lists.
• Contacts: Sort alphabetically and choose a specific letter
to begin viewing your entries.
• Phone settings: Pair another phone, and set ring tones
and alerts.
• Text messages.
• Do not disturb: Send all calls to your voicemail, and all ring
tones and alerts set to silent mode.
Note: Use the voice commands to make calls. Say “Call James at
home” or “Dial 555-1212”. You can use the touchscreen to place calls as
well. Refer to your SYNC Supplement for complete details.
USING MY PHONE WITH SYNC 3
Note: Enter your phone book contacts with both first and last
names to increase the ability of SYNC to select the correct contact.
Remember to say the contact name exactly as you listed it in your
phone book.
Making a Phone Call
Use SYNC to make a phone call to anyone in your phone
book by pulling the voice control
voice command.
For example, you could say “Call Jake Smith at home”. SYNC
repeats the command back to you and dials the number.
Note: You can also make phone calls by pressing the voice button
and when prompted, give the voice command “Dial” to initiate
the call.
Answering Incoming Calls
Whenever you have an incoming call, the name and number
of the person calling appears in your display. Press the
phone button
to answer an incoming call. You can hang
up at any time by pressing the phone button .
Do Not Disturb Mode
This feature blocks incoming calls and text messages, and
saves them for later. You still have access to outgoing calls
when this feature is active. Say the voice command “Do not
disturb on” to enable and “Do not disturb o” to disable.
. When prompted, give a
NAVIGATION
*
Press the navigation* icon and then select one of two ways
to find your destination:
• Destination mode lets you key in a specific address or use
a variety of search methods to locate where you want
to go.
• Map mode shows advanced viewing of 2-D city maps,
3-D landmarks and 3-D city models (when available).
Set a Destination
Press Destination on your touchscreen and then press
Search. Enter a street address, intersection, city or a point
of interest (POI).
You can also use voice commands. Say “Find a point of
interest” and then select a category, such as hotels
or restaurants.
Aer you choose your destination, press Start Route. The
system uses a variety of screens and visible prompts to
guide you to your destination.
The navigation map shows your estimated time of arrival,
remaining travel time and the distance to your destination.
Navigation Menu
While you are on your route, you can change your
touchscreen view: Touch Menu on the bottom of the screen,
and then select Screen View to choose from any of
the following:
• Turn List shows all of the available turns on your
current route.
• Trac List displays SiriusXM Trac and Travel Link*
information. The system calculates ecient routes based
on available speed limits, trac and road conditions.
SETTINGS
Touch the Settings icon to customize information within
your vehicle. Adjust the clock, display, some vehicle features
and sound settings.
APPS
Stream Apps
The system supports the use of certain audio apps
such as Pandora
Bluetooth-enabled devices.
Each app gives you dierent onscreen options depending
on the app’s content.
For more information, refer to your SYNC Supplement.
For support, visit the website or call the toll-free number.
See the inside front cover of this guide for details.
®
or iHeartRadio® through a USB or
• Full Map.
• Highway Exit Info displays on the right side of the
touchscreen. View POI icons (restaurants, ATMs, etc.)
as they pertain to each exit. You can select a POI as a
10 11
waypoint, if you wish.
*if equipped
Page 7
AUDIO
SURPLUS MODE
Convenience
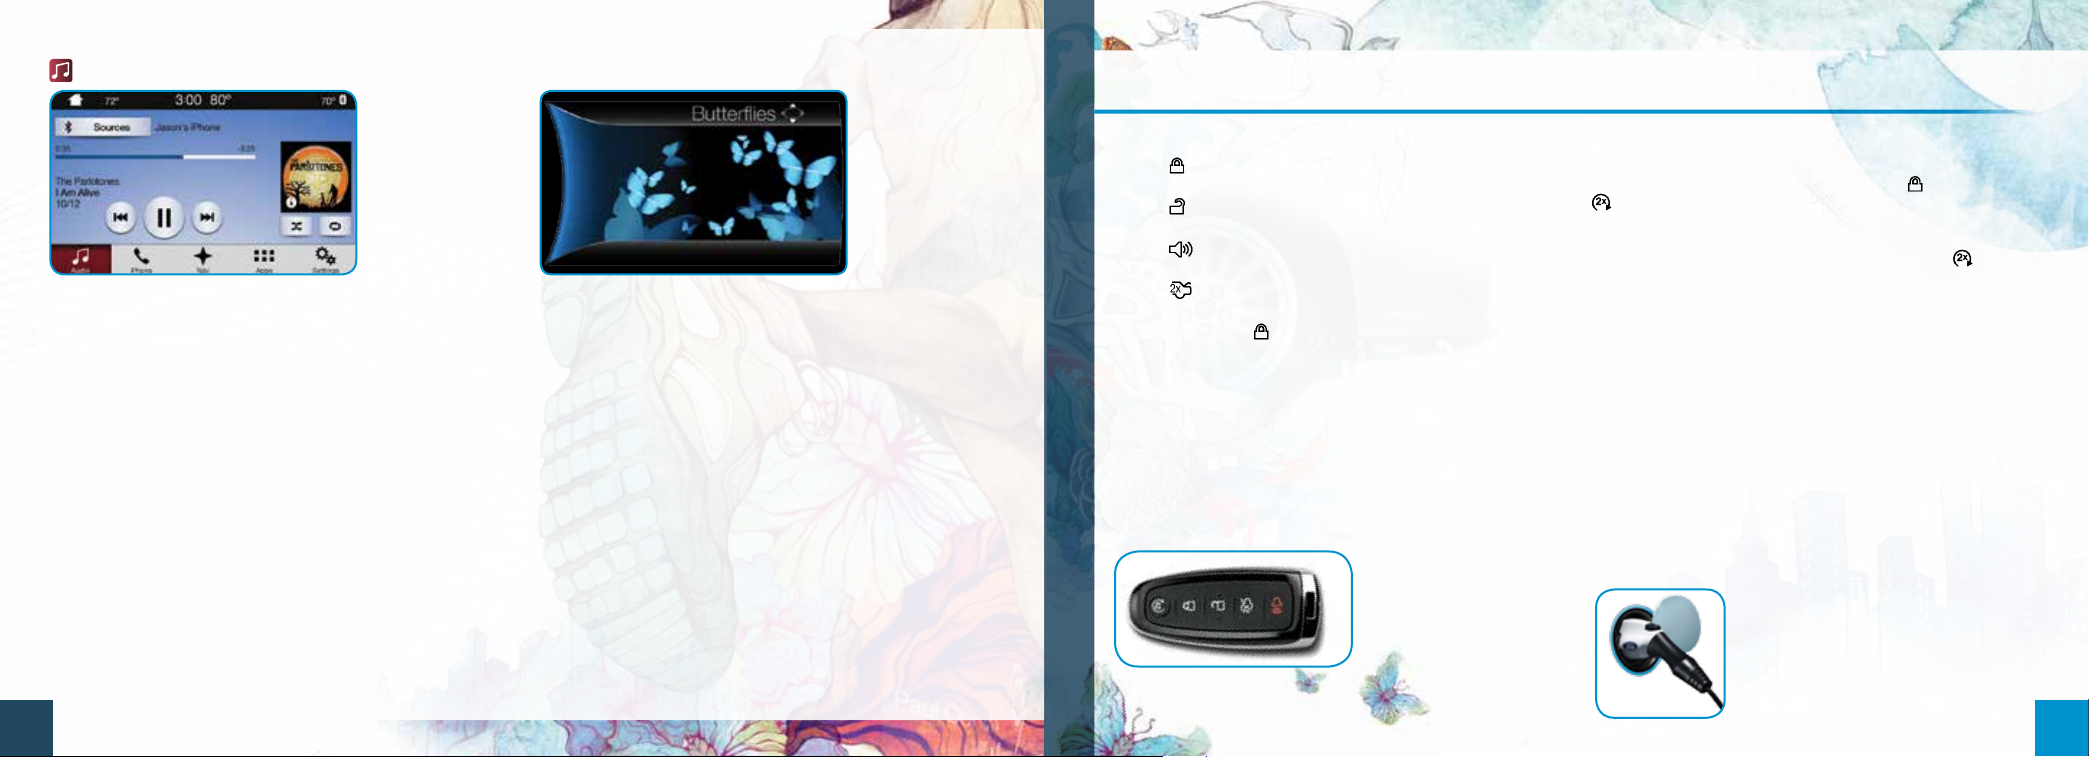
No matter how you store your music, SYNC makes it
yours to enjoy when you’re behind the wheel. Press the
audio icon on the touchscreen. From here, you can easily
go between AM, FM, SiriusXM and other media sources.
Set Your Radio Presets
• Tune to the station and then press and hold one of the
memory preset buttons. The audio mutes briefly while the
system saves the station, and then the audio returns.
• Two preset banks are available for AM and three banks for
FM. To access additional presets, tap the preset button.
The indicator on the preset button shows which bank of
presets you are currently viewing.
Bring in Your Own Music
Use SYNC to play all of your favorite music from phones,
flash drives and other devices.
Plug your device into a USB port, select SOURCE and
then choose USB. Wait for the system to finish indexing
your music to begin listening. You can even create random
playlists by using the Shue function.
12
In Surplus mode, either butterflies or a gauge represent your
surplus or status. The number of butterflies matches the
current surplus or status distance, with a maximum of
16 butterflies.
• If you entered your next charge destination in the
navigation system and you see butterflies on your screen,
then you should be able to make your destination, and
have a Surplus.
• If you see butterflies but did not enter your next charge
destination, then you should be able to achieve the range
estimate shown at the start of your drive, and have a
positive Status.
See the Information Displays chapter in your Owner’s Manual
for more information.
REMOTE ENTRY ICONS
• Press once to lock all doors. Press again within three
seconds to confirm that you locked all doors.
• Press
within three seconds to unlock all doors.
• Press to activate the panic alarm. Press again or
switch the vehicle on to deactivate.
• Press twice within three seconds to release the
ligate latch.
• Car finder: Press twice within three seconds to
locate your vehicle. The horn sounds and the direction
indicators flash.
once to unlock the driver’s door. Press again
INTELLIGENT ACCESS
Note: Your transmitter must be within 3 feet (1 meter) of the
vehicle for intelligent access to function properly.
To unlock the driver’s door, pull the front exterior door
handle. To lock the doors, press the sensor button on
the door handles. To unlock and open the ligate, press
the exterior ligate release button near the license plate.
The intelligent access
transmitter also contains
a mechanical key blade
which can be used to
unlock the driver door,
if necessary.
REMOTE START
Remote start allows you to start your vehicle from outside
the vehicle using your key. To start, press and then press
twice within three seconds. Once inside, apply the
brake while pressing the START STOP control. Shi into
drive (D) and go. To switch o your vehicle from outside
the vehicle aer using your remote start, press once.
Note: It is also possible to switch your vehicle on and o using the
®
Mobile application on your smartphone.
MyFord
CHARGING YOUR VEHICLE
Your vehicle must be in park (P) to charge. Press the
indentation located on the charge port door and the door
rotates open. Plug the charging coupler into the vehicle’s
charge port receptacle and make sure that the button
“clicks” confirming that you completely engaged it.
• When the vehicle detects the connection, each quadrant
of the light ring flashes in a clockwise manner two full
times (indicating the start of a normal charge cycle).
• When you are done charging your vehicle, press the
button on the charging coupler and remove it from the
charge port receptacle.
• Close the charge port door by
pressing and holding the indentation
on the door until the door rotates
counterclockwise and closes. See
your Owner’s Manual kit for complete
information on charging your vehicle.
13
Page 8
Essential Information Function
SINGLE-SPEED TRANSMISSION
Your single-speed transmission is built specifically
to handle the high RPM range that comes with an allelectric motor. This gives you a quiet, energy-ecient ride,
delivering quick responsiveness, smooth acceleration and
no-compromise driving fun.
ROADSIDE ASSISTANCE
Your new Ford vehicle comes with the assurance and
support of 24-hour emergency roadside assistance. To
receive roadside assistance in the United States, call
1-800-241-3673. In Canada, call 1-800-665-2006.
REAR VIEW CAMERA
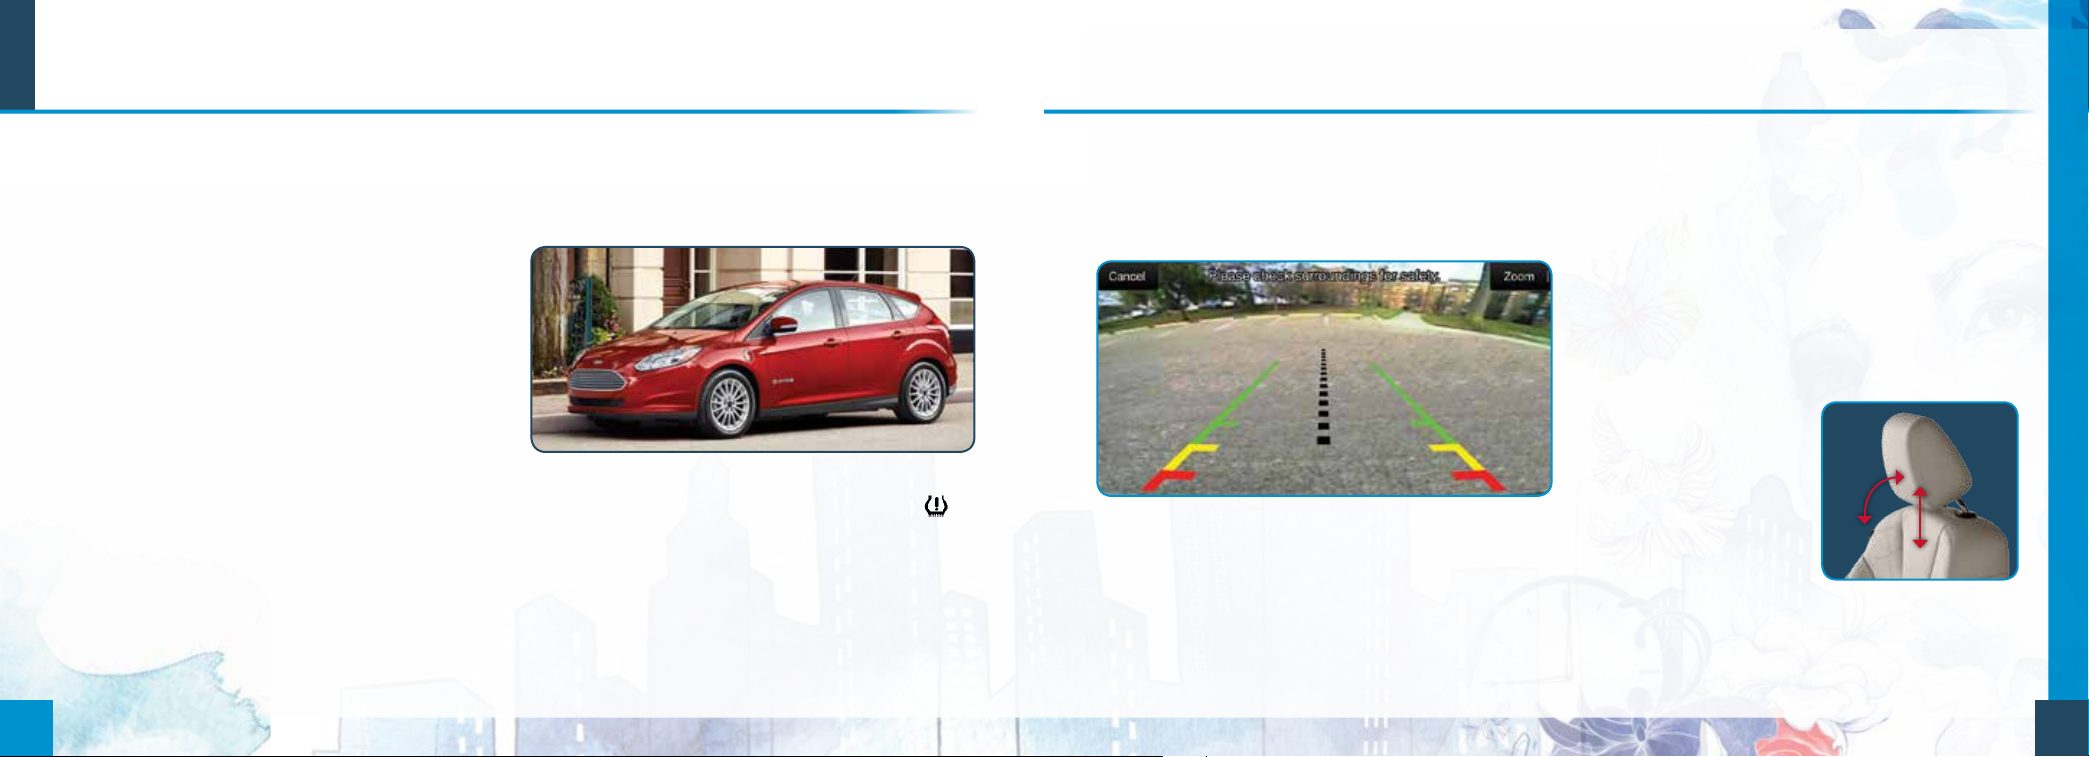
This system provides a video image of the area behind
the vehicle. The display automatically appears in the
touchscreen when the vehicle is in reverse (R) and uses
green, yellow and red guides to alert you of your proximity
to objects.
MYKEY®
MyKey allows you to program certain driving restrictions
in order to promote good driving habits. You can program
speed restrictions, limit audio volume levels and force
safety belt reminder chimes to remain on. For complete
information, refer to the MyKey chapter in your
Owner’s Manual.
TOWING YOUR VEHICLE
Towing your vehicle behind an RV or any other vehicle may
be limited. Refer to Towing the Vehicle on Four Wheels in
the Towing chapter of your Owner’s Manual.
TEMPORARY MOBILITY KIT
Your temporary mobility kit is in the luggage compartment.
The kit consists of an air compressor to reinflate the tire
and a canister of sealing compound that seals most
punctures caused by nails or similar objects. This kit
provides a temporary tire repair, allowing you to drive your
vehicle up to 120 miles (200 km) at a maximum speed of
50 mph (80 km/h) to reach a tire service location. Refer
to the Wheels and Tires chapter of your Owner’s Manual
for complete instructions on use.
14 15
TIRE PRESSURE MONITORING SYSTEM
Your vehicle lights a low tire pressure warning light
in your instrument cluster when one or more of your tires
are significantly under-inflated. If this happens, stop and
check your tires as soon as possible. Inflate them to the
proper pressure. Refer to the Wheels and Tires chapter of
your Owner’s Manual for more information.
REAR PARKING AID
This system sounds a warning tone if there is an obstacle
near the vehicle’s rear bumper when the vehicle is in
reverse (R) and is traveling less than 3 mph (5 km/h).
The warning tone increases in frequency as the object
gets closer.
Note: Visibility aids do not replace the need to watch where
the vehicle is moving. Refer to your Owner’s Manual for safety
information, more details and limitations.
TILTING HEAD RESTRAINTS
The front head restraints may have a tilting feature for
extra comfort. Tilt the head restraint forward by gently
pulling the top of the head restraint. Once it is in the
forward-most position, tilting it forward once more
releases it back to the
upright position.
Pull up to raise the head
restraint. To lower, press
the head restraint down
while pressing and holding
the guide sleeve adjust/
release button.
Note: Do not attempt to force
the head restraint backward aer
it is tilted. Instead, continue tilting
it forward until the head restraint releases to the upright position.
 Loading...