

Page 1

Factory Workshop Manual
Ford
F 150 4wd Pickup
V8-5.4L SOHC VIN 3 (1999)
Anonymous
1st January 2018
Make
Model
Engine and year
This manual was submitted by
Date
Page 2

Ford F 150 4wd Pickup Workshop Manual (V8-5.4L SOHC VIN 3 (1999))
Ford Workshop Manuals > A L L Diagnostic Trouble Codes ( DTC ) > Codes by Number > P0500-P05ZZ > P0500 - P0504,
( P0501 P0502 P0503 0500 0501 0502 0503 0504 ) > System Information > System Diagnosis > P0500 ( P 0500 )
Page 3

P0500 - P0504: Testing and Inspection P0500 ( P 0500 )
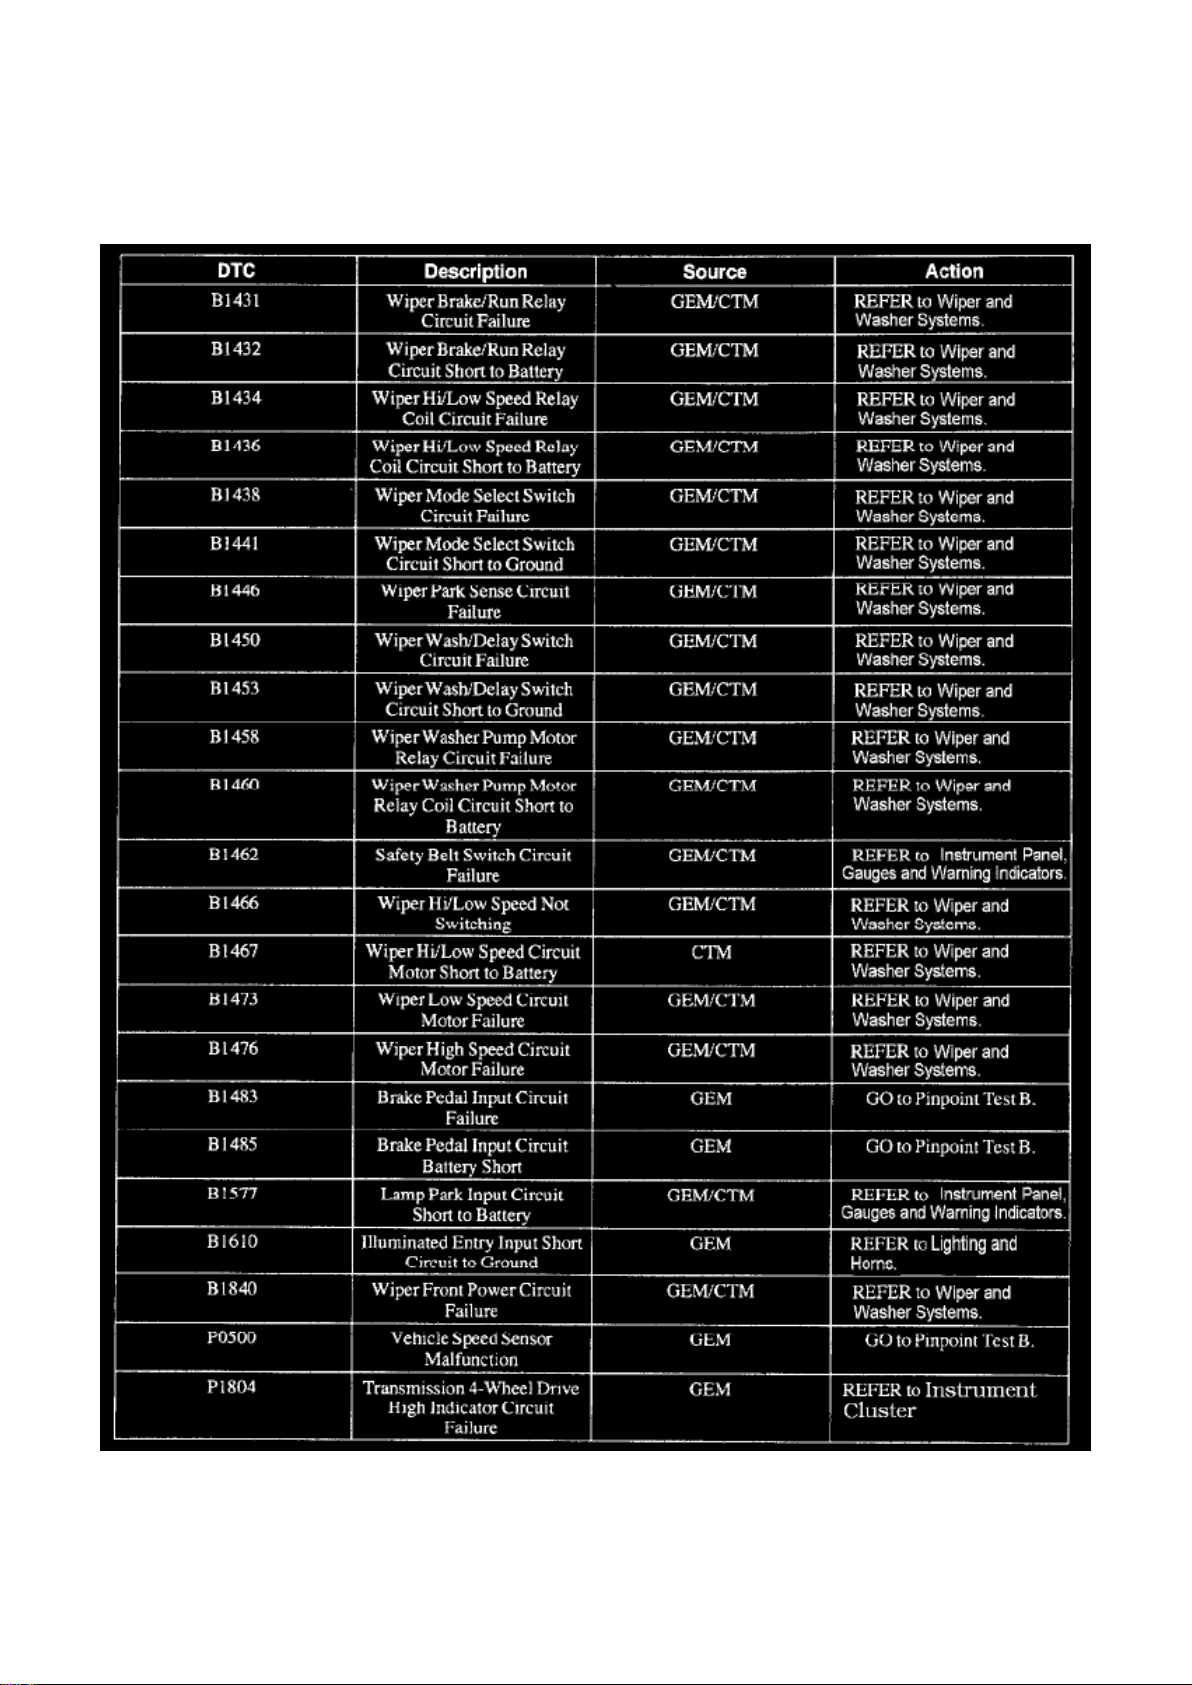
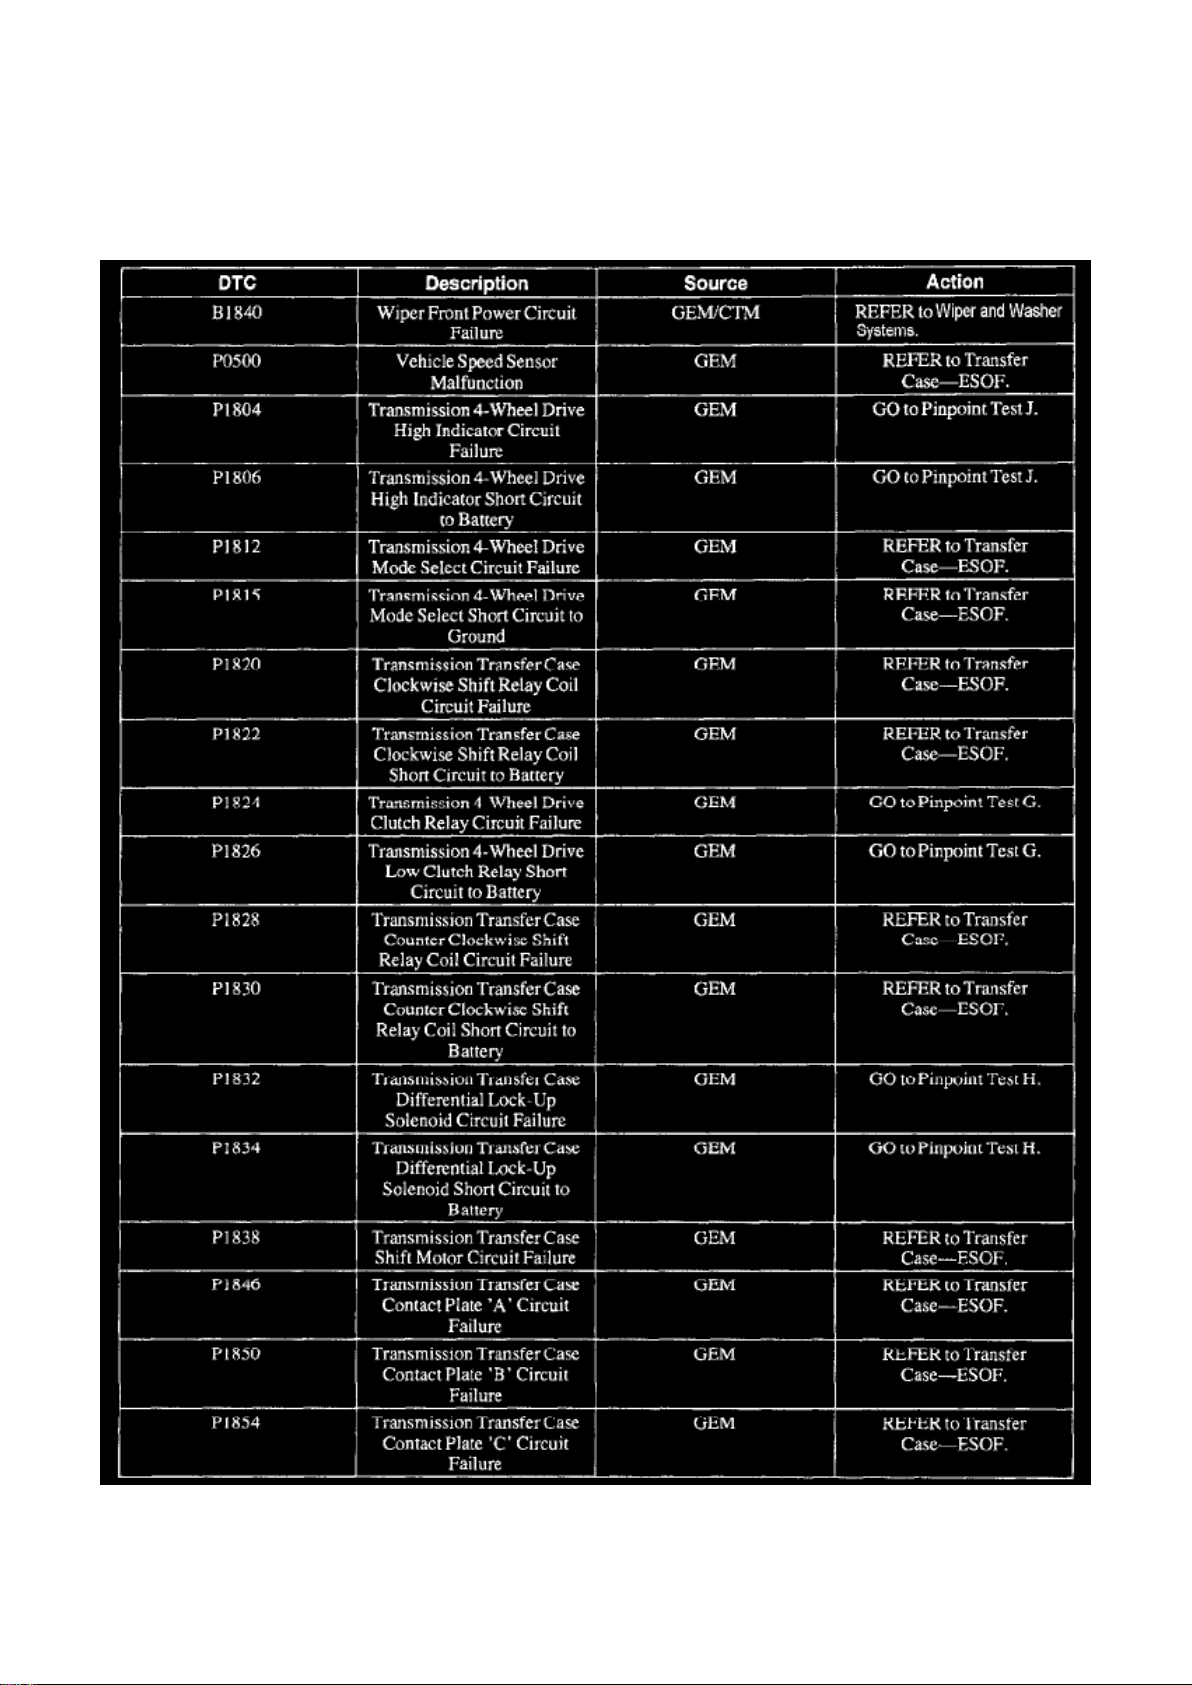
For diagnosis of P0500 refer to the system experiencing the problem.
Computers and Control Systems or Transmission Control System
For the 'F' Series 4x4 U/8500 (MSOF) refer to DP30. See: Powertrain Management/Computers and
Control Systems/Testing and Inspection/Pinpoint Tests/DP - Vehicle Speed/Transfer Case Speed
Sensors/DP30 - DP35
For all others refer to DP1. See: Powertrain Management/Computers and Control Systems/Testing
and Inspection/Pinpoint Tests/DP - Vehicle Speed/Transfer Case Speed Sensors
For complete Engine Control diagnostic information, See: Powertrain Management/Computers and
Control Systems/Testing and Inspection
Transfer Case
ESOF - Electronic Shift on the Fly
Page 4
Ford F 150 4wd Pickup Workshop Manual (V8-5.4L SOHC VIN 3 (1999))
Ford Workshop Manuals > A L L Diagnostic Trouble Codes ( DTC ) > Codes by Number > P0500-P05ZZ > P0500 - P0504,
( P0501 P0502 P0503 0500 0501 0502 0503 0504 ) > System Information > System Diagnosis > P0500 ( P 0500 ) > Page 9
Part 2 Of 4
Page 5

MSOF - Mechanical Shift on the Fly
Page 6
Ford F 150 4wd Pickup Workshop Manual (V8-5.4L SOHC VIN 3 (1999))
Ford Workshop Manuals > A L L Diagnostic Trouble Codes ( DTC ) > Codes by Number > P0500-P05ZZ > P0500 - P0504,
( P0501 P0502 P0503 0500 0501 0502 0503 0504 ) > System Information > System Diagnosis > P0500 ( P 0500 ) > Page
10
Page 7

Part 3 Of 4
For complete Transfer Case diagnostic information, See: Transmission and Drivetrain/Transfer
Case/Testing and Inspection
Page 8

Ford F 150 4wd Pickup Workshop Manual (V8-5.4L SOHC VIN 3 (1999))
Ford Workshop Manuals > A L L Diagnostic Trouble Codes ( DTC ) > Codes by Number > P0700-P07ZZ > P0720 - P0724,
( P0721 P0722 P0723 0720 0721 0722 0723 0724 ) > System Information > System Diagnosis > P0720 ( P 0720 )
Page 9

P0720 - P0724: Testing and Inspection P0720 ( P 0720 )
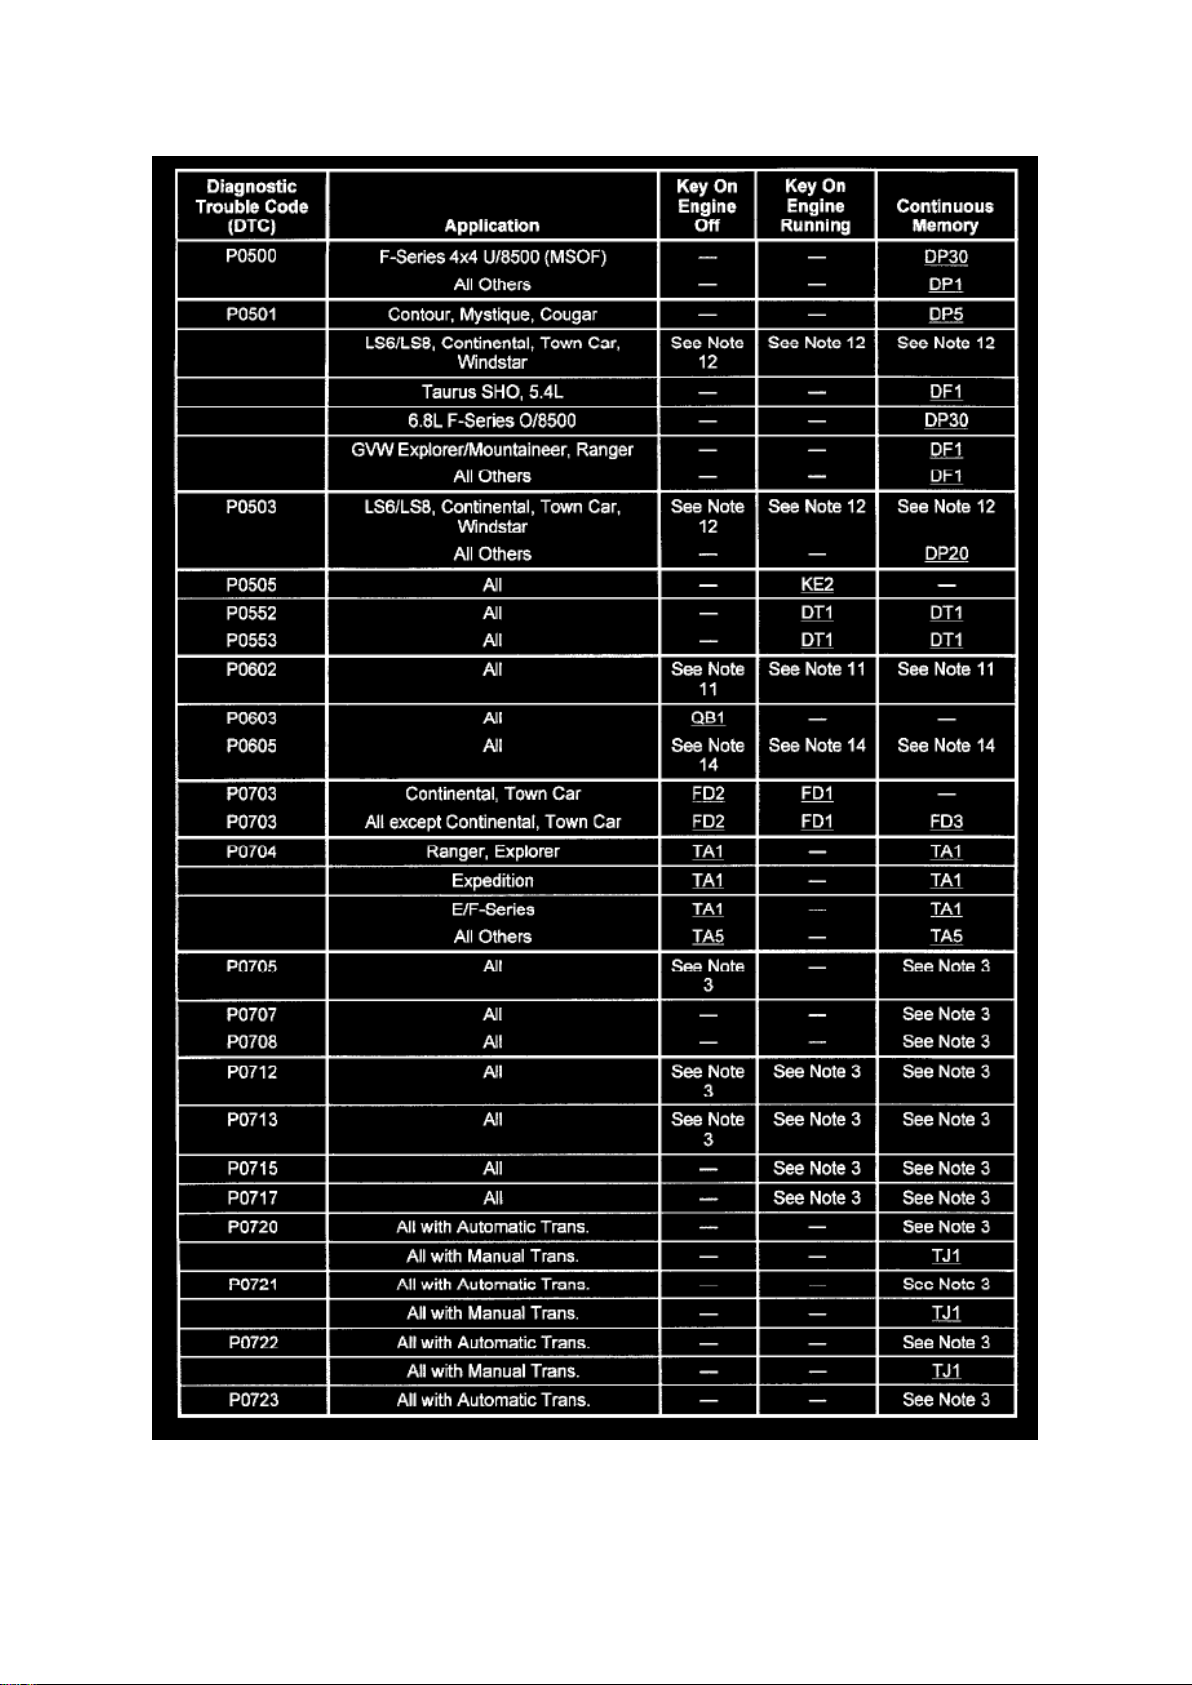
Manual Transmission (M.T.)
For diagnosis of P0720 refer to chart
Page 10

Ford F 150 4wd Pickup Workshop Manual (V8-5.4L SOHC VIN 3 (1999))
Ford Workshop Manuals > A L L Diagnostic Trouble Codes ( DTC ) > Codes by Number > P0700-P07ZZ > P0720 - P0724,
( P0721 P0722 P0723 0720 0721 0722 0723 0724 ) > System Information > System Diagnosis > P0720 ( P 0720 ) > Page
16
Page 11
For complete Engine Control diagnostic information, See: Powertrain Management/Computers and
Control Systems/Testing and Inspection
Page 12

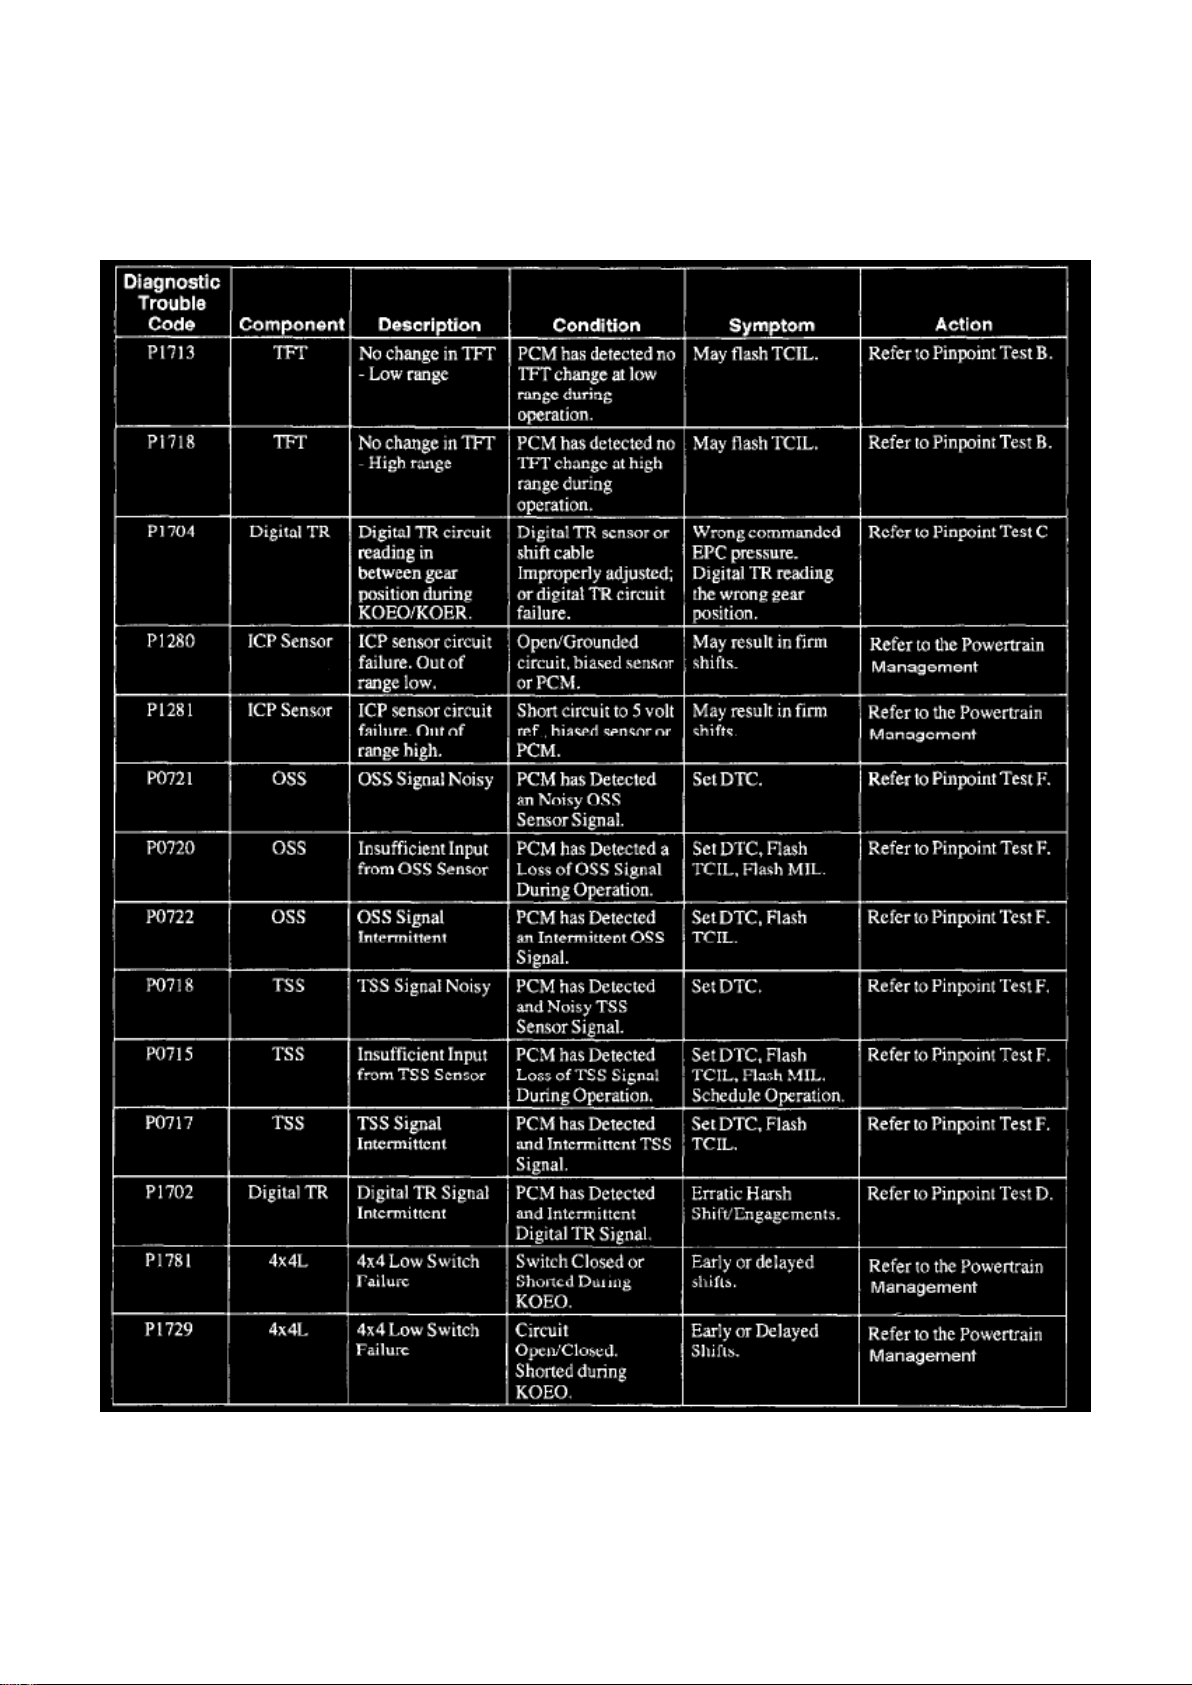
Automatic Transmission (A.T.)
For diagnosis of P0720 refer to chart
Page 13
Ford F 150 4wd Pickup Workshop Manual (V8-5.4L SOHC VIN 3 (1999))
Ford Workshop Manuals > A L L Diagnostic Trouble Codes ( DTC ) > Codes by Number > P0700-P07ZZ > P0720 - P0724,
( P0721 P0722 P0723 0720 0721 0722 0723 0724 ) > System Information > System Diagnosis > P0720 ( P 0720 ) > Page
17
Part 7 Of 8
Page 14

For complete Transmission Control diagnostic information, See: Powertrain
Management/Transmission Control Systems/Testing and Inspection
For complete Engine Control diagnostic information, See: Powertrain Management/Computers and
Control Systems/Testing and Inspection
Page 15

Ford F 150 4wd Pickup Workshop Manual (V8-5.4L SOHC VIN 3 (1999))
Ford Workshop Manuals > A L L Diagnostic Trouble Codes ( DTC ) > Codes by Number > P0700-P07ZZ > P0720 - P0724,
( P0721 P0722 P0723 0720 0721 0722 0723 0724 ) > System Information > System Diagnosis > P0720 ( P 0720 ) > Page
18
Page 16

P0720 - P0724: Testing and Inspection P0721 ( P 0721 )
Page 17

Manual Transmission (M.T.)
For diagnosis of P0721 refer to chart
Page 18

Ford F 150 4wd Pickup Workshop Manual (V8-5.4L SOHC VIN 3 (1999))
Ford Workshop Manuals > A L L Diagnostic Trouble Codes ( DTC ) > Codes by Number > P0700-P07ZZ > P0720 - P0724,
( P0721 P0722 P0723 0720 0721 0722 0723 0724 ) > System Information > System Diagnosis > P0720 ( P 0720 ) > Page
19
Page 19
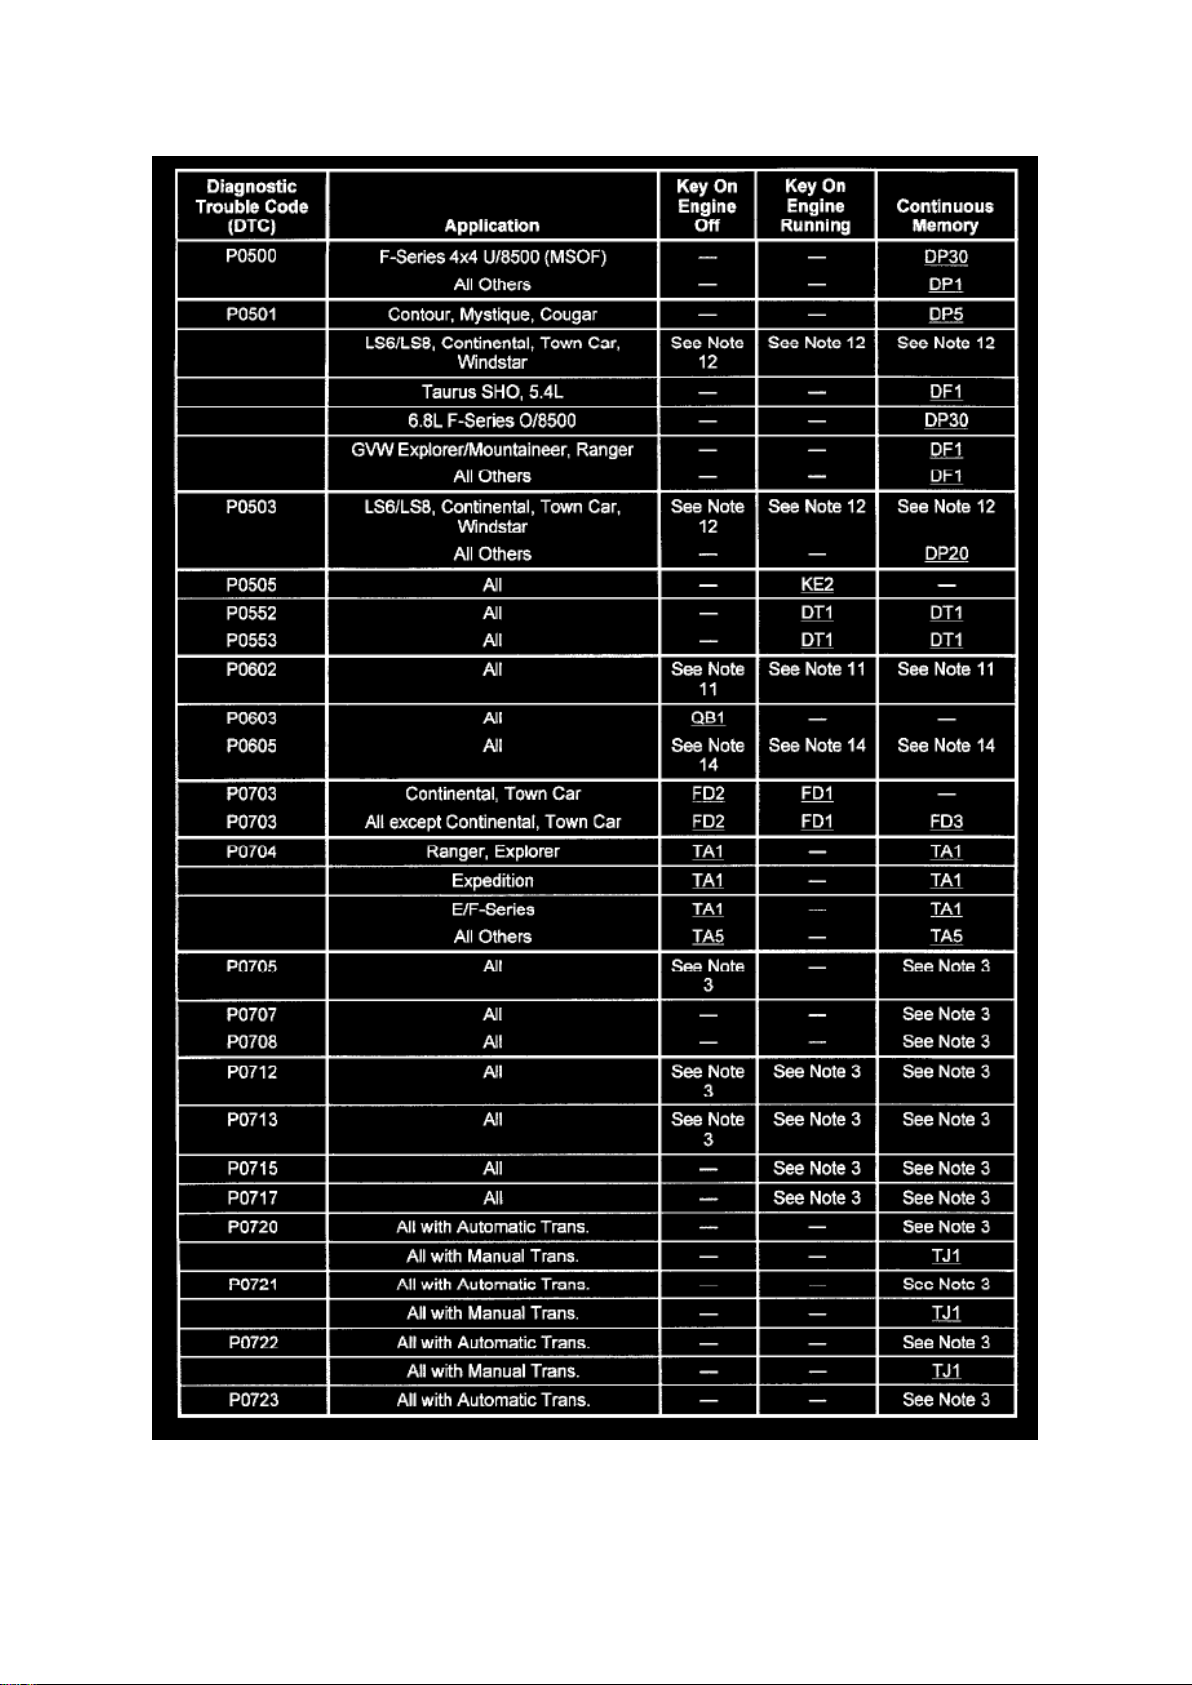
For complete Engine Control diagnostic information, See: Powertrain Management/Computers and
Control Systems/Testing and Inspection
Page 20

Automatic Transmission (A.T.)
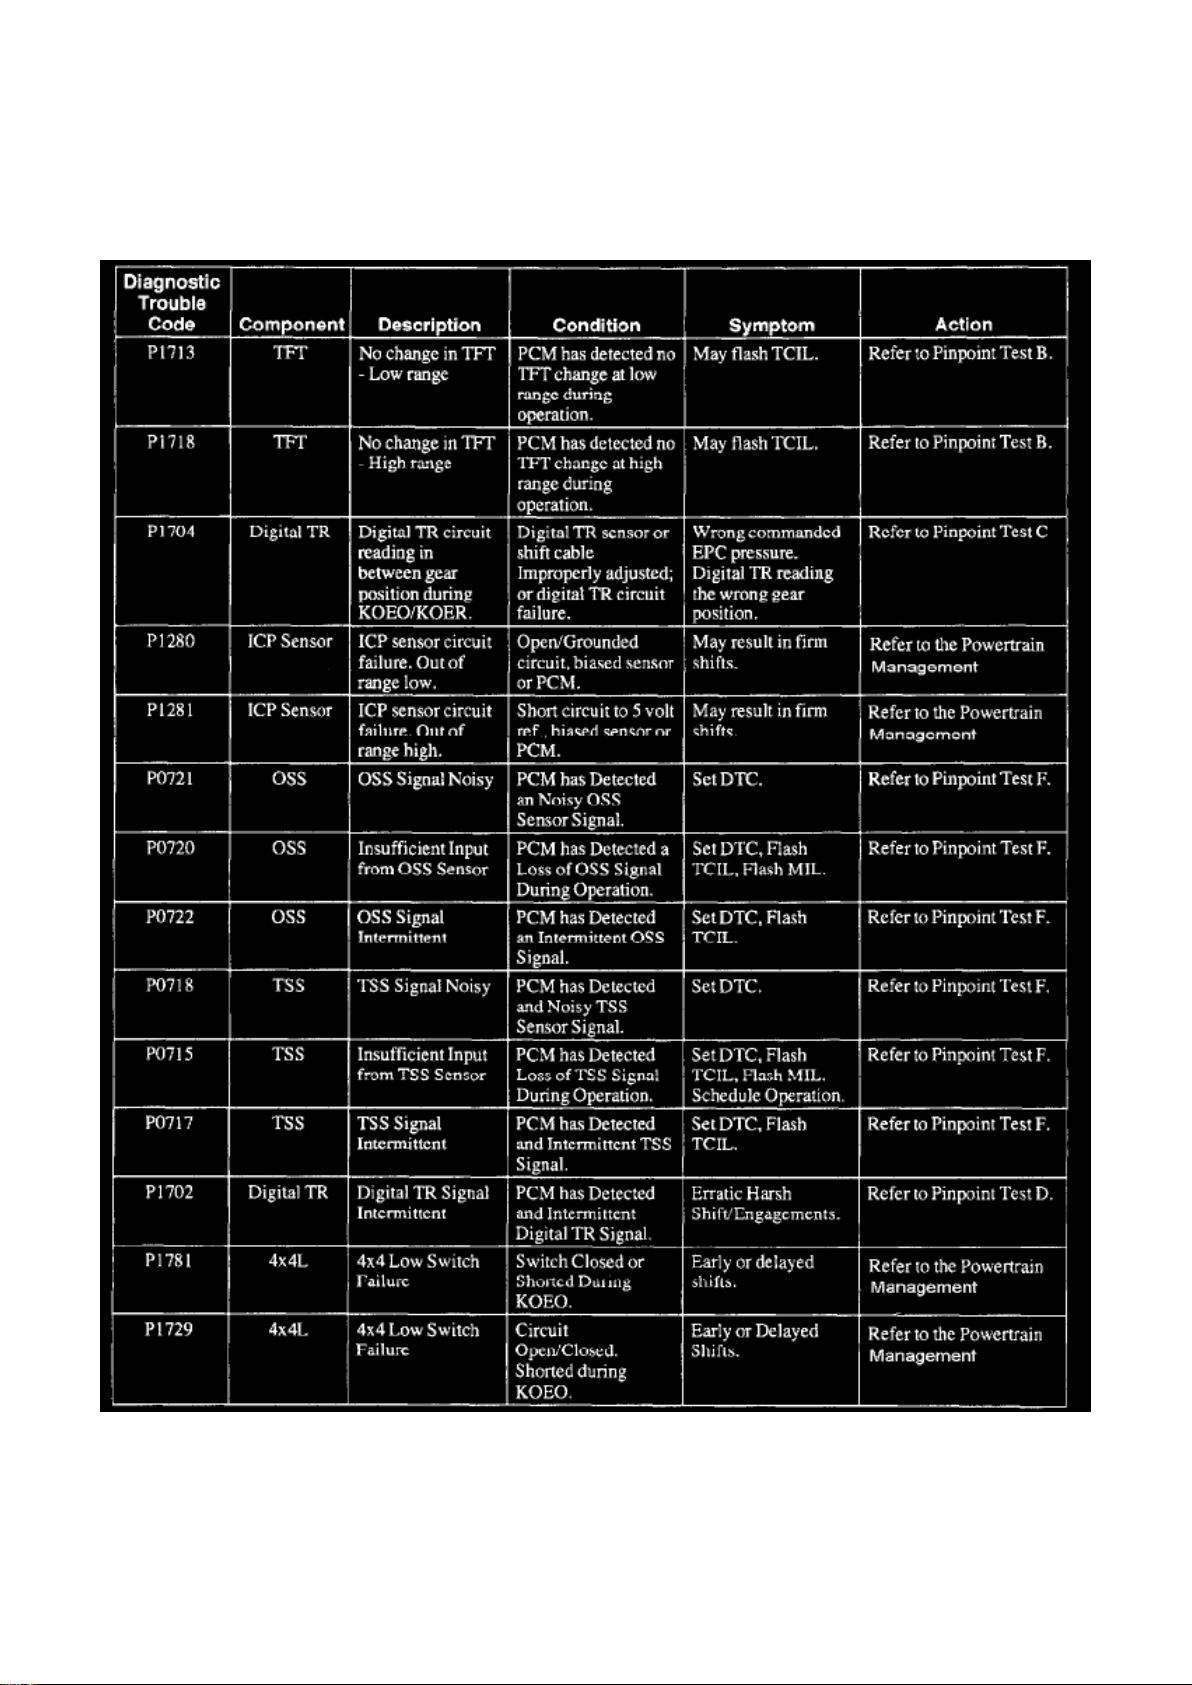
For diagnosis of P0721 refer to chart
Page 21
Ford F 150 4wd Pickup Workshop Manual (V8-5.4L SOHC VIN 3 (1999))
Ford Workshop Manuals > A L L Diagnostic Trouble Codes ( DTC ) > Codes by Number > P0700-P07ZZ > P0720 - P0724,
( P0721 P0722 P0723 0720 0721 0722 0723 0724 ) > System Information > System Diagnosis > P0720 ( P 0720 ) > Page
20
Part 7 Of 8
Page 22

For complete Transmission Control diagnostic information, See: Powertrain
Management/Transmission Control Systems/Testing and Inspection
For complete Engine Control diagnostic information, See: Powertrain Management/Computers and
Control Systems/Testing and Inspection
Page 23

Ford F 150 4wd Pickup Workshop Manual (V8-5.4L SOHC VIN 3 (1999))
Ford Workshop Manuals > A L L Diagnostic Trouble Codes ( DTC ) > Codes by Number > P0700-P07ZZ > P0720 - P0724,
( P0721 P0722 P0723 0720 0721 0722 0723 0724 ) > System Information > System Diagnosis > P0720 ( P 0720 ) > Page
21
Page 24

P0720 - P0724: Testing and Inspection P0722 ( P 0722 )
Page 25

Manual Transmission (M.T.)
For diagnosis of P0722 refer to chart
Page 26

Ford F 150 4wd Pickup Workshop Manual (V8-5.4L SOHC VIN 3 (1999))
Ford Workshop Manuals > A L L Diagnostic Trouble Codes ( DTC ) > Codes by Number > P0700-P07ZZ > P0720 - P0724,
( P0721 P0722 P0723 0720 0721 0722 0723 0724 ) > System Information > System Diagnosis > P0720 ( P 0720 ) > Page
22
Page 27
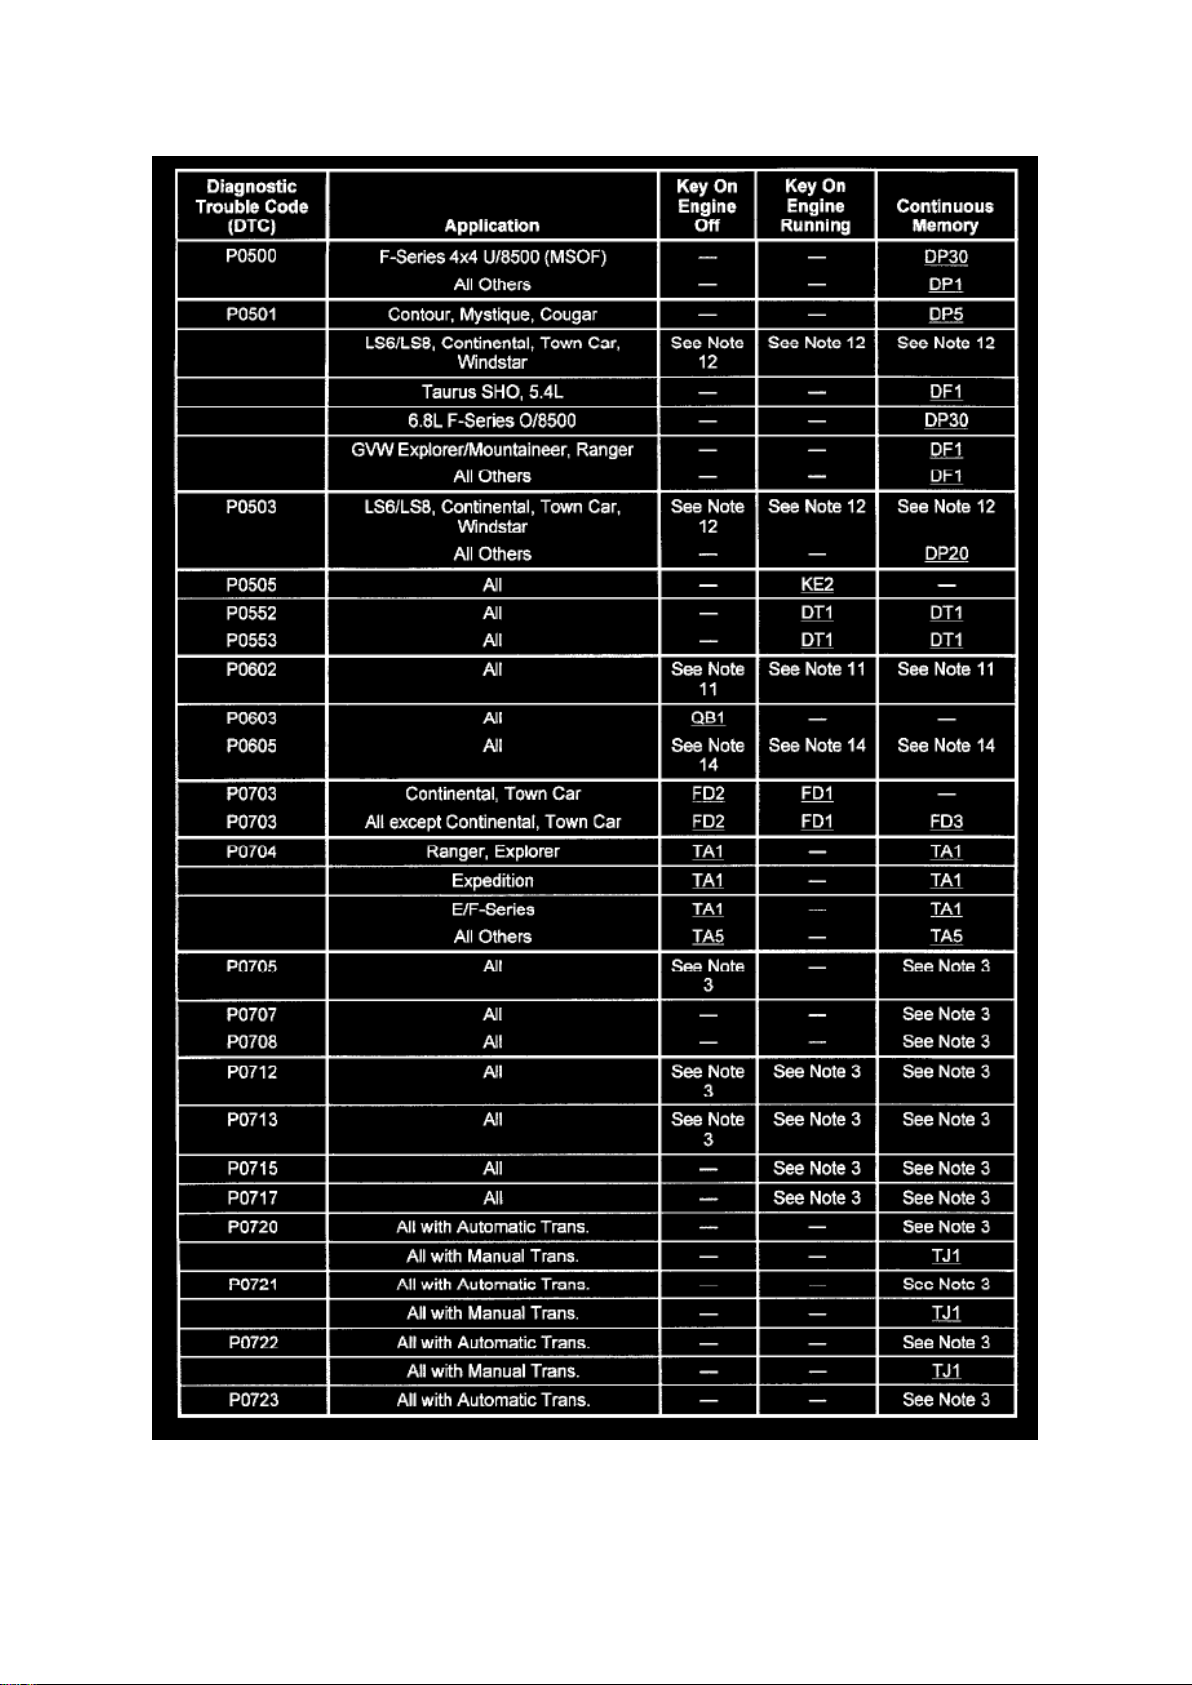
For complete Engine Control diagnostic information, See: Powertrain Management/Computers and
Control Systems/Testing and Inspection
Page 28

Automatic Transmission (A.T.)
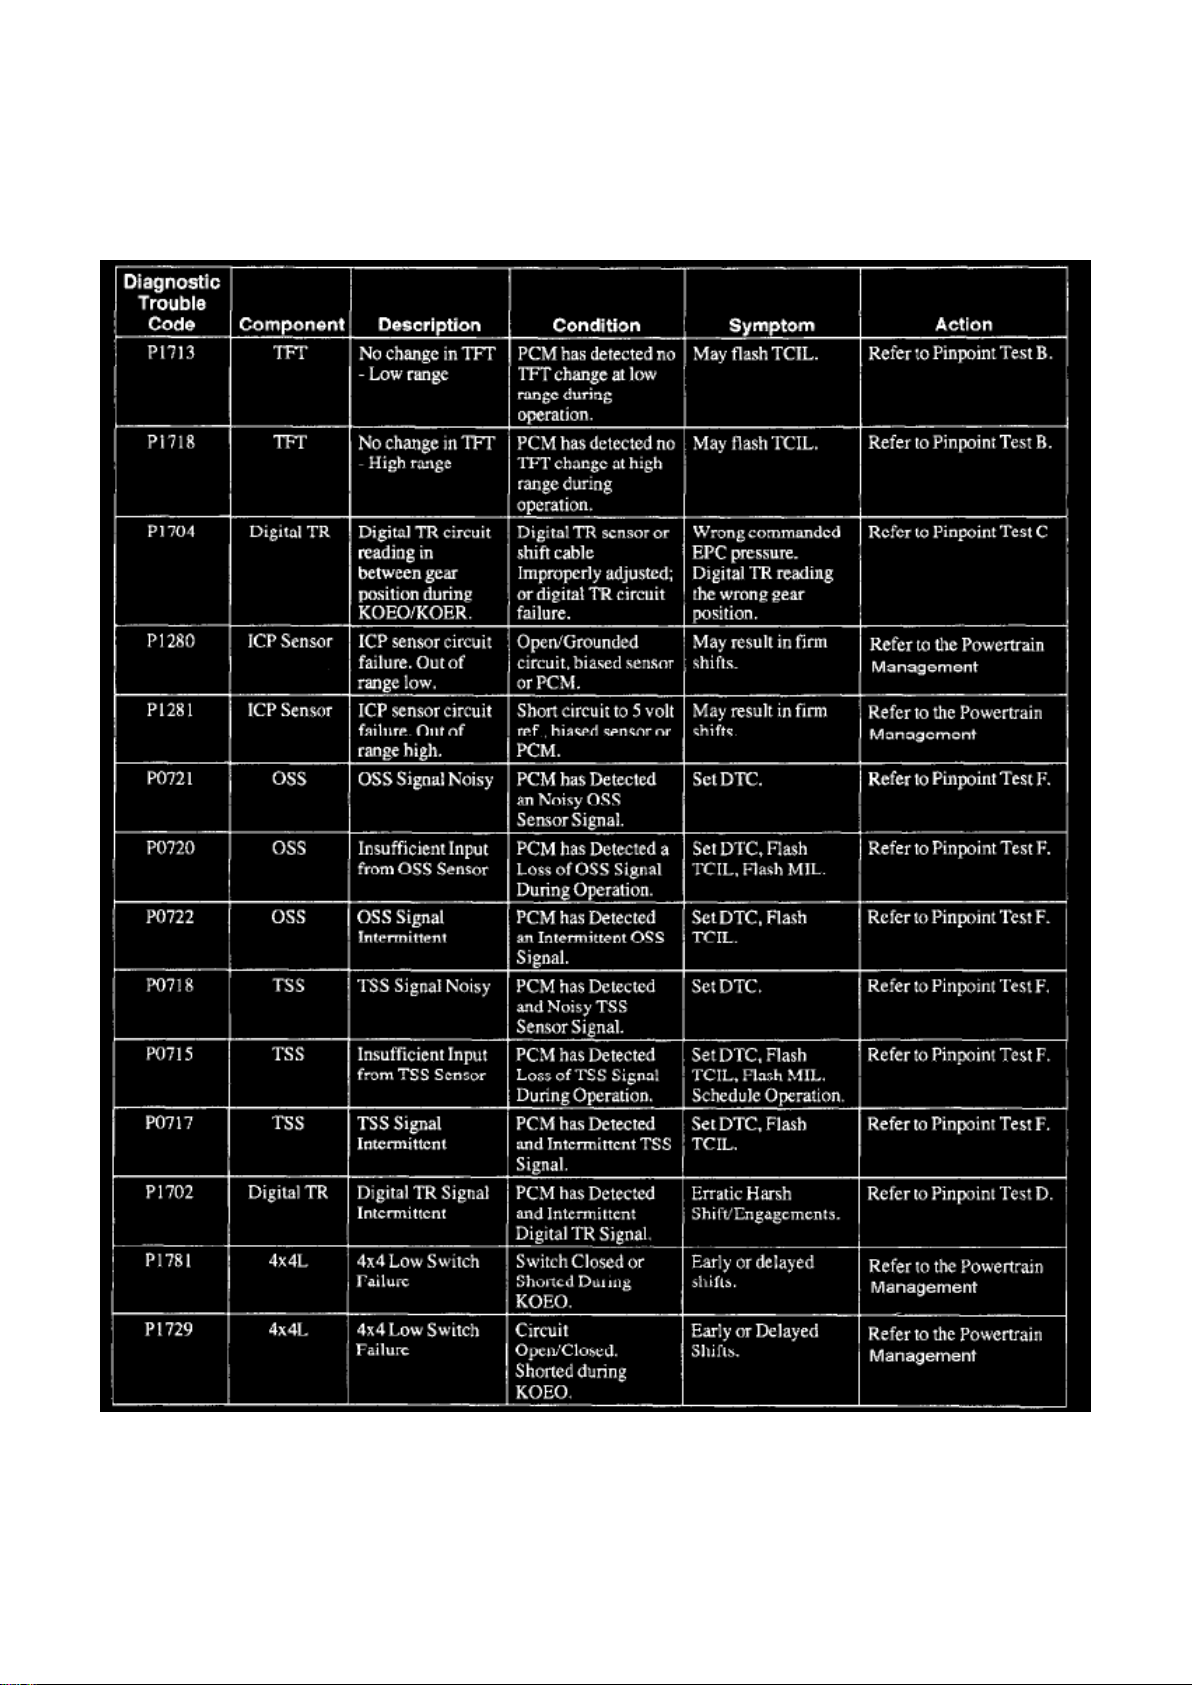
For diagnosis of P0722 refer to chart
Page 29
Ford F 150 4wd Pickup Workshop Manual (V8-5.4L SOHC VIN 3 (1999))
Ford Workshop Manuals > A L L Diagnostic Trouble Codes ( DTC ) > Codes by Number > P0700-P07ZZ > P0720 - P0724,
( P0721 P0722 P0723 0720 0721 0722 0723 0724 ) > System Information > System Diagnosis > P0720 ( P 0720 ) > Page
23
Part 7 Of 8
Page 30

For complete Transmission Control diagnostic information, See: Powertrain
Management/Transmission Control Systems/Testing and Inspection
For complete Engine Control diagnostic information, See: Powertrain Management/Computers and
Control Systems/Testing and Inspection
Page 31
Ford F 150 4wd Pickup Workshop Manual (V8-5.4L SOHC VIN 3 (1999))
Ford Workshop Manuals > A L L Diagnostic Trouble Codes ( DTC ) > Codes by Number > P1800-P18ZZ > P1800 - P1804,
( P1801 P1802 P1803 1800 1801 1802 1803 1804 ) > System Information > System Diagnosis
Page 32

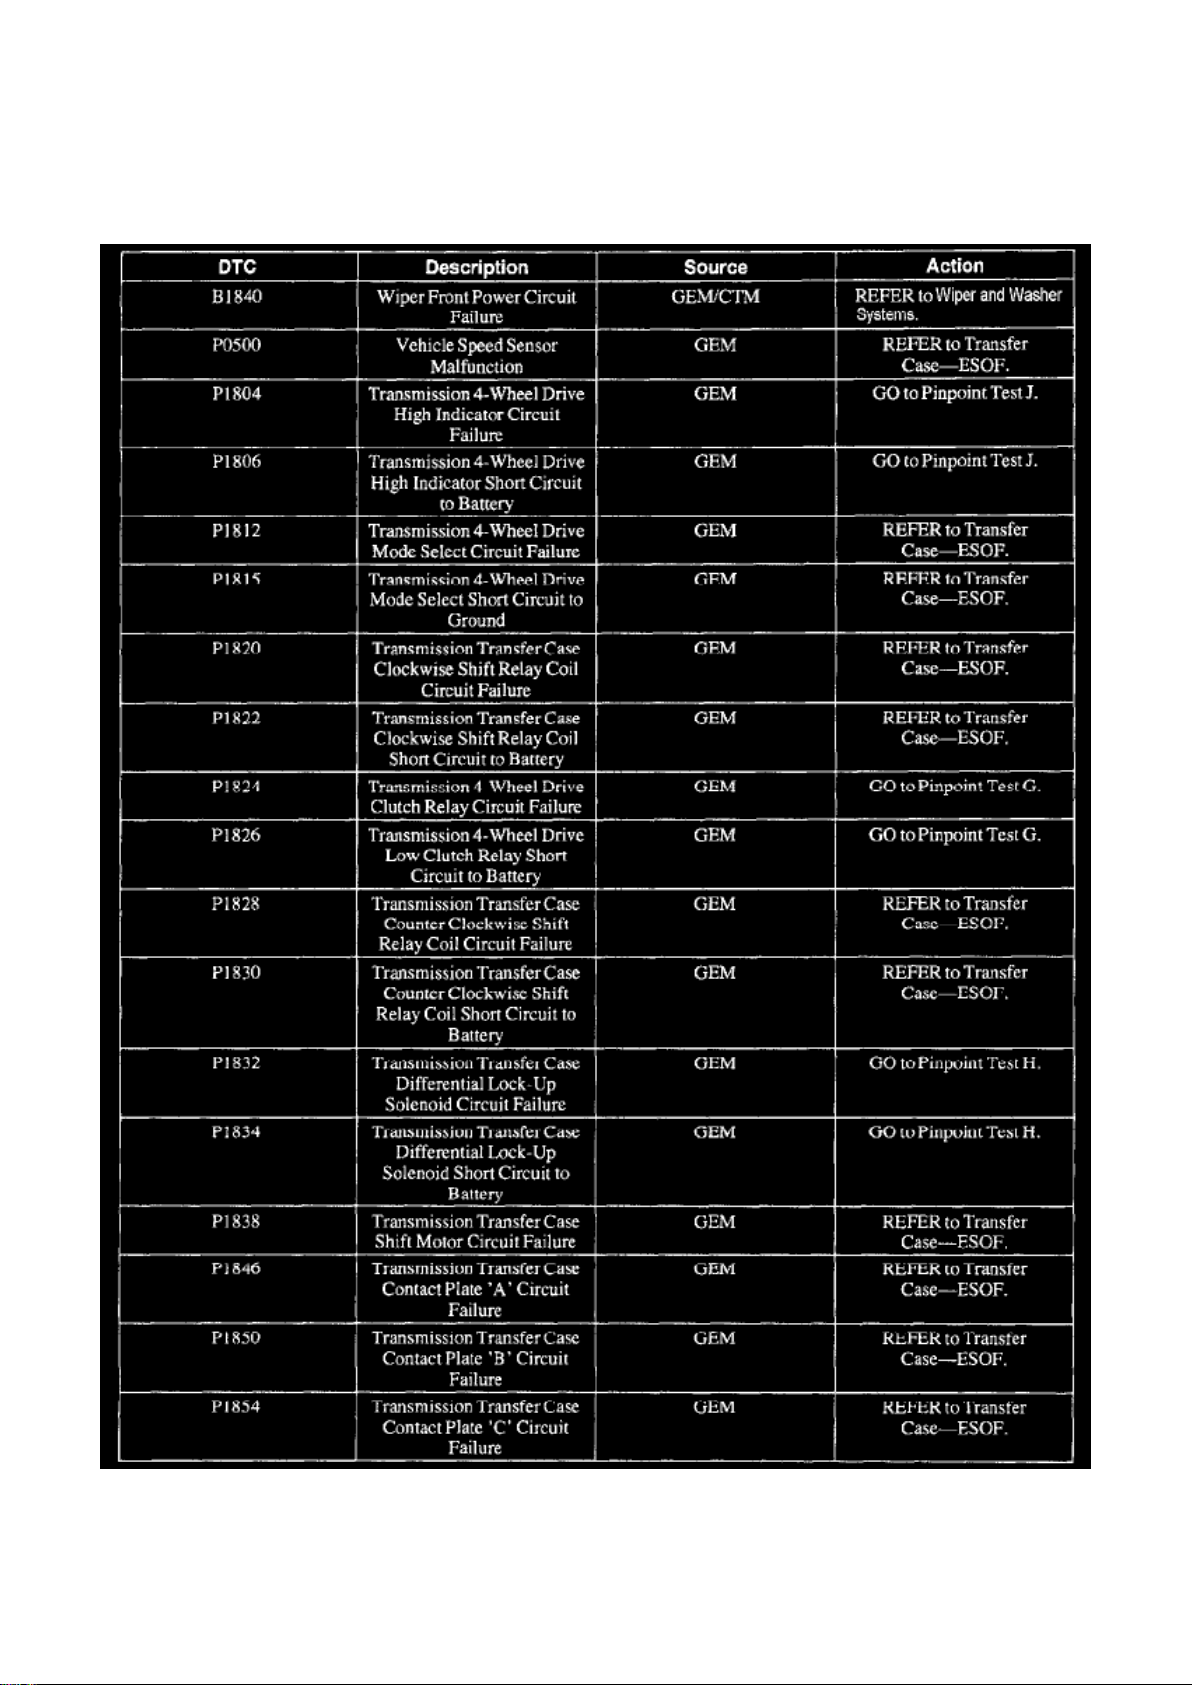
P1800 - P1804: Testing and Inspection
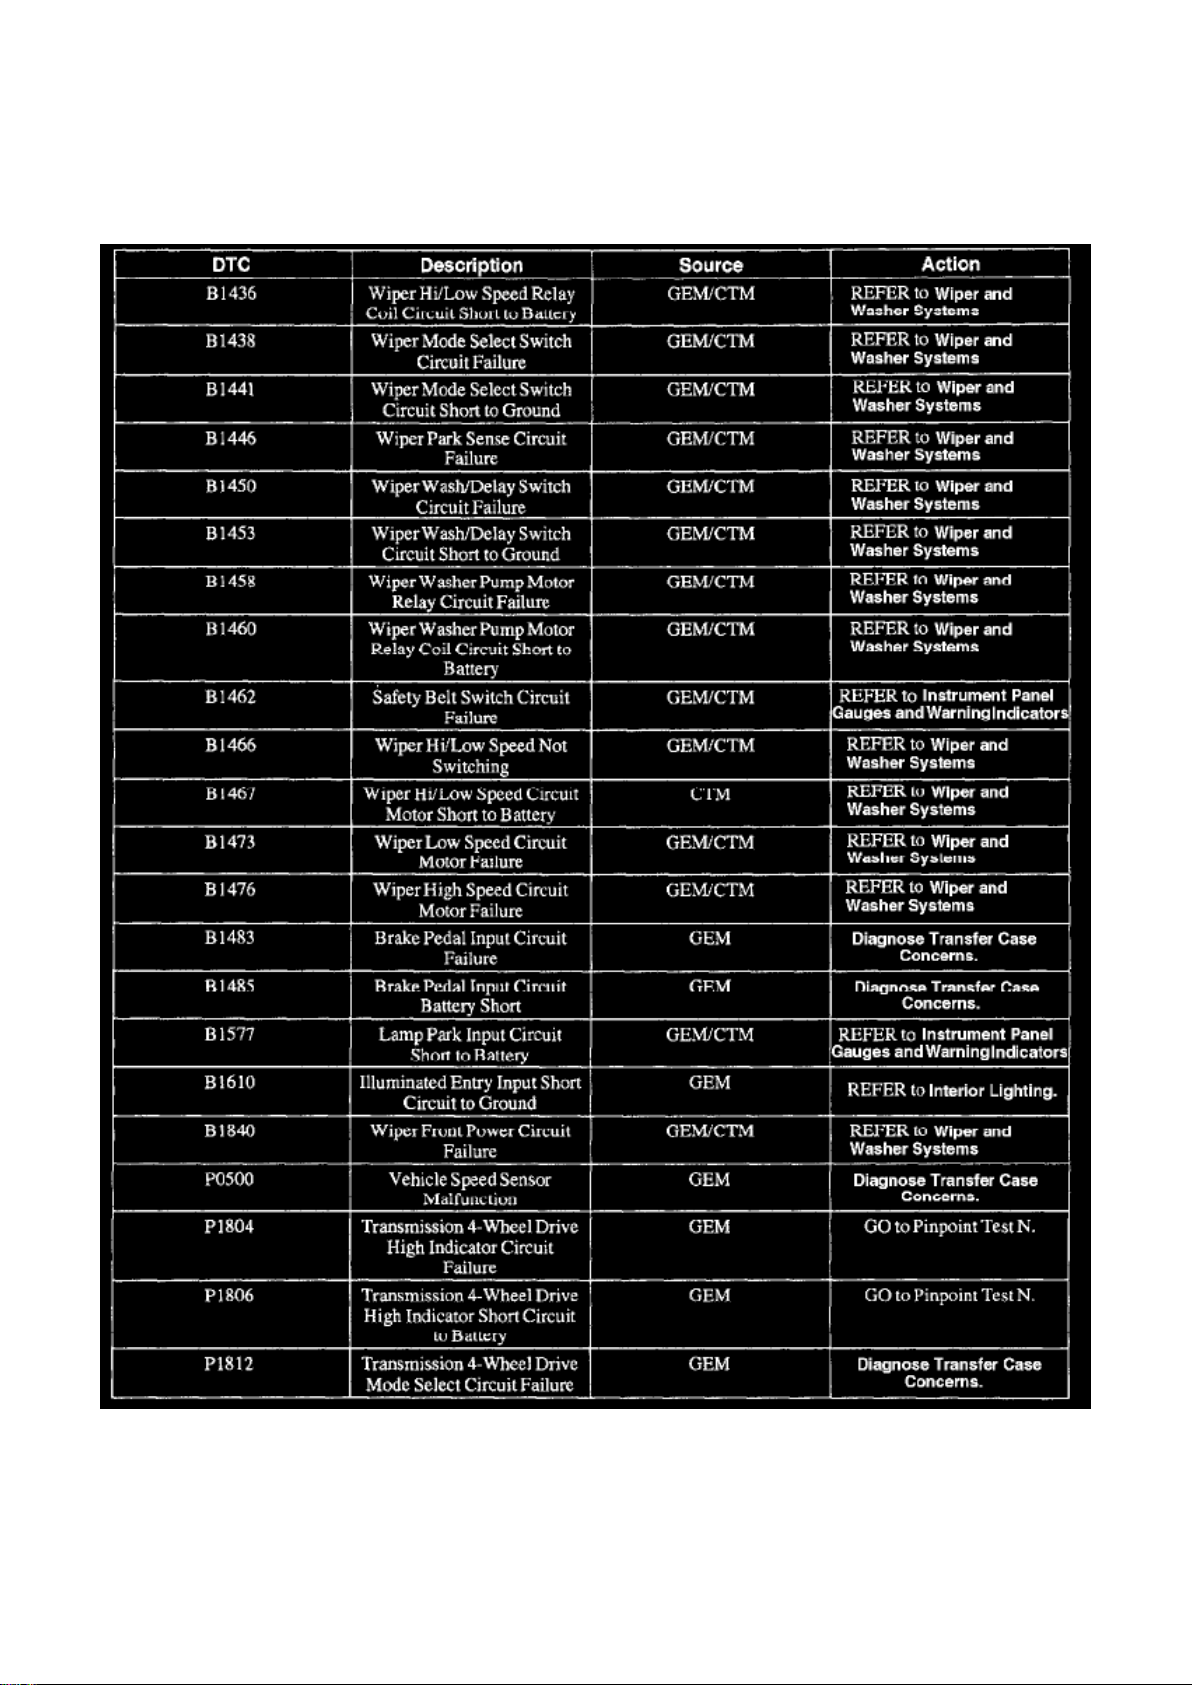
For diagnosis of P1804 refer to the system experiencing the problem.
Transfer Case
ESOF - Electronic Shift on the Fly
Refer to Instrument Panel below
MSOF - Mechanical Shift on the Fly
Page 33
Ford F 150 4wd Pickup Workshop Manual (V8-5.4L SOHC VIN 3 (1999))
Ford Workshop Manuals > A L L Diagnostic Trouble Codes ( DTC ) > Codes by Number > P1800-P18ZZ > P1800 - P1804,
( P1801 P1802 P1803 1800 1801 1802 1803 1804 ) > System Information > System Diagnosis > Page 28
Part 3 Of 4
Page 34

For complete Transfer Case diagnostic information, See: Transmission and Drivetrain/Transfer
Case/Testing and Inspection
Instrument Panel
Part 3 Of 4
For complete Instrument Panel diagnostic information, See: Instrument Panel, Gauges and
Warning Indicators/Instrument Cluster / Carrier/Testing and Inspection
Page 35
Ford F 150 4wd Pickup Workshop Manual (V8-5.4L SOHC VIN 3 (1999))
Ford Workshop Manuals > A L L Diagnostic Trouble Codes ( DTC ) > Codes by Number > P1800-P18ZZ > P1805 - P1809,
( P1806 P1807 P1808 1805 1806 1807 1808 1809 ) > System Information > System Diagnosis
Page 36

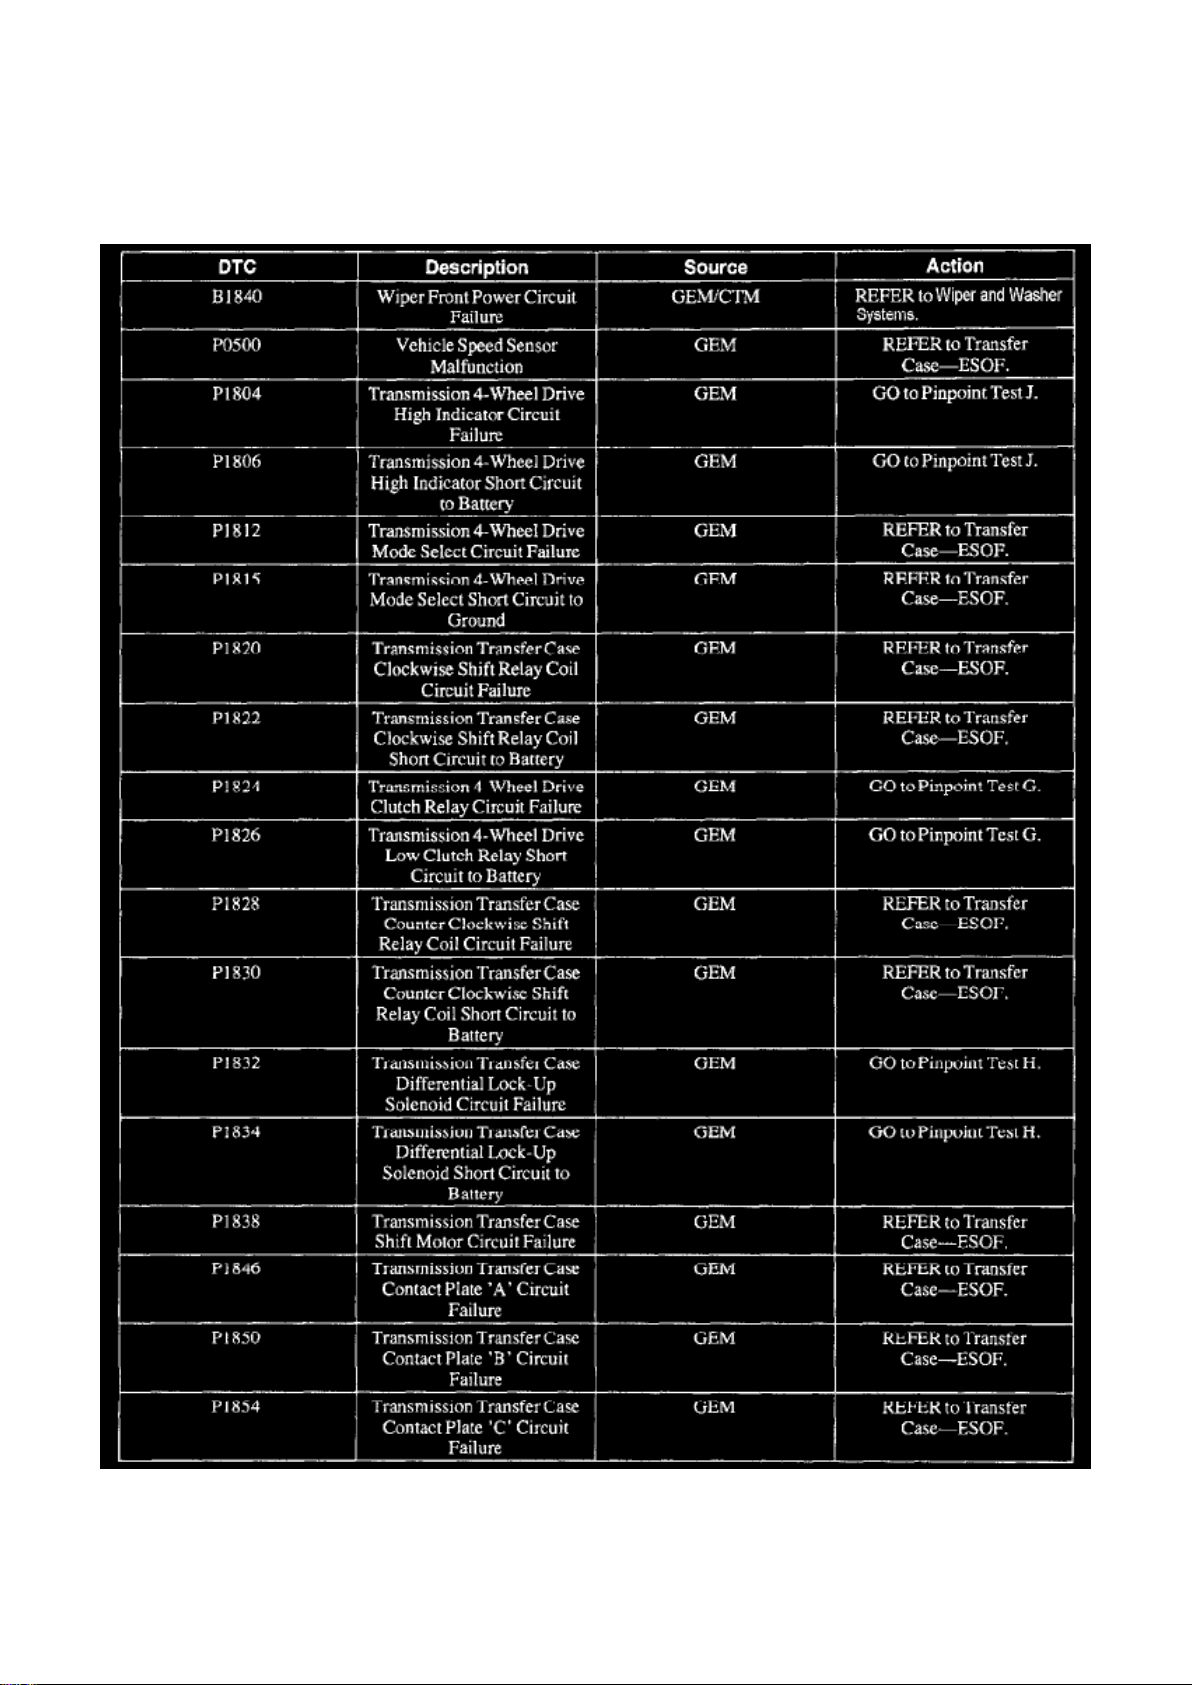
P1805 - P1809: Testing and Inspection
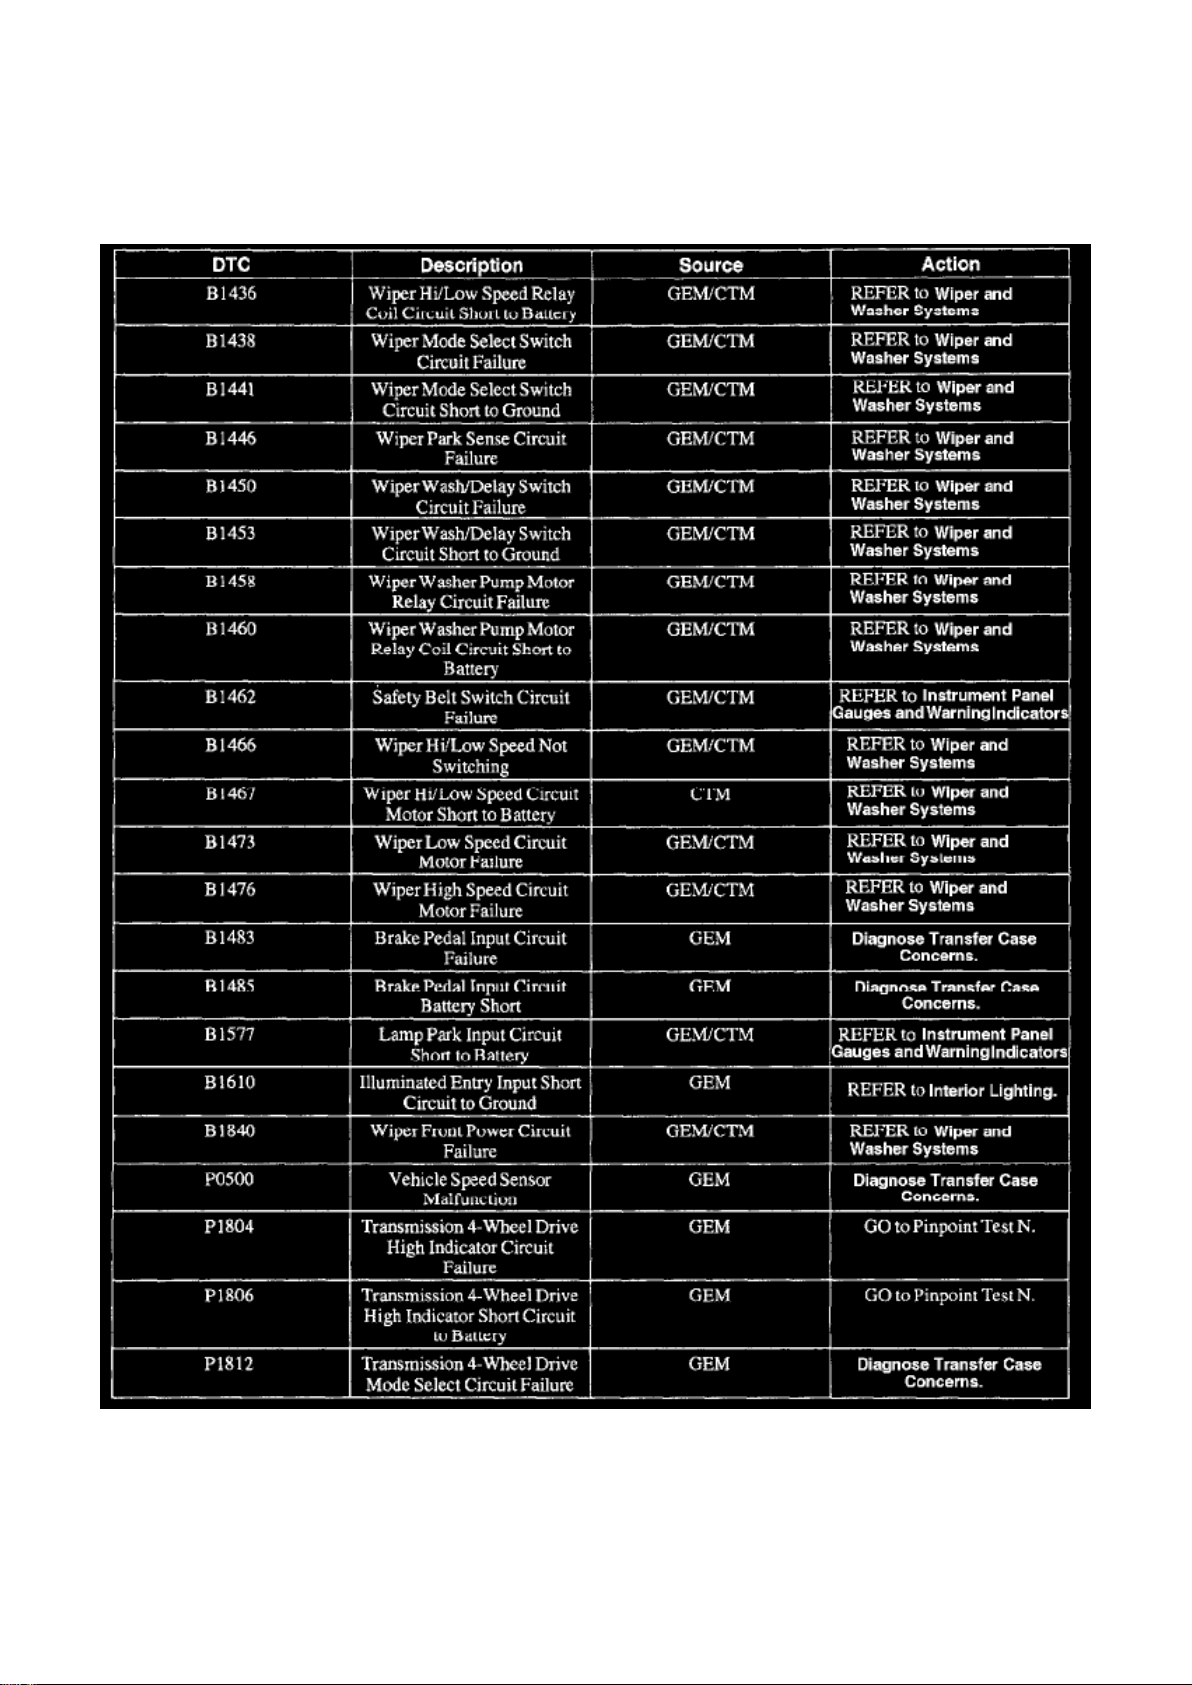
For diagnosis of P1806 refer to the system experiencing the problem.
Transfer Case
ESOF - Electronic Shift on the Fly
Refer to Instrument Panel below
MSOF - Mechanical Shift on the Fly
Page 37
Ford F 150 4wd Pickup Workshop Manual (V8-5.4L SOHC VIN 3 (1999))
Ford Workshop Manuals > A L L Diagnostic Trouble Codes ( DTC ) > Codes by Number > P1800-P18ZZ > P1805 - P1809,
( P1806 P1807 P1808 1805 1806 1807 1808 1809 ) > System Information > System Diagnosis > Page 32
Part 3 Of 4
Page 38

For complete Transfer Case diagnostic information, See: Transmission and Drivetrain/Transfer
Case/Testing and Inspection
Instrument Panel
Part 3 Of 4
For complete Instrument Panel diagnostic information, See: Instrument Panel, Gauges and
Warning Indicators/Instrument Cluster / Carrier/Testing and Inspection
Page 39
Ford F 150 4wd Pickup Workshop Manual (V8-5.4L SOHC VIN 3 (1999))
Ford Workshop Manuals > Relays and Modules > Relays and Modules - Accessories and Optional Equipment > Accessory
Delay Module > Accessory Delay Relay > Component Information > Locations
Page 40

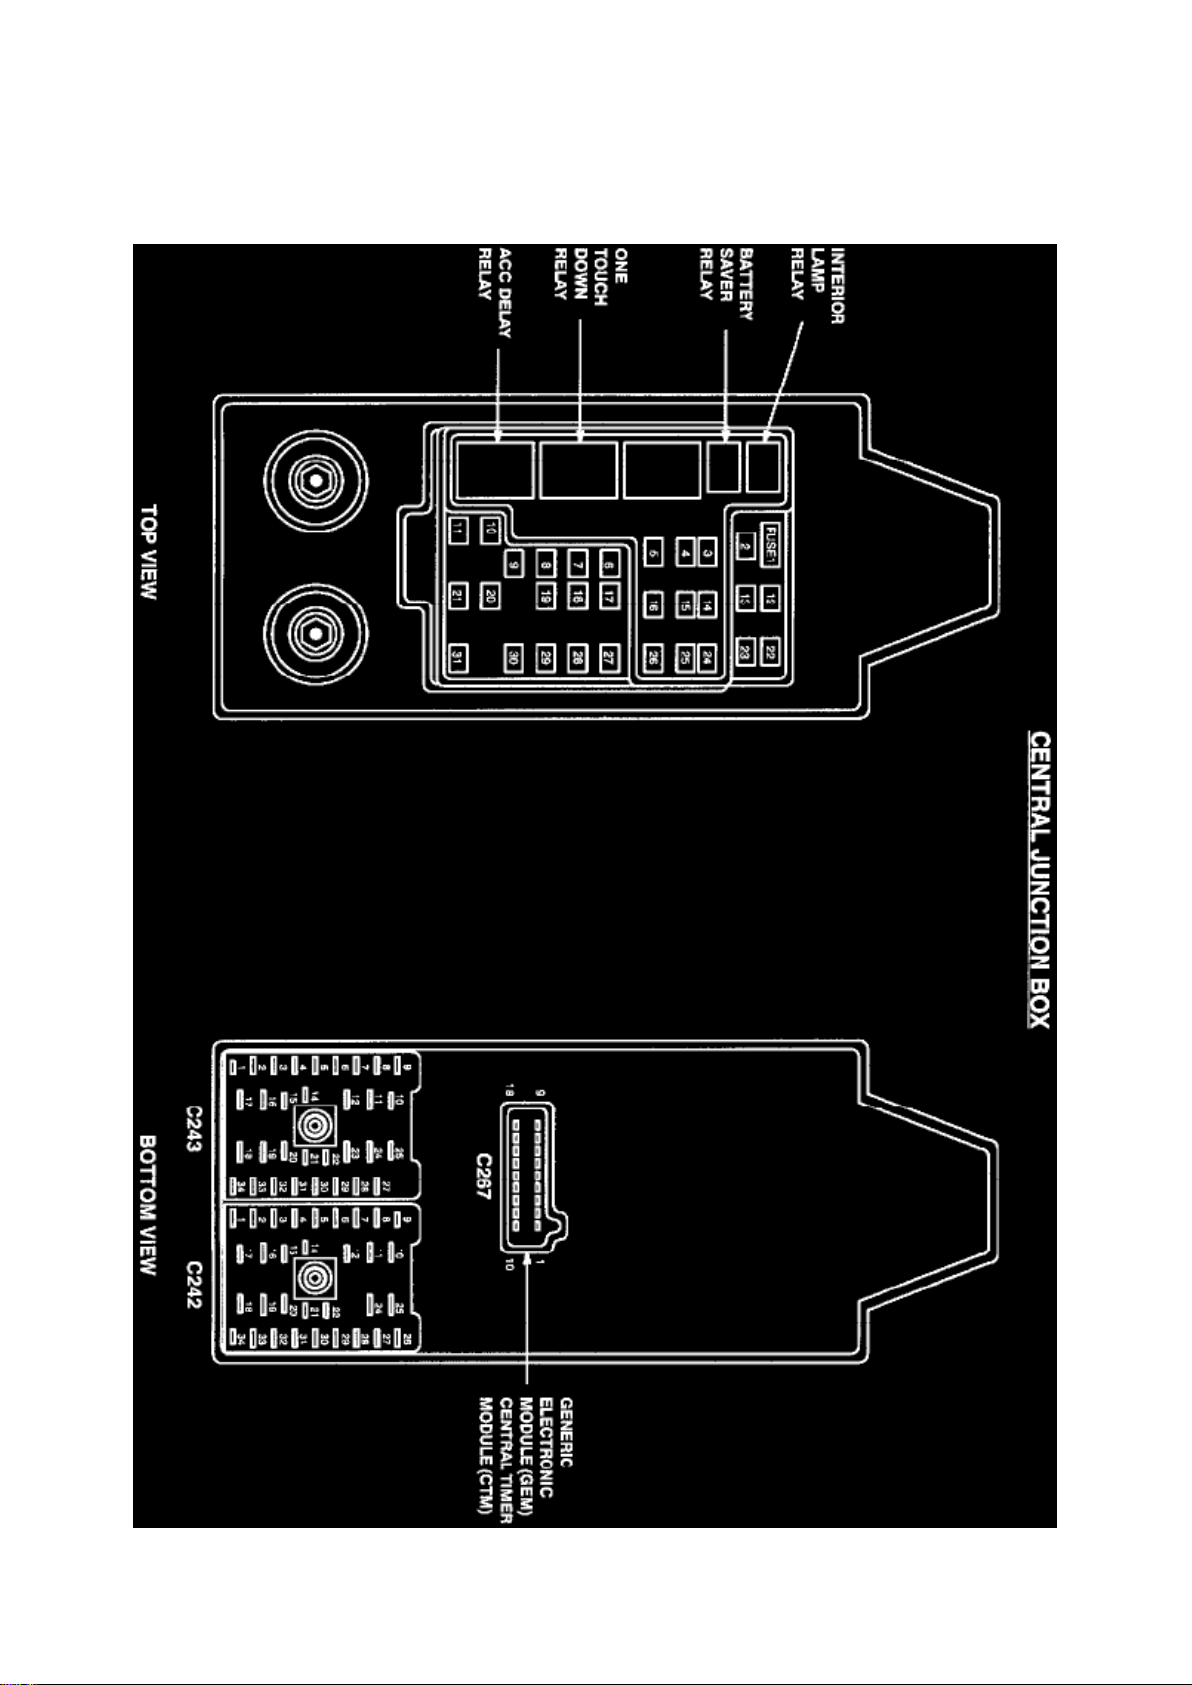
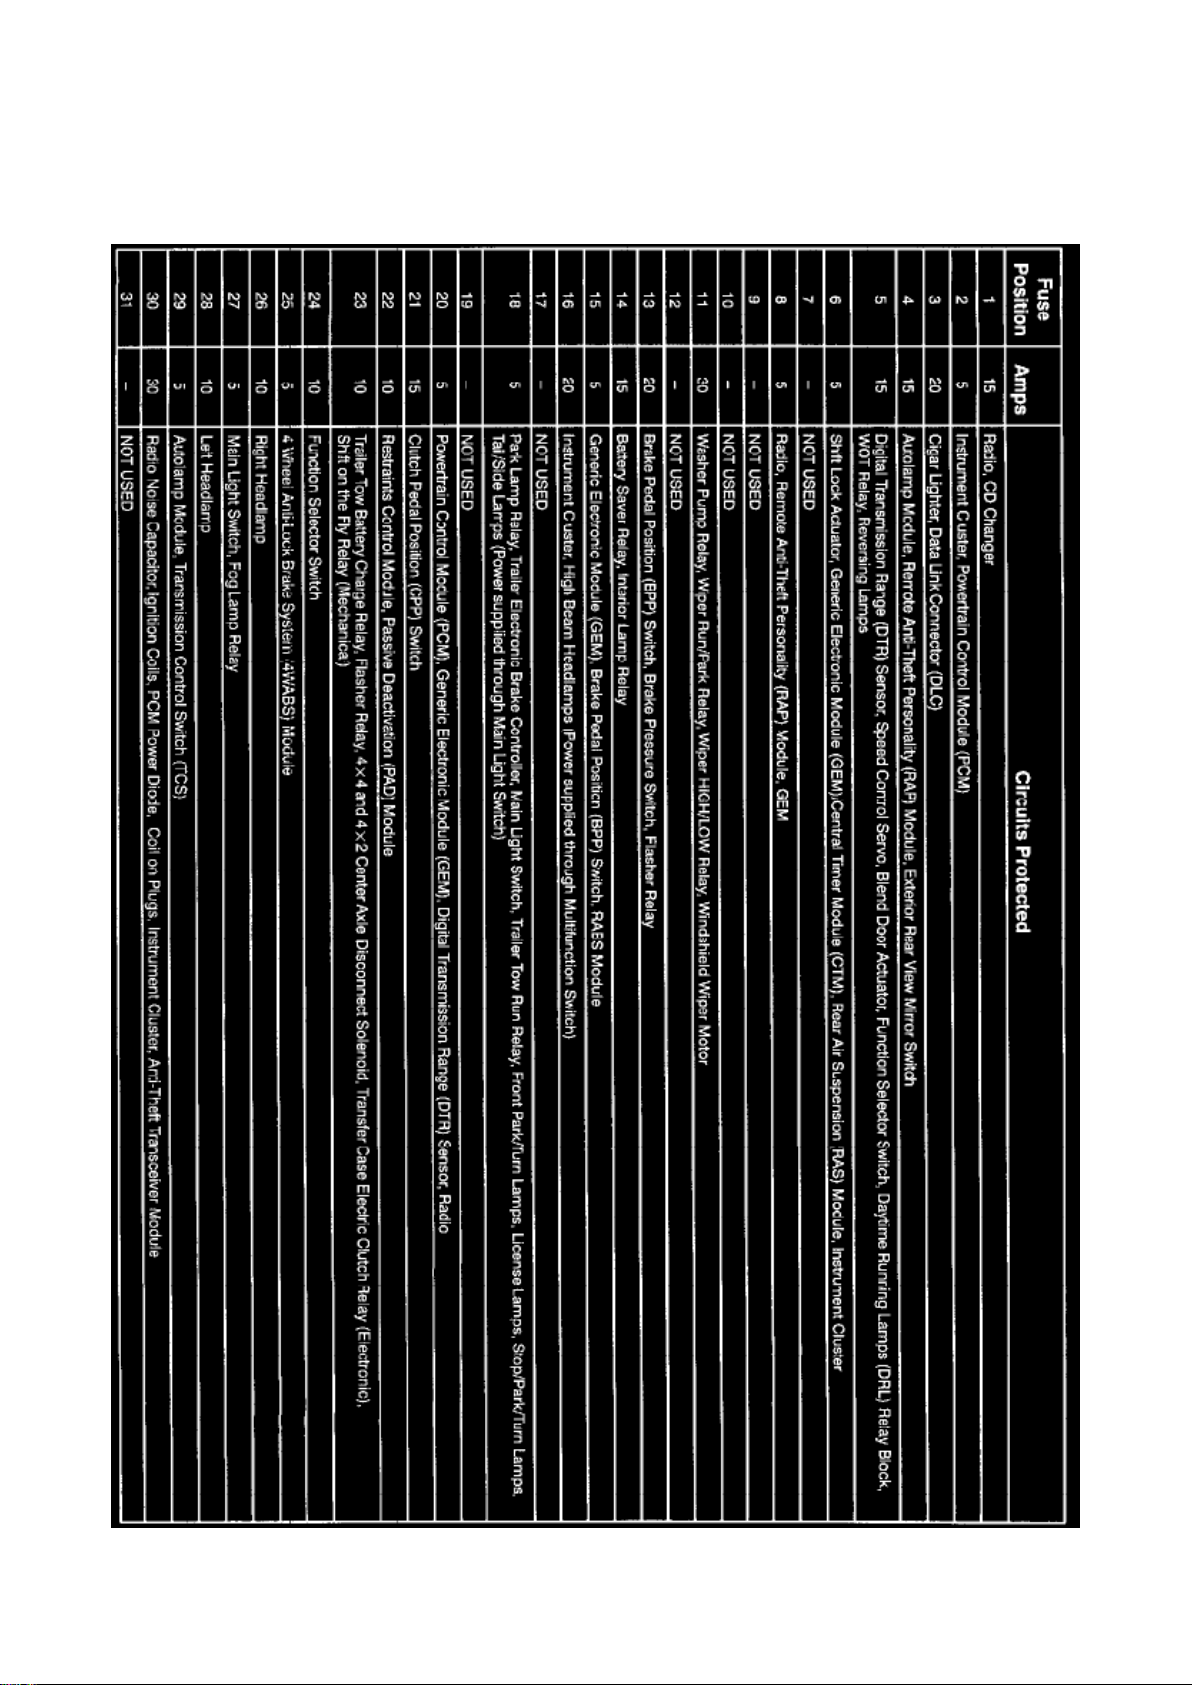
Accessory Delay Relay: Locations
Page 41
Ford F 150 4wd Pickup Workshop Manual (V8-5.4L SOHC VIN 3 (1999))
Ford Workshop Manuals > Relays and Modules > Relays and Modules - Accessories and Optional Equipment > Accessory
Delay Module > Accessory Delay Relay > Component Information > Locations > Page 39
Page 42

Page 43
Ford F 150 4wd Pickup Workshop Manual (V8-5.4L SOHC VIN 3 (1999))
Ford Workshop Manuals > Relays and Modules > Relays and Modules - Accessories and Optional Equipment > Accessory
Delay Module > Accessory Delay Relay > Component Information > Locations > Page 40
Page 44

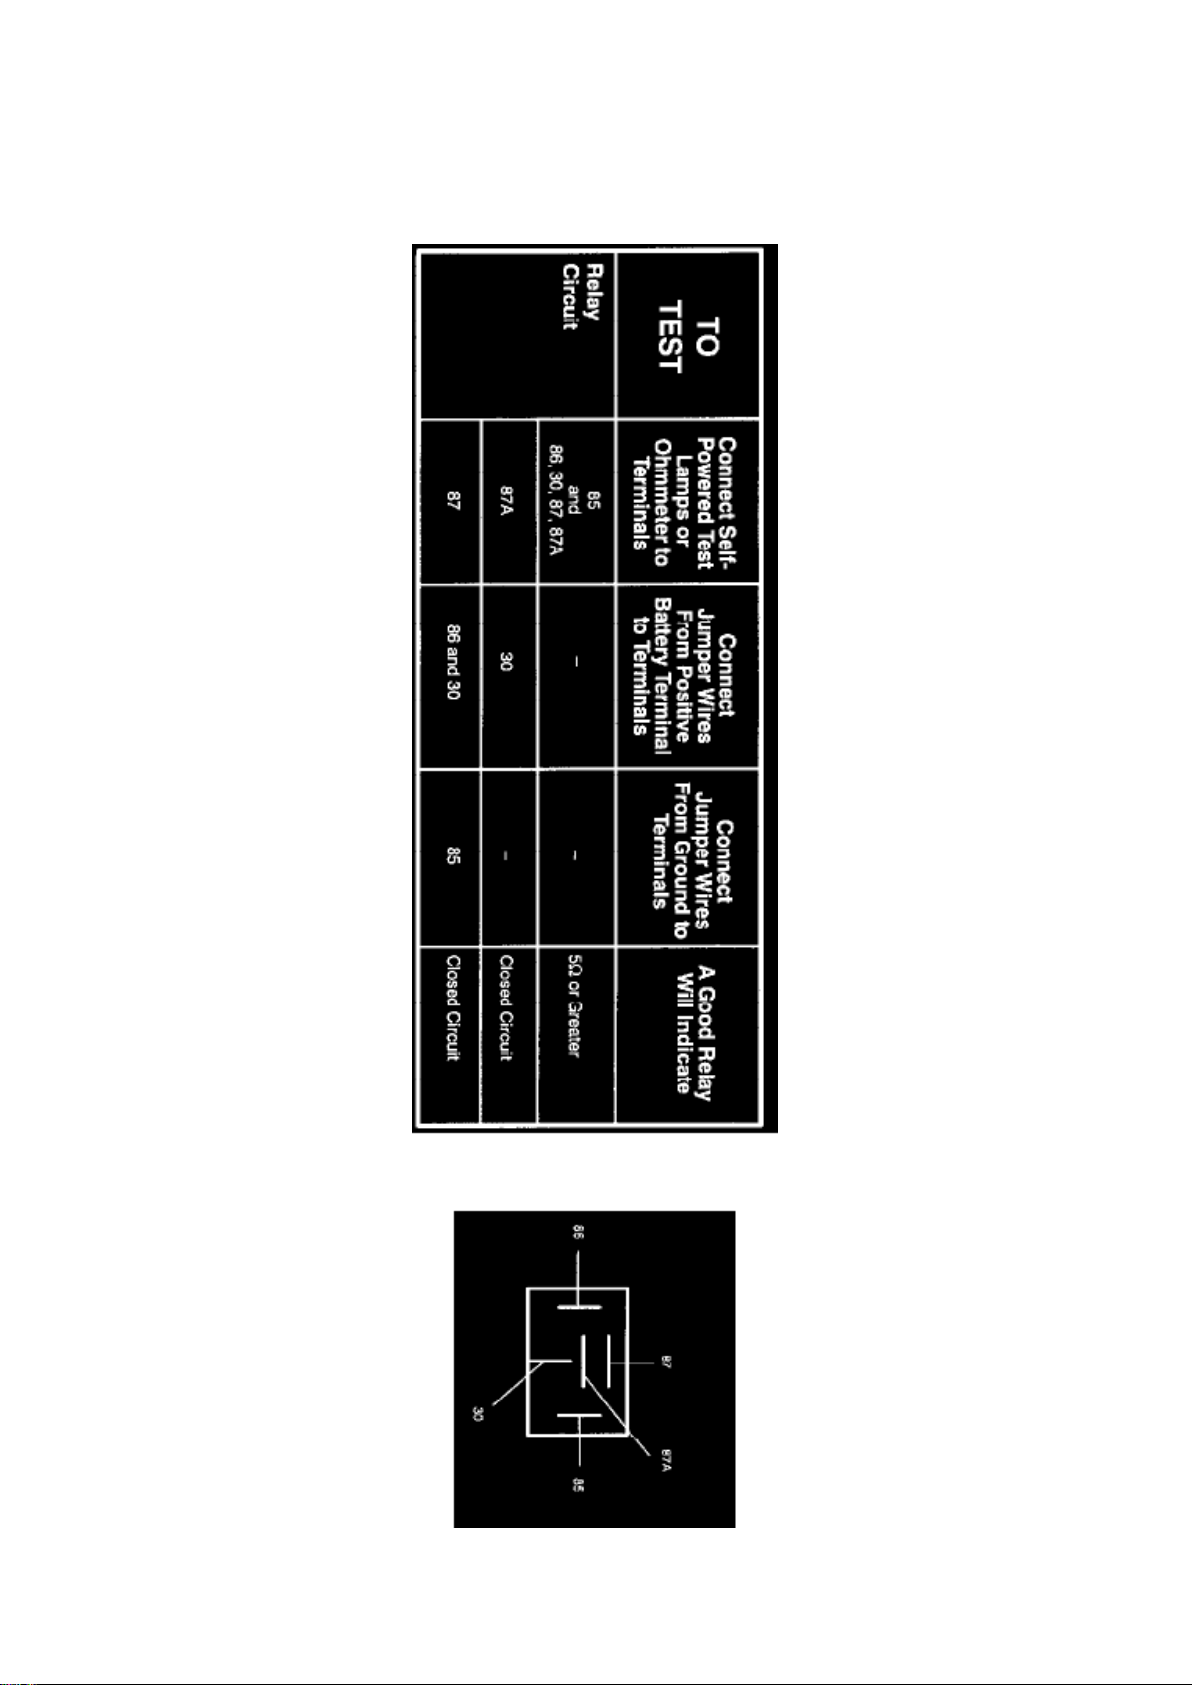
Accessory Delay Relay: Testing and Inspection
Component Testing Procedure
Terminals
Page 45
Ford F 150 4wd Pickup Workshop Manual (V8-5.4L SOHC VIN 3 (1999))
Ford Workshop Manuals > Relays and Modules > Relays and Modules - Accessories and Optional Equipment > Accessory
Delay Module > Accessory Delay Relay > Component Information > Locations > Page 41
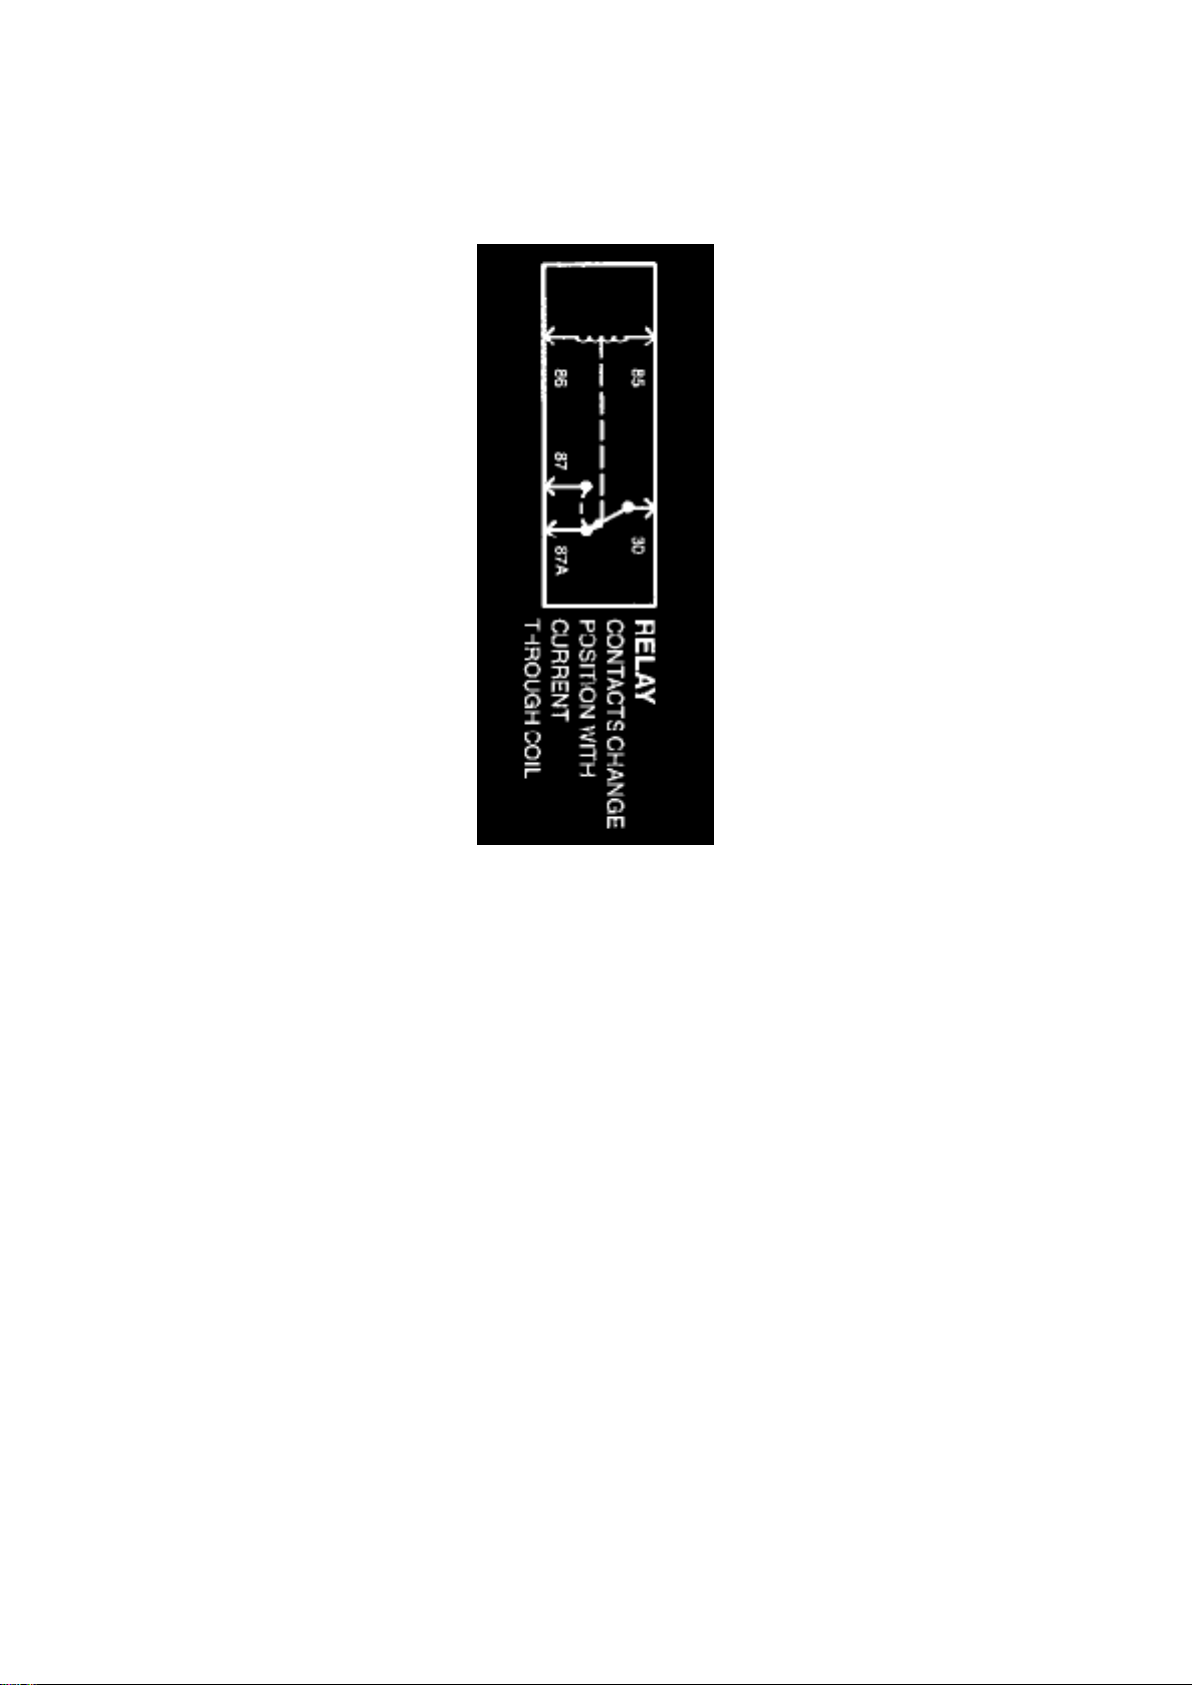
Schematic
Page 46
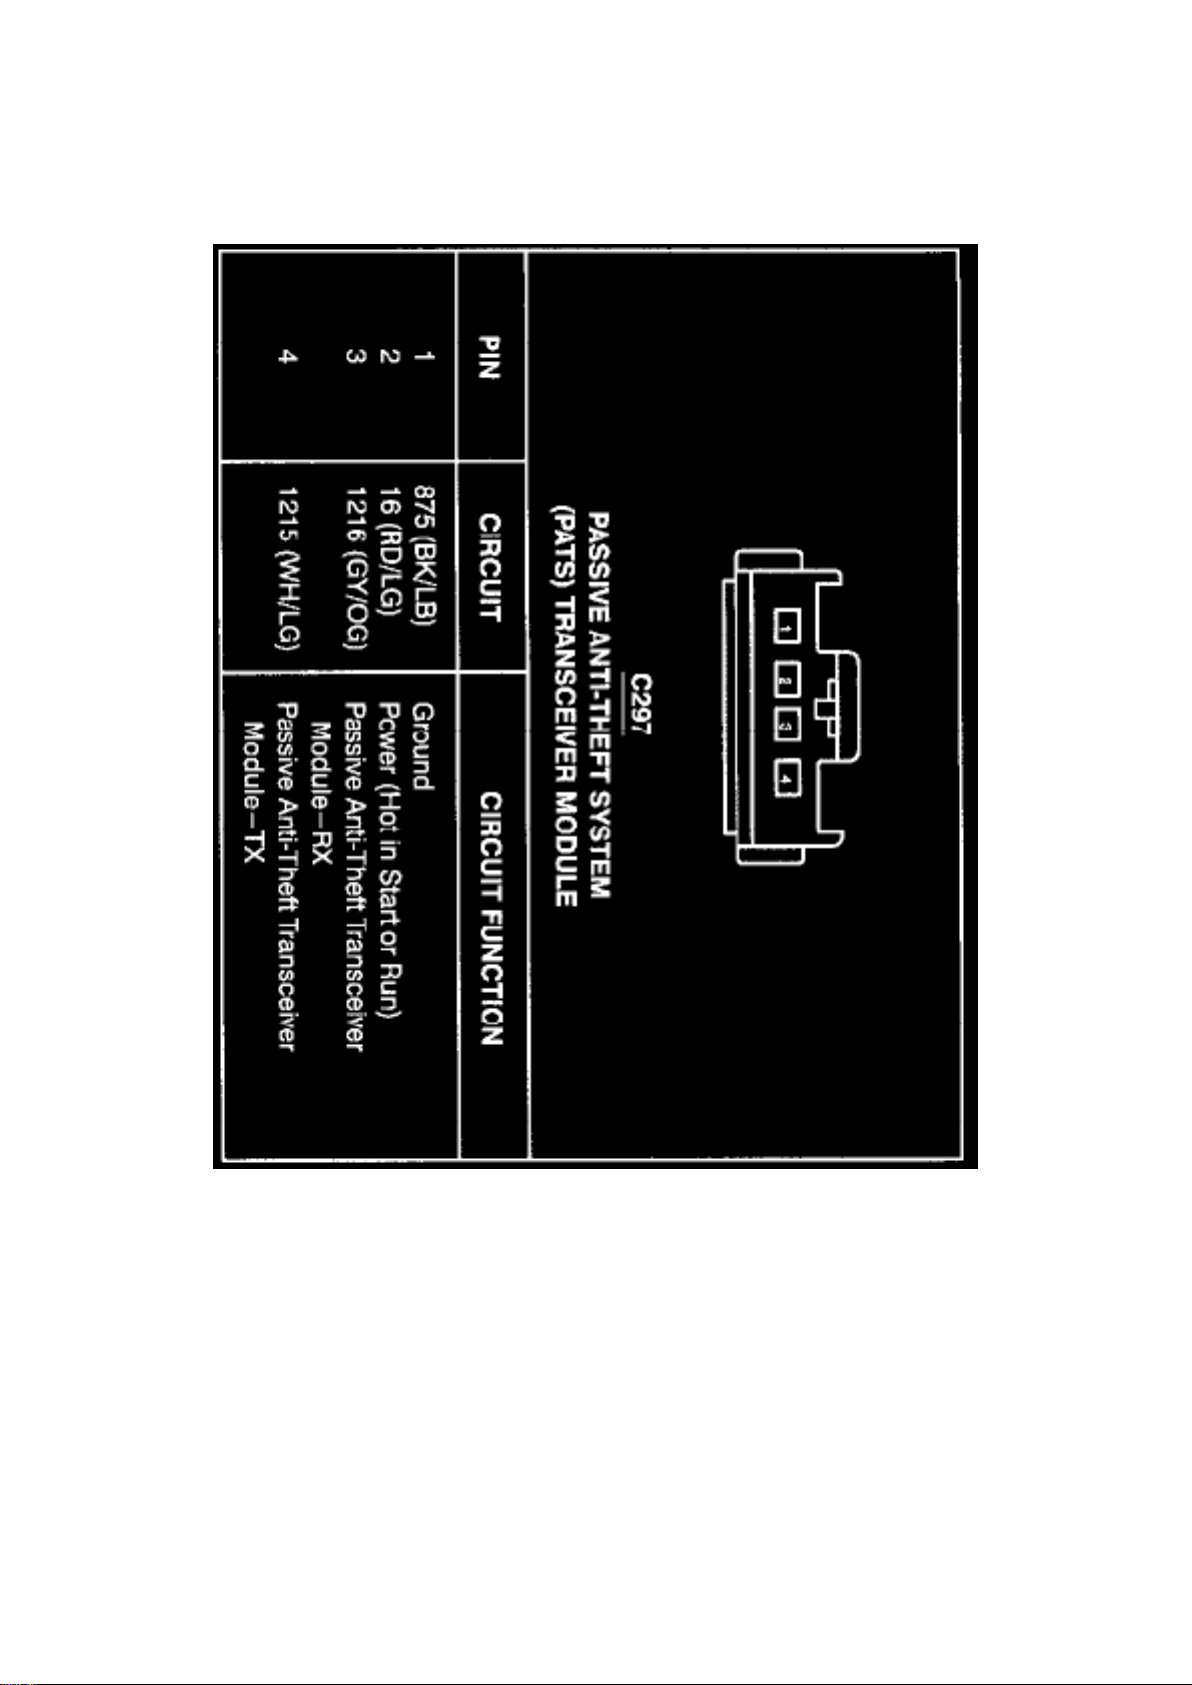
Ford F 150 4wd Pickup Workshop Manual (V8-5.4L SOHC VIN 3 (1999))
Ford Workshop Manuals > Relays and Modules > Relays and Modules - Accessories and Optional Equipment > Alarm
Module, (Vehicle Antitheft) > Component Information > Diagrams > Anti-Theft Transceiver Module
Page 47
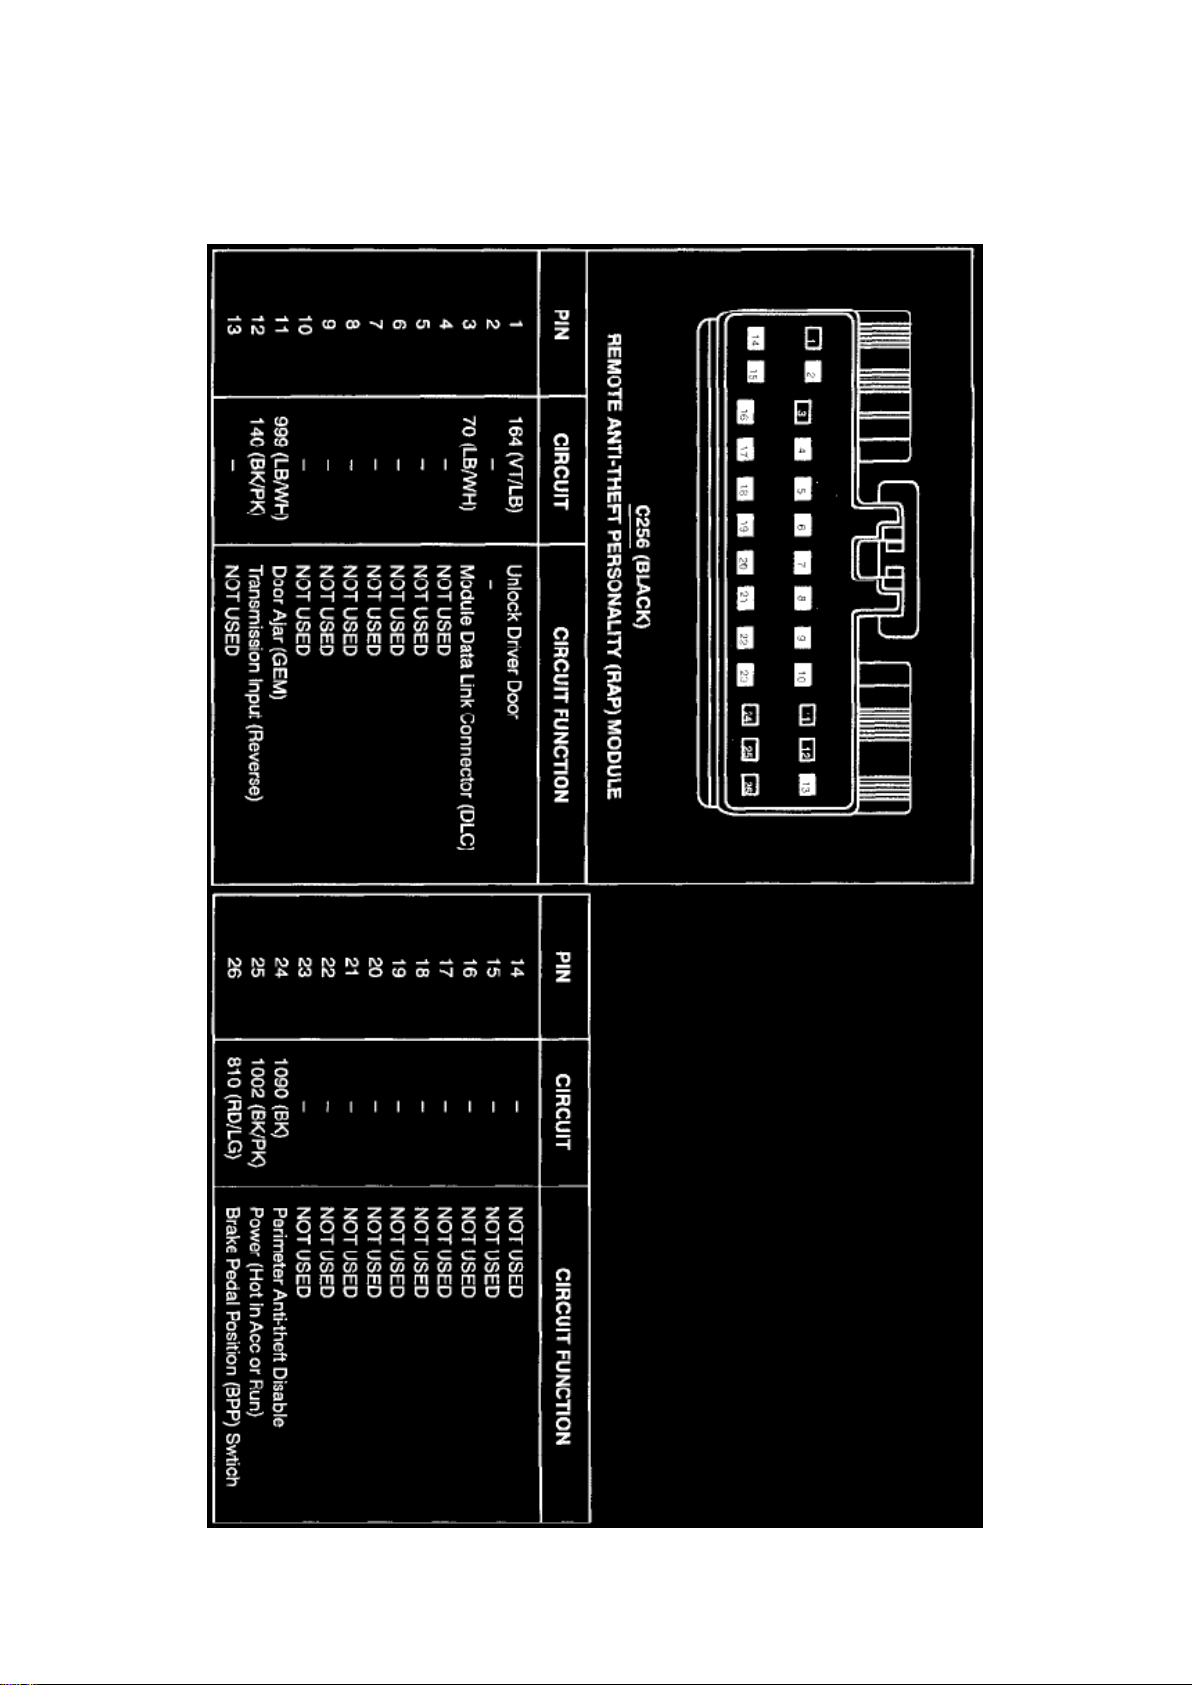
Ford F 150 4wd Pickup Workshop Manual (V8-5.4L SOHC VIN 3 (1999))
Ford Workshop Manuals > Relays and Modules > Relays and Modules - Accessories and Optional Equipment > Alarm
Module, (Vehicle Antitheft) > Component Information > Diagrams > Anti-Theft Transceiver Module > Page 46
Page 48

Alarm Module: Diagrams Remote Anti-Theft Personality Module
Page 49
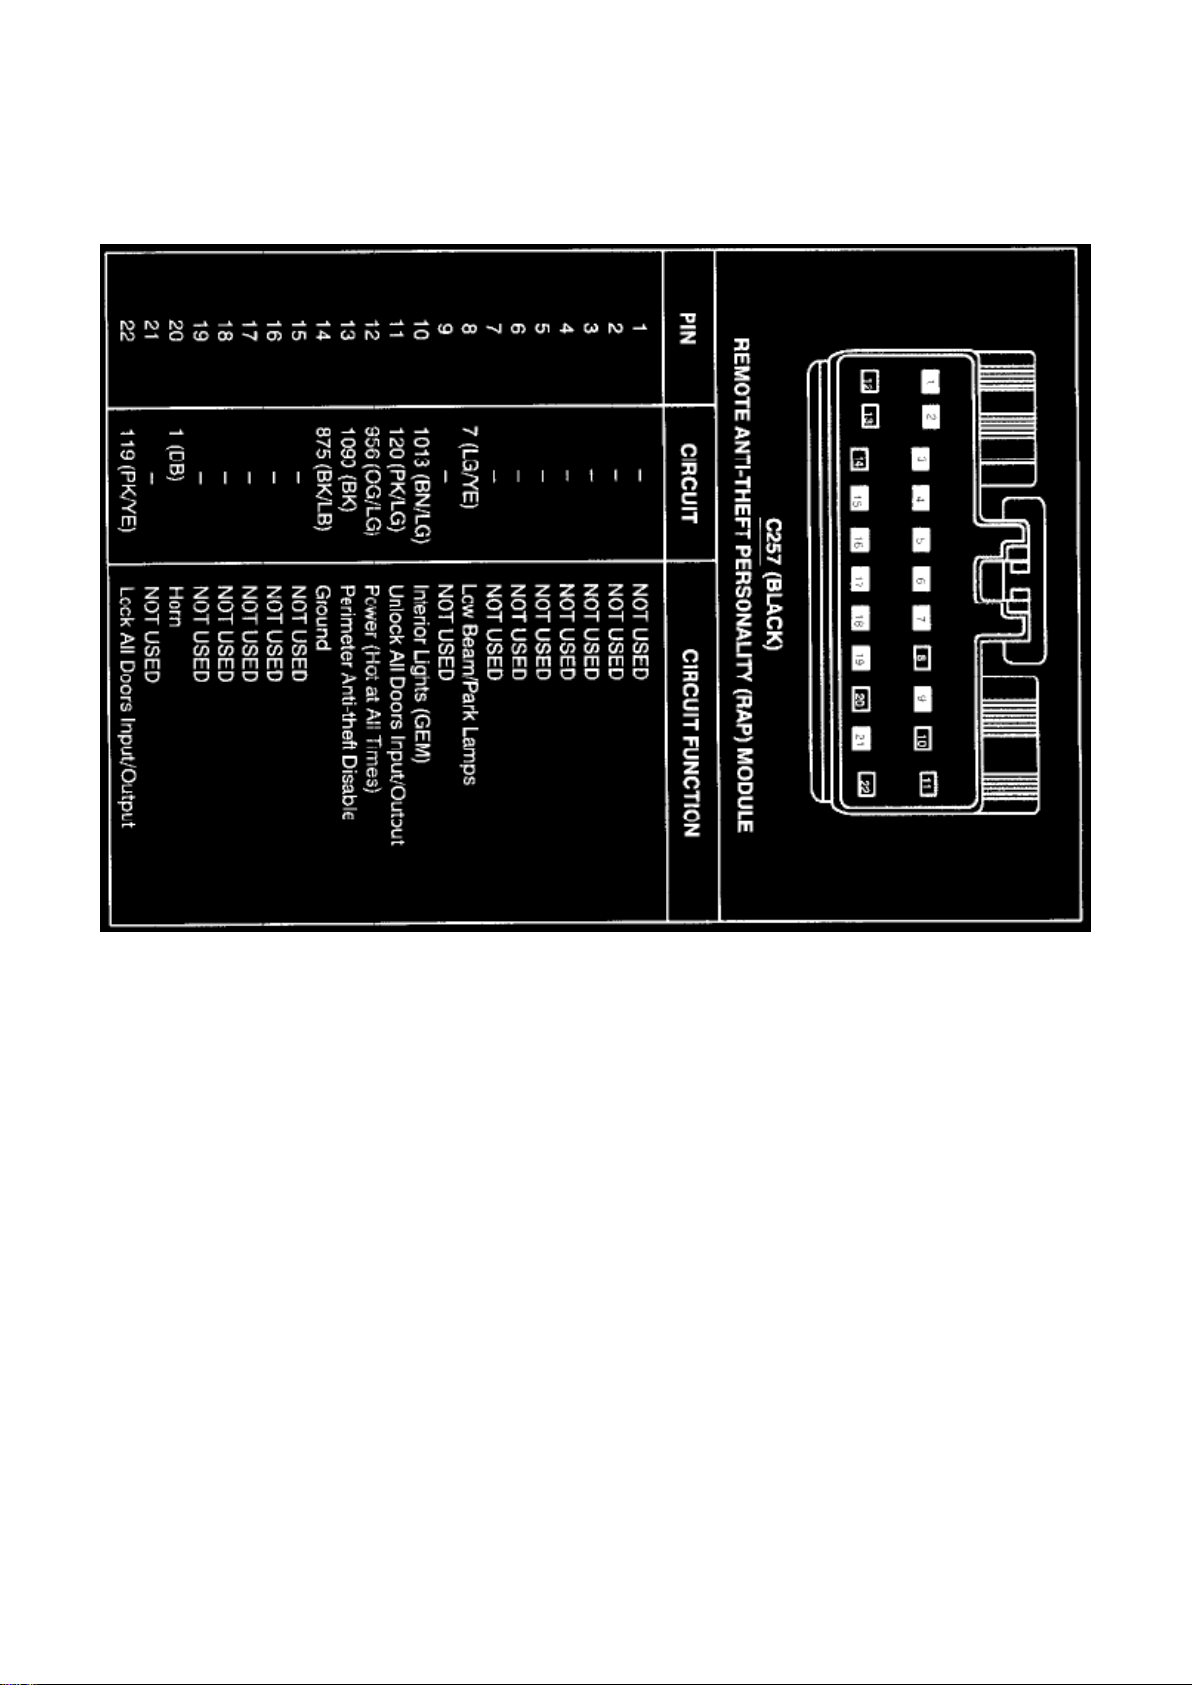
Ford F 150 4wd Pickup Workshop Manual (V8-5.4L SOHC VIN 3 (1999))
Ford Workshop Manuals > Relays and Modules > Relays and Modules - Accessories and Optional Equipment > Alarm
Module, (Vehicle Antitheft) > Component Information > Diagrams > Anti-Theft Transceiver Module > Page 47
Page 50
Ford F 150 4wd Pickup Workshop Manual (V8-5.4L SOHC VIN 3 (1999))
Ford Workshop Manuals > Relays and Modules > Relays and Modules - Accessories and Optional Equipment > Alarm
Module, (Vehicle Antitheft) > Component Information > Service and Repair > Module Replacement
Page 51

Alarm Module: Service and Repair Module Replacement
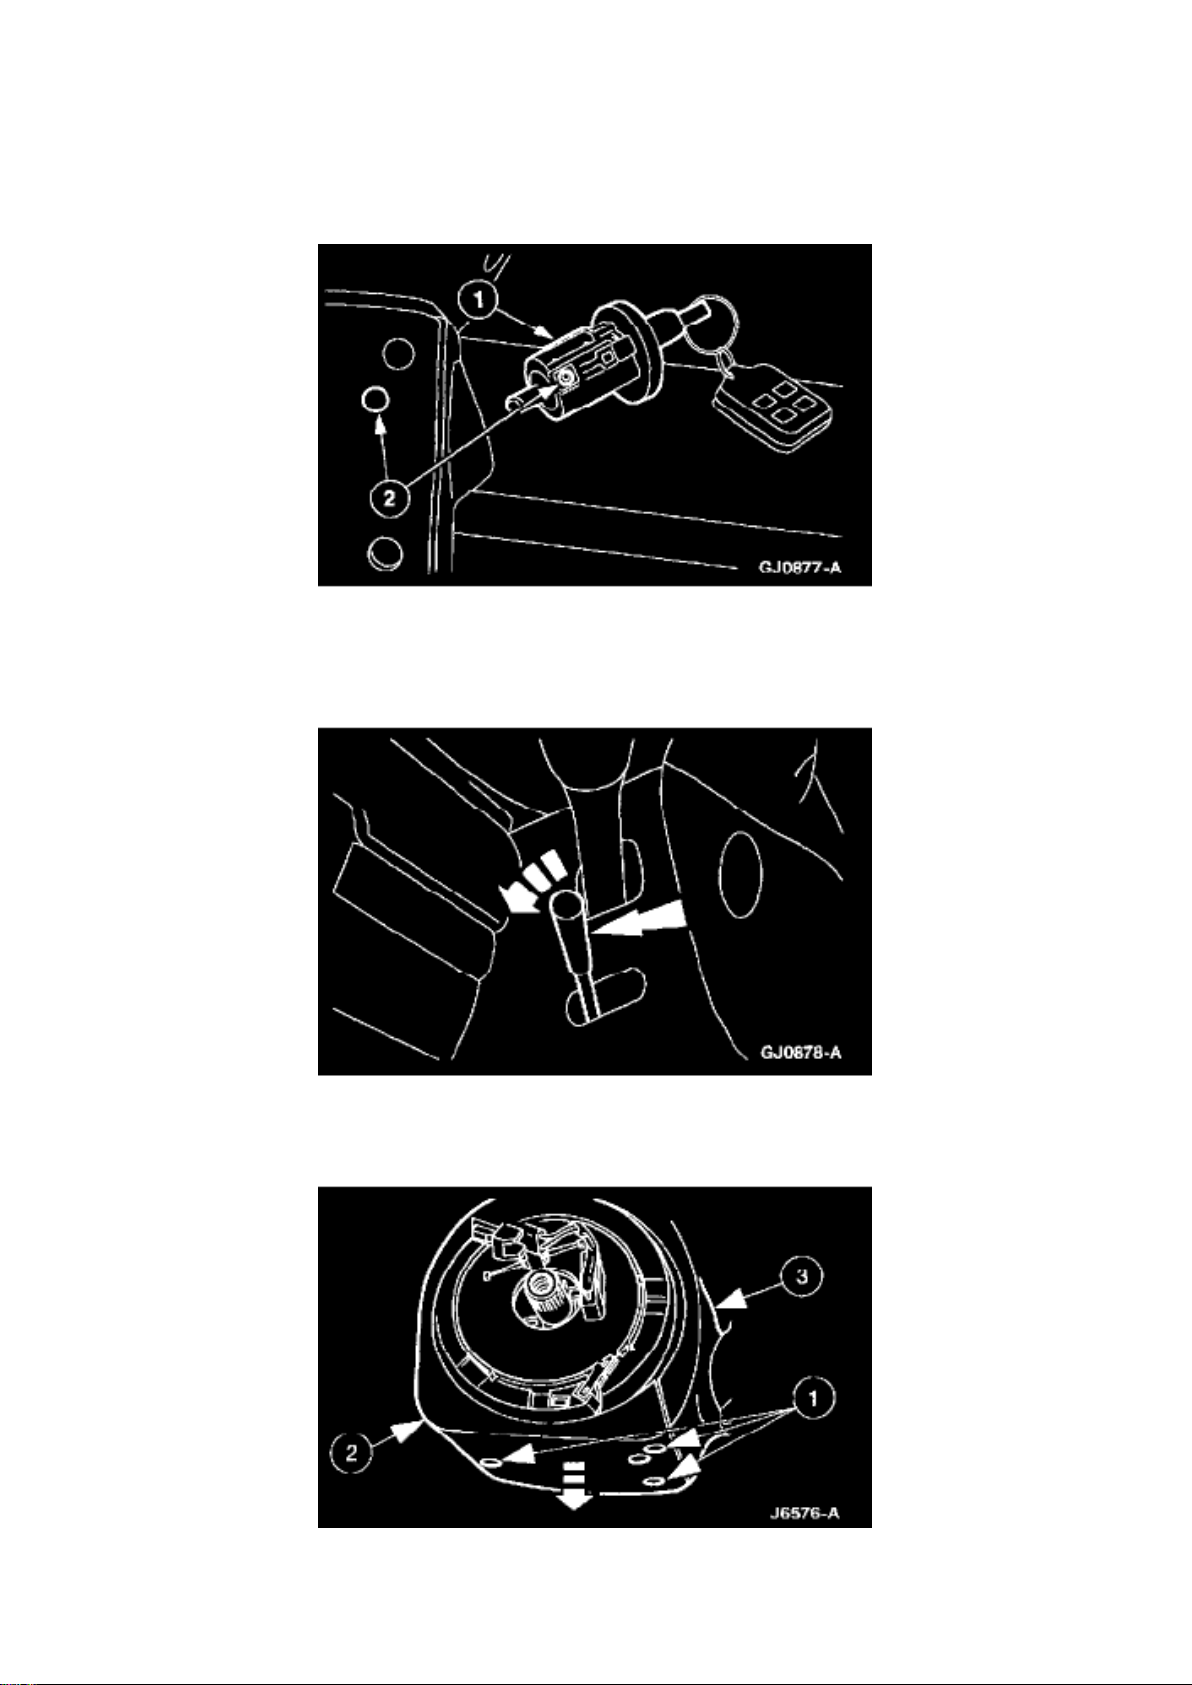
REMOVAL
1. Disconnect the battery ground cable.
CAUTION: Electronic modules are sensitive to electrical charges. If exposed to these charges,
damage may result.
2. Remove the ignition switch lock cylinder.
1 Insert the ignition key into the ignition switch lock cylinder and turn to the RUN position.
2 Insert a punch in the access hole of the steering column and press the release tab while pushing
out the ignition switch lock cylinder.
3. Unscrew and remove the tilt wheel handle and shank. 4. Remove the instrument panel steering
column cover.
5. Remove the upper and lower steering column shrouds.
1 Remove the screws.
2 Remove the lower steering column shroud.
3 Remove the upper steering column shroud.
NOTE: The steering wheel has been removed for clarity.
Page 52
Ford F 150 4wd Pickup Workshop Manual (V8-5.4L SOHC VIN 3 (1999))
Ford Workshop Manuals > Relays and Modules > Relays and Modules - Accessories and Optional Equipment > Alarm
Module, (Vehicle Antitheft) > Component Information > Service and Repair > Module Replacement > Page 50
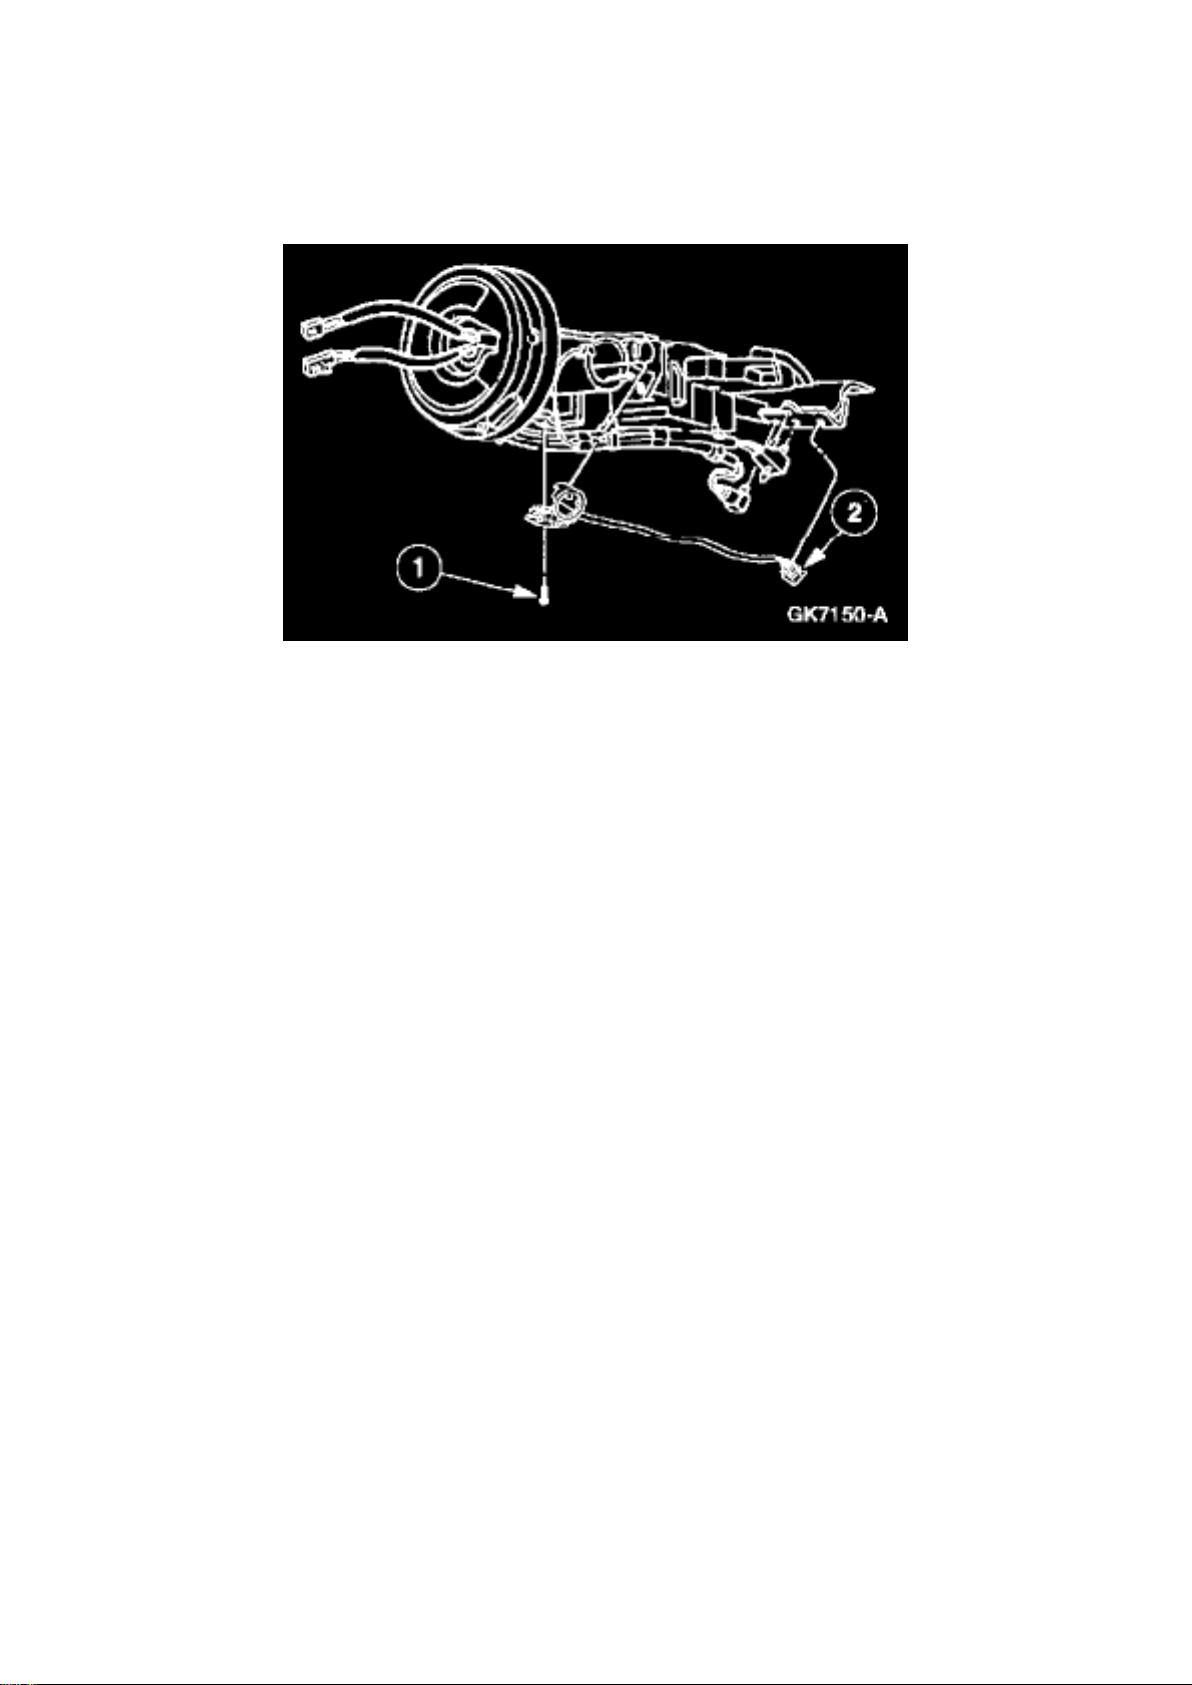
6. Remove the anti-theft transceiver module.
1 Remove the screw from the bottom of the transceiver module.
2 Disconnect the electrical connector and remove the module.
NOTE: Only apply pressure or leverage below the key cylinder lower rib.
INSTALLATION
1. To install, reverse the removal procedure.
NOTE: When the battery is disconnected and reconnected, some abnormal drive symptoms may
occur while the vehicle relearns its adaptive strategy. The vehicle may need to be driven 16 km (10
mi) or more to relearn the strategy.
Page 53
Ford F 150 4wd Pickup Workshop Manual (V8-5.4L SOHC VIN 3 (1999))
Ford Workshop Manuals > Relays and Modules > Relays and Modules - Accessories and Optional Equipment > Alarm
Module, (Vehicle Antitheft) > Component Information > Service and Repair > Module Replacement > Page 51
Page 54

Alarm Module: Service and Repair Remote Anti-Theft Personality Module
REMOVAL
1. Disconnect the battery ground cable.
CAUTION: Electronic modules are sensitive to electrical charges. If exposed to these charges,
damage may result.
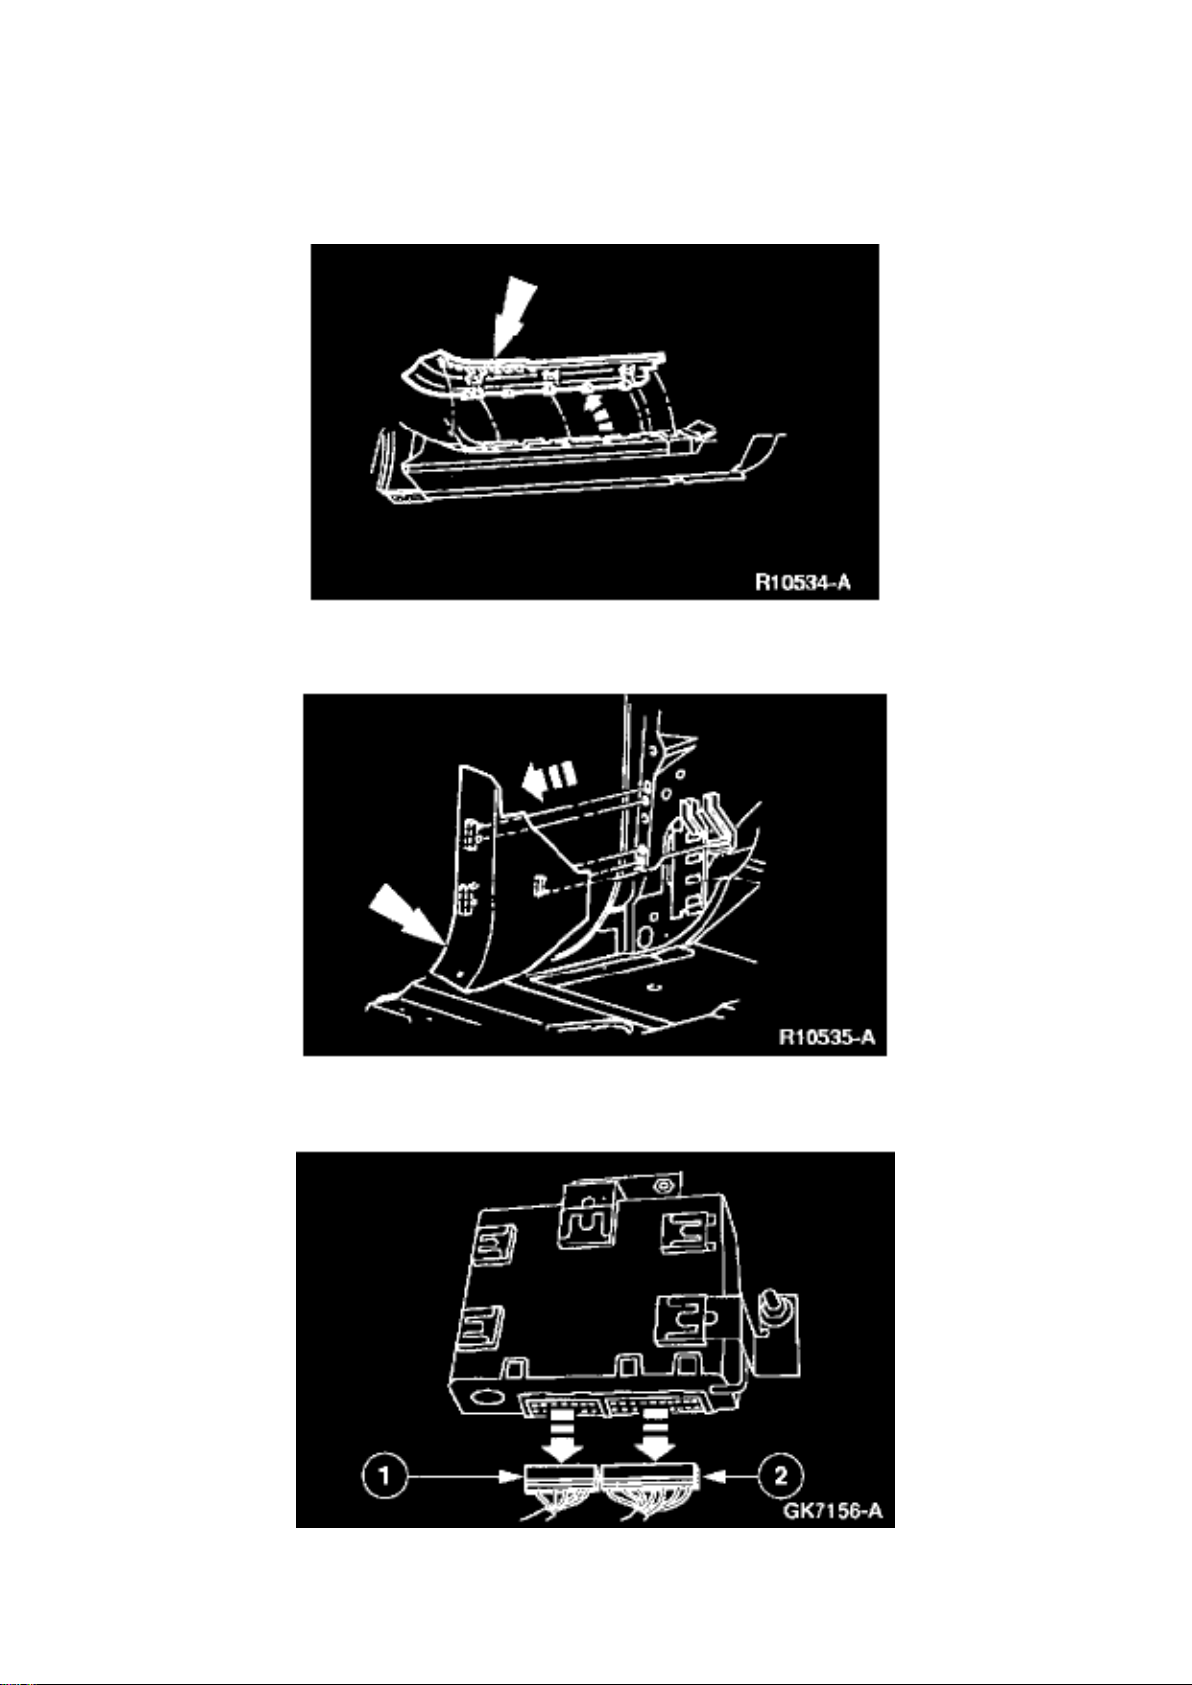
2. Remove the LH front door scuff plate.
3. Remove the LH cowl side trim panel.
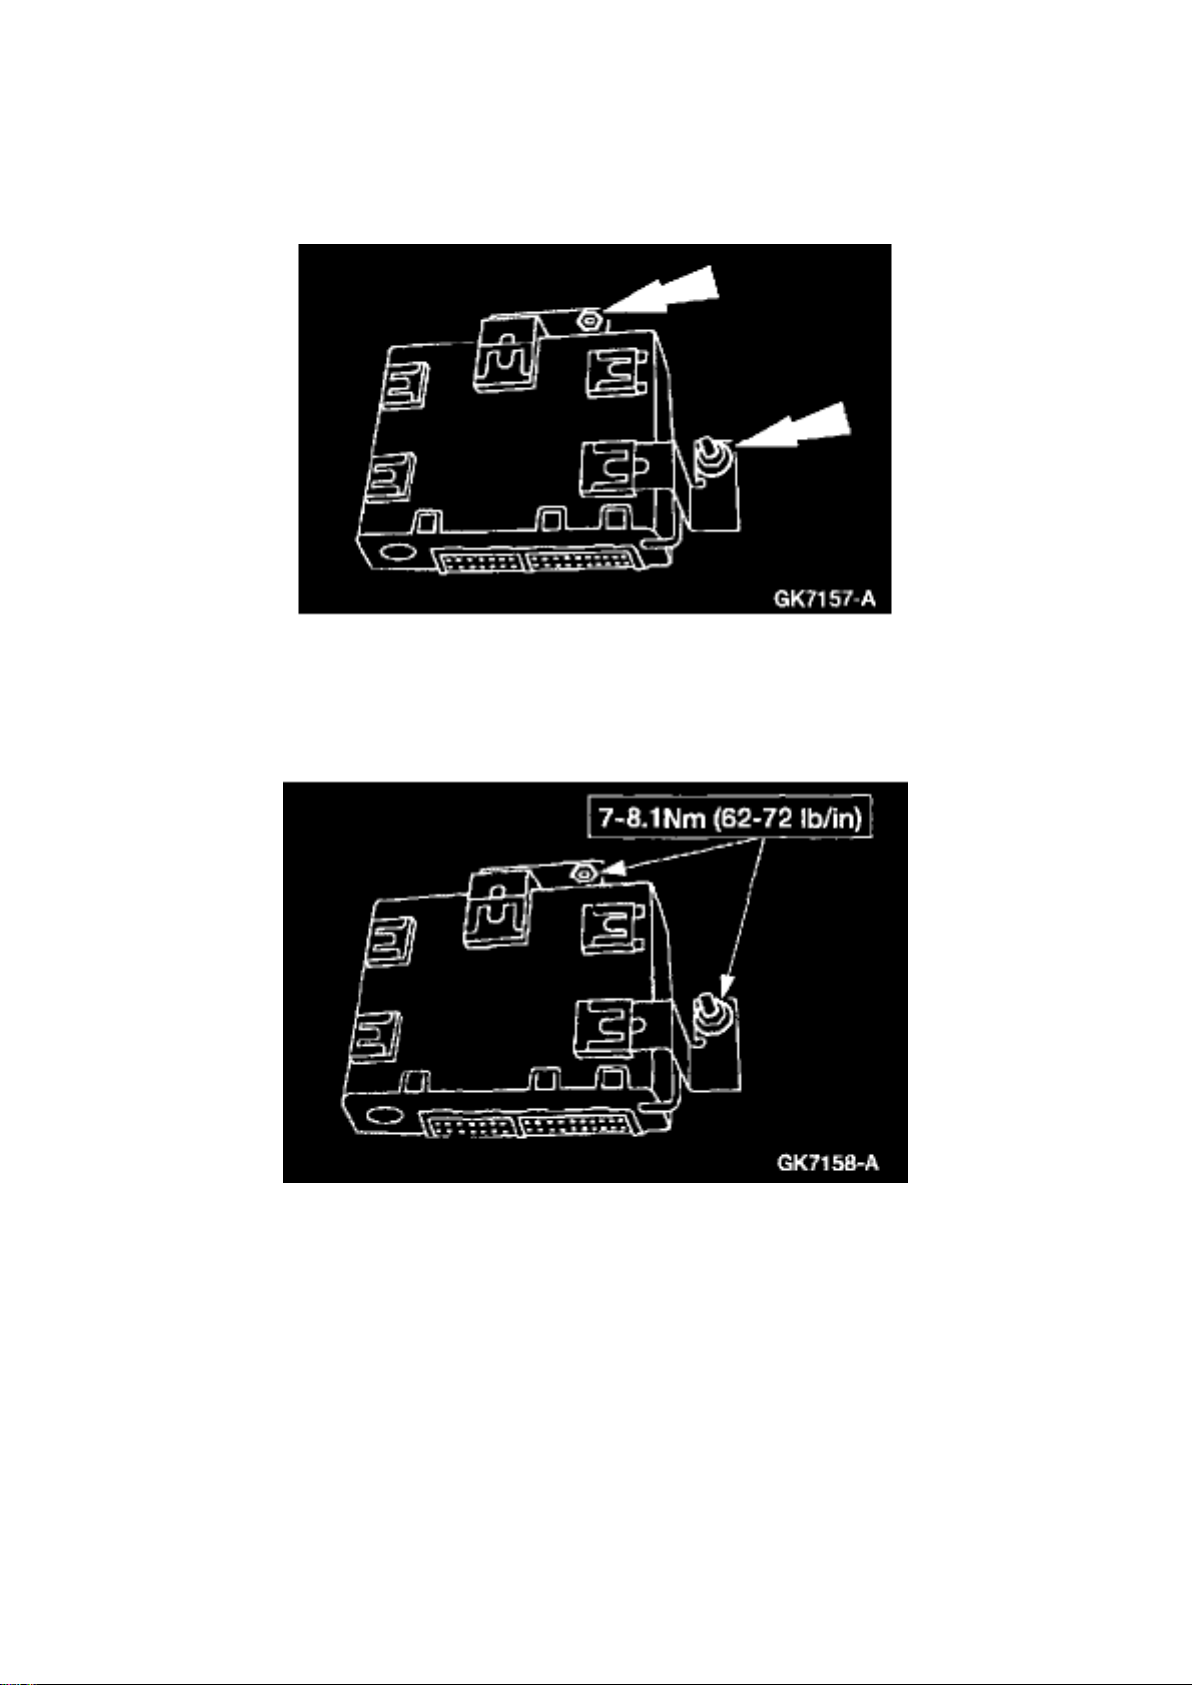
4. Disconnect the two Remote Anti-Theft Personality (RAP) module electrical connectors.
1 Disconnect C257.
2 Disconnect C256.
NOTE: If C256 is disconnected first, an inadvertent IGNTAM alarm event (AL__EVT) will be stored
and the alarm will sound. The alarm must be disarmed by the remote unlock button or a key in the
door lock cylinder to UNLOCK. To avoid this condition, disconnect (1) C257 before (2) C256 and
reconnect (2) C256 before (1) C257.
Page 55
Ford F 150 4wd Pickup Workshop Manual (V8-5.4L SOHC VIN 3 (1999))
Ford Workshop Manuals > Relays and Modules > Relays and Modules - Accessories and Optional Equipment > Alarm
Module, (Vehicle Antitheft) > Component Information > Service and Repair > Module Replacement > Page 52
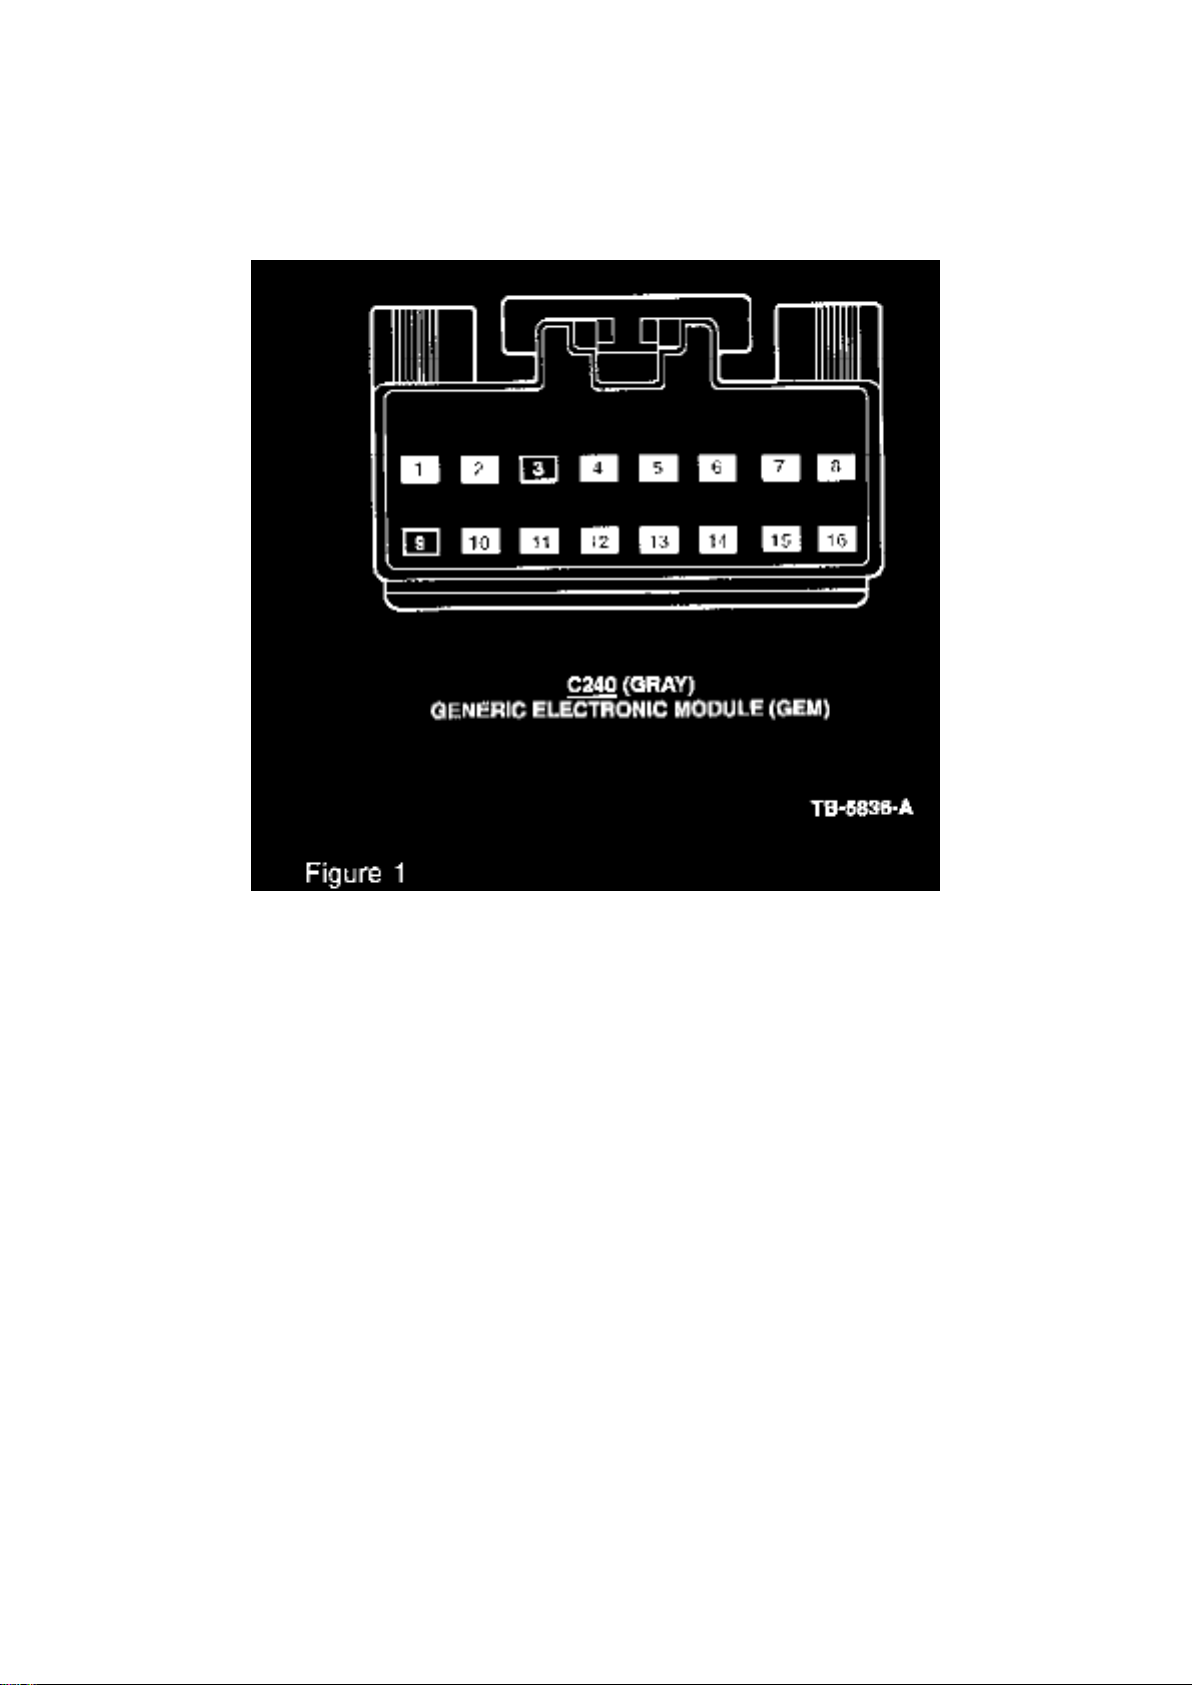
5. Remove the RAP module nuts and the RAP module.
INSTALLATION
1. To install, reverse the removal procedure.
NOTE When the battery is disconnected and reconnected, some abnormal drive symptoms may occur
while the vehicle relearns its adaptive strategy. The vehicle may need to be driven 16 km (10 miles)
or more to relearn the strategy.
- To avoid inadvertent alarm activation, reconnect C256 first.
Page 56
Ford F 150 4wd Pickup Workshop Manual (V8-5.4L SOHC VIN 3 (1999))
Ford Workshop Manuals > Relays and Modules > Relays and Modules - Accessories and Optional Equipment > General
Module > Component Information > Technical Service Bulletins > Customer Interest: > 99-21-3 > Oct > 99 > Autolock
System - Functions Not Operating Properly
General Module: Customer Interest Autolock System - Functions Not Operating Properly
Article No 99-21-3
10/18/99
AUTO-LOCK - AUTO-LOCK FUNCTIONS NOT OPERATING PROPERLY - VEHICLES BUILT
FROM 6/3/1999 THROUGH 6/8/1999
FORD: 1999 F-150, F-250 LD
ISSUE The Auto-Lock Functions may not be operating properly. This may consist of the relock
function inoperative after initial lock or door locks engaging with door open/ajar. Additionally, the
double chirp horn alert which indicates door ajar does not operate when the key fob lock button is
actuated. These may be due to the door ajar circuit missing from the Generic Electronic Module
(GEM) to the Remote Anti-theft Personality (RAP) Module.
ACTION Install missing Circuit 999. Refer to the following Service Procedure for details.
SERVICE PROCEDURE
1. Remove the instrument panel fuse junction panel. Refer to the 1999 F-150/250 Workshop
Manual, Page 419-10-3, Removal and Installation - Module GEM/CTM.
2. Disengage pin locking bar on C240 connector (GEM 16-way connector) and insert Circuit 999
(LB/W, jumper XL3Z-14A411-BA) into connector location Pin # 3 (Figure 1). Reinsert locking bar.
Page 57

3. Remove left scuff plate and kick panel to access the C247F connector.
4. Route jumper wire along the -14401- harness to C247F connector at the -14A005- harness in left
kick panel area.
5. Remove C247F connector (gray 16-way connector) from finger bracket and disconnect from
mating connector.
Page 58
Ford F 150 4wd Pickup Workshop Manual (V8-5.4L SOHC VIN 3 (1999))
Ford Workshop Manuals > Relays and Modules > Relays and Modules - Accessories and Optional Equipment > General
Module > Component Information > Technical Service Bulletins > Customer Interest: > 99-21-3 > Oct > 99 > Autolock
System - Functions Not Operating Properly > Page 61
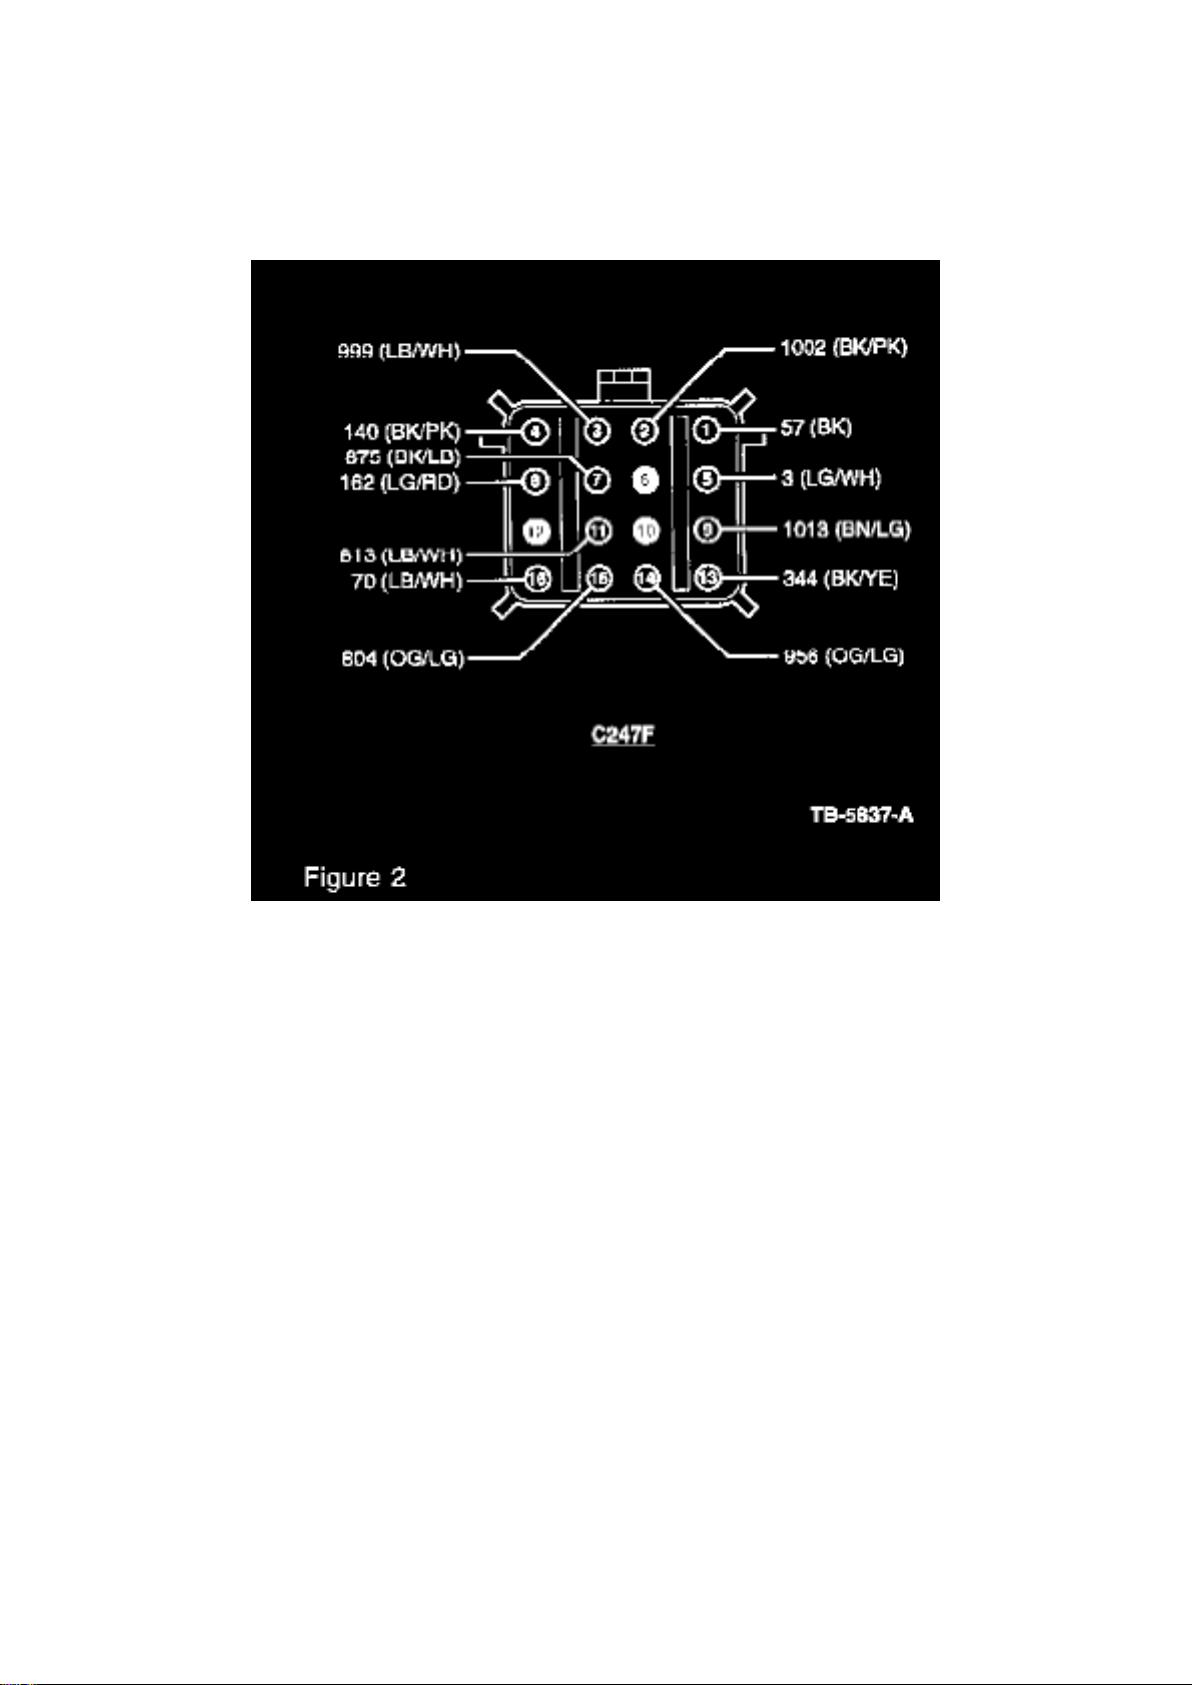
6. Disengage and remove red locking spacer from C247F connector and insert Circuit 999 (LB/W,
jumper XL3Z-14A411-BA) into connector location Pin # 3 (Figure 2). Reinsert red locking spacer.
Spot tape jumper circuit along -14401-harness to the -14A005- harness.
7. Reconnect -14401- connector to -14A005- 16-way connector and reattach to finger bracket.
8. Reinstall left kick panel and scuff plate.
9. Reassemble instrument panel fuse junction panel and GEM per Workshop Manual, Page
419-10-3.
10. To functionally test repair, ensure either the driver/passenger door is open, press lock button on
key fob twice, and listen for two horn chirps.
11. Connect New Generation Star (NGS) Tester to the vehicle and clear all codes. Then test RAP
and GEM modules for any system failure induced during the repair procedure.
PART NUMBER PART NAME
XL3Z-14A411-BA Jumper Harness
OTHER APPLICABLE ARTICLES: NONE
WARRANTY STATUS: Eligible Under The Provisions Of Bumper To Bumper Warranty Coverage
OPERATION DESCRIPTION TIME
Page 59

992103A Repair Door Ajar Circuit 0.9 Hrs.
DEALER CODING
CONDITION
BASIC PART NO. CODE
14A411 39
OASIS CODES: 112000, 203000, 203200, 205000
Page 60
Ford F 150 4wd Pickup Workshop Manual (V8-5.4L SOHC VIN 3 (1999))
Ford Workshop Manuals > Relays and Modules > Relays and Modules - Accessories and Optional Equipment > General
Module > Component Information > Technical Service Bulletins > All Technical Service Bulletins: > 99-21-3 > Oct > 99 >
Autolock System - Functions Not Operating Properly
General Module: All Technical Service Bulletins Autolock System - Functions Not Operating
Properly
Article No 99-21-3
10/18/99
AUTO-LOCK - AUTO-LOCK FUNCTIONS NOT OPERATING PROPERLY - VEHICLES BUILT
FROM 6/3/1999 THROUGH 6/8/1999
FORD: 1999 F-150, F-250 LD
ISSUE The Auto-Lock Functions may not be operating properly. This may consist of the relock
function inoperative after initial lock or door locks engaging with door open/ajar. Additionally, the
double chirp horn alert which indicates door ajar does not operate when the key fob lock button is
actuated. These may be due to the door ajar circuit missing from the Generic Electronic Module
(GEM) to the Remote Anti-theft Personality (RAP) Module.
ACTION Install missing Circuit 999. Refer to the following Service Procedure for details.
SERVICE PROCEDURE
1. Remove the instrument panel fuse junction panel. Refer to the 1999 F-150/250 Workshop
Manual, Page 419-10-3, Removal and Installation - Module GEM/CTM.
Page 61

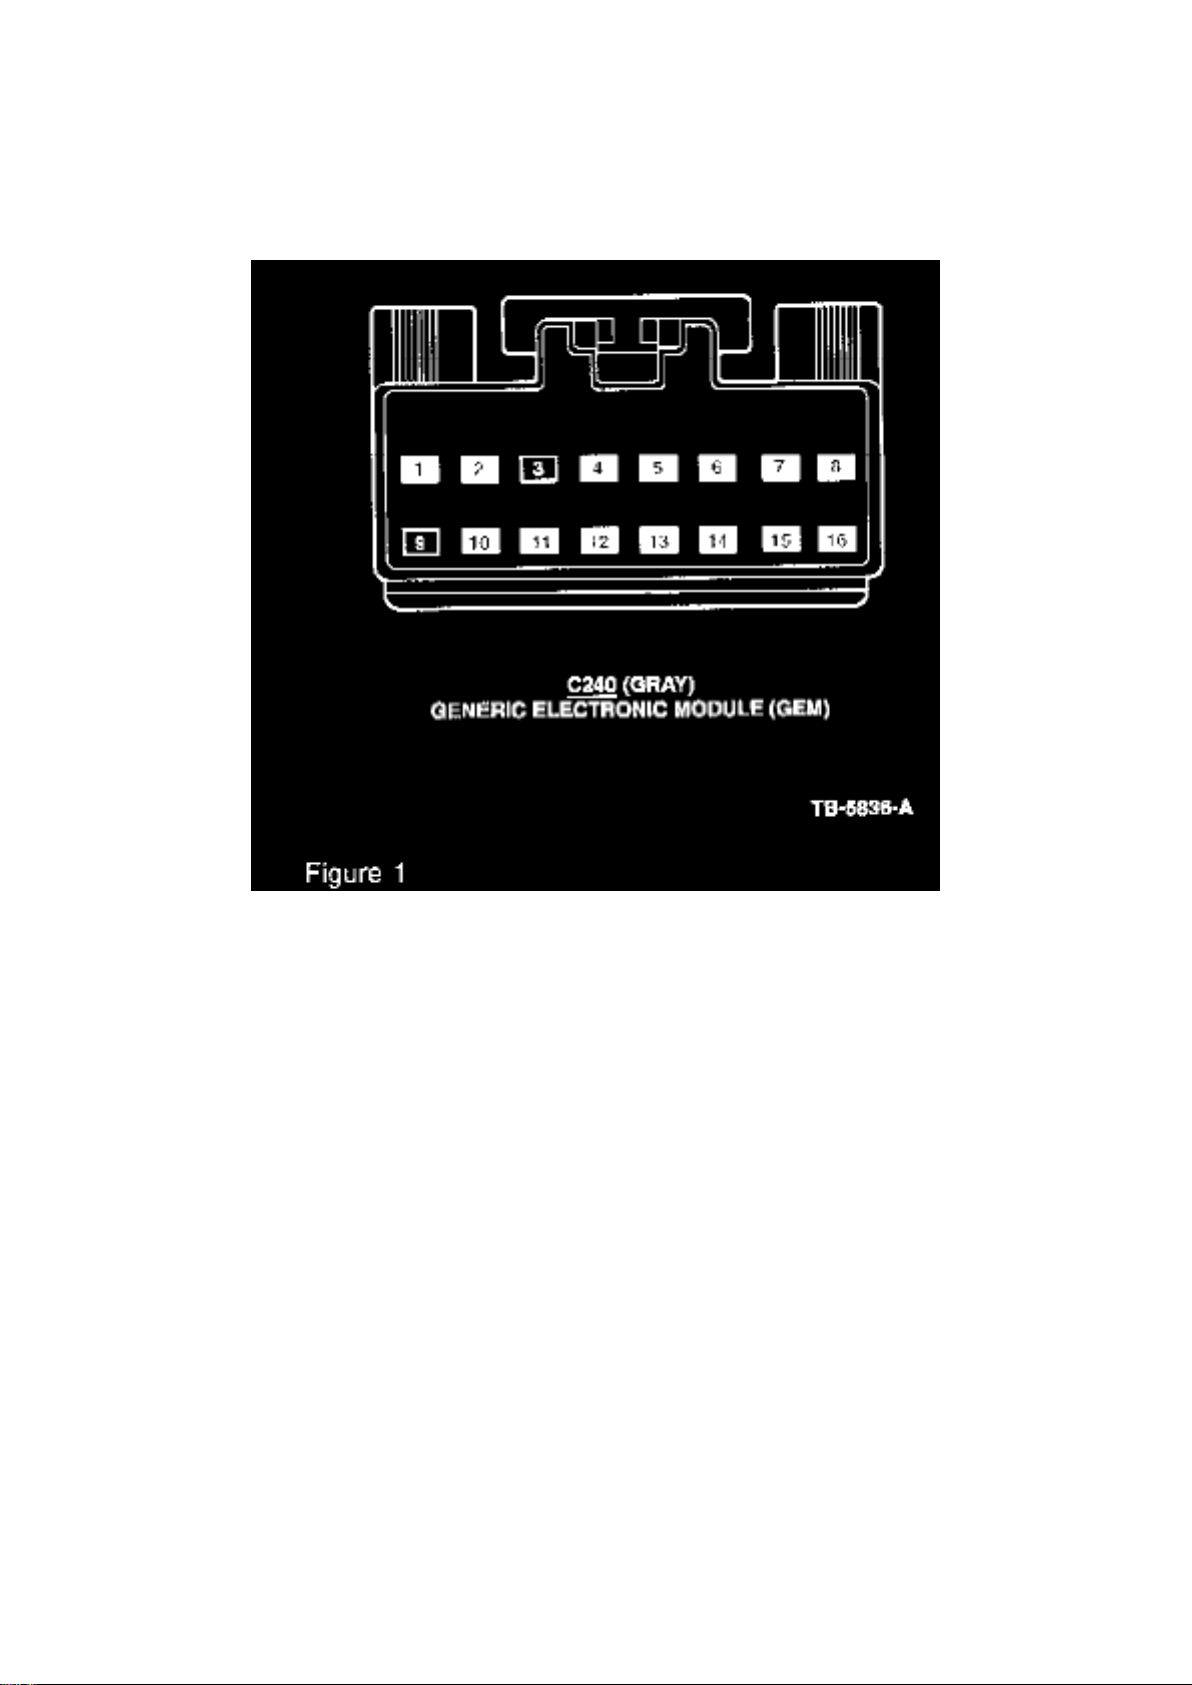
2. Disengage pin locking bar on C240 connector (GEM 16-way connector) and insert Circuit 999
(LB/W, jumper XL3Z-14A411-BA) into connector location Pin # 3 (Figure 1). Reinsert locking bar.
3. Remove left scuff plate and kick panel to access the C247F connector.
4. Route jumper wire along the -14401- harness to C247F connector at the -14A005- harness in left
kick panel area.
5. Remove C247F connector (gray 16-way connector) from finger bracket and disconnect from
mating connector.
Page 62
Ford F 150 4wd Pickup Workshop Manual (V8-5.4L SOHC VIN 3 (1999))
Ford Workshop Manuals > Relays and Modules > Relays and Modules - Accessories and Optional Equipment > General
Module > Component Information > Technical Service Bulletins > All Technical Service Bulletins: > 99-21-3 > Oct > 99 >
Autolock System - Functions Not Operating Properly > Page 67
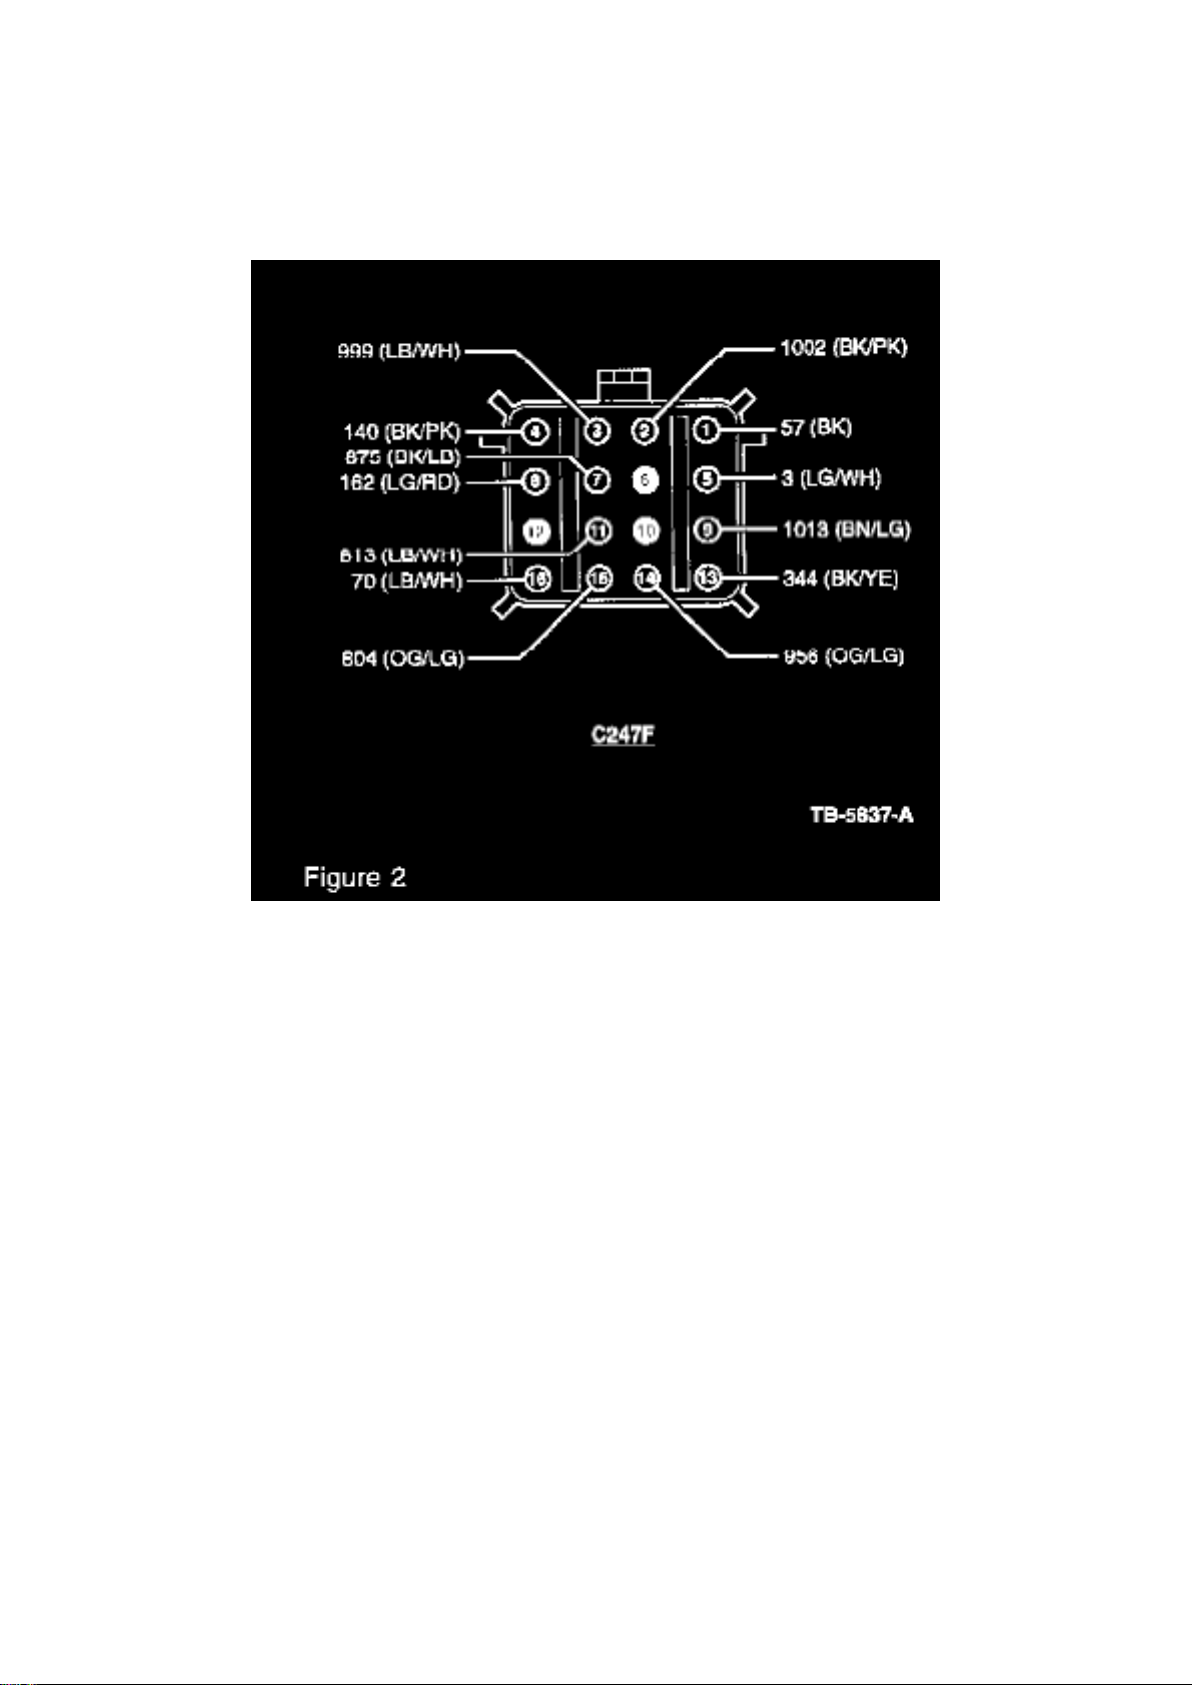
6. Disengage and remove red locking spacer from C247F connector and insert Circuit 999 (LB/W,
jumper XL3Z-14A411-BA) into connector location Pin # 3 (Figure 2). Reinsert red locking spacer.
Spot tape jumper circuit along -14401-harness to the -14A005- harness.
7. Reconnect -14401- connector to -14A005- 16-way connector and reattach to finger bracket.
8. Reinstall left kick panel and scuff plate.
9. Reassemble instrument panel fuse junction panel and GEM per Workshop Manual, Page
419-10-3.
10. To functionally test repair, ensure either the driver/passenger door is open, press lock button on
key fob twice, and listen for two horn chirps.
11. Connect New Generation Star (NGS) Tester to the vehicle and clear all codes. Then test RAP
and GEM modules for any system failure induced during the repair procedure.
PART NUMBER PART NAME
XL3Z-14A411-BA Jumper Harness
OTHER APPLICABLE ARTICLES: NONE
WARRANTY STATUS: Eligible Under The Provisions Of Bumper To Bumper Warranty Coverage
OPERATION DESCRIPTION TIME
Page 63

992103A Repair Door Ajar Circuit 0.9 Hrs.
DEALER CODING
CONDITION
BASIC PART NO. CODE
14A411 39
OASIS CODES: 112000, 203000, 203200, 205000
Page 64

Ford F 150 4wd Pickup Workshop Manual (V8-5.4L SOHC VIN 3 (1999))
Ford Workshop Manuals > Relays and Modules > Relays and Modules - Accessories and Optional Equipment > General
Module > Component Information > Technical Service Bulletins > All Other Service Bulletins for General Module: > 00-14-2
> Jul > 00 > Speedometer Defective,, 4X4 Lamp ON, DTCs P1635/P1639
Page 65

Four Wheel Drive Indicator Lamp: All Technical Service Bulletins Speedometer Defective,, 4X4
Lamp ON, DTCs P1635/P1639
Page 66

Article No. 00-14-2
Date 7/10/00
^ DIAGNOSTIC TROUBLE CODE (DTC) - P1635 AND/OR P1639 PRESENT AFTER
POWERTRAIN CONTROL MODULE (PCM) OR INSTRUMENT CLUSTER REPLACEMENT GASOLINE ENGINE VEHICLES ONLY
^ LAMP - 4X4 LAMP ILLUMINATED AFTER POWERTRAIN CONTROL MODULE (PCM) OR
INSTRUMENT CLUSTER REPLACEMENT - GASOLINE ENGINE VEHICLES ONLY
^ SPEEDOMETER - INACCURATE AND/OR INOPERATIVE AFTER POWERTRAIN CONTROL
MODULE (PCM) OR INSTRUMENT CLUSTER REPLACEMENT - GASOLINE ENGINE
VEHICLES ONLY
FORD: 1999-2000 MUSTANG, EXPEDITION, F-150, F-250 2000 ECONOLINE
LINCOLN: 1999-2000 TOWN CAR, NAVIGATOR
This TSB is being republished in its entirety to update the vehicles affected.
ISSUE
Some vehicles may exhibit an inoperative or inaccurate speedometer, 4X4 lamp illuminated, and/or
Diagnostic Trouble Codes (DTCs) P1635 or P1639 present after a Powertrain Control Module
(PCM) or instrument cluster replacement.
ACTION
This may be caused by the PCM Vehicle Identification (VID) block not being updated. The following
Service Procedure should be used along with the Worldwide Diagnostic System (WDS) to update
the VID block.
SERVICE PROCEDURE
1. To perform this procedure, turn on WDS, wait for full boot-up and undock WDS.
2. Enter user information (will need to have blue car icon at top of screen).
3. Select "16 pin", all except those below, press tic.
4. Make connections as shown, press tic. WDS will display the message "Network Test or Running
Data Collection" in the bottom box. When finished, it will display the vehicle configuration; select
yes if correct.
5. Enter or skip vehicle/dealer information and press tic.
6. Select the toolbox from the icon menu.
7. Select Module Programming and press tic.
8. Select Programmable Parameters, Powertrain and press tic. A list will pop up displaying VID
block options that can be changed. The options include Tire Size, Axle Ratio, 4X4/4X2, and
manual/electronic shift on the fly (ESOF). The formula for revolutions per mile (rev/mile) is 63,360
divided by the circumference of the tire in inches.
9. Select the correct attributes per vehicle application and follow WDS prompts to complete
procedure.
Page 67

10. Once the VID has been updated, clear any codes and test-drive to verify procedure was
accepted.
OTHER APPLICABLE ARTICLES: NONE
SUPERSEDES: 00-12-2
Page 68

Ford F 150 4wd Pickup Workshop Manual (V8-5.4L SOHC VIN 3 (1999))
Ford Workshop Manuals > Relays and Modules > Relays and Modules - Accessories and Optional Equipment > General
Module > Component Information > Technical Service Bulletins > All Other Service Bulletins for General Module: > 00-14-2
> Jul > 00 > Speedometer Defective,, 4X4 Lamp ON, DTCs P1635/P1639 > Page 73
Page 69

WARRANTY STATUS: Eligible Under The Provisions Of Bumper To Bumper Warranty Coverage
And Emissions Warranty Coverage
Page 70

OPERATION DESCRIPTION TIME
001402A Reprogram Vehicle 0.6 Hr.
Identification (VID)/Speedometer Using Worldwide Diagnostic System (WDS)
DEALER CODING
CONDITION
BASIC PART NO. CODE
12A650 42
OASIS CODES: 203000, 203200, 204000, 204100, 204200, 206000, 508000, 601300, 602300,
603300, 613000
Page 71

Ford F 150 4wd Pickup Workshop Manual (V8-5.4L SOHC VIN 3 (1999))
Ford Workshop Manuals > Relays and Modules > Relays and Modules - Accessories and Optional Equipment > General
Module > Component Information > Technical Service Bulletins > All Other Service Bulletins for General Module: > 00-14-2
> Jul > 00 > Speedometer Defective,, 4X4 Lamp ON, DTCs P1635/P1639 > Page 79
Page 72

WARRANTY STATUS: Eligible Under The Provisions Of Bumper To Bumper Warranty Coverage
And Emissions Warranty Coverage
Page 73

OPERATION DESCRIPTION TIME
001402A Reprogram Vehicle 0.6 Hr.
Identification (VID)/Speedometer Using Worldwide Diagnostic System (WDS)
DEALER CODING
CONDITION
BASIC PART NO. CODE
12A650 42
OASIS CODES: 203000, 203200, 204000, 204100, 204200, 206000, 508000, 601300, 602300,
603300, 613000
Page 74
Ford F 150 4wd Pickup Workshop Manual (V8-5.4L SOHC VIN 3 (1999))
Ford Workshop Manuals > Relays and Modules > Relays and Modules - Accessories and Optional Equipment > General
Module > Component Information > Diagrams > Diagram Information and Instructions
General Module: Diagram Information and Instructions
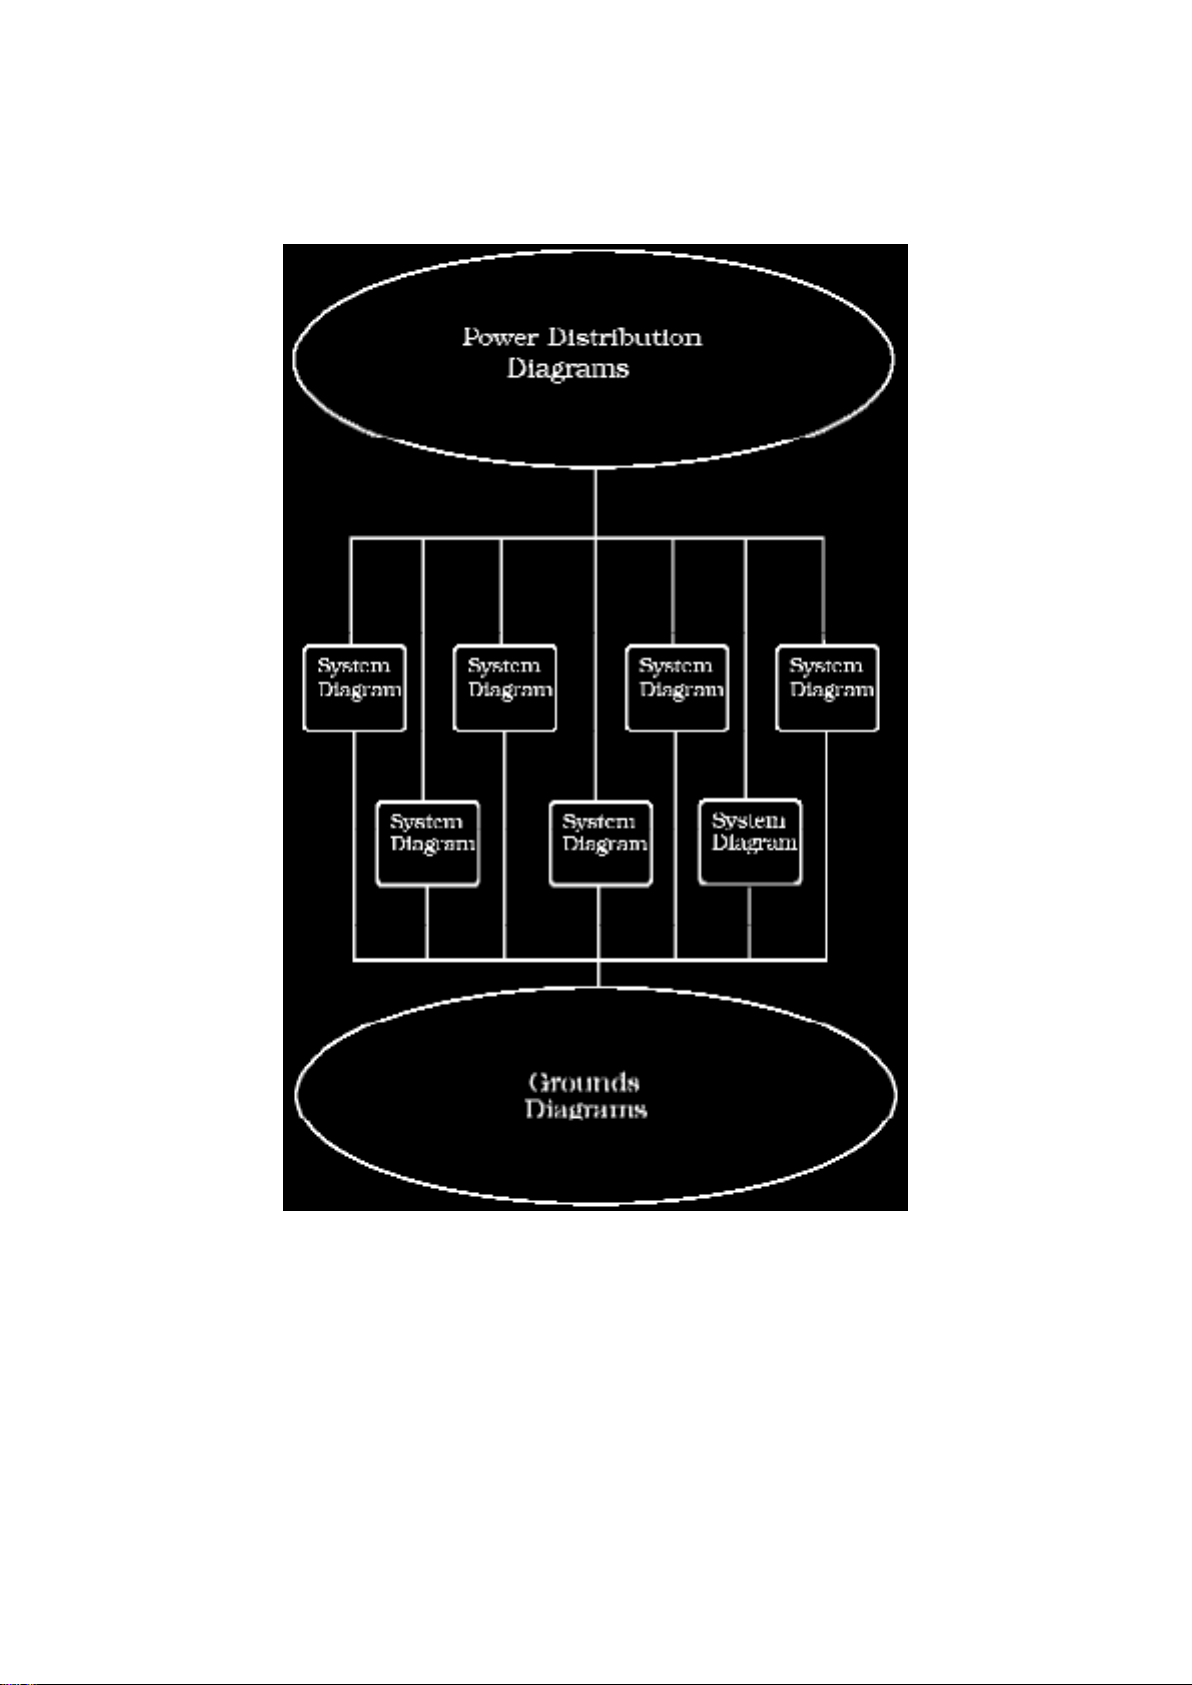
How to Find and Use These Diagrams
Diagrams are presented in three main categories:
- Power Distribution Diagrams
- System Diagrams
- Grounds Diagrams
Page 75
Ford F 150 4wd Pickup Workshop Manual (V8-5.4L SOHC VIN 3 (1999))
Ford Workshop Manuals > Relays and Modules > Relays and Modules - Accessories and Optional Equipment > General
Module > Component Information > Diagrams > Diagram Information and Instructions > Page 82
Page 76

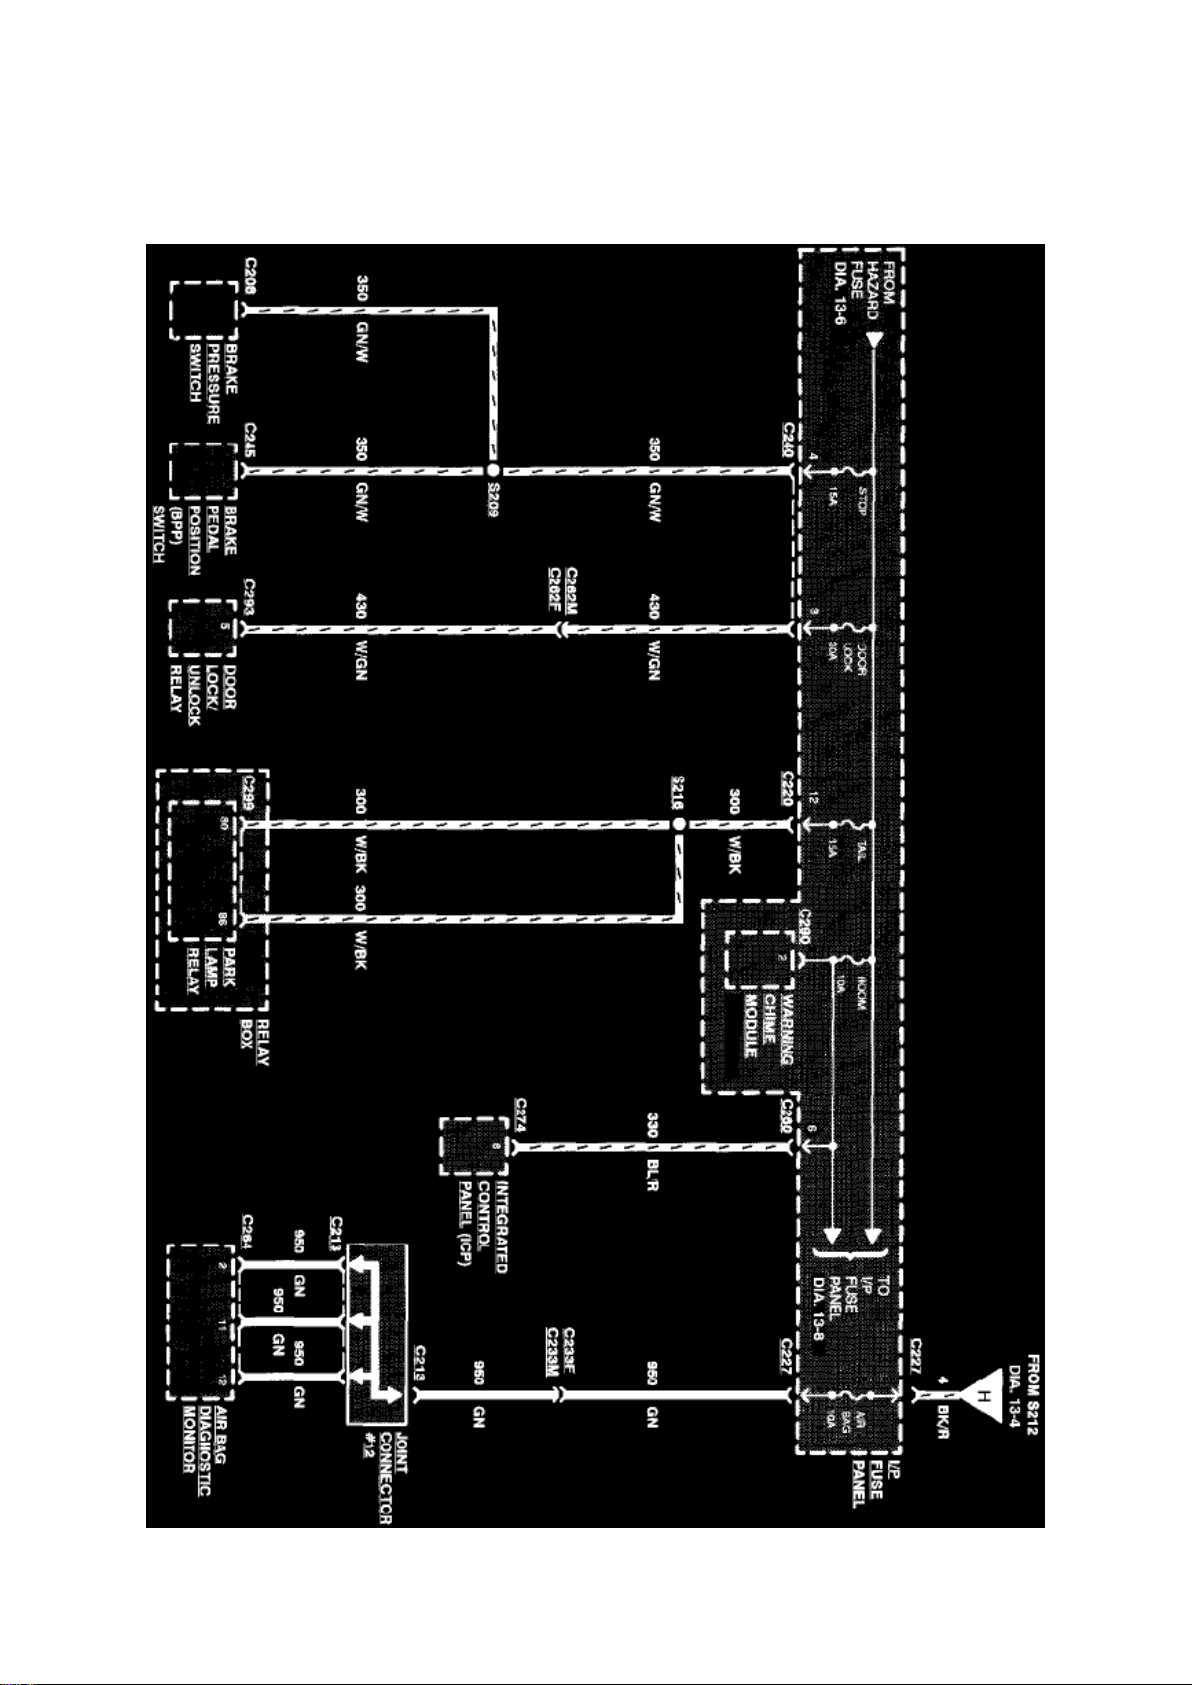
Diagram 13-7 (Sample Power Distribution Diagram Page)
Power Distribution Diagrams Provide the circuit details of how the system diagrams are powered.
The power distribution source is shown at the top of a diagram page. All wires, connectors, and
splices are shown in the same manner that the current flows, ending at the component/system
being powered near the bottom of a diagram page. Circuits that go from one diagram page to
another will be marked with large arrow heads indicating which diagram page the circuit went
to/came from.
The power distribution diagrams can be found at Starting and Charging/Power and Ground
Distribution, or by following the hyperlinks at the top of the
Page 77
Ford F 150 4wd Pickup Workshop Manual (V8-5.4L SOHC VIN 3 (1999))
Ford Workshop Manuals > Relays and Modules > Relays and Modules - Accessories and Optional Equipment > General
Module > Component Information > Diagrams > Diagram Information and Instructions > Page 83
Page 78

diagram pages within the system diagrams.
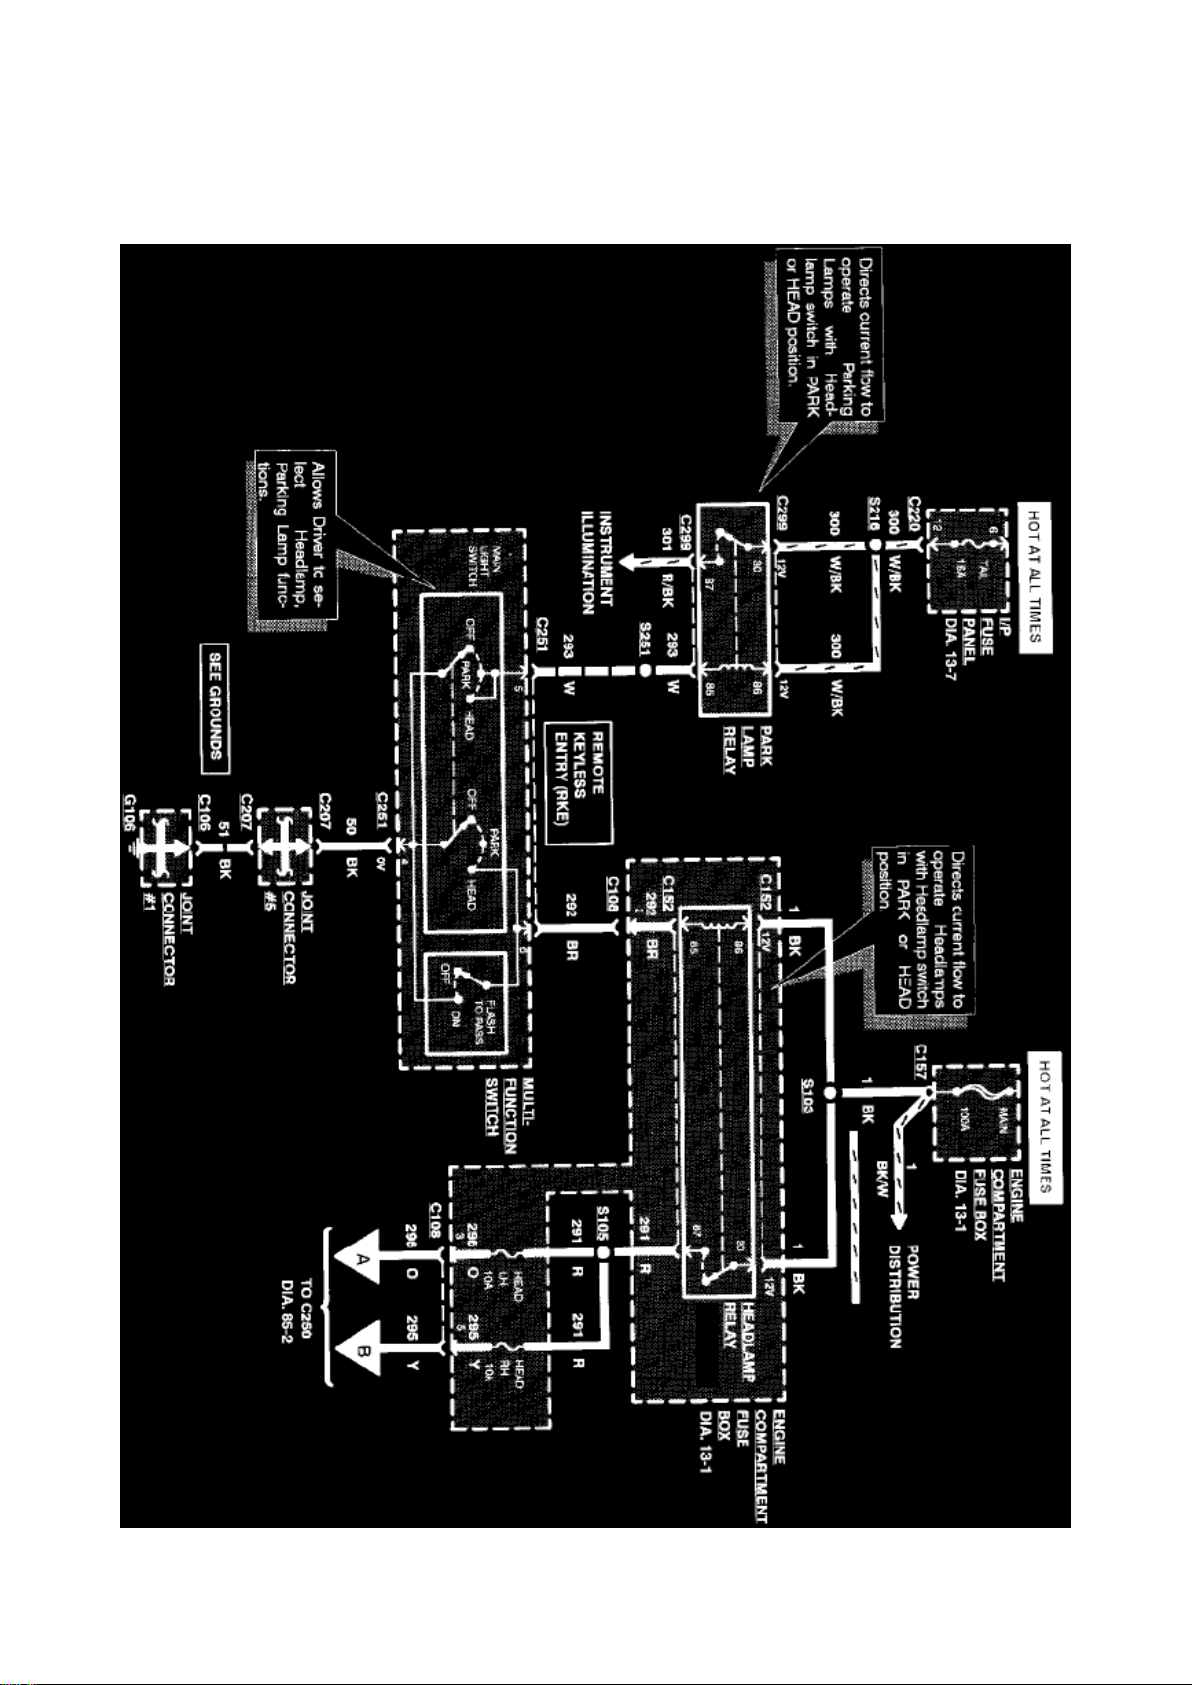
Diagram 85-1 (Sample System Diagram Page)
System Diagrams Components that work together are shown together in a system/subsystem
diagram or set of diagrams. The system feed (circuit breaker, fuse, etc.) is shown at the top of a
diagram page. All wires, connectors, components, and splices are shown in the same manner that
the current flows, ending at the ground at the bottom of a diagram page. Circuits that go from one
diagram page to another will be marked with large arrow heads indicating which diagram page the
circuit went to/came from.
Page 79
Ford F 150 4wd Pickup Workshop Manual (V8-5.4L SOHC VIN 3 (1999))
Ford Workshop Manuals > Relays and Modules > Relays and Modules - Accessories and Optional Equipment > General
Module > Component Information > Diagrams > Diagram Information and Instructions > Page 84
Page 80

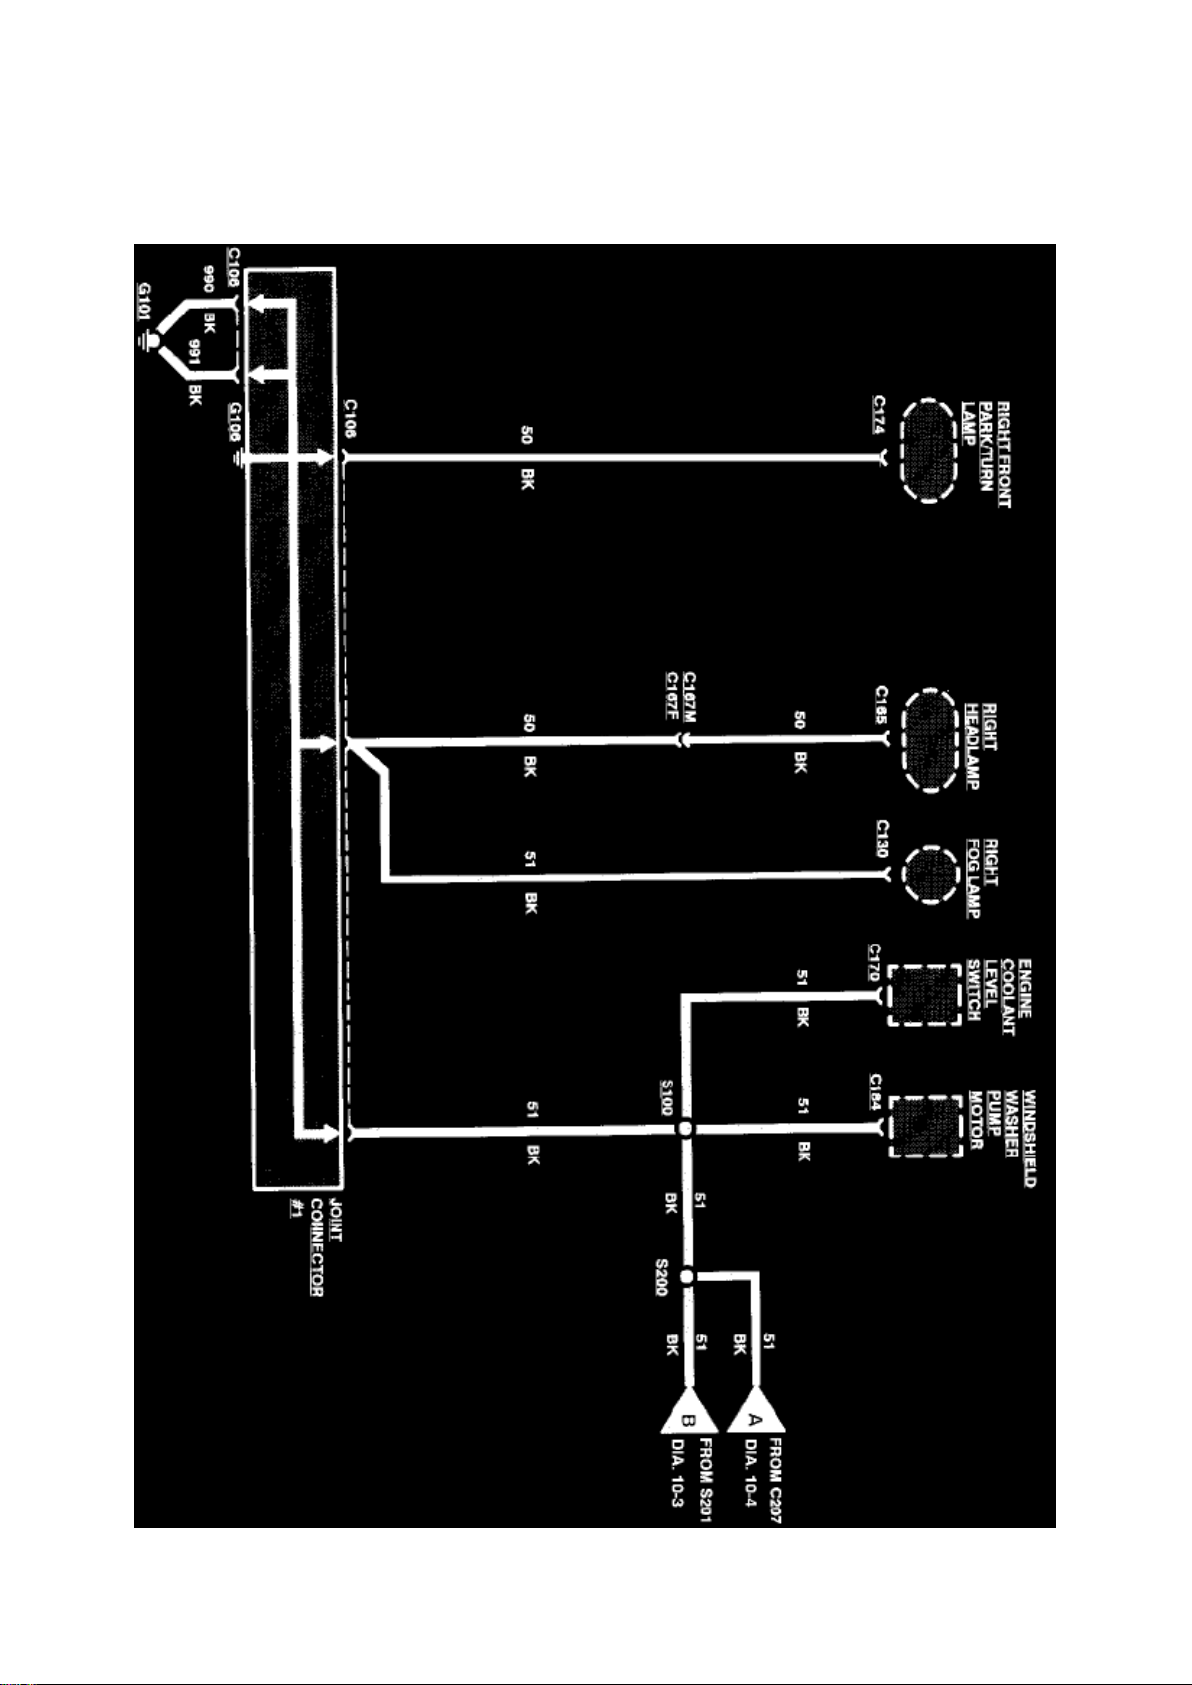
Diagram 10-1 (Sample Grounds Diagram Page)
Grounds Diagrams Provide the circuit details of how the system diagrams are grounded. This
information is useful for checking interconnections of the grounding circuits of different systems.
The components/systems being grounded are shown at the top of a diagram page. All wires,
connectors, and splices are shown in the same manner that the current flows, ending at the ground
at the bottom of a diagram page. Circuits that go from one diagram page to another will be marked
with large arrow heads indicating which diagram page the circuit went to/came from.
Page 81
Ford F 150 4wd Pickup Workshop Manual (V8-5.4L SOHC VIN 3 (1999))
Ford Workshop Manuals > Relays and Modules > Relays and Modules - Accessories and Optional Equipment > General
Module > Component Information > Diagrams > Diagram Information and Instructions > Page 85
Page 82

The grounds diagrams can be found at Starting and Charging/Power and Ground Distribution, or by
following the hyperlinks at the bottom of the diagram pages within the system diagrams.
Page 83
Ford F 150 4wd Pickup Workshop Manual (V8-5.4L SOHC VIN 3 (1999))
Ford Workshop Manuals > Relays and Modules > Relays and Modules - Accessories and Optional Equipment > General
Module > Component Information > Diagrams > Diagram Information and Instructions > Page 86
Page 84

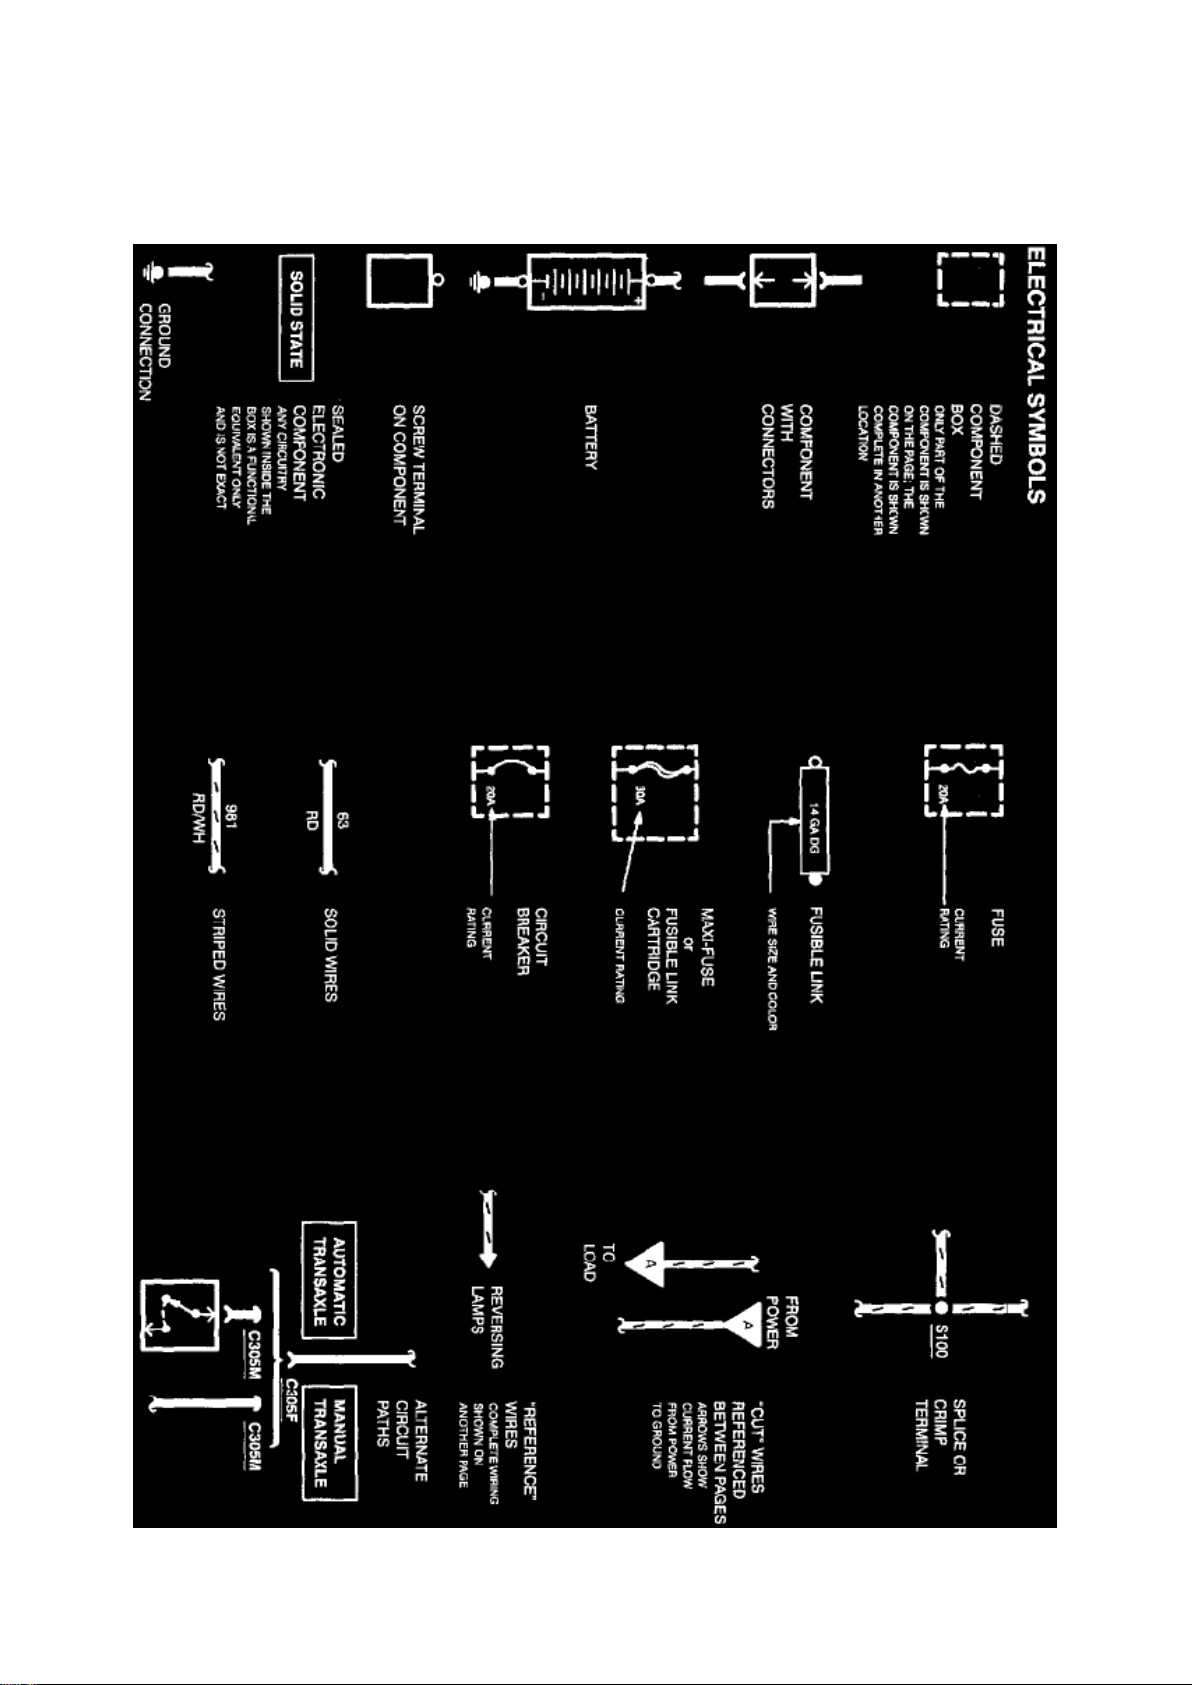
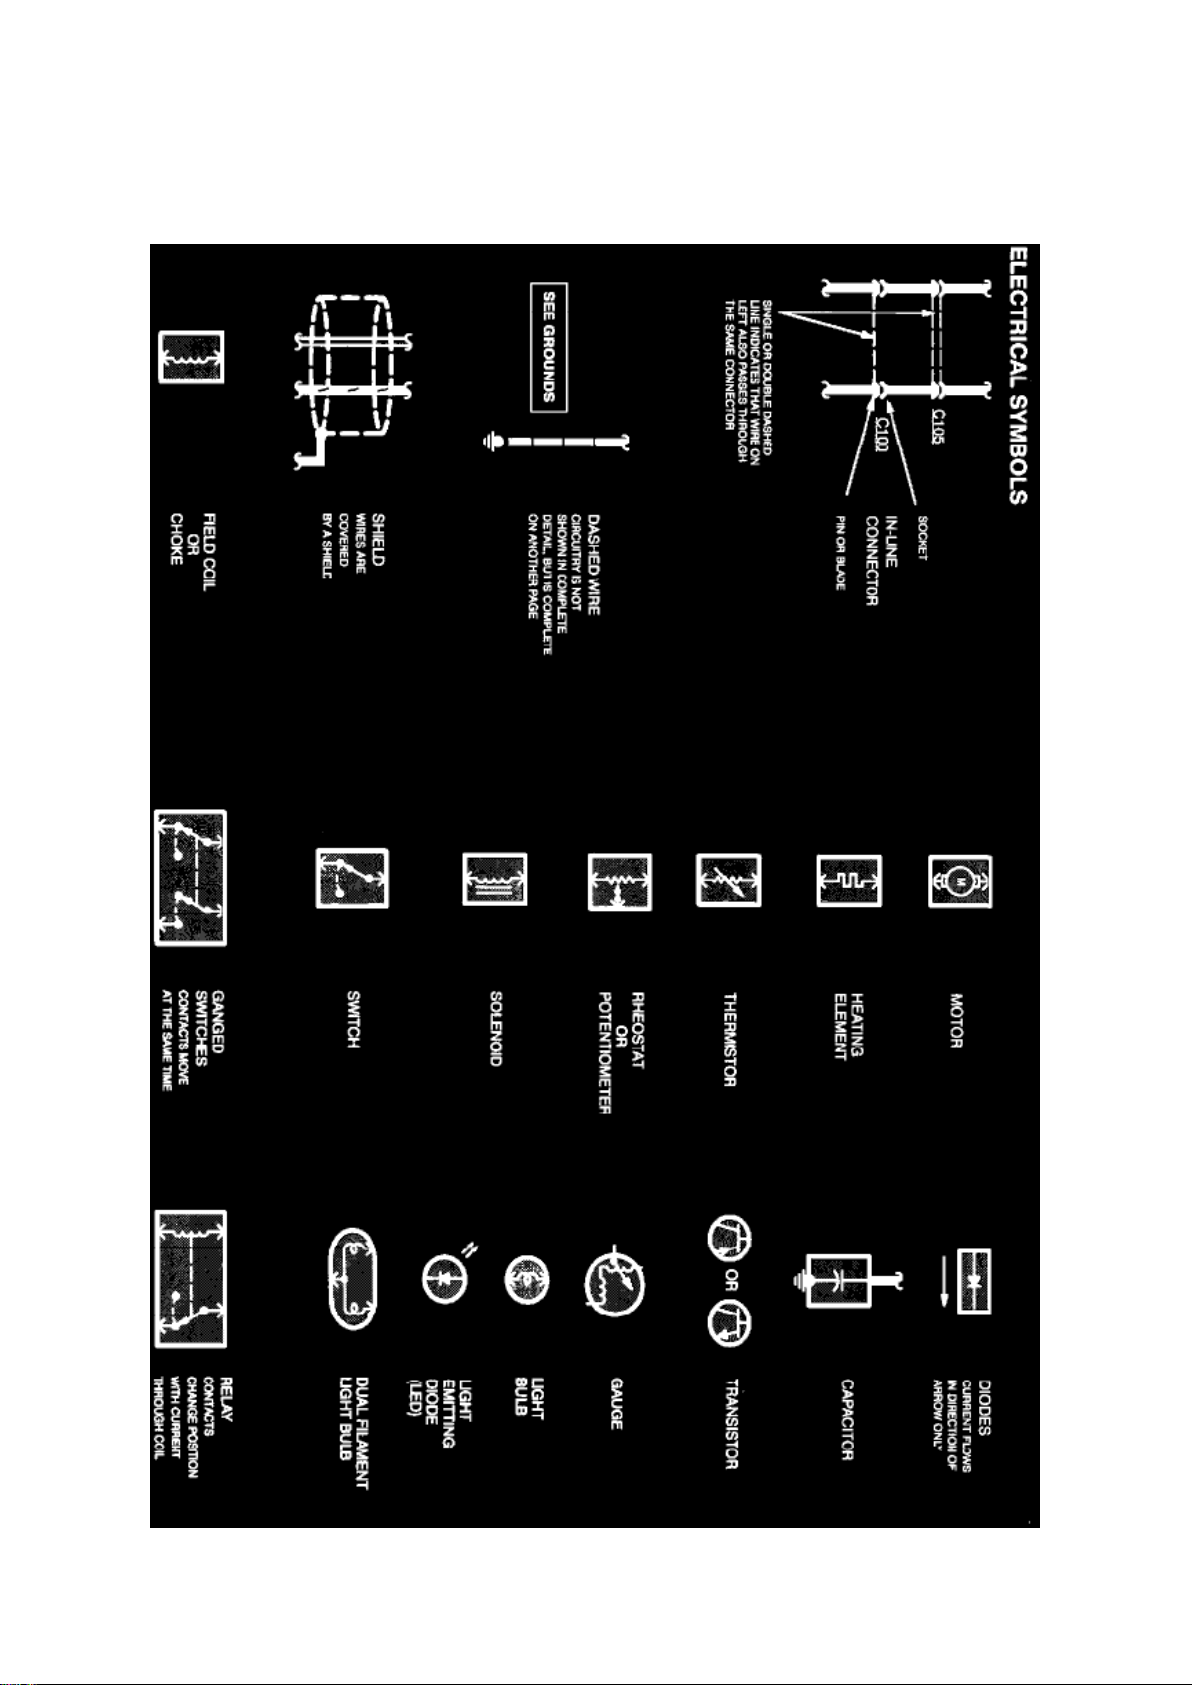
Electrical Symbols
Wire Color Code Identification
Wire and connector colors are listed as follows (standard Ford color abbreviations are used):
COLOR ABBREVIATIONS BU
Blue NA Natural
BK Black OG Orange
Page 85

Ford F 150 4wd Pickup Workshop Manual (V8-5.4L SOHC VIN 3 (1999))
Ford Workshop Manuals > Relays and Modules > Relays and Modules - Accessories and Optional Equipment > General
Module > Component Information > Diagrams > Diagram Information and Instructions > Page 87
Page 86

BN Brown PK Pink
DB Dark Blue VT Purple
DG Dark Green RD Red
GN Green SR Silver
GY Gray TN Tan
LB Light Blue WH White
LG Light Green YE Yellow
Note: Whenever a wire is labeled with two colors, the first color listed is the basic color of the wire,
and the second color listed is the stripe marking of the wire.
Page 87
Ford F 150 4wd Pickup Workshop Manual (V8-5.4L SOHC VIN 3 (1999))
Ford Workshop Manuals > Relays and Modules > Relays and Modules - Accessories and Optional Equipment > General
Module > Component Information > Diagrams > Diagram Information and Instructions > Page 88
General Module: Diagnostic Aids
HOW TO FIND ELECTRICAL CONCERNS
TROUBLESHOOTING STEPS
These six steps present an orderly method of troubleshooting.
Step 1. Verify the concern.
- Operate the complete system to check the accuracy and completeness of the customer's
complaint.
Step 2. Narrow the concern.
- Using the wiring diagrams, narrow down the possible causes and locations of the concern to
pinpoint the exact cause.
- Read the description notes at the components and study the wiring schematic. You should then
know enough about the circuit operation to determine where to check for the trouble.
Step 3. Test the suspected cause.
- Use electrical test procedures to find the specific cause of the symptoms.
- The component location reference bars and the pictures will help you find components.
Component location information for connectors, diodes, resistors, splices and grounds can be
found at Vehicle Locations.
Step 4. Verify the cause.
- Confirm that you have found the correct cause by connecting jumper wires and/or temporarily
installing a known good component and operating the circuit.
Step 5. Make the repair.
- Repair or replace the inoperative component.
Page 88

Step 6. Verify the repair.
- Operate the system as in Step 1 and check that your repair has removed all symptoms without
creating any new symptoms.
Some engine circuits may need special test equipment and special procedures. See Testing and
Inspection for the specific component, system, or sub-system in question.
NOTE: Most Ford testing and inspection procedures will be found at the system/sub-system level;
only a few component tests are provided by OE.
TROUBLESHOOTING TOOLS
JUMPER WIRE
This is a test lead used to connect two points of a circuit. A Jumper Wire can bypass an open to
complete a circuit.
WARNING: Never use a jumper wire across loads (motors,etc.) connected between hot and
ground. This direct battery short may cause injury or fire.
VOLTMETER
A DC Voltmeter measures circuit voltage. Connect negative (- or black) lead to ground, and
positive (+ or red) lead to voltage measuring point.
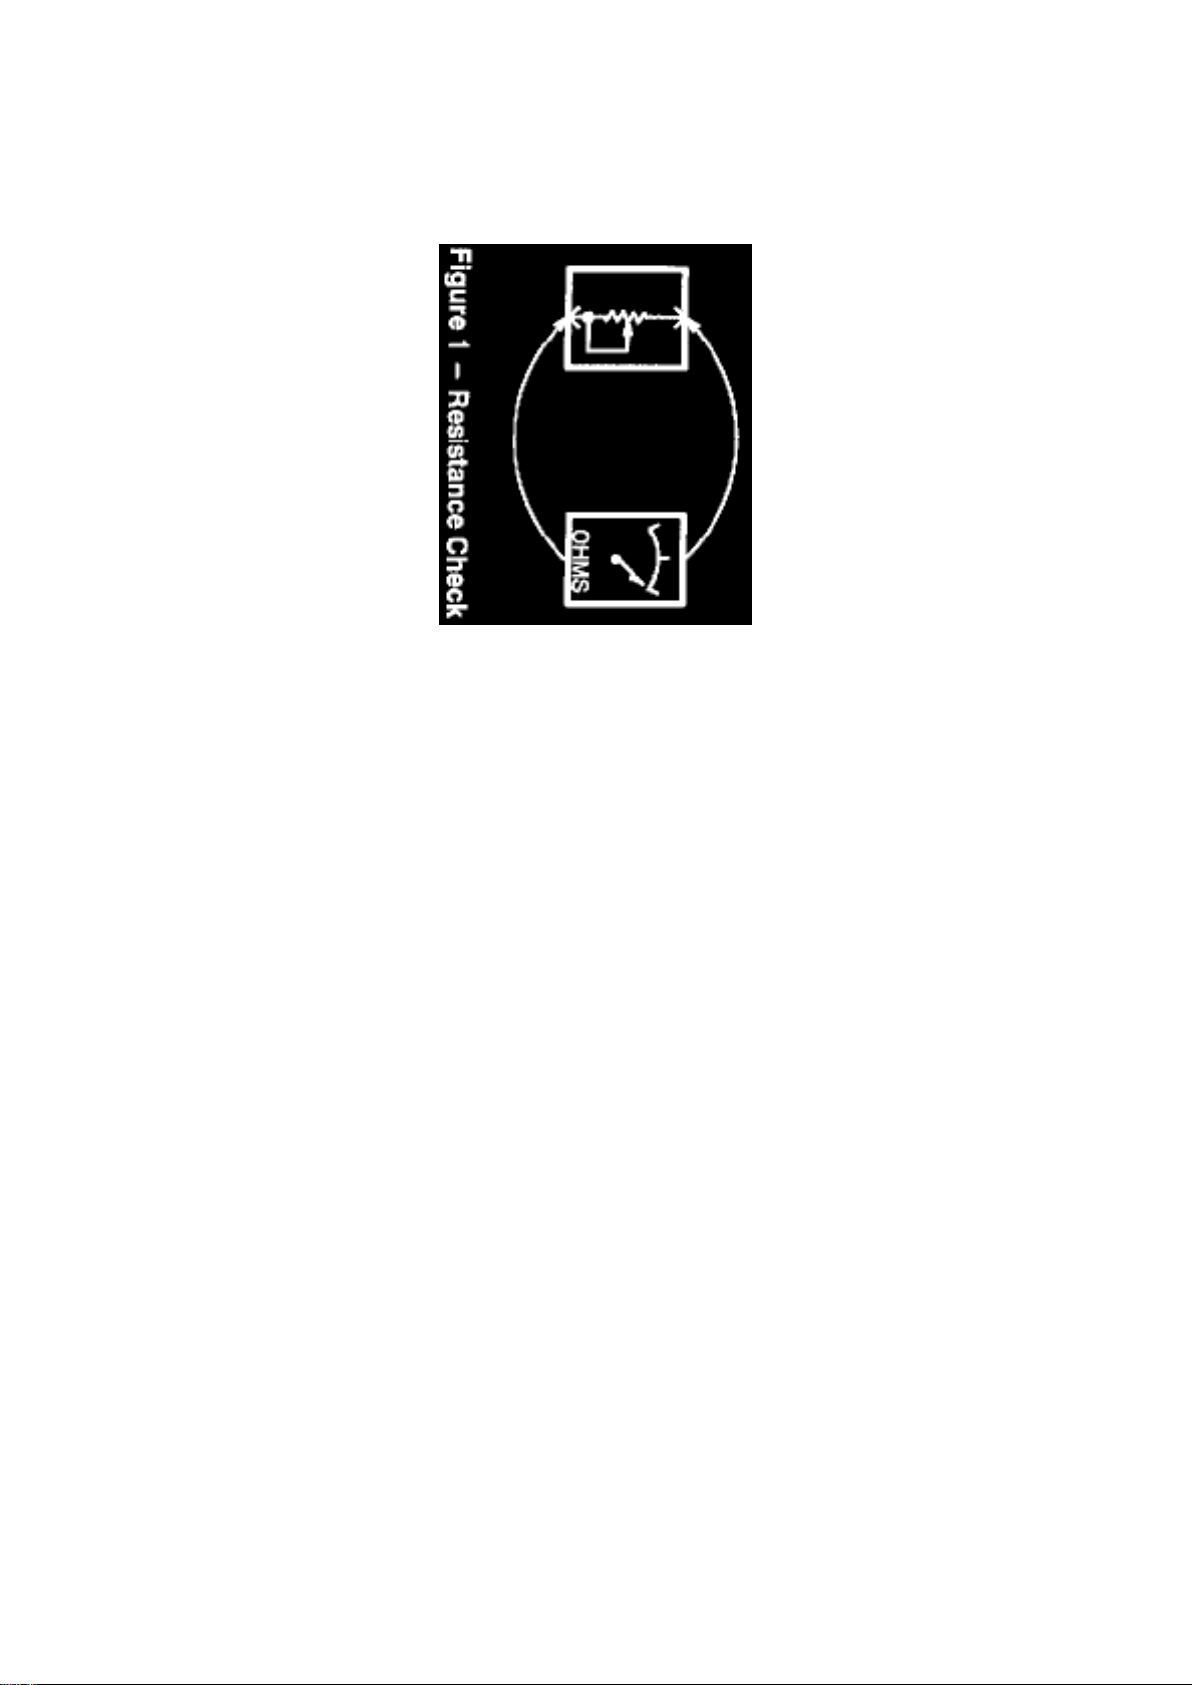
OHMMETER
An Ohmmeter shows the resistance between two connected points.
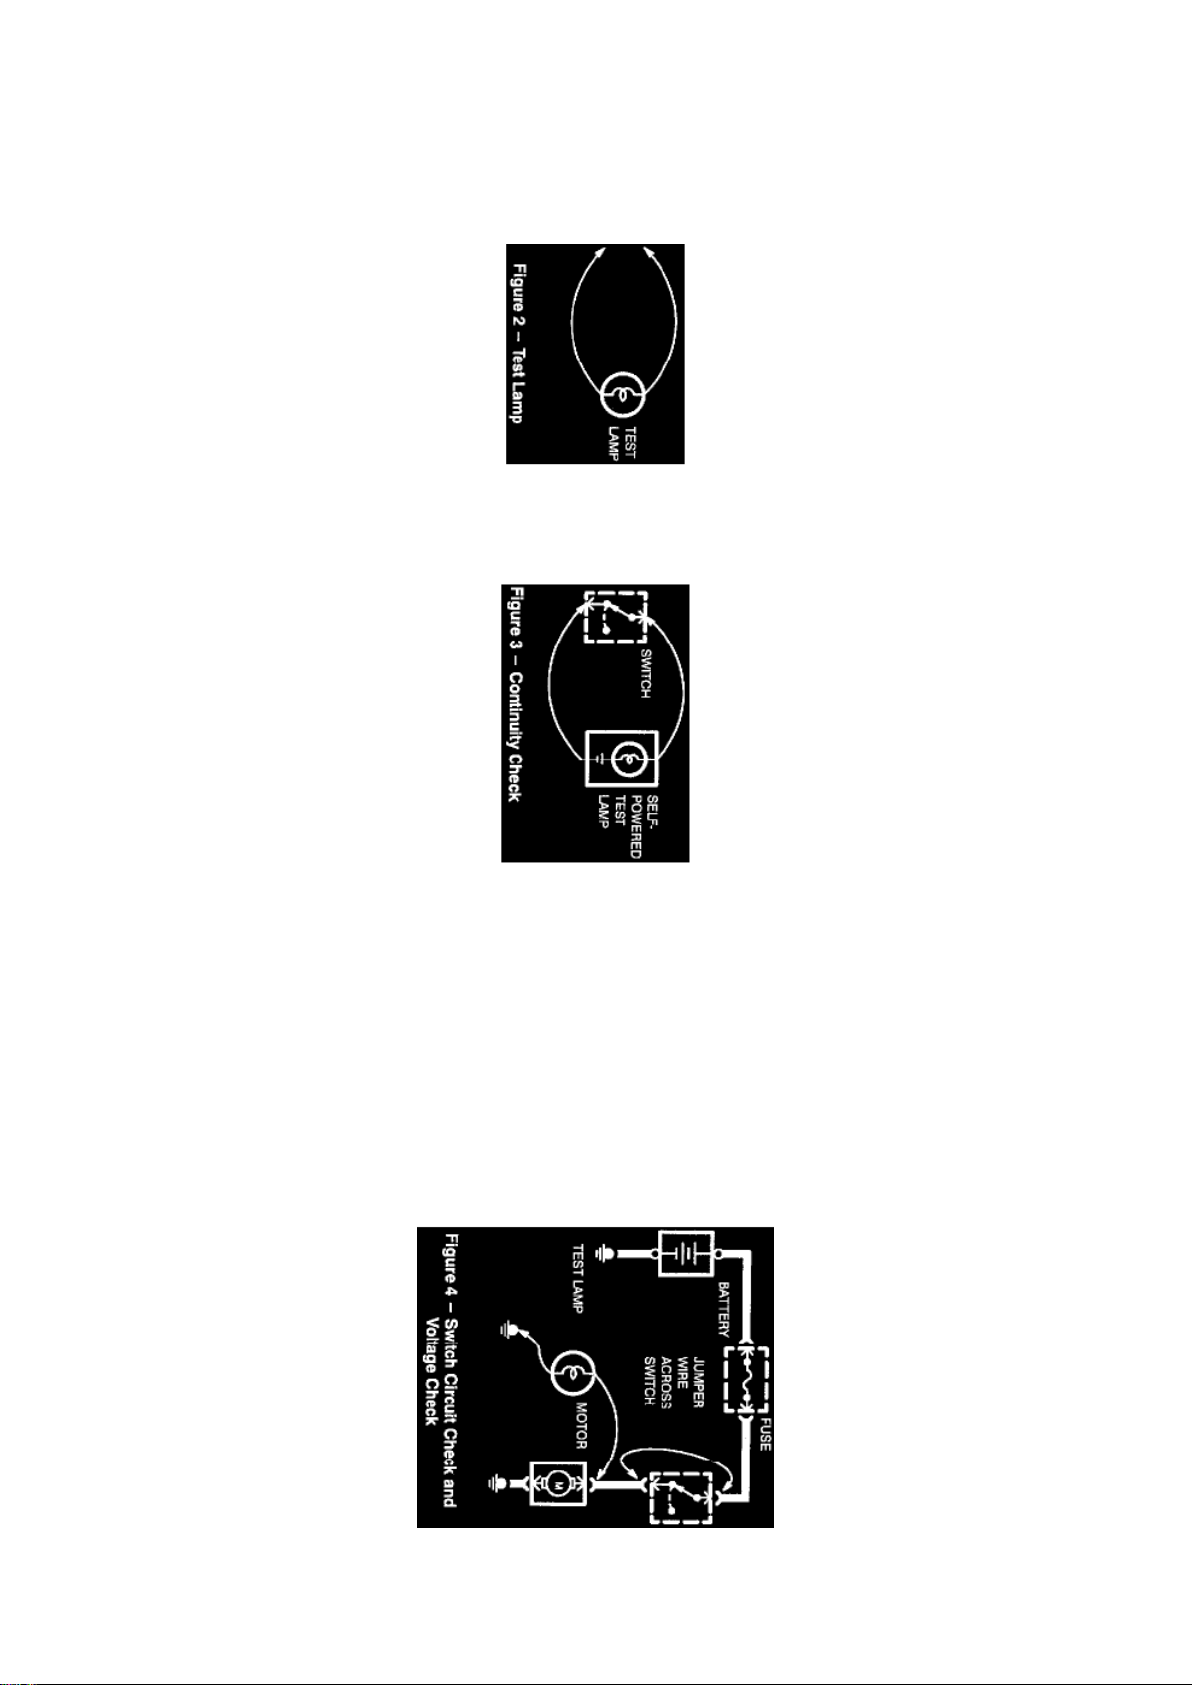
TEST LAMP
Page 89
Ford F 150 4wd Pickup Workshop Manual (V8-5.4L SOHC VIN 3 (1999))
Ford Workshop Manuals > Relays and Modules > Relays and Modules - Accessories and Optional Equipment > General
Module > Component Information > Diagrams > Diagram Information and Instructions > Page 89
Page 90

A Test Light is a 12-volt bulb with two test leads. Uses: Voltage Check, Short Check.
SELF-POWERED TEST LAMP
The Self-Powered Test Lamp is a bulb, battery and set of test leads wired in series. When
connected to two points of a continuous circuit, the bulb glows. Uses: Continuity Check, Ground
Check.
CAUTION: When using a self -powered test lamp or ohmmeter; be sure power is off in circuit
during testing. Hot circuits can cause equipment damage and false readings.
In an inoperative circuit with a switch in series with the load, jumper the terminals of the switch to
power the load. If jumpering the terminals powers the circuit, the switch is inoperative.
CONTINUITY CHECK (Locating open circuits)
Connect one lead of Self-Powered Test Lamp or Ohmmeter to each end of circuit. Lamp will glow if
circuit is closed. Switches and fuses can be checked in the same way.
VOLTAGE CHECK
Connect one lead of test lamp to a known good ground or the negative (-) battery terminal. Test for
voltage by touching the other lead to the test
Page 91
Ford F 150 4wd Pickup Workshop Manual (V8-5.4L SOHC VIN 3 (1999))
Ford Workshop Manuals > Relays and Modules > Relays and Modules - Accessories and Optional Equipment > General
Module > Component Information > Diagrams > Diagram Information and Instructions > Page 90
Page 92

point. Bulb goes on when the test point has voltage.
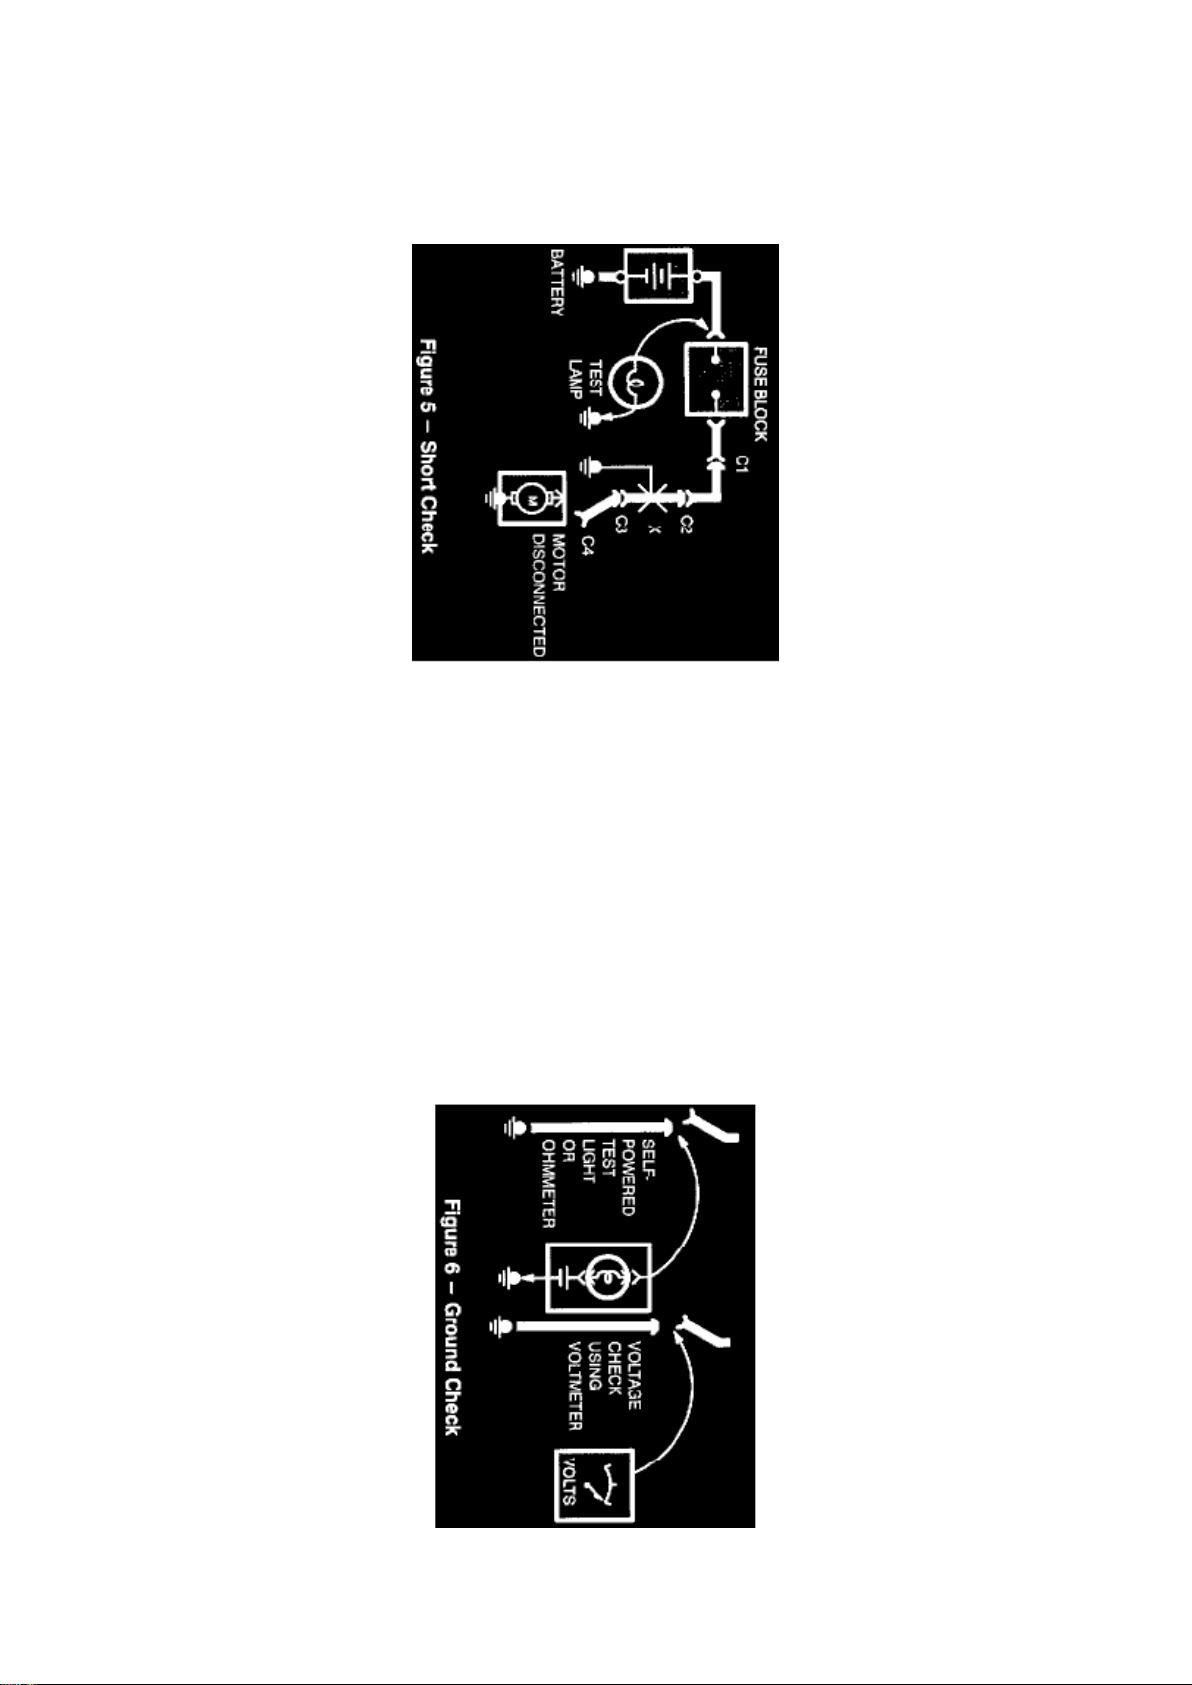
SHORT CHECK
A fuse that repeatedly blows is usually caused by a short to ground. It's important to be able to
locate such a short quickly. 1. Turn off everything powered through the fuse. 2. Disconnect other
loads powered through the fuse:
- Motors: disconnect motor connector (Connector C4).
- Lights: remove bulbs.
3. Turn Ignition Switch to RUN (if necessary) to power fuse. 4. Connect one Test Lamp lead to hot
end of blown fuse. Connect other lead to ground. Bulb should glow, showing power to fuse. This
step is
just a check to be sure you have power to the circuit)
5. Disconnect the test lamp lead that is connected to ground, and reconnect it to the load side of
the fuse at the connector of the disconnected
component. (Connect the test lamp lead to connector C4). If the Test Lamp is off, the short is in the disconnected component.
- If the Test Lamp goes on, the short is in the wiring. You must find the short by disconnecting the
circuit connectors, one at a time, until the Test Lamp goes out. For example, with a ground at X,
the bulb goes out when C1 or C2 is disconnected, but not after disconnecting C3. This means the
short is between C2 and C3.
GROUND CHECK
Turn on power to the circuit. Perform a Voltage Check between the suspected inoperative ground
and the frame. Any indicated voltage means that the ground is inoperative.
Turn off power to the circuit. Connect one lead of a Self-Powered Test Lamp or Ohmmeter to the
wire in question and the other lead to a known ground. If the bulb glows, the circuit ground is OK.
DIAGRAMS These diagrams make it easy to identify common points in circuits. This knowledge
can help narrow the concern to a specific area. For example, if several circuits fail at the same
time, check for a common power or ground connection (see Power and Ground Distribution
Diagrams). If part of a
Page 93
Ford F 150 4wd Pickup Workshop Manual (V8-5.4L SOHC VIN 3 (1999))
Ford Workshop Manuals > Relays and Modules > Relays and Modules - Accessories and Optional Equipment > General
Module > Component Information > Diagrams > Diagram Information and Instructions > Page 91
Page 94

circuit fails, check the connections between the part that works and the part that doesn't work.
For example, if the lo beam headlamps work, but the high beams and the indicator lamp don't
work, then power and ground paths must be good. Since the dimmer switch is the component that
switches this power to the high beam lights and indicator, it is most likely the cause of failure.
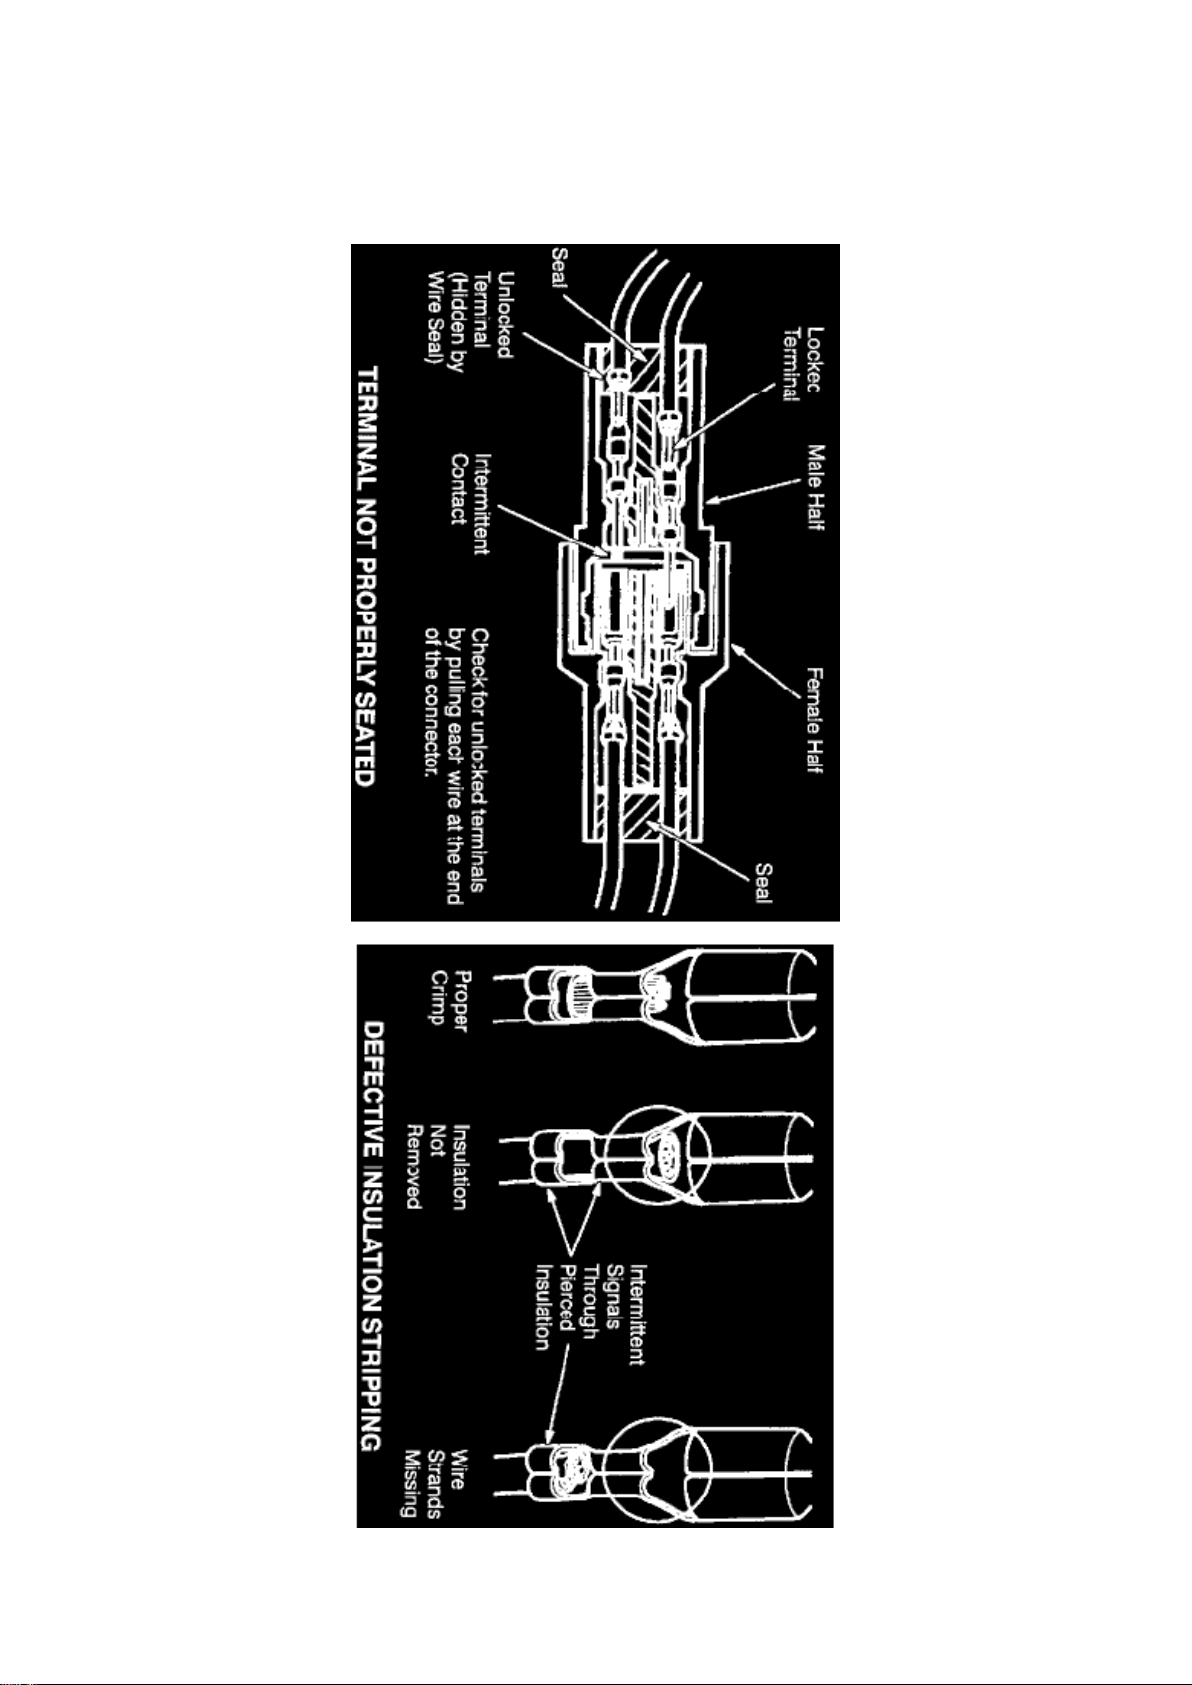
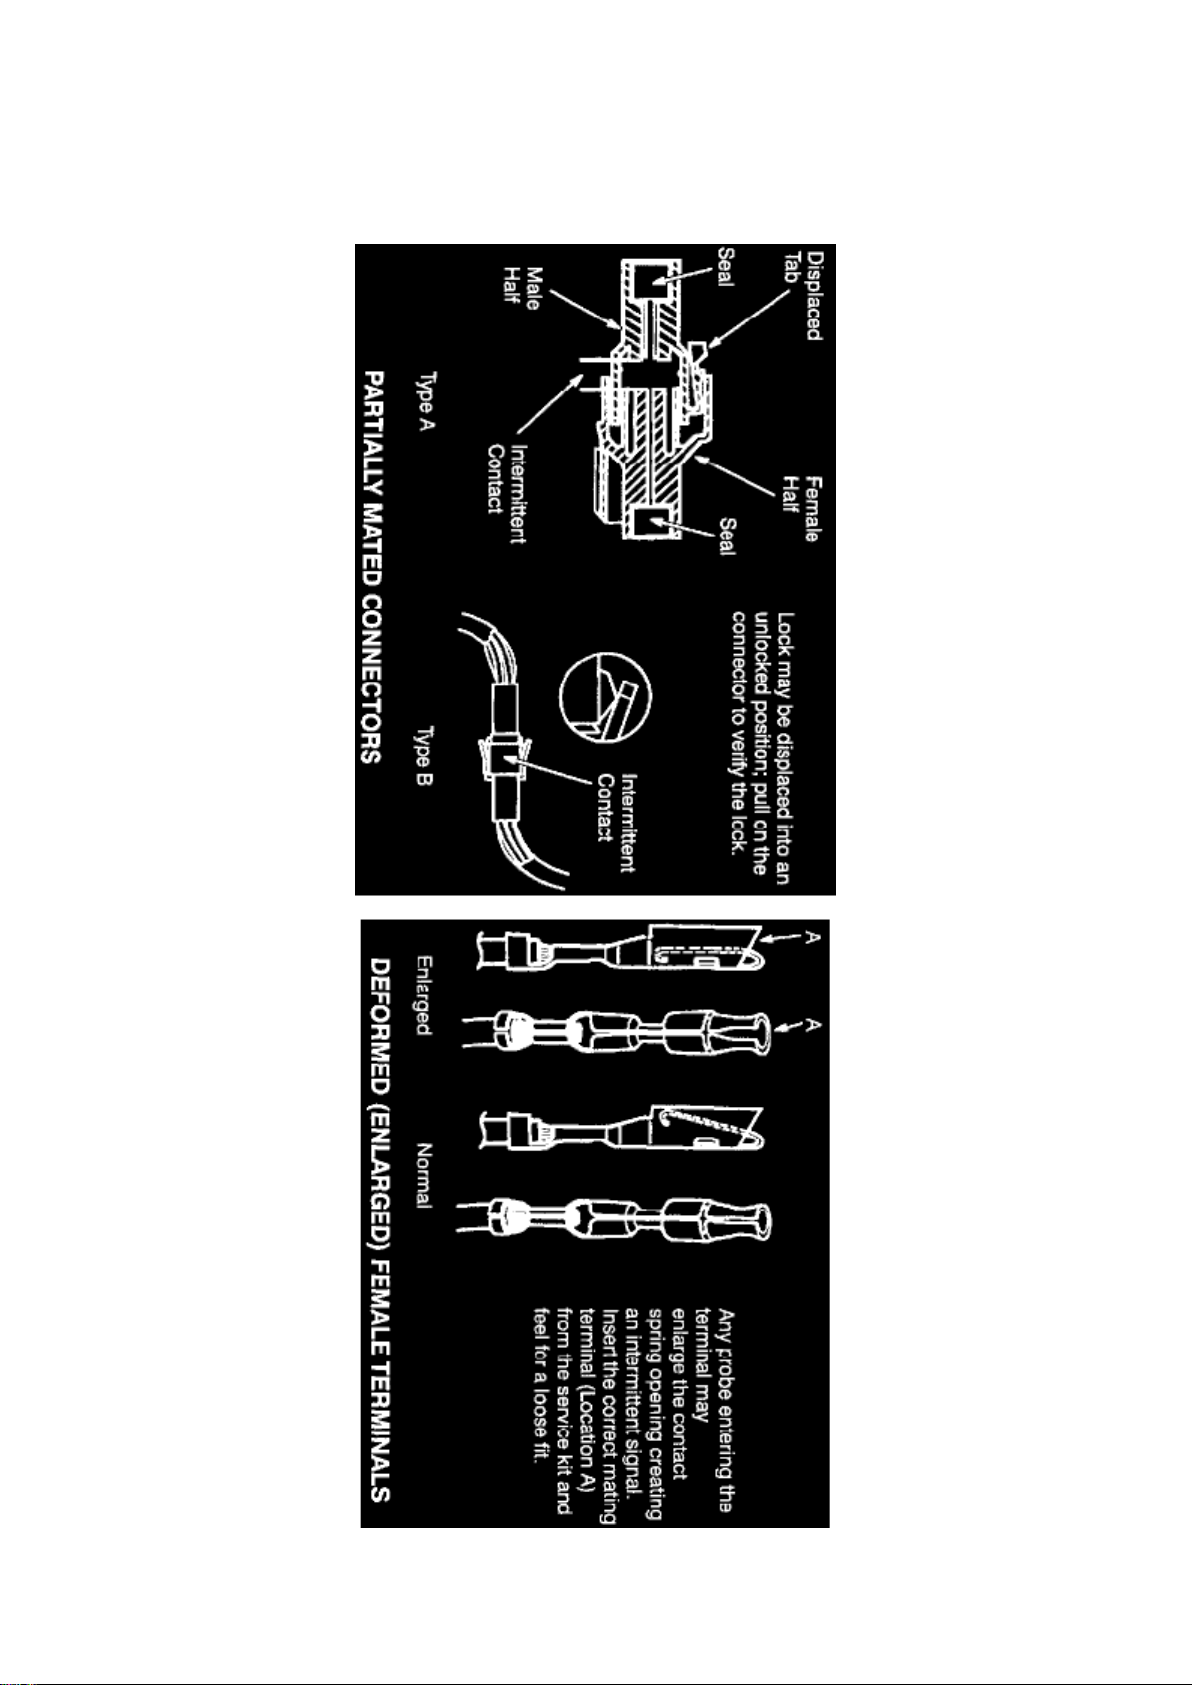
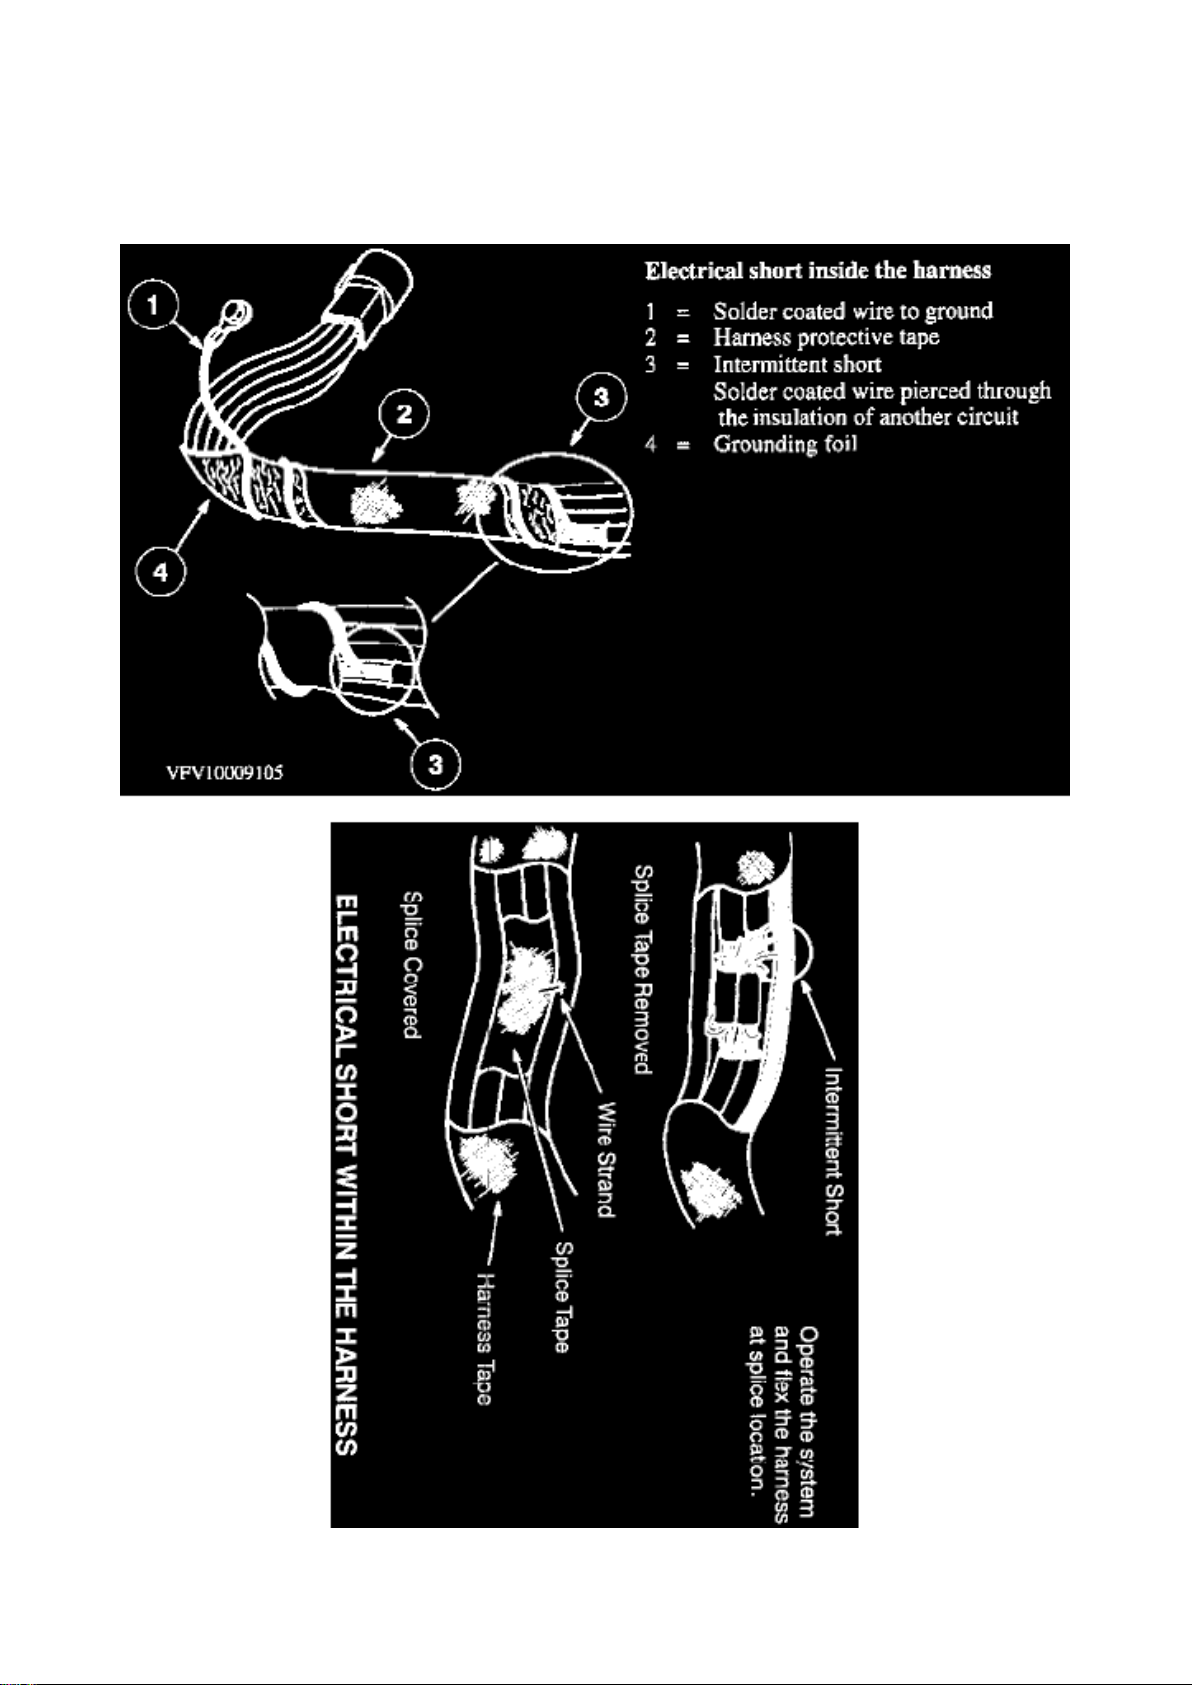
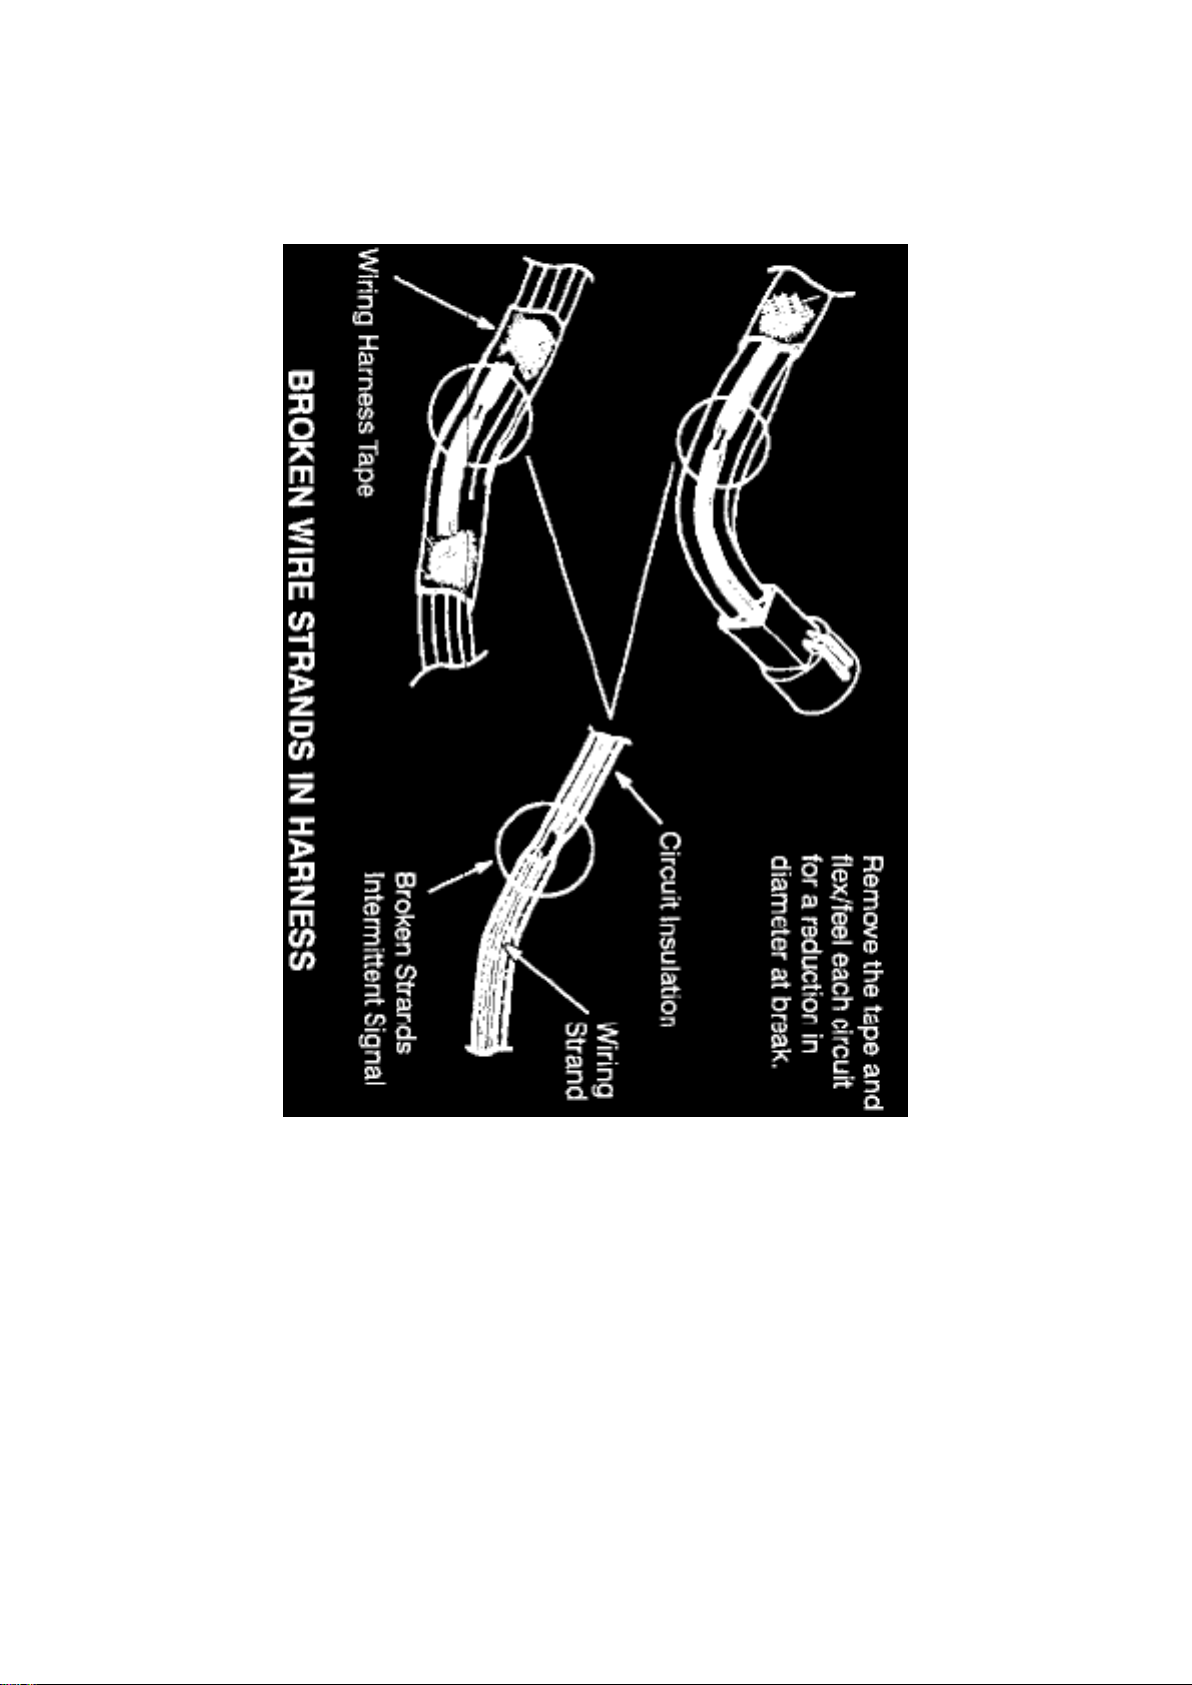
TROUBLESHOOTING WIRING HARNESS AND CONNECTOR HIDDEN CONCERNS
The following illustrations are known examples of wiring harness, splices and connectors that will
create intermittent electrical concerns. The concerns are hidden and can only be discovered by a
physical evaluation as shown in each illustration.
NOTE: Several components, such as the PCM, utilize gold plated terminals in their connections to
the wiring harness. If those terminals need to be replaced, they must be replaced with a gold plated
terminal.
Page 95
Ford F 150 4wd Pickup Workshop Manual (V8-5.4L SOHC VIN 3 (1999))
Ford Workshop Manuals > Relays and Modules > Relays and Modules - Accessories and Optional Equipment > General
Module > Component Information > Diagrams > Diagram Information and Instructions > Page 92
Page 96

Page 97
Ford F 150 4wd Pickup Workshop Manual (V8-5.4L SOHC VIN 3 (1999))
Ford Workshop Manuals > Relays and Modules > Relays and Modules - Accessories and Optional Equipment > General
Module > Component Information > Diagrams > Diagram Information and Instructions > Page 93
Page 98

Page 99
Ford F 150 4wd Pickup Workshop Manual (V8-5.4L SOHC VIN 3 (1999))
Ford Workshop Manuals > Relays and Modules > Relays and Modules - Accessories and Optional Equipment > General
Module > Component Information > Diagrams > Diagram Information and Instructions > Page 94
Page 100
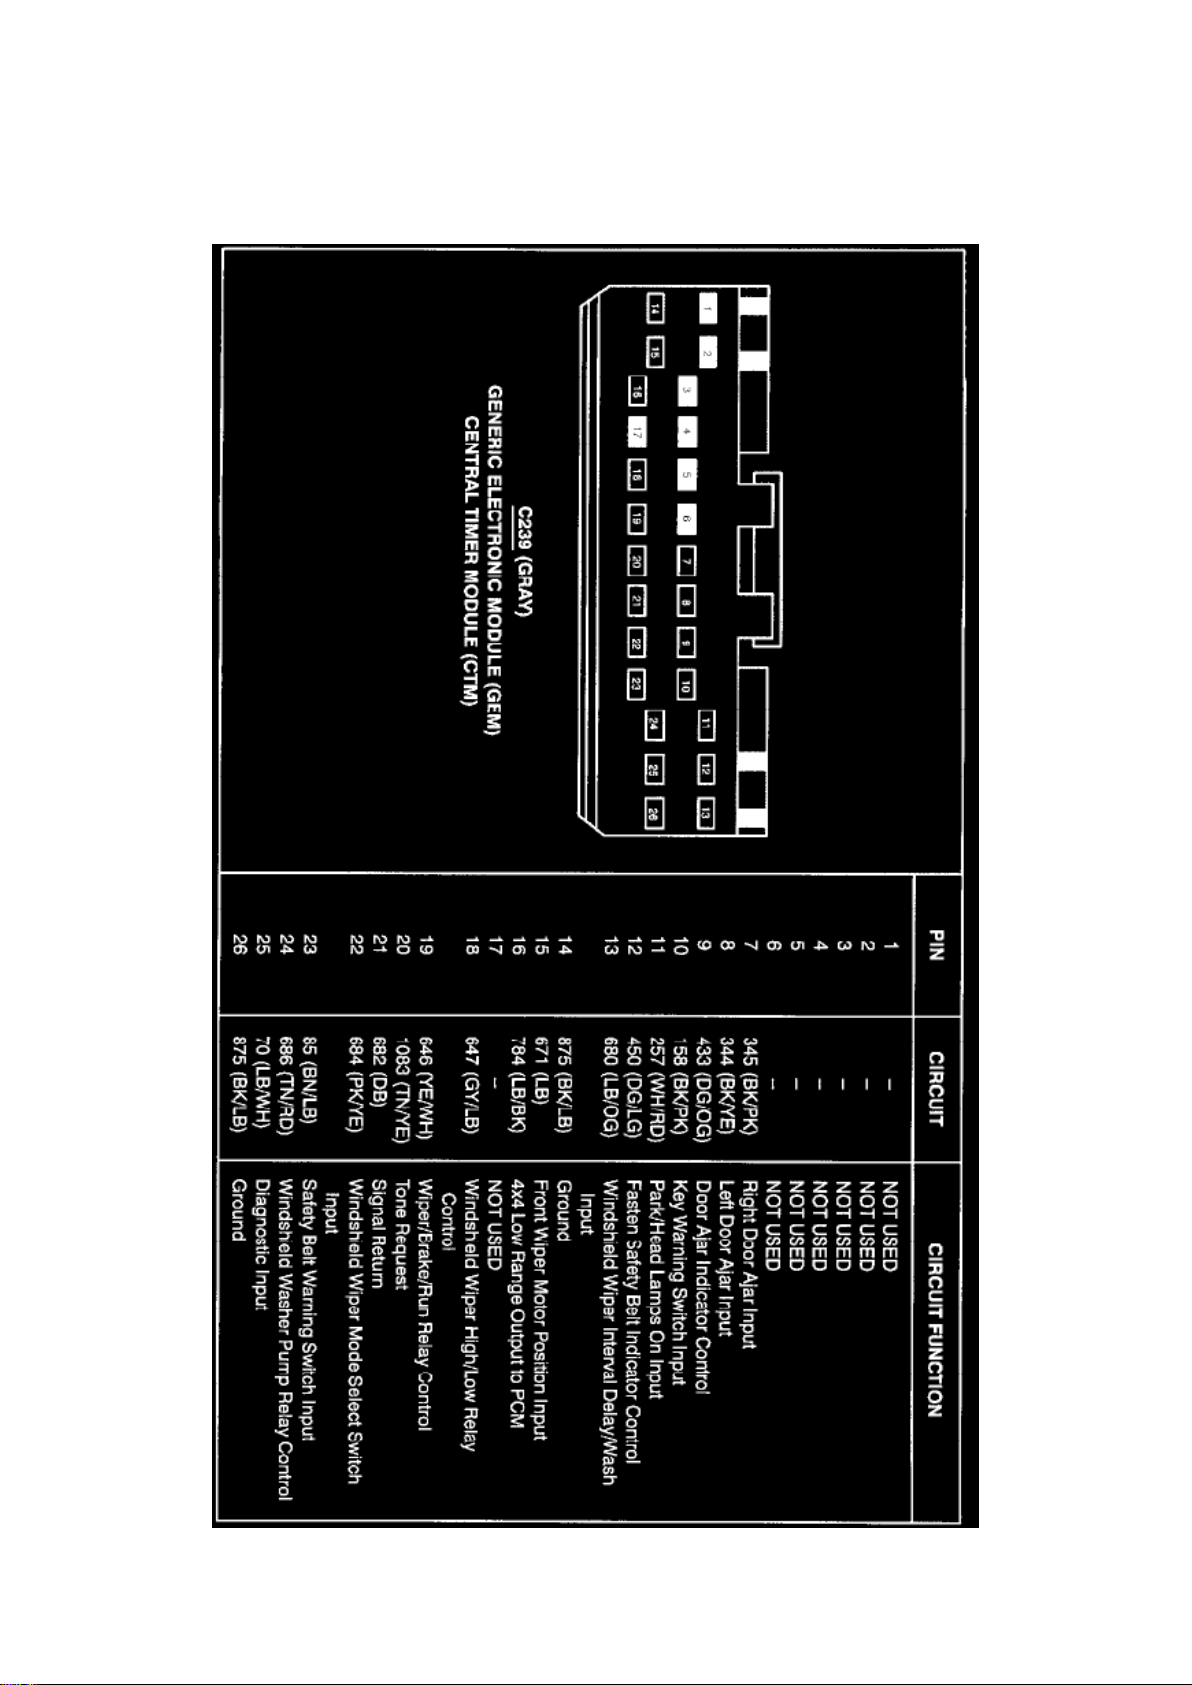
Ford F 150 4wd Pickup Workshop Manual (V8-5.4L SOHC VIN 3 (1999))
Ford Workshop Manuals > Relays and Modules > Relays and Modules - Accessories and Optional Equipment > General
Module > Component Information > Diagrams > Diagram Information and Instructions > Page 95
 Loading...