

Page 1
FORD KUGA Quick Reference Guide
Page 2
About This Quick Reference Guide
We have created this guide to help you get to know certain
features of your vehicle. It only contains basic instructions
to get you started and is not a substitute for the Owner's
Manual.
You must read the full instructions in the Owner's Manual
along with all the warnings. The more that you know about
your vehicle, the greater the safety and pleasure you will get
from driving it.
Thank you for choosing Ford.
WARNING
Driving while distracted can result in loss of vehicle control, crash and injury. We strongly
recommend that you use extreme caution when using any device that may take your focus off
the road. Your primary responsibility is the safe operation of your vehicle. We recommend against
the use of any hand-held device while driving and encourage the use of voice-operated systems when
possible. Make sure you are aware of all applicable local laws that may affect the use of electronic devices
while driving.
Note: This guide describes product features and options available throughout the range of available models,
sometimes even before they are generally available. It may describe options not fitted to the vehicle you
have purchased.
Note: Some of the illustrations in this guide may show features as used in different models, so may appear
different to you on your vehicle. However, the essential information in the illustrations is always correct.
Note: Always use and operate your vehicle in line with all applicable laws and regulations.
The information contained in this publication was correct at the time of going to print. In the interest of
continuous development, we reserve the right to change specifications, design or equipment at any time
without notice or obligation. No part of this publication may be reproduced, transmitted, stored in a
retrieval system or translated into any language in any form by any means without our written permission.
Errors and omissions excepted.
© Ford Motor Company 2015
All rights reserved.
Part Number: CG3586en 09/2014 20150113092436
Page 3
AT A GLANCE
1
Kuga (CBS) Vehicles Built From: 08-09-2014 Vehicles Built Up To: 31-05-2015, CG3586en enGBR, Edition date: 09/2014, Second Printing
Page 4
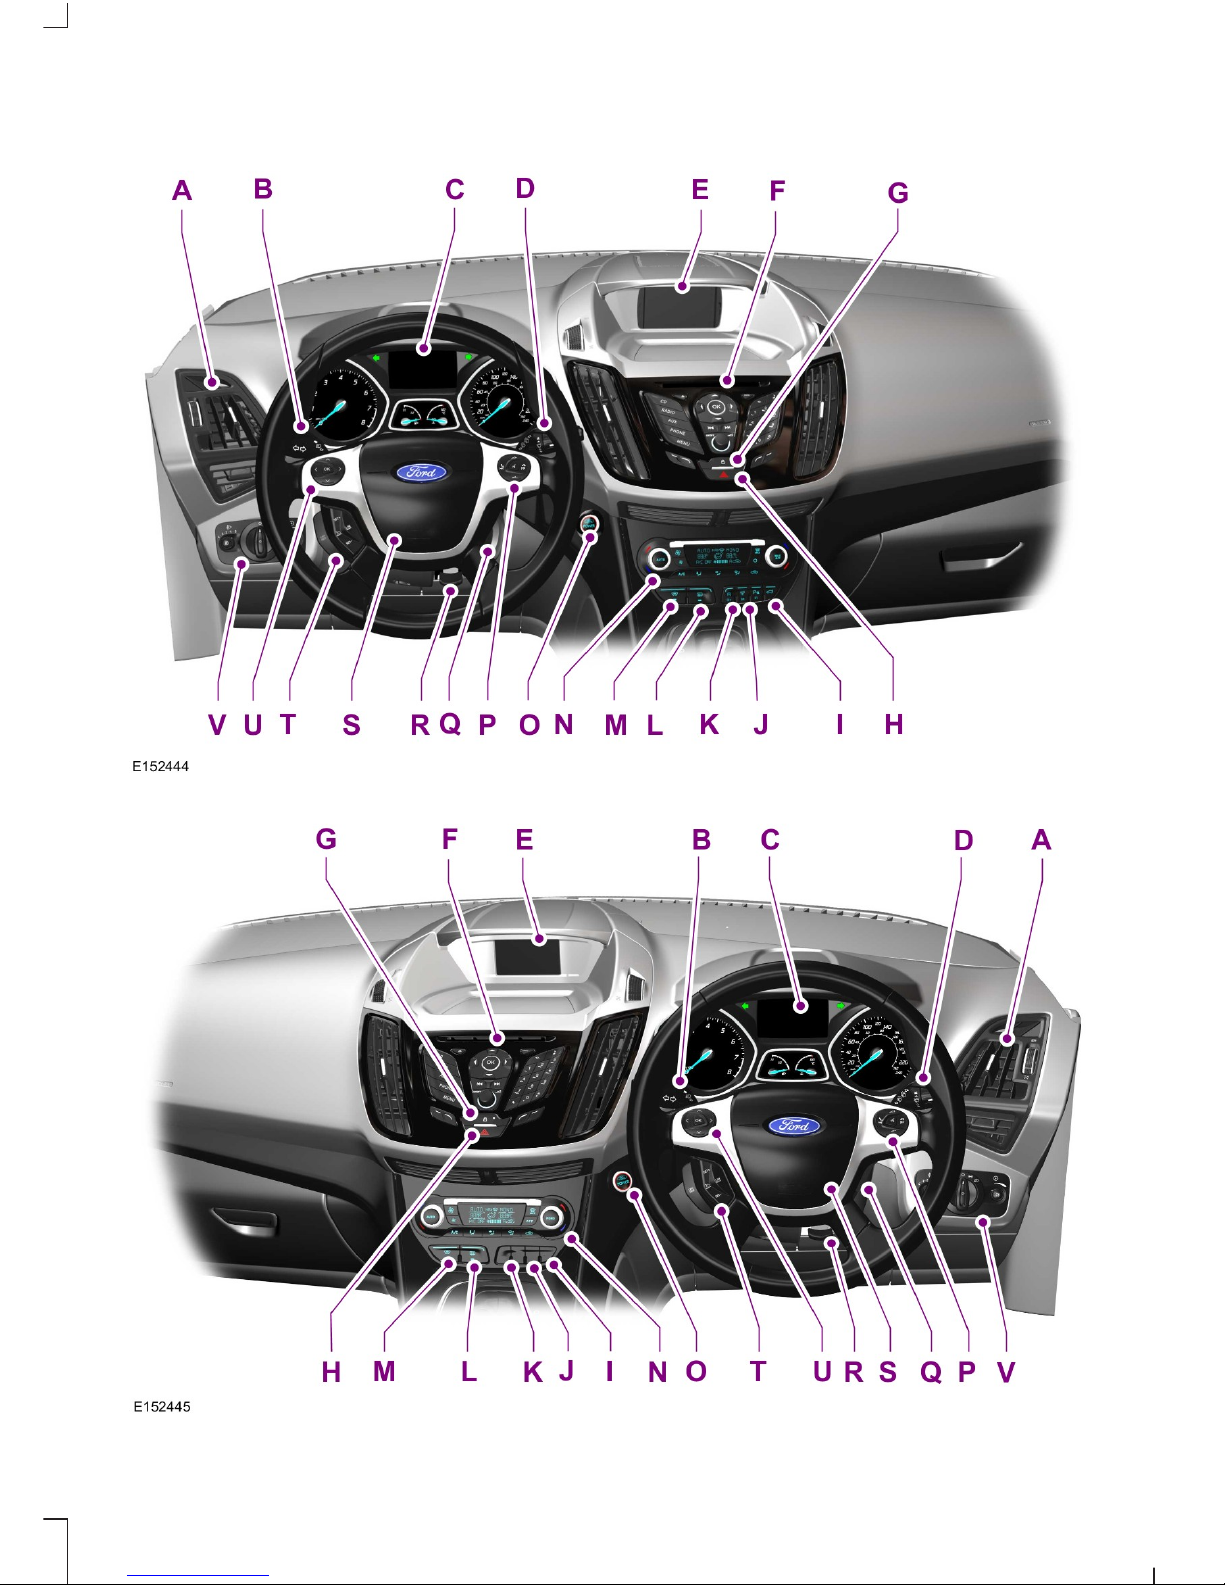
Air vents.A
Direction indicators. High beam.B
Instrument cluster.C
Wiper lever.D
Information and entertainment display.E
Audio unit.F
Door lock indicator.G
Hazard warning flasher switch.H
Parking aid switch.I
Active park assist switch.J
Start-stop switch.K
Heated rear window switch.L
Heated windshield switch.M
Climate controls.N
Start button.O
Audio control. Voice control. Telephone control.P
Ignition switch.Q
Steering wheel adjustment.R
Horn.S
Cruise control switches. Adaptive cruise control (ACC) switches.T
Information display controls.U
Lighting control. Front fog lamps. Rear fog lamp. Headlamp levelling control.
Instrument lighting dimmer.
V
LOCKING AND UNLOCKING
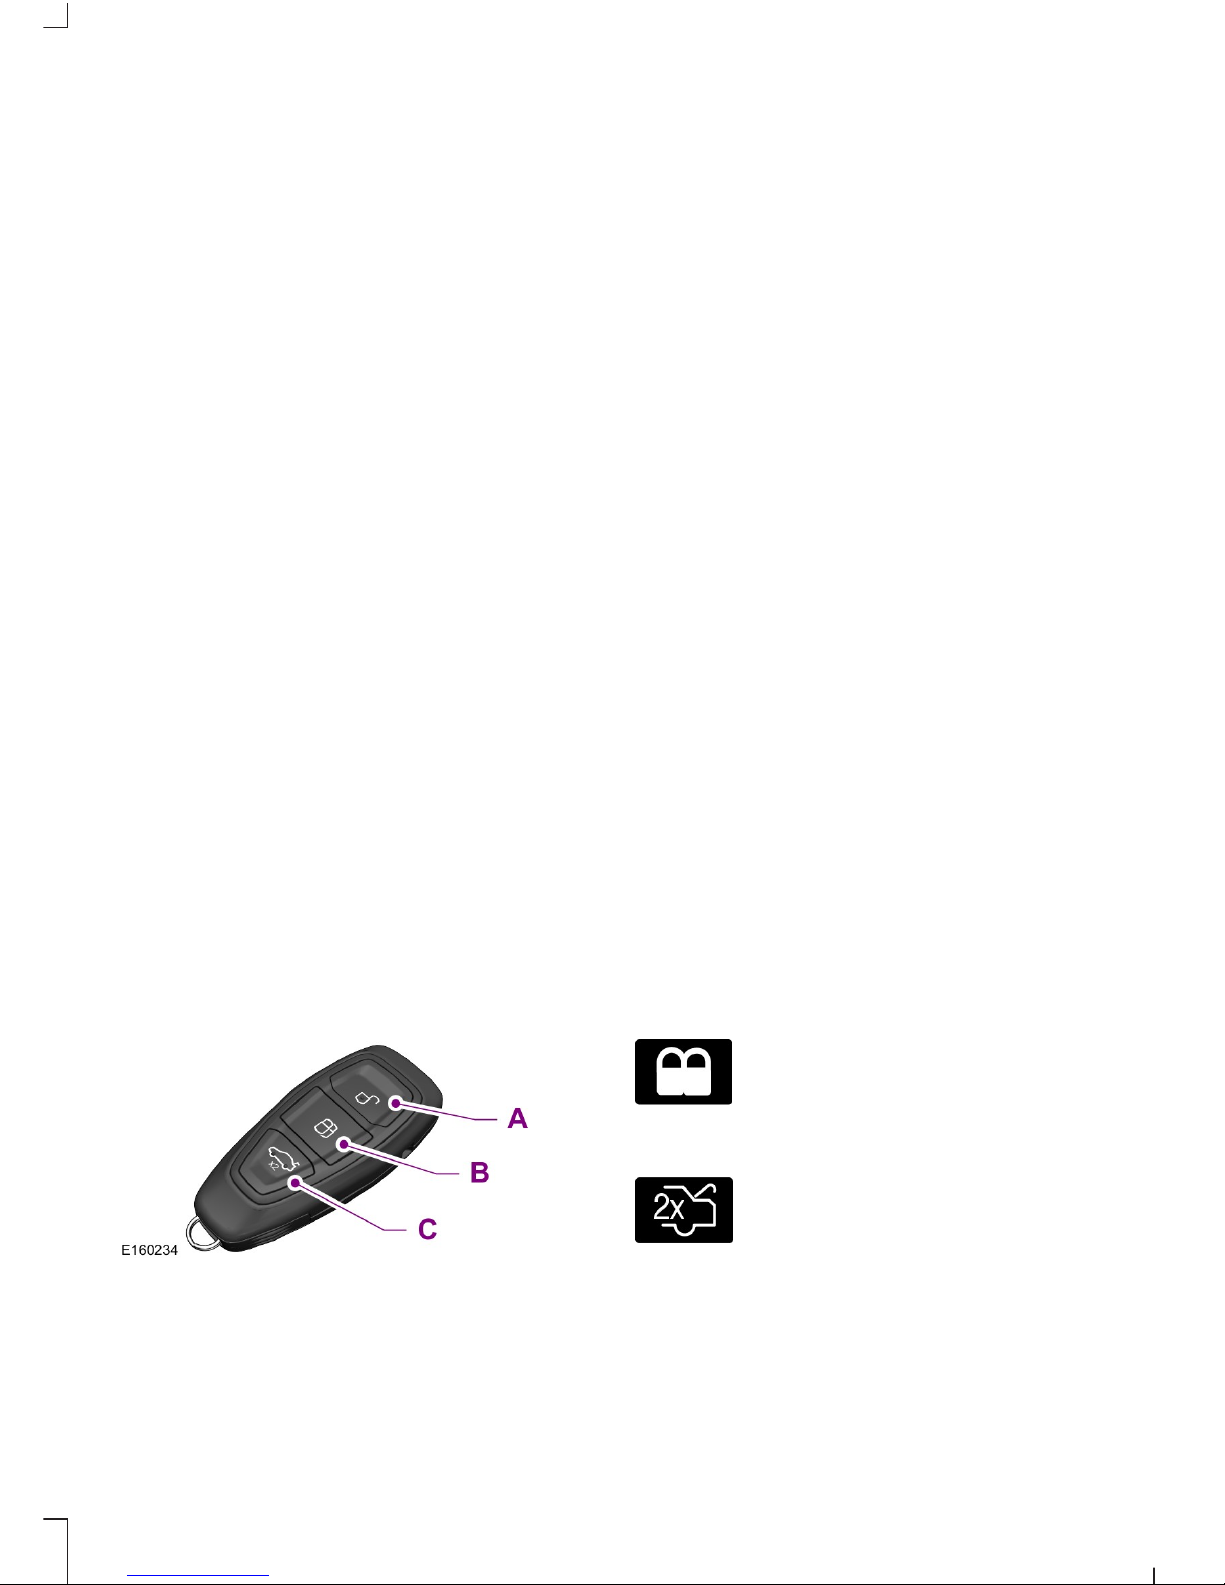
UnlockA
LockB
LiftgateC
Double Locking With the Remote
Control
Press the button twice within
three seconds.
Liftgate
Press the button twice within
three seconds.
2
Kuga (CBS) Vehicles Built From: 08-09-2014 Vehicles Built Up To: 31-05-2015, CG3586en enGBR, Edition date: 09/2014, Second Printing
Page 5
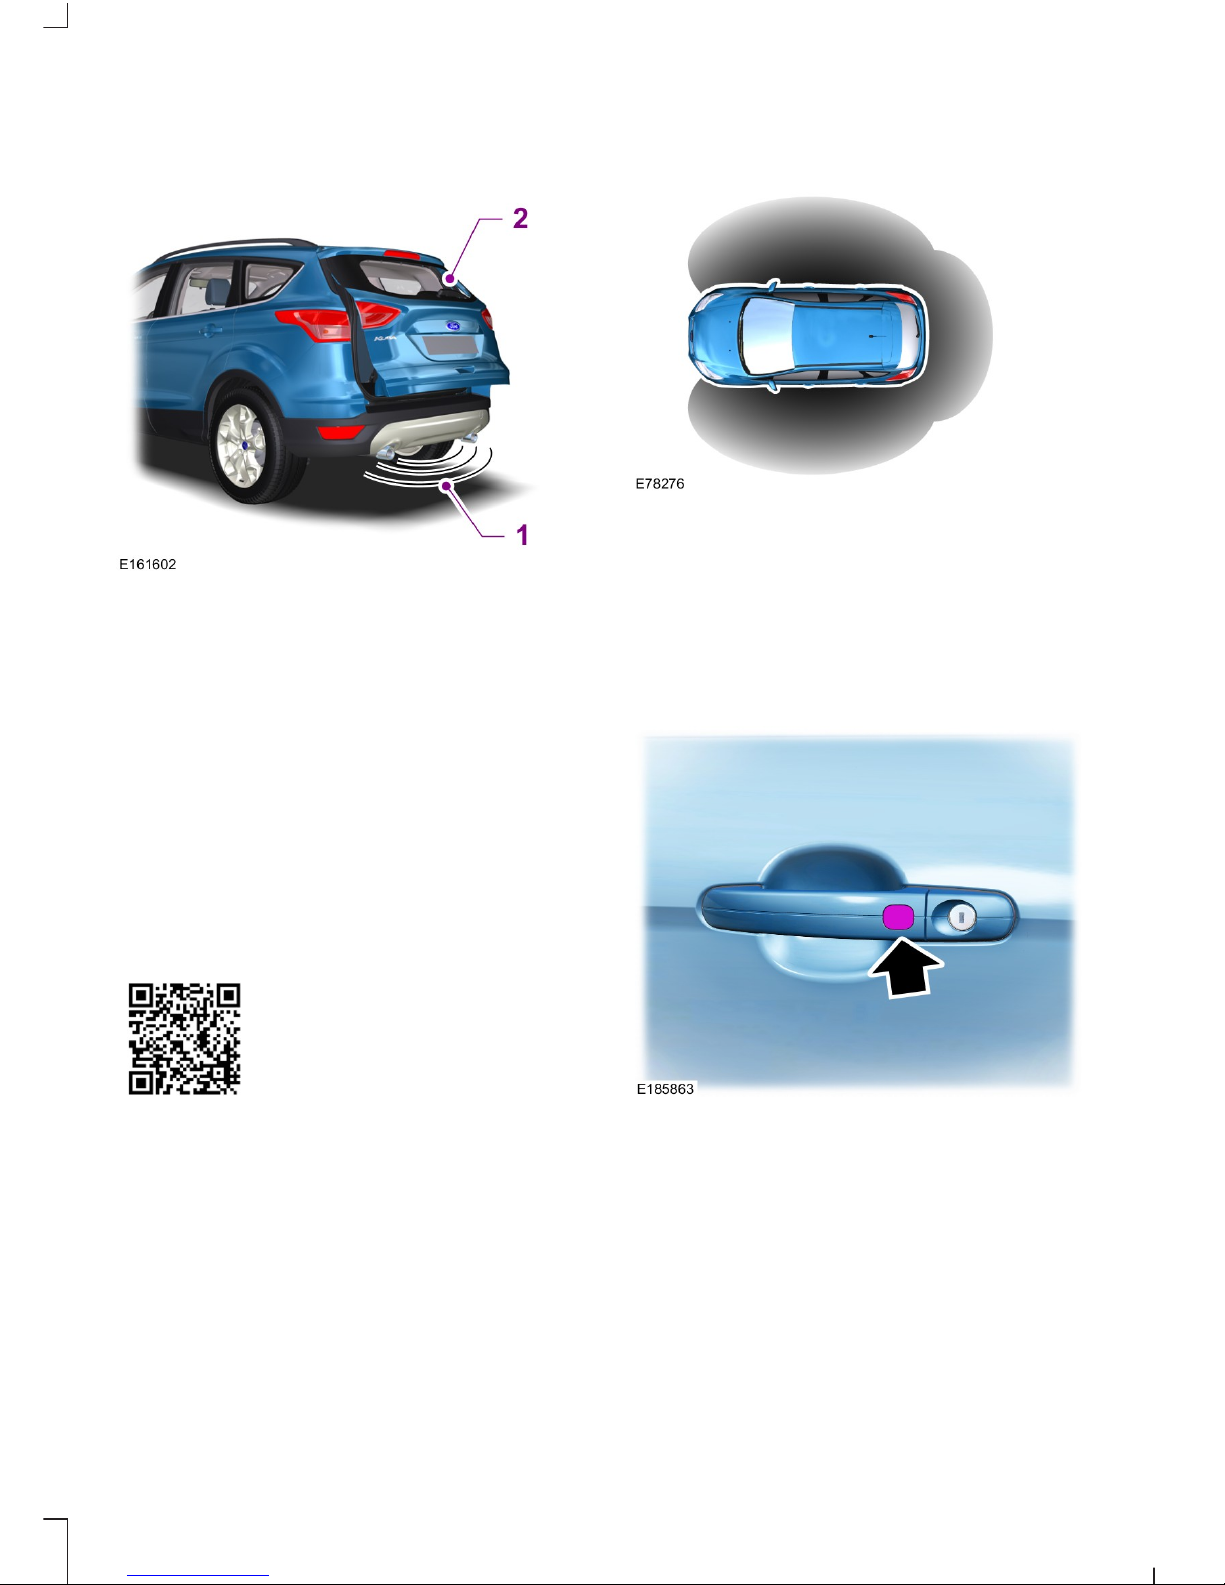
POWER LIFTGATE
Hands-Free Feature
1. Move your foot under and away from
the rear bumper similar to a kicking
motion.
2. The liftgate will power open or close.
Note: Make sure you have a remote control
within 3 feet (1 meter) of the liftgate.
Note: Manually pushing or pulling the
liftgate may enable the bounce-back feature
and stop the liftgate from opening or closing.
Note: Splashing water may cause the
liftgate to open. Keep the remote control
away from the rear bumper detection area
when washing your vehicle.
KEYLESS ENTRY
General Information
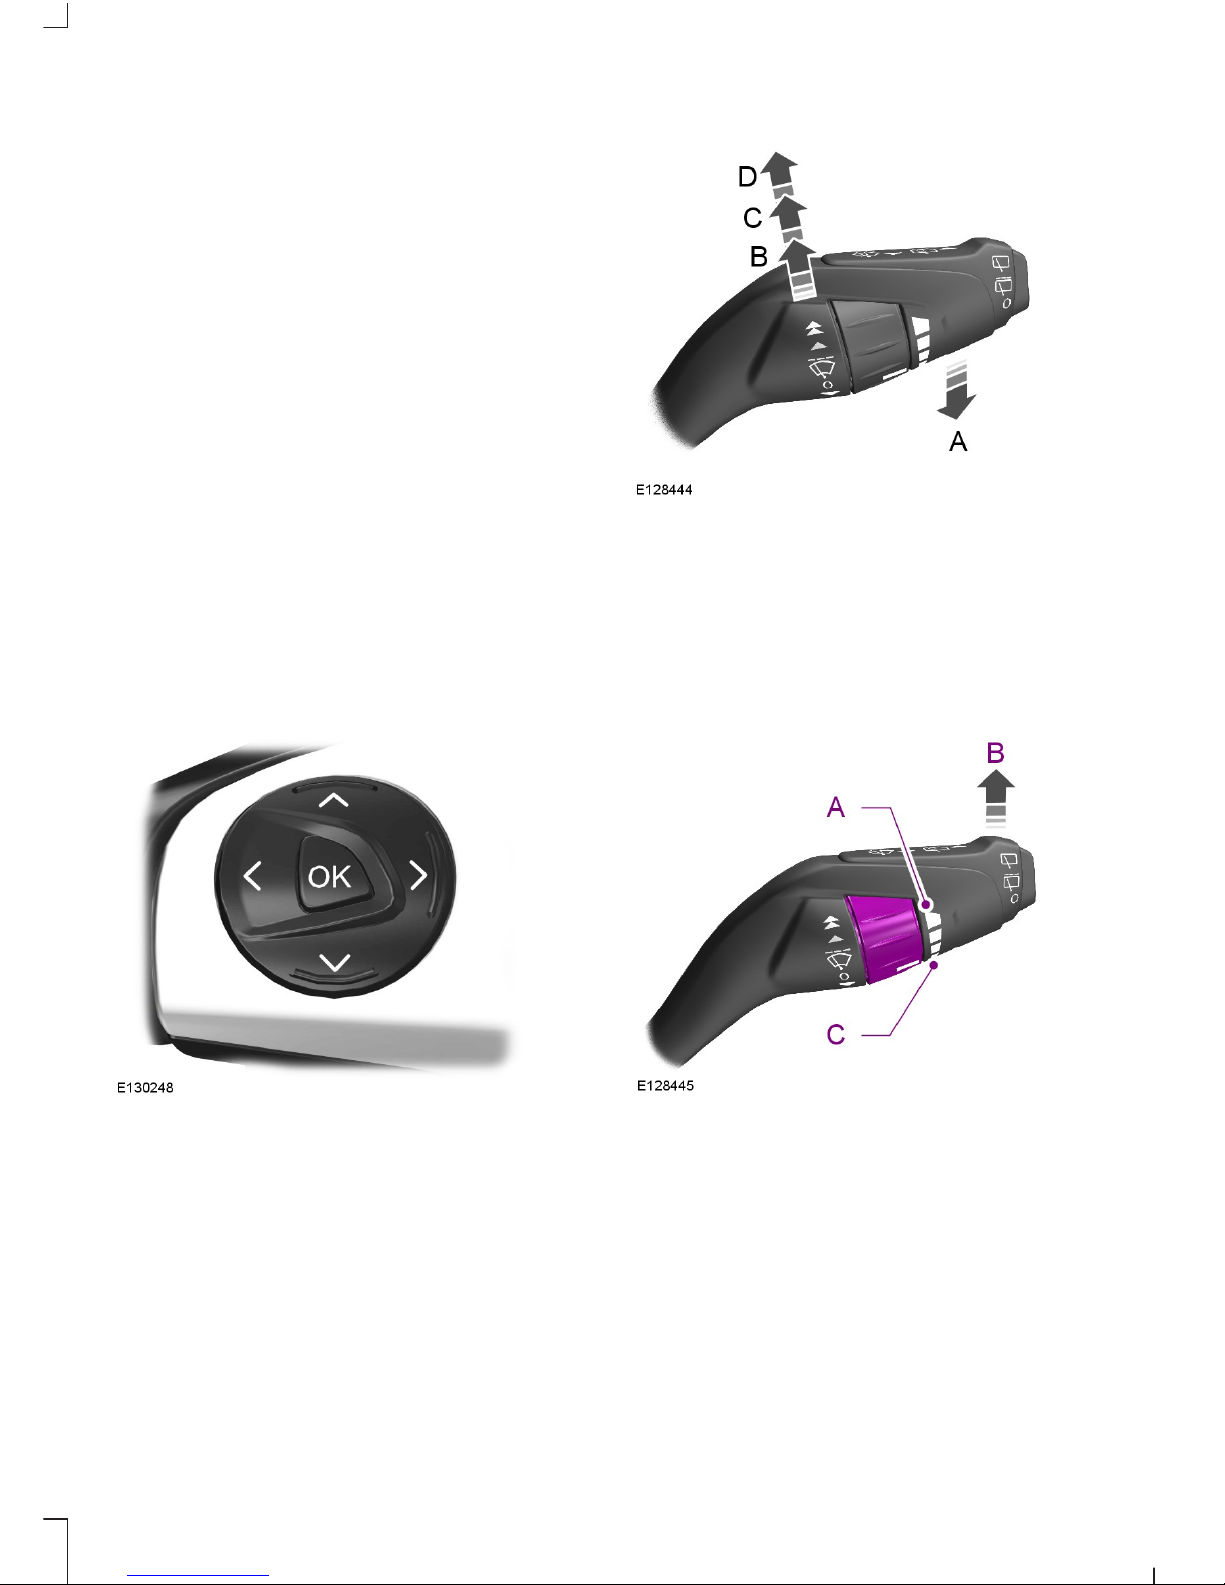
Passive locking and unlocking requires a
valid passive key to be located within one
of the three external detection ranges.
These are located approximately five feet
(1.5 meters) from the front door handles
and the liftgate.
Locking Your Vehicle
Touch a locking sensor once to lock your
vehicle and arm the alarm.
Touch a locking sensor twice within three
seconds to double lock your vehicle and
arm the alarm.
Two short flashes of the direction indicators
confirms that all the doors and the liftgate
have been locked and that the alarm has
been armed.
3
Kuga (CBS) Vehicles Built From: 08-09-2014 Vehicles Built Up To: 31-05-2015, CG3586en enGBR, Edition date: 09/2014, Second Printing
Page 6
PASSIVE ANTI-THEFT SYSTEM
Arming the Engine Immobilizer
When you switch the ignition off the engine
immobilizer will arm automatically after a
short time.
Disarming the Engine Immobilizer
When you switch the ignition on the engine
immobilizer will disarm automatically if a
correctly coded key is used.
Disarming the Alarm
Disarm and silence the alarm by unlocking
the doors with the key and switching the
ignition on with a correctly coded key, or
unlocking the doors or the luggage
compartment lid with the remote control.
INFORMATION DISPLAY
CONTROL
Press the OK button to acknowledge and
remove some messages from the
information display.
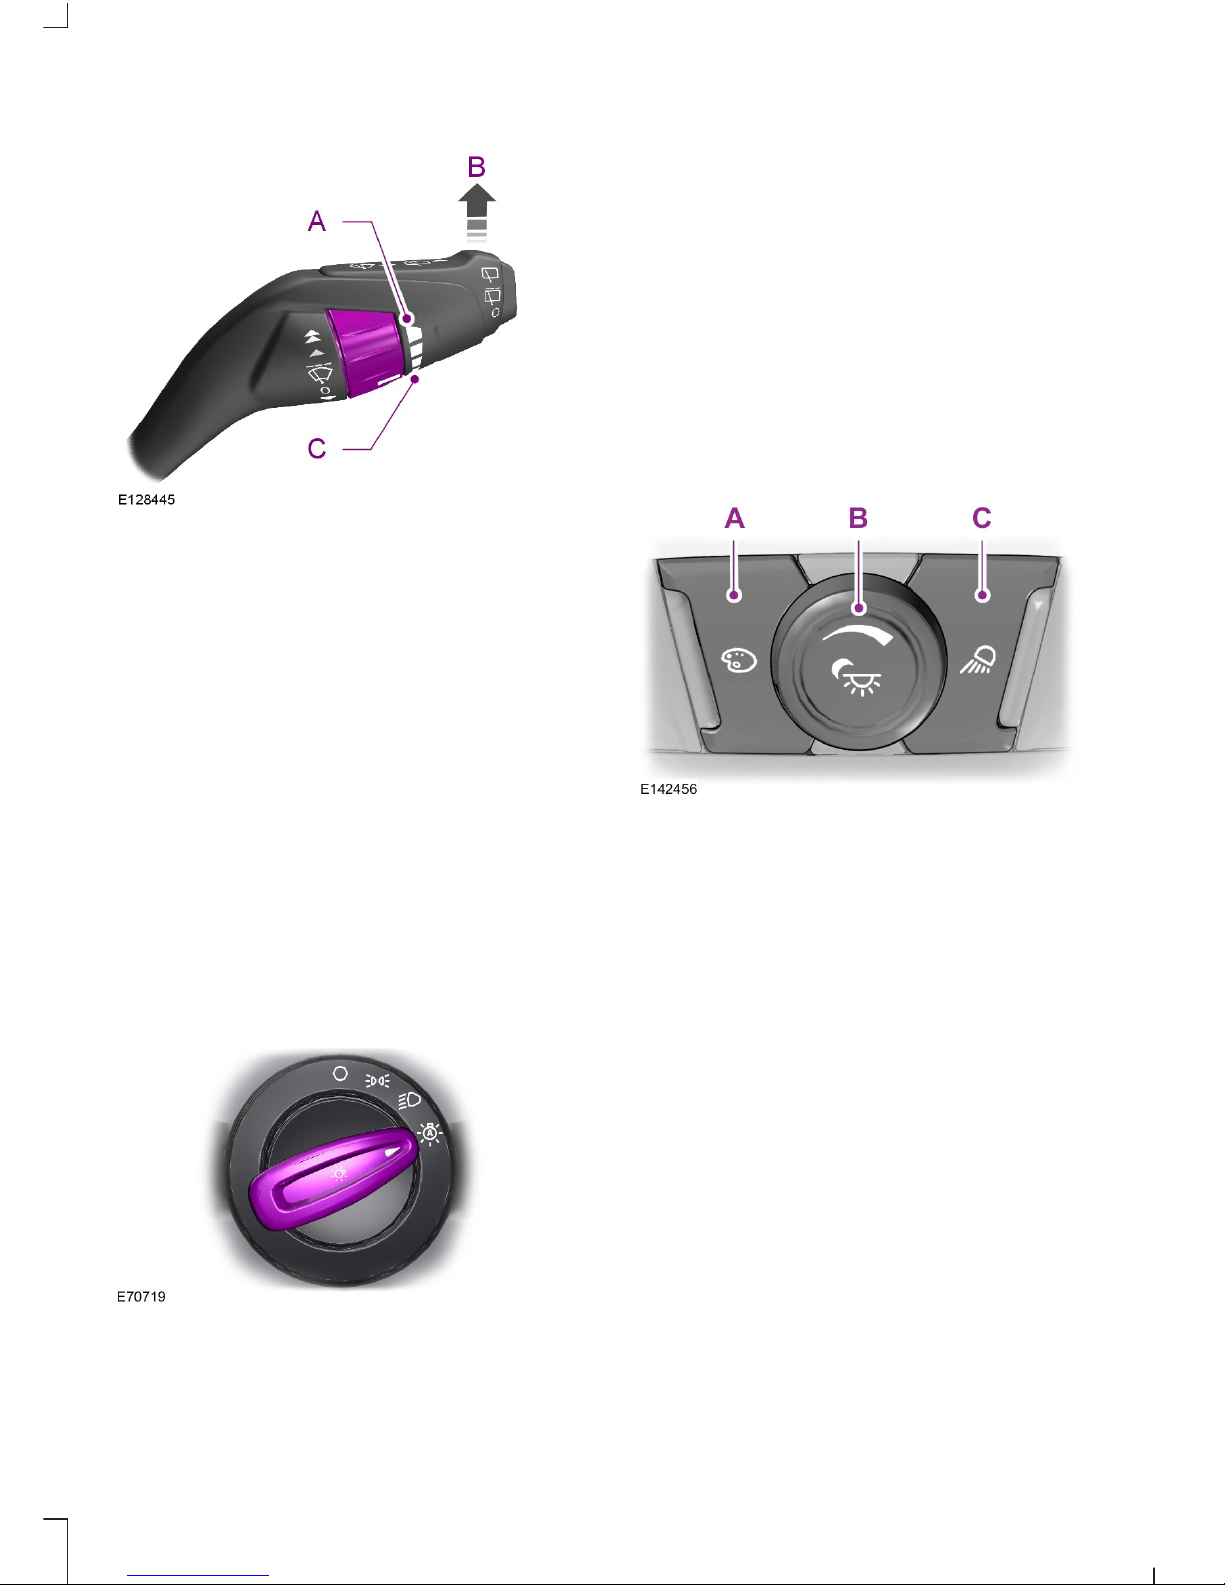
WINDSHIELD WIPERS
Single wipeA
Intermittent wipeB
Normal wipeC
High speed wipeD
Intermittent Wipe
Short wipe intervalA
Intermittent wipeB
Long wipe intervalC
4
Kuga (CBS) Vehicles Built From: 08-09-2014 Vehicles Built Up To: 31-05-2015, CG3586en enGBR, Edition date: 09/2014, Second Printing
Page 7
AUTOWIPERS (If Equipped)
High sensitivityA
OnB
Low sensitivityC
Use the rotary control to adjust the
sensitivity of the rain sensor. With low
sensitivity, the wipers will operate when the
sensor detects a large amount of moisture
on the windshield. With high sensitivity, the
wipers will operate when the sensor detects
a small amount of moisture on the
windshield.
Keep the outside of the windshield clean.
Sensor performance will be affected if the
area around the interior mirror is dirty.
AUTOLAMPS
The headlamps will turn on and off
automatically in low light situations or
during inclement weather.
HEADLAMP EXIT DELAY
After you switch the ignition off, you can
switch the headlamps on by pulling the
direction indicator lever toward you. You
will hear a short tone. The headlamps will
switch off automatically after three minutes
with any door open or 30 seconds after the
last door has been closed. You can cancel
this feature by pulling the direction indicator
toward you again or switching the ignition
on.
AMBIENT LIGHTING (If Equipped)
Color paletteA
Control knobB
Search modeC
Press A to cycle through the color choices.
Rotate B past the first detent to switch on
and adjust to the desired brightness.
Press C to switch on all interior lamps and
the ambient lighting. Press C again to
switch off the interior lamps and return the
ambient lighting to the previously selected
color.
The ambient lighting will switch on when
the following conditions have been met:
• you switch the ignition on
• you switch the headlamps on
• the outside ambient light level is low.
5
Kuga (CBS) Vehicles Built From: 08-09-2014 Vehicles Built Up To: 31-05-2015, CG3586en enGBR, Edition date: 09/2014, Second Printing
Page 8

POWER WINDOWS
To reduce wind noise or buffeting when just
one window is open, open the opposite
window slightly.
GLOBAL OPENING AND
CLOSING
Global Opening
1. Press and release the remote control
unlock button.
2. Press and hold the remote control
unlock button for at least three seconds.
Press the lock or unlock button to stop the
opening function.
Global Closing
Vehicles Without Keyless Entry
To close all the windows, press and hold
the remote control lock button for at least
three seconds. Press the lock or unlock
button to stop the closing function.
Vehicles With Keyless Entry
To close all the windows, press and hold
the driver’s door handle for at least three
seconds.
MOONROOF (If Equipped)
Opening and Closing the Sunscreen
Press and release the rear of the control to
open the sunscreen. Press and release the
front of the control to close the sunscreen.
Opening and Closing the Moonroof
Press and release the rear of the control to
open the moonroof. Press and release the
front of the control to close the moonroof.
CLOCK
Type 1
To adjust the clock, switch the ignition on
and press buttons H or M on the information
and entertainment display as necessary.
Type 2
Use the information display to adjust the
clock.
TRIP COMPUTER
Fuel Used
Indicates the approximate distance your
vehicle will travel on the fuel remaining in
the tank. Changes in driving pattern may
cause the value to vary.
6
Kuga (CBS) Vehicles Built From: 08-09-2014 Vehicles Built Up To: 31-05-2015, CG3586en enGBR, Edition date: 09/2014, Second Printing
Page 9
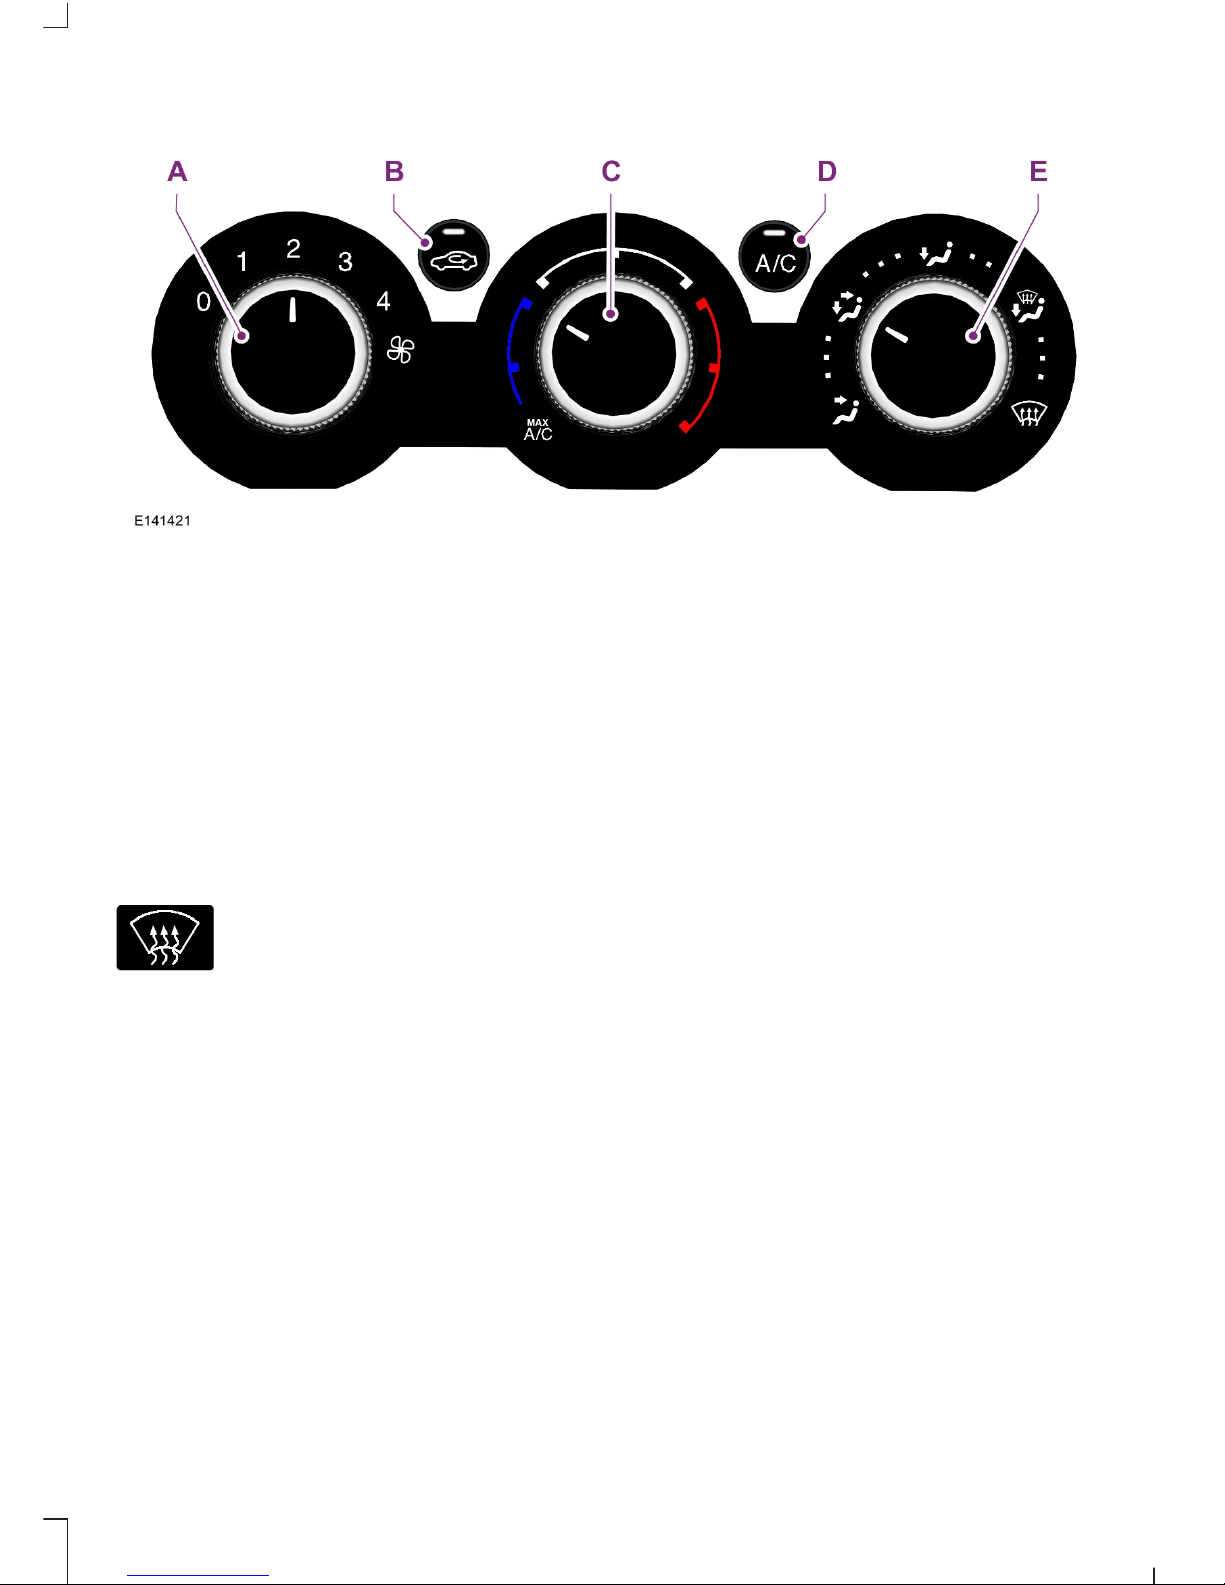
MANUAL CLIMATE CONTROL
Fan speed control: Controls the volume of air circulated in your vehicle.A
Recirculated air: Press the button to switch between outside air and recirculated
air.
B
Temperature control: Controls the temperature of the air circulated in your
vehicle.
C
Air conditioning: Press the button to switch the air conditioning on or off.D
Air distribution control: Adjust to select the desired air distribution.E
Defrosting and Demisting the
Windshield
Select to distribute air through
the windshield air vents.
When the temperature is above 4°C (39°F),
the air conditioning will switch on
automatically. Make sure that the blower
is on. The indicator in the switch will
illuminate during defrosting and demisting.
7
Kuga (CBS) Vehicles Built From: 08-09-2014 Vehicles Built Up To: 31-05-2015, CG3586en enGBR, Edition date: 09/2014, Second Printing
Page 10
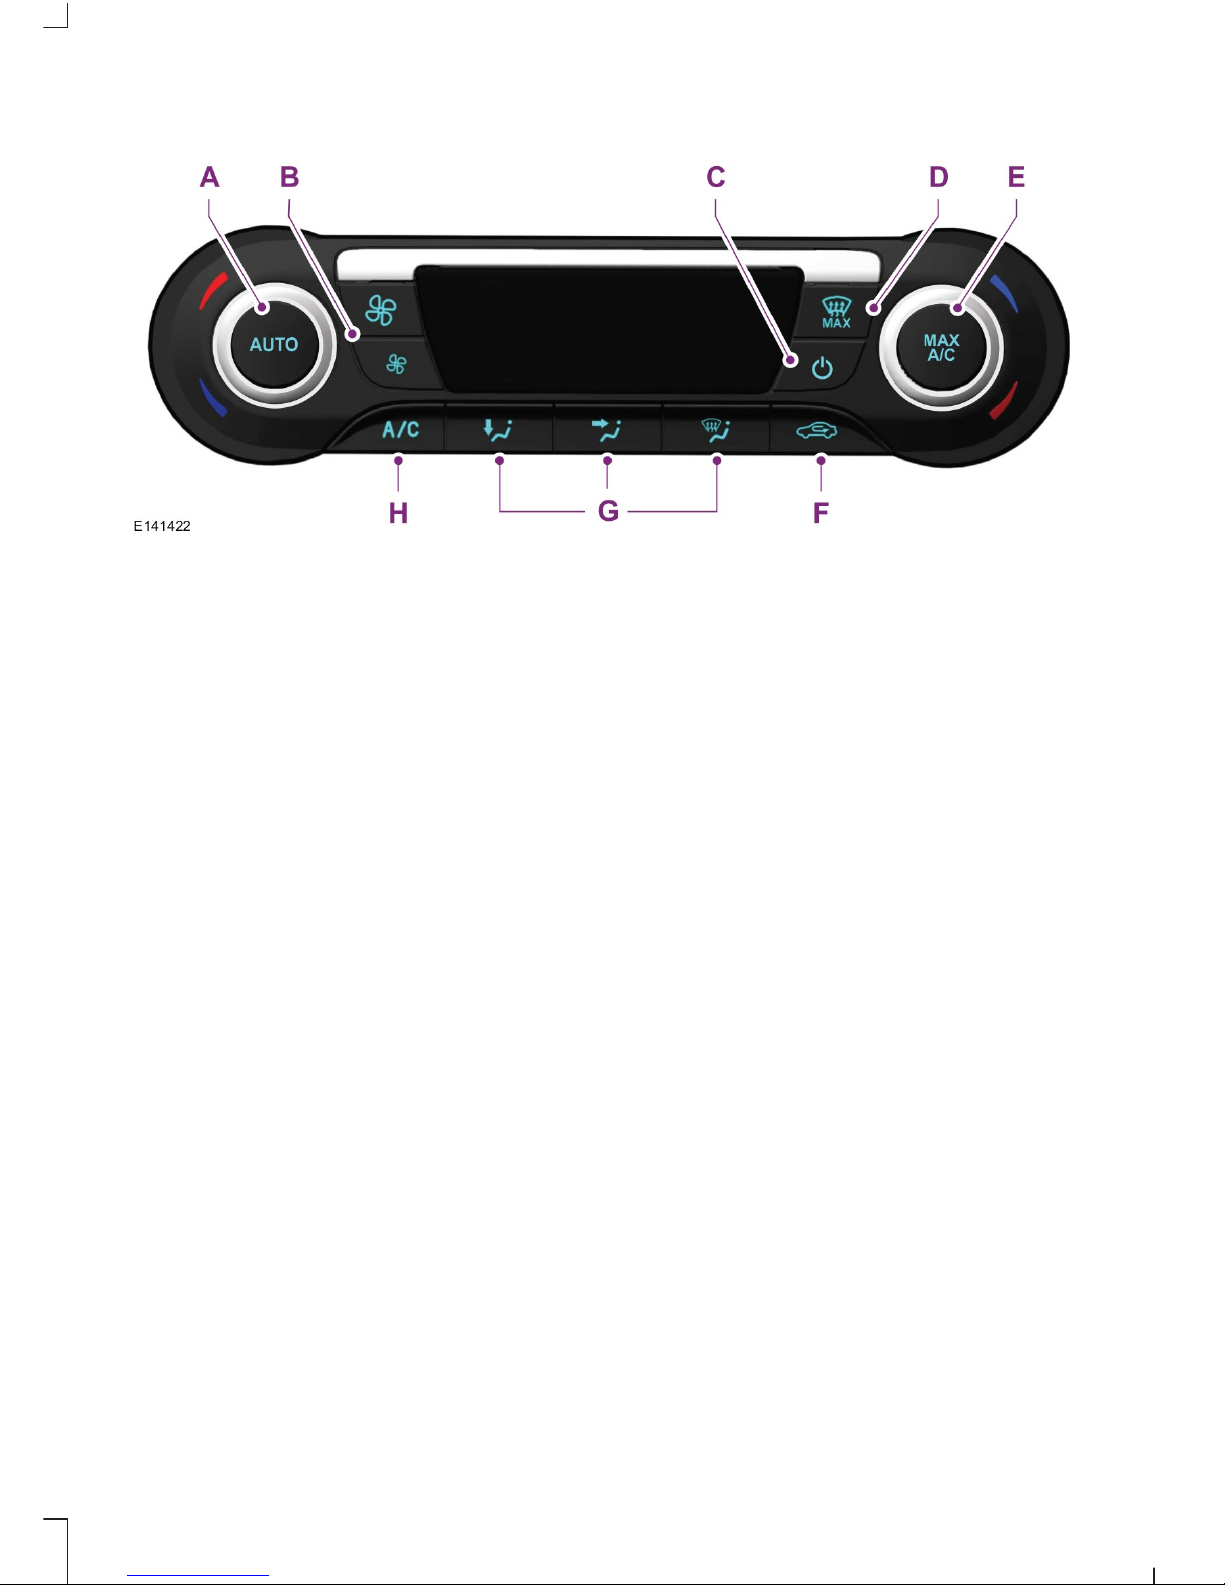
AUTOMATIC CLIMATE CONTROL
AUTO: Press the button to select automatic operation.A
Fan speed: Controls the volume of air circulated in your vehicle.B
On and off button: Press the button to switch the system on and off.C
MAX Defrost: Press the button to distribute outside air through the windshield
air vents.
D
MAX A/C: Press the button to distribute maximum air conditioning through the
instrument panel air vents.
E
Recirculated air: Press the button to switch between outside air and recirculated
air.
F
Windshield: Press the button to distribute air through the windshield air vents.G
Instrument panel: Press the button to distribute air through the instrument
panel air vents.
H
Footwell: Press the button to distribute air through the footwell air vents.I
Air conditioning: Press the button to switch the air conditioning on or off.J
Recommended settings: AUTO, 22ºC
Mono Mode
In this mode, the temperature settings for
both the driver side and passenger side are
linked. If you adjust the setting using the
rotary control on the driver side, the system
adjusts the temperature to the same setting
on the passenger side.
Switching Mono Mode Back On
Press and hold the AUTO button. The
passenger side temperature is adjusted to
the driver side temperature setting.
8
Kuga (CBS) Vehicles Built From: 08-09-2014 Vehicles Built Up To: 31-05-2015, CG3586en enGBR, Edition date: 09/2014, Second Printing
Page 11
HINTS ON CONTROLLING THE
INTERIOR CLIMATE
Manual Climate Control
Recommended Settings for Cooling
• Adjust the fan speed to the second
speed setting.
• Adjust the temperature control to the
midway point of the cold settings.
• Adjust the air distribution control to the
instrument panel air vents position.
Recommended Settings for Heating
• Adjust the fan speed to the second
speed setting.
• Adjust the temperature control to the
midway point of the hot settings.
• Adjust the air distribution control to the
footwell and windshield air vents
position.
HEATED WINDOWS AND
MIRRORS
Heated Windshield
Heated Rear Window
Heated Exterior Mirror (If Equipped)
Both mirrors are heated to remove ice, mist
and fog when the heated rear window is
switched on.
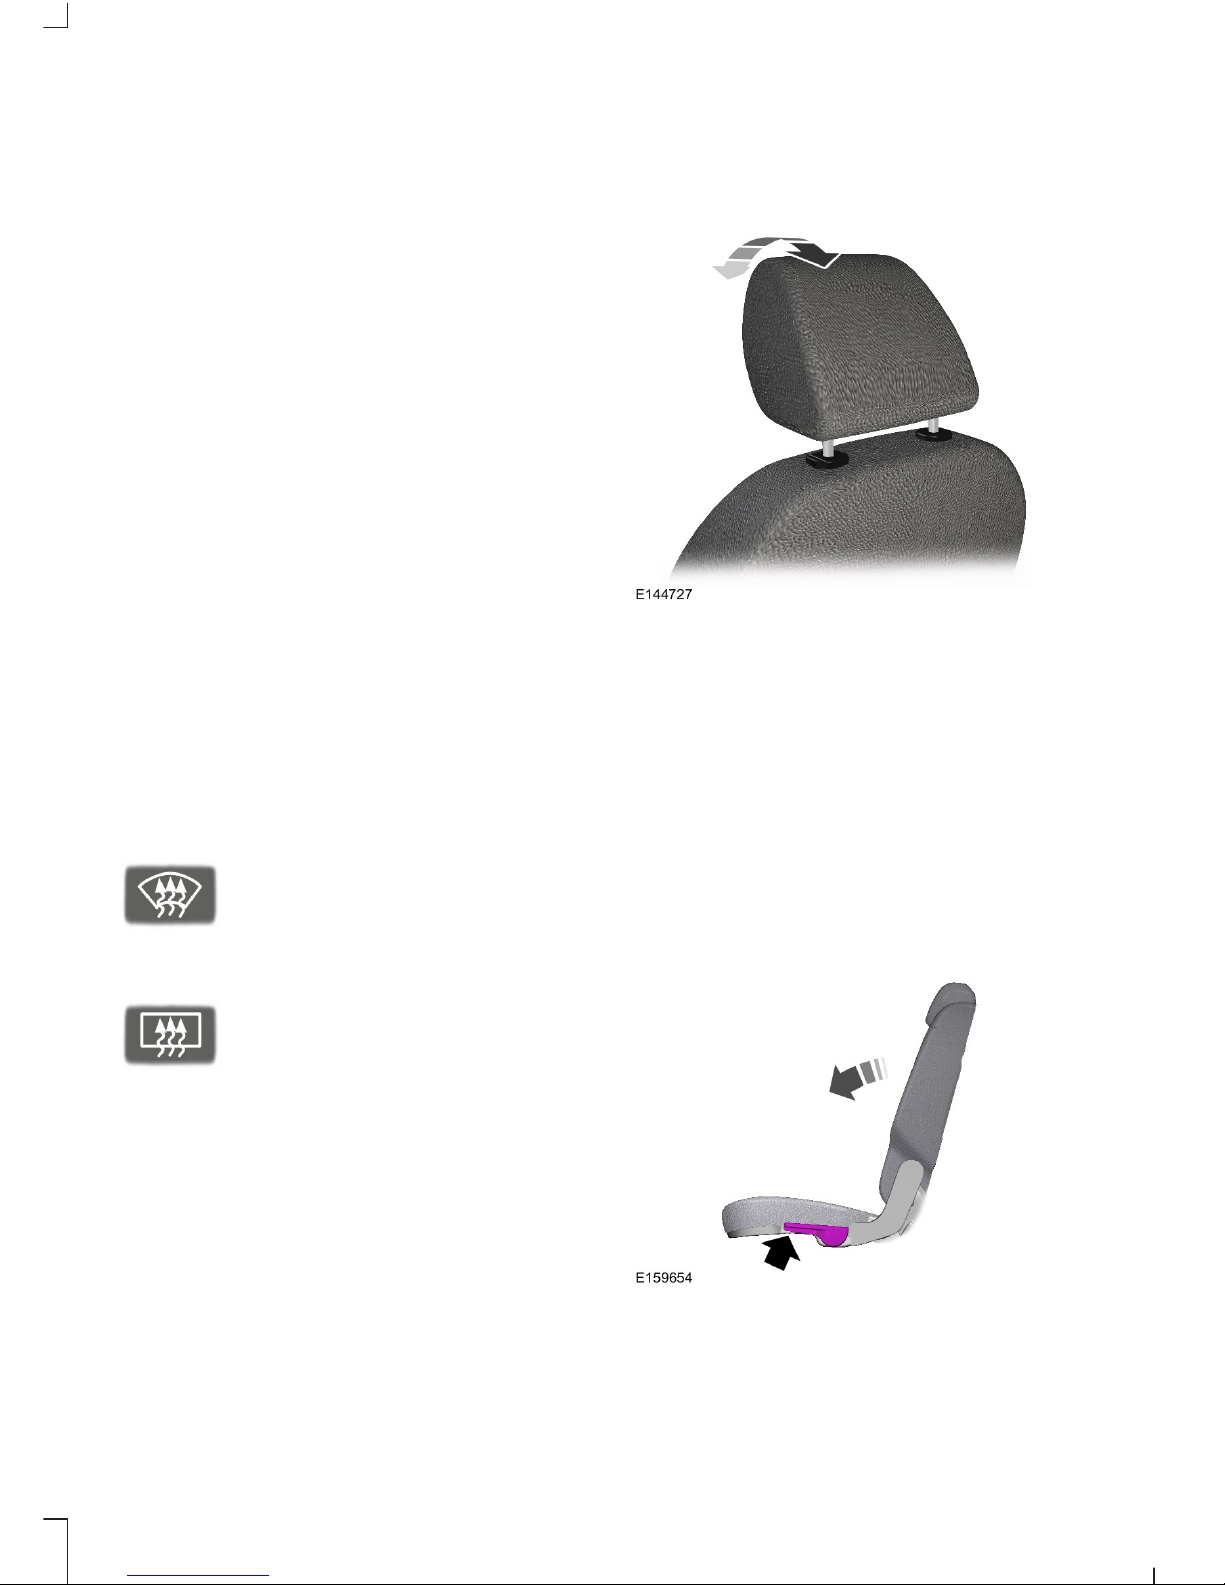
HEAD RESTRAINTS
Adjusting the Head Restraint
Raising the Head Restraint
Pull the head restraint up.
Tilting the Head Restraint
The front head restraints may have a tilting
feature for extra comfort. To tilt the head
restraint, do the following:
1. Adjust the seat back to an upright
driving or riding position.
2. Pivot the head restraint forward toward
your head to the desired position.
After the head restraint reaches the
forward-most tilt position, pivot it forward
again to release it to the rearward, un-tilted
position.
REAR SEATS
Folding the Seatback
9
Kuga (CBS) Vehicles Built From: 08-09-2014 Vehicles Built Up To: 31-05-2015, CG3586en enGBR, Edition date: 09/2014, Second Printing
Page 12
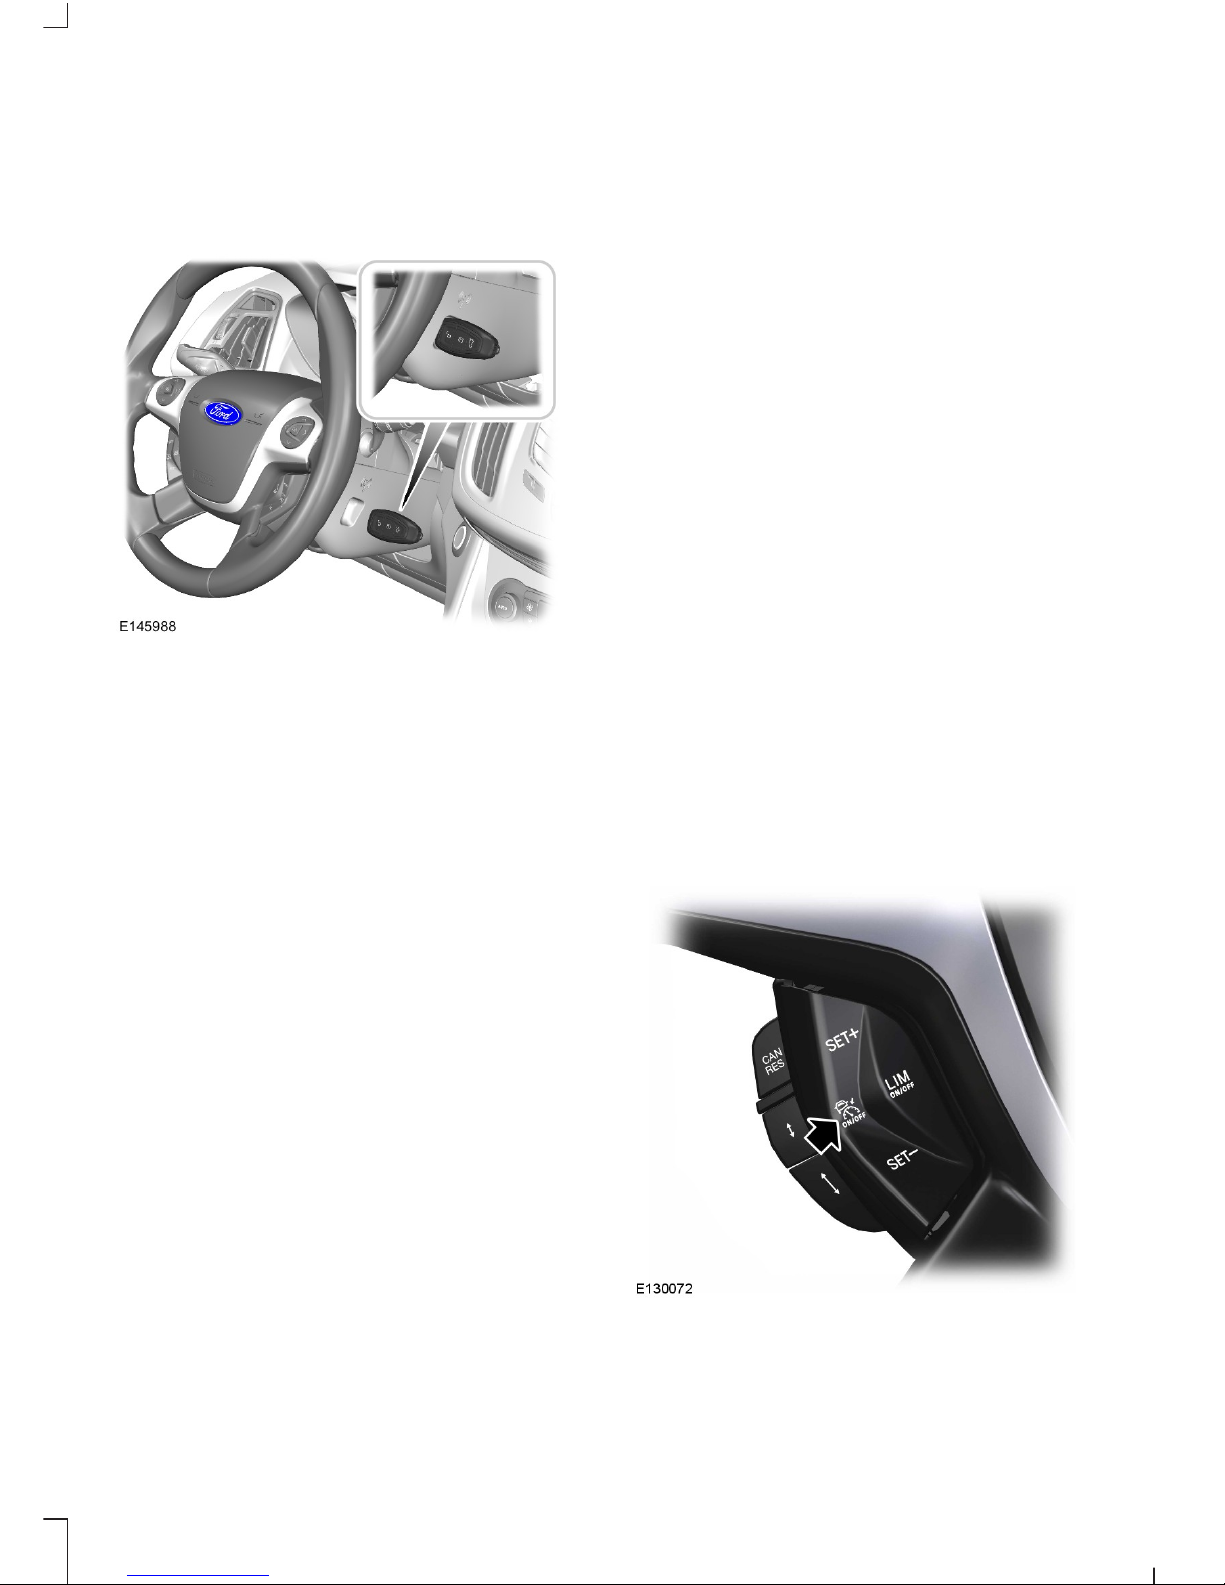
KEYLESS STARTING
Failure to Start
If you are unable to start your vehicle, do
the following.
1. Hold the passive key next to the symbol
on the steering column.
2. With the passive key in this position, you
can use the button to switch the ignition
on and start your vehicle.
DIESEL PARTICULATE FILTER
During regeneration at low speed or engine
idle, you may smell a hot metallic odor and
could notice a clicking metallic sound. This
is due to the high temperatures reached
during regeneration and is normal.
HILL START ASSIST
The system makes it easier to pull away
when your vehicle is on a slope without the
need to use the parking brake.
When the system is active, your vehicle will
remain stationary on the slope for two to
three seconds after you release the brake
pedal. This allows you time to move your
foot from the brake to the accelerator
pedal. The brakes are released
automatically once the engine has
developed sufficient drive to prevent your
vehicle from rolling down the slope.
BRAKES
Emergency Brake Assist
Emergency brake assist detects when you
brake heavily by measuring the rate at
which you press the brake pedal. It provides
maximum braking efficiency as long as you
press the pedal. Emergency brake assist
can reduce stopping distances in critical
situations.
Anti-lock Brake System
This system helps you maintain steering
control and vehicle stability during
emergency stops by keeping the brakes
from locking.
CRUISE CONTROL
Cruise control lets you maintain a set speed
without keeping your foot on the
accelerator pedal. You can use cruise
control when your vehicle speed is greater
than 20 mph (30 km/h).
USING CRUISE CONTROL
Switching Cruise Control On
Setting a Speed
1. Accelerate to the desired speed.
2. Press and release SET+.
10
Kuga (CBS) Vehicles Built From: 08-09-2014 Vehicles Built Up To: 31-05-2015, CG3586en enGBR, Edition date: 09/2014, Second Printing
Page 13
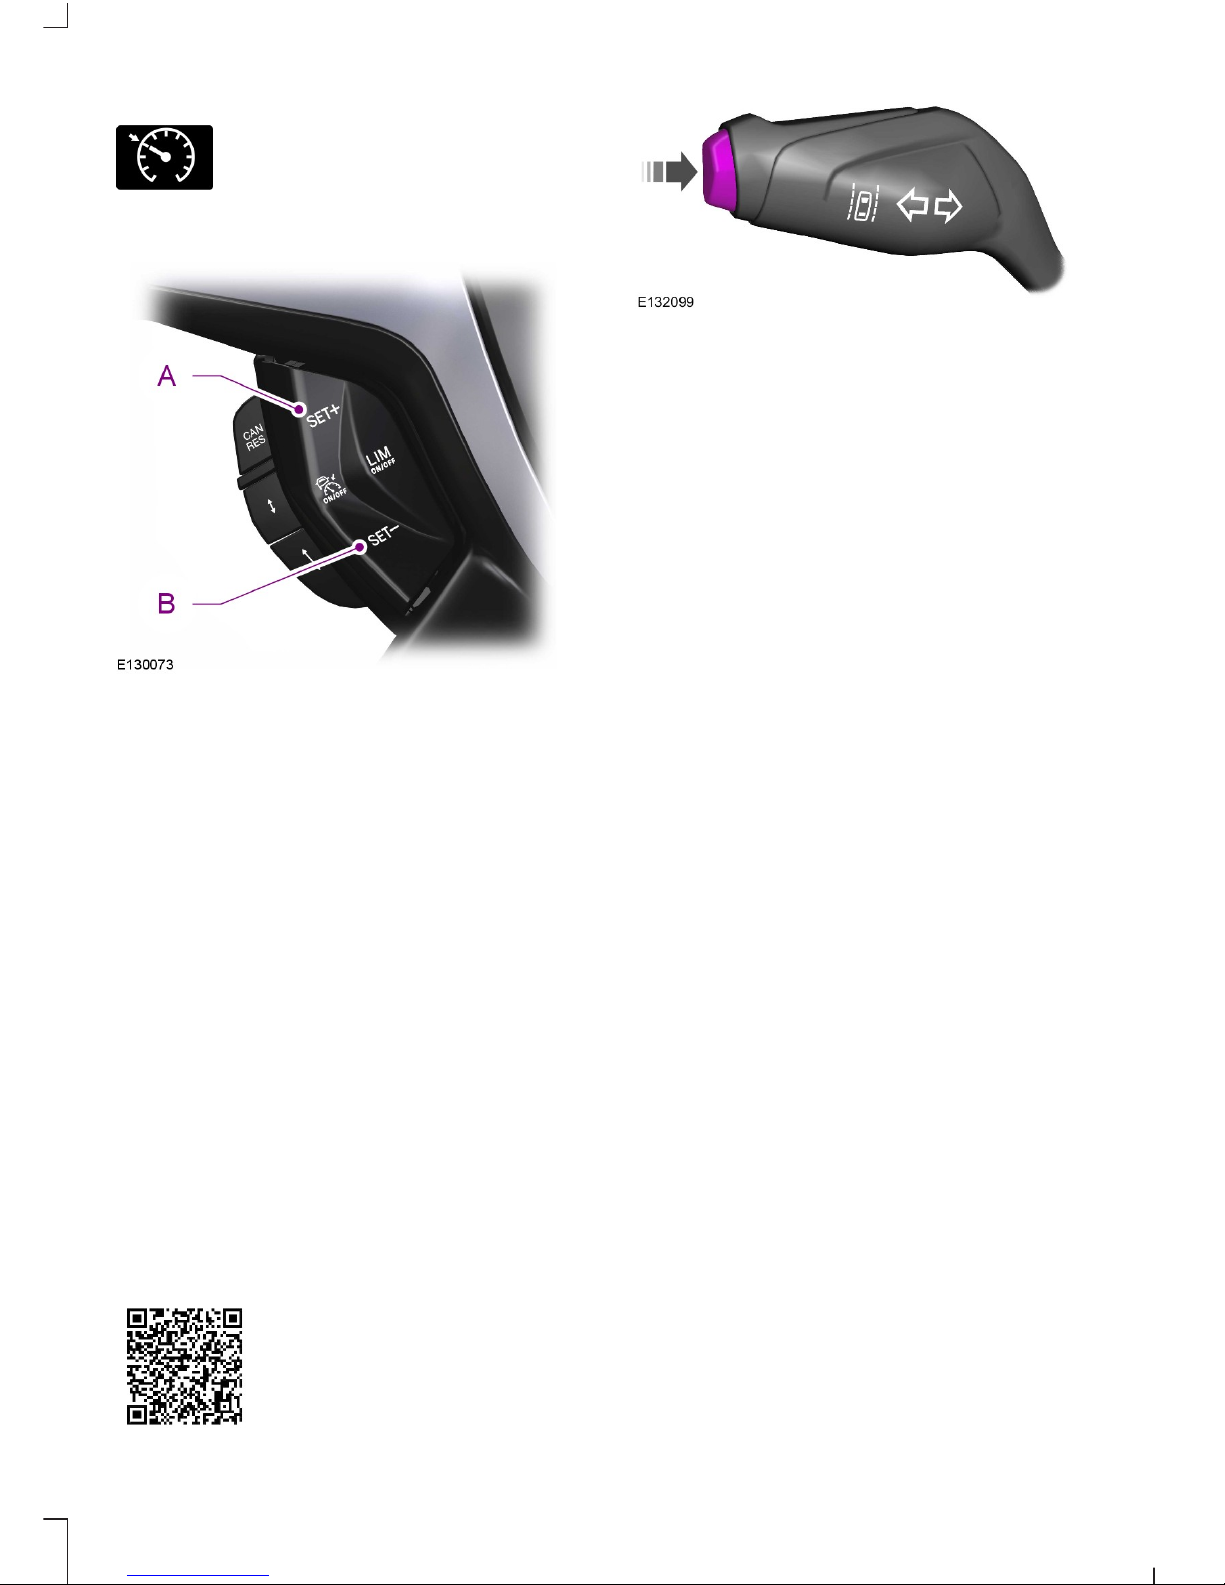
3. Take your foot off the accelerator pedal.
The indicator will display in the
instrument cluster.
Changing the Set Speed
AccelerateA
DecelerateB
Canceling the Set Speed
Pull CAN toward you and release, or tap
the brake pedal.
Resuming the Set Speed
Pull RES toward you and release.
LANE KEEPING SYSTEM
Principle of Operation
The system will automatically detect and
track the lane markings on the road. If your
vehicle unintentionally drifts toward the
road lane markings, a warning will be shown
in the display. There is also a warning given
in the form of a vibration felt through the
steering wheel.
Lane Keeping Alert
Press the button twice to switch the system
on. Press the button again to switch the
system off.
Setting the Steering Wheel Vibration
Level
The system has three intensity levels which
you can set using the information display.
Setting the System Sensitivity
You can adjust how quickly the system
warns you of a dangerous situation. The
system has two sensitivity levels which you
can set using the information display.
Lane Keeping Aid
Press the button three times to switch the
system on. Press the button again to switch
the system off.
Setting the System Sensitivity
You can adjust how quickly the system
intervenes in a dangerous situation. The
system has two sensitivity levels which you
can set using the information display.
11
Kuga (CBS) Vehicles Built From: 08-09-2014 Vehicles Built Up To: 31-05-2015, CG3586en enGBR, Edition date: 09/2014, Second Printing
Page 14
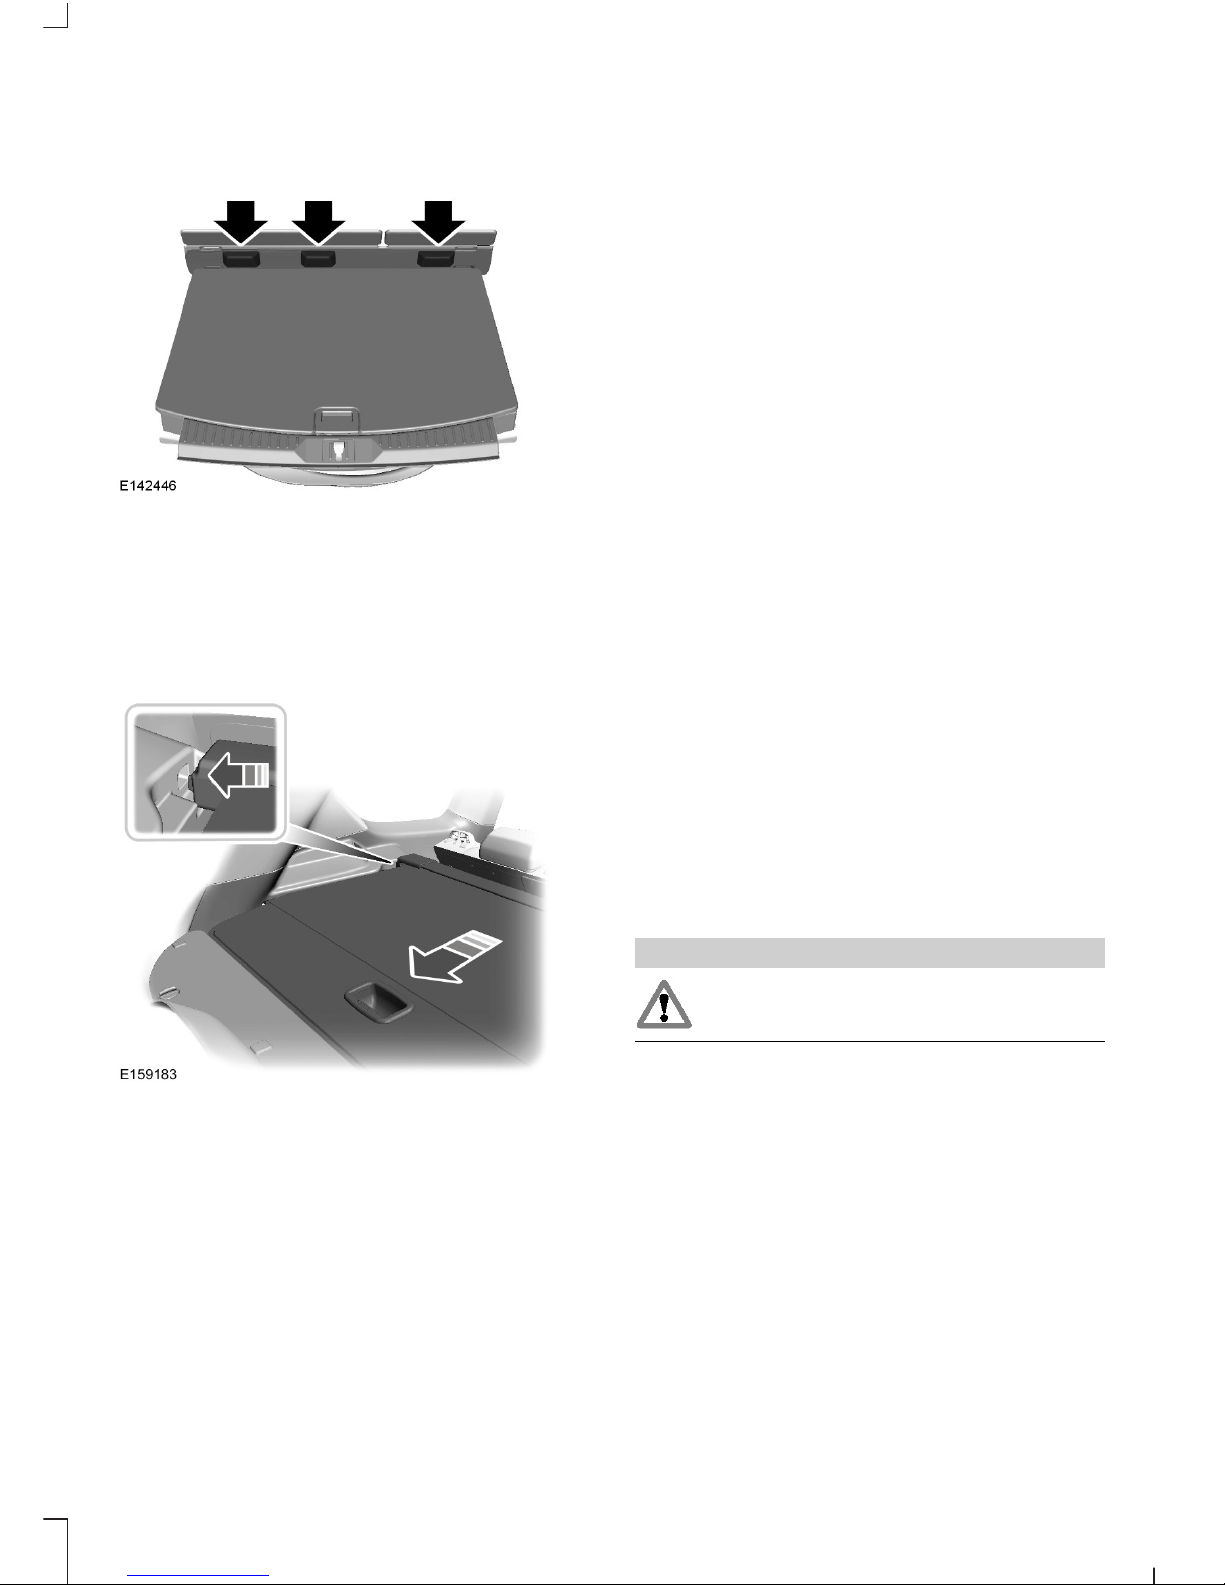
REAR UNDER FLOOR STORAGE
Adjustable Load Floor
The front of the load floor can be placed
either on (for high position) or below (for
low position) the ledges behind the rear
seats.
LUGGAGE COVERS
Insert the ends of the cargo shade into the
mounting features located behind the rear
seat on the rear trim panels to install the
shade. Pull the rear edge of the cargo shade
rearward until it clicks into place.
TOWING POINTS
Locate the towing eye inside the foam box
in the spare wheel well.
Remove the cover and install the towing
eye.
BREAKING-IN
During the first 2000 miles (3000
kilometers), you may notice a ticking sound
when your vehicle slows down. This is due
to adjustments of your new diesel engine
and is normal.
ECONOMICAL DRIVING
The following will help to improve fuel
consumption.
Check your tire pressures regularly to
optimize fuel economy.
Gear Shifting
Use the highest drivable gear appropriate
for the road conditions.
Anticipation
Adjust your vehicle speed and the distance
to other vehicles without the need for heavy
braking or acceleration.
Efficient Speed
Higher speeds use more fuel. Reduce your
cruising speed on open roads.
MAINTENANCE
WARNING
Keep your hands and clothing clear
of the engine cooling fan.
Note: Under certain conditions, the fan may
continue to run for several minutes after you
have switched the engine off.
TEMPORARY MOBILITY KIT
Your vehicle may not have a spare tire.
Therefore you will have a temporary
mobility kit which will only repair one
damaged tire.
12
Kuga (CBS) Vehicles Built From: 08-09-2014 Vehicles Built Up To: 31-05-2015, CG3586en enGBR, Edition date: 09/2014, Second Printing
Page 15
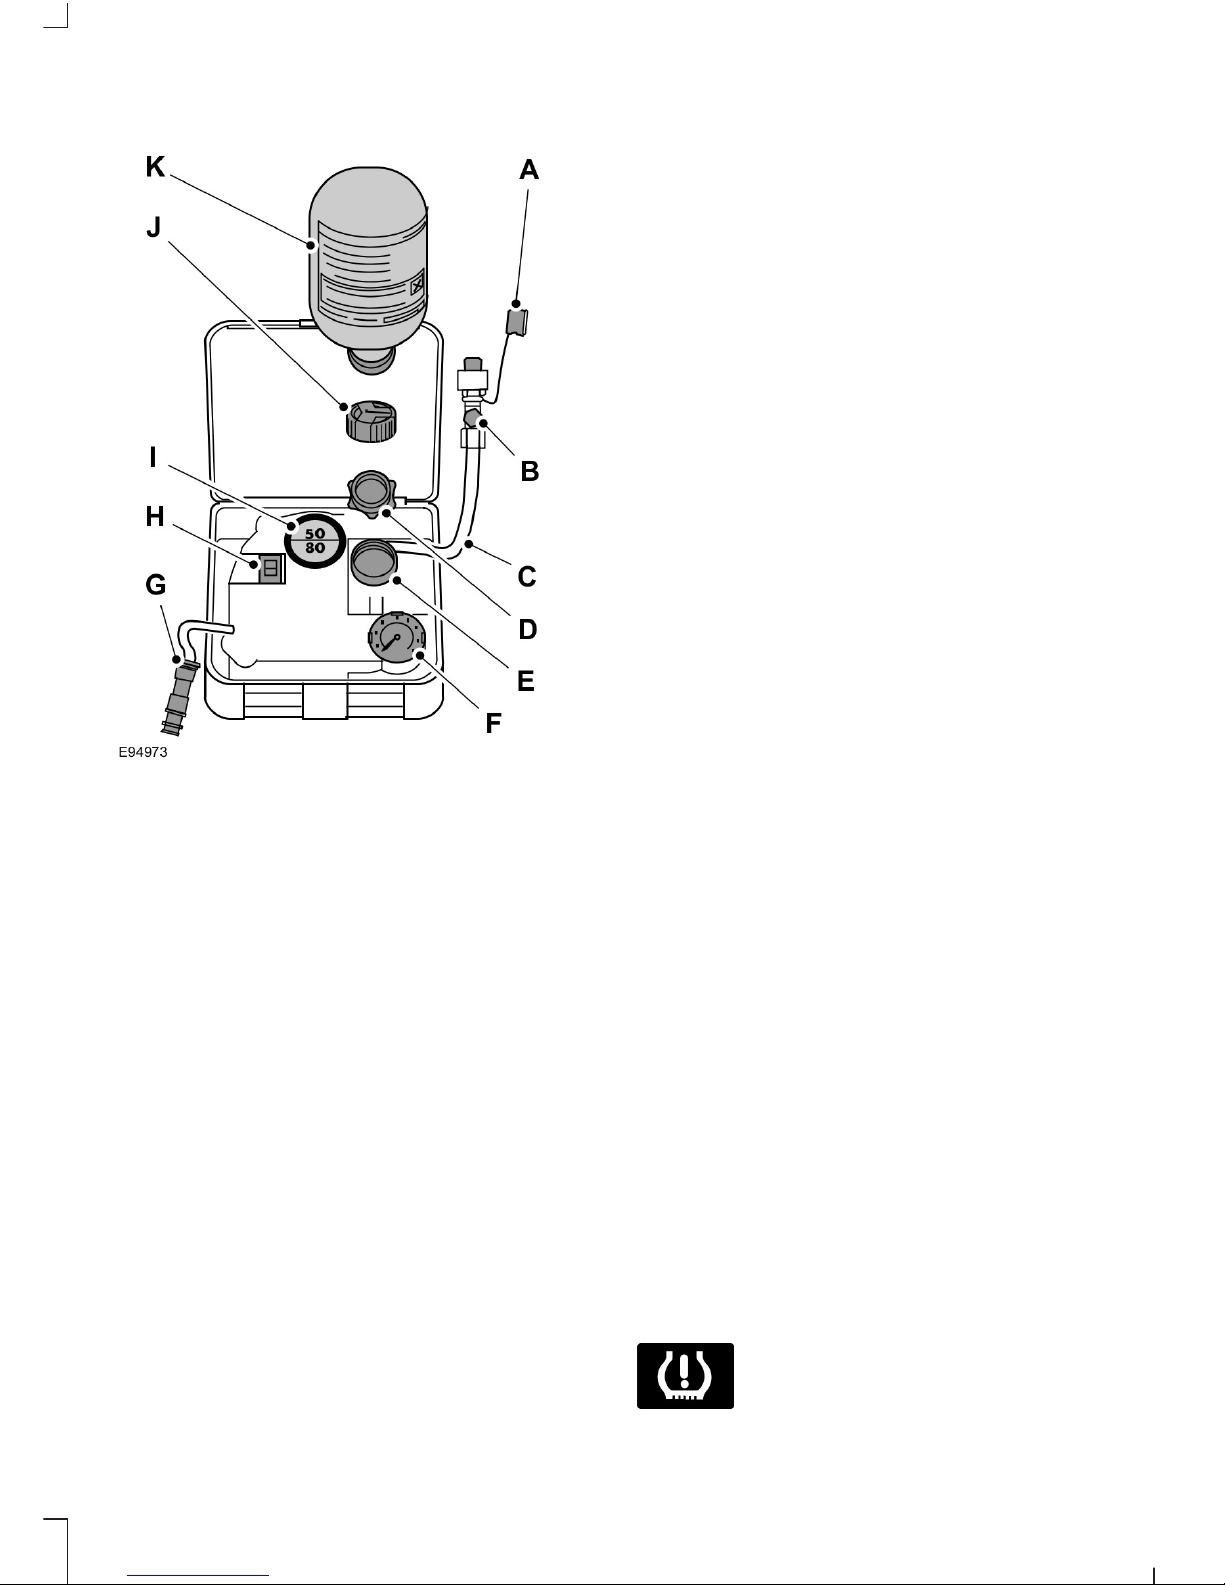
Inflating the Tire
Protective capA
Pressure relief valveB
HoseC
Orange capD
Bottle holderE
Pressure gaugeF
Power plug with cableG
Compressor switchH
LabelI
Bottle lidJ
Sealant bottleK
1. Open the lid of the kit.
2. Peel off the label I showing the
maximum permissible speed of 50 mph
(80 km/h) from the casing and attach
it to the instrument panel in the driver’s
field of view. Make sure the label does
not obscure anything important.
3. Take the hose C and the power plug
with cable G out of the kit.
4. Unscrew the orange cap D and the
bottle lid J.
5. Screw the sealant bottle K clockwise
into the bottle holder E fully tight.
6. Remove the valve cap from the
damaged tire.
7. Detach the protective cap A from the
hose C and screw the hose C firmly onto
the valve of the damaged tire.
8. Make sure that the compressor switch
H is in position 0.
9. Insert the power plug G into the cigar
lighter socket or auxiliary power point.
10. Start the engine.
11. Move the compressor switch H to
position 1.
12. Inflate the tire for no longer than 10
minutes to an inflation pressure of
minimum 1.8 bar (26 psi) and a
maximum of 3.5 bar (51 psi). Move the
compressor switch H to position 0 and
check the current tire pressure with
pressure gauge F.
13. Remove the power plug G from the
cigar lighter socket or auxiliary power
point.
14. Quickly unscrew the hose C from the
tire valve and replace the protective
cap A. Fasten the valve cap again.
15. Leave the sealant bottle K in the
bottle holder E.
16. Make sure the kit, the bottle lid and
the orange cap are stored safely, but
still easily accessible in your vehicle.
The kit will be required again when you
check the tire pressure.
17. Immediately drive approximately
two miles (three kilometers) so that
the sealant can seal the damaged
area.
TIRE PRESSURE MONITORING
SYSTEM
13
Kuga (CBS) Vehicles Built From: 08-09-2014 Vehicles Built Up To: 31-05-2015, CG3586en enGBR, Edition date: 09/2014, Second Printing
Page 16

As a driver assistance feature, your vehicle
has a tire pressure monitoring system. A
warning lamp will illuminate when one or
more of the tires are significantly
under-inflated. If the low tire pressure
warning lamp illuminates, you should stop
your vehicle as soon as it is safe to do so,
check the tires and inflate them to the
correct pressure.
Driving on under-inflated tires can:
• Cause them to overheat.
• Lead to tire failure.
• Reduce fuel efficiency.
• Reduce tire life.
• Affect vehicle handling or stopping
ability.
The system is not a substitute for correct
tire maintenance.
You must maintain the correct tire
pressures, even if low tire pressure has not
illuminated the warning lamp.
Understanding the Tire Pressure
Monitoring System
The system measures the pressure in the
four road tires and sends the tire pressure
readings to your vehicle.
The system detects this lower pressure as
being significantly below the correct
inflation pressure and the warning lamp
illuminates. You must inflate the tires to
the correct pressure.
If the Warning Lamp is On:
1. Check each tire to verify that none are
flat.
2. If one or more tires are flat, repair as
necessary.
3. Check the tire pressures and inflate all
the tires to the correct pressure.
4. Carry out the tire pressure monitoring
system reset procedure.
Tire Pressure Monitoring System
Reset Procedure
You must carry out the system reset
procedure after each tire replacement or
adjustment of the tire pressures.
Carrying Out the System Reset
Procedure
1. Check the tire pressures and inflate all
the tires to the correct pressure.
2. Use the information display controls on
the steering wheel or instrument panel.
To reset the tire pressure monitoring system, scroll to:
Description and ActionMessage
Press the OK button.Settings
Press the OK button.Driver assist
Press and hold the OK button until confirmation appears.
Alternatively, if your vehicle has a tire pressure monitoring
system reset button, press and hold the button until confirmation appears.
Tire Monitor
14
Kuga (CBS) Vehicles Built From: 08-09-2014 Vehicles Built Up To: 31-05-2015, CG3586en enGBR, Edition date: 09/2014, Second Printing
Page 17

CG3586en
 Loading...