

Page 1
Quick Reference Guide
2015 Escape
FJ5J 19G217 AA
January 2015
Second Printing
Quick Reference Guide
Escape
Litho in U.S.A.
This Quick Reference Guide is not intended to rep lace
your vehicle Owner’s Manual which contains more
detailed information concerning the features of your
vehicle, as well as important safety warnings designed to
help reduce the risk of injury to you and your passengers.
Please read your entire Owner’s Manual carefully as
you begin learning about your new vehicle and refer
to the appropriate chapters when questions arise. All
information contained in this Quick Reference Guide
was accurate at the time of duplication. We reserve the
right to change features, operation and/or functionality
of any vehicle specification at any time. Your Ford dealer
is the best source for the most current information.
For detai led operating and safety information, please
consult your Owner’s Manual.
United States
Ford Customer Relationship Center
1-800-392-3673 (FORD)
(TDD for the hearing impaired:
1-800-232-5952)
fordowner.com
@FordService
Canada
Ford Customer Relationship Centre
1-800-565-3673 (FORD)
ford.ca
@FordServiceCA
Page 2
Instrument Panel
SYNC
SYNC with MyFord Touch
Convenience
Comfort
Ligate
Function
Essential Information
4 – 5
6 – 7
8 – 10
11
12 – 13
14 – 15
16 – 17
18 – 19
Navigation**
• Navigation list of commands
• Destination street address
<number, name, city>
• Destination home
• Navigation voice <On/O>
• Navigation voice volume
<increase/decrease>
• Repeat instruction
• Show <map/north-up/
heading-up/3-D>
• Travel Link list of commands
• Tra c
• Weather
• Movie listings
• Fuel prices
• Sports <headlines/
scores/schedule>
3
Table of Contents
Entertainment
• Audio list of commands:
You can also get detailed
lists of commands for radio,
USB, Bluetooth® audio,
SiriusXM and SD card*
• Radio
- <On/O>
- FM <87.9-107.9>
- FM preset <#>
• CD
- Play track <1-512>
- Shue <On/O>
• USB
- Play song <name>
- Play album <name>
• SiriusXM
- <Channel name>
- Preset <#>
Phone
• Phone list of commands
• Dial
• Call <name> on cell/at
home/at work
• Call voicemail
• Do not disturb <On/O>
• Listen to text messages
(phone-dependent feature)
Basic Commands
• What can I say?
• List of commands
• Main menu
• Previous
• Next
• Go back
• Exit
• Help
• Pair my phone
Climate*
• Climate control list
of commands
• Climate <On/O>
• Climate temperature
2
WARNING
Driving while distracted can result in loss of
vehicle control, crash and injury. We strongly
recommend that you use extreme caution
when using any device that may take your focus
o the road. Your primary responsibility is the
safe operation of your vehicle. We recommend
against the use of any hand-held device while
driving and encourage the use of voice-operated
systems when possible. Make sure you are aware
of all applicable local laws that may aect the
use of electronic devices while driving.
fordowner.com (U.S.)
Learn More About Your New Vehicle
Scan the country-appropriate QR code with
your smartphone (make sure you have a scanner
app installed) and you can access even more
information about your vehicle.
Some services may not be available in your area. Refer to your Owner’s
Manual, visit the website or call the toll-free number for more information.
For U.S. customers:
Visit SyncMyRide.com or call 1-800-392-3673 (select Option 1 or 2 for
language, then Option 3).
For Canadian customers:
Visit SyncMyRide.ca or call 1-800-565-3673 (select Option 1 or 2 for
language, then Option 3).
*if equipped
**available only with MyFord Touch
Commonly Used SYNC® Voice Commands
Press the voice button on the steering wheel and then say:
ford.ca (Canada)
Page 3
Instrument Panel
1
3
2
4
5
6
7
4 5
9
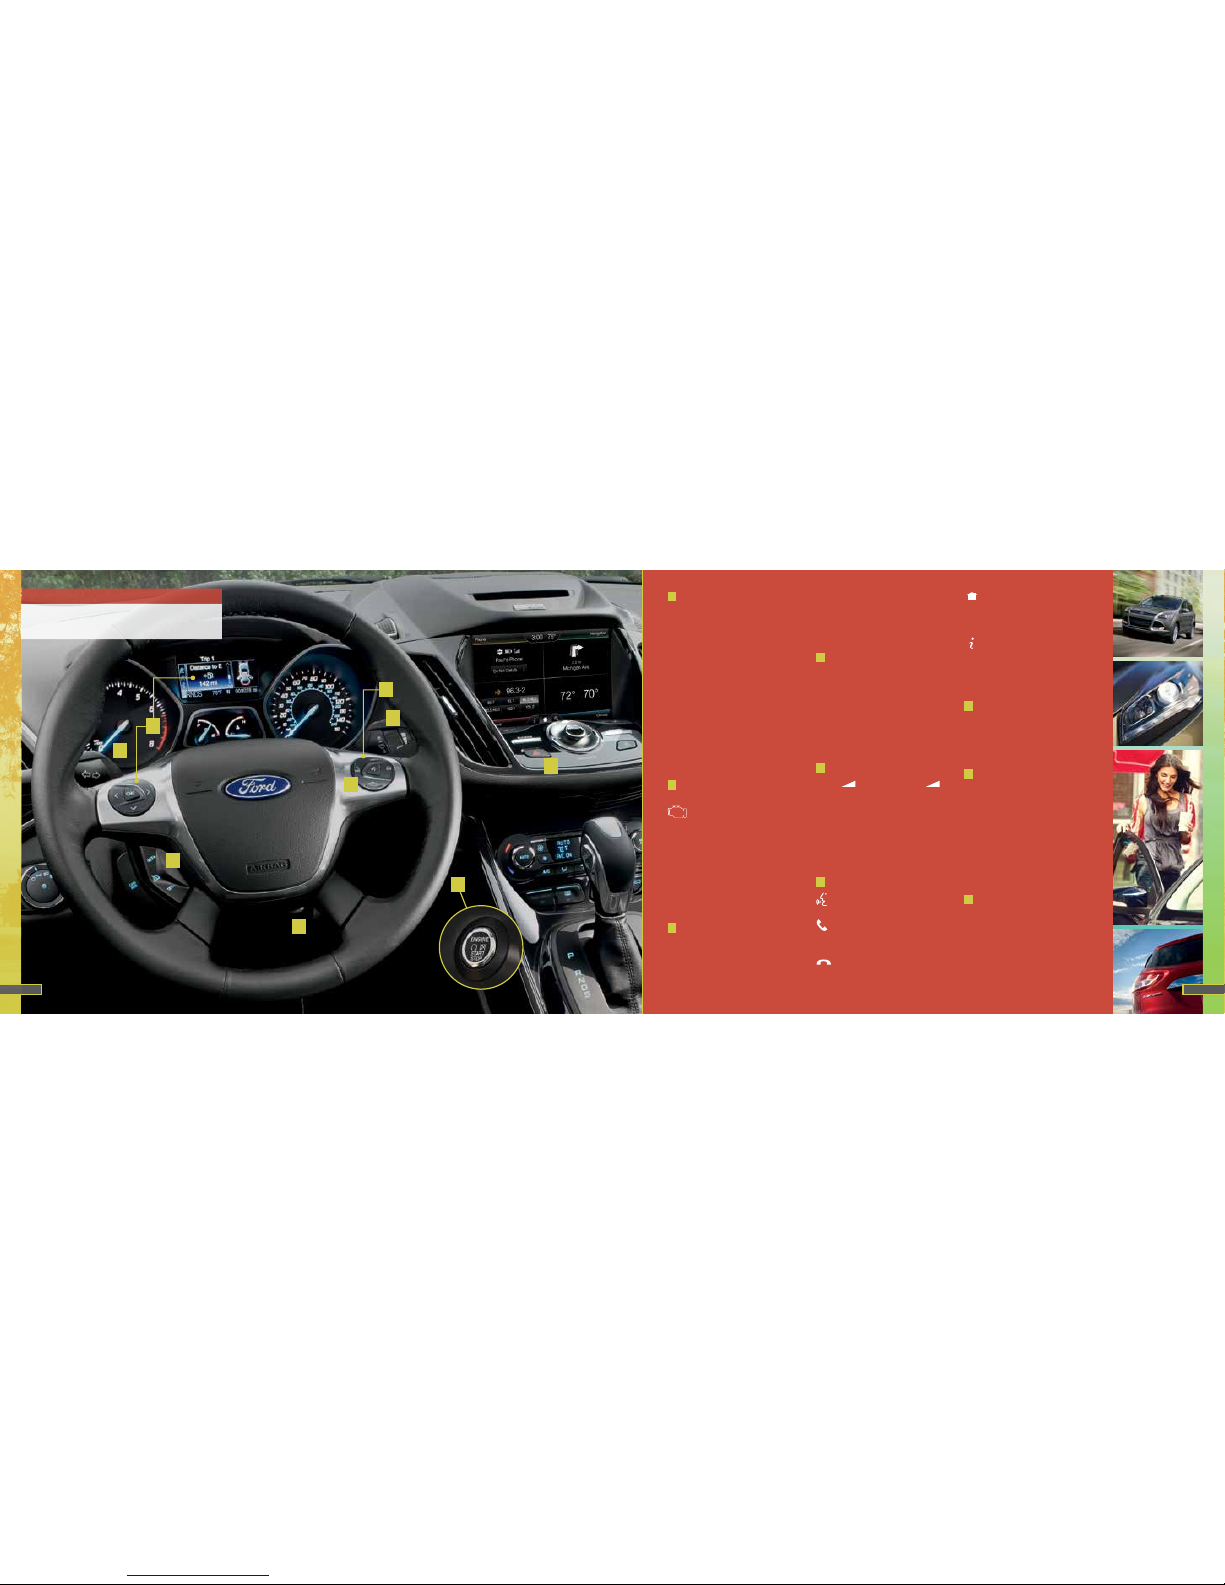
1
Cruise Control
To Set Your Cruise
Control Speed
A. Press and release ON.
B. Accelerate to the
desired speed.
C. Press and release SET +,
then take your foot o
the accelerator.
Aer you set a speed, you
can press SET + or SET – to
adjust cruise speed. To switch
cruise control o, pull the
CAN (Cancel) control toward
you or tap the brake pedal.
2
Service Engine
Soon Light
Lights briefly when
you switch on the ignition.
If it remains on or is flashing
aer you start the engine,
the On-Board Diagnostics
(OBD-II) system has
detected a problem. Drive in a
moderate fashion and contact
your authorized dealer as
soon as possible.
3
Information Display
Provides information about
various systems on your
vehicle. Use the le, 5-way
controls located on the
steering wheel to choose
and confirm settings and
messages. Refer to the
Information Displays chapter
of your Owner’s Manual for
more information.
4
Tilt and Telescope
Steering Column
Unlock the steering wheel by
pulling the lever down. Adjust
the wheel to the desired
position (in, out, up and
down). Push the lever back
up to lock the steering wheel
in place.
5
Media Controls*
Press + to increase or –
to decrease volume levels.
Press |⊳⊳ ⊲⊲|
to hear the
next or previous saved radio
station, CD or MP3 track.
Press and hold to seek up or
down the frequency band, or
through CD or MP3 tracks.
6
Voice Controls*
Press to access
voice recognition.
Press the phone
button to answer an
incoming call.
Press and hold to exit
phone mode or end
a call.
Press the home icon
at any time to return
to your MyFord Touch
®
home screen.
Press the information
icon to access MyFord
Touch, SiriusXM Travel
Link
®
, Alerts, Calender
and more.
7
Wiper Controls
Use the rotary control on
the lever to adjust the wipe
intervals. Pull the lever toward
you to wash the windshield.
8
Push Button Start*
Allows you to start your
vehicle by pressing the START
STOP button while fully
pressing down on the brake
pedal. Press the button again
to switch o the engine.
Note: Your intelligent access
transmitter* must be inside the
vehicle to start the ignition.
9
Hazard Warning
Flasher Control
*if equipped
8
Page 4

6 7
Why Do You Need a SYNC Owner Account?
You need an account if you wish to view your reports online
and take advantage of the many personalization features,
such as saving your Favorites and Points of Interest (POI).
An account also lets you receive the latest soware updates
that add new places, directions and information; and if you
have questions, you’ll get free customer support.
Note: Your SYNC system may oer advanced features. Visit
the website or call the toll-free number for more information.
See the inside front cover of this guide for details.
Using Your Phone with SYNC
Note: You must download your phone book to make phone
calls with voice commands by name.
Making a Phone Call
Use SYNC to make a phone call to anyone in your phone
book by pressing the voice button
. When prompted, say
a voice command.
For example, you could say “Call Jake Smith at home”.
When the system confirms the number, say “Dial” again to
initiate the call.
Note: You can also make phone calls by pressing the voice
button
. When prompted, say the voice command “Dial”,
then verbally say the phone number.
Answering Incoming Calls
Whenever you have an incoming call, the name and number
of the person calling displays. Press the phone button
to answer an incoming call. You can hang up at any time by
pressing the phone button
.
Do Not Disturb Mode
This feature blocks incoming calls and text messages and
saves them for later. You still have access to outgoing calls
when this feature is active. Say the voice command “Do not
disturb on” to enable and “Do not disturb o” to disable.
Using SYNC to Access Digital Media
Plug in your USB media devices such as phones and MP3
players, and use SYNC to play all of your favorite music.
Using Voice Commands to Play Music
1. Plug your media player into your USB port.
2. Press the voice button
. When prompted, say “USB”,
then follow-up saying a voice command.
Getting Started with
Your SYNC
System
SYNC is a hands-free, voice
recognition system used for
entertainment, information
and communication.
SYNC. Say the Word.
Before You Get Started
1. Set up your owner account at
SyncMyRide.com (U.S.) or
SyncMyRide.ca (Canada).
Register by following the on-screen
instructions. Aer registering, you can
see what available services you are
eligible for.
2. SYNC uses a wireless connection
called
Bluetooth® to communicate
with your phone. Switch on Bluetooth
mode in your phone’s menu
options. This lets your phone find
SYNC. If you need more details on
setting up your phone with SYNC,
visit SyncMyRide.com (U.S.) or
SyncMyRide.ca (Canada), or your
phone manufacturer’s website.
Pairing Your Phone with SYNC
In order to use many of the features of
SYNC, such as making a phone call or
receiving a text, you must first pair and
connect your phone with SYNC.
To Pair Your Phone for the First Time
1. Make sure that your vehicle is in
park (P), you switch the ignition and
radio on, and your cellular phone is in
the proper mode. See your phone’s
manual, if necessary.
2. Press the phone button. When the
display indicates No Phone Found,
press OK.
3. When Find SYNC appears in the
display, press OK.
Note: If the system prompts you to enter
a PIN on your cellular phone, it does not
support Secure Simple Pairing. To pair,
enter the PIN displayed on the SYNC
touchscreen, then skip Steps 4 and 5.
4. When prompted on your phone’s
display, confirm that the PIN provided
by SYNC matches the PIN displayed
on your cellular phone.
5. When prompted from SYNC, confirm
that the PIN provided by SYNC
matches the PIN that your cellular
phone displayed.
6. The display indicates when the
pairing is successful.
Note: The system may prompt you
to set your phone as primary or favorite
(the primary phone receives messages
and voicemail); download your phone
book (a requirement to use the full set
of voice commands); and switch on
911 Assist
®
.
Tips
• Make sure that you accept the
request from SYNC to access
your phone.
• To pair subsequent phones, please
refer to Pairing Subsequent Phones
in the SYNC chapter of your
Owner’s Manual.
• If you experience pairing problems,
try performing a clean pairing by
deleting your services from SYNC
and deleting the SYNC connection
from your phone, and then repeat
the process.
SYNC
®
Page 5
8 9
Phone
Voice-control your phone for handsfree calling with your phone securely
put away. With SYNC, you won’t even
need to know the phone number.
Just say the name of the person you
want from your contacts.
Your Phone Connects You
with Many Other Features*
• Automatically connect to a
911 Operator in the event of an
accident (you must switch this
feature on prior to the event).
• Transfer calls seamlessly from
SYNC to phone as you get in or
out of your vehicle.
Refer to the SYNC with MyFord Touch
chapter of your Owner’s Manual for
complete details.
Navigation*
Get started with your navigation
system by pressing the upper-right
green corner. The available,
voice-activated navigation
system includes:
• SiriusXM Trac™
• Sirius Travel Link™
• GPS (Global Positioning
System) technology
• 3-D mapping
• Turn-by-turn navigation
Some features require activation.
Refer to the MyFord Touch chapter
of your Owner’s Manual for
complete details.
Set a Destination
You can use the touchscreen to set
a destination in many ways, like a
street address, a city center, a place
on the map or a point of interest
(POI). The easiest way is by voice.
1. Press the voice button
.
When prompted, say “Destination
street address”.
2. The system asks you to say the
full address and displays an
example on-screen.
3. You can then speak the address
naturally, such as: “One two three
Main Street, Anytown”.
You can also use the touchscreen to
enter a destination and narrow your
choices by city or street as you type.
You can choose from up to three
dierent types of routes:
• Fastest: Uses the fastest moving
roads possible.
• Shortest: Uses the shortest
distance possible.
• Eco (EcoRoute): Uses the most
fuel ecient route.
Pairing Your Phone with MyFord Touch
Make sure your vehicle is in park (P), your
ignition and radio are switched on and your
cellular phone is in the proper mode. See
your phone’s manual, if necessary.
1. Touch Add Phone on your touchscreen.
Find SYNC appears on the screen, and
instructs you to begin the pairing process
from your device.
2. Select SYNC and a six-digit PIN appears
on your device. If prompted to enter a
PIN on your device, it does not support
Secure Simple Pairing. To pair, enter the
PIN displayed on the touchscreen, and
then skip the next step.
3. When prompted on your phone’s display,
confirm that the PIN provided by SYNC
matches the PIN displayed on your
cellular phone. The display indicates
when pairing is successful.
SYNC® with MyFord Touch
®
*
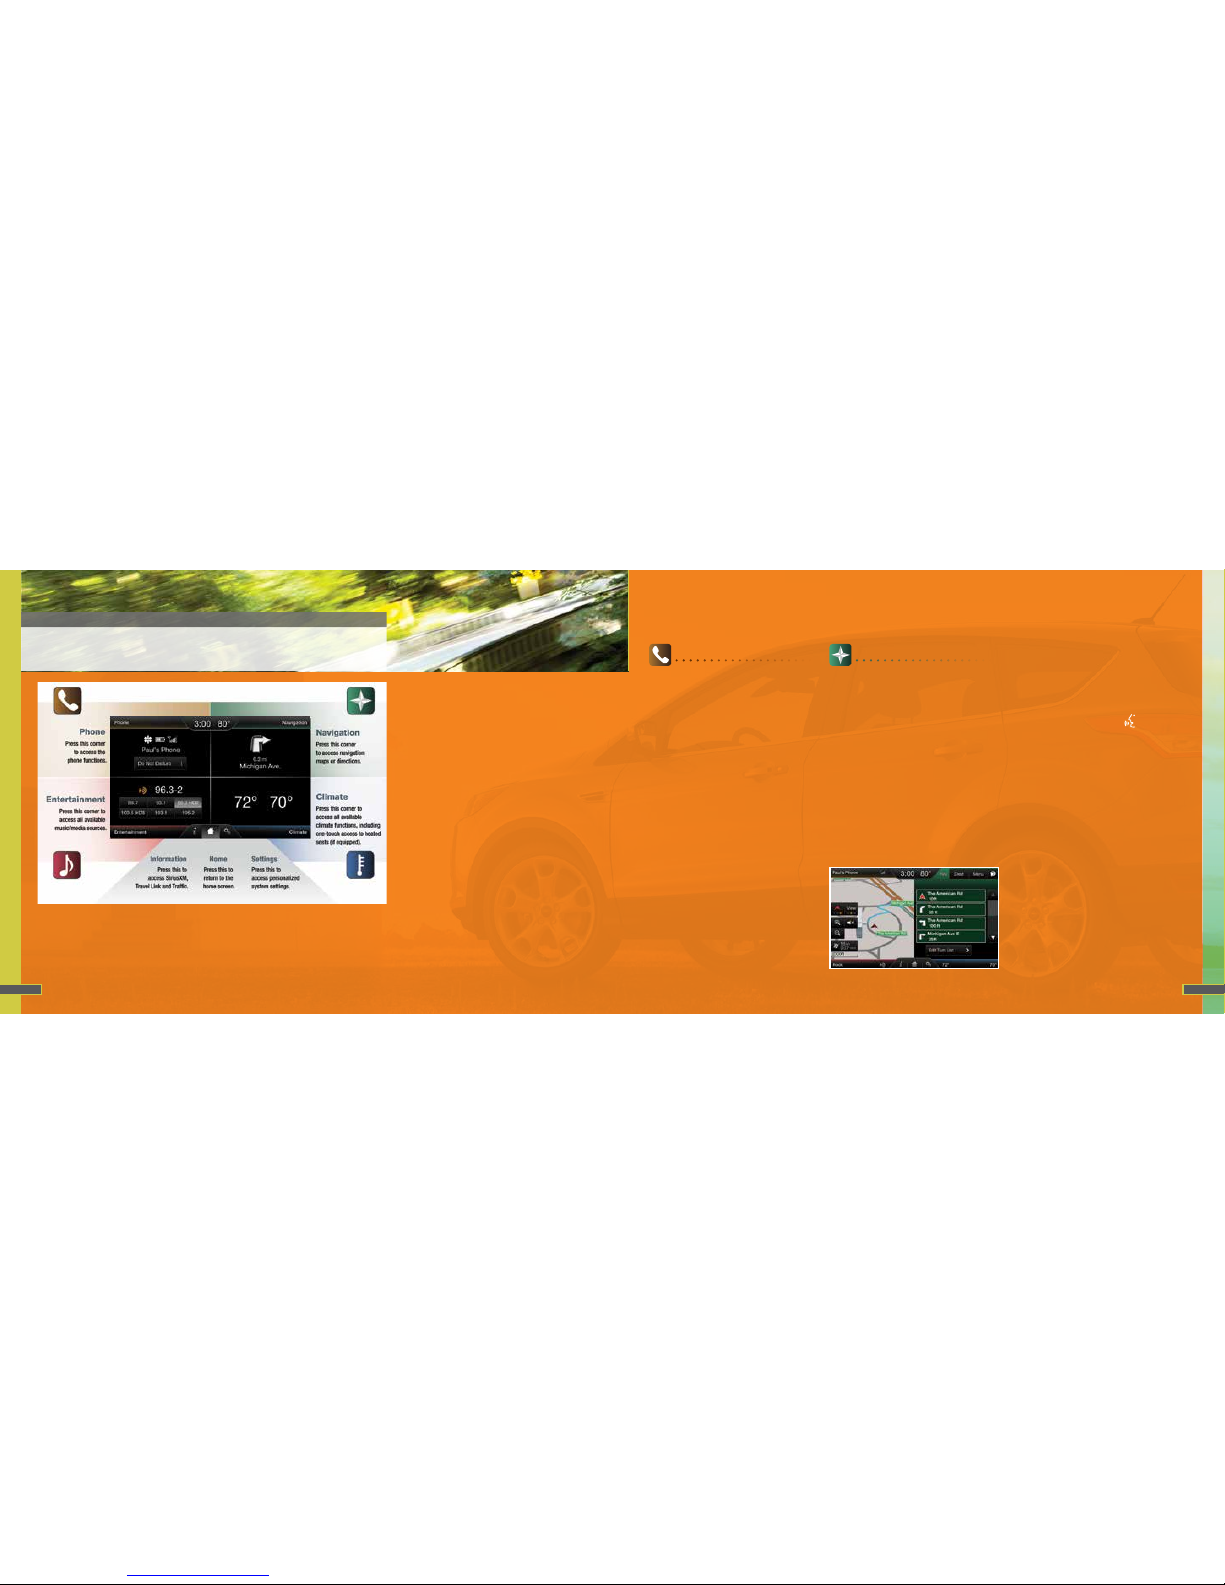
Get in Touch Using Your Four-corner Touchscreen
Phone, Navigation*, Climate and Entertainment are the four main operations of SYNC with MyFord Touch.
Each feature has its own corner represented by its own color.
Getting Started, Understanding SYNC with MyFord Touch
Use the four-corner, four-color touchscreen to explore and interact with your vehicle. The touchscreen works the same way
traditional controls, knobs and buttons do. Press the various corners on your touchscreen to personalize the many features
and settings of your vehicle all in one place. The system provides easy interaction with your cellular phone, multimedia
entertainment, climate controls and navigation system*.
*if equipped
A revolutionary way to connect with your vehicle.
*if equipped
Page 6
11
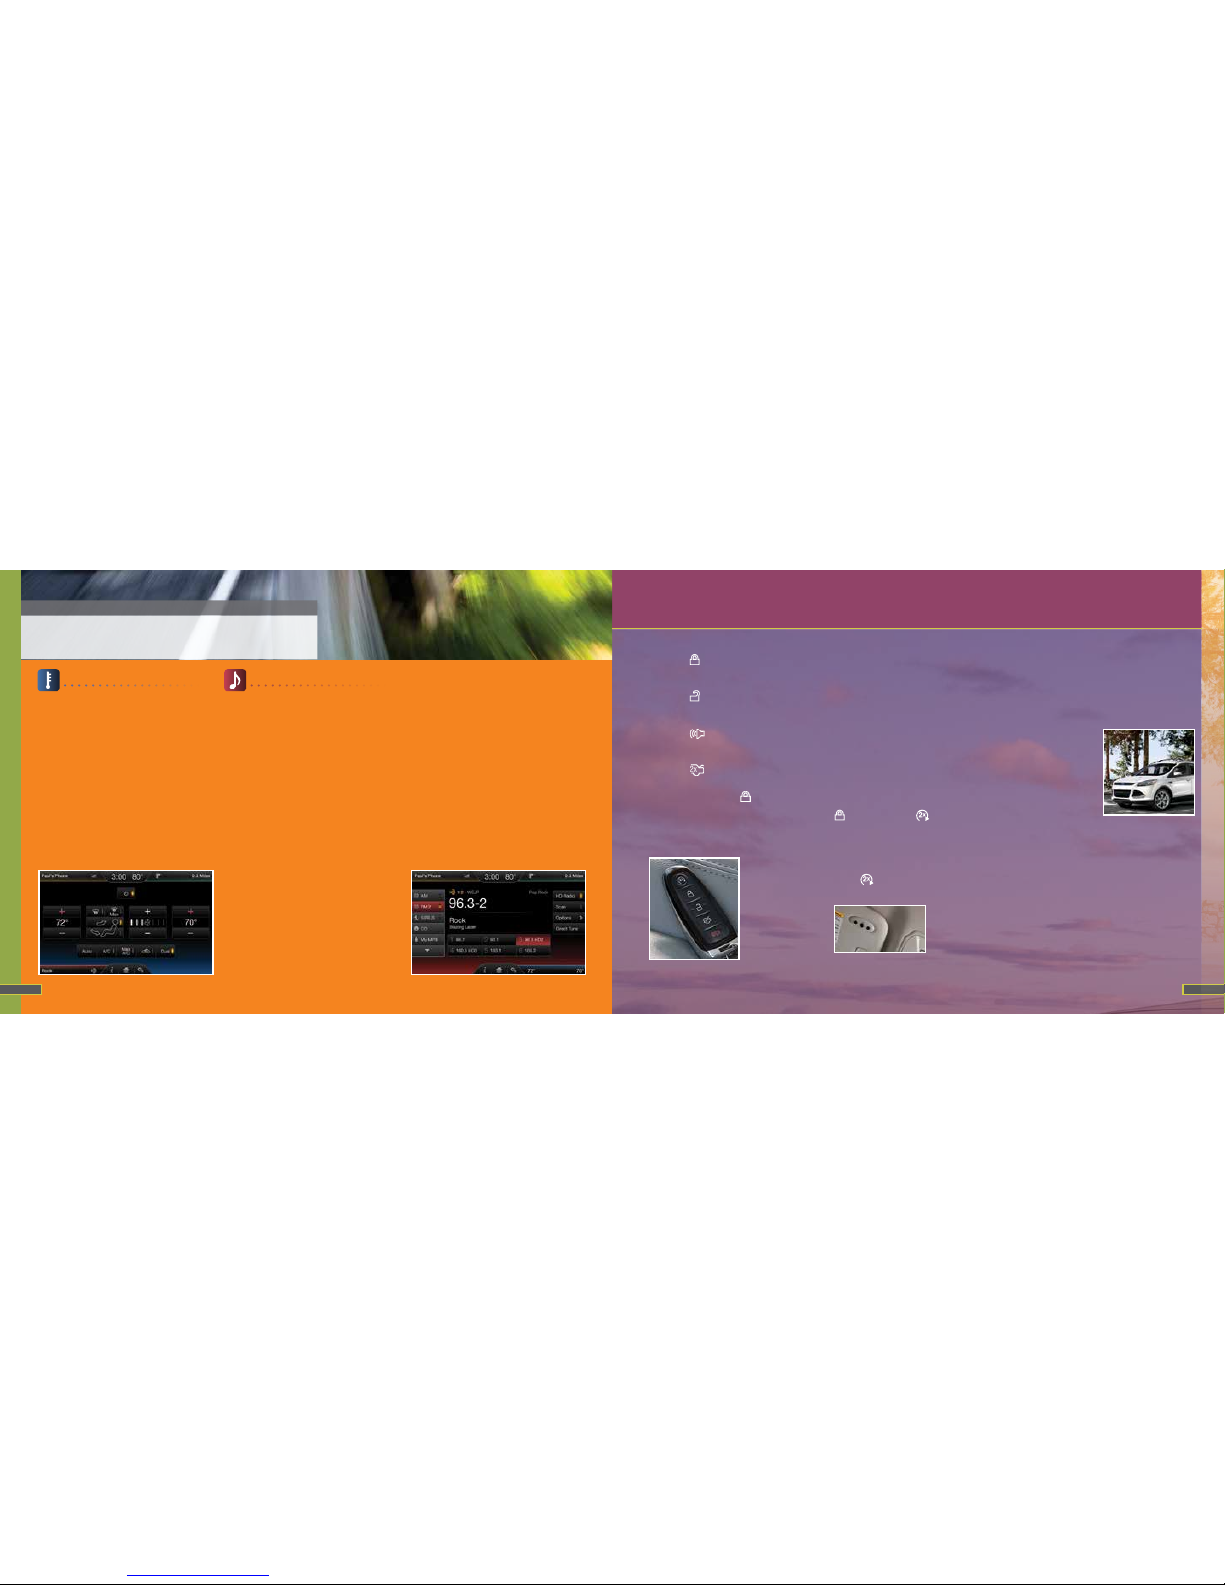
Climate
SYNC with MyFord Touch controls
the temperature, airflow direction and
fan speed.
To use voice commands to operate
the climate controls, say a voice
command like “Climate temperature
72 degrees” and MyFord Touch makes
the adjustment.
Set Your Temperature
• Touch the lower-right blue
corner on your touchscreen.
• Set your exact, desired temperature
using the + or – buttons.
Entertainment
No matter how you store your music,
SYNC makes it yours to enjoy when
you’re behind the wheel. Just press
the lower-le, red corner of the
touchscreen. From here, you can easily
go between AM and FM, SiriusXM and
other media sources.
Set Your Radio Presets
• Touch the Entertainment corner
on the touchscreen.
• Touch FM.
• Enter the desired station and
touch Enter.
• Touch Presets and then touch and
hold one of the memory preset
buttons to save it. The system
mutes briefly and the sound
returns once it saves the station.
Bring in Your Own Music
Gain access to any audio source by
voice and even control how each
operates, like changing radio stations,
CD tracks or music on one of the
following devices:
• USB
• Bluetooth
®
streaming
• SD card*
• Audio in
Refer to the MyFord Touch chapter in
your Owner’s Manual, visit the website
or call the toll-free number for more
information. See the inside front cover
of this guide for details.
Remote Entry Icons
• Press once to lock all doors.
Press again within three seconds to
confirm all doors are locked.
• Pres s
once to unlock the driver’s
door. Press again within three
seconds to unlock all doors.
• Press
to activate the panic
alarm. Press again or switch on the
ignition to deactivate.
• Press
twice within three
seconds to open the ligate.
• Car finder: Press
twice within
three seconds to locate your
vehicle. The horn sounds and the
lamps flash.
Intelligent Access*
Note: Your
transmitter
must be within
3 feet (1 meter)
of the vehicle
for intelligent
access to
function
properly.
To unlock and open the door, pull a
front exterior door handle. Tolock
the doors, press and hold the
sensor button on the door handle.
Tounlock and open the ligate, press
the exterior ligate release button
in the top of the pull cup handle.
Theintelligent access transmitter also
contains a mechanical key blade that
you can use to unlock the driver door,
if necessary.
Remote Start*
Remote start allows you to start the
engine from outside your vehicle
using your transmitter. To start, press
and then press twice within
three seconds. Once inside, apply the
brake while pressing the START STOP
button. Shi into drive (D) and go. To
switch o the engine from outside the
vehicle aer using your remote start,
press
once.
Universal Garage Door Opener*
Your driver’s
side visor has a
built-in wireless
transmitter
that replaces
the common hand-held garage door
opener. This system can also be
programmed to security systems,
entry gates and home or oce
lighting. Refer to the Universal Garage
Door Opener chapter in your Owner’s
Manual for programming instructions
and additional information on how to
use this device.
Active Park Assist*
The system
detects an
available parallel
parking space
and automatically
steers the vehicle
into that space
(hands-free)
while you control
the accelerator, gearshi and brakes.
The system visually and audibly
instructs you to park the vehicle. To
initiate active park assist, press the
AUTO |P| button located on the
instrument panel. To stop the parking
procedure, grab the steering wheel or
press the control again. For complete
information, see the Parking Aids
chapter of your Owner’s Manual.
Note: The driver is always responsible
for controlling the vehicle, supervising
the system and intervening, if required.
*if equipped
10
SYNC® with MyFord Touch
®
*
continued
Convenience
*if equipped
Page 7
Comfort
continued
*if equipped
Memory Function*
This feature automatically recalls the
position of the driver seat and power
mirrors. The memory control is on the driver
door. You can save up to three memory
position presets. To use, switch the ignition
on. Adjust the seat and exterior mirrors to
your desired position. Press and hold the button until you
hear a single tone. You can now use these controls to
recall the set memory positions.
You can also program your memory seats to your
transmitter, and when you unlock your door, your memory
features automatically move into your saved position. See
the Seats chapter in your Owner’s Manual for more details.
Tilting Front-row Head Restraints
Tilt the head restraint
forward for additional
comfort by gently pulling
the top of the head
restraint. Once it is in the
forward-most position,
tilting it forward once
more releases it to the
upright position.
Note: Do not attempt to
force the head restraint
backward aer it is tilted.
Comfort
*if equipped
12
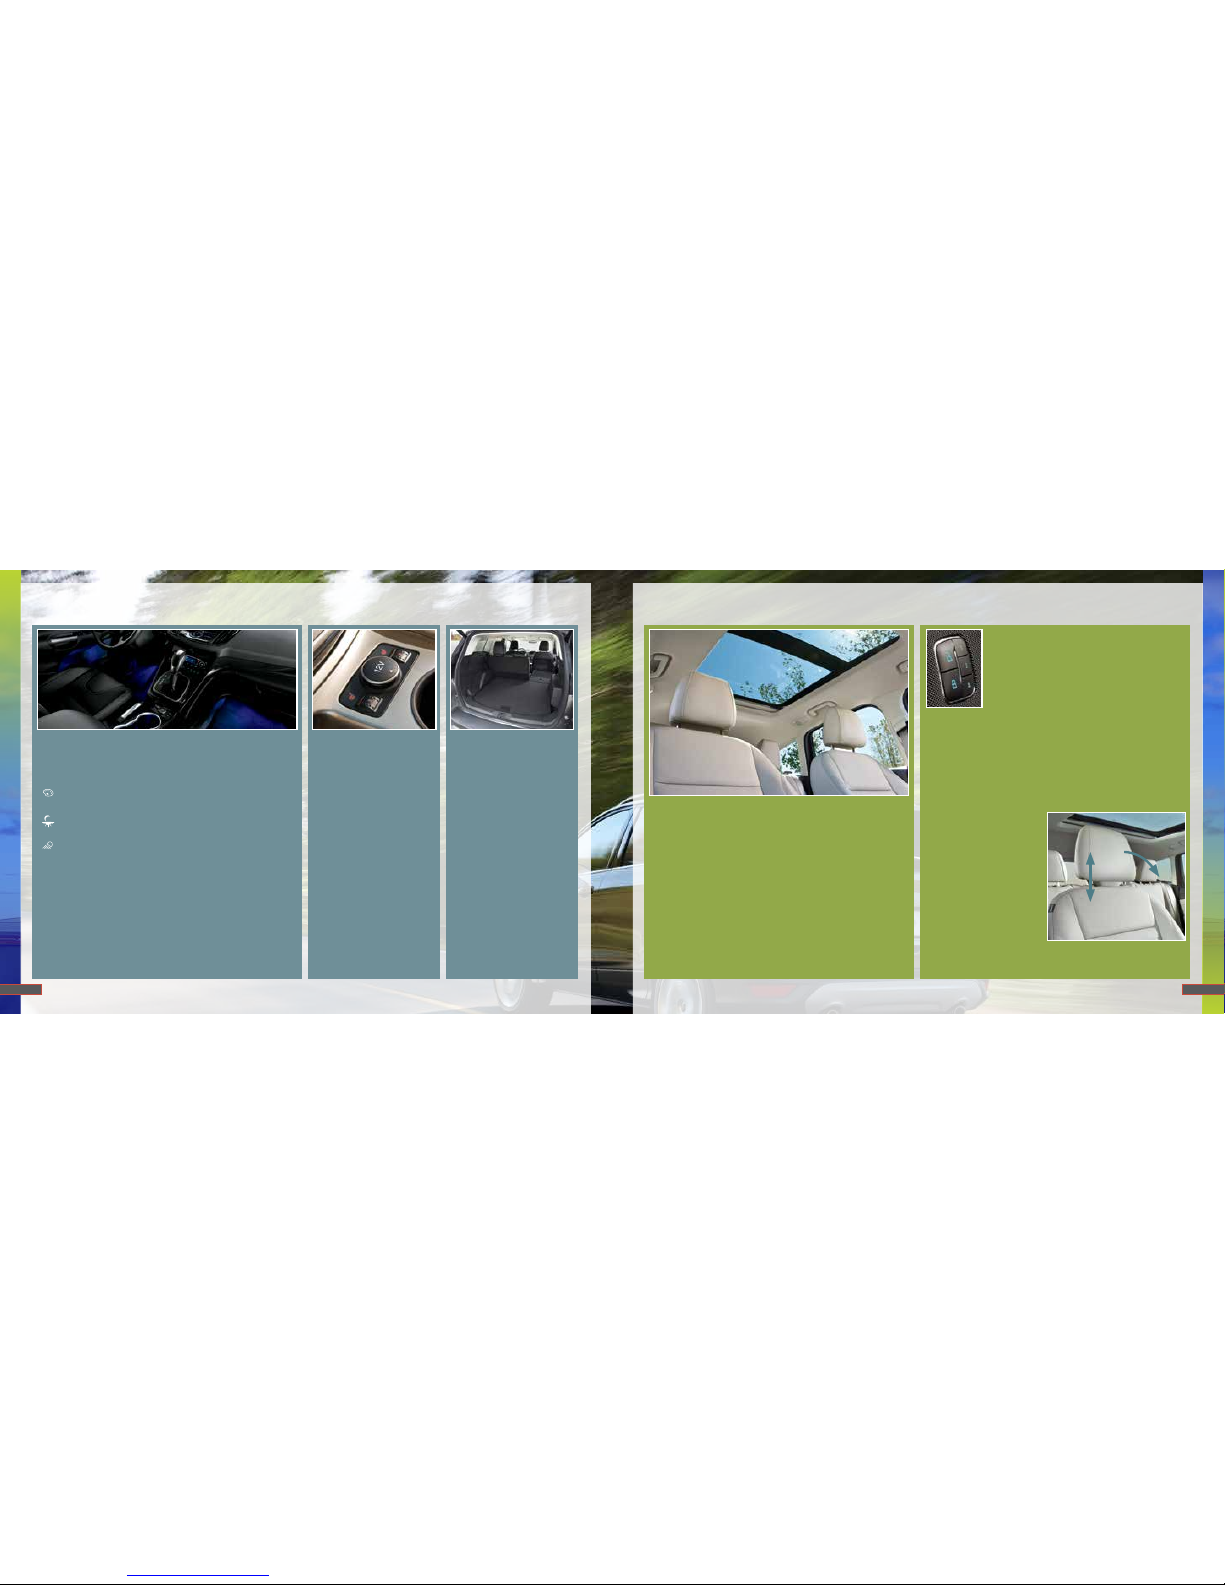
Ambient Lighting*
Light the interior with a choice of several colors by using
the ambient lighting feature. The ambient lighting controls
are in the overhead console.
Color Palette – Press to cycle through the various
color choices.
Control Knob – Turn the knob to switch ambient
lighting on and adjust the brightness.
Search Mode – Press to switch on all interior lamps
and ambient lighting. Press again to switch o the
interior lamps.
The ambient lighting turns on when you switch on the
ignition and the headlamps.
The ambient lighting remains on until you switch o the
ignition and either lock your vehicle, or allow the accessory
delay timer to expire.
Heated Front Seats*
The front heated seat
controls are on the center
console near the gearshi
lever. Rotate the dial to
select your preferred
heat mode.
Note: Aer starting your
vehicle with remote start*,
you must switch the seats
on manually.
Rear Reclining Seats
Pull the lever up to recline
the seatback to the desired
position. Pull the lever
up to fold the seatback
forward. You may need to
fold the outboard head
restraints and lower the
center head restraint first.
Cargo Storage*
You can store additional
items in the cargo space
located underneath the
load floor in the rear of the
vehicle. Li the release
handle to open it. Vehicles
with the standard sized
spare tire can adjust the
load floor to two positions:
high or low.
Additionally, there are four
tie-down anchors in the
rear cargo area (one in
each corner) to help
secure objects.
13
Panoramic Vista Roof® and Power Sunscreen*
The moonroof and sunscreen controls are on the overhead
console. Both features have a “one-touch” opening and
closing operation.
Press and release the following controls:
• Sunscreen: The rear of the control opens the sunshade,
while the front of the control closes it.
Note: If the moonroof is open, it closes automatically
before the sunscreen.
• Moonroof: The rear of the control opens the sunscreen
and moonroof. The front of the control closes the
moonroof glass panel.
Page 8
Manual Ligate
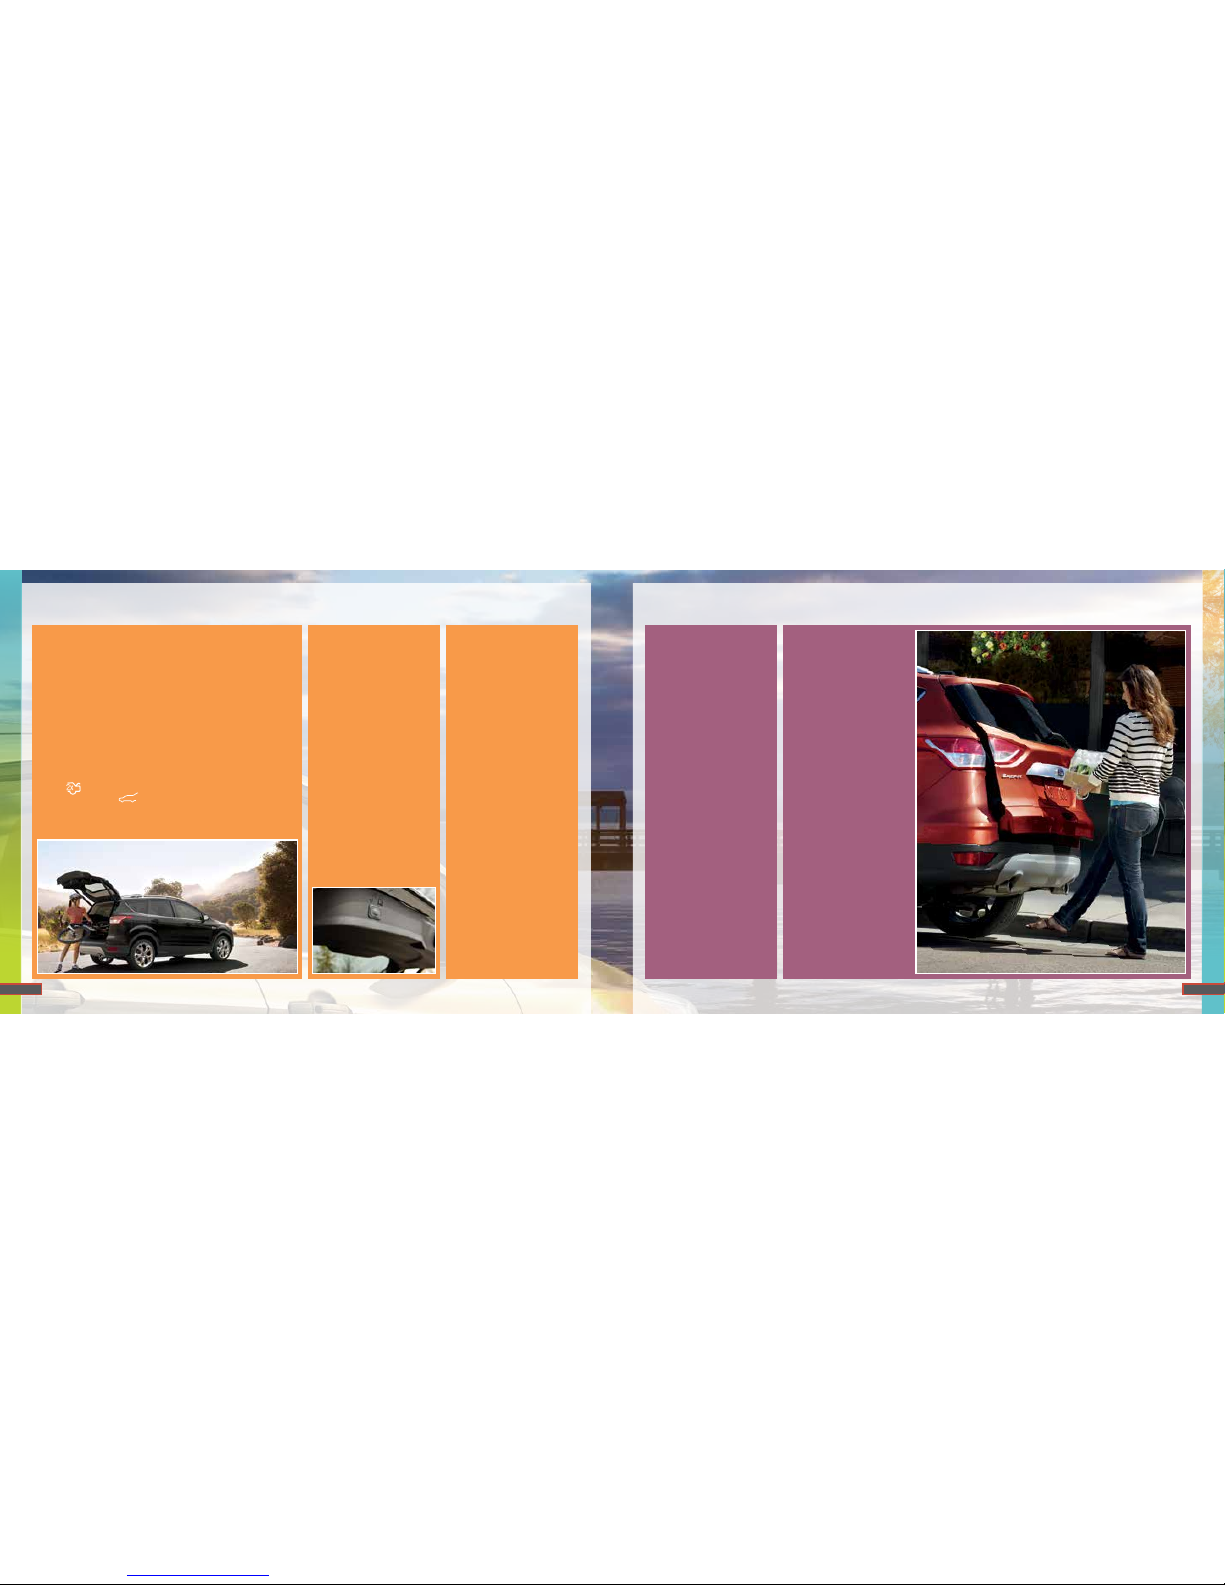
To Open the Ligate
1. Unlock all the vehicle doors.
2. Press the button located inside the ligate pull-cup
handle to unlatch the ligate.
3. Pull on the outside handle to raise the ligate.
Power Ligate*
Note: If the vehicle is running,the ligate operates only
with the transmission in park (P).
Touch a button to open or close the ligate:
Press
twice within three seconds on your remote entry
transmitter or the
button on the instrument panel. A
tone sounds when the ligate starts to move.
You Can Also Open the
Ligate from the Rear of
Your Vehicle
1. Make sure you unlock
your ligate first and
then press the button
located in the top of the
ligate pull-cup handle.
2. Allow the power system
to open the ligate aer
pressing the control.
3. To close, press and
release the button
located on the ligate
(pictured below).
When the ligate begins to
move, a tone sounds.
Setting the Ligate
Open Height
Once you open the power
ligate, you can move
it manually to a desired
height. If the previously
programmed ligate height
is lower than the fully
opened position, you can
manually push it upward.
To Program a New Height
1. Open the ligate.
2. Manually move the
ligate to your
desired height.
3. Press and hold the
control button on the
ligate until you hear
a tone, indicating that
your programming of
the ligate height
is successful.
The ligate then opens
to its newly programmed
height when you use the
power feature to open it.
To change the
programmed height,
repeat the process above.
Obstacle Detection
When you use the power
open or close feature
and the ligate detects
a problem, it sounds a
warning tone and the
ligate stops.
The Ligate Cannot Power
Open or Close When
• It detects an object in its
opening or closing path.
• The 12-volt battery does
not have enough charge
to power the ligate.
• The ignition is on and
the transmission is not in
park (P).
• You are traveling at
speeds at or above 3 mph
(5 km/h).
Note: Entering the vehicle
while the ligate is closing
could cause the vehicle
to bounce and activate
obstacle detection.
Hands-Free
Ligate Operation*
To Open Your Ligate
Hands-Free While You Are
at the Ligate
1. Make sure you have
an intelligent access
transmitter* within
3 feet (1 meter)
of the ligate.
2. Move your foot under
and away from the
rear bumper similar
to a kicking motion.
Do not move your
foot sideways or
the sensors may not
detect the motion.
Note: In vehicles equipped
with the towing package
and the hands-free power
ligate feature, you must
kick your foot between
the trailer hitch and the
exhaust system. Do not
kick under the hitch.
14
*if equipped *if equipped
15
Ligate
continued
Ligate
Page 9
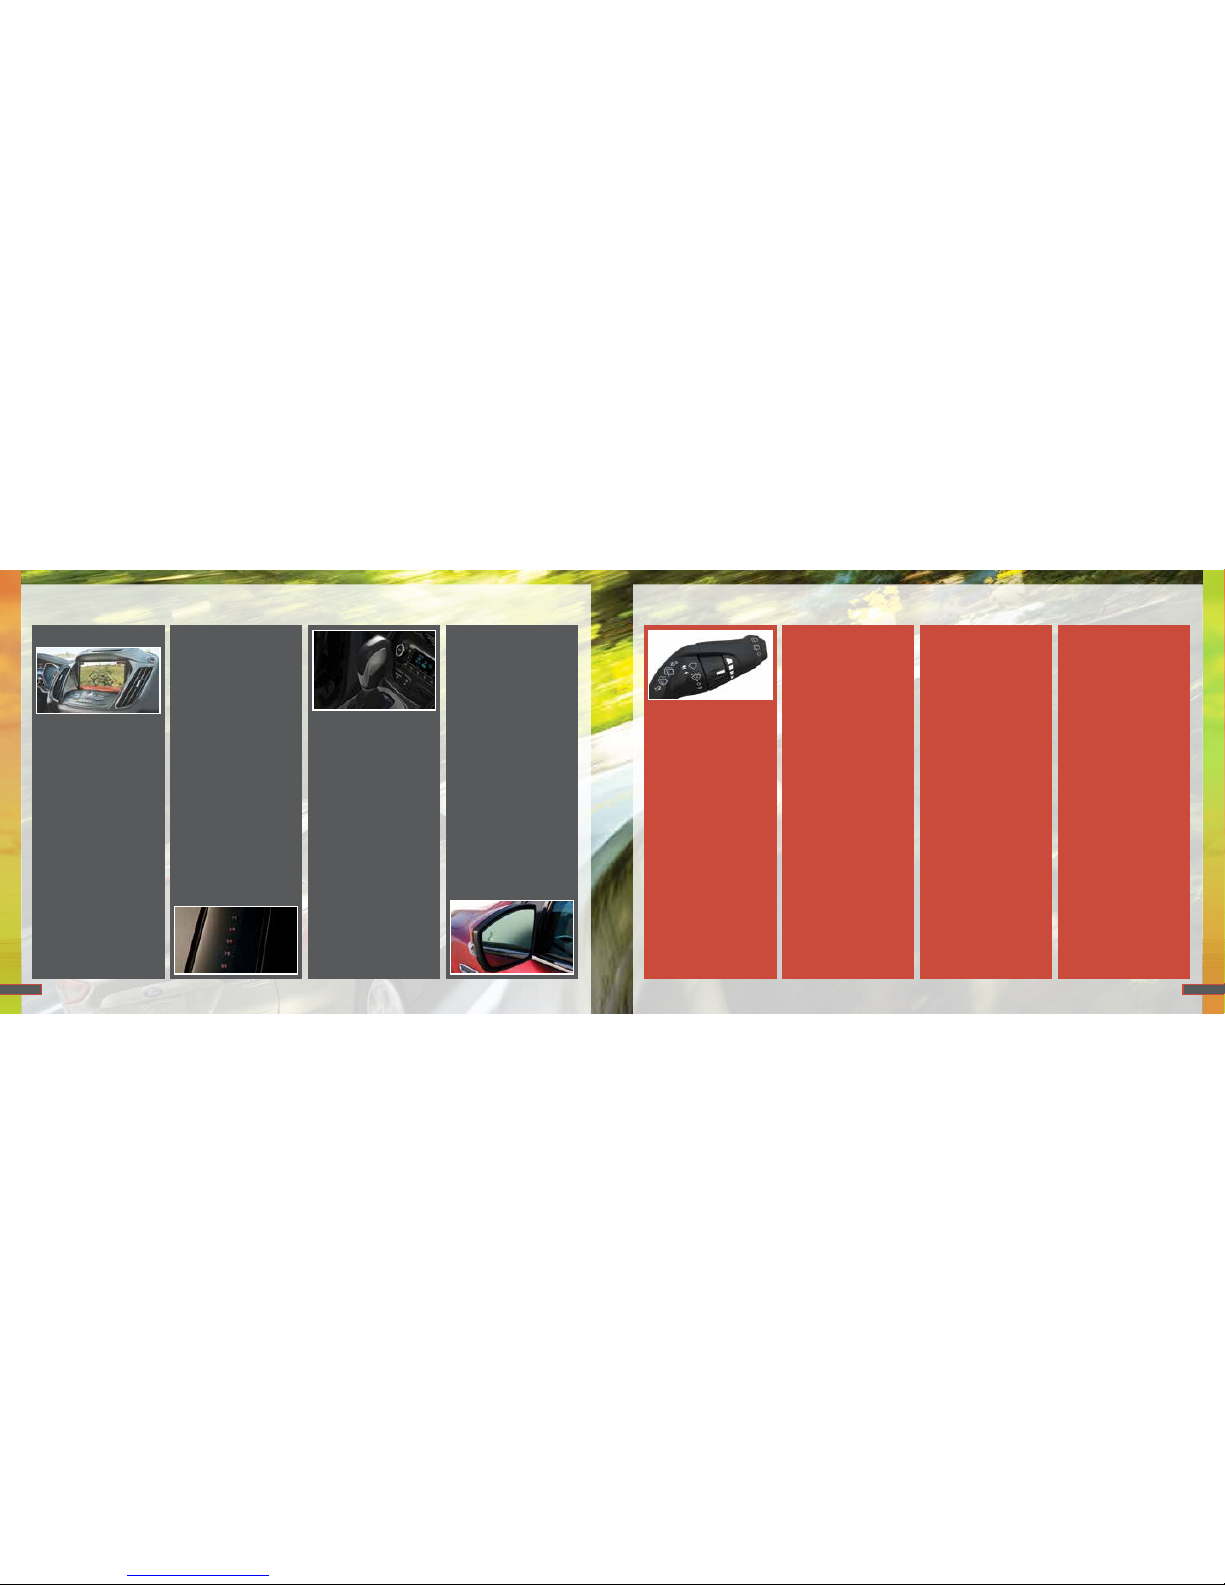
Rear View Camera
This system provides a
video image of the area
behind the vehicle. The
display automatically
appears when the vehicle
is in reverse (R) and uses
green, yellow and red
guides to alert you of your
proximity to objects.
MyKey
®
MyKey allows you to
program certain driving
restrictions in order to
promote good driving
habits. You can program
things like: speed
restrictions, limited volume
levels and traction control
always on. For complete
information, refer to the
MyKey
chapter in your
Owner’s Manual.
SecuriCode™ Keyless
Entry Keypad*
Lock or unlock the doors and
arm or disarm the anti-the
alarm using the keypad
located near the driver’s
window. It is invisible until
touched and then it lights
up so you can see and touch
the buttons.
To unlock the driver door,
enter your 5-digit factory
code found on your owner’s
wallet card (located in the
glove box). To unlock all of
the doors, enter your 5-digit
code and then press 3•4
within five seconds.
To lock all of the doors,
press and hold 7•8 and
9•0 at the same time. For
complete information, refer
to the Locks chapter in your
Owner’s Manual.
SelectShi
Automatic
®
Transmission
Your SelectShi automatic
transmission gives you
the ability to change gears
manually, if you like.
To use SelectShi, move
the gearshi lever into S
(Sport). Use the (+) and
(–) buttons on the side
of your gearshi lever to
manually change gears.
• Press (+) to upshi,
• Press (–) to downshi.
• Move the gearshi lever
to drive (D) to return to
automatic control.
Blind Spot
Information System
(BLIS
®
) with Cross
Trac Alert*
The Blind Spot Information
System aids you in
detecting vehicles that
may have entered the blind
spot zone. Cross trac
alert warns you of vehicles
approaching from the sides
when the transmission is
in reverse (R).
Both systems display a
yellow indicator light in your
exterior mirrors. Cross trac
alert also sounds tones and
displays messages to warn
you from which direction
vehicles are approaching.
Refer to the Driving Aids
chapter in your Owner’s
Manual for more information.
16
Function
*if equipped
Function
continued
*if equipped
Wiper Operation
Adjust the wiper lever and
its controls to operate the
front and rear wipers.
• Single wipe –
Pull the lever down.
• Intermittent wipe –
Push the lever upward
to the first detent.
• Normal wipe –
Push the lever upward to
the second detent.
• High speed wipe –
Push the lever upward to
the third detent.
Intermittent Wipe
Putting the wiper lever in
intermittent mode allows
the driver to set the amount
of time between wipes.
Use the rotary control on
the wiper lever to adjust the
intermittent wipe intervals.
• Rotate the control upward
for short wipe intervals.
• Rotate the control
downward for long
wipe intervals.
Speed Dependent
Wipers
When your vehicle speed
increases, the interval
between wipes decreases.
Autowipers*
To switch this feature on,
move the wiper controls
to intermittent wipe. The
autowiper system turns
the wipers on only when
moisture is present on the
windshield. The wiper speed
depends on how much
moisture the system detects
and the sensitivity setting.
• Low sensitivity — the wipers
turn on when the system
detects a large amount of
moisture on the windshield.
• High sensitivity — the
wipers turn on when the
rain sensor detects a small
amount of moisture on
the windshield.
To switch this feature o,
use your wiper controls.
To change this feature to
intermittent wipe every time
you use your wipers, use the
information display.
To switch intermittent wipe
back to autowipers, use the
information display.
Note: Make sure you switch
o this feature before
entering a car wash.
To Reduce Smearing, We
Recommend the Following
• Lower the sensitivity of
the autowipers.
• Switch to normal or
high-speed wipe.
• Switch the autowipers o.
Note: Keep the outside of the
windshield clean. Dirt, bugs
and road debris can prevent
it from detecting rain.
Washing the
Windshield
To operate the windshield
washer, pull the wiper lever
toward you.
• For a short spray, pull
and release.
• For a longer spray, pull
and hold the wiper lever
toward you. Release the
lever once the windshield
is clear of dirt or debris.
Rear Window Wiper
To operate, press the rocker
switch on the end of the
lever to change between
o, intermittent and low
speed. Aer you shi into
reverse (R) and switch the
wipers on, the rear wiper
automatically turns on to
intermittent speed.
Rear Window Washer
To use the rear window
washer, push the wiper lever
away from you. When you
release the lever, the wiper
operates for a short time.
17
Page 10
SOS Post-Crash
Alert System™
Provides audible and visual
alarms when a crash causes
the deployment of an airbag
or the activation of the
safety belt pretensioners.
The direction indicators
flash and the horn sounds.
To deactivate, press the
hazard flasher control or the
panic button
on your
remote transmitter.
Towing Your Escape
Towing your vehicle behind
an RV or any other vehicle
may be limited. Refer to
Towing the Vehicle on Four
Wheels section in the
Towing chapter of your
Owner’s Manual.
Tire Pressure
Monitoring System
Your vehicle shows a low tire
pressure warning light
in
your instrument cluster when
one or more of your tires are
significantly under-inflated. If
this happens, stop and check
your tires as soon as possible.
Inflate them to the proper
pressure. Refer to the Tire
Pressure Monitoring System
section in the Wheels and
Tires chapter of your Owner’s
Manual for more information.
Rear Window Bueting
You may hear a pulsing
noise when just one of the
windows is open. Lower the
opposite window slightly to
reduce this noise.
Front and Rear
Sensing Systems*
The rear sensors are
only active when the
transmission is in reverse
(R) and the object is moving
toward the vehicle or the
vehicle is approaching the
object at 3 mph (5 km/h)
or less.
As your vehicle moves
closer to the obstacle, the
rate of the audible warning
increases. You can switch
the system o through the
information display.
The front sensors are active
when the gearshi is in any
position other than park
(P) or neutral (N) and your
vehicle speed is below 6
mph (10 km/h).
The system sounds an
audible warning when
obstacles are near
either bumper.
See the Parking Aids
chapter in your Owner’s
Manual for complete
information on your
vehicle’s sensing systems.
Essential Information
continued
Fuel Tank Capacity
and Fuel Info
Your vehicle has a 15.5
gallon (58.7L) fuel
tank capacity. Use only
UNLEADED gasoline
blended with a maximum
of 15% ethanol and a
minimum octane rating
of 87.
Do not use fuel ethanol
(E85), diesel, fuelmethanol, leaded fuel
or any other fuel because
it could damage or
impair the emission
control system.
Easy Fuel® System
When fueling:
1. Put your vehicle in park
(P) and switch the
ignition o, and open the
fuel filler door.
2. Slowly insert the fuel filler
nozzle fully into the fuel
system. Leave the nozzle
fully inserted until you are
done pumping.
3. Wait at least 10 seconds
before removing the fuel
pump nozzle to allow any
residual fuel to drain into
the fuel tank.
Location of
Spare Tire and Tools
Your spare tire and tools
are beneath the carpeted
load floor in the rear of your
vehicle. The spare tire is
designed for emergency
use only and should
be replaced as soon as
possible. For complete
details on changing your
tire, refer to the Changing a
Road Wheel section in the
Wheels and Tires chapter
of your Owner’s Manual.
Running Out of Fuel
When using a portable
fuel container, use the fuel
funnel (located in the rear
of the vehicle, inside the
load compartment and
underneath the load
floor carpet).
Note: Do not use
aermarket funnels as they
do not work with the Easy
Fuel system and may cause
damage. Properly clean the
funnel or dispose of it aer
each use.
18
Essential Information
Note: Visibility aids do
not replace the need to
watch where the vehicle
is moving. Refer to your
Owner’s Manual for safety
information, more details
and limitations.
Roadside Assistance
Your new Ford vehicle
comes with the assurance
and support of 24-hour
emergency roadside
assistance. To receive
roadside assistance in
the United States, call
1-800-241-3673.
In Canada, call
1-800-665-2006.
19
*if equipped
 Loading...