

Ford 2012 Mustang Quick Referenc Manual
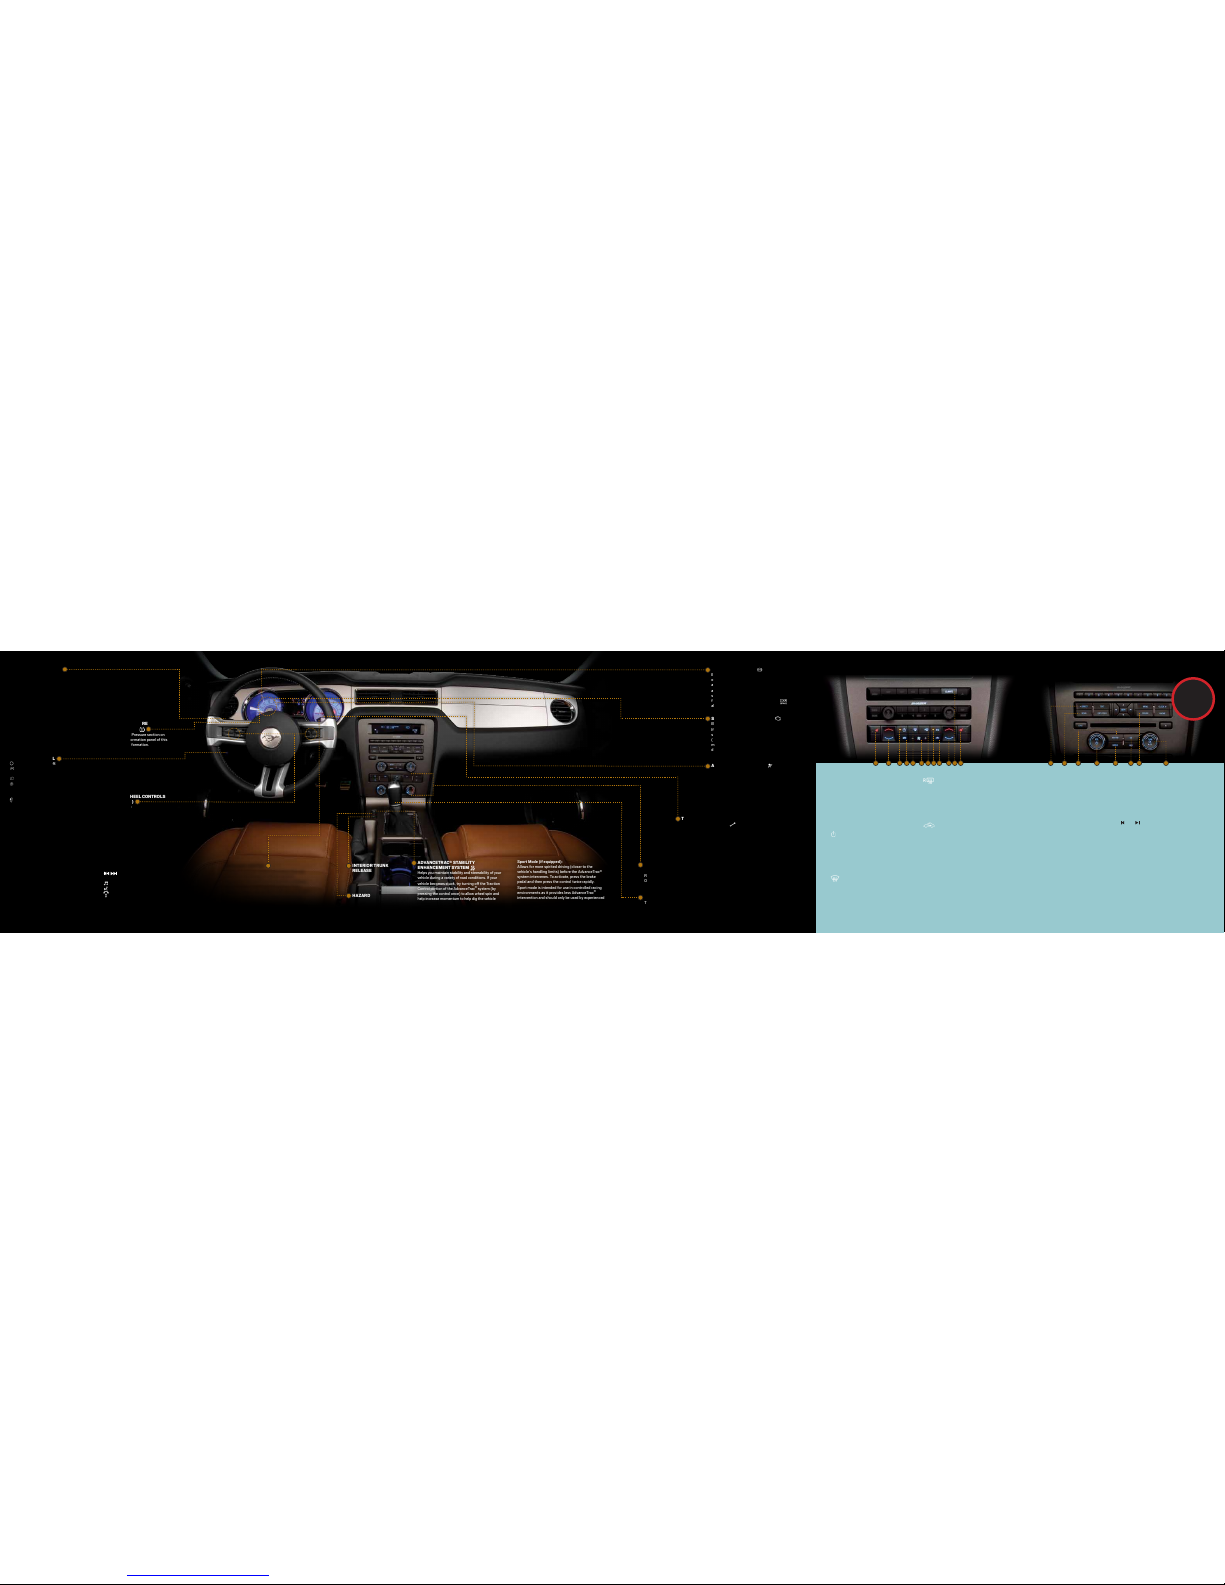
headLamp ControL
Turns the headlamps off.
Turns on parking, instrument panel,
license plate and tail lamps.
Turns on headlamps.
Autolamps (if equipped): Automatically
turns the exterior lamps on/off based on
available daylight.
Pull toward you to turn on the
fog lamps (if equipped).
Note: Your vehicle is equipped with automatic
instrumentation illumination. When the
headlamps or park lamps are turned on, a
light sensor in your vehicle monitors the
outside lighting conditions and automatically
sets the instrumentation illumination to the
appropriate mode. Refer to your Owner’s
Guide for further information.
VoL • 1
Push to turn the system on/off. Turn
to increase/decrease the volume.
Cd • 2
Press to enter CD/MP3 mode.
If a disc is already present in the
system, CD play will begin where
it last ended.
am/Fm • 3
Press repeatedly to cycle through
AM, FM1 or FM2 frequency bands.
SIrIUS • 4
Press repeatedly to cycle through
SAT1, SAT2 and SAT3 (satellite
radio modes, if equipped). Press
MENU when active and then OK to
enter the satellite radio menu and
access more options. Refer to your
Owner’s Guide for more information.
SoUnd • 5
Press repeatedly to access:
Bass, Treble, Balance, Fade,
Speed compensated volume and
All seats (Occupancy mode, if
equipped). Press
SEEK to
make adjustments.
SCan • 6
Press for a brief sampling of all radio
stations, CD tracks or satellite radio
channels (if equipped). Press
again to stop.
dIreCt • 7
Press DIRECT and then, using the
memory presets (0-9), enter in the
desired radio station, track number,
MP3 folder number (if in MP3
mode), or satellite radio channel.
tUne • 8
Turn to go to the next/previous
satellite radio channel, or to go
up/down the radio band frequency
in individual increments.
SynC® (IF eqUIpped)
SYNC® is a hands-free
communications and entertainment
system with special phone
and media features. For more
information, please refer to
the SYNC
®
Supplement, the
SYNC
®
section in the Navigation
Supplement (if equipped) or visit
www.SyncMyRide.com.
In-daSh Cd/mp3 SateLLIte CompatIbLe SoUnd SyStem (IF eqUIpped)
Note: Your vehicle is equipped with an auxiliary input jack and possibly a USB port inside your center console. The
auxiliary input jack allows you to plug in your portable MP3 player and play music through the vehicle speakers. The USB
port (if equipped) allows you to plug in and access media devices. For more information, refer to your Owner’s Guide.
SIRIUS
®
satellite radio broadcasts music, sports, news and entertainment programming. For more information and a
complete list of SIRIUS
®
satellite radio channels, visit www.sirius.com in the United States, www.sirius-canada.ca in
Canada, or call SIRIUS
®
at 1–888–539–7474. Satellite radio is only available with a valid SIRIUS® radio subscription.
4
3
8
1
7
6
A
u d io c on t r ol s
to Set
the tIme:
Press CLOCK. Use
the memory preset
#s to enter the
desired time and
press OK.
heated drIVer/paSSenger
SeatS • 1
Press to activate heated seats, press again
to deactivate.
drIVer SIde temperatUre • 2
Press to increase/decrease the air temperature for
the driver side of the vehicle. If the passenger side
controls (dual zone) are not active, this control
adjusts the temperature for the entire vehicle
cabin (single zone).
• 3 Press to turn on/off.
aUto • 4
Press to engage full automatic operation. Select
the desired temperature using the temperature
control. The system will automatically determine
fan speed, airow location, A/C on or off, and
outside or recirculated air, to heat or cool the
vehicle to reach the desired temperature.
deFroSt • 5
Distributes outside air through the windshield
defroster and demister vents. Can be used to clear
thin ice or fog from the windshield.
Fan Speed • 6
Press + to increase or - to decrease the fan speed.
c
l i mA t e c o nt r o l s
naVIgatIon baSed dUaL zone aUtomatIC temperatUre ControL (IF eqUIpped)
rear deFroSt • 7
Press to activate and clear the rear window and side
heated mirrors of thin ice and fog. Press again to
deactivate. The defroster will turn off automatically
after 15 minutes.
a/C • 8
Press to activate/deactivate. Use with recirculated
air to improve cooling performance efciency.
reCIrCULated aIr • 9
Recirculated air may reduce the amount of time
needed to cool down the interior of the vehicle
and may also help reduce undesirable odors from
reaching the interior of the vehicle.
paSSenger SIde
temperatUre • 10
Press to activate passenger side climate control
(dual zone) and to increase/decrease temperature
on the passenger side.
CLImate • 11
Press to access climate control features on the
navigation touchscreen. Refer to your Owner’s
Guide and/or Navigation supplement for
more information.
Note: Fuel economy can be affected by climate control usage. Using MAX A/C helps improve fuel economy as it
“re-cools” recirculated air and is more economical and efcient. Press the CLIMATE hard button and then press
MAX A/C on the touchscreen.
Use extreme caution when using any device or feature that may take your attention off the road.
Ford recommends against the use of any hand-held device while driving and that you comply with all
applicable laws. Your primary responsibility is the safe operation of the vehicle.
aIrbag readIneSS LIght
Illuminates briey when the ig nition is turned
on. If this light fails to illum inate, remains on or
continues to ash after the engi ne is started,
contact your authorized dealer for service as
soon as possible. A chime will also sound if ther e
is a malfunction in the indicat or light.
hazard
FLaSher
InterIor trUnk
reLeaSe
2
5
SerVICe engIne Soon LIght
Illuminates briey when the ignition is turned on.
If it remains on or is blinking after the engine is
started, the on-board diagnostics system
(OBD-II) has detected a malfunction. Drive in a
moderate fashion and contact your authorized
dealer as soon as possible.
abS WarnIng LIght
Illuminates briey when the ignition is turned
on. If the light remains on or continues to ash,
a malfunction has been detected. Contact your
authorized dealer as soon as possible and have the
system serviced. Normal braking (less ABS) is still
functional unless the brake warning light
is
also illuminated.
mULtI-FUnCtIon LeVer
Rotate the end of the control to
increase/decrease the speed of the wipers.
Push the end of the stalk:
• quickly for a single swipe without uid
• and hold briey for three swipes with
washer uid
• and hold for a longer wash cycle
Note: A courtesy wipe will automatically occur
after the washing cycle to ensure that any drips
have been cleared from your windshield. For
optimal wiper performance, clean blades and
glass regularly. Refer to your Owner’s Guide for
more information.
throttLe ControL/
tranSmISSIon LIght
Illuminates when a powertrain fault is detected.
If the light remains on or continues to come on,
contact your authorized dealer for service as
soon as possible.
SteerIng WheeL ControLS
(IF eqUIpped)
To set the speed:
1
Press ON.
2 Accelerate to the desired speed.
3 Press SET + and take your foot off the accelerator.
• To set a higher speed, press and hold SET + or press
SET + repeatedly until the desired speed is reached.
• To set a lower speed, press and hold SET – or press
SET – repeatedly until the desired speed is reached.
• To return to a previously set speed, press RESUME.
• To turn off, press OFF or turn off the ignition.
VOL +/-: Press to increase/decrease volume levels.
: Press to access the previous/next radio station,
CD track or preset satellite radio channel.
: Press repeatedly to access all possible media sources.
: Press to access SYNC
®
voice recognition, if equipped.
: Press to access SYNC® phone features, if equipped.
meSSage Center
Displays important vehicle information through
a constant monitoring of vehicle systems.
The system will notify you of potential problems
with a display of warnings followed by a long
indicator chime. Use the INFO, SETUP and RESET
buttons to access various menus and settings
within the message center such as MyColor
®
ambient lighting and halo lighting. Refer to your
Owner’s Guide for more information.
adVanCetraC® StabILIty
enhanCement SyStem
Helps you maintain stability and steerability of your
vehicle during a variety of road conditions. If your
vehicle becomes stuck, try turning off the Traction
Control portion of the AdvanceTrac
®
system (by
pressing the control once) to allow wheel spin and
help increase momentum to help dig the vehicle
out. This control also enables other AdvanceTrac
®
modes, please refer to your Owner’s Guide for
more information.
Sport Mode (if equipped):
Allows for more spirited driving (closer to the
vehicle’s handling limits) before the AdvanceTrac
®
system intervenes. To activate, press the brake
pedal and then press the control twice rapidly.
Sport mode is intended for use in controlled racing
environments as it provides less AdvanceTrac
®
intervention and should only be used by experienced
drivers in a controlled and safe manner. Always be
familiar with the vehicle and the conditions before
selecting this mode. Refer to your Owner’s Guide
for more information.
manUaL heatIng and
aIr CondItIonIng SyStem
Refer to the Climate Control chapter in your
Owner’s Guide for more information.
manUaL tranSmISSIon
The gearshift lever can only be moved to R (Reverse) by pushing
the knob down before shifting to reverse. This is a lockout
feature which protects the transmission from accidentally
engaging R (Reverse) when intending to select 1 (First).
11 2 3 4 5 6 7 8 9 10 11
LoW tIre preSSUre
WarnIng LIght
Refer to the Tire Pressure section on
the Essential Information panel of this
guide for more information.
naVIgatIon SyStem (IF eqUIpped)
The Mobile Media Navigation System allows
you to record CDs, listen to your saved music,
play DVDs and access climate control
options in addition to navigating the vehicle.
Refer to your Navigation supplement for
more information.
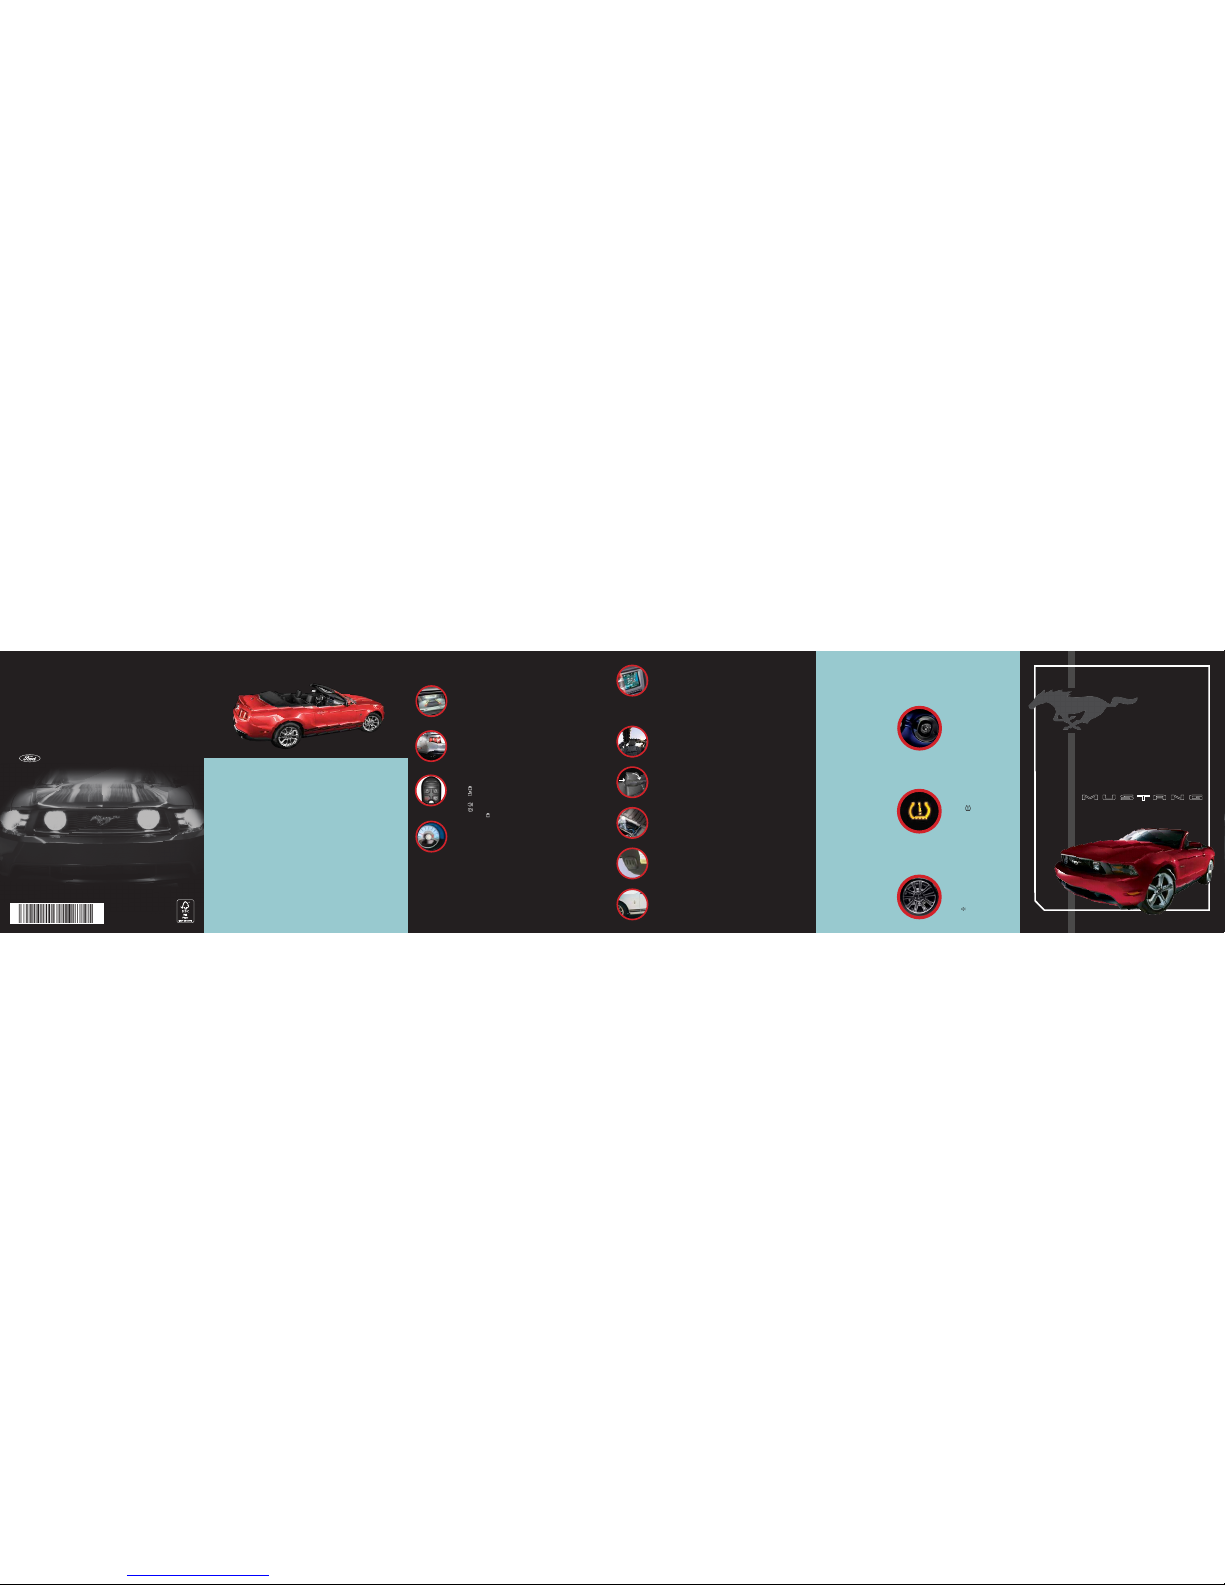
rearVIeW Camera (IF eqUIpped)
This system provides a visual display of the area behind the vehicle. The display
automatically appears on the navigation screen (if equipped) or in the rearview mirror
when the vehicle is in Reverse (R) and uses colors (green, yellow and red) to help judge
your proximity to objects. Note: Visibility aids do not replace the need to watch where
the vehicle is moving. Refer to your Owner’s Guide for safety information, more detail
and limitations.
reVerSe SenSIng SyStem (IF eqUIpped)
This system sounds a warning tone if there is an obstacle near the vehicle’s rear bumper
when the vehicle is in R (Reverse) and is traveling less than 3 mph (5km/h). The warning
tone will increase in frequency as the object gets closer and then will sound continuously
when the object is less than 10 inches away. Note: Visibility aids do not replace the need to
watch where the vehicle is moving. Refer to your Owner’s Guide for safety information, more
detail and limitations.
Integrated keyhead tranSmItter (Ikt)
• Press once to lock all doors. Press again to conrm all doors are closed.
• Press
once to unlock the driver’s door. Press again within ve seconds to
unlock all doors.
• Press
to activate the panic alarm. Press again or turn the ignition on to deactivate.
• Press
twice to open the trunk.
• Car nder: Press
twice within three seconds to locate your vehicle. The horn will
chirp and the turn lamps will ash.
aCCeSSIng and adjUStIng gaUge CoLor, ambIent CoLor,
haLo CoLor and myCoLor
®
Your Mustang is equipped with a very unique message center which allows you to select
specic colors to backlight your gauges (Gauge color) the area around your gauges (Halo
color) as well as selecting ambient lighting options to appear in the footwell areas, cupholders
and console bin (Ambient color). To access, rst ensure that your vehicle is in P (Park). Press
SETUP repeatedly until the desired feature (GAUGE COLOR, AMBIENT COLOR or HALO
COLOR) appears in the display. Press RESET repeatedly to scroll through all possible color
options as well as MyColor
®
. (Note: Ensure that Ambient light is set to ON.)
MyColor® allows you to create your own color preference by adjusting the levels of the three
primary colors (blue, red and green). You can save up to three custom colors. To set
MyColor
®
, press SETUP repeatedly until the desired category for which you want to create a
unique color appears (Gauge color, Ambient color or Halo color). Press RESET until MyColor
®
appears in the display. Then, press and hold RESET for three seconds. Now, press SETUP
repeatedly to scroll through Red (R), Green (G), Blue (B) and Exit. When the desired color is
in the display, press RESET to adjust the level of color. Press SETUP again to mix with
any other colors.
mykey™
Allows you to program certain driving restrictions on any standard key in order to
promote good driving habits. When MyKey™ is programmed:
• Belt-minder
®
cannot be disabled and will sound continuously and the audio will be
muted until the driver’s and front passenger’s safety belt is buckled.
• Audible and visual low fuel warnings are displayed.
• Certain features cannot be turned off such as the reverse sensing system.
• Audio volume and vehicle speed can be limited
• Audible and visual speed warnings can be congured at preselected speeds
• AdvanceTrac
®
cannot be programmed off
For complete information, refer to MyKey™ in the Locks and Security chapter in your
Owner’s Guide.
gLaSS rooF and roLLer bLInd SUnShade (IF eqUIpped)
Use the center mounted handle to slide the shade open or closed.
rear SeatS/head reStraIntS
Your vehicle is equipped with second row outboard non-adjustable head restraints.
The head restraints can be rotated forward to improve rear vision when there are no
rear occupants.
ConSoLe LoCk
For added security, you can lock/unlock your center console using your ignition key.
After unlocking, press the latch to open.
Car2U® (IF eqUIpped)
Car2U® is a universal transmitter located on the driver’s visor. This system has two
primary features – a garage door opener and a platform for remote activation of devices
in your home. This system’s garage door opener function replaces the common hand
held garage door opener with a three button transmitter. For more information, refer to
Car2U
®
in the Driver Controls chapter of your Owner’s Guide.
CLeanIng
When washing your vehicle, do not use a commercial or high pressure wand to wash
striped surfaces.
A
d d it i o nA l Fe At u r es
e
s s en t i Al i nF o r m A t i o n
ConVertIbLe
(IF eqUIpped)
Do not store articles behind
rear seat. Articles stored in
the convertible top stowage
compartment may break the
rear glass window when the
top is lowered. The convertible
top can be lowered with the
side windows down. The
windows automatically lower
when lowering or raising the
top. Do not lower the top when
the top material is wet. Note:
The convertible top will not
operate unless the vehicle is
traveling under 3 mph (5 km/h).
to LoWer the
ConVertIbLe top
1 Stop the vehicle completely.
Turn the key to the on
position. It is recommended
that the engine is running to
prevent draining the battery.
2 Ensure the convertible top
stowage compartment
behind the rear seat is empty
and ready to receive the top.
Check the convertible top
outer surface to ensure it is
free of leaves and debris.
3 Unclamp the top from the
windshield header at both
the right and left sides by
pulling each handle down
and rearward until the
handle clears the windshield
header. Note: If the top has
not been lowered for a while
and sticks to the windshield
header, push the front of
the top up slightly with your
hand to loosen it. 4 Push
the convertible top switch
on the overhead console and
hold until the windows are
completely down and the top
is completely stored.
to raISe the
ConVertIbLe top
1 Stop the vehicle completely.
Turn the key to the on
position. It is recommended
that the engine is running to
prevent draining the battery.
2 Push and hold the convertible
top switch until the windows
lower completely and the top
unfolds and moves forward
toward the windshield header.
3 Open both handles before
the top meets the windshield
header. 4 Continue to use the
convertible top switch to raise
the top until it has reached the
fully closed position ush to
the header. The two pins under
the forward edge of the top
should seat in the matching
holes in the header. 5 Secure
the driver’s side latch rst, then
secure the passenger’s side.
Pull down rmly on the latch
handles before rotating them
into the windshield header
until they reach the full forward
position. Pulling down on the
latch handles and at the center
grip in the header will make it
easier to fasten the top. Push
the latch handles up into the
stowed position once the latch
is rotated into the full forward
position. 6 Raise the rear
windows rst and then raise
the front windows.
c
o n ve r t ib l e t o p
This Quick Reference Guide is not intended to replace your vehicle Owner’s Guide which contains
more detailed information concerning the features of your vehicle, as well as important safety
warnings designed to help reduce the risk of injury to you and your passengers. Please read your
entire Owner’s Guide carefully as you begin learning about your new vehicle and refer to the
appropriate sections when questions arise.
All information contained in this Quick Reference Guide was accurate at the time of duplication.
We reserve the right to change features, operation and/or functionality of any vehicle specication
at any time. Your Ford dealer is the best source for the most current information. For detailed
operating and safety information, please consult your Owner’s Guide.
Ford Motor Company | Customer Relationship Center | P.O. Box 6248 | Dearborn, MI 48121
1-800-392-3673 (FORD) | (TDD for the hearing impaired: 1-800-232-5952)
www.fordowner.com | www.ford.ca
CR3J 19G217 AA
December 2010
First Printing
Quick Reference Guide
Mustang
Litho in U.S.A.
eaSy FUeL™ SyStem
With this system, you simply open the fuel ller door, insert
the nozzle and begin fueling. It is self sealing and therefore
protected against dust, dirt, water, snow and ice. With
the Easy Fuel
TM
system, wait ve seconds from
the time the refueling nozzle is shut-off until
the nozzle is pulled back out of the ll pipe to
allow residual fuel in the nozzle to drain into
the tank.
To use a portable fuel container,
slowly insert the fuel funnel (located with the
tire changing tools or the temporary mobility
kit), and pour the fuel into the funnel. When
done, clean the funnel or properly dispose of it.
Extra funnels can be purchased from your authorized
dealer. Do not use aftermarket funnels as they will not work
with the Easy Fuel™ system and may cause damage.
FUeL tank CapaCIty/FUeL InFo
Your fuel tank capacity is 16.0 gallons (60.6L). Your
vehicle is designed to use “Regular” unleaded
gasoline with an octane rating of 87. Do not
use E85 fuels because your vehicle was not
designed to run on fuels with more than
10% ethanol.
LoCatIon oF Spare tIre
and tooLS
Your vehicle is either equipped with a
temporary spare tire or a temporary mobility
kit, both of which are located in the trunk. The kit
contains an air compressor to re-inate the tire and a
sealing compound that will seal most punctures caused
by nails or similar objects. Do not attempt to repair
large punctures or damage to the tire’s sidewall. The
mobility kit provides a temporary seal allowing you to
drive up to 120 miles at a maximum speed of 50
mph. After sealant use, the TPMS sensor and
valve stem on the wheel must be replaced
by an authorized Ford dealer. Note: The
sealant in the canister is to be used for
one tire only. See your authorized dealer
for replacement canisters. For complete
information refer to your Owner’s Guide.
roadSIde aSSIStanCe
Your new Ford Mustan g comes wi th the
assurance and su pport of 24-hour eme rgency
roadside assista nce. Roads ide assist ance
includes such s ervices as : lockout
assistance, limited fuel delivery, battery
jump starts, cha nging a f lat tire,
towing, and winch out. To receiv e
roadside assista nce in the United
States, call 1 (8 00) 241-3673 . In
Canada, call 1 ( 800) 665- 2006.
tIre preSSUre
Check your tire pressure at least once a month
and before long trips (including spare, if equipped).
The recommended specications are on the Safety
Compliance Certication Label or Tire Label located
on the B-Pillar or the edge of the driver’s door. As
an added safety feature, your vehicle has been
equipped with a Tire Pressure Monitoring
System (TPMS) that illuminates when
one or more of your tires are signicantly
under-inated. If the low tire pressure
warning light
remains on at start up
or while driving, stop and check your tires
as soon as possible and ensure that they
are inated to the proper pressure. If the
light ashes for approximately one minute
and then remains on, a malfunction h as
been detected in the TPMS system. Contact your
authorized dealer as soon as possible for service. For
more information on TPMS, refer to Tire Pressure
Monitoring System (TPMS) in the Tires, Wheels
and Loading chapter in your Owner’s Guide.
SoS poSt-CraSh aLert SyStem
tm
This system provides audible and visual
alarms when a crash causes the
deployment of airbags or the activation
of the safety belt pretensioners. The turn
signals will ash and the horn will sound.
To deactivate, press the hazard asher
control, or
on your remote transmitter.
Qu ic k Re fe re nc e Gu id e
2012
 Loading...