

Page 1

MyFord Touch
™
MyLincoln Touch™
Supplement
Page 2

Table of Contents
Introduction
Customizing your home screen 4
Setting the clock 6
Infotainment display 7
Help 9
Cleaning the touchscreen 10
Voice recognition system overview
Media features
AM/FM 16
HD Radio™ 18
SIRIUS威 satellite radio 22
Accessing and using your USB port 30
Supported media file types 33
Streaming music from your phone 33
Phone features
Pairing your phone for the first time 37
Pairing other phones 40
Text messaging 40
SYNC姞 Services and Apps
911 Assist™ 44
Vehicle health report 46
Traffic, Directions and Information 48
3
12
16
37
44
Settings
Wi-Fi 52
System settings 54
Display settings 54
Notifications 54
2011 HMI-2 Gen 2 (ln1)
Supplement, 1st Printing
USA (fus)
52
1
Page 3

Table of Contents
Navigation features
SIRIUS威 Travel Link™ 66
End User License Agreements
Index
56
69
86
All rights reserved. Reproduction by any means, electronic or mechanical
including photocopying, recording or by any information storage and retrieval
system or translation in whole or part is not permitted without written
authorization from Ford Motor Company. Ford may change the contents without
notice and without incurring obligation.
2
2011 HMI-2 Gen 2 (ln1)
Supplement, 1st Printing
USA (fus)
Copyright © 2010 Ford Motor Company
Page 4

Introduction
MYFORD TOUCH™ AND MYLINCOLN TOUCH™ SYSTEMS
(IF EQUIPPED)
WARNING: Driving while distracted can result in loss of vehicle
control, accident and injury. Ford strongly recommends that
drivers use extreme caution when using any device or feature that may
take their focus off the road. Your primary responsibility is the safe
operation of the vehicle. We recommend against the use of any
handheld device while driving and that you comply with all applicable
laws.
4
3
This system uses a four corner strategy and dynamic menu listings to
provide quick access to vehicle features and settings.
Using the four corners
The system is comprised of these main sections:
1.
access map mode. These screens will appear with a green tone. Refer to
the Navigation features chapter in this supplement. Note: If your
vehicle is not equipped with navigation, the information section (
will appear in this corner instead of at the bottom of the screen.
2.
climate control features. These screens will appear with a blue tone.
Refer to Touchscreen features in the Climate Controls chapter of your
Owner’s Guide for more information.
Navigation (if equipped): Press this area to set a destination or
)
Climate control: Press this area to access the touchscreen
See End User License Agreement at the end of this book
1
2
3
2011 HMI-2 Gen 2 (ln1)
Supplement, 1st Printing
USA (fus)
Page 5

Introduction
3. Entertainment: Press this area to access music and media
features such as radio, CD, USB port, etc. These screens will appear with
a red tone. Refer to the Media features chapter in this supplement.
4.
features. These screens will appear with a yellow tone. Refer to the
Phone features chapter in this supplement.
The corners will also display any active modes within those menus, such
as your phone being connected or the climate temperature.
Quick access buttons
In addition to accessing the corners, you can also press MENU,
or for quick access to additional settings and features.
Press MENU to access:
Press
Note: If the
in the Settings chapter.
Note: Some features are not available while the vehicle is moving.
Screen differences: Depending on your vehicle’s option package and
software, your screens may vary in appearance from the screens shown
in this supplement. Your features may also be limited depending on your
market. Please check with your authorized dealer for availability.
Phone: Press this area to access SYNC威 hands-free phone
• Clock • Display
• Sound • Vehicle
• Settings • Help
to access:
• SYNC Services • SIRIUS Travel Link
• Notifications • Calendar
• SYNC Apps
icon appears with a yellow tone, refer to Notifications
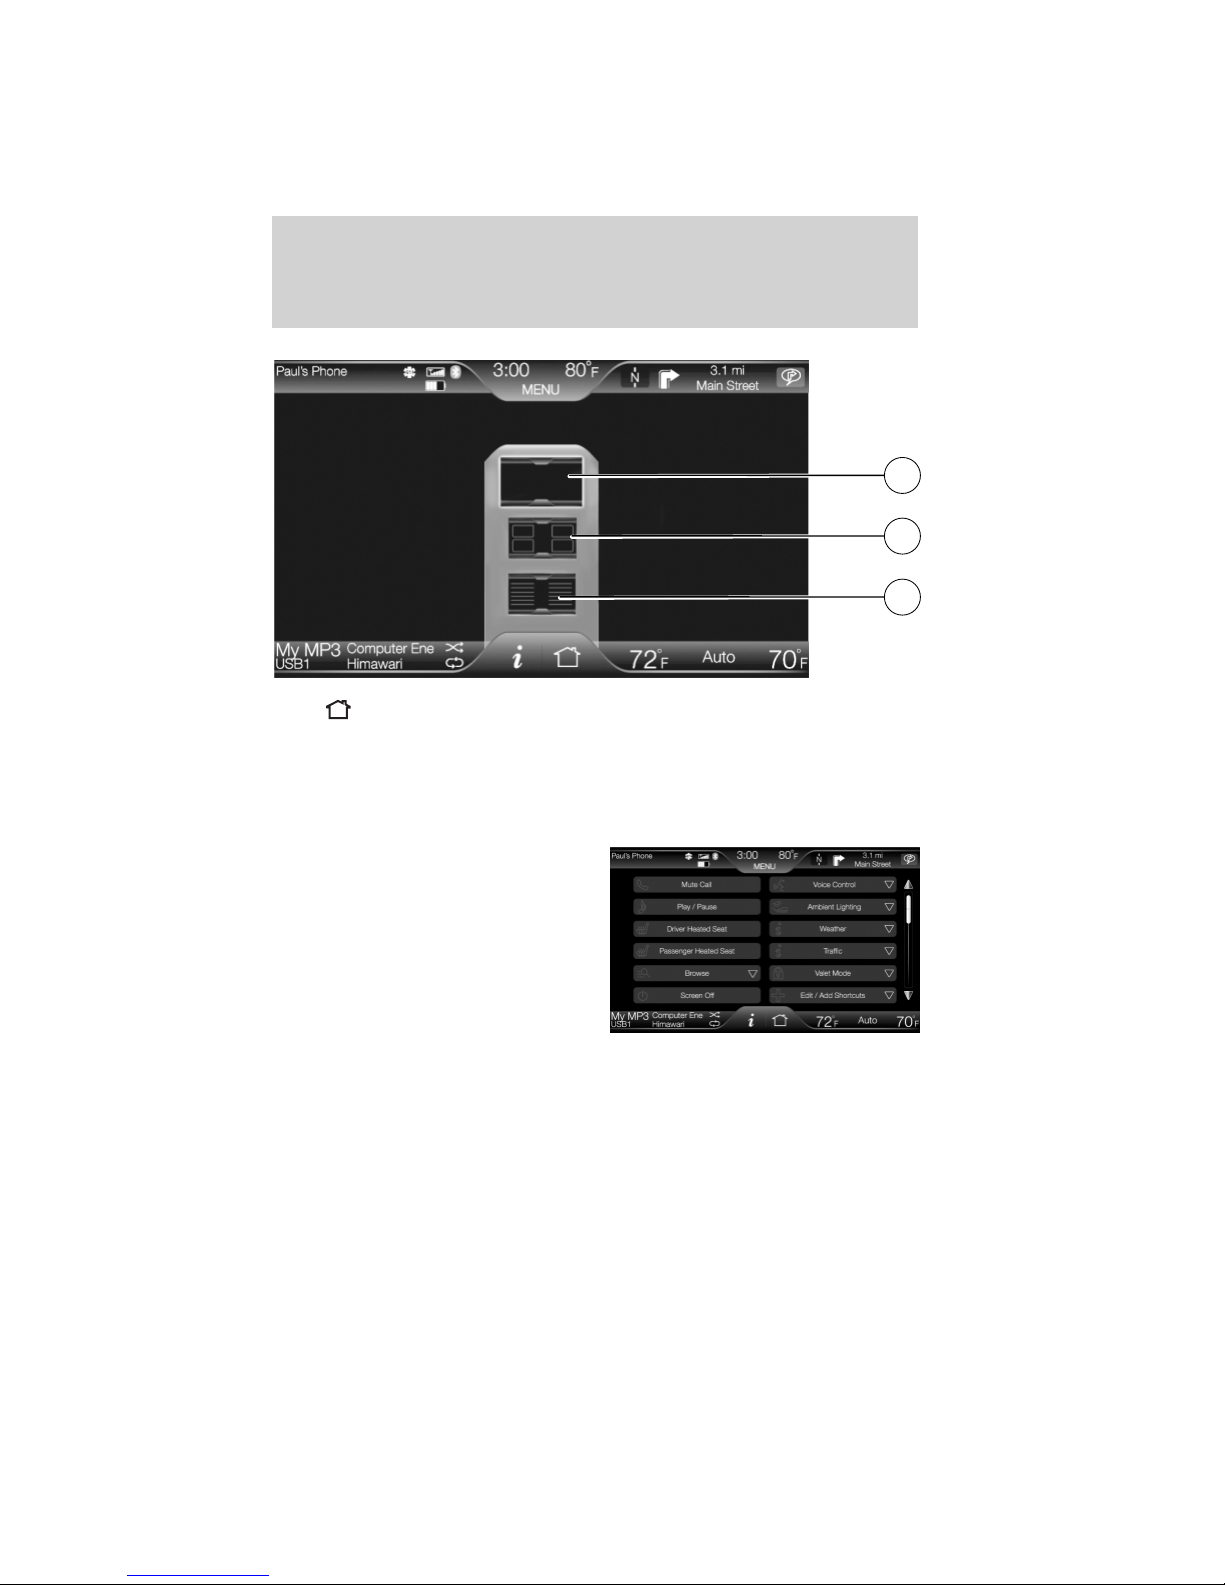
Customizing your home screen
Press
4
to access the home screen.
See End User License Agreement at the end of this book
2011 HMI-2 Gen 2 (ln1)
Supplement, 1st Printing
USA (fus)
Page 6
Introduction
Press again and a pop-up will appear with three graphics.
1. Select (1) for your display to be your chosen wallpaper (if saved).
2. Select (2) for the full corners display with preselected shortcuts.
3. Select (3) to customize your home screen by setting up your own
shortcuts.
When on the shortcut screen, select
‘Edit/Add shortcuts’ and the system
will walk you through the process of
setting and saving your shortcuts.
1
2
3
Note: The full corner display (2) with preselected shortcuts is the
default home screen. This screen will momentarily appear at vehicle start
up and will then transition to your chosen selection, if different.
See End User License Agreement at the end of this book
2011 HMI-2 Gen 2 (ln1)
Supplement, 1st Printing
USA (fus)
5
Page 7

Introduction
Setting the clock
1. Press MENU > Clock.
2. Press + and — to adjust the time.
From this screen, you can also
access other adjustments such as 12
or 24 hour mode, to activate GPS
time synchronization, and to have
the system automatically update
new time zones.
Once you update any settings they will be automatically saved.
Note: The date will be set by your vehicle’s GPS. You cannot manually
set the date.
Note: After a battery disconnect, your vehicle will need to acquire a GPS
signal to update the clock. A GPS signal can be received in an open sky
area. Once your vehicle acquires the signal, it may take a few minutes
for the update to display the correct time.
Using the touch sensitive controls on your system
Your vehicle’s centerstack is equipped with touch sensitive switches for
your infotainment and climate control systems. To activate or deactivate
a feature, you need only touch the graphic with your finger.
For optimum performance of these touch sensitive controls,
please note the following:
• The touch sensors are sensitive to light touch. You do not need to
apply forceful pressure on these controls to use them.
• Use your bare finger to touch the center of a touch control graphic.
Touching off-center of the graphic may cause nearby control to
activate/deactivate.
• Ensure that your hands are clean, dry and free of moisture.
• Since the touch control sensor operates based on the touch of a
finger, you may have trouble using them if you are wearing gloves.
• Metal and other conductive material should be kept away from the
surface of the touch controls as this may cause electronic interference
(i.e. control activation).
6
See End User License Agreement at the end of this book
2011 HMI-2 Gen 2 (ln1)
Supplement, 1st Printing
USA (fus)
Page 8
Introduction
Depending on your vehicle and option package, you may also have
some of the following controls on your bezel:
(Power): Press to turn the media (or climate features) on/off.
•
• VOL: Use to increase/decrease the volume.
• VOL and
slider area to increase/decrease the volume or fan levels.
slider bars: Lightly slide your finger over the rear
•
/ and TUNE +/- : Use as you normally would in media
modes.
(Eject): Press to eject a CD from the system.
•
• SOURCE: Touch the word repeatedly to cycle through all available
media modes. The screen will not change, but you will see the media
changes in the lower left status bar.
• SOUND: Touch the word to access the Sound menu on screen where
you can make adjustments to settings such as: Bass, Treble, Midrange,
Balance and Fade, THX Deep note demo (if equipped), DSP (if
equipped), Occupancy mode (if equipped), Audio Visualizer (if
equipped) and Speed compensated volume settings.
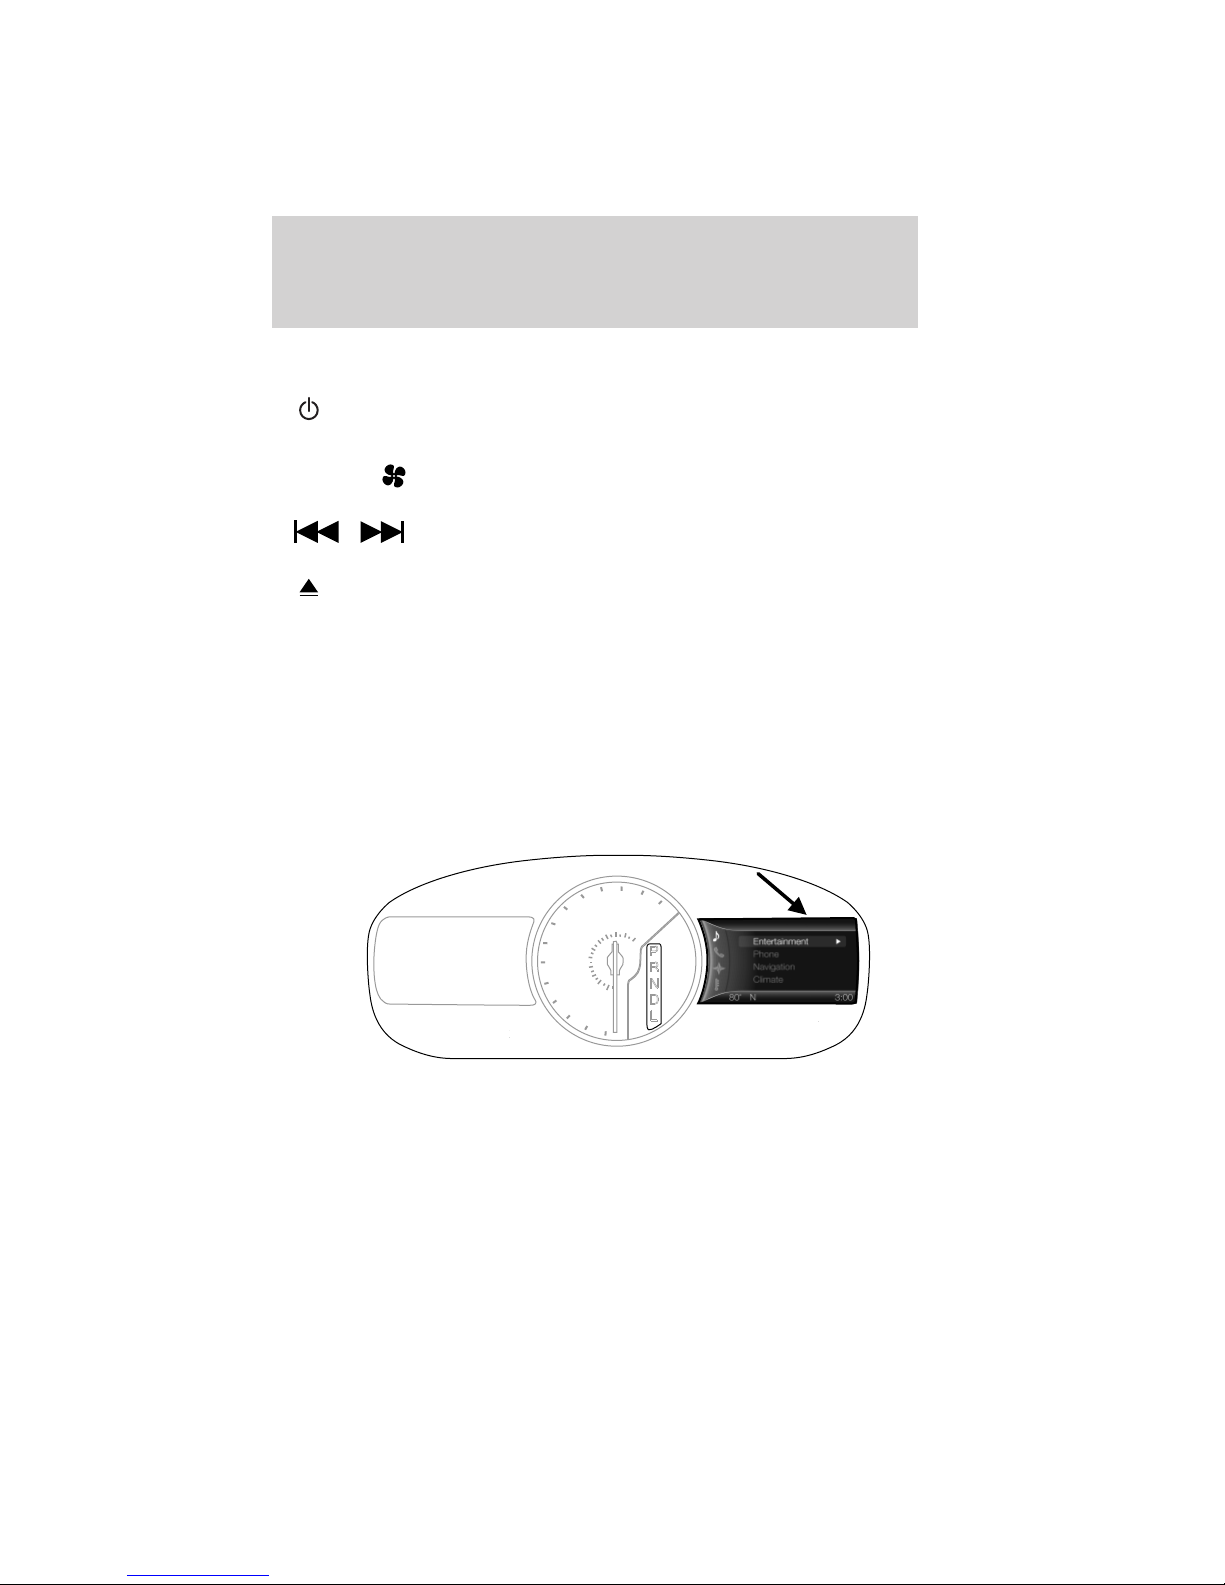
Accessing and adjusting modes through your infotainment display
120
100
80
120
60
100
80
40
20
140
180
200
160
220
140
60
40
20
0
km/h
MPH
0
Your infotainment display is located on the right side of your instrument
cluster. The display allows you to view and make minor adjustments to
your active modes without taking your hands off the wheel.
See End User License Agreement at the end of this book
2011 HMI-2 Gen 2 (ln1)
Supplement, 1st Printing
USA (fus)
7
Page 9
Introduction
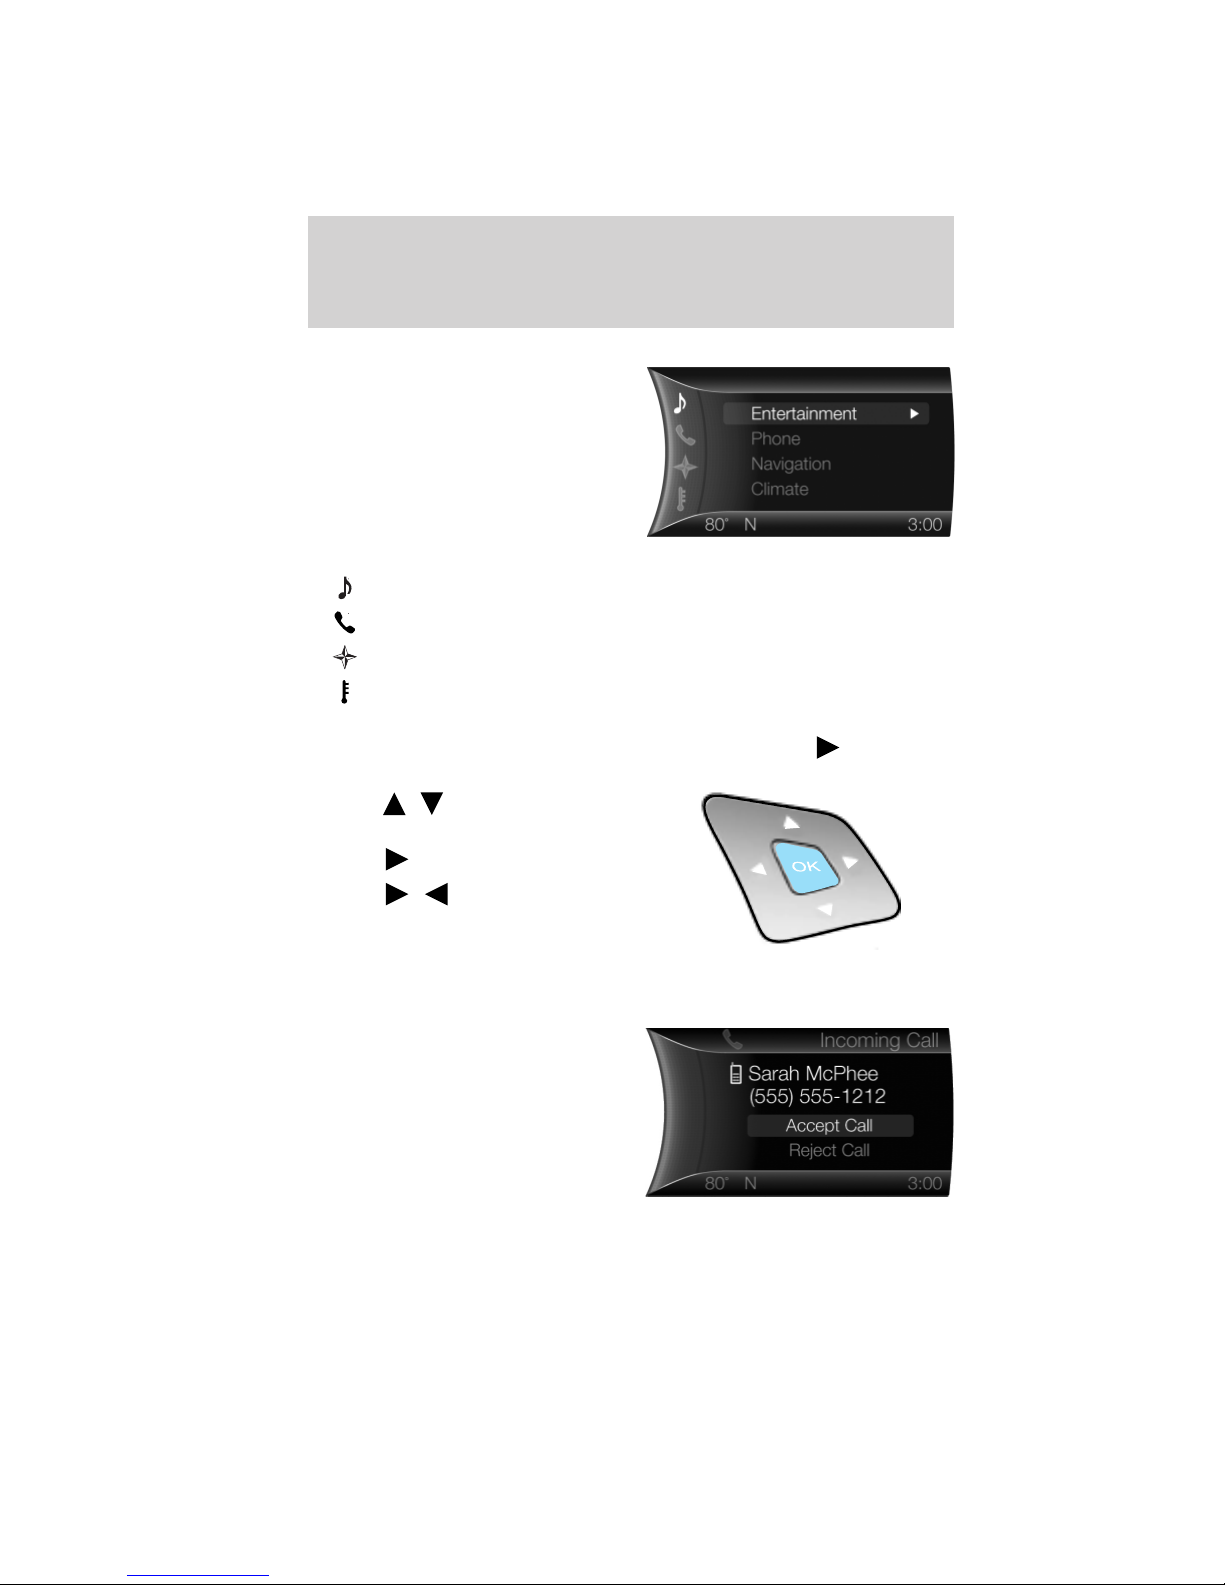
Use the OK and arrow buttons on
the right side or your steering wheel
to scroll through your available
modes:
•
•
•
•
Note: If your vehicle is not equipped with navigation, Compass will
appear in the display instead of Navigation. If you press
the Compass menu, you can see the compass graphic.
• Press
• Press
• Press
• Press OK to confirm your
For example, in phone mode, you
can accept or reject an incoming
call.
Entertainment
Phone
Navigation (if equipped)
Climate
to go into
/ to scroll through
the modes.
to enter the mode.
/ to make
adjustments within the chosen
mode.
selection.
8
See End User License Agreement at the end of this book
2011 HMI-2 Gen 2 (ln1)
Supplement, 1st Printing
USA (fus)
Page 10

Introduction
In Entertainment mode, you can
view what is playing and make some
adjustments.
You can also access and make adjustments in Navigation mode (if
equipped) and Climate mode.
Help!
Your touchscreen system has a help feature which you can access at any
time.
To access:
1. Press Menu > Help.
2. From this screen you can access:
• Where am I?: Select to view the vehicle’s current location. If your
vehicle is equipped with navigation, you will see your location on a
map. If your vehicle is not equipped with navigation, or if your SD
card is not inserted, you will receive your vehicle’s latitude and
longitude.
• 911 Assist: Select to access the 911 Assist™ settings, vehicle restart
instructions and emergency quick dial contacts.
In Case of Emergency (ICE) Quick Dial: This feature allows you
to save up to two numbers as ICE contacts for quick access in the
event of an emergency. Select Edit to access your phonebook and
then select the desired contacts. The numbers will then appear as
options on this screen for the ICE 1 and ICE 2 buttons. The ICE
contacts you pre-select will also be presented to you at the completion
of the 911 Assist call process for quick access.
• Voice command list: Select to view possible voice commands.
From this screen, you can also access: System information, Software
Licenses and Driving Restrictions.
See End User License Agreement at the end of this book
2011 HMI-2 Gen 2 (ln1)
Supplement, 1st Printing
USA (fus)
9
Page 11

Introduction
To access help using the voice commands:
1. Press .
2. After the tone, say, “Help”. The system will provide voice commands
that can be used in the current mode.
Cleaning your touchscreen display
Clean the display with a clean, soft cloth such as one used for cleaning
glasses. If dirt or finger prints are still visible, apply a small amount of
alcohol to the cloth. Do not pour/spray alcohol onto the display. Do not
use detergent or any type of solvent to clean the display.
Safety information
WARNING: Driving while distracted can result in loss of vehicle
control, accident and injury. Ford strongly recommends that
drivers use extreme caution when using any device that may take their
focus off the road. Your primary responsibility is the safe operation of
the vehicle. We recommend against the use of any handheld device
while driving and that you comply with all applicable laws.
• Do not attempt to service or repair the system. See your authorized
dealer.
• Do not operate playing devices if the power cords and/or cables are
broken, split or damaged. Carefully place cords and/or cables where
they will not be stepped on or interfere with the operation of pedals,
seats and/or compartments, or safe driving abilities.
• Do not leave playing devices in the vehicle in extreme conditions as it
could cause damage to your device. Refer to your device’s user guide
for further information.
• For your safety, some functions are speed dependent and cannot be
performed when the vehicle is traveling at speeds greater than 5 mph
(8 km/h).
• Ensure that you review your device’s user guide before using with the
system.
10
See End User License Agreement at the end of this book
2011 HMI-2 Gen 2 (ln1)
Supplement, 1st Printing
USA (fus)
Page 12

Introduction
Privacy information
When a cellular phone is connected to SYNC威, SYNC威 creates a profile
within your vehicle that is linked to that cellular phone. This profile is
created in order to offer you more cellular features and to operate more
efficiently. Among other things, this profile may contain data about your
cellular phone book, text messages (read and unread), and call history,
including history of calls when your cell phone was not connected to
SYNC威. In addition, if you connect a media device, SYNC威 creates and
retains an index of media content supported by SYNC威. SYNC威 also
records a short development log of approximately 10 minutes of all
recent SYNC威 activity. The log profile and other SYNC威 data may be
used to improve SYNC威 and help diagnose any problems that may occur.
The cellular profile, media device index, and development log will remain
in the vehicle unless you delete it and are generally accessible only in
the vehicle when the cellular phone or media player is connected. If you
no longer plan to use SYNC威 or the vehicle, we recommend you perform
a Master Reset to erase all information stored in SYNC威.
SYNC威 data cannot be accessed without special equipment and access to
the vehicle’s SYNC威 module. Ford Motor Company and Ford of Canada
will not access SYNC威 data for any purpose other than as described
absent consent, a court order, or where required by law enforcement,
other government authorities, or other third parties acting with lawful
authority. Other parties may seek to access the information
independently of Ford Motor Company and Ford of Canada. For further
privacy information, see the sections on 911 Assist™ (if equipped),
Vehicle Health Report (if equipped), and Traffic, Directions and
Information (if equipped).
See End User License Agreement at the end of this book
2011 HMI-2 Gen 2 (ln1)
Supplement, 1st Printing
USA (fus)
11
Page 13

Voice recognition system overview
VOICE RECOGNITION FEATURE
Your system is equipped with an advanced interactive voice recognition
(VR) system. This system allows you to perform many operations by
speaking certain commands to the system. The system will respond with
a series of audible tones, questions and spoken confirmations depending
on the situation and the chosen level of dialogue interaction.
System feedback and interaction
Your voice recognition system provides feedback via audible tones when:
• You are entering a new voice session
• A voice session is successful or unsuccessful
• A speed dependent feature is accessed
• The system is ready to listen for a command
• You choose to access the Help feature
• The system gives a positive or negative recognition
The system will also ask short questions (confirmation prompts) when it
has not clearly understood your request or when there are several
possible responses to your request.
Voice recognition visual feedback
When using voice commands, the following icons and words may appear
in the lower left status bar indicating the voice session status:
Listening • Paused
•
Success •
•
• Failed
?
Try Again
Voice settings
Voice settings allow you to customize the level of system interaction,
help and feedback. The system defaults to standard interaction which
uses candidate lists and confirmation prompts as these provide the
highest level of guidance and feedback. To access these settings, you can
either:
1. Press Menu > Settings > Voice control.
12
See End User License Agreement at the end of this book
2011 HMI-2 Gen 2 (ln1)
Supplement, 1st Printing
USA (fus)
Page 14

Voice recognition system overview
2. Select from the following:
• Interaction Mode • Confirmation Prompts
• Media Candidate Lists • Phone Candidate Lists
• Voice Control Volume
Or
1. Press
by the prompt, “Please say a command”. Another tone will sound to
signify the system is listening.
2. Say one of the following commands:
• Interation Mode Advanced • Interation Mode Standard
• Confirmation Prompts On •Confirmation Prompts Off
• Phone Candidate Lists On • Phone Candidate Lists Off
• Media Candidate Lists On • Media Candidate Lists Off
Interaction Mode: Standard interaction mode provides more detailed
interaction and guidance while the advanced mode has less audible
interaction and more tone prompts.
Confirmation Prompts: Confirmation prompts are short questions
asked by the system when the system has not clearly heard or
understood your request. Note: Even with confirmation prompts turned
off, you may be asked to confirm settings occasionally and number
inputs.
Phone/Media Candidate Lists: Candidate lists are a list of possible
results from your voice commands. These occur when SYNC威 has equal
confidence of several possible results from your voice command.
How to use voice commands with your system
1. Press
Depending on the feedback setting, you will either hear, “Please say a
command” followed by a tone or just the tone, signaling the system is
ready to accept your command.
2. After the tone, speak the command clearly.
For best voice recognition performance
• Ensure that the interior of the vehicle is as quiet as possible.
• Speak naturally without long pauses between words.
• After pressing
appear in the display. Any command spoken prior to this will not
register with the system.
on the steering wheel controls. A tone will sound followed
on the steering wheel controls.
, wait for the tone to sound and for ‘Listening’ to
See End User License Agreement at the end of this book
13
2011 HMI-2 Gen 2 (ln1)
Supplement, 1st Printing
USA (fus)
Page 15

Voice recognition system overview
• You can interrupt the system at any time while it is speaking by
pressing . The system will respond with a tone and allow you to
speak your command.
What can I say?
To access the available voice commands for the current session, do one
of the following:
• During a voice session, press the
• Say “What Can I Say??” for an on screen listing of the possible voice
commands that are associated with your current voice session.
• Press
for an audible list of possible voice commands.
To access a list of available voice commands
• Press Menu > Help > Voice command list
OR
• Press
of the following (if available):
• List of Commands • Phone List of Commands
• Radio List of Commands
• Navigation List of Commands • Travel Link List of Commands
• Sirius Satellite List of Commands • Audio List of Commands
• USB List of Commands • SD Card List of Commands
• Bluetooth Audio List of
Commands
Global voice commands
The following voice commands can be spoken at any time during a voice
session:
• Help • What Can I Say?
• Main Menu • Go Back
• Next • Previous
• Exit • List of Commands
on the steering wheel controls and after the tone say “Help”
on the steering wheel controls and when prompted, say any
icon at the bottom of the screen.
• Climate Control List of
Commands
• Browse List of Commands
14
See End User License Agreement at the end of this book
2011 HMI-2 Gen 2 (ln1)
Supplement, 1st Printing
USA (fus)
Page 16

Voice recognition system overview
Using voice commands with the touchscreen options
Your voice system has a special dual mode feature which allows you to
switch between using voice commands and the touchscreen. The most
common place this is available is with your navigation feature (if
equipped). During a navigation voice session, you will notice that some
of the buttons on the screen are outlined in blue and some are not.
The buttons on the screen that are outlined in blue are both voice
commands and can be selected during a voice session. The buttons that
are not outlined in blue can’t be used as voice commands and if they are
touched during a voice session will cancel the voice session. Some
examples are as follows:
• If you press
command and prompts you again, say, “Destination”. The system will
change to the destination screen.
• If you say, “Intersection”, then the system will change the screen to
the intersection screen where “Street”, “City” and “State” are outlined
in blue. You are able to switch between fields by touching the buttons
or by saying, “Enter first street” or “Change city”.
• If you say, “Street Address” the screen will change to the street
address screen and then “Enter City”, where State, City, Street and
Number are outlined in blue indicating that you are able to switch
between the fields by touching the buttons or by saying commands
like “Enter Street”, “Change City”, or “Enter House Number”.
• If you are in the process of entering a destination by voice and your
vehicle comes to a stop, (for example, stopping at a red light), the key
board will appear on the screen. If you make more than three
consecutive button presses, (for example, spelling a city), then the
voice session will be cancelled.
and say, “Navigation”, after the system confirms the
See End User License Agreement at the end of this book
2011 HMI-2 Gen 2 (ln1)
Supplement, 1st Printing
USA (fus)
15
Page 17

Media features
AM/FM RADIO
Press the lower left corner of the touchscreen and then select the
AM/FM tab. To change between AM and FM, repeatedly press the
AM/FM tab. To change between AM1/AM AST or the FM/FM1/FM2/FM
AST presets, repeatedly press the lower left corner of the touchscreen.
From the main screen, you can:
• Save a station by tuning to the station and then pressing and holding
one of the memory preset areas (on the right side of the screen). You
will hear a brief mute and the sound will return when the station is
saved.
• Press ‘Direct Tune’ and enter the desired station number when
prompted. Then press ‘Enter’.
• Select ‘Browse’ to view a list of all available stations. Scroll and select
the desired station.
• Press ‘Options’ to access:
Sound Settings: Select to adjust Bass, Treble, Midrange, Balance and
Fade, THX Deep note demo (if equipped), DSP (if equipped),
Occupancy mode (if equipped), Audio Visualizer (if equipped) and Speed
compensated volume settings.
Set PTY for Seek/Scan: Select a category of music you would like to
search for and then choose to either seek or scan for the stations.
RDS Text Display On/Off: Select On to always view the information
broadcast by FM stations.
Auto Presets (AST)- Autostore: Select to have the system
automatically store the six strongest stations in your current location.
These will not override any presets stored in any of the AM or FM
frequency bands.
HD Radio On/Off (if equipped): HD Radio威 technology enables you to
receive radio broadcasts digitally, (where available), providing free,
crystal clear sound. Refer to the HD Radio威 information in the
following section.
TAG On/Off (if equipped): Select On for the TAG icon to appear on
screen when HD Radio is active. The tagging feature allows you to tag a
song to download later. You can press TAG to save the information of the
song that is playing. Then, when you plug in your portable music player,
the information will be transferred (if supported by your device). When
you are connected to iTunes威, the tags will appear to remind you of the
songs you’d like to download. Refer to the HD Radio威 information in
the following section.
16
See End User License Agreement at the end of this book
2011 HMI-2 Gen 2 (ln1)
Supplement, 1st Printing
USA (fus)
Page 18

Media features
Browse voice commands
When listening to any type of audio, you can browse through other
devices without having to change to a different audio. For example, if
you are currently listening to the radio, you can browse all the artists
that are stored on your USB device. Press
controls and when prompted, you can say:
• Browse station list • Browse AM station list
• Browse FM station list • Browse SIRIUS channel guide
• Browse <genre> channels • Browse <league> games
• Browse CD track list • Browse USB
• Browse SD card • Browse Bluetooth audio
• Browse*
*Note: If you have said, “Browse”, you can then say any of the following
commands:
• AM station list • FM station list
• SIRIUS channel guide • CD track list
• <League> games • USB
• SD card • Bluetooth audio
For a complete list of Browse voice commands, refer to Voice
commands for your USB and SD Card and Voice commands for
Bluetooth Audio in the following sections.
Radio voice commands
While listening to the radio, press
When prompted, you may say any of the following commands:
• Radio On • Radio Off
• Set PTY • AM
• AM <530–1710> • AM Autoset
• FM • FM <87.9–107.9>
• FM1 • FM2
• FM Autoset • FM Preset <#>
• FM <87.9–107.9> • Preset <#>
• AM Preset <#> • AM Autoset Preset <#>
• FM 1 Preset <#> • FM 2 Preset <#>
• FM Autoset Preset <#> • HD <#> (if available)
• Tune* • Browse**
Note: If you are not listening to the radio, press
prompted, say, “Radio” and you can say any of the above commands.
See End User License Agreement at the end of this book
on the steering wheel controls.
on the steering wheel
and when
17
2011 HMI-2 Gen 2 (ln1)
Supplement, 1st Printing
USA (fus)
Page 19

Media features
*Note: If you have said, “Tune”, you can then say any of the following
commands:
• <530–1710> • <87.9–107.9>
• AM <530–1710> • FM <87.9–107.9>
• AM • FM
• FM1 • FM2
• AM Autoset •FM Autoset
• Preset <#> • AM Preset <#>
• AM Autoset Preset <#> • FM 1 Preset <#>
• FM 2 Preset <#> • FM Autoset Preset <#>
• FM Preset <#> • HD <#> (if available)
HD Radio™ information (if equipped, U.S. only)
What is HD Radio™ technology and how does it work? HD Radio™
technology is the digital evolution of analog AM/FM radio. Your system
has a special receiver which allows it to receive digital broadcasts (where
available) in addition to the analog broadcasts it already receives. Digital
broadcasts provide a better sound quality than analog broadcasts with
free, crystal clear audio and no static or distortion. For more information,
and a guide to available stations and programming, please visit
www.hdradio.com.
Using HD Radio™ technology
To access, press the lower left corner of the touchscreen. Then, press
AM/FM > Options > HD Radio > On.
When this feature is enabled and you are tuned to a station broadcasting
HD Radio technology, you may notice the following indicators on your
screen:
A. HD) logo: This indicator will
blink when a digital station is being
acquired and will be solid when
digital audio is playing.
Note: When this logo is available,
you will also see Title and Artist
fields on screen.
18
See End User License Agreement at the end of this book
2011 HMI-2 Gen 2 (ln1)
Supplement, 1st Printing
USA (fus)
Page 20

Media features
B. Multicast indicator: This will
appear in FM mode (only) if the
current station is broadcasting
multiple digital broadcasts. The
numbers that are highlighted signify
available digital channels where
new/different content is available.
HD1 will signify the main
programming status and is available in analog and digital broadcasts. Any
additional multicast stations (HD2–HD7) are only broadcast digitally.
The tagging feature
The tagging feature allows you to tag a song to download later. When
you are on an acquired HD Radio station, the TAG button will become
available (provided the feature has been turned on. To turn on, press
AM/FM > Options > TAG On).
When you are listening to a song
you would like to tag to download
later, simply press the TAG button.
The system will automatically save
the song’s information and transfer
it to your portable music player (if supported) when it is connected to
the system. If your music player is connected at the time, the system will
automatically transfer the tag to your player and a pop up will confirm
the transfer. When you access iTunes威 with your portable music player,
the tags will appear to you will be reminded of the song. The system will
allow you to tag up to approximately 100 songs.
Note: For a list of devices that support tagging, refer to
www.SyncMyRide.com or www.syncmaroute.ca.
When HD Radio broadcasts are active, you can access the
following functions:
• Scan: Your scan feature will still work when HD Radio reception is
activated, although it will not scan for HD2 - HD7 channels. You may
see the HD logo appear if the station has a digital broadcast.
• Seek: Press to seek to the next strong radio station. If the current
station has multiple digital broadcasts, the multicast indicator will
display. Press Seek repeatedly to advance through all available
broadcasts. If you are on the last multicast channel, press Seek to
advance to the next strong station.
See End User License Agreement at the end of this book
2011 HMI-2 Gen 2 (ln1)
Supplement, 1st Printing
USA (fus)
19
Page 21

Media features
• Tune: Use to go up/down the frequency in individual increments.
If the current station has multiple digital broadcasts, the
multicast indicator will display. Use Tune to advance through all
available broadcasts. If you are on the last broadcast channel, turn to
advance to the next frequency on the band.
• Saving a multicast station as a preset: When the channel is active
on-screen, press and hold a memory preset slot on the right of the
screen until the sound returns. There will be a momentary mute and
then the sound will return signifying it was saved. When recalling a
HD2/HD3 memory preset, there will be a mute before the digital
audio is played as the system must once again acquire the digital
signal. If you have turned this feature off and press a memory preset
containing an HD Radio broadcast station, a pop-up will appear asking
you if you would like to turn the feature back on.
Note: As with any saved radio station, you will not be able to access
the saved station if your vehicle is outside the station’s reception area.
HD Radio reception factors
• Reception area: If you are listening to a multicast station and you
are on the fringe of the reception area, the station may mute due to
weak signal strength. If you are listening to HD1, the system will
switch back to the analog broadcast until the digital broadcast is
available again. However, if you are listening to any of the possible
HD2–HD7 multicast channels, the station will mute and stay muted
unless it is able to connect to the digital signal again.
• Station blending: When a station is first received (aside from
HD2–HD7 multicast stations), the system will first play the station in
the analog version and then, if receiver verifies the station is an HD
Radio station, it will shift into the digital version. Depending on the
station quality, you may hear a slight sound change when the station
changes from analog to the digital version. This shift from analog to
digital sound or digital back to analog, is known as ‘blending’.
Station issues
In order to provide the best possible experience, a contact form has been
developed to report any station issues found while listening to a station
broadcasting with HD Radio technology. Every station is independently
owned and operated. These stations are responsible for ensuring all
audio streams and data fields are accurate. This form can be found at:
http://www.ibiquity.com/automotive/report_radio_station_experiences.
20
See End User License Agreement at the end of this book
2011 HMI-2 Gen 2 (ln1)
Supplement, 1st Printing
USA (fus)
Page 22

Media features
Experience Cause Possible action
Echo, stutter, skip or
repeat in audio
Increase or decrease
in audio volume
Sound fading,
blending in and out
Audio mute delay
when selecting
HD2/HD3 multicast
preset or direct tune.
Cannot access
HD2/HD3 multicast
channel when
recalling a preset or
from a direct tune
Text information does
not match currently
playing audio
No text information
shown for currently
selected frequency.
HD2–HD7 stations not
found when Scan is
pressed.
Poor time alignment
by the radio
broadcaster.
The radio is shifting
between analog and
digital audio.
The digital multicast
is not available until
the HD Radio
broadcast is decoded.
Once decoded, the
audio will be available.
The previously stored
multicast preset or
direct tune is not
available in your
current reception
area.
Data service issue by
the radio broadcaster.
Data service issue by
the radio broadcaster.
Pressing Scan will
disable HD2–HD7
channel search.
None — broadcast
Reception issue that
may clear up as you
continue to drive.
This is normal behavior.
Wait until the audio is
available.
None — the station is
not available in your
current location.
Fill out the station
issue form at
www.ibiquity.com
/automotive/
report_radio
_station_experiences.
Fill out the station
issue form at
www.ibiquity.com
/automotive/
report_radio
_station_experiences.
None — this is normal
behavior.
issue.
See End User License Agreement at the end of this book
2011 HMI-2 Gen 2 (ln1)
Supplement, 1st Printing
USA (fus)
21
Page 23
Media features
HD Radio™ Technology manufactured under license from iBiquity Digital
Corp. U.S. and foreign patents. HD Radio™ and the HD and HD Radio
logos are proprietary trademarks of iBiquity Digital Corp. Ford Motor
Company and iBiquity Digital Corp. are not responsible for the content
sent using HD Radio technology. Content may be changed, added or
deleted at any time at the station owner’s discretion.
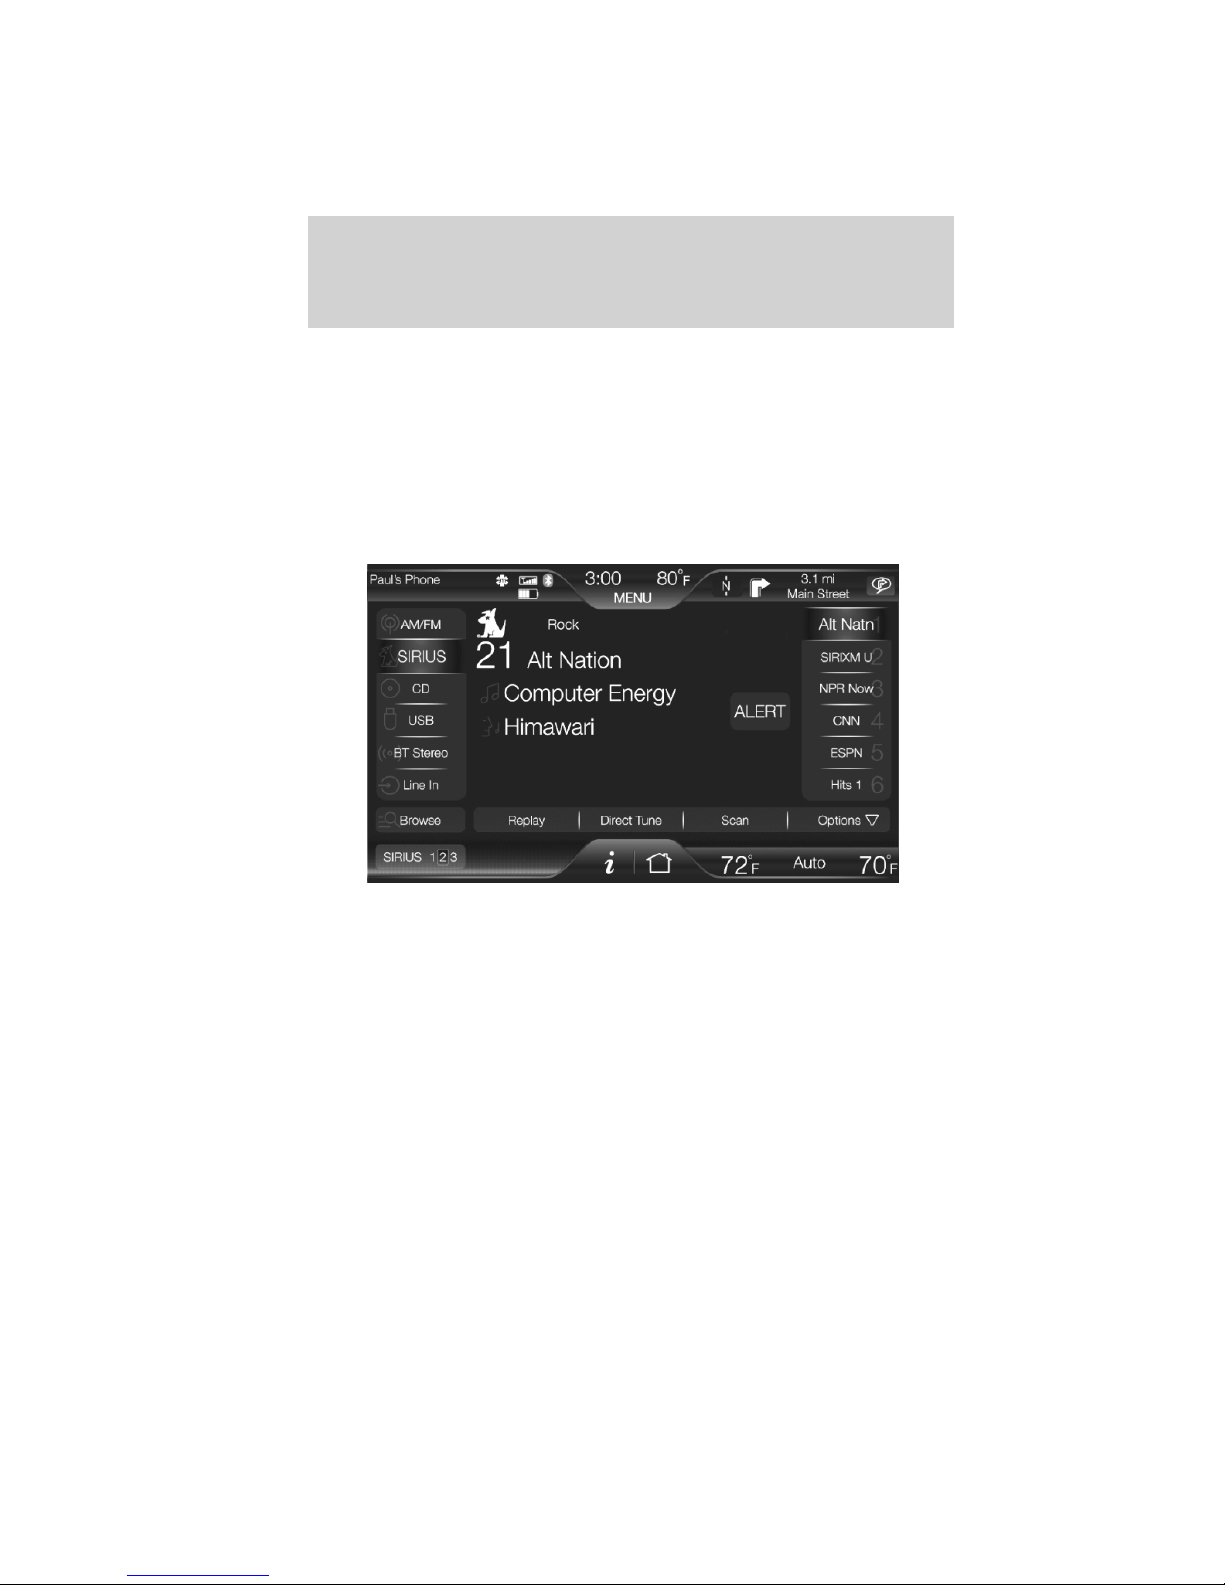
SIRIUS姞 SATELLITE RADIO (IF ACTIVATED)
Press the lower left corner of the touchscreen and then select the
SIRIUS tab. You can then:
• Press and hold one of the memory preset areas (on the right side of
the screen). You will hear a brief mute and the sound will return when
the station is saved.
• Press ‘Direct’ Tune and enter the desired satellite channel number via
the on screen keypad.
• Press the SIRIUS button repeatedly to change SIRIUS presets (SIRIUS
1,2or3).
• Press ALERT to save the current song, artist, or team as a favorite
and the system will alert you when it plays again on any SIRIUS
channel.
• Select ‘Browse’ to view a list of all available stations. Scroll and select
the desired station. You can also lock or skip unwanted channels or
view the song/artist on other stations.
• Press ‘Scan’ for a brief sampling of channels.
22
See End User License Agreement at the end of this book
2011 HMI-2 Gen 2 (ln1)
Supplement, 1st Printing
USA (fus)
Page 24

Media features
• Select the ‘Replay’ soft key to replay audio on the current channel.
You can replay approximately 45 minutes of audio as long as you have
remained tuned to the current station. If you change stations, the
previous audio will be erased. While in replay mode, you can:
• Press and release
song.
• Press and hold
in the current track.
• Press
• Press ‘Replay’ again to return to live audio if you had been using
the replay feature to replay audio.
• Press ‘Options’ to select from:
Sound settings: Select to adjust Bass, Treble, Midrange, Balance and
Fade, THX Deep note demo (if equipped), DSP (if equipped),
Occupancy mode (if equipped), Audio Visualizer (if equipped), and
Speed compensated volume settings.
Set Category for Seek/Scan: Use to select the desired category (Rock,
Country, etc) and then use Seek or Scan to initiate a search for those
channels.
Parental Lockout: Use to lock/unlock channels, change or reset your
PIN or unlock all channels. To use this feature you will need your initial
PIN which is 1234.
Artist/title Alerts: Use this to select Artists and Titles that you would
like the system to alert you to when they are playing on other channels.
Press ‘Edit Alerts’ to delete or turn off alerts. You can also set all alerts
to on or off. When an alert appears on the screen, you can choose to
‘Tune’ to the channel, to ‘Cancel’ the alert or to ‘Disable Alerts’.
If you are listening to a sporting event, you can save your favorite teams
so that the system can alert you when they are playing on a satellite
radio channel.
Electronic Serial Number (ESN): You must have your ESN when
communicating with SIRIUS威 about your account.
/ to play / pause the audio.
/ to advance to the previous/next
/ to advance to reverse or fast forward
See End User License Agreement at the end of this book
2011 HMI-2 Gen 2 (ln1)
Supplement, 1st Printing
USA (fus)
23
Page 25

Media features
SIRIUS威 voice commands
While listening to SIRIUS威 satellite radio, (if activated), press
steering wheel controls. When prompted, you may say any of the
following commands:
• Sirius Off •<0–233>
• <Channel Name> • Sports Game**
• SAT • SAT 1
• SAT 2 • SAT 3
• Preset <#> • SAT Preset <#>
• SAT 1 Preset <#> • SAT 2 Preset <#>
• SAT 3 Preset <#> • Tune*
Note: If you are not listening to SIRIUS威 satellite radio, press
steering wheel controls. When prompted, say, “SIRIUS” and then you can
say any of the above commands.
*Note:If you have said “Tune” you may say any of the following
commands:
• <0–233> • <Channel Name>
• SAT • SAT 1
• SAT 2 • SAT 3
• Preset <#> • SAT 1 Preset <#>
• SAT 2 Preset <#> •SAT 3 Preset <#>
**Note: If you have said, “ Sports Game”, you may say any of the
following commands:
• Tune to the <team city> game
• Tune to the <team name> game
• Tune to the <team city> <team
name> game
• Tune to the <college name>
game
on the
on the
24
See End User License Agreement at the end of this book
2011 HMI-2 Gen 2 (ln1)
Supplement, 1st Printing
USA (fus)
Page 26

Media features
Satellite radio (if activated)
SIRIUS威 satellite radio service:
SIRIUS威 satellite radio is a
subscription based satellite radio
service that broadcasts a variety of
music, sports, news, weather, traffic
and entertainment programming.
Your factory installed SIRIUS威
satellite radio system includes: hardware and a limited subscription term
which begins on the date of sale or lease of the vehicle. Refer to your
authorized dealer for availability.
For more information on extended subscription terms (a service fee is
required), the online media player and a complete list of SIRIUS威
satellite radio channels, and other features, please visit www.sirius.com in
the United States, www.sirius-canada.ca in Canada, or call SIRIUS威 at
1–888–539–7474.
Satellite radio reception factors
• Antenna obstructions: For optimal reception performance, keep the
antenna clear of snow and ice build-up and keep luggage and other
material as far away from the antenna as possible.
• Terrain: Hills, mountains, tall buildings, bridges, tunnels, freeway
overpasses, parking garages, dense tree foliage and thunderstorms can
interfere with your reception.
• Station overload: When you pass a ground based broadcast repeating
tower, a stronger signal may overtake a weaker one and result in an
audio mute.
You will hear an audio mute when there is a satellite radio signal
interference. Your display may show ACQUIRING...toindicatethe
interference.
Satellite radio electronic serial number (ESN): You will need your
ESN to activate, modify or track your satellite radio account. The ESN is
found on the System Information Screen (SR ESN:XXXXXXXXXXXX).
To access your ESN, press the bottom left corner of the
touchscreen, then SIRIUS > Options > ESN.
Note: SIRIUS威 reserves the unrestricted right to change, rearrange, add
or delete programming including canceling, moving or adding particular
channels, and its prices, at any time, with or without notice to you. Ford
Motor Company shall not be responsible for any such programming
changes.
See End User License Agreement at the end of this book
25
2011 HMI-2 Gen 2 (ln1)
Supplement, 1st Printing
USA (fus)
Page 27

Media features
Troubleshooting tips
Radio Display Condition Possible action
Acquiring Radio requires more
than two seconds to
produce audio for the
selected channel.
Sat Fault / SIRIUS威
system failure
Invalid Channel Channel no longer
Unsubscribed Channel Subscription not
No Signal Loss of signal from
Updating Update of channel
Call SIRIUS威
1–888–539–7474
Internal module or
system failure
present.
available.
available for this
channel.
the SIRIUS威 satellite
or SIRIUS威 tower to
the vehicle antenna.
programming in
progress.
Satellite service has
been deactivated by
SIRIUS威 Satellite
Radio.
No action required.
This message should
disappear shortly.
If this message does
not clear within shortly,
or with an ignition key
cycle, your receiver
may have a fault. See
your authorized dealer
for service.
Tune to another
channel or choose
another preset.
Contact SIRIUS威 at
1–888–539–7474 to
subscribe to the
channel, or tune to
another channel.
The signal is currently
being blocked. When
you move into an open
area, the signal should
return.
No action required. The
process may take up to
three minutes.
Call SIRIUS威 at
1–888–539–7474 to
reactivate or resolve
subscription issues.
26
See End User License Agreement at the end of this book
2011 HMI-2 Gen 2 (ln1)
Supplement, 1st Printing
USA (fus)
Page 28

Media features
Radio Display Condition Possible action
No Channels Available All the channels in
the selected category
are skipped or locked.
Subscription Updated SIRIUS威 has updated
the channels available
for your vehicle.
CD
WARNING: Driving while distracted can result in loss of vehicle
control, accident and injury. Ford strongly recommends that
drivers use extreme caution when using any device or feature that may
take their focus off the road. Your primary responsibility is the safe
operation of the vehicle. We recommend against the use of any
handheld device while driving and that you comply with all applicable
laws.
To access, press the lower left corner of the touchscreen and then select
theCDtab.
• Select on-screen options such as Repeat, Shuffle and Scan.
• Press ‘Options’ to access:
• Sound settings: Select to adjust Bass, Treble, Midrange, Balance
and Fade, THX Deep note demo (if equipped), DSP (if equipped),
Occupancy mode (if equipped), Audio Visualizer (if equipped), and
Speed compensated volume settings.
• Text Display settings: Allows you to choose how you would like
the information to display on screen.
• Compression settings: Allows you to access compression
settings.
• You can also advance and reverse the current track or current folder
(if applicable).
Using the channel
guide, unlock or unskip
the channels.
No action required.
See End User License Agreement at the end of this book
2011 HMI-2 Gen 2 (ln1)
Supplement, 1st Printing
USA (fus)
27
Page 29

Media features
Disc voice commands
While listening to a disc, press
when prompted, you may say any of the following commands:
• Play • Pause
• Repeat • Repeat Off
• Shuffle • Shuffle CD (WMA or MP3 only)
• Shuffle Folder (WMA or MP3
only)
• Repeat Folder (WMA or MP3
only)
• Play previous track • Play next track
• Play track <1–512> • Help
Note: If you are not listening to a CD, press
controls and when prompted, say any of the above commands.
SD CARD
WARNING: Driving while distracted can result in loss of vehicle
control, accident and injury. Ford strongly recommends that
drivers use extreme caution when using any device or feature that may
take their focus off the road. Your primary responsibility is the safe
operation of the vehicle. We recommend against the use of any
handheld device while driving and that you comply with all applicable
laws.
on the steering wheel controls and
• Shuffle Off
• Repeat Track
on the steering wheel
Your vehicle is equipped with an SD card slot which can be used for your
SD navigation card (if equipped) or for putting in your SD card which
contains music. Your SD card slot is either located in the center console
or behind a small access door in your instrument panel.
Note: In order for the navigation features to work (if equipped), the SD
navigation card MUST be in this slot. To re-order navigation SD cards,
contact your authorized dealer.
Note: Your SD card slot is spring loaded. To remove the SD card, simply
press the card in and the system will eject the card. Do not attempt to
pull the card to remove it as this could cause damage.
To access and play music from your SD card slot:
1. Press the lower left corner of the touchscreen.
28
See End User License Agreement at the end of this book
2011 HMI-2 Gen 2 (ln1)
Supplement, 1st Printing
USA (fus)
Page 30

Media features
2. Insert the SD card into the card
slot and select the SD card tab once
recognized. You can then select
from the following options:
Repeat: Select to repeat the currently playing song/album.
Shuffle: Select to play music on the selected album or folder in random
order.
Browse: Select to browse the contents of the SD card. This feature can
also allow you to search and play by genre, artist, album, etc.
Similar Music: Select to choose music similar to that currently playing.
Options:
• Sound Settings: Select to adjust Bass, Treble, Midrange, Balance and
Fade, THX Deep note demo (if equipped), DSP (if equipped),
Occupancy mode (if equipped) and Speed compensated volume
settings.
• Media Player Settings: Select to access:
• Autoplay on/off: With this feature on, you can listen to music
which has already been randomly indexed during the indexing
process. With this feature off, the system will not begin to play any
of your music until all the media has been indexed and you make a
selection.
• Bluetooth Devices: Select to connect, disconnect, add or delete a
device. You can also set a device as your favorite so that the
system will automatically attempt to connect to that device at
every ignition cycle.
• Index Bluetooth Audio Devices on/off: Turn this feature on to
have the system automatically index a Bluetooth audio device, if
able.
• Gracenote Database Info: Allows you to view the version level of
the Gracenote Database.
• Gracenote Media Management on/off: When turned on, this
feature will pull in metadata information from the Gracenote
Database for your music files. This will override information from
your device. This feature defaults to off.
• Gracenote Cover Art on/off: When turned on, this feature will
pull in cover art from the Gracenote Database for your music files.
This will override any art from your device. This feature defaults to
off.
See End User License Agreement at the end of this book
29
2011 HMI-2 Gen 2 (ln1)
Supplement, 1st Printing
USA (fus)
Page 31

Media features
• Media Device Information: Displays descriptive information about
the device, if connected.
• Text Display: Allows you to choose how you would like the
information to display on screen.
To view song information such as Title, Artist, File, Folder, Album,
and Genre, touch the on-screen album art. This will take you to another
screen where you can view this information.
You can also press What’s Playing to hear how the system pronounces
the current band and song. This can be helpful when using voice
commands to ensure that the system correctly plays your request.
Voice commands for your SD card
For a complete listing of available voice commands, please refer to Voice
commands for USB and SD card in the following USB section.
SD logo is a trademark of SD-3C,
LLC.
USB
WARNING: Driving while distracted can result in loss of vehicle
control, accident and injury. Ford strongly recommends that
drivers use extreme caution when using any device or feature that may
take their focus off the road. Your primary responsibility is the safe
operation of the vehicle. We recommend against the use of any
handheld device while driving and that you comply with all applicable
laws.
This feature allows you to plug in
media playing devices, memory
sticks, flash/thumb drives and also
charge devices if they support this
feature. Your USB ports are either
located in your center console or
behind a small access door in your
instrument panel.
30
See End User License Agreement at the end of this book
2011 HMI-2 Gen 2 (ln1)
Supplement, 1st Printing
USA (fus)
Page 32

Media features
To access and play music from your USB:
1. Select the lower left corner of the touchscreen to access the media
screen.
2. Insert your flash/thumb drive into the USB slot and select the USB tab
once recognized. You can then select from the following options:
Repeat: Select to repeat the currently playing song/album.
Shuffle: Select to play music on the selected album or folder in random
order.
Browse: Select to browse the contents of the flash drive/thumb drive
connected to the USB port. This feature also allows you to search and
play by genre, artist, album, etc.
Similar Music: Select to choose music similar to that currently playing.
Options:
• Sound Settings: Select to adjust Bass, Treble, Midrange, Balance and
Fade, THX Deep note demo (if equipped), DSP (if equipped),
Occupancy mode (if equipped) and Speed compensated volume
settings.
• Media Player Settings: Select to access:
• Autoplay on/off: With this feature on, you can listen to music
which has already been randomly indexed during the indexing
process. With this feature off, the system will not begin to play any
of your music until all the media has been indexed and you make a
selection.
• Bluetooth Devices: Select to connect, disconnect, add or delete a
device. You can also set a device as your favorite so that the
system will automatically attempt to connect to that device at
every ignition cycle.
• Index Bluetooth Audio Devices on/off: Turn this feature on to
have the system automatically index a Bluetooth audio device, if
able.
• Gracenote Database Info: Allows you to view the version level of
the Gracenote Database.
• Gracenote Media Management on/off: When turned on, this
feature will pull in metadata information from the Gracenote
Database for your music files. This will override information from
your device. This feature defaults to off.
• Gracenote Cover Art on/off: When turned on, this feature will
pull in cover art from the Gracenote Database for your music files.
This will override any art from your device. This feature defaults to
off.
See End User License Agreement at the end of this book
31
2011 HMI-2 Gen 2 (ln1)
Supplement, 1st Printing
USA (fus)
Page 33

Media features
• Media Device Information: Displays descriptive information about
the device, if connected.
• Text Display: Allows you to choose how you would like the
information to display on screen.
To view song information such as Title, Artist, File, Folder, Album,
and Genre, touch the on-screen album art. This will take you to another
screen where you can view this information.
You can also press What’s Playing to hear how the system pronounces
the current band and song. This can be helpful when using voice
commands to ensure that the system correctly plays your request.
Voice commands for your USB and SD card
While listening to a USB or SD card, press
controls. When prompted, you may say any of the following commands:
• Play Genre <name> • Play Playlist <name>
• Play Artist <name> • Play Author <name>
• Play Album <name> • Play Composer <name>
• Play Podcast <name> • Play Folder <name>
• Play Podcast Episode <name> • Play Audiobook <name>
• Play Video <name>**
• Play Video Playlist <name>** • Play Movie <name>
• Play TV Show Episode <name> • What’s this?
• Play • Pause
• Next • Previous
• Repeat One • Repeat All
• Repeat Off •Shuffle
• Shuffle Off •Play Similar Music
• Browse*
* If you have said you would like to Browse your USB or SD card, the
system will prompt you to specify what you would like to browse. When
prompted, you may say any of the following commands:
**Note: These commands are only available in USB mode and are device
dependent.
on the steering wheel
• Play Video Podcast Episode
<name>**
32
See End User License Agreement at the end of this book
2011 HMI-2 Gen 2 (ln1)
Supplement, 1st Printing
USA (fus)
Page 34

Media features
• Genre <name> • All Genres
• All Songs • Playlist <Name>
• Current Playlist • All Playlists
• Artist <name> • All Artists
• Album <name> • All Albums
• Author <name> • All Authors
•Composer <name> • All Composers
• Audiobook <name> • All Audiobooks
• Podcast <name> • All Podcasts
• Video <Name>** • All Videos**
• Video Playlist <name>** • All Video Playlists**
• TV Show <name> • All TV Shows
• All Movies • Video Podcast <Name>**
• All Video Podcasts** • All Music Videos**
• Folder <name> • All Folders
**Note: These commands are only available in USB mode and are device
dependent.
Supported media players, formats and metadata information
SYNC威 is capable of hosting nearly any digital media player, including
iPod威, Zune™, “Plays from device” players, and most USB drives.
Supported audio formats include MP3, WMA, WAV and AAC.
SYNC威 is also able to organize and sort your indexed media from your
playing device by metadata tags. Metadata tags are descriptive software
identifiers embedded in your media files which provide information about
the media file.
If your indexed media files contain no information embedded in these
metadata tags, SYNC威 may classify the empty metadata tags as
UNKNOWN.
BLUETOOTH AUDIO
Your system allows you to stream audio over the vehicle speakers from
your connected, Bluetooth enabled cellular phone.
To access, press the lower left corner on the touchscreen. Then, select
theBTtab.
See End User License Agreement at the end of this book
2011 HMI-2 Gen 2 (ln1)
Supplement, 1st Printing
USA (fus)
33
Page 35

Media features
Voice commands for Bluetooth audio
Note: The following voice commands are only available if you have
turned on the Index Bluetooth Audio Device setting and if your device
supports indexing.
While listening to Bluetooth stereo, press
controls. When prompted, you may say any of the following commands:
• Play Genre <name> •Play Playlist <name>
• Play Artist <name> • Play Author <name>
• Play Album <name> • Play Composer <name>
• Play Podcast <name> •Play Folder <name>
• Play Composer <name> • Play Podcast Episode <name>
• Play Audiobook <name> • Play
• Pause • Next
• Previous • Repeat One
• Repeat All • Repeat Off
• Shuffle •Shuffle Off
• Play Similar Music • What’s this?
• Browse*
Note: If your phone does not support Bluetooth media streaming, then
the following commands are the only commands that are valid:
• Play • Pause
• Previous • Next
* If you have said you would like to Browse your Bluetooth audio, the
system will prompt you to specify what you would like to browse. When
prompted, you may say any of the following commands:
• Genre <name> • All Genres
• All Songs • Playlist <Name>
• Current Playlist • All Playlists
• Artist <name> • All Artists
• Album <name> • All Albums
• Author <name> • All Authors
• Composer <name> • All Composers
• Audiobook <name> • All Audiobooks
on the steering wheel
34
See End User License Agreement at the end of this book
2011 HMI-2 Gen 2 (ln1)
Supplement, 1st Printing
USA (fus)
Page 36

Media features
• Podcast <name> • All Podcasts
• Folder <name> • All Folders
A/V INPUTS
WARNING: Driving while distracted can result in loss of vehicle
control, accident and injury. Ford strongly recommends that
drivers use extreme caution when using any device or feature that may
take their focus off the road. Your primary responsibility is the safe
operation of the vehicle. We recommend against the use of any
handheld device while driving and that you comply with all applicable
laws.
Your A/V inputs allow you to connect an auxiliary audio/video source
(game systems, personal camcorders, etc.) by connecting RCA cords
(not included) to these input jacks. The jacks are yellow, red and white
and are located behind a small access door on the instrument panel or in
your center console.
You can also use the A/V inputs as
an auxiliary input jack (AIJ) to play
music from your portable music
player over the vehicle speakers.
Simply plug in your 1/8 in. (3.5mm)
RCA adapter into the two left A/V
input jacks (red and white).
To access,
1. Press the lower left corner of the touchscreen.
2. Then, select A/V inputs.
To use the auxiliary input jack feature: Ensure that your portable
music player is designed to be used with headphones and that it is fully
charged. You will also need an audio extension cable with stereo male
1/8 in. (3.5 mm) connectors at one end and a RCA jack at the other.
1. Begin with the vehicle parked and the radio and portable device are
turned off.
2. Attach one end of the audio extension cable to the headphone output
of your player and the other end into the adaptor in one of the two left
A/V input jacks (white or red) inside the center console.
3. Press the lower left corner on the touchscreen. Select either a tuned
station from the FM tab or the CD tab (if there is a CD already loaded
into the system.) Adjust the volume to a comfortable listening level.
See End User License Agreement at the end of this book
35
2011 HMI-2 Gen 2 (ln1)
Supplement, 1st Printing
USA (fus)
Page 37

Media features
4. Turn the portable music player on and adjust the volume to 1/2 the
volume.
5. Press the lower left corner on the touchscreen. Select the A/V in tab.
(You should hear audio from your portable music player although it may
be low.)
6. Adjust the sound on your portable music player until it reaches the
level of the FM station or CD by switching back and forth between the
controls.
Troubleshooting:
• Do not connect the audio input jack to a line level output. The AIJ will
only work correctly with devices that have a headphone output with a
volume control.
• Do not set the portable music player’s volume level higher than is
necessary to match the volume of the CD or FM radio as this will
cause distortion and will reduce sound quality.
• If the music sounds distorted at lower listening levels, turn the
portable music player volume down. If the problems persists, replace
or recharge the batteries in the portable music player.
• The portable music player must be controlled in the same manner
when it is used with headphones as the AIJ does not provide control
(play, pause, etc.) over the attached portable music player.
• For safety reasons, connecting or adjusting the settings on your
portable music player should not be attempted while the vehicle is
moving. Also, the portable music player should be stored in a secure
location, such as the center console or the glove box, when the vehicle
is in motion. The audio extension cable must be long enough to allow
the portable music player to be safely stored while the vehicle is in
motion.
36
See End User License Agreement at the end of this book
2011 HMI-2 Gen 2 (ln1)
Supplement, 1st Printing
USA (fus)
Page 38

Phone features
PHONE DEPENDENT FEATURES
While SYNC威 supports a variety of features, many are dependent upon
the functionality of your cell phone with Bluetooth威 wireless technology.
At a minimum, most cellular phones with Bluetooth wireless technology
support the following functions:
• Answering an incoming call
• Ending a call
• Using privacy mode
• Dial a number
• Redial
• Call waiting notification
• Caller ID
• Phonebook / Caller ID photos
Other features, such as text messaging via Bluetooth, and automatic
phone book download are phone dependent features. To ensure that you
have a compatible cellular phone, refer to your phone’s user manual and
visit www.SyncMyRide.com or www.syncmaroute.ca.
PAIRING YOUR PHONE FOR THE FIRST TIME
WARNING: Driving while distracted can result in loss of vehicle
control, accident and injury. Ford strongly recommends that
drivers use extreme caution when using any device or feature that may
take their focus off the road. Your primary responsibility is the safe
operation of the vehicle. We recommend against the use of any
handheld device while driving and that you comply with all applicable
laws.
The first thing you must do to use the phone features of SYNC威 is to
pair your Bluetooth enabled cellular phone with SYNC威. This allows you
to use your phone in a hands-free manner.
1. Touch ‘Add Phone’ in the upper left corner of the touchscreen.
2. When prompted, select ‘Add’.
3. Select ‘Add Device’.
4. Ensure that Bluetooth is set to ON and that your cellular phone is in
the proper mode. (Refer to your cellular phone’s user guide for more
information).
See End User License Agreement at the end of this book
2011 HMI-2 Gen 2 (ln1)
Supplement, 1st Printing
USA (fus)
37
Page 39

Phone features
5. When prompted by your phone, enter the six digit pass key provided
by SYNC威 on the screen.
Depending on your phone’s capability, you may be prompted with
additional options. For more information on your phone’s capability, refer
to your phone’s user guide and visit www.SyncMyRide.com
6. CONNECTED will appear in the display when the pairing is successful.
7. The system will ask you if you want to download your phone book.
MAKING A CALL
Once your phone is paired, you can make hands-free calls using SYNC威.
1. Press
2. When prompted, say, “Call <name> or say “Dial” and the desired
number.
To end the call or exit phone mode, press and hold
RECEIVING A CALL
An incoming call interacts with SYNC威 in much the same way it interacts
with your Bluetooth-enabled cellular phone.
• During an incoming call, an audible tone will sound. If available, call
information will appear in the display.
• Accept the call by pressing ’Accept’ on the touchscreen or by
pressing
• Reject the call by pressing ’Reject’ on the touchscreen or by pressing
and holding
• Ignore the call by doing nothing. SYNC威. will log the call as a missed
call.
.
.
on your steering wheel controls.
on your steering wheel controls.
PHONE FEATURES
Hands-free calling is one of the main features of SYNC威. As many
features are phone dependent, check your device’s user guide and refer
to www.SyncMyRide.com or www.syncmaroute.ca to ensure that your
phone is compatible.
38
See End User License Agreement at the end of this book
2011 HMI-2 Gen 2 (ln1)
Supplement, 1st Printing
USA (fus)
Page 40

Phone features
Press the top left corner on your touchscreen to select from the
following options:
Phone: Select to access the on screen numerical pad to enter a number
and place a call. During an active call, you can also chose to:
• Mute the call
• Put the call on hold
• Activate privacy (returns the call to your cellular phone)
• Join two calls
• End the call
Quick Dial: SYNC威 allows you to select and call contacts stored in your
phone book contacts and call history folder.
Phone Book: Select to access and call any contacts in your previously
downloaded phone book. The system will place the entries in
alphabetical categories summarized at the top of the screen.
Note: To enable contact picture settings (if your device supports this
feature), press Phone > Settings > Manage Phonebook > Download
photos from Phonebook > On.
Call History: Select to access any previously dialed, received or missed
calls while your Bluetooth enabled phone has been connected to SYNC威.
You can also choose to save any of these to your Favorites or Quick Dial.
Note: This is a phone dependent feature. If your phone doesn’t support
downloading call history via Bluetooth, SYNC威 will keep track of calls
made with the SYNC威 system.
See End User License Agreement at the end of this book
39
2011 HMI-2 Gen 2 (ln1)
Supplement, 1st Printing
USA (fus)
Page 41

Phone features
Messaging: Select to send text messages via your touchscreen system.
Refer to Text messaging later in this section.
Settings: Select to access various phone settings such as Bluetooth
on/off, Manage your Phone Book and more. Refer to Phone Settings
later in this section.
PAIRING SUBSEQUENT PHONES
1. Press Menu > Settings > Phone > Bluetooth Devices > Add Device.
2. Ensure that Bluetooth is set to ON and that your cellular phone is in
the proper mode. (Refer to your cellular phone’s user guide for more
information).
3. When prompted by your phone, enter the six digit pass key provided
by SYNC on the screen.
Depending on your phone’s capability, you may be prompted with
additional options. For more information on your phone’s capability, refer
to your phone’s user guide and visit www.SyncMyRide.com
4. CONNECTED will appear in the display when the pairing is successful.
5. The system will ask you if you want to download your phone book.
Depending on your phone’s capability, you may be prompted with
additional options. For more information on your phone’s capability, refer
to your phone’s user guide and visit www.SyncMyRide.com
TEXT MESSAGING
SYNC威 not only enables you to send and receive text messages via
Bluetooth, but SYNC威 will read them to you aloud and also translate text
messaging acronyms such as “lol”. To access your text messaging menu:
Note: Downloading and sending text messages via Bluetooth are phone
dependent features.
Note: Certain features in text messaging are speed dependent and
cannot be completed when the vehicle is traveling at speeds over 5 mph
(8 km/h).
1. Touch the top left corner of the display to access the phone menu.
2. Select ‘Messaging’.
40
See End User License Agreement at the end of this book
2011 HMI-2 Gen 2 (ln1)
Supplement, 1st Printing
USA (fus)
Page 42

Phone features
3. Select from the following options:
• Listen • Dial
• Send Text • View
• Delete • Delete all
• Download new
Note: SYNC威 does not download read text messages from your phone.
Composing a text message
Note: This is a speed dependent feature and cannot be completed when
the vehicle is traveling at speeds over 5 mph (8 km/h).
1. Touch the top left corner of the display to access the phone menu.
2. Press Messaging > Send Text.
3. Select from the following options:
• I’ll call you back in a few
minutes
• Can you give me a call? • I’m on my way.
• I’m running a few minutes late.
• I’m outside. • I’ll call you when I get there.
• Ok • Yes
• No • Thanks
• Stuck in traffic • Call me later
• LOL
You can also select to ‘Edit text’ and
use the system keyboard to create
your text message.
• I just left, I’ll be there soon.
• I’m ahead of schedule, so I’ll be
there early.
Note: Downloading and sending text messages via Bluetooth are a
phone dependent feature.
See End User License Agreement at the end of this book
2011 HMI-2 Gen 2 (ln1)
Supplement, 1st Printing
USA (fus)
41
Page 43

Phone features
Receiving an incoming text message
When there is an incoming text message, an audible tone will sound and
the screen will display a pop-up with the caller name and ID if supported
by your phone.
• Press ‘View’ to view the text
message.
• Press ‘Listen’ for SYNC威 to read
the message to you aloud.
• Press ‘Reply’ to send a reply text
message.
• Press ‘Dial’ to call the contact.
• Press ‘Ignore” to exit the screen.
Note: If you press ‘View’ and your vehicle is traveling over 5 mph
(8 km/h), the system will instead offer to read the message to you.
PHONE SETTINGS
To access phone settings:
1. Press Phone > Settings. (You can also press Menu > Settings >
Phone).
2. Select from the following settings:
• Bluetooth Devices: Select to connect, disconnect, add or delete a
device, as well as save it as a favorite.
• Bluetooth on/off: Select to turn Bluetooth on or off.
• Do not disturb: Select to have all calls go directly to your voice mail
and not ring in the vehicle cabin.
• 911 Assist: Select to turn 911 Assist™ on/off. Refer to 911 Assist™
in the SYNC威 Services and Apps chapter in this supplement for
complete information on this feature.
• Phone ringer: Allows you to select what you would like to hear when
you receive a call. Choose from possible system ring tones, your
currently paired phone’s ring tone, a beep, text to speech or if you
would like the notification to be silent.
• Text message notification: Allows you to select how you would like
to be notified when you receive a text message (if supported by your
phone). Select from possible system alert tones, text to speech or
silent.
42
See End User License Agreement at the end of this book
2011 HMI-2 Gen 2 (ln1)
Supplement, 1st Printing
USA (fus)
Page 44

Phone features
• Internet Data Connection (if equipped): Use this screen to make
adjustments to your internet data connection. Select to make your
connection profile with the DUN (dial up network) or PAN (personal
area network) or to turn off your connection. You can also choose to
make adjustments to your DUN settings, and have the system always
connect, never connect when roaming or query on connect. Note:
Press ? for additional information.
• Manage Phonebook: Select to access features such as automatic
phonebook download, to re-download your phonebook, to add contacts
from your phone as well as delete or upload your phonebook.
• Display call history: Select to display call history.
• Birthday reminders: Select to have the system remind you of
important birthdays. When the notification arrives, you can also
choose to send a message.
Phone voice commands
Press
any of the following commands:
• Dial • Call
• Call <name> • Call <name> at work
• Call <name> on other • Call <name> at home
• Call <name> on cell • Go to hands free*
• Call Voicemail • Privacy On*
• Do not disturb on • Do not disturb off
• Hold On* • Hold Call Off*
• Pair Phone • Connect <phone name>
• Mute Call* • Un-Mute Call
• Join Calls • Messages**
• Bluetooth On • Bluetooth Off
• Turn Ringer On • Turn Ringer Off
*Note: These commands are only available during an active call.
**Note: If you have said, “Messages”, you may say any of the following
commands:
• Forward text messages • Reply to text messages
• Listen to text messages • Call
on the steering wheel controls. When prompted, you may say
See End User License Agreement at the end of this book
2011 HMI-2 Gen 2 (ln1)
Supplement, 1st Printing
USA (fus)
43
Page 45

SYNC姞 Services and Apps
911 ASSIST™ (IF EQUIPPED)
For 911 Assist™ to function properly, the vehicle must have
battery power after the crash, the cell phone must be previously
paired, connected to SYNC威, and continue to function properly
with the ability to make and maintain a 911 call, and the 911
Assist™ feature must be previously enabled (set to ON).
WARNING: Do not wait for 911 Assist™ to initiate an
emergency call if you are capable yourself. Dial emergency
services immediately to avoid delayed response time, which could
increase the risk of serious injury or death after a crash. If you do not
hear 911 Assist™ within 5 seconds after the crash, the system or
phone may be damaged or nonfunctional.
The cell phone or 911 Assist™ hardware may become damaged in
a crash, the vehicle may lose battery power, or the cell phone may
be thrown from the vehicle, which could prevent operation.
Additionally, every cell phone operates differently. While SYNC
911 Assist™ works with most cell phones, some may have trouble
using this feature. Finally, not all crashes deploy an airbag or, in
certain vehicles, activate the fuel pump shut-off which are the
criteria to initiate 911 Assist™.
Airbags generally deploy in certain frontal, near frontal, side and rollover
crashes, and the deployment of any airbag is intended to act as a 911
Assist™ trigger if those events occur. For more information about airbag
deployment, see the Seating and Safety Restraints chapter of your
Owner Guide. The fuel pump shut-off, in certain vehicles, is intended to
act as a trigger for 911 Assist™ in rear-end crashes, in which airbags
generally do not deploy. To determine if your vehicle has this trigger,
check the Roadside Emergency chapter in your Owner’s Guide. If your
Owner Guide describes a “Fuel Pump Shut-off”, it will trigger 911
Assist™. If your Owner Guide describes a “Fuel Pump Shut-off Switch”,
it will not trigger 911 Assist™.
WARNING: Always place cell phone in a secure location to
prevent it from becoming a projectile or becoming damaged in
the event of a collision. Failure to do so may cause serious injury or
damage the phone which could prevent 911 Assist from functioning
properly.
44
See End User License Agreement at the end of this book
2011 HMI-2 Gen 2 (ln1)
Supplement, 1st Printing
USA (fus)
Page 46

SYNC姞 Services and Apps
911 ASSIST™ PRIVACY NOTICE: Once 911 Assist™ is enabled
(set to ON), 911 Assist™ may, through any paired and connected
cell phone, disclose to emergency services that the vehicle has
been in a crash involving the deployment of an airbag or, in
certain vehicles, the activation of the fuel pump shut-off. Certain
versions or updates to 911 Assist™ may also be capable of
electronically or verbally disclosing to 911 operators the vehicle
location, and/or other details about the vehicle or crash to assist
911 operators to provide the most appropriate emergency
services. If you do not want to disclose this information, do not
enable (set to ON) the feature.
Note: If 911 Assist™ is enabled/disabled by any user, the current setting
will apply for all paired phones. If the 911 Assist™ setting is disabled
(set to OFF), a voice message and/or display item will inform the vehicle
occupants when a previously paired phone connects to SYNC威 at vehicle
start up.
In the event of a crash involving the deployment of an airbag or the
activation of the fuel pump shut-off, in certain vehicles, SYNC威 is
designed to assist occupants in attempting to contact emergency services
by dialing 911 through the occupant’s paired and connected Bluetooth
enabled cellular phone. In the event that a connected cellular phone is
damaged or loses connection to SYNC威, SYNC威 will search for and
connect to any available, previously paired cell phone and attempt to
place the call to 911. Before initiating the call, SYNC威 provides a short
window of time (approximately 10 seconds) that allows the driver or
passenger to decide whether to cancel the call by pressing and
holding
system. Before initiating the 911 call for the occupants, SYNC威 will say
the following or a similar message:
“SYNC威 will attempt to call 911. If you wish to cancel the call, press and
hold the phone button.”
If the call is not cancelled and a successful call is made, a prerecorded
message will be played for the 911 operator and then the occupant(s) in
the vehicle will be able to communicate with the 911 operator.
Note: Failure to cancel the call as described above will result in SYNC威
dialing 911.
Note: When you are connected to the 911 operator, be prepared to
provide your name, phone number and location immediately, because not
all 911 systems are capable of receiving this information electronically.
or PHONE on the steering wheel controls or on the audio
See End User License Agreement at the end of this book
2011 HMI-2 Gen 2 (ln1)
Supplement, 1st Printing
USA (fus)
45
Page 47

SYNC姞 Services and Apps
The following steps are required for the 911 Assist™ feature to perform
properly:
• SYNC威 is on and functioning properly at the time of the incident and
throughout feature activation and use.
• SYNC威 911 Assist™ feature is set to ON prior to the incident.
• A Bluetooth enabled and compatible cellular phone is paired and
connected to SYNC威.
• A connected Bluetooth enabled cellular phone that has the ability to
make an outgoing call at the time of the incident.
• A connected Bluetooth enabled cellular phone that has adequate
network coverage, battery power and signal strength.
• The vehicle is located in the U.S. or Canada or in a territory in which
911 is the emergency number.
WARNING: Unless 911 Assist™ is previously configured to ON
prior to a crash, 911 Assist™ will not dial for help during an
emergency, which could delay response time, increasing the risk of
serious injury or death after a crash.
The 911 Assist™ feature is initially set to OFF.
To access the setting:
1. Press
2. Select ON.
You can also access 911 Assist by:
• Pressing Menu > Settings> Phone > 911 Assist or
• Pressing Menu > Help > 911 Assist.
For more information, please visit www.SyncMyRide.com.
Note: Before enabling (setting to ON), review the 911 Assist™
Privacy Notice.
VEHICLE HEALTH REPORT (IF EQUIPPED, U.S. ONLY)
problem you suspect. Vehicle Health Report supplements, but cannot
replace normal maintenance and vehicle inspection. Vehicle Health
Report only monitors certain systems that are electronically monitored
by the vehicle and will not monitor or report the status of any other
system, (i.e., brake lining wear). Failure to perform scheduled
maintenance and regularly inspect your vehicle may result in vehicle
damage and serious injury.
> SYNC Apps. > 911 Assist.
WARNING: Always follow scheduled maintenance instructions,
regularly inspect your vehicle, and seek repair for any damage or
46
See End User License Agreement at the end of this book
2011 HMI-2 Gen 2 (ln1)
Supplement, 1st Printing
USA (fus)
Page 48

SYNC姞 Services and Apps
Note: Your Vehicle Health Report feature requires activation
prior to use. Visit www.SyncMyRide.com to register. There is no fee
or subscription associated with Vehicle Health Report, but you must
register to use this feature.
Note: In order to allow a break-in period for your vehicle, you will not
be able to create a Vehicle Health Report until your vehicle odometer has
reached 100 miles.
SYNC威 allows you to check your vehicle’s overall ‘health’ in the form of
diagnostic report card. The vehicle health report contains valuable
information such as:
• Vehicle Diagnostic Information
• Scheduled maintenance
• Open Recalls and Field Service Actions
• Unserviced items from a prior vehicle inspection by your authorized
dealer
VEHICLE HEALTH REPORT PRIVACY NOTICE: When you run a
Vehicle Health Report, Ford Motor Company may collect your cell
phone number (to process your report request) and diagnostic
information about your vehicle. Certain versions or updates to
Vehicle Health Report may also collect additional vehicle
information. Ford may use the vehicle information it collects for
any purpose. If you do not want to disclose your cell phone
number or vehicle information, do not run the feature or set up
your Vehicle Health Report profile at www.SyncMyRide.com. Refer
to www.SyncMyRide.com — Vehicle Health Report Terms and
Conditions, and Privacy Statement — for more information.
You can initiate a Vehicle Health Report in the vehicle at any time and
view the complete report with all information listed above on
SyncMyRide.com. You can also choose for SYNC威 to automatically
remind you to run reports at specific mileage intervals. After you’ve
registered for the Vehicle Health Report service and established your
preferences at www.SyncMyRide.com, you can then request a Vehicle
Health Report (in your vehicle) and return to your account at
www.SyncMyRide.com to view your report. Cell phone airtime usage may
apply when reporting.
To access and run a report:
1. Press Menu > Vehicle > Vehicle Health Report OR press
Apps > Vehicle Health Report.
2. Or, press
“Vehicle Health Report”.
on the steering wheel controls, and when prompted, say
See End User License Agreement at the end of this book
> SYNC
47
2011 HMI-2 Gen 2 (ln1)
Supplement, 1st Printing
USA (fus)
Page 49

SYNC姞 Services and Apps
3. From this screen, you can turn automatic reminders on or off, select
the mileage intervals at which you would like to run a report and also
you can choose to ‘Run a report now.’
Note: This feature may not function properly if you have enabled caller
ID blocking on your mobile phone. Before running a report, review
Vehicle Health Report Privacy Notice.
SYNC姞 SERVICES: TRAFFIC, DIRECTIONS & INFORMATION (TDI),
IF EQUIPPED, U.S. ONLY
Note: SYNC威 with Traffic, Directions & Information Services
requires activation prior to use. Visit www.SyncMyRide.com to
register. This features has a free introductory period, but you must
register to use the service. You must also have a paired and connected
Bluetooth enabled cellular phone in order to connect to SYNC威 Traffic,
Directions & Information Services. Refer to the Phone Features chapter
for pairing instructions.
SYNC威 Services uses advanced vehicle sensors, integrated GPS
technology and comprehensive map and traffic data, to give you
personalized traffic reports, precise turn-by-turn directions, business
search, news, sports, weather and more. For a complete list of services,
or to learn more, please visit www.SyncMyRide.com.
To connect to SYNC威 Traffic, Directions & Information Services
using voice commands:
1. Press
2. When prompted, say, “Services”. This initiates an outgoing call to
SYNC威 TDI Services using your paired and connected Bluetooth enabled
cellular phone.
3. Once connected, follow the voice prompts to request your desired
service such as “Traffic” or “Directions”. You can also say, “What are my
choices?” to receive a complete list of available services from which to
choose.
4. To return to the services main menu, say “Services” or for help, simply
say, “Help”.
To connect to SYNC威 Traffic, Directions & Information Services
using the touchscreen:
1. Press
2. Then, select ‘Connect to Services’. This initiates an outgoing call to
SYNC威 TDI Services using your paired and connected Bluetooth enabled
cellular phone.
48
.
> SYNC Services.
See End User License Agreement at the end of this book
2011 HMI-2 Gen 2 (ln1)
Supplement, 1st Printing
USA (fus)
Page 50

SYNC姞 Services and Apps
3. Once connected, follow the voice prompts to request your desired
Service such as Traffic or Information. You can also say, “What are my
choices?” to receive a complete list of available services from which to
choose.
4. To return to the services menu, say “Services” or for help, simply say,
“Help”.
To disconnect from SYNC威 Services (TDI) you can:
• Press ‘Disconnect from Services’ on the touchscreen.
• Press and hold the phone button (
• Say “Goodbye” from the SYNC Services main menu.
Receiving Turn by Turn Directions (when your vehicle is not
equipped with the navigation feature):
1. When connected to the Services portal, say “Directions” or “Business
Search”.
2. Follow the voice prompts to select your Destination. Once your
destination is selected, your current vehicle location is uploaded and a
route based on current traffic conditions is calculated and sent back to
your vehicle . After the route download is complete, the phone call is
automatically ended. The turn-by-turn directions will display in the
infotainment display (right side of your instrument cluster), in the status
bar of your touchscreen system and also on the SYNC Services screen.
You will also receive driving instructions via audible prompts.
3. While on an active route, you can select ‘Route Summary or ‘Route
Status’ using the touchscreen controls or voice commands to view the
Route summary turn list or the Route Status ETA. You can also turn
voice guidance on or off, cancel the route or update the route.
Receiving Turn by Turn Directions (when your vehicle is equipped
with the navigation feature):
1. When connected to the Services portal, say “Directions” or “Business
Search”.
2. Follow the prompts to select your destination. Once your destination
is selected, the destination information is sent to your vehicle. After the
destination download is complete, the phone call is automatically ended.
3. Your navigation feature will then calculate the route and provide
driving instructions. Refer to the Navigation Features chapter for more
information.
) on the steering wheel.
See End User License Agreement at the end of this book
2011 HMI-2 Gen 2 (ln1)
Supplement, 1st Printing
USA (fus)
49
Page 51

SYNC姞 Services and Apps
Personalizing Traffic, Directions and Information: Your Traffic,
Directions and Information Services can be personalized to provide
quicker access to your most used or favorite information. You can save
address points such as, ‘work’ or ‘home’. You can also save favorite
information like sports teams, such as ‘Detroit Lions’, or a news category.
To learn more, log onto www.SyncMyRide.com.
Push to interrupt: You can, at any time while you are connected to
SYNC TDI Services, press
clip (such as a sports report) and say your voice command.
Portable: Your SYNC TDI Services subscription is associated with your
Bluetooth enabled cellular phone number, not your VIN (Vehicle
Identification Number). Thus, you can use your SYNC TDI Service with
any vehicle equipped with Traffic, Directions and Information. Simply
pair and connect your phone to any vehicle equipped with Traffic,
Directions and Information and continue enjoying your personalized
services.
Note: The driver is ultimately responsible for the safe operation of the
vehicle, and therefore, must evaluate whether it is safe to follow the
suggested directions. Any navigation features are provided only as an aid.
Make your driving decisions based on your observations of local
conditions and existing traffic regulations. Do not follow the route
suggestions if doing so would result in an unsafe or illegal maneuver, if
you would be placed in an unsafe situation, or if you would be directed
into an area that you consider unsafe. Maps used by this system may be
inaccurate because of errors, changes in roads, traffic conditions or
driving conditions.
Note: When you connect to Traffic, Directions and Information, the
service uses GPS technology and advanced vehicle sensors to collect the
vehicle’s current location, travel direction and speed to help provide you
with the directions, traffic reports, or business searches you request.
Further, to provide the services you request and for continuous
improvement, the service may collect and record call details and voice
communications. For more information, see Traffic, Directions and
Information, Terms and Conditions at www.SyncMyRide.com. If you do
not want Ford or its service providers to collect the vehicle travel
information or other information identified in the Terms and Conditions,
do not activate or use the service.
to interrupt a voice prompt or an audio
50
See End User License Agreement at the end of this book
2011 HMI-2 Gen 2 (ln1)
Supplement, 1st Printing
USA (fus)
Page 52

SYNC姞 Services and Apps
Note: SYNC威 with Traffic, Directions & Information Services
requires activation prior to use. Visit www.SyncMyRide.com to
register. Standard phone and message rates may apply. Subscription
may be required. To register and check your eligibility for free services,
log onto www.SyncMyRide.com.
Note: Traffic, Directions & Information Services will not function
properly if you have enabled caller ID blocking on your mobile
phone. Prior to using SYNC TDI Services, ensure that your mobile
phone is not blocking caller ID.
SYNC姞 Services voice commands (if equipped)
If SYNC威 Services is active and a route has been downloaded, press
on the steering wheel controls. When prompted, you may say any of the
following commands:
• Services • Update Route
• Route status • Navigation voice on
• Navigation voice off • Cancel route
• Next turn • Route Summary
See End User License Agreement at the end of this book
2011 HMI-2 Gen 2 (ln1)
Supplement, 1st Printing
USA (fus)
51
Page 53

Settings
WIRELESS & INTERNET
Your system is equipped with Wireless & Internet features and settings.
To access, press Menu > Settings > Wireless and Internet. From this
screen, you can select from:
• Wi-Fi settings • USB mobile broadband
• Bluetooth settings • Prioritize connection methods
Wi-Fi
Your system has a Wi-Fi feature which creates a wireless network within
your vehicle, thereby allowing other devices (i.e. personal computers,
phones) in your vehicle to speak to each other, share files, play games,
etc. Using this Wi-Fi feature, everyone in your vehicle can also gain
access the internet if:
• You have a USB mobile broadband connection inside the vehicle
• Your phone supports PAN (personal area networking)
• You are parked outside of a wireless hotspot
To access, press Menu > Settings > Wireless and Internet > Wi-Fi
settings.
In the WiFi settings screen, select from the following options:
• Wi-Fi Network (Client) Mode On/Off: This will turn the Wi-Fi
feature on or off in your vehicle. Ensure that On is selected for
connectivity purposes.
• Choose a Wireless Network: Allows you to use a previously stored
wireless network. You can categorize by alphabetical listing, Priority
and Signal Strength. You can also choose to search for a network,
connect to a network, disconnect from a network, receive more
information, prioritize a network or delete a network.
• Search for Wireless Networks: Allows you to view a list of wireless
networks.
• Gateway Access Point Mode (On/Off): Turn this On to make SYNC
an access point for a phone or a computer. This forms the local area
network within the vehicle for things such as game playing, file
transfer, internet browsing, etc.
• Gateway Access Point Device List: Allows you to view who has
connected to your Wi-Fi connection recently.
Note: Press the ? button (if available) for additional information.
52
See End User License Agreement at the end of this book
2011 HMI-2 Gen 2 (ln1)
Supplement, 1st Printing
USA (fus)
Page 54

Settings
The Wi-Fi CERTIFIED Logo is a
certification mark of the Wi-Fi
Alliance.
USB mobile broadband
Instead of using Wi-Fi, your system can also use a USB mobile broadband
connection to access the internet. This screen allows you to set up what
will be your typical area for your USB mobile broadband connection. You
can select the following:
• Country
• Carrier
• Phone number
• User name
• Password
Note: You must activate your mobile broadband device on your PC prior
to connecting it to the system.
Note: USB mobile broadband settings may not be displayed if the device
is already activated.
Prioritize connection methods
This screen allows you to choose your connection methods and change
them as needed. You can select to Change Order and have the system
either always attempt to connecting using a USB mobile broadband or
using Wi-Fi.
Bluetooth姞 settings
This screen will show you what device is currently paired with the
system as well as giving you your typical Bluetooth options to connect,
disconnect, set as favorite, delete and add device.
Bluetooth is a registered trademark of the Bluetooth SIG.
See End User License Agreement at the end of this book
2011 HMI-2 Gen 2 (ln1)
Supplement, 1st Printing
USA (fus)
53
Page 55

Settings
SYSTEM SETTINGS
1. Press Menu > Settings > System.
2. Select from the following:
• Language • Distance Units
• Temperature Units • System Prompt Volume
• Touchscreen beeps • Keyboard layout
Display settings
Your touchscreen system allows you to make adjustments to the
touchscreen display. To access:
1. Press Menu > Display.
2. Choose to adjust any of the following:
• Brightness • Mode: Auto, Day or Night
• Auto Dim on/off • Edit Wallpaper
To access this screen using voice commands, press
steering wheel controls and when prompted, say, “Display settings”.
Notifications
This screen will display any system messages such as an SD card fault,
etc. You can select the message and then choose to:
• View the complete message
• Delete the message
• Delete All messages
Note: The system will alert you that you have messages by turning
the
deleted, the icon will return to white.
icon yellow (instead of white). When the messages are read or
on your
VEHICLE SETTINGS
Vehicle settings allow to you access and make adjustments to many
features (if available) such as:
• Ambient lighting
• Vehicle Health Report (if equipped, U.S. only): Refer to Vehicle
Health Report in the SYNC威 Services and Apps chapter in this
supplement.
• Rear View Camera
54
See End User License Agreement at the end of this book
2011 HMI-2 Gen 2 (ln1)
Supplement, 1st Printing
USA (fus)
Page 56

Settings
• Enable Valet Mode
• Edit Door Keypad code
Ambient lighting (if equipped)
When activated, ambient lighting will illuminate footwells and cupholders
with a choice of colors. To access:
1. Press Menu > Vehicle > Ambient lighting.
2. Touch the desired color.
3. Use the scroll bar to increase/decrease the intensity.
To turn the feature on/off, simply press the power button (
Rearview camera (if equipped)
The rear-view camera provides a video image of the area behind the
vehicle.
1. Press Menu > Vehicle > Reverse camera.
2. Select from the following settings:
• Rear camera delay • Visual park aid alert
• Guideline
Valet mode
Valet mode allows you to lock the system so that none of your
information on the system can be accessed until it is unlocked with the
correct PIN.
1. Press Menu > Vehicle > Valet mode.
2. Select ‘Enable valet mode’.
3. When prompted, enter a four digit PIN.
Note: After you press to ‘Continue’ the system will be locked until the
correct PIN is entered again.
Note: If you are locked out and need to reset the PIN, you can enter
3681 and the system will unlock.
).
Changing your door keypad code
To change the keypad code for your keyless entry keypad system:
1. Press Menu > Vehicle > Edit door keypad code.
2. Enter your current keypad code and, when prompted, enter the new
code you would like.
See End User License Agreement at the end of this book
2011 HMI-2 Gen 2 (ln1)
Supplement, 1st Printing
USA (fus)
55
Page 57

Navigation features
NAVIGATION FEATURES (IF EQUIPPED)
Note: Your navigation SD card MUST be in the SD card slot in order for
you to access the navigation features.
Your navigation system is comprised of two main features, destination
mode and map mode.
To set a destination, press Dest in the upper right hand corner of the
touchscreen. Then, refer to Setting a destination which follows.
To view the navigation map and the vehicle’s current location,
touch the green bar in the upper right hand corner of the touchscreen.
Or, you can also press Dest > Map. Refer to Map mode later in this
section.
To order replacement SD navigation cards, see your authorized
dealer.
Note: Your SD card slot is spring loaded. To remove the SD card, simply
press the card in and the system will eject the card. Do not attempt to
pull the card to remove it as this could cause damage.
SETTING A DESTINATION
To set a destination:
1. Press ‘Dest’ on the top right corner of the screen.
2. Choose to set a destination using any of the following:
• My Home • Street Address
• Favorites • Intersection
• Previous Destinations • City Center
• Point of Interest (POI) • Map
• Emergency
3. Follow the highlighted text fields to enter any necessary information.
Note that any order of entry is acceptable. For address destination entry,
the Go! button will appear once all the necessary information has been
entered. Pressing the Go! button will trigger the display of the address
location on the map.
4. Select ‘Set as Dest’ to make this your destination. You can choose to
‘Set as Waypoint’ to have the system route to this point on the way to
your current destination. You can also choose to save the destination as a
Favorite.
Note: Any Avoid Areas which have been selected are also considered in
route calculation.
56
See End User License Agreement at the end of this book
2011 HMI-2 Gen 2 (ln1)
Supplement, 1st Printing
USA (fus)
Page 58

Navigation features
5. Now choose from up to three different routes based on route length
and estimated times of arrival:
• Fastest: Uses the fastest moving roads possible.
• Shortest: Uses the shortest distance possible.
• Eco (EcoRoute): Uses the most fuel efficient route.
6. Select ‘Start Route’.
You can also choose to cancel the route or to have the system demo the
route for you. Select ‘Route Prefs’ to set route preferences such as
having the system avoid freeways, toll roads, ferries and car trains as
well as to use or not use HOV lanes. (HOV lanes are High Occupancy
Vehicle Lanes also known as carpool or diamond lanes. These lanes are
reserved for people who ride in buses, vanpools or carpools.)
POI categories
Your system offers a variety if POI (Points of Interest) categories.
The main categories are as follows:
• Food / drink & dining • Automotive
• Travel & transportation • Shopping
• Financial • Entertainment & arts
• Emergency • Recreation & sports
• Community • Government
• Health & medicine • Domestic services
Within these main categories, you will find subcategories which contain
more listings. They subcategories are as follows:
• Restaurant • Auto Dealership
• Golf • Govt. Office
• Parking • Public Transit
• Home & Garden • Education
• Personal Care Services
To expand these listings, simply press the + in front of the POI listing.
The system also allows you to sort the POIs by distance, alphabetically
or by WCities listings (if available).
See End User License Agreement at the end of this book
2011 HMI-2 Gen 2 (ln1)
Supplement, 1st Printing
USA (fus)
57
Page 59

Navigation features
WCities (if available)
WCities is a service which provides
additional information about certain
points of interest (POIs) such as
restaurants, hotels and attractions
(if available).
Note: WCities POI information is
limited to approximately 100 cities
(92 U.S. cities and eight Canadian).
When you have selected a POI, the
location and information will appear,
such as address and phone number.
If the POI is listed with WCities, you
will also see information such as a
brief description, check in /out
times, when the restaurant is open,
etc.
Press ‘More Information’ for a longer
review, a list of services and
facilities, the average room or meal
price as well as the website (if available).
This screen will display the POI icon such as:
Hotel
Coffeehouse
Food & Drink
58
See End User License Agreement at the end of this book
2011 HMI-2 Gen 2 (ln1)
Supplement, 1st Printing
USA (fus)
Page 60

Navigation features
Nightlife
Attraction
This icon will appear when your
selection exists in multiple
categories within the system.
When you are viewing additional information for Hotels, WCities will also
tell you if the hotel has certain services and facilities using icons:
Restaurant • 24 hr room service
•
Business center • Fitness center
•
• Handicap facilities • Internet access
Laundry • Pool
•
Refrigerator • Wi-Fi
•
For restaurants, WCities can provide information such as star rating,
average cost, review, handicap access, hours of operation, and website
address.
For hotels, WCities can provide information such as star rating, price
category, review, check in/out times, hotel service icons and website
address.
Setting your navigation preferences
Your touchscreen system allows you to choose and set preferences which
the system will take into account when planning your route.
• Press Menu > Settings > Navigation to access:
• Map Preferences • Route Preferences
• Navigation Preferences • Traffic Preferences
• Avoid Areas
See End User License Agreement at the end of this book
2011 HMI-2 Gen 2 (ln1)
Supplement, 1st Printing
USA (fus)
59
Page 61

Navigation features
Map Preferences: Allows you to
turn breadcrumbs on/off, select how
you would like to view your turn list
(top to bottom or bottom to top) ,
as well as setting the automatic
parking POI notification. If you turn
on the parking POI notification, this
will display parking POI icons on the
map when you get close to your
destination. This feature may not be
as useful in very dense areas, and
may clutter the map if other POIs are also set for display on the map.
Route Preferences: Allows you to
select to avoid freeways, toll roads,
ferries, car trains and tunnels when
planning your route. You can also
select to use HOV lanes (if
available), and have the system
always select the shortest distance,
fastest time or most ecological route
when calculating a route for you.
Navigation Preferences: Allows
you to choose your navigation
prompts to be either voice or tone
only. You can also choose to have
the system automatically fill the
state and province based on the
information already entered into the
system.
60
See End User License Agreement at the end of this book
2011 HMI-2 Gen 2 (ln1)
Supplement, 1st Printing
USA (fus)
Page 62

Navigation features
Traffic Preferences: The Avoid Traffic Problems setting allows you to
set how you would like the system to handle traffic problems along your
route. Choose ‘Automatic’ for the system to automatically reroute you to
avoid traffic incidents that develop and impact the current route (no
notification is provided). Choose ‘Manual’ for the system to always
provide a traffic alert notification for traffic incidents along the planned
route. You will have a choice to accept or ignore the notification before
the route deviation is made.
You can also activate the display of certain or all traffic icons on the map
(road work, incidents, accidents, closed roads, weather related icons) by
choosing on or off.
Avoid Areas: Allows you to select areas which you would like the
system to avoid when calculating a route for you. Press ‘Add’ to add a
location from one of these categories to your avoid list:
• My Home • Street Address
• Favorites • Intersection
• Previous Destinations • City Center
• Point of Interest (POI) • Map
• Emergency
Once an avoid area is added, the system will try to avoid the area(s) if
possible for all routes. To delete an avoid area, select its listing on the
screen and when the screen changes to the Avoid Areas Edit screen
(avoid area is displayed on a map) press the Delete button at the bottom
right of the screen.
MAP MODE
To access map mode, press the green bar in the upper right area of the
touchscreen. The map screen will display.
Your system offers advanced map viewing comprised of both 2D city
maps as well as 3D landmarks (when available).
2D city maps show detailed outlines of buildings, visible land use and
land elements and detailed railway infrastructure for the most essential
cities around the globe. These 2D city maps also contain primary
features such as town blocks, building footprints, and railways.
See End User License Agreement at the end of this book
2011 HMI-2 Gen 2 (ln1)
Supplement, 1st Printing
USA (fus)
61
Page 63

Navigation features
3D landmarks will appear when
available on your current map.
These are clear, visible objects
which are typically recognizable and
have a certain tourist value.
You can adjust how your map
appears. Press the arrow icon
repeatedly on the upper left side of
the screen to choose between:
• Heading up: Select for direction
of forward travel to always be the
upward direction on screen.
Available for map scales up to 2.5
mi (5 km). For scales above that, the setting for Heading-Up is
remembered, but the map is shown in North-Up only. If the scale
returns below this level, then the Heading-Up setting is restored.
• North up: In this mode, the
northern direction is always the
upward direction on screen.
• 3D map mode: This map view
provides an elevated perspective
of the map. The viewing angle
can be adjusted and the map can
be rotated 180 degrees by dragging your finger along the circle tool
that appears in the center of the map.
62
See End User License Agreement at the end of this book
2011 HMI-2 Gen 2 (ln1)
Supplement, 1st Printing
USA (fus)
Page 64

Navigation features
MAP ICON DESCRIPTIONS
• Vehicle mark: This icon is shown
in scroll mode also. The ring
around the vehicle mark will
flash. The vehicle mark is shown
in the center of the map display, except when in scroll mode.
• Scroll cursor: This icon is fixed
in the center of the screen. The
map position closest to the cursor
is in a window on the top center
part of the screen.
• Address book entry default
icon(s): This icon indicates the
location on the map of an address
book entry. This is the default
symbol shown after the entry has been stored to the Address Book by
any method other than the map. A different icon can be selected from
the 22 icons available; each icon can be used more than once.
• Home: This icon indicates the
location on the map currently
stored as the home position. Only
one entry from the Address Book
can be saved as Home. This icon cannot be changed.
• POI (Point Of Interest) icon:
Icons such as this can be
displayed on the map and can be
turned on or off. There are about
56 subcategories of POIs that can be selected to be displayed on the
map one at a time.
• Starting point: This icon
indicates the starting point of a
planned navigation route.
• Waypoints: This icon indicates
the location of a waypoint on the
map. The number inside the
circle is different for each
waypoint and represents the position of the waypoint in the route list.
See End User License Agreement at the end of this book
2011 HMI-2 Gen 2 (ln1)
Supplement, 1st Printing
USA (fus)
63
Page 65

Navigation features
• Destination symbol: This icon
indicates the location of the final
destination on the map.
• Next maneuver point: This icon
shows the location where the
next turn should occur on the
planned route.
• No GPS symbol: This icon
indicates that insufficient GPS
satellite signals are being received
for accurate map positioning. The
symbol may be intermittently displayed under normal operation in an
area with poor GPS access.
Quick touch buttons
When in map mode, touch anywhere on the map display to access the
following options:
• Set as Dest: Press to select a scrolled location on the map as your
destination. (You may scroll the map by pressing your index finger on
the map display. When you reach the desired location, simply let go
and then press ‘Set as Dest’.
• Set as Waypoint: Press to set the current location as a waypoint.
• Save to Favorites Press to save the current location to your
favorites.
• POI Icons On/Off: Press to select POI icons to be displayed on the
map. Up to three icons can be selected for display on the map at the
same time.
• Traffic List (if SIRIUS威 Travel Link™ is active): Press to display
nearby traffic incidents when a route is not active. The incidents can
be sorted by distance, incident, or A-Z. When a route is active, the
system will automatically display traffic incidents on route. If there are
not incidents on the current route, the system will indicate that and
switch to the Other Traffic Places screen which will allow selection of
Traffic near My Home, Traffic Near Favorite Destination, or My Traffic
Places. These selections refer to locations previously entered into the
system.
64
See End User License Agreement at the end of this book
2011 HMI-2 Gen 2 (ln1)
Supplement, 1st Printing
USA (fus)
Page 66

Navigation features
• View/Edit Route: Press to access the following features when a route
is active:
• Cancel route • View route
• Edit route preferences • Edit traffic preferences
• Edit destination/waypoints • Edit turn list
Map Scrolling: The map is touch sensitive, so you can use a swipe
scrolling method (as you would on your portable music player) to scroll
the map.
Navigation voice commands (if equipped)
If your vehicle is equipped with the SD card navigation feature, you then
have the ability to enter in a street address using a new feature called
One Shot Destination Street Address. When you say either “Navigation
Destination Street Address” or “Destination Street Address”, the system
will ask you to say the full address. The system will display an example
on-screen. You can then speak the address naturally, such as “One two
three four Main Street, Anytown”.
When in navigation mode, press
When prompted, you may say any of the following commands:
• Repeat Instruction • Detour
• Cancel Route • Cancel Next Waypoint
• Show Next Waypoint •Show Destination
• Show Turn List • Show Route
• Show 3D • Where Am I
• Show Map • Show North Up
• Voice Off • Voice On
• Voice Volume Decrease • Voice Volume Increase
• Zoom Out • Zoom In
• Destination • Destination Home
• Destination <nametag> • Destination play nametag
• Destination <POI Category> • Destination POI
• Destination Nearest <POI
Category>
• Destination Favorites • Destination Intersection
• Destination Previous Destination • Destination Nearest POI
on the steering wheel controls.
• Destination Street Address
See End User License Agreement at the end of this book
2011 HMI-2 Gen 2 (ln1)
Supplement, 1st Printing
USA (fus)
65
Page 67

Navigation features
• Destination Nearest <POI
Category>
• Navigation*
*Note: If you have said the command, “Navigation”, you may say any of
the above or following commands:
• Zoom Street • Zoom Country
• Zoom City • Zoom in <distance>
• Zoom State • Zoom out <distance>
• Zoom Province • Zoom out Maximum
• Zoom in Minimum • Destination*
*Note: If you have said, “Destination”, you may then say any of the
following commands:
• Home • <nametag>
• Intersection • <POI Category>
• Play Nametags • Street Address
• POI Category • Favorites
• Previous Destination • Nearest <POI Category>
• Nearest POI
SIRIUS姞 TRAVEL LINK™(IF ACTIVATED, U.S. ONLY)
Note: In order to use SIRIUS威 Travel Link™, your vehicle must be
equipped with navigation and your navigation SD card must be in the SD
card slot.
SIRIUS威 Travel Link™ (if activated) can help you locate the best gas
prices, find movie listings, get current traffic alerts, access the current
weather map, get accurate ski conditions as well as scores to current
sports games.
Note: A paid subscription is required to access/use these features. Go to
www.sirius.com/travellink for more information.
• Play Nametags
WARNING: Driving while distracted can result in loss of vehicle
control, accident and injury. Ford strongly recommends that
drivers use extreme caution when using any device that may take their
focus off the road. Your primary responsibility is the safe operation of
the vehicle. We recommend against the use of any handheld device
while driving and that you comply with all applicable laws.
66
See End User License Agreement at the end of this book
2011 HMI-2 Gen 2 (ln1)
Supplement, 1st Printing
USA (fus)
Page 68

Navigation features
To access:
1. Press
2. Choose from any of the following services:
• Traffic On Route • Weather
• Traffic Nearby • Sports Info.
• Other Traffic Places • Movie Listings
• Fuel Prices • Ski Conditions
Traffic features: Select to identify traffic incidents on your route,
nearby your vehicle’s current location or near any of your favorite places
(if programmed).
Weather: Select to view the nearby weather, current weather, or the
5 day forecast for the chosen area. Select ’Map’ to see the weather map
which can show storms, radar information, charts and winds. Select
’Area’ to select from a listing of weather locations.
Ski conditions: Displays ski conditions for a specific area.
Fuel Prices: Displays gas prices at stations close to your vehicle’s
location or on an active navigation route.
Sports Info: Displays scores and schedules for a variety of sports. You
can also save up to 10 favorite teams for easier access. The score will
automatically refresh when a game is in process.
Movie Listings: Display nearby movie theaters and their show times (if
available).
> Sirius Travel Link.
SIRIUS姞 Travel Link™ voice commands (if equipped)
Note: In order to use SIRIUS威 Travel Link™, your vehicle must be
equipped with navigation and your navigation SD card must be in the SD
card slot.
To access SIRIUS威 Travel Link ™ features by voice, press
steering wheel controls. When prompted, you may say any of the
following commands:
• Traffic • Weather Map
• Weather • 5–Day Weather Forecast
• Movie Listings • Fuel Prices
• Sports Schedules* • Sports Scores*
• Sports Headlines* • Help
See End User License Agreement at the end of this book
on the
67
2011 HMI-2 Gen 2 (ln1)
Supplement, 1st Printing
USA (fus)
Page 69

Navigation features
Note: The following commands for SIRIUS威 Travel Link™ require you to
say “Travel Link” first and then you can say any of the following
commands:
• NFL Scores • NFL Schedule
• NFL Headlines • NBA Scores
• NBA Schedule • NBA Headlines
• NHL Scores • NHL Schedule
• NHL Headlines • Baseball Scores
• Baseball Schedule • Baseball Headlines
• College Football Scores • College Football Schedule
• College Football Headlines • College Basketball Scores
• College Basketball Schedule • College Basketball Schedule
• Motor Sports Order • Motor Sports Schedule
• Motor Sports Headlines • Golf Leaderboard
• Golf Schedule • Golf Headlines
• WNBA Scores • MLS Scores
• WNBA Schedule • MLS Schedule
• WNBA Headlines • MLS Headlines
• My Teams Scores • My Teams Schedule
• My Team Headlines • Sports Scores*
• Sports Schedules* • Sports Headlines*
•Help
*Note: If you have said, “Sports Scores” or “Sports Schedules” or
“Sports Headlines” you may say any of the following commands:
• NFL • College Football
• NHL • College Basketball
• NBA •WNBA
• Baseball • Golf
• MLS •
• Help
My Teams
68
See End User License Agreement at the end of this book
2011 HMI-2 Gen 2 (ln1)
Supplement, 1st Printing
USA (fus)
Page 70

End User License Agreements
GENERAL INFORMATION
SYNC姞 End User License Agreement (EULA)
• You have acquired a device (“DEVICE”) that includes software
licensed by FORD MOTOR COMPANY from an affiliate of Microsoft
Corporation (“MS”). Those installed software products of MS origin, as
well as associated media, printed materials, and “online” or electronic
documentation (“MS SOFTWARE”) are protected by international
intellectual property laws and treaties. The MS SOFTWARE is licensed,
not sold. All rights reserved.
• The MS SOFTWARE may interface with and/or communicate with, or
may be later upgraded to interface with and/or communicate with
additional software and/or systems provided by FORD MOTOR
COMPANY. The additional software and systems of FORD MOTOR
COMPANY origin, as well as associated media, printed materials, and
“online” or electronic documentation (“FORD SOFTWARE”) are
protected by international intellectual property laws and treaties. The
FORD SOFTWARE is licensed, not sold. All rights reserved.
• The MS SOFTWARE and/or FORD SOFTWARE may interface with
and/or communicate with, or may be later upgraded to interface with
and/or communicate with additional software and/or systems provided by
third party software and service suppliers. The additional software and
services of third party origin, as well as associated media, printed
materials, and “online” or electronic documentation (“THRID PARTY
SOFTWARE”) are protected by international intellectual property laws
and treaties. The THIRD PARTY SOFTWARE is licensed, not sold. All
rights reserved.
• The MS SOFTWARE, FORD SOFTWARE and THIRD PARTY
SOFTWARE hereinafter collectively and individually will be referred to as
⬙SOFTWARE.⬙
IF YOU DO NOT AGREE TO THIS END USER LICENSE
AGREEMENT (“EULA”), DO NOT USE THE DEVICE OR COPY
THE SOFTWARE. ANY USE OF THE SOFTWARE, INCLUDING
BUT NOT LIMITED TO USE ON THE DEVICE, WILL
CONSTITUTE YOUR AGREEMENT TO THIS EULA (OR
RATIFICATION OF ANY PREVIOUS CONSENT).
GRANT OF SOFTWARE LICENSE: This EULA grants you the
following license:
• You may use the SOFTWARE as installed on the DEVICE and as
otherwise interfacing with systems and/or services provide by or
through FORD MOTOR COMPANY or its third party software and
service providers.
69
2011 HMI-2 Gen 2 (ln1)
Supplement, 1st Printing
USA (fus)
Page 71

End User License Agreements
DESCRIPTION OF OTHER RIGHTS AND LIMITATIONS:
• Speech Recognition: If the SOFTWARE includes speech recognition
component(s), you should understand that speech recognition is an
inherently statistical process and that recognition errors are inherent
in the process. Neither FORD MOTOR COMPANY nor its suppliers
shall be liable for any damages arising out of errors in the speech
recognition process.
• Limitations on Reverse Engineering, Decompilation and
Disassembly: You may not reverse engineer, decompile, or
disassemble nor permit others to reverse engineer, decompile or
disassemble the SOFTWARE, except and only to the extent that such
activity is expressly permitted by applicable law notwithstanding this
limitation.
• Limitations on Distributing, Copying, Modifying and Creating
Derivative Works: You may not distribute, copy, make modifications
to or create derivative works based on the SOFTWARE, except and
only to the extent that such activity is expressly permitted by
applicable law notwithstanding this limitation.
• Single EULA: The end user documentation for the DEVICE and
related systems and services may contain multiple EULAs, such as
multiple translations and/or multiple media versions (e.g., in the user
documentation and in the software). Even if you receive multiple
EULAs, you are licensed to use only one (1) copy of the SOFTWARE.
• SOFTWARE Transfer: You may permanently transfer your rights
under this EULA only as part of a sale or transfer of the DEVICE,
provided you retain no copies, you transfer all of the SOFTWARE
(including all component parts, the media and printed materials, any
upgrades, and, if applicable, the Certificate(s) of Authenticity), and
the recipient agrees to the terms of this EULA. If the SOFTWARE is
an upgrade, any transfer must include all prior versions of the
SOFTWARE.
• Termination: Without prejudice to any other rights, FORD MOTOR
COMPANY or MS may terminate this EULA if you fail to comply with
the terms and conditions of this EULA.
• Security Updates/Digital Rights Management: Content owners use
the WMDRM technology included in your DEVICE to protect their
intellectual property, included copyrighted content. Portions of the
SOFTWARE on your DEVICE use WMDRM software to access
WMDRM-protected content. If the WMDRM software fails to protect
the content, content owners may ask Microsoft to revoke the
70
2011 HMI-2 Gen 2 (ln1)
Supplement, 1st Printing
USA (fus)
Page 72

End User License Agreements
SOFTWARE’s ability to use WMDRM to play or copy protected
content. This action does not affect unprotected content. When your
DEVICE downloads licenses for protected content, you agree that
Microsoft may include a revocation list with the licenses. Content
owners may require you to upgrade the SOFTWARE on your DEVICE
to access their content. If you decline an upgrade, you will not be able
to access content that requires the upgrade.
• Consent to Use of Data: You agree that MS, Microsoft Corporation,
FORD MOTOR COMPANY, third party software and systems suppliers,
their affiliates and/or their designated agent may collect and use
technical information gathered in any manner as part of product
support services related to the SOFTWARE or related services. MS,
Microsoft Corporation, FORD MOTOR COMPANY, third party software
and services suppliers, their affiliates and/or their designated agent
may use this information solely to improve their products or to
provide customized services or technologies to you. MS, Microsoft
Corporation, FORD MOTOR COMPANY, third party software and
systems suppliers, their affiliates and/or their designated agent may
disclose this information to others, but not in a form that personally
identifies you.
• Internet-Based Services Components: The SOFTWARE may
contain components that enable and facilitate the use of certain
Internet-based services. You acknowledge and agree that MS, Microsoft
Corporation, FORD MOTOR COMPANY, third party software and
service suppliers, their affiliates and/or their designated agent may
automatically check the version of the SOFTWARE and/or its
components that you are utilizing and may provide upgrades or
supplements to the SOFTWARE that may be automatically
downloaded to your DEVICE.
• Additional Software/Services: The SOFTWARE may permit FORD
MOTOR COMPANY, third party software and service suppliers, MS,
Microsoft Corporation, their affiliates and/or their designated agent to
provide or make available to you SOFTWARE updates, supplements,
add-on components, or Internet-based services components of the
SOFTWARE after the date you obtain your initial copy of the
SOFTWARE (“Supplemental Components”).
If FORD MOTOR COMPANY or third party software and services
suppliers provide or make available to you Supplemental Components
and no other EULA terms are provided along with the Supplemental
Components, then the terms of this EULA shall apply.
2011 HMI-2 Gen 2 (ln1)
Supplement, 1st Printing
USA (fus)
71
Page 73

End User License Agreements
If MS, Microsoft Corporation, their affiliates and/or their designated agent
make available Supplemental Components, and no other EULA terms are
provided, then the terms of this EULA shall apply, except that the MS,
Microsoft Corporation or affiliate entity providing the Supplemental
Component(s) shall be the licensor of the Supplemental Component(s).
FORD MOTOR COMPANY, MS, Microsoft Corporation, their affiliates
and/or their designated agent reserve the right to discontinue without
liability any Internet-based services provided to you or made available to
you through the use of the SOFTWARE.
• Links to Third Party Sites: The MS SOFTWARE may provide you
with the ability to link to third party sites through the use of the
SOFTWARE. The third party sites are not under the control of MS,
Microsoft Corporation, their affiliates and/or their designated agent.
Neither MS nor Microsoft Corporation nor their affiliates nor their
designated agent are responsible for (i) the contents of any third
party sites, any links contained in third party sites, or any changes or
updates to third party sites, or (ii) webcasting or any other form of
transmission received from any third party sites. If the SOFTWARE
provides links to third party sites, those links are provided to you only
as a convenience, and the inclusion of any link does not imply an
endorsement of the third party site by MS, Microsoft Corporation,
their affiliates and/or their designated agent.
• Obligation to Drive Responsibly: You recognize your obligation to
drive responsibly and keep attention on the road. You will read and
abide with the DEVICE operating instructions particularly as they
pertain to safety and assumes any risk associated with the use of the
DEVICE.
UPGRADES AND RECOVERY MEDIA: If the SOFTWARE is provided
by FORD MOTOR COMPANY separate from the DEVICE on media such
as a ROM chip, CD ROM disk(s) or via web download or other means,
and is labeled “For Upgrade Purposes Only” or ⬙For Recovery Purposes
Only⬙ you may install one (1) copy of such SOFTWARE onto the
DEVICE as a replacement copy for the existing SOFTWARE, and use it
in accordance with this EULA, including any additional EULA terms
accompanying the upgrade SOFTWARE.
INTELLECTUAL PROPERTY RIGHTS: All title and intellectual
property rights in and to the SOFTWARE (including but not limited to
any images, photographs, animations, video, audio, music, text and
“applets,” incorporated into the SOFTWARE), the accompanying printed
materials, and any copies of the SOFTWARE, are owned by MS,
Microsoft Corporation, FORD MOTOR COMPANY, or their affiliates or
72
2011 HMI-2 Gen 2 (ln1)
Supplement, 1st Printing
USA (fus)
Page 74

End User License Agreements
suppliers. The SOFTWARE is licensed, not sold. You may not copy the
printed materials accompanying the SOFTWARE. All title and intellectual
property rights in and to the content which may be accessed through use
of the SOFTWARE is the property of the respective content owner and
may be protected by applicable copyright or other intellectual property
laws and treaties. This EULA grants you no rights to use such content.
All rights not specifically granted under this EULA are reserved by MS,
Microsoft Corporation, FORD MOTOR COMPANY, third party software
and service providers, their affiliates and suppliers. Use of any on-line
services which may be accessed through the SOFTWARE may be
governed by the respective terms of use relating to such services. If this
SOFTWARE contains documentation that is provided only in electronic
form, you may print one copy of such electronic documentation.
EXPORT RESTRICTIONS: You acknowledge that the SOFTWARE is
subject to U.S. and European Union export jurisdiction. You agree to
comply with all applicable international and national laws that apply to
the SOFTWARE, including the U.S. Export Administration Regulations,
as well as end-user, end-use and destination restrictions issued by U.S.
and other governments. For additional information, see http://
www.microsoft.com/exporting/.
TRADEMARKS: This EULA does not grant you any rights in connection
with any trademarks or service marks of FORD MOTOR COMPANY, MS,
Microsoft Corporation, third party software or service providers, their
affiliates or suppliers.
PRODUCT SUPPORT: Product support for the SOFTWARE is not
provided by MS, its parent corporation Microsoft Corporation, or their
affiliates or subsidiaries. For product support, please refer to FORD
MOTOR COMPANY instructions provided in the documentation for the
DEVICE. Should you have any questions concerning this EULA, or if you
desire to contact FORD MOTOR COMPANY for any other reason, please
refer to the address provided in the documentation for the DEVICE.
No Liability for Certain Damages: EXCEPT AS PROHIBITED BY
LAW, FORD MOTOR COMPANY, ANY THRID PARTY SOFTWARE OR
SERVICES SUPPLIERS, MS, MICROSOFT CORPORATION AND THEIR
AFFILIATES SHALL HAVE NO LIABILITY FOR ANY INDIRECT,
SPECIAL, CONSEQUENTIAL OR INCIDENTAL DAMAGES ARISING
FROM OR IN CONNECTION WITH THE USE OR PERFORMANCE OF
THE SOFTWARE. THIS LIMITATION SHALL APPLY EVEN IF ANY
REMEDY FAILS OF ITS ESSENTIAL PURPOSE. IN NO EVENT SHALL
MS, MICROSOFT CORPORATION AND/OR THEIR AFFILIATES BE
LIABLE FOR ANY AMOUNT IN EXCESS OF U.S. TWO HUNDRED
FIFTY DOLLARS (U.S.$250.00).
73
2011 HMI-2 Gen 2 (ln1)
Supplement, 1st Printing
USA (fus)
Page 75

End User License Agreements
• THERE ARE NO WARRANTIES OTHER THAN THOSE THAT MAY
EXPRESSLY BE PROVIDED FOR YOUR NEW VEHICLE.
End user notice
Microsoft姞 Windows姞 Mobile for Automotive Important Safety
Information
This system Ford SYNC™ contains software that is licensed to
Manufacturer FORD MOTOR COMPANY by an affiliate of Microsoft
Corporation pursuant to a license agreement. Any removal, reproduction,
reverse engineering or other unauthorized use of the software from this
system in violation of the license agreement is strictly prohibited and
may subject you to legal action.
Read and follow instructions
Before using your Windows Automotive-based system, read and follow all
instructions and safety information provided in this end user manual
(“User’s Guide”). Not following precautions found in this User’s Guide
can lead to an accident or other serious consequences.
Keep User’s Guide in Vehicle
When kept in the vehicle, the User’s Guide will be a ready reference for
you and other users unfamiliar with the Windows Automotive-based
system. Please make certain that before using the system for the first
time, all persons have access to the User’s Guide and read its
instructions and safety information carefully.
WARNING: Operating certain parts of this system while driving
can distract your attention away from the road, and possibly
cause an accident or other serious consequences. Do not change
system settings or enter data non-verbally (using your hands) while
driving. Stop the vehicle in a safe and legal manner before attempting
these operations. This is important since while setting up or changing
some functions you might be required to distract your attention away
from the road and remove your hands from the wheel.
General operation
Voice Command Control
Functions within the Windows Automotive-based system may be
accomplished using only voice commands. Using voice commands while
driving allows you to operate the system without removing your hands
from the wheel.
74
2011 HMI-2 Gen 2 (ln1)
Supplement, 1st Printing
USA (fus)
Page 76

End User License Agreements
Prolonged Views of Screen
Do not access any function requiring a prolonged view of the screen
while you are driving. Pull over in a safe and legal manner before
attempting to access a function of the system requiring prolonged
attention. Even occasional short scans to the screen may be hazardous if
your attention has been diverted away from your driving task at a critical
time.
Volume Setting
Do not raise the volume excessively. Keep the volume at a level where
you can still hear outside traffic and emergency signals while driving.
Driving while unable to hear these sounds could cause an accident.
Use of Speech Recognition Functions
Speech recognition software is inherently a statistical process which is
subject to errors. It is your responsibility to monitor any speech
recognition functions included in the system and address any errors.
Navigation Features
Any navigation features included in the system are intended to provide
turn by turn instructions to get you to a desired destination. Please make
certain all persons using this system carefully read and follow
instructions and safety information fully.
Distraction Hazard
Any navigation features may require manual (non-verbal) setup.
Attempting to perform such set-up or insert data while driving can
seriously distract your attention and could cause an accident or other
serious consequences. Stop the vehicle in a safe and legal manner before
attempting these operations.
Let Your Judgment Prevail
Any navigation features are provided only as an aid. Make your driving
decisions based on your observations of local conditions and existing
traffic regulations. Any such feature is not a substitute for your personal
judgment. Any route suggestions made by this system should never
replace any local traffic regulations or your personal judgment or
knowledge of safe driving practices.
Route Safety
Do not follow the route suggestions if doing so would result in an unsafe
or illegal maneuver, if you would be placed in an unsafe situation, or if
you would be directed into an area that you consider unsafe. The driver
is ultimately responsible for the safe operation of the vehicle and
therefore, must evaluate whether it is safe to follow the suggested
directions.
75
2011 HMI-2 Gen 2 (ln1)
Supplement, 1st Printing
USA (fus)
Page 77

End User License Agreements
Potential Map Inaccuracy
Maps used by this system may be inaccurate because of changes in
roads, traffic controls or driving conditions. Always use good judgment
and common sense when following the suggested routes.
Emergency Services
Do not rely on any navigation features included in the system to route
you to emergency services. Ask local authorities or an emergency
services operator for these locations. Not all emergency services such as
police, fire stations, hospitals and clinics are likely to be contained in the
map database for such navigation features.
TeleNav Software End User License Agreement
Please read these terms and conditions carefully before you use the
TeleNav Software. Your use of the TeleNav Software indicates that
you accept these terms and conditions. If you do not accept these
terms and conditions, do not break the seal of the package, launch,
or otherwise use the TeleNav Software.
Please read these terms and conditions carefully before you use the
TeleNav Software. Your use of the TeleNav Software indicates that you
accept these terms and conditions. If you do not accept these terms and
conditions, do not break the seal of the package, launch, or otherwise
use the TeleNav Software.
TeleNav may revise this Agreement and the privacy policy at any time,
with or without notice to you. You agree to visit http://www.telenav.com
from time to time to review the then current version of this Agreement
and of the privacy policy.
1. Safe and Lawful Use
You acknowledge that devoting attention to the TeleNav Software may
pose a risk of injury or death to you and others in situations that
otherwise require your undivided attention, and you therefore agree to
comply with the following when using the TeleNav Software: (a) observe
all traffic laws and otherwise drive safely; (b) use your own personal
judgment while driving. If you feel that a route suggested by the TeleNav
Software instructs you to perform an unsafe or illegal maneuver, places
you in an unsafe situation, or directs you into an area that you consider
to be unsafe, do not follow such instructions; (c) do not input
destinations, or otherwise manipulate the TeleNav Software, unless your
vehicle is stationary and parked; (d) do not use the TeleNav Software for
any illegal, unauthorized, unintended, unsafe, hazardous, or unlawful
purposes, or in any manner inconsistent with this Agreement; (e)
76
2011 HMI-2 Gen 2 (ln1)
Supplement, 1st Printing
USA (fus)
Page 78

End User License Agreements
arrange all GPS and wireless devices and cables necessary for use of the
TeleNav Software in a secure manner in your vehicle so that they will
not interfere with your driving and will not prevent the operation of any
safety device (such as an airbag).
You agree to indemnify and hold TeleNav harmless against all claims
resulting from any dangerous or otherwise inappropriate use of the
TeleNav Software in any moving vehicle, including as a result of your
failure to comply with the directions above.
2. Account Information
You agree: (a) when registering the TeleNav Software, to provide
TeleNav with true, accurate, current, and complete information about
yourself, and (b) to inform TeleNav promptly of any changes to such
information, and to keep it true, accurate, current and complete.
3. Software License
Subject to your compliance with the terms of this Agreement, TeleNav
hereby grants to you a personal, non-exclusive, non-transferable license
(except as expressly permitted below in connection with your permanent
transfer of the TeleNav Software license), without the right to sublicense,
to use the TeleNav Software (in object code form only) in order to
access and use the TeleNav Software. This license shall terminate upon
any termination or expiration of this Agreement. You agree that you will
use the TeleNav Software only for your personal business or leisure
purposes, and not to provide commercial navigation services to other
parties.
3.1 License limitations
You agree not to do any of the following: (a) reverse engineer,
decompile, disassemble, translate, modify, alter or otherwise change the
TeleNav Software or any part thereof; (b) attempt to derive the source
code, audio library or structure of the TeleNav Software without the
prior express written consent of TeleNav; (c) remove from the TeleNav
Software, or alter, any of TeleNav’s or its suppliers’ trademarks, trade
names, logos, patent or copyright notices, or other notices or markings;
(d) distribute, sublicense or otherwise transfer the TeleNav Software to
others, except as part of your permanent transfer of the TeleNav
Software; or (e) use the TeleNav Software in any manner that (i)
infringes the intellectual property or proprietary rights, rights of publicity
or privacy or other rights of any party, (ii) violates any law, statute,
ordinance or regulation, including but not limited to laws and regulations
related to spamming, privacy, consumer and child protection, obscenity
or defamation, or (iii) is harmful, threatening, abusive, harassing,
tortuous, defamatory, vulgar, obscene, libelous, or otherwise
77
2011 HMI-2 Gen 2 (ln1)
Supplement, 1st Printing
USA (fus)
Page 79

End User License Agreements
objectionable; and (f) lease, rent out, or otherwise permit unauthorized
access by third parties to the TeleNav Software without advanced written
permission of TeleNav.
4. Disclaimers
To the fullest extent permissible pursuant to applicable law, in no event
will TeleNav, its licensors and suppliers, or agents or employees of any of
the foregoing, be liable for any decision made or action taken by you or
anyone else in reliance on the information provided by the TeleNav
Software. TeleNav also does not warrant the accuracy of the map or
other data used for the TeleNav Software. Such data may not always
reflect reality due to, among other things, road closures, construction,
weather, new roads and other changing conditions. You are responsible
for the entire risk arising out of your use of the TeleNav Software. For
example but without limitation, you agree not to rely on the TeleNav
Software for critical navigation in areas where the well-being or survival
of you or others is dependent on the accuracy of navigation, as the maps
or functionality of the TeleNav Software are not intended to support
such high risk applications, especially in more remote geographical areas.
TELENAV EXPRESSLY DISCLAIMS AND EXCLUDES ALL WARRANTIES
IN CONNECTION WITH THE TELENAV SOFTWARE, WHETHER
STATUTORY, EXPRESS OR IMPLIED, INCLUDING ALL WARRANTIES
WHICH MAY ARISE FROM COURSE OF DEALING, CUSTOM OR TRADE
AND INCLUDING, BUT NOT LIMITED TO, THE IMPLIED WARRANTIES
OF MERCHANTABILITY, FITNESS FOR A PARTICULAR PURPOSE AND
NON-INFRINGEMENT OF THIRD PARTY RIGHTS WITH RESPECT TO
THE TELENAV SOFTWARE. Certain jurisdictions do not permit the
disclaimer of certain warranties, so this limitation may not apply to you.
5. Limitation of Liability
TO THE EXTENT PERMITTED UNDER APPLICABLE LAW, UNDER NO
CIRCUMSTANCES SHALL TELENAV OR ITS LICENSORS AND SUPPLIERS
BE LIABLE TO YOU OR TO ANY THIRD PARTY FOR ANY INDIRECT,
INCIDENTAL, CONSEQUENTIAL, SPECIAL OR EXEMPLARY DAMAGES
(INCLUDING IN EACH CASE, BUT NOT LIMITED TO, DAMAGES FOR THE
INABILITY TO USE THE EQUIPMENT OR ACCESS DATA, LOSS OF DATA,
LOSS OF BUSINESS, LOSS OF PROFITS, BUSINESS INTERRUPTION OR
THE LIKE) ARISING OUT OF THE USE OF OR INABILITY TO USE THE
TELENAV SOFTWARE, EVEN IF TELENAV HAS BEEN ADVISED OF THE
POSSIBILITY OF SUCH DAMAGES.
NOTWITHSTANDING ANY DAMAGES THAT YOU MIGHT INCUR FOR ANY
REASON WHATSOEVER (INCLUDING, WITHOUT LIMITATION, ALL
DAMAGES REFERENCED HEREIN AND ALL DIRECT OR 09/22/09 - 10 of
19 - Confidential GENERAL DAMAGES IN CONTRACT, TORT (INCLUDING
78
2011 HMI-2 Gen 2 (ln1)
Supplement, 1st Printing
USA (fus)
Page 80

End User License Agreements
NEGLIGENCE) OR OTHERWISE), THE ENTIRE LIABILITY OF TELENAV
AND OF ALL OF TELENAV’S SUPPLIERS SHALL BE LIMITED TO THE
AMOUNT ACTUALLY PAID BY YOU FOR THE TELENAV SOFTWARE.
SOME STATES AND/OR JURISDICTIONS DO NOT ALLOW THE
EXCLUSION OR LIMITATION OF INCIDENTAL OR CONSEQUENTIAL
DAMAGES, SO THE ABOVE LIMITATIONS OR EXCLUSIONS MAY NOT
APPLY TO YOU.
6. Arbitration and Governing Law
You agree that any dispute, claim or controversy arising out of or relating
to this Agreement or the TeleNav Software shall be settled by
independent arbitration involving a neutral arbitrator and administered
by the American Arbitration Association in the County of Santa Clara,
California. The arbitrator shall apply the Commercial Arbitration Rules of
the American Arbitration Association, and the judgment upon the award
rendered by the arbitrator may be entered by any court having
jurisdiction. Note that there is no judge or jury in an arbitration
proceeding and the decision of the arbitrator shall be binding upon both
parties. You expressly agree to waive your right to a jury trial.
This Agreement and performance hereunder will be governed by and
construed in accordance with the laws of the State of California, without
giving effect to its conflict of laws provisions. To the extent judicial
action is necessary in connection with the binding arbitration, both
TeleNav and you agree to submit to the exclusive jurisdiction of the
courts of the County of Santa Clara, California. The United Nations
Convention on Contracts for the International Sale of Goods shall not
apply.
7. Assignment
You may not resell, assign, or transfer this Agreement or any of your
rights or obligations, except in totality, in connection with your
permanent transfer of the TeleNav Software, and expressly conditioned
upon the new user of the TeleNav Software agreeing to be bound by the
terms and conditions of this Agreement. Any such sale, assignment or
transfer that is not expressly permitted under this paragraph will result
in immediate termination of this Agreement, without liability to TeleNav,
in which case you and all other parties shall immediately cease all use of
the TeleNav Software. Notwithstanding the foregoing, TeleNav may
assign this Agreement to any other party at any time without notice,
provided the assignee remains bound by this Agreement.
2011 HMI-2 Gen 2 (ln1)
Supplement, 1st Printing
USA (fus)
79
Page 81

End User License Agreements
8. Miscellaneous
8.1 This Agreement constitutes the entire agreement between TeleNav
and you with respect to the subject matter hereof.
8.2 Except for the limited licenses expressly granted in this Agreement,
TeleNav retains all right, title and interest in and to the TeleNav
Software, including without limitation all related intellectual property
rights. No licenses or other rights which are not expressly granted in this
Agreement are intended to, or shall be, granted or conferred by
implication, statute, inducement, estoppel or otherwise, and TeleNav and
its suppliers and licensors hereby reserve all of their respective rights
other than the licenses explicitly granted in this Agreement.
8.3 By using the TeleNav Software, you consent to receive from TeleNav
all communications, including notices, agreements, legally required
disclosures or other information in connection with the TeleNav Software
(collectively, “Notices”) electronically. TeleNav may provide such Notices
by posting them on TeleNav’s Website or by downloading such Notices to
your wireless device. If you desire to withdraw your consent to receive
Notices electronically, you must discontinue your use of the TeleNav
Software.
8.4 TeleNav’s or your failure to require performance of any provision
shall not affect that party’s right to require performance at any time
thereafter, nor shall a waiver of any breach or default of this Agreement
constitute a waiver of any subsequent breach or default or a waiver of
the provision itself.
8.5 If any provision herein is held unenforceable, then such provision will
be modified to reflect the intention of the parties, and the remaining
provisions of this Agreement will remain in full force and effect.
8.6 The headings in this Agreement are for convenience of reference
only, will not be deemed to be a part of this Agreement, and will not be
referred to in connection with the construction or interpretation of this
Agreement. As used in this Agreement, the words “include” and
“including,” and variations thereof, will not be deemed to be terms of
limitation, but rather will be deemed to be followed by the words
“without limitation.”
9. Other Vendors Terms and Conditions
The TeleNav Software utilizes map and other data licensed to
TeleNav by third party vendors for the benefit of you and other end
users. This Agreement includes end-user terms applicable to these
companies (included at the end of this Agreement), and thus your
use of the TeleNav Software is also subject to such terms. You agree to
comply with the following additional terms and conditions, which
are applicable to TeleNav’s third party vendor licensors:
80
2011 HMI-2 Gen 2 (ln1)
Supplement, 1st Printing
USA (fus)
Page 82

End User License Agreements
9.1 End User Terms Required by Tele Atlas North America, Inc.
The TeleNav Software utilizes software licensed to TeleNav by Tele Atlas
North America, Inc. (“Tele Atlas”). You may use this software (the “Tele
Atlas Software”) as part of the TeleNav Software subject to the following
terms and conditions:
• You may only use the Tele Atlas Software for internal business or
personal uses.
• Your use of the Tele Atlas Software is otherwise limited by the scope
of the license agreement between Tele Atlas and TeleNav.
• The Tele Atlas Software is the confidential information of Tele Atlas.
• You are prohibited from making any unauthorized copies of the Tele
Atlas Software.
• You are prohibited from removing or obscuring any copyright or
trademark notice, or restrictive legend with respect to the Tele Atlas
Software.
• The liability of Tele Atlas and its suppliers is limited by the limitation
of liability provision set forth above.
• The Tele Atlas Software is provided “as is” and on a “with all faults
basis”, and Tele Atlas and its suppliers expressly disclaim all other
warranties, express or implied, including but not limited to the implied
warranties of non-infringement, merchantability, satisfactory quality,
accuracy, title and fitness for a particular purpose. No oral or written
advice or information provided by Tele Atlas or any of its agents,
employees or third party providers shall create a warranty, and you
are not entitled to rely on any such advice or information. This
disclaimer is an essential condition of this Agreement.
In the event that you are a government entity, the following provisions
apply to you:
U.S. GOVERNMENT RIGHTS. If you are an agency, department, or other
entity of the United States Government, or funded in whole or in part by
the United States Government, then use, duplication, reproduction,
release, modification, disclosure or transfer of this commercial product
and accompanying documentation, is restricted in accordance with the
LIMITED or RESTRICTED rights as described in DFARS 252.2277014(a)(1) (JUN 1995) (DOD commercial computer software definition),
DFARS 227.7202[not ]1 (DOD policy on commercial computer software),
FAR 52.227-19 (JUN 1987) (commercial computer software clause for
civilian agencies), DFARS 252.227-7015 (NOV 1995) (DOD technical data
– commercial items clause); FAR 52.227-14 Alternates I, II, and III (JUN
81
2011 HMI-2 Gen 2 (ln1)
Supplement, 1st Printing
USA (fus)
Page 83

End User License Agreements
1987) (civilian agency technical data and noncommercial computer
software clause); and/or FAR 12.211 and FAR 12.212 (commercial item
acquisitions), as applicable. In case of conflict between any of the FAR
and DFARS provisions listed herein and this Agreement, the construction
that provides greater limitations on the Government’s rights shall control.
Contractor/manufacturer is Tele Atlas North America, Inc., 11 Lafayette
Street, Lebanon, NH 03766[not ]1445. Phone: 603.643.0330. The Tele
Atlas Software is 娀1984-200_ by Tele Atlas North America, Inc. ALL
RIGHTS RESERVED. For purpose of any public disclosure provision
under any federal, state or local law, it is agreed that the Tele Atlas
Software is a trade secret and a proprietary commercial product and not
subject to disclosure.
If you are an agency, department, or other entity of any State
government, the United States Government or any other public entity or
funded in whole or in part by the United States Government, then you
hereby agree to protect the Tele Atlas Software from public disclosure
and to consider the Tele Atlas Software exempt from any statute, law,
regulation, or code, including any Sunshine Act, Public Records Act,
Freedom of Information Act, or equivalent, which permits public access
and/or reproduction or use of the Tele Atlas Software. In the event that
such exemption is challenged under any such laws, this Agreement shall
be considered breached and any and all right to retain any copies or to
use the Tele Atlas Software shall be terminated and considered
immediately null and void. Any copies of the Tele Atlas Software held by
you shall immediately be destroyed. If any court of competent
jurisdiction considers this clause void and unenforceable, in whole or in
part, for any reason, this Agreement shall be considered terminated and
null and void, in its entirety, and any and all copies of the Tele Atlas
Software shall immediately be destroyed.
You acknowledge that the use of the Tele Atlas Software with a non-Tele
Atlas map may result in increased variance between the location
displayed on the map and ground truth location.
You shall not provide display or allow access to the actual numerical
latitude and longitude coordinates of the Tele Atlas Software.
You are prohibited from using the Tele Atlas Software (i) to create
mailing lists or (ii) for other such similar uses.
Tele Atlas shall be a third party beneficiary of TeleNav’s rights under this
Agreement.
Effective as of May 1st 2007
82
2011 HMI-2 Gen 2 (ln1)
Supplement, 1st Printing
USA (fus)
Page 84

End User License Agreements
Gracenote姞 copyright
CD and music — related data from Gracenote, Inc., copyright
娀2000–2007 Gracenote. Gracenote Software, copyright 娀 2000–2007
Gracenote. This product and service may practice one or more of the
following U.S. Patents #5,987,525; #6,061,680; #6,154,773, #6,161,132,
#6,230,192, #6,230,207, #6,240,459, #6,330,593, and other patents issued
or pending. Some services supplied under license from Open Globe, Inc.
for U.S. Patent: #6,304,523.
Gracenote and CDDB are registered trademarks of Gracenote. The
Gracenote logo and logotype, and the ⬙Powered by Gracenote™⬙ logo are
trademarks of Gracenote.
Gracenote姞 End User License Agreement (EULA)
This device contains software from Gracenote, Inc. of 2000 Powell Street
Emeryville, California 94608 (“Gracenote”).
The software from Gracenote (the “Gracenote Software”) enables this
device to do disc and music file identification and obtain music-related
information, including name, artist, track, and title information
(“Gracenote Data”) from online servers (“Gracenote Servers”), and to
perform other functions. You may use Gracenote Data only by means of
the intended End User functions of this device
This device may contain content belonging to Gracenote’s providers. If
so, all of the restrictions set forth herein with respect to Gracenote Data
shall also apply to such content and such content providers shall be
entitled to all of the benefits and protections set forth herein that are
available to Gracenote.
You agree that you will use the content from Gracenote (“Gracenote
Content”), Gracenote Data, the Gracenote Software, and Gracenote
Servers for your own personal, non-commercial use only. You agree not
to assign, copy, transfer or transmit the Gracenote Content, Gracenote
Software or any Gracenote Data (except in a Tag associated with a music
file) to any third party. YOU AGREE NOT TO USE OR EXPLOIT
GRACENOTE CONTENT, GRACENOTE DATA, THE GRACENOTE
SOFTWARE, OR GRACENOTE SERVERS, EXCEPT AS EXPRESSLY
PERMITTED HEREIN.
You agree that your non-exclusive licenses to use the Gracenote Content,
Gracenote Data, the Gracenote Software, and Gracenote Servers will
terminate if you violate these restrictions. If your licenses terminate, you
agree to cease any and all use of the Gracenote Content, Gracenote
Data, the Gracenote Software, and Gracenote Servers. Gracenote,
83
2011 HMI-2 Gen 2 (ln1)
Supplement, 1st Printing
USA (fus)
Page 85

End User License Agreements
respectively, reserve all rights in Gracenote Data, the Gracenote
Software, and the Gracenote Servers and Gracenote Content, including
all ownership rights. Under no circumstances will either Gracenote
become liable for any payment to you for any information that you
provide, including any copyrighted material or music file information. You
agree that Gracenote may enforce its respective rights, collectively or
separately, under this agreement against you, directly in each company’s
own name.
Gracenote uses a unique identifier to track queries for statistical
purposes. The purpose of a randomly assigned numeric identifier is to
allow Gracenote to count queries without knowing anything about who
you are. For more information, see the web page at www.gracenote.com
for the Gracenote Privacy Policy
THE GRACENOTE SOFTWARE, EACH ITEM OF GRACENOTE DATA AND
THE GRACENOTE CONTENT ARE LICENSED TO YOU “AS IS.” NEITHER
GRACENOTE MAKES ANY REPRESENTATIONS OR WARRANTIES,
EXPRESS OR IMPLIED, REGARDING THE ACCURACY OF ANY
GRACENOTE DATA FROM THE GRACENOTE SERVERS OR GRACENOTE
CONTENT. GRACENOTE COLLECTIVELY AND SEPARATELY RESERVE
THE RIGHT TO DELETE DATA AND/OR CONTENT FROM THE
COMPANIES’ RESPECTIVE SERVERS OR, IN THE CASE OF
GRACENOTE, CHANGE DATA CATEGORIES FOR ANY CAUSE THAT
GRACENOTE DEEMS SUFFICIENT. NO WARRANTY IS MADE THAT
EITHER GRACENOTE CONTENT OR THE GRACENOTE SOFTWARE OR
GRACENOTE SERVERS ARE ERROR-FREE OR THAT THE
FUNCTIONING OF THE GRACENOTE SOFTWARE OR GRACENOTE
SERVERS WILL BE UNINTERRUPTED. GRACENOTE IS NOT OBLIGATED
TO PROVIDE YOU WITH ANY ENHANCED OR ADDITIONAL DATA TYPES
THAT GRACENOTE MAY CHOOSE TO PROVIDE IN THE FUTURE AND IS
FREE TO DISCONTINUE ITS ONLINE SERVICES AT ANY TIME.
GRACENOTE DISCLAIM ALL WARRANTIES EXPRESS OR IMPLIED,
INCLUDING, BUT NOT LIMITED TO, IMPLIED WARRANTIES OF
MERCHANTABILITY, FITNESS FOR A PARTICULAR PURPOSE, TITLE,
AND NON-INFRINGEMENT. NEITHER GRACENOTE WARRANTS THE
RESULTS THAT WILL BE OBTAINED BY YOUR USE OF THE
GRACENOTE SOFTWARE OR ANY GRACENOTE SERVER. IN NO CASE
WILL GRACENOTE BE LIABLE FOR ANY CONSEQUENTIAL OR
INCIDENTAL DAMAGES OR FOR ANY LOST PROFITS OR LOST
REVENUES FOR ANY REASON WHATSOEVER.
娀 Gracenote 2007
FCC ID: KMHSYNCG2 IC: 1422A-SYNCG2
84
2011 HMI-2 Gen 2 (ln1)
Supplement, 1st Printing
USA (fus)
Page 86

End User License Agreements
This device complies with Part 15 of the FCC Rules and with RSS-210 of
Industry Canada. Operation is subject to the following two conditions:
(1) This device may not cause harmful interference, and (2) this device
must accept any interference received, including interference that may
cause undesired operation.
WARNING: Changes or modifications not expressively approved
by the party responsible for compliance could void the user’s
authority to operate the equipment. The term “IC:” before the radio
certification number only signifies that Industry Canada technical
specifications were met.
The antenna used for this transmitter must not be co-located or
operating in conjunction with any other antenna or transmitter.
2011 HMI-2 Gen 2 (ln1)
Supplement, 1st Printing
USA (fus)
85
Page 87

Index
911 Assist™ ................................44
A
Accessing and using your USB
port ..............................................30
Ambient mood/lighting ...............55
AM/FM .........................................16
A/V inputs ....................................35
C
Cleaning the touchscreen ..........10
Customizing your home screen ...4
D
Display settings ...........................54
E
End user license agreement ......69
H
HD Radio™ .................................18
Help ................................................9
I
Infotainment display .....................7
K
Keyless entry system
programming entry code .........55
M
Map icons ....................................63
Map mode ....................................61
86
N
Navigation features .....................56
Notifications ................................54
P
Pairing other phones ..................40
Pairing your phone for the first
time ..............................................37
Phone dependent features .........37
Privacy information ....................11
Q
Quick touch buttons ...................64
R
Rear view camera display ..........55
S
Safety information ......................10
Satellite Radio .............................25
SD card ..................................28, 56
Setting a destination ..................56
Setting the clock ...........................6
SIRIUS威 satellite radio ...............22
SIRIUS Travel Link .....................66
Supported media file types ........33
SYNC威 Services ...........................48
System settings ...........................54
T
Text messaging ...........................40
2011 HMI-2 Gen 2 (ln1)
Supplement, 1st Printing
USA (fus)
Page 88

Index
Traffic, Directions and
Information ..................................48
V
Vehicle health report ..................46
Vehicle settings ...........................54
Voice recognition ........................12
W
Wi-Fi ............................................52
2011 HMI-2 Gen 2 (ln1)
Supplement, 1st Printing
USA (fus)
87
Page 89

BT4J 19A285 AA
May 2010
First Printing
HMI Supplement
Litho in U.S.A.
fordowner.com
lincolnowner.com
www.ford.ca
 Loading...