

Page 1
3
2
9
4
1
5
8
7
6
10
14
13
19
1817
11 15
12
16
TAURUS X
2009
QUICKREFERENCE GUIDE
2009
TAURUS X
QUICK REFERENCEGUIDE
9F9J19G217 AA
MAY2008
FIRSTPRINTING
QUICKREFERENCE GUIDE
TAURUSX
LITHOIN USA
FORDMOTOR COMPANY
CUSTOMERRELATIONSHIPCENTER
P.O.BOX6248
DEARBORN,MI 48121
1-800-392-3673(FORD)
(TDDFOR THEHEARINGIMPAIRED:1-800-232-5952)
ThisQuick ReferenceGuideis notintended toreplace yourvehicleOwner’s Guidewhich containsmore detailed
informationconcerning the features of your vehicle,as well as important safetywarnings designed to help
reducethe risk ofinjury to youand your passengers.Please readyour entire Owner’sGuide carefully asyou
beginlearning aboutyour newvehicle and referto theappropriate sectionswhen questionsarise.
Allinformation containedin thisQuick ReferenceGuide wasaccurate atthe timeof duplication.We reservethe
right tochange features, operation and/or functionality of anyvehicle specification at any time. YourFord
dealeris thebest sourcefor the mostcurrent information.
Fordetailed operatingand safetyinformation, pleaseconsult your Owner’sGuide.
ADDITIONALFEATURES(CON’T)
REVERSESENSINGSYSTEM
(IFEQUIPPED)
Your vehicle may be equipped
with a reverse sensing system
whichcan warnyou ifthere isan
objectbehind the vehicle which
you maybe unable to see.The
system will sound a wa rning
tone thatincreases in frequency as the object
getscloser andwill soundcontinuouslywhen the
objectis lessthan 10inches away.Pleasereferto
yourOwner’sGuide formore information.
ADVANCETRAC
®
Your vehicle is equipped with
the AdvanceTrac stability
enhancementsystem.Thissystem
consists of : Traction co ntrol,
whichhelpsavoid wheelspinand
loss of traction, and Electronic
Stability Control, which helps avoid skids or
lateral slides. Thesefeatures work together to
helpyou to maintainstability and steerability of
yourvehicle during avariety ofroad conditions.
The systemdefaults to on and the controlwill
illuminatewhen turned off.Refer to yourOwner
Guidefor moreinformation.
AUXILIARYINPUTJACK
The Auxiliary InputJack allows
you to plug and play auxiliary
audio devices, inclu ding MP3
players.PressAUX repeatedlyon
your audiosystem until LINEIN
appears in the display, then
plug in your auxiliary audio device. For more
information,pleaseconsult yourOwner’s Guide.
USBPORT(IF EQUIPPED)
SYNC-equippedvehicles havea USBport inside
the centerconsole which allows youto plug in
your media playing devices among other
options.For moreinformation, referto theSYNC
Supplement o r the SYNC section of the
NavigationSupplement.
OVERDRIVECONTROL/CANCEL
WITHGRADEASSIST
Drivewith thevehiclein D(Overdrive) forthebest
fuel economy.You can deactivateoverdrive by
pressingthe transmission controlswitch on the
sideof theshift handle.Your vehicleis equipped
with a special Grade Assist feature which is
automaticallyactivated whenoverdrive isturned
off. Gradeassist helps to provideoptimal gear
selectionand additional engine brakingon hilly
terrain.To return to overdrive,simply press the
transmissioncontrol switchagain.
CLIMATE CONTROL
D
ual Zone Automatic TemperatureControl with
H
eatedSeats
(
IFEQUIPPED)
Driverand PassengerSide Temperature
Pressthe blueside ofthe controlto decreaseor the
redside of the controlto increasethe temperature
settingforthe driveror passengersideof thevehicle.
When the passenger side temperature controls
are pressed, dual zone will be activated where
the driver and passenger can set their individual
climatesettings.
AutomaticOperation
Press AUTO to engage au tomatic temperature
control.Setthe desiredtemperature. Thesystemwill
then automatically determine fan speed, airflow
location,A/C on or offas well as usingoutside or
recirculated airto heat orcool thevehicle to reach
thedesired temperature.
RearDefrost
Press toactivate the rear windowdefroster and
clearthe rear windowof thin iceand fog. Press
againto deactivate.
Defrost
Pressto distributeoutsideair throughthe windshield
defrosteranddemister ventsandto clearthinice and
fogfrom thewindshield.
AirFlow DirectionControl
Pressrepeatedlyto selectdesiredairflowdirection.
A/C
Pressto activateor deactivate airconditioning.
RecirculatedAir
Press to activate recirculatedair in the vehicle
cabin.Usingthis modemayreduce thetimeto cool
downthe interiorof thevehicle andmay alsohelp
reduceunwanted odorsfrom reachingthe interior
ofthe vehicle.
HeatedSeats
Press tocycle through availablesettings of high
heat(2 lights),low heat(1light), andoff (nolights).
DualZone
Press DUAL to activate dual zone where the
driver andpassenger can select their individual
temperature settings. Press again to return to
single zone where the driver side temperature
controldetermines the temperaturefor theentire
vehiclecabin.
19
20
14
13
12
16
18
17
1511
LOAD
Toload aCDinto thesystem,
pressLOAD.Whenprompted,
select the desiredslot (1-6)
using the memory presets
and insert the CD into the
system.Pressand holdLOAD
to autoloadup to six discs.
Insert the discs, one at a
time,when prompted.
Tune/DiscSelector
Press togo up ord ownthe
radio frequency band or to
selecta desireddisc.
On/Off/Volume
Pushto turnon oroff. Turnto
increaseordecreasevolume.
CD
Press to enterCD mode. If
a CDis already loaded into
thesystem, theCD willbegin
playingwhere itlast ended.
AM/FM
PressrepeatedlytoselectAM,
FM1,orFM2frequencybands.
SEEK
Press to access the next/
previousstrong stationorthe
next/previoustrack.
SCAN
Pressfor a briefsampling of
radio stationsor CD tracks.
Pressagain tostop.
SettingMemory Presets
Youcan save upto 18 radio
stations(6 each inAM, FM1
or FM2)or 18 satellite radio
channels(6eachinSAT1,SAT2
or SAT3) in your me mory
presets. To save a station/
channel to your memory
presets: tuneto the desired
stationor channel,thenpress
and hold a memory preset
(1-6)until soundreturns.
AUX
Press AUX repeatedly to
accessSAT1, SAT2or SAT3
(satellite radio, if equipped),
LINEIN(auxiliaryaudiomode),
FES/DVD (if equipped) or
SYNC(ifequipped).
MENU
Settingthe Clock
Press MENU until SELECT
HOUR or SELECT MINS is
displayed.Use the up/down
arrows to adjus t the
hours/minutes.
Bass/Treble/Fade/Balance
Press MENU, when the
desiredsettingappearsin the
display,press /to make
thenecessary adjustments.
SatelliteRadio Menu
When SATEL LITE R ADIO
MENUappears inthe display
(if satellite radio is active),
pressOK to enterthe menu.
Then press / to cycle
through: CATEGORY, SAVE
SONG, DELETE SONG,
DELETE AL L SONGS or
ENABLE/DISABLE ALERTS.
Fora fulldescription ofthese
features,please referto your
Owner’sGuide.
10
9
7
6
5
4
2
1
8
3
SEATING
ADJUSTING2NDROWBUCKET
ANDBENCHSEATS
Lift theside handle to adjustthe
seatback. Usingthe samecontrol
willfold the seat backflat. Lifting
the control (if equipped) located
underneaththe seat cushion will
adjusttheseat forwardorbackward.
ACCESSINGTHE3RDROWSEATS
Ensure that the 2nd rowseat
adjustable head restraints (if
equipped) are in the full down
positionand thatno objects(such
asbooks,purses,or briefcases)are
on thefloor in frontof the 2nd rowseats before
foldingthem down. Placethe front rowseat in a
forwardpositiontoallow the2ndrow seattobe fully
“tumbled.”Liftthehandleonce tofoldthe seatback
flat.Liftthe samehandle asecondtime to“tumble”
theseatforwardto allowaccessto the3rdrowseat.
STOWINGTHE3RDROWBENCH
ORSPLITBENCHSEATINTUB
Movethe adjustablehead restraint
(ifequipped)fully down.Ensurethat
thestowagetub isclear ofobjects.
Fromthe rear of thevehicle, fold
the seat back bypull ing and
holdingthe number1 strapwhile pushingtheseat
backforward.Release thestrapafter theseatback
startsrotatingforward.
Release the cushion latches by pulling the
number 2 strap whilepulling on the long strap
locatedon theseat back,to rotatethe seatall the
wayinto thetubin thefloor.
AUDIOSYSTEM
P
remium/AudiophileIn-Dash 6-CD/MP3/SatelliteCompatible
S
oundSystem
(
IFEQUIPPED)
MaxA/C Operation
Toreach maximum cooling performance whenin
automatic mode (AUTO), sim ply u se th e
temperature controls or to set to th e desired
temperature.If you arenot in AUTOmode, select
or , A/Cand andset thetemperature
to 60°F(16°C). Set the fan speedto the highest
settingbut thenadjust for comfort.
Defogging/Demistingin ColdWeather
Select . Select A/C andadjust the temperature
controlto main comfort. Set the fan tothe highest
speed and directthe outer instrument panel vents
towardthe sidewindows.
INTEGRATEDKEYHEAD
TRANSMITTER(IKT)AND
REMOTEENTRYSYSTEM
Your vehiclecomes equipped
withtwoprogrammedIntegrated
Keyhead Transm itters (IKTs)
whichare both a programmed
ignitionkeyanda remotekeyless
entrytransmitter.Handlethe IKT
carefully when st arting th e car t o avoid
accidentally pressingany of the remote entry
buttons. Press once to unlock the driver’s
door. The interi or lamps will i lluminate.
Press twice tounlock allthe doors.Press
onceto lock all thedoors. The turnlamps will
flash. Press twice to confirm all the doors
andtrunk areclosed. Thedoors will lockagain,
thehorn will chirpand the turnlamps willflash
onceif allthe doorsand trunkare closed.Note:
Ifany door orthe trunk isnot closed, thehorn
will chirp twice and the lamps will notflash.
Press to activatethe panicalarm. Thehorn
will sound and the tur n lamps wi ll flash.
Press again or turn the i gnition on t o
deactivatethe panic alarm.Press to unlock
the trunk. Car finder: Press twice within
threeseconds. The hornwill chirpand the turn
lampswill flash. Itis recommended touse this
methodto locateyour vehicle,rather thanusing
thepanic alarm.Note: Ensurethat youkeep the
adhesive security labels in a safe place for
futurereference.Replacementsareonly available
throughan authorizeddealer.
POWERLIFTGATE
(IFEQUIPPED)
To open the power liftgate,
push the button on the
instrument pa nel, press
remote entrytransmitter (IKT)
control twice,or push the
buttonunder thecenter of the
license pl ate lamp shield. For th e best
performance allowthe power system to open
theliftgat eafter pushing thecontrol. Manually
pushingor pulling theliftgate may activatethe
systems obstacle detection feature and stop
thepower system.Do not openthe liftgatein a
garage or other enclos ed area with a low
ceiling.To close theliftgate, press andrelease
thecontrol locatedin theleft rear quarterpanel
orpull downthe liftgatea fewinches toactivate
powerclosing. Keep clear ofthe liftgate when
operating therear switch. The liftgate can be
reversed with a second press on a control
buttonor remote entry transmitterand can be
manuallyclosed atany time.Yourpower liftgate
isequipped withan obstacle detectionfeature.
Ifthe liftgatedetects anobstaclewhile opening,
the system will stop and achime will sound
three times.If the liftgate detectsan obstacle
while closing,the system will reverseto a full
open position and a chime will sound three
times.Once anobstacle isremoved, thepower
liftgatecan beoperated normally.Refer toyour
Owner’sGuide formore information.Warning:
Keep clearof the liftgate when activating the
rearswitch.
KEYLESSENTRYKEYPAD
To unlock the driver’s door,
enter your five digit factory
code. To unloc k all doors,
enter your five digit factory
codeand, withinfive seconds,
press 3•4. Tolock all vehicle
doors, simply press7•8 and 9•0 at the same
time (you do not need to enter your factory
code first). Refer to your Owner’s Guide for
moreinformation.
MOONROOF (IFEQUIPPED)
Yourvehicle may beequipped with amoon roof
which has an automatic, one-touc h express
openingand closing feature. Toopen the moon
roof, press the SLIDE control. Pull the SLIDE
controlto close.Tostop motionat anytime during
the one-touch operation, press the control a
secondtime.To ventthemoon roof,pressthe TILT
control.The moonroof hasa built-inshade which
canbe manuallyopenedor closedwhen theglass
panelis closed.
SYNC(IF EQUIPPED)
Yourvehicle maybe equipped
withSYNC –a hands-freecommunications and
entertainmentsystem withspecial phone and
mediafeatures. Formore information,please
referto theSYNC Supplementor to theSYNC
sectionin theNavigation Supplement. Please
alsofeel freeto visit www.SyncMyRide.com.
2005TAURUSX
ADDITIONAL
FEATURES
SEATING
FEATURES
HEATEDSEATS (IFEQUIPPED)
Press the heated seat b utton
repeatedlytocyclethrough available
settingsof high heat(2 lights), low
heat(1 light),and off (nolights).
REARHEATEDSEATS (IFEQUIPPED)
Theheated seat control islocated on theback of
the front console. To operate the heated seats,
pushthe right side formaximum heat andthe left
sidefor minimumheat. Push againto deactivate.
SECONDROW AUTOFOLDSEAT
(IFEQUIPPED)
Press thecontrol once to fold the
seat back down and then tumble
the seatforward for access tothe
3rdrow. Note:The powerfeature is
operational when thevehicle is in
Park (P)and the liftgate has been
openfor lessthan 10minutes.
FOLDINGDOWNTHEFRONT
PASSENGERSEATBACK
Thefront passenger seatback can
befolded downto allow roomfor a
longload. Ensurethat the seatis in
therearmost positionand the head
restraintisfully down,priorto pulling
the strap located on the back of the seatback.
Without releasing the strap, push the seatback
forward.Move theseat asfarforward aspossible.
20
Page 2
ONE | HEADLAMPSANDFOG LAMPS
Turnthe controloneposition tothe right toturnon theparking lamps,instrument panel
lamps,license plate lampsand taillamps. Turnthe control tothe secondposition on the
right toturn onthe headlamps.Turn thecontrol oneposition tothe left to activate
theautolamp feature(if equipped),whichautomatically turnsthe exteriorlamps onandoff,
based onavailable daylight. Pull the control towardsyou to activate the fog lamps,if
equipped.(Thefog lampswillnot operatewhenthe controlisturned off( )or whenthehigh beamsareon).
TWO | PANELDIMMER
Usethis controlto adjustthe brightnessofthe instrumentpanel andall applicableswitches
inthe vehicle duringheadlamp and parkinglamp operation. Move thecontrol to thefull
uprightposition, pastthe detent, toturn onthe interiorlamps.
THREE | ADJUSTABLEPEDALS (IFEQUIPPED)
Pressthe topof thecontrol tomove the pedalsfurther awayfrom youor pressthe bottom
ofthe controlto move thepedals closerto you.The pedalsshould only beadjusted when
thevehicle isstopped and inPark (P).
FOUR | HOOD RELEASE
Toopen thehood, pullthe hoodrelease handleunder thebottom ofthe instrumentpanel,
near thesteering column. Go tothe front of thevehicle and release the auxiliarylatch
locatedunder thefront center ofthe hood.Use theprop rodto support theraised hood.
FIVE | SPEEDCONTROL
Toset thespeed control,press andrelease ON.Accelerate tothe desiredspeed.Press and
release the SET+ control. Take your foot off the acceleratorpedal. The speed control
indicatorlight will illuminatein the cluster.To seta higher speed:press and holdSET+
until thedesired speed is reached,or briefly press SET+to increase the speedby small
amounts.To seta lower speed:press andhold SET-until the desiredspeed isreached, or
brieflypress SET-todecrease thespeed bysmall amounts.Press RSMtoreturn tothe previouslyset speed.
Toturn speedcontrol off,depress the brakepedal orpress OFFor CNCL(Cancel).
SIX | TILTSTEERINGCOLUMN
To adjustthe steering wheel, push the adjustment lever down tounlock the steering
column.While the leveris down, tiltthe steering column toyour desired position.While
holdingthe steering columnin place, pullthe lever upto its original positionto lock the
steeringcolumn. Donot adjust whiledriving.
SEVEN | STEERINGWHEELAUDIOCONTROLS
Audio Steering Wheel Controls: The appearance a nd functionality of your vehicle’s
steeringwheel controlsmay varyaccordingto youroption package.Refer toyourOwner’s
Guide for a comple te description of all possible o ptions. Press – VOL + to
decrease/increasethe volume.Press –SEEK +toaccess theprevious/next strongstation
orCD track. Press MEDIArepeatedly to scrollthrough all possible mediasources (AM,
FM1,FM2,CD .. .etc).Press MUTEto mutethe playingmedia. Pressagain toreturn tothe playingmedia.
SYNCSteering WheelControls (if equipped):Press toactivatethe Voice recognition
system.Press toanswer acall ifequipped with SYNC.Press andhold toend a call.
Refer to your SYNC supplement for more information. Press OK to confirm menu
selections.Refer toyour SYNCsupplement (if equipped)for moreinformation.
EIGHT | MULTI-FUNCTIONLEVER
Rotatethe end ofthe controlup to increasethe speed ofthe wipersand rotate downto
decreasethe speed ofthe wipers.Briefly press theend ofthe stalk fora single swipeof
thewipers withoutwasher fluid.A quickpush andholdresults inthree swipeswith washer
fluidwhile a longerpush and holdactivates thewash pattern forup to fiveseconds. For
bettervisibility, your vehiclewill automatically turnon your headlights ifyour windshield
wipersand autolamps (if equipped) areon. To operateyour rear windowwiper, turn
therear wiper controlto 1 (intermittentspeed), 2 (normalspeed), or off.For a rearwash cycle,turn the
rearwiper controlto the position.Your rearwiper bladesare automaticallyheated to helpreduce any
icebuild upon your rearwindshield.
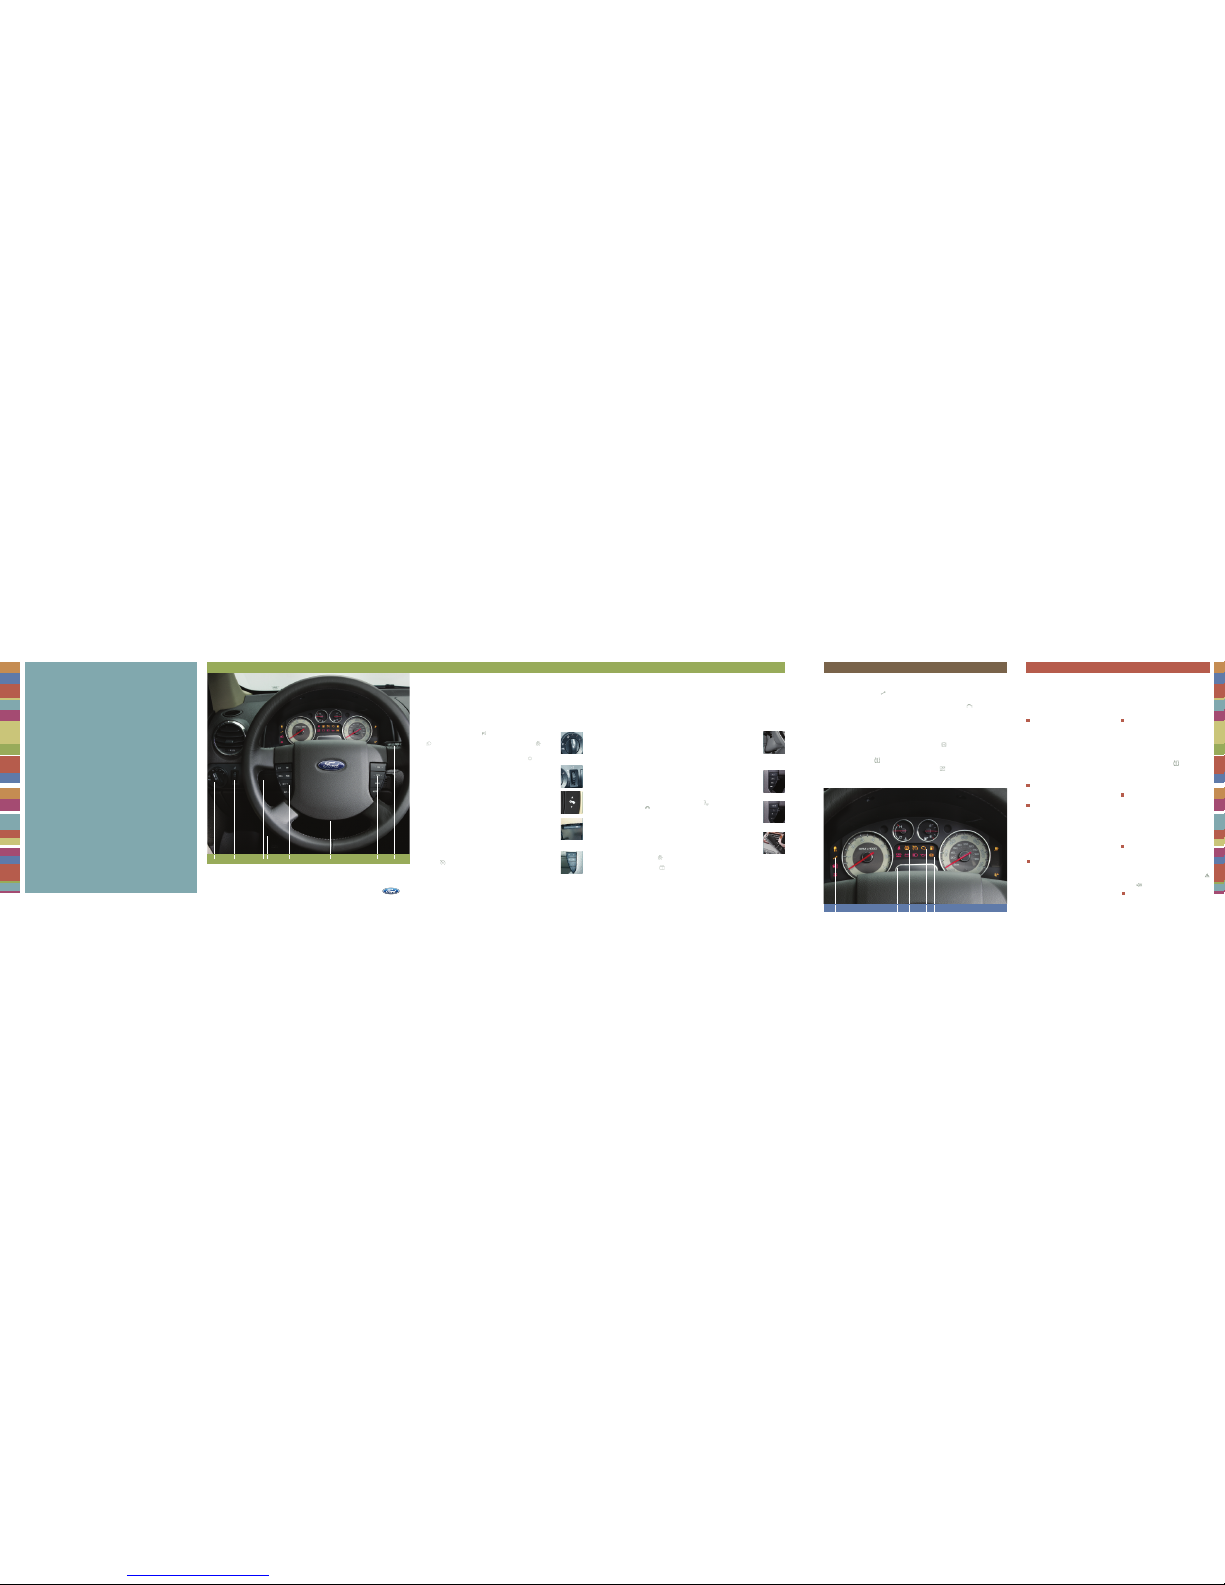
TEN TWELVE THIRTEEN
NINE | THROTTLE CONTROL/
TRANSMISSION LAMP
Thethrottle control/transmissionlight illuminateswhen
apowertrainor anAWDfault hasbeendetected.Contact your
authorizeddealeras soonaspossible.
TEN | MESSAGECENTER
Themessagecenter displaysimportantvehicleinformationby
constantlymonitoringvehiclesystems.Youmay selectdisplay
featureson the messagecenter fora display ofstatus. The
systemwillalso notifyyouof potentialvehicleproblemswith a
display of systemwarnings. For more information, please
consultyourOwner’s Guide.
ELEVEN| LOWTIREPRESSUREWARNING
Your vehicleis equipped with a Tire Pressure Monitoring
System(TPMS).Thisindicatorlight illuminateswhenyour
tirepressureis low.Whentheignition isturnedon, thelightwill
illuminatefora fewsecondsto ensurethatthebulb isworking.
If the light remainson, or begins to flash, check the tire
pressure.Iftheissue persists,havethesysteminspectedby an
authorizeddealer.Formoreinformationon thissystem,referto
TirePressureMonitoringSystem inyourOwner’s Guide.
TWELVE | SERVICEENGINE SOON
Theser viceengine soon light illuminateswhen the
ignitionis first turned onto check the bulb.If the lamp
turnssolid or blinks, theOn Board Diagnostics System
hasdetected a malfunction. Drivein a moderatefashion
(avoidheavy accelerationor deceleration) and haveyour
vehicleserviced immediately.
THIRTEEN | ABSWARNINGLIGHT
TheABS light illuminatesbriefly whenthe ignition is
turned on.If the ABS light remains onor continues to
flash,a malfunctionhas beendetected. Havethe system
servicedimmediately by yourauthorized dealer. Normal
braking (less ABS) is still functional unless the brake
warninglight is alsoilluminated.
ELEVENNINE
TAURUS X
2009
QUICKREFERENCE GUIDE
INSTRUMENTPANEL AND
INTERIOR
FEATURES
LOCATIONOF SPARETIRE
Ifyou get aflat tirewhile driving, donot applythe brake
heavily.Instead,gradually decreaseyour speed.Hold the
steeringwheel firmlyand slowlymove toa safe placeon
the side of the road. Yourvehicle is equipped with a
temporaryspare tire.The spare tireand jackare located
underthe carpetedfloor panelinthe rearof thevehicle. If
the3rd row seatis stowed inthe floor, youwill need to
unstowit to gainaccess to the sparetire and jack.The
temporaryspare isdesigned foremergency useonly and
should bereplaced as soon as possible.For complete
detailson howto changeyour tire,refer tothe Roadside
Emergencieschapterin yourOwner’s Guide.
FUSES
Ifyour electricalcomponents arenot working properly,a
fusemay haveblown.Please consultyourOwner's Guide.
FUELTYPEANDTANKCAPACITY
Depending on whether youhave a Front Wheel Drive
(FWD)or AllWheelDrive (AWD)vehicle andifyour vehicle
hasa specialemissions package,your fueltank capacity
will eitherbe 20 gallons (75.7L)or 20.5 gallons (77.6L).
Your vehicle is designed to use “Regular” unleaded
gasolinewith anoctane ratingof 87.Do notuse gasoline
labeledas “Regular” inhigh altitude areasthat are sold
with octaneratings less than 87. Yourvehicle was not
designed to runon E85 fuels that are blended with a
maximumof 85%ethanol.
ALLWHEELDRIVE(AWD)(IFEQUIPPED)
Yourvehicle maybe equipped withAll Wheel Drive(AWD).
TheAWDsystem isalways activeanduses allfour wheelsto
powerthe vehicle. Thisincreases traction,enabling you to
driveoverterrainand roadconditionsthata conventionaltwowheeldrive vehiclecannot.Refer to yourOwner’sGuide for
moreinformation.Note:If yourvehicleis equippedwithAWD,
aspare tire ofa differentsize (other thanthe tireprovided)
shouldnever beused.Using adifferent sizecouldcause the
AWDsystem tostop functioning anddefault tofront wheel
drive.Yourvehicle isnotintended foroff-roaduse.
TIREPRESSURE
Your tire pressure is properly set at the dealership
accordingto the recommendedspecifications found on
the SafetyCompliance Certification Label orTire Label
locatedon the B-Pillar orthe edge ofthe driver’s door.
Check your tire pressure at least once a month and
before longtrips (including spare). As anadded safety
feature, your vehicle has been equipped with a Tire
PressureMonitoring System (TPMS)that illuminates
alow tire pressurewarning light when oneor more
of your tires is significantly under-inflated. Improperly
inflated tires can affect vehicle handling and can fail
suddenly, possibly resulting inloss of vehicle control.
Referto theTires, Wheelsand Loadingchapter inyour
Owner’sGuide formore details andsafety information.
ROADSIDEASSISTANCE
Yournew Ford TaurusX comeswith the assuranceand
support of 24-hour eme rgency roadside assistance.
Roadsideassistance includes suchservices as: lockout
assistance,limitedfueldelivery,batteryjumpstarts,changing
a flat tire,towing, and winch out. To receive roadside
assistancein the UnitedStates, call1 (800)241-3673. In
Canada,call 1 (800)665-2006. For moreinformation on
coverage period and details of service, refer to your
RoadsideAssistance informationcard.
S.O.S.POSTCRASHALERTSYSTEM
Yourvehicle isequippedwith the S.O.S.PostCrash Alert
system.This systemprovidesaudible andvisualalarms in
the event ofa crash which causes the deployment of
airbagsor theactivation of thesafety beltpretensioners.
The turn signalswill flash and the horn will sound.To
deactivatethesystem, pressthehazard flashercontrol
(locatedon theinstrument panelby theradio), oryou can
pressthe buttonon yourremotetransmitter.
HAZARDFLASHERCONTROL
Press to activate the front and rear direction signals
when yourvehicle is disabled and is creating asafety
hazardfor othermotorists. Press againto turnoff.
2005TAURUSX
ESSENTIAL
INFORMATION
“YOUR
ADVENTURES
ARE ABOUTTO BEGIN.”
ONE
TWO
THREE
FOUR FIVE SIX
SEVEN EIGHT
Useextreme caution whenusing anydevice or
feature that may take your attention off the
road. Your primary responsibility is the safe
operationof thevehicle. Onlyuse non-essential
featuresand deviceswhen it issafe todo so.
Yournew Ford TaurusX speaksvolumes without sayinga word.
Not onlydoes the Taurus Xsurround you with sleek,trim good
looksand unexpectedluxury, butit surroundsyou withsafetytoo.
Winningthe HighwayTraffic SafetyAdministration’s highest5star
ratingfor front, sideand rearcrash tests,your newFord TaurusX
israted asthe safestseven passengercrossover inAmerica.Now
that’s something.It’s listing as a‘top safety pick’is no surprise
with features like the Safety Canopy™ system, the Personal
Safety system™, optional All Wheel Drive, standard electronic
stabilitycontrol, theS.O.S. PostCrash AlertSystem aswellas the
SPACE™architecture (SideProtection and CabinEnhancement);
which utilizesadvanced crash forcemanagement techniques to
helpchannel impact forcesaround andaway fromthe passenger
cabin. All of thisad dsup to complete 5-star protection in the
spaciousand comfortable TaurusX crossover.
 Loading...