

Ford 2007 Transit Owner's Handbook Manual
Supplementary Owner's Handbook
Ford Transit 8/9 Seat Minibus
February 2007 on

1
The illustrations, technical information, data and descriptions contained in this publication,
were correct at the time of going to print. VFS (Southampton) Ltd reserve the right to make any
changes necessary in line with continuous development and improvement.
No liability can be accepted for any inaccuracies or omissions in this publication, although due care has
been taken to make it as complete and accurate as possible. This publication describes options and
trim levels available throughout the Ford Transit 8/9 Seat Bus model range,
and therefore some of the items covered may not be available or apply to your vehicle.
This publication may not be duplicated, reprinted, stored in a data processing system or transmitted
by electronic, mechanical, photographic or other means, or recorded, translated, edited, abridged or
expanded without the prior written consent of VFS (Southampton) Ltd.
The same also applies for parts of this manual and their use in other publications.
© Copyright 2006. Issued by VFS (Southampton) Ltd. Part No: VFS01-16-062A
Printed by: Bob Watkins Artwork & Design 01708 222322. Printed on totally Chlorine-free (TCF) paper

Table of Contents
2
Table of Contents
Introduction 3
Legal Requirements 4
Tachograph
Vehicle Layout 5
Doors 6
Overview
Opening sliding doors
Occupant Protection 7
General references
Rear compartment seating
Locks 8
Locking the vehicle
Unlocking the vehicle
Alarm 12
Arming the perimeter alarm
Triggering the perimeter alarm
Disarming the perimeter alarm
Lighting 14
Stepwell illumination
Luggage compartment illumination
Climate Control 16
Seats 19
Cab seats
Rear Passenger seats
Luggage 21
Emergency Equipment 22
Information & Warning Decals
23
Maintenance 24
Vehicle Identification 25
Technical Specifications 26
Wiring Diagrams 27
Luggage compartment Illumination
Stepwell Illumination
Spare Parts 29
Parts supply
Parts Lists
Parts listing by category including
diagrams
Warranty 39
Index 40
Maintenance & Repair Log 42

Introduction
3
This supplementary owners handbook must be referred to in addition
to the standard Transit owners handbook. Read and understand both
manuals and familiarise yourself with the vehicle before operating the
vehicle on the road.
Note: This manual only details the features on the Transit 9 seat bus
that are not covered in the standard Transit owners manual, therefore
it is imperative that this manual is kept with the standard Transit owners
guide at all times.
Note: Always use and operate your vehicle in line with all applicable
laws and regulations.
Note: Pass on this handbook when selling your vehicle, it is an integral
part of the vehicle.
SYMBOLS GLOSSARY
Symbols in this handbook
You risk death or serious injury to yourself and others
if you do not follow the instructions highlighted by the
warning symbol.
Warning
!

Legal Requirements
4
The Transit 9 seat minibus complies with all UK vehicle legislation.
Before taking the vehicle outside the United Kingdom, local legislation
of the destination country and any countries that are travelled through
must be checked to ensure compliance.
Tachograph
If it is intended that the vehicle is taken outside of the United Kingdom
a tachograph will be required.
For use within the UK a tachograph may be required under certain use
conditions defined in 'Drivers Hours and Tachograph Rules for
Passenger Vehicles in the UK and Europe' and revisions, copies of
which can be obtained from VOSA at the Department for Transport.
Vehicle Layout
5
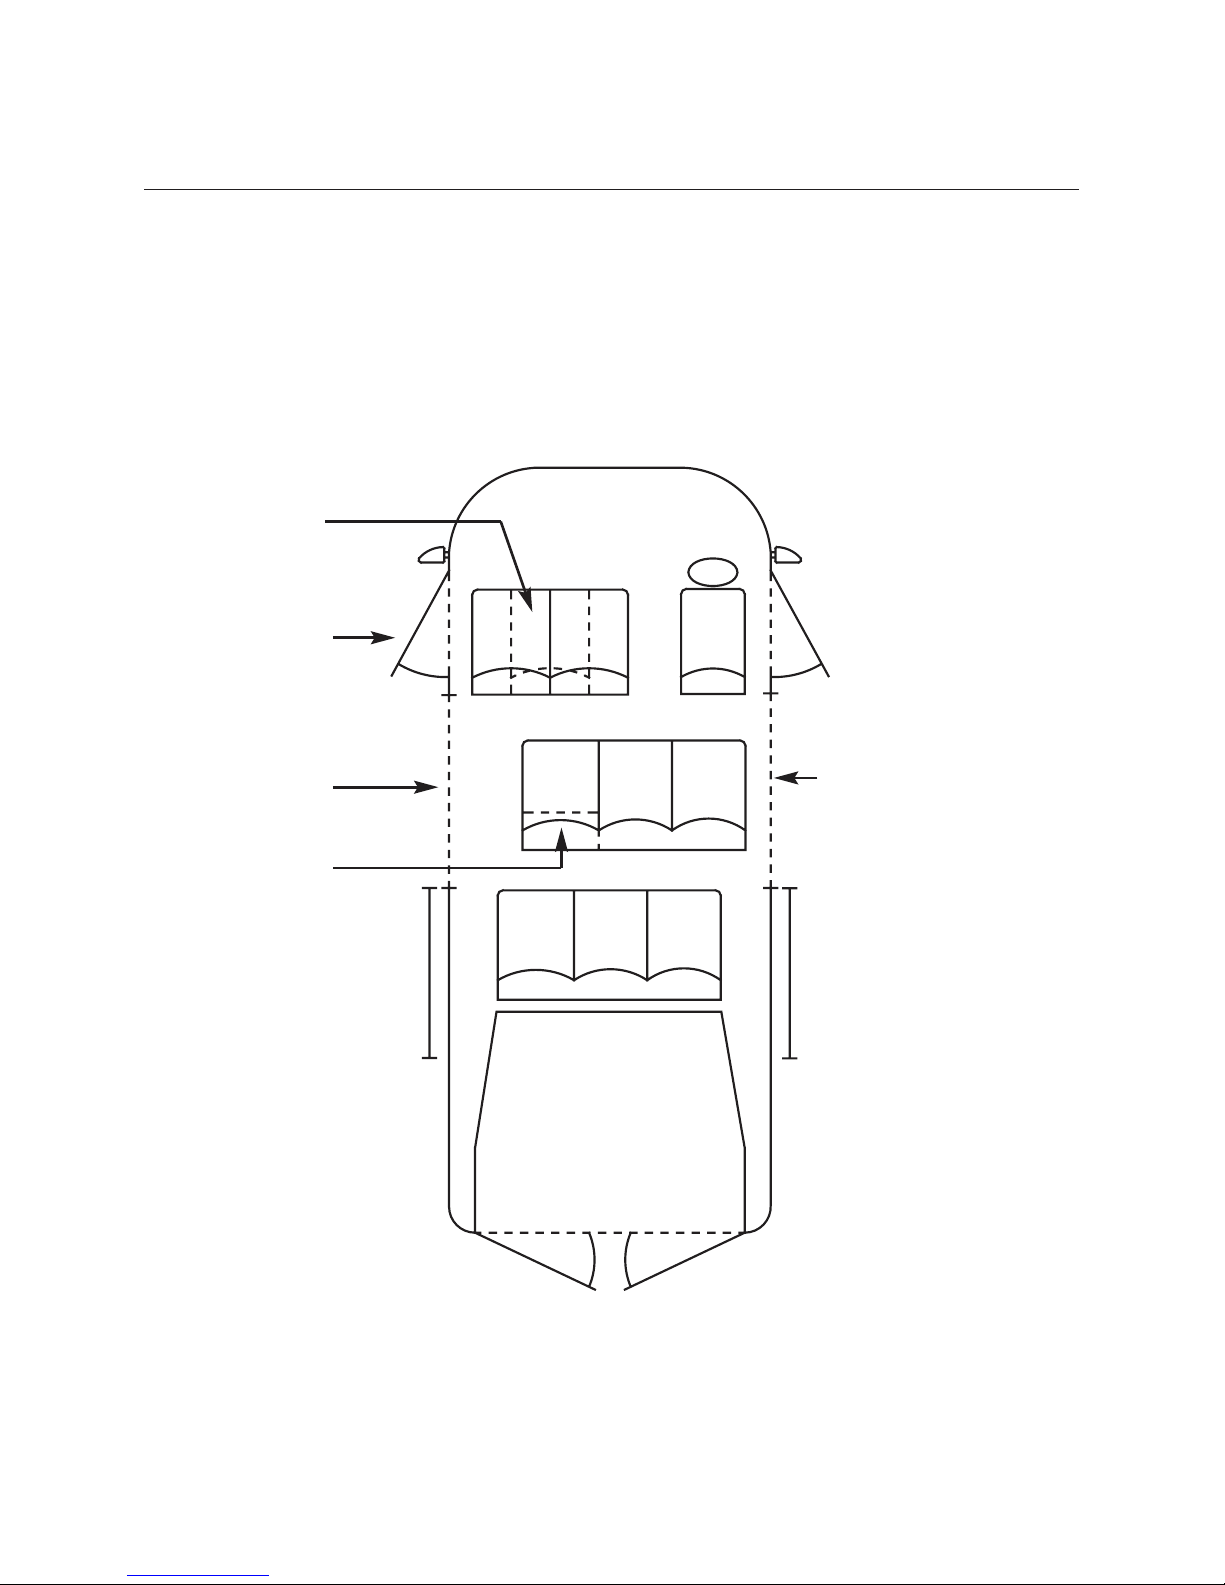
Familiarise yourself with the layout of the vehicle, before operating.
Knowing the position and control of the entry/exit doors is essential to
the safe operation of the vehicle and safety of the passengers.
The luggage compartment can only be accessed from the rear
of the vehicle.
Single passenger
seat for 8 seat
variant
Front passenger
entrance / exit
Rear compartment
entrance / exit
Folding seat
back
Drivers door
Rear
compartment
entrance/
exit
Seats
Row 1
Row 2
Row 3
Luggage
Rear luggage
compartment doors

Doors
6
Opening sliding doors
To open from the inside or
from the outside pull the door
handle and then slide the door
backwards until it engages
with the stop.
To manually lock a sliding door,
turn the locking knob on the
inside of the door to the locked
position. To unlock, turn it to
the unlocked position.
Make sure that the roof rack and its load do not obstruct
the sliding door. Ask your dealer for advice on roof racks
suitable for your vehicle.
Warning
!

Occupant Protection & Child Safety
General requirements:
Refer to Transit owners handbook – 'Occupant protection' and 'Child
safety' for details relevant to the cab compartment.
Rear compartment seating:
Refer to Transit owners handbook – 'Occupant protection' and 'Child
safety'.
Row 2 – Row 2 is equipped with ISOFIX anchor points – see 'Child
safety' in the Transit owners manual for further info. Standard lap and
diagonal seat belts are supplied with row 2.
7

8
Locks
Please refer to the Transit owner's handbook for details on 'Keys and
Remote Controls', 'Alarm', and 'Engine Immobiliser'. The perimeter
alarm can be specified as an option on the 9 seat bus, no other alarm
options are available.
Locking the vehicle
Type of locks:- Power locking with remote key entry.
Locking the vehicle using the remote control buttons
To lock all the doors on the vehicle, press the 'lock' button on the
remote key once. Pressing button twice for double locking.
Warning - Passengers will not be able to exit the vehicle in an
emergency if it is double locked
A Lock
B Unlock
C Cargo Lock
Press the lock button once.
A
CB

9
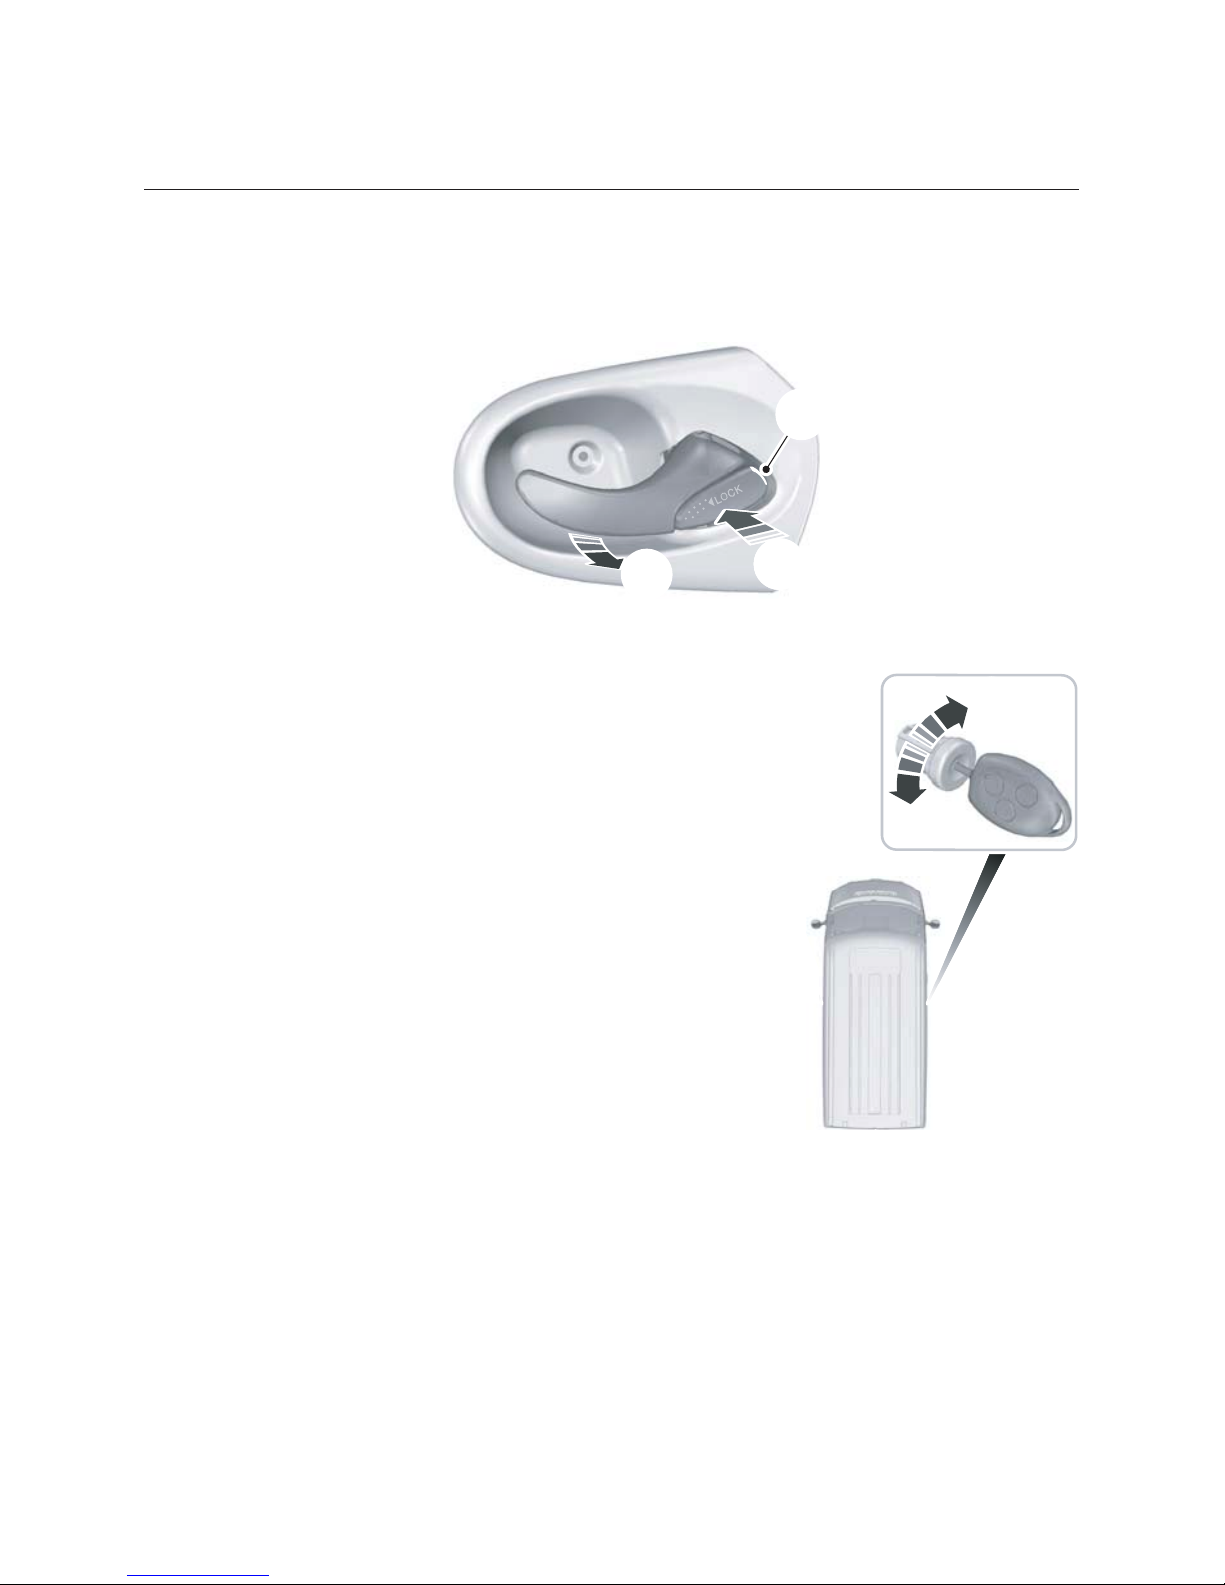
Locks
Locking the vehicle using the
internal door controls
To lock all the doors on the vehicle,
push the driver's or passenger's
interior door handle.
A
B
B
E71286
B
C
A
A White mark
B Lock
C Unlock
If you see the white mark
the door is locked.
Locking the vehicle using the
mechanical key
To lock all the doors on the vehicle, turn
the key in the lock to position B.
A Unlock
B Lock

10
Locks
Visible locking feedback
A locking action is indicated to the user by a single long flash of the
direction indicators. Locking feedback is only given once the vehicle is
in its most secure locking state. For all vehicles, this is when they are
double locked.
If a lock attempt is unsuccessful (e.g. a door is still open), no locking
feedback is given.
Audible mislock feedback
If a lock attempt is unsuccessful (e.g. a door is still open), then mislock
feedback is indicated to the driver by a short beep of the vehicle horn.
Audible mislock feedback is standard on all vehicles with power
locking, but can be disabled or enabled by a Ford dealer.
Locks
Unlocking the vehicle
Unlocking the vehicle using the internal door controls
To unlock the vehicle,
pull the driver's or
passenger's interior
door handle.
It is not possible to unlock the rest of the vehicle from the rear door
interior door release.
Unlocking the vehicle using the
mechanical key
To unlock the vehicle, turn the key in the lock
to position A.
Unlocking the vehicle using the
remote control buttons
To unlock the vehicle, press the 'unlock' button. To unlock the rear
passenger compartment press the 'cargo unlock' button on the
remote key.
Unlocking feedback
An unlocking action is indicated to the user by two flashes of the
direction indicators. Unlocking feedback is only given for each
unlock action.
11
E71286
B
C
A
A White mark
B Lock
C Unlock
If you see the white
mark the door is locked.
A
BB

12
Alarm
Perimeter alarm
Perimeter alarm is an optional feature.
The perimeter alarm acts as a deterrent against unauthorised persons
opening the cabin, passenger area doors, bonnet or removing the
audio system. This is also operational when removing a trailer (if a Ford
trailer-tow kit is fitted).
Arming the perimeter alarm
The alarm is fully armed by …
Centrally locking the vehicle using the lock button on the remote key
The alarm is armed in reduce guard mode by …
Centrally locking the vehicle using the key in one of the door locks
In reduced guard mode, trailer detection is disabled.
Once the vehicle is locked, the 20 second arming delay begins. This
allows any open doors or the bonnet to be closed without triggering
the alarm. After 20 seconds the alarm arms.

Alarm
Triggering the perimeter alarm
The alarm is triggered when …
• Any door is opened
• The bonnet is opened
• An attempt is made to start the vehicle without a valid key
• An attempt is made to remove the radio
• A trailer that was connected at the time of arming is disconnected
(not reduced guard)
When the alarm is triggered, the alarm horns sound for 30 seconds and
the hazard lights flash for 5 minutes. If the trigger event has been
removed, the alarm re-arms. If a trigger event still exists, the alarm
horns will sound again.
Disarming the perimeter alarm
The alarm can be disarmed and silenced by…
• Unlocking the vehicle using the unlock button or cargo unlock
button on the remote key
• Unlocking the vehicle with the key
• Turning on the ignition with the correct key
13
 Loading...