

Page 1
ThisQuickReference Guideis not intendedto replace yourOwner’s Guide, which
containsmoredetailed informationconcerningthe features ofyour vehicle andimportant
safetywarningsto help reducethe risk ofinjury to you andyour occupants.Always read
yourentireOwner’s Guide carefullywhen firstlearning aboutyour vehicle andrefer to the
appropriatesectionwhen questionsarise.
FordMotor Company
CustomerRelationship Center
P.O.Box 6248
Dearborn,MI 48121
1-800-392-3673(FORD)
(TDDfor the hearing impaired: 1-800-232-5952)
April2007
FirstPrinting
QuickReference Guide
7L3J19G217 AA
F-150
Lithoin USA
E S S E N T I A L I N F O R M A T I O N
FUEL –Yourvehicle is designedto use "Regular" unleadedgasoline with pump (R+M)/2octane rating
of87.If your vehicle is a flexiblefuel vehicle (FFV), useonly unleaded fuel and fuelethanol (Ed 75 - Ed
85).For more information,please refer toyour Owner’s Guide.
TIRE PRESSU RE–Your tire pressureis properly set at thedealership to the recommended
specificationsfound onthe Tire Label or CertificationLabel located inside onthe edge of the driver'sdoor
pillar.Please checkyour tire pressure duringroutine maintenance and seasonalchanges.
FUSES –
Ifelectrical componentsin the vehicle are notworking, a fuse may haveblown. For more
informationabout changinga fuse, refer to yourOwner's Guide.
FUEL PUMP SHUT-OFF SWITC H–After a collision, ifthe engine cranks but doesnot start, the fuel
pumpshut-off switchmay have to be reset. Theswitch is located in thefront passenger's footwell,
behindthe kick panelaccess cover, to theleft of the fuse box.For complete details onresetting the
switch,refer to yourOwner's Guide.
CHANGI NGTHE TIRE S–For more informationon changing the tires,refer to your Owner’s Guide.
LOCATIO NOF THE SPARE TIRE ANDT OOLS
ITEM LOCATION
SpareTire Underthe vehicle,just forward of the rearbumper.
Jack,Jack Handle,
WheelNut Wrench
2007 QuickReference Guide
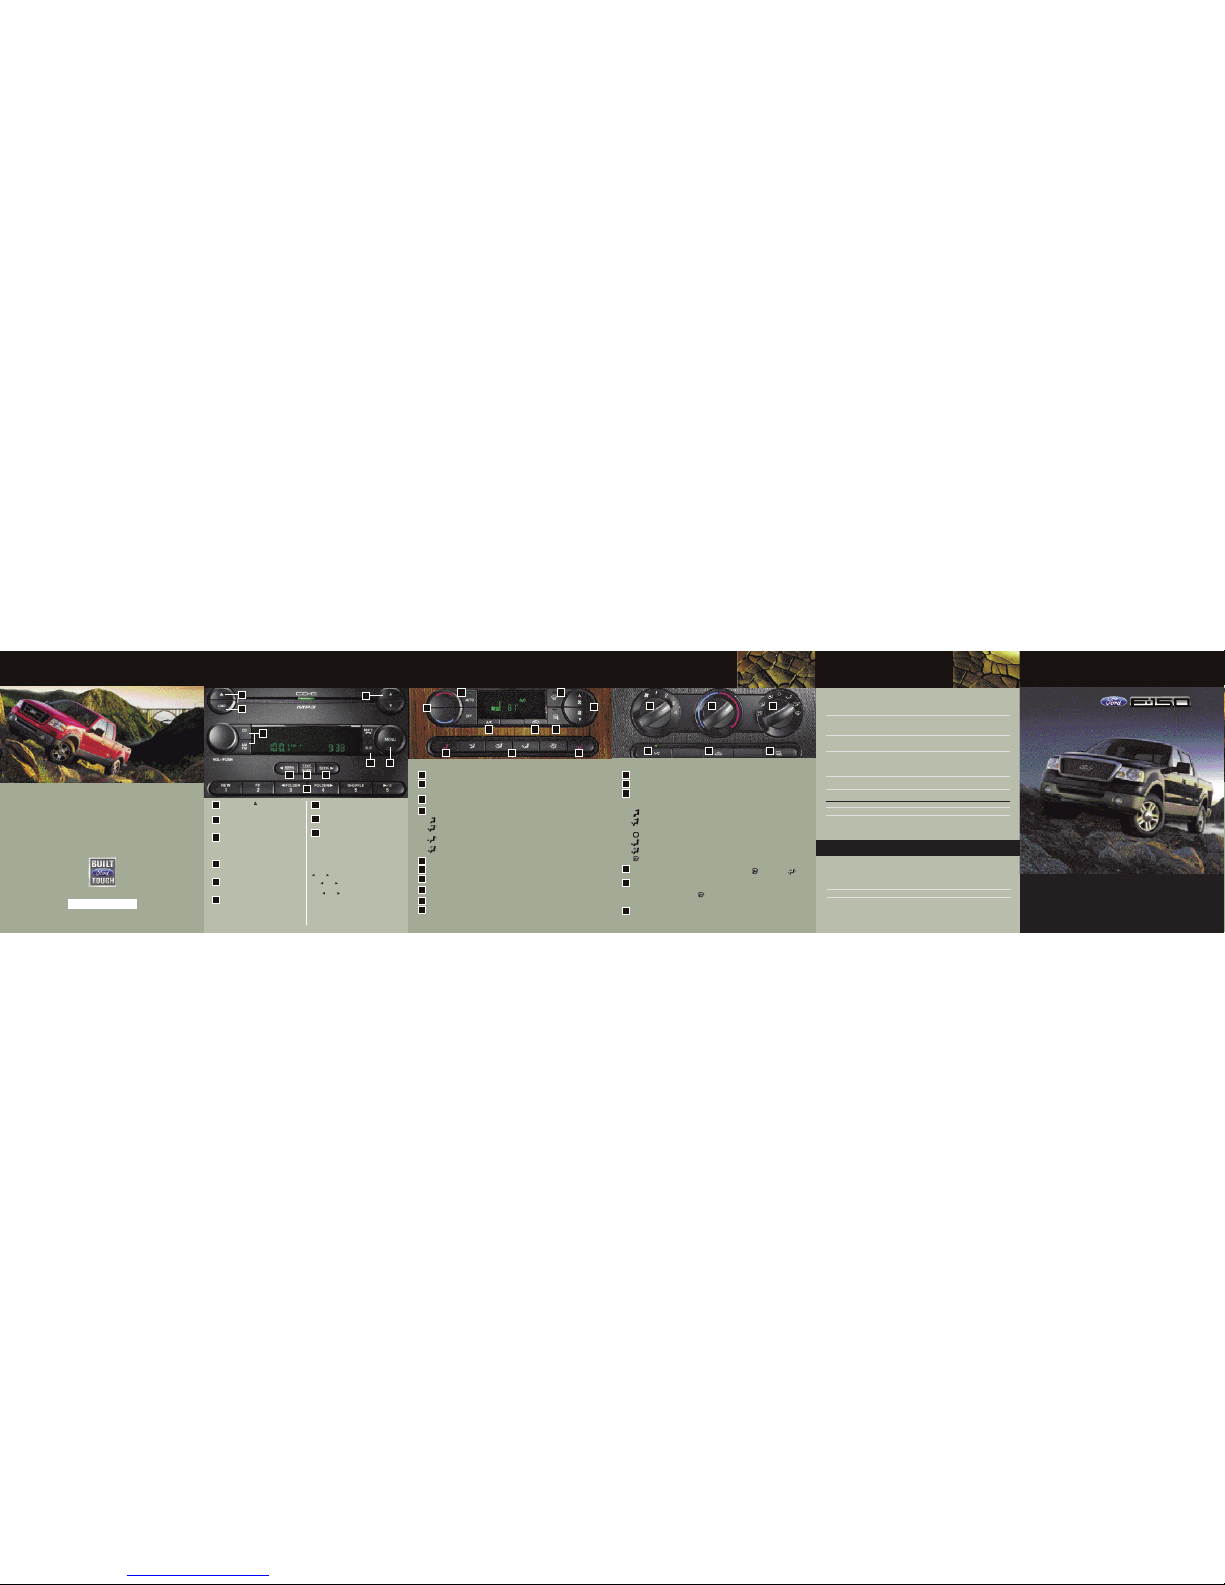
PR E M I U M / A U D I O P H I L E IN - D A S H S I X CD / M P 3 /
SA T E L L I T E CO M PA T I B L E SO U N D SYS T E M (If equ ippe d)
REGULARCAB: Behindtheinterior trimon the rear
passengerside ofthe vehicle.
SUPERCABand SUPERCREW:Under the rearseat
onthe passengerside of the vehicle.
1
1
2
2
8
9
5 6 7
3
6
7
8
3 4 10
454
CDEJE CT:Press anda preset (1-6) to
ejecta CD. Press and hold to auto-eject all
CDspresent in the system.
TUNE/DISC SELECTOR:Press tomanually
moveup or down the radio frequency or to
selecta desired disc. Also use in menu mode to
selectvarious settings.
MENU:Press repeatedly to cycle through
thefollowing modes: Category (if equipped
withsatellite radio), Treble, Bass, Balance, Fade,
SPEEDVOL(Speed Sensitive Volume, if equipped),
ALLSEATS (Occupancy Mode), Clock,Autoset,
Track/Folder,Compression, and RBDS.
SEEK:In radio mode, press to move to the
nextstrong station up or down the
frequencyband. In CD mode, press to move to the
next/previoustrack on the current disc.
TEXT/SCAN:Press andhold for a brief
samplingofstations or CD tracks.In CD/MP3
mode,pressand release to displaytrack title,artist
name,disc titleand file name(if available).
SETTING MEMORYPRESETS: Selectthe
desiredradio station or satellite radio
channel(if equipped). Press and hold a memory
preset(1-6) until the sound returns. Youmay store
upto six stations in AM/FM1/FM2, SAT1,SAT2
andSAT3.
AM/FM ANDCD:Press AM/FM to select
AM,FM1 or FM2 frequency bands. Press
CDto enter CD/MP3 mode.
LOAD:Press LOAD and then a preset
numberto select a slot. Press and hold
LOADto activate autoload, for loading up to 6CDs.
SATELLITER ADIOFEATURES AND
CONTROLS (ifequipped):
AUX:Press repeatedly to cycle through FES/DVD
(ifequipped), SAT1,SAT2, SAT3 (satelliteradio
modeif equipped) or LINE IN (auxiliary audio
modeif equipped). Once satellite radio mode is
activatedyou may use the following functions:
PressMENU until CATEGORYMODE appearsin
thedisplay.CATEGORY ALL willallow you to seek
allavailable SIRIUScategories and channels. Press
SEEK orTEXT/SCAN to select from various
categoriesof music (country,rock, etc.). Pressand
hold SEEK orTEXT/SCANto search for
channelsplaying thatspecific category of music.
Press SEEK toaccess the previous/next
channels.Press and release TEXT/SCAN to
displaycurrent song title. Press again to scroll
throughcurrent song title, artist, channel category
andthe SIRIUS long channel name. Press and
holdfor a brief sampling of the next channels.
Pressagain to stop.
Ifyourvehicle is equipped with the navigation system, please refer to the
NavigationSupplementfor more information.
1
2
3
4
5
6
7
8
9
9
TEMPER ATURE CONTROL:
Increases/decreasesthetemperatureof the vehicle.
AUTO: Pressto engage and select the desired temperature usingthe temperature control. The
systemwill automatically determine fan speed, airflow location, A/C onor off, and outside or
recirculatedair, to heat or cool the vehicleto reach the desired temperature.
DRIVER HEATE DSEAT CONTRO L(ifequipped): Press once to activate high heat; press a
secondtime to activate low heat. Press a third timeto deactivate.
AIRFLO WDIR ECTION CONTROLS: This mode allows you to choose the air distribution mode
youdesire.
:Distributes air through the instrument panel and center consoleregisters.
:Distributes air through the instrument panel, center console registers(if equipped), and the
frontand rear seat floor vents.
:Distributes air through the floor and rear seat floorvents. The system will automatically
provideoutside air to reduce window fogging.
:Distributes air throughthe windshield defrostervents, demister outlets, andthe front and rear
seatfloor vents. Thesystem will automatically provideoutside air to reducewindow fogging.
A/C: Activates/deactivatestheair conditioning.
RECIRC ULATION: Recirculates air in thecabin, thereby reducing the amount of time to cool
downthe interior of the vehicle when used with A/C.
HEATED MIRROR S(ifequ ipped):Press to activate/deactivate. This function will clear snow, fog
andthin ice from the side rear view mirrors.
DEFROS T:Used to clear iceor fog from the windshield by distributing air through the windshield
defrostervents.
FAN SPEED CONTROL: Increases/decreasesthe fan speed.
PASSENG ERHE ATEDSE ATCONT ROL(if equipped): Press once toactivate high heat; press
asecond time to activate low heat. Press a thirdtime to deactivate.
MAX A/C OVERRIDE OF AUTO FUNCTION: Selectairflowdirection. Then select A/Cand
recirculatedair.Set the temperature setting to60°F. Adjustfan speed to maintain comfort.
FAN SPEED ADJUSTME NT:Controls the volume ofair circulated in the vehicle.
TEMPER ATURE SELECTION DIAL: Controlsthe temperature of the airflow inthe vehicle.
AIRFLO WSEL ECTION DIAL: Controlsthedirection of the airflow in the vehicle.
:Uses recirculated air to cool the vehicle. Air flowsfrom the instrument panel vents and center
consolevents (if equipped).
:Distributes air through the instrument panel vents and centerconsole vents (if equipped).
:Distributes air through the instrument panel vents, center consolevents (if equipped) and the
floorvents.
:(OFF) Outside air is shut out and the climatesystem is turned off.
:Distributes air through the floor vents.
:Distributes air through the windshield defroster vents and floorvents.
:Distributes outside air through the windshield defroster vents.
A/C
(ifequipped):
Pressto activate/deactivateair conditioning. Use withrecirculated air to
improve
coolingperformance. A/Cengages automatically in MAXA/C, defrost andfloor defrost modes.
RECIRC ULATED AIR:Press to manually enable or disable recirculated air operation. When
activated,air recirculates in the cabin, reducing the amount oftime to cool down or warm up the
interiorof the vehicle. This feature engages automatically with MAXA/C or can be engaged
manuallyin any mode except defrost .Recirculationmay turn off automatically in all airflow
selectionsexcept MAX A/C.
HEATED MIRROR S(ifequipped): Press to activate/deactivate. This function will clear snow,fog
andthin ice from the side rear view mirrors.
AUTOMAT ICTE MPERAT URE CONTROL (ifequipped) MANUA L TEMPERATU RE CONTROL (ifequipped)
C L I M A T E CO N T R O L SY S T E M S
1
2
3
4
5
6
1
2
3
4
5
6
7
8
9
10
1 2 3
4 5 6
MAX
A/C
ROADSI DEEME RGENCIES
Tofully assist you if you shouldhave a vehicle concern, Ford offers a complimentary Roadside
AssistanceProgram. This program is separate from the New VehicleLimited Warranty. The service
isavailable 24 hours a day,seven days a week for the New Vehicle Limited Warrantyperiod (U.S.)
orBasic Warranty period (Canada) of threeyears or 36,000 miles (60,000 km). Roadside
Assistancewill cover: Changing a flat tire, jump-starts, limited fuel delivery,lock-out assistance,
andtowing of your vehicle.
RoadsideAssistance Centers:UNITED STATES(800) 241-3673 | CANADA(800)665-2006
Forcompletedetailsonanyroadsideassistanceconcern,seetheRoadsideEmergenciessectionortheCustomerAssistancesectioninyourOwner’sGuide
.
*7L3J_19G217_AA*
Page 2
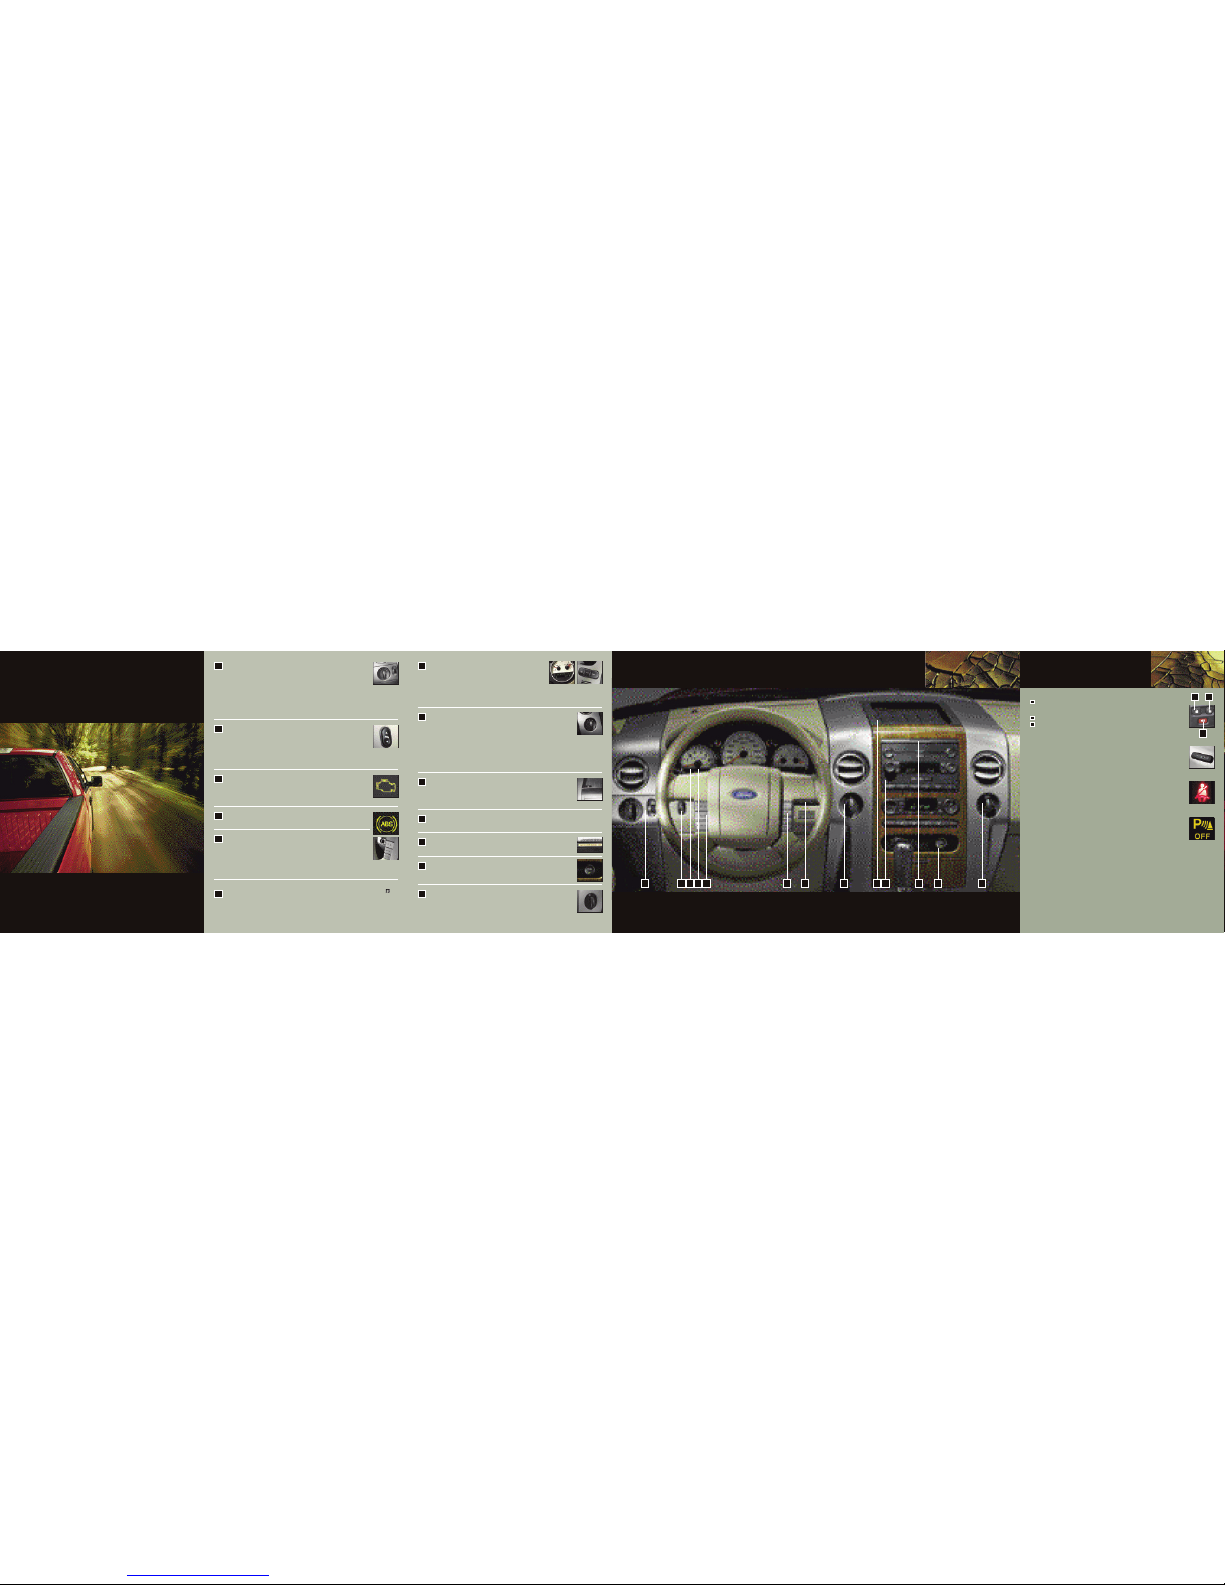
HEADL AMPAN DPANEL DIMM ERCON TROL
Rotatethe control clockwise one position from off to turnon the parking lamps.
Rotatetwo positions from off to also turn on theheadlamps. Rotate counterclockwise
fromoff to activate autolamp (if equipped), which provides light-sensitiveautomatic
on/offcontrol of the exterior lights and keeps them onfor a short period of time after
theignition is turned off. When the control is inany position except high beams or off,
pullthe control toward you to activate the foglamps (ifequipped).
Usethe panel dimmer control, located to the right ofthe headlamp control, to adjust the brightness of
theinstrument panel during the headlamps and parking lamps operation.Rotate to the full up position,
pastthe detent, to turn on the interior lamps. Rotateto the full down position, past the detent, to
preventthe interior lights from illuminating when doors are opened.
POWER ADJUSTA BLEP EDALS (ifequipped)
Pressand hold the top end of rocker control toadjust the accelerator and brake
pedalsaway from you. Hold the lower end of thecontrol to move the pedals toward
you.Adjust the pedals only when the vehicle is stoppedand the gearshift lever is in the
P(Park) position.
Ifequipped with memory function, the adjustable pedals, along with the driver'sseat, can be
automaticallypositioned in two programmable positions using the control locatedon the driver's seat.
Referto your Owner's Guide for instructions on how touse this memory feature.
SERVIC EENG INESO ONLA MP
Illuminatesbriefly when the ignition is turned to the ONposition, to ensure the
systemis functional. If the light comes on after theengine is started, refer to your
Owner'sGuide. This lamp will illuminate if the fuel capis not fully secured. In addition,
"Checkfuel cap" will appear in the message center display(if equipped). Make sure that
thefuel cap is secure by turning it clockwise 1/4of a turn until it stops.
ABS WARNING LAMP
Illuminatesbriefly when the ignition is turned to the ONposition. If the light
comeson after the engine is started, refer to yourOwner's Guide.
SPEED CONTRO L(if equipped)
Toset the speed control, press theON button and release. Accelerate to the
desiredspeed and press the SET button and release. Oncethe system is engaged, an
iconwill appear in the instrument cluster. Toincrease speed, tap the SET button and the
speedwill increase in small increments each time, or usethe accelerator pedal to reach
desiredspeed and then press SET.To reduce speed, press and hold CST until desired
speedis reached. Release or tap the CSTbu ttonand speed will decrease in small increments. Also, you
candepress the brake pedal until desired speed is reachedand press SET. Press RES/RESUME to return
thevehicle to a previously set speed if the vehicleis traveling more than 30 mph (48 km/h).
STEERI NGWHE ELCO NTROLS (ifequipped)
Thesecontrols allowyou to operate features ofthe radio and climate controlsystems. Press to
selectAM, FM1,FM2 (if equipped), TAPE,CD, FES/DVD, AUX(if equipped) or SAT1,SAT2, or
SAT3,if yourvehicle is equipped withthese features. In AM, FM1or FM2 mode, press andrelease SEEK
toselect the nextpreset station or press andhold SEEK to select thenext strong station withinthe
selectedradio band.In CD mode, press and releaseSEEK to select the nexttrack selection on theCD or
pressand hold SEEKto fast forward in the currenttrack selection. In CDmode, press SEEK to selectthe
nextselection on theCD. In any mode, pressVOL + or – to adjustvolume. Press TEMP + or– to adjust
temperatureand FAN+ or – to adjustfan speed.
MESSAG ECEN TER(if equipped)
Withthe ignition on, the message center displays important
vehicleinformation through a constant monitor of vehicle systems. The
systemwill notify you of potential vehicle problems by displaying
warnings,followed by a long indicator chime. Youmay select the INFO
orSETUP buttons on the message center to display tripodometer, odometer, compass, distance to
empty,average fuel economy,and trip elapsed drive time. The RESET button may be used toreset
selectedfunctions in the INFO and SETUP menus. Formore information about message center
functions,please refer to your Owner's Guide.
FOUR-W HEELD RIVEC ONTROL (ifequipped)
2H(2WD HIGH) delivers power to the rear wheels onlyand is the optimal
positionfor smoothness and fuel economy. 4H(4x4 HIGH) provides mechanically
lockedfour-wheel drive power to all four wheels. 4L (4x4LOW) provides mechanically
lockedfour-wheel drive when extra power at reduced speeds isrequired. With either
anelectronic shift 4WD system or manual 4WD system, toshift from 2H to 4H move the control at any
forwardspeed up to 55 mph (88 km/h). Toshift to or from 4L, bring the vehicle to a stop andkeep the
brakepedal depressed. Next, place the gearshift in N (Neutral),and then move the control to or from 4L.
Somemechanical noise may be heard when the system engages.This is normal and no service is
required.Note: The manual 4WD system has an N (Neutral)position in the transfer case. This setting
overridesthe transmission and puts the vehicle in Neutral regardlessof gearshift position. This setting
shouldonly be used when towing the vehicle.
AUXILI ARYIN PUTJA CK(if equipped)
Yourvehicle may be equippedwith an Auxiliary Input Jack (AIJ) located in the
instrumentpanel tray. This allows you toplug and play auxiliary audio devices.
PressAUX repeatedly on your audio system to access.When LINE IN appears in the
display,plug in your auxiliary audio device. Formore information, please refer to your
Owner’sGuide.
IN-DAS HCD6/ MP3D ISCAU DIOSY STEM(if equipped)
Pleasesee reverse side for more details.
PASSENG ERAI RBAGD EACTIVATED LAMP (ifequipped)
Pleaserefer to the Seating and Safety Restraints section ofyour Owner's Guide
forinformation on the Passenger Airbag Deactivated Lamp.
TRACTI ONCON TROL™ (ifequipped)
TheTCS switch has an indicator light that illuminateswhen the system is off. The
systemwill automatically turn on every time the ignition is turnedoff and on. For more
information,please refer to your Owner’s Guide.
AUXILI ARYPO WERPO INT( 12V)
Anauxiliary power point is located on the instrument panel. ForSuperCab and
SuperCrewvehicles, there is an additional auxiliary power point located onthe lower
rearside of the center console that is accessible fromthe rear seats. Do NOT plug
optionalelectrical accessories into the cigarette lighter.
REMOTE ENTRY SYSTEM (ifequipped)
Pressthis controlonce to lockall doors.The parklamps willflash. Pressingthe control
asecond timewill chirp thehorn to confirmthat all doorsare closed andlocked, and
theparklampswill flash oncemore.
Pressthis control once to unlock the driver's door andtwice to unlock all doors.
Pressthis control to sound the panic alarm. Tosilence, press the control again, or
turnthe ignition on.
Theremote entry system can also control the memory feature (if equipped). Pleaserefer
toyour Owner's Guide for instructions on how to activatethis feature.
KEYLES SENT RYSYST EM(ifequipped)
Withthis control you can lock or unlock alldoors without using a key.
Unlockall doors = Enter the five-digit program codeand then press 3 • 4
Lockall doors = Press 7 • 8 and 9• 0 at the same time
DRIVER / PASSENGER BELTM INDER
TheBeltMinder featureis a supplemental warningto the safety belt warningfunction.
Thisfeature
providesadditional remindersby intermittently soundinga chime and
illuminatingthe safetybelt warning
lampin the instrumentcluster when the driver'sand
frontpassenger's safetybelts are unbuckled. Boththe
driver'sand front passenger's
safetybelt usages aremonitored and either mayactivate the BeltMinder feature.
REVERS ESEN SINGS YSTEM(RSS) (if equipped)
Thissonar system sounds a tone to warn the driverof obstacles near the rear bumper
whenthe reverse gear is selected. Obstacles can be detectedwithin approximately
6feet (2 m) behind the rear bumper while thevehicle moves in reverse at speeds less
than3 mph (5 km/h). The reverse sensing system defaultsto on, but can be disabled
byturning the ignition on, placing the gearshift in (R)Reverse and pressing the RSS control.
Anindicator light on the control, located next to thecigarette lighter, will illuminate when the system
isturned off.
TIRE PRESSU REMON ITORING SYSTEM (ifequipped)
Usingradio-frequency pressure sensors, this system monitors tire pressure onal lroad tires and
providesthe driver with a yellow warning light when airneeds to be added. Message center equipped
vehiclesprovide additional warning messages. The TPMS warning light willreset itself (turn off) after
thetires are set to specification and the vehicle isdriven above 20 mph (32 km/h) for at least 2
minutes.Please Note: Outside temperature affects tire pressure. Please referto your Owner’s Guide.
TOWING INFOR MATION
Formore details on towing with your vehicle,please refer to your Owner's Guide or request a copy
ofthe Ford Motor CompanyRV and Trailer TowingGuide fromyour dealer.
DOOR CONTROL S
TheFord F-150:there’s nothing like it on earth. It’sthe boldest, strongest, and most capableFord F-150
toroam the crowdedstreet or climba remote trail. Outside,its stance is firm.Inside, it initiatesa new era
oftruck design and comfort. Underneath, it is builton the strongest, most advanced F-150 chassisand
suspension ever. And above all, it is Built Ford Tough. The F-150 comes equipped with many new
features, some of which will require no explanation, while others may be new to you. This Quick
ReferenceGuide was designed toacquaint you with many of the featuresyou will use most. This Quick
ReferenceGuide isnot intended toreplace the vehicleOwner’s Guide. Pleaserefer to it formore detailed
informationon your F-150.
1
2
3
4
5
6
7
8
9
10
11
12
13
10 11 13123 4 5 876 921
A D D I T I O N A L F E A T U R E SC O C K P I T FE A T U R E S
132
1
2
3
 Loading...