

Ford 2006 Mondeo Owner's Handbook Manual
Owner's handbook
FordMondeo
100% Ford. 100% Enjoyment.

The information contained in this publication was correct at the time of going to print. In the
interest of development the right is reserved to change specifications, design or equipment
at any time without notice and without incurring any obligations. This publication, or part
thereof, may not be reproduced nor translated without our approval. Errors and omissions
excepted.
© Ford Motor Company 2006
All rights reserved.
Order Code: 6S7J-19A321-ADA (CG3369en) 12/2005 20060110211039

Introduction..................5
About this handbook........................5
Symbols glossary..............................5
Parts and accessories......................5
Quick start....................7
Child safety.................18
Child seats........................................18
Child seat positioning......................19
Booster cushions.............................21
Child safety locks............................24
Occupant
protection................25
Principle of operation.....................25
Seat belt reminder..........................29
Fastening the seat belts................29
Seat belt height adjustment..........30
Using seat belts during
pregnancy.....................................31
Airbag warning lamp.......................31
Keys and remote
controls...................32
General information on radio
frequencies..................................32
Programming the remote
control...........................................32
Changing the remote control
battery...........................................33
Locks..........................35
Locking and unlocking...................35
Global opening and closing...........40
Engine immobiliser.....41
Principle of operation......................41
Coded keys......................................41
Arming the engine immobiliser.....43
Disarming the engine
immobiliser...................................43
Alarm..........................44
Arming the alarm.............................44
Disarming the alarm........................44
Steering wheel...........46
Adjusting the steering wheel.........46
Horn..................................................46
Audio control...................................46
Voice control....................................47
Wipers and
washers...................48
Windscreen wipers.........................48
Windscreen washers.....................49
Rear window wiper and
washers........................................50
Adjusting the windscreen washer
jets..................................................51
Headlamp washers.........................51
Checking the wiper blades............51
Changing the wiper blades...........52
Lighting.......................53
Lighting control................................53
Front fog lamps...............................54
Rear fog lamps................................54
Adjusting the headlamps...............55
Headlamp levelling..........................55
1
Table of Contents

Hazard warning flashers................56
Direction indicators.........................56
Interior lamps...................................57
Changing a bulb..............................57
Approach lamps..............................66
Windows and
mirrors.....................67
Electric windows.............................67
Exterior mirrors................................69
Electric exterior mirrors..................70
Interior mirror...................................70
Instruments................72
Gauges.............................................72
Warning lamps and indicators.......73
Audible warnings and
indicators.......................................76
Information displays...78
Trip computer..................................78
Climate control...........80
Principle of operation.....................80
Air vents.............................................81
Manual climate control....................81
Automatic climate control.............84
Heated windows and mirrors.......86
Auxiliary heater................................87
Electric sunroof................................87
Seats..........................90
Sitting in the correct position........90
Manual seats...................................90
Electric seats....................................91
Head restraints................................92
Rear seats........................................93
Heated seats...................................95
Ventilated seats...............................95
Convenience
features...................97
Sun visors.........................................97
Instrument lighting dimmer............97
Clock.................................................97
Cigar lighter......................................97
Ashtray..............................................98
Auxiliary power sockets.................99
Cup holders.....................................99
Storage compartments.................99
Starting the engine...100
General information......................100
Ignition switch................................100
Starting a petrol engine................100
Starting a diesel engine.................101
Switching off the engine...............102
Fuel and refuelling....103
Safety precautions........................103
Fuel quality......................................103
Catalytic converter........................103
Fuel filler flap...................................104
Refuelling........................................104
Technical specifications................104
Transmission............109
Manual transmission.....................109
Automatic transmission................110
2
Table of Contents

Brakes.......................118
Principle of operation.....................118
Hints on driving with ABS..............118
Parking brake..................................119
Stability control.........120
Principle of operation....................120
Using stability control....................120
Traction control.........121
Principle of operation.....................121
Using traction control....................121
Self-levelling
suspension.............122
Principle of operation....................122
Parking aid................123
Principle of operation....................123
Using the parking aid....................123
Cruise control...........124
Principle of operation....................124
Using cruise control......................124
Load carrying...........126
General information......................126
Cargo nets......................................126
Luggage covers.............................127
Roof racks and load carriers........127
Towing......................129
Towing a trailer...............................129
Essential towing checks...............129
Detachable tow ball......................130
Driving hints..............133
Running-in......................................133
Emergency
equipment..............134
First aid kit.......................................134
Warning triangle.............................134
Status after a
collision..................135
Fuel cut-off switch.........................135
Inspecting safety system
components...............................135
Fuses........................136
Fuse box locations........................136
Changing a fuse.............................137
Fuse specification chart................137
Vehicle recovery.......141
Towing points..................................141
Transporting the vehicle...............142
Towing the vehicle on four
wheels.........................................143
Maintenance.............144
General information......................144
Engine compartment
overview......................................145
Opening and closing the
bonnet.........................................149
Engine oil check.............................149
Engine coolant check....................151
Automatic transmission fluid
check...........................................152
Brake and clutch fluid check.......152
3
Table of Contents

Power steering fluid check..........153
Washer fluid check........................153
Technical specifications................154
Vehicle care..............156
Cleaning the exterior....................156
Cleaning the interior......................156
Repairing minor paint damage.....157
Vehicle battery..........158
Battery care....................................158
Using booster cables....................158
Wheels and tyres......160
Changing a road wheel................160
Tyre care.........................................166
Using winter tyres..........................166
Using snow chains........................166
Technical specifications................167
Vehicle
identification..........172
Vehicle identification plate............172
Vehicle identification number
(VIN)..............................................172
Engine number..............................172
Technical
specifications.........173
Technical specifications................173
Type approvals.........183
4
Table of Contents
ABOUT THIS HANDBOOK
Congratulations on acquiring your
new Ford. Please take the time to get
well acquainted with your vehicle by
reading your owner literature. The
more you know and understand
about your vehicle the greater the
safety, economy, and pleasure you
will derive from driving it.
The Owner’s handbook
describes every option and
model variant available in
every European country and
therefore some of the items
covered may not apply to your
particular vehicle.
Furthermore, due to printing
cycles it may describe options
before they are generally
available.
Regular servicing of your vehicle
helps maintain both its
roadworthiness and its resale value.
A network of more than 7 000 Ford
authorized repairers throughout
Europe can help you with their
professional servicing expertise.
Their specially trained personnel are
best qualified to service your vehicle
properly and expertly. Also, they are
supported by a wide range of highly
specialised tools and equipment
specially developed for servicing Ford
vehicles.
Note: Remember to pass on the
Owner’s handbook when reselling
the vehicle. It is an integral part of the
vehicle.
SYMBOLS GLOSSARY
Warning symbols in this
handbook
WARNING
How can you reduce the risk of
personal injury and prevent
possible damage to others, your
vehicle and its equipment? In this
handbook, answers to such
questions are contained in
comments highlighted by the
warning triangle symbol.
Note: Important information is also
given in paragraphs starting with the
highlighted word Note:
Warning symbols on your
vehicle
When you see this symbol,
it is imperative that you
consult the relevant section
of this handbook before touching or
attempting adjustment of any kind.
PARTS AND
ACCESSORIES
Important: Ford genuine parts and
accessories have been specifically
designed for Ford vehicles. They are
dedicated for your Ford vehicle.
5
Introduction

We would like to point out that other
parts and accessories than
mentioned above have not been
examined and approved by Ford
unless explicitly stated by Ford. In
spite of continuous market product
monitoring, we cannot certify the
suitability of such products. Ford is
not liable for any damage caused by
the use of such products.
6
Introduction
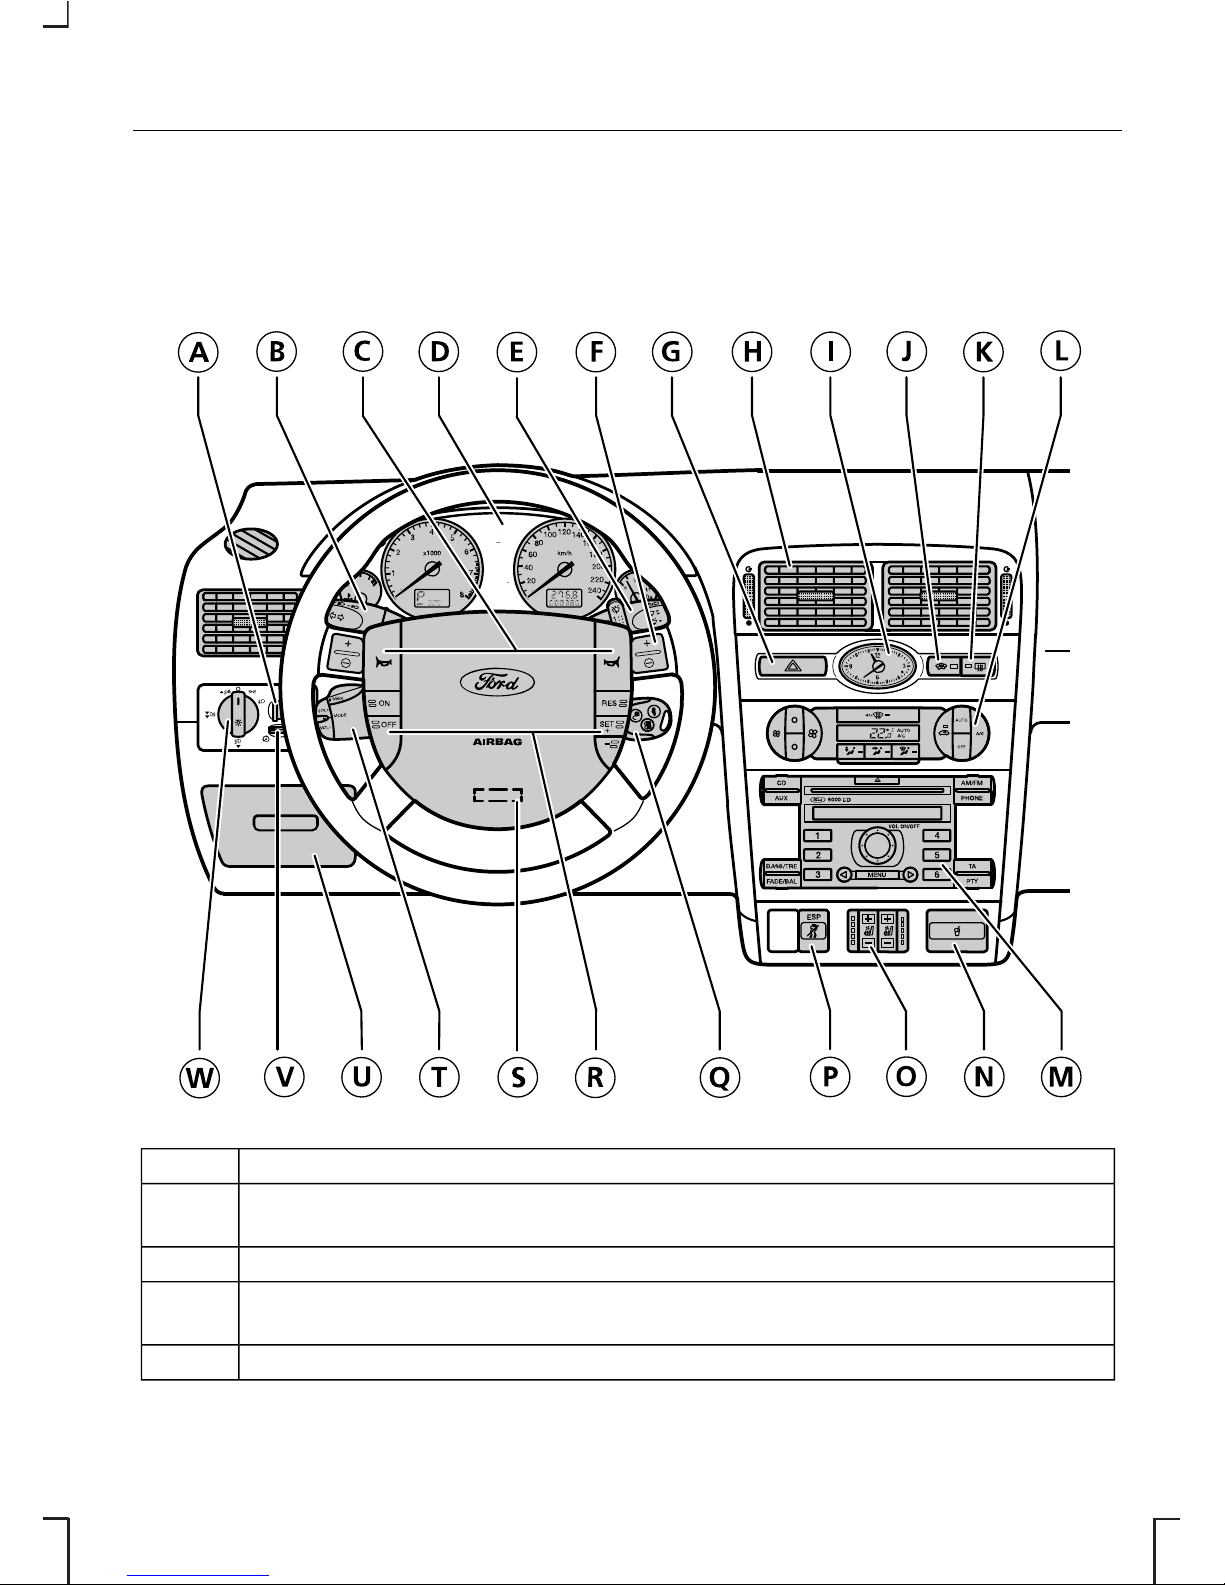
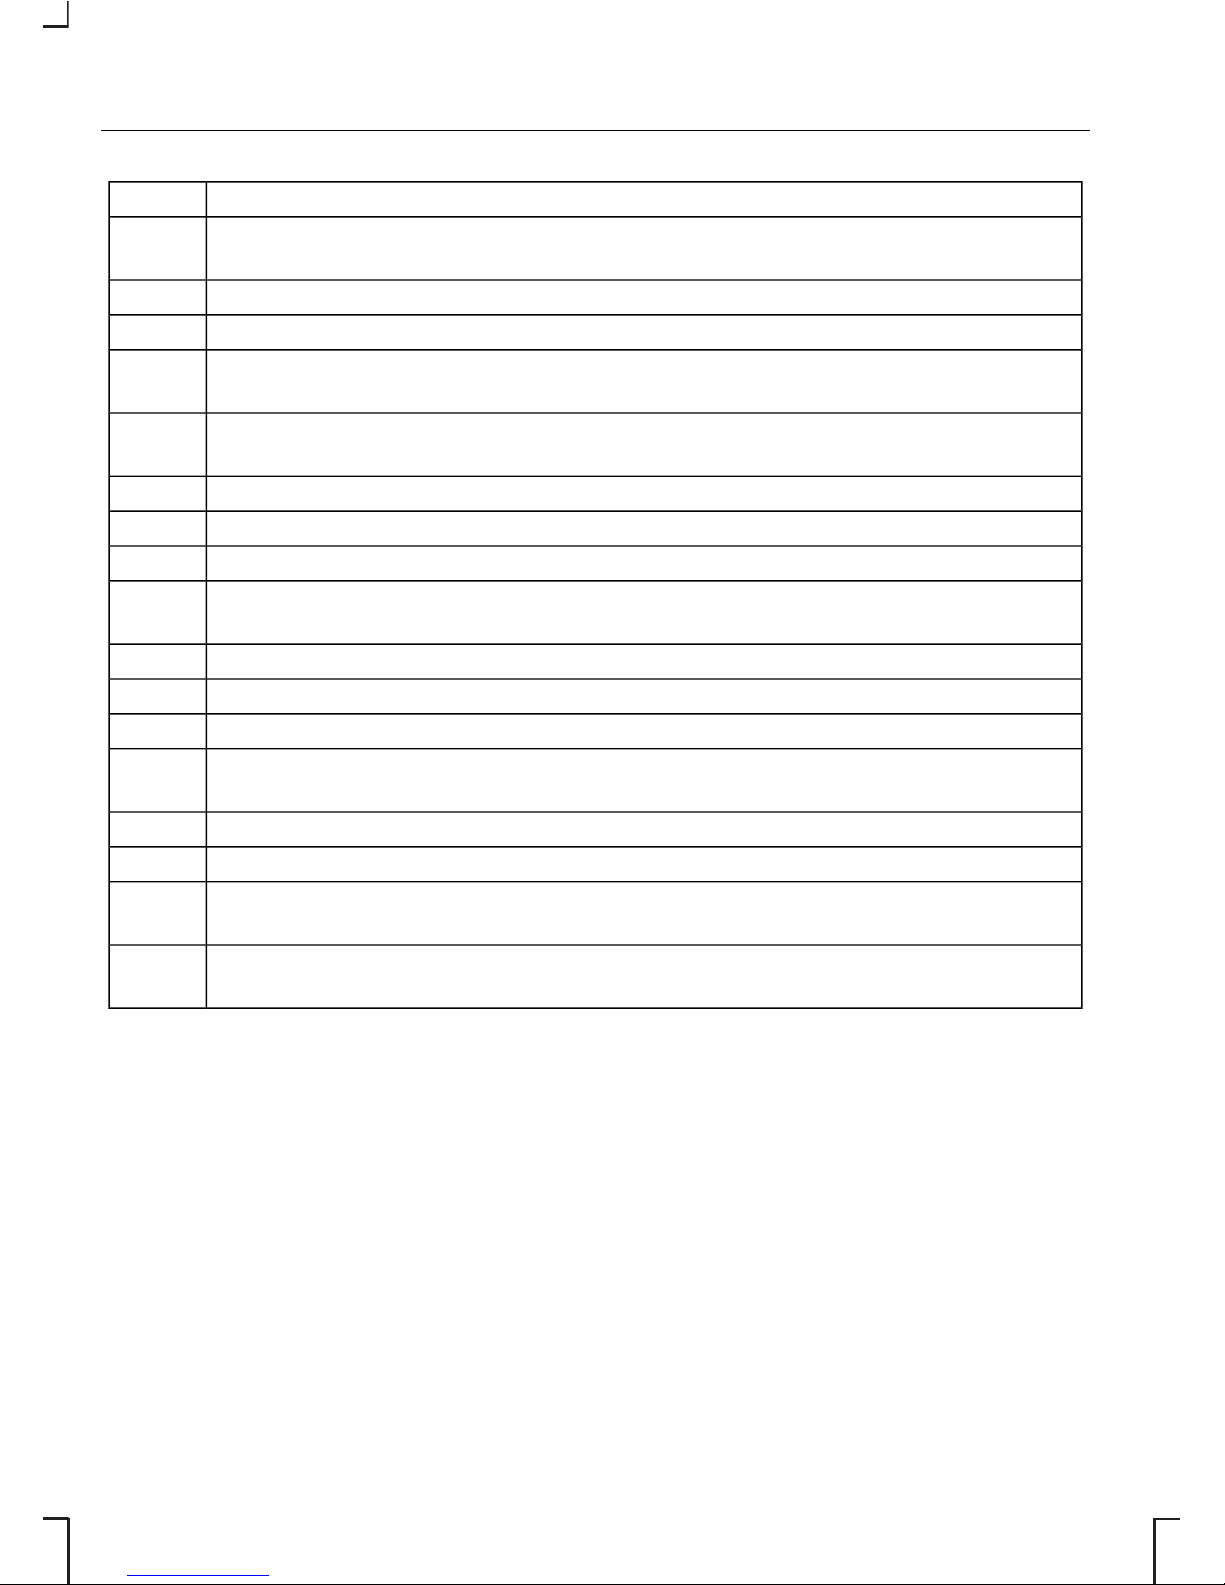
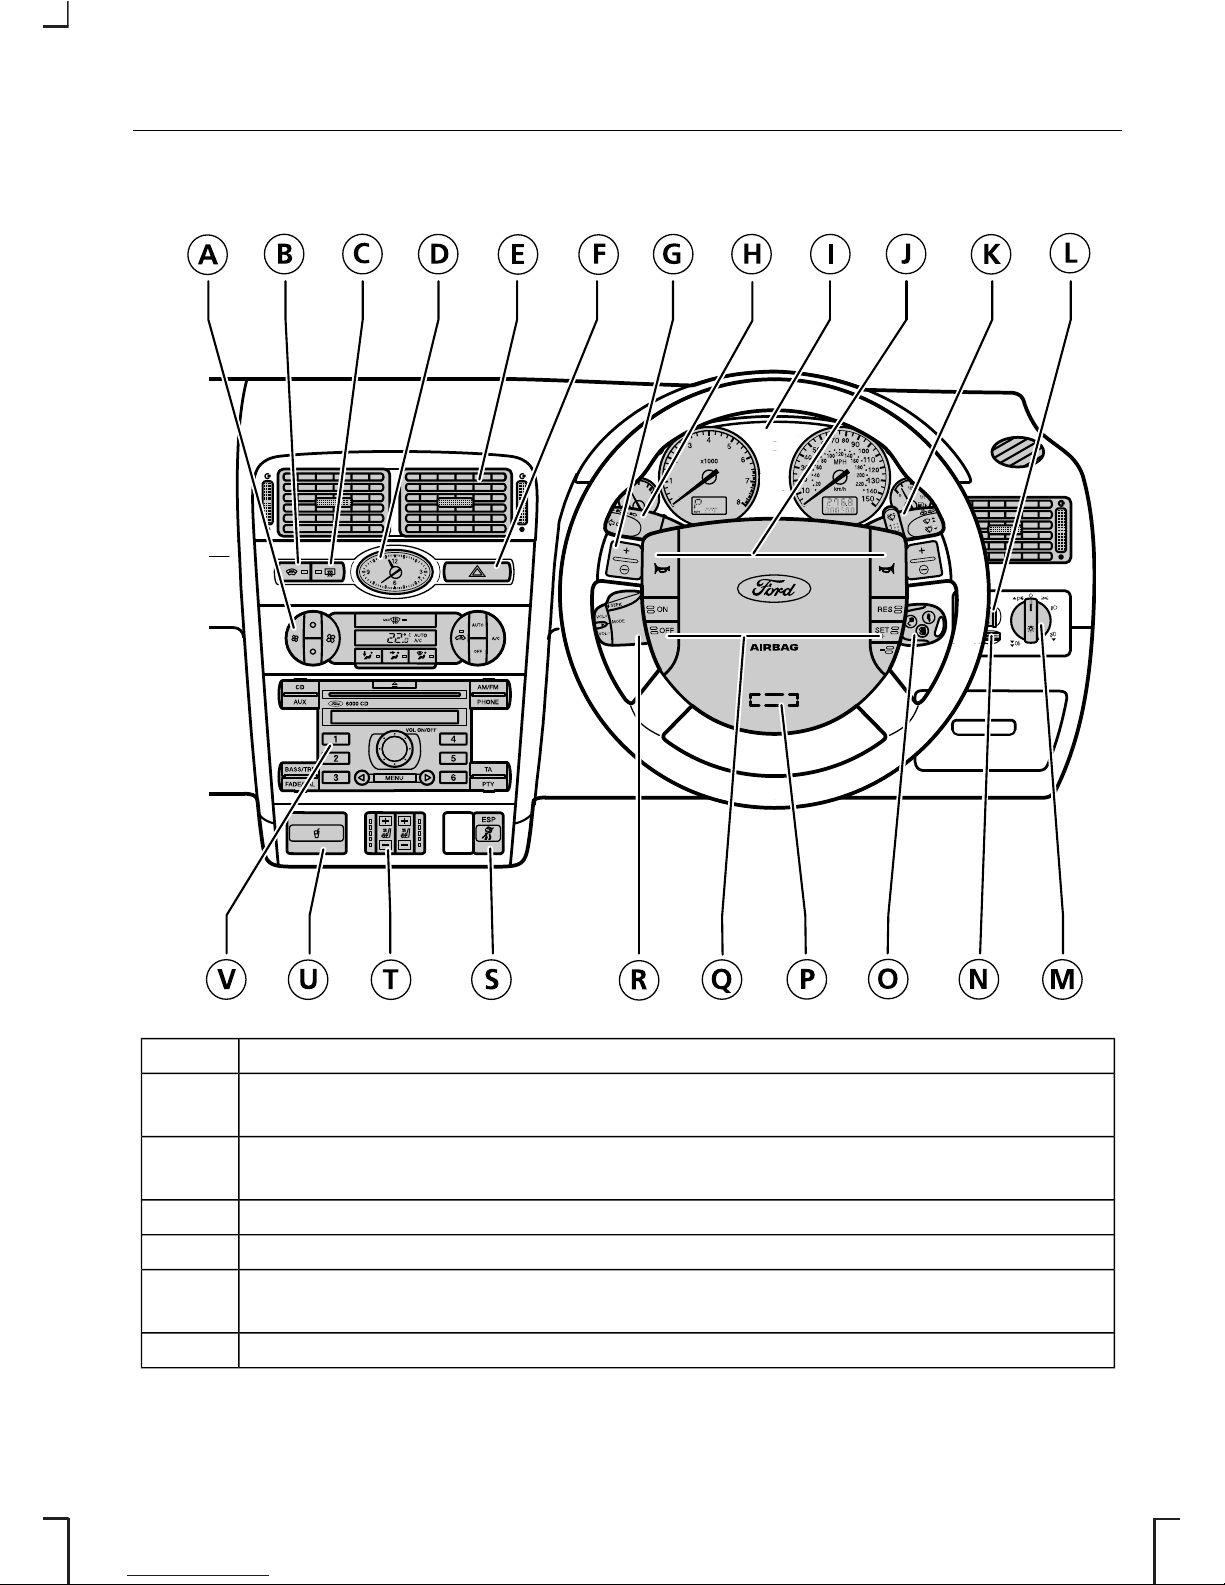
Instrument panel overview
Left-hand drive
E70431
Headlamp levelling control. See Headlamp levelling (page 55).A
Multi-function lever: direction indicators, main beam, trip computer
controls. See Lighting (page 53). See Trip computer (page 78).
B
Horn. See Horn (page 46).C
Instrument cluster. See Gauges (page 72). See Warning lamps and
indicators (page 73).
D
Wiper lever. See Windscreen wipers (page 48).E
7
Quick start
Gear selector buttons. See Automatic transmission (page 110).F
Hazard warning flasher switch. See Hazard warning flashers (page
56).
G
Air vents. See Air vents (page 81).H
Analogue clock. See Clock (page 97).I
Heated windscreen switch. See Heated windows and mirrors (page
86).
J
Heated rear window switch. See Heated windows and mirrors (page
86).
K
Climate controls. See Climate control (page 80).L
Audio/navigation equipment. See the separate handbooks.M
Cup holder. See Cup holders (page 99).N
Heated and ventilated seat switch. See Heated seats (page 95). See
Ventilated seats (page 95).
O
Stability control (ESP) switch. See Using stability control (page 120).P
Ignition switch. See Ignition switch (page 100).Q
Cruise control. See Using cruise control (page 124).R
Steering wheel adjustment. See Adjusting the steering wheel (page
46).
S
Audio control. See Audio control (page 46).T
Fuses. See Fuses (page 136).U
Instrument lighting dimmer. See Instrument lighting dimmer (page
97).
V
Lighting control/front fog lamps/ rear fog lamps. See Lighting (page
53).
W
8
Quick start
Right-hand drive
E70432
Climate controls. See Climate control (page 80).A
Heated windscreen switch. See Heated windows and mirrors (page
86).
B
Heated rear window switch. See Heated windows and mirrors (page
86).
C
Analogue clock. See Clock (page 97).D
Air vents. See Air vents (page 81).E
Hazard warning flasher switch. See Hazard warning flashers (page
56).
F
Gear selector buttons. See Automatic transmission (page 110).G
9
Quick start
Multi-function lever: direction indicators, main beam, trip computer
controls. See Lighting (page 53). See Trip computer (page 78).
H
Instrument cluster. See Gauges (page 72). See Warning lamps and
indicators (page 73).
I
Horn. See Horn (page 46).J
Wiper lever. See Windscreen wipers (page 48).K
Headlamp levelling control. See Headlamp levelling (page 55).L
Lighting control/front fog lamps/ rear fog lamps. See Lighting (page
53).
M
Instrument lighting dimmer. See Instrument lighting dimmer (page
97).
N
Ignition switch. See Ignition switch (page 100).O
Steering wheel adjustment. See Adjusting the steering wheel (page
46).
P
Cruise control. See Using cruise control (page 124).Q
Audio control. See Audio control (page 46).R
Stability control (ESP) switch. See Using stability control (page 120).S
Heated and ventilated seat switch. See Heated seats (page 95). See
Ventilated seats (page 95).
T
Cup holder. See Cup holders (page 99).U
Audio/navigation equipment. See the separate handbooks.V
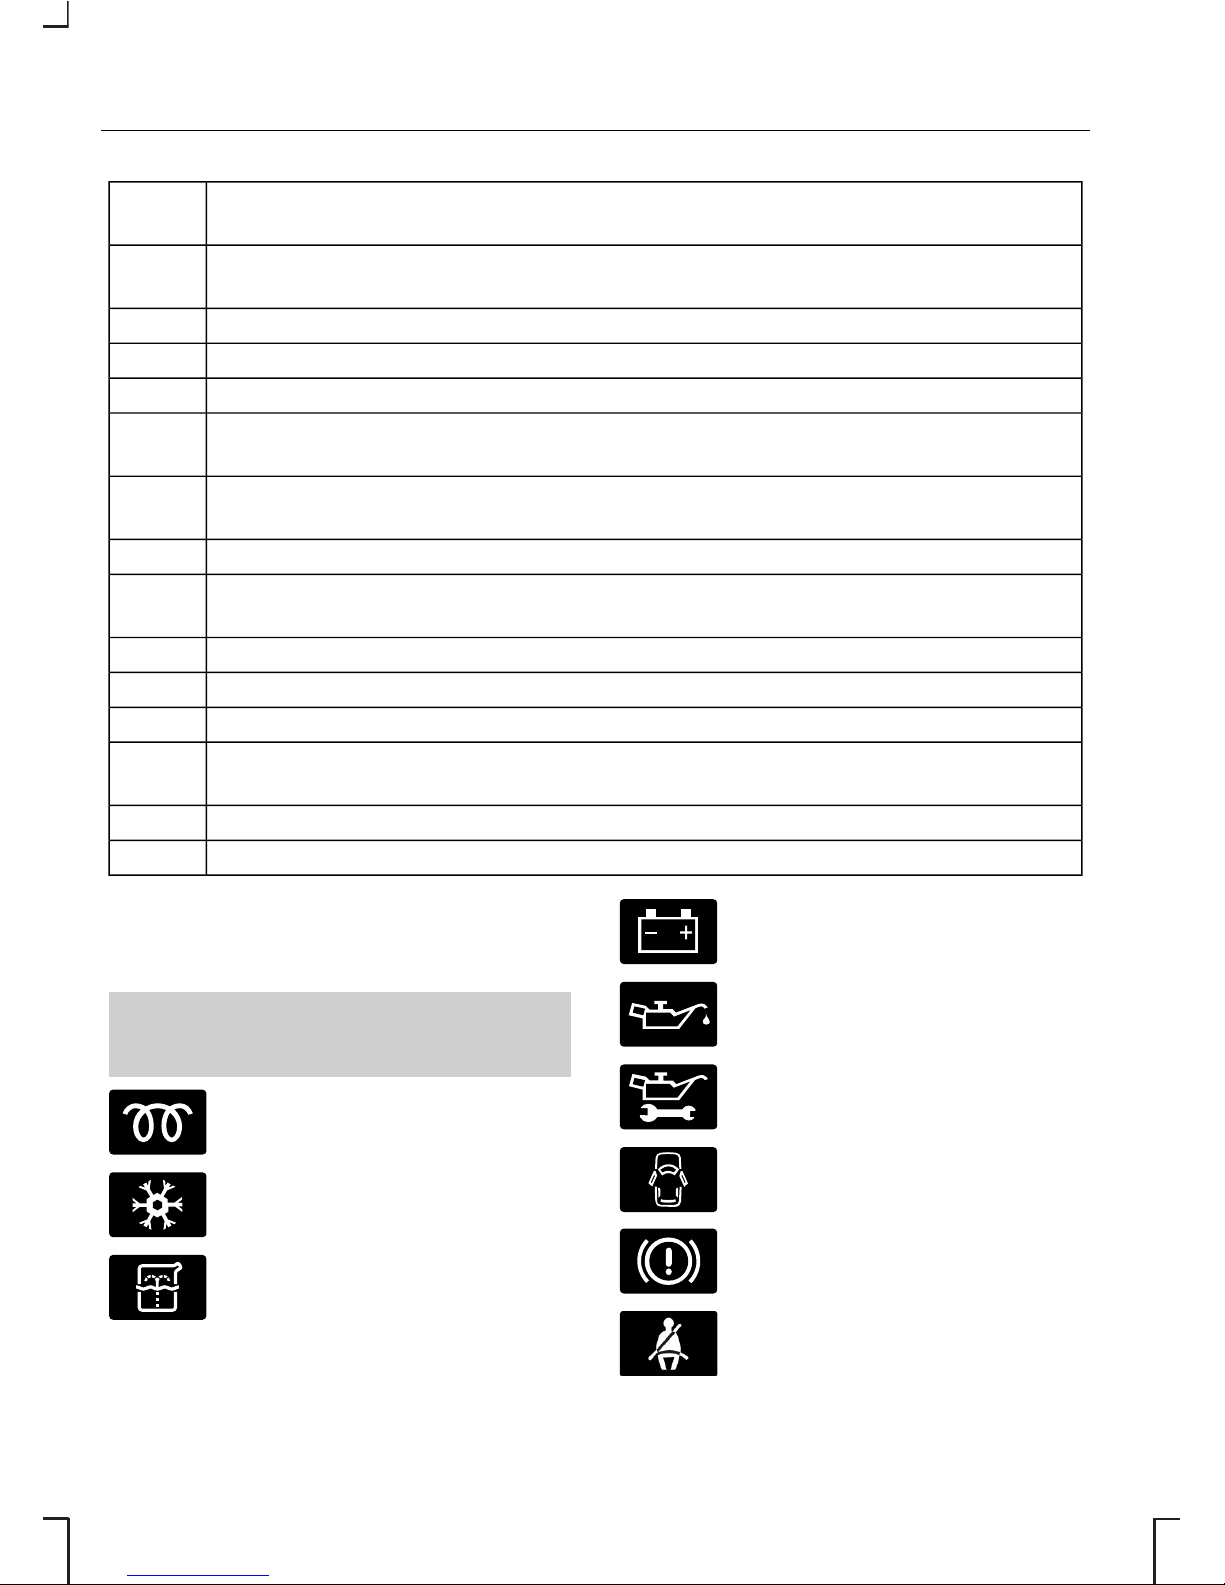
Warning lamps and
indicators
See Warning lamps and indicators
(page 73).
Glow plug indicator lamp
Frost warning lamp
Low washer fluid warning
lamp
Ignition warning lamp
Oil pressure warning lamp
Oil change indicator lamp
Doors open warning lamp
Brake system warning lamp
Seat belt reminder
10
Quick start
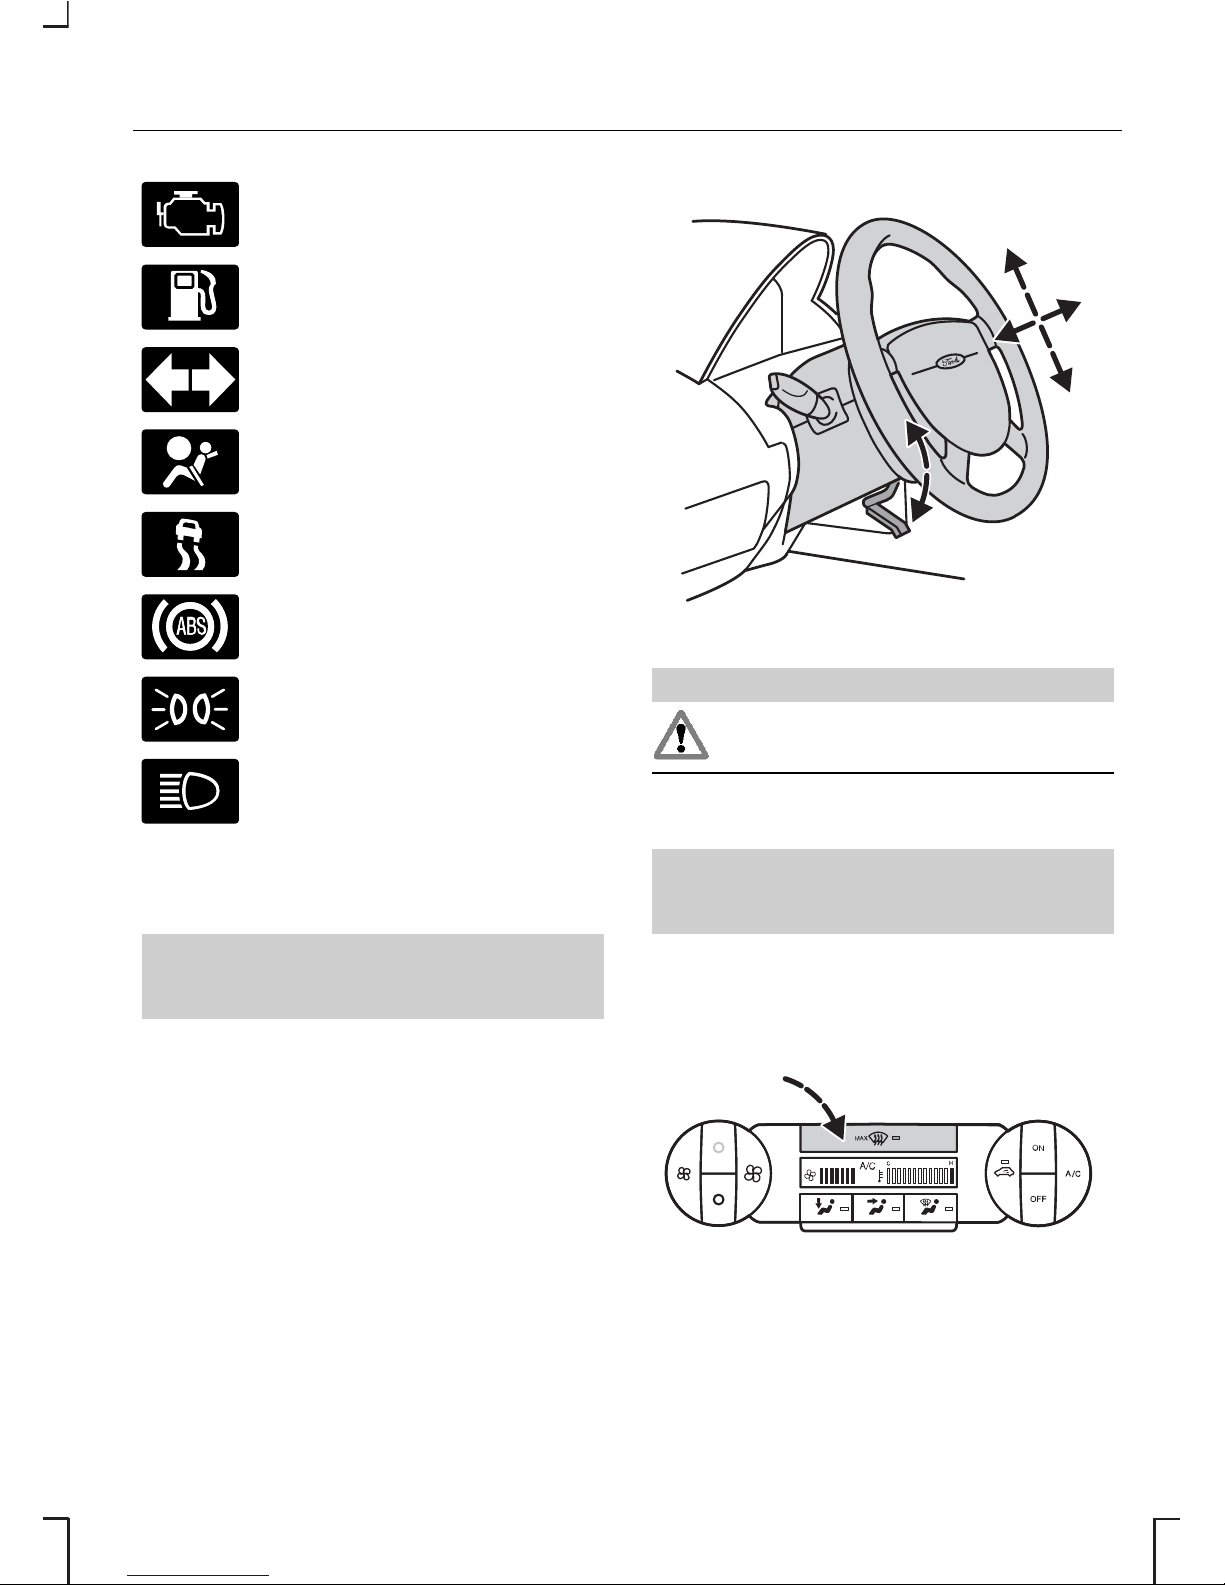
Engine warning lamp
Low fuel level warning lamp
Direction indicator lamp
Airbag warning lamp
Stability control (ESP)
indicator lamp
ABS warning lamp
Headlamp indicator lamp
Main beam indicator lamp
Adjusting the steering
wheel
See Adjusting the steering wheel
(page 46).
E70358
WARNING
Never adjust the steering wheel
when the vehicle is moving.
Manual climate control
See Manual climate control (page
81).
Rapid window
defrosting/demisting
E70446
11
Quick start
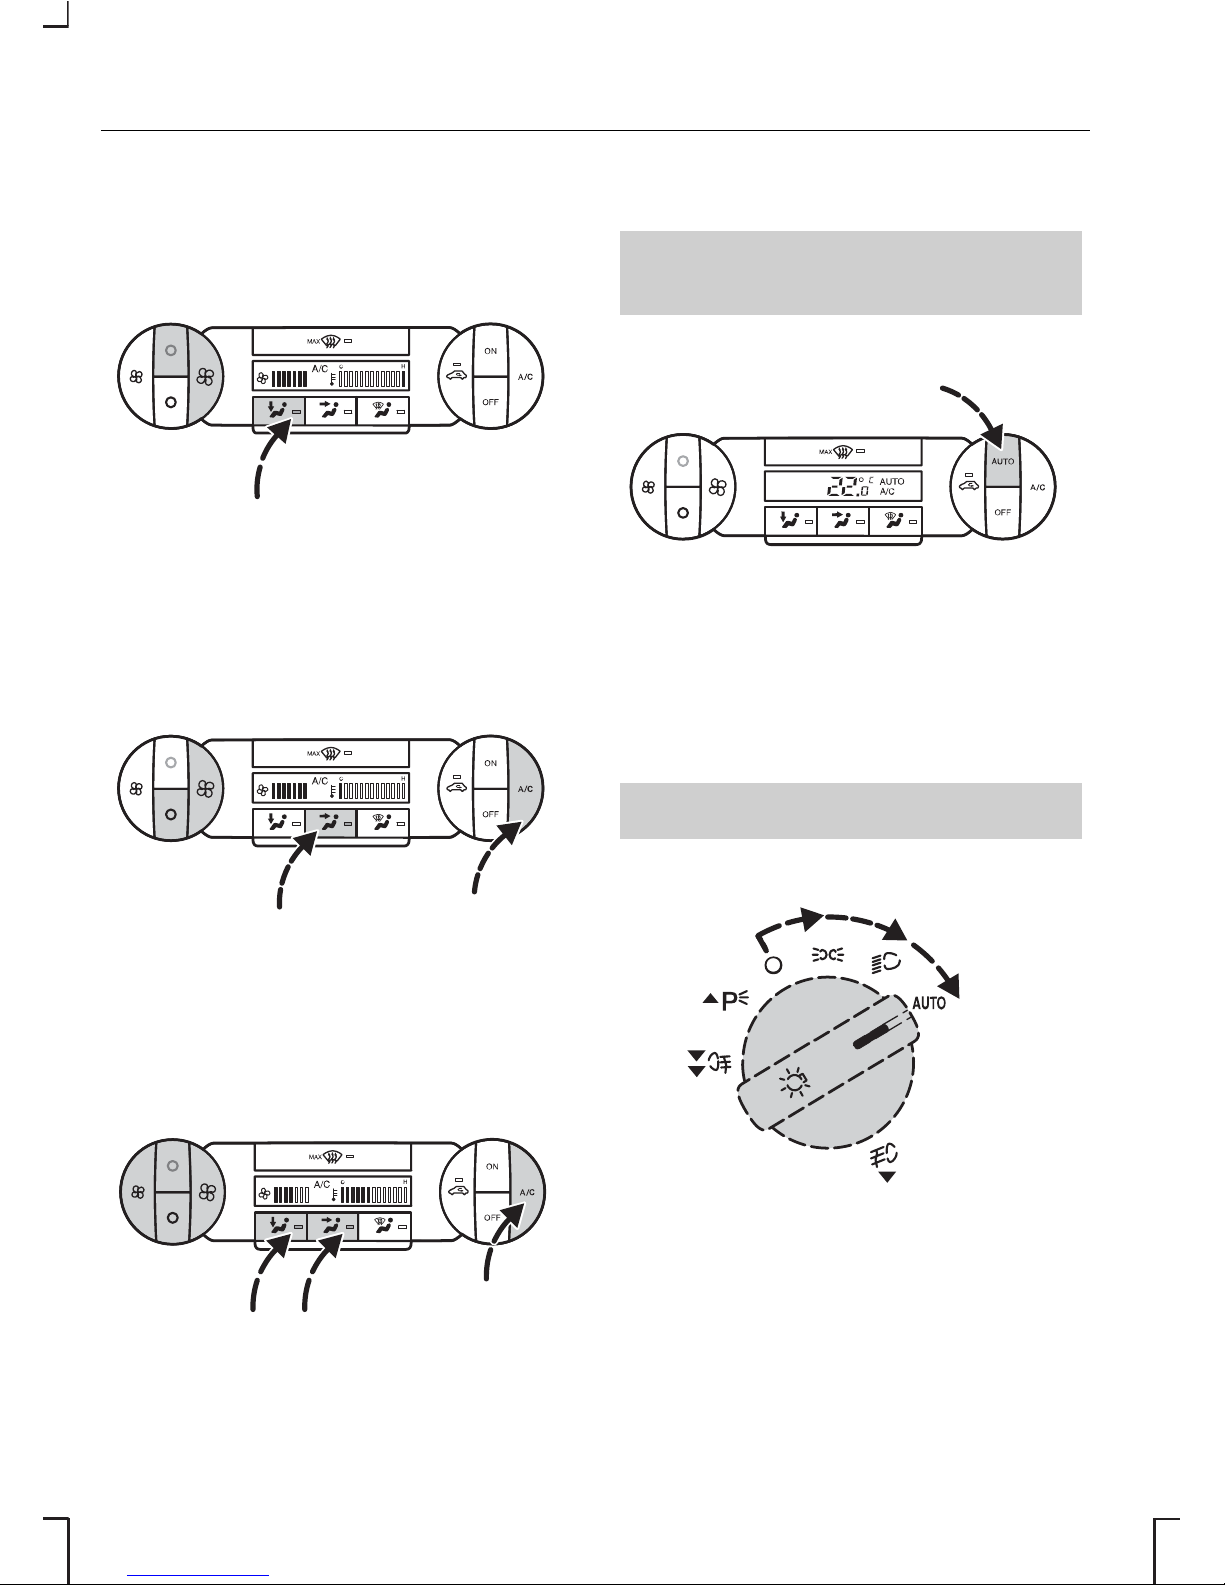
Rapid heating of the vehicle
interior
E70451
Rapid cooling of the vehicle
interior
E70452
Permanent comfort settings
E70450
Automatic climate control
See Automatic climate control
(page 84).
E72153
Recommended setting is AUTO and
22°C.
Autolamps
See Lighting control (page 53).
E72162
12
Quick start
Note: It is not possible to switch on
the fog lamps when the lighting
switch is set to AUTO. To switch on
the fog lamps, switch off the
autolamps feature.
When the switch is set to AUTO, the
dipped beam headlamps will switch
on and off automatically depending
on the ambient light.
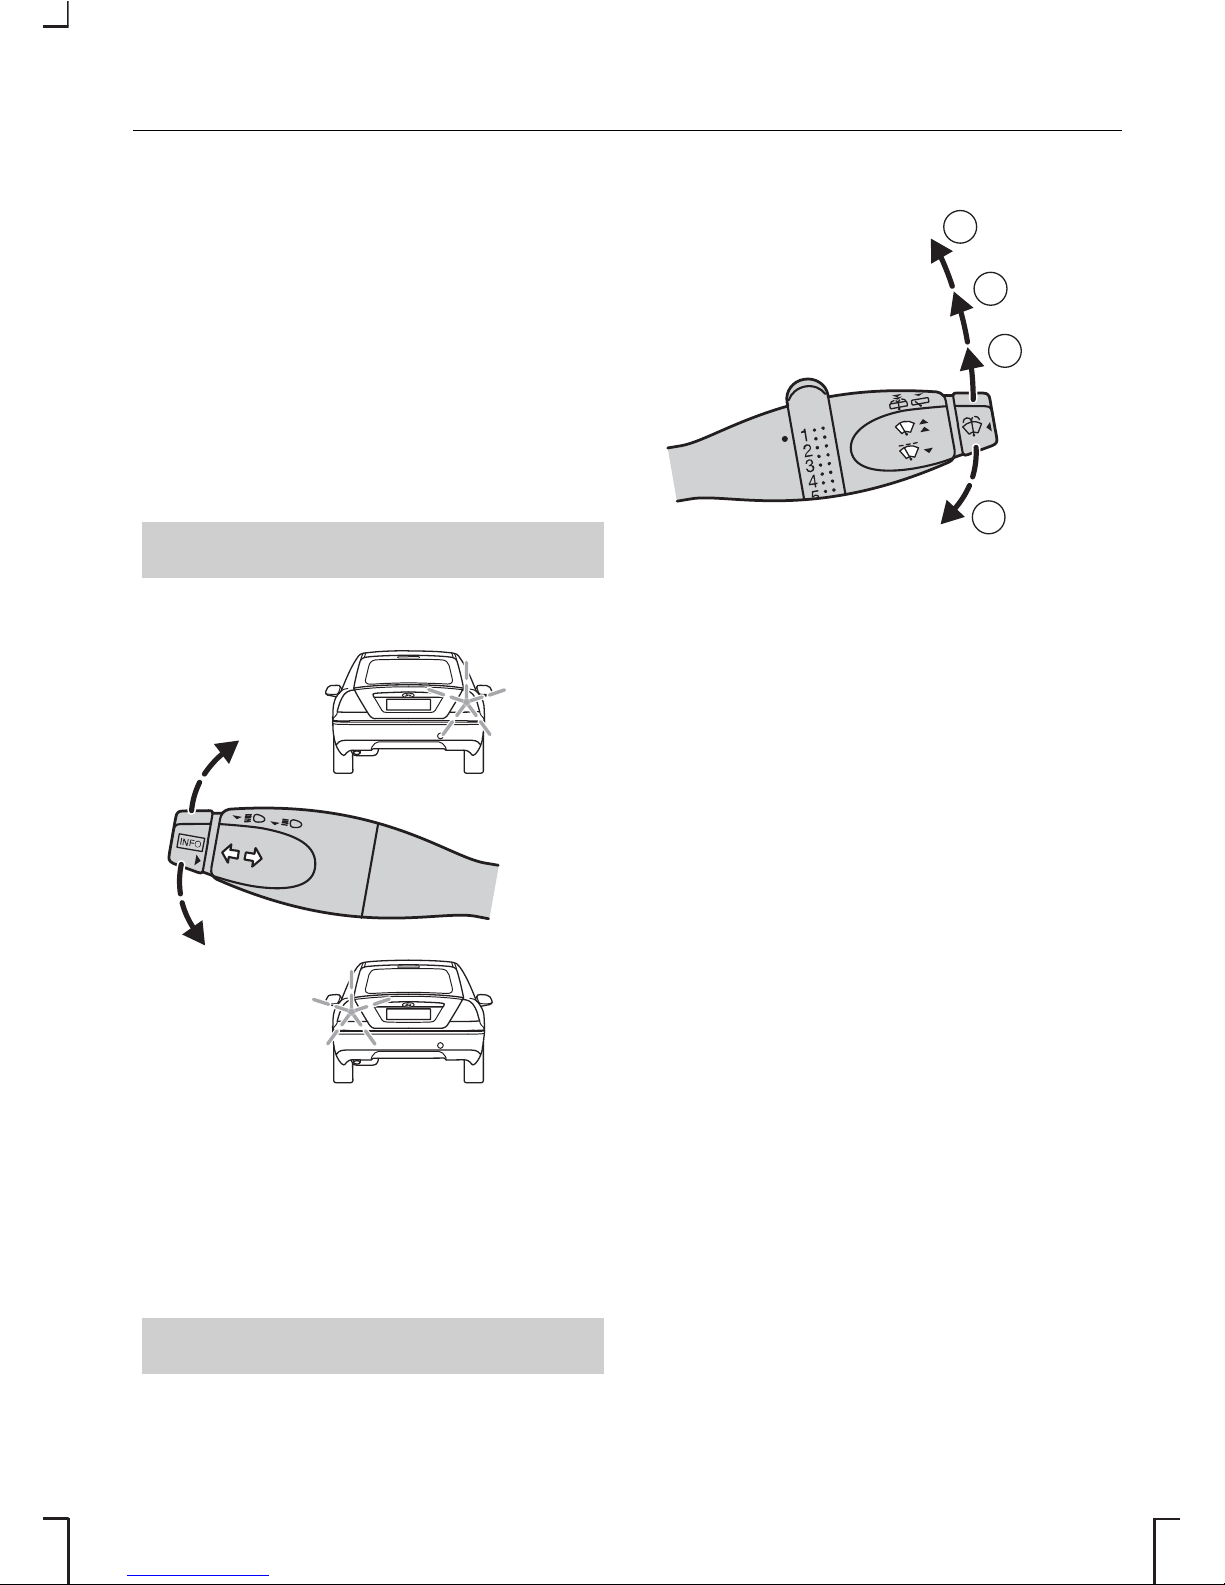
Direction indicators
See Direction indicators (page 56).
E72167
Briefly tap the lever up or down and
the direction indicators will flash three
times.
Windscreen wipers
See Windscreen wipers (page 48).
A
B
C
D
E72172
Single wipeA
Intermittent wiping or
autowipers
B
Normal wipingC
High speed wipingD
Autowipers
When autowipers is selected, the
wipers will cycle once regardless of
whether the windscreen is wet or dry.
Thereafter, or when the ignition is
switched on with autowipers
selected, the wipers will not cycle
until water is detected on the
windscreen. Alternatively, move the
lever to another position and then
select autowipers, or operate the
washer.
The rain sensor will continuously
measure the amount of water on the
windscreen and adjust the speed of
the front wipers automatically (single
wipe, intermittent, normal or high
speed wiping).
13
Quick start
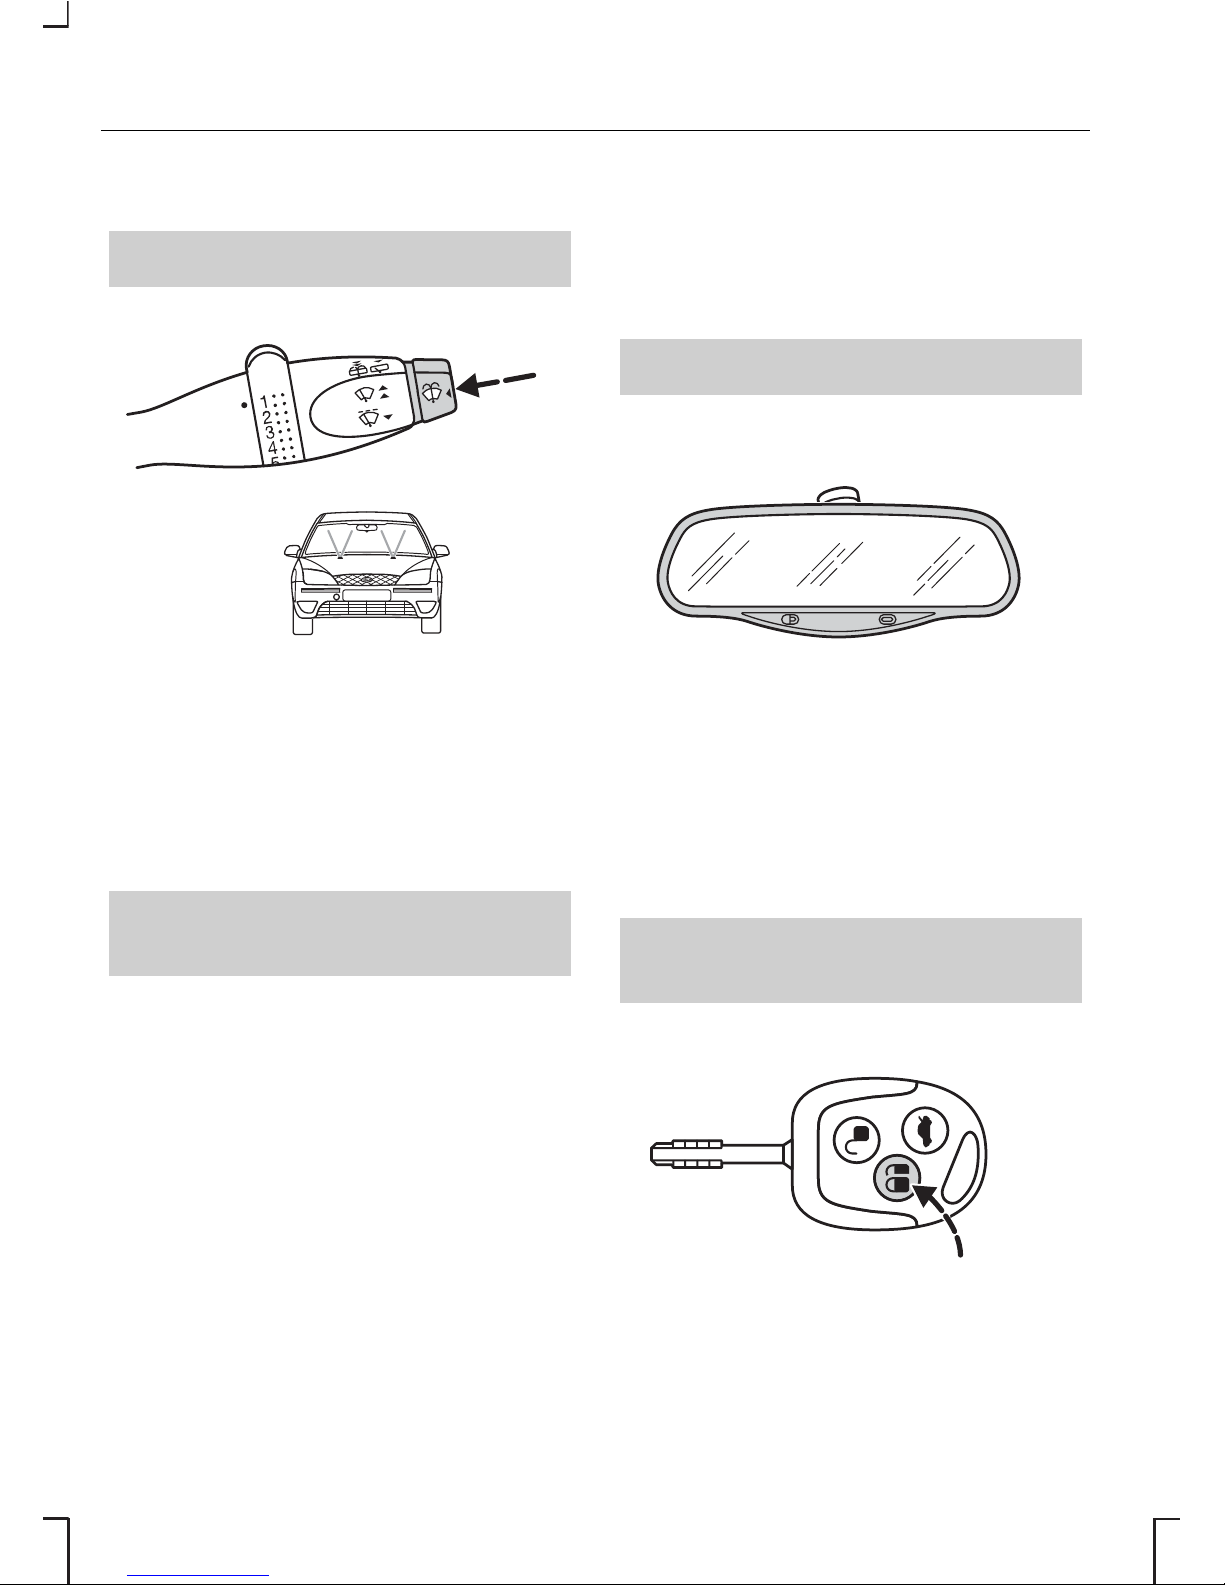
Windscreen washers
See Windscreen washers (page 49).
E72174
Once the wash and wipe cycle is
completed, the wipers will pause and
then perform one more wipe to clear
the windscreen.
Rear window wiper
See Rear window wiper and
washers (page 50).
Reverse gear wipe
The rear wiper will be activated
automatically when selecting reverse
gear, if
• the rear wiper is not already
switched on,
•
the wiper lever is in position C, or
D
•
in position B and the front wipers
are operating.
The rear wiper will follow the front
wiper interval (at intermittent or
normal speed).
Auto-dimming mirror
See Interior mirror (page 70).
E70418
The auto-dimming mirror
automatically activates the dimming
function when hit by glaring light from
behind.
Locking and unlocking
See Locking and unlocking (page
35).
Unlocking
E72207
Press once to activate central locking
and arm the anti−theft alarm system.
14
Quick start
Press twice within three seconds to
activate double locking and arm the
anti−theft alarm system. The direction
indicators flash twice.
Press and hold for three seconds to
lock the vehicle and close the
windows and sunroof (global closing).
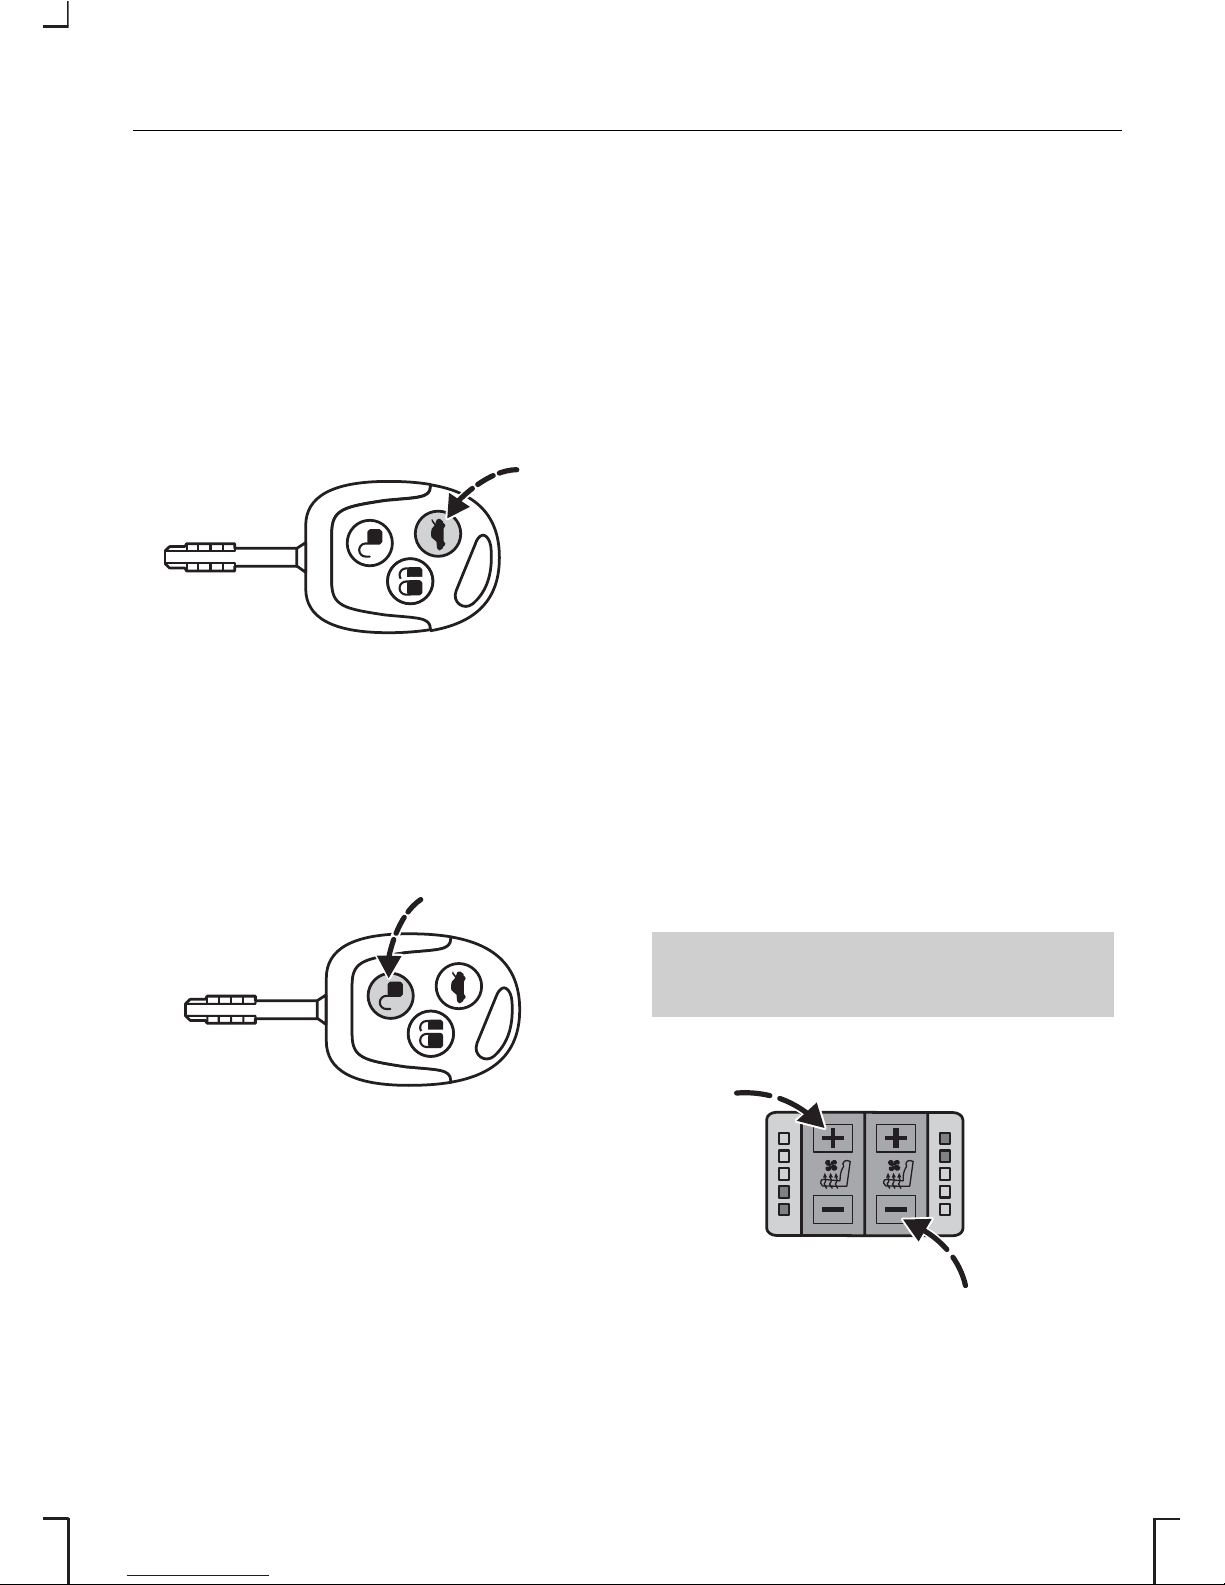
E72202
Press twice within three seconds to
open the tailgate only.
Locking
E72201
Note: On vehicles with enhanced
security, the anti-theft alarm system
is deactivated by pressing the unlock
button on the remote control.
Unlocking a front door with a key will
not deactivate this alarm.
Press once to unlock the vehicle. You
can change this setting (e.g. driver
door opening only). See Locking and
unlocking (page 35).
Press and hold for three seconds to
unlock the vehicle and open the
windows and sunroof (global
opening).
Automatic relocking
To prevent the vehicle being left
unlocked inadvertently, central
locking and the anti-theft alarm
system will be reactivated
automatically 45 seconds after the
button is pressed if the following
occurs during this period:
• No door is opened.
• The luggage compartment is not
opened.
• The ignition is not switched on.
Heated and ventilated
seats
See Heated seats (page 95). See
Ventilated seats (page 95).
E72335
15
Quick start

Note: The settings of the heated
seats are stored when the ignition is
switched off.
+ = raise the temperature.
- = lower the temperature.
Red lamps warmer setting.
Blue lamps = cooler setting.
Reverse gear - 5-speed
transmission
See Manual transmission (page 109).
E72455
Reverse gear - 6-speed
transmission
See Manual transmission (page 109).
E72456
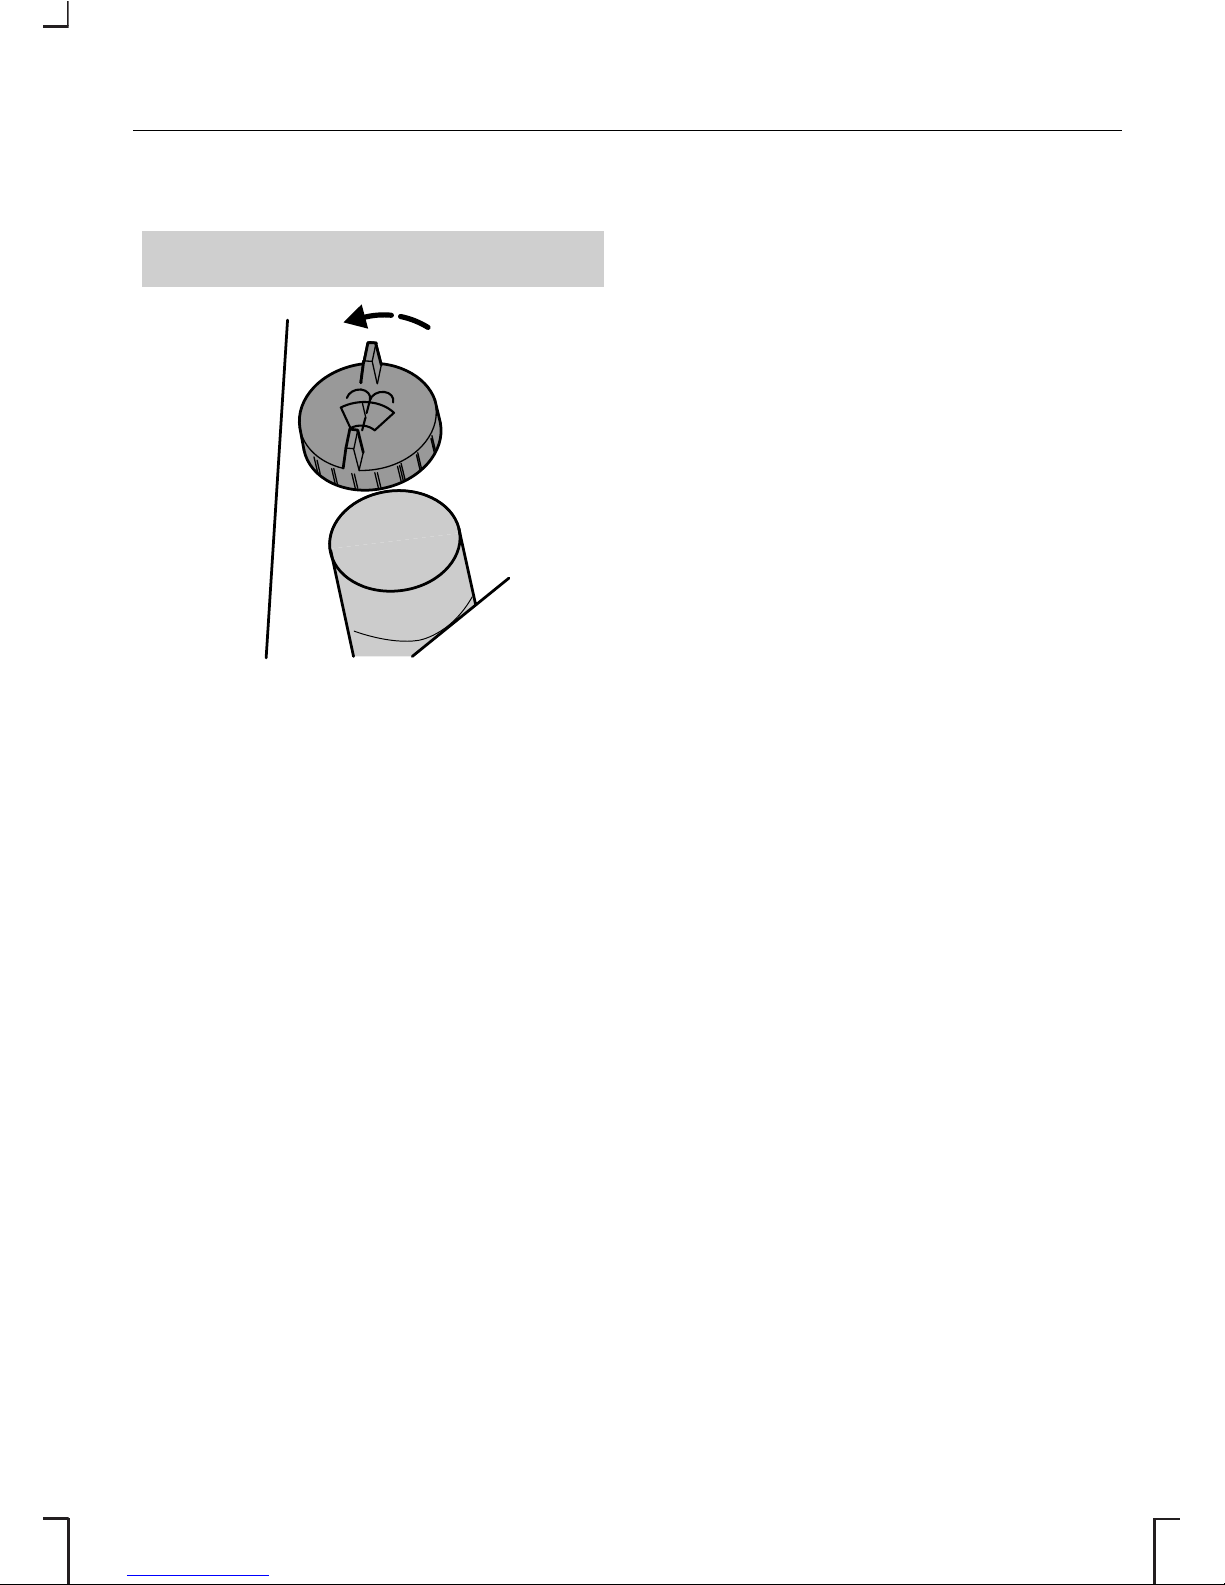
Opening the bonnet
See Opening and closing the
bonnet (page 149).
E73406
Swivel the Ford badge in the radiator
grille to the side. Insert the key in the
lock on the radiator grille. Turn the
key first anticlockwise 1. Raise the
bonnet slightly and turn the key fully
clockwise 2 to open the bonnet.
16
Quick start
Washer fluid reservoir
See Maintenance (page 144).
E73422
Front and rear washer systems are
supplied from the same reservoir.
The reservoir is located behind the
right−hand headlamp.
17
Quick start

CHILD SEATS
E72336
WARNINGS
Extreme Hazard! Do not use a
child restraint on a seat
protected by an airbag in front of it!
Original text according to ECE
R94.01: Extreme Hazard! Do not
use a rearward facing child restraint
on a seat protected by an air bag in
front of it!
There is a risk of death or
serious injury when the airbag
deploys.
Always have the rear row head
restraint raised when a child
restraint is being installed or
occupying the seat, provided doing
so does not move the child restraint
away from the vehicle seat.
Note: If the vehicle has been
involved in an accident, have the child
safety seat checked by an expert as
it might be damaged.
Note: Do not leave children
unattended in the child safety seat or
in the vehicle.
Note: When installing a child
seat/restraint with the seat belt,
always ensure belts fit without slack
or twists.
WARNING
There is a risk of death or
serious injury when the
manufacturer’s instructions are not
followed properly or when the child
seat/restraint is modified in any way.
Whenever installing a child
seat/restraint, always read and follow
the manufacturer’s instructions.
WARNING
Do not hold a child on your lap
while the vehicle is moving.
Children of height 150 cm or under
or aged 12 years or under should be
secured in special restraints for
children, such as baby seats, child
safety seats or booster cushions in
the rear seats.
18
Child safety
Such equipment must be suitable
and government approved
(depending on country).
A choice of ECE approved child
restraints is available at your Ford
Dealer. Please ask for the
recommended child seats. Together
with the adult seat belt, these
restraints help to provide maximum
security for the children.
Child restraints for different
mass groups
The correct restraint to be used
depends on the child’s age and
weight:
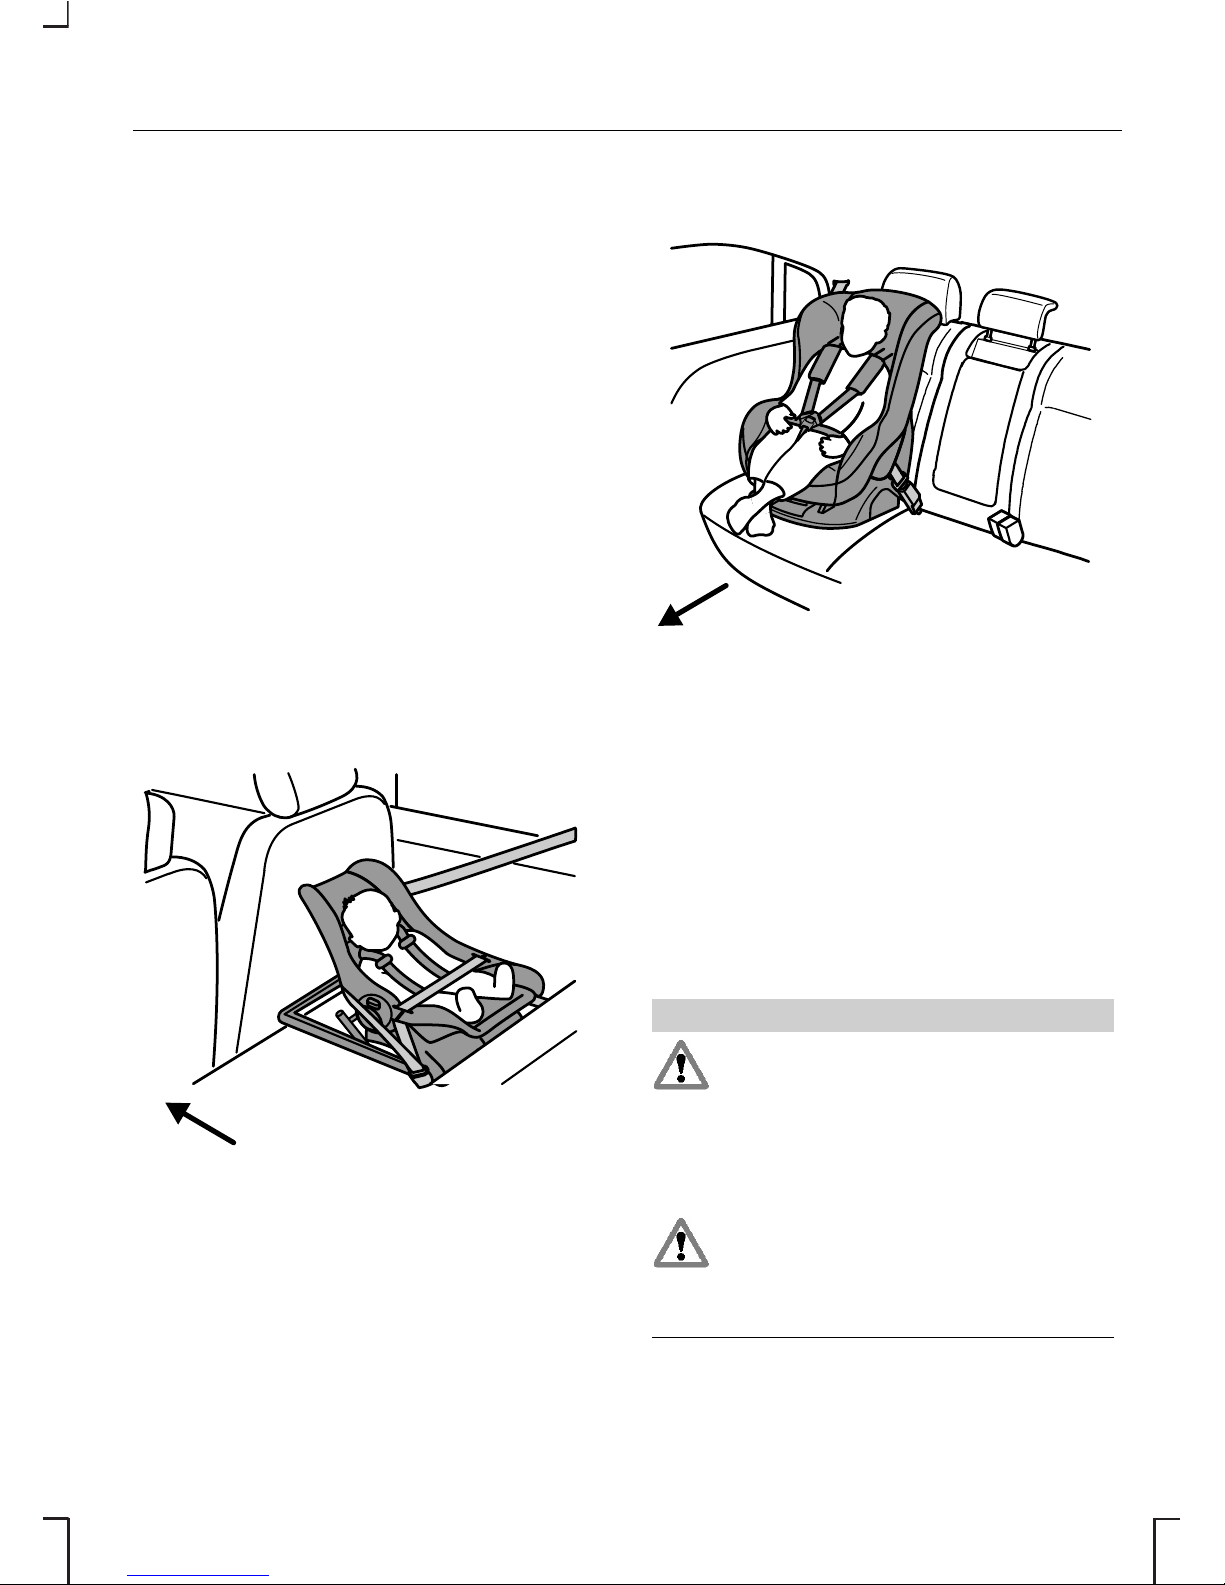
Baby safety seat
E72337
Babies under 13 kg (approximately
18 months) are best protected if
properly restrained in rearward facing
baby safety seats (Group 0+) on
the rear seat.
Child safety seat
E72338
Children weighing between 13 and
18 kg (approximately nine months to
four years old) should be carried
properly restrained in child safety
seats (Group I) in the rear seat.
CHILD SEAT
POSITIONING
WARNINGS
If your Ford vehicle is equipped
with a front passenger airbag,
children of height 150 cm or under or
aged 12 years and under must only
be properly restrained in the rear seat
– never in the front.
Extreme Hazard! Do not use a
rearward facing child restraint
on a seat protected by an airbag in
front of it!
19
Child safety
Note: If individual circumstances
require that a child weighing more
than 9 kg must travel in a front seat
protected by an operational front
airbag, only use a forward facing
restraint.
The following table advises on the
suitability of child restraint fitment
locations.
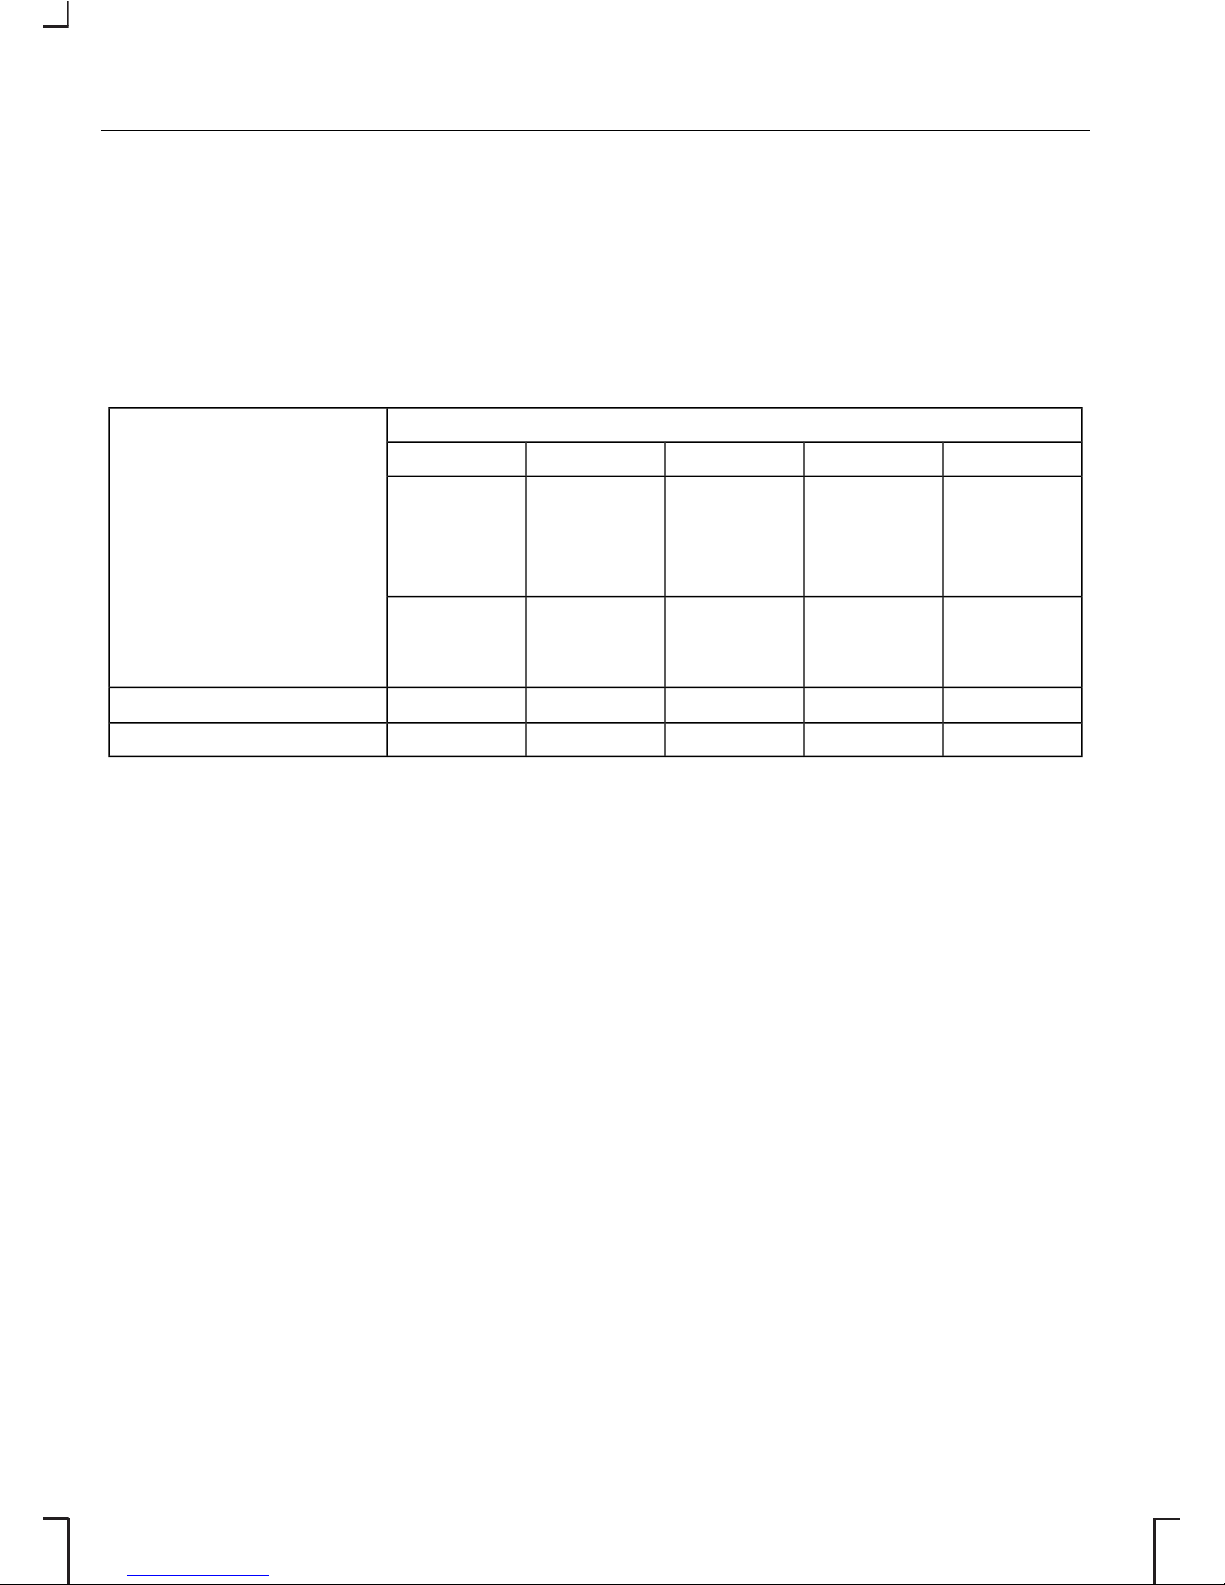
Child seat positions
Mass group categoriesSeating positions
IIIIII0+0
22 to 36
kg (about
6− 12
years)
15 to 25
kg (about
31/2 − 12
years)
9 to 18 kg
(about 9
months−
4 years)
Up to 13
kg (about
0− 2
years)
Up to 10
kg (about
0− 9
months)
Booster
seat/
cushion
Booster
seat/
cushion
Child
safety
seat
Baby
safety
seat
Baby
safety
seat
U
1
U
1
U
1
XXFront passenger seat
UUUUURear seats
X = Seat position not suitable for children in this mass/age group.
U = Seat position suitable for universal category restraints approved for use
in this mass/age group.
U1 = Seat position suitable for universal category restraints but Ford
recommends that children should be secured in an appropriate child restraint
in the rear seats.
20
Child safety
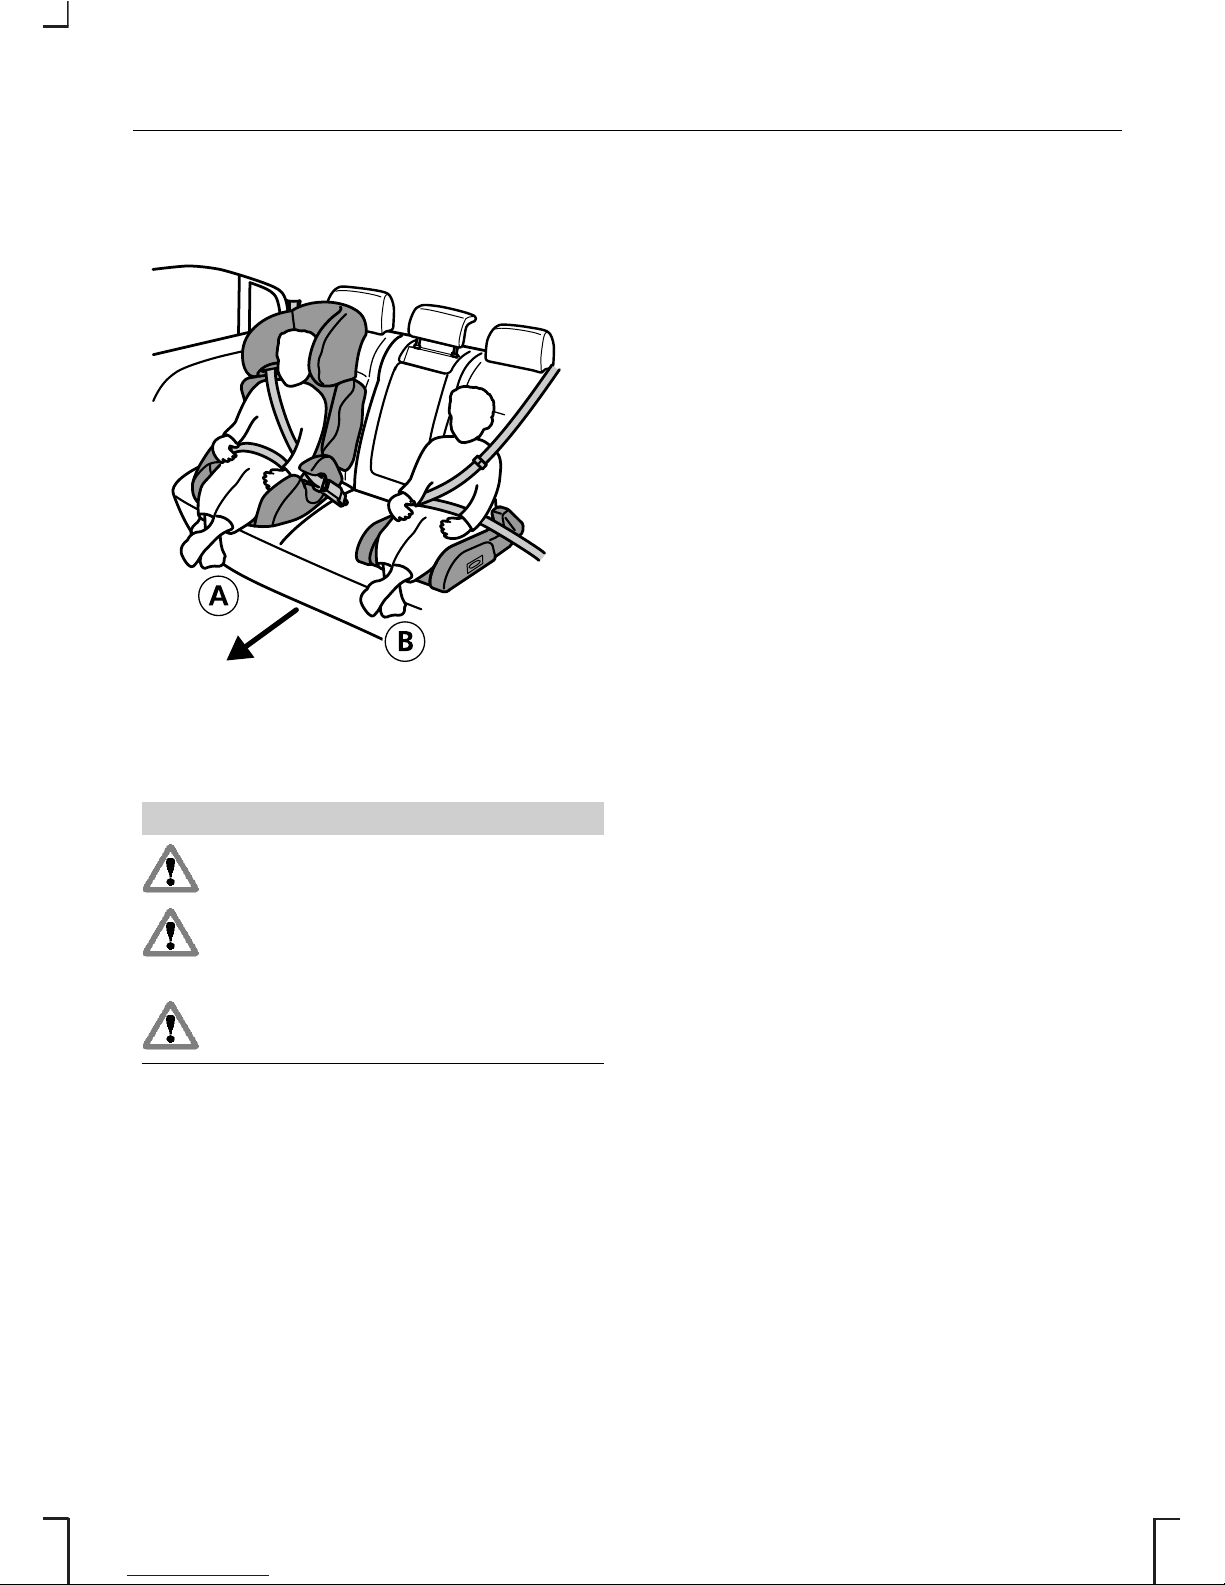
BOOSTER CUSHIONS
E72362
Booster seatA
Booster cushionB
WARNINGS
You should never use a booster
seat with only a lap belt.
Never put the shoulder belt
under a child’s arm or behind
the back.
Never use pillows, books, or
towels to boost a child.
Children weighing more than 15 kg
and under 150 cm should use a
booster seat or booster cushion.
Ford recommends using booster
seats that combine a booster
cushion and a back rest into one seat
for children between 15 and 25 kg.
The raised seating position ensures
that the adult seat belt can be
correctly guided over the centre of
the shoulder instead of along the
neck, the lap belt lying tightly across
the hips instead of the stomach.
Make sure that your child sits in an
upright position.
Integrated booster cushion
Note: Do not use the raised booster
cushion together with a child safety
seat.
The booster cushion should be used
for children from approximately 6 to
12 years, with a height of up to 150
cm and weighing between 22 and
36 kg.
21
Child safety
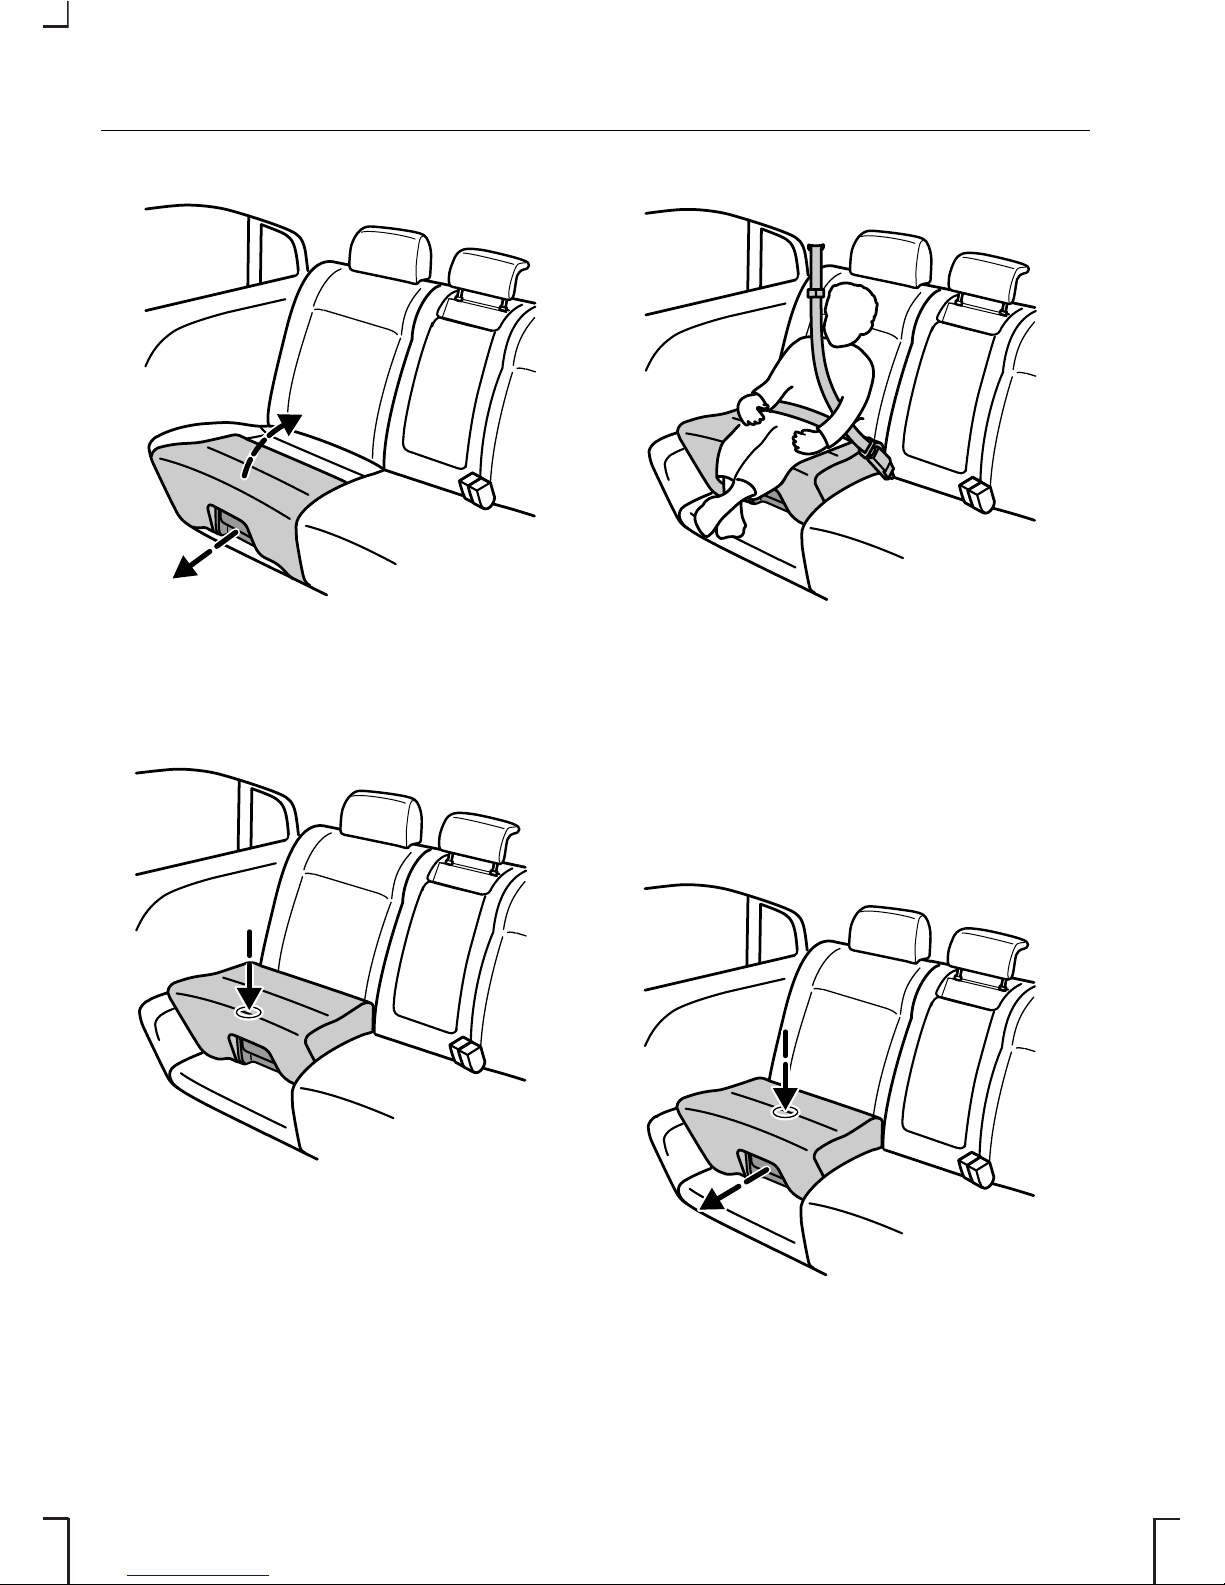
E72363
Pull the unlocking lever. Push the
cushion to the back of the seat.
E72364
Push down on it until you feel the
locking mechanism engage.
E72365
The raised seating position makes it
possible to position the seat belt
correctly: The shoulder strap should
cross the centre of the shoulder; the
lap strap should fit tightly across the
hips, not the stomach.
E72366
22
Child safety
Note: Before returning the booster
cushion to its original position, make
sure there are no objects hidden
under it.
Proceed in reverse order. Make sure
that the locking mechanism engages
properly.
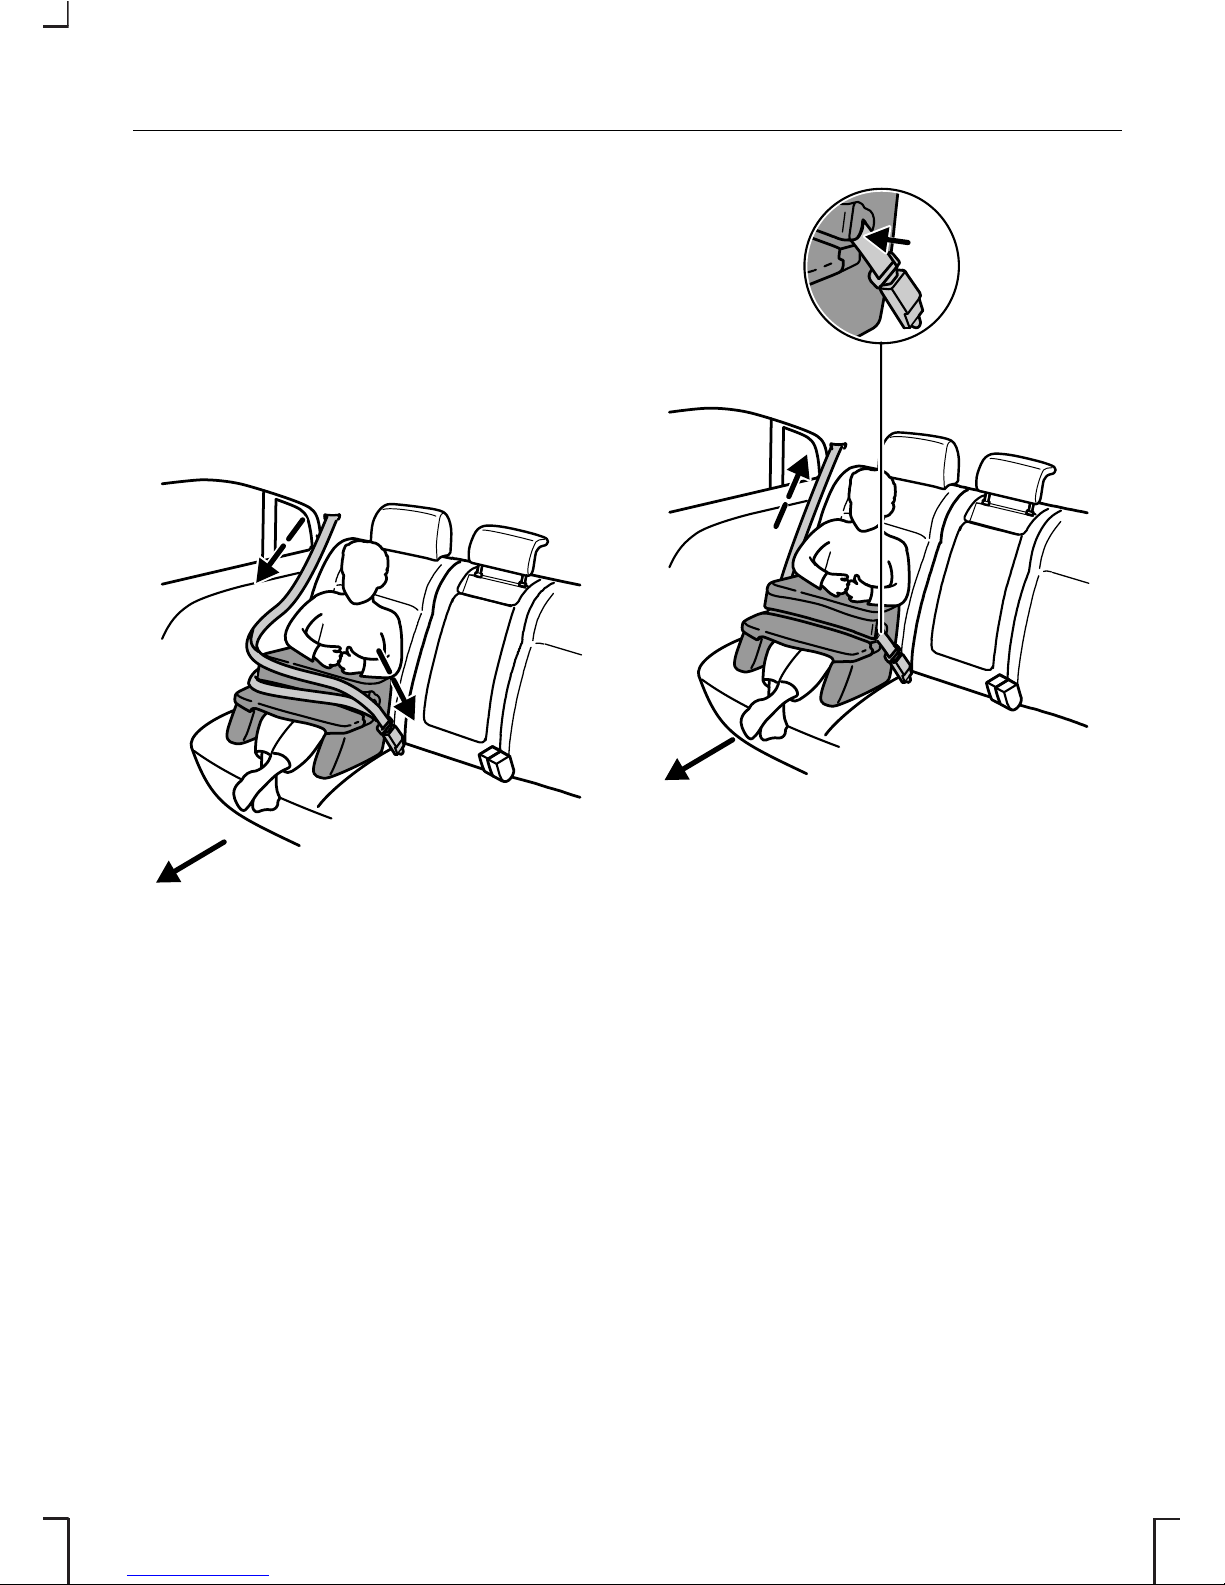
Vario child safety seat
E72367
The Vario child safety seat should be
used for children from three and a
half years up to seven years and
weighing between 15 and 25 kg. It
must be secured with an inertia reel
three-point seat belt. The child safety
seat may be used in any seating
position in the rear seats including the
centre.
E72368
Note: Refer also to the instructions
provided with the child safety seat.
Once the child is seated on the
vehicle seat, put the Vario child safety
seat in front of the child. Secure it as
follows with an inertia reel three-point
belt:
1. Insert the tongue into the buckle
until a distinct click is heard.
2. Place the lap strap in the mould
provided and tighten it.
3. Place the shoulder strap over the
lap strap and tighten.
23
Child safety
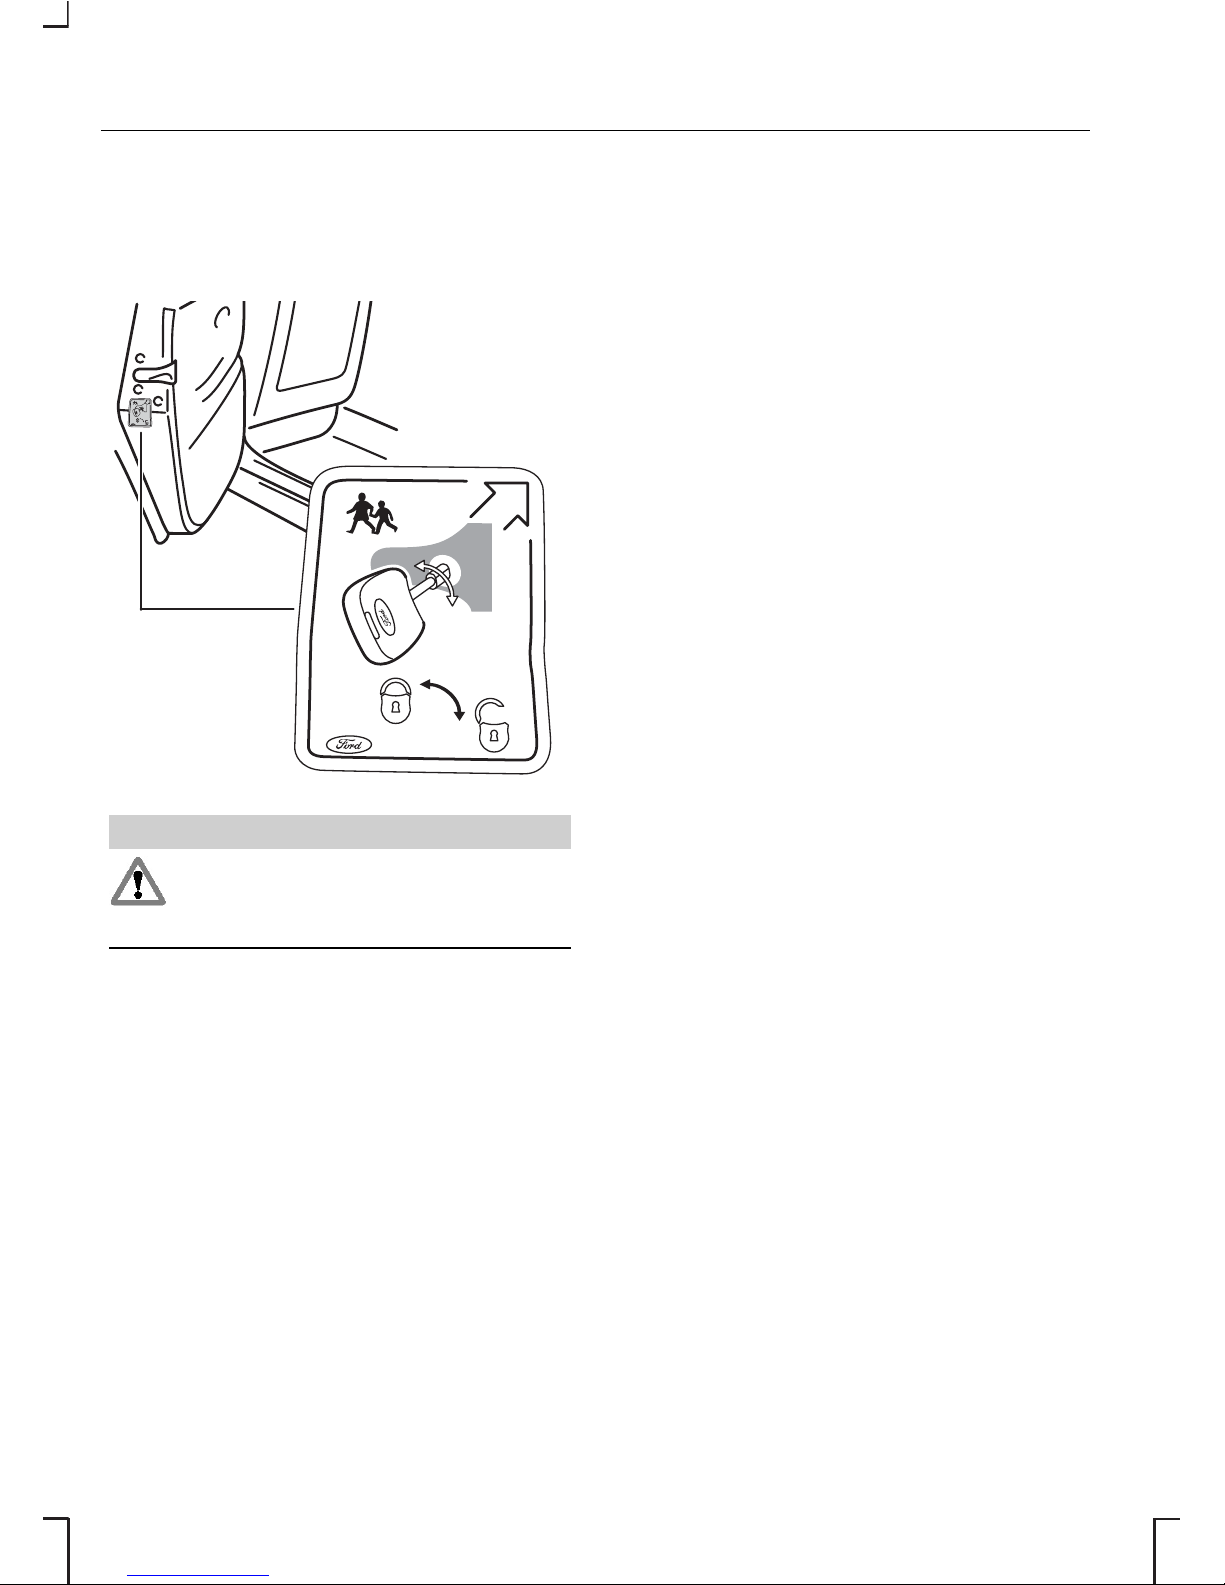
CHILD SAFETY LOCKS
E72192
WARNING
When the child safety lock is
activated, the door can only be
opened from outside.
Turn the key in the rear door
outwards to activate the lock.
To deactivate the lock, turn the key
inwards.
24
Child safety
PRINCIPLE OF OPERATION
Airbags
E72324
WARNING
Do not modify the front of the
vehicle in any way, as this can
adversely affect the airbag
deployment.
Note: A loud bang will be heard
when an airbag deploys and it is
normal to see a cloud of harmless
powdery residue.
The airbag system comprises the
following:
• dual-stage inflatable nylon bags
(airbags) with gas generators.
• side airbags
• curtain airbags
• seat belt pretensioners
• occupant sensors
• crash sensors.
• a warning lamp in the instrument
panel.
• an electronic control and
diagnostic unit.
E72330
25
Occupant protection
WARNINGS
Repairs to either of the front
seat covers, the sensors
attached to the seats as well as to
the roof lining should only be carried
out by properly trained technicians.
Injuries may result if the side airbags
are triggered inadvertently.
Do not block, obstruct or cover
the airbag because it may
prevent proper deployment. Do not
poke any sharp objects into the areas
where airbags are fitted. This could
damage the airbags.
Do not use any accessory seat
covers that are not specifically
designed for seats with side airbags.
These seat covers must be fitted by
properly trained technicians.
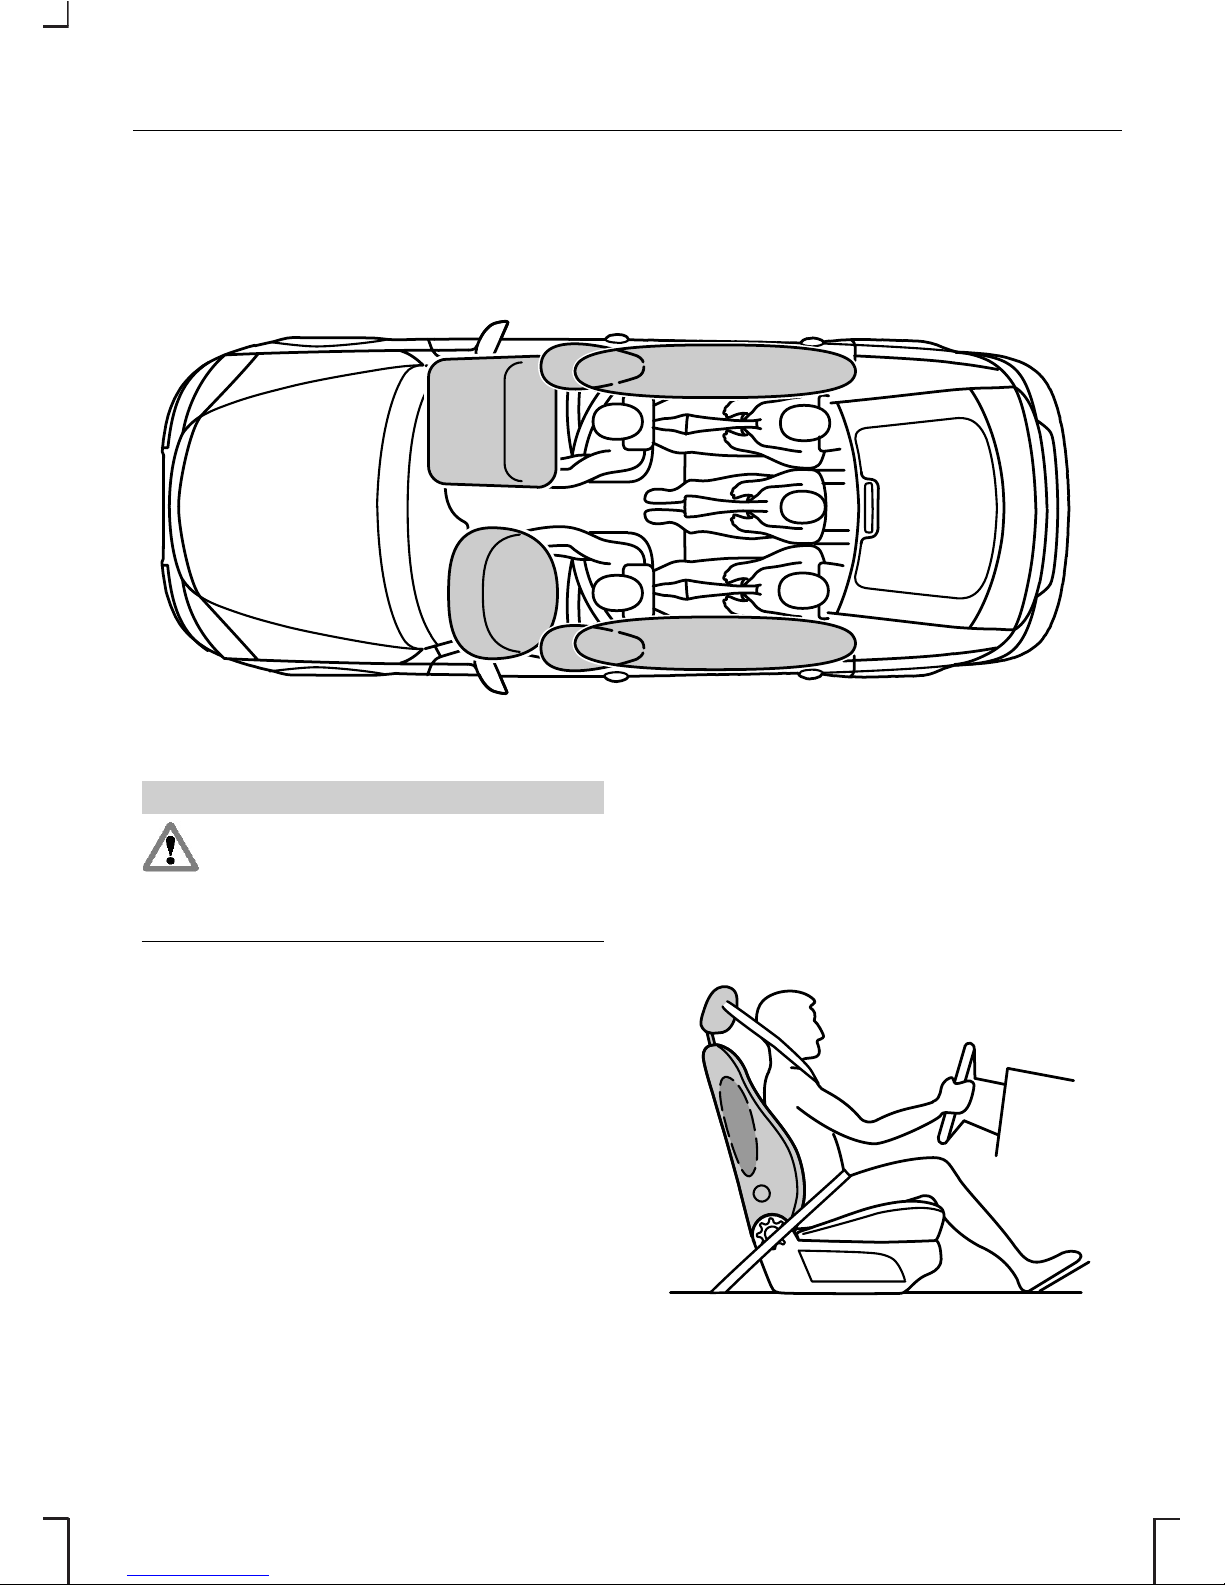
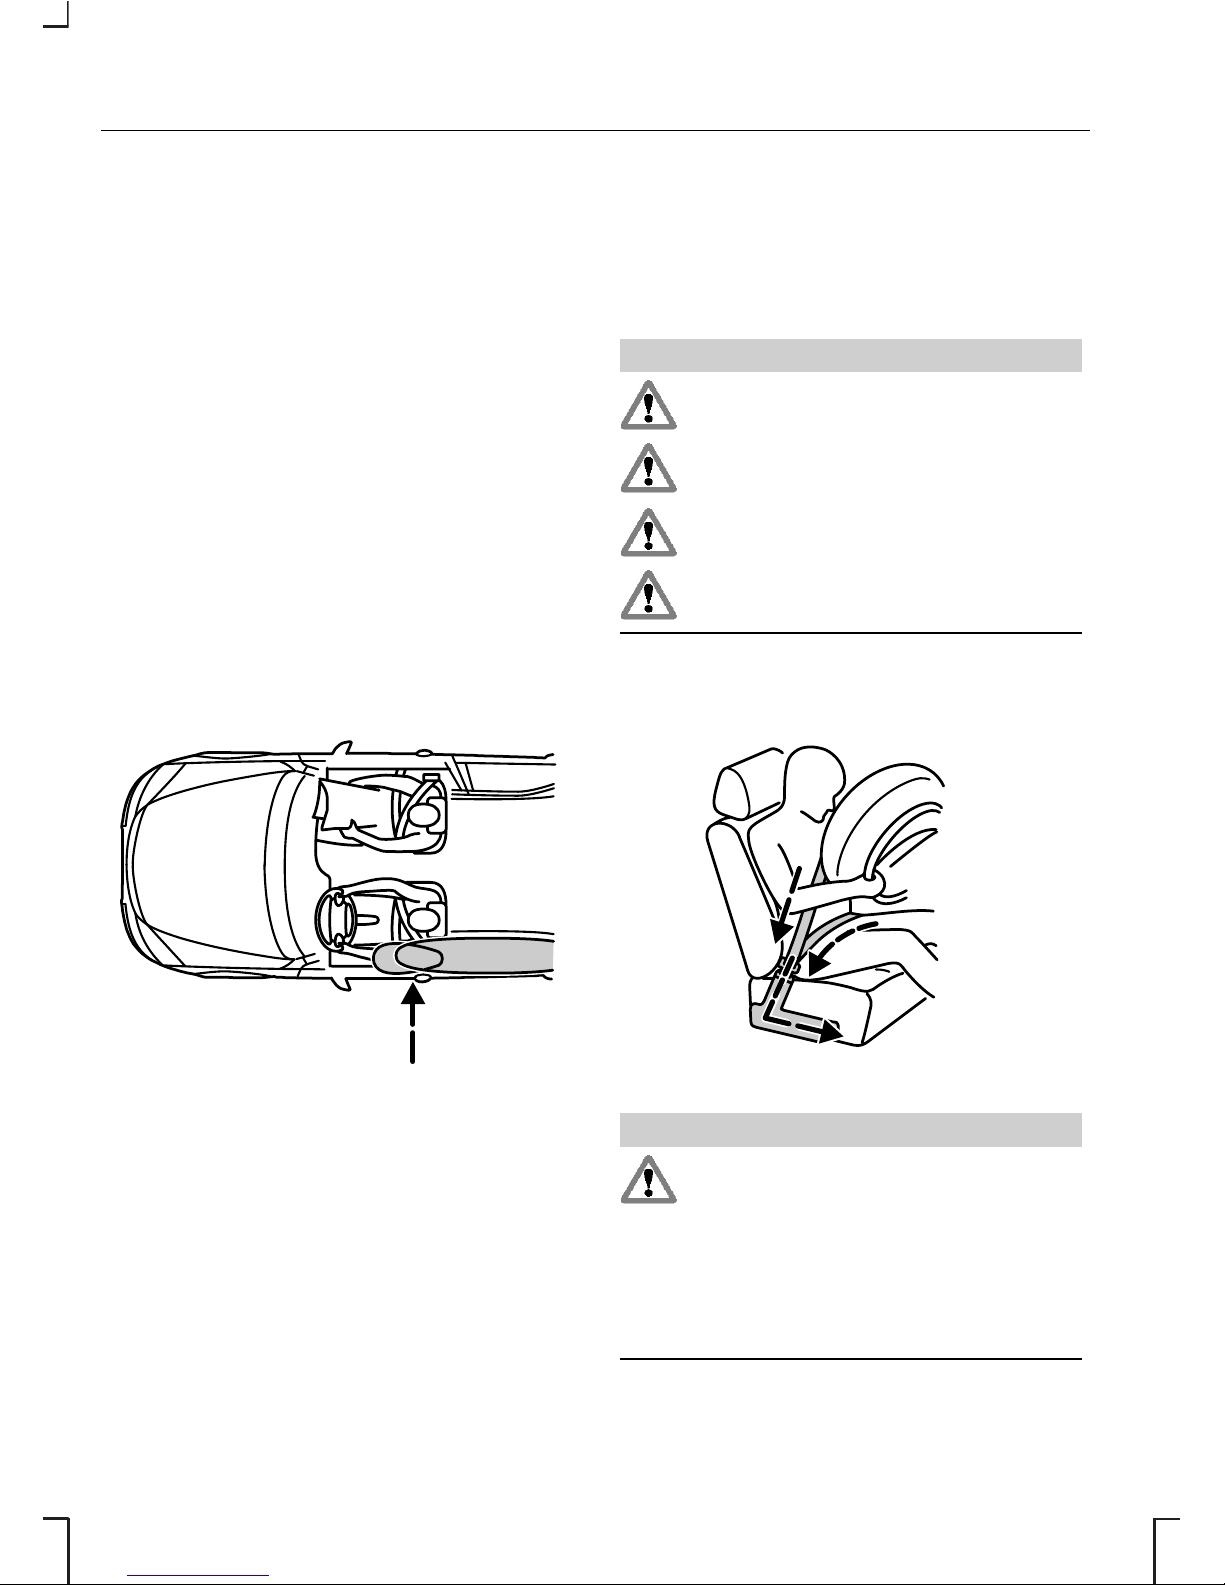
E66553
WARNING
Always wear the seat belt and
keep sufficient distance
between the driver and the steering
wheel. Only when the seat belt is
used properly, can it hold the body
in a position which allows the airbag
to achieve its optimum effect. There
is a risk of injury when the airbag
deploys.
The seat and back must be set
correctly for the airbags to be
optimally effective. See Sitting in the
correct position (page 90).
This is the ideal seating position for
the driver and front passenger and
helps reduce the risk of injury from
sitting too close to an inflating airbag.
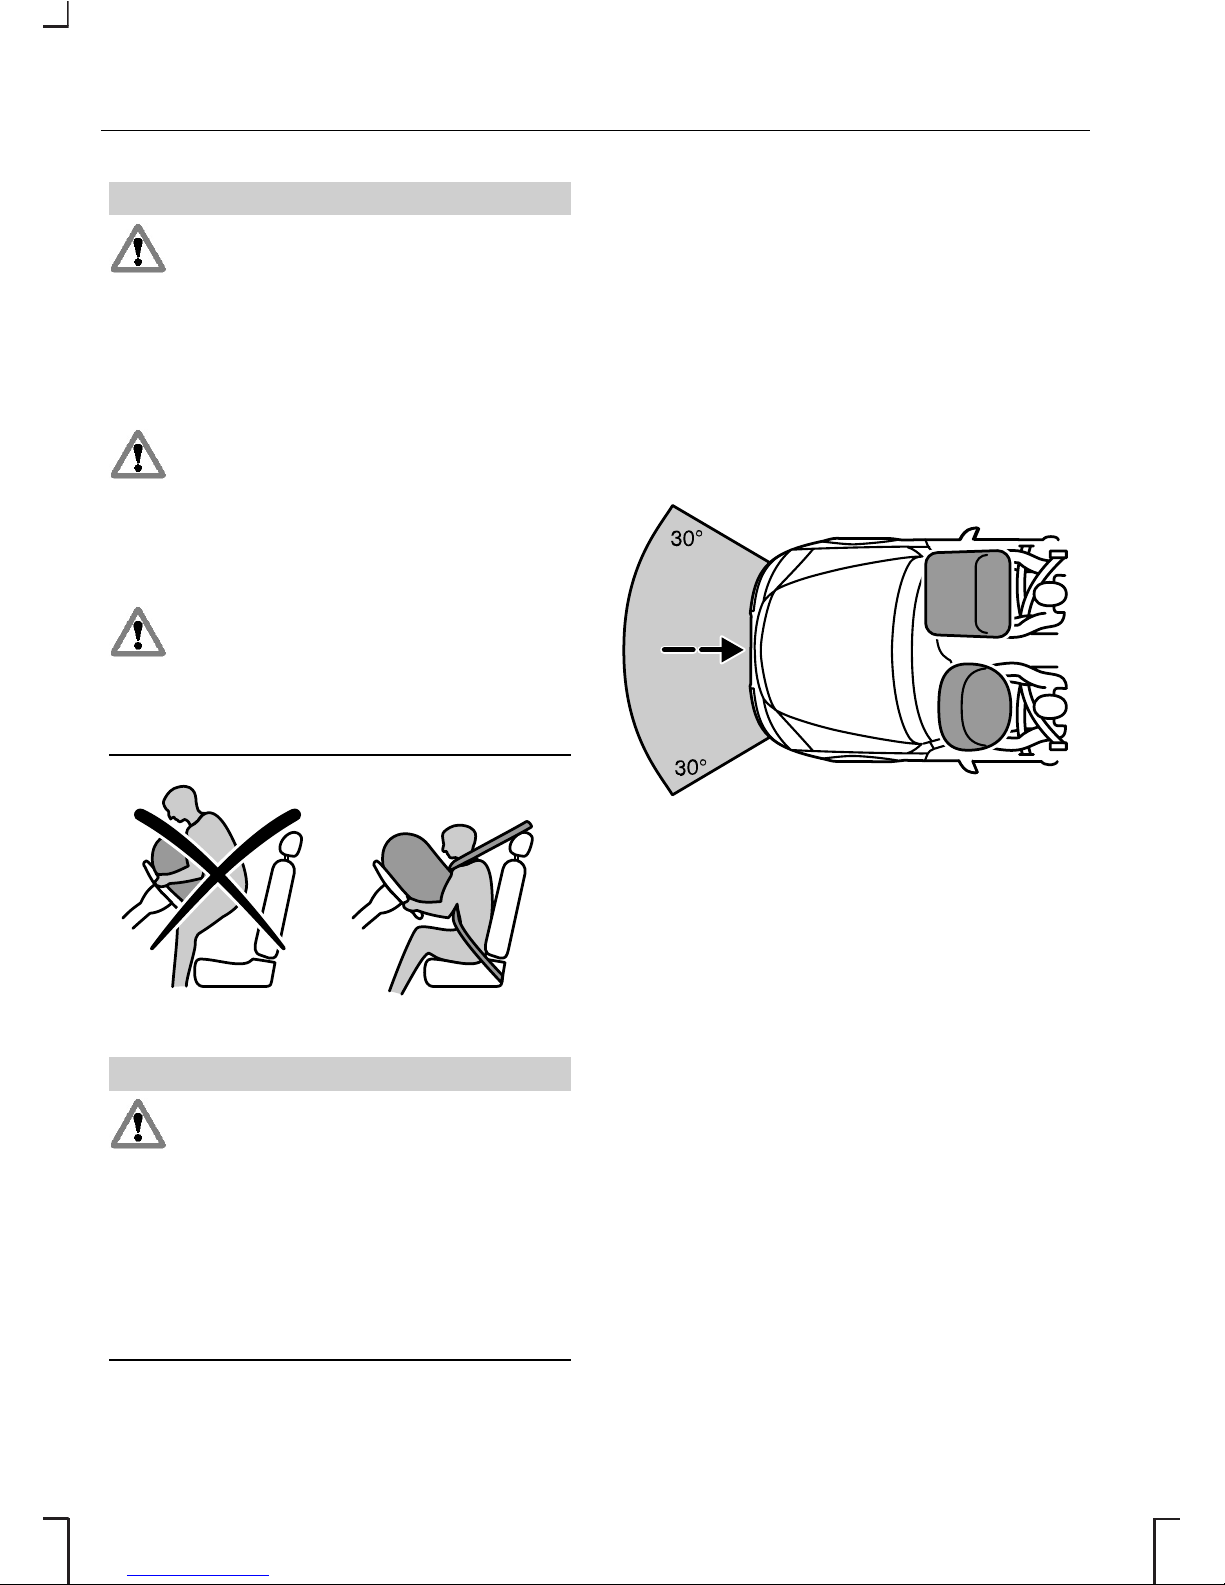
E72325
The front airbags activate during
significant collisions which are
either frontal or up to 30
degrees from the left or the right.
The airbags inflate within a few
thousandths of a second. They will
deflate on contact with the front
occupants thus cushioning forward
body movement.
26
Occupant protection

E72326
During minor collisions as well as
overturns and rear or side collisions,
the front airbag system will not be
activated.
E72327
WARNINGS
Repairs to the steering wheel,
steering column and airbag
system should be carried out by
properly trained technicians.
Always keep the areas in front
of the airbags free. Never affix
anything to or over these areas.
These areas should only be wiped
with a damp cloth, never with a wet
cloth.
Dual-stage strategy
A system of sensors in the vehicle
monitors vehicle speed, the status of
the seat belt and the position of the
driver’s seat. In case of an accident,
the system is able to analyze different
crash and occupant conditions and
activate the appropriate safety
devices.
In most airbag deployments, the first
stage is deployed to provide
occupant restraint. The second stage
is deployed afterwards. In the most
severe crash events both stages are
deployed to provide occupant
restraint.
The system increases the safety
potential particularly for drivers who
are not of a standard height or not in
a standard seating position.
Side air bags
E72328
27
Occupant protection
A label on the seatback indicates that
side airbags are fitted. The side
airbags are fitted on the side of the
seatbacks of the front seats. In case
of a severe lateral collision, the airbag
on the side affected by the collision
will be inflated.
The airbag will inflate between the
door panel and occupant. Once the
occupant’s body contacts the airbag,
the propellant escapes, thereby
cushioning the impact.
The side airbags are not activated
upon minor lateral collisions nor upon
front or rear impacts.
Curtain air bags
E72329
Moulded writing on the door pillars
over the seat belts indicates that
curtain airbags are fitted. The curtain
airbags are fitted over the front and
rear side windows inside the roof
lining. In case of a severe lateral
collision, the air bag on the side
affected by the collision will be
inflated.
The curtain air bags are not activated
upon minor lateral collisions nor upon
front or rear impacts.
Seat belts
WARNINGS
Use seat belts at all times.
Never use a seat belt for more
than one person.
Avoid wearing thick clothing.
The seat belts should fit tightly
around the body.
Seat belt pretensioner
E72333
WARNING
The belt pretensioners must not
be removed. If the
pretensioners deployed during an
accident, they must be replaced.
Have the pretensioners serviced and
disposed of by specially trained
personnel only.
28
Occupant protection
 Loading...