

Ford 1999 Contour Owner's Manual

1
Contents
Before driving
Introduction 2
Instrumentation 4
Controls and features 20
Seating and safety restraints 72
Starting and driving
Starting 104
Driving 112
Roadside emergencies 137
Servicing
Maintenance and care 158
Capacities and specifications 217
Customer assistance 223
Reporting safety defects (U.S. only) 235
Index 236

Introduction
2
ICONS
Indicates a warning. Read the
following section on Warnings for
a full explanation.
Indicates that vehicle information
related to recycling and other
environmental concerns will follow.
We must all play our part in
protecting the environment.
Correct vehicle usage and the
authorized disposal of waste
cleaning and lubrication materials
are significant steps toward this
aim.
BREAKING IN YOUR VEHICLE
There are no particular breaking-in
rules for your vehicle. Simply avoid
driving too fast during the first
1 600 km (1 000 miles). Vary
speeds frequently. This is
necessary to give the moving parts
a chance to break in.
WARNINGS
How can you reduce the risk of
personal injury and prevent
possible damage to others, your
vehicle, and its equipment?
In this owner’s guide, answers to
such questions are contained in
comments highlighted by the
warning triangle symbol.

Introduction
3
INFORMA TION ABOUT THIS
GUIDE
The information found in this guide
was in effect at the time of
printing. Ford may change the
contents without notice and
without incurring obligation.
If possible, you should avoid hard
braking for the first 1 600 km
(1 000 miles).
From 1 600 km (1 000 miles)
onwards, you can gradually
increase the performance of your
vehicle up to the permitted
maximum speeds.

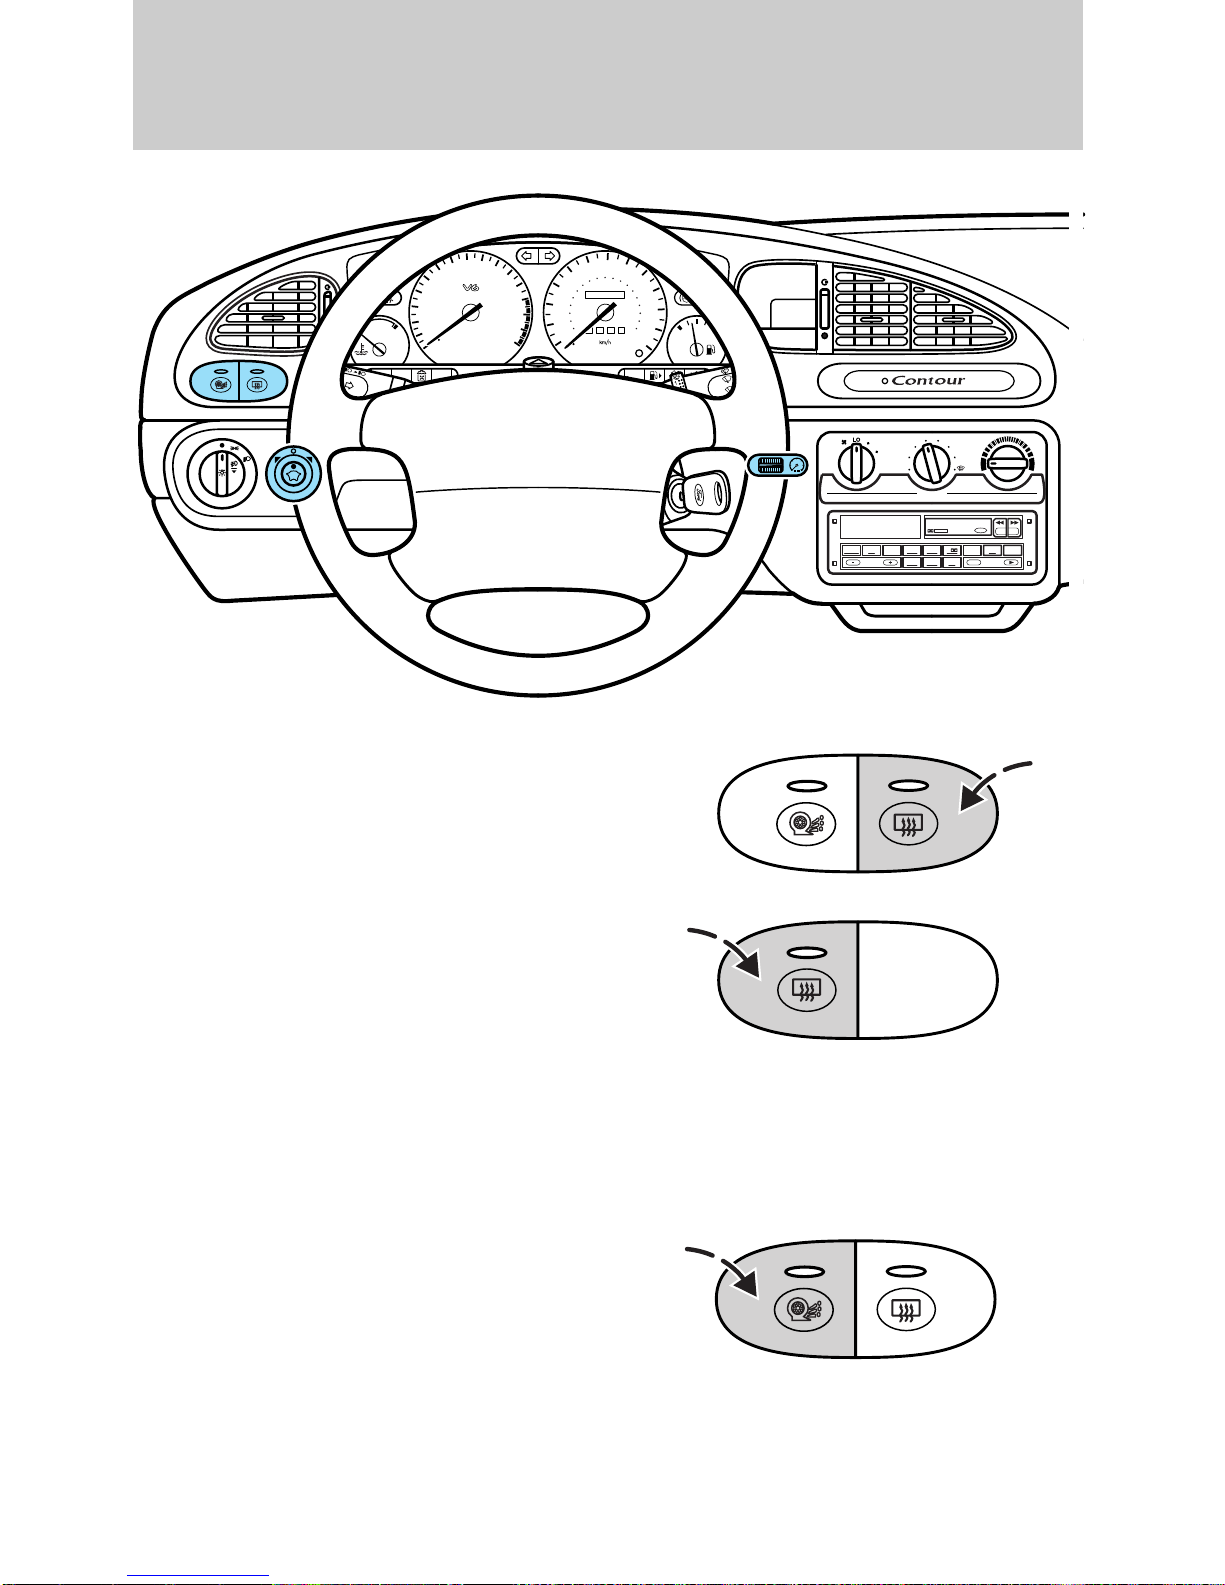
Instrumentation
Page 55
Turn signal/high beam
Page 6
Instrument cluster
Page 54
Hazard flasher
control
Page 56
Windshield
wiper/washer
control
Page 162
Hood release
Page 20, 21
Headlamp control/
Foglamp control*
Page 53
Tilt steering
wheel lever
Page 52
Ignition switch
Page 57
Speed control*
Page 54
Horn
Page 22
Traction control*
Page 23
Power Mirrors*
Page 22
Rear window
defroster control*
TRACTION
CONTROL
CHECK
ENGINE
O/D
OFF
Res
Set
Acc
CoastOff
On
EF
000123
0 0 0 0
10
20
30
40
50
60
70
80
90
100
110
120
130
MPH
20
40
60
55
80
120
100
140
160
180
200
1
2
0
3
x 1000
4
5
6
7
8
M
I
R
R
O
R
S
BRAKE
CH
4

5
Instrumentation
Page 23
Instrument panel dimmer
switch
On various models, the
appearance and location of
some items may differ from
those shown here. However,
the page references given
still apply.
OFFLO PNL/FLR
PANEL
A/C
FLOOR
DEF
FLR
DEF
MAX
A/C
HI
/
POWER AUDIO AM/FM
SCAN
SEEK
3
1
2
4
5
ANS
SIDE 1-2
EJECT
VOLUME
CLOCK
Page 24
Climate control system
Page 32
Electronic sound system
Page 70
Anti-theft system status
indicator*
*if equipped

Instrumentation
6
Turn signal
Flashes when the left or right turn
signal or hazard lights are
activated.
There are two different instrument
cluster designs. The individual
warning and indicator lights are
described on the following pages.
INSTRUMENT CLUSTER
LIGHTS AND CHIMES
Alternative design
CH
40
30
20
10
55
50
60
40
20
70
60
100
80
120
000123
0 0 0 0
MPH
80
140
90
100
160
180
200
130
110
120
BRAKE
EF
1
2
0
O/D
OFF
3
O/D
OFF
4
x 1 000
5
6
7
8
TRACTION
CONTROL
CH
TRACTION
CONTROL
40
30
20
10
55
50
60
40
20
70
60
100
80
120
000123
0 0 0 0
MPH
80
140
CHECK
ENGINE
90
100
160
110
180
200
120
130
CHECK
ENGINE
BRAKE
EF

Instrumentation
7
High beams
Illuminates when the headlamp
high beams are on.
Charging system
Briefly illuminates when the
ignition is turned on and the engine
is off. The light also illuminates
when the battery is not charging
properly and the vehicle may
require electrical system service.
Safety belt
Illuminates when the ignition is
switched on as a reminder to fasten
the safety belts. For more
information, refer to Safety belt
indicator light and warning
chime in the Seating and safety
restraints chapter.
Alternative design
Alternative design
Alternative design
Air bag secondary warning
Flashes periodically when there is
a malfunction with the air bag
system.
For more information, refer to the
Seating and safety restraints
chapter.
O/D
OFF
TRACTION
CONTROL

Instrumentation
8
Traction control system light
(if equipped)
This light comes on when the
traction control system has been
disengaged. It may flash on and off
while driving to indicate the system
is operating.
000123
0 0 0 0
10
20
30
40
50
60
70
80
90
110
120
130
MPH
20
40
60
55
80
120
100
140
160
180
200
100
EF
000123
0 0 0 0
10
20
30
40
50
60
70
80
90
110
120
130
MPH
20
40
60
55
80
120
100
140
160
180
200
100
EF
1
2
0
3
x 1 000
4
5
6
7
8
O/D
OFF
CHECK
ENGINE
BRAKE
TRACTION
CONTROL
CH
O/D
OFF
TRACTION
CONTROL

Instrumentation
9
O/D Off indicator
(Automatic transaxle only)
Illuminates and remains
illuminated when the transaxle
control switch (TCS) on the side of
the gearshift lever is pressed and
overdrive is turned off. For details,
refer to the Driving chapter.
Indicates the status of the
transaxle and will flash steadily if a
malfunction is detected. If the
flashing persists, have your
transaxle serviced by your dealer
or a qualified service technician as
soon as possible.
If the condition persists, your
transaxle may be damaged.
O/D
OFF
TRACTION
CONTROL
O/D
OFF
TRACTION
CONTROL
If the light stays on for more than
three (3) seconds after the
ignition is turned to the ON
position or stays on continuously
while you are driving, have the
traction control system checked
by a qualified technician as soon
as possible.
For more information, refer to
Traction Control in the Driving
chapter.
Low coolant (if equipped)
Briefly illuminates when the
ignition is turned on and the engine
is off. Illuminates when the engine
coolant level is low. Refer to the
Maintenance and care chapter to
check the engine coolant level.

Instrumentation
10
Check engine
Your vehicle is equipped with a
computer that monitors the
engine’s emission control system.
This system is commonly known
as the On Board Diagnostics (OBD
II) system. This OBD II system
protects the environment by
ensuring that your vehicle
continues to meet government
emission standards. The OBD II
system also assists the service
technician in properly servicing
your vehicle.
CHECK
ENGINE
000123
0 0 0 0
10
20
30
40
50
60
70
80
90
110
120
130
MPH
20
40
60
55
80
120
100
140
160
180
200
100
EF
BRAKE
O/D
OFF
CHECK
ENGINE
TRACTION
CONTROL
CH
000123
0 0 0 0
10
20
30
40
50
60
70
80
90
110
120
130
MPH
20
40
60
55
80
120
100
140
160
180
200
100
EF
1
2
0
3
x 1 000
4
5
6
7
8
TRACTION
CONTROL
O/D
OFF
CHECK
ENGINE
BRAKE
TRACTION
CONTROL
CH

Instrumentation
11
The check engine indicator light
illuminates when the ignition is first
turned to the ON position to check
the bulb. If it comes on after the
engine is started, one of the
engine’s emission control systems
may be malfunctioning. The light
may illuminate without a
driveability concern being noted.
The vehicle will usually be drivable
and will not require towing.
What you should do if the check
engine light illuminates
Light turns on solid:
This means that the OBD II system
has detected a malfunction.
Temporary malfunctions may cause
your check engine light to
illuminate. Examples are:
• The vehicle has run out of fuel.
(The engine may misfire or run
poorly)
• Poor fuel quality or water in the
fuel.
• The fuel cap may not have been
securely tightened.

Instrumentation
12
These temporary malfunctions can
be corrected by filling the fuel tank
with good quality fuel and/or
properly tightening the fuel cap.
After three drive cycles without
these or any other temporary
malfunctions present, the check
engine light should turn off. (A
driving cycle consists of a cold
engine startup followed by mixed
city/highway driving.). No
additional vehicle service is
required.
If the check engine light remains
on, have your vehicle serviced at
the first available opportunity.
Light is blinking:
Engine misfire is occuring which
could damage your catalytic
converter. You should drive in a
moderate fashion (avoid heavy
acceleration and deceleration) and
have your vehicle serviced at the
first available opportunity.
Under engine misfire
conditions, excessive
exhaust temperatures could
damage the catalytic converter,
the fuel system, interior floor
coverings or other vehicle components, possibly causing a fire.
Instrumentation
13
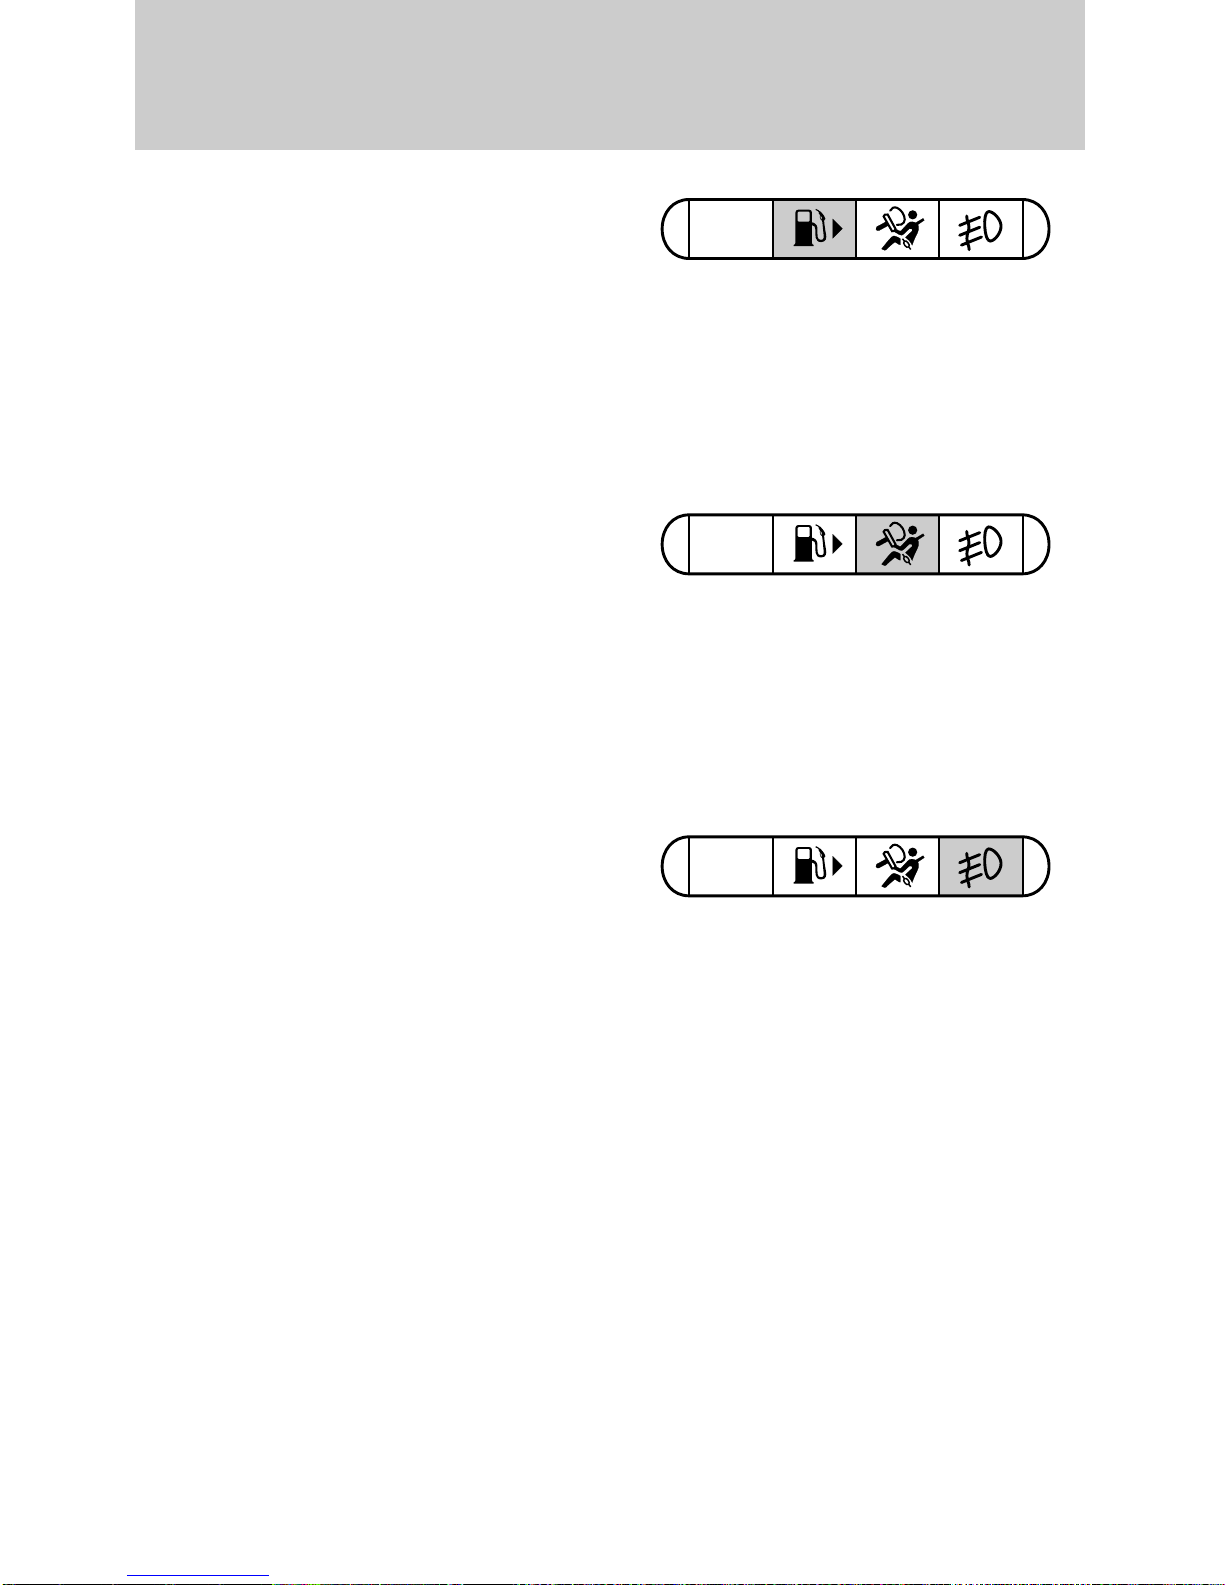
Air bag readiness
Briefly illuminates when the
ignition is turned on. If the light
fails to illuminate, continues to
flash, or remains on, have the
system serviced immediately.
Low fuel
Illuminates when the fuel tank has
approximately eight liters (two
gallons) remaining. The lamp will
also illuminate when the ignition
key is turned to ON and the engine
is off.
CHECK
ENGINE
CHECK
ENGINE
Front foglamps (if equipped)
Illuminates when foglamps are
switched on.
Refer to Foglamp control in the
Controls and features chapter for
notes on use.
CHECK
ENGINE

Instrumentation
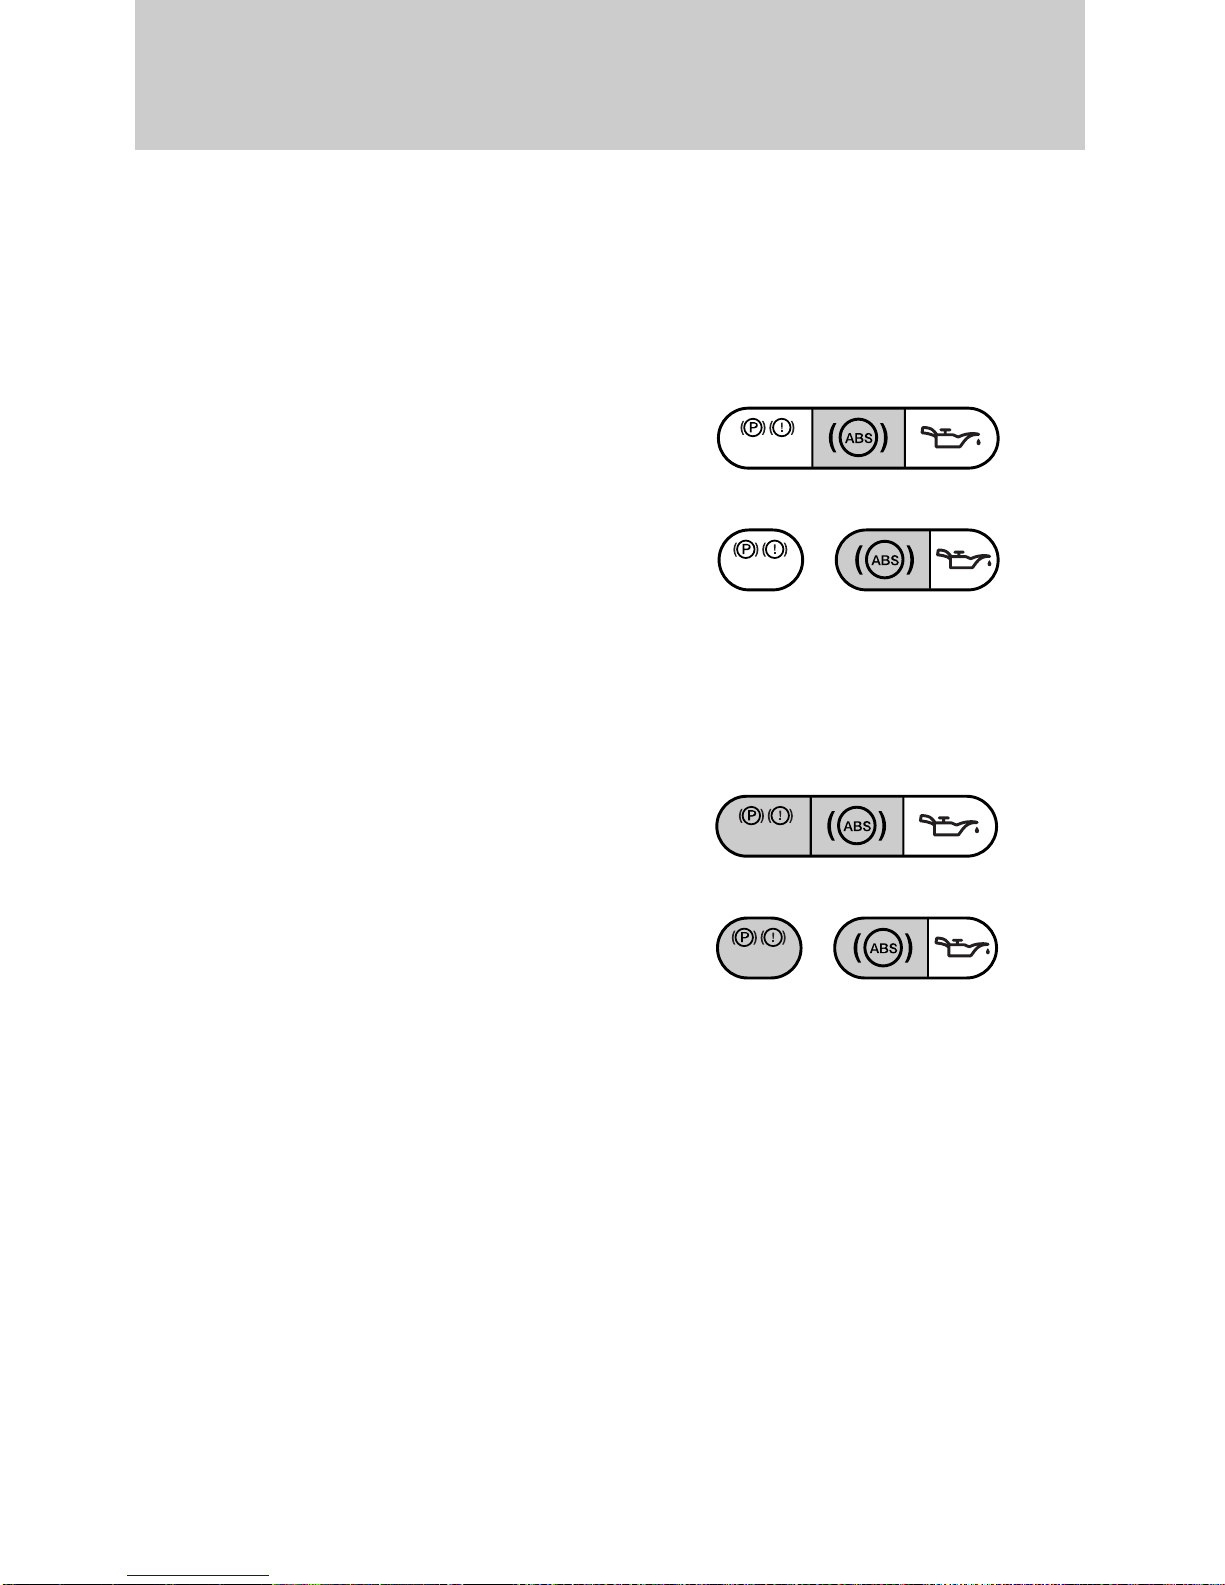
14
Brake system warning
Extinguishes when the parking
brake is released. Illuminates after
releasing the parking brake to
indicate low brake fluid level.
Illumination while driving may
indicate that one of the braking
circuits has failed. The second
braking circuit will remain intact.
However, you will need to brake
harder and allow for increased
stopping distances.
BRAKE
BRAKE
Alternative design
EF
BRAKE
O/D
OFF
000123
0 0 0 0
10
20
30
40
50
60
70
80
90
110
120
130
MPH
20
40
60
55
80
120
100
140
160
180
200
100
CHECK
ENGINE
TRACTION
CONTROL
CH
000123
0 0 0 0
10
20
30
40
50
60
70
80
90
110
120
130
MPH
20
40
60
55
80
120
100
140
160
180
200
100
EF
1
2
0
3
x 1 000
4
5
6
7
8
O/D
OFF
CHECK
ENGINE
BRAKE
TRACTION
CONTROL
CH
Instrumentation
15
Anti-lock brake system (ABS)
(if equipped)
Momentarily illuminates when the
ignition is turned on and the engine
is off. If the light stays on or
continues to flash, the ABS needs
to be serviced.
BRAKE
BRAKE
Alternative design
Brake system and ABS warning
lights
If both warning lights illuminate at
the same time while driving, stop
the vehicle as soon as it is safe to
do so. Have the braking system
checked by your dealer or qualified
service technician before
continuing your journey.
When stopping the vehicle, slowly
reduce the speed. Use the brakes
with great care.
Have the system checked by your
dealer or qualified technician
before continuing your journey.
BRAKE
BRAKE
Alternative design

Instrumentation
16
EF
BRAKE
O/D
OFF
000123
0 0 0 0
10
20
30
40
50
60
70
80
90
110
120
130
MPH
20
40
60
55
80
120
100
140
160
180
200
100
CHECK
ENGINE
TRACTION
CONTROL
CH
000123
0 0 0 0
10
20
30
40
50
60
70
80
90
110
120
130
MPH
20
40
60
55
80
120
100
140
160
180
200
100
EF
1
2
0
3
x 1 000
4
5
6
7
8
O/D
OFF
CHECK
ENGINE
BRAKE
TRACTION
CONTROL
CH
Engine oil pressure
Illuminates when the ignition is
turned on and the engine is off.
The light also illuminates when
engine oil pressure has been lost.
Refer to the Maintenance and
care chapter to check the engine
oil level as soon as possible. If the
engine oil level is correct and the
light stays on, see your dealer or
qualified service technician.
BRAKE
BRAKE
Alternative design

Instrumentation
17
Headlamps on warning chime
Sounds when the headlamps are
on, the ignition is off (and the key
is not in the ignition) and the
driver’s door is open.
Testing the warning and
indicator lights and chimes
Turn the ignition key to the on
position without starting the
engine. The following warning and
indicator lights will illuminate
briefly: charging system, safety belt
(does not illuminate, if the driver’s
safety belt is fastened), traction
control, ABS, brake, low coolant,
low fuel, engine oil pressure, check
engine and air bag readiness.
If any of these lights do not
illuminate, see your dealer or
qualified service technician.
Key-in-ignition warning chime
Sounds when the key is left in the
off/lock or accessory position and
the driver’s door is open.
Safety belt warning chime
For information on the safety belt
warning chime, refer to the
Seating and safety restraints
chapter.
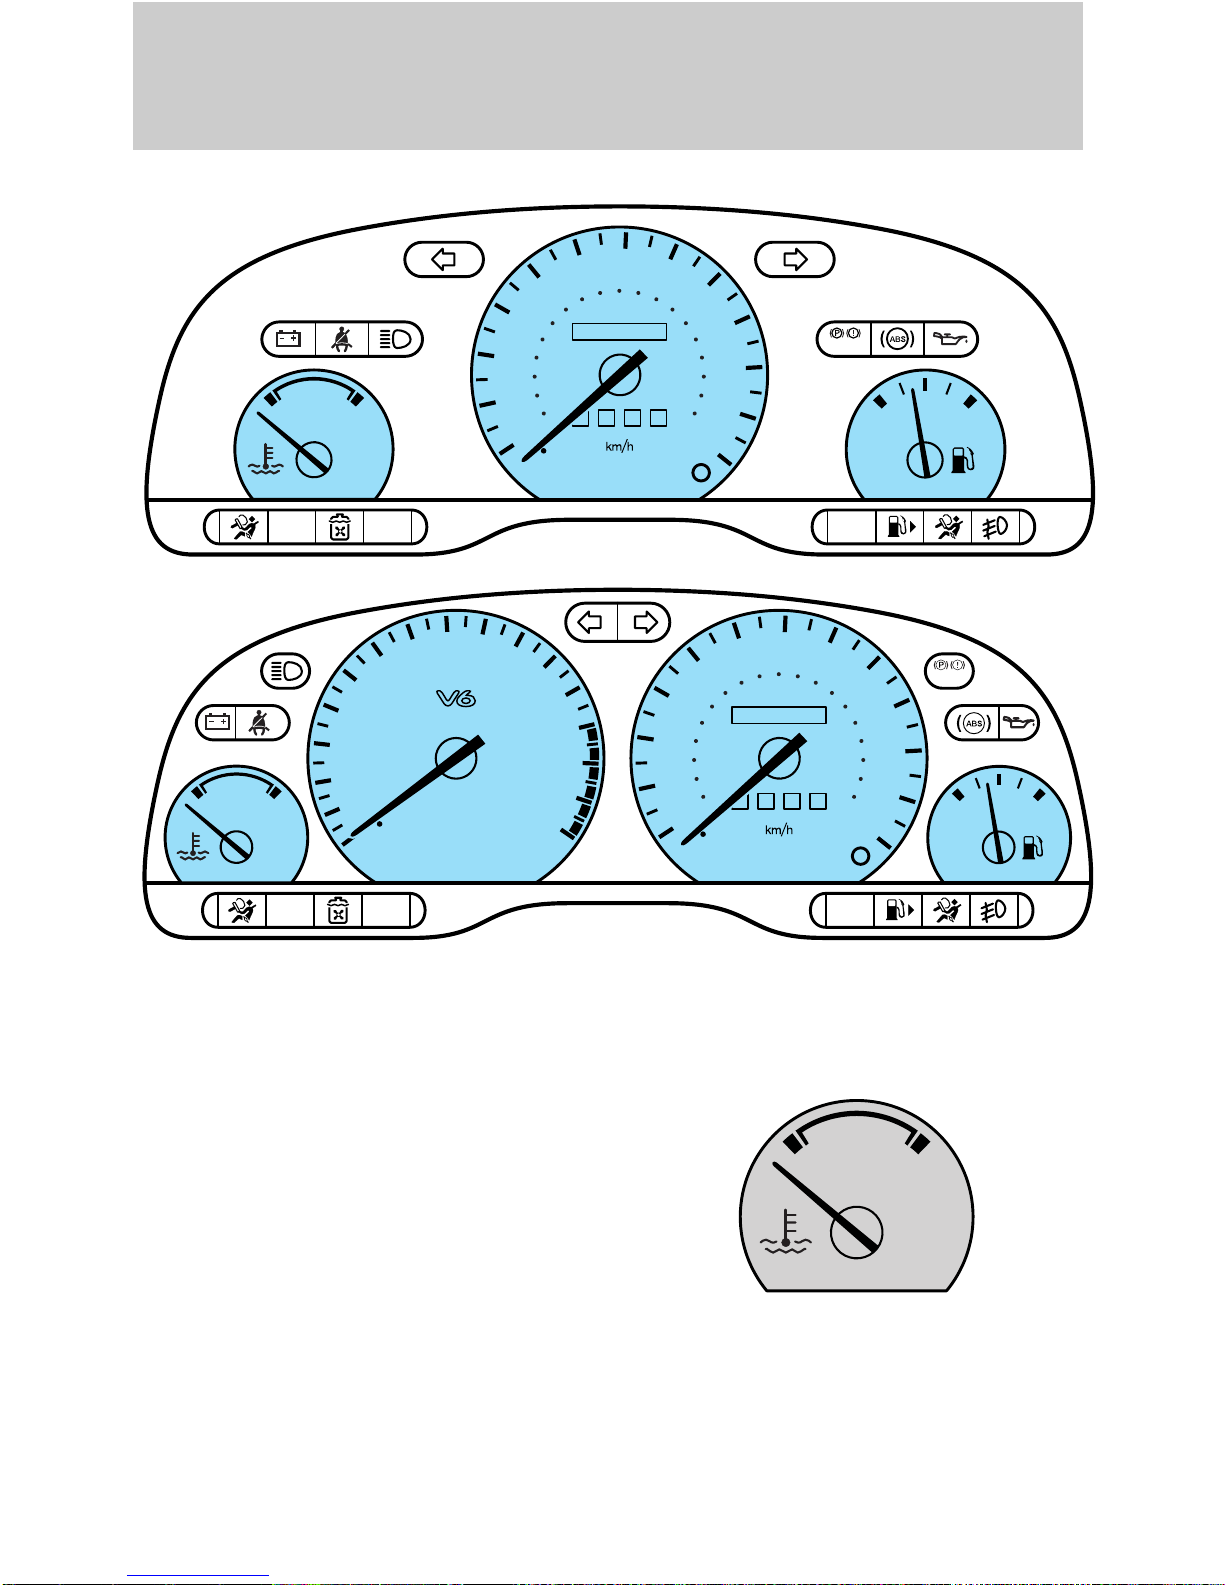
Instrumentation
18
Engine coolant temperature
gauge
Indicates the temperature of the
engine coolant. If it enters the red
section, the engine is overheating.
Switch off the ignition and
determine the source of the
problem. Refer to Checking and
adding engine coolant in the
Maintenance and care chapter.
INSTRUMENT CLUSTER
GAUGES
CH
40
30
20
10
55
50
60
40
20
70
60
100
80
120
000123
0 0 0 0
MPH
80
140
90
100
160
180
200
130
110
120
BRAKE
EF
TRACTION
TRACTION
CONTROL
CONTROL
O/D
OFF
4
3
2
1
CH
0
x 1 000
TRACTION
CONTROL
O/D
OFF
5
8
6
7
40
30
20
10
55
50
60
40
20
70
60
100
80
120
000123
0 0 0 0
MPH
80
140
CHECK
ENGINE
90
100
160
110
180
200
120
130
CHECK
ENGINE
BRAKE
EF
CH
Instrumentation
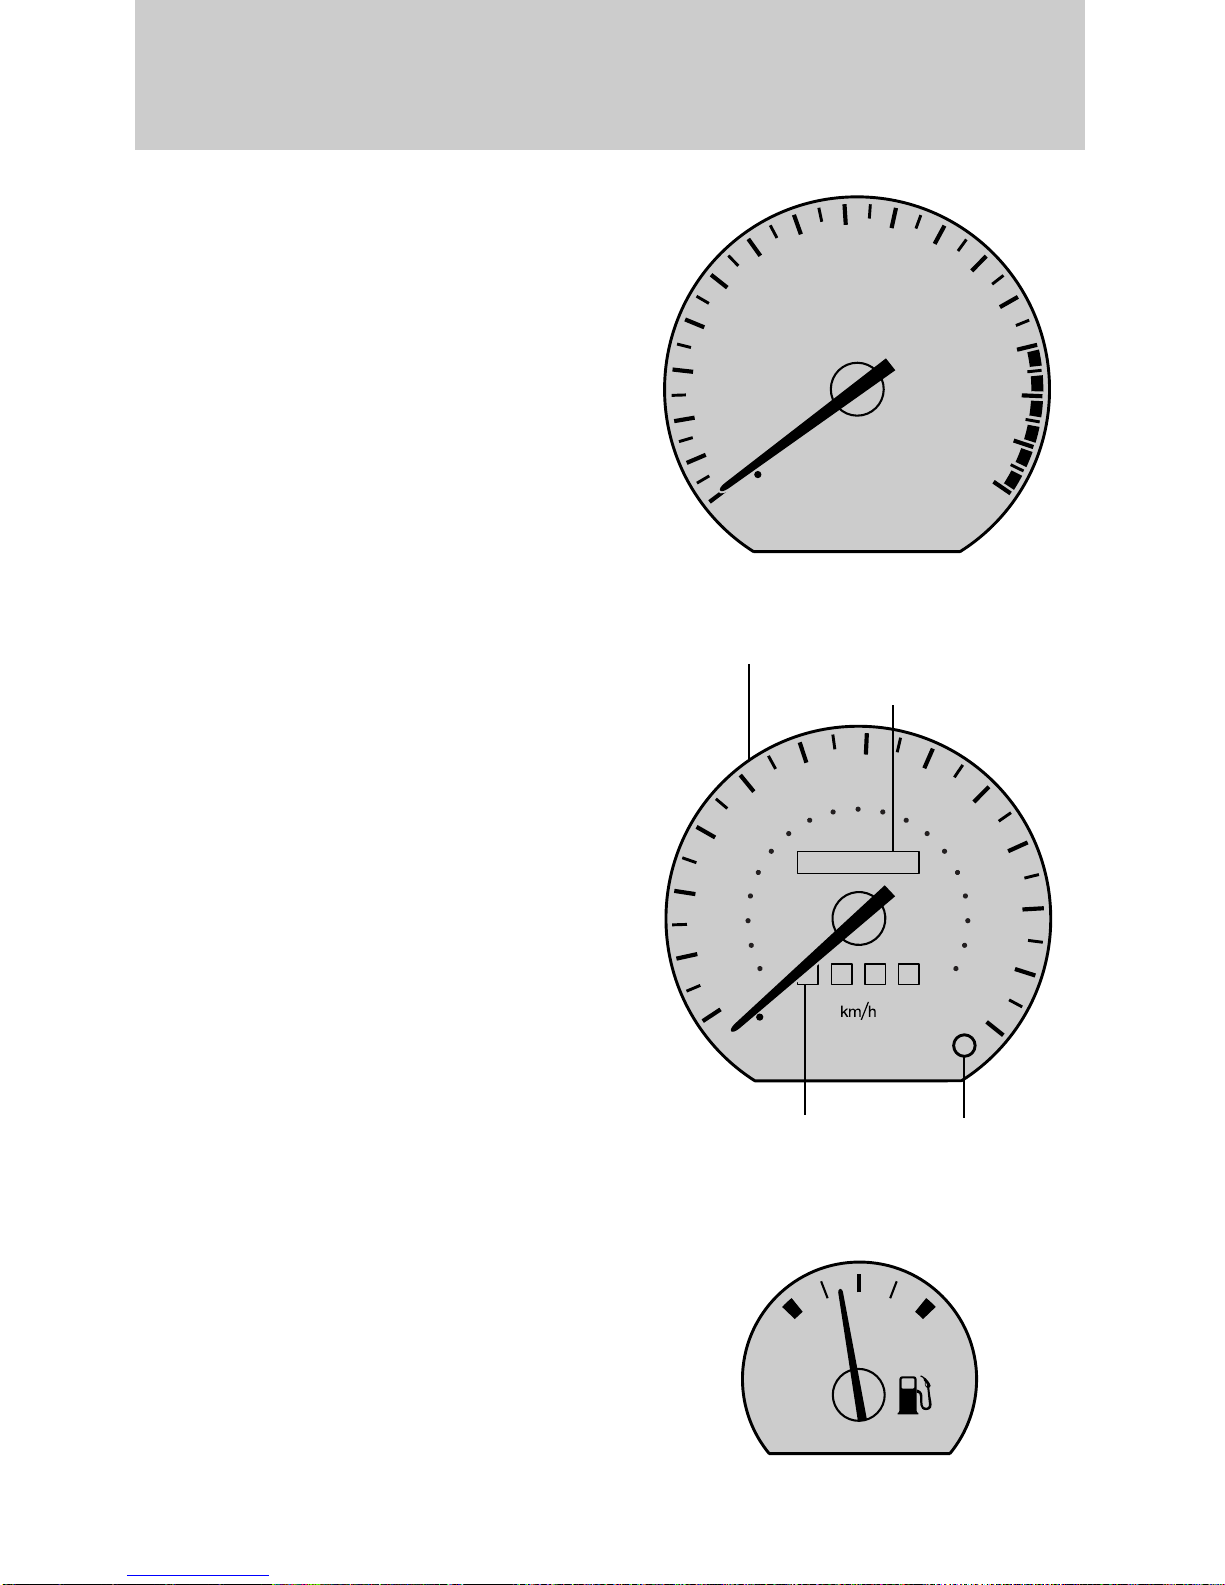
19
Speedometer
Indicates the current vehicle
speed.
Odometer
Registers the total mileage of the
vehicle.
Trip odometer
The trip odometer can register the
mileage of individual journeys. To
reset, depress the button.
Speedometer
Odometer
Trip odometer Reset button
Tachometer (if equipped)
Indicates the engine speed in
revolutions per minute (rpm).
Fuel gauge
The fuel gauge displays the
approximate level of usable fuel left
in the fuel reservoir.
3
2
1
0
55
50
40
60
30
40
4
x 1 000
70
60
100
80
000123
120
5
80
140
90
160
180
6
7
8
100
110
20
20
0 0 0 0
10
MPH
EF
200
120
130

Controls and features
20
INSTRUMENT PANEL
CONTROLS
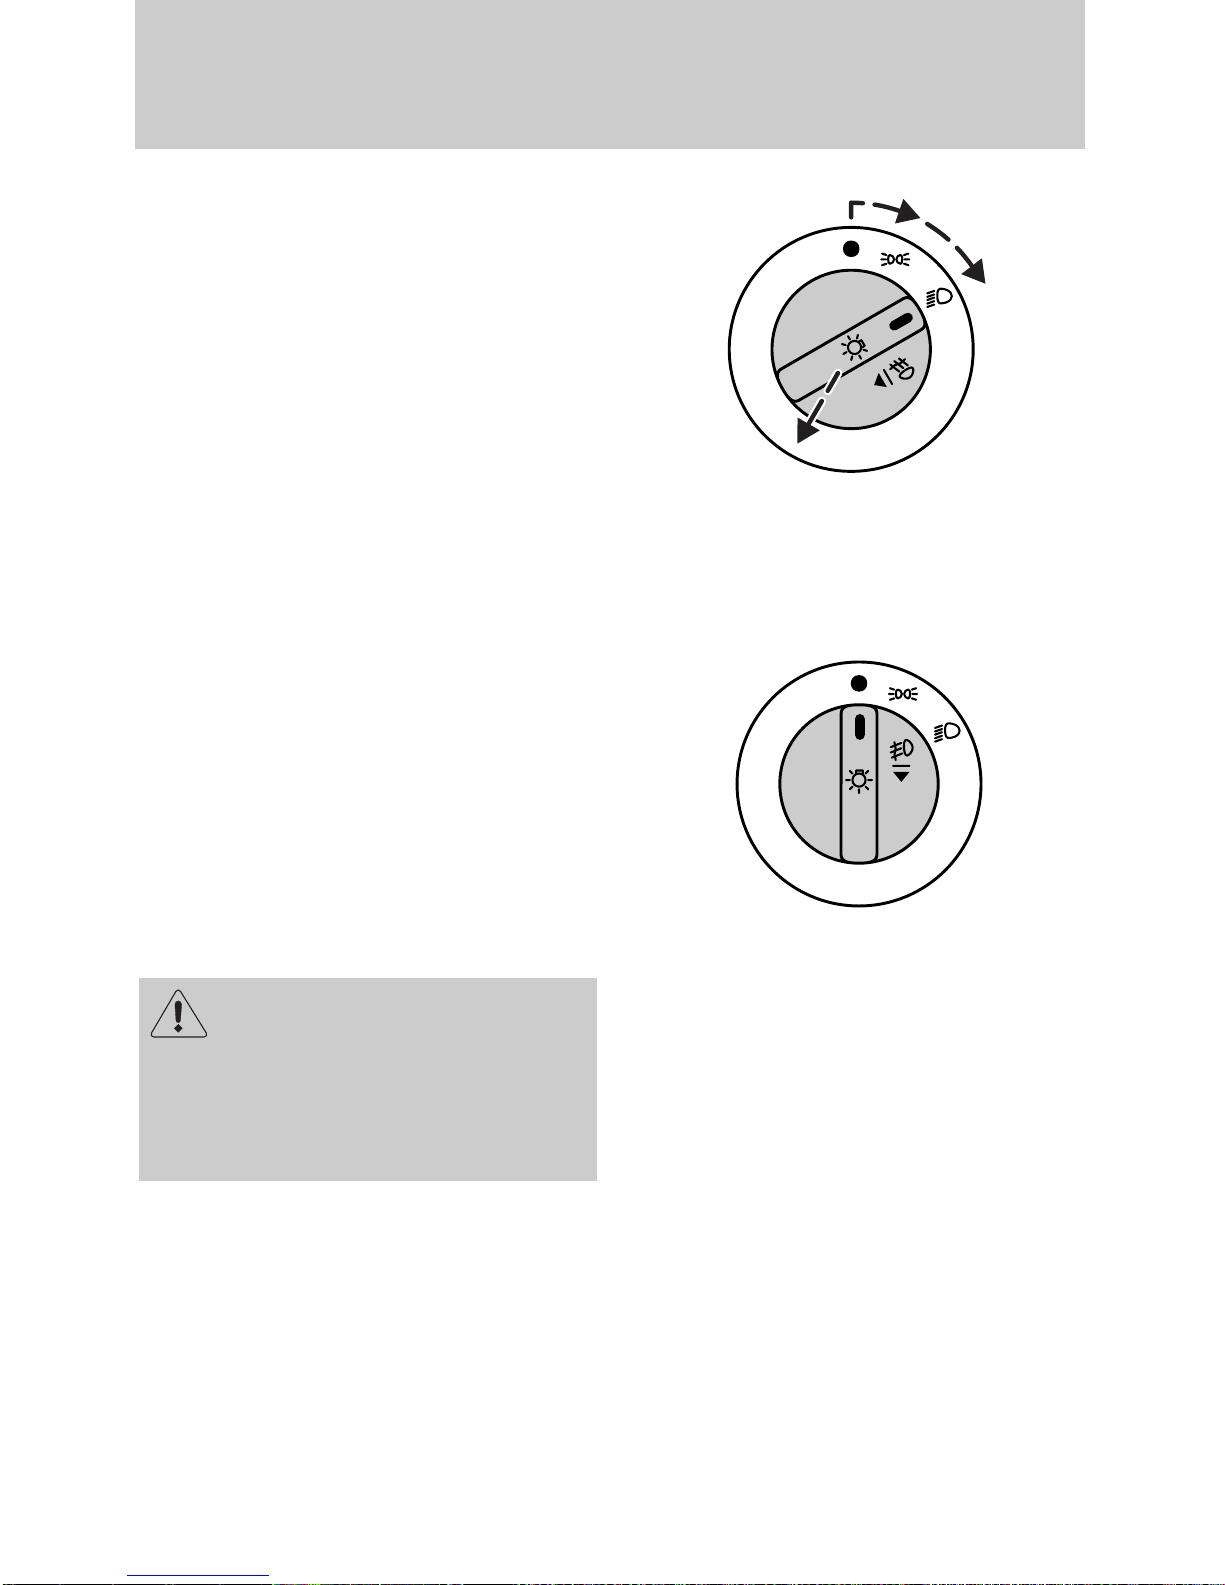
Headlamp control
Lamps off.
Turn one position clockwise:
Parking lamps, instrument panel
lamps, license plate lamps, and tail
lamps on.
Turn two positions clockwise:
Headlamps on.
4
5
3
2
1
CH
M
S
I
R
R
R
O
TRACTION
CONTROL
0
O/D
OFF
x 1000
6
8
50
40
30
7
20
10
60
40
55
60
80
20
70
100
000123
0 0 0 0
MPH
80
120
90
140
100
160
BRAKE
110
180
200
120
EF
130
CHECK
ENGINE
OFFLO PNL/FLR
PANEL
FLOOR
HI
POWER AUDIO AM/FM
VOLUME
A/C
MAX
A/C
FLR
/
DEF
DEF
SIDE 1-2
31
ANS
2
CLOCK
4
5
EJECT
SCAN
SEEK
Controls and features
21
Daytime running lights (DRL)
(Canadian vehicles only)
The DRL system turns on the
highbeam headlamps, with a
reduced light output, when:
• the vehicle is running and the
ignition is in the on position and
• the headlamp system is in the off
position.
The daytime running light
(DRL) system will not
illuminate the tail lamps and
parking lamps. Turn on your
headlamps at dusk. Failure to do
so may result in a collision.
Foglamp control (if equipped)
Pull out the control while the
headlamps are on to turn the
foglamps on.
Push in the control to deactivate
the foglamps.
Controls and features
22
Rear window defroster
(if equipped)
Press the defroster control to clear
the rear window of thin ice and fog.
The ignition must be in the on
position to operate the rear
window defroster.
The defroster turns off
automatically after 10 minutes or
when the ignition is turned to the
off position. To manually turn off
the defroster, push the control
again.
Traction control system
(if equipped)
This button turns the traction
control system off and on. See
Driving for more information.
4
5
3
2
1
CH
M
S
I
R
R
R
O
TRACTION
TRACTION
TROL
CONTROL
0
O/D
OFF
x 1000
6
40
30
7
20
10
8
50
55
60
40
20
60
100
80
000123
0 0 0 0
MPH
70
80
120
90
140
100
160
110
180
200
120
EF
130
CHECK
ENGINE
OFF PNL/FLR
PANEL
FLOOR
HI
POWER AUDIO AM/FM
VOLUME
A/C
MAX
A/C
FLR
/
DEF
DEF
SIDE 1-2
31
2
4
5
ANS
EJECT
SCAN
CLOCK
SEEK

Controls and features
23
Panel dimmer control
Adjust the control to vary the
intensity of the panel lighting.
Operates only when the exterior
lights are switched on.
To switch on the interior lamp,
rotate the control completely to the
left.
Power mirrors (if equipped)
The control can be swivelled and
turned.
Turn the control counterclockwise
to adjust the driver’s side mirror,
clockwise to adjust the passenger
side mirror. Adjust the selected
mirror by moving the center
control in the desired direction.
Then turn the control back to the
center position.
M
M
I
R
I
R
S
R
R
O
S
R
R
O

Controls and features
24
Climate control system
Vents
Airflow from the vents may be
adjusted by moving the horizontal
control or vertically adjusting the
vent (except passenger side outer
vent) according to your airflow
preference.
Your vehicle has one of the
following climate control systems:
• Manual heating system
• Manual heating and air
conditioning system
In some modes, the two systems
function similarly. In modes where
the systems do not function
similarly, the different functions
are noted.
4
3
2
1
CH
0
x 1000
TRACTION
O/D
TRACTION
ROL
OFF
CONTROL
M
S
I
R
R
R
O
55
70
60
5
6
7
8
80
50
100
120
90
80
140
40
000123
100
60
30
20
160
110
180
40
200
20
120
0 0 0 0
10
MPH
ENGINE
130
CHECK
EF
HI
POWER AUDIO AM/FM
VOLUME
PANEL
A/C
MAX
A/C
4
OFFLO PNL/FLR
31
2
5
CLOCK
FLOOR
FLR
/
DEF
DEF
SIDE 1-2
ANS
SCAN
EJECT
SEEK

Controls and features
25
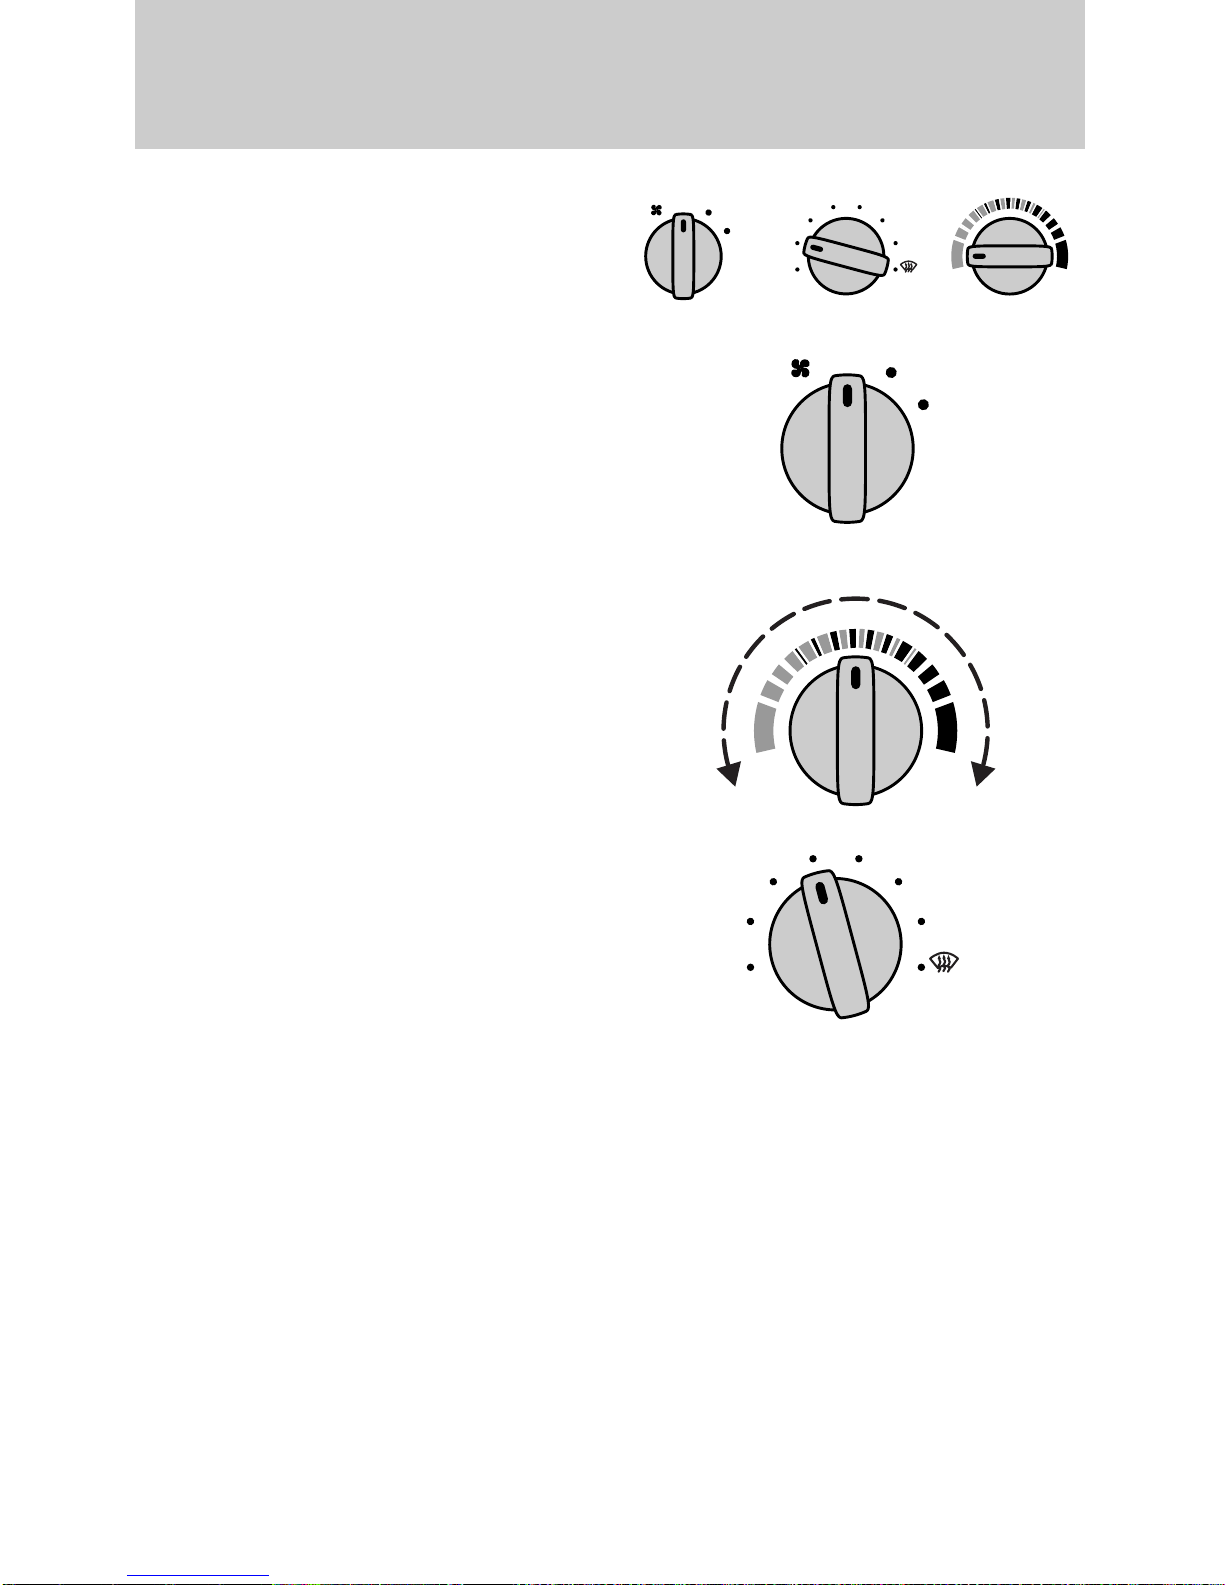
Heater only system
(if equipped)
Temperature control knob
Controls the temperature of the
airflow inside the vehicle. On
heater-only systems, the air cannot
be cooled below the outside
temperature.
Mode selector control
Controls the direction of the
airflow to the inside of the vehicle.
• PANEL – Distributes outside air
through the instrument panel
registers.
• OFF – Outside air is shut out and
the fan will not operate.
• PNL/FLR – Distributes outside
air through the instrument panel
registers and the floor ducts.
• FLOOR – Allows for maximum
heating. Distributes outside air
through floor ducts.
Fan speed control
Controls the volume of air
circulated in the vehicle.
OFFLO PNL/FLR
PANEL FLOOR
HI
LO
FLR
/
DEF
DEF
HI
Controls and features
26
• FLR/DEF – Distributes outside
air through the floor ducts and the
windshield defroster ducts.
• DEF – Distributes outside air
through the windshield defroster
ducts. It can be used to clear ice or
fog from the windshield.
Operating tips
• In humid weather, select DEF
before driving. This will help to
prevent your windshield from
fogging. After a few minutes, select
any desired position.
• To prevent humidity buildup
inside the vehicle, don’t drive with
the climate control system in the
OFF position.
• Don’t put objects under the front
seat that will interfere with the
airflow to the back seats.
• Remove any snow, ice or leaves
from the air intake area (at the
bottom of the windshield under the
hood).
• When placing objects on top of
your instrument panel, be careful
to not place them over the
defroster outlets. These objects
can block airflow and reduce your
ability to see through your
windshield. Also, avoid placing
small objects on top of your
instrument panel. These objects
can fall down into the defroster
outlets and block airflow and
possibly damage your climate
control system.
Controls and features
27
Manual heating and air
conditioning system
(if equipped)
Fan speed control
Controls the volume of air
circulated in the vehicle.
Temperature control knob
Controls the temperature of the
airflow inside the vehicle.
Mode selector control
Controls the direction of the
airflow to the inside of the vehicle.
The air conditioning compressor
will operate in all modes except
PANEL, PNL/FLR, and FLOOR.
However, the air conditioning will
only function if the outside
temperature is about 10°C (50°F )
or above.
Since the air conditioner removes
considerable moisture from the air
during operation, it is normal if
clear water drips on the ground
under the air conditioner drain
while the system is working and
even after you have stopped the
vehicle.
OFFLO PNL/FLR
PANEL
A/C
MAX
HI
A/C
LO
FLOOR
FLR
DEF
/
DEF
HI
PANEL
A/C
MAX
A/C
OFF PNL/FLR
FLOOR
FLR
DEF
/
DEF

Controls and features
28
Under normal conditions, your
vehicle’s climate control system
should be left in any position other
than MAX A/C or OFF when the
vehicle is parked. This allows the
vehicle to “breathe” through the
outside air inlet duct.
• MAX A/C – Uses recirculated air
to cool the vehicle. MAX A/C is
noisier than A/C but more
economical and will cool the inside
of the vehicle faster. Airflow will be
from the instrument panel
registers. This mode can also be
used to prevent undesirable odors
from entering the vehicle.
• A/C – Uses outside air to cool the
vehicle. It is quieter than MAX A/C
but not as economical. Airflow will
be from the instrument panel
registers.
• PANEL – Distributes outside air
through the instrument panel
registers. However, the air will not
be cooled below the outside
temperature because the air
conditioning does not operate in
this mode.
• OFF – Outside air is shut out and
the fan will not operate. For short
periods of time only, use this mode
to prevent undesirable odors from
entering the vehicle.

Controls and features
29
• PNL/FLR – Distributes outside
air through the instrument panel
registers and the floor ducts.
However, the air will not be cooled
below the outside temperature
because the air conditioning does
not operate in this mode. For
added customer comfort, when the
temperature control knob is
anywhere in between the full hot
and full cold positions, the air
distributed through the floor ducts
will be slightly warmer than the air
sent to the instrument panel
registers.
• FLOOR – Allows for maximum
heating by distributing outside air
through the floor ducts. However,
the air will not be cooled below the
outside temperature because the
air conditioning does not operate in
this mode.
• FLR/DEF – Distributes outside
air through the windshield
defroster ducts and the floor ducts.
Heating and air conditioning
capabilities are provided in this
mode. For added customer
comfort, the air distributed through
the floor ducts will be slightly
warmer than the air sent to the
windshield defroster ducts. If the
temperature is about 10°C (50°F)
or higher, the air conditioner will
automatically dehumidify the air to
prevent fogging.

Controls and features
30
• DEF – Distributes outside air
through the windshield defroster
ducts. It can be used to clear ice or
fog from the windshield. If the
temperature is about 10°C (50°F)
or higher, the air conditioner will
automatically dehumidify the air to
prevent fogging.
Operating tips
• In humid weather, select DEF
before driving. This will prevent
your windshield from fogging. After
a few minutes, select any desired
position.
• To prevent humidity buildup
inside the vehicle, don’t drive with
the climate control system in the
OFF position.
• Don’t put objects under the front
seat that will interfere with the
airflow to the back seats.
• Remove any snow, ice or leaves
from the air intake area (at the
bottom of the windshield under the
hood).
• If your vehicle has been parked
with the windows closed during hot
weather, the air conditioner will do
a much faster job of cooling if you
drive for two or three minutes with
the windows open. This will force
most of the hot, stale air out of the
vehicle. Then operate your air
conditioner as you would normally.
 Loading...