

Force10 Networks Galley, 62551 Owner's Manual

Professional Series
Galley Range
OWNER’S MANUAL
Read all instructions and warnings before operating.
Force 10 Manufacturing Corporation
Unit A – 19169 21st Ave
Surrey, BC
V3S 3M3
Tel: 604.536.0379
Fax: 604.535.1210
Website: www.force10.com

If you are missing any parts or have questions regarding assembly,
performance or operation please contact Force 10 Manufacturing
Customer Service at 1-800-663-8515 or email at sales@force10.com.
INTRODUCTION
Thank you for selecting the Force 10 Professional Series Galley Range. Your unit was
carefully inspected and tested at our factory. Please take the time to read this manual
carefully; many of its instructions are essential to the safe operation of your new Force 10
Range.
Because of the continuing refinement of our product designs, your Range may possess
features not discussed in the manual. We have tried to supply all the information you
might need, so please take time to read this manual before installing and using your
Range.
Force 10 advises strongly against unauthorized modification of this product, but we do
encourage you to correct problems which may arise by under-taking the simple repairs
and maintenance described in this manual.
Any recommendation or advice given by Force 10 Marine Company or any of its employees is solely
an accommodation to the customer, and should not be relied upon by the customer without an
independent verification of its applicability to the customer’s particular situation.
SAFETY & PRECAUTIONS
Read all Instructions before operating.
• If the Information in this manual is not followed exactly, a fire or explosion may
result, causing property damage, personal injury or death.
• Open flame cooking appliances consume oxygen and produce carbon monoxide.
To avoid asphyxiation, or death from exposure to carbon monoxide, maintain
open ventilation when using this appliance.
• Do not use this appliance as a source of heat.
• Test all fuel lines and connection points for leaks with a soapy water. Do not attempt
to locate leaks by using an open flame.
• Close the main gas valve when the appliance is not in use.
• Never leave this appliance unattended during use.
• Save this manual for future reference.
Page 1 of 15

GAS PRESSURE
Your Force 10 Galley Ranges (unless otherwise specified) is designed to operate from
low pressure Propane gas.
Gas Pressure
mbar psi Auxiliary
Burner
Propane 30 0.44 0.45/ 0.30 0.78/ 0.47 0.68/ NA 0.74/ 0.37
Orifice Size (mm) / By Pass (mm)
Rapid
Burners
Broiler Thermostatic
Oven Burner
INSTALLATION
Unpacking
1. Remove all plastic coating before use.
2. Please copy the model and serial number of your unit into your manual. This is
located both on the shipping box and the right stove side of the Range.
MODEL #_________________ SERIAL #___________________
Packing List
Owners Manual Gimbal Wall Brackets (2)
Pot Holders (2 sets) Built-in Trim kit
Gimbal Wall Brackets (2) LPG warning plates (3)
Gas connection
Note: This appliance is designed to operate from low pressure (30mbar) Propane.
Exposure to high pressure can damage the unit
Connect your Galley Range to a properly installed low pressure Propane System. Force
10 Manufacturing recommends that your Propane system meet the regulations specified
in the American Boat and Yacht Council Standard A-1. (Marine Liquefied Petroleum Gas
(LPG) Systems)
The gas fitting on this range is a 3/8” SAE 45 Male flare fitting, located in the back on
the lower left as you are facing the front of the unit.
For gimbaled installation there must be a minimum of 24” (600mm) of flexible hose to
allow the unit to gimbal freely.
Test all fuel lines and connection points for leaks with a soapy water before use. Do not
attempt to locate leaks by using an open flame.
An optional 8mm Nozzle adaptor fitting is also available (Part # 87155)
Page 2 of 15

Minimum Clearances to Overhead Cabinets
30" (762mm) minimum clearance between the top of the cooking surface and the bottom
of an unprotected wood or metal cabinet;
or
24” (610mm) minimum when bottom of wood or metal cabinet is protected by a flame
retardant heat shield.
To eliminate the risk of burns or fire by reaching over the heated surface, cabinet storage
space located above the surface units should be avoided. If cabinet storage is to be
provided, the risk can be reduced by installing a range hood that projects horizontally a
minimum of 5" beyond the bottom of the cabinets
This Range can be installed as a Gimbaled or Built-in (stationary).
Gimbal Installation
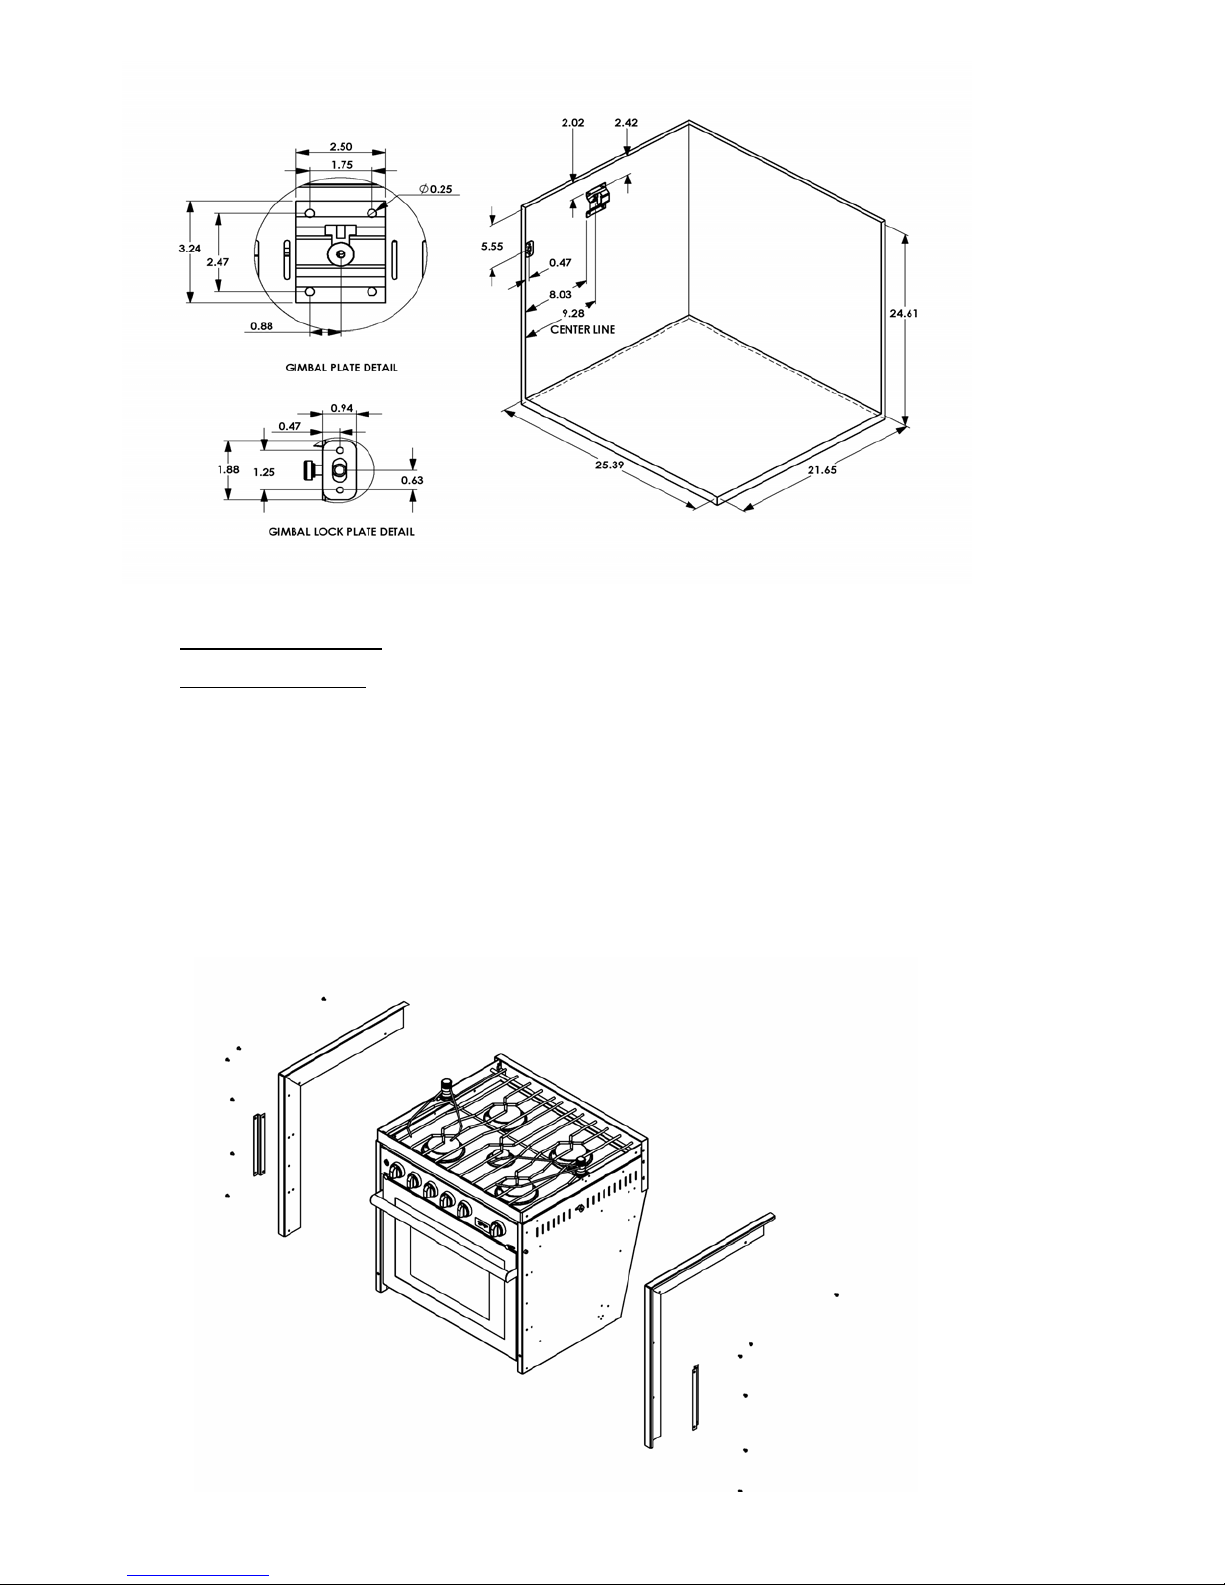
Cutout Dimensions
:
Width: 25.4” (645 mm)
Depth: 21.65” (550 mm)
Height: 24.61” (625 mm)
The opening between the cabinets should be 25.40” (645mm) wide, a minimum of 21.65”
(550mm) deep and 24.61” (625mm) high for proper gimbal. The range requires a
minimum 1” (25mm) open space behind the range, and at least 2” (51mm) of space
below to allow the range to gimbal correctly.
Mount a gimbal bracket on each side of the opening, positioning the top edge of the
bracket 2.02” (51.3mm) below the countertop, and the front side of the bracket 8.03”
(204mm) back from the front edge of the cabinets. This will position the stove so that the
top of the cooking grill frame is flush with the countertop and the front of the unit will be
flush with the front surface of the adjacent cabinets.
Level each bracket and fasten with four #12 wood screws at least 1/2” in length. (Screws
not included)
Drill a 3/8” (10mm) hole on each side of the opening for the gimbal pin. Locate the hole
0.47” (12mm) in from the face of the cabinet and 5.55” (141mm) below the countertop.
Fasten the gimbal lock plate over the hole using two # 8 wood screws at least 3/8” in
length. (Screws not included)
Carefully lift the stove into position so that the gimbal pins slide into the brackets. Gently
pry the safety tabs of the bracket inward, toward the stove so that they protrude over the
gimbal pins.
Make sure the stove swings freely at least 15 degrees. Check to ensure the gimbal lock
pins slide into the hole you drilled.
Page 3 of 15
Built-in Installation
Cutout Dimensions:
Width: 25.1” (635 mm)
Depth: 21.75” (553 mm)
Height: 24.5.” (623 mm)
The opening between the cabinets should be 25” (635mm) wide, 21.75” (553mm) deep
and 24.5” (623mm) high. This height leaves clearance for changing the battery.
Attach the trim kit and front spacer to the right and left stove sides as shown in the
diagram below using the enclosed screws. (6) Screws per side.
Page 4 of 15
 Loading...