

Page 1
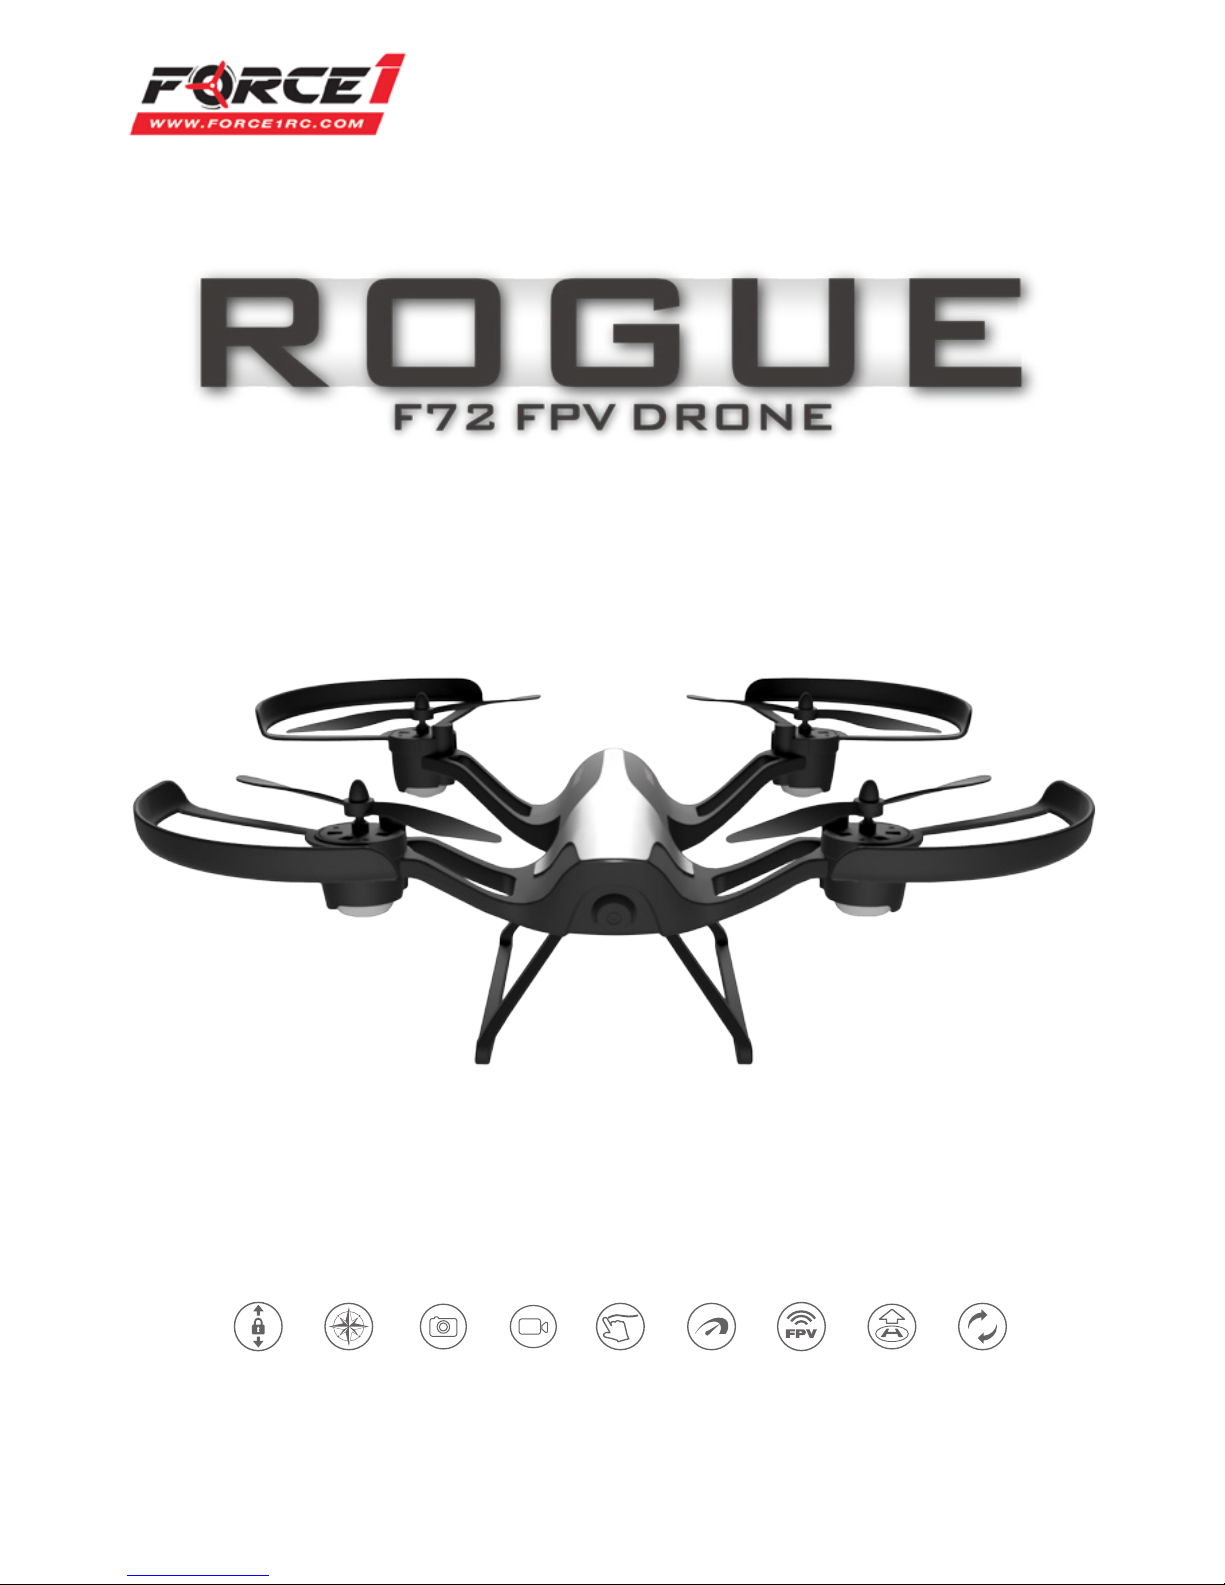
USER MANUAL
Visit us online at force1rc.com for product information, replacement parts, and ight tutorials.
FOR MORE INFORMATION
Altitude Hold
VideoPhotoHeadless
Mode
3 SpeedFlight Path
Mode
FPV Mode One Key
Lift/Land
360
°
360°
Inversion
Page 2

Page 3
ATTENTION:
PLEASE WATCH THIS
FLIGHT INSTRUCTION
VIDEO BEFORE
FLYING YOUR DRONE.
https://youtu.be/tk3qzsUwoWs
Page 4

FORCE1
2
CONTENTS
Welcome & General Safety Precautions ······················· 3
LI-PO Battery Care ·······················································4
Drone Battery Charging ···············································5
Contents & Transmitter Battery Installation ·················· 6
Drone Overview ···························································7
LCD Overview and Phone Clip ·····································8
Throttle Modes Overview ············································· 9
Drone Assembly ·························································10
Preflight Operations ···················································12
Preflight Checklist ·······················································13
Basic Flight Controls ···················································14
Trim Adjustments ························································15
Functions ···································································· 16
Force1 F72 App Installation ······································20
App Icons Overview ···················································21
App Controls ······························································24
Aerial Photography & Video ·······································26
Troubleshooting ·························································27
Spare Parts ·································································28
Page 5

F72 Rogue User Manual
3
WELCOME!
SAFETY PRECAUTIONS
Welcome to the Force 1 Team, and thank you for your Force1 drone purchase. Please read this manual
carefully before drone operation.
(1) This drone is not a toy! It’s a pro-level drone suitable for experienced RC drone users aged 14 years and
older. You accept all liability for operation.
(2) This drone does not require FAA registration or permitting, but FAA rules still apply. Please download
the B4UFLY mobile app for the most up-to-date zoning info, and heed all local government ordinances.
(3) The ying eld must be legally approved by your local government.
Any questions? We’d love to hear from you! Please contact us at [email protected] any time and we’ll
be happy to help.
*Please use only original Force1 parts and accessories.
*Please keep the packaging and this user manual for future reference.
This drone is suitable for experienced RC drone operators aged 14 years and older. It contains small
parts, and should be kept out of reach of small children.
Please follow these safety procedures:
(1) Flight Zone
This drone does not require FAA registration or permitting, but FAA rules still apply. Please download
the B4UFLY mobile app for the most up-to-date zoning info, and heed all local government
ordinances.
(2) Avoid Moisture
Humidity and water can damage your drone, which in turn may cause accidents.
(3) Fly Safely
Please operate your drone as your skill level allows. User fatigue, impairment and improper operation
can cause accidents.
(4) Avoid Moving Parts & Hot Motors
Do not touch propellers, motors or other moving parts while your drone is on.
(5) Avoid Heat
Keep your drone away from heat and prolonged exposure to direct sunlight to avoid damage.
Page 6

FORCE1
4
LI-PO BATTERY CARE
Avoid Overheating
Your batteries will sometimes be warm/hot to the touch after use. This is normal, but beware that battery
components will fail if not allowed to cool down between uses. Also, do not leave batteries exposed to
direct sunlight.
Store Properly
Store batteries at room temperature, between 5C°/40°F and 27°C/80°F.
Use Carefully
• Leave time between charging and using the battery
• To extend the lifetime of the battery, always keep about 20% of the power remaining in the drone
battery (rather than completely draining it)
• If the battery is pushed beyond its limits, the battery could get hot and the performance will drop
• When using the battery for a long time, the battery will increase in temperature. If it is sealed, the air
inside will inate rapidly causing further heating
Charging
• DO NOT overcharge the battery; never charge batteries unattended, and stop charging as soon as your
batteries indicate they are charged
• DO NOT attempt to charge batteries that appear damaged in any way (cracking, swelling, discoloration, etc.)
• If you feel a battery isn’t charging properly, try using another charger if possible. If you nd your battery
or charger is defective, please visit force1rc.com for a replacement, or email us at [email protected]
• To inspect a battery, remove it from the device and examine the battery, battery pins and contacts. If
you notice damage, please visit force1rc.com for a replacement, or email us at [email protected]
• Check your battery and connections after every crash
• Please use genuine factory parts and replacements from force1rc.com
WARNING:
DO NOT LEAVE BATTERY
CHARGING UNSUPERVISED
Page 7
F72 Rogue User Manual
5
DRONE BATTERY CHARGING
LI-PO BATTERY DISPOSAL & RECYCLING
Do not put lithium-polymer batteries in household trash. Please contact your
local waste management agency or LI-PO battery recycling center for more info.
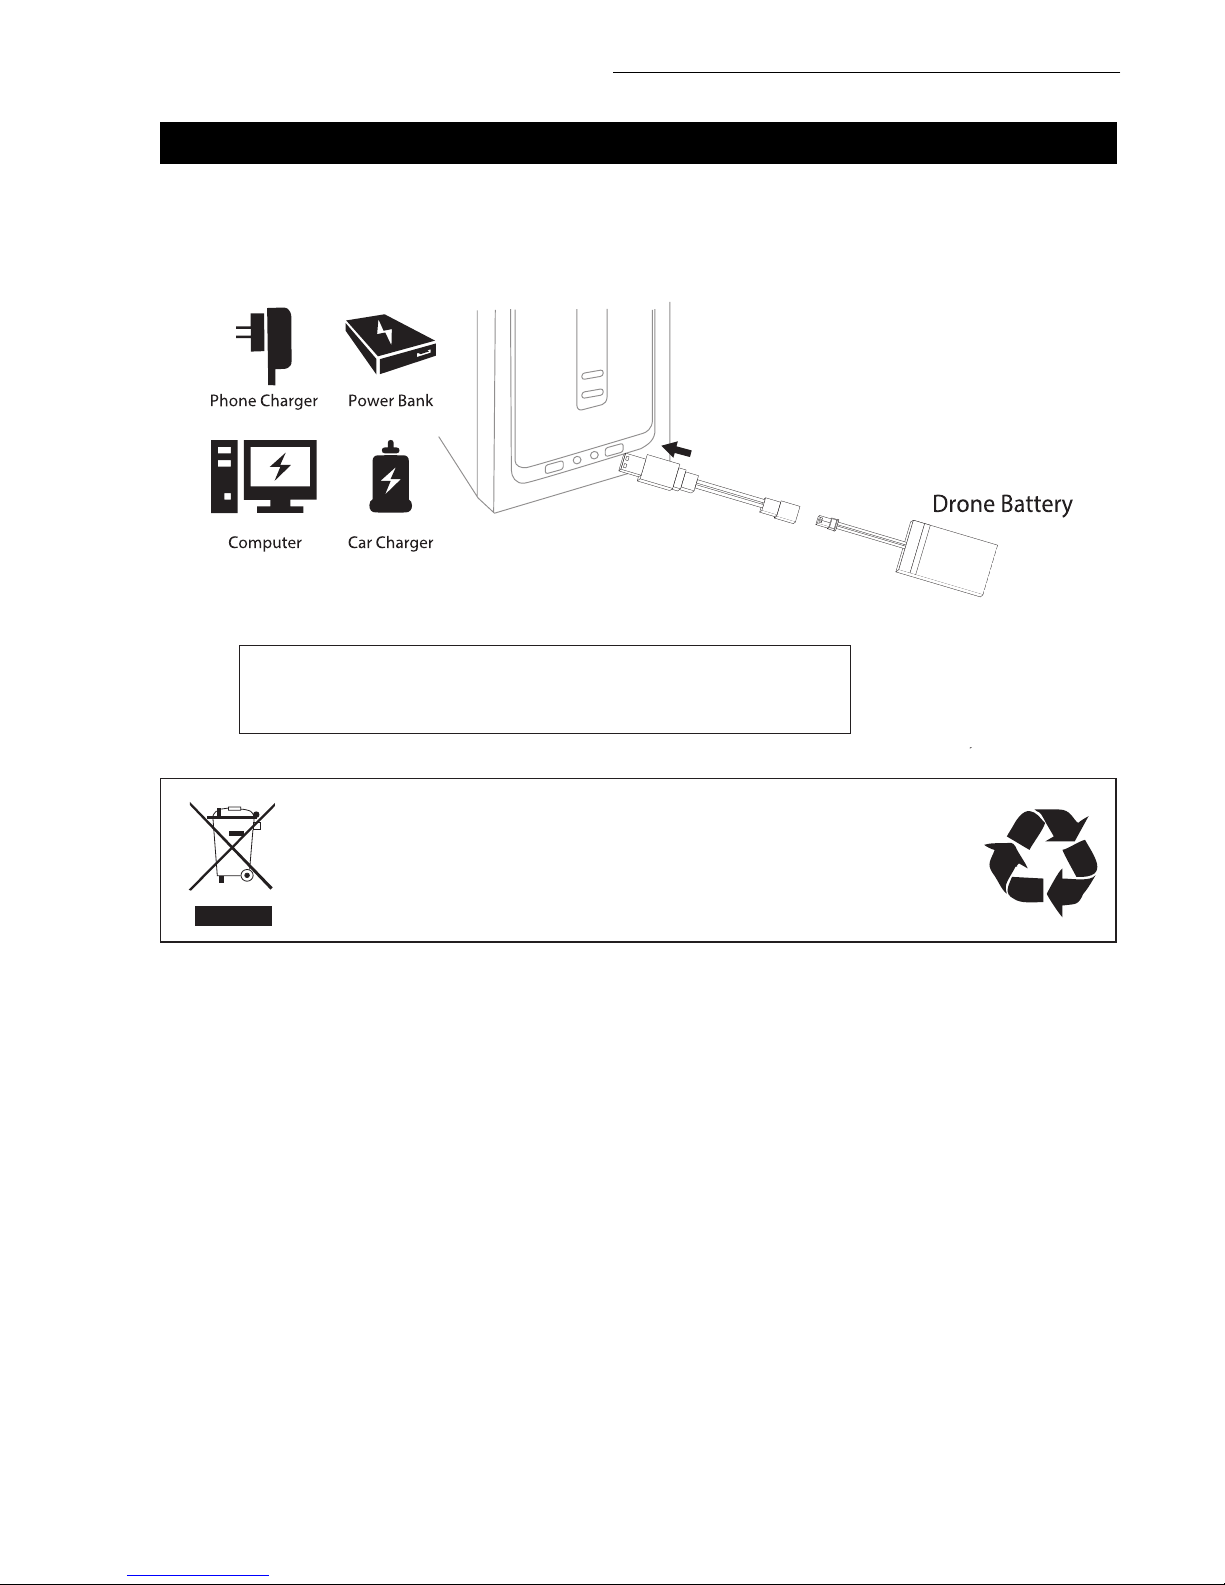
1. First, attach your USB cable to the drone battery, then connect it to your preferred charging
source.
2. When the battery is charging, a red indicator light on the USB appears. When the battery is fully
charged, a green indicator light appears. The battery charging time is around 70-85 minutes.
NOTE
Use a 5V 2A AC adapter (not included) for faster charging.
Page 8
FORCE1
6
PHONE CLIP
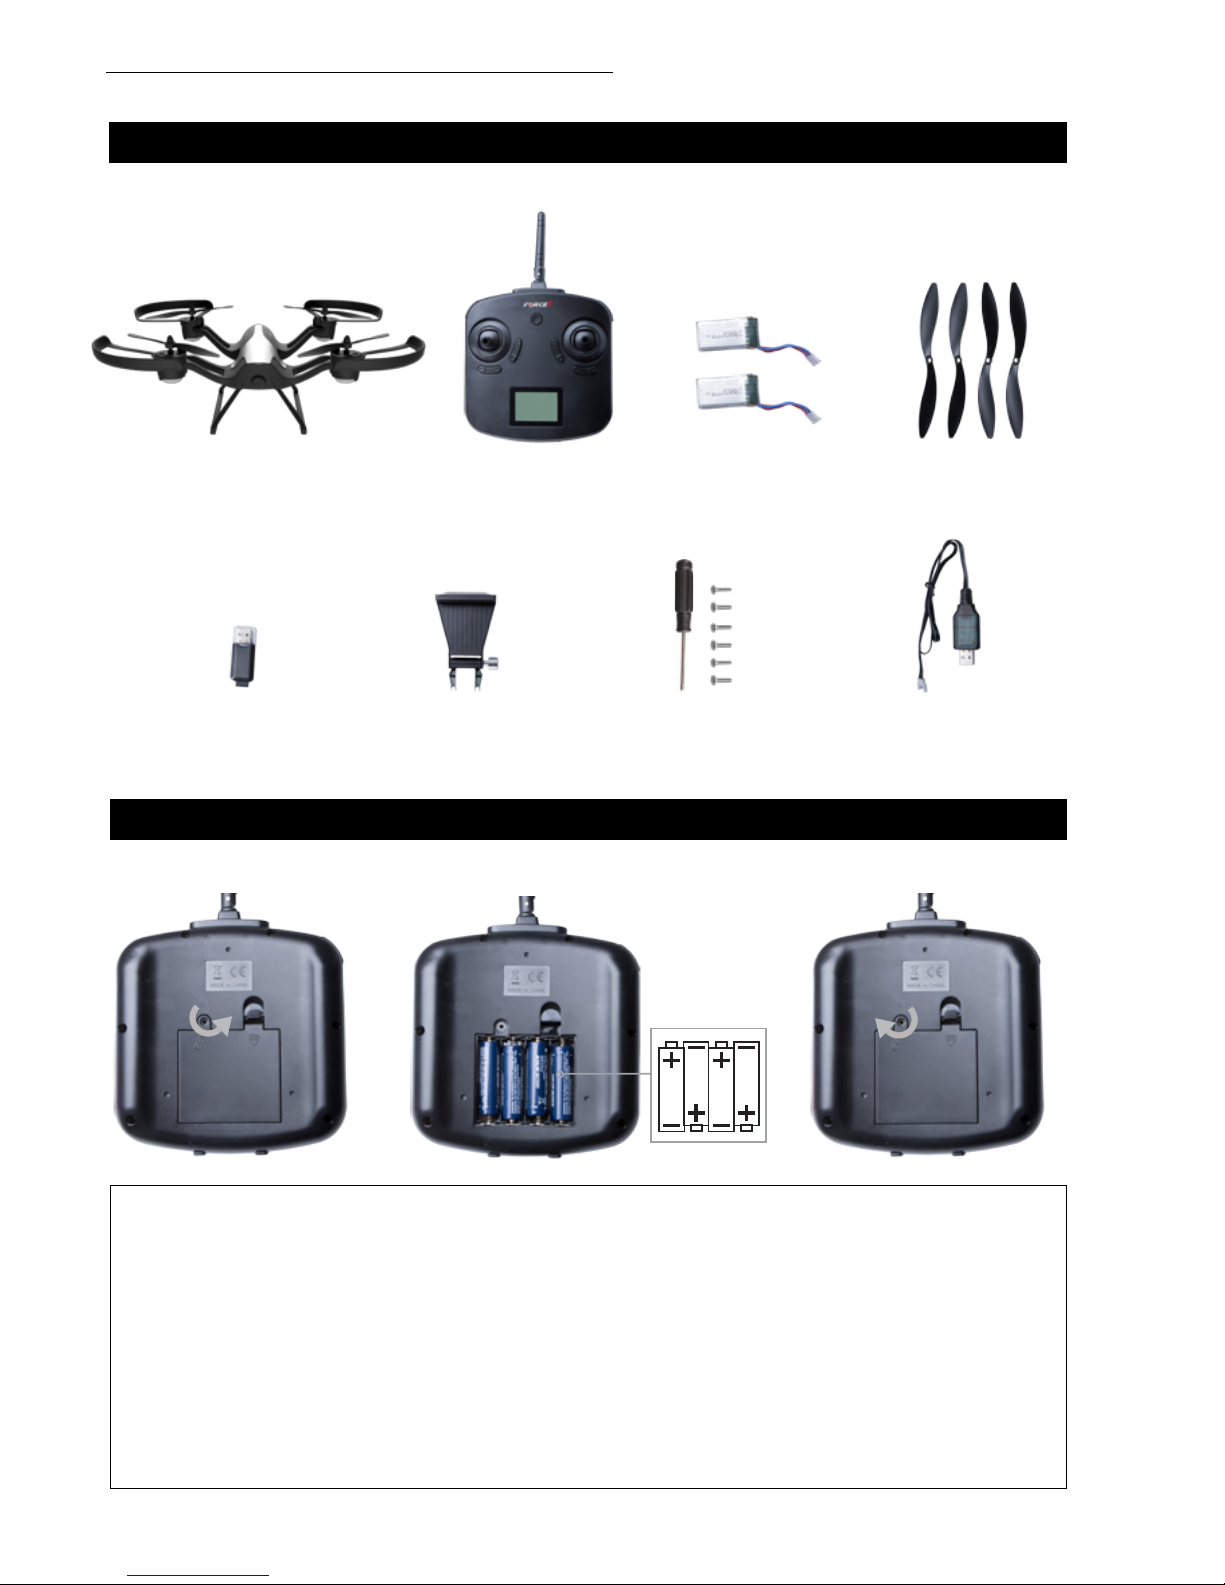
BOX CONTENTS
DRONE WITH CAMERA TRANSMITTER
PROPELLERS (4)
USB CHARGER
SD CARD READER
DRONE TOOLS
7.4v 350mAh
LITHIUM BATTERY (2)
TRANSMITTER BATTERY INSTALLATION
Open the battery cover and insert 4 AA batteries as shown below (not included).
• The transmitter needs 4 AA batteries to work
• Insert batteries in correct polarity (+) and (-)
• Don’t mix old and new batteries
• Don’t mix alkaline, standard (carbon-zinc) and rechargeable (nickel-cadmium) batteries
• Remove rechargeable batteries before charging
• Only charge batteries under adult supervision
• Remove spent batteries from the transmitter
• Regularly inspect the charging cable, cord, plug, enclose and other parts; if you notice damage, please
visit Force1rc.com for a replacement, or email us at [email protected]
CAUTION:
Page 9
F72 Rogue User Manual
7
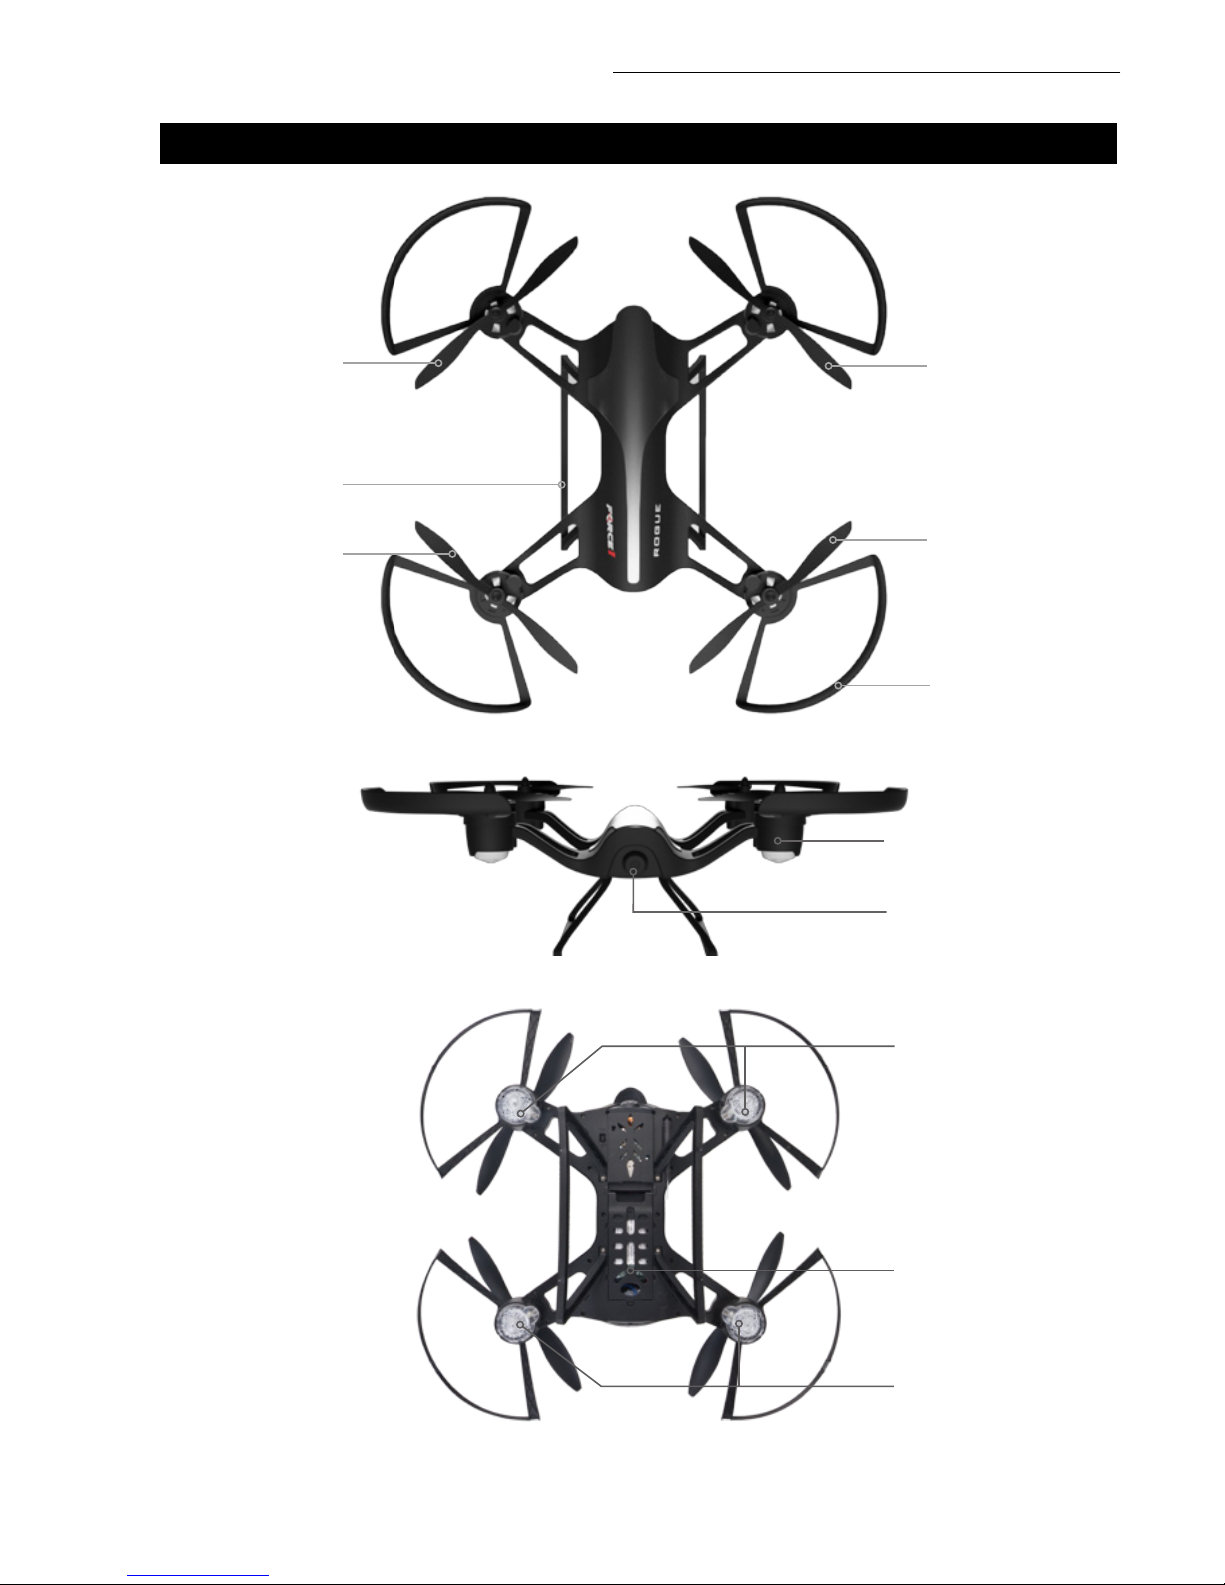
DRONE OVERVIEW
FRONT
PROPELLER B
COUNTERCLOCKWISE
PROPELLER A
CLOCKWISE
PROPELLER A
CLOCKWISE
PROPELLER GUARD
PROPELLER B
COUNTERCLOCKWISE
REAR
LANDING GEAR
[1] MOTOR
[2] CAMERA
[3] FRONT INDICATOR LIGHT
[4] BATTERY COMPARTMENT
[5] REAR INDICATOR LIGHT
[1]
[3]
[4]
[5]
[2]
Page 10
FORCE1
8
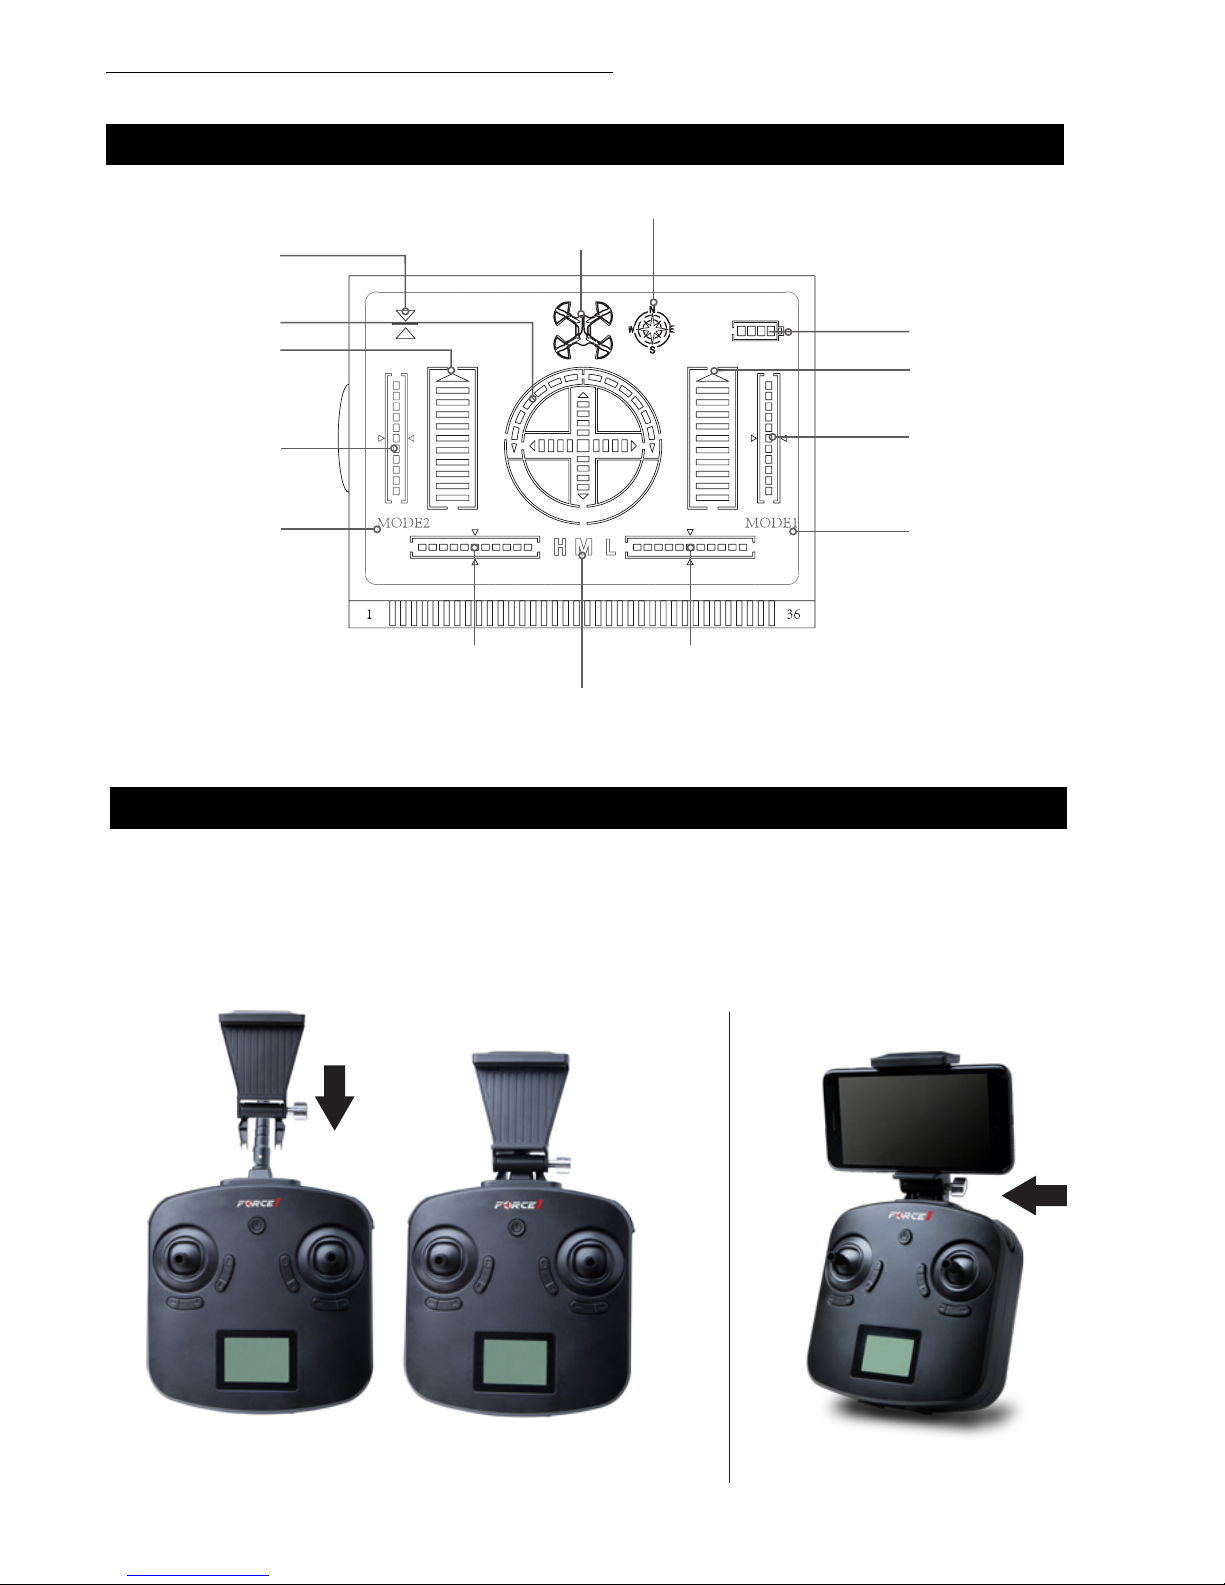
1. Insert the clip vertically, down into the transmitter in front of the antennae (Fig. 1). There will be a
click when the clip is firmly in place.
2. Put the phone into the clip and then release the clamp; the clamp should hold your phone
tightly.
3. Use the right silver knob to modify the angle of the phone clip (Fig. 2).
PHONE CLIP ATTACHMENT & USE
FIGURE 1 FIGURE 2
DIRECTIONAL TRIMMINGROTATIONAL TRIMMING
LCD SCREEN
ALTITUDE
HOLD
DIRECTION
DISPLAY ICON
THROTTLE
DISPLAY ICON
MODE 2 DISPLAY
FORWARD/
BACKWARD TRIM
(MODE 1)
4 AXIS FLIGHT ICON
HEADLESS MODE ICON
HIGH/MED/LOW
SPEED ICONS
MODE 1 DISPLAY
TRANSMITTER
BATTERY LEVEL
FORWARD/
BACKWARD TRIM
(MODE 2)
THROTTLE
DISPLAY ICON
Page 11
F72 Rogue User Manual
9
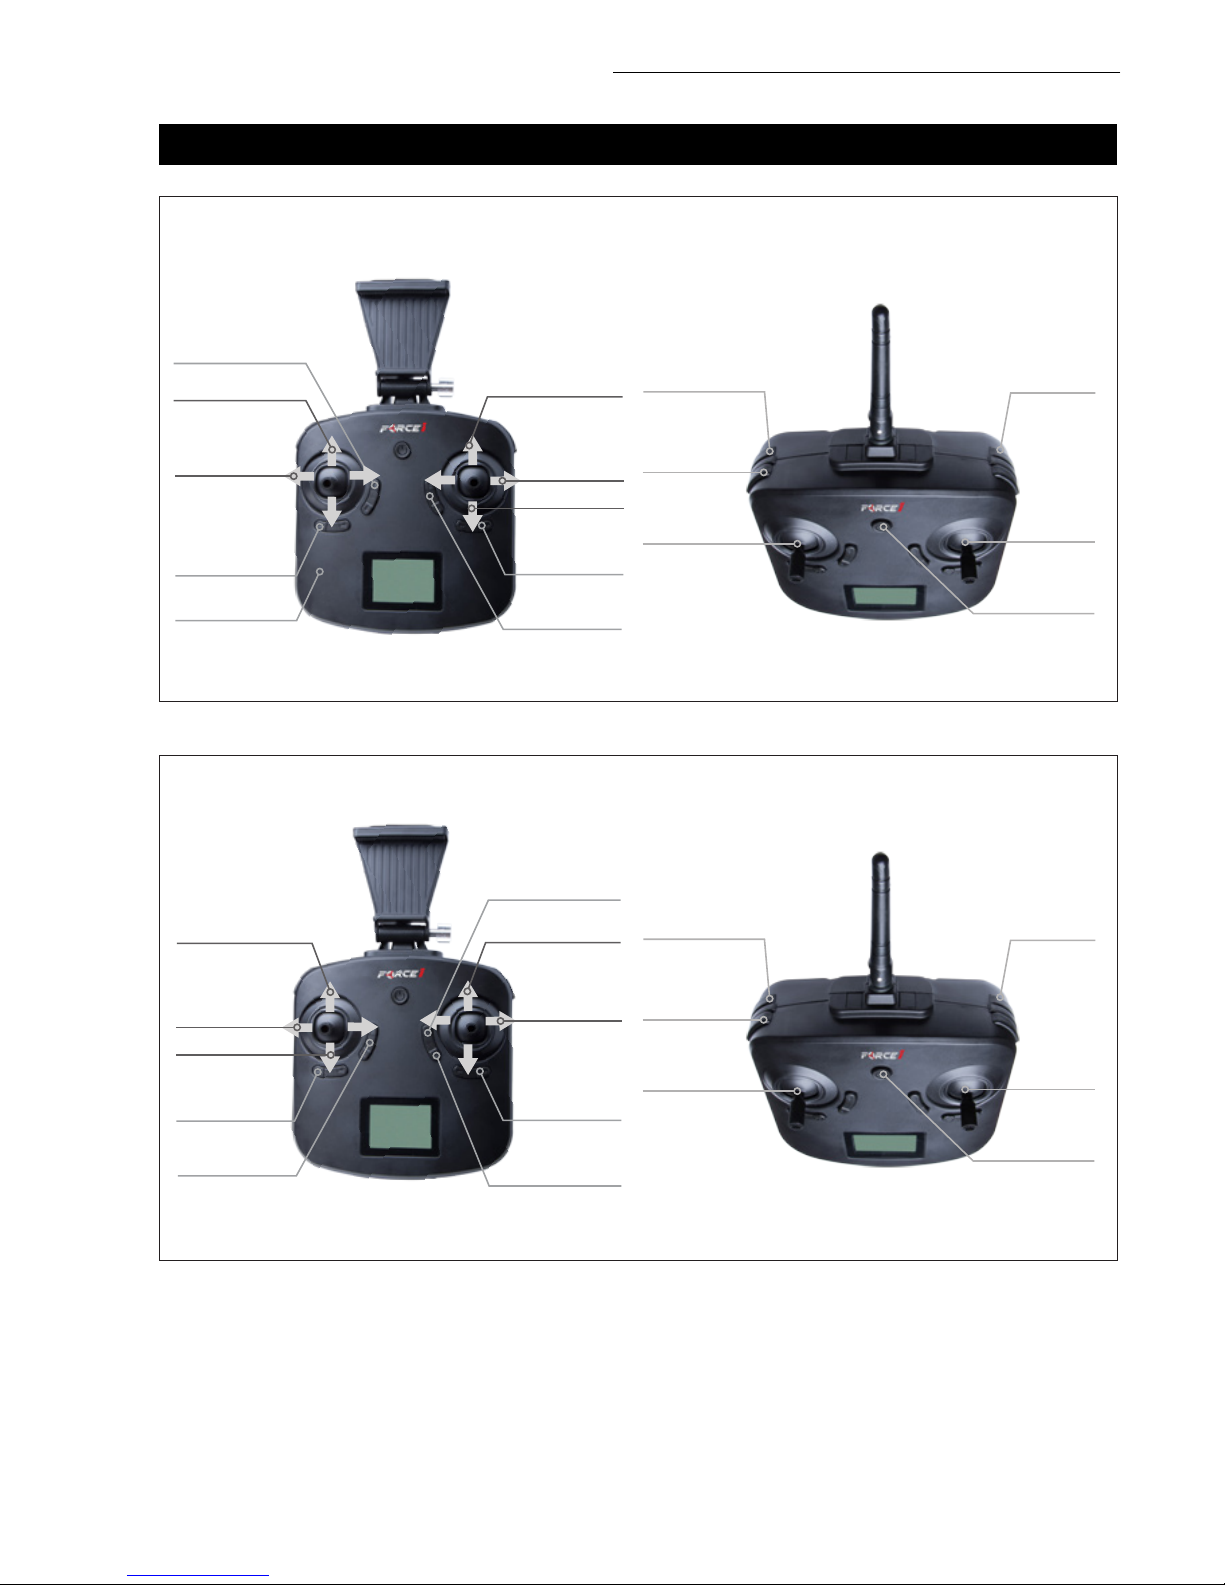
ONE-KEY
TAKE OFF
Mode 2 (Default)
Mode 1
ROTATE
LEFT/RIGHT
ROTATIONAL
TRIM
RECORD BUTTON
ONE-KEY
TAKE OFF
SPEED MODE
360° FLIP
ONE-KEY
LANDING
ONE-KEY
LANDING
THROTTLE
CAMERA BUTTON
FORWARD
THROTTLE
BACKWARD
LEFT/RIGHT
TRIM
ROTATIONAL
TRIM
FORWARD/
BACKWARD TRIM
HEADLESS
MODE
HEADLESS
MODE
LEFTWARD/
RIGHTWARD
ROTATE
LEFT/RIGHT
360° FLIP
SPEED
BUTTON
POWER
BUTTON
POWER
BUTTON
FORWARD
BACKWARD
LEFT/RIGHT
TRIM
FORWARD/
BACKWARD TRIM
LEFTWARD/
RIGHTWARD
THROTTLE MODES
CAMERA BUTTON
RECORD BUTTON
Page 12
FORCE1
10
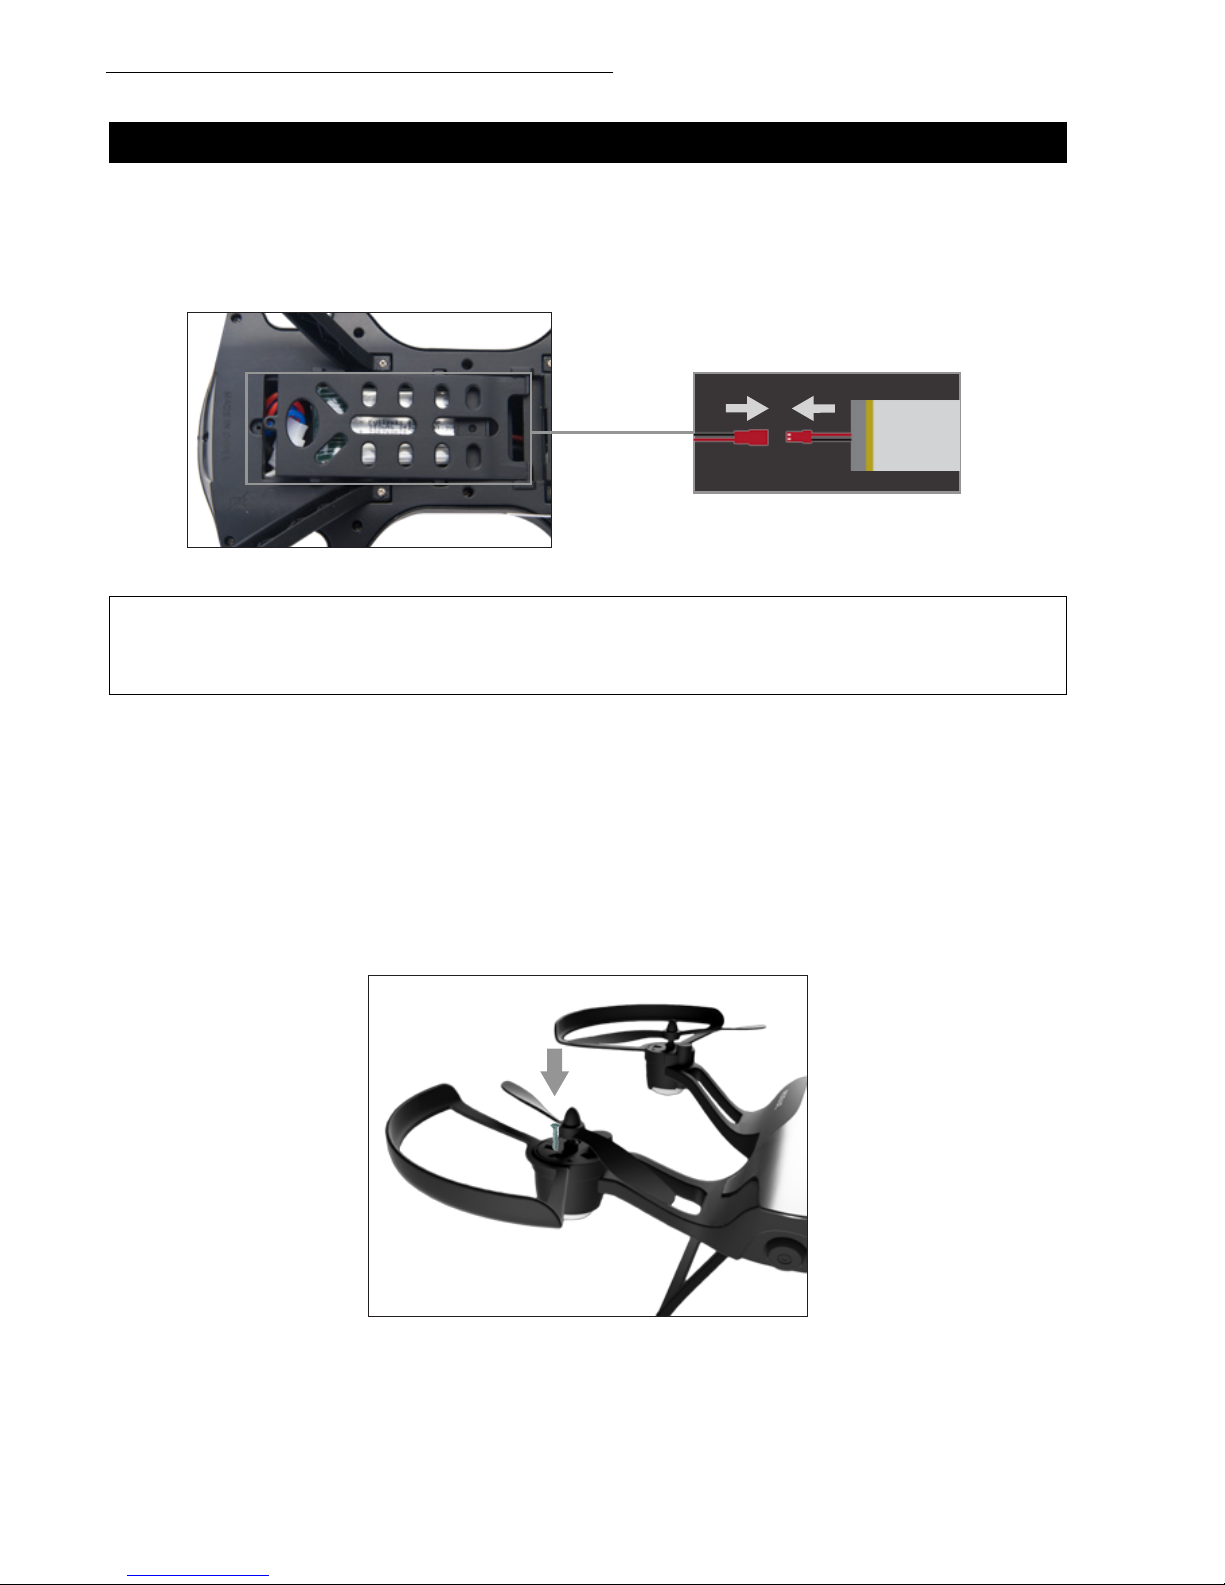
BATTERY REMOVAL
Make sure the drone power switch is in the “OFF” position. Open the battery cover using a
screwdriver and disconnect the wire of the battery from the receiver wire.
DRONE ASSEMBLY
PROPELLER GUARD INSTALLATION
Attach the propeller guard as shown in figure 5. Make sure that all three prongs are snapped into place.
Install a screw to the center prong to secure the guard completely.
BATTERY INSTALLATION
1. Open the battery cover using a screwdriver and insert the battery into the power port (Fig. 3).
2. Connect the wire of the 7.4v 350mAh lithium battery to the receiver wire in the power port (Fig. 4).
3. Replace the battery cover, and move the power switch to the “ON” position.
FIGURE 5
Install the battery rmly; failure to do so may affect ight safety.
CAUTION:
FIGURE 3
FIGURE 4
Page 13
F72 Rogue User Manual
11
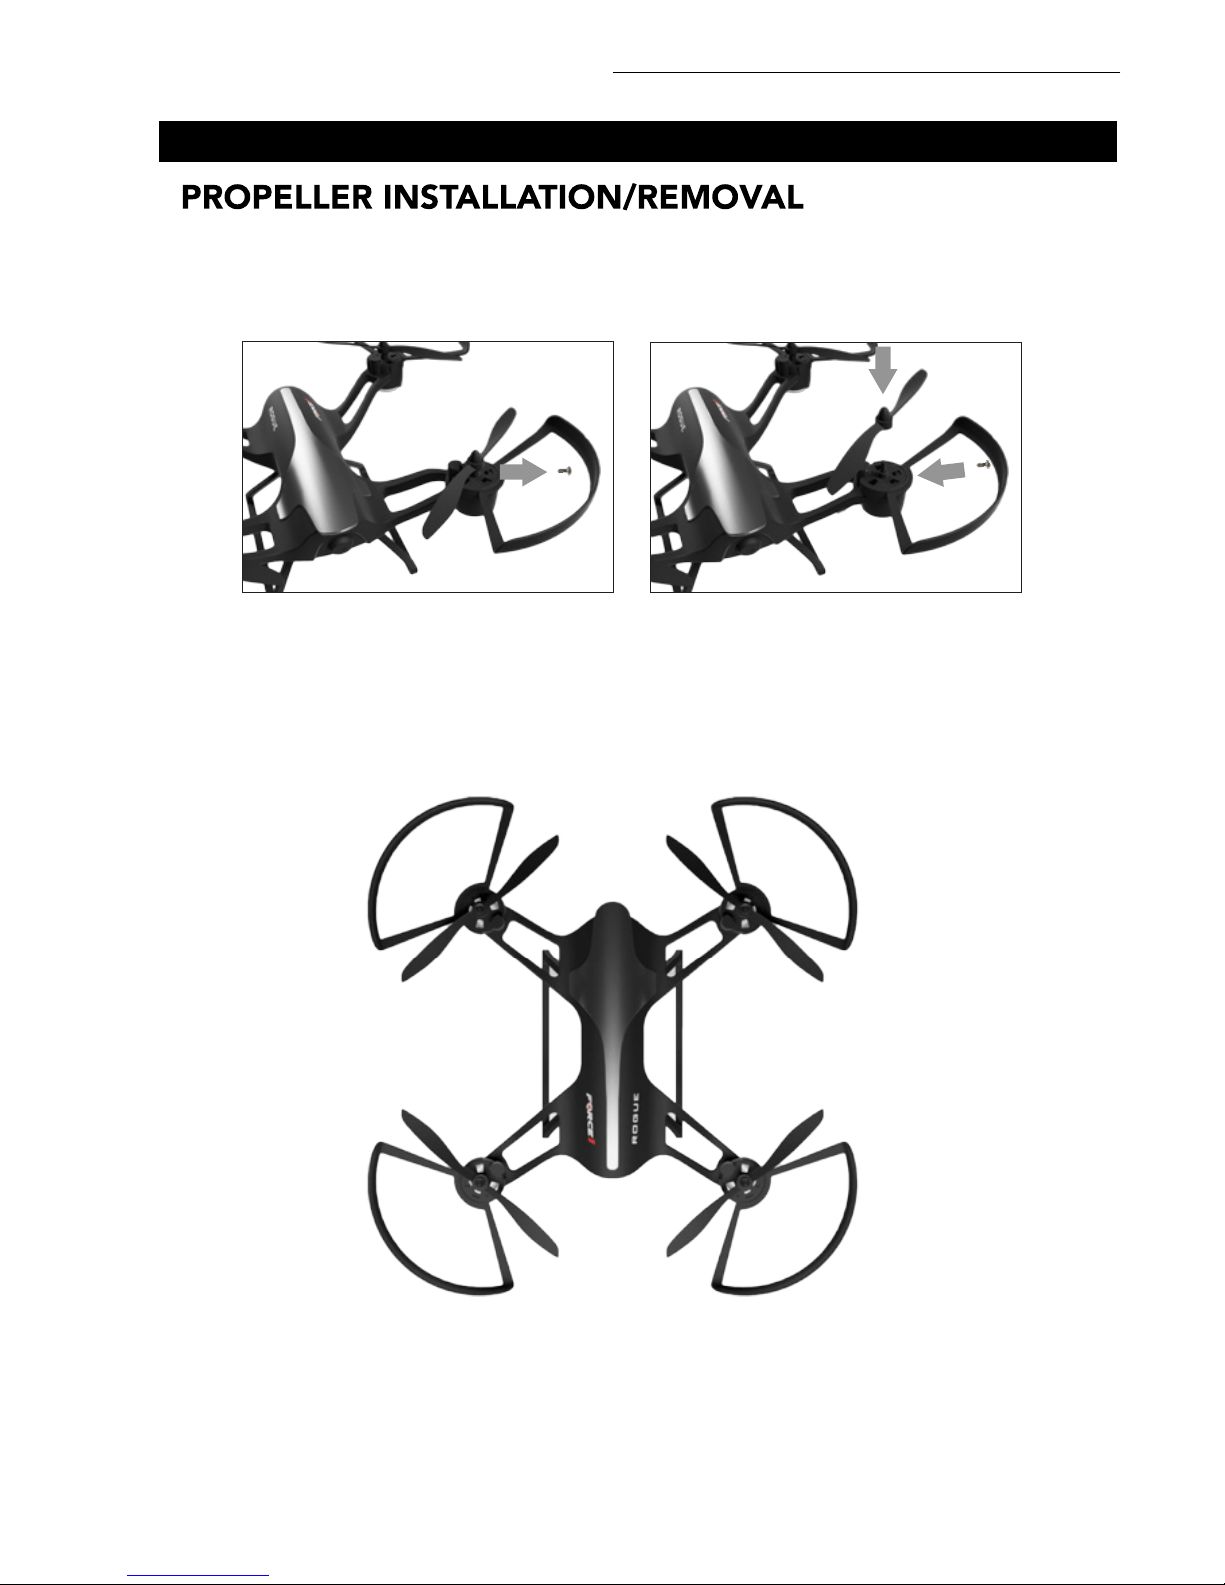
DRONE ASSEMBLY
FRONT
REAR
A B
AB
FIGURE 8
NOTE
• Be sure to install the correct propellers matching A and B (Fig. 8)
• Be careful with the propellers, as they can be sharp
• Purchase extra propellers at Force1rc.com
• To remove propeller, use a screwdriver to remove the propeller screw (Fig. 6)
• The replacement propeller should have the same rotational direction; reinsert the screw and
tighten (Fig. 7)
FIGURE 6 FIGURE 7
Page 14
FORCE1
12
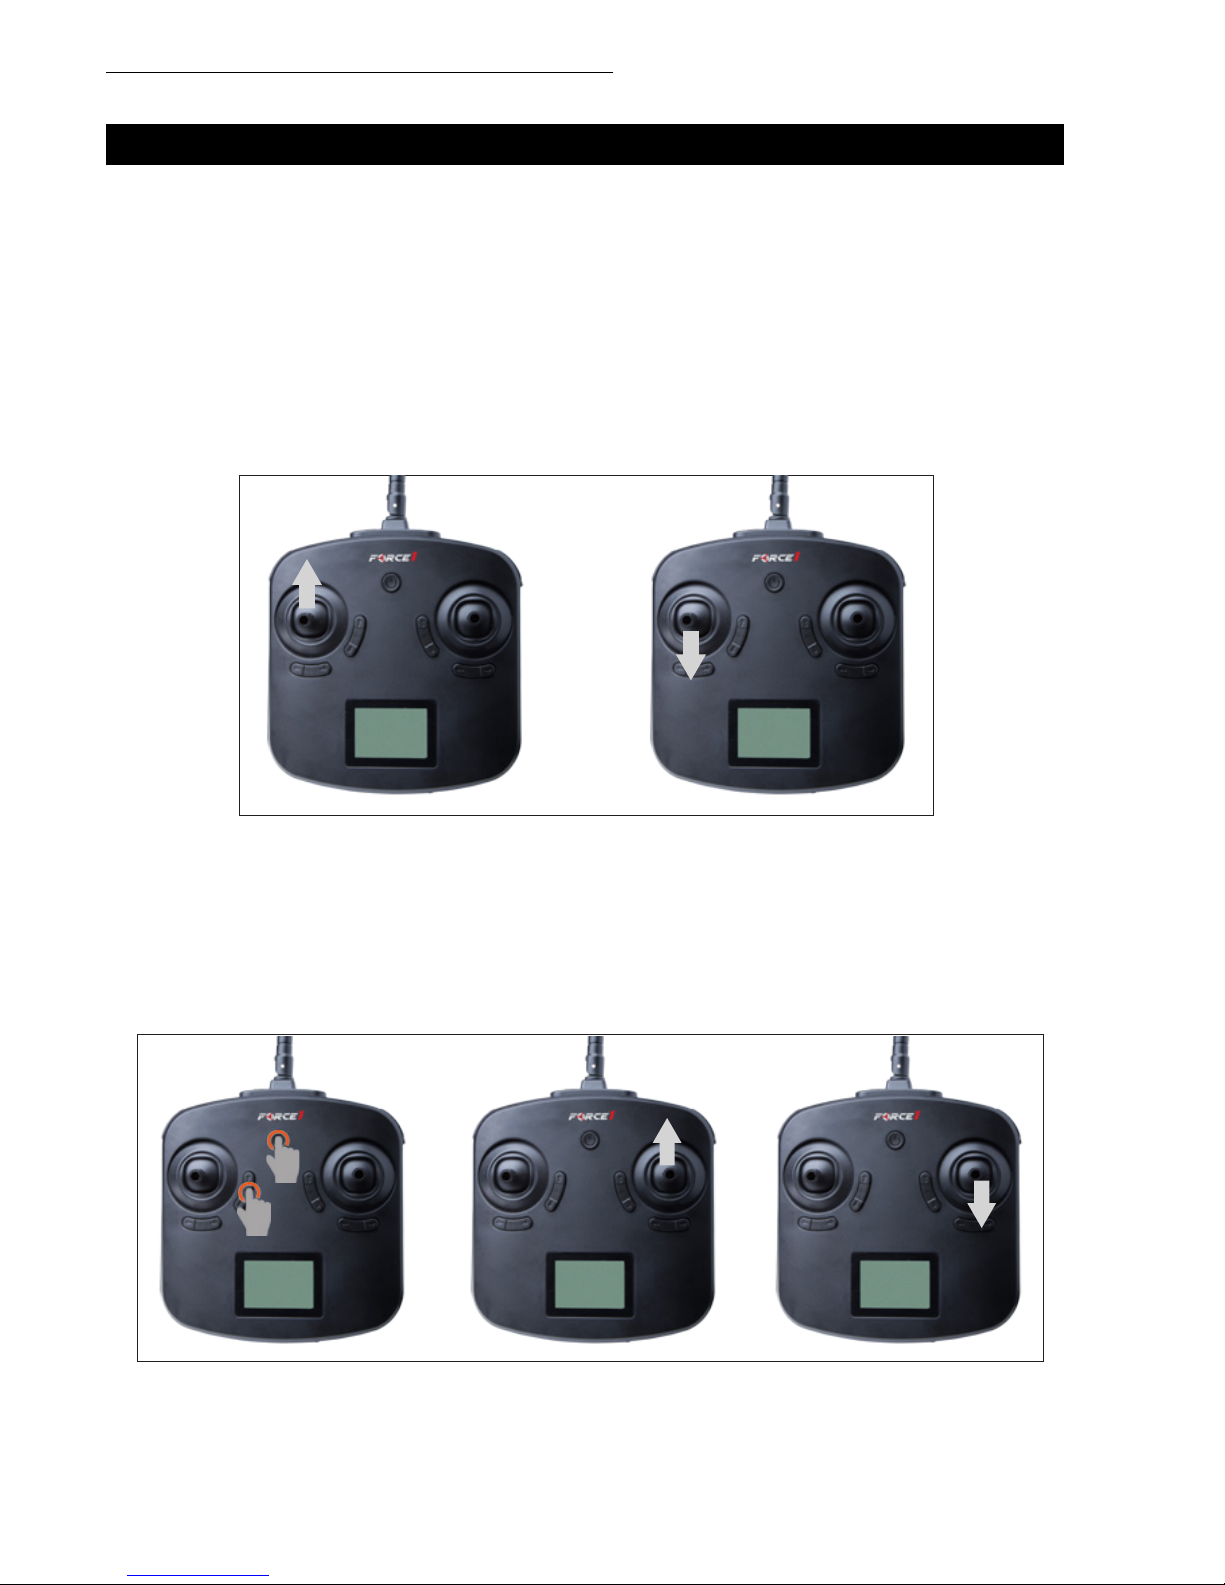
Mode 1: Right-Hand Throttle
Push the ne-tuning button and the power button simultaneously. The LCD transmitter indicator will
ash slowly. Move the accelerator (right stick) up, and then down. The indicator will ash and indicate
Mode 1. This means that frequency connection AND pairing are complete, and the drone can y
normally in Mode 1.
PREFLIGHT OPERATIONS
THROTTLE MODE SELECTION & PAIRING
Mode 2: Left-Hand Throttle (Default)
Insert batteries and push the power button. Move the accelerator (left stick by default) up, and then
down (Fig. 9). The LCD transmitter indicator should come on, and show as Mode 2. This means that
frequency connection AND pairing are complete, and the drone can y normally in Mode 2.
NOTE
Be sure to select throttle mode and pair your drone while standing within 5 meters of it to
avoid interference.
FIGURE 9
FIGURE 10
Page 15
F72 Rogue User Manual
13
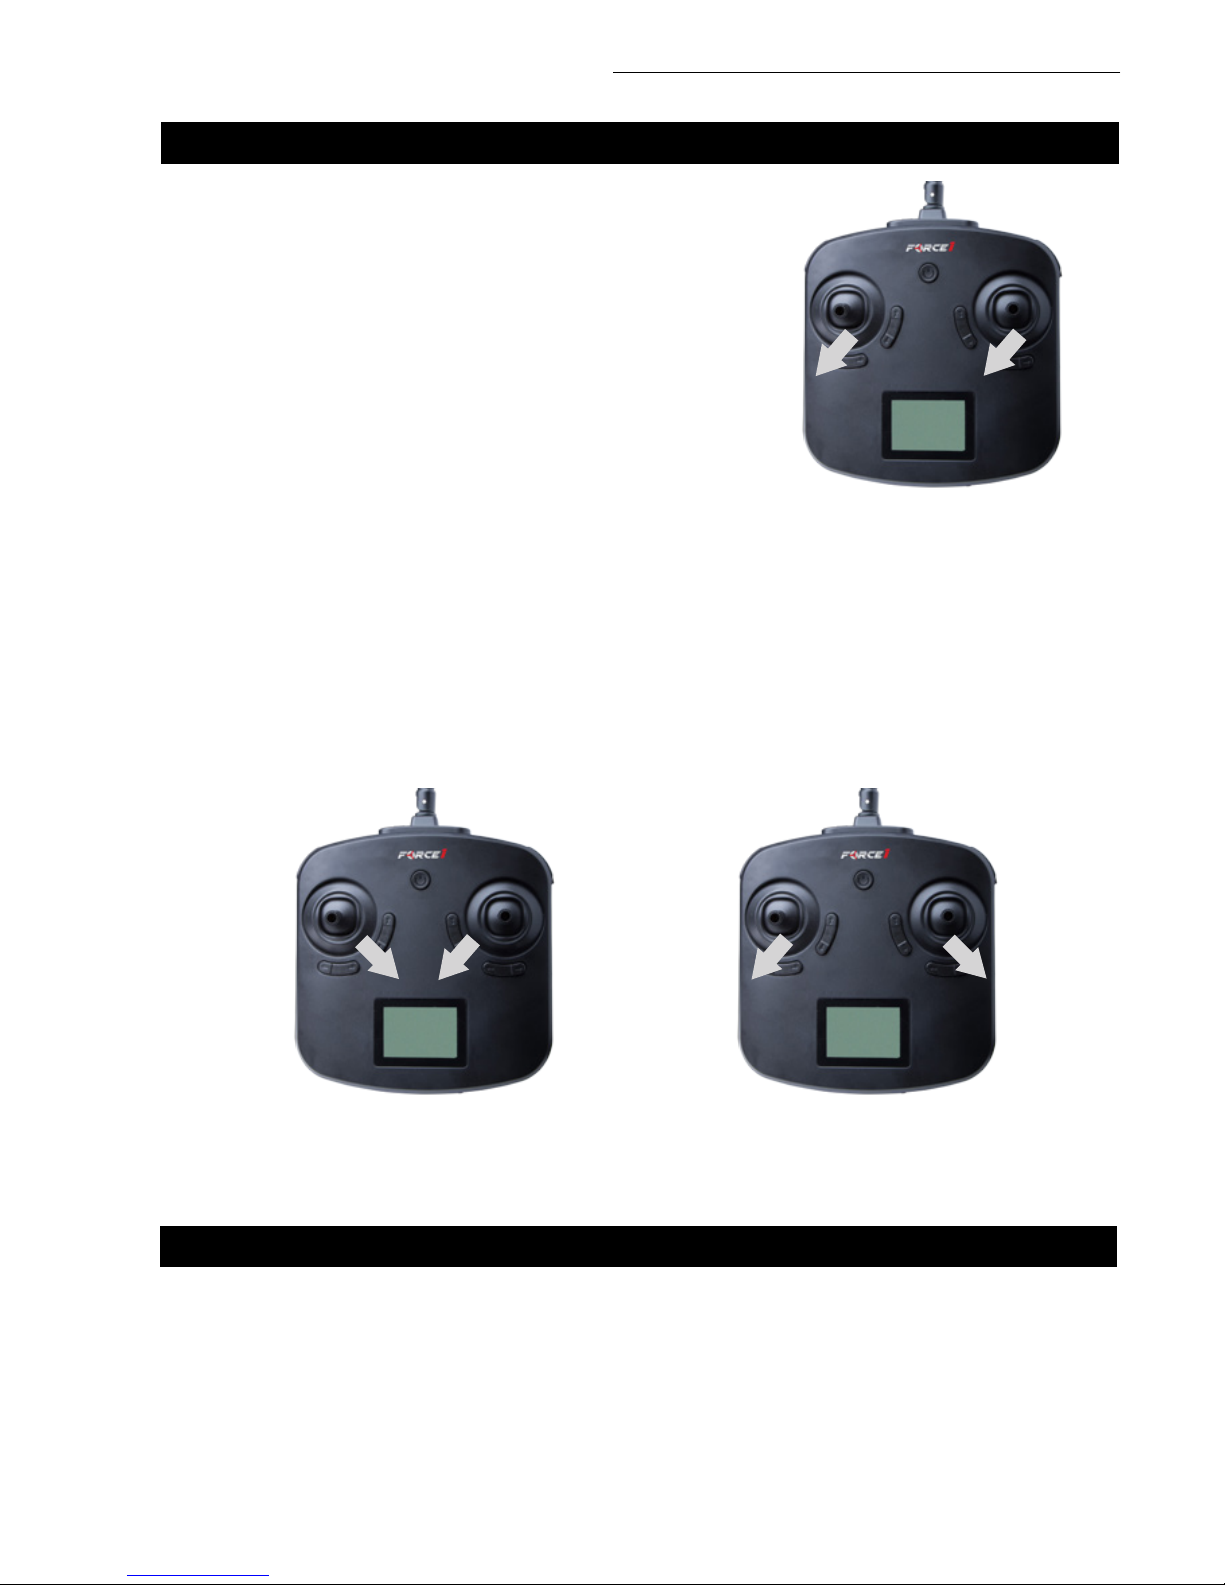
LOCK/UNLOCK YOUR DRONE
UNLOCK
Place the drone on a flat surface. Move the left and right sticks down and inward simultaneously (Fig.
12). Drone propellers will rotate, indicating it is unlocked and ready to fly.
LOCK
Move the left and right sticks down and outward simultaneously (Fig. 13). Propellers will stop rotating,
and the drone is now locked.
FIGURE 13FIGURE 12
PREFLIGHT CHECKLIST
1. Fly in an open area and abide by all local and federal guidelines. Check the FAA’s B4UFLY mobile app
for up-to-date drone flight info.
2. Make sure your drone and transmitter batteries are fully charged.
3. Put the left stick of the transmitter in the middle position.
4. Follow the Mode Selection and Calibration instructions closely. Always turn ON your transmitter first
before flying, and turn OFF the drone first when you’re finished.
5. Make sure the connection is solid between your battery and motor; vibration may cause loosening.
6. Make sure the propellers are installed correctly and the motors are working normally after unlocking.
NOTE
After the drone is unlocked, it can operate normally. Otherwise, it can’t be operated.
FIGURE 11
CALIBRATION
Move both sticks down and to the left (Fig. 11) and drone fuselage
lights will ash, and then stay on. This means calibration is nished
and the drone is ready to y.
PREFLIGHT OPERATIONS
Page 16
FORCE1
14
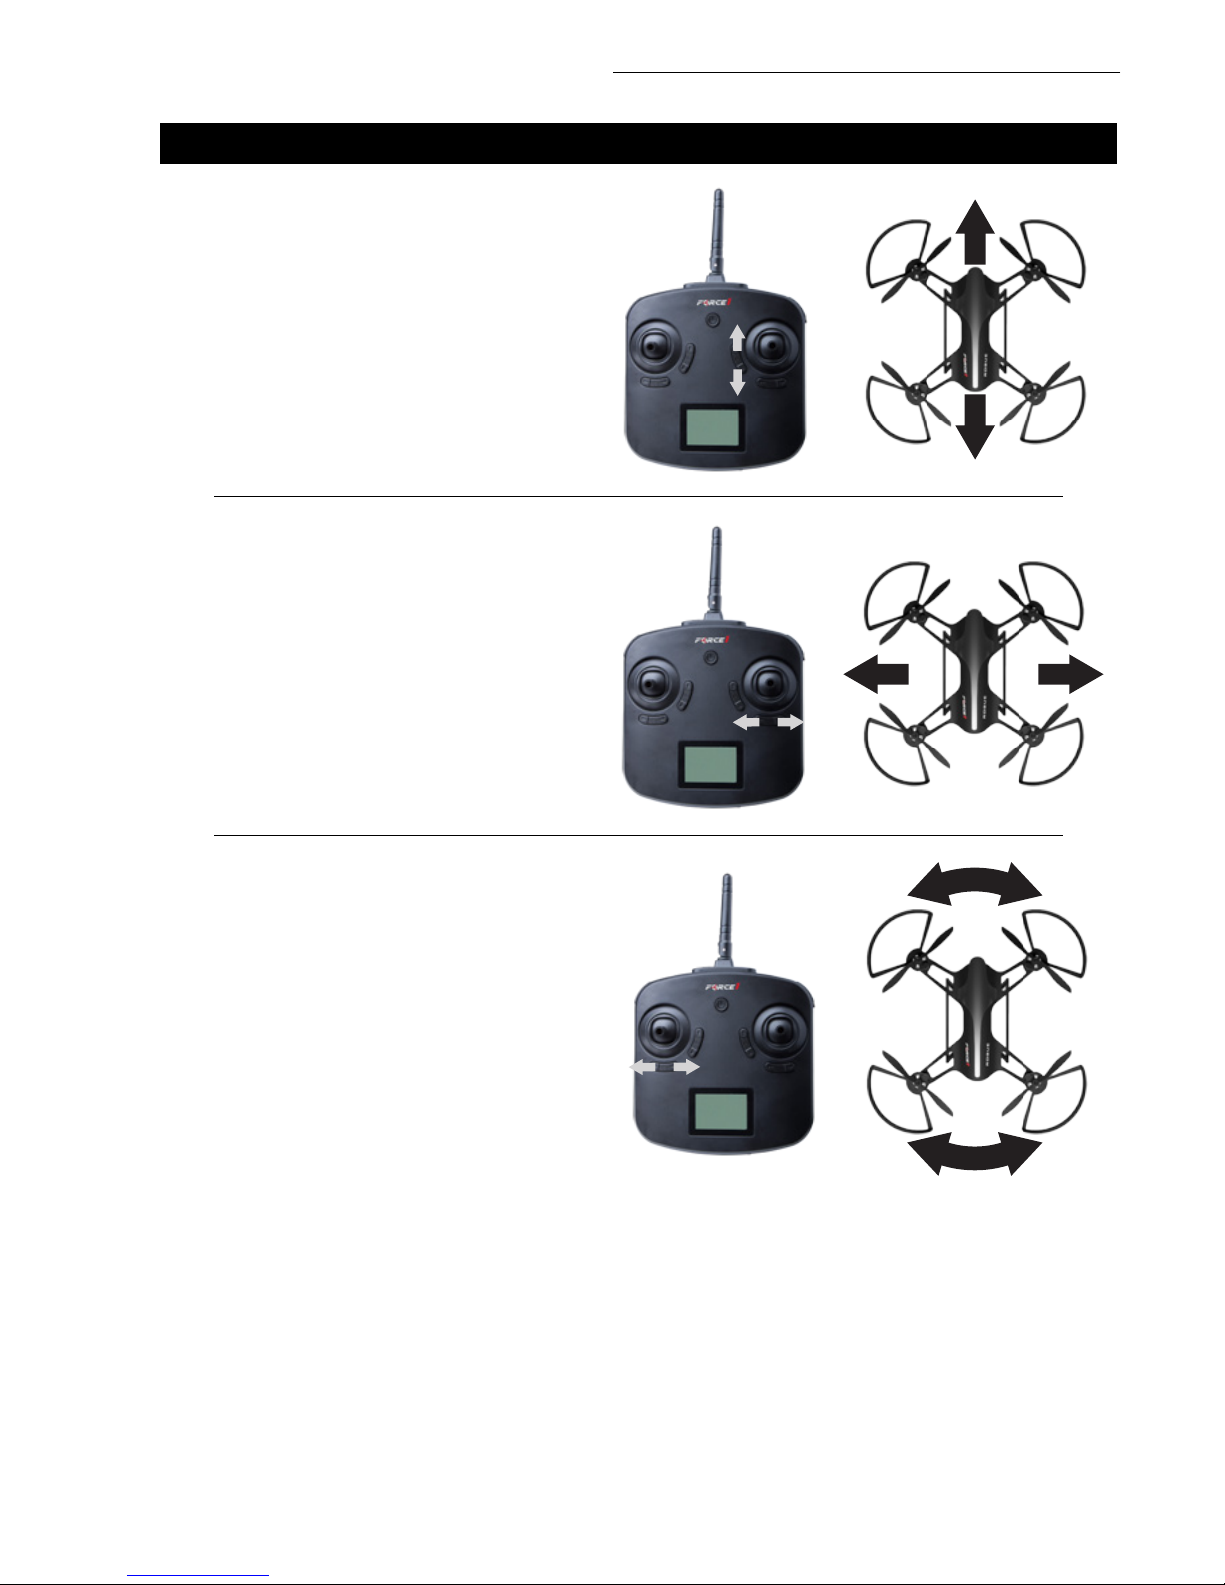
BASIC FLIGHT CONTROLS
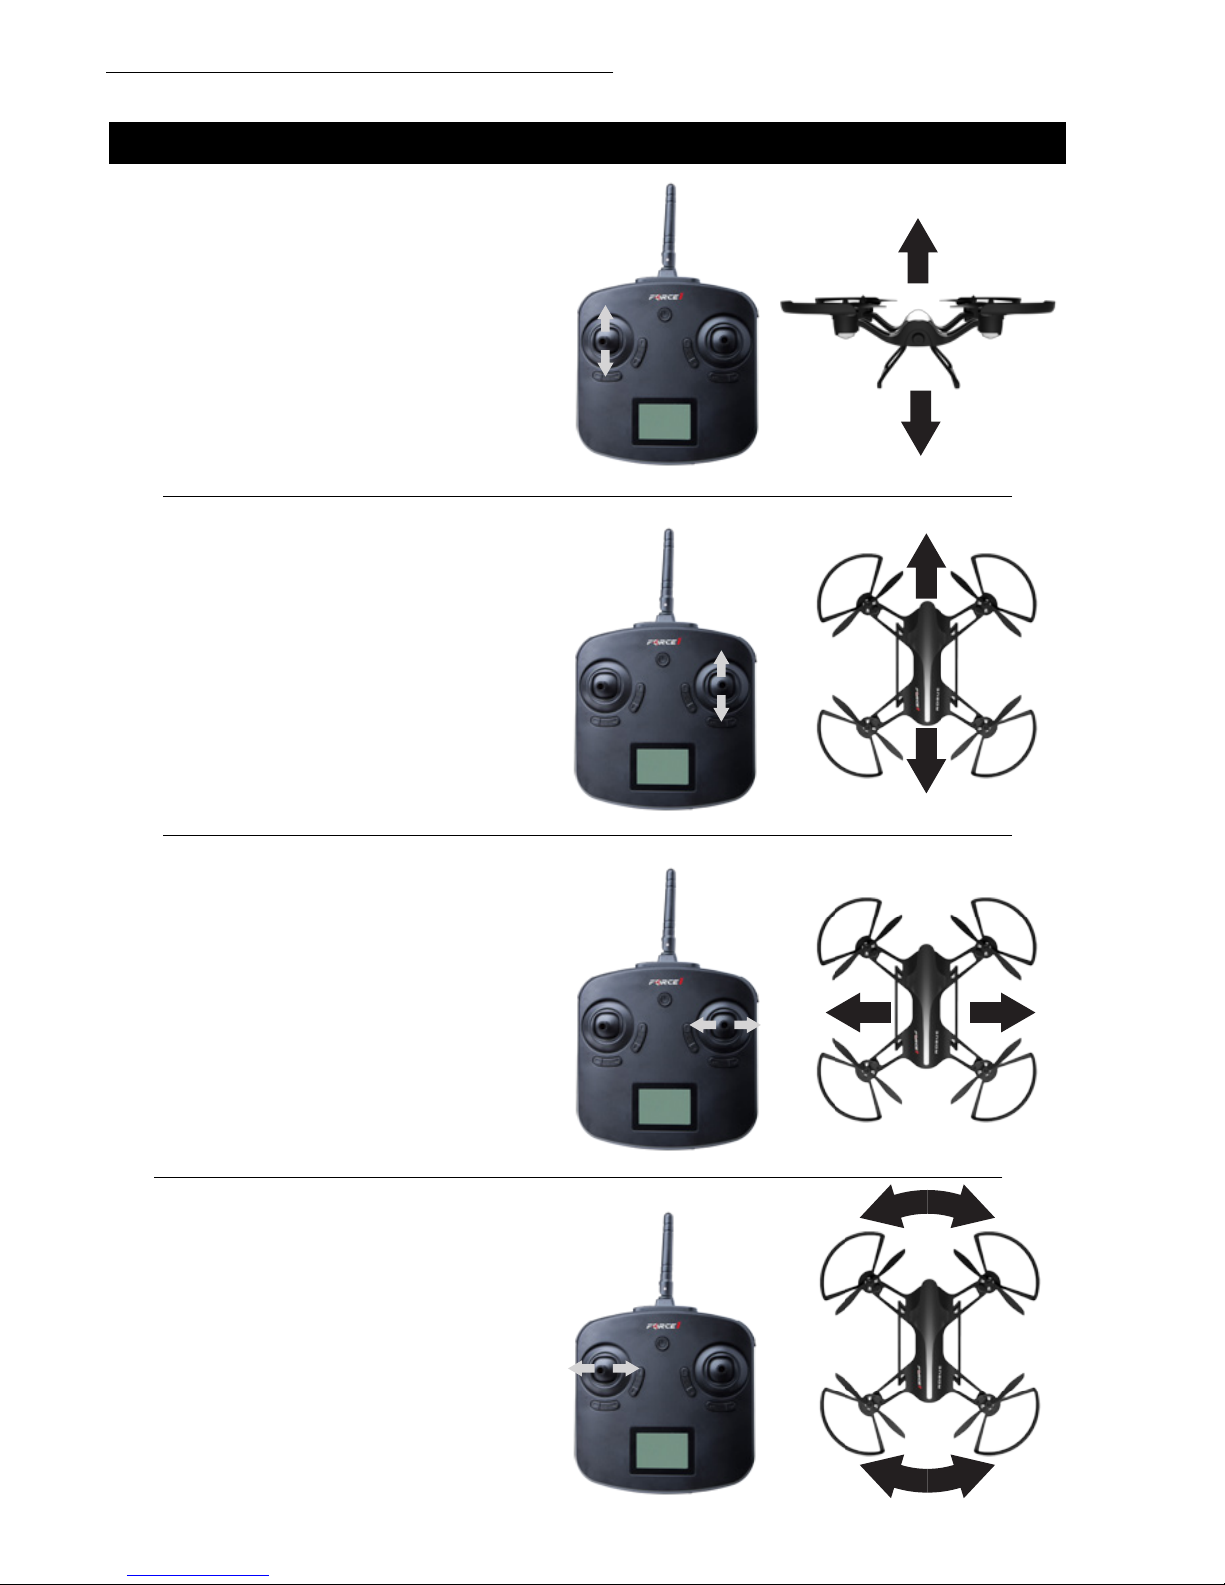
HOVER UP AND DOWN
Push the THROTTLE/RUDDER STICK up to y
the drone up, and pull the THROTTLE/RUDDER
STICK down to y the drone down.
FLY FORWARD OR BACKWARD
Push the DIRECTION CONTROL STICK up to
y the drone forward, and pull the DIRECTION
CONTROL STICK down to y the drone
backward.
FLY LEFT OR RIGHT
Move the DIRECTION CONTROL STICK to
the left to y the drone to the left, and move
the DIRECTION CONTROL STICK to the
right to y the drone to the right.
ROTATE LEFT OR RIGHT
Move the THROTTLE/RUDDER STICK to the
left to rotate the drone to the left, and move
the THROTTLE/RUDDER STICK to the right to
rotate the drone to the right.
Page 17
F72 Rogue User Manual
15
TRIM ADJUSTMENTS
FORWARD/BACKWARD TRIM
Adjust the FORWARD/BACKWARD TRIMMER
backwards if the drone drifts forward when
taking off, and adjust the FORWARD/
BACKWARD TRIMMER forwards if drone
drifts backwards. In Mode 1, the FORWARD/
BACKWARD TRIMMER is on the left side.
LEFT/RIGHT TRIM
Adjust the LEFT/RIGHT FLYING TRIMMER to
the right if the drone drifts to the left when
taking off, and adjust the LEFT/RIGHT FLYING
TRIMMER to the left if drone drifts to the right.
LEFT OR RIGHT ROTATION TRIM
Adjust the LEFT/RIGHT RUDDER TRIMMER to
the right if the drone rotates to the left when
taking off, and adjust the LEFT/RIGHT RUDDER
TRIMMER to the left if drone rotates to the
right.
Page 18
FORCE1
16
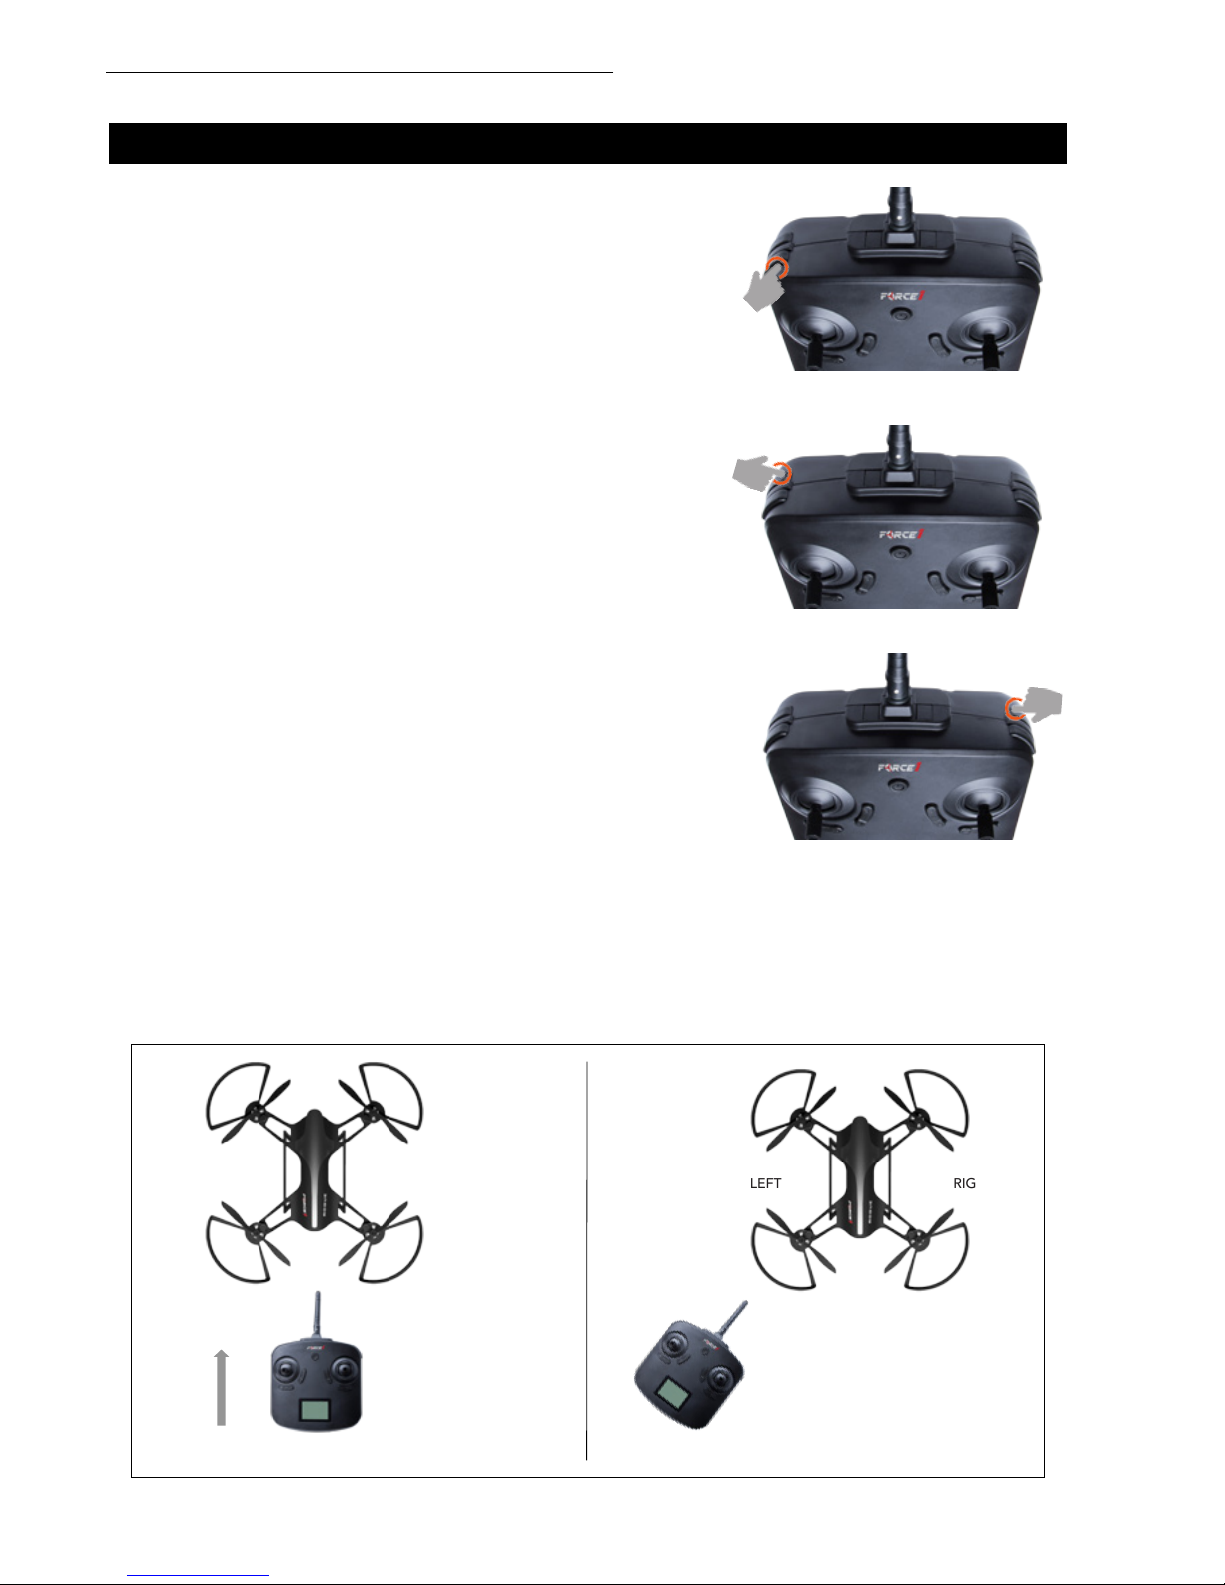
Press the top-right corner button (back) to enter Headless Mode
before takeoff (Fig. 16). Your transmitter will beep every two seconds,
the drone lights will flash 3 times to indicate mode selection and
the LCD Headless Mode indicator will appear. You can now fly your
drone without knowing its orientation, because it will be fixed in the
direction you set it. Press button again to exit mode.
FUNCTIONS
ONE-KEY TAKEOFF
ONE-KEY LANDING
HEADLESS MODE
Place the drone on a at surface. Move the left and right sticks
down and inward simultaneously to unlock – propellers should
start rotating. Press the top-left corner button (Fig. 14) – the drone
should lift off and hover at about 1.5 meters.
Press the top-left corner button (back) while the drone is aloft to
land it (Fig. 15).
Setting Headless Mode Drone Direction
You must verify your drone’s flight direction before entering Headless Mode:
• Be sure your drone is facing away from you (Fig. 17)
• Move the left and right sticks down and to the left for about 2 seconds (Fig. 18)
• Drone lights will flash quickly for and then stay on, indicating direction is verified
FIGURE 14
FIGURE 15
FIGURE 16
FRONT
REAR
RIGHTLEFT
FRONT
REAR
RIGHTLEFT
✔
✖
FIGURE 17
Page 19
F72 Rogue User Manual
17
HEADLESS MODE (CONT.)
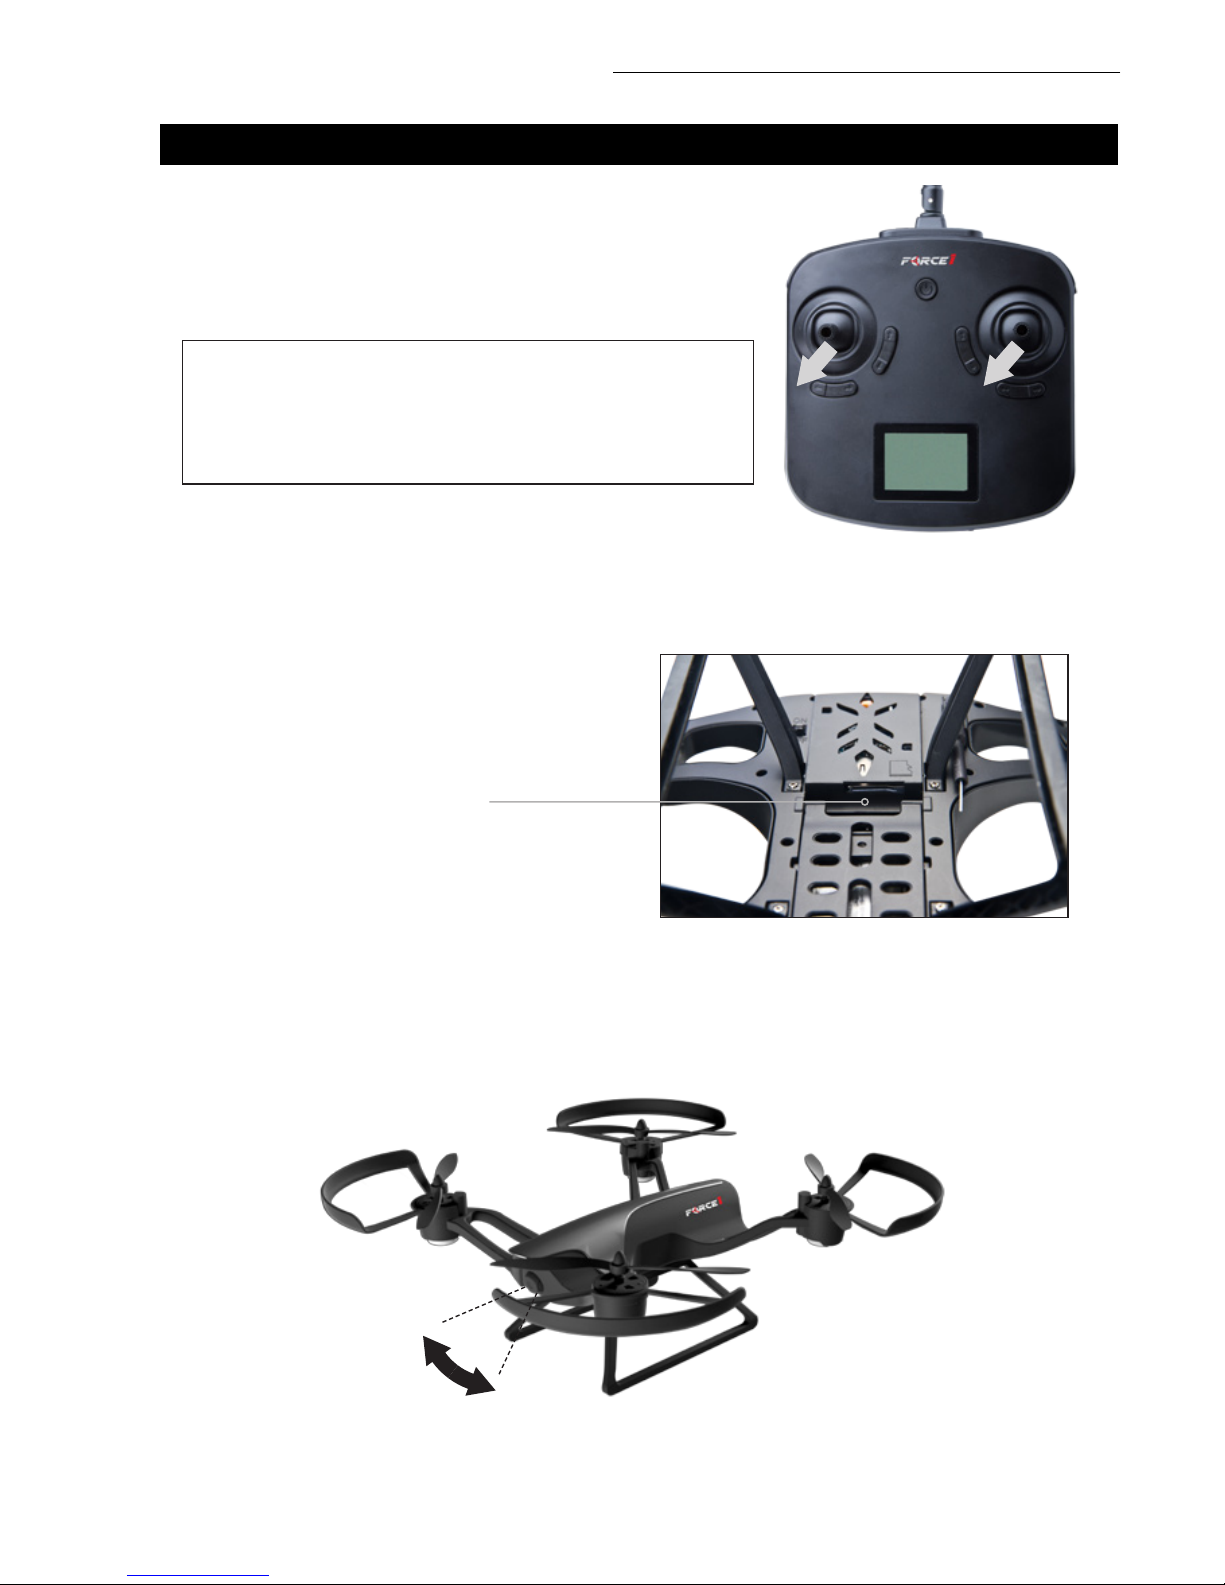
FIGURE 18
TIP: Do not change the transmitter orientation after
entering Headless Mode. Otherwise, you will lose track
of the set orientation (i.e., that you and your transmitter
are facing “forward.”)
NOTE
You may calibrate your drone while in Headless Mode to
ensure normal flight control if you notice any variation.
FUNCTIONS
MEMORY CARD INSTALLATION
Insert an SD card (not included) into the SD slot
on the underside of the drone, at the back of
the camera casing (Fig. 19). To remove, press in
slightly to release.
You can adjust the angle of this drone’s camera between 0° and 35° (Fig. 20).
FIGURE 19
FIGURE 20
CAMERA ANGLE ADJUSTMENT
SD CARD SLOT
Page 20
FORCE1
18
FUNCTIONS
NOTE
This will cause the drone to fall from the sky; use only in case of emergency.
LOW BATTERY WARNING
LOW/MEDIUM/HIGH SPEED MODES
Your drone’s lights will flash and the transmitter will beep in midflight when the battery is low. This means
you have 30 seconds to land your drone before you lose power.
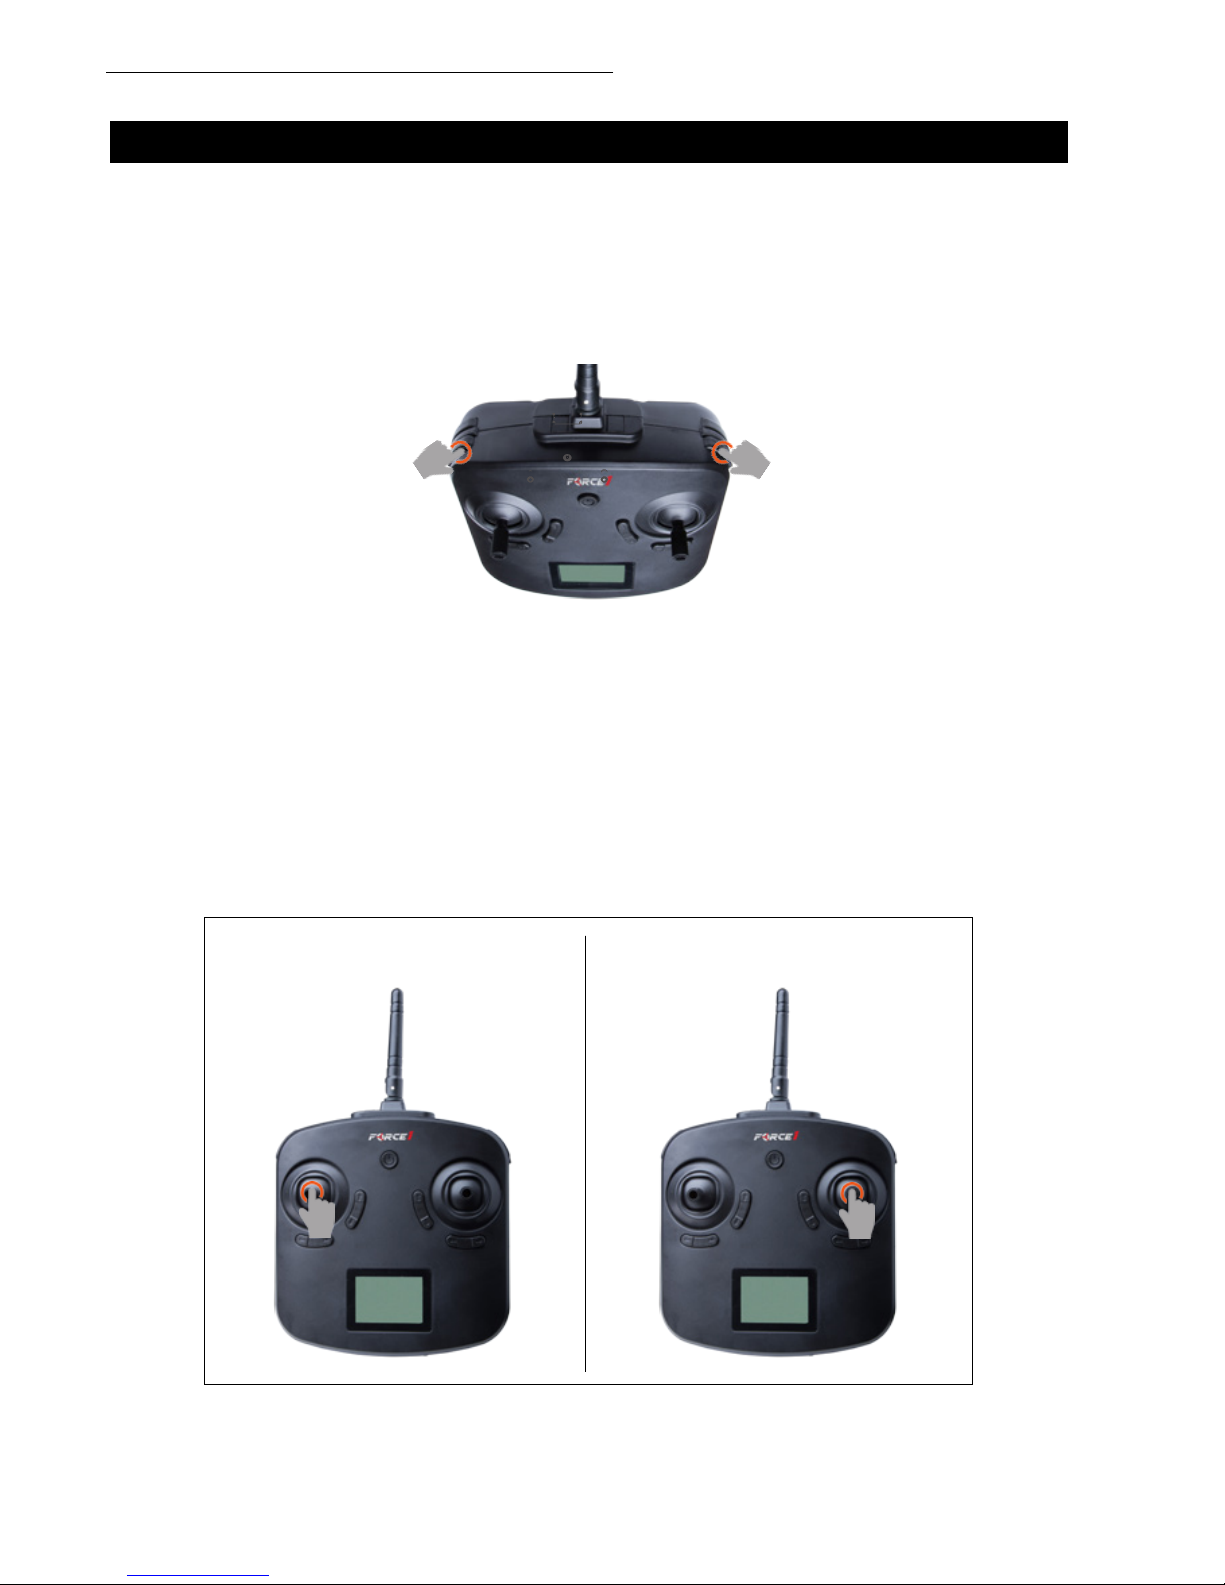
The Rogue has three speed modes: low (30%), medium (default 60%) and high (100%). To switch
speeds, press straight down on the accelerator stick as if it were a button. See Figure 22 for Mode 1
and Mode 2 operation.
EMERGENCY STOP
Press the one-key takeoff (top-left corner) and the top right corner buttons (Fig. 21) simultaneously to
initiate an emergency stop – this will cut power and stop the propellers immediately.
Mode 2 (Default) Mode 1
FIGURE 21
FIGURE 22
Page 21
F72 Rogue User Manual
19
FUNCTIONS
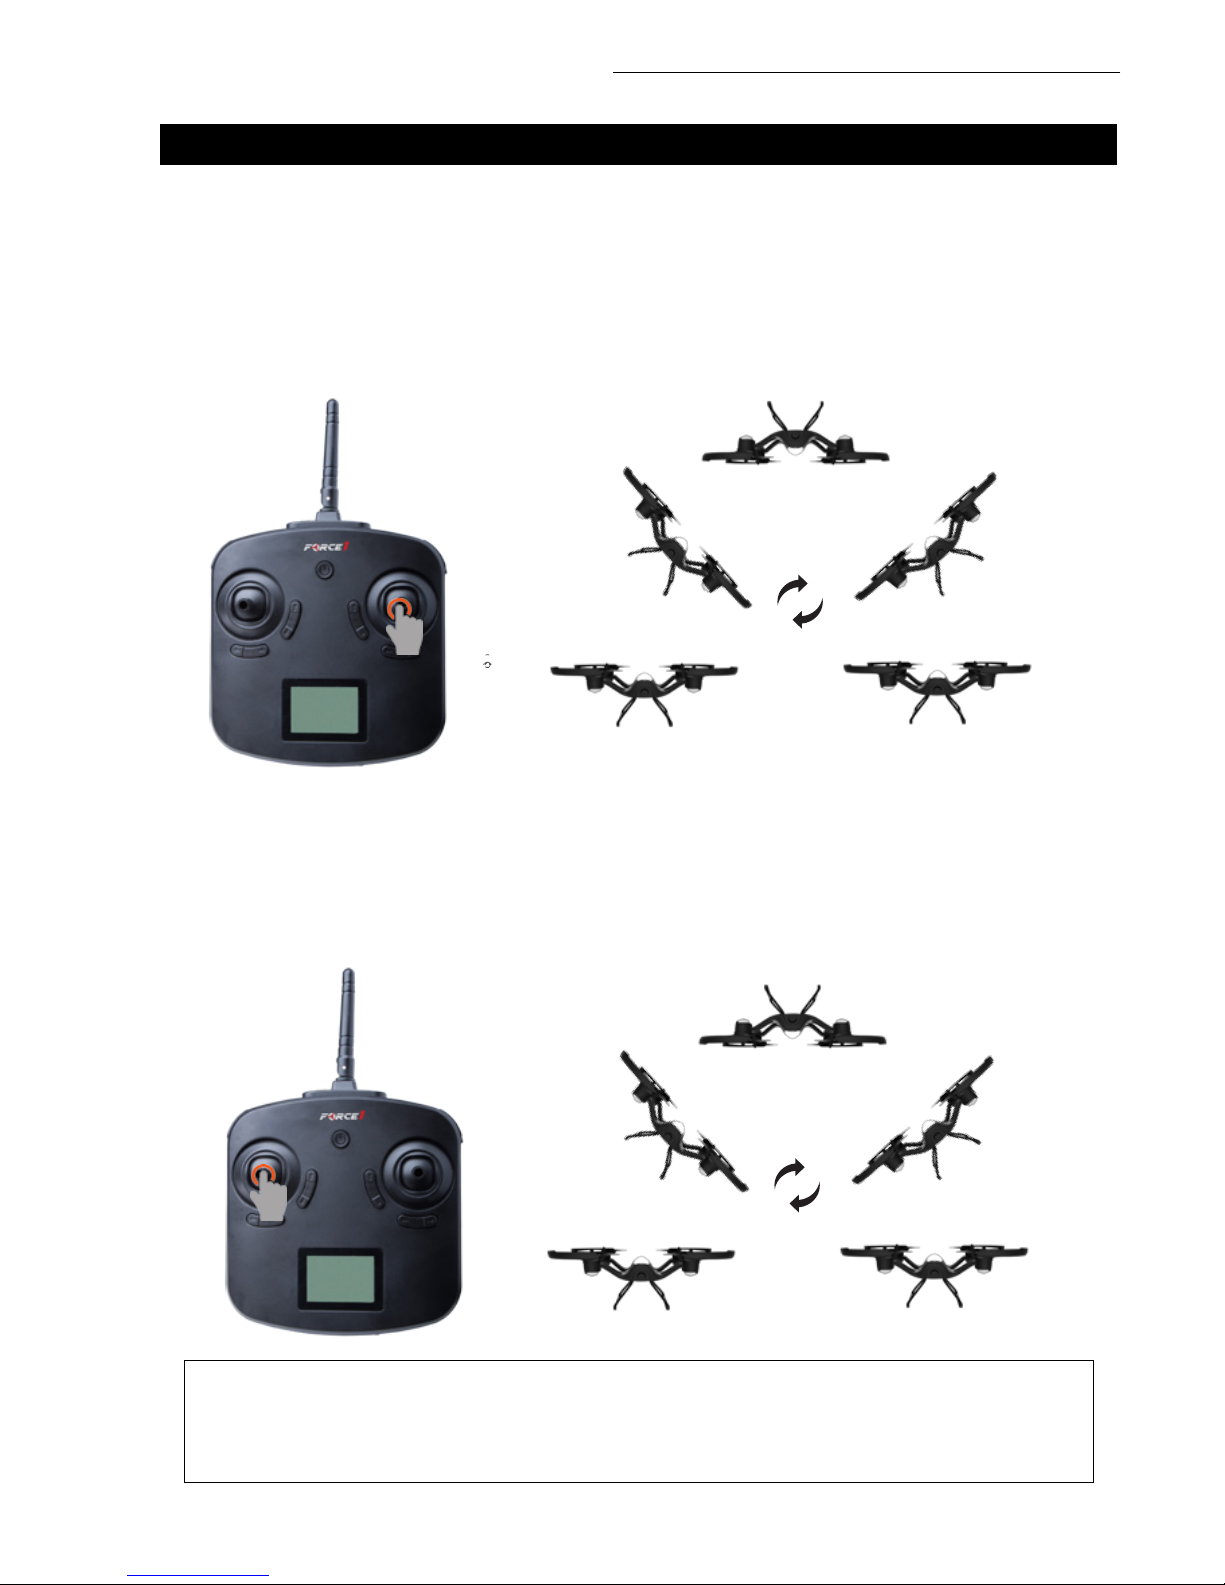
Mode 1
To roll the drone, press straight down on the left stick as if it were a button. The transmitter will begin to
beep. Next, move the left stick all the way in any direction, then let it return to center. Your drone should
roll 360° in the chosen direction. Rolling Mode will cease automatically.
Only execute rolls when you have plenty of airspace.
CAUTION:
360
360
°
°
ROLLING MODE
Mode 2 (Default)
To roll the drone, press straight down on the right stick as if it were a button. The transmitter will begin to
beep. Next, move the right stick all the way in any direction, then let it return to center. Your drone should
roll 360° in the chosen direction. Rolling Mode will cease automatically.
Page 22
FORCE1
20
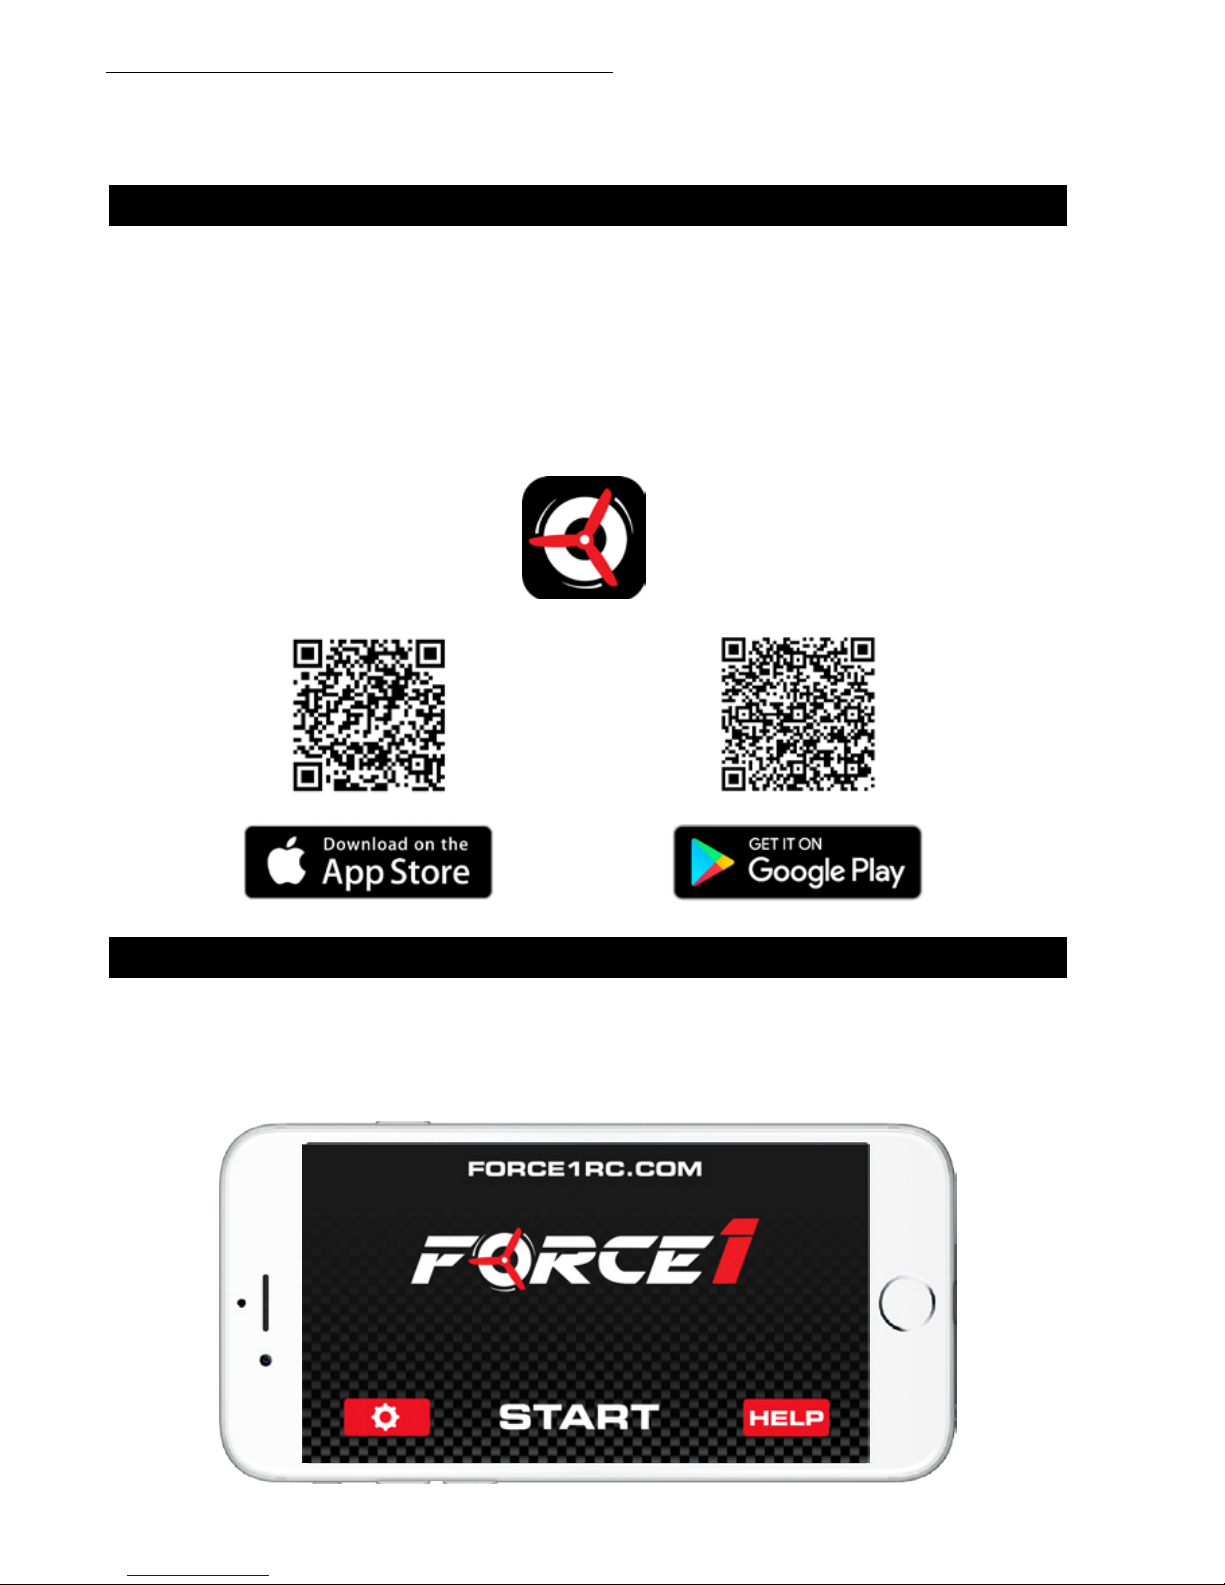
Use the Force1 F72 app to enjoy first-person view (FPV) control and photo/video capture via your mobile
device while flying your F72 Rogue drone. The app is compatible with iOS and Android phones. To download
the app from the App Store or Google Play:
1. Scan the QR code on the product box or below, OR
2. For iOS phones: Search for the Force1 F72 app in the App Store;
3. For Android phones: Search for the Force1 F72 app in Google Play.
1. DOWNLOAD AND INSTALL THE FORCE1 F72 APP
GETTING TO KNOW YOUR APP
1. Install the battery and power on the drone. Put the drone on a flat surface in a horizontal position.
2. Make sure your mobile device Wi-Fi settings are on and connect to the Wi-Fi name Force1_*****.
3. Open the Force1-F72 app and click on “START” to fly in FPV and capture photos/video via your
mobile device.
2. HOW TO PAIR YOUR MOBILE DEVICE & DRONE WI-FI
Force1-F72
Page 23
F72 Rogue User Manual
21
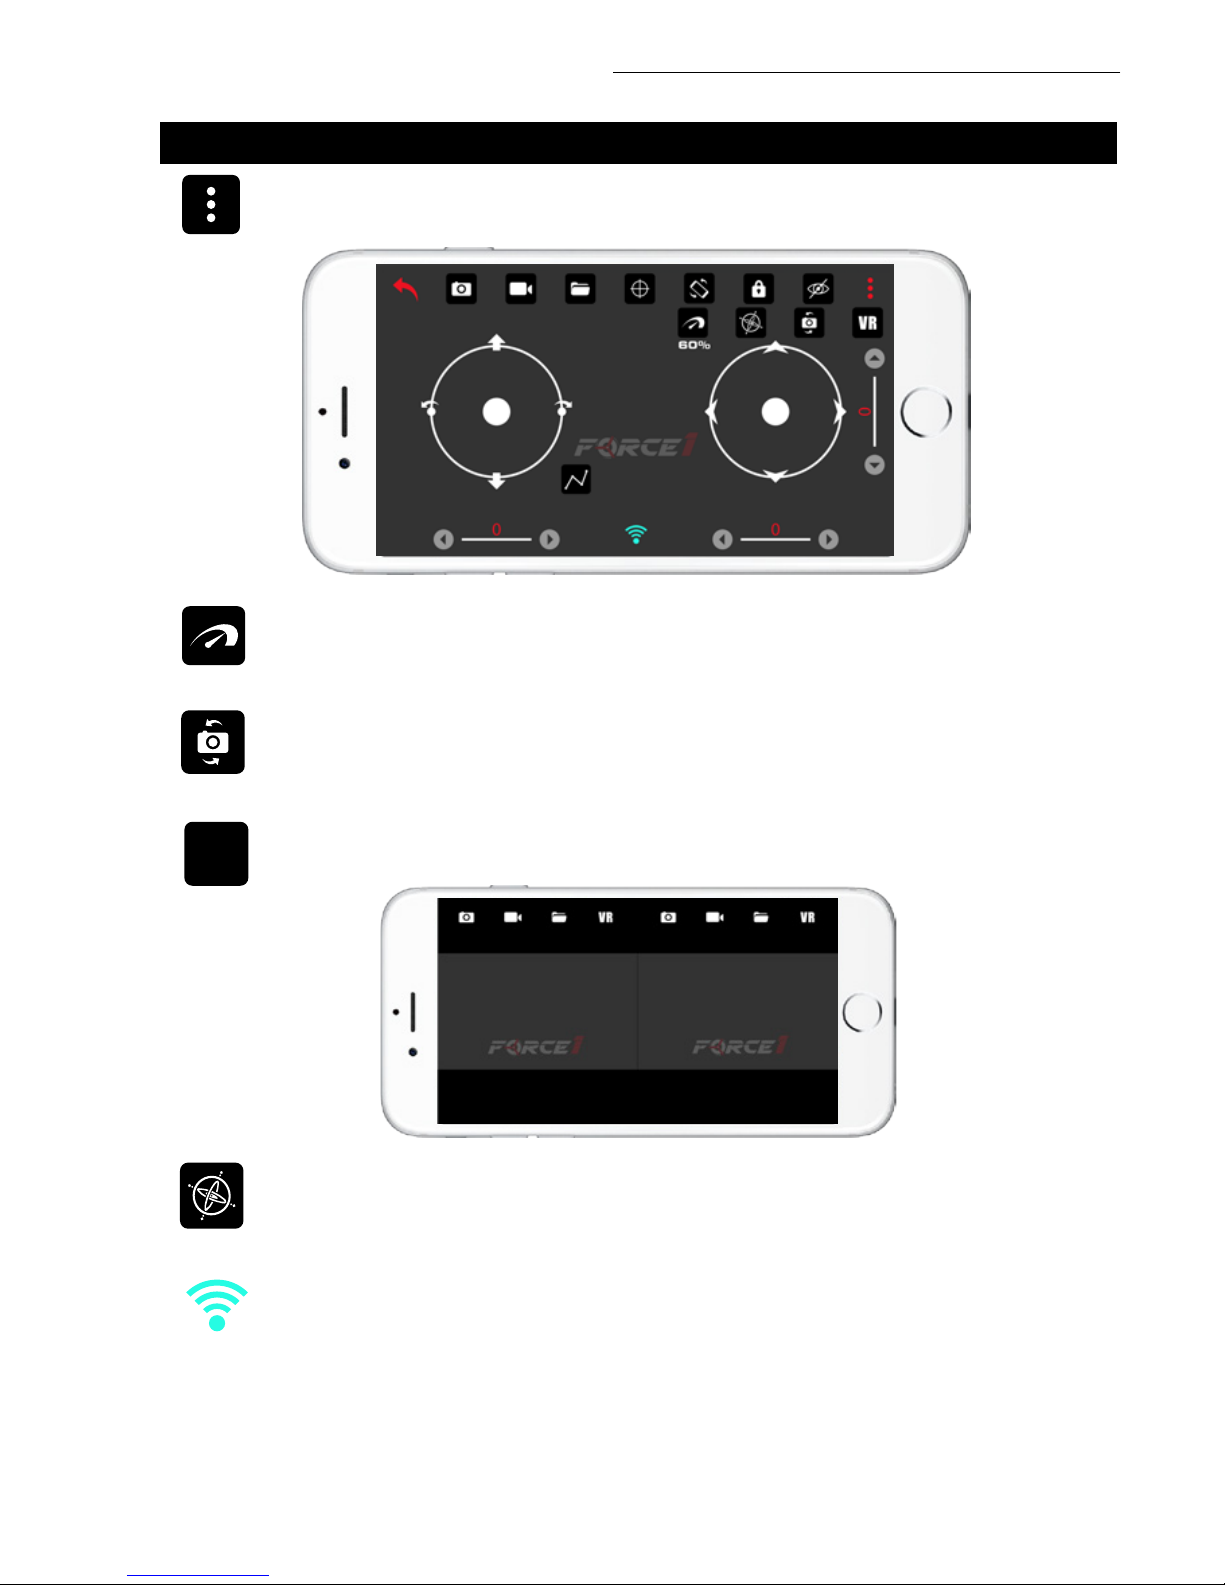
3. APP ICONS
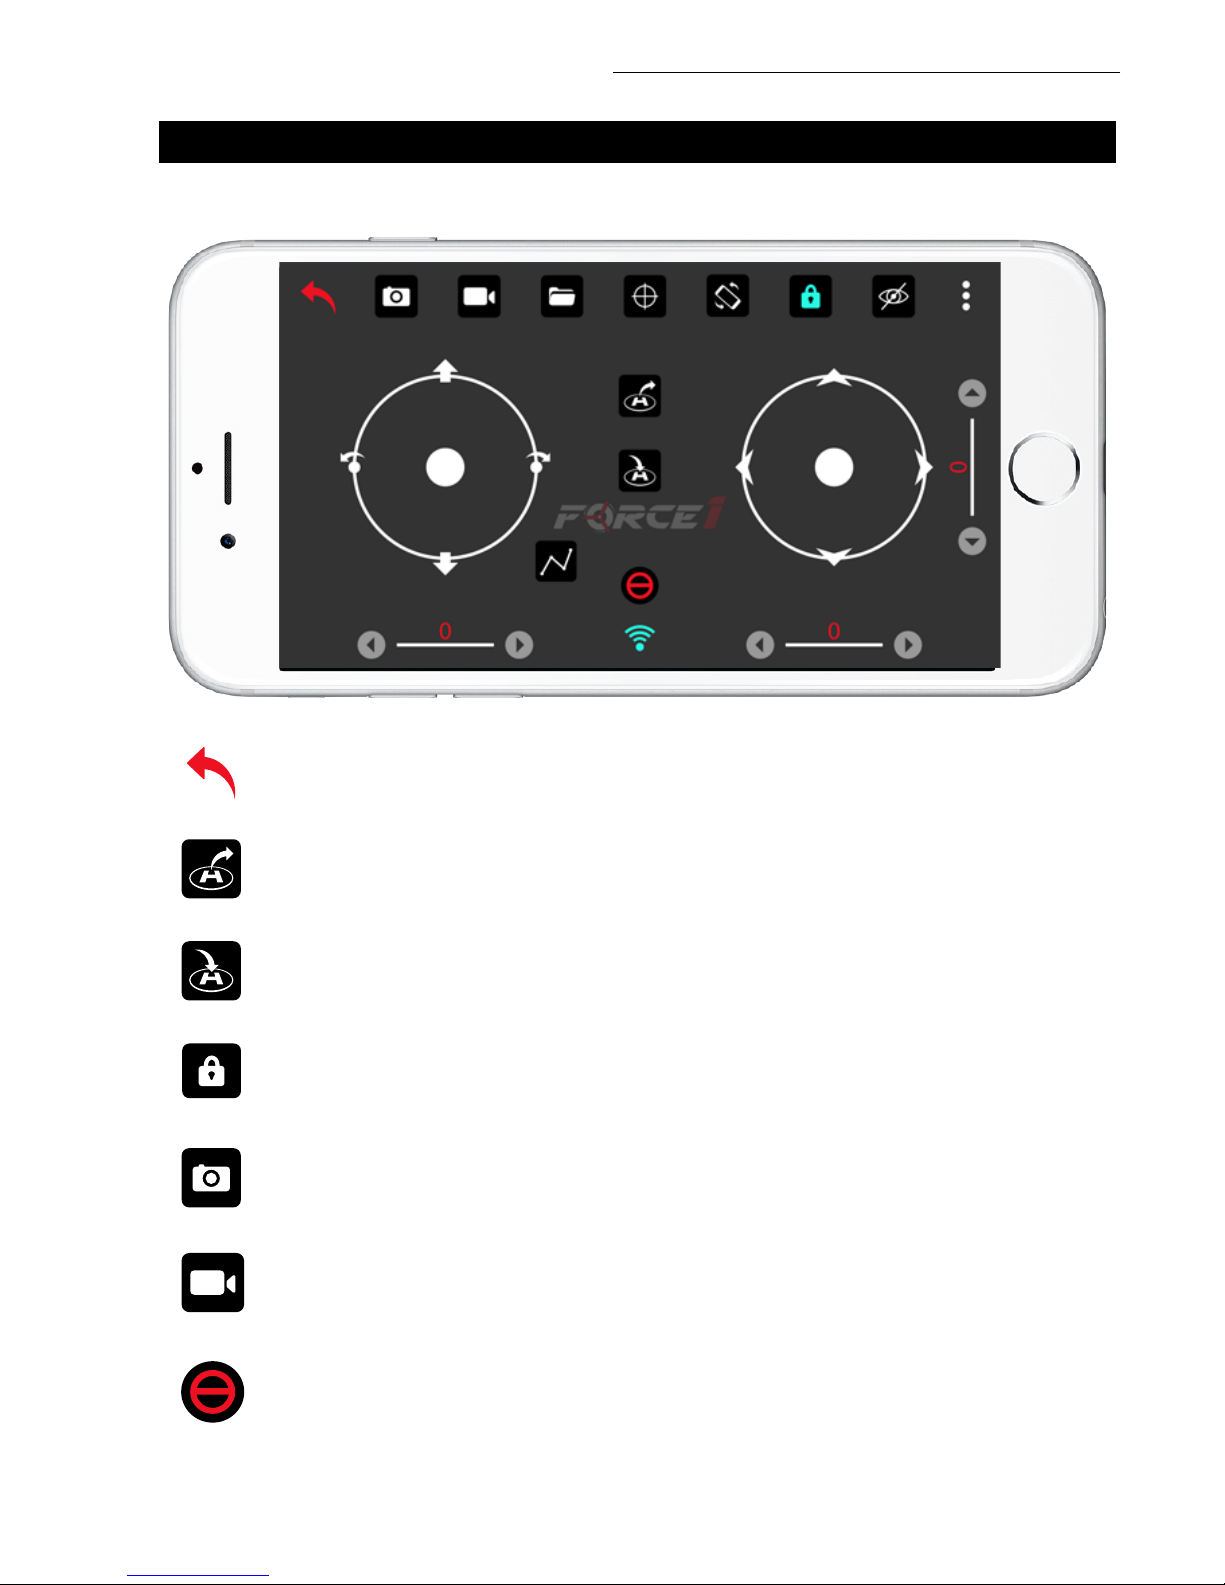
1. APP TRANSMITTER INTERFACE
Return Icon: Click to return to the home page.
Photo: Click to take photo.
Video: Click to record video; click again to stop. Recording time appears at the bottom of your
screen.
One-Key Takeoff: Click and the icon turns red; the drone ies up automatically and hovers.
One-Key Landing: Click and the icon turns red; the drone descends slowly and lands, and
propellers stop.
Lock: Click to unlock the drone; click again to lock.
Emergency Stop: Click and the propellers stop immediately – your drone will
fall from the sky.
Do not use the emergency stop function unless in emergency situation.
Page 24
FORCE1
22
3. APP ICONS
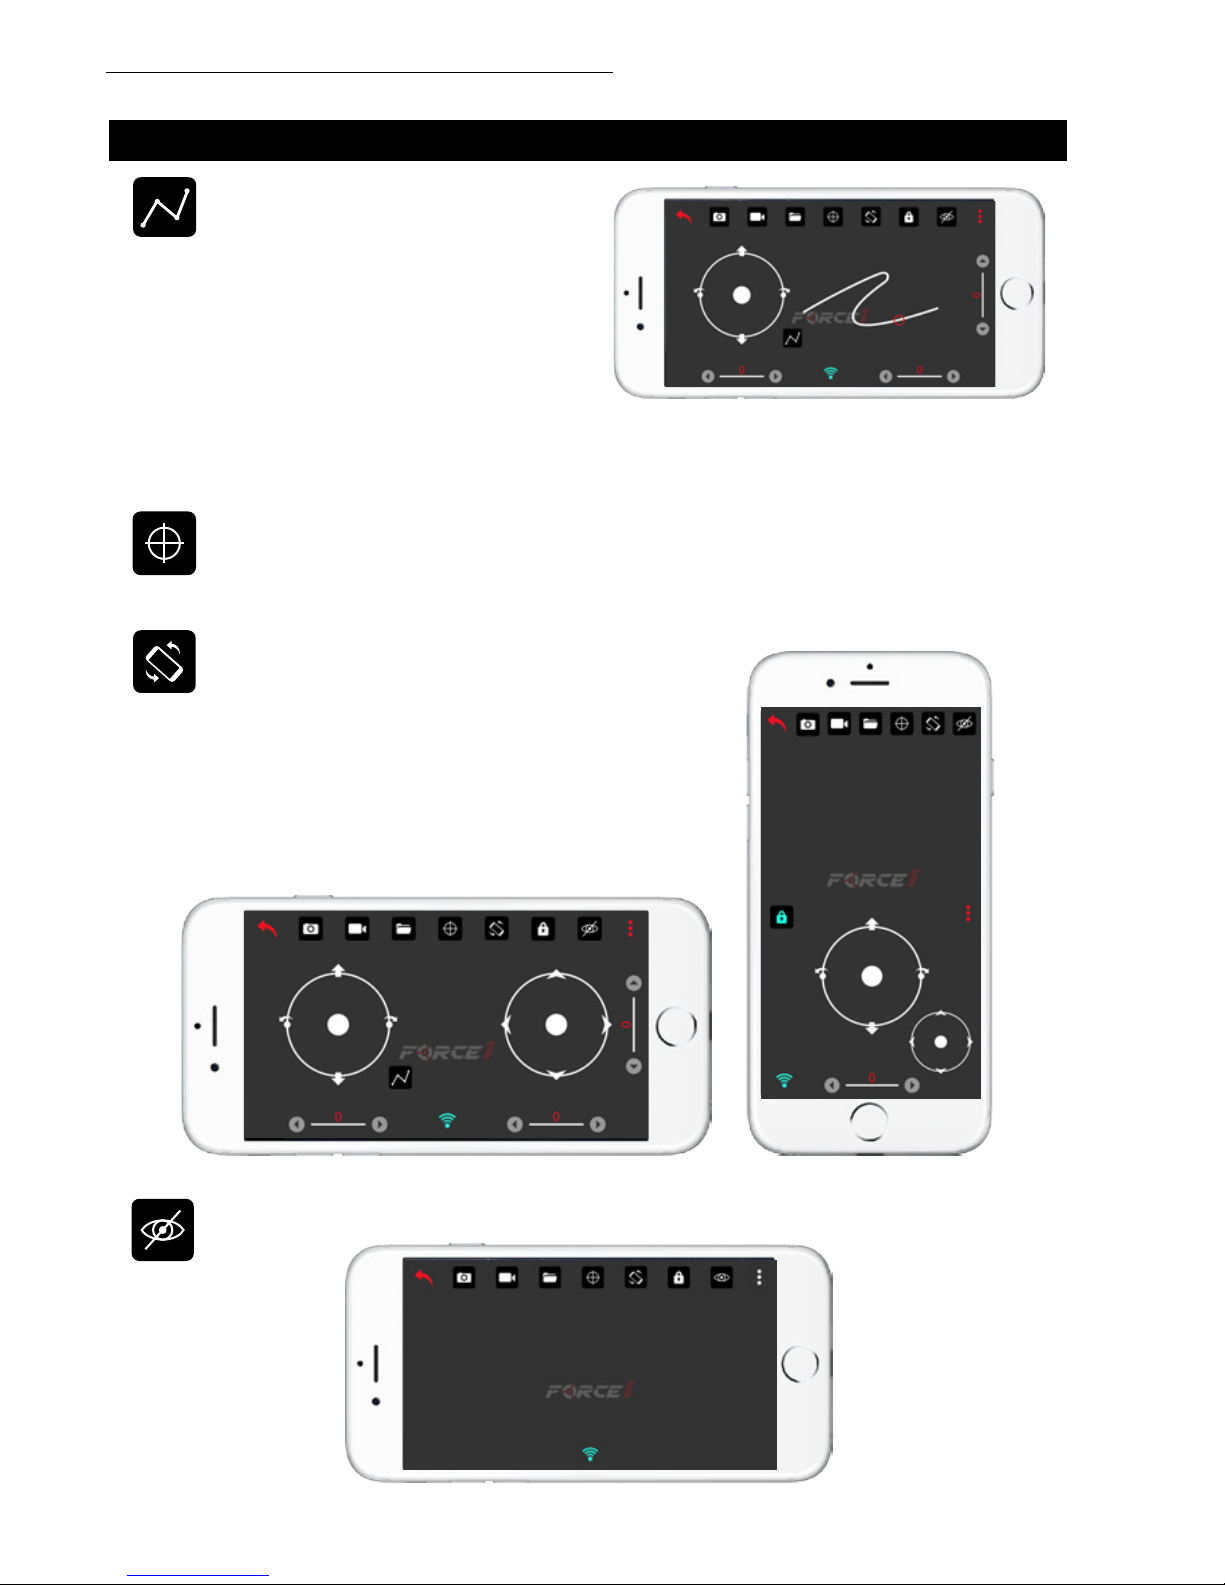
Custom Route Mode: Click on the icon to
pull up a touch-sensitive track interface.
Trace a route on the right with your nger
and watch your drone y the route. Use the
proportion tool below the throttle controls
to adjust the relationship between route
line length and ying distance – the higher
the proportion, the longer the distance.
Click again to exit Custom Route Mode.
NOTE:
This feature must be used in an open area to avoid the risk of collision.
Rotate Screen: Click to rotate the interface from
horizontal to vertical.
Calibration Mode: Click to calibrate the drone (on a at surface) after a crash when it can’t be
adjusted by the trimmer. Calibration ensures all sensors are accurate; LED lights will stop ashing
when calibration is complete.
Hide: Click to hide the throttle and directional control icons; click again to see them.
Page 25
F72 Rogue User Manual
23
NOTE
No Wi-Fi signal? No problem. Turn off your Wi-Fi then turn it on again to establish a connection.
Your drone must be controlled within the 40m Wi-Fi control radius.
NOTE
Exit the app when switching between the transmitter and your mobile device.
Gyroscope Mode: Click to y your drone by tilting your phone (left, right, forward and backward
only; the throttle remains in place). Click again to exit.
Extended Menu: Click to view additional app functions.
3. APP ICONS
Virtual Reality Mode: Click to engage VR Mode, which when paired with VR glasses will enable
live 3D viewing.
Speed Mode: Default speed is set at Medium (60%). Click to set to Low (30%) or
High (100%).
Camera Flip: Click to change drone camera orientation.
VR
Signal Icon: This icon shows the transmitter’s signal strength.
Page 26
FORCE1
24
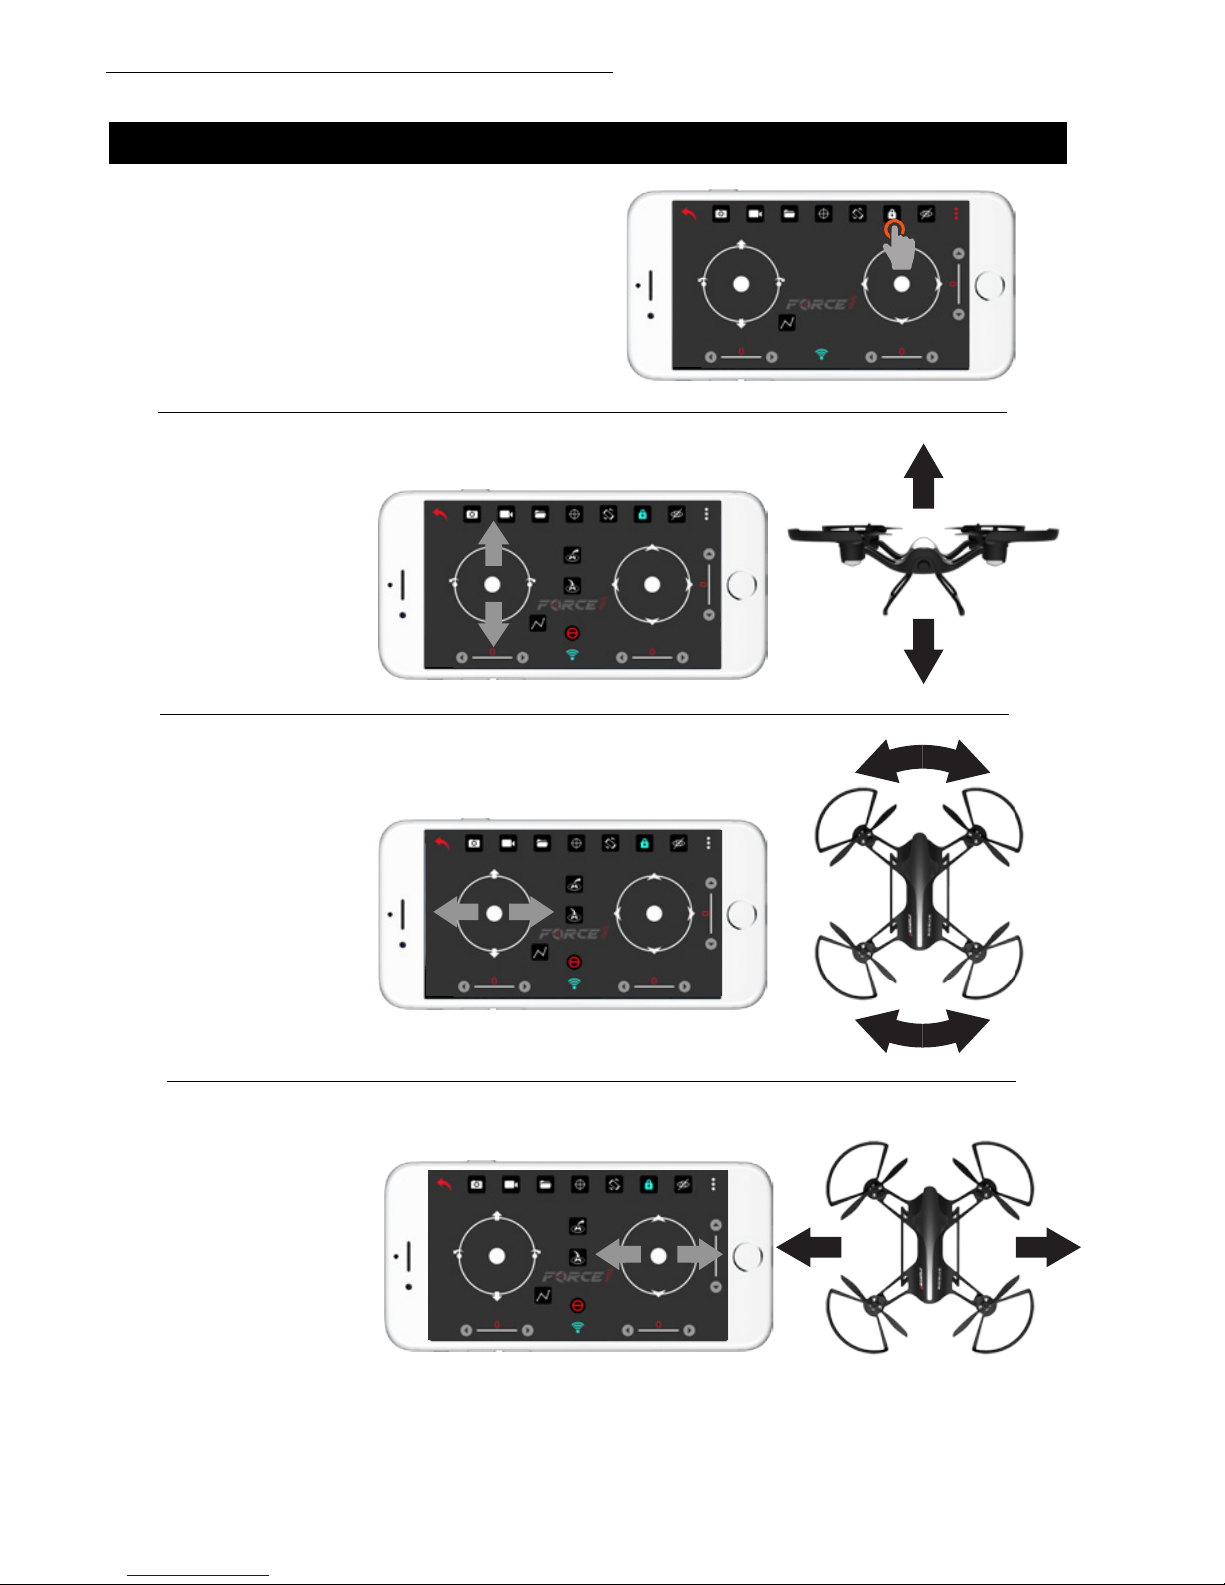
Click the Unlock icon to prep the drone for ight. The
icon will turn blue and certain icons will appear.
Click the One-Key Takeoff icon to start the drone; the
drone will ascend and hover a few feet off the ground.
4. APP FLYING CONTROL
STARTING THE DRONE
FLY UP AND DOWN
Move the left control lever
up to y the drone up and
move the left control lever
down to y the drone
back down. The drone will
stay ying at appointed
altitude.
ROTATE LEFT OR RIGHT
Move the left control lever
to the left to rotate the
drone to the left. Move
the left control lever to the
right to rotate the drone to
the right.
FLY LEFT OR RIGHT
Move the right control
lever to the left to y the
drone to the left, and move
the right control lever to
the right to y the drone to
the right.
Page 27
F72 Rogue User Manual
25
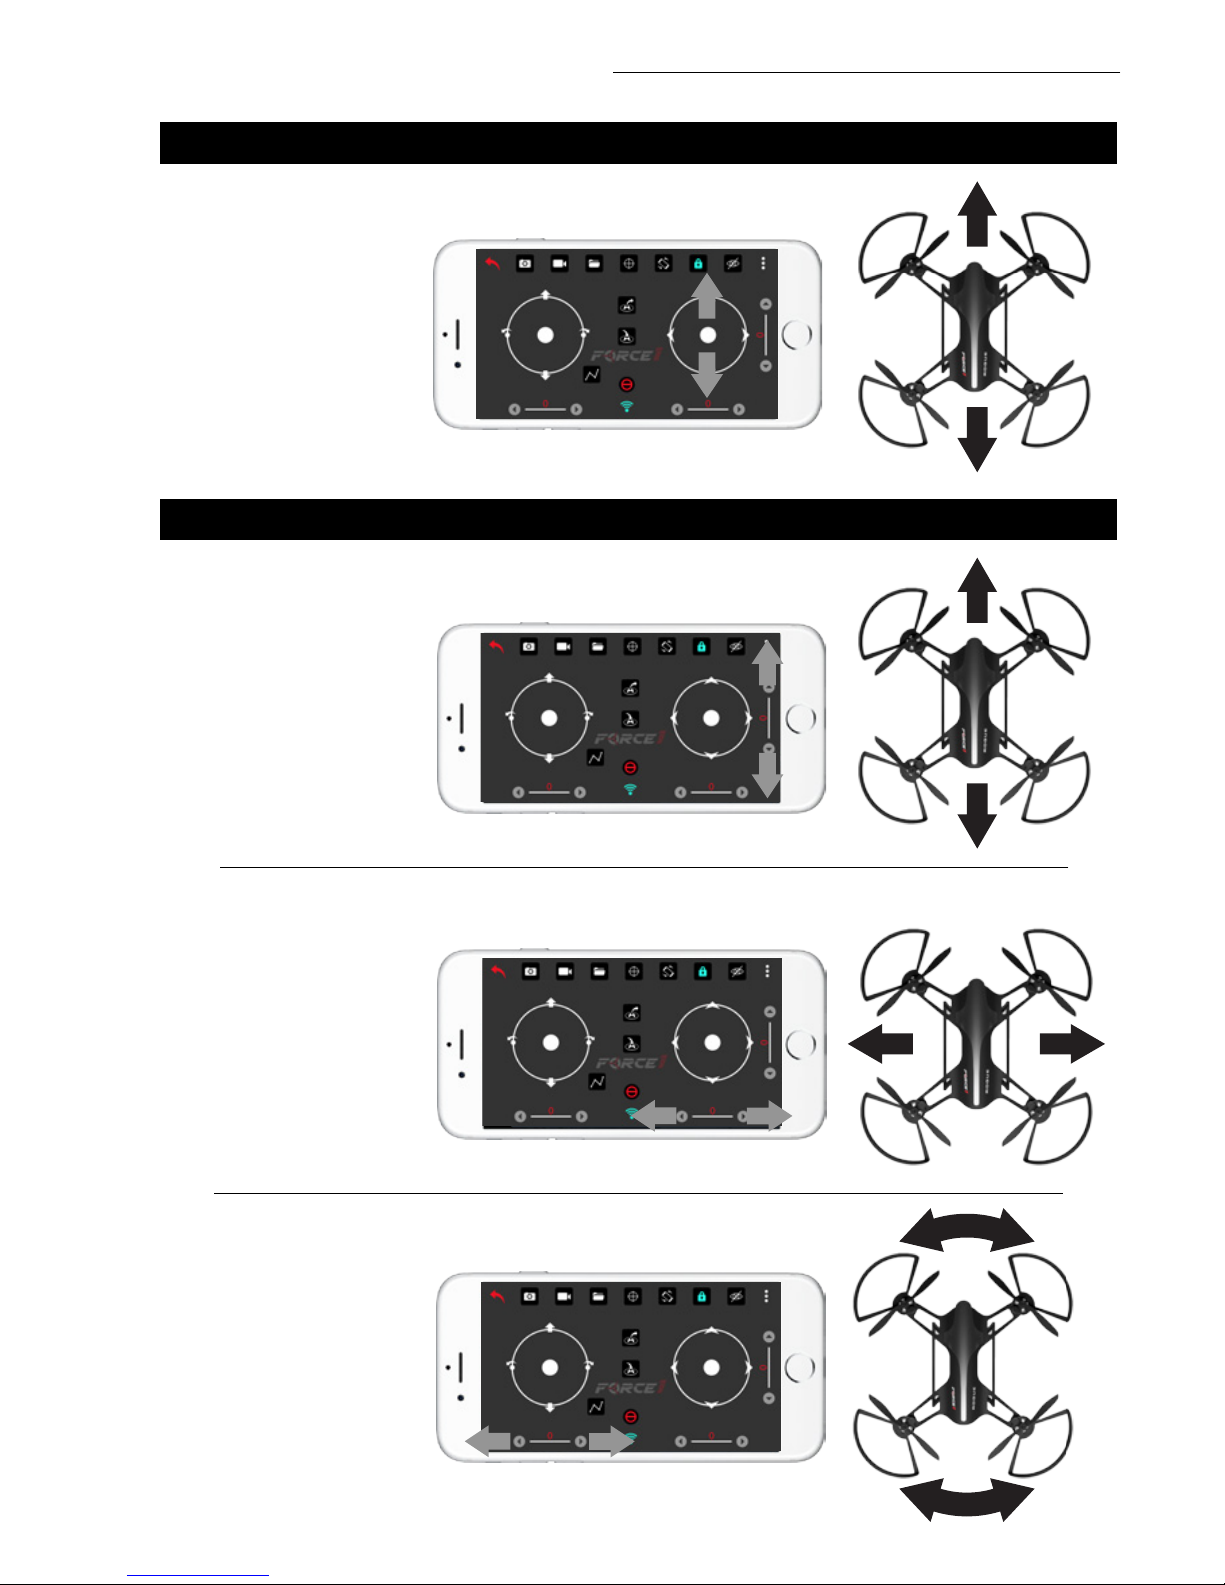
FLY FORWARD OR BACKWARD
Move the right control
lever up to y the drone
forward, and move the
right control lever down to
y the drone backwards.
FORWARD/BACKWARD TRIM
LEFT/RIGHT TRIM
Click the “-” of the Forward
/ Backward Trimmer to
adjust the drone until
balance of the drone tilts
forward. Click the “+”
to adjust the drone until
balance of the drone tilts
backward.
Click the “+” of the Left /
Right Trimmer until balance
of the drone tilts to the left.
Click the “-” to adjust the
drone until balance of the
drone tilts to the right.
5. APP TRIMMING ADJUSTMENTS
4. APP FLYING CONTROL
LEFT OR RIGHT ROTATION TRIM
Click the “+” of the Left
/ Right Rudder Trimmer
until balance of the drone
rotates left. Click the “-”
to adjust the drone until
balance of the drone
rotates right.
Page 28
FORCE1
26
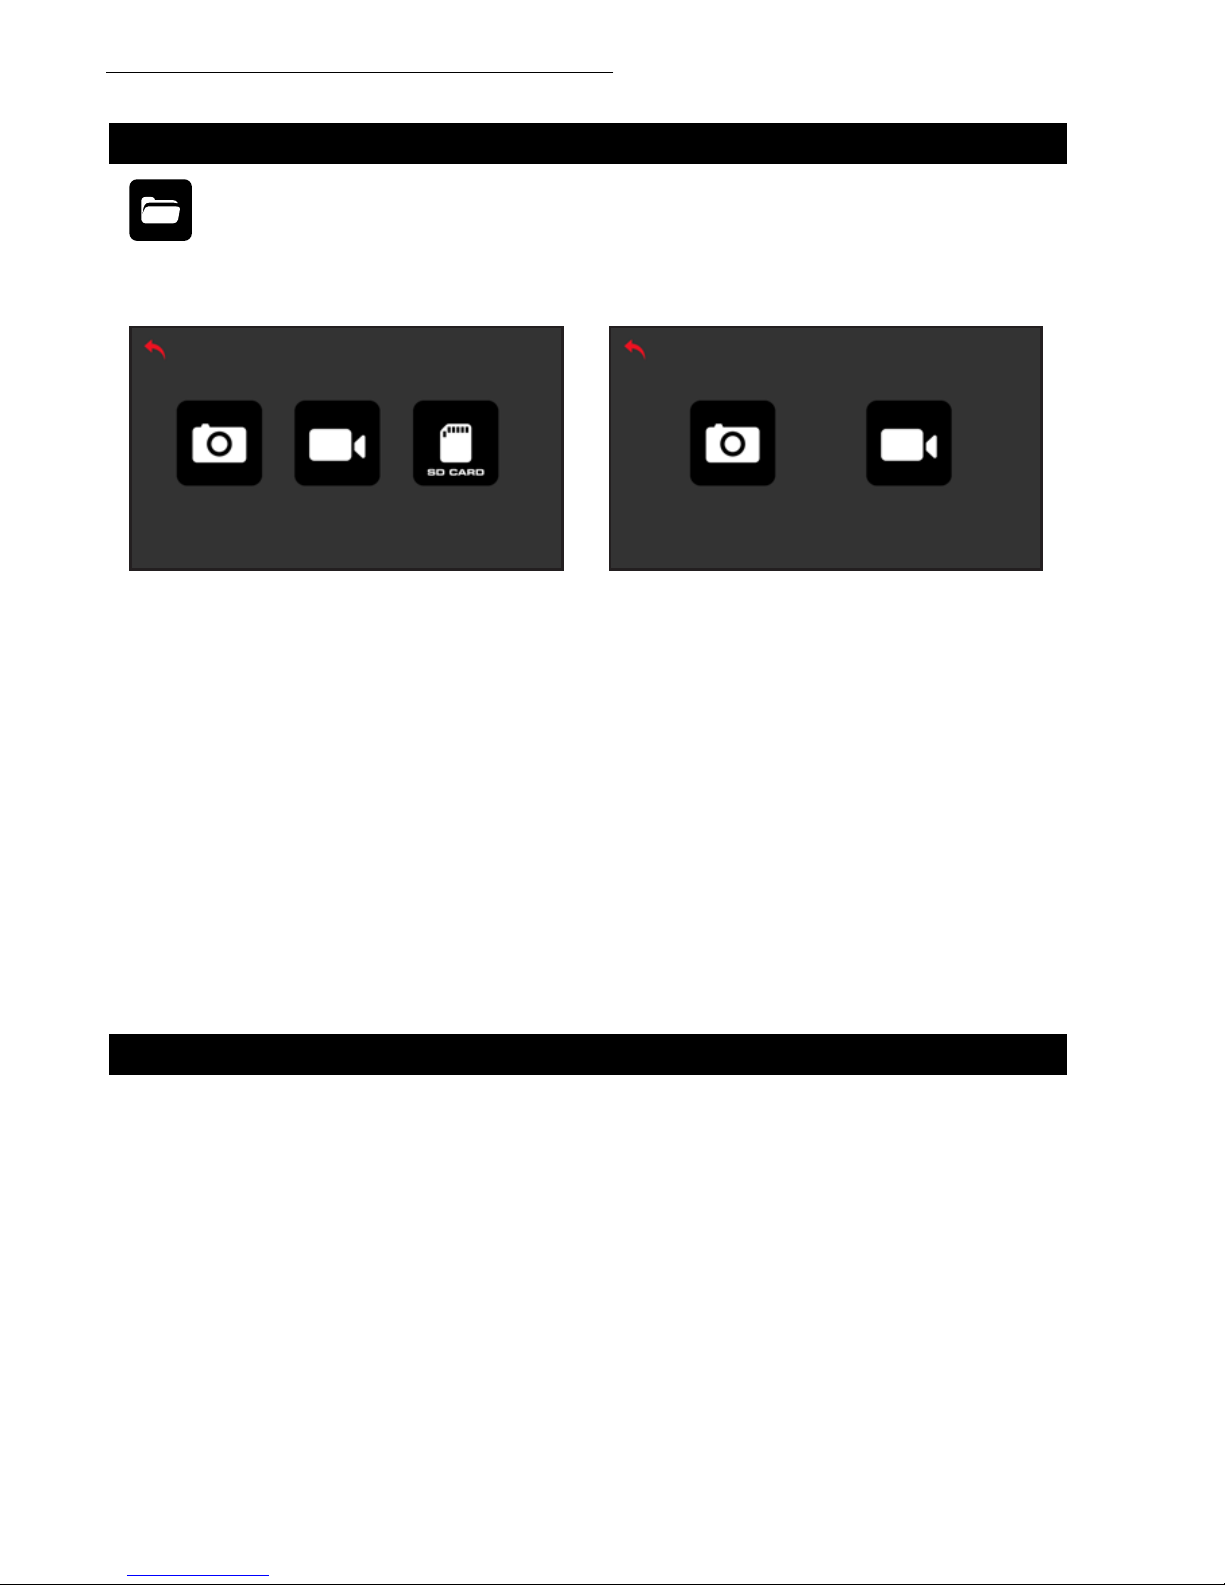
Tap the photo folder on the left to view all captured images, or edit a photo. Tap the video folder on the
right to view all captured video or edit the video (Fig. 23). When a memory card is inserted, click on the
memory card icon to view photos and videos (Fig. 24).
FIG. 23 FIG. 24
6. AERIAL PHOTOGRAPHY & VIDEO
Library: Click to view photos/videos.
Photos/video are stored on the memory card if installed. If not, they are saved to the app.
CARE AND MAINTENANCE
•
Competing Wi-Fi signals, magnetic elds and other electronic signals can interfere with the
mobile app; avoid operation where interference is high to ensure optimum ight conditions
• Try a different mobile device or browser if the mobile app fails to download
• As a safety measure, your drone will slowly descend when the app is interrupted by an incoming call
• The Force1 F72 app only works with the F72 Rogue drone; interface may change with software
updates/upgrades
1. Regularly clean the drone using a cloth.
2. Do not expose the drone to direct sunlight or high temperatures.
3. Do not expose the drone to water as this will damage the electrical components.
4. Regularly inspect the charging plug and other parts for damage. If there are any signs of damage,
discontinue use immediately until the part has been fully repaired.
CAUTION:
Page 29
F72 Rogue User Manual
27
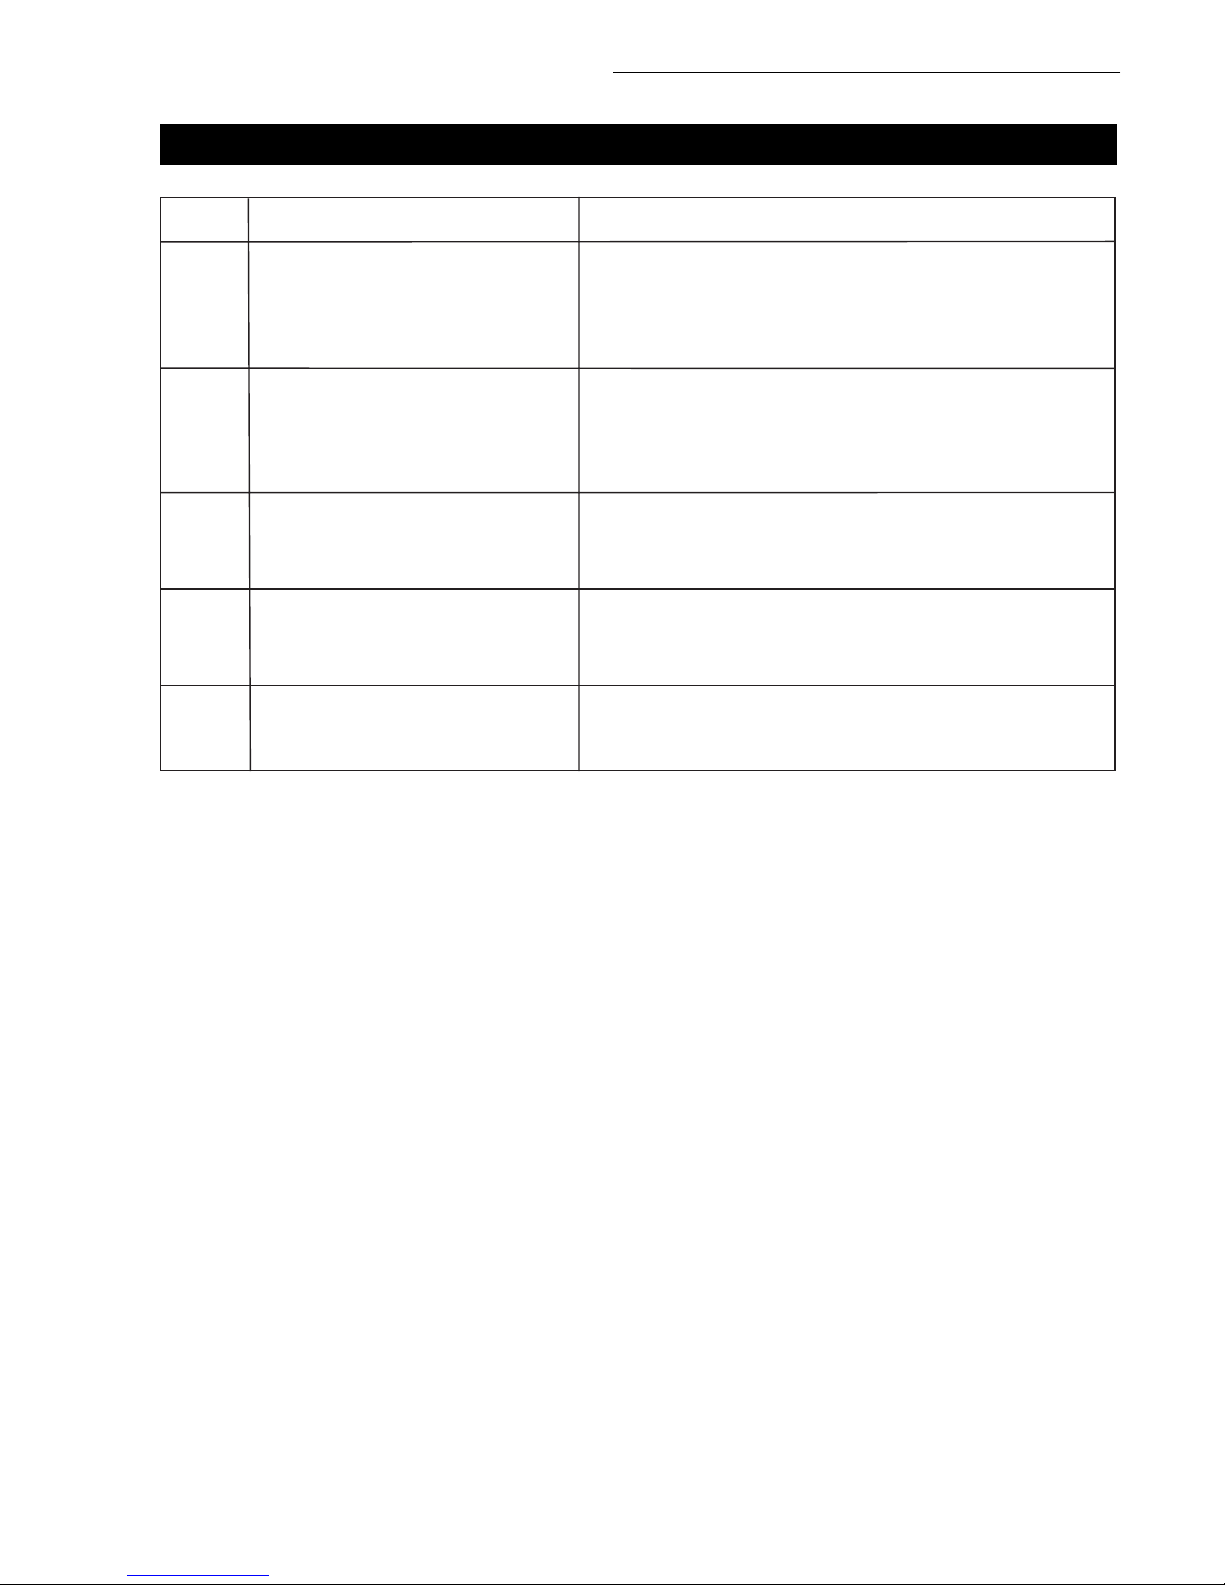
Drone lights are flashing, but
drone is not responding.
Drone propellers rotate, but it
can’t fly.
Drone delivers an electric shock.
Trimming has been performed,
but the aircraft won’t stabilize.
After a drone crash, the drone
flies erratically.
1) The transmitter and drone are not paired. Refer to pg.
12 to pair again.
2) Drone has low battery. Charge the battery.
1) Drone has low battery. Charge the battery.
2) The fan is deformed or was installed wrong. Replace
the fan.
1) The fan is deformed. Replace the fan.
2) The axle is bent. Replace the axle.
1) The fan is deformed. Replace the fan.
2) The motor is damaged. Replace the motor.
1) The gyroscope is out of balance. Refer to pg. 13 to
recalibrate the fuselage.
PROBLEM SOLUTIONNO.
TROUBLESHOOTING
1
2
3
4
4
Page 30
FORCE1
28
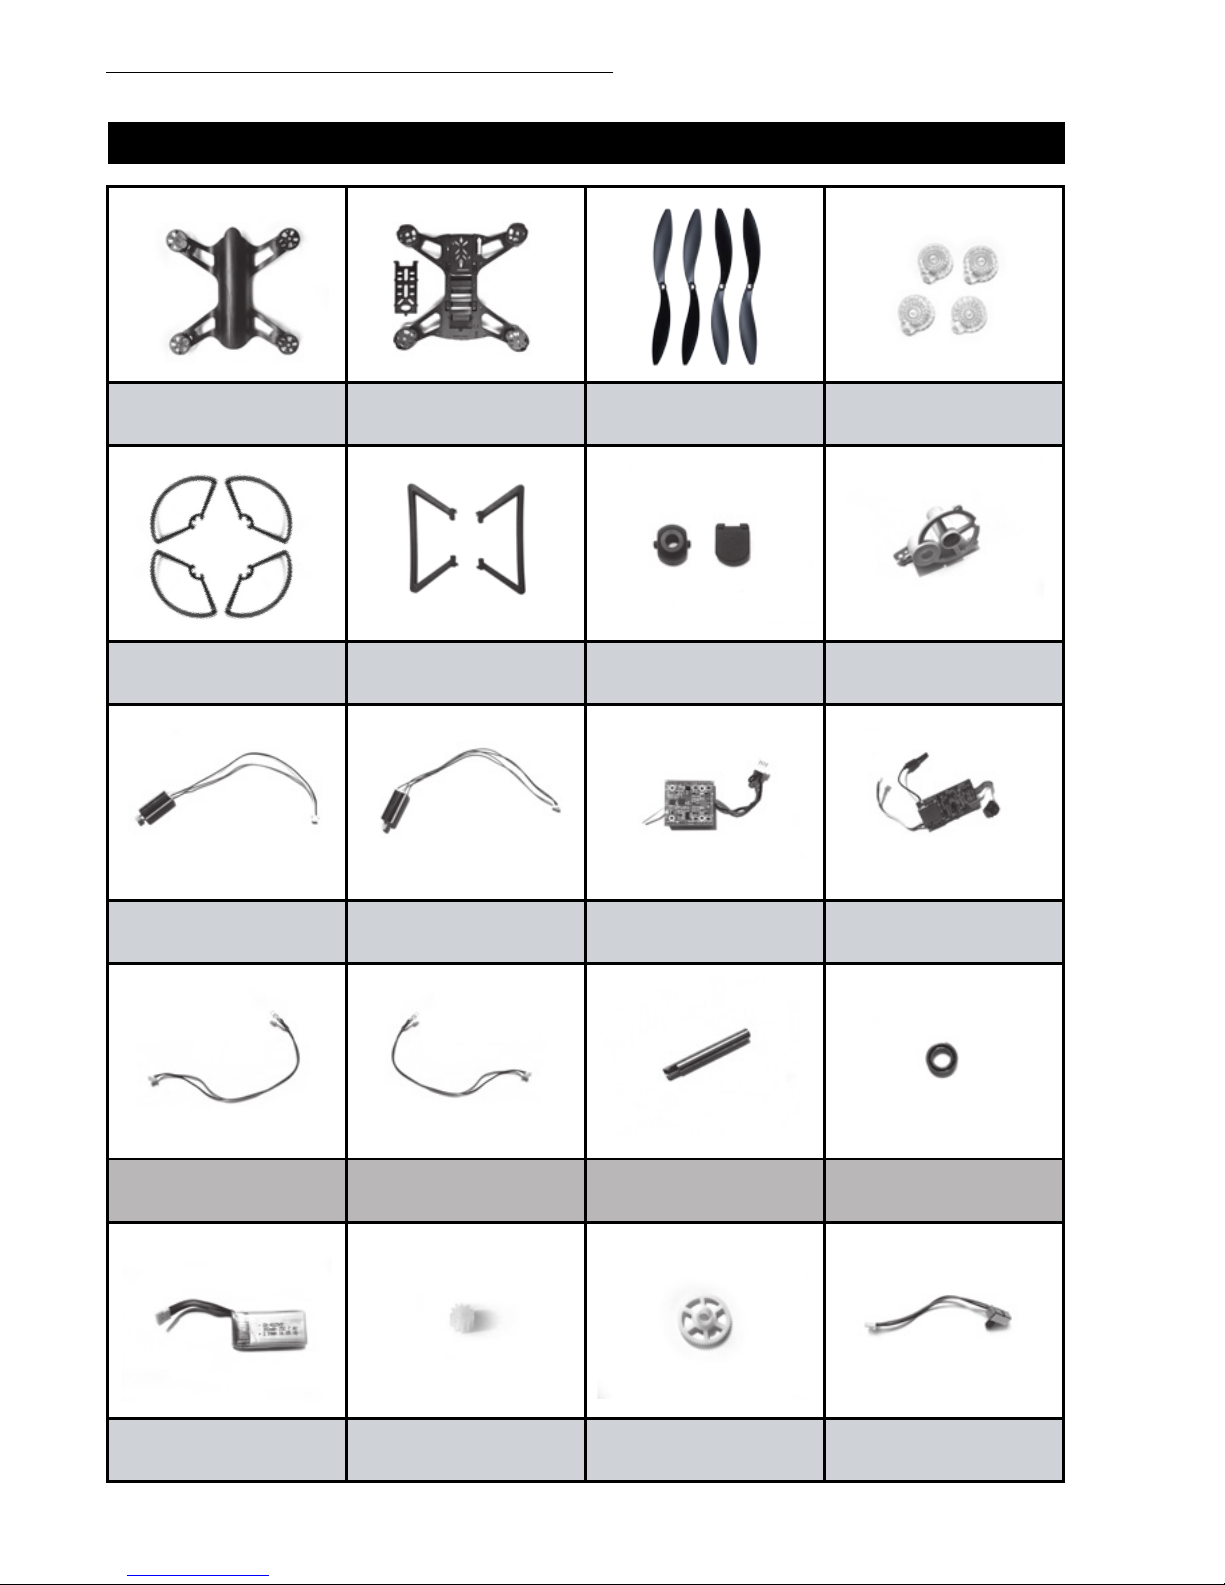
SPARE PARTS
Upper Cover
001
Propeller Guards
005
White LED Indicator
013
Fuselage Batteries
017
Lower Cover
002
Blue LED Indicator
014
Motor Cone
018
Transmission Gear
019
Switch with Plug
020
Propellers (A/B)
003
Dash Receiver
011
Hollow Steel Tube
015
Front/Rear Light Covers
004
Lens Accessories
007
Wifi Camera Plate
012
Clockwise Motor
009
Landing Gear
006
Motor Cabinet
008
Counterclockwise Motor
010
Bearing
016
Page 31
F72 Rogue User Manual
29
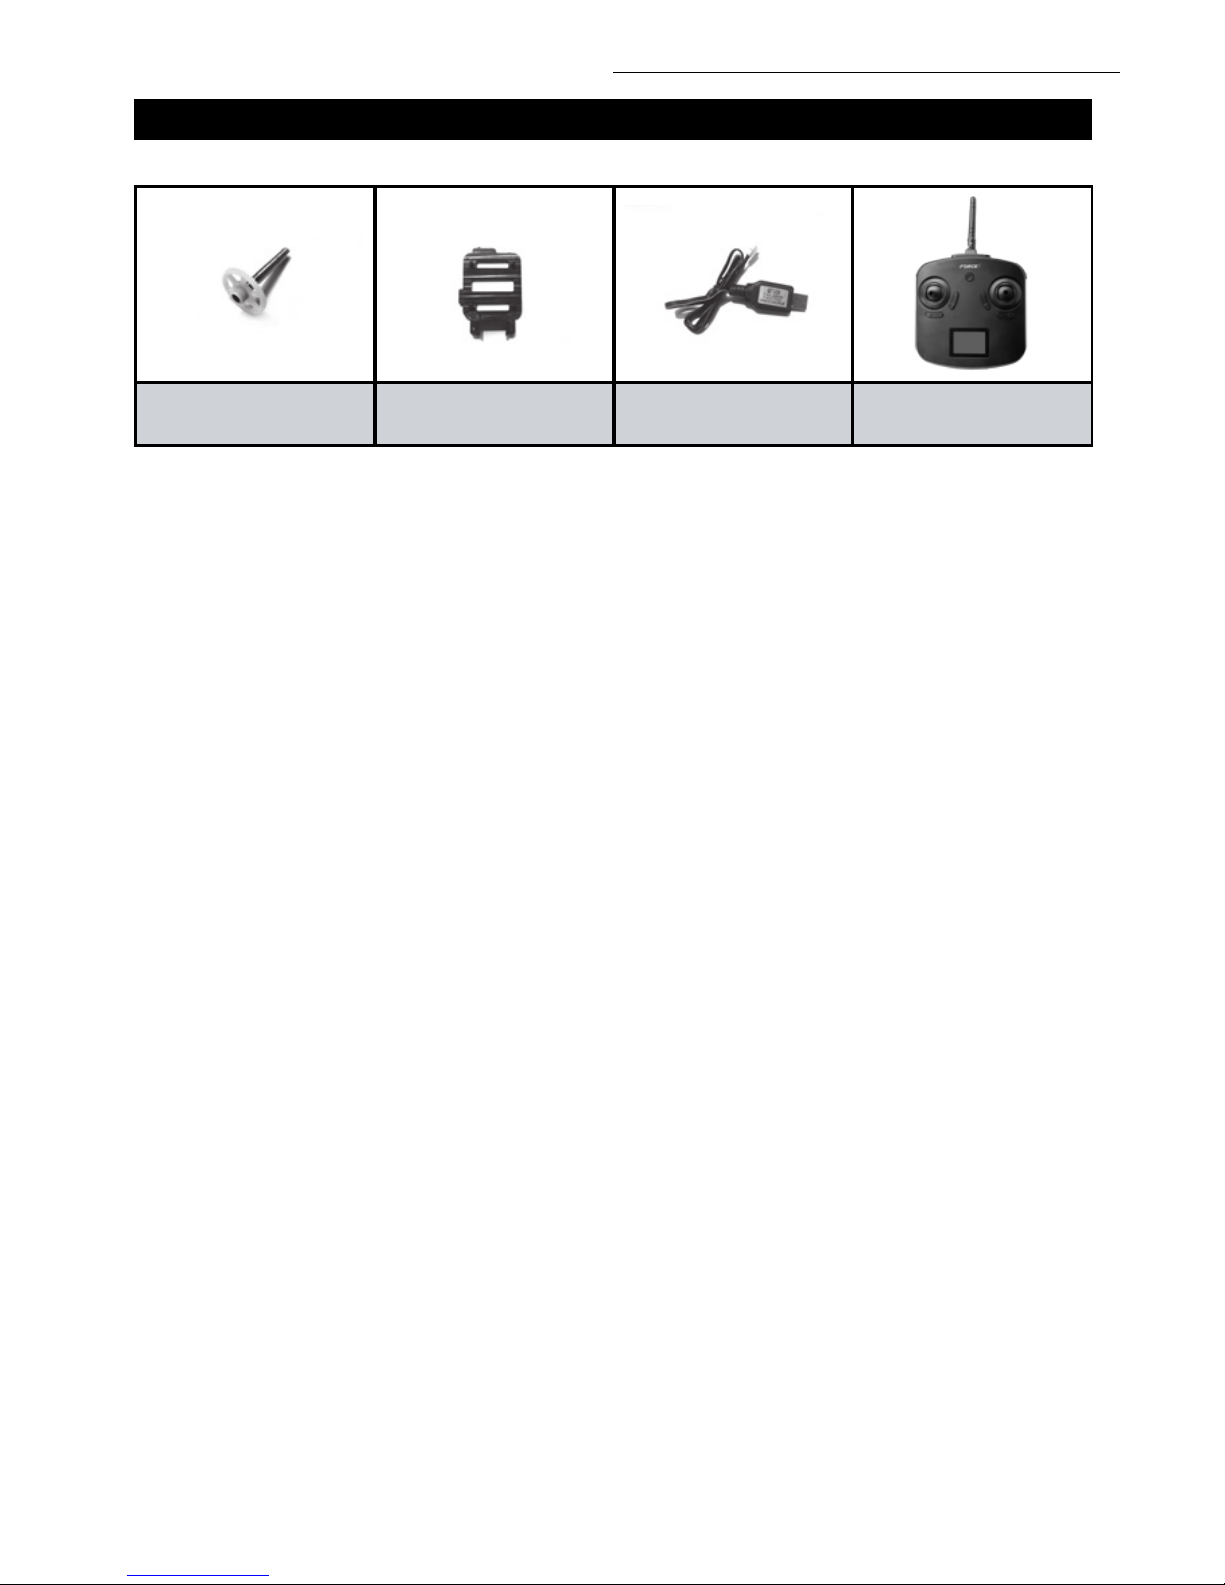
SPARE PARTS
Steel Pipe/Gear Assembly
021
Fixed Plate
022
3.7v*2 Charger
023
Transmitter
024
Page 32
This equipment has been tested and found to comply with the limits for a Class B digital device,
pursuant to part 15 of the FCC Rules. These limits are designed to provide residential protection against
harmful interference in a residential installation. This equipment generates, uses and can radiate radio
frequency energy and, if not Installed and used in accordance with the instructions, may cause harmful
interference to radio communications. However, there is no guarantee that interference will not occur
in a particular installation. If this equipment does cause harmful interference to radio or television
reception. If this device causes radio or TV interference, which can be determined by turning the device
off and on, try to correct the interference using the following measures:
• Reorient or relocate the receiving antenna
• Increase the separation between the equipment and receiver
• Connect the equipment into an outlet on the circuit different from that to which the receiver is
connected
• Consult the dealer or an experienced technician for help
The equipment may generate or use radio frequency energy. Changes or modifications to this
equipment may cause harmful interference unless the modifications are expressly approved in the
instruction manual. Modifications not authorized by the manufacturer may void user’s authority to
operate this device.
This device complies with part 15 of the FCC Rules. Operation is subject to the following two conditions:
1. The device does not cause harmful interference, and
2. The device accepts interference, including interference that may cause undesired operation.
FCC INFORMATION
FCC WARNING
force1rc.com
 Loading...