

Page 1

1
Foreword
Dear Force owner
Congratulations on your selection of a Force receiver. Your new Force receiver represents the best and most
advanced properties that the new digital DVB technology offers.
Our objective is easy access to infotainment.
We have combined user-friendly design with the latest digital technology, thus allowing us to achieve a high
standing among our customers and in the industry as a whole.
Our ambition is for our customers to be able to have information and entertainment brought to them in a
simple and intuitive way. To achieve this, we work together with both experienced and inexperienced user
groups. The knowledge and experience we gain enables us to develop products that can be enhanced to meet
future needs, products people can enjoy for years and years.
We work with our distributors and dealers. We form partnerships, both in the consumer market and in the
professional market.
Finally, in our product development we continually focus on our core values and our pledge to the market to be
innovative, reliable, strong and bold.
Our vision is therefore to inspire our customers and the industry as a whole.
Yours sincerely
TechniSat Force Digital
April 2007
Page 2
2
Using this manual
This manual introduces your new TechniSat Force receiver and shows how to install and operate it.
Important Conditions
You have purchased a license for the software. You have not purchased ownership rights for the software but a
user licence to be able to use the software in the equipment. Therefore, under no circumstances are you
entitled to copy the software, regardless of the reason. TechniSat Force
Digital
reserves the right to regularly
change the software and add extra features or services in addition to the features you originally paid for – this
may be based on a form of subscription or any other form of payment.
If you cannot accept these conditions, you must not connect the apparatus to the power supply. The
connection of the equipment to the power supply will be regarded as constituting acceptance of the above
conditions. NOTE that initial operation of the equipment is automatically registered in the unit. Changes in
software and user interface may occur without warning.
Functionality is ONLY guaranteed when using original TechniSat Force accessories or accessories that are
approved by TechniSat Force. See our website for up-to-date information on accessories: www.technisat-
force.tv.
WARNING!
We recommend that you read section 1.3 on safety before you connect your receiver to the power supply for
the first time.
To reduce the risk of fire or electric shock, the receiver must not be exposed to rain or moisture. Do not
remove the cover. This product contains no parts that can be serviced by the user. Any servicing must be
carried out by qualified service personnel.
TAKE CARE!
Do not block the vent holes. If these are blocked, the unit may overhead.
Do not place naked flames (for example lit candles) on top of the equipment.
The equipment must not be subject to rain, moisture, drips or splashes and containers with liquid, for example
vases, should not be placed on the apparatus.
The equipment has been designed to function in operating environments where the temperature does not
exceed 35°C.
WARNING
RISK OF ELECTRIC SHOCK
D
O NOT OPEN
AVIS
RISQUE DE CHOC
ELECTRIQUE
Page 3

3
Table Of Contents
1 How to get the most out of your TechniSat Force Receiver ................................................................4
1.1
Getting Started..............................................................................................................................4
1.2
Support ........................................................................................................................................4
1.3
Safety ..........................................................................................................................................4
2 Connections .......................................................................................................................................5
2.1
Example connection diagrams .........................................................................................................5
2.2
Connecting the receiver to a Cable-TV wall outlet ..............................................................................5
2.3
Connecting to TV via SCART............................................................................................................6
2.4
Connecting to a video recorder........................................................................................................6
2.5
Connecting to a DVD Player ............................................................................................................6
2.6
Connecting to Hi-fi equipment .........................................................................................................6
2.7
Connecting to a second receiver ......................................................................................................6
2.8
Connecting an external IR Accessory................................................................................................6
2.9
Power connection...........................................................................................................................6
3 Getting to know your equipment........................................................................................................7
3.1
Controls on the receiver..................................................................................................................7
3.2
Viewing card .................................................................................................................................8
3.3
Remote control..............................................................................................................................8
3.4
What to do when not in use ............................................................................................................9
4 Installation and basic operation.......................................................................................................10
4.1
Selecting your country and operator and finding TV and radio channels ..............................................10
4.2
Channel selection and info bar.......................................................................................................12
4.3
Creating a favourites list...............................................................................................................13
4.4
Using the TV Guide ......................................................................................................................14
4.5
Using teletext..............................................................................................................................14
5 More on channel selection and channel lists ....................................................................................16
5.1
Four ways to switch to new channel ...............................................................................................16
5.2
Switching between channel lists.....................................................................................................16
5.3
Quick Zap mode ..........................................................................................................................17
6 More on using the TV Guide..............................................................................................................18
6.1
Defining the TV guide time window ................................................................................................18
6.2
Defining the TV guide detail level...................................................................................................18
6.3
Using the TV guide to remind you about interesting programmes.......................................................19
6.4
Keeping the TV guide up to date....................................................................................................19
7 More on channel search and channel list updates ............................................................................20
7.1
Channel list updates.....................................................................................................................20
7.2
Default search .............................................................................................................................20
7.3
Advanced channel search..............................................................................................................20
7.3.1 Automatic search.....................................................................................................................20
7.3.2 Network search .......................................................................................................................20
7.3.3 Manual search.........................................................................................................................21
8 Advanced use...................................................................................................................................22
8.1
Menu system...............................................................................................................................22
8.2
Menu language ............................................................................................................................22
8.3
Volume control and muting ...........................................................................................................22
8.4
Audio options ..............................................................................................................................23
8.5
Subtitle options ...........................................................................................................................23
8.6
Overriding audio and subtitle language...........................................................................................24
8.7
Setting external device mode of remote control ...............................................................................24
8.8
Timer .........................................................................................................................................25
8.9
Parental Lock ..............................................................................................................................26
8.10 Mini menu...................................................................................................................................27
8.11 Conditional Access (CA) Management.............................................................................................27
8.12 Messages via the mail system .......................................................................................................28
8.13 On screen timeout .......................................................................................................................28
8.14 Product Information .....................................................................................................................29
9 Configuring your receiver – settings menu.......................................................................................30
9.1
TV-format Menu...........................................................................................................................30
9.1.1 TV Format (aspect ratio of the connected TV)..............................................................................30
9.1.2 TV Adjustment (Aspect ratio conversion) ....................................................................................30
9.1.3 Video format on the TV-SCART..................................................................................................31
9.1.4 Video format on the VCR-SCART................................................................................................31
9.2
Adjusting Clock for Different Time Zones ........................................................................................31
9.3
Factory settings - deleting all set-up information .............................................................................31
9.4
Updating the software ..................................................................................................................32
9.5
TV-guide settings.........................................................................................................................33
9.6
System maintenance....................................................................................................................33
10 Troubleshooting ...............................................................................................................................34
11 Specifications...................................................................................................................................35
Page 4

4
1 How to get the most out of your TechniSat Force
Receiver
Your TechniSat Force receiver is your key to receiving a wide range of TV and radio programmes. With your
receiver, you will also get a Remote Control, which can be used to control all the functions of the receiver using
a comprehensive set of on-screen menus.
This manual shows you how to install and set up your TechniSat Force receiver, then how to operate it to
maximise your enjoyment.
TechniSat Force continually develop and enhance their products. The software and user interface will change
regularly, but you will always be able to download the latest manual in PDF format from our website at
www.technisat-force.tv.
1.1 Getting Started
Your new receiver should be delivered in a clean and undamaged box. If not, contact your distributor
immediately. The box should contain the following:
• TechniSat Force receiver
• Remote control
• Two AAA batteries
• Quick Installation Guide
• SCART cable
• Power cable
To be able to use your new TechniSat Force receiver, you must have a cable-TV outlet in your home,
connected with a suitable lead to the input on the back of your receiver.
Many services are encrypted and require a viewing card so that you can view them. This may have been
supplied with your receiver; your distributor will be able to advise you on what is necessary.
You need to find a suitable place to put your TechniSat Force receiver, then connect it to the cable network,
the TV and any other equipment you have. TechniSat Force equipment can be connected in several ways to
your entertainment system. The SCART cable included with your receiver is used to connect the receiver to the
TV. You can then turn the power on to your equipment, and start the installation wizard which will set up your
system to your own requirements. These steps are described in more detail in chapter 4.
After that you can sit back and enjoy your new TechniSat Force receiver.
NOTE: Make sure that all connections are made before turning on the power to the receiver on the
first time.
1.2 Support
If you have any questions regarding your TechniSat Force product or problems during installation, please
contact your TechniSat Force distributor. TechniSat Force works in partnership with its distributors and ensures
that they have the necessary training and skills to support you.
You may also contact TechniSat Force directly by email address [email protected]. If you do, please
enclose the serial number of your receiver as well as the name of the TechniSat Force dealer from whom you
purchased it. Alternatively, visit our website www.technisat-force.tv where you may find the answer to your
question in the Frequently Asked Questions (FAQ) section. You can also add your own question here.
1.3 Safety
The TechniSat Force receiver must be placed on a fixed, stable surface in clean surroundings and at a suitable
distance from any heat source, such as other electronic devices, radiators, etc. The vents in the upper and
lower part of the casing must not be covered, and there should be clearance of at least 5 cm above the
TechniSat Force receiver. Do not connect the receiver to the mains supply until all other connections have been
completed.
NOTE: The warranty does not cover damage that has arisen as a direct or indirect consequence of lightning
strikes or other electrical surge.
WARNING!
The cover must not be removed, as the equipment contains high voltage circuits. In the event of unauthorised
access, physical damage or abnormal use of the receiver, the warranty is void.
Page 5
5
2 Connections
2.1 Example connection diagrams
Your
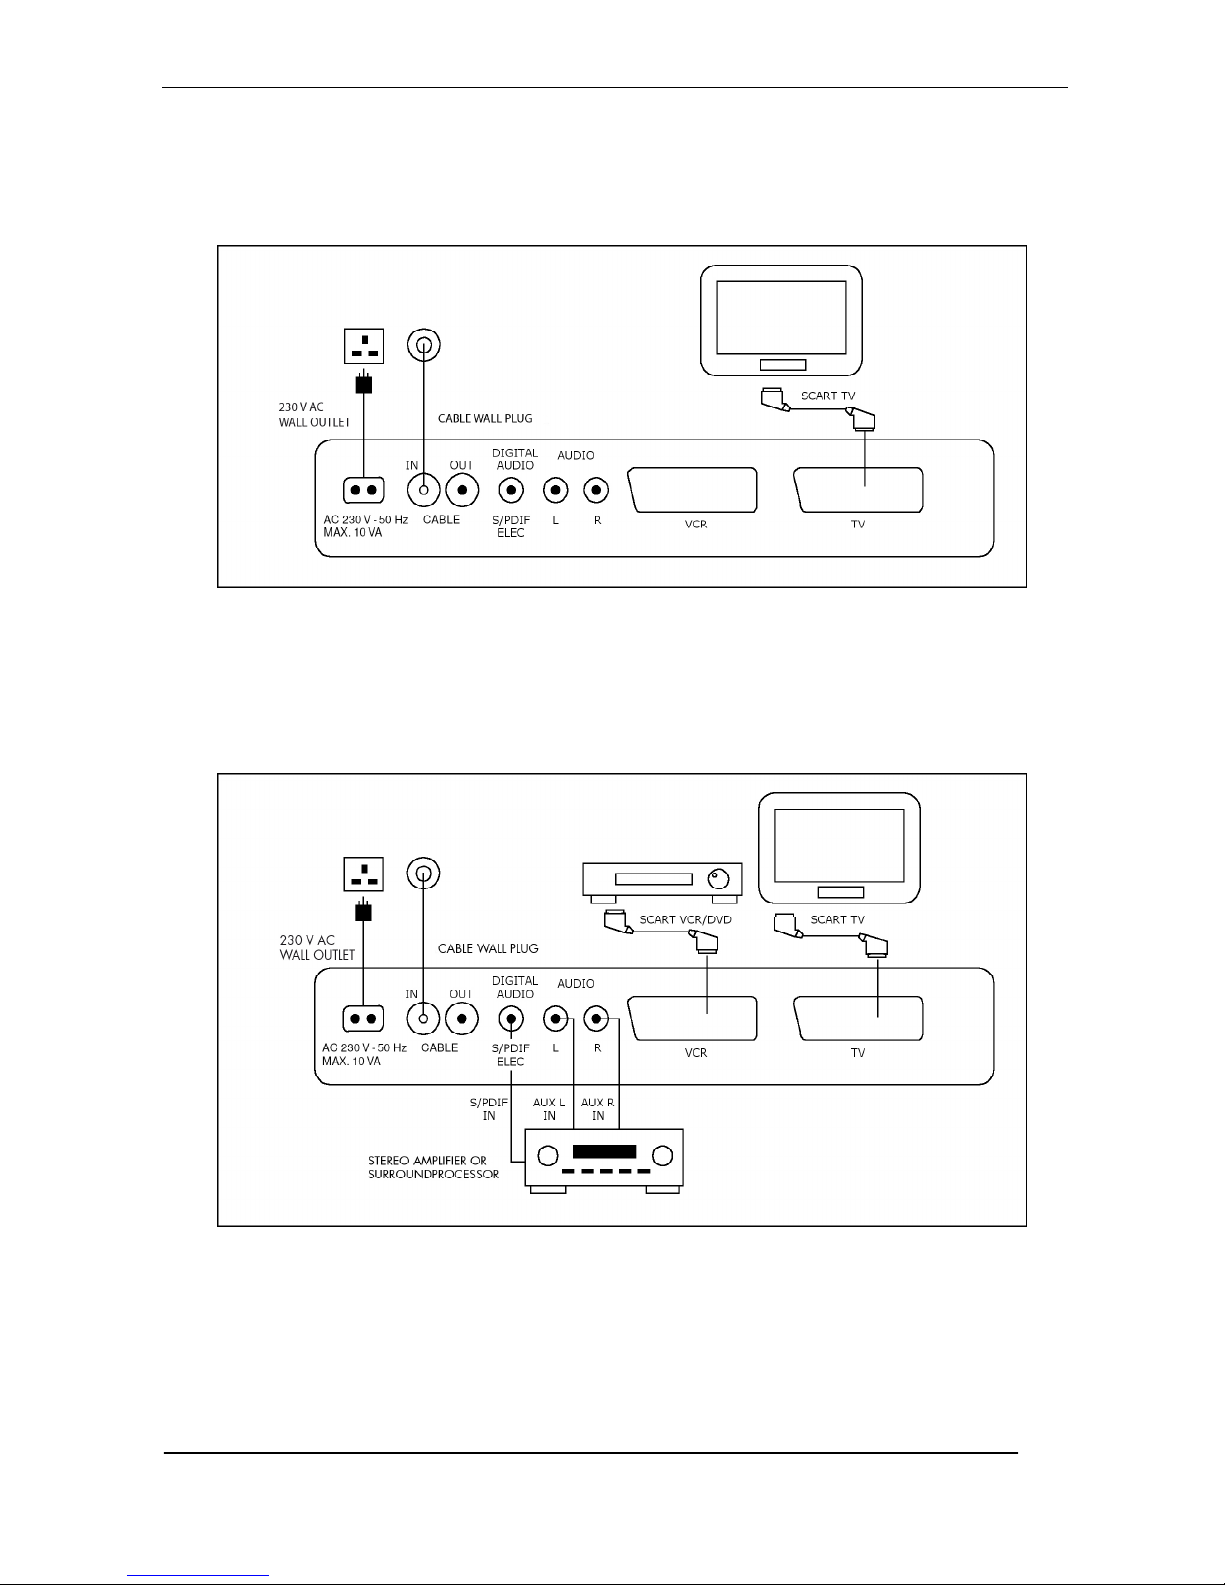
TeVeMaster C1 receiver can be connected to your TV and other domestic equipment in a number of ways,
please see example diagrams below and the following sections for details and examples.
Figure 1
Basic connection diagram
Connecting the receiver to mains, TV signal and TV.
Use the connection diagram, as shown in Figure 1 if your cable service only contains digital channels, and your
TV has a SCART connector.
Figure 2
Advanced connection diagram
Connecting a surround processor/amplifier, VCR or DVD player and TV, or external IR Accessory
If you want to feed the audio through your Hi-Fi system to enjoy better sound, please refer to Figure 2 for how
to connect to an external amplifier or surround processor. This figure also shows how to connect a VCR or DVD
player or recorder, and connection of the external IR Accessory (available separately).
2.2 Connecting the receiver to a Cable-TV wall outlet
Connect the cable-TV lead to Cable In connector (on the left side of the receiver), as shown in Figure 1.
Page 6

6
2.3 Connecting to TV via SCART
You connect your receiver to your TV using the SCART cable. This must be connected from the TV SCART
socket on the back of the receiver to an available SCART socket on the TV set. The output from the receiver is
set as RGB by default. This can be changed to Component, S-video or CVBS/Video once you have completed
the basic installation.
When you connect the receiver to the TV and the receiver is switched on, you should see the output of the
receiver automatically when using a SCART connection. If the TV continues to show an analogue channel, you
should use the TV’s controls to switch to AV input.
2.4 Connecting to a video recorder
Use a SCART cable to connect from the Video VCR SCART socket on the back of the receiver to your video
recorder. When the video recorder is playing, you will automatically see that picture on your TV set.
2.5 Connecting to a DVD Player
If your TV set does not have a separate SCART socket for a DVD player (this could be marked VCR on the TV
Set) you can connect a DVD player instead of the VCR to the Video VCR SCART on the TechniSat Force
receiver. When the DVD player is running, the TV will automatically receive its signal.
2.6 Connecting to Hi-fi equipment
There are two options for connecting your TechniSat Force receiver to Hi-fi equipment. An analogue signal is
available on the two PHONO plugs, marked L and R. A serial digital signal is available on the S/PDIF ELEC
output. Refer to your Hi-fi equipment manual to find out the most suitable one to use.
2.7 Connecting to a second receiver
You can connect a second receiver to the VCR SCART socket on the back of the receiver. Connect a cable from
‘cable out’ on the receiver to the cable in on the second receiver. Several receivers can be connected in this
way.
2.8 Connecting an external IR Accessory(option not on standard product)
You can connect an external IR Accessory (available separately) to the EXT IR socket on the back of the
receiver (if fitted)., as shown in the connection diagram Figure 2. This is so the main receiver can be hidden
away, saving space, and still be controlled via an external IR sensor on a lead that can be positioned in a
convenient location.
Point the remote control handset at the external IR sensor and operate the receiver as normal.
2.9 Power connection
Once all other connections have been made, connect the mains cable to the back of the receiver and then plug
in to the wall socket.
The equipment is double insulated class 2. Power consumption is less than 15W.
Page 7
7
3 Getting to know your equipment
3.1 Controls on the receiver
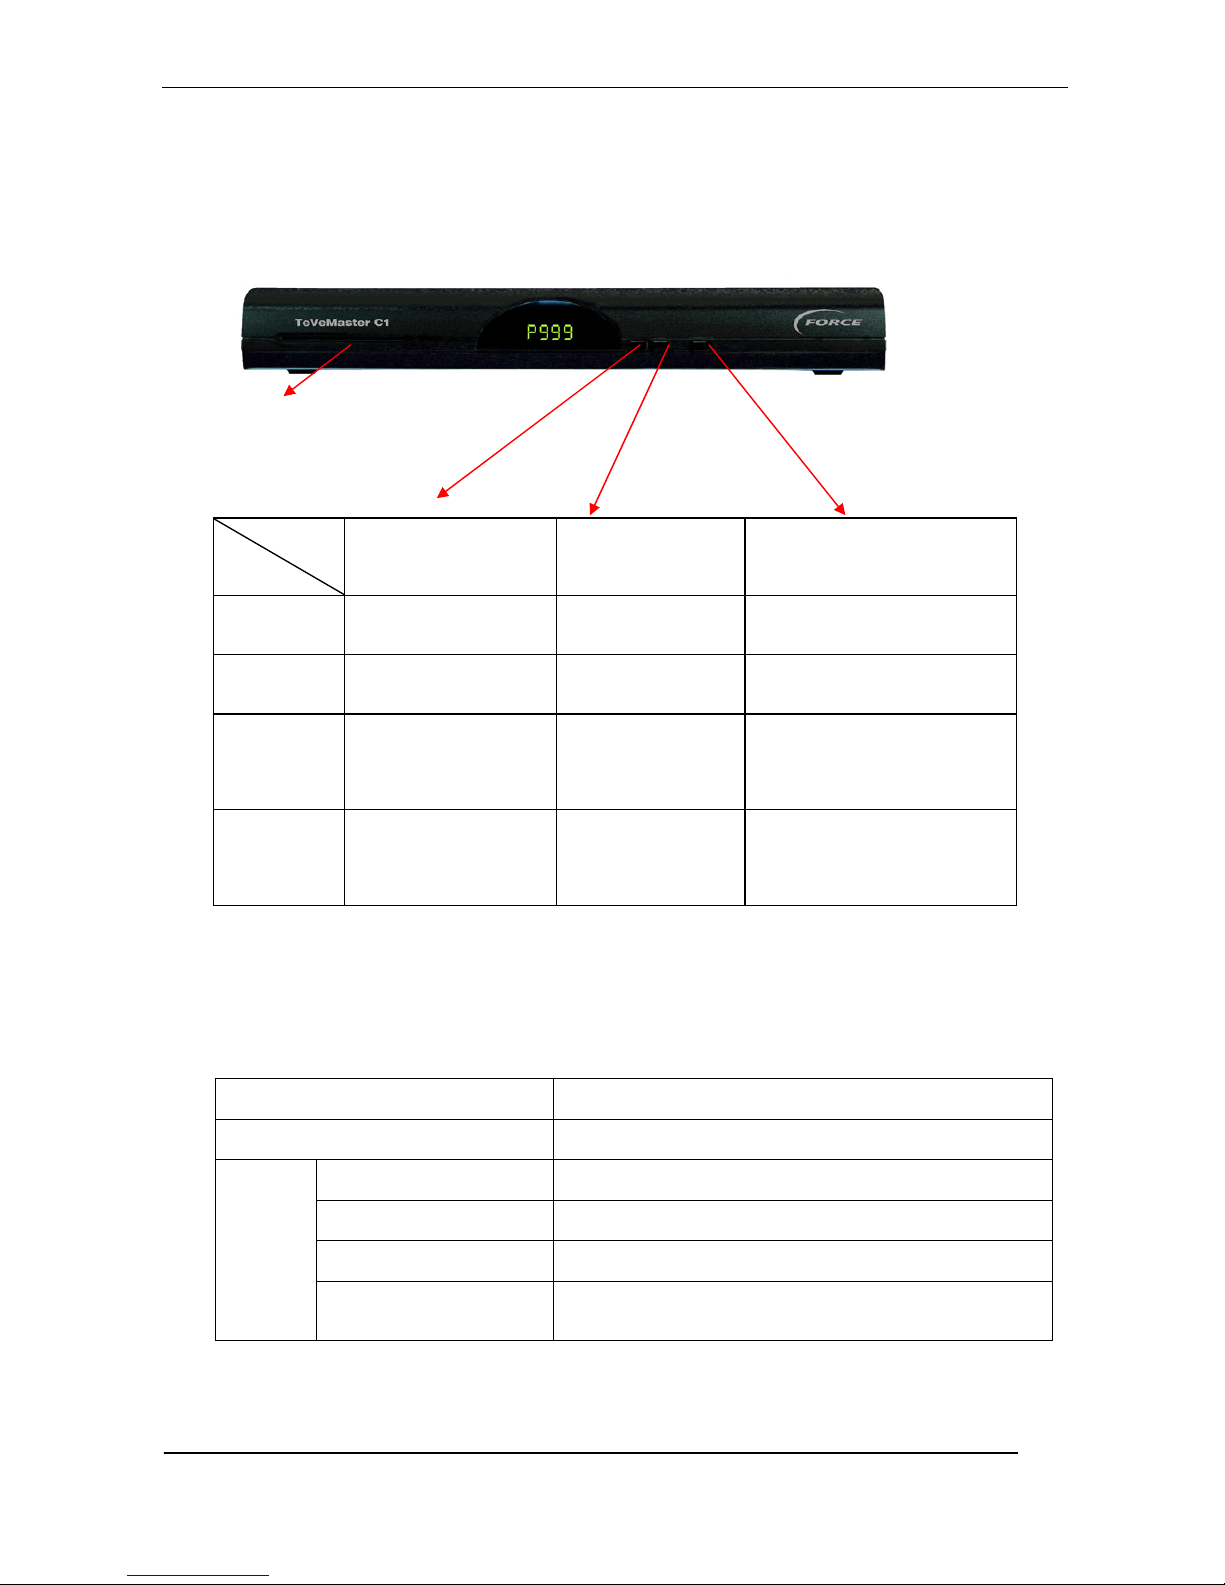
There are 3 buttons on the front of the receiver for operating it without the remote control. The function of
each button is shown in the table below.
cardreader
These buttons give access to the menu system to enable you to exercise many of the controls without the
remote control itself. The functions are the same as those provided by the buttons on the remote control.
To the left of the buttons, there is a display. When the power is connected to the receiver, 4 green dashes will
initially appear and alternate to two dashes as the receiver is initialised, then the display will show the current
channel.
The display can show the following information:
Status of Receiver Status of display
Standby Displays a clock (hour. min).
OK antenna signal Displays current channel number.
No or bad antenna signal Slow flashing dot (next to last digit on display).
Remote control activity Fast Flashing dot (next to last digit on display).
On
Volume Change (-/+) Displays a volume symbol (U) and a number between 0-100,
indicating volume sound level.
NOTE: If the display is blank after the receiver has been switched on and is working correctly, it may be
because no channels have been scanned and stored by the receiver. Please refer to chapter 7 which explains
how to search for channels.
Button
Status
Button 1 (down
arrow)
Button 2 (up
arrow)
Button 3 (Standby and OK)
Standby Short press: No function Short press: No
function
Short press: No function
Long press: On
On Channel – Channel + Short press: Menu
Long press: Standby
Channel list Moves channel highlight
down
Moves channel
highlight up
Short press: OK - changes to
selected channel.
Long press: Standby
Menu Moves menu highlight
down
Moves menu highlight
up
Short press: OK – selects
current menu item or confirms
option.
Long press: Standby
Page 8
8
3.2 Viewing card
Viewing cards are used with the built-in conditional access system in the receiver to enable you to watch
encrypted channels. The card reader is on the front left-side of the receiver. Insert the card slowly into the
reader with the gold contacts facing downwards.
The status of the card can be checked via the on-screen menu, as described in section 8.11
3.3 Remote control
Use the remote control supplied with your receiver to control it. Point the remote control at the receiver; not at
the TV. When a button is pressed on the remote control a little green dot flashes rapidly on the display to
indicate that input from the remote control is working.
The remote control uses 2 AAA batteries that accompany your receiver. Always make sure that the batteries
are in good condition and are not leaking. When the device is not going to be used for a long period, take the
batteries out. Poor batteries affect the range of the remote control.
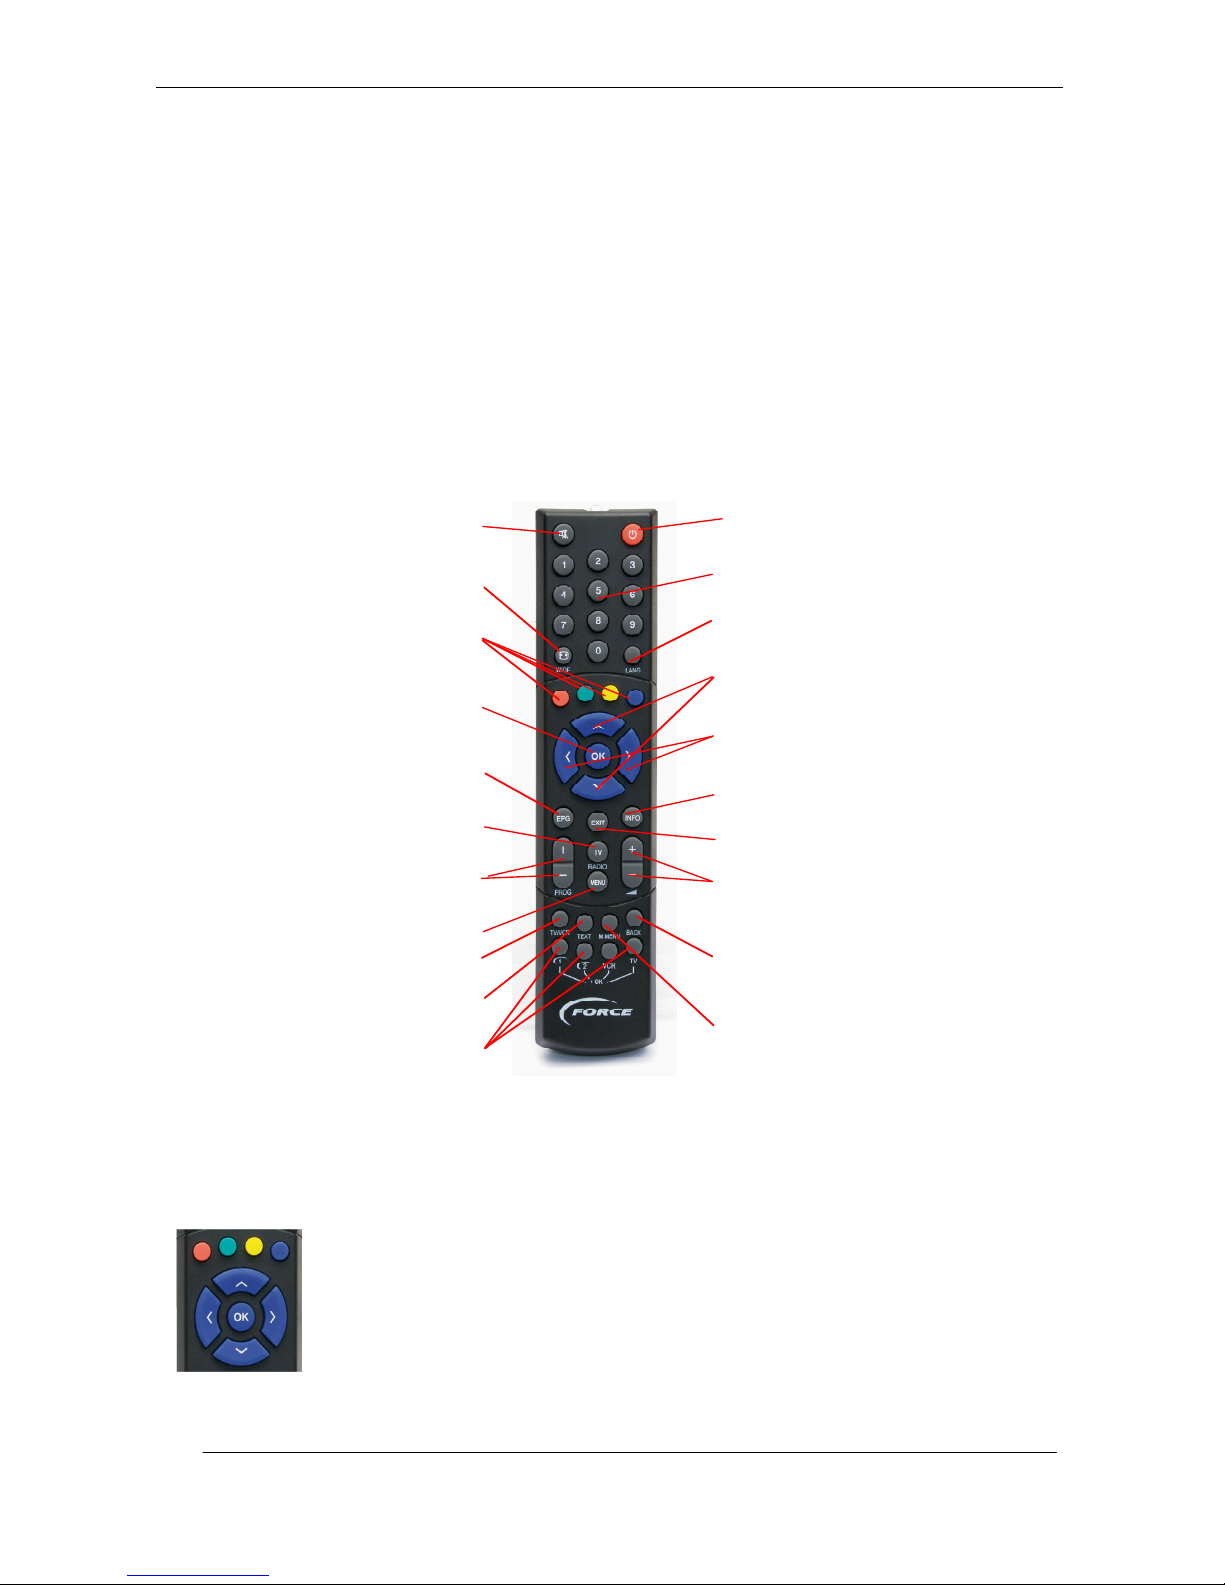
The remote control functionality is shown below in Figure 3.
Figure 3 - Remote control
You turn the receiver into and out of standby using the red standby button at the top of the remote control.
When the receiver is in standby the current time will be shown on the digital display. When the receiver is
switched on, the display will show the current channel number. The receiver will always start on the channel it
was tuned to when it was put into standby.
Figure 4 shows the area of the remote control used for programme selection and menu
operation. Arrow keys allow you to move around lists and menus on the screen. When you want
to access or confirm a selection, press OK.
The coloured buttons are short cuts. In some menus you can move quickly around by pressing
the relevant colour. The menu shows the function used on the particular page.
Figure 4 – Programme selection/navigation and short cut buttons
Mute Sound On/Off
TV/Radio
Channels
Programme
Information
Exit
Back to menu or TV
programmes
Change mode
(OK+button)
Electronic Programme
Guide (EPG)
Display channel list
or accept menu or
option choice
Display Main
menu
Channel change
up/down
Teletext
Volume up/down
Menu navigation or
channel change up/down
Menu Navigation or
volume change up/down
Numeric key
Coloured sho
r
tcuts
Mini Menu
Standby
Subtitle Language
Picture For
mat
(Wide/4:3)
Toggle output TV/VCR
Page 9

9
3.4 What to do when not in use
If you put the receiver in STANDBY while not in use, it will perform system maintenance during night hours.
System maintenance involves 1) updating the TV guide and 2) checking if a new software version is available
in the network.
If you disconnect the power by pulling out the mains lead, the receiver will not be able to perform the
maintenance functions described above.
During thunder storms, disconnect the power to prevent possible damage.
Page 10
10
4 Installation and basic operation
4.1 Selecting your country and operator and finding TV and radio channels
The first time you switch on the receiver the installation wizard appears, guiding you through the process of
setting up your receiver. The installation wizard also appears after a factory reset, as described in section 9.3.
When this has finished, you will have list of available channels and be able to view TV programmes. Any of the
settings selected using the Installation Wizard can be altered later via the on-screen menus.
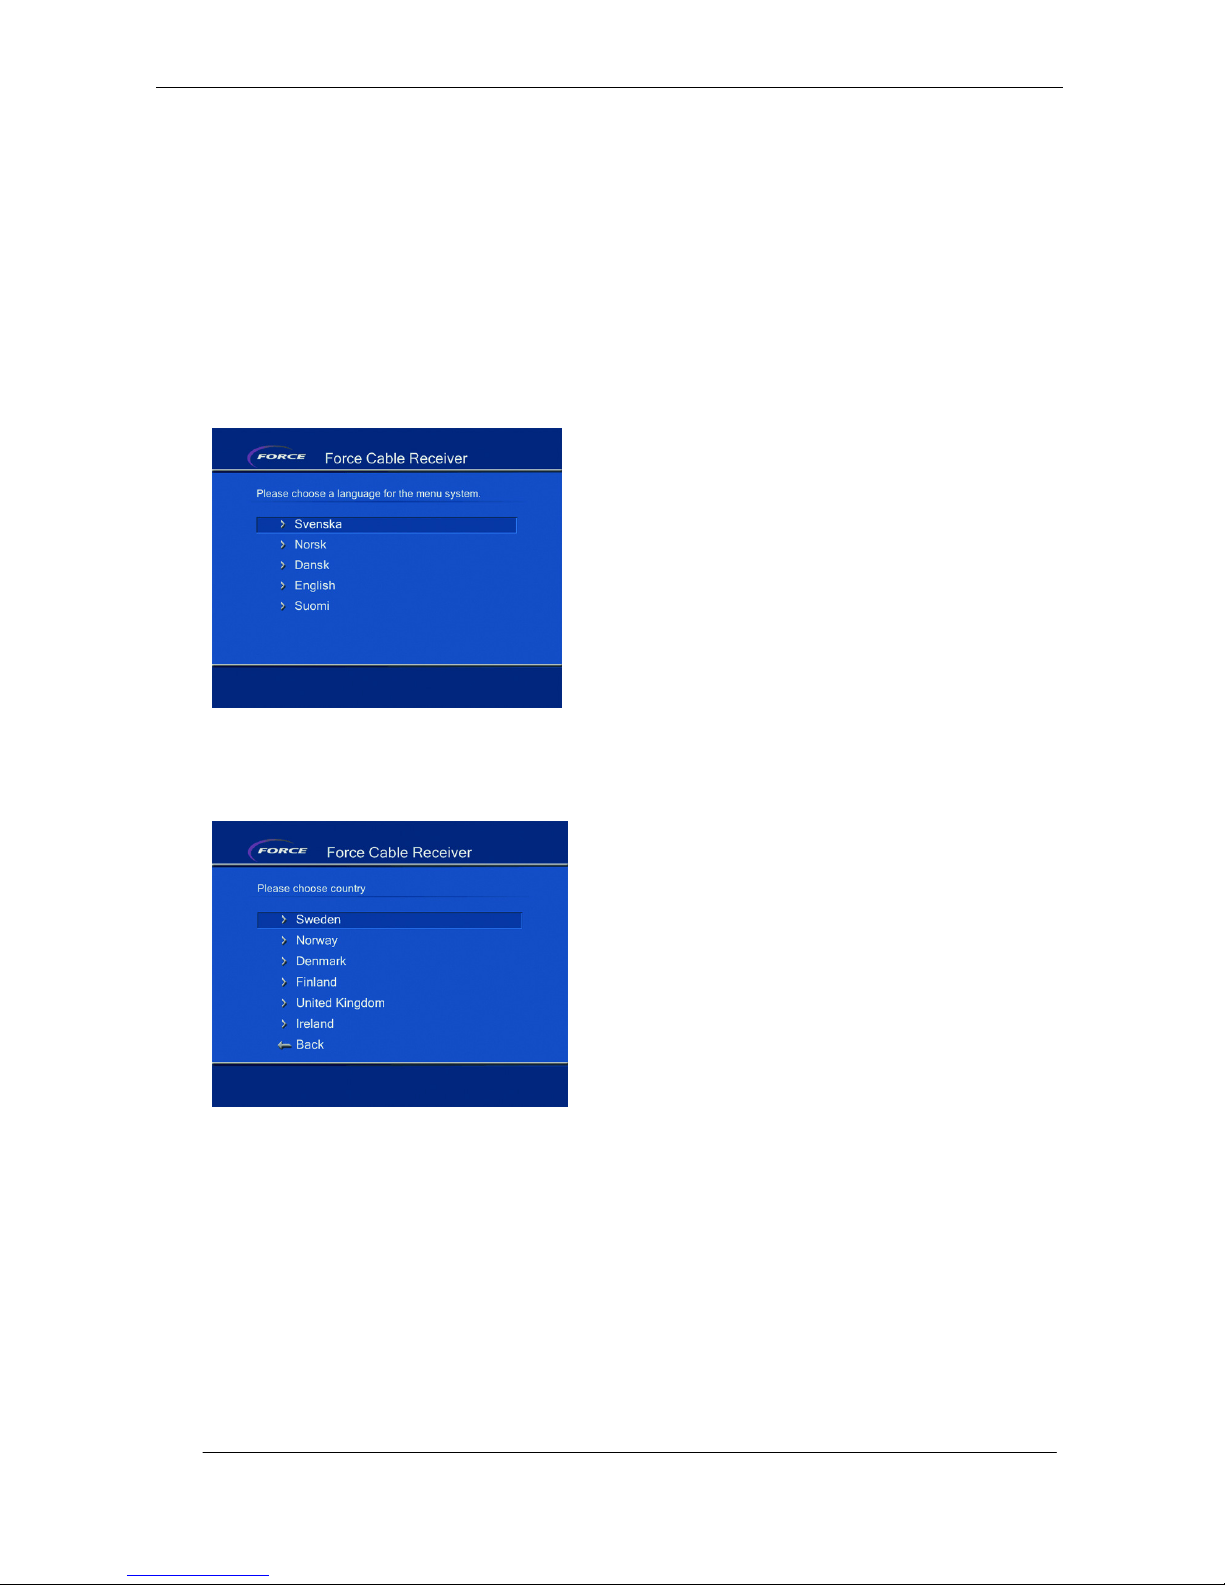
The first screen asks you select your preferred language for the menu system – see Figure 5. The chosen
language will also be used as the primary language for audio and subtitling. Press the arrow keys until you
have highlighted the relevant language. Press OK. The next screen will appear in a few seconds.
Figure 5 – Select language
You will be asked to identify your country. The country selection is used to create a list of cable operators that
you are likely to be connected to, and to set your time zone. See below, Figure 6.
Figure 6 – Select country
Page 11
11
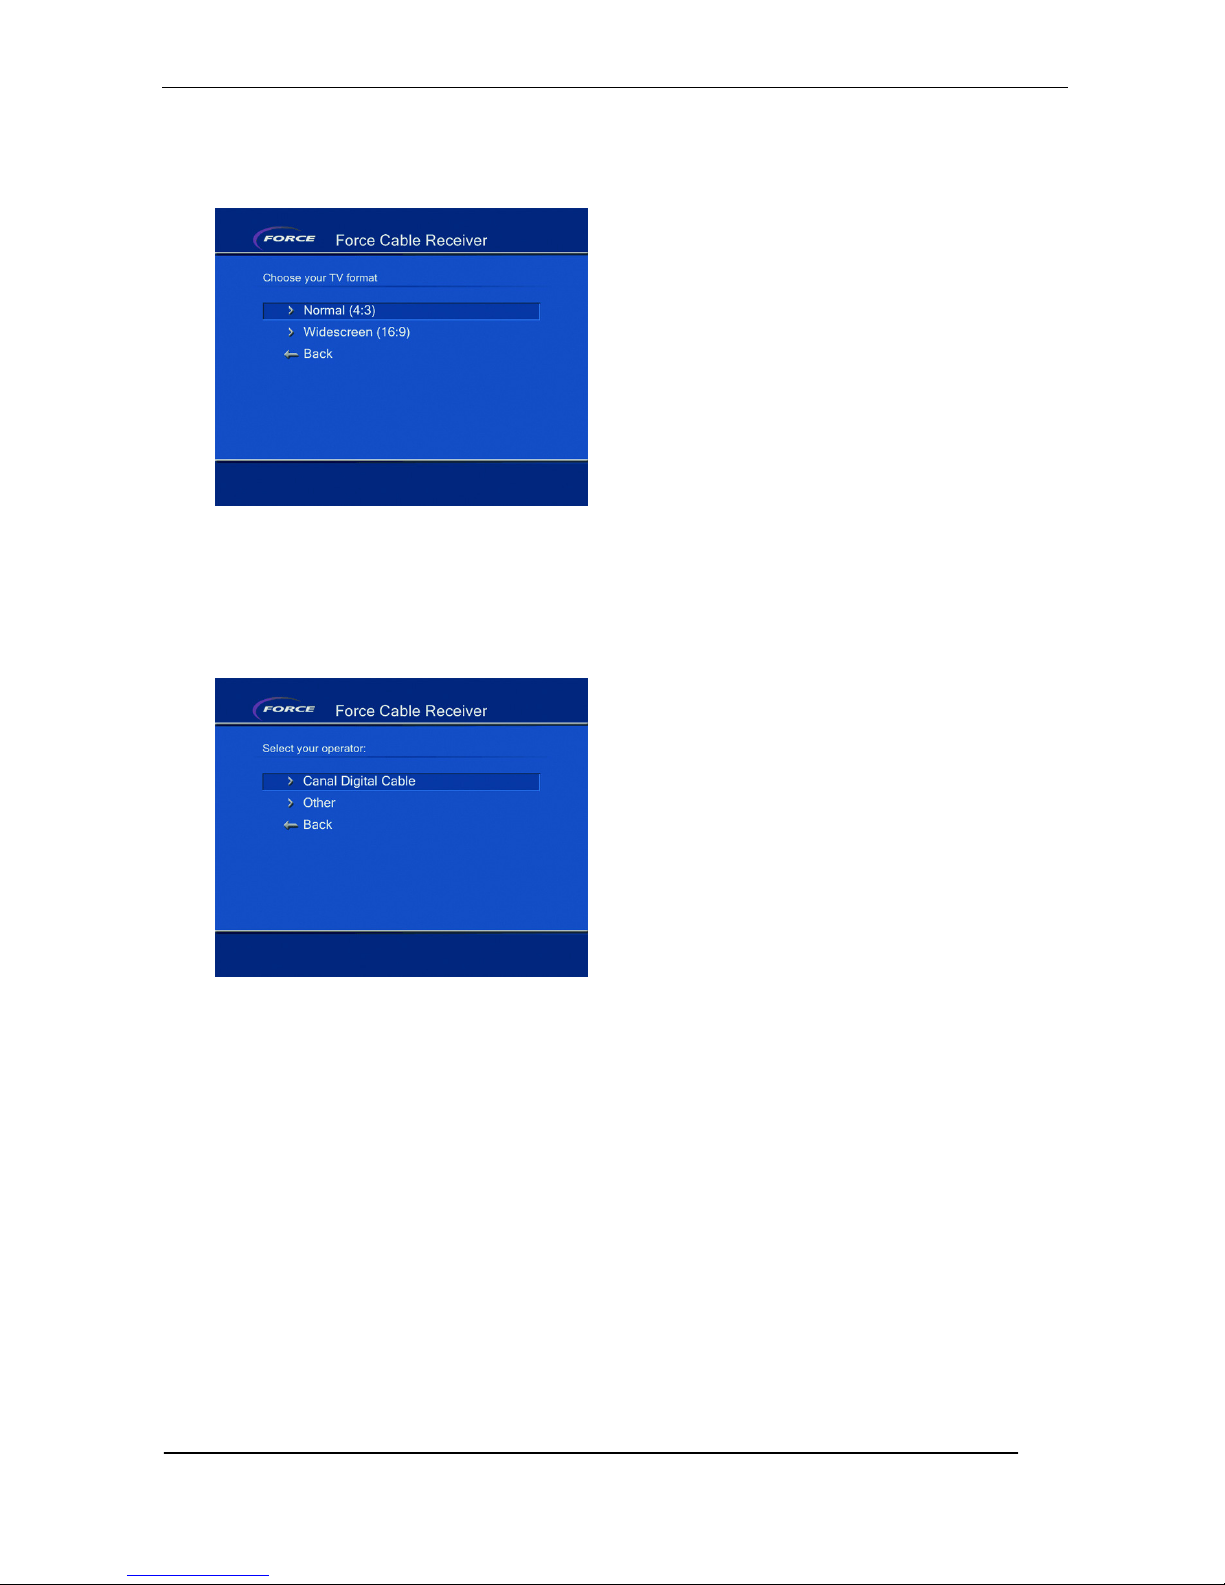
Next, select the picture format (aspect ratio) of your TV, as shown in Figure 7. If your TV screen is a standard
square format, choose “Normal (4:3)”. If your TV screen is a wide, cinema-style format, choose “Widescreen
(16:9)”.
Figure 7 – Select TV picture format (aspect ratio)
Then identify the network of your local cable service, as shown in Figure 8. Several networks are preconfigured in the receiver for plug&play installation. Select your cable operator if listed. If your operator is not
listed, please read 7.3 for advice on how to perform a channel search in SMATV networks and in other
networks that are not listed in the installation wizard.
Figure 8 – Select operator
Depending on your local network, the receiver will now either start a search directly, or you will be asked to
enter your Network ID before it starts to search for channels. You will find your Network ID in the Quick
Installation Guide provided with your receiver.
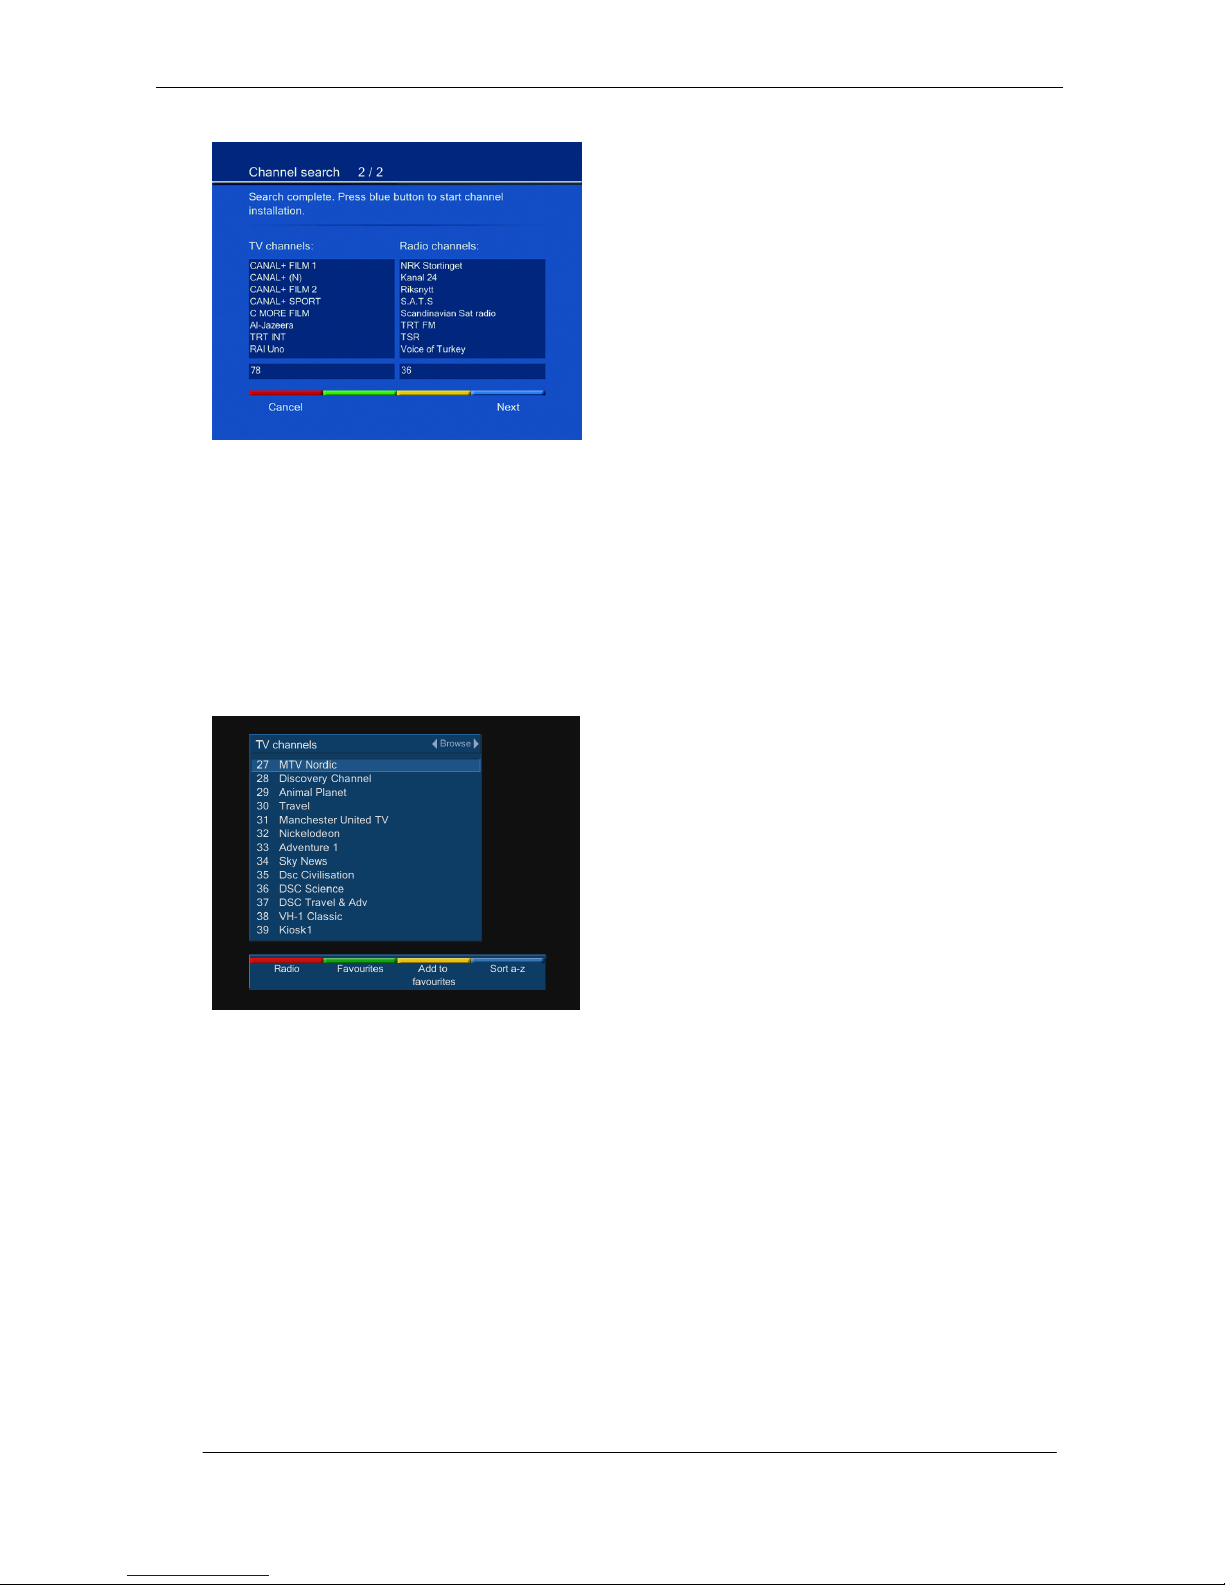
After a few seconds, TV and radio channel names will start appearing in the two columns on the screen.
When the channel scan is finished, the top line will show “Search complete”, as shown in Figure 9. Press the
blue button on the remote control to store channels and continue.
Page 12
12
Figure 9 – Search complete
TIP: If the channel scan shows no channels found during a 20-30 second period, is most likely that your input
signal is missing or search parameters entered incorrectly. Press the red short cuts button to exit the scan and
check the connections and settings. You can then start the scan again.
Once the scan is successful, you will see a complete list of TV/radio channels, as shown in Figure 10. Follow
the instructions to store the channels. When this is complete, you will see a message “Channel list has been
updated”. Press OK to complete the installation procedure.
After installation is complete, the screen automatically changes to the channel list. To select a channel, move
through the list using the up/down and left/right arrow keys, highlight the desired channel and press OK.
Figure 10 – Channel list
4.2 Channel selection and info bar
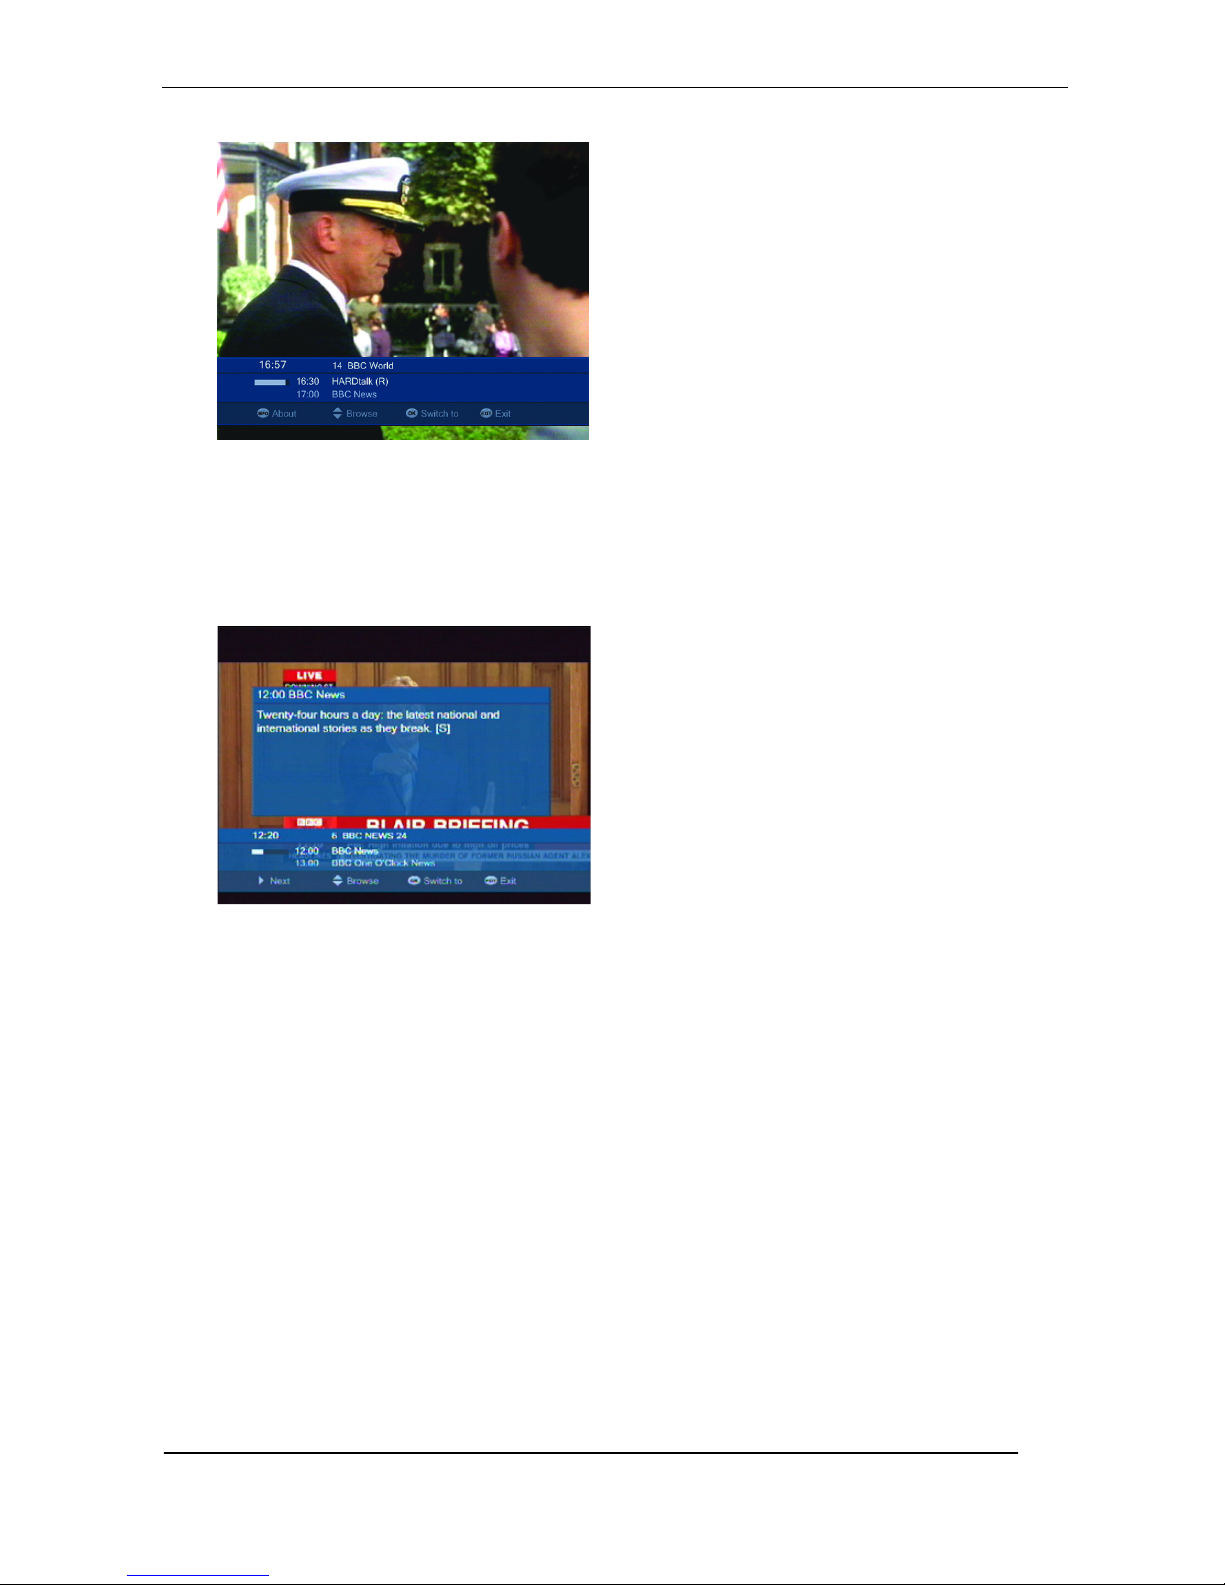
You select channel by using the up/down buttons on the remote control, or by entering a channel number with
the number pads (more details in chapter 5). Whenever you change channel, an information bar appears,
showing the channel name, start times, and title of the current and next programme. A useful feature is the
progress bar showing how much of the current programme has elapsed. The info bar is shown only for a few
seconds and is described in the following section.
You can view the info bar at any time by pressing the INFO button on the remote control. Available commands
are shown along the bottom of the screen, as shown below in Figure 11.
Page 13
13
Figure 11 – Info bar
Press INFO again to obtain extended information about the programme you are watching (subject to
availability), as shown in Figure 12. The programme on now will be displayed. The next programme on can be
seen by pressing the Left/Right arrow buttons. Press Left/Right arrow buttons to toggle between Now and Next
information. Press INFO again to go back to the Info bar.
Press EXIT to close the info bar and return to the current TV channel.
Figure 12 - Info bar - Extended Programme Information (Now/Next)
TIP:
Quick-Zap
: When the info bar has been activated by pressing the INFO and is visible, you can browse
information for adjacent channels by using the up/down buttons. This functionality is also available when
viewing extended programme information. Switch to the desired new channel by pressing OK, or press EXIT to
return to the current TV channel. Read more about Quick-Zap in section 5.3.
4.3 Creating a favourites list
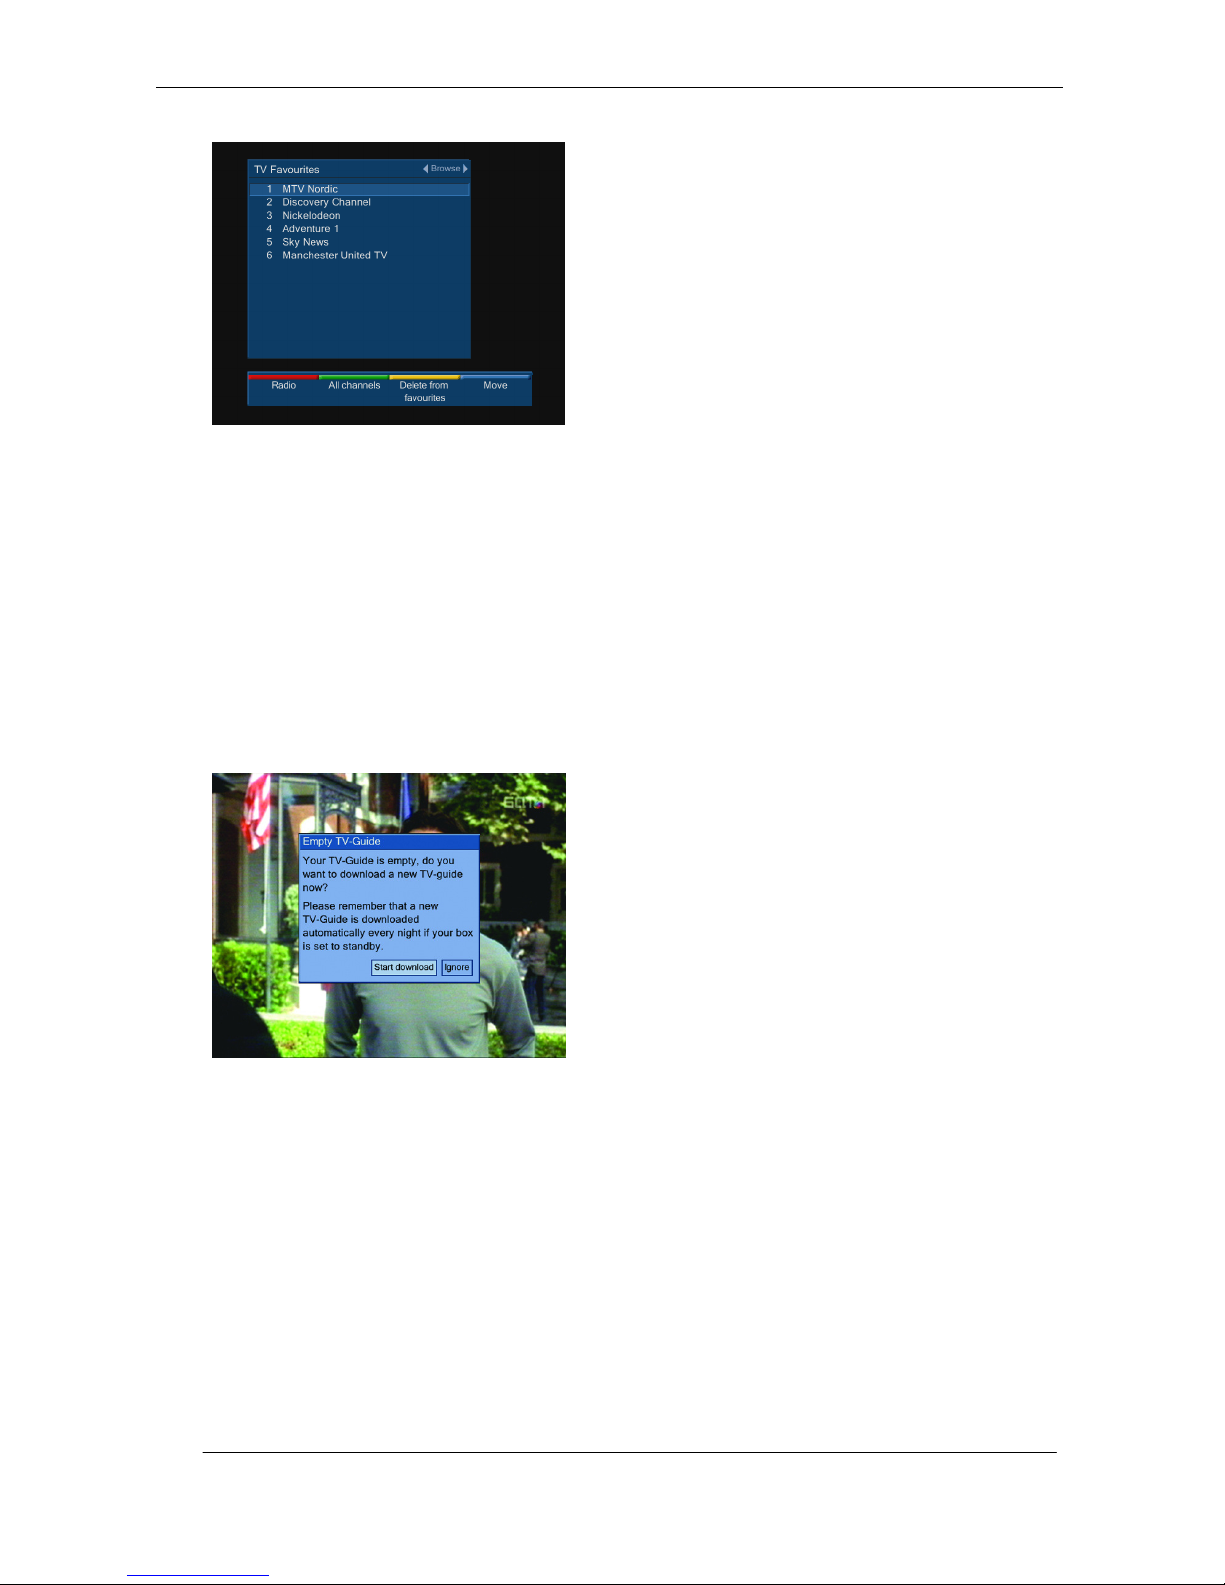
Press OK to bring up the full channel list, as shown in Figure 13. To define your own favourites list of channels,
highlight a channel you like and press the yellow button. A star symbol will appear to the left of the channel
name to indicate that this channel is included in your favourites list. Repeat the above for all the channels you
would like to include in your favourites list.
Now, make the favourites list your “active” channel list by pressing the green button and selecting a channel in
your favourites list. To delete a favourite channel, press the yellow button.
TIP: Favourite channels will initially be arranged in the same order as they were marked off during selection,
but can be moved (re-numbered) by using the blue button.
Page 14
14
Figure 13 - Favourites
4.4 Using the TV Guide
The receiver contains a TV Guide that allows you to browse the programme schedules for each channel. The TV
Guide will only collect information for channels in your favourites list. See the previous section 4.3 for details
on creating a favourites list.
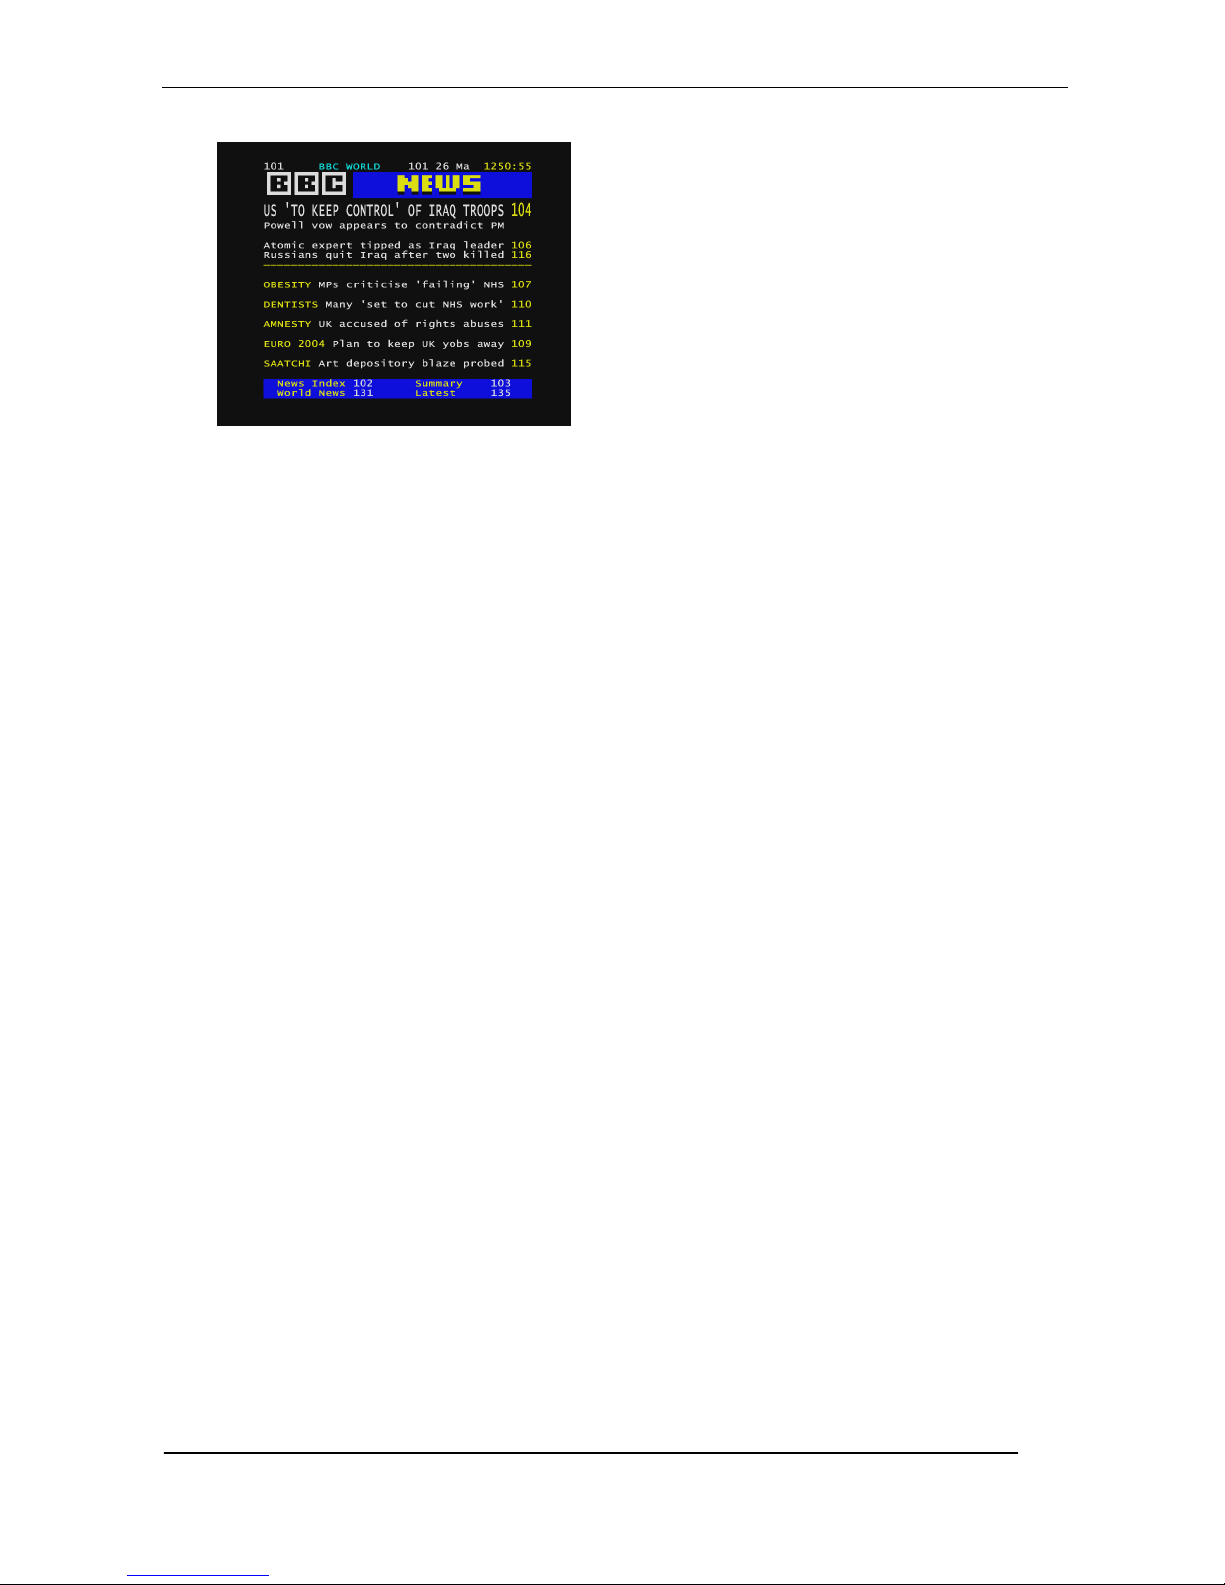
You can access the guide by pressing the EPG button on the remote control. However, after installation the TVguide is empty and a download will need to be performed in order to obtain information. See Figure 14.
Highlight Start download and press OK to update your TV-guide. See chapter 6 for more advanced TV-guide
options.
TIP: If the TV Guide information is incomplete, it may be due to the number of channels in your favourites list.
The more channels in your favourites list, the more memory is needed to store the TV Guide information for
each channel. Try removing some of your favourites. See the previous section 4.3 for details on deleting
channels from your favourites list.
Figure 14 – TV guide empty
4.5 Using teletext
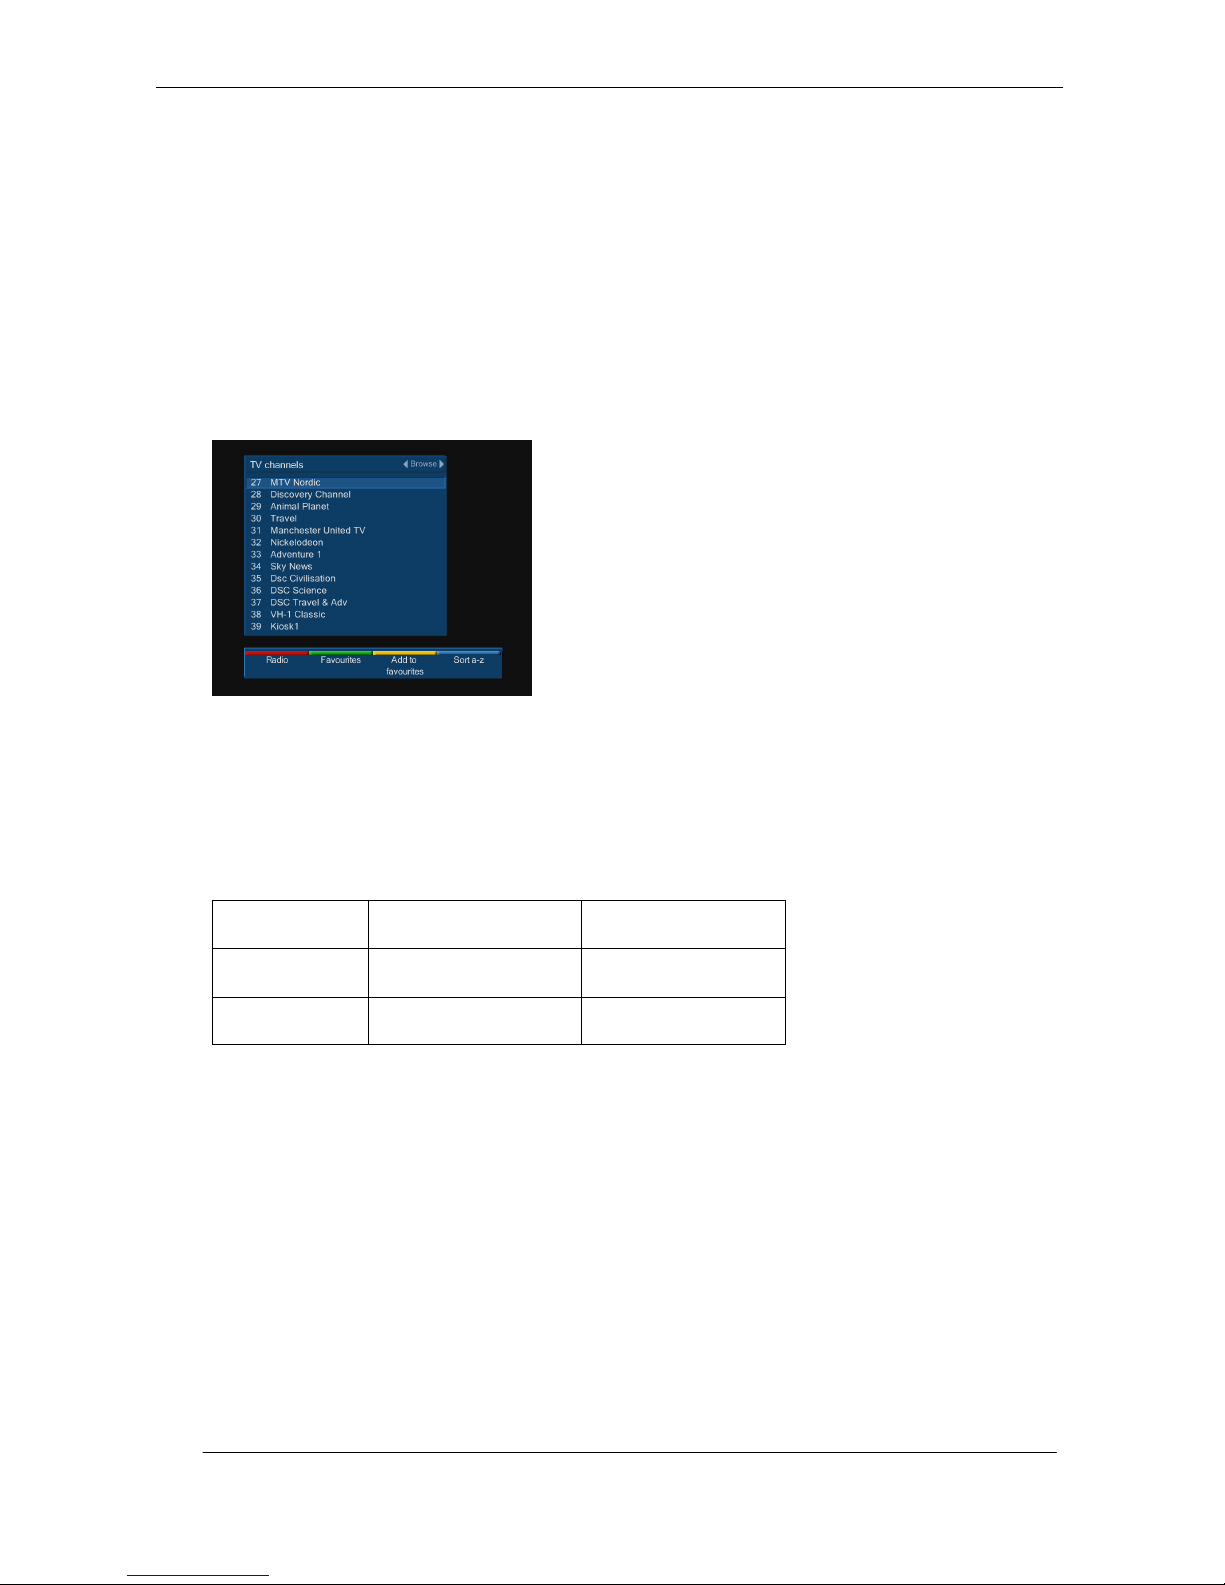
If a channel carries Teletext information, it can be viewed by pressing the TEXT button on the remote control,
as shown in Figure 15. Select a desired page by entering the page number with the numerical keys. To revert
to watching the TV programme, press TEXT again. You navigate in the Teletext pages by using the up/down
buttons for page up/page down, left/right for sub-page up/sub-page down or you can enter a page number
directly with the number pads.
TIP: If the Teletext page you have requested is not displayed this may be because the page has not been
downloaded by the receiver yet, or the page may have been already flushed from the memory. You must wait
for the page to be received and displayed. This can take several minutes.
Page 15
15
Figure 15 - Teletext
Page 16
16
5 More on channel selection and channel lists
5.1 Four ways to switch to new channel
While watching TV, you can switch to a new channel in five ways:
1. Press the +(up) or –(down) PROG button on the remote control.
2. Press the up or down arrow button on the remote control.
3. Press the desired channel number by using the number keys on the remote control.
4. Go back to the channel you were last watching by pressing the BACK button. Press it repeatedly to toggle
between two channels.
5. Bring up the channel selector by pressing the OK button (See Figure 16). Use the arrow up/down buttons
to move up and down the list on the screen, or use the arrow left/right buttons to move to the
next/previous page in the list.
Figure 16 - Channel selector
5.2 Switching between channel lists
After the initial channel search, the receiver will contain two channel lists – a TV channel list and a Radio
channel list. We refer to these lists as the “full” channel lists.
In addition to the full channel lists, you can define your own TV favourites list and radio favourites list as
explained in section 4.3, this will give you a total of four channel lists.
Full Favourites
TV
Full TV list Favourite TV list
Radio
Full Radio list Favourite Radio list
At any time, you will have two “active” lists in your receiver, one “active” TV channel list and one “active” radio
channel list. You activate a channel lists as follows:
Press OK to bring up the channel selector, then use the red and/or green button to bring up one of the four
lists. Select a channel in the list you want to activate by highlighting a channel in the list and press OK to
select it.
To switch between your active radio channel list and your active TV channel list, press the TV/RADIO button on
your remote.
The channel lists can be sorted either alphabetically or by channel number. Press the blue short cut button
change from one order to the other.
The Favourites list can be arranged in any order you want by moving individual channels. Highlight the channel
you want to move, press the blue short cut button, and then move the channel using the up/down buttons.
The channel name will move accordingly. When it is in the desired position, press the blue short cut button
again. Please refer to section 4.4 on using the TV Guide to download TV guide information for channels in your
favourites list.
Page 17

17
5.3 Quick Zap mode
If you press the INFO button on your remote while watching TV, an info bar will be displayed (also see section
4.2) with short information about the present and following program on the channel you are watching.
While the INFO bar is up, you can browse your channel list quickly by pressing the UP/DOWN arrow buttons. In
this “Quick Zap” mode, the receiver will not actually tune away from the channel you are watching. It will only
switch the info bar, so that you can get a quick overview of what’s on right now on other channels without
entering the TV guide or moving away from an interesting program. Press EXIT to return to normal TV viewing.
If you press the INFO button again while the info bar is displayed on screen, more detailed information about
the current program will be displayed. The “Quick zap” mode, as described above, works in this mode too.
Page 18
18
6 More on using the TV Guide
The receiver contains a fully featured TV Guide that allows you to browse the programme schedules for each
channel. You access this by pressing the EPG button on the remote control, when you will see details for either
the main channel list or the favourites list depending on what you had previously used in the channel selector.
•
For each of the programmes in the main channel list you can see the title of the current and the
following programme.
•
For each of the programmes in the favourites list, you can see programmes for up to 7 days ahead.
Note that this information has to be obtained daily and is not available in some networks.
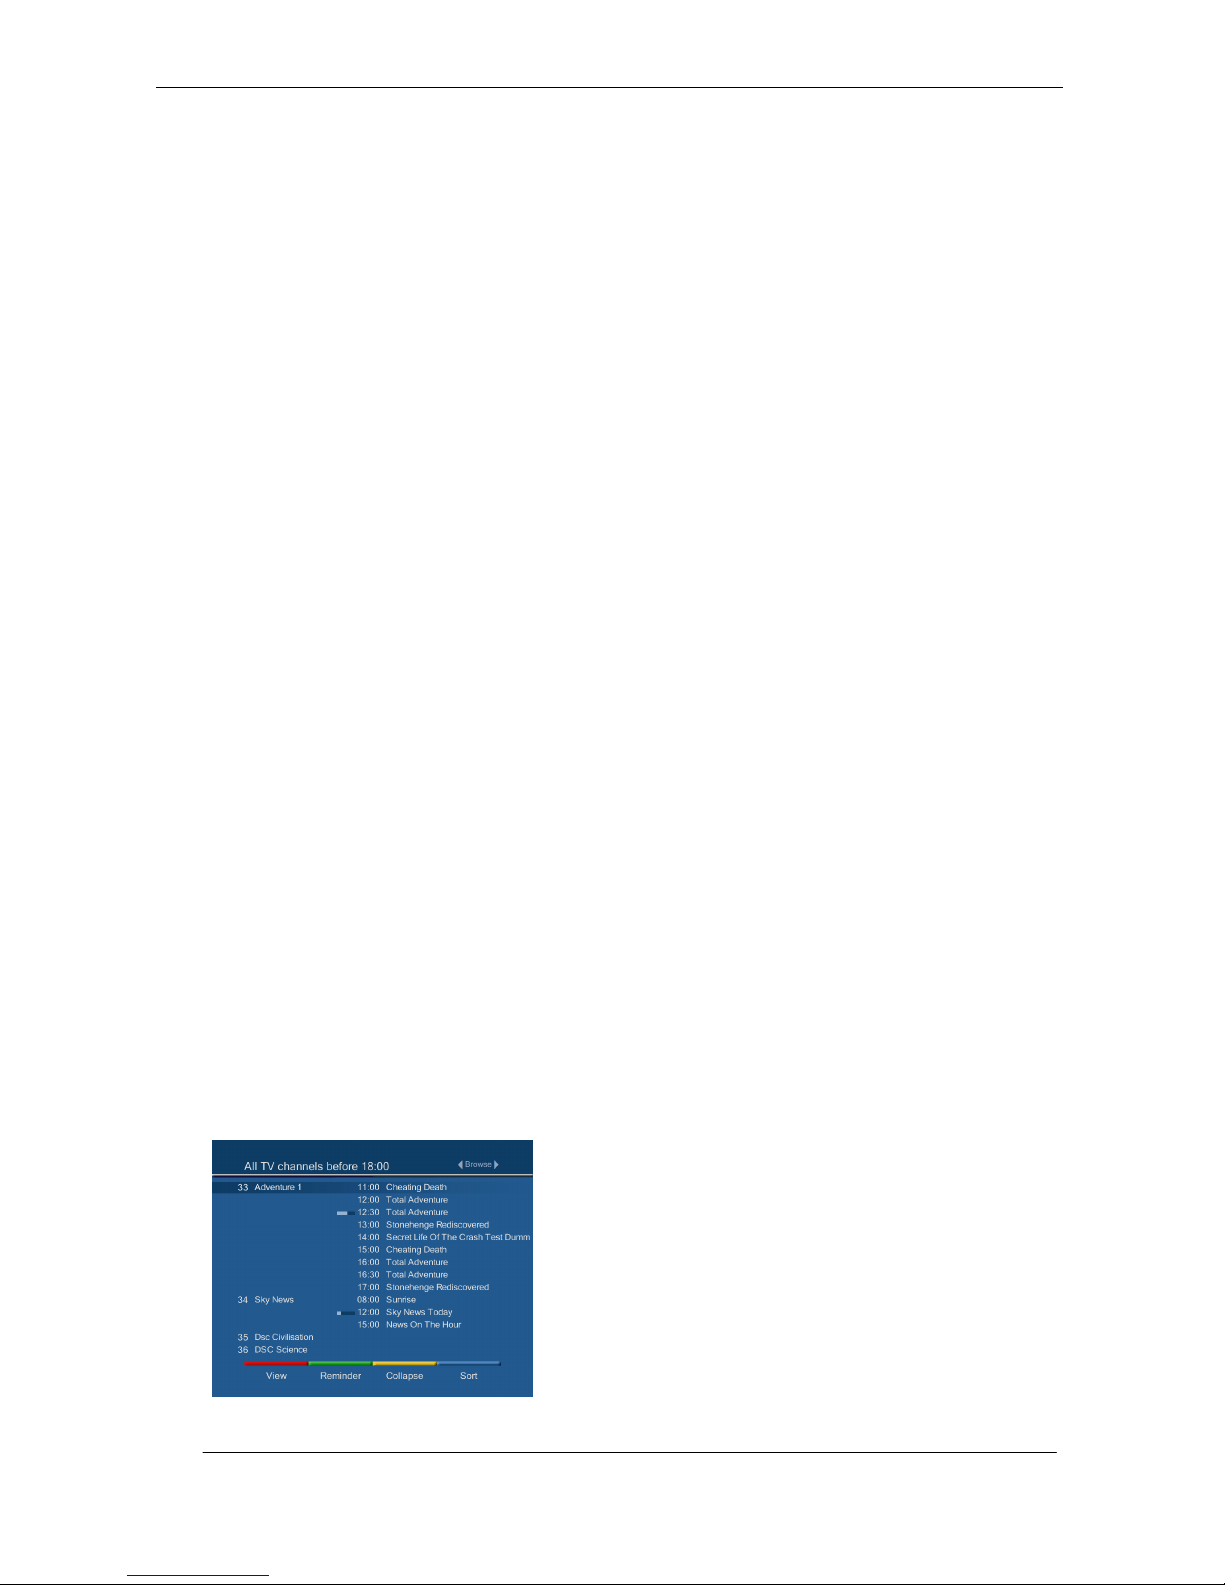
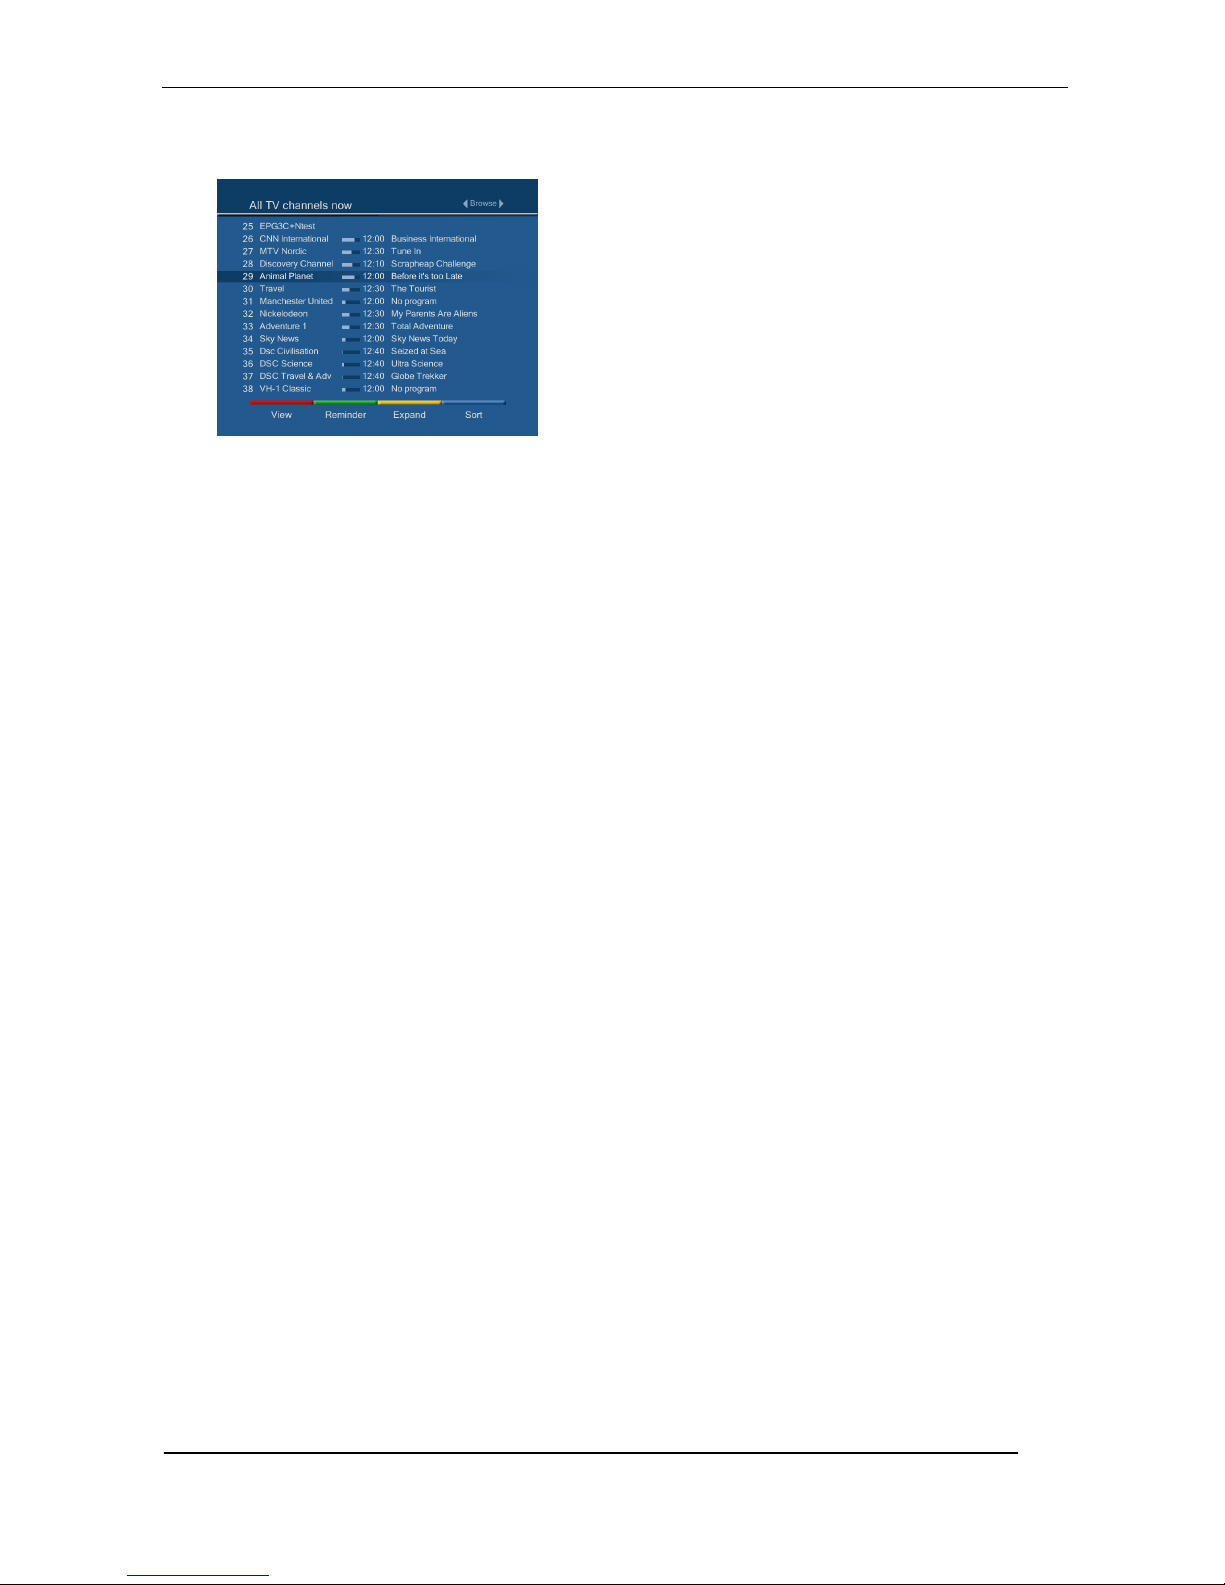
The display for the full channel list is illustrated in Figure 17. You can browse through the list using the
up/down arrows within a page and the left/right arrows to move from one page to the next. You can sort the
list either by channel number or alphabetically using the blue short cut button.
As the TV guide can contain a lot of information, you should learn how to use the red and green buttons to
limit the amount of information shown and to navigate quickly – see the following sections.
6.1 Defining the TV guide time window
Use the red button to define the time window of the TV guide. Several choices are available:
• Now
Displays present and following programme on each channel
• Before 18:00
Displays all event starting before 18:00 on the present day
• After 18:00
Displays all events starting after 18:00 on the present day
• Tomorrow/Weekday
Displays all events on the selected week-day and until 6:00 the day after
• All programmes
Displays all programmes in the TV guide database - no time window limit
6.2 Defining the TV guide detail level
Use the yellow button to navigate quickly between channels. The yellow button will toggle between two
different views:
• Program view
This is the default view – it will display all programmes (inside the time window defined by using the
red button) for each channel, as shown in Figure 17. In this view, it can be rather time consuming to
browse to some specific channel of interest – in order to speed navigation you should use the yellow
button to create a condensed TV guide view showing only one event per channel, the “Channel view”:
• Channel view
If you press the yellow button while in “Program view”, the TV guide will shrink down and display only
the current programme on each channel, as shown in Figure 18. Now you use up/down/left/right
button to move to the channel you want to check out. When you have navigated to the channel of
interest, you press the yellow button again to return to “Program view”.
Figure 17 - TV guide – program view
Page 19
19
Figure 18 – TV guide – channel view
Press EXIT to remove the TV Guide and go back to the channel you were originally watching.
6.3 Using the TV guide to remind you about interesting programmes
If you press the green button on the highlighted event in the TV guide, you will get a reminder when the
programme is due to start. A little green bell will appear to the left of the programme name to indicate that a
reminder is associated with it.
6.4 Keeping the TV guide up to date
If you put your receiver in standby while not in use, it will automatically update the TV guide every night. See
section 9.6 on how to enable/disable this feature and on how to specify when to perform the update.
If you un-power your receiver, the TV guide will become empty and you need to perform a manual download of
programme schedules, as described in section 9.5.
Page 20
20
7 More on channel search and channel list updates
7.1 Channel list updates
From time to time, the channels available in your area will change as new channels are added.
For some networks, the receiver will perform background search and automatically add new channels to the
main channel lists. You will be notified via a message on the screen that new channels have been detected and
can then add them to your favourites list if you want.
For other networks, the receiver will not perform background search, so may want to search manually for new
channels.
From the main menu select SETTINGS, then CHANNEL SEARCH. You then have the option to perform either
the default search or an advanced search.
Note that if you move your receiver from one network to another, or in some cases from one town to another,
the data used by the receiver to search for channels may have changed. You should check with your service
provider about local settings.
7.2 Default search
The default search is the same as that performed during the installation process and uses the parameters
about your network which you entered at that time. Normally, this is the search you want to use to check for
new channels.
At the end of the search, you will be told whether or not new channels have been found and then go directly to
the channel selector.
7.3 Advanced channel search
If your cable operator is not listed in the “Select operator” part of the installation wizard, you must select
“other” to proceed with the installation. You will then be presented with three scan alternatives: Automatic,
Network, or Manual search.
The three search alternatives work as described in the following sections:
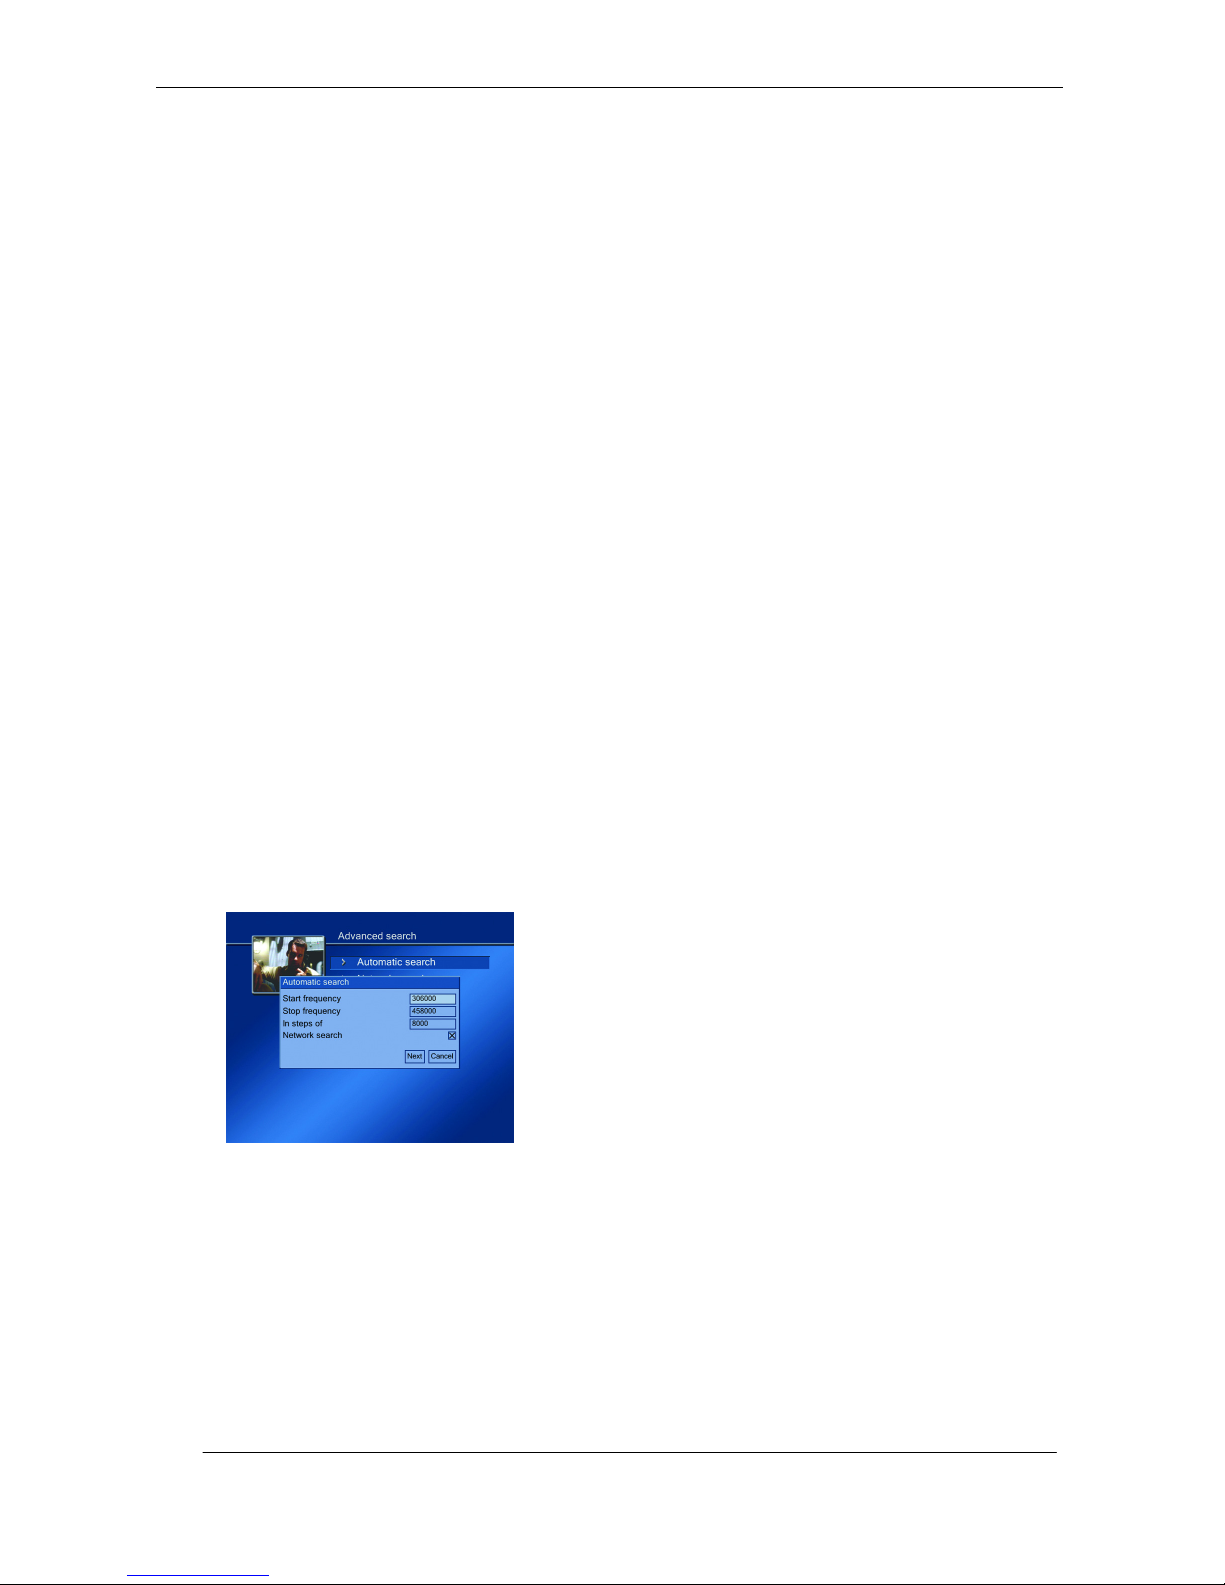
7.3.1 Automatic search
This search will make a best attempt to find channels, based on running through a long list of possible
combinations of QAM constellations and symbol rates. You still need to know the start frequency and channel
spacing used for the digital channels. See Figure 19.
Figure 19 – Automatic search
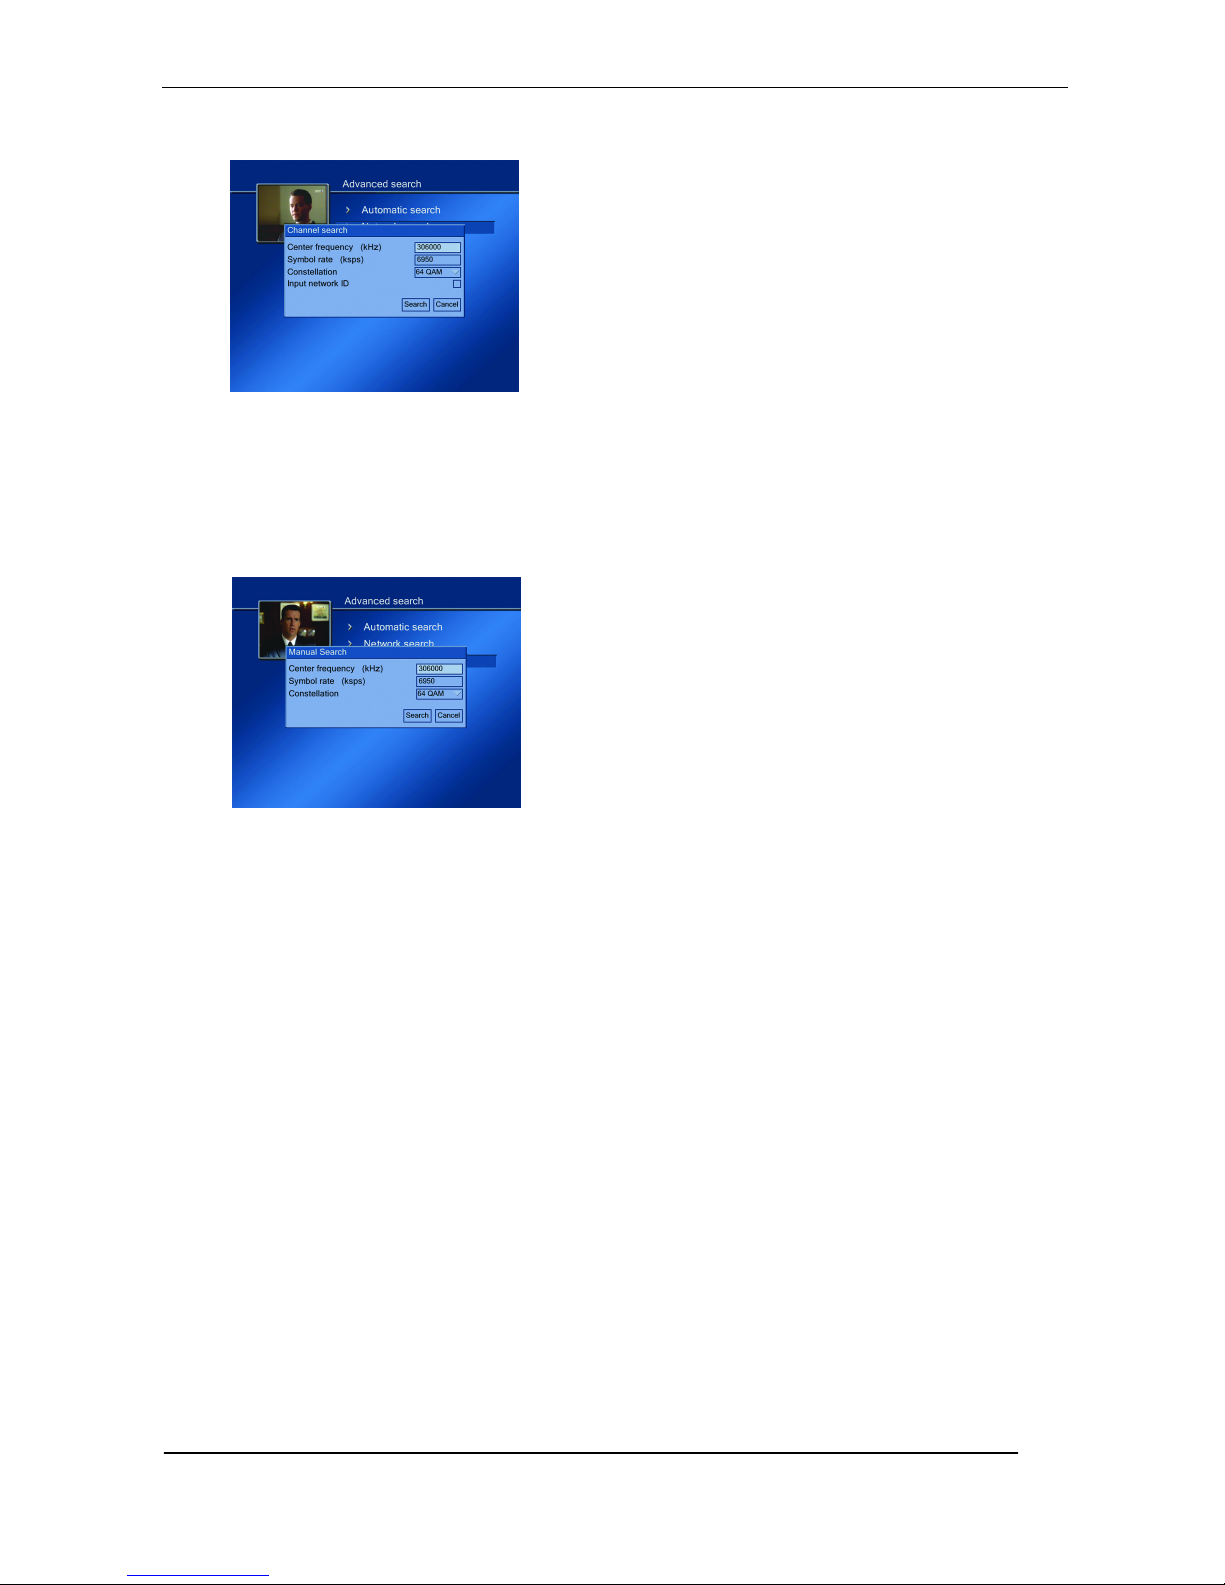
7.3.2 Network search
If you are connected to a professionally managed cable network that is not supported by the installation
wizard, this is most likely the search you want to use. You need to contact your cable operator’s technical
support and ask where you can find a homing channel (frequency, symbol rate and QAM constellation). Also,
ask whether they maintain “NIT actual” or “NIT other” in their network. If they maintain “NIT other”, ask for
your Network ID. The data provided from your operator you manually input in the on screen dialog that
appears. See Figure 20.
Page 21
21
Figure 20 – Network search
7.3.3 Manual search
If you are connected to SMATV (Satellite Master Antenna TV), this is most likely the search you want to use.
You need to know, for each digital multiplex, what frequency, symbol rate and QAM constellation it is played
out on. This information you must get from a local technician (the guy who maintains the local head-end).
You need to repeat the manual search for each multiplex in your network. See Figure 21.
Figure 21 – Manual search
Page 22
22
8 Advanced use
8.1 Menu system
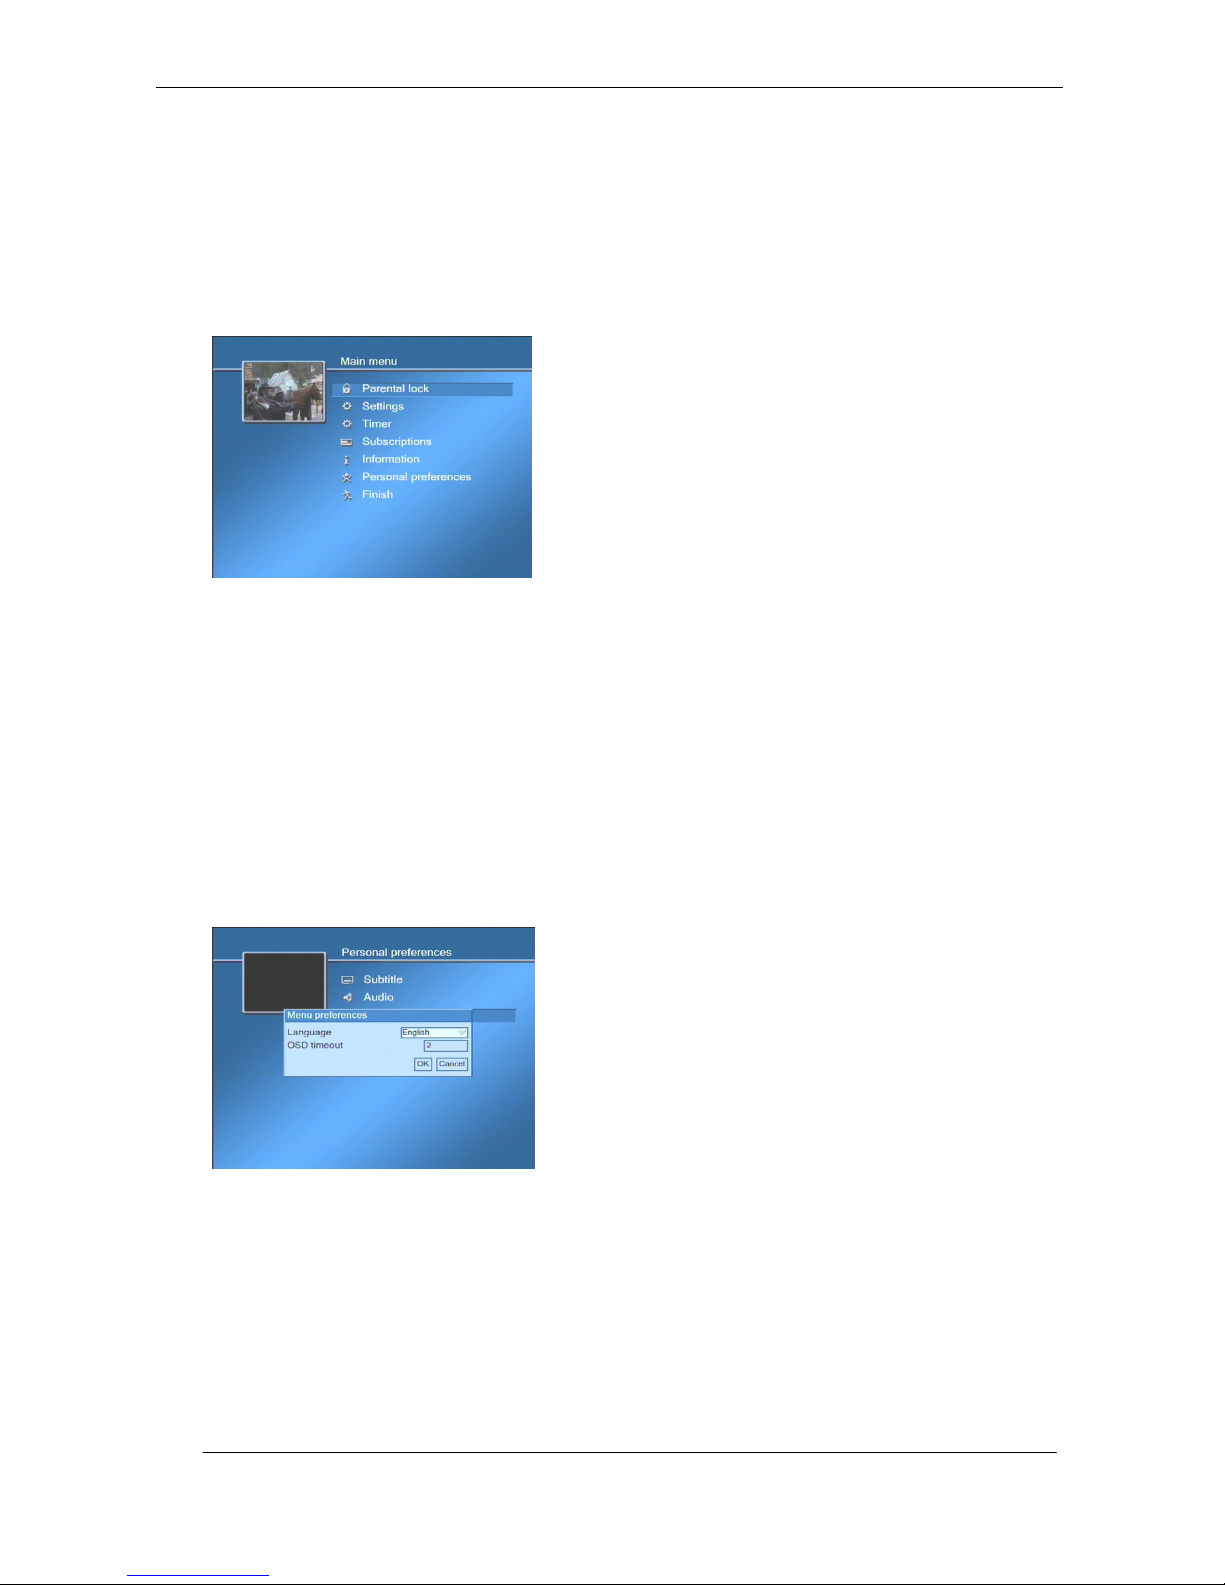
Press MENU on the remote control to access the menu system. There is a selection of main menu options, and
these lead to sub-menus where further selections are available. The main menu is shown below, with “Parental
Lock” highlighted. See Figure 22.
Figure 22 – Main menu
Basic menu navigation: Use the up/down arrow keys on the remote control to highlight items listed and then
select or confirm by pressing OK. To return to the previous menu page, highlight FINISH and press OK.
Alternatively you can press BACK on the remote. Press EXIT at any time to exit the menu system.
When making changes, you are generally asked to confirm by pressing OK. If you do not want to complete the
selection, you can return to the previous menu by selecting BACK or by pressing the BACK button on the
remote control. In this case, any changes made in the menu are not saved.
In some menus the coloured short cuts buttons on the remote control are used. Where applicable, they are
displayed at the bottom of the screen with an explanatory text.
8.2 Menu language
The menu language selected during installation can be altered at any time. From the main menu, select
PERSONAL PREFERENCES, then MENU PREFERENCES. Choose a new language from the drop-down list, and
select OK. See Figure 23.
Figure 23 – Language selection
8.3 Volume control and muting
You can adjust the audio volume on the TechniSat Force receiver with the left and right arrows on the remote
control. You will see a slider bar indicating the volume setting for a few seconds. The display on the front of the
receiver will also change to show a volume symbol (U) and a number between 0-100 indicating the current
volume, as the left/right volume buttons are pressed.
The volume on the VCR SCART and the digital audio outputs is not affected by volume adjustment.
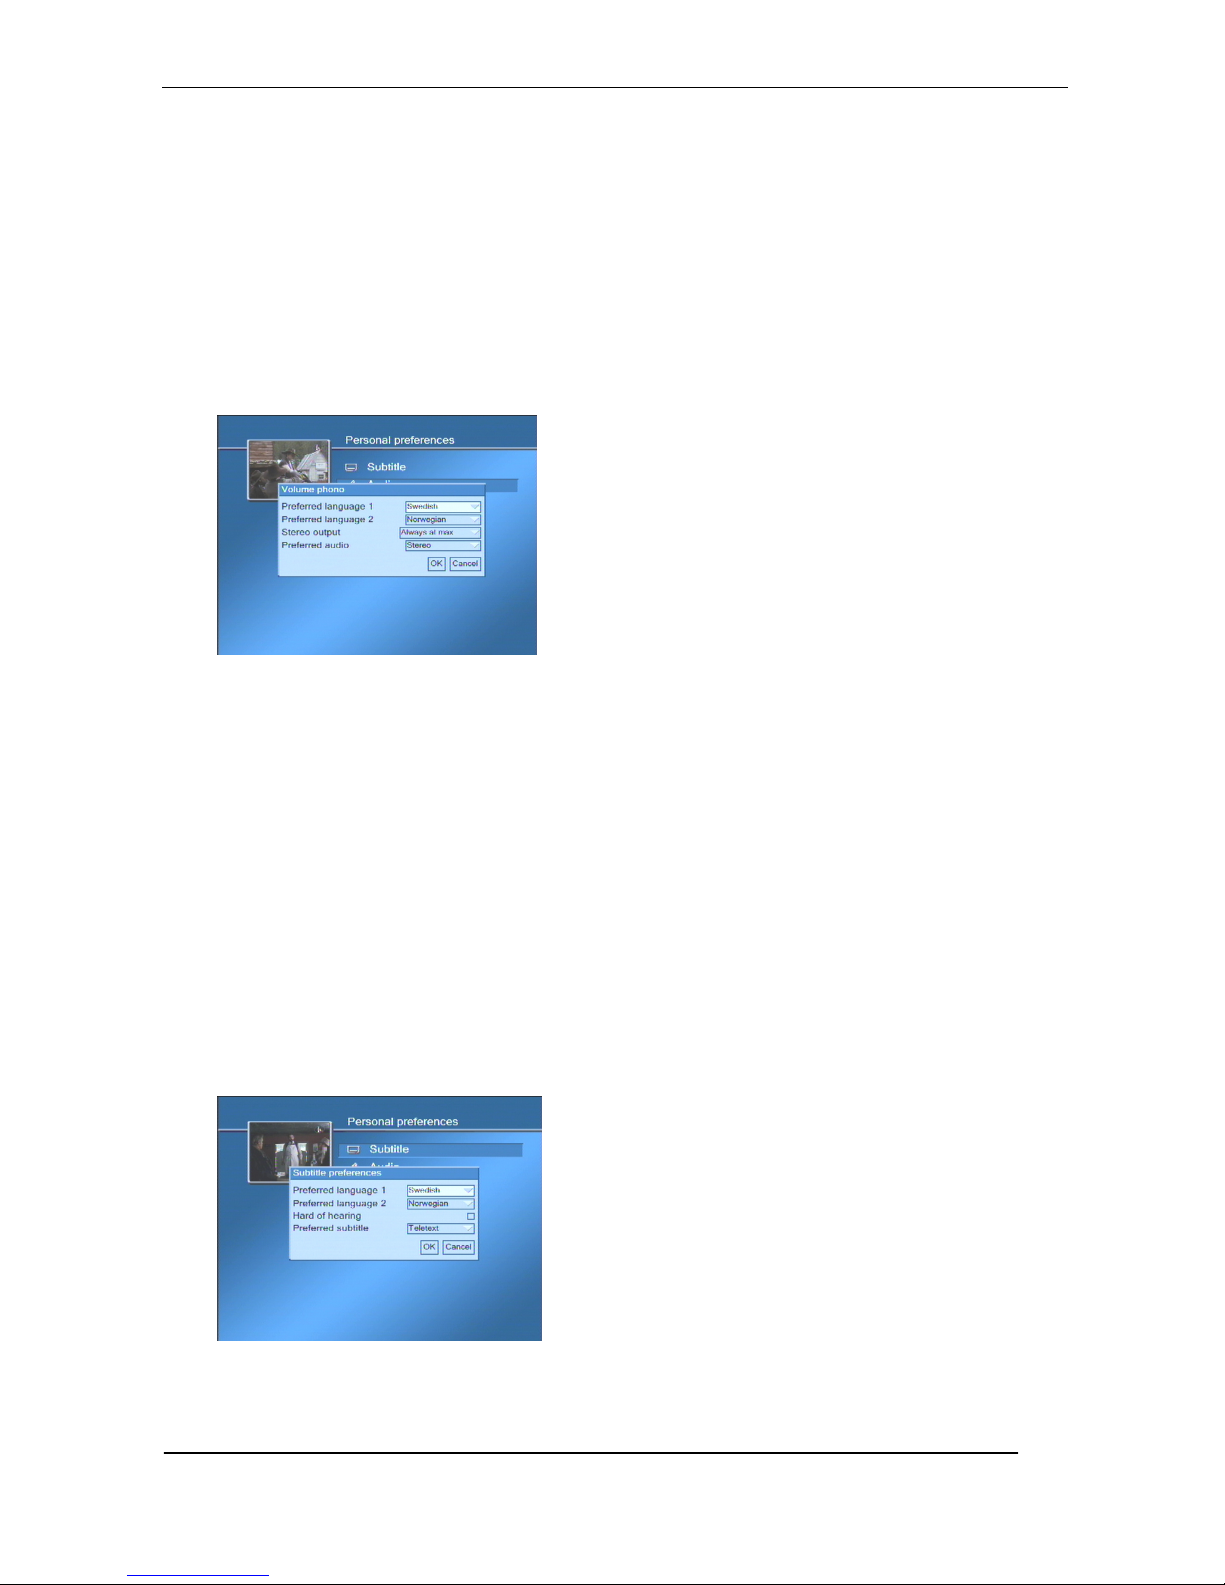
For the separate analogue RCA stereo outputs, you can decide whether the volume is controlled from the
receiver (see Figure 24 in section 8.4 below).
Page 23
23
Set the STEREO OUTPUT to be either:
•
Always at max – where the volume is always at maximum and can be controlled on your Hi-Fi
equipment
•
Follow TV SCART – where the volume is set by the control on the receiver.
The Mute button on the top left of the remote control can be used for switching the audio on/off. A little icon
that indicates the mute/no mute status appears for a few seconds.
8.4 Audio options
To select preferred audio language and formats, enter the Main menu and select PERSONAL PREFERENCES,
then AUDIO. See Figure 24.
Figure 24 – Audio options
Some programmes are transmitted with several audio tracks of different languages. The receiver will pick the
audio track that matches your preferred language 1 if present. If not, it will check for preferred language 2 and
select that one if it is present. If none of your preferred audio languages are present on the channel you are
watching, the receiver will pick some other language for you (see 8.6 on how to override the receiver’s
selection).
You can also set your preferred output format to either Stereo or Dolby Digital.
NOTE: If you select Dolby Digital as your preferred audio format, and there is a Dolby Digital audio track in the
programme you are watching, there will only be audio on the digital audio outputs (i.e. no audio on the
SCARTs or the stereo RCA connectors).
NOTE: If you select Stereo as your preferred audio format, a stereo track will be selected even if there is a
Dolby Digital audio track and no stereo track that matches one of your preferred languages.
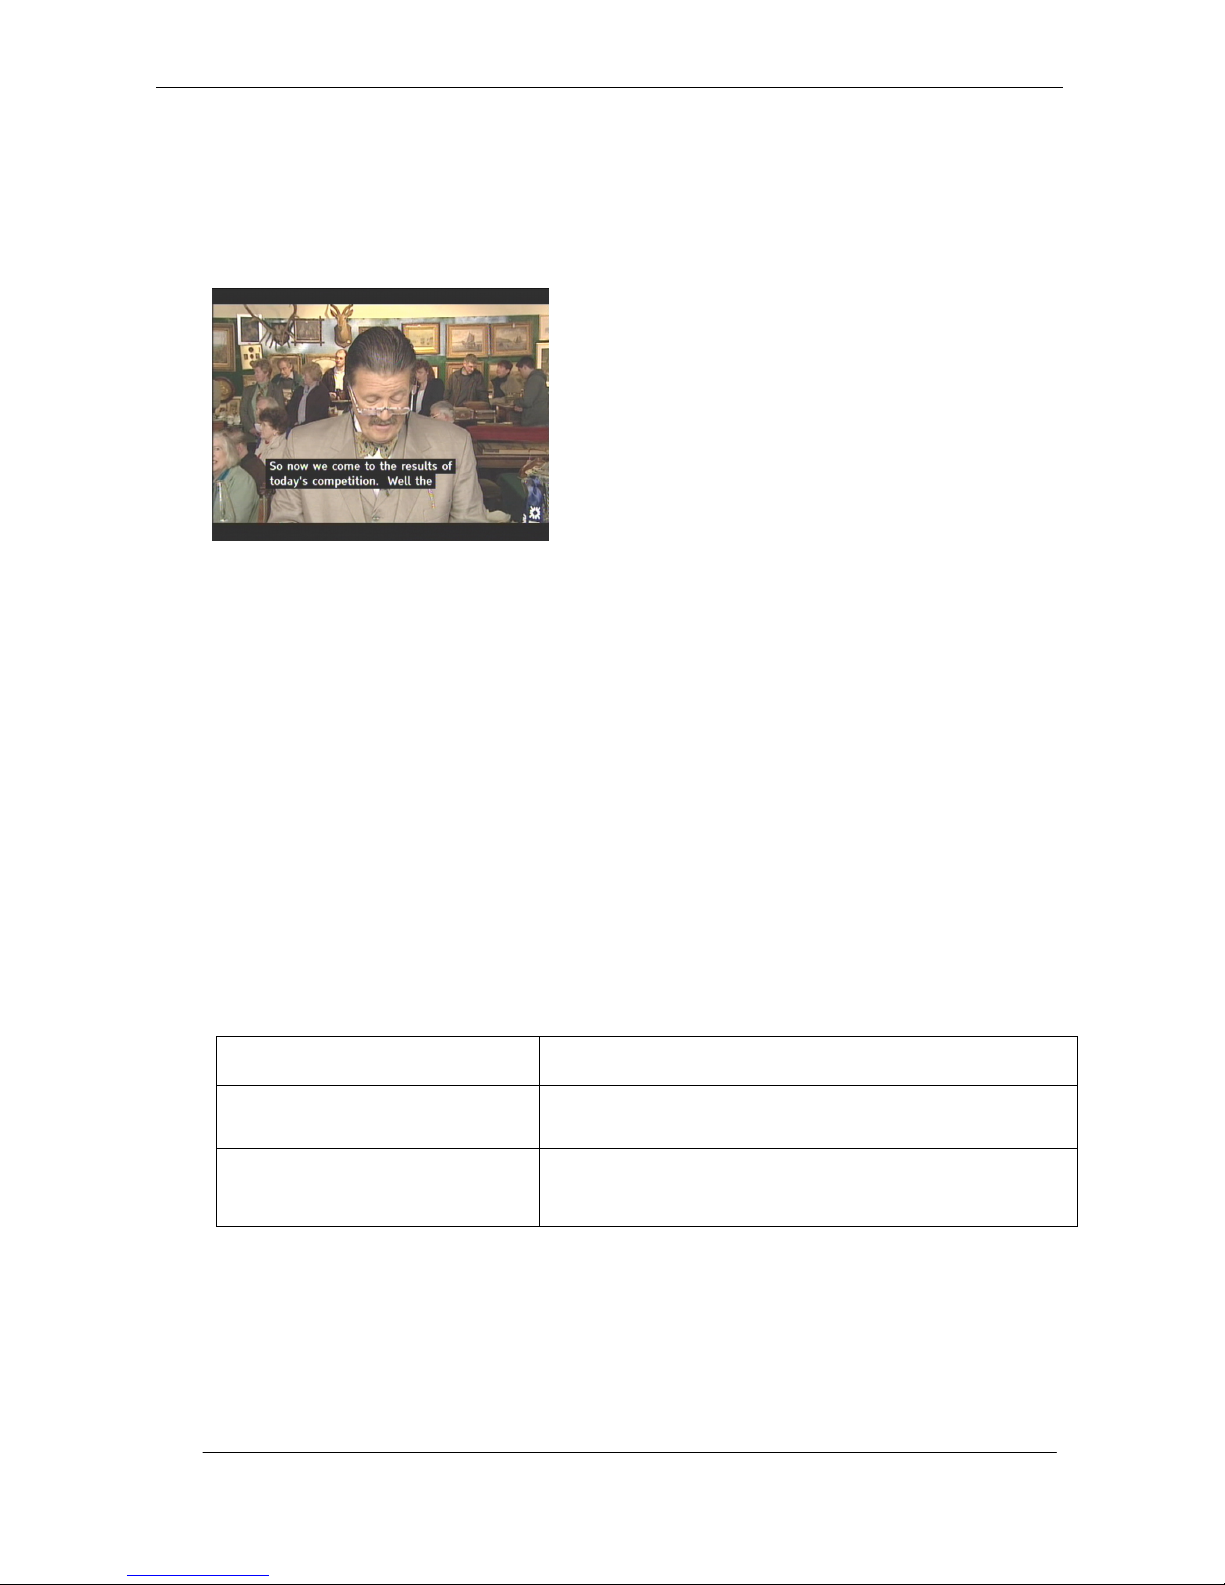
8.5 Subtitle options
Some programmes are transmitted with several subtitle languages. The receiver will pick the subtitle language
that matches your preferred subtitle language 1 if present. If not, it will check for preferred subtitle language 2
and select that one if present. If none of your preferred subtitle languages are present, the receiver will NOT
make a choice for you, i.e. there will be no subtitles displayed. See Figure 25.
Figure 25 – Subtitle options
Page 24
24
You can also set your preferred subtitle format to either Teletext or Digital. Digital subtitles are used in some
newer networks, but Teletext subtitling is more common at the point of writing. The receiver’s factory setting
will depend on your Operator.
NOTE: If you select Digital as your preferred subtitling format, there will sometimes be hard of hearing text. If
you have selected the Hard of Hearing option in the “Subtitle preferences” menu, these options will be shown
automatically when available as you are watching a programme.
Figure 26 – Subtitle on screen
8.6 Overriding audio and subtitle language
While watching TV, press the LANG button to see what audio and subtitling (if any) languages are available. If
more than one language is available, there will be a drop-down list where you can select to override the
language that has been automatically selected by the receiver based on your language preferences.
NOTE:
•
For software versions 1.1.8 and older, the language overrides you make with the LANG button take
effect for all channels, not only the one you are currently watching.
•
For software versions 1.1.9 and later, the language overrides you make with the LANG buttons take
effect only for the channel you are currently watching.
8.7 Setting external device mode of remote control
The Remote Control Unit (RCU) can be set to control up to three external devices, including the receiver. The
control of each device can be changed by setting the remote control mode. This is done by pressing the “OK”
button plus one of the mode buttons arranged at the bottom of the handset.
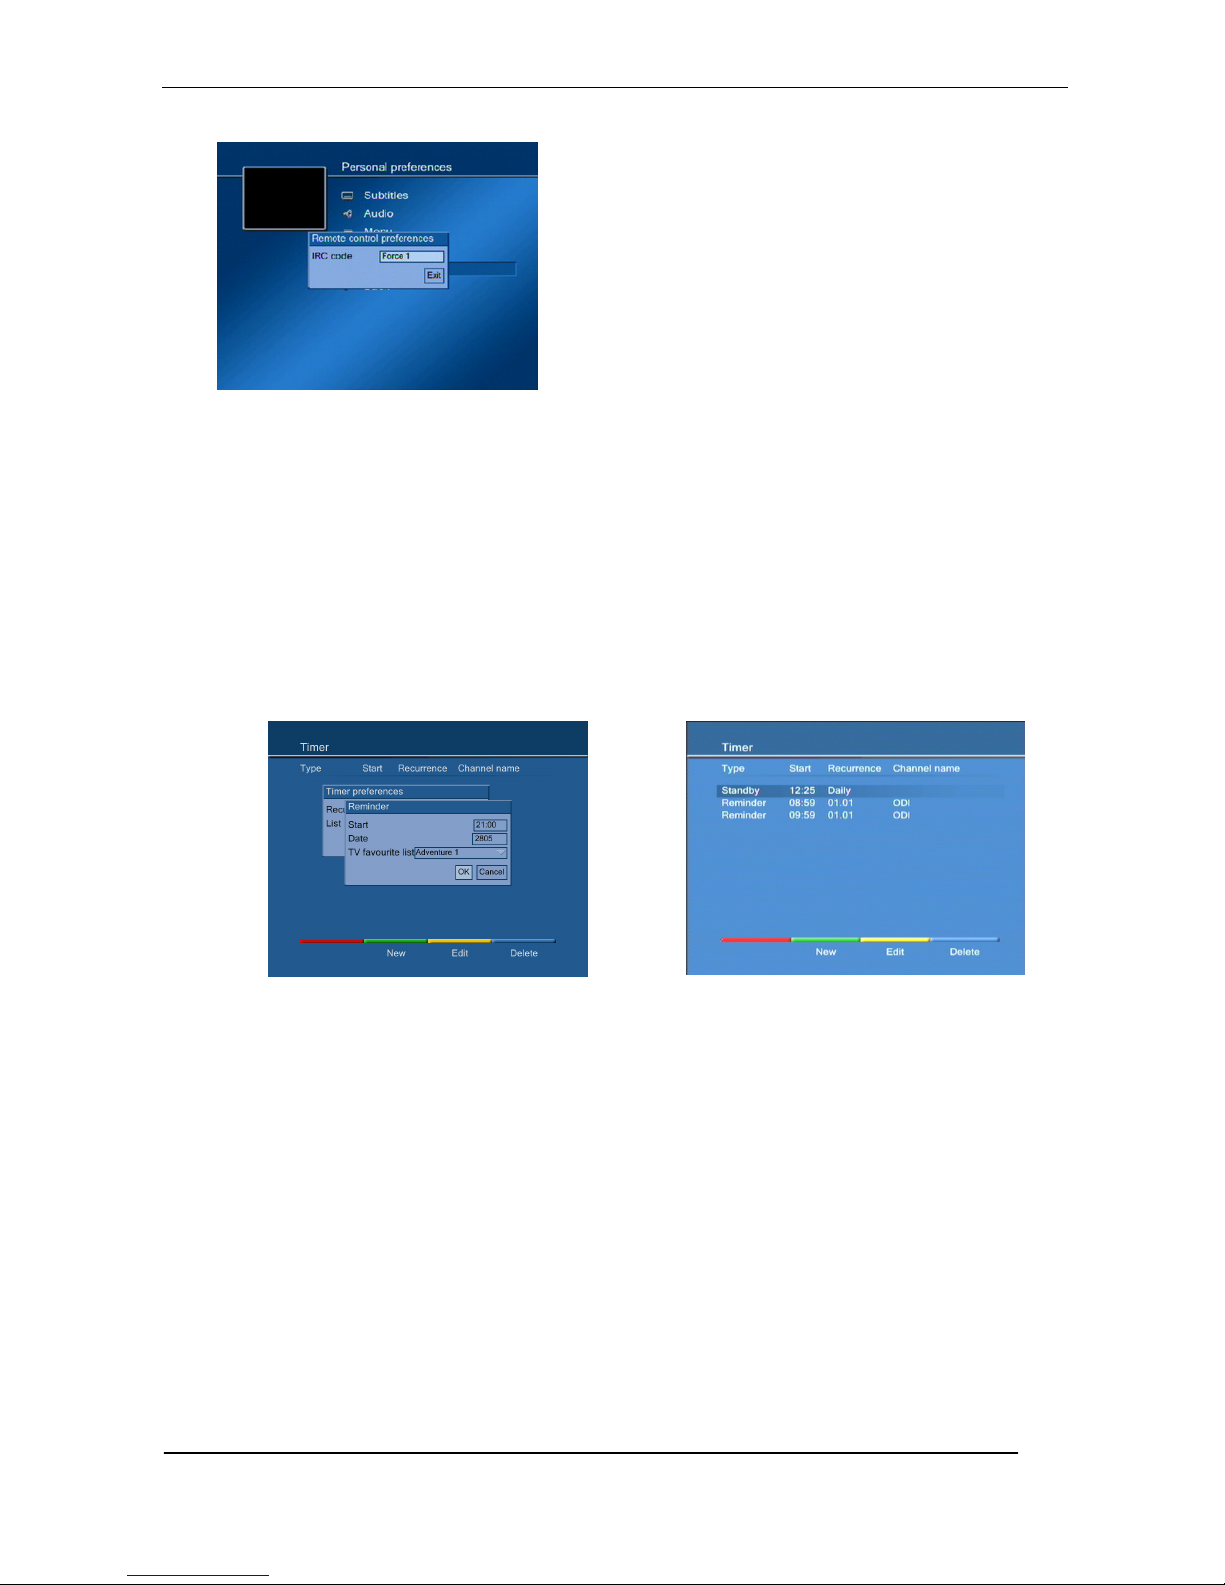
The receiver can be synchronised with the mode set on the remote control by selecting PERSONAL
PREFERENCES from the Main menu, then choosing the REMOTE CONTROL menu option, as shown in Figure 27.
The current mode is shown in the box and changes when the mode select buttons are pressed on the handset.
The following table shows the various mode settings and functions:
Buttons Mode/Function
OK + Button 1 (labelled with logo and
number “1”)
Sets remote control to communicate with your main receiver –
Force 1.
OK + Button 2 (labelled with logo and
number “2”)
Sets remote control to communicate with your secondary receiver –
Force 2. See chapter 2 about connections, for details of connecting
external devices to your receiver.
Page 25
25
Figure 27 - Remote control preferences
8.8 Timer
By using the Timer, your receiver can perform actions automatically at a defined time. Two types of actions are
supported:
•
Standby
•
Reminder (see Figure 28 and also section 6.3 on how to add a reminder from the TV-guide)
From the main menu, select TIMER. You will now see the display, Figure 29, which shows some timers already
set up.
NOTE: the time is always entered using the 24 hour clock. Thus 6pm is entered as 18:00.
Figure 28 – Setting a reminder
Figure 29 – Timer overview
To add a new timed action, press the green short cuts button on the remote control. Highlight the drop down
list and select either
Reminder – to get notified when a programme is due to start.
Standby – to put the receiver automatically into standby
To set the reminder, enter the recurrence – each weekday, daily, or daily if you want to enter a specific date.
Choose the list that contains the programme, and then select OK.
In the next screen, enter the start time and date. If you have opted for a single date, the format is 2 digits for
the day followed by two digits for the month (for example 25 May is 2505). Then select the channel you want
from the drop down list. The timer is now added to the list. If it is for a single event, it will be deleted once
that event has happened.
NOTE: the standby timer does not work if you are using the menus or if the info bar is displayed on
the screen.
Page 26
26
8.9 Parental Lock
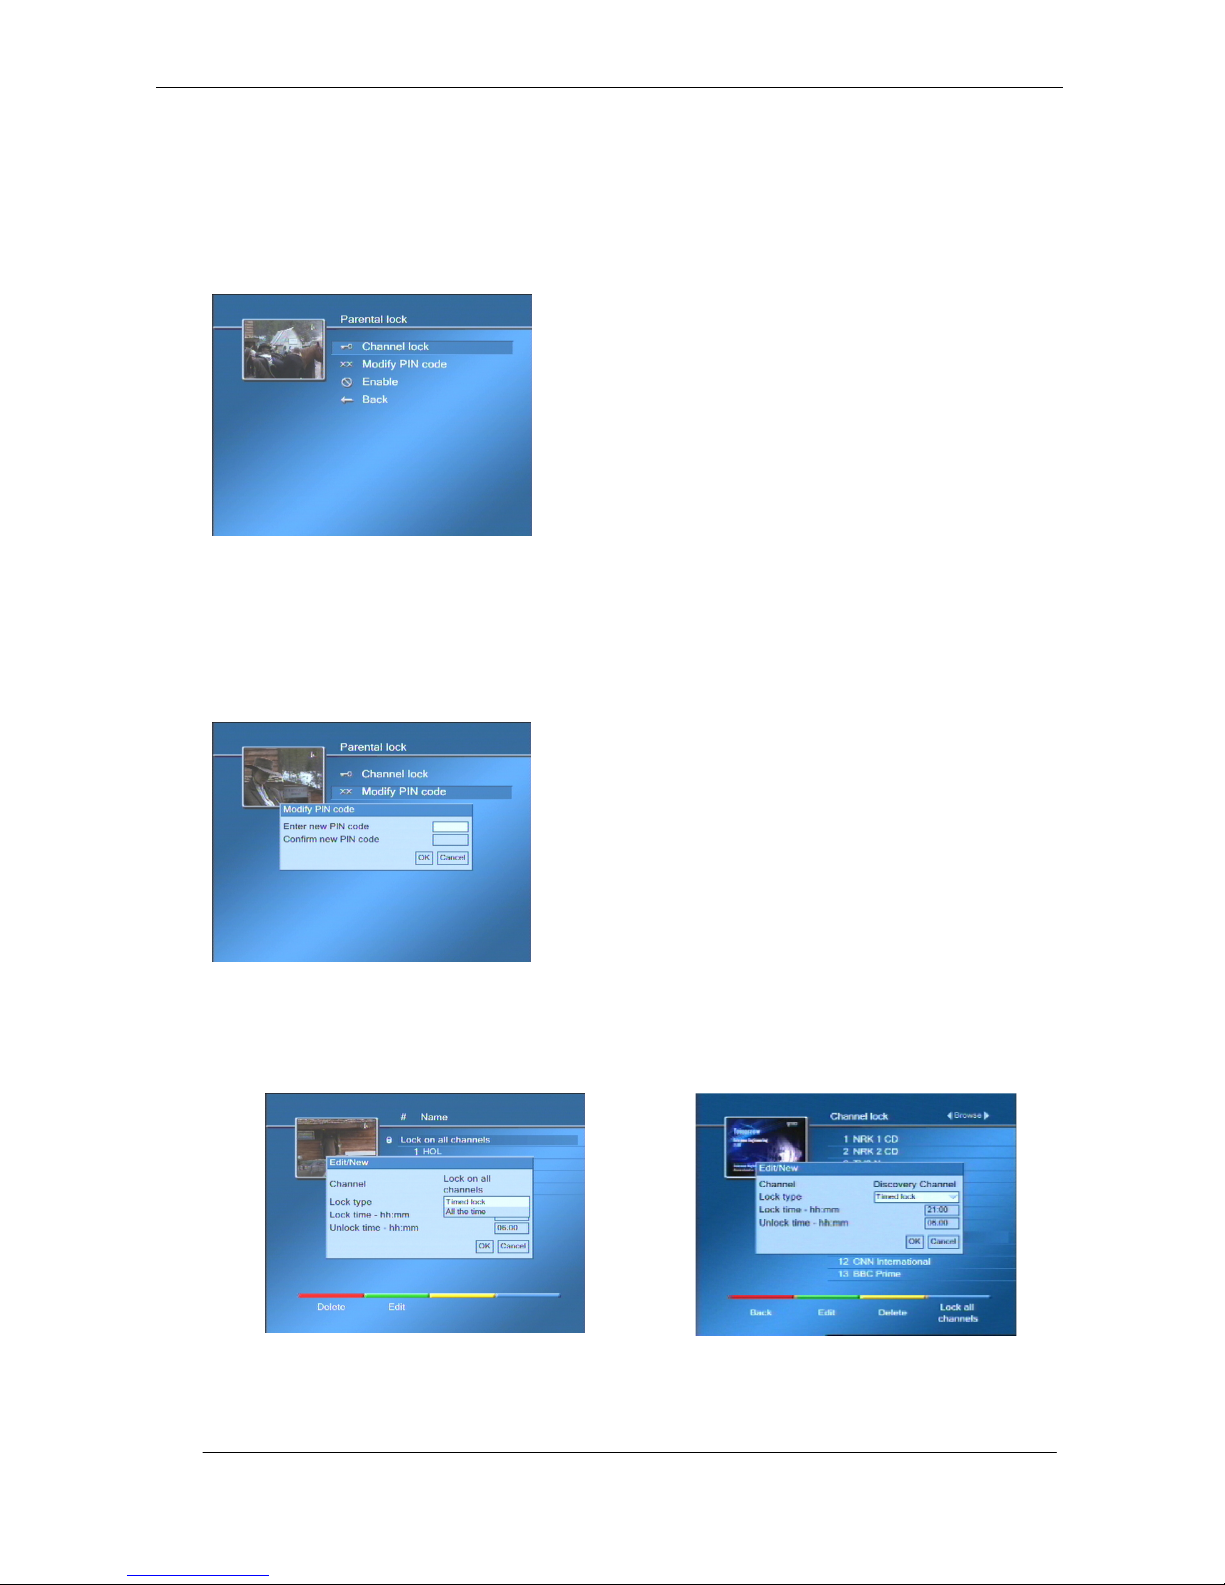
Parental lock enables you to restrict access to the receiver or to specific channels. A PIN code is stored in the
receiver and this must be entered each time you want to view a locked channel. This function operates only on
TV channels and is separate from the parental controls (maturity rating) provided with your viewing card.
The parental lock menu, shown in Figure 30, is accessed directly from the main menu. First of all you will be
asked for the PIN code before you can use the menu. This is set in the factory to a default value of “1234”.
Figure 30 – Parental lock ON
Before initiating the parental lock, it is advised you set your own PIN code. Select MODIFY PIN CODE and enter
your chosen PIN twice., and select OK. You can repeat this process at any time to change PIN-code. See Figure
31.
NOTE: If you forget your PIN-code, you can re-install the factory-set PIN-code (“1234”) by doing a factory
reset (see section 9.3).
Figure 31 – Setting your parental lock PIN-code
To configure what channels to lock, select CHANNEL LOCK in the menu and a list of all the TV channels will
appear. You have the option to lock all channels or to select a particular channel. You will then see one of the
screens shown below.
Figure 32 – locking all channels
Figure 33 – locking a specific channel
Page 27
27
Select Timed lock or All the time as required. In the former case, select the start and stop time to lock the
channel. Then press OK. A lock symbol is shown to the left of the channel name for channels that are locked.
Press the BACK key to complete the operation and return to the parental control menu.
Complete the configuration by selecting ENABLE in the Parental Lock menu, and select ENABLE again for Lock
on channels. When you have done this, the receiver also locks the menu that is used to alter its internal clock.
This is done to prevent unauthorised access by changing the clock settings. You can separately disable access
to that menu by enabling the Lock on Submenus in this screen.
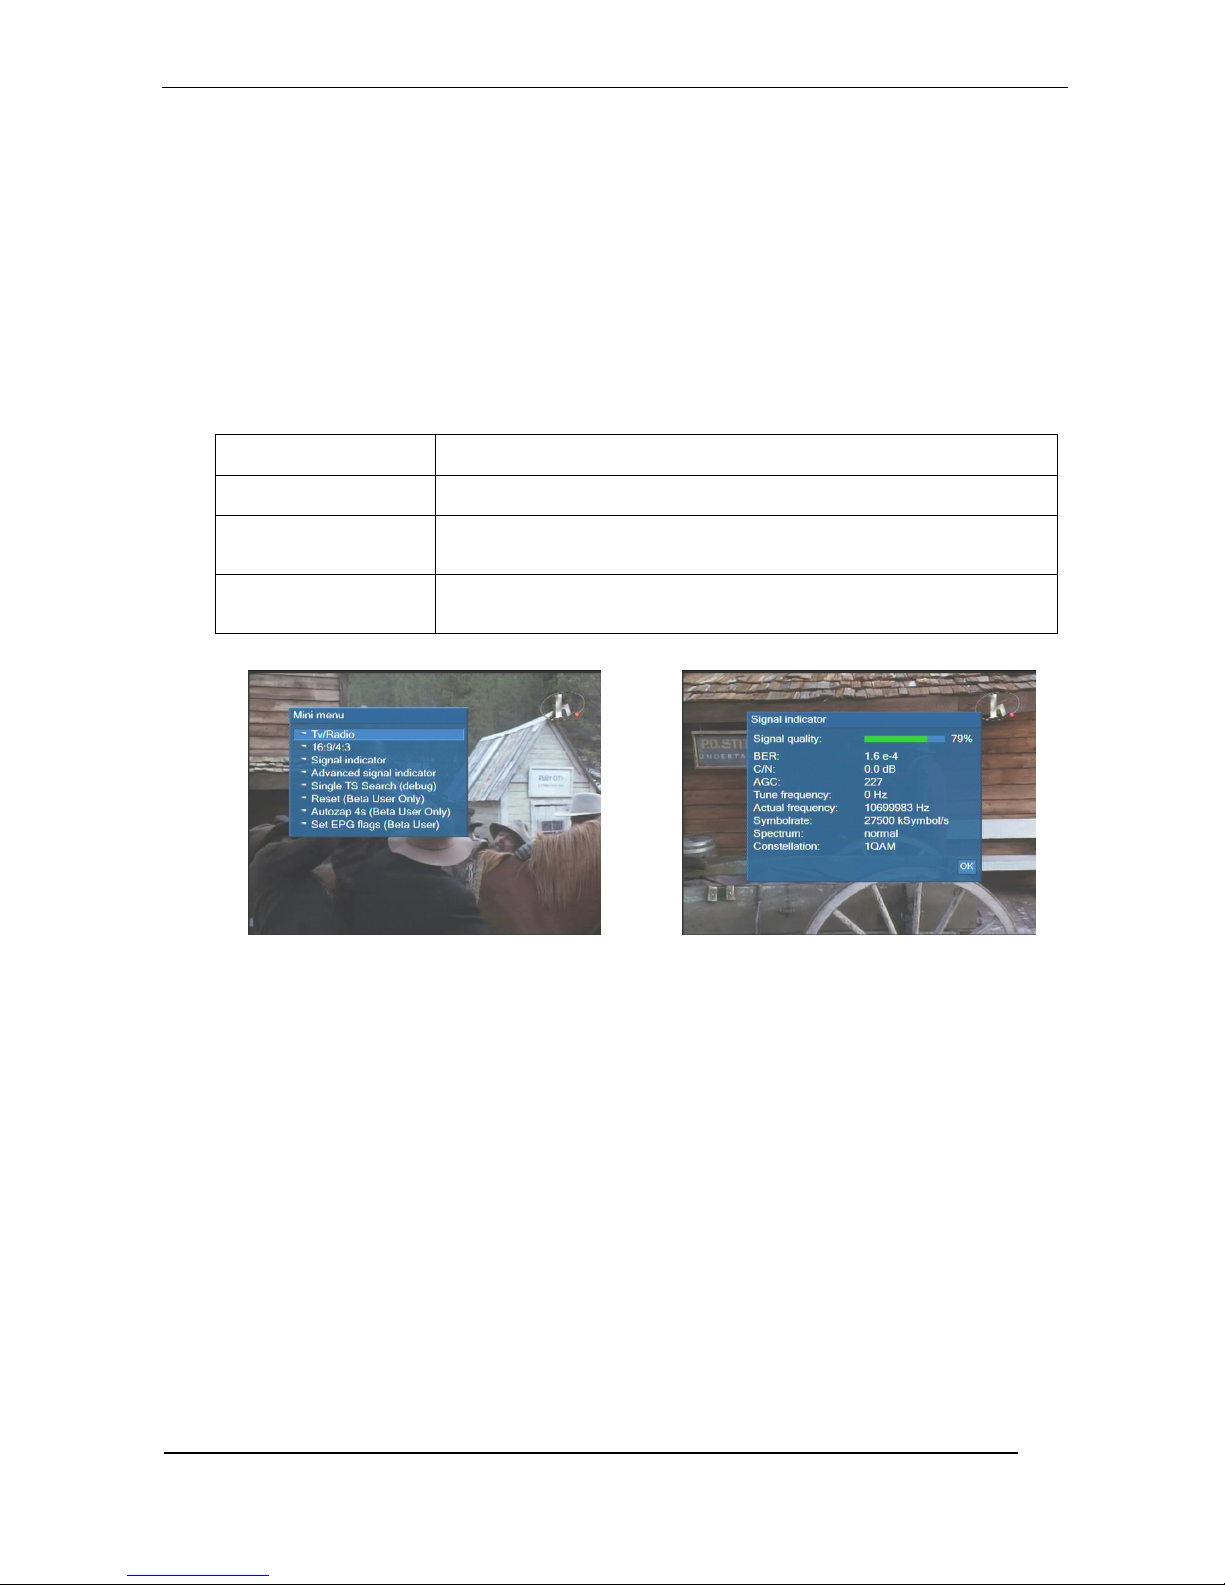
8.10 Mini menu
Pressing “M MENU” on the remote control activates a mini menu to give quicker access to certain functions, as
shown in Figure 34.
You can choose one of the following options by highlighting it and pressing OK.
TV/Radio Switches between radio channels and TV channels
16:9/4.3 Switches between widescreen format (16:9) and standard TV (4:3)
Signal Indicator A graphical indication of the signal level for the frequency of the channel you
are watching. See Figure 34.
Advanced signal indicator Shows the signal indicator, frequency and various other parameters for the
frequency of the channel you are watching. See Figure 35.
Figure 34
“M MENU” button menu
Figure 35
Advanced signal indicator
NOTE: you can also access the signal status from the main menu by selecting INFORMATION and
then SIGNAL INDICATOR.
8.11 Conditional Access (CA) Management
Some channels are restricted to viewers who pay for them. To watch these channels you need to obtain the
correct programme card, usually from your dealer or service provider. These cards are inserted in the slots on
the front, as described in section 3.2. Insert the cards with the gold contacts facing down.
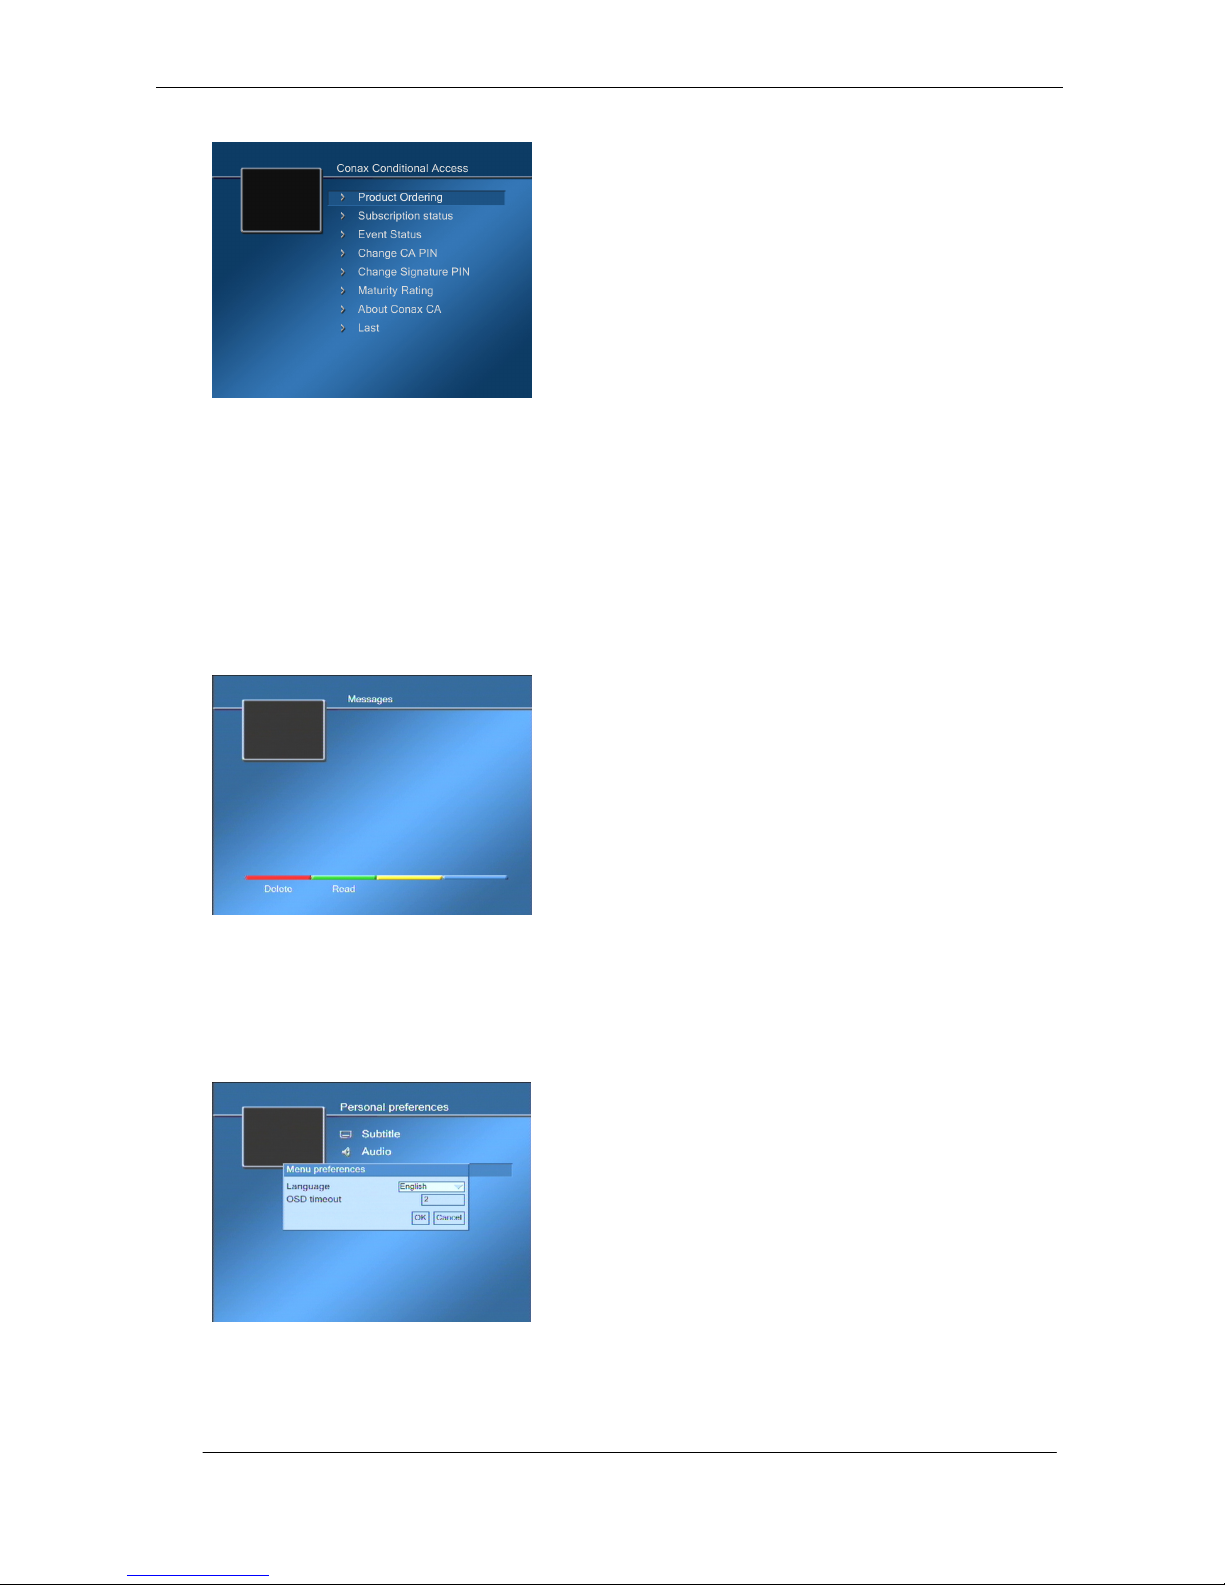
The next menu is generated by the smart card itself, so refer to the information that was provided with the
smart card. An example of a typical conditional access menu is shown in Figure 36. You should be able to
check the subscription status, update the card and find out which programme packages are supported by the
card. A typical initial menu is shown below.
You can check the status of any cards inserted in your receiver from the main menu by selecting
SUBSCRIPTIONS.
The card may restrict access to some programmes that are not suitable for children. You will then be asked to
enter a PIN when such programmes are selected. The card comes with a default PIN (often 1234) and you
should change that to your own PIN when you install a new card. Note that this control is separate from the
parental control built in to the receiver, as described in section 8.9.
Page 28
28
Figure 36 – Typical conditional access menu
8.12 Messages via the mail system
The mail system enables TechniSat Force to tell you about updates to your receiver. See Figure 37.
Mail will automatically arrive to your receiver and this will be indicated by an "envelope" symbol on your TV
screen. Once all new mail has been read, the "envelope" symbol automatically disappears until the next
message is received.
To read a new message, select INFORMATION from the main menu and then MESSAGES. Highlight the subject
in the message overview in order to read the individual messages and press the green short cut button. Delete
the message once you no longer want to keep it by pressing the red short cut button.
Figure 37 – TechniSat Force messages
8.13 On screen timeout
Some on-screen information is only shown for a short time. The default for this is 2 seconds, but it can be
changed – from the main menu. Select PERSONAL PREFERENCES, then MENU PREFERENCES. Enter a new
value, then select OK. See Figure 38.
Figure 38 – On-screen display timeout
Page 29
29
8.14 Product Information
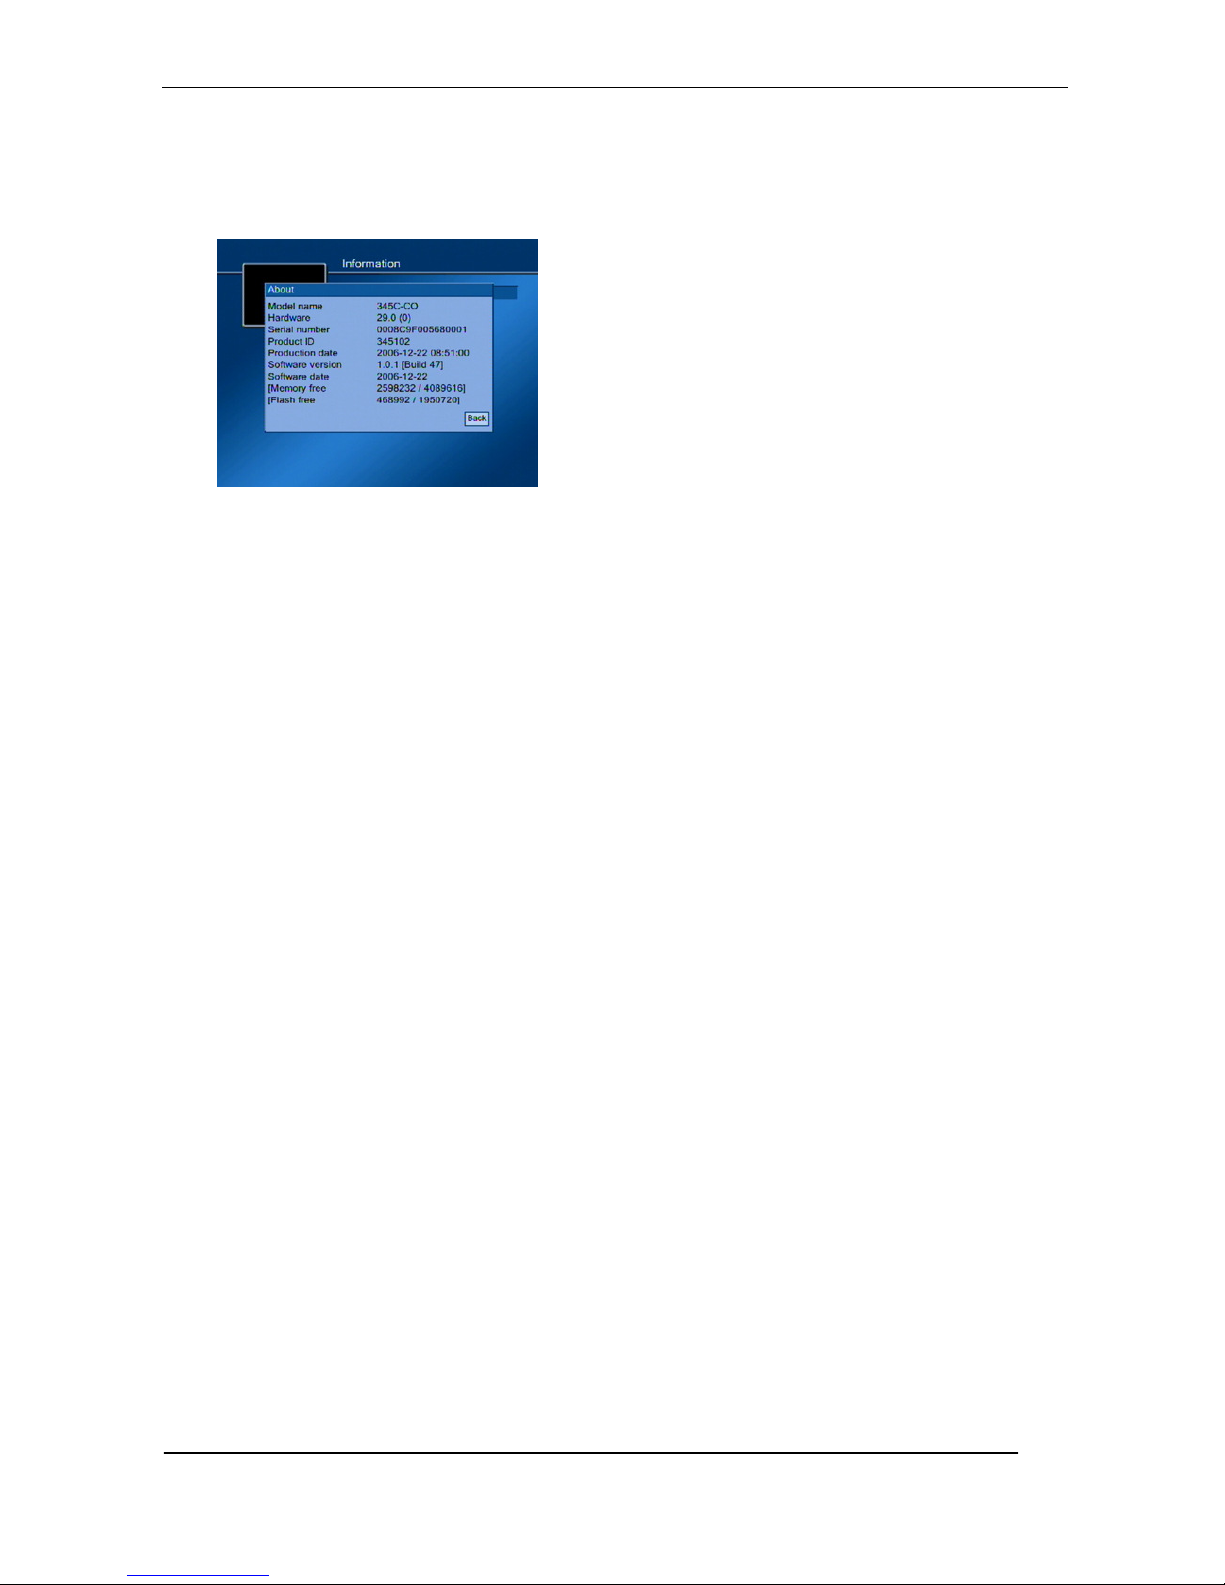
To find information about your product, such as model number and software version, enter the main menu and
select INFORMATION, then PRODUCT INFO. A typical set of information is shown below in Figure 39.
Figure 39 – Product information
Page 30
30
9 Configuring your receiver – settings menu
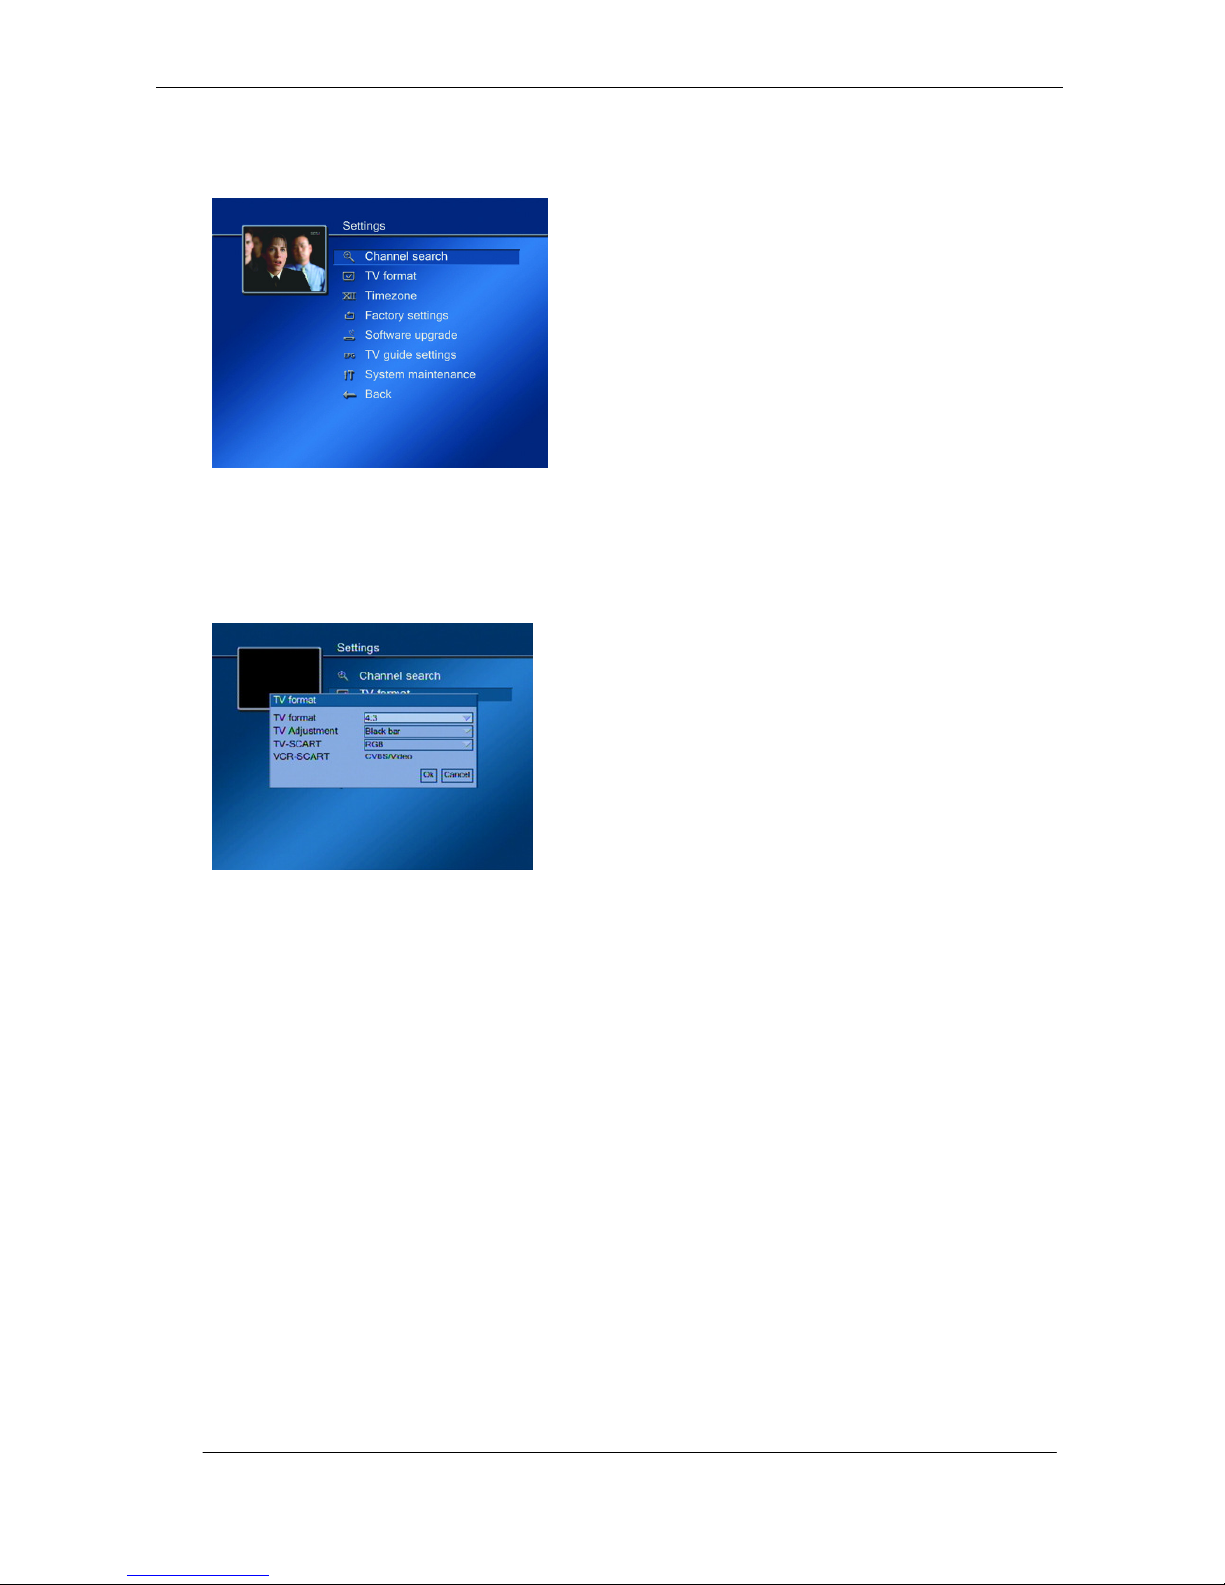
Figure 40 – Settings menu
9.1 TV-format Menu
Your receiver has various functions which control the way it works with your TV set and with other equipment.
From the main menu, select SETTINGS and then TV FORMAT. See Figure 41.
Figure 41 - TV format menu
9.1.1 TV Format (aspect ratio of the connected TV)
Set this to 4:3 for standard TV sets and 16:9 for widescreen TV sets.
9.1.2 TV Adjustment (Aspect ratio conversion)
When the source video is intended for display on a screen with a different aspect ratio than your TV screen
(16:9 video on 4:3 screen or vice versa), the receiver can compensate in a number of different ways, as
outlined below:
•
You can leave aspect ratio conversion to your TV set (select “Via TV”) in the TV adjustment dropdown
•
You can set your receiver to compensate in one of the following ways:
o
Black bars – with this choice the receiver will add black bars to the source video, either on
the sides (4:3 video on 16:9 TV) or top and bottom (16:9 video on 4:3 TV).
o
Clipped – with this choice the receiver will perform a centre cut-out of the source video.
o
Combined – with this choice the receiver will perform a bigger centre cut- out of the source
video and add narrower black bars.
Please refer to Figure 42 below for further details.
Page 31
31
AR conversion
done TV format
Source video is
intended for
display on
Output
level on
scart pin 8
What aspect ratio conversion actually
takes place in STB?
Via STB
16:9
16:9
6V (16:9)
none
Via STB
16:9
4:3
6V (16:9)
Selectable black bars/clipped/combined
Via STB
4:3
16:9
12V (4:3)
Selectable black bars/clipped/combined
Via STB
4:3
4:3
12V (4:3)
none
Via TV
16:9
16:9
6V (16:9)
none
Via TV
16:9
4:3
12V (4:3)
none
Via TV
4:3
16:9
6V (16:9)
none
Via TV
4:3
4:3
12V (4:3)
none
Figure 42
Details of aspect ratio conversion and SCART signalling
9.1.3 Video format on the TV-SCART
If you are using the SCART connection to the TV, there are four signal options. Refer to your TV manual to
find out what it will receive and select the one that gives the best picture quality. Some trial and error may
be necessary.
1. Component – this option requires a SCART to component lead. Component gives the best picture quality
but is only found on high end TV sets.
2. RGB – this give excellent picture quality and is recommended.
3. S-Video – this gives good picture quality but is not always available on the TV set.
4. CVBS/Video. This is the "standard" signal, and can be used in all TVs with a video input.
Highlight the drop down list, select the desired format and press OK to complete.
9.1.4 Video format on the VCR-SCART
If you are using the SCART connection to the VCR or DVD player, CVBS/Video is fixed at the "standard"
signal. You cannot change this setting.
9.2 Adjusting Clock for Different Time Zones
You can set up your receiver for different time zones to ensure that the time that is displayed is correct, or it
can automatically detect the current time from the TV-signal.
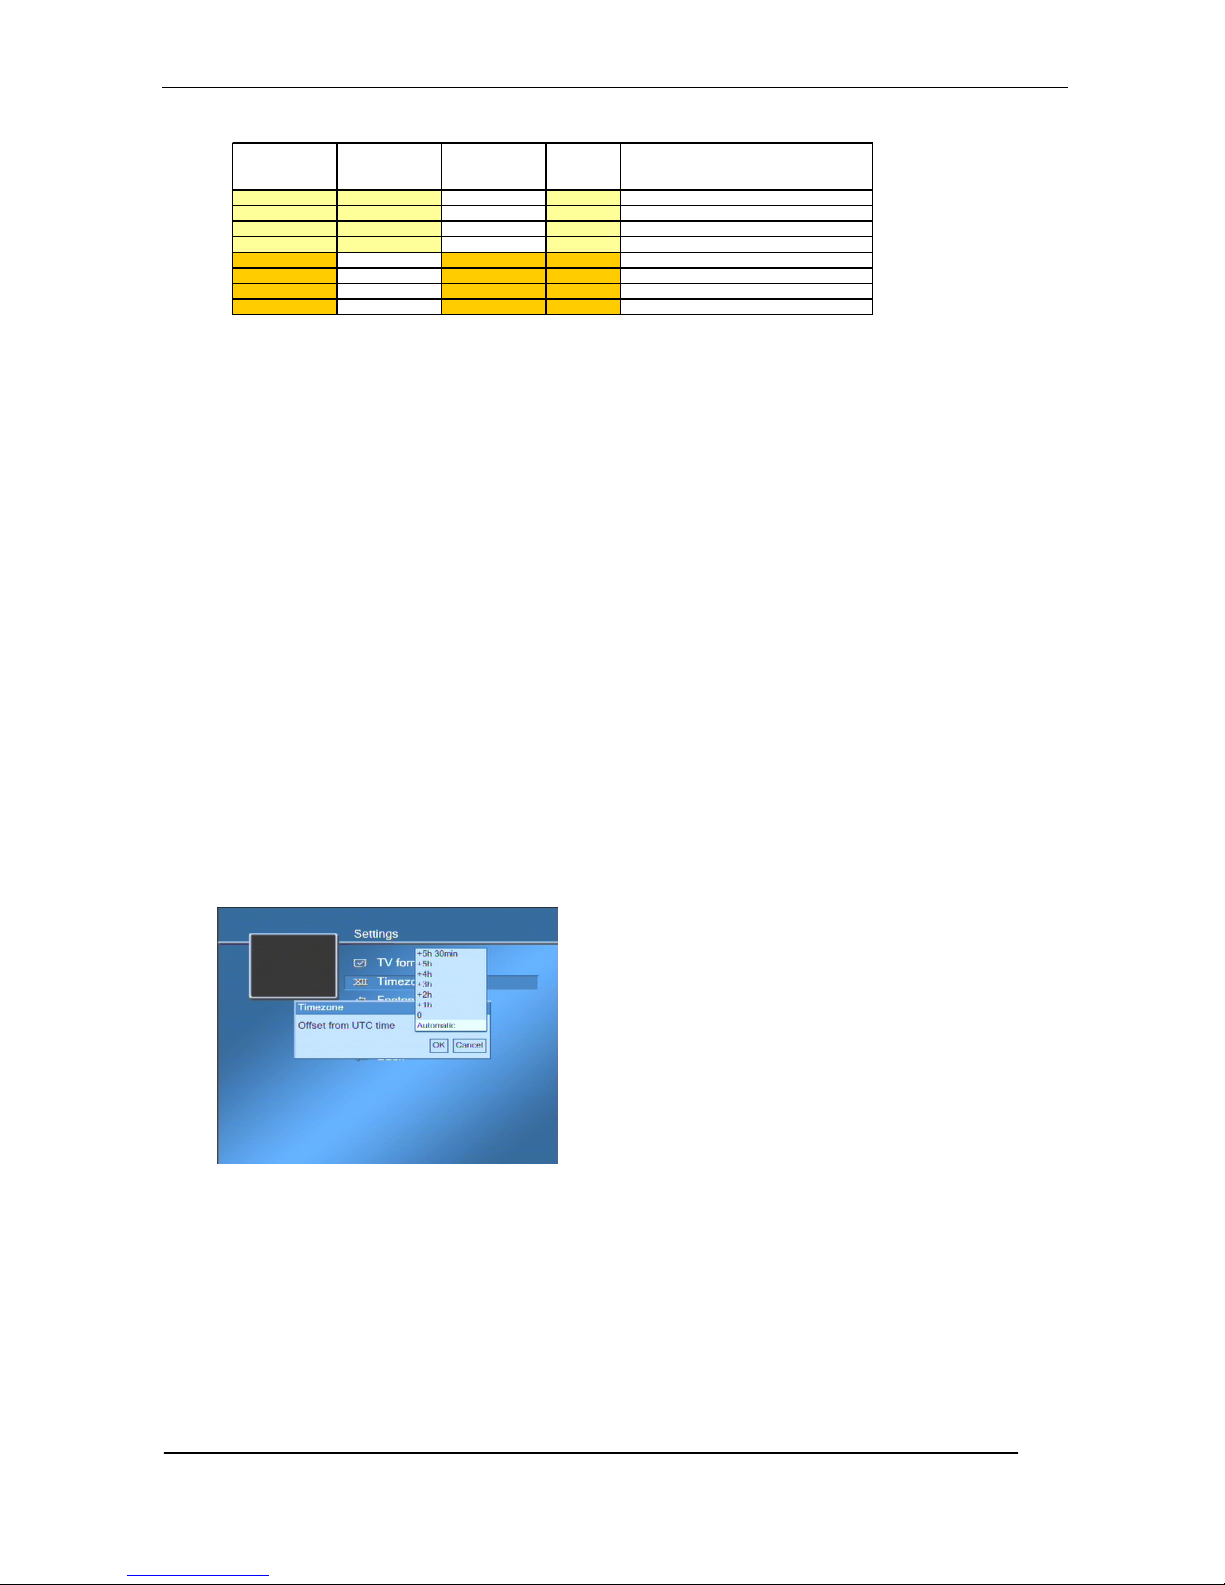
From the main menu, select SETTINGS, followed by TIMEZONE. Highlight the offset box and select the offset
from UTC (Universal Time Clock, the same at GMT). See Figure 43.
NOTE: Normally you do not want to set the time zone manually, as the receiver will select the correct time
zone and adjust the time correctly from your country selection in the installation wizard and from time
information in the network.
Figure 43 – setting the time zone
9.3 Factory settings - deleting all set-up information
It is possible to completely reset the internal configuration data held in the receiver, i.e. back to the condition
in which the unit was delivered.
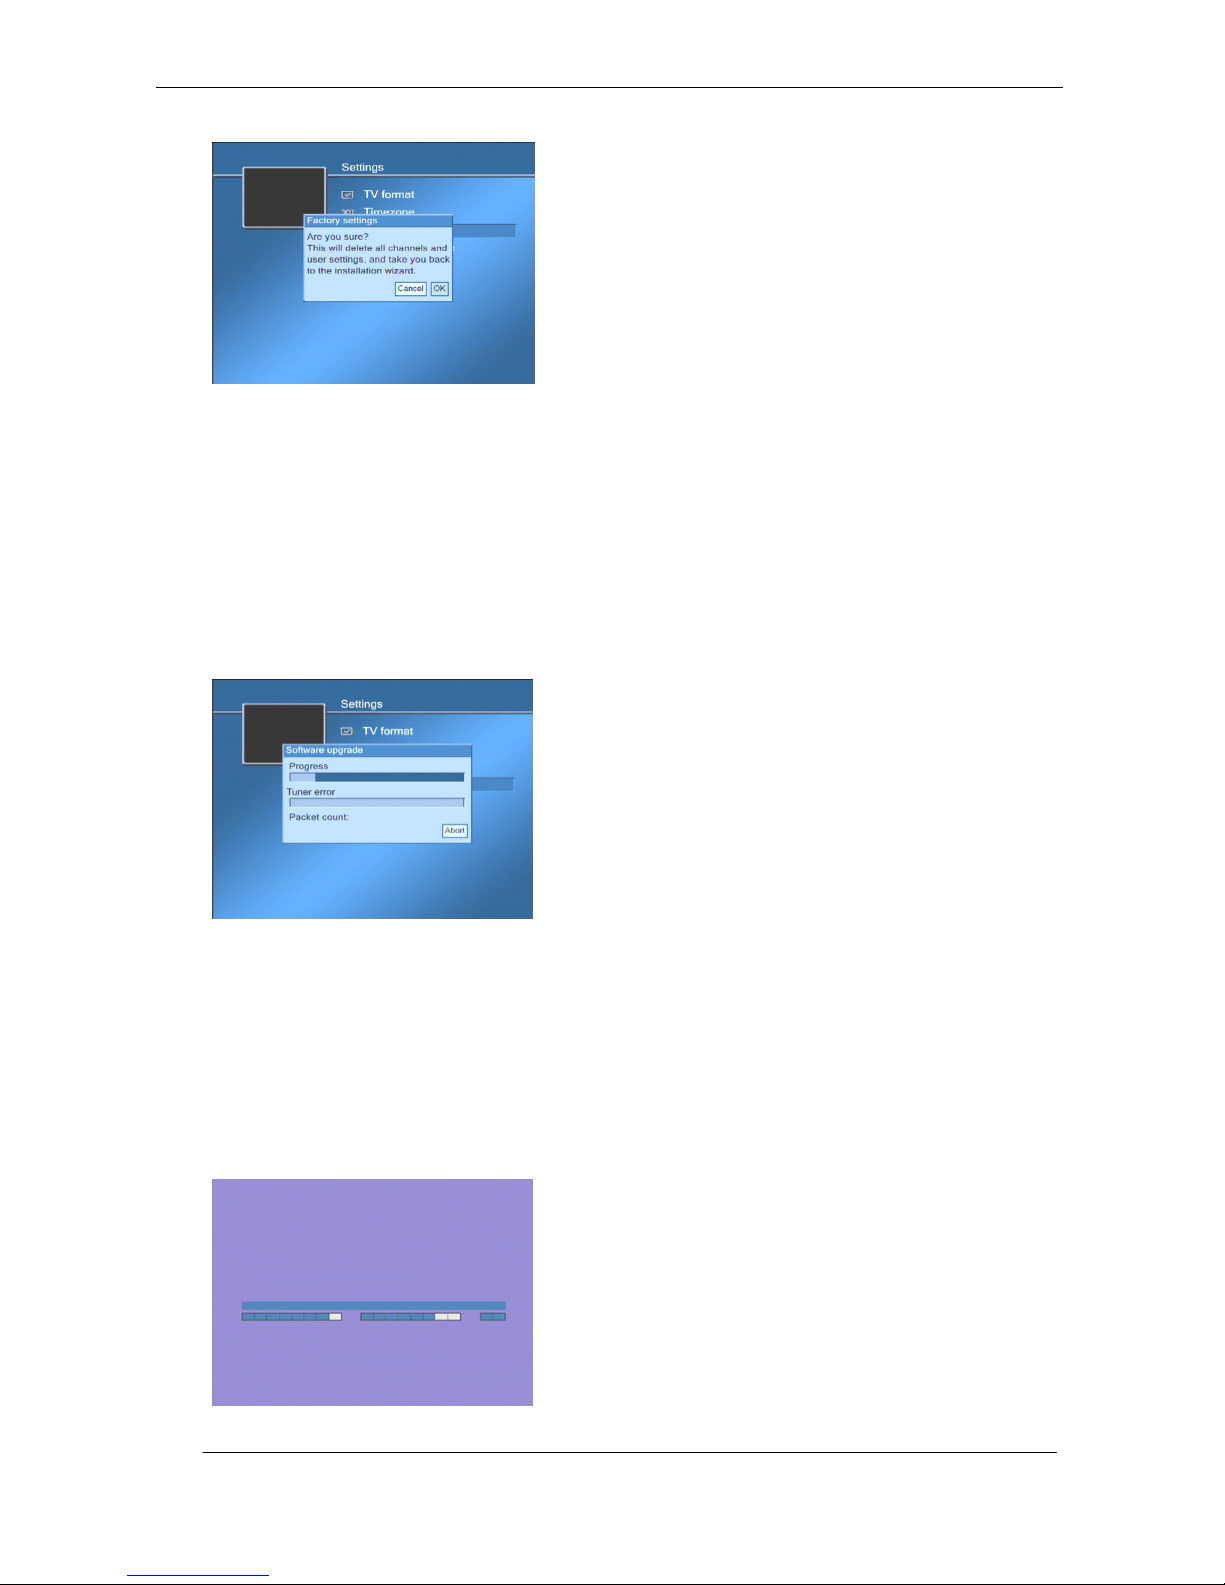
To do this, select SETTINGS from the main menu, then FACTORY SETTINGS. See Figure 44.
Page 32
32
Figure 44 – recall factory settings
You will be asked to confirm your request. Select OK and press OK on the remote control. This process takes a
few seconds, during which you will see the screen below. You will then go into the start-up wizard described in
chapter 4.
9.4 Updating the software
TechniSat Force has a policy of continual product improvement and will from time to time make a new
software available for download. If you leave your receiver in standby overnight, it will check if new software is
available, and when you take the receiver out of standby, you will be notified with an on-screen message if a
new software is available.
To check for new software manually, select SETTINGS from the main menu, then SOFTWARE UPGRADE.
Figure 45 – Software update in progress – Stage 1
The receiver will now begin Stage 1 of the update by downloading the latest software directly from the
network, as shown in Figure 45. This can take anything from half a minute to several minutes (network
dependent).
After the progress indicator is complete, the receiver will restart automatically. This process can take 10-15
seconds.
Another screen will be displayed showing a horizontal bar and no text, as shown in Figure 46 below. Again,
after the progress indicator is complete, the receiver will restart automatically. When the update is complete,
the receiver will display the current TV channel. You can resume using your receiver as normal.
Figure 46 - Software update – Stage 2
Page 33
33
9.5 TV-guide settings
Your receiver is able to check regularly for updated TV Guide information. Information is normally downloaded
from a preset channel. If you for any reason have to change the settings, this can be done in the TV-guide
Configuration menu. The TV-guide downloads information daily at 04.00 am. You can change the time by going
to the main menu choosing SETTINGS and then System maintenance. Click on the Enable TV-guide Update
box. Change the update time if you wish, and confirm with OK.
Note: You can also manually download TV Guide information at any time. From the main menu, choose
SETTINGS and then DOWNLOAD EPG. A progress bar will show move across the screen until the download is
complete.
9.6 System maintenance
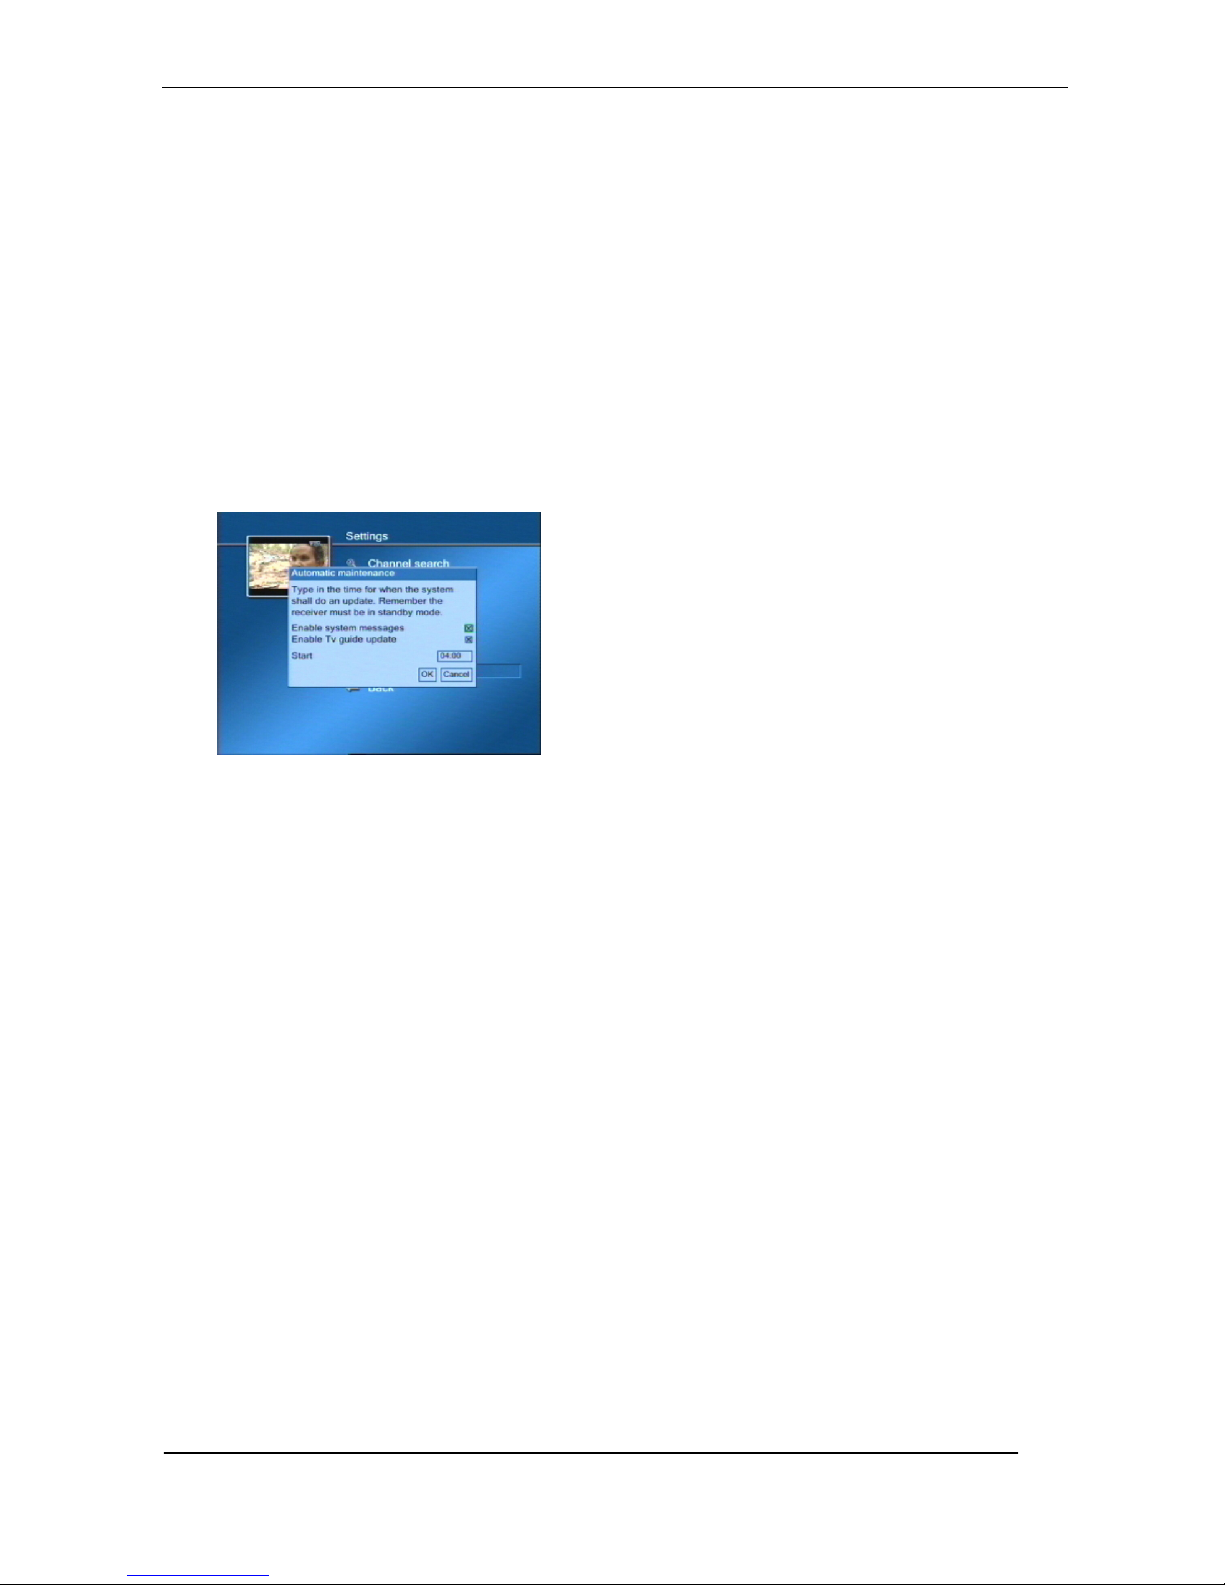
The system maintenance menu allows you to set the time for automatic TV-guide information download (as
described above in section 9.5). If you also want the receiver to check for messages, for example regarding
software updates, tick off the Enable System Messages box in the menu. See Figure 47.
Note: The receiver must be in standby at the configured time in order to check for messages and
download TV-guide information.
Figure 47 – System maintenance
Page 34
34
10 Troubleshooting
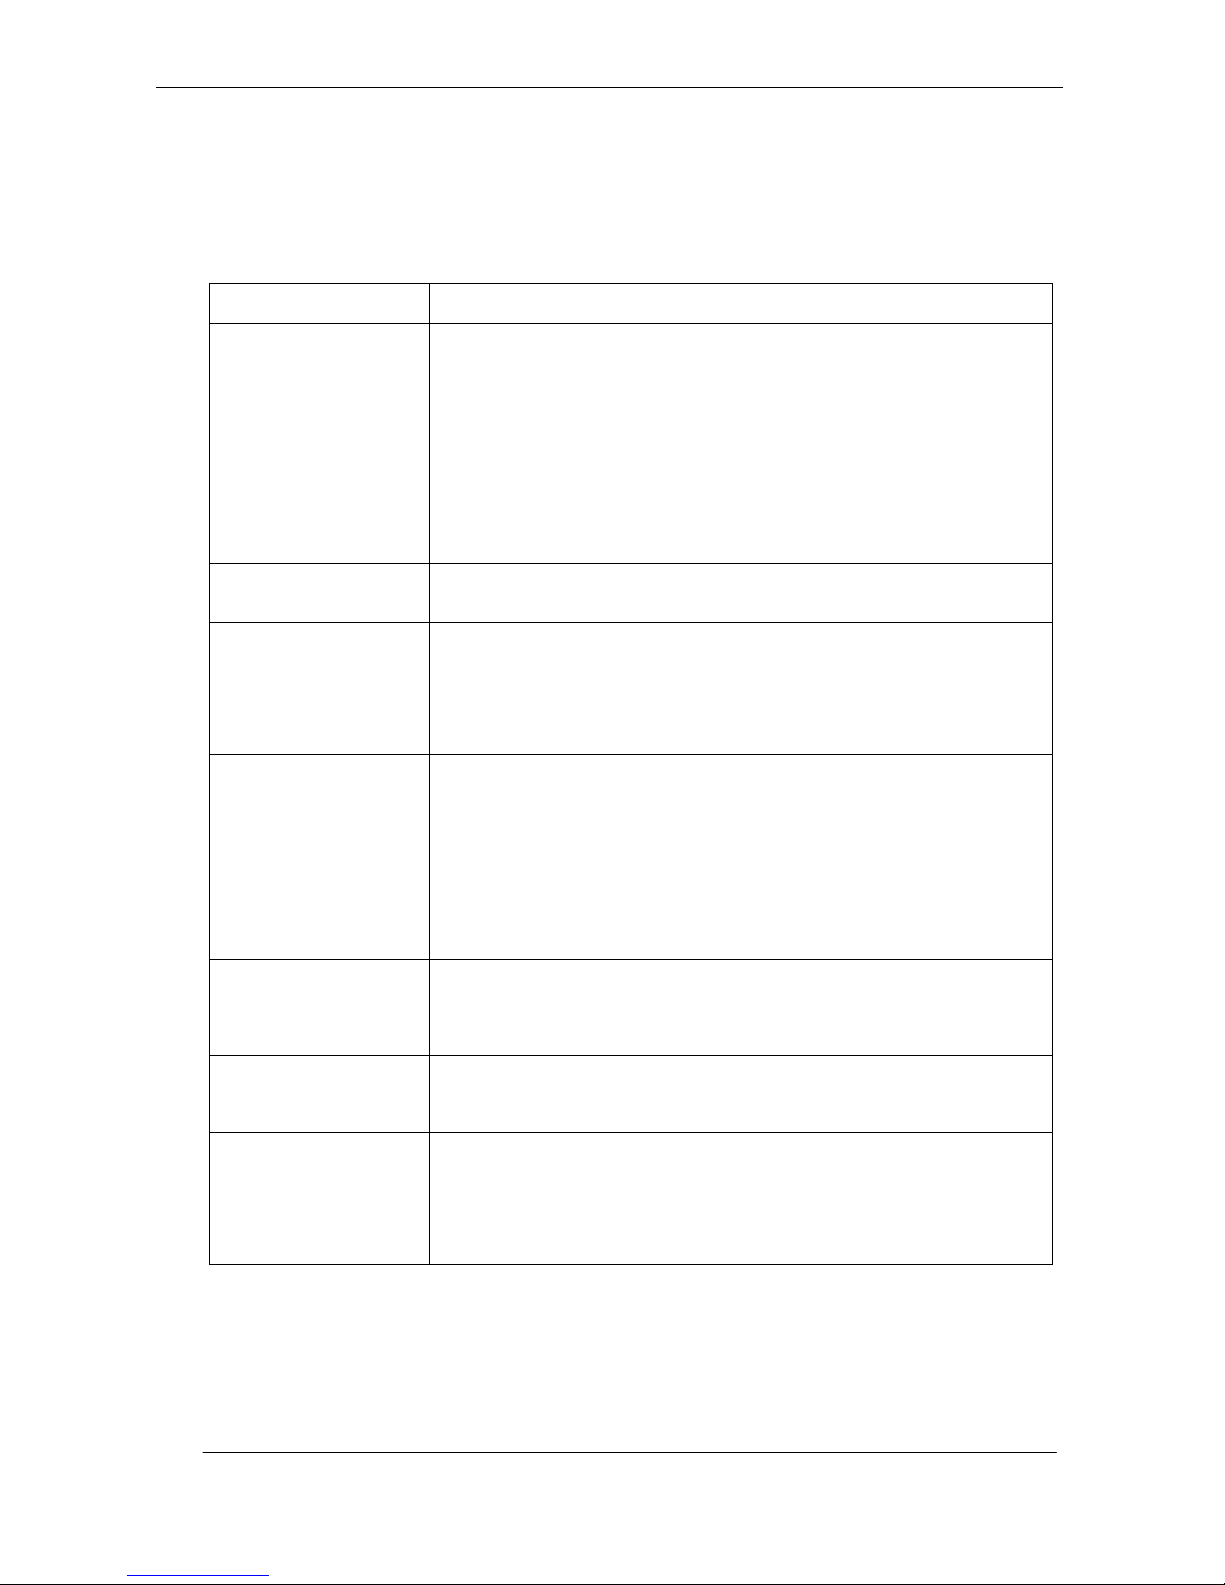
Here are some problems you may run into as a new digital cable user, and some suggestions on how to solve
them on your own.
Problem Self-help
“No access” message on
screen
This message can occur for one of two reasons:
1. Your subscription (viewing card) does not cover the channel you want
to see. Normally, you will find a listing of the channels covered by
your viewing card on your operator’s home page on the Internet.
2. Your card has been removed from the receiver or the receiver has
been turned off or left in standby for a long time, so that your viewing
card needs to be updated. Please leave the receiver on with the card
inserted for up to one hour, to allow your viewing card to receive key
updates from the network.
“No card” message on
screen
Please check that you have inserted your viewing card and that it is inserted
with the gold connectors in and facing downwards.
“No signal” message on
screen
Please check that your antenna cable is connected properly in both ends (LNB
on the receiver and TV OUT in the wall outlet). If this message only occurs for
some of the channels, not all, you should update your channel list by
performing a channel search (see section 7.1).
Note if the decimal point on the display flashes slowly this also indicates that
there is no signal.
No picture on TV Check that the TV is on (not in standby), and that the receiver is on (channel
number shown on receiver’s front display panel).
Check that the SCART lead is connected properly in both ends. Check that
your TV is set to accept video input from the correct SCART connector (note
that different TV vendors handle this differently. Check your TV set’s remote
control for a button labelled “AV” or “TV/AV” or with an illustration of a TV
screen. Press this button a number of times and see if the TV picture appears.
If necessary, find the section in the user guide for your TV that describes how
to select AV input source.
No response on the
remote control
Check Remote is in correct external device mode. See Section 8.7 for details
of how to change the mode.
Replace the batteries of your remote control.
If the batteries are OK, try to restart the receiver turning of the mains supply.
There is no sound on the
TV
Check that the SCART connector is connected properly in both ends. Check
that neither the receiver nor the TV has been muted. Check the volume
control both on the TV set and on the receiver.
Video disturbance
This indicates a weak or noisy signal, or a local noise source, such as a poorly
shielded electric engine.
If there is no obvious local noise source, press the Mini Menu ‘M MENU’ button
on the remote control, then SIGNAL INDICATOR. If the signal indication bar is
not green, you have a weak or noisy signal. Try to replace the antenna cable
with a new one. If the problem persists, contact your network provider.
Page 35
35
11 Specifications
Inputs
DVB Cable
Connector IEC 169-2 Female, 75 ohm
Frequency range: 52-860 MHz (centre frequency)
Channel bandwidth: 8MHz,.
Outputs Video
TV SCART – Component, RGB, S-Video, CVBS/Video
Video SCART – CVBS/Video
Aspect ratio: Auto 16:9/4:3 or locked to 4:3. User choice of display
when 16:9 pictures shown on 4:3 TV and vice versa.
Digital Audio
Serial stereo – SPDIF.
Analogue
audio
Unbalanced, stereo L and R or mono
Nominal output level 500mV RMS at 1kHz for a modulation factor on
transmitter of 54%.
Impedance 600 ohm.
RF Pass
Through
Input signal without processing but with DC blocking.
Physical
Details
Self contained unit, dimensions : 283mm by 129mm by 38mm.
Voltage:200-240V AC, 50/60Hz
Environmental
and Safety
Certified to following for CE marking :
EMC: EN55013, EN61000
Immunity: EN55020
Safety: EN60065
 Loading...