

Page 1
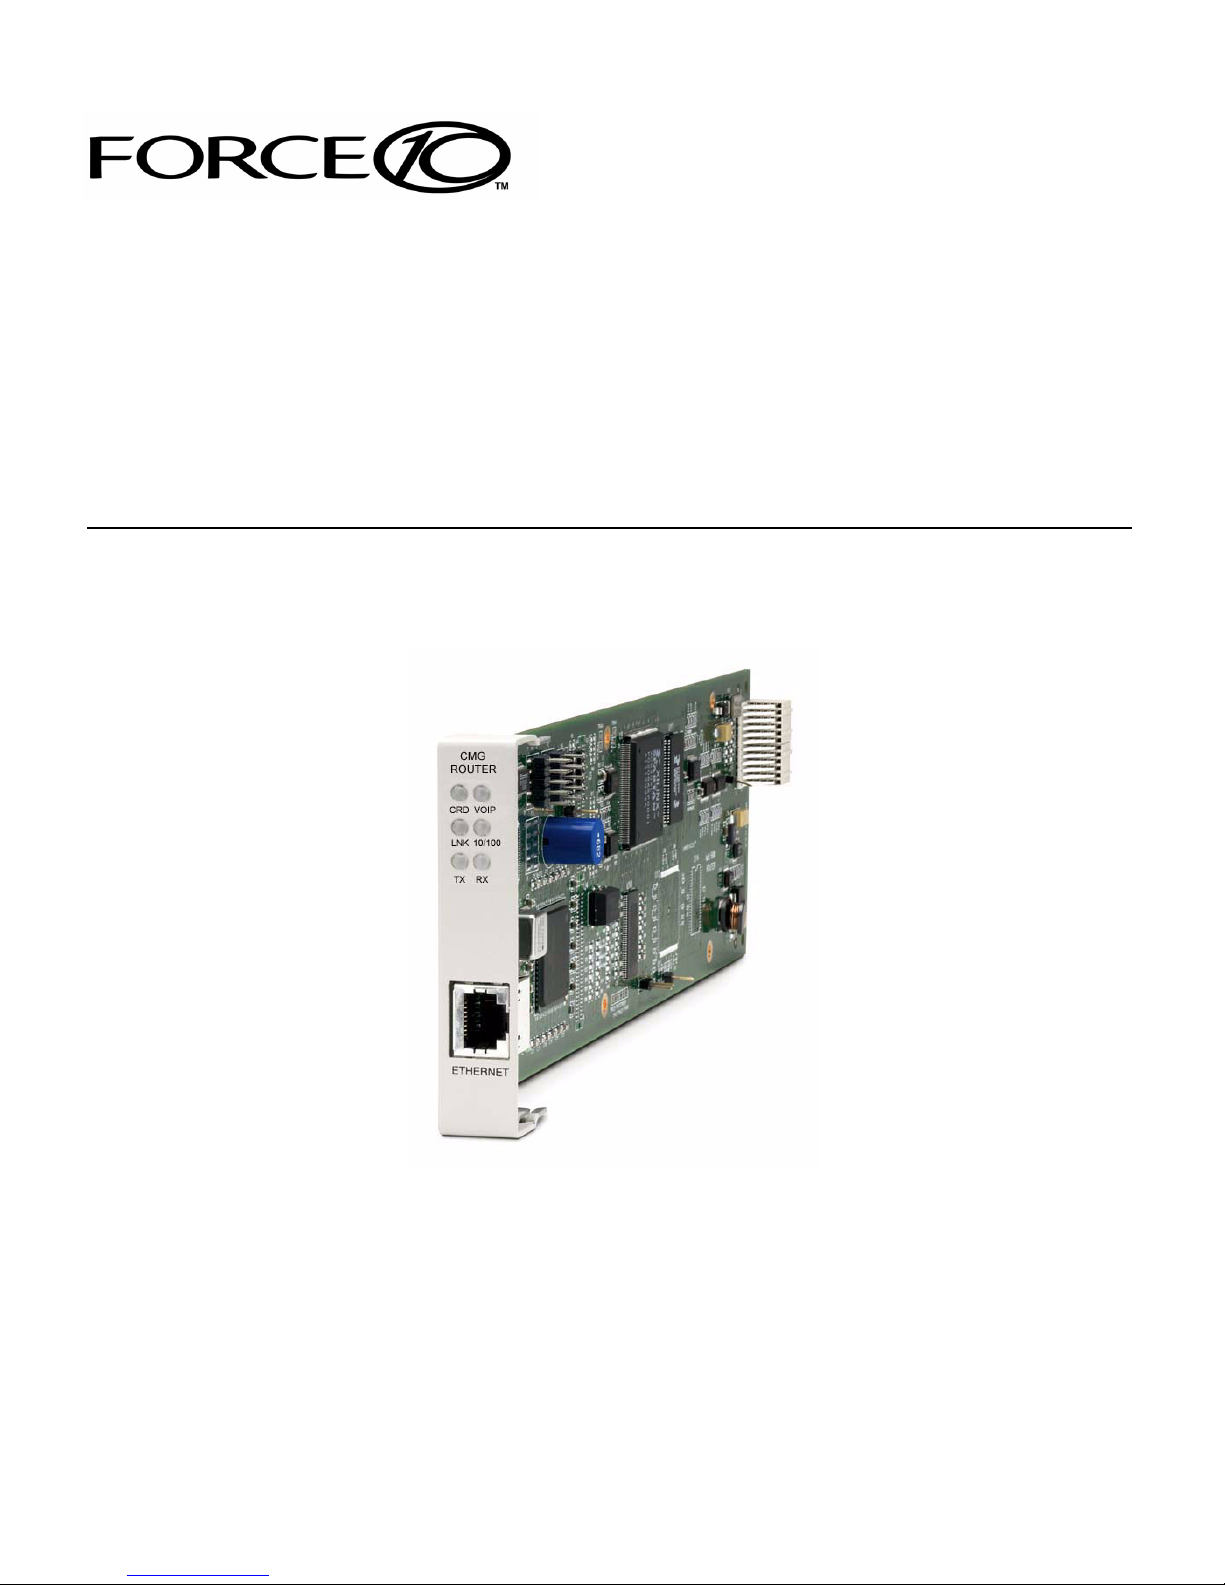
CMG Router
QUICK START GUIDE
Part Number: 002-0142-0210
Product Release: 2.97
August 2009
Page 2

Copyright © 2009 Force10 Networks Inc. All rights reserved.
Force10 Networks
®
reserves the right to change, modify, revise this publication without notice.
The hardware and software described herein are furnished under a license or non-disclosure agreement. The
hardware, software, and manual may be used or copied only in accordance with the terms of this agreement.
It is against the law to reproduce, transmit, transcribe, store in a retrieval system, or translate into any medium
- electronic, mechanical, magnetic, optical, chemical, manual, or otherwise - any part of this manual or
software supplied with the product for any purpose other than the purchaser’s personal use without the
express written permission of Force10 Networks Inc.
Trademarks
Adit and Force10 Networks are registered trademarks of Force10 Networks, Inc. Force10 and the Force10
logo are trademarks of Force10 Networks, Inc. or its affiliates in the United States and other countries and are
protected by U.S. and international copyright laws. All other brand and product names are trademarks or
registered trademarks of their respective holders.
Statement of Conditions
In the interest of improving internal design, operational function, and/or reliability, Force10 Networks
reserves the right to make changes to products described in this document without notice. Force10 Networks
does not assume any liability that may occur due to the use or application of the product(s) described herein.
Corporate Contact Information:
Force10 Networks, Inc.
350 Holger Way
San Jose, CA 95134-1362
Phone: +1 (866) 571-2600 or +1 (408) 571-3500
www.Force10Networks.com
Supporting Software Versions:
CMG Router Release 2.97
Adit 600 Controller Release 10.1.1
Technical Assistance Center:
E-mail: [email protected]
Phone: (US) 866-887-4638
Phone (International/Direct): 1-707-665-4355
Page 3

QUICK START GUIDE
In this Guide
Installation
Basic Setup
Basic VoIP Setup
Fax and Modem Setup
PPP Internet Connection and Public IP Address
Routing
Frame Relay Internet Connection and Public IP
Address Routing
Internet Connection using PPP, NAT/PAT and
Firewall Filters
Internet Connection using NAT and Static NAT
Addresses
Back-to-Back with PPP
Back-to-Back with Multi-Link PPP
Back-to-Back with Frame Relay
Page 4

Quick Start Guide
Installation
Installation
Installation of the CMG Router card into the Adit 600 chassis:
z Unit can be on or off
z CMG Router card will work in any slot
z Slide card into slot until fully seated
z CMG Router has completed its boot cycle when CRD light is solid
NOTE: Configuration can be done with CLI commands from the Adit 600
controller or with the Router Menu-Driven Software.
Basic Setup
Command Description
set {ds0-addr} type data Confirm DS0 is set to type data.
ds0-addr = {slot:port:channel} of DS0
Example: set a:1:1-24 type data
connect {slot:port:trunk}
{slot:port:channel}
set {router-addr} proxy Disable/enable router proxy.
set {slot:port} up Set Router LAN as In-Service. Example: set 6:1 up
telnet {router_card-addr} Telnet to Router card.
Local and Remote Profile Setup
reset
Cross-connect T1 to router card.
Example: connect a:1:1-24 6:1:1 (router in slot 6)
router-addr = {slot:port}| of router card.
Example: set 6:1 disable.
router_card-addr = {slot} location of router card
Example: telnet 6 (if earlier than 3.0 release {slot:port} must
be used)
For most router configuration changes to go into effect,
the router must be reset. Best practice is to always reset
the router after making configuration changes.
4 CMG Router - Release 2.97
Page 5
Quick Start Guide
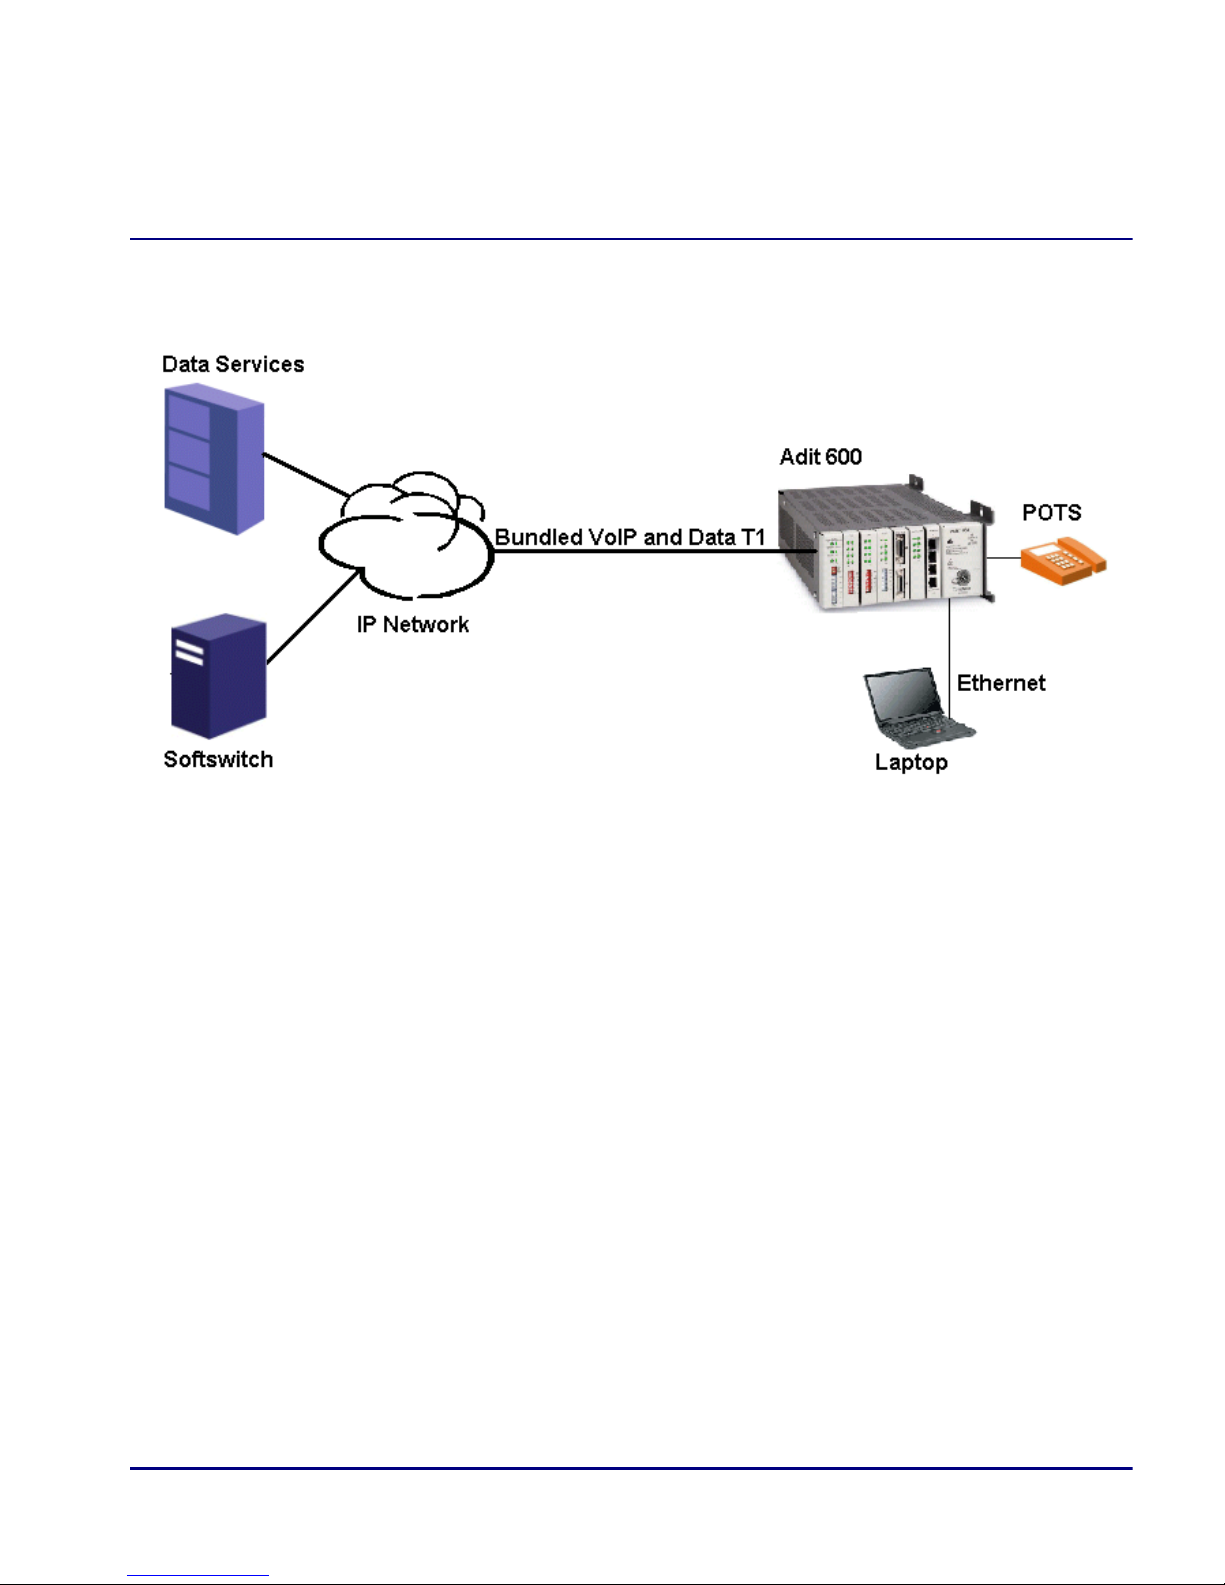
Adit 600 Implementation in VoIP Application
Basic VoIP Setup
Basic VoIP Setup
This example is with an Adit 600 with the following cards installed:
z Controller Card (4.0 or higher)
z CMG Router Card, 1.0 or higher (example - slot 6)
z 3 FXS Cards, 1.03 or higher (example - slots 1, 2 and 3). Cards are configured for
Loop Start POTS lines.
Overview
z Adit 600: the DS0s supporting the bundled service delivery will be cross-
connected to the CMG card
z Adit 600: the CMG voice channels are connected to the FXS channels
z Adit 600 CMG: the VoIP parameters and data parameters are configured
z Adit 600 uses endpoint prefix "aaln" and endpoint suffix "1-48" i.e. channel 1
would be suffix "1", channel 5 would be suffix "5"
CMG Router - Release 2.97 5
Page 6

Quick Start Guide
Basic VoIP Setup
Command Description
set local off
disconnect a:1
disconnect 1
disconnect 2
disconnect 3
disconnect 6
set a:1 up
set a:1 fdl none
set a:1 lbo 1
set a:1 framing esf
set a:1 id "F10 DS1# A:1"
set a:1 linecode b8zs
set a:1 loopdetect on
Set the controller to use CLI commands
Disconnect all connections to the T1-1 on the
Controller (slot a)
Disconnect all connections to the FXS card in slot 1
Disconnect all connections to the FXS card in slot 2
Disconnect all connections to the FXS card in slot 3
Disconnect all connections to the router card in slot 6
Set the T1 on the controller up
Disable FDL output messages on the DS1
Sets the DS1 Line Build Out to 0-133 feet
Sets the DS1 to Extended Superframe (ESF) framing
Sets the DS1 ID to "F10 DS1# A:1"
Sets the DS1 line coding to B8ZS.
Enables the detection of CSU loop code on the DS1
set a:1:all type data
set a:2 down
set clock1 a:1
set clock2 internal
set a:2 up
connect a:1:1-24 6:1:1
connect 6:1:1:1-8 1:1-8
connect 6:1:1:9-16 2:1-8
connect 6:1:1:17-24 3:1-8
set verification off
Set the T1-1 of the Controller, Type to Data
Set the T1-2 as Out-of-Service
Set primary master transmit clock source
Set secondary clock source
Set the T1-2 as In-Service
Connect Data DS0s to the CMG card
Connect CMG voice ports to FXS ports
Connect CMG voice ports to FXS ports
Connect CMG voice ports to FXS ports
Disable verification prompts
6 CMG Router - Release 2.97
Page 7
Quick Start Guide
Basic VoIP Setup
Command Description
set 6:1:1 encapsulation ppp
set 6:1:1 up
set 6:1 ip address {ip-addr}
{mask}
set 6:1 up
add 6 "RemoteUnit" static ip
network {ip-addr} {mask}
{next-hop-ip-addr} 1
set 6 "RemoteUnit" trunk 1
set 6 "RemoteUnit" up
set 6 log last detail
set 6 voip sdpaddress 11.168.1.1
Set Router trunk encapsulations to Point-to-Point
Protocol.
Set Router trunk as In-Service
Set Router IP Address and Subnet Mask
Set Router as In-Service
Set router WAN static ip network. Metric set as 1,
normally indicates a direct network
Set router WAN trunk to port 1
Set router WAN as In-Service
Set the router log to add new entries and display the log
in detail
Set the address value to be used for the origin
and connection lines in the SDP. (May be required
depending on how the LAN and WAN are configured.)
reset 6
Reset the CMG card to apply all configurations
CMG Router - Release 2.97 7
Page 8

Quick Start Guide
Fax and Modem Setup
Fax and Modem Setup
To configure the fax and modem bypass, the following is required.
z Adit 600, release 8.0
z CMG Router, release 2.3 with G.729 feature enabled (software keyed)
The following will configure the Fax and Modem
1. Telnet into the Router
> telnet 4
Connected.
Escape character is '^]'.
Attempting Force10 Networks CMG connection...
CMG [Wed Jan 2, 2002 0:05:05] (<CR> to login)
Password >******
Select a terminal type...
(<space> or <back-space> to toggle, <CR> to accept)
Terminal: <Generic>
8 CMG Router - Release 2.97
Page 9
Quick Start Guide
Main
Menu
Profile
Directory
Window
Fax and Modem Setup
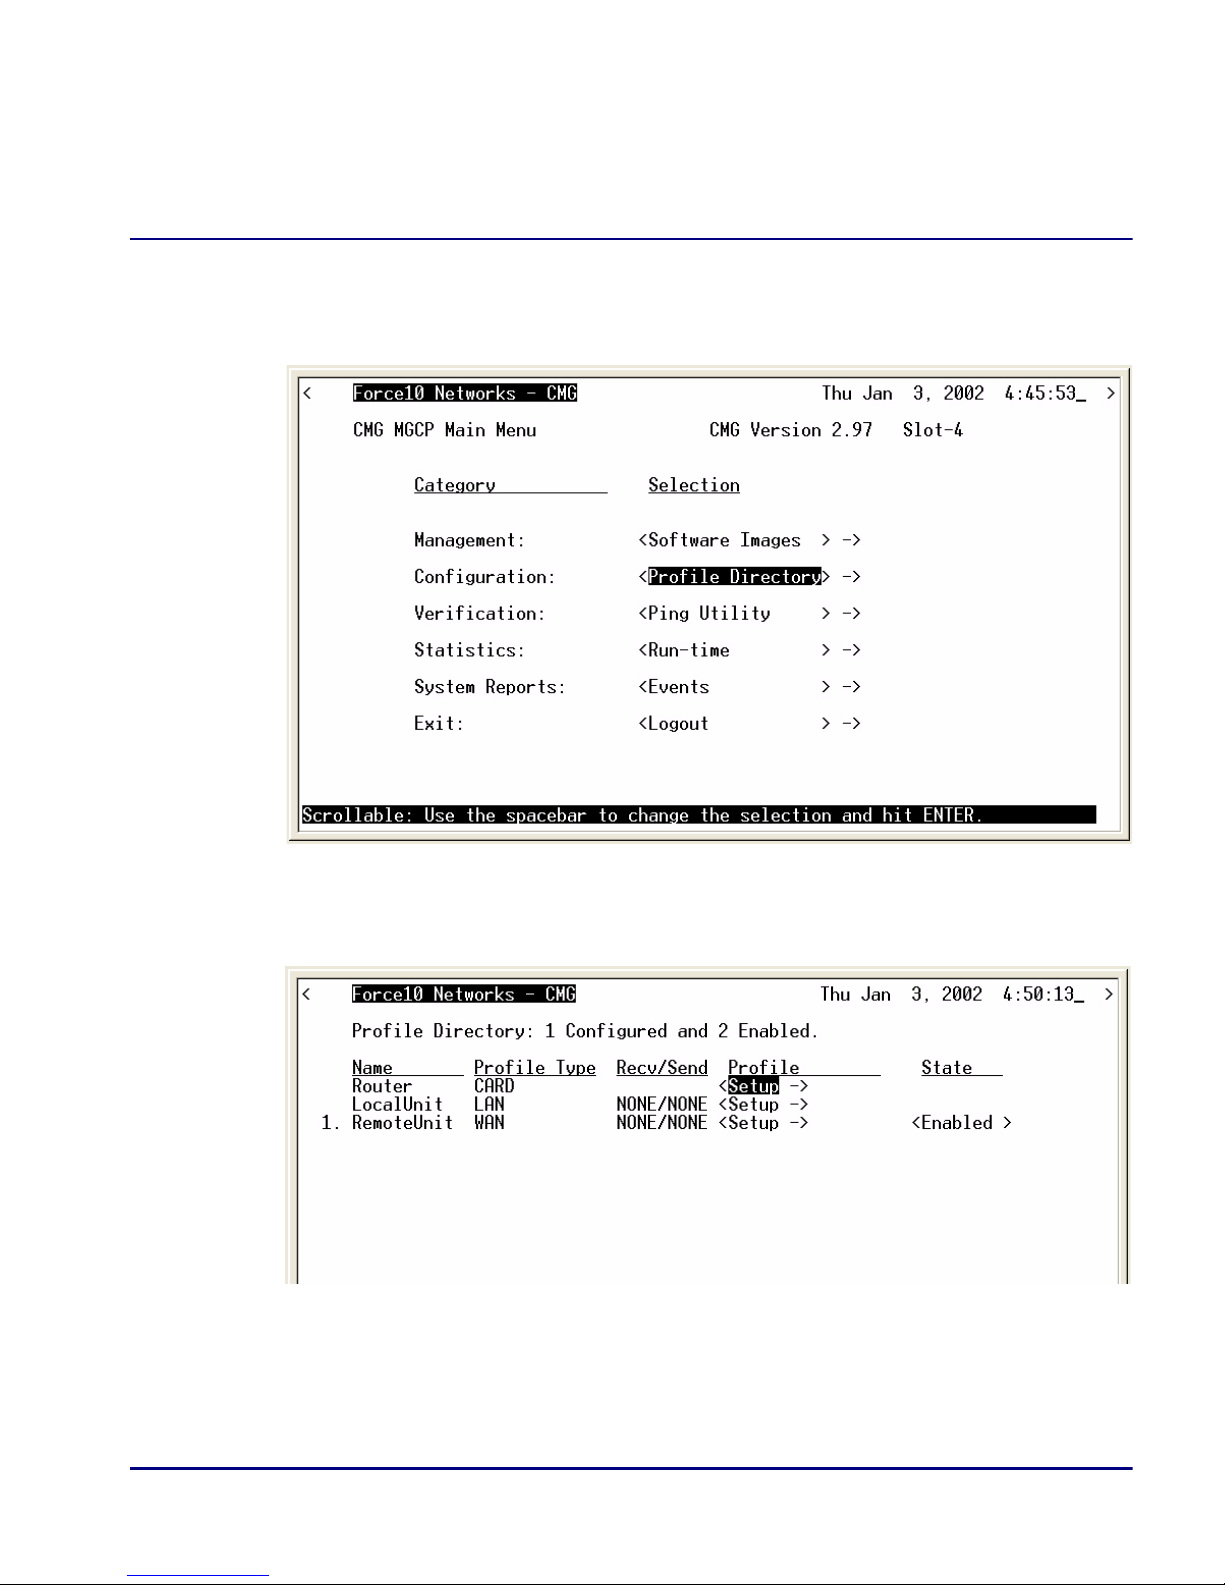
2. Select Configuration: <Profile Directory> from the Main Menu, and select
[E
NTER].
3. Select Router CARD <Setup -> and select [E
CMG Router - Release 2.97 9
NTER].
Page 10
Quick Start Guide
Fax and Modem Setup
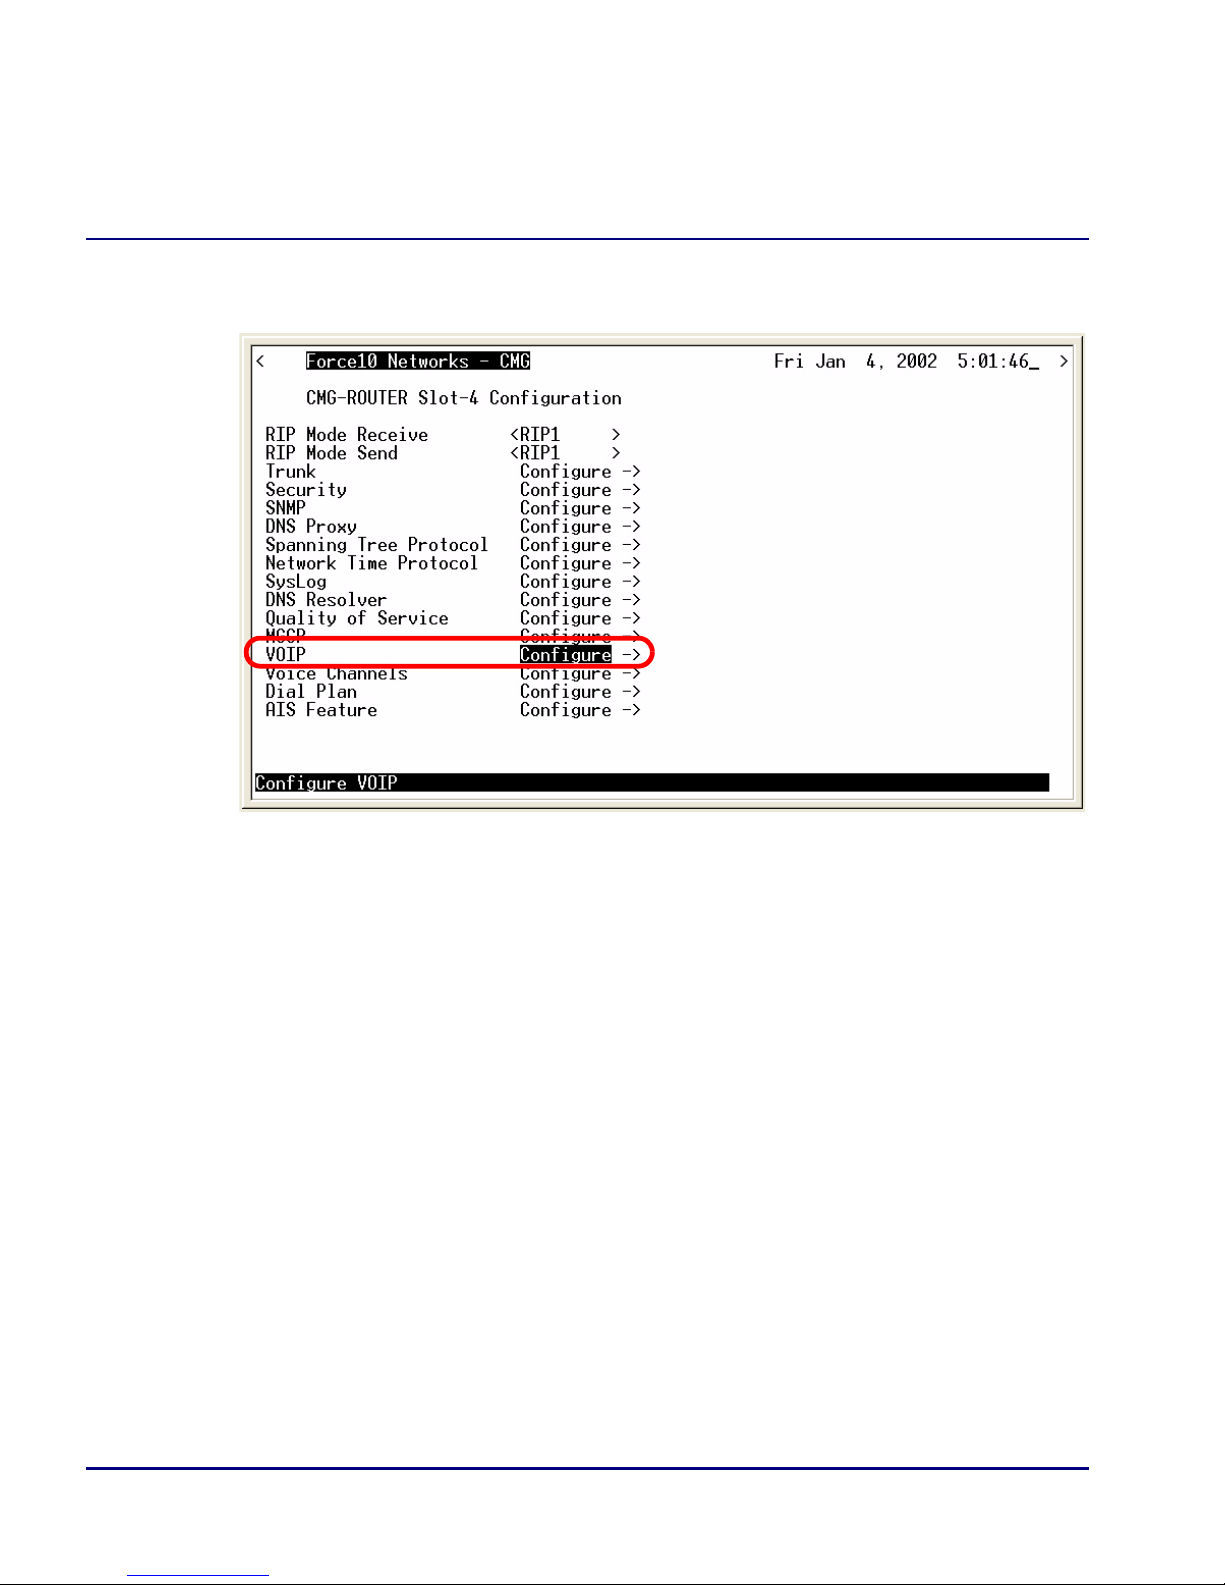
4. Select VOIP Configure -> and select [ENTER].
10 CMG Router - Release 2.97
Page 11
Quick Start Guide
Fax and Modem Setup
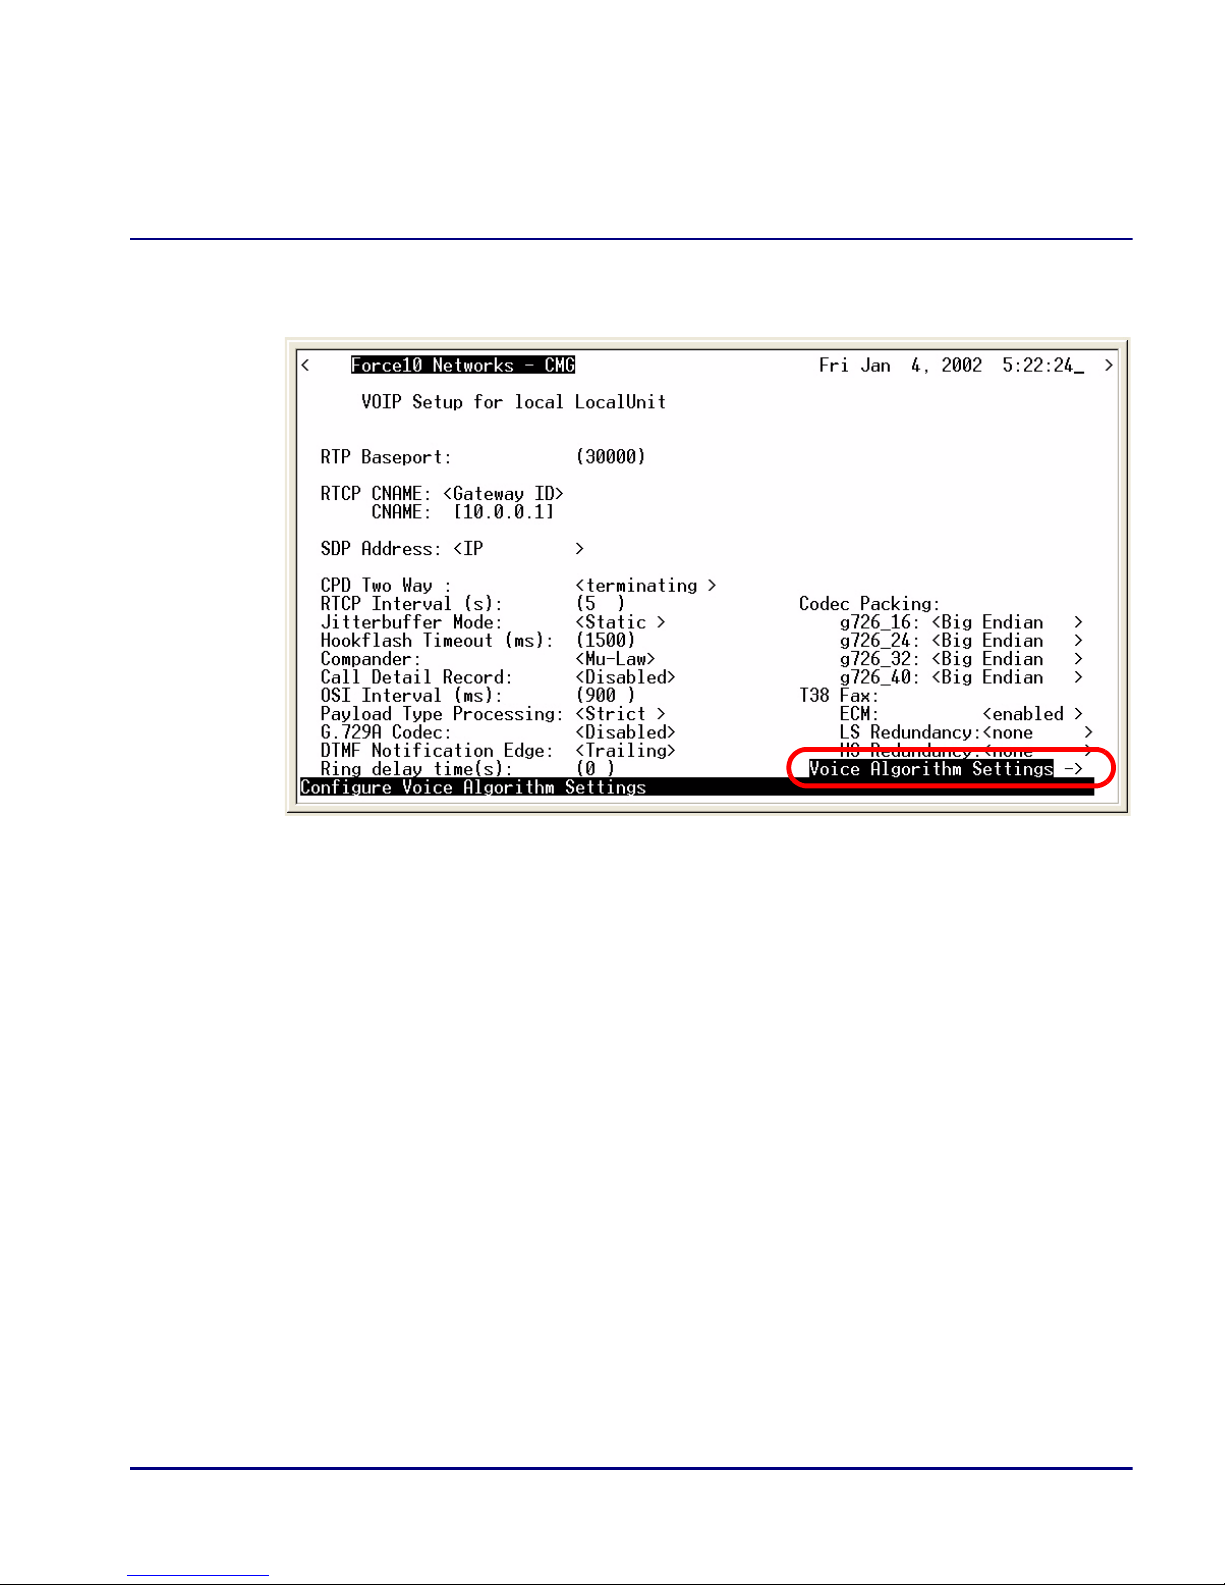
5. Tab to Voice Algorithm Settings - > and select [ENTER].
CMG Router - Release 2.97 11
Page 12
Quick Start Guide
Fax and Modem Setup
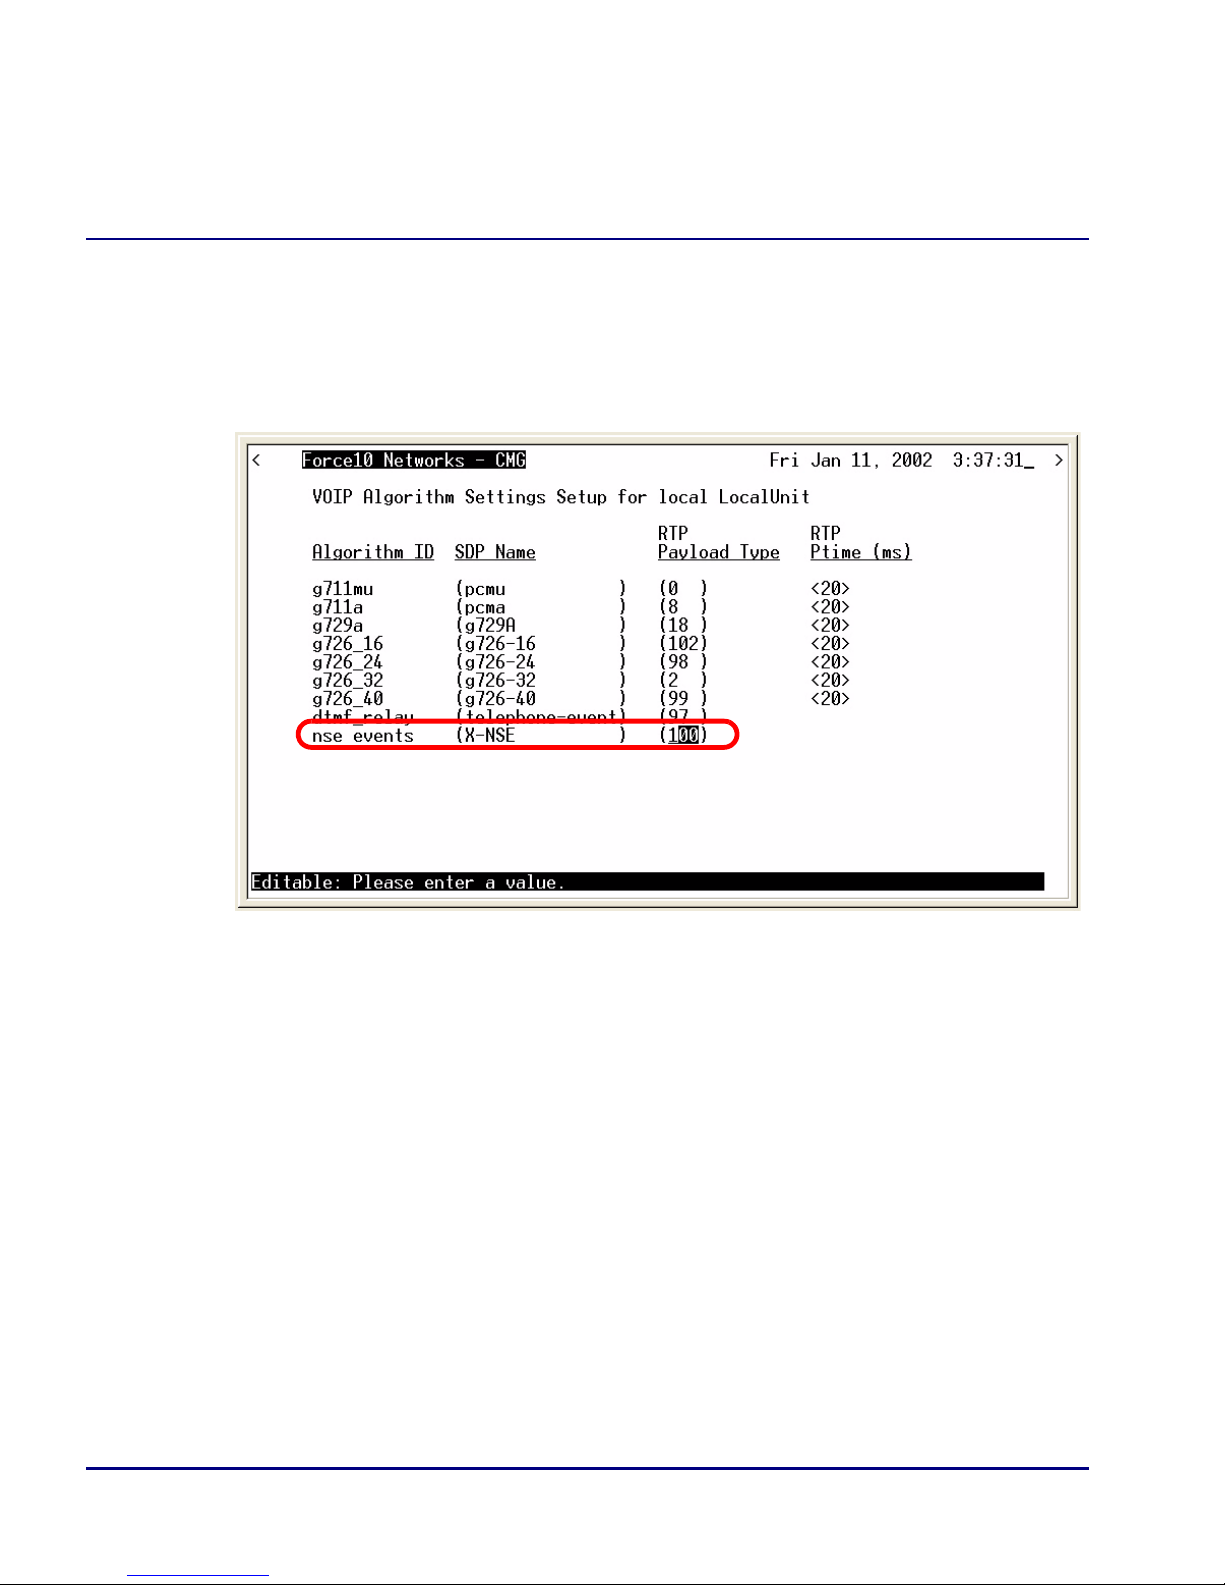
6. Verify that the RTP Payload type for nse events is set to a value that other
gateways are using. For most applications this is 100, which is the default
setting. Select [E
any changes.
SC] to exit this window, select <YES> and [ENTER] to save
12 CMG Router - Release 2.97
Page 13
Quick Start Guide
Fax and Modem Setup
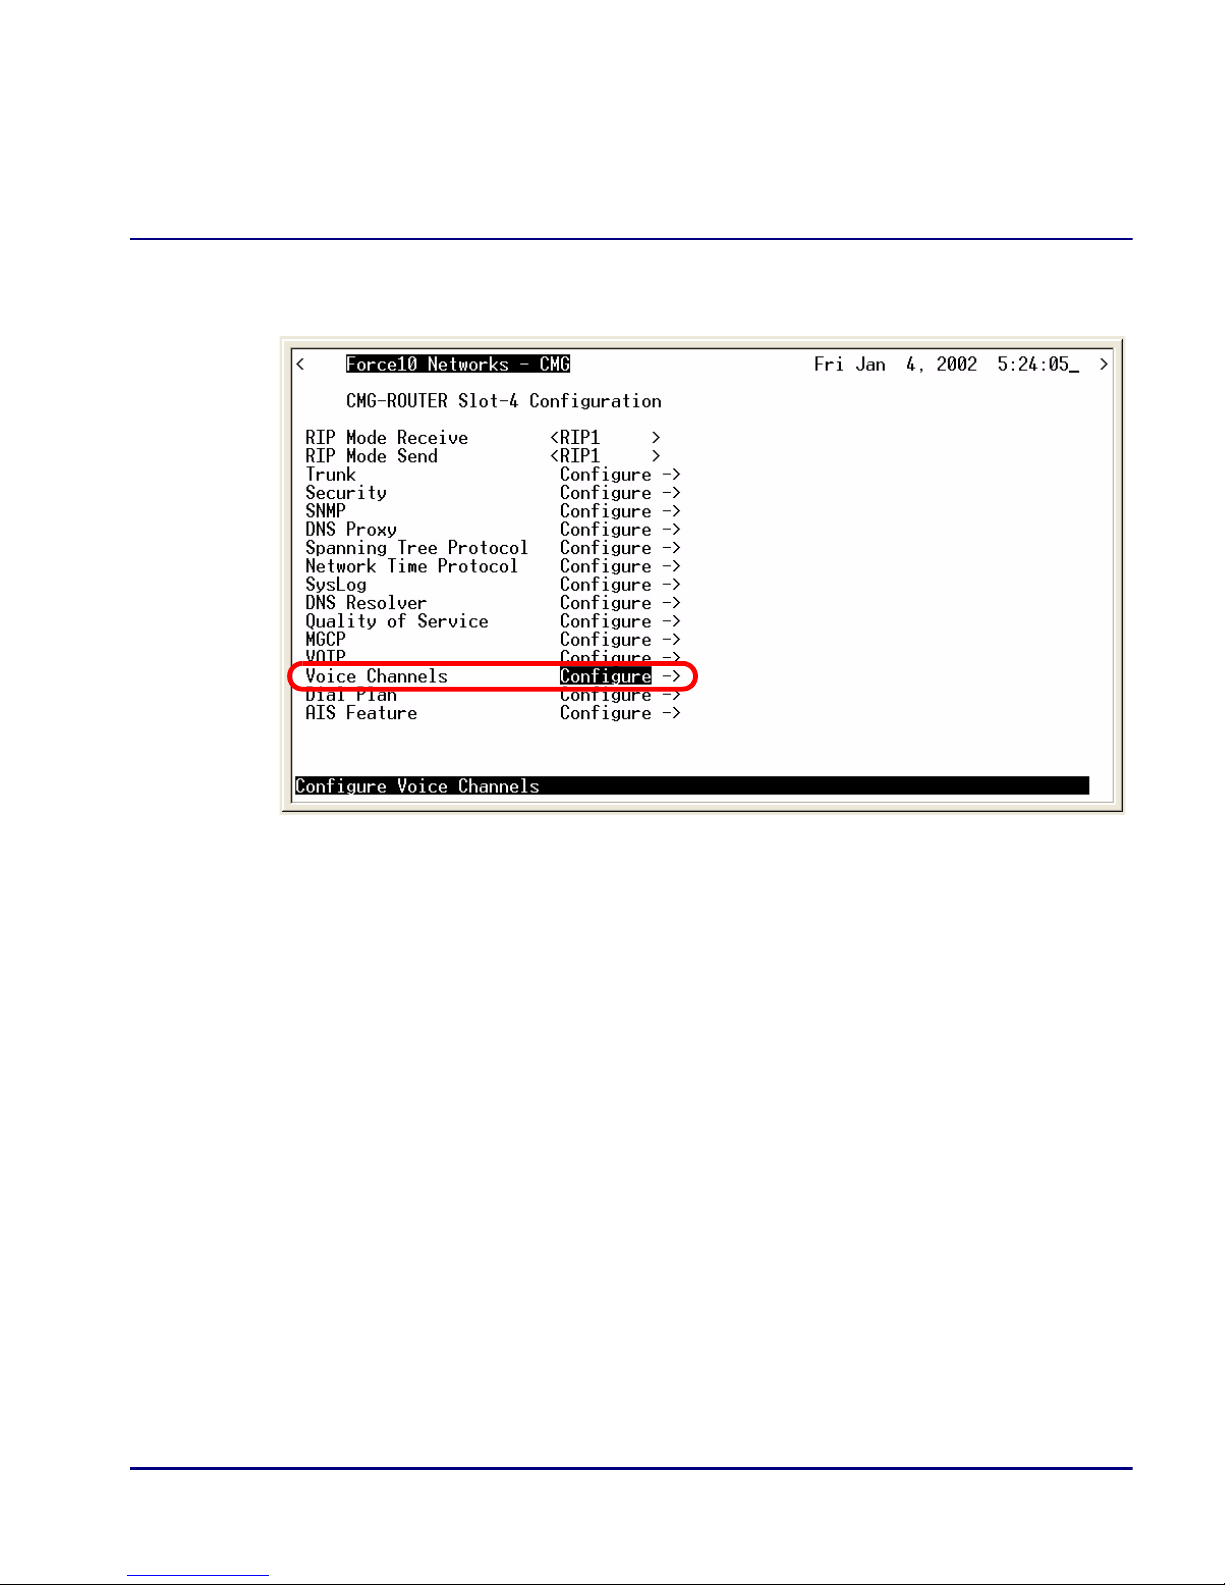
7. Select Voice Channels Configure -> and select [Enter].
CMG Router - Release 2.97 13
Page 14
Quick Start Guide
Fax and Modem Setup
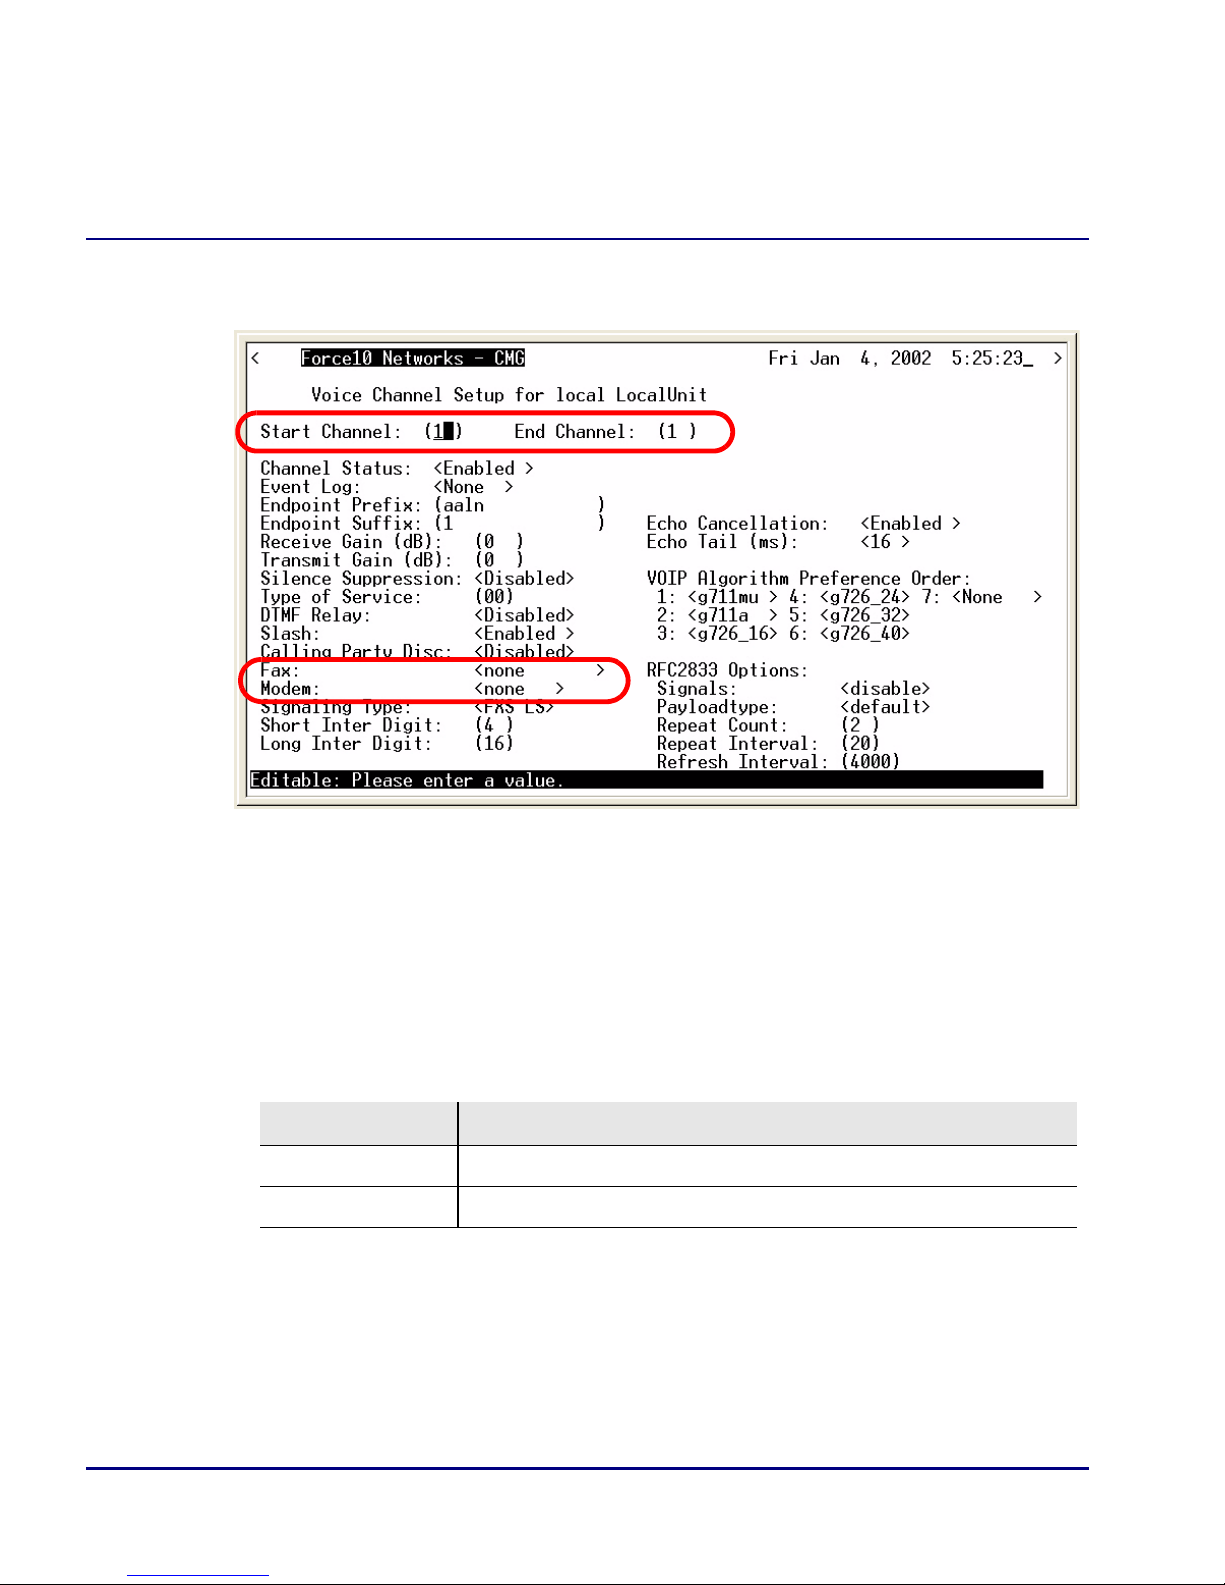
8. Select a channel or range of channels to configure.
9. Set the Fax setting to one of the four Fax options:
<none> - a fax call would be treated as a normal voice call. Default.
<bypass> - will cause the line to transmit in G.711 mode, with silence
suppression disabled, on detection of Fax tones.
<T38> - will use T.38 relay if no more than 5 channels are already using T.38
at the same time. Note: there is a limit of six simultaneous T.38 sessions.
<T38reserved> - this line will always be able to use T.38 relay.
Card Maximum # of Channels configured for T.38 Reserved
CMG, CMG-01 6 Channels
CMG-02 12 Channels
10. Set the Modem setting to one of the two Modem options:
<none> - a modem call would be treated as a normal voice call. Default.
<bypass> - upon detection of a modem tone, the line will switch to G.711
mode, with echo cancellation and silence suppression disabled.
14 CMG Router - Release 2.97
Page 15
Quick Start Guide
Fax and Modem Setup
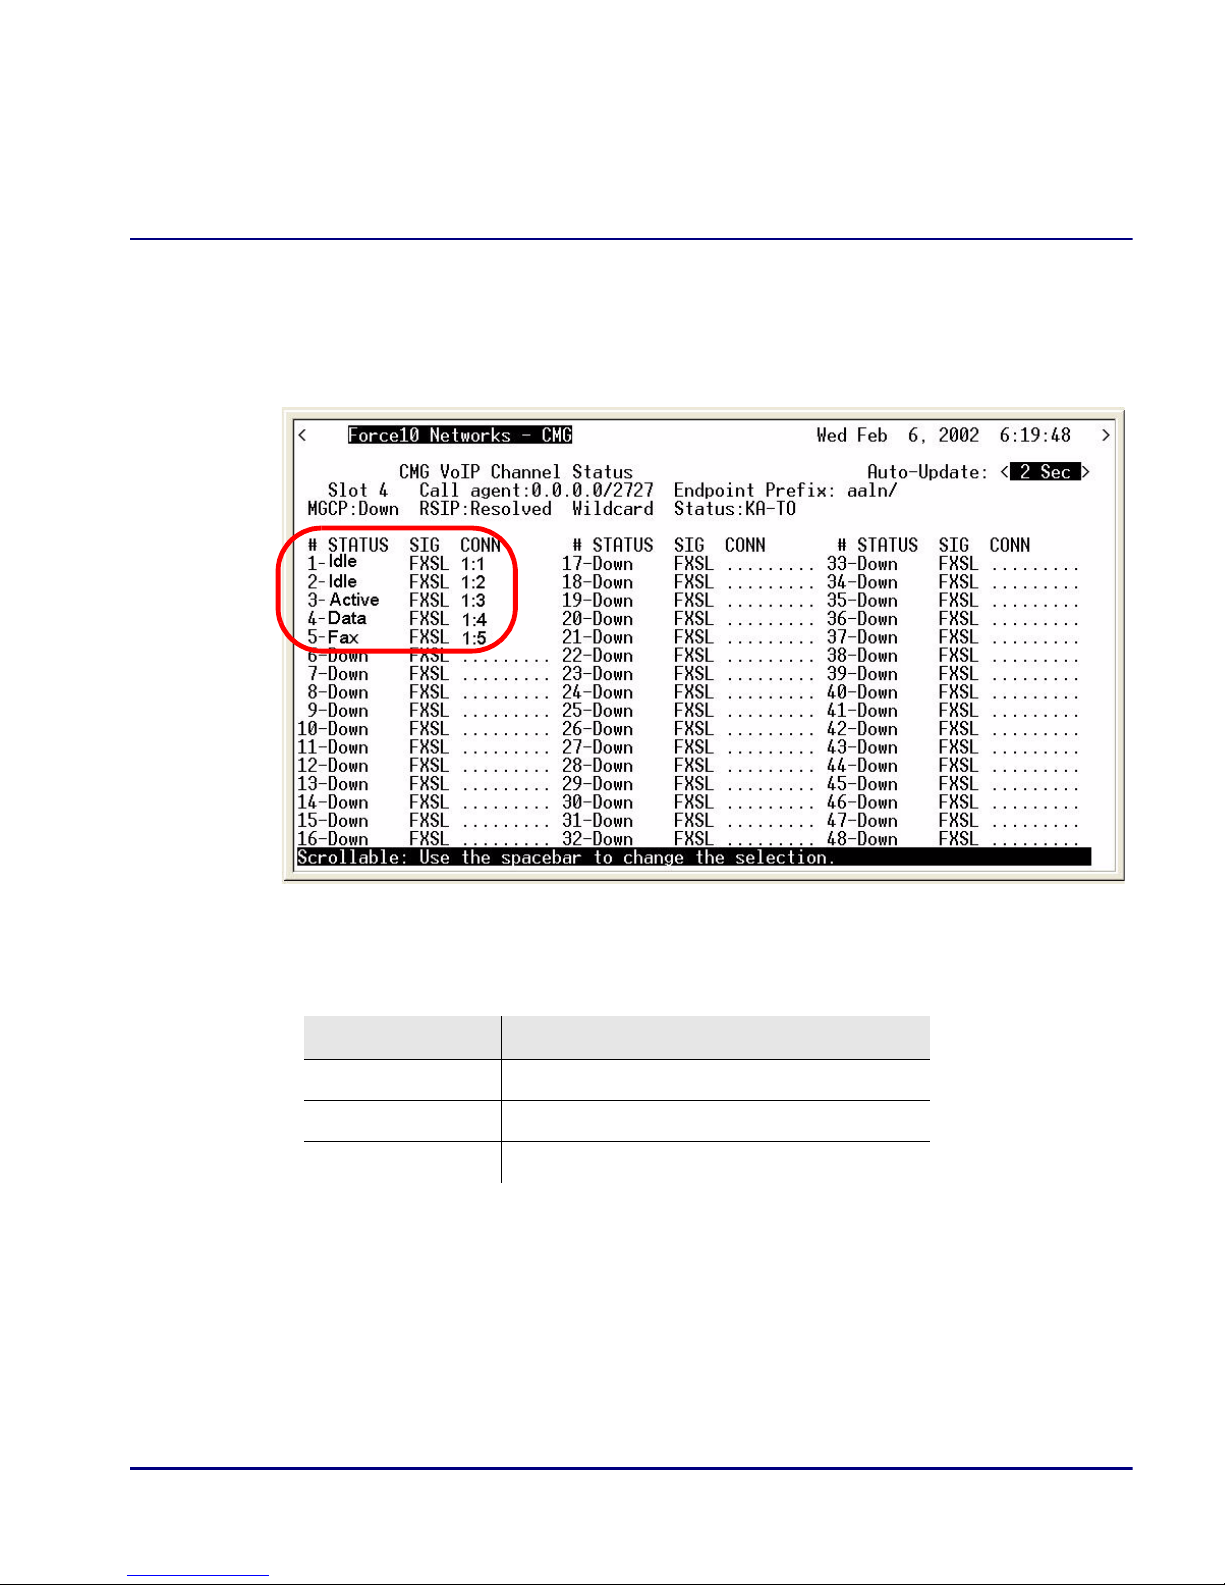
11. After the configuration is complete, check the channel status.
On the Main Menu, select Statistics: <VoIP Channel View> and [E
NTER].
12. Press [E
NTER]. The VoIP Channel View window will display.
In the status field, the following can be displayed, regarding Fax and Modem
settings:
Display Setting
Fax Channel is set to T.38
Data Channel is set to Modem Bypass
Active Channel is set for a Voice call
CMG Router - Release 2.97 15
Page 16

Quick Start Guide
PPP Internet Connection and Public IP Address Routing
PPP Internet Connection and
Public IP Address Routing
Router in Slot 1
ISP Router that provides the Internet connection.
Command Description
set clock1 a:1 Set primary master transmit clock source
set 1 default Set Router to default settings
disconnect a:1 Disconnect all connections to the T1 on the
Controller (slot a)
disconnect 1 Disconnect all connections to the router in slot 1
set a:1:all type data Set the T1-1 of the Controller, Type to Data
connect a:1:all 1:1:1 Connect all of T1-1 to the Router that is in slot 1
rename 1 "LocalUnit" "Boulder" Rename "LocalUnit" (default) to "Boulder"
(LAN)
rename 1 "RemoteUnit" "wan1" Rename WAN #1 from "RemoteUnit" (default) to
"wan1"
set 1:1 ip address 215.168.21.14
255.255.255.0
add 1 "wan1" static ip network
0.0.0.0 0.0.0.0 1
set 1 "wan1" trunk 1 Set the WAN interface named "wan1" to be
reset 1 Reboot the router, to enable all configurations set
Set the ethernet IP address, in the conventional IP
address format. (Router LAN)
Adds a static IP network (route) to the WAN
interface
mapped to trunk 1
16 CMG Router - Release 2.97
Page 17

Quick Start Guide
Frame Relay Internet Connection and Public IP Address Routing
Frame Relay Internet Connection and
Public IP Address Routing
Router in Slot 1
ISP Router that provides the Internet connection.
Command Description
set clock1 a:1 Set primary master transmit clock source
set 1 default Set Router to default settings
disconnect a:1 Disconnect all connections to the T1 on the
Controller (slot a)
disconnect 1 Disconnect all connections to the router in slot 1
set a:1:all type data Set the T1-1 of the Controller, Type to Data
connect a:1:all 1:1:1 Connect all of T1-1 to the Router that is in slot 1
rename 1 "LocalUnit" "Boulder" Rename the "LocalUnit" (default) to "Boulder"
(LAN)
rename 1 "RemoteUnit" "wan1" Rename WAN #1 from "RemoteUnit" (default) to
"wan1"
set 1:1 ip address 215.168.21.14
255.255.255.0
add 1 "wan1" static ip network
0.0.0.0 0.0.0.0 1
set 1:1:1 encapsulation fr Set the encapsulation on trunk 1 to Frame Relay
set 1 lmi annexd Disable LMI to Annex D
set 1 "wan1" trunk 1 Set the WAN interface named "wan1" to be
set 1 "wan1" dlci 101 Set the DLCI number
reset 1 Reboot the router, to enable all configurations set
Set the ethernet IP address, in the conventional IP
address format. (Router LAN)
Adds a static IP network (route) to the WAN
interface
mapped to trunk 1
CMG Router - Release 2.97 17
Page 18

Quick Start Guide
Internet Connection using PPP, NAT/PAT and Firewall Filters
Internet Connection using PPP, NAT/PAT and
Firewall Filters
Router in Slot 1
ISP Router that provides the Internet connection. Router with NAT/PAT and Firewall
Filters.
Command Description
set clock1 a:1 Set primary master transmit clock source
set 1 default Set Router to default settings
disconnect a:1 Disconnect all connections to the Controller T1 (a:1)
disconnect 1 Disconnect all connections to the router in slot 1
set a:1:all type data Set the T1-1 of the Controller, Type to Data
connect a:1:all 1:1:1 Connect all of T1-1 to the Router that is in slot 1
rename 1 "LocalUnit" "Boulder" Rename "LocalUnit" (default) to "Boulder" (LAN)
rename 1 "RemoteUnit" "wan1" Rename WAN #1 from "RemoteUnit" (default) to
"wan1"
set 1:1 ip address
192.168.21.14 255.255.255.0
set 1 "wan1" nat enable Set the WAN interface named "wan1" enable NAT
set 1 "wan1" nat port dynamic Set the WAN interface named "wan1" to set NAT port
set 1 "wan1" nat address
216.174.44.2 1
add 1 "wan1" static ip network
0.0.0.0 0.0.0.0 1
add 1 "wan1" firewall 1 pass
incoming log telnet
192.168.21.14/32
xxx.xxx.xxx.xxx/32
Set the ethernet IP address, in the conventional IP
address format. (Router LAN)
mapping
mapping to be dynamic
Set the WAN interface named "wan1" NAT address
Adds a static IP network (route) to the WAN interface
Adds a Firewall rule to the WAN. Where
xxx.xxx.xxx.xxx is the host’s IP address at the far end
that will be able to ping or telnet to the router. 0.0.0.0/0
will allow any other host at the far end to ping and/or
telnet to the router.
18 CMG Router - Release 2.97
Page 19

Quick Start Guide
Internet Connection using PPP, NAT/PAT and Firewall Filters
Command Description
add 1 "wan1" firewall 2 pass
inout nolog ping
192.168.21.14/32
xxx.xxx.xxx.xxx/32
add 1 "wan1" firewall 3 pass
inout nolog ping 0.0.0.0/0
0.0.0.0/0
add 1 "wan1" firewall 4 pass
inout nolog tcp 1-65535
0.0.0.0/0 0.0.0.0/0
add 1 "wan1" firewall 5 pass
inout nolog udp 1-65535
0.0.0.0/0 0.0.0.0/0
set 1 "wan1" trunk 1 Set WAN interface "wan1" to be mapped to trunk 1
set 1:1:1 encapsulation ppp Set the encapsulation on trunk 1 to PPP
reset 1 Reboot the router, to enable all configurations set
Adds a Firewall rule to the WAN. Where
xxx.xxx.xxx.xxx is the host’s IP address at the far end
that will be able to ping or telnet to the router. 0.0.0.0/0
will allow any other host at the far end to ping and/or
telnet to the router.
Adds a Firewall rule to the WAN.
Adds a Firewall rule to the WAN.
Adds a Firewall rule to the WAN.
CMG Router - Release 2.97 19
Page 20

Quick Start Guide
Internet Connection using NAT and Static NAT Addresses
Internet Connection using NAT and Static NAT
Addresses
Router in Slot 1
ISP Router that provides the Internet connection. Router with NAT and Static NAT
addresses.
Command Description
set clock1 a:1 Set primary master transmit clock source
set 1 default Set Router to default settings
disconnect a:1 Disconnect all T1 connections on the Controller
(slot a)
disconnect 1 Disconnect all connections to the router in slot 1
set a:1:all type data Set the T1-1 of the Controller, Type to Data
connect a:1:all 1:1:1 Connect all of T1-1 to the Router that is in slot 1
rename 1 "LocalUnit" "Boulder" Rename "LocalUnit" (default) to "Boulder" (LAN)
rename 1 "RemoteUnit" "wan1" Rename WAN #1 from "RemoteUnit" (default) to
"wan1"
set ethernet ip address
192.168.21.15 255.255.255.0
set ip gateway 192.168.21.14 Set the IP gateway (default route) for the Unit
set 1:1 ip address 192.168.21.14
255.255.255.0
set 1 "wan1" nat enable Set the WAN interface named "wan1" enable NAT
set 1 "wan1" nat port dynamic Set the WAN interface named "wan1" to set NAT
set 1 "wan1" nat address
216.174.44.2 1
add 1 "wan1" static ip network
0.0.0.0 0.0.0.0 1
Set the Ethernet IP address and Subnet Mask for
the Unit
Set the ethernet IP address, in the conventional IP
address format. (Router LAN)
mapping
port mapping to be dynamic
Set the WAN interface named "wan1" NAT
address
Adds a static IP network (route) to the WAN
interface
20 CMG Router - Release 2.97
Page 21

Quick Start Guide
Internet Connection using NAT and Static NAT Addresses
Command Description
add 1 "wan1" static nat address
192.168.21.14 216.174.44.232
add 1 "wan1" static nat address
192.168.21.15 216.174.44.233
add 1 "wan1" static nat address
192.168.21.16 216.174.44.234
add 1 "wan1" static nat address
192.168.21.17 216.174.44.235
set 1:1:1 encapsulation fr Set the encapsulation on trunk 1 to Frame Relay
set 1 lmi annexd Disable LMI Annex D
set 1 "wan1" trunk 1 Set the WAN interface ( "wan1") to be mapped to
set 1 "wan1" dlci 101 Set the DLCI number
reset 1 Reboot the router, to enable all configurations set
Add static NAT bi-directional mapping to wan1
Add static NAT bi-directional mapping to wan1
Add static NAT bi-directional mapping to wan1
Add static NAT bi-directional mapping to wan1
trunk 1
216.174.44.232 is the static NAT address assigned to the router.
216.174.44.233 is the static NAT address assigned to the controller.
216.174.44.234 is the static NAT address for a server*.
216.174.44.235 is the static NAT address for a host*.
*In the private network that can be reached from the outside world.
There can be up to 16 static NAT addresses, therefore the actual range can be
216.174.44.232 to 216.174.44.247. Only 4 were used in this example.
CMG Router - Release 2.97 21
Page 22
Quick Start Guide
Boulder
1.1.1.1/24
Denver
2.2.2.1 / 24
24 DS0s
wan1: PPP or Frame Relay
Static Routes
IP
Boulder
1.1.1.1/24
Denver
1.1.1.1/24
Back-to-Back with PPP
Back-to-Back with PPP
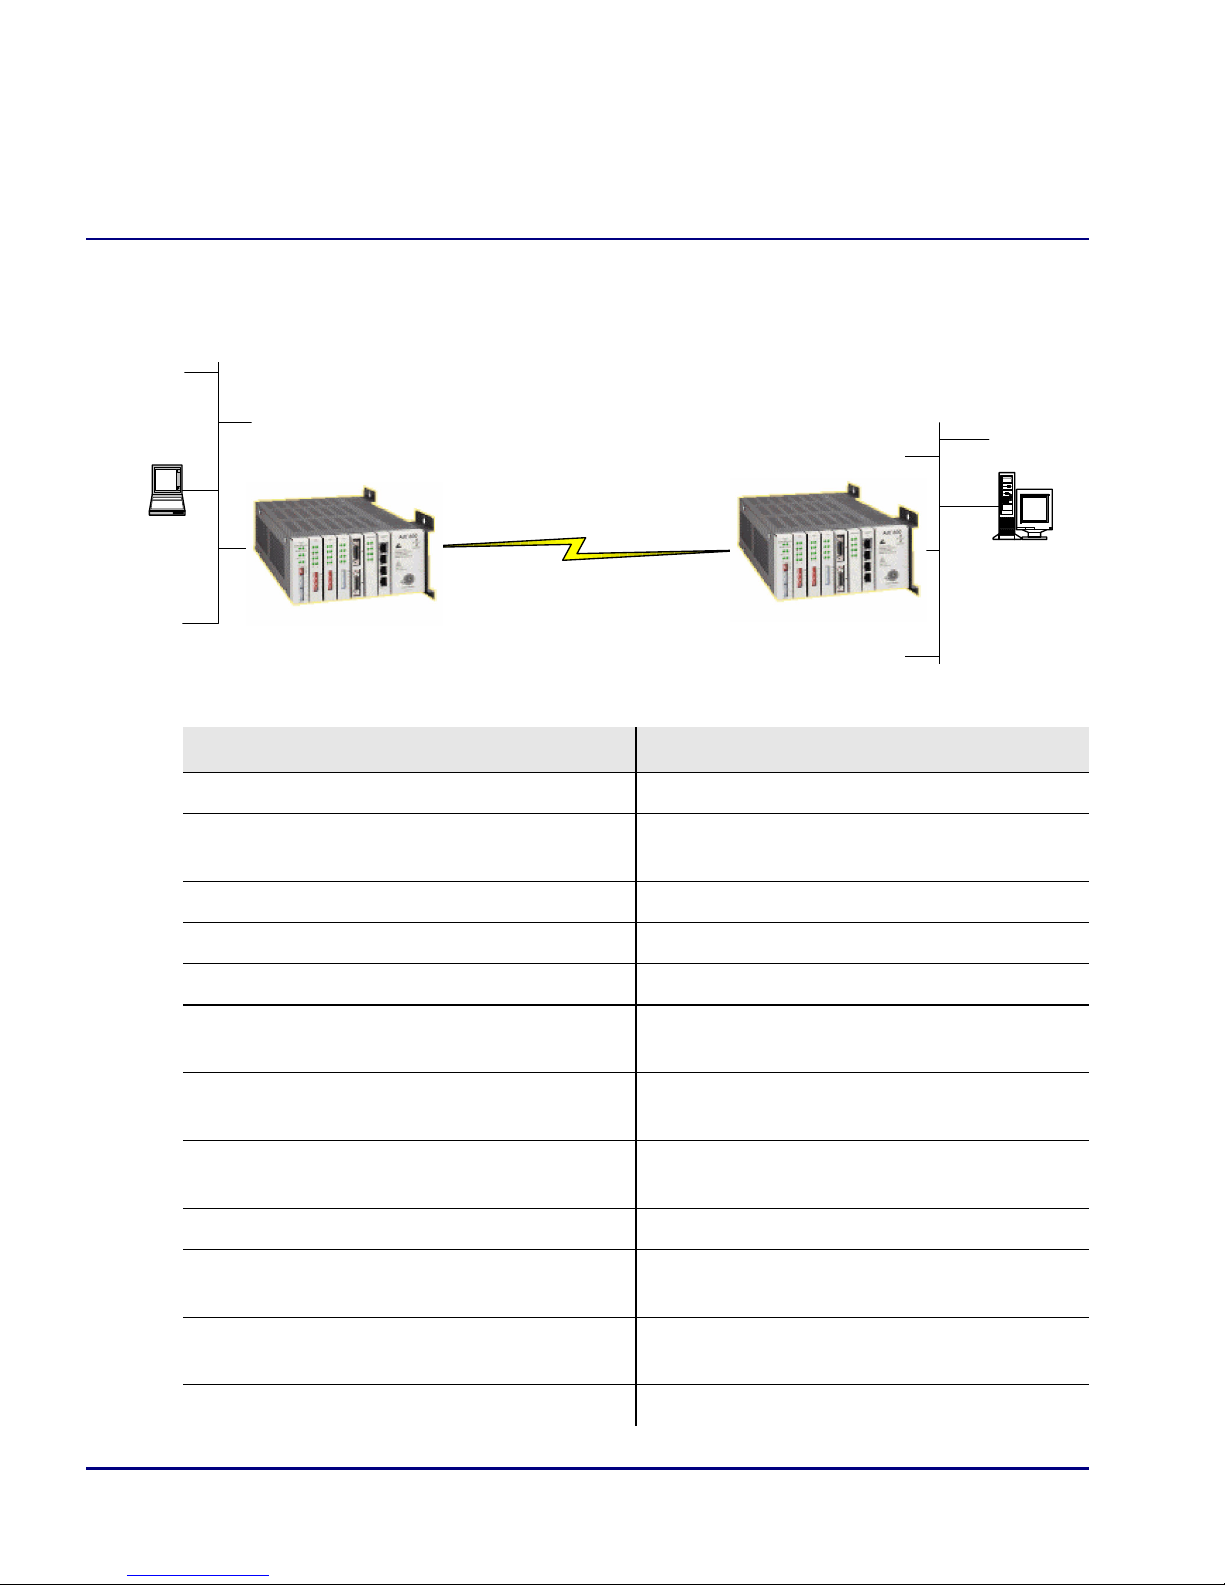
The following configuration will set up two Adit Routers back-to-back with PPP.
Boulder Router in Slot 1
Command Description
set 1 default Set Router to default settings
disconnect a:1 Disconnect all connections to the T1 on the
Controller (slot a)
disconnect 1 Disconnect all connections to the router in slot 1
set a:1:all type data Set the T1-1 of the Controller, Type to Data
connect a:1:all 1:1:1 Connect all of T1-1 to the Router that is in slot 1
rename 1 "LocalUnit" "Boulder" Rename the "LocalUnit" (default) to "Boulder"
(LAN)
rename 1 "RemoteUnit" "wan1" Rename WAN #1 from "RemoteUnit" (default) to
"wan1"
set 1:1 ip address 1.1.1.1
255.255.255.0
Set the ethernet IP address, in the conventional IP
address format. (Router LAN)
set 1:1 phy auto Set the Physical Specifications to auto-negotiate
add 1 "wan1" static ip network
2.2.2.0 255.255.255.0 1
set 1 "wan1" trunk 1 Set the WAN interface named "wan1" to be
Adds a static IP network (route) to the WAN
interface
mapped to trunk 1
reset 1 Reboot the router, to enable all configurations set
22 CMG Router - Release 2.97
Page 23

Quick Start Guide
Back-to-Back with PPP
Denver Router in Slot 1
Command Description
set 1 default Set Router to default settings
disconnect a:1 Disconnect all connections to the T1 on the
Controller (slot a)
disconnect 1 Disconnect all connections to the router in slot 1
set clock1 a:1 Set primary master transmit clock source
set a:1:all type data Set the T1-1 of the Controller, Type to Data
connect a:1:all 1:1:1 Connect all of T1-1 to the Router that is in slot 1
rename 1 "LocalUnit" "Denver" Rename the "LocalUnit" (default) to "Denver"
(LAN)
rename 1 "RemoteUnit" "wan1" Rename WAN #1 from "RemoteUnit" (default) to
"wan1"
set 1:1 ip address 2.2.2.1
255.255.255.0
set 1:1 phy auto Set the Physical Specifications to auto-negotiate
add 1 "wan1" static ip network
1.1.1.0 255.255.255.0 1
set 1 "wan1" trunk 1 Set the WAN interface named "wan1" to be
reset 1 Reboot the router, to enable all configurations set
Set the ethernet IP address, in the conventional IP
address format. (Router LAN)
Adds a static IP network (route) to the WAN
interface
mapped to trunk 1
CMG Router - Release 2.97 23
Page 24
Quick Start Guide
Back-to-Back with Multi-Link PPP
Back-to-Back with Multi-Link PPP
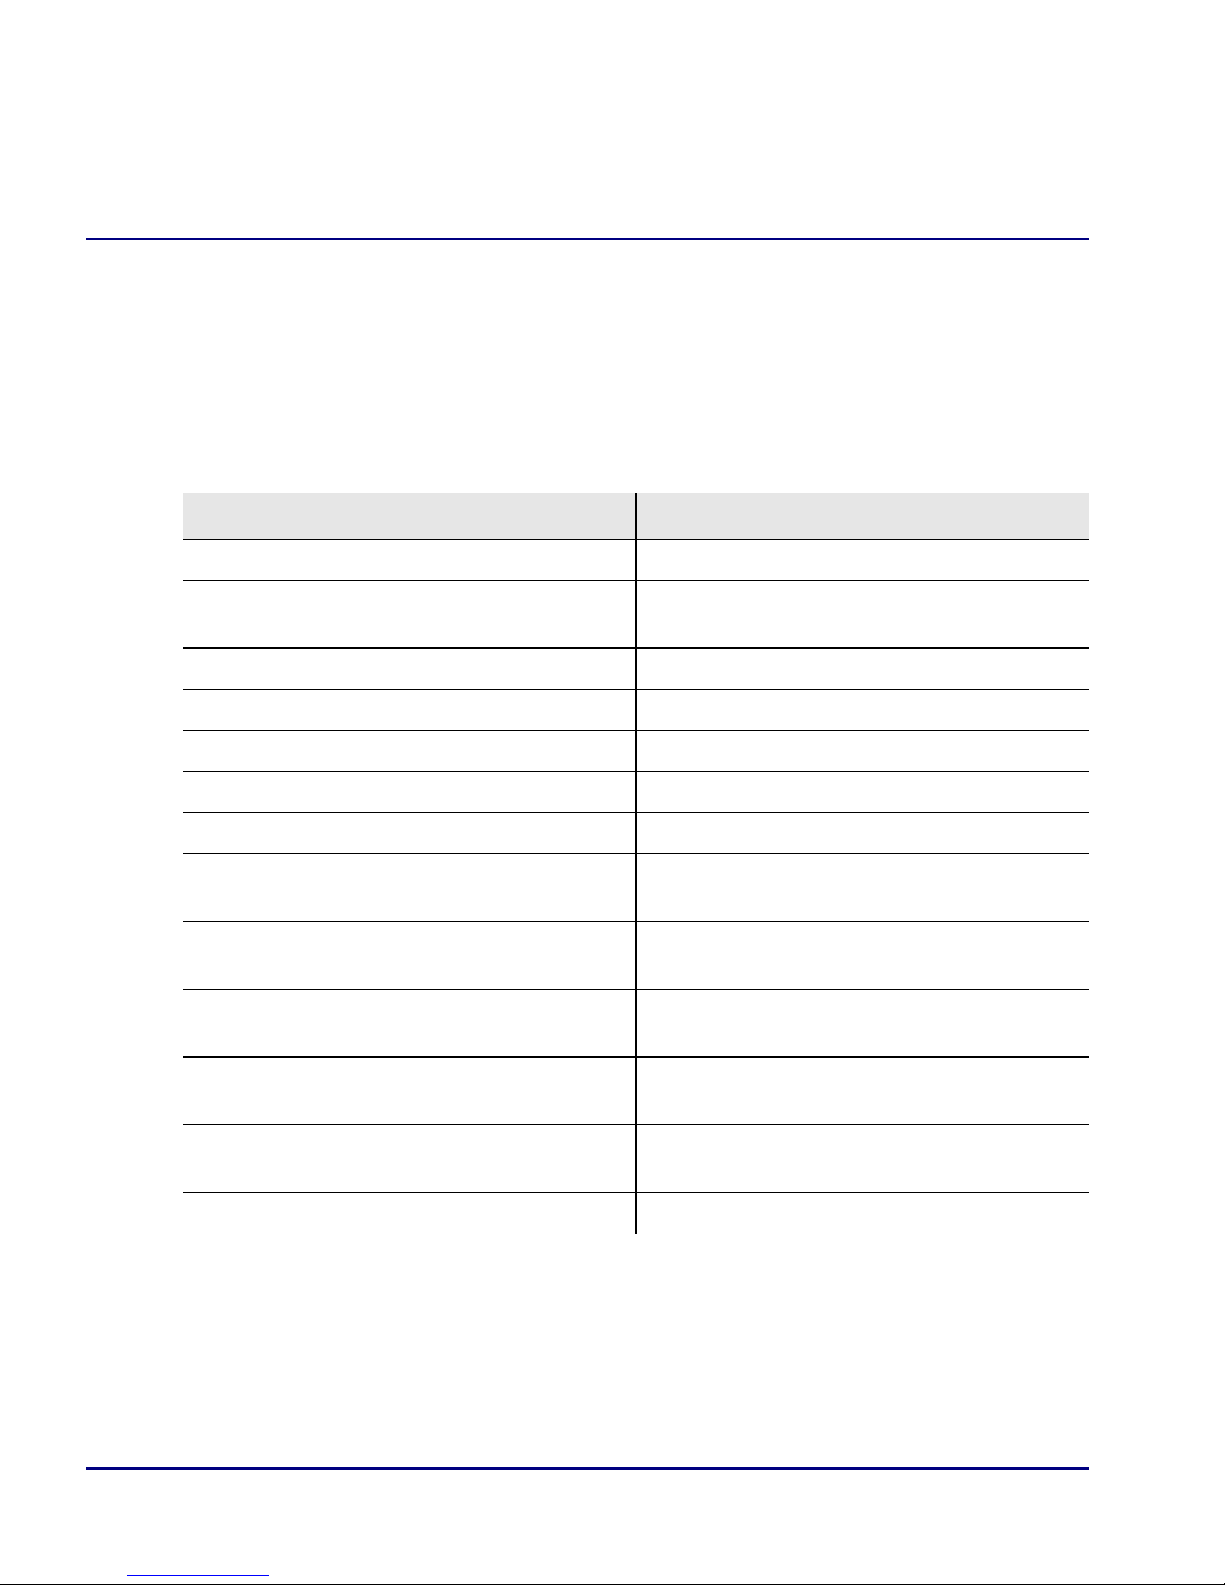
The following configuration will set up two Adit 600 Routers back-to-back with MultiLink PPP.
Boulder Router in Slot 1
Command Description
set 1 default Set Router to default settings
disconnect a:1 Disconnect all connections to the T1 on the
Controller (slot a)
disconnect 1 Disconnect all connections to the router in slot 1
set a:1:all type data Set the T1-1 of the Controller, Type to Data
connect a:1:all 1:1:1 Connect all of T1-1 to the Router that is in slot 1
connect a:2:all 1:1:2 Connect all of T1-2 to the Router that is in slot 1
set 1:1:1-2 multilink group 1 Assign 1:1:1-2 to multilink group 1.
rename 1 "LocalUnit" "Boulder" Rename the "LocalUnit" (default) to "Boulder"
(LAN)
rename 1 "RemoteUnit" "wan1" Rename WAN #1 from "RemoteUnit" (default) to
"wan1"
set 1:1 ip address 1.1.1.1
255.255.255.0
add 1 "wan1" static ip network
2.2.2.0 255.255.255.0 1
set 1 "wan1" trunk multilink
group 1
reset 1 Reboot the router, to enable all configurations set
Set the Ethernet IP address, in the conventional IP
address format. (Router LAN)
Adds a static IP network (route) to the WAN
interface
Set the WAN interface named "wan1" to be
mapped to trunk multilink group 1
24 CMG Router - Release 2.97
Page 25

Quick Start Guide
Back-to-Back with Multi-Link PPP
Denver Router in Slot 1
Command Description
set 1 default Set Router to default settings
disconnect a:1 Disconnect all connections to the T1 on the
Controller (slot a)
disconnect 1 Disconnect all connections to the router in slot 1
set clock1 a:1 Set primary master transmit clock source
set a:1:all type data Set the T1-1 of the Controller, Type to Data
connect a:1:all 1:1:1 Connect all of T1-1 to the Router that is in slot 1
connect a:2:all 1:1:2 Connect all of T1-2 to the Router that is in slot 1
set 1:1:1-2 multilink group 1 Assign 1:1:1-2 to multilink group 1
rename 1 "LocalUnit" "Denver" Rename "LocalUnit" (default) to "Denver"
(LAN)
rename 1 "RemoteUnit" "wan1" Rename WAN #1 from "RemoteUnit" (default) to
"wan1"
set 1:1 ip address 2.2.2.1
255.255.255.0
add 1 "wan1" static ip network
1.1.1.0 255.255.255.0 1
set 1 "wan1" trunk multilink
group 1
reset 1 Reboot the router, to enable all configurations set
Set the ethernet IP address, in the conventional IP
address format. (Router LAN)
Adds a static IP network (route) to the WAN
interface
Set the WAN interface named "wan1" to be
mapped to trunk multilink group 1
CMG Router - Release 2.97 25
Page 26
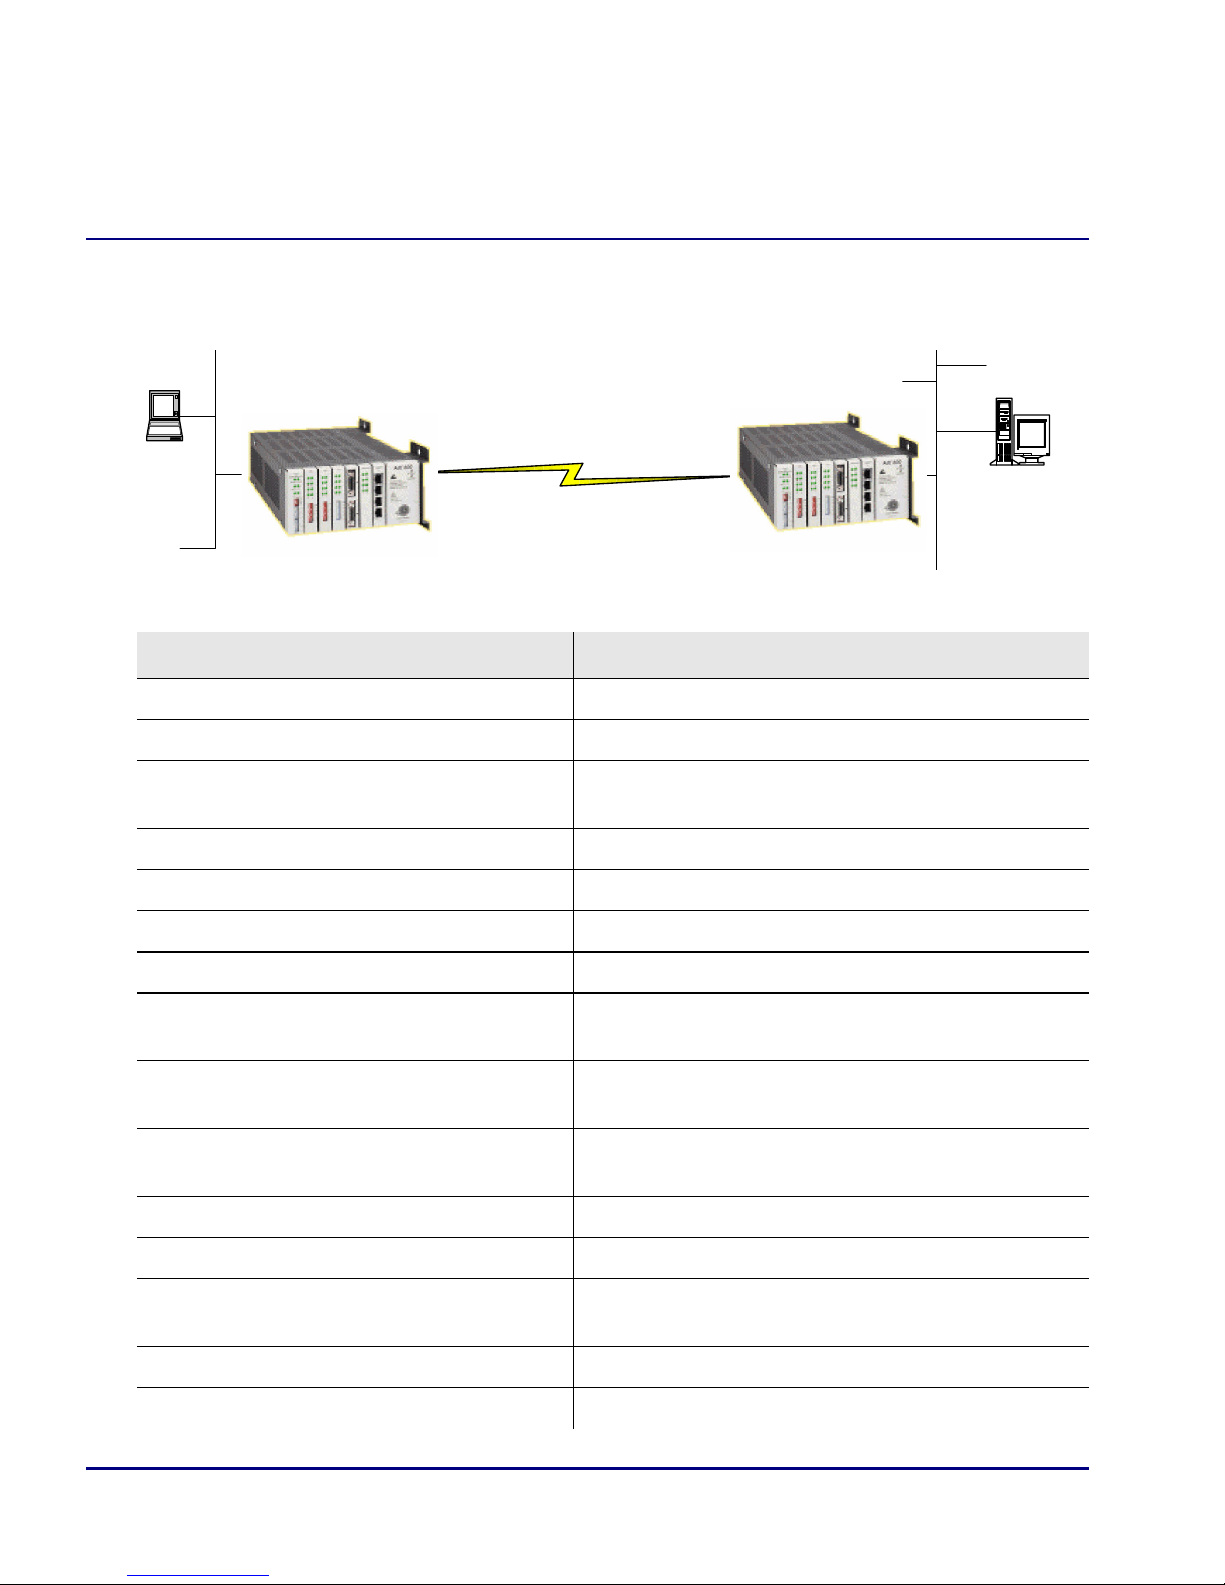
Quick Start Guide
Boulder
1.1.1.1/24
Denver
2.2.2.1 / 24
24 DS0s
wan1: PPP or Frame Relay
Static Routes
IP
Boulder
1.1.1.1/24
Denver
1.1.1.1/24
Back-to-Back with Frame Relay
Back-to-Back with Frame Relay
The following configuration will set up two Adit Routers back-to-back with Frame Relay.
Boulder Router in Slot 1
Command Description
set clock1 internal Set primary master transmit clock source
set 1 default Set Router to default settings
disconnect a:1 Disconnect all connections to the T1 on the Controller
(slot a)
disconnect 1 Disconnect all connections to the router in slot 1
set a:1:all type data Set the T1-1 of the Controller, Type to Data
connect a:1:all 1:1:1 Connect all of T1-1 to the Router that is in slot 1
rename 1 "LocalUnit" "Boulder" Rename the "LocalUnit" (default) to "Boulder" (LAN)
rename 1 "RemoteUnit" "wan1" Rename WAN #1 from "RemoteUnit" (default) to
"wan1"
set 1:1 ip address 1.1.1.1
255.255.255.0
add 1 "wan1" static ip network
Set the ethernet IP address, in the conventional IP
address format. (Router LAN)
Adds a static IP network (route) to the WAN interface
2.2.2.0 255.255.255.0 1
set 1:1:1 encapsulation fr Set the encapsulation on trunk 1 to Frame Relay
set 1 lmi disable Disable LMI (Local Management Interface)
set 1 "wan1" trunk 1 Set the WAN interface named "wan1" to be mapped to
trunk 1
set 1 "wan1" dlci 101 Set the DLCI number
reset 1 Reboot the router, to enable all configurations set
26 CMG Router - Release 2.97
Page 27

Quick Start Guide
Back-to-Back with Frame Relay
Denver Router in Slot 3
Command Description
set 3 default Set Router to default settings
disconnect a:1 Disconnect all connections to the T1 on the
Controller (slot a)
disconnect 3 Disconnect all connections to the router in slot 1
set clock1 a:1 Set primary master transmit clock source
set a:1:all type data Set the T1-1 of the Controller, Type to Data
connect a:1:all 3:1:1 Connect all of T1-1 to the Router that is in slot 1
rename 3 "LocalUnit" "Denver" Rename the "LocalUnit" (default) to "Denver"
(LAN)
rename 3 "RemoteUnit" "wan1" Rename WAN #1 from "RemoteUnit" (default) to
"wan1"
set 3:1 ip address 2.2.2.1
255.255.255.0
add 3 "wan1" static ip network
1.1.1.0 255.255.255.0 1
set 3:1:1 encapsulation fr Set the encapsulation on trunk 1 to Frame Relay
set 3 lmi disable Disable LMI (Local Management Interface)
set 3 "wan1" trunk 1 Set the WAN interface named "wan1" to be
set 3 "wan1" dlci 101 Set the DLCI number
reset 3 Reboot the router, to enable all configurations set
Set the ethernet IP address, in the conventional IP
address format. (Router LAN)
Adds a static IP network (route) to the WAN
interface
mapped to trunk 1
CMG Router - Release 2.97 27
Page 28

Quick Start Guide
Back-to-Back with Frame Relay
28 CMG Router - Release 2.97
 Loading...