

Page 1

1
Foreword
Dear Force owner
Congratulations on your selection of a Force receiver. Your new Force receiver represents the best and most advanced
properties that the new digital DVB technology offers.
Our objective is easy access to infotainment
We have combined user-friendly design with the latest digital technology, thus allowing us to achieve a high standing
among our customers and in the industry as a whole.
Our ambition is for our customers to be able to have information and entertainment brought to them in a simple and
intuitive way. To achieve this, we work together with both experienced a nd inexperienced user groups. The knowledge
and experience we gain enables us to develop products that can be enhanced to meet future needs, products people
can enjoy for years and years.
We also work with our distributors and dealers. We form partnerships, both in the consumer market and in the
professional market.
Finally, in our product development we continually focus on our core values and our pledge to the market to be
innovative, reliable, strong and bold.
Our vision is therefore to inspire our customers and the industry as a whole.
Yours sincerely
Force Electronics A/S
January 2004
English
Page 2
2
Using this manual
This manual introduces your new Force receiver and shows how to install and operate it. Several versions of the product
are described. There are important differences between terrestrial receivers, indicated by a product number including
the letter “T”, e.g. 310T or 320T, and satellite receivers, indicated by the product number including the letter “S” e.g.
310S or 320S. Sections of the manual which only apply to one of type of product are indicated by these symbols:
Terrestrial Satellite
Important Conditions
You have purchased a license for the software. You have not purchased ownership rights for the software but a user
licence to be able to use the software in the equipment. Therefore, under no circumstances are you entitled to copy the
software, regardless of the reason. Force Electronics A/S reserves the right to regularly change the software and add
extra features or services in addition to the features you originally paid for – this may be based on a form of subscription
or any other form of payment.
Force Electronics reserves the right to use the MAIL system or an equivalent system to send certain advertising material.
Force Electronics will maintain the satellite channel list for the Scandinavian ones at 1° West and 5° East free of charge.
However, Force reserves the right, at a given time, to demand a symbolic subscription for updates to the channel list for
other satellites.
If you cannot accept these conditions, you must not connect the apparatus to the power supply. The connection of the
equipment to the power supply will be regarded as constituting acceptance of the above conditions. NOTE that initial
operation of the equipment is automatically registered in the unit. Changes in software and user interface may occur
without warning.
Functionality is ONLY guaranteed when using original Force accessories or accessories that are approved by Force. See
our website for up-to-date information on accessories: www.force.tv
WARNING
We recommend that you read section 2.1 on safety before you connect your receiver to the power supply for the first
time.
To reduce the risk of fire or electric shock, the receiver must not be exposed to rain or moisture. Do not remove the
cover. This product contains no parts that can be serviced by the user. Any servicing must be carried out by qualified
service personnel.
TAKE CARE!
Avoid blocking the vent holes. If these are blocked, the unit may overhead.
Avoid placing naked flames (for example lit candles) on top of the equipment.
The equipment must not be subject to rain, moisture, drips or splashes and containers with liquid, for example vases,
should not be placed on the apparatus.
The equipment has been designed to function in operating environments where the temperature does not exceed 35°C.
RISK OF ELECTRIC SHOCK
DO NOT OPEN
RISQUE DE CHOC
ELECTRIQUE
English
Page 3

3
Table Of Contents
1 How to get the most out of your Force Receiver.....................................................................................4
1.1 Getting Started.................................................................................................................................................................... 5
1.2 Support................................................................................................................................................................................. 5
2 Installation.........................................................................................................................................6
2.1 Safety.................................................................................................................................................................................... 6
2.2 Connection of Satellite Dish ............................................................................................................................................... 6
2.2.1 Installing the Dish................................................................................................................... 6
2.2.2 Connection to an existing dish (Set-up)........................................................................................ 6
2.2.3 Connection to several dishes or LNB heads (Set-up) ........................................................................6
2.2.4 LNB assembly (Set-up) .............................................................................................................7
2.2.5 Connecting the F-type plug.......................................................................................................7
2.2.6 Connecting the Dish to the Receiver ...........................................................................................7
2.3 Connection of Terrestrial Antenna..................................................................................................................................... 8
2.4 Connection to TV.................................................................................................................................................................9
2.5 Receiving Analogue Channels ............................................................................................................................................ 9
2.6 Connection to video recorder............................................................................................................................................. 9
2.7 Connecting a DVD Player (320 model only)....................................................................................................................... 9
2.8 Audio connection to Hi-fi equipment (Model 320 only)...................................................................................................9
2.9 Distributing Signals to other TV Sets................................................................................................................................ 10
2.10 Modem connection ........................................................................................................................................................... 10
2.11 Power connection..............................................................................................................................................................10
3 Getting to Know your equipment .......................................................................................................11
3.1 Controls on the receiver.................................................................................................................................................... 11
3.2 Programme cards...............................................................................................................................................................11
3.3 Remote control.................................................................................................................................................................. 12
3.4 Powering down when not in use ..................................................................................................................................... 12
4 Start up............................................................................................................................................13
4.1 Installation Wizard............................................................................................................................................................13
4.2 Select language ................................................................................................................................................................. 13
4.3 TV-format Menu................................................................................................................................................................ 13
4.3.1 TV-format........................................................................................................................... 13
4.3.2 TV-SCART (Start-up > TV-format).............................................................................................. 13
4.3.3 UHF channel (Start-up > TV-format).......................................................................................... 14
4.3.4 RF System........................................................................................................................... 14
4.4 Positions (Start-up) ............................................................................................................................................................14
4.5 Channel search (Start-up).................................................................................................................................................. 14
4.6 Saving Your Configuration...............................................................................................................................................15
4.7 LNB Set-up.......................................................................................................................................................................... 15
5 Selecting Programmes on your Force Receiver .....................................................................................15
5.1 Menu system...................................................................................................................................................................... 15
5.2 Shortcut buttons................................................................................................................................................................16
5.3 Channel selection .............................................................................................................................................................. 16
5.4 EPG .....................................................................................................................................................................................17
5.5 Info bar............................................................................................................................................................................... 18
5.6 Switching between TV and Radio .................................................................................................................................... 18
5.7 Sound control .................................................................................................................................................................... 18
5.8 Language Control..............................................................................................................................................................18
5.9 Teletext ..............................................................................................................................................................................18
6 Timer ............................................................................................................................................... 19
6.1 TV Manager .......................................................................................................................................................................19
6.2 Stand-By .............................................................................................................................................................................20
6.3 Get Mail.............................................................................................................................................................................. 20
6.4 Get EPG ..............................................................................................................................................................................21
6.5 Card update.......................................................................................................................................................................21
6.6 Editing timer settings........................................................................................................................................................ 22
6.7 Deleting timer settings...................................................................................................................................................... 22
7 Adult Lock ........................................................................................................................................23
8 Channel List Management..................................................................................................................24
8.1 Terrestrial Receivers........................................................................................................................................................... 24
8.1.1 Organising the channel list ..................................................................................................... 24
8.1.2 Updating the channel list ....................................................................................................... 25
8.1.3 Automatic channel search:...................................................................................................... 25
8.1.4 Manual search: .................................................................................................................... 26
8.1.5 UHF Channel List.................................................................................................................. 26
8.2 Satellite Receivers.............................................................................................................................................................. 27
8.2.1 Organising channel lists ......................................................................................................... 27
8.2.2 Searching for channels........................................................................................................... 28
8.2.3 Package Information............................................................................................................. 28
English
Page 4

4
9 Short Cuts ........................................................................................................................................29
9.1 Shortcut menu....................................................................................................................................................................29
9.2 Shortcut buttons................................................................................................................................................................30
10 Controlling the source of your TV signal..............................................................................................30
11 Other Functions.................................................................................................................................30
11.1 Conditional Access (CA) Management .............................................................................................................................30
11.2 Messages via the mail system............................................................................................................................................31
11.3 Updating the software......................................................................................................................................................31
11.3.1 Terrestrial receiver................................................................................................................ 31
11.3.2 Satellite receiver .................................................................................................................. 32
11.4 On screen timeout .............................................................................................................................................................32
11.5 Adjusting Clock for Different Time Zones........................................................................................................................32
11.6 Menu lock...........................................................................................................................................................................32
11.7 Modem ...............................................................................................................................................................................33
11.8 Active Antenna Control.....................................................................................................................................................33
11.9 Language Control..............................................................................................................................................................33
11.10 Deleting all set-up information ........................................................................................................................................33
12 Specifications ...................................................................................................................................34
English
Page 5
5
1 How to get the most out of your Force Receiver
Your Force receiver is your key to receiving a wide range of TV and radio programmes. With your receiver, you will also
get a Remote Control, which can be used to control all the functions of the receiver using a comprehensive set of onscreen menus.
This manual shows you how to install and set up your Force receiver, then how to operate it to maximise your
enjoyment.
Force continually develop and enhance their products. The software and user interface will change regularly, but you
will always be able to download the latest manual in PDF format from our website at: www.for ce.tv
,
1.1 Getting Started
Your new receiver should be delivered in a clean and undamaged box. If not, contact your distributor immediately. The
box should contain the following:
• Force receiver
• Remote control
• Two AA batteries
• Manual
• SCART cable
• Power cable
If you have a satellite receiver, you will need a satellite dish to receive the TV signals. There are different types of dish
equipment depending on which satellite or satellites you want to use. These are discussed in more detail below. The
dish has to be installed securely in a position where it is not obstructed. This is a job best done by an experienced
professional installer. An indication of the equipment required is given in section 2.2
If you have a terrestrial receiver, you will need a suitable antenna. An existing analogue antenna may be suitable, but in
many cases a new one may be required, or it may be necessary to adjust the direction the antenna points to get a good
signal. Talk to your distributor to get the best advice. More details are given in section 2.3.
Many services, particularly when broadcast over satellite, are encrypted and require a plug-in card so that you can view
them. This may have been supplied with your receiver; your distributor will be able to advise you on what is necessary.
You need to find a suitable location for your Force receiver, then connect it to the satellite dish or antenna, the TV and
any other equipment you have. Force equipment can be connected in several ways to your entertainment system. The
SCART cable included with your receiver is the best way to connect the receiver to the TV. You can then turn the power
on to your equipment, and start the installation wizard which will set up your system to your own requirements. These
steps are described in more detail in section 4.1 below.
After that you can sit back and enjoy your new Force receiver.
Make sure that all connections are made before turning on the power to the rece iver on the first time.
Connect the receiver to a good antenna to make sure that all available programmes are found during
installation.
1.2 Support
If you have any questions regarding your Force product or problems during inst allation, please contact yo ur Force
distributor. Force works in partnership with its distributors and ensures that they have the necessary training and skills
to support you.
You may also contact Force directly by email address [email protected]
. If you do, please enclose the serial number of
your receiver as well as the name of the Force dealer from whom you purchased it. Alternatively, visit our website
www.force.tv
, where you may find the answer to your question in the Frequently Asked Questions (FAQ) section. You
can also add your own question here.
English
Page 6
6
2 Installation
2.1 Safety
The Force receiver must be placed on a fixed, stable surface in clean surroundings and at a suitable distance from any
heat source, such as other electronic devices, radiators, etc. The vents in the upper and lower part of the casing must not
be covered, and there should be clearance of at least 5 cm above the Force receiver. Do not connect the receiver to the
mains supply until all other connections have been completed. This includes the aerial, TV, DVD player, video and other
accessories.
The Force receiver should be in "stand-by" mode when not in use so that it can receive updates. However, the power
should be disconnected if lightning is likely to occur, as it contains very sensitive components. It is also necessary to
momentarily disconnect the power when you change the programme cards, as described in section 3.2.
As there is no on-off switch on the receiver, the plug must be easily accessible.
NOTE! The warranty does not cover damage that has arisen as a direct or indirect consequence of lightning strikes or
other electrical surge.
WARNING!
The cover must not be removed, as the equipment contains high voltage circuits. In the event of unauthorised access,
physical damage or abnormal use of the receiver, the warranty is void.
2.2 Connection of Satellite Dish
2.2.1 Installing the Dish
Mount the dish on a wall, aerial mast or a free-standing pole. It does not matter if the dish is mounted at a high or low
position, although it is important that the mounting is stable. Please note that a wooden gable on a house may be
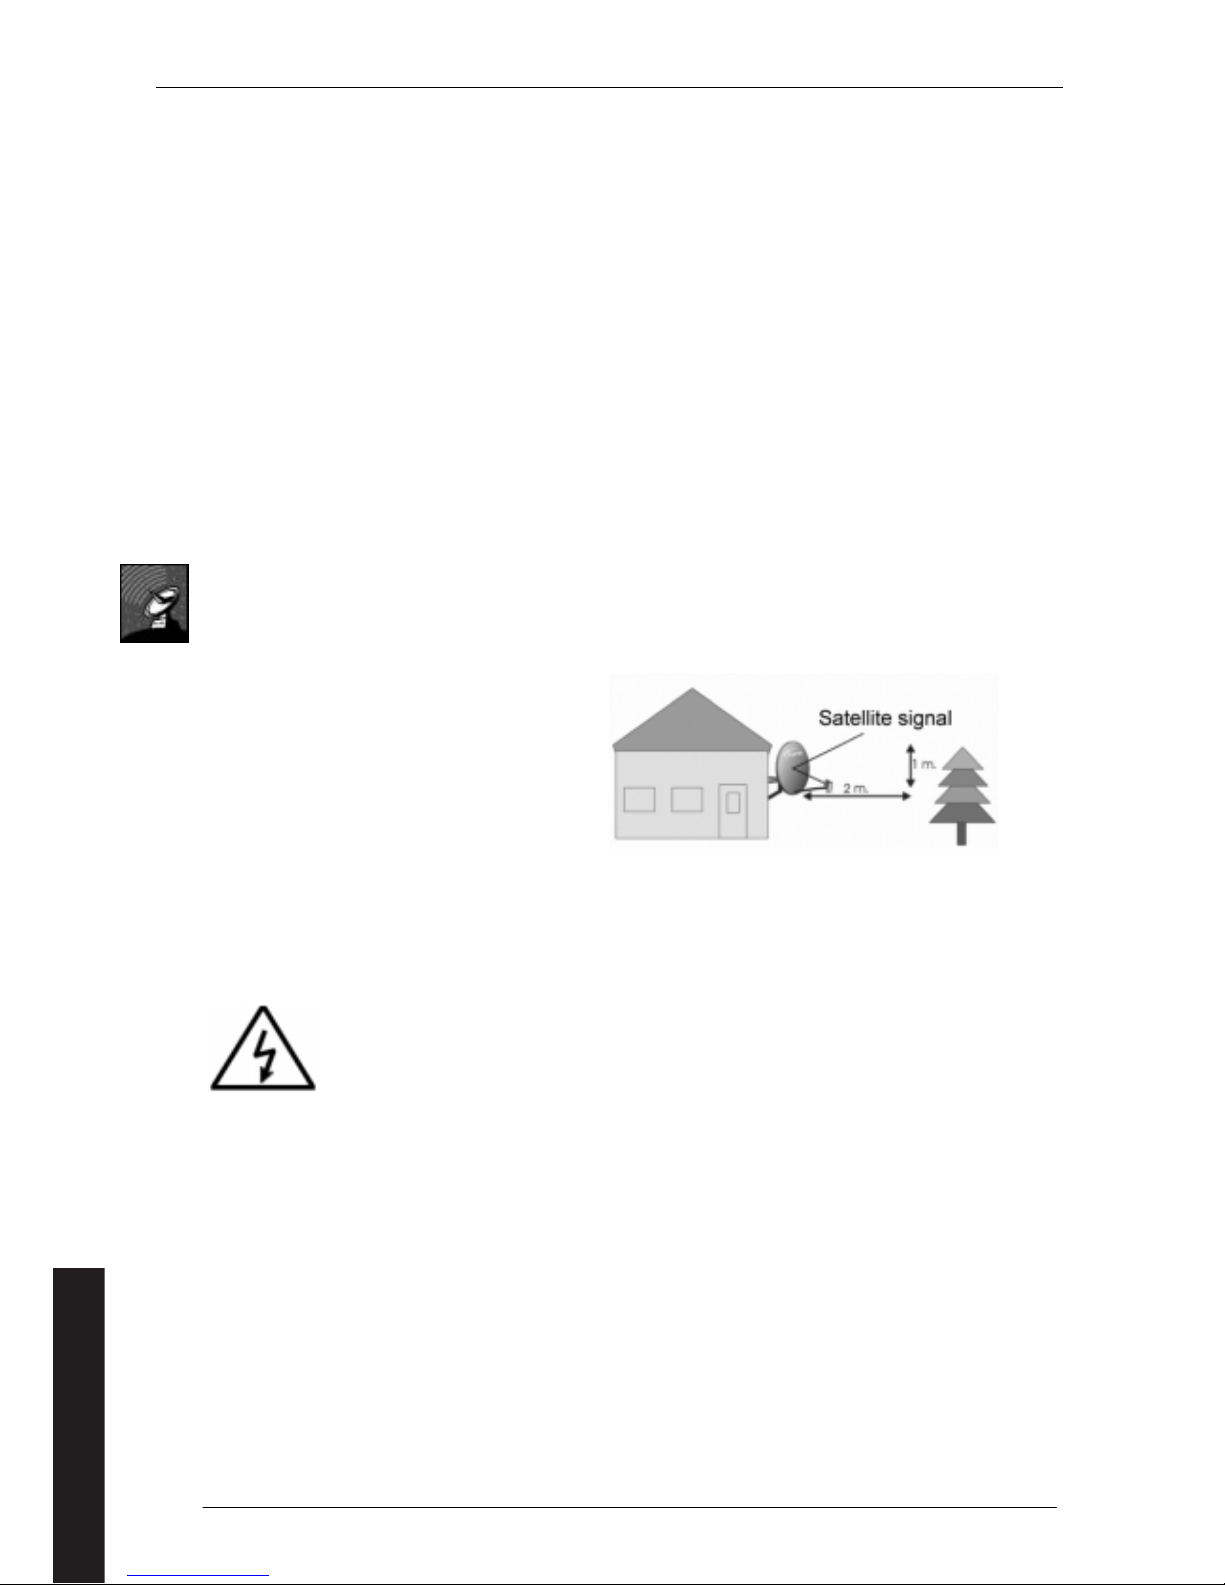
unsatisfactory, as it will deteriorate over time. The dish must have an unhindered view to the south (see Figure 1). Turn
the dish towards the south and position it almost vertically (approximately 25 degrees inclination on the fitting).
Tighten the screws and bolts loosely before the dish is adjusted.
A good rule of thumb:
The distance to any obstacles should be
twice the height of those obstacles.
In other words, if an obstacle is 1 metre high,
the dish should be two metres away from it.
Figure 1 (Positioning of dish)
TIP:
You can paint your dish so that it blends better into the surroundings. However, please note that the warranty for the
dish itself will no longer be valid.
WARNING!
The LNB tuner input is live once the receiver is in use.
2.2.2 Connection to an existing dish (Set-up)
If you already have a dish, you need to know the type of LNB the dish is fitted with. The univer sal type is recomme nded.
If your Force receiver is not set-up for the correct LNB type, the receiver will not display the correct channel and
programme information.
2.2.3 Connection to several dishes or LNB heads (Set-up)
Your Force receiver can receive signals from several satellites without it being necessary to turn the actual dish. You
should use a DiSEqC switch to enable the receiver to control several LNB units on one cable. With the correct
combination, the receiver can control up to 4 LNB units on one cable. Ask your dealer about the options.
Note!
Force only guarantees the correct functionality when using Force accessories or accessories approved by Force. See our
website for more information.
English
Page 7
7
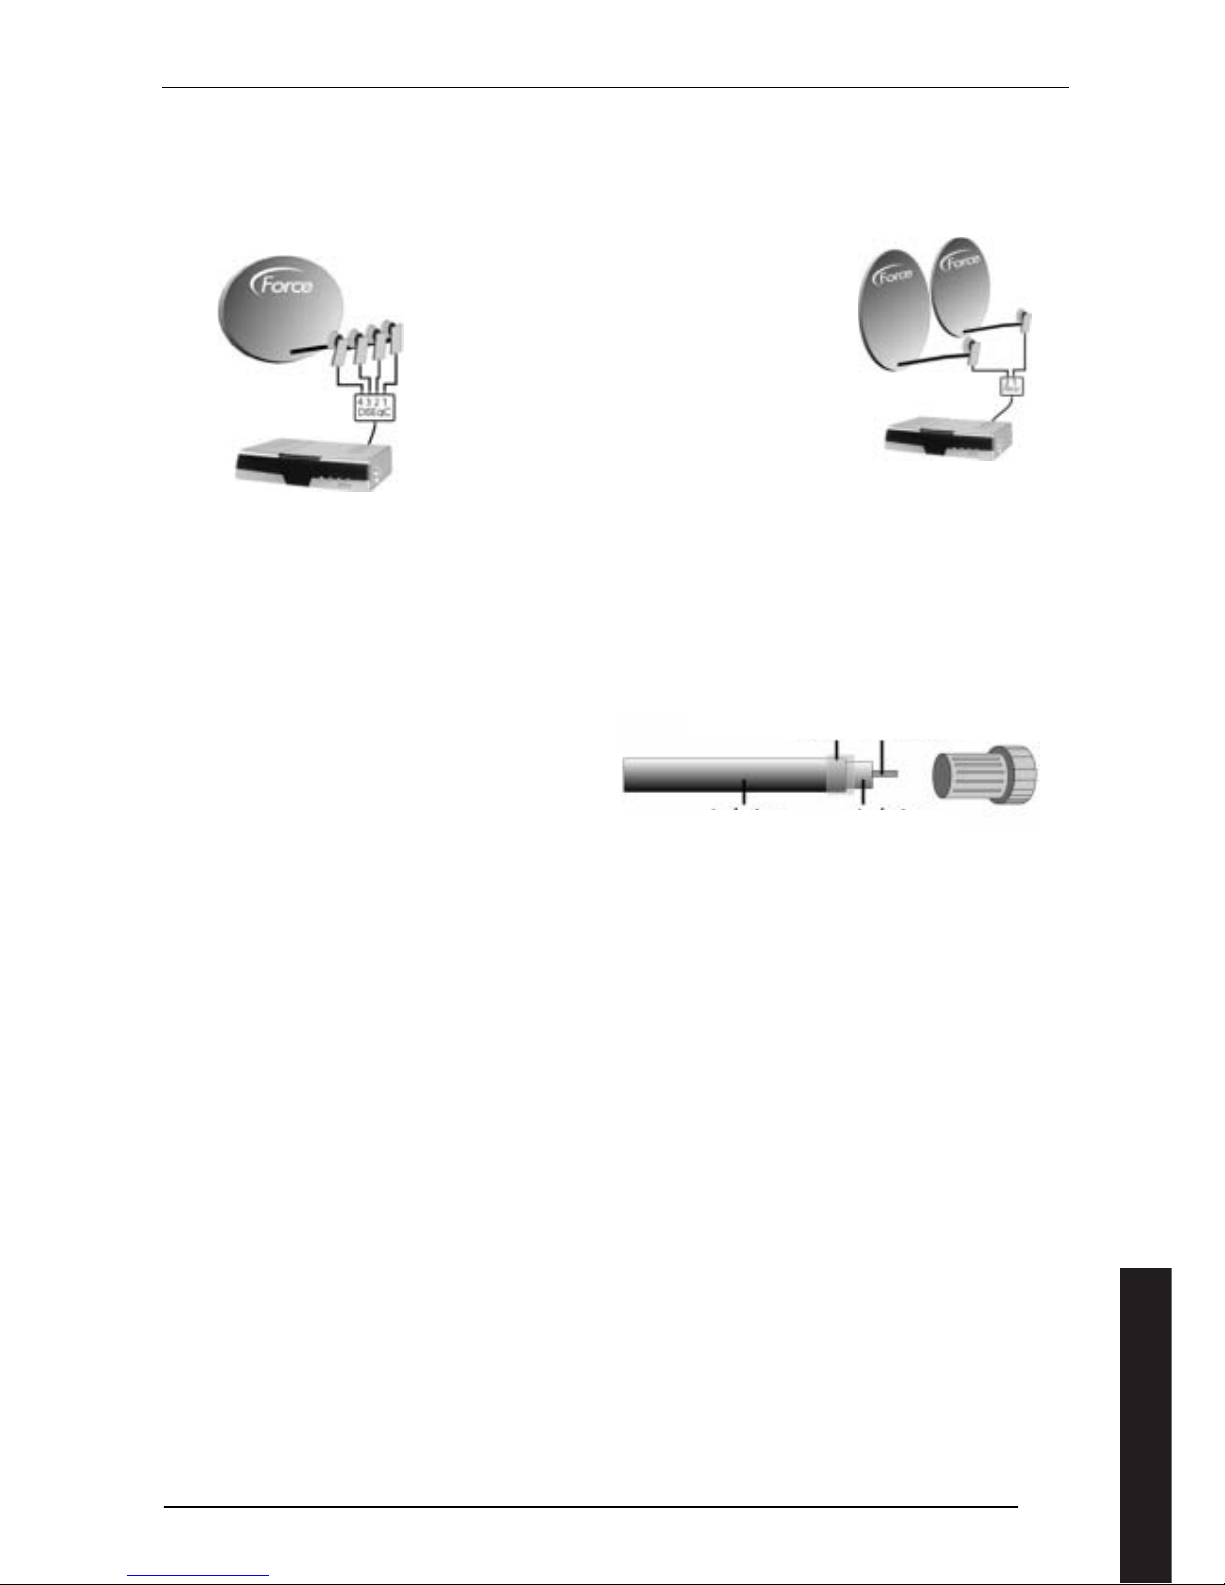
Figure 2 (LNB connection 2 heads) shows that, with a DiSEqC switch, you can collect signals from 2 dishes in one cable.
Naturally, there could also be 2 LNB units mounted on the same dish. The Force receiver will switch automatically
between the 2 LNB units or dishes.
In Figure 3 (LNB connection with 4 heads) you can see how
to connect as many as 4 LNB units on only one cable. The
LNB units can either be of the standard or universal type.
With the set-up illustrated, you will typically receive signals
from satellites at 1° West, 5° East, 13° East and 19° East.
Figure 2 (LNB connection 2 heads)
Figure 3 (LNB connection with 4 heads)
2.2.4 LNB assembly (Set-up)
Make sure that the LNB is not subjected to shocks or knocks as it contains extremely sensitive electronic parts. Place the
LNB in the dish holder so that the LNB cable terminal turns vertically to the ground. Now install a 7 mm quality cable
with fixed inner conductors on the LNB via the F plug, see Figure 4 (Assembly of the F plug). Avoid sharp bends on the
cable as this may cause reduced picture quality.
2.2.5 Connecting the F-type plug.
Take care to avoid a short circuit between
the inner conductor and the metallic protective
screening (the wires around the inner conductor).
Figure 4 (Assembly of the F plug)
Note!
The LNB F plug must be protected from moisture. This is best done with a special, self-amalgamating cable tape,
available from specialist shops, or grease, such as Vaseline. Never use hardening silicone.
2.2.6 Connecting the Dish to the Receiver
Use a high-quality 75 Ohm cable. Remember that very high frequency signals are transmitted through the cable. The
cable must be of a type containing a fixed inner conductor.
Make sure that the inner conductor is cut cleanly as any deformity or burring of the inner conductor may damage both
the LNB and Force satellite receiver input. In such a case, the warranty does not cover repair.
You can normally run approximately 50 m of cable from the dish to the receiver without reducing the signal quality. If
the signal quality suffers from resistance from equipment or cable length, the LNB voltage can be increased – see section
4.7.
You can also install a line amplifier. Contact your dealer if you want to have one fitted.
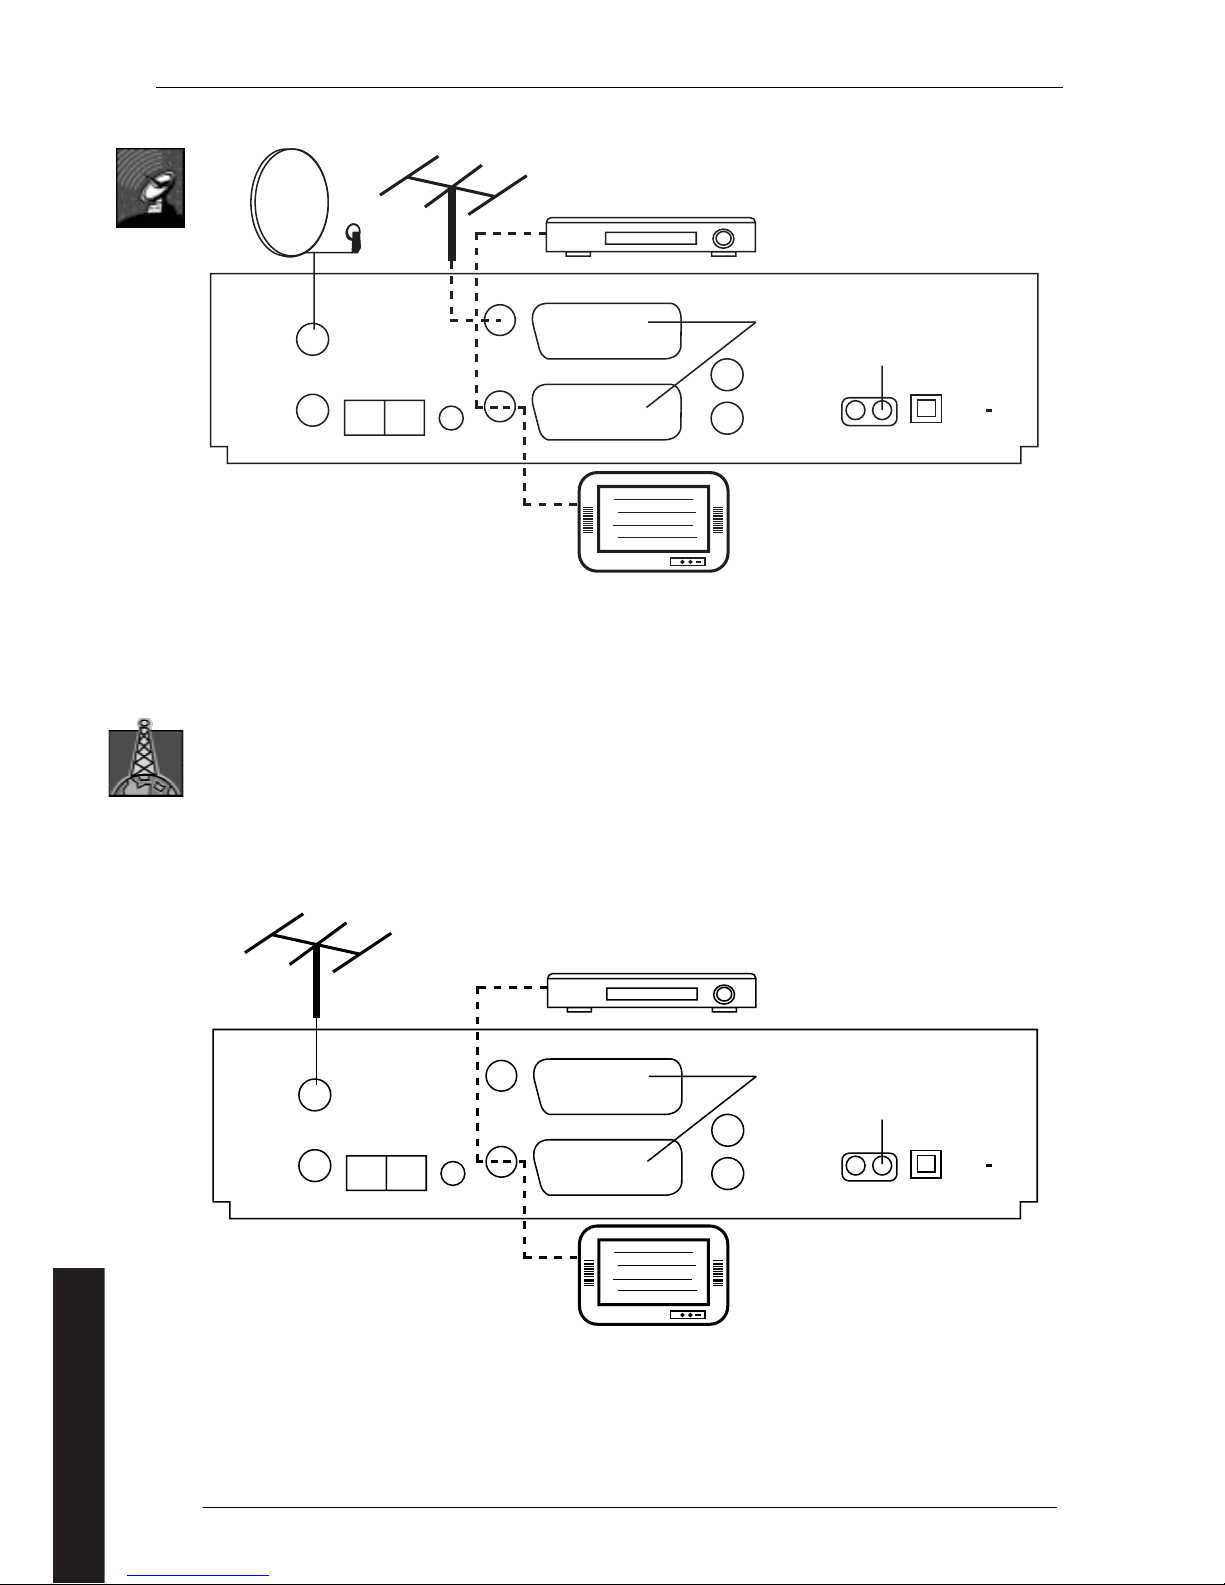
Connect the dish to the top input on the receiver marked ANT IN shown in figure 5.
Screen Inner conductor
Insulation Insulation
English
Page 8
8
IN
OUT
ANT
DATA LINE
DIGITAL
AUDIO
OUT
R
L
VIDEO
TV
RF
IN
180
- 250 V -
50 HZ
C C
SCART
NETSTIK
Figure 5 (Satellite Receiver 320 as seen from rear)
Important!
The 'DATA' port on the receiver is only for service use. Connection of units not approved by Force will mean the
guarantee on the receiver no longer applies.
2.3 Connection of Terrestrial Antenna
The antenna must be pointing in the direction of the terrestrial TV transmitter and within its range. High performance
antennas are available for areas where the signal is weak. A modern antenna installed for analogue reception may give
adequate reception, but due to the differences in signal frequencies you may find that only some TV channels can be
received. Your local distributor will be able to give you more advice.
The Force receiver is able to power an active antenna. This is enabled during set-up.
The coax cable from your aerial must be connected to the “antenna - in" socket. This is the socket at the top left of the
rear.
IN
OUT
ANT
DATA LINE
DIGITAL
AUDIO
OUT
R
L
VIDEO
TV
RF
IN
180
- 250 V -
50 HZ
C C
SCART
POWER PLUG
Figure 6 (Terrestrial receiver 320 seen from the rear)
Important!
The 'DATA' port on the receiver is only for service use. Connection of units not approved by Force will mean the
guarantee on the receiver no longer applies.
English
Page 9

9
2.4 Connection to TV
You have two options for connecting your receiver to your TV. One way is using the SCART cable. The other option is
ordinary aerial input (RF). The SCART connection provides the optimum picture and sound quality for most modern TV
equipment and is therefore the one recommended whenever the TV set has a SCART input.
The SCART cable must be connected from "TV SCART" (the bottom SCART plug) on the receiver to an available SCART
plug on the TV set.
If you want to use the ordinary aerial input to your TV, you should connect a standard aerial cable from the "RF OUT"
on the Force receiver to the aerial connection on your TV equipment. The signal from the Force receiver can be carried in
any channel in the range 21 to 69. As standard, channel 38 is used. This can be altered during installation or normal
operation.
2.5 Receiving Analogue Channels
If you use the ordinary aerial input to your TV, you can include analogue TV signals on this connection.
If you have a satellite receiver, you will also need an analogue TV aerial. Connect this aerial to the RF IN on the Force
receiver.
For Terrestrial receivers, the signals will already be present on the aerial connected to the Antenna In. Add a short RF
cable between ANT OUT and RF IN on the Force receiver.
2.6 Connection to video recorder
The analogue output (RF Out) can be used to connect to a video recorder.
If you have a 320 model, you are advised to use the VCR SCART output as this gives a better picture. Make sure to
connect the video to the Video SCART socket. If you have a stereo video and want to record broadcasts from your Force
receiver in stereo, you must use a fully configured SCART cable.
The Force receiver has various controls to give flexibility in the way the receiver interacts with your TV set and VCR (or
DVD player). Please refer to section 10.
2.7 Connecting a DVD Player (320 model only)
If your TV set does not have a separate SCART socket for a DVD player (this could be marked VCR on the TV Set) you can
connect a DVD player instead of the VCR to the VCR socket on the Force receiver. When the DVD player is running, the
TV will automatically receive its signal.
2.8 Audio connection to Hi-fi equipment (Model 320 only)
There are two options for connecting your Force receiver to Hi-fi equipment. An analogue signal is available on the two
PHONO plugs, marked L and R. A serial digital signal (SPDIF) is available on the DIGITAL AUDIO output. Refer to your Hifi equipment manual to find out the most suitable one to use.
English
Page 10
10
2.9 Distributing Signals to other TV Sets
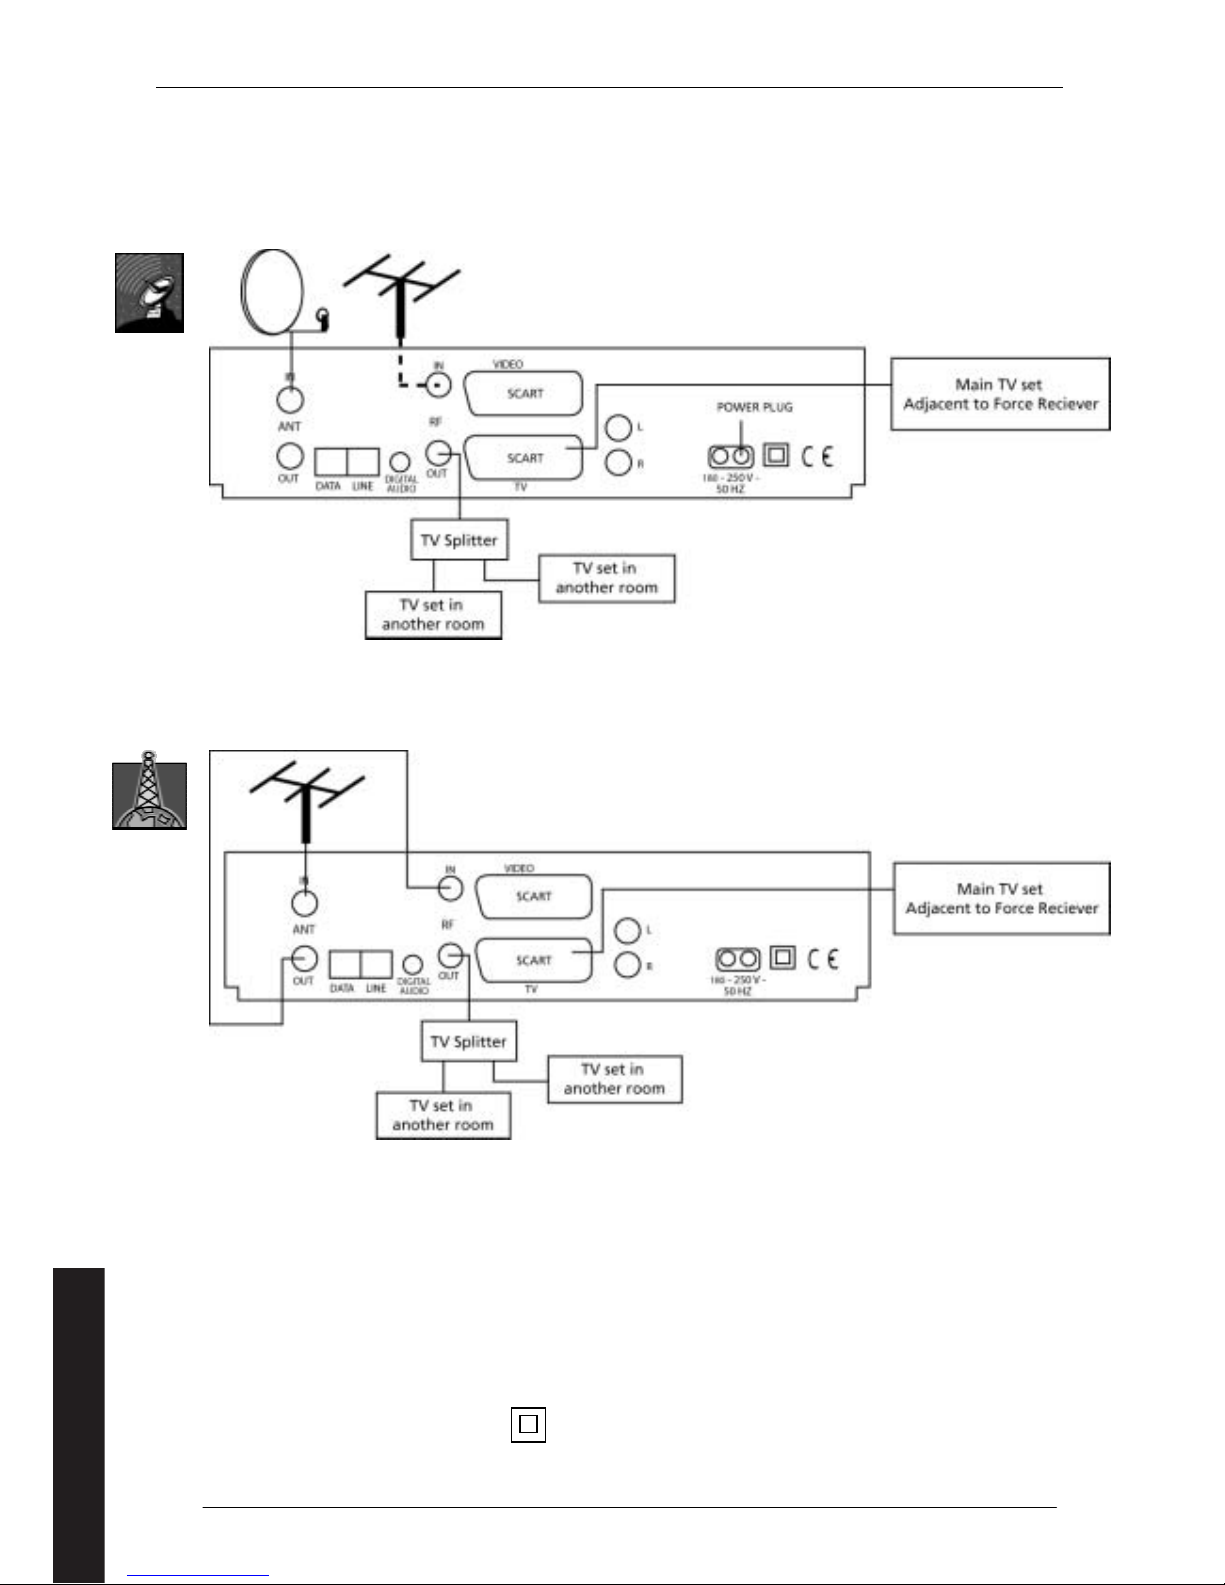
Your Force receiver can be used in a variety of ways with other TV sets in your home. For instance, you can connect the
RF OUT via coaxial cable to other TV sets or video recorders. These can then either show the channel selected on the
Force Receiver, or providing an analogue signal is available as described in section 2.5, any analogue channel. One such
arrangement is shown in figure 7 for satellite receivers and figure 8 for terrestrial receivers.
Figure 7 (Satellite receiver distribution)
Figure 8 (Terrestrial receiver distribution)
If you have a second Force Receiver, it can be connected to the ANT OUT connector on the first receiver. Several receivers
fed from the same dish or antenna can be set up in this way.
2.10 Modem connection
Some Force receivers are fitted with a modem which can be used, among other things, to order "Pay per view" films in
some networks. The modem connected via an RJ11 socket. Your service provider will indicate when this connection is
needed.
2.11 Power connection
Once all other connections have been made, put the mains plug into the receiver and then plug in and switch on.
The equipment is double insulated class 2 Power consumption is 6W in stand-by an d 15W when the receiver is on.
English
Page 11
11
3 Getting to Know your equipment
3.1 Controls on the receiver
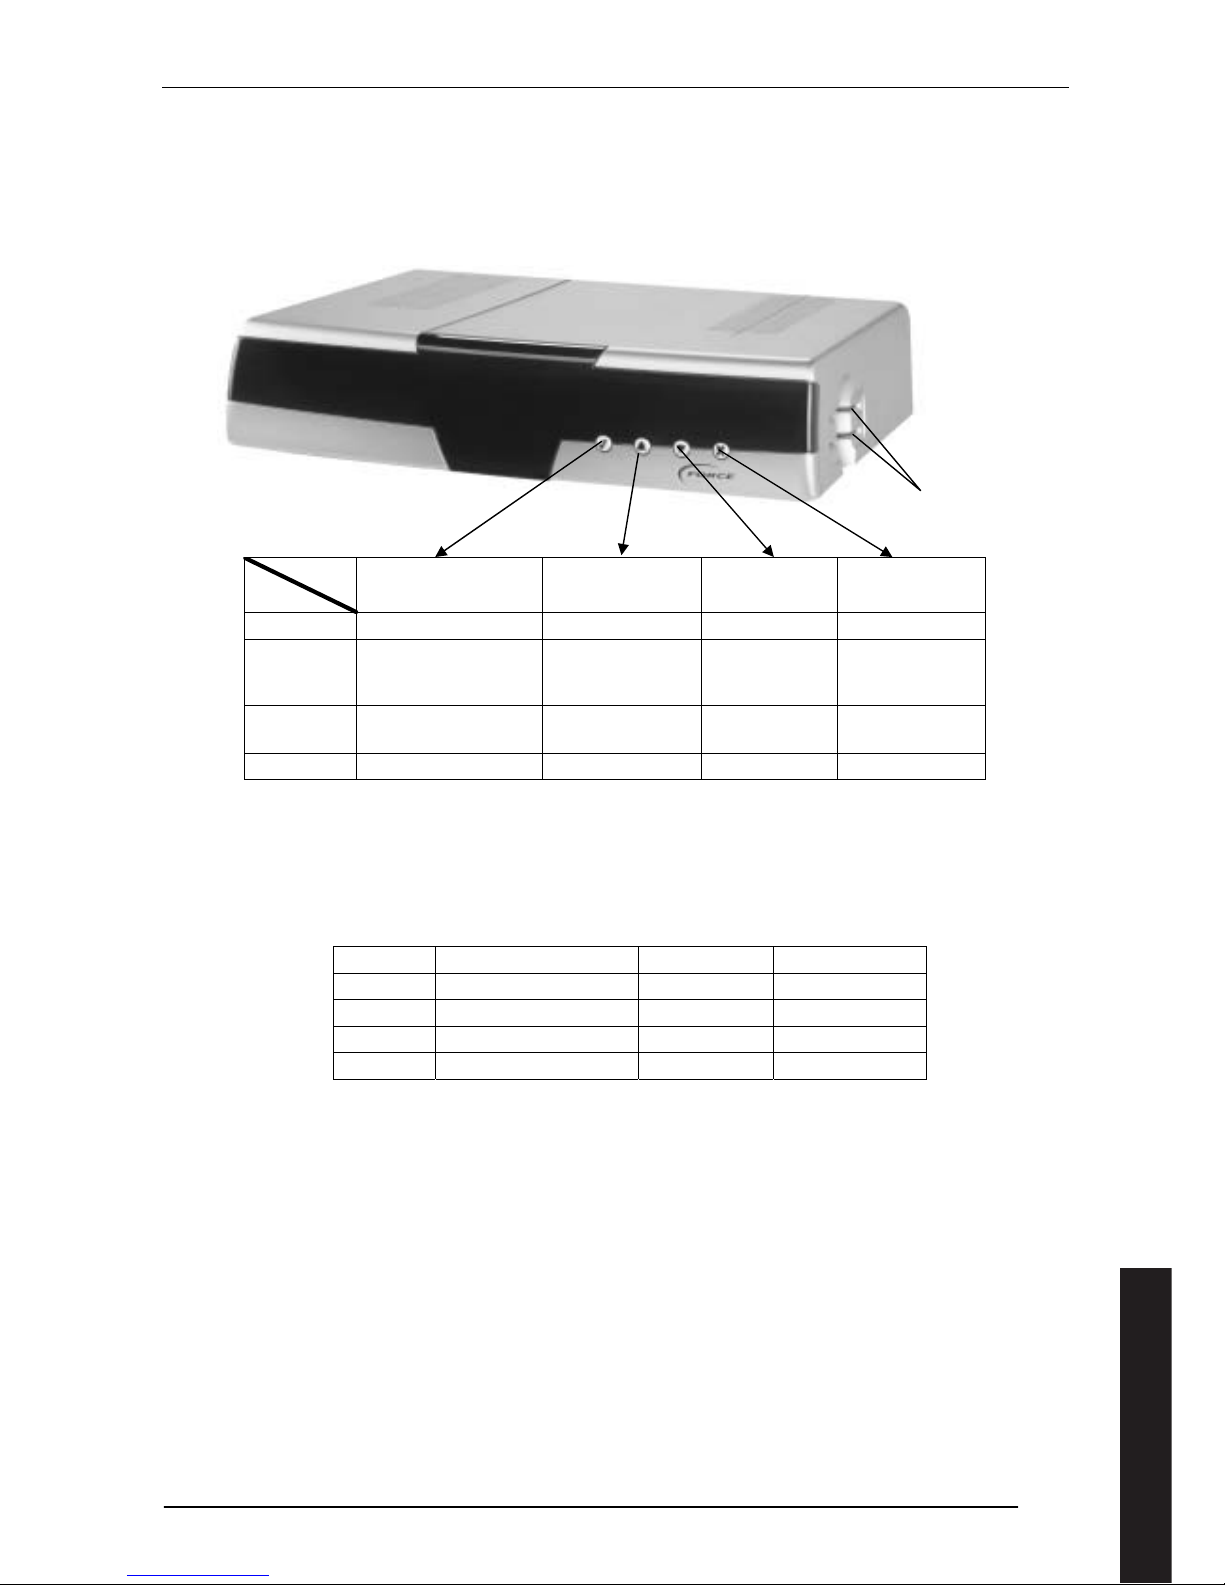
On the right side of the receiver’s front there are 4 buttons for operating the receiver manually (see Figure 9 (Receiver
Front End)).
Figure 9 (Receiver Front End)
These buttons give access to the menu system to enable you to exercise many of the controls without the remote control
itself. The functions are the same as those provided by the buttons on the remote control.
To the left of the buttons, there are two LEDS – a red one and a blue one. When the power is connected to the receiver,
both lights flash as the unit is initialised. After that, the indications given are :
Red Blue
Standby On Off
In use Input normal Off On
No input Off Flashing
Searching for channels Off Flashing
Note that when the unit goes into standby, both red and blue LEDs are on for a short time while the unit is shut down.
3.2 Programme cards
Programme cards are used with the inbuilt conditional access system in the receiver to enable you to watch encrypted
channels. There are two card readers on the right-hand side of the receiver.
Warning: turn the power off before changing programme cards.
Insert cards into the reader so that the gold contacts are facing downwards.
The status of the cards can be checked via the on-screen menu, as described in section 11.1
Status
Button 1 (OK)
Button 2 (^)
Button 3 (v)
Button 4 (Exit)
Stand-by On No function No function No function
On
Short press: channel
list
Long press: off
Channel + Channel - Menu
Channel list OK
Up
Down
Exit
Menu OK Up Down Exit
Card
Reader
A
B
English
Page 12
12
3.3 Remote control
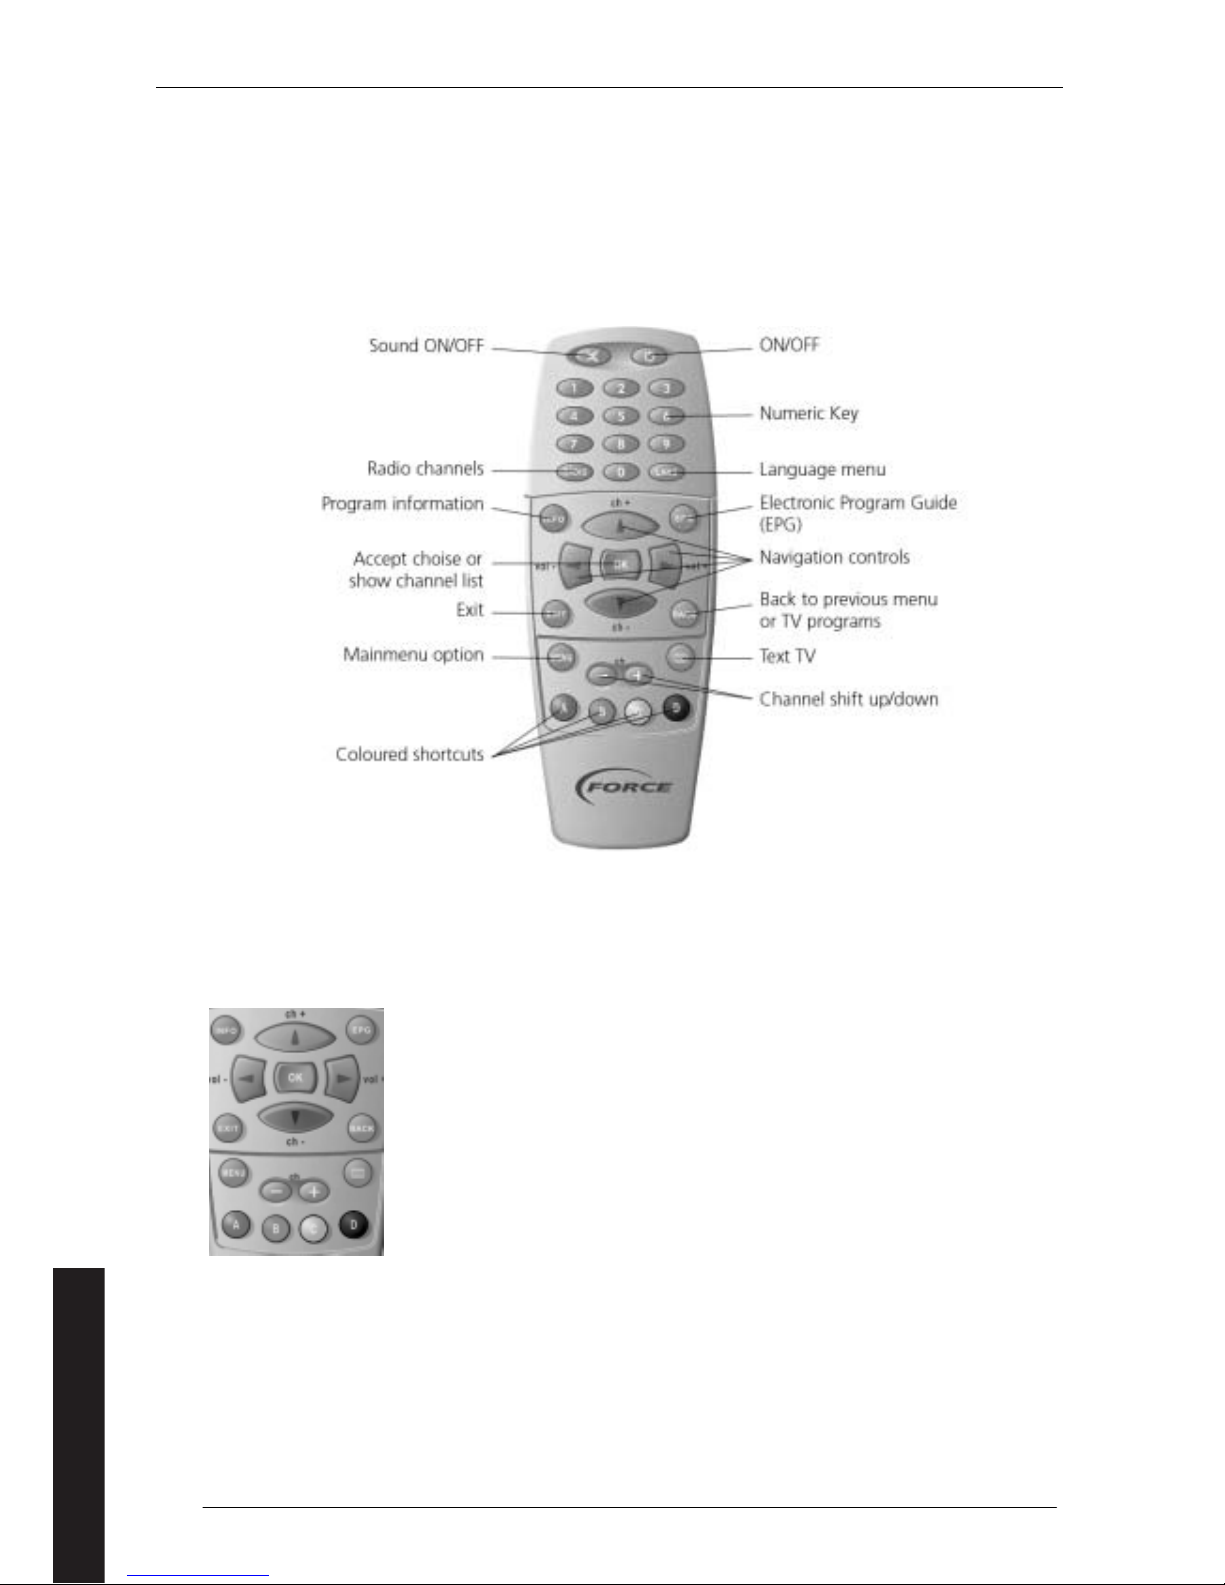
The remote control that comes with your Force box is able to control all the functions in the receiver. Point the remote
control at the receiver. Press the buttons firmly then release to transmit a command. You can usually see the command
taking effect by watching the display on the TV screen. Buttons can be pressed in fairly quick succession, but allow
enough time for each instruction to take effect before pressing the next button.
The remote control uses 2 AAA batteries that accompany your receiver. Always make sure that the batteries are in good
condition and are not leaking. When the device is not going to be used for a long period, take the batteries out. Poor
batteries affect the range of the remote control.
Figure 10 (Remote control)
You turn the receiver into and out of standby using the red button at the top of the remote control. When the receiver
is in standby a red LED in the front of the receiver will come on. When the receiver is switched on, the red LED will go
off and a blue LED will be seen. The receiver will always start on the channel it was tuned to when it was put into
standby.
This area (figure 11) of the remote control is also used for programme selection and menu
operation. Arrow keys allow you to move around lists and menus on the screen. When you
want to access or confirm a selection, press OK.
The coloured buttons are shortcuts. In some menus you can move quickly around by pressing
the relevant colour. The menu shows the function used on the particular page.
The coloured buttons can also be used when you are looking at teletext and can be
programmed for various functions while watching the TV.
Figure 11 (Remote control menu keys)
3.4 Powering down when not in use
When the receiver is not in use, it should be put in STANDBY using the remote control or front panel switch.
Disconnecting the power supply to the receiver is not recommended, as the receiver will then not be able to receiver
updates, mail, etc.
Disconnect the power if you change a programme card.
During lightning disconnect the power to prevent possible damage.
English
Page 13
13
4 Start up
4.1 Installation Wizard
The first time, and only the first time, you switch on the receiver, the installation wizard will guide you through the
process of setting up your receiver.
The installation procedure varies depending on the product you have purchased. In some networks, the receiver will be
programmed with the channels it can receive. In other cases, the receiver will search for available channels. Terrestrial
receivers always search for channels.
Any of the settings selected using the Installation Wizard can be altered at a later date via the on-screen menus.
4.2 Select language
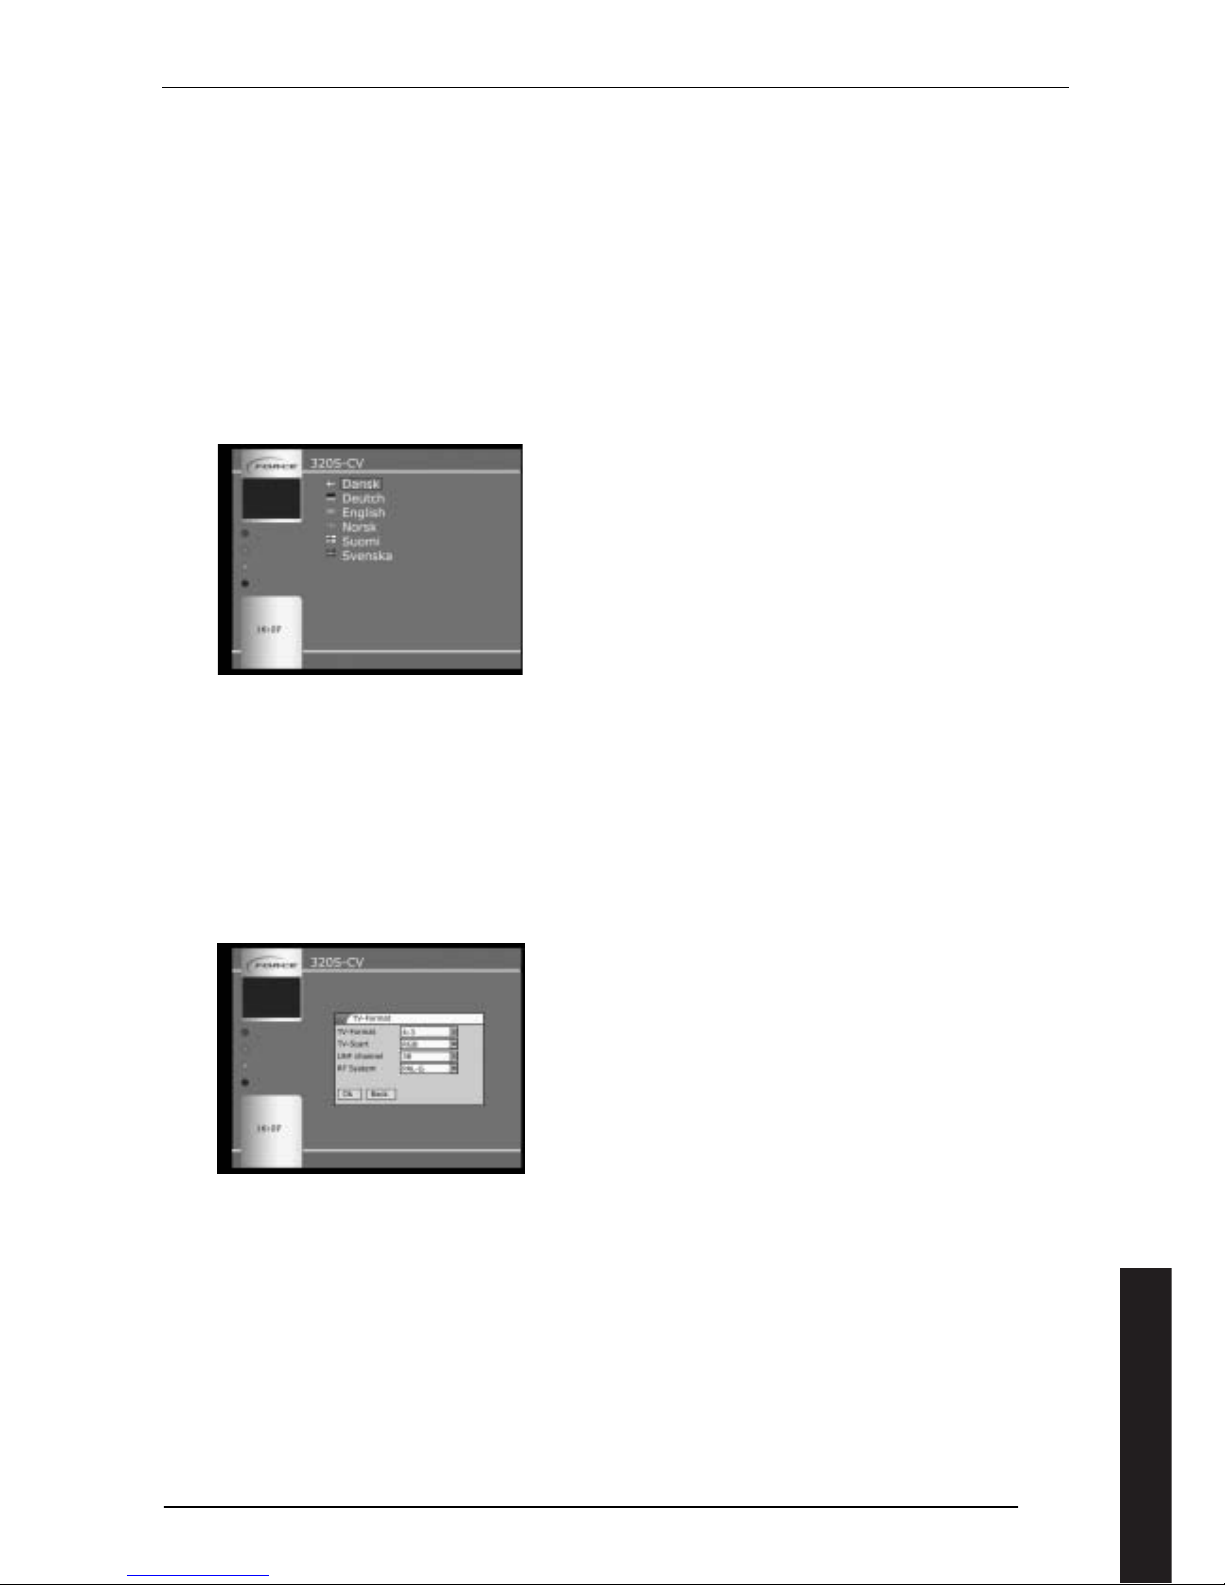
Select a particular country’s flag to change the entire menu to the relevant language – see Figure 12 (Select language).
This is also the main language for audio and subtitling. Select the language by pressing the arrow keys until you have
highlighted the relevant language with a red box. Press OK. You will now see a message – “Please wait – reading
settings.” Allow a few seconds for this operation to be completed.
Figure 12 (Select language)
4.3 TV-format Menu
4.3.1 TV-format
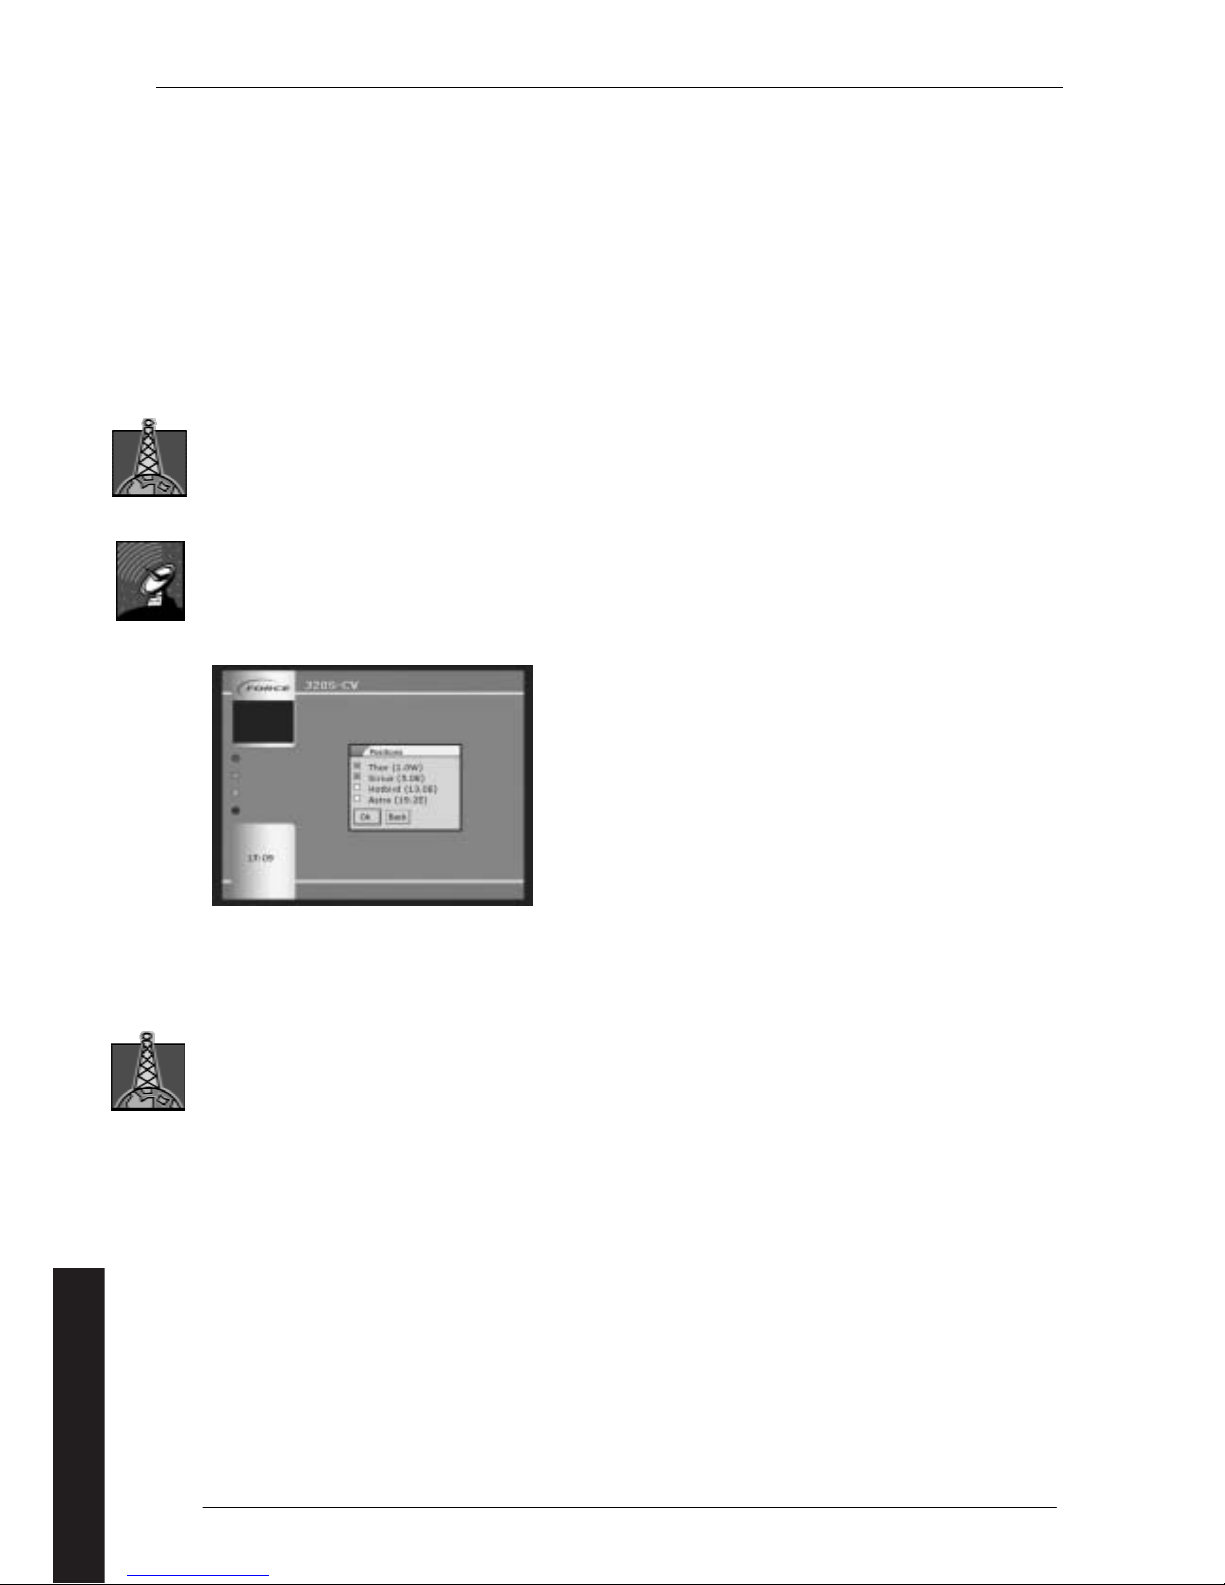
TV-format refers to whether you have a standard 4:3 TV or a widescreen 16:9 TV.
• 4:3 This setting is suitable for most TVs
• 16:9 This setting is only for widescreen TVs. Only select this if you are sure your TV is widescreen or widescreen
compatible, as the picture will otherwise be displayed in the wrong format. This can always be changed later.
To change the setting to 16:9, use the up/down arrow keys to highlight the box adjacent to TV FORMAT, press OK, then
use the up/down arrow keys to select the desired format. Press OK to select.
Figure 13 (TV-format)
4.3.2 TV-SCART (Start-up > TV-format)
If you are using the SCART connection to the TV, there are three signal options. Refer to your TV manual to find out
what it will receive and select the one that gives the best picture quality. Some trial and error may be necessary.
1. RGB – this gives the best quality picture and is recommended.
2. S-Video – this gives good picture quality but is not always available on the TV set.
3. CVBS. This is the "standard" signal, and can be used in all TVs with a video input.
Highlight the box, press OK, then select the desired format using the up/down arrows. Press OK to complete.
English
Page 14
14
4.3.3 UHF channel (Start-up > TV-format)
This enables you to select the channel used on the RF Output to carry the decoded channel.
If you are not using the RF Output from the receiver, ignore this step.
If you are using the RF Output, find out if channel 36 is already used. If it is not, then use this default value. If channel
36 is already in use, select a free analogue channel in the range 21 to 65.
Highlight the item, press OK and select the required channel in the list.
4.3.4 RF System
Here you can select the version of PAL that your TV uses.
When you have completed making your selections on this page, highlight SUMBIT and press OK.
4.3.5 Active Antenna
If you have an active antenna on your terrestrial receiver, select +5 Volt, otherwise leave it at 0 Volt.
4.4 Positions (Start-up)
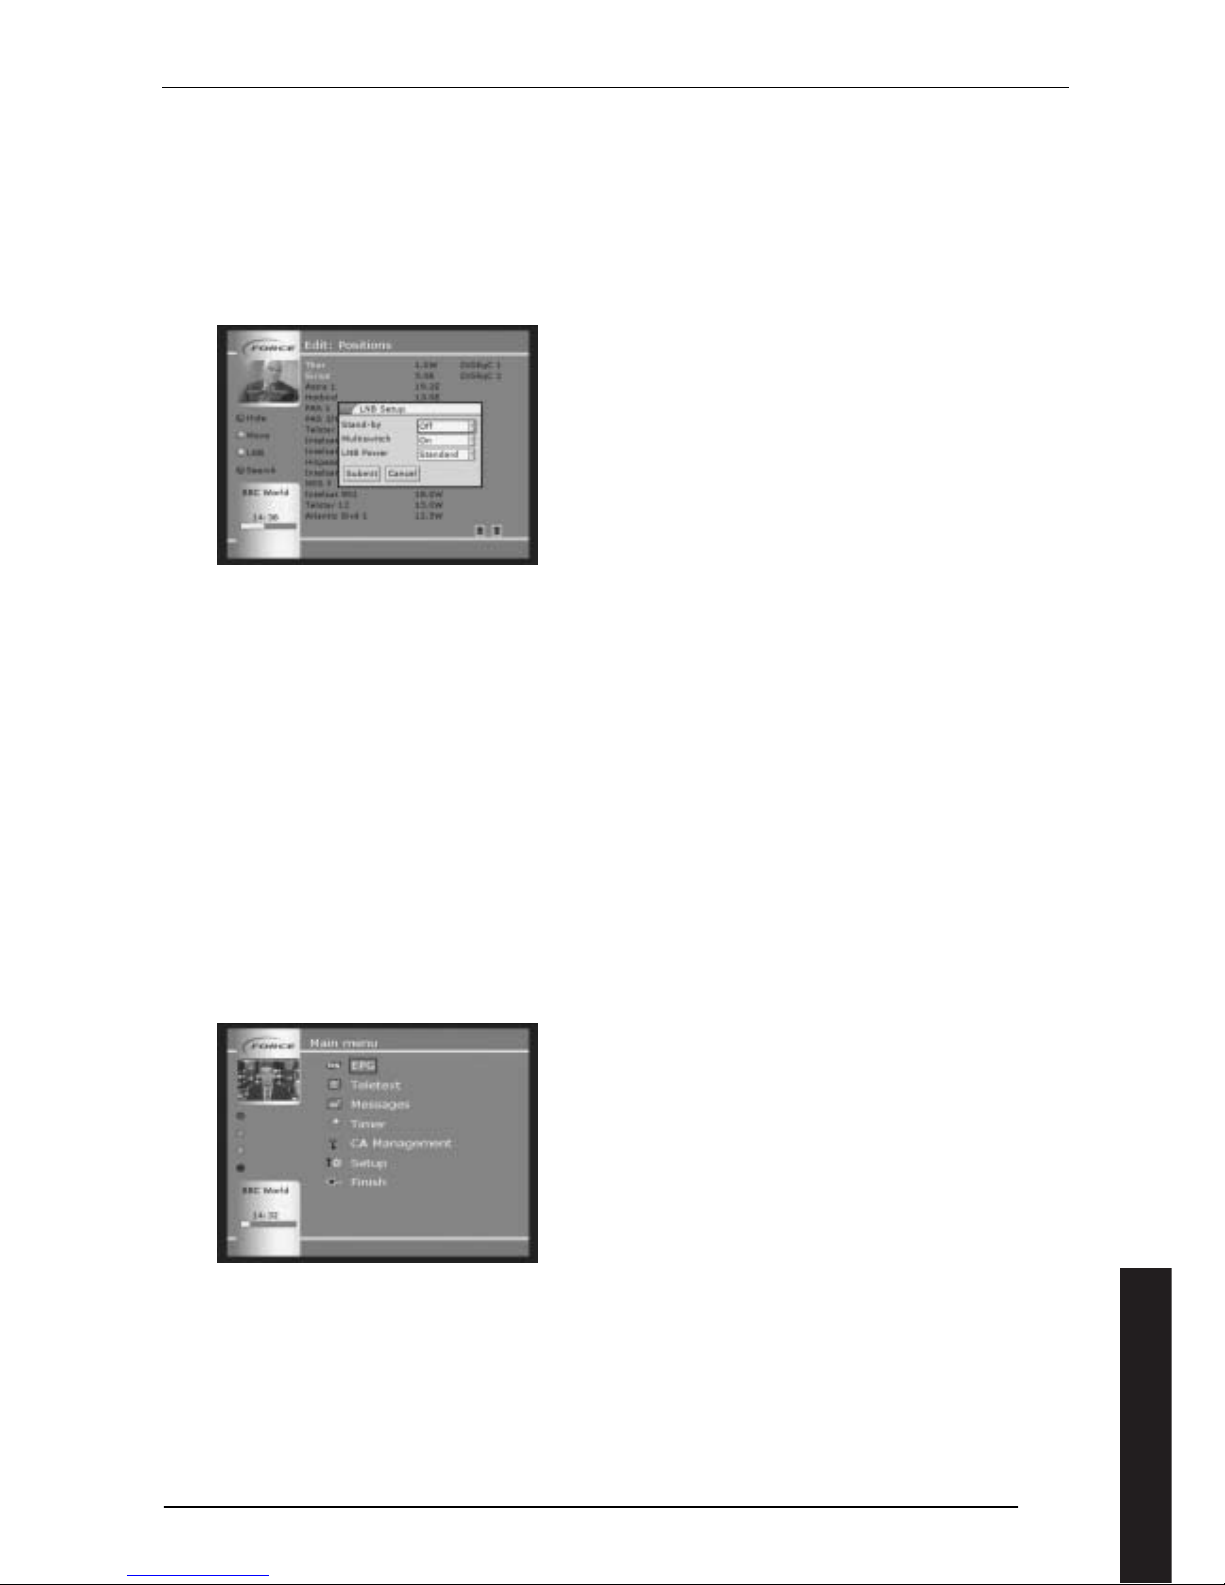
In this item you select how many satellites your dish is to have access to, see Figure 14 (Positions).
A typical Nordic system with 2 LNB heads will use Thor and Sirius. Highlight positions with the arrow buttons and press
OK to select. Press OK again to deselect. The satellites selected are those with an X in the box against the name.
If the satellites from which you want to receive are not shown here, they can be selected later and searched for
available channels, see section 8.2.2.
Figure 14 (Positions)
The installation wizard sets up the basic parameters for the LNB, but advanced settings are configured after the wizard
has finished. These are described in section 4.7.
4.5 Channel search (Start-up)
If you have a terrestrial receiver, it will now search for all the available TV and radio channels. This may take a few
minutes, but you will see the UHF channel number increase and a yellow bar to show progress; all the channels up to 69
are checked in turn.
If you have connected the receiver correctly, the list of available channels will be shown at the right of your TV screen.
The order of channels in the channel list is determined by the frequency on which they are transmitted. If for any reason
you are unable to receive a signal at this stage and therefore the channel search does not work, complete the set-up
process and then investigate using the on-screen menus.
Once the search is complete, you will see a message “Press OK to continue." Use your remote control to do this.
If a programme card is required for reception, you should now place it in card reader A or B, with the components on
the lower surface and the contact surface downwards.
NOTE:
On start-up, you may get the error message "no access". The programme card needs to be updated with your user
privileges. This will take approximately 20 minutes. Switch the receiver on and leave the card in until it is updated.
English
Page 15
15
4.6 Saving Your Configuration
You conclude your installation by highlighting SUBMIT and pressing OK. Now the clock will appear in the display on the
receiver as long as you have a signal from the dish or antenna.
You may find that the clock shows the wrong time. If it is wrong by an exact number of hours, the receiver has been set
up for the wrong time zone. This can be changed via the on-screen menu as described in section 11.5.
4.7 LNB Set-up
Additional configuration of the LNB takes place after the basic set-up has been completed. From the main menu, select
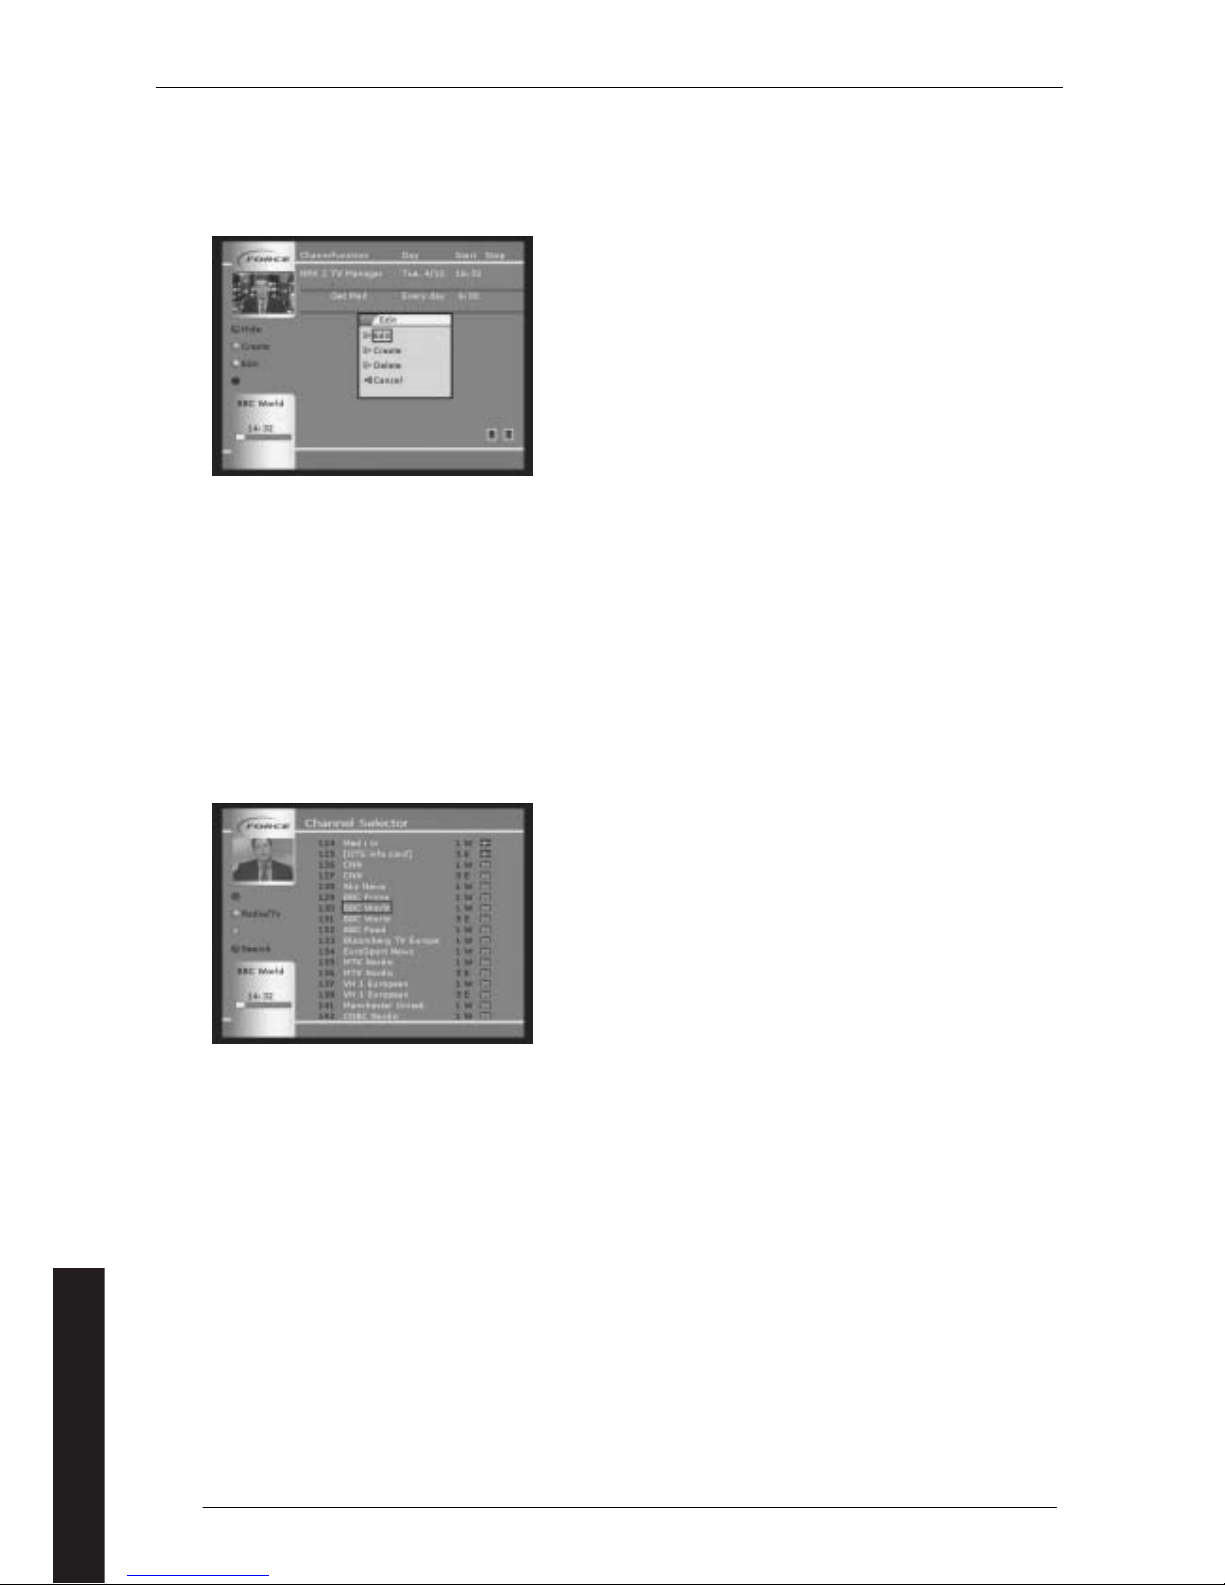
SETUP – LISTS – POSITIONS. Then press the yellow short cut button for LNB control to get the menu shown in figure 15.
Figure 15 (Set up LNB)
If the cable to the dish attenuates the signal too much and its quality is degraded, the LNB voltage can be increased.
Change the LNB POWER from ‘standard’ to ‘+1 volt’.
If your dish is connected to multiple receivers, you must ensure that the receiver which provides power to the LNB, that
is the receiver directly connected to the LNB, continues to power the LNB when it is in standby. On this menu, change
Stand-by from Off to On. If you only have a single receiver, keep this setting at Off.
If you have a DiSEqC unit to control your LNBs (see section 2.2.3), a command is sent to the DiSEqC every time you
change channel, even if the DiSEqC setting is not changed. If you set MULTISWITCH to Off, this command is only sent
when necessary. It is recommended that this command is set on On.
5 Selecting Programmes on your Force Receiver
5.1 Menu system
The Menu system in a Force receiver is comprehensive but easy to move around. There is a selection of main menu
options, and these lead to sub-menus where further selections are available. The operating system is similar to the way
you navigate around a personal computer.
In order to be able to enter the various parameters in the Force receiver, you must go into the main menu. This is done
by pressing MENU on the remote control. You select/activate menu items or functions by using the up/down arrow keys
on the remote control to highlight the relevant point or function with a red border and then confirm by pressing OK.
You can see the main menu on the picture below; here the red box is positioned over the EPG sub-menu.
Figure 16 (Main menu with red box)
When you have finished, highlight FINISH and press ENTER. Alternatively you can press MENU again at any time to exit
the menu system.
If you make a menu selection which you do not want, you can return to the previous menu by selecting FINISH or by
pressing the EXIT button. If you choose the EXIT button, no changes made on the menu are saved.
English
Page 16
16
5.2 Shortcut buttons
In some of menus/overviews the coloured shortcut buttons are used. Where this happens, they are shown down the lefthand side of the menu with their allocated functions. An example of such a menu is shown below. If you want to open a
sub-menu with extended functionality in this overview, you must press the yellow button. The blue button in this
illustration has no function.
Figure 17 (Menu with shortcut buttons)
5.3 Channel selection
One of the functions you will use often is the channel selector. When you are watching a TV programme (no matter
which) and you want to change to a different programme, you can do this in three ways:
1. To move to the next channel, press either the arrow up/arrow down or the CH +/- buttons on the remote control.
You can repeat this to look at each channel in turn.
2. If you want a better overview of the available channels, press the OK button. You will then access the channel
selector shown in Figure 18 (Channel selector). Use the arrow up/down buttons to move up and down the list on the
screen, or use the arrow left/right buttons to move to the next/previous page in the list. Use the Radio/TV button to
switch between their separate lists. Highlight the desired channel, then press OK. You can also search the list, as
described in section 8.
3. If you know the number of the channel you want to view, enter the channel number on the numbered keys on the
remote control. Press OK, or wait for a few seconds, and the channel will appear.
Figure 18 (Channel selector)
You can search the channel selector using the blue shortcut key shown in Figure 18 (Channel selector).
Terrestrial networks transmit a limited number of channels, so you can only search using a text field. To enter te xt,
highlight the letter and then press OK. Numbers can be entered directly from the remote control. Delete is the key on
the bottom right. When complete select OK on the bottom middle of the display, press OK on the remote control, then
select SUMBIT. The channel list then shows only those programmes which include the selected text, which could for
instance be the name of the broadcaster, such as Sky. To remove the selection, go back to the Channel Selector screen
and press the blue button again. Highlight Reset, press OK on the remote control, then highlight SUMBIT. The full list
should again be visible.
On the satellite receiver, you can search the available channels for a particular category, e.g. sport. You will then only
see the channels categorised as sports channels; the same can be done for language, package, position or a specific text
field which you enter yourself.
English
Page 17
17
5.4 EPG
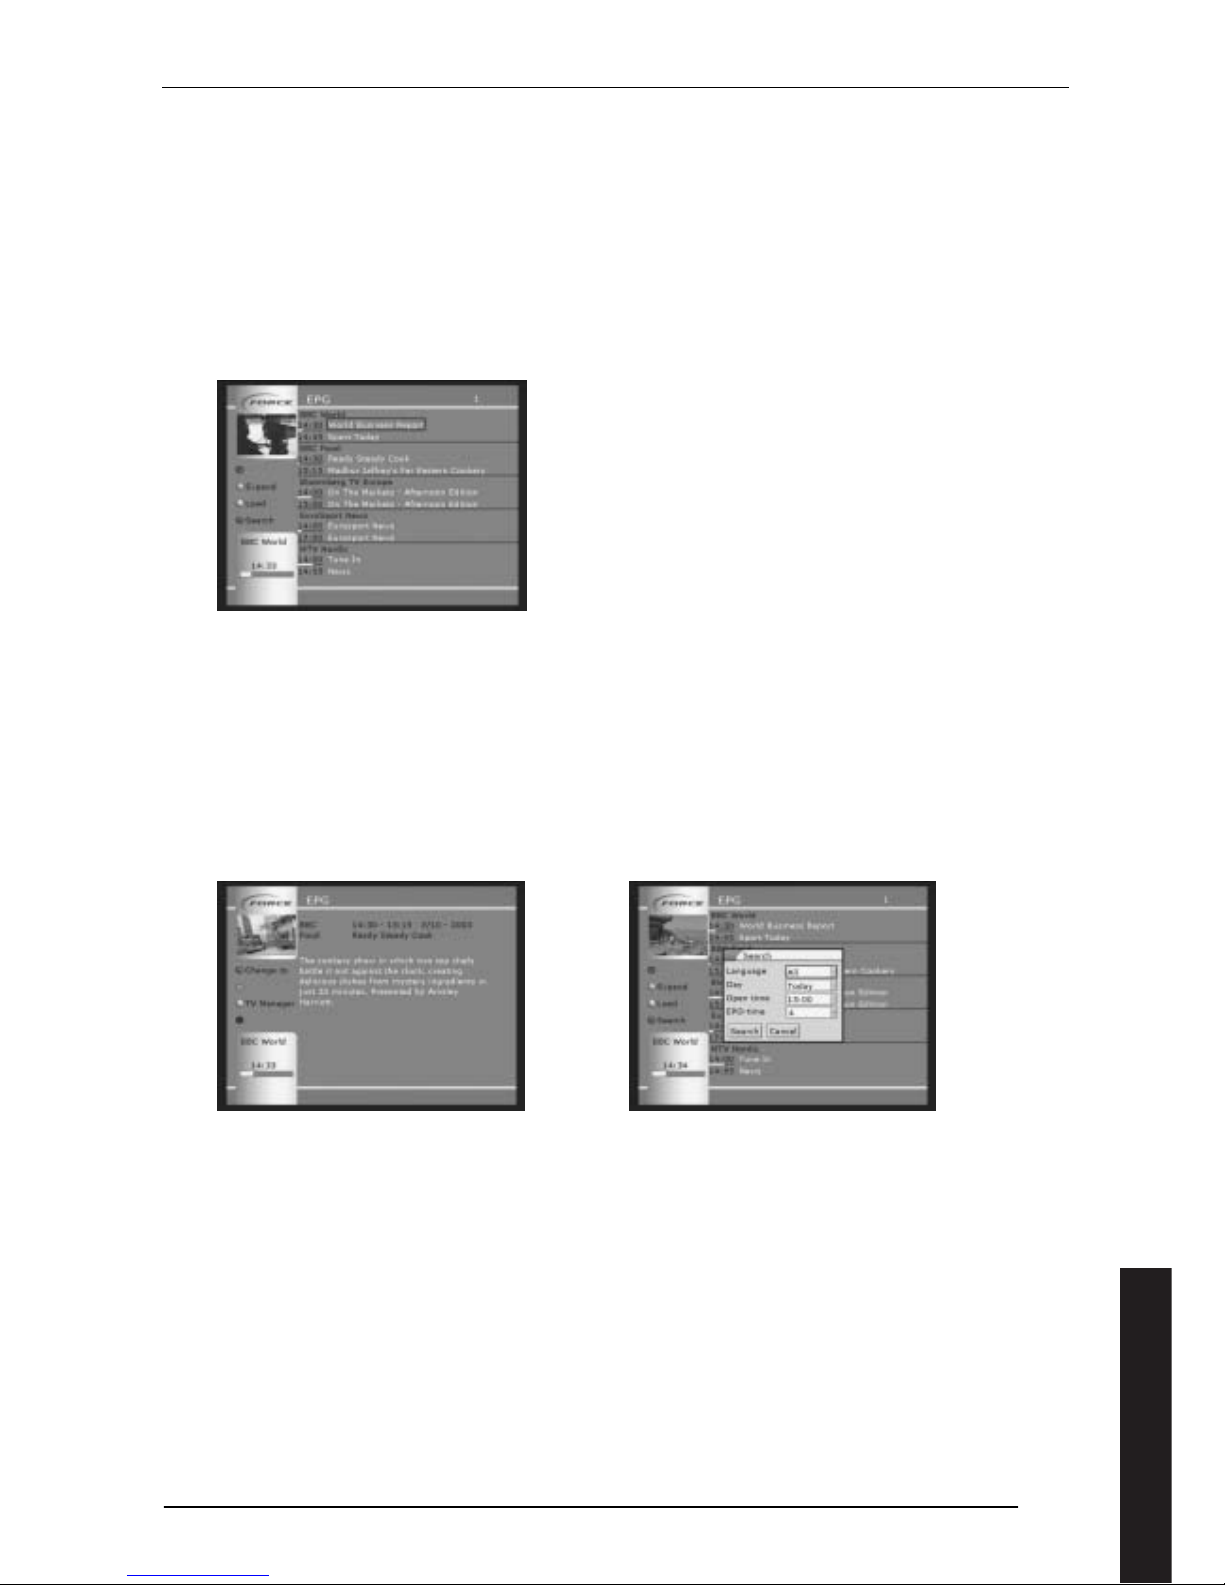
EPG is the Electronic Program Guide that allows you to get a quick overview of the current selection of programmes.
You can access the EPG by pressing the EPG button on the remote control. Alternatively, go into the main menu and
select EPG.
When you select the EPG, you will see an overview of all the channels for which EPG data is available. Not all channels
carry EPG information. Some channels, especially Terrestrial ones, only show current and next programme. For other
networks, up to 7 days information will be displayed.
You can browse through the list using the up/down arrows within a page and the left/right arrows to move from one
page to the next.
To change to a channel in the EPG, highlight the programme and press OK.
Figure 19 (EPG)
Load – yellow button. The receiver will then load the EPG data. A black bar will indicate progress.
Search - blue button. Search on language, day or broadcast time up to 7 days in advance. See figure 21.
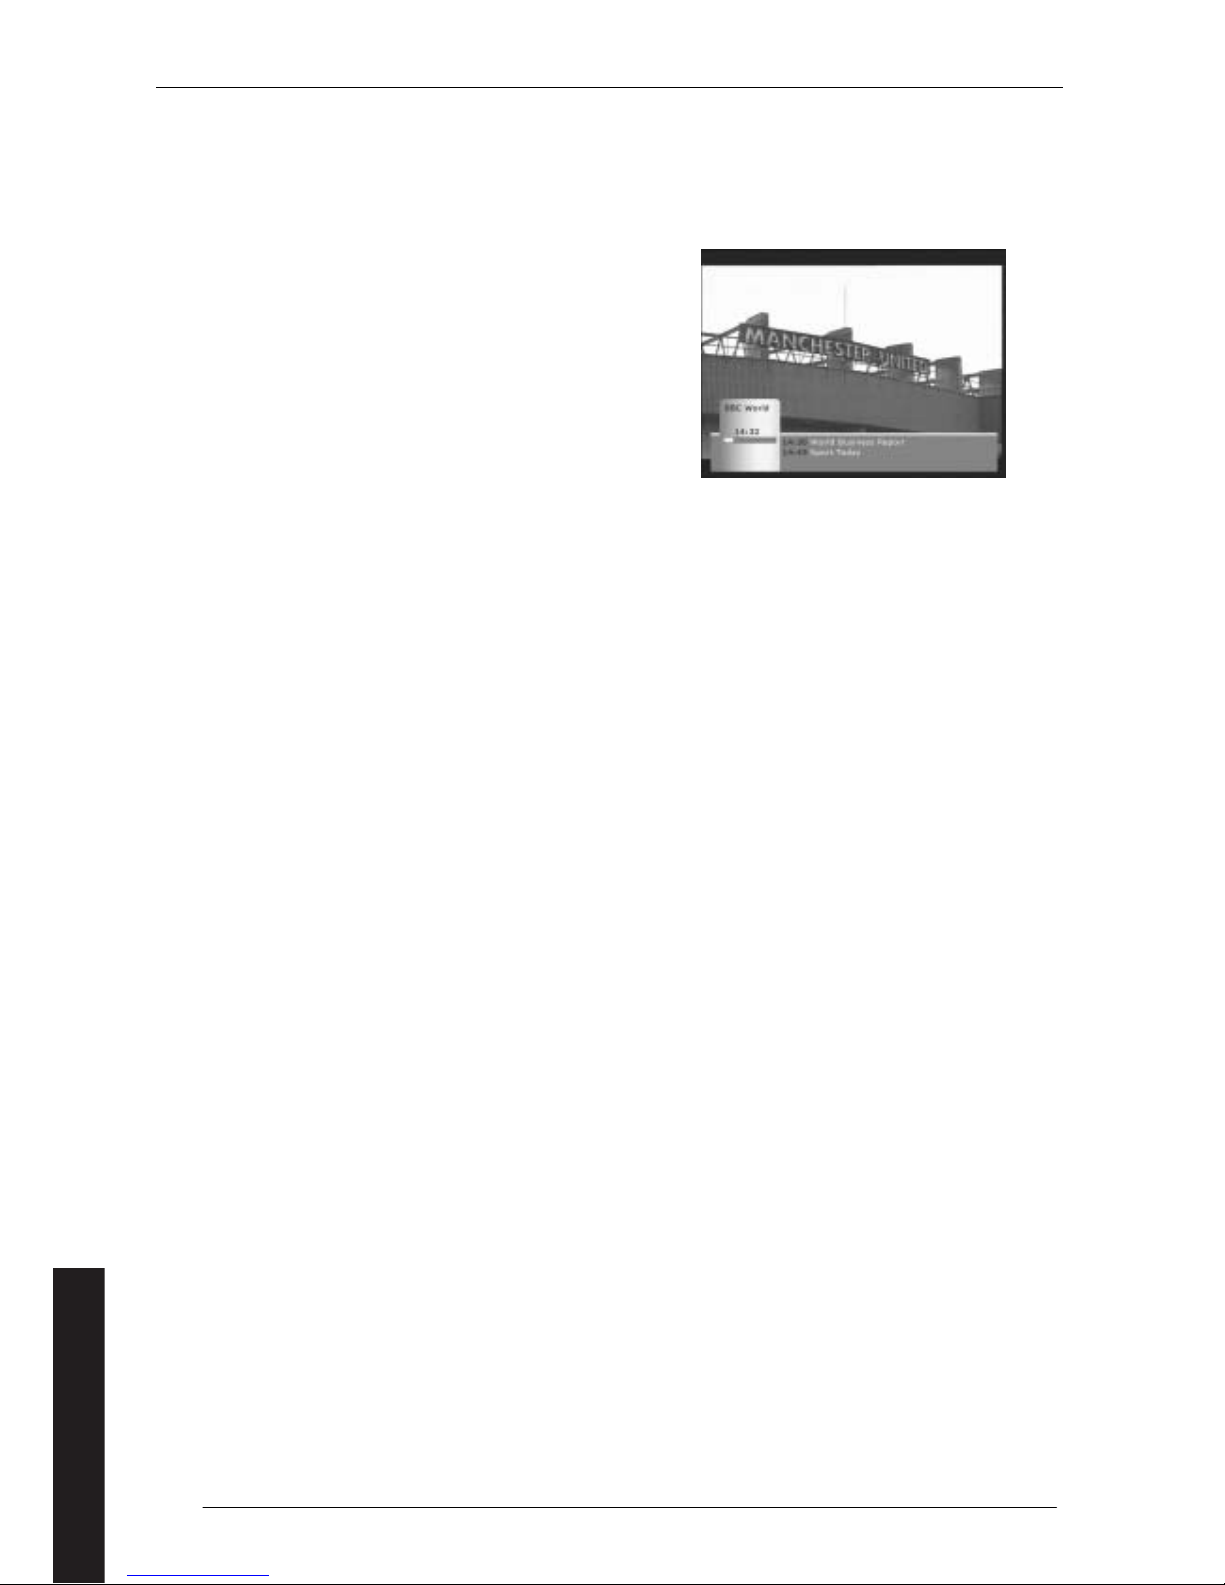
You can see more information about a particular programme by highlighting it and either pressing the EPG button
again or by pressing the green shortcut button, see figure 20. You are now in the menu for the individual program. This
menu gives access to two more functions:
• Change to - red button. The receiver changes to this channel immediately.
• TV manager – yellow button. The receiver will add the programme in the TV Timer Manager, which will then show
the programme at the correct time. Remember not to do this for a programme which is currently being broadcast.
Figure 20 (EPG Extended information) Figure 21 (Search)
As noted above, the EPG data displayed depends on what is available.
The EPG needs to be regularly kept up to date. Where only current and next programme information is shown, this is
done automatically and no further action is needed. Otherwise, you can update the EPG manually, using the yellow
shortcut button as shown above, or you can set up a timer to do this automatically, as shown i n section 6.4.
The receiver gets its EPG information from a particular channel.
• For Terrestrial receivers, this is set up in the UHF channel list. From the main menu, select LISTS, then UHF Channels.
Select a UHF channel which carries EPG information, press the yellow shortcut key. Then EDIT. Ensure that the box
next to EPG has a cross in it and press SUMBIT. This process can be repeated if there are other channels carrying EPG
information. In the UHF Channels screen, you will see the letter E against those channels nominated to carry EPG
information.
• For satellite receivers, this is edited in the Frequencies list. From the main menu, select LISTS, then Frequencies.
Select a frequency on which EPG information is carried, press the yellow shortcut key. Then EDIT. Ensure that the
box next to EPG has a cross in it and press SUMBIT. This process can be repeated if there are other channels carrying
EPG information. In the UHF Channels screen, you will see the letter E against those channels nominated to carry
EPG information.
English
Page 18
18
5.5 Info bar
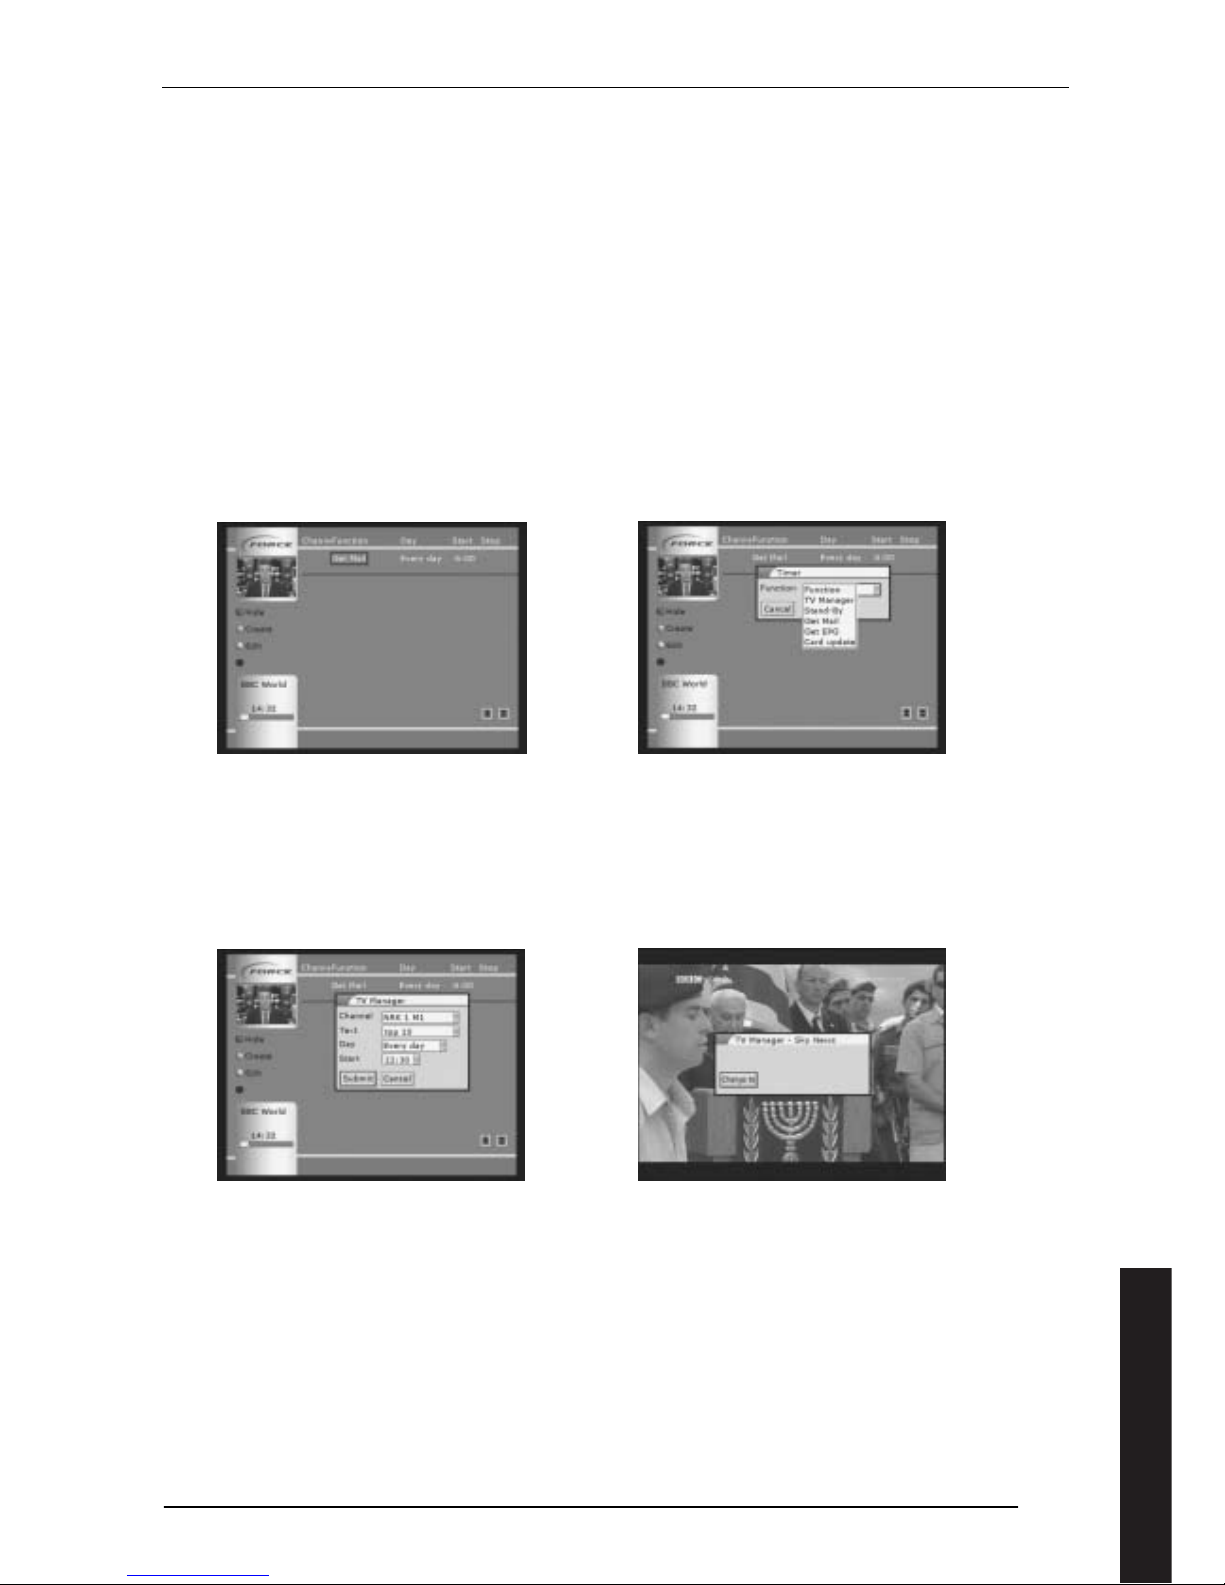
When you change channel, you will see an information bar for the new programme, showing the name of the chosen
channel, the title of the current programme, the time the programme started and a bar showing how much of the
programme has been transmitted as a proportion of the total duration. It also shows the title of the next programme
with the time it starts. Some of this information may not be available for the chosen channel.
The info bar can also be accessed by pressing INFO on the remote
control at any time.
If INFO is pressed twice, you will see the extended Programme
Description.
Figure 22 (Info bar)
5.6 Switching between TV and Radio
By pressing RADIO on the remote control, you can switch between TV and Radio channels. Radio channels have their
own channel list which can be accessed and organised in the same way as the TV channel list.
5.7 Sound control
You can adjust the audio volume on the Force receiver with the left and right arrows on the remote control. The Sound
On/Off button on the top left of the remote control can be used for switching the audio on/off.
Since these controls are also available directly on your TV set, they can conflict. It is suggested that you only use one of
these controls.
The volume on the VCR SCART and the digital audio outputs ar e not affected by adjustment on the Force receiver. You
can decide whether the volume on the Analogue Audio outputs is or is not controlled from the receiver. From Main
Menu, select SYSTEM, then TV FORMAT. Set the Phono option to be either
• DIRECT – where the volume is always at maximum and can be controlled on your Hi-Fi equipment
• FOLLOW TV – where the volume is set by the control for the receiver.
5.8 Language Control
Some programmes are transmitted with a choice of languages on the audio channel and subtitle text. In this case, the
language matches your selection for the on-screen menus, but you can choose any other available language by pressing
the LANG button on the remote control.
You will see a menu which also allows you to turn on or off the left and right audio channels. A cross present in the box
indicates that the audio channel is enabled.
When you have made your new selection, highlight SUBMIT and press OK on the remote control.
5.9 Teletext
If a channel carries teletext, it can be viewed by pressing the TEXT button on the remote control or from the main menu
by selecting TELETEXT. Select a desired page by entering the number. The coloured buttons on the remote control give
direct access to pages 100, 200, 300 and 400 respectively.
Note that teletext is not provided on terrestrial channels in some countries.
English
Page 19
19
6 Timer
Your Force receiver can be set, in a unique and simple way, to carry out various tasks at set times.
• Press the MENU button on the remote control to bring up the main menu
• Select TIMER
Alternatively, you can set up one of the short cut buttons to take you directly to the timer.
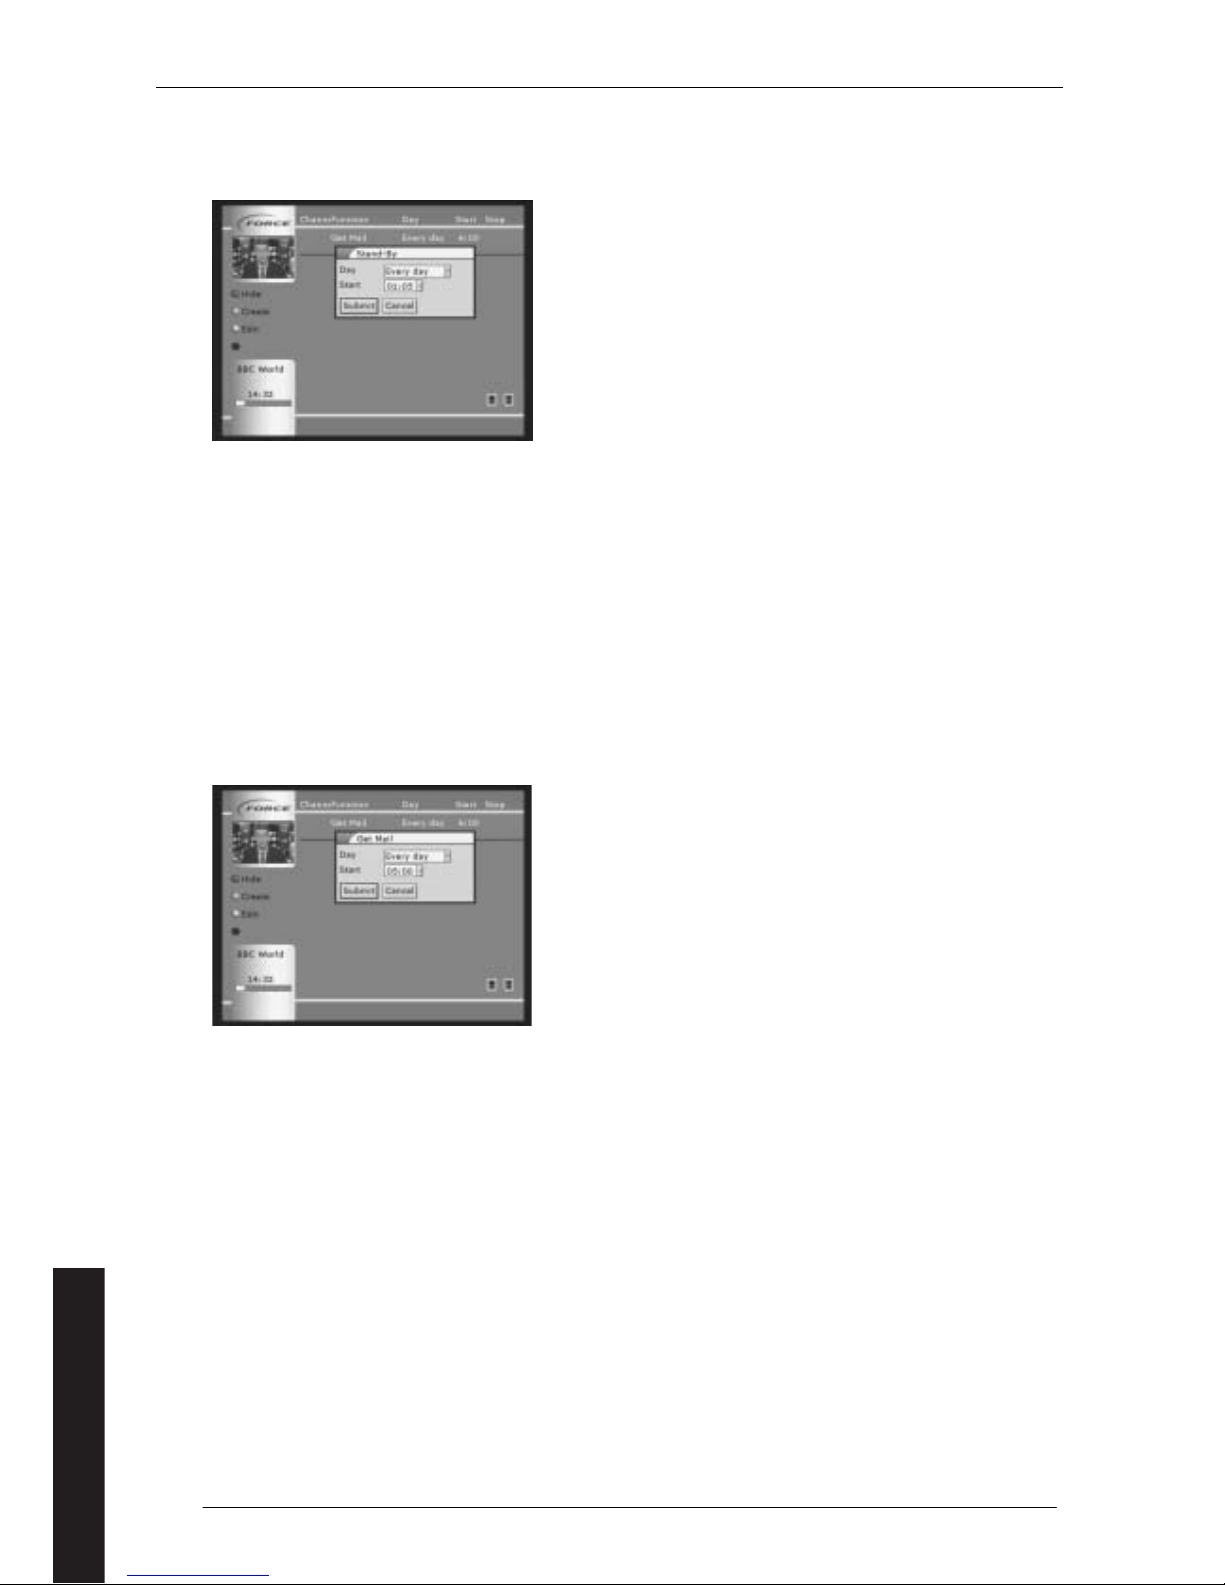
You will now see the display, figure 29, showing the timers current set up. The timer is set as standard to download mail
daily.
Note that time is always entered using the 24 hour clock. Thus 6pm is entered as 18:00.
To add a new task, press the green shortcut button on the remote control (Create). Highlight the "Function" field and
press OK. You will now see a list of the following options:
• TV Manager – to tell you when a programme is due to start.
• Stand-By – to put the receiver automatically into standby
• Get Mail – to check for new mail
• Get EPG – update your electronic programme guide.
• Card update
Figure 23 (Timer overview) Figure 24 (Timer function selection)
To temporarily disable a timer function selecting the timer function you wish to hide, and then press the red shortcut
button (hide). If you want the timer to be active again, press the red shortcut button again.
6.1 TV Manager
Your Force receiver can be set to automatically advise you when a programme is due to start. When the time for the
programme arrives, the receiver will show a message on the screen and you can then choose to change over to the
programme or cancel by pressing the EXIT button on the remote control.
Figure 25 (TV Manager) Figure 26 (TV Manager set up)
To set the timer to indicate start of a programme:
• From the main menu go down to TIMER. Press OK.
• Press the green button on the remote control.
• In "Function", select "TV Manager"
• In "Channel", select the channel you wish to watch
• In "Text", you can write a suitable reminder, e.g. which programme you want to watch. You can insert letters from
this display or numbers from the keyboard.
• In "Day", select the date the programme starts (every day or a date up to 30 days ahead)
• In "Start" enter the start time
• Select SUBMIT
You will now return to the timer overview, where you can see that your selected timer function will be listed (together
with any other selected timer functions). The Force receiver will show a message when the programme starts.
English
Page 20
20
6.2 Stand-By
Here you can set your receiver to automatically go to stand-by mode at a given time. This may be useful if you forget to
switch off the receiver yourself. This function saves energy and prolongs the receiver’s service life.
Figure 27 (Stand By)
The steps are:
• From the main menu go down to “Timer”. Press OK.
• Press the green button on the remote control.
• In "Function", select "Stand-By"
• In "Day", select the date the receiver is to go to stand-by mode (every day or a date up to 30 days ahead)
• In "Start", enter the time when the receiver is to go to stand-by mode.
• Select SUBMIT
You will now return to the timer overview, where you can see that your selected timer function will be listed (together
with any other selected timer functions). The Force receiver will carry out this function as soon as the time arrives.
6.3 Get Mail
Your receiver is set as standard to check for new mail every day. However, you can set a time yourself when you wish to
check for new mail, e.g. if you want to download mail twice a day.
Figure 28 (Get Mail)
Perform the following:
• From the main menu go down to “Timer”. Press OK.
• Press the green button on the remote control.
• In “Function” select “Get Mail”
• In "Day", select the date the receiver is to check for new mail (every day or a date up to 30 days ahead)
• In "Start", enter a time when the receiver is to check for new mail.
• Select SUBMIT
You will now return to the timer overview, where you can see that your selected timer function will be listed (together
with any other selected timer functions). The Force receiver will carry out this function as soon as the time arrives.
English
Page 21
21
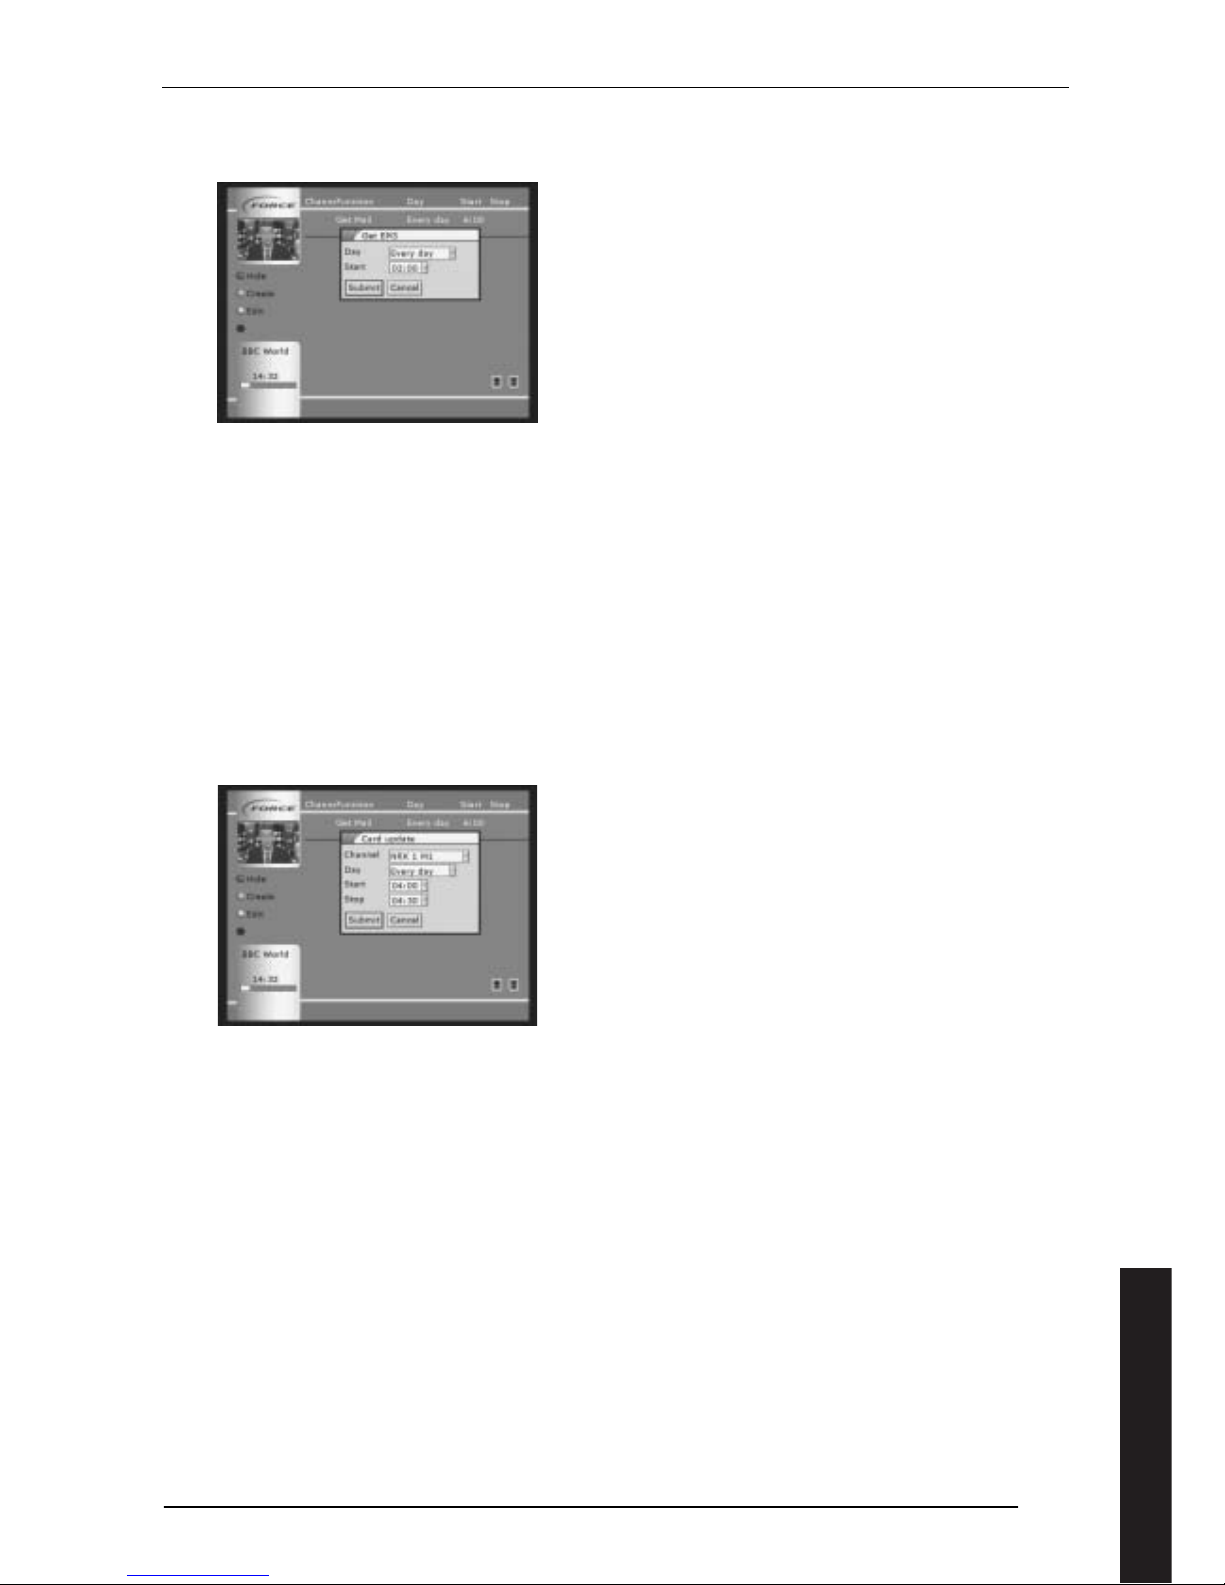
6.4 Get EPG
You can set your receiver to update the EPG data at specific times, e.g. at night.
Figure 29 (Get EPG)
Perform the following:
• From the main menu go down to “Timer”. Press OK.
• Press the green button on the remote control.
• In "Function", select "Get EPG"
• In "Day", select the date the receiver is to download the new EPG data (every day or a date up to 30 days ahead)
• In "Start", enter the time when the receiver is to record the EPG data
• Select SUBMIT
You will now return to the timer overview, where you can see that your selected timer function will be listed (together
with any other selected timer functions). The Force receiver will carry out this function as soon as the time arrives.
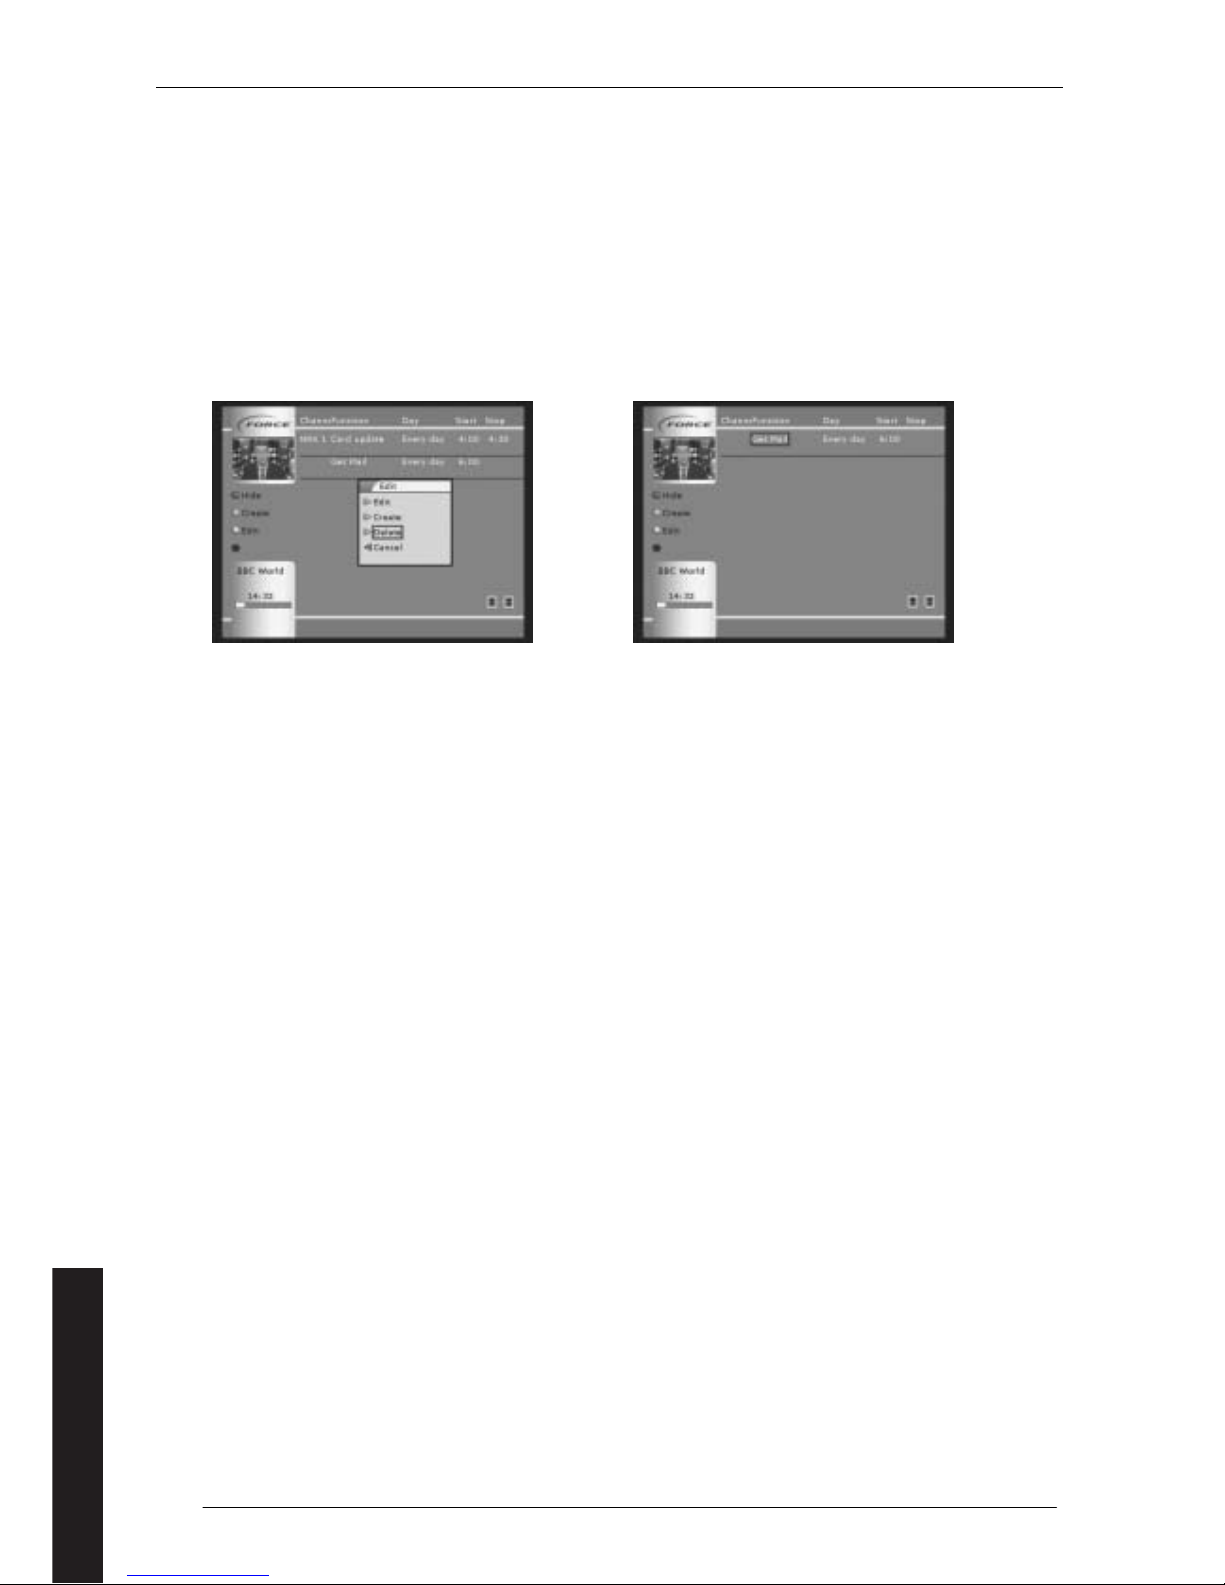
6.5 Card update
This function can update your programme card(s) at specific times. This may be particularly useful if, for example, you
are on holiday or for any other reason your receiver is not being used for a long period and your programme cards are
thus not being updated. You can check the status of the cards as described in section 11.1.
Figure 30 (Card update)
Perform the following:
• From the main menu go down to “Timer”. Press OK.
• Press the green button on the remote control.
• In "Function", select " Card Update"
• In "Channel", select the channel where the associated programme card is to be updated.
• In ”Day”, select the date the receiver is to update the programme card (every day or a date up to 30 days ahead).
• In "Start" enter the time when the receiver is to begin the update.
• In "Stop" enter the time when the receiver is to stop the update.
• Select SUBMIT.
You will now return to the timer overview, where you can see that your selected timer function will be listed (together
with any other selected timer functions). The Force receiver will carry out this function as soon as the time arrives.
English
Page 22
22
6.6 Editing timer settings
If you want to change one of the timer settings selected, perform the following :
• Go into the timer overview (Main menu > Timer).
• Highlight the setting you want to change and press OK.
You will now access the menu for the relevant timer and can change the various parameters.
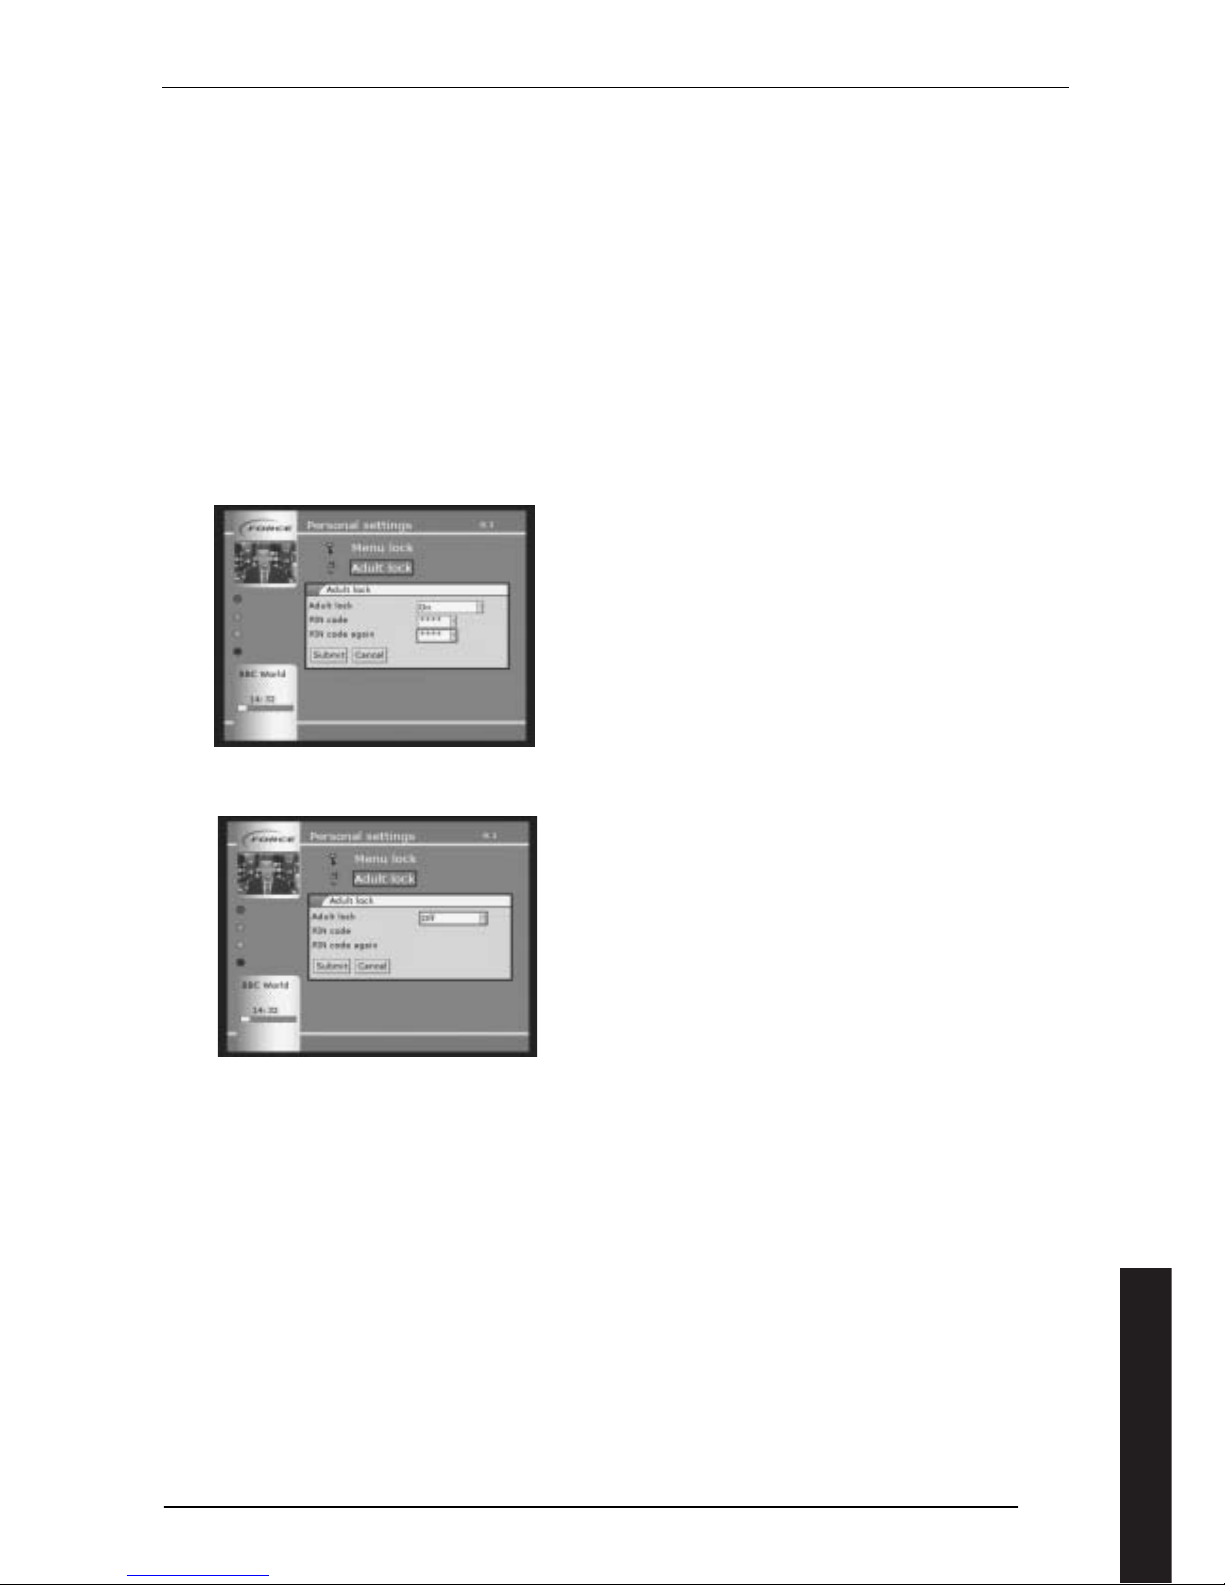
6.7 Deleting timer settings
If you want to delete a timer setting, perform the following:
• Go into the timer overview (Main menu > Timer).
• Highlight the setting you want to delete and press OK. You will now access the menu for the relevant timer.
• Highlight EDIT and press OK. The setting is now deleted.
Figure 31 (Timer list) Figure 32 (Edit/delete timer setting)
English
Page 23
23
7 Adult Lock
Adult lock enables you to restrict access to specific channels. A PIN code is stored in the receiver and this must be
entered each time you want to view a locked channel.
Note that for both this function and the menu lock, authorisation remains active until the unit goes into standby. If you
watch a locked channel and then want to prevent anyone else watching it, make sure to turn your receiver into standby.
To use this feature, you must enable it as described in this section and then identify each pr ogramme which is to be
restricted as described in section 8.1.1 (if you have a terrestrial receiver) or 8.2.1 (if you have a satellite receiver).
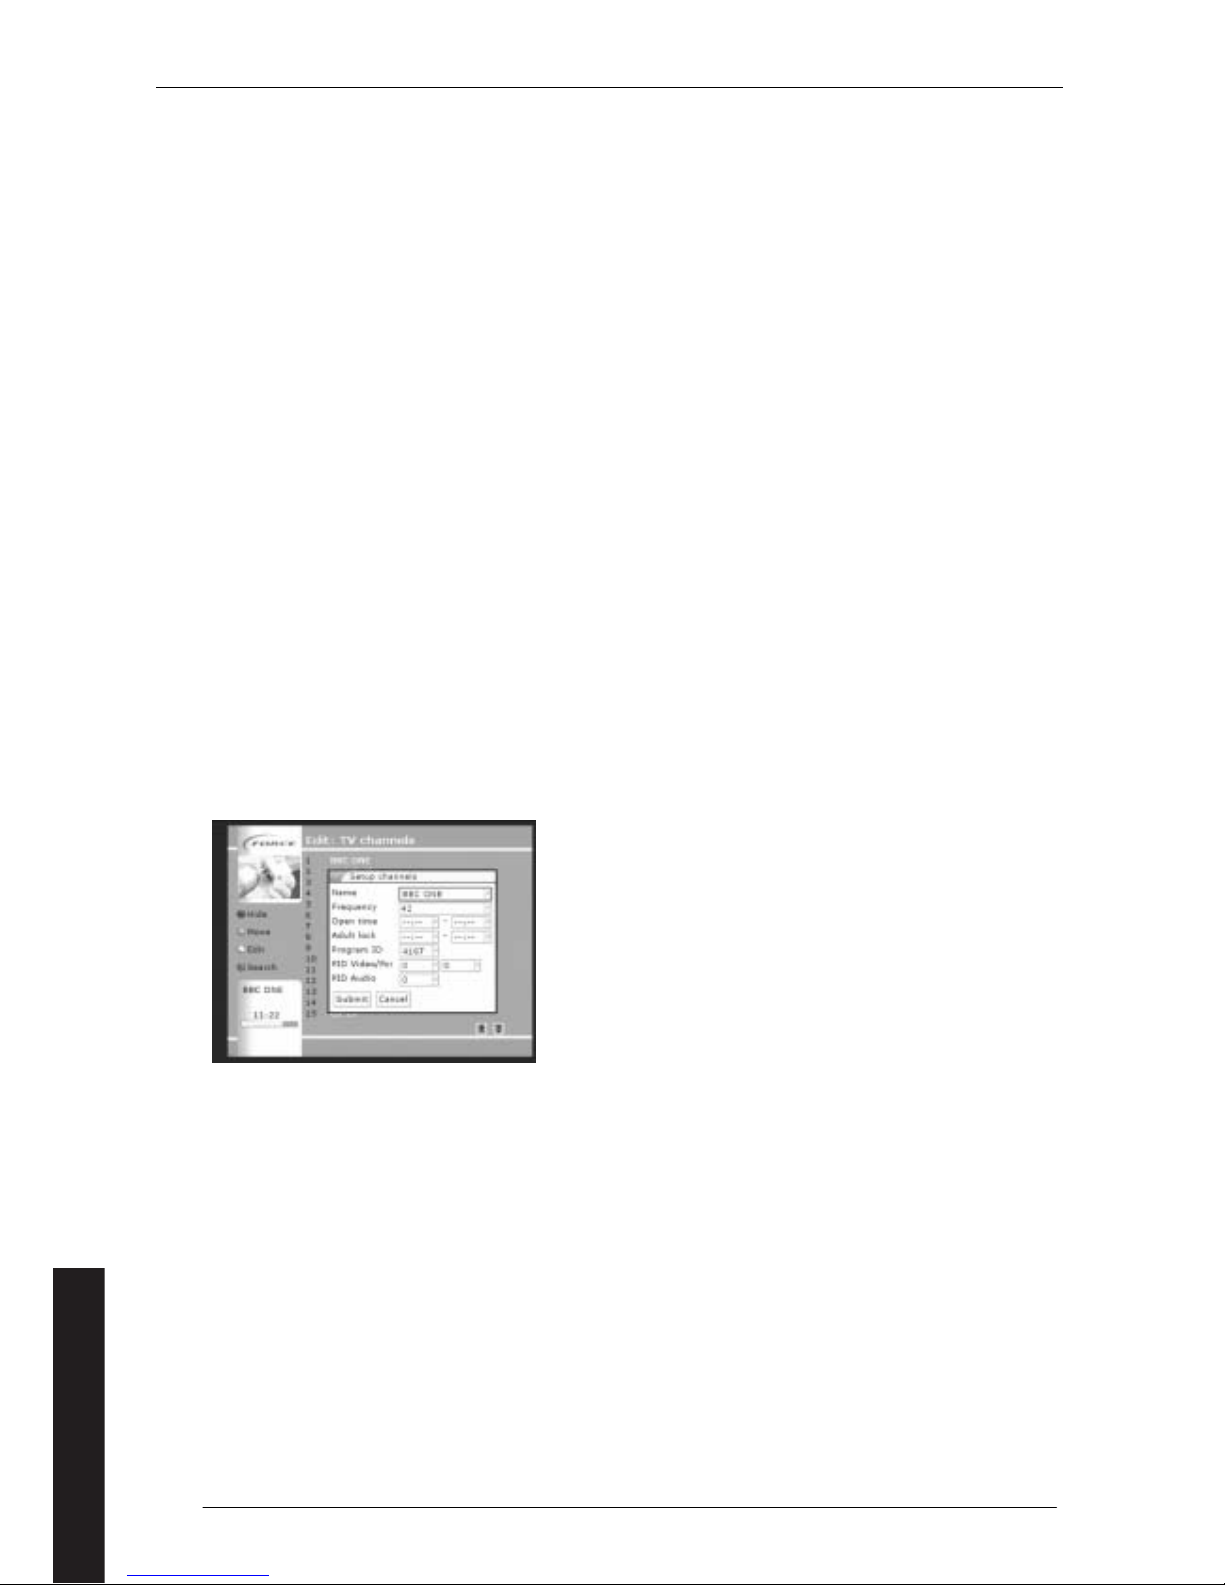
To activate the Adult Lock in the receiver :
• Press MENU
• select SETUP. Press OK
• Select PERSONAL SETTINGS and press OK.
• Select ADULT LOCK. Select ON.
• Enter a 4-figure code (PIN code) for use in the programmes to be locked. Enter the code again. Press SUBMIT.
IMPORTANT! Use a PIN code that is easy to remember!
Figure 33 (Adult Lock ON)
Figure 34 (Adult Lock OFF)
When the Adult Lock is activated, you can lock specific channels at specific times. Select the following:
• Main Menu - Setup - Lists - TV - Select Channel
• Press the yellow button on the remote control - Edit.
• Select the channel to be locked and press OK.
• Select "From Time" and "To Time".
• Press "SUBMIT" to save.
If you try to view a channel while it is locked you will be asked for your PIN code to gain access. You will not be asked
for your PIN code again until the receiver has been in standby.
By stopping the Adult Lock in the main menu, the channel will no longer be blocked, but the time will be saved. When
the Adult Lock is switched on again, the channel lock will be activated.
English
Page 24
24
8 Channel List Management
8.1 Terrestrial Receivers
8.1.1 Organising the channel list
If you have setup the system with the installation wizard, the channel list will be sorted in the order they were found.
You can easily change this list:
• Go into the main menu and highlight SETUP. Press OK.
• Highlight LISTS. Press OK.
• Highlight TV. Press OK.
The settings for radio channels are the same settings as for TV channels, with the exception that Adult Lock is not
available.
To hide a channel, select the red shortcut button using the arrows on the remote control. You will still see the channel
in this list, although it is in black text, but it will not appear in the channel list that you see when watching the TV. To
restore the channel to the active list, repeat this procedure.
To move a channel, the channel to be moved using the arrow keys. Then press the green button on the remote control.
You will now see that the channel has been "removed" from the list and replaced with a red pointer. Use the arrow
buttons to reach the number of the channel where you wish to place the channel and then press the green shortcut
button again to place the channel.
To display only channels which match certain categories, use the blue short cut button and select the options that you
want under each category and press submit. Leave the selection at ALL if you do not want to make a selection. To see
the full list again, select ALL under each of the categories or select RESET, then select SUMBIT.
You can edit the information held against a channel and also control its access. From the TV or radio channel list, press
the Yellow shortcut button. You have three other options :
Create a new channel. Normally this will be done automatically. If it is done manually, care should be taken to enter
the correct information.
Delete a channel permanently from the list. This is a permanent alternative to hiding the channel using the red short
cut button, as described above
Edit the information against a specific channel, as shown in figure 35.
Figure 35 (Channel Edit)
Frequency: this should not be altered.
Open time: Some channels do not broadcast 24 hours a day. In order to prevent a channel which is not broadcasting
from appearing in the channel selector, you can enter the start of transmission time here.
Adult Lock: A channel can be locked so that it is only accessed if a PIN code is entered. You can do this for the channel
by highlighting the box for time, pressing OK and entering the time during which you want it locked. If you want it
locked all the time, enter 00:00 in both start and finish times.
In order to activate the lock, the Adult Lock must be activated as described in section 7.
Programme ID: All digital channels have a Programme ID which the receiver can recognise. In individual cases, digital
transmissions contain soundtracks in different languages. If you wish to change the standard language selection, you
must enter Vpid and Apid.
WARNING! : Do not change programme ID and PID, unless you are absolutely sure you know what you are doing. If you
do make changes, remember the old settings.
English
Page 25
25
8.1.2 Updating the channel list
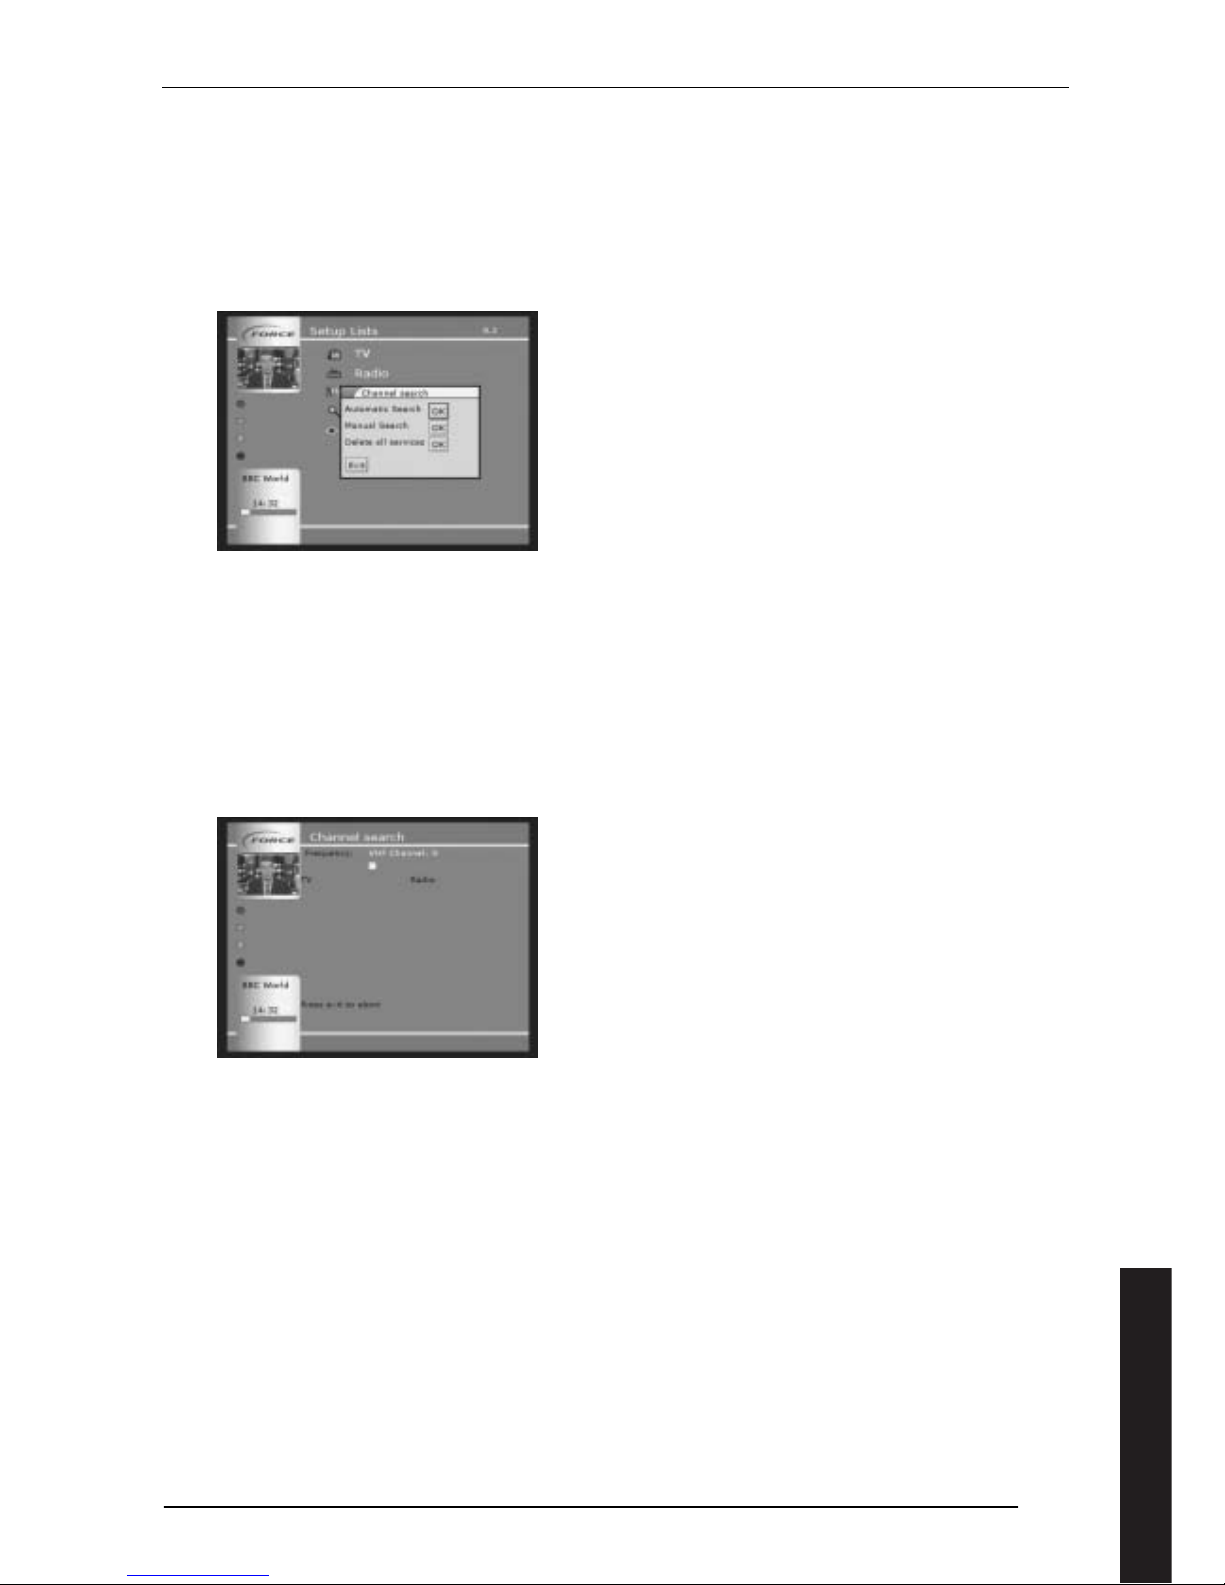
From time to time, the channels available in your area will change as new channels are added. You can search for these
by running an update of the channel list as follows.
• Go into the main menu and highlight SETUP. Press OK.
• Highlight LISTS. Press OK.
• Select " Channel Search " by moving the box using ▼/▲ and press "OK" on the remote control.
See Figure 36 (Channel search).
Figure 36 (Channel search)
You can elect to delete the existing services by selecting Delete All Services and starting a completely new channel
search, for instance if you have moved the receiver from one area to another, or simply start a new channel search to
add to the existing list.
New searches can either be automatic or manual. Use the Automatic option normally, but select Manual if you know the
UHF channel number and only want to try to detect a signal there.
8.1.3 Automatic channel search:
Select “Automatic Search” and press “OK” on the remote control. The receiver will now search for all available
frequencies. This may take a few minutes. Once the search is complete, press “OK” on your remote control - see Figure
37 (Automatic search). The progress bar will show how far this task is complete and any new channels will be displayed.
Figure 37 (Automatic search)
English
Page 26
26
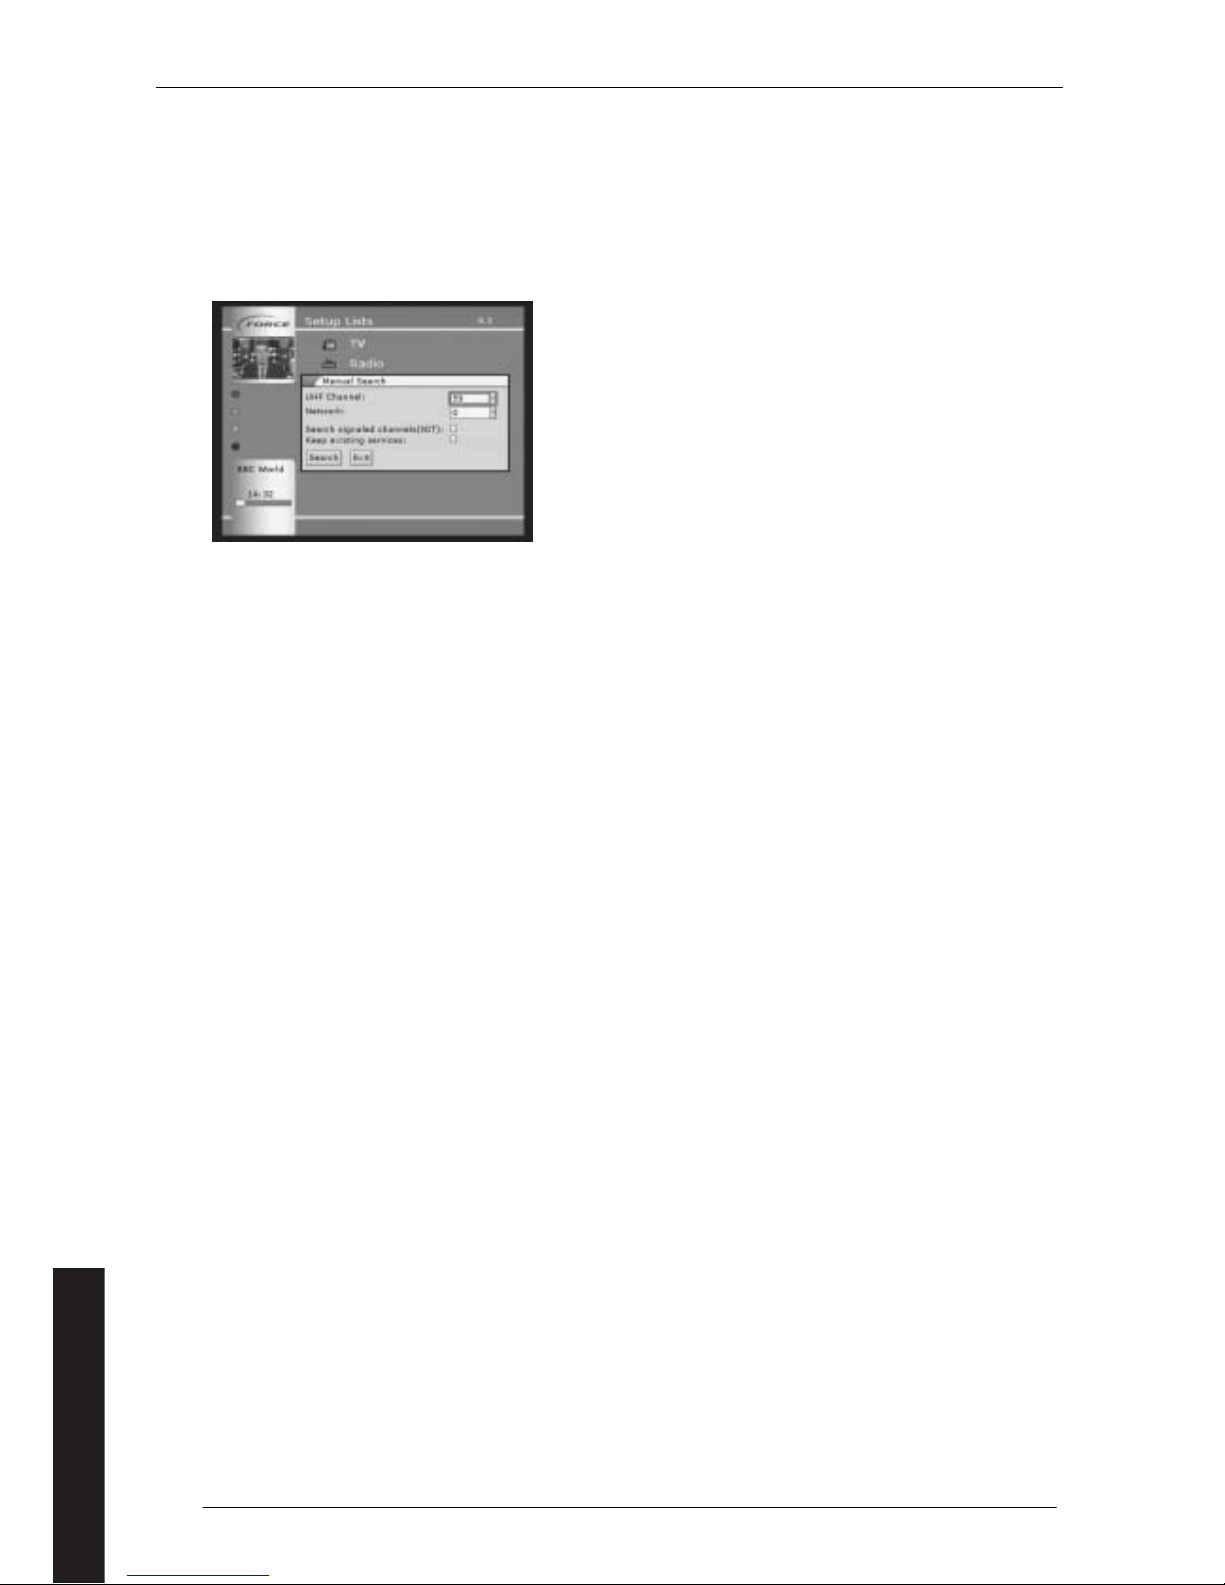
8.1.4 Manual search:
Select “Manual Search” and press “OK” on your remote control. You must now enter the channel number that you are
searching for in the “VHF/UHF-Channel” field. See Figure 38 (Manual search). This is done by moving the box to the
“UHF-Channel” field, then entering the channel number, e.g. "51" and pressing "OK" on the remote control.
You can then enter Network, although this is not necessary. This is done by moving the box to the "Network" field, then
entering the Network ID e.g. "1" (your network supplier can give you information about this) and press "OK" on the
remote control.
Figure 38 (Manual search)
The receiver will now begin to search for TV and radio channels for the selecte d frequency and network. This may take a
few minutes. Once the search is complete, press "OK" on your remote control. You can then continue searching on
another frequency or select EXIT if the search is complete.
8.1.5 UHF Channel List
In the SETUP LISTS menu, you will also see an option UHF CHANNELS. This shows a list of the UHF channels which have
been found. This is a useful check to see that your receiver has detected all the UHF channels which should be available
in your area.
You have the option to hide, move or edit this list in the same way as the TV or Radio channel lists described above.
You can also identify any channels which carry EPG information by entering a cross in the EPG box. Such channels are
identified by a letter E in the UHF Channel list.
English
Page 27
27
8.2 Satellite Receivers
8.2.1 Organising channel lists
If you have setup the system with the installation wizard, the channel list will usually be sorted according to language,
packages and satellite positions, with your country’s channels placed at the beginning of the list. You can easily change
this list:
• Go into the main menu and highlight SETUP. Press OK.
• Highlight LISTS. Press OK.
• Highlight TV. Press OK.
The settings for radio channels are the same settings as for TV channels, with the exception that Adult Lock is not
available.
To hide a channel, select it using the arrows on the remote control and press the red shortcut button. You will still see
the channel in this list, although it is in black text, but it will not appear in the channel list that you see when watching
the TV. To restore the channel to the active list, repeat this procedure.
To move a channel, highlight the channel to be moved using the arrow keys. Then press the green button on the
remote control. You will now see that the channel has been "removed" from the list and replaced with a red pointer.
Use the arrow buttons to reach the number of the channel where you wish to place the channel and then press the
green shortcut button again to place the channel.
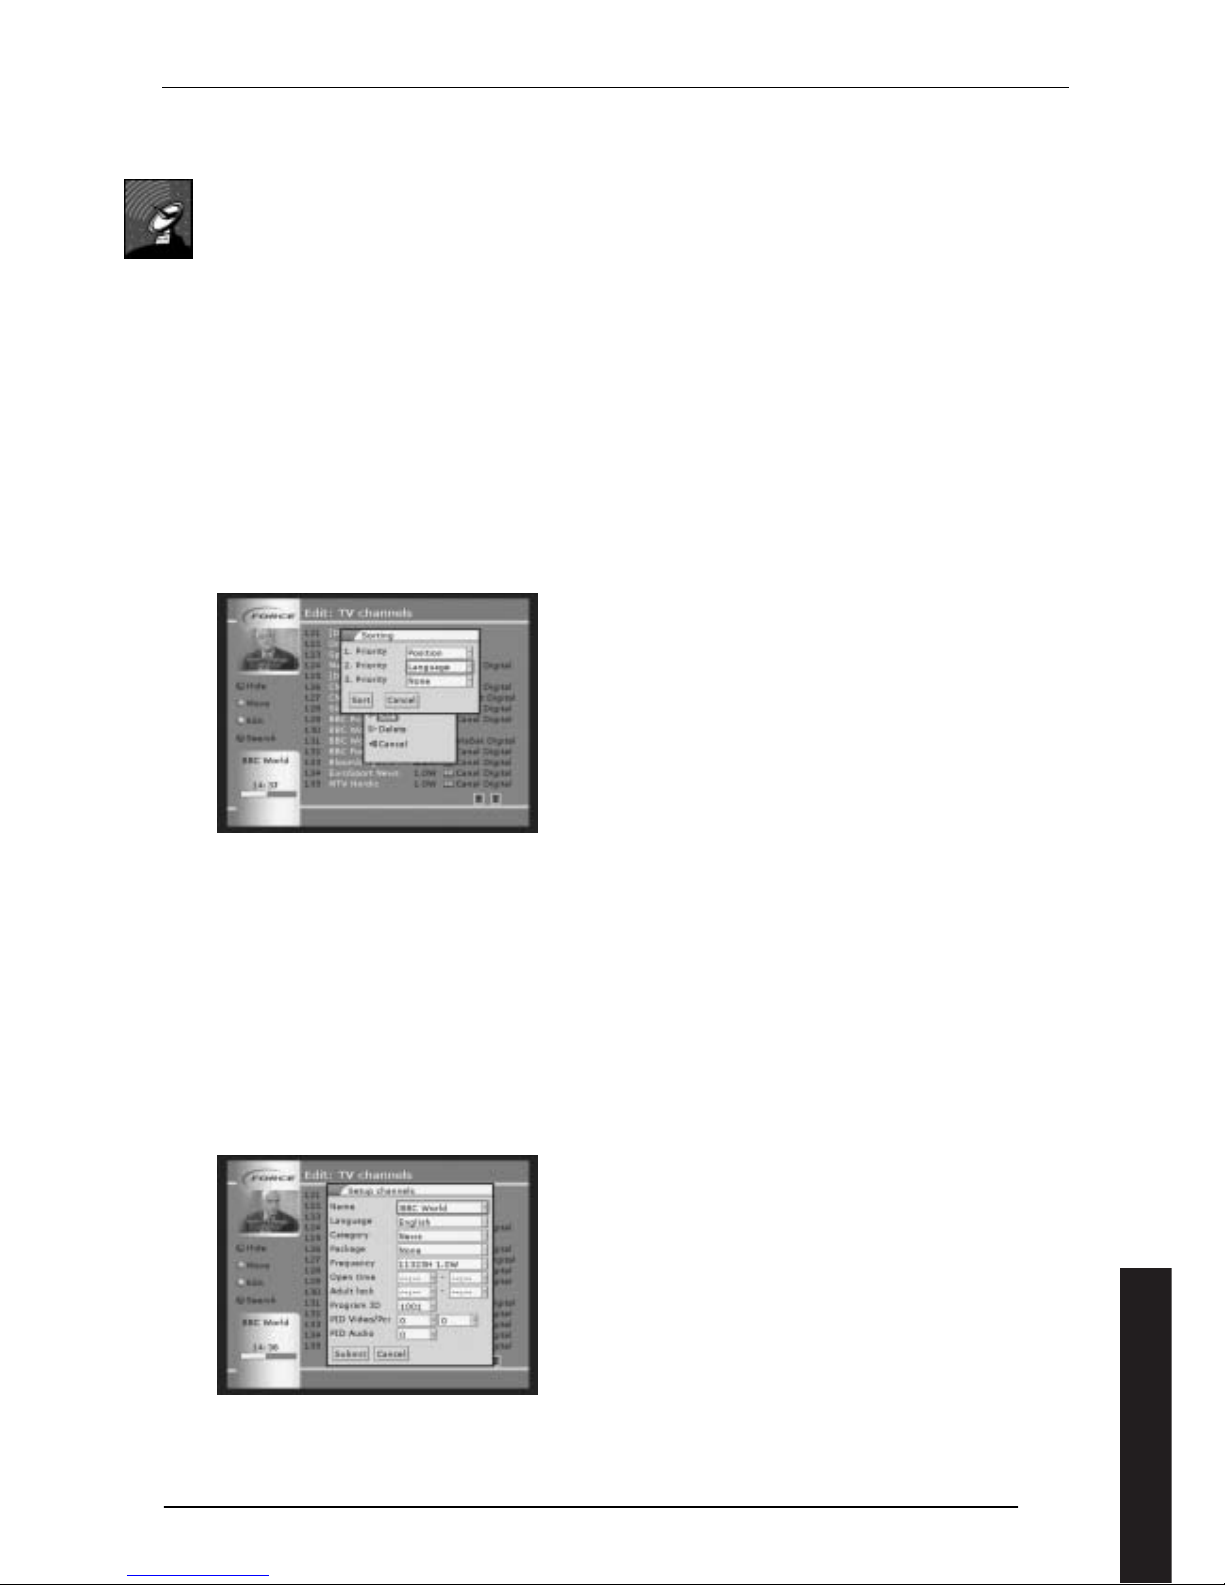
To sort the channels, press the yellow short cut button, then select SORT. You then have three priorities, for each of
which you can select position, language or category, to sort the channels.
Figure 39 (Sorting (Yellow shortcut key))
To display only channels which match certain categories, use the blue short cut button and select the options that you
want under each category and press submit. Leave the selection at ALL if you do not want to make a selection. To see
the full list again, select ALL under each of the categories or select RESET, then select SUMBIT.
You can edit the information held against a channel and also control its access. From the TV or radio channel list, press
the Yellow shortcut button. As well as the sorting function described above, you have three other options :
Create a new channel. Normally this will be done automatically. If it is done manually, care should be taken to enter
the correct information.
Delete a channel permanently from the list. This is a permanent alternative to hiding the channel using the red short
cut button, as described above
Edit the information against a specific channel, as shown in figure 38.
Figure 40 (Channel Edit)
English
Page 28

28
Language, category and package can be changed in this menu without affecting the ability to see or hear the
programme. These settings are only important for sorting and filtering the channel list. (Applies to satellite only.) You
can also edit the categories which are available if you want – this list is accessed by selecting CATEGORIES on the SETUP
LISTS menu.
Open time: Some channels do not broadcast 24 hours a day. In order to prevent a channel which is not broadcasting
from appearing in the channel selector, you can enter the start of transmission time here.
Adult Lock: A channel can be locked so that it is only accessed if a PIN code is entered. You can do this for the channel
by highlighting the box for time, pressing OK and entering the time during which you want it locked. If you want it
locked all the time, enter 00:00 in both start and finish times.
In order to activate the lock, the Adult Lock must be activated as described in section 7.
Programme ID: All digital channels have a Programme ID which the receiver can recognise. In individual cases, digital
transmissions contain soundtracks in different languages. If you wish to change the standard language selection, you
must enter Vpid and Apid.
WARNING! : Do not change programme ID and PID, unless you are absolutely sure you know what you are doing. If you
do make changes, remember the old settings.
8.2.2 Searching for channels
You can search for all available channels on a particular satellite. From the main menu choose SETUP, then LISTS, then
POSITIONS. Highlight the satellite you want to search and press OK.
The search process will take some minutes, during which a yellow bar will show progress and the names of any channels
found will be displayed.
When complete, you will see the message “Press OK to Continue”.
8.2.3 Package Information
Satellite channels are grouped in packages, each from a service provider. Generally, you will be receiving one su ch
package. You can access and edit package details stored in the Force receiver.
From the main menu, select SETUP, then LISTS. You are then presented with a list of all the packages available.
Packages which are used are shown in white, those which are hidden are in black type. To hide a package, highlight it
and press the red shortcut button. If it is hidden, the same actions will put it back in use.
Packages can be moved using the green shortcut button. This works in the same way as moving channels in the channel
list, as shown in section 8.2.
Pressing the Yellow short cut key enables you to edit package details.
English
Page 29
29
9 Short Cuts
Your Force receiver includes features to make regularly used controls quicker to implement. These can be adapted for
your own requirements. It may help to set up these functions when you are more familiar with your receiver and know
what functions you use regularly.
9.1 Shortcut menu
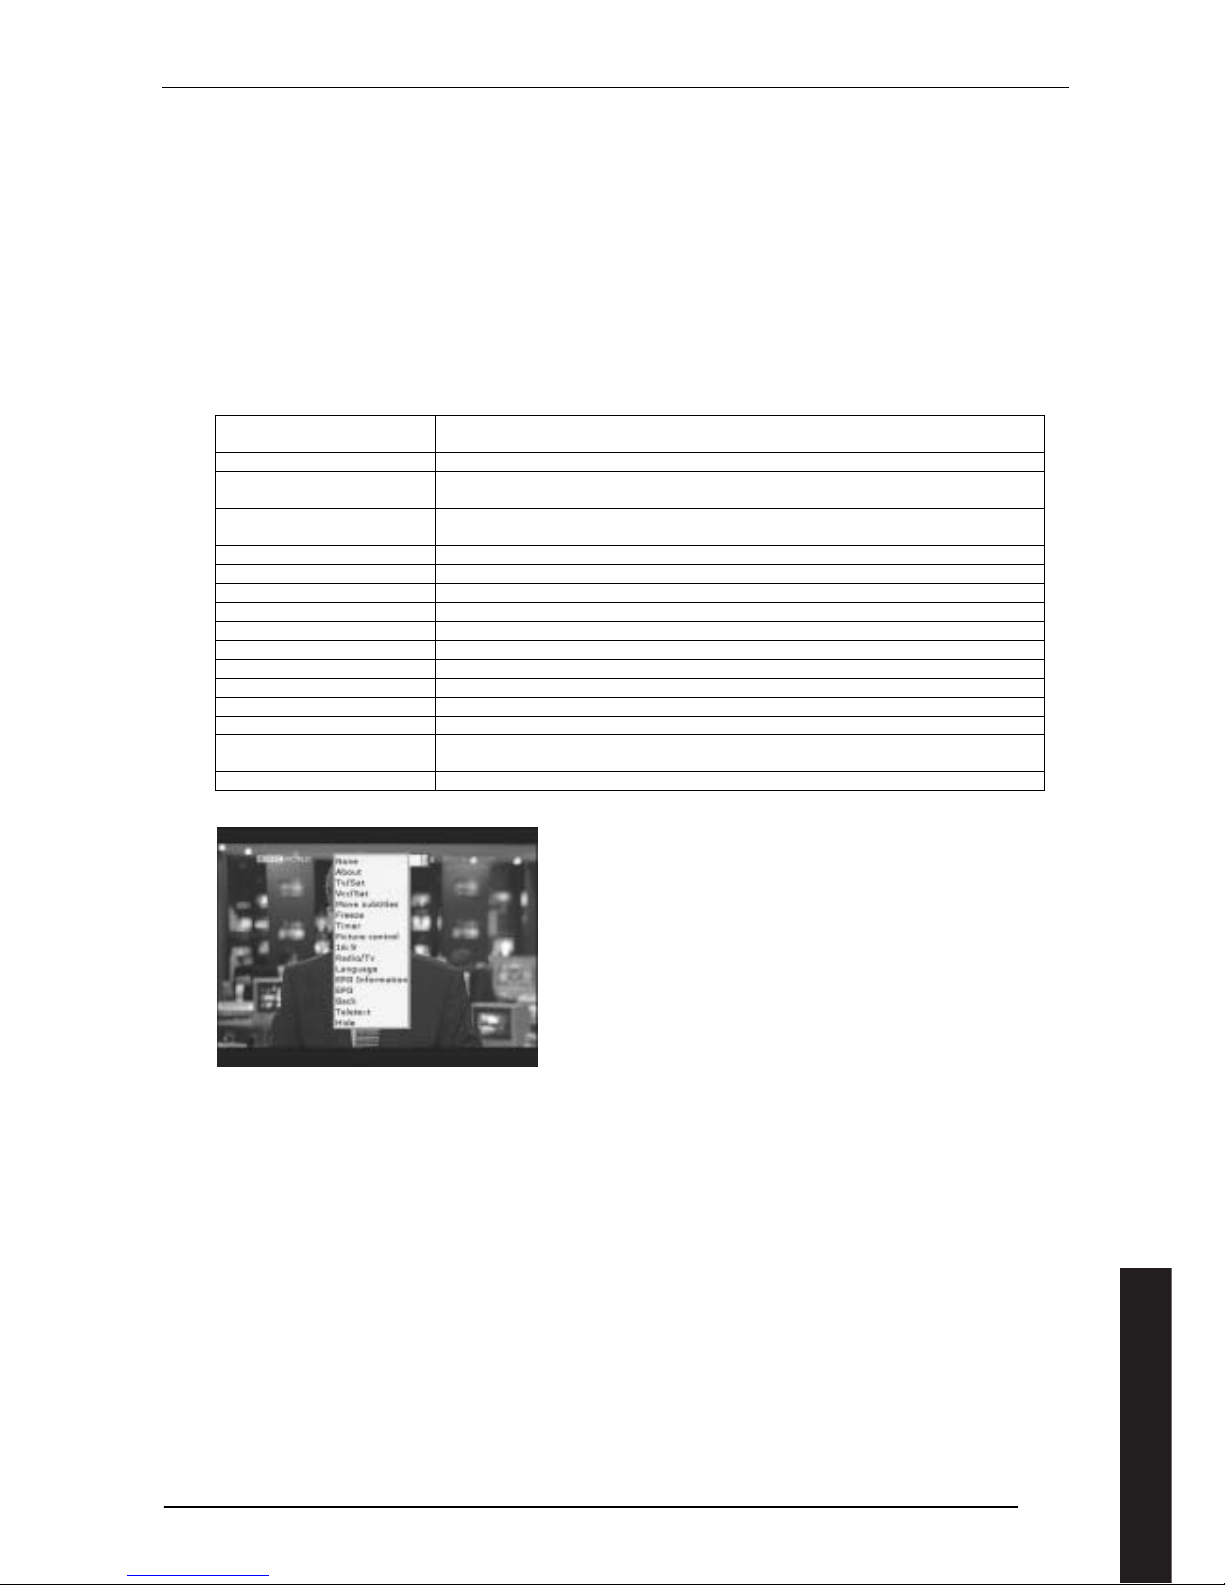
Pressing "0" on the remote control activates a shortcut menu to give quicker access to certain functions.
When this is selected for the first time, a small text field containing "None" will be displayed on the screen. Press OK to
see the full list of short cuts available. Select the desired one, then press OK.
Whenever “0” is pressed thereafter, the previous short selection appears first. Press 0 again to make that selection, or
press OK to make a new selection.
The options in the shortcut menu are:
Information (satellite
receivers only)
Displays signal parameter
About Shows channel information plus the satellite and its position.
TV/SAT Switches the source of the signal in the TV between the Force Receiver and the
selection made on the TV itself. Refer to section 10 for details on how this is used.
VCR/SAT
(Model 320 only)
Switches the source of signal in the VCR from the Force Receiver to the selection
made on the VCR. Refer to section 10 for details on how this is used.
Move subtitles Moves teletext-based subtitles
Freeze Freezes the picture on the TV screen
Timer Shows the Timer Overview menu
Picture Control Adjustment of brightness, contrast and saturation.
16:9 Switches between widescreen format (16:9) and standard TV (4:3)
Radio/TV Switches between radio channels and TV channels
Language Selection of sound and subtitles
EPG information Information on the relevant programme
EPG Electronic Program Guide
Back Returns to the previous screen.
Text TV Force Intellitext – shows any teletext information supplied with the channel
selected at that time.
Hide Hides extra displays on the screen
Figure 41 (Shortcut menu)
English
Page 30
30
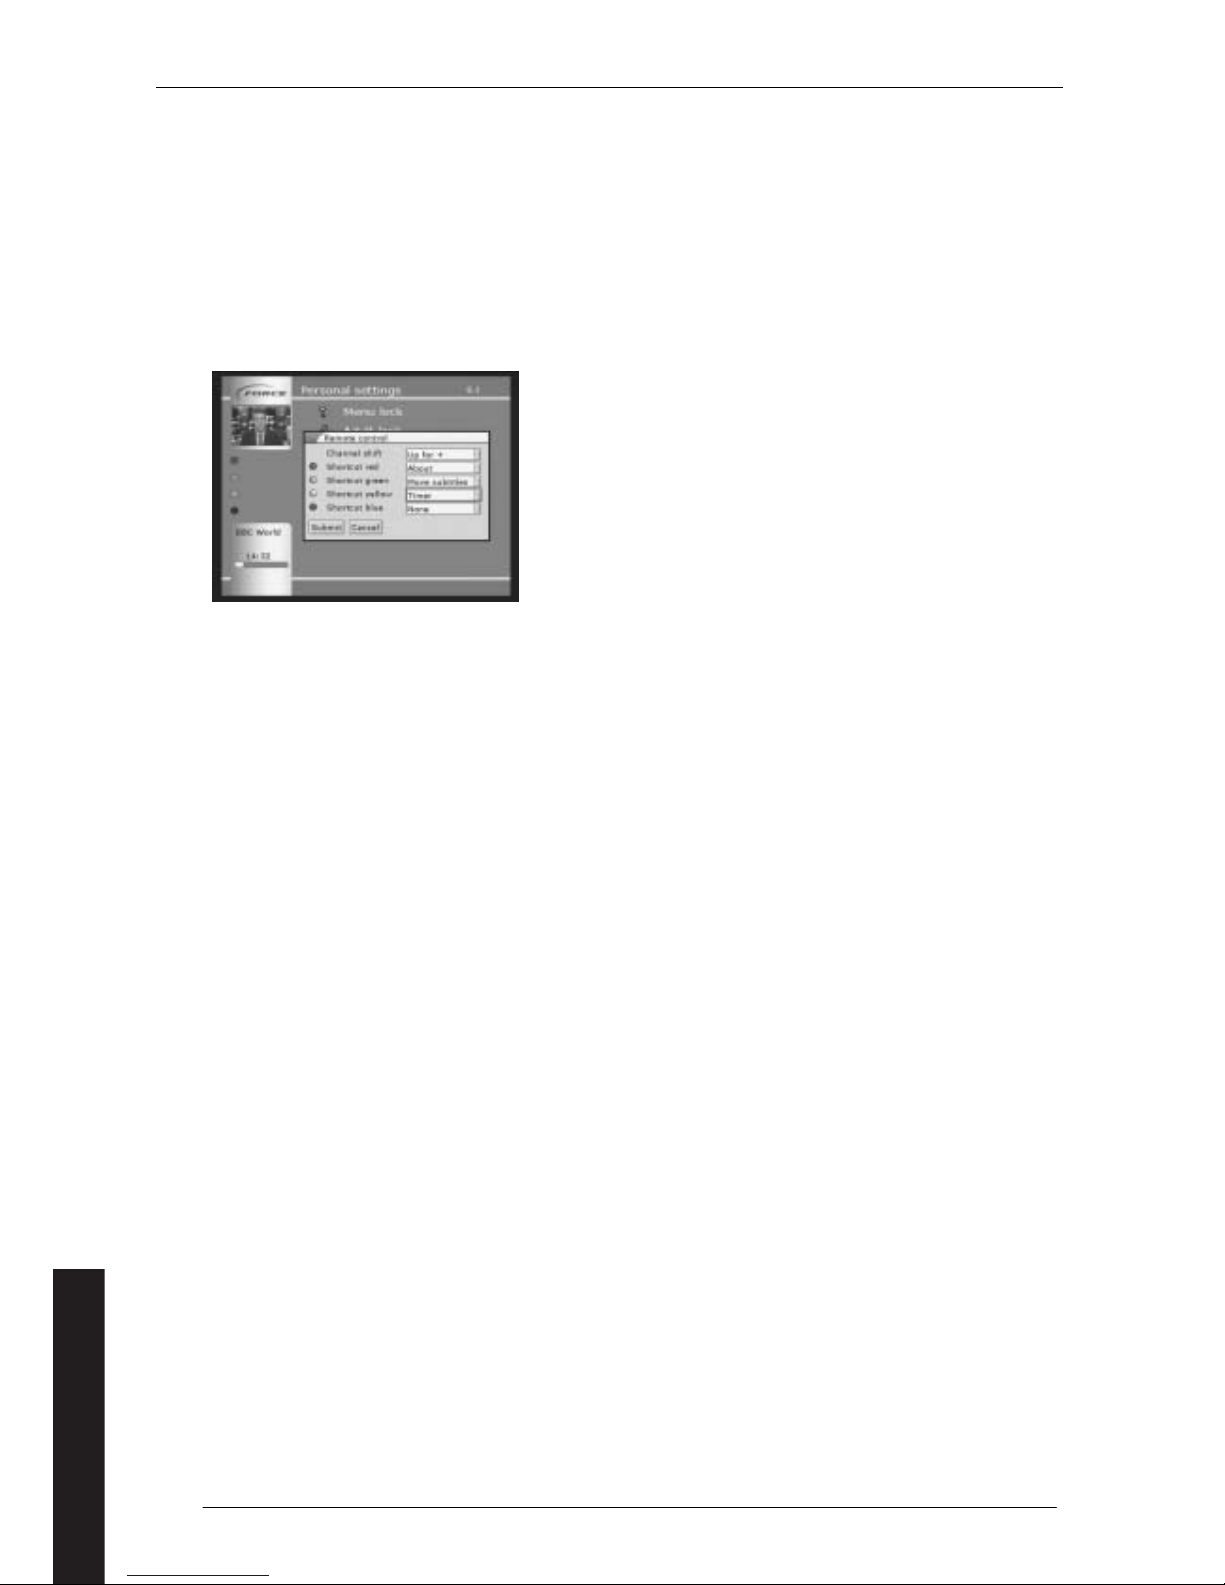
9.2 Shortcut buttons
The coloured buttons on the remote control are used as shortcut keys in the menu system, but can also be programmed
to carry out various functions while you are watching TV. The functions available are the same as those for the shortcut
key, described in section 9.1.
In the various menus/tables, the coloured shortcut buttons and their functions can be seen at the top of the page, just
under the menu title. The functions of the shortcut button can be programmed for use while you watch TV
programmes:
• Go into the main menu and highlight SETUP. Press OK.
• Highlight PERSONAL SETTINGS. Press OK.
• Highlight REMOTE CONTROL. Press OK.
Figure 42 (Shortcut buttons)
Channel Shift enables you to reverse the actions of the Channel +/- button.
For each of the shortcut buttons, a range of options is available on right of the menu. Press SUBMIT to complete the
operation, or press CANCEL if you decide not to change anything.
10 Controlling the source of your TV signal
This section applies where you use SCART connections from your receiver to the TV set or any other equipment.
SCART cables work on the principle that the unit at one end is in control. When the Force receiver is active, it controls
the TV and the signal which appears on the TV screen comes from the receiver.
Similarly with a VCR or DVD connected via the VCR SCART connector on the receiver, the VCR is the source of the signal
when it is playing.
If you want the TV set to select its own input,
• press ‘0’ on the remote control
• press OK to bring up the selection
• select Tv/Sat and press OK
Alternatively, you can set up one of the shortcut buttons to make the Tv/Sat switch, as described in section 9.2.
In this mode, you can select an analogue signal on the TV set and that will be routed via the Force receiver to the VCR.
In addition, if your TV set has the facility to accept a video input directly, this can also be routed to the VCR.
You can reverse this if you press ‘0’ again twice.
Similarly, if you want the VCR to be able to receive an input on the SCART cable, for instance from the Force receiver,
• press ‘0’ on the remote control
• press OK to bring up the selection
• select Tv/Sat and press OK
Again this can be reversed by pressing ‘0’ again twice.
11 Other Functions
11.1 Conditional Access (CA) Management
Some channels are restricted to viewers who pay for them. To watch these channels you need to obtain the correct
programme card, usually from your dealer or programme provider. These cards are inserted in the slots on the right, as
shown in section 3.2. Insert the cards with the gold contacts facing downwards.
You can check which the status of any cards plugged in to your receiver from the main menu by selecting CA
MANAGEMENT.
NOTE:
If you have a Free-to-air receiver (Model 320T-FTA), this function does not appear in the menu.
English
Page 31
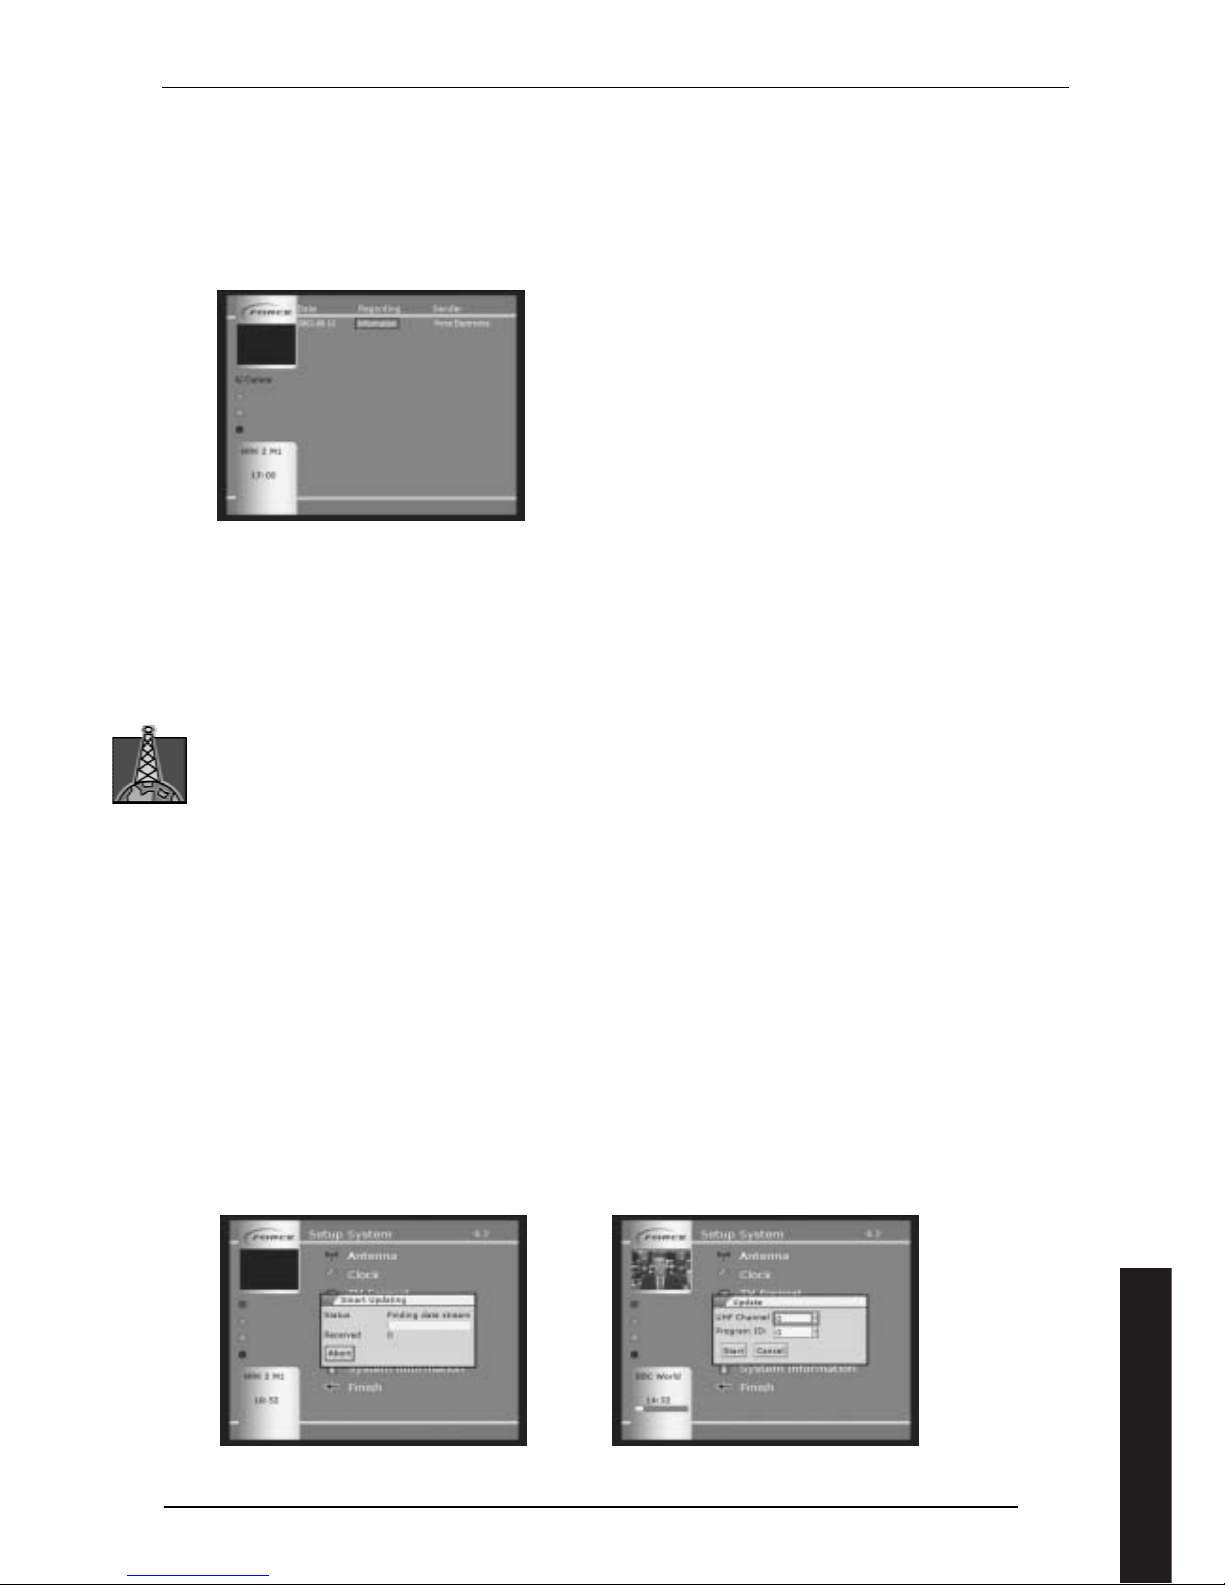
31
11.2 Messages via the mail system
The mail system enables Force to tell you about updates to your receiver.
Mail will automatically arrive in your receiver and this will be indicated by an "envelope" symbol on your TV screen.
Once all new mail has been read, the "envelope" symbol automatically disappears until the next message is received.
To read a new message, select MESSAGES from the main menu and press OK. Highlight the subject in the message
overview in order to read the individual messages and press OK. Delete the message once you no longer want to keep it
Figure 43 (Messages)
11.3 Updating the software
Force have a policy of continual product improvement and will make new software available for download.
There are differences between the way the software is updated in satellite and terrestrial receivers, but in both cases,
you will be advised through the mail system that new software is available or you can search manually for the latest
version.
11.3.1 Terrestrial receiver
When you know that new software is available, carry out the following:
• Press "MENU" on the remote control.
• Select "Setup" and press "OK" on the remote control.
• Highlight "System" and press "OK" on the remote control.
• Highlight "Update" and press "OK" on the remote control.
• Select "START" for automatic updates and press "OK" on the remote control.
The receiver will now begin to download the latest software directly from the network. This will take approx. 3 minutes.
Never disconnect the receiver from the power supply during updating.
When the update is complete, you can resume using your receiver as normal.
If this does not work and you know the channel number and programme identity on which the software is available,
you can download it manually. Your distributor should be able to provide this information. Follow the first four steps
above, but instead of selecting “START”, select "Manual Search", and press "OK". Now enter the channel broadcasting
the update in the "VHF/UHF-Channel" field. This is done by moving the box to the VHF/UHF-Channel" field, then
entering the channel number, e.g. "51" and pressing "OK" on the remote control.
You must then enter the program ID. This is done by moving the box to the "Program ID" field, then entering the
program ID, e.g. "1" and pressing "OK" on the remote control. Highlight "Search" and press "OK" on the remote
control. The receiver will now begin to download the latest software directly from the network. This will take approx. 3
minutes.
If this does not work after a few minutes, press the ABORT key. This means that automatic updating has failed. Consult
your distributor for further advice; he may able to manually update your software.
Figure 44 (Update – terrestrial)
Figure 45 (Manual search)
English
Page 32
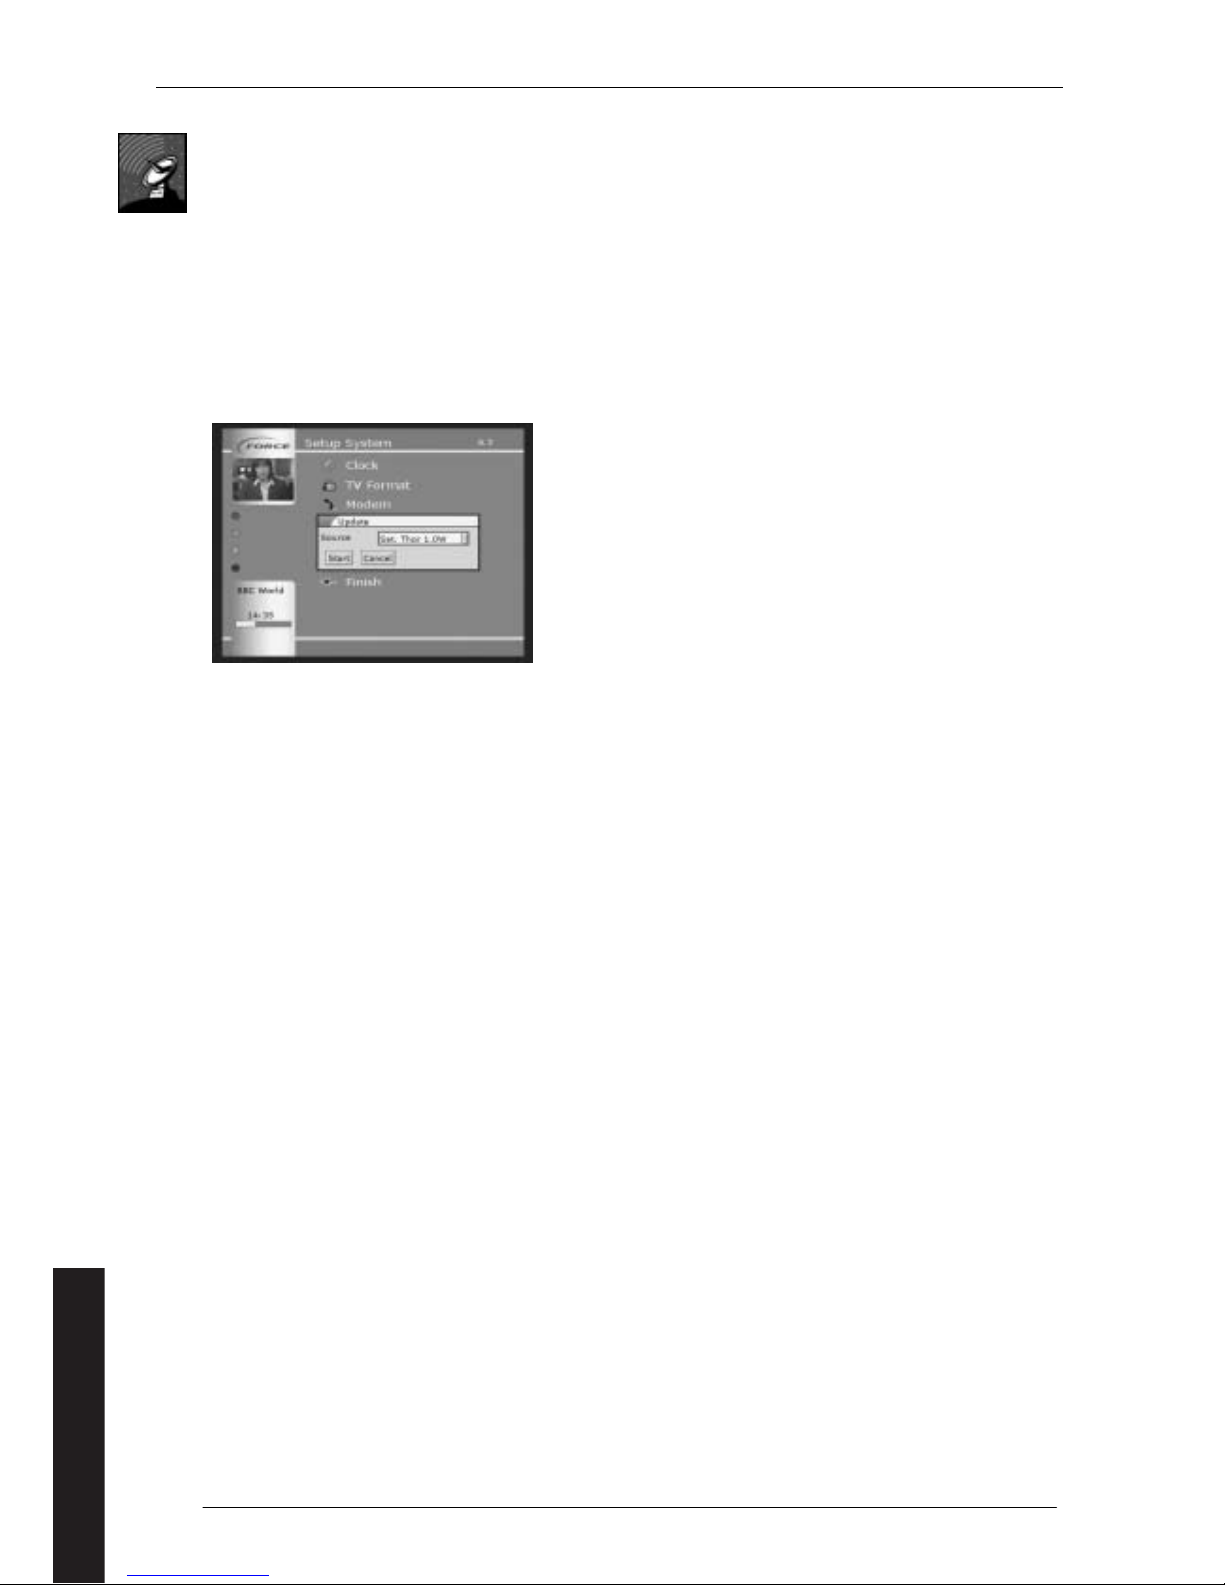
32
11.3.2 Satellite receiver
Updated software is currently only distributed on the satellites Thor 1.0W and Astra 19.0E. A message will be sent to you
by email to tell you when it is available. If you cannot see either of these satellites, contact your dealer to find out how
to get updated software.
To implement the update, perform the following:
• Go into the main menu and highlight SETUP. Press OK.
• Highlight SYSTEM. Press OK.
• Highlight UPDATE. Press OK.
• Check that "Source" is "Sat. Thor 1.0W" or "Sat. Astra 19.0E"
• Highlight START and press OK.
The receiver will now begin to download the latest software directly from the satellite. This can take up to 15 minutes.
Never disconnect the receiver from the power supply during updating.
Figure 46 (Updating via satellite)
Channels and their frequencies change frequently, and new ones become available. When you update the software in
your receiver, you will automatically get the latest channel and/or frequency information, but it is necessary to reset the
receiver to be able to use it. This is done as follows:
• Go into the main menu and highlight SETUP. Press OK.
• Highlight SYSTEM. Press OK.
• Highlight RESET RECEIVER. Press OK.
NOTE!
When you reset the receiver, the channels will be in the order that Force has selected. If you wish to sort this order, see
"Sorting TV channels".
11.4 On screen timeout
Some on-screen information is only shown for a short time. The default for this is 5 seconds, but it can be changed –
from the main menu, select SETUP, then PERSONAL SETTINGS, then OSD setup.
11.5 Adjusting Clock for Different Time Zones
You can set up your receiver for different time zones to ensure that the clock which is displayed is correct.
From the main menu, select SETUP, followed by SYSTEM and then CLOCK. Highlight TIMEZONE and press OK for a drop
down menu giving you the option to set the time zone. The DAYLIGHT SAVING box should normally be set to
Automatic, but you have the option to control this manually. Press SUMBIT when you have finished and confirm that the
correct time is now shown on the screen.
11.6 Menu lock
This enables you to prevent menu changes unless the selected PIN code is entered. This function will only be switched on
once the equipment has been in stand-by mode at least once. Perform the following:
• Select SETUP from the main menu and press OK.
• Select Personal Settings using OK.
• Select MENU LOCK using OK.
• Enter your selected PIN code and repeat the entry for confirmation.
• Select SUBMIT.
When this function is enabled, you will be asked to enter your PIN code when the MENU is selected. Once the PIN code
has been entered, it does not have to be entered again until the unit goes into standby. Cycle the unit through standby
again if you want to immediately lock the menu.
If the Menu Lock is in use, you can still use the EPG and access the Timer from the EPG.
There is no default PIN for menu lock. However, if you use this function and forget the PIN, the receiver will have to be
returned to your Force dealer before the menu system can be enabled again.
English
Page 33
33
11.7 Modem
Some networks use the built-in PSTN for interaction between the receiver and the service provider, for instance to
enable pay-per-view programmes.
For ordinary telephone lines, no configuration is required in the receiver. However, if the receiver is connected to a line
where an access code has to be dialled to reach the public network, for instance on a PABX line, the access code can be
entered in the receiver. From the main menu select SETUP, then MODEM. Enter the predial digits and select SUBMIT.
NOTE:
If you have a Free-to-air receiver (Model 320T-FTA), this function does not appear in the menu.
11.8 Active Antenna Control
If you have a terrestrial receiver and want to use an active antenna, this can be enabled from the main menu by
selecting SETUP and then ANTENNA. The options are 0 volt, which is the default, or 5 volt. Refer to your antenna
information to ensure that your receiver is correctly configured.
If you have to enable this function as part of the installation process, you will not have been able to complete the
channel search part of the installation. You should now be able to do this as described in section 8.1.2.
11.9 Language Control
The language set up during installation can be altered at any time. From the main menu select SETUP, the PERSONAL
SETTINGS.
In the LANGUAGE menu, you can select the language for the menu system in the receiver. Where a programme is
transmitted with multiple audio channels or with multiple-language subtitles, these will normally use the language
selected by the broadcaster as default. If you want another choice, this can be made here.
The settings on this menu do not conflict with the selection made via the Language button, as described in section 5.8,
which only affects the programme being watched at that time.
11.10 Deleting all set-up information
It is possible to completely reset the internal configuration data held in the receiver, i.e. back to the condition in which
the unit was delivered. This is a drastic step which should normally only be done for the most serious problems.
For instructions on this procedure, please refer to the Frequently Asked Questions (FAQ) section on the Support page of
our web site at www.force.tv
.
English
Page 34
34
12 Specifications
Inputs
Satellite
Models
DVB Satellite –
QPSK
Connector: IEC 169-24 Female, 75 ohm
LNB power: 13.5V, 18.5V, +5% 400mA at IRD output automatic or off.
22KHz tone on/off, amplitude 0.65V +0.25V, duty cycle 50% +10%.
LNB LO frequencies – 9.750, 10.000, 10.050, 10.600, 10.750MHz.
Frequency range: 950 to 2150 MHz
LNB Tuning range 10.7 to 12.75GHz
Symbol rate range: 2 - 45 Msym/s
FEC coding rates ½,
2
/3, ¾, 5/
6,
7
/8.
DiSEqC ver 1.2 compliant
Terrestrial
Models
DVB Terrestrial –
QPSK, 16-QAM,
64-QAM
Connector IEC 169-2 Female, 75 ohm
Frequency range: 50-860 MHz (centre frequency)
Channel bandwidth: 6, 7 or 8MHz,.
Input level -78 to -20 dBm (Average power), 75 Ω
FEC coding rates ½,
2
/3, ¾, 5/
6,
7
/8..
All models Analogue TV
Off-air reception via TV aerial. UHF or VHF frequencies. Connected only to RF
Analogue output.
Outputs Video
TV SCART – CVBS, RGB or S-Video
Video SCART (Model 320 only) – CVBS or S-Video
Video formats: PAL-G/I/K,
Aspect ratio: Auto 16:9/4:3 or locked to 4:3. User choice of display when 16:9 pictures
shown on 4:3 TV and vice versa.
RF Analogue – channels 21 – 69, default 38. (Also carries Analogue TV input.)
Digital Audio
Model 320 only
Serial stereo – SPDIF.
Analogue audio
Model 320 only
Unbalanced, stereo L and R or mono
Nominal output level 500mV RMS at 1kHz for a modulation factor on transmitter of
54%.
Impedance 600 ohm.
Pass Through
Satellite or terrestrial input without processing but with DC blocking.
Physical Details
Self contained unit, dimensions : 278mm by 189mm by 66mm.
Voltage:200-240V AC, 50/60Hz
Environmental
and Safety
Certified to following for CE marking :
EMC: EN55013, EN55022, EN61000
Immunity: EN55020, EN55024
Safety: EN60065
English
 Loading...