

Page 1
Cover page
Back page
Fresh & Safe Water
EDGE
Produced for Forbes Lux Grou p,
Switzerland
Dubai Office:
Forbes Lux FZE, # 207, LOB Building 17, P.O. Box 261698,
Jebel Ali Free Zone, Dubai, UAE, Tel: +9714-8810115
For more information visit us at www.forbeslux.com
USER MANUAL
Y:\EFL - AQUASURE-FORBES\Forbes international\EDGE\EDGE - user manual final.cdr
Page 2
IMPORTANT
To enjoy the reassurance of delicious, refreshing, healthy and hygienic drinking
water, please follow the instructions contained in this document. Please retain
these instructions for future reference in a safe and convenient place.
• This appliance is for use with potable drinking water only. Never use this
appliance with unknown or unsafe sources
• Check if the voltage indicated on the appliance corresponds to the local mains
voltage before you connect the appliance
• Do not use this appliance if the mains cord, plug or other parts are damaged
• Do not allow children to use the appliance without supervision
• Never leave the appliance unattended when water is being dispensed
• Never use the appliance if there is any visible damage to the appliance or the
power cord
• The reservoir may be stored in the fridge if you would like to dispense cold water
from the appliance
• Unplug the appliance before removing any part of the appliance for servicing
• This appliance is for indoor use only
• Never immerse the appliance in water or spray any liquid onto the outside of the
appliance
• Do not overfill the reservoir
• When re-inserting any screws make sure that they are hand tightened only
• Only use authorised parts from the manufacturer to repair and service the unit
• Only use Waterlogic UV lamps and filters with the appliance, failure to do so will
void the warranty
• When the appliance has not been used for 3 hours or is idle, the UV lamp will turn
on for 60 seconds at 3 hour intervals
• Make sure the appliance is placed on a flat, level, dry and secure surface
Why Forbes ----------------------------------------------------- 1
Stylishly Efficient-Forbes EDGE---------------------------------------------------- 3
Why Forbes EDGE?------------------------------------------------------------------- 4
What makes your Forbes EDGE so special?----------------------------------- 6
Know your Forbes EDGE----------------------------------------------------------- 7
Here's how your Forbes EDGE works-------------------------------------------- 9
Installing your Forbes EDGE ----------------------------------------------------- 10
Operating your Forbes EDGE---------------------------------------------------- 12
Maintaining your Forbes EDGE-------------------------------------------------- 13
Troubleshooting------------------------------------------------------------------------- 14
The Forbes Advantage---------------------------------------------------------- 15
Technical Specifications-------------------------------------------------------------- 16
Frequently Asked Questions--------------------------------------------------------- 17
Service at your Doorstep------------------------------------------------------------- 18
CONTENTS
100
FORBES
Page 3
32
• Read all instructions contained in this user manual prior to using this appliance
• When removing the water reservoir from the appliance, place one hand on top of
the appliance securing it while using your other hand to remove the reservoir
Declaration
The UV lamp in our appliance conforms to the applicable provisions of the Code of
Federal Regulations (CFR) requirements including, Title 21, Chapter 1, Subchapter
J, Radiological Health
Cautions
• Only trained competent technicians should carry out repairs on the appliance
• Packing materials could present a trip hazard. Keep them off the floor and out of
reach of infants and small children
• Avoid the power plug and cord contacting water or moisture. Should this
happen, unplug the lead from the power source and discontinue using the
appliance until deemed safe to do so
• Do not handle or move the appliance when the reservoir contains water
GROUNDING INS TRUCTIONS - This appliance must be grounded. In the event of
a malfunction or breakdown, grounding will reduce the risk of electric shock by
providing a path of least resistance for electric current. This appliance is equipped
with a cord having an appliance-grounding conductor and a grounding plug.
The plug must be plugged into an appropriate outlet that is installed and grounded
in accordance with all local codes and ordinances
WARNING – Improper connection of the appliance-grounding conductor can result
in a risk of electric shock.
Check with a qualified electrician or service representative if you are in doubt
whether the appliance is properly grounded.
Do not modify the plug provided with the appliance; if it will not fit the outlet, have a
proper outlet installed by a qualified technician
Warning – Isolate power supply before removing cover
This Class A system conforms to NSF Standard 55 and P231 for the disinfection of
micro biologically contaminated water that meets all other public health standards.
The system is not intended to convert wastewater or raw sewage into drinking
water. The system is intended to be installed on visually clear water
Page 4
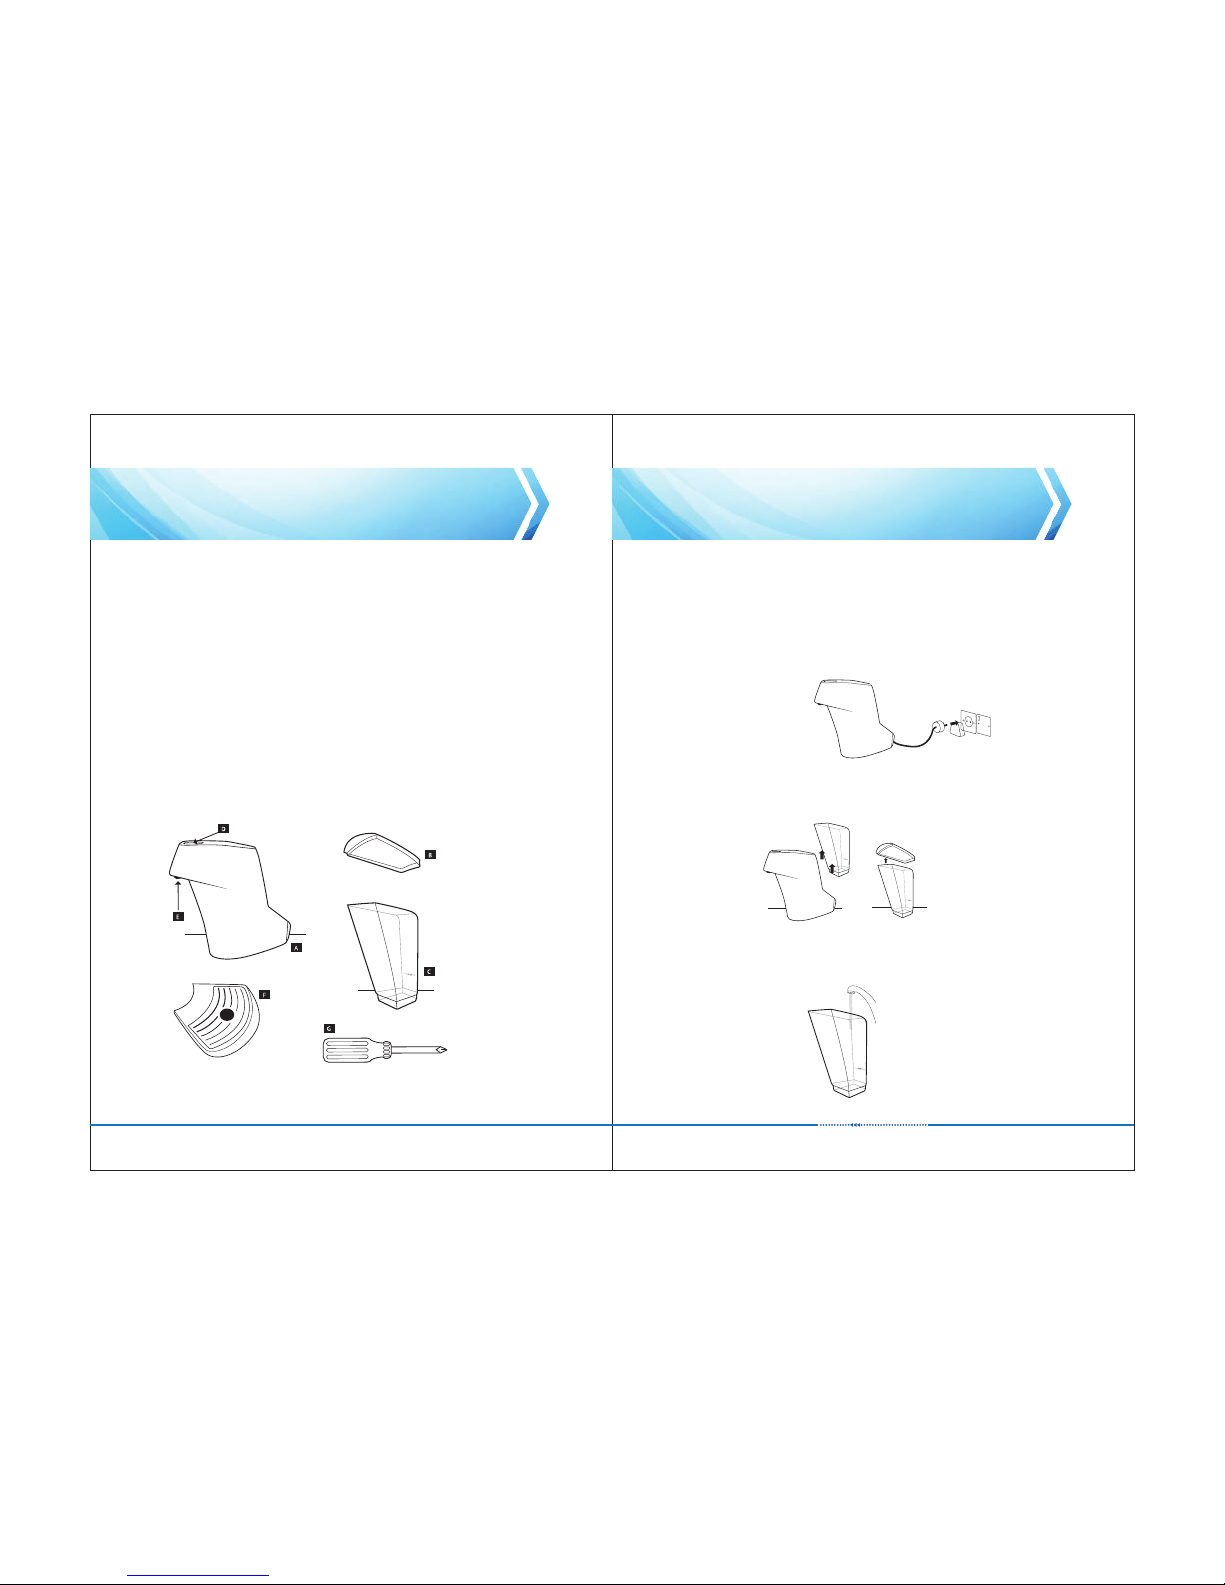
1. BOX CONTENTS
1.1 Remove the EDGE from the box. To avoid damaging the appliance DO NOT
use any sharp object to open the box
1.2 Please check the contents of the box and make sure that all items are present
1.3 The UV lamp and filter are pre-installed and ready to use.
A] EDGE Unit
B] Reservoir LID
C] Reservoir
D] Dispensing Button
E] Faucet
F] Drip Tray
G] Screwdriver
2. SET-UP GUIDE
54
If any of the items are missing please contact customer service
Important
2.1 Check the unit for any damage, if the appliance is damaged then please return
to the place of purchase
2.2 Insert the plug into the mains socket.
When the mains power is switched on the appliance will automatically go
through a self check/test and once this is complete the button will turn blue
2.3 Remove the water reservoir from the main body of the appliance and remove
the lid from the reservoir
2.4 Rinse the reservoir and then fill the reservoir from a potable water source.
Do not overfill the reservoir. Re-fit the reservoir cover
Page 5
7
6
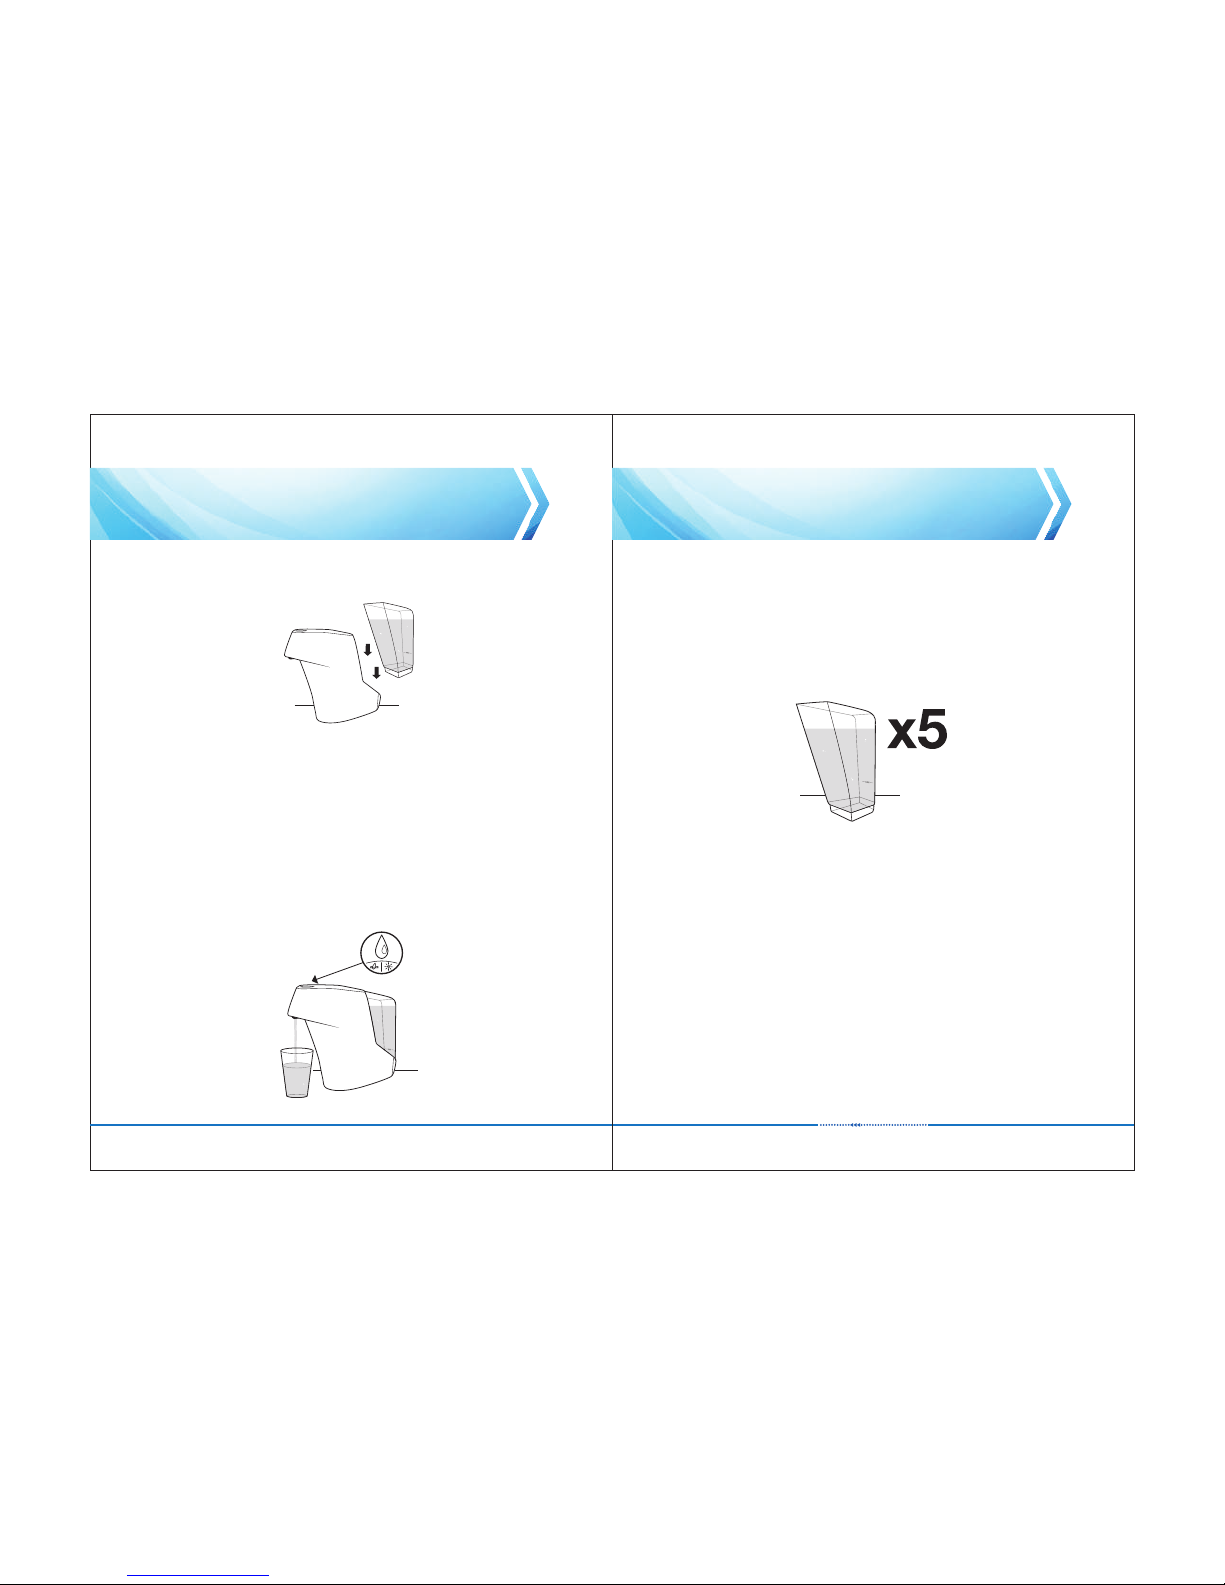
2.5 Re-fit the reservoir to the appliance making sure it is firmly fitted
2.6 Place a glass or large container under the dispense area and touch the
dispense button to operate the unit, and touch again to stop the appliance.
Allow water to run through the unit until the reservoir has been emptied. Refer
to section 4 in this manual for the button functions
Note: Do not consume the water until step 2.7 has been completed. The first
3-5 litres of water dispensed may contain some fine, black carbon particles.
Carbon is a natural, organic material made from coconut shell, and is harmless
to your health. Clear water should be noticed after flushing through 3 to 5 litres
of water (2 to 3 full reservoirs). Do not allow the water level in the reservoir to
drop below the minimum fill line, as when the reservoir is completely empty the
pump will begin to suck in air and make bubbling noises.
2.7 Repeat steps 2.3-2.6 five times (5x).
This will flush the carbon from the new filter
2.8 Once step 2.7 has been completed you can drink purified, healthy and safe
water from your appliance
Note: For a cold refreshing drink the reservoir may be stored full of water in the
fridge
Page 6
3. UV BULB AND FILTER REPLACEMENT
This product is a high performance water purifier, keeping it in good working order
will provide the reassurance of truly great drinking water
Please read and note section 5 “Indication & Warning ICONS”
Important - unplug the appliance from the mains before replacing the
UV lamp or Filter
The UV Bulb and Filter must be replaced every 12 months to ensure that your
appliance is dispensing the highest quality drinking water.
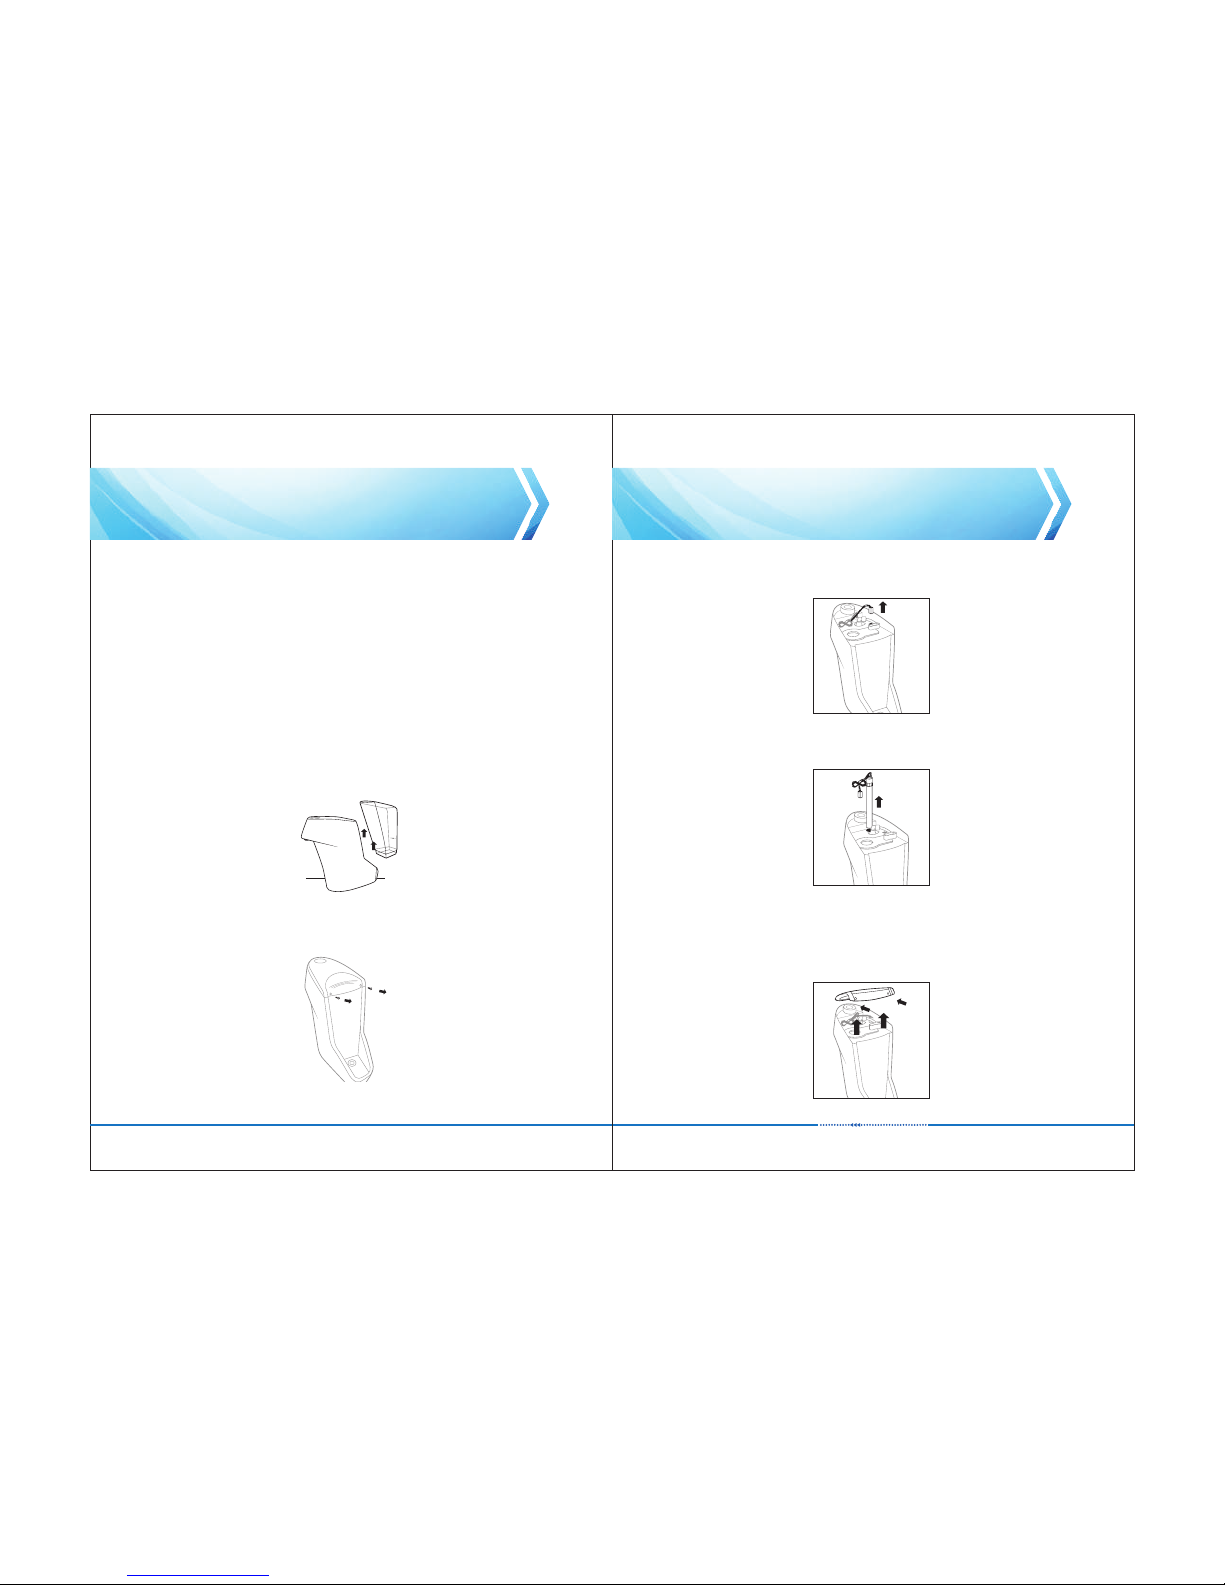
3.1 Remove the water reservoir from the main body of the appliance. This can be
cleaned with a light solution of dishwashing liquid. Never use abrasive
chemicals or materials to clean the reservoir as this could scratch and deface
the product
98
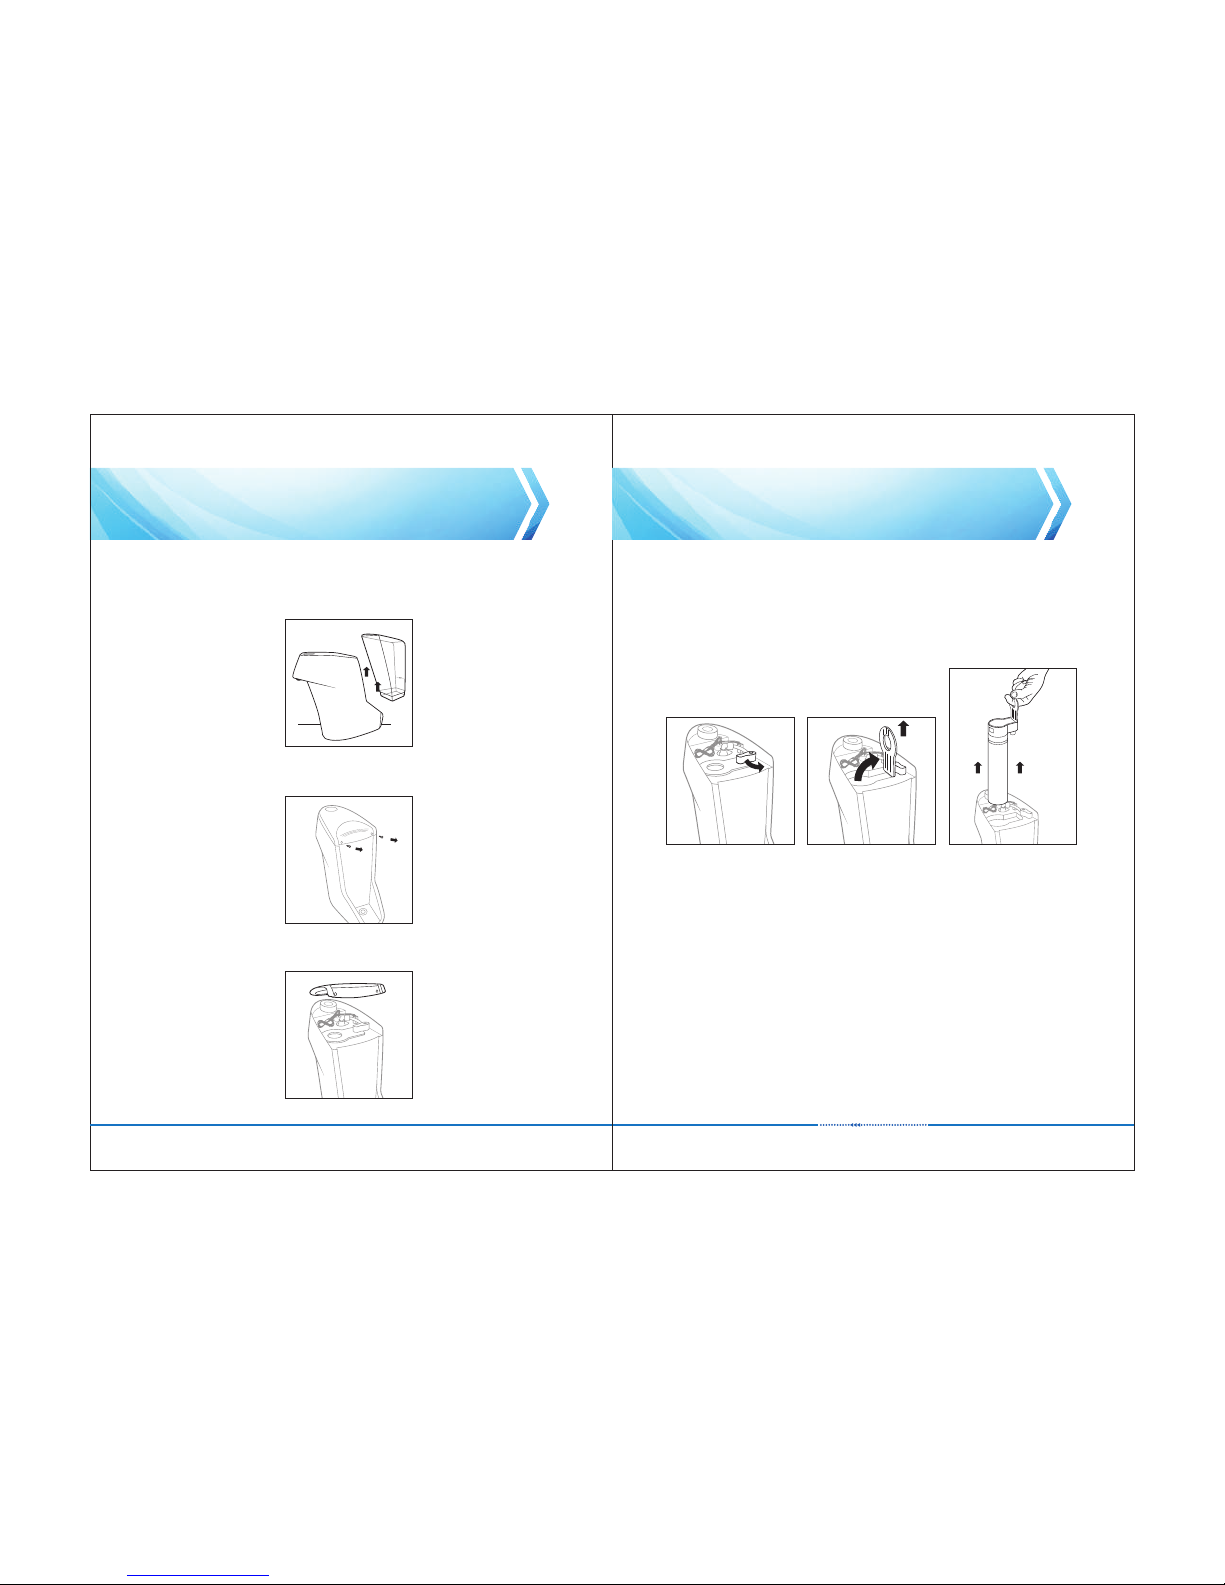
3.2 Remove the two screws that hold the top cover in place. Y ou will need to use a
screwdriver to carry out step 3.2
3.3 Remov e th e to p cover from the uni t by sli ghtly pus hing it back and the n
lifti ng it up
3.4 Disconnect the UV lamp connector by holding it and pressing in the clip on the
connector and pulling it up
3.5 To remove the UV lamp firmly pull it up and out. Do not pull the lamp out at an
angle as it may break or damage the internal parts of the appliance
Note: The UV lamp must be disposed of correctly and must not be disposed of
with normal household waste
Page 7
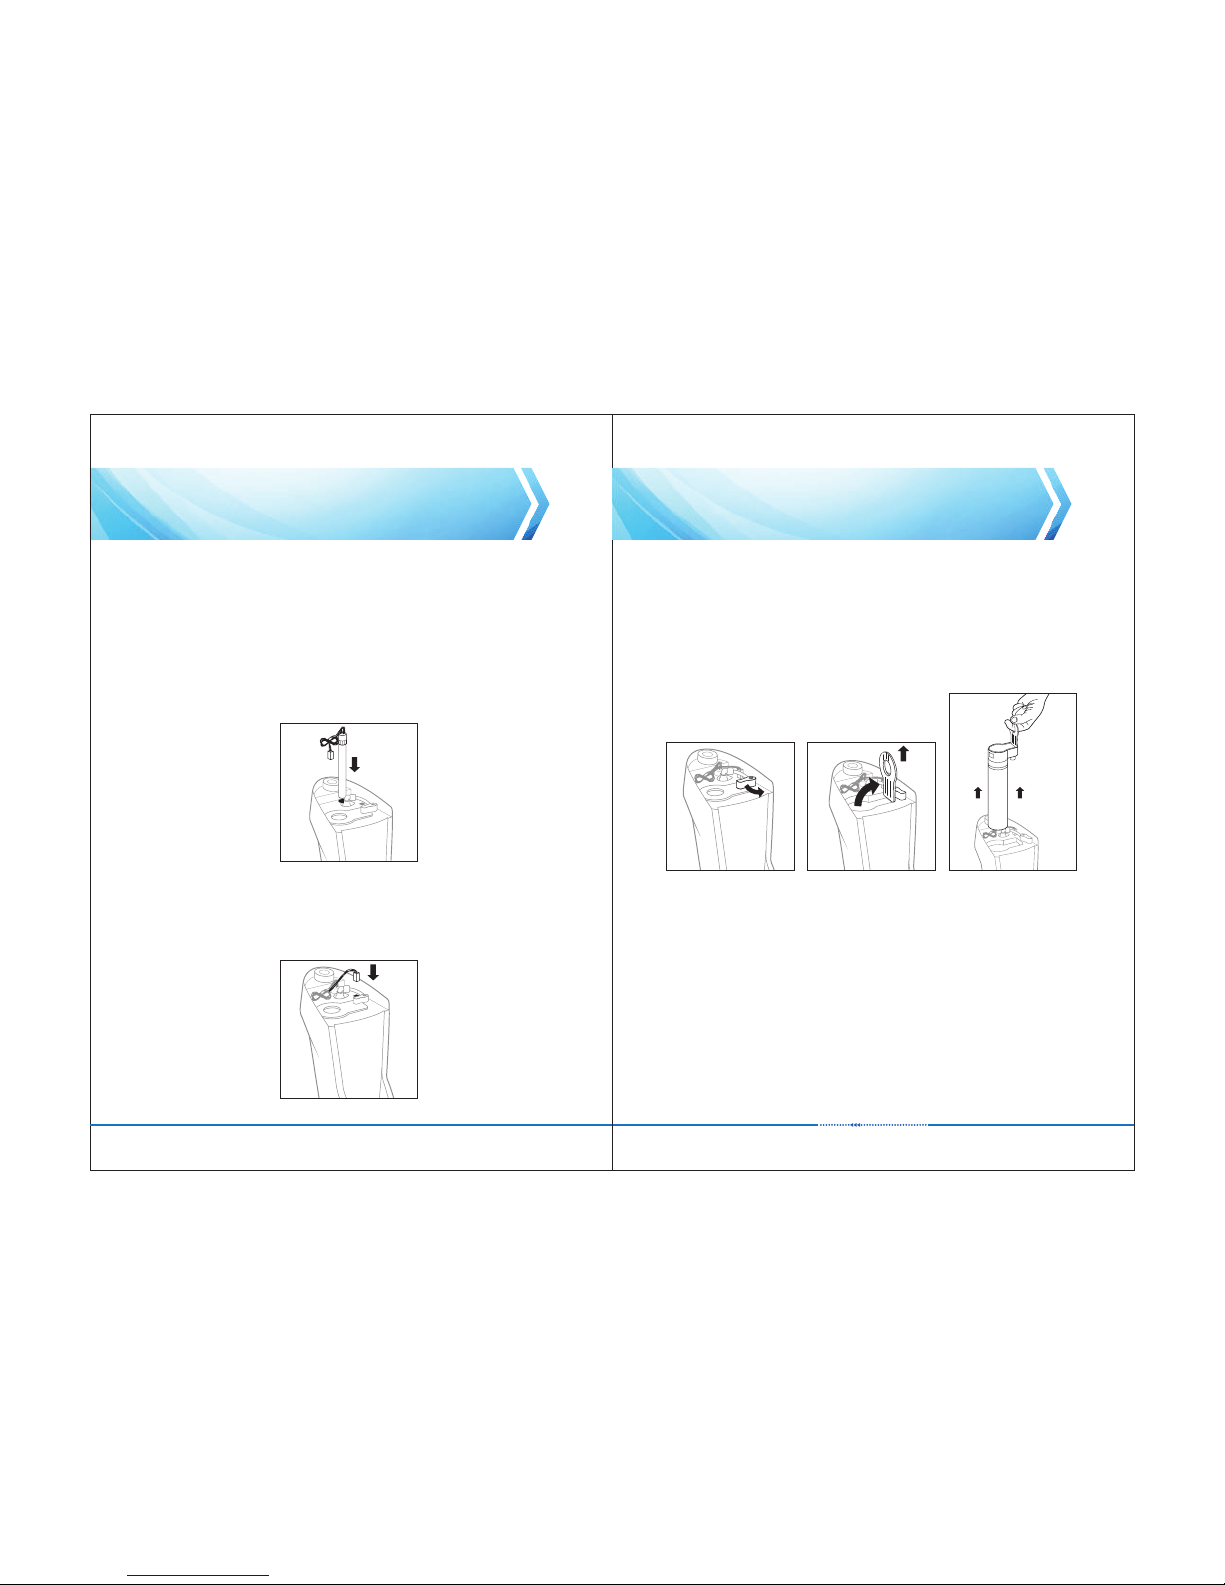
3.6 Insert the new UV lamp while holding the white end caps only. Insert the UV
lamp as shown in the illustration and push it all the way down until it cannot go
any further
Caution:
- Do not use force when removing and inserting the UV lamp as you may
damage internal parts
- Do not touch the UV lamp glass surface with your fingers as this will affect the
performance of the UV lamp
1110
3.7 Re-connect the UV lamp connector making sure the connectors are lined up
correctly as they will only fit together when correctly aligned
3.8 To remove the Filter, do the following:
1. Rotate the red rotating lever so that it is parallel with the side panel
2. Insert your finger into the round hole of the lever, and pull the lever up to the
vertical position
3. Pull the lever straight up to remove the Filter assembly (some slight force may
be required).
Page 8
1312
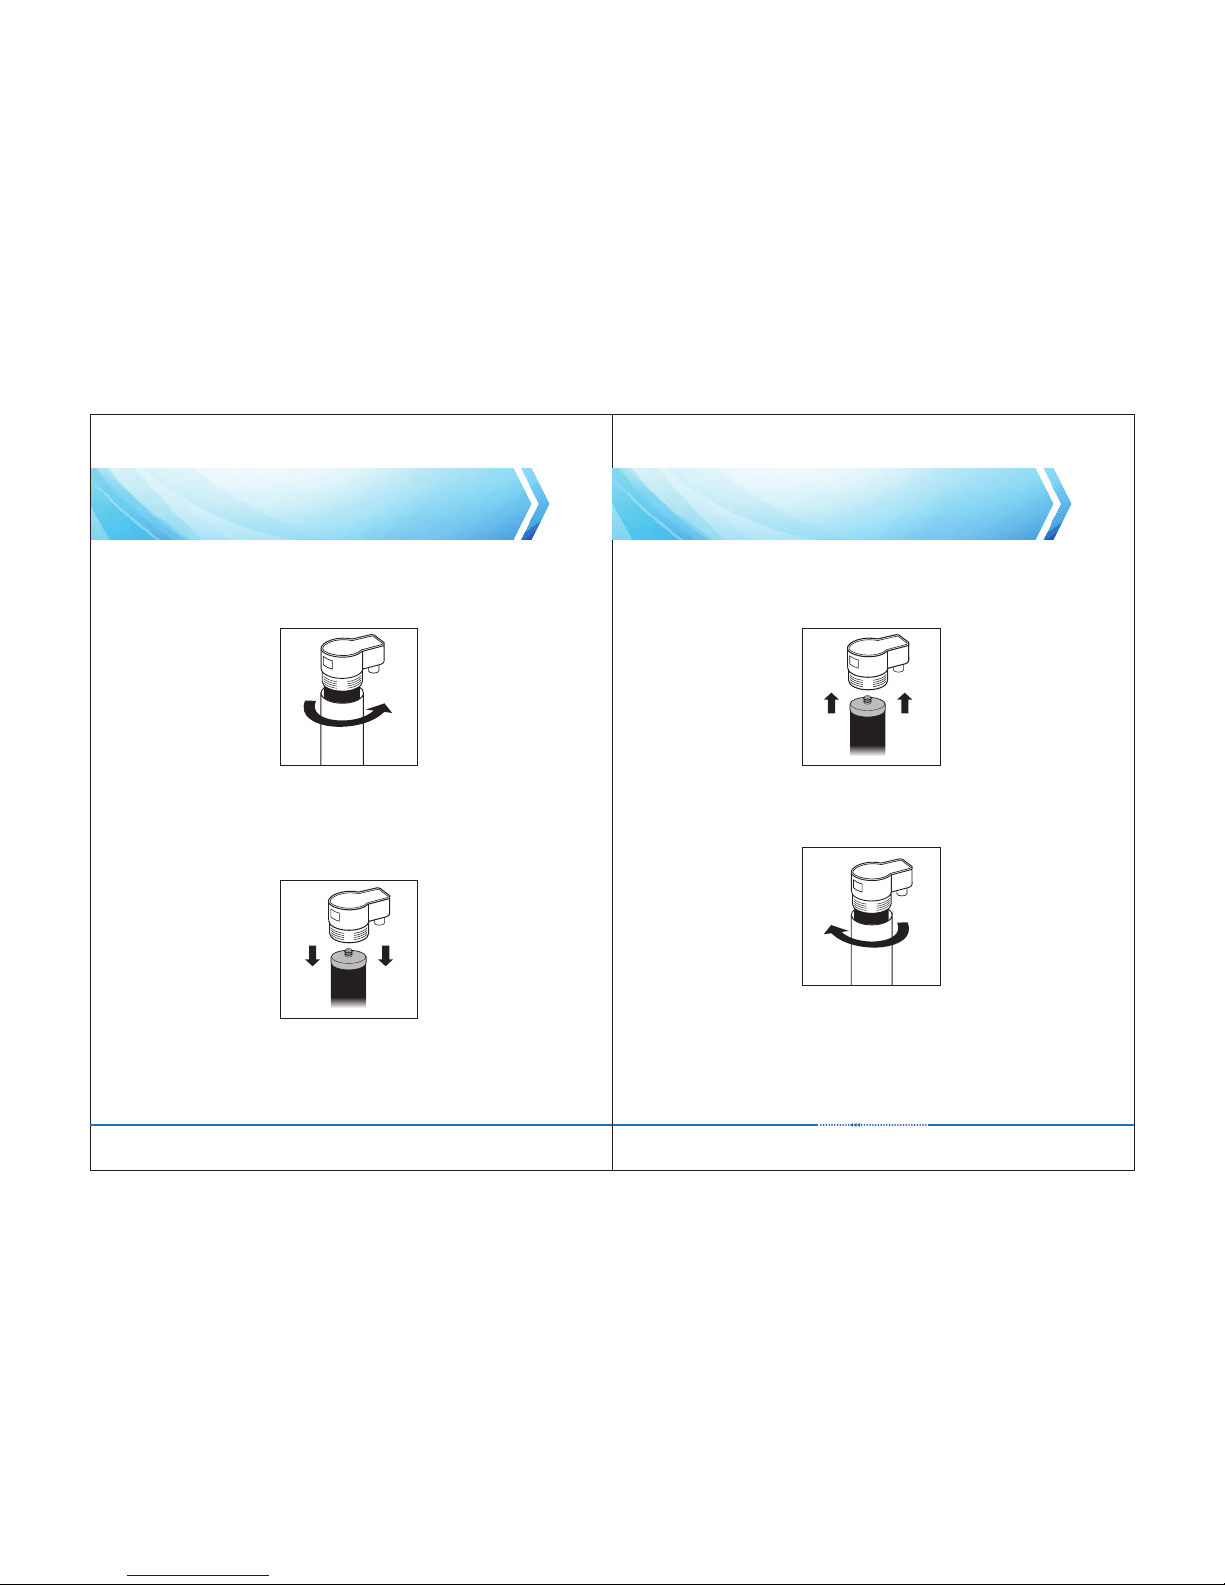
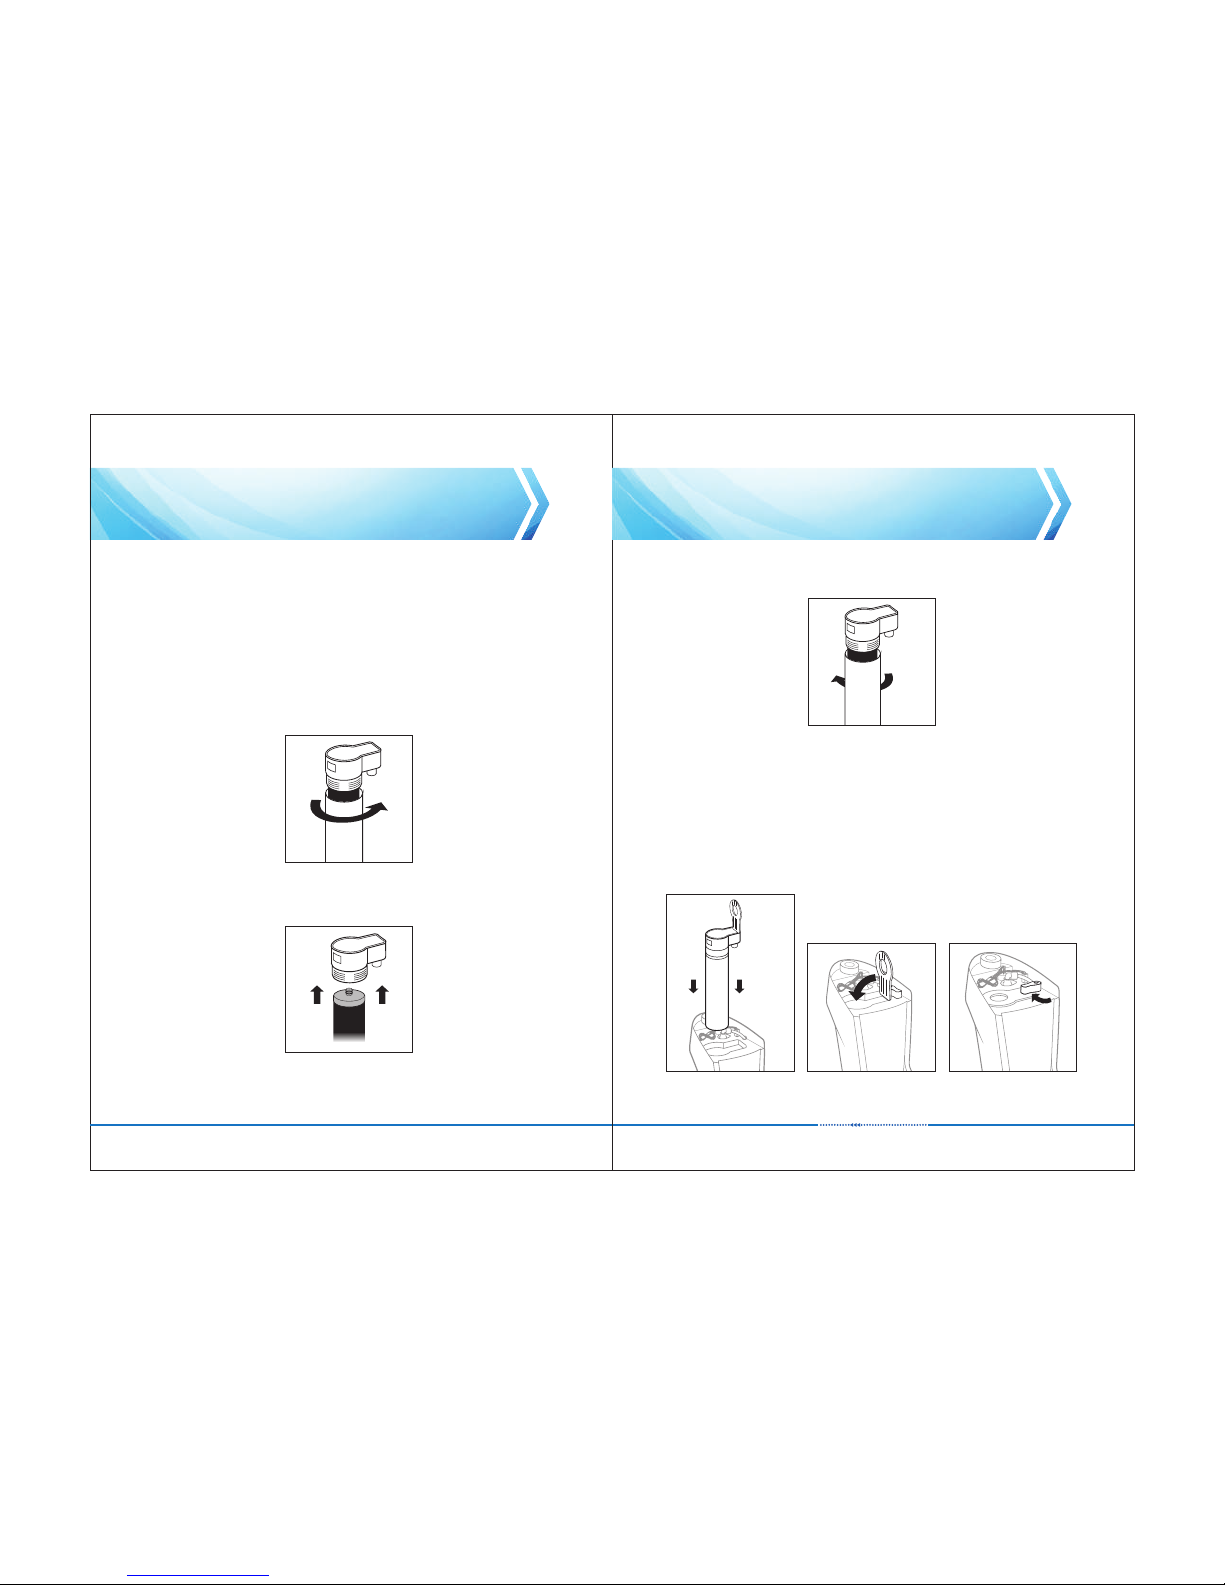
3.9 Unscrew the filter body from the filter head by turning the base in an anti
clockwise direction as per the illustration
Note: Be careful as the filter body will contain water
3.10 Remove the filter cartridge from the head by pulling it out as per illustration.
Note: Be careful as the filter body will contain water
Note: The filter cartridge can be disposed of with normal household waste as it
is purely organic (natural) material
3.11 Remove the new filter cartridge from the packaging and fit it by firmly pushing
it into the filter head, making sure it is firmly and securely fitted. Make sure the
new filter you are fitting comes in a sealed bag for hygienic purposes
3.12 Screw the filter head and the filter body together, making sure it is firmly
tightened
Page 9
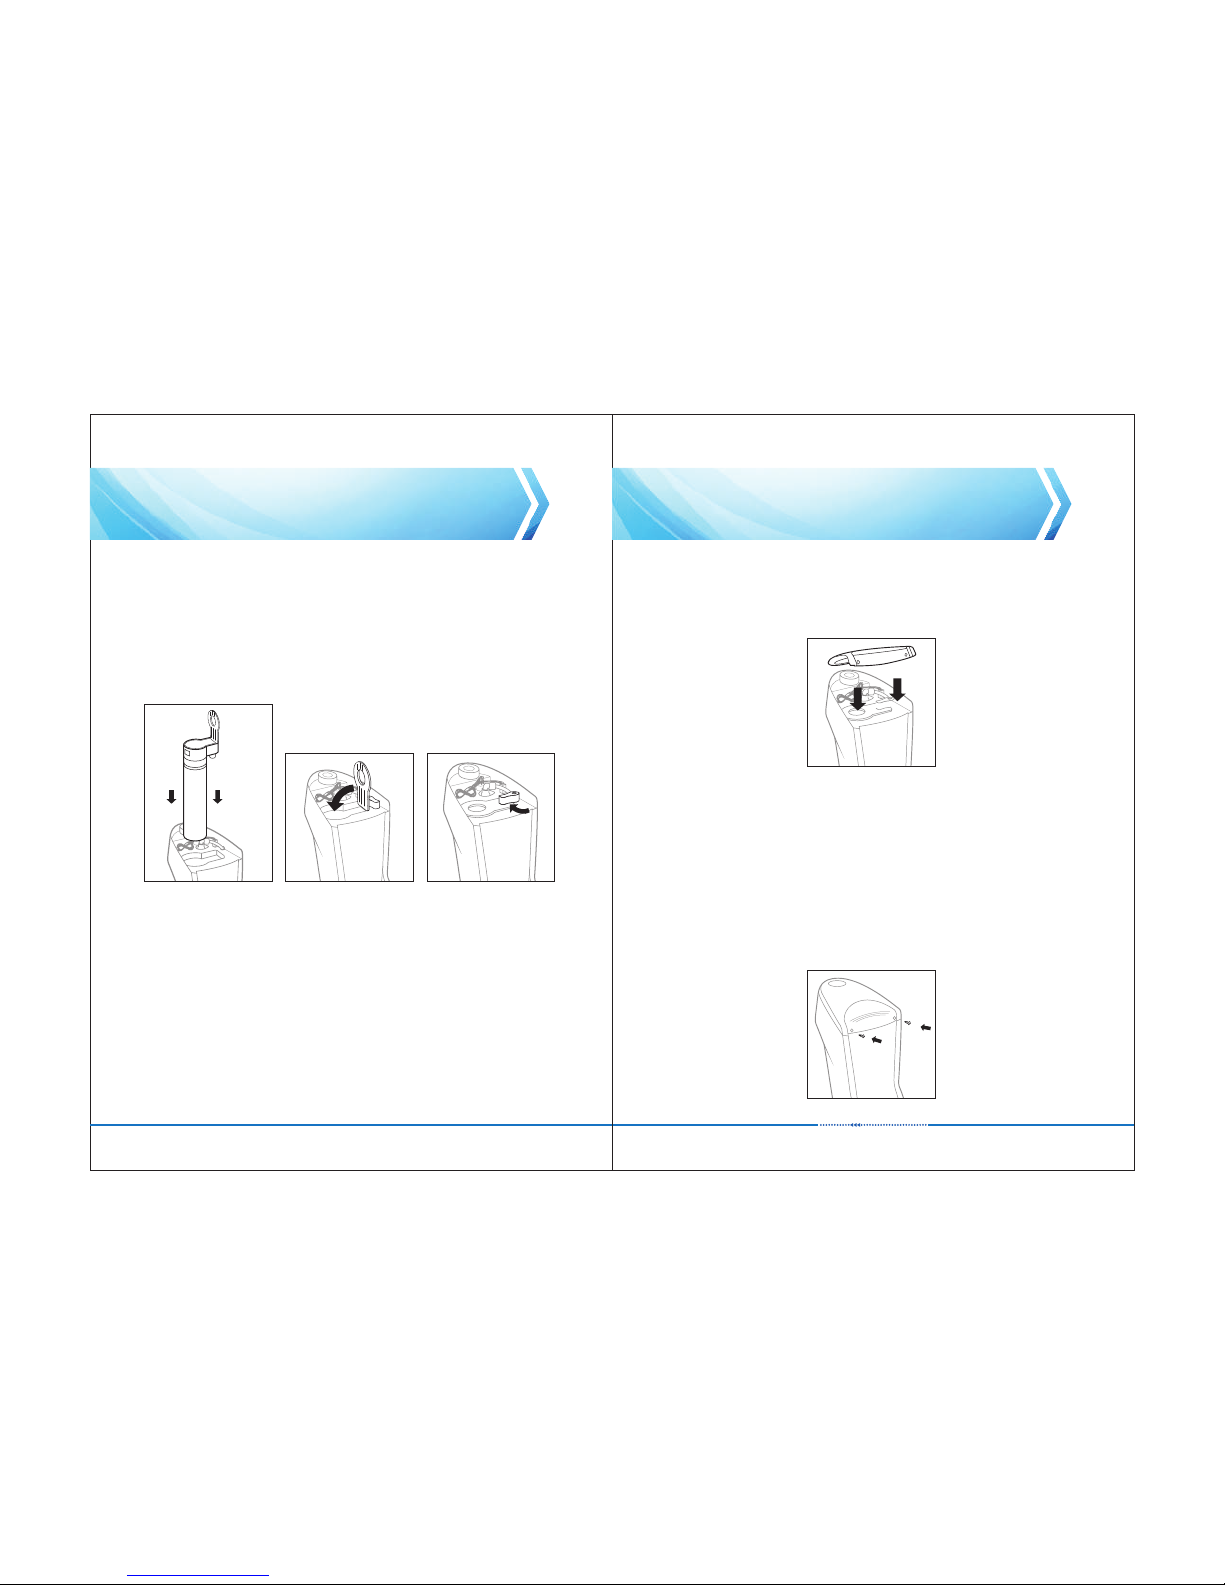
3.13 Fit the filter assembly with the back into the appliance as follows:
1. Insert the filter assembly back into its cradle, aligning the two male spigots
with the female holes in the cradle
2. Push firmly until the filter sits snugly and is flush inside the cradle and with
the cradle top surface
3. Lock the filter by closing the locking lever until it ‘clicks’ into place
4. Rotate the red rotating lever back into the LOCK position
1514
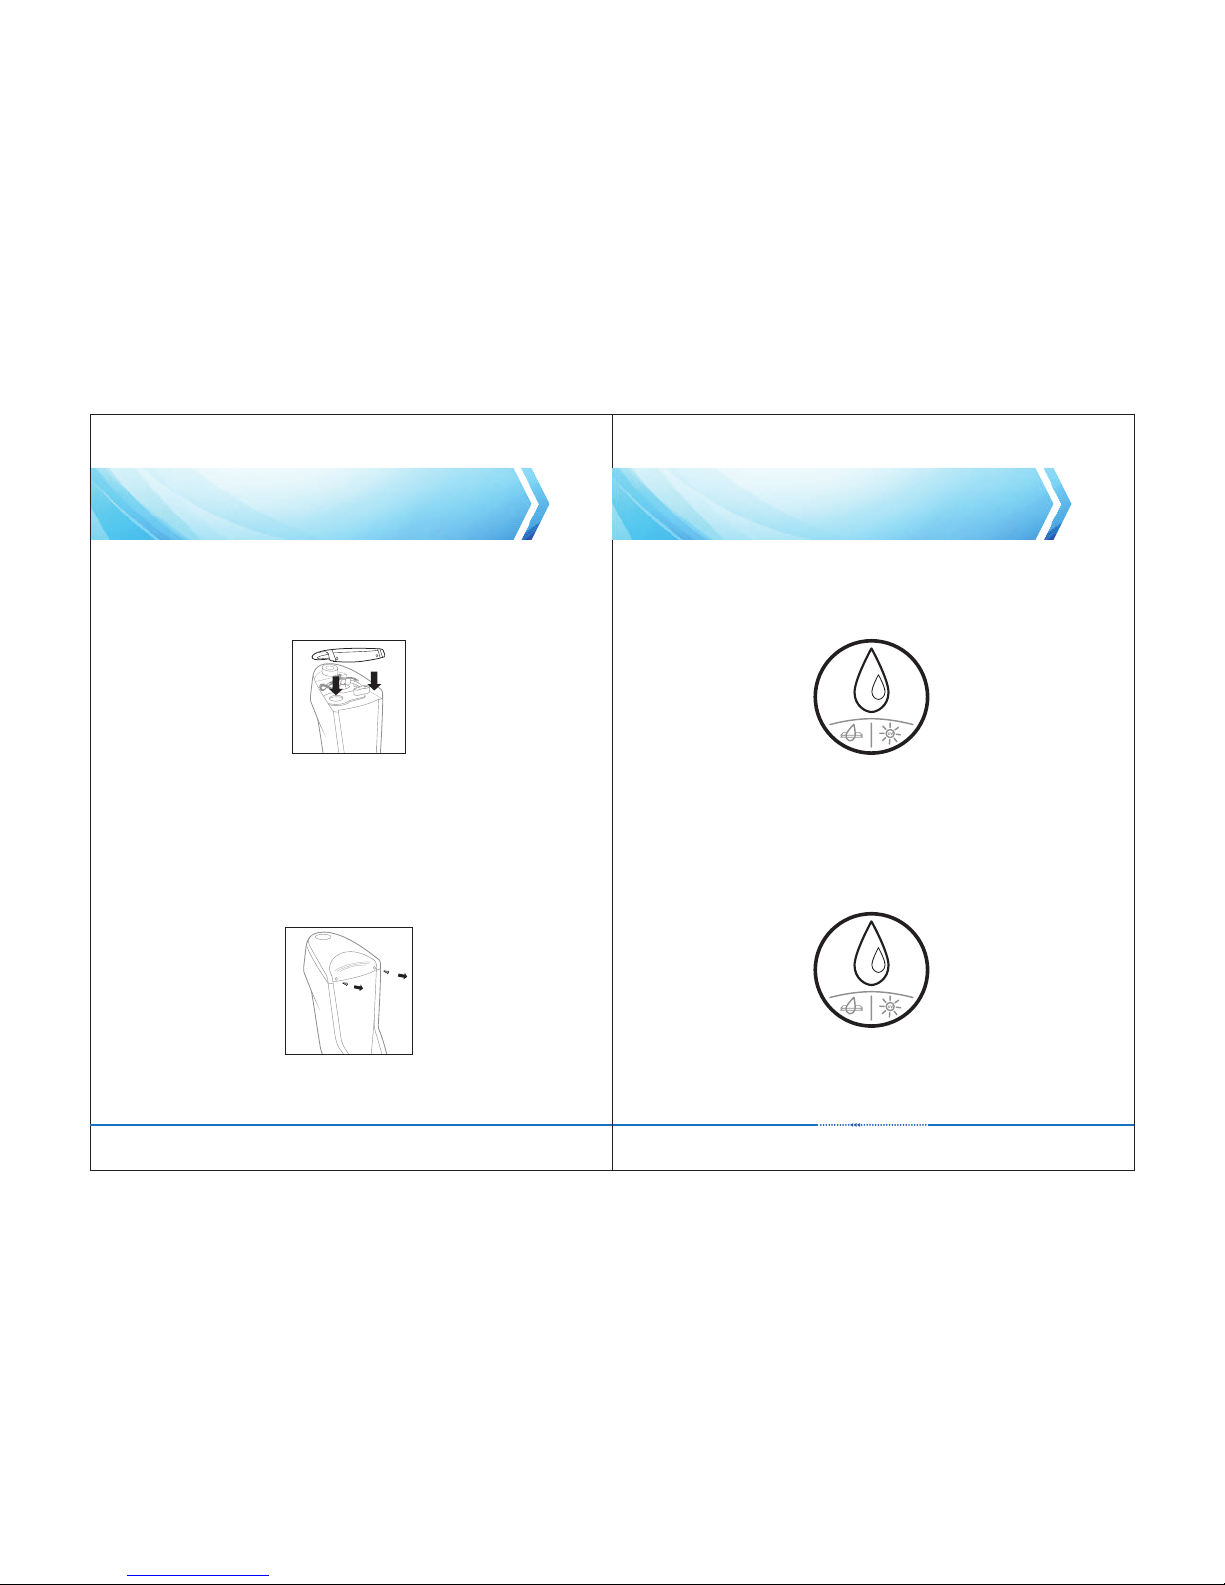
3.14 Re-fit the top cover, making sure the front is attached first. If the top cover is
not fitted correctly the unit will not switch on
Hint: Fit the top cover making sure the front is pushed in place first and then
push the back end with the screws down to give a snug fit
3.15 Re-fit the two screws that hold the lid down using a screwdriver.
Caution: The screws should be hand tightened, do not over tighten
Insert the plug into the mains socket.
3.16 Press and hold the dispense button for 10 seconds until you hear a beep as
this will rest the filter timer
Note: Place a cup or container under the dispense area before carrying out
step 3.16
3.17 The filter now needs to be flushed, follow step 2.3 through to 2.8
Page 10
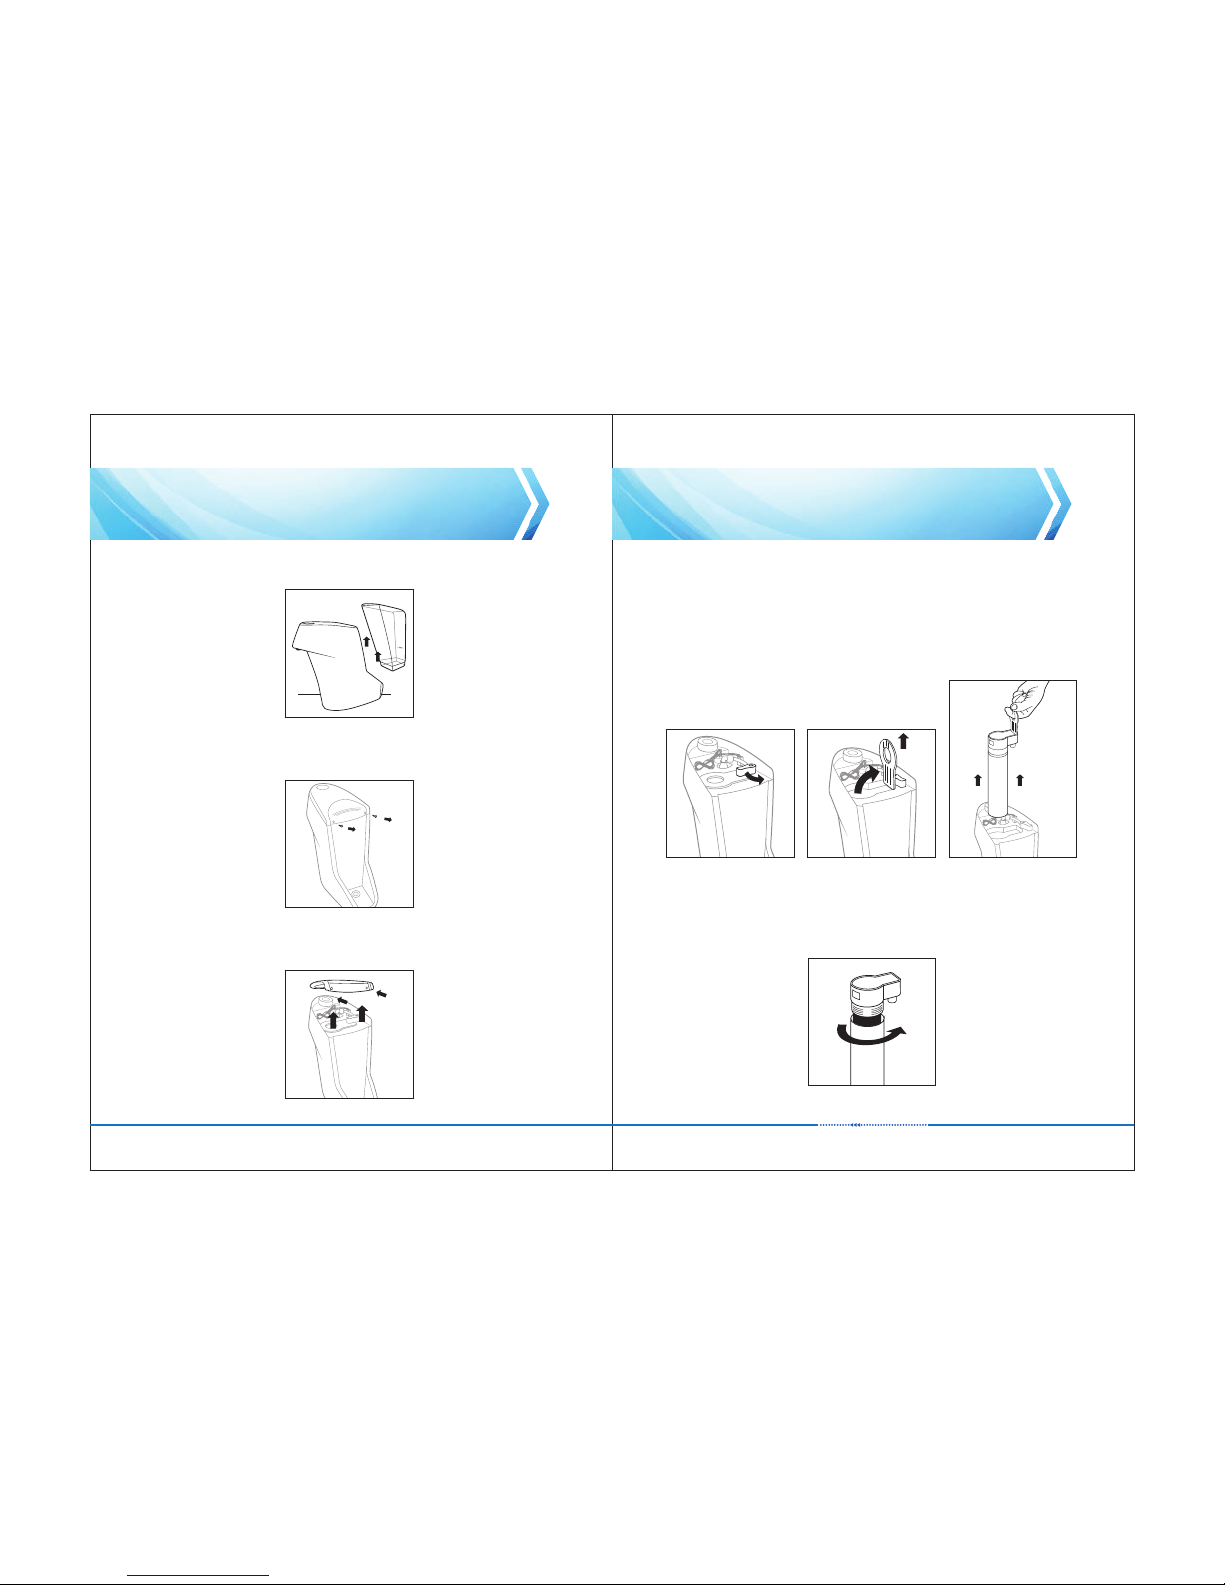
17
4. DE-SCALING OF THE WATER PURIFIER
4.1 Remove the water reservoir from the main body of the appliance
4.4 To remove the Filter, do the following:
1. Rotate the red rotating lever so that it is parallel with the side panel
2. Insert your finger into the round hole of the lever, and pull the lever up to
the vertical position
3. Pull the lever straight up to remove the Filter assembly (some slight force
may be required).
16
4.5 Unscrew the filter body from the filter head by turning the base in an anti
clockwise direction as per the illustration
Note: Be careful as the filter body will contain water
4.2 Remove the two screws that hold the top cover in place. Y ou will need to use
a screwdriver to carry out step 4.2
4.3 Remove the top cover from the unit by slightly pushing it back and then
lifting it up
Page 11
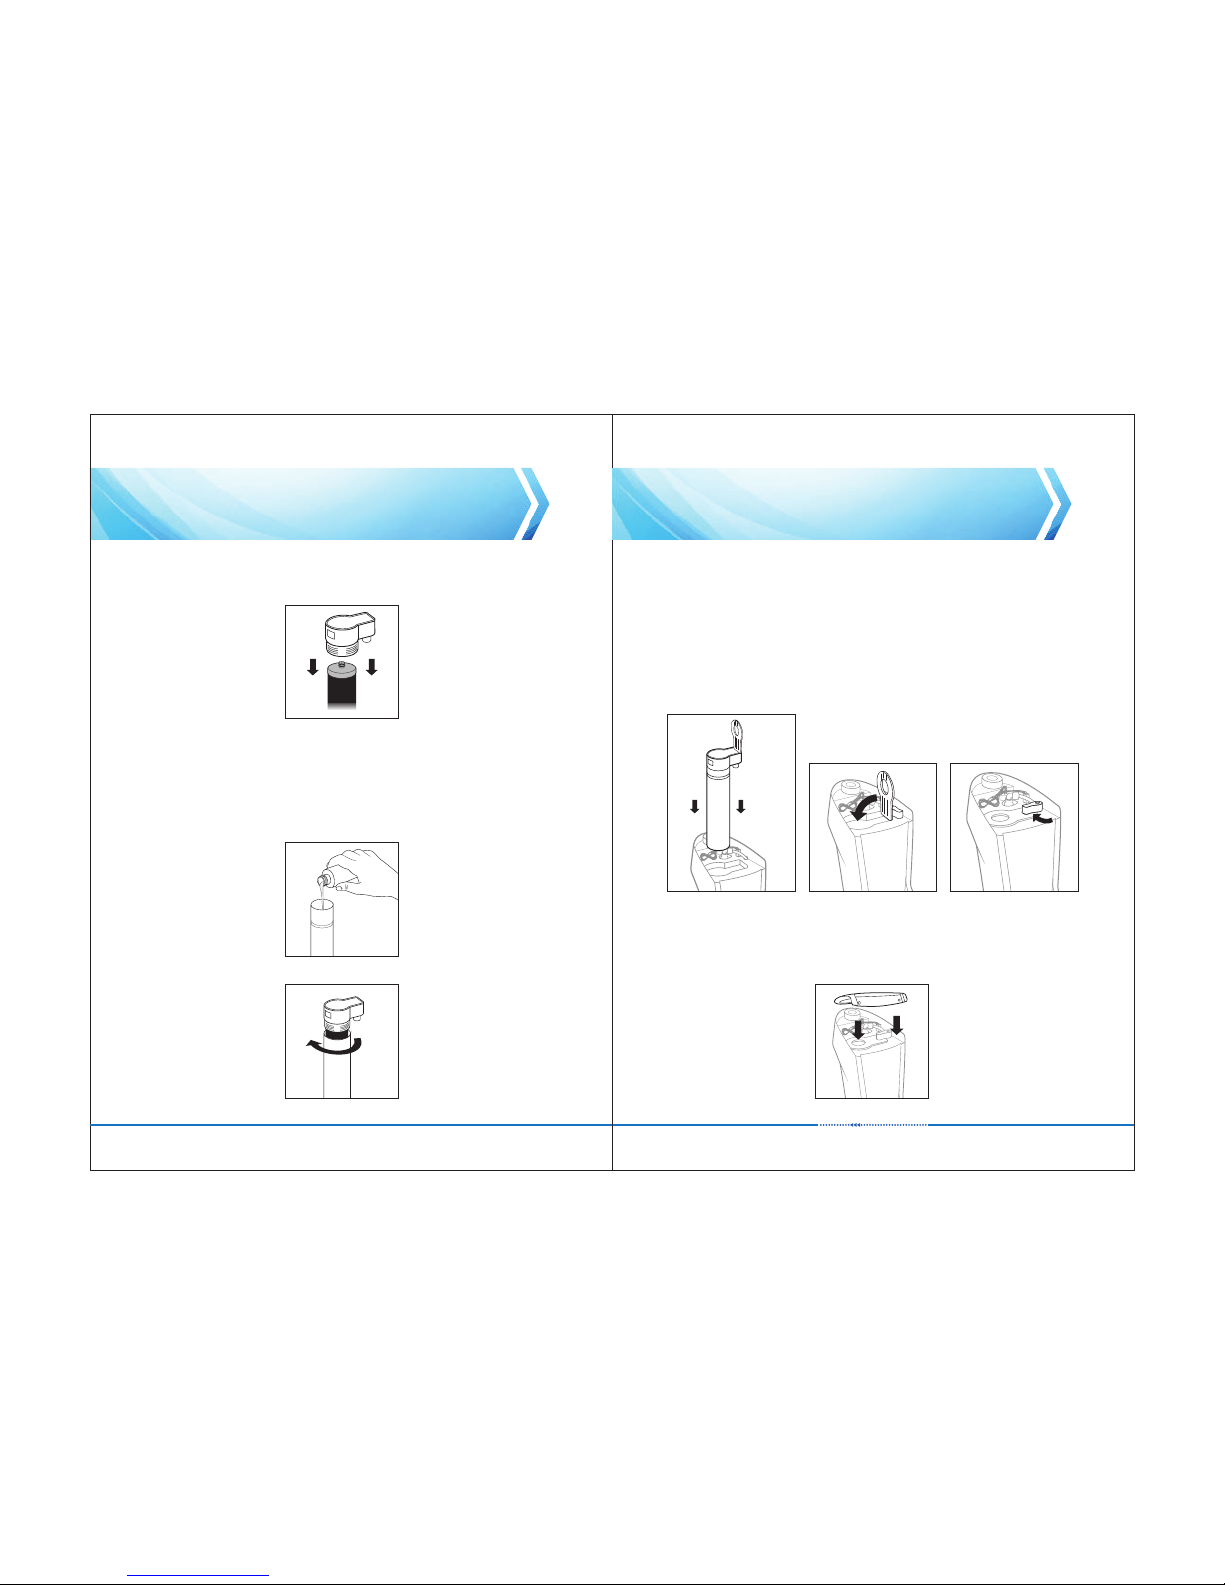
1918
4.6 Remove the filter cartridge from the head by pulling it out as per illustration.
Note: Be careful as the filter body will contain water
4.9 Fit the filter assembly with the de-scaling solution back into the appliance as
follows:
1. Insert the filter assembly back into its cradle, aligning the two male
spigots with the female holes in the cradle
2. Push firmly until the filter sits snugly and is flush inside the cradle and with
the cradle top surface
3. Lock the filter by closing the locking lever until it ‘clicks’ into place
4. Rotate the red rotating lever back into the LOCK position
4.7 Add the de-scaler to the empty filter housing
N ote: 1. After contact with skin, wash immediately with plenty of water
2. In case of contact with eyes, rinse immediately with plenty of water and
seek medical advice
3. Do not swallow. If swallowed drink large amounts of water and seek
medical advice immediately and show the medical staff the packaging.
4.8 Screw the filter body together, making sure it is firmly tightened
4.10 Re-fit the top cover, making sure the front is attached first. If the top cover is
not fitted correctly the unit will not switch on
Hint: Fit the top cover making sure the front is pushed in place first and then
push the back end with the screws down to give a snug fit
Page 12
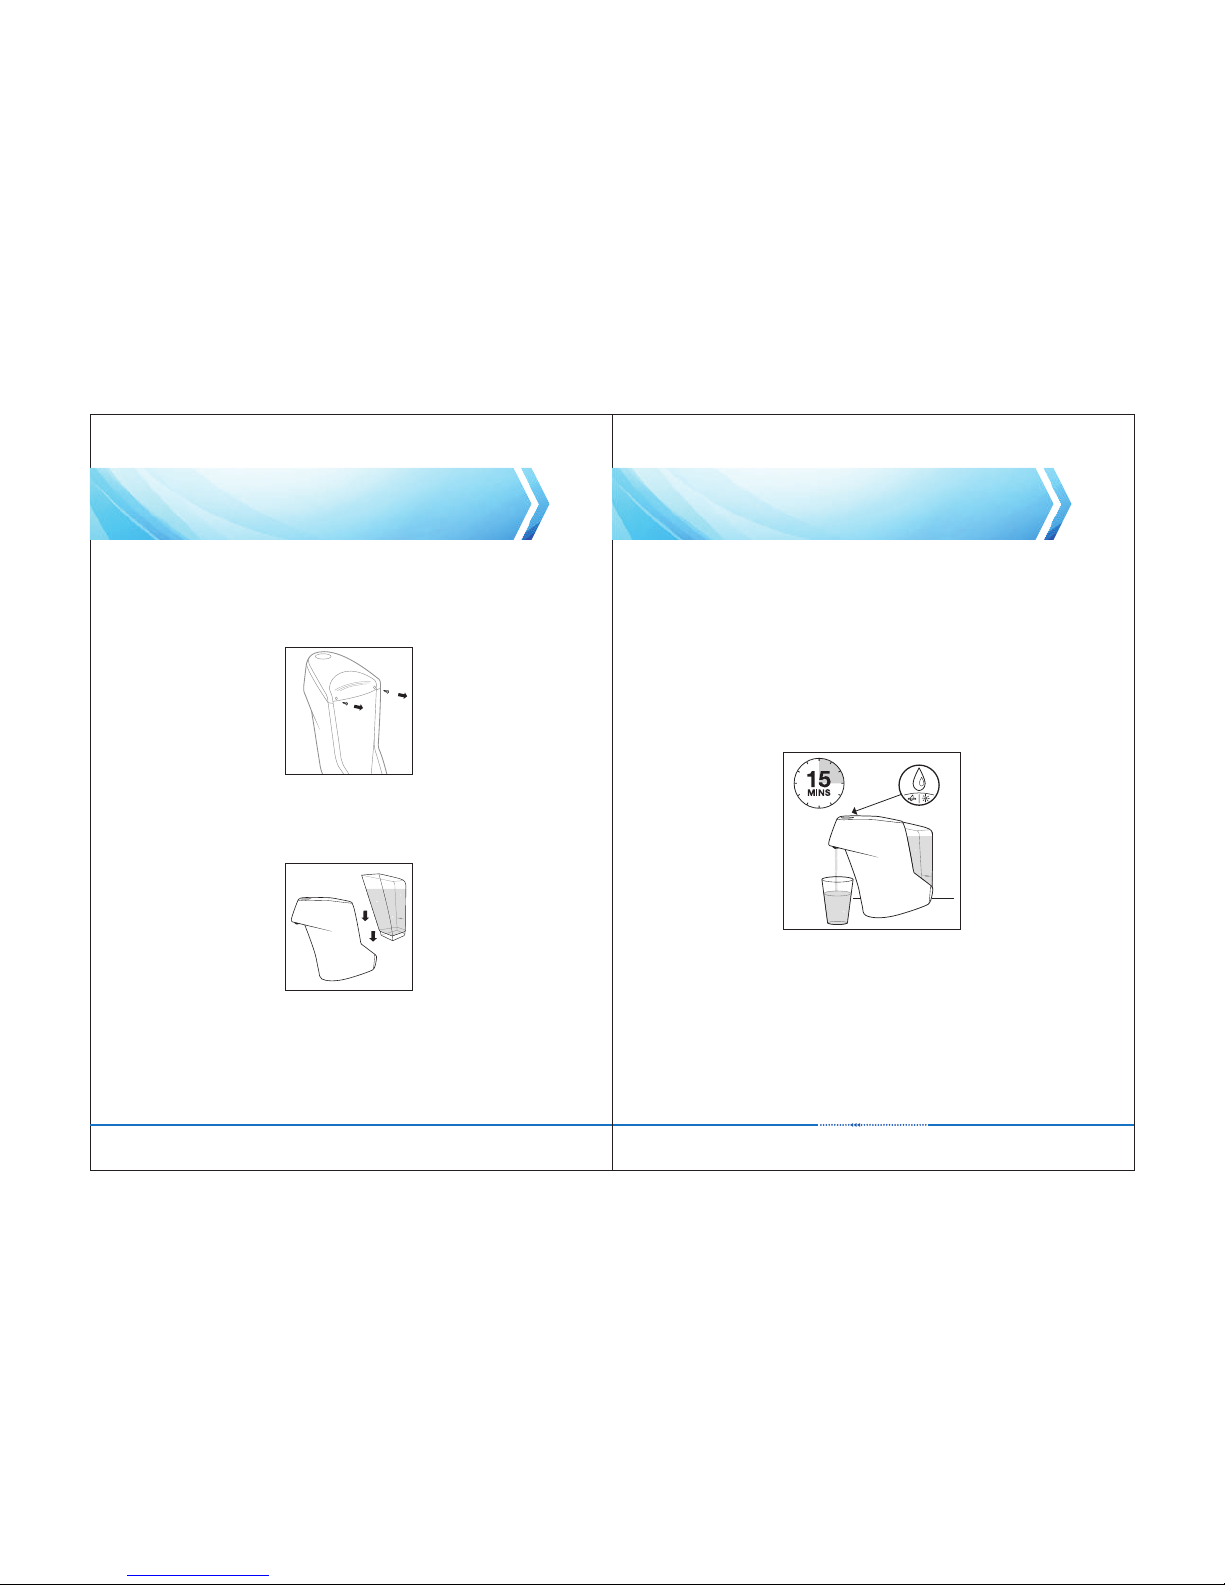
2120
4.11 Re-fit the two screws that hold the lid down using a screwdriver.
Caution: The screws should be hand tightened, do not over tighten. Insert
the plug into the mains socket
4.12 Fill the reservoir and re-fit the reservoir to the appliance making sure it is
firmly fitted
4.13 Place a glass or large container under the dispense area and touch the
dispense button until you have dispensed 300ml of water.
Touch the dispense button again to stop dispensing. Dispose of the water
by pouring it down the drain. Remove the plug from the power source to
isolate the electricity supply.
Allow the de-scaling solution to remain in the appliance for 15 minutes.
Once the waiting time of 15 minutes has passed, Insert the plug into the
mains electricity and flush a further 3 liters of water through the appliance
Note: After contact with skin, wash immediately with plenty of water
Page 13
23
4.14 Remove the water reservoir from the main body of the appliance
Note: Remove the plug from the power source to isolate the electricity
supply
22
4.15 Remove the two screws that hold the top cover in place. Y ou will need to use
a screwdriver to carry out this step
4.16 Remove the top cover from the unit by slightly pushing it back and then
lifting it up
4.17 To remove the Filter, do the following:
1. Rotate the red rotating lever so that it is parallel with the side panel
2. Insert your finger into the round hole of the lever, and pull the lever up to
the vertical position
3. Pull the lever straight up to remove the Filter assembly (some slight force
may be required)
Page 14
2524
4.18 Unscrew the filter body from the filter head by turning it in an anti-clock wise
direction as per illustration. Empty the water that is left in the filter housing,
this can be disposed of by pouring it down the drain. Rinse the filter housing
using normal tap water
NOTE: Be careful as the filter body could contain water and some de-scaler.
NOTE: After contact with skin, wash immediately with plenty of water. In
case of contact with eyes, rinse immediately with plenty of water and seek
medical advise. Do not swallow. If swallowed drink large amounts of water
and seek medical advice immediately and show the medical staff the descaling packaging.
4.20 Screw the filter head and the filter body together, making sure it is firmly
tightened
4.19 Re- Fit the cartridge by firmly pushing it into the filter head, making sure it is
firmly and securely fitted
4.21 Fit the filter assembly with the back into the appliance as follows:
1. Insert the filter assembly back into its cradle, aligning the two male
spigots with the female holes in the cradle
2. Push firmly until the filter sits snugly and is flush inside the cradle and with
the cradle top surface
3. Lock the filter by closing the locking lever until it ‘clicks’ into place
4. Rotate the red rotating lever back into the LOCK position
Page 15
27
5. BUTTON FUNCTIONS
26
5.1 When the appliance is in standby mode the button will be blue but when it is
touched it will turn green and water will be dispensed
Note: If the button is not touched within 2 minutes of being activated then it
will automatically stop the flow of water and turn the pump off.
4.22 Re-fit the top cover, making sure the front is attached first. If the top cover is not
fitted correctly the unit will not switch on
Hint: Fit the top cover making sure the front is pushed in place first and then
push the back end with the screws down to give a snug fit
4.23 Re-fit the two screws that hold the lid down using a screwdriver.
Caution: The screws should be hand tightened, do not over tighten. Insert
the plug into the mains socket.
4.24 Press and hold the dispense button for 10 seconds as this will reset the filter
timer
Note: Place a cup or container under the dispense area before carrying out
step 4.24
4.25 The filter now needs to be flushed, follow step 2.3 through to 2.8
5.2 Touch to STOP dispensing water.
When you touch the button to stop water being dispensed the button will
change colour from green to blue
Note: After one minute the product is in a stand-by mode it goes in an
energy saving mode as the UV is off; when the product is in this condition,
there will be a 2 second delay before the water is dispensed after the
dispense button is touched so to activate the UV lamp and purify the water.
Page 16
29
6. INDICATION AND WARNING ICONS 7. TROUBLESHOOTING
28
If there is no water being dispensed:
• Check that the unit is plugged in and switched on at the mains wall socket
• Check that the reservoir is fitted correctly
• Check that there is water in the reservoir
• Make sure that the top cover is fitted correctly
• Make sure the button is blue. Should the appliance be faulty please either return
the product in its original packaging with proof of purchase or contact the local
customer service centre. Should there be no response from the button remove
the power cord and wait 10 seconds before plugging it back in. This will reset
the appliance
Your product has been designed and internationally certified to the highest
standards of water purification, and guarantees at all times, to dispense the purest
and cleanest water. The self monitoring system will warn you of any potential risks,
by way of 3 possible alarms.
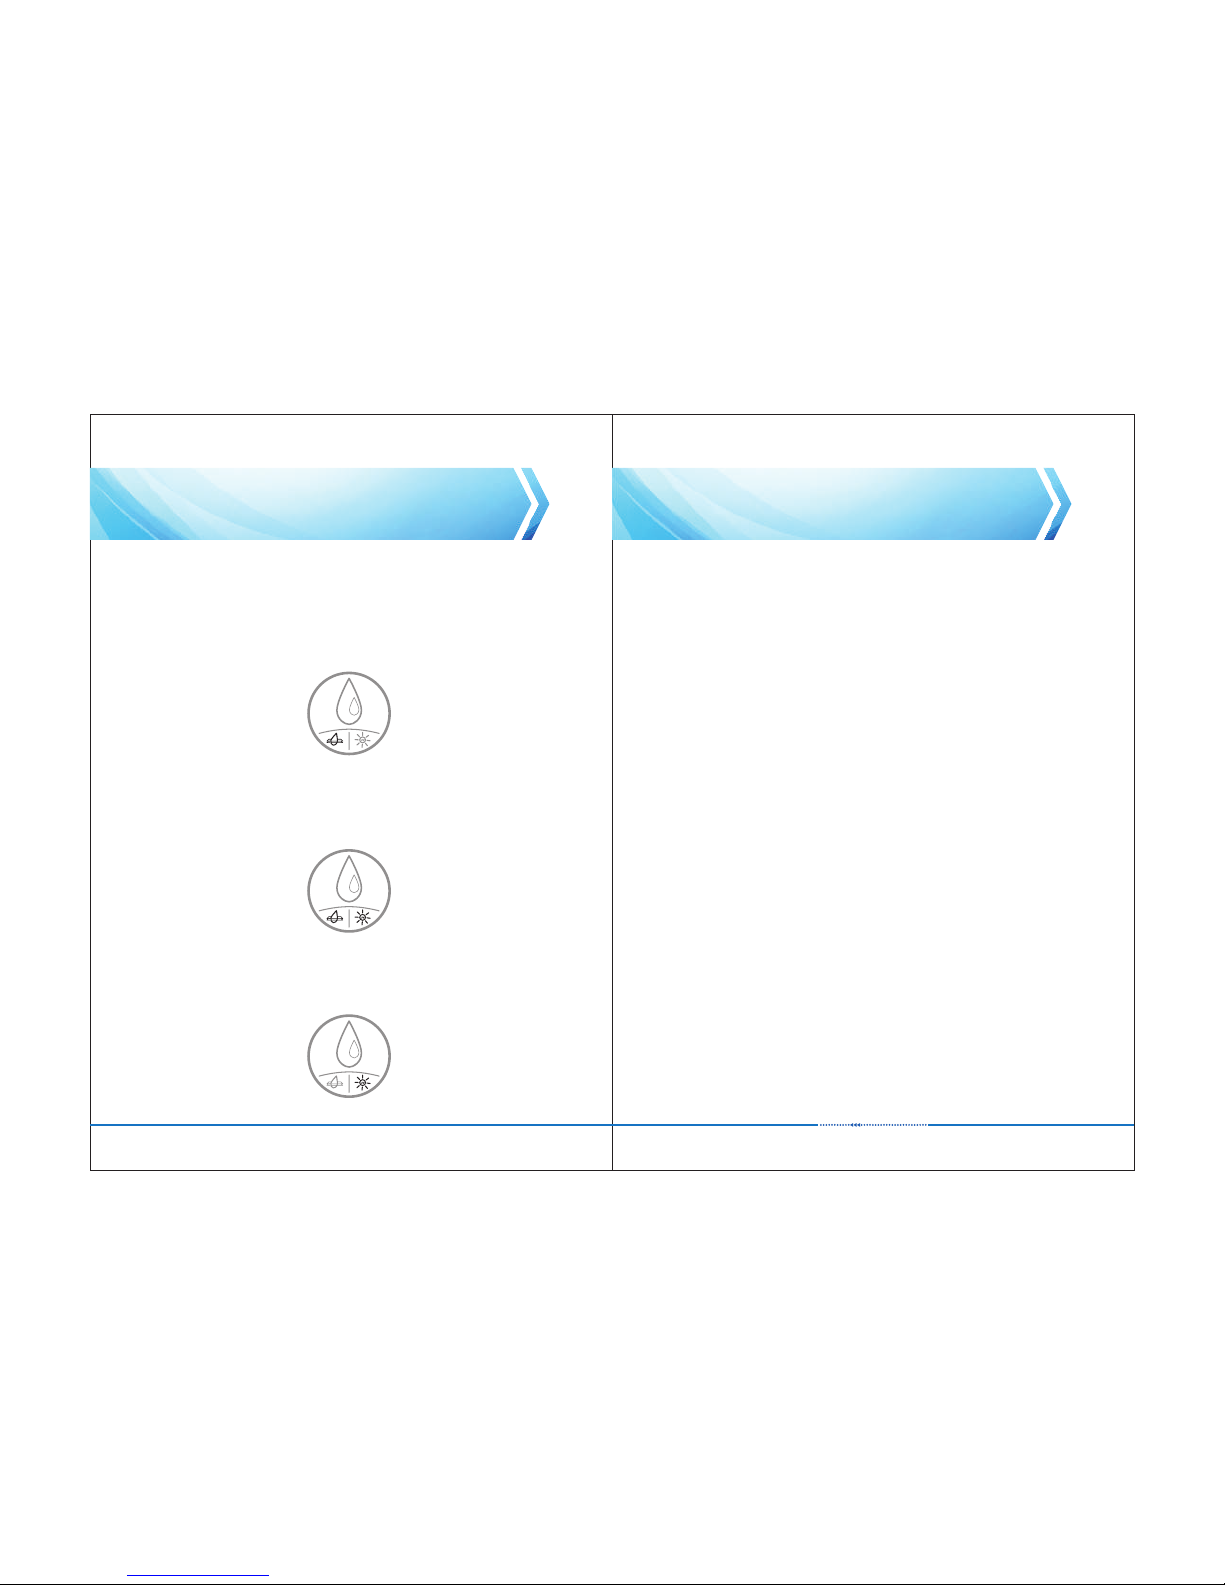
6.1 Once the Filter has reached 95% of its life, the Filter icon will flash as a
reminder, and continue to flash until the filter has been replaced as per 6.2
below. During this time, your machine will continue to dispense water, until
6.2 below has been reached
6.2 After a 12 month period, both the UV Bulb and Filter must be replaced to
ensure optimal water purification. Both the UV Icon and Filter Icon will alarm
20 times and flash alternately. When this occurs, no water will be dispensed,
until the Filter and UV Bulb have both been replaced and the machine reset
(to do this you will need to follow steps 3.1 to 3.17 )
6.3 In the unlikely event that the UV bulb should fail the UV icon will flash and
alarm 20 times.
No water will be dispensed until steps 3.1 to 3.7 and steps 3.14, 3.15 and 4.6
are completed
Page 17
31
8. CLEANING
9. STORAGE
30
It is recommended that you maintain your appliance by cleaning it on a regular
basis.The appliance can be cleaned using a damp lint free cloth. Never use any
alcohol or alcohol based chemicals or abrasive materials on any part of the product
Never store the appliance with water in the reservoir and always store it the correct
way up in a dry environment. If the unit has not been used for more than 3 months it
is recommended that the filter be replaced before the appliance is used
Page 18
33
10. SAFETY
32
• Do not touch or look directly into the faucet
• We recommend that the appliance should not be handled or lifted by holding
the reservoir, especially when the reservoir is full of water
• Only authorised trained technicians may carry out repairs on this appliance
• The user may only replace the filter and UV lamp
• The filter and UV lamp must be replaced every 12 months.
• Never use any chemicals or abrasive materials on any part of the product
• Should a fault occur on the appliance always unplug it from the mains power
supply
• If the power lead is damaged in any way it must be replaced by an authorised
dealer or qualified person
• This appliance is not intended for use by persons (including children) with
reduced physical, sensory or mental capabilities, or lack of experience and
knowledge, unless they have been given supervision or instruction concerning
use of the appliance by a person responsible for their safety
• Children should be supervised to ensure that they do not play with the
appliance
11. CERTIFICATION
The appliance has attained and complies with the following certifications and
directives: CE, NSF 42 & 53, NSF 55a, NSF P231, RoHS, REACH
Manufactured by Qindao Waterlogic Manufacturing Co., Ltd.
No 10 Jinling Road, Jinling Industrial Zone, Chengyang District,
Qingdao, 266111, Shangdong, P.R. CHINA
TEL: +86-532-87909132
Correct Disposal of this product
This marking indicates that this product should not be disposed with
other household wastes throughout the EU.
To prevent possible harm to the environment or human health from
uncontrolled waste disposal, recycle it responsibly to promote the
sustainable reuse of material resources. To return your used device,
please use the return and collection systems or contact the retailer
where the product was purchased. They can take this product for
environmental safe recycling.
12. DISPOSAL
Do not dispose of the appliance with normal household waste, hand it in at an
official collection point for recycling. By doing this you are doing your bit for the
environment. WEEE compliance
 Loading...