

Page 1
1
Dear System Owner:
Thank you for purchasing the ForaCare D20 No-Coding Blood
Glucose plus Blood Pressure Monitoring System. This manual
provides important information which helps you to operate this
system smoothly. Before using this product, please read the following contents thoroughly and carefully.
According to the clinical studies from American Diabetes Association, elevated blood pressure often accompanies adult diabetes
patients. These studies also suggest that diabetes patients could
reduce the risk of cardiovascular diseases by managing their
blood glucose levels and blood pressure. Therefore, with easy operation of this ForaCare D20 No-Coding Blood Glucose plus Blood
Pressure Monitoring System, you can easily monitor your blood
glucose levels and blood pressure by yourself at any place, any
time. In addition, this system can help you and your healthcare
professionals to monitor and adjust your treatment plans, and
keep your diabetes and blood pressure under control.
If you have other questions regarding this product, please contact
the place of purchase.
Version 4.0 2013/01 311-3263100-006
English
Page 2

2
IMPORTANT SAFETY PRECAUTIONS
READ BEFORE USE
● The meter and lancing device are for single patient use. Do not share
them with anyone including other family members! Do not use on
multiple patients!
● All parts of the kit are considered biohazardous and can potentially
transmit infectious diseases, even after you have performed cleaning
and disinfection.
For more information, please visit
1.“FDA Public Health Notification: Use of Fingerstick Devices on More than One
Person Poses Risk for Transmitting Bloodborne Pathogens: Initial Communication”
(2010)
http://www.fda.gov/MedicalDevices/Safety/AlertsandNotices/ucm224025.htm
2.“CDC Clinical Reminder: Use of Fingerstick Devices on More than One Person Poses
Risk for Transmitting Bloodborne Pathogens” (2010)
http://www.cdc.gov/injectionsafety/Fingerstick-DevicesBGM.html
1. Use this device ONLY for the intended use described in this manual.
2. Do NOT use accessories which are not specified by the manufacturer.
3. Do NOT use the device if it is not working properly or damaged.
4. Do NOT use the equipment where aerosol sprays are being used or
where oxygen is being administered.
5. Do NOT use under any circumstances on newborns or infants.
Page 3

3
6. This device does NOT serve as a cure for any symptoms or diseases. The
data measured is for reference only.
7. Before using this device to test blood glucose, read all instructions
thoroughly and practice the test. Do all quality control checks as
directed.
8. Keep the device and testing supplies away from young children. Small
items such as the battery cover, batteries, test strips, lancets and vial
caps are choking hazards.
9. Keep the equipment and its flexible cord away from hot surfaces.
10. Do NOT apply the cuff to areas other than the place directed.
11. Use of this device in a dry environment, especially if synthetic
materials are present (synthetic clothing, carpets etc.) may cause
damaging static discharges that may cause erroneous results.
12. Do NOT use this device in close proximity to sources of strong electro
magnetic radiation, as these may interfere with the correct operation.
13. Proper maintenance and periodically calibration are essential to the
longevity of your device. If you are concerned about your accuracy of
measurement, please contact local customer service for help.
KEEP THESE INSTRUCTIONS IN A SAFE PLACE
Page 4

4
TABLE OF CONTENTS
IMPORTANT SAFETY PRECAUTIONS 02
BEFORE YOU BEGIN 06
Important Information 06
Intended Use 07
Test Principle 07
Contents of System 08
Monitor Overview 09
Screen Display 10
Test Strip 11
Speaking Function 12
SETTING THE MONITOR 14
TESTING YOUR BLOOD GLUCOSE 18
Control Solution Testing 18
Performing a Control Solution Test 19
TESTING WITH BLOOD SAMPLE 22
Preparing the Lancing Device for Blood Testing 22
Preparing the Puncture Site 23
Alternative Site Testing 25
Performing a Blood Glucose Test 27
TESTING YOUR BLOOD PRESSURE 30
Before Measurement 30
Taking a Single Measurement 33
Page 5
5
MONITOR MEMORY 34
Reviewing Test Results 34
Reviewing Day Average Results 35
DOWNLOADING RESULTS ONTO A COMPUTER 36
MAINTENANCE 37
Battery 37
Using AC Adapter 39
Caring for Your Monitor 40
Caring for Your Test Strips 43
Important Control Solution Information 44
SYSTEM TROUBLESHOOTING 45
Result Readings 45
Error Messages 46
Troubleshooting 48
DETAILED INFORMATION 51
Reference Values 51
Comparing Monitor and Laboratory Results 53
SPECIFICATIONS 55
Page 6

6
BEFORE YOU BEGIN
Important Information
• Severe dehydration and excessive water loss may cause readings
which are lower than actual values. If you believe you are suffering
from severe dehydration, consult a healthcare professional
immediately.
• If your blood glucose results are lower or higher than usual, and
you do not have symptoms of illness, first repeat the test. If you
have symptoms or continue to get results higher or lower than
usual, follow the treatment advice of your healthcare professional.
• Use only fresh whole blood sample to test your blood glucose.
Using other substances will lead to incorrect results.
• If you are experiencing symptoms that are inconsistent with your
blood glucose test results and you have followed all instructions
described in this owner’s manual, call your healthcare professional.
• We do not recommend using this product on severely hypotensive
individuals or patients in shock. Readings which are lower than
actual values may occur for individuals experiencing a
hyperglycemic-hyperosmolar state, with or without ketosis.
Please consult the healthcare professional before use.
Page 7

7
Intended Use
This system is a 2 in 1 system designed to measure blood glucose
outside the human body (in vitro diagnostic use) and to measure
blood pressure non-invasively. It is intended for use at home as an aid
to monitoring the effectiveness of diabetes control.
It shall not be used for the diagnosis of diabetes and hypertension, or
for the testing of neonates. It is intended to be used by a single person
and should not be shared.
Test Principle
Your system measures the amount of sugar (glucose) in whole blood.
The glucose testing is based on the measurement of electrical current
generated by the reaction of glucose with the reagent of the strip. Your
monitor measures the current, calculates the blood glucose level, and
displays the result. The strength of the current produced by the reaction depends on the amount of glucose in the blood sample.
The blood pressure is measured non-invasively at the arm based on
the Oscillometric method.
This device is NOT able to take measurements in the presence of
common arrhythmia, such as arterial or ventricular premature beats or
arterial fibrillation. It may produce reading errors.
Page 8
8
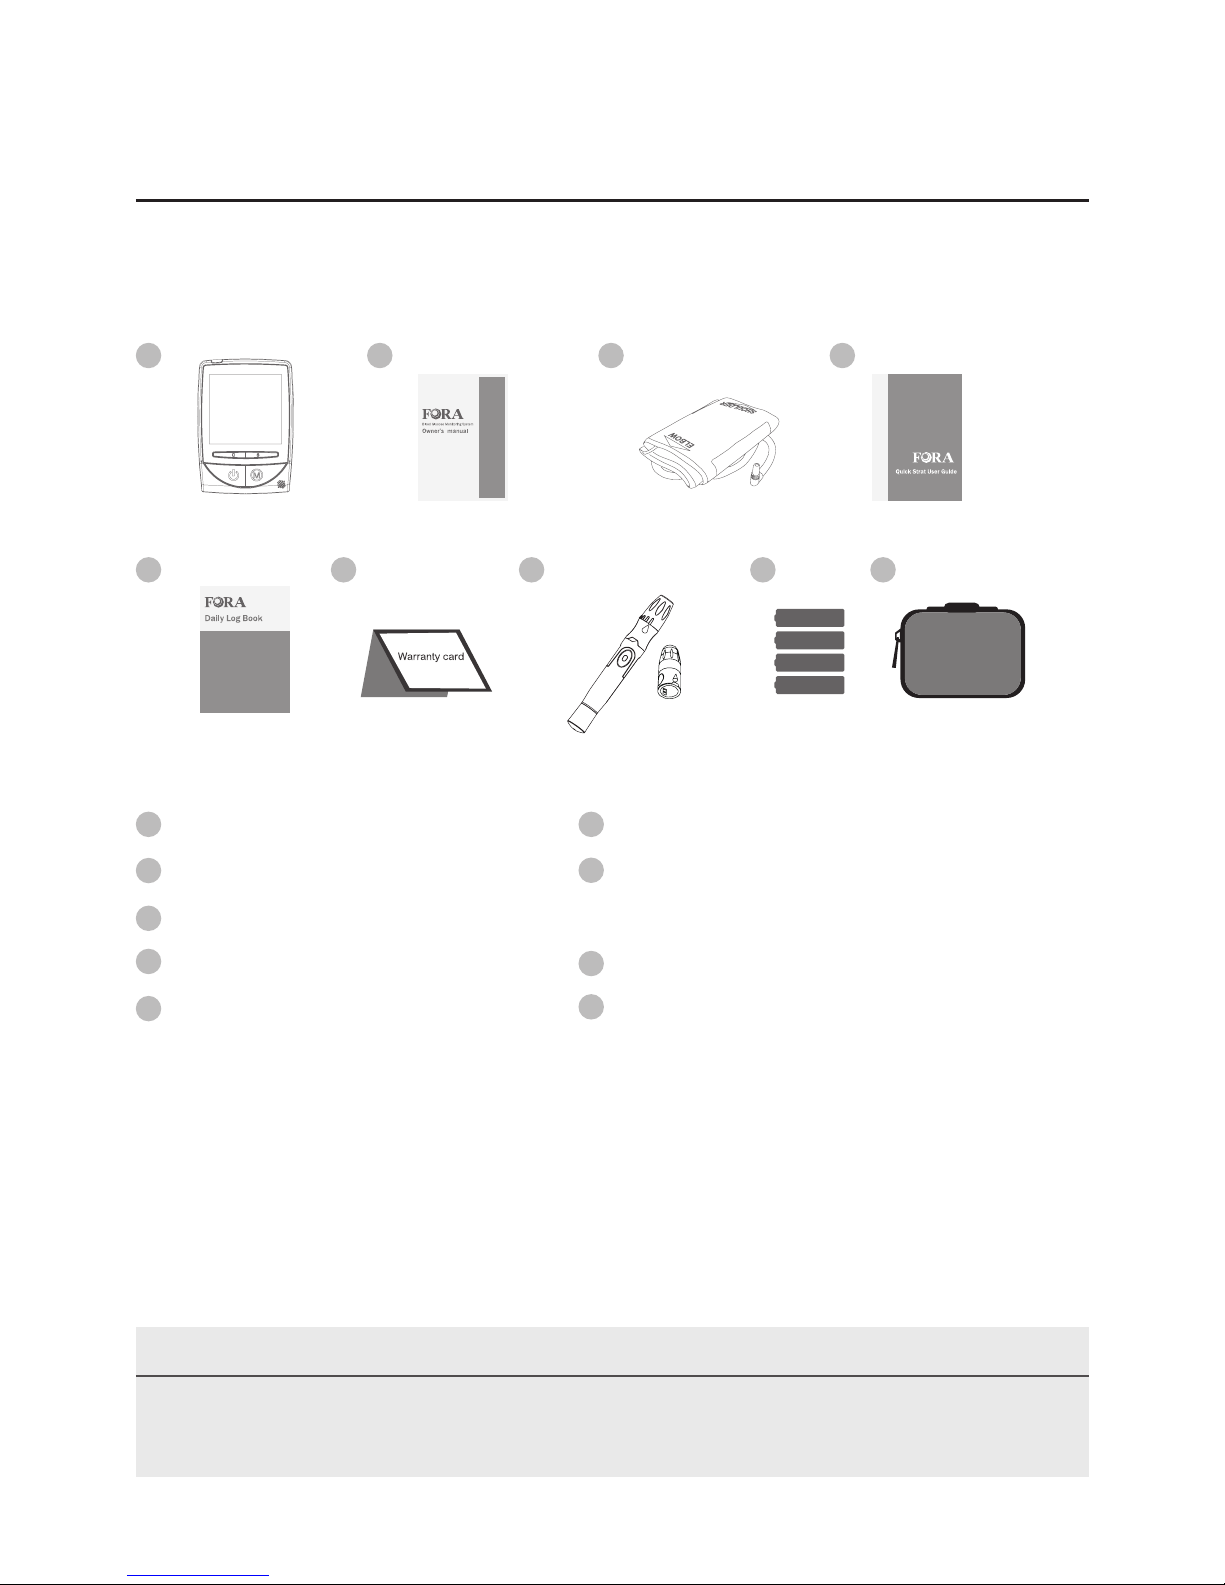
Contents of System
Your new ForaCare D20 No-Coding system kit includes:
Test strips, control solutions, lancing device or sterile lancets may not
be included in the kit (please check the contents on your product box).
They may be purchased separately. Please make sure you have those
items needed for a blood glucose test beforehand.
NOTE
If any items are missing from your kit or opened before use, please contact
local customer service or place of purchase for assistance.
1 432
7
8
9
6
Warranty Card
Lancing Device with One Clear Cap
(Optional)
4 x 1.5V AA alkaline batteries
Protective Storage Case
1
4
5
3
2
Monitor
Owner’s Manual
Pressure Cuff (arm type)
Quick Start User Guide
Daily Log Book
65 8 97
Page 9
9
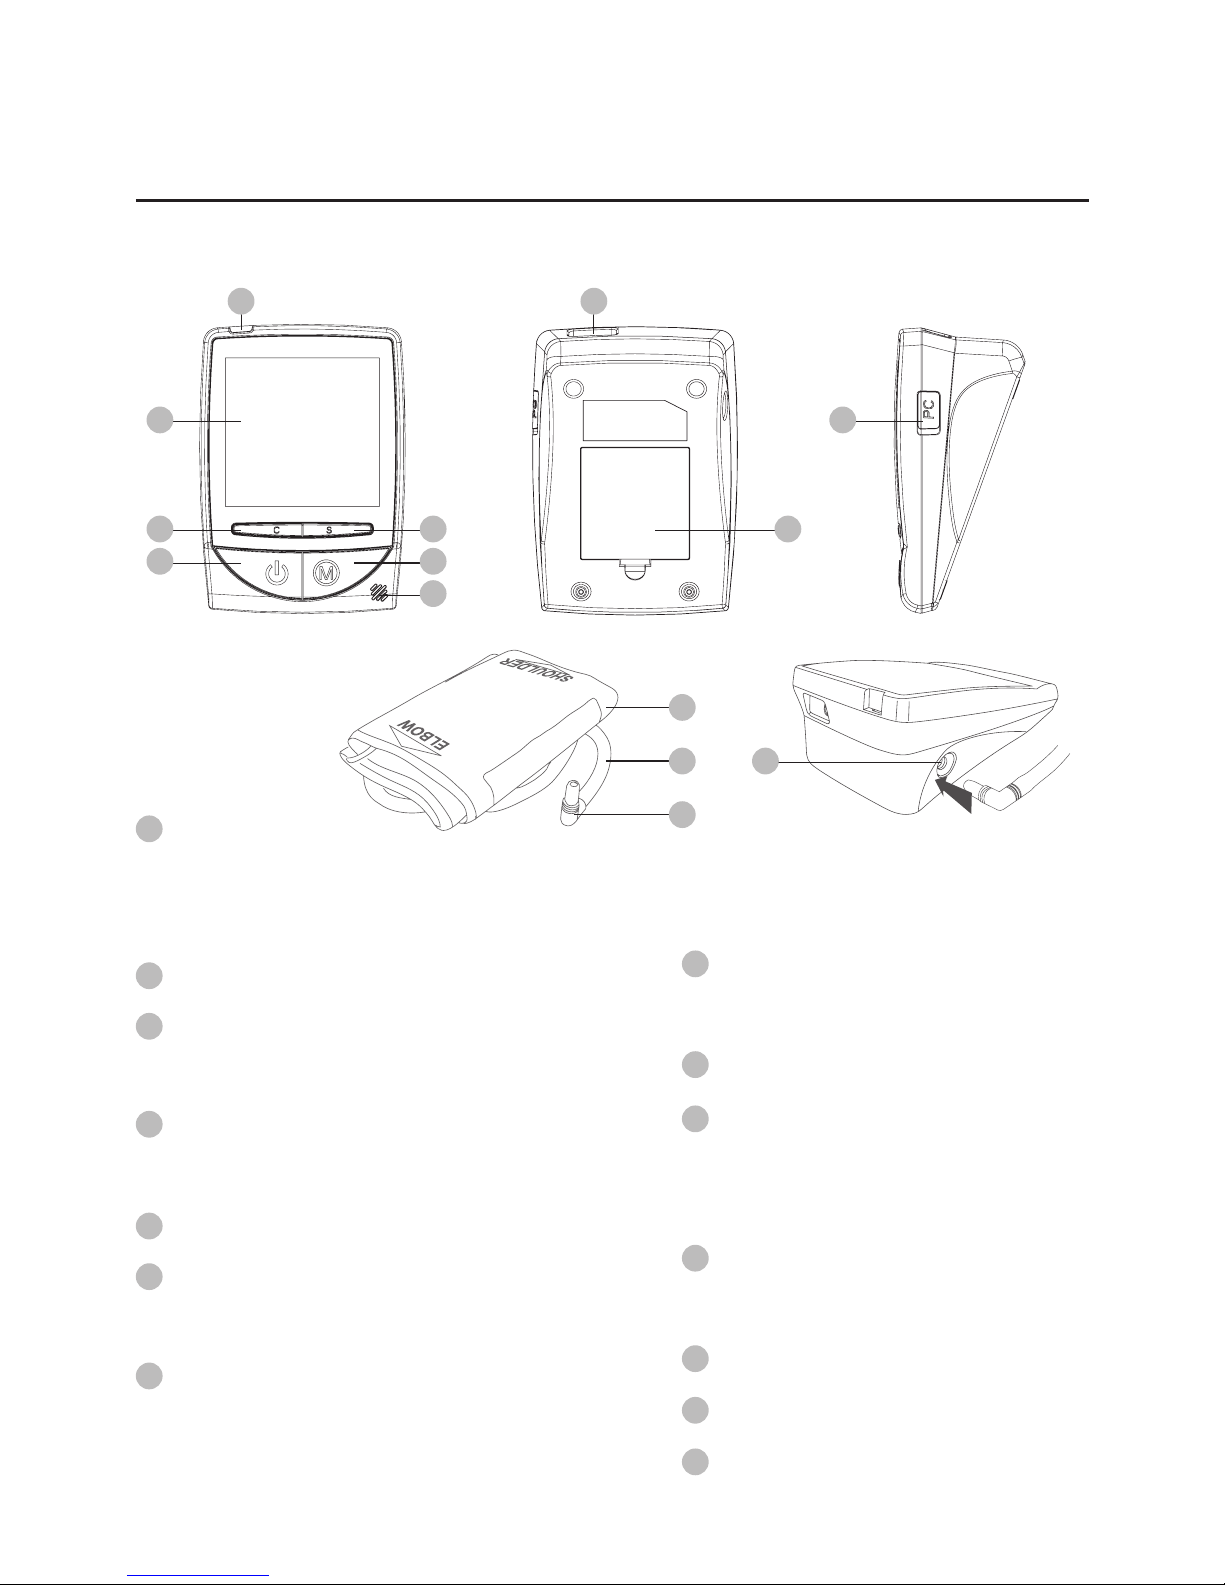
Monitor Overview
Front Back Side
Test Slot
Insert test strip here to turn the
monitor on for testing.
Display Screen
C Button
Enter control solution test.
On/Off Button
To start a single NIBP measurement.
Speaker
M Button
Enter the monitor memory.
S Button
Enter and confirm the monitor
settings.
AC/DC Adapter Port
Connect to a power supply.
Battery Compartment
USB Link Port
Download test results with
a cable connection.
Air Plug
Connect to air jack.
Air Tube
Pressure Cuff
Air jack
1
8
2
9
3
4
5
10
12
13
14
11
7
6
1 8
2
3
4
7 9
6
5
10
14
11
12
13
Page 10
10
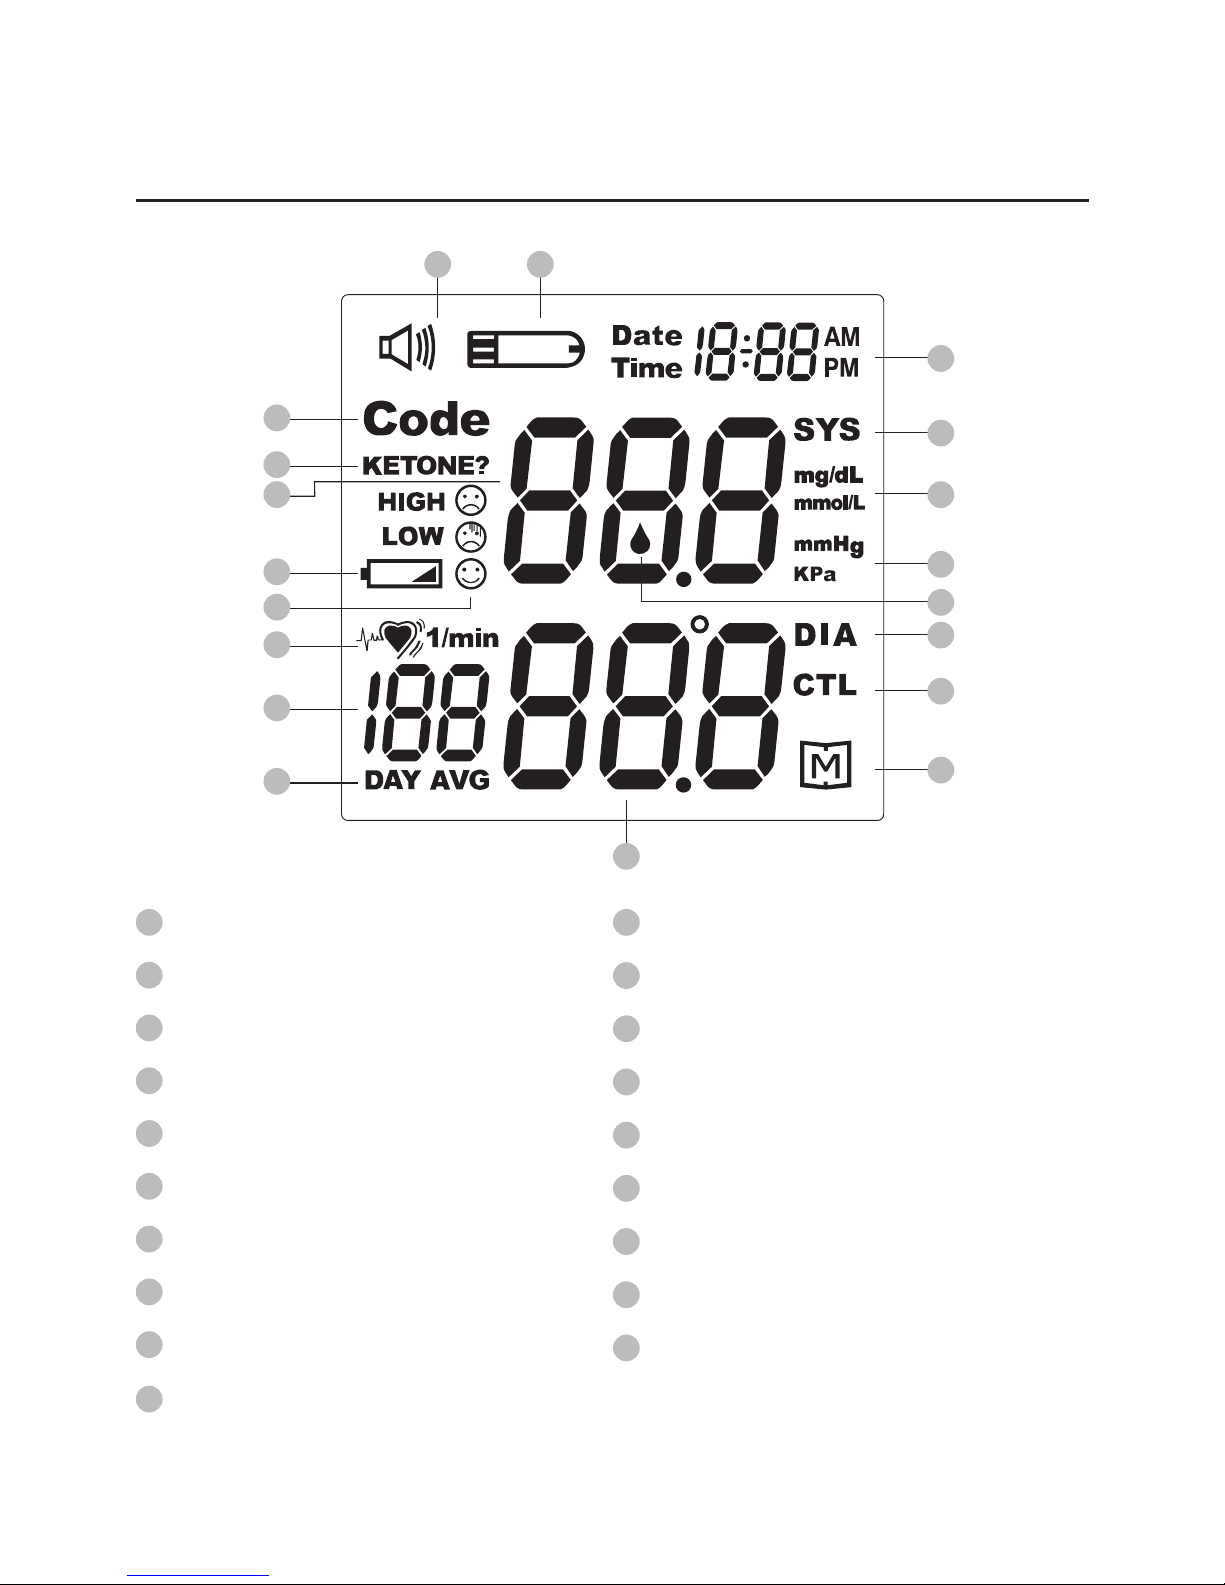
Screen Display
Test Strip Symbol
Volume Symbol
Code Number
Special Message
Systolic Pressure Value
Battery Symbol
Indicator Symbol
Heart Symbol
Pulse Rate
Day Average Result
Diastolic Pressure Value
Memory Mode Symbol
Control Mode Symbol
Diastolic Pressure Symbol
Blood Drop Symbol
Unit for Blood Pressure
Unit for Blood Glucose
Systolic Pressure Symbol
Date/Time
1
6
9
4
7
5
8
3
2
10
11
19
17
14
18
15
16
13
12
3
7
6
8
9
4
5
12
13
14
15
16
17
18
19
10
12
11
Page 11
11
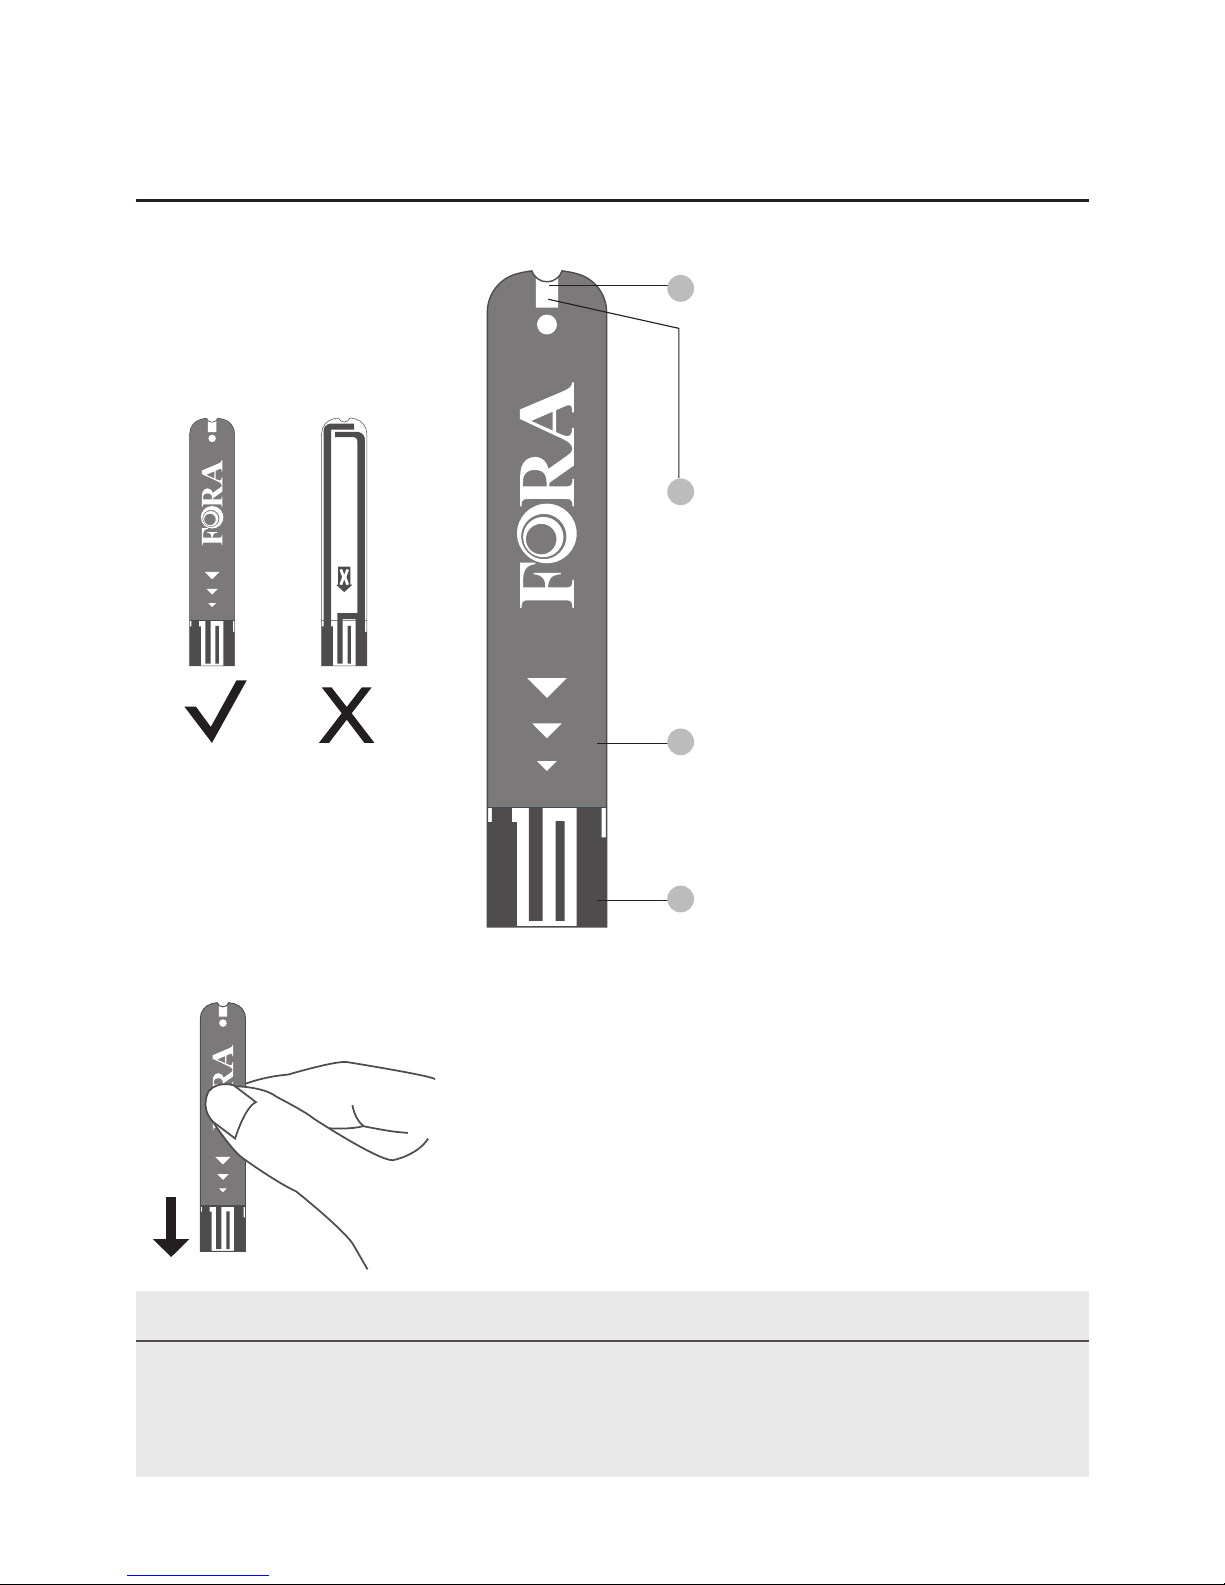
Test Strip
NOTE
The ForaCare D20 No-Coding monitor should only be used with FORA D20
Test Strips. Using other test strips with this meter can produce inaccurate
results.
Absorbent Hole
Apply a drop of blood here.
The blood will be
automatically absorbed.
Conrmation Window
This is where you confirm if
enough blood has been
applied to the absorbent
hole in the strip.
Test Strip Handle
Hold this part to insert the
test strip into the slot.
Contact Bars
Insert this end of the test
strip into the meter. Push
it in firmly until it will go no
further.
ATTENTION:
Test results might be wrong if the contact bar
is not fully inserted into the test slot.
The front side of the
test strip should face
up when inserting
the test strip.
Front Back
1
4
3
2
Page 12
12
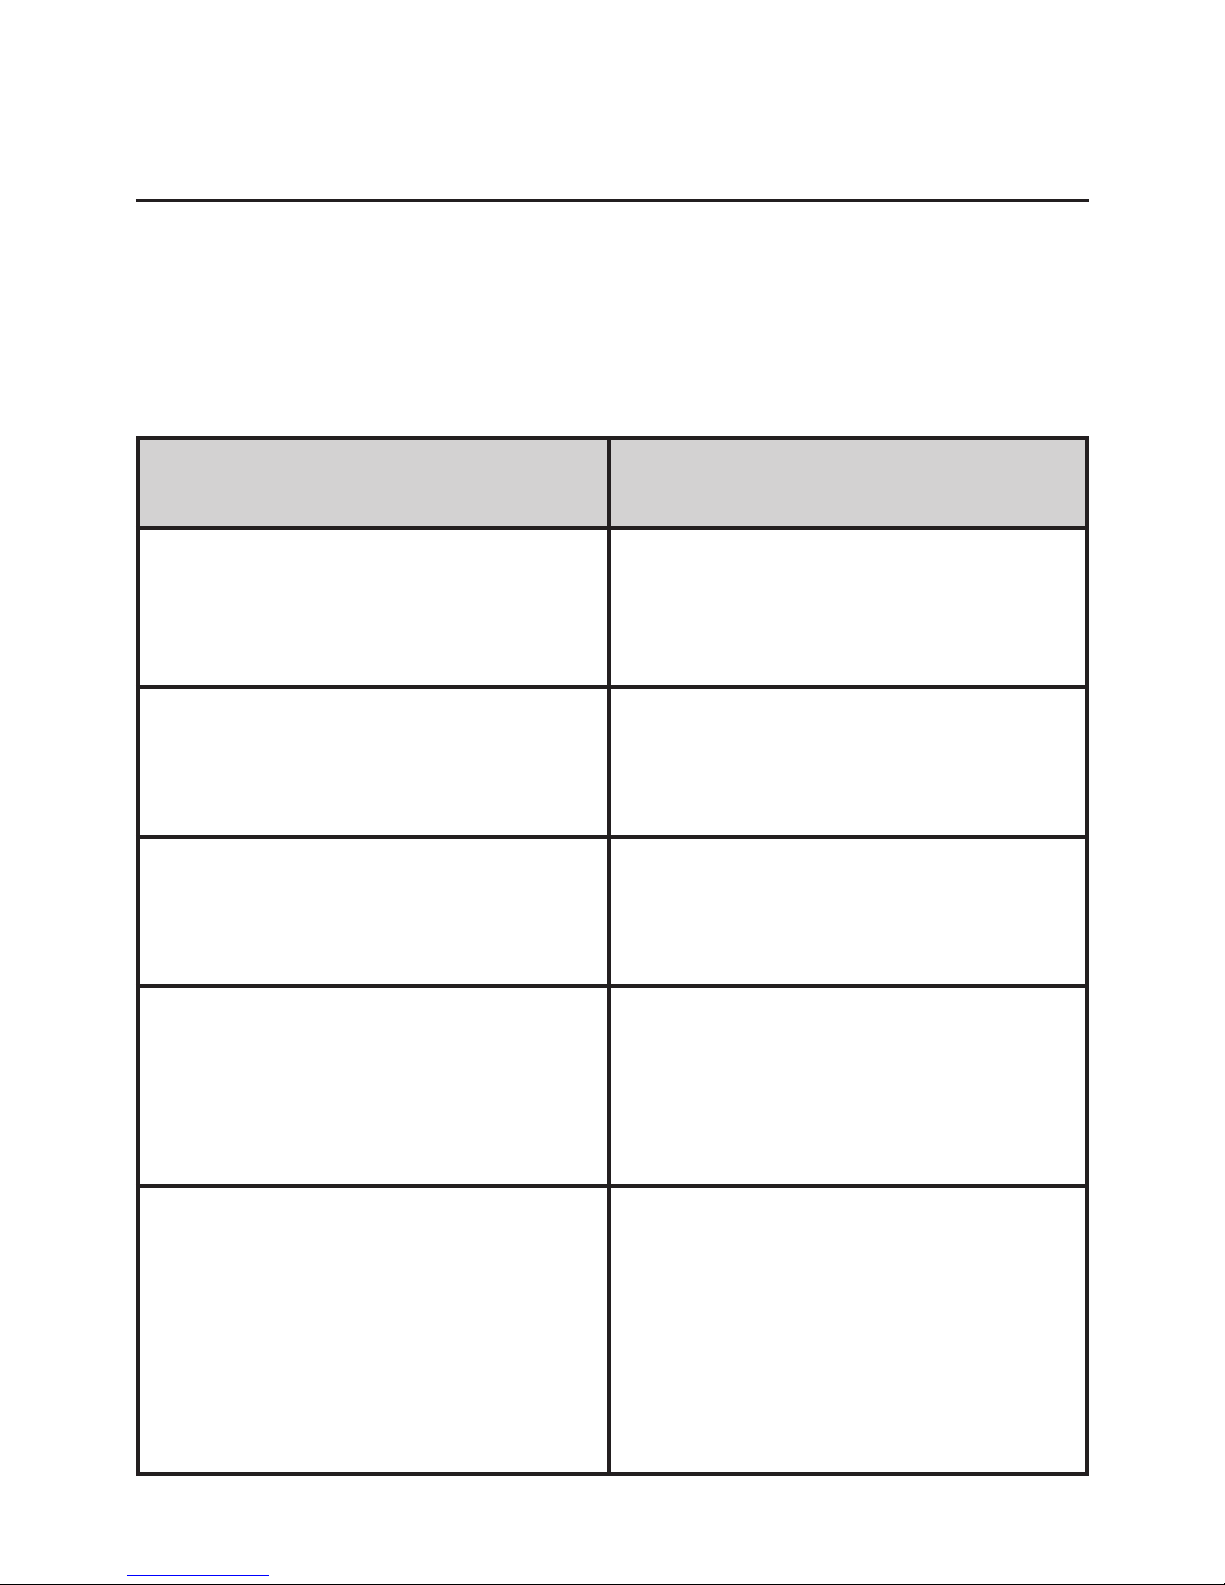
Speaking Function
ForaCare D20 No-Coding “speaks” aloud with step-by-step instructions
to guide you through the process of blood glucose testing. The following
table tells you when and what the monitor “speaks”.
WHEN
does the monitor speak?
When turn on the monitor.
When room temperature is
outside operating range, which
is 50°F to 104°F (10°C to 40°C).
When the monitor is ready to test
the glucose measurement. (symbol appears on display)
When the glucose test is
completed (the result appears
on display) or when entering the
memory mode.
When the blood pressure test is
completed (the result appears
on display) or when entering the
memory mode.
WHAT
does the monitor speak?
Thank you for using FORA
Telehealth product. Please relax
during measurement.
Room temperature out of range,
unable to measure.
Please apply blood into the strip.
The blood glucose is (number)
milligram per deciliter/ millimole
per liter.
The systolic blood pressure is
(number) millimeter of mercury,
the diastolic blood pressure is
(number) millimeter of mercury
and the heart rate is (number)
beats per minute.
Page 13
13
WHEN
does the monitor speak?
When the glucose test result is
outside measurement range,
which is 20 to 600 mg/dL (1.1
to 33.3 mmol/L).
WHAT
does the monitor speak?
The blood glucose out of range,
unable to measure.
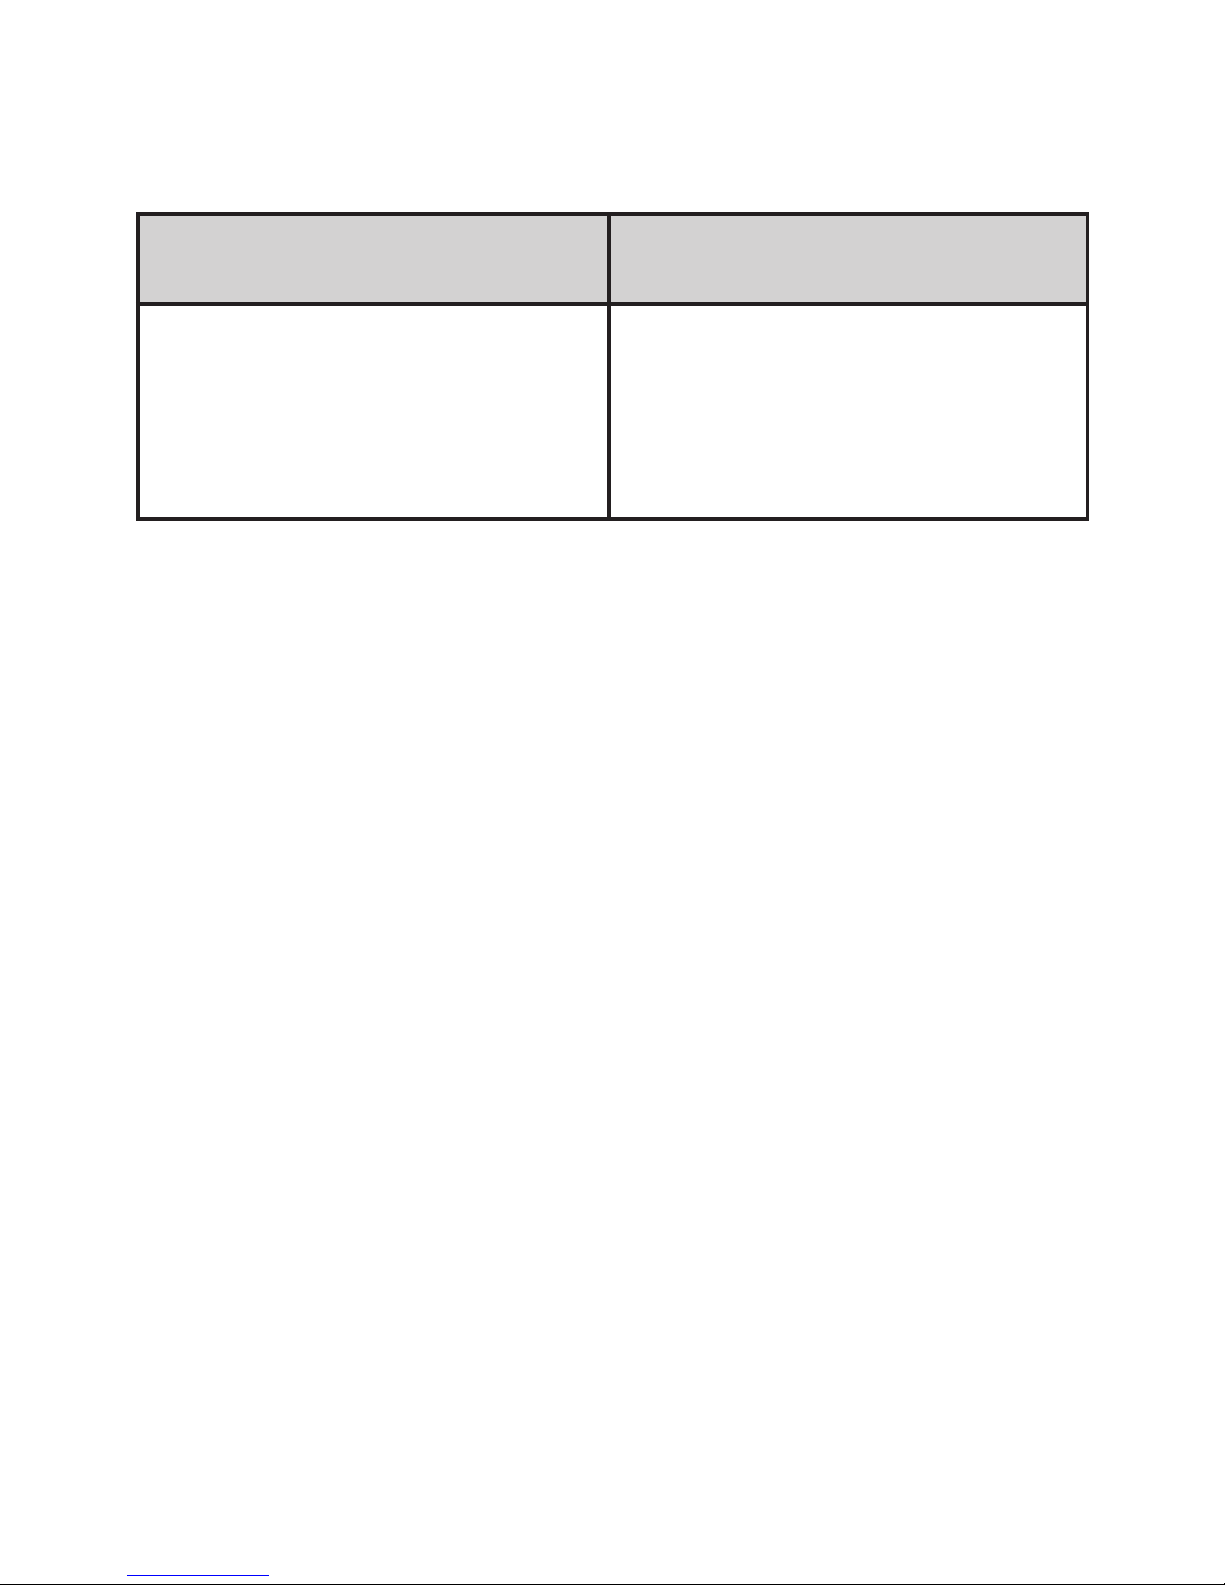
This monitor has some speaking functions but has not been validated
for use by visually impaired users.
Page 14
14
Before using your monitor for the first time or if you change the meter
battery, check and update these settings. Make sure you complete the
steps below and have your desired settings saved.
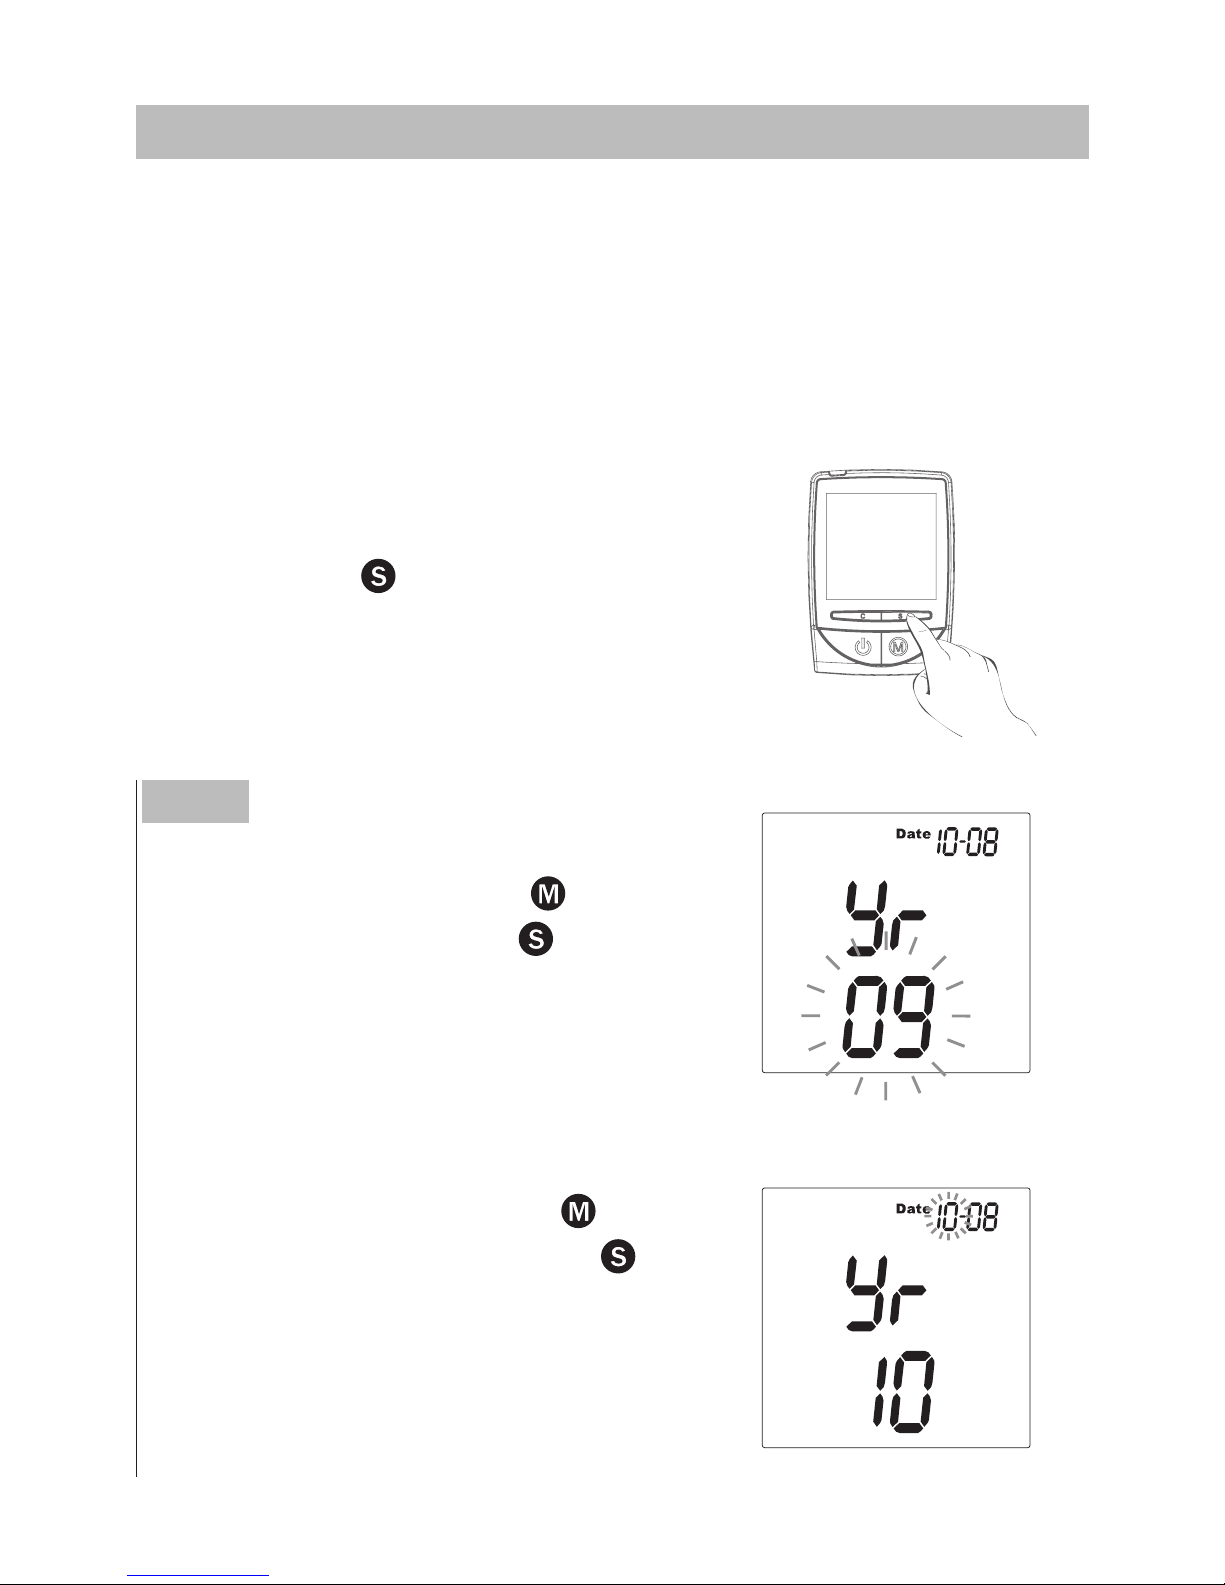
► Entering the setting mode
Start with the monitor off (no test strip
inserted). Press until the monitor turns
on.
Step 1
Setting the date.
With the year flashing, press
until the
correct year appears. Press .
With the month flashing, press
until
the correct month appears. Press .
SETTING THE MONITOR
Page 15
15
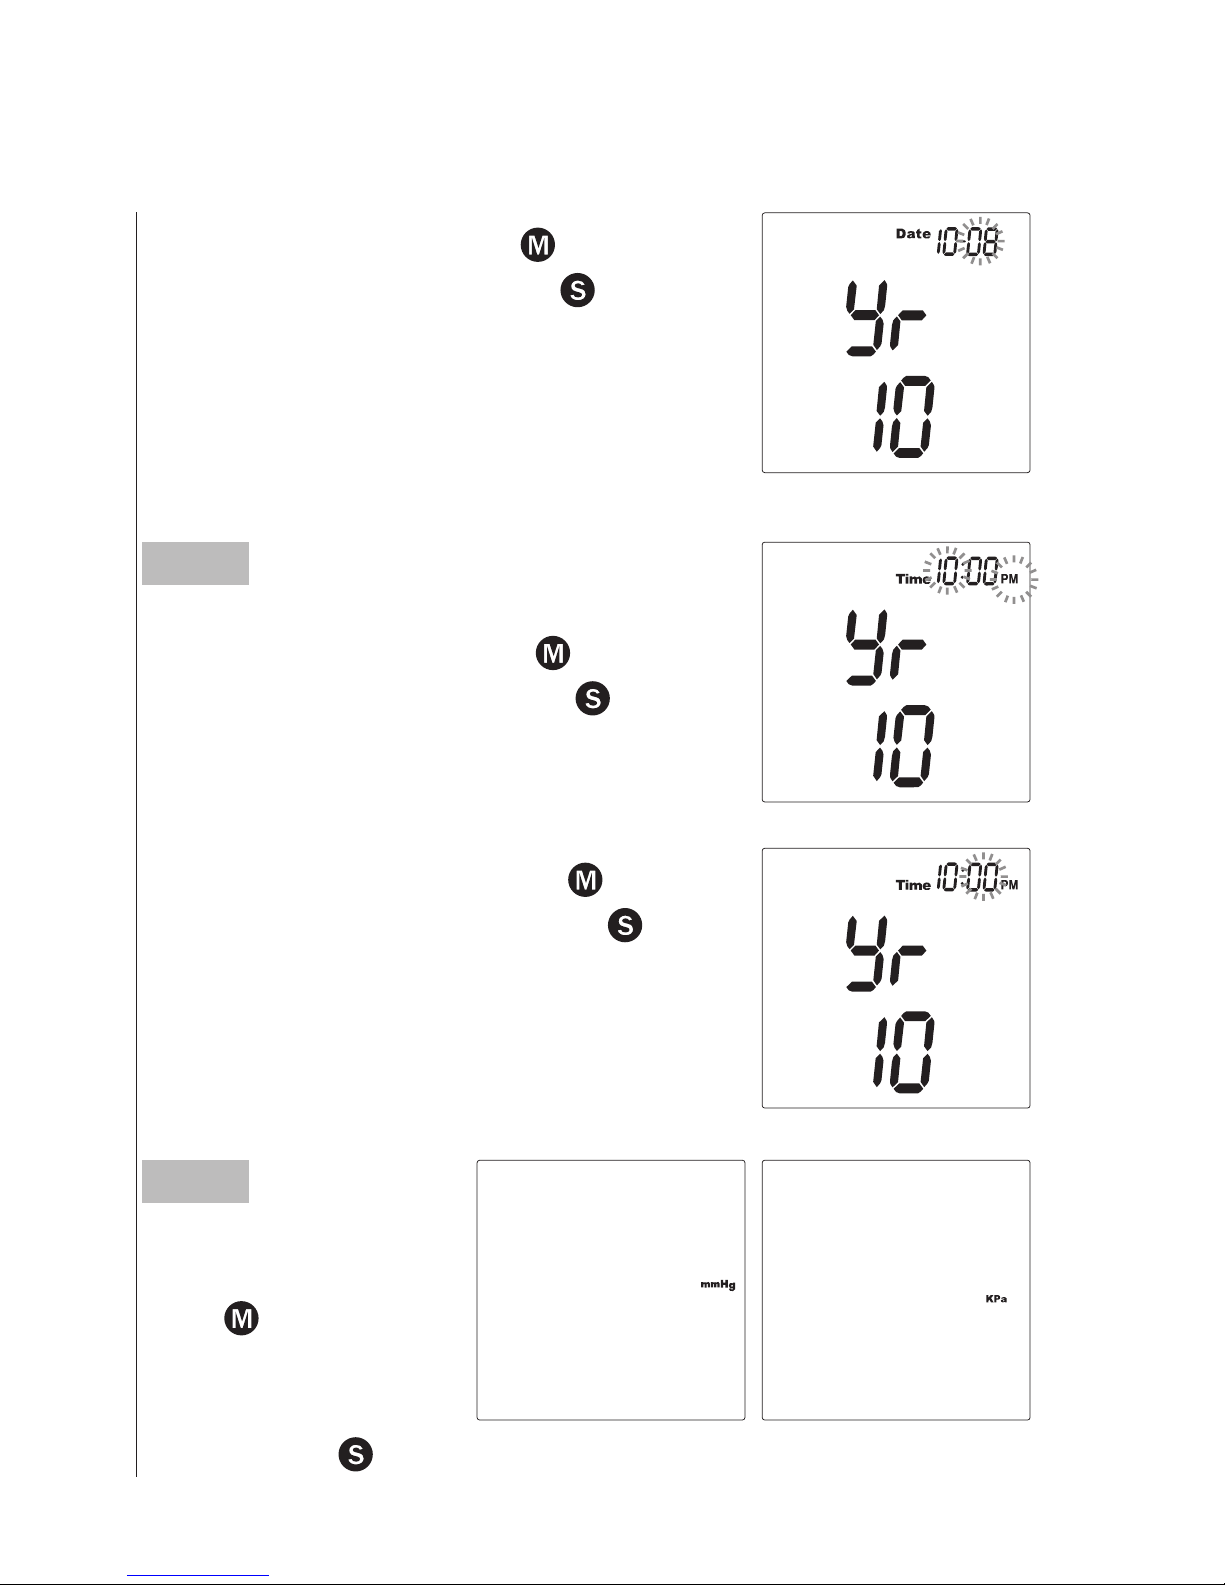
With the day flashing, press
until
the correct day appears. Press .
Step 2
Setting the time.
With the hour flashing, press
until
the correct hour appears. Press .
With the minute flashing, press
until
the correct minute appears. Press .
Step 3
Setting the unit of
measurement.
Press
to select
mmHg or Kpa (the
default setting is
mmHg). Press
.
Page 16
16
Step 4
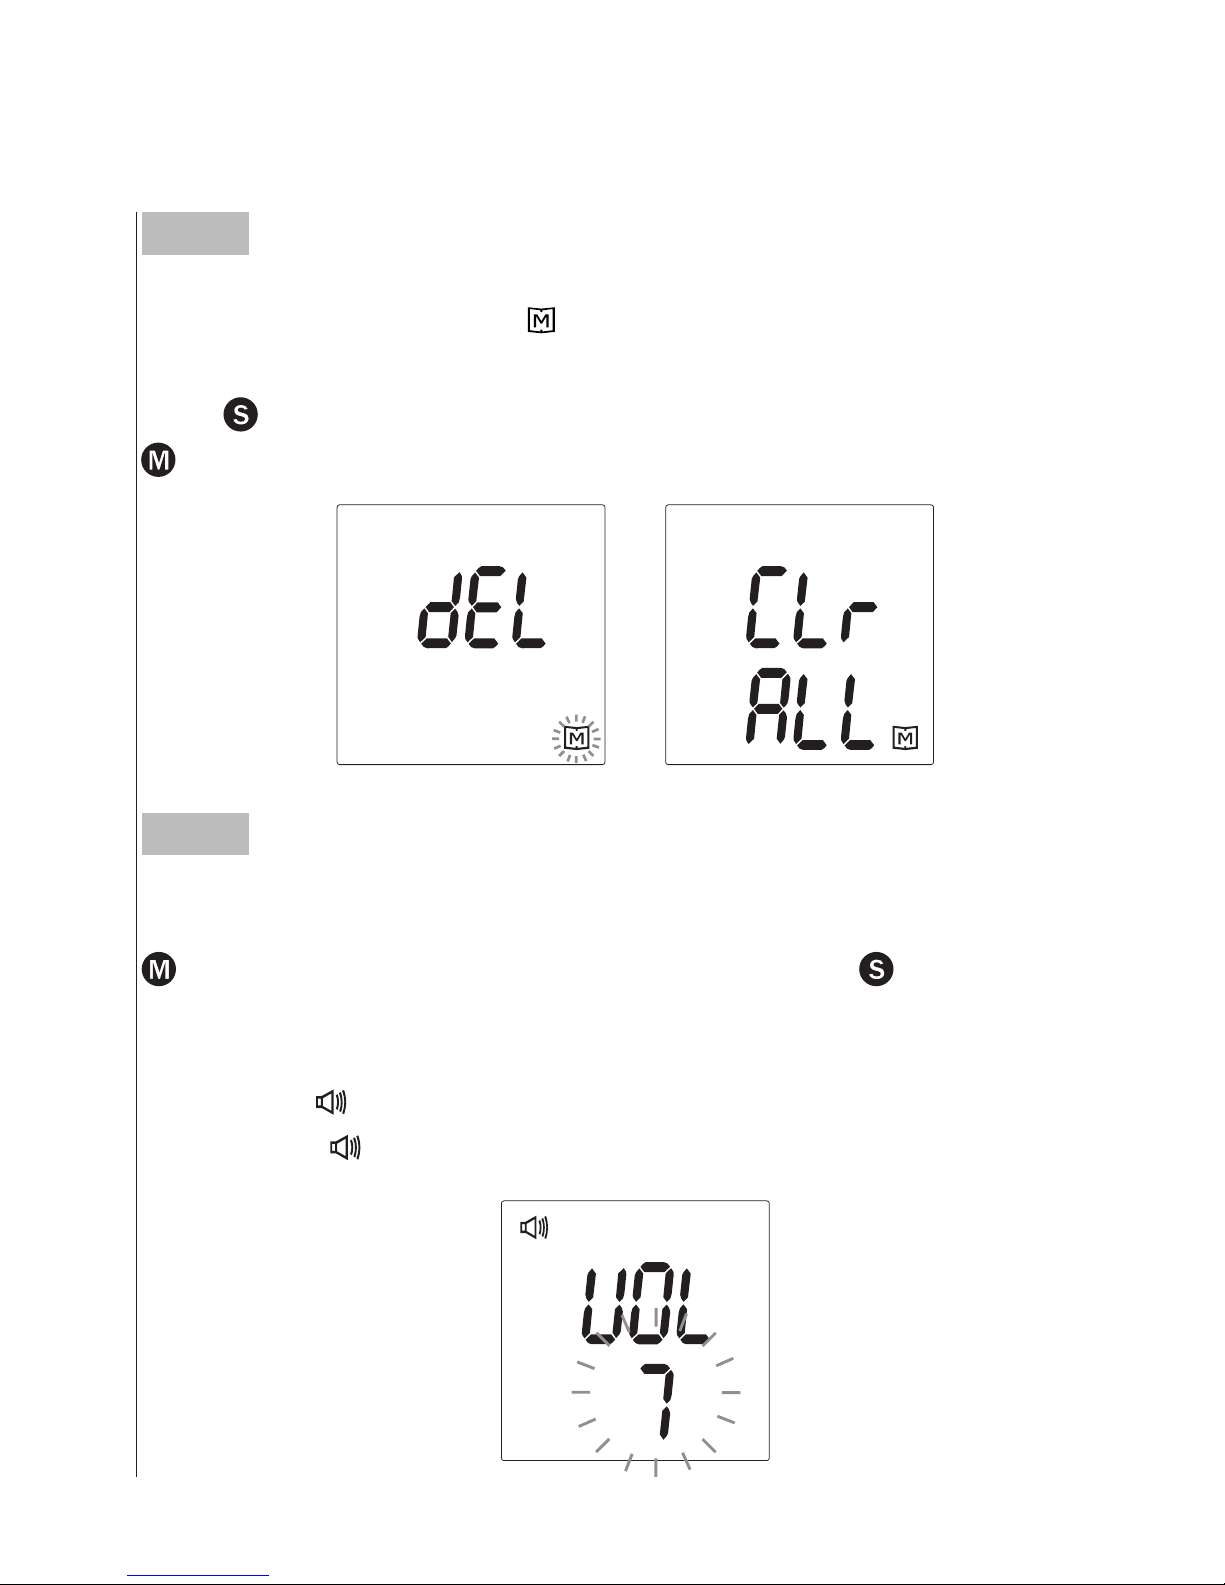
Deleting the memory.
While “dEL” and a flashing “ ” symbol appear on the display along
with user numbers, if you do not wish to delete the saved results,
press to skip this step. If you wish to delete ALL the results, press
twice.
Step 5
Setting the speaking volume.
There are seven (7) speaking volume options to let you choose. Press
until the desired speaking volume appears. Press .
Volume 0 indicates that the speaking function is turned off, and will
not display “ ”. Volume 1 to 7 indicates speaking volume from low
to high, and “ ” will be displayed during testing.
Page 17
17
Step 6
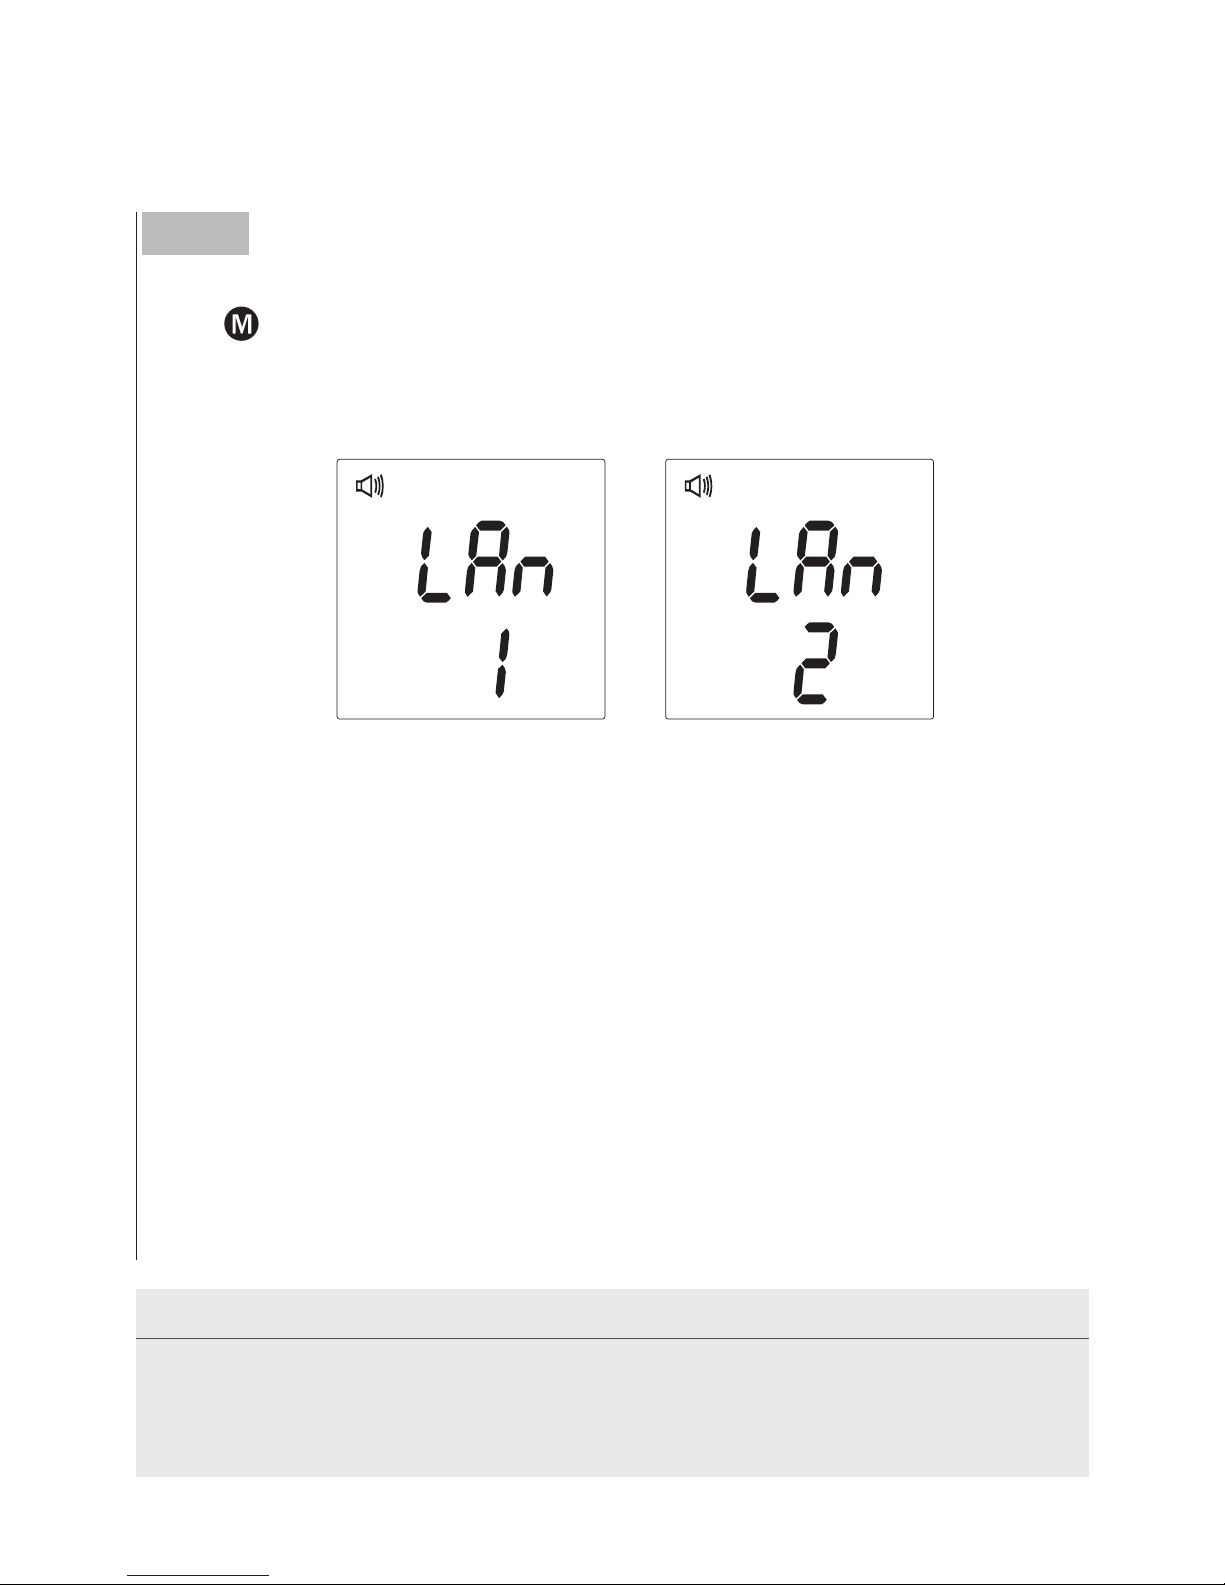
Choose a language.
Press
to select LAn1 / LAn2. The default language is English (LAn
1). LAn2 is Spanish.
Congratulations! You have completed all settings!
NOTE
• These parameters can ONLY be changed in the setting mode.
• If the monitor is idle for 3 minutes during the setting mode, it will turn off
automatically.
Page 18

18
TESTING YOUR BLOOD GLUCOSE
Control Solution Testing
FORA Control Solution contains a known amount of glucose that reacts with test strips and is used to ensure your monitor and test strips
are working together correctly.
Do a control solution test when:
• you first receive the monitor
• at least once a week to routinely check the monitor and test strips
• you begin using a new vial of test strips
• you suspect the monitor or test strips are not working properly
• your blood glucose test results are not consistent with how you feel,
or if you think the results are not accurate
• testing process or
• you have dropped or think you may have damaged the monitor.
Page 19
19
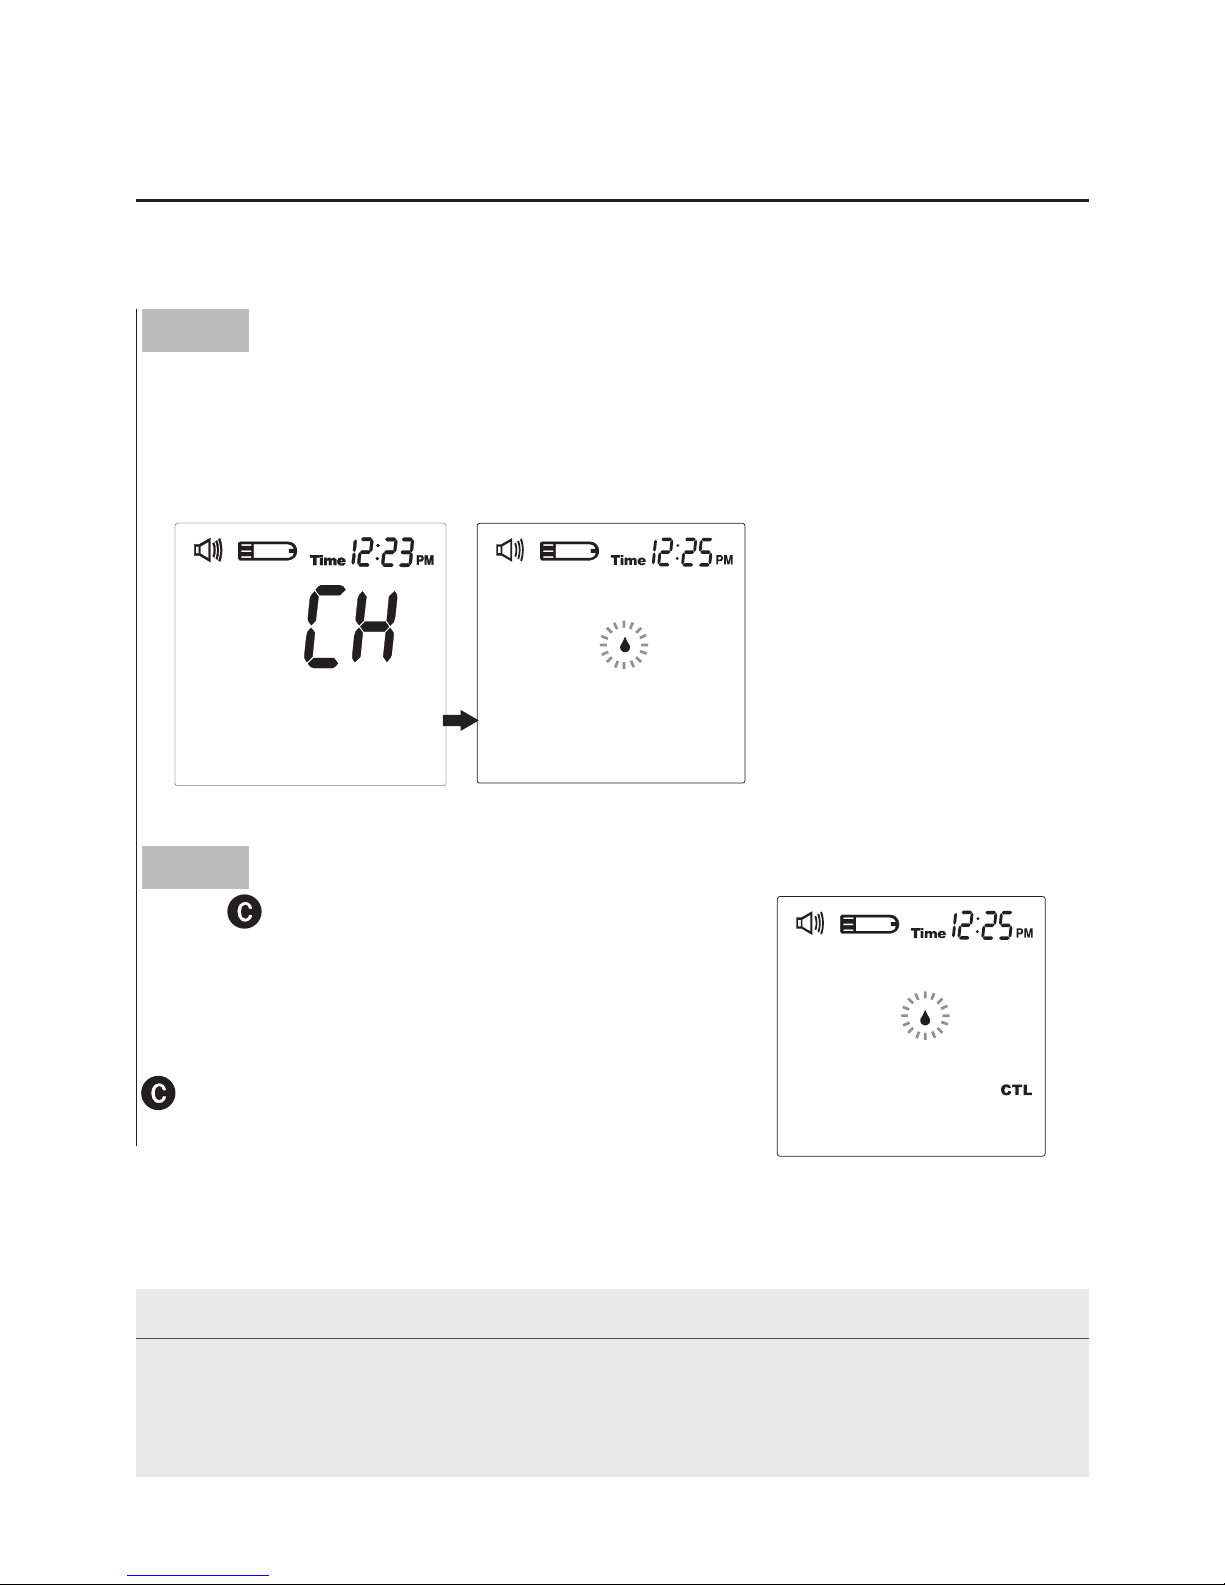
Step 2
Press
to mark this test as a control
solution test.
With “CTL” displayed, the monitor will not
store your test result in memory. If you press
again, the “CTL” will disappear and this
test is no longer a control solution test.
WARNING
When doing the control solution test, you have to mark it so that the test
result will not be stored in the memory. Failure to do so will mix up the blood
glucose test results with the control solution test results in memory.
Performing a Control Solution Test
Step 1
Insert the test strip to turn on the monitor.
Insert the test strip into the monitor. Wait for the monitor to display
the test strip and blood drop symbol.
Page 20
20
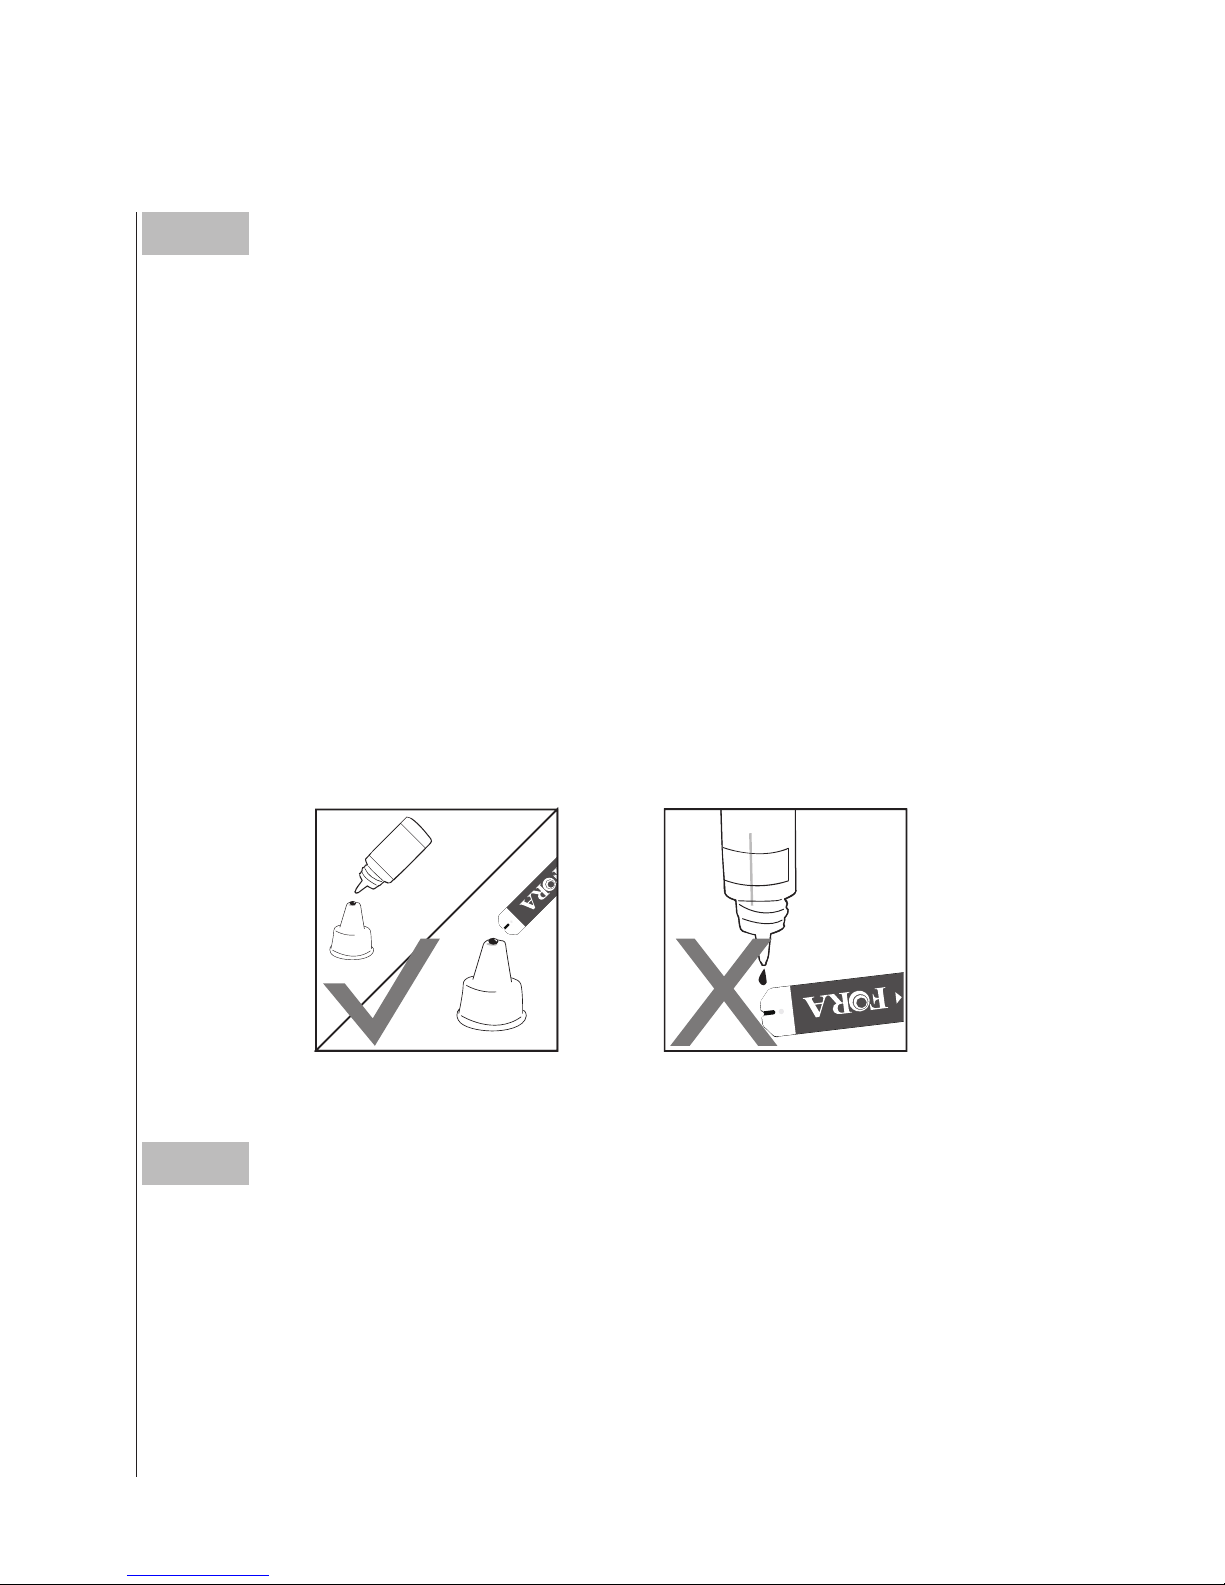
Step 3
Apply Control Solution.
Shake the control solution vial thoroughly before use. Squeeze out a
drop and wipe it off, then squeeze another drop and place it on the tip
of the vial cap.
Hold the monitor to move the absorbent hole of test strip to touch the
drop. Once the confirmation window fills completely, the monitor will
begin counting down.
To avoid contaminating the control solution, do not directly apply
control solution onto a strip.
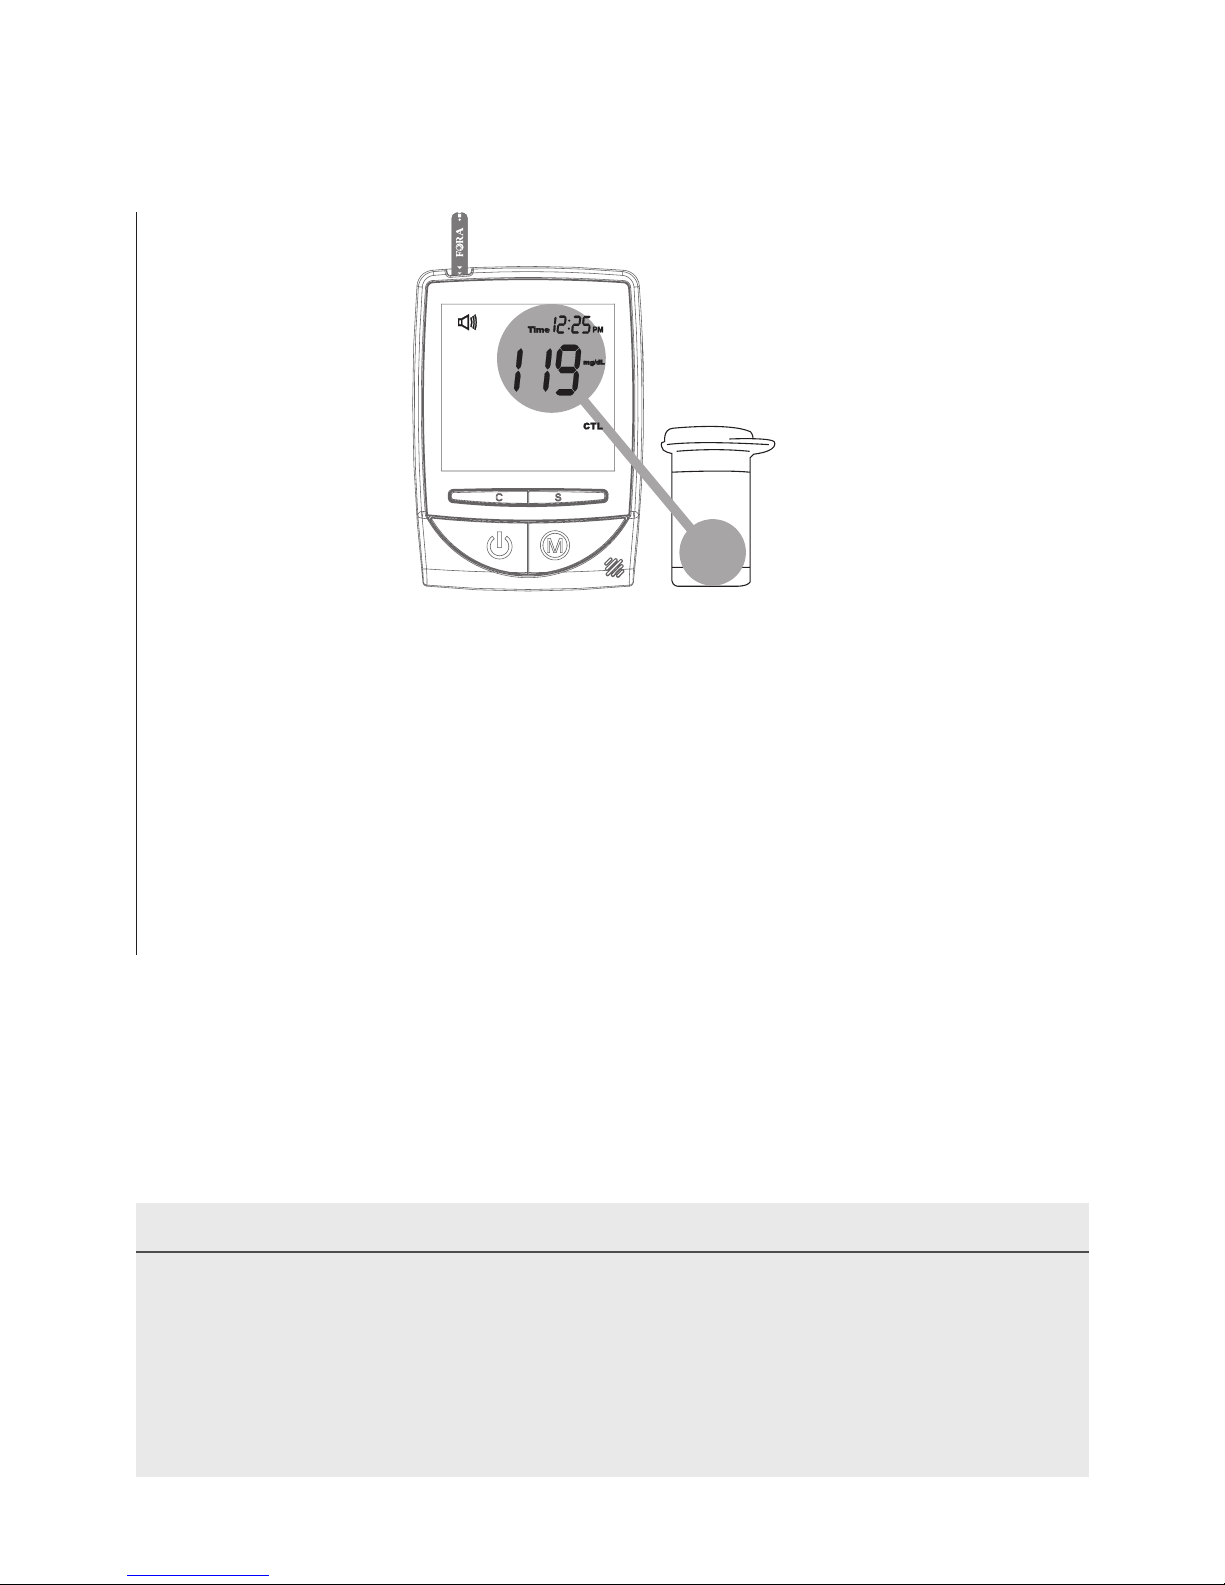
Step 4
Read and Compare the Result.
After counting down to 0, the test result of control solution will appear
on the display. Compare this result with the range printed on the test
strip vial and it should fall within this range. If not, please read the
instructions again and repeat the control solution test.
Page 21
21
Out-of-range results.
If you continue to have test results fall outside the range printed on
the test strip vial, the monitor and strips may not be working properly.
Do NOT test your blood. Contact the local customer service or place of
purchase for help.
NOTE
• The control solution range printed on the test strip vial is for control
solution use only. It is not a recommended range for your blood glucose
level.
• See the MAINTENANCE section for important information about your
control solutions.
Normal
109~165
Page 22
22
TESTING WITH BLOOD SAMPLE
Preparing the Lancing Device for Blood Testing
Please follow the instructions in the lancing device insert for collecting
a blood sample.
Sharing the lancing device and lancets may increase the risk of
spreading infectious diseases. Lancing device must not be used on
more than one person.
WARNING
To reduce the chance of infection:
• Never share a lancet or the lancing device.
• Always use a new, sterile lancet. Lancets are for single use only.
• Avoid getting hand lotion, oils, dirt, or debris in or on the lancets or the
lancing device.
• Wash and dry your hands thoroughly before and after handling the meter,
lancing device and test strips to prevent infection. For more information,
please refer to the “Cleaning and Disinfection” section.
• If the meter is being operated by a person who is providing testing
assistance to the user, the meter and lancing device should be
decontaminated prior to use by that person.
Page 23

23
Preparing the Puncture Site
Stimulating blood perfusion by rubbing the puncture site before blood
extraction has a significant influence on the glucose value obtained.
Blood from a site that has not been rubbed exhibits a measurably
different glucose concentration than blood from the finger. When the
puncture site was rubbed prior to blood extraction, the difference was
significantly reduced.
Please follow the suggestions below before obtaining a drop of
blood:
• Wash and dry your hands before starting.
• Select the puncture site either at fingertips or another body parts
(please see section “Alternative Site Testing” (AST) on how to select
the appropriate sites).
• Clean the puncture site using cotton moistened with 70% alcohol
and let it air dry.
• Rub the puncture site for about 20 seconds before penetration.
• Use a clear cap (included in the kit) while setting up the lancing
device.
Page 24
24
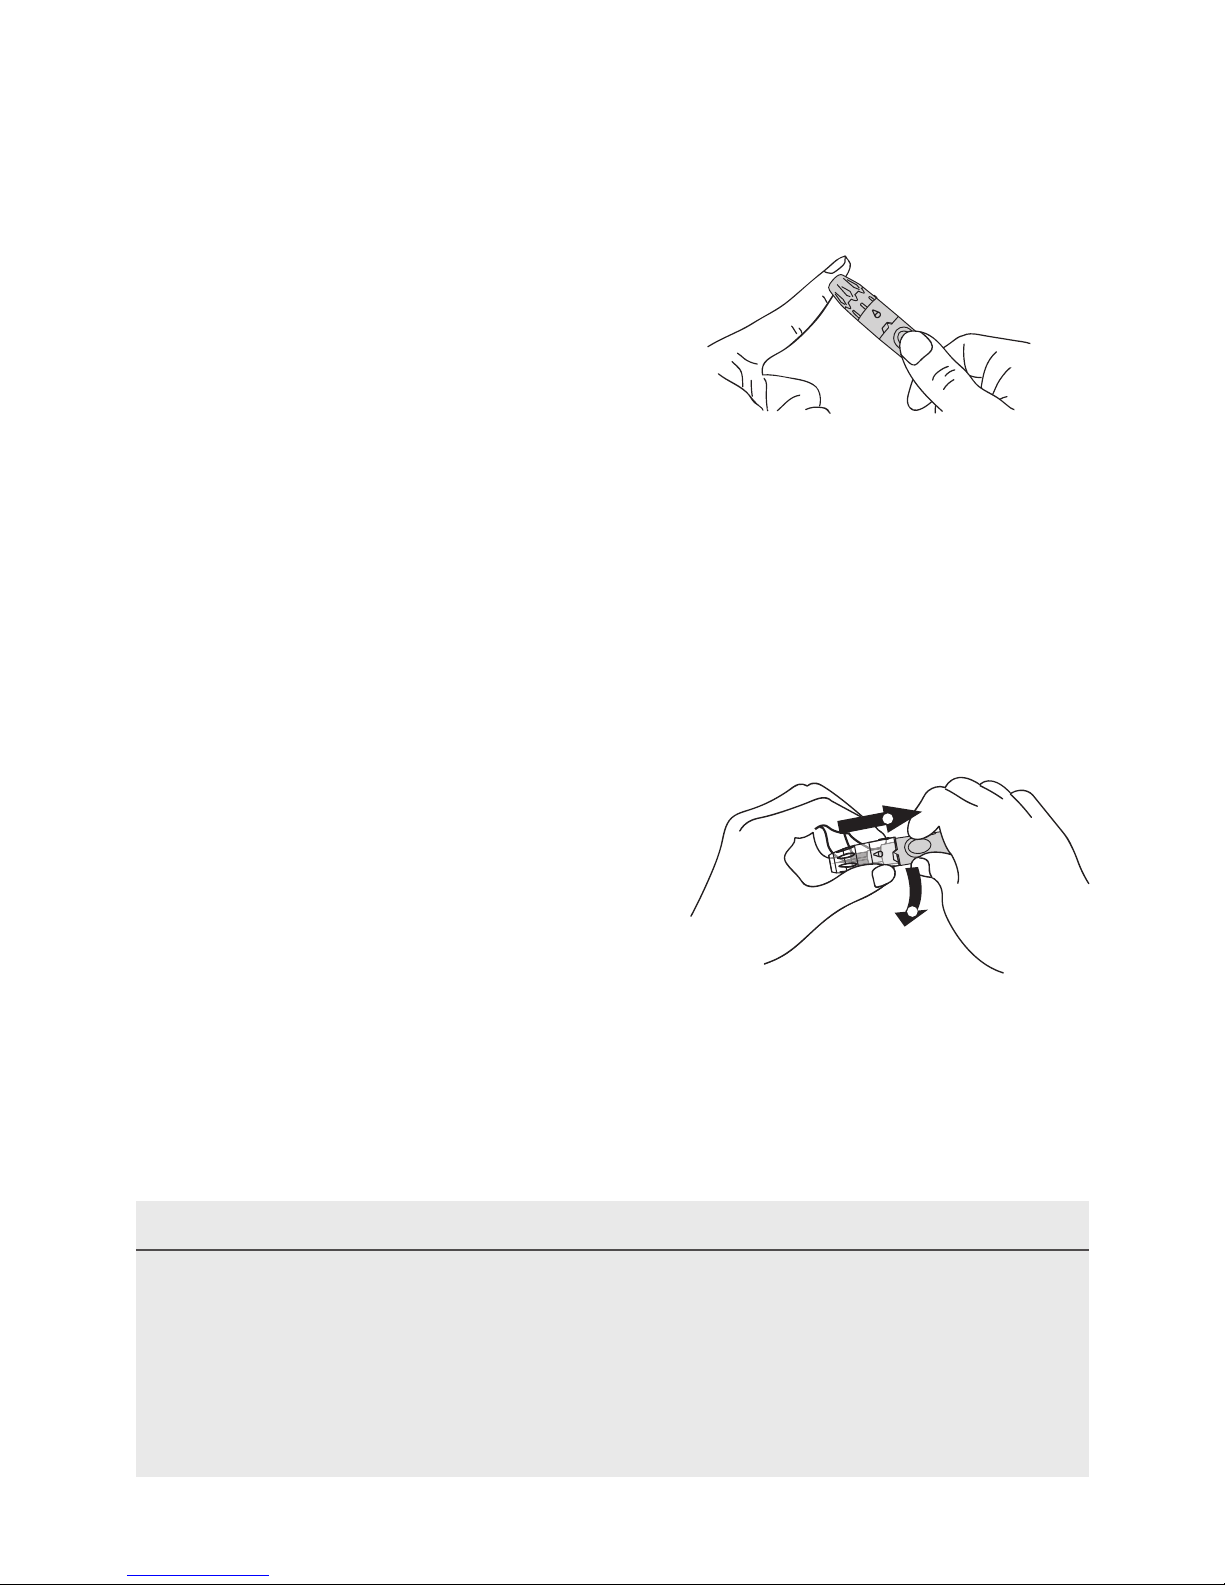
► Fingertip Testing
Press the lancing device’s tip firmly
against the side of your fingertip.
Press the release button to prick your
finger, then a click indicates that the
puncture is complete.
► Blood from Sites Other Than the Fingertip
Replace the lancing device cap with the clear cap for AST. Pull the
cocking control back until it clicks. When lancing the forearm, upper
arm, hand, thigh, or calf, avoid lancing the areas with obvious veins
because of excessive bleeding.
NOTE
• Choose a different spot each time you test. Repeated punctures at the
same spot may cause soreness and calluses.
• Please consult your health care professional before you begin AST.
• It is recommended to discard the first drop of blood as it might contain
tissue fluid, which may affect the test result.
1
2
Page 25
25
Alternative Site Testing
IMPORTANT: There are limitations with AST (Alternative Site
Testing). Please consult your health care professional before you
perform AST.
●
AST results should not be used for CGM calibration.
●
AST results should not be used for insulin dosing calculations
When to use AST?
Food, medication, illness, stress and exercise can affect blood glucose
levels. Capillary blood at fingertip reflects these changes faster than
capillary blood at other sites. Thus, when testing blood glucose during
or immediately after meal, physical exercise, or any other event, take
the blood sample from your nger only.
What is AST?
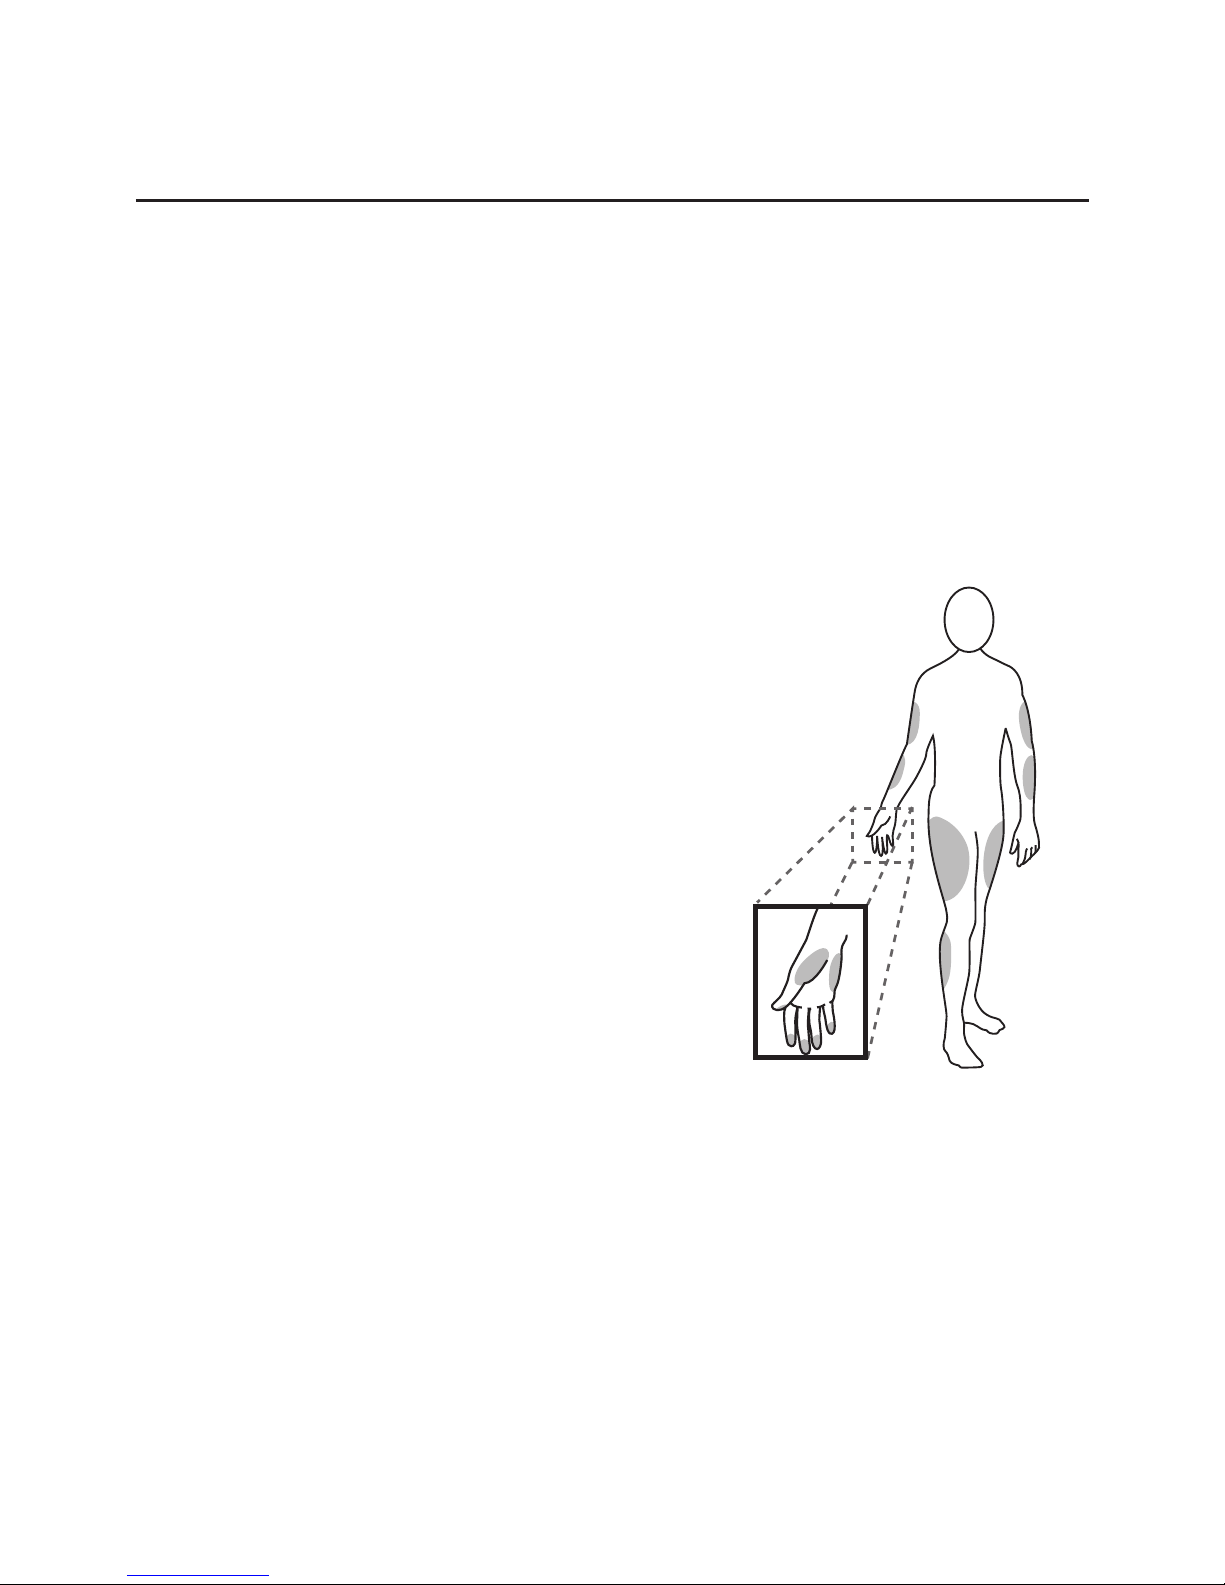
Alternative site testing (AST) means that
people use parts of the body other than
the fingertips to check their blood glucose
levels. This system allows you to test on the
palm, the forearm, the upper arm, the calf
or the thigh with the equivalent results to
fingertip testing.
What is the advantage?
Fingertips feel pain more readily because
they are full of nerve endings (receptors).
At other body sites, since nerve endings are
not so condensed, you will not feel as much pain at the fingertips.
Page 26

26
We strongly recommend that you perform AST ONLY at the following
times:
• In a pre-meal or fasting state (more than 2 hours since the last
meal).
• Two hours or more after taking insulin.
• Two hours or more after exercise.
Do NOT use AST if:
• You think your blood glucose is low.
• You are unaware of hypoglycemia
• You are testing for hyperglycemia
• Your AST results do not match the way you feel.
• Your routine glucose results are often fluctuating.
Page 27
27
Performing a Blood Glucose Test
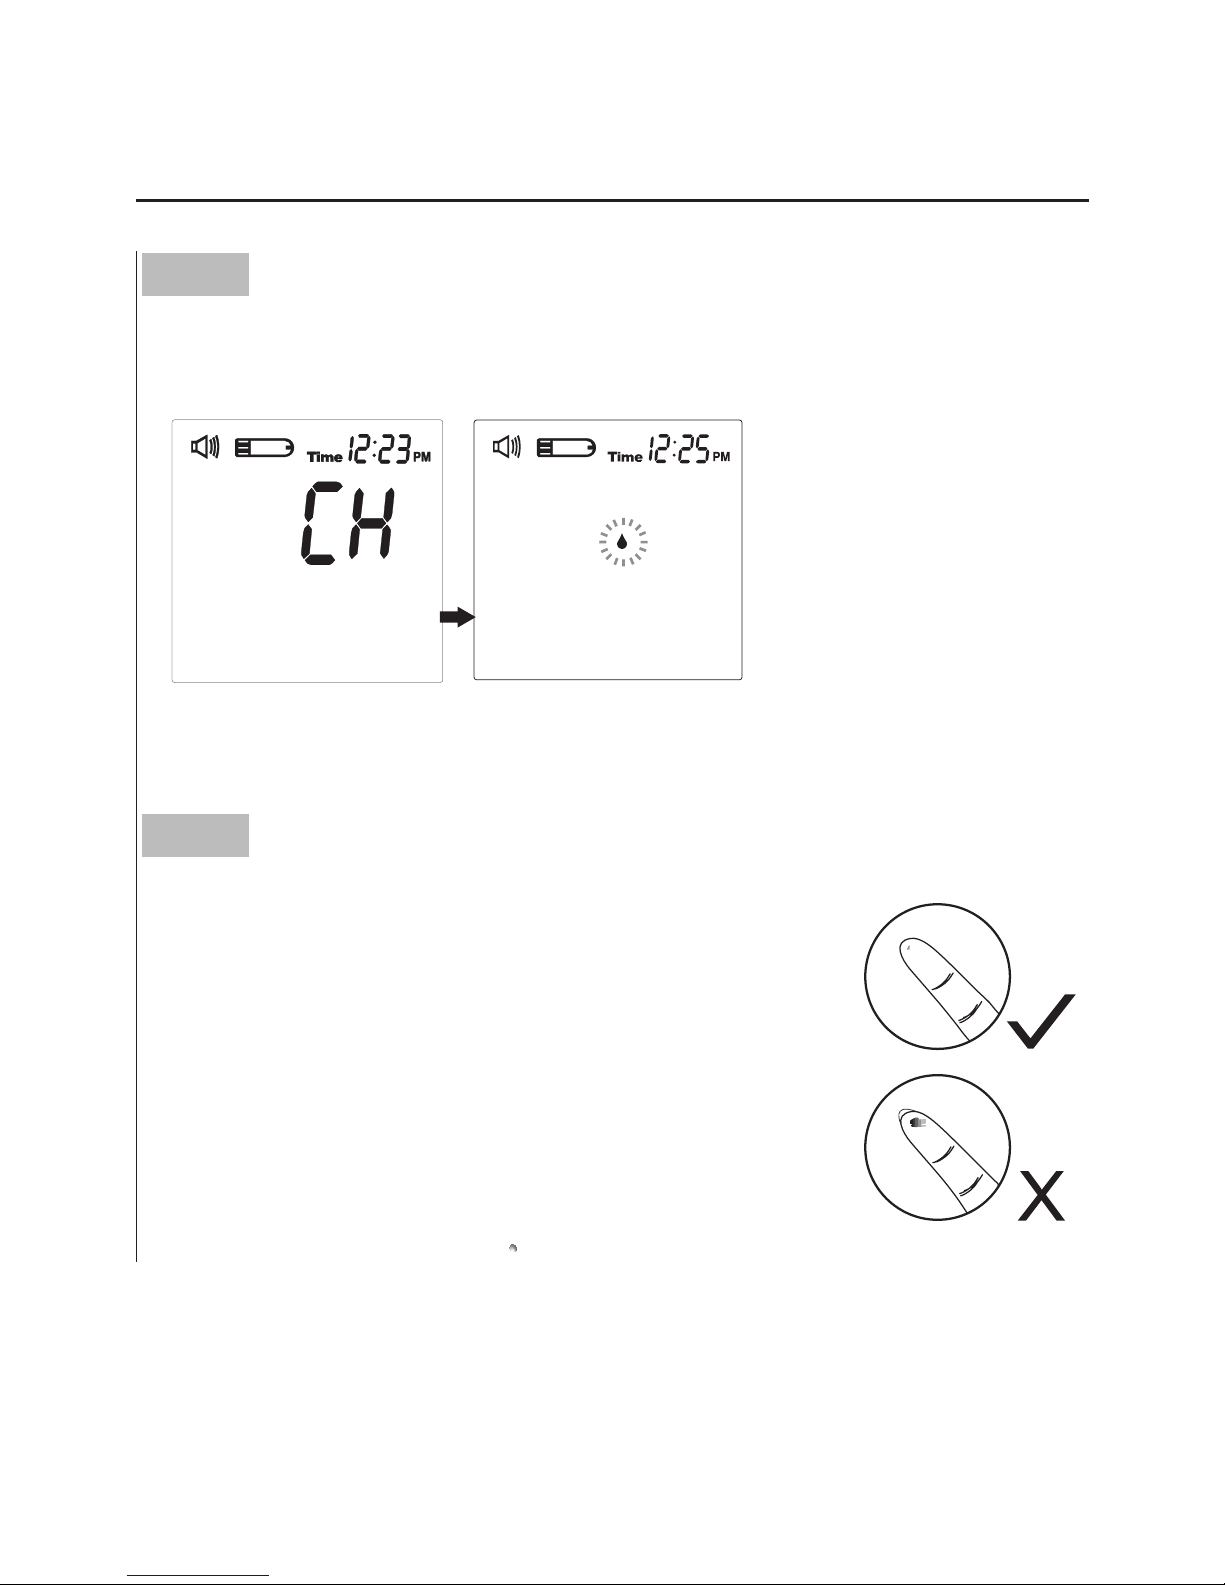
Step 1
Insert the test strip to turn on the monitor.
Wait for the monitor to display the test strip and blood drop symbol.
Step 2
Obtaining a blood sample.
Use the pre-set lancing device to puncture your desired site. After penetration, discard the first drop of
blood with a clean tissue or cotton. Gently squeeze
the punctured area to obtain another drop of blood.
Be careful NOT to smear the blood sample.
The volume of blood sample must be at least 0.7
microliter (μL) of volume. ( actual size).
Page 28
28
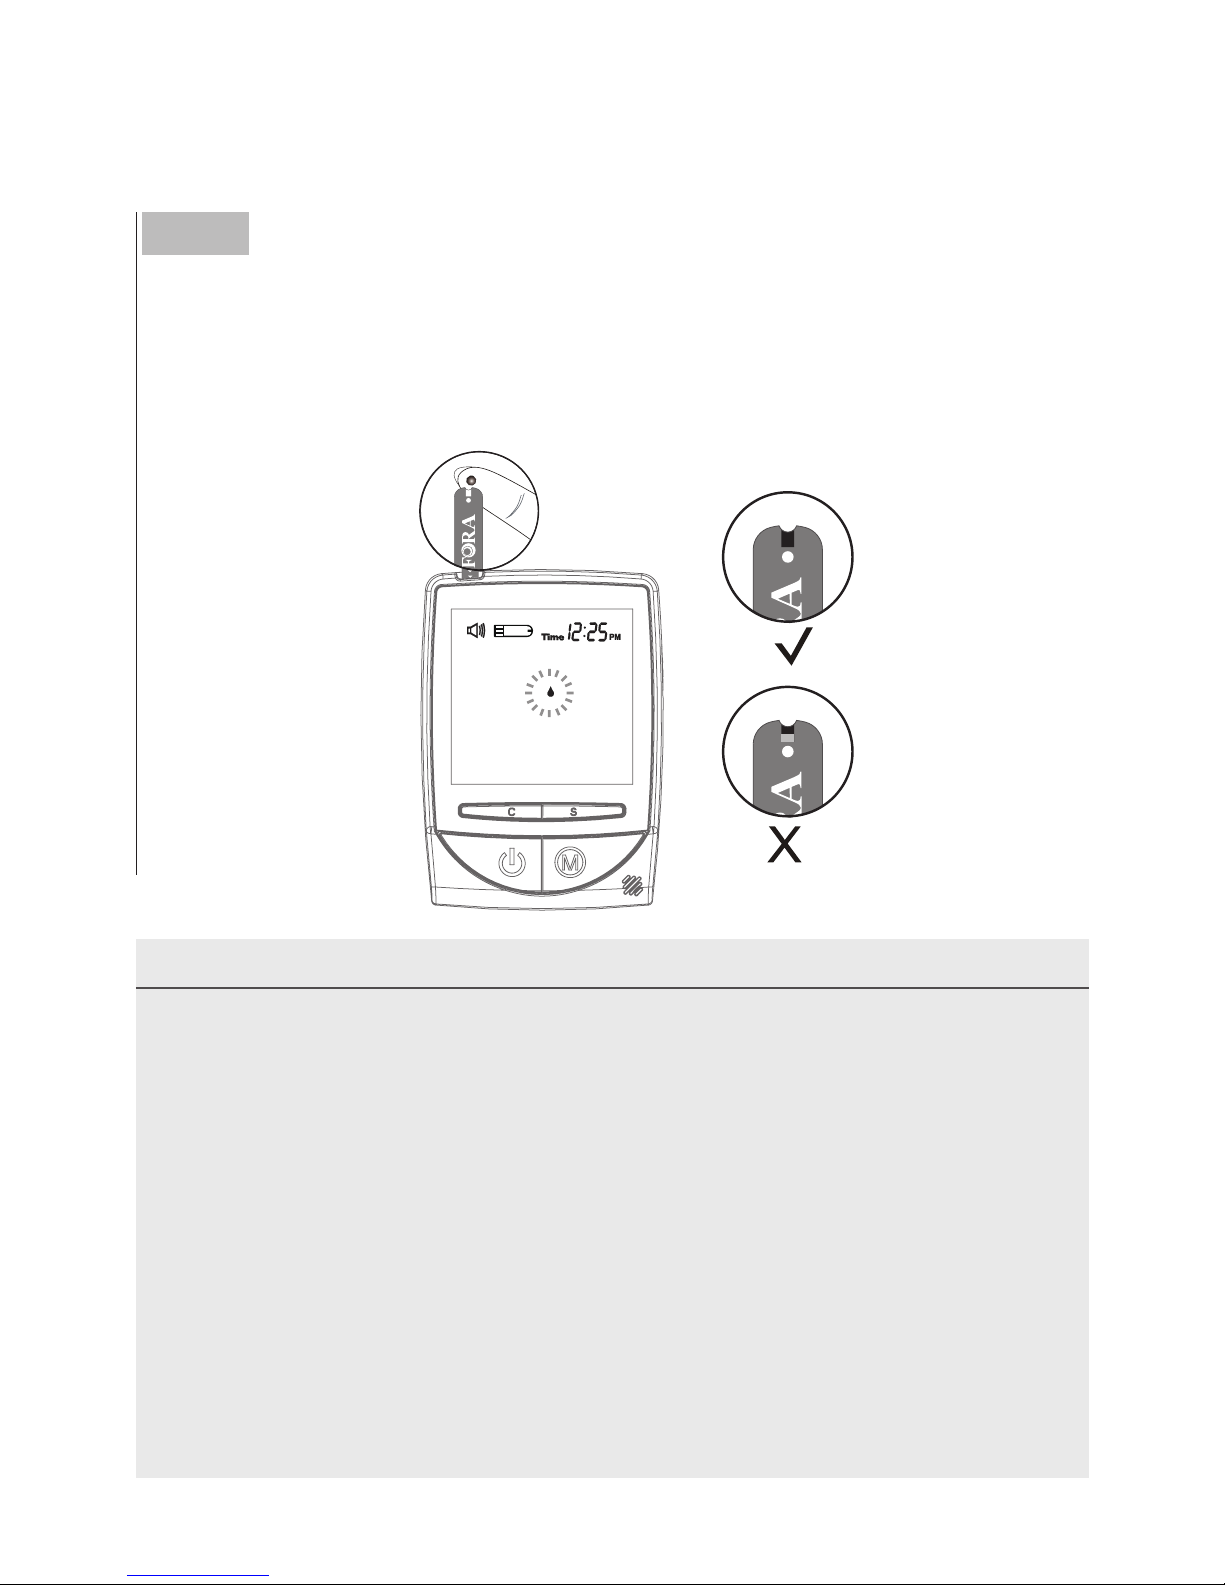
Step 3
Apply the sample.
Hold the blood drop to touch the absorbent hole of the test strip.
Blood will be drawn in and after the confirmation window is
completely filled, the monitor begins counting down.
NOTE
• Do not press the punctured site against the test strip or try to smear the
blood.
• If you do not apply a blood sample to the test strip within 3 minutes, the
monitor will automatically turn off. You must remove and reinsert the test
strip to start a new test.
• The confirmation window should be filled with blood before the monitor
begins to count down. NEVER try to add more blood to the test strip after
your drop of blood has moved away. Discard the used test strip and retest
with a new one.
• If you have trouble filling the confirmation window, please contact your
health care professional or the local customer service for assistance.
Page 29
29
Step 4
Read your result.
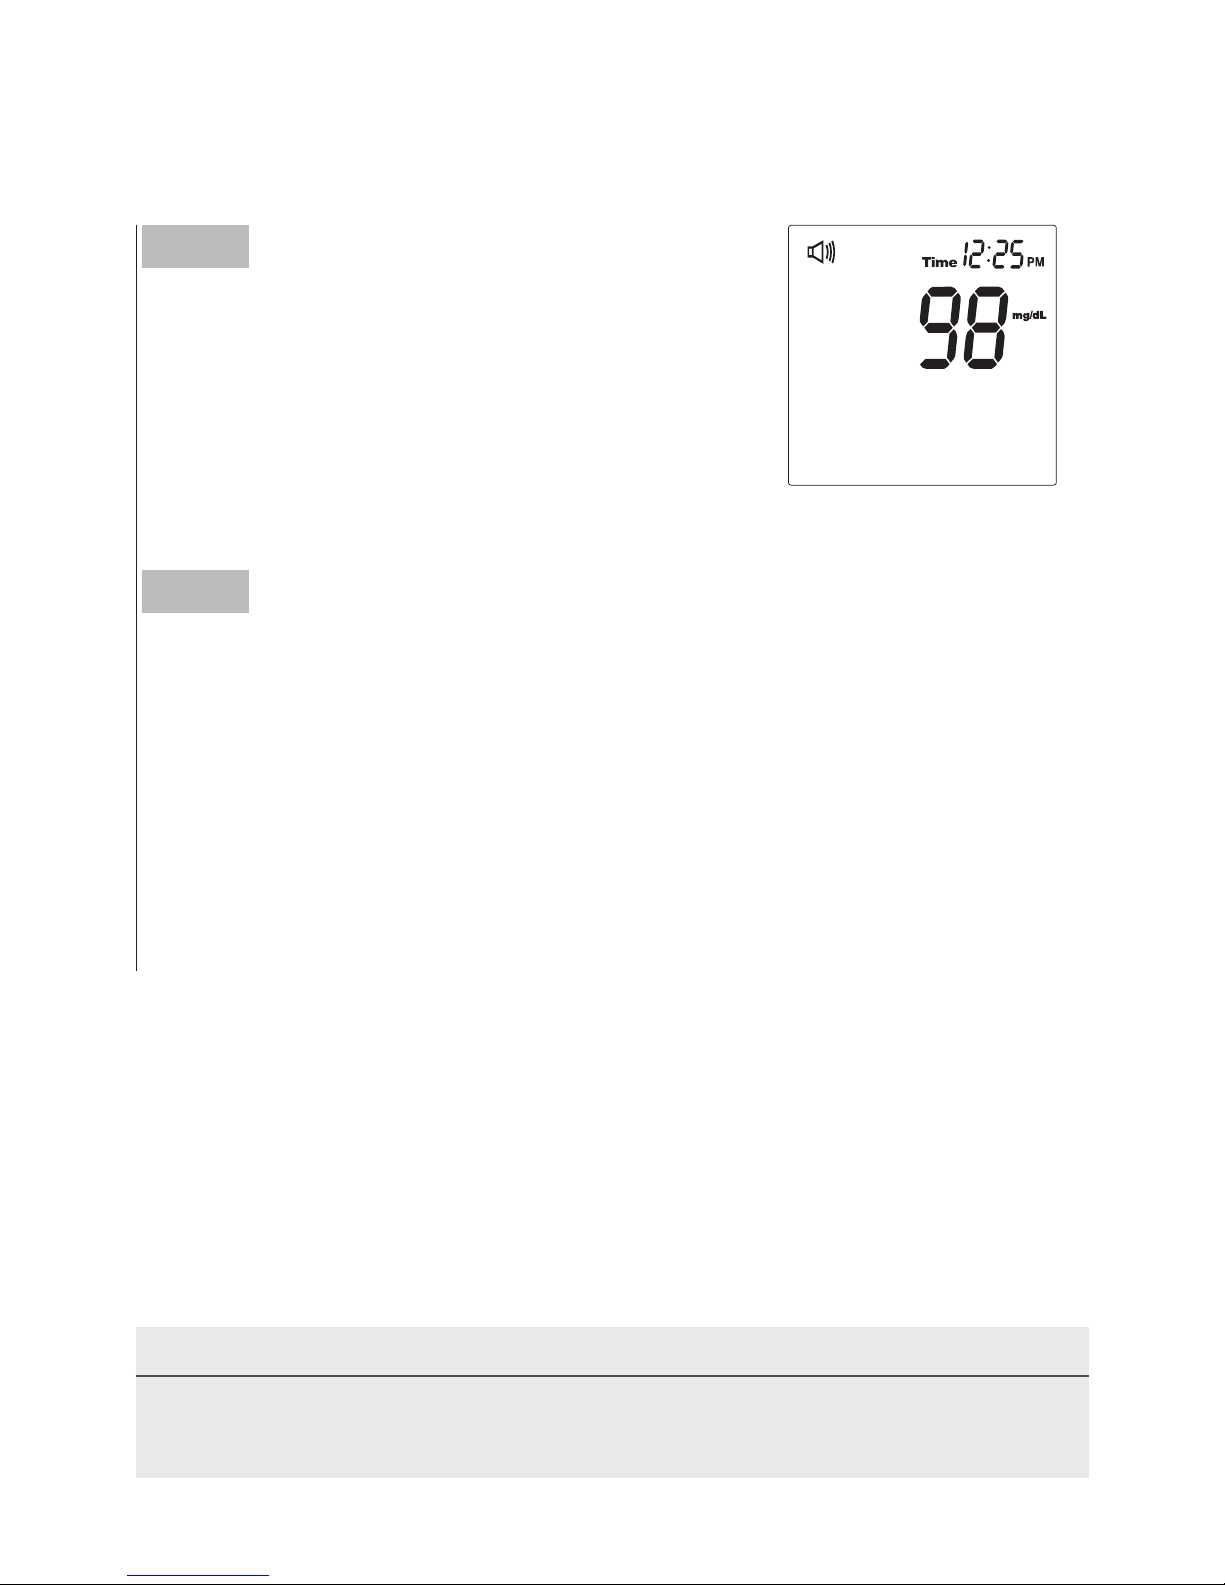
The result of your blood glucose test will
appear after the monitor counts down to 0.
This blood glucose result will automatically
be stored in the memory.
Step 5
Remove the used test strip and remove the lancet.
Remove the test strip by hand, throw the strip into a disposal container. The meter will turn itself off automatically after the test strip is
removed.
Always follow the instructions in the lancing device insert when
removing the lancet.
WARNING
The used lancet and test strip may be biohazards. Please discard them
carefully according to your local regulations.
Page 30

30
TESTING YOUR BLOOD PRESSURE
This monitor allows you to measure your blood pressure.
• Single measurement
Perform an individual blood pressure measurement.
• Avoid caffeine, tea, alcohol and tobacco at least 30 minutes before
measurement.
• Wait 30 minutes after exercising or bathing before measurement.
• Sit or lie down for at least 10 minutes before measurement.
• Do not measure when feeling anxious or tense.
• Take a 5-10 minute break between measurements. This break can
be longer if necessary, depending on your physical conditions
• Keep the records for your doctor as reference.
• Blood pressure varies between each arm. Always measure your
blood pressure on the same arm.
• To take a blood pressure measurement after performing a blood
glucose test, make sure that the test strip has been removed from
the monitor.
Before Measurement
Page 31
31
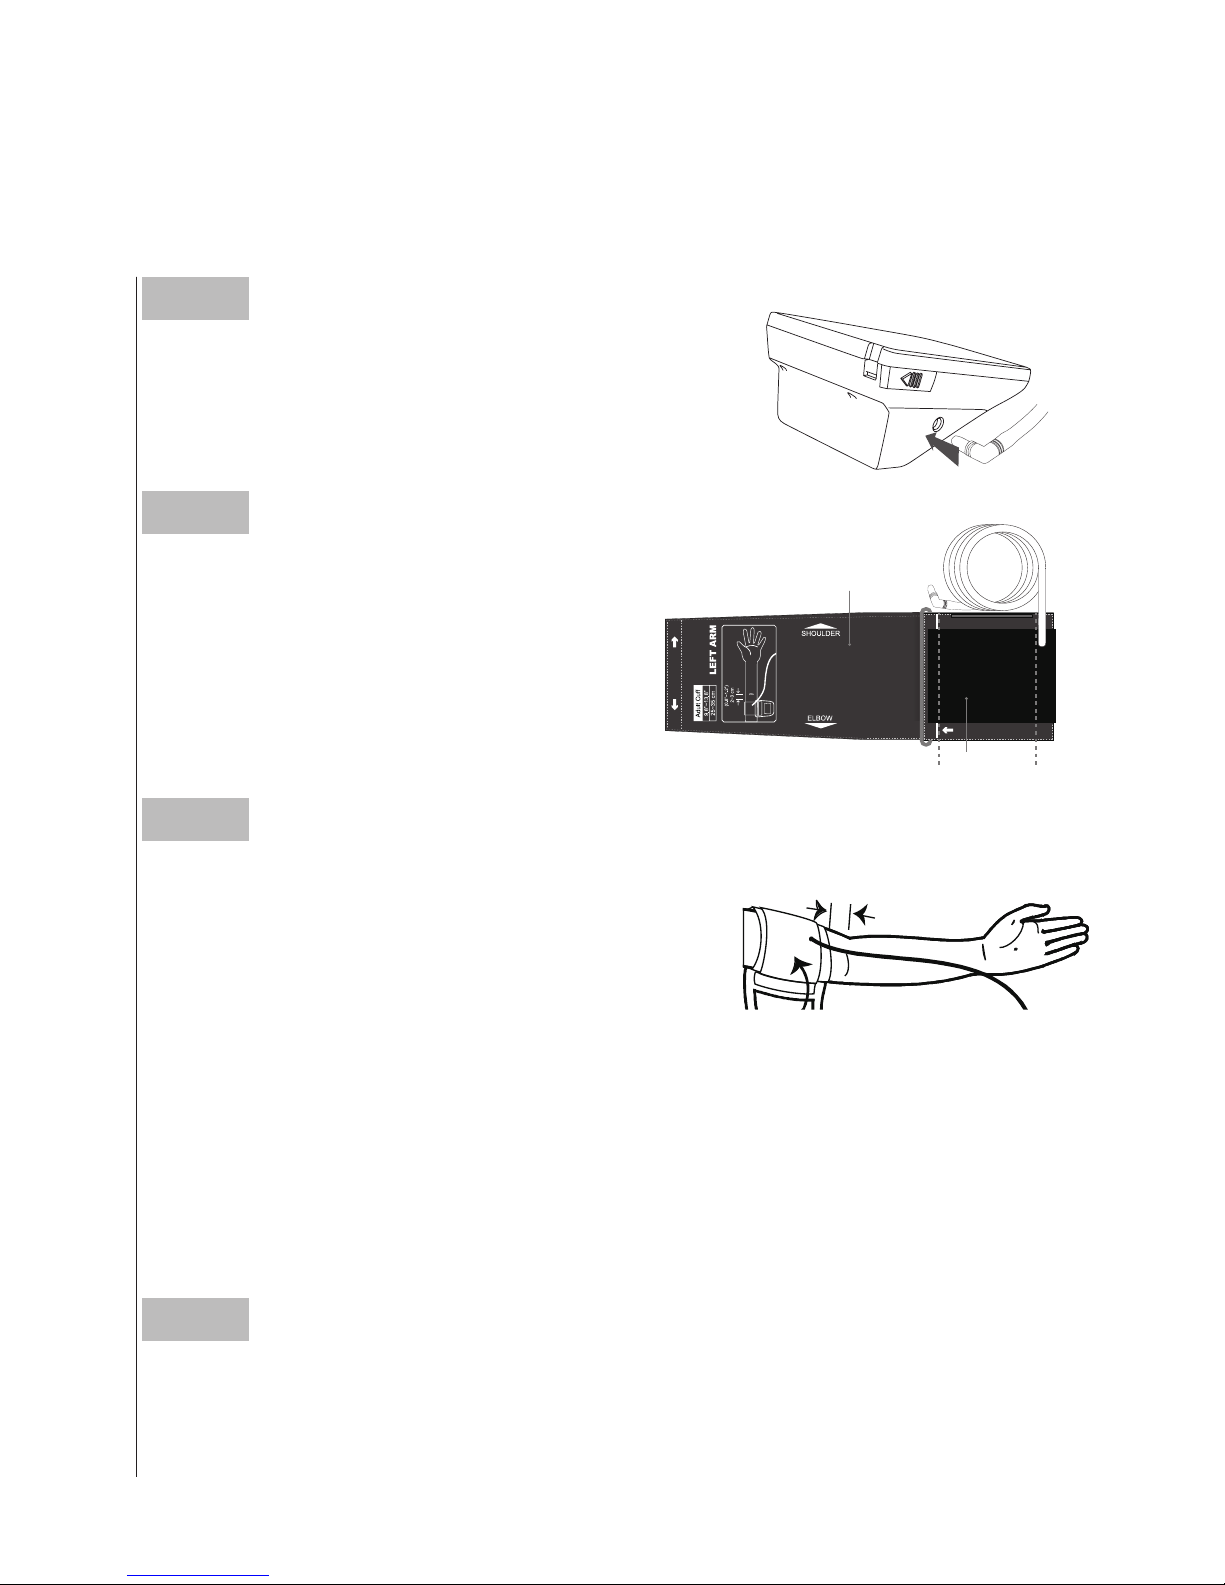
► Fitting the Cuff Correctly
Step 1
Connect the air plug of the tubing to the air
jack of the monitor.
Step 2
Assemble the cuff as shown on the
right. The smooth surface should be
inside the cuff loop and the metal
D-ring should not touch your skin.
Step 3
Stretch your left (right) arm in front of you
with your palm facing up. Slide and place
the cuff onto your arm with the air tube
and artery mark region (in red) toward
the lower arm.
Step 4
Leave a little free space between the arm and the cuff, you should be
able to fit 2 fingers between them. Clothing must not restrict the arm.
Remove all clothing covering or constricting the measurement arm.
Wrap and tighten the cuff above your elbow. The red line on the edge
of the cuff should be approximately 0.8 to 1.2 inches (2 to 3 cm)
above your elbow. Align the tube over the main arteries on the inside.
2
~
3
c
m
(0
.8
”~
1
.2
”)
INDEX
RED LINESHOULD BE AT THE INSID
INDEX MUST
Pile Side Material
Sewn Hook Material
Page 32
32
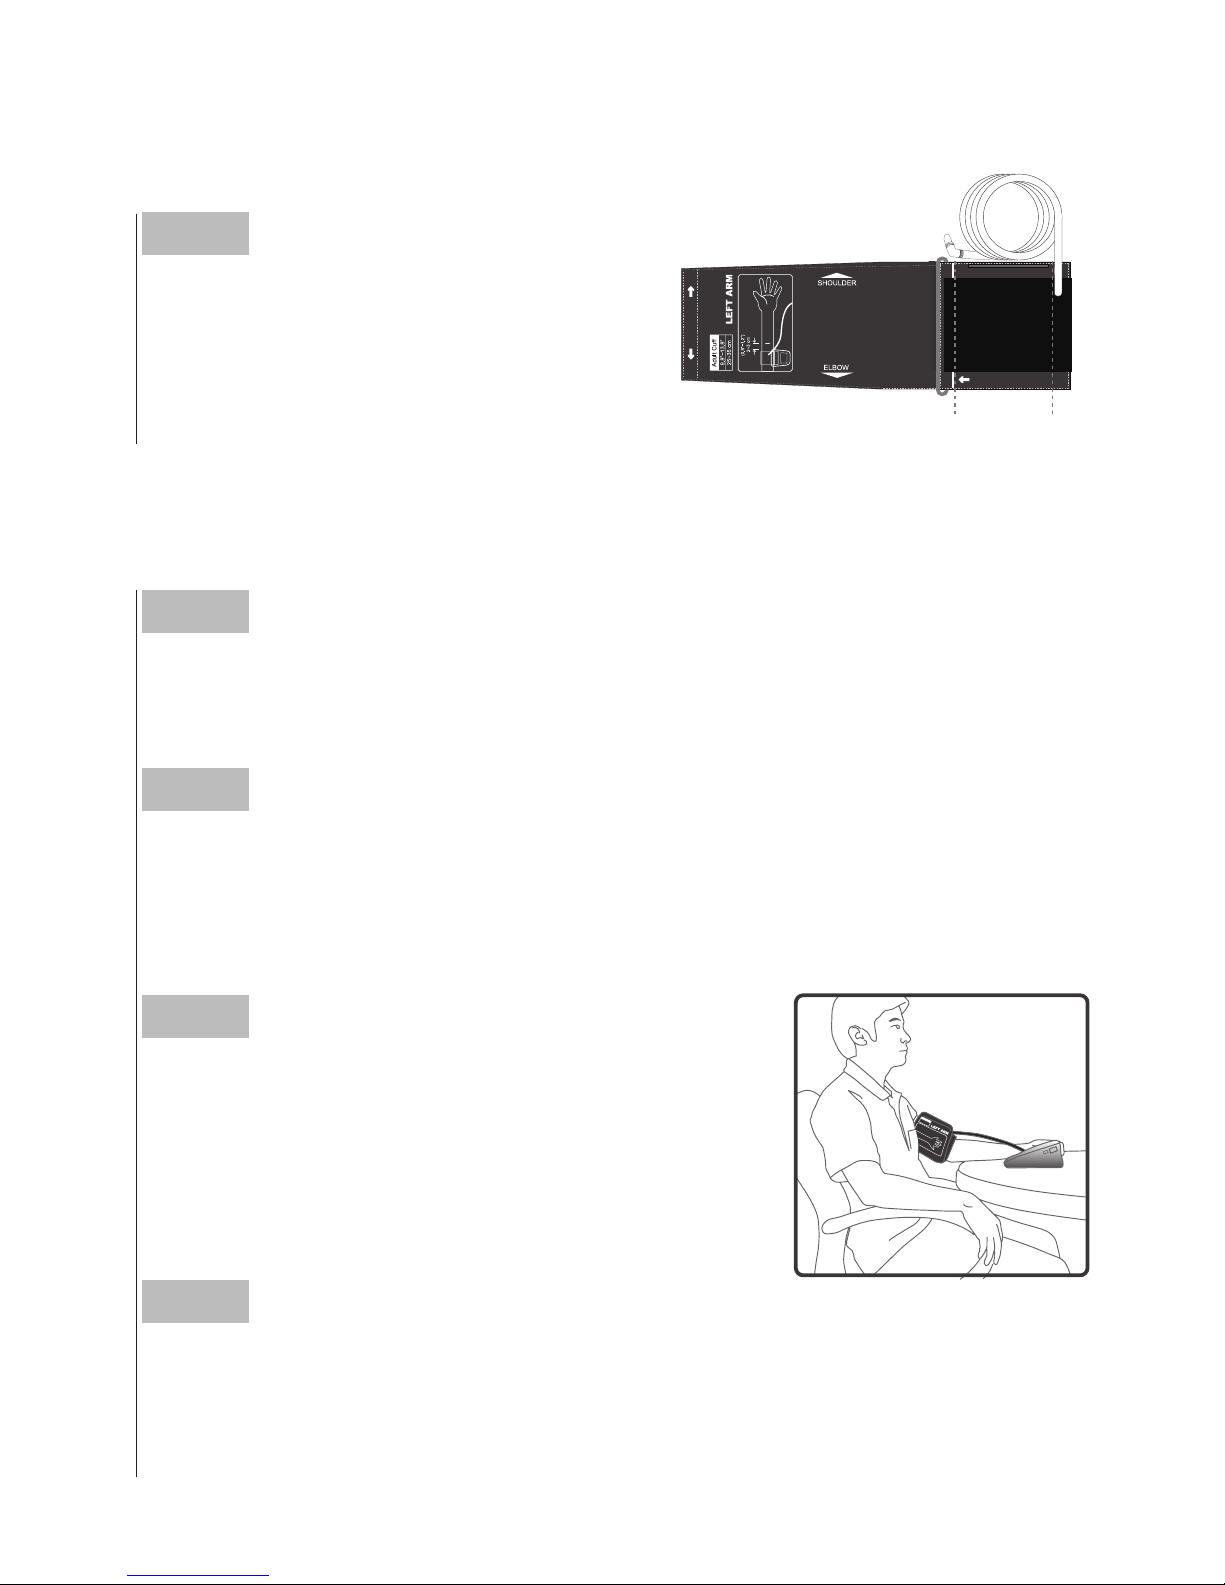
► Proper Measurement Position
Step 1
Sit down for at least 10 minutes before measuring.
Step 2
Place your elbow on a flat surface. Relax your hand with the palm
facing up.
Step 3
Make sure the cuff is about the same height
as the location of your heart. Remain still and
do not talk or move during the measurement.
Step 4
Measurement is in progress.
After the monitor is turned on, the cuff will begin to inflate automatically.
Step 5
Press the hook material firmly against
the pile material. The top and bottom
edges of the cuff should be tightened
evenly around your upper arm.
INDEX
RED LINESHOULD BE AT THE INSID
INDEX MUST
►The range index of cuff should
fall into this range.
Page 33
33
NOTE
• If you press
during measurement, the monitor will be turned off.
• If the pulse rate symbol is shown as
“
”
instead of
“
”
, this
indicates that the monitor has detected an irregular heart beat.
Always apply the pressure cuff before turning on the monitor.
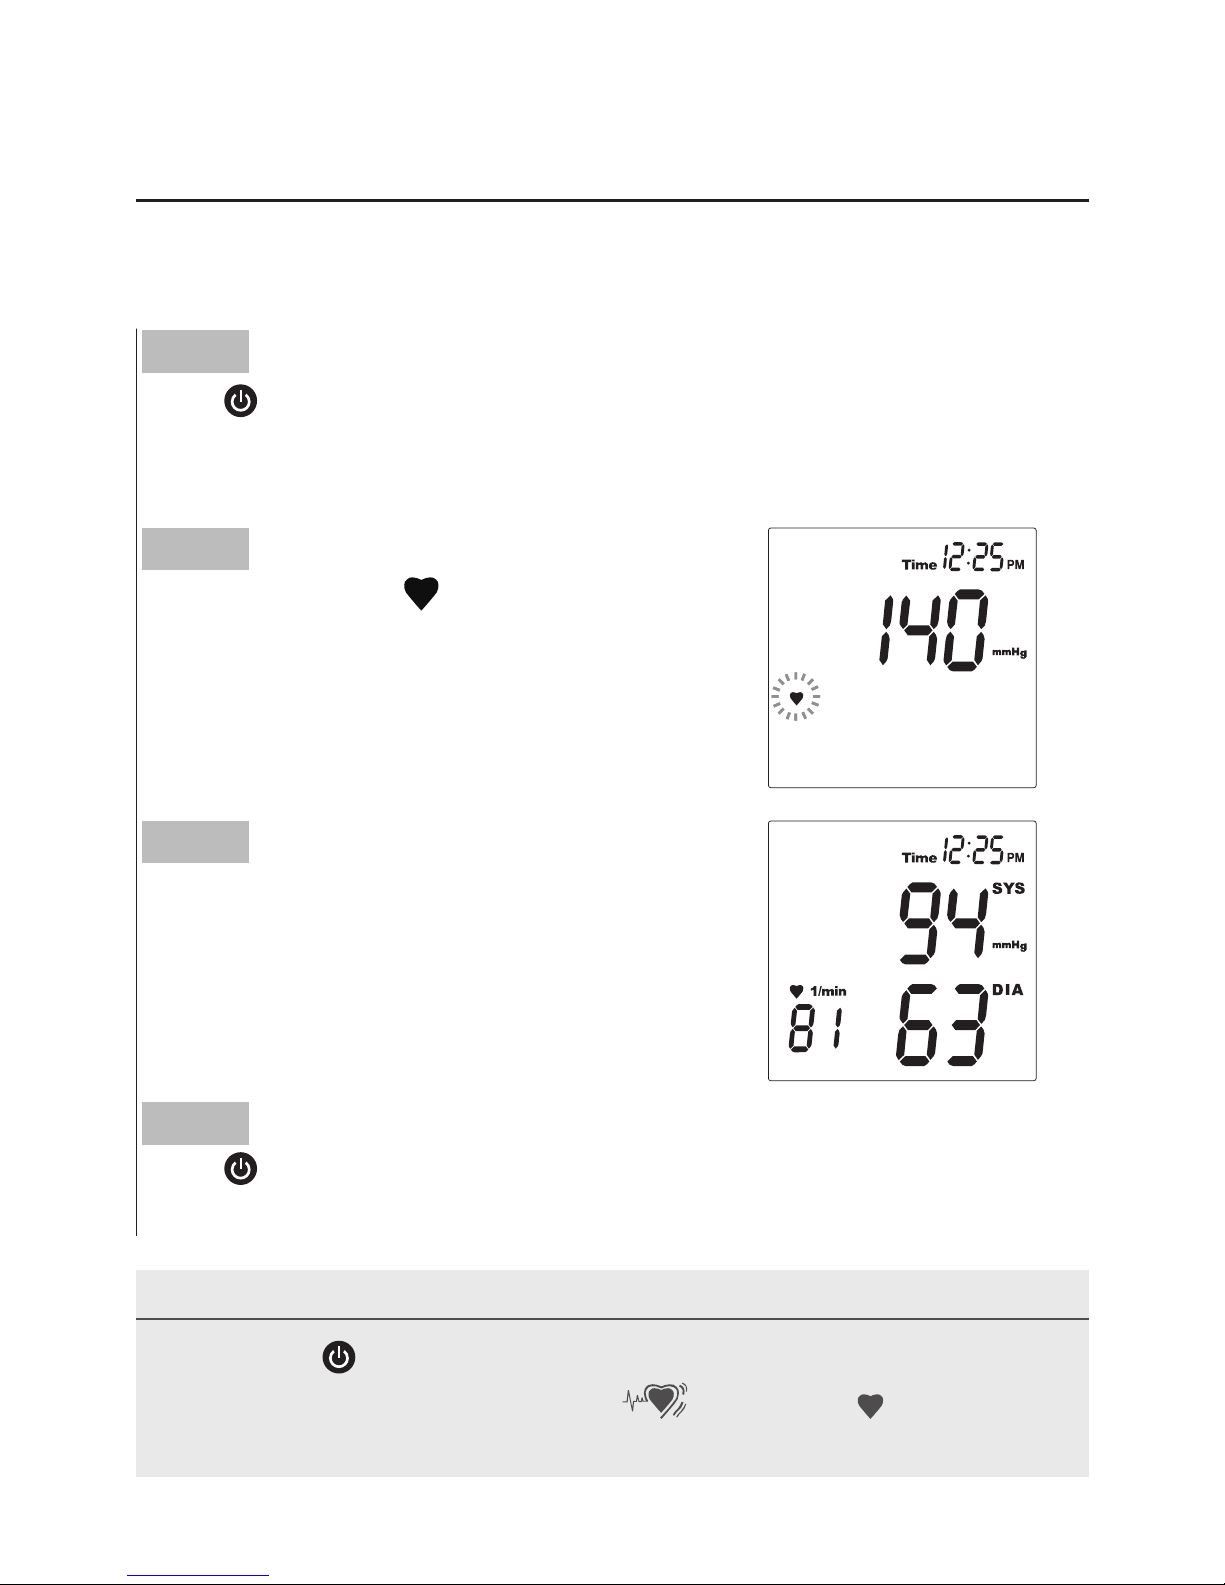
Taking a Single Measurement
Step 2
The heart symbol “ ” will flash when a
pulse is detected during the inflation.
Step 3
After the measurement, the monitor
displays the systolic pressure, diastolic
pressure and pulse rate.
Step 4
Press
to switch off. Or it will switch off
automatically after left idle for 3 minutes.
Step 1
Press
. All the LCD symbols will appear. Then the cuff will begin to
inflate automatically.
Page 34
34
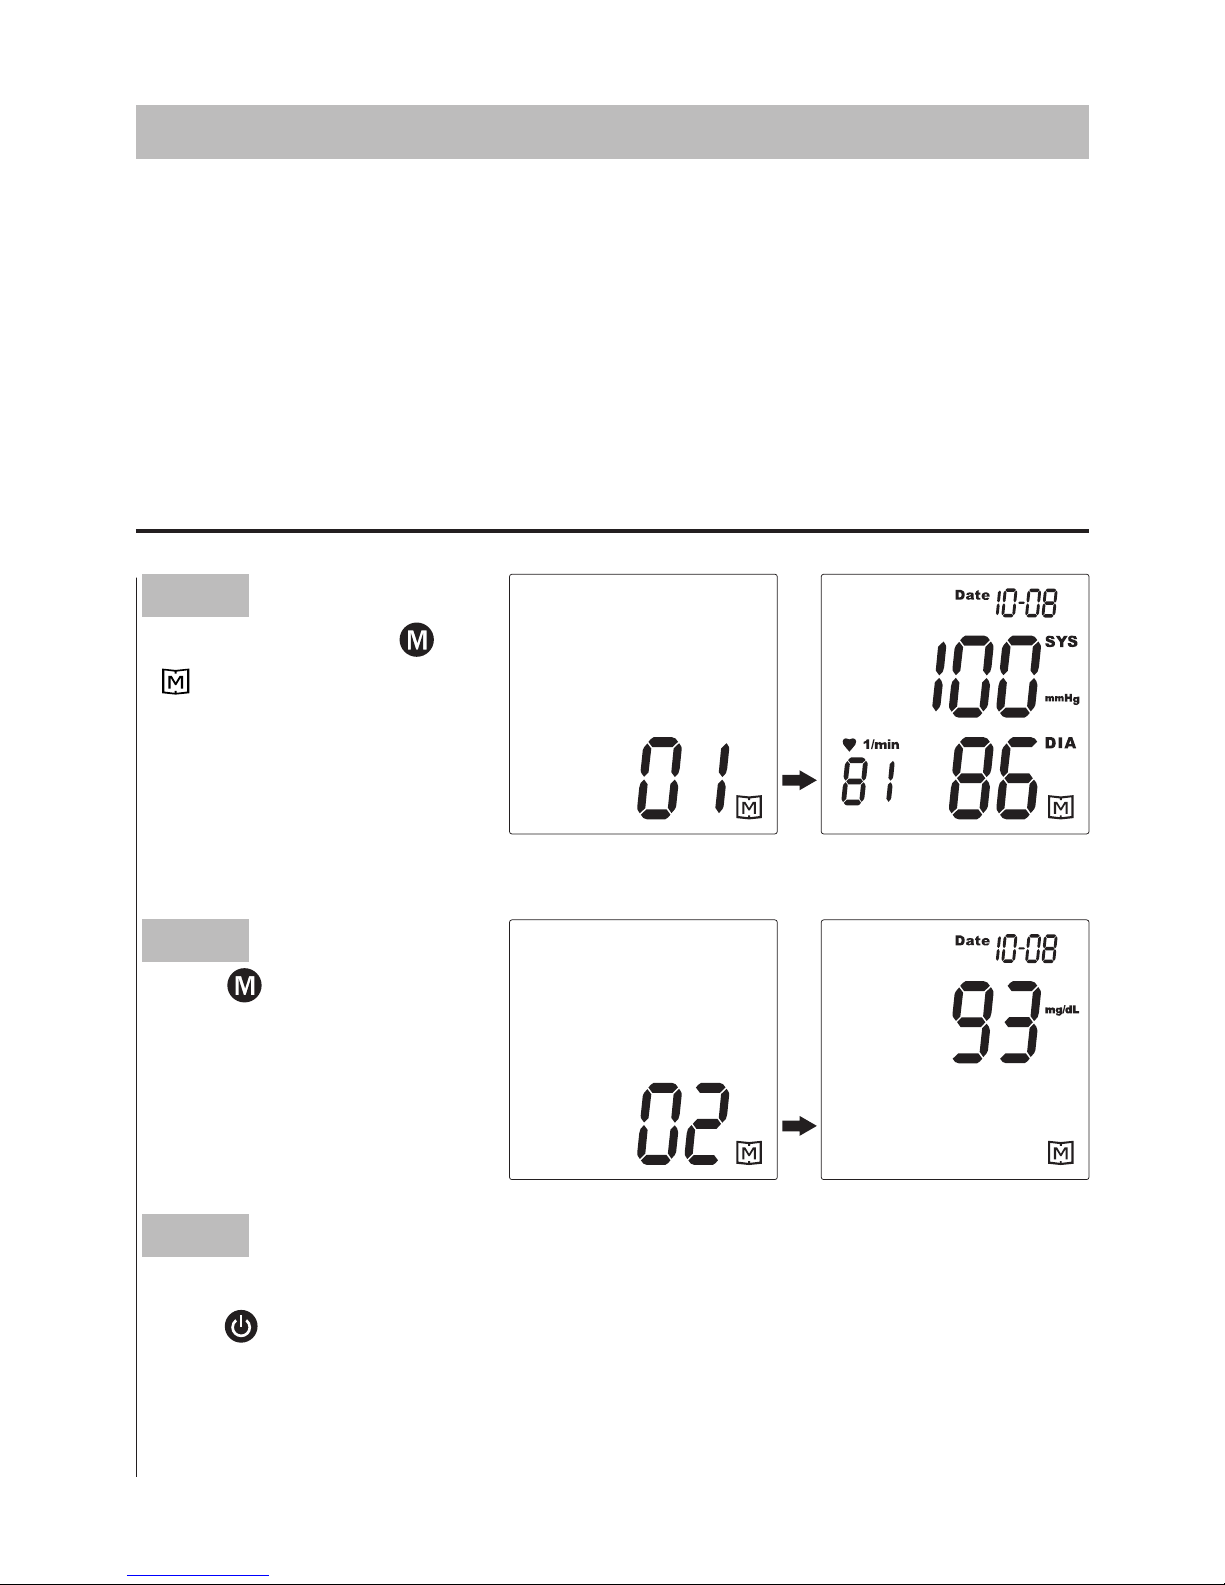
MONITOR MEMORY
Your monitor stores the 450 most recent test results along with
respective dates and times in its memory. To recall the memory, start
with the monitor off.
Reviewing Test Results
Step 1
Press and release
.
“
”will appear on the
display.
Step 2
Press
.
Review all test results
stored in the monitor.
Step 3
Exit the memory.
Press
and the monitor will turn off.
Page 35
35
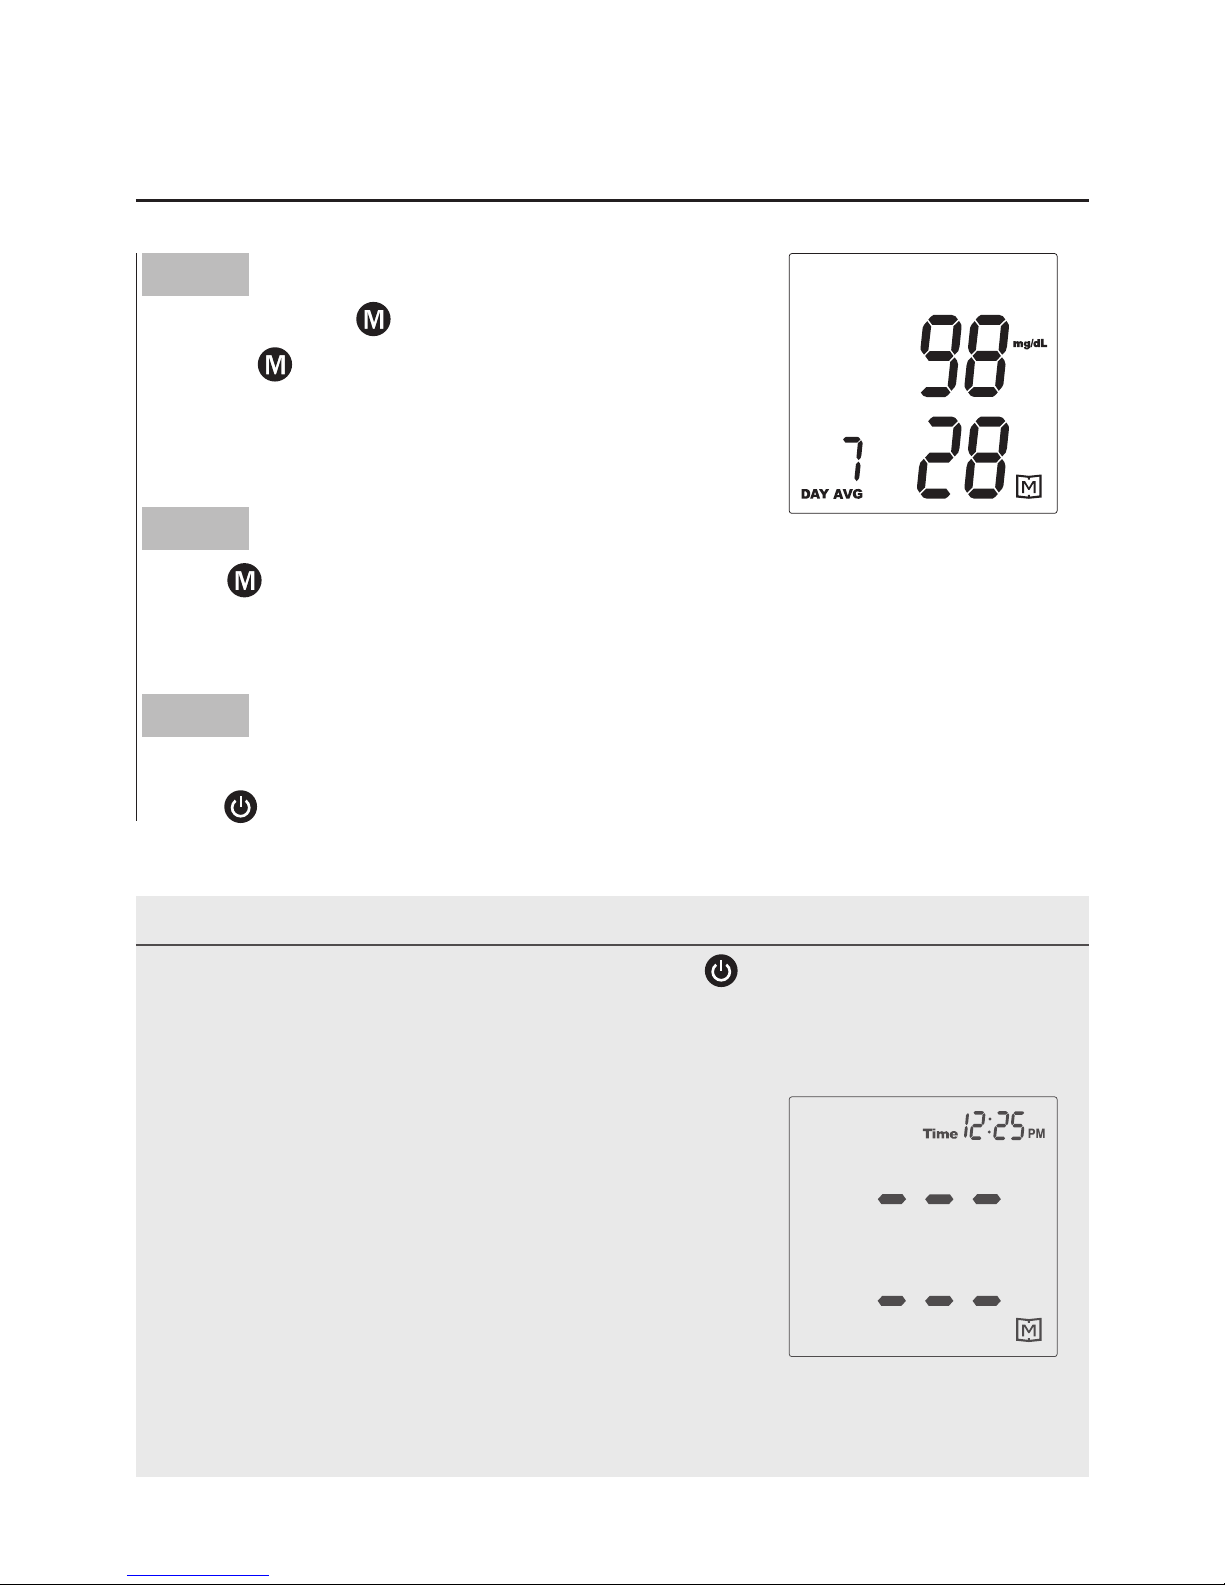
Reviewing Day Average Results
Step 1
Press and hold
for 3 seconds.
Release
and then your blood glucose 7-day
average result will appear on the display.
Step 2
Press
.
Review your 14-, 21-, 28-, 60- and 90-day average.
Step 3
Exit the memory.
Press
and the monitor will turn off.
NOTE
• Any time you wish to exit the memory, press
or leave it without any
action for 3 minutes. The monitor will turn off automatically.
• Control solution results are NOT included in the day average.
• If using the monitor for the first time, “---” displays
when you recall the test results or review the
average result. This indicates that there is no
test result in the memory.
• The blood pressure results are NOT provided in day averages as the blood
glucose results are.
Page 36
36
Step 1
Installing the Software.
Download Health Care System Software and instruction manual
provided on Fora Care website: www.foracare.com to your
computer.
Follow the instructions to install the software in your computer.
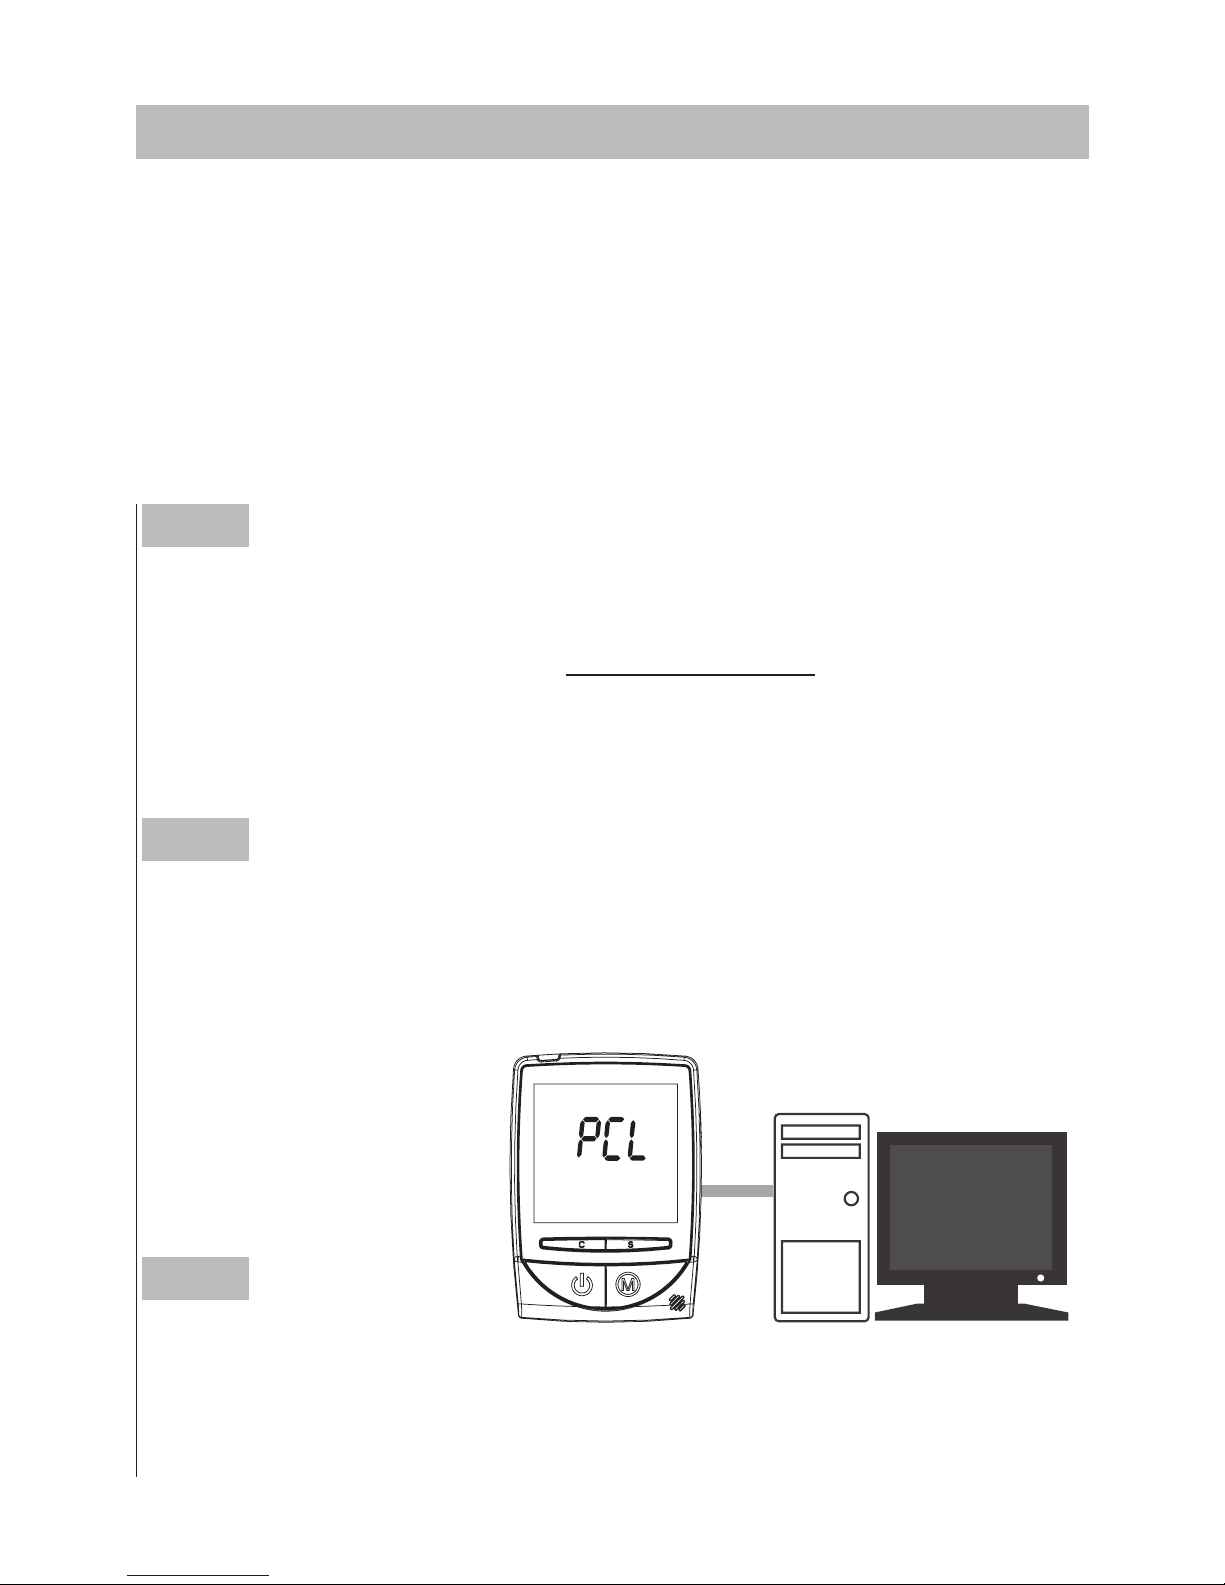
Step 2
Connecting the USB cable to the data port on PC.
With the monitor turned off, connect the cable to the data port
located at the side of the monitor. “PCL” will appear on the display,
indicating that the monitor is ready to transmit data.
► Data transmission via cable (For all ForaCare D20 No-Coding)
Results in memory can be transmitted to the personal computer.
Health Care Software System and a RS232 cable are required before
installation. To learn more about Health Care Software System or to
obtain a USB cable separately, please contact your place of purchase.
DOWNLOADING RESULTS ONTO A COMPUTER
Step 3
Data transmission.
Follow the instructions provided in the software to transmit data. Data
transmitted will include results with date and time. Remove the cable
and the monitor will automatically turn off.
Page 37
37
MAINTENANCE
Battery
Your monitor comes with four 1.5V AA size alkaline batteries.
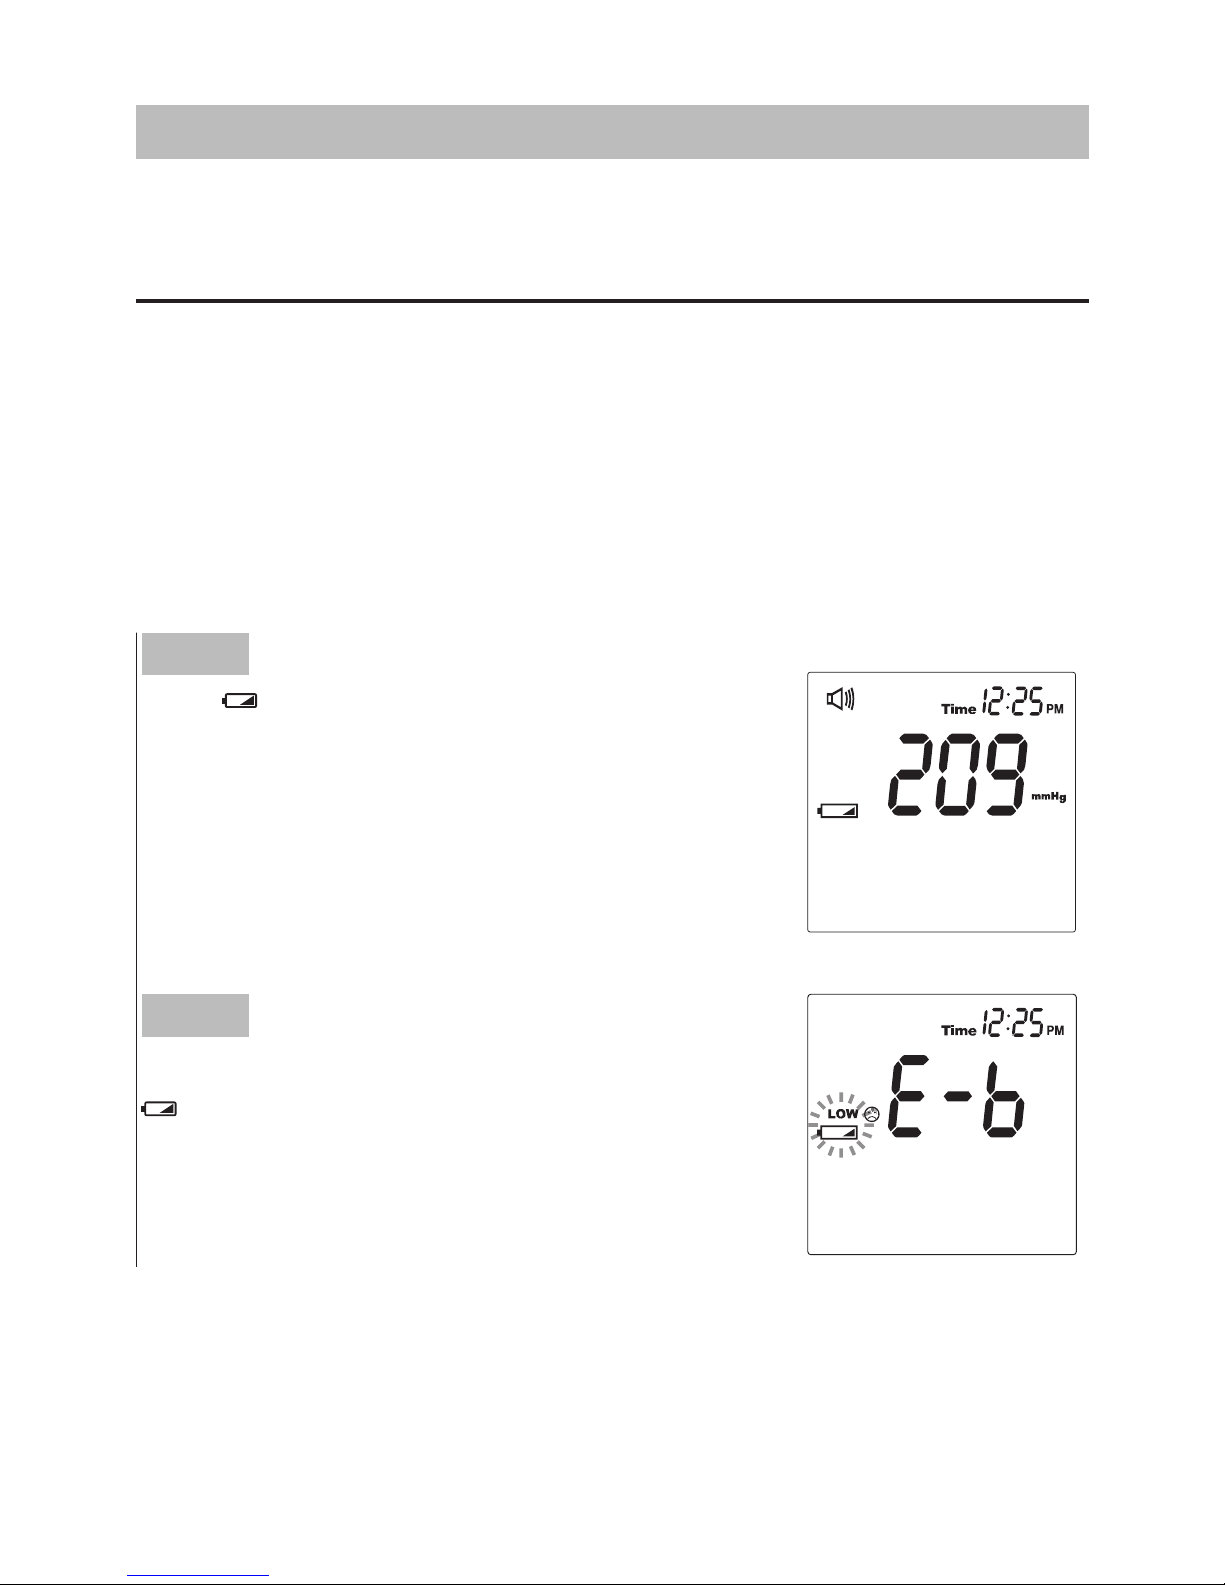
► Low Battery Signal
The monitor will display the two messages below to alert you when the
monitor power is getting low.
Step 1
The “ ” symbol appears along with display
messages:
The monitor is functional and the result remains
accurate, but it is time to change the batteries.
Step 2
If the power is not enough to do a test, the
symbol starts blinking. Please change or
recharge the batteries immediately.
Page 38
38
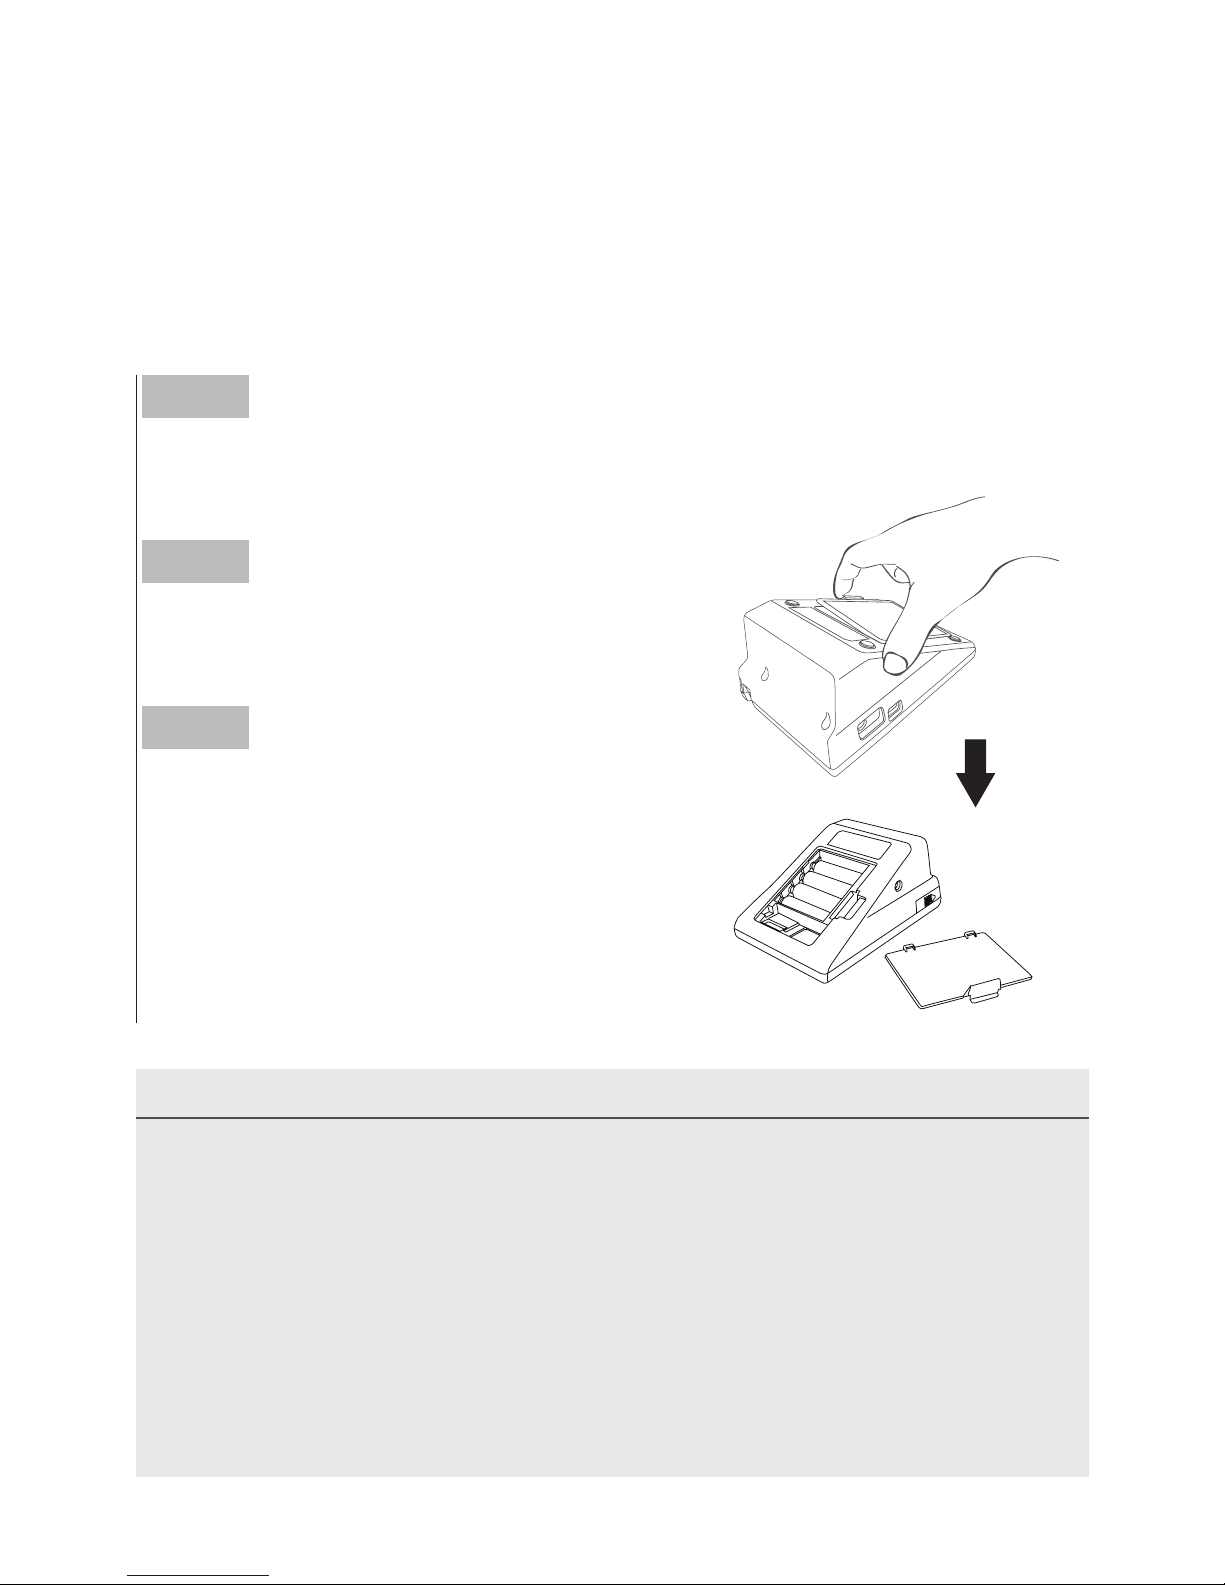
To replace the batteries, make sure that the monitor is turned off.
Step 1
Press the edge of the battery cover and
lift it up to remove.
Step 2
Remove the old batteries and replace
with four 1.5V AA size alkaline batteries.
Step 3
Close the battery cover. If the batteries
are inserted correctly, you will hear a
“
beep” afterwards.
► Replacing the Battery
NOTE
• Replacing the batteries does not affect the test results stored in memory.
• As with all small batteries, these batteries should be kept away from small
children. If swallowed, promptly seek medical assistance.
• Batteries may leak chemicals if unused for a long time. Remove the
batteries if you are not going to use the device for an extended period (i.e.
3 months or more).
• Properly dispose of the batteries according to your local environmental
regulations.
Page 39
39
Using AC Adapter
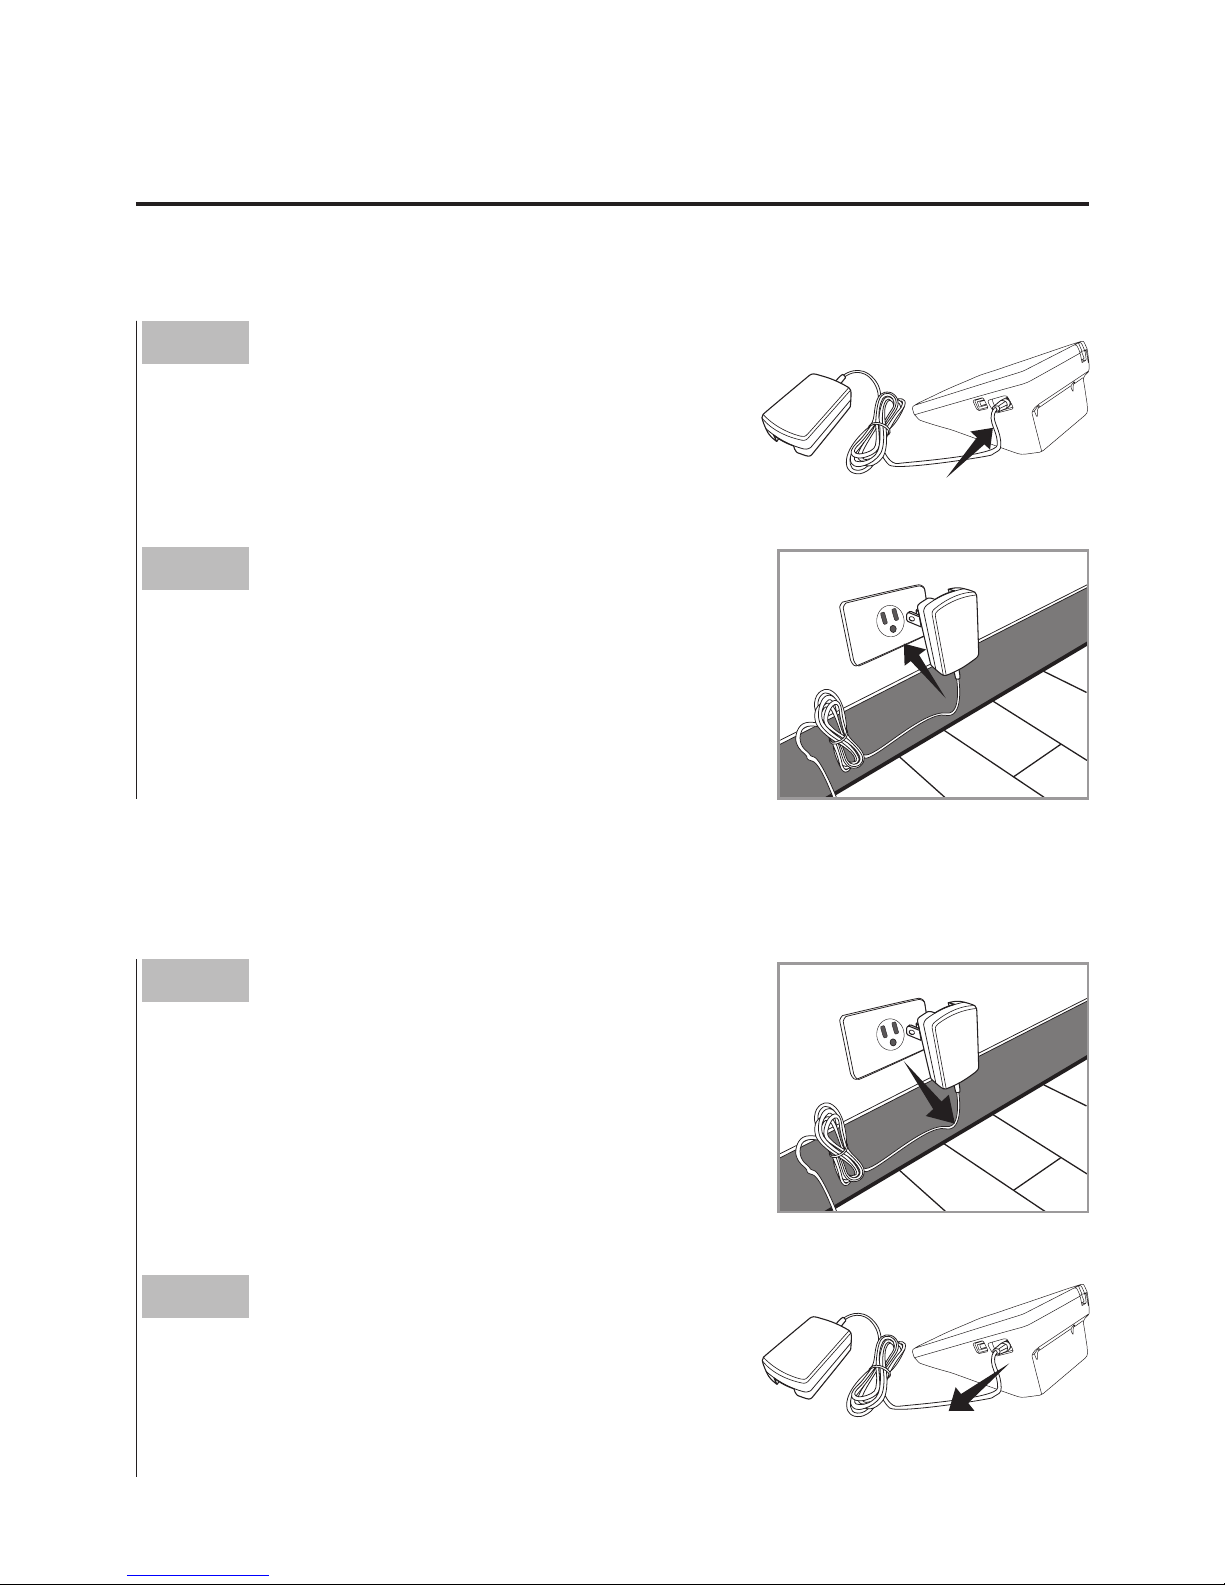
► Connect AC adapter to the monitor
► Remove AC adapter from the monitor
Step 1
Connect AC adapter plug to AC adapter
jack of the monitor.
Step 2
Plug AC adapter power plug into an electrical outlet. The monitor is ready for use.
Step 1
When the monitor is off, remove AC
adapter power plug from the electrical
outlet.
Step 2
Disconnect AC adapter plug from AC
adapter jack of the monitor.
Page 40

40
Caring for Your Monitor
To avoid the meter and test strips attracting dirt, dust or other
contaminants, please wash and dry your hands thoroughly before use.
Why the cleaning and disinfection should be performed?
Cleaning and disinfection are different. Cleaning is the process of
removing dirt (e.g. food debris, grease, dust), disinfection is the
process of killing germs (e.g. bacteria and viruses).
When to clean and disinfect the meter?
Clean the meter when you see any dirt on it. You should disinfect the
meter at least once a week to prevent infection.
How to clean and disinfect the meter?
The meter must be cleaned prior to the disinfection. Use one
disinfecting wipe to clean exposed surfaces of the meter thoroughly
and remove any visible dirt or blood or any other body fluid with the
wipe. Use a second wipe to disinfect the meter. Do NOT use organic
solvents to clean the meter.
We recommend for meter cleaning and disinfection you should use the
disinfecting wipe/towelette from below.
► Micro-Kill+™ (Micro-Kill Plus™) by Medline
(EPA Reg. No. 59894-10-37549)
To obtain disinfecting wipes and other information, please contact
Medline at 1-800-MEDLINE (1-800-633-5463) or visit
www.medline.com.
Page 41
41
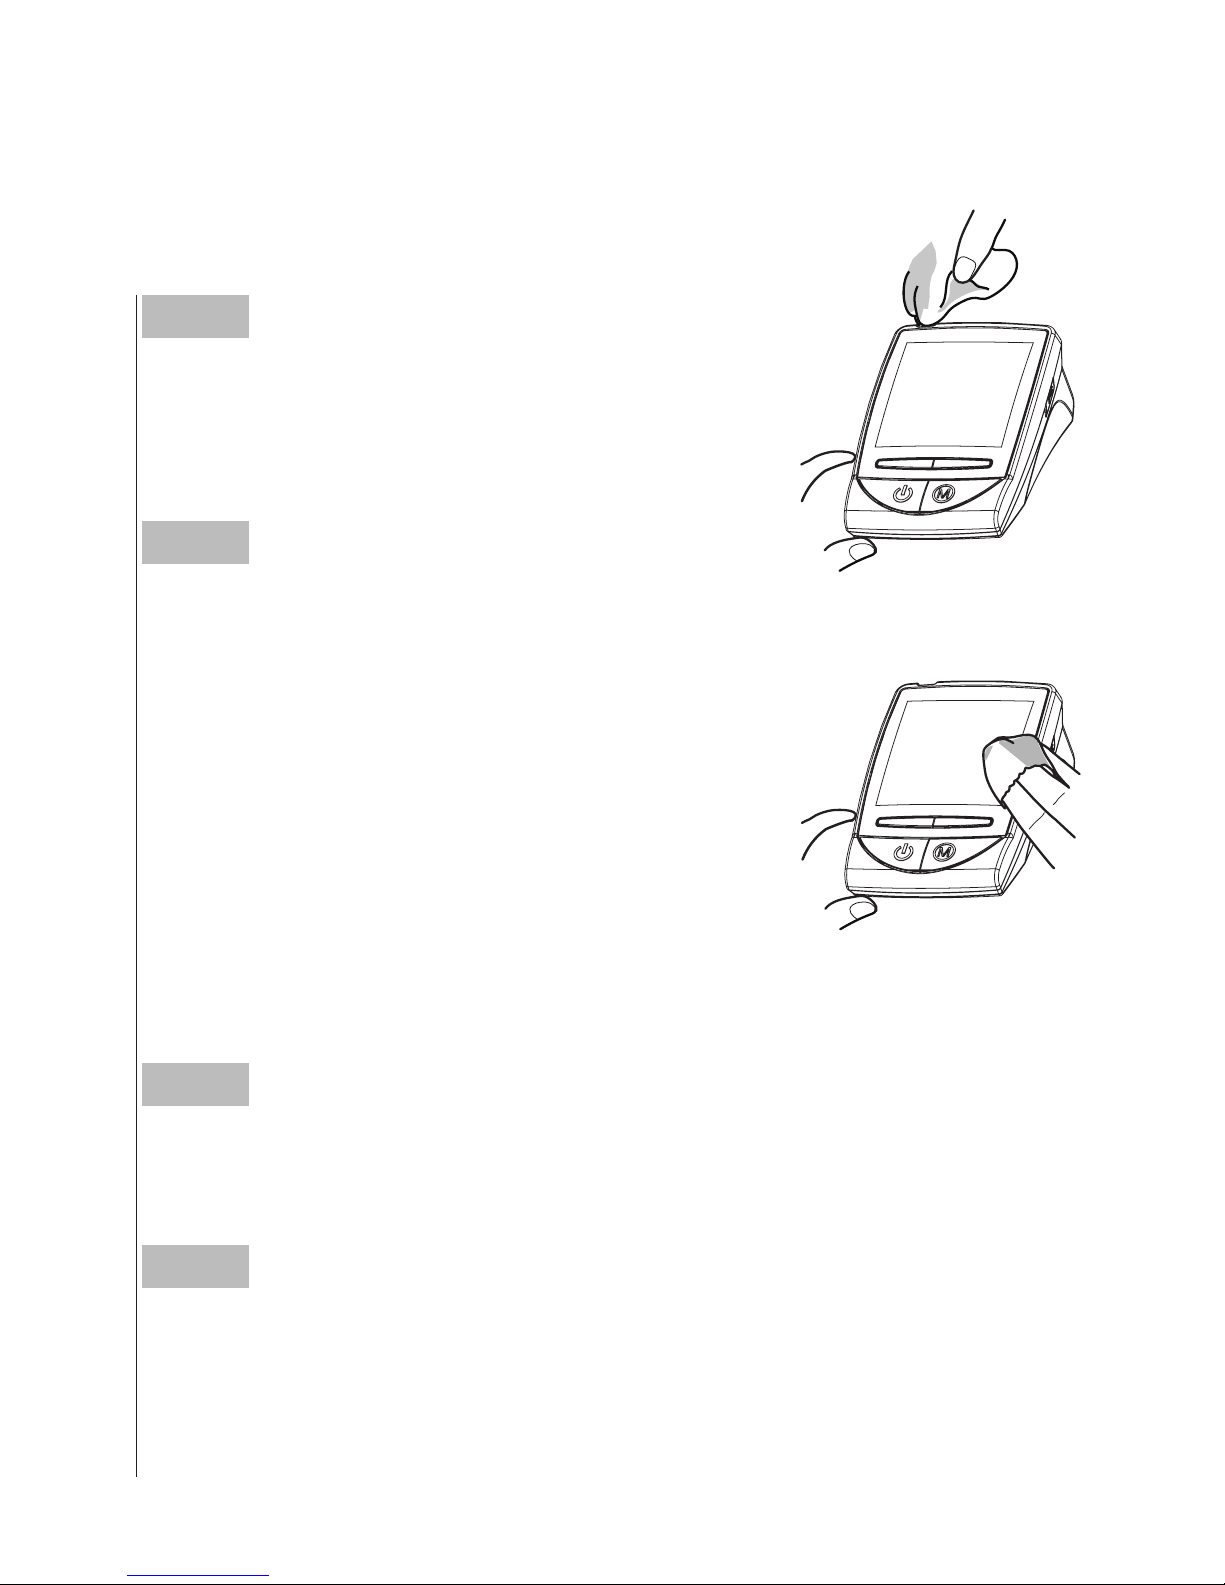
Disinfecting Procedures
Step 1
Take out one disinfecting wipe from the package
and squeeze out any excess liquid in order to
prevent damage to the meter.
Step 2
Wipe all exterior surface of the meter including
the display and buttons. Hold the meter with the
test strip slot pointing down and wipe the area
around the test slot but be careful not to allow
excess liquid to get inside. Keep the meter moist
with disinfection solution contained in the wipe
for a minimum of 2 minutes for Micro-Kill+™
wipes. Follow the instructions on the package
label of disinfecting wipe. Use two or more wipes
if necessary.
Step 3
Remove the wipe. Allow the meter surface to dry
completely.
Step 4
Discard the used wipes and never reuse them.
Wash your hands thoroughly with soap and
water after handling the meter, lancing device
and test strips to avoid contamination.
Page 42

42
Improper system cleaning and disinfection may result in meter malfunction. If you have a question, please contact local customer service
at 1-866-469-2632 for assistance.
This device has been validated to withstand up to 5,000 cleaning
and disinfection cycles using the recommended disinfecting wipe/
towelette. The tested number of cycles is estimated by 5 cleaning and
disinfection cycles per day over 2 years, the expected life of the device.
The meter should be replaced after the validated number of cleaning
and disinfection cycles or the warranty period, which ever comes first.
Stop using the meter if you see any signs of deterioration, for example,
LCD display cracks or becomes cloudy, buttons no longer function, or
outer casing cracks. Please contact the customer service or call at
1-866-469-2632 for a replacement meter if any of the signs of deterioration are noticed.
NOTE
• Do NOT clean or disinfect the meter while performing a test.
• If the meter is being operated by a second person, the meter and lancing
device should be decontaminated prior to handling by an assistant.
• Do NOT allow cleaning or disinfecting solution to get in the test slot, battery
compartment, or strip-ejection button.
• If you do get moisture in the test strip slot, wipe it away with the corner of a
tissue.
• Always dry the meter thoroughly before using it.
• Do not spray the meter directly with cleaning solutions especially those
containing water (i.e. soapy water), as this could cause the solution to enter
the case and damage the electronic components or circuitry.
Page 43

43
Caring for Your Test Strips
• Storage condition: 39.2°F to 104°F (4°C to 40°C), below 85%
relative humidity. Do not freeze.
• Store your test strips in their original vial only. Do not transfer to
other container.
• Store test strip packages in a cool and dry place. Keep away from
direct sunlight and heat.
• After removing a test strip from the vial, immediately close the vial
cap tightly.
• Touch the test strip with clean and dry hands.
• Use each test strip immediately after removing it from the vial.
• Write the opening date on the strip vial label when you first opened
it. Discard remaining test strips after 3 months.
• Do not use test strips beyond the expiration date. This may cause
inac curate results.
• Do not bend, cut, or alter a test strip in any way.
• Keep the strip vial away from children since the cap and the test
strip may be a choking hazard. If swallowed, promptly see a doctor
for help.
Monitor Storage
• Storage condition: -4°F to 140°F (-20°C to 60°C), below 95%
relative humidity.
• Always store or transport the monitor in its original storage case.
• Avoid dropping and heavy impact.
• Avoid direct sunlight and high humidity.
Page 44

44
Important Control Solution Information
• Use only FORA control solutions with your monitor.
• Do not use the control solution beyond the expiration date or 3
months after first opening. Write the opening date on the control
solution vial and discard the remaining solution after 3 months.
• It is recommended that the control solution test should be done at
room temperature (68°F to 77°F / 20°C to 25°C). Make sure your
control solution, monitor, and test strips are at this specified
temperature range before testing.
• Shake the vial before use, discard the first drop of control solution,
and wipe off the dispenser tip to ensure a pure sample and an
accurate result.
• Store the control solution tightly closed at temperatures between
35.6°F and 86°F (2°C and 30°C). Do NOT freeze.
For further information, please refer to the test strip package insert.
Page 45
45
SYSTEM TROUBLESHOOTING
If you follow the recommended action but the problem persists, or error messages other than the ones below appear, please call your local
customer service. Do not attempt to repair by yourself and never try to
disassemble the monitor under any circumstances.
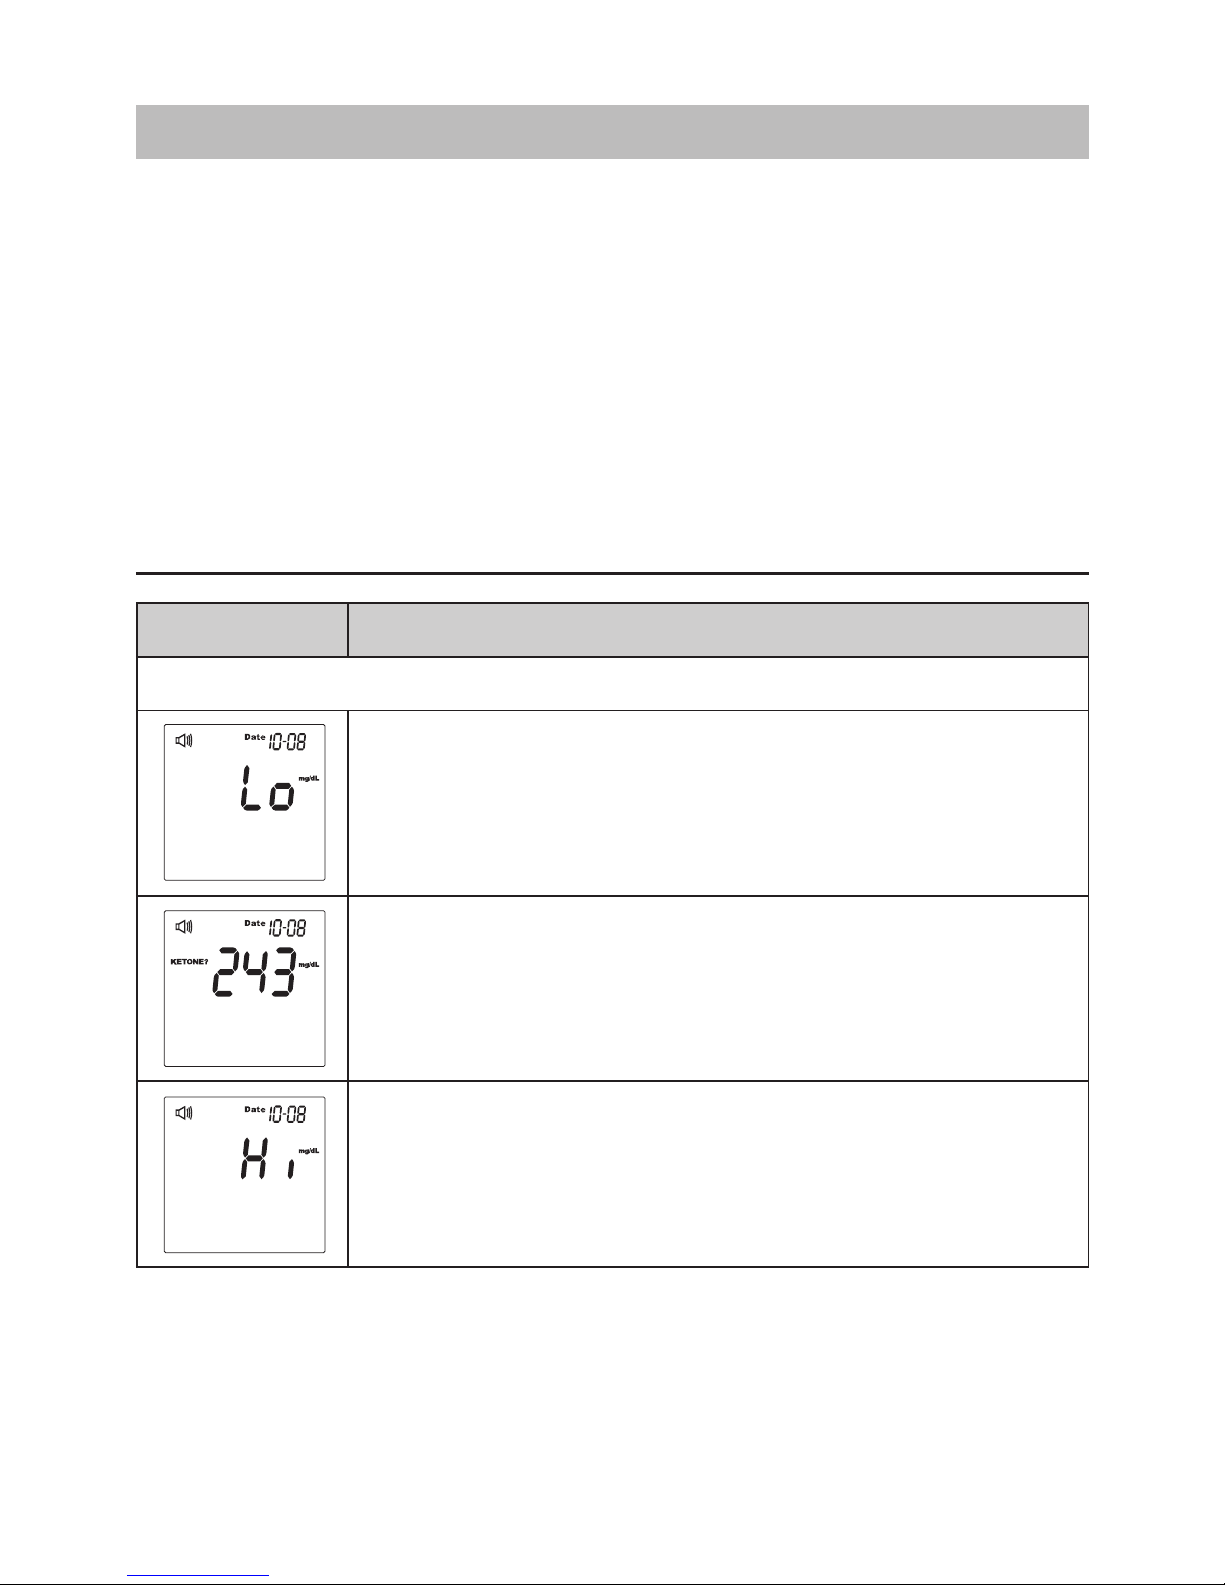
Result Readings
MESSAGE WHAT IT MEANS
BLOOD GLUCOSE
Appears when your result is below measurement limit,
which is less than 20 mg/dL (1.1 mmol/L).
Appears when your result is equal to or higher than 240
mg/dL (13.3 mmol/L). This indicates the possibility of
ketone accumulation for type 1 diabetes. Please seek
medical assistance immediately.
Appears when your result is higher than the limit of
measurement, which is higher than 600 mg/dL
(33.3mmol/L).
Page 46
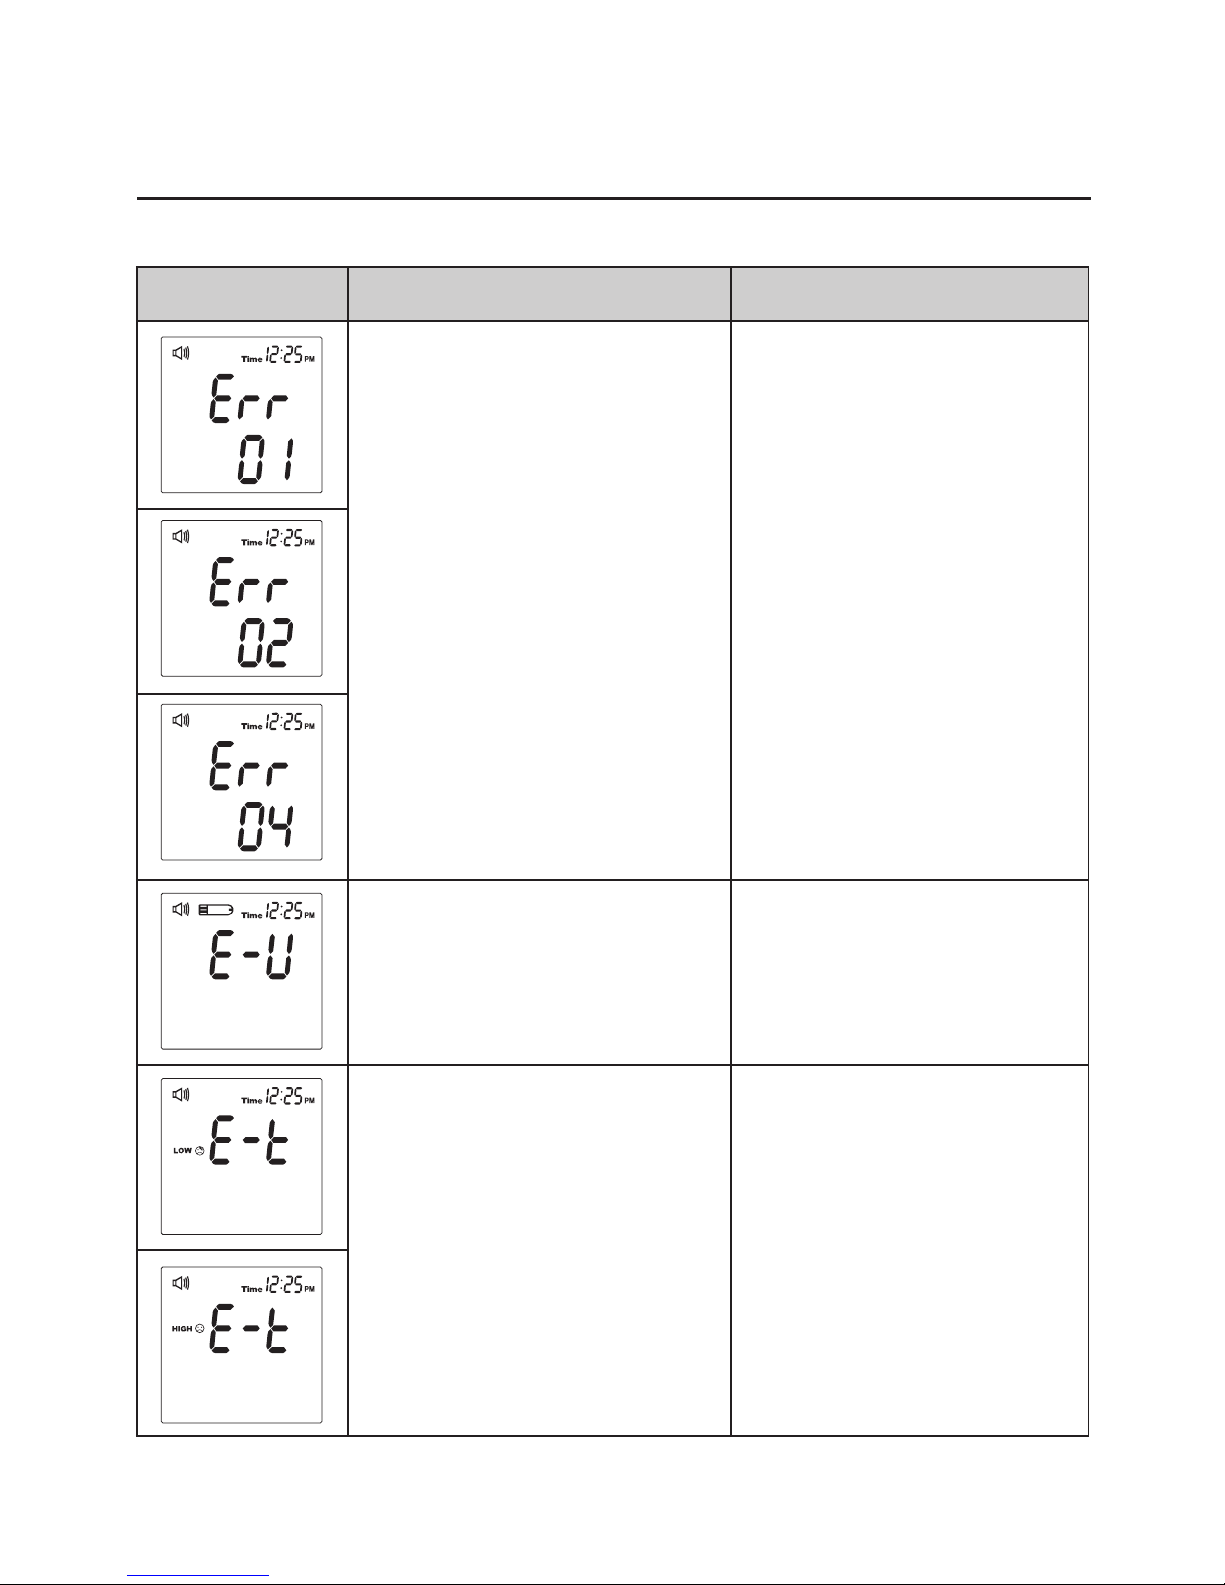
46
MESSAGE CAUSE WHAT TO DO
Inflation or pressure error.
Refit cuff tightly and
correctly. Relax and repeat
the measurement. If the
error still remains, please
contact local customer
service for help.
Strip has been used.
Repeat the test with a new
strip.
Environmental temperature
is outside the system’s
operational range.
System operational range
is 50°F to 104°F (10°C
to 40°C). Repeat the test
after the monitor and test
strip have reached the
above temperature.
Error Messages
Page 47
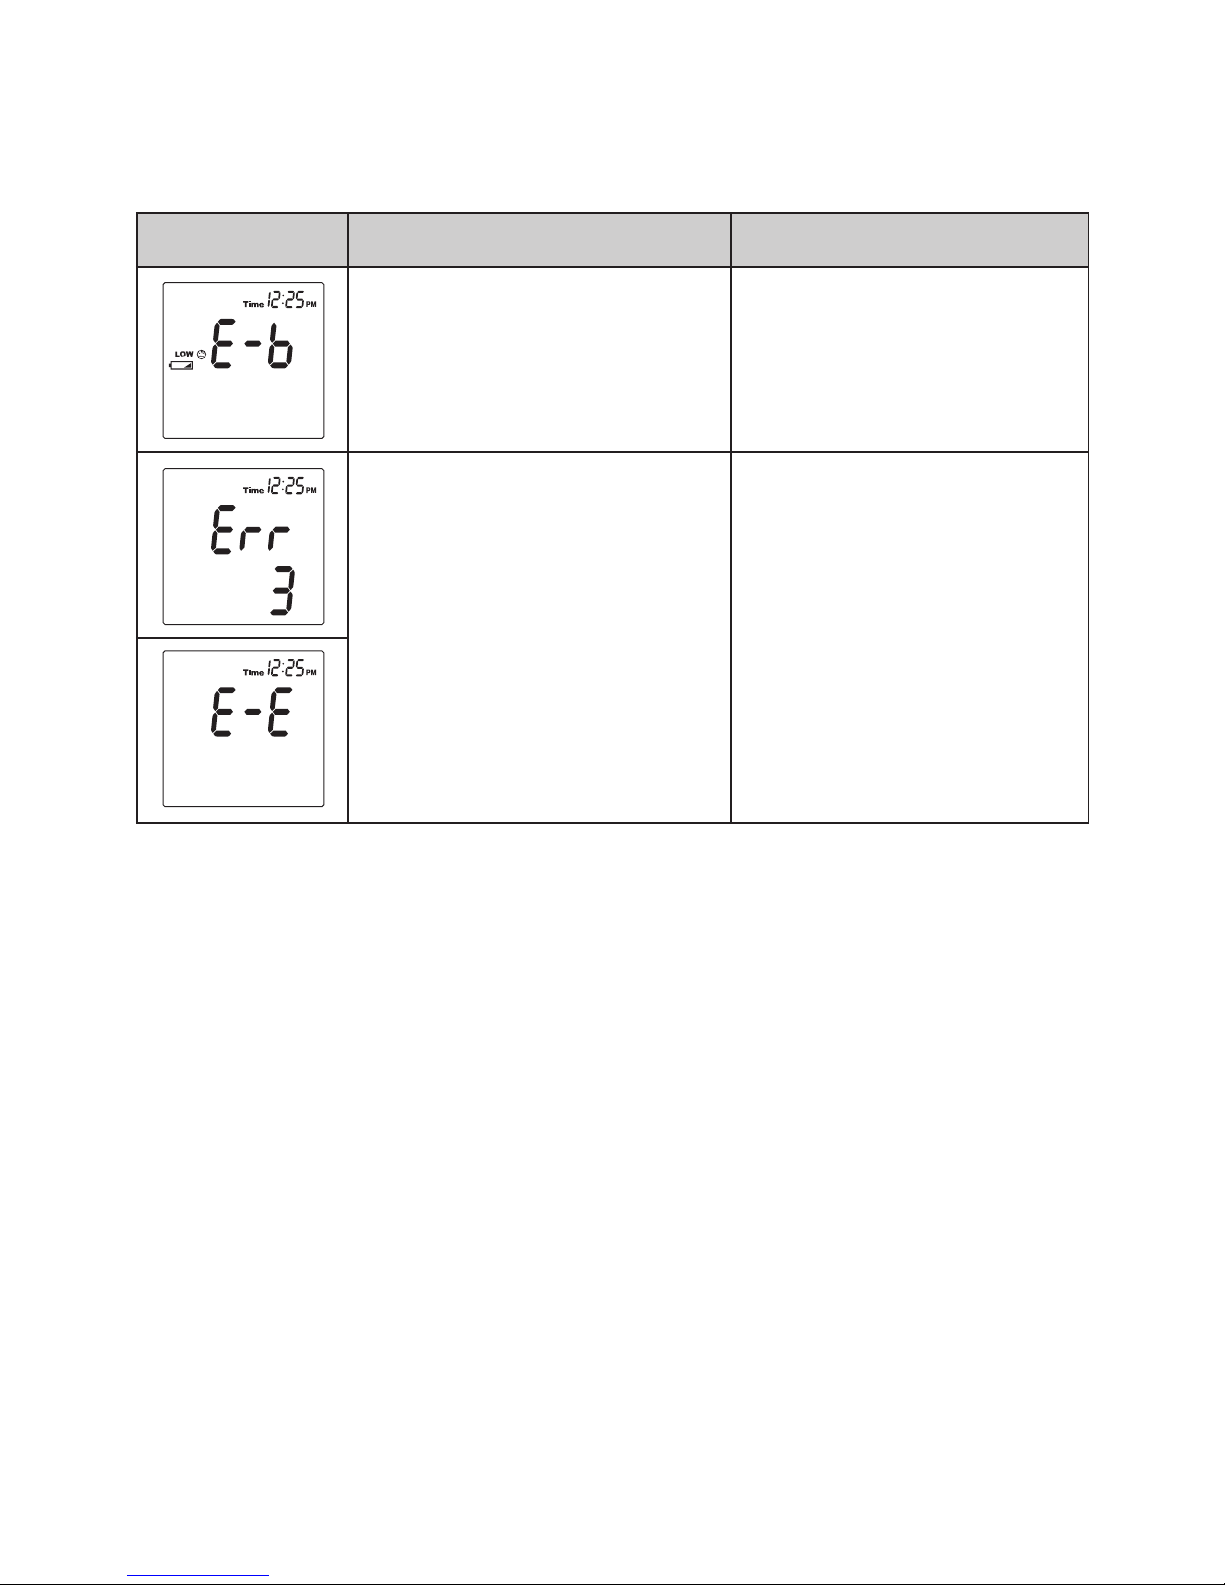
47
MESSAGE CAUSE WHAT TO DO
Appear when the battery can
not provide enough power
for a test.
Replace the battery im-
mediately.
Problem with the meter.
Review the instructions
and re-test with a new test
strip. If the problem is still
unsolved, please contact
with local customer service
for help.
Page 48
48
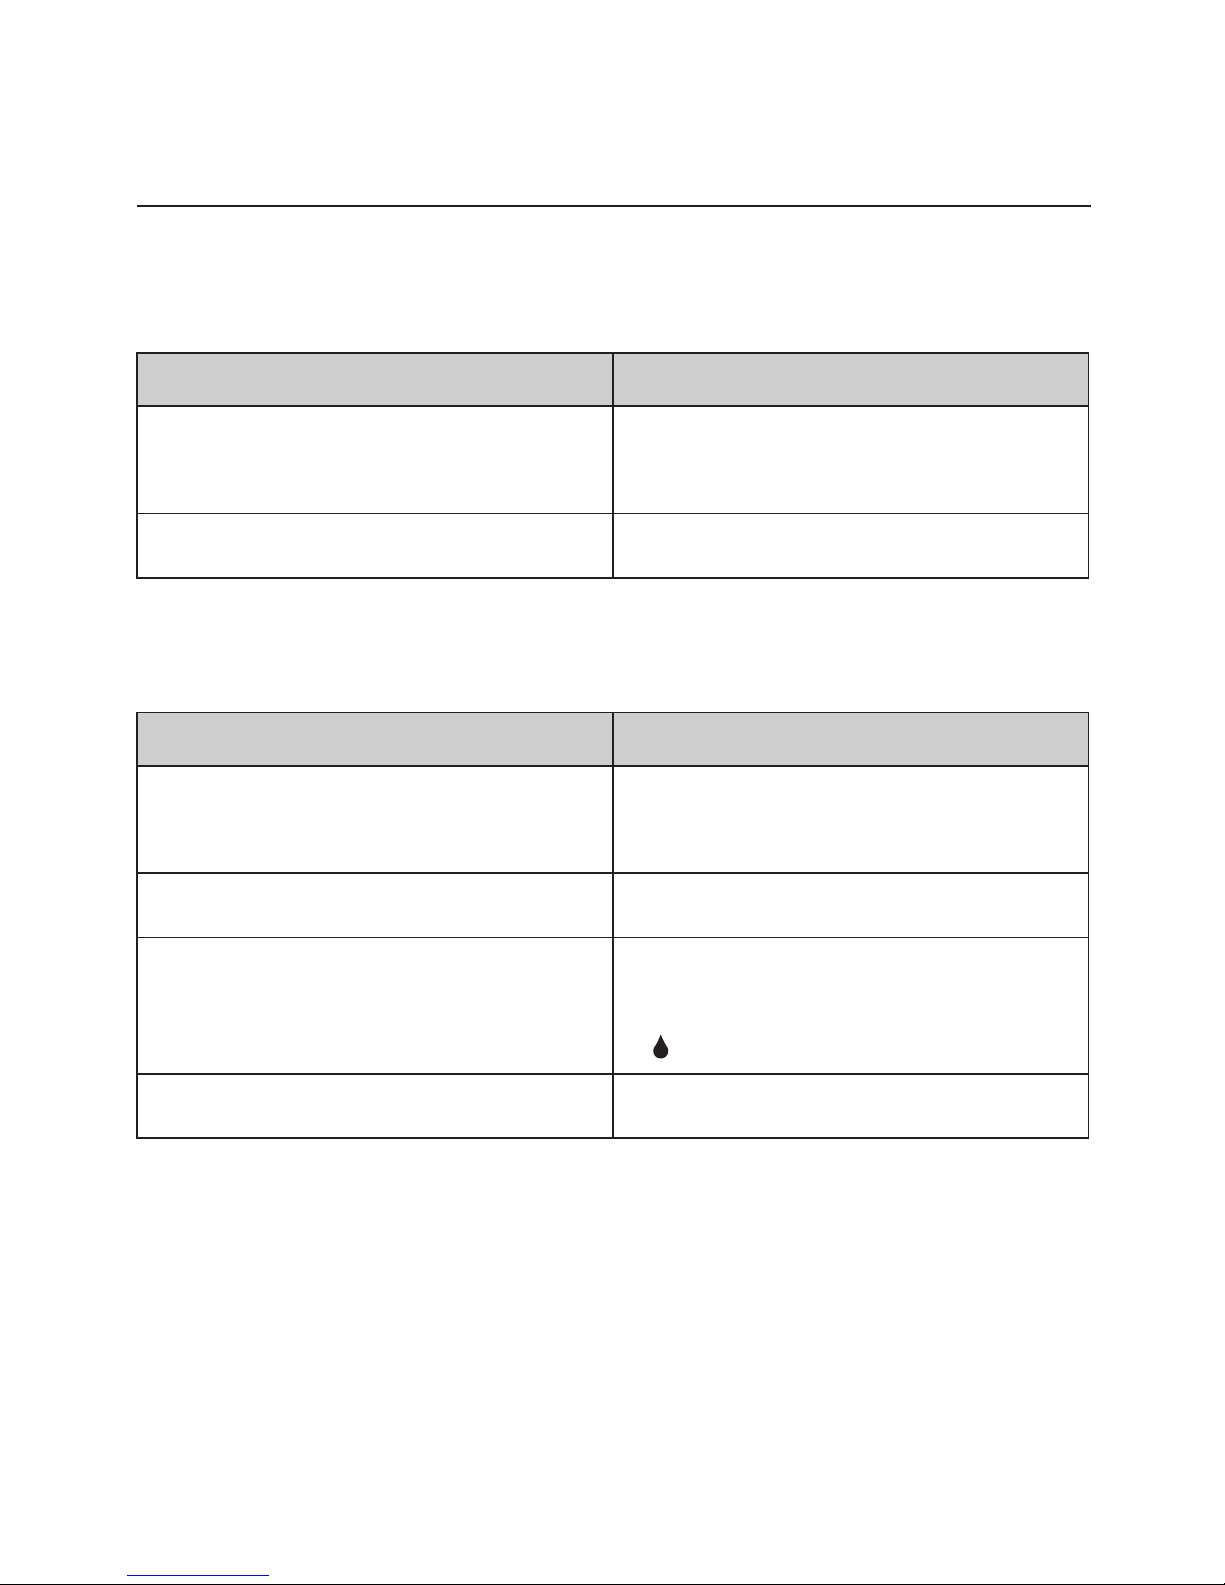
Troubleshooting
► Blood Glucose Measurement
1. If the monitor does not display a message after inserting a test strip:
2. If the test does not start after applying the sample:
POSSIBLE CAUSE WHAT TO DO
Test strip inserted upside down or
incompletely.
Insert the test strip with contact bars
end first and facing up.
Defective monitor or test strips. Please contact customer service.
POSSIBLE CAUSE WHAT TO DO
Insufficient blood sample.
Repeat the test using a new test strip
with larger volume of blood sample.
Defective test strip. Repeat the test with a new test strip.
Sample applied after automatically
shutoff (3 minutes after last user
action).
Repeat the test with a new test strip.
Apply sample only when flashing
“ ” appears on the display.
Defective monitor. Please contact customer service.
Page 49
49
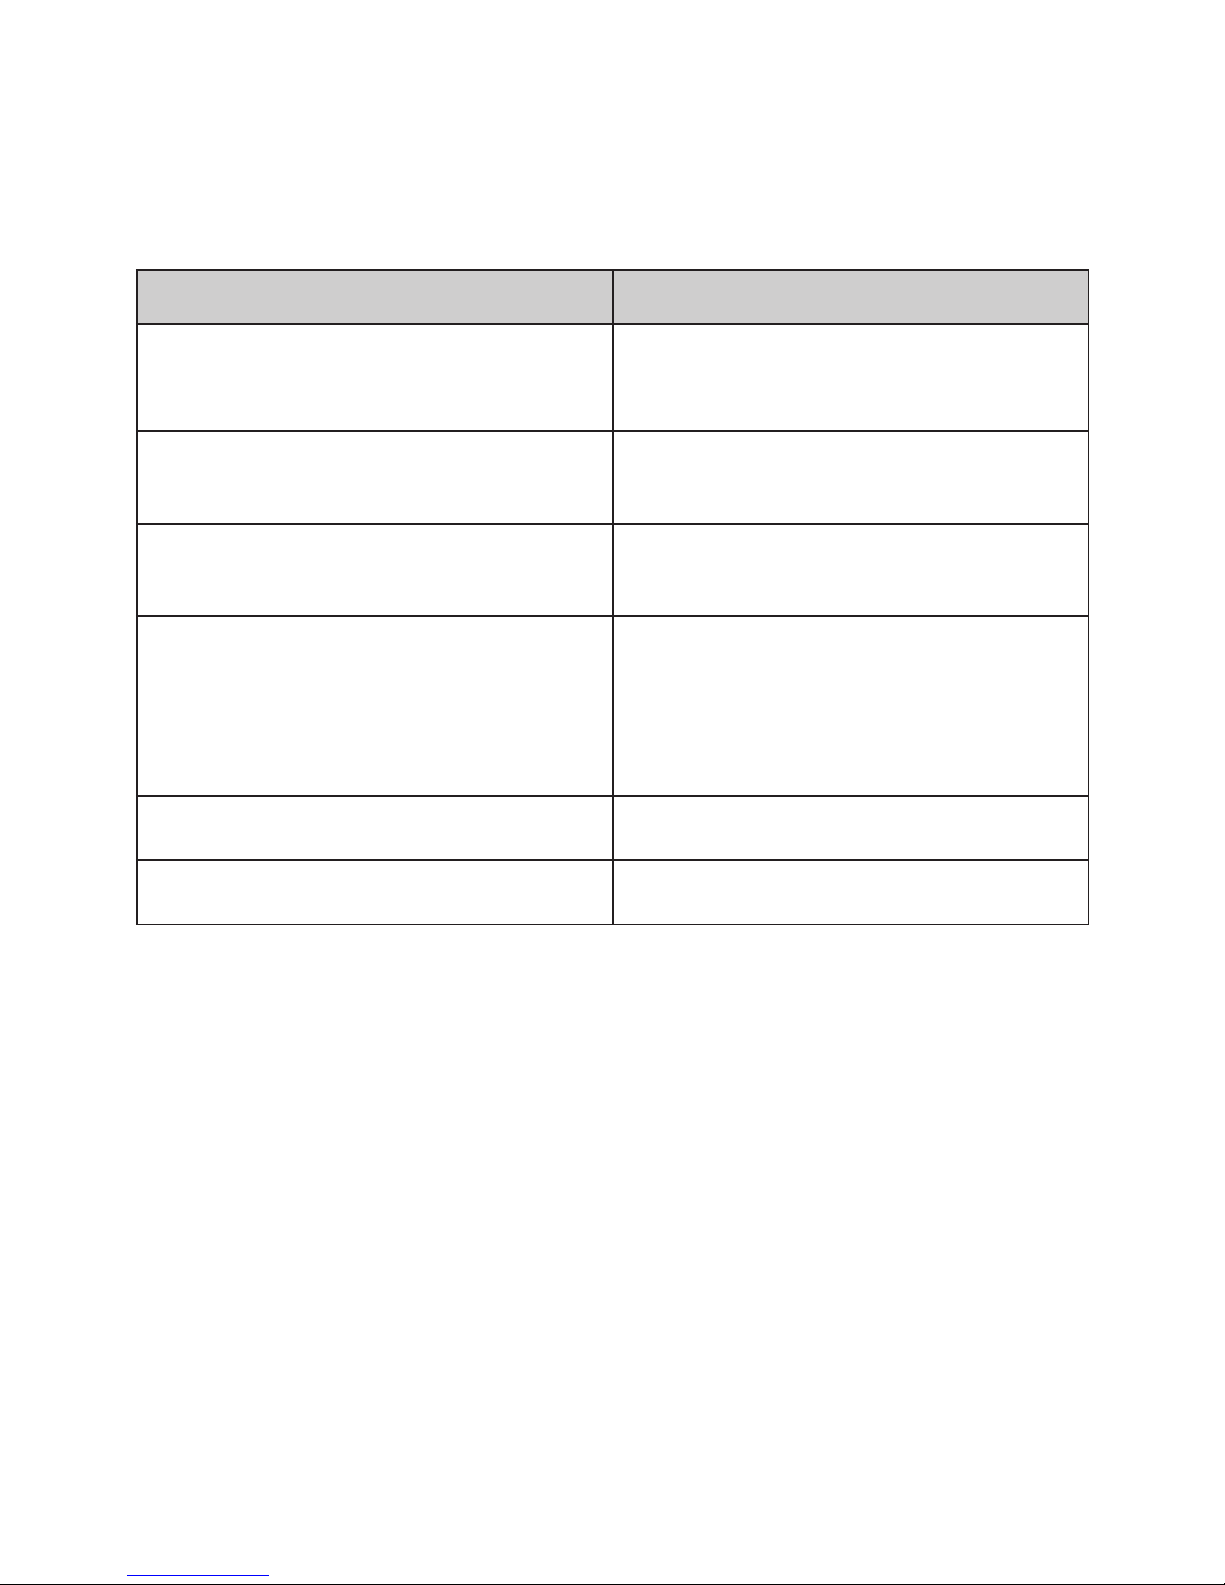
3. If the control solution testing result is out of range:
POSSIBLE CAUSE WHAT TO DO
Error in performing the test.
Read instructions thoroughly and
repeat the test again.
Control solution vial was poorly
shaken.
Shake the control solution vigorously
and repeat the test again.
Expired or contaminated control
solution.
Check the expiration date of the
control solution.
Control solution that is too warm or
too cold.
Control solution, monitor, and test
strips should be at room temperature
(68°F to 77°F / 20°C to 25°C)
before testing.
Defective test strip. Repeat the test with a new test strip.
Monitor malfunction. Please contact customer service.
Page 50
50
► Blood Pressure Measurement
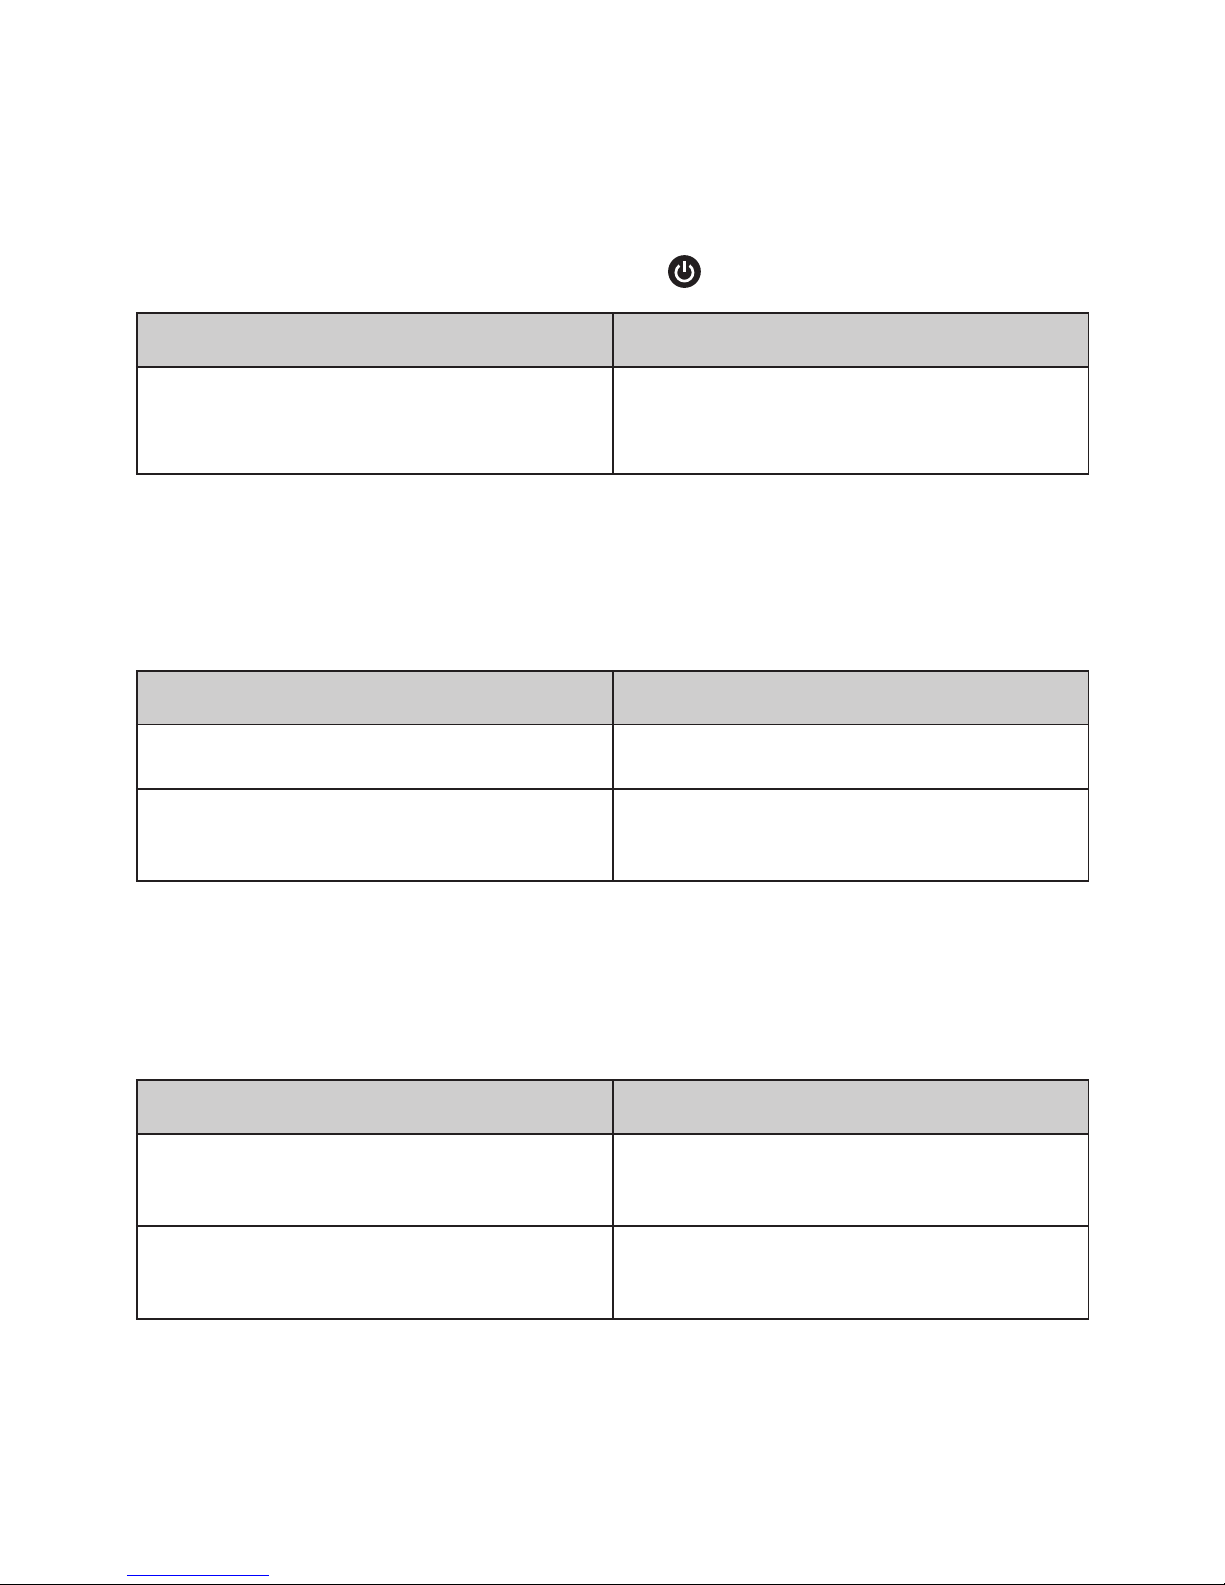
1. If nothing is displayed after pressing
:
POSSIBLE CAUSE WHAT TO DO
Batteries incorrectly installed or
absent.
Check that the batteries are correctly
installed.
2. If the heart rate is higher/lower than user’s average:
3. If the result is higher/lower than user’s average measurement:
POSSIBLE CAUSE WHAT TO DO
Movement during measurement. Repeat measurement.
Measurement taken just after
exercise.
Rest at least 30 minutes before
repeating measurement.
POSSIBLE CAUSE WHAT TO DO
May not be in correct position while
measuring.
Adjust to the correct position to
measure.
Blood pressure naturally varies from
time to time.
Keep in mind for next measurement.
Page 51
51
DETAILED INFORMATION
Reference Values
Blood Glucose
Blood glucose monitoring plays an important role in diabetes control.
A long-term study showed that maintaining blood glucose levels
close to normal can reduce the risk of diabetes complications by up
to 60%*1. The results provided by this system can help you and your
healthcare professional monitor and adjust your treatment plan to
gain better control of your diabetes.
Source: American Diabetes Association (2012). Diabetes Care, 35 (Suppl 1):
64-71.
Please consult your doctor to determine a target range that works
best for you.
References:
*1: American Diabetes Association position statement on the Diabetes Control
and Complications Trial (1993).
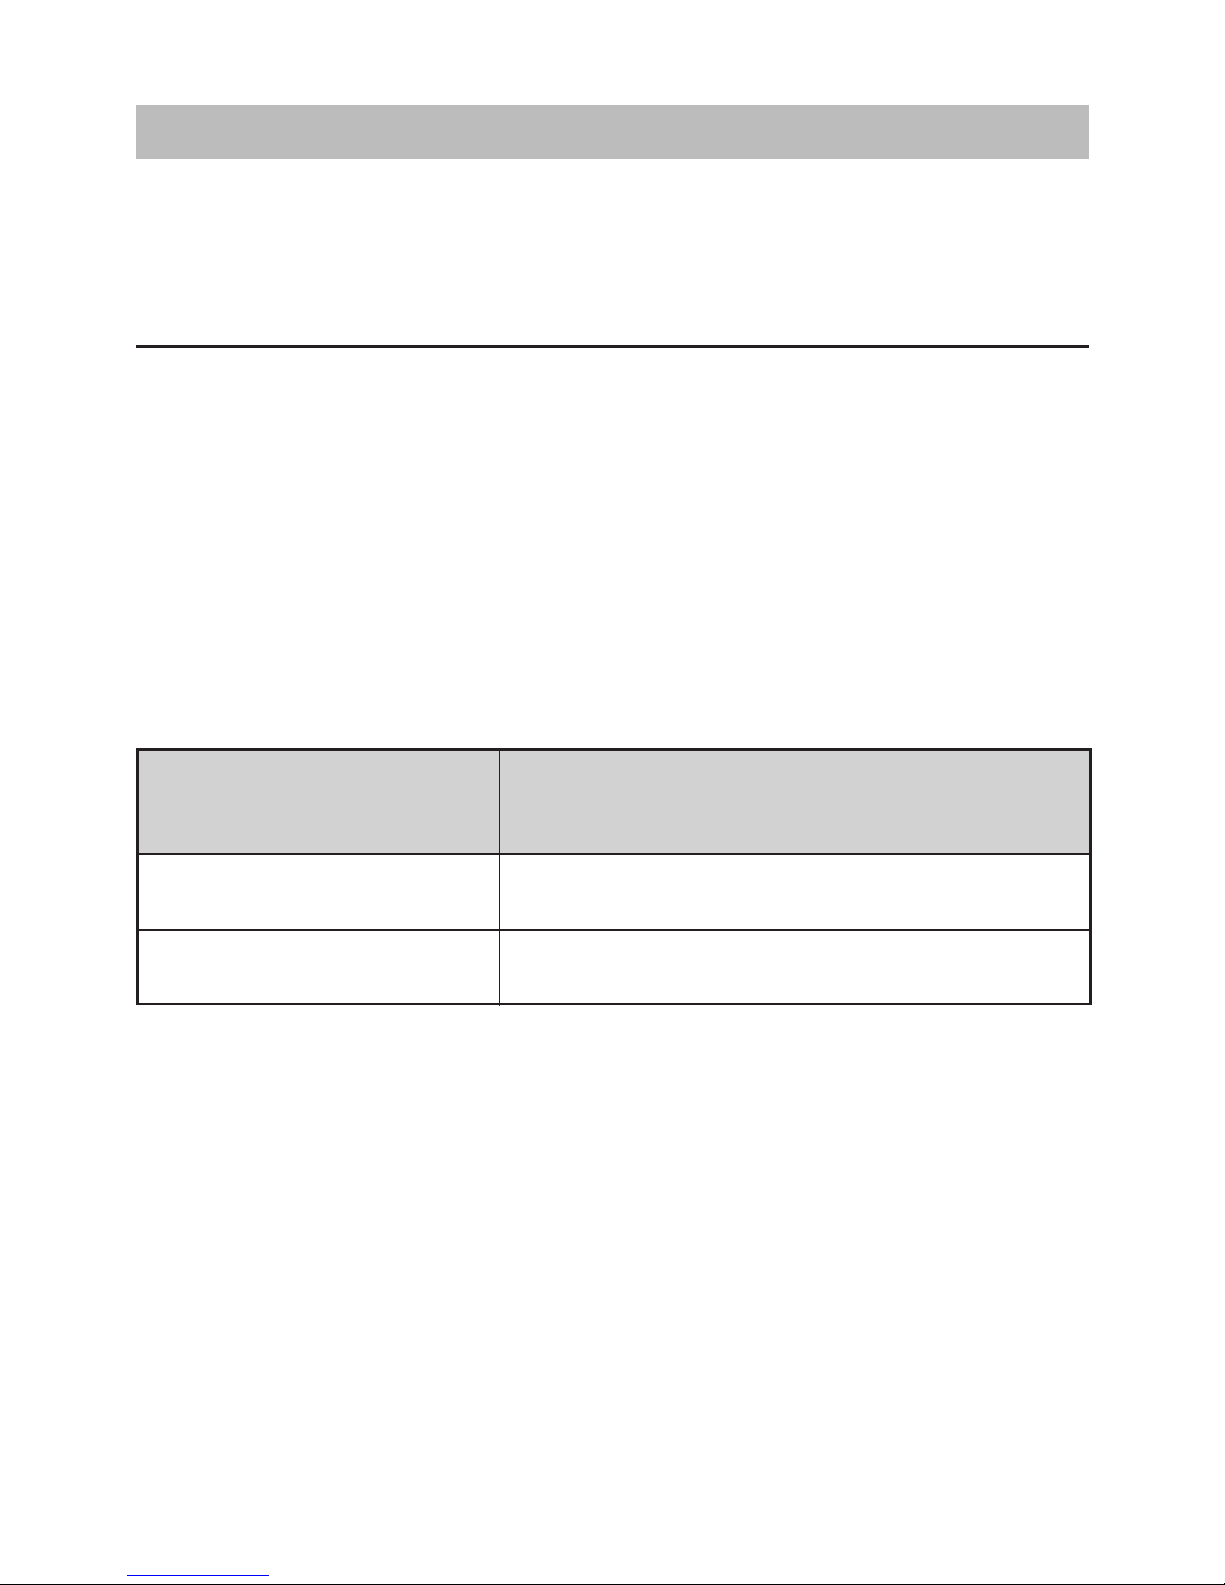
Time of day Normal plasma glucose range for people
without diabetes (mg/dL)
Less than 100 mg/dL (5.6 mmol/L)
Less than 140 mg/dL (7.8 mmol/L)
Fasting and before meal
2 hours after meals
Page 52
52
Blood Pressure
Clinical studies show that adult diabetes is often accompanied by elevated blood pressure. People with diabetes can reduce their heart risk
by managing their blood pressure along with diabetes treatment*2.
Knowing your routine blood pressure trend tells whether your body is
in good condition or not. Human blood pressure naturally increases
after reaching middle age. This symptom is a result of continuous
ageing of the blood vessels. Further causes include obesity, lack of
exercise and cholesterol (LDL) adhering to the blood vessels. Rising
blood pressure accelerates hardening of the arteries, and the body
becomes more susceptible to apoplexy and coronary infarction. The
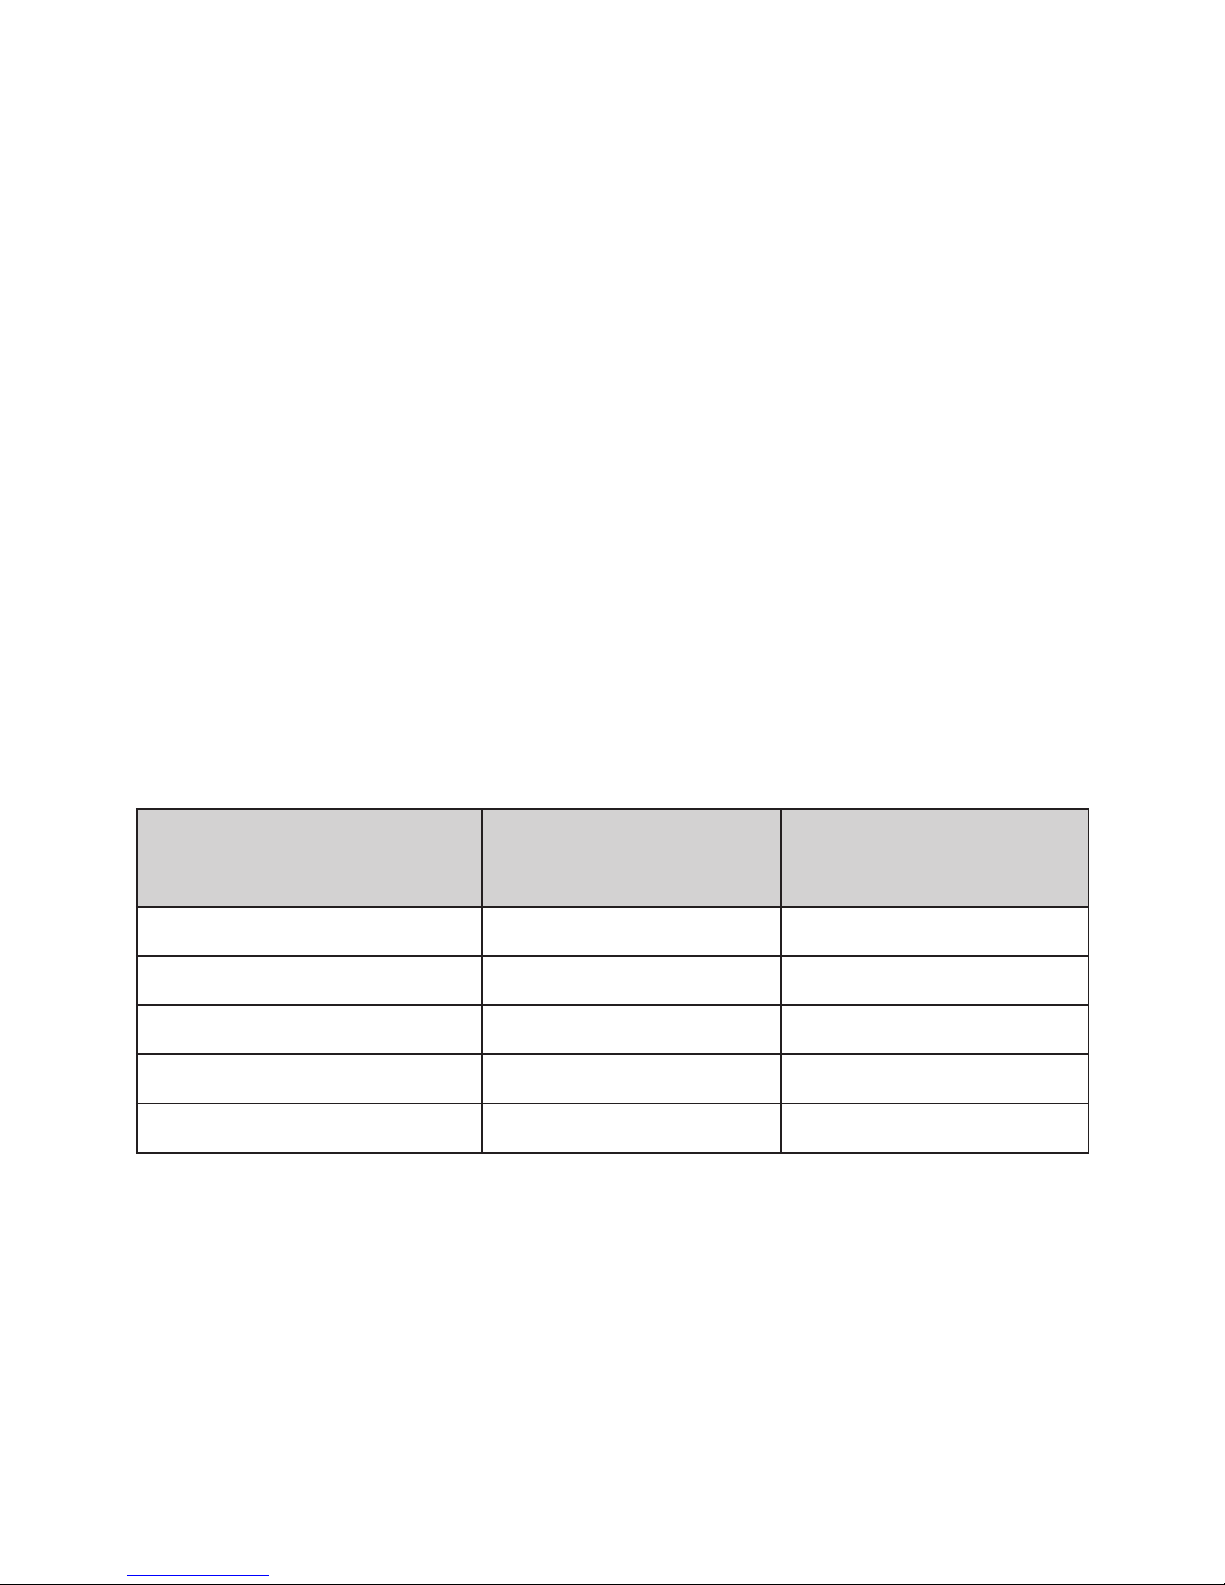
recommended blood pressure range is as below:
References:
*2: National Heart, Lung, and Blood Institute, Diseases and Conditions.
*3: The Seventh Report of the Joint National Committee on Prevention,
Detection, Evaluation, and Treatment of High Blood Pressure. NIH Publication.
2003. No. 03-5233.
*4: American Diabetes Association: The Diabetes-Heart Disease Link Surveying
Attitudes, Knowledge and Risk (2002)
Classication
Systolic Pressure
(mmHg)
Diastolic Pressure
(mmHg)
Hypotension
*3
< 90 < 60
Normal
*4
< 120 < 80
Pre-hypertension
*4
120–139 80–89
Stage 1 Hypertension
*4
140–159 90– 99
Stage 2 Hypertension
*4
≥ 160 ≥ 100
Page 53

53
Comparing Monitor and Laboratory Results
The monitor provides you with plasma equivalent results. The result
you obtain from your monitor may differ somewhat from your laboratory result due to normal variation. Monitor results can be
affected by factors and conditions that do not affect laboratory results
in the same way. To make an accurate comparison between monitor
and laboratory results, follow the guidelines below.
Before going to the lab:
• Perform a control solution test to make sure that the monitor is
working properly.
• Fast for at least eight hours before doing comparison tests,
if possible.
• Take your monitor with you to the lab.
While staying at the lab:
Make sure that the samples for both tests are taken and tested within
15 minutes of each other.
• Wash your hands before obtaining a blood sample.
• Never use your monitor with blood that has been collected in a
gray-top test tube.
• Use fresh capillary blood only.
Page 54

54
You may still have a variation from the result because blood glucose
levels can change significantly over short periods of time, especially if
you have recently eaten , exercised, taken medication, or experienced
stress*5. In addition, if you have eaten recently, the blood glucose level
from a finger prick can be up to 70 mg/dL (3.9 mmol/L) higher than
blood drawn from a vein (venous sample) used for a lab test*6. Therefore, it is best to fast for eight hours before doing comparison tests.
Factors such as the amount of red blood cells in the blood (a high or
low hematocrit) or the loss of body fluid (dehydration) may also cause
a monitor result to be different from a laboratory result.
References:
*5: Surwit, R.S., and Feinglos, M.N.: Diabetes Forecast (1988), April, 49-51.
*6: Sacks, D.B.: “Carbohydrates. “ Burtis, C.A., and Ashwood, E.R.( ed.), Tietz
Textbook of Clinical Chemistry. Philadelphia: W.B. Saunders Company (1994),
959.
Page 55
55
SPECIFICATIONS
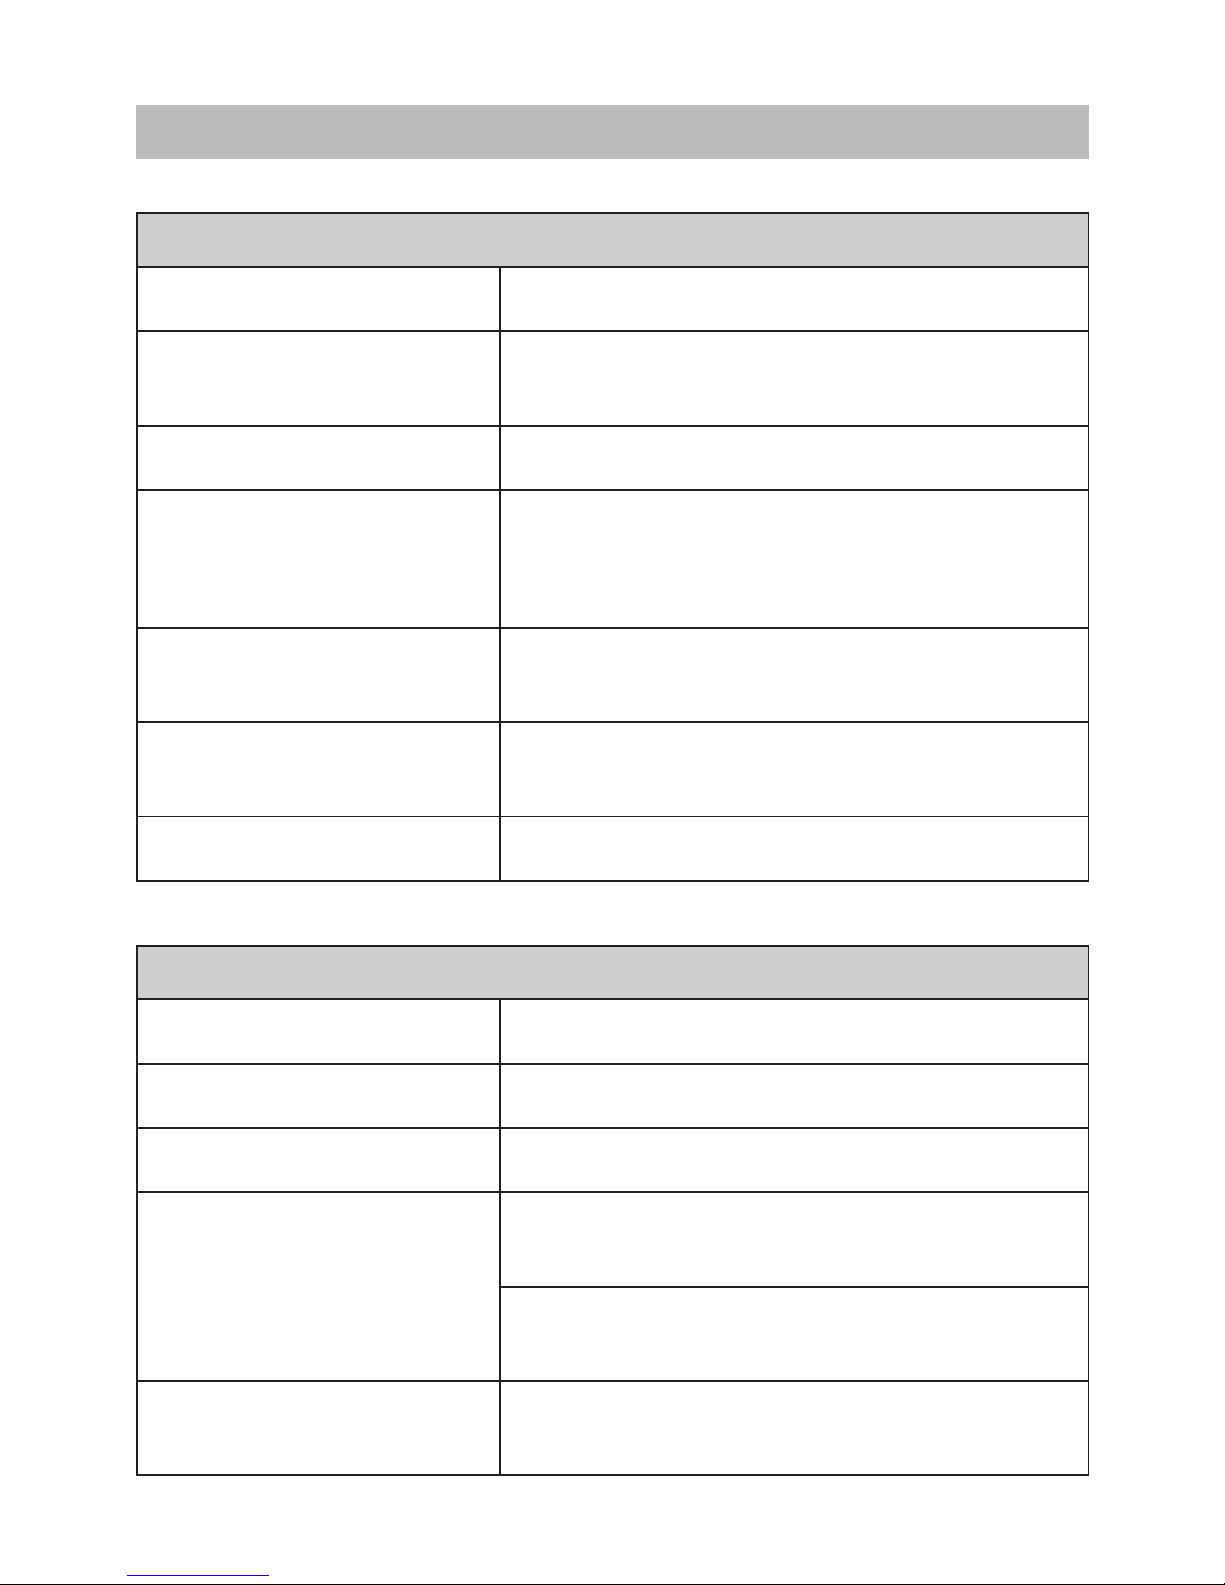
SYSTEM PERFORMANCE
Power Source Four 1.5V AA alkaline batteries
Size of Monitor w/o Cuff
155 (L) x 110 mm (W) x 69 mm (H),
340g with batteries
Memory Maximum 450 memory records
Power Saving
Automatic power off if system idle for 3
minutes (normal mode) or 5 minutes (RF
mode).
System Operating
Condition
50
°
F to
104
°
F
(10
°
C to
40
°
C
), below 85%
RH
Monitor Storage Condition
-4
°
F to
140
°
F
(-20
°
C to
60
°
C
), below 95%
RH
Power Supply Input DC +6V / 1A (max) via Power Plug
BLOOD GLUCOSE MEASUREMENT PERFORMANCE
Measurement Unit mg/dL
Linear Range 20 to 600 mg/dL (1.1 to 33.3mmol/L)
Precision ±5 % (CV)
Accuracy
±15 mg/dL (0.83 mmol/L) when glucose <
75mg/dL (4.2 mmol/L)
±20% when glucose ≥ 75mg/dL (4.2
mmol/L)
Ketone Warning
glucose value is over 240 mg/dL (13.3
mmol/L)
Page 56
56
BLOOD PRESSURE MEASUREMENT PERFORMANCE
Pressure Range 0 - 300 mmHg
Heart Rate Range 40 -199 beat per minute
Measurement Unit mmHg
Systolic Measurement Range 50 mmHg -250 mmHg
Diastolic Measurement Range 30 mmHg -180 mmHg
Pulse Rate Measurement Range 40 -199 beats / minute
Maximum Ination Pressure 300 mmHg
Accuracy of Pressure ±3 mmHg or ±2% of reading
Accuracy of Pulse Rate ±4% of reading
Page 57

57
This device has been tested to meet the electrical and safety
requirements of: IEC/EN 60601-1, IEC/EN 60601-1-2, IEC/EN
61010-1, IEC/EN 61010-2-101, IEC/EN 61326-2-6.
Reference to Standards:
• EN 1060-1 / EN 1060-3, NIBP-requirements
• IEC 60601-1 General requirement for safety
• IEC 60601-1-2 Requirements for EMC
• EN 1060-4, NIBP clinical investigation
• AAMI/ANSI /IEC 80601-2-30, ANSI/AAMI/ISO 81060-2, NIBP
requirements
Page 58

58
 Loading...