

Page 1
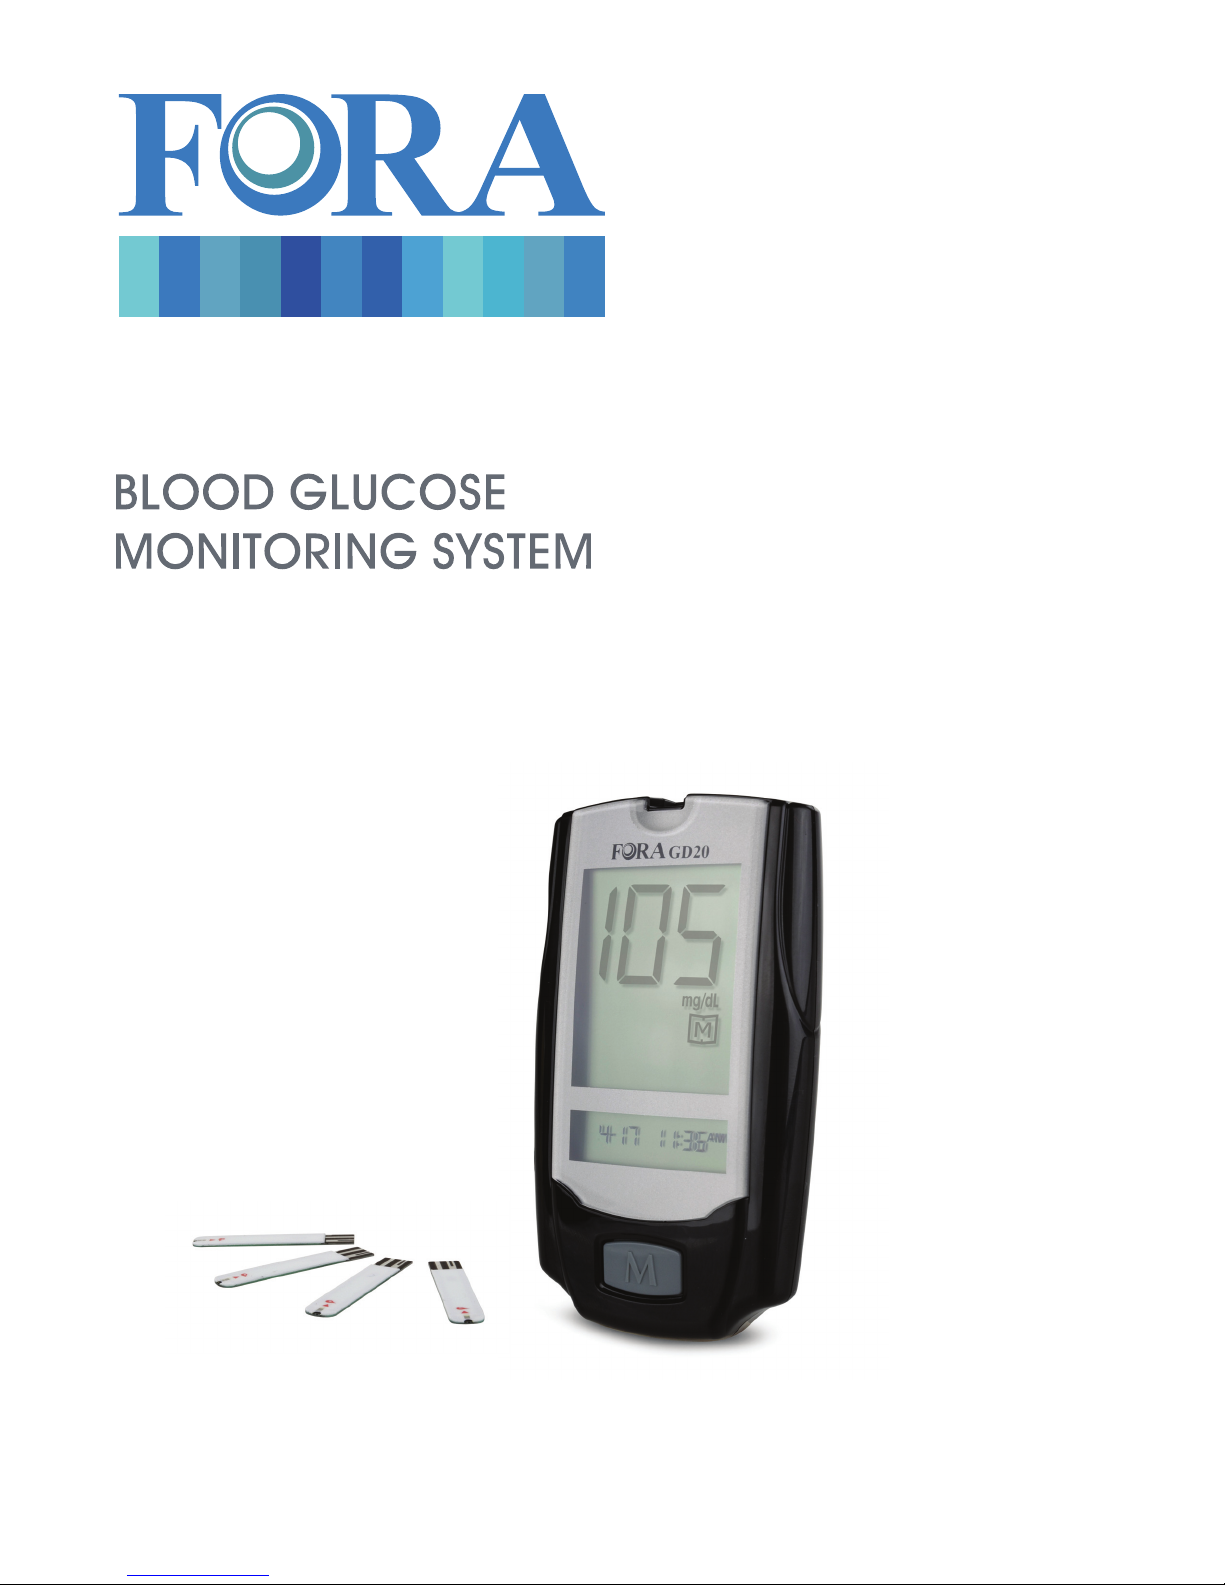
GD20
Operations & Procedures Manual
Long Term Care
Page 2

Thank you for purchasing the ForaCare GD20 Blood Glucose Monitoring System. This manual
provides important information to help you to use the system properly. Before using this product,
please read the following contents thoroughly and carefully.
If you have other questions regarding this product, please contact the place of purchase or call
Customer Service at (888) 425-1149.
The FORA GD20 is intended for multi-patient use in a long term care setting. Please note that the
following Procedures are provided only as a model to help your facility establish its own policy and
procedures. Your own policy may differ depending upon the existing procedures. Please consult with
the Director of Nursing for further guidance.
CAUTION: Please carefully read the User’s Manual and all product instructions before using
this Long Term Care Manual and administering blood glucose tests.
Page 3
TABLE OF CONTENTS
IMPORTANT SAFETY PRECAUTIONS
Interfering Substances / Regulatory Requirements
BEFORE YOU BEGIN
INTENDED USE
TEST PRINCIPLE
ALTERNATIVE SITE TESTING
METER OVERVIEW
Test Strip
Setting the Meter
QUALITY CONTROL TESTING
BLOOD GLUCOSE TESTING
CLEANING AND DISINFECTION PROCEDURES
METER MEMORY
DOWNLOADING RESULTS ONTO A COMPUTER
3
4
5
5
5
6
7
8
8
9
11
13
14
14
MAINTENANCE
Replacing the Battery
Meter Storage
Important Test Strip Information
Important Control Solution Information
SYSTEM TROUBLESHOOTING
Result Readings
Error Messages
Troubleshooting
SPECIFICATIONS
TRAINING TOOLS
Attachment 1: Training Checklist
Attachment 2: Training Quiz
Attachment 3: Quality Control Records Result
15
15
16
16
16
17
17
17
17-18
18
19
19
20-21
22
Notes
2
23-24
Page 4

IMPORTANT SAFETY PRECAUTIONS
READ BEFORE USE
Users need to adhere to Standard Precautions when handling or using this device. All parts of the
glucose monitoring system should be considered potentially infectious and are capable of transmitting
blood-borne pathogens between patients and healthcare professionals. For more information, refer to
“Guideline for Isolation Precautions: Preventing Transmission of Infectious Agents in Healthcare Set-
tings 2007”, http://www.cdc.gov/hicpac/2007ip/2007isolationprecautions.html .
The meter should be disinfected after use on each patient. This Blood Glucose Monitoring System
may only be used for testing multiple patients when Standard Precautions and the manufacturer’s
disinfection procedures are followed.
Only auto-disabling, single use lancing devices should be used with this device.
1. Use this device ONLY for the intended use described in this manual.
2. DO NOT use accessories which are not specifi ed by the manufacturer.
3. DO NOT use the device if it is not working properly or if it is damaged.
4. DO NOT under any circumstances use the device on neonates or infants.
5. This device does NOT serve as a cure for any symptoms or diseases. The data measured is for
reference only.
6. Before using this device to test blood glucose, read all instructions thoroughly and practice the test.
Carry out all the quality control checks as directed.
7. Keep the device and testing equipment away from young children. Small items such as the battery
cover, batteries, test strips, lancets and vial caps are choking hazards.
3
Page 5
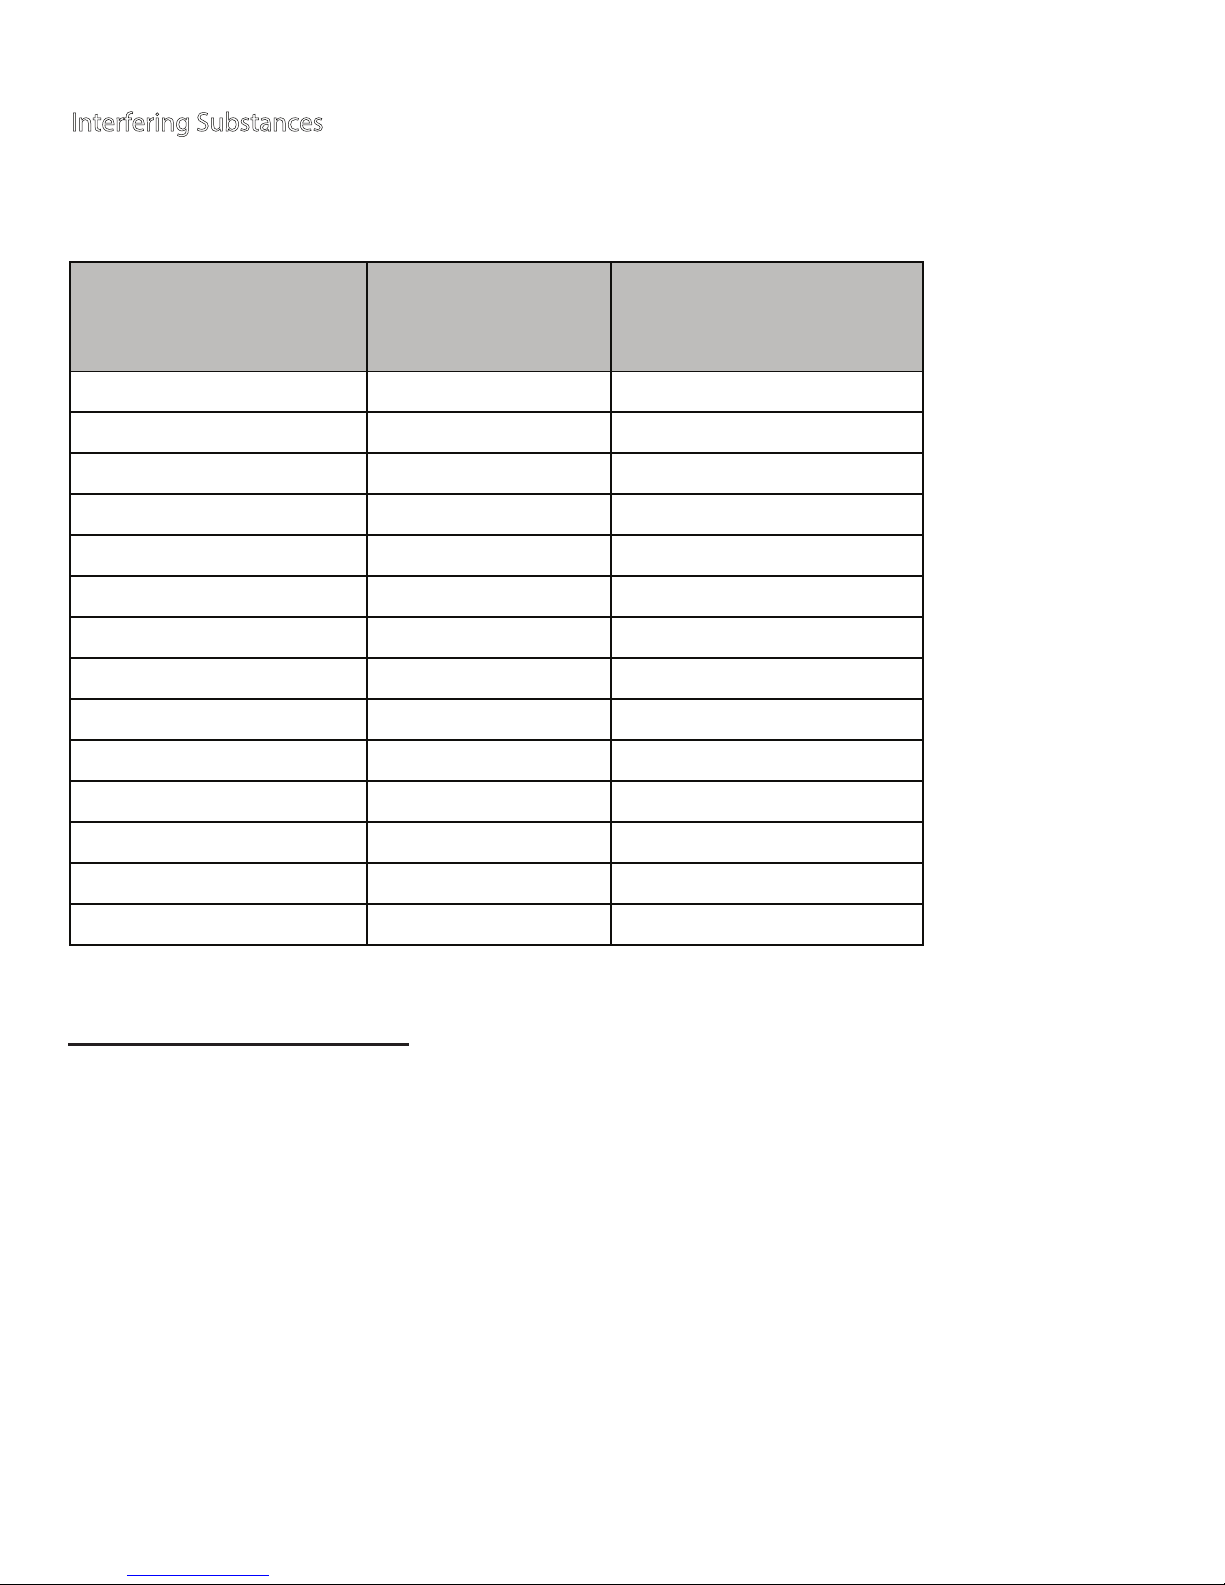
Interfering Substances
Interfering substances depend on the concentration. The interfering substances listed
below may produce elevated glucose test results (up to test concentration levels noted).
Substance
Limiting
Concentration
(mg/dL)
Therapeutic / Physiological
Concentration Range
(or Upper Limit) (mg/dL)
Acetaminophen 6.25 0.45 - 3
Ascorbic Acid 5 2
Bilirubin (Unconjugated)
20 0 - 2
Dopamine 1.25 0.03
Levo - Dopa 0.7 0.02 - 0.28
Methyl - Dopa 1.875 0.1 - 0.5
Glutathione Reduced 23 47 - 100 (intracellular)
Pralidoxime Iodide 5 ~10 ( IV Dose 500mg)
Tolazamide 12.5 1.6
Uric Acid 10 .2 - 8
Mannitol 5000 0.0128
Mannose 125 1.15
Xylose 3.125 N/A
*Na-Fluoride/K-Oxalate <250 250
* The NaF/Koxalate concentration is the standard concentration in a blood collection tube.
Regulatory Requirements
The Clinical Laboratory Improvement Amendments (CLIA) has classifi ed tests of blood glucose as
tests that are waived. For all entities that conduct one or more tests, including waived tests
on materials derived from the human body for the purpose of providing information for the diagnosis,
prevention or treatment of any disease or impairment of, or the assessment of the health
of human beings, CLIA has stated that the entity conducting the tests shall meet certain Federal
requirements. If any entity conducts tests for the aforementioned purposes, then the entity, under
CLIA, is considered to be a laboratory and thus must register with the CLIA Program.
KEEP THESE INSTRUCTIONS
4
IN A SAFE PLACE
Page 6
BEFORE YOU BEGIN
INTENDED USE
Severe dehydration and excessive water loss
may cause readings which are lower than actual
values. If the patient is suffering from severe
dehydration, consult a healthcare professional
immediately.
If the patient’s blood glucose results are lower or
higher than usual, and do not have any
symptoms of illness, fi rst repeat the test. If
the patient has symptoms or continue to get
results which are higher or lower than usual,
follow the treatment advice of the healthcare
professional.
Use only fresh whole blood samples to test
patient’s blood glucose. Using other substances
will lead to incorrect results.
Test Concentration
mg/dl
This system is intended to be used for the
quantitative measurement of glucose (sugar)
in fresh whole blood samples (from the fi nger,
palm, forearm and upper arm). This system is
intended for multiple-patient use in professional
healthcare settings as an aid to monitor the
effectiveness of diabetes control.
It should not be used for the diagnosis of
diabetes, or testing on neonates. Alternative
site testing should be done only during
steady–state times (when glucose is not
changing rapidly).
% Bias at
80±5 mg/dl
% Bias at
120±5 mg/dl
TEST PRINCIPLE
Your system measures the amount of sugar
(glucose) in whole blood. The glucose testing is
If the patient has symptoms that are inconsistent
with the blood glucose test results and you have
followed all the instructions given in this owner’s
manual, contact the healthcare professional.
We do not recommend using this product on
severely hypotensive individuals or patients in
shock. Readings which are lower than actual
values may occur for individuals experiencing
a hyperglycaemic-hyperosmolar state, with or
without ketosis. Please consult the healthcare
professional before use.
based on the measurement of electrical
current generated by the reaction of glucose with
the reagent of the strip. The meter measures the
current, calculates the blood glucose level, and
displays the result. The strength of the
current produced by the reaction depends on
the amount of glucose in the blood sample.
This system uses enzyme of FAD–dependent
glucose dehydrogenase.
5
Page 7
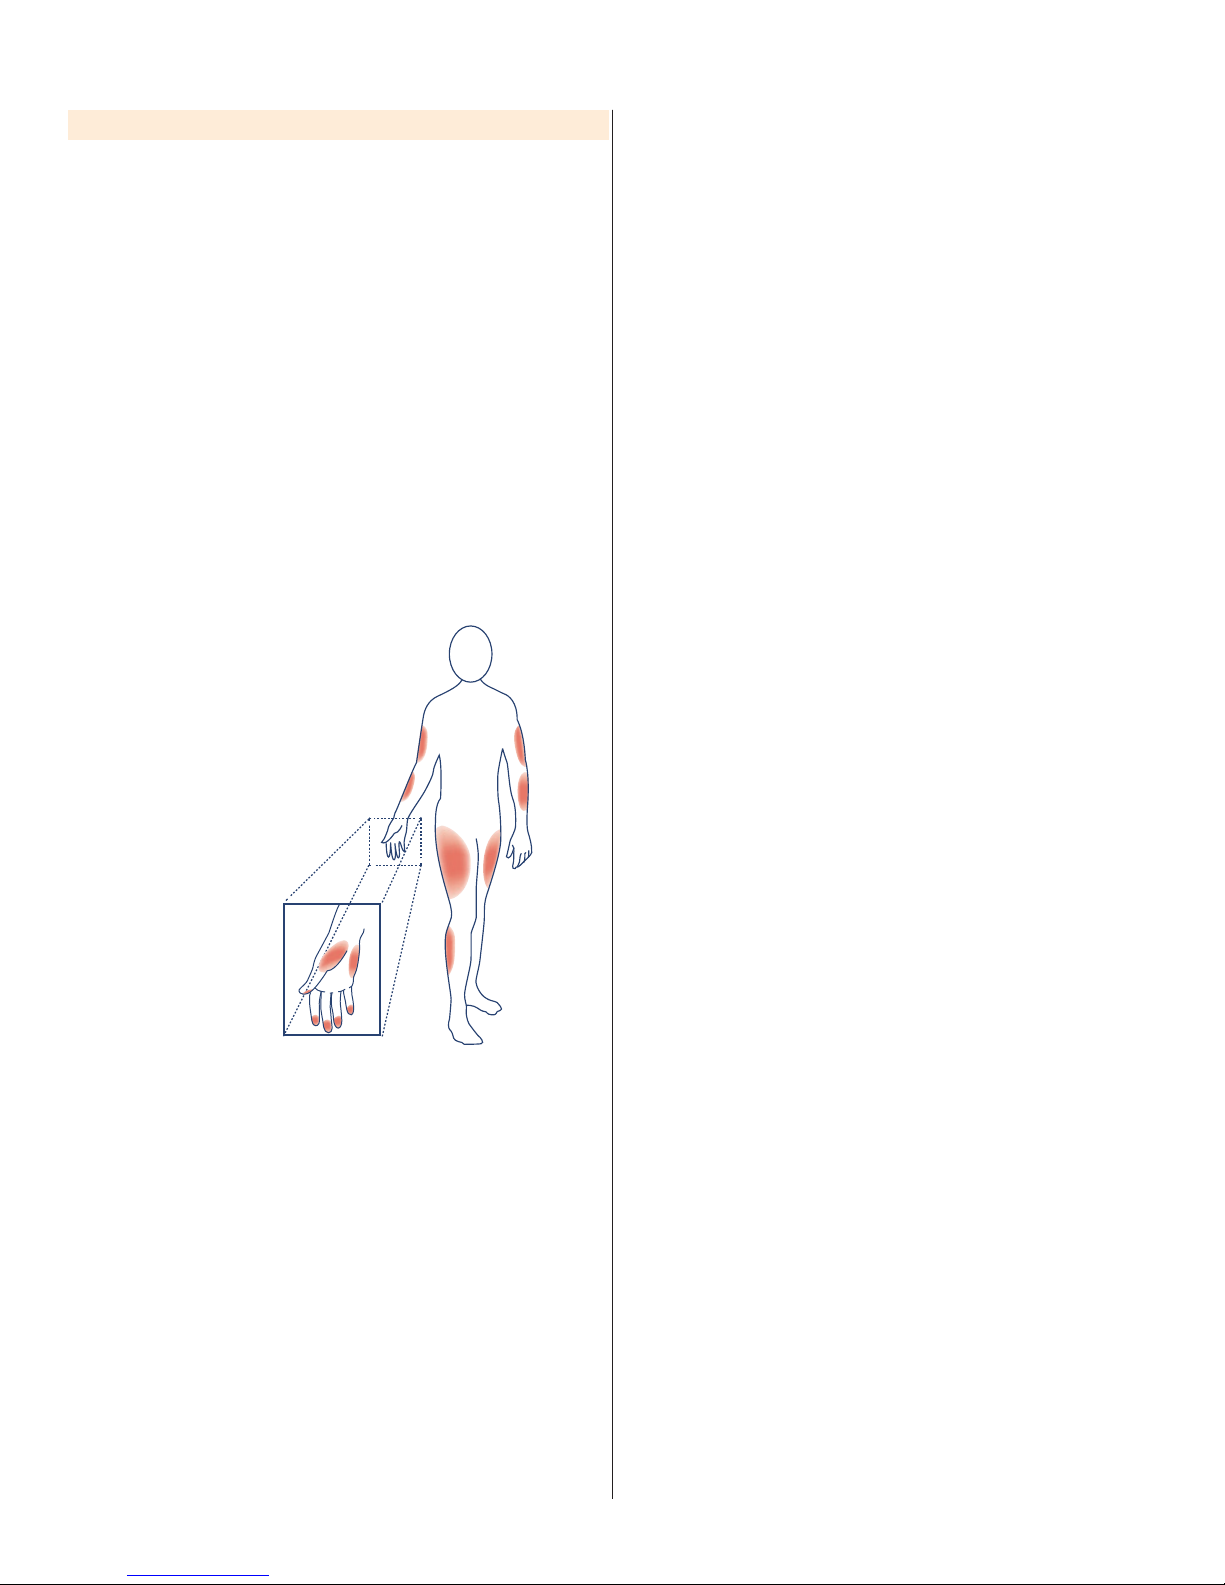
ALTERNATIVE SITE TESTING
IMPORTANT:
There are limitations with AST (Alternative Site
Testing). The alternative site testing of the system
can be used in only during steady-state blood
glucose conditions. Please consult the doctor
before you perform AST on the patient.
so condensed, patients will not feel as much pain
as at the fi ngertip.
When to use AST?
Food, medication, illness, stress and exercise
can affect blood glucose levels. Capillary blood
at fi ngertip refl ects these changes faster than
capillary blood at other sites. Therefore when
testing blood glucose during or immediately after
Measurements from alternative site testing
should never be used to calibrate a continuous
glucose monitoring systems (CGMs) or entered
into insulin dose calculators for insulin dosing
recommendations.
meal, physical exercise, or any other event, take
blood sample from fi nger only. We strongly
recommend that you perform AST ONLY at the
following times:
• In a pre-meal or fasting state (more than 2
hours since the last meal).
• Two hours or more after aking insulin.
• Two hours or more after exercise.
Do NOT use AST if:
• Your patient has frequent low blood glucose.
• The AST results do not match the way the
patient feels.
• You are testing for hyperglycemia.
What is AST?
Alternative site testing (AST) means that people
use parts of the body other than fi ngertips to check
their blood glucose levels. This system provides
you to test on the palm, the forearm, the upper
arm, and with the equivalent results to fi ngertip
testing.
What’s the advantage?
Fingertips feel pain more readily because they are
full of nerve endings (receptors).
At other body sites, since nerve endings were not
6
• You are testing for hypoglycemia.
• The patient’s routine glucose results are often
fl uctuating.
Page 8
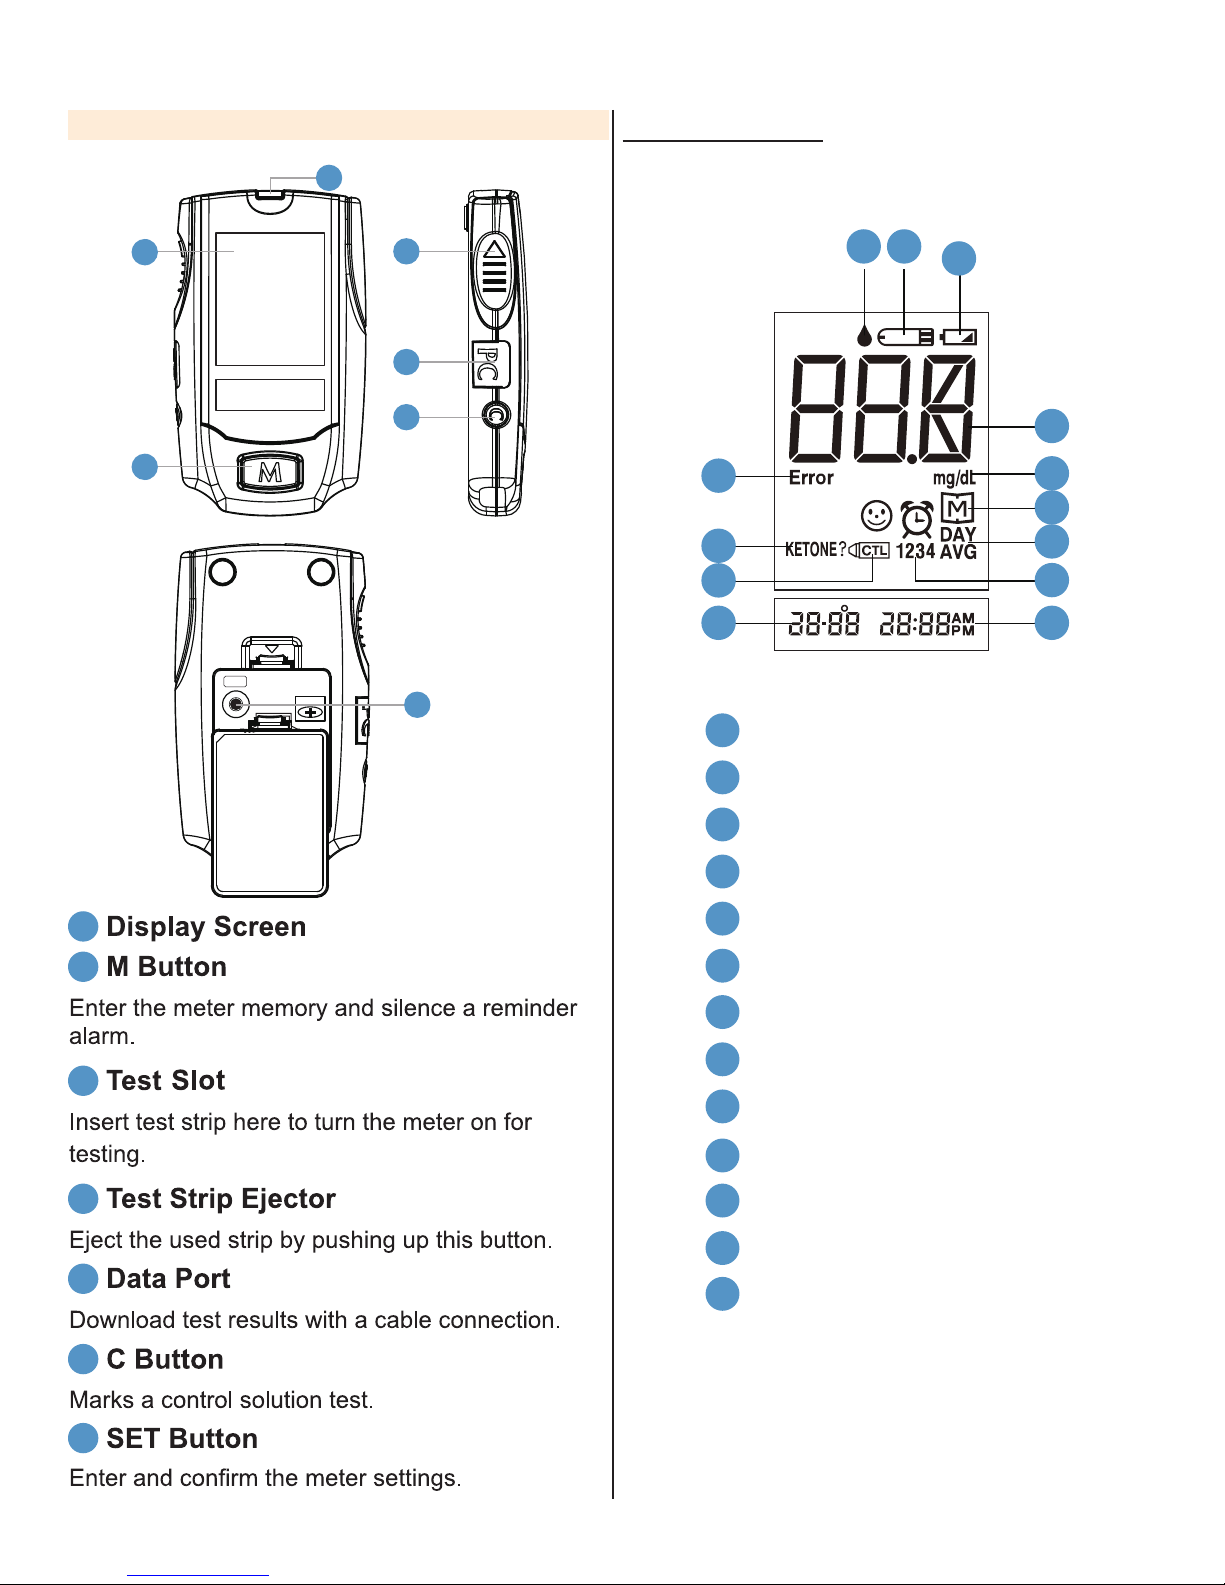
METER OVERVIEW
3
1
Display Screen
4
5
1
3
2
6
2
13
4
5
6
12
11
7
8
910
SET
1
2
BATTERY
CR2032
7
1
Blood sample symbol
2
Test strip symbol
3
Low battery symbol
4
Test result
5
Measurement unit
6
Memory symbol
3
4
5
6
7
7
8
9
10
11
12
13
Day average
Reminder alarm
Time
Date
Control solution mode
Ketone warning
Error
7
Page 9
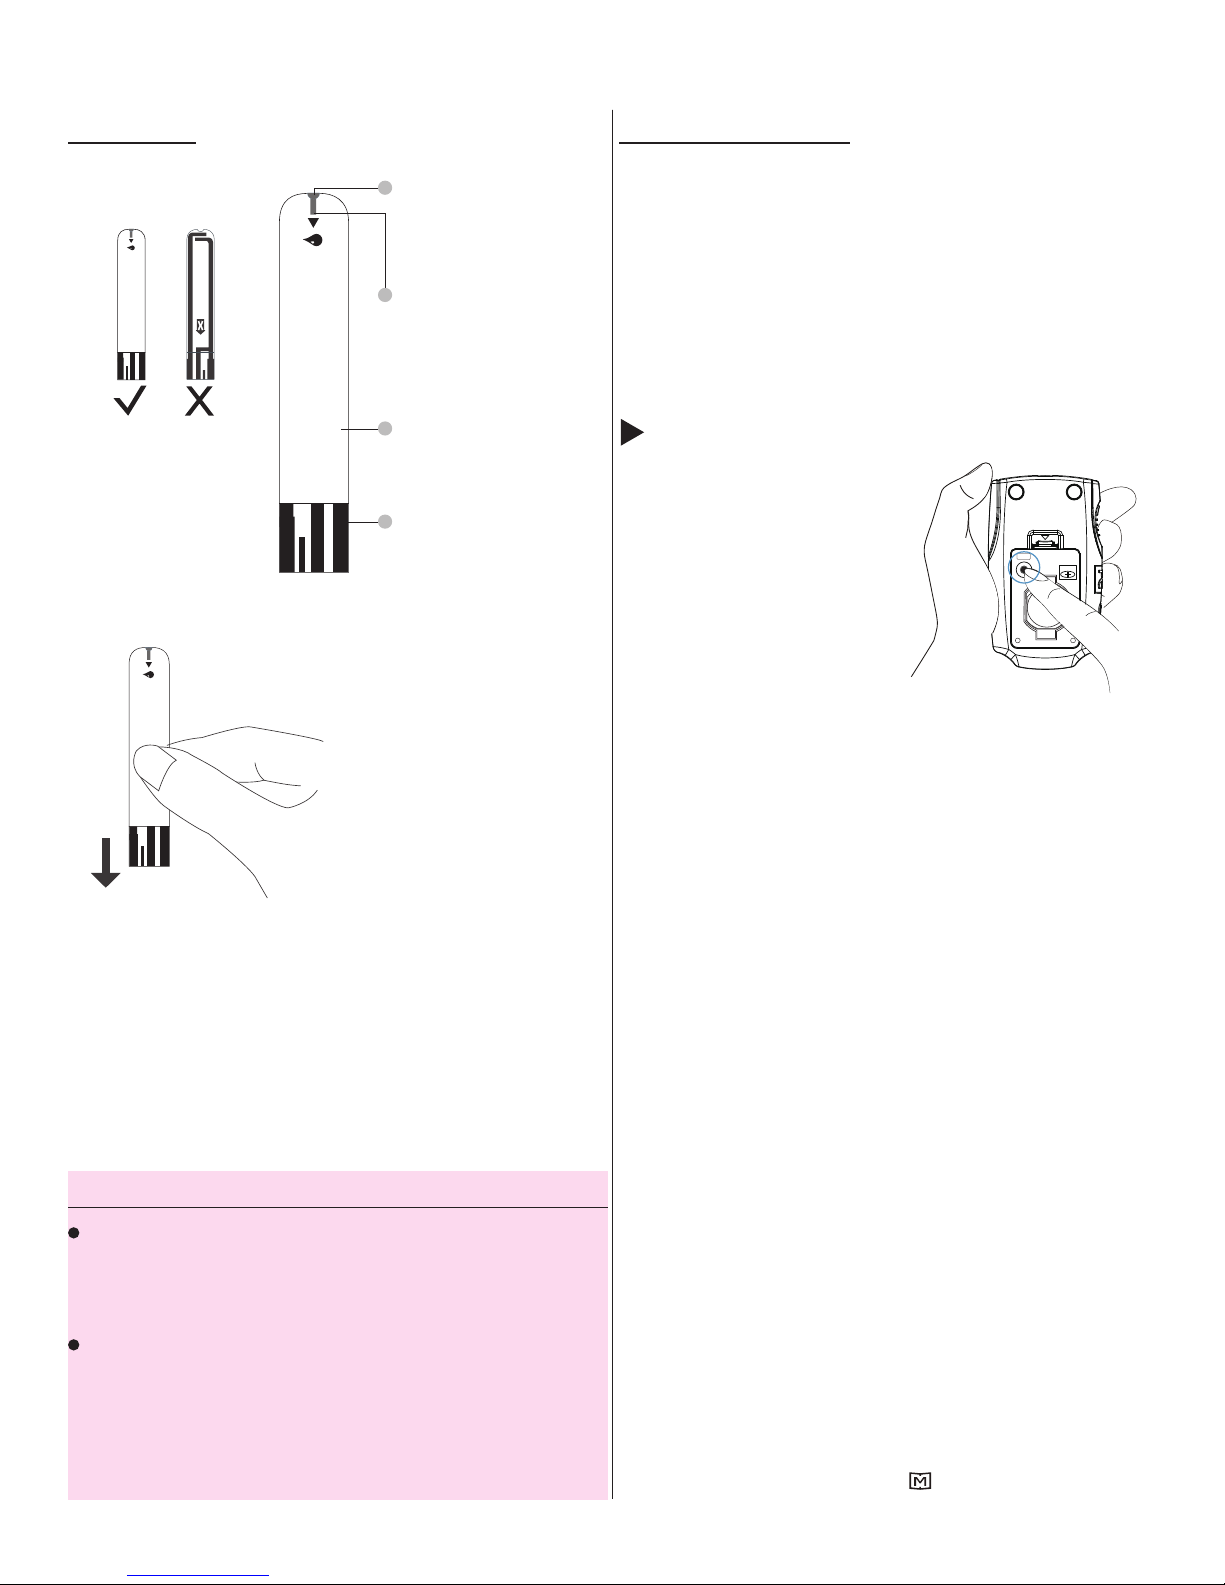
Test Strip Setting the Meter
1
BackFront
The front side of the
test strip should face
up when inserting
the test strip.
Absorbent Hole
Apply a drop of blood here.
The blood will be
automatically absorbed.
2
Confi rmation Window
This is where you confi rm if
enough blood has been
applied to the absorbent
hole in the strip.
3
Test Strip Handle
Hold this part to insert the
test strip into the slot.
4
Contact Bars
Insert this end of the test
strip into the meter. Push
it in fi rmly until it will go no
further.
Before using the meter for the fi rst time or if you
change the meter battery, you should check and
update these settings. Make sure you complete
the steps below and have your desired settings
saved.
Entering the Setting Mode
Start with the meter off
(no test strip inserted).
Press SET to turn on the
meter.
1. Setting the date
With the year fl ashing,
SET
CR2032
BATTERY
ATTENTION:
Test results might be wrong if the
contact bar is not fully inserted into
the test slot.
NOTE
This system uses enzyme of glucose
dehydrogenase (GDH).
press M to select
the correct year. Press SET.
With the month fl ashing, press M to select
the correct month. Press SET.
With the day fl ashing, press M to select the
correct day. Press SET.
2. Setting the time format
Press and release M to select the desired time
format --- 12h or 24h. Press SET to confi rm.
3. Setting the time
With the hour fl ashing, press M to select the
correct hour. Press SET to confi rm.
The FORA GD20 meter should only be used
with FORA GD20 Test Strips. Using other test
strips with this meter will produce inaccurate
results.
8
With the minute fl ashing, press M to select
the correct minute. Press SET to confi rm.
4. Deleting the memory
With “dEL” and a fl ashing “ ” symbol on the
Page 10
display, press M and select “No” to keep the results
in memory then press SET to skip.
QUALITY CONTROL TESTING
Quality control testing using the FORA Control
To delete all the results, press M to select “Yes”.
Then press SET to delete All results. ”OK” is dis-
played in the meter, which means that all data
stored is deleted.
5. Setting the reminder alarm
You may set up any or all of the reminder alarms
(1-4). The meter displays “On” or “OFF” and ,
press M to turn on or turn off to set the fi rst
reminder alarm.
Press M to select “On”, then press SET to set the
hour. When the hour is fl ashing, press M to add an
hour. Press SET to confi rm. Now adjust the
minutes. Press M to add one minute. Hold M
longer to add faster. Press SET to confi rm and go
Solution is required to check the performance
of the FORA GD20 Blood Glucose Monitoring
System. The FORA Control Solution checks if the
meter and test strips are working correctly as a
system and if the system is being utilized correctly.
This section explains how to take a control
solution test in order to verify the performance of
FORA GD20 Blood Glucose Monitoring System.
You Should Perform a Control Solution Test
Before testing with the FORA GD20 Blood
Glucose Monitoring System for the fi rst time.
When you open a new vial of test strips.
to the next alarm setting.
If you do not want to set an alarm, press SET to
skip this step. If you want to turn off an alarm, fi nd
the alarm number by pressing SET in the setting
mode, press M to change from “ON” to “OFF”. At
the time of your alarm, the meter will beep and
automatically turn on.
You can press M to silence the alarm and insert
a test strip to begin testing. If you do not press M,
the meter will beep for 2 minutes then switch off.
If you do not want to test at this time, press M to
switch off the meter.
NOTE
These parameters can ONLY be changed in the
Whenever you suspect the meter or test strips
may not be functioning properly.
If test results appear to be unusually high or low
or are inconsistent with clinical symptoms.
To check your technique.
When the FORA GD20 meter has been dropped
or you think you may have damaged the meter.
IMPORTANT:
Depending on different state regulations,
control solution testing may be required on a
daily basis. Refer to your facility procedures for
further details.
setting mode.
If the meter is idle for 3 minutes during the
setting mode, it will automatically switch off.
9
Page 11
NOTE
WARNING:
Only use the control solutions for FORA GD20
test strips.
When using a new bottle of control solution,
write the opening date on the bottle label. Each
bottle of control solution is stable for use within 90
days after fi rst opening (replace cap tightly after
each use). Discard all remaining open solutions
after 90 days.
Shake the control solution bottle several times
before use, discard the fi rst drop of control
solution and wipe off the dispenser tip to ensure a
pure sample and an accurate result.
Equipment Needed:
1. FORA GD20 Blood Glucose Meter
2. FORA GD20 (GDH) Control Solutions
3. FORA GD20 Test Strips
When doing a control solution test, you need to
Press C to mark it so the test result will not be
stored in the memory. Failure to do so will mix
up the control solution test with a blood glucose
test result in the memory.
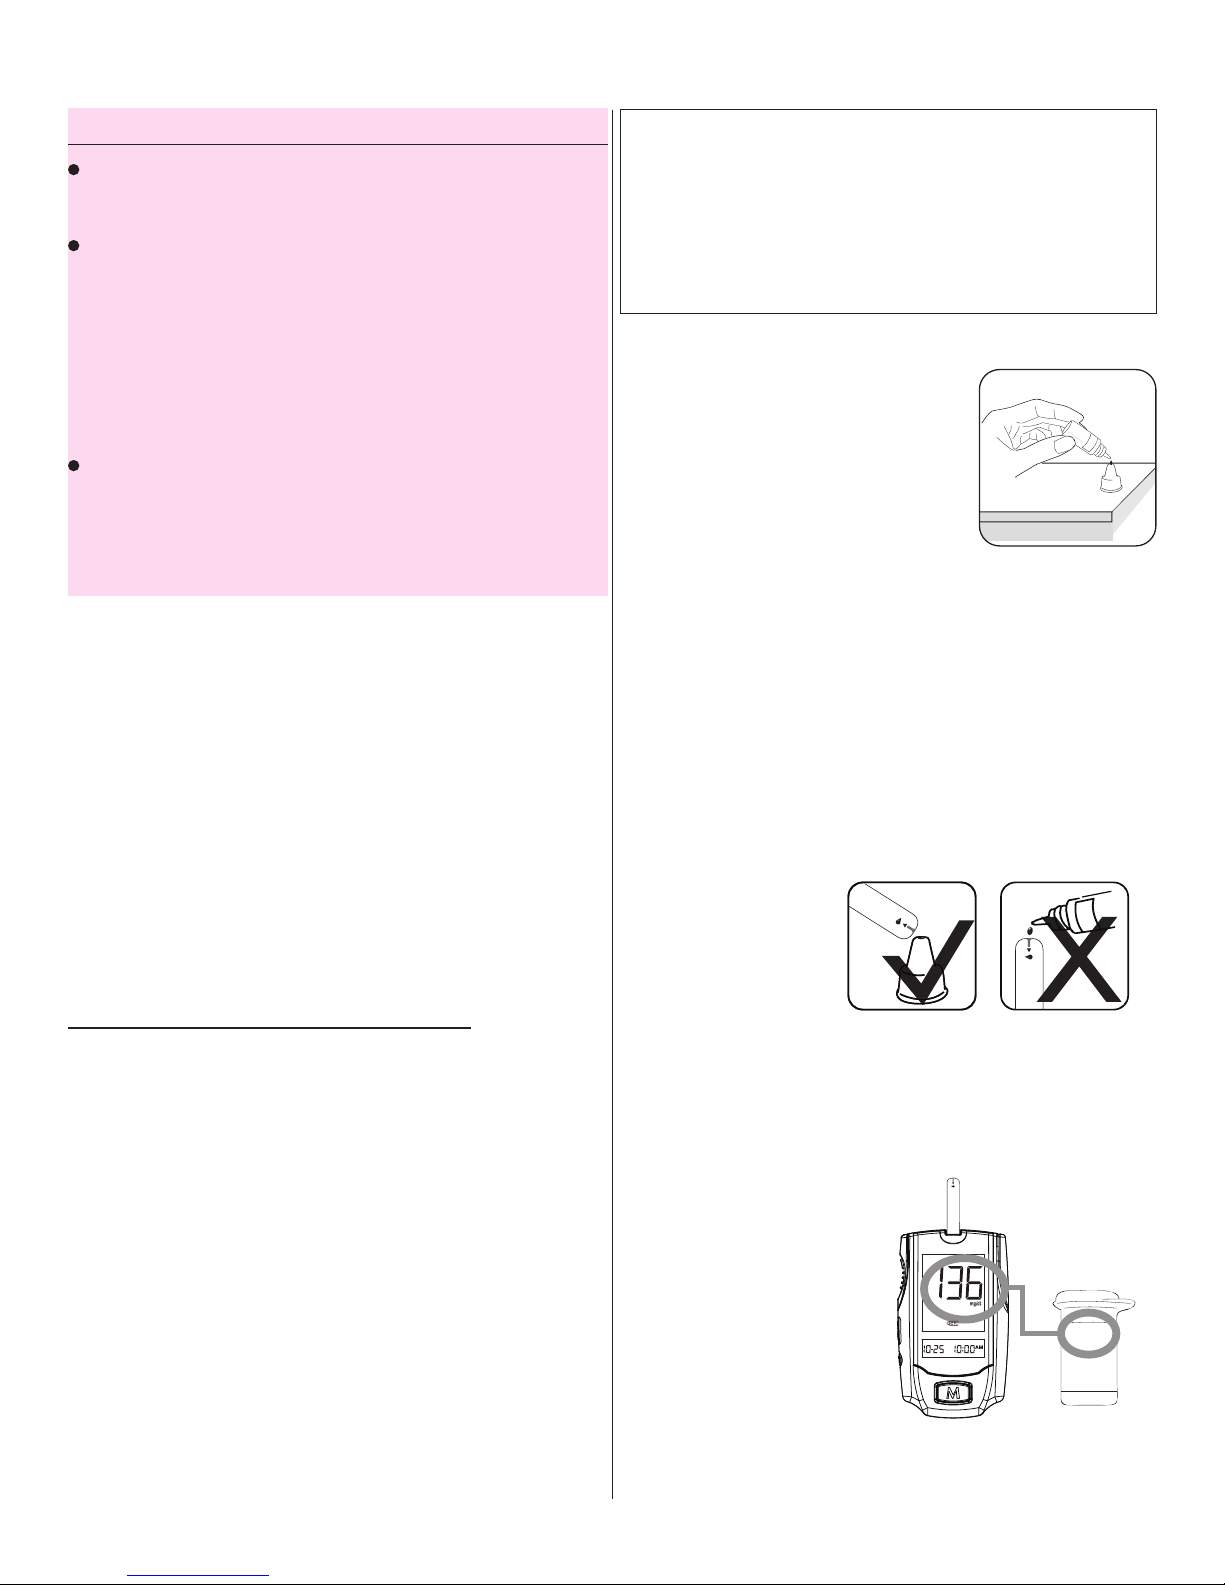
3. Apply control solution
Shake the control solution vial
thoroughly before use.
Squeeze out a drop and wipe it
off, then squeeze out another
drop and place it on the tip of the
vial cap.
Hold the meter to move the sample area of the
test strip to touch the drop. Once the confi rmation
window fi lls completely, the meter will begin
counting down.
4. FORA GD20 Meter Record Sheet
Performing a Control Solution Test
1. Insert the test strip to turn on the meter
Insert the test strip into the meter. Wait for the
meter to display the test strip and blood drop
symbols.
2. Press C to mark this test as a control
solution test
With “CTL” displayed, the meter will not store your
test result in memory. If you press the C button
again, the “CTL” will disappear and this test is no
To avoid contaminating the control solution, do not
directly apply control solution onto a strip.
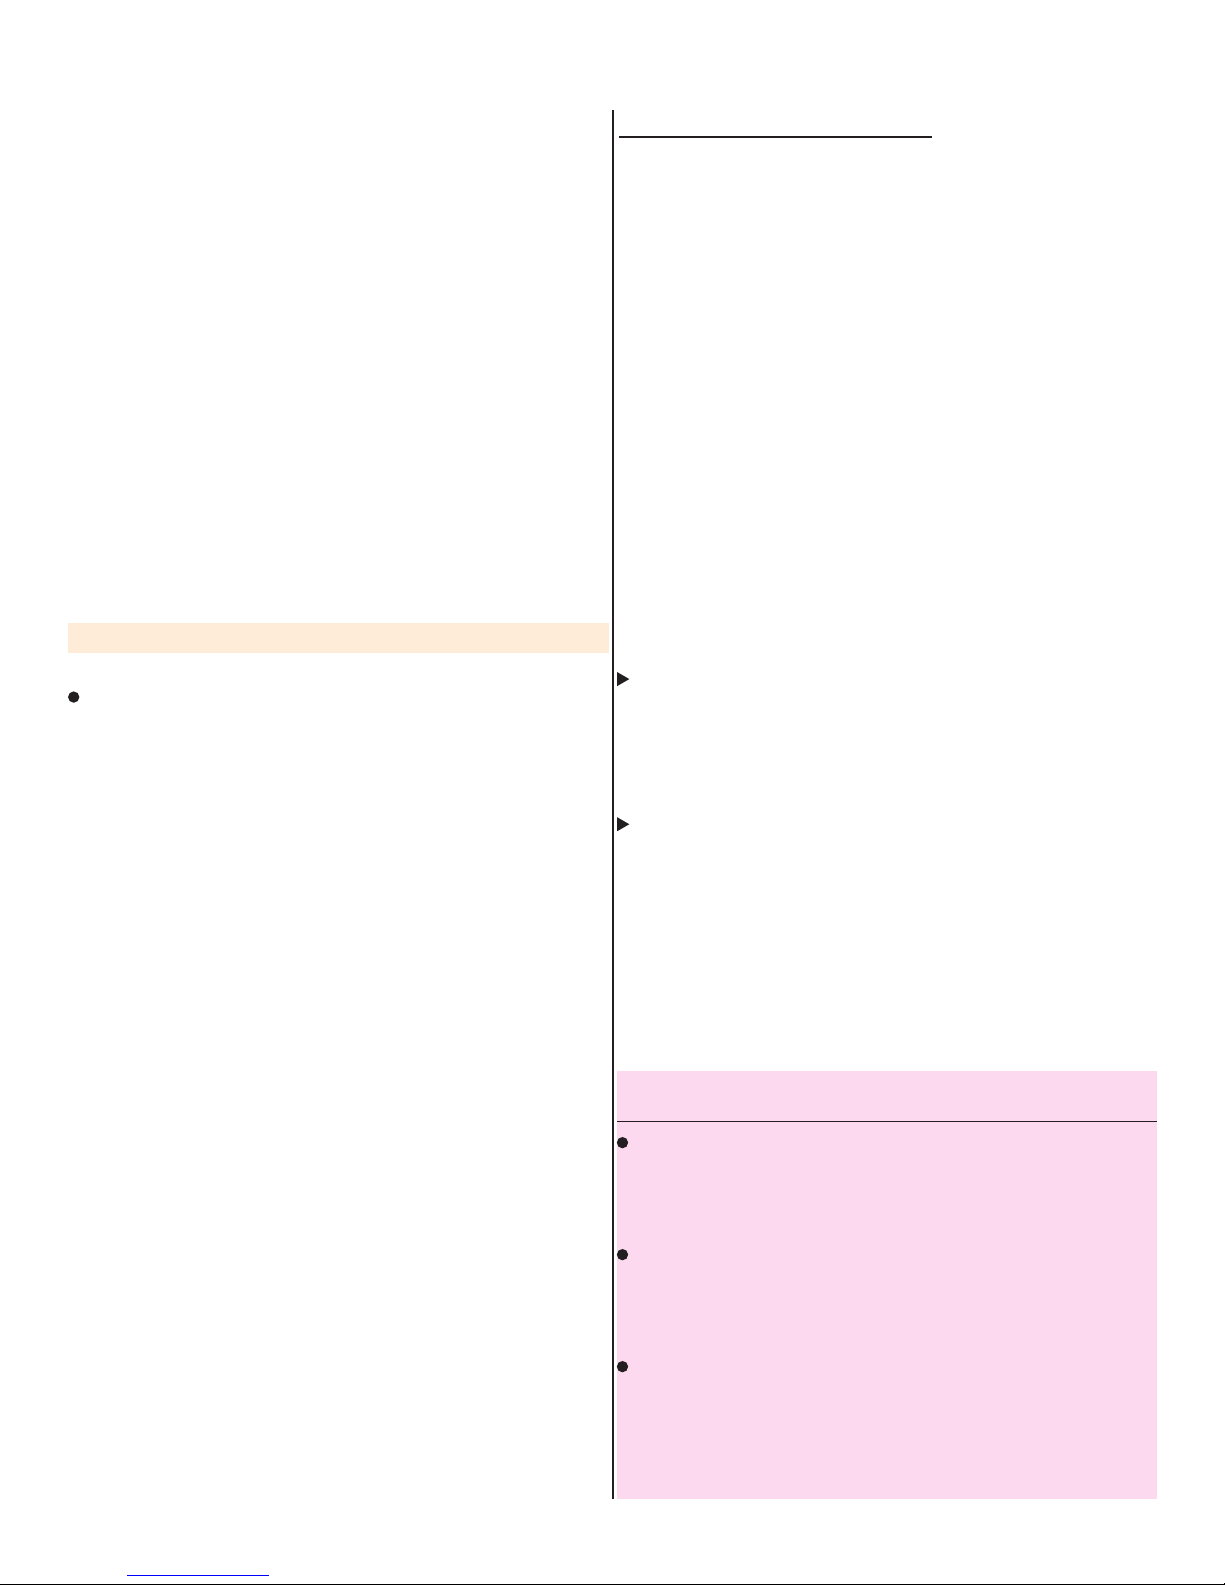
4. Read and compare the result
After counting down to 0, the control solution
test result will appear on the display. Compare
this result with the range printed on the test strip
vial. It should fall within
this range. If not, please
read the instructions
again and repeat
the control solution test.
109~165
longer a control solution test.
10
Page 12
5. Record the results.
Preparing the Puncture Site
Record the control solution test results in the
System Quality Control Results Record sheet or
as instructed by your facility.
Out-of-range results
If you continue to have test results fall outside the
range printed on the test strip vial, the meter
and/or strips may not be working properly.
Please check the Troubleshooting section for
possible causes and actions. If a problem still
persists, contact Customer Service at
(888) 425-1149 for assistance.
BLOOD GLUCOSE TESTING
If a single meter is used to test multiple patients,
the meter must be cleaned and disinfected using
the instructions as specifi ed in this manual after
Stimulating blood perfusion by rubbing the
puncture site before blood extraction has a
signifi cant infl uence on the glucose value obtained.
Please follow the suggestions below before
obtaining a drop of blood:
Wash and dry your hands before starting.
1. Put on a new pair of gloves.
2. Select the puncture site.
3. Clean the puncture site using cotton moistened
with 70% alcohol and let it air dry.
4. Rub the puncture site for about 20 seconds
before penetration.
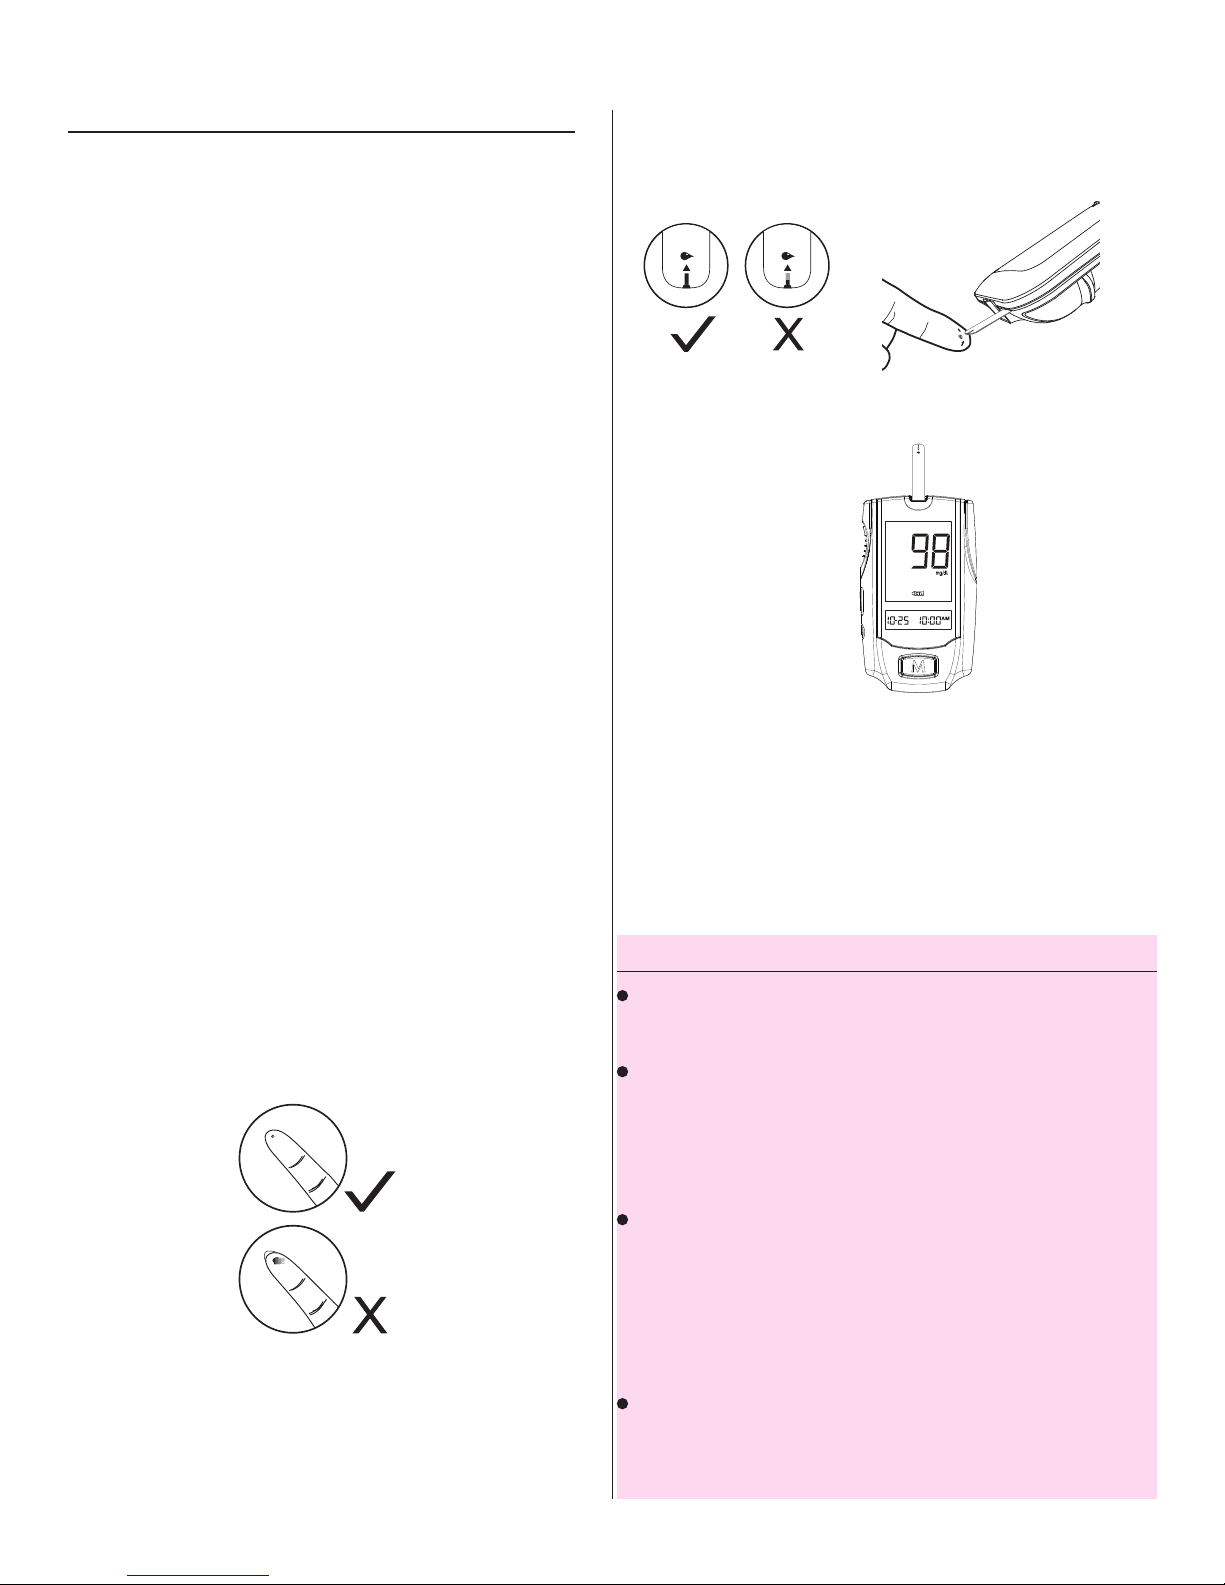
Fingertip testing
Press the lancing device’s tip fi rmly against the
lower side of patient’s fi ngertip.
each use, whether or not blood contamination is
suspected.
Equipment Needed:
1. FORA GD20 Blood Glucose Meter
2. FORA GD20 Test Strips
3. Safety lancet
4. Gloves
5. Alcohol wipe or swab
Only auto-disabling, single use lancing devices
should be used with this device.
Blood from sites other than the fi ngertip
When lancing the palm, forearm and upper arm
avoid lancing the areas with obvious veins because
of excessive bleeding.
NOTE
Choose a different spot each time you test.
Repeated punctures at the same spot may cause
soreness and calluses.
It is recommended that you discard the fi rst drop
of blood as it might contain tissue fl uid, which may
affect the test result.
When cleaning the puncture site, make sure
alcohol is throughly dry before puncture site is
lanced. Testing with alcohol remaining on skin can
cause higher results.
11
Page 13
Performing a Blood Glucose Test
Consult manufacturer’s instructions for additional
information regarding the use of the FORA GD20
Blood Glucose Meter.
1. Verify physician’s order.
2. Identify the patient.
3. Explain procedure.
4. Provide privacy.
5. Wash hands.
6. Put on non-sterile gloves.
7. Ensure that the meter and test strips are at
room temperature. If there is a temperature
change, the meter and test strips should sit at
room temperature for 10 to 12 minutes.
8. Verify that the vial of test strips has not expired
wicked and after the confi rmation window is
fi lled, the meter will begin counting down.
(0.7 μL blood
sample required)
13. Read the result.
and/or that the vial has not been opened for
longer than 90 days. Discard the vial of test
strips if it has expired and/or has been opened
for more than 90 days.
9. Cleanse area that is to be punctured with an
alcohol swab. Allow area to dry.
10. Insert a test strip in the meter.
11. Lightly hold lancet device against the skin and
lance the area. Obtain a blood sample (a
hanging drop of blood).
14. Eject the used test strip.
15. Clean and/or disinfect the meter following
the cleaning and disinfecting procedures in
this manual.
16. Remove gloves and wash hands.
NOTE
Do not press the punctured site against the test
strip or try to smear the blood.
If you do not apply a blood sample to the test
strip within 3 minutes, the meter will automatically
turn off. You must remove and reinsert the test
strip to start a new test.
The confi rmation window should be fi lled with
blood before the meter begins to count down.
NEVER try to add more blood to the test strip after
12. Make contact with the blood sample to the
sample area of the test strip. Blood will be
12
the blood sample has moved away. Discard the
used test strip and retest with a new one.
If you have trouble fi lling the confi rmation
window, please contact Customer Service at
(888) 425-1149.
Page 14
CLEANING AND DISINFECTION
PROCEDURES
Their product offerings include:
• Super Sani-Cloth“ Germicidal Wipe - ideal
Cleaning & Disinfecting the FORA GD20
Blood Glucose Meter
It is Links Medical Product’s policy to advise heal
care professionals to clean and disinfect blood
glucose meters between each resident test in order
to avoid cross-contamination issues. Whether your
facility uses an alcohol based solution or a bleach
based solution should depend upon your individual
resident requirements and your facility’s disinfection
protocol.
Links Medical Product’s cleaning and disinfecting
guidelines are as follows:
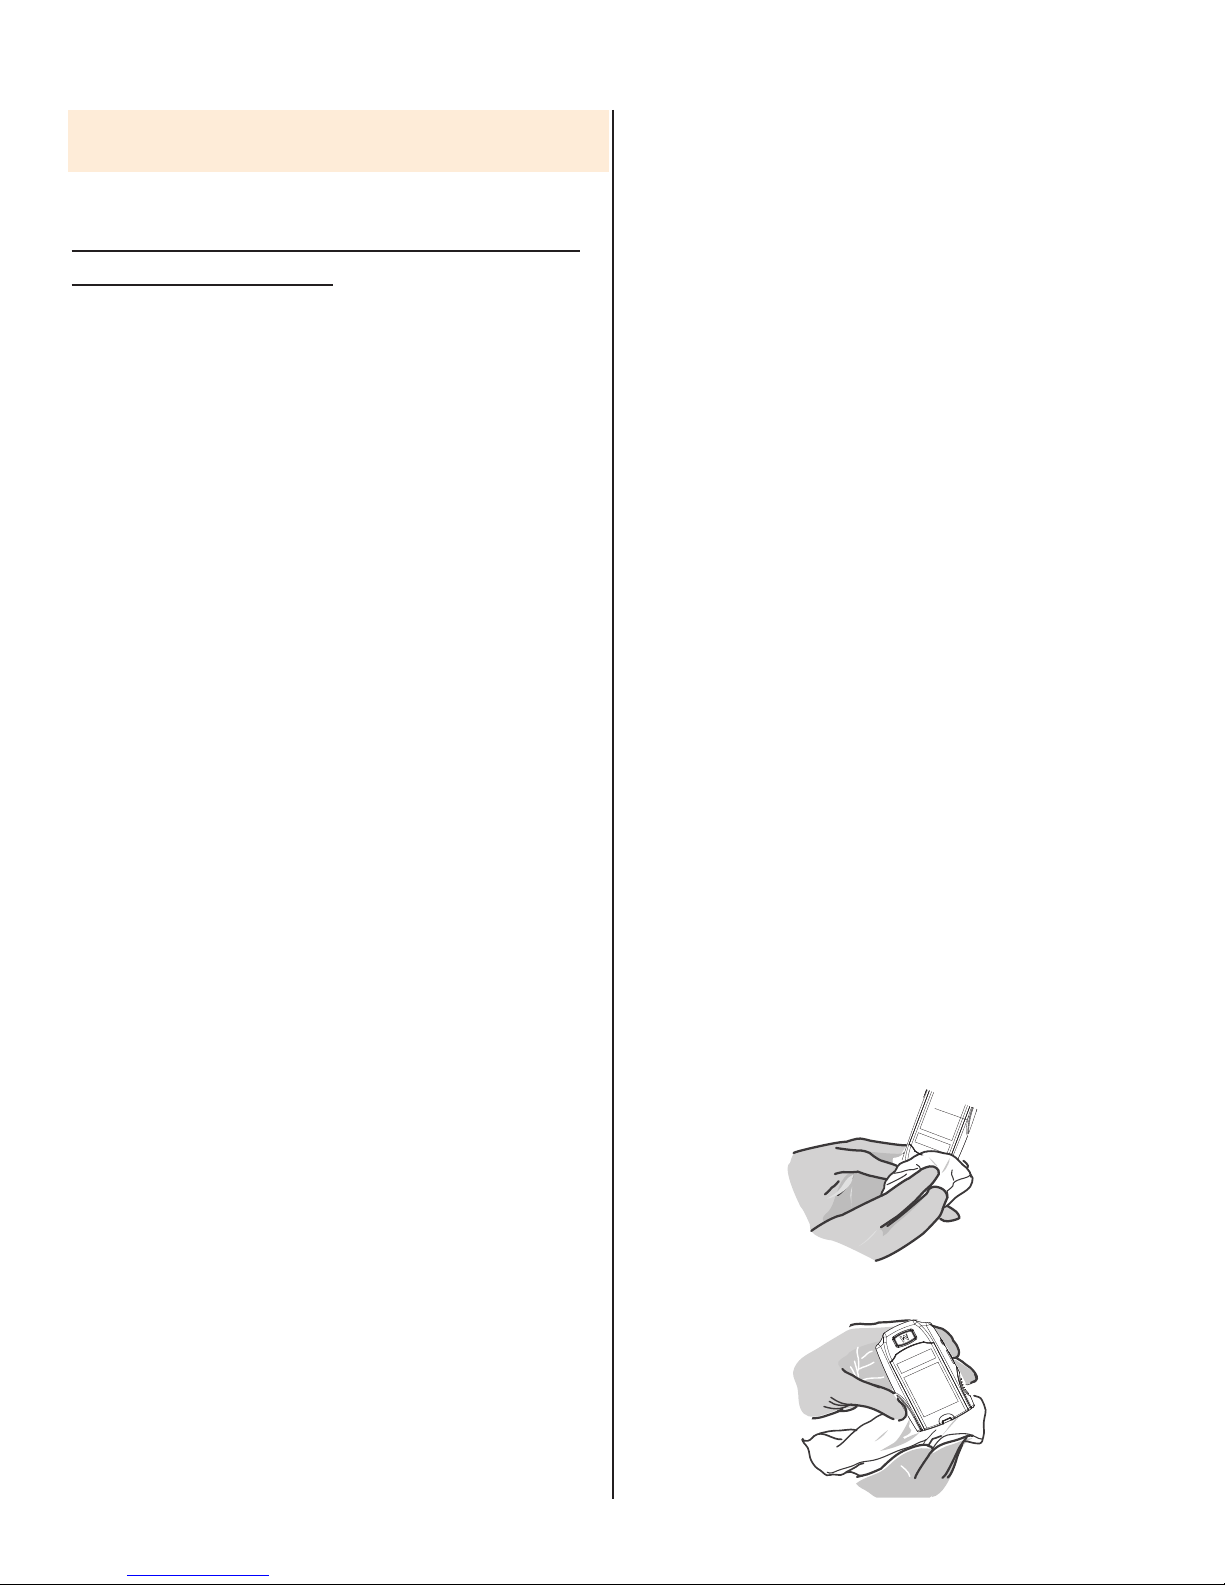
FORA GD20 Cleaning Guidelines: Use a lint free
cloth dampened with soapy water or isopropyl
(70% - 80%) to clean the outside of the blood
glucose meter.
NOTE: Lint free cloth should not be dripping wet
when cleaning the meter.
disinfection for most residents and hard surfaces.
• Sani-Cloth“ Bleach Germicidal Disposable Wipe -
ideal disinfection for residents with C-Diff.
Both germicidal wipes mentioned above are EPA
registered wipes that are compliant with the CDC
guideline for disinfection and sterilization in
healthcare facilities and are readily available
through major medical distributors. When using any
disinfection wipe, take extreme care not to get liquid
in the test strip dock or key code parts of the
meter. With all recommended glucose meter
cleaning methods, it is crucial that the FORA GD20
meter be completely dry before testing a resident’s
glucose level. Please follow the disinfectant product
label instructions to ensure proper drying time.
While there are many other options for
disinfecting blood glucose meters, Links Medical
Products has not tested the effectiveness of these
products on the FORA GD20 meter. If you use a
product or method other than those that we’ve
FORA GD20 Disinfecting Guidelines: To
disinfect the meter, dilute 1 mL of household bleach
(5% - 6% sodium hypochlorite solution) in 9 mL of
water to achieve a 1:10 dilution (fi nal concentration
of 0.5% - 0.6% sodium hypochlorite). The solution
can then be used to dampen a paper towel (do not
saturate the towel). Then use the damped towel to
thoroughly wipe down the meter.
Please note that there are commercially available
1:10 quaternary/alcohol wipes and bleach wipes
from a variety of manufactures. Professional
Disposables Inc (PDI) is an example of a
manufacturer that offers both of these options.
recommend above, you should document
accordingly in your cleaning protocol.
13
Page 15
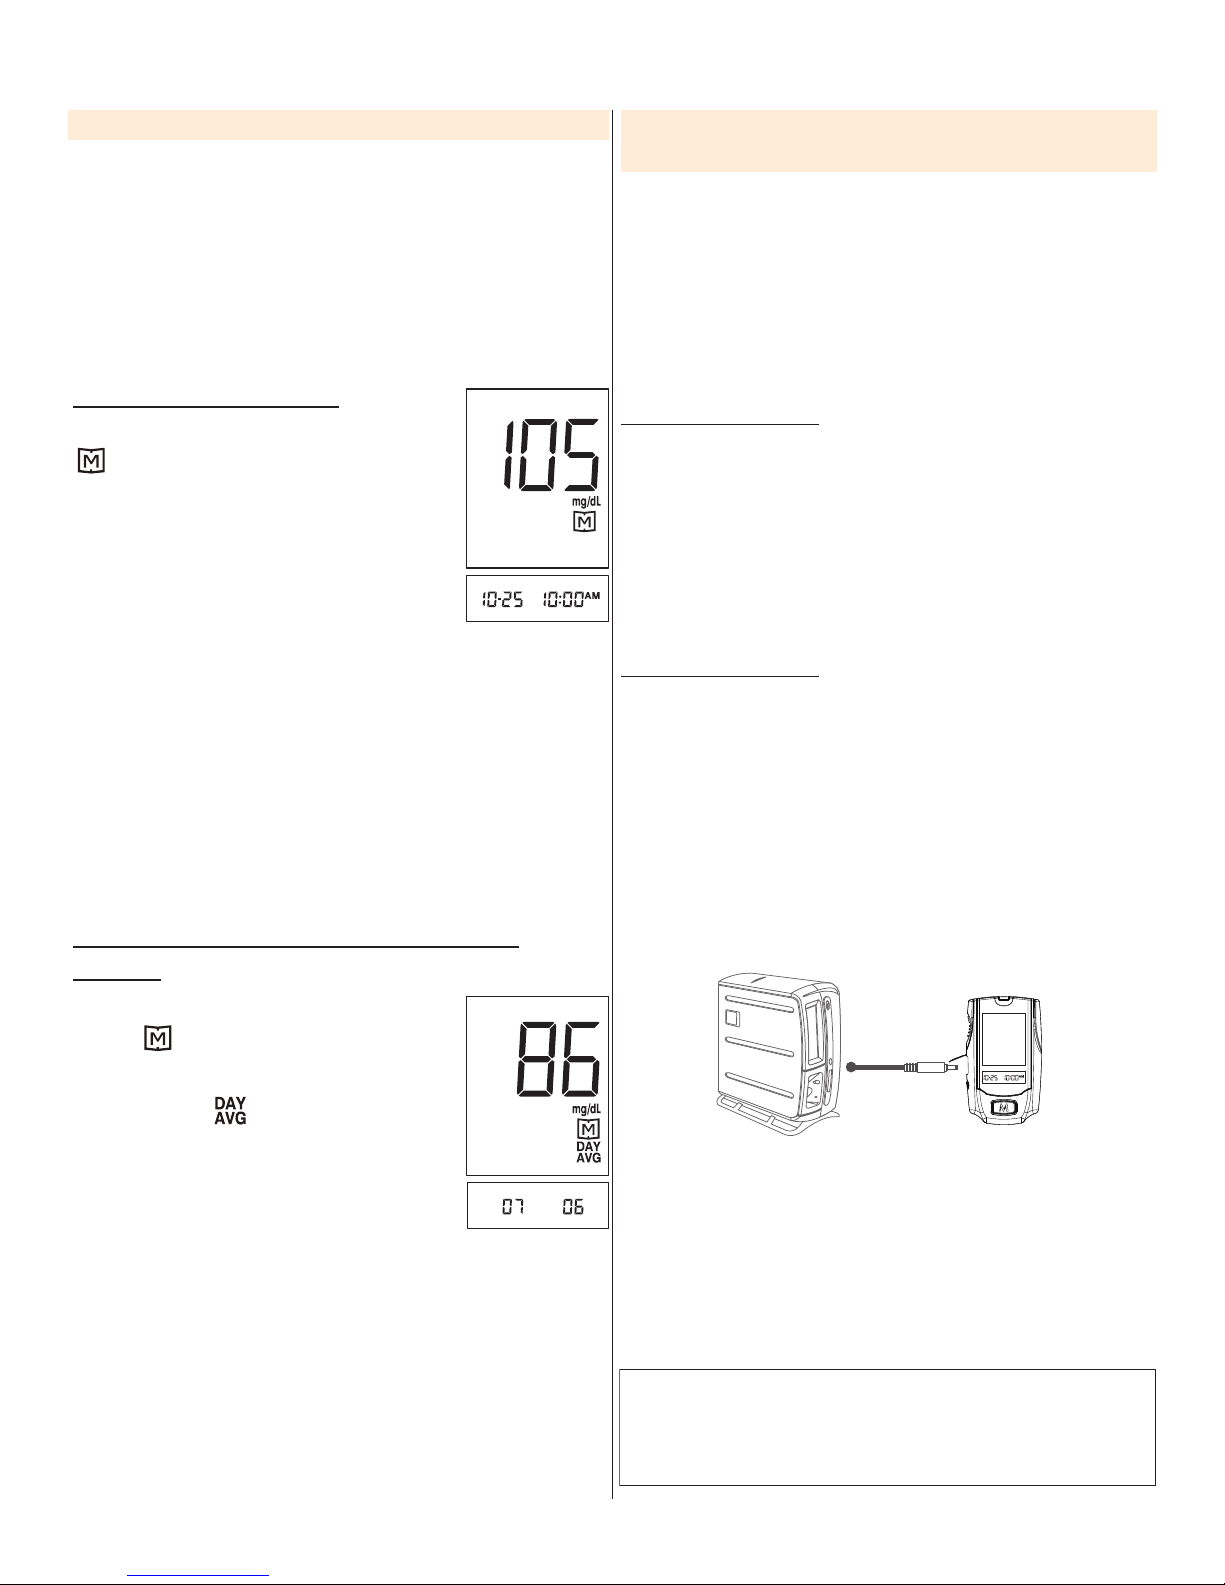
METER MEMORY
The meter stores the 448 most recent blood
glucose test results along with respective dates
and times in its memory. To enter the meter
memory, start with the meter switched off.
DOWNLOADING RESULTS ONTO A
COMPUTER
You can use the meter with an interface cable and
the Health Care Software System to view test
results on your personal computer. To learn more
about the Health Care Software System or to
Reviewing Test Results
1. Press and release M.
will appear on the display.
Press M again, and the fi rst reading
you see is the last blood glucose
result along with date and time.
2. Press M repeatedly to recall the test results
stored in the meter.
3. Exit the meter memory.
After the last test results, press M again and the
meter will be turned off.
Reviewing Blood Glucose Day Average
Results
obtain an interface cable separately, please visit
www.foracare.com or call (888) 425-1149 for
assistance.
1. Obtaining the required cable and installing
the software
To download the Health Care Software System,
please visit the FORA Care Inc. website at
www.foracare.com.
2. Connecting to a personal computer
Connect the cable to an interface port on your
computer. With the meter switched off, connect
the other end of the interface cable to the meter
data port. “PC” will appear on the meter display,
indicating that the meter is in communication
mode.
1. Press and release M.
When appears on the display,
keep pressing M for 3 seconds until
the fl ashing “ ” appears. Release
M and then your 7-day average
result measured in general mode
will appear on the display.
2. Press M to review 14-, 21-, 28-, 60- and 90- day
average results stored in memory.
3. Exit the meter memory.
Keep pressing M and the meter will turn off after
displaying the last test result.
14
3. Data transmission
To transmit data, follow the instructions provided
with the software. Results will be transmitted with
date and time. Remove the cable and the meter
will automatically switch off.
WARNING:
While the meter is connecting to the PC, it will be
unable to perform a blood glucose test.
Page 16
MAINTENANCE
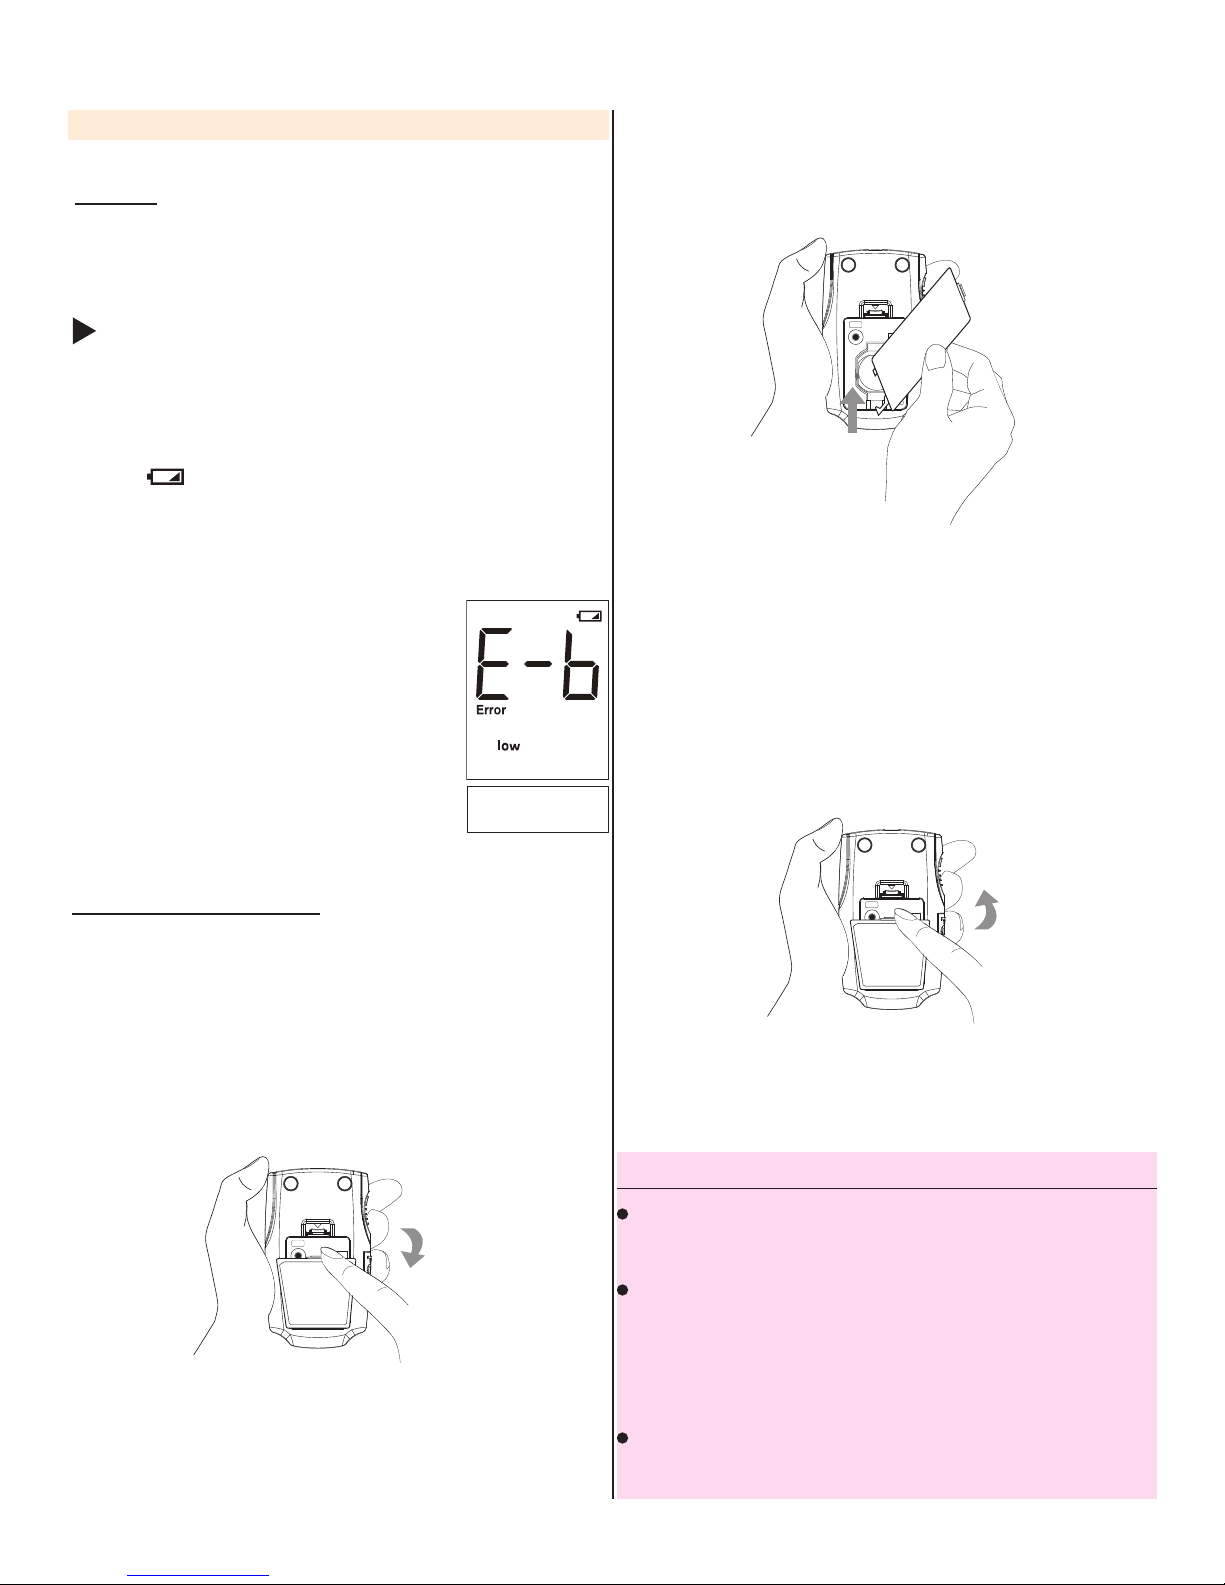
Battery
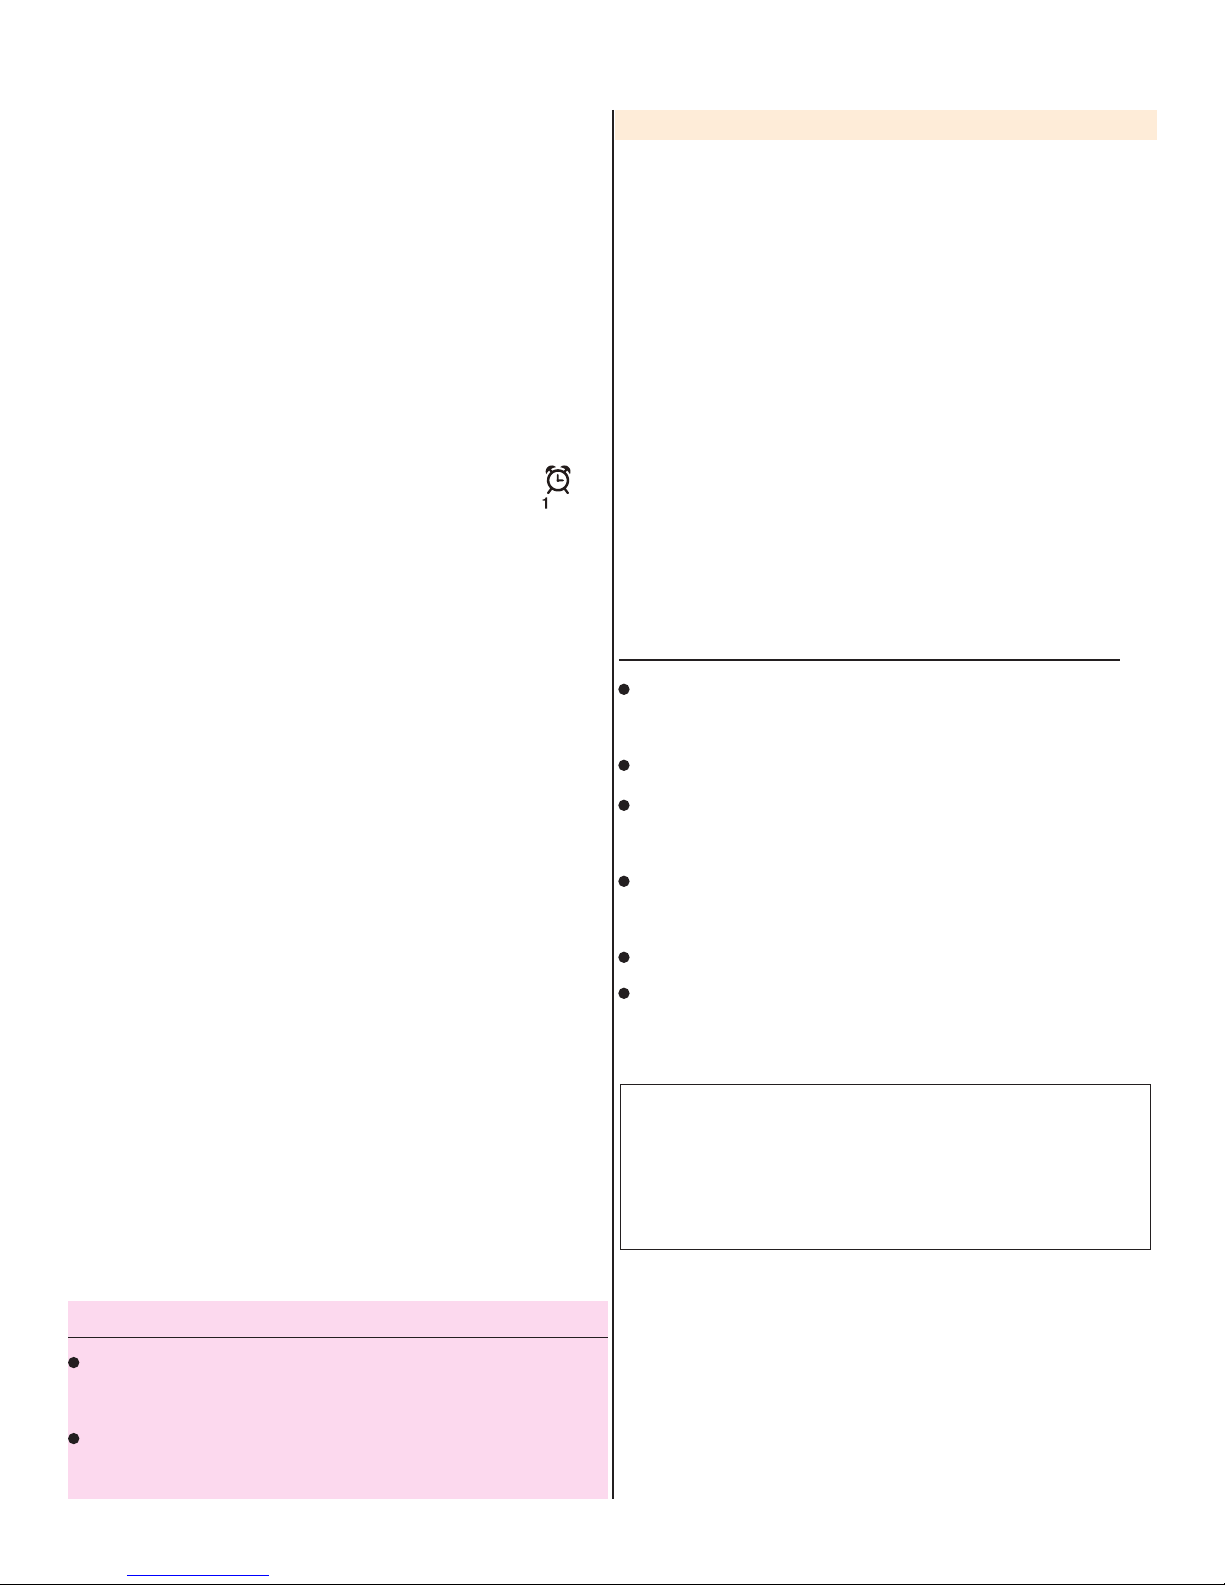
2. Remove the old battery and replace with a new
3V CR2032 lithium battery.
Your meter comes with one 3V CR2032 lithium
battery.
Low Battery Signal
The meter will display one of the messages below
to alert you when the meter's power is getting low.
1. The symbol appears along with a display
message: The meter is functional and the results
remain accurate, but it is time to change the
battery.
2. The meter displays E-b:
There is not enough power for a test.
Please change the battery
immediately.
Replacing the Battery
To replace the battery, make sure that the
meter is turned off.
SET
CR2032
BATTERY
3. Close the battery cover. If the battery is
inserted correctly, you will hear a "beep"
confi rming the battery has been properly
inserted.
SET
CR2032
BATTERY
1. Press the edge of the battery clip and lift it up
to remove.
SET
CR2032
BATTERY
NOTE
Replacing the battery does not affect the test
results stored in the memory.
Battery might leak chemicals if unused for a long
period of time. Remove the battery if you are not
planning to use the device for an extended period
(i.e., 3 months or more).
Properly dispose of the battery according to your
local environmental regulations.
15
Page 17
Meter Storage
Important Control Solution Information
Storage conditions: -4°F to 140°F (-2°C to
6°C), below 95% relative humidity.
Always store or transport the meter in its
original storage case.
Avoid dropping and heavy impact.
Avoid direct sunlight and high humidity.
Important Test Strip Information
Storage conditions: 35.6숳 to 89.6숳 (2삸 to 32삸),
below 85% relative humidity. Do not freeze.
Store your test strips in their original vial only.
Do not transfer to another container.
Store test strip packages in a cool dry place.
Keep away from direct sunlight and heat.
After removing a test strip from the vial,
Use only FORA control solutions with your
meter.
• Do not use the control solution beyond the
expiration date or 3 months after fi rst opening.
Write the opening date on the control solution
vial and discard the remaining solution after 3
months.
It is recommended that the control solution test
be done at room temperature (68°F to 77°F) 20°C
to 25°C. Make sure your control solution, meter,
and test strips are at this specifi ed temperature
range before testing.
Store the control solution tightly closed at
temperatures between 36°F and 86°F (2°C and
30°C). DO NOT FREEZE.
immediately close the vial cap tightly.
Touch the test strip with clean and dry hands.
Use each test strip immediately after removing
it from the vial.
Write the opening date on the vial label when you
fi rst open it. Discard remaining test strips after 3
months (90 days).
Do not use test strips beyond the expiration date.
This may cause inaccurate results.
Do not bend, cut, or alter a test strip in any way.
Keep the strip vial away from children. The cap
and the test strip may be a choking hazard. If
swallowed, promptly seek medical attention.
For further information, please refer to the test
strip package insert.
16
Page 18
SYSTEM TROUBLESHOOTING
f you follow the recommended action but the
problem persists, or error messages other than the
ones below appear, please call (888) 425-1149 for
assistance. Do not attempt to repair yourself and
never try to disassemble the meter under any
circumstances.
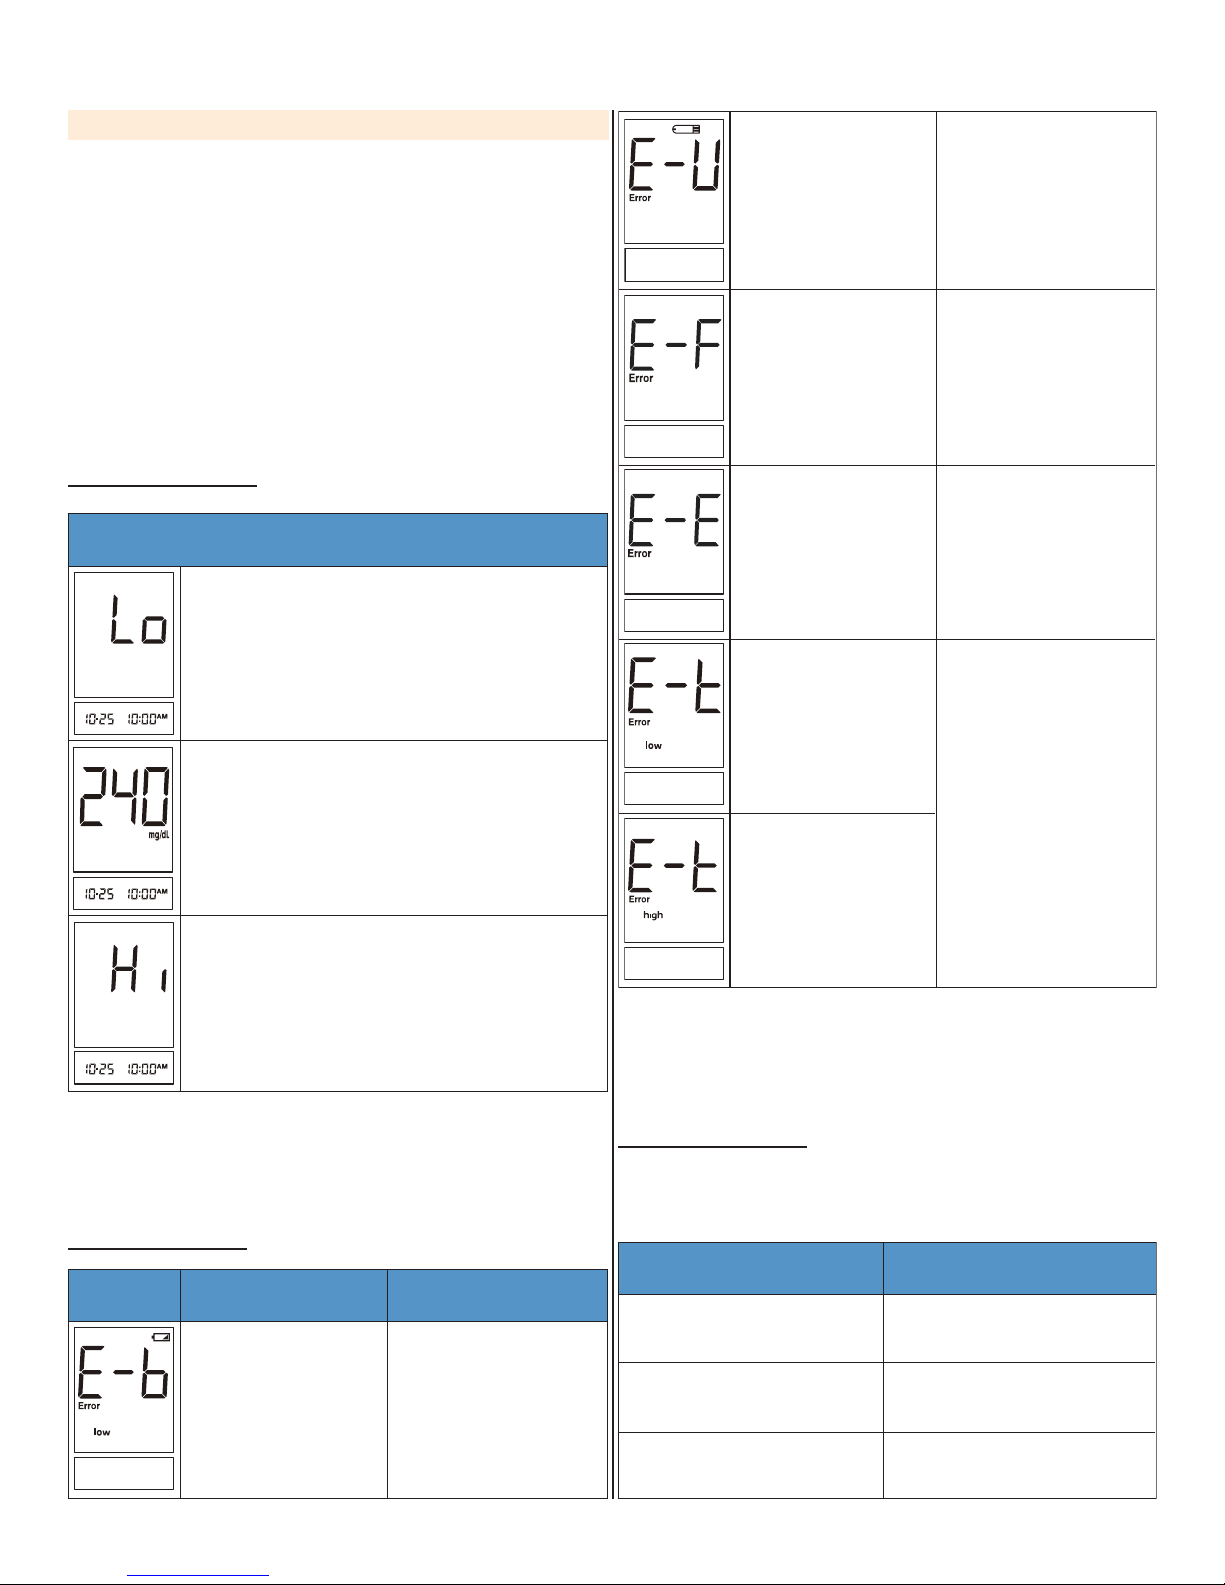
Result Readings
MESSAGE
KEYTONE?
Appears when the result is below the
measurement limit of 20 mg/dL (1.1 mmol/L).
Appears when the result is equal to or
higher than 240 mg/dL (13.3 mmol/L).
This inndicates the possibility of ketone
accumulation for type 1 diabetes.
Appears when the result is above the
measurement limit of 600 mg/dL (33.3
mmol/L).
WHAT IT MEANS
Appears when
inserting a used
test strip.
Test strip was
removed after
applying a blood
sample prior
to glucose test
completion.
Problem with the
meter.
Appears when the
environmental
temperature is
below system
operation range:
50°F (10°C).
Appears when the
environmental
temperature is
above system
operation range:
104°F (40°C).
Re-test using a
new test strip.
Re-test using a
new test strip.
Review the
instructions and
re-test with a new
test strip. If the
above steps do not
work, please contact
Customer Service.
System operation
range is 50°F to
104°F (10°C to 40°C).
Repeat the test
after the meter
and test strip have
reached the
appropriate
temperature.
Error Messages
MESSAGE
WHAT IT MEANS WHAT TO DO
Appears when
the battery can
not provide
enough power
for a test.
Replace the battery
immediately.
Troubleshooting
1. If the meter does not display a message after
inserting a test strip:
POSSIBLE CAUSE
Battery exhausted.
Test strip inserted upside
down or incorrectly.
Defective meter.
Replace the battery.
Insert the test strip
correctly with the contact
bars end fi rst and facing up.
Please contact Customer
Service at (888) 425-1149.
WHAT TO DO
17
Page 19
SPECIFICATIONS
2. If the test does not start after applying the
sample:
POSSIBLE CAUSE
Insuffi cient blood sample.
Defective test strip.
Sample applied after
automatic switch-off
(3 minutes after last
user action).
Defective meter.
Re-test using a new test
strip with larger volume of
blood.
Re-test with a new test
strip.
Re-test with a new test
strip. Apply sample only
when " " appears
on the display.
Please contact Customer
Service at (888) 425-1149.
WHAT TO DO
3. If the control solution testing result is out of
range.
Model No.: TD-4251
Dimension & Weight: 86.9mm(L) x 51mm(W) x
15.8mm(H), 42.2g
Power Source: one CR2032 lithium battery
Display: LCD
Memory: 448 measurement results with
respective date and time
External output: RS232 PC interface
Auto electrode insertion detection
Auto sample loading detection
Auto reaction time count-down
Auto switch-off after 3 minutes without action
Temperature warning
Operating Condition: 50°F to 104°F (10°C to
40°C), below 85% R.H. (non-condensing)
Storage/Transportation Conditions:
Meter: -4°F to 140°F (-20°C to 60°C), below 95%
POSSIBLE CAUSE
Error in performing the test.
Control solution vial was
porly shaken.
Expired or contaminated
control solution.
Control solution that is too
warm or too cold.
Defective test strip.
Meter malfunction.
.
.
WHAT TO DO
Read the instructions
thoroughly and repeat the
test again.
Shake the control solution
vial and repeat the test
again.
Check the expiration date
or the discard date of the
control solution.
Control solution, meter, and
test strips should come to
room temperature (68°F to
77°F(20°C to 25°C) before
testing.
Re-test with a new test strip.
.
Please contact Customer
Service at (888) 425-1149.
R.H.
Test strip: 35.6°F to 89.6°F (2°C to 32°C), below
85% R.H. Do not freeze.
Measurement Units: mg/dL
Measurement Range: 20 to 600mg/dL (1.1 to
33.3mmol/L)
This device has been tested to meet the electrical
and safety requirements of: IEC/EN 61010-1, IEC/
EN 61010-2-101, EN 61326-1, IEC/EN 61326-2-2.
Distributed by: Manufactured by:
ForaCare Inc.
893 Patriot Dr., Suite D,
Moorpark, CA 93021
18
9247 Research Drive · Irvine, CA
Toll Free: (888) 425-1149
(8:00am-5:00pm PST, Mon.-Fri.)
www.linksmed.com
Page 20
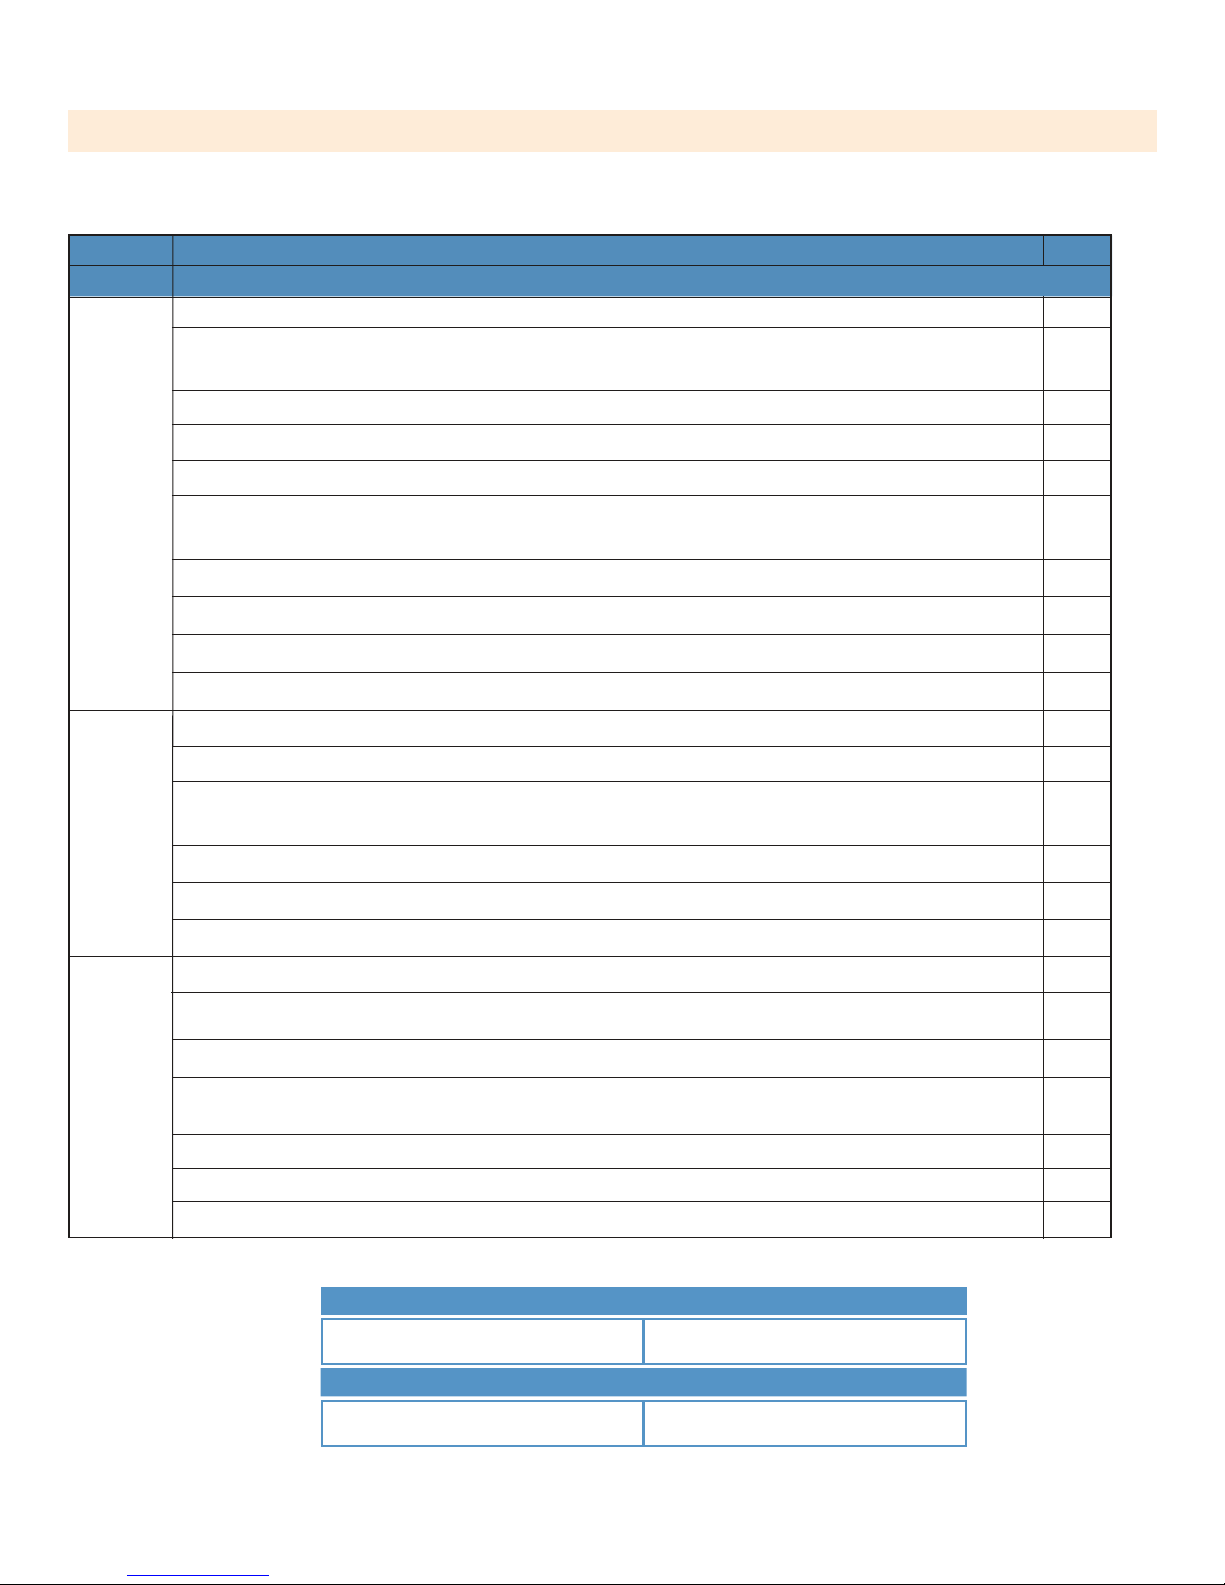
Attachment 1:
FORA GD20 Blood Glucose Monitoring System Training Checklist
Use the following checklist to assess the trainee’s understanding and knowledge of the
following areas:
Area
Area
Knowledge
Equipment
Task
Clinical Use of Device
Knows key features of FORA GD20 meter.
Understands different test types - fi nger, AST, quality control, preferred sample type and
sample volume.
Principles of quality testing and QC materials.
Only uses FORA GD20 test strips and FORA control solution with the FORA GD20 meter.
Understands the important features, benefi ts and limitations of the FORA GD20 system.
Knows the proper method of disposing of used test strips, lancet and gloves according to
facility procedures.
Understands the displayed error messages and corresponding actions to take.
Understands the appropriate steps to take for troubleshooting.
Knows the actions to be taken when the results are abnormally high or low.
Understands the information required to be documented by law and by institution.
Identify the essential equipment used with the FORA GD20 system.
Locates the serial number, test strip port, test strip ejector, M, C and SET buttons on the meter.
Locates the expiration date, fi rst opening date, lot number and control solution ranges on the
test strip vial. Locates sample area, confi rmation window, contact bars and test strip handle
on the test strips.
Locates the expiration date, fi rst opening date and lot number on the control solution bottle.
Knows the proper storage conditions of the meter, test strips and control solutions.
( √ )
Knows how to maintain the meter.
Demonstrates proper safety lancet technique when collecting a blood sample.
Demonstrates the correct blood testing procedures using the FORA GD20 Blood Glucose
Monitoring System.
Demonstrates the correct test strip insertion technique.
Performs quality control tests at specifi c times and determines if the results are acceptable.
Takes appropriate action if there is a problem.
Practical
Training Completed by:
The trainee must complete the training of the FORA GD20 Blood Glucose Monitoring System before performing
glucose testing on residents.
Demonstrates the proper cleaning and disinfecting techniques for the FORA GD20 meter.
Performs meter set up, memory retrieval and data transmission operations.
Demonstrates the proper actions to take for inaccurate results.
Name of Trainee Date
Name of Instructo Sr ignature of Instructor
19
Page 21
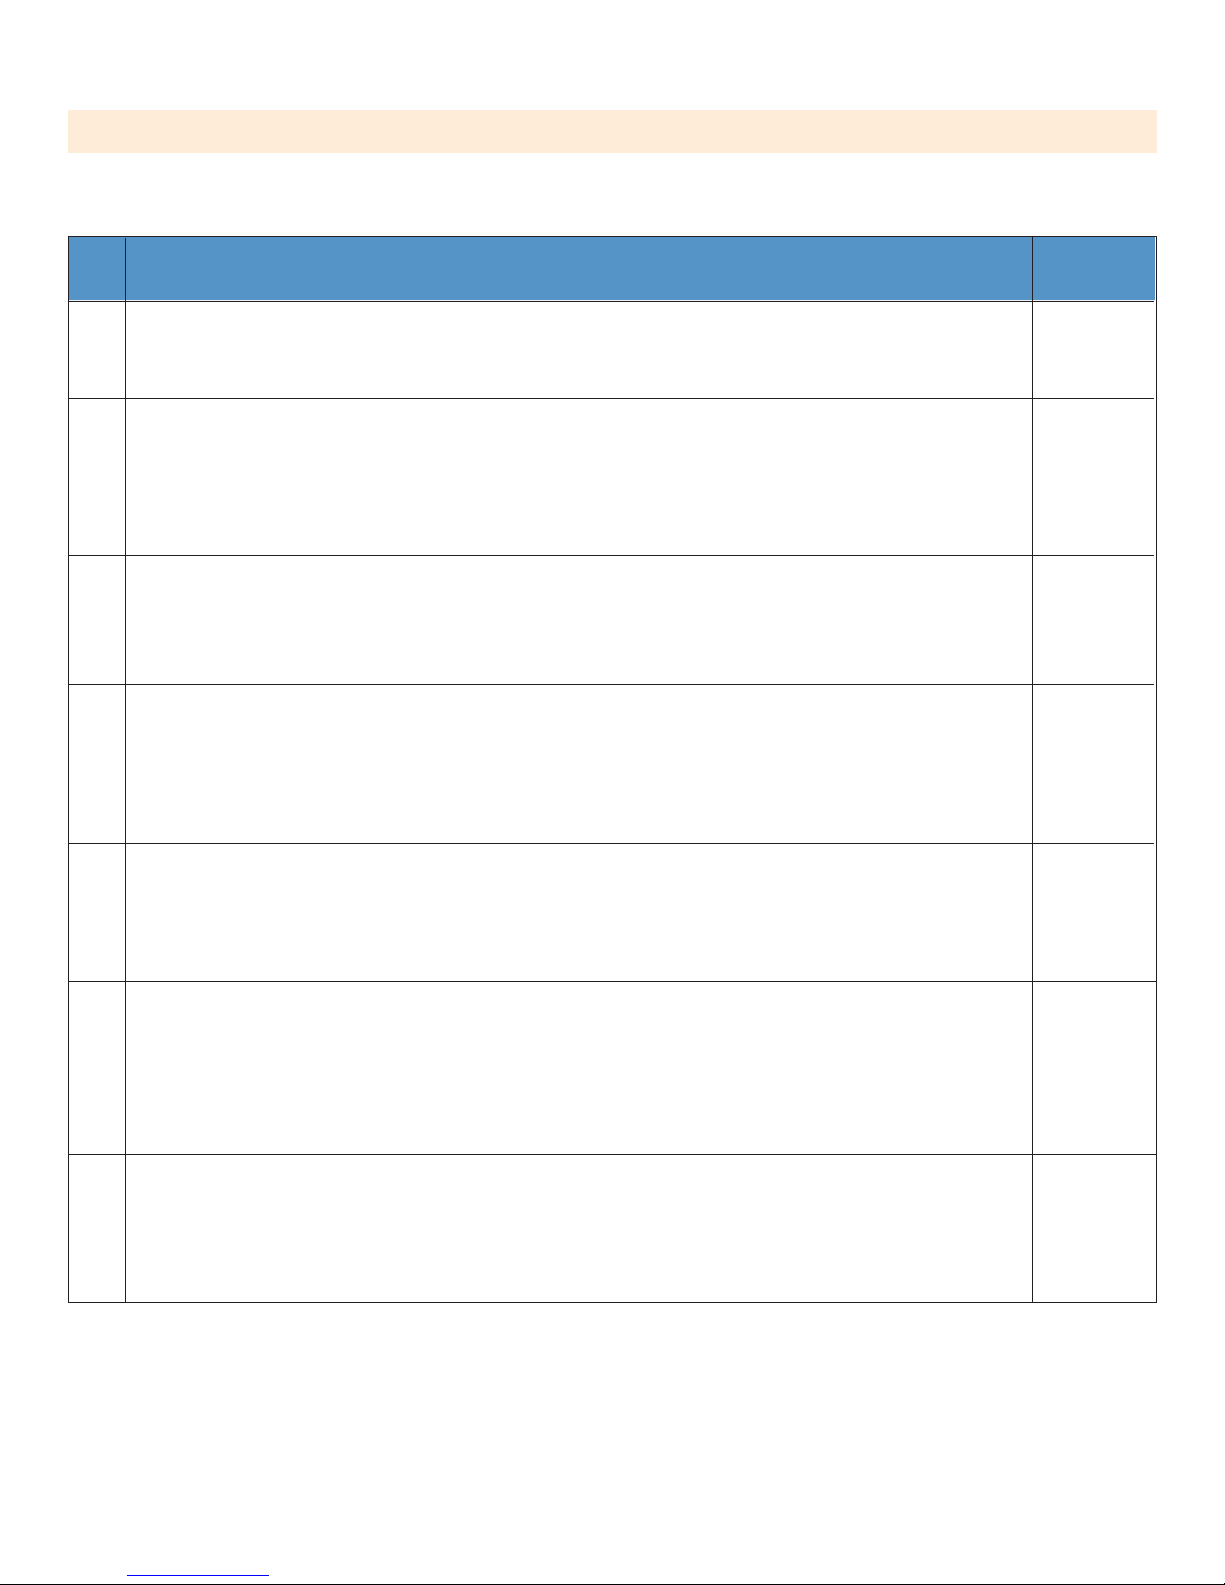
Attachment 2:
FORA GD20 Blood Glucose Monitoring System Training Quiz
Complete the following questions to assess your understanding about using the
FORA GD20 Blood Glucose Monitoring System to perform blood glucose tests on residents.
No.
1.
2.
3.
4.
Questions
The FORA GD20 Blood Glucose Monitoring System uses:
a). GOD (glucose oxidase) enzyme
b). GDH (glucose dehydrogenase) enzyme
The FORA GD20 Blood Glucose Monitoring System can test samples from:
a). Finger
b). AST (Alternative Sites Testing)
c). Control solutions
d). All of the above
The FORA GD20 Blood Glucose Monitoring System requires a blood volume of:
a). 0.3μL
b). 0.7μL
d). 1.0μL
You should perform a control solution test when:
a). You think the meter or test strip may be working incorrectly
b). You drop the meter
c). You have repeated a test and the test result is still lower or higher than expected
d). All of the above
Answer
After the control solution and test strip vials have been opened, when do you discard the remaining materials?
5.
a). 30 days
b). 90 days
c). 6 months
d). 1 year
When performing a quality control test, how do you apply the control solution onto the test strip?
6.
a). Place a drop directly onto the test strip
b). Place a drop on a clean surface and then contact the drop with the test strip
c). Place a drop on your fi nger and then contact the drop with the test strip
d). Shake the control solution vial and squeeze out a drop onto the tip of the vial cap, then touch test strip
to drop
When do you clean and disinfect the meter?
7.
a). After each use
b). Daily
c). Weekly
d). Monthly
20
Page 22
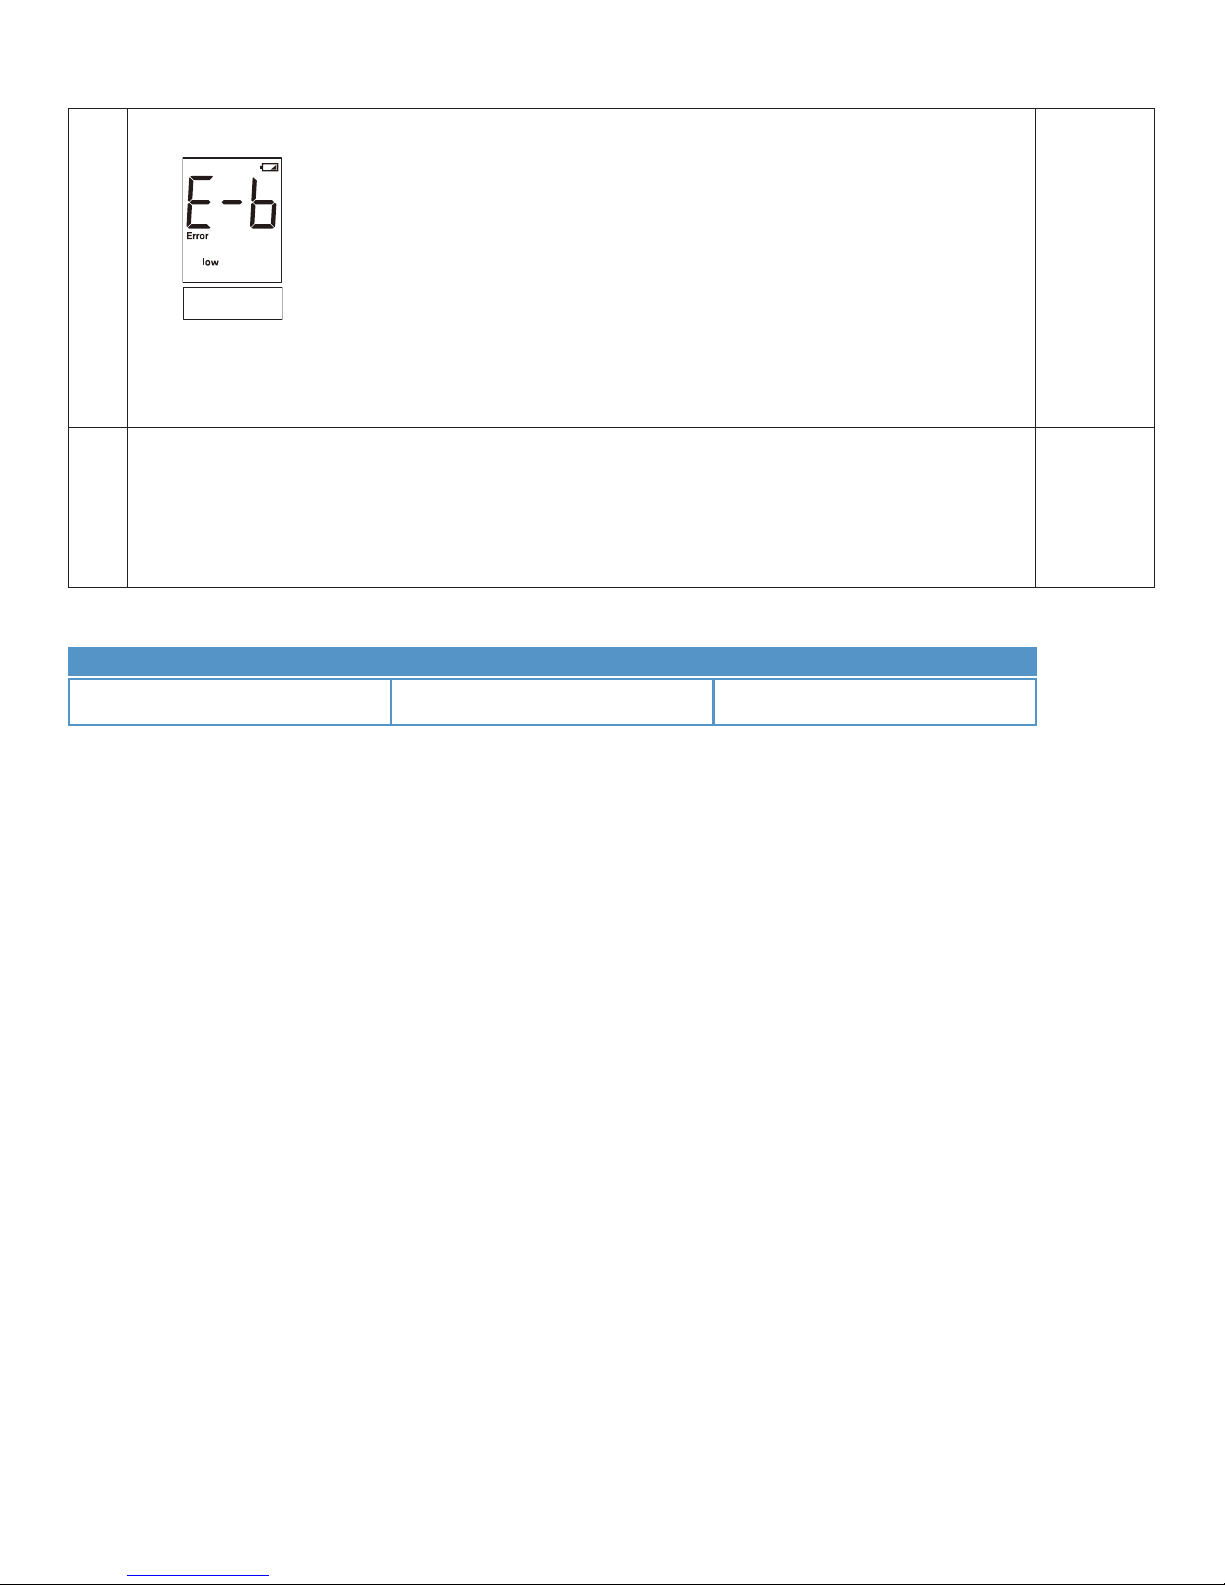
If you saw the following massage on the meter's display, what action should you take?
8.
a). Replace the battery
b). Re-test with a new strip
c). Repeat the test when the room temperature is within 50°F to 104°F
The test strips should be stored:
9.
a). At 35.6°F to 89.6°F (2°C to 32°C), below 85% humidity
b). At -4°F to 140°F (-20°C to 60°C), below 95% humidity
c). In the freezer
d). In a different container than the original vial
Quiz Completed by:
Name of Trainee Date Score
21
Page 23
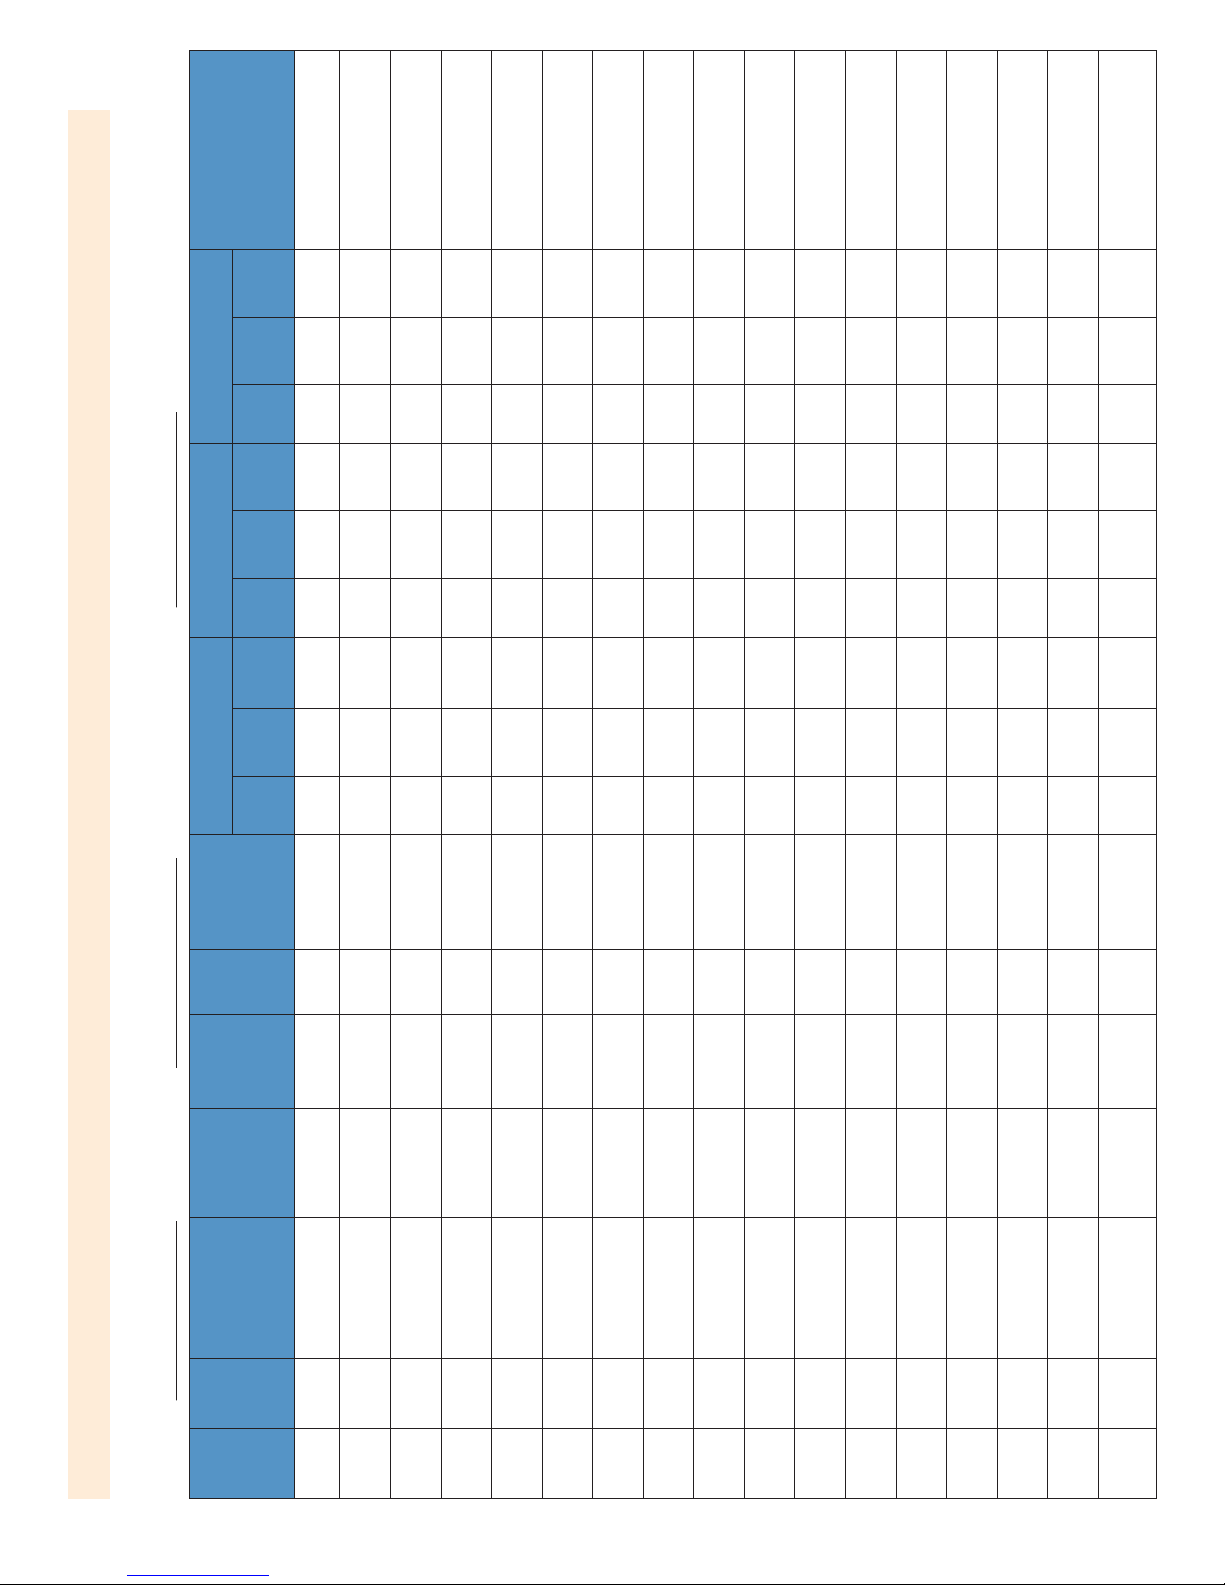
action
Corrective
Level 3 Control
lot # range result
Normal (W2) High (B3)
Level 2 ControlLevel 1 Control
lot # range result
Low (Y1)
lot # range result
date
Test strip
expiration
lot #
Test
strip
(Y/N)
Meter
cleaned
FORA GD20 Blood Glucose Monitoring System Quality Control Results Record
Attachment 3:
22
Date Time Station/shift Operator
Meter #: Month/Year: Results reviewed by:
Page 24

Notes:
23
Page 25

Notes:
24
Page 26

Distributed by:
9247 Research Drive · Irvine, CA
Toll Free: (888) 425-1149
(8:00am-5:00pm PST, Mon.-Fri.)
www.linksmed.com
 Loading...