

Page 1
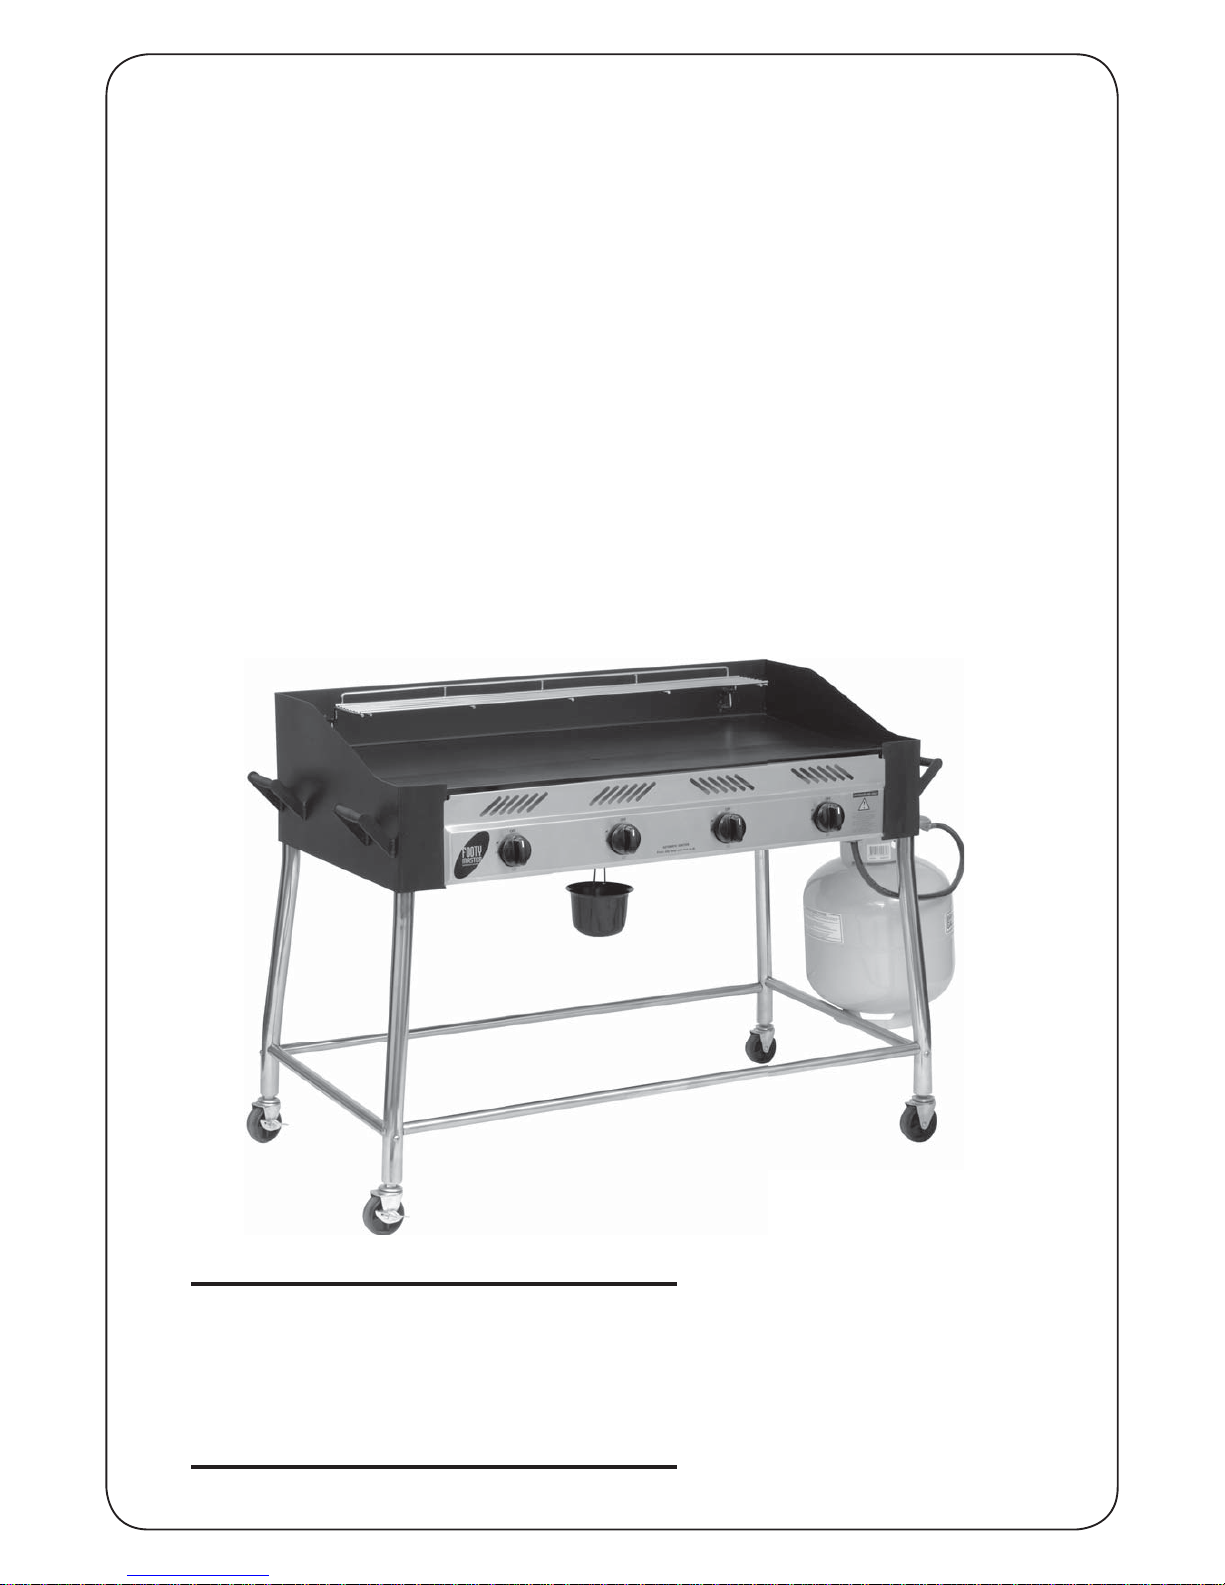
For The Safe Use And
En joy ment Of Your
New FootyMaster
Barbeque
IN STRUC TIONS
Solid plate style barbeques
Tools required: 2 adjustable spanner/wrenches
1 phillips head screwdriver
Model G4FTYK
Page 2

Safety First
Australia has an excellent safety record when it comes to gas ap pli anc es. This refl ects both the high
quality of appliances sold, as well as growing consumer awareness about safe prac tice. It is vital
that you study these instructions carefully before operating the appliance. In addition, we would like
to draw your attention to these points:
• This barbeque is an outdoor appliance only. Under no circumstances should it be used indoors.
• This barbeque has not been approved for marine use.
• Do not perform any servicing on the barbeque yourself. This in cludes internal ad just ment of the regulator
and gas valves. Servicing can only be carried out by authorised technicians.
• It is important that you install the barbeque exactly as described in these in struc tions. In particular you
should keep the barbeque clear of combustible ma te ri al, and you should check for leaks when ev er a new
con nec tion is made.
• Follow all manufacturer’s instructions to periodically check for gas leaks.
• Do not store chemicals or fl ammable materials near this appliance.
• Do not place articles on or against, or enclose this appliance.
• The barbeque gets extremely hot while in use. Keep children away from the ap pli ance until it has cooled
to normal tem per a tures.
• It is a good idea to tie back long hair and loose clothing while cook ing in case of unexpected fl are ups.
• Do not leave food unattended on the barbeque.
• Take care when touching a hot barbeque, especially on surfaces close to the fi rebox or roasting hood.
• NEVER leave a barbeque unattended with any burners switched on. Always switch OFF all burners and
cylinders when the barbeque is not in use.
• Fat fi res are the most common cause of problems in barbeques. They are caused by a build up of grease
in the grease can and the inside of the barbeque frame. A fat fi re can be dif fi cult to put out, and will be
dan ger ous if it spreads to the gas hose. You should keep your barbeque clean to avoid this occurrence.
Fat fi res will void the warranty.
• Empty the grease can after each use. Before changing the grease can, ensure the barbeque is switched
off, and the barbeque and grease can have com plete ly cooled down.
• Do not move the barbeque whilst it is hot because there is a risk that the grease can may become
dislodged and fall out. Similarly, avoid sudden knocks that can upset the can.
• Safety with LPG: Store your cylinder in a well ventilated area. Use a cylinder sealing plug or a gas safety
gauge to reduce danger from leaks. Always keep cylinder upright. Have your cylinder safety inspected
every 10 years. Keep the gas hose free of knots and kinks. Ensure that the hose remains out of contact
with any hot surfaces. Ensure cylinder has been leak tested.
• When transporting a cylinder: Always keep bottle upright and protected from falling over. Drive with the
windows open. Do not store cylinder in a plastic milk crate as this may cause static electricity to build up.
Do not light a fl ame or cigarette close to the cylinder. Do not leave the cylinder unattended in a vehicle.
Do not expose the cylinder to direct heat or sunlight in a vehicle or exposed area. Drive slower and with
care.
Congratulations On Your Pur chase
Thank you and congratulations for choosing a quality barbeque as part of your outdoor
entertaining world.
By following these instructions for safe and easy operation, you will enjoy years of satisfying, trouble-free
outdoor cooking.
And when you’re fully up and running, you can visit your retailer for some great accessories and cooking
tips to make your experience even more rewarding.
But fi rst things fi rst....
Page 3
Where To Put Your Barbeque
Most importantly, you must observe the clearances listed on the data sticker on your
barbeque.
It will tell you how close you can put the barbeque to combustible surfaces (wood, gyprock,
trees, wooden fences etc). If you don’t follow these clearances, there is a chance that nearby
surfaces will heat up and catch fi re. In addition, you should:
• Keep the barbeque sheltered from the wind. Wind interferes with the fl ames and can
prevent your barbeque from heating up properly and can even damage some components.
• Make sure the surface is level. This is safer, and makes cooking easier.
• Don’t put the barbeque too close to windows or anywhere else where cooking smoke is
likely to cause a problem.
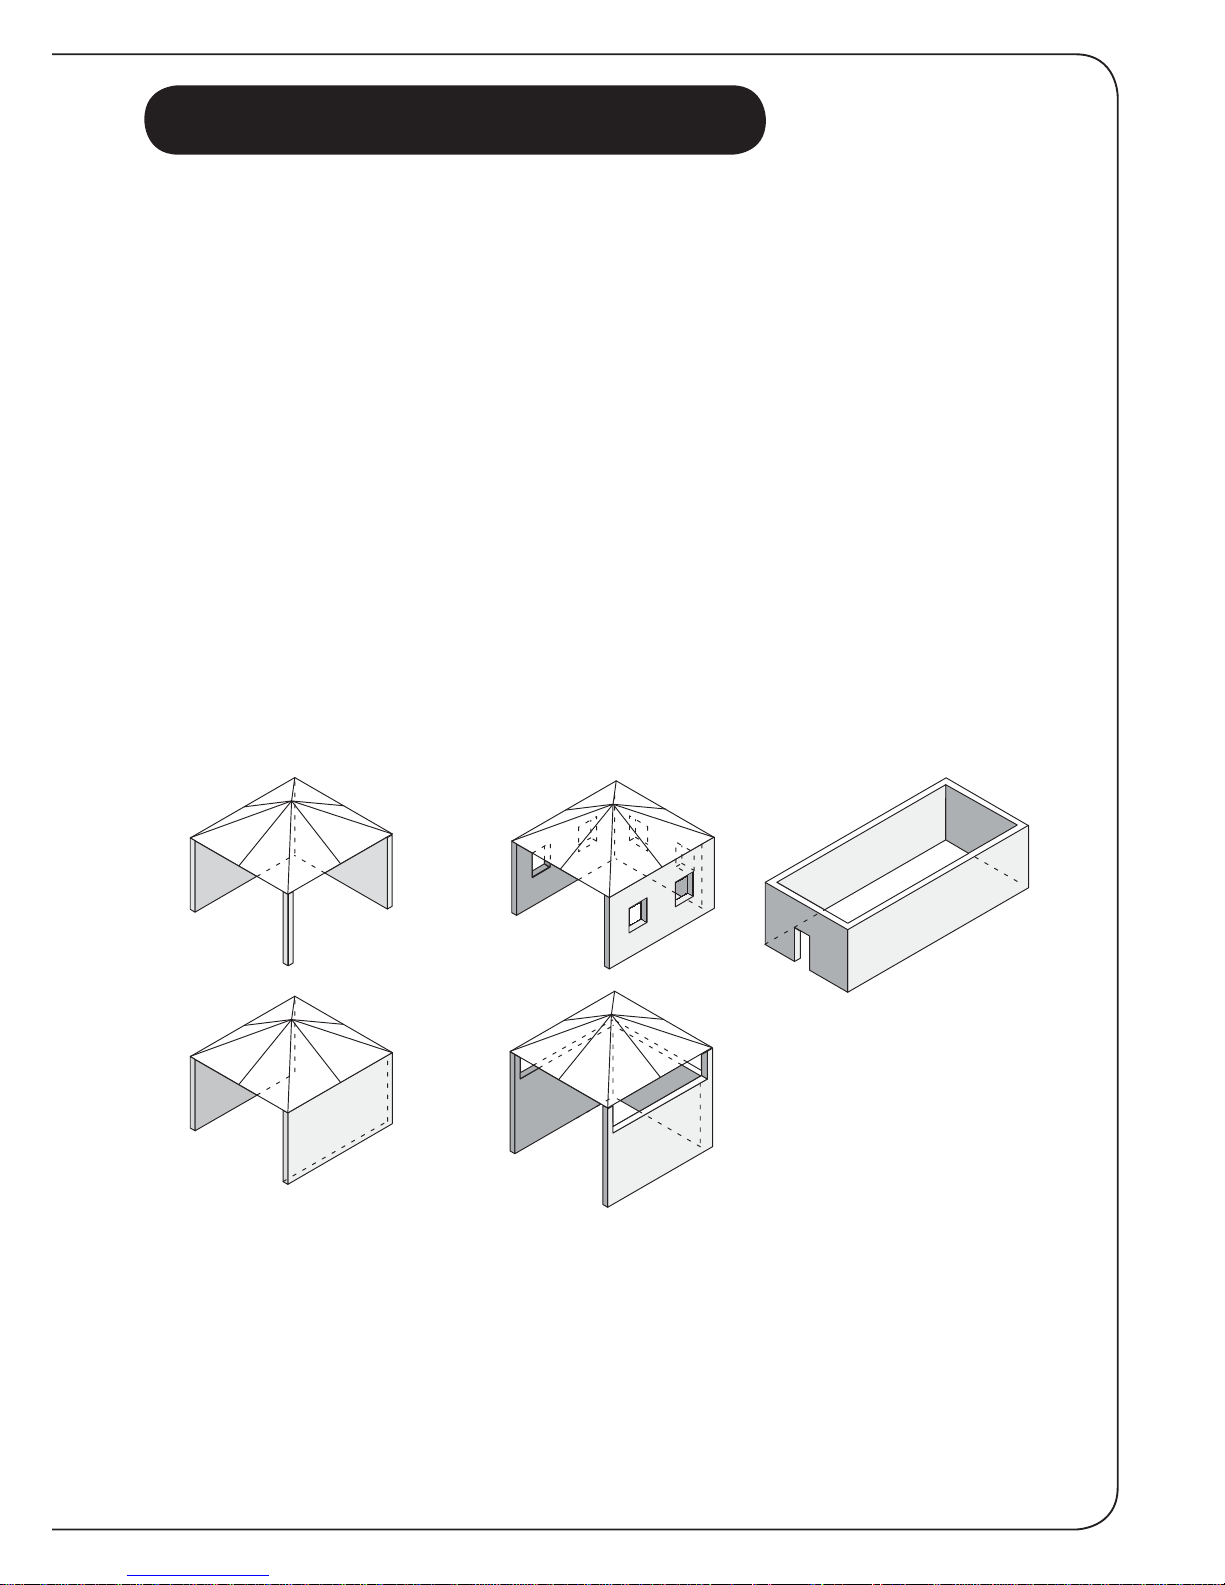
Putting Your Barbeque In An Enclosure
Any enclosure with walls on
all sides, but at least one
permanent opening at ground
level, and no overhead cover.
Within a partial enclosure
that includes an overhead
cover and no more than two
walls.
Within a partial enclosure that includes an overhead cover and
more than two walls, the following shall apply:
• At least 25% of the total wall area is completely open; and
• At least 30% of the remaining wall area is open and
unrestricted.
In the case of balconies, at least 20% of the total of the
side, back and front wall areas shall be and remain open and
unrestricted.
This appliance must only be used in an above ground, open air situation with natural ventilation,
without stagnant areas, where gas leakage and products of combustion are rapidly dispersed by wind
and natural convection. Any enclosure in which the appliance is used must comply with one of the
following:
Page 4

Start by unpacking the barbeque, and placing it on a smooth, fl at surface. Be careful not to damage the
painted fi nish. If there is any protective fi lm on the barbeque, it should be removed at the end of the
assembly process.
Make Sure You Have All The Parts
Gas Cylinder Hook x 1
Warming Rack x 1
Standard
Casters x 2
Lockable
Casters x 2
Leg Securing
Bolts x 4
Left Hand Legs Right Hand Legs
Long Braces x 2
Short Braces x 2
M6 x 12mm Screw x 4M6 x 50mm Screw x 8
Cylinder Heat
Shield x 1
Grease Can
and Handle x 1
Grease Can
Securing Clip x 1
Barbeque Body x 1
Page 5

Assembling Your Barbeque
Attach The Legs
Turn the barbeque upside down. Push the legs into
the corners of the barbeque, with the fl at part of the
leg facing inwards. Make sure the leg goes all the
way into place.
If you intend to use the leg braces and casters, you
will need to arrange the legs to allow for the cross
braces.
• The holes for the long brace should match the
opposite leg.
• The holes for the shorter brace should match the
opposite leg.
Attach The Leg Braces (Optional)
If you intend to use the optional casters, you will need to use the leg braces
for added strength when moving the barbeque over uneven surfaces.
Ensure the holes line up, and screw the braces into place, as shown.
Long Braces (Front and Back)
Short Braces
(Left and Right)
holes for long brace
should line up on both
back legs and both
front legs
holes for short brace
should line up on both
left legs and both right
legs
Page 6

lockable casters
on these legs.
Attach The Casters (Optional)
Screw the casters into the bottom of the
legs, and tighten with a spanner. You will
fi nd it most convenient to place the lockable
casters on the legs shown, so they are on
the left side of the barbeque when it is
upright.
Assembling Your Barbeque
Standard
Casters x 2
Lockable
Casters x 2
Turn the angled screw so that it tightens in
towards the leg. Note that it does not screw into
a hole in the leg. Rather, it simply presses into
the leg to keep it in place.
Tighten The Legs
Page 7

Attach The Grease Can Hook And Grease Can
Turn the barbeque right side up.
Attach the handle to the grease can.
Attach the grease can hook to the pipe that extends
down from the centre of the barbeque plate.
Hang the grease can on the hook underneath the
middle of the barbeque plate.
Assembling Your Barbeque
Attach The Heat Shield And Gas Cylinder Hook
Use 4 screws to attach the cylinder
heat shield and cylinder hook to
the side of the barbeque.
For the heat shield, use only the
two holes closest to the edge. This
will allow the shield to sit a bit
further away from the burners.
When assembled, the heat shield
should be between the cylinder
hook and the outside edge of the
barbeque body.
Use the top
holes only
Put the grease can
hook through the
hole in the grease
pipe.
Page 8
Installation
Connecting To Portable LPG
You should now connect your barbeque to either a 4 kg or 9 kg gas cylinder, which can be refi lled or
swapped at petrol stations or your place of purchase when empty.
Before connecting the cylinder, inspect the hose, fi ttings and rubber seals. If there is any sign of splitting
or wear, have the hose replaced.
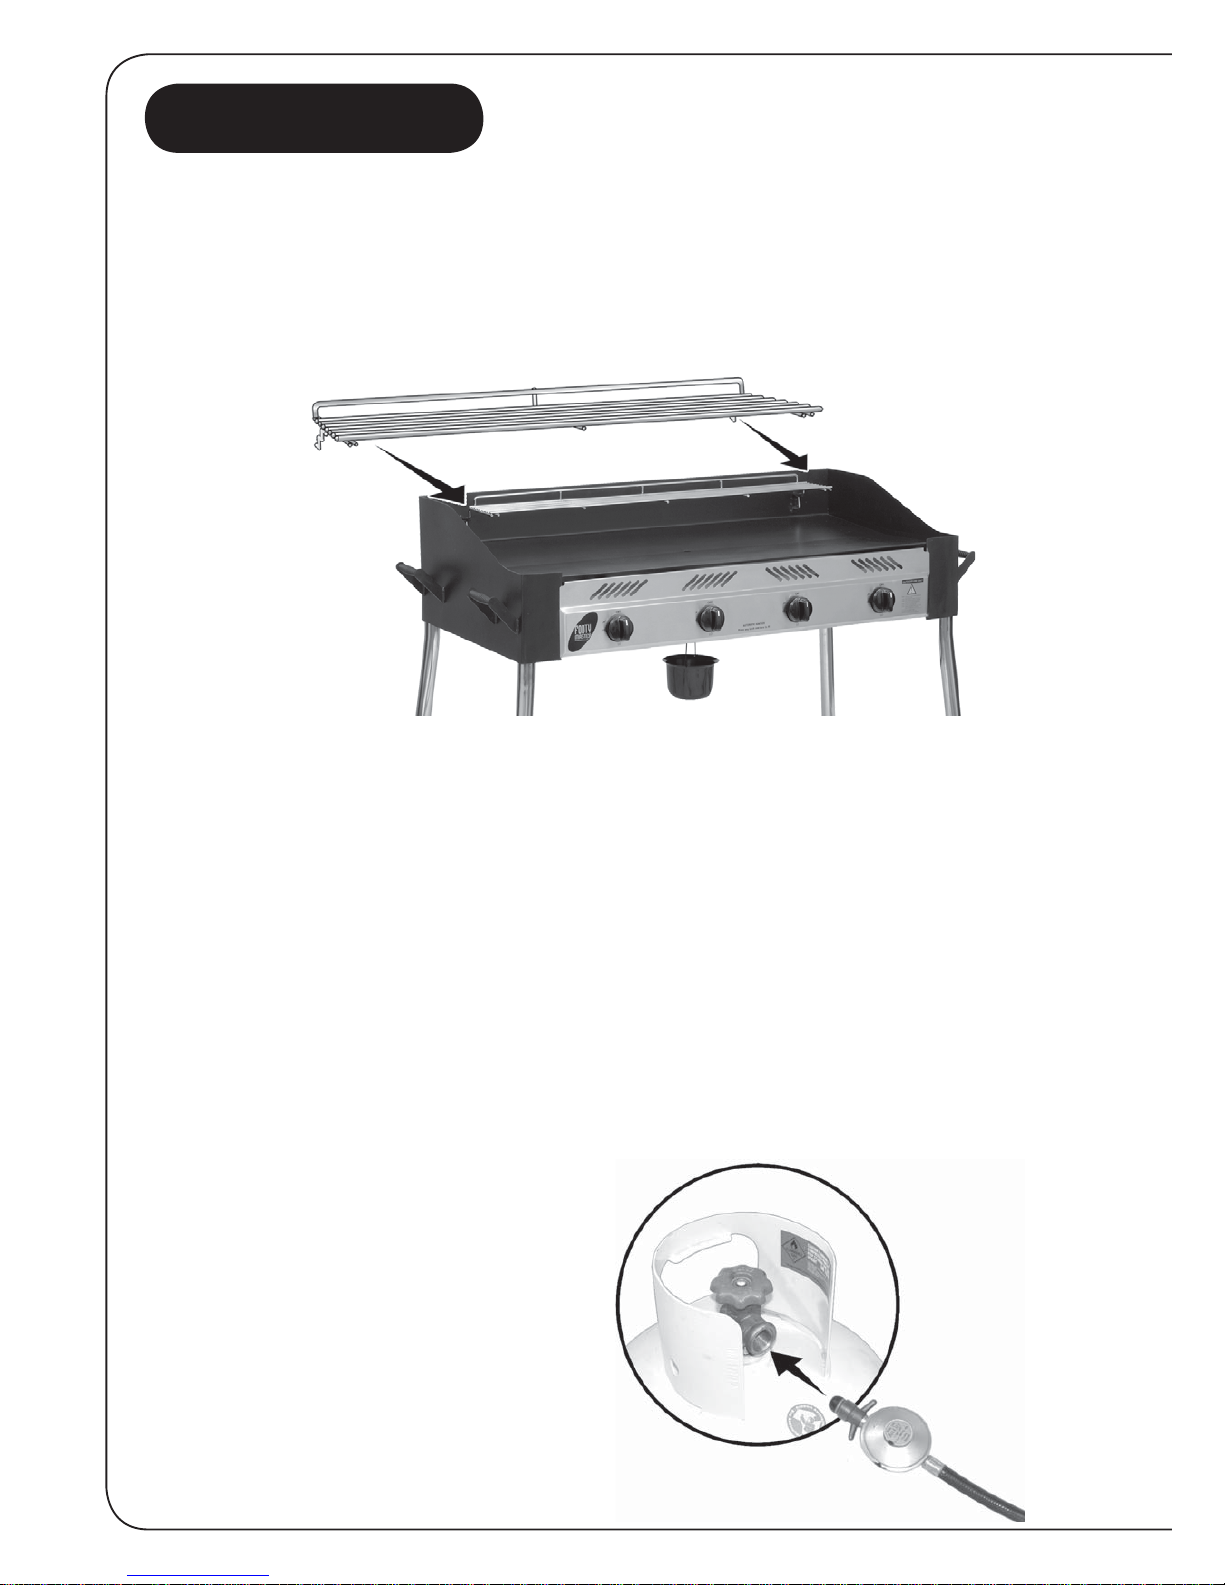
Place the LPG cylinder onto the hook on the right side of the barbeque.
If you have a gas safety gauge, ensure this is connected to your bottle according to the manufacturer’s
instructions. Now connect the regulator end of the hose to the gas bottle. You won’t need a spanner
here. Just turn the fi tting in an anticlockwise direction and hand tighten as much as you can. This
should seal it suffi ciently. Ensure the gas bottle is upright at all times.
Conduct a leak test before use - see the next section.
Attach The Warming Rack
There are two prongs on the rear
underside of the warming rack. Insert
these prongs into the brackets above
the hotplate. The warming rack should
sit fl at above the hotplate.
Page 9
Checking For Leaks
This should be done the fi rst time you connect up the barbeque, and again every time you
disconnect and reconnect any fi tting. Before proceeding, it is important that you leak test the
barbeque. Make sure all the barbeque control knobs are OFF.
If you have a portable gas cylinder, turn the cylinder ON by rotating the knob anti-clockwise. If you have a
wall connection, ensure the bayonet fi tting is connected.
Spray or pour soapy water (about the same concentration as washing up water) along the gas line
including:
• The gas connection at the inlet of the barbeque
• The gas hose or copper piping, including any joints or bends in the piping.
• The gas connection at the gas cylinder or the wall connection.
If bubbles appear, there is a gas leak. If the leak is at a connection, tighten and retest. If the leak is
anywhere else, or if you cannot resolve the leak, do not proceed.
• If you have a portable gas cylinder, turn the gas cylinder OFF and consult your retailer.
• If you have a bayonet connection, remove the hose from the wall fi tting and consult your retailer.
You can also check for leaks using a gas safety gauge, available at your Barbeques Galore store. This
provides an easier and more convenient way to check for leaks.
First Time Use
Lighting The Barbeque
Lighting the barbeque is easy, but must be done with due care. Make sure that the gas is
turned on at the cylinder, or that gas is available to the barbeque.
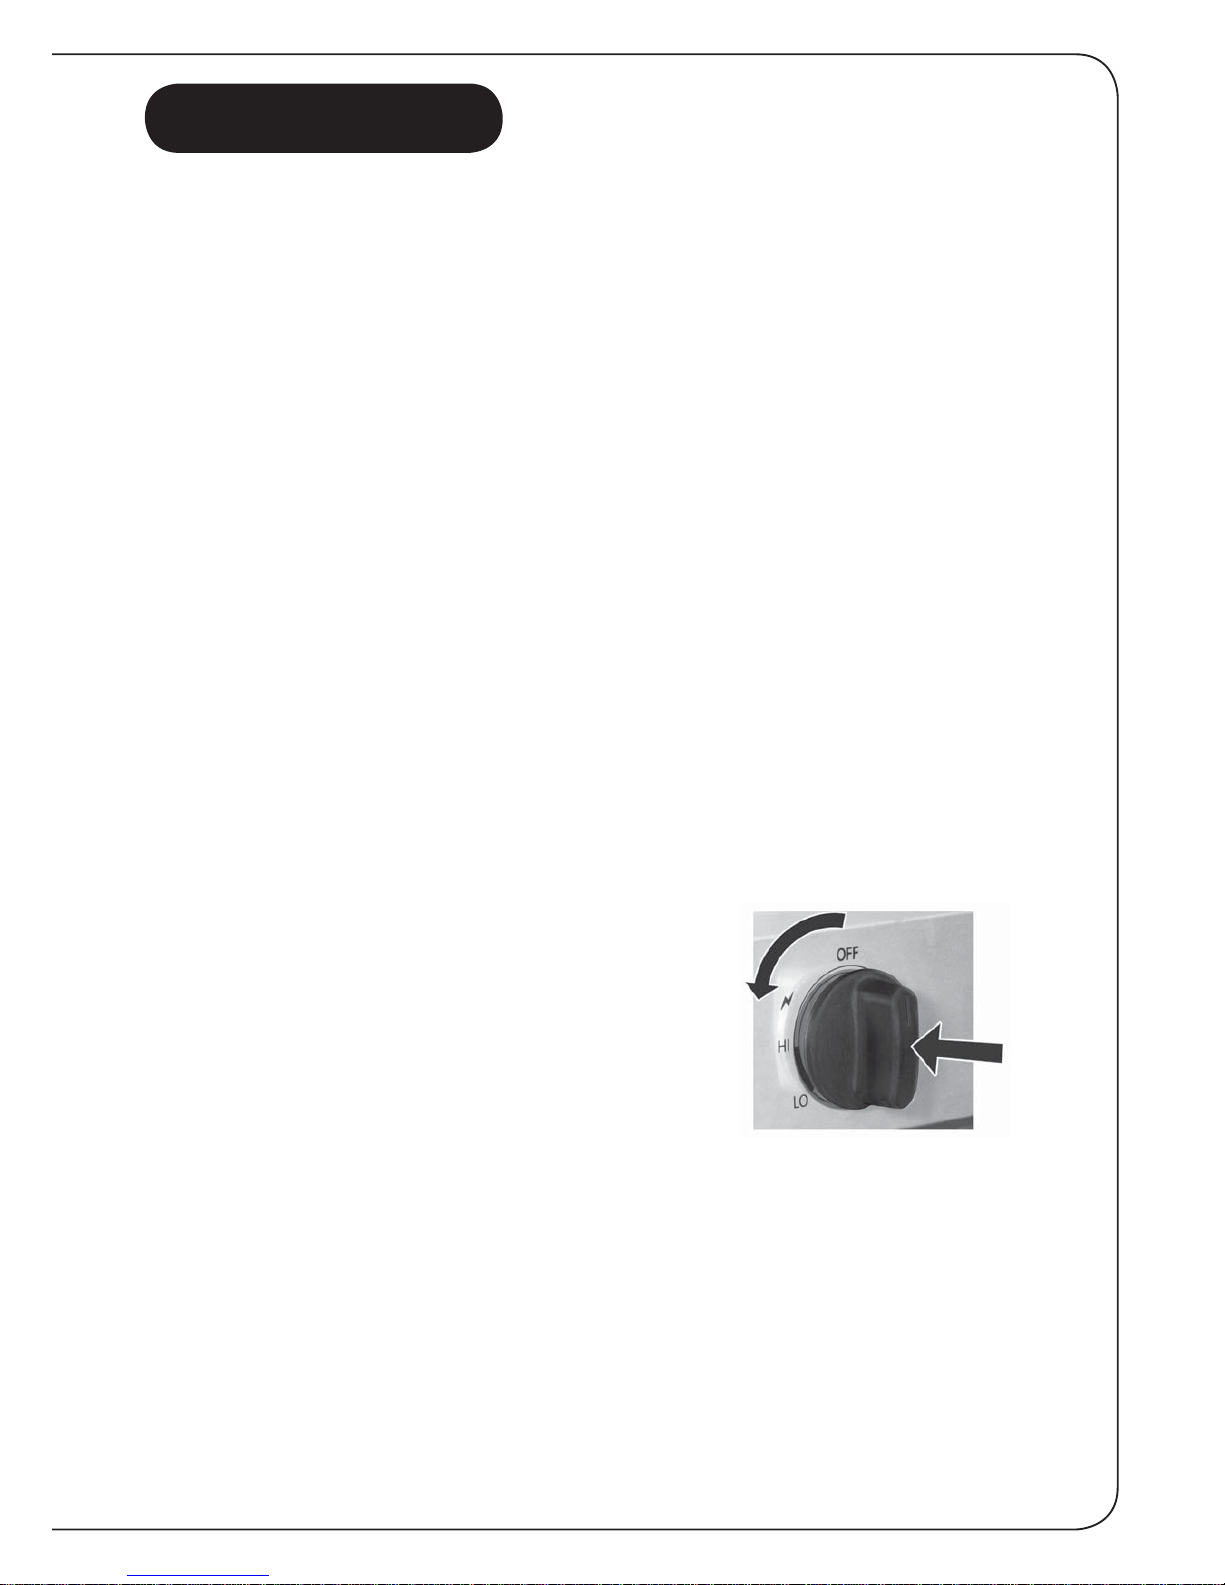
Automatic Ignition - Footymaster barbeques are equipped with
automatic ignition on each burner. Push the knob in and turn
anticlockwise to the MAX position. You should hear and feel a click
from the knob.
Manual Ignition - Place a lighted match or gas lighter underneath
the barbeque near the far right burner. Keep your hand below the
bottom of the burner while doing this. Now turn the burner on. You
should see the burner alight. Repeat to light the other burners.
If You Have Diffi culty Lighting
If the burner doesn’t light fi rst go, return the knob to the off position and try a couple more
times. If the burner still does not light, wait a few minutes to allow the gas to disperse
before trying again. If satisfactory operation cannot be achieved, consult your retailer before
proceeding.
Note carefully: Failure to follow the lighting procedures correctly can lead to a hazardous
condition.
Page 10

First Time Use
Controlling The Flame
The knobs have three basic positions: Off, MAX and MIN. You can achieve any fl ame
height between HI and LO by rotating the barbeque control knob between these
positions.
burner on Max burner on Min
Off is
straight up
To turn to MAX,
push the knob
in and turn anticlockwise
Keep turning
to reach the
MIN position
Checking The Flames
Look underneath the barbeque so that you can see the fl ames. They
should be a soft blue colour with yellow tips. If the fl ames are too
yellow, there is too much gas and not enough air. The fl ame will
be ineffi cient and will give off too much smoke. If the fl ame is too
pale, there is too much air and not enough gas. If either of these
situations occur, you will need to adjust the burners.
Wait for the burners to cool down, then remove them. You will see
a screw on the right side of each burner. Screw it in to increase the
yellow tipping, and screw it out to reduce the yellowness of the
fl ame. You may need to loosen the lock nut that keeps the screw in
position. Be sure to retighten the nut when you have fi nished. If you
are unable to set the fl ame correctly, you should consult your retailer
before further use.
Special note: “Blowback” is a situation where the fl ame burns inside
the burner, towards the front. It can be recognised by a sharp
roaring sound coming from the burner. It is not dangerous unless it
is allowed to persist. If this occurs, simply turn the burner off, wait a
few seconds, then relight.
This adjustment should rarely
be necessary as the burners
are set at the factory.
correct fl ame too much yellow tipping
Page 11

Turn
cylinder
off fi rst
Then turn
burners off
First Time Use - Curing The Hotplate
During manufacturing, the cooking surfaces were coated with a non-toxic paint. This paint will come
off completely over time. Its purpose is purely to help protect your barbeque during transport and
storage.
Coat the top of the hotplate with canola oil or some other edible oil. Light the barbeque as described
earlier. Leave the barbeque with all burners on Min for about 30 minutes. Paint may come off at this
time. Now clean the surface with water and a brush. Be careful of steam coming off the cast iron
surface while doing this. The hotplate is now cured and ready for use.
For ongoing protection of the cooking surface, follow the procedures in the Cleaning, Storage and
Maintenance sections.
First Time Use
Turning Off
When you’ve fi nished cooking, leave the burner controls on Max for a maximum of 5 minutes to
burn off excess grease from the burner and other surfaces.
To turn the barbeque off, it is best to turn off the cylinder fi rst, and allow all the gas left in the
hose to burn off. This will only take a couple of seconds. Then turn off all burner controls. If your
barbeque is connected to natural gas or piped LPG, you can simply turn the burner controls off.
It’s okay to leave the cylinder connected to your barbeque while it’s not in use.
Note carefully: Failure to follow these shutdown procedures correctly can lead to a hazardous
condition.
Page 12

Using Your Barbeque
Cooking Hints
Follow these guidelines to keep food moist and succulent on a barbeque:
Flare-up Control
This barbeque has a lot of power. Most of the time, best results will be achieved with the burners on a low
setting, or in some cases with the burners OFF.
Keeping Your Food Moist
It’s easy to keep your food moist and succulent on a barbeque by following these guidelines:
• Use tongs instead of a fork when turning meat and poultry. A fork pierces the fl esh and causes the juice to
seep out.
• Resist the temptation to keep turning meat over. Juices tend to rise to the top of a piece of meat and then
settle. Each time you turn the meat over, the juices are lost. It’s better to quickly sear the meat on each
side (about half a minute) then with the burners down near low, leave the meat cook on one side at a
time, turning once only before serving.
• If you like salt with your food, try adding it at the end instead of before or during cooking. Salt draws the
natural moisture out of the food and dries it out.
• Baste the food with light marinade or canola oil a couple of times while cooking, though watch out for
excessive fl are-up.
• As an alternative to simply cooking, try mar i nat ing your meat, fi sh, poultry or vegetables fi rst. The longer
you leave the food to stand in the mar i nade, the more thoroughly the fl avour will soak through. Several
pre-made marinades are available and good recipes are easy to come by. It is best to leave food standing
in the refrigerator.
• If you use a tomato or sugar based sauce for basting, apply it in the last 5-10 minutes of cook ing. Using
these sauces over a longer period of time will result in over-browning.
• To prevent meat from curling, slash the re main ing fat at roughly 5cm intervals, taking care not to cut into
the meat.
• Avoid burning or charring food as this has been shown to be unhealthy. Don’t leave cooked food standing
for too long before eating.
Preparing To Cook
Ensure the fat container is empty and is back in position underneath the barbeque, as you did during the
assembly.
Lightly coat the cooking surfaces with edible oil. This will prevent food from sticking.
Light the burners and leave on Max for about 3-5 minutes to warm the barbeque up. Once this is done, turn
the burners down to the desired temperature.
You’re now ready to start cooking up a feast.
Page 13
Storing Your Barbeque
Your barbeque is designed to be used outdoors. However, just like a car, you will prolong the life of the
appliance if you store it out of direct exposure to the elements when not in use. This can be done in
many ways:
• Place a waterproof cover over it. These are avail able from most barbeque retailers.
• Move the barbeque to a covered location. If you are storing it in a closed room (eg a shed or a garage)
you should keep the cylinder away from any other cylinders or any cars, boats, motorcycles or any
other petrol engines.
• If you don’t intend to use it for a few months, lightly spray all surfaces with canola oil. This will help
protect against corrosion.
Maintaining Your Barbeque
Apart from cleaning, your barbeque is a fairly low main te nance item. A couple of things are worth looking
at though. Remember to turn off and disconnect the gas before any maintenance is carried out.
• If your barbeque uses a fl exible hose to connect to the gas, check the rubber O-ring on the regulator
end of the hose assembly at least once a year. If it appears worn or cracked, have it replaced.
• We recommend having your barbeque checked by an authorised service agent every 5 years. This is to
ensure there are no leaks and that all components are still functioning correctly.
• Service and spare parts are available from your retailer.
• If you use a portable LPG gas cylinder, you will need to have the cylinder serviced or replaced every ten
years. The date of the last service should be stamped on the neck of the bottle.
As you can see, it’s easy to keep your barbeque in great shape so it can give you years of trouble free
enjoyment.
Cleaning
Your barbeque will look better and last longer if you keep it clean.
The cooking surface. While the hotplate is still hot, take a long handled brush and a scraper and
remove remaining oil and food scraps. You should use an oven mitt to avoid burning yourself. Then
recoat the plate with canola oil for continued protection.
The burners. Occasionally the burner holes may get clogged with grease, marinades or food particles.
Leaving the burner controls on Max for a maximum of 5 minutes after you’ve fi nished cooking will
remove most of this. When the burner has cooled down, remove remaining residue with hot water and
detergent. You should also check the burners periodically for any sort of blockage. In particular, you
should ensure that the aeration vents are free of insect nests and spider webs. To clean the burners, let
them cool down, then remove and inspect them. If any of the holes are clogged, gently tap the burner
onto a hard surface to remove residue. Use a wire brush to unclog the holes. Then lightly coat the
burners with canola oil for ongoing protection.
The frame. Grease can build up on the frame itself. Most of it can be cleaned off with hot water. Use a
non-caustic cleanser for more stubborn stains.
The grease can. You should empty the grease can after every barbeque. When necessary, replace it
with a similar sized can. 4 litre paint tins are of the right size. Never touch the can until the barbeque
and grease can have cooled down completely.
Care and Maintenance
Page 14

Care and Maintenance
If there are any signs of wear or cracking in the barbeque, you will need to replace it immediately.
Ensure you replace it with a hose and regulator purchased from Barbeques Galore to ensure proper
gas connection compatibility.
Connect the nut of the hose to the gas inlet underneath the right side of the barbeque. You MUST
use a spanner to tighten it properly. It is best to use two spanners, with the second spanner
holding the manifold inlet.
Do not use sealing tape. The connection is designed to seal properly without it. Perform a leak test
as explained in the First Time Use section before using.
Replacing The Hose
Page 15
Spare Parts
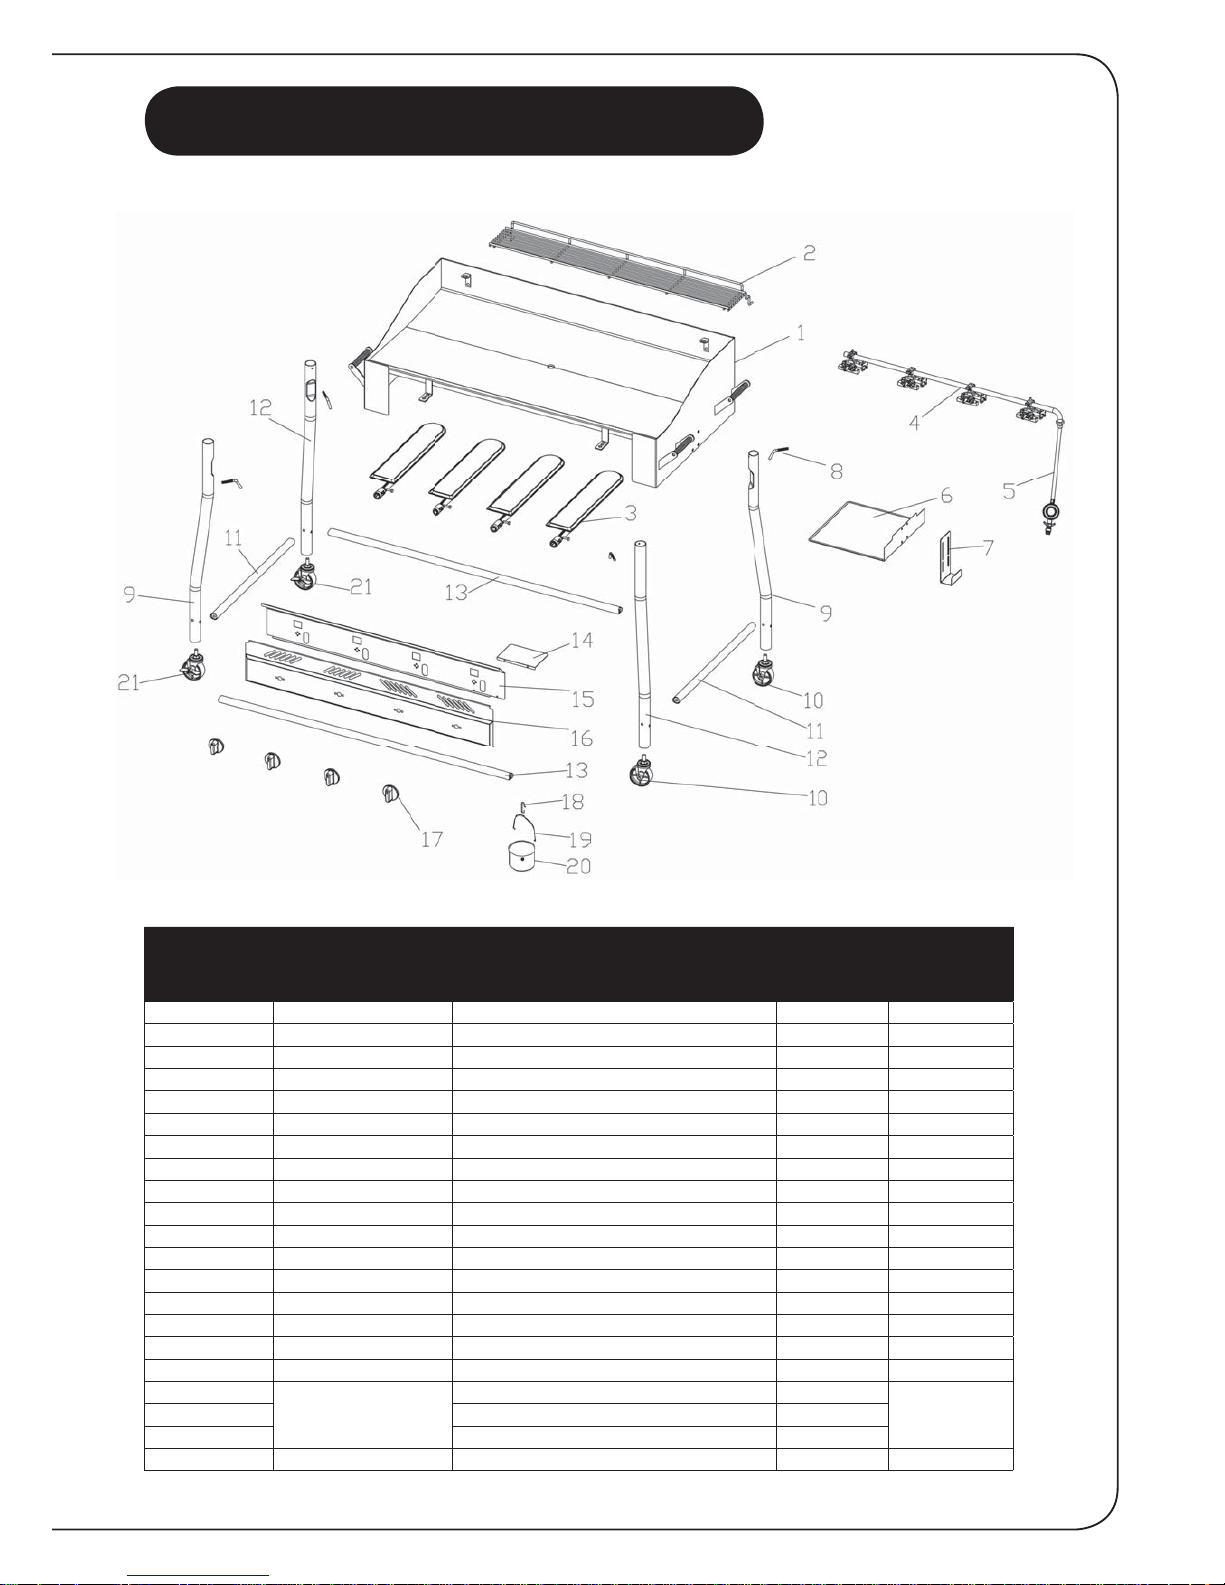
Spare Parts #GLG Code GLG Description Part QTY
Per BBQ
Part QTY
Per Spares
Code
1 G4FTYH-A020100 Fire box 1 1
2 G4FTYH-A0202 Warming rack 1 1
3 G4FTYH-A0203 Burner 4 1
4 G4FTYH-A0204 Valve 1 1
5 RP8W900 Hose and Regulator 1 1
6 G4FTYK-7A0207 Gas bottle heat insulation panel 1 1
7 G4FTYK-5A0210 Gas bottle hook 1 1
8 G4FTYH-A0303 Leg bolt 4 1
9 G4FTYK-030100 Leg - front left / back right 2 1
10 G4FTYK-B0302B Wheel - no lock 2 1
11 G4FTYK-031100 Leg brace - sides with bolts 2 1
12 G4FTYK-030700 Leg - back left / front right 2 1
13 G4FTYK-030900 Leg brace - front / back with bolts 2 1
14 G4FTYK-2A0208 Hose heat shield 1 1
15 G4FTYH-A0205 Control panel heat shield 1 1
16 G4FTYH-A0206 Control panel 1 1
17 HHKNOB Control knob 4 1
18
G4FTYH-A0306K
Grease cup hook 1
119 Grease cup handle 1
20 Grease cup 1
21 G4FTYK-B0302A Wheel with lock 2 1
Page 16
300
Gas Connection
Point
Width
15
Depth
G.L.G. Australia Pty Ltd (acn 001 185 002)
Building A2, Campus Business Park, 350-374 Parramatta Road Homebush NSW 2140
Ph. 02 9735 4111
Footymaster_0813
Technical
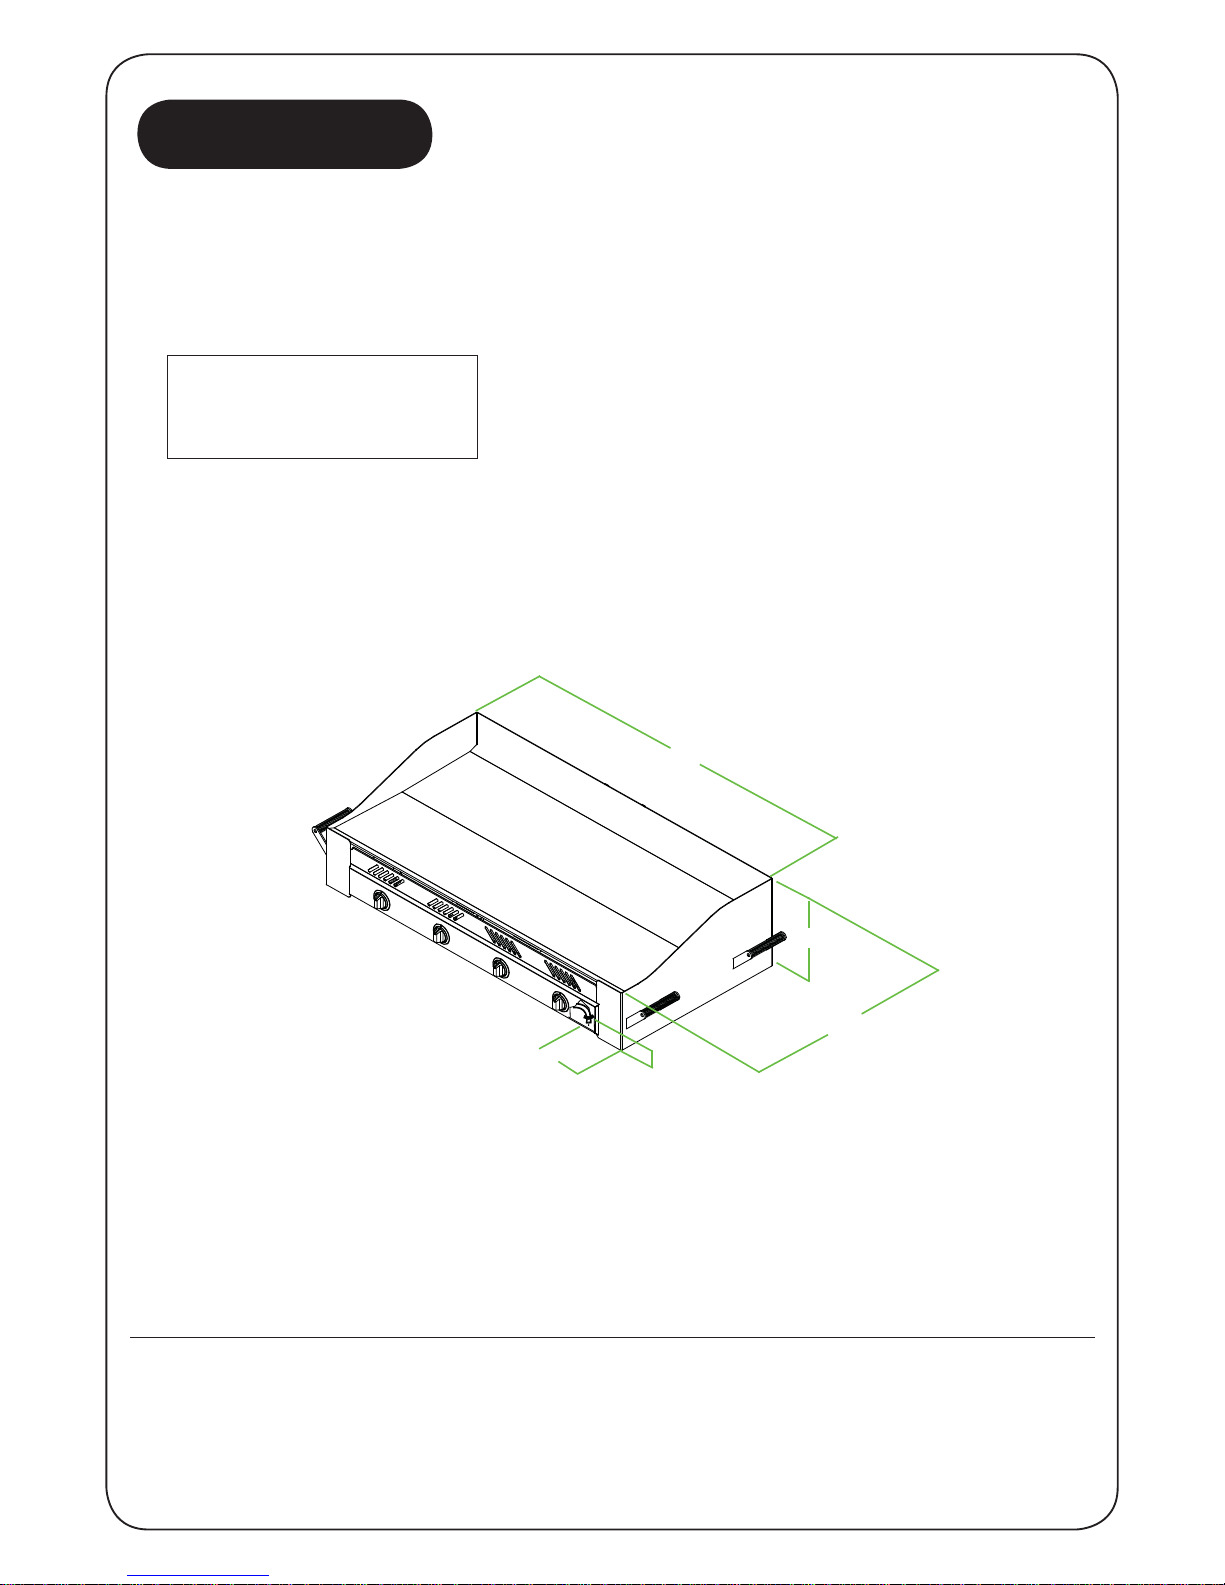
Refer to the sticker on your barbeque for jet sizes, gas pressures etc. Please note that we are
continually updating our barbeques, so these specifi cations may change over time. All dimensions are
in millimetres.
Width 1146 mm
Gas Connection 150 mm
Depth 585 mm
Inlet thread 5/8”- 18 UNF
 Loading...