

FoodSaver Vacuum Sealing, GameSaver Silver, FSFSSL0320, FSFSSL0321, FSFSSL032210EM2 System User Manual
User Manual
www.foodsaver.com 1-877-777-8042
Vacuum Sealing System

IMPORTANT SAFEGUARDS & TIPS
Important Safeguards
For your own safety, always follow these basic
precautions when using a FoodSaver
®
appliance:
1. Read the User Manual carefully for operating
instructions. Read all instructions in this manual
before use.
2. Do not use appliance on wet or hot surfaces, or
near a heat source.
3. To protect against electric shock, do not
immerse any part of appliance, power cord or
plug in water or other liquid. Unplug from outlet
when not in use and before cleaning.
4. To disconnect, unplug power cord from electrical
outlet. Do not disconnect by pulling on cord.
5. Do not operate appliance with a damaged
power cord or plug. Do not operate appliance
if it malfunctions or is in any way damaged. For
details, contact Consumer Services at number
listed below.
6. Use appliance only for its intended use.
7. Closely supervise children when using any
electrical appliance. Do not allow appliance to
be used as a toy.
8. 120v Appliances Only: The FoodSaver
®
appliance has a polarized plug (one blade is
wider than the other). To reduce risk of electrical
shock, this plug is intended to fit in a polarized
outlet only one way. If plug does not fit fully in
the outlet, reverse plug. If it still does not fit,
contact a qualified electrician. Do not modify
plug in any way.
9. Caution: Do not use extension cord. Appliance
power cord should not drape over counter or
tabletop where cord can be tripped over or
pulled on unintentionally, especially by children.
10. Do not place on or near a hot gas or electric
burner, or heated oven. Extreme caution must
be used when moving products containing hot
liquids.
11. Extreme caution must be used when sealing
bags with hot liquids.
12. Wait 20 seconds between seals to allow
appliance to cool.
13. CAUTION: Do not use outdoors.
For Household Use Only
SAVE THESE INSTRUCTIONS
Important Tips
1. Vacuum packaging is NOT a substitute for the
heat process of canning. Perishables still need to
be refrigerated or frozen.
2. For best results, use only with FoodSaver
®
Bags,
Containers and Accessories.
3. During the vacuum packaging process, small
amounts of liquids, crumbs or food particles can
be inadvertently pulled into the Vacuum Channel.
Empty the Drip Tray after each use.
4. Avoid overfilling, always leave at least 3 inches
of bag material between bag contents and top
of bag. This allows room for the bag material
to cinch tightly against the food and prevents
the bag from pulling out of the vacuum channel
during the sealing process. Then leave at least
one additional inch of bag material for each time
you plan to reuse bag.
5. Do not create your own side seams for a
FoodSaver
®
Bag. These bags are manufactured
with a special side seam, which is sealed all the
way to the outer edge.
6. To prevent wrinkles in the seal when vacuum
packaging bulky items, gently stretch bag flat
along Sealing Strip before you close lid.
7.
When you are vacuum packaging items with sharp
edges (dry spaghetti, silverware, etc.), protect bag
from punctures by wrapping item in soft cushioning
material, such as a paper towel. You may want to
use a canister or Mason jar instead of a bag.
8. When using accessories, remember to leave one
inch of space at top of canister or container.
9. Pre-freeze fruits and blanch vegetables before
vacuum packaging for best results. See
guidelines for Vacuum Packaging Section.
www.foodsaver.com 1-877-777-8042
1
This appliance has a polarized plug (one blade
is wider than the other). As a safety feature,
this plug will fit in a polarized outlet only one
way. If the plug does not fit fully in the outlet,
reverse the plug. If it still does not fit, contact a
qualified electrician. Do not attempt to defeat
this safety feature.

Welcome to FoodSaver
®
WELCOME
Congratulations…
You are about to enjoy the freshness
benefits of FoodSaver
®
, The #1 Selling
Brand of Vacuum Packaging Systems.
For years, the FoodSaver
®
Vacuum
Packaging System has helped millions
of households keep food fresh longer
in the refrigerator, freezer and pantry.
The FoodSaver
®
system is designed to
remove air and extend freshness up
to five times longer than conventional
storage methods. Keep your FoodSaver
®
appliance on your countertop, and
you’ll soon discover its convenience and
versatility.
Free Gift with Registration!
Register now and you’ll receive
a free gift. It’s our “thanks” to you
for being a FoodSaver customer.
Register online at
www.foodsaver.com/register.
You’ll have access to special sale items
for online registrants only!
www.foodsaver.com 1-877-777-8042
Questions?
Contact customer service at
877-777-8042
or visit www.foodsaver.com.
Do not return this product
to place of purchase.
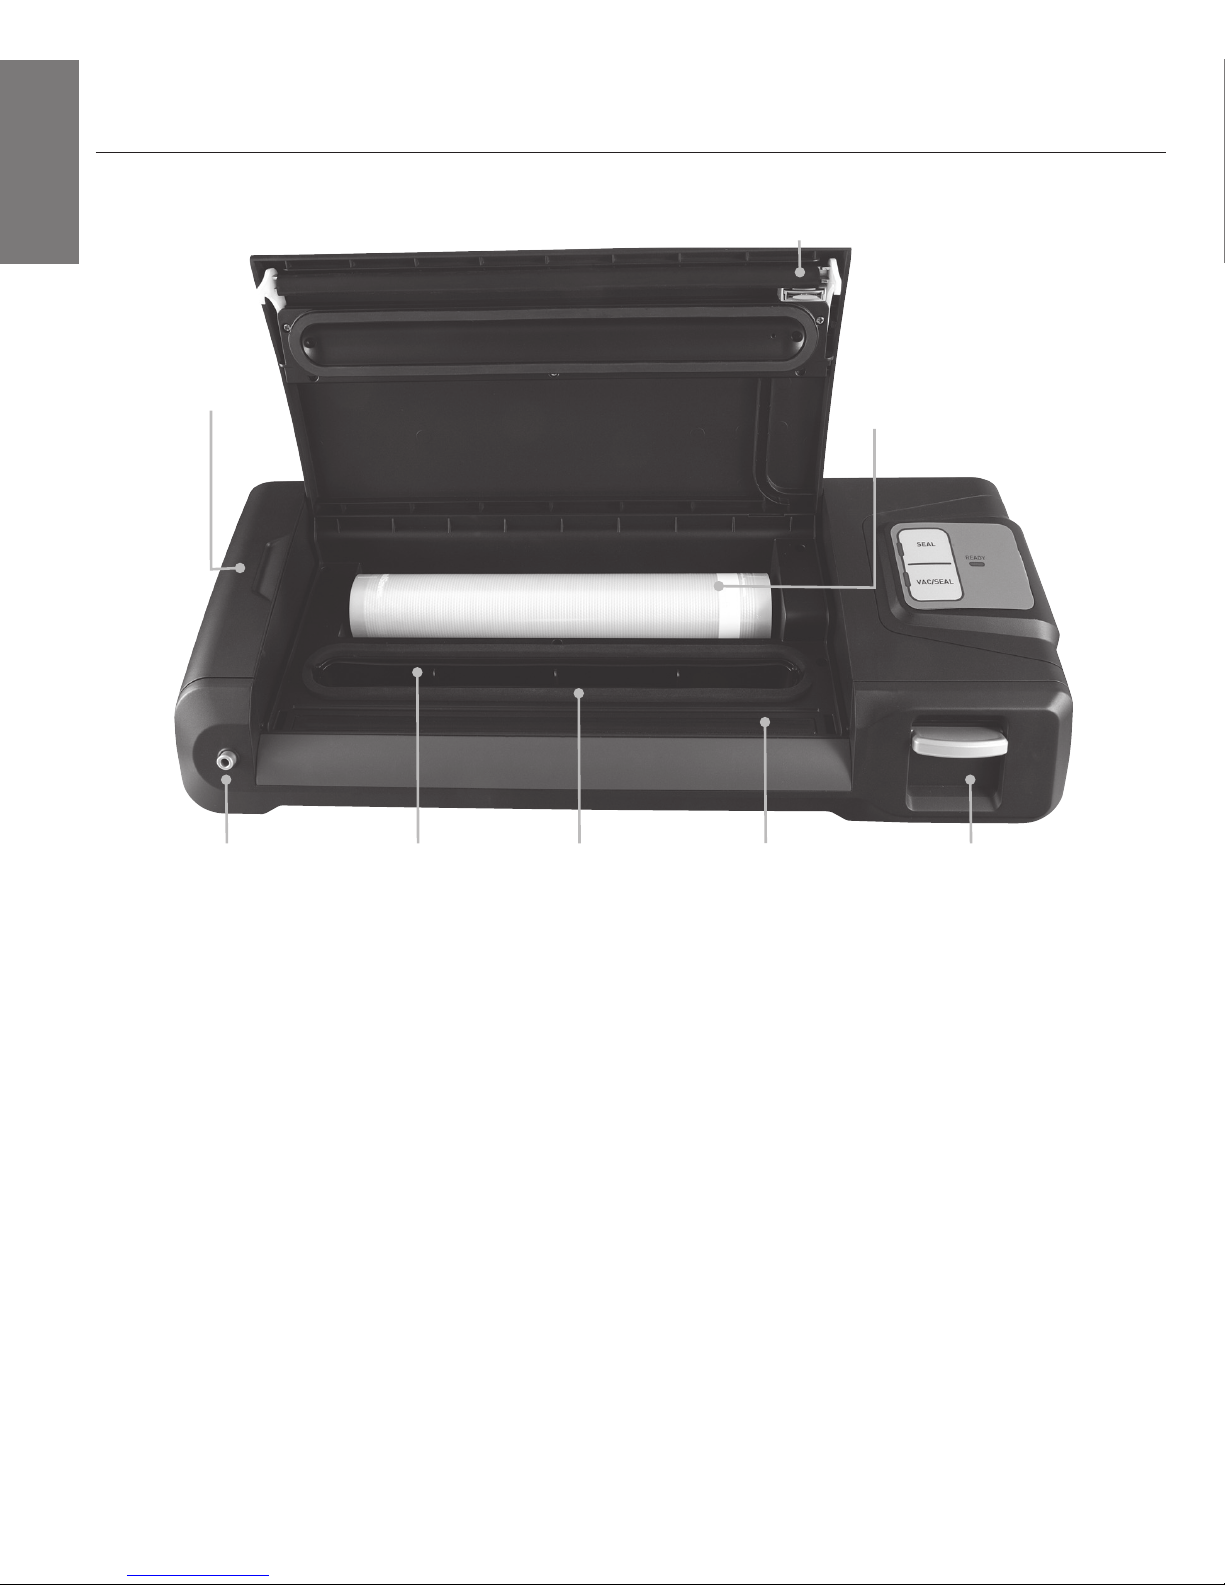
A. Accessory Storage Compartment – Stores
Accessory Hose.
B. Bag Cutter on Lid – Simplifies making
custom-sized bags
C. Built-in Roll Holder – For storage of
FoodSaver
®
Vacuum Sealing Rolls
D. Front Lid Latch – Easily Open and Close unit;
also has Store Position
FEATURES
Features
of Your FoodSaver® Appliance
3 4
www.foodsaver.com 1-877-777-8042
A
B
C
DEFGH
E. Sealing Strip - Provides extra secure, airtight
seal that’s two times wider
F. Foam Gasket – make sure this is correctly
positioned to ensure proper vacuum sealing
G. Removable Drip Tray – Large size helps to
catch overflow liquids
H. Accessory Hose Port – Accessory hose can be
used with all FoodSaver
®
Brand Accessories
Features
of Your FoodSaver® Appliance
FEATURES
www.foodsaver.com 1-877-777-8042
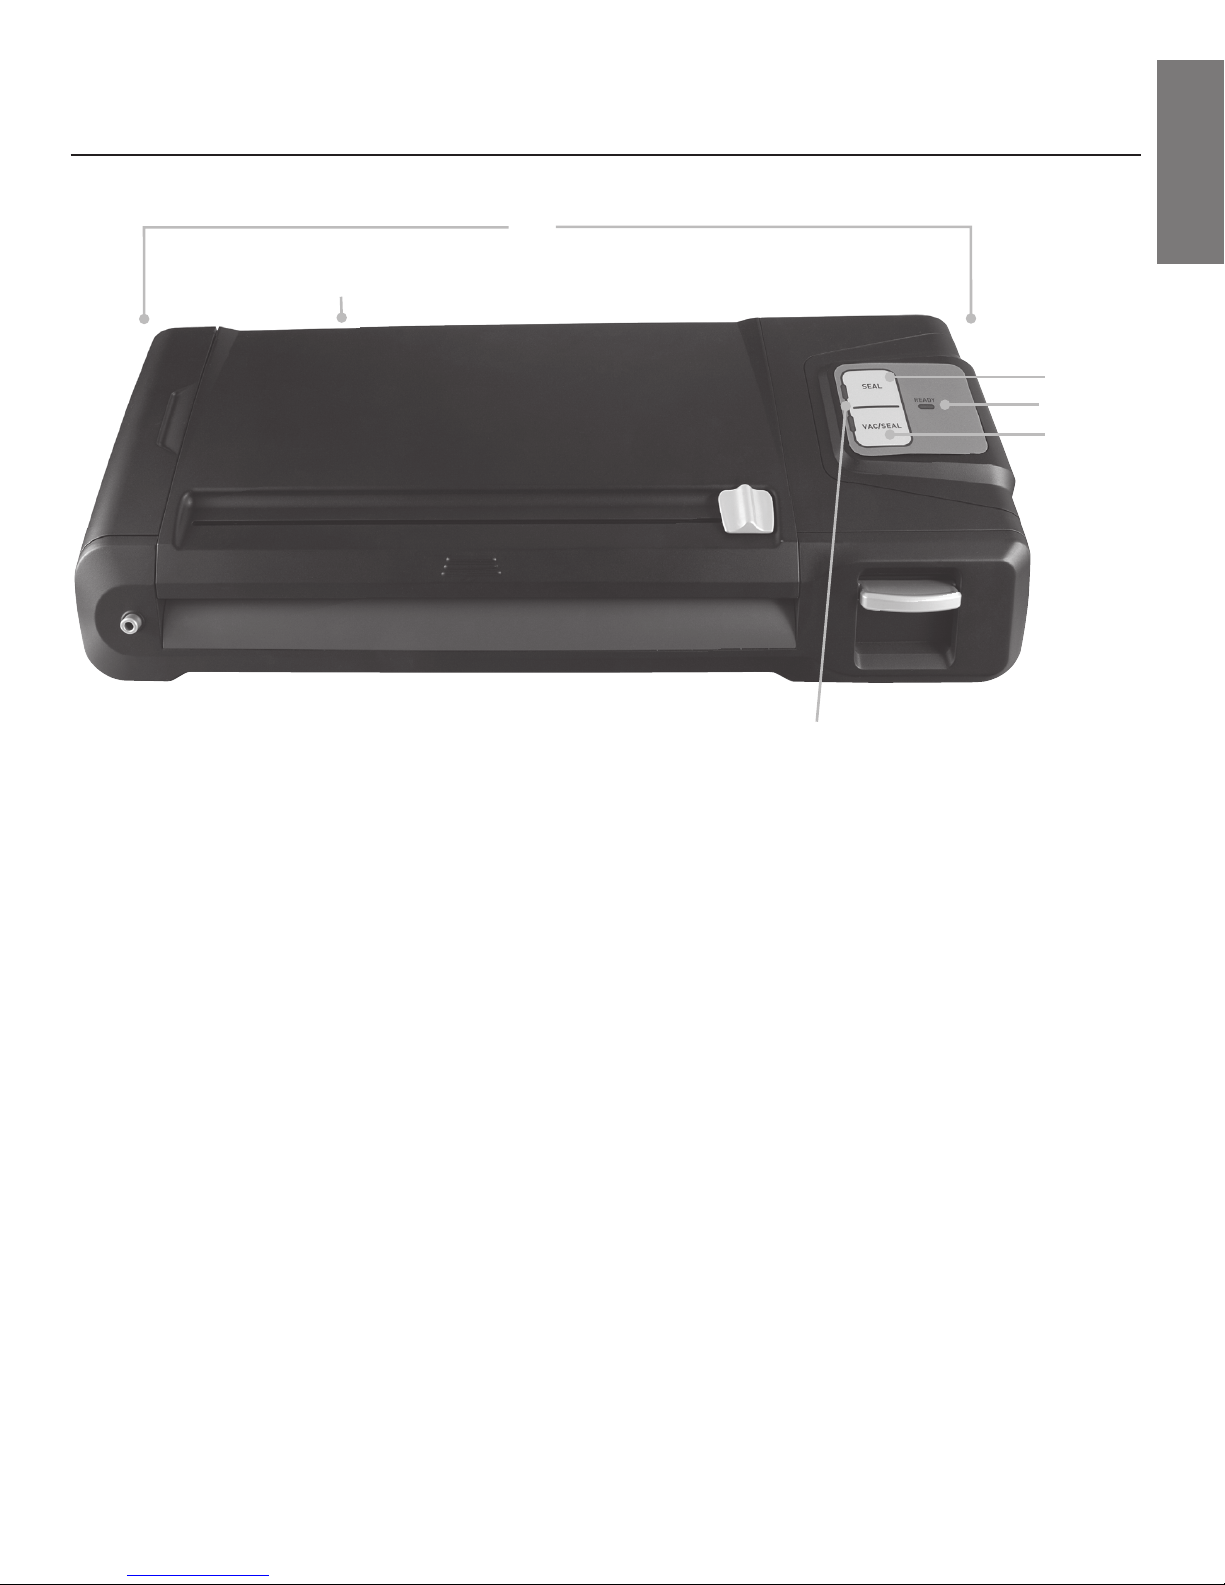
I. Power Cord Storage – On back side of
appliance
J. Rubber Feet for Vertical Storage – space-
saving feature allows appliance to be stored
vertically
K. Seal Button – The Seal button has three uses:
1. Press to create a seal when making bags
from a FoodSaver® Roll.
2. Press to immediately stop the vacuum
process and begin sealing the bag. This
prevents crushing delicate items such as
bread, cookies and pastries.
3. Press to create a seal on Mylar bags
(such as a potato chip bag) to keep food
sealed airtight.
L. Closed Light - Comes on when latch is
pushed down to Close position, which locks
down the lid.
M. Vac/Seal Button – Press to vacuum package
and seal your food air-tight with a single
touch. Shuts off automatically, Also can be
used to pause the vacuuming cycle.
N. Indicator Lights – Shows status of appliance.
I
J
K
L
N
M

5 6
www.foodsaver.com 1-877-777-8042
HOW TO
If you want to seal a bag without vacuuming, use
the Seal Button on the Control Panel. You can even
reseal bags such as mylar-type bags.
1. Place open end of bag on Sealing Strip, close lid
and use latch to lock.
2. Press Seal Button on Control Panel .
3. When Motor and Red Indicator Light turn off,
unlock latch, open lid and remove bag.
Note: As long as you place open end of bag on
Sealing Strip (not in Vacuum Channel), no air will
be removed.
How to
Seal Only
1. Prepare container according to FoodSaver®
Accessory Guidelines .
2. Insert one end of Accessory Hose into Accessory
Port on appliance. Insert other end into port on
accessory. Twist tab on Accessor y Hose while
inserting to ensure a tight fit.
3. Press Vac/Seal Button.
4. When motor and Indicator Light turn off, vacuum
process is complete. Note that the appliance
will still go through sealing cycle even when
vacuuming an accessory. You will hear Motor
shut off and then the sealing cycle will begin.
5. Gently twist and remove Accessory Hose from
accessory and appliance.
6. To test vacuum, simply tug on accessory lid. It
should not move.
Note: For important tips on using accessories with
different foods, please refer to the FoodSaver
®
Reference Guide.
How to
Vacuum Package with FoodSaver® Accessories
FoodSaver Vacuum Packaging Canisters (without
large knob on lid)
To release vacuum and open, push gray rubber
button on lid.
FoodSaver Bulk Canisters and Quick Marinators
(with large knob on lid) and Universal Lids.
To release vacuum and open, turn knob on lid to
Open.
FoodSaver Jar Sealer with Mason Jars
For use with Ball
®
and Kerr® brand Mason jars.
Important: Do NOT use screw bands when vacuum
packaging jars. To open, wedge spoon between
Mason jar lid and highest part of threaded rim.
Twist spoon gently to release vacuum.
FoodSaver Bottle Stoppers
To release vacuum and open, twist and pull up
on Bottle Stopper.
How to
Open FoodSaver® Accessories after Vacuum Packaging
 Loading...