

FoodSaver FM5400 Series Owner's Manual
Notice d’emploi
Owner’s Manual
FM5400 Series
Série FM5400

Service à la clientèle : 1 877 804.5383
Contents
www.FoodSaver.ca
Important Safeguards . . . . . . E4
Product Features . . . . . . E5
1. How to Install a FoodSaver
®
Roll
2. How to Make a Bag from a FoodSaver
®
Roll
3. How to Vacuum and Seal a Bag from a FoodSaver
®
Roll
4. How to Use PulseVac control feature
5. How to Use the Retractable Handheld Sealer
Care and Cleaning . . . . . . E11
Guidelines for Successful Vacuum Sealing . . . . . . E12
Troubleshooting . . . . . . E16
Replacement Parts . . . . . . E18
Warranty . . . . . . E19
Quick Start Guide . . . . . . . E7
E3
Customer Service: 1.877.804.5383
www.FoodSaver.ca Service à la clientèle : 1 877 804.5383
K
O
M
L
N
IMPORTANT SAFEGUARDS
When using electrical appliances, basic safety
precautions should always be followed to reduce
the risk of fire, electric shock, and/or injury to persons
including the following:
1. Read all instructions before use.
2. Unplug from outlet when not in use and before
cleaning. Allow to cool before putting on or taking
off parts, and before cleaning the appliance.
3. To protect against electric shock, do not immerse
any part of appliance, power cord or plug in water
or other liquid.
4. To disconnect, unplug power cord from electrical
outlet. Do not disconnect by pulling on cord.
5. Do not operate any appliance with a damaged
cord or plug or after the appliance malfunctions,
or has been damaged in any manner. Return
appliance to an Authorized Service Center for
examination, repair or adjustment. Do not attempt
to replace or splice a damaged cord. For details,
contact Customer Service at 1.877.804.5383.
6. Use appliance only for its intended use.
7. This appliance is not to be used by children or by
persons with reduced physical, sensory or mental
capabilities.
8. Close supervision is necessary when any appliance
is used near children. Children should not play with
the appliance.
9. Do not place on or near wet surfaces, or heat
sources such as a hot gas or electric burner, or
heated oven. Extreme caution must be used when
moving products containing hot liquids.
10. Do not let cord hang over edge of table or
counter, or touch hot surfaces. Place cord where it
cannot be pulled.
11. Lid closes down automatically with force. Do not
obstruct the lid from closing. Do not manually
force the lid to close.
12. Do not put fingers or any foreign objects
inside of Vacuum View Window while
vacuum sealing.
SAVE THESE INSTRUCTIONS
For Household Use Only
POWER CORD INSTRUCTIONS
A short power-supply cord (or detachable powersupply cord) is provided to reduce risks resulting from
becoming entangled in or tripping over a longer
cord. Longer detachable power-supply cords or
extension cords are available and may be used if care
is exercised in their use. If a long detachable powersupply cord or extension cord is used; the marked
electrical rating of the detachable power-supply cord
or extension cord should be at least as great as the
electrical rating of the appliance.
The longer cord should be arranged so that it will not
drape over the counter top or table top where it can
be pulled on by children or tripped over unintentionally.
IMPORTANT TIPS
1. Vacuum packaging is NOT a substitute for the
heat process of canning. Perishables still need
to be refrigerated or frozen.
2. For best results, use only with FoodSaver® Bags,
Rolls, and Accessories.
3. During the vacuum packaging process, small
amounts of liquids, crumbs or food particles can
be inadvertently pulled into the Vacuum Channel.
Empty the Drip Tray after each use.
4. Avoid overfilling, always leave at least three inches
(7.62 cm) of bag material between bag contents
and top of bag. This allows room for the bag
material to cinch tightly against the food and
prevents the bag from pulling out of the vacuum
channel during the sealing process. Then leave at
least one additional inch (2.54 cm) of bag material
for each time you plan to reuse bag.
5. Do not create your own side seams for a
FoodSaver® Bag. These bags are manufactured
with a special side seam, which is sealed all the
way to the outer edge.
6. To prevent wrinkles in the seal when vacuum
packaging bulky items, gently stretch bag flat while
inserting bag into vacuum channel and continue
to hold bag until vacuum pump starts.
7. When you are vacuum packaging items with sharp
edges (dry spaghetti, silverware, etc.), protect bag
from punctures by wrapping item in soft cushioning
material, such as a paper towel. You may want to
use a canister or mason jar instead of a bag.
8. When using accessories, remember to leave
one inch (2.54 cm) of space at top of canister or
container.
9. Pre-freeze fruits and blanch vegetables before
vacuum packaging for best results. See the
FoodSaver.ca website for “Guidelines for Vacuum
Packaging” and other tips.
10. Wait 20 seconds between seals to allow appliance
to cool.
Important Safeguards & Tips
FoodSaver
®
FM5400 Series
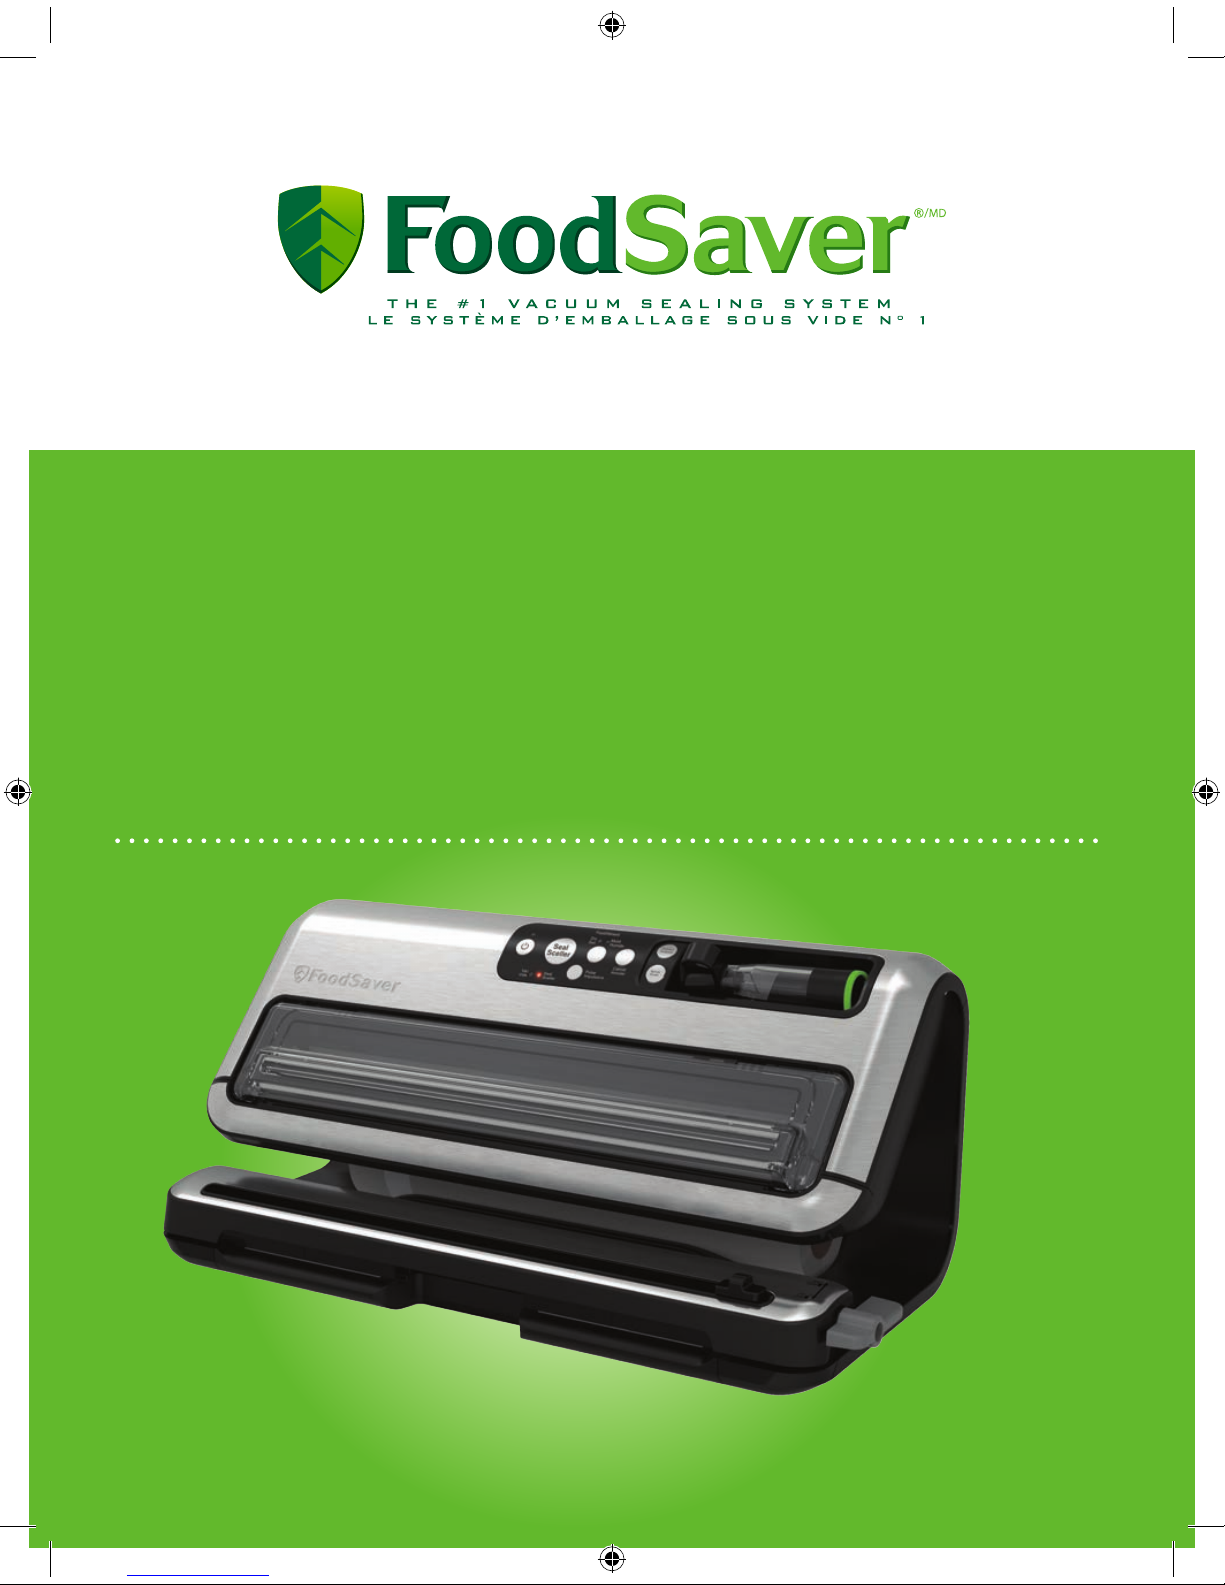
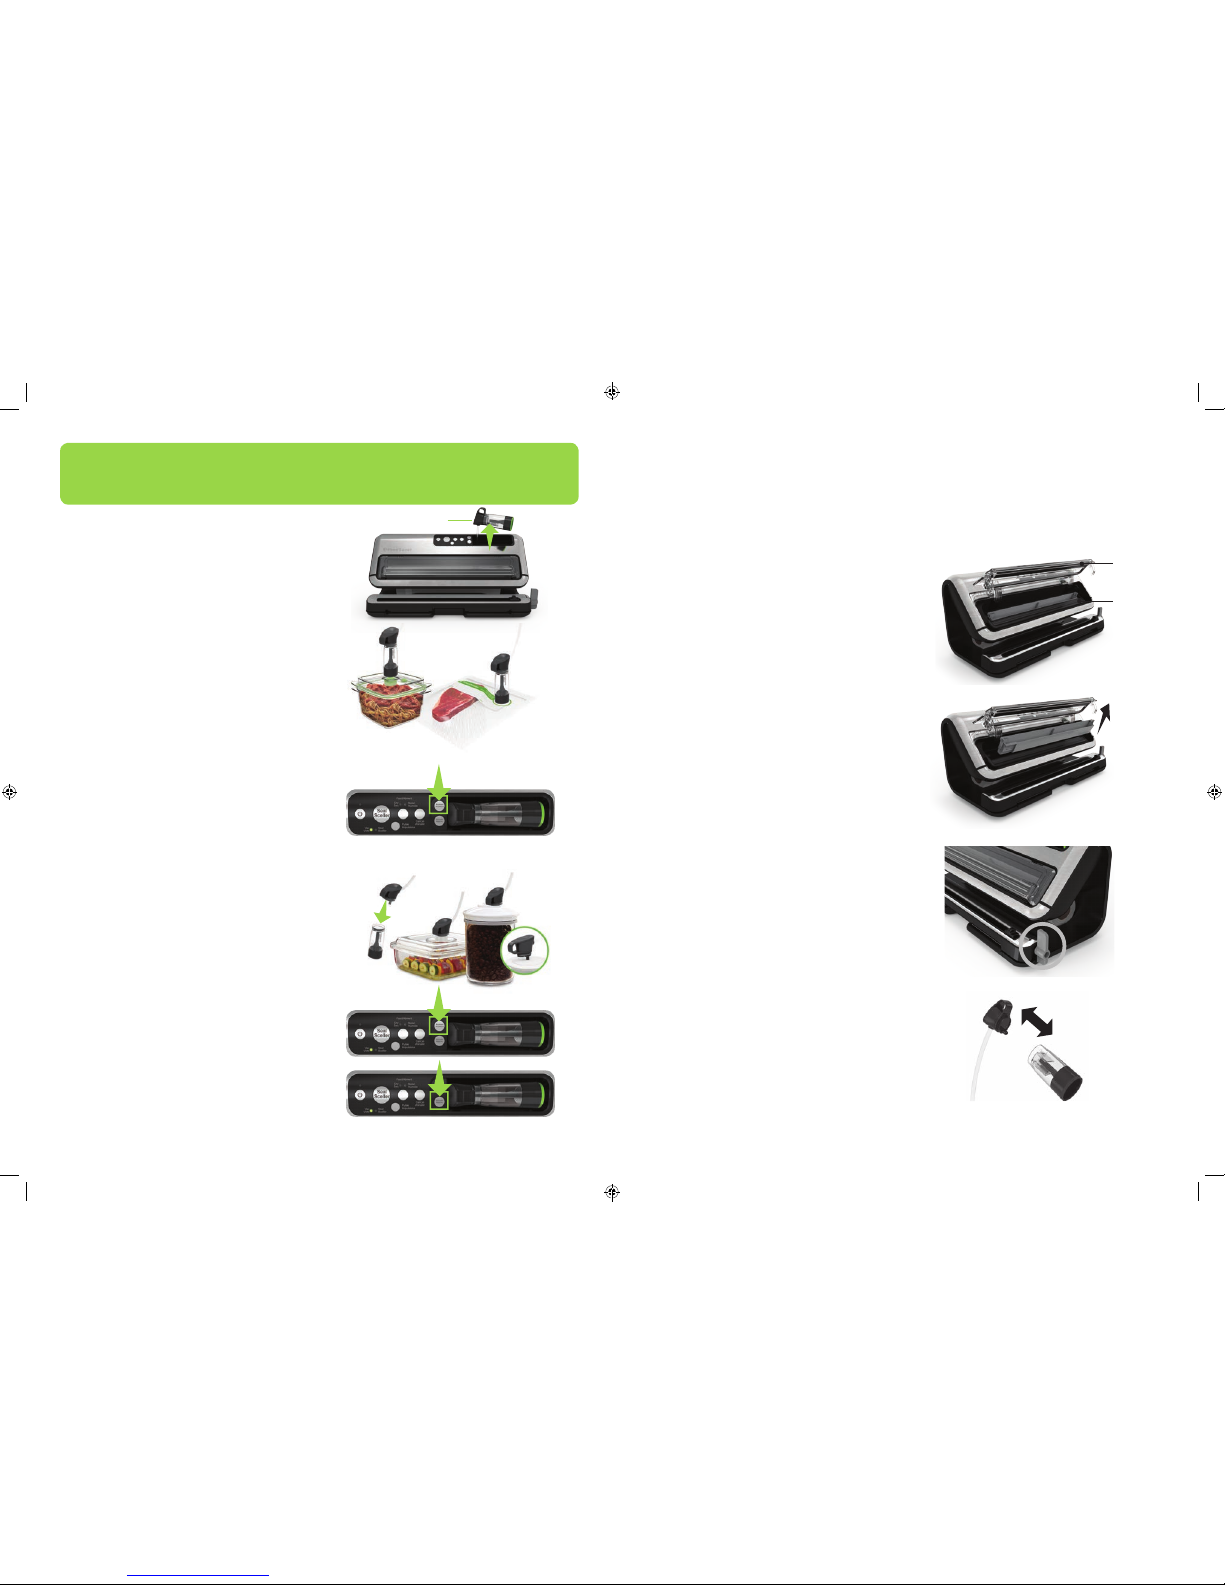
Product Features
A. Controls and Indicator Lights
Indicate current setting and vacuum progress
for added control.
B. Retractable Handheld Sealer
Works with FoodSaver® zipper bags, containers,
canisters* and marinators*.
C. Vacuum View Window
Provides visibility to vacuum channel, drip tray
and sealing strip.
D. Vacuum Channel
Simply insert the bag and press the Vacuum and
Seal Activation Bar to start the vacuuming sealing
process.
E. Unlock /Seal Lever
Seal: Turn back to put in seal mode.
This will make a seal.
Unlock: Turn forward to Unlock bag material.
F. Bag Cutter
G. Bag Dispenser
Pull to receive sealed bag.
H. Lower Seal and Cut Bar
Simplifies making custom-sized bags.
I. Vacuum and Seal Bar
Press to vacuum and seal. Simply insert open end
of bag into the vacuum channel and press down
on vacuum seal bar. The Vacuum View Window
will automatically close and grasp the bag to
begin the vacuum and seal process.
J. Power Cord Storage
Located on the back of the unit.
K. Upper Gasket
Non-Removable.
L. Removable Drip Tray
Catches overflow liquids and is dishwasher-safe.
M. Lower Gasket
Non-Removable.
N. Sealing Strips
Provides extra secure, air-tight seal
O. Open Roll Storage
For storage of FoodSaver® Vacuum Sealing Rolls.
J
*Not included with purchase
POLARIZED PLUG
This appliance has a polarized plug (one blade is wider than the
other). As a safety feature to reduce the risk of electricl shock, this
plug is intended to fit in a polarized outlet only one way. If the plug
does not fit fully in the outlet, reverse the
plug. If it still does not fit, contact a qualified
electrician. Do not attempt to defeat this
plug safety feature or modify the plug in any
way. If the plug fits loosely into the AC outlet
or if the AC outlet feels warm do not use
that outlet.
D
G
A
B
H
I
C
E
F
E5E4
Customer Service: 1.877.804.5383
www.FoodSaver.ca Service à la clientèle : 1 877 804.5383
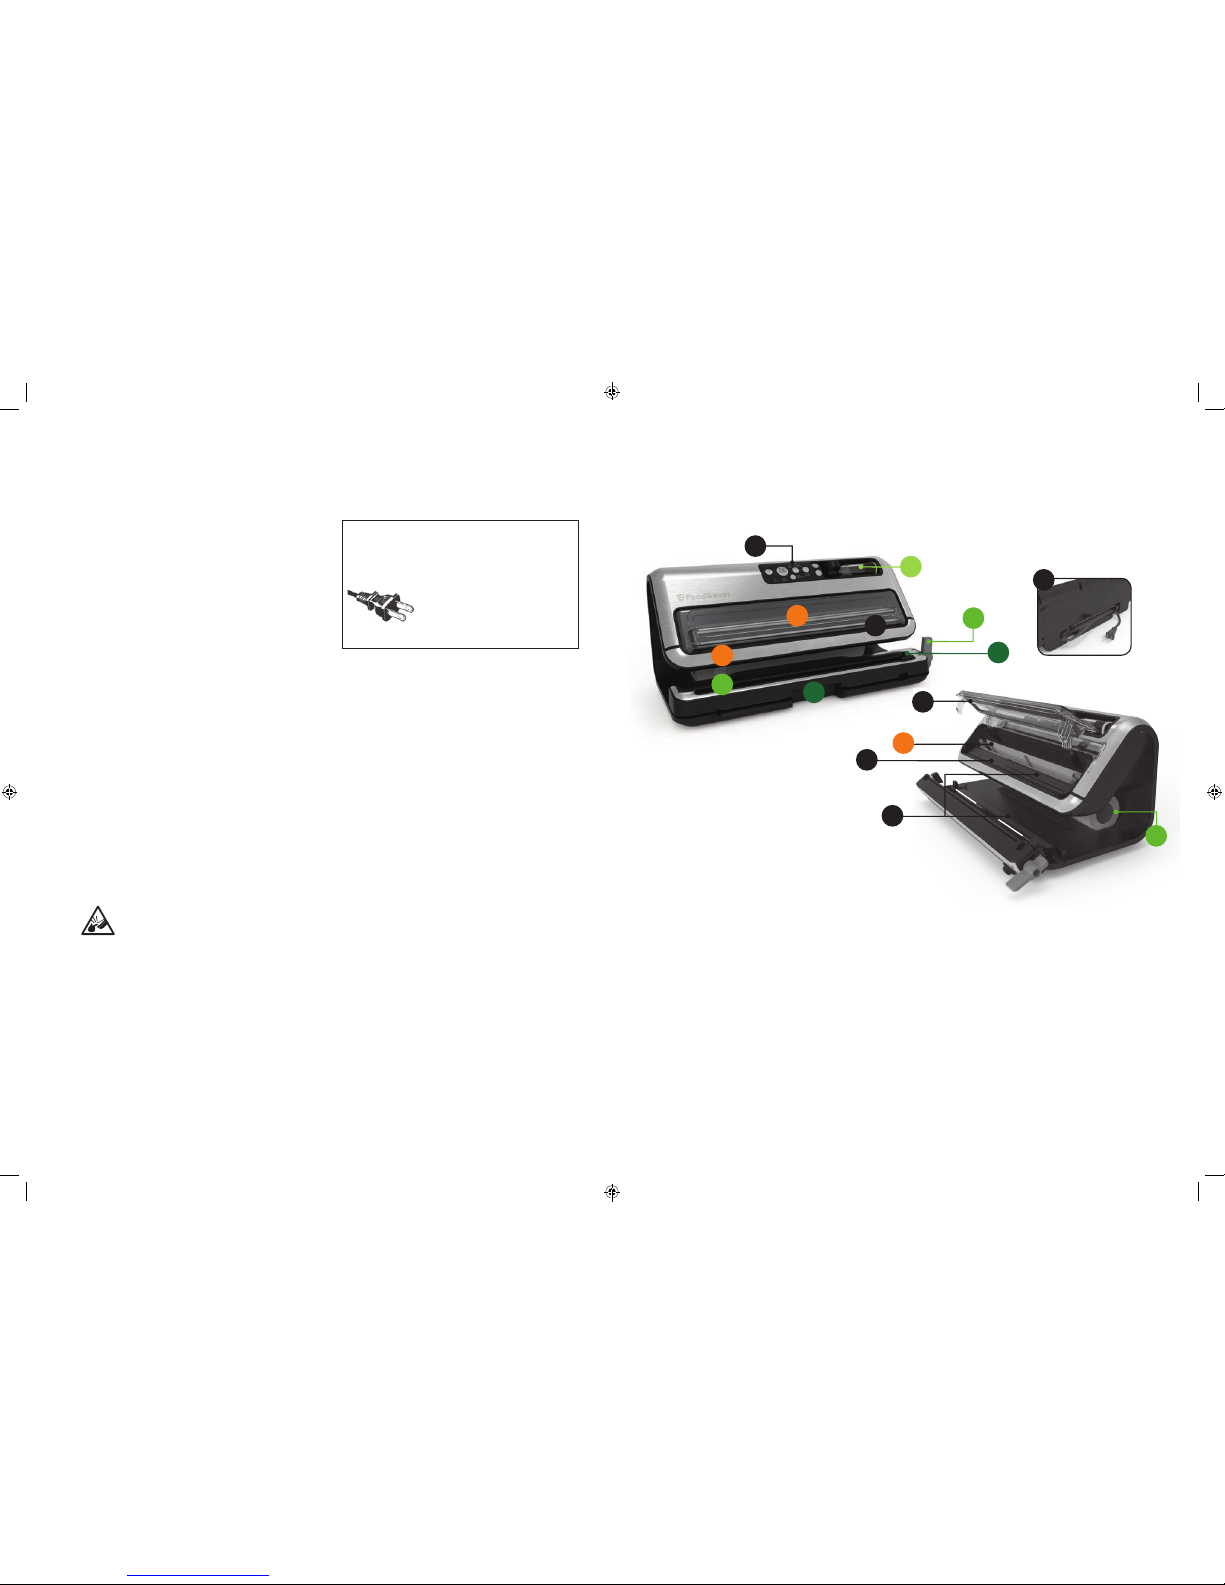
Control Panel
1
Power Button
Press the Power button to begin. The Power
light will become illuminated green. After
vacuum sealing press Power Button to turn
off appliance.
2
Seal Button
This button ha s two uses:
1. Press to immediately s top the vacuum
process and begin sealing the bag. This
prevents crushing delicate items such as
bread, cookies and pastries.
2. Press to create a seal on multilayer film
bags (such as a potato chip bag) to keep
food sealed airtight.
3
Seal Indicator Light
Thi s light has two u ses:
1. The pulsing red light indicates sealing
process is engaged.
2. Flashing red lig ht indicates error. (See
Troubleshooting section on pg. 16 for
more information).
4
Vacuum Indicator Light
Illuminates green when vacuum process is
engaged. S huts off when the full process is
finished.
5
PulseVac Button
Use to manually control the vacuum
process and avoid crushing delicate items.
(See “Using PulseVac Control Feature”
section on pg. 9 for further information).
6
Adjustable Food Settings Button
For optimal vacuuming and sealing of moist
or juicy foods. Press the Adjustable Food
Settings Button until the Moist Indicator Light
is illuminated. Choose the dry food setting for
foods without liquid. The Moist Food Indicator
light will flash when Food Sealing Sensors
automatically detect any moisture or liquid
in the drip tray.
7
Cancel Button
Immediately halts your current function.
8
Accessory Button
Press for use with FoodSaver® accessories
using the Retractable Handheld Sealer.
Push Accessory Mode Button to begin
vacuum process. Motor will run until
Vacuum Sealing Process is complete. Press
Accessory button again or Cancel button if
you want to stop or cancel the vacuum
sealing process.
9
Marinate Button
For use with Retractable Handheld Sealer. A
ten minute sequence of vacuum pulse to
rest ratio allowing foods to get optimum
flavor infusion in the least amount of time.
During this sequence the appliance will
automatically vacuum and release three
times. Press Marinate button again or
Cancel button if you want to stop or cancel
the vacuum sealing process.
10
Retractable Handheld Sealer
Works with FoodSaver® zipper bags,
containers, canisters* and marinators*.
3
Power
Button
Power
Indicator
Light
Vacuum
Indicator
Light
Seal
Indicator
Light
1
5
PulseVac
Button
4
Retractable
Handheld Sealer
7
Cancel
Button
2
Seal
Button
6
Adjustable
Food
Settings
Button
Dry/Moist
Food
Indicator
Lights
Accessory
Button
8
Marinate
Button
9
10
*Not included with purchase
PULL bag material forward
to white line, sliding edges of
bag all the way to indicator
line marked on appliance.
4
PRESS power button, light will
illuminate to indicate power is on.
1
CLOSE Express Bag Maker
Lower Seal and Cut Bar (H) by
pushing all the way back until it
stops. TURN Unlock/Seal Lever (E)
to seal position to make first seal.
5
OPEN the Express Bag Maker Lower
Seal and Cut Bar (H)
by pulling forward, away
from the appliance.
2
INSERT roll from either side
of appliance and slide in
until it sets into notched
out area.
3
IMPORTANT TIP: The visible roll allows you to see how much
bag material you have left, so you can quickly see when you
will need to replace a roll or purchase more.
(H)
(E)
(H)
QUICK START GUIDE
HOW TO INSTALL A ROLL
1
NOTE: Red Seal light pulses while seal is being made.
When the Red Seal light turns off the seal is complete.
Cannot use upper vacuum view window until red light turns off.
E7E6
Customer Service: 1.877.804.5383
www.FoodSaver.ca Service à la clientèle : 1 877 804.5383
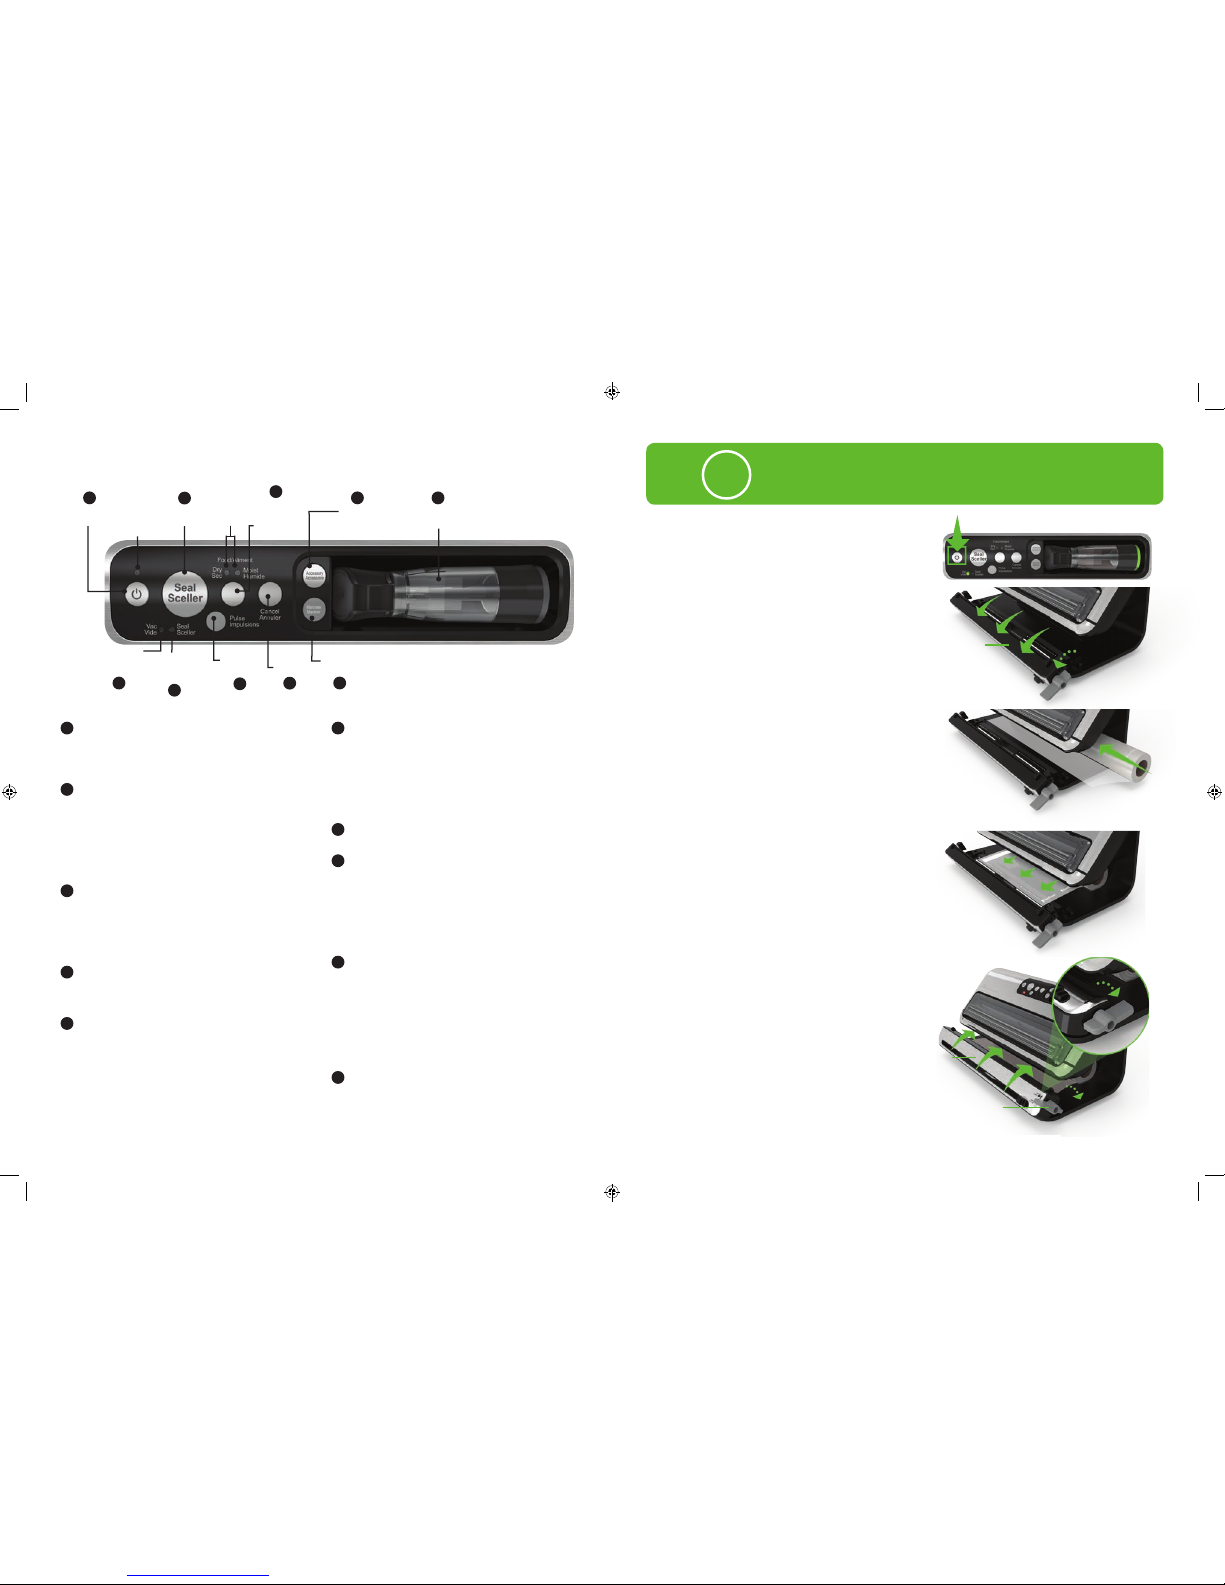
REPEAT steps 1, 2 and 3 to make more bags.
TURN lever to unlock position and
PULL bag from Bag Dispenser Area
(G) to desired length.
1
SLIDE Bag Cutter (F) across to
get your current bag.
3
2
TURN Unlock/Seal Lever (E)
to seal position. This creates
the first seal of the next bag.
(E)
(F)
2 3
IMPORTANT TIP: Each time you turn
the Unlock/Seal Lever (E) to seal you
create the seal for your next bag,
making continuous bag making a
simpler process.
IMPORTANT TIP: Accurately measure the
amount of bag material you will need by
placing the food you will seal on the counter,
and by pulling enough bag material to fit the
amount of food for each bag. Remember to
leave three inches (7.62 cm) of space
between bag contents and top of bag.
QUICK START GUIDE
HOW TO
VACUUM AND SEAL A BAG
QUICK START GUIDE
HOW TO
MAKE A BAG
When the Red Seal light
turns off, the vacuum seal
process is complete, the
Vacuum View Window will
release and the sealed
bag is ready for storage.
(G)
(G)
2
With the bag in place,
PUSH and RELEASE the
Vacuum and Seal Bar
(I) with both hands. The
Vacuum View Window
will automatically close
and grasp the bag, which
begins the vacuum and
seal process.
1
With both hands,
INSERT the open
end of the bag
through the bottom
of the Vacuum View
Window (C) into
Drip Tray (L)
NOTE: Red Seal light pulses while seal is being
made. When the Red Seal light turns off the
seal is complete.
(C)
IMPORTANT TIP: The
Vacuum View W indow
allows you to ea sily see
where to ins ert the end of
the bag into t he drip tray,
before activating the
vacuum and sealing bar
IMPORTANT TIP:
When Dr y and
Moist li ghts flash, the d rip tray is
full. Ple ase empty it. Vacuum
and Seal f unction will b egin
again after drip tray is emptied.
CAUTIONS: 1. Do not put
fingers or any foreign objects
inside of Vacuum View
Window while vacuum sealing.
2. Lid closes down
automatically with force.
Do not obstruct the lid from
closing. Do not manually force
the lid to close.
Use the PulseVac Control feature to
manually control the vacuum process and
avoid crushing delicate items.
1. Place item(s) in bag, allowing at least
three inches (7.62 cm) of space between
bag contents and top of bag.
2. Press the PulseVac button. This will cause
the “Vacuum” light to illuminate.
3. Insert open end of the bag into the
Vacuum View Window until it is just inside
of the drip tray. Then Press Seal activation
bar to close the window.
4. Press the PulseVac Button. The vacuum
pump will run when the PulseVac Button is
held down. Release the PulseVac Button
to stop the vacuum process. This will allow
you to adjust the contents of the bag
for better control of the vacuum sealing
process. Repeat pushing the PulseVac
Button until desired amount of air has
been removed.
NOTE: If the vacuum p ump stops enga ging after severa l
pushes o f the PulseVac Butto n, it means the ma ximum
vacuum ha s been reached. Do n ot continue to pus h the
PulseVac But ton. The bag wil l be sealed autom atically if
you reach max va cuum.
5. Press Seal Button to seal the bag and end
the PulseVac mode.
6. When the red Seal Indicator light turns
off, remove bag. Refrigerate or freeze if
needed.
Use PulseVac Control Feature
(I)
(I)
E9E8
Customer Service: 1.877.804.5383
Service à la clientèle : 1 877 804.5383
FOR CANISTERS*
& MARINATORS*:
Requires disassembly of adapter.
Remove clear bottom portion of
Retractable Handheld Sealer from
top handle. Insert the tip into the
port on the canisters or marinators.
4
* Not included with purchase
PULL Retractable
Handheld Sealer (B)
from appliance.
1
FOR ZIPPER BAGS
& CONTAINERS:
Place end of Retractable
Handheld Sealer over valve
on bag or container.
2
TO VACUUM IN CANISTERS*:
Press Accessory button.
5
TO MARINATE
IN CANISTER*:
Press Marinate button.
6
TO VACUUM ZIPPER BAGS
AND CONTAINERS:
Press Accessory button.
3
QUICK START GUIDE
HOW TO USE THE
RETRACTABLE HANDHELD SEALER
and Cleaning of your Vacuum Sealer
Care
Appliance:
Unplug from outlet and allow to cool before
cleaning.
CAUTION: Do not immerse any part of
appliance, power cord or plug in water or
other liquid.
Check Gaskets and around Drip Tray to
make sure they are free from food materials.
Wipe off Gaskets with warm soapy cloth if
needed. Upper Gasket can not be removed.
The Removable Drip Tray makes cleanup
easy when small amounts of liquids are
inadvertently pulled into the Vacuum
Channel during vacuum process.
Empty Drip Tray af ter each use. Wash in
warm soapy water or place on top rack
of dishwasher. Dry thoroughly before
re-inserting into the appliance.
Retractable Handheld Sealer
Reservoir:
Empty Reser voir after each use. Wash in warm
soapy water. Air dry before replacing. To remove
Reservoir from handheld sealer, holding top
portion (black upper piece) firmly, pull lower
reservoir down and off.
NOTE: Al ways clean after ea ch use when fluid i s visible.
(K)
(M)
www.FoodSaver.ca
CAUTIONS: 1. Do not put fingers
or any foreign objects inside of
Vacuum View Window while
vacuum sealing.
2. Lid closes down automatically
with force. Do not obstruct the lid
from closing. Do not manually force
the lid to close.
IMPORTANT TIP:
Always lea ve Unlock/Sea l lever in the Unloc k position
when you are do ne using your Foo dSaver
®
appliance.
(B)
E11E10
Customer Service: 1.877.804.5383
 Loading...