

Page 1
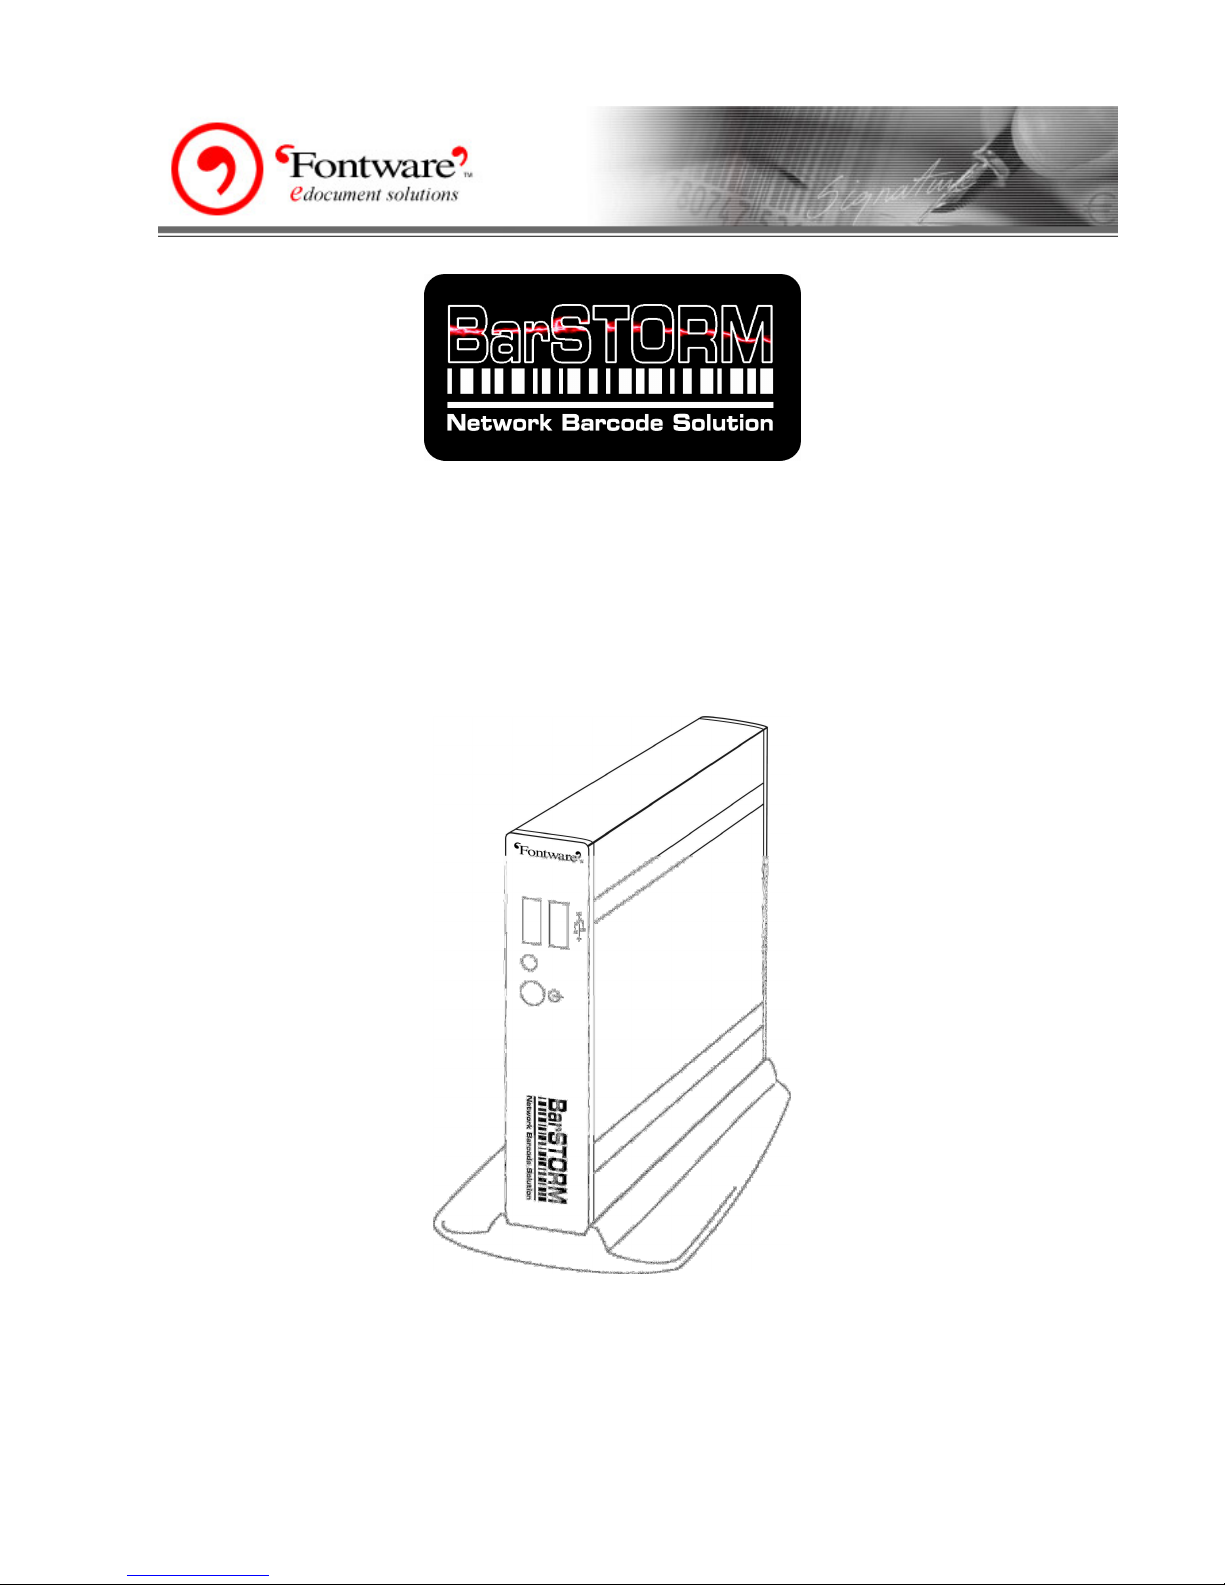
BarSTORM Installation Guide
Manual Version 1.0c
November 2005
©BarSTORM Installation Guide:®
BarSTORM Version 1
Copyright © 2005 Fontware Limited. All rights reserved.
All Trademarks observed.
Intelligent Output
Page 2

BarStorm Installation Guide
- - 2 - -
Copyright © Fontware Limited. All rights reserved.
Table of Contents Page
Acknowledgements: - 3 Software Licence and Copyright - 3 Introduction to BarSTORM - 4 Connection to the Unit - 4 USB Port Layout - 5 Screen Setup Administration - 5 Web Interface Administration - 6 Password and KEY - 8 Firmware Upload - 9 Bridged Queues - 10 Fonts & Overlay - 12 Font & Form Management - 12 Core Resource Files - 12 Form Overlay Creation - 15 Freescape - 16 Diagnostics - 16 Windows Printer Setup - 17 Test Data Files - 21 Support Information - 24 -
This manual is intended for use to setup the BarStorm to connect to the printer and to the network.
Please also refer to the BarSTORM Barcode Manual, to review and understand the methods for Barcode
programming.
Page 3

BarStorm Installation Guide
- - 3 - -
Copyright © Fontware Limited. All rights reserved.
Acknowledgements:
HP is registered to Hewlett Packard
SAP is registered to SAP AG
TrueType is registered to Apple
Postscript is registered to Adobe
Microsoft and Windows are registered to Microsoft Corporation
© 2005 Fontware Limited. All rights reserved.
Fontware is a registered Trademark
All Trademarks observed.
Software Licence and Copyright
BarDIMM 3.3 (c)1004-2005 Jetmobile SA. All Rights Reserved.
BarDIMM is a registred trademark of Jetmobile SA.
E&OE
IMPORTANT: Before using the BarSTORM Software please read the licence agreement carefully. The right
to use this software is granted only if the Customer agrees to the terms of this Licence. If you do not agree to
the terms of this Licence, please return the product unused.
Fontware Limited considers that installation of the Software is your acceptance of our terms and conditions
of the license.
1. The Software has been developed for use with the BarSTORM, The Licence is to be used without any
time limit and maybe subject to change.
2. The Software may not be duplicated, copied, resold, or re-branded without the written consent of Fontware
Limited.
3. It is the responsibility of any user, reseller, Distributor, OEM and other third party to protect Fontware
Limited rights against violation of this Software Licence.
4. Fontware will consider any attempt to duplicate the functionality of any application provided by the
software will constitute a breach of software licence, and may instigate legal proceedings to protect the
intellectual property rights of the BarSTORM and Fontware Limited.
5. This Licence and the Software product may be transferred to a third party provided the third party agrees
to all the terms of this licence and that no copies of the Software are retained by the transferring party.
6. Fontware reserves the right to terminate this Licence upon breach.
7. In the event of a termination, all copies of the software must be returned to Fontware Ltd
8. Any disputes In respect of the Software Licence will be considered a breach of copyright and is subject to
English Law.
Page 4
BarStorm Installation Guide
- - 4 - -
Copyright © Fontware Limited. All rights reserved.
Introduction to BarSTORM
The BarSTORM unit is a powerful multiport print server / network bridge with the capability of translating
standard PCL5 escape sequences to print the most commonly used bar codes. The barcodes are generated
internally by the BarSTORM’s on board software. The unit uses “BarDIMM inside” technology so is
compatible with the most commonly used applications that support PCL5 bar code printing.
Additional fonts and form overlays can be stored on the unit and can be associated with each output port
using a control list. The device by default comes with 1 USB output and 1 network bridge connection and can
be licensed to print to a maximum of 4 local USB PCL5 printers and up to 50 Network ready PCL5 printers.
Some of the following configuration information relates to Windows XP, some other systems can be used in
a similar manner.
Connection to the Unit
The BarSTORM can be connected to any 10/100 Ethernet network that supports TCP/IP Raw port or LPR
printing.
To setup this unit you must initially connect to the box from an attached screen and keyboard or a network
client within the IP range 192.0.0.??? Once DHCP or a valid IP address for your network has been set the unit
will be available on the network and can be further configured via a browser.
You will need one Ethernet RJ45 cable of the right type for your network configuration.
You may also require one or more USB printer cables. You can connect to a parallel printer with a standard
USB/Parallel conversion cable.
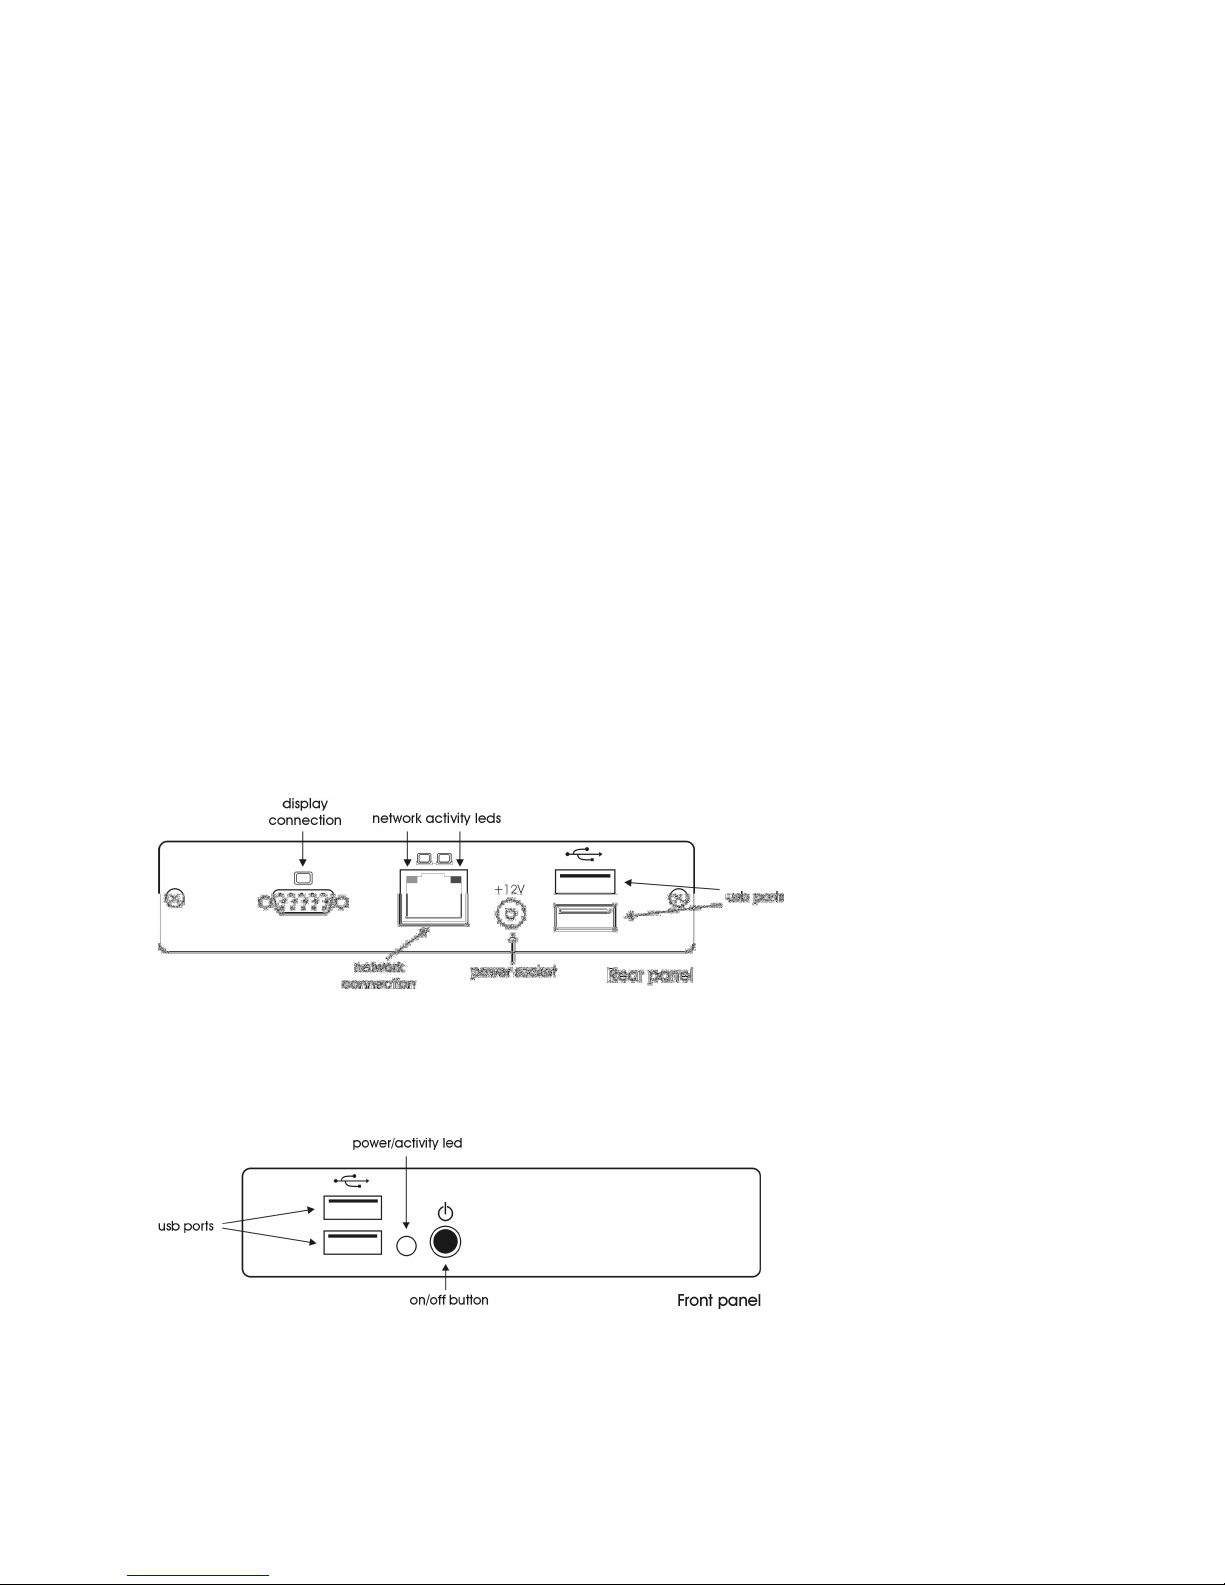
The unit comes with four USB output ports (2 on the front, 2 on the back). You can use one or all
simultaneously depending how the box is licensed.
Connect the box to your network by plugging the relevant RJ45 cable into the network port on the back of the
unit.
Plug into the power socket marked on the back of the unit. Turn the box on using the button on the front of
the box. You should see the blue indicator light come on.
The default unit is configured with 1 USB port and 1 bridged network port available.
The printer connection can be bridged to a network printer, or directly plugged to a USB connected printer. It
is best to initially establish a test printout with a USB connected printer. Use USB1. Bridging Information is
described later.
Page 5

BarStorm Installation Guide
- - 5 - -
Copyright © Fontware Limited. All rights reserved.
USB Port Layout
USB Port 1 Rear Panel Top Slot
USB Port 2 Rear Panel Bottom Slot
USB Port 3 Front Panel Top Slot
USB Port 4 Front Panel Bottom Slot
Note: If the box is licensed for one local (USB) port you can plug the USB cable into any port. If the
unit is licensed for multiple local USB ports please connect as per the port layout table above.
Note: After you have connected the unit to a USB printer a test and configuration page will be
printed to USB1 only when the IP address of the unit is changed, or alternatively when you switch the
printer connected off and on again.
Configuration
The unit can be configured via a built in Web page which can be accessed from a browser on a suitable
network or can be configured initially from a plugged in monitor screen and USB keyboard, and then
additionally fully configured from a browser.
Screen Setup Administration
A way to setup the Network configuration details is to plug a screen into the Monitor port on the rear of the
unit, and a USB keyboard into any of the USB slots. If you power on the unit the system will show boot
information and end up with a “device login” prompt.
Enter the user “admin”
Enter the password “password” or previously set password. (case sensitive)
The system will allow several options:
“q” to quit and return, your system will now have any new settings applied.
“manual” will allow you to enter the IP Address, Subnet Mask, and Gateway info.
Enter IP address: enter in the format xxx.xxx.xxx.xxx and return
Enter Subnetmask: enter in the format xxx.xxx.xxx.xxx and return
(The Gateway address will be set to the IP address at this stage, so the Gateway is local, you can then
change it via the browser later as required).
then enter “q” to quit
you can now access the unit via a browser with the new IP address.
“dhcp” will select a DHCP connection, and ignore previously set static IP information.
The unit will scan for a DHCP server, if one is found it will receive a network IP address and gateway, it will
confirm the network settings on screen. Print a status sheet to the USB1 printer port showing the new
information.
You can now access the unit via a browser with the new IP address, and continue with further setup.
If a DHCP Server is not found, the unit will revert to the previously set IP address and gateway or to the
Factory defaults if one had not previously been set.
The screen can be disconnected and is not required.
Page 6
BarStorm Installation Guide
- - 6 - -
Copyright © Fontware Limited. All rights reserved.
Web Interface Administration
A browser can be used to monitor and configure the unit. Once the unit is communicating then a browser can
be used for all aspects of configuring the system.
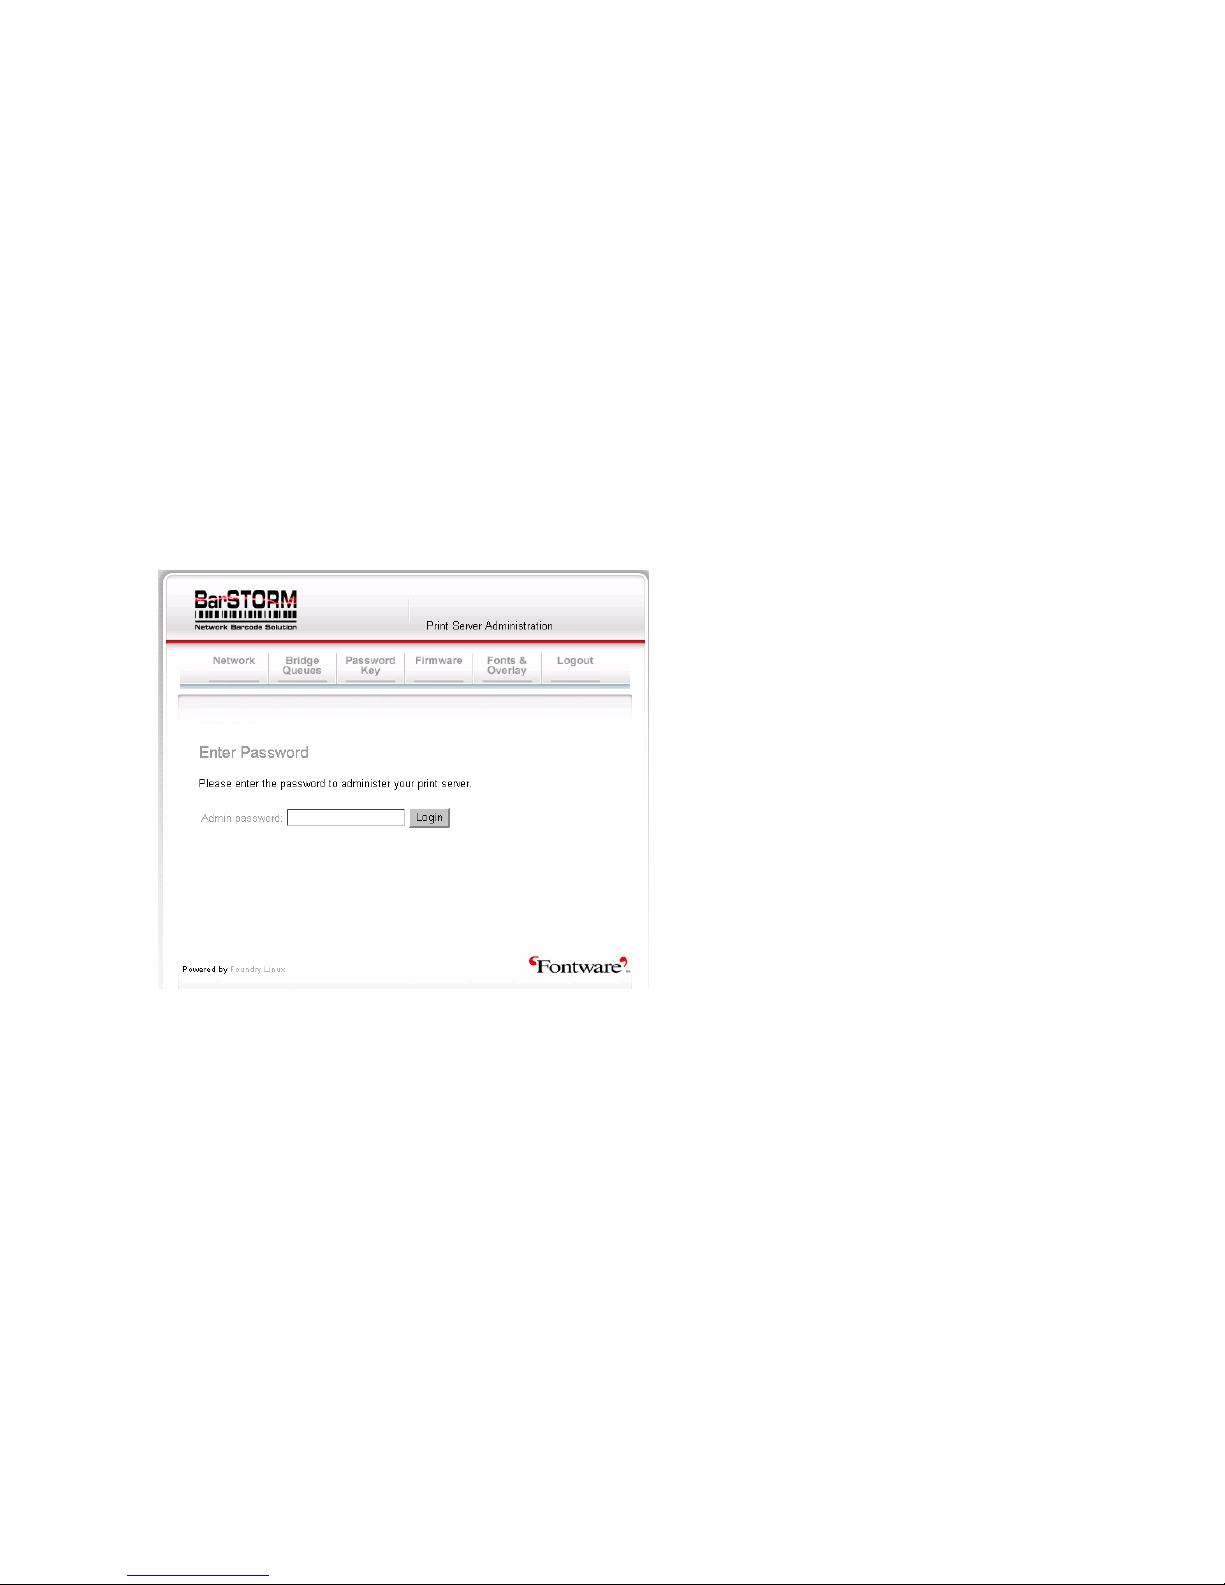
To initially configure the unit from Factory defaults, access the Administration Web page of the unit by
entering http://192.0.0.192 this will display the password page of the web administration.
If your network is in the range 192.0.0.xxx you should be able to connect to the unit via a browser.
If your network is not in the 192.0.0.xxx range, then you can either use the screen setup method for the
initial network configuration or you will need to isolate the configuring PC, disable you current Network
connection that uses your current IP range and setup a new network connection using the 192.0.0.xxx
range, this will allow you to connect to the device, change the IP address and network settings to the ones
you require. Once done revert your PC connection back to its normal settings.
Once you have established a connection you can now use a browser for further setup and can enter the
Login Page.
The default Admin password is “password”
Type password into the Admin Password field and click on Login.
(Press the Login Button, hitting return will not function)
The Network setup Screen will be displayed.
Page 7
BarStorm Installation Guide
- - 7 - -
Copyright © Fontware Limited. All rights reserved.
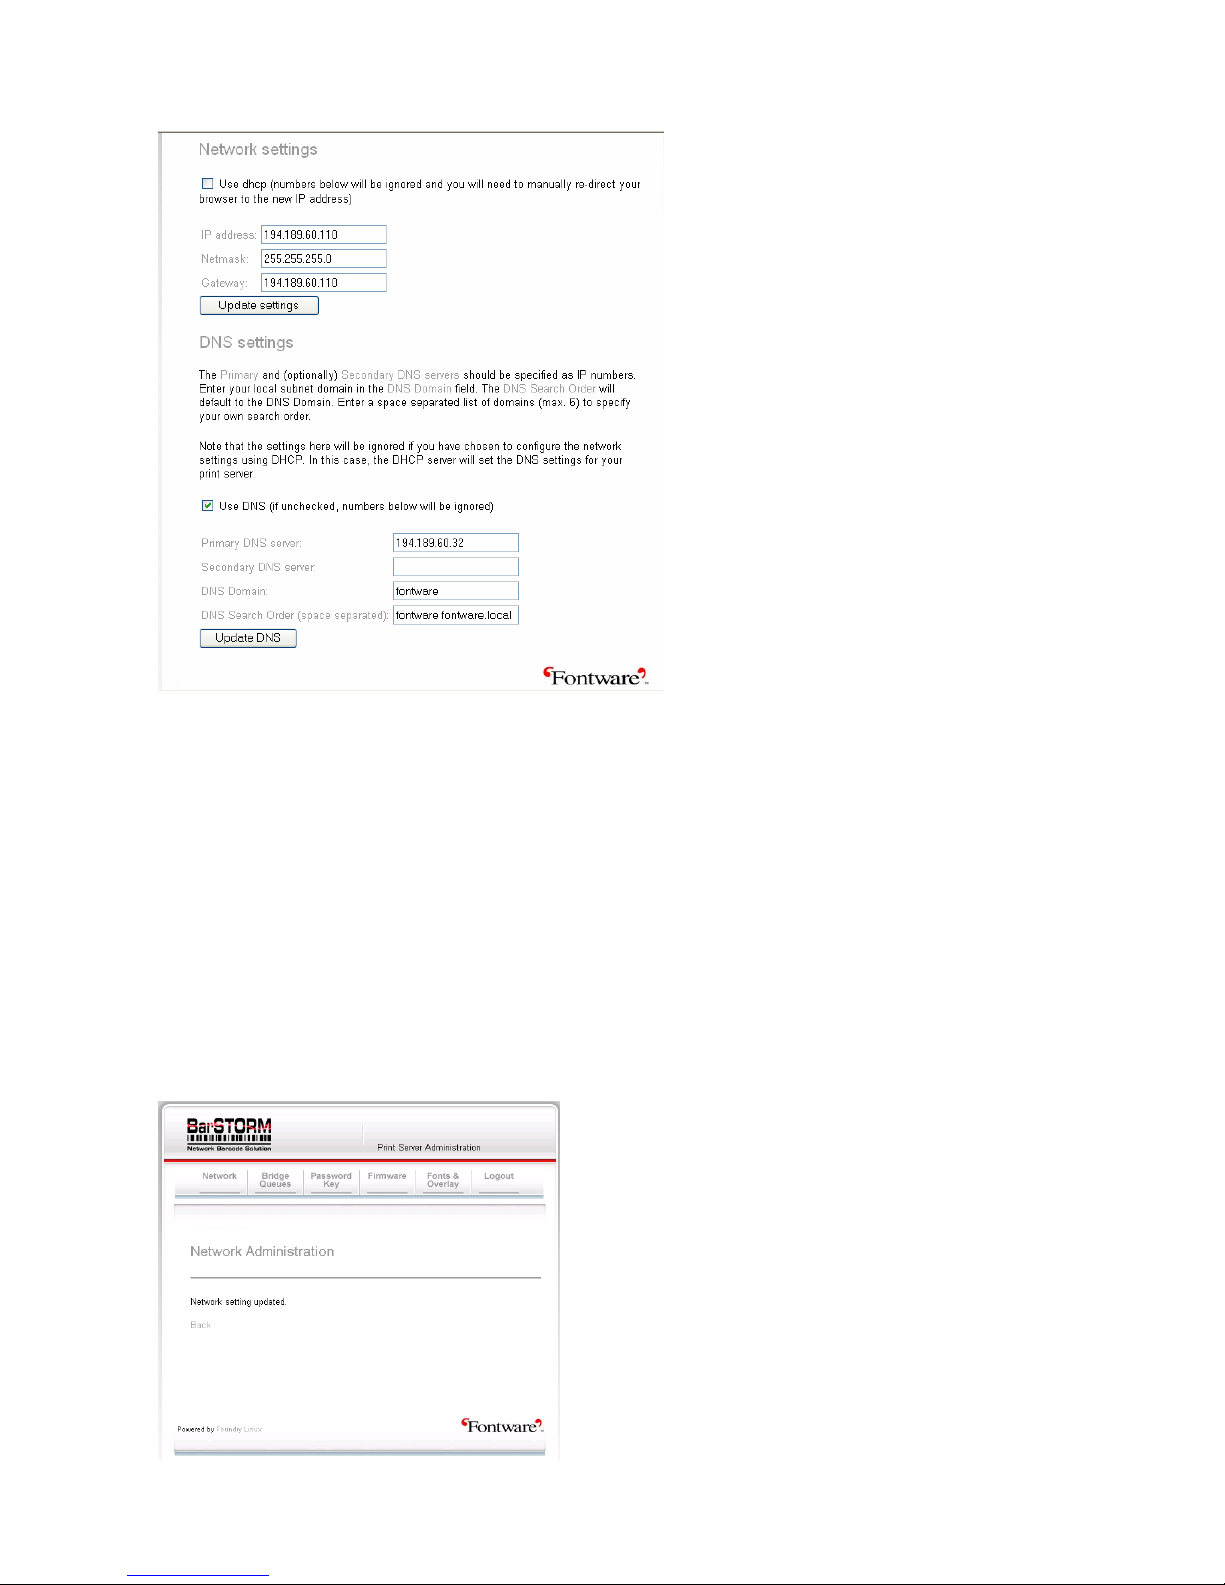
This screen will allow you to change the units IP address, Subnet mask and Gateway information where
necessary.
If you select to use a DHCP connection, the system will ignore previously set static IP information.
Once you select “update Settings” the unit will scan for a DHCP server, if one is found it will receive a
network IP address and gateway. A status sheet will be printed to the USB1 printer port showing any new
information.
If a DHCP Server is not found, the unit will revert to the previously set IP address and gateway or to the
Factory defaults if one had not previously been set.
If you have a DNS server and wish to use printer names on your network this can be set from this page also.
Options allow for Primary and Secondary DNS servers.
The DNS Domain field allows entry of your DND Domain name used for searching, and optionally a search
order can be entered if you have main Domains.
When you are happy with the settings, click the Update setting button.
Page 8
BarStorm Installation Guide
- - 8 - -
Copyright © Fontware Limited. All rights reserved.
Password and KEY
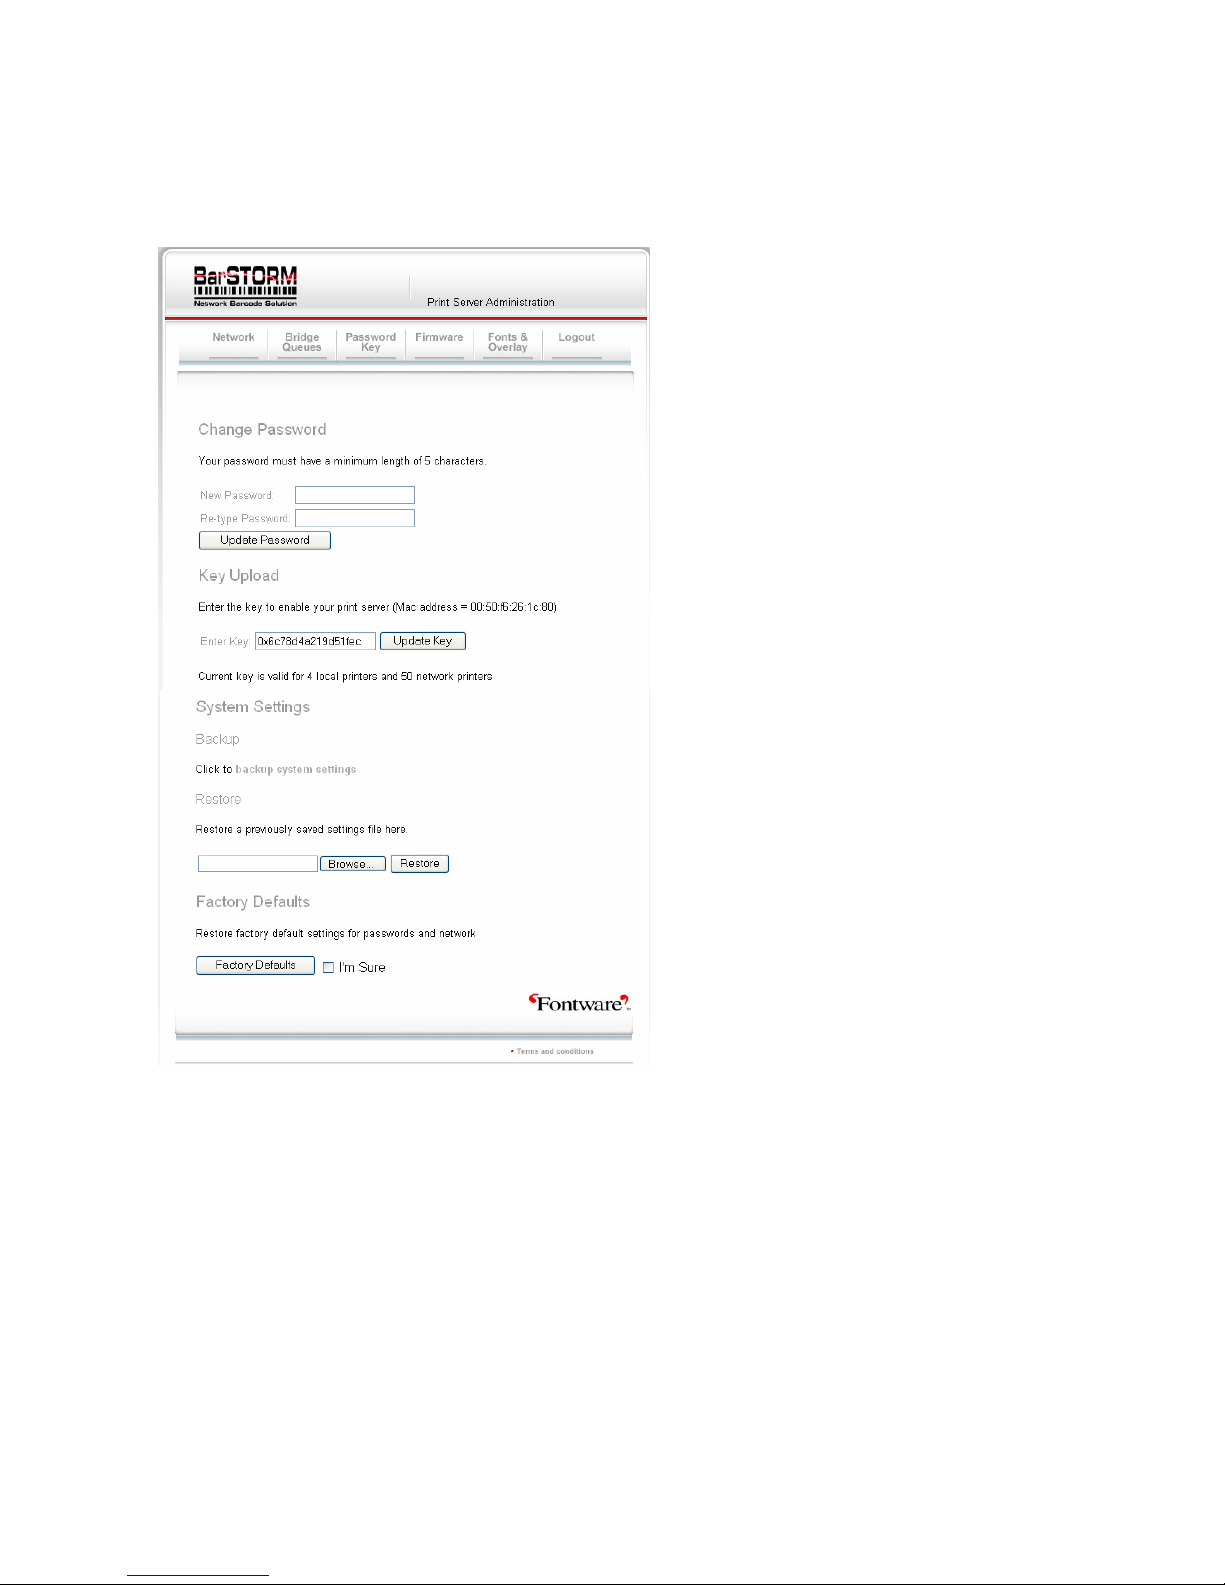
From this page a user can define and update the Admin Password, Update configuration Keys and restore
the factory default settings of the unit.
Note: Only install a valid Key that has been provided via FONTWARE or you may permanently disable the unit.
You will only need a key if changing access to the number of printer ports available.
Password
The password will be case sensitive. If you forget the password you will NOT be able to log in to the unit.
Key
This is the output port unlocking licence key specific to this unit, and is matched only with the unique MAC
address of the unit. It can only be used with the specific unit it is meant for.
It is used to unlock extra printer ports which have been additionally licenced,
Evaluation Units.
There is an evaluation variant of the BarStorm system used for testing and mission critical backup units.
The evaluation version, has all BarSTORM ports open, but has a limited use timer running.
This version of the firmware has an extra field for evaluation keys to be entered and updated. The screen will
show the amount of evaluation time set, and how much is used before the unit expires.
Page 9
BarStorm Installation Guide
- - 9 - -
Copyright © Fontware Limited. All rights reserved.
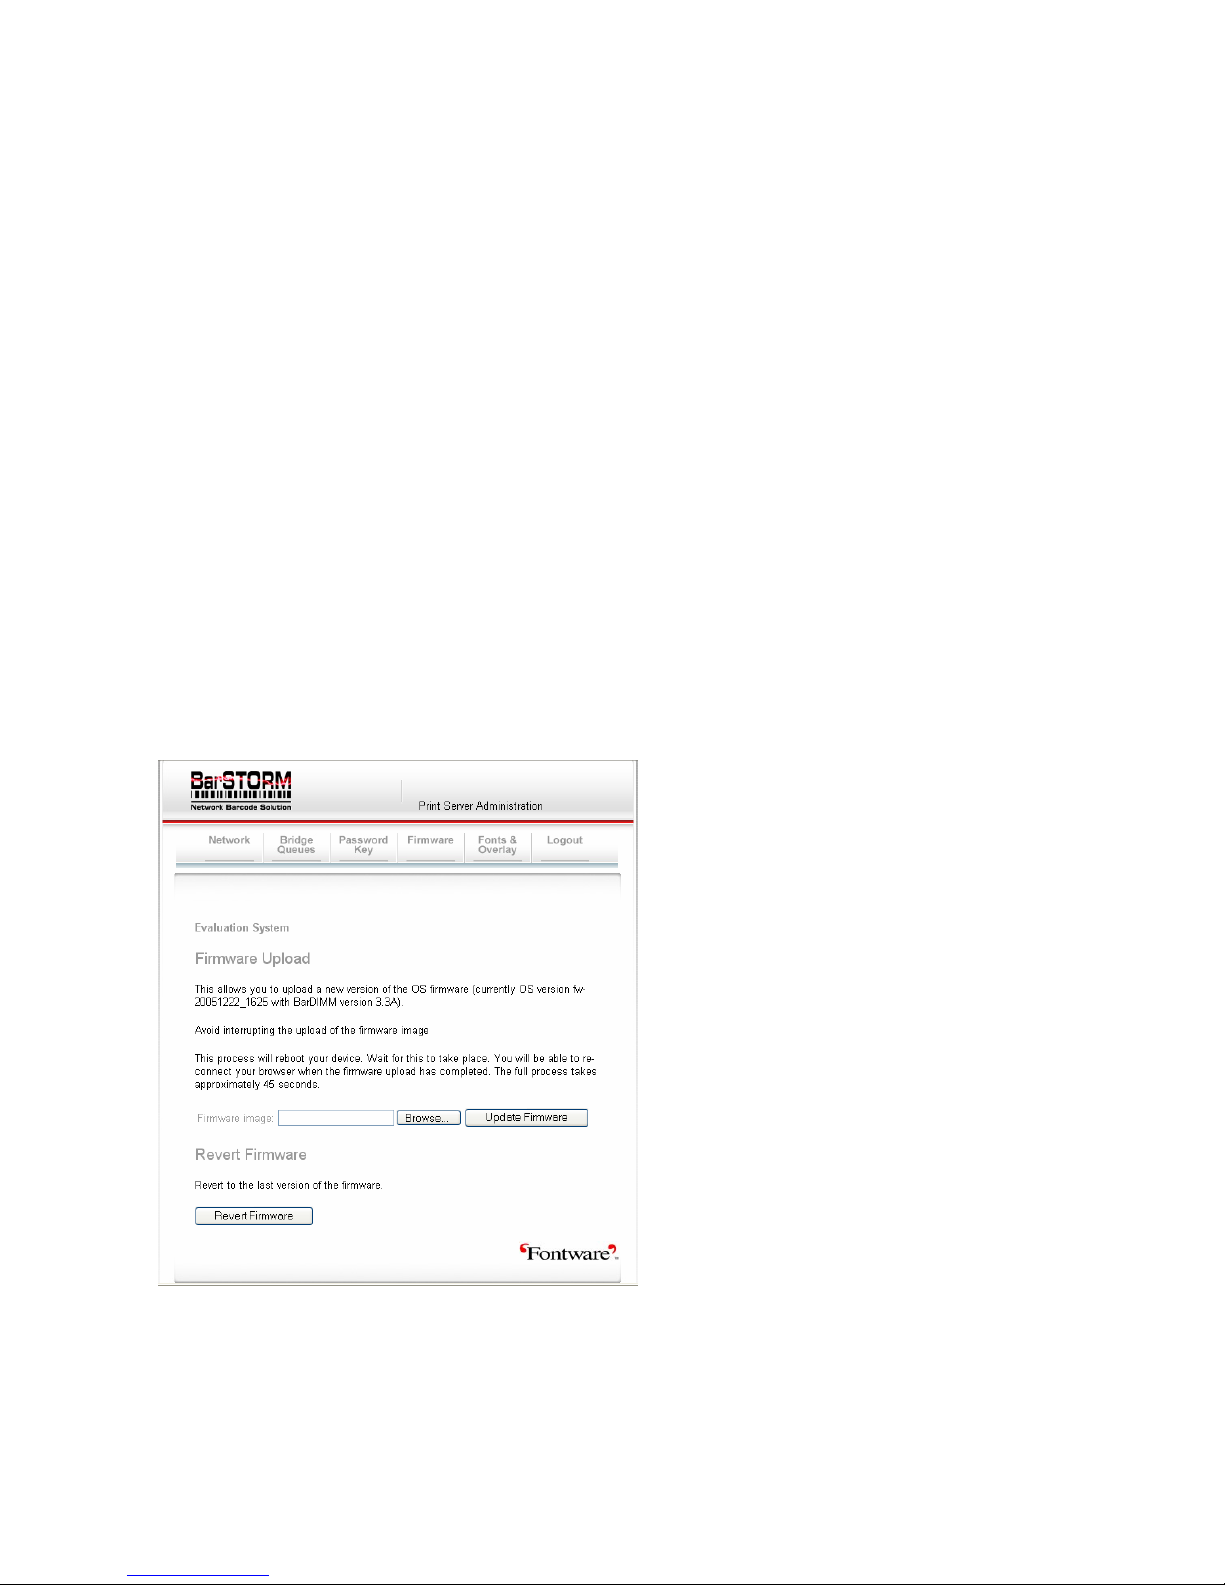
It also shows on each of the browser pages that the system is an evaluation version.
Systems Settings.
This option allows the user to save all the settings, setup within the unit.
Backup
Will compile all the settings and save to a specified output file in *.tar format, which is then saved outside the
unit.
Restore
Will allow the user to browse for a backup systems settings file and reload it back into the unit.
Factory Defaults.
Resetting factory defaults will return the units network settings to its delivery defaults.
Remember the IP address will return to 192.0.0.192.
Any Bridge queue settings will be removed, be sure to use the “backup” option first.
Any newly loaded fonts and forms will stay in place.
Port extension Licence keys will stay in place.
Firmware Upload
From time to time Fontware may release upgrades or later revisions of the firmware.
The current system operating version number is shown on this page. New Firmware can be updated from
this page. The user can browse the network and select the required update file, much as you would do from
any system, press the Update firmware button and the box will automatically update and reboot. This may
take up to 45 seconds and you may have to log into the Web page after an update has been completed.
The Revert Firmware button will allow the user to Revert to the last know working Firmware, a copy of the
previous firmware is kept within the unit.
Note: Uploading the same Firmware twice will mean that you will loose the previous version of the Firmware.
Whilst firmware upload should not often be required, It does allow for unknown bugs to be tackled, firmware
to be upgraded, new features to be added, and temporary licence keys to be used and loaded easily.
Page 10
BarStorm Installation Guide
- - 10 - -
Copyright © Fontware Limited. All rights reserved.
Bridged Queues
The BarSTORM unit can serve Barcodes, fonts and form overlays to up to 50 network ready PCL printers,
depending on how the unit is licensed.
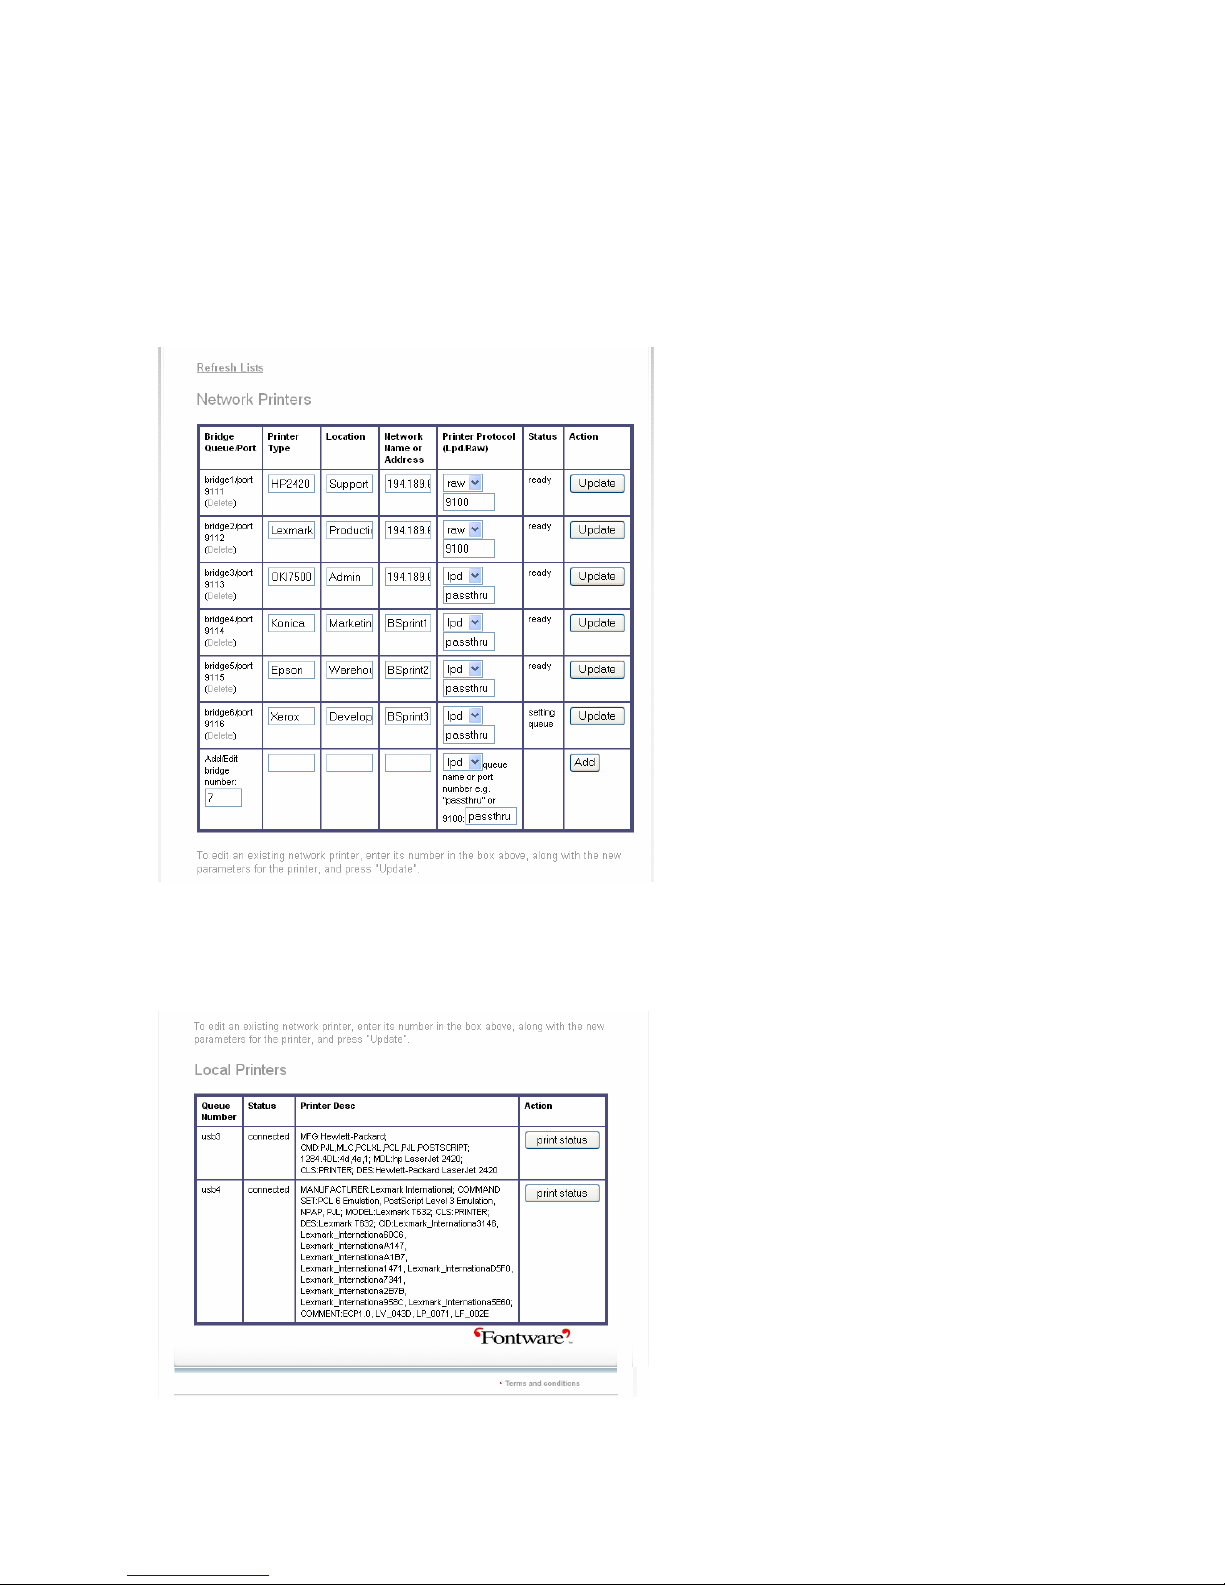
Select the Bridge queues page on the web interface, from this page you can manage which input data
stream or system queue will be pointed to each output network printer.
The bridge name / port number is used to send data to the unit.
In this example BSPrint1, BSPrint2 and BSPrint3 are DNS names that must be available to DNS either as
resolved names or manually set up in the DNS Tables.
local printers attached via USB will also be shown if connected and powered on as follows:
(The network printer list box will adjust its width depending on what has been typed in.)
Page 11

BarStorm Installation Guide
- - 11 - -
Copyright © Fontware Limited. All rights reserved.
Input fields
Bridge Queue/Port descriptive field that describes bridged network printer and port number.
e.g. bridge45/port 9155
Input a number for the bridge queue.
Printer Type User set descriptive only field e.g. PCL Laser
Location User set descriptive only field e.g. Warehouse
Network Name or Address Enter the static IP address of the network printer or if DHCP is being used
the DNS printer name for the target output printer.
If a printer name is used the DNS information must be set up on the network DNS servers DNS tables.
Printer Protocol (Lpd / Raw) Select Raw port or LPD from the drop down menu.
Queue name or port number: (Output to printer information)
If Raw port is selected in the printer protocol field the port number should be entered for that specific network
printer, normally this is 9100 for most network printers or print servers.
If Lpd is selected in the printer protocol field the print server queue should be entered for the network printer,
normally for many network printers or Jetdirect print servers this would be passthru.
If the network is NOT dhcp and the IP address is fixed then raw port should be used.
BarStorm does not Broadcast out a DNS name.
If you need to use a name to target input to the BarStorm, then you must set one up in your dns tables.
BarStorm can be configured to allow direct IP printing, if only 1 device is attached, which must be via the
USB port. Then any data sent directly to the BarStorm without queue information will be sent to the USB
connected printer.
Page 12
BarStorm Installation Guide
- - 12 - -
Copyright © Fontware Limited. All rights reserved.
Fonts & Overlay
Font & Form Management
Additional Fonts and Form Overlays can be added to the BarSTORM and assigned to be used with specific
output ports.
BarStorm contains a number of default fonts and overlays that are activated and be deactivated if required.
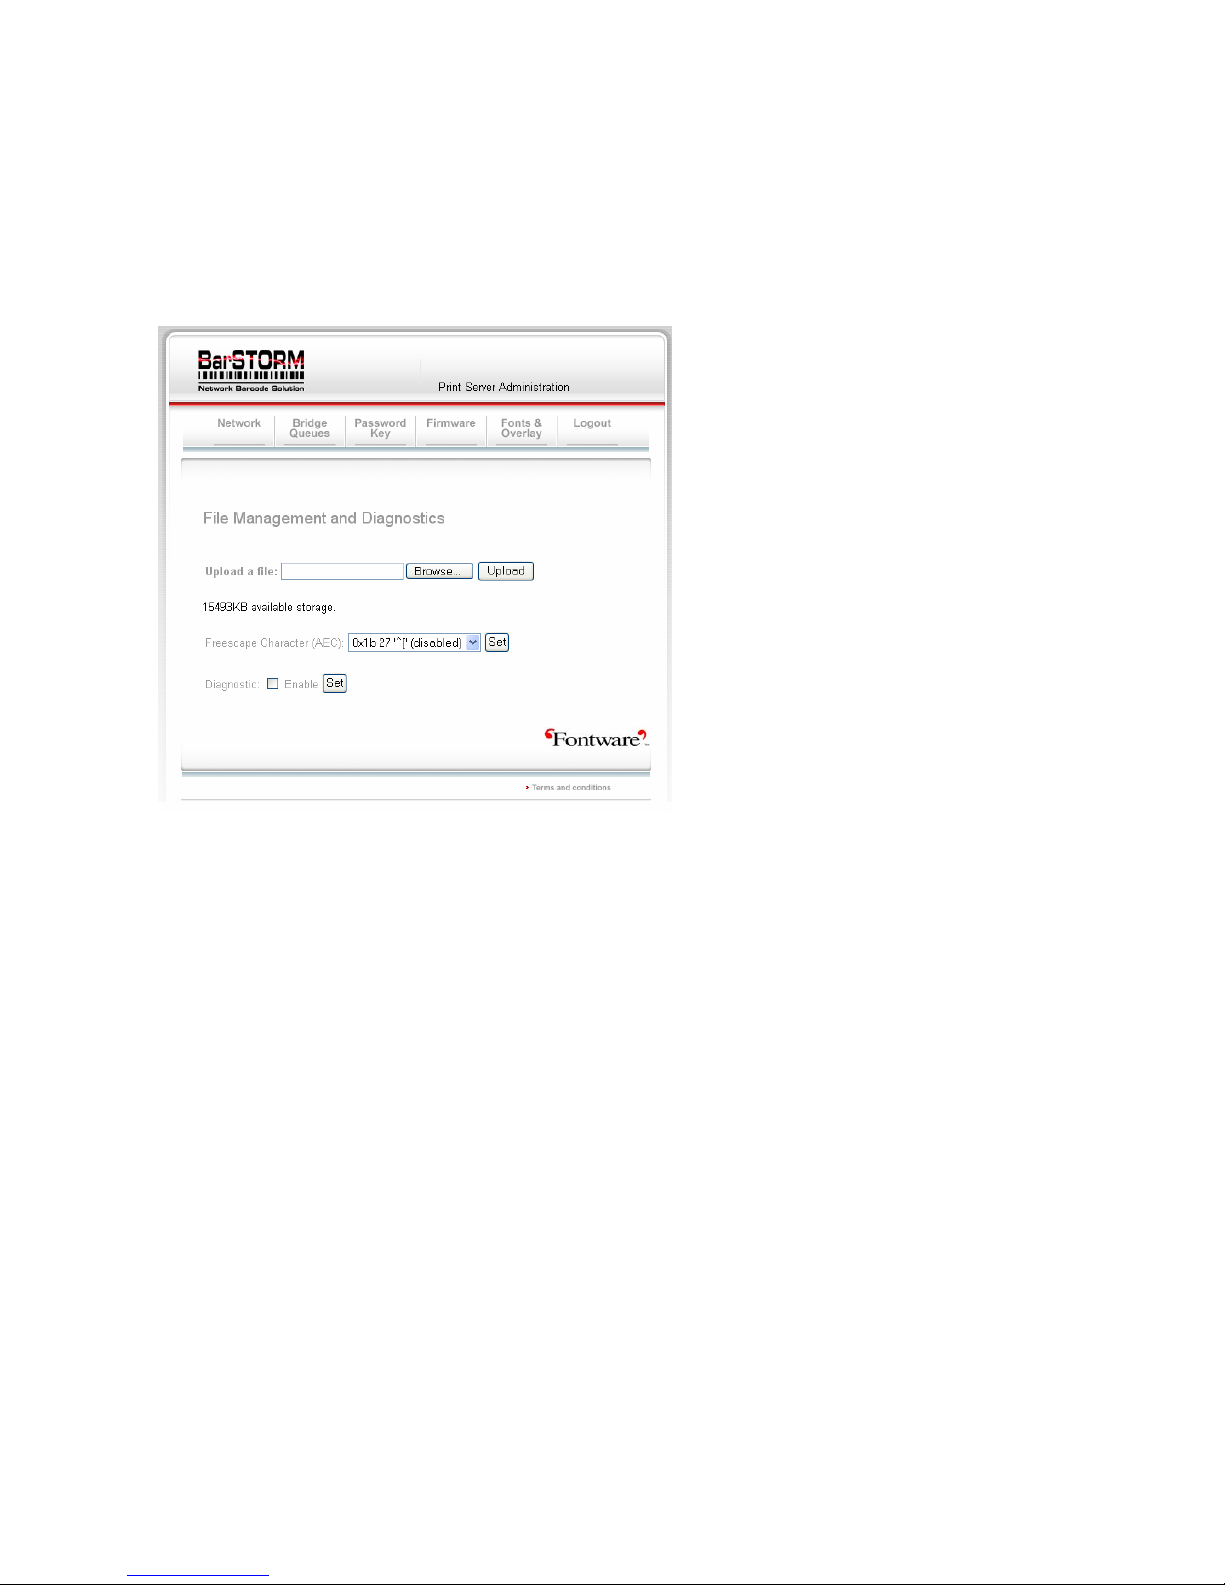
From this page you have the option to store any file including, Fonts, Logos, Signatures and Form overlays
for any of the output ports, each of the 4 USB ports on the Unit or any of the bridged ports set up on the unit.
The specific information controlling what fonts or Form Overlays are sent to what printer port and when, is
defined in the configuration file CONTROL.txt, and this is then loaded to the BarSTORM, via this browser
page.
All information in this file is Case sensitive !!!! , please check the information entered.
Fonts or Form Overlays files are loaded to the printer at a time specified in the control.txt file.
This may be once or before every print job.
An obvious example of an overlay would be a company letter head this is a file that remains constant.
Browse and upload to install the required custom font or Form overlay files and the Control.txt file.
Each font or Form overlay that has been uploaded will be displayed. A delete option will appear beside each
uploaded file so that it can be removed if required.
Core Resource Files
There are a number of Core fonts and forms stored on the BarSTORM unit. These form part of the standard
configuration of the unit, If required they can be de-configured and not used.
The Core font names if needed can be re-configured in a control file, core.txt file as described.
Control.txt and core.txt are configured and work in the same way.
Page 13

BarStorm Installation Guide
- - 13 - -
Copyright © Fontware Limited. All rights reserved.
The file names used in core.txt are:
JM2dpost.bin – Required only if using UPS Maxicode, or 4 State Postal Barcodes
JMsymocr.bin – Required for using OCR fonts, or Manufacturing symbols, or Euros as described in
Programming manual.
JM6forms.bin – Required for using BarDIMM Odette forms.
BSbcplus.bin – Required if using legacy barcode font sets.
The fonts and form use specific ID’s, if you are using these resources, then the incoming data should not
contain the same ID’s:
Fonts ID’s 370 – 396
Form Overlay ID’s 300, 301, 302, 303, 304, 311, 312
Once re-configured the new core.txt file must be uploaded to the unit and tested.
Associating Fonts and Form Overlays with particular output ports
The control files control.txt and core.txt contain lines which specify which fonts and overlays should go to
which printers. An example line is:
usb1: font "font.bin"
This indicates "send the font with filename font.bin to the printer on usb1".
You can specify multiple lines per printer and multiple fonts per line:
usb1: font "font.bin"
usb1: font "font1.bin"
and
usb1: font "font.bin", font "font1.bin"
are equivalent.
In each of these cases, the file is expected to have the font id encoded within it.
If you are sending a raw font, and need to specify the font id, you do it like this:
usb1: font "font.bin" <12>
again, you can put multiple entries per line in:
usb3: font "font.bin" <12>, font "font1.bin" <14>
Overlays work in a similar way:
usb4: font "font.bin" <1>, overlay "ovl1.pcl" <3>
Here the setup will send one font as font_id 1, and an overlay as macro id 3.
When an id is included for a font, it causes the following command to be prepended to the font:
Esc*c#D
where Esc is the escape (or freescape AEC) character and # is the id.
When an id is included for an overlay, the following commands are prepended to the overlay data:
Esc&f#Y Esc&f0X
Page 14

BarStorm Installation Guide
- - 14 - -
Copyright © Fontware Limited. All rights reserved.
where # is the macro id. This is appended to the overlay data to signify the end of the macro data:
Esc&f1X
In either the font or the overlay case, omitting the id field means that the font/overlay is expected to contain
the command to set the font/macro id.
The font_id and macro_id can be in the range 1-32767 inclusive.
Specifying the id <0> is equivalent to omitting the id directive and will NOT have the effect of sending the font
as font id 0 (which PCL allows).
If you specify a font twice:
usb1: font "font1.bin" <3>, font "font1.bin" <3>
It will simply be loaded on to the printer twice before the print job.
You can place as many entries on each line as you want, up to a maximum line length of 1000 characters.
usb1: font "font1.bin" <3>, once, font "font1.bin" <3>, overlay "ovlay.pcl", overlay "ovlay1.pcl".
Loading macros before each job or just when printer is booted
The default behavior is that the font/overlay will be sent before each printer job. It is possible to tell the
BarSTORM server to send the fonts/overlays only when necessary, by adding a keyword to a font/overlay
line:
usb1: once, font "font1.bin" <4>
This means that the font is loaded to the printer on usb1 only once, when the first print job is processed. The
font will be re-loaded if the printer is disconnected or power-cycled.
If the line relates to a bridge queue:
bridge1: once, font "font1.bin" <4>
then the BarSTORM cannot know when the destination printer is power cycled, so the once keyword should
not be used.
If several directives are listed for a given printer, the once keyword need only appear on one line. If it
appears on *any* line, then the "send when necessary" behavior is enabled.
This:
usb1: font "font1.bin" <3>, once
usb1: font "font.bin"
means that both font1.bin AND font.bin are sent to the usb1 printer only when necessary (when printer is re-
connected/power cycled). It DOESN'T mean that font.bin is sent with each job and font1.bin is sent only
once.
The "all" keyword
There is a special keyword which matches all queues:
all: font "font.bin", overlay "ovl1.pcl" <10>
will cause font.bin to be sent to all connected usb printers and bridge queues. The once keyword can be
added here and will then apply to all queues, including bridge queues. (This may be considered bad
practice).
Page 15

BarStorm Installation Guide
- - 15 - -
Copyright © Fontware Limited. All rights reserved.
Form Overlay Creation
If you have a simple way of creating an overlay, or have existing overlays, then you should be able to use
them simply.
Using forms assumes that the overlays are tried, tested and known to work with the intended output
printer first.
These filenames should use 8.3 filename format, an 8 character alpha numeric file name plus a 3 character
extension i.e. Letter01.prn
Printing the output to file, and trying to edit the output is not a good method, unless you have expertise in
that technique.
Fontware supply a service to create overlay files as required, we can also generally accept, Word and PDF
master files as input for conversion.
Page 16

BarStorm Installation Guide
- - 16 - -
Copyright © Fontware Limited. All rights reserved.
Freescape
The Freescape option shows a selection of available Alternate Escape characters to use. The default is
hex1b, ASCII Escape. A new character can be selected from the list and will be active across all ports.
This is used here the host, or the host data can not easily send an ASCII Escape Character, hex1b. An
alternate character can be selected from the list and used. The selected character and the ESCAPE
character hex1b can both be used at the same time.
The available characters are:
Dec Hex Char
27 – 1b – [!]
34 – 22 – [~]
35 – 23 – [#]
36 – 24 – [$]
47 – 2f – [/]
63 – 3f – [?]
92 – 5c – [\]
123 – 7b – [{]
124 – 7c – [|]
125 – 7d – [}]
126 – 7e – [~]
This setting will apply to all ports.
The software is sophisticated enough to not replace these characters within ordinary data.
The alternate character can also be set via a control code sent in the data:
<ESC or AEC>**#J
Where # is the ASCII Decimal value of the required character.
i.e.
ESC**126J will use and set the “~” tilde character.
Diagnostics
The Diagnostics option will allow data capture, pre and post incoming data filtering. This option is set with a
check box, and set apply button. When this option is set the unit will write the incoming data to disk, and also
write the filtered output data to disk.
Two files are created, prefilter.out, and postfilter.out.
These 2 files will then appear on the File Management page at the top of any existing file list. An option will
appear to download these files from the box.
Click on download to get each file, and save to new folder on local host.
These files can then be used for analysis.
This option should be normally switched off.
If the item is selected and switched on, only 1 set of input and output files will be kept, and overwritten with
every printjob.
If the unit is set in Diagnostic mode, then all other printing to the unit should be held off.
Page 17
BarStorm Installation Guide
- - 17 - -
Copyright © Fontware Limited. All rights reserved.
Windows Printer Setup
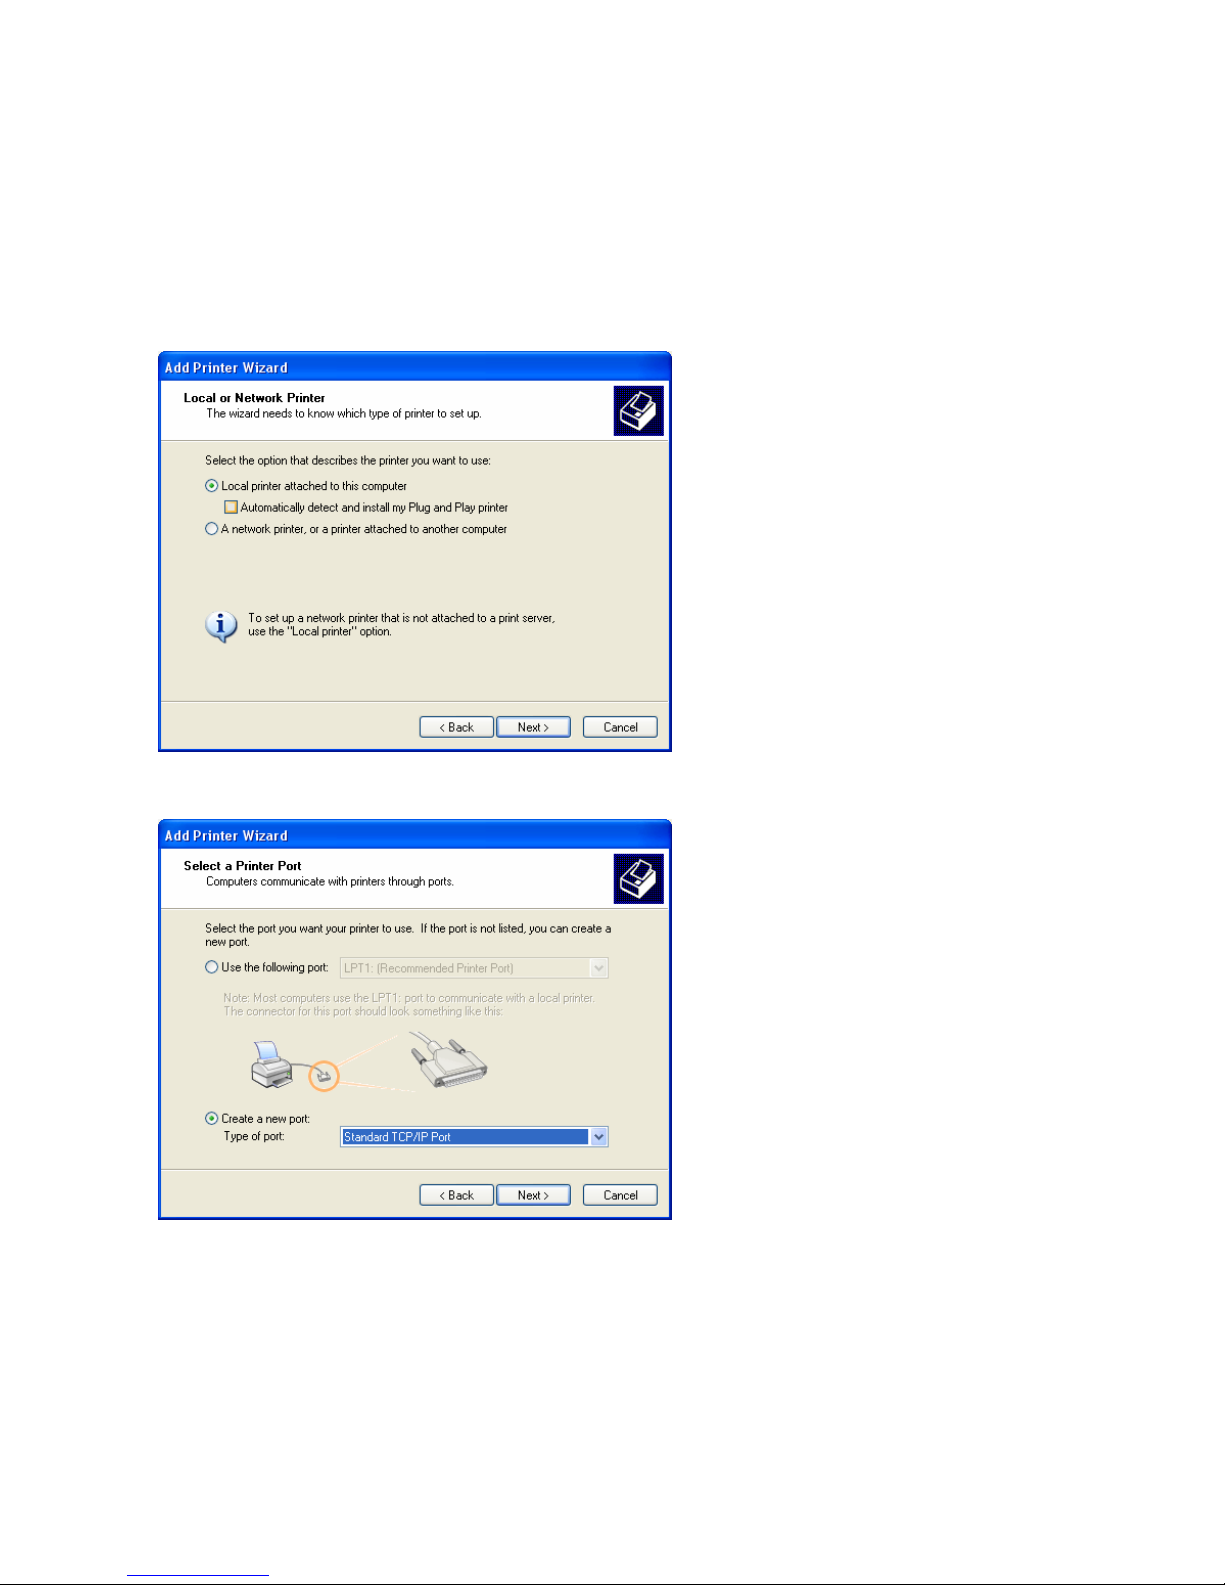
If Windows is used as the printing host, then you can use Windows print queues to send data to the printer
via the BarStorm ports.
In Windows:
From the Control Panel window select Printers and Faxes,
from Printer tasks menu select Add Printer.
Select Local Printer and click Next
Click Create a new port and select Standard TCP/IP Port from the drop down menu
Page 18
BarStorm Installation Guide
- - 18 - -
Copyright © Fontware Limited. All rights reserved.
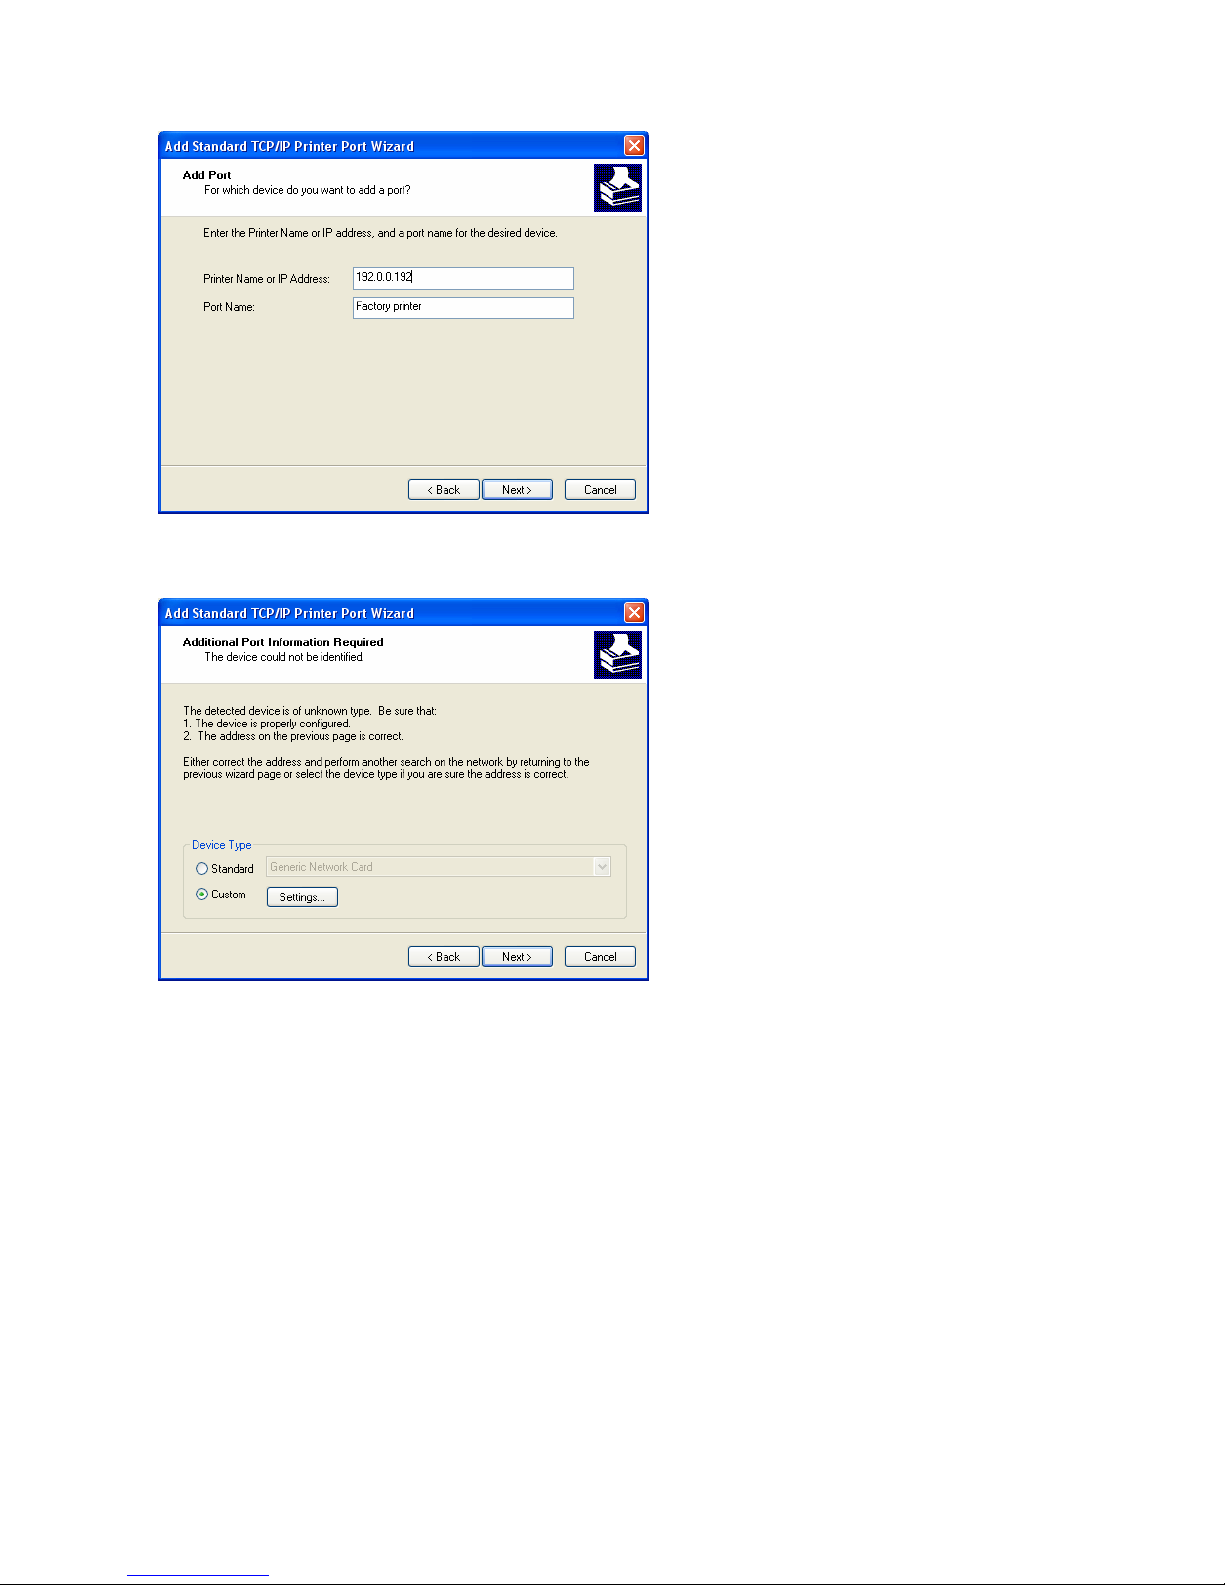
Input the Units IP address or Printer name that you have previously selected. Any descriptive printer name
can be used. Click Next
Select Custom and Click Settings
Click Next
Page 19
BarStorm Installation Guide
- - 19 - -
Copyright © Fontware Limited. All rights reserved.
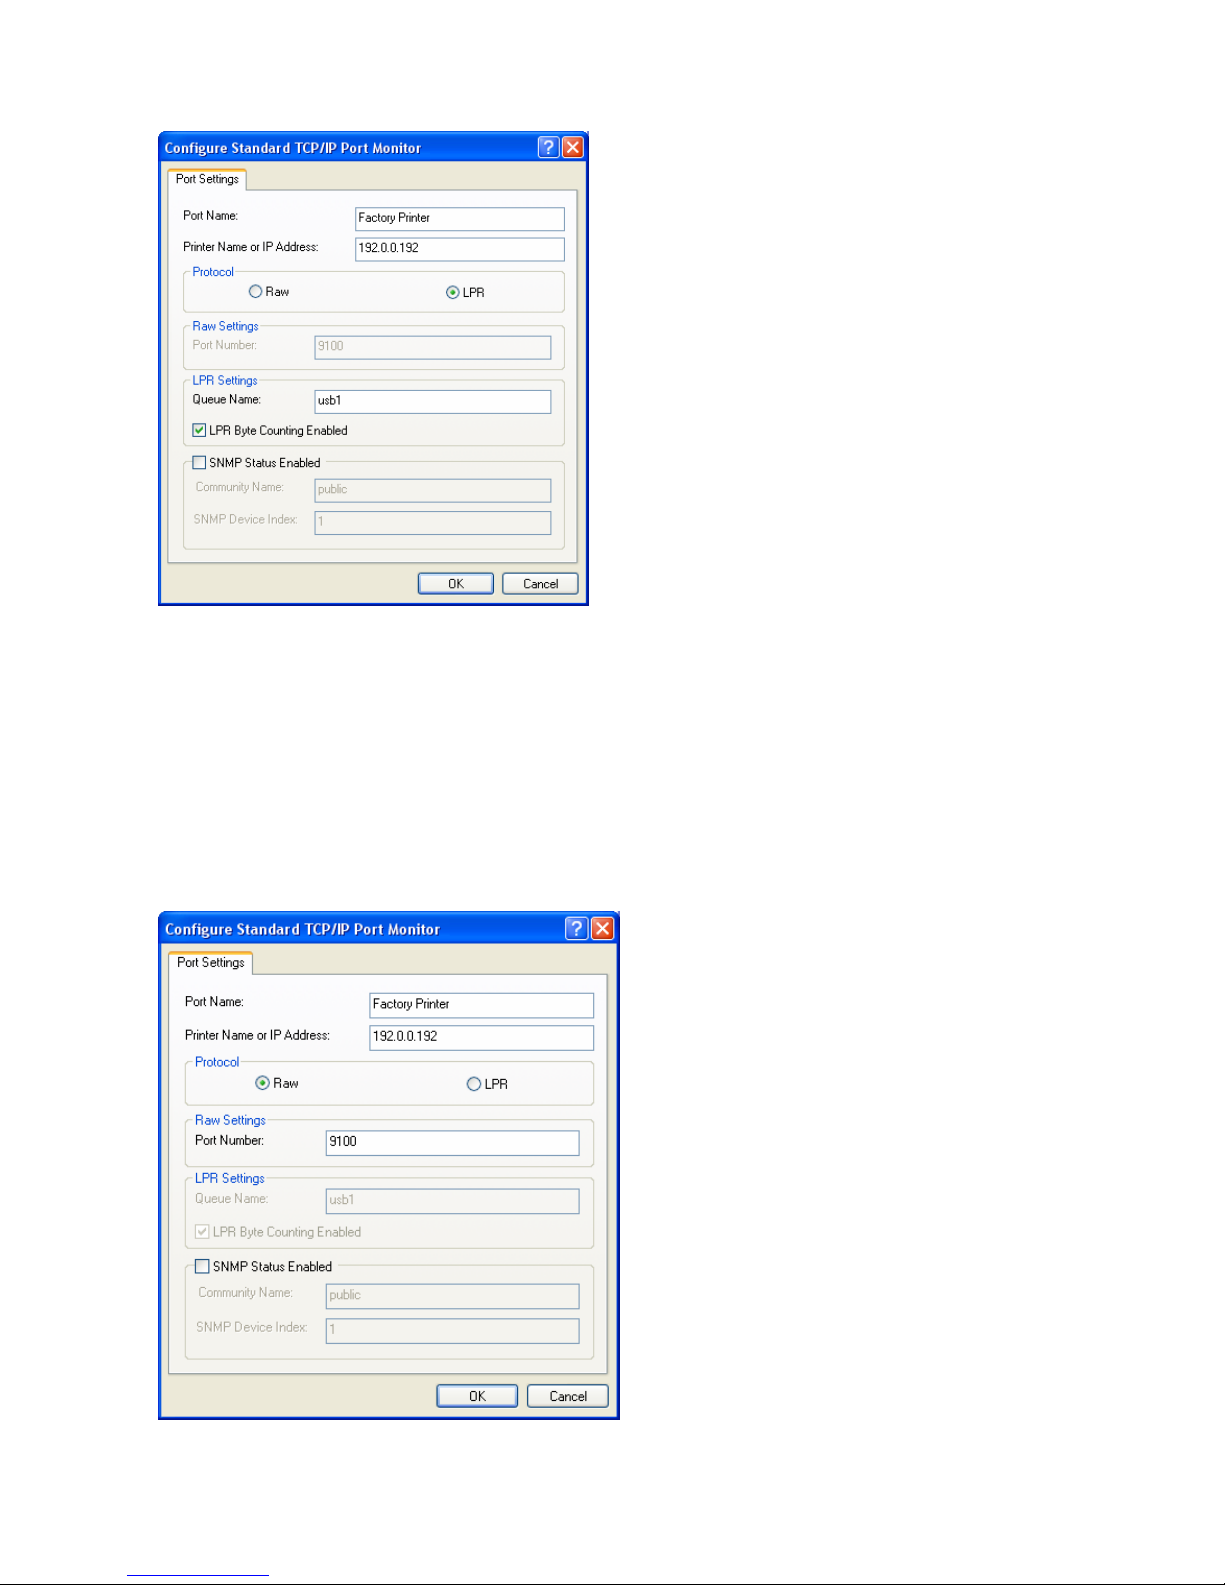
The BarSTORM will support RAW port or LPR settings.
If you select LPR each port on the unit is defined with a different queue name as follows:
First USB queue name is usb1
Second USB queue name is usb2
Third USB queue name is usb3
Fourth USB queue name is usb4
First bridged printer queue name is the DNS name assigned to that network printer.
Select LPR byte counting and Click OK
Page 20

BarStorm Installation Guide
- - 20 - -
Copyright © Fontware Limited. All rights reserved.
If you whish to use raw port printing Select RAW
The following Port numbers can be used to print from each physical output port or bridged printer set up on
the unit.
9100 = USB1
9101 = USB2
9102 = USB3
9103 = USB4
9111 – 9160 = Bridged printers 1 – 50
e.g.
Bridged printer 1 = port 9111
Bridged printer 5 = port 9115
Bridged printer 45 = port 9155
This completes the port setup and you can select your printer type and driver as normal.
Page 21
BarStorm Installation Guide
- - 21 - -
Copyright © Fontware Limited. All rights reserved.
Test Data Files
Test data is provided with the unit. These files are PCL files that will show you the capabilities of the
BarSTORM.
The testfiles are PCL files as supplied on the CD these are in the BSfiles folder as *.pcl files.
There are many ways to send data to the unit once configured depending on the system attached to.
The easiest way to send this data to a connected PCL5 printer on the BarSTORM is to use:
DOS/UNIX
lpr –S <ipaddress> -P <portname> -o l <filename>
i.e.
lpr –S 192.189.60.110 –P bridge1 –o l bspdf417.pcl
or
lpr –S 192.189.60.110 –P usb1 –o l bspdf417.pcl
or
lpr –S Bcprint1 –P bridge2 –o l bspdf417.pcl
Where Bcprint1 is a preset name setup in the dns tables.
-o l allows binary files to be sent correctly.
In UNIX there are different versions of LPR which use a different syntax, these generally are similar and
have similar features and options, you will need to check you specific system.
Also if queue names have been configured then use:
copy/b bspdf417.pcl \\servername\queuename
i.e.
copy/b bspdf417.pcl \\Server_1\printer_queue_1
Also provided are some other useful files.
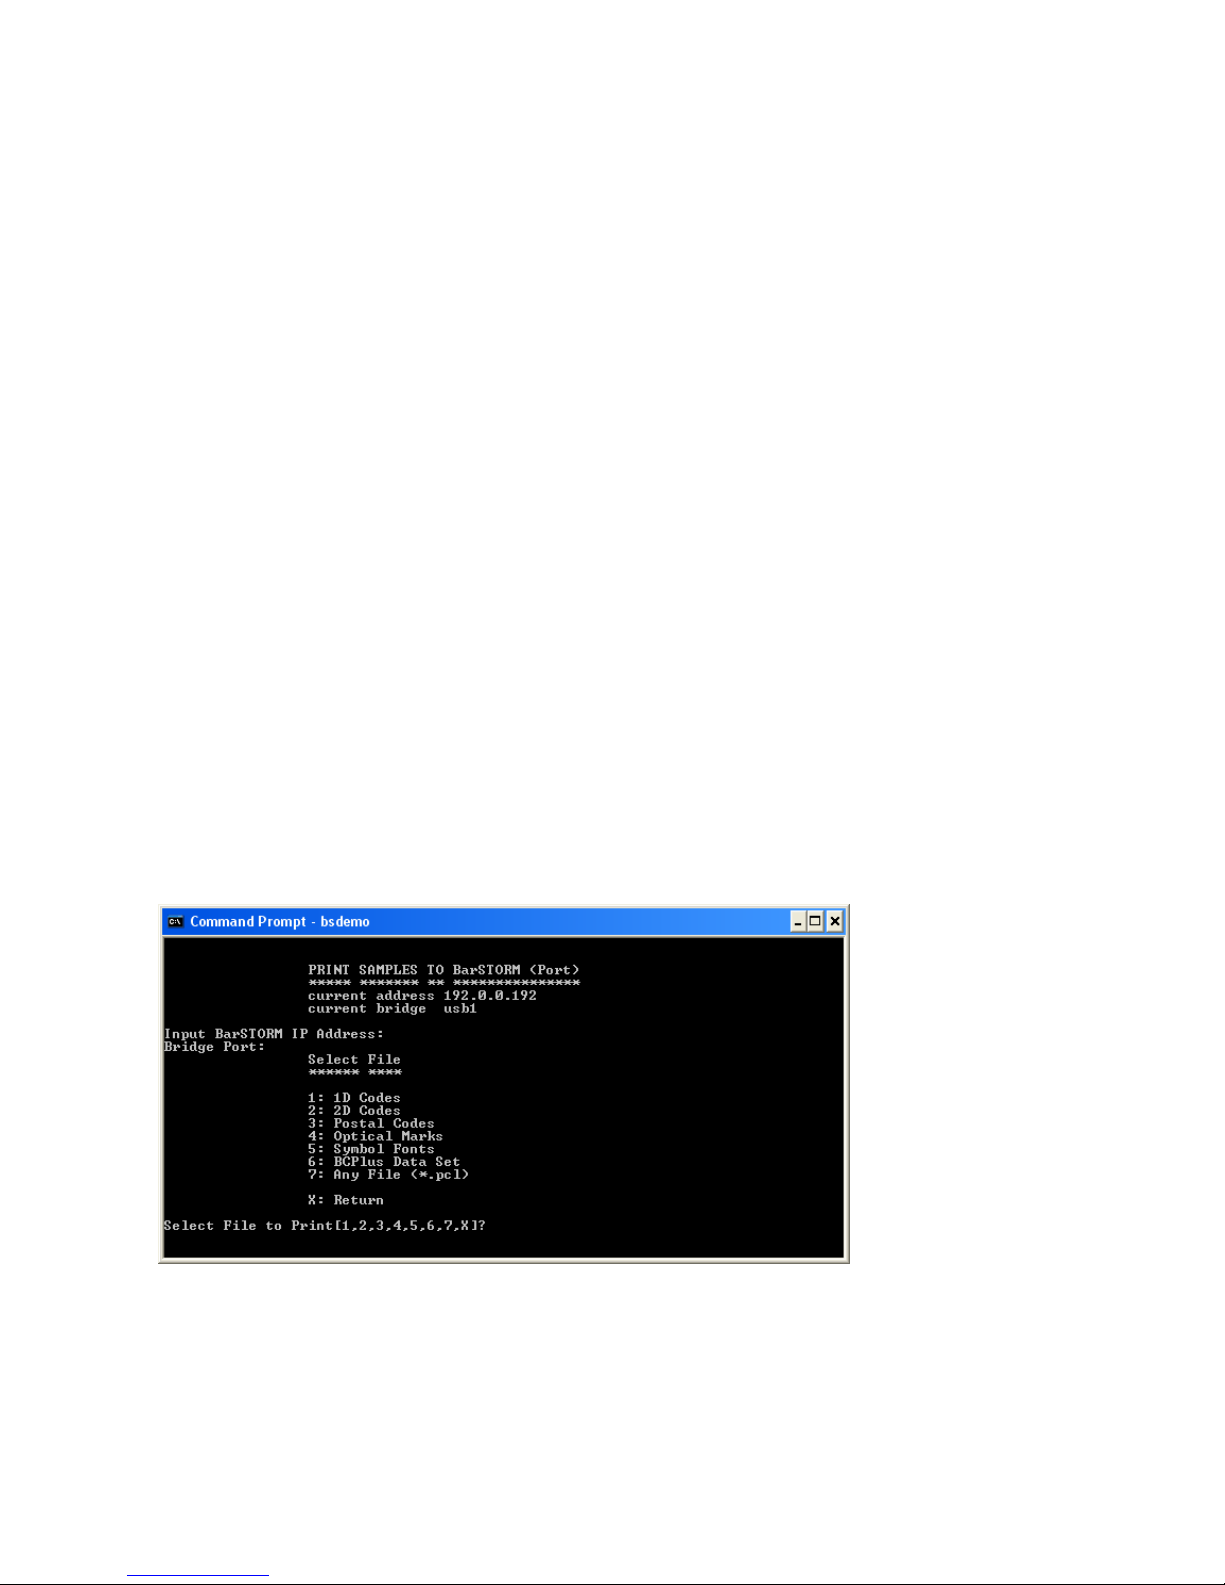
Use the DOS Utility on the CD, BSDEMO.bat. It requires you enter the IP address and bridge name, or can
be edited and changed as required.
Page 22
BarStorm Installation Guide
- - 22 - -
Copyright © Fontware Limited. All rights reserved.
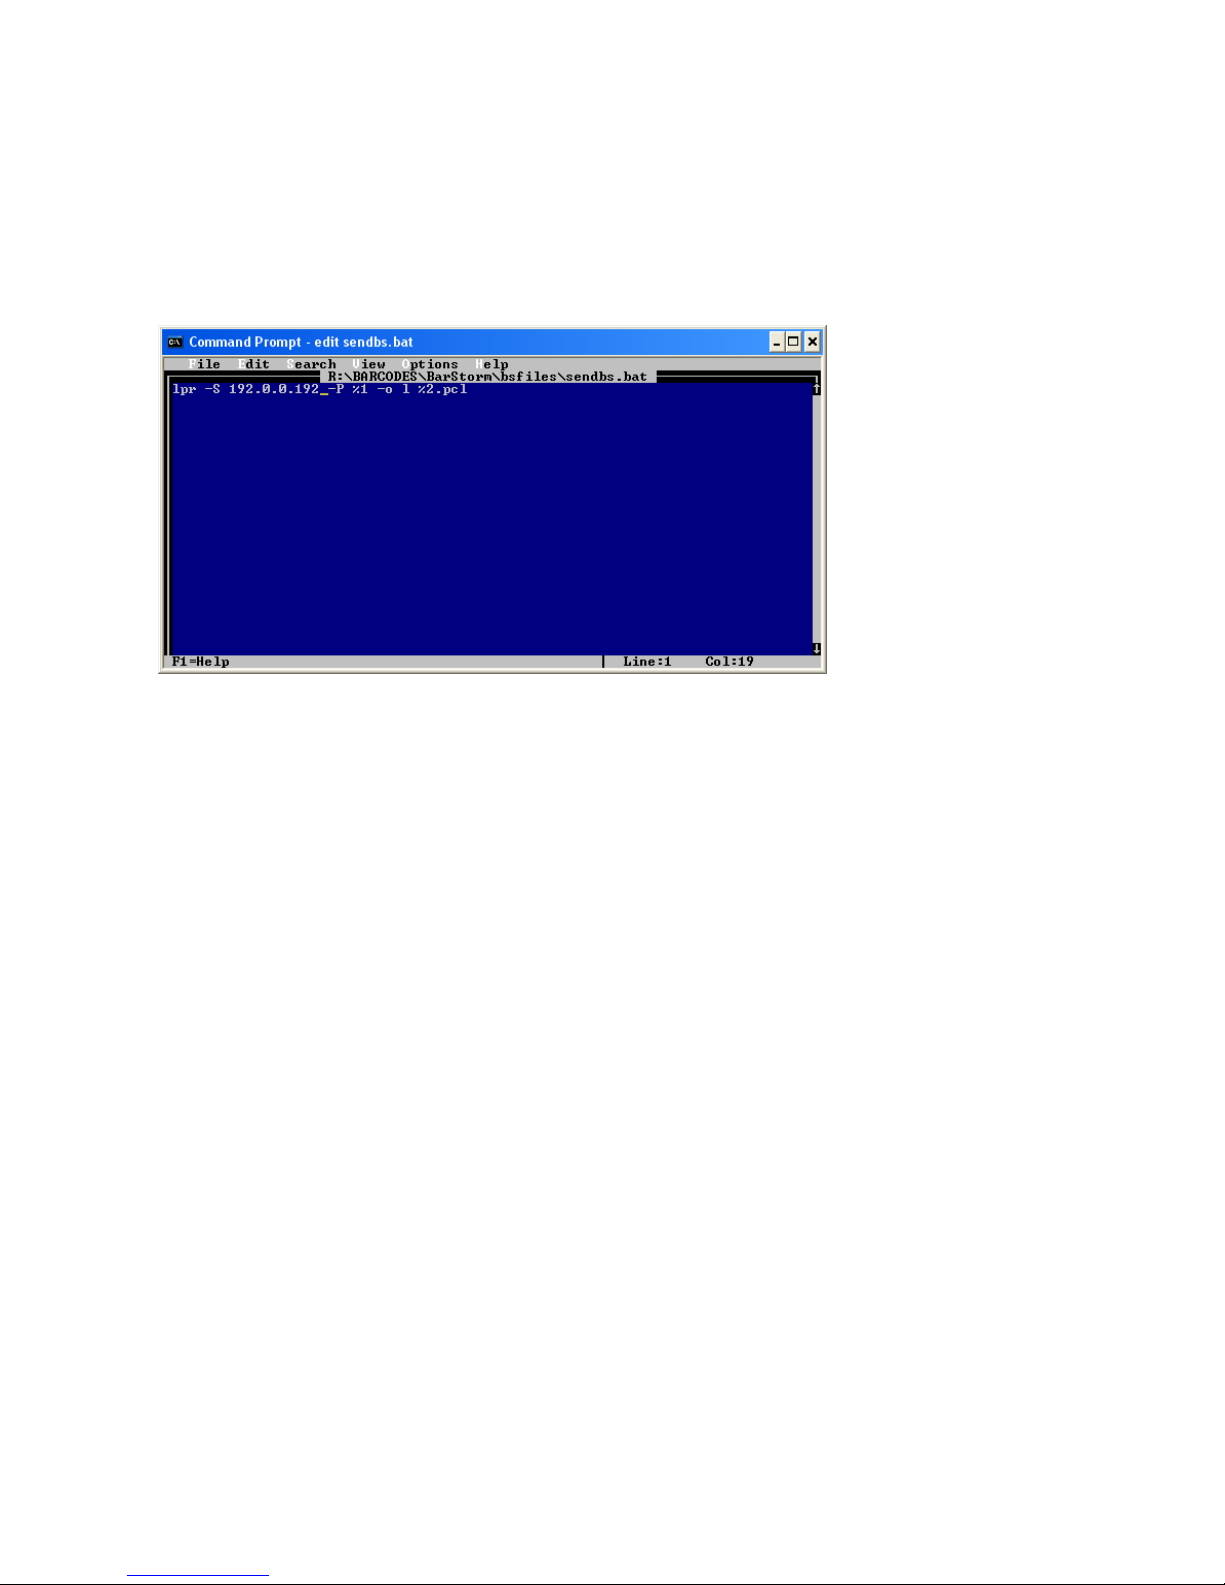
Use the DOS Batch file on the CD SendBS.
It takes two parameters of a <portname> and the <filename> to be printed.
The portname will be a valid bridge name or valid usb# port.
The filename is a valid pcl filename without the .pcl extension.
The batch file contains an IP address, so should be edited as required.
For example:
After editing the SendBS.bat to have the correct IP address (if the unit has a different IP address from the
default 192.0.0.192) use the DOS command:
i.e.
SendBS bridge1 bspdf417
or
SendBS usb1 bspdf417
The printer connected to bridge1 will print the PDF417 bar code examples.
The printer connected to USB1 will print the PDF417 bar code examples.
Page 23
BarStorm Installation Guide
- - 23 - -
Copyright © Fontware Limited. All rights reserved.
Windows Utility
Install the Windows Utility on CD.
It will install files on your system to the “\program files\fontware\barstorm\” folder.
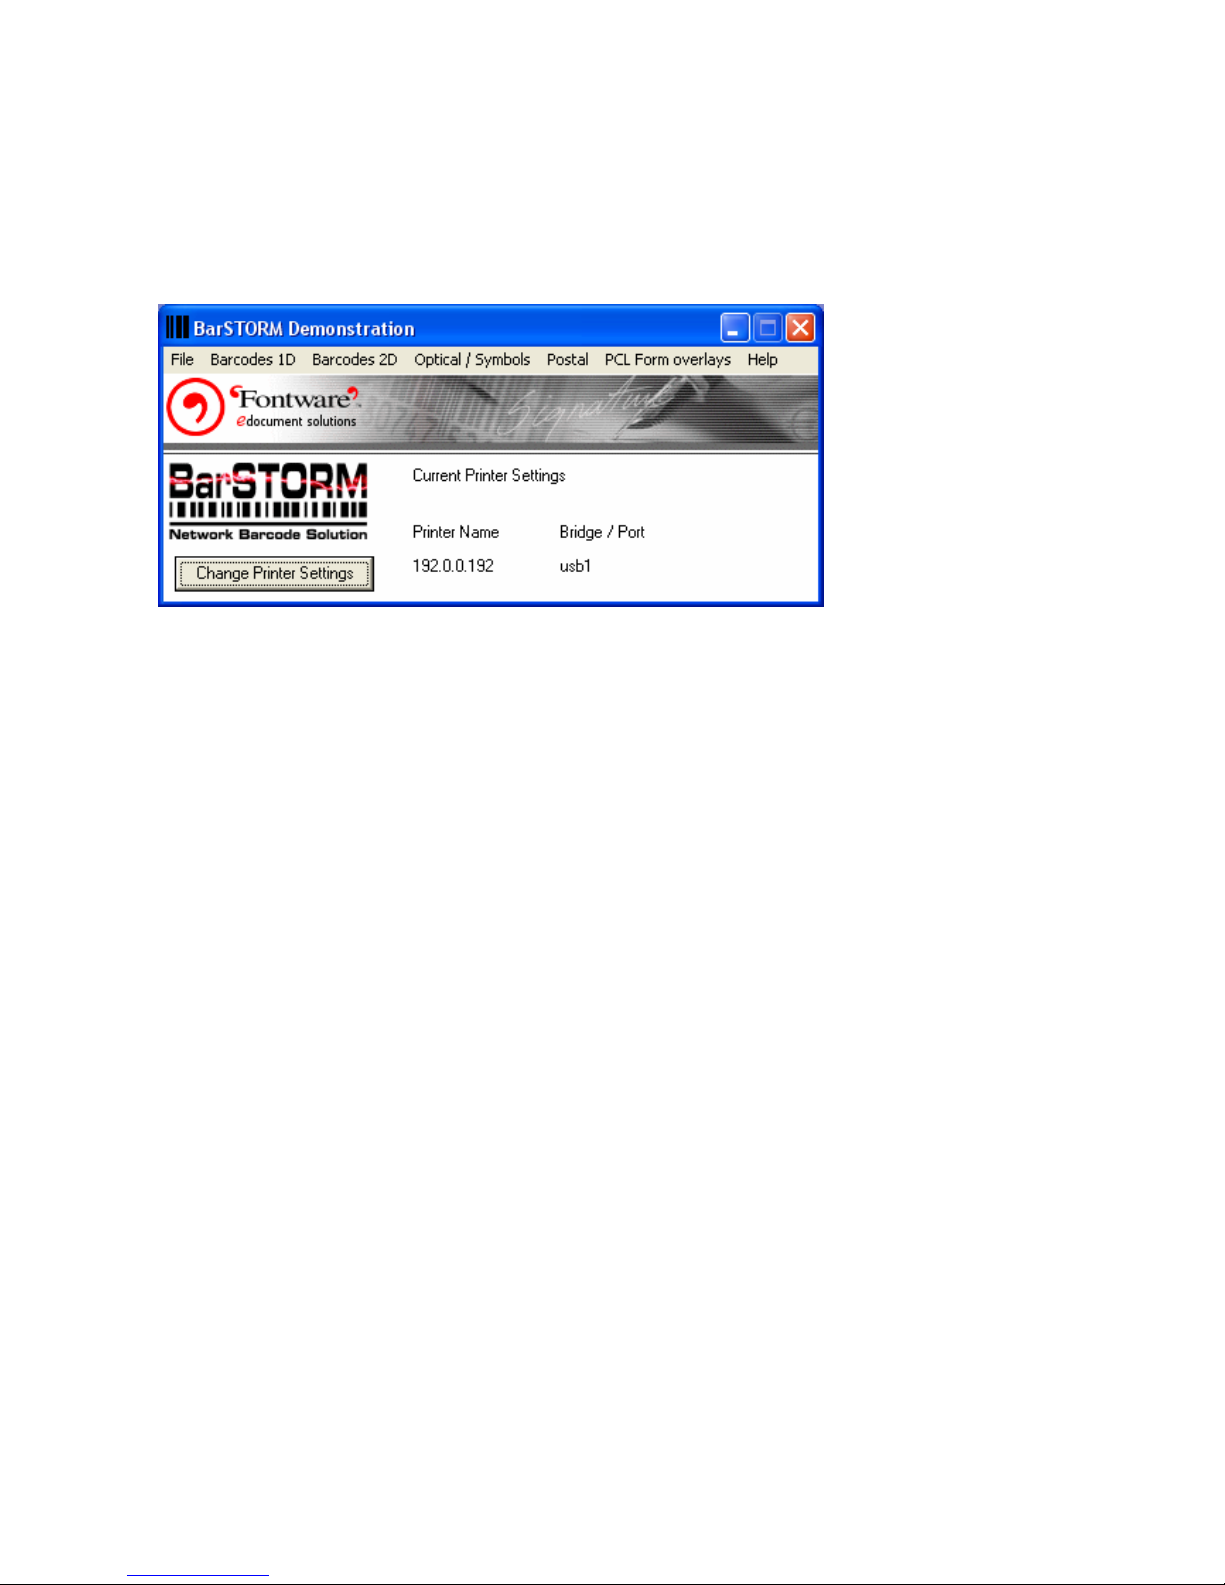
The demo program is BSDEMO.exe
This program, will allow you to test / demonstrate that the BarStorm unit is printing and processing Barcoded
prints from an easy Windows interface.
Use the change Printer Settings option to set the required IP address of the BarStorm, and which usb or
bridged port to use.
If you have pre-configured a Windows print queue to print to the BarStorm, this can alternatively be selected
as the target device.
Each dropdown menu will print pre-selected and installed files to the target printer for test.
The PCL Form option simply allows you to enter the Macro ID number of any Forms that may have been
configured into the BarStorm, a default test form is delivered on the unit with a form ID 312.
The File option, allows you to select any file that you wish to print via the BarStorm unit as a test.
(This program in the background is simply sending data via an LPR process).
Page 24

BarStorm Installation Guide
- - 24 - -
Copyright © Fontware Limited. All rights reserved.
Support Information
BarSTORM Supplier:
© Copyright 2002-2006 Fontware Limited
All rights reserved.
Associated Products Available from Fontware Limited.
Visit: www.fontware.com
Windows Based Truetype and Postscript fonts with Barcode encoding plug-ins and utility.
Barcode Singles 1D Barcodes
Barcode Singles 2D Barcodes
Barcode Singles Site Licences
Barcode Singles Developers Licences
www.fontware.com/barcodesingles
Windows Based Toolbar for Logos, Signatures, Office Templates and Email Templates, such as
Letterheads, Businesscards, Fax Headers, including easy Template creation Wizard.
Windows Stationery Manager
www.fontwarewsm.com
???
?
Fontware Limited
Katana House
Fort Fareham
Newgate Lane
Fareham
Hampshire
PO14 1AH
United Kingdom
T: +44 (0) 1329 221121
F: +44 (0) 1329 281145
W: www.fontware.com
E: [email protected]
 Loading...