

Page 1
WiFi Tür & Fenstersensor
D
Vielen Dank dass Sie sich für dieses Fontastic® Produkt
entschieden haben.
Auf den folgenden Seiten werden die Bedienung und Funktionen des WLAN Tür & Fenstersensors erläutert. Bitte nehmen Sie sich einen Moment Zeit, um diese Kurzanleitung zu lesen.
Bitte beachten Sie die Sicherheitshinweise.
Verpackungsinhalt
Tür & Fenstersensor | Magnet | Batterie | Klebepads | Schrauben | Bedienungsanleitung
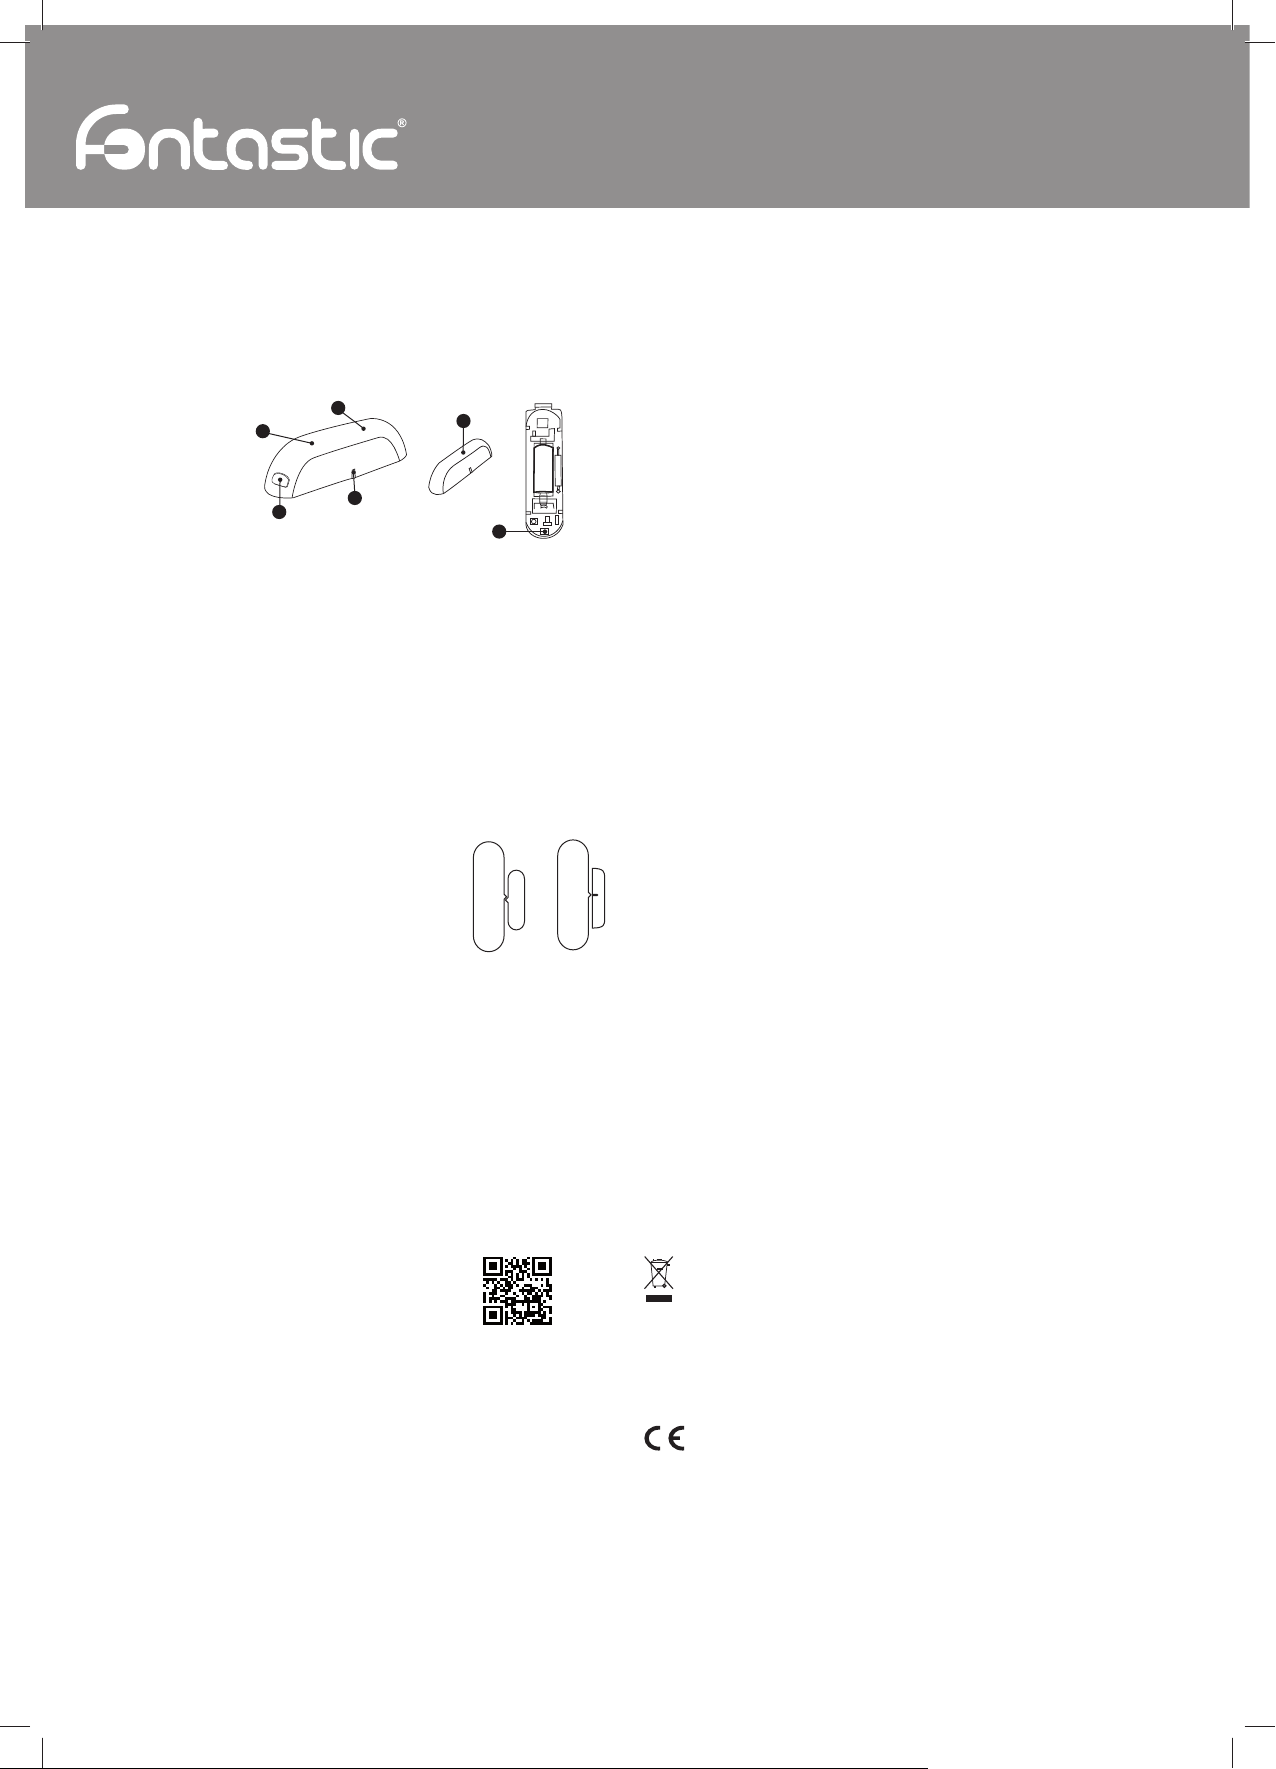
Übersicht
1. Tür & Fenstersensor
2. LED
3. Markierung
4. Entriegelung
5. Magnet
6. Taste (Abdeckung geöffnet)
Erste Schritte
Der Fontastic Smart Home Tür & Fenstersensor erkennt das Öffnen und Schließen von Türen
und Fenstern. So wissen Sie zum Beispiel, wann jemand in Ihr Zuhause kommt und geht, oder
können sensible Bereiche überwachen. Ob zuhause oder unterwegs – Sie werden sofort visuell
per LED und Push-Benachrichtigung informiert. Über die FontaHome App können Sie weitere
Automationen programmieren. Der Sensor ist einfach anzubringen und verbindet sich problemlos über die FontaHome App mit Ihrem Heim-WLAN. Sie können den Tür & Fenstersensor mit
anderen Fontastic Smart Home Geräten kombinieren und über die FontaHome App für iOS und
Android steuern.
Einsetzen der Batterie
Der Tür & Fenstersensor wird über eine CR2 Lithium Batterie mit Strom versorgt.
1. Drücken Sie die Entriegelung vorsichtig ein und die nehmen Sie die Gehäuseabdeckung des
Tür & Fenstersensors ab.
2. Die mitgelieferte Batterie ist bereits eingelegt. Entfernen Sie den Kunststoffstreifen zwischen
der Batterie und dem Kontakt, um den Tür & Fenstersensor mit Strom zu versorgen.
Hinweis: Achten Sie beim Einlegen der Batterie auf die richtige Polarität.
Montage
Bei der Montage wird ein Teil des Tür- und Fenstersensors auf
dem beweglichen Teil (Tür- oder Fensterfl ügel) und der andere
auf dem festen Teil (Rahmen) montiert.
Entscheiden Sie anhand der Einsatzbedingungen, welches Teil
Sie wo montieren möchten. Die Markierung am Tür & Fenstersensor
bestimmt die Position des Magnet Sensors (Abb.1).
Hinweis: Achten Sie bei der Montage darauf, dass die Markierungen von Sensor und Magnet
zueinander zeigen. Sensor und Magnet müssen eben und mittig platziert sein. Eine Montage
von Sensor und Magnet im 90° Winkel (Abb.2) ist möglich. Der Maximalabstand von Sensor zu
Magnet beträgt 5 mm.
Montieren Sie den Tür & Fenstersensor, sowie den Magneten entweder über die mitgelieferten
Klebepads oder verschrauben Sie diese. Folgen Sie den folgenden Schritten für die Montage
mit Schraube.
1. Drücken Sie die Entriegelung vorsichtig ein und die nehmen Sie die Gehäuseabdeckung des
Tür & Fenstersensors ab.
2. Entfernen Sie die Batterie des Tür & Fenstersensors, um an die Schraubenöffnungen zu
gelangen.
3. Nehmen Sie die Abdeckung des Magnets ab, indem Sie einen Schraubenzieher in die
Schraubenöffnung des Magnets stecken und schräg herausziehen.
4. Schrauben Sie den Tür & Fenstersensor, sowie den Magneten an die gewünschte Position.
Setzen Sie die Gehäuseabdeckung in umgekehrter Reihenfolge wieder auf.
Die Gehäuseabdeckung ist eingerastet, sobald ein deutliches Klicken zu hören ist.
App Installation
Beziehen Sie die „FontaHome“-App aus Google Play,
dem App Store oder folgen Sie dem QR-Code
bzw. Link (URL: www.d-parts.de/app/fontahome).
Registrierung
Vor Verwendung der FontaHome App müssen Sie sich registrieren. Sie können hier über verschiedene Optionen der Registrierung wählen.
Hinweis: Eine Nutzung der App ohne Registrierung ist technisch nicht möglich. Bitte beachten
Sie die Datenschutzerklärung für die Verarbeitung Ihrer personenbezogener Daten in der App
oder unter www.d-parts.de/privacy_fontahome.
Konfi guration (Einfacher Modus)
1. Versorgen Sie den Tür & Fenstersensor wie oben beschrieben mit Strom.
2. Sobald die LED schnell blinkt (ca. 2-mal/Sekunde) kann das Gerät konfi guriert werden
(Einfacher Modus). Falls die LED nicht wie beschrieben blinkt, drücken und halten Sie die
Taste am Gerät so lange, bis die LED schnell blinkt. Nehmen Sie hierzu die Gehäuseab deckung des Tür & Fenstersensors wie oben beschrieben ab, um an die Taste zu gelangen.
3. Öffnen Sie die FontaHome App, melden Sie sich an und tippen Sie auf „Gerät Hinzufügen“
bzw. das „+“-Symbol.
4. Erlauben Sie dem Gerät, sich mit dem WLAN-Netzwerk welches mit Ihrem Smartphone
verbunden ist, zu verbinden, indem Sie das Passwort des WLAN-Netzwerks eingeben und
folgen Sie den Anweisungen der App. Stellen Sie sicher, dass neue Geräte in das WLAN
hinzugefügt werden können.
5. Bei erfolgtem Hinzufügen des neuen Geräts öffnet sich die Detailseite.
1
2
4
3
5
6
Abb.1 Abb.2
Hinweis: Falls die Konfi guration im Einfachen Modus nicht funktioniert, verwenden Sie den
AP-Modus. Das Gerät baut hierbei einen Access Point auf zu dem Sie Ihr Smartphone
verbinden müssen.
Konfi guration (AP-Modus)
1. Versorgen Sie den Tür & Fenstersensor wie oben beschrieben mit Strom.
2. Sobald die LED langsam blinkt (ca. 1-mal alle 2 Sekunden) kann das Gerät konfi guriert
werden (AP-Modus). Falls die Taste nicht wie beschrieben blinkt, drücken und halten Sie die
Taste am Gerät so lange, bis sie langsam blinkt. Nehmen Sie hierzu die Gehäuseabdeckung
des Tür & Fenstersensors wie oben beschrieben ab, um an die Taste zu gelangen.
3. Öffnen Sie die FontaHome App, melden Sie sich an und tippen Sie auf „Gerät Hinzufügen“
bzw. das „+“-Symbol.
4. Tippen Sie oben rechts auf „AP“.
5. Erlauben Sie dem Gerät, sich mit dem WLAN-Netzwerk welches mit Ihrem Smartphone
verbunden ist, zu verbinden, indem Sie das Passwort des WLAN-Netzwerks eingeben und
folgen Sie den Anweisungen der App.
6. Verbinden Sie Ihr Smartphone mit dem vom Gerät erstellten WLAN-Netzwerk
„Smart Life-XXXX“, wobei die letzten vier Stellen variieren.
7. Bei erfolgtem Hinzufügen des neuen Geräts öffnet sich die Detailseite.
Hinweis: Das Gerät und die App unterstützen nur 2.4GHz WLAN-Netzwerke. Sollte die
Verbindung fehlschlagen, schauen Sie bitte im Menü „FAQ“ in der App nach. Wir empfehlen
Ihnen dem Gerät einen eindeutigen Namen zu geben, z.B. „Türsensor Eingang“.
Für die Integration von IFTTT schauen Sie bitte in der FontaHome App im Bereich „Profi l“
unter „Drittanbieter-Integration“ nach.
Gerätefreigabe mit anderen FontaHome Nutzern
Sie können die mit Ihrem FontaHome Konto verbundenen Geräte mit anderen Nutzern von
FontaHome freigeben, sodass beispielsweise Ihre Freunde und Familie auf die Geräte
zugreifen können.
1. Öffnen Sie die Gerätefreigabe im Menu „Profi l“.
2. Wählen Sie die Geräte aus, die Sie freigeben möchten.
3. Wählen Sie die Mitglieder aus, die sie freigeben möchten.
Alternativ können Sie in das Menü des Gerätes gehen und dort „Gerätefreigabe“ wählen.
Gerät auf Werkseinstellungen zurücksetzen
Um das Gerät auf Werkseinstellungen zurückzusetzen und die WLAN-Einstellungen zu löschen,
gehen Sie in der App in das Menü vom Gerät und wählen Sie „Werkseinstellungen“, oder
drücken und halten Sie die Taste am Gerät so lange, bis sie blinkt.
Bei falscher Bedienung wird keine Haftung für eventuelle Schäden übernommen.
Falls Sie Technischen Support benötigen, kontaktieren Sie bitte unser Support-Team unter
unserer Website support.fontastic.eu.
Sicherheitshinweise:
• Demontieren Sie das Gerät nicht.
• Tauchen Sie das Gerät nicht in Wasser und schützen Sie es vor Feuchtigkeit.
• Benutzen Sie das Gerät nie, wenn es sichtbare Schäden aufweist.
• Betreiben Sie das Gerät nicht im Freien oder in Räumen mit hoher Luftfeuchtigkeit.
Technische Daten:
• WLAN Standard: Generation 4 (2.4GHz), Reichweite 45m
• Stromversorgung: 1x Batterie CR2-3V
• Batterie Laufzeit: 2 Jahre
• Stromverbrauch Standby: 10μA
• Betriebstemperatur: 0°C - 40°C
• Betriebsfeuchtigkeit: 20% - 85%
• Abmessungen: 72 x 32 x 25 mm / 40 x 11 x 11 mm
• Gewicht: 21g / 5g
Hinweis zum Umweltschutz:
Ab dem Zeitpunkt der Umsetzung der europäischen Richtlinie 2012/19 EU in nationales
Recht gilt folgendes: Elektrische und elektronische Geräte dürfen nicht mit dem Hausmüll
entsorgt werden. Der Verbraucher ist gesetzlich verpfl ichtet, elektrische und elektronische
Geräte am Ende ihrer Lebensdauer an den dafür eingerichteten, öffentlichen
Sammelstellen oder an die Verkaufsstelle zurückzugeben. Einzelheiten dazu regelt das jeweilige
Landesrecht. Das Symbol auf dem Produkt, der Gebrauchsanleitung oder der Verpackung weist
auf diese Bestimmungen hin. Mit der Wiederverwertung, der stoffl ichen Verwertung oder anderer
Formen der Verwertung von Altgeräten leisten Sie einen wichtigen Beitrag zum Schutz unserer
Umwelt. In Deutschland gelten oben genannte Entsorgungsregeln, laut Batterieverordnung, für
Batterien und Akkus entsprechend.
Hiermit erklären wir, dass dieses Gerät die CE Kennzeichnung gemäß den
Bestimmungen und Vorgaben trägt. Es entspricht somit den grundlegenden
Anforderungen der RED-Richtlinie 2014/53/EU.
App Store is a service mark of Apple Inc., registered in the U.S. and other countries.
©2018 Google LLC All rights reserved. Google and Google Play are trademarks of Google LLC.
IFTTT and the IFTTT wordmark are trademarks of IFTTT Inc.
Improvement and changes of the technical specifi cations and other data’s could be made without prior notice Fontastic, by D-Parts Mobilphon & Zubehör GmbH ● Birkenweiherstr, 16 ● 63505 Langenselbold, Germany / V1_12_18
Page 2
WiFi Door & Window Sensor
GB
Thank you for choosing this Fontastic® product.
The following pages explain the operation and functions of the WiFi motion detector.
Please take a moment to read this quick guide.
Please observe the safety instructions.
Package content
Door & window sensor | Magnet | Battery | Sticky pads | Screws | Manual
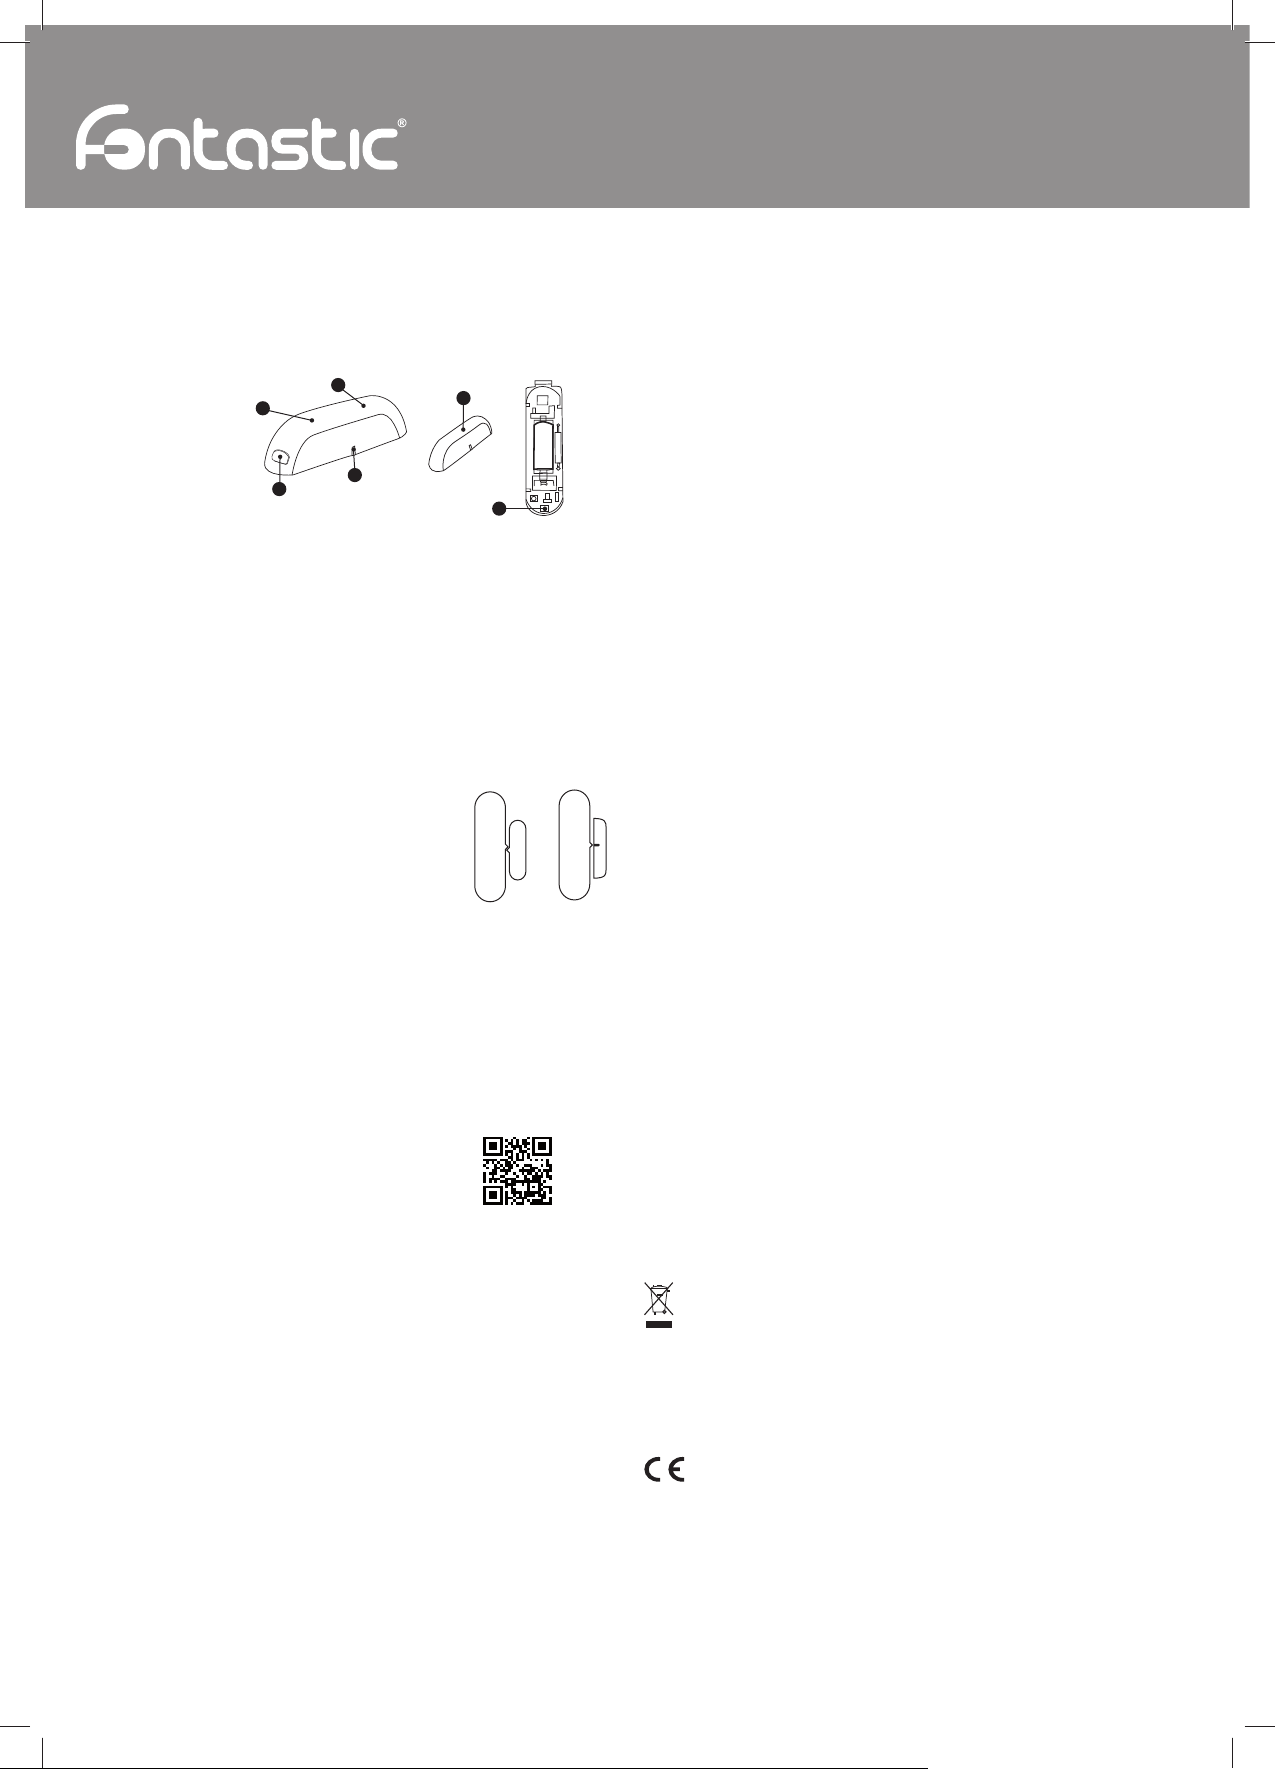
Overview
1. Door & window sensor
2. LED
3. Marking
4. Unlocking
5. Magnet
6. Button (Cover open)
Get Started
The Fontastic Smart Home door & window sensor detects the opening and closing of doors and
windows. For example, you know when someone is coming and going, or you can monitor sensitive areas. Whether at home or on the go - you are immediately informed visually via LED and
push notifi cation. The FontaHome App allows you to program further automations. The sensor
is easy to install and connects seamlessly to your home WiFi via the FontaHome app. You can
combine the door & window sensor with other Fontastic smart home devices and control it via
the FontaHome App for iOS and Android.
Inserting the battery
The door & window sensor is powered by a CR2 lithium battery.
1. Gently push in the release and remove the housing cover of the door & window sensor.
2. The supplied battery is already inserted. Remove the plastic strip between the battery
and the contact to power the Door & Window Sensor.
Note: Make sure the polarity is correct when inserting the battery.
Mounting
When mounting, one part of the door & window sensor is mounted
on the moving part (door or window leaf), the other on the fi xed
part (frame). Decide on the basis of the mounting conditions which
part you would like to mount where.
The marking on the door & window sensor indicates the position of
the magnet sensor (Fig.1).
Note: When mounting, make sure that the markings of the sensor and magnet point towards
each other. Sensor and magnet must be level and centered. It is possible to mount the sensor
and magnet in 90° angle (Fig.2). The maximum distance from sensor to magnet is 5 mm.
Mount the door & window sensor, as well as the magnet either with the supplied adhesive pads
or screw them together. Follow the following steps for mounting with screw.
1. Push the release carefully in and remove the door & window sensor housing cover.
2. Remove the Door & Window Sensor battery to access the screw holes.
3. Remove the cover of the magnet by inserting a screwdriver into the magnet‘s screw hole
and pulling it diagonally out.
4. Screw the door & window sensor, as well as the magnet to the desired position.
Reattach the housing cover in reverse order. The housing cover is engaged as soon as
a clear click is heard.
App installation
Get the „FontaHome“ app from Google Play, the App Store,
or follow the QR code or link
(URL: www.d-parts.de/app/fontahome)
Registration
You must register before using the FontaHome app. You can choose from various registration
options.
Note: It is technically not possible to use the app without registration. Please note the privacy
policy for the processing of your personal data in the app or at d-parts.de/privacy_fontahome.
Confi guration (easy mode)
1. Power the door & window sensor as described above.
2. As soon as the LED quickly fl ashes (approx. 2 times/second), the device can be confi gured
(simple mode). If the LED does not fl ash as described, press and hold the button on the
device until it quickly fl ashes. Remove the door & window sensor housing cover as described
above to access the button.
3. Open the FontaHome app, log in and press the „Add Device“ or the „+“ symbol.
4. Allow the device to connect to the wireless network connected to your phone by entering the
wireless network password and follow the instructions in the app. Make sure that new devices
can be added to the wireless network.
5. After adding the new device, the detail page opens.
1
2
4
3
5
6
Fig.1 Fig.2
Note: If confi guration does not work in simple mode, use AP mode. The device sets up an
access point to which you must connect your phone.
Confi guration (AP mode)
1. Power the door & window sensor as described above.
2. As soon as the LED slowly fl ashes (approx. once every 2 seconds), the device can be
confi gured (AP mode). If the LED does not fl ash as described, press and hold the button on
the unit until it slowly fl ashes. Remove the door & window sensor housing cover as described
above to access the button.
3. Open the FontaHome app, log in and press the „Add Device“ or the „+“ symbol.
4. Press „AP“ in the upper right corner.
5. Allow the device to connect to the wireless network connected to your phone by entering the
wireless network password and follow the instructions in the app.
6. Connect your phone to the „Smart Life-XXXX“ WiFi network created by the device, with the
last four digits varying.
7. After adding the new device, connect the desired appliance to the device.
Note: The device and app only supports 2.4GHz WiFi networks. If the connection fails, please
refer to the „FAQ“ menu in the app. We recommend that you give the device a unique name,
e.g. „Door sensor entrance“.
For the integration of IFTTT please look in the FontaHome App in the „Profi le“ section under
„3rd party integration“.
Device Sharing with other FontaHome Users
You can share the devices connected to your FontaHome account with other FontaHome
users so that your friends and family can access the devices
1. Open the device share in the „Profi le“ menu.
2. Select the devices you want to share.
3. Select the members you want to share.
Alternatively, you can go to the menu of the device and select „Device Sharing“.
Reset Device to Factory Settings
To reset the device to factory settings and delete WiFi settings, go to the devices menu in the
app and select „Factory settings“, or press and hold the button on the device until it fl ashes.
No commitment for any damage at misuse.
In case you need technical support, please contact our support team at our website under
support.fontastic.eu.
Safety advice:
• Do not dismantle the device.
• Do not immerse the device in water and protect it from humidity.
• Never use the device if it is visibly damaged.
• Do not operate the unit outdoors or in rooms with high humidity.
Technical Data:
• WiFi Standard: Generation 4 (2.4GHz), range 45m
• Power supply: 1x battery CR2-3V
• Batterie life: 2 years
• Power consumption stand by: 10μA
• Operating temperature: 0°C - 40°C
• Operating humidity: 20% - 85%
• Dimensions: 72 x 32 x 25 mm / 40 x 11 x 11 mm
• Weight: 21g / 5g
• Power supply: 1x battery CR123A-3V
• Batterie life: 5 years
• Power consumption stand by: 13μA
• Operating temperature: 0°C - 40°C
• Operating humidity: 20% - 85%
• Dimensions: 48 x 48 x 48 mm
• Weight: 46g
Note on environmental protection:
After the implementation of the European Directive 2012/19/EC in the national legal
system, the following applies: Electrical and electronic devices may not be disposed
of with domestic waste. Consumers are obliged by law to return electrical and electronic
devices at the end of their service lives to the public collecting points set up for this
purpose or point of sale. Details of this are defned by the national law of the respective
country. This symbol on the product, the instruction manual or the package indicates that a
product is subject to these regulations. By recycling, re-using the materials or other forms of
utilising old devices, you are making an important contribution to protecting our environment.
Registration and Safety
Certifcation/General Information
We hereby declare, that this device carries the CE mark in accordance with the
regulations and standards. It conforms with the fundamental requirements of the
(RED) 2014/53/EU directive.
App Store is a service mark of Apple Inc., registered in the U.S. and other countries.
©2018 Google LLC All rights reserved. Google and Google Play are trademarks of Google LLC.
IFTTT and the IFTTT wordmark are trademarks of IFTTT Inc.
Improvement and changes of the technical specifi cations and other data’s could be made without prior notice Fontastic, by D-Parts Mobilphon & Zubehör GmbH ● Birkenweiherstr, 16 ● 63505 Langenselbold, Germany / V1_12_18
 Loading...