

Page 1
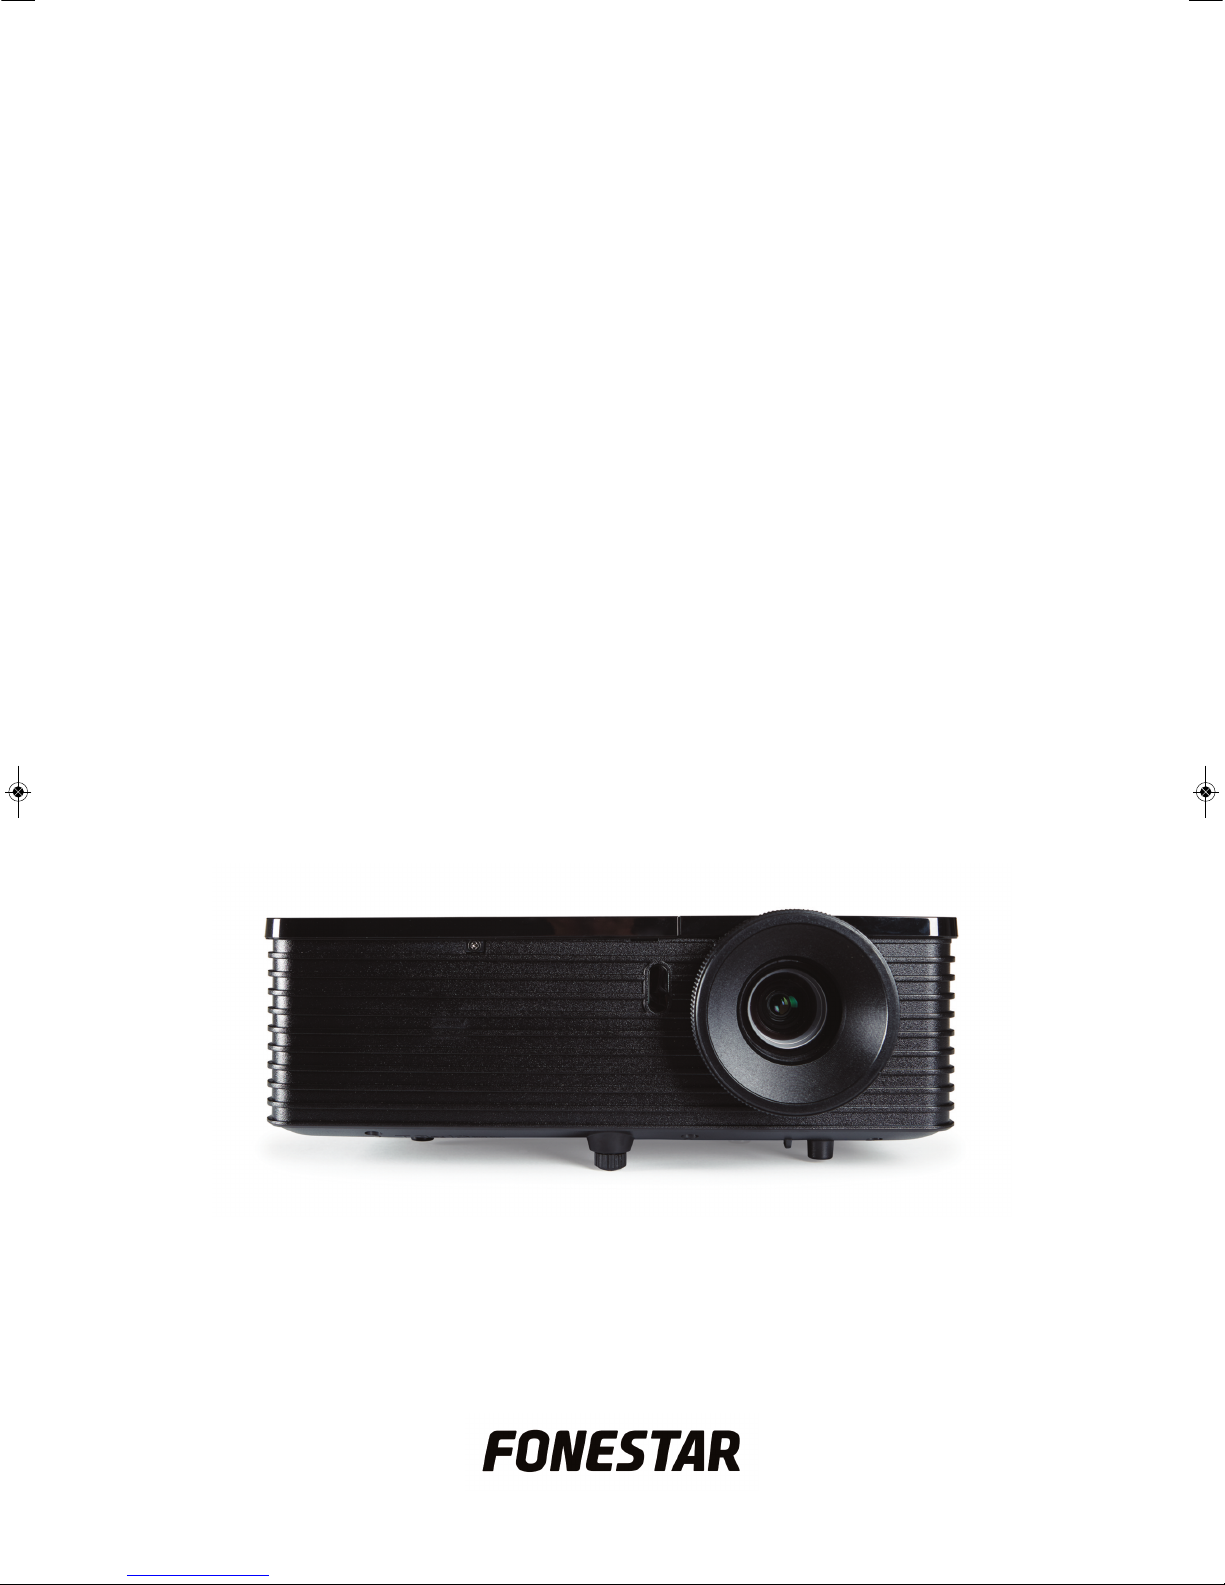
PR-3000
DLP PROJECTOR
INSTRUCTION MANUAL
Page 2

E
N
- 2-
We take this opportunity to thank you for buying this product.
W
e recommend you read the instruction manual before switching on the machine and follow the instructions
that are given. Keep the manual for future reference.
SECURITY AND THE ENVIRONMENT
ELECTRICAL SECURITY
C
heck that the current in the mains connection where the machine is to be installed corresponds to the
power supply of the machine.
To avoid damaging the equipment, electrical shocks, fire or physical injury when you connect or disconnect
the equipment from the power supply, pull the plug firmly out of the mains socket holding the plug, never the
cable.
Always do this with dry hands.
Keep the power supply cable far from sources of heat. Do not put heavy objects on top of it or change it.
Clean dust and dirt off the power supply cable regularly.
Do not open the machine; you could get an electric shock.
CAUTION
While installing the machine, make sure it is switched off and unplugged.
Do not open the machine. Touching the internal parts is dangerous and you could receive an electric shock.
The machine must not be splashed or dripped on. Never place recipients with liquid inside on the machine.
Do not place anything inside the machine.
LOCATION
Place the equipment on a horizontal surface with enough space around it to allow ventilation.
Avoid direct sunlight, heat sources and excessive dust.
Do not place the machine near magnetic fields or static electricity.
Do not use surfaces which vibrate or receive impact.
Do not pile machines on top of one another.
VENTILATION
Never block or cover the ventilation slits on the machine.
Do not expose it to direct sunlight or place it near sources of heat.
PERIODS OF INACTIVITY
When the machine is not going to be used for a long period of time, disconnect it from the mains.
If you are using an adapter, take into account that it will continue using electricity even if the machine is
switched off. If it is not going to be used for a long period of time, disconnect it from the mains.
THE ENVIRONMENT
To save energy, switch the machine off when you are not going to use it for a long time. The machine could
contain substances that are harmful to the environment or human health. To minimize the effect of these
substances the machine must be correctly managed and recycled when you decide to dispose of it.
When you dispose of it remember: it cannot be thrown into a conventional rubbish bin.
If it contains or uses batteries, these must be disposed of separately.
The machine (without batteries) must be disposed of correctly. Put it in a container specially intended for the
collection of electronic and electrical appliances, at the dump or hand it over to the dealer when you purchase
similar equipment, so that the dealer can dispose of it correctly (at no added cost).
Page 3
E
N
- 3-
SIGNIFICANCE OF THE SYMBOLS ON THE MACHINE*
The symbol formed by the expression “Class 1 laser product” written in a rectangle
indicates that visible or invisible laser radiation could be produced. Avoid direct expose to
the laser.
The symbol formed by a ray of lightening inside a triangle shows that the machine has
c
onnection terminals or a circuit with areas with a current which could cause an electric
shock, even in normal working conditions.
The symbol formed by an exclamation mark in a triangle shows that the instruction manual
must be referred to for information on how the machine works and its use.
The symbol formed by one square inside another square shows that the machine has
double electrical insulation.
The European Community symbol shows that the machine complies with the current
European Union legislation, as well as its transposition to local legislation.
The symbol of a rubbish bin crossed out and over a horizontal line shows that when the
product is disposed of it must be done properly, placing it in a special selective electronic
and electrical equipment container or through a dealer when purchasing a similar product,
at no additional cost. It also shows that the machine was put on the market after 13th
August 2005 (European Community Directive 2002/96/CE of Electrical and Electronic
recycling, and its Spanish equivalent R.D.208/2005).
In accordance with what is set out in the aforementioned decree, FONESTAR is registered
in the RAEE (Registro de Aparatos Eléctricos y Electrónicos) in a special section REI
(Registro de establecimientos Industriales), with the entry number 001851.
*It is possible that some of these symbols do not appear on the machine.
EXEMPTION OF LIABILITY
The characteristics of the equipment and the content of the manual can change without forewarning.
FONESTAR, S.A. does not assume responsibilities regarding the inappropriate use of the equipment or the
information supplied in this instruction manual, and specifically disclaims any implied liability for marketability
or fitness for any other use.
All rights reserved by FONESTAR, S.A.
Page 4
- 4-
DESCRIPTION
DLP projector of 3,000 ANSI lumens with high brightness halogen lamp. For 30” to 300” screens. XGA
r
esolution (1024 x 768). Compatible with 480p, 480i, 576p, 576i, 720p, 1080i and 1080p.
It has keystone correction which allows the image positioning to be adjusted. It has multiple audio and video
i
nputs as well as a speaker integrated in the projector itself. It allows the type of projection to be selected:
t
abletop or ceiling, frontal or rear projection.
CONTROLS AND FUNCTIONS
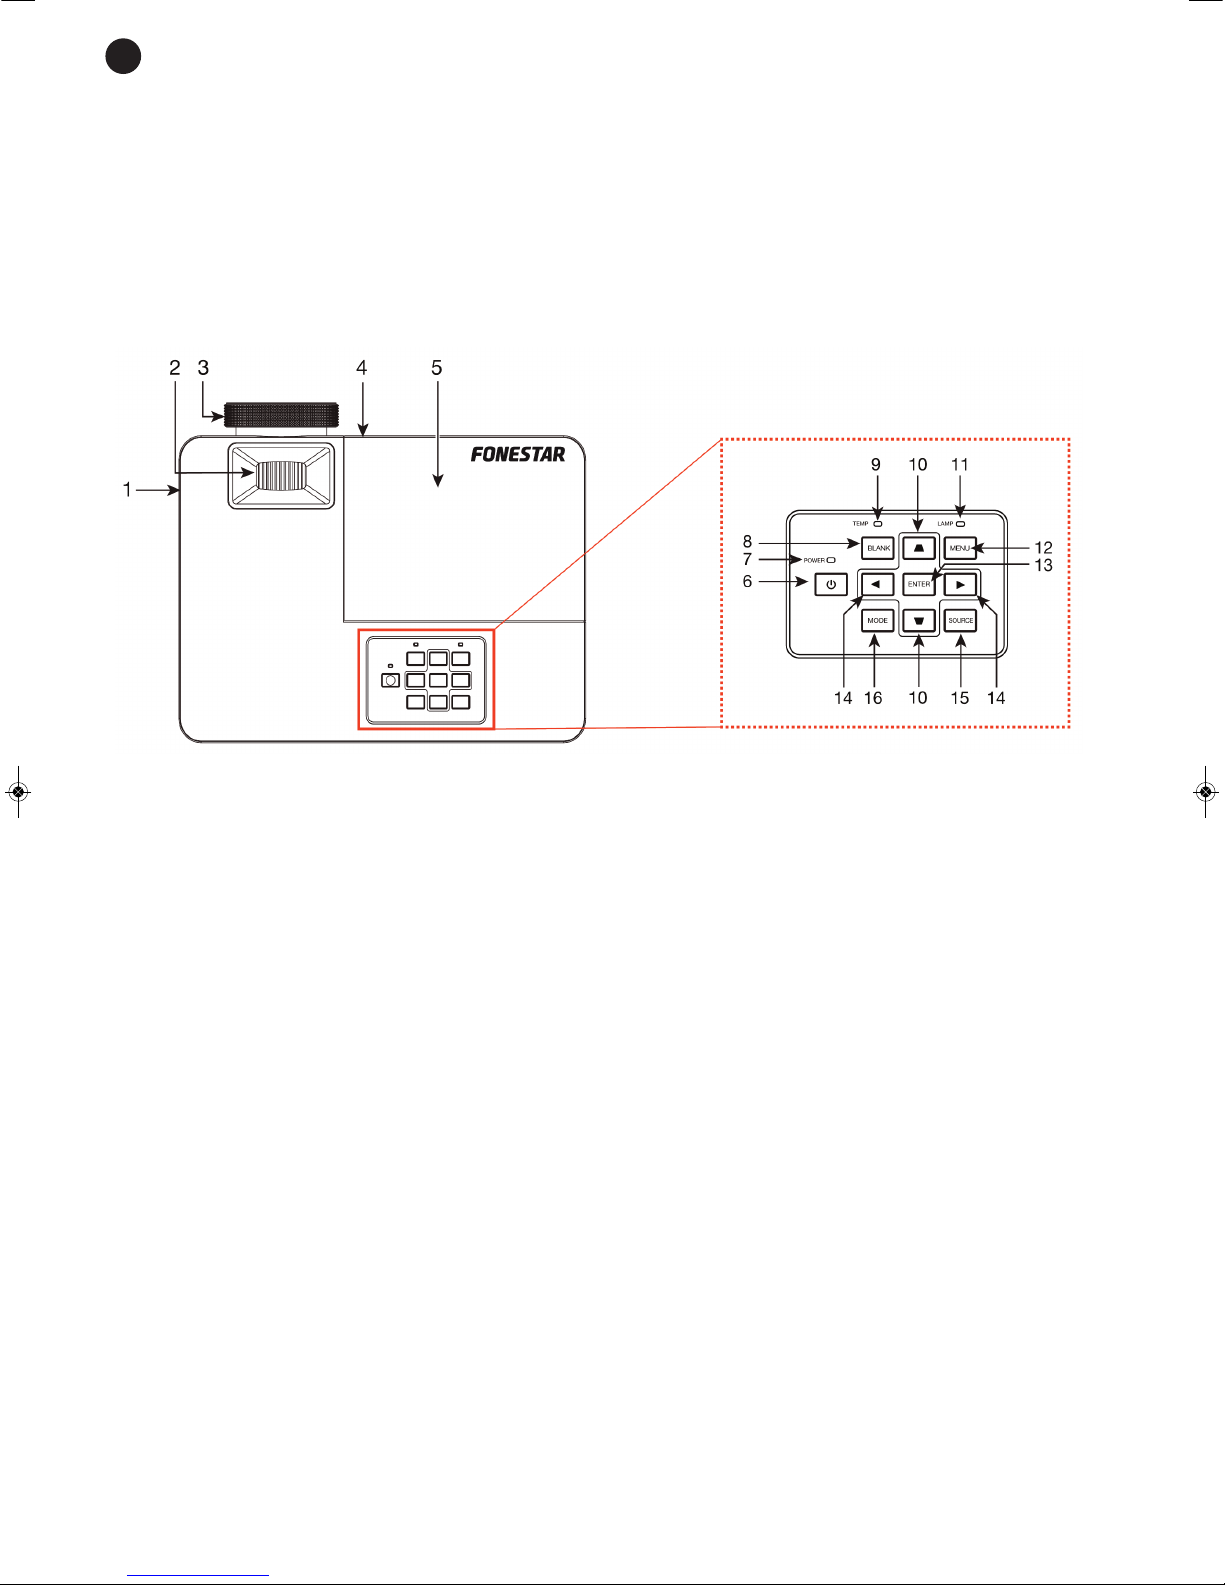
UPPER PANEL
1.- Integrated speaker.
2.- ZOOM: image zoom knob in manual mode.
3.- FOCUS: image focus knob in manual mode.
4.- Remote control infrared receiver.
5.- Extractable panel for lamp replacement.
6.-
q
: projector on/off button.
7.- POWER: LED power indicator.
It lights up orange when the projector is in standby mode.
It flashes orange when the device is being switched on or off.
It lights up green when the projector is operating.
8.- BLANK: temporarily deactivates the image displayed by
the projector, leaving the screen the colour set
using the menu options. Press this button again to be able to dispaly the image from the selected input.
9.- TEMP: LED indicator that lights up when a bulb reaches a very high temperature.
10.- Keystone correction and menu option navigation keys.
11.- LAMP: LED indicator that lights up red when the lamp is about to stop working and its replacement is
recommended.
12.- MENU: displays the main menu on the screen and allows you to return to the previous screen/menu.
13.- ENTER: allows the selected menu option to be confirmed.
14.- Navigation keys to move through the different menu options.
15.- SOURCE: allows the required input source to be selected.
16.- MODE: allows colour adjustments to be made to display the image. You can choose among Whiteboard,
PC, Film, ViewMatch, User 1 and User 2.
E
N
Page 5

REAR PANEL
1.- AUDIO IN 1: stereo audio input, 3.5 mm jack connector. Complementary audio input for COMPUTER 1
and VIDEO inputs, S-Video connector.
2.- VIDEO: S-video input, mini DIN 4 connector.
3.- COMPUTER IN 1: video 1 input, VGA connector.
4.- COMPUTER OUT: video output, VGA connector.
5.- HDMI: audio/video input, HDMI connector.
6.- RS-232: port for remote connection of projector to a computer, female D9 connector. For more
information consult the Projector Remote Control section.
7.- TYPE B USB: update port.
8.- AUDIO IN 2: stereo audio input, 3.5 mm jack connector. Complementary audio input for COMPUTER 2
and VIDEO inputs, composite video connector.
9.- AUDIO OUT: stereo audio output, 3.5 mm jack connector.
10.- VIDEO: composite video input, RCA connector.
11.- Power supply connector.
12.- COMPUTER IN 2: VIDEO 2 INPUT, VGA connector.
LOWER PANEL
1.- Adjustable screw for the vertical positioning of
the projected image.
2.- Bolt holes for mount.
- 5-
E
N
Page 6
- 6-
REMOTE CONTROL
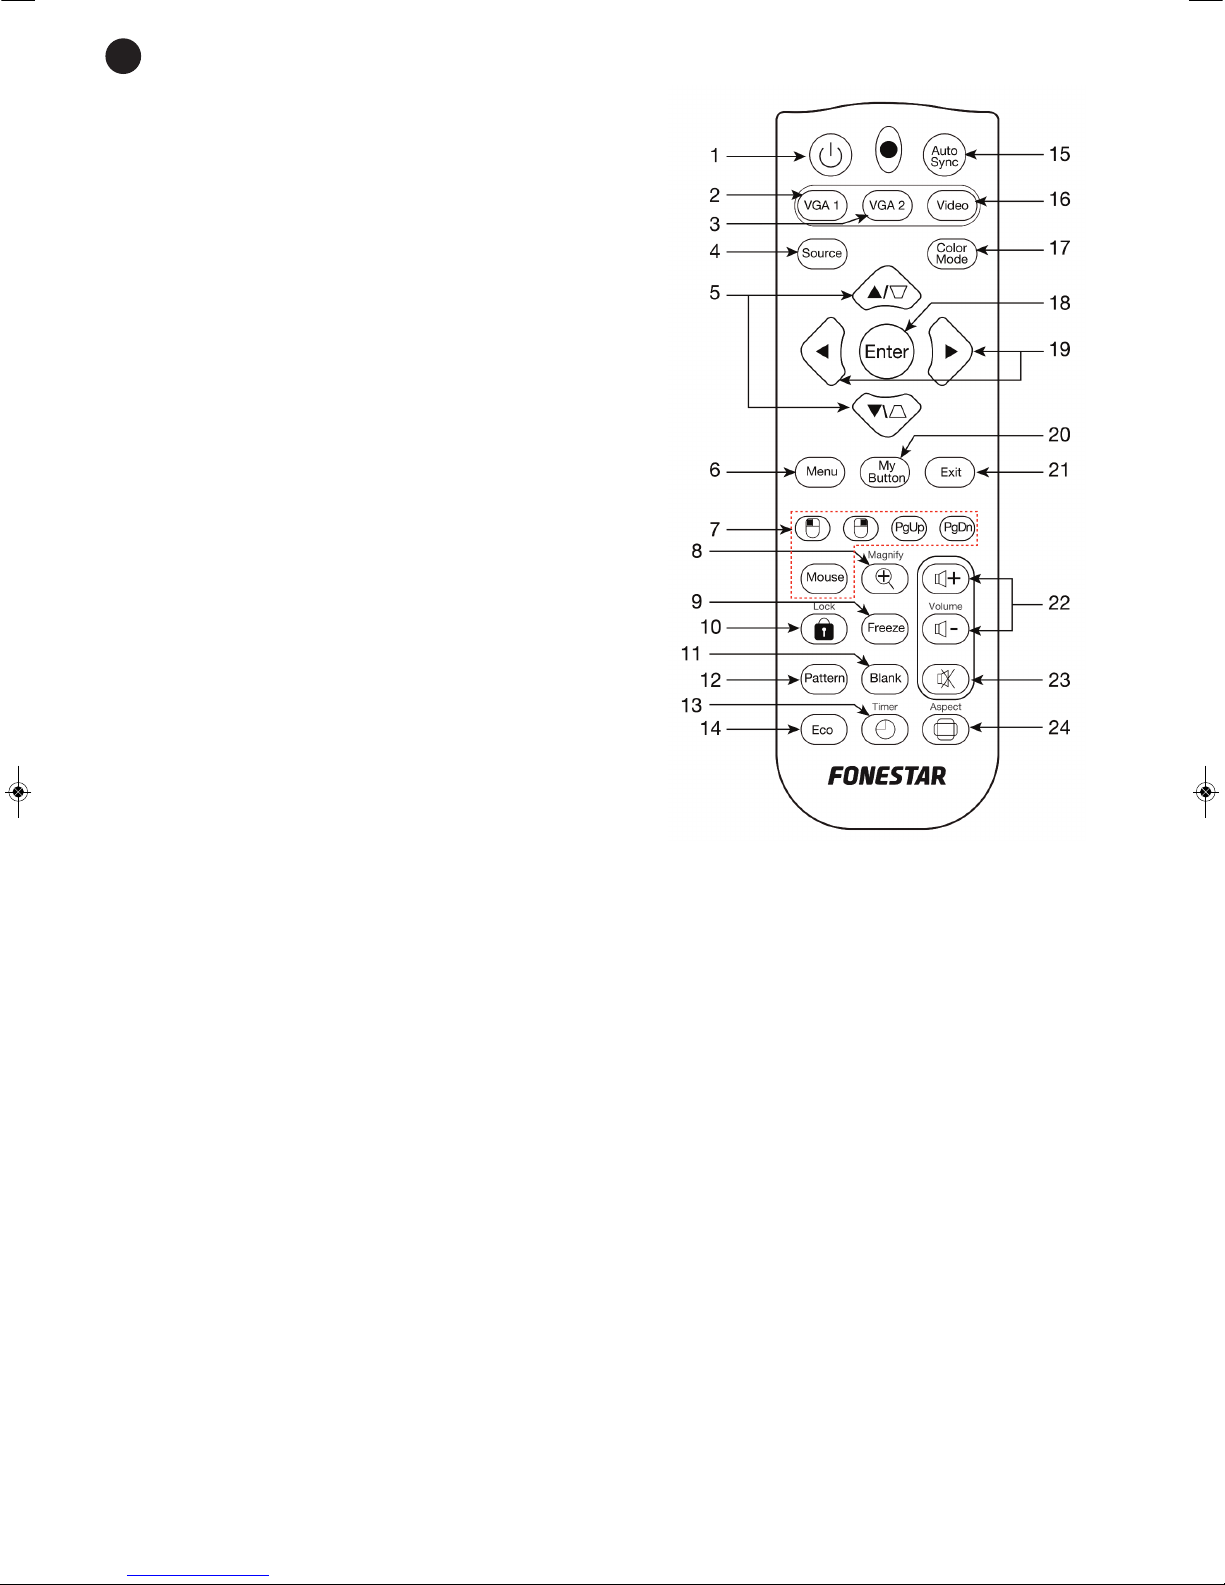
1.- POWER: projector on/off button.
2.- VGA 1: COMPUTER IN 1 input direct selection button.
3
.- VGA 2: COMPUTER IN 2 input direct selection button.
4
.- SOURCE: allows selection among the different input
sources.
5.- Keystone correction and navigation keys to scroll
through the different menu options.
6.- MENU: displays main menu on the screen.
7.- Function not available.
8.- MAGNIFY: allows the central part of the image to be
digitally increased x5.
9.- FREEZE: freezes the image. Press the button again to
return to normal playback mode.
10.- LOCK: allows the buttons on the upper panel of the
projector to be locked.
11.- BLANK: temporarily deactivates the image displayed
by the projector, leaving the screen the colour set
using the menu options. Press this button again to be
able to display the image from the selected input.
12.- PATTERN: allows selection among the different
predefined images in the projector.
13.- TIMER: activates a countdown timer.
14.- ECO: activates/deactivates low consumption (ECO)
mode.
15.- AUTO SYNC: scans the sources connected to the projector and automatically adjusts the different
configuration parameters depending on the input.
16.- VIDEO: allows selection of the HDMI, composite video and S-Video inputs.
17.- COLOR MODE: allows colour adjustments to be made to display the image. You can choose among
Whiteboard, PC, Film, ViewMatch, User 1 and User 2.
18.- ENTER:
confirms the selected menu option
.
19.- Navigation buttons to use for the different menu options.
20.- MY BUTTON: using the menu options you can assign this button a function of your choice.
21.- EXIT: to return to the previous display/menu.
22.- VOLUME+/-: projector volume controls.
23.- MUTE: activates/deactivates audio output.
24.- ASPECT: allows the screen format to be selected among normal, panoramic, anamorphic or automatic.
E
N
Page 7

CONNECTION
Before making any connections, switch the devices off and disconnect them from the mains supply.
It is recommended that you read the whole manual before connecting the devices.
The general connection procedure is as follows:
-
First connect the required audio/video sources to the corresponding inputs on the projector. You can
connect, for example, a computer or a laptop with HDMI or VGA output, a DVD player with composite
video output.
- If you wish, connect the projector’s 3.5 mm stereo jack audio output to an amplifier in order to amplify
the sound through loudspeakers or directly to some autoamplified loudspeakers.
- Once the connections have been made according to your needs, connect the devices to the mains supply
and switch them on.
- Press the POWER button on the projector or on the remote control to switch the projector on.
Adjust the distance between the projector and the screen according to the following table. Choose the column
16:9 or 4:3 according to the format of the image you are going to project.
Diagonal size Projector-screen distance
Inches Meters Screen 4:3 Screen 16:9
60” 1.52 m 2.3 - 2.6 m 2.6 - 2.8 m
80” 2.03 m 3.1 - 3.5 m 3.5 -3.8 m
100” 2.54 m 3.9 - 4.4 m 4.4 - 4.8 m
150” 3.81 m 5.9 - 6.6 m 6.5 - 7.2 m
200” 5.08 m 7.9 - 8.8 m 8.7 - 9.6 m
250” 6.35 m 9.9 - 11 m 10.9 - 12 m
300” 7.62 m 11.9 m 13.1 - 14.4 m
- 7-- 7-
E
N
Page 8

- 8-
INSTRUCTIONS FOR USE
I
NPUT SELECTION
P
ress the SOURCE button on the remote control or on the projector itself to
access the list of available inputs.
Select the required input with the navigation buttons up (w) and down (s) on the remote control or on the
projector itself and then press the confirmation button ENTER.
If there is no signal available, the projector will show the message NO SIGNAL.
CONFIGURATION MENU
Press the MENU button on the remote control or on the projector itself to access the projector’s 6
configuration menus. These 6 menus are: PICTURE, VIDEO/AUDIO, SETTING, OPTION, LANGUAGE and
INFORMATION. You can scroll through them using the navigation buttons left (a) and right (d) on the remote
control or on the projector itself. Then, use the navigation button down (s) to access the submenu of the
required option. To return to the main menu, press the MENU button.
PICTURE MENU
COLOR MODE SETTING
This option allows the visualisation parameters on the screen to be adjusted.
There are predefined settings: Whiteboard, PC, Film and ViewMatch; and two other options that are freely
configurable: User 1 and User 2.
The settings: Reference mode, Brightness, Contrast, User Color, White intensity and Gamma can only be
modified by selecting one of the freely configurable modes (User 1 or User 2).
Note: This setting can be made either from this setting in the menu or directly by pressing the MODE button
on the projector itself or COLOR MODE on the remote control.
REFERENCE MODE SETTING
Allows selection among: PC, Film, ViewMatch and Brighter.
BRIGHTNESS SETTING
Its value can be adjusted from 0 to 86.
CONTRAST SETTING
Its value can be adjusted from 0 to 92.
E
N
Page 9

- 9-
USER COLOR SETTING
I
t allows the Red, Green, Blue, Cyan, Magenta and Yellow to be individually configured, adjusting the Hue
values (from -99 to 0), Saturation (from 0 to 199) and Gain (from 0 to 199).
WHITE INTENSITY SETTING
Allows its value to be adjusted from 0 to 10.
G
AMMA SETTING
Allows its value to be adjusted from 1 to 8.
COLOR SETTING
This option allows the colour temperature and the gain of the Red, Green and Blue channels to be adjusted.
There are predefined settings: Cool, Normal and Warm; and a setting to personalize: User.
ASPECT RATIO SETTING
Allows the aspect ratio of the screen to be selected.
The options available for this setting are: Auto, 4:3, 16:9 and Anamorphic.
Note: This setting can be made both from the setting in the menu and directly by pressing the ASPECT
button on the remote control.
DYNAMIC MODE SETTING
Allows the brightness of the image to be automatically adjusted reducing the consumption of the lamp up to
70%, when this option is activated.
KEYSTONE SETTING
Allows the image to be deformed to be viewed correctly by correcting the differences between the width of
the upper and lower parts of the image that are produced when the projector isn’t positioned at an ideal
angle with the projection surface.
The values of this setting range from -40 to 40.
Note: This setting can be made both from the setting in the menu and directly by pressing the up and down
buttons on the remote control or on the projector itself.
3D SETTINGS
By using this setting we indicate to the projector that the signal that is being projected is a 3D signal in order
to view it correctly.
Its submenu allows setting of: 3D synchronization (activates/deactivates viewing of the 3D signal, 3D Format
(Frame sequential, Frame packing, Side by side or Top-bottom) and Invert 3D synchronization (Activated or
Deactivated).
VIDEO/AUDIO MENU
E
N
Page 10

- 10 -
FREQUENCY SETTING
A
llows adjustment of the image frequency of the projector with the image frequency of the input signal.
This setting allows values from 0 to 31.
TRACKING SETTING
A
llows the projector’s image phase to be set with the input signal image phase.
This setting allows values from -5 to 5.
H POSITION SETTING
Allows the image to be moved slightly on the horizontal axis.
V POSITION SETTING
Allows the image to be moved slightly on the vertical axis.
ZOOM SETTING
Allows the central part of the image projected to be digitally increased x5.
Note: This adjustment can be made both from the setting in the menu and directly by pressing the MAGNIFY
button on the remote control.
VIDEO SETTING
Allows more image adjustments to be made: Contour, Tint and Saturation.
AUDIO SETTING
From this setting we can change the volume or directly silence the audio output.
SETTING MENU
PROJECTION SETTING
Allows the position of the projector to be set with regard to the projection screen: front-table, front-ceiling,
back-table or back-ceiling.
E
N
Page 11

- 11 -
MENU SETTING
A
llows the different menu display options to be set: menu position (top left, top right, centre, bottom left or
bottom right), duration of the menu on the screen (values of 5 to 60 seconds) and OSD transparency (values
from 0 to 90).
HDMI FORMAT SETTING
Allows you to indicate to the projector what type of HDMI signal is connected to the input.
HDMI RANGE SETTING
Allows you to make slight color changes to the HDMI signal.
BLANK SCREEN SETTING
We are able to select the screen colour of our choice that appears when we press the BLANK button on the
remote control or on the projector itself. The predefined colours that can be selected are: White, Black, Red,
Green, Blue, Cyan, Yellow, Magenta and Default (default value).
STARTUP SCREEN SETTING
Allows the the colour of the screen wallpaper to be selected (the display that is shown when no signal is
detected in the selected input).
MESSAGE SETTING
Allows activation/deactivation of display of the informative message on the startup screen (the display that
is shown when no signal is detected in the selected input).
AUTO SOURCE SETTING
Allows an automatic scan to be made of the inputs when no signal is detected in the selected input.
AUTO POWER OFF SETTING
Allows a time to be set to automatically switch off the projector after the last interaction with the device .
This setting allows the following values to be set: 5 mins, 10 mins, 15 mins, 20 mins, 25 mins, 30 mins and
OFF.
SLEEP TIMER SETTING
Allows a time to be set to switch off the projector automatically.
This setting allows the following values to be set: 30 mins, 1h, 2h, 3h, 4h, 8h, 12h or OFF.
STANDBY SETTING
Allows configuration of: Eco mode (Activated/Deactivated), active VGA output (Activated/Deactivated) acting
on the MONITOR OUT video output, active Audio output (Activated/Deactivated) acting on the AUDIO OUT,
Quick off (Activated/Deactivated) and Intelligent Restart (Activated/Deactivated).
Note: It is recommended that the Quick off option remains deactivated so that when the projector is switched
off the ventilator keeps working for a few minutes. This will help the lamp to cool down and make the lamp
last longer.
E
N
Page 12

- 12 -
OPTION MENU
CLOSED CAPTION SETTING
Function not available.
PASSWORD SETTING
This projector allows a password to be set which will be requested when the device is switched on. This
setting allows the password to be changed, activated and eliminated.
PRESENTATION TIMER SETTING
Using this setting we can add a countdown timer in the upper lefthand part of the image. This timer is solely
informative and will not switch off the device or the screen when it reaches 0.
HIGH ALTITUDE SETTING
Allows the speed of the fan to be increased for situations that require greater heat dissipation.
LAMP SETTING
Informs about the number of hours the lamp has been in use , restarts the time when the lamp is replaced,
ECO mode (Activated/Deactivated) and dynamic ECO timer (Activated/Deactivated).
MY BUTTON SETTING
Allows configuration of the operating of MY BUTTON on the remote control. The following functions can be
assigned to it: Brightness, Contrast, Projection, Menu position, 3D configuration, ECO mode, OSD
transparency, Closed captions, Automatic switch off, Timer and Automatic Source.
PATTERN SETTING
Allows a wallpaper screen display among the 5 preestablished in the projector.
E
N
Page 13

- 13 -
FACTORY DEFAULT SETTINGS
A
llows the factory settings to be reset in all the settings except the chosen language.
LANGUAGE MENU
Allows a language to be selected from among the 20 available.
INFORMATION MENU
Displays the most relevant information about the signal that is being projected (input source, resolution and
horizontal and vertical frequencies) and the operating time of the lamp.
E
N
Page 14

- 14 -
PROJECTOR REMOTE CONTROL
It is possible to control the projector via the serial port using RS-232 protocol or via the local area network
(
LAN).
RS-232 COMMUNICATION PROTOCOL
To configure the device using the RS-232 port, it is recommended that the application IO Ninja or similar
applications are used and configured in the following way:
- Select the corresponding COM port, press Configure and set the following values:
- Bits per second: 19200
- Data bits: 8
- Parity: none
- Stop bits: 1
- Flux control: none
The cable used for this connection must respect the following pinout:
The RS-232 protocol allows you to perform several actions with the projector. To do so, write the following
commands in the application followed by a carriage return.
C1 COLOR C2
1 Black 1
2 Brown 3
3 Red 2
4 Orange 6
5 Yellow 5
6 Green 4
7 Blue 8
8 Purple 7
9 White 9
PIN
FUNCTION
1 1 CD
2 RXD
3 TXD
4 DTR
5 GND
6 DSR
7 RTS
8 CTS
9 RI
COMMAND FUNCTION
BE,EF,10,05,00,C6,FF,11,11,01,00,01,00 Switches the projector on when it is in StandBy mode
BE,EF,03,06,00,DC,DB,69,00,00,00,00,00 Switches the projector off
BE,EF,03,19,00,19,29,01,47,02,CC,CC,00 Selects the COMPUTER 1 input
BE,EF,03,19,1E,90,72,01,47,02,CC,CC,00 Selects the COMPUTER 2 input
BE,EF,03,19,00,E8,69,01,47,02,CC,CC,00 Selects the S-Video input
BE,EF,03,19,00,78,A8,01,47,02,CC,CC,00 Selects the Composite video input
BE,EF,03,19,00,DA,2B,01,47,02,CC,CC,00 Selects the HDMI input
BE,EF,02,06,00,E9,D3,30,00,00,00,00,00 Displays the main menu (MENU button)
BE,EF,02,06,00,6D,D2,34,00,00,00,00,00 Up
BE,EF,02,06,00,0B,D2,32,00,00,00,00,00 Down
BE,EF,02,06,00,DA,D3,33,00,00,00,00,00 Left
BE,EF,02,06,00,38,D2,31,00,00,00,00,00 Right
BE,EF,03,06,00,EF,DB,6A,00,00,00,00,00 Activation of lamp ECO mode
BE,EF,03,06,00,3E,DA,6B,00,00,00,00,00 Deactivation of lamp ECO mode
E
N
Page 15

- 15 -
COMMAND FUNCTION
BE,EF,02,06,00,40,D3,80,00,00,00,00,01 Increases the fan speed
BE,EF,02,06,00,40,D3,80,00,00,00,00,00 Resets the normal fan speed
B
E,EF,03,06,00,10,DB,65,00,00,00,00,00
K
eystone setting + (w button)
BE,EF,03,06,00,23,DB,66,00,00,00,00,00 Keystone setting - (s button)
BE,EF,02,06,00,DF,DF,66,00,00,00,00,00 Aux screen (BLANK button)
BE,EF,02,07,00,AF,DF,67,00,00,00,00,00 Exit
BE,EF,02,06,00,F1,DE,68,00,00,00,00,00 Increases volume
BE,EF,02,06,00,20,DF,69,00,00,00,00,00 Decreases volume
BE,EF,02,06,00,0E,DE,67,00,00,00,00,00 Silences the audio
BE,EF,03,06,00,89,DB,6C,00,00,00,00,00 Activates input signal autoscan
BE,EF,03,06,00,58,DA,6D,00,00,00,00,00 Deactivates input signal autoscan
BE,EF,02,06,00,57,D0,2E,00,00,00,00,00 Input menu (SOURCE button)
BE,EF,03,06,00,D5,D9,70,00,00,00,00,00 Display firmware information
BE,EF,1A,0C,00,09,0B,3A,00,01,00,00,01 Change language to English
BE,EF,1A,0C,00,09,0B,3A,00,02,00,00,02 Change language to Nederlands
BE,EF,1A,0C,00,09,0B,3A,00,03,00,00,03 Change language to Français
BE,EF,1A,0C,00,09,0B,3A,00,04,00,00,04 Change language to Español
BE,EF,1A,0C,00,09,0B,3A,00,05,00,00,05 Change language to Italiano
BE,EF,1A,0C,00,09,0B,3A,00,06,00,00,06 Change language to o
BE,EF,1A,0C,00,09,0B,3A,00,07,00,00,07 Change language to o
BE,EF,1A,0C,00,09,0B,3A,00,08,00,00,08 Change language to Português
BE,EF,1A,0C,00,09,0B,3A,00,09,00,00,09 Change language to o
BE,EF,1A,0C,00,09,0B,3A,00,0A,00,00,0A Change language to o
BE,EF,1A,0C,00,09,0B,3A,00,0B,00,00,0B Change language to o
BE,EF,1A,0C,00,09,0B,3A,00,0C,00,00,0C Change language to o
BE,EF,1A,0C,00,09,0B,3A,00,0D,00,00,0D Change language to Deutsch
BE,EF,1A,0C,00,09,0B,3A,00,0E,00,00,0E Change language to Svenska
BE,EF,1A,0C,00,09,0B,3A,00,0F,00,00,0F Change language to Türkçe
BE,EF,1A,0C,00,09,0B,3A,00,10,00,00,10 Change language toSuomi
BE,EF,1A,0C,00,09,0B,3A,00,11,00,00,11 Change language to Polski
BE,EF,02,06,00,22,55,76,00,00,00,00,01 Digitally increase image
BE,EF,02,06,00,22,55,76,00,00,00,00,00 Digitally reduce image
BE,EF,02,06,00,40,B5,86,00,00,00,00,01 Activate low consumption (ECO) operating mode
BE,EF,02,06,00,40,B5,86,00,00,00,00,00 Deactivate low consumption (ECO) operating mode
E
N
Page 16

- 16 -
LAMP REPLACEMENT
It is recommnded that the lamp is replaced when the warning is shown.
Follow this procedure to replace the lamp:
- Switch off the projector and disconnect it from the power supply. Let the projector cool down for at least
45 minutes.
- Remove the protective cover to access the lamp.
- Use the handle to take the lamp out of its installation place.
- Install the replacement lamp and put the protective cover back on and reconnect the projector to the
power supply.
EN
Page 17

TECHNICAL SPECIFICATIONS
PR-3000
CHARACTERISTICS Projector.
DLP.
Silent.
Integrated speaker.
RESOLUTION XGA 1024x768
Compatible with 480p, 480i, 576i, 576p, 720p, 1080i and 1080p.
BRIGHTNESS 3,000 ANSI lumens
CONTRAST 20,000:1
LAMP 190 W, 5,000 hours life in standard mode
TECHNOLOGY Single 0.55" DPL panel
IMAGE SIZE 30'' to 300'' (76 to 762 cm)
PROJECTION RATIO 60'' @ 2.3-2.6 m format 4:3
150'' @ 5.9-6.6 m format 4:3
PROJECTION DISTANCE 1.2 to 10 m (30" to 300")
SCREEN FORMAT 16:9, 4:3
ZOOM Manual optical 1.1x
Digital: 5x and image displacement
FOCUS Manual
NOISE LEVEL 32 dB (normal), 30 dB (ECO)
INSTALLATION Tabletop, ceiling, front and rear
INPUTS Video: 1 x HDMI, 2 x VGA, 1 x RCA composite video and 1 x S-Video
Audio: 2 x 3.5 mm stereo jack
OUTPUTS Video: VGA
Audio: 3.5 mm stereo jack
CONTROL RS-232 and USB B
POWER SUPPLY 100-240 V AC, 265 W
Standby < 0.5 W
COLOUR Black
DIMENSIONS 294 x 113 x 219 mm depth
ACCESSORIES VGA cable, 1.8 m
Remote control
Batteries for the remote control
- 17 -
EN
Page 18

WARRANTY
This product has been tested and has passed the corresponding quality control prior to being put on the market.
FONESTAR guarantees the suitability of the product for its specified use during a period of 2 years from the delivery date
and commits itself to repair or substitute the goods as expressed in the Spanish law ‘La Ley General para la Defensa de los
Consumidores y Usuarios, Real Decreto Legislativo 1/2007 16 Noviembre.
The lack of conformity in the first six months after purchase, due to a manufacturing defect, will be rectified with no more
than showing the proof of purchase. After six months FONESTAR reserves the right to demand proof of the product being
sold with that problem.
This warranty does not include damage produced by: inappropriate use or negligence, accidents, worn out parts due to use,
breakages, burns, spilt liquids or other substances, excessive humidity, battery deterioration and internal manipulation of the
device, the software or its components by unauthorized persons, and in general any use that is unrelated to the nature and
purpose of the product.
If any service is needed during the warranty period because of lack of conformity, please contact the business or distributor
where the product was purchased in no more than 2 months after being conscious of the problem. It is only necessary to
contact FONESTAR if it is impossible or imposes an undue burden for them to solve it.
To benefit from this warranty it is necessary to show the proof of purchase with the date clearly visible, with no corrections
or crossing out
This document adds information, and never decreases the consumers’ rights, which in all cases are protected by the Spanish
law ‘La Ley General para la Defensa de los Consumidores y Usuarios, Real Decreto Legislativo 1/2007 16 Noviembre.
FONESTAR is a member of ECOEMBALAJES ESPAÑA, S.A. “ECOEMBES”, with number 03497 and all our products
carry the symbol, backed by our membership and subscription to the above mentioned organization with the recycling
and subsequent management of our packaging.
FONESTAR, S.A. - NIF: A28780443 - Polígono Trascueto - 39600 Revilla de Camargo, Cantabria (Spain)
www.fonestar.com
 Loading...