

Page 1
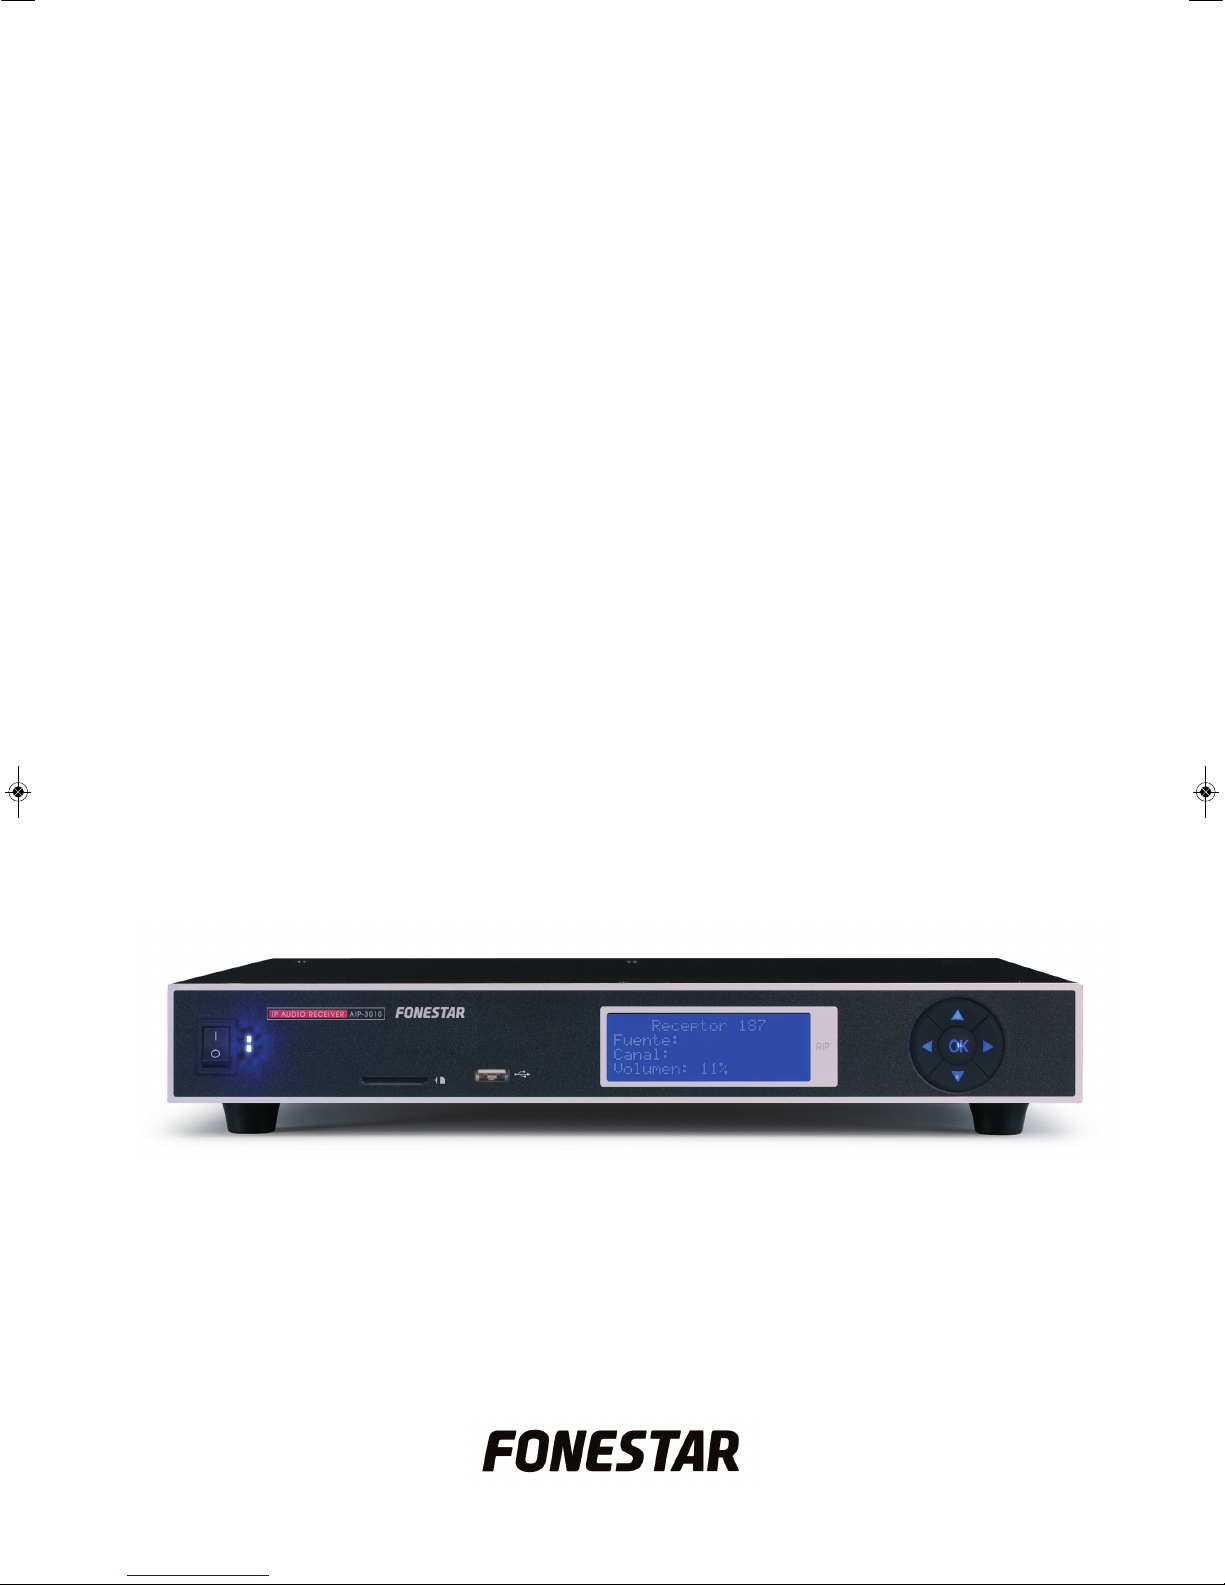
AIP-3010
IP AUDIO RECEIVER WITH LINE OUTPUT
INSTRUCTION MANUAL
Page 2

EN
- 2-
We take this opportunity to thank you for buying this product.
We recommend you read the instruction manual before switching on the machine and follow the instructions that are given. Keep the manual for future reference.
SECURITY AND THE ENVIRONMENT
ELECTRICAL SECURITY
Check that the current in the mains connection where the machine is to be installed corresponds to the
power supply of the machine.
To avoid damaging the equipment, electrical shocks, fire or physical injury when you connect or disconnect
the equipment from the power supply, pull the plug firmly out of the mains socket holding the plug, never the
cable.
Always do this with dry hands.
Keep the power supply cable far from sources of heat. Do not put heavy objects on top of it or change it.
Clean dust and dirt off the power supply cable regularly.
Do not open the machine; you could get an electric shock.
CAUTION
While installing the machine, make sure it is switched off and unplugged.
Do not open the machine. Touching the internal parts is dangerous and you could receive an electric shock.
The machine must not be splashed or dripped on. Never place recipients with liquid inside on the machine.
Do not place anything inside the machine.
LOCATION
Place the equipment on a horizontal surface with enough space around it to allow ventilation.
Avoid direct sunlight, heat sources and excessive dust.
Do not place the machine near magnetic fields or static electricity.
Do not use surfaces which vibrate or receive impact.
Do not pile machines on top of one another.
VENTILATION
Never block or cover the ventilation slits on the machine.
Do not expose it to direct sunlight or place it near sources of heat.
PERIODS OF INACTIVITY
When the machine is not going to be used for a long period of time, disconnect it from the mains.
If you are using an adapter, take into account that it will continue using electricity even if the machine is switched off. If it is not going to be used for a long period of time, disconnect it from the mains.
THE ENVIRONMENT
To save energy, switch the machine off when you are not going to use it for a long time. The machine could
contain substances that are harmful to the environment or human health. To minimize the effect of these
substances the machine must be correctly managed and recycled when you decide to dispose of it.
When you dispose of it remember: it cannot be thrown into a conventional rubbish bin.
If it contains or uses batteries, these must be disposed of separately.
The machine (without batteries) must be disposed of correctly. Put it in a container specially intended for the
collection of electronic and electrical appliances, at the dump or hand it over to the dealer when you purchase
similar equipment, so that the dealer can dispose of it correctly (at no added cost).
Page 3
EN
- 3-
SIGNIFICANCE OF THE SYMBOLS ON THE MACHINE*
The symbol formed by the expression “Class 1 laser product” written in a rectangle indicates that visible or invisible laser radiation could be produced. Avoid direct expose to the
laser.
The symbol formed by a ray of lightening inside a triangle shows that the machine has connection terminals or a circuit with areas with a current which could cause an electric shock,
even in normal working conditions.
The symbol formed by an exclamation mark in a triangle shows that the instruction manual
must be referred to for information on how the machine works and its use.
The symbol formed by one square inside another square shows that the machine has double electrical insulation.
The European Community symbol shows that the machine complies with the current European Union legislation, as well as its transposition to local legislation.
The symbol of a rubbish bin crossed out and over a horizontal line shows that when the product is disposed of it must be done properly, placing it in a special selective electronic and
electrical equipment container or through a dealer when purchasing a similar product, at no
additional cost. It also shows that the machine was put on the market after 13th August
2005 (European Community Directive 2002/96/CE of Electrical and Electronic recycling,
and its Spanish equivalent R.D.208/2005).
In accordance with what is set out in the aforementioned decree, FONESTAR is registered
in the RAEE (Registro de Aparatos Eléctricos y Electrónicos) in a special section REI (Registro de establecimientos Industriales), with the entry number 001851.
*It is possible that some of these symbols do not appear on the machine.
EXEMPTION OF LIABILITY
The characteristics of the equipment and the content of the manual can change without forewarning.
FONESTAR, S.A. does not assume responsibilities regarding the inappropriate use of the equipment or the
information supplied in this instruction manual, and specifically disclaims any implied liability for marketability or fitness for any other use.
All rights reserved by FONESTAR, S.A.
Page 4

- 4-
DESCRIPTION
IP audio receiver with line output.
Manages background music, programmed and instant messages, alarms and voice messages using the
software included. It has 4 level inputs and 4 output relays for event activation and external device control.
Automatic network parameter setting.
The perfect solution for large shopping centres, schools, office blocks etc.
CONNECTION
- Connect the AIP-3010 receiver to the local area network using the ethernet port, RJ-45.
- Connect the LINE OUT audio output to the amplifier or power amp.
- Connect the equipment to the mains.
CONFIGURATION
Allocating an IP address to the device
The AIP-3010 receiver obtains an IP address automatically as long as the router has the DCHP activated.
Otherwise, it has to be allocated manually. Use the selection keys on the front panel of the receiver to do this:
- Press OK to access the main menu.
- Select the configuration option using the up and down selection keys and press OK.
- Select the Net option and press OK. Then select Edit/Editar and press OK again.
- Select FIXED IP/IP FIJA and press OK. A screen will appear that will let you set the IP address (IP), the
subnet mask (MS) and the gateway (PE) manually. At the same time the left and right selection keys let you
move one of the digits from every group of eight and the up and down selection keys let you modify the
value of the selected digit. Once the desired information has been inserted, select the ACCEPT/ACEPTAR
option using the left or right keys to save the changes or CANCEL/CANCELAR to return to the previous
menu and press OK again.
Allocating a name to the AIP-3010 receiver
Using the selection keys on the front panel of the receiver give the receiver a name that will be seen in the
network:
- Press OK to access the main menu.
- Select the configuration/configuración option using the up and down selection keys and press OK.
- Select EQUIPMENT NAME/NOMBRE DE EQUIPO and press OK. The receiver screen will show the current
name (by default it is ECEPTORXXX, where XXX are the last 3 numbers from the last octave of the IP
assigned by default). Innsert the new name and press OK. Select the ACCEPT/ACEPTAR option using the
left or right selection keys to save the changes or CANCEL/CANCELAR to return to the previous menu and
press OK again.
AIP-GO
- After connecting the AIP-3010 receiver to the local network, install the AIP-Go software in the PC. To do
this you must insert the CD supplied into your computer and follow the installation instructions shown on
the screen.
- Execute the program and the following screen will appear:
EN
Page 5
- 5-
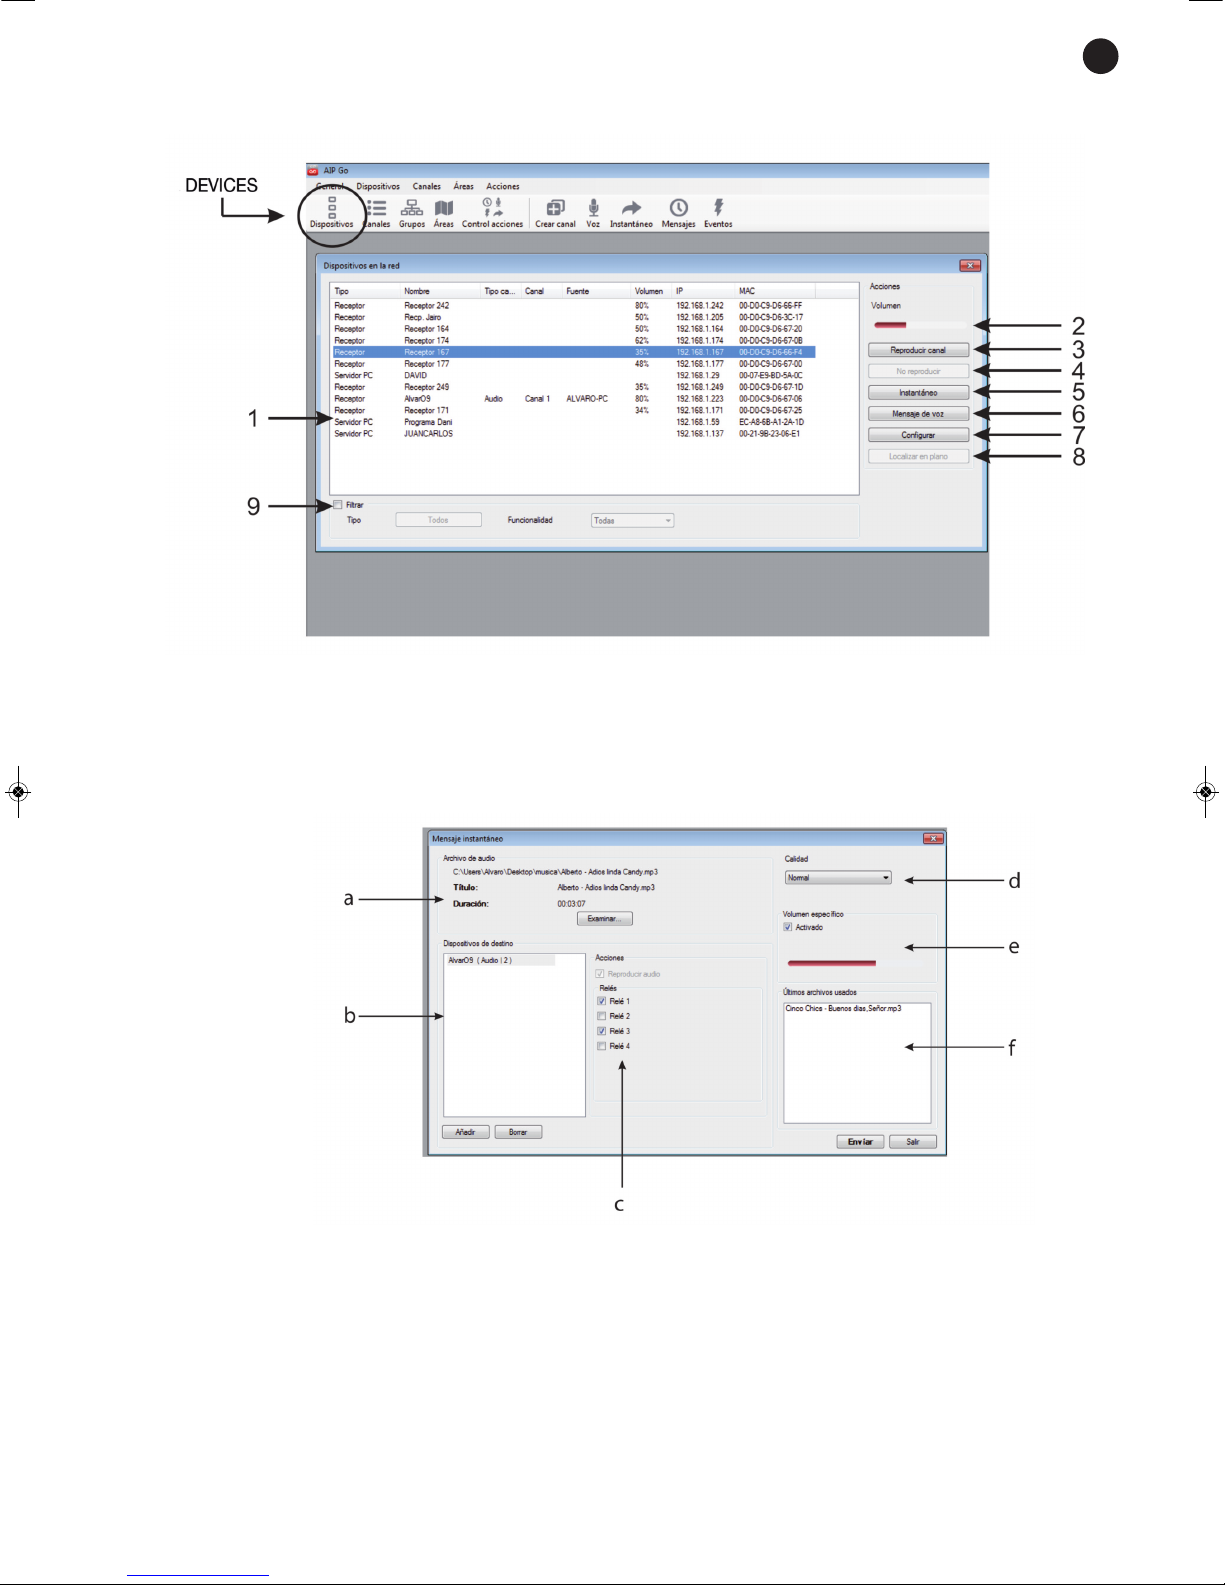
Devices
Click on the Devices/Dispositivos icon to open the window shown below:
1.- List of devices in the network/dispositivos en la red: it shows the state and the characteristics of the
devices connected to the network, receivers and PC with AIP-Go software.
2.- Volume/volumen: controls the volume of the selected device, if this is possible.
3.- Play channel/reproducir canal: to choose the audio channel to be listened to in the selected device.
4.- No playback/no reproducir: stops playback of audio from a channel in the selected device.
5.- Instant/instantaneo: to send a prerecorded audio file to the device. The window below will appear:
a.- Audio file/archivo de audio: press the Examine/examinar button and select the audio track that you
want to send.
b.- Destiny devices/dispositivos de destino: press Add/añadir to select the devices that you want to
send the audio track to.
c.- Actions/acciones: for activating an event in each one of the 4 output relays/relés on each
selected AIP-3010 receiver (see point 7.C, Configurar>E/S, in this section for more information).
The relays that will be activated in each one of the devices will be shown using numbers 1-4 in
the destiny device/dispositivos de destino window.
EN
Page 6

- 6-
d.- Quality/calidad: for selecting the message audio quality. Select low quality/baja (64 kbps) if you
have a loaded network or normal quality/normal (128 kbps) or high/alta (320 kbps) if you have a
network with enough bandwidth.
e.- Specific volume/volumen específico: if you select this option the volume of the instant message
transmitted can be adjusted. By default the volume selected will be transmitted in each one of the
receivers.
f.- Last files used/últimos archivos usados: this shows a list of the last instant messages sent, so that
they can be sent again quickly.
6.- Voice message/mensaje de voz: for sending a voice message through a microphone connected to the
computer.
The window below will appear:
g.- Devices available/dispositivos: select the devices that you want to send the voice message to and
press the + button to add them to the list of destiny devices.
h.- Specific volume/volumen específico: if this option is selected, you can choose the specific volume
that the voice message will be sent at. The selected volume will be transmitted through each one
of the receivers by default.
i.- Speak/Stop / Hablar/parar: press the button and speak through the microphone. Once the
message has been transmitted, press the button again to finish.
7.- Set/configurar: for remotely making adjustments on the selected receiver.
A.- Network/Red: for selecting the DCHP state.
DCHP activated/activado: automatic setting of the network parameters.
DCHP deactivated/desactivado: the IP address, subnet mask and gateway must be inserted.
EN
Page 7

B.- Audio: for changing the general output volume on the selected receiver.
C.- E/S: for modifying the default state of the output relays/relés and the activation condition of the
input sensors.
i.- Relays in standby/relés en estado de reposo: for selecting the relays in standby state/estado
de reposo.
N.Open/abierto: in standby the terminals NO and 0 stay together.
N.Closed/cerrado: in standby the terminals NC and 0 stay together.
ii.- Sensor activation/activación de sensores: for selecting the condition to activate an event under.
C.Closed/cerrado: the event will be activated if the sensor detects circuit closure.
C.Open/abierto: the event will be activated if the sensor detects an opening in the circuit.
D.- Options/opciones: for remotely upgrading/actualizar or restarting/reiniciar the selected AIP-3010
receiver.
8.- Find in the map: for finding the selected receiver if it is within any area image.
Note: these options are also available pressing the right-hand button on the mouse over the receiver in the
list of devices.
- 7-
EN
Page 8

Channels
The AIP-Go software lets you create as many audio channels as the data network supports. These channels
are accessible for all the receivers connected to the same network.
Press over the Channels/canales icon to show the window below:
1.- Network channel list/canales en la red: shows the state and the characteristics of the channels available
in the network.
2.- For starting or pausing playback of the selected channel.
3.- Stops playback in the selected channel.
4.- New/nuevo: for creating a new channel. The available options are the following:
a.- Name/nombre: insert the desired name for each channel.
b.- Start with/iniciar con: for choosing the audio tracks to be assigned to the channel, they can be files
from a folder (files), directories (directories), playback lists (previously selected and saved and
accessible from the channel menu/playback list) or files of playback lists (files .m3u).
c.- Codec: for selecting the coding that the files will be sent to the data network with.
d.- Quality/calidad: for selecting the quality of the channel audio. Choose low quality/baja (64 kbps)
if you have a loaded network or normal quality/normal (128 kbps) or high/alta (320 kbps) if you have
a network with enough bandwidth.
e.- Mono or stereo/estéreo mode.
f.- Repeat all/repetir todo: with this option selected, all the tracks will be repeated indefinitely.
g.- Start when the channel is created/iniciar al crear canal: with this option selected the tracks will start
being played and will be available for the AIP-3010 receivers in our network as soon as the channel
is created.
- 8-
EN
Page 9

h.- Create everytime the application is started/crear siempre al iniciar la aplicación: if this option is
selected, the channel will be created everytime the program is started.
Once the channel has been set, press the Create/crear option and a channel playback window will appear.
The following are the available options:
i.- Playback controls: previous track, playback/pause, following track and stop playback.
The upper bar lets you move within the song.
ii.- Monitoring/monitorizar: for listening to the selected channel in the server PC being used.
Note: take into account that only the audio channel will be heard. Programmed, instant or
voice messages will not be heard.
iii.- Tracks/pistas: shows the channel playback list. Select the track and double click over it to start
playback. Using the “+” and “-” tracks can be added to or deleted from the playback list.
Note: tracks can only be inserted in the channels created by the server itself.
iv.- Devices/dispositivos: to show the devices that are listening to the channel. The buttons “+” and
“-” add or delete devicess that listen to the channel.
v.- To hide the channel playback window.
vi.- Player minimized mode. Click on the lower button to go back to normal mode.
vii.- Close and delete the channel.
viii.- Repeat: the channel playback list will be repeated indefinitely.
ix.- Channel switch on options.
5.- Delete/borrar: for deleting the selected channel. Take into account that you can only delete channels
created from the server PC.
6.- Assign devices/asignar dispositivos: it shows a window to assign the receivers to the selected channel.
7.- Monitoring/monitorizar: for listening to the channel selected in the PC being used as server.
Note: take into account that only the audio channel will be heard. Programmed, instant and voice
messages will not be heard.
8.- Insert tracks/insertar pistas: for adding tracks to the channel in the same way as when a channel is
created.
9.- Show/mostrar: if the channel was hidden, it shows the player window.
10.- Filters/filtros: for selecting the visible channels in the channels in the network list.
- 9-
EN
Page 10

Groups
Click on the Groups/grupos icon to open the following window:
For creating groups to be able to manage several receivers together.
Areas
Click on the Areas/Área icon to open the following window:
This option lets you load an image in order to locate the receivers grafically on an installation map or diagram.
A.- Options/opciones:
1.- Manage areas/gestionar áreas: to create or delete areas. To create an area select an image in .jpg,
.png, .bmp or .tif format.
2.- Devices/dispositivos: quick access to the options described in the Devices section. The desired
device must be selected previously.
3.- Area/área: quick accesses to the options described in the previous sections applied to all the
devices in the area.
B.- Devices/dispositivos: shows the devices in the area. Click on any of the devices to highlight its position
in the image.
C.- New/nuevo: shows all the devices in the local network and lets you place them in the image. To do this,
select a device and drag it to the desired position. Once in the correct place, the devices that are on will
be highlighted in green, those that are off in red and the selected device in blue.
- 10 -
EN
Page 11

Action Control
Click on the Action Control/control acciones icon to open the following window:
1.- Action window: shows the actions taking place or registered. Each action creates a warning (number of
actions being executed in red) in the Action Control/control de acciones icon.
2.- Cancel/cancelar: to cancel any action in process.
Note: take into account that you can only delete an action in process from the PC server that created
it. An action can also be cancelled locally from the front of the corresponding receiver.
3.- Delete the finished ones from the register/borrar los terminados del registro: lets you clean the actions
window by deleting the actions that are not active.
4.- See only active actions/ver solo acciones activas: with this option activated, only the actions in process
will be shown.
Create channel/crear canal
Shows the Create Channel window described in the Channels/New section.
Voice/voz
Shows the voice message window described in Devices/Voice messages.
Instant/instantáneo
Shows the Instant message window described in Devices/Instant.
Programmed messages/programación de mensajes
Click over the Messages/mensajes icon to open the following window:
- 11 -
EN
Page 12

1.- Message/mensaje Window: shows the programmed messages in process.
2.- New/nuevo: for creating a new programmed message.
A.- Configuration/configuración: for establishing the message transmission date and time parameters
and selecting the audio track to be played.
B.- Devices/dispositivos: for selecting the receivers that the programmed message is to be sent to and
activating an event in the output relays of each one independently. Furthermore, the specific
volume that you want the message to be played at can be selected.
3.- Information/información: shows the name of the message, the file route, the programmed time and the
days that the message is programmed for.
4.- Devices/dispositivos: when you select a message from the programmed message window, the devices
that it has been assigned to will be shown.
5.- Delete/borrar: to delete the selected programmed message.
6.- Edit/editar: to change the configuration of the selected programmed message.
- 12 -
EN
Page 13

Events
To set events that have been activated by a change of state in the input sensors on the receivers.
Click on the Events/eventos icon to open the window below:
1.- List of programmed events/lista de eventos programados: shows the events in process.
2.- New/nuevo: for creating a new event. The available options are the following:
A.- Configuration/configuración: to select the activation options.
1.- Name/nombre: insert the name of the event.
2.- Sensor: select the sensor that will activate the event. The sensor configuration by default must
be selected as E/S in devices.
3.- Configuration/configuración: select the type of event. The available options are:
Level/nivel: the event is maintained while the sensor is activated.
Pulse/pulso: the event is activated by the change in state of the sensor, by default. You can
choose that the event lasts a certain amount of time/duración por tiempo or as long as the
selected audio file/duracion de audio.
4.- Use audio/usar audio: to select the audio file that will be played while the event is active.
- 13 -
EN
Page 14

B.- Devices/dispositivos: select the devices to respond to the event being created. The output
relays/relés that will be activated in each receiver can be selected. You can also select
independently which receivers will play the audio file selected in the event configuration. In this
case you can also choose the output volume/volumen específico.
3.- Edit/editar: to modify the configuration of the selected event.
4.- Delete/borrar: to delete the selected event.
AUDIO PRIORITY
Audio priority is the following (from more to less priority):
- Voice announcements
- Events
- Instant and/or programmed messages
- Audio channel
Note: in the case that you try to play two audios with the same priority simultaneously, the one that started
first will have priority.
- 14 -
EN
Page 15

TECHNICAL SPECIFICATIONS
AIP-3010
CHARACTERISTICS IP audio receiver.
For audio reception through streaming using multicast through a
local area network (LAN).
Selection of the audio channel and setting through the front keypad
and remotely through a PC.
General use separate inputs and outputs.
Remote upgrading using software for PC, or locally using SD or
USB.
INPUTS 1 x 10/100 base T ethernet, RJ-45
4 separate programmable inputs for events activation through contact
closure: message playback, alarms, switching on devices, etc.,
euroblock
1 USB/SD port for firmware upgrading
OUTPUTS
1 line, 2 x RCA
4 separate programmable outputs for opening and closing contacts,
euroblock
POWER SUPPLY
100-240 V AC, 16 W
DIMENSIONS
337 x 44.5 x 240 mm depth. 1 U 19" rack
ACCESSORIES
Mounts for 19" rack assembly
SOFTWARE Software for PC with automatic detection of the AIP series devices
connected to the local area network
Audio channel creation
Remote selection of the audio channel in each receiver
Remote adjustment of the configuration parameters
Scheduled and real-time messages
Firmware upgrading
- 15 -
EN
Page 16

WARRANTY
This product has been tested and has passed the corresponding quality control prior to being put on the market.
FONESTAR guarantees the suitability of the product for its specified use during a period of 2 years from the delivery date and
commits itself to repair or substitute the goods as expressed in the Spanish law ‘La Ley General para la Defensa de los
Consumidores y Usuarios, Real Decreto Legislativo 1/2007 16 Noviembre.
The lack of conformity in the first six months after purchase, due to a manufacturing defect, will be rectified with no more than
showing the proof of purchase. After six months FONESTAR reserves the right to demand proof of the product being sold with that
problem.
This warranty does not include damage produced by: inappropriate use or negligence, accidents, worn out parts due to use,
breakages, burns, spilt liquids or other substances, excessive humidity, battery deterioration and internal manipulation of the device,
the software or its components by unauthorized persons, and in general any use that is unrelated to the nature and purpose of the
product.
If any service is needed during the warranty period because of lack of conformity, please contact the business or distributor where
the product was purchased in no more than 2 months after being conscious of the problem. It is only necessary to contact
FONESTAR if it is impossible or imposes an undue burden for them to solve it.
To benefit from this warranty it is necessary to show the proof of purchase with the date clearly visible, with no corrections or
crossing out.
This document adds information, and never decreases the consumers’ rights, which in all cases are protected by the Spanish law
‘La Ley General para la Defensa de los Consumidores y Usuarios, Real Decreto Legislativo 1/2007 16 Noviembre.
FONESTAR is a member of ECOEMBALAJES ESPAÑA, S.A. “ECOEMBES”, with number 03497 and all our products
carry the symbol, backed by our membership and subscription to the above mentioned organization with the recycling
and subsequent management of our packaging.
FONESTAR, S.A. - NIF A28780443 - Polígono Trascueto - 39600 Revilla de Camargo, Cantabria (Spain)
www.fonestar.com
 Loading...