

Page 1

ISA 828
User Guide
Mode d’emploi
FA0145-04
Page 2

WARNINGS & CAUTIONS
THE APPARATUS SHALL NOT BE EXPOSED TO DRIPPING OR SPLASHING, AND NO OBJECTS FILLED WITH LIQUIDS,
SUCH AS VASES, SHALL BE PLACED ON THE APPARATUS
VENTILATION SHALL NOT BE IMPEDED BY COVERING THE VENTILATION OPENINGS WITH ITEMS, SUCH AS
NEWSPAPERS, CLOTHS, CURTAINS ETC.
NO NAKED FLAME SOURCES, SUCH AS LIGHTED CANDLES, SHOULD BE PLACED ON THE APPARATUS
MAINS LEAD - THIS EQUIPMENT MUST BE EARTHED AND FITTED WITH THE CORRECT LEAD FOR THE COUNTRY
OF OPERATION. THIS WILL NORMALLY BE ACHIEVED FROM THE CORRECT MAINS SUPPLY SOCKET
DO NOT USE A DAMAGED OR FRAYED POWER CORD
IF THE MAINS PLUG SUPPLYING THIS APPARATUS INCORPORATES A FUSE THEN IT SHOULD ONLY BE REPLACED
WITH A FUSE OF IDENTICAL OR LOWER RUPTURE VALUE
SHOULD THE APPARATUS OR SUPPLY CORD BECOME PHYSICALLY DAMAGED THEN IT SHOULD NOT BE POWERED,
AND ADVICE SOUGHT FROM SUITABLY QUALIFIED PERSONNEL
THIS UNIT MUST BE EARTHED BY THE POWER CORD
UNDER NO CIRCUMSTANCES SHOULD THE MAINS EARTH BE DISCONNECTED FROM THE MAINS LEAD
This unit is capable of operating over a range of mains voltages as marked on the rear panel. Ensure correct mains
voltage setting and correct fuse before connecting mains supply. Do not change mains voltage settings while mains
supply is connected. To avoid the risk of fire, replace the mains fuse only with the correct value fuse, as marked on the
rear panel. The internal power supply unit contains no user serviceable parts. Refer all servicing to a qualified service
engineer, through the appropriate Focusrite dealer.
2
Page 3

Contents
Getting Started and Powering Up . . . . . . 4
Front Panel . . . . . . . . . . . . . . . . . . . . . . . . 5
Rear Panel . . . . . . . . . . . . . . . . . . . . . . . . . 8
Digital Options . . . . . . . . . . . . . . . . . . . . . 10
Applications . . . . . . . . . . . . . . . . . . . . . . . 12
FAQs . . . . . . . . . . . . . . . . . . . . . . . . . . . . . 16
Specifications . . . . . . . . . . . . . . . . . . . . . 18
Warranty . . . . . . . . . . . . . . . . . . . . . . . . . 19
Mode d’emploi . . . . . . . . . . . . . . . . . . . . . 22
3
Page 4

Getting Started and Powering Up
The ISA 828 is a high quality eight-channel microphone preamplifier, which can be used to record microphone, line-level
or instrument sources. Microphones and line-level sources for all eight inputs are connected on the rear panel, whilst
instruments are plugged directly into the front panel (inputs 1-4 only). The front panel also features level controls and
other settings such as phantom power and impedance for each of the eight analogue inputs. LED metering is provided on
each channel in dBFS, to indicate when the level is reaching the digital clipping point, with a dial on the rear panel for
calibration.
If wanting to maintain pristine Focusrite quality in the digital domain, an optional digital output card can be installed, for
connecting an AES, S/PDIF or ADAT™ signal directly to the DAW. With the card fitted, the clock sample rate and sync
source can be selected with switches on the front panel.
A 2-way switch labelled
Power supplies power to the unit, providing the supplied IEC mains lead is connected to the
input on the rear panel. Make sure that the ISA 828 is turned on before powering up any devices connected to the
outputs.
The IEC mains lead supplied with the unit should have the correct moulded plug for your country. The wiring colour code
used is:
For units shipped to the USA, Canada, Taiwan and Japan:
Live - Black Neutral - White Earth – Green
For units shipped to any other country:
Live - Brown Neutral - Blue Earth - Green and Yellow
4
Page 5
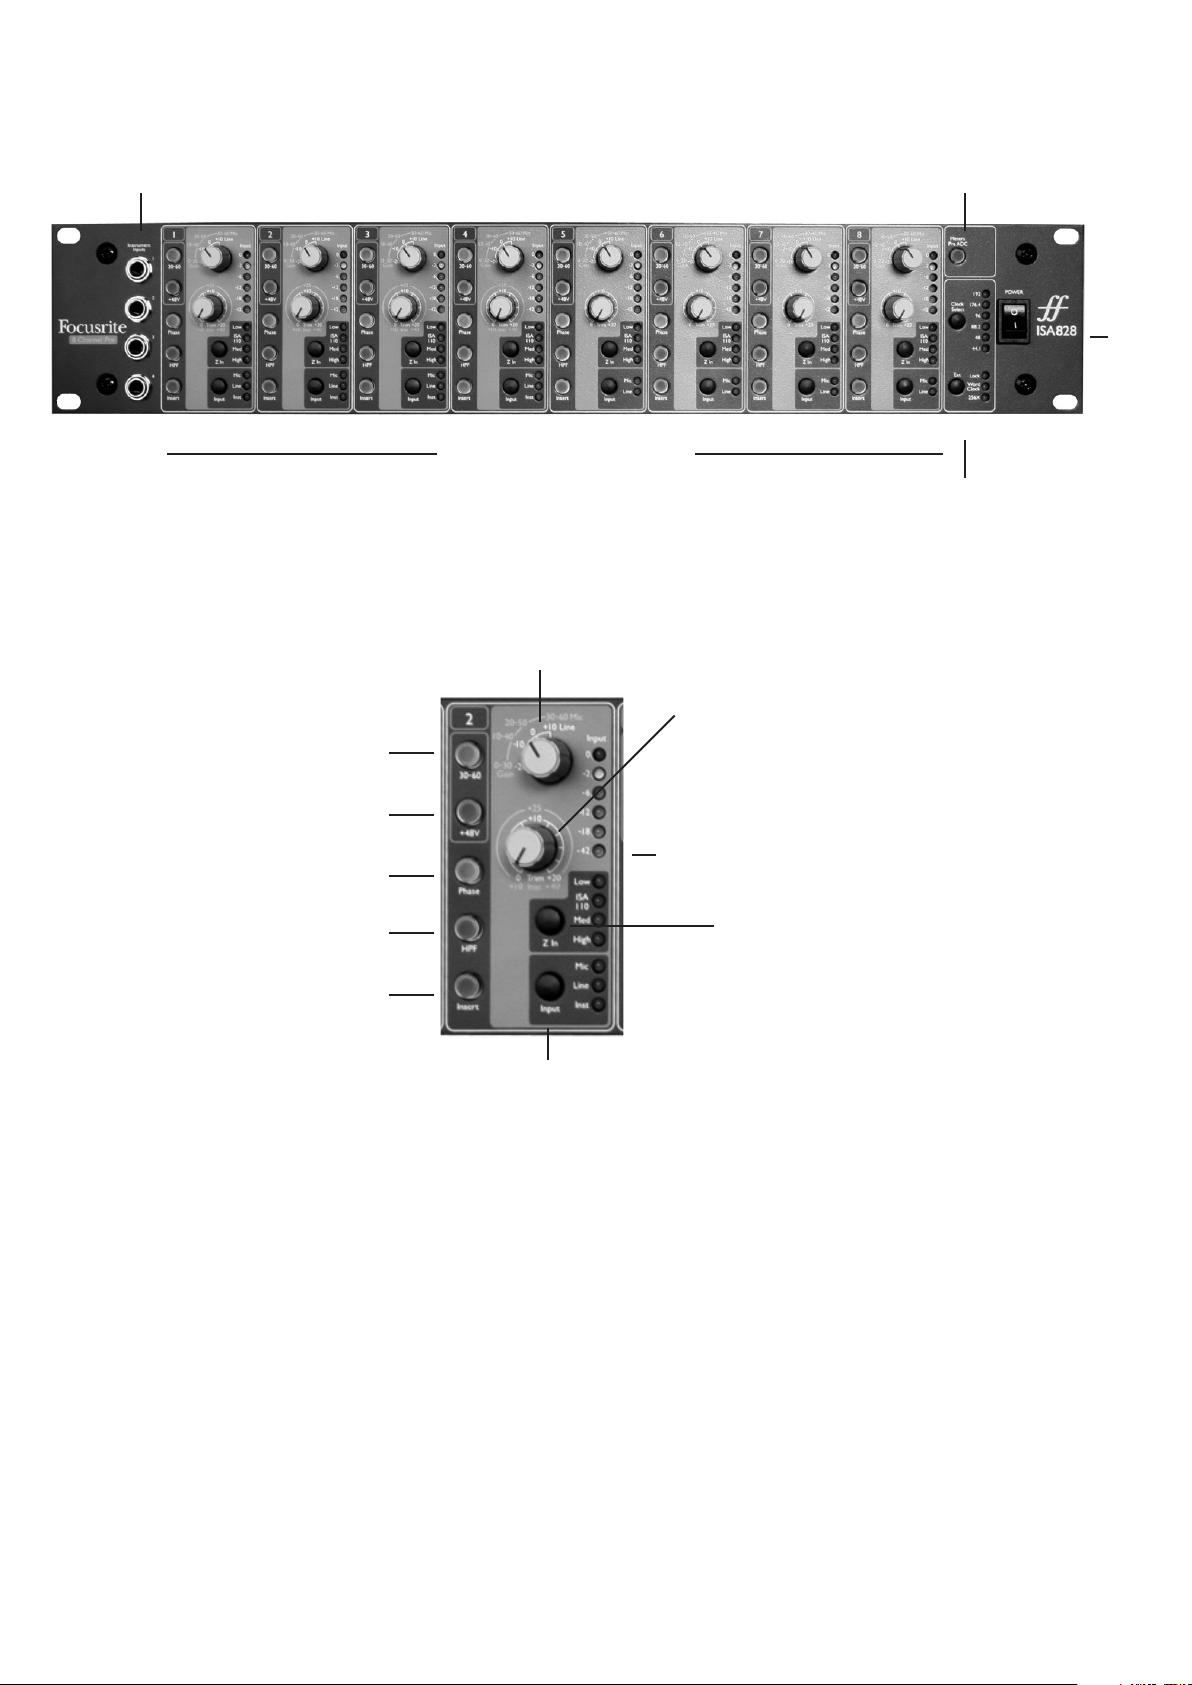
Front Panel
Input Stage
Eight numbered sections are included on the front panel for setting up each of the eight analogue inputs.
Input
Pressing Input steps through each of the three inputs, as indicated by the corresponding LEDs. When the Mic LED is lit,
the microphone input is active etc. Hence a mixture of microphone, line and instrument inputs may be selected across
the eight channels simultaneously. Note that only inputs 1-4 can be used for instruments however.
XLR inputs for microphones and TRS 1/4” inputs for line-level sources are available on the rear panel. TS 1/4” inputs for
instruments are available on the front panel (inputs 1-4 only).
Mic Input Gain
With the Mic input selected, the user has access to the full gain range in 10dB steps from 0dB to +60dB (yellow legend).
The gain range is split between two gain modes depending upon the status of the 30-60 switch (see description on page 6).
Instrument Inputs (Inputs 1-4)
Switch Input metering to pre
ADC (when using Inserts for
external processing of Inputs)
Digital Options (for optional card)
Power
switch
Controls for Inputs 1-8
Phantom Power switch
Activates a gain range
of 30-60 across the
Gain (stepped) dial
(the default is 0-30)
Selects type of input
Meter in dBFS
Selects input impedance to
600, 1k4, 2k4 or 6k8 Ohms
Selects the gain of the input
in stepped values of 10
Allows an additional 20dB of gain to be applied
to a mic or line signal, or sets the gain of the
instrument to between 10 and 40dB
Routes channel 2 of the ADC Input on
the rear panel to the optional digital
card, instead of the direct mic/line/inst
signal for input 2
Inverts phase of signal
Activates a high-pass filter
5
Page 6

Mode 1 Mic Gain Range 0-30
With the 30-60 switch off, the stepped gain dial operates over a gain range of 0dB to +30dB, the level of gain chosen
being indicated on the front panel by the outer arc of yellow numbers around the gain knob.
Mode 2 Mic Gain Range 30-60
With the 30-60 switch on (illuminated), the stepped gain dial operates over a gain range of 30dB to 60dB, the level of
gain chosen being indicated on the front panel by the outer arc of yellow numbers around the gain knob.
An additional 20dB of gain can be applied to the signal after the mic/line Gain knob using the Trim knob. (See the
‘Trim’ control text below for a full explanation.)
Line Input Gain
With the line input selected, the user has access to gain settings ranging from –20dB to +10dB, indicated on the front
panel by the arc of white numbers around the gain knob. The 30-60 switch is inactive when the line input is selected,
as the gain range for Line level inputs is restricted to –20dB to +10dB in 10dB steps. An additional 20dB of gain can be
applied to the signal after the mic/line gain knob using the Trim knob. (See the ‘Trim’ control text below for a full
explanation.)
Instrument Input Gain
With the instrument input selected (inputs 1-4 only), gain is applied to the input signal by using the trim control only,
which allows +10dB to +40dB of gain range. The level of gain chosen is indicated on the front panel by the outer arc of
yellow numbers around the gain knob. This input is suitable for high impedance sources such as guitar or bass pickups
(which may be connected directly without the need for an external DI box) or vintage synthesizers with high impedance
outputs.
Trim
The Trim control provides additional variable gain of 0dB to +20dB when mic or line inputs are selected. The level
of gain chosen is indicated on the front panel by the inner arc of white numbers around the gain knob. The additional
20dB of gain that can be applied to the mic or line signal is very useful for two reasons:
When high gain is required
Using trim in conjunction with the mic gain of 60dB gives a total of up to 80dB of pre-amp gain, making it very useful
for getting good digital recording levels from very low output dynamic and ribbon microphones.
Gain adjustment during recording
When small amounts of gain adjustment are needed to correct performance level variations during recording, use the
trim knob rather than the stepped mic/line gain knob, as switching the 10dB gain steps would be much too intrusive.
It is therefore good practice to apply some Trim gain
before using the 10dB stepped gain knob to find the optimum
recording level so that the Trim control can be used to gently add or take away gain later, if so required.
+48V
Pressing the +48V switch provides phantom power, suitable for condenser microphones, to the rear panel XLR
microphone connector. This switch does not affect the other inputs. If you are unsure whether your microphone requires
phantom power, refer to its handbook, as it is possible to damage some microphones (most notably ribbon microphones)
by providing phantom power.
Phase
Pressing PHASE inverts the phase of the selected input to correct phase problems when using multiple microphones,
or when incorrect wiring polarity has occurred.
6
Page 7
Insert In
Activating the INSERT switch (illuminated when active) breaks the signal path of the channel, so that the signal
connected to the ADC Input 25-pin connector on the rear panel routes to the digital output card (if connected) rather
than the direct mic, line or instrument signal. Note that the mic, line or instrument signal will still route to the analogue
output on the rear panel with this switch active. This switch is designed to allow the input signal to be routed to other
hardware for processing (out of the analogue output) and then back into the 828 (using the ADC input) for digital
conversion. The
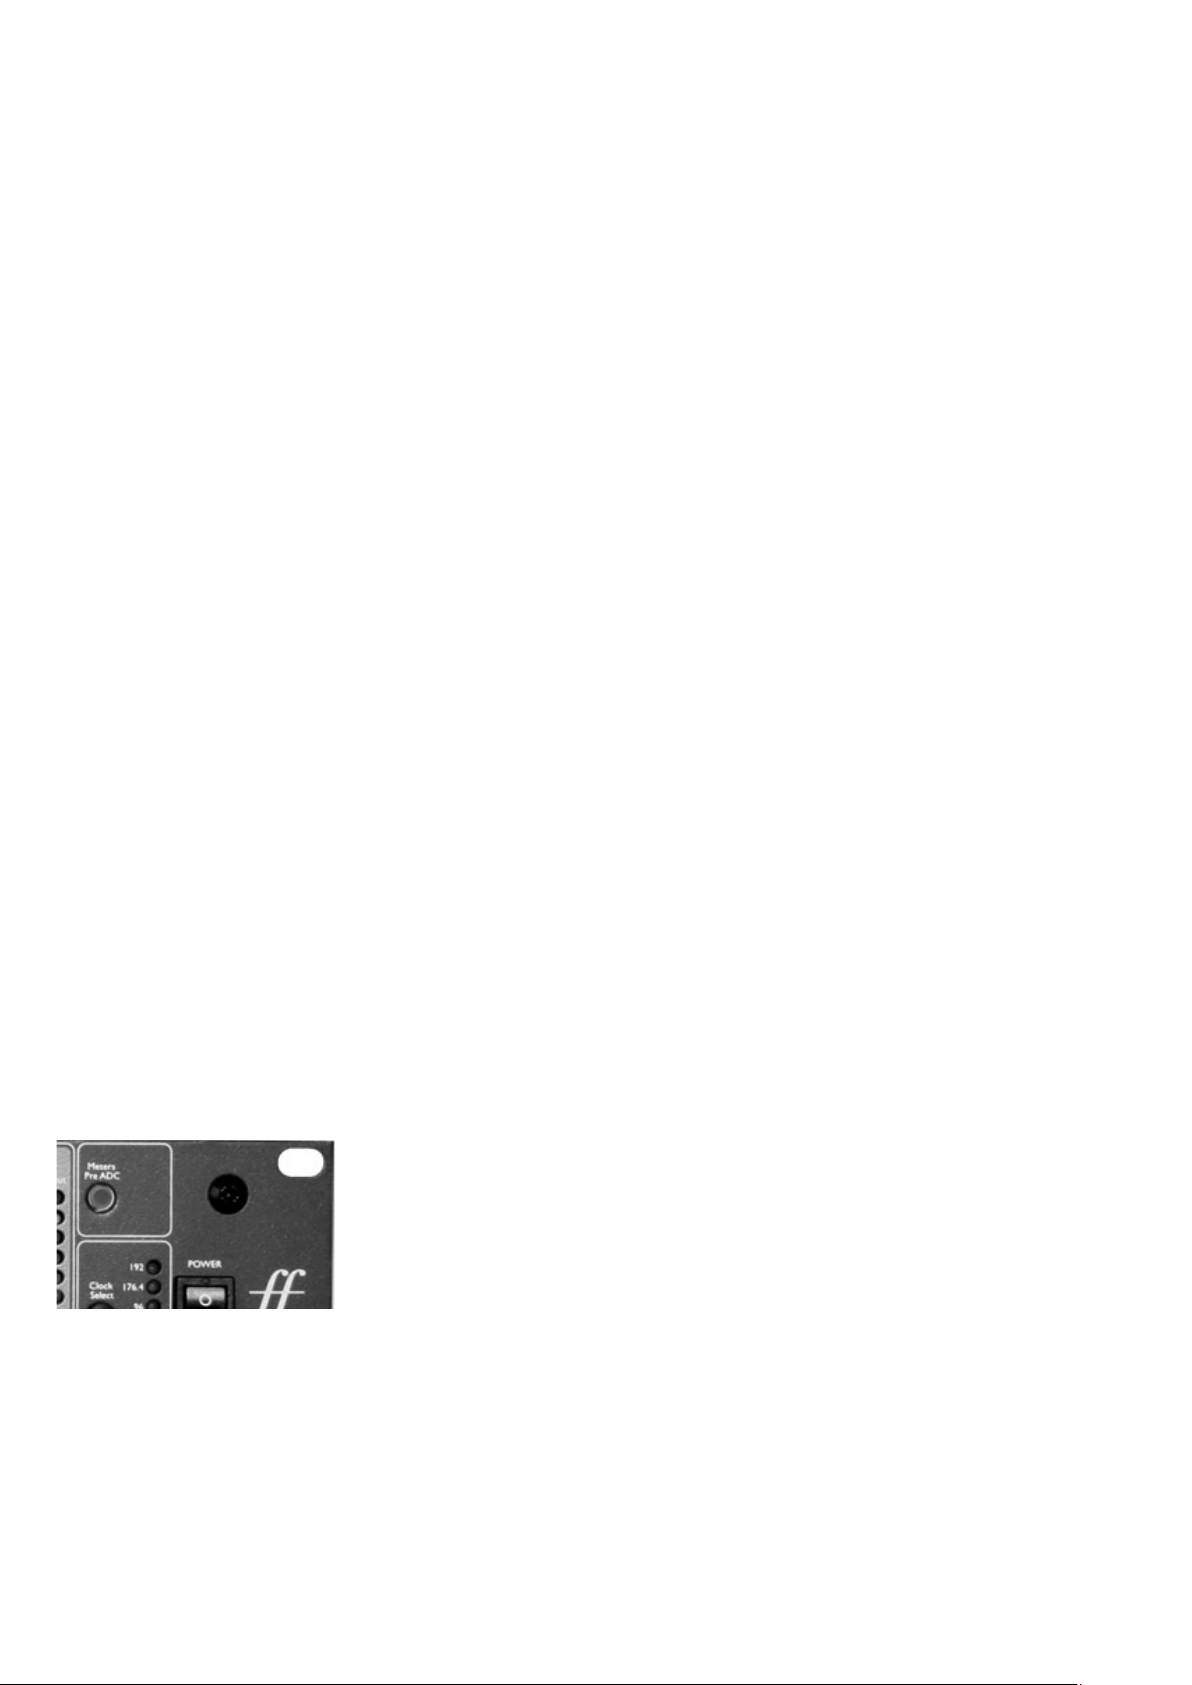
Meters Pre ADC switch on the front panel allows the ‘return’ signal level to be viewed on the LED
strip meters before conversion (see the Metering section below for details).
HPF
Pressing the HPF switch makes the High Pass Filter for that channel active in the audio path. This is useful for
removing any unwanted bass caused by proximity effect or rumble. The filter provides a 75Hz knee frequency with
18dB/octave roll-off.
Input Impedance
Pressing the Z In switch steps through each of the four transformer pre-amp input impedance values, as indicated
by the corresponding LEDs. By selecting different values for the impedance of the ISA 828 transformer input, the
performance of both the ISA 828 pre-amp and the microphone connected can be tailored to set the desired level and
frequency response. The impedance values are as follows:
Low – 600
Ω
ISA 110 – 1k4 Ω
Med – 2k4 Ω
High – 6k8 Ω
A guide to setting input impedance is available in the Applications section.
The impedance switch is also active on the instrument input. In this case, pressing the Z In switch toggles between
High and Low impedance settings. The impedance values are as follows:
Low – 470 k
Ω
High – 2.4 MΩ
Metering
The vertical columns of LEDs indicate the peak signal levels of channels 1-8 in one of two modes, defined by the state
of the ‘Meters Pre ADC’ switch on the front panel:
Mode 1. Meters Pre ADC switch disengaged
This is the default state and the mode to use when no digital output card is installed. Meters 1 to 8 indicate the analogue
level directly after the Gain stages set on the front panel. 0dBFS (reached when the red LED is lit) indicates that a signal
level of +22dBu is present at the analogue output. -18dBFS (unless recalibrated on the rear panel, see description on
page 8) therefore indicates that there is a signal level of +4dBu at the analogue output.
7
Page 8

Mode 2. Meters Pre ADC switch engaged
This is the mode to use when the analogue input signals are being routed to other hardware devices (such as dynamics
processors) using the analogue outputs/ADC Input on the rear panel (acting as sends/returns) before converting to
digital. Obviously, the optional digital output card should be installed if wanting to use this mode. Meters 1 to 8 indicate
the peak level of channels 1-8 received at the ADC Input. 0dBFS (reached when the red LED is lit) indicates that a signal
level of +22dBu is present at the ADC Input connector. -18dBFS (unless recalibrated on the rear panel, see description
below) therefore indicates that there is a signal level of +4dBu at the ADC input connector.
Meter Calibration
A Trim dial on the rear panel allows the meters to be calibrated so that a different peak level is set. See the TRIM
section on page 9 for details.
Instrument Inputs
Instrument sources may only be connected via the front panel. Four unbalanced Instrument input
connectors are located to the far left of the front panel and are numbered 1-4, relating to analogue
inputs 1-4. These connectors are used primarily for connecting low-level unbalanced signals such
as those from passive guitars and basses, or from active instruments such as keyboards and
electro-acoustic guitars. The high and low impedance settings available on the instrument input,
allow a better match to be achieved with different output impedances of various instruments.
All 1/4” unbalanced jack connections are wired as follows:
Tip: Audio 0°
Sleeve: Screen/Chassis
Sample rate and clock select
The last section allows the sample rate and clock source of the digital output card (if fitted) to be selected. See the
Digital Options section on page 10 for details.
Rear Panel
Optional digital card connections
Analogue Outputs
1-8, 25-pin, D-type
Balanced Line Inputs
1-8, TRS Jack
Analogue Inputs
Mic Inputs 1-8, XLR
Mains IEC connector
TRIM dial: Calibrates the
meters on the front panel
ADC Inputs 1-8, 25-pin, D-type
(each input is activated by Insert
switches on the front panel)
8
Page 9

Analogue Inputs
On the rear panel, there are 8 XLR inputs for connecting microphones and 8 1/4” TRS inputs for line-level sources.
Each one is numbered accordingly and corresponds to the relevant section on the front panel. All 3-pin XLR balanced
audio connectors are wired as follows:
Pin 1: Screen/Chassis
Pin 2: Audio 0°
Pin 3: Audio 180°
All 1/4” balanced jack connections are wired as follows:
Tip: Audio 0°
Ring: Audio 180°
Sleeve: Screen/Chassis
Analogue Outputs
Eight balanced analogue outputs are transmitted via a 25-pin connector that utilises the DB-25FM (Tascam™/Pro
Tools™) pinout, as follows:
ADC Input
An additional 25-pin connector, also following the Tascam™/Pro Tools™ standard, allows 8 analogue channels to be sent
to the digital card (if installed) for conversion. This means that any or all of the 8 input signals (mics, lines, instruments)
could have their Insert switches engaged and be ‘sent’ to additional audio processors using the analogue outputs, then
be ‘returned’ using the ADC Input. The 25-pin connector is wired as follows:
Trim
The dial labelled TRIM is for calibrating the front panel LED meters peak level. The default state is with the knob
in a central (de-tented) position, where the top (red) LED lights at +22dBu. Rotating the knob will set the value between
+18dBu (fully anticlockwise) and +26dBu (fully clockwise).
Pin-out for TASCAM DB25 8 Channel Balanced Connector
H = HOT
C = COLD
G = GROUND
1 2 3 4 5 6 7 8
12345678910111213
GC HGCHGC H GC H GC HGC HGC HGCH
22232425 18192021 14151617
9
Pin-out for TASCAM DB25 8 Channel Balanced Connector
1 2 3 4 5 6 7 8
GC HGCHGC H GC H GC HGC HGC HGCH
12345678910111213
22232425 18192021 14151617
H = HOT
C = COLD
G = GROUND
Page 10

IEC mains inlet
This socket allows the supplied IEC cable to be connected to enable the 828 to be powered. A fused voltage selector
is also present, with a diagram alongside to indicate the positions that relate to each voltage.
Optional digital card connections
The remaining connections (if present) are those on the optional digital card and are explained fully in the next section.
Digital Options
The optional ADC can be retrofitted to a standard ISA 828 at any time. No engineering experience is required as the
card can be fitted easily by the user. Full fitting instructions for this option are included along with the ADC.
Digital Outputs (AES, S/PDIF)
A 25-pin (Tascam DB-25FM) connector allows up to 8 channels of 24-bit digital audio (AES or S/PDIF) to be transmitted
to a DAW or other digital storage medium. The card can be configured using jumpers (on the card) and using two push
button switches on the rear panel. The table on page 11 shows the pinout details for all available configurations. Below
is a brief description of the overall functionality available.
Jumper position
The digital card has four jumpers (movable plastic clips) that can be positioned so as to disable AES outputs 5-8, and
therefore make the 828 pin to pin compatible with a Pro Tools HD™ 192 interface using a standard 25-pin to 25-pin cable.
With the jumpers in the disabled position (default), channels 1-8 are available at 44.1-96kHz and channels 1-4 at
176.4/192kHz. Depending on the position of 1-wire/2-wire switch. (See Appendix 1 for details of the cable pinout for
recording all 8 channels to Pro Tools™ at 192kHz - jumpers are enabled in this case.)
AES, S/PDIF switch
This switch selects whether the signal is professional (AES) or consumer (S/PDIF) digital format. With the switch out,
channels 1-8 are in AES format and are duplicated across the connector, allowing 16 outputs (dependent on wire mode
switch). With the switch in, channels 1-8 are available as S/PDIF and AES formats (number of channels available in AES
format is dependent on wire mode switch). See the table on page 11 for pinout details.
1-Wire/2-Wire AES mode switch
For sample rates from 88.2 to 192kHz, a dual-wire mode is available for connecting to older equipment with AES
inputs, which can only receive speeds up to 192kHz by using both digital channels of a single AES connection (known
as ‘2-wire’). Engaging this switch ‘splits’ the digital signal and activates dual wire mode, which means that half the
number of channels are transmitted down the same number of wires. Transmitting channels 1-8 in 2-wire mode
requires all of the pins of the DB25 connector. Therefore, if the S/PDIF mode is selected, only channels 1-4 can
be transmitted as AES format. (See the table on page 11 for pinout details.)
Selects 1-wire or 2-wire mode for
connecting a 176.4 or 192kHz AES
signal to older equipment
AES, S/PDIF Outputs 1-8,
25-pin, D-type
Selects AES (switched out)
or S/PDIF (pressed in)
Word Clock In and Out, BNC connectors
ADAT™ Outputs, 1-8 across both @
44.1/48kHz, 1-4 then 5-8 @ 88.2/96kHz
and 1-4 @ 176.4/192kHz
10
Page 11

In single-wire mode, switch out, the AES channels 1-8 can be transmitted at sample rates up to 192kHz using only 8 AES
connections. Therefore, channels 1-8 are always available in AES format, regardless of the S/PDIF switch setting.
24-bit/192kHz ADAT™ interface operation
The card provides digital outputs for all eight ISA 828 channels, which operate over the sample frequency ranges
44.1-192kHz. The card features two ADAT™-type ‘lightpipe’ output connectors. For speeds up to 48kHz, both connectors
transmit all 8 channels simultaneously. However, ADAT™-type connectors are bandwidth-limited at sample rates
88.2kHz and 96kHz - each audio channel uses two ADAT™ digital channels to accommodate the increased quantity
of data (SMUXII). At sample rates 176.4kHz and 192kHz, each audio channel uses four ADAT™ digital channels to
accommodate the increased quantity of data (SMUXIV).
The ADAT™ output connectors operate as follows:
44.1/48kHz sample rates:
Connector 1 = channels 1 to 8 in parallel
Connector 2 = channels 1 to 8 in parallel (identical to connector 1)
88.2/96kHz sample rates:
Connector 1 = channels 1 to 4
Connector 2 = channels 5 to 8
1 NC NC AES 7/8+ AES 7/8+ AES 8+ AES 4+
2 GND GND GND GND GND GND
3 NC NC AES 5/6- AES 5/6- AES 7- AES 34 NC NC AES 3/4+ AES 3/4+ AES 6+ AES 2+
5 GND GND GND GND GND GND
6 NC NC AES 1/2- AES 1/2- AES 5- AES 17 AES 7/8+ AES 4+ AES 7/8+ SPDIF 7/8+ AES 4+ SPDIF 7/8+
8 GND GND GND GND GND GND
9 AES 5/6- AES 3- AES 5/6- SPDIF 5/6+ AES 3- SPDIF 5/610 AES 3/4+ AES 2+ AES 3/4+ SPDIF 3/4+ AES 2+ SPDIF 3/4+
11 GND GND GND GND GND GND
12 AES 1/2- AES 1- AES 1/2- SPDIF 1/2- AES 1- SPDIF 1/213 NC NC NC NC NC NC
14 NC NC AES 7/8- AES 7/8- AES 8- AES 415 NC NC AES 5/6+ AES 5/6+ AES 7+ AES 3+
16 GND GND GND GND GND GND
17 NC NC AES 3/4- AES 3/4- AES 6- AES 218 NC NC AES 1/2+ AES 1/2+ AES 5+ AES 1+
19 GND GND GND GND GND GND
20 AES 7/8- AES 4- AES 7/8- SPDIF 7/8- AES 4- SPDIF 7/821 AES 5/6+ AES 3+ AES 5/6+ SPDIF 5/6+ AES 3+ SPDIF 5/6+
22 GND GND GND GND GND GND
23 AES 3/4- AES 2- AES 3/4- SPDIF 3/4- AES 2- SPDIF 3/424 AES 1/2+ AES 1+ AES 1/2+ SPDIF 1/2+ AES 1+ SPDIF 1/2+
25 GND GND GND GND GND GND
ADC Card DB25 Pin Out Configurations
Pin No.
Jumpers disabled
(default) ProTools™
Compatible 44.1 - 96kHz
Jumpers disabled
ProTools™ Compatible
Dual Wire Mode
88.2 - 192kHz
Jumpers enabled Single
Wire Mode 44.1 - 192kHz
Jumpers enabled + S/PDIF
Switch In - Single Wire
Mode 44.1 - 192kHz
Jumpers enabled +
Dual Wire Mode
88.2 - 192kHz
Jumpers enabled + S/PDIF
Switch In + Dual Wire
Mode 88.2 - 192kHz
11
Page 12

176.4/192kHz sample rates:
Connector 1 = channels 1 and 2
Connector 2 = channels 3 and 4
ADAT™ lightpipe cables are available from your local dealer, or in the UK from Studiospares (tel +44 (0)20 74821692):
stock number 585-510.
Word Clock In and Out
The internal ADC can be synchronised to an external word clock. By pressing the front panel Ext switch, the
synchronisation mode can be switched between standard external word clock and 256x external word clock.
Both types of external word clock should be connected to the ISA 828 ADC card at the Word Clock In BNC connector.
The Word Clock Out BNC connector either regenerates the external word clock connected at the Word Clock In BNC
connector, or transmits the internal sample frequency of the ADC card. Where the ISA 828 is being used as a slave device
within a larger digital system, the Word Clock Out BNC connector can be used to pass on the external word clock signal
to the next device. When the unit is not slaved to another device and is in internal clock mode, the Word Clock Out BNC
connector outputs the sample frequency selected on the ISA 828 front panel.
Digital Output Front Panel Controls
Clock Select
Pressing this switch allows the user to select between sample frequencies of 44.1kHz, 48kHz, 88.2kHz, 96kHz, 176.4kHz
and 192kHz.
Ext Select
Pressing EXT allows the ISA 828 to be slaved to an external word clock source, connected to the word clock input on
the rear panel. Selecting 256x allows the ISA 828 to be slaved to an external clock running at 256 times faster than the
sample frequency and enables connection to systems such as the Digidesign ‘Superclock’ or other 256x slave clock
devices. Both options have LEDs to indicate selection; with neither LED illuminated, the 828 will synchronise to its
own internal clock.
Lock LED
When lit, LOCK indicates that the unit is successfully synchronised to an external clock. Note: When using 256x external
clock, no lock indication is given, if audio can be heard in this mode then 256x clock is locked.
Applications
Mic Pre-amp Input Impedance
A major element of the sound of a mic pre is related to the interaction between the specific microphone being used and
the type of mic pre-amp interface technology it is connected to. The main area in which this interaction has an effect is
the level and frequency response of the microphone, as follows:
Selects sample rate
Selects the ADC to lock to an external source
connected to the word clock input on the rear
panel (either standard word clock or 256x)
Lock LED indicates when a successful
synchronisation is achieved
12
Page 13

Level
Professional microphones tend to have low output impedances and so more level can be achieved by selecting the
higher impedance positions of the ISA 828 mic pre-amp.
Frequency response
Microphones with defined presence peaks and tailored frequency responses can be further enhanced by choosing lower
impedance settings. Choosing higher input impedance values will tend to emphasise the high frequency response of
the microphone connected, allowing you to get improved ambient information and high end clarity, even from averageperformance microphones. Various microphone/ISA 828 pre-amp impedance combinations can be tried to achieve the
desired amount of colouration for the instrument or voice being recorded. To understand how to use the impedance
selection creatively, it may be useful to read the following section on how the microphone output impedance and the
mic preamp input impedance interact.
Switchable Impedance: In Depth Explanation
Dynamic moving coil and condenser microphones
Almost all professional dynamic and condenser microphones are designed to have a relatively low nominal output
impedance of between 150
Ω and 300Ω when measured at 1kHz. Microphones are designed to have such low output
impedance because the following advantages result:
• They are less susceptible to noise pickup
• They can drive long cables without high frequency roll-off due to cable capacitance
The side-effect of having such low output impedance is that the mic pre-amp input impedance has a major effect on the
output level of the microphone. Low pre-amp impedance loads down the microphone output voltage, and emphasizes any
frequency-related variation in microphone output impedance. Matching the mic pre-amp resistance to the microphone
output impedance (e.g. making a pre-amp input impedance 200
Ω to match a 200Ω microphone) still reduces the
microphone output and signal to noise ratio by 6dB, which is undesirable.
To minimise microphone loading, and to maximise signal to noise ratio, pre-amps have traditionally been designed to
have an input impedance about ten times greater than the average microphone, around 1.2k
Ω to 2kΩ. (The original ISA
110 pre-amp design followed this convention and has an input impedance of 1.4k
Ω at 1kHz.) Input impedance settings
greater than 2k
Ω tend to make the frequency-related variations of microphone outputs less significant than at low
impedance settings. Therefore high input impedance settings yield a microphone performance that is flatter in the
low and mid frequency areas and boosted in the high frequency area when compared to low impedance settings.
Ribbon microphones
The impedance of a ribbon microphone is worthy of special mention, as this type of microphone is affected enormously
by pre-amp impedance. The ribbon impedance within this type of microphone is incredibly low, around 0.2
Ω, and
requires an output transformer to convert the extremely low voltage it can generate into a signal capable of being
amplified by a pre-amp. The ribbon microphone output transformer requires a ratio of around 1:30 (primary: secondary)
to increase the ribbon voltage to a useful level, and this transformer ratio also has the effect of increasing the output
impedance of the mic to around 200
Ω at 1kHz. This transformer impedance, however, is very dependent upon frequency
- it can almost double at some frequencies (known as the resonance point) and tends to roll off to very small values at
low and high frequencies. Therefore, as with the dynamic and condenser microphones, the mic pre-amp input impedance
has a massive effect on the signal levels and frequency response of the ribbon microphone output transformer, and thus
the ‘sound quality’ of the microphone. It is recommended that a mic pre-amp connected to a ribbon microphone should
have an input impedance of at least 5 times the nominal microphone impedance.
For a ribbon microphone impedance of 30
Ω to 120Ω, the input impedance of 600Ω (Low) will work fine. For 120Ω to
200
Ω ribbon microphones, the input impedance setting of 1.4kΩ (ISA 110) is recommended.
13
Page 14

Impedance Setting Quick Guide
In general, the following selections will yield these results:
High mic pre-amp impedance settings
· Will generate more overall level
· Will tend to make the low- and mid-frequency response of the microphone flatter
· Will improve the high-frequency response of the microphone.
Low pre-amp impedance settings
· Will reduce the microphone output level
· Will tend to emphasise the low- and mid-frequency presence peaks and resonant points of the microphone
Signal Connections
Recording from Analogue Outputs to the DAW
14
DAW Interface/Soundcard
25-pin
TRS Jack XLR
Synth – Line out +4dBu
Microphone
Page 15

x8
Digital Storage Medium
Pro Tools HD™ 192 Interface
AES/EBU 25-pin Inputs
(requires 2 cards)
Cable pinout according
to Appendix 1
Word Clock Output (1x or 256x)
ISA 828 Digital Card in 2-wire mode
(Jumpers in default ‘enabled’ position)
15
Recording with Inserts
Recording from AES Outputs 1-8 to Pro Tools HD
™ at 192kHz
Focusrite Compounders (Stereo Compression) x 4
ISA 828 has all eight Insert switches engaged
Analogue I/Ps Analogue O/Ps
Page 16

FAQs
Q: What are the basic features of the ISA 828?
A: Eight Focusrite mic pres, eight line inputs, four instrument inputs, optional 8-channel 192kHz A/D conversion.
Q: Which applications is the ISA 828 suitable for?
A: The ISA 828 can be used as a multi-channel high quality front end for Digital Audio Workstations, allowing multichannel recording to HD. Equally, it can be used simply as the perfect interface or A/D converter for synths/other linelevel devices. It also provides additional channels for anyone who has run out of mic pres on their analogue console
(either live or recording), and is especially useful as a source of additional mic pres for digital consoles.
Q: Which Focusrite pre is featured in the ISA 828?
A: It’s the original transformer-balanced mic pre that featured in the classic analogue Focusrite consoles in the 1980s.
This is also the classic pre that features in the ISA 430 MKII and 428.
Q: Do the pres have the usual phantom power and High-Pass Filter controls?
A: Yes, and more… each pre has switchable mic impedance so that you can match to your chosen mic’s impedance,
or ‘mismatch’ for creative ‘input response colours’. Also, there are inserts per channel, plus fixed 75Hz HPF, phase
reverse, and phantom power.
Q: What’s significant about the impedance switching for each pre?
A: Each pre can either be matched perfectly to any microphone (vintage or modern), or offset to offer a variety of
‘response colours’ by interacting with any particular microphone. The impedance of each preamp is switchable (via
a single switch labelled ‘Z In’) between 4 settings: original ISA 110 (Zobal network influence for the classic Vintage
Focusrite sound), Low (600 Ohms), High (2.4k) and Higher (6.8K, relatively lively, great for room ambience). For more
information, read the impedance guide in the Applications section.
Q: Are insert points featured?
A: Yes, switchable in- or out- of circuit on each of channels 1-8.
Q: What do the insert switches actually do?
A: Activating an insert switch for an input switches the signal fed to the ADC (for that channel) to the corresponding one
received at the ADC Input on the rear panel. This is so that the mic/line/inst signals can be sent to additional hardware
such as compressors (using the analogue outputs) before being converted by the optional digital card.
Q: What are the four extra inputs on the left hand side of the front fascia for?
A: They are unbalanced inputs that enable you to easily connect unbalanced sources like guitars/basses to the unit
without the need for an external DI box.
Q: What’s the specification of the A/D option?
A: AES (both single and dual wire specs), S/PDIF and ADAT™ formats, sample rates selectable between 44.1, 48, 88.2,
96, 176.4 and 192kHz, (ADAT™ above 48kHz is, of course, via 2 ports), internal or external word clock, and 256X clock,
S/N Ratio better than 121dBFS ‘A-weighted to AES17’. Connections are via a 25-pin D-type connector and standard
lightpipes, word clock is via BNC in and out.
Q: Does the ISA 828’s A/D option feature word clock as standard?
A: Yes, word clock may be fed in via a BNC connector on each A/D to allow the 828 to synchronise to any word clock
master source.
Q: Why do I need word clock anyway?
A: When using multiple pieces of digital equipment, it is necessary to make sure that their bit-streams are all in sync.
In order to do this, all equipment needs to be synchronized to a common word clock system. Somewhere in this system
a word clock ‘master’ must be dictating the word clock for the rest of the equipment (‘word clock slaves’) to follow.
Failure to sync all pieces of digital equipment to a common word clock source will result in audible clicks and glitches
in programme material. Note that the 828 regenerates word clock at its BNC output, further boosting word clock stability.
Q: How many rack spaces does ISA 828 take up?
A: The ISA 828 is a 2U device.
16
Page 17

Q: What rear panel connections are featured?
A: The ISA 828 has 8 XLRs for connecting microphones and 8 1/4” TRS Jack line-level inputs. There are also 2 25-pin
D-type connectors: one for the analogue outputs and another for sending an external signal to the optional ADC (most
likely if using the Insert switches on the front panel and returning the mic/line/inst signals from additional processing
for digital conversion). Lastly, there are digital connections, if the optional ADC is fitted, and a voltage-switching power
socket to connect to the internal power supply.
ENGLISH
Q: Should balanced connectors be used with the ISA 828?
A: Yes, where possible. Alternatively, if using an unbalanced instrument source, you can connect to the four unbalanced
1/4” inputs on the front panel.
Q: Is there an optional digital input card?
A: No, because the ISA 828 is primarily a ‘front end’ product. In other words, the only devices that are likely to be
connected to the 828’s inputs are analogue sound sources such as microphones, guitars etc.
Q: Why is the 24-bit 192kHz specification important?
A: An A/D converter works by sampling the audio waveform at regular points in time, and then quantizing those values
into a binary number, which relates to the number of bits specified. The quantized signal must then be passed through
a D/A converter before it becomes audible. In simple terms, the D/A essentially joins the dots plotted by the A/D
converter when the signal was first converted to digital. The number of dots to join, combined with how little those
dots have been moved, determines how accurate the final signal will be compared to the original.
The greater the sample rate and bit rate, the more accurate the whole digital process is. So, 24-bit/192kHz performance
will ensure more accurate digital transfer of your audio information compared to the old 16-bit/44.1kHz standards. This
is especially important if further digital signal processing is to be applied to the signal once converted to digital, as any
mathematical operations taking place on the data (as a result of a gain change or dynamic effect process, for example),
may result in quantization and rounding errors. The higher the resolution of the digital data, the smaller the audible
effect of these errors.
Q: How many digital outputs can I use at the same time?
A: It depends on which sample rate you choose.
At 48kHz or lower: 8 AES and S/PDIF + 2 x 8 ADAT™ = max. 32 outputs simultaneously
At 96kHz: 8 AES* and S/PDIF + 8 ADAT™ = max. 24 outputs simultaneously
At 192kHz: 8 AES* and S/PDIF, 4 ADAT™** = max. 20 outputs simultaneously
* Both AES single-wire and split-wire configurations are supported; split wire will obviously reduce the maximum
number of simultaneous outputs.
** ADAT™ SMUXIV supports sample rates above 96kHz, only channels 1-4 are available at 176.4kHz & 192kHz.
Q: When the A/D is used, are my analogue outputs available for use?
A: Yes. The 8 line outputs can run simultaneously with all of the ADAT™, AES or S/PDIF outputs.
Q: Do I need to buy an optional cable to use either of the A/D cards?
A: Yes; Standard Tascam™, Pro Tools™ and ADAT™ optical cables are available from many sources.
17
Page 18

Specifications
Mic Input Response
• Gain range = 0dB to 60dB in 10dB steps
• Input Impedance, variable as follows:-
Switched Impedance setting Equivalent Input Impedance at 1kHz
Low 600
ISA 110 1400
Med (Medium) 2400
High 6800
• EIN (equivalent input noise) = -126dB measured at 60dB of gain with 150 Ohm terminating impedance and
22Hz/22kHz bandpass filter
• Noise at main output with gain at unity (0dB) = -97dBu measured with a 22Hz/22kHz bandpass filter
• Signal to noise ratio relative to max headroom (9dBu) = 106dB
• THD at medium gain (30dB) = 0.0008% measured with a 1kHz -20dBu input signal and with a 22Hz/22kHz bandpass filter
• Frequency response at minimum gain (0dB) = -0.5dB down at 10Hz and –3dB down at 110kHz
• Frequency response at maximum gain (60dB) = –3dB down at 16Hz and –3dB down 85kHz
• CMRR=91.8dB (Channel 1, 1kHz, maxiumum gain)
• Crosstalk Channel to Channel: with 10dB@1kHz input to chA, chB output =102dBrA. With 10dB@10kHz input to chA,
chB output = 84dBrA
Line Input Response
• Gain range = -20dB to +10dB in 10dB steps
• Input Impedance = 10kΩ from 10Hz to 200kHz
• Noise at main output with gain at unity (0dB) = -96dBu measured with a 22Hz/22kHz bandpass filter
• Signal to noise ratio relative to max headroom (24dBu)=120dB
• Signal to noise ratio relative to 0dBFS (+22dBu) = 118dB
• THD at unity gain (0dB) = 0.001% measured with a 0dBu input signal and with a 22Hz/22kHz bandpass filter
• Frequency Response at unity gain (0dB) = 0.3dB down at 10Hz and –3dB down at 122kHz
Instrument Input Response
• Gain range = 10dB to 40dB continuously variable
• Input Impedance:
High >1MΩ
Low > 300kΩ
• Noise at minimum gain (+10dB) = -90dBu measured with a 22Hz/22kHz bandpass filter
• Noise at maximum gain (+40dB) = -62dBu measured with a 22Hz/22kHz bandpass filter
• THD at minimum gain (+10dB) = 0.002% measured with a 10dBu input signal and with a 22Hz/22kHz bandpass filter
• Frequency Response at 10dB gain with -10dB input = 10Hz-200kHz +/- 0.6dB
• Frequency Response at 40dB gain with -40dB input = -2.5dB down at 10Hz and 0dB at 200kHz
High Pass Filter
• Roll off = 18dB per octave 3 pole filter
• Fixed Frequency 75Hz measured at the 3dB down point
Input Meter
• Calibrated in the detent position for 0dBFS = +22dBu and indicates the level after the High Pass Filter and before the
Insert Send output. LED levels are as follows:
0 = +22dBu
-2 = +20dBu
-6 = +16dBu
-12 = +10dBu
-18 = +4dBu
-42 = -20dBu
• Calibration is adjustable to allow 0dBFS to equal +10dBu to +26dBu
18
Page 19

Warranty
All Focusrite products are covered by a warranty against manufacturing defects in material or craftsmanship for a period
of one year from the date of purchase. Focusrite in the UK, or its authorised distributors worldwide, will do their best to
ensure that any fault is remedied as quickly as possible. This warranty is in addition to your statutory rights.
This warranty does not cover any of the following:
• Carriage to and from the dealer or factory for inspection or repair.
• Labour charge if repaired other than by the distributor in the country of purchase or Focusrite in the UK.
• Consequential loss or damage, direct or indirect, of any kind, however caused.
• Any damage or faults caused by abuse, negligence, improper operation, storage or maintenance.
If a product is faulty, please first contact the dealer from which the product was purchased. If the product is to be
shipped back, please ensure that it is packed correctly, preferably in the original packing materials. We will do our best
to remedy the fault as quickly as possible.
Please help us to serve you better by completing and returning the Warranty Registration Card, or registering online at
http://www.focusrite.com. Thank you.
Accuracy
Whilst every effort has been made to ensure the accuracy and content of this manual, Focusrite Audio Engineering Ltd
makes no representations or warranties regarding the contents.
Copyright
© 2007-2008 Focusrite Audio Engineering Ltd. All rights reserved. No part of this manual may be reproduced,
photocopied, stored on a retrieval system, transmitted or passed to a third party by any means or in any form without
the express prior consent of Focusrite Audio Engineering Ltd. ADAT™ is a registered trade mark of Alesis Corporation
Inc. Pro Tools™ and 192 HD™ are registered trademarks of Digidesign Inc. Tascam™ is a registered trademark of TEAC
Corporation Inc.
19
Page 20

Appendix 1
Recording AES Outputs 1-8 to Pro Tools ™ HD at 192kHz
To record all eight channels digitally to Pro Tools™ HD at 192kHz, all eight AES channels need to be enabled on the ISA
828 (default jumper positions shown on Appendix 2) and 2 Digital cards must be fitted in the HD192 interface. A 25-pin to
two 25-pin cable must then be used, with the following pinout:
Pin No. ISA 828 ADC Connector HD 192 Break Out Connector 1 HD 192 Break Out Connector 2
1 AES 8+ NC NC
2 GND GND GND
3 AES 7- NC NC
4 AES 6+ NC NC
5 GND GND GND
6 AES 5- NC NC
7 AES 4+ AES 4+ AES 8+
8 GND GND GND
9 AES 3- AES 3- AES 710 AES 2+ AES 2+ AES 6+
11 GND GND GND
12 AES 1- AES 1- AES 513 NC NC NC
14 AES 8- NC NC
15 AES 7+ NC NC
16 GND GND GND
17 AES 6- NC NC
18 AES 5+ NC NC
19 GND GND GND
20 AES 4- AES 4- AES 821 AES 3+ AES 3+ AES 7+
22 GND GND GND
23 AES 2- AES 2- AES 624 AES 1+ AES 1+ AES 5+
25 GND GND GND
20
Page 21

21
Appendix 2
Digital Card Jumper Positions - Disabling AES Outputs 5-8
Four jumpers on the digital card can be made to disable channels 5-8 on the AES Output. This is so that a standard
25-pin to 25-pin Pro Tools™ cable can be used to record channels 1-4 at 192kHz. (Half of the connections on the
Digidesign Digital Input are used for receiving and the other half for transmitting.) For more information, consult the
relevant section of the Pro Tools™ User Guide.
As shown on the card, with the jumpers in the lower position (on the bottom two pins), outputs 5-8 are enabled.
Removing the jumpers and placing them in the upper position (on the top two pins) disables outputs 5-8, as shown:
AES Outputs 5-8 enabled
AES Outputs 5-8 disabled
 Loading...