

Page 1
User Guide
Version 2
focusrite.com
Page 2

TABLE OF CONTENTS
OVERVIEW..................................................................... 3
Introduction .................................................................3
Features ....................................................................4
Box Contents ................................................................5
System Requirements.........................................................5
GETTING STARTED .............................................................6
Software Installation ..........................................................6
Registering your Clarett+ 8Pre..................................................6
Hardware Features ...........................................................8
Front Panel ....................................................................8
Rear Panel ...................................................................10
Connecting your Clarett+ 8Pre .................................................11
Computer audio setup ..........................................................11
Audio Setup in your DAW ........................................................11
Connecting Clarett+ 8Pre to loudspeakers..........................................12
Working with surround sound ....................................................14
EXAMPLES OF USAGE ..........................................................16
1. Recording a band ............................................................16
2. Using the optical connections ..................................................18
3. Using the Clarett+ 8Pre as a stand-alone mixer ...................................19
4. Providing foldback while recording..............................................20
FOCUSRITE CONTROL - OVERVIEW...............................................21
CLARETT+ 8PRE TECHNICAL SPECIFICATIONS.....................................22
Performance Specications ...................................................22
Physical and Electrical Characteristics . . . . . . . . . . . . . . . . . . . . . . . . . . . . . . . . . . . . . . . . . .23
TROUBLESHOOTING ........................................................... 24
COPYRIGHT AND LEGAL NOTICES................................................ 24
2
Page 3

OVERVIEW
WARNING: Excessive sound pressure levels from earphones and headphones can cause
hearing loss.
WARNING: This equipment must only be connected to USB Type 2.0+ or Thunderbolt 3.0+ ports.
Introduction
Thank you for purchasing this Clarett+ 8Pre, a high-performance and immensely capable studio
centrepiece for PC or Mac. Eight next-generation, high-headroom, low-noise, low-distortion Clarett+
mic preamps - featuring the unique All-analogue Air function - help you capture superbly clear
recordings, and independent A-D and D-A converters with improved dynamic range bring you closer
than ever to your music.
This User Guide provides a detailed explanation of the hardware to help you achieve a thorough
understanding of the product’s operational features. We recommend you take the time to read the
Guide, so you are fully aware of all the features the Clarett+ 8Pre has to offer.
IMPORTANT: As well as this User Guide, you will need the Focusrite Control Software
Guide which can be downloaded from focusrite.com/downloads.
This contains full details of Focusrite Control, the software application designed
specically for use with the Focusrite Clarett+ range of interfaces.
If either User Guide does not have the information you need, please go to
support.focusrite.com, where you can nd articles and tutorials beyond the scope of this
user guide. A Getting Started video tutorial is also available, at
focusrite.com/get-started/ClarettPlus-8Pre.
3
Page 4

Features
The Clarett+ 8pre has eight next-generation, high-performance Clarett+ preamps to capture clear
and powerful sounds with a preamp design that brings masses of headroom, low distortion and low
noise. New and improved high-performance A-D and D-A converters maintain the purity of analogue
and deliver extremely low noise and high dynamic range.
Vocals will shine with the All-analogue Air, its analogue circuitry emulating the classic Focusrite
ISA 110 preamp. J-FET instrument inputs offer dedicated, ultra-high-impedance, extremely wide
audio bandwidth, and mimic guitar amp inputs to preserve the natural tone of guitars.
The accompanying software application, Focusrite Control, is designed to let you easily congure the
Clarett+ 8Pre with signal routings appropriate for most common recording tasks. For more complex
situations, it provides extensive routing and monitoring options, as well as the ability to control global
hardware settings such as sample rate and synchronisation. You can download Focusrite Control
from focusrite.com/downloads.
iPad and iPhone users can additionally download Focusrite iOS Control from the App Store®. The
app communicates via WiFi with Focusrite Control running on your computer, and lets you adjust
your monitor mixes and input settings from your iOS device. See the Focusrite Control User Manual
for more information.
4
Page 5

Box Contents
Along with your Clarett+ 8Pre you should have:
• AC mains cable with IEC connector
• USB-C to USB-A cable
• USB-C to USB-C cable
Focusrite Control is available at focusrite.com/downloads. On Windows, Focusrite Control will
also install the driver required. Mac users: Clarett+ 8Pre is class-compliant on Macs, therefore no
drivers are required.
As a Clarett+ owner, you are also entitled to a selection of third-party software.
Go to focusrite.com/included_software/ClarettPlus-8Pre to nd out what’s included.
System Requirements
IMPORTANT – Please visit the following link for up-to-date information on computer and
operating system compatibility for all Clarett+ products:
support.focusrite.com
5
Page 6
GETTING STARTED
Software Installation
Focusrite Control and the driver software needed for the Clarett+ 8Pre are available for download
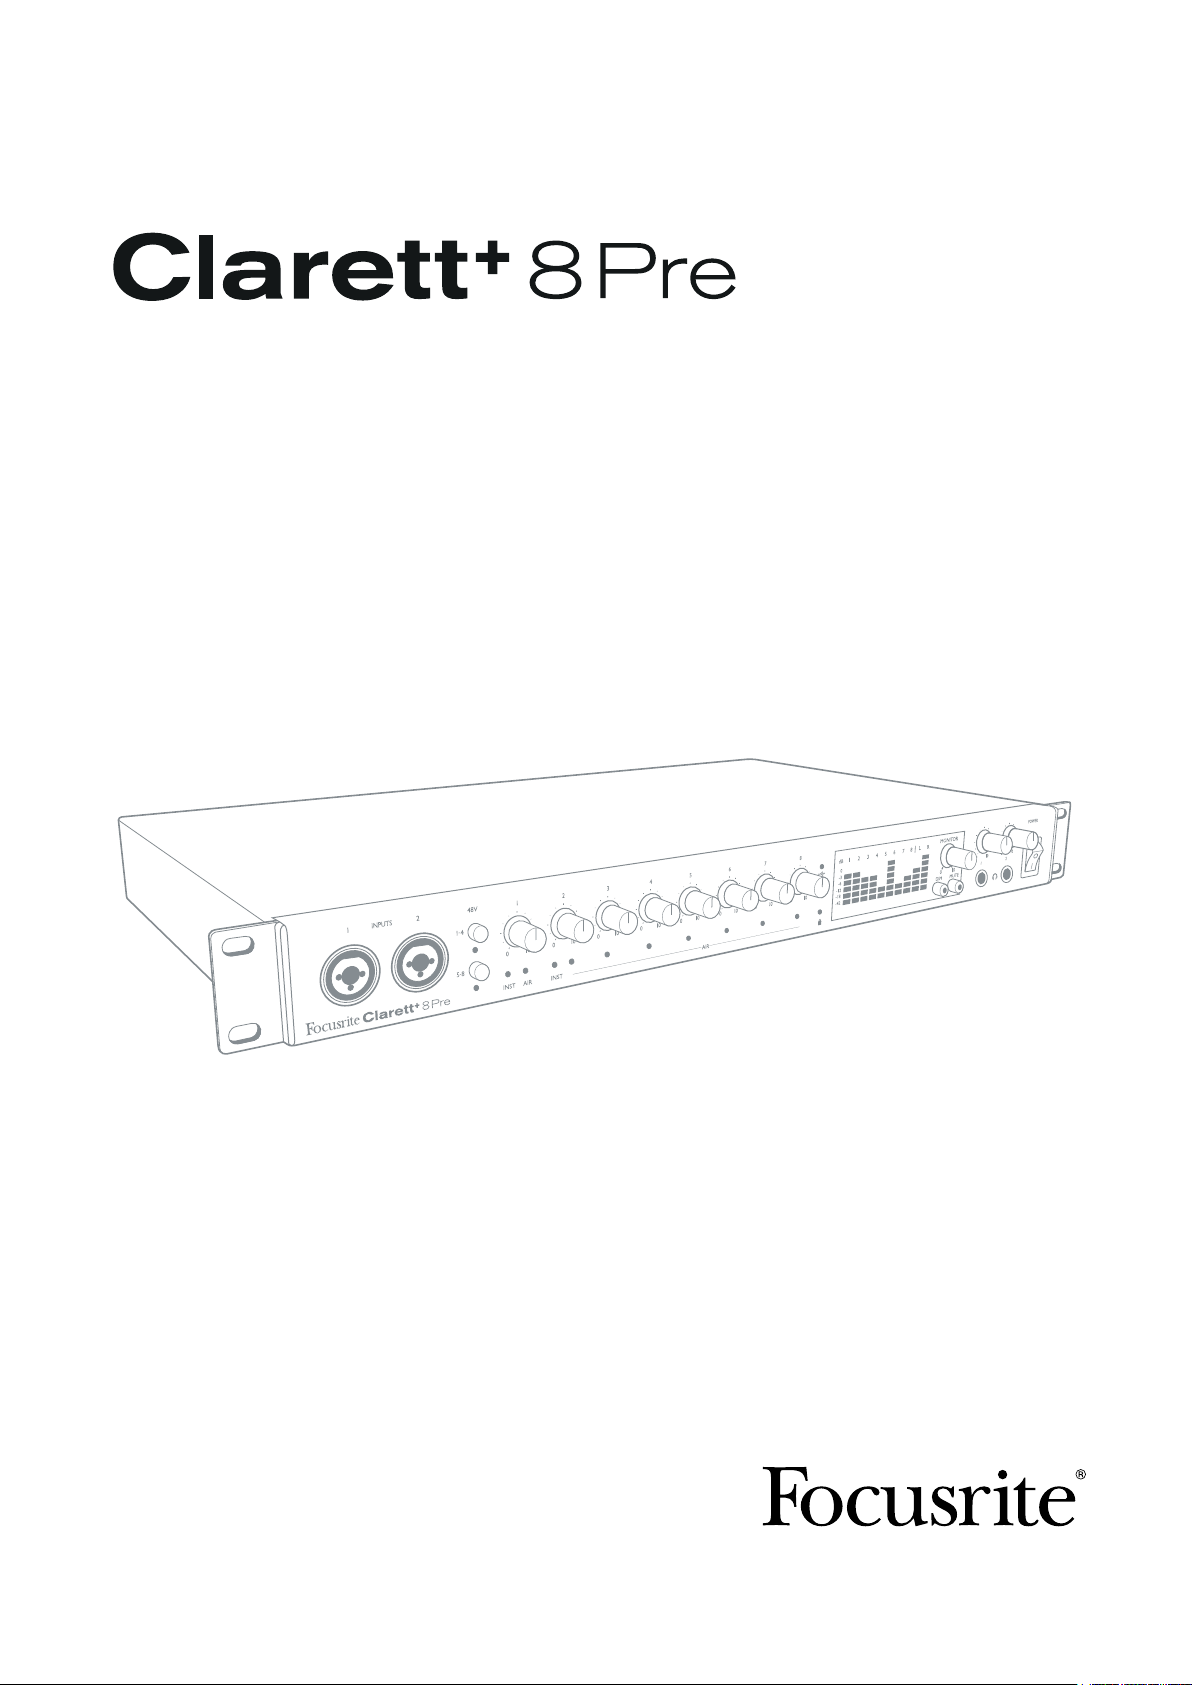
from the Focusrite website: focusrite.com/downloads.
Clarett+ range on the Downloads page. This will take you to a page with all the downloads
Click
which are available for the Clarett+ range.
To download the Focusrite Control version you need, click the appropriate Download button.
Note that the Windows driver is included within the Focusrite Control download. No additional
driver is needed for Macs.
Registering your Clarett+ 8Pre
If you are having trouble with the steps below, please watch our video guide here:
focusrite.com/get-started/ClarettPlus-8Pre.
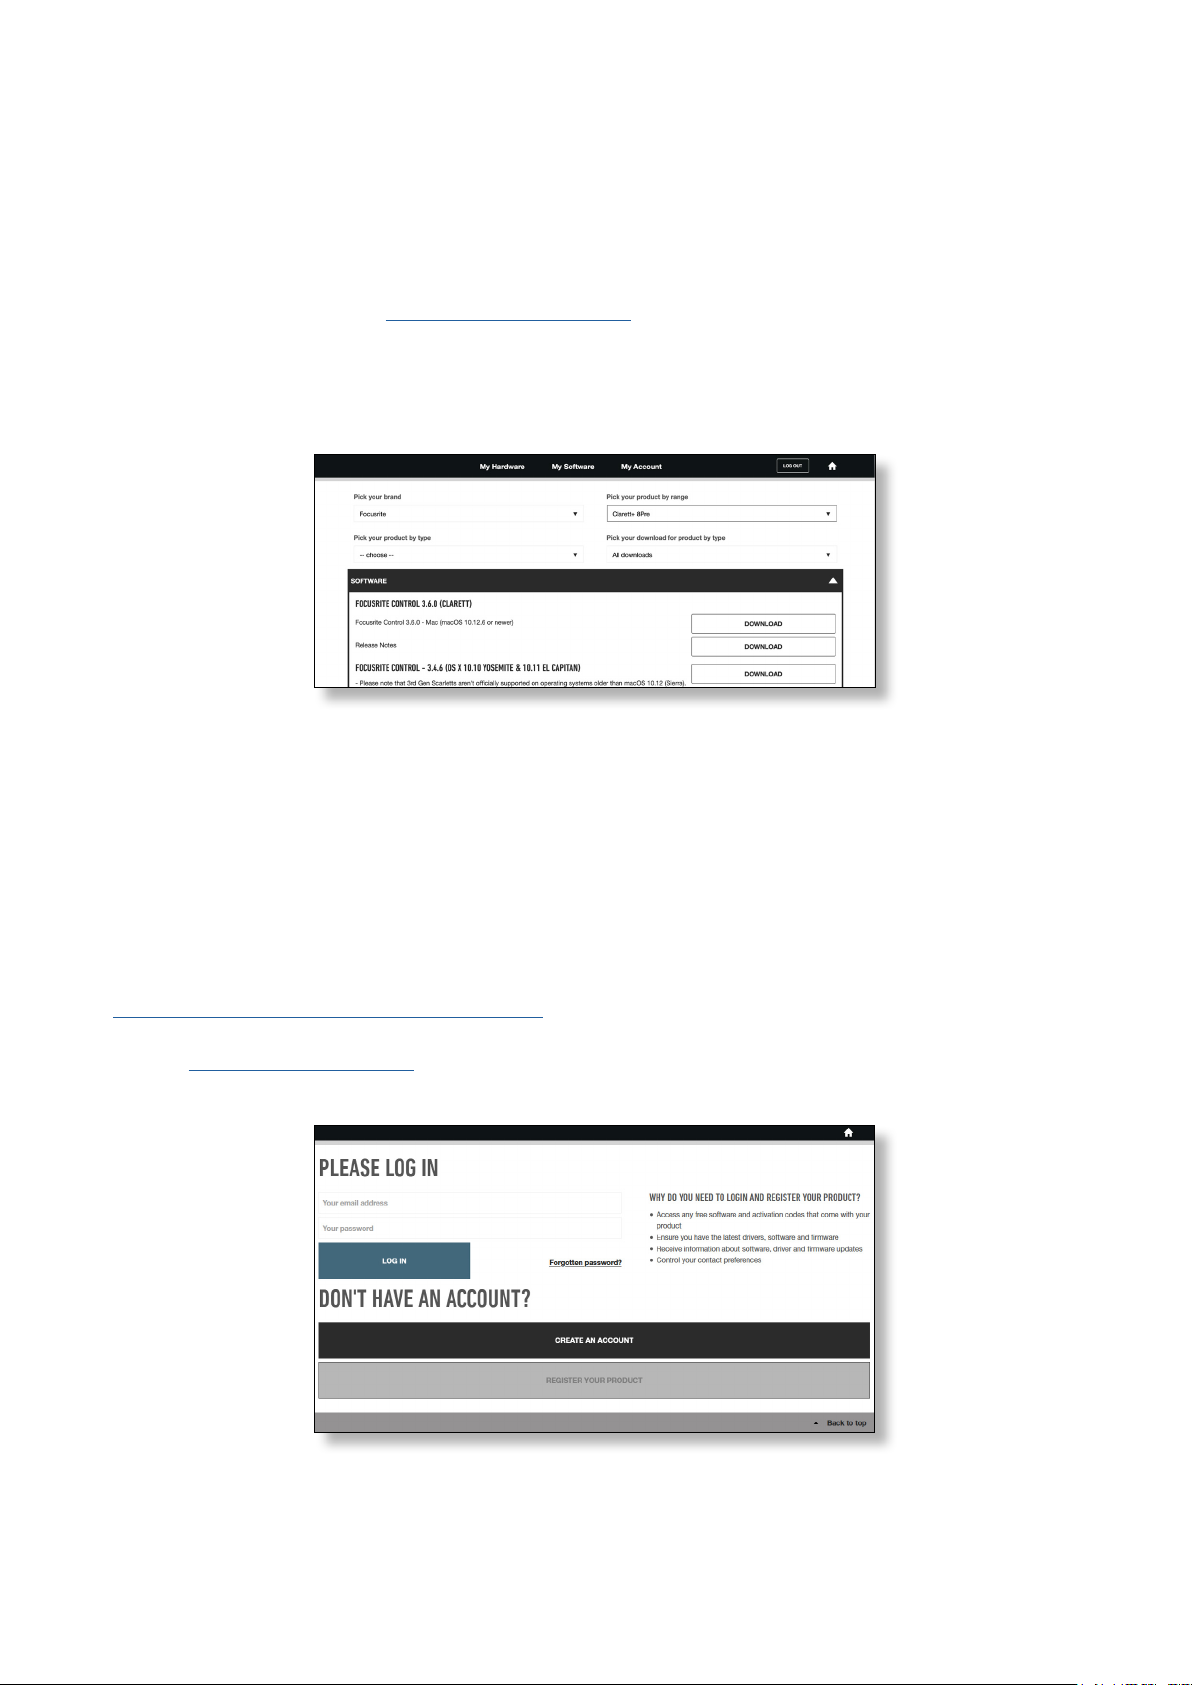
1. Go to focusrite.com/register/.
2. If you do not have already have a Focusrite/Novation account, select CREATE AN ACCOUNT and
follow the on-screen instructions.
6
Page 7
3. If you do have an account, log in and select REGISTER A NEW PRODUCT:
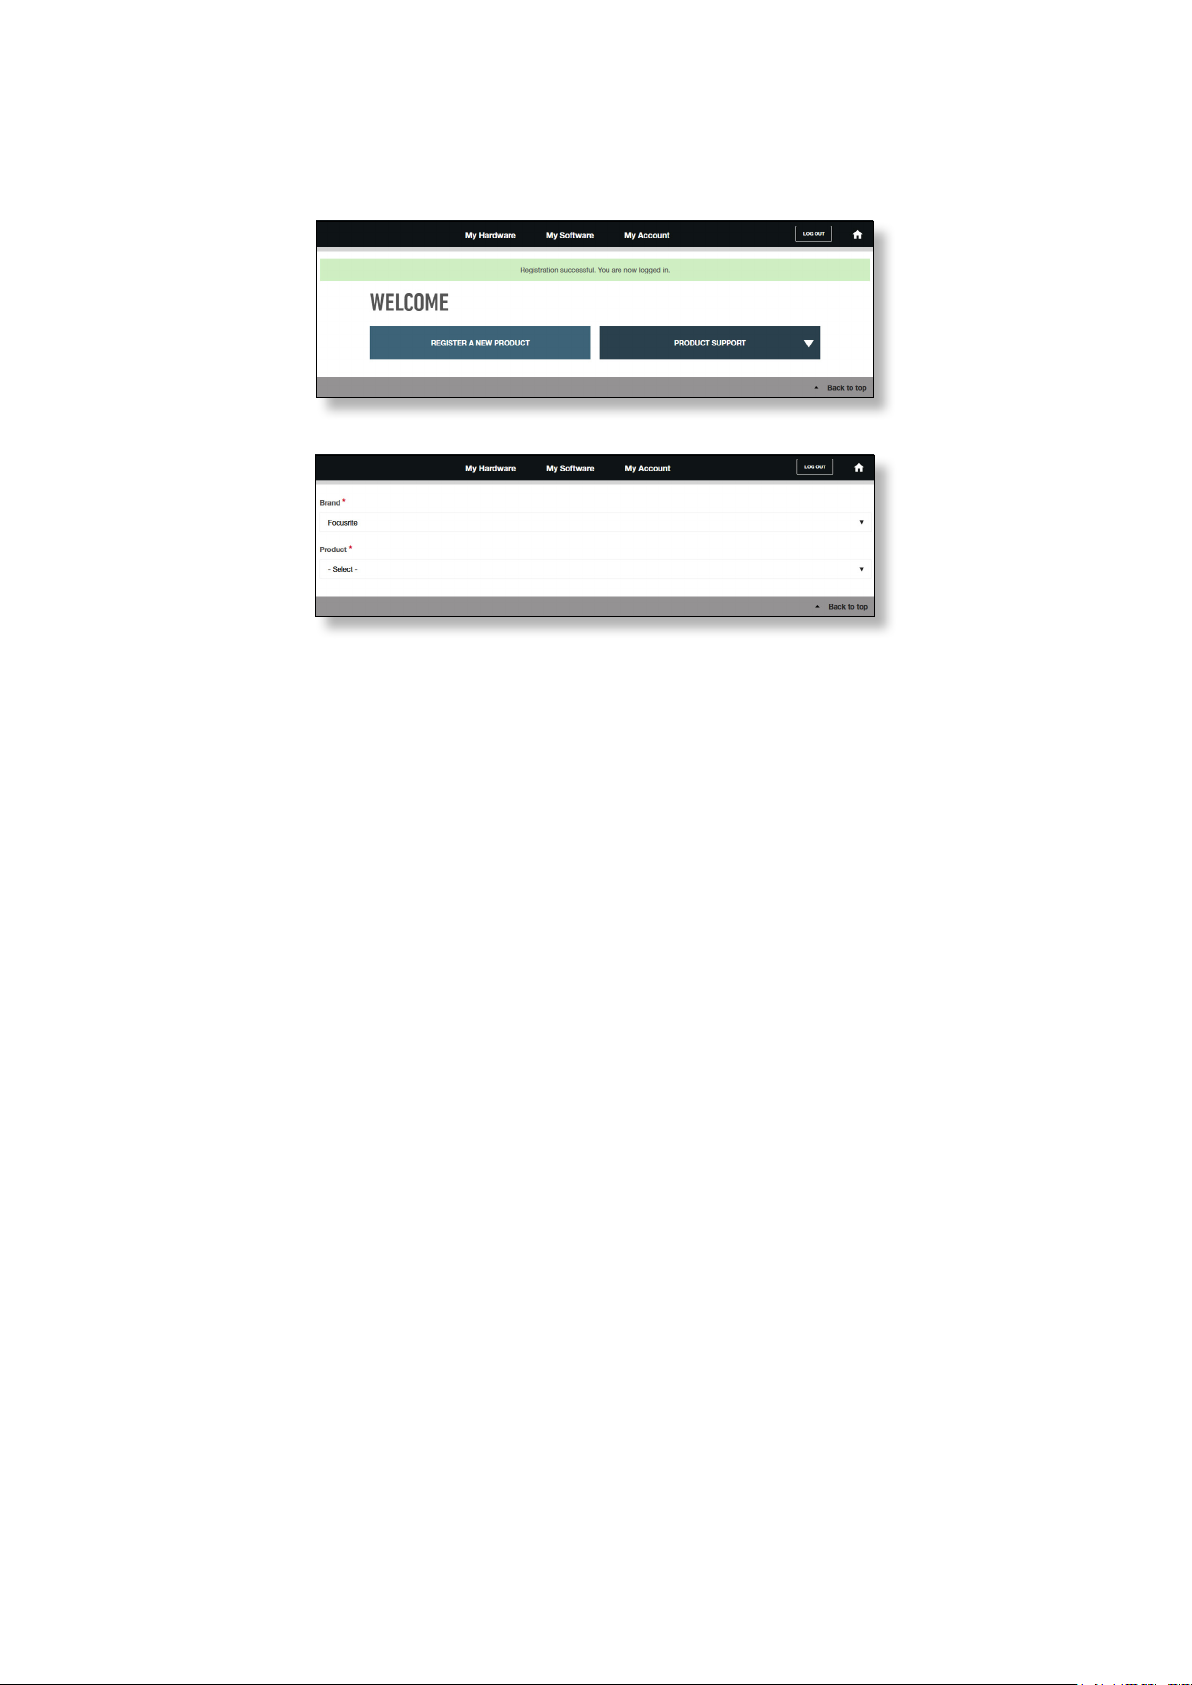
4. Select your Clarett+ device from the
Product drop-down list and enter your device’s Serial Number
at the bottom of the page. You can nd the serial number on the underside of the Clarett+ 8Pre,
and also on the gift box. Then click Set Serial Number.
5. Follow the rest of the on-screen instructions to nish registering your device.
6. When the registration is complete, your Product will appear in your Account under the
My Hardware tab.
7. All your bundled software can be found under the My Software tab in your account
7
Page 8

Hardware Features
Front Panel
1
2
454
5
8 9
67 10 123
1414
11
13
The front panel includes all input gain and monitoring controls as well as two input connectors for
Mic, Line and Instrument signals.
1. INPUTS 1 & 2 – Combo XLR input sockets - connect microphones, instruments (e.g., guitar), or
line level signals via XLR or ¼” jacks as appropriate. Either TRS (balanced) or TS (unbalanced)
jack plugs can be used for instruments or line level signals.
2. 48V – two switches enabling 48 V phantom power at the Combo connectors’ XLR contacts
for mic inputs 1-4 and 5-8 respectively. (Note that inputs 3 to 8 are on the rear panel.) Each
switch has a red LED to show when phantom power is enabled. Note that not all microphones
require phantom power. If you are unsure whether your microphone needs it to work, please
read the microphone documentation.
3. Gain 1 to 8 – eight rotary controls: adjust input gain for signals at Inputs 1 to 8 respectively.
4. INST – two red LEDs which illuminate when Instrument mode is selected for the jack
Inputs 1 or 2 from Focusrite Control software. When INST is selected, gain range and input
impedance are altered (relative to LINE), and the input is made unbalanced. This optimises
it for connecting instruments directly via a 2-pole (TS) jack plug. When INST is off, you can
connect line level signals. Line level signals may be connected either in balanced form via a
3-pole (TRS) jack or unbalanced, via a 2-pole (TS) jack.
5. AIR – eight yellow LEDs – one per input - which illuminate when AIR function is selected
for the input from Focusrite Control. AIR modies the input stage’s frequency response to
model classic, transformer-based Focusrite ISA mic preamps.
6. Meters – ten 6-segment LED bargraph meters indicating a) the signal levels of the eight
analogue input signals (meters 1 to 8), and b) the signal levels at the MONITOR 1 and 2
outputs (meters L and R). The input meters show signal level after the input gain stage. The
output meters show signal level before the monitor level control [10], which therefore does
not affect their indication. The LEDs illuminate at -42 (green, “signal present”), -18 and -12
dBFS (green), -6 and -3 dBFS (yellow) and 0 dBFS (red). 0 dBFS implies digital clipping, and
should always be avoided.
7.
(USB active) – a green LED which illuminates when the unit has established a connection
with the computer to which it is connected.
8. MIDI – a green LED which illuminates when MIDI data is being received at the rear panel
MIDI IN port.
9.
(Locked) – a green LED which conrms clock synchronisation, either to the Clarett+ 8Pre’s
internal clock or to an external digital input.
10. MONITOR – main monitor output level control – this control will normally control the level at
8
Page 9

the main monitor outputs on the rear panel, but can be congured in Focusrite Control to
adjust the level of multiple pairs of outputs.
11. DIM and MUTE – two switches controlling the Clarett+ 8Pre’s monitor outputs; DIM reduces
the output levels by 18 dB, while MUTE turns the outputs off. By default, these switches affect
the main monitor outputs 1 and 2, but may be congured in Focusrite Control to act on any
of the analogue outputs. The switches are internally illuminated (DIM: yellow, MUTE: red)
indicating the function is selected.
12.
13. POWER – AC power switch and LED.
14. Rack ears for mounting the Clarett+ 8Pre in a standard 19” equipment rack.
(Headphones) 1 and 2 – connect one or two pairs of stereo headphones at the two ¼” TRS
jack sockets below the controls. The headphone outputs always carry the signals currently
routed to analogue outputs 7/8 and 9/10 (as stereo pairs) in Focusrite Control.
9
Page 10

Rear Panel
9
58 7 4
1236
1. MIC/LINE INPUTS 3 to 8 – Combo XLR input sockets - connect further microphones or line
level signals via XLR or ¼” jacks as appropriate. Either ¼” TRS (balanced) or TS (unbalanced)
jack plugs can be used for line level signals.
2. LINE OUTPUTS 3 to 10 – eight balanced analogue line outputs on ¼” jack sockets; use TRS
jacks for a balanced connection or TS jacks for unbalanced. Signals routed to these outputs
are dened in Focusrite Control, for driving alternative speakers (i.e., mideld, neareld,
etc.), the additional speakers in a multichannel monitoring system, or to send audio to
outboard FX processors.
3. MONITOR 1 and 2 – two balanced analogue line outputs on ¼” jack sockets (with “antithump”); use TRS jacks for a balanced connection or TS jacks for unbalanced. These are also
Line Outputs 1 and 2, and will generally be used for driving the main L and R speakers of your
monitoring system. However, output routing may be customised in Focusrite Control.
4. OPTICAL IN and OUT – two TOSLINK connectors, each carrying eight channels of digital audio
in ADAT format at 44.1/48 kHz sample rate or four channels at 88.2/96 kHz. This input is also
capable of accepting a stereo optical S/PDIF source: this option is selected from Focusrite
Control. Note that this input is disabled at sample rates of 176.4/192 kHz.
5. WORD CLOCK OUTPUT – a BNC connector carrying the Clarett+ 8Pre’s word clock; this may
be used to synchronise other digital audio equipment.
6.
– USB connector; connect the Clarett+ 8Pre to your computer with a USB cable.
7. MIDI IN and MIDI OUT – standard 5-pin DIN sockets to connect external MIDI equipment. You
can send/receive MIDI data between your computer and external MIDI devices.
8. SPDIF IN and OUT – two phono (RCA) sockets carrying two-channel digital audio signals in
and out of the Clarett+ 8Pre in S/PDIF format. Like all other inputs and outputs, the routing of
S/PDIF signals may be customised in Focusrite Control.
9. AC mains – standard IEC (AC) connector. The Clarett+ 8Pre is tted with a “Universal” power
supply, and will run from any AC mains voltage from 100 to 240 V, at 50 or 60 Hz.
10
Page 11

Connecting your Clarett+ 8Pre
The Clarett+ 8Pre should be connected to AC mains with the supplied AC power cable. Plug the IEC
connector into the rear panel IEC receptacle and turn the unit on with the front panel power switch.
The Clarett+ 8Pre has a USB-C™ port (on the rear panel). Once the software installation is complete,
simply connect the Clarett+ 8Pre to your computer using a USB cable.
Computer audio setup
When you connect your Clarett+ 8Pre to your computer for the rst time, you will need to select it as
the audio input/output device.
• MacOS: selection is made in System Preferences > Sound: select the Focusrite device on
both the Input and Output pages.
• Windows: selection is made in Control Panel > Sound: right-click on the Focusrite device
and select Set as Default Device in both Recording and Playback tabs.
If you have any problems, full details of how to select the Clarett+ 8Pre as the audio device can be
found at focusrite.com/get-started/ClarettPlus-8Pre.
After the rst connection, your OS should automatically select the Clarett+ 8Pre as the default audio
device.
Audio Setup in your DAW
After installing the drivers and connecting the hardware, you can start using the Clarett+ 8Pre with
your DAW.
Please note - your DAW may not automatically select the Clarett+ 8Pre as its default I/O device. In this
case, you must manually select the driver on your DAW’s Audio Setup* page, and select Clarett+
8 Pre USB (Mac) or Focusrite USB ASIO (Windows). Please refer to your DAW’s documentation or
Help les if you are unsure where to select the Clarett+ 8Pre as your audio device.
* Typical name – page names may vary with DAW
11
Page 12

Connecting Clarett+ 8Pre to loudspeakers
The 1/4” jack MONITOR outputs on the rear panel (Line Outputs 1 and 2) will normally be used to
drive monitoring speakers. Self-powered monitors have internal ampliers, and may be connected
directly. Passive loudspeakers will require a separate stereo amplier; in this case, the rear panel
outputs should be connected to the amplier’s inputs.
Connecting active speakers
Connecting passive speakers
Stereo amplifier
All the line output connectors are 3-pole (TRS) ¼” jack sockets, and are electronically balanced.
Typical consumer (hi-) ampliers and small powered monitors will have unbalanced inputs, either
on phono (RCA) sockets, or via a 3.5 mm 3-pole jack plug intended for direct connection to a computer.
In either case, use a suitable connecting cable with jack plugs at one end.
Professional power ampliers will generally have balanced inputs.
12
Page 13

Connecting additional monitors
When mixing, you can connect several pairs of additional speakers (mideld, neareld, etc.) to output
pairs and use Focusrite Control to route your mix to the different outputs as desired, to check your
mix on the different speakers.
IMPORTANT:
MONITOR 1 and 2 outputs have “anti-thump” circuitry that protects your speakers if the
Clarett+ 8Pre is turned on while the speakers (and amplier if used) are connected and
active.
LINE OUTPUTS 3 to 10 do not have this circuitry. If you’re using additional speakers
connected to these outputs, power your Clarett+ 8Pre on rst, then turn on the speakers
or power amplier.
But get into the habit of following this general rule in any case - it is good audio practice
to turn on any speaker system
after
turning on the equipment feeding it.
13
Page 14

Working with surround sound
Because the Clarett+ 8Pre is equipped with ten line outputs, it is suitable for working in multichannel
sound formats – LCRS, 5.1 surround or 7.1 surround, for example.
To route each channel to the correct output you will need to route the DAW outputs to the Line
Outputs in Focusrite Control (e.g. DAW Output 1 > Line Output 1, DAW Output 2 > Line Output 2,
etc.).
Windows users:
In Windows, surround sound can only be used in software supporting multichannel ASIO. In most
cases this will be your DAW, and in general, DAWs capable of mixing in surround allow you to set the
speaker mapping up in the DAW’s Audio Output Preferences or I/O Settings page.
Please see the User Manual (or Help les) for your DAW for guidance on setting up the outputs for
surround mixing with the speaker conguration you wish to use.
Mac users:
On Macs, surround sound conguration can be done from all applications that support multichannel
audio (DAWs & regular macOS Applications). To do this, go to: Applications > Utilities >
Audio MIDI Setup > Clarett+ 8Pre > Congure Speakers > Conguration > Select the
desired conguration.
14
Page 15

The example below shows how you would connect the six loudspeakers in a 5.1 surround monitoring
g
arrangement
Left (L)
Right (R)
Centre (C)
(Sub Bass) LFE
Rear Left (RL) Rear Ri
ht (RR)
15
Page 16

EXAMPLES OF USAGE
The Clarett+ 8Pre is an excellent choice for many recording and monitoring applications. Some
typical congurations are shown below.
1. Recording a band
(Front Panel)
(Rear Panel)
Bass GuitarGuitar
USB
Engineer’s Headphones
Stereo Keys
This setup illustrates a typical conguration for multitrack recording with DAW software on your
computer.
A selection of sources – microphones, guitars and a keyboard – are shown connected to Clarett+
8Pre’s inputs. Note that only Inputs 1 and 2 can be congured to accept instruments directly, so we
have chosen to plug the guitars into these. Ensure Instrument mode is selected for Inputs 1 and 2
from Focusrite Control, and the INST LEDs are illuminated.
The connection to the computer running DAW software is via a USB cable. This will carry all input and
output signals between the DAW and the Clarett+ 8Pre. Once the audio setup is correctly congured
in the DAW, each input source will be automatically routed to its own DAW track for recording.
16
Page 17

A note about latency
You will probably have heard the term “latency” used in connection with digital audio systems. In
the case of the DAW recording application described above, latency is the time it takes for your input
signals to pass through your computer and audio software, and back to you.
While not an issue for most recording situations, latency can be a problem for a performer who
wishes to record while monitoring their input signals. This might be the case if you need to increase
your buffer size, which could be needed when you record overdubs on a large project using many
DAW tracks, software instruments and FX plug-ins.
Common symptoms of a buffer setting that is too low could be glitching audio (clicks and pops), or a
particularly high CPU load within your DAW (most DAWs have CPU readouts). If you experience this
on a Mac, you can raise the buffer size from the DAW application itself; on a Windows PC you will
need to change this from the
Setup Preferences*.
ASIO ControlPanel which can usually be accessed from your DAW
The Clarett+ 8Pre, in conjunction with Focusrite Control, allows “low latency monitoring”, which
overcomes this problem. You can route your input signals directly to the Clarett+ 8Pre’s headphone
and line outputs. This enables the musicians to hear themselves with ultra-low latency – i.e.,
effectively in “real time” – along with the computer playback. The input signals to the computer
are not affected in any way by this setting. However, note that any effects being added to the live
instruments by software plug-ins will not be heard in the headphones in this case, although the FX
will still be present on the recording.
* Typical name – page names may vary with DAW
17
Page 18

2. Using the optical connections
Up to 16 Mic/Line Sources
In addition to eight analogue inputs, the Clarett+ 8Pre has an ADAT input port (OPTICAL IN) which
can provide an additional eight audio inputs at 44.1/48 kHz sample rate, or four at 88.2/96 kHz.
Using a separate 8-channel microphone preamplier equipped with an ADAT output – such as the
Focusrite Clarett OctoPre – provides a simple and excellent method of expanding the Clarett+ 8Pre’s
input capability.
Inputs 1 & 2 on front panel
Clarett+ Octopre
8ch Mic Amp
Clarett+ 8Pre
AC ONLY 100-240V~ 50/60Hz 30W
AVERTISSEMENT
WARNING /
THIS EQUIPMENT MUST BE EARTHED BY THE POWER CORD
CET APPAREIL DOIT ETRE MIS A LA TERRE PAR LE CORDON D’ALIMENTATION
Inputs 1 & 2 on front panel
USB
48 1-8
965-8 1-4
OUT
192
1-2
3-4
OUT
IN
IN
ADAT
WORD CLOCK
LINE OUTPUTS
R
8
INSERT 8
7
INSERT 7INSERT 6
MIC/LINE INPUTS
6
INSERT 5
4
5
INSERT 4
INSERT 3
1
3
2
INSERT 1/2TIP = SEND RING = RETURN
Optional Word Clock link
Optical ADAT connection (TOSLINK)
Computer running DAW
and Focusrite Control
The Clarett OctoPre’s OPTICAL OUT port is connected to the Clarett+ 8Pre’s OPTICAL IN port with a
single TOSLINK optical cable. Stable word clock synchronisation may be achieved by connecting the
Clarett+ 8Pre’s WORD CLOCK output to the Clarett OctoPre’s WORD CLOCK IN and setting the Clarett
OctoPre to use this as its sync source. Alternatively, the Clarett+ 8Pre may be set to synchronise
via the ADAT format signal at the OPTICAL IN port. To do this in Focusrite Control go to Device
Settings and set Clock Source to ADAT.
NOTE: when connecting two digital devices by any method, always ensure both are set to use the
same sample rate.
You can route additional ADAT inputs in the same way as other inputs in Focusrite Control. ADAT
inputs can form part of any musician’s headphone mix, as needed.
If a suitable D-to-A converter with an ADAT input is available, the OPTICAL OUT port may be used
in the opposite manner; for example, additional outputs from the DAW may be converted into the
analogue domain to allow the use of an external hardware mixing console to mix down a large
number of DAW tracks.
18
Page 19

3. Using the Clarett+ 8Pre as a stand-alone mixer
The Clarett+ 8Pre can store a mix conguration dened in Focusrite Control within the hardware.
This feature lets you congure it – for example, as an on-stage keyboard mixer – using your computer,
and then retain the conguration in the device itself. Then you can use the Clarett+ 8Pre as a rack-
mounting mixer as part of your keyboard rig to control the overall mix of multiple keyboards.
To FOH Mixer
In the example illustrated, three stereo keyboards are connected to rear panel inputs of the Clarett+
8Pre; Outputs 1 and 2 connect to the main PA system. You can adjust the volume of the individual
keyboards from the front panel, and you can adjust the level you hear the mixed keyboards at through
the speakers.
19
Page 20

4. Providing foldback while recording
While recording, musicians often prefer to hear themselves along with other players, and when
overdubbing, tracks that have already been recorded.
Focusrite Control lets you dene several different mixes, each of which may be either mono or
stereo, and can be routed to any of the Clarett+ 8Pre’s outputs. This means each musician being
recorded can have a unique mix. In their mix you can include any hardware inputs on the Clarett+
8Pre and combine them with DAW tracks, such as click or pre-recorded backing tracks. See the
Focusrite Control Guide (obtainable from focusrite.com/downloads) for details of how to congure
different mixes, and how to route them to the Clarett+ 8Pre’s various outputs.
Each of the two headphone outputs on the front panel initially provides a default mix: Headphone
1’s mix is always the same stereo mix routed to Line Outputs 7 and 8, while Headphone 2 has a
completely independent mix dedicated for headphone monitoring use. You can adjust the content of
both mixes in Focusrite Control - Outputs 7/8 denes what is heard by Headphones 1, and Outputs
9/10 (which have no corresponding rear panel sockets) denes what is heard by Headphones 2.
Either or both of these may be used for a musician’s mix; each output can drive a pair of headphones
directly. This is the easiest method, and has the advantage the mixes are stereo. If you need to drive
additional pairs of headphones, you’ll need to include an external headphone amplier as part of
your set-up:
Headphone Distribution Amplifier
Always remember - when sourcing monitor mixes from input signals, ensure the DAW channels on
which you are recording are muted, otherwise the musicians will hear themselves “twice”, with one
signal audibly delayed as an echo.
20
Page 21

FOCUSRITE CONTROL - OVERVIEW
Focusrite Control is the software application used with the Clarett+ 8Pre, which can be downloaded
from focusrite.com/downloads. An iOS app allowing WiFi control of Focusrite Control is also
available, from the Apple App Store.
Focusrite Control allows you to create a custom monitor mix for each musician, and specify the
routing of all audio signals to the physical audio outputs. Sample rate and clock source selection are
also available from Focusrite Control.
Focusrite Control has its own dedicated User Guide, which has detailed operating
instructions for all aspects of the software.
This may be downloaded from focusrite.com/downloads.
21
Page 22

CLARETT+ 8PRE TECHNICAL SPECIFICATIONS
Performance Specifications
Where possible, specications are measured to AES17. Unless stated, all specication measurements
are unweighted.
Configuration
Inputs 18: analogue (8), S/PDIF (2), ADAT (8)
Outputs 8: analogue (4), S/PDIF (2), HP (2)
Mixer Fully assignable 26-in/10-out mixer
Custom mixes 10 mono
Maximum custom mix inputs 18 mono
Digital Performance
Supported sample rates 44.1 kHz, 48 kHz, 88.2 kHz, 96 kHz, 176.4 kHz, 192 kHz
Microphone Inputs
Frequency Response
Dynamic Range 118 dB at minimum gain (A-Weighted)
THD+N -110 dB @ -1 dBFS and 20 dB gain
Noise EIN -129 dBu (A-Weighted)
Maximum input level 18 dBu
Gain Range 57 dB
Impedance
Line Inputs
Frequency Response
Dynamic Range 118 dB at minimum gain (A-Weighted)
THD+N -100 dB @ -1 dBFS and minimum gain
Maximum input level 26 dBu
Gain Range 57 dB
Impedance 66K �
Instrument Inputs
20 Hz – 20 kHz, +/-<0.03 dB;
20 Hz – 35 kHz, +/-<0.15 dB
AIR off: 6.2K�
AIR on: 2.2K�
20 Hz – 20 kHz, +/-<0.05 dB;
20 Hz – 35 kHz, +/-<0.15 dB
Frequency Response
Dynamic Range 116 dB (A-Weighted)
THD+N -96.5 dB @ -1 dBFS and minimum gain
Maximum input level 15 dBu
Gain Range 57 dB
Impedance 2.3M �
20 Hz – 20 kHz, +/-<0.04 dB;
20 Hz – 35 kHz, +/-<0.15 dB
22
Page 23

Line and Monitor Outputs
Frequency Response
Dynamic Range Outputs (1-2) 124 dB (A-Weighted)
THD+N Outputs (1-2) -106 dB
Maximum Output Level (0 dBFS)
Balanced Line/TRS Outputs
Impedance 68 �
Headphone Outputs
Frequency Response
Dynamic Range 118 dB (A-Weighted)
THD+N -104 dB
Maximum Output Level 16 dBu
Impedance 5 �
20 Hz – 20 kHz, +/-<0.02 dB;
20 Hz – 35 kHz, +/-<0.02 dB
18 dBu
20 Hz – 20 kHz, +/-<0.06 dB;
20 Hz – 35 kHz, +/-<0.07 dB
Physical and Electrical Characteristics
Analogue Inputs 1 & 2
Connectors Combo XLR sockets: Mic/Line/Inst, on front panel
Mic/Line switching Automatic
Line/Instrument switching via Focusrite Control
Phantom power +48 V switches for inputs 1 to 4, 5 to 8
Analogue Inputs 3 to 8
Connectors Combo XLR: Mic/Line, on rear panel
Mic/Line switching Automatic
Phantom power +48 V switches for inputs 1 to 4, 5 to 8
Analogue Outputs
Main outputs 10 x balanced ¼” TRS jacks (on rear panel)
Stereo headphone output 2 x ¼” TRS jack on front panel
Main monitor output level control
Headphones level control
On front panel
23
Page 24

Other I/O
ADAT input
2 x TOSLINK optical connectors:
8 channels at 44.1/48 kHz
4 channels at 88.2/96 kHz
S/PDIF I/O
Data connector (to computer) 1 x USB-C™ connector
MIDI I/O 2 x 5-pin DIN sockets
Weight and Dimensions
W x H x D
Weight 4.08 kg (9.0 lb)
2 x phono (RCA); can be re-assigned
to ADAT ports in software
482.5 mm x 43.9 mm x 291 mm
19” x 1.73” x 11.46”
24
Page 25

TROUBLESHOOTING
For all troubleshooting queries, please visit the Focusrite Help Centre at support.focusrite.com.
COPYRIGHT AND LEGAL NOTICES
Focusrite, Clarett and OctoPre are registered trade marks of Focusrite Audio Engineering Ltd. in the
United States and other countries.
ADAT is a registered trademark of inMusic Brands in the US and other countries.
iOS, iPhone, iPad and App Store are trademarks of Apple Inc., registered in the US and other countries
and regions.
USB Type-C® and USB-C® are registered trademarks of USB Implementers Forum.
Thunderbolt is a trademark of Intel Corporation or its subsidiaries in the US and/or other countries.
2021 © Focusrite Audio Engineering Limited. All rights reserved.
25
 Loading...