

Page 1

User Guide
www.focusrite.com
FFFA001411-01
Page 2

2
TABLE OF CONTENTS
OVERVIEW..................................................................... 3
Introduction .................................................................3
Features . . . . . . . . . . . . . . . . . . . . . . . . . . . . . . . . . . . . . . . . . . . . . . . . . . . . . . . . . . . . . . . . . . . . 3
Box Contents ................................................................4
System requirements .........................................................4
Mac OS X ......................................................................4
Windows ......................................................................4
GETTING STARTED .............................................................5
Software Installation ..........................................................5
HARDWARE FEATURES.......................................................... 6
Front Panel..................................................................6
Rear Panel ..................................................................8
Connecting your Scarlett 18i8 ..................................................9
Power ........................................................................9
USB ..........................................................................9
Mac OS X only ..................................................................9
Windows only ..................................................................9
Audio Setup in your DAW .....................................................10
Example of Usage ...........................................................12
Connecting microphones and instruments .........................................12
Low Latency Monitoring ........................................................13
Connecting Scarlett 18i8 to loudspeakers ..........................................15
Using the ADAT connection ......................................................16
Using the Scarlett 18i8 as a stand-alone mixer......................................17
FOCUSRITE CONTROL ..........................................................18
SPECIFICATIONS .............................................................. 20
Performance Specifications ...................................................20
Physical and Electrical Characteristics ..........................................22
TROUBLESHOOTING ........................................................... 23
COPYRIGHT AND LEGAL NOTICES ...............................................23
Page 3

3
OVERVIEW
Introduction
Thank you for purchasing this Second Generation Scarlett 18i8, one of the family of Focusrite
professional audio interfaces incorporating high quality Focusrite analogue pre-amplifiers. In
conjunction with the unit’s accompanying software application, Focusrite Control, you now have a
compact yet highly versatile solution for routing high quality audio to and from your computer. You
can also use the Scarlett 18i8 as a “stand-alone” interface to any other type of recording device, once
you have configured it using Focusrite Control.
Focusrite Control, and several other exciting and useful software applications, can be downloaded
free of charge once you have registered your product. Note that a separate Focusrite Control User
Guide is also available; we strongly recommend that you download this as well.
In developing the Second Generation series of Scarlett interfaces, we have enhanced both the
performance and feature set including support for sample rates up to 192 kHz, improved mic preamp
performance with low noise and plenty of gain, and upgraded instrument inputs with additional
headroom for recording the loudest guitar parts without clipping.
Your Second Generation Scarlett interface is compatible with the new Focusrite Control software
application: this lets you control various hardware features, set up monitor mixes and configure
routings. There is a Focusrite Control installer for both Mac and Windows platforms, and no driver
is required for Macs. The Windows version of the installer contains the driver, so in either case, you
only need to install Focusrite Control to get up and running.
This User Guide provides a detailed explanation of the hardware to help you achieve a thorough
understanding of the product’s operational features. We recommend that you take the time to read
through the user guide, whether you’re new to computer-based recording or a more experienced
user, so that you are fully aware of all the possibilities that the Scarlett 18i8 and accompanying
software have to offer. If the main User Guide sections do not provide the information you need,
be sure to consult https://support.focusrite.com/, which contains a comprehensive collection of
answers to common technical support queries.
Features
The Scarlett 18i8 audio interface provides the means for connecting microphones, musical
instruments, line level audio signals and digital audio signals in both ADAT and S/PDIF formats to
a computer running compatible versions of Mac OS X or Windows via one of the computer’s USB
ports. The signals at the physical inputs can be routed to your audio recording software / digital audio
workstation (referred to throughout this user guide as the “DAW”) at up to 24-bit, 192 kHz resolution;
similarly, the DAW’s monitor or recorded output signals can be configured to appear at the unit’s
physical outputs.
The outputs can be connected to amplifiers and speakers, powered monitors, headphones, an audio
mixer or any other analogue or digital audio equipment that you wish to use. Although all inputs and
outputs on the Scarlett 18i8 are routed directly to and from your DAW for recording and playback, you
can configure the routing within your DAW in order to meet your precise needs.
The accompanying software application, Focusrite Control, provides further routing and monitoring
options, as well as the ability to control global hardware settings such as sample rate and
synchronisation.
Page 4

4
All inputs on the Scarlett 18i8 are routed directly to your DAW software for recording, but Focusrite
Control also allows you to route these signals internally within the device to the outputs so that you
can monitor the audio signals with ultra-low latency - before they arrive at your DAW, should you
need to do so.
The Scarlett 18i8 also has connectors for sending and receiving MIDI data; this lets you use it as a
MIDI “hub” between your computer’s USB port and other items of MIDI equipment in your system.
Box Contents
Along with your Scarlett 18i8 you should find:
• Bundle code* for accessing the following on-line resources:
- Focusrite Control (also available from www.focusrite.com/downloads)
- Focusrite Red 2 & 3 Plug-in Suite
- Softube Time and Tone bundle
- ProTools | First
- Ableton Live Lite
- LoopMasters sample library
- Novation Bass station
- Multi-language User Guides for both Scarlett 18i8 and Focusrite Control
• USB cable
• Getting Started Guide and Important Safety Information*
* information printed on the inside of the gift box
System requirements
Mac OS X
Apple Macintosh with a USB 2.0 or 3.0-compliant USB port and an Internet connection*
OS: Mac OS X 10.10 (Yosemite) or OS X 10.11 (El Capitan)**
Windows
Windows compatible computer with a USB 2.0 or 3.0-compliant USB port and an Internet connection*
OS: Windows 7 (32- or 64-bit), 8.1 and 10**
* Internet connection required for downloading on-line resources.
** System requirements are subject to change. Please check the following link for compatibility details:
www.focusrite.com/downloads/os
Page 5

5
GETTING STARTED
IMPORTANT: PLEASE ENSURE THAT YOU INSTALL FOCUSRITE CONTROL BEFORE
CONNECTING THE INTERFACE TO YOUR COMPUTER.
NOTE THAT THE SECOND GENERATION SCARLETT 18i8 DOES NOT REQUIRE
SEPARATE USB DRIVERS TO BE INSTALLED FOR EITHER MAC OR WINDOWS.
FOCUSRITE CONTROL INCLUDES THE NECESSARY DRIVERS.
Software Installation
All software required by the Scarlett 18i8 - and several powerful and useful extras - are available for
download from the Focusrite website (www.focusrite.com/register). You will find a “Bundle Code”
printed on the inside of the box your Scarlett 18i8 comes in, and the Serial number can be found on
the underside of the unit. You will need to enter these when you access the downloads area of the
website; this procedure ensures that you will have the most up-to-date software versions.
To download the included softw are, you will need to register your Scar lett 18i8 at focusrite.com/r egister
You will need the product serial number, found on the b ottom of your 18i8 hardware.
Once you have entered the seria l number, you will be asked to enter your BUND LE CODE, found below:
PRODUCT BUNDLE CODE XXXXXX-XXXXXX-XXXXXX
For an in depth video tutorial, plea se go to focusrite.c om/get-started
DOWNLOADING THE INCLUDED SO FTWARE
Pour obtenir des instructions en Français sur la façon de commencer, veuillez-vous rendre sur focusrite.com/downloads
Für eine Kurzanleitung zum sc hnellen Start in deutscher Sp rache besuche bitte focusrite.co m/downloads
Para la guía de inicio en E spañol, diríjase a focusri te.com/downloads
所有使用说明中文版,请上网站: focusrite.com/downloads
日本語での説明書はこちら: focusrite.com/downloads
시작 방법에 관한 한국어 가이드는 focusrite.com /downloads 에서 찾으실 수 있습니다
1. Using your usual browser, go to www.focusrite.com/register/.
2. Follow the on-screen instructions, entering the Serial number and then the Bundle Code
(XXXXXX-XXXXXX-XXXXXX) into the form where prompted. Your Bundle Code is printed on the inside
of the gift box.
3. You will then be able to access the “My Products” page, where Focusrite Control and the other
software products to which your registration entitles you are available for download, complete with
activation codes where applicable.
4. Download and install the Focusrite Control version (Mac or Windows) appropriate for your
computer. Follow all on-screen instructions.
5. When the installation is complete, restart your computer.
6. After restart, connect the Scarlett 18i8 to your computer with the USB cable supplied.
This information is accurate as of May 2016, however we are constantly striving to improve the customer experience and as a result
this process is subject to change. If anything appears to have changed please refer to www.focusrite.com/get-started for the latest
info.
Page 6
6
HARDWARE FEATURES
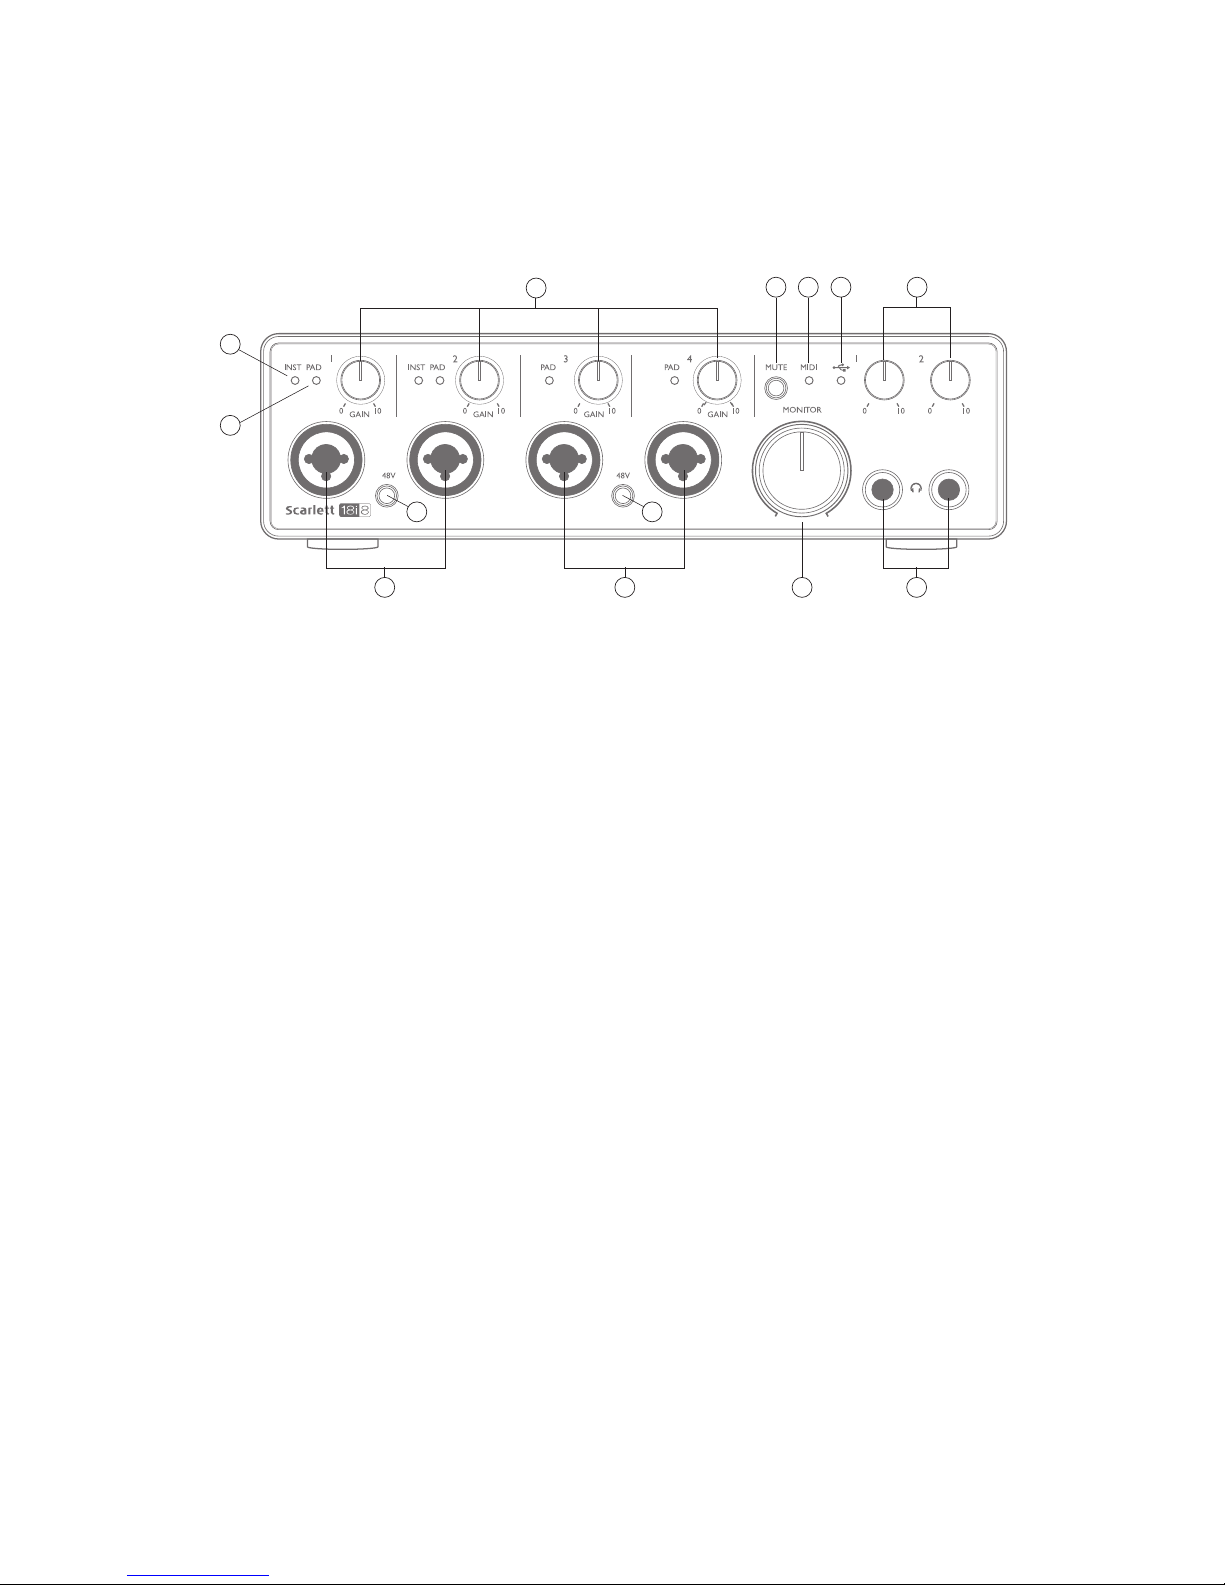
Front Panel
1
4
3
5
6
3
10 78
2 11
11
9
The Front Panel includes input connectors for Mic, Line and Instrument signals, the input gain and
monitoring controls, and sockets for headphones.
1. Inputs 1 and 2 – XLR Combo type input sockets - connect microphones, instruments (e.g.,
guitar), or line level signals via XLR or ¼” (6.35 mm) jacks as appropriate. Either ¼” TRS
(balanced) or TS (unbalanced) jack plugs can be used for instruments or line level signals.
2. Inputs 3 and 4 – XLR Combo type input sockets – as [1], but accept mic or line level signals
only. Direct connection of instruments should be via Inputs 1 and/or 2.
3. 48V – two switches enabling 48 V phantom power at the XLR contacts (mic inputs) of the
Combo connectors, in pairs (1 & 2; 3 & 4). The switch illuminates when phantom power is
selected.
4. GAIN 1 and GAIN 4 – adjust the input gain for the signals at Inputs 1 to 4 respectively. The
gain controls have concentric bi-colour LED ‘rings’ to confirm signal level: green indicates
an input level of at least -24 dBFS (i.e., ‘signal present’), the ring then turns red when signal
level reaches 0 dBFS.
5. INST – the input configuration for the jack contacts at Inputs 1 and 2 can be selected via
software from Focusrite Control. The green LEDs illuminate when INST is selected. With
INST selected, the gain range and input impedance are altered (relative to LINE), and the
input is made unbalanced. This optimises it for the direct connection of instruments (usually
via a 2-pole (TS) jack plug). When INST is off, the inputs are suitable for the connection of line
level signals. Line level signals may be connected either in balanced form via a 3-pole (TRS)
jack or unbalanced, via a 2-pole (TS) jack.
6. PAD – a 10 dB pad may be inserted in each of the four analogue input signal paths; these are
controlled via software from Focusrite Control. The pad increases the headroom of the input
stage, and should be used to reduce mic or line level signals which are ‘too hot’ (i.e., when the
gain halo is turning red while at minimum gain). It is not intended for use with the Instrument
inputs. The red LEDs illuminate when PAD is selected.
Page 7

7
7.
USB LED – a green LED which illuminates when the unit is recognised by the computer
to which it is connected.
8. MIDI LED – a green LED illuminates when MIDI data is received at the MIDI IN port.
9. MONITOR – main monitor output level control – this is an analogue control and adjusts the
level at Outputs 1 and 2 on the rear panel.
10. MUTE – push this button to mute Outputs 1 and 2. The button illuminates when MUTE is
active.
11. – connect one or two pairs of stereo headphones at the two ¼” (6.25 mm) TRS jack sockets
below the headphone volume controls 1 and 2. The headphone outputs always carry the
signals that are currently routed to analogue outputs 3 & 4 and 5 & 6 respectively (as stereo
pairs) in Focusrite Control.
Page 8
8
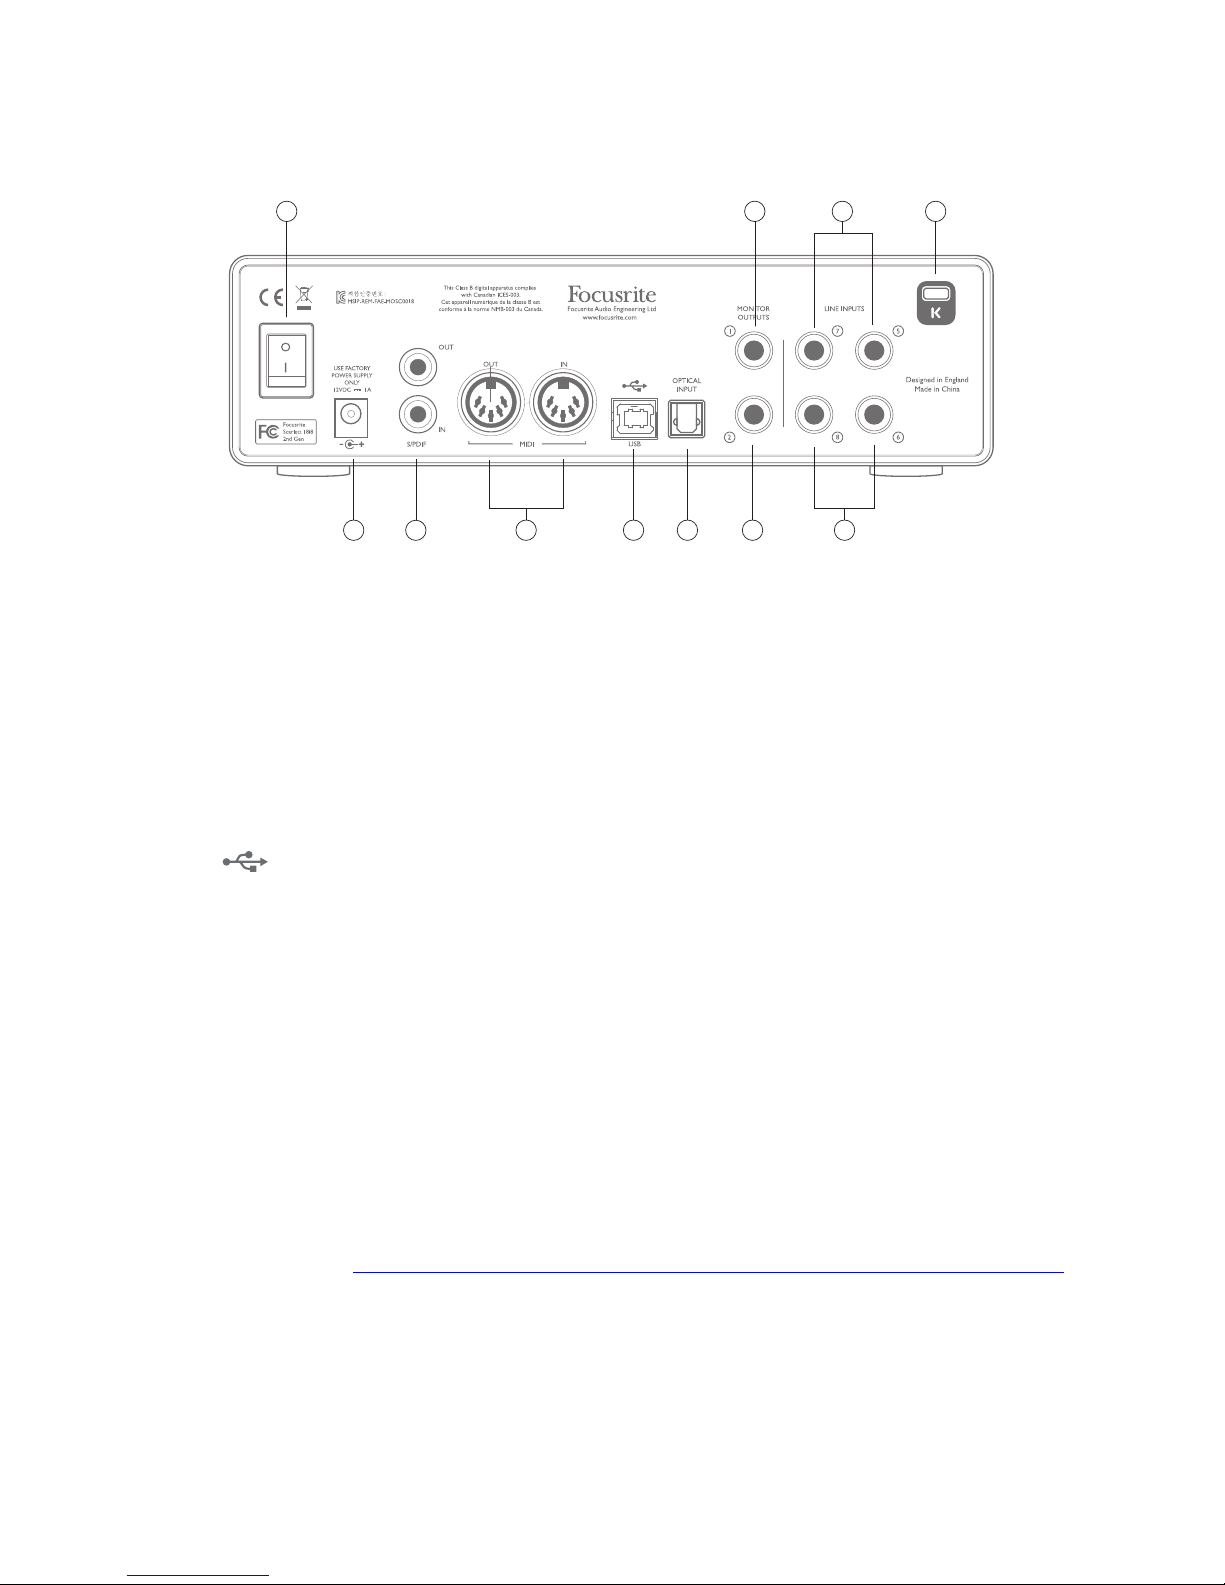
Rear Panel
12
12
13141516
17
13 1920
18
12. LINE INPUTS 5 to 8 – the inputs are balanced, on ¼” (6.35 mm) jack sockets. Connect further
line level sources here, using either ¼” TRS (balanced) or TS (unbalanced) jack plugs.
13. MONITOR OUTPUTS 1 and 2 – two balanced analogue line outputs on ¼” (6.35 mm) jack
sockets; use TRS jacks for a balanced connection or TS jacks for unbalanced. These will
generally be used for driving the main L and R speakers of your monitoring system; however,
the signals at the outputs may be defined in Focusrite Control.
14. OPTICAL INPUT – TOSLINK connector able to carry eight channels of digital audio in ADAT
format at 44.1/48 kHz sample rate or four channels at 88.2/96 kHz. These are simply additional
inputs (11 to 18) to the Scarlett 18i8. Note that the optical input is disabled when sample rates
of 176.4/192 kHz are in use.
15.
USB 2.0 port – Type B connector; connect the Scarlett 18i8 to your computer with the
cable supplied.
16. MIDI IN and MIDI OUT – standard 5-pin DIN sockets for connection of external MIDI equipment.
The Scarlett 18i8 acts as a “Break-out (and Break-in) Box”, allowing MIDI data to/from your
computer to be distributed to additional MIDI devices.
17. SPDIF IN and OUT – two phono (RCA) sockets carrying two-channel digital audio signals in and
out of the Scarlett 18i8 in S/PDIF format. These are essentially Inputs 9 and 10 and Outputs 7
and 8 to/from the unit. Like all the other inputs and outputs, signals at these connectors may
be routed in Focusrite Control.
18. External DC power input – power the Scarlett 18i8 via the separate AC adaptor (PSU) supplied
with the unit. Note that the Scarlett 18i8 cannot be powered via its USB port from the host
computer.
19. Power On/Off switch.
20. K (Kensington security lock) – secure your Scarlett 18i8 to a suitable structure if desired.
Please see www.kensington.com/kensington/us/us/s/1704/kensington-security-slot.aspx
for further information on how to use this feature.
Page 9

9
Connecting your Scarlett 18i8
IMPORTANT: Before you connect your Scarlett 18i8 to your
computer, please complete the software installation according to the
instructions at page 5. This will ensure that the hardware uses the
correct drivers, and will prevent unexpected behaviour.
Power
Your Scarlett 18i8 should be powered from an external 12 V DC, 1 A mains adaptor. A suitable adaptor
is supplied with the unit.
IMPORTANT: We very strongly recommend that you only use the supplied mains adaptor. Failure to
use this adaptor is likely to permanently damage the unit and will also invalidate your warranty.
USB
Your Scarlett 18i8 has a single USB 2.0 port (on the rear panel). Once the software installation is
complete, simply connect it to your computer; we recommend you use the USB cable provided. (Note
that Scarlett 18i8 is a USB 2.0 device, and thus the USB connection requires a USB 2.0-compliant
port on your computer. It will not operate correctly with USB 1.0/1.1 ports, however typically a USB
3.0 port will support a USB 2.0 device.)
Mac OS X only:
Your OS should automatically switch the computer’s default audio inputs & outputs to the
Scarlett 18i8. To verify this, go to System Preferences > Sound, and ensure that the input and
output are set to Scarlett 18i8. For more detailed setup options on a Mac, open Applications >
Utilities > Audio MIDI Setup.
Windows only:
Your OS should automatically switch the computer’s default audio inputs and outputs to be the
Scarlett 18i8. To verify this go to: Start > Control Panel > Hardware and Sound > Sound
> Manage Audio Devices and ensure that ‘Default Playback’ and ‘Recording’ are set to
‘Scarlett 18i8’
Page 10

10
Audio Setup in your DAW
The Scarlett 18i8 is compatible with any Windows-based DAW that supports ASIO or WDM or any Macbased DAW that uses Core Audio. After installing Focusrite Control and connecting the hardware,
you can start using your Scarlett 18i8 with the DAW of your choice. To allow you to get started if
you do not already have a DAW application installed on your computer, both Pro Tools | First and
Ableton Live Lite are included; these will be available to you once you’ve downloaded and activated
your software online. To install either DAW, download and save the relevant installer file from your
registered Focusrite “My Products” page as described on page 5, and then run it, following all
on-screen instructions.
Operating instructions for Ableton Live Lite and Pro Tools | First are beyond the scope of this User
Guide, but both applications include a full set of Help files. You can also find a video tutorial on
getting started with Ableton Live Lite at www.focusrite.com/getting-started.
Please note - your DAW may not automatically select the Scarlett 18i8 as its default I/O device. In this
case, you must manually select the driver on your DAW’s Audio Setup* page (select Scarlett 18i8
for Mac or Focusrite USB 2.0 driver for Windows). Please refer to your DAW’s documentation (or
Help files) if you are unsure where to select the ASIO/Core Audio driver. The example below shows
the correct configuration in the Ableton Live Lite Preferences panel (Mac version shown).
*Typical name. Terminology may differ slightly between DAWs.
Page 11

11
Once the Scarlett 18i8 is set as the preferred Audio Device* in your DAW, all 18 inputs and 8 outputs
will appear in your DAW’s Audio I/O preferences (note however that Ableton Live Lite is limited to a
maximum of four simultaneous mono input channels and four simultaneous mono output channels).
Depending on your DAW, you may need to enable certain inputs or outputs before use. The two
examples below show two inputs and two outputs enabled in Ableton Live Lite Audio Preferences.
*Typical name. Terminology may differ slightly between DAWs.
Page 12

12
Example of Usage
The Scarlett 18i8 is an excellent choice for several different recording and monitoring applications.
Some typical configurations are shown below.
Connecting microphones and instruments
Stereo Keys
Stereo Keys
Amplifier
Guitar Bass
Microphones
Musician’s individual
foldback mixes
This setup illustrates a configuration for recording a group of musicians with DAW software on Mac or
PC. In this case, Inputs 1 and 2 are used for two guitars, while Inputs 3 and 4 are used for vocals. Two
stereo keyboards are connected to Inputs 5 to 8 at the rear. During recording, playback of the DAW
can be monitored on the loudspeakers (if they are in a separate room – otherwise use headphones!),
and Focusrite control can be configured to provide each vocalist with their own dedicated headphone
mix. This can consist of any mix of themselves, the other singer, the guitars and keyboards, plus any
other DAW tracks that may have already been recorded.
Page 13

13
The front panel input sockets are XLR Combo type, which accept either an XLR male connector (you
will probably have one on the end of your microphone cable) or a ¼” (6.35 mm) jack plug. Note the
Scarlett 18i8 has no “Mic/Line” switch – the Focusrite preamplifier stage is automatically configured
for a microphone when you plug an XLR into the input, and for a line or instrument when you connect
a jack plug. Select INST in Focusrite Control (on the Device Settings page) if you are connecting a
musical instrument (like a guitar) via an ordinary 2-pole guitar jack, or LINE if you are connecting a
line level source such as the balanced output of an external audio mixer via a 3-pole (TRS) jack. Note
the Combo connector accepts both types of jack plug.
If you are using capacitor (condenser) microphones, press the 48V button to supply phantom power
to the mics. (In the example, this would be the 48V button for Inputs 3 and 4.) We recommend that
you don’t turn it on if you’re using any other type of mic. As the 48V button enables phantom power at
both inputs of a pair, it is best not to intermix condenser mics and other types (e.g., dynamics) in the
same pair, as the application of phantom power may cause damage to some types of non-condenser
microphones.
Channels 1 to 4 of the Scarlett 18i8 each have a PAD facility, selectable from Focusrite Control
(on the Device Settings page); switching the Pad into circuit reduces the input sensitivity by 10 dB.
You may find this useful if you are feeding the input from a line-level source when the output is
particularly “hot”.
Low Latency Monitoring
You will frequently hear the term “latency” used in connection with digital audio systems. In the
case of the simple DAW recording application described above, latency will be the time it takes for
your input signals to pass through your computer and audio software, and back out again via your
audio interface. While not an issue for most simple recording situations, under some circumstances,
latency can be a problem for a performer who wishes to record while monitoring their input signals.
This might be the case if you need to increase the size of your DAW’s recording buffer, which could
be necessary when you record overdubs on a particularly large project using many DAW tracks,
software instruments and FX plug-ins. Common symptoms of too low a buffer setting include audio
glitching (clicks and pops) or an unusually high CPU overhead within your DAW (most DAWs show
current CPU usage). Buffer size may be increased on Macs from within the DAW application itself,
while on PCs it is usually accessed on the DAW Setup Preferences page.
The Scarlett 18i8, in conjunction with Focusrite Control, allows “low latency monitoring”, which
overcomes this problem. You can route your input signals directly to the Scarlett 18i8’s headphone
outputs. This enables the musicians to hear themselves with ultra-low latency – i.e., effectively in
“real time” – along with the computer playback. The input signals to the computer are not affected
in any way by this setting. However, note that any effects being added to the live instruments by
software plug-ins will not be heard in the headphones in this case, although the FX will still be
present on the recording.
Page 14

14
In the example, each vocalist is receiving his/her own monitor mix because they each have their
“own” Scarlett 18i8 headphone output. Focusrite Control lets you define up to four separate stereo
mixes (or eight mono) and these mixes may include previously recorded DAW tracks as well the
current input signals. Here, just two stereo mixes are being used.
Stereo Keys
Amplifier
Microphones
Musician’s individual
foldback mixes
Direct Monitoring
set up in
Focusrite Controller
Stereo Keys
When using Direct Monitoring, ensure that your DAW software is not set to route any inputs (what you
are currently recording) to any outputs. If it is, the musicians will hear themselves “twice”, with one
signal audibly delayed as an echo.
Page 15

15
Connecting Scarlett 18i8 to loudspeakers
The 1/4” MONITOR OUTPUTS jacks on the rear panel will normally be used to send audio to monitoring
speakers. Self-powered monitors incorporate internal amplifiers with a volume control, and may be
connected directly. Passive loudspeakers will require a separate stereo amplifier; in this case, the
rear panel outputs should be connected to the amplifier’s inputs.
Active Speakers
Amplifier
Passive Speakers
All the line output connectors are 3-pole (TRS) ¼” (6.35 mm) jack sockets, and are electronically
balanced. Typical consumer (hi-fi) amplifiers and small powered monitors will probably have
unbalanced inputs, either on phono (RCA) sockets, or via a 3.5 mm 3-pole jack plug intended for
direct connection to a computer. In either case, use a suitable connecting cable with jack plugs at
one end.
Professional active monitors and professional power amplifiers will generally have balanced inputs.
NOTE: You run the risk of creating an audio feedback loop if loudspeakers are active at the same time
as a microphone! We recommend that you always mute (or turn off) monitoring loudspeakers while
recording, and use headphones when overdubbing.
Page 16

16
Using the ADAT connection
In addition to the eight analogue inputs, the Scarlett 18i8 has an optical ADAT input port which can
provide an additional eight audio inputs at 44.1/48 kHz sample rate or four at 88.2/96 kHz. (Note
that the optical ADAT input port does not support 176.4/192 kHz sample rates.) Using a separate
8-channel microphone preamplifier equipped with an ADAT output – such as the Focusrite OctoPre
MkII – provides a simple and excellent method of expanding the Scarlett 18i8’s input capability.
Computer
running DAW
and F
ocusrite Control
Inputs 1 & 2 on front panel
Optical ADAT connection (TOSLINK)
Inputs 1 to 4 on front panel
Up to 16 Mic/Line Sources
Octopre
8ch Mic Amp
The OctoPre MkII’s ADAT output is connected to the Scarlett 18i8’s ADAT input with a single TOSLINK
optical cable. To synchronise the devices, set the clock source of the OctoPre MKII to Internal and
that of the Scarlett 18i8 (via Focusrite Control) to ADAT.
TIP: When interconnecting two digital devices by any method, always ensure that both are set
to the same sample rate.
The additional inputs realised by use of the ADAT port may be routed using Focusrite Control in
exactly the same manner as the other inputs. The additional inputs can form part of any musician’s
headphone mix, as required.
Page 17

17
Using the Scarlett 18i8 as a stand-alone mixer
The Scarlett 18i8 has the ability to store a mix configuration defined in Focusrite Control within the
hardware. This feature lets you configure it – for example, as an on-stage keyboard mixer – using your
computer, and then upload the configuration to the device itself. Then you can use the Scarlett 18i8
as a simple local mixer as part of your keyboard rig to control the overall mix of multiple keyboards.
Stereo Keys
To FOH Mixer
Stereo Keys
Stereo Keys
In the example illustrated, three stereo keyboards are connected to the inputs of the Scarlett 18i8;
the Monitor Outputs go to the main PA system. The performer can adjust the volume of two of the
keyboards against the third from the front panel; he/she can also adjust the overall level of the
keyboard mix.
Greater flexibility of on-stage mixing could be achieved by connecting an OctoPre Mk II via the optical
ADAT port, as in the previous example; all keyboard sources could be connected directly to the
OctoPre Mk II, providing pre-input level control.
Page 18

18
FOCUSRITE CONTROL
Focusrite Control software allows flexible mixing and routing of all audio signals to the physical
audio outputs, as well as control of output monitor levels. Sample rate selection and digital sync
options are also available from Focusrite Control.
NOTE: Focusrite Control is a generic product, and may be used with
other Focusrite hardware interfaces. When you connect an interface to
your computer and launch Focusrite Control, the model of interface is
automatically detected, and the software configured to suit the number of
inputs and outputs, and other facilities, available on the hardware.
IMPORTANT: A separate Focusrite Control User Guide can be downloaded
once you have completed the on-line registration process. This describes the
use of Focusrite Control in full detail, together with examples of application.
To open Focusrite Control:
Installing Focusrite Control on your computer will place an FC icon on the dock or desktop.
Click the icon to launch Focusrite Control.
Assuming that your Scarlett interface is connected to your computer with the USB cable, the Focusrite
Control GUI (Graphical User Interface) will appear as shown below (Mac version illustrated).
Page 19

19
The following table provides the channel routings when preset option “Direct Routing” is selected
in Focusrite Control; see the screen image on page 18.
At 44.1 kHz and 48 kHz sample rates:
CH NO. INPUTS OUTPUTS
1 Input 1 Output 1
2 Input 2 Output 2
3 Input 3 Output 3
4 Input 4 Output 4
5 Input 5 Output 5
6 Input 6 Output 6
7 Input 7 S/PDIF 1
8 Input 8 S/PDIF 2
9 S/PDIF 1
10 S/PDIF 1
11 ADAT 1
12 ADAT 2
13 ADAT 3
14 ADAT 4
15 ADAT 5
16 ADAT 6
17 ADAT 7
18 ADAT 8
Page 20

20
Please refer to the Focusrite Control User Guide for further details.
CH NO. INPUTS OUTPUTS
1 Input 1 Output 1
2 Input 2 Output 2
3 Input 3 Output 3
4 Input 4 Output 4
5 Input 5 Output 5
6 Input 6 Output 6
7 Input 7 S/PDIF 1
8 Input 8 S/PDIF 2
9 S/PDIF 1
10 S/PDIF 1
11 ADAT 1
12 ADAT 2
13 ADAT 3
14 ADAT 4
15
16
17
18
CH NO. INPUTS OUTPUTS
1 Input 1 Output 1
2 Input 2 Output 2
3 Input 3 Output 3
4 Input 4 Output 4
5 Input 5 Output 5
6 Input 6 Output 6
7 Input 7 S/PDIF 1
8 Input 8 S/PDIF 2
9 S/PDIF 1
10 S/PDIF 1
11
12
13
14
15
16
17
18
At 88.2 kHz and 96 kHz sample rates: At 176.4 kHz and 192 kHz sample rates:
Page 21

21
SPECIFICATIONS
Performance Specifications
Configuration
Inputs 18: analogue (8), ADAT (8), S/PDIF (2)
Outputs 8: analogue (6), S/PDIF (2)
Mixer
Fully assignable 18-in/8-out software mixer
(Focusrite Control)
Digital Performance
Supported sample rates 44.1 kHz, 48 kHz, 88.2 kHz, 96 kHz, 176.4 kHz and 192 kHz
Clock jitter <250 ps
Microphone Inputs
Frequency Response 20 Hz to 20 kHz, +0.5/-1.5 dB
Dynamic Rnge 109 dB (‘A’-weighted)
THD+N < 0.002%
Noise EIN –127 dBu
Maximum Input Level +8.5 dBu (without pad)
Gain Range 50 dB
Line Inputs 1 & 4
Frequency Response 20 Hz to 20 kHz, +0.5/-1.5 dB
Dynamic Range 109 dB (‘A’-weighted)
THD+N < 0.003%
Maximum Input Level +22 dB
Gain Range 50 dB
Line Inputs 5 & 8
Frequency Response 20 Hz to 20 kHz, +/-0.5 dB
Dynamic Range 110 dB (‘A’-weighted)
THD+N < 0.003%
Maximum Input Level +16 dB
Page 22

22
Instrument Inputs
Frequency Response 20 Hz to 20 kHz, +0.5/-1.5 dB
Dynamic Range 109 dB (‘A’-weighted)
THD+N < 0.003%
Maximum Input Level +12 dBu
Gain Range 50 dB
Monitor Outputs 1 & 2
Frequency Response 20 Hz to 20 kHz, +/-0.5 dB
Dynamic Range 108 dB (‘A’-weighted)
THD+N < 0.001%
Maximum Output Level (0 dBFS) +16 dBu, balanced
Headphone Outputs
Frequency Response 20 Hz to 20 kHz, +/-0.5 dB
Dynamic Range 108 dB (‘A’-weighted)
THD+N < 0.001%
Maximum Output Level (0 dBFS) +13 dBu
Page 23

23
Physical and Electrical Characteristics
Analogue Inputs 1 & 2
Connectors XLR Combo type: Mic/Line/Inst, on front panel
Mic/Line switching Automatic
Line/Instrument switching Via software from Focusrite Control
Phantom power Shared +48 V phantom power switch for inputs 1 and 2
Analogue Inputs 3 & 4
Connectors XLR Combo type: Mic/Line/Inst, on front panel
Mic/Line switching Automatic
Phantom power Shared +48 V phantom power switch for inputs 3 and 4
Analogue Outputs 1 to 6
Connectors (Outputs 1 & 2) 2 x balanced ¼” TRS jacks on rear panel
Stereo headphone outputs
(Outputs 3 to 6)
2 x ¼” TRS jacks on front panel
Main monitor output level control
On front panel
Headphones level controls
Other I/O
ADAT
TOSLINK optical connector
8 channels @ 44.1/48 kHz or 4 channels @ 88.2/96 kHz
S/PDIF I/O 2 x phono (RCA)
USB 1 x USB 2.0 Type B connector
MIDI I/O 2 x 5-pin DIN sockets
Weight and Dimensions
W x D x H
192 mm x 66 mm x 229 mm
7.56” x 2.6” x 9.02”
Weight
1.68 kg
3.70 lb
Page 24

24
TROUBLESHOOTING
For all troubleshooting queries, please visit the Focusrite Answerbase at
https://support.focusrite.com/hc/en-gb/requests/new where you will find articles covering
numerous troubleshooting examples.
COPYRIGHT AND LEGAL NOTICES
Focusrite is a registered trade mark and Scarlett 18i8 is a trade mark of Focusrite Audio
Engineering Limited.
All other trade marks and trade names are the property of their respective owners.
2016 © Focusrite Audio Engineering Limited. All rights reserved.
Page 25

GET STARTED WITH SCARLETT 6i6, 18i8 & 18i20
Thanks for choosing the Scarlett 2nd Gen. as your audio interface.
For an in depth video tutorial, please go to focusrite.com/getstarted or see the quick step guide below...
Mac Users
1. Please go to: focusrite.com/register
2. Enter your serial number, found on the bottom of your hardware
3. Then, enter your PRODUCT BUNDLE CODE found on the
inside of the product box
4. Download and install the Focusrite Control software installer for
your operating system
5. Run the installer
6. Connect your Scarlett audio interface with the included IEC
power cable, connect the device to your Mac using the included
USB cable then power up the unit
7. Go to "System Preferences" then "Sound" and select your
Scarlett Eg. "Scarlett 18i20" as the input and output device
8. You are now ready to use your audio interface
(Please Note: You may need to select the Scarlett as your
interface within your music software preferences)
Windows Users
1. Please go to: focusrite.com/register
2. Enter your serial number, found on the bottom of your hardware
3. Then, enter your PRODUCT BUNDLE CODE found on the
inside of the product box
4. Download and install the Focusrite Control software installer for
your operating system (includes drivers)
Page 26

5. Run the installer
6. Connect your Scarlett with the included IEC power cable,
connect the device to your PC using the included USB cable then
power up the unit
7. Go to "CONTROL PANEL" then "SOUND" and select your
Scarlett Eg. "Scarlett 18i20" as the playback and recording default
device
8. You are now ready to use your audio interface
(Please Note: You may need to select the Scarlett as your
interface within your music software preferences)
DOWNLOADING THE INCLUDED SOFTWARE
To download the included software, you will need to register your
Scarlett at focusrite.com/register
You will need the product serial number, found on the bottom of
your hardware
Once you have entered the serial number, you will be asked to
enter your PRODUCT BUNDLE CODE, found printed on the inside
of the product box in the following format:
XXXXXX-XXXXXX-XXXXXX
This info is accurate as of May 2016, however we are constantly
striving to improve the customer experience and as a result this
process is subject to change. If anything appears to have changed
please refer to www.focusrite.com/get-started for the latest info.
Focusrite is a trademark of Focusrite Audio Engineering Limited
registered in the UK and other countries. Scarlett 6i6, Scarlett 18i8
and Scarlett 18i20 are trademarks of Focusrite Audio Engineering
Limited registered in the UK and other countries. 2016 © Focusrite
Audio Engineering Limited. All rights reserved.
!
!
!
Page 27

Important Safety Precautions
CAUTION:
USER---SERVICEABLE
ATTENTION :
LE
DOS).
TOUTE
The lightning flash
the
user
that
may be
Le
A
WARNING:
MOISTURE
AVERTISSEMENT:
TO
AND
REDUCE
OBJECTS
POUR
THE
RISK
FILLED
WITH
PREVENIR
OF
symbole d'eclair
l'utilisateur
tension
The exclamation
presence
accompanying the appliance.
Le
point
presence d'instructions importantes de
Ia
documentation accompagnant
FIRE
OR
LIQUIDS,
TOUT
DANGER
Environmental Declaration
I
Precautions importantes de
TO
REDUCE
THE
RISK
OF
PARTS
POUR
AUCUNE
REPARATION
to
d'amplitude
of
d'exclamation dans un
ELECTRIC
REDUIRE
PIECE
A
DU
with
the
presence
of
sufficient magnitude
a
de
pointe de
Ia
presence d'une "tension
suffisante pour constituer un risque
point
important
within
operating and maintenance (servicing) instructions in
SHOCK,
SUCH
AS
VASES,
D'INCENDIE
PLUIE
Nl
A
L'HUMIDITE.
ELECTRIC
INSIDE.
REFER
LE
RISQUE
N'EST
REPARABLE
PERSONNEL
arrowhead symbol,
of
uninsulated "dangerous
fleche
an
equilateral triangle
triangle equilateral
l'appareil.
DO
NOT
SHOULD
OU
DE
SHOCK,
SERVICING
DE
PAR
DE
MAINTENANCE QUALIFIE.
to
constitute a risk
dans un
dangereuse"
fonctionnement
EXPOSE
NOT
CHOC,
TO
CHOC
ELECTRIQUE,
L'UTILISATEUR
within
equilateral triangle,
voltage"
triangle equilateral
is
est destine
THIS
BE
PLACED
N'EXPOSEZ
DO
intended
securite
NOT
REMOVE
COVER
(OR
QUALIFIED
of
non
d'electrocution
et
APPLICANCE
SERVICE
NE
RETIREZ
A
L'INTERIEUR.
is intended
within
electric
the product's enclosure
shock
to
est destine
isolee
dans !'enceinte du produit,
pour
to
alert
the
a
alerter
de maintenance (reparation) dans
l'utilisateur
TO
ON
THIS
APPARATUS
PAS
CET
APPAREIL
BACK).
PERSONNEL.
PAS
LE
CAPOT
CONFIEZ
to
persons.
a
alerter
les
personnes.
user
to
the
the
literature
de
RAIN
OR
A
NO
(NI
alert
Ia
LA
Compliance
Product Identification:
Responsible
Address:
party:
Information Statement:
Focusrite
American Music and Sound
4325 Executive Drive
Suite
300
Scarlett
2i2
(2nd
Gen)
Declaration
Southaven
MS
Telephone:
38672
800-431-2609
This device
interference, and (2) this device must accept any interference received, including interference
For
1.
Do
Modifications
2.
Important
quality shielded cables
and televisions and void your
3. Note: This
limits
can radiate radio frequency energy and,
communications. However, there
interference
the
Reorient
Increase
Connect
Consult
complies
with
USA
•··
to
the
User:
not
modify
this
unit!
not
expressly approved by Focusrite may void your authority, granted by
:
This
product
or
equipment
are designed
interference by one
or
relocate the receiving antenna
the separation between the
the
the
dealer
to
to
radio
or
equipment
or
has
provide
an
part 15
of
the
FCC
Rules.
Operation
This product, when
satisfies
FCC
to
follow
FCC
authorization
been tested and found
reasonable
is
television
or
into
reception, which
more
of
an
outlet
experienced radio/TV technician
installed
as
regulations when high
the installation instructions
no guarantee
the
equipment
to
use this product in
to
protection against
if
not
following
on a circuit
comply
installed and used in accordance
that
can
measures:
and receiver
different
is
subject
to
the
following
indicated in the instructions contained in this
quality
shielded cables
within
this
manual
the
USA
.
with
the
limits
for
a
harmful
interference
be determined by
for
from
help
will
that
interference in a residential installation. This
to
Class
with
not
occur in a particular installation.
turning
which the receiver
of
Compliance
two
conditions: (1) This device may
that
may cause undesired operation.
FCC,
to
to
connect
off
is
connected
manual,
use
and on,
the
are used
may cause magnetic interference
B
digital device, pursuant
the instructions, may cause
the equipment
procedure
meets
this product.
with
other
to
If
this
the
FCC
equipment.
with
part
15
equipment
harmful
equipment
user
is
encouraged
not
cause
requirements.
Failure
appliances such
of
the
FCC
generates, uses and
interference
does cause
to
harmful
to
use high
Rules.
to
radio
try
as
radios
These
harmful
to
correct
For Canada This
Cet appareil
RoHS
Focusrite Audio Engineering Limited
on Restrictions
25214.10.2, and 58012,
Class
Notice
B
to
the
User:
digital apparatus
numerique de
of
Hazardous Substances
Health
complies
Ia
classe
with
Best
has
and Safety
Canadian ICES--003
conforme
conformed and this
(RoHS)
Code;
a
Ia
norme NMB---003 du
as
product
the
as
well
Section 42475.2,
Canada.
conforms, where
following sections
Public
Resources
applicable,
of
California law
Code.
to
the European Union's Directive 2011/65/EU
which refer
to
RoHS,
namely sections 25214.10,
FFFA001303-01
Page 28

Important Safety Instructions
1.
Read
these instructions
2.
Keep these instructions
3.
Heed
all
warnings
4.
Follow all instructions
5.
Do
not
<I
use this apparatus near
6.
Clean
only
with
dry
cloth
7.
Do
not
install
near any heat sources such
produce heat
8.
Do
not
defeat
the
safety purpose
than
the
other. A grounding type plug has
provided
obsolete
Protect
9.
where
The socket---outlet
10.
Only
11.
Use
12.
cart
Unplug this apparatus during lightning storms
13.
Refer
14.
such
apparatus
No naked flames, such
15.
for
your
safety.
outlet
the
power
cord
they
exit
from
the apparatus
shall
use attachments/accessories specified by
only
with
the cart, stand,
is
used, use caution
all
as
power
servicing
to
---supply cord
has
been exposed
qualified service
water
of
the
If
the
provided plug does
from
being walked on
be
installed
when
as
lighted candles, should be placed on
tripod,
moving
or
plug
to
rain
near
is
or
as
radiators, heat registers, stoves,
polarized
bracket,
the
personnel.
damaged, liquid
moisture, does
or
grounding---type plug. A polarized plug has
two
blades and a
not
or
pinched particularly
the
equipment
the
manufacturer
or
table specified by
cart/apparatus
or
when
Servicing
third
fit
into
and shall
combination
unused
is
required
has
been
not
operate
or
grounding prong. The
your
outlet,
consult
at
plugs, convenience
be easily accessible
the
manufacturer,
to
avoid
for
long periods
when
the
spilled
or
objects have
the
apparatus
normally,
or
other
apparatus
two
wide
blade
an
electrician
receptacles,
or
sold
with
injury
from
tip---over
of
time
apparatus
has been dropped.
has
been damaged in any way,
fallen
into
(including
for
the
amplifiers)
blades
with
or
the
third
replacement
and
the
apparatus. When a
apparatus,
one
prong are
of
the
point
the
that
wider
the
WARNING:
Instructions de
(I
Excessive sound pressure
This
equipment
must
securite importantes
1.
Lisez
ces
instructions
2.
Conservez
3.
Tenez
4.
Suivez
5.
N'utilisez pas cet appareil avec de l'eau
6.
Nettoyez---le
7.
Ne bloquez aucune
8.
Ne
amplificateurs)
9.
Ne supprimez pas le
dont
de
rem placement de
10. Evitez que
sortie de l'appareil
11. N'utilisez que des fixations/accessoires
12. N'utilisez
un chariot, prenez garde lors du deplacement de
13. Debranchez cet appareil
14.
Confiez
endommage de quelque
liquide
l'humidite,
ces
instructions
compte
de tous
toutes
les
uniquement
l'installez
terre
pas
qui
une plus large que
servent
a
le
cordon
qu'un
chariot, stand,
toute
reparation
a
ete
renverse sur l'appareil ou
ne
fonctionne
instructions
ouverture
pres
d'une
produit
dispositif
votre
Ia
prise obsolete
d'alimentation
levels
from
earphones and headphones can cause hearing loss
only
be connected
les
avertissements
avec un
chiffon
de
ventilation.lnstallez---le
source de chaleur de
de
Ia
chaleur
de
securite que represente
I' autre. Une fiche de
securite.
Si
trepied,
durant
les
a
un personnel de maintenance qualifie . Une reparation est necessaire
fa~;on
que
pas
normalement
to
USB
a
proximite
doux
terre
Ia
fiche
fournie
ne soit
pietine
specifies
fixation ou table
orages ou en
ce
soit,
notamment
sides
objets
ouest
2.0
type
ports
conformement
type
radiateur, bouche de chaleur,
Ia
fiche
polarisee
a deux bornes
ne
rentre
ou
pince,
par
le
fabricant
specifie
I'
ensemble chariot/appareil
cas
de non
si
sont
tombe
et
une troisieme
pas
dans
votre
particulierement
par
le fabricant, ou vendu avec
utilisation prolongee
le
cordon
d'alimentation
tombes
a
l'interieur,
aux instructions du
poele
ou de terre. Une fiche
pour
prise, consultez un electricien
au
niveau des fiches, des multiprises
a
ne pas
ou
si
l'appareil est expose
fabricant
ou
autre
appareil
polarisee
Ia
terre.
La
lame large ou
pour
l'appareil.
etre
blesse par un renversement
si
sa
fiche
sont
Si
l'appareil a
endommages,
a
Ia
pluie ou
(dont
des
a deux lames
Ia
borne
le
et
de
vous utilisez
ete
si
du
a
Ia
AVERTISSEMENT:
Des
niveaux de pression sonore excessifs
Cet
equipement
doit
etre
connecte
au
casque
uniquement
et
dans des ecouteurs
a
des ports
USB
de type 2.0
peuvent
entralner
une
perte
auditive
FFFA001303-01
 Loading...