

Focus Foodservice West Bend Commercial Stainless Steel Coffeemakers User Manual [en, de, es, fr]

Use and Care Instructions
English Instructions begin on page 1.
Instructions d’utilisation
et d’entretien
Les instrucions en Français
commencent en page 7.
Instrucciones para el
Uso y Cuidado
Las instrucciones en Español
comienzan en la página 13.
Bedienungs-und
Pflegeanleitung
Die deutsche Gebrauchsanleitung
beginnt auf Seite 9.
Gebruiks en
Onderhoudsaanwijzigingen
Nederlandse instructies beginnen op pagina 27.
220-240V~
50/60Hz
b
y
FFS_220V_COFFMAKER_MANUAL_050113_L20153COM 5/4/13 11:47 AM Page 1

TO PREVENT PERSONAL INJURY OR PROPERTY DAMAGE, READ AND FOLLOW THE
INSTRUCTIONS AND WARNINGS IN THIS CARE AND USE INSTRUCTION MANUAL.
IMPORTANT SAFEGUARDS
Use electricity safely and wisely. Observe safety precautions when using your coffeemaker
including the following:
• Read all instructions before using.
• Be sure switch is pushed to “o” (“OFF”) before plugging cord into wall outlet. If coffeemaker does
not have a switch, be sure coffeemaker contains water or brewed coffee before plugging in. Do
not leave coffeemaker plugged in when it is not being used.
• Plug coffeemaker into 220-240 volt AC grounded (earthed) electric outlet ONLY. Ensure that
plug is wired correctly as follows.
• Coffeemaker should always be unplugged and allowed to cool before cleaning.
• Do not let cord touch hot surfaces or hang over the edge of a counter, table or surface area.
• Make sure cover, basket and stem are properly attached before coffeemaker is plugged in (see
instructions). No part of the coffeemaker should be removed during the brewing cycle as
scalding could occur.
• Your coffeemaker, its cord and plug should not be used outdoors, immersed in liquids, placed
near a hot electric or gas burner or placed in a heated oven.
• Do not touch coffeemaker when it is hot. Use handles or knob.
• Supervise closely when coffeemaker is used by or near children.
• Use your coffeemaker only for the uses described in this booklet. Do not use attachments with
your coffeemaker unless recommended by Focus Foodservice.
• Do not use your coffeemaker if it or its cord are damaged or not working properly.
• This appliance is not suitable for installation in an area where a water jet could be used.
• This appliance is only to be installed in locations where it can be overseen by trained personnel.
• This appliance is not intended for use by persons (including children) with reduced physical, sensory
or mental capabilities, or lack of experience and knowledge, unless they have been given supervision
or instruction concerning use of the appliance by a person responsible for their safety.
SAVE THESE INSTRUCTIONS
1
DECLARATION OF CONFORMITY
Product: Coffeemakers
Model No: 57060-220, 57100-220, 58010V, 58015V, 58016V,
This Product Complies with all applicable European Community Directives.
Electromagnetic Compatibility Directive 2004/108/EC; Low Voltage Directive 2006/95/EC
FFS_220V_COFFMAKER_MANUAL_050113_L20153COM 5/4/13 11:47 AM Page 2
WARNING: THIS
APPLIANCE MUST BE GROUNDED
NOTICE
If the supply cord of this appliance is damaged, it must be replaced by a repair
shop appointed by the manufacturer because special purpose tools and a special
cord are required.
Promptly dispose of any plug that has been cut from the power supply cord.
WARNING: A shock hazard could result if the cut-off plug is inserted in a socket outlet
elsewhere in the house.
2
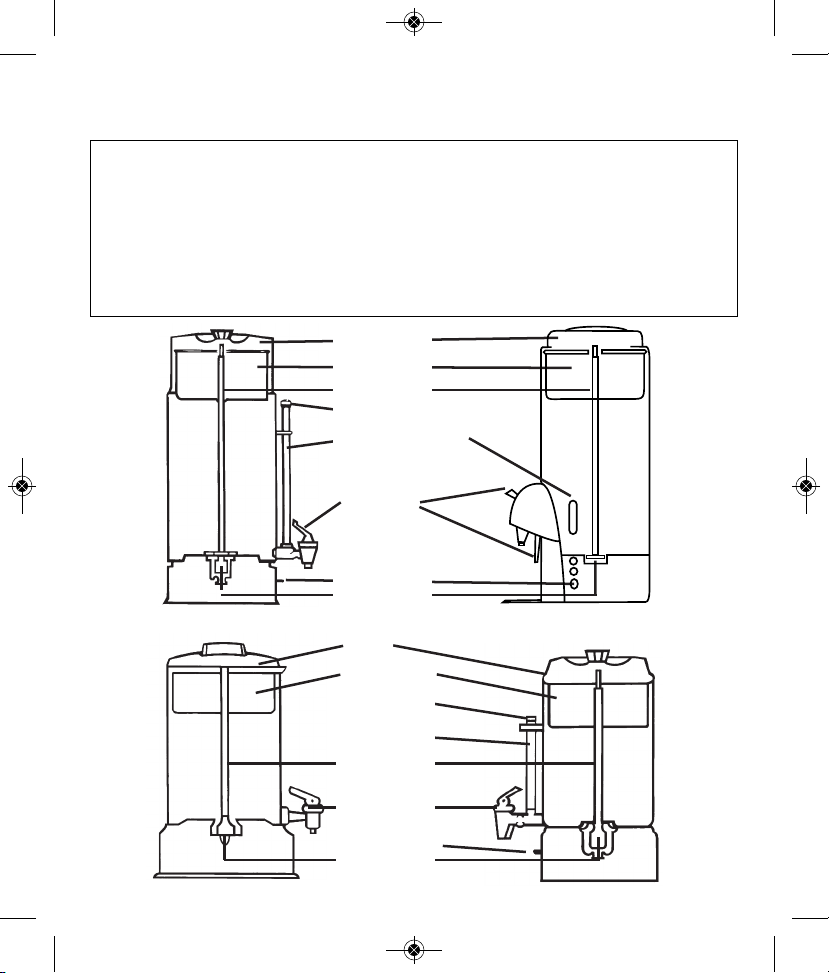
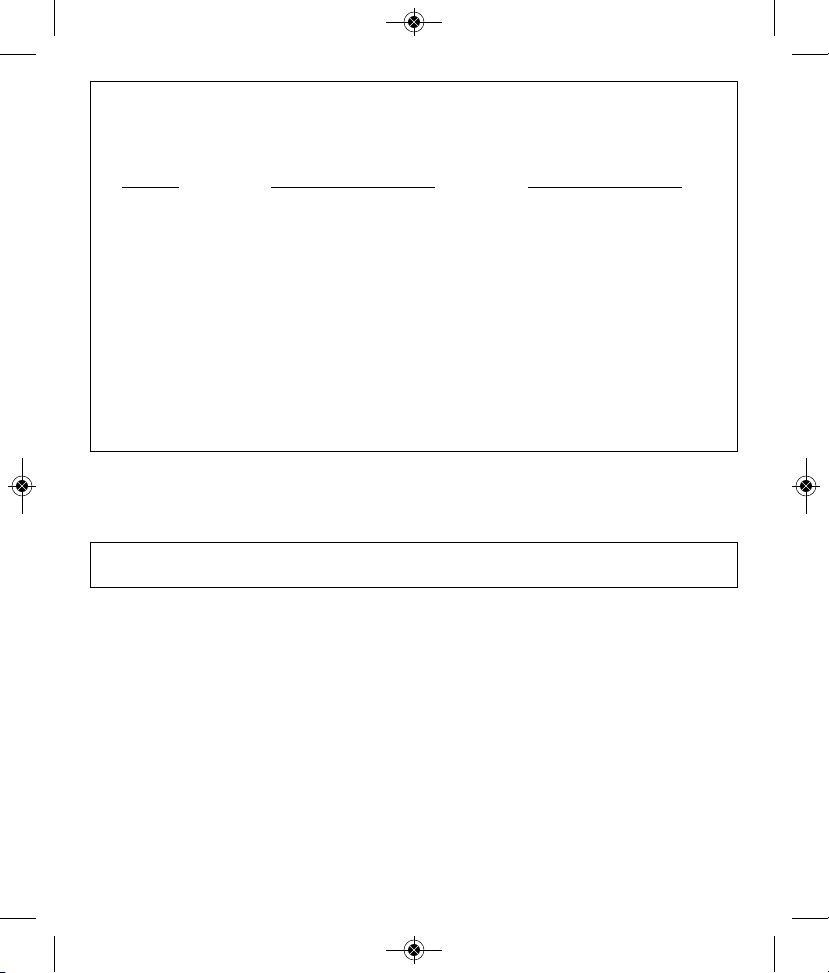
COVER
COFFEE BASKET
GAUGE CAP
G
COFFEE-LEVEL
AUGE
STEM
FAUCET ( TAP)
ON-OFF SWITCH
HEATING WELL
UNIT
60 CUP:
57060-220
100 CUP:
57100-220
100 CUP:
58010V
COVER
COFFEE BASKET
GAUGE CAP
COFFEE-LEVEL
GAUGE
STEM
FAUCET ( TAP)
ON-OFF SWITCH
HEATING WELL
UNIT
36 CUP:
58016V
55 CUP:
58015V
FFS_220V_COFFMAKER_MANUAL_050113_L20153COM 5/4/13 11:47 AM Page 3
INSTRUCTIONS FOR MAKING COFFEE
1. Before using the first time, clean coffeemaker thoroughly. Refer to Regular Cleaning
Instructions on pages 5 and 6.
CAUTION: TO PREVENT PERSONAL INJURY OR ELECTRIC SHOCK, DO NOT IMMERSE
COFFEEMAKER, ITS PLUG OR CORD IN WATER OR OTHER LIQUID.
2. Always use coffeemaker on a dry, level surface. Be sure hands are dry.
3. With basket and stem removed, fill coffeemaker with COLD water. Marks on inside of
coffeemaker show water levels.
4. Press stem into heating well unit in bottom of coffeemaker; put basket on stem. Put electric
perk ground coffee in basket; do not let any fall into stem. Follow proper chart for amount
to use. Spread evenly in basket. (Use standard measuring cups as used to measure flour,
sugar, etc. to measure coffee.) Amount of coffee can be adjusted to suit taste preference.
SPECIAL NOTE ON GRINDING BEANS: If grinding your own coffee beans, grind to
medium coarseness for best results. DO NOT grind too fine (powder-like) as this can
cause basket to flood.
5. Place cover on coffeemaker, twisting to secure in place inside handles. Note the arrows
3
COFFEE MEASURING GUIDE
These are recommended amounts only – coffee strength can be adjusted to personal
taste by adding or subtracting from these quantities.
CUPS
* GROUND COFFEE (MILD) GROUND COFFEE (STRONG)
12-15
3
⁄4 cup (64 g) 11⁄4 cup (106 g)
20-25 1
1
⁄2 cups (128 g) 21⁄2 cups (213 g)
30-36 2 cups (170 g) 3 cups (255 g)
40-45 2
1
⁄2 cups (213 g) 4 cups (340 g)
50-55 3
1
⁄4 cups (276 g) 5 cups (425 g)
60-65 3
3
⁄4 cups (319 g) 61⁄4 cups (531 g)
80-85 5
1
⁄2 cups (468 g) 73⁄4 cups (659 g)
95-100 6
1
⁄4 cups (531 g) 91⁄2 cups (808 g)
*1 cup = 5 oz./150 mL serving
Allow approximately 1 minute per cup brewing time. Voltage changes or variations in
water temperature will affect brewing time. NEVER MAKE LESS THAN THE MINIMUM
CAPACITY OR MORE THAN THE MAXIMUM CAPACITY OF YOUR COFFEEMAKER.
FFS_220V_COFFMAKER_MANUAL_050113_L20153COM 5/4/13 11:47 AM Page 4
on the cover for correct turning. To reduce coffee spills, especially if coffeemaker is
tipped over, make sure cover has been turned clockwise until it is completely secured into
the handle slots. Care should be used when moving the coffeemaker as the secured cover
only temporarily reduces coffee spills if coffeemaker is tipped over.
6. Plug cord into a 220-240 volt AC grounded electric outlet ONLY. If coffeemaker has a
switch, push switch “l” (“ON”).
CAUTION: TO PREVENT PERSONAL INJURY OR PROPERTY DAMAGE, DO NOT ALLOW
LONG CORD TO DRAPE OR HANG OVER THE EDGE OF A COUNTERTOP OR TABLETOP
WHERE IT CAN BE PULLED ON BY CHILDREN OR TRIPPED OVER. YOUR COFFEEMAKER
HAS A LONG CORD FOR EASY ACCESS TO ELECTRIC OUTLET. DO NOT ALLOW CHILDREN
TO BE NEAR OR USE THIS COFFEEMAKER WITHOUT CLOSE ADULT SUPERVISION.
7. The coffeemaker will stop perking automatically. (Each cup requires no longer than 1
minute brewing.) Coffee is ready when light in base glows. Coffee will remain at serving
temperature as long as coffeemaker is plugged in (and/or switch is “l” (“ON”). Before
serving, twist and remove cover. (Some condensation may form on the inside of the
coffeemaker handles which is normal.) Using a hot pad, remove coffee basket and
stem. If basket and stem are not removed, bitter oils from the extracted grounds will
drip into coffee. Replace cover making sure it is completely secured in the handle slots.
8. For cup-on-saucer filling, press faucet handle down. Release handle when filled. For a
continuous flow when filling a coffee server, lift handle straight up until it holds the open
position. Lower handle when server is filled.
9. When about three cups of coffee remain in coffeemaker or when coffee can no longer be
seen in glass gauge, unplug cord from wall outlet and push switch “o” (“OFF”).
10. To reheat cold coffee, simply plug in coffeemaker and push switch “l” (“ON”). Be sure basket
and stem are removed. There must be at least 12 cups of coffee in coffeemaker to reheat.
11. Operate between ambient temperatures 5°C - 45°C (40°F - 110°F).
INSTRUCTIONS FOR CLEANING COFFEEMAKER
Regular Cleaning–after each use
Unplug coffeemaker. Do not let water contact electrical parts in base.
Clean inside of coffeemaker by filling with hot water to about one-third its capacity. Add
detergent and wash with a sponge or cloth. Scour the heating well unit (into which stem
4
CAUTION: LIQUID MUST COVER INSIDE BOTTOM OF UNIT AT ALL TIMES. FALLING
BELOW THIS LEVEL (APPROX. 2 INCHES) COULD CAUSE OVERHEATING AND DAMAGE
TO INTERNAL COMPONENTS. THIS WILL VOID THE WARRANTY.
FFS_220V_COFFMAKER_MANUAL_050113_L20153COM 5/4/13 11:47 AM Page 5
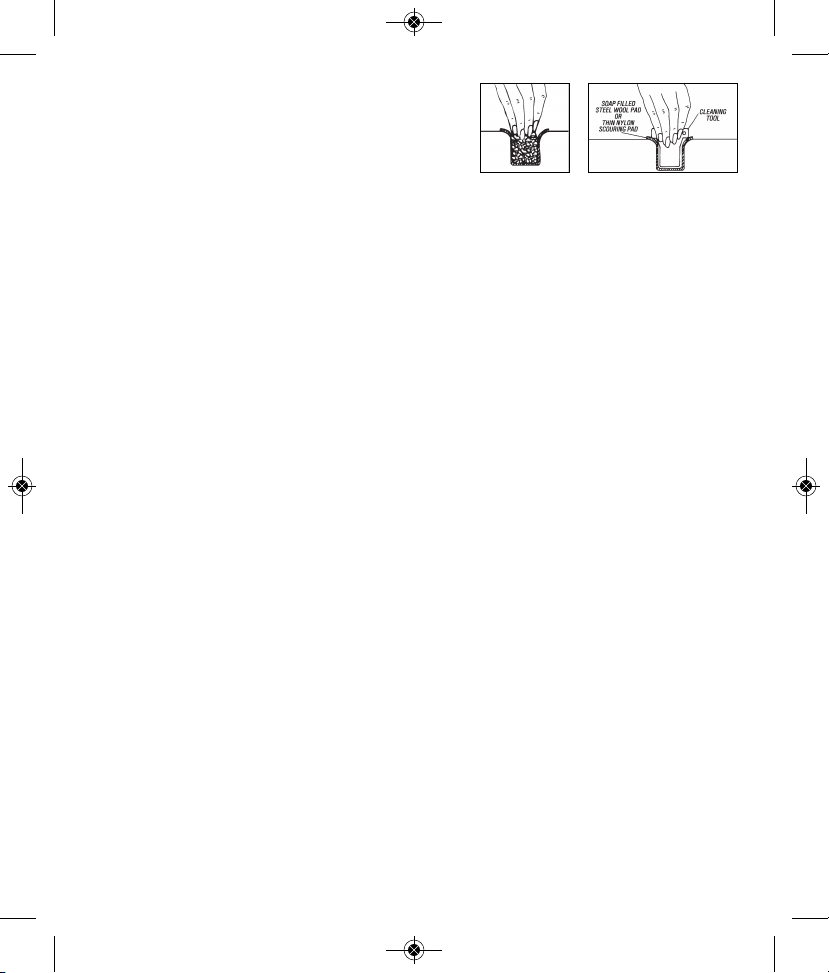
fits) with special cleaning tool provided and a
scouring pad such a Brillo
®
or Scotch-Brite.®Twist
pad inside unit well to clean. Unit well must be kept
clean for coffeemaker to work properly. Rinse
thoroughly with clear hot water and dry.
• Clean faucet (tap) by letting clear hot water run
through it, while moving handle up and down. (Keep
faucet (tap) in closed position when not in use.)
• Clean basket, stem and cover in hot soapy water. Rinse thoroughly. Do not clean cover
in a dishwasher; surface may permanently discolor.
• Clean outside of coffeemaker with a damp cloth, then polish with a dry cloth. Sterling
silver polish may be used. Do not use scouring pads or powders.
Special Cleaning–every 2 weeks
If coffeemaker is used daily, a special cleaning every 2 weeks (in addition to regular
cleaning) is necessary to thoroughly clean the heating well unit. If the heating well unit is
not kept clean, the performance of the coffeemaker will be affected.
• Fill coffeemaker with 1 quart each of cold water and white distilled vinegar. Put empty basket
and stem in coffeemaker, secure cover on and plug in (and/or push “l” (“ON”). Let
coffeemaker run through perking cycle. Let stand 20 minutes. Push “o” (“OFF”) and/or
unplug. Drain coffeemaker and cool. (The vinegar and water solution may be saved for future
cleaning. Label container of solution indicating its contents and use. Add an additional 1 to
2 cups (16.3 cl to 32.6 cl) of vinegar to the solution when reusing for thorough cleaning.)
• Add a small amount of hot soapy water to coffeemaker and scour interior and heating
well unit following regular cleaning instructions. Drain. Wash basket and stem.
• Clean coffee-level gauge (100-cup/16.3 liter and 55-cup/9 liter models) with the brush
provided. Unscrew the gauge cap and remove the tube. Clean tube in hot soapy water.
Rinse thoroughly. Replace. The brush may also be used to clean the stem.
• Unscrew faucet handle. Move a brush up and down through faucet, then insert brush
through opening inside coffeemaker to clean faucet connection. Wash faucet handle in
hot soapy water and rinse. Replace faucet handle.
• Rinse inside of coffeemaker and parts thoroughly with clean hot water, then dry.
• Do not use a baking soda solution; it may discolor and pit the surface.
INSTRUCTIONS FOR HEATING WATER FOR INSTANT BEVERAGES
Plain water may be heated in your coffeemaker for use with instant beverages. Simply fill
the clean coffeemaker with cold water to the desired cup level and place stem and clean,
5
C
lean heating well with
scouring pad.
F
or large units, clean heating well using
scouring pad and cleaning tool.
FFS_220V_COFFMAKER_MANUAL_050113_L20153COM 5/4/13 11:47 AM Page 6
empty basket into position as for making coffee. Secure cover in place and plug
coffeemaker in. Also push switch to “l” (“ON”) position for 55-cup (9 liter), 100-cup (16.3
liter) models. Heat water until perking stops and light in base glows. Twist cover, remove
basket and stem with a hot pad and replace cover, making sure it is secured in place. Unplug
coffeemaker when less than 3 cups (49 cl)of water remain. Inside of coffeemaker may
darken after heating water which is normal and does not affect coffeemaker or water heated.
When coffeemaker is used to heat water only, it must be cleaned well after each use in
addition to special weekly cleaning using vinegar to remove mineral deposits. If these
deposits are not removed, pitting of the metal can occur and result in damage to
coffeemaker. See Special Cleaning Instructions on pages 5 and 6.
6
Limited Warranty
Your new appliance is warranted by Focus Foodservice, to be free from defects in material
and workmanship under normal use for one (1) year from date of purchase. This warranty
shall not cover damage caused by improper use, abuse, accidents, overheating or
alterations to the product, nor does it cover damage resulting from service by persons
other than those authorized by Focus Foodservice. This warranty is limited to the original
purchaser only.
FOCUS FOODSERVICE LIABILITY UNDER THIS WARRANTY IS LIMITED TO THE
REPAIR OR REPLACEMENT OF THE DEFECTIVE PRODUCT AT FOCUS FOODSERVICE,
SOLE OPTION. FOCUS FOODSERVICE SHALL NOT BE LIABLE FOR ANY INCIDENTAL
OR CONSEQUENTIAL DAMAGES, WHETHER DIRECT OR INDIRECT.
THIS WARRANTY IS EXPRESSLY GRANTED IN LIEU OF ALL OTHER WARRANTIES
INCLUDING THE IMPLIED WARRANTIES OF MERCHANTABILITY AND FITNESS FOR A
PARTICULAR PURPOSE.
Warranty valid only in USA and Canada
Foodservice Customers
Focus Foodservice
Retail Service Department
300 Knightsbridge Parkway Suite 500
Lincolnshire, IL 60069
800-968-3918 |(8:00 AM - 5:00 PM Central)
www.focusfoodservice.com
Household and Consumer
Focus Electrics, LLC
Consumer Service Department
P.O. Box 2780
|
West Bend, WI 53095
866-290-1851
|
(8:00 AM - 4:30 PM Central)
www.westbend.com
FFS_220V_COFFMAKER_MANUAL_050113_L20153COM 5/4/13 11:47 AM Page 7
7
PERCOLATEUR
Notice d’entretien et d’utilisation
AFIN D’ÉVITER TOUTE BLESSURE OU TOUT DÉGÂT MATÉRIEL, LIRE ET SE CONFORMER AUX
CONSIGNES ET/OU AVERTISSEMENTS FIGURANT DANS CETTE NOTICE D’ENTRETIEN ET D’UTILISATION.
PRÉCAUTIONS IMPORTANTES
L’utilisation d’appareils électriques impose des précautions. Observez donc toutes les
précautions qui s’imposent lorsque vous utilisez votre percolateur :
• Lire la notice en entier avant de l’utiliser.
• Assurez-vous de placer l’interrupteur sur la position « o » (ARRÊT) avant de brancher le cordon
dans la prise murale. En l’absence d’interrupteur, s’assurer que le percolateur contient de l’eau ou
du café infusé avant de le brancher. Ne pas laisser le percolateur branché lorsqu’il n’est pas utilisé.
• Brancher le percolateur UNIQUEMENT dans une prise munie d’une borne de terre de 220-240
volts secteur. S’assurer que la prise est convenablement câblée de la façon suivante.
• Toujours débrancher le percolateur et le laisser refroidir avant de le nettoyer.
• Ne pas laisser le cordon toucher de surfaces chaudes ou pendre du bord d’un plan de travail
ou d’une table.
• Vérifier que le couvercle, le panier et la tige sont convenablement fixés avant de brancher le
percolateur (voir la notice). Ne retirer aucune pièce du percolateur pendant le cycle de
percolation ; ceci provoquerait des brûlures.
• Ne pas utiliser le percolateur, son cordon et ses prises à l’extérieur, ne pas les immerger dans
des liquides, les placer à proximité d’un brûleur de cuisinière à gaz ou électrique et ne pas les
mettre dans un four chaud.
• Ne pas toucher le percolateur lorsqu’il est chaud. Utiliser les poignées ou le bouton.
• Surveiller attentivement lorsque le percolateur est utilisé par des enfants ou à leur proximité.
• N’utiliser le percolateur que pour les usages décrits dans ce livret. N’utiliser d’accessoires que
s’ils sont conseillés par la Focus Foodservice.
• Ne pas utiliser le percolateur s’il est, ou si son cordon est endommagé ou s’il ne fonctionne
pas convenablement.
• Cette machine ne convient pas pour une installation dans un endroit où un jet d'eau pourrait
être utilisé.
• Cette machine ne doit être installée que dans des endroits où elle peut être supervisée par un
personnel qualifié.
• Cette machine n’est pas conçu pour être utilisé par une personne (y compris un enfant) avec
des capacités physiques, sensorielles ou mentales réduites, ou qui ne possède pas
l’expérience et les connaissances requises, sauf si elle est supervisée ou formée sur son
utilisation par la personne qui est responsable de sa sécurité.
CONSERVER CETTE NOTICE
FFS_220V_COFFMAKER_MANUAL_050113_L20153COM 5/4/13 11:47 AM Page 8

16,3 LITRES:
58010V
14,2 LITRES:
57060-220
16,3 LITRES:
57100-220
COUVERCLE
PANIE R-FI LTRE
BOUCHON DE L’INDICATEUR
INDICATEUR DE NIVEAU
DU CAFÉ
TIGE
ROBINET
INTERRUPTEUR
DE MARCHE/ARRÊT
CAVITÉ DE L’UNITÉ
DE CHAUFFAGE
AVERTISSEMENT : CET
APPAREIL DOIT ÊTRE MIS À LA TERRE
AVIS
Si le cordon d’alimentation de cet appareil est endommagé, le faire remplacer dans un
atelier de réparation désigné par le fabricant car il faut des outils et un cordon spéciaux.
Jeter immédiatement toute fiche coupée du cordon d’alimentation. AVERTISSEMENT :
Une fiche coupée introduite dans une prise de la maison risque de provoquer des
secousses électriques.
8
5,8 LITRES:
58016V
9 LITRES:
58015V
COUVERCLE
PANIE R-FI LTRE
TIGE
BOUCHON DE L’INDICATEUR
INDICATEUR DE NIVEAU
DU CAFÉ
ROBINET
INTERRUPTEUR
DE MARCHE/ARRÊT
CAVITÉ DE L’UNITÉ
DE CHAUFFAGE
FFS_220V_COFFMAKER_MANUAL_050113_L20153COM 5/4/13 11:47 AM Page 9
POUR FAIRE DU CAFÉ
1. Nettoyer le percolateur à fond avant la première utilisation. Se reporter aux consignes de
nettoyage ordinaire de à la pages 13 et 14.
ATTENTION : POUR DIMINUER LE RISQUE DE SECOUSSE ÉLECTRIQUE, NE PAS IMMERGER
LE PERCOLATEUR, SA FICHE OU SON CORDON DANS DE L’EAU OU TOUT AUTRE LIQUIDE.
2. Toujours utiliser le percolateur sur une surface sèche et horizontale. Ne le toucher
qu’avec des mains sèches.
3. Après avoir enlevé le panier-filtre et la tige, remplir le percolateur d’eau FROIDE. Les
repères à l’intérieur de la cafetière indiquent les niveaux d’eau.
4. Enfoncer la tige dans la cavité de l’unité de chauffage au fond du percolateur ; mettre le
panier-filtre sur la tige. Mettre du café moulu pour percolateur dans le panier-filtre ; ne
pas en faire tomber dans la tige. Suivre le tableau correspondant pour savoir la quantité
à utiliser. L’étaler uniformément dans le panier-filtre. (Utiliser des tasses mesure standard
pour mesurer le café, comme celles utilisées pour mesurer la farine, le sucre, etc.). On
peut modifier la quantité de café pour l’adapter au goût.
REMARQUE SPÉCIALE SUR LA MANIÈRE DE MOUDRE LES GRAINS : Si l’on moud son café
soi-même, c’est en le moulant à une grosseurmoyenne que l’on obtient les meilleurs résultats.
NE PAS moudre trop fin (c’est-à-dire comme de la poudre) car cela peut faire déborder le panier.
9
GUIDE DE MESURE DU CAFÉ
Il s’agit uniquement de recommandations – la robustesse du café s’ajuste en fonction des
goûts personnels en modifiant plus ou moins ces quantités.
TASSES
* CAFÉ MOULU (LÉGER) CAFÉ MOULU (FORT)
12-15 64 g 106 g
20-25 128 g 213 g
30-36 170 g 255 g
40-45 213 g 340 g
50-55 276 g 425 g
60-65 319 g 531 g
80-85 468 g 659 g
95-100 531 g 808 g
*1 tasse = 150 ml
Comptez une minute environ de temps de filtrage par tasse. Les fluctuations de tension et les
variations de température d’eau influeront sur le temps de filtrage. NE FAITES JAMAIS MOINS QUE
LA CAPACITÉ MINIMUM OU PLUS QUE LA CAPACITÉ MAXIMALE DANS VOTRE CAFETIÈRE.
FFS_220V_COFFMAKER_MANUAL_050113_L20153COM 5/4/13 11:47 AM Page 10
5. Placer le couvercle sur le percolateur en tournant pour verrouiller le panier en place à
l’intérieur des poignées. Remarquer les flèches sur le couvercle indiquant le sens dans
lequel il faut tourner. Pour minimiser les quantités renversées, surtout en cas de
basculement accidentel, tourner le couvercle à fond dans le sens des aiguilles d’une montre
pour le bloquer complètement en place, à l’intérieur des encoches des poignées. Il faut
prendre des précautions lorsqu’on déplace le percolateur car le couvercle blocable empêche
momentanément la plus grande partie du café de se renverser si le percolateur bascule.
6. Brancher le cordon dans une prise 220-240 V avec borne de terre UNIQUEMENT. Si la
cafetière comprend un interrupteur, placez-le sur la position « l » (MARCHE).
ATTENTION : LE PERCOLATEUR EST MUNI D’UN LONG CORDON AFIN DE FACILITER L’ACCÈS
À LA PRISE ÉLECTRIQUE. POUR EMPÊCHER TOUT RISQUE DE BLESSURE OU DE DÉGÂTS
MATÉRIELS, NE PAS LAISSER UN LONG CORDON PENDRE DU BORD D’UN PLAN DE TRAVAIL
OU D’UNE TABLE CAR DES ENFANTS RISQUERAIENT DE TIRER DESSUS OU DES PERSONNES
POURRAIENT TRÉBUCHER DESSUS. NE PAS LAISSER D’ENFANTS S’APPROCHER DE CE
PERCOLATEUR OU L’UTILISER SANS LA SURVEILLANCE ATTENTIVE D’UN ADULTE.
7. Le percolateur s’arrête automatiquement une fois toute l’eau passée. (Il ne faut pas plus d’une
minute par 16,3 cl). Le café est prêt lorsque le voyant situé sur la base s’illumine. Le café reste
chaud, à la température de service tant que la cafetière est branchée (et/ou si l’interrupteur se
trouve sur « l» (MARCHE). Débloquer et retirer le couvercle avant de servir. (Il est possible que
de la condensation se forme à l’intérieur des poignées du percolateur, ce qui est normal).
Retirer le panier-filtre et la tige à l’aide d’une manique. Si l’on ne retire pas le panier-filtre
et la tige, des huiles de goût amer provenant du marc s’égouttent dans le café. Replacer le
couvercle en s’assurant qu’il est complètement bloqué dans les encoches des poignées.
8. Pour remplir une tasse, appuyer sur la manette du robinet vers le bas. Relâcher la
manette une fois la tasse pleine. Pour obtenir un écoulement continu afin de remplir une
verseuse, lever la manette droit vers le haut jusqu’à ce qu’elle se bloque en position
ouverte. Abaisser la manette une fois la verseuse pleine.
9. Lorsqu’il reste environ trois tasses de café dans la cafetière ou que vous ne pouvez plus
voir le café dans le tube de niveau, débranchez le cordon de la prise murale et placez
l’interrupteur sur « o » (ARRÊT).
10. Pour réchauffer du café froid, branchez simplement la cafetière et placez l’interrupteur
sur « l » (MARCHE). S’assurer que le panier-filtre et la tige ont été retirés. Il faut qu’il
reste au moins 0,2 litre de café dans le percolateur pour réchauffer.
11. Fonctionne à une température ambiante entre 5 et 45°C (40 et 110°F).
10
ATTENTION : LE LIQUIDE DOIT TOUJOURS RECOUVRIR LE FOND DE L’APPAREIL. UN
NIVEAU DE LIQUIDE INSUFFISANT (MOINS DE 10 CM) RISQUE DE CAUSER UNE
SURCHAUFFE ET D’ENDOMMAGER LES COMPOSANTS INTERNES, CE QUI ANNULERA
LA GARANTIE.
FFS_220V_COFFMAKER_MANUAL_050113_L20153COM 5/4/13 11:47 AM Page 11
 Loading...