

Page 1
ASSEMBLY
INSTRUCTIONS
FOODSERVICE, LLC
Two people required for assembly. Read All Instructions & Tips before assembly.
HDS-Plus™ High Density Storage System
2
1
5
7
6
4
3
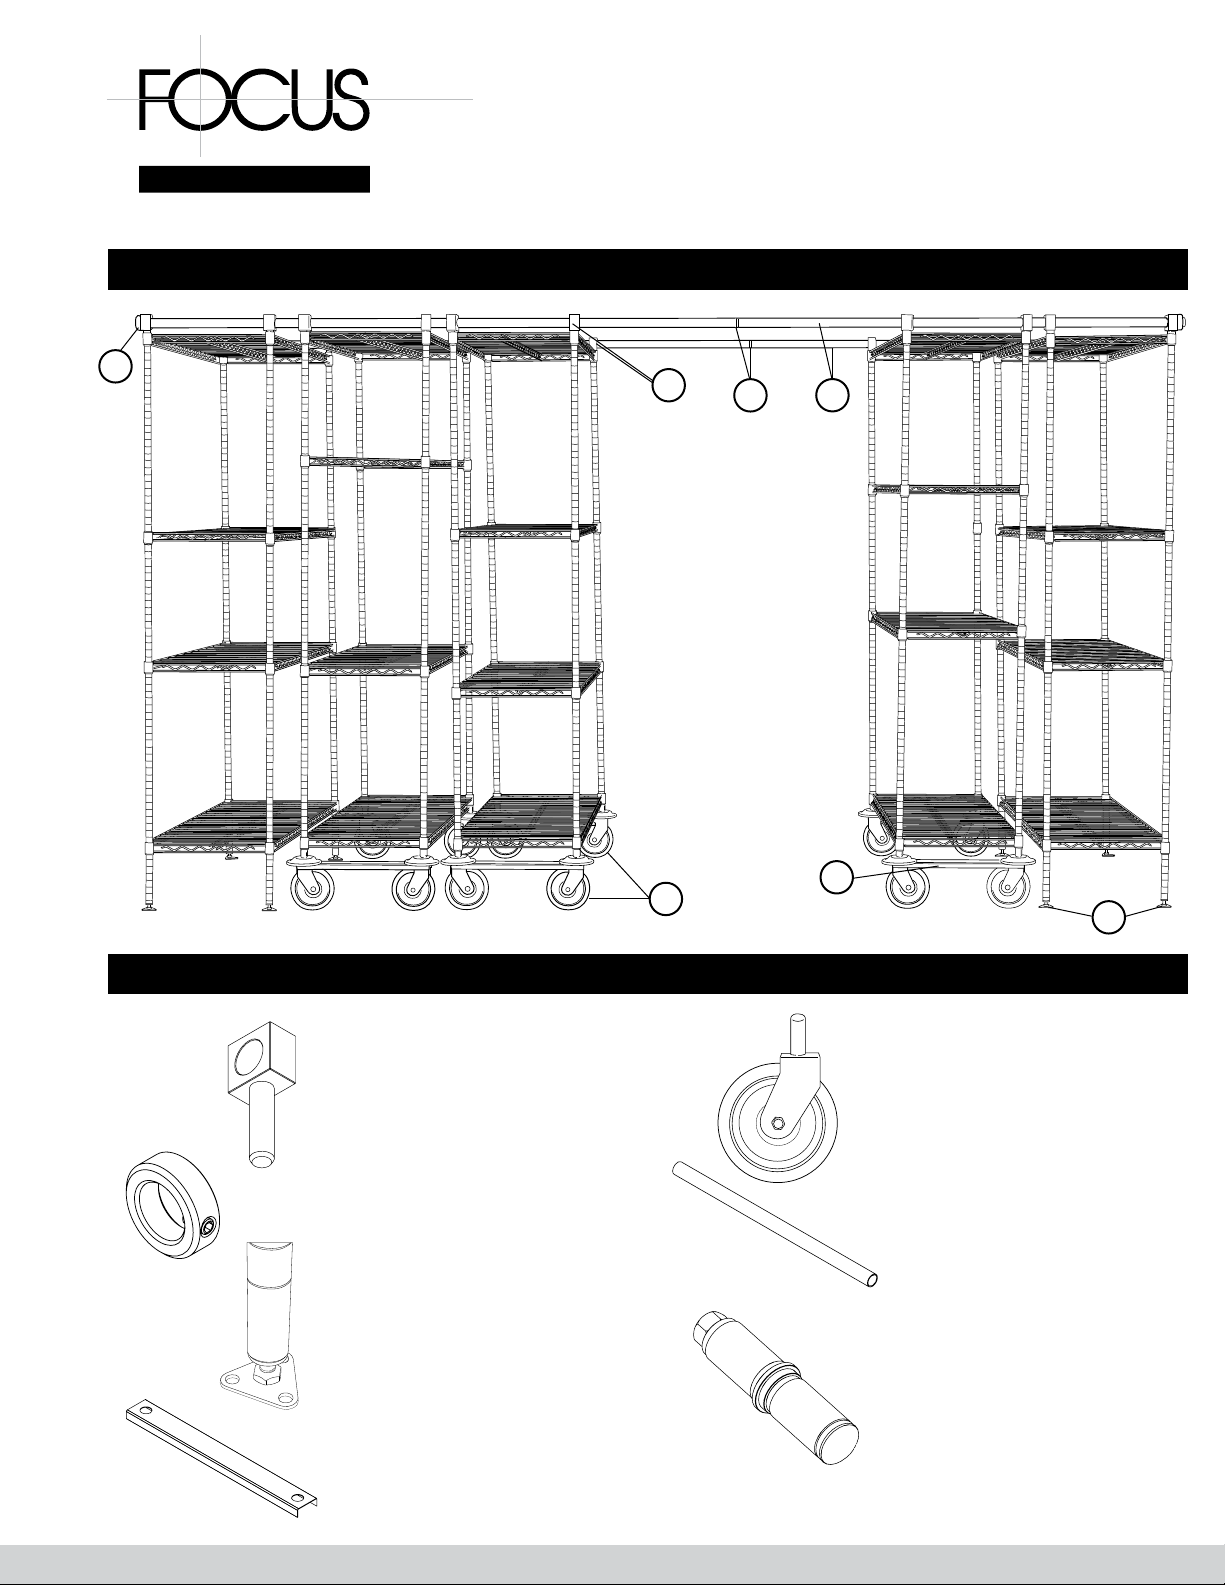
Core HDS-Plus™ System Components (Full Component Checklist located at end of document)
1. FTSGB (Guide Blocks) Used at
tops of posts to guide mobile units
on track.
2. FTSLC (Locking Collars)
Used on stationary units to
lock in track position.
3. FTSFZ (Triangular Security Feet)
Used to anchor stationary units to
the floor.
4. FTSU18, FTSU21,
5. FTSC6 (6" Casters w/ Bumpers) -
Smooth rolling casters for
mobile units. Bumpers prevent
collision of units..
6. FTST2, FTST3, FTST5
(Stainless Steel Track Tubing)
Used at tops of units to allow
movement of mobile units on track.
7. FTSJ (Track Joiner Connectors)
that allow two sections of
stainless steel track tubing to
be joined together.
FTSU24 (Caster Channels)
Aligns casters on mobile units.
Page 2
ASSEMBLY INSTRUCTIONS
INSTALLATION TIPS
1 Two or more people are required for installation.
5 Locking collars must be used for each stationary unit.
2 Stationar y end unit should be used for heavier item storage.
3 If all shelving units are not the same width, the wider units
should always be used as the stationary units.
4 Guide blocks, when inserted into the tops of posts, must be
free to move up or down to adjust to uneven floors
(see illustration) - on page 3.
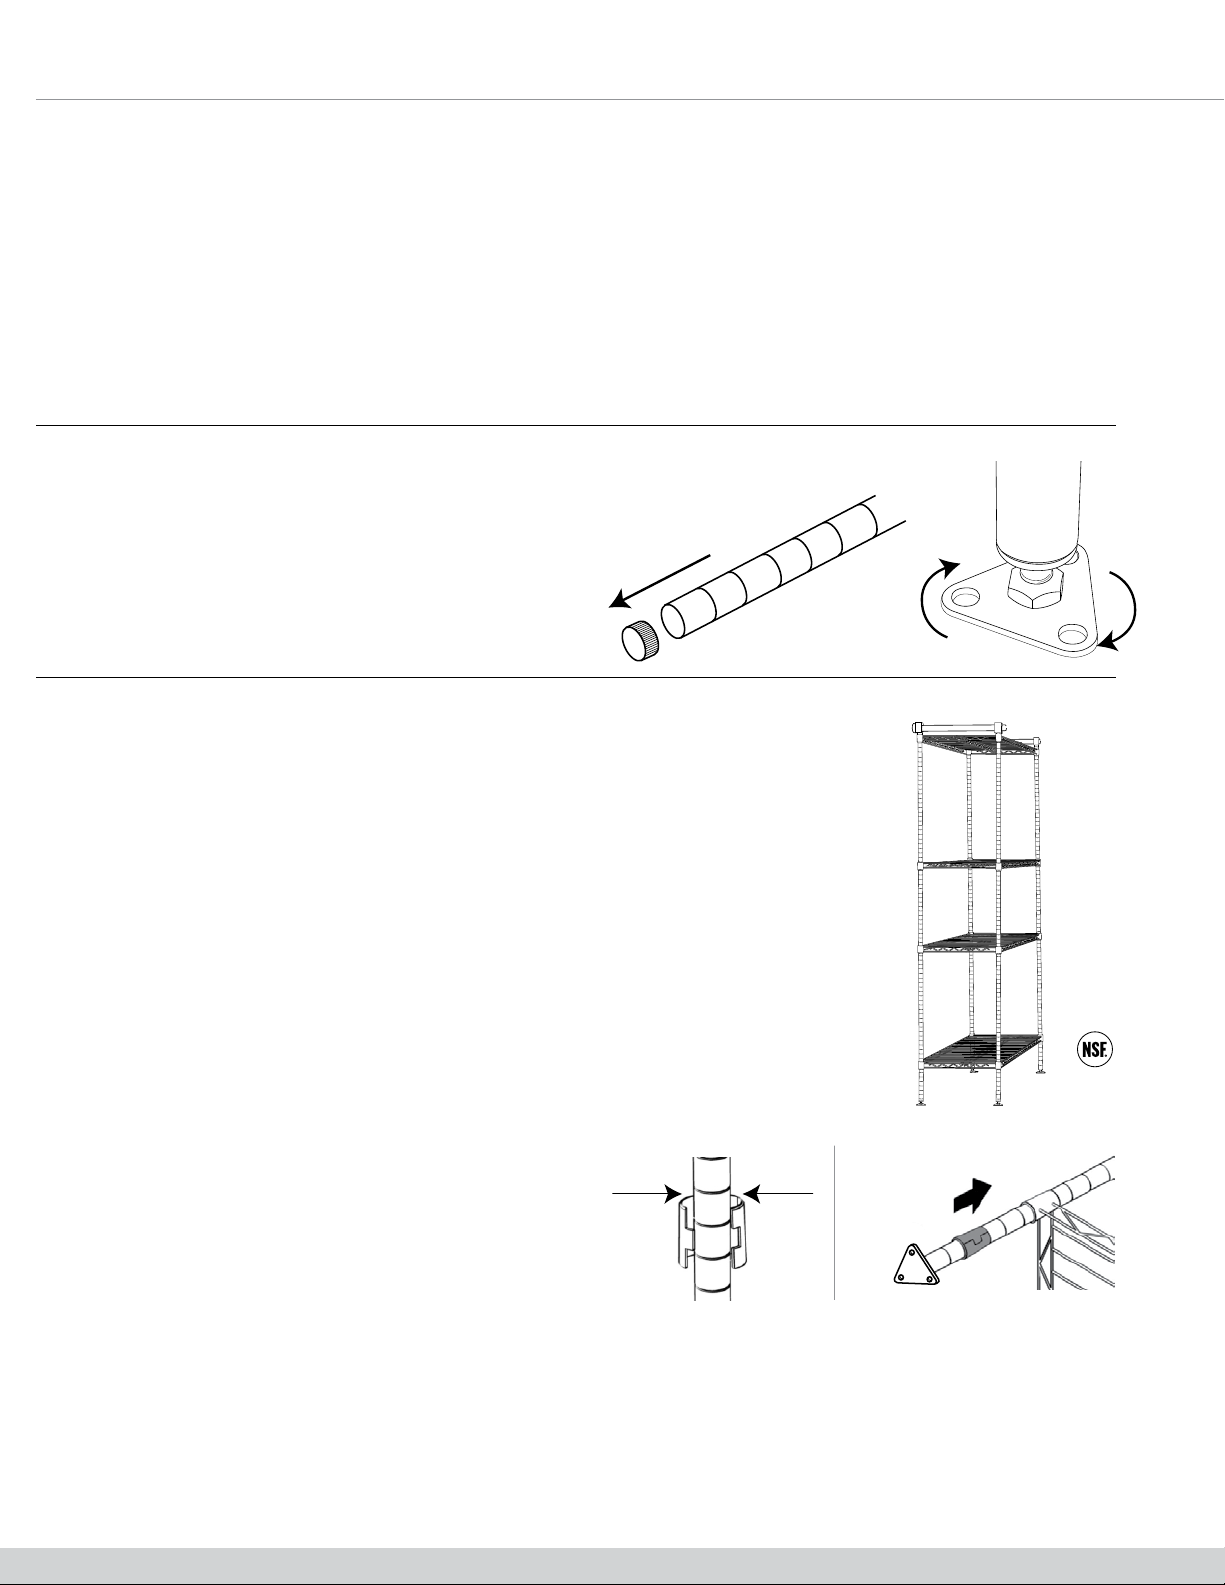
PART 1: TRIANGLE SECURITY FOOT ASSEMBLY Use 80" posts for stationary units.
Step 1 Remove black plastic post caps from top of all posts
(See illustration).
Step 2 First an unscrew the leveling bolt and then screw in
a Triangular Security Foot (FTSFZ) into a 80" post
(FG080CH or FG080GN). Turn clockwise until foot is
secure in post.
PART 2: ASSEMBLE SHELVING UNITS
Note: Please dispose of loose, round white plastic pieces in shelving boxes. These are used to separate
the shelves for shipping purposes only.
6 HDS-Plus system should only be used on hard surface.
7 For added stability, it is recommended that the bottom shelf is
installed no more than 6" from the floor and the top shelf no
more than 6"(2 – 3 lines) from the top – for all shelving units in
the system.
Helpful Hint: When placing the plastic tapered sleeves onto the posts (Step 1), slide the plastic
tapered sleeves up or down on the post until you feel it “snap” into the lines or grooves of the post. It is
normal to have a slight gap in-between the two pieces of the plastic tapered sleeves when it is placed
on the post.
Step 1 Choose the desired height of the bottom shelf for added stability, it is recommended
that the bottom shelf is installed no more than 6" from the floor and the top shelf no
more than 6" from the top.
Snap two (2) plastic tapered sleeves, with the arrows facing up, at the desired height on
each post. (See Diagram #1) Shelves can be adjusted every 1". (Note: double grooves in
the posts are placed every 8th groove for simple shelf height reference. Posts are numbered in even number increments).
Step 2 Place shelf on its side, making sure the wider
portion of the four (4) round shelf collars are
facing the bottom of the unit. Slide the top of the
posts through the round shelf collars on each
corner of the shelves. Push the shelves firmly onto
the plastic tapered sleeves. (See Diagram #2) After
installing the bottom shelf, set the unit upright.
Step 3 For remaining shelves, snap the plastic tapered sleeves into place on posts at the next desired shelf height. Slide the shelf down
from the top of the posts onto the plastic tapered sleeves and repeat this step for the remaining shelves.
NOTE: HEAVY OBJECTS MUST BE PLACED--NOT DROPPED--ONTO THE SHELVES!!
DIAGRAM 1
Top
DIAGRAM 2
Top
Note: When all shelf heights are established, a rubber mallet may be used to tap each corner of the shelves so they firmly install onto the
plastic tapered sleeves.
Note: The triangle leveling feet may need to be adjusted in order to make the unit level.
Page 3

PART 3: CASTER ASSEMBLY OR MOBILE POST ASSEMBLY. Use 74" mobile posts.
Step 1 Lay completed shelving unit(s) with 74" posts on their side.
Step 2 With the opening of the bumper facing towards the bottom, slide bumper
over bottom of posts.
Step 3 Install 6" Casters (FTSC6 - CASTER MUST POINT INWARD AS SHOWN) through
openings in caster channels (FTSU18, FTSU21 or FTSU24).
Step 4 Install caster/caster channel assembly into 74" posts (FGN074C or FGN074G) until
caster fit is tight. If needed, use a rubber mallet and tap bottom of caster to drive
casters into posts. Repeat process for all mobile shelving units.
PART 4: OVERHEAD TRACK ASSEMBLY
Step 1 Connect track tube lengths using track joiners. To connect tubes with track joiners,
insert cap end of track joiner into tube section until it stops. Use wrench to tighten nut
on exposed end of track joiner until track joiner is snug in tubing. Take another section
of tube and twist onto exposed section of track joiner until two sections of tube meet.
Repeat process until both sections of track are assembled.
SHELVING
Step 2 Place locking collar on one end of fully assembled track length and tighten with Allen
wrench. Slide on ½ of the guide blocks, if your system requires a stationary
middle unit, place 1 locking collar on the track, then slide on 2 guide blocks then slide
on another locking collar. Do not tighten inner locking collars at this point. Then place
another locking collar on open end of tube and tighten with Allen wrench. Repeat
process with second section of track.
PART 5: INSTALL TRACK ASSEMBLY ONTO SHELVING UNITS
Step 1 Line up Shelving Units in a straight line in the area where the unit will be installed. Allow a minimum of 30" of open aisle
space for each system. Bumpers add a minimum of 3" to the width of the mobile units. Place stationary units on the outside
and middle (as needed**) and mobile units on the inside. To ensure smooth movement of mobile sections take great care
that all shelving units are aligned in a straight line.
Note: Track lengths over 20 ft in length require a stationary unit in the middle of the system.
Step 2 Using two or more people, raise one section of track assembly over tops of posts and starting on one end of shelving
run. Insert guide blocks into tops of posts. Continue to opposite end. Repeat process with second section of track. Recheck
shelving sections to ensure they are in straight alignment. To adjust for uneven floor surfaces, turn triangle security feet on
stationary posts (clockwise or counter-clockwise). For systems with stationary units in the middle of the track, tighten down
the locking collars surrounding these units..
Page 4

ASSEMBLY INSTRUCTIONS
FULL HDS-PLUS SYSTEM COMPONENT CHECKLIST
Please use this reference checklist to ensure that have all the components necessary to assemble your
HDS-Plus shelving system.
BASE HDS-PLUS
COMPONENTS
Kit Item # Desc Qty.
Kit Component #
FTSSU Stationary Unit Kit
FTSFZ Triangular Security Feet, Zinc 4/Pkg 1
FTSGB Guide Blocks, Set Of 4 1
FTSLC
FTSMU18 Mobile Unit Kit 18 In.
FTSC6 6 In. Casters W/ Bumpers, Set Of 4 1
FTSGB Guide Blocks, Set Of 4 1
FTSU18 18 In. Caster Channels, Set Of 2 1
FTSMU21 Mobile Unit Kit 21 In.
FTSC6 6 In. Casters W/ Bumpers, Set Of 4 1
FTSGB Guide Blocks, Set Of 4 1
FTSU21 21 In. Caster Channels, Set Of 2 1
FTSMU24 Mobile Unit Kit 24 In.
FTSC6 6 In. Casters W/ Bumpers, Set Of 4 1
FTSGB Guide Blocks, Set Of 4 1
FTSU24 24 In. Caster Channels, Set Of 2 1
FTSTK6 Track Set 6 Ft.
FTST3 3 Ft. Track Tube, Set Of 2 2
FTSJ Track Joiner, Set Of 2 1
FTSTK7 Track Set 7 Ft.
FTST5 5 Ft. Track Tube, Set Of 2 1
FTST2 2 Ft. Track Tube, Set Of 2 1
FTSJ Track Joiner, Set Of 2 1
FTSTK8 Track Set 8 Ft.
FTST5 5 Ft. Track Tube, Set Of 2 1
FTST3 3 Ft. Track Tube, Set Of 2 1
FTSJ Track Joiner, Set Of 2 1
FTSTK9 Track Set 9 Ft.
FTST5 5 Ft. Track Tube, Set Of 2 1
FTST2 2 Ft. Track Tube, Set Of 2 2
FTSJ Track Joiner, Set Of 2 2
FTSTK10 Track Set 10 Ft.
FTST5 5 Ft. Track Tube, Set Of 2 2
FTSJ Track Joiner, Set Of 2 1
FTSTK11 Track Set 11 Ft.
FTST5 5 Ft. Track Tube, Set Of 2 1
FTST3 3 Ft. Track Tube, Set Of 2 2
FTSJ Track Joiner, Set Of 2 2
Locking Collars, Set Of 4 W/ Allen Wrench
Kit Item # Desc Qty.
Kit Component #
FTSTK12 Track Set 12 Ft.
FTST5 5 Ft. Track Tube, Set Of 2 2
FTST2 2 Ft. Track Tube, Set Of 2 1
1
FTSJ Track Joiner, Set Of 2 2
FTSTK13 Track Set 13 Ft.
FTST5 5 Ft. Track Tube, Set Of 2 2
FTST3 3 Ft. Track Tube, Set Of 2 1
FTSJ Track Joiner, Set Of 2 2
FTSTK14 Track Set 14 Ft.
FTST5 5 Ft. Track Tube, Set Of 2 2
FTST2 2 Ft. Track Tube, Set Of 2 2
FTSJ Track Joiner, Set Of 2 3
FTSTK15 Track Set 15 Ft.
FTST5 5 Ft. Track Tube, Set Of 2 3
FTSJ Track Joiner, Set Of 2 2
FTSTK16 Track Set 16 Ft.
FTST5 5 Ft. Track Tube, Set Of 2 2
FTST3 3 Ft. Track Tube, Set Of 2 2
FTSJ Track Joiner, Set Of 2 3
FTSTK17 Track Set 17 Ft.
FTST5 5 Ft. Track Tube, Set Of 2 3
FTST2 2 Ft. Track Tube, Set Of 2 1
FTSJ Track Joiner, Set Of 2 3
FTSTK18 Track Set 18 Ft.
FTST5 5 Ft. Track Tube, Set Of 2 3
FTST3 3 Ft. Track Tube, Set Of 2 1
FTSJ Track Joiner, Set Of 2 3
FTSTK19 Track Set 19 Ft.
FTST5 5 Ft. Track Tube, Set Of 2 3
FTST2 2 Ft. Track Tube, Set Of 2 2
FTSJ Track Joiner, Set Of 2 4
FTSTK20 Track Set 20 Ft.
FTST5 5 Ft. Track Tube, Set Of 2 4
FTSJ Track Joiner, Set Of 2 3
FTSTK21 Track Set 21 Ft.
FTST5 5 Ft. Track Tube, Set Of 2 3
FTST3 3 Ft. Track Tube, Set Of 2 2
FTSJ Track Joiner, Set Of 2 4
SHELVING
Item No. Qty. Item No. Qty. Width Length
Chromate Green Epoxy (in) (mm) (in) (mm)
FF1824C
FF1830C FF1830G 18 455 30 760
FF1836C FF1836G 18 455 36 910
FF1842C FF1842G 18 455 42 1060
FF1848C FF1848G 18 455 48 1220
FF1854C FF1854G 18 455 54 1370
FF1860C FF1860G 18 455 60 1525
FF1872C FF1872G 18 455 72 1825
FF2124C FF2124G 21 530 24 610
FF2130C FF2130G 21 530 30 760
FF2136C FF2136G 21 530 36 910
FF2142C FF2142G 21 530 42 1060
FF2148C FF2148G 21 530 48 1220
FF2154C FF2154G 21 530 54 1370
FF2160C FF2160G 21 530 60 1525
FF2172C FF2172G 21 530 72 1825
FF2424C FF2424G 24 610 24 610
FF2430C FF2430G 24 610 30 760
FF2436C FF2436G 24 610 36 910
FF2442C FF2442G 24 610 42 1060
FF2448C FF2448G 24 610 48 1220
FF2454C FF2454G 24 610 54 1370
FF2460C FF2460G 24 610 60 1525
FF2472C FF2472G 24 610 72 1825
FF1824G
18 455 24 610
Call Customer Service at 1.800.968.3918 | Fax 1.800.968.4129
FOODSERVICE, LLC
POSTS
Item No. Qty. Item No. Qty. Length
Chromate Green Epoxy (in) (mm)
FG080CH FG080GN
FGN074C FGN074G Mobile Posts 74 1880
Stationary
Posts
80 2032
www.focusfoodservice.com
LTS0510 rev. 0311
 Loading...