

Page 1
ASSEMBLY INSTRUCTIONS
FOODSERVICE, LLC
CAUTION: INSPECT CONTENTS IMMEDIATELY TO ENSURE PRODUCT WAS NOT DAMAGED DURING SHIPPING.
Step 1 Unpack carton, identify and confirm quality of components.
Step 2 Before assembly of shelving unit to Truck Dolly, unscrew the leveling feet on the posts (See Diagram 1).
Step 3 Attach the posts to Truck Dolly frame, using leveling feet and washers and tighten down (See Diagram 2).
Step 4 Assemble shelving unit with at least three shelves. The top shelf should be mounted at the top groove of the post.
The bottom shelf on a 74" post, in order to be inside the security enclosure, must be 13" above the dolly. If using
a 63" post and the bottom shelf should be located on the second groove from the bottom. Third shelf should be
placed in the middle of the posts.
Step 5 Remove the plastic top caps from all four posts (See Diagram 3).
Step 6 Install the steel inserts into the holes where the plastic top caps were (See Diagram 4). Make sure steel insert is
set all the way into the top of post. You may use a rubber mallet to secure the inserts.
DO NOT SCREW IN THE BOLTS UNTIL ALL PANELS ARE INSTALLED.
Step 7 Assemble the side panels with the loops on the bottom facing inward. Tilt the panel so the loops lock around the
posts on both ends and then slide down so the loops are on the posts (See Diagram 5). Align holes in guide plates
with steel insert at the top of the posts. Partially screw in bolt through guide plate into top of the front post. This
will keep side panel in place during the assembly process. Repeat with other panel.
Step 8 Assemble left side back panel first. Place the wires that are facing downward into the loops on each side panel
(See Diagram 6).
Step 9 Repeat the same for the right side back panel as in Step 8.
Step 10 Secure back panels with back panel assembly hardware. Install as shown (See Diagram 7). For greater security,
assemble uppermost plates through top shelf. Place additional securing clip at the bottom of the back panels.
(Push down so that the 2 prongs of the clip wrap over the truss of the bottom shelf.)
Step 11 Install the left front door assembly, by placing the side wires into the loops of the side panels.
Step 12 Repeat with right front door assembly as in Step 11.
Step 13 Line up holes of the guide plates in the top of the panels over the steel inserts in the top of the posts and screw
in bolts into posts (See Diagram 8). Tighten down bolts in front posts.
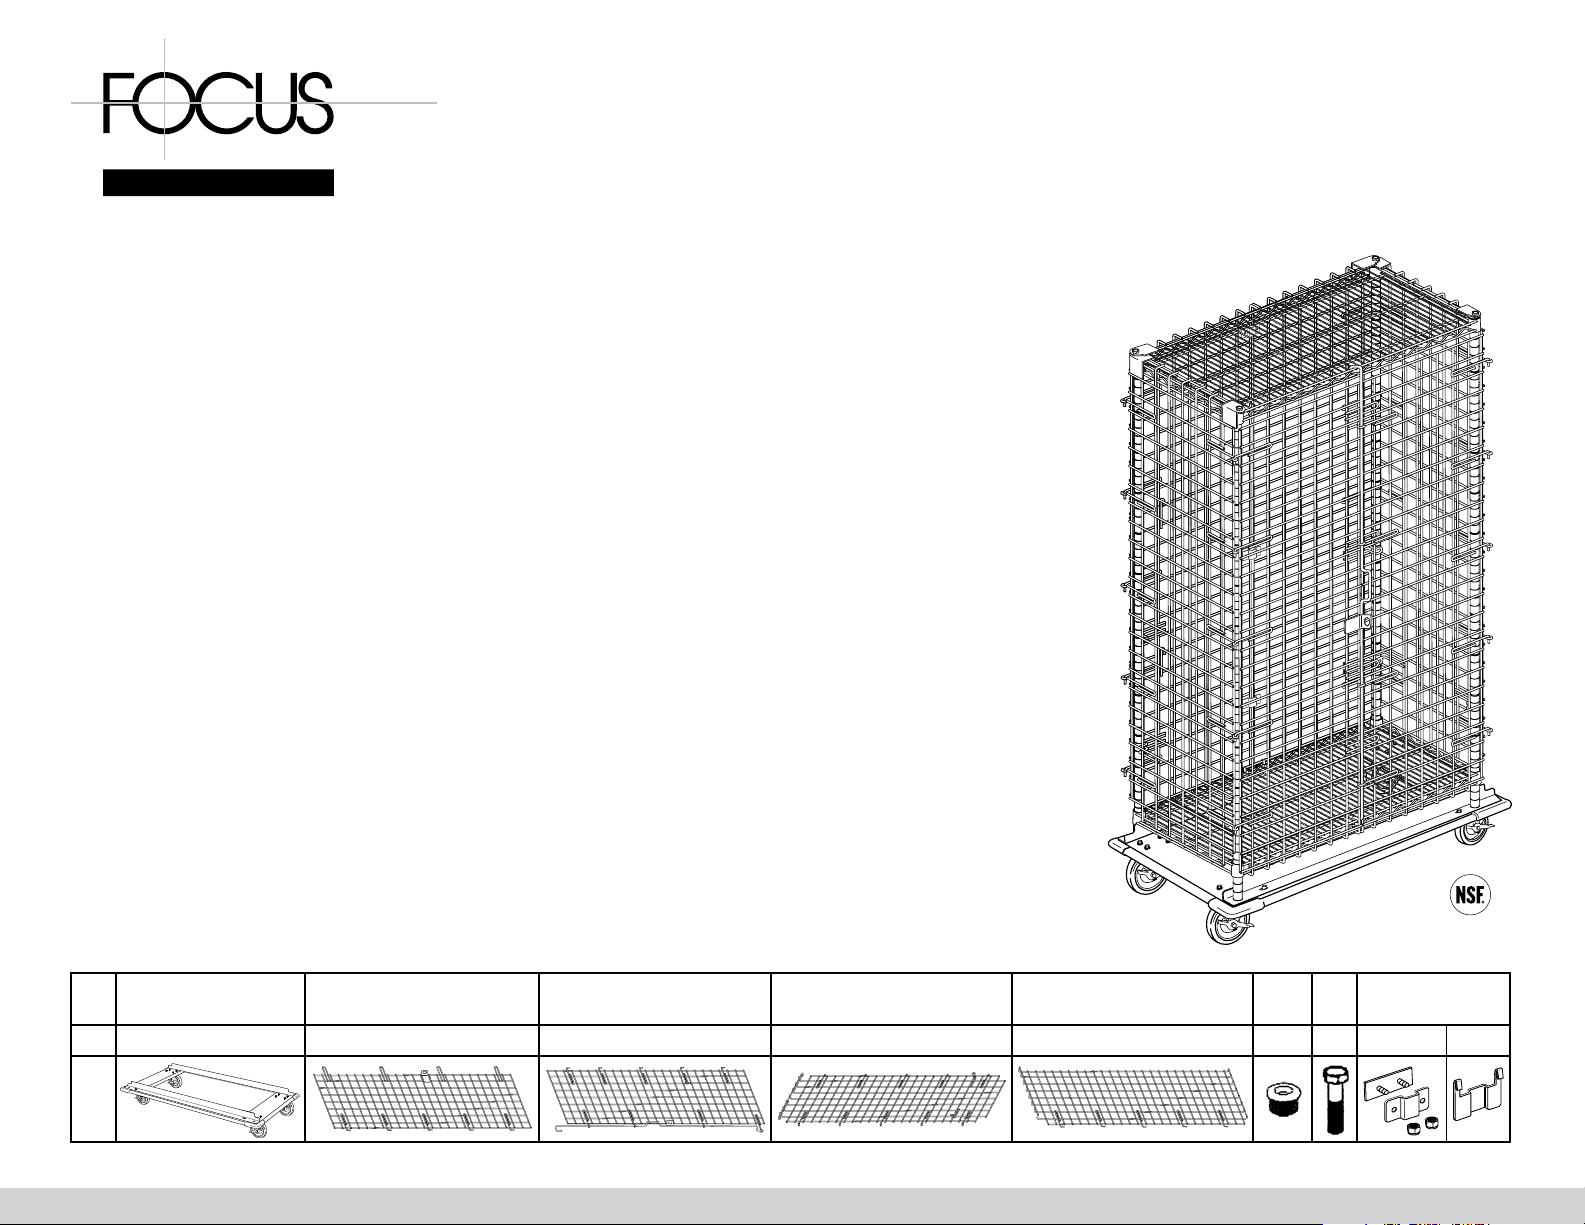
Security Cage with Aluminum Truck Dolly
Steel
Part Truck Dolly Front Left Front Right w/Latch Sides Back
Qty 1 1 1 2 2 4 4
Insert Bolt
Assembly
Hardware
3 1
Page 2

ASSEMBLY INSTRUCTIONS
Casters, Shelves, & Posts Sold Separately
Note: Be sure that top & bottom shelves are mounted so that
enclosures just clear wrap around edges for maximum security at top
most point. Bottom is 63" from top of post.
Diagram 1 Diagram 2 Diagram 3
FOODSERVICE,LLC
Diagram 4
Diagram 7
Diagram 5
Diagram 8
Diagram 6
Call Customer Service at 1.800.968.3918 | Fax 1.800.968.4129
www.focusfoodservice.com
rev. 0811
Page 3

INSTRUCCIONES DE ARMADO
FOODSERVICE, LLC
PRECAUCIóN: INSPECCIONE EL CONTENIDO INMEDIATAMENTE PARA ASEGURARSE DE QUE EL PRODUCTO NO SE HAYA
DAÑADO DURANTE EL TRANSPORTE.
Paso 1 Desempaque el cartón de embalaje e identifique y confirme la calidad de los componentes.
Paso 2 Antes de ensamblar la estantería sobre el carro, desatornille los pies de nivelación de los postes (ver Diagrama 1).
Paso 3 Fije los postes al chasis del carro utilizando los pies de nivelado y las arandelas, y apriételos (ver Diagrama 2).
Paso 4 Ensamble la estantería con por lo menos tres estantes. El estante superior debe montarse en la ranura superior del poste. A fin de
que quede dentro del cercado de seguridad, el estante inferior en un poste de 74 pulgadas (188 cm) debe estar a 13 pulgadas (33 cm)
por encima del carro. Si se está utilizando un poste de 63 pulgadas (160 cm), el estante inferior deberá estar ubicado en la segunda
ranura desde el fondo. El tercer estante deberá colocarse en el medio de los postes.
Paso 5 Retire las capuchas superiores de plástico de todos los cuatro postes (ver Diagrama 3).
Paso 6 Instale los insertos de acero dentro de los orificios donde se encontraban las capuchas de plástico (ver Diagrama 4). Asegúrese
de colocar el inserto de acero totalmente adentro de la parte superior del poste. Puede utilizar un mazo de goma para fijar bien
los insertos.
NO ATORNILLAR LOS PERNOS HASTA TANTO TODOS LOS PANELES ESTÉN INSTALADOS.
Paso 7 Ensamble los paneles laterales con las asas en el fondo de cara hacia adentro. Incline el panel de manera que las asas encajen alrededor
de los postes en ambos extremos y luego deslícelo de manera que las asas queden enganchadas en los postes (ver Diagrama 5). Alinee
los orificios en las placas de guía con los insertos de acero en la parte superior de los postes. Atornille el perno parcialmente a través
de la placa de guía y dentro de la parte superior del poste delantero. Esto mantendrá al panel lateral en su lugar durante el proceso de
ensamblaje. Repita lo mismo con el otro panel.
Paso 8 Ensamble primero el panel posterior del lado izquierdo. Coloque los alambres que dan cara abajo dentro de las asas en cada panel
latera (ver Diagrama 6).
Paso 9 Para el panel posterior del lado derecho, repita lo mismo del Paso 8.
Paso 10 Fije los paneles posteriores utilizando los herrajes para el ensamblaje de los paneles posteriores. Instálelos tal como se muestra
(ver Diagrama 7). Para mayor seguridad, ensamble las placas de más arriba a través de el estante superior. Coloque una grapa de
sujeción adicional en la parte inferior de los paneles posteriores. (Presione de manera que las 2 púas de la grapa envuelvan la viga de
celosía del estante inferior.)
Paso 11 Instale el conjunto de la puerta delantera izquierda colocando los alambres laterales dentro de las asas de los paneles laterales.
Paso 12 Para el conjunto de la puerta delantera derecha, repita lo mismo que en el Paso 11.
Paso 13 Alinee los orificios de las placas de guía en la parte superior de los paneles sobre los insertos de acero en la parte superior de los
postes y atornille los pernos dentro los postes (ver Diagrama 8). Apriete los pernos en los postes delanteros.
Jaula de Seguridad con Carro de Aluminio
Steel
Pieza Truck Dolly Front Left Front Right w/Latch Sides Back
Cant. 1 1 1 2 2 4 4
Insert Bolt
Assembly
Hardware
3 1
Page 4

INSTRUCCIONES DE ENSAMBLAJE
Las ruedas, los estantes y los postes se venden por separado
Note: Be sure that top & bottom shelves are mounted so that
enclosures just clear wrap around edges for maximum security at top
most point. Bottom is 63" from top of post.
Diagrama 1 Diagrama 2 Diagrama 3
FOODSERVICE,LLC
Diagrama 4
Diagrama 7
Diagrama 5
Diagrama 8
Diagrama 6
Call Customer Service at 1.800.968.3918 | Fax 1.800.968.4129
www.focusfoodservice.com
rev. 0911
 Loading...