

FOCUS Enhancements DR-HD100 User Manual
ProHD
DR-HD100
Portable DTE Recorder
User Guide
Release 2.0
Part Number: MANL-0995-04


LEGAL NOTICES
THIS DOCUMENT CONTAINS CONFIDENTIAL AND TRADE
SECRET INFORMATION OF FOCUS ENHANCEMENTS AND
ITS RECEIPT OR POSSESSION DOES NOT CONVEY ANY
RIGHTS TO REPRODUCE OR DISCLOSE ITS CONTENTS, OR
TO MANUFACTURE, USE, OR SELL ANYTHING THAT IT MAY
DESCRIBE. USE IN WHOLE OR IN PART WITHOUT THE
SPECIFIC WRITTEN AUTHORIZATION OF FOCUS
ENHANCEMENTS IS STRICTLY FORBIDDEN.
EVERY EFFORT HAS BEEN MADE TO ENSURE THAT THE
INFORMATION IN THIS DOCUMENT IS COMPLETE AND
ACCURATE AT THE TIME OF PRINTING; HOWEVER, THE
INFORMATION CONTAINED IN THIS DOCUMENT IS SUBJECT
TO CHANGE.
Copyright 2006 Focus Enhancements
All Rights Reserved
The material contained in this document is also protected by
copyright laws of the United States of America and other
countries. It may not be reproduced or distributed in any form by
any means, altered in any fashion, or stored in a data base or
retrieval system, without express written permission of FOCUS
ENHANCEMENTS.
FOCUS ENHANCEMENTS cannot be responsible for
unauthorized use of equipment and will not make allowance or
credit for unauthorized use or access.
ProHD DR-HD100 Portable DTE Recorder

Contacting FOCUS ENHANCEMENTS:
Office Hours: Monday through Friday
8:00 AM to 5:00PM (Central Time)
Email: support@focusinfo.com
Telephone: 763-398-1658
Fax: 763-571-7688
Address: Focus Enhancements, Inc.
1370 Dell Avenue
Campbell, CA. 95008
www.focusinfo.com
ii ProHD DR-HD100 Portable DTE Recorder

Regulations and Safety
Focus Enhancements, Inc.
1370 Dell Avenue
Campbell, CA. 95008
Model Number: ProHD DR-HD100
Date of Manufacture:
Reference the Serial Number label attached to
the unit.
Serial Number
The serial number for this equipment is located on the back of the
unit. Please write this serial number on the enclosed warranty
card and keep it in a secure area.
FCC Class A
This product satisfies FCC regulations when shielded cables and
connectors are used to connect the unit to other equipment. To
prevent electromagnetic interference with electric appliances
such as radios and televisions, use shielded cables and
connectors.
This equipment has been tested and found to comply within the
limits for a Class A digital device, pursuant to Part 15 of the FCC
Rules. These limits are designed to provide reasonable
protection against harmful interference in a residential
installation. This equipment generates, uses, and can radiate
radio frequency energy and, if not installed and used in
accordance with the instructions, may cause harmful interference
to radio communications. However, there is no guarantee that
interference will not occur in a particular installation. If this
equipment does cause harmful interference to radio or television
reception, which can be determined by turning the equipment off
and on, correct the interference by one or more of the following:
• Reorient or relocate the receiving antenna.
• Increase the separation between the equipment and
receiver.
• Connect the equipment to an outlet on a circuit different from
that used by the receiver.
• Consult the dealer or an experienced radio/TV technician for
help.
ProHD DR-HD100 Portable DTE Recorder iii

Symbol Used In the ProHD DR-HD100 Unit
This symbol indicates the presence of an uninsulated
Dangerous Voltage within the product’s enclosure that
may constitute a risk of electric shock to persons.
Symbols Used in This Documentation
This symbol indicates important information that the User
should read.
This symbol indicates supplemenatry information about
features, functions, or operations that may be of interest to
the user.
Documentation
Read, Retain, and Follow Instructions
All the safety and operating instructions should be read before
the product is operated.
• Retain Documentation
Place documentation in a secure place for future reference
on operating and safety instructions.
• Follow All Operating and Safety Instructions
• Pay Attention to All Warnings
Warnings are provided to protect the operator, the
equipment, and content.
iv ProHD DR-HD100 Portable DTE Recorder

Electrical Precautions
Do Not Expose to Moisture
Do not use this product near water or in an environment where it
is exposed to dampness or there is the possibility of it getting wet.
Do Not Remove Cover
There are No User Serviceable Parts inside this unit. Servicing
should be done by qualified service personnel.
ON / OFF Switch in Stand-By Position
The On/Off switch Does Not Separate the Unit From the Main
Power when it is in the stand-by position.
Power Sources
Use only power sources that match those indicated on the
marking label. If unsure sure of the type of power supply that is
available, consult your dealer or local power company.
Do Not Overload Power Outlets
Do not overload wall outlets, extension cords, or integral
convenience receptacles as this can result in a risk of fire or
electric shock.
Verify Power Plugs are Fully Inserted
To prevent potential electrical shock to personnel, verify that the
DR-HD100 power cord plug is fully inserted in to a grounded
receptor and that the plug blades are not exposed.
ATTENTION
POUR PREVENIR LES CHOCS ELECTRIQUES NE PAS
UTILISER CETTE FICHE POLARISEE AVEC UN
PROLONGATEUR, UNE PRISE DE COURANT OU UNE AUTRE
SORTIE DE COURANT, SAUF SI LES LAMES PEUVENT ETRE
INSEREES A FOND SANS EN LAISSER AUCUNE PARTIE A
DECOUVERT.
Power-Cord Protection
• Routing Power-Cords
Route power supply cords so that they are not likely to be
walked on or pinched by items placed upon or against them.
Avoid sharp angles in the cord, particularly at plugs,
convenience receptacles, and the point where they exit the
product.
ProHD DR-HD100 Portable DTE Recorder v
• Non-Use Period
During extended periods when the device is not used,
unplug it from the power source and retract the power-cord.
Grounding or Polarization
• Polarized
If this product is equipped with a polarized alternating
current line plug (a plug having one blade wider than the
other), it will fit into the outlet only one way. This is a safety
feature. If you are unable to insert the plug fully into the
outlet, try reversing the plug. If the plug should still fail to fit,
contact your electrician to replace your obsolete outlet. Do
not defeat the safety purpose of the polarized plug.
• Grounded
If this product is equipped with a three-wire grounding type
plug, a plug having a third (grounding) pin, it will only fit into
a grounding type power outlet. This is a safety feature. If you
are unable to insert the plug into the outlet, contact your
electrician to replace your obsolete outlet. Do not defeat the
safety purpose of the grounding type plug.
Outdoor Antenna Grounding
If an outside antenna
or cable system is
connected to the DRHD100, verify that the
antenna or cable
system is grounded.
This provides some
protection against
voltage surges and
built-up static charges.
Refer to Article 810 of the National Electric Code, ANSI/NFPA 70,
for information about the proper grounding of the mast and
supporting structure, grounding of the lead-in wire to an antenna
discharge unit, size of grounding connectors, location of antenna
discharge unit, connection to grounding electrodes, and
requirements for the grounding electrode.
Lightning and Power Surges
During electrical storms or when left unattended and unused for
long periods of time, unplug the DR-HD100 from the power
source and disconnect the antenna or cable system.
vi ProHD DR-HD100 Portable DTE Recorder

Power Lines
Do not locate an outside antenna system in the vicinity of
overhead power lines, electric light or power circuits, or where it
can fall onto such lines or circuits.
When installing an outside antenna system, extreme care should
be taken to keep from touching such power lines or circuits as
contact with them might be fatal.
Optical Precaution
The use of optical instruments with this device will increase
hazards to the eyes hazard.
Maintenance and Moving
Cleaning
Unplug this product from the wall outlet before cleaning. The
product should be cleaned only with a polishing cloth or a soft dry
cloth. Never clean with furniture wax, benzine, insecticides or
other volatile liquids since they may corrode the cabinet.
Servicing
Unplug the device from the power outlet and refer servicing to
qualified service personnel under the following conditions:
• When the power-supply cord or plug is damaged.
• If liquid has been spilled, or objects have fallen into the
product.
• If the product has been exposed to rain or water.
• If the product does not operate normally when following the
operating instructions. Adjust only those controls that are
covered by the operating instructions. The incorrect
adjustment of other controls can result in damage and often
requires extensive work by a qualified technician to restore
the product to its normal operation.
• If the product has been dropped or damaged in any way.
• When the product exhibits a distinct change in performance.
ProHD DR-HD100 Portable DTE Recorder vii

Accessories and Replacement Parts
Use only attachments and accessories recommended by Focus
Enhancements.
Use only replacement parts specified by the Focus
Enhancements or of comparable quality and characteristics as
the original parts.
Unauthorized substitution of parts can result in fire, electrical
shock, other hazards, and loss of warranty.
Safety Check
Upon completion of any service or repairs to this product, ask the
service technician to perform safety checks to determine that the
product is in proper operating condition.
Operating Environment
Location
Any mounting of this device should follow its instructions, and
should use only mounting accessories recommended by Focus
Enhancements.
• Install this device on a sturdy, level surface, away from
moisture and dust.
• Heat
Locate this device away from heat sources such as
radiators, heat registers, stoves or other electrical devices
(including amplifiers) that generate heat.
Ventilation
Do not block the ventilation openings in the DR-HD100 body.
Overheating can occur and damage the device. Do not place this
device in a built-in installation, such as a bookcase or rack,
unless proper ventilation is provided.
viii ProHD DR-HD100 Portable DTE Recorder

Table of Contents
Introduction 1
DTE Eliminates Pre-edit Processing . . . . . . . . . . . . . . . . . . 1
Unpacking . . . . . . . . . . . . . . . . . . . . . . . . . . . . . . . . . . . . . . 2
Features . . . . . . . . . . . . . . . . . . . . . . . . . . . . . . . . . . . . . . . 3
DR-HD100 Features . . . . . . . . . . . . . . . . . . . . . . . . . . . 3
Quickstart 5
Physical Description and Basic Controls . . . . . . . . . . . . . . 6
Front Panel Controls . . . . . . . . . . . . . . . . . . . . . . . . . . . 6
LCD Display . . . . . . . . . . . . . . . . . . . . . . . . . . . . . . 6
Function buttons (A, B, C) . . . . . . . . . . . . . . . . . . . 6
Power On Button . . . . . . . . . . . . . . . . . . . . . . . . . . 7
Navigation Buttons . . . . . . . . . . . . . . . . . . . . . . . . . 7
Transport Control Buttons . . . . . . . . . . . . . . . . . . . 7
Record . . . . . . . . . . . . . . . . . . . . . . . . . . . . . . . 8
Back Search . . . . . . . . . . . . . . . . . . . . . . . . . . 8
Play . . . . . . . . . . . . . . . . . . . . . . . . . . . . . . . . . 8
Forward Search . . . . . . . . . . . . . . . . . . . . . . . . 8
Back Index . . . . . . . . . . . . . . . . . . . . . . . . . . . . 9
Pause, STOP and Power OFF . . . . . . . . . . . . 9
Forward Index . . . . . . . . . . . . . . . . . . . . . . . . . 9
Top Panel . . . . . . . . . . . . . . . . . . . . . . . . . . . . . . . . . . 10
Computer FireWire Connector . . . . . . . . . . . . . . . 11
Remote Control, Serial Connector . . . . . . . . . . . . 11
Camera FireWire Connector . . . . . . . . . . . . . . . . 11
Rear Panel . . . . . . . . . . . . . . . . . . . . . . . . . . . . . . . . . 12
Side Panel . . . . . . . . . . . . . . . . . . . . . . . . . . . . . . . . . 12
Bottom Panel . . . . . . . . . . . . . . . . . . . . . . . . . . . . . . . 13
Internal Speaker . . . . . . . . . . . . . . . . . . . . . . . . . . 13
The DR-HD100 Menu System . . . . . . . . . . . . . . . . . . . . . 14
ProHD DR-HD100 Portable DTE Recorder ix

Table of Contents
Powering the DR-HD100 . . . . . . . . . . . . . . . . . . . . . . . . . 18
Connecting the DR-HD100 to AC Power . . . . . . . . . . 18
Installing / Removing the Battery Pack . . . . . . . . . . . . 19
Installing a Battery . . . . . . . . . . . . . . . . . . . . . . . . 19
Removing a Battery . . . . . . . . . . . . . . . . . . . . . . . 19
Charging the Battery . . . . . . . . . . . . . . . . . . . . . . 20
Connecting a DR-HD100 to a DV/HD Camcorder . . . . . . 21
Record and Playback with the DR-HD100 . . . . . . . . . . . . 22
Power On the DR-HD100 . . . . . . . . . . . . . . . . . . . . . . 22
Select HDD Recorder Mode . . . . . . . . . . . . . . . . . . . . 23
Select a DV/HD File Format . . . . . . . . . . . . . . . . . . . . 24
Set Time and Date . . . . . . . . . . . . . . . . . . . . . . . . . . . 25
Record With the DR-HD100 . . . . . . . . . . . . . . . . . . . 27
Manual Recording . . . . . . . . . . . . . . . . . . . . . . . . 29
Creating a New File without Dropping Frames 29
JVC GY-HD . . . . . . . . . . . . . . . . . . . . . . . . . . . . . 30
Series Record and Split Slave Control Modes . . . 31
Series Record . . . . . . . . . . . . . . . . . . . . . . . . 31
Split Slave . . . . . . . . . . . . . . . . . . . . . . . . . . . 31
Syncro Slave . . . . . . . . . . . . . . . . . . . . . . . . . . . . 32
External . . . . . . . . . . . . . . . . . . . . . . . . . . . . . . . . 33
Recording Timecode in the File . . . . . . . . . . . . . . 33
Playback on the DR-HD100 . . . . . . . . . . . . . . . . . 34
DR-HD100: Using with a Computer 35
Initial Setup . . . . . . . . . . . . . . . . . . . . . . . . . . . . . . . . . . . . 36
Mounting the DR-HD100 in Windows . . . . . . . . . . . . . . . . 37
DR-HD100 and FAT 32 . . . . . . . . . . . . . . . . . . . . . . . . 39
Using Avid OMF Clips (Required for DV mode only) . 40
Dismounting the DR-HD100 (Windows) . . . . . . . . . . . . . . 43
Mounting the DR-HD100 (Macintosh) . . . . . . . . . . . . . . . . 44
Dismounting the DR-HD100 (Macintosh) . . . . . . . . . . . . . 45
Mounting Hardware . . . . . . . . . . . . . . . . . . . . . . . . . . . . . . 46
Mounting DR-HD100 to a Camcorder . . . . . . . . . . . . 46
Clipping to a Belt . . . . . . . . . . . . . . . . . . . . . . . . . . . . 46
DR-HD100 Functions 47
General Screen Information . . . . . . . . . . . . . . . . . . . . . . . 48
Welcome Screen . . . . . . . . . . . . . . . . . . . . . . . . . . . . 48
Home Screen . . . . . . . . . . . . . . . . . . . . . . . . . . . . . . . 49
DISP (display) Information Fields . . . . . . . . . . . . . 50
x ProHD DR-HD100 Portable DTE Recorder

Table of Contents
DR-HD100 System Information Screens . . . . . . . . . . . 51
Record Screens . . . . . . . . . . . . . . . . . . . . . . . . . . . . . . . . . 52
Normal Record . . . . . . . . . . . . . . . . . . . . . . . . . . . . . . 53
Retro Cache Record Mode . . . . . . . . . . . . . . . . . . . . . 53
Retro Disk Record Mode . . . . . . . . . . . . . . . . . . . . . . 54
Loop Record . . . . . . . . . . . . . . . . . . . . . . . . . . . . . . . . 55
Saving Loop Record Clips . . . . . . . . . . . . . . . . . . . 55
Snap Record DV modes only . . . . . . . . . . . . . . . . . . . 55
Time Lapse Record DV modes only . . . . . . . . . . . . . . 56
HDD Mode Screen . . . . . . . . . . . . . . . . . . . . . . . . . . . . . . . 57
Setting Up Master and Slave DR-HD100 . . . . . . . . . . 59
Format Screen . . . . . . . . . . . . . . . . . . . . . . . . . . . . . . . . . . 60
DV Formats . . . . . . . . . . . . . . . . . . . . . . . . . . . . . . . . . 60
HD Format Screen . . . . . . . . . . . . . . . . . . . . . . . . . . . . 61
Setup Screens . . . . . . . . . . . . . . . . . . . . . . . . . . . . . . . . . . 62
Date . . . . . . . . . . . . . . . . . . . . . . . . . . . . . . . . . . . . . . . 63
Time . . . . . . . . . . . . . . . . . . . . . . . . . . . . . . . . . . . . . . . 63
Version . . . . . . . . . . . . . . . . . . . . . . . . . . . . . . . . . . . . . 64
LCD Light On, Off, Auto . . . . . . . . . . . . . . . . . . . . . . . . 64
Alarm On, Off . . . . . . . . . . . . . . . . . . . . . . . . . . . . . . . . 64
Stop Frame, Gray, No video . . . . . . . . . . . . . . . . . . . . 65
EXT CTL OFF, Pause, Frame, File . . . . . . . . . . . . . . . 65
TIME CODE EXT, REC RUN, FREE RUN, REGEN . . 66
TC SET . . . . . . . . . . . . . . . . . . . . . . . . . . . . . . . . . . . . 67
UB SET . . . . . . . . . . . . . . . . . . . . . . . . . . . . . . . . . . . . 68
TC DROP, NON-DROP NTSC only . . . . . . . . . . . . . . . 69
LCD CONTRAST . . . . . . . . . . . . . . . . . . . . . . . . . . . . . 69
Functions Screen . . . . . . . . . . . . . . . . . . . . . . . . . . . . . . . . 70
Functions List . . . . . . . . . . . . . . . . . . . . . . . . . . . . . . . 71
Assigning Clips to Reels . . . . . . . . . . . . . . . . . . . . 73
Blank . . . . . . . . . . . . . . . . . . . . . . . . . . . . . . . . . . . 73
Utilities Screen . . . . . . . . . . . . . . . . . . . . . . . . . . . . . . . . . . 74
Organize Reel . . . . . . . . . . . . . . . . . . . . . . . . . . . . . . . 75
Organize OMF . . . . . . . . . . . . . . . . . . . . . . . . . . . . . . . 75
Organize PINN . . . . . . . . . . . . . . . . . . . . . . . . . . . . . . 75
Delete Clip . . . . . . . . . . . . . . . . . . . . . . . . . . . . . . . . . . 76
Format Disk . . . . . . . . . . . . . . . . . . . . . . . . . . . . . . . . . 77
Repair Disk . . . . . . . . . . . . . . . . . . . . . . . . . . . . . . . . . 78
Repair Clip DV Mode only . . . . . . . . . . . . . . . . . . . . . 79
File Name . . . . . . . . . . . . . . . . . . . . . . . . . . . . . . . . . . 80
Upgrade . . . . . . . . . . . . . . . . . . . . . . . . . . . . . . . . . . . . 81
Upgrade Errors . . . . . . . . . . . . . . . . . . . . . . . . . . . 82
ProHD DR-HD100 Portable DTE Recorder xi

Table of Contents
System Reset . . . . . . . . . . . . . . . . . . . . . . . . . . . . . . . 83
Diagnostic . . . . . . . . . . . . . . . . . . . . . . . . . . . . . . . . . . 83
Status . . . . . . . . . . . . . . . . . . . . . . . . . . . . . . . . . . . . . 84
Reels Screen . . . . . . . . . . . . . . . . . . . . . . . . . . . . . . . . . . 85
Placing a Clip in a Reel . . . . . . . . . . . . . . . . . . . . . . . 85
Using a Wired Remote Control . . . . . . . . . . . . . . 86
Play Screen . . . . . . . . . . . . . . . . . . . . . . . . . . . . . . . . . . . . 87
Play From Screen . . . . . . . . . . . . . . . . . . . . . . . . . . . . . . . 88
Control Screen . . . . . . . . . . . . . . . . . . . . . . . . . . . . . . . . . 89
LCD Display Symbols and Text 91
GY-HD100 1394 REC Trig Mode . . . . . . . . . . . . . . . . . . . 92
Technical Specifications 93
Physical Description . . . . . . . . . . . . . . . . . . . . . . . . . . 93
Input/Outputs . . . . . . . . . . . . . . . . . . . . . . . . . . . . . . . 93
Power . . . . . . . . . . . . . . . . . . . . . . . . . . . . . . . . . . . . . 93
Audio/Video/Timecode Specification . . . . . . . . . . . . . 93
DTE File Formats . . . . . . . . . . . . . . . . . . . . . . . . . . . . 94
Disk Information . . . . . . . . . . . . . . . . . . . . . . . . . . . . . 94
Log Files . . . . . . . . . . . . . . . . . . . . . . . . . . . . . . . . . . . 94
Error Messages . . . . . . . . . . . . . . . . . . . . . . . . . . . . . 95
Warranty . . . . . . . . . . . . . . . . . . . . . . . . . . . . . . . . . . . 95
Temperature . . . . . . . . . . . . . . . . . . . . . . . . . . . . . . . . 95
Compatible Camcorders and Accessories . . . . . . . . . 96
xii ProHD DR-HD100 Portable DTE Recorder


Introduction
Thank you for purchasing a Focus Enhancements’ FireStore
DR-HD100 portable direct-to-edit (
DR-HD100 is the first portable DVHD disk recorder with DTE
technology designed for hand held camcorders in a small, rugged
and shock proof chassis.
If you edit with applications from Adobe, Apple, Avid, Canopus,
Matrox, Pinnacle, Sony, Ulead, and many others, FireStore's DTE
Technology is the only solution that can save hundreds of hours a year
by recording clips to disk in your non-linear editor’s (NLE) native file
format.
DTE Eliminates Pre-edit Processing
The DR-HD100 DTE disk recorder eliminates the need to capture,
transfer or convert video clips before editing. The DR-HD100 is a
stand-alone device that records DV25, HD 720p, and HD 1080i video
to its disk drive as a NLE native file. In HD Recorder mode it has the
capability of capturing to disk HD 720p and 1080i video from HDV
camcorders equipped with a 1394 interface. For most DV and many
HDV compatible NLE systems, when the disk drive is connected to a
computer the clips are immediately available for editing. Shoot,
connect, and edit: it is now that easy.
DTE) disk recorder. The FireStore
These capabilities make the DR-HD100 the perfect companion for the
JVC GY-HD100/101.
ProHD DR-HD100 Portable DTE Recorder 1
Introduction
Unpacking
1
7
6
2
3
4
5
Verify that the DR-HD100 has the following items:
1. DR-HD100 unit
2. Belt clip
3. User guide
4. Firewire cables, four and one foot long, 6-pin to 6-pin
5. Power cord
6. Power supply with cable and connector to the DR-HD100
7. Removable Li-Ion battery pack
Missing or Damaged Components
If there are missing or damaged items, contact Focus Enhancements
Support for assistance.
Email: Support@focusinfo.com
Telephone: 763-398-1658
2 ProHD DR-HD100 Portable DTE Recorder

Features
DR-HD100 Features
The DR-HD100 offers the following features:
• Tapeless acquisition
Especially equipped camcorders permit the use of Direct To
Edit (DTE) Technology to record directly from a camcorder
while shooting and without the need of a tape.
• True DTE Technology
When shooting is finished, connect the DR-HD100 to a
computer and instantly be ready to edit in the timeline. Files
are recorded to disk as
Introduction
HD Recorder
M2T
DV Recorder:
AVI Type 1
AVI Type 2
Avid OMF
Canopus AVI
Matrox AVI
Pinnacle
QuickTime
RawDV
DV Recorder
(NTSC units):
AVI Type 2 24p
QuickTime 24p
DR-HD100 provides support for cutting edge HDV
camcorders with 720p and 1080i MPEG-2 capabilities and
FireWire, 1394, connection.
• Fast and Efficient Editing
When shooting is finished, mount the DR-HD100 to a Mac or
PC editing system like a typical FireWire hard disk drive.
Transfer clips to your NLE's media drive at up to 400 Mbps
or edit instantly in real-time using the DR-HD100 as your
media source. With some DV and HDV compatible NLE
systems, it is necessary to capture the video footage using the
NLE system’s capture capability.
• Confidence in Recording
Now, simultaneously record to disk and tape while you shoot,
providing an immediately available, drop out free, edit source
with an archive and backup on tape.
ProHD DR-HD100 Portable DTE Recorder 3

Introduction
• Compact, Lightweight, Rugged Design
The FireStore DR-HD100 weighs approximately one pound
including the battery and is only 1.5" thick. You can mount
the DR-HD100 directly to your camcorder using the optional
camera mount kit, or clip the DR-HD100 directly to your
belt. The DR-HD100 is designed to withstand the rigors of
field shooting. The programmable, 10-second electronic
shock cache ensures that your video is always recorded even
in the roughest of conditions.
• Flexible Capacities and Power
The DR-HD100 is available with either a 40GB or 80GB
hard drive that provides a record time of approximately 3 or 6
hours respectively. Extend record times by linking two DRHD100 units together.
Power the DR-HD100 using slim, removable battery packs or
power it using the supplied AC adapter.
• Easy to Use, Control and Update
The DR-HD100 interfaces with your camcorder using a
single FireWire cable that passes audio, video, timecode and
control information. When a tape is present, each press of
start and stop on your camcorder's record button creates an
individual clip on disk. The DR-HD100 features a
comprehensive backlit display, menu system and buttons
allowing easy control and management. In addition, these
units are upgradeable in the field.
• Never Miss A Shot
DR-HD100's ten second retro record mode means you are
always recording. When action happens, you know up to ten
seconds prior to the event occurring is saved in your clip.
• Retro Disk and Loop Record modes.
• Scene Marking:
This allows categorizing video clips into pre-named folders
on the disk during a shoot.
• User definable time lapse.
• Loop playback modes.
• Free Run, Rec Run, and Regen timecode modes.
4 ProHD DR-HD100 Portable DTE Recorder

Quickstart
This section provides the following information necessary for using
the DR-HD100 as quickly as possible.
Physical Description and Basic Controls................................ 6
The DR-HD100 Menu System ............................................ 14
Connecting the DR-HD100 to AC Power ............................ 18
Installing / Removing the Battery Pack ............................... 19
Connecting a DR-HD100 to a DV/HD Camcorder .............. 21
Record and Playback with the DR-HD100 .......................... 22
Power On the DR-HD100 .................................................... 22
Select HDD Recorder Mode ................................................ 23
Select a DV/HD File Format ................................................ 24
Set Time and Date .............................................................. 25
Record With the DR-HD100 ................................................ 27
Manual Recording ............................................................... 29
JVC GY-HD ......................................................................... 30
Syncro Slave ....................................................................... 32
External ............................................................................... 33
Playback on the DR-HD100 ................................................ 34
ProHD DR-HD100 Portable DTE Recorder 5
Quickstart
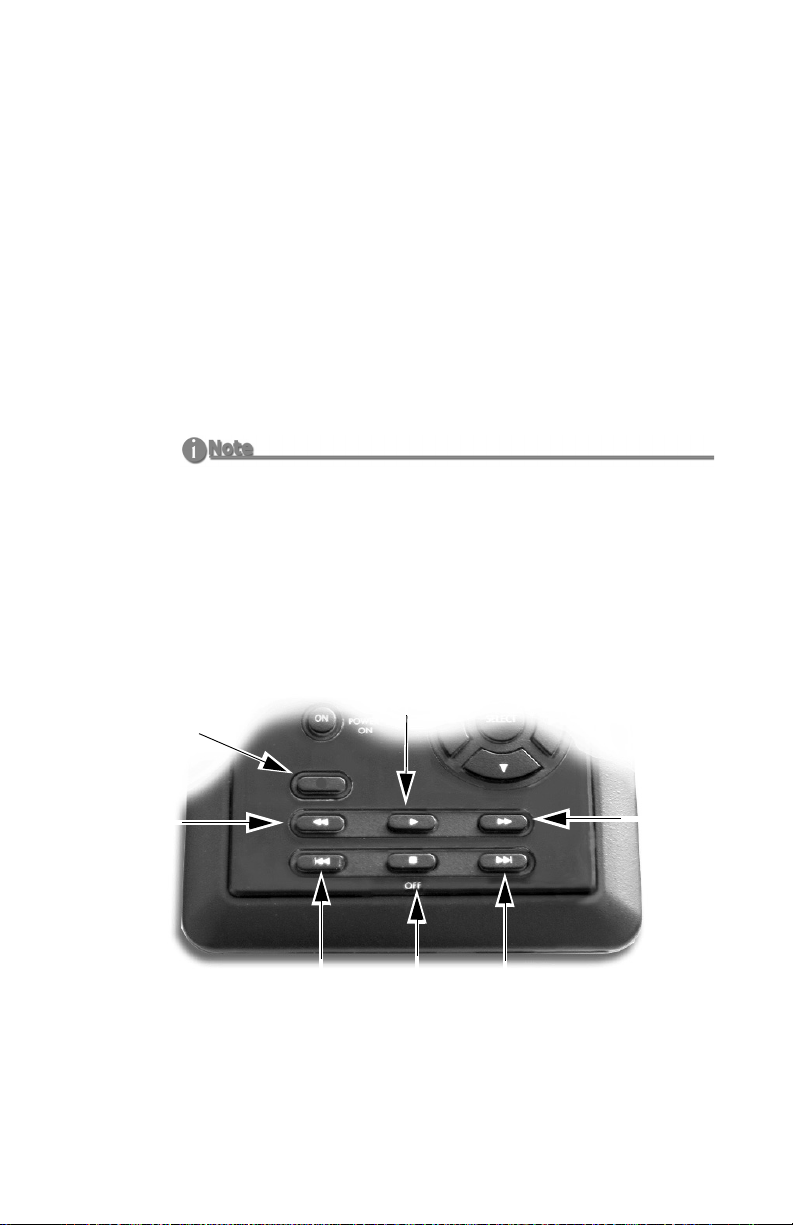
Physical Description and Basic Controls
Front Panel Controls
LCD
Display
Function
buttons
A B C
Power ON
Power ON
and Reset
and Reset
Button
Button
Record
Button
Navigation
buttons
Transpor t
Transpor t
Control
Control
buttons
buttons
Power OFF
and
Stop button
Speaker
LCD Display
This is a backlit, 14 character by 7 line dot matrix display.
In event of a mild electrical discharge to the unit the LCD could go blank. To
correct, hold the SELECT button down for 5 seconds.
Function buttons (A, B, C)
Below the DR-HD100 LCD display are three user-defined
function buttons: A (left), B (center), and C (right). Use them as
short-cut keys for the most frequently selected functions at the
bottom of the LCD display. The function of these soft buttons
changes, depending on the options displayed above that specific
button. Refer to the “Functions Screen” on page 70 for more
information.
6 ProHD DR-HD100 Portable DTE Recorder
Quickstart
Power On Button
The Power ON button provides two functions.
•Power ON
Turn on the DR-HD100.
• Reset DR-HD100
• DR-HD100 first must be powered on.
• Hold down the
Power On button for more than one second.
•Power OFF
Hold down the OFF button for three (3) seconds. During
power off, the DR-HD100 beeps, indicating that it is turning
off.
Alarm OFF
If the Alarm feature is set to OFF, then the power-down sequence
occurs silently.
Navigation Buttons
Use these buttons to navigate through the DR-HD100 menus. The
navigation buttons are
Left, Right, Up, Down, and Select.
Transport Control Buttons
Record
Back
Search
Back
Index
Use these buttons to control DR-HD100 playback and record
functions. You usually operate these transport buttons while on
the Home screen.
ProHD DR-HD100 Portable DTE Recorder 7
Play
STOP
Power Off
Forward
Search
Forward
Index
Quickstart
Record
Press this button once when the DR-HD100 is in
DR-HD100 into
REC-PAUSE. Press it again to start recording. Pressing
Stop mode to put the
the Record button while recording, causes the current clip to close and a
new clip is created without dropping any frames. This button is the only
button that has a red legend on the front panel.
Back Search
WW
Press this button to play video at speeds different than real-time. Refer
to the note in the Forward Search section.
Play
X
Press this button to start playback of the selected clip.
Some HDV Camcorders Require a Moment to Synchronize
Some HDV camcorders require a moment to synchronize the video from an
external source. Typically during this period, they display a solid blue or black
video until synchronized.
Forward Search
XX
Press this button to play video at speeds different than real-time.
Fast Forward and Reverse
Pressing the Forward Search button multiple times results in increases in the
search speed, i.e. fast forward. This mode works both in forward and reverse
functions. For instance, if you are in 10X FF speed and you press the Back
Search button once, the DR-HD100 is now in 2X FF mode. In addition, this
applies to backward search speeds. The default speed resolution is as
follows (NTSC and PAL have slightly different multiples for < 1X)
• Reverse: -30X, -10X, -2X, -1X (reverse play), -1/2X(-15fps), Still.
• Forward: Still, +1/2X (+15fps), +1X (play), +2X, +10X, +30X
Fast Forward and Reverse Search Compatible Camcorders
In Forward and Reverse Search modes, some camcorders do not display
video when played-back from an external device, such as the DR-HD100.
Search Modes and HD Recorder Mode
Slow-motion Forward Playback and all Reverse Playback search modes are
not available when in HD Recorder mode.
8 ProHD DR-HD100 Portable DTE Recorder

Quickstart
Back Index |WW
This button returns the DR-HD100 to the beginning of the current clip
when in playback mode. Press this button twice in sequence to return
the DR-HD100 to the previous clip during playback. In
STOP mode,
press this button to return the DR-HD100 to the beginning of the
previous clip.
Using Back Index with Short Clips
When using Back Index with short clips, it is first necessary to place the
DR-HD100 in STOP mode.
Pause, STOP
and Power OFF
While in the Home screen, and in any transport mode, press this button
to Pause the DR-HD100. Press it again to stop the DR-HD100. Refer to
the section, “Setup Screens” on page 62 for more information.
To power off the DR-HD100, hold down the
seconds. During Power OFF and if the Alarm function is
STOP button for three
ON, the
DR-HD100, makes an audible beep indicating it is turning off.
Forward Index
XX|
Use this button to skip forward to the next clip in STOP and PLAY
modes.
ProHD DR-HD100 Portable DTE Recorder 9
Quickstart
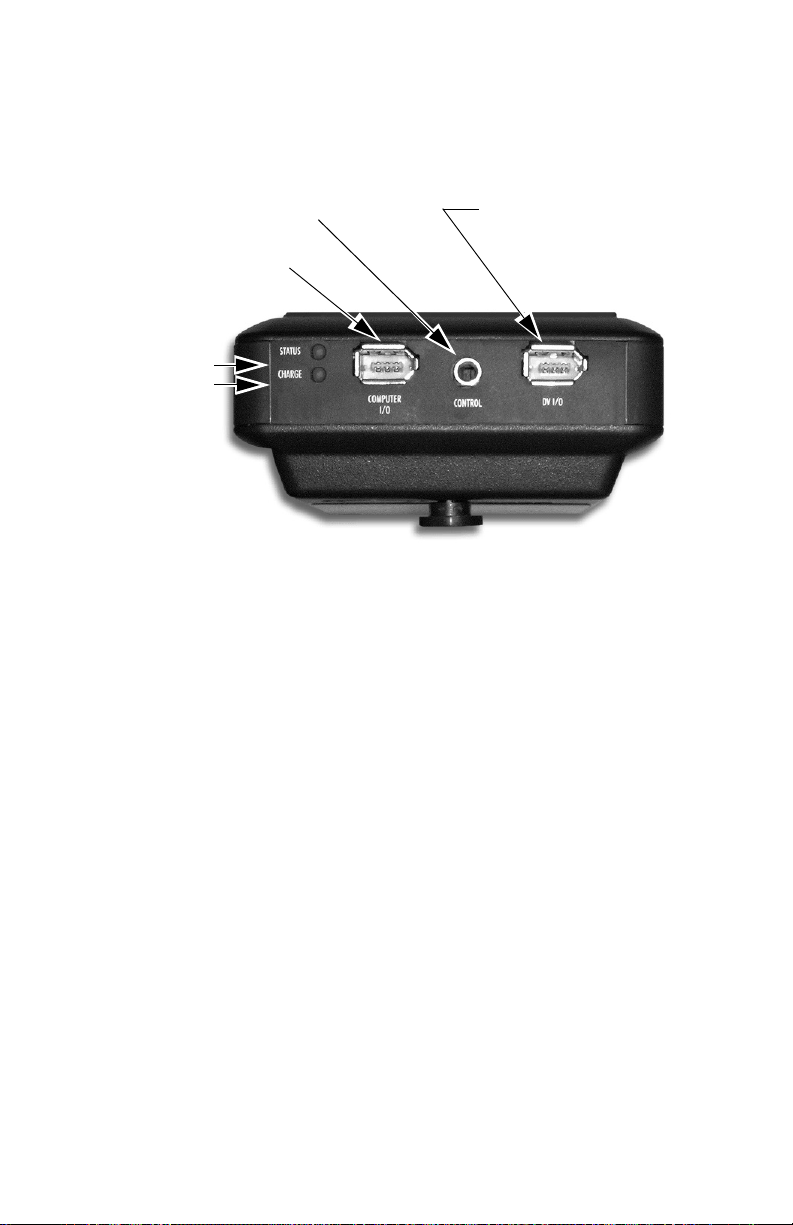
Top Panel
The top panel contains the following connectors and LEDs:
Remote Control
(Serial Connector)
Computer
(FireWire Connector)
Status LED
Charge LED
Camera
(FireWire Connector)
Table 1: Charge LED States
LED Indicates
Off No Charger Connected
Green Charging Cycle Completed
Amber / Green Floating Charge Mode
Amber Fast Charge Mode (Maximum charging rate.)
Red Charging Error
Red / Amber No Battery Installed / Battery Error
(Charging almost completed.)
Amber, flashing Insufficient Voltage to Charger
Table 2: Status LED States
LED Indicates
Off Power OFF
Green Power ON (Power On but there is no activity.)
Orange, solid Playback
Orange, fluttering Hard drive being accessed during playback.
Red, solid Recording Mode
Red, blinking Recording Pause
10 ProHD DR-HD100 Portable DTE Recorder

Computer FireWire Connector
• In/Out: 6-pin IEEE-1394a port x 1
• Asynchronous Data I/O
Remote Control, Serial Connector
• GPI / RS232C; 3.5mm TRS mini jack. (3.5mm to DB-9 cable
accessory available).
• Configure as a simple contact closure or RS-232C port.
• Connect an optional wired remote commander.
Camera FireWire Connector
• DV/I/O
• 6-pin IEEE-1394a connector
• Isochronous 25Mb/s DV video I/O
DR-HD100 supports 1080i/720p video I/O when used with
HDV camcorders equipped with a 1394 connection like the
JVC GY-HD100/101.
• DV Audio: embedded 2-channel (48kHz, 16-bit) or 2-channel
(12-bit, 32kHz) audio, 720p/1080i HDV MPEG1 Audio Layer
II.
Quickstart
4-Channel Audio
4-channel (12-bit, 32kHz) audio is available only with RawDV
format.
GY-HD10X Does Not Support 1080i
The GY-HD10X companion camcorder does not support 1080i
ProHD DR-HD100 Portable DTE Recorder 11
Quickstart
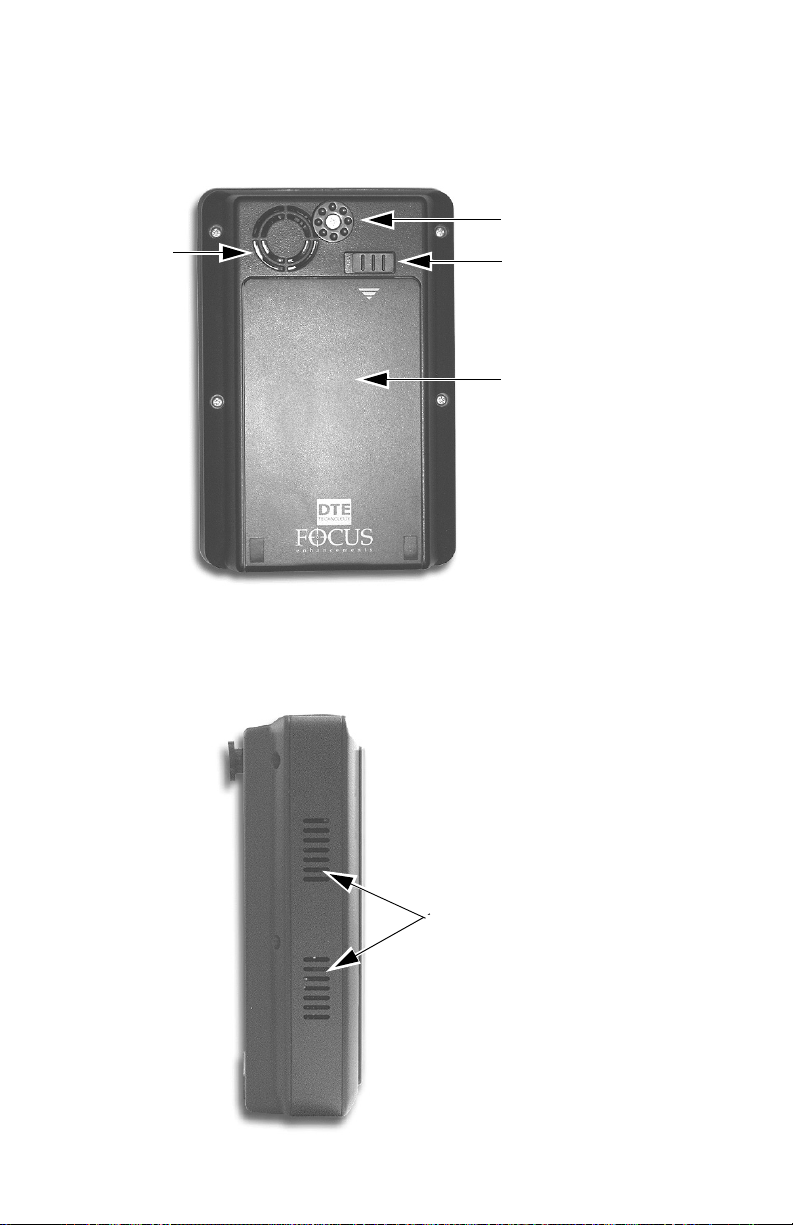
Rear Panel
The rear panel contains the following important items:
Belt Clip Post
Fan Intake
Ven t
Do Not Block
Battery
Compartment
Latch
Battery
Compartment
Side Panel
The side panel contains cooling vents as illustrated below.
Cooling Vents
Do Not Block
12 ProHD DR-HD100 Portable DTE Recorder
Quickstart
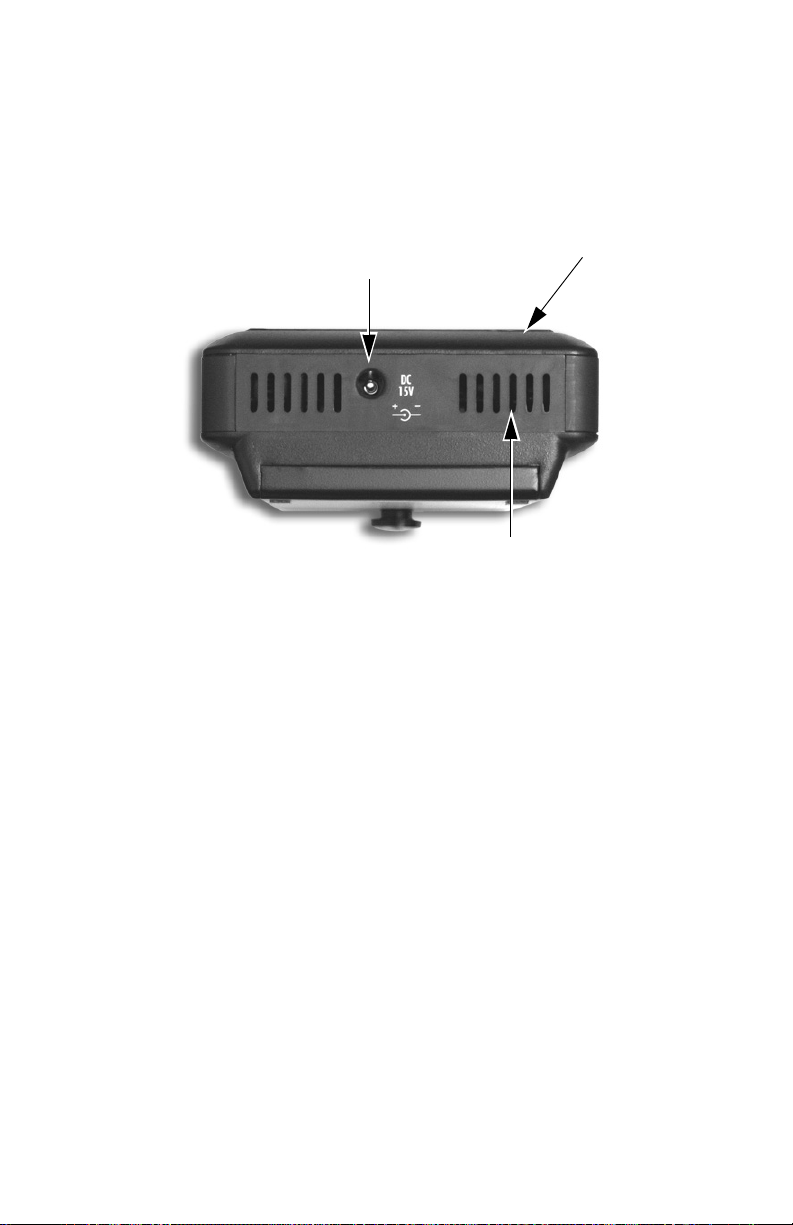
Bottom Panel
The DR-HD100 bottom panel features a single 2-pin DC power
connector. Connect the supplied AC power adapter here.
DC
Power
Connector
Cooling Vent
Do Not Block
Internal
Speaker
Internal Speaker
An internal speaker provides alarms and audible feedback.
To disable the audible feedback, go to the Settings menu and
select
ALARM OFF. However, the power, temperature, and disk
capacity alarms are always active.
ProHD DR-HD100 Portable DTE Recorder 13

Quickstart
The DR-HD100 Menu System
The DR-HD100 menu system provides access to all the functions
available in the unit. Each of the screens below (except the Welcome
and Home screens which come up automatically when the unit starts)
are accessed by pressing the
functions of each of the selections on these screens is explained in
more detail in “DR-HD100 Functions” on page 47.
Returning to the Top of Menu or Home screen
To get to the top of any menu, press the Left button. To get back to the Home
screen:
• Highlight the screen title at the top of the screen.
• Press the Select button.
• Welcome
Only appears for several seconds upon power up.
•Home
Gateway screen for all functions, it displays disk and
operational status.
• Control
Contains the following selections:
• Local
• JVC GY-HD
• Syncro Slave
•AV/C
• External
• Play From
Provides lists to select play material from:
• Track List
• Reel List
•Play
Contains the following Play selections:
• Play Clip
• Loop Clip
• Loop All
• Play All
Left or Right navigation buttons. The
14 ProHD DR-HD100 Portable DTE Recorder
 Loading...