

Page 1
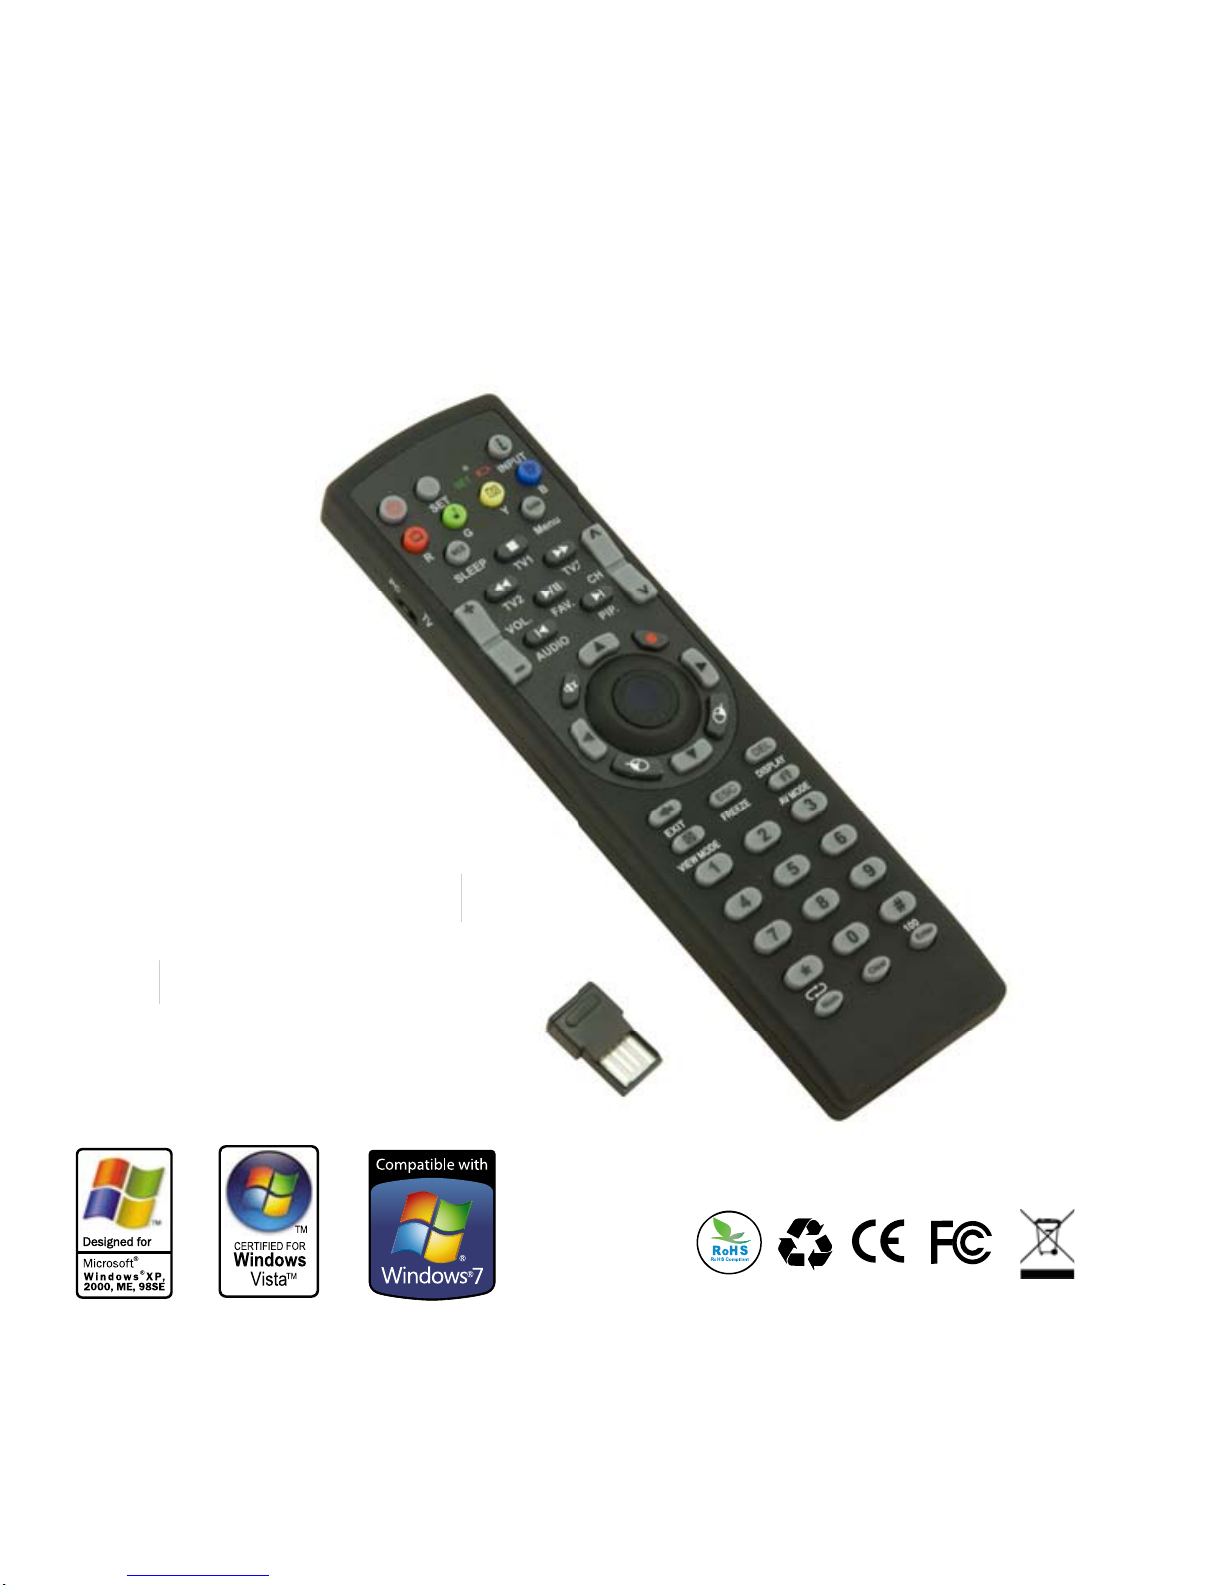
User Manual
RM-868
All-in-one Remote :
2.4G MCE remote & IR TV remote
er Manua
l
M-86
8
Compatible with Windows 2000 / Windows XP / Windows Vita / Windows 7.
Page 2

Introduction:
This remote is an all-in-one product for the use in your PC
and TV by the combination technology of RF & IR in one
device.
The 2.4G RF Media Center remote control with finger touch
slim sensor combining with IR functions is the best computer
input device and TV remote on market today. Its RF design
is equipped with Finger Touch sensor with mouse keys and
MCE Hot Keys. Not only this, it combines IR within this model
to control home device like TV. With RF/IR combination, you
can have multi-choices and pleasures.
Under 2.4GHz RF, you can control devices even when you
can’t see them, so just keep the entertainment system behind
the cabinet.
With this RF/IR remote control and follow the instructions
contained in this manual, you will definitely obtain higher
than ever entertainment enjoyment.
1
Page 3
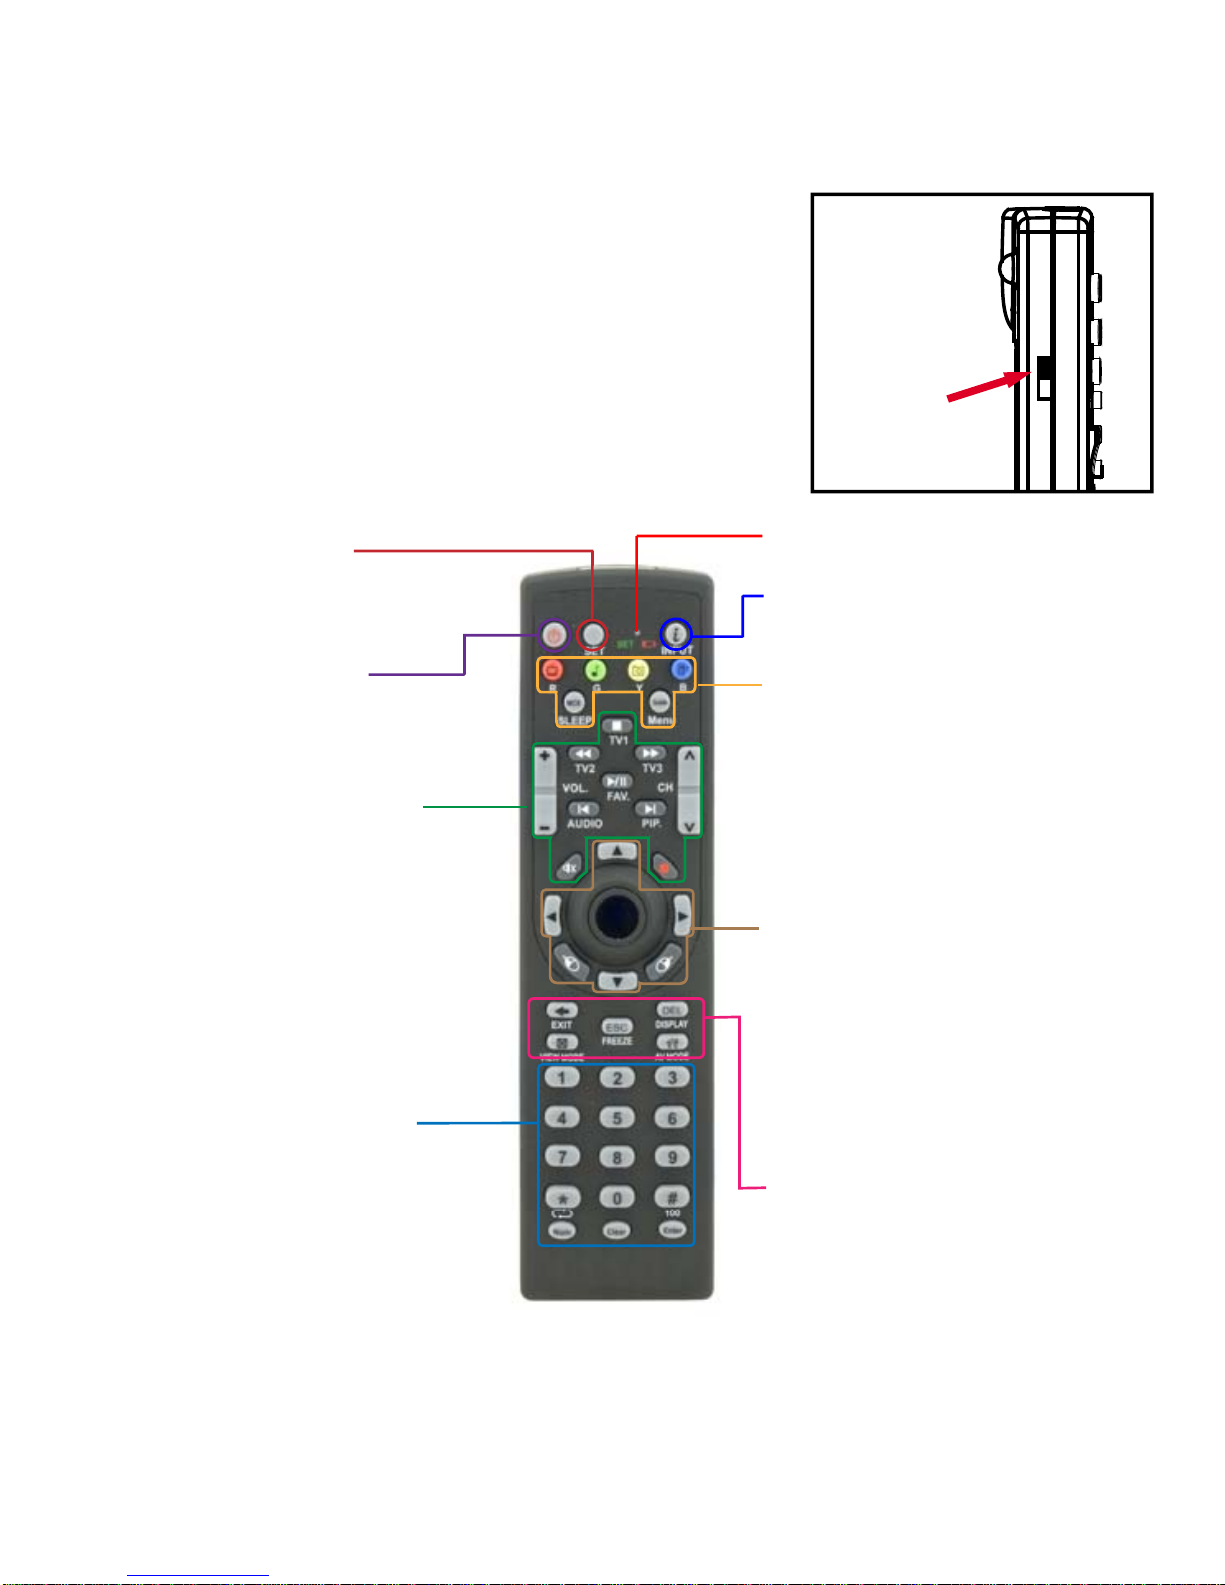
RF mode for PC :
1. RF and IR switch mode
Keys Description(RF)
Switch
to PC mode
TV
PC
Battery Low LED
Number Lock, Clear, Enter,
0-9 , * , #
Hot Keys:
MCE Direct Keys:
Multimedia Control Keys:
My TV ,My Music,
My Picture ,My Video,
MCE start key, Guide
Record ,Stop ,Play/Pause ,
Forward ,Rewind,Next-Track ,
Pre-Track , Volume Up,
Volume Down ,Mute ,
Channel Up, Channel Down
Finger Touch Sensor
and Mouse Keys:
Back , Del , Esc , Close ,
Internet
Numerical keys :
INFO
Power Down
Press sensor as Left Click
Directional 4 keys ,
Mouse keys:
Left click ,Right Click
CPI adjustable:
Set + number button 1 : 1000
Set + number button 5 : 500
Installation
2
Page 4
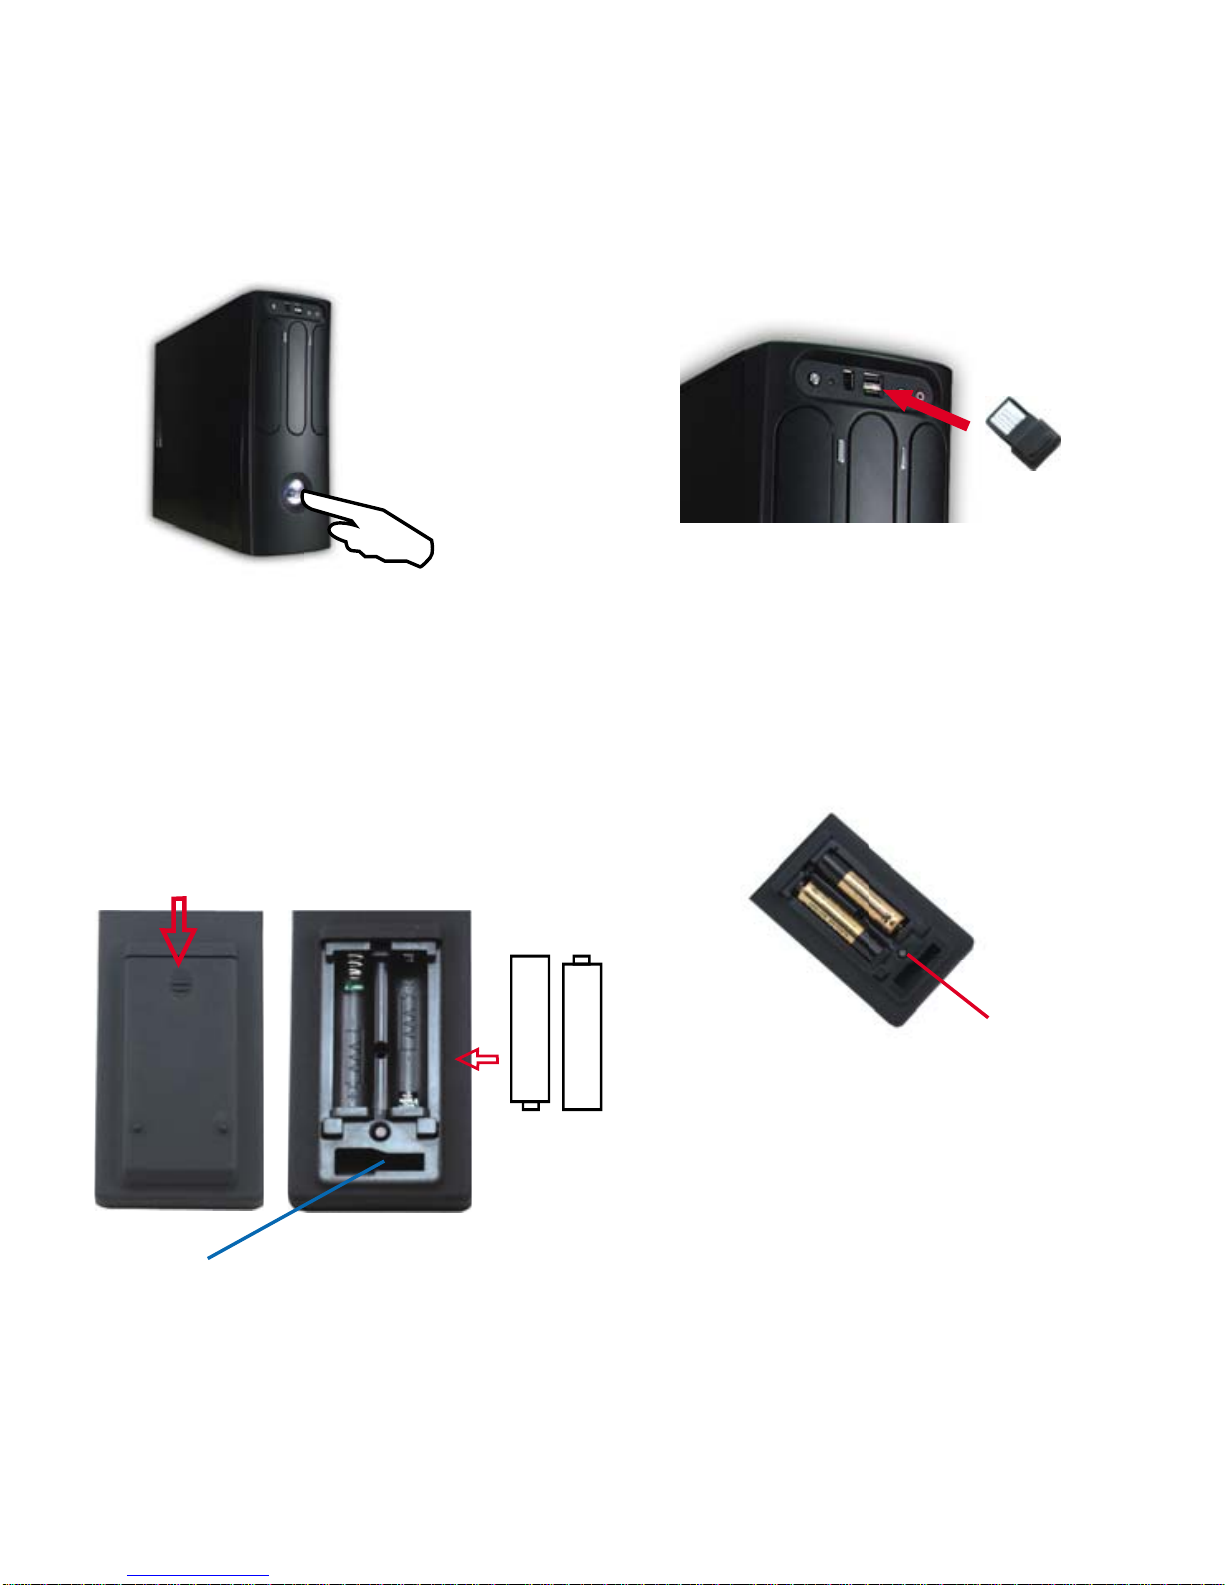
2. Turn on the computer
3. Plug the nano receiver into
the USB port of your computer.
e USB
po
rt of
yo
ur c
3
4.Open the battery cover under
the remote and place 2 AAA
batteries inside the battery
compartment.
Push to open
Dongle storage
ID Button
5. Setting ID:
a. Press ID button on the
back of remote
b. Close the battery cover.
2. When processing ID setting,
make sure the distance between
the receiver and remote is within
30 cm ( around 1 feet )
1. When Battery Low LED is on,
please change batteries.
Note:
Page 5
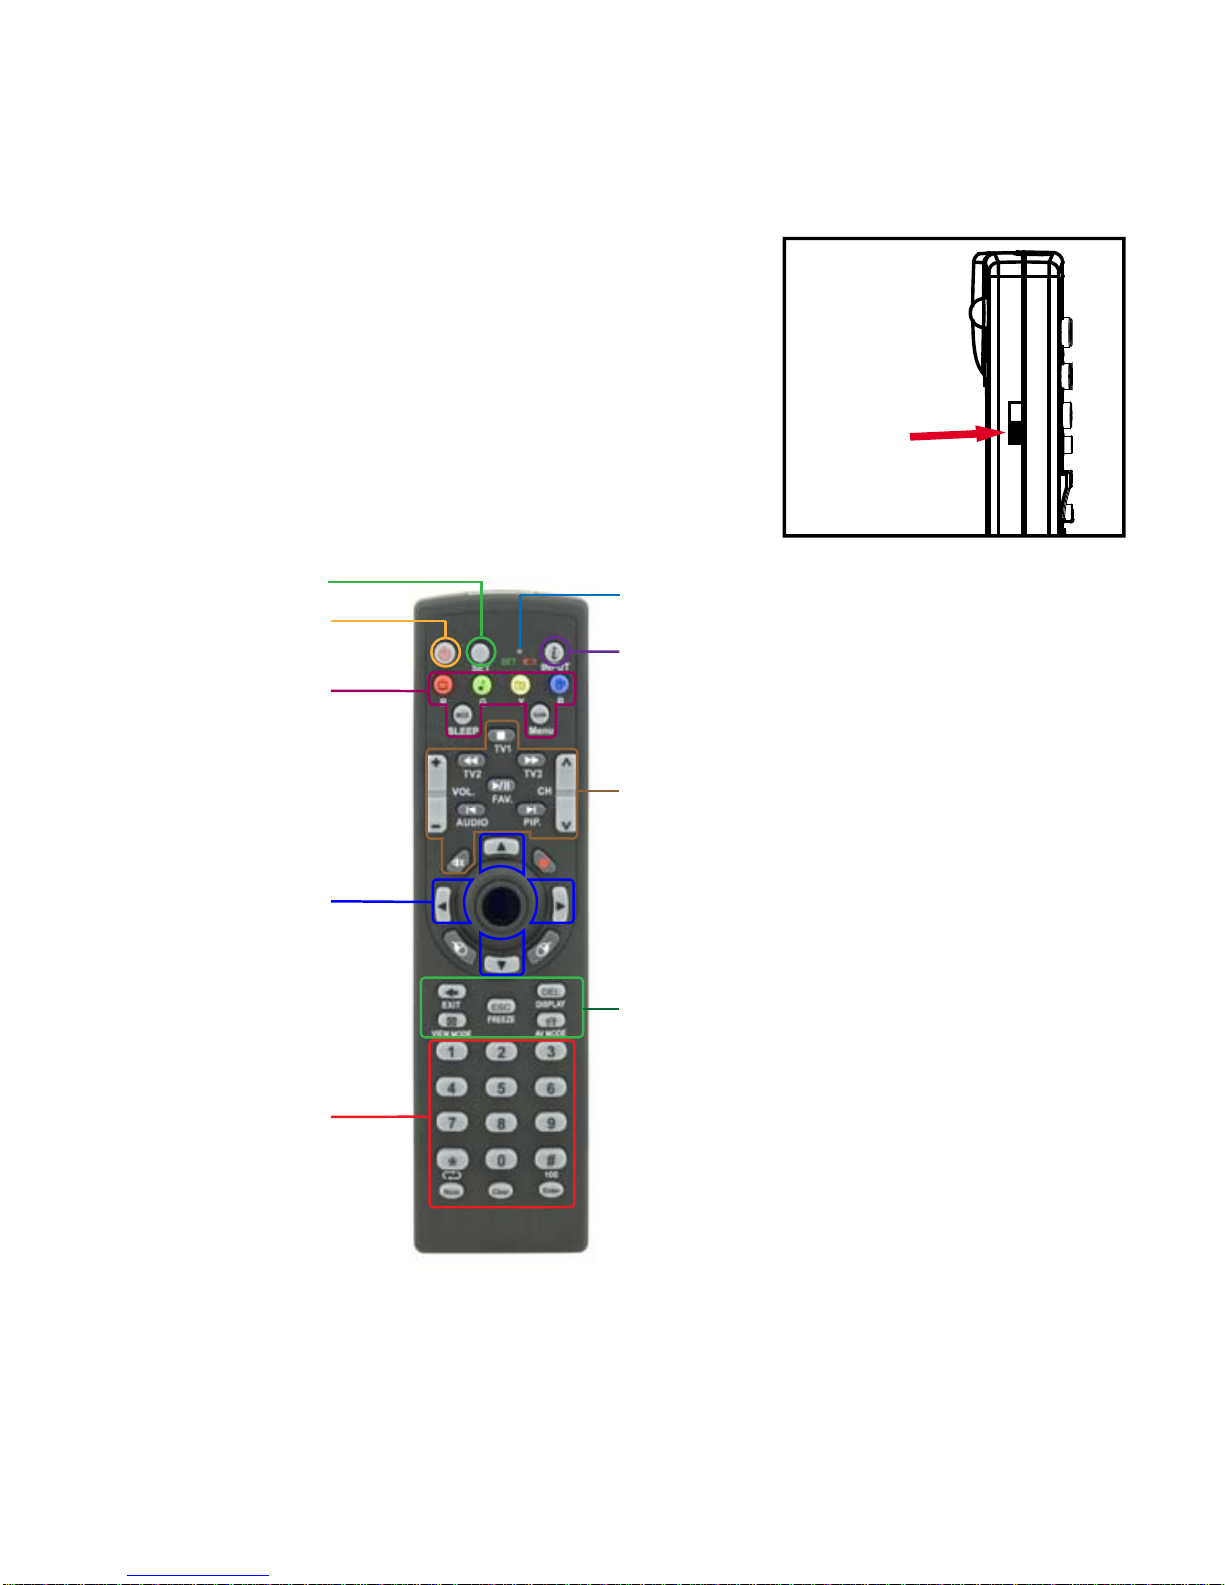
IR mode for TV
1. RF and IR switch mode
Keys Description(IR)
Switch
to TV mode
TV
PC
EXIT, FREEZE, VIEW MODE,
DISPLA Y, AV MODE
Set LED
Set Key
TV Power
Input
R,G,Y,B,SLEEP,
Menu
TV1,TV2,TV3,FAV.,AUDIO,PIP.,
Volume Up, Volume Down,
Mute, Channel Up,
Channel Down
Directional keys
0-9, Channel
return, 100
4
Page 6
5
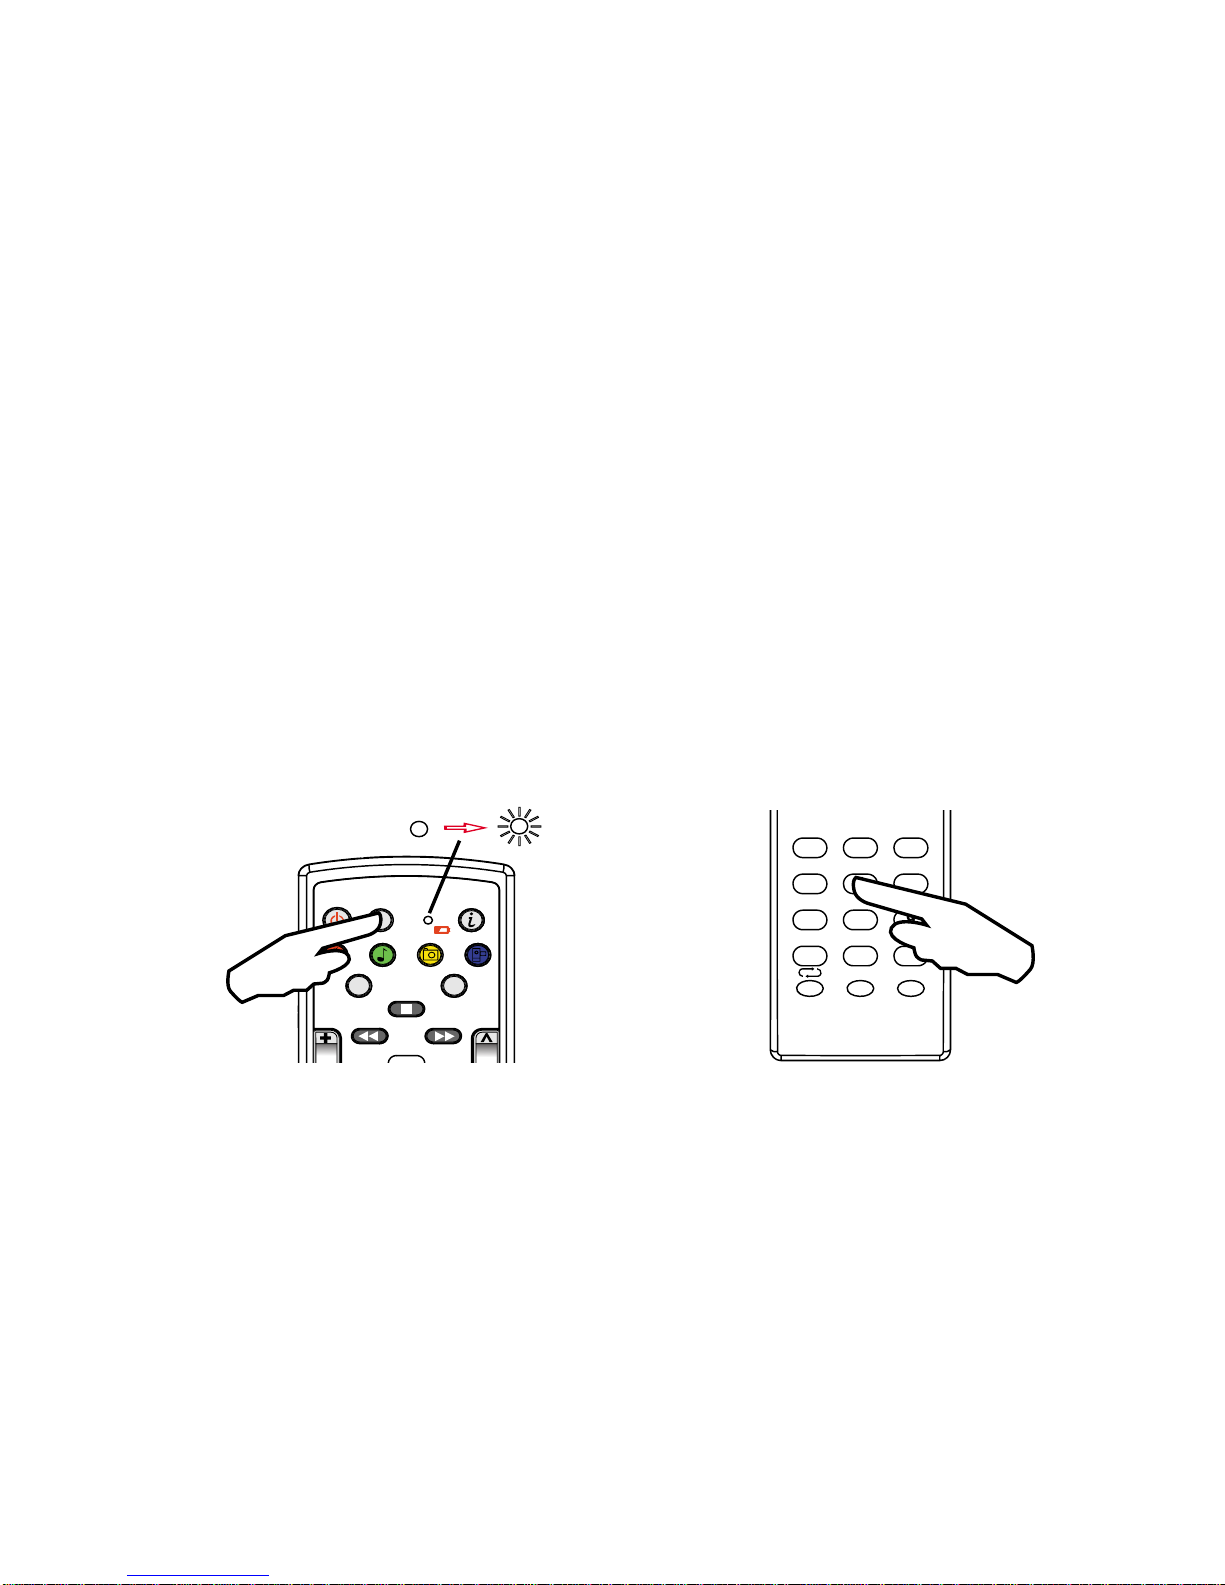
2. Code Set up
a. Turn on TV
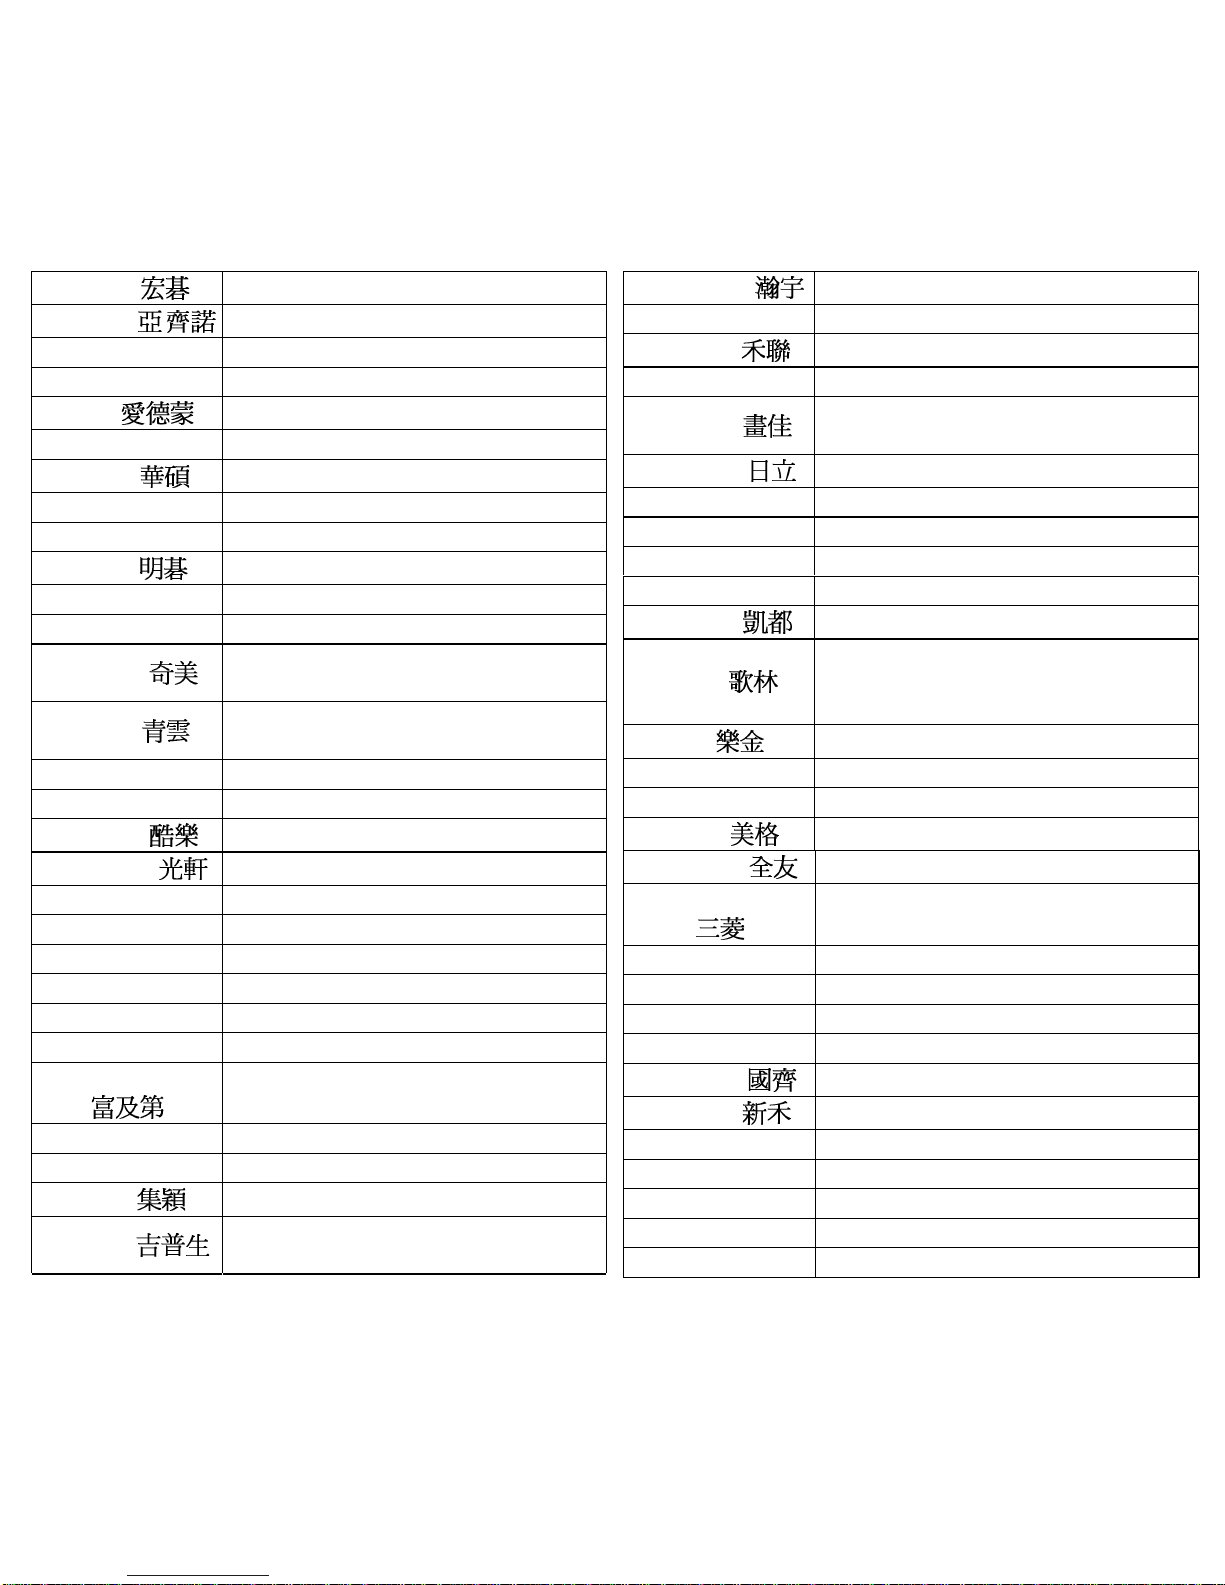
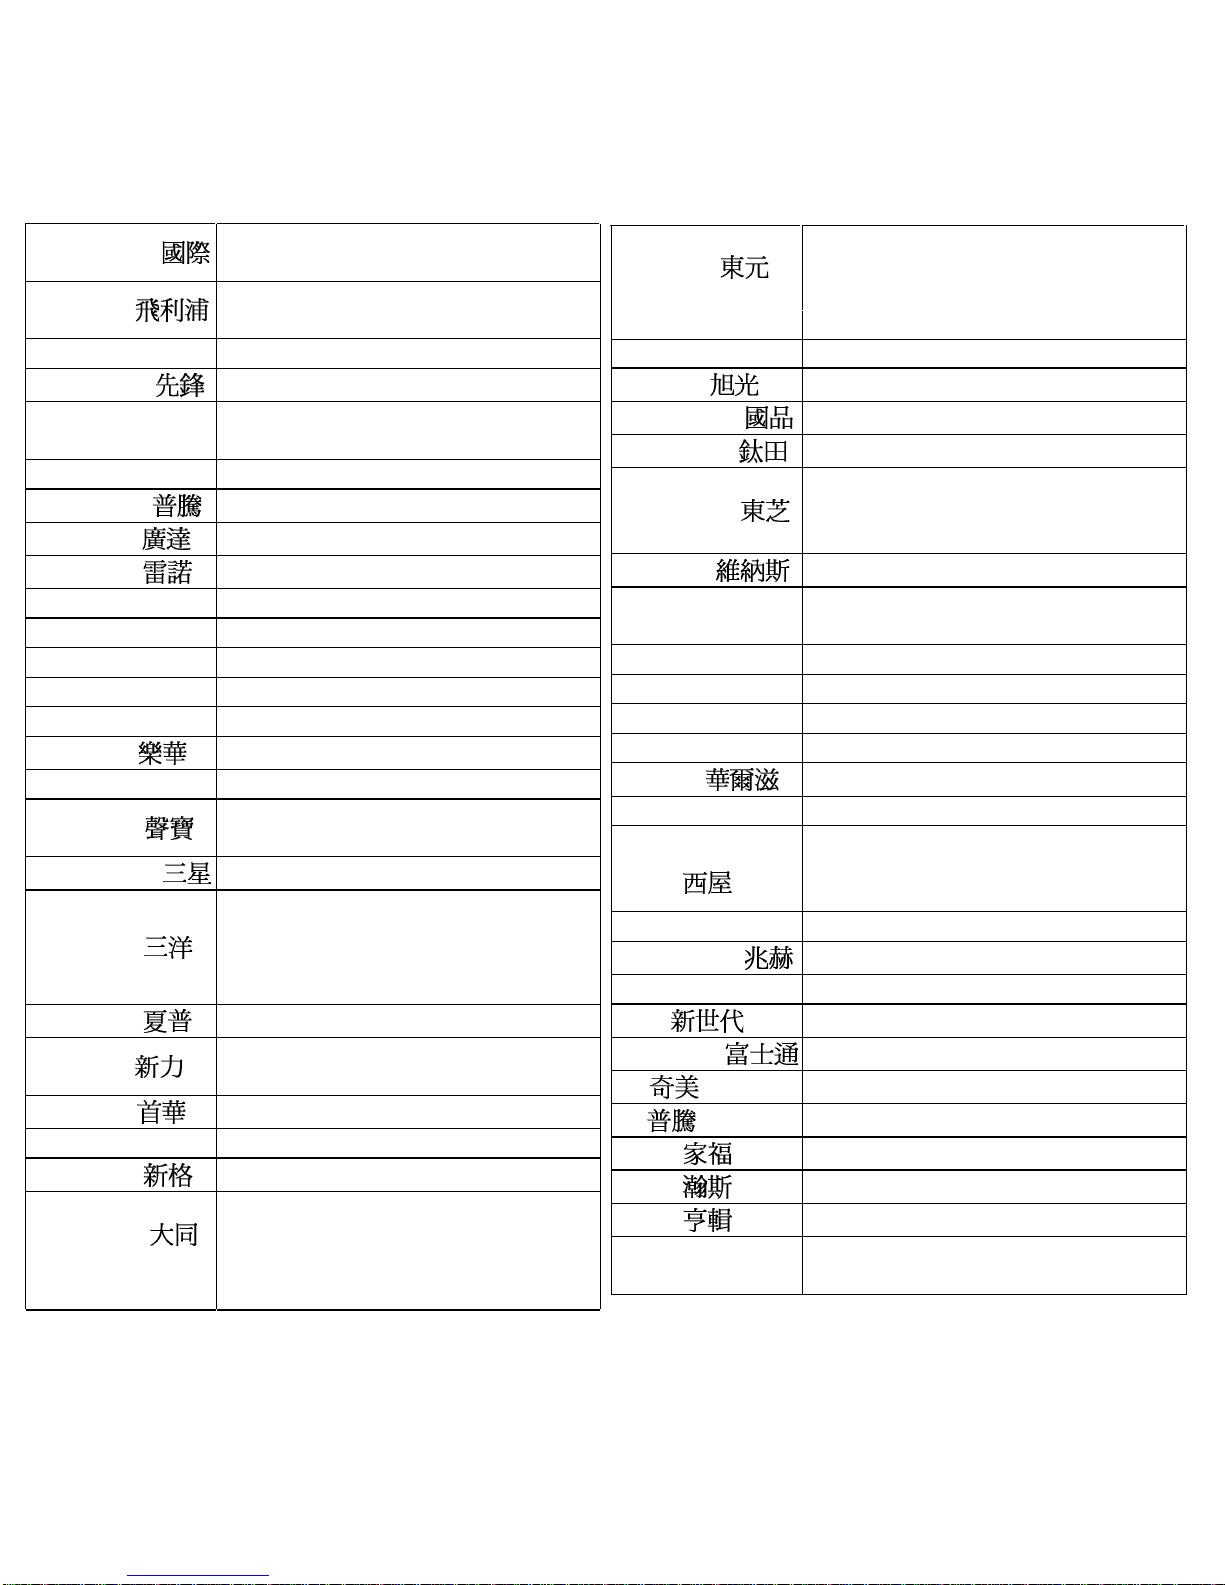
b. See the table from page 8 “TV code table” and find out
the code of your TV.
c. Press and keep holding “set “ key for 5 seconds until the
LED indicator lights up. (Picture A)
d. Press the number buttons to enter the TV code
( 3 digits ) (Picture B)
SET
SET
INPUT
SLEEP
Menu
TV1
TV3
TV2
MCE
Guide
R
G
Y
B
5 seconds
1
2
3
8
7
6
4
5
0
Num
9
#
EnterClear
*
100
(Picture A)
(Picture B)
i. The LED will be off if the code is correct, otherwise the LED
will be flashing 2 times, that means the setup is incomplete.
Return to Step d and enter the correct code again.
Page 7
6
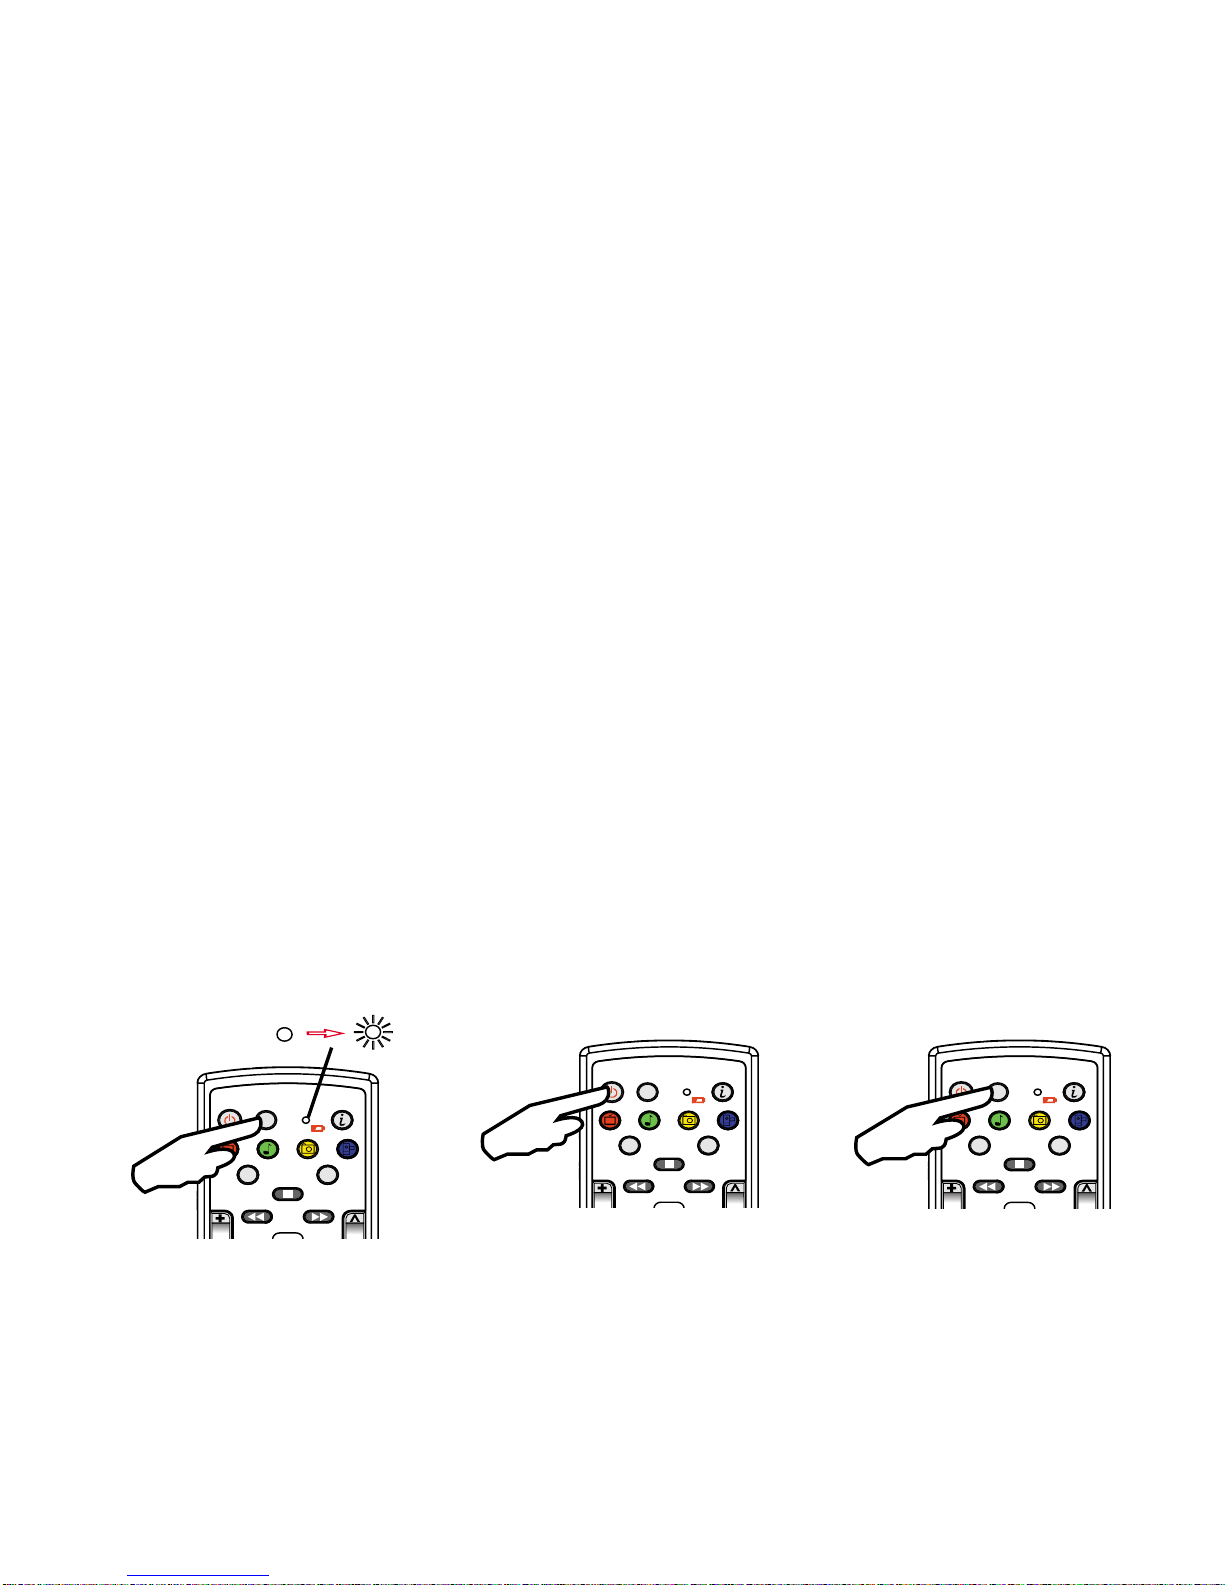
3. Code Auto Search
c. Press and release “ Power” key, the remote will enter the
status of Auto Search.(Picture B)
d. While the remote has searched the right code successfully,
the TV will be turned off automatically, then press” “Set” key
to save the code and leave Auto Search . The indicator will
be off.(Picture C)
ii. Setting for IR TV remote is completed.
During the setting ,if you want to stop and not save the
code, please press the “ set “ key any time and the LED
will be off.
(remote will quit from setting mode in 15 sec. if no any input.)
b. Press and keep holding “set “ key for 5 seconds until the LED
indicator lights up.(Picture A)
a. Turn on TV.
SET
SET
INPUT
SLEEP
Menu
TV1
TV3
TV2
MCE
Guide
R
G
Y
B
5 seconds
(Picture A)
SET
SET
INPUT
SLEEP
Menu
TV1
TV3
TV2
MCE
Guide
R
G
Y
B
(Picture B)
SET
SET
INPUT
SLEEP
Menu
TV1
TV3
TV2
MCE
Guide
R
G
Y
B
(Picture C)
Page 8

7
Information to the users
The herein code is applicable for most popular TV on market,
later version of TV which is not included in the list may result
in improper function for some keys on the remote.
e. Checking the setting :
Turn on the TV and check functions of other keys to see if
they are working correctly, such as [CH+/-] & [ 0- 9 ]. If not,
return to step b to enter the status of Auto Search again.
* The default value of first setting is for TV1 and please press
TV 2 before pressing “ set “ key for the setting of the second
TV.This remote is available for up to 3 sets of TV setting at
one time
Warning
Changes or modifications not expressly approved by the
manufacturer could void the user’s authority to operate the
equipment.
Page 9
8
ACER
001,002 ,258,360,361
Achineo
003,004,005,006,256
AKAI 007,008
Albatron 009,010
AOC
011,012
ASIA 013
ASUS
014,015 ,257
Avorcent 016
Bateslas 017
BenQ
018,019 ,359
BLUEsky 020
CLAIR E 021 ,259
CHIMEI
022,023,024,025,026,02
7
,308,
309,310,311,312,313
CHUN
028,029,030,031,032,03
3
,03
4
393,394,396,397,398,399
Color ta
c
254
COMBO 036
CORAL
037
CRESCO
038
Digimaster 039,040
Dynaview 041,042,043,044
ELEO 045
ESONIC 046,047,260,362
Ex-POWER 048
Freetech 049
Frigidair
e
050,051,052,053,261
FORMASA 054,055
Fujimaru 056
Genii
057
Gibson
058,059,060,061,062,063,064,
065,066,067,263,264,265
HANNS-G
068 ,390
HANNspree 069,070,071,072
HERAN
073,074,075,267
Hero Sonic 075
HIPLUS
076,077,078,079,080,081,082,
083,306,438,439,440,441,442
HITACHI
084,085 ,268,269,421
IMir
o
086 ,270
iWitch 087
JEAN 088
JVC 089,090 ,271,435
KAIDEL
091,092,093,094,307,346,34
7
Kolin
095,096,097,098,099,100,101,
102,103,104,105,106,107,108,
109,272,273,274,422,423,424,
LG
110,111,112,318,31
9
LCD TV 113,114
LiTE I 115
MAG
116
Microtek
117,118,278
MITSUBISHI
119,275 ,426,42
7
MODE e-style120,121
Monix 122,123
MOZO 124
MRT-N 125,277
NALTEC
126
NEOKA
127,276
NEO SCAN 128
NEW COLOR 129
NICHIRO 130,131
Optima 132
ORWARE 133
425
TV code table
Page 10
9
Panasonic
134,135,136,340,341,342,343,
344,345
PHILIPS
137,138,139,140,141,417,418
,
419,420
Pinker 075
PIONEER
143
POLY VISION
144,145,146,147,148,255,279,
377,378,379
POWER SONIC 07 5
PROTON
149,150
Quanta
151
RELON
152,366
RGB 153
RGM 154,155
RCA 281,363
RM-7 415,428,
RMG 432,
ROWA
156
SAGA 157
SAMPO
158,159,160,284,348,349,350,
351,352,356,357,358,392
SAMSUNG
161,162,416
SANYO
163,164,165,166,167,168,169,
285,286,287,324,325,326,327,
328,329,330,331,332,333,334,
335,336,337,338,339
SHARP
170,171,172,288,353,354,355
SONY
173,175,177,289,381,383,385,
386,443,444,445
SOWA
178,179,180,181,182,29
0
SUPER SONIC 075
SYNCO
183,184,185,186,291,36
5
TATUNG
187,188,189,190,191,192,193,
194,292,400,401,402,403,404,
405,406,407,431,446,447,448,
449,450,451
TECO
034,142,195,196,197,198,199,
200,201,202,203,204,282,294,
382,384,408,409,410,411,412,
413,414
TES 205,206
TFC
207,208,209
TOPPIING
210
TOP TEN
211,212
TOSHIBA
213,214,215,216,217,218,295,
296,297,314,315,433,434,
VENUS
219,220
ViewSonic
221,222,223,224,298,299,321,
322,323
ViewSonic 103 283
VITO 225,226,227,228,229,230,293,
VIZIO 231,316,317,437
VTEK 232,320
Waltz
176,233,234,301
WEELGO OD 235
Westinghouse
174,236,237,238,239,240,241,
242,302,303,364,367,368,369,
370,371,372,373,374
ZEN Audio 243
ZIN WELL
244,245
ZINWEU 436,
246,280
FUJITSU
262
32RT
304
60TW
305
375,376
387,388,389
391
247,248,249,250,251,252,253,
429,430
300
others
Page 11

10
Trouble Shooting
If your remote cannot work after installation, please check
followings:
RF remote for PC :
a. Make sure you have connected the receiver correctly
to the computer. The receiver has been properly plugged
into computer’s USB ports.
b. Make sure you have inserted two AAA batteries into its
compartment correctly.
c. If without any interference, such as other computer
peripherals, the working distance (distance between
remote and the receiver) is about 10 meters.
IR remote for TV :
a. Make sure you have inserted two AAA batteries into its
compartment correctly.
b. There is no guarantee that interference will not occur in
a particular installation. User is encouraged to try to
correct the interference by one of the following measures ;
● Reorient or relocate the receiving antenna.
● Consult the dealer or an experienced radio/TV technician
for help.
Page 12

11
FCC Information:
FCC Information:
The Federal Communication Commission Radio Frequency Interference
The Federal Communication Commission Radio Frequency Interference
Statement includes the following paragraph:
Statement includes the following paragraph:
The equipment has been tested and found to comply with the limits for a Class
The equipment has been tested and found to comply with the limits for a Class
B Digital Device, pursuant to part 15 of the FCC Rules. These limits are
B Digital Device, pursuant to part 15 of the FCC Rules. These limits are
designed to provide reasonable protection against harmful interference in a
designed to provide reasonable protection against harmful interference in a
residential installation. This equipment generates, uses and can radiate radio
residential installation. This equipment generates, uses and can radiate radio
frequency energy and, if not installed and used in accordance with the
frequency energy and, if not installed and used in accordance with the
instruction, may cause harmful interference to radio communication. However,
instruction, may cause harmful interference to radio communication. However,
there is no grantee that interference will not occur in a particular installation. If
there is no grantee that interference will not occur in a particular installation. If
this equipment dose cause harmful interference to radio or television reception,
this equipment dose cause harmful interference to radio or television reception,
which can be determined by turning the equipment off and on, the user is
which can be determined by turning the equipment off and on, the user is
encouraged to try to correct the interference by one or more of the following
encouraged to try to correct the interference by one or more of the following
measures:
measures:
- Reorient or relocate the receiving antenna.
- Reorient or relocate the receiving antenna.
- Increase the separation between the equipment and receiver.
- Increase the separation between the equipment and receiver.
- Connect the equipment into an outlet on a circuit different from that to which
- Connect the equipment into an outlet on a circuit different from that to which
the receiver is connected.
the receiver is connected.
- Consult the dealer or an experienced radio/TV technician for help.
- Consult the dealer or an experienced radio/TV technician for help.
 Loading...