

Page 1
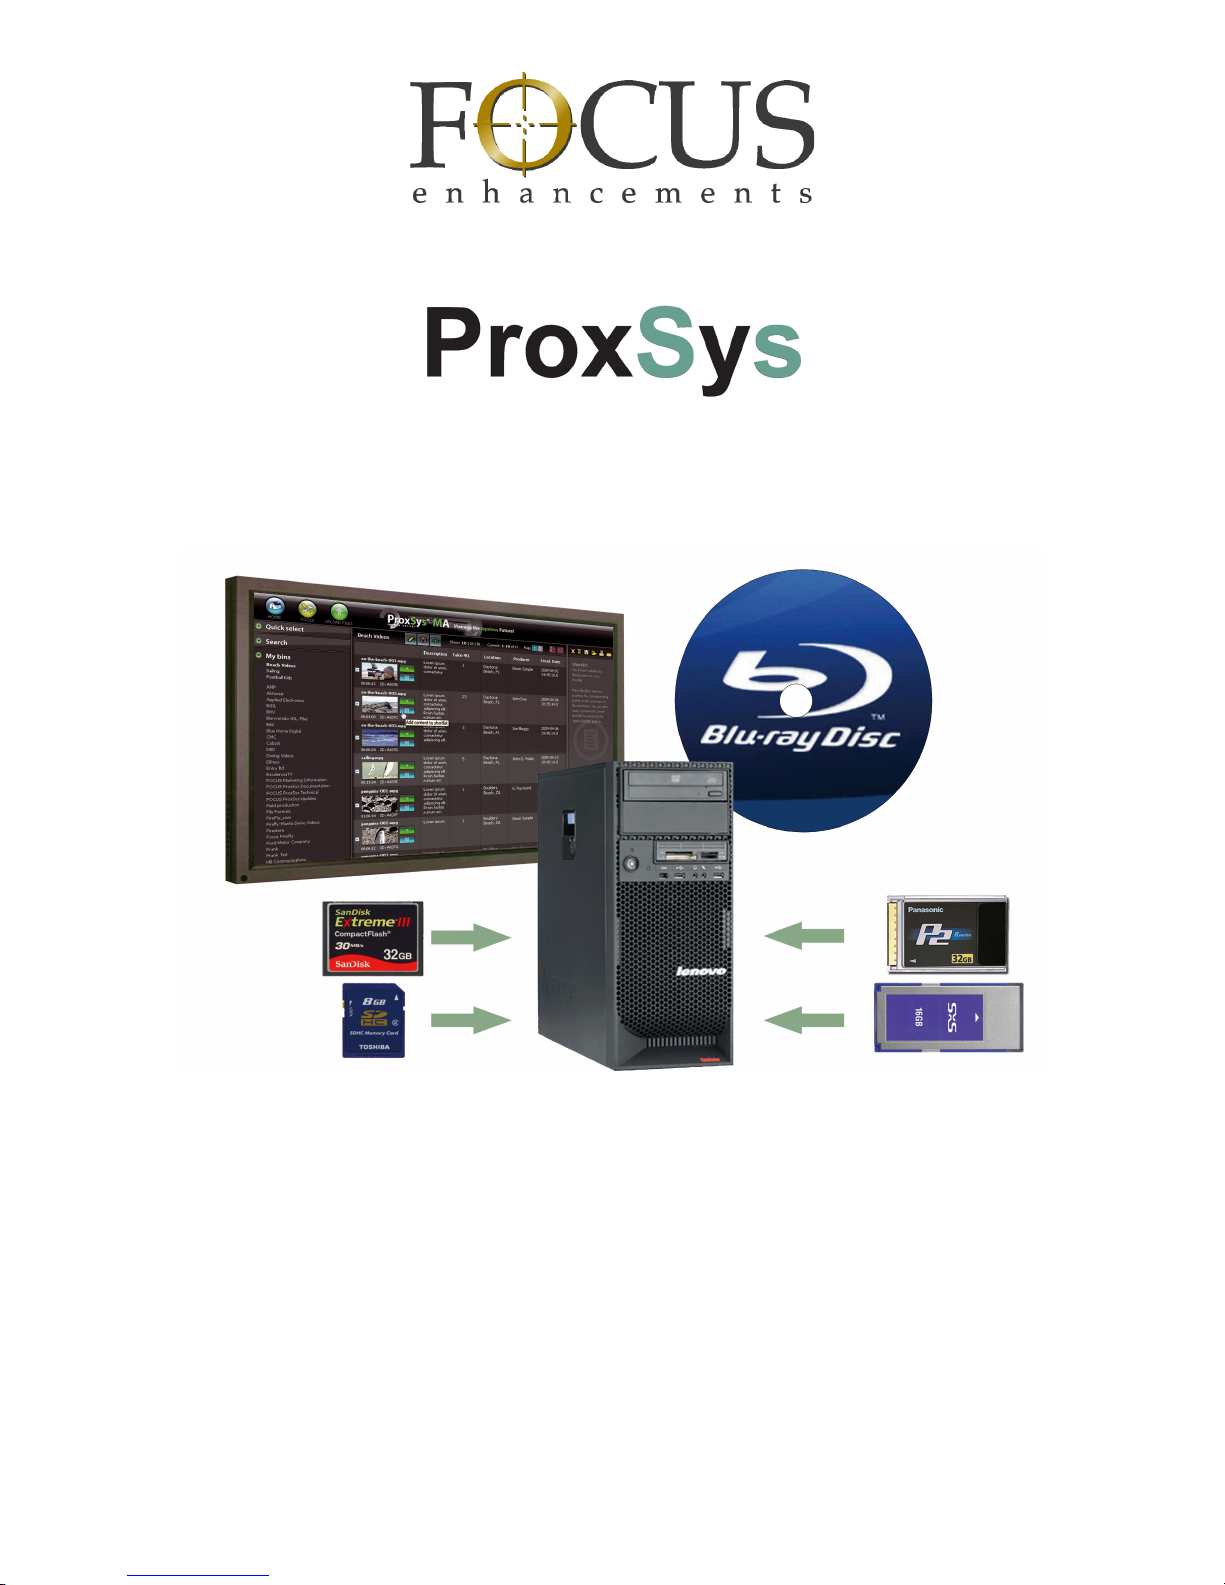
MA Series Media Archive Servers
User Guide
MANL-1161-04
Page 2

Page 3

Notices:
Legal, Regulatory, and Safety
LEGAL
THIS DOCUMENT CONTAINS CONFIDENTIAL AND PROPRIETARY INFORMATION
OF FOCUS ENHANCEMENTS AND ITS RECEIPT OR POSSESSION DOES NOT
CONVEY ANY RIGHTS TO REPRODUCE OR DISCLOSE ITS CONTENTS, OR TO
MANUFACTURE, USE, OR SELL ANYTHING THAT IT MAY DESCRIBE, OR USE IN
WHOLE OR IN PAR T WITHOUT THE SPECIFIC WRITTEN AUTHORIZATION OF
FOCUS ENHANCEMENTS IS STRICTLY FORBIDDEN.
EVERY EFFORT HAS BEEN MADE TO ENSURE THAT THE INFORMATION IN THIS
DOCUMENT IS COMPLETE AND ACCURATE AT THE TIME OF PRINTING;
HOWEVER, THE INFORMATION CONTAINED IN THIS DOCUMENT IS SUBJECT TO
CHANGE.
Copyright
Copyright 2009 Focus Enhancements
All Rights Reserved
The material contained in this document is protected by copyright laws of the United States of
America and other cou ntr ie s. I t ma y not be re produced or distributed i n an y f orm by any means,
altered in any fashion, or stored in a database or retrieval system, without the express written
permission of FOCUS ENHANCEMENTS.
MA Series Media Archive Servers
i
Page 4

Contacting FOCUS ENHANCEMENTS
USA
Office Hours: Monday through Friday
8:00 AM to 5:00PM (Pacific Time)
Email: [email protected]
Telephone: +1 408 866 8300 Option 4
Fax: +1 408 866 4859
Address: Focus Enhancements, Inc.
1370 Dell Avenue
Campbell, CA. 95008
www.focusinfo.com
EMEA (Europe, Middle East, Africa)
Office Hours: Monday through Friday
9:00 AM to 5:00PM
Email: [email protected]
Telephone: +49 4307 - 83 58 58
Fax: +49 4307 - 83 58 99
Address: COMO Computer & Motion GmbH
A Focus Enhancements Company
Lise-Meitner-Str. 15
24223 Schwentinental / Germany
www.focusinfo.com
Serial Number
The serial number for th is equipmen t is located on the back of the unit. Please write this serial
number on the enclosed warranty card and keep it in a secure area.
MA Series Media Archive Servers
ii
Page 5
Regulations
Environmental Precaution
Focus Enhancements, Inc.
1370 Dell Avenue
Campbell, CA. 95008
Model Numbers: PX MA-10 or PX MA-50
Date of Manufacture:
Reference the Serial Number label attached to the unit.
For more information about regulatory compliance and other details, please refer to the Safety
and Warranty Guide included with the server hardware.
Documentation
Read, Retain, and Follow Instructions
All the safety and operating instructions should be read before the product is operated.
•
Retain Documentation
Place documentation in a secure place for future reference on operating and safety
instructions.
•
Follow All Operating and Safety Instructions
•
Pay Attention to All Warnings
Warnings are provided to protect the operator, the equipment, and content.
Symbols Used In the MA Documentation
This symbol Indicates Important Information about conditions or actions that might
damage equipment or data.
This symbol indicates information that the User will find helpful.
MA Series Media Archive Servers
iii
Page 6

MA Series Media Archive Servers
iv
Page 7

Table of Content s
Introduction . . . . . . . . . . . . . . . . . . . . . . . . . . . . . . . . . . . . . . . . . . . . . . . . . . .1
Overview . . . . . . . . . . . . . . . . . . . . . . . . . . . . . . . . . . . . . . . . . . . . . . . . . .1
MA Series Servers . . . . . . . . . . . . . . . . . . . . . . . . . . . . . . . . . . . . . . . .1
Features . . . . . . . . . . . . . . . . . . . . . . . . . . . . . . . . . . . . . . . . . . . . . . . . . . .1
Web-based Graphical User Interface (GUI) . . . . . . . . . . . . . . . . . . . . .1
Operating Systems . . . . . . . . . . . . . . . . . . . . . . . . . . . . . . . . . . . . . . . .1
RAID Data Security . . . . . . . . . . . . . . . . . . . . . . . . . . . . . . . . . . . . . . . .2
RAID 1 . . . . . . . . . . . . . . . . . . . . . . . . . . . . . . . . . . . . . . . . . . . . .2
RAID 5 . . . . . . . . . . . . . . . . . . . . . . . . . . . . . . . . . . . . . . . . . . . . .2
Software . . . . . . . . . . . . . . . . . . . . . . . . . . . . . . . . . . . . . . . . . . . . . . . .2
ProxSys Media Upload Utility . . . . . . . . . . . . . . . . . . . . . . . . . . . .2
ProxSys Media Archive Manager . . . . . . . . . . . . . . . . . . . . . . . . .2
ProxSysMA Burn Tool Services . . . . . . . . . . . . . . . . . . . . . . . . . .2
Disc Burning Software (MA-10 Only) . . . . . . . . . . . . . . . . . . . . . .2
VMware . . . . . . . . . . . . . . . . . . . . . . . . . . . . . . . . . . . . . . . . . . . . .2
Blu-ray Burner . . . . . . . . . . . . . . . . . . . . . . . . . . . . . . . . . . . . . . . . . . . .2
MA-10 - Internal Blu-ray Burner . . . . . . . . . . . . . . . . . . . . . . . . . .2
MA-50 Automated Blu-ray Burner System . . . . . . . . . . . . . . . . . .2
USB Hardware Key (Dongle) . . . . . . . . . . . . . . . . . . . . . . . . . . . . . . . . . . .3
Third-Party Software . . . . . . . . . . . . . . . . . . . . . . . . . . . . . . . . . . . . . . . . .3
Documentation Convention . . . . . . . . . . . . . . . . . . . . . . . . . . . . . . . . . . . .3
About this Guide . . . . . . . . . . . . . . . . . . . . . . . . . . . . . . . . . . . . . . . . . . . . .3
ProxSys MA Media Archiving Server Operations . . . . . . . . . . . . . . . . . . . . . .5
Overview of MA Server Workflow . . . . . . . . . . . . . . . . . . . . . . . . . . . . . . .6
Ingest Video Clips . . . . . . . . . . . . . . . . . . . . . . . . . . . . . . . . . . . . . . . . .6
MANUAL . . . . . . . . . . . . . . . . . . . . . . . . . . . . . . . . . . . . . . . . . . . .7
AUTO WATCH . . . . . . . . . . . . . . . . . . . . . . . . . . . . . . . . . . . . . . .7
MA Series Media Archive Servers
v
Page 8

Archive . . . . . . . . . . . . . . . . . . . . . . . . . . . . . . . . . . . . . . . . . . . . . . . . .9
MA-10 . . . . . . . . . . . . . . . . . . . . . . . . . . . . . . . . . . . . . . . . . . . . . .9
MA-50 . . . . . . . . . . . . . . . . . . . . . . . . . . . . . . . . . . . . . . . . . . . . . .9
Archiving Discs and Shortlist Reference Documents . . . . . . . . . .9
Search and Retrieve Content . . . . . . . . . . . . . . . . . . . . . . . . . . . . . . .10
Storage Media File (Shortlist) . . . . . . . . . . . . . . . . . . . . . . . . . . .10
ProxSys Media Upload Utility . . . . . . . . . . . . . . . . . . . . . . . . . . . . . . . . . .11
Downloading and Installing . . . . . . . . . . . . . . . . . . . . . . . . . . . . . . . .11
Connecting to the MA Server . . . . . . . . . . . . . . . . . . . . . . . . . . . . . . .12
Manual Upload . . . . . . . . . . . . . . . . . . . . . . . . . . . . . . . . . . . . . . . . . .13
Auto Watch . . . . . . . . . . . . . . . . . . . . . . . . . . . . . . . . . . . . . . . . . . . .16
Folder watch . . . . . . . . . . . . . . . . . . . . . . . . . . . . . . . . . . . . . . .17
Device watch . . . . . . . . . . . . . . . . . . . . . . . . . . . . . . . . . . . . . . .17
Configuring Watch Settings . . . . . . . . . . . . . . . . . . . . . . . . . . . .18
Editing a Watch . . . . . . . . . . . . . . . . . . . . . . . . . . . . . . . . . . . . . .18
Transaction History . . . . . . . . . . . . . . . . . . . . . . . . . . . . . . . . . . .18
Configuration . . . . . . . . . . . . . . . . . . . . . . . . . . . . . . . . . . . . . . . . . . .19
Watch Settings . . . . . . . . . . . . . . . . . . . . . . . . . . . . . . . . . . . . . .19
Load External Metadata . . . . . . . . . . . . . . . . . . . . . . . . . . . . . . .20
Assign Equal Named . . . . . . . . . . . . . . . . . . . . . . . . . . . . . . . . .20
Reset All Assignments . . . . . . . . . . . . . . . . . . . . . . . . . . . . . . . .21
Miscellaneous Settings . . . . . . . . . . . . . . . . . . . . . . . . . . . . . . . .21
MA Series Operations . . . . . . . . . . . . . . . . . . . . . . . . . . . . . . . . . . . . . . .22
Login . . . . . . . . . . . . . . . . . . . . . . . . . . . . . . . . . . . . . . . . . . . . . . . . .22
User’s Rights and Default Login . . . . . . . . . . . . . . . . . . . . . . . . .22
Home Workspace . . . . . . . . . . . . . . . . . . . . . . . . . . . . . . . . . . . . . . . .23
Quick select . . . . . . . . . . . . . . . . . . . . . . . . . . . . . . . . . . . . . . . . . . . .23
not yet processed . . . . . . . . . . . . . . . . . . . . . . . . . . . . . . . . . . . .23
via watchfolder . . . . . . . . . . . . . . . . . . . . . . . . . . . . . . . . . . . . . .23
year . . . . . . . . . . . . . . . . . . . . . . . . . . . . . . . . . . . . . . . . . . . . . . .23
Bins . . . . . . . . . . . . . . . . . . . . . . . . . . . . . . . . . . . . . . . . . . . . . . . . . .24
Bin Name . . . . . . . . . . . . . . . . . . . . . . . . . . . . . . . . . . . . . . . . . .24
Description . . . . . . . . . . . . . . . . . . . . . . . . . . . . . . . . . . . . . . . . .24
Actions . . . . . . . . . . . . . . . . . . . . . . . . . . . . . . . . . . . . . . . . . . . .24
Search . . . . . . . . . . . . . . . . . . . . . . . . . . . . . . . . . . . . . . . . . . . . . . . .25
General Search . . . . . . . . . . . . . . . . . . . . . . . . . . . . . . . . . . . . . .26
Date . . . . . . . . . . . . . . . . . . . . . . . . . . . . . . . . . . . . . . . . . . . . . .26
Discs . . . . . . . . . . . . . . . . . . . . . . . . . . . . . . . . . . . . . . . . . . . . . .26
Metadata Tags . . . . . . . . . . . . . . . . . . . . . . . . . . . . . . . . . . . . . .26
Bins . . . . . . . . . . . . . . . . . . . . . . . . . . . . . . . . . . . . . . . . . . . . . . .26
MA Series Media Archive Servers
vi
Page 9

My bins . . . . . . . . . . . . . . . . . . . . . . . . . . . . . . . . . . . . . . . . . . . . . . .27
Display Layout . . . . . . . . . . . . . . . . . . . . . . . . . . . . . . . . . . . . . .27
Content List Functions . . . . . . . . . . . . . . . . . . . . . . . . . . . . . . . .27
Content Status . . . . . . . . . . . . . . . . . . . . . . . . . . . . . . . . . . . . . .28
Shortlist (Reference List) . . . . . . . . . . . . . . . . . . . . . . . . . . . . . . . . . .29
Organizing Shortlist Content . . . . . . . . . . . . . . . . . . . . . . . . . . . . 29
Select Content to Delete . . . . . . . . . . . . . . . . . . . . . . . . . . . . . . .29
Shortlist Output: Printer and PDF . . . . . . . . . . . . . . . . . . . . . . . .29
Preview Player . . . . . . . . . . . . . . . . . . . . . . . . . . . . . . . . . . . . . . . . . .30
Workflow: Burning Blu-ray (BD) and DVD Discs . . . . . . . . . . . . . . . . . . .31
MA-10 . . . . . . . . . . . . . . . . . . . . . . . . . . . . . . . . . . . . . . . . . . . . . . . . .31
MA-50 . . . . . . . . . . . . . . . . . . . . . . . . . . . . . . . . . . . . . . . . . . . . . . . . .31
ISO Files After Burning Disc . . . . . . . . . . . . . . . . . . . . . . . . . . . . . . . .31
Burns Start After All Flash Files Are Created . . . . . . . . . . . . . . . . . . .32
Maximum Video Clip Size . . . . . . . . . . . . . . . . . . . . . . . . . . . . . . . . . .32
Identifying Archived Content . . . . . . . . . . . . . . . . . . . . . . . . . . . . . . . .32
ProxSysMA Services Burn Tool . . . . . . . . . . . . . . . . . . . . . . . . . . . . .32
Checking Burn Status . . . . . . . . . . . . . . . . . . . . . . . . . . . . . . . . .32
Print-to-DVD Labeling . . . . . . . . . . . . . . . . . . . . . . . . . . . . . . . . . . . . .33
Administration Tools . . . . . . . . . . . . . . . . . . . . . . . . . . . . . . . . . . . . . . . . . . .35
Default Login . . . . . . . . . . . . . . . . . . . . . . . . . . . . . . . . . . . . . . . . . . . . . .35
User Admin . . . . . . . . . . . . . . . . . . . . . . . . . . . . . . . . . . . . . . . . . . . . . . .36
User Privileges . . . . . . . . . . . . . . . . . . . . . . . . . . . . . . . . . . . . . . . . . .36
Adding a New User . . . . . . . . . . . . . . . . . . . . . . . . . . . . . . . . . . . . . . .36
Removing a User . . . . . . . . . . . . . . . . . . . . . . . . . . . . . . . . . . . . . . . .37
Changing User Privileges . . . . . . . . . . . . . . . . . . . . . . . . . . . . . . . . . .37
Metadata Management . . . . . . . . . . . . . . . . . . . . . . . . . . . . . . . . . . . . . .38
Metadata Tags . . . . . . . . . . . . . . . . . . . . . . . . . . . . . . . . . . . . . . . . . .38
Simple Metadata Workflow . . . . . . . . . . . . . . . . . . . . . . . . . . . . .38
Complex Metadata Workflow . . . . . . . . . . . . . . . . . . . . . . . . . . .38
Metadata Controls . . . . . . . . . . . . . . . . . . . . . . . . . . . . . . . . . . . . . . .39
Number . . . . . . . . . . . . . . . . . . . . . . . . . . . . . . . . . . . . . . . . . . . .39
Name . . . . . . . . . . . . . . . . . . . . . . . . . . . . . . . . . . . . . . . . . . . . .39
Field in use . . . . . . . . . . . . . . . . . . . . . . . . . . . . . . . . . . . . . . . . .39
Performance . . . . . . . . . . . . . . . . . . . . . . . . . . . . . . . . . . . . . . . . . . . . . .40
System Update . . . . . . . . . . . . . . . . . . . . . . . . . . . . . . . . . . . . . . . . . .40
Recreate Search Index . . . . . . . . . . . . . . . . . . . . . . . . . . . . . . . . . . . .40
MA Series Media Archive Servers
vii
Page 10

Statistics . . . . . . . . . . . . . . . . . . . . . . . . . . . . . . . . . . . . . . . . . . . . . . .40
System Information . . . . . . . . . . . . . . . . . . . . . . . . . . . . . . . . . . . . . . .40
Burn Settings . . . . . . . . . . . . . . . . . . . . . . . . . . . . . . . . . . . . . . . . . . . . . .41
Burn Settings . . . . . . . . . . . . . . . . . . . . . . . . . . . . . . . . . . . . . . . . . . .41
Number of media . . . . . . . . . . . . . . . . . . . . . . . . . . . . . . . . . . . .41
One bin per media . . . . . . . . . . . . . . . . . . . . . . . . . . . . . . . . . . .42
Media size . . . . . . . . . . . . . . . . . . . . . . . . . . . . . . . . . . . . . . . . . .42
Work directory . . . . . . . . . . . . . . . . . . . . . . . . . . . . . . . . . . . . . . .42
Burn fill ratio (MA-50 only) . . . . . . . . . . . . . . . . . . . . . . . . . . . . .42
Minimum fill ratio (MA-50 only) . . . . . . . . . . . . . . . . . . . . . . . . . .42
Delete files after ISO creation . . . . . . . . . . . . . . . . . . . . . . . . . . .42
Automatic Burning Schedule . . . . . . . . . . . . . . . . . . . . . . . . . . . . . . .43
Create media now (Burn-on-Demand) . . . . . . . . . . . . . . . . . . . .43
Backend Settings - MA-10 . . . . . . . . . . . . . . . . . . . . . . . . . . . . . . . . .43
Backend Type . . . . . . . . . . . . . . . . . . . . . . . . . . . . . . . . . . . . . . .43
Backend Settings - MA-50 . . . . . . . . . . . . . . . . . . . . . . . . . . . . . . . . .43
Backend Type . . . . . . . . . . . . . . . . . . . . . . . . . . . . . . . . . . . . . . .43
Primera Settings . . . . . . . . . . . . . . . . . . . . . . . . . . . . . . . . . . . . .44
Rimage Settings . . . . . . . . . . . . . . . . . . . . . . . . . . . . . . . . . . . . .44
Label Settings . . . . . . . . . . . . . . . . . . . . . . . . . . . . . . . . . . . . . . . . . . .44
MA-10 . . . . . . . . . . . . . . . . . . . . . . . . . . . . . . . . . . . . . . . . . . . . .44
MA-50 . . . . . . . . . . . . . . . . . . . . . . . . . . . . . . . . . . . . . . . . . . . . .44
Custom Labels . . . . . . . . . . . . . . . . . . . . . . . . . . . . . . . . . . . . . .44
ProxSys Settings . . . . . . . . . . . . . . . . . . . . . . . . . . . . . . . . . . . . . . . .45
Unarchived Content . . . . . . . . . . . . . . . . . . . . . . . . . . . . . . . . . . . . . . . .46
Preview File Status . . . . . . . . . . . . . . . . . . . . . . . . . . . . . . . . . . . . . . .47
Render Preview . . . . . . . . . . . . . . . . . . . . . . . . . . . . . . . . . . . . . . . . .47
Replace Failed Preview with Generic Preview . . . . . . . . . . . . . . . . . .47
Technical Information . . . . . . . . . . . . . . . . . . . . . . . . . . . . . . . . . . . . . . . . . . .49
Media Formats . . . . . . . . . . . . . . . . . . . . . . . . . . . . . . . . . . . . . . . . . . . . .50
Calculated Storage Requirements . . . . . . . . . . . . . . . . . . . . . . . . . . .51
Maximum File Size Supported . . . . . . . . . . . . . . . . . . . . . . . . . . . . . . . . .52
BD and DVD Disc Capacities . . . . . . . . . . . . . . . . . . . . . . . . . . . . . . . . .52
Hardware . . . . . . . . . . . . . . . . . . . . . . . . . . . . . . . . . . . . . . . . . . . . . . . . .53
MA Dongle . . . . . . . . . . . . . . . . . . . . . . . . . . . . . . . . . . . . . . . . . . . . .53
Hard Drives . . . . . . . . . . . . . . . . . . . . . . . . . . . . . . . . . . . . . . . . . . . . .53
North, Central, and South America . . . . . . . . . . . . . . . . . . . . . . .53
Europe, Middle East, Africa and Asia . . . . . . . . . . . . . . . . . . . . .55
MA Series Media Archive Servers
viii
Page 11

RAID Data Protection . . . . . . . . . . . . . . . . . . . . . . . . . . . . . . . . . . . . . . . .56
RAID 1 . . . . . . . . . . . . . . . . . . . . . . . . . . . . . . . . . . . . . . . . . . . . . . . .56
RAID 5 . . . . . . . . . . . . . . . . . . . . . . . . . . . . . . . . . . . . . . . . . . . . . . . .56
Replacing a Failed Drive . . . . . . . . . . . . . . . . . . . . . . . . . . . . . . . . . . .56
OS and Virtual Machine Operations . . . . . . . . . . . . . . . . . . . . . . . . . . . . .56
Windows XP PRO . . . . . . . . . . . . . . . . . . . . . . . . . . . . . . . . . . . . . . . .56
SUSE Linux . . . . . . . . . . . . . . . . . . . . . . . . . . . . . . . . . . . . . . . . . . . .56
Installing Third-party Software . . . . . . . . . . . . . . . . . . . . . . . . . . . . . . . . .57
Operations . . . . . . . . . . . . . . . . . . . . . . . . . . . . . . . . . . . . . . . . . . . . . . . .58
MA Server Applications Fail to Initialize . . . . . . . . . . . . . . . . . . . . . . .58
Viewing Preview and Video Files Without the MA Server . . . . . . . . .58
Backing Up Proxy Preview Files and Metadata . . . . . . . . . . . . . . . . .58
RAID 1 (North, Central, and South America) . . . . . . . . . . . . . . .58
RAID 5 (Europe, Middle East, Africa, Asia) . . . . . . . . . . . . . . . .58
Restarting the MA Server . . . . . . . . . . . . . . . . . . . . . . . . . . . . . . . . .59
If MA Server Login Fails . . . . . . . . . . . . . . . . . . . . . . . . . . . . . . . . . . .60
IP Networking Information . . . . . . . . . . . . . . . . . . . . . . . . . . . . . . . . .61
Assign the MA Server A Fixed IP Address . . . . . . . . . . . . . . . . .61
Configure Host (Windows) Network Settings . . . . . . . . . . . . . . .62
Configure MA Server VM Network Settings . . . . . . . . . . . . . . . .64
P2 Information . . . . . . . . . . . . . . . . . . . . . . . . . . . . . . . . . . . . . . . . . . . . .66
File Handling During Ingesting and Archiving . . . . . . . . . . . . . . . . . . .66
High Resolution Content . . . . . . . . . . . . . . . . . . . . . . . . . . . . . . . . . . . 66
P2 and PX MA Metadata . . . . . . . . . . . . . . . . . . . . . . . . . . . . . . . . . .66
MA Series Media Archive Servers
ix
Page 12

MA Series Media Archive Servers
Page 13

Introduction
Overview
Thank you for purchasing a Focus Enhancements, ProxSys MA Series Media Archive Server.
MA Series Media Archive Servers provide the ability to efficiently ingest video clips with their
metadata from tape less r ecord ing media i nto th e MA serve r’ s medi a arc hiv e. There , previ ew Flas h
clips are rendered and Blu-ray discs are burned for archiving.
Ingesting media into the MA server clears the recording medium and allows it to be returned
quickly to the field for reuse. This eliminates the practice of using expensive tapeless recording
media as archive storage.
MA Series Servers
There are two MA Series Server editions:
•
MA-10 with Internal Blu-ray Burner
•
MA-50 with External Automatic Blu-ray Burner System
Both versions provide the same level of media ingest and archive functionality. The single
difference: the
provides for the automated burning of multiple Blu-ray discs.
The MA-Server’s user interface is browser-based and no proprietary client software is required
to access the server. A Flash player application must be installed on local client machines to
view the MA Flash preview clips.
MA-10 is for the manual burning of individual Blu-ray discs while the MA-50
Features
Web-based Graphical User Interface (GUI)
The ProxSys MA Series Media Archive Server GUI is compatible with the Microsoft Internet
Explorer, version 6 and higher (IE 6/7) and Apple Safari browsers.
Depending on how the MA server is setup, MA functions are accessible via the GUI directly
from the MA server, over a netw ork or the Internet.
Operating Systems
Microsoft Windows XP PRO, 32-bit, Edition
SUSE 11 Linux running as a virtual machine
MA Seri es Media Archive Servers
1
Page 14

Features
RAID Data Security
RAID 1
In North America, the MA servers use three high-capacity hard drives, one 500GB buffer
drive and two 1TB data drives, along with RAID 1 to protect data from drive failure.
RAID 5
In the Europe, due to m arke t req uirem ents , the MA ser ver s use thre e high -ca pacit y, 1TB, hard
drives and RAID 5 to protect data from drive failure.
Software
ProxSys Media Upload Utility
This application r uns on t he MA s erver or a remote Mac/Windows system for ingesting video
clips from shared storage devices and network drives into the MA server for archiving on
Blu-ray disks.
ProxSys Media Archive Manager
Use this browser-based application to manage video content metadata and st or age on the MA
server. In addition, the manager includes a set of server administration tools.
ProxSysMA Burn Tool Services
Click on the ProxSysMA Services icon in the Tool Tray to display the progress of a running
burn job.
This application uses Administrator defined settings to create ISO files of the content,
configure the BD discs, and contro l the BD burn er, see
Burn Settings on page 41.
Disc Burning Software (MA-10 Only)
A disc burning application is installed on the MA server. Use it to burn ISO files to disc.
VMware
This virtual machine ho sting application is inte gral to the MA server but transparent to the
User . For more inf or mati on, see
OS and Virtual Machine Operations on page 56.
Blu-ray Burner
MA-10 - Internal Blu-ray Burner
Manual operation, burn disks individually.
MA-50 Automated Blu-ray Burner System
Automatic burning of multiple disc sets.
MA Series Media Archive Servers
2
Page 15

USB Hardware Key (Dongle)
USB Hardware Key (Dongle)
Before the MA Series Media Archive Server can operate, a USB hardware key (dongle) must be
inserted in to one of the server’s USB ports. The dongle authorizes the MA server applications.
The dongle must remain in the USB port for the applications to function.
There is no limit to the num ber of server Users.
Third-Party Software
Focus Enhancements recommend s that, with the followi ng exceptio ns, third-p arty soft ware should
not be installed on the MA servers:
• P2 and Sony XDCAM/XDCAM-EX players on MA-10 and MA-50 servers, see
Third-party Software
• PDF Reader on MA-10 and MA-50 servers.
on page 57.
Installing
These third-party applications must be installed on the MA server’s
Third-party Software
on page 57.
T ools (T:) drive, see Installing
Documentation Convention
In general, information in this guide applies to all MA Series Media Archive Severs unles s it is
specifically identified as MA-10 or MA-50.
About this Guide
It is assumed that the use r of this guide is familiar with:
• Collection and use of tapeless content
• Use of tapeless media devices on Windows / Mac computer systems
• NLE (non-linear editin g) workflow
This guide is divided into three sections:
ProxSys MA Media Archiving Server Operations 5
Administration Tools 35
Technical Information 49
MA Seri es Media Archive Servers
3
Page 16

MA Series Media Archive Servers
4
Page 17

ProxSys MA Media Archiving Server Operations
This chapter provides step-by-st ep instructions for the ingesting and archiving of video
clips using the ProxSys MA Series Media Archive Server.
This chapter contains the topics:
Overview of MA Server Workflow 6
Ingest Video Clips 6
Archive 9
Search and Retrieve Content 10
ProxSys Media Upload Utility 11
Downloading and Installing 11
Connecting to the MA Server 12
Manual Upload 13
Auto Watch 16
Configuration 19
MA Series Operations 22
Login 22
Home Workspace 23
Quick select 23
Bins 24
Search 25
Shortlist (Reference List) 29
Preview Player 30
Workflow: Burning Blu-ray (BD) and DVD Discs 31
MA-10 31
MA-50 31
Burns Start After All Flash Files Are Created 32
Maximum Video Clip Size 32
Identifying Archived Content 32
ProxSysMA Services Burn Tool 32
MA Seri es Media Archive Servers
5
Page 18
Overview of MA Server Workflow
Overview of MA Server Workflow
The MA Series Media Archive Server is a desktop workstation/server that:
• Uploads high resolution video clips and associated metadata
• Creates low resolution proxy preview files for later referen ce
• Stores preview files and metadata in MA server database for search a nd reference
• Burns high resolution content to single- and dual-layer DVDs and BD discs
In addition, the MA server provides the ability to:
• Add or edit existing video metadata
• List archived video files in a shortlist to use for search and retrieval
• Output the shortlist as a PDF or printed reference document
• Create print-to-DVD labels
The MA server workflow involves three primary steps:
1. Ingest high-resolution video clips and their metadata using the Media Upload Utility:
• Select media for transfer
• Optionally add or edit metadata
• Upload content to MA server
2. Archive:
• Optionally edit metadata
• Burn content (high resolution video and proxy preview files) to single- and dual-layer
BD and DVD discs using Auto or Manual procedures
• Store archive discs
3. Search and Retrieve Content (Shortlist):
• Search for metadata and preview clips in online MA st orage
• Play preview clips
• Optionally edit metadata,
• Select content to retrieve (creating shortlist)
• Publish shortlist as PDF file or printout
• Retrieve content using shortlist
Ingest Video Clips
Ingest is the process that involves the transfer of video clips from the video device’s storage
media to digital files stored on the MA server. The Ingest process is controlled with the
ProxSys Media Upload Utility and performed from the MA server or a computer wi th net work
access to the server. The MA server can ingest clips from local or networked hard drives and a
variety of solid state media, such as P2,
SxS Pro and Compact Flash (CF) cards.
Ingesting P2 Cards: Amount Stored Versus Maximum File Size
• The MA server can ingest and support files sizes of up to and including 50GB.
• When ingesting cont ent fro m a s tora ge de vi ce , lik e a P2 c ard, the total size of the content stored
on the card is not important so long as no single clip exceeds 50GB in size.
MA Series Media Archive Servers
6
Page 19
Overview of MA Server Workflow
The upload utility provides three methods for ingesting video files:
• Manual
• Folder watch (Auto Watch function)
• Device watch (Auto Watch function)
As each high resolution video file is uploaded, the MA server creates a preview Flash clip for
that file. Each video clip, its preview file, and its associated metadata, are logged into the MA
server’s media database. Video metadata can be added to or changed as a part of the manual
ingest procedure or once the clips are stored in a bin, named folder, on the MA server.
MANUAL
The User manually:
1. Selects the video clips to ingest.
2. Modifies their metadata.
Adding and Modifying Metadata
The Manual method offers the opportunity to add, change or delete video clip metadata
before the ingest process begins. Because Folder and Device watch are automated
methods, they do not provide the ability to edit video clip metadata.
3. Selects or creates a destination bin on the MA server.
4. Initiates th e ingest process.
Selected video clips can be dragged and dropped into the utility window from the system’s
file/folder browser, for example Windows Explorer.
AUTO WATCH
The upload utility’s two
Folders and Devices, such as CF card readers, and automatically upload video content and
AUTO WATCH functions allow the ut ility to monitor specifie d
metadata when new content appears.
Folder watch
The User:
1. Selects folders to monitor for new content.
2. Selects an existing bin or creates a new bin to receive the uploaded content.
3. Sets the time for the upload utility to periodicall y check the folders.
Folders can reside on a NLE client computer or the MA server so long as the folder
is shared on the network.
4. When new video clips are found the upload utility automatically ingests them.
MA Seri es Media Archive Servers
7
Page 20
Overview of MA Server Workflow
Device watch
When Uploading Structured Content, Use Device Watch.
Device watch may be used to upload both structured and unstructured content.
This is similar to the Folder watch except that a device is identified as the target of the
watch. The most common devices are removable hard drives and card readers attached to
the MA server. Do not use Device watch to monitor shared and local drives.
An example is when the CF card is inserted into a watched card reader slot. Inserting the
CF card initialize s the reade r as a new device on the syst em. The upl oad ut ilit y rec eives the
system alert, recognizes that it is a watched device, and ingests the card’s contents. The
video clips, metadata, and preview clips are automatically stored in the User designated
MA server bin.
Watch Function and Me tadata
If the watched video content, such as P2 or XDCAM, has metadata, it is ingested with the video
and logged in the MA server’s database. The User can set whether external metadata is
ingested or not, see Load External Metadata on page 20.
Metadata Can Not Be Edited During Ingest Procedure
It is possible to edit metadata once the video clips are stored on the MA server.
MA Servers Support File Sizes Up To 50GB, Including XDCAM
There are only two limits to the amount of content that the MA servers can store:
• The amount of open storage available.
• An individual video clip can not exceed 50GB in size.
Watch Content and MA Quick Select Workspace
When content arri ves from a watche d folder o r devi ce the d estinatio n bin is marked as cont aining
watch upload. In the MA Series Quick Select worksp ace, the bin appears in the via wa tch fol der
list under the Quick select option. The purpose of this is to notify the user that their metadata
may not exist and should be added before archiving.
For instructions about using the upload utility, see
Once a video file is ingested into the MA server it appears in the des ignated bin with a
thumbnail of the first usable frame of the video file. Clicking on the thumbnail, opens the
Preview Player, see page 30. To preview clips from a remote workstation, it is necessary that a
Flash player application is installed on the workstation.
At this point, it is possible to u se the MA server’ s web-based user in terface to edit select ed video
metadata.
MA Series Media Archive Servers
8
ProxSys Media Upload Utility on page 11.
Page 21
Overview of MA Server Workflow
Archive
The MA servers are equipped with burners that can create BD and DVD discs. Both MA servers
create ISO files that they use for burning discs.
MA-10
The MA-10 is equipped with an internal, manual DVD and Blu-ray burner.
1. Use the MA- 10 to create an ISO file of the intende d archive content.
2. Use the separate bu rni ng a ppl ication to manually burn the di sc a nd print the disc label.
MA-50
The MA-50 employs a robotic DVD and BD burner that can be configured to burn multiple
discs using either a burn schedule or on-demand.
In addition, the MA-50 of fers the opti on to create two ide ntical copie s of the original disc, one
for active use and one for deep archiving.
MA Servers are designed for archiving data and are not intende d for use in disc productio n.
Once content is uploaded to the MA and ingested, it can be added to the burning queue and
the burn process begun. Depending on the settings, it is possible to start burning ingested
content while uploading other content.
Archiving Discs and Shortlist Reference Documents
Once the discs are created, two ID codes are automatically assigned to each file:
• A unique File ID
• The archive disc ID, see
Identifying Archived Content on page 32
MA Seri es Media Archive Servers
9
Page 22
Overview of MA Server Workflow
Search and Retrieve Content
The MA server provides the ability to create a Storage Media File, or Shortlist, that allows the
User to search the archive discs for high-resolution content.
Storage Media File (Shortlist)
Shortlist is a User specified list of archived high-resolution content. This list provides
The
the User with the information needed to retrieve th e original, high-resolution content stored
on archive discs.
To create a Shortlist:
1. Use the MA server’s search function to locate the desired content and then place it in
the shortlist pane.
2. Once the shortlist is created, it can be sorted by filename or media storage ID.
3. When the shortlist is completed, it can be output it as:
HTML Print file
The MA server creates the shortlist as a HTML file that appears in a browser window. This
file can be sent to the User’s local printer. This shortlist con tains each video clip’s:
Filename
Thumbnail
All metadata tags in use, see
Creation date
Length
Storage Media ID
Metadata Management on page 38.
PDF File
The MA server generat es a PDF file of the Sh ort li st which can be displaye d or saved to the
User’s local hard drive. This list is on letter size pages, with a cover page, a table of
contents, list of Storage Media IDs, and a list of videos with their:
Filename
Thumbnail
Individual file ID
Creation date
Length
All metadata tags
A PDF Viewer Must Be Installed On the Local Machine
MA Series Media Archive Servers
10
Page 23
ProxSys Media Upload Utility
1
2
3
ProxSys Media Upload Utility
Use the ProxSys Media Upload Utility to configure and initiate the MA server’s Ingest process.
This utility may be installed in computers networked to the MA server and used to load ingest
video from those computers.
Downloading and Installing
The Media Upload Utility is a JAVA application and it is necessary that the computer running
the utility have the latest version of JAVA in stalled before installation of the upload utility. To
get the latest version of JAVA go to www.java.com.
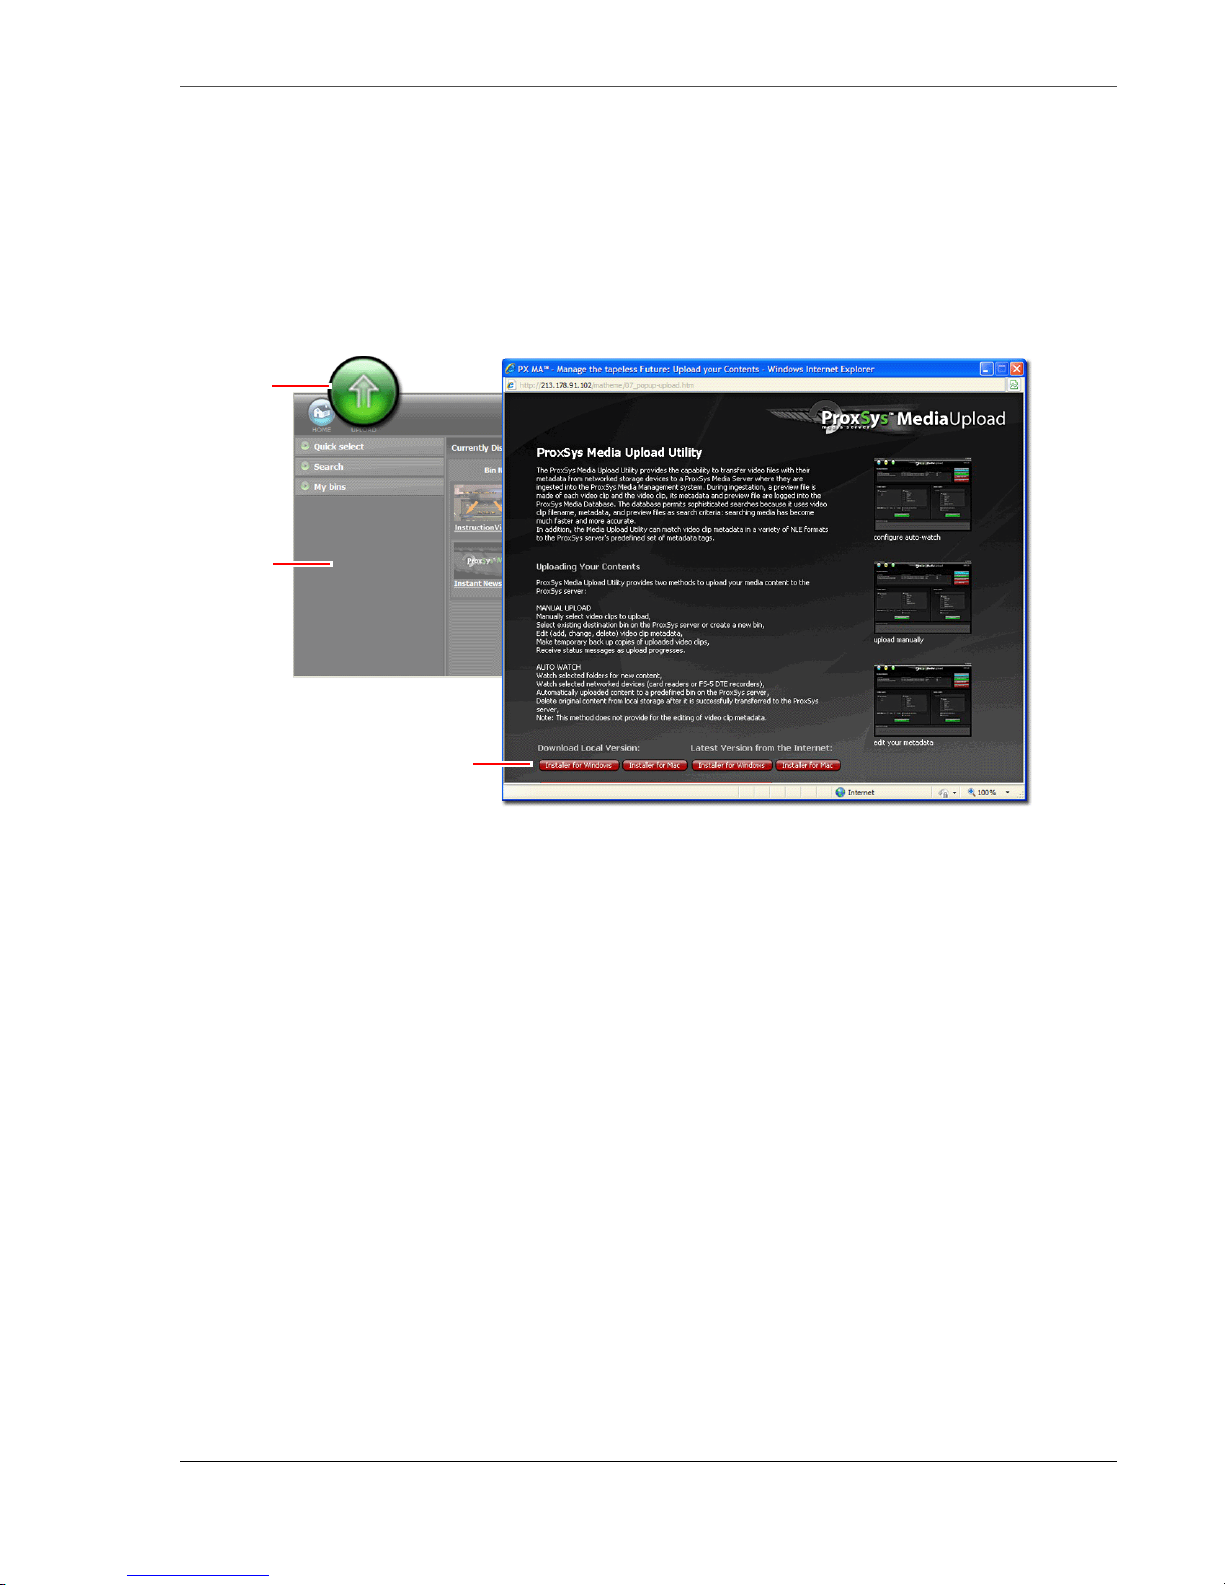
The latest versions of the upload utility, for Windows and Mac, are available through this
window. To download and install the utility:
1. Open the MA server’s web-based interface, see Login on page 22.
2. Click on the Upload button.
The
ProxSys Media Upload window appears.
3. Select and click the source from which to download the ProxSys Media Upload Utility
installer: from the MA server or the interne t. Installers for Windows and Mac are
available.
4. Follow the instructions to download the installer.
5. Locate the upload utility install file and run it.
To download directly from Focus Enhancements:
• Latest Window version
http://www.focusinfo-emea.com/staticdownloads/MediaUploadSetup.msi
• Latest Mac version
http://www.focusinfo-emea.com/staticdownloads/MediaUploadSetup_MAC.zip
MA Seri es Media Archive Servers
11
Page 24
ProxSys Media Upload Utility
Connecting to the MA Server
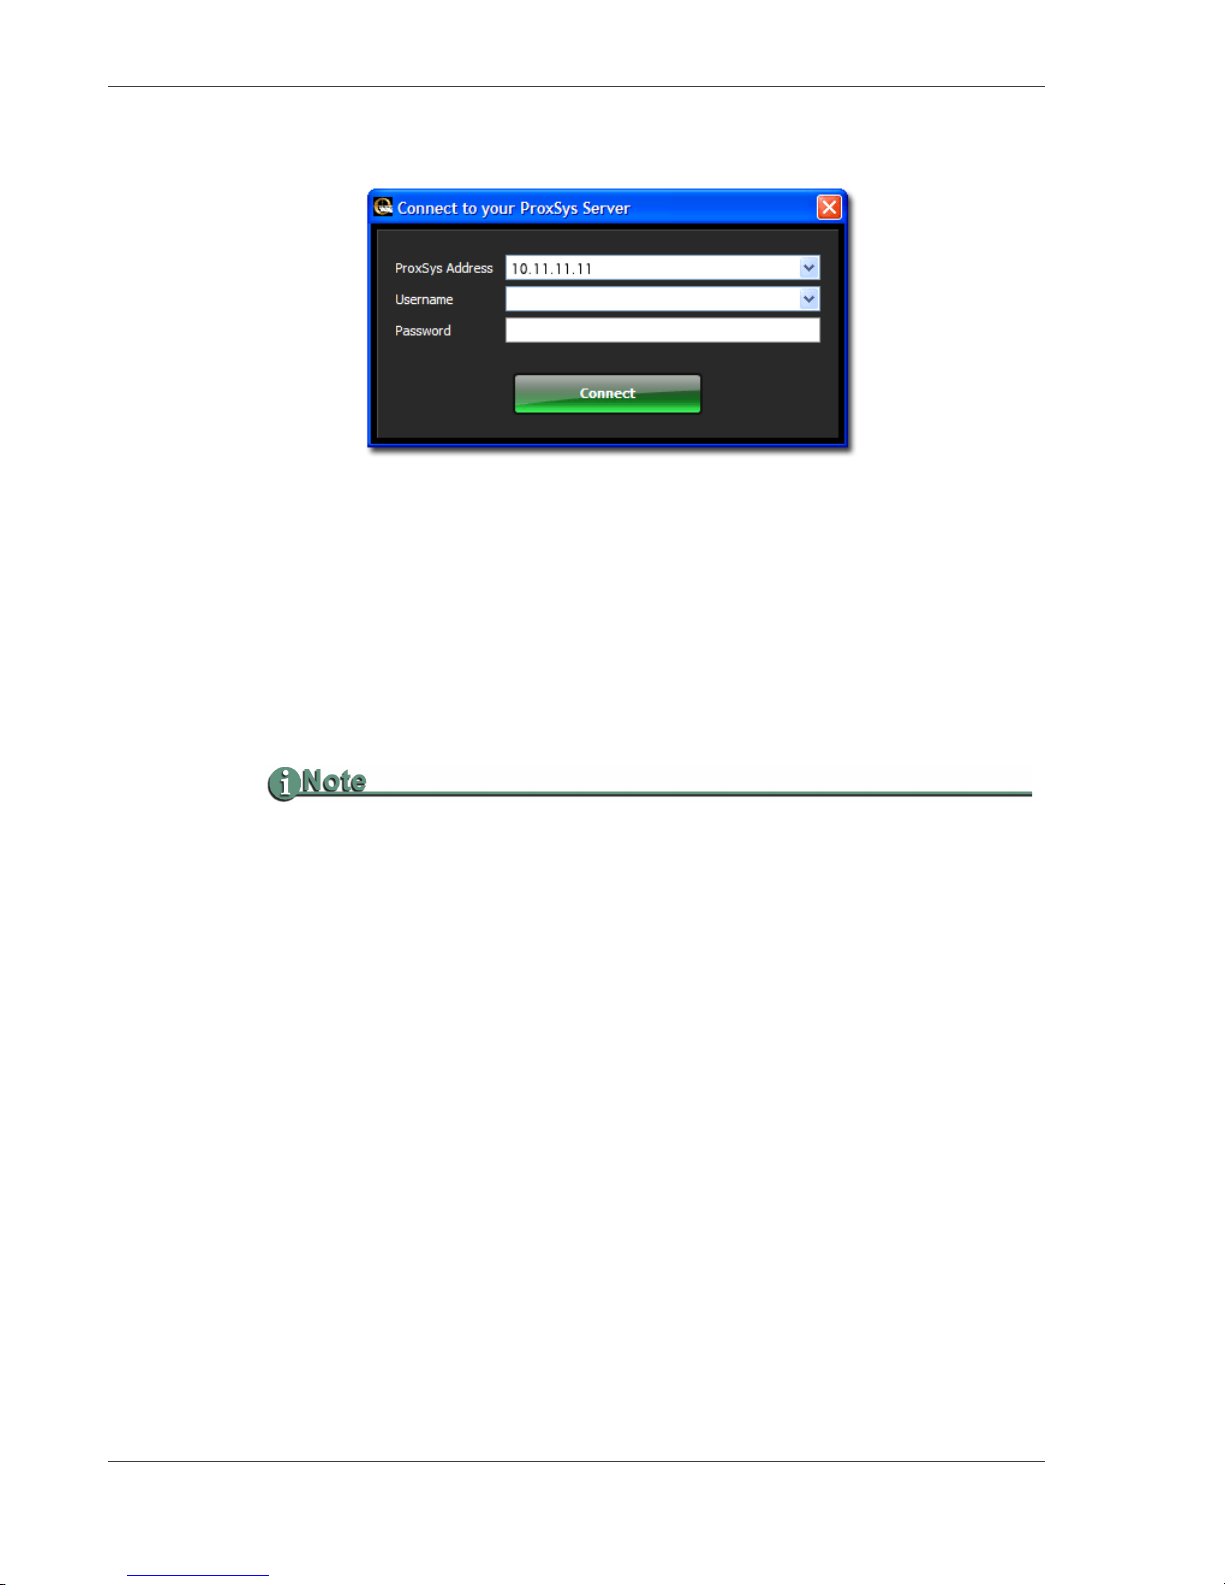
When a User starts the Media Upload Utility the Connect to your ProxSys Server window
appears.
The first time a User starts the upload utility it is necessary to enter:
Proxsys Address
Enter only the server’s numerical address. The default is 10.11.11.11.
Username and Password
The MA server ships with the default Username and Password.
Username:
Password:
Administrator
admin
Username and Password Are Case Sensitive
To ensure the best security for your MA and content, it is recommended that the MA
Administrator change this logon to a more secure form during installation.
Next, press
Connect.
This information is compared to User access privileges and stored.
In the future, the User only needs to complete the
automatically completed -- and click on
The first utility window to appear is th e
Connect.
MANUAL UPLOAD.
Username or Password -- the other fields are
MA Series Media Archive Servers
12
Page 25
Manual Upload
Function Buttons
MANUAL UPLOAD AUTO WATCH CONFIGURATION
1
2
3
4
56
Content
& Metadata
Tools
ProxSys Media Upload Utility
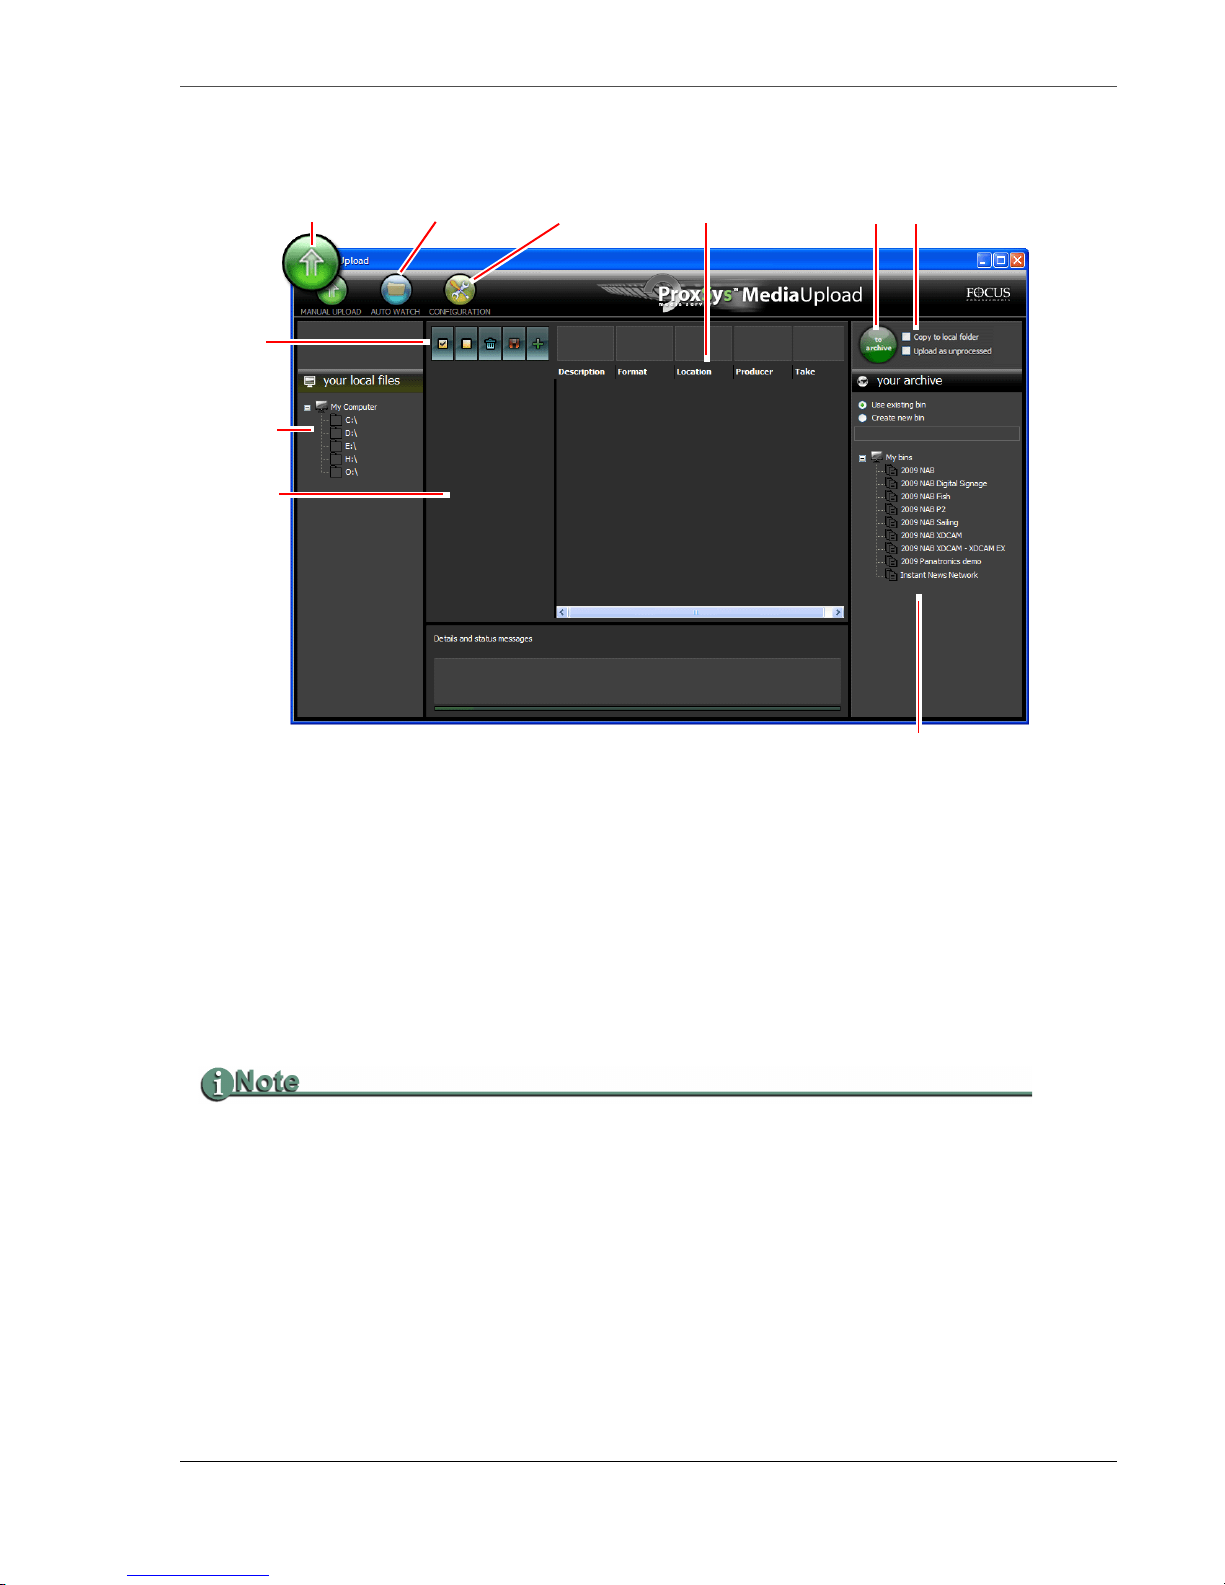
Use this window to manually select the video clips to upload and their destination bin on the
MA server. In addition,
clip metad ata.
1. Locate the video clips to upload usi ng the your local files directory tree.
2. Drag and drop the files into the area under the Content and Metadata Tools, to the right of
the directory tree.
The cursor indicates where to drop file.
If there are video clips in other folders, drag and drop them into the upload area.
If there is metadata associat ed with a vi deo clip it appears i n the row to the right of the vid eo
clip filename.
Dragging and Dropping P2 Files
• To load a single P2 file, drag the video clip’s XML file into the open area under the Content and
Metadata Tools.
• P2 content can also be adde d by draggi ng the enti re root direc tory for the P2 clip s into the upload
area under the Content and Metadata Tools. The MA automatically finds and loads all the clips.
Dragging and Dropping XDCAM Files
• To load a single XDCAM file, drag the video clip’s XML file into the open area under the Content
and Metadata Tools.
• To load an entire XDCAM card, drag the entire BPAV directory into the upload area under the
Content and Metadata Tools. The MA automatically finds and loads all the clips.
MANUAL UPLOAD provides the ability to add, change, or delete video
When the utility uploads the P2 or XDCAM XML file(s) the associated video clip(s) also upload.
MA Seri es Media Archive Servers
13
Page 26
ProxSys Media Upload Utility
Select
All
Deselect
All
Delete
Selected
Add
Identical
Metadata
Overwrite
Metadata
b1
b2, b3
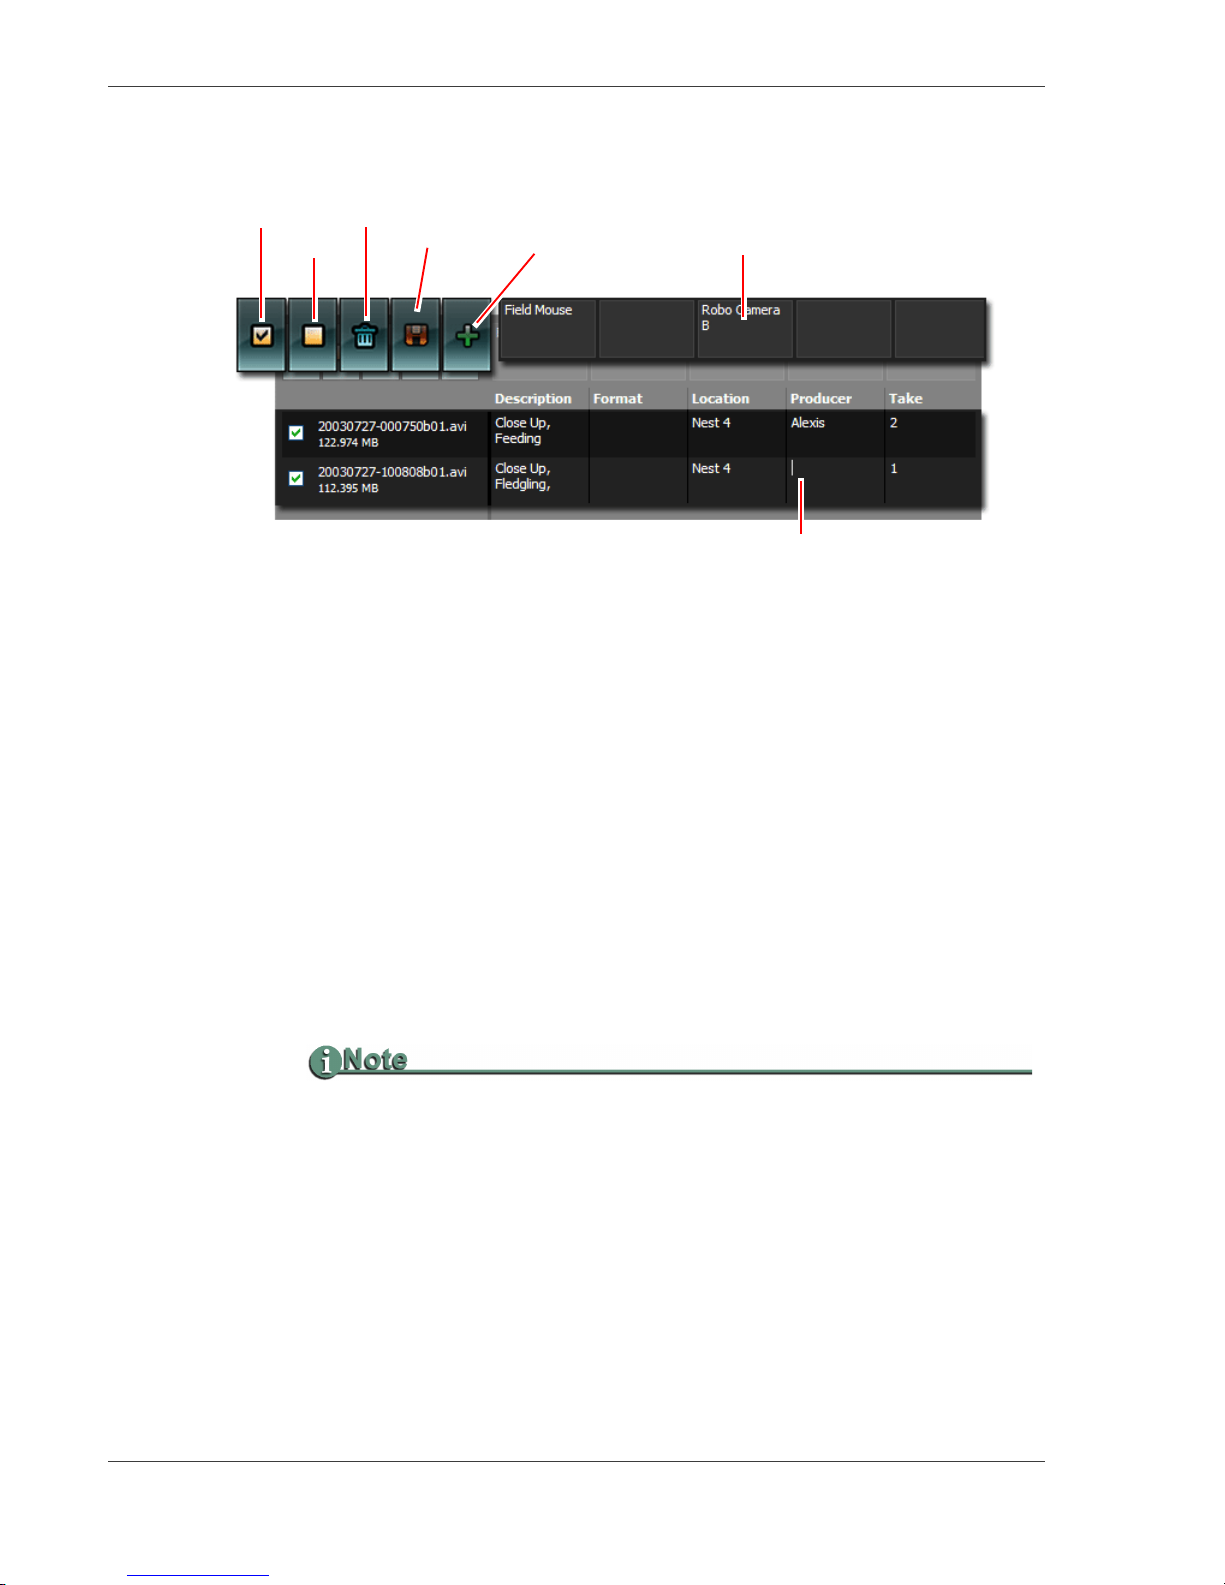
3. Edit the video clip metadata, if necessary.
It is possible to edit a single clip or multiple clips in a batch.
a. If batch editing, place a check mark by the filename of the files in the batch.
b. Edit metadata tags.
1. Edit individual metadata tags
Click on the text to insert the cursor.
2. Add metadata to existing data
Click on the empty field at the top of the metadata tag’s column.
Enter text.
Click on the
selected file.
3. To overwrite metadata
Click on the empty field at the top of the metadata tag’s column.
Enter text.
Click on the Diskette icon. This overwrites the metadata with the new text in each
selected file. This is helpful if accide nta l d uplications occur or large amounts of text
need to be modified in a single field.
Plus sign. This appends the text to the end of the existing data in each
Metadata Fields Cleared When the Media Upload Utility Is Shut Down
Shutting down the upload utility clears both the metadata fields and Auto Watches, see
Auto Watch on page 16, and it will be necessary to re-enter them when the utility
restarts. Metadata that has been saved with content is safe.
4. Select the destination bin in the your archive pane.
There are two types of bins:
Select the bin type.
• If the bin already exists, click on it.
• If creating a new bin, click on the empty field below the Create new bin option.
Enter the new bin’s name.
MA Series Media Archive Servers
14
Use existing bin or Create new bin.
Page 27
ProxSys Media Upload Utility
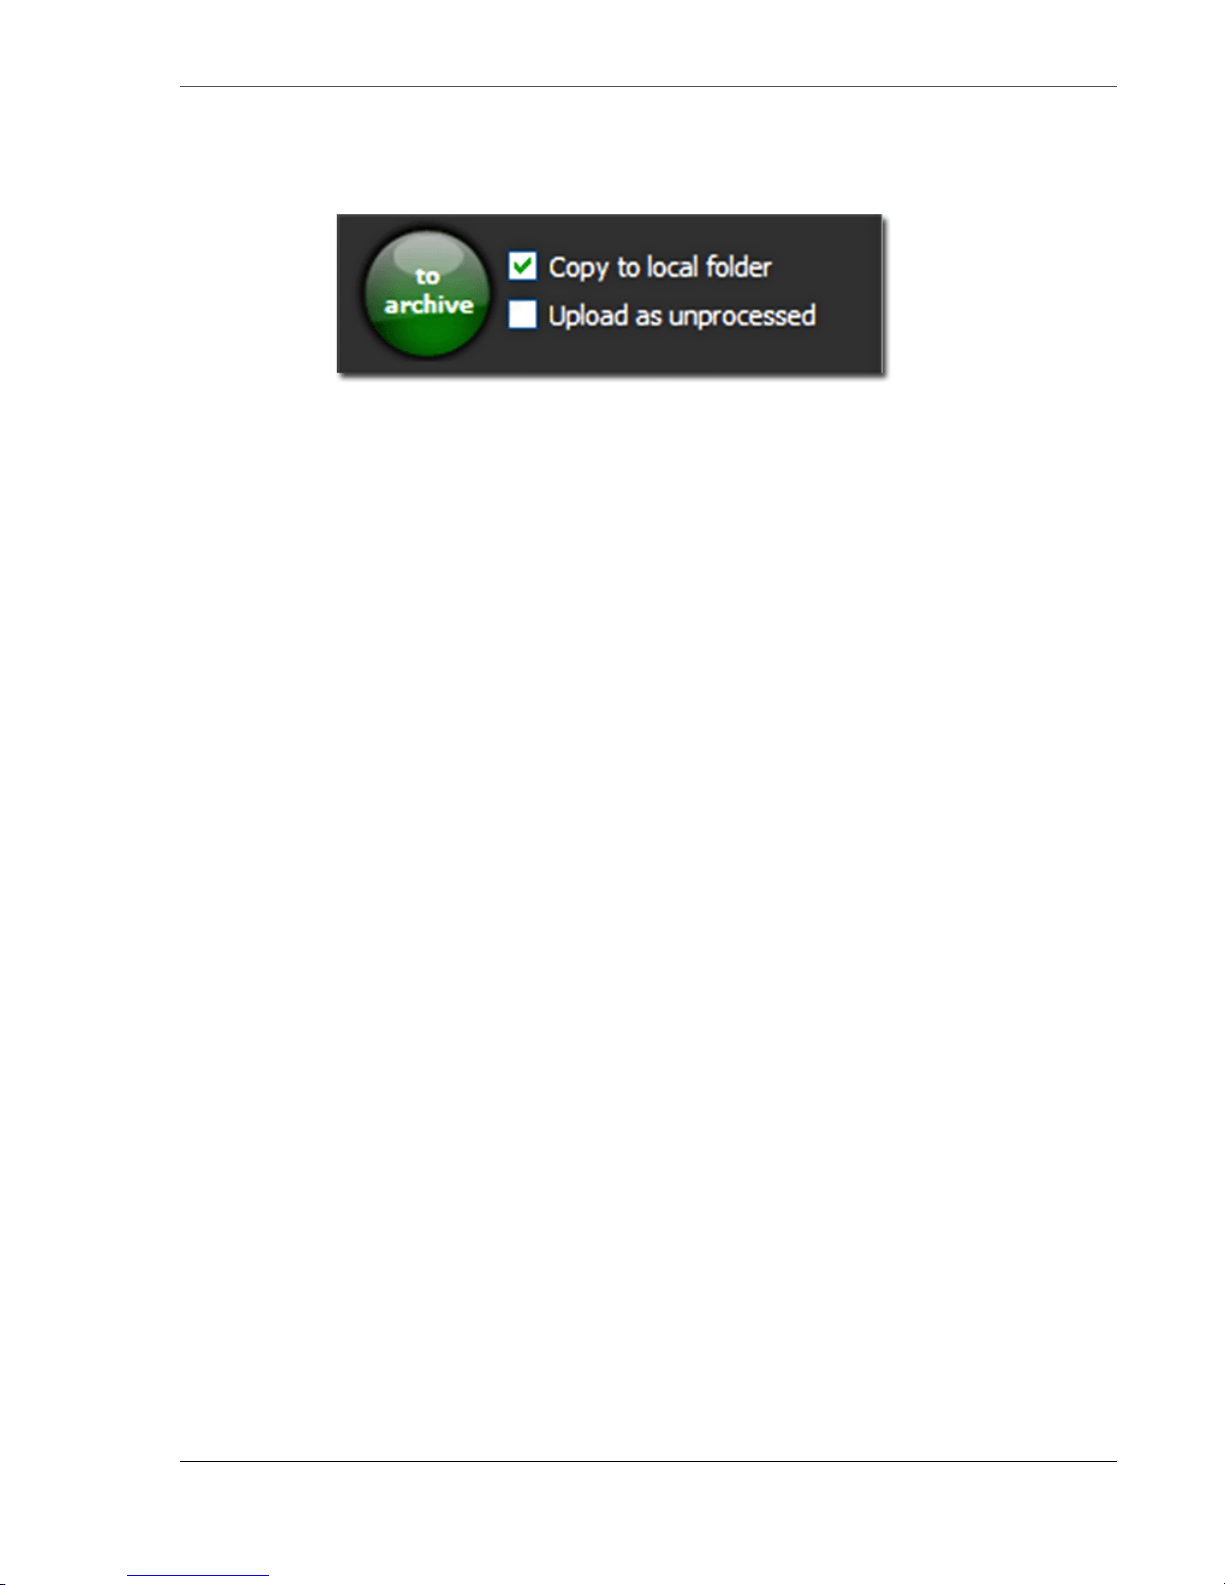
5. Select to Archive options.
It is possible to select, one, both or neither of these options.
Copy to local folder
Use this to create a copy of the uploaded clip(s) in a local folder: for more information, see
Configuration on page 19.
Upload as unprocessed
Use this option if uploading video clips without editing their metadata tags. The
unprocessed clips a re placed in a bin that is accessed by cl icking on the
not yet processed. Once uploaded to the MA server, use the server’s web interface to edit
Quick sele ct button
clip metad ata.
6. Click on the to Archive button to start the upload.
The progress of the upload is displayed in the
Details and status messages box at the
bottom of the upload window.
MA Seri es Media Archive Servers
15
Page 28
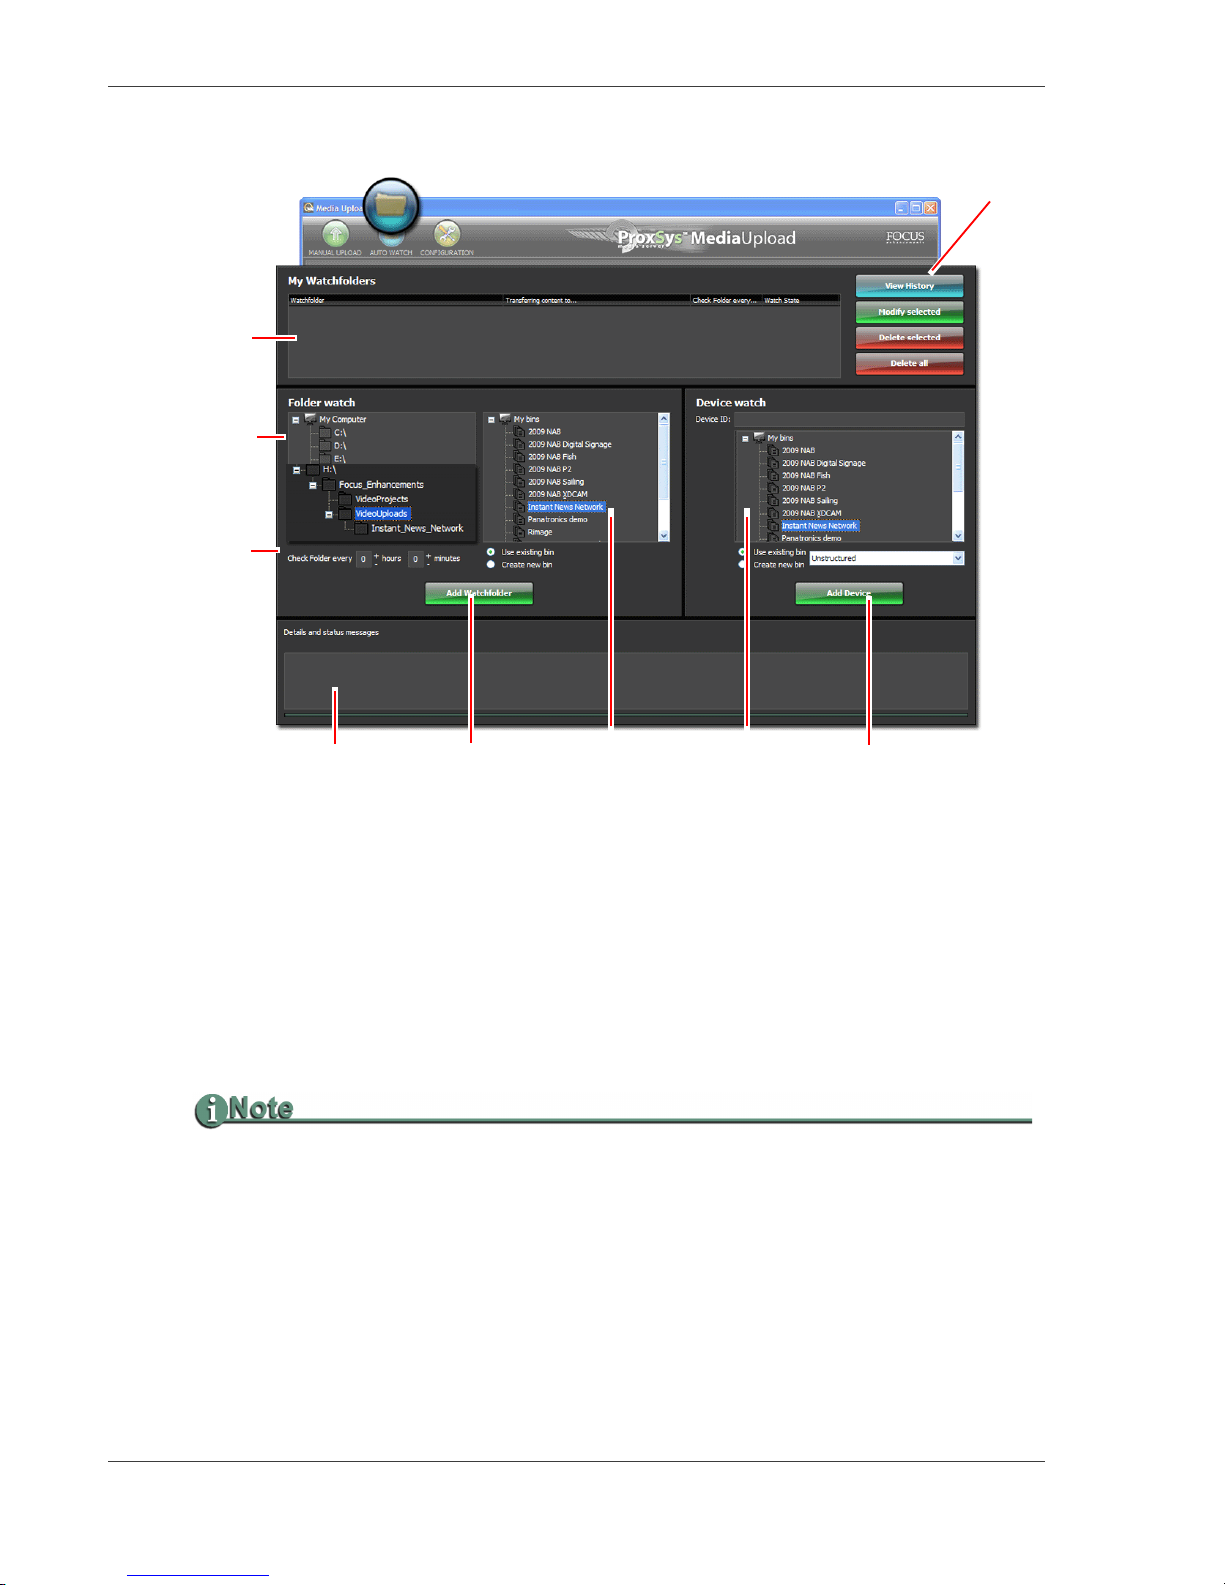
ProxSys Media Upload Utility
Set
Folder watch
Destination
Bins
(Folder watch)
Watch List
Controls
System Messages
Watch
List
Folder
Watch
Timer
Folders
Set
Device Watch
Destination
Bins
(Device watch)
Auto Watch
AUTO WATCH provides the ability to automatically upload video clips to the MA server from
local
Folders or Devices, such as CF card readers. In bot h cases, the watch procedure in volves:
• Designating a target (folder or device) to be watched by the
Media Upload Utility.
• Designating a destination bin on the MA server.
Frequency of the automated upload depends on:
•
Folder - the User sets a ti m er tha t t el ls the utility when to check t he fol d er. A watch can be
continuous or as infrequently as once every 24 hours.
•
Device - the utility watches for the system message that is sent when storage media is
inserted into the device and the device goes online.
AUTO WATCH Functions Do Not Provide Metadata Editing Capabilities
Because
The metadata is uploaded and logged into the MA server’s database in its original form.
Watch Functions Are Active Only While Media Upload Utility Is Active
Because AUTO WATCH is an upload utility function, it runs only when the utility is running.
AUTO WATCH runs in the background, minimize the utility window to hide it.
To add the utility to the computer’s autostart list, use the extension -autologin.
To Import Structured Content Use Device Watch
To import structured content like P2 and SxS, use the Device watch function.
AUTO WATCH is an automated upload process, it is not possible to edit video clip metadata.
MA Series Media Archive Servers
16
Page 29
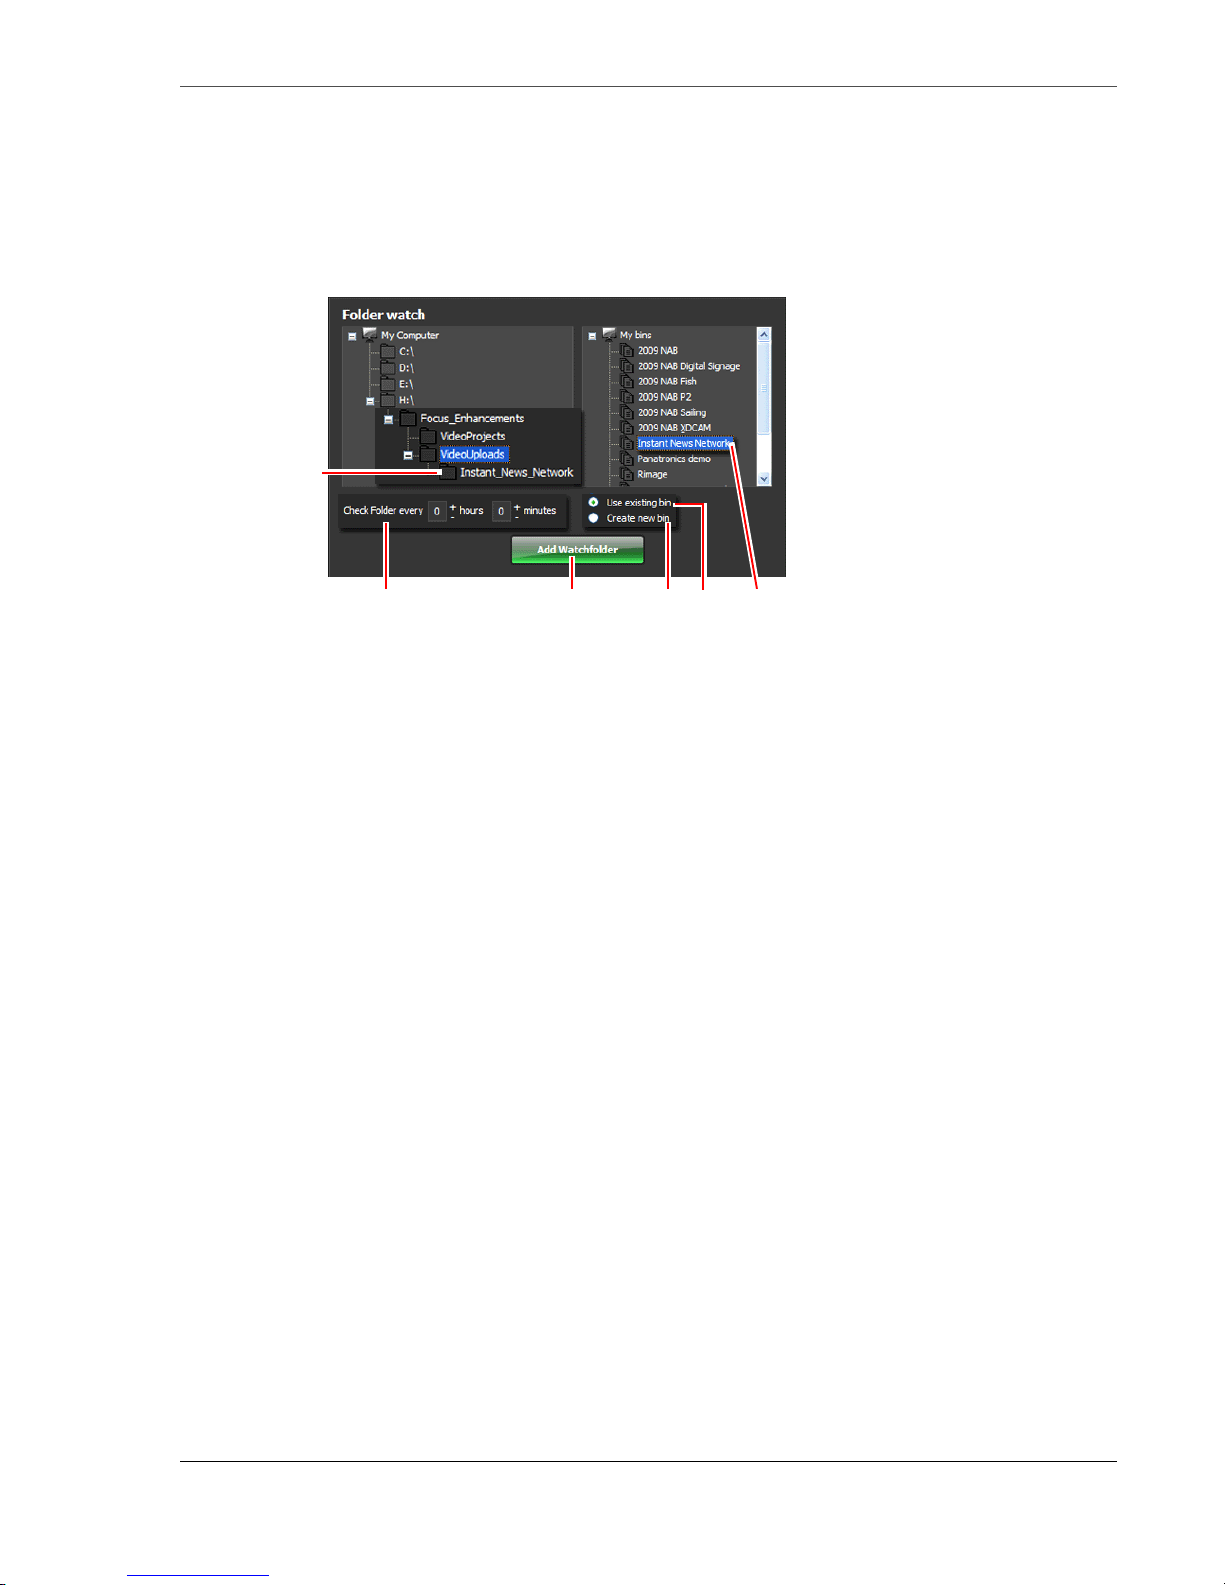
ProxSys Media Upload Utility
2
1
2a
2b 3 4
On the MA server, locate and track the upload of content from the watchfolder. In the Quick
select
menu, click on the via watchfolder button to display a list of bins that are ingesting or
have ingested content via a watch.
Folder watch
1. Select the host folder to watch.
2. Select the destination bin.
a. If the bin already exists, click on the bin and select Use existing bin option: in
the illustra tion,
b. If the bin does not exist it must be created. Select the Create new bin option.
Instant_News_Network.
The MA server will create a new bin using the name assigned to the sub-folder
in Step 1. The MA bin structure does not include sub-bins.
3. Set the Check folder timer.
This is the t ime that the upload timer waits before it checks the folder and uploads its
contents. As long as the Media Upload Utility is active, the timer runs continuously
and uploads are performed periodically.
4. Click Add Watchfolder to save and activate the watch.
The watch is listed in the
Watchfolder pane.
Uploading Files
To upload files, place them in the host directory’s target sub-directory.
Device watch
1. Enter the dev ice’s ID in the Device ID field. This tells the utility which device to
monitor for a ctivity.
An example of a device ID is the system assigned drive letter for a P2 card reader. It
may be necessary to include the drive name with the drive lette r.
2. Select the destination bin.
a. If the bin already exists, click on the bin and select Use existing bin option.
b. If the bin needs to be created, select the Create new bin option. When the
upload occurs, the MA server creates a new bin with the date of the upload.
MA Seri es Media Archive Servers
17
Page 30
ProxSys Media Upload Utility
3. Select the type of file being uploaded from the dropdown menu.
4. Click Add Watchfolder to save the watch.
The watch is listed in the
When storage media matching the
system message is sent out, the upload utility receives the message and initiates the
upload/ingest. The utility upload message window,
ProxSys
Watchfolder Function Is Active Only When Media Upload Utility Is Running
The Watchfolder is a function of the Media Upload Util ity, not the MA server . Watchfolder is
active only while the uploa d utility is run ning. If it is ne cess ary for W at chfold er to run 24 x 7,
the upload utility must be allowed to run continuously, in the background.
Configuring Wat ch Settings
Watchfolder pane.
Device watch criteria is inserted into a reader, a
Transfer content to your
, appears. The upload occurs automatically: no actions are required.
There are th ree watch settings located in the
•
Delete local content after upload
•
Transfer already existing content
•
Wait for copy completion
For more information a bout these settin gs, see
CONFIGURATION window.
Wait for copy completion in Minutes on
page 19.
Editing a Watch
Watches are editable.
1. Select the watch to edit f r om the list in the My Watchfolders pane.
The watch settings display in either the Folder or D evice watch areas.
2. Change any of the settings.
3. Click Modify selected to save the changes.
The changes appear in the watch item in the
MyWatchfolders pane.
Transaction History
Click on the
View History button to see an itemized list of all AUTO WA TCH activ ities f or th e
time that the upload utility has been running. These transactions include:
• Creation and modification of watches (monitors),
• When watch timers ar e started,
• When uploads begin, end, and if they are successful,
•Errors,
Closing the upload utility resets the history function and clears the transaction list.
MA Series Media Archive Servers
18
Page 31
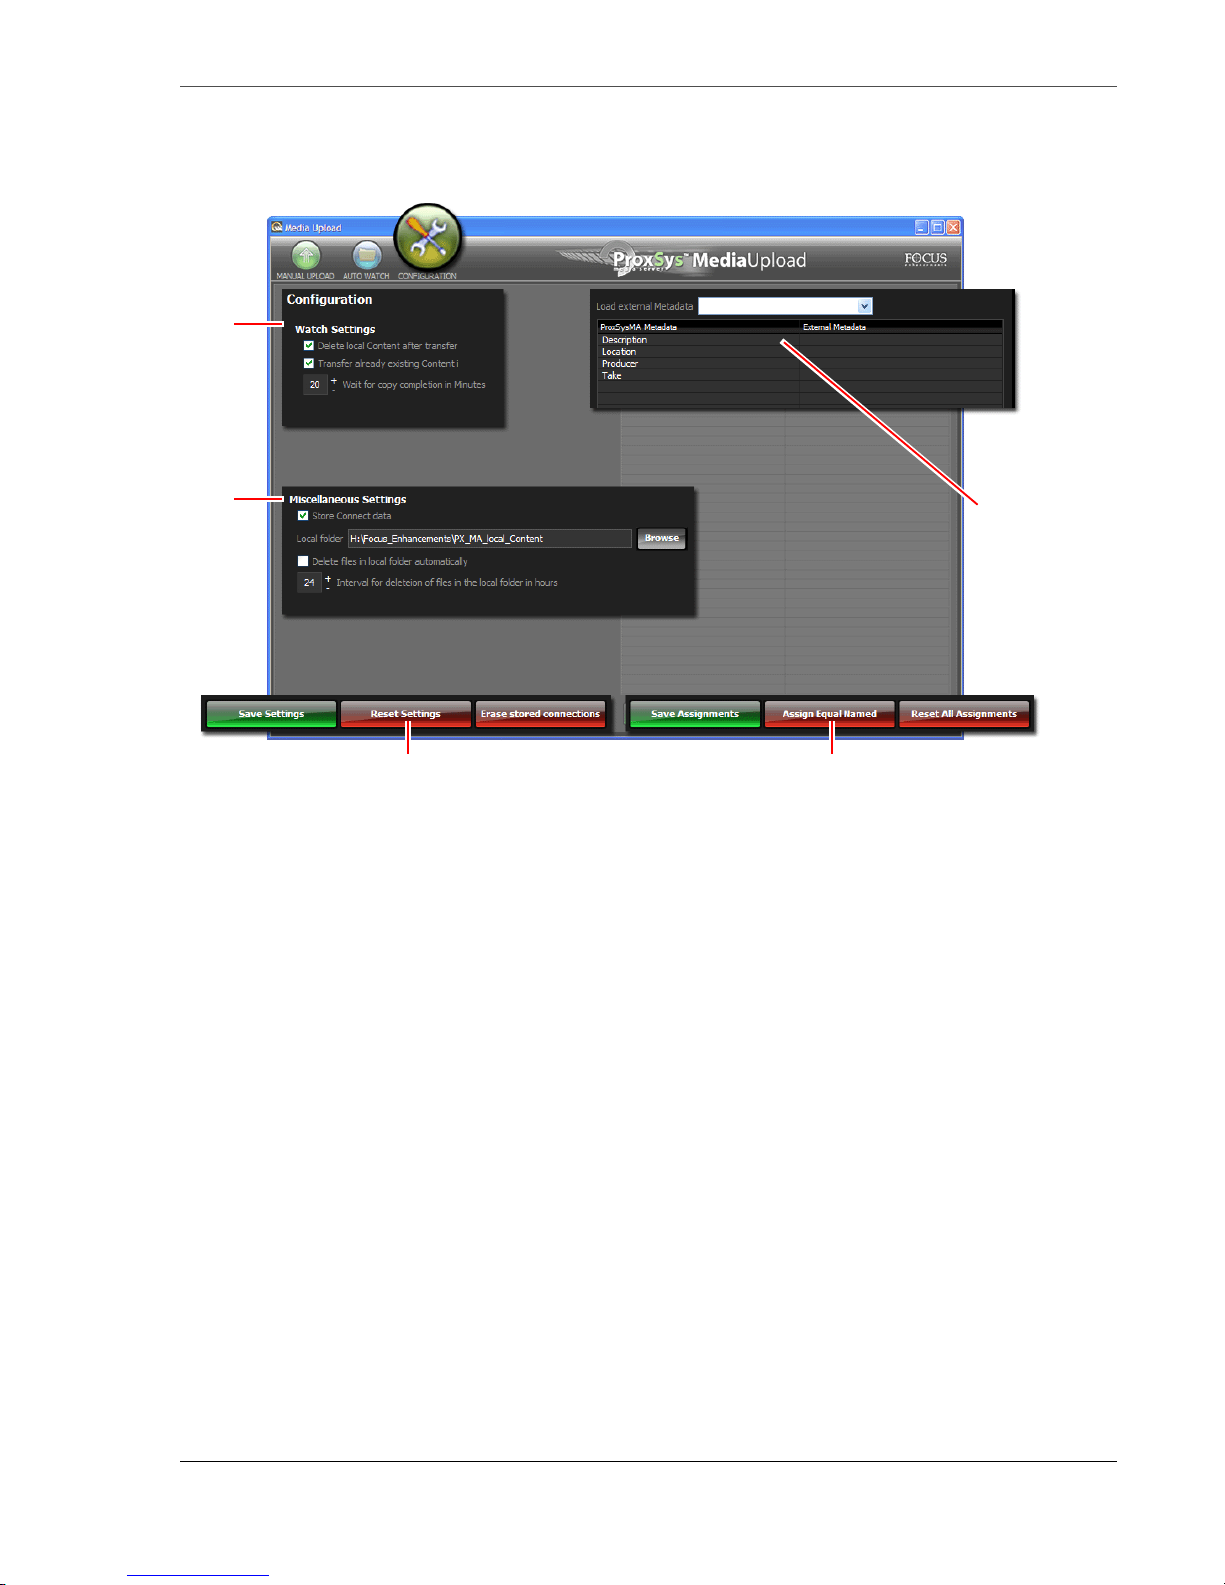
Configuration
Load
External
Metadata
Watch
Settings
Watch and Miscellaneous Settings Controls
Misc.
Settings
Load External Metadata Controls
ProxSys Media Upload Utility
The CONFIGURATION window provides additional p aramete rs i n th ree areas : W a tch Settings,
Loading external metadata, Miscellaneous Settings.
Watch Settings
Delete local Content after transfer
When enabled, the upload utility deletes the
Watch folder files after they have been
uploaded to their destination bin.
Transfer already existing Content
Use this setting to upload content that has been uploaded previously.
When previously uploaded content is about to be transferred, the upload utility appends a
copy number to the f ilename an d posts a me ssage in
Details and status messages pane to
alert the User.
It does not matter if the previously uploaded file is transferred to the same bin as before or
to a new bin, it will receive a new copy number each time it is uploaded.
Wait for copy completion in Minutes
Use this time to create a wait period before the upload starts. This is done, to insure that
there is enough time to allow the complete copying of a file to the target folder before
upload begins.
MA Seri es Media Archive Servers
19
Page 32
ProxSys Media Upload Utility
3
1
2
Load External Metadata
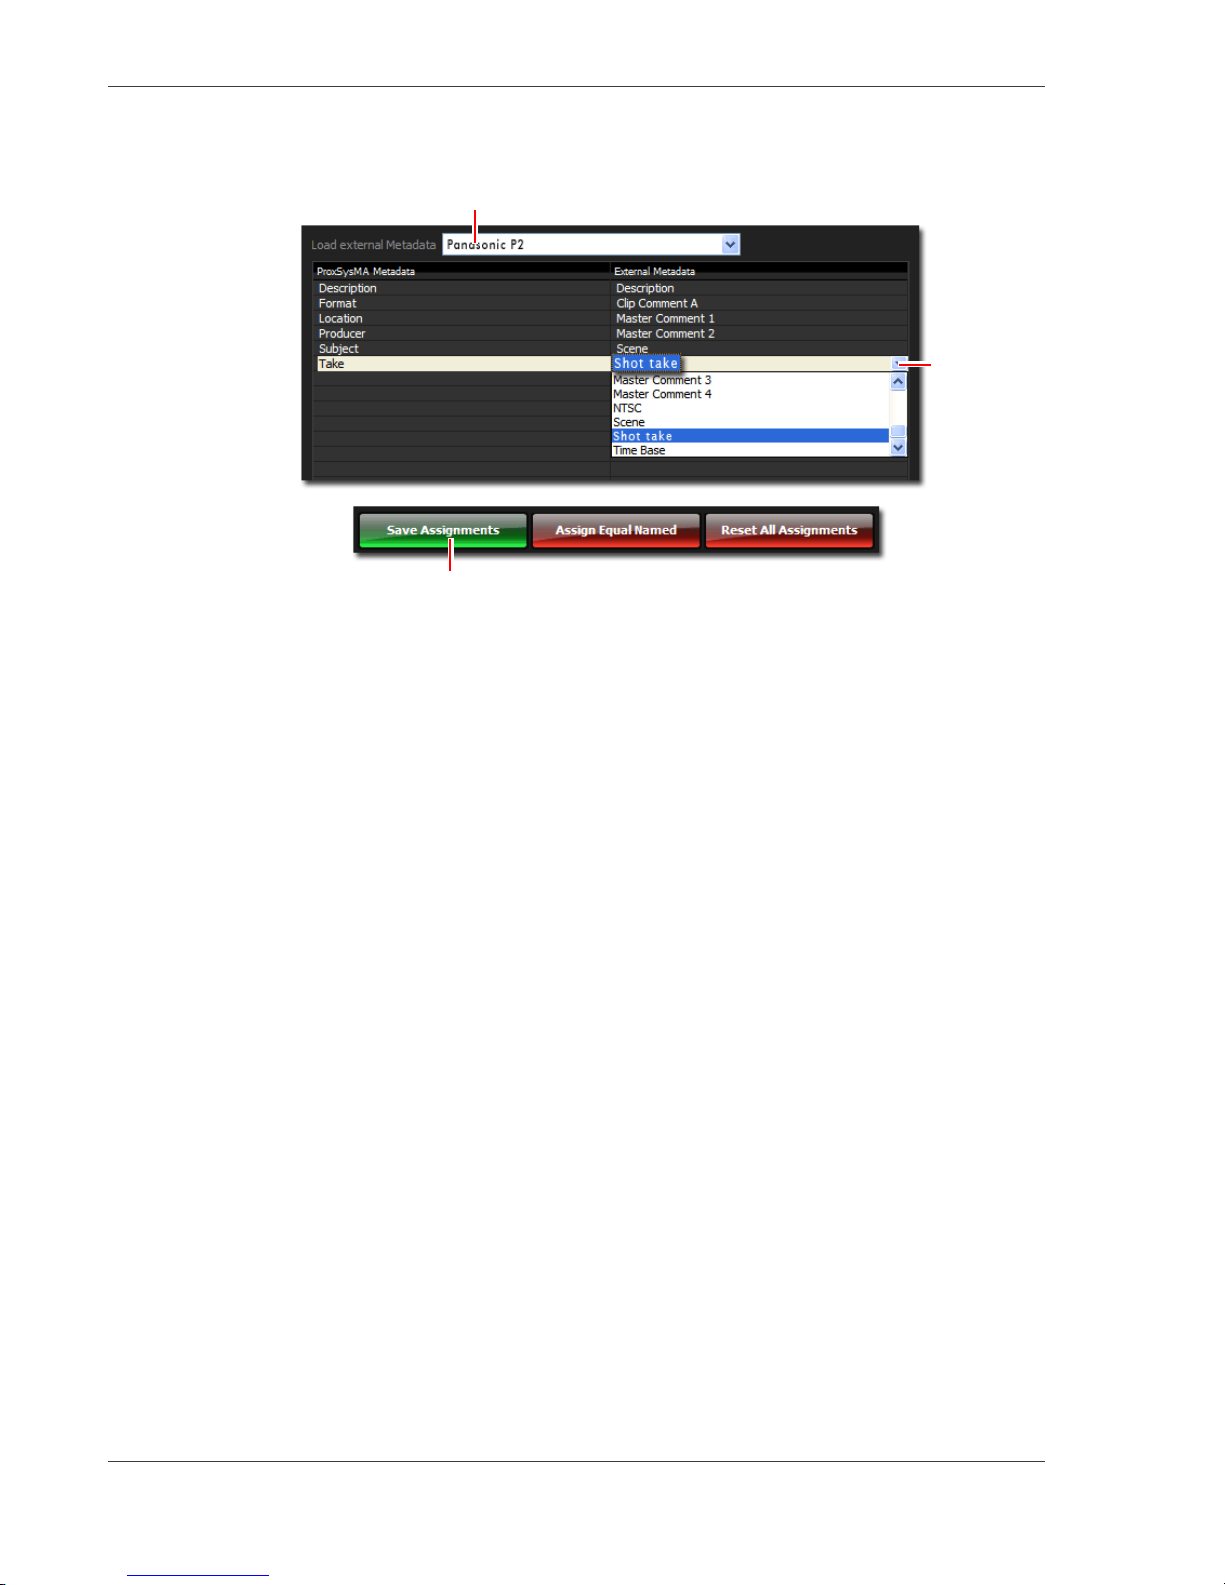
Use this workspace to ingest the external video c lip metadata (native meta data). The
ProxSysMA Metadata column lists the MA metadata tags used by the MA server to perform
content search and retrieve operations. It is important to identify the external metadata tags
that have the same type of data a s the MA s erver’ s tags . The upload utilit y provides the abil ity
to translate external tag s with different names to the MA server tags. F or more information
about metadata see
Metadata Management on page 38.
Use these settings to match external metadata with the MA server’s metadata.
1. Select the type of metadata being uploaded from the Load external metadata
dropdown menu.
The dropdown menu contains a list of metadata standards . Pick the one use d during the
recording of the video.
Displayed in the ProxSysMA Metadata column is a list of the MA server metadata
tags. This is a list that th e MA server Administrator manages, see
Management
2. Assign video clip meta data to each MA metadata ta g.
Click on the empty field in the
on page 38.
Ex terna l metadata column opposite the MA tag. A
Metadata
dropdown list of video metadata tags appears. Pick the tag whose data is similar to the
MA tag.
3. Click on Save Assignments to complete.
In addition, there are the
Assign Equal Named and Reset All Assignments controls.
Assign Equal Named
Click on this button to automatically assign external metadata tags to MA tags that have the
same name.
MA Series Media Archive Servers
20
Page 33

ProxSys Media Upload Utility
Reset All Assignments
Click on this button to reset all metadata assignments to empty default.
Miscellaneous Settings
Store Connect Data
Check this box to save server connec tion data for future use.
It is possib le to save mul tiple users and servers in the upload utility.
Local folder
Use the Browse function to set a path to a folder where the upload utility can save files that
it has uploaded to the MA server.
Delete files in local folder automatically
Use this function with
Interval for deletion ...
Check this b ox to remove files saved to the local fold er.
Interval for deletion of files in loca l folder
Set a time period that the upload utility should wait before it deletes files in the local folder:
minimum is 6 and maximum is 96 hours.
MA Seri es Media Archive Servers
21
Page 34
MA Series Operations
MA Series Operations
Use a Windows or Mac supported browser to access the MA server’s features:
• Search content metadata to locate newly uploaded and archived content
• Preview video content using Flash proxy preview files
• Manage metadata fields
• Add or edit video clip metadata
• Manage the MA server’s User rights
• Create and output shortlists of selected content which provide content metadata, video
thumbnails , file details , and archival location (disc ID)
• Manage archive disc burn settings
• Monitor MA system performance
The browser requires only that a Flash player be installed on the host computer.
Login
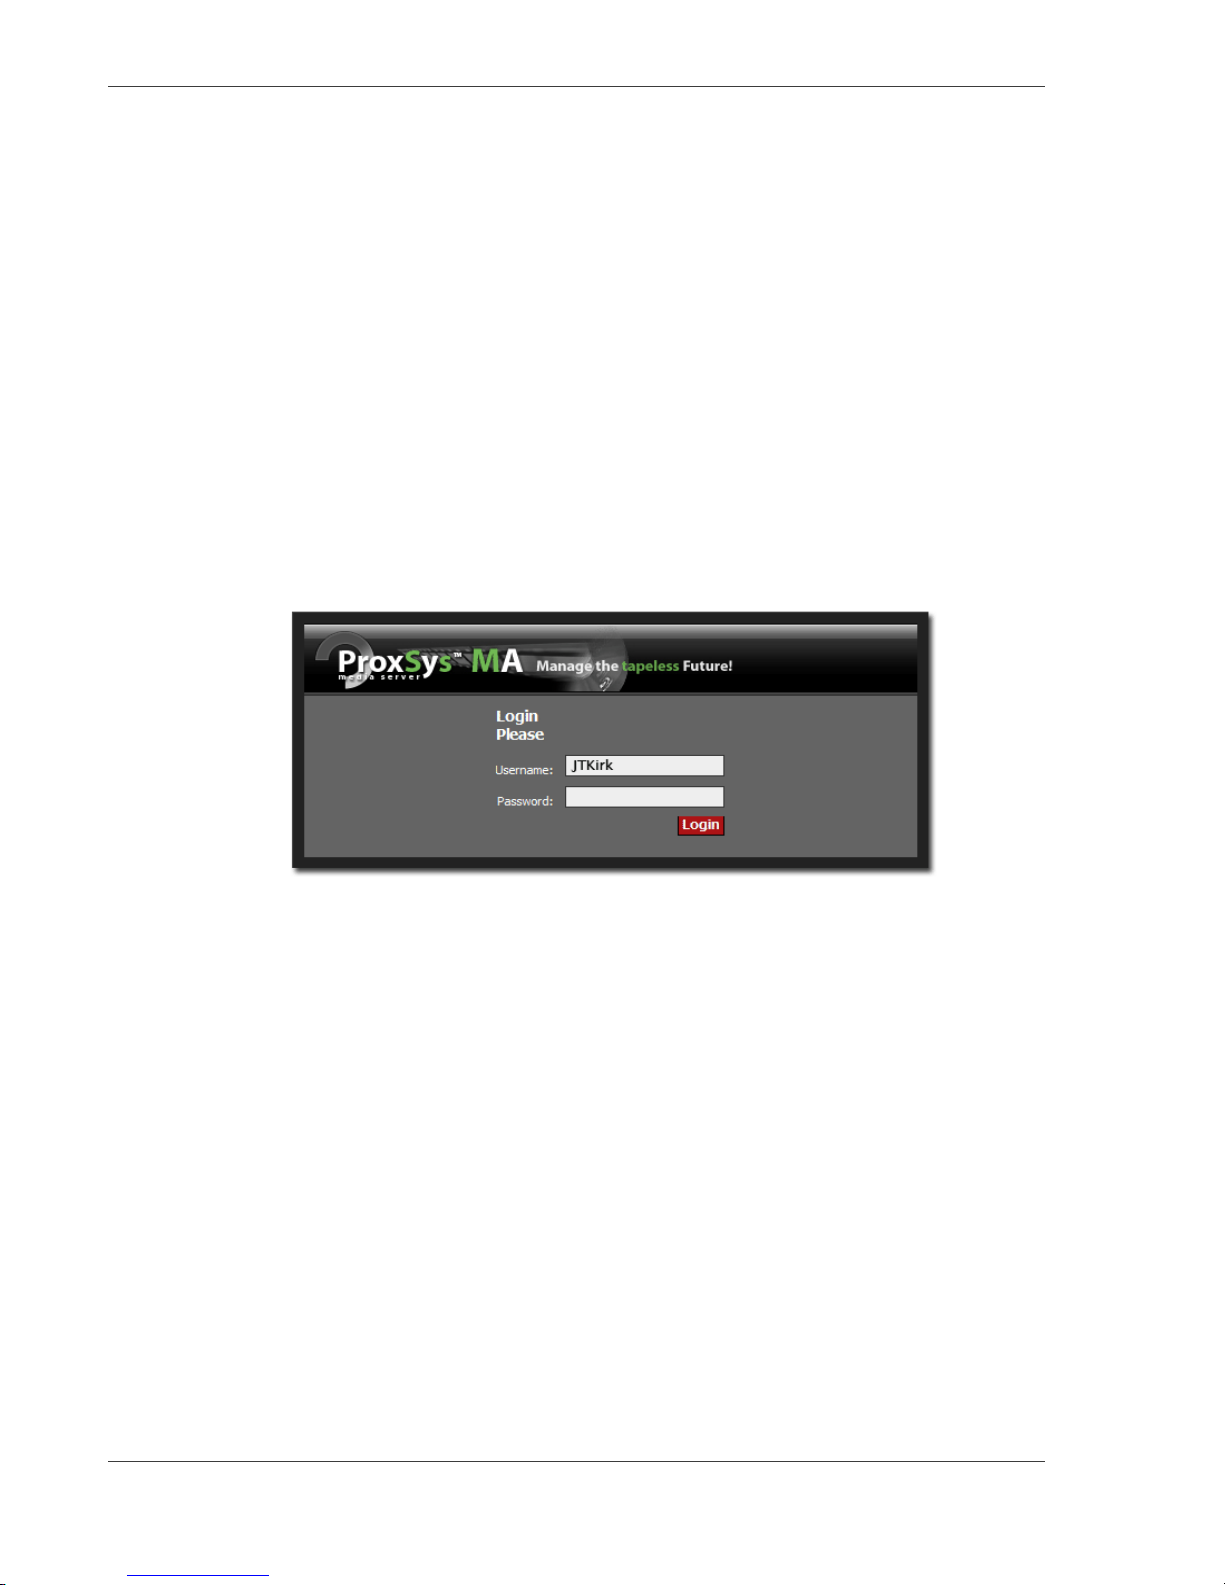
Using a Mac Safari or Internet Explor er , versi on 6 or higher , brows er , ent er the IP address of the
server in the browser’s address field to open the MA server’s Login window.
1. Enter your Username and Password.
2. Click on Login.
The main User window appears.
User’s Rights and Default Login
The MA Administrator sets User’s rights includi ng Usernam e and Password. The MA server
default login is
MA Series Media Archive Servers
22
Administrator and admin, for more information see User Admin on page 36.
Page 35
MA Series Operations
Set Number of Items
Shown In Content Area
Retrieve Latest Version
Media Upload Utility
Select Method to
Find Content
Bin Short List Area
Home Workspace
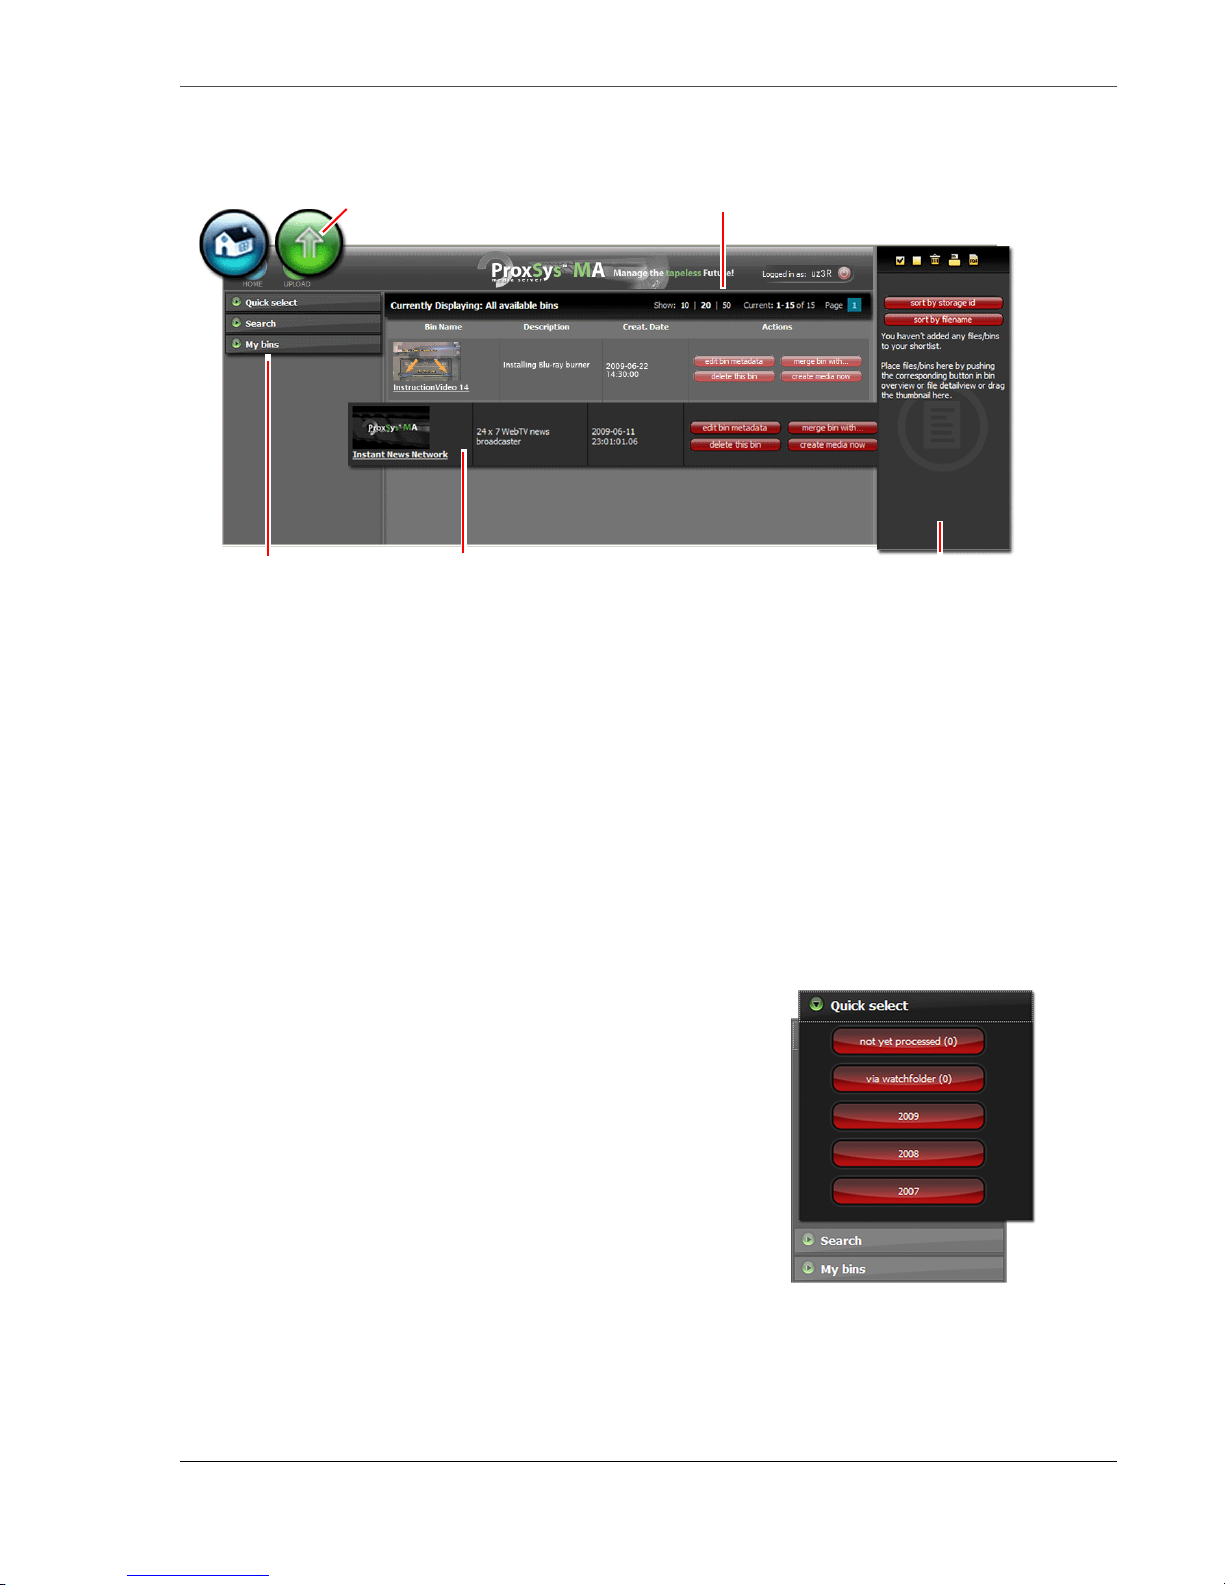
The Home workspace has the following areas and functions:
•
Home button - use to return to default Home workspace from other pages.
•
Upload - retrieves latest version of Media Upload Utility from Focus Enhancements
website for installation on the MA server.
•
Show - use to set the number of items, bins or content files, to show on a workspace page.
•
Quick select, Search, My bins -- use to locate con tent files stored on MA server.
•
Bin Name - click on name or icon to open a bin and show its content.
•
Action - use these buttons to manage content in a bin. The User’s privileges determine
which actions are available, see
User Admin on page 36.
See below for a full description of each workspace feature.
Quick select
Use Quick select to list bins by the cr iteria:
not yet processed
This button lists bins tha t contain content uploaded befo r e th e
User could enter or modify its metadata: see
on page 13.
via watchfolder
This button lists bins containing content recently uploaded
using one of the watchfolder functions, see
page 16.
year
Bins are also listed by the year that they were uploaded.
Manual Upload
Auto Watch on
MA Seri es Media Archive Servers
23
Page 36
MA Series Operations
Bins
Bin Name
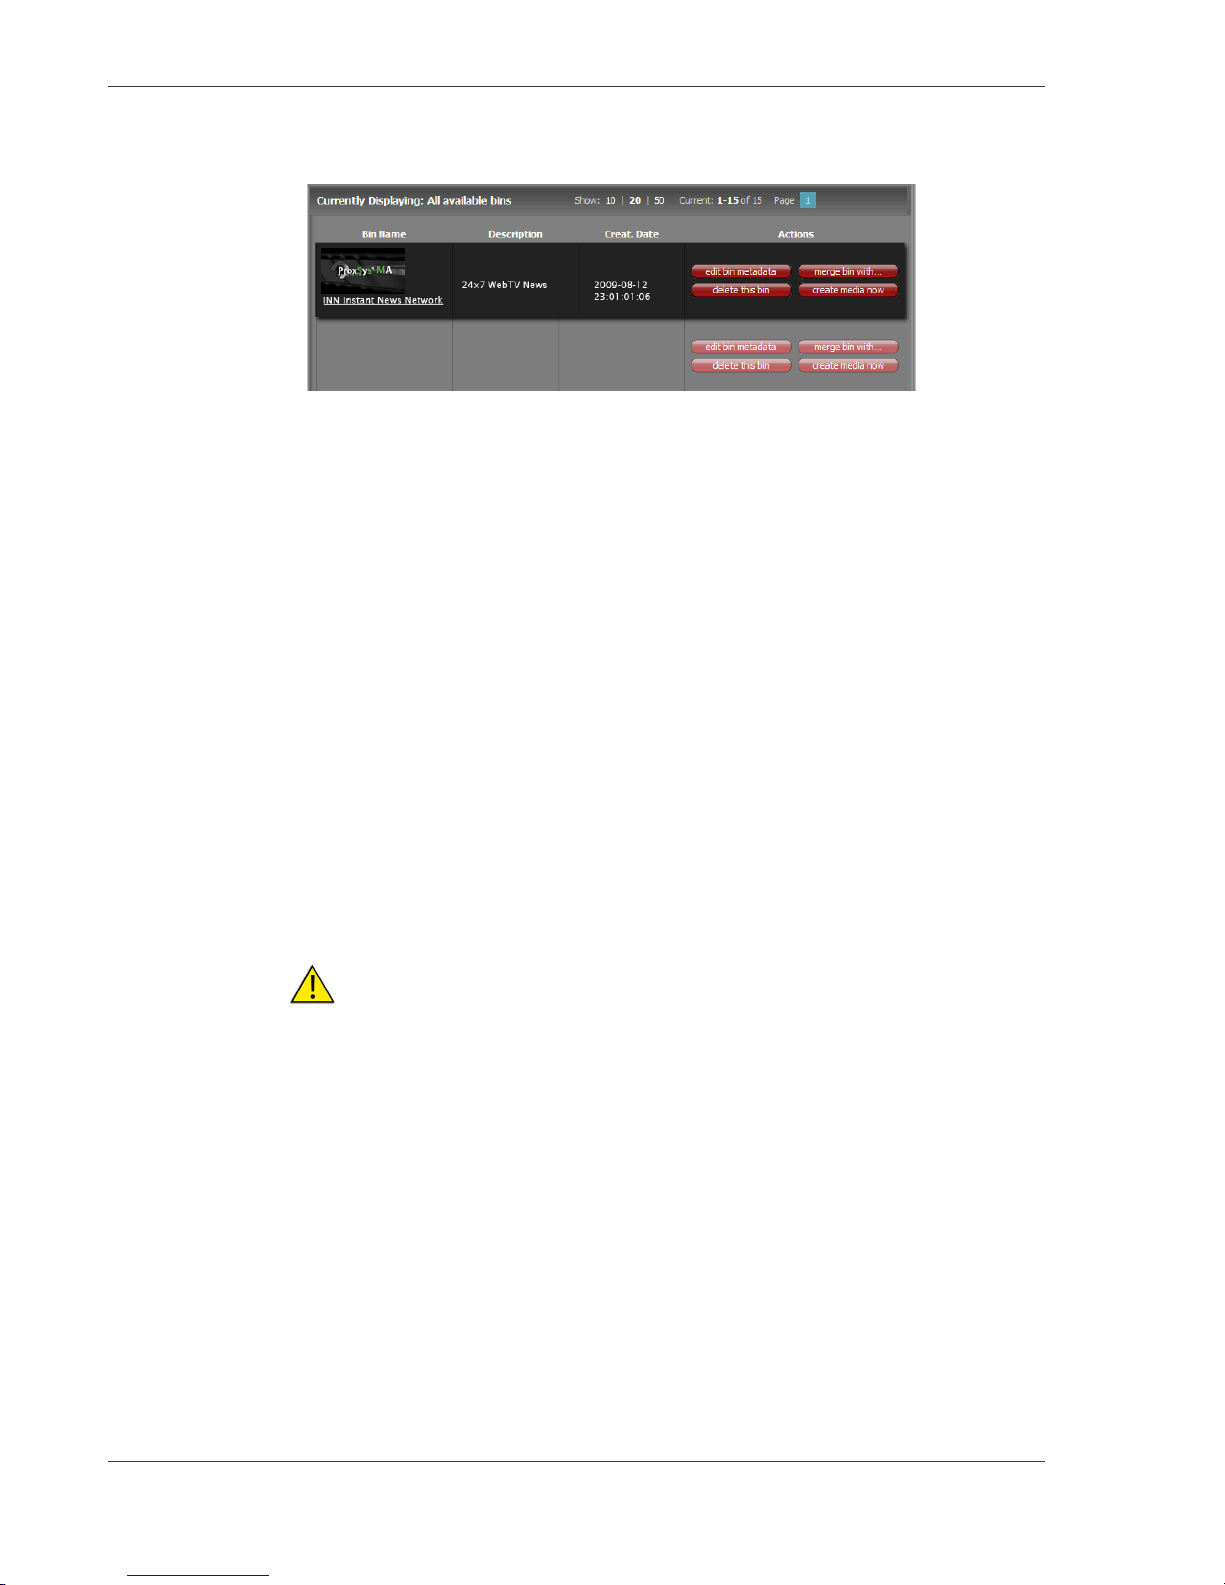
Click on the Bin Name or the thumbnail image above it to display contents of that bin. The
name is from the bin’s metadata.
Description
Description entered in the bin’s metadata.
Actions
The User’s right s determine whic h of these actio ns are availabl e, see
User Admin on page 36.
edit bin metadata
• Add, change, or delete the bin’s metadata.
Refresh page to see changes.
• Display list of media in the bin.
• Upload graphic file to display as bin’s thumbnail image.
delete this bin
• Delete the bin and its contents from the MA server.
This Procedure Permanently Deletes Files. There is no undo for this procedure.
merge bin with ...
• Specify a target bin to merge with.
• MA server moves the contents from the current bin to the target bin.
• Once empty, the current bin is deleted.
create media now
• Use this function to create an archive immediately, without meeting default burn
setting criteria: e.g. 70% of archive disc has not been met.
• Immediately burns content to an archive disc, provided it does not conflict with a
scheduled burn. ProxSysMA Services manual settings are used.
• Uses Administrator predefined media settings, see
Demand)
on page 43.
Create media now (Burn-on-
MA Series Media Archive Servers
24
Page 37
Search
Metadata Tag
Start Search
BinsDiscs
Search Criteria
Area
Date
General
Search
MA Series Operations
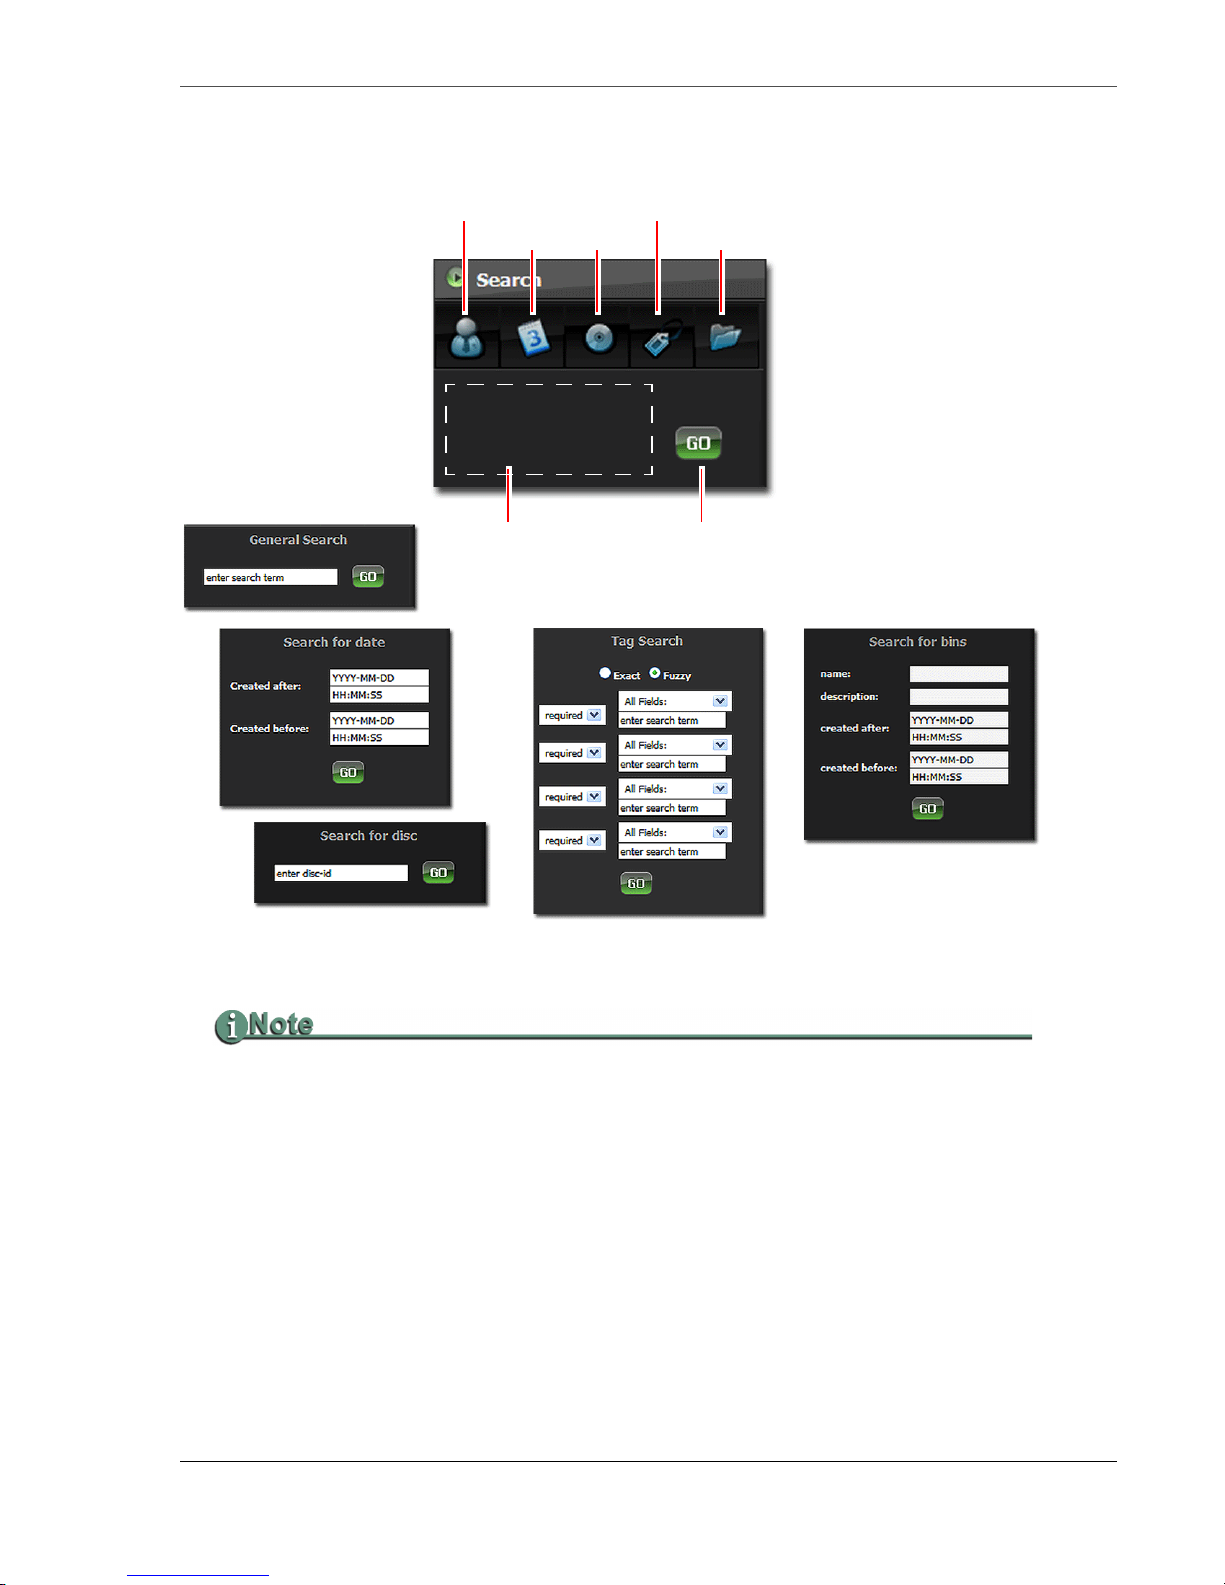
The Search menu bar provides five categories of search criteria.
MA Server Search Engine
The MA server employs the Apache Lucene search engine. The MA server supports:
• Single and multiple character wildcard searches.
• Boolean logical operators AND, OR, and NOT.
These operators must be entered in ALL CAPS.
• Phrases delimited by quotation marks.
• Escaping the special characters that are part of the query syntax.
These special characters are + - && || ! ( ) { } [ ] ^ " ~ * ? : \ .
In general, the search procedure involves:
1. Selecting a search category: General Search, Date, Discs, Tags, or Bins.
2. Filling the search param eters.
3. Clicking on Go to start the search.
MA Seri es Media Archive Servers
25
Page 38

MA Series Operations
Search results appear in the Search Results pane to the right of the Search function.
General Search
Use a word or character string to perform a search of the properties of all contents for
matches. General Search does not support dates.
Date
Search for contents using their creation dates. It is possible to specify a specific date, if
known, or a range of dates using the
Discs
Enter the disc ID number of the disc to look for.
This search returns all of the contents on the requested disc.
Metadata Tags
Created after and Created before parameters.
Use up to four metadata t ags and
1. Select the metadata tag from the dropdown menu listing all MA server metadata tags.
2. Enter the search term for the tag.
3. Select the type of term: required, optional, or not.
not excludes the term from the search.
Exact or Fuzzy logic to search content metada ta. To search:
Bins
Search for bins using their parameters
name, description, and created after/before dates:
either individually or in combination.
MA Series Media Archive Servers
26
Page 39
My bins
Number of Items Shown
In Content Area
Viewer
Shortlist
Display Layout
Tabular or List
User’s Bin List Thumbnail
Content File Listing
(metadata layout)
Delete
Selected
Edit
Metadata
De-Select
All
Select
All
MetadataContent
Status
MA Series Operations
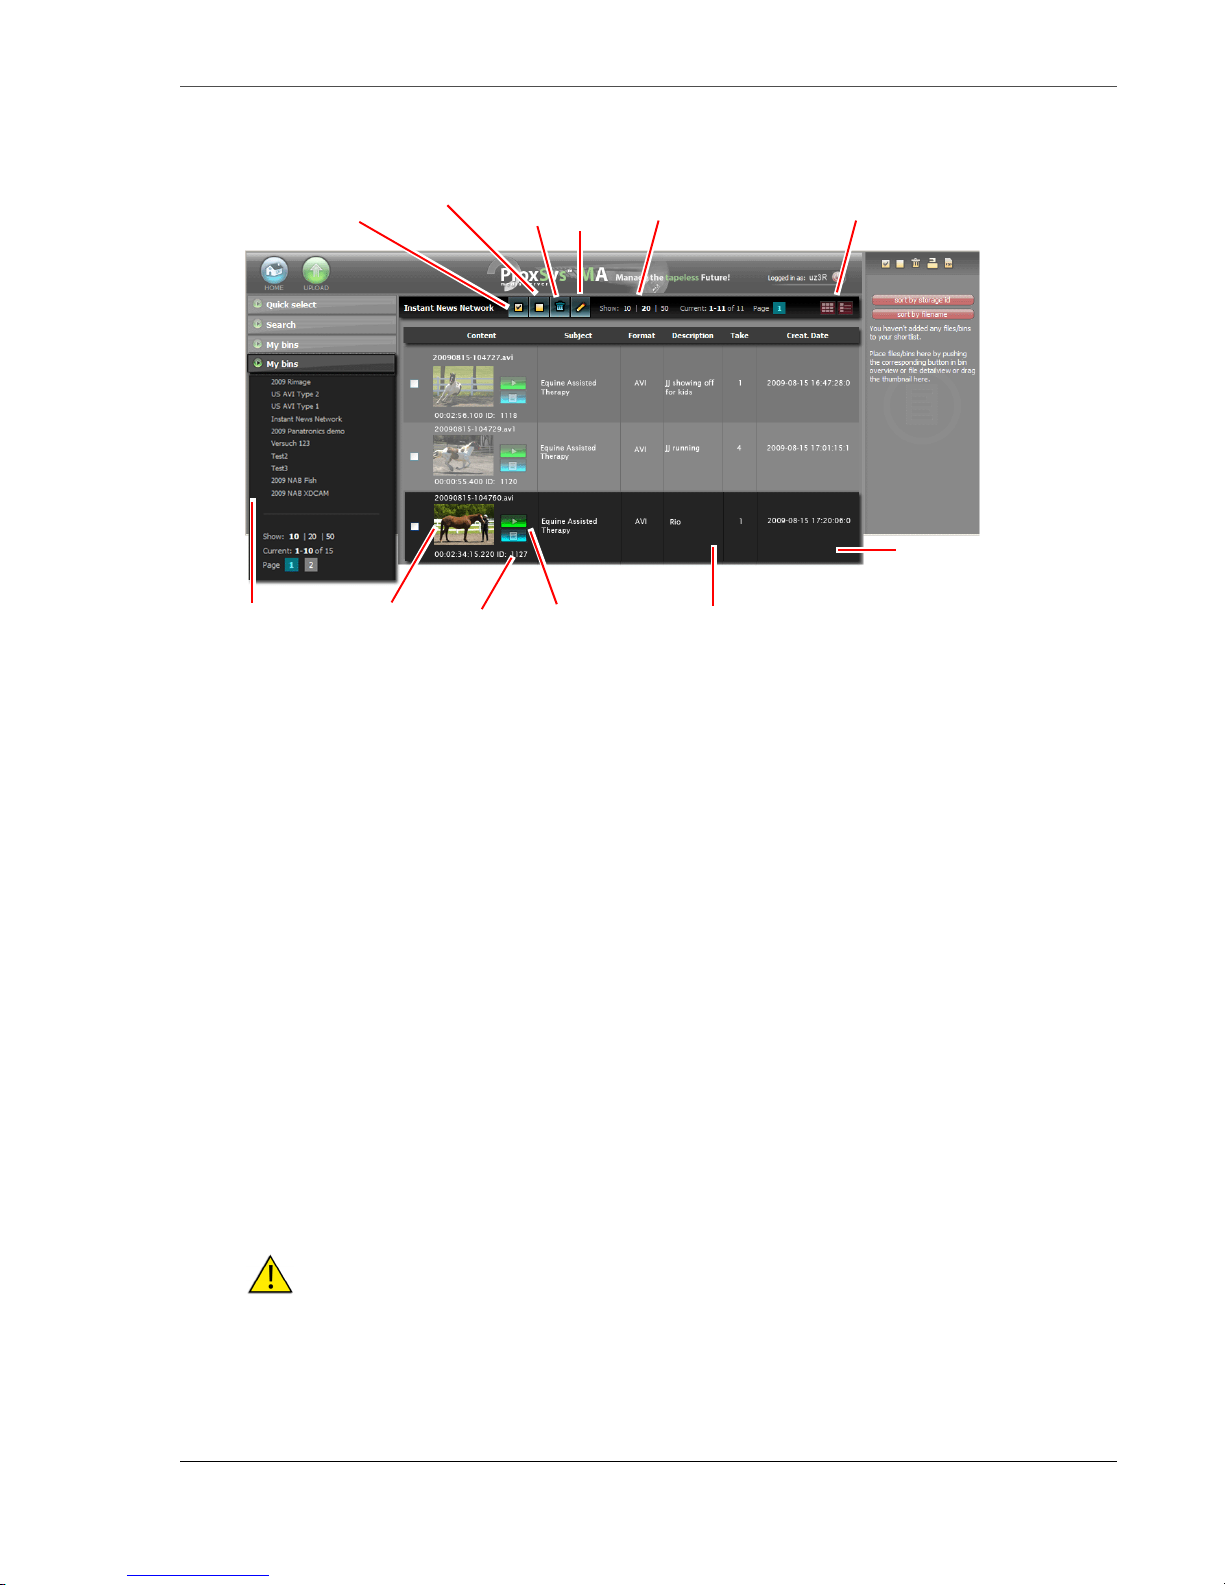
Click on a bin to display its contents.
Display Layout
How the content displays depends on the layout selected.
• T abul ar - di splay s th e conten t fil es’ as a table of thumbna il im ages ac companie d by thei r
filenames, lengths and a set function buttons:
• List - displays all content as a list, see illustration above. Also includes metadat a fields.
Content List Functions
Before a content file can have its metadata edited or be delete d, it must be selected for the
action.
Select All
Selects all content: places a check mark before each content item.
De-Select All
De-select s all content: clears all check marks.
Delete Selected
Deletes content item from the bin and the MA server.
Viewer and Shortlist.
Caution: This Procedure Permanently Deletes Files: there is no undo.
MA Seri es Media Archive Servers
27
Page 40
MA Series Operations
3
1
Original
Metadata
4a
Overwrite
4b
Add
2
Content
Status
Edit Metadata
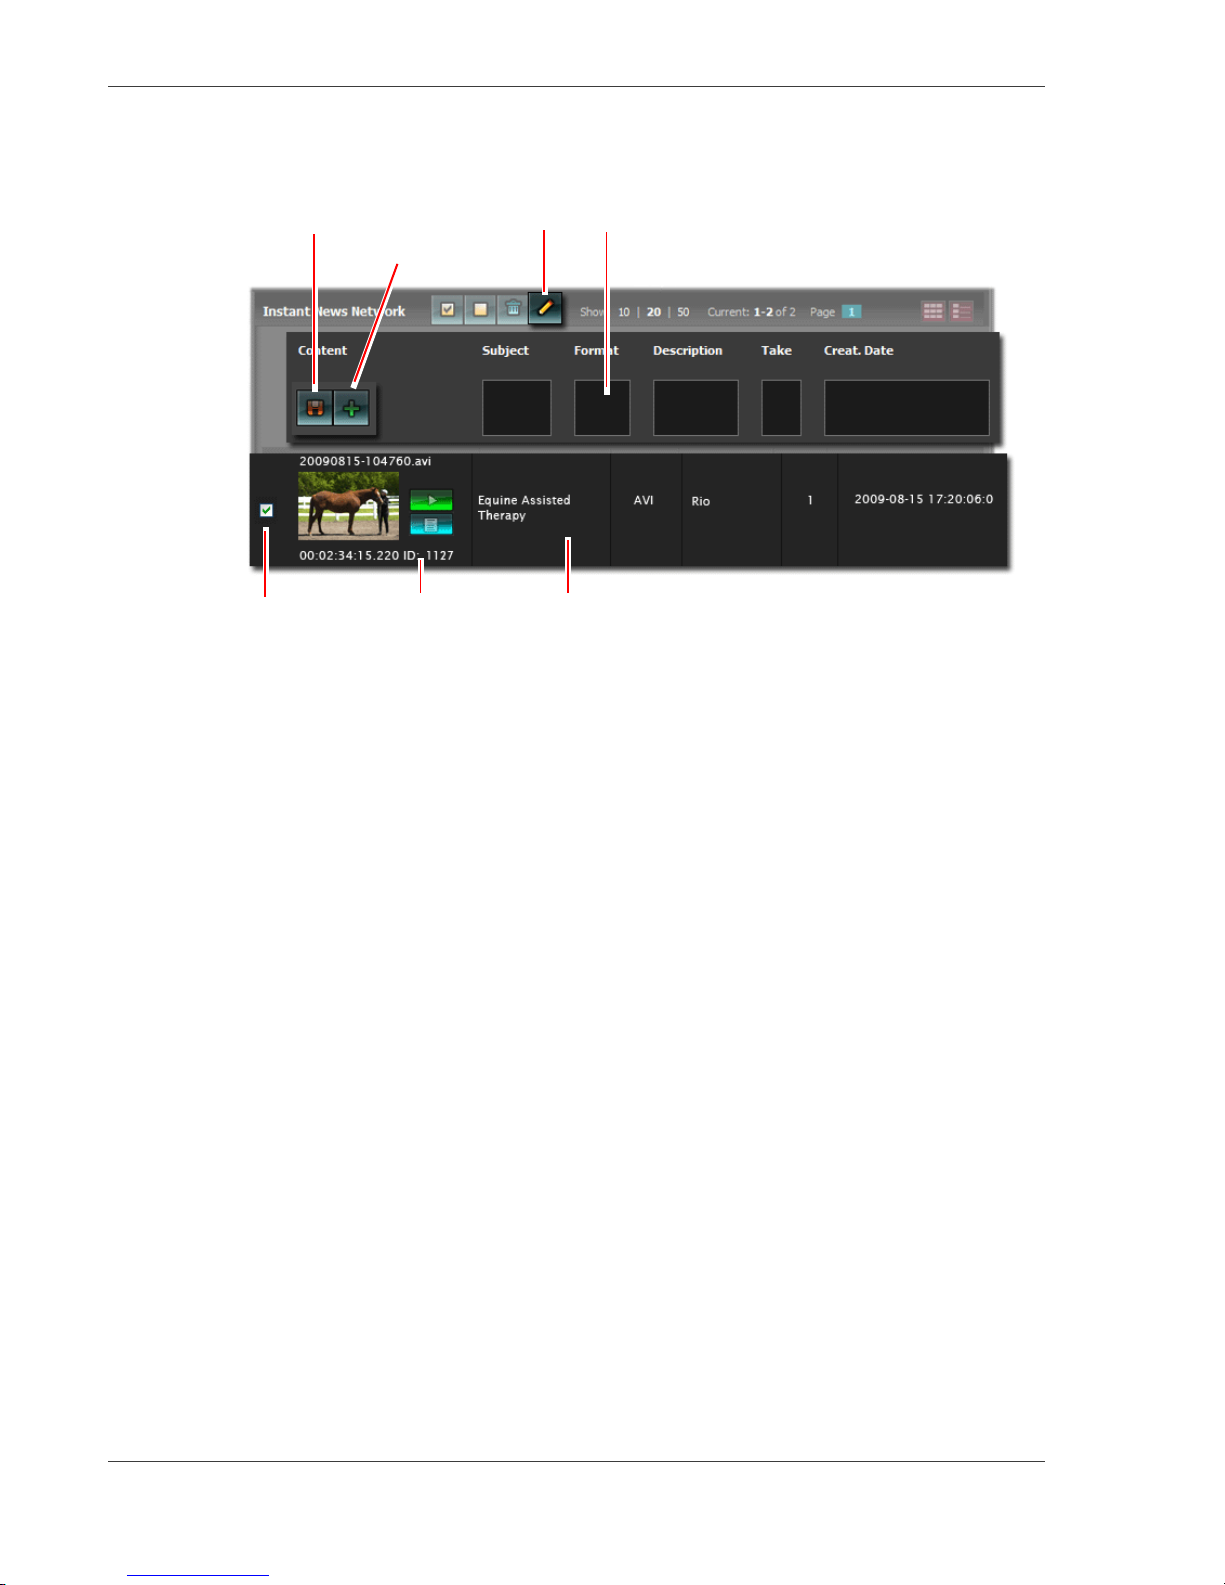
It is possib le to add or overwrite meta data to the existing cont ent metadata.
1. Click on the Edit Metadata icon.
The metadata editing workspace appears, there are five editable metadata fields and
two editing buttons: Overwrite and Add.
The MA server and the content may have more than five active metadata tags,
however, in the My bins view, the MA server displays only the first four and the
content file’s creation date. To edit all metadata tags, open the Preview Player, see
Preview Player on page 30.
2. Select the content file(s) to edit by placing a check mark in front of each content
file’s thumbnail.
It is possib le to edit mult iple content files at the same time.
3. Enter new metadata in the proper field(s).
4. Select the method for applying the metadata:
a. Overwrite Existing Metadata
Click on the Diskette icon.
b. Add Metadata to Existing
Click on the Plus ic on and the new metadata is append ed t o t he end of the existing data.
Content St atus
ST: HDD
Indicates that the high resolution content is stored on the PX MA temporary storage hard
drive, see
Hard Drives and Data Security on page 2.
Rendering
Indicates that the preview file is being created.
MA Series Media Archive Servers
28
Page 41
TO ARCHIVE
Indicates that the high resolution content is stored on the PX MA temporary storage hard
drive, but is being processed and burned to archive disc by the ProxSysMA Burn Service,
see
ProxSysMA Services Burn Tool on page 32.
ID: 1000
The assignment of a content ID number indicates that the content is now offline and
available o n an archival disc with the same ID.
Shortlist (Reference List)
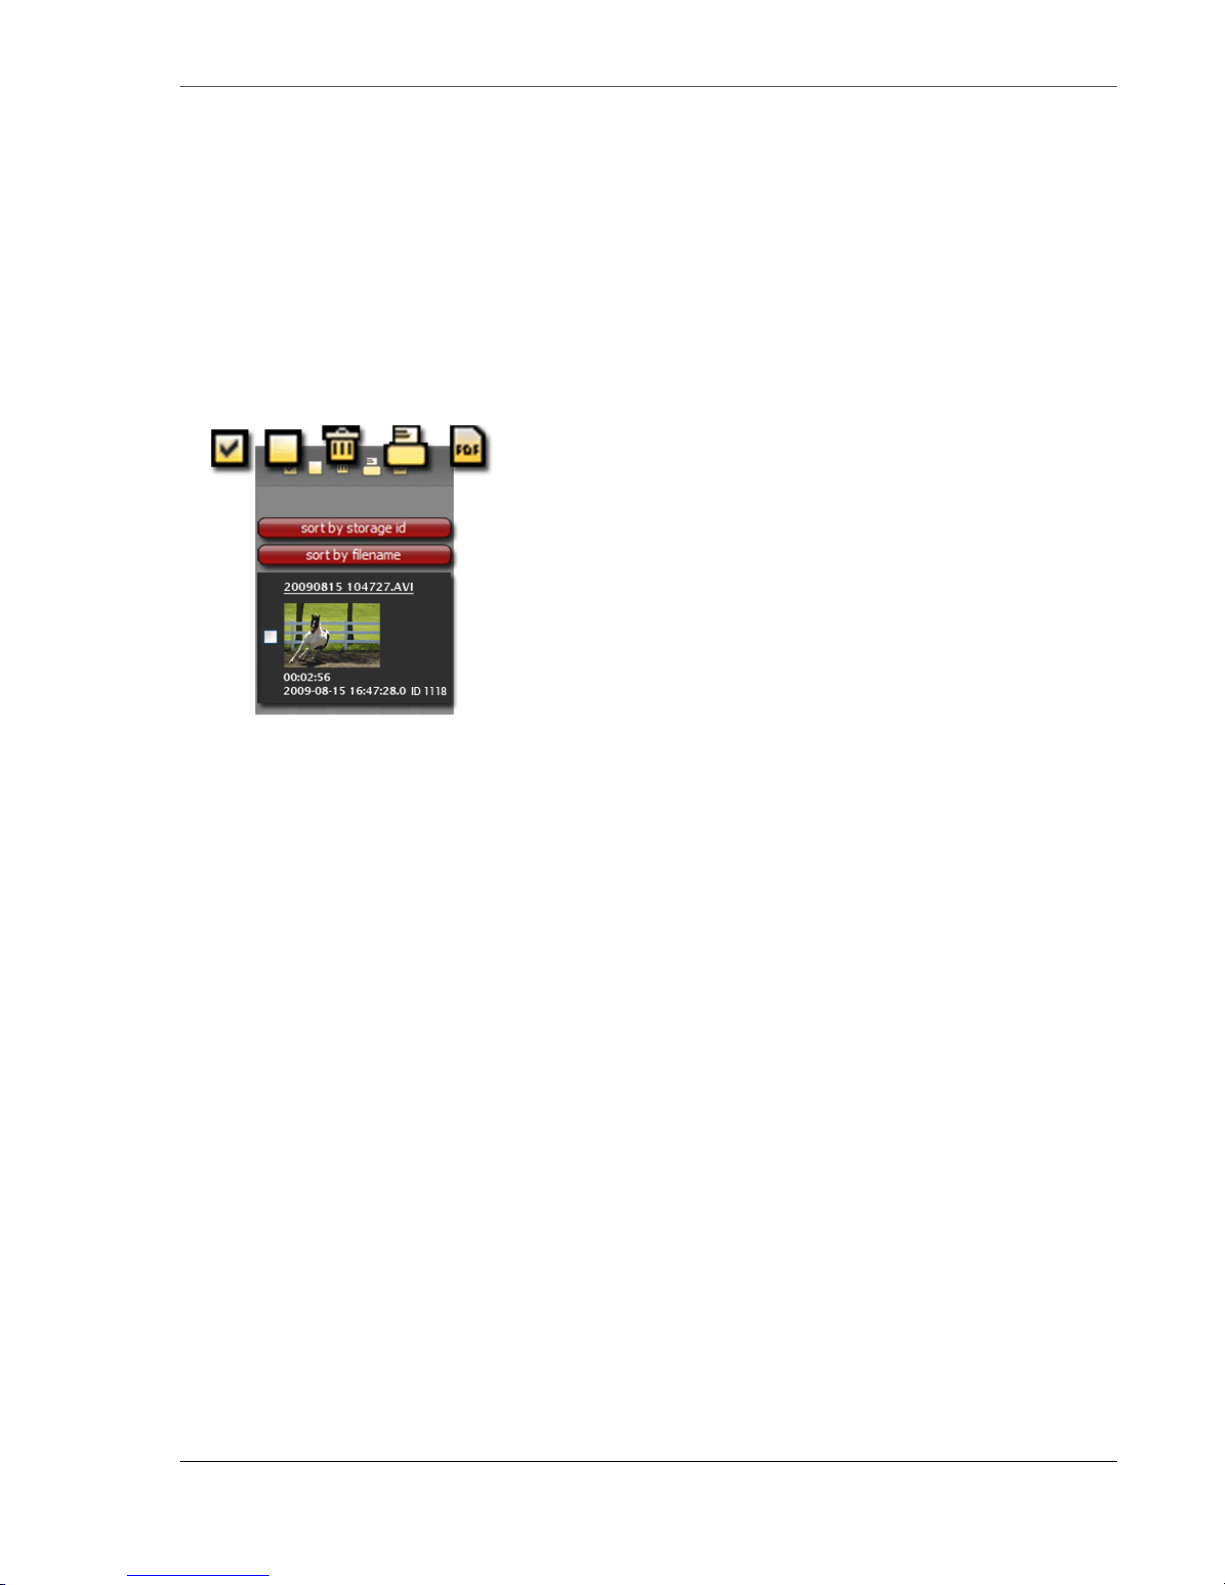
Use the Shortlist to create a reference list for locating
archived content. Output the list as a PDF document or an
HTML page. Either can be printed.
PDF files require a PDF reader, such as Acrobat.
Begin by collecting the archived content’s proxy preview
files in the
function. Then, either:
•Drag and Drop files into the
•Click on a file’s
•Click the
Player
Shortlist pa ne. Locate the file s using the search
Shortlist pane.
Shortlist icon.
Add file to shortlist button in the Preview
, see Preview Player on page 30.
MA Series Operations
Organizing Shortlist Content
Organize the content list using the
sort by storage id or sort by filename buttons.
Select Content to Delete
It is necessary to select content files before deleting them from the list.
Place a check mark in the box in front of the content thumbnail. The check mark icon selects
all listed content and the empty box icon de-selects all content.
Shortlist Output: Printer and PDF
The procedures for generating a printer copy or PDF of a shortlist are similar.
Click on the
Printer - The MA server generates and displays an HTML print file, then opens the
Printer or PDF icon.
client computer’s printer function. The list of content items contains, filename,
thumbnail, subject, creation date, length, media storage ID of the archive disc where the
content item is stored, and all enabled metadata, see
Metadata Manage ment on page 38.
In addition, the printou t includes a w eb link to the MA server generating the list.
PDF - The MA server generates a PDF document with cover page, a table of contents, a
list of and the list. The list contains the filename, thumbnail, all metadata tags, creation
date, length, and the media storage ID of the archive disc where the content item is
stored, and all enabled metadata, see
Metadata Management on page 38.
MA Seri es Media Archive Servers
29
Page 42
MA Series Operations
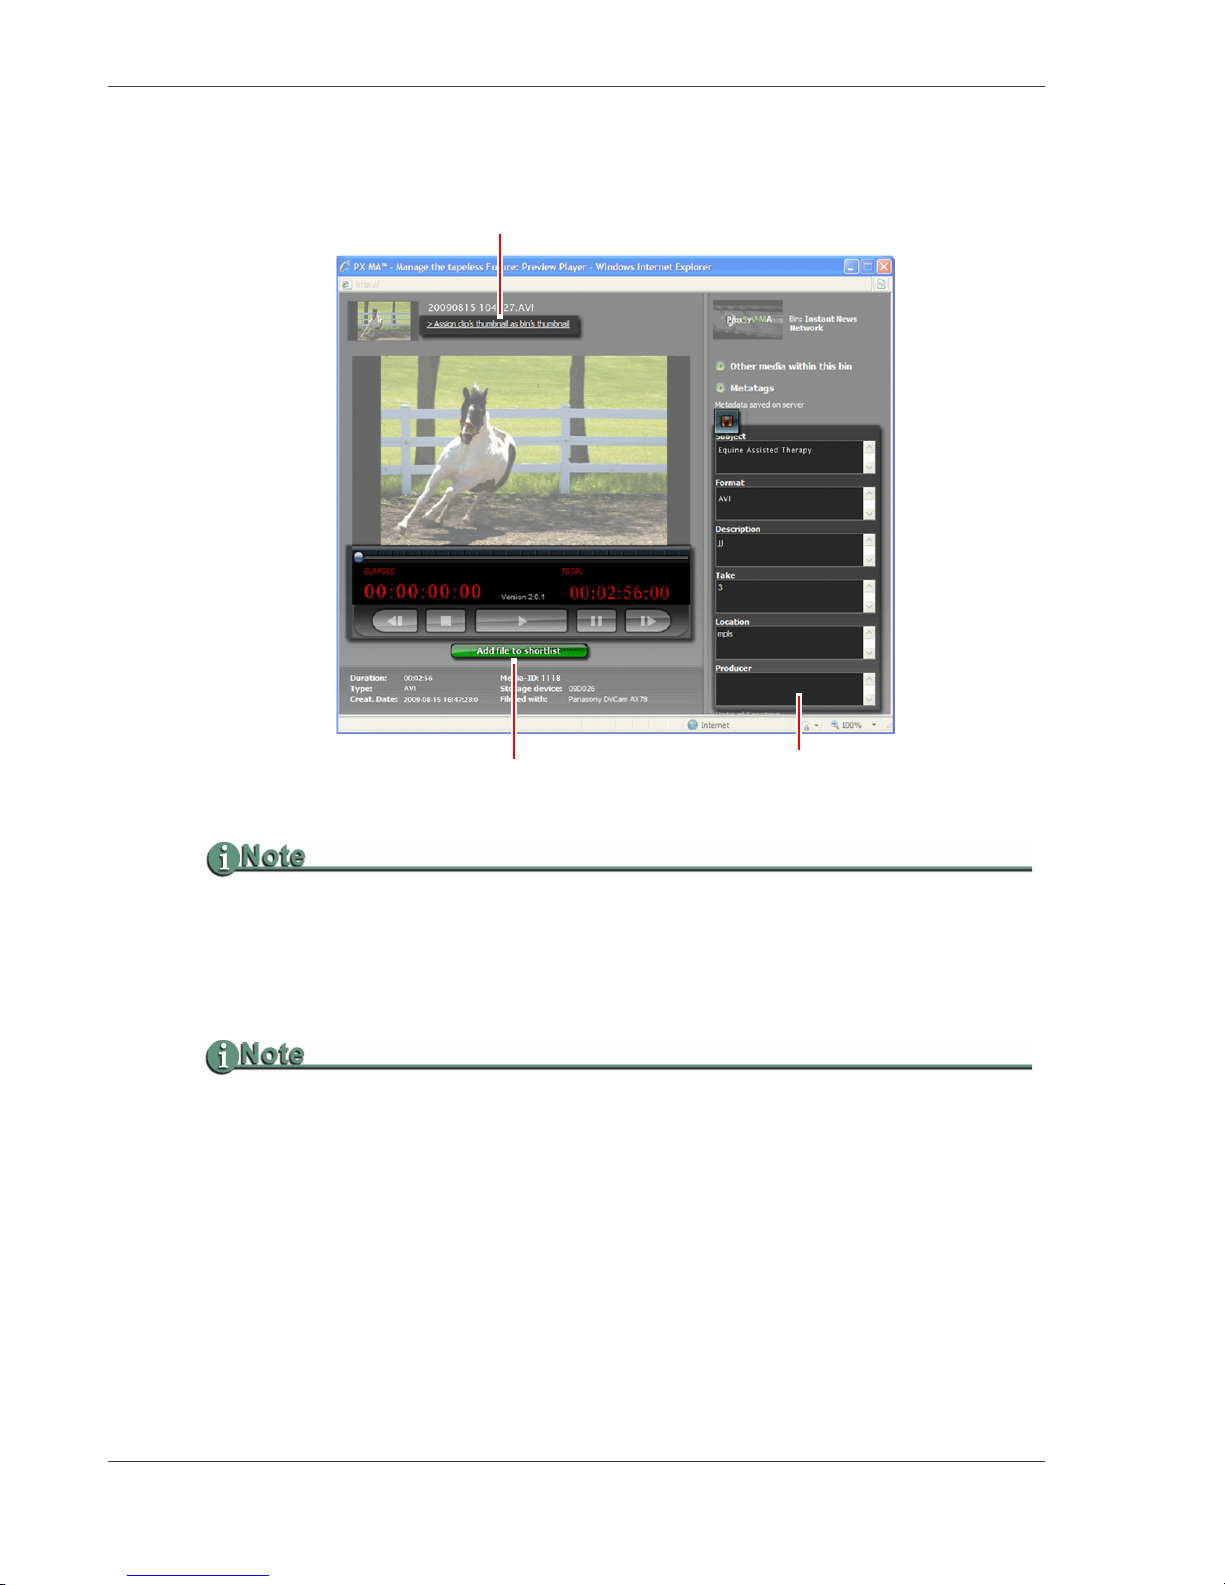
Add File to Shortlist
(Media List)
Edit File Metadata
(all metadata tags)
Assign Clip Thumbnail
As Bin Thumbnail
Preview Player
Flash Must Be Installed on the Client Computer for the Preview Player to Function.
The Preview Player provides the ability to run the preview Flash files of the high resolution
content file. The preview file was automatically created when the content file was uploaded to
the MA server, see
Rendering Thumbnails and Preview Flash Files
A video’s thumbnail appears before its preview Flash file is completely rendered. It is possible to
check the status of the Flash file generation by previewing and looking at the Elapsed time slider.
Ingest on page 29.
The player displays all of the content file’s data and metadata, as well as a list of other files in
the same bi n.
In addition, the Preview Player allows the User to:
• Edit the f ile’s metadata.
• Add file to the
Shortlist.
• Assign the file thumbnail to be the bin thumbnail.
The thumbnail is the first frame of the video clip.
MA Series Media Archive Servers
30
Page 43

Workflow: Burning Blu-ray (BD) and DVD Discs
Workflow: Burning Blu-ray (BD) and DVD Discs
All MA series servers offer the ability to burn single- and dual-layer BD and
DVD discs for archiving. The model of MA server determines ho w the discs
are created, manually or automatically.
It is recommended that Panasonic Blu-ray media be used for archiving.
For disc storage capacities, see
Archive Disc Capacities on page 50.
MA-10
The MA-10 server has a manually operated, internal disc burner.
To create archive discs:
1. Create ISO image file(s ) of the content using ProxSysMA Se rvices.
Once the ISO file has been created, it appears in the
T: (Tools) drive. For information on drives, see Hard Drives on page 53.
2. Set Tools > Bur n Settings > Backend > ISO target director y to the location of the ISO
ISO-Files folder on the F: (Work) or
file.
3. Burn each disc manually, using the ISO file and the application provided with the MA
server.
a. Login for the burner application is pxma for both Username and Password.
b. Consult the burner’s documentation for specific operation instructions.
4. Create and output a Shortlist, see Search and Retrieve Content on page 10. This list
includes the Media Storage ID of the disc for each archived content item.
MA-50
The MA-50 uses an automated Blu-ray bu rner to automatically create multiple BD or DVD
discs.
To create archive BD or DVD discs:
1. Set to Primera or Rimage in Burn Settings, see Burn Settings on page 41.
2. Select when to burn the disc:
• Immediately with create media now, see Create media now (Burn-on-Demand)
on page 43.
• Schedule burn time, see Automatic Burning Schedule on page 43.
3. When a burn starts, high resolution content is downloaded from the MA server, the virtual
machine, to the work directory, see
4. Once content is downloaded, an ISO and disc image graphic is created.
5. Content is then passed to the automated burner’s software for automatic bu rning.
Hard Drives on page 53.
ISO Files After Burning Disc
In addition, the MA server provides the option that once the ISO file is burned and verified, the
MA server can remove the high-resolution content from server storage. This option is available
to Users with Administrator rights, see
The preview Flash files and metadata are maintained on the MA server for future reference.
Delete files after ISO creation on page 42.
MA Seri es Media Archive Servers
31
Page 44
Workflow: Burning Blu-ray (BD) and DVD Discs
Burns Start Af ter All Flash Files Are Created
If the User attempts to burn a disc before all of the preview Flash files for a job’s content have
been created, the MA serve r aler ts the Use r and ignores the burn request . The j ob remain s in t he
queue and once all the previe w files are gener ated, t he job is r un durin g the next schedul ed burn.
To burn the job as soon as possible, click on the
media now
action, se e
on page 24. It is also necessary that the MA server’s burn settings be set for this
Create media now (Burn-on-Demand) on page 43.
Create media now action button, see create
Maximum Video Clip Size
A single video clip cannot exceed 50GB in size, P2 or SxS. Archiving a video clip this size
requires the use of a dual-sided BD disc.
Identifying Archived Content
When a content file is archived: the file is burned to disc, file integrity verified, and the ID
number of the archive disc is assigned to the content file. This number appears as the:
ID in the bin, below the file thumbnail,
Media ID in the Preview Player
Stored on media: in the shortlist output
In addition , each conte nt file is assigned a uniqu e identifier that is liste d in the shortlist as the
file’s
ID.
Disc IDs Are Automatically Assigned and Not Customizable
To create a series of discs with a distinct name, the User can modify the Company name field, see
Label Settings on page 44. In addition, the MA server prints the filenames of the largest clips.
ProxSysMA Services Burn Tool
ProxSysMA Services is a pre-installed application on the MA server. It starts automatically
when the MA server boots up.
The burn tool uses the current
• Create ISO files of the content
• Configure the BD or DVD discs
• Control the disc burner, see
Checking Burn Status
The state of the
ProxSysMA Services icon in the desktop Tool Tray indicates the stage that
the archive process is in. When the icon flashes:
•
Red - content is downloading
•
Green - ISO file is being created
•
Yellow - burning is taking place
Burn Settings to:
Burn Settings on page 41.
MA Series Media Archive Servers
32
Page 45
Workflow: Burning Blu-ray (BD) and DVD Discs
In addition, it is possib le to display archive process details.
1. Click on the ProxSysMA Services icon in the desktop Tool Tray.
The
ProxSys MA Services Status window appears.
2. Click on the Details button in the status window for more information and access to the
burn log.
If the
Details window does not appear, it is because the burn tool is in idle mode.
3. Click Close to close the status window.
This does not terminate the service.
Print-to-DVD Labeling
The MA-50 server has the ability to print directly to inkjet ready DVDs.
Use Only Print-to-DVD Media for Disc Labeling
Focus Enhancements recommends using only inkjet print-to-DVD media for disc labeling, rather
than:
• Adhesive labels
• Writing on the disc surface with indelible markers
Preventing Data Corruption
Media must be kept extremely clean during recording and playback or un-correctable digital
errors will occur.
.
MA Seri es Media Archive Servers
33
Page 46

MA Series Media Archive Servers
34
Page 47
Administration T ools
Tools
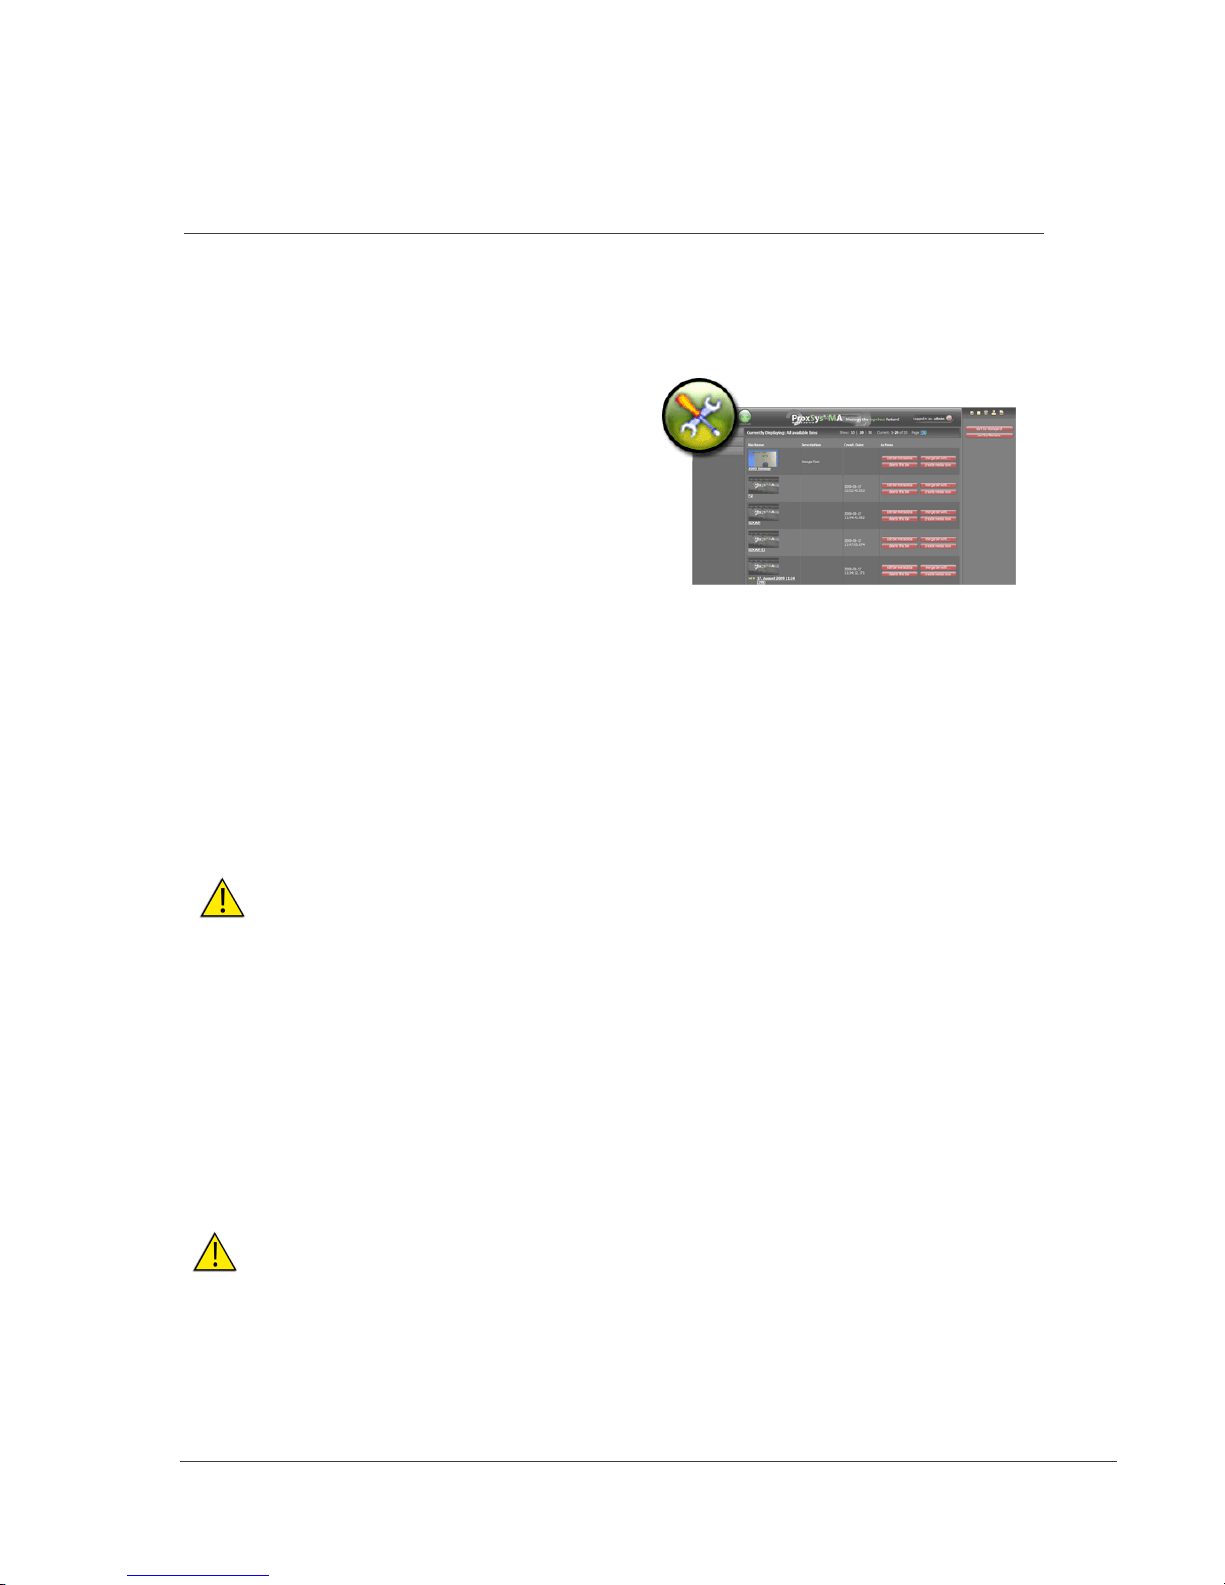
These functions require Administrator’s
rights.
The MA server Administrator has all the
capabilities of t he User plus a set of four
server administration tools:
User Admin 36
Metadata Management 38
Performance 40
Burn Setting s 41
Unarchived Content 46
Hardware Key Required Before MA Applications Can Function
Before the MA applica tions ca n work, it is nec essary to i nstal l a hardware k ey, dongle, in one of the
USB ports of the MA server, see MA Dongle on page 53.
Default Login
The MA serve r is shipped with a default login to permit the Administrator initial access.
Username: Administrator
Password: admin
Username and Password are case sensitive.
Once the MA server is inst alled, sec ure the serv er by changing its Username and Password.
MA Seri es Media Archive Servers
35
Page 48
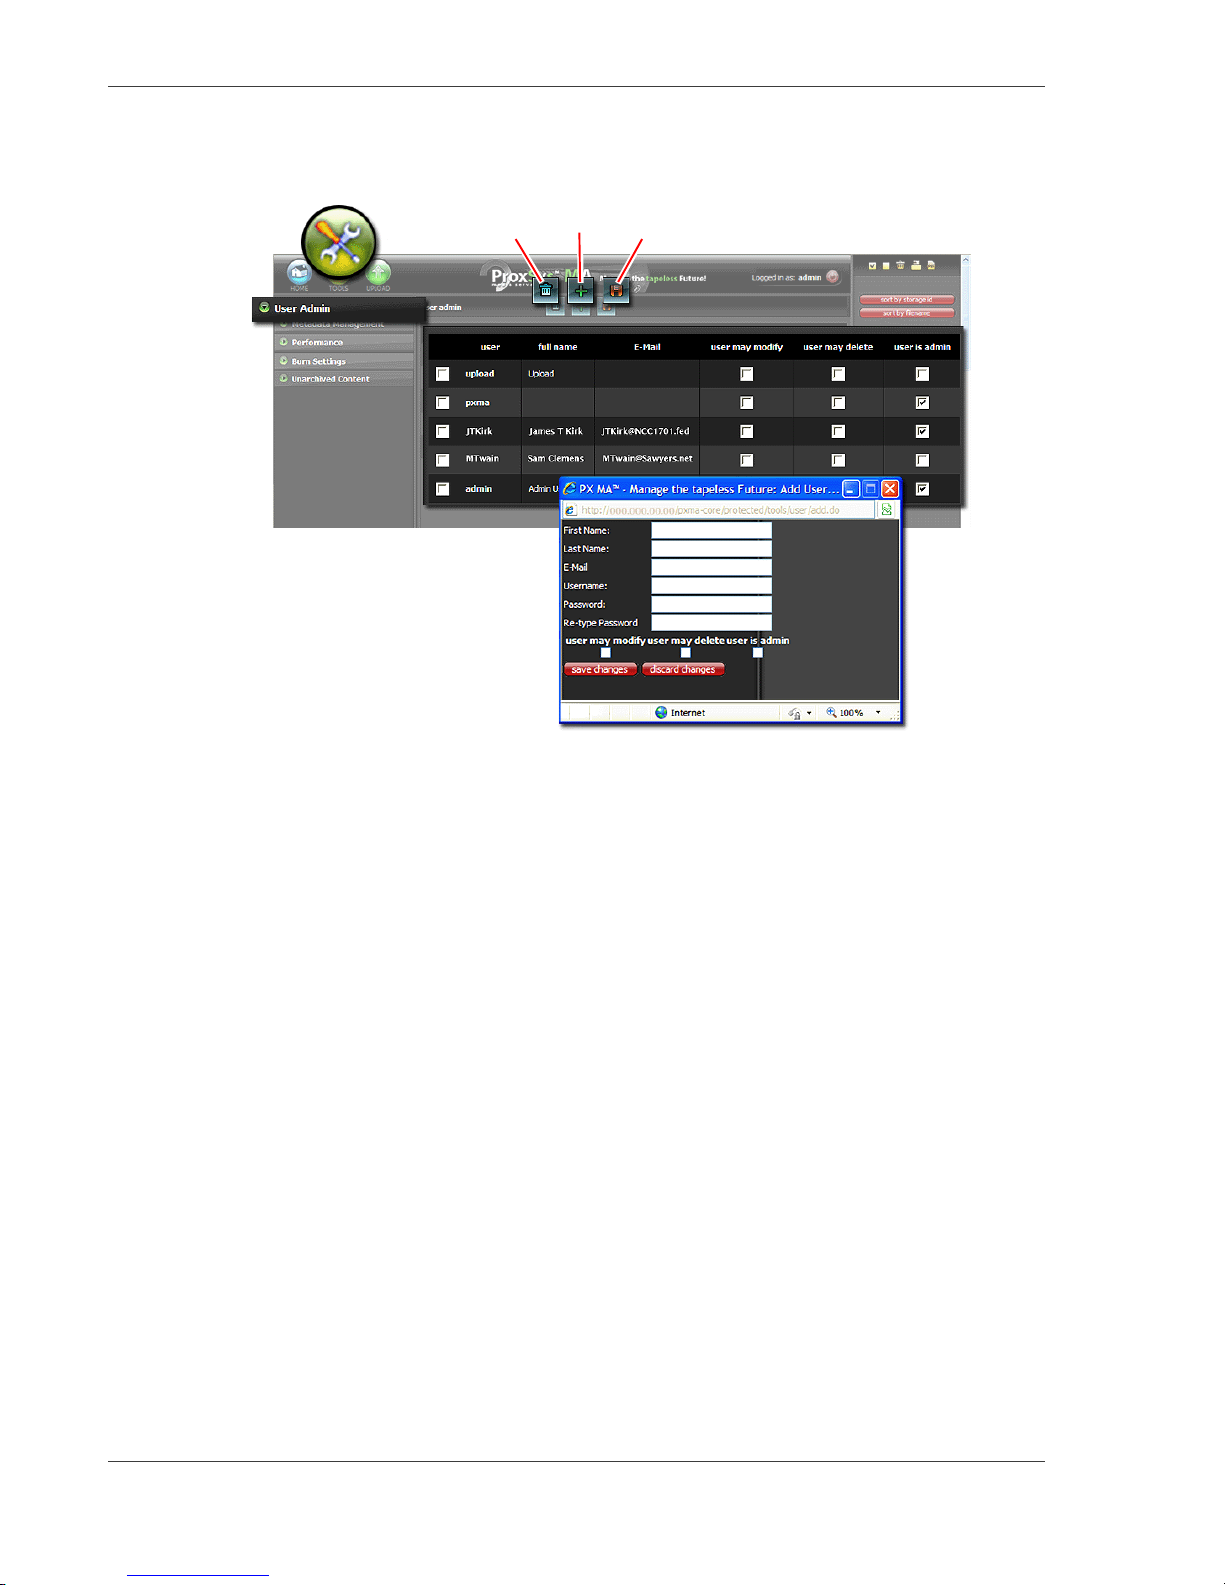
User Admin
Remove Add Save
User Admin
The User Admin tool supplies the ability to add and remove MA server Users and set their
privileges.
User Privileges
The privileges assigned determine which bin Actions are available.
User may modify bin and content metadata and merge bins.
User may delete content and bins.
User is admin assigns modify and delete privileges and access to administration TOOLS.
Adding a New User
1. Click on the Plus sign above the list of Users.
2. Complete the new user’s information.
3. Set User privileges .
4. Click Save Changes.
A form window appears.
The new User appears in the User list.
MA Series Media Archive Servers
36
Page 49

Removing a User
1. Insert a check mark in front of the User(s) to be removed.
2. Click on the Trash Can icon.
A dialogue window appears asking confirmation for removal.
3. Click on Yes.
4. The MA serv er removes the User.
Changing User Privileges
1. Insert a check mark before the User(s ) with changing privileges.
2. Insert or remove a check marks in front of the privileges that are changing.
3. Click on the Diskette icon to save changes.
User Admin
MA Seri es Media Archive Servers
37
Page 50
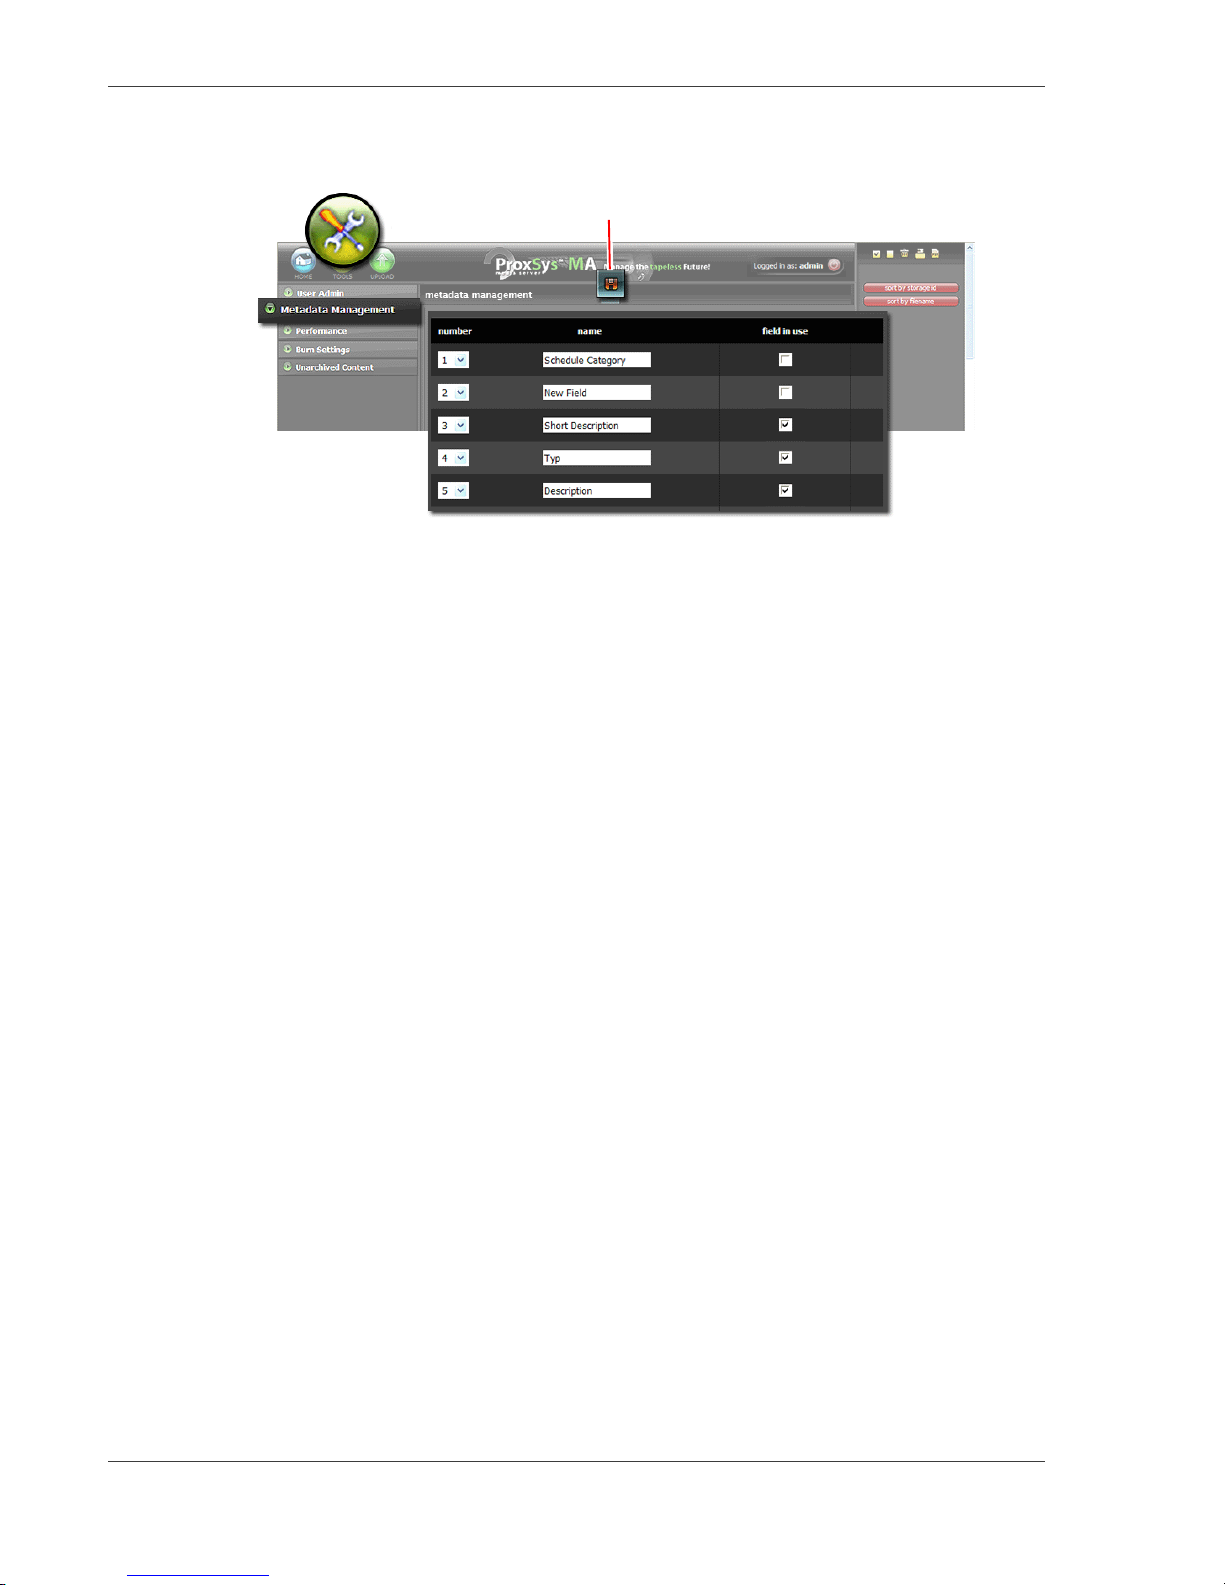
Metadata Management
Save
Metadata Management
Use the Metadat a Management li st t o cr eate, name, organize, and act iv at e the MA se rve r’s set of
25 metadata tags. The User/Administrator can name these tags to match any metadata standard or
job required. Placing a check mark in a tag’s
upload utility’s Load External Metadata table where it is used t o synchronize th e ingestin g of video
clip metad ata, see
field in use box enables the tag and it appears in t he
Load External Metadata on page 20.
Metadata Tags
Metadata is information that relates to the content itself or the organization’s categorization of
content. Most often, metadata is initially added during production and then used in postproduction. The list of metadata tags created and how they are used depends on the complexity
of the production/post-production environment.
Two examples are below:
Simple Metadata Workflow
A simple metadata workflow is when the same set of metadata tags are used, in its entirety,
for all projects: from production and through post-production. In such a case, the User/
Administrator creates and enables a list of tags once. Only if the organizational workflow
changes, will it be necessary to change the list of tags.
An example is a wedding videographer who records events that have identical metadata
requirements.
Complex Metadata Workflow
A complex metadata workflow is when there are different types of projects that require
different sets of metadata. In such a case, the User/Administrator creates a master set of all
tags and th en enables project specific subsets of the master list. The User/Administrator may
need to frequently enable/disable tags, depending on the content being ingested.
An example is a video news company that records a variety of event types: business, crime,
interviews, sports, etc. When collecting and ingesting content from a variety of events, it is
more efficient to use only the metadata tags that apply to each event.
MA Series Media Archive Servers
38
Page 51
Metadata Management
The metadata tags that are available for a specific project are set by the User/Admin with the
Field in use control, see page 39. In addition , the Media Upload Utility m ust be confi gured
for each project workflow. These settings are saved on the MA server.
Multiple MA Server User/Administrators and Multiple Media Uploaders
If the MA server has multiple User/Admins and each has installed their own media upload utility,
then each User/Admin must setup the MA metadata and their uploader for those metadata tags
that they need.
Metadata Controls
The MA server metadata controls are:
Number
Set the order in which the metadata tags appear in the metadata management window.
Name
Enter the name of the metada ta tag. This name may be a sta ndardized tag name used i n a NLE
or unique.
Field in use
Placing a check mark enables the metadata tag and allows it to collect metadata. Enabled
fields appear in the
ProxSysMA metadat a column in the Media Upload Utility Configuration
window.
Remember to Save Metadata Settings
Notify Users When Making Changes to Metadata Fields
A User must restart their
management
.
Media Upload Utilit y to download changes made with the metadata
MA Seri es Media Archive Servers
39
Page 52
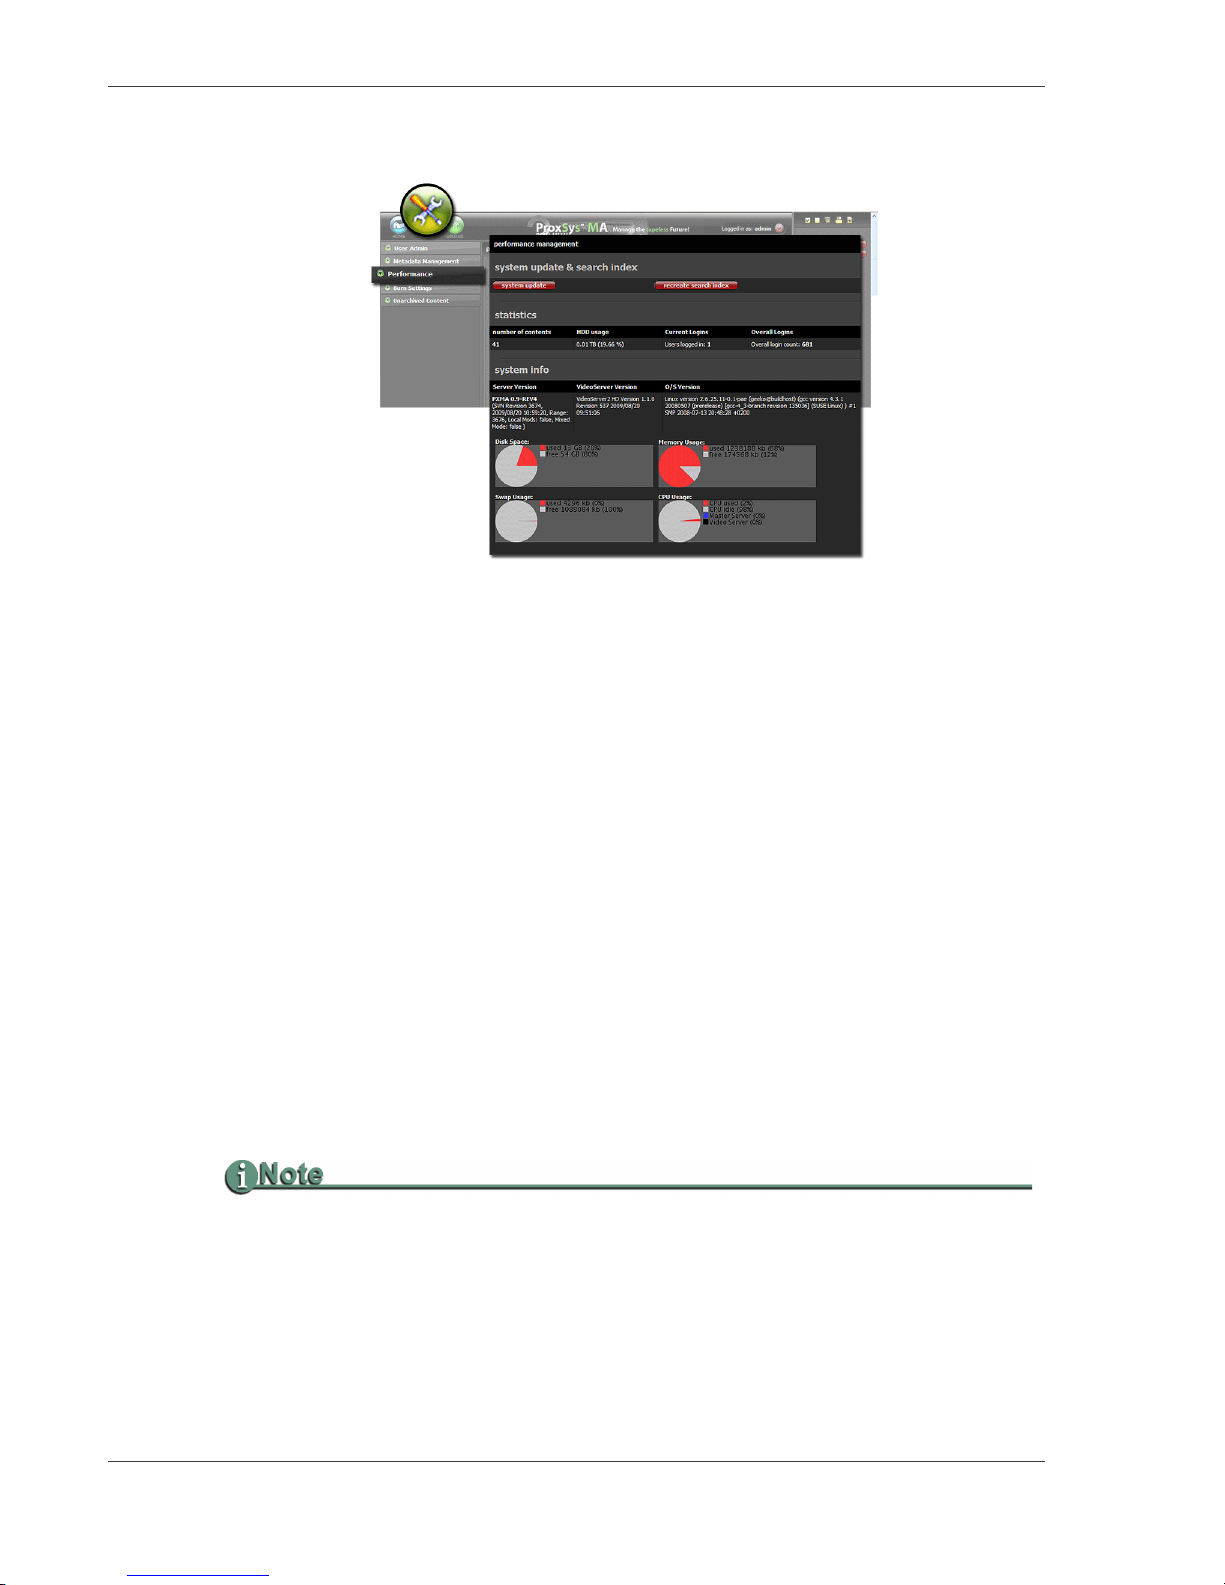
Performance
Performance
The Performance provides controls for updating the system and regenerating the MA server’s
search index and displays of current MA server statistics and system information.
System Update
Click on this button an d the MA searc hes for updat e f il es t hat have been uploaded to the server.
Recreate Search Index
Use to regenerate the MA server’s search index.
Remember to
Save.
Statistics
number of contents
HDD usage
Current Logins (Users)
Overall Logins
System Information
Server Version
Video Server Version
O/S Version (operating system)
Disk Space (used/free)
Disk Space Is For PX MA VM Core Storage and Does Not Include Windows Temporary Storage
Memory Usage (used/free)
Swap Usage (used/free)
CPU Usage (used/idle, master server, video server)
MA Series Media Archive Servers
40
Page 53
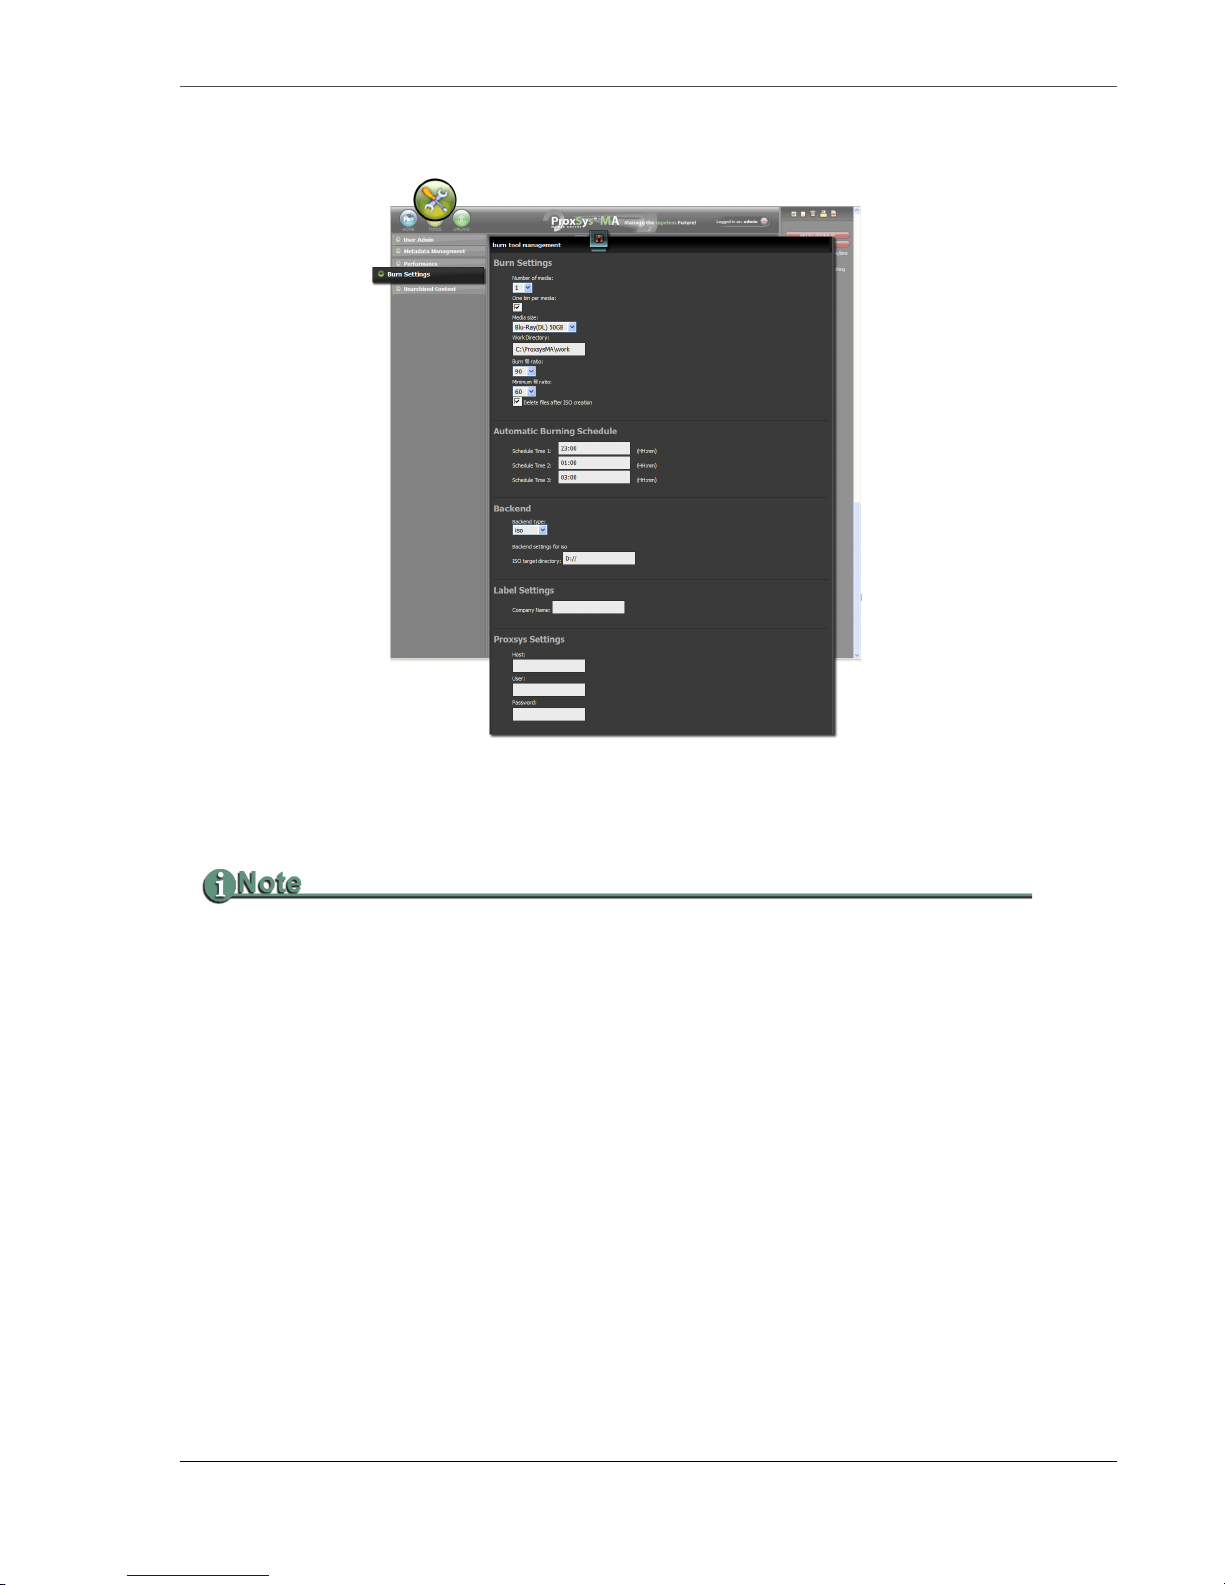
Burn Settings
Burn Settings
Burn Settings controls the configuration and operation of the MA server’s Blu-ray burner. The
User can burn a disc , on demand, using the
Create media button in their bin bu t, the confi gurat ion
for the disc is predefined by the Administrator.
Burn Settings and Their Options Depend on the MA Server Model and the Type of Disc Burner
Used
Remember to Save Settings By Clicking On the Diskette Icon.
The settings are grouped by function.
Burn Settings
These settings define the type of media to be used.
Number of media
Select the maximum number of discs to use when creating the burn job.
The MA server uses the
storage.
Burn fill ratio to optimize the ISO files for most efficient use of disc
MA Seri es Media Archive Servers
41
Page 54

Burn Settings
One bin per media
There are two modes: One Bin and Mixed.
One Bin Mode
When enabled, the BD burner, burns the content from one bin on each media. This can be
used to separate content from different Users or projects to different media.
Creation of the ISO file will not st art for a que ued bin until all of it s preview files have been
rendered.
Mixed Mode
It is possible to create a disc with content from multiple bins, if the burn schedule is set to
00:00h and the
To start the mixed mode burn, the User clicks
one bin per media is not set.
Create media now in the bin, with this
button only the cont ent f rom this bi n is bur ned to a medi a, even t he func tion i s acti vated on
several bin´s. Then at 00:00 the ProxSys MA will burn all the remaining content and
optimize to use minimal media to burn.
Media size
Select the type of storage media and capacity from the dropdown list.
Work directory
Located in the MA server’s Windows OS, this directory is where the ISO files used for
burning discs are created and saved. This directory is shared with
ProxSysMA Serv ices.
Burn fill ratio (MA-50 only)
This setting trigger s the aut omated bur ning of discs. Th e rati o is s ize of co ntent to capac ity of
selected media type.
Example
If Blu-ray DL (double layer) discs are used, each disc has a capacity of 50GB. Setting the
Burn Fill Ratio to 90% means that there must be 45GB of content loaded in the bin bef ore
the automated burn begins.
Minimum fill ratio (MA-50 only)
This setting specifies the minimum size of content required to trigger a disc burn. The ratio is
the size of content to capacity of selected media type.
Delete files after ISO creation
Enable this option to delete all local files, i.e. high-resolution content and metadata files, after
successful creation of the ISO file.
MA Series Media Archive Servers
42
Page 55
Automatic Burning Schedule
The MA server provides three timers for scheduling batch burns during a 24 hour period. At
each scheduled time, all queued jobs are processed.
Burn Settings
The MA-50 uses templates to create media labels, see
Label Settings on page 44.
Create media now (Burn-on-Demand)
T ypically, the automatic burning timers control when storage media is created. However, it is
possible to allow Users to burn-on-demand discs for individual bins. To do this:
1. The User must select a burn time that does not conflict the scheduled burn settings.
2. The following Administration Burn Settings must be:
One bin per media is enabled.
One of the
3. The Backend settings must be set to the appropriate MA-50 burner, see Backend
Settings - MA - 50
4. Start the burn by clicking on the Create media now button in the bin.
Creation of the bin’s ISO file will not start until all of its preview files have been rendered.
Automatic Burn Schedules set to 00:00.
on page 43.
Backend Settings - MA-10
Backend Type
From the dropdown list, select the type of output.
ISO - Create ISO files that the User then burns to disc.
ISO target directory - This directory receives the ISO files after they are generated.
Backend Settings - MA-50
Backend Type
From the dropdown list, select the type of output. The type selected determines which group
of settings is displayed.
ISO - burn an ISO file for manual archiving.
ISO target directory - This directory receives the ISO files after they are generated.
Primera - The MA-50 is equipped with this robot burner.
Rimage - A robot burner.
Check Focus Enhancements for the latest list of qualified devices,
www.focusinfo.com.
MA Seri es Media Archive Servers
43
Page 56

Burn Settings
Primera Settings
The Primera burner is pre-installed and its settings are automatically filled.
Client ID: pxma
Primera Hot Folder:C:\PTBurnJobs
Primera Label: C:\ProxsysMAService\ProxsysMAPTTemplate.std
Rimage Settings
The Rimage burner is pre-installed and its settings are automatically filled.
Client ID: pxma
Rimage User Host: depends on Customer’s network configuration.
Rimage User Port: depends on Customer’s network configuration.
Rimage XML Path: C:\RTBurnJobs
Rimage Label: C:\ProxsysMAService\ProxsysMAPTTemplate.btw
Label Settings
The User may create disc labels containing Comp any Name and Disc ID with the default
template supplied with the MA server.
Use Inkjet Ready Discs for Print to Disc Labeling
Do not use adhesive labeling ma teri als .
MA-10
When burning ISO files, the MA server generates a PNG image file for the label. The ISO
and PNG files are stored in the same directory. The label is manually printed on to the disc.
MA-50
The MA-50 uses templates to position graphics and text fields for the automatic printing of
media labels. The template filenames are:
Primera - ProxsysMAPTTemplate.std
Rimage - ProxsysMAPTTemplate.btw
Custom Labels
Custom labels may be created: this requires the use of the label making application supplied
by the burner manufacturer:
Primera - use PTPublisher
Rimage - use CD Label
At a minimum, custom templates must have the same fields as in the default template.
MA Series Media Archive Servers
44
Page 57

Burn Settings
ProxSys Settings
These setti ngs allow th e ProxSysMA Services to connect with the MA server and the Blu-ray
burner.
1. Set Host to localhost.
Windows Admin Privileges Required To Change the ProxSys IP Addresses.
2. Set User name and Password.
MA Seri es Media Archive Servers
45
Page 58
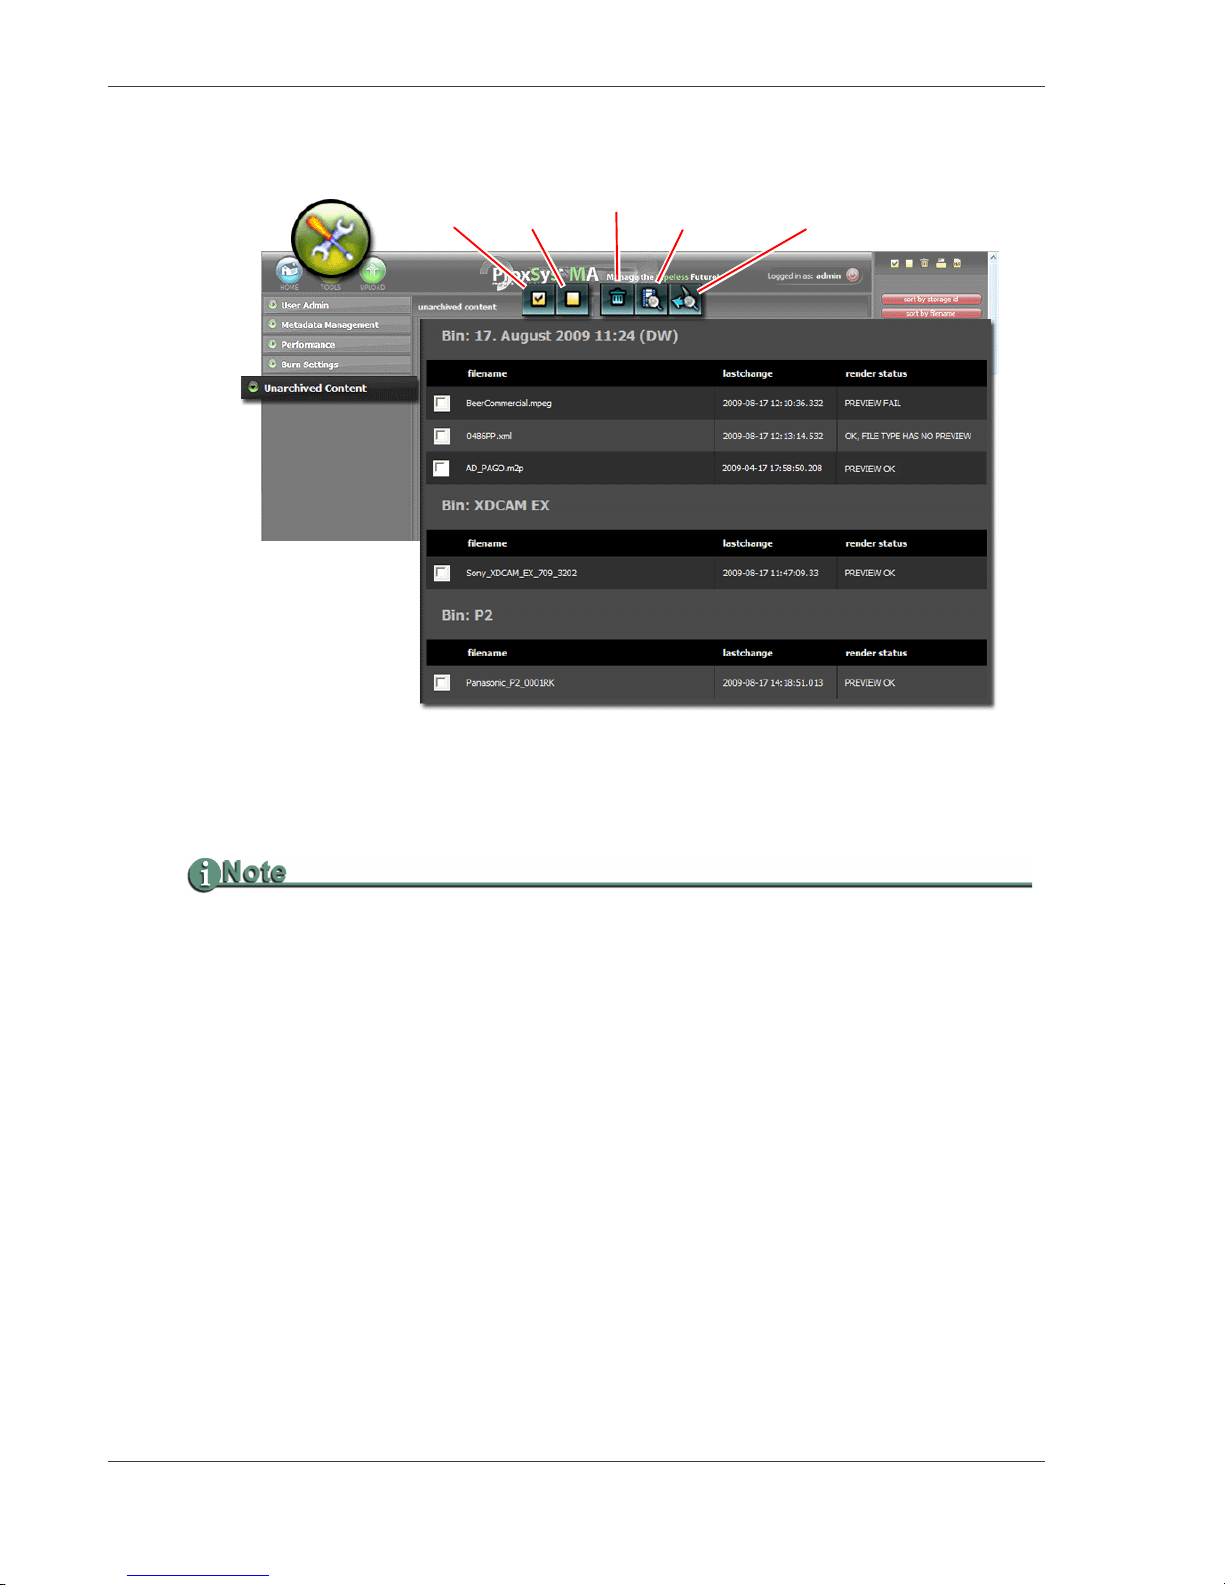
Unarchived Content
Select Deselect Remove Render
All All
Preview
Replace Preview
with Generic
Unarchived Content
The Unarchived Content menu provides a list of the content that i s curre ntly on t he MA serv er. It
is good practice to r ev iew MA serve r cont ent at leas t once e very t wo weeks t o veri fy that a dequat e
storage remains available for temporary and preview files.
Available Disk Space in the Performance Menu is for PX MA VM Core Only
The available disk space shown in the Performance menu does not include Windows temporary
storage.
The
Unarchived Content menu offers three features:
• Current status of preview file creation for listed content,
• Expedite creation of preview files for selected high resolution content,
• Replace functional generic MA preview file for failed preview file,
MA Series Media Archive Servers
46
Page 59
Unarchived Content
Preview File St a tus
The User may determine the status of preview flash file creation for files that have been
uploaded to the MA server but not yet archived. There are four rendering status messages:
• RENDERING
This message appears with a status bar indicating progress. of rendering process.
• PREVIEW OK
Indicates that the preview flash file was rendered successfully.
• PREVIEW FAILED
Indicates that rendering was attempted but terminated. Check to see if file type is
supported.
• OK, FILE TYPE HAS NO PREVIEW
Indicates that the uploaded file is not a video and that a preview file was not generated.
Files that do not have preview files display a generic thumbnail.
Render Preview
To create preview files, select file(s) and click on the Render icon. This places the files at the
end of the current rendering queue.
If Render Fails
The most comm on rea son for th e rende r pro cess to fail i s that the fi le’ s forma t is n ot sup ported by the
MA server.
To view the latest rendering status for listed files, use the browser’s
Refresh function to update
the page.
Replace Failed Preview with Generic Preview
Video clips that do not have functional preview files are not automatically archived. The User
may either:
• Attempt to create a fun ctional preview file by re-rendering the high resolution content,
• Delete the content,
• Replace the failed preview file with a functional generic preview file supplied by the MA
server,
To replace t he failed preview file with the functional generic MA preview:
1. Go to Tools > Unarchived Content.
This procedure requires Administ ra tor rights.
2. Select the high resolution clip(s) that have failed previews.
3. Click on the Replace Preview with Generic icon at the top of the unarchived content
list.
The MA server can now archive the high resolution video clip.
MA Seri es Media Archive Servers
47
Page 60

MA Series Media Archive Servers
48
Page 61

T echnical Inform ation
This chapter provides technical in formation about the ProxSys MA Series Media Archive
Server’s operation.
This chapter contains the topics:
Media Formats 50
Calculated Storage Requirements 51
Archive Disc Capacities 50
Maximum File Size Supported 52
Hardware 53
MA Dongle 53
Hard Drives 53
RAID Data Protection 56
OS and Virtual Machine Operations 56
Windows XP PRO 56
SUSE Linux 56
Installing Third-party Software 57
Operations 58
MA Server Applica ti o ns F a il to In it ia liz e 58
Viewing Preview and Video Files Without the MA Server 58
Backing Up Proxy Preview Files and Metadata 58
Restarting the MA Server 59
If MA Server Login Fails 60
IP Networking Information 61
P2 Information 66
File Handling During Ingesting and Archiving 66
High Resolution Content 66
P2 and PX MA Metadata 66
MA Seri es Media Archive Servers
49
Page 62

Media Formats
Media Formats
Standard Res. Frame
Rate
P2 NTSC
DV 480 24 P
DV 480 24 PA, P2
DVCPRO 480 24 P2
DVCPRO 480 24 PA, P2
DVCPRO50 480 24 P2
DVCPRO50 480 24 PA, P2
DVCPRO50 480 30 P2
DVCPROHD 1080 24 PA, P2
DVCPROHD 1080 24 P2
DVCPROHD 780 24 P2
P2 PAL
DV 576 25 P2
DVCPRO 576 25 P2
DVCPRO50 576 25 P2
Camera/
DTE Recorder
XDCAM NTSC
HQ 1080 60 i (1920X1080/59.94i)
SP 1080 60 i (1440X1080/59.94i)
HQ 1080 30 P (1920X1080/
29.97P)
HQ 1080 24 P (1920X1080/
23.98P)
SP 1080 24 P (1440X1080/
23.98P)
HQ 720 60 P (1280X720/59.94P)
HQ 720 30 P (1280X720/29.97P)
HQ 720 24 P (1280X720/23.98P)
XDCAM PAL
HQ 1080 50 i (1920X1080/50i)
SP 1080 50 i (1920X1080/50i)
HQ 1080 50 i (1920X1080/25P)
HQ 720 25P (1280X720/25P)
MA Series Media Archive Servers
50
Page 63

Standard Res. Frame
Rate
M2T NTSC
GY-HD2XX M2T 720 30 P
GY-HD2XX M2T 720 60 P
CANNON XL H1 M2T 1080 24 F
CANNON XL H1 M2T 1080 30 F
CANNON XL H1 M2T 1080 60 i
SONY V1 M2T 1080 24 A
SONY V1 M2T 1080 24 P
SONY V1 M2T 1080 30 P
SONY V1 M2T 1080 60 i
M2T PAL
GY-HD2XX M2T 720 25 P
Media Formats
GY-HD2XX M2T 720 50 P
SONY HDR-HC 7e M2T 1080 50 i
Standard
QuickTime .Mov
Audio Format
MPEG Audio Layer 1–2 32 kHz–48 kHz
MPEG-2 32 kHz–48 kHz
Calculated Storage Requirements
Video Format Hours/Terabyte
DV
HDV
MPEG-2 (4 Mbps)
MPEG-2 (6 Mbps)
MPEG-2 (10 Mbps)
DVCPRO HD (1080i 60)
720 60 P
1080 60 P
79
90
538
364
222
19
MA Seri es Media Archive Servers
51
Page 64

Maximum File Size Supported
MA servers support file sizes as large as 50GB, including XDCAM.
BD and DVD Disc Capacities
Disc Type Single Layer Dual Layer
DVD 4.7GB 8.4GB
Blu-ray 25GB 50GB
MA Series Media Archive Servers
52
Page 65

Hardware
MA Dongle
MA servers require that a USB hardware key (dongle) be installed in a server USB port before
the server will operate. Insert the don gle before power up of the server.
The dongle must remain in the USB port for the applications to function.
Hard Drives
MA servers use three high capacity hard drives. How the drives are configured depends on
where they are used.
North, Central, and South America
These MA servers have three drives: two 1TB and one 500GB.
The 500GB drive has two virtual drives:
C: (Windows)
•
Windows XP PRO operating system.
This drive provides temporary storage of the high-resolution content during the Ingest
process. When the MA server verifies that the content is archived on a disc, this content
is erased from the drive.
•
F: (Work)
This is the where the User works. There are five folders:
PXMA-auto-archive
This folder is shared on the network and used by the
uploading files from local NLE or ingest stations.
PXMA-local-Copy
This folder is shared on the ne twork and use d by the
downloading files from the MA server to local NLE systems or shared network
storage.
ISO-Files
Folder where the ISO files are generated. On PX-10 they need to be dragged into the
burn tool manually, on MA-50 they are stored here temporally until taken into the
automated disc burner.
PXMA-auto-archive
This folder is shared on the network and used by the
uploading files from local NLE or ingest stations.
Do Not Modify: This Is Not A User Drive.
Auto Watch functions for
Copy to local folder function for
Auto Watch functions for
Hardware
MA Seri es Media Archive Servers
53
Page 66
Hardware
Tools
This folder is used by the various MA applications and has various sub folders.
Desktop Shortcuts Provide Access to User Folders
Drive
T: is the only drive with User accessible folder s. To assist the User , des ktop shor tcuts
are provided for all accessible folder.
The two 1TB data drives form a RAID 1 system. This is represented by the virtual drive:
•
V: (PX-VM-Storage)
This drive is for PX MA serv er and VMwar e storage. It i s where the MA server store’s
its database and preview clips.
Backup PX-VM-Storage Folder to Archive MA Database and Proxy Preview Files
Backup the
PX-VM-Storage folder as part of MA server disaster recovery plans.
Do Not Modify: This Is Not A User Drive.
MA Series Media Archive Servers
54
Page 67
Europe, Middle East, Africa and Asia
These MA servers have three 1TB drives, each with two partitions, creating 6 virtual drives.
C: (Windows)
•
Windows XP PRO operating system.
Do Not Modify: This Is Not A User Drive.
This drive provides temporary storage of the high-resolution content during the Ingest
process. When the MA server verifies that the content is archived on a disc, this content
is erased from the drive.
•
T: (Tools)
Tools drive, this is the drive where the User works. There are four folders:
PXMA-auto-archive
This folder is shared on the network and used by the
Auto Watch functions for
uploading files from local NLE or ingest stations.
PXMA-local-Copy
This folder is shared on the ne twork and use d by the
Copy to local folder function for
downloading files from the MA server to local NLE systems or shared network
storage.
ISO-Files
Folder where the ISO files are generated. On PX-10 they need to be dragged into the
burn tool manually, on MA-50 they are stored here temporally until taken into the
automated disc burner.
Tools
This folder is used by the various MA applications and has various sub folders.
Hardware
Desktop Shortcuts Provide Access to User Folders
T: is the only drive with User accessible folders. To assist the User, desktop shortcuts
Drive
are provided for all accessible folder.
• V: (PX-VM-Storage)
PX MA server and VMware storage.
The
V: drive stores the virtual MA server’s database and preview clips.
Backup PX-VM-Storage V: Drive to Archive MA Database and Proxy Preview Files
Backup
V: drive as part of MA server disaster recovery pla ns .
Do Not Modify: This Is Not A User Drive.
MA Seri es Media Archive Servers
55
Page 68

RAID Data Protection
RAID Data Protection
RAID 1
In North America, the MA server s prot ect dat a usin g a RAID 1 impl ementat ion. The MA serve r
has three drives, a 500GB drive used as a buffer and two 1TB drives for data storage. One data
drive is the data mirror of the other. Should one data drive fail, it is possible to replace it and
duplicate the data on that drive from the other.
RAID 5
In Europe, t he MA servers protect data u sing a RAID 5 implementation. Each of the three 1TB
drives has two partitions, creating 6 virtual drives. Data and parity information is striped across
the virtual dri ves. Should any singl e real ha rd drive fail, it is po ssible t o recrea te that d rive’s data
on its replacement drive.
Replacing a Failed Drive
Power down the MA server before replacing the failed drive. When the server p owers up, the
data from the failed drive is automatically rebuilt on its replacement.
OS and Virtual Machine Operations
The PX MA Series server’ s ho st oper ating system i s Windows XP PRO. VMware is used to create
a virtual machine with SUSE Lin ux as it s OS. During operati on the se rver’ s XP PRO/vi rtual SUSE
Linux configuration is invisible to the User/Administrator.
Windows XP PRO
The XP PRO, 32-bit, provides the e nvironment in which the following applications run:
• Internet Browsers
The MA server supports Microsoft Internet Explorer 6 or higher and Safari browsers.
• JAVA Runtime 6 V13
This is required for the ProxSysMA Services application.
• Media Upload Utility
The upload utility is a JAVA application.
• ProxSysMA Burn Tool Services
ProxSysMA Services is a JAVA application used for creating ISO files and burning BD
discs.
• Disc Burning Application
This application is provided with the MA server. Use it to burn ISO files to disc.
•VMware
The VMware Workstation automatically starts when the MA server powers up. The
workstation window appears on the desktop and should be left open and allowed to run in
the background.
SUSE Linux
SUSE provides the environment for the ProxSys MA Series Server application.
MA Series Media Archive Servers
56
Page 69
Installing Third-party Software
Installing Third-party Software
With the following exceptions, Focus Enhancements recommends that third-party software
should not be installed on the MA servers.
These applications must be installed on the MA server
C: (Windows) drive.
For the MA-10 and MA-50:
• P2 Viewer
The User may download the P2 viewer from
https://eww.pavc.panasonic.co.jp/pro-av/sales_o/p2/p2viewer/index.html.
P2 Drivers May Be Required
If the Media Uploa d U til ity is ins talled on a Wind ows or Mac system, it is ne ce ss ary to d ow nl oad
the appropriate platform P2 drivers.
Go to: https://eww.pavc.panasonic.co.jp/pro-av/support/desk/e/download.htm#p2pcdriver
For P2 files, it is assumed that there is a P2 card reader installed.
• Sony XDCAM EX Clip Browser software
The browser may be downloaded from:
http://pro.sony.com/bbsc/ssr/micro-xdcamexsite/resource.downloads.
SxS Drivers May Be Required
If the Media Uploa d U til ity is ins talled on a Wind ows or Mac system, it is ne ce ss ary to d ow nl oad
the appropriate platform SxS drivers.
http://pro.sony.com/bbsc/ssr/micro-xdcamexsite/resource.downloads
Go to:
• PDF Reader
MA Seri es Media Archive Servers
57
Page 70

Operations
Operations
This section provides information and inst ructions for situations that require inter vention
on the part of the Administrator.
MA Server Applica ti o ns F a il to In it ia liz e 58
Viewing Preview and Video Files Without the MA Server 58
Backing Up Proxy Preview Files and Metadata 58
Restarting the MA Server 59
If MA Server Login Fails 60
IP Networking Information 61
P2 Information 66
MA Server Applications Fail to Initialize
Verify that the MA server’s dongle, USB hardware key, is installed in one of the server’s USB
ports. If the dongle is removed, MA applications will not function.
Viewing Preview and Vi deo Files Without the MA Server
If the MA is in accessible, it is possible to view proxy preview files and video clips that ar e
stored on an archive disc. This includes P2 and XDCAM. Required to view these files:
• A PC or Mac with a disc drive that is compatible with the archive disc: BD or DVD.
• an installed Flash player for viewing the proxy preview files.
• A player application that is compatible with the video clip format.
P2 and XDCAM embed the video file, its metadata, and other information in an MXF
wrapper file. P2 and XDCAM each re qui re a spe ci fi c pl aye r, or can be loaded into an NLE
for viewing.
Backing Up Proxy Preview Files and Metadata
Typically, a MA Server can store 2500 hours of proxy preview files and their associated
metadata before it is necessary to backup content. Metadata is stored in the MA server’s
database.
The location of the files to backup depends on the drive configuration of the MA server:
RAID 1 (North, Central, and South America)
Backup proxy preview files and database from the system’s Window
information about system drives, see
North, Central, and South America on page 53.
RAID 5 (Europe, Middle East, Africa, Asia)
V: drive. For more
Backup proxy preview files and database from the system’s Window
information about system drives, see
MA Series Media Archive Servers
58
V: drive. For more
Europe, Middle East, Africa and Asia on page 55.
Page 71
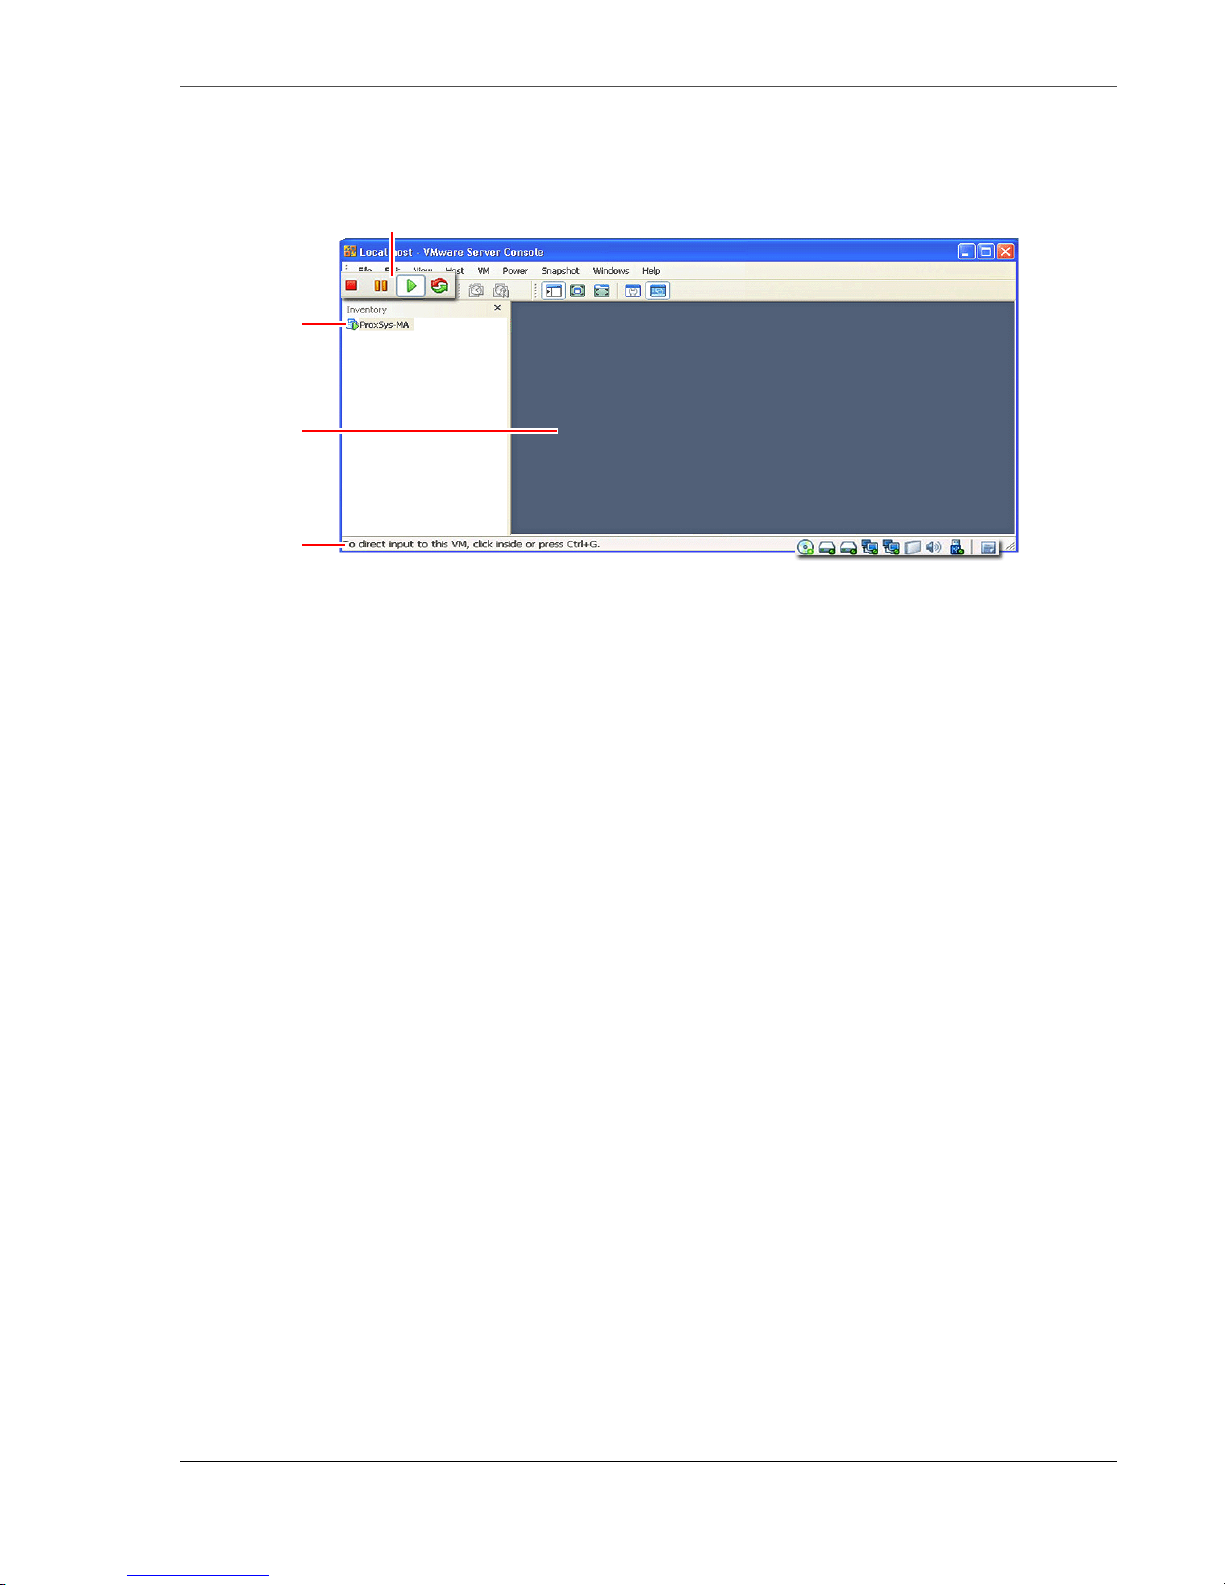
Restarting the MA Server
Virtual Machine
Environment
Status Bar
Virtual Connections
Virtual Machine Power Options
Power Off Suspend Power On Reset
Console Work
Area
Ctrl+G or
Click in area to Enter.
Disc HDD Network Virtual Log
Machine
Operations
Occasionally, it may be necessary to reboot the MA server system, i.e. after installing a
Windows security upgrade. To do this, it is necessary to:
1. Power down the MA server on the virtual machine.
This step immediately stops the MA server regardless of the programs that are running.
• Select the server in the VM environment.
• Click on the red Power Off button.
2. Shut down th e VMware application.
3. Conduct Windows restart of the MA server system.
When powering up the MA server the VMware virtual machine starts automatically in the
background as the sy stem is b oot ing. It can t ake up to 10 mi nutes for t he v irtual machi ne to load
all necessary services, including the MA server.
For more information about the VMware Control Console, refer to official VMware
documentation.
59
MA Seri es Media Archive Servers
Page 72
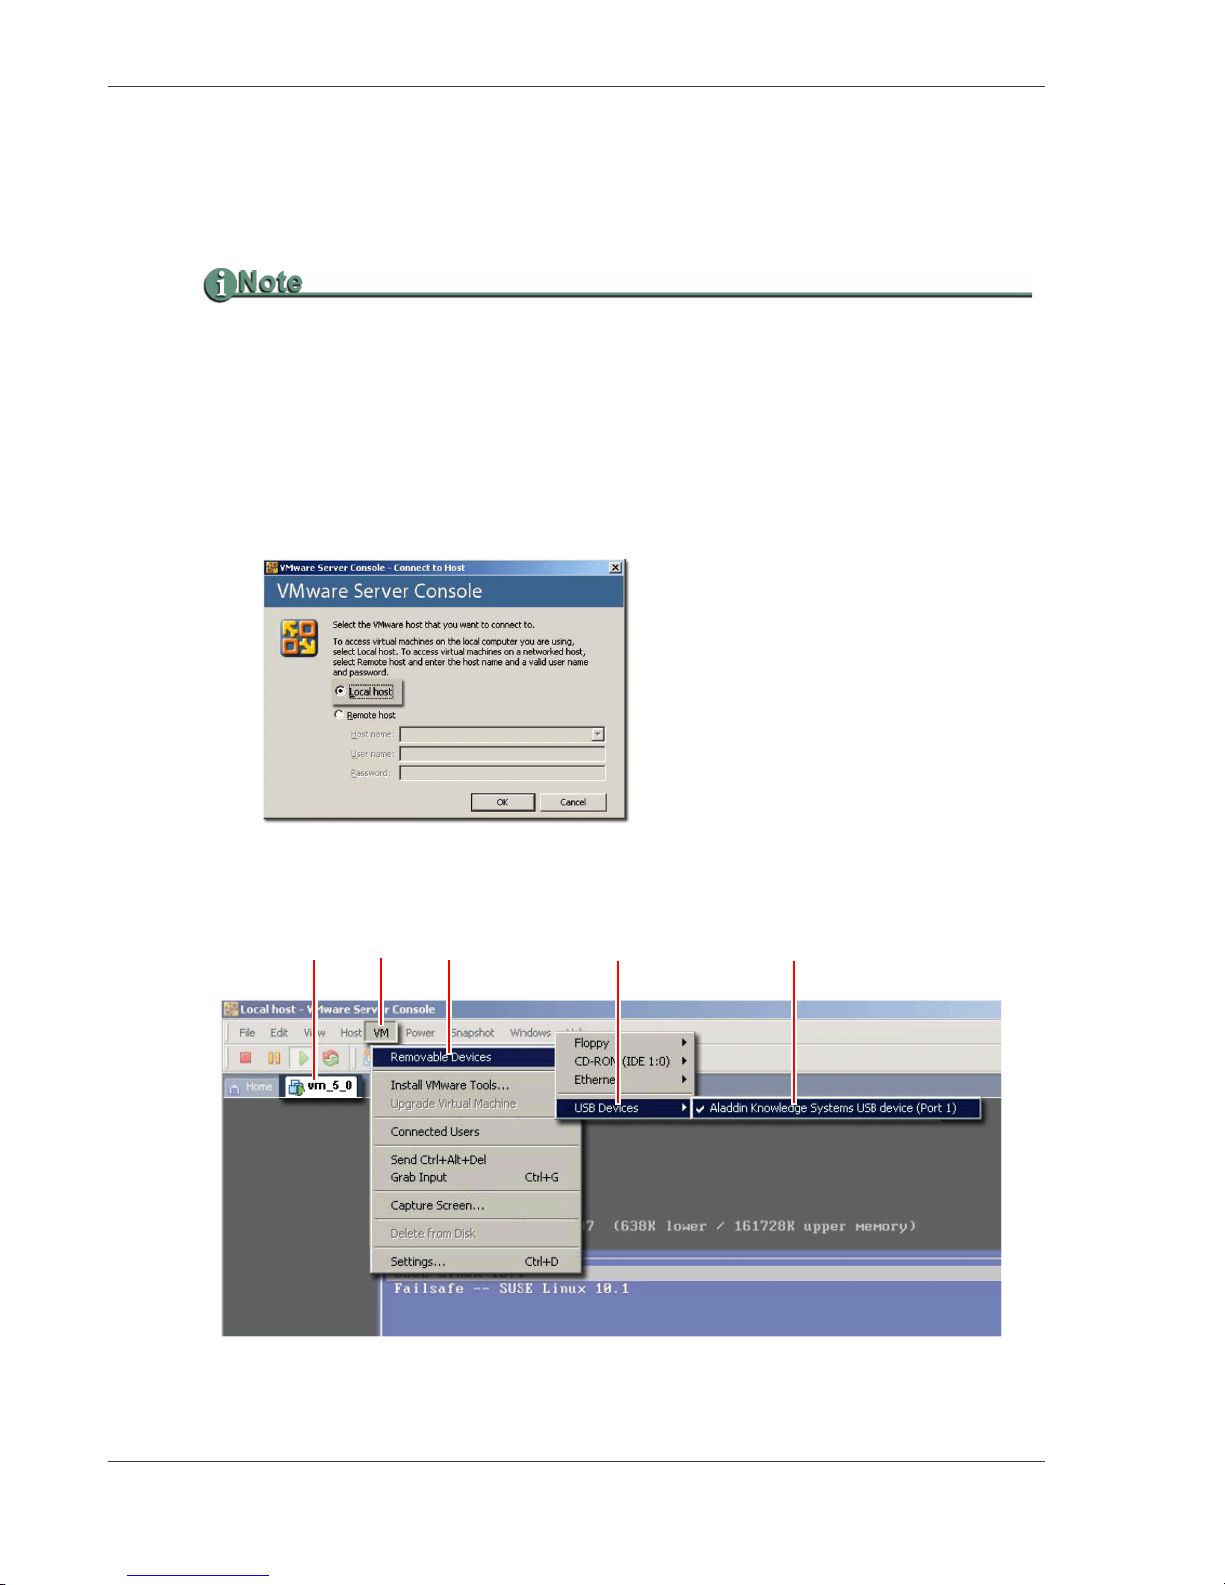
Operations
3b
3a
3c
3d 3e
If MA Server Login Fails
If, when logging on to the MA server through a Web browser, the login fails, determine if the
ProxSys Dongle is in the right USB-Port. If the dongle is in the correct port, then the dongle
activation by the VMware host may be missing.
Virtual Machine Must Be Running for the Following Procedure
The virtual machine must be runn ing before im ple me nti ng the proc ed ure bel ow. If the VMware GUI
window is inactive, use the key-combination
the mouse: VMware’s
Release Cursor Function.
To activate the MA server’s dongle:
1. Open the VMware Server Console.
Click on the VMware icon on the server’s desktop.
2. Select Choose Local host.
CTRL+ALT to un-block the window. Next, click on it with
3. Activate the ProxSys MA Server Dongle.
In the illustration, the dongle is the Aladdin Knowledge System USB device in port 1.
a. Select the tab for the MA server’s virtual machine: in the illustration, vm_5_0.
MA Series Media Archive Servers
60
Page 73
Operations
b. Select the VM button in the menu bar.
c. Select Removable Devices.
d. Select USB Devices.
e. Select the MA server dongle from the list: in the illustration, Aladdin
Knowledge System USB device (Port1)
.
The virtual machine starts.
4. After the restart, click o n Stop and then Start.
5. Log on to the MA server, using the browser on the User-PC.
IP Networking Information
This IP networking information is to assist the User/Admin if network IP settings need to be
changed. Because the MA server is pre configured to User network specifications, the actual
LAN IP addresses may be different from those used in the examples and illustrations.
It is assumed that both the Windows host operating system and the SuSE Linux guest operating
system are functional.
The MA server’s network IP setup has two primary steps:
1. Configuring the Windows (host) LAN IP networking settings.
2. Configuring the MA Server’s Linux (Guest to Host) IP network settings.
This requires the VMware Workstation.
Assign the MA Server A Fixed IP Address
The MA Server must be assigned a fixed networ k IP address to ensure that a stable
connection is maintai ne d with the re al network, the host system, and the overtur e MA se rve r.
Because many networks employ dynamic IP addressing, it is necessary to convert the MA
server’s dynamic network IP to fixed. The following procedure includes a method for
converting a network IP from dynamic to fixed.
However, depending on the DHCP server’s consistency at issuing the same IP to the MA
server, the User/Administrator may need to periodically reset the MA system’s network
settings.
Fixed IP Addresses Preferred For MA Server LAN Connections
When connecting the MA server to a network using dynamic IP addressing, the most consistent
connection uses fixed IPs.
Contact the Network Administrator and request a range of IP addresses to use for MA server
network set up.
MA Seri es Media Archive Servers
61
Page 74
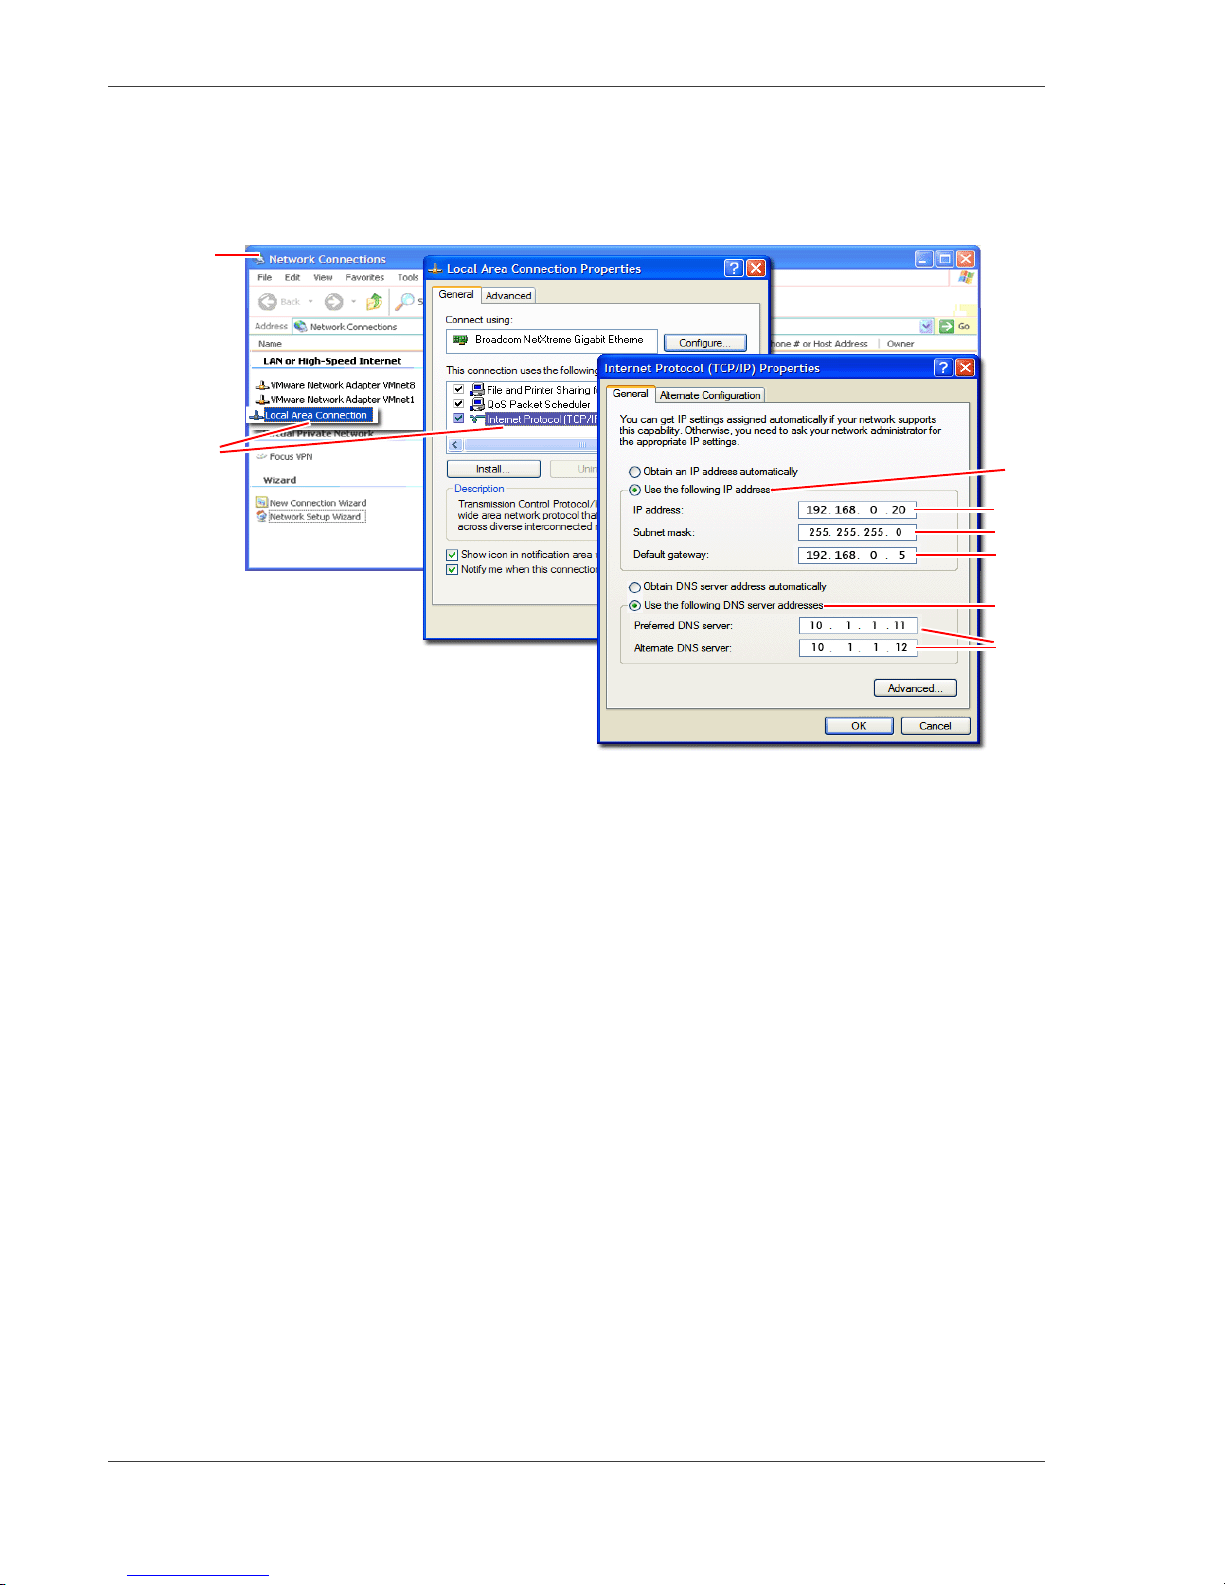
Operations
4
3
1
2
3a
3b
3c
3d
3e
Configure Host (Windows) Network Settings
1. Display the Windows Network Connections window.
2. Select the system’s Local Area Connection and display its TCP/IP Properties.
3. Click on the Use the following IP address button.
This opens the fixed IP network space.
To convert LAN IP from dynamic to fixed, requires assigning a Default gateway and
DNS servers to the existing LAN IP.
To do this:
a. Enter the given LAN IP in the IP address field.
b. Enter Subnet Mask - 255.255.255.0.
In this example,
192.168.0.20.
c. Enter Default gateway IP.
This is select ed f r om the IP range provided by the network administr ator. In t his
example
d. Click on Use the following DNS server addresses.
e. Enter IPs for Preferred and Alternate DNS servers.
Select these from the IP range provided by the network administrator.
In this example
192.168.0.5.
10.1.1.11 and 10.1.1.12.
For a fixed IP, the above settings already exist. Make a note of these settings because
they will be used later.
4. Click OK to save.
MA Series Media Archive Servers
62
Page 75
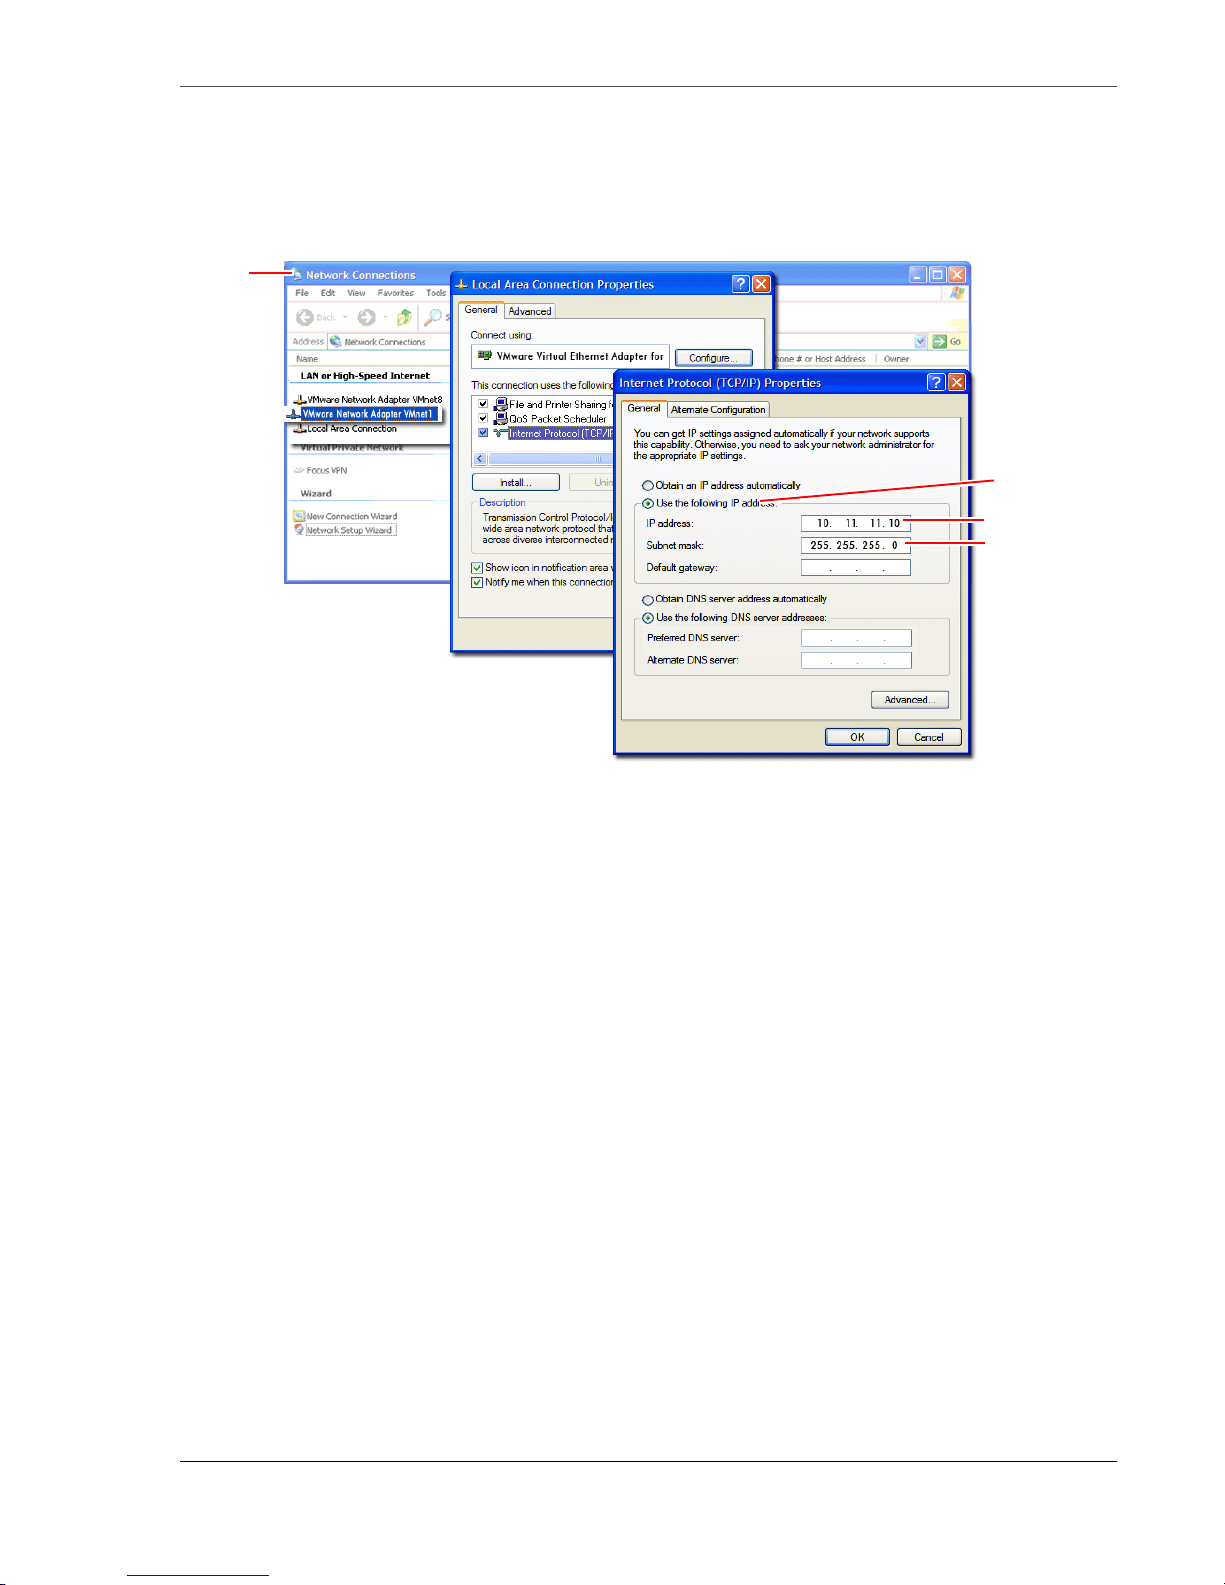
5. Return to the network connections window and select the VMnet1 connection.
5
8
7
7a
7b
VMnet1 provides PC to VM connections.
Ignore VMnet8, it is an internal VM to PC connection.
Operations
6. Display the V Mnet1’s TCP/IP Properties.
7. Select Use the following IP address and enter the following:
a. IP address - 10.11.11.10.
b. Subnet mask - 255.255.255.0.
This matches the LAN IP Subnet Mask.
8. Click OK to save.
Now configure the MA server’s VM network settings.
MA Seri es Media Archive Servers
63
Page 76
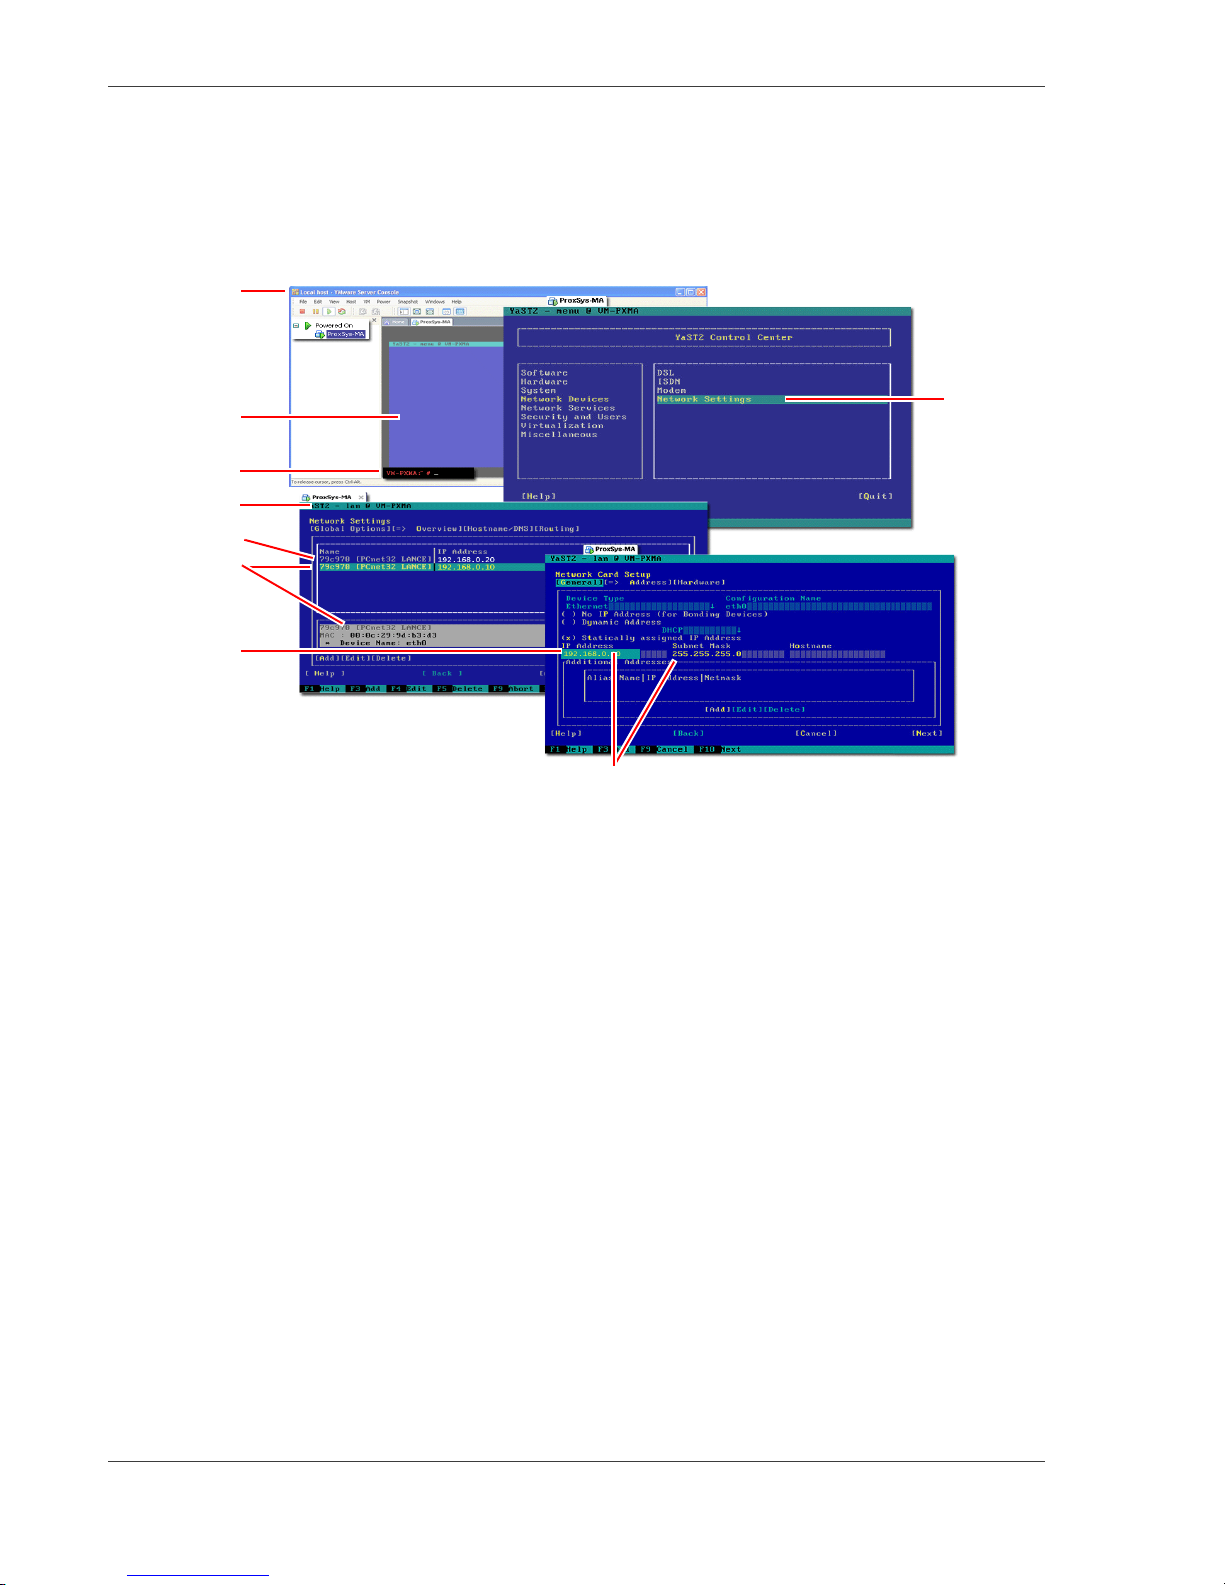
Operations
1
2
3
4
5
6
8
9
10
Settings shown are for Network card eth0.
Configure MA Server VM Network Settings
1. Open the VMware Server Console.
This should be running in the background. It is not necessary to shut it down.
2. Click on the control line screen to ent er the console ’s work are a.
Inside this area, use the keyboard for all actions.
Press
Ctrl-Alt to return the Windows environment.
3. Login to PX MA in the virtual mach ine with root and toor1.
4. Open the YaST Tool by entering yast on the control line and pressing the keyboard
Enter key.
The
YaST Control Center appears.
5. Select Network Devices and then Network Settings.
6. Use Tab key to select Network Port eth0.
7. Press Alt-I on the keyboard for editing the settings.
The
Network Settings screen appears.
8. Enter eth0 IP address.
This IP must be within the range of Windows host system, for example:
The Windows Host Syste m has the IP address 192.168.0.20. This is a common private
network IP address range.
Then, MA Server
eth0 should have an IP address like 192.168.0.xxx. Often, 10 is a
good choice for xxx.
9. Return to the Network Settings screen by using the keyboard function key F10.
MA Series Media Archive Servers
64
Page 77

10. Select Network Port eth1.
The
Network Card Settings screen appears.
11. Enter the eth1 IP address.
This IP must be in the range of the VMNet1 IP Address of the Windows Host system
which is 10.11.11.10.
eth1 can be set fixed to 10.11.11.11 because the VMNet1 network is only used
between the VM and the Windows Host system. It is not accessible by other computers
in the Windows Host network.
Remember to set the
12. Press F10 to finish.
13. Reboot the MA server in the VM or enter on the command line:
/etc/init.d/network restart.
Subnet Mask is set to 255.255.255.0.
Operations
MA Seri es Media Archive Servers
65
Page 78

P2 Information
P2 Information
File Handling During Ingesting and Archiving
The most important i ssue when t he MA serv er uploads and inges ts con tent from a P2 card i s that
the maximum size of a single video clip can not exceed 50GB in size.
Searching fo r and retriev ing archived clips is simplified becaus e the MA server maintains the
clips relationshi p on the P2 car d from upl oad thr ough sto rage on ar chive discs. Rel ated c lips ar e
kept together on a single disc or a sequence of discs. The MA shortlist for the content identifies
each clip and on which disc it is stored.
High Resolution Content
The MA server does not change the original high resolution content. It looks the same
regardless of the NLE tha t it is imported to.
P2 and PX MA Metadata
There can be two sets of metadata associated with a P2 file:
• Native P2 Metadata
This is the metadata that was added in the field, in-camera, during production and before
the clip is uploaded and ingested by the MA server. The P2 metadata downloads to the
NLE.
• PX MA Metadata
This is the d ata that is added using the ProxSys Media Upload Utility and/or one of the
MA server’s metadata editing functions. This metadata is maintained in the MA server
database and is used for searching and retrieving proxy preview files. PX MA metadata is
not compatible with P2 metadata and it is not downloaded to the NLE.
These two metadata sets are maintained separately.
MA Series Media Archive Servers
66
Page 79

Page 80

MA Series Media Archive Servers
MANL-1161-04
 Loading...