

Focus DVCPRO/DV, DVCPROHD, FOCUS FireStore FS-100, FS-100 DVCPRO50, FS-100 DVCPROHD User Manual
...Page 1
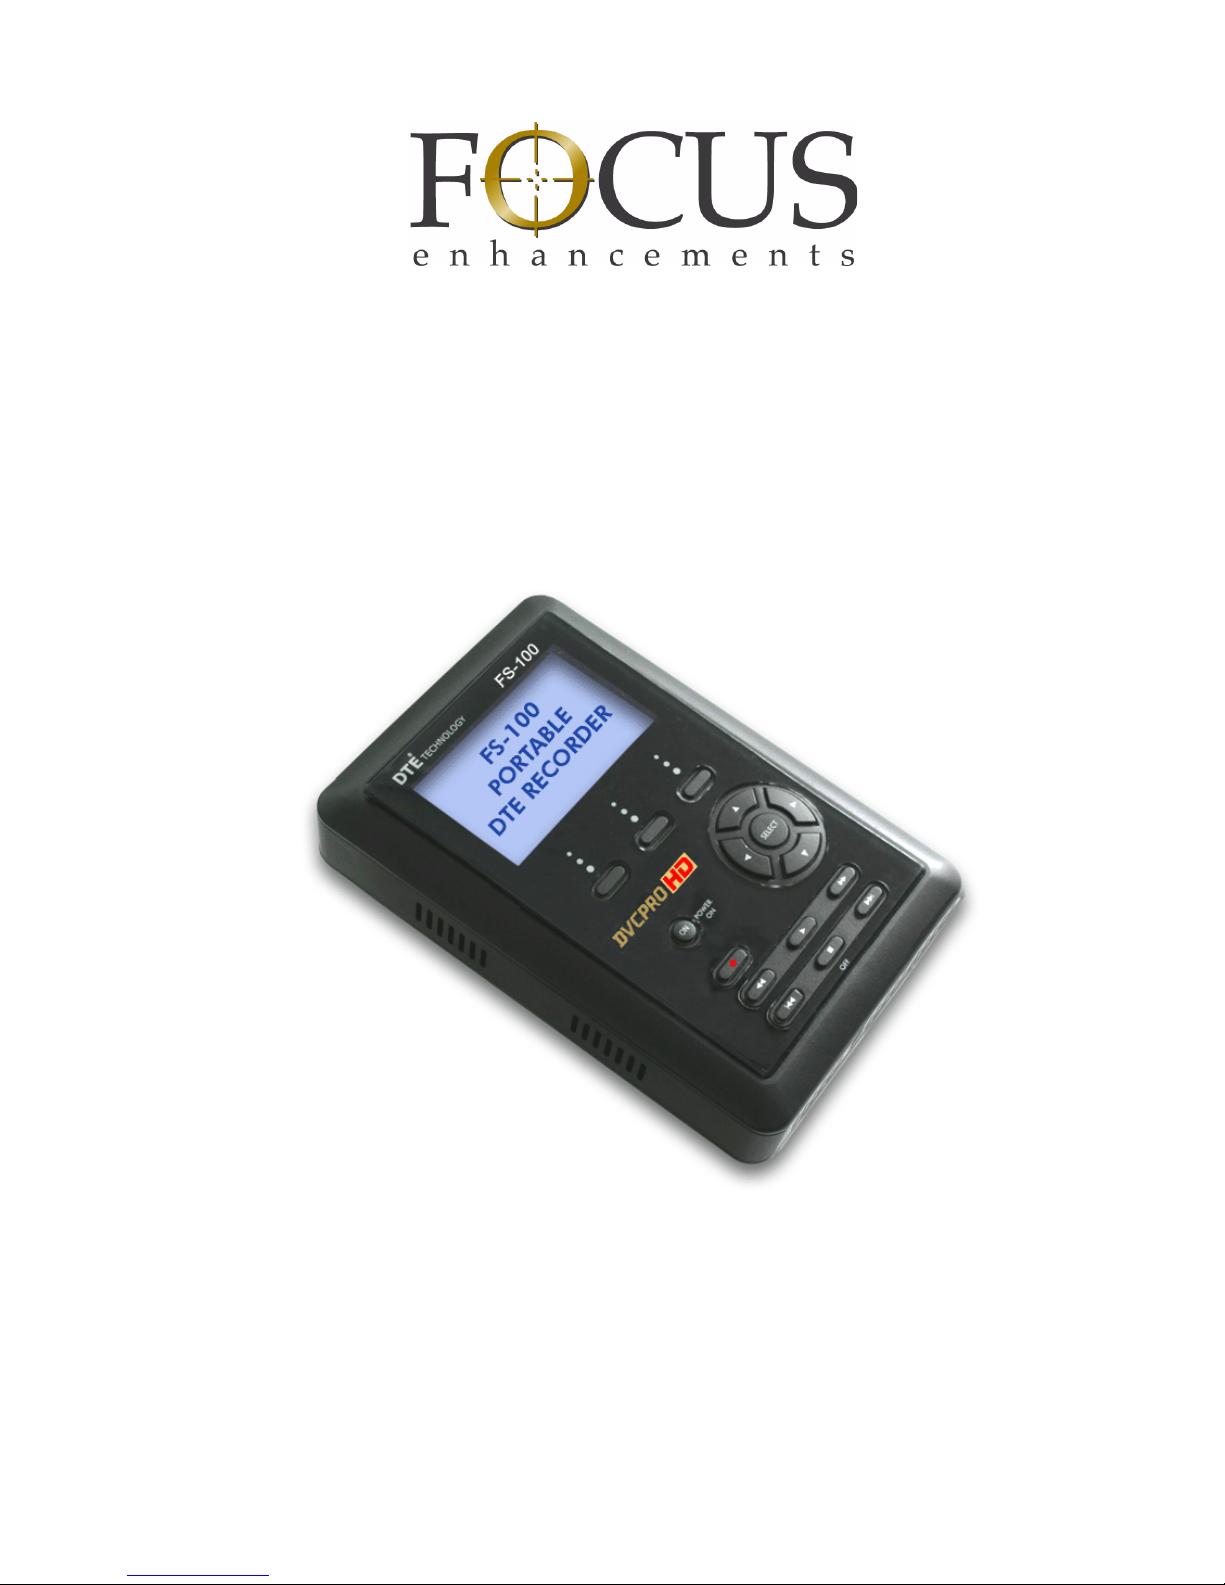
FS-100
DVCPROHD DVCPRO50 DVCPRO/DV
Portable DTE Recorder
User Guide
Part Number: MANL-1023-10
Page 2

Page 3

FS-100 Portable DTE Recorder
i
LEGAL NOTICES
THIS DOCUMENT CONTAINS CONFIDENTIAL AND TRADE
SECRET INFORMATION OF FOCUS ENHANCEMENTS AND
ITS RECEIPT OR POSSESSION DOES NOT CONVEY ANY
RIGHTS TO REPRODUCE OR DISCLOSE ITS CONTENTS, OR
TO MANUFACTURE, USE, OR SELL ANYTHING THAT IT MAY
DESCRIBE. USE IN WHOLE OR IN PART WITHOUT THE
SPECIFIC WRITTEN AUTHORIZATION OF FOCUS
ENHANCEMENTS IS STRICTLY FORBIDDEN.
EVERY EFFORT HAS BEEN MADE TO ENSURE THAT THE
INFORMATION IN THIS DOCUMENT IS COMPLETE AND
ACCURATE AT THE TIME OF PRINTING; HOWEVER, THE
INFORMATION CONTAINED IN THIS DOCUMENT IS SUBJECT
TO CHANGE.
Copyright 2007 Focus Enhancements
All Rights Reserved
The material contained in this document is also protected by
copyright laws of the United States of America and other
countries. It may not be reproduced or distributed in any form by
any means, altered in any fashion, or stored in a data base or
retrieval system, without express written permission of FOCUS
ENHANCEMENTS.
FOCUS ENHANCEMENTS cannot be responsible for
unauthorized use of equipment and will not make allowance or
credit for unauthorized use or access.
Page 4

FS-100 Portable DTE Recorder
ii
Contacting FOCUS ENHANCEMENTS:
Serial Number
The serial number for this equipment is located on the back of the
unit. Please write this serial number on the enclosed warranty
card and keep it in a secure area.
USA
Office Hours: Monday through Friday
8:00 AM to 5:00PM (Central Time)
Email: [email protected]
Telephone: +1 763-398-1658
Fax: +1 763-571-7688
Address: Focus Enhancements, Inc.
1370 Dell Avenue
Campbell, CA. 95008
www.focusinfo.com
EMEA (Europe, Middle East, Africa)
Office Hours: Monday through Friday
9:00 AM to 5:00PM
Email: [email protected]
Telephone: +49 4307 - 83 58 58
Fax: +49 4307 - 83 58 99
Address: COMO Computer & Motion GmbH
A Focus Enhancements Company
Lise-Meitner-Str. 15
24223 Raisdorf / Germany
www.focusinfo.com
Page 5

FS-100 Portable DTE Recorder
iii
Regulations and Safety
FCC Class A
This product satisfies FCC regulations when shielded cables
and connectors are used to connect the unit to other equipment.
To prevent electromagnetic interference with electric appliances
such as radios and televisions, use shielded cables and
connectors.
This equipment has been tested and found to comply within the
limits for a Class A digital device, pursuant to Part 15 of the
FCC Rules. These limits are designed to provide reasonable
protection against harmful interference in a residential
installation. This equipment generates, uses, and can radiate
radio frequency energy and, if not installed and used in
accordance with the instructions, may cause harmful
interference to radio communications. However, there is no
guarantee that interference will not occur in a particular
installation. If this equipment does cause harmful interference to
radio or television reception, which can be determined by
turning the equipment off and on, correct the interference by
one or more of the following:
• Reorient or relocate the receiving antenna.
• Increase the separation between the equipment and
receiver.
• Connect the equipment to an outlet on a circuit different
from that used by the receiver.
• Consult the dealer or an experienced radio/TV technician
for help.
Focus Enhancements, Inc.
1370 Dell Avenue
Campbell, CA. 95008
Model Number: FS-100 Portable DTE Recorder
Date of Manufacture:
Reference the Serial Number label attached to
the unit.
Page 6

FS-100 Portable DTE Recorder
iv
Compliance
FS-100 is a device marketed for use in industrial or business
environments. The FS-100 complies with the regulations the
following testing agencies:
Australia and New Zealand
European Union
Page 7
FS-100 Portable DTE Recorder
v
Safety
Symbols
In the FS-100 Unit
This symbol indicates the presence of an un-insulated
Dangerous Voltage within the product’s enclosure that
may constitute a risk of electric shock to persons.
In the FS-100 Documentation
Documentation
Read, Retain, and Follow Instructions
All the safety and operating instructions should be read before
the product is operated.
• Retain Documentation
Place documentation in a secure place for future reference on
operating and safety instructions.
• Follow All Operating and Safety Instructions
• Pay Attention to All Warnings
Warnings are provided to protect the operator, the equipment,
and content.
This symbol indicates important operating or maintenance (servicing) information that the user should read and understand.
This symbol indicates supplementary information about features, functions, or operations that may be of interest to the user.
Page 8

FS-100 Portable DTE Recorder
vi
Electrical Precautions
Do Not Expose to Moisture
Do not use this product near water or in an environment where it
is exposed to dampness or there is the possibility of it getting wet.
Do Not Remove Cover
There are No User Serviceable Parts inside this unit. Servicing
should be done by qualified service personnel.
ON / OFF Switch in Stand-By Position
The On/Off switch Does Not Separate the Unit From the Main
Power when it is in the stand-by position.
Power Sources
Use only power sources that match those indicated on the
marking label. If unsure sure of the type of power supply that is
available, consult your dealer or local power company.
Do Not Overload Power Outlets
Do not overload wall outlets, extension cords, or integral
convenience receptacles as this can result in a risk of fire or
electric shock.
Verify Power Plugs are Fully Inserted
To prevent potential electrical shock to personnel, verify that the
FS-100 power cord plug is fully inserted in to a grounded receptor
and that the plug blades are not exposed.
ATTENTION
POUR PREVENIR LES CHOCS ELECTRIQUES NE PAS
UTILISER CETTE FICHE POLARISEE AVEC UN
PROLONGATEUR, UNE PRISE DE COURANT OU UNE AUTRE
SORTIE DE COURANT, SAUF SI LES LAMES PEUVENT ETRE
INSEREES A FOND SANS EN LAISSER AUCUNE PARTIE A
DECOUVERT.
Page 9

FS-100 Portable DTE Recorder
vii
Power-Cord Protection
• Routing Power-Cords
Route power supply cords so that they are not likely to be
walked on or pinched by items placed upon or against them.
Avoid sharp angles in the cord, particularly at plugs,
convenience receptacles, and the point where they exit the
product.
• Non-Use Period
During extended periods when the device is not used, unplug
it from the power source and retract the power-cord.
Grounding or Polarization
• Polarized
If this product is equipped with a polarized alternating current
line plug (a plug having one blade wider than the other), it will
fit into the outlet only one way. This is a safety feature. If you
are unable to insert the plug fully into the outlet, try reversing
the plug. If the plug should still fail to fit, contact your
electrician to replace your obsolete outlet. Do not defeat the
safety purpose of the polarized plug.
• Grounded
If this product is equipped with a three-wire grounding type
plug, a plug having a third (grounding) pin, it will only fit into a
grounding type power outlet. This is a safety feature. If you
are unable to insert the plug into the outlet, contact your
electrician to replace your obsolete outlet. Do not defeat the
safety purpose of the grounding type plug.
Page 10
FS-100 Portable DTE Recorder
viii
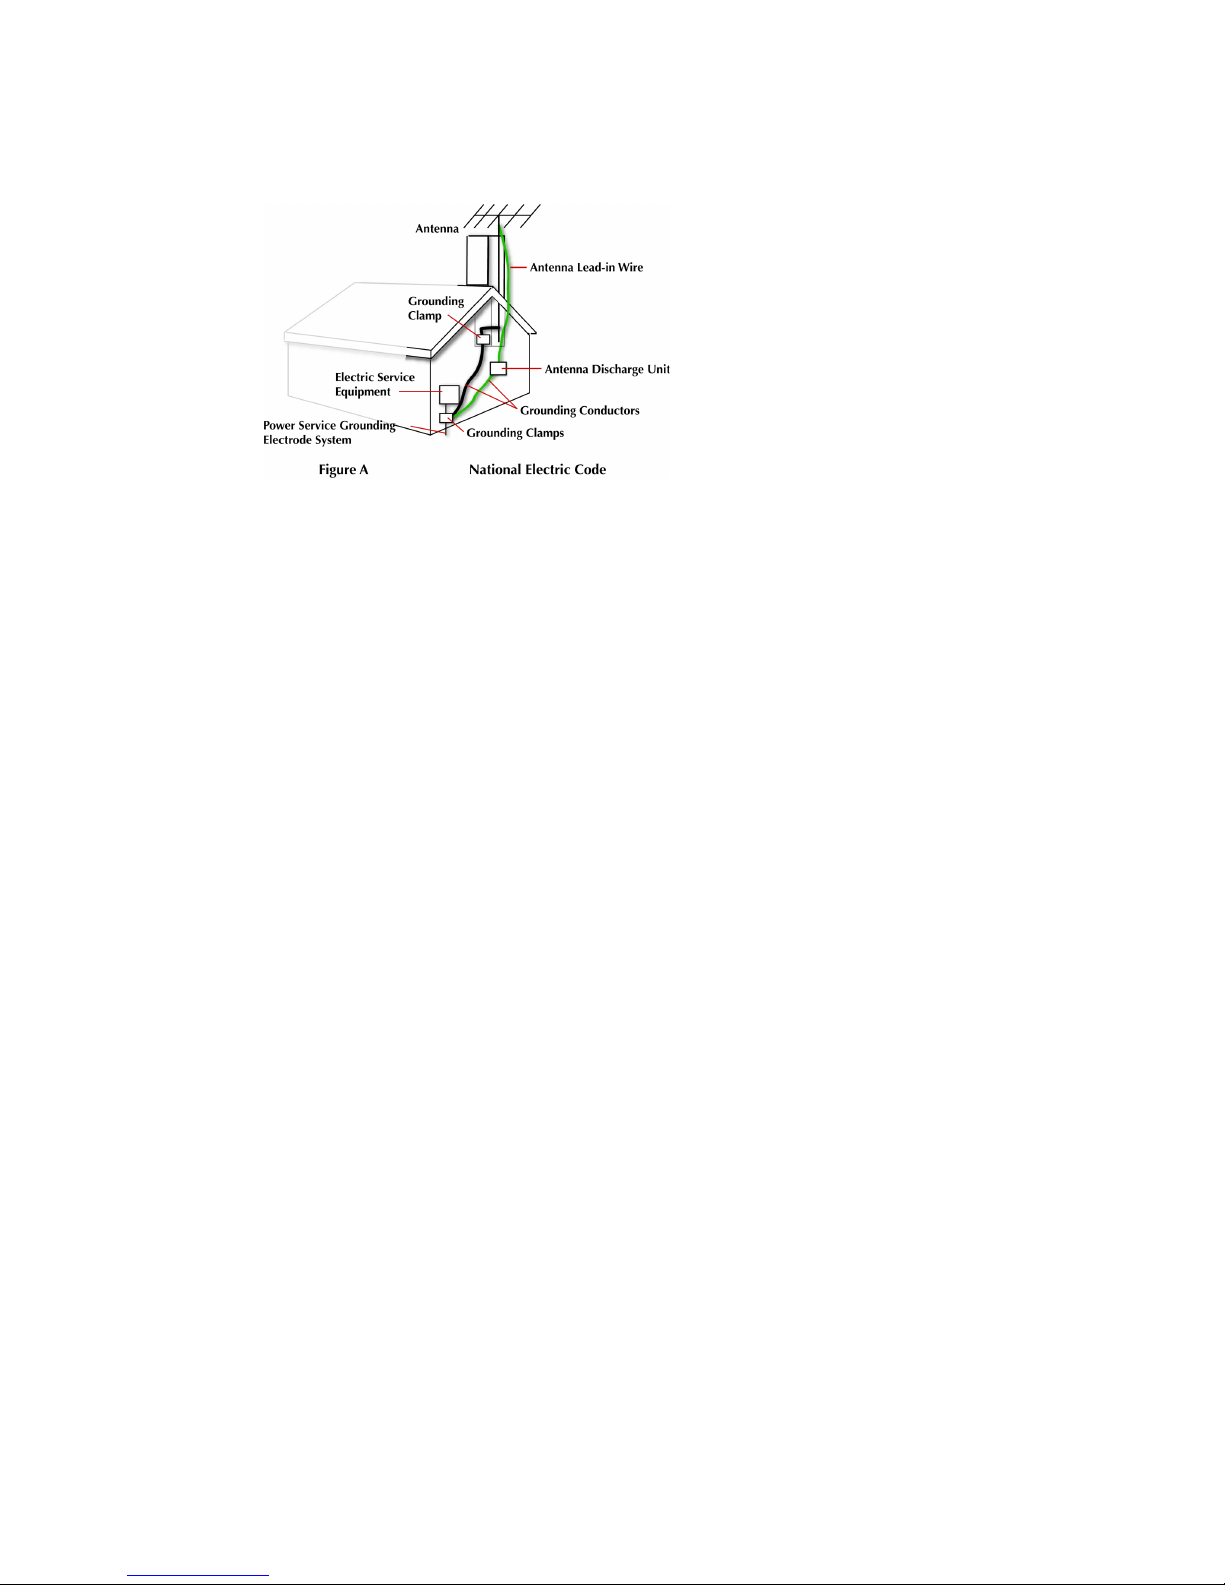
Outdoor Antenna Grounding
If an outside antenna
or cable system is
connected to the FS100, verify that the
antenna or cable
system is grounded.
This provides some
protection against
voltage surges and
built-up static charges.
Refer to Article 810 of
the National Electric Code, ANSI/NFPA 70, for information about
the proper grounding of the mast and supporting structure,
grounding of the lead-in wire to an antenna discharge unit, size of
grounding connectors, location of antenna discharge unit,
connection to grounding electrodes, and requirements for the
grounding electrode.
Ground Loop WARNING:
To avoid earth or ground loops, insure that all equipment
connected to the FS-100 share a common ground. Use a single,
grounded outlet strip as opposed to separate outlets with the
possibility of different ground potentials.
Lightning and Power Surges
During electrical storms or when left unattended and unused for
long periods of time, unplug the FS-100 from the power source
and disconnect the antenna or cable system.
Power Lines
Do not locate an outside antenna system in the vicinity of
overhead power lines, electric light or power circuits, or where it
can fall onto such lines or circuits.
When installing an outside antenna system, extreme care should
be taken to keep from touching such power lines or circuits as
contact with them might be fatal.
Optical Precaution
The use of optical instruments with this device will increase
hazards to the eyes hazard.
Page 11

FS-100 Portable DTE Recorder
ix
Maintenance and Moving
Cleaning
Unplug this product from the wall outlet before cleaning. The
product should be cleaned only with a polishing cloth or a soft dry
cloth. Never clean with furniture wax, benzine, insecticides or
other volatile liquids since they may corrode the cabinet.
Servicing
Unplug the device from the power outlet and refer servicing to
qualified service personnel under the following conditions:
• When the power-supply cord or plug is damaged.
• If liquid has been spilled, or objects have fallen into the
product.
• If the product has been exposed to rain or water.
• If the product does not operate normally when following the
operating instructions. Adjust only those controls that are
covered by the operating instructions. The incorrect
adjustment of other controls can result in damage and often
requires extensive work by a qualified technician to restore the
product to its normal operation.
• If the product has been dropped or damaged in any way.
• When the product exhibits a distinct change in performance.
Accessories and Replacement Parts
Use only attachments and accessories recommended by Focus
Enhancements.
Use only replacement parts specified by the Focus
Enhancements or of comparable quality and characteristics as
the original parts.
Unauthorized substitution of parts can result in fire, electrical
shock, other hazards, and loss of warranty.
Safety Check
Upon completion of any service or repairs to this product, ask the
service technician to perform safety checks to determine that the
product is in proper operating condition.
Page 12

FS-100 Portable DTE Recorder
x
Operating Environment
Location
Any mounting of this device should follow its instructions, and
should use only mounting accessories recommended by Focus
Enhancements.
• Install this device on a sturdy, level surface, away from
moisture and dust.
• Heat
Locate this device away from heat sources such as radiators,
heat registers, stoves or other electrical devices (including
amplifiers) that generate heat.
Ventilation
Do not block the ventilation openings in the FS-100 body.
Overheating can occur and damage the device. Do not place this
device in a built-in installation, such as a bookcase or rack,
unless proper ventilation is provided.
Page 13

FS-100 Portable DTE Recorder
xi
Table of Contents
Introduction . . . . . . . . . . . . . . . . . . . . . . . . . . . . . . . . . . . .1
DTE Eliminates Pre-edit Processing . . . . . . . . . . . . . . 1
Unpacking . . . . . . . . . . . . . . . . . . . . . . . . . . . . . . . . . 2
Features . . . . . . . . . . . . . . . . . . . . . . . . . . . . . . . . . . .3
Quickstart . . . . . . . . . . . . . . . . . . . . . . . . . . . . . . . . . . . . . 5
Physical Description and Basic Controls . . . . . . . . . . . 6
Front Panel Controls . . . . . . . . . . . . . . . . . . . . . . .6
LCD Display . . . . . . . . . . . . . . . . . . . . . . . . . . . 6
Function buttons (A, B, C) . . . . . . . . . . . . . . . .6
Power Control . . . . . . . . . . . . . . . . . . . . . . . . . 7
Power OFF . . . . . . . . . . . . . . . . . . . . . . . . . . .7
Navigation Buttons . . . . . . . . . . . . . . . . . . . . .7
Transport Control Buttons . . . . . . . . . . . . . . . . 7
Record . . . . . . . . . . . . . . . . . . . . . . . . . . . .8
Back Search . . . . . . . . . . . . . . . . . . . . . . . 8
Play . . . . . . . . . . . . . . . . . . . . . . . . . . . . . .8
Forward Search . . . . . . . . . . . . . . . . . . . . .8
Back Index . . . . . . . . . . . . . . . . . . . . . . . . .9
Pause, STOP and Power OFF . . . . . . . . . 9
Forward Index . . . . . . . . . . . . . . . . . . . . . .9
Top Panel . . . . . . . . . . . . . . . . . . . . . . . . . . . . . . .10
Charge LED Status . . . . . . . . . . . . . . . . . . . . 10
Status LED States . . . . . . . . . . . . . . . . . . . . . 10
Computer FireWire Connector . . . . . . . . . . . . 11
Remote Control, Serial Connector . . . . . . . . . 11
Camera FireWire Connector . . . . . . . . . . . . . 12
Page 14

Table of Contents
FS-100 Portable DTE Recorder
xii
Rear Panel . . . . . . . . . . . . . . . . . . . . . . . . . . . . . 13
Side Panel . . . . . . . . . . . . . . . . . . . . . . . . . . . . . . 14
Bottom Panel . . . . . . . . . . . . . . . . . . . . . . . . . . . 15
Internal Speaker . . . . . . . . . . . . . . . . . . . . . . 15
The FS-100 Menu System . . . . . . . . . . . . . . . . . . . . 16
Outline of Menu and Option Screens . . . . . . . . . 17
Powering the FS-100 . . . . . . . . . . . . . . . . . . . . . . . . 21
Connecting the FS-100 to AC Power . . . . . . . . . 21
Installing / Removing the Battery Pack . . . . . . . . 22
Installing a Battery . . . . . . . . . . . . . . . . . . . . 22
Removing a Battery . . . . . . . . . . . . . . . . . . . 22
Charging the Battery . . . . . . . . . . . . . . . . . . . 23
Connecting a FS-100 to a DV/HD Camcorder . . . . . 25
Record and Playback with the FS-100 . . . . . . . . . . . 26
Power On the FS-100 . . . . . . . . . . . . . . . . . . . . . 27
Select HDD Recorder Mode . . . . . . . . . . . . . . . . 28
Select a DV File Format . . . . . . . . . . . . . . . . . . . 29
Set Time and Date . . . . . . . . . . . . . . . . . . . . . . . 30
Record With the FS-100 . . . . . . . . . . . . . . . . . . 32
Manual Recording . . . . . . . . . . . . . . . . . . . . . 34
Creating a New File without Dropping Frames
34
Syncro Slave . . . . . . . . . . . . . . . . . . . . . . . . . 35
Tapeless . . . . . . . . . . . . . . . . . . . . . . . . . . . . 36
Configuring AG-HVX200 and Recording . . . 37
Variable Frame Rate ( . . . . . . VFR) Settings 38
AG-HVX200 Camera Settings . . . . . . . . . 38
FS-100 Settings . . . . . . . . . . . . . . . . . . . 39
Preparing P2 File for NLE . . . . . . . . . . . . . . . 39
Recording Timecode in the File . . . . . . . . . . 39
Playback on the FS-100 . . . . . . . . . . . . . . . . . . . 40
FS-100 Functions . . . . . . . . . . . . . . . . . . . . . . . . . . . . . . 41
General Screen Information . . . . . . . . . . . . . . . . . . . 42
Welcome Screen . . . . . . . . . . . . . . . . . . . . . . . . . 42
Home Screen . . . . . . . . . . . . . . . . . . . . . . . . . . . 43
DISP (display) Information Fields . . . . . . . . . 44
Page 15

Table of Contents
FS-100 Portable DTE Recorder
xiii
FS-100 System Information Screens . . . . . . . . . . 46
Record Screens . . . . . . . . . . . . . . . . . . . . . . . . . . . . .47
Normal Record . . . . . . . . . . . . . . . . . . . . . . . . . . .48
PRE-REC Record Mode . . . . . . . . . . . . . . . . . . .48
PRE-REC Disk Record Mode . . . . . . . . . . . . . . .49
Loop Record . . . . . . . . . . . . . . . . . . . . . . . . . . . .50
Saving Loop Record Clips . . . . . . . . . . . . . . . 50
Snap Record . . . . . . . . . . . . . . . . . . . . . . . . . . . .50
Time Lapse Record . . . . . . . . . . . . . . . . . . . . . . .51
Format Screen . . . . . . . . . . . . . . . . . . . . . . . . . . . . . .52
DV Formats . . . . . . . . . . . . . . . . . . . . . . . . . . . . .52
HDD Mode Screen . . . . . . . . . . . . . . . . . . . . . . . . . .54
Setting Up Master and Slave FS-100 . . . . . . . . .56
Setup Screens . . . . . . . . . . . . . . . . . . . . . . . . . . . . . .57
Date . . . . . . . . . . . . . . . . . . . . . . . . . . . . . . . . . . .59
Time . . . . . . . . . . . . . . . . . . . . . . . . . . . . . . . . . . .59
Version . . . . . . . . . . . . . . . . . . . . . . . . . . . . . . . . .60
LCD Light On, Off, Auto . . . . . . . . . . . . . . . . . . . .60
Alarm On, Off . . . . . . . . . . . . . . . . . . . . . . . . . . . .60
Stop Frame, No Video . . . . . . . . . . . . . . . . . . . . .61
EXT CTL OFF, Pause, Frame, File . . . . . . . . . . .61
TIME CODE EXT, REC RUN, FREE RUN, REGEN 62
TC SET . . . . . . . . . . . . . . . . . . . . . . . . . . . . . . . .63
UB SET . . . . . . . . . . . . . . . . . . . . . . . . . . . . . . . .64
TC DROP, NON-DROP NTSC only . . . . . . . . . . . 65
VFR MODE . . . . . . . . . . . . . . . . . . . . . . . . . . . . .66
NTSC Menu . . . . . . . . . . . . . . . . . . . . . . . . . .66
PAL Menu . . . . . . . . . . . . . . . . . . . . . . . . . . .66
Set AG-HVX200 to Standard Record Mode . .67
Undercranking and Overcranking . . . . . . . . .68
Using VFR recordings in NLEs . . . . . . . . . . .69
LCD CONTRAST . . . . . . . . . . . . . . . . . . . . . . . . .70
Functions Screen . . . . . . . . . . . . . . . . . . . . . . . . . . . .71
Functions List . . . . . . . . . . . . . . . . . . . . . . . . . . .72
Assigning Clips to Reels . . . . . . . . . . . . . . . .74
Blank . . . . . . . . . . . . . . . . . . . . . . . . . . . . . . .74
Utilities Screen . . . . . . . . . . . . . . . . . . . . . . . . . . . . . .75
Organize Reel . . . . . . . . . . . . . . . . . . . . . . . . . . .75
Page 16

Table of Contents
FS-100 Portable DTE Recorder
xiv
Organize OMF DVCPRO/DV only . . . . . . . . . . . 76
Organize P2 . . . . . . . . . . . . . . . . . . . . . . . . . . . . 76
File Naming Conventions . . . . . . . . . . . . . . . 77
Organize PINN DVCPRO/DV only . . . . . . . . . . . 77
Make Ref MOV Version 4.x only . . . . . . . . . . . . . 78
File Name Convention . . . . . . . . . . . . . . . . . 79
Delete Clip . . . . . . . . . . . . . . . . . . . . . . . . . . . . . 80
Format Disk . . . . . . . . . . . . . . . . . . . . . . . . . . . . . 81
Repair Disk . . . . . . . . . . . . . . . . . . . . . . . . . . . . . 82
Repair Clip . . . . . . . . . . . . . . . . . . . . . . . . . . . . . 83
Run Repair Clip after Organize P2 . . . . . . . . 83
File Name . . . . . . . . . . . . . . . . . . . . . . . . . . . . . . 85
Upgrade . . . . . . . . . . . . . . . . . . . . . . . . . . . . . . . 86
Upgrade Errors . . . . . . . . . . . . . . . . . . . . . . . 87
System Reset . . . . . . . . . . . . . . . . . . . . . . . . . . . 88
Diagnostic . . . . . . . . . . . . . . . . . . . . . . . . . . . . . . 89
Status . . . . . . . . . . . . . . . . . . . . . . . . . . . . . . . . . 89
Reels Screen . . . . . . . . . . . . . . . . . . . . . . . . . . . . . . 90
Placing a Clip in a Reel . . . . . . . . . . . . . . . . . . . . 90
Using a Wired Remote Control . . . . . . . . . . . 91
Play Screen . . . . . . . . . . . . . . . . . . . . . . . . . . . . . . . 92
Play From Screen . . . . . . . . . . . . . . . . . . . . . . . . . . . 93
Control Screen . . . . . . . . . . . . . . . . . . . . . . . . . . . . . 94
LCD Display Symbols and Text . . . . . . . . . . . . . . . . . . . 97
Using the FS-100 with a Computer . . . . . . . . . . . . . . . . . 99
Initial Setup . . . . . . . . . . . . . . . . . . . . . . . . . . . . . . . 100
Mounting the FS-100 in Windows . . . . . . . . . . . . . . 101
FS-100 and FAT 32 . . . . . . . . . . . . . . . . . . . . . . 104
Using Avid OMF Clips . . . . . . . . . . . . . . . . . . . . 105
Dismounting the FS-100 (Windows) . . . . . . . . . . . . 108
Mounting the FS-100 (Macintosh) . . . . . . . . . . . . . 109
Dismounting the FS-100 (Macintosh) . . . . . . . . . . . 110
Mounting Hardware . . . . . . . . . . . . . . . . . . . . . . . . 111
Mounting FS-100 to a Camcorder . . . . . . . . . . . 111
Page 17

Table of Contents
FS-100 Portable DTE Recorder
xv
Clipping to a Belt . . . . . . . . . . . . . . . . . . . . . . . . 112
Technical Specifications . . . . . . . . . . . . . . . . . . . . . . . . 113
Physical Description . . . . . . . . . . . . . . . . . . . . . 113
Input/Outputs . . . . . . . . . . . . . . . . . . . . . . . . . . . 113
Power . . . . . . . . . . . . . . . . . . . . . . . . . . . . . . . . 114
Audio/Video/Timecode Specification . . . . . . . . . 114
DTE File Formats . . . . . . . . . . . . . . . . . . . . . . . 115
Disk Information . . . . . . . . . . . . . . . . . . . . . . . . . 115
Log Files . . . . . . . . . . . . . . . . . . . . . . . . . . . . . . 116
Error Messages . . . . . . . . . . . . . . . . . . . . . . . . . 116
Miscellaneous Files . . . . . . . . . . . . . . . . . . . . . . 117
fwxdc.dat . . . . . . . . . . . . . . . . . . . . . . . . . . . 117
Warranty . . . . . . . . . . . . . . . . . . . . . . . . . . . . . . 117
Shock and Vibration . . . . . . . . . . . . . . . . . . . . . . 117
Temperature . . . . . . . . . . . . . . . . . . . . . . . . . . . 117
Compatible Camcorders and Accessories . . . . . 117
Index . . . . . . . . . . . . . . . . . . . . . . . . . . . . . . . . . . . . . . . .i-1
Page 18

FS-100 Portable DTE Recorder
Page 19

FS-100 Portable DTE Recorder
1
Introduction
Thank you for purchasing a Focus Enhancements’ FS-100 portable
Direct To Edit (
DTE) disk recorder. The FS-100 is the first portable
DVCPROHD/DVCPRO50/DVCPRO/DV disk recorder with Focus
Enhancement’s DTE technology designed for hand held camcorders
in a small, rugged and shock proof chassis.
If you edit with applications from Adobe, Apple, Avid, Canopus,
Matrox, Pinnacle, Sony, Ulead, and many others, Focus
Enhancement's DTE Technology is the only solution that can save
hundreds of hours a year by recording clips to disk in your non-linear
editor’s (
NLE) native file format.
DTE Eliminates Pre-edit Processing
The FS-100 DTE disk recorder eliminates the need to capture, transfer
or convert video clips before editing. The FS-100 is a stand-alone
device that records DVCPROHD, DVCPRO50, and DVCPRO/DV
video to its disk drive as a NLE native file. For most DV and many P2
compatible NLE systems, when the disk drive is connected to a
computer the clips are immediately available for editing.
Shoot, connect, and edit: it is now that easy.
In addition, the FS-100 can record digital video streams up to and
including 100Mb/s.
These capabilities make the FS-100 the perfect companion for the
Panasonic HVX200 P2 DVCPROHD camcorder. In addition, the FS100 is suitable for use with other Panasonic DVCPROHD,
DVCPRO50, and DVCPRO camcorders with an IEEE-1394 interface.
Page 20
Introduction
FS-100 Portable DTE Recorder
2
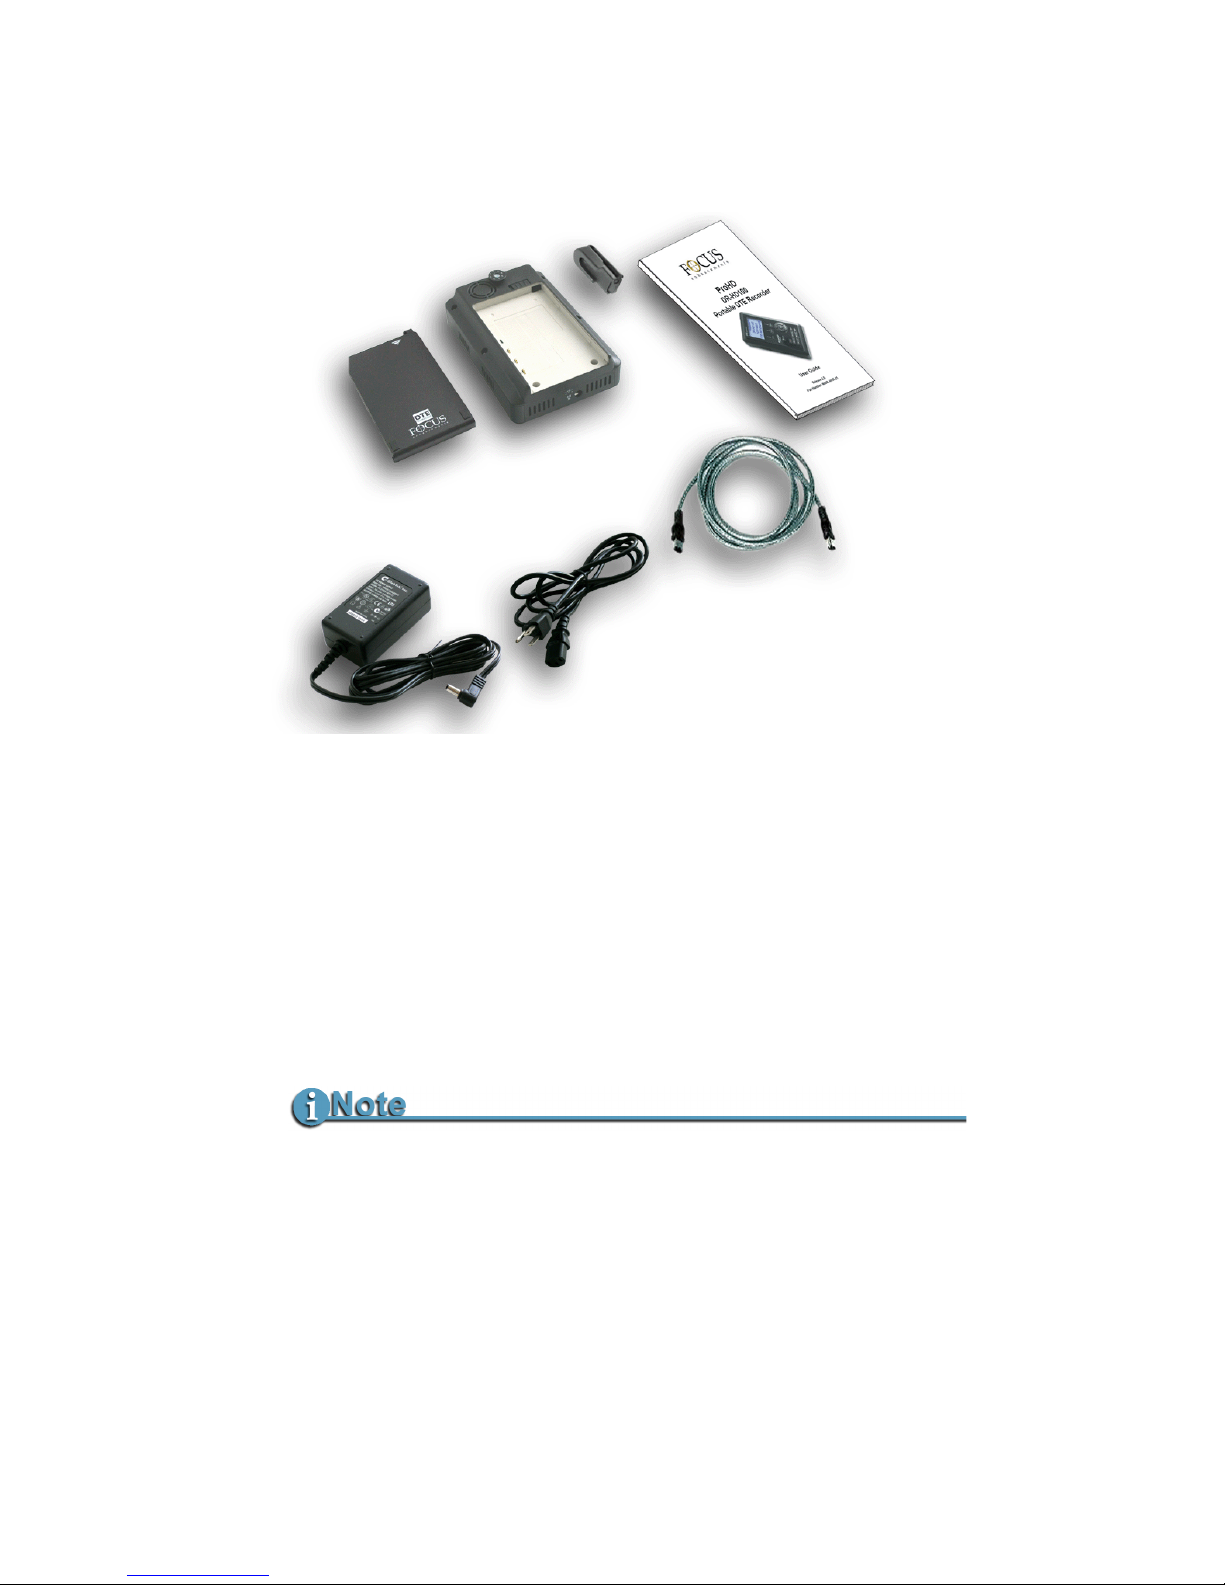
Unpacking
Verify that the FS-100 has the following items:
1. FS-100 unit
2. Belt clip
3. User guide
4. One Firewire cable
5. Power cord
6. Power supply with cable and connector to the FS-100
7. Removable Li-Ion battery pack
Missing or Damaged Components
If there are missing or damaged items, contact Focus Enhancements
Support for assistance.
USA Email: [email protected]
USA Telephone: +1 763-398-1658
EMEA Email: [email protected]
EMEA Telephone: +49 4307 - 83 58 58
1
7
2
3
4
5
6
Page 21

Introduction
FS-100 Portable DTE Recorder
3
Features
The FS-100 offers the following features:
•
Tapeless Acquisition
Especially equipped camcorders permit the use of Direct To Edit
(DTE) Technology to record directly from a camcorder while
shooting and without the need of a tape.
•
True DTE Technology
When shooting is finished, connect the FS-100 to a computer and
instantly be ready to edit in the timeline. Files are recorded to
disk as
• Fast and Efficient Editing
When shooting is finished, mount the FS-100 to a Mac or PC
editing system like a typical FireWire hard disk drive. Transfer
clips to your NLE's media drive at up to 400 Mbps or edit
instantly in real-time using the FS-100 as your media source.
With some DV and P2 compatible NLE systems, it is necessary
to capture the video footage using the NLE system’s capture
capability.
•
Confidence in Recording
Now, simultaneously record to disk and tape while you shoot,
providing an immediately available, drop out free, edit source
with an archive and backup on tape.
•
Compact, Lightweight, Rugged Design
The FS-100 weighs approximately one pound including the
battery and is only 1.5" thick. You can mount the FS-100 directly
to your camcorder using the optional camera mount kit, or clip
the FS-100 directly to your belt. The FS-100 is designed to
withstand the rigors of field shooting. The programmable,
seconds of electronic shock cache ensures that your video is
always recorded even in the roughest of conditions.
DVCPROHD and
DVCPRO50
P2
P2 PN
(DVCPROHD with 4.x)
QUICKTIME (4.x)
QUICKTIME PN
(DVCPROHD with 4.x)
RAW DV
DVCPRO/DV
RAW DV (.dv)
AVI T YPE 1 (.av i )
AVI Type 2 (.avi)
Canopus AVI (.avi)
Matrox AVI (.avi, .wav)
QuickTime (.mov)
AVID OMF
Pinnacle (.avi, .wav)
P2
DVCPRO/DV
(NTSC Only)
AVI Type 2 24p (.avi)
QuickTime 24p (.mov)
Page 22

Introduction
FS-100 Portable DTE Recorder
4
•
Flexible Capacities and Power
The FS-100 hard drive provides hours of recorded content
capacity. See www.focusinfo.com for the currently available
hard drive capacities.
Extend record times by linking two FS-100 units together.
Power the FS-100 using slim, removable battery packs or power
it using the supplied AC adapter.
• Easy to Use, Control and Update
The FS-100 interfaces with your camcorder using a single
FireWire cable that passes audio, video, timecode and control
information. When a tape is present, each press of start and stop
on your camcorder's record button creates an individual clip on
disk. The FS-100 features a comprehensive backlit display, menu
system and buttons allowing easy control and management. In
addition, these units are upgradeable in the field.
•
Never Miss A Shot
FS-100's PRE-record mode means you are always recording.
When action happens, you now can have up to six seconds prior
to the event occurring saved in your clip.
•
PRE-REC Disk and Loop Record Modes
•
Scene Marking
This allows categorizing video clips into pre-named folders on
the disk during a shoot.
•
User Definable Tme Lapse
•
Loop Playback Modes
•
Free Run, Rec Run, and Regen Timecode Modes
Page 23

FS-100 Portable DTE Recorder
5
Quickstart
This section provides the following information necessary for using
the FS-100 as quickly as possible.
Physical Description and Basic Controls 6
The FS-100 Menu System 16
Connecting the FS-100 to AC Power 21
Installing / Removing the Battery Pack 22
Connecting a FS-100 to a DV/HD Camcorder 25
Record and Playback with the FS-100 26
Power On the FS-100 27
Select HDD Recorder Mode 28
Select a DV File Format 29
Set Time and Date 30
Record With the FS-100 32
Manual Recording 34
Syncro Slave 35
Tapeless 36
Playback on the FS-100 40
Page 24
Quickstart
FS-100 Portable DTE Recorder
6
Physical Description and Basic Controls
Front Panel Controls
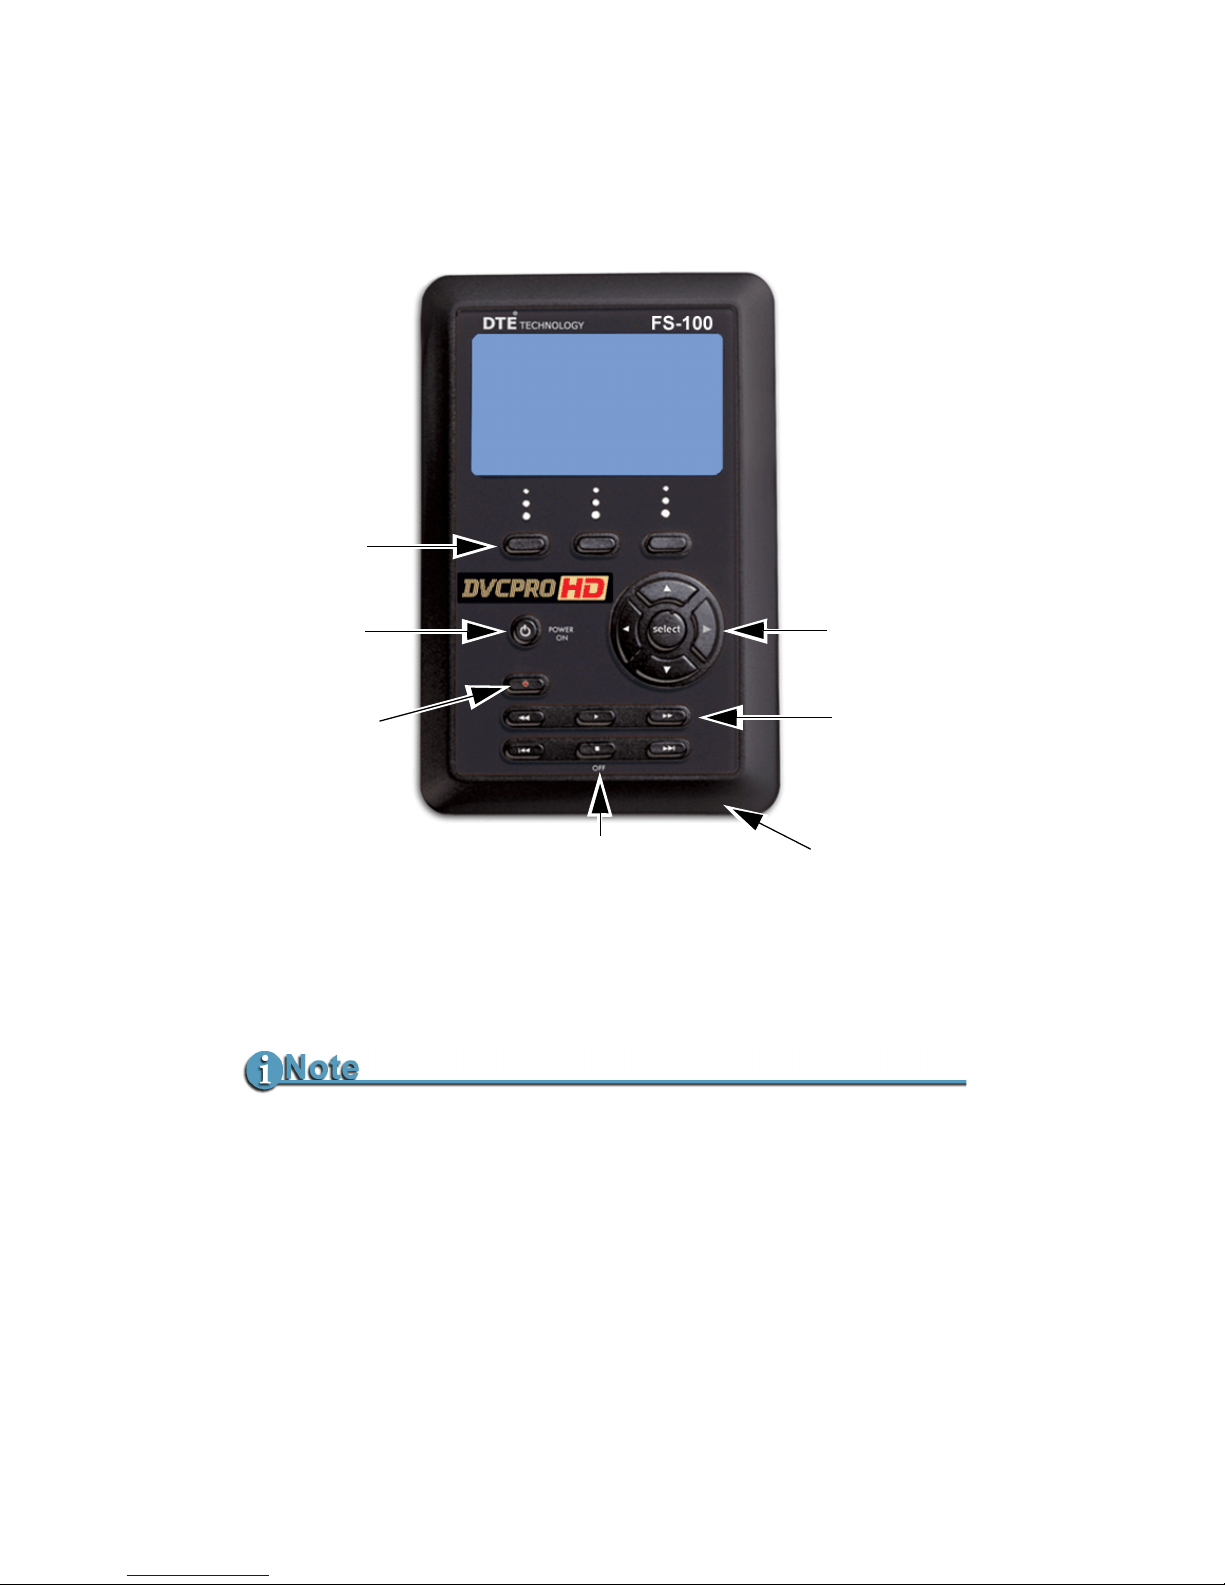
LCD Display
This is a backlit, 14 character by 7 line dot matrix display.
Function buttons (A, B, C)
Below the FS-100 LCD display are three user-defined function
buttons: A (left), B (center), and C (right). Use them as short-cut
keys for the most frequently selected functions at the bottom of
the LCD screen. The function of these soft buttons changes,
depending on the options displayed above that specific button.
Refer to the
Functions Screen on page 71 for more information.
Recovering LCD Display After A Mild Shock to FS-100
In the event of a mild electrical discharge to the unit, the LCD could go
blank. To correct, hold the SELECT button down for 5 seconds.
LCD
Display
Function
buttons
A B C
Power OFF
and
Stop button
Speaker
Navigation
buttons
Record
Button
Power ON
and Reset
Button
Transport
Control
buttons
Page 25
Quickstart
FS-100 Portable DTE Recorder
7
Power Control
The Power ON button provides two functions.
•Power ON
Turn on the FS-100.
•
Reset FS-100
First, FS-100 must be powered on.
Next, hold down the
Power On button for two seconds.
Power OFF
Hold down the OFF/STOP button for three (3) seconds. During
power off, the FS-100 beeps, indicating that it is turning off.
Navigation Buttons
Use these buttons to navigate through the FS-100 menus. The
navigation buttons are
Left, Right, Up, Down, and Select.
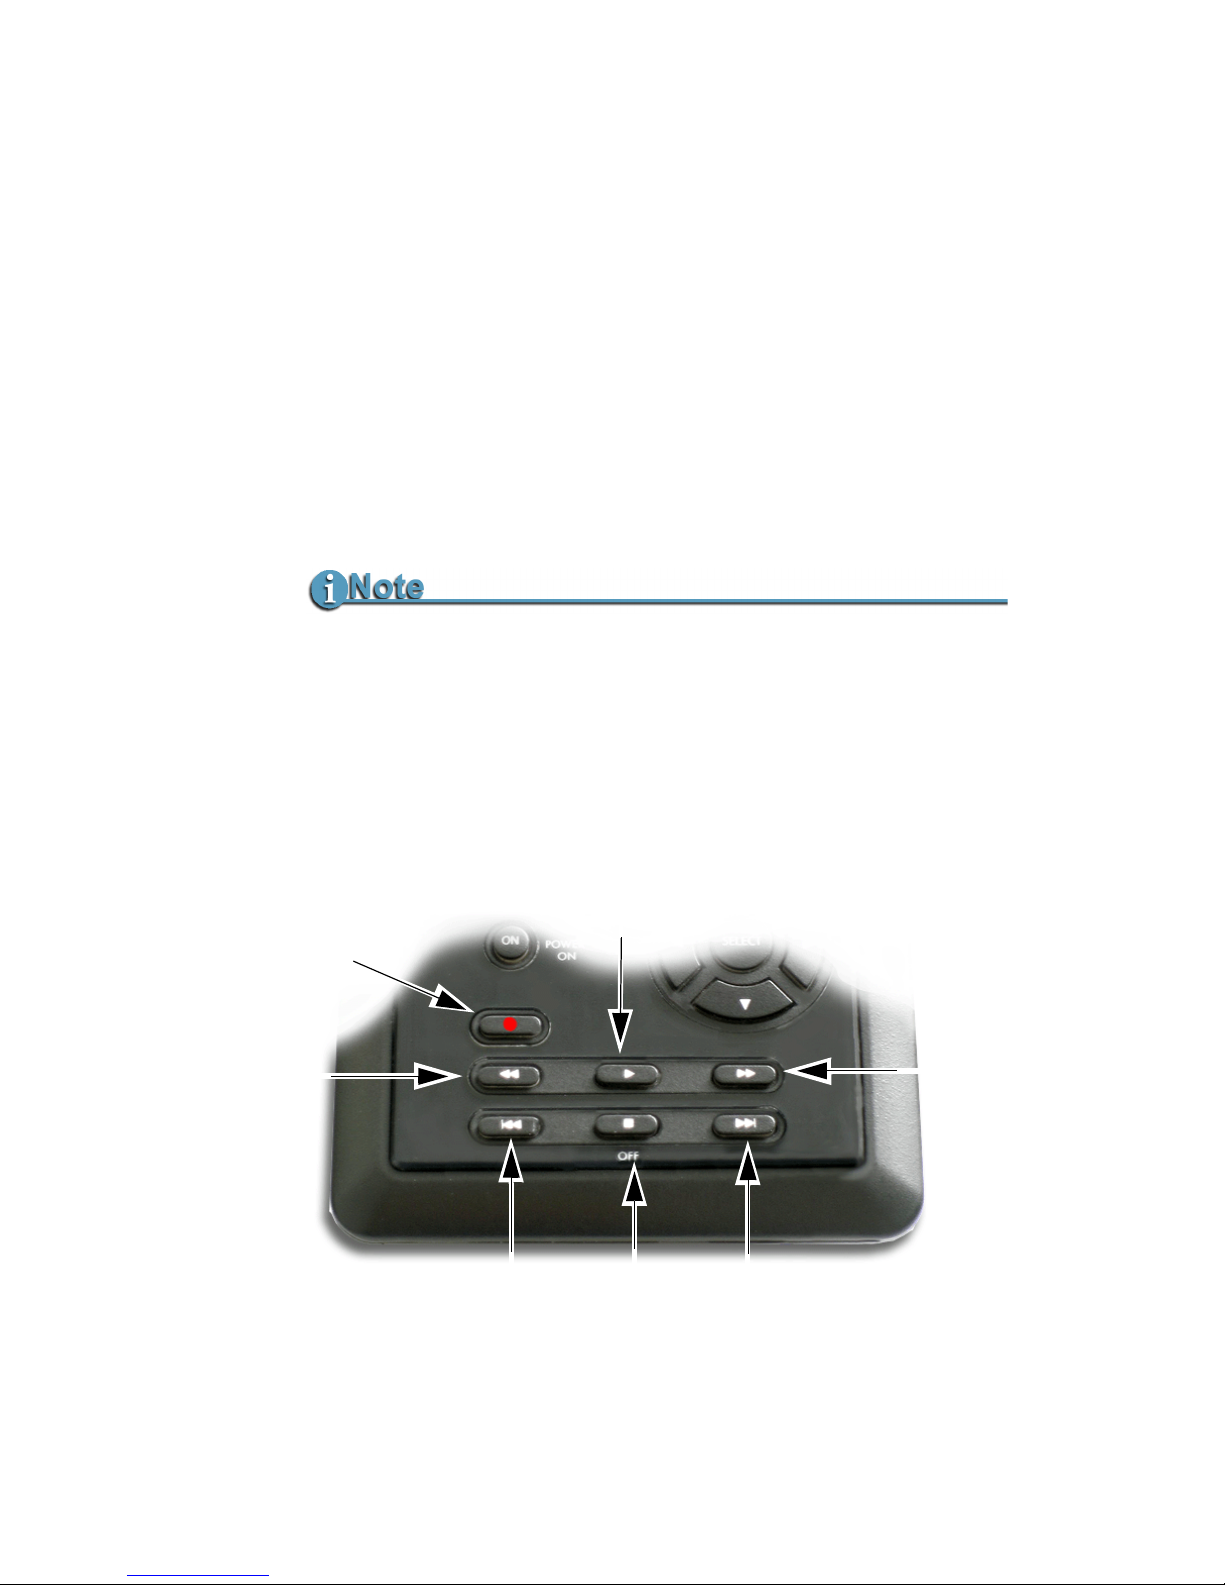
Transport Control Buttons
Use these buttons to control FS-100 playback and record
functions while on the HOME Screen.
Alarm OFF
If the Alarm feature is set to OFF, then the power-down sequence occurs
silently.
Back
Search
Forward
Search
Back
Index
Forward
Index
STOP
Power Off
Record
Play
Page 26

Quickstart
FS-100 Portable DTE Recorder
8
Record
Press this button once when the FS-100 is in Stop mode to put
the FS-100 into
REC-PAUSE. Press it again to start recording.
Pressing the Record button while recording, causes the
current clip to close and a new clip is created without
dropping any frames. This button is the only button that has a
red legend on the front panel.
Back Search WW
Press this button to play video at speeds different than realtime. Refer to the note in the Forward Search section.
Play X
Press this button to start playback of the selected clip.
Forward Search XX
Press this button to play video at speeds different than realtime.
Fast Forward and Reverse
Pressing the Forward Search button multiple times results in increases in
the search speed, i.e. fast forward. This mode works both in forward and
reverse functions. For instance, if you are in 10X FF speed and you press
the Back Search button once, the FS-100 is now in 2X FF mode. In
addition, this applies to backward search speeds. The default speed
resolution is as follows (NTSC and PAL, have slightly different multiples for
< 1X):
• Reverse: -30X, -10X, -2X, -1X (reverse play), -1/2X(-15fps), Still.
• Forward: Still, +1/2X (+15fps), +1X (play), +2X, +10X, +30X
Fast Forward and Reverse Search Compatible Camcorders
In Forward and Reverse Search modes, some camcorders do not display
video when played-back from an external device, such as the FS-100.
Page 27

Quickstart
FS-100 Portable DTE Recorder
9
Back Index |WW
This button returns the FS-100 to the beginning of the current
clip when in playback mode. Press this button twice in
sequence to return the FS-100 to the previous clip during
playback. In
STOP mode, press this button to return the FS-
100 to the beginning of the previous clip.
Pause, STOP and Power OFF
While in the Home screen, and in any transport mode, press
this button to Pause the FS-100. Press it again to stop the FS-
100. Refer to the section,
Setup Screens on page 57 for more
information.
To power off the FS-100, hold down the
STOP button for
three seconds. During Power OFF and if the Alarm function is
ON, the FS-100, makes an audible beep indicating it is turning
off.
Forward Index XX|
Use this button to skip forward to the next clip in STOP and
PLAY modes.
Using Back Index with Short Clips
When using Back Index with short clips, it is first necessary to place the
FS-100 in STOP mode.
Using the Forward and Back Index Keys
Use the Back and Forward Index keys to jump to the previous or next
partition. For example, when the current clip is the last on a partition,
pressing the Forward Index moves to next partition.
Page 28
Quickstart
FS-100 Portable DTE Recorder
10
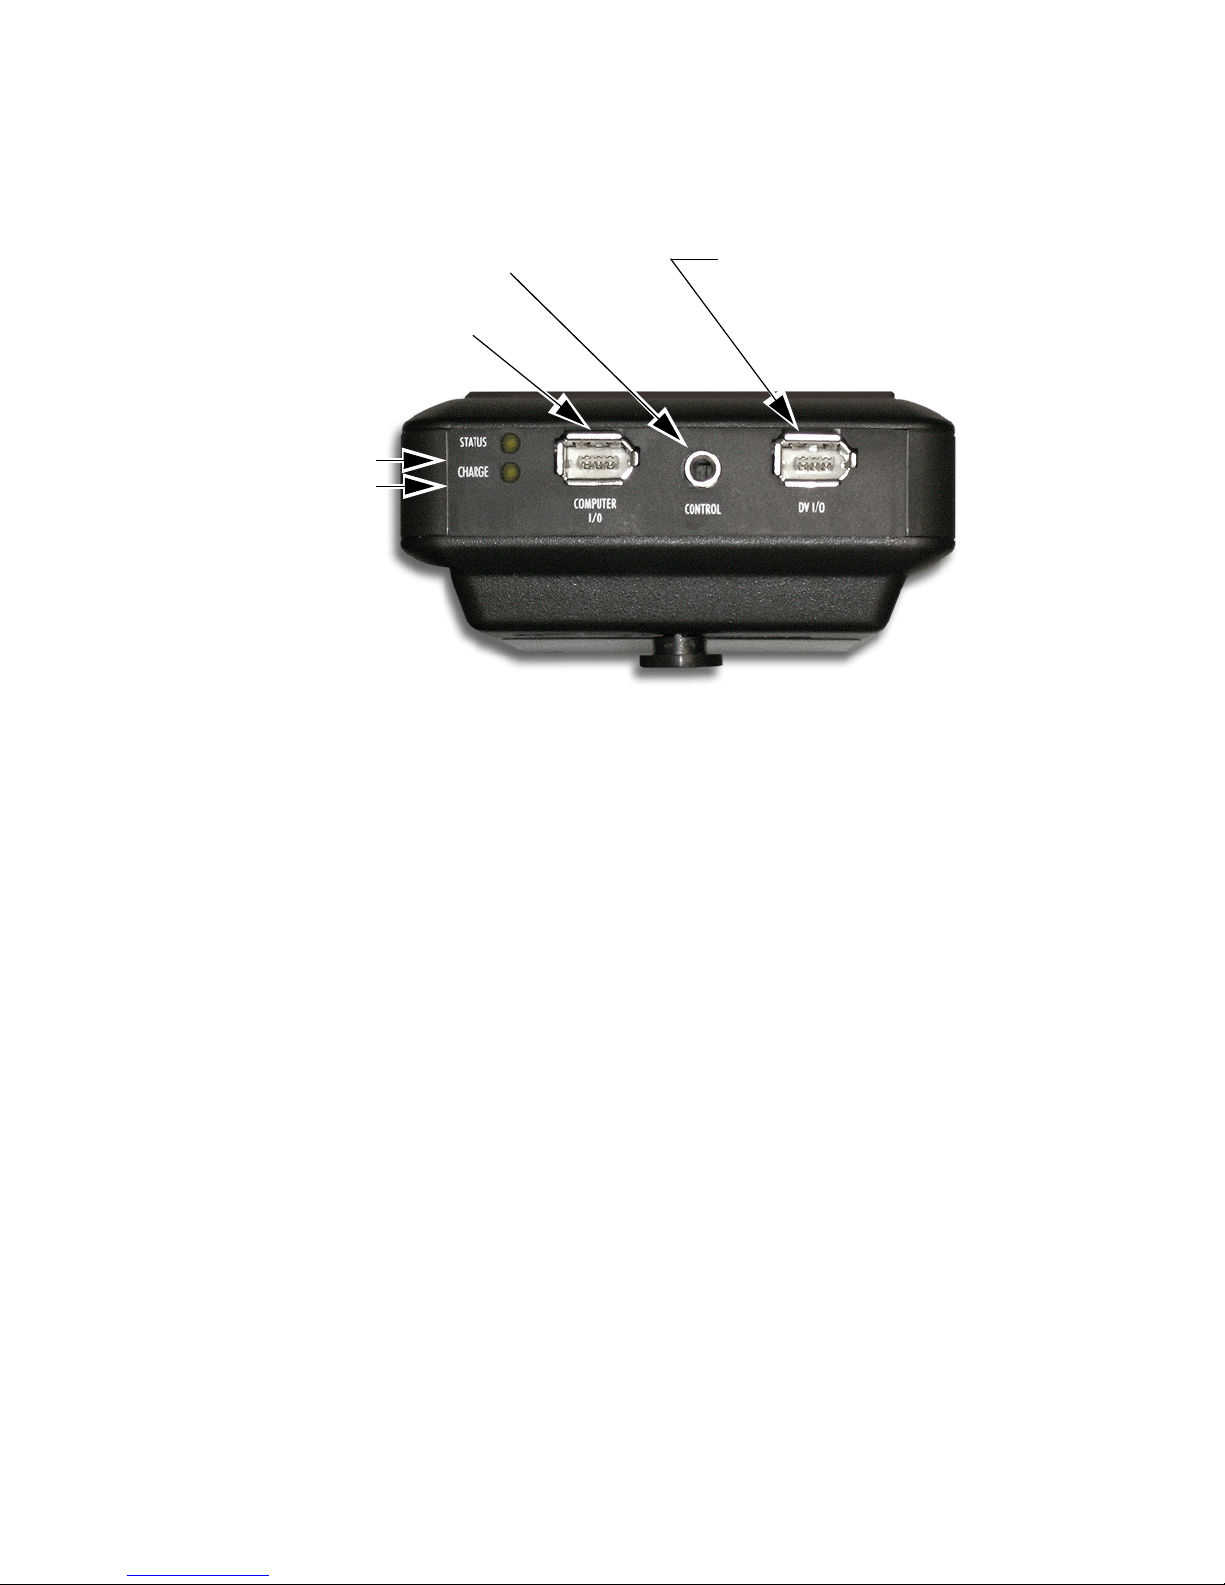
Top Panel
The top panel contains the following connectors and LEDs:
Charge LED Status
Status LED States
LED Indicates
Off No Charger Connected
Green Charging Cycle Completed
Amber / Green Floating Charge Mode
(Charging almost completed.)
Amber Fast Charge Mode (Maximum charging rate.)
Red Charging Error
Red / Amber No Battery Installed / Battery Error
Amber, flashing Insufficient Voltage to Charger
LED Indicates
Off Power OFF
Green Power ON
(Power On but there is no activity.)
Orange, solid Playback
Orange, fluttering Hard drive being accessed during playback.
Red, solid Recording Mode
Red, blinking Recording Pause
Computer
(FireWire Connector)
Remote Control
(Serial Connector)
Camera
(FireWire Connector)
Status LED
Charge LED
Page 29
Quickstart
FS-100 Portable DTE Recorder
11
Computer FireWire Connector
• In/Out: 6-pin IEEE-1394a port x 1
• Asynchronous Data I/O
Remote Control, Serial Connector
• GPI / RS232C; 3.5mm TRS mini jack. (3.5mm to DB-9 cable
accessory available).
• Configure as a simple contact closure or RS-232C port.
• Connect an optional wired remote commander.
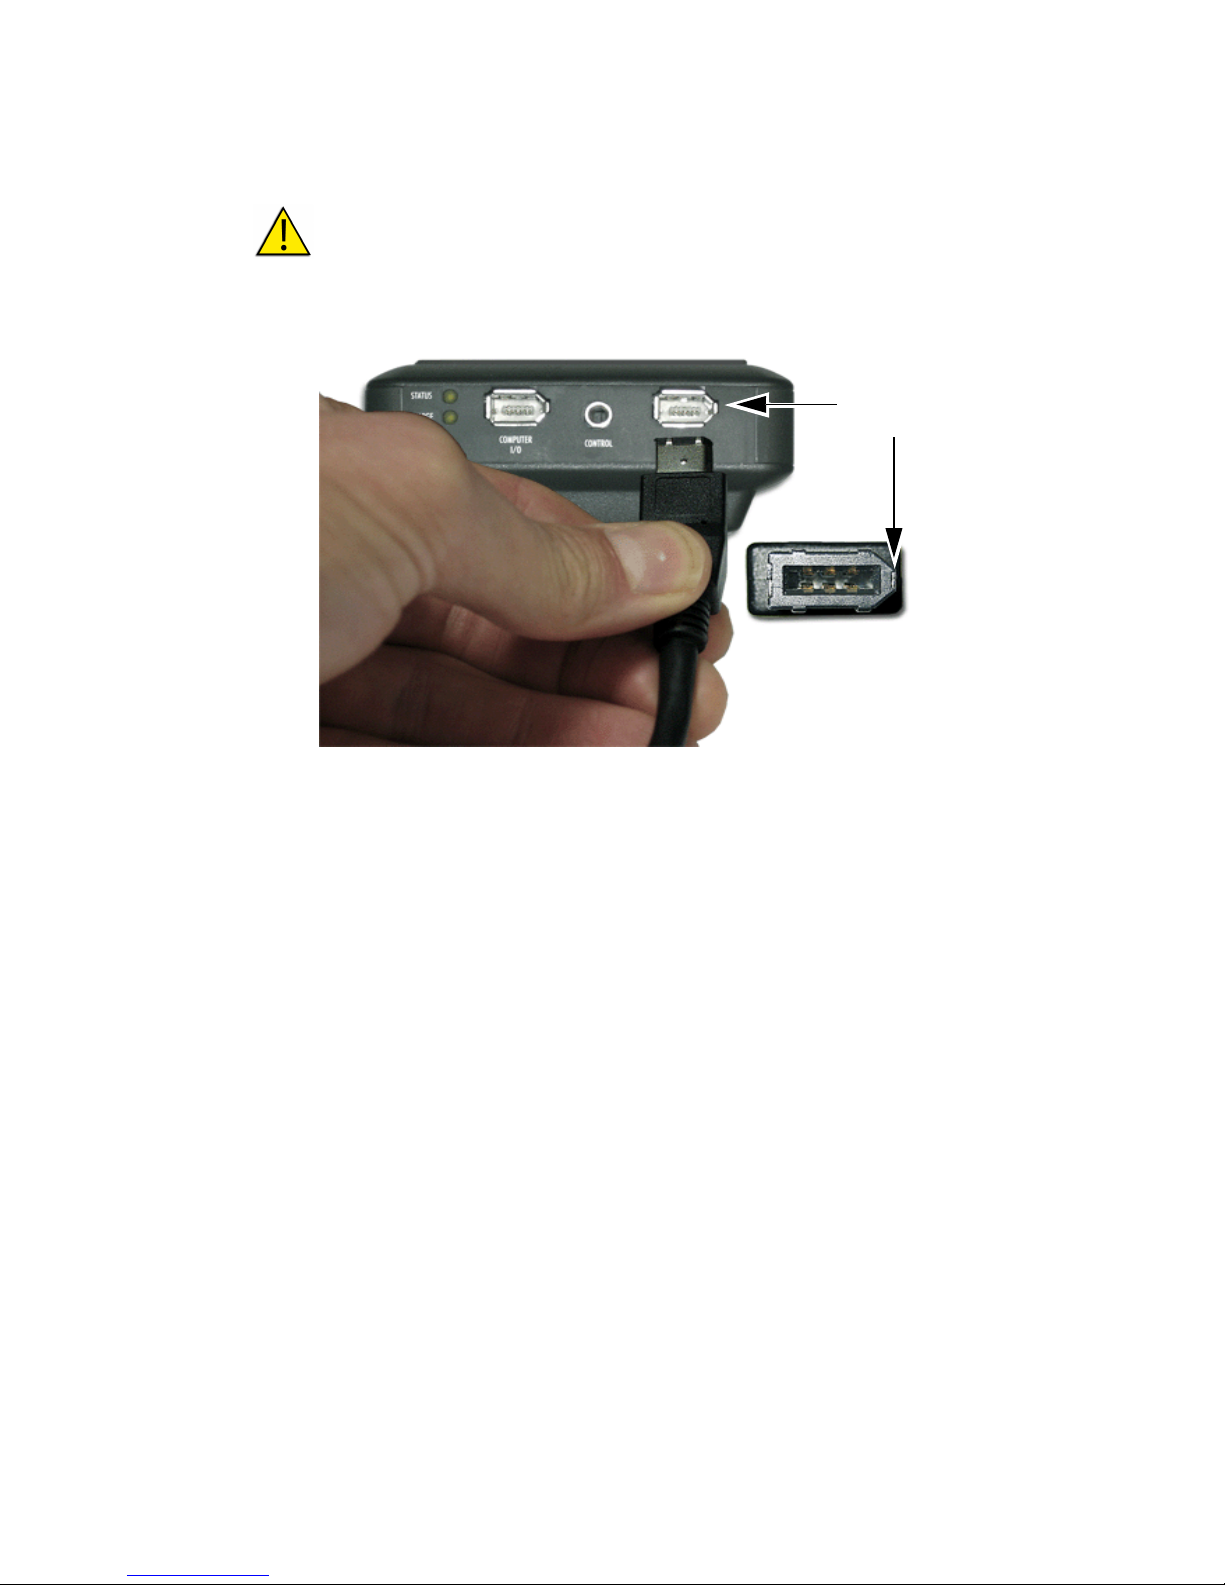
IMPROPER INSERTION WILL DAMAGE UNIT
Properly Align FireWire Cable and Connector - Do Not Force
Correctly align the FireWire cable to the connector before insertion. The
pointed end of the connector and the jack should be on the same side
before insertion:
Align pointed ends of
connector and
cable jack.
Page 30

Quickstart
FS-100 Portable DTE Recorder
12
Camera FireWire Connector
•DV/I/O
• 6-pin IEEE-1394a connector
See the note
Computer FireWire Connector on page 11.
• Isochronous 25Mb/s to 100Mb/s DV video I/O
FS-100 supports 1080i/720p video I/O in DVCPROHD
REC mode.
• Supported inputs for DVCPROHD / DVCPRO50 /
DVCPRO / DV:
• For DVCPROHD input, audio is embedded 4-ch, 48kHz,
16-bit.
• For DVCPRO50 input, audio is embedded 4-ch., 48kHz, 16bit.
• For DVCPRO input, audio is embedded 2-ch., 48kHz, 16bit,
• For DV input, audio is embedded 2-ch., 48kHz, 16-bit or 4ch., 32-khz, 12-bit.
NTSC
• 1080 60i (30P, 24P, 24PA)
• 720 60P
(30P, 24P) **
• 480 60i (30P, 24P, 24PA)
PAL
• 1080 50i (25P)
• 720 50P (25P) **
• 576 50i
(25P)
( )
indicates pull down format - (same stream)
** The 720 24PN, 25PN, and 30PN recordings are supported in
version 3.X or 4.x. These are generated from the 720 24P/25P/30P
as an
input. The PN modes are not supported as input streams.
4-Channel Audio
4-channel (12-bit, 32kHz) audio is available only with RawDV format.
Page 31
Quickstart
FS-100 Portable DTE Recorder
13
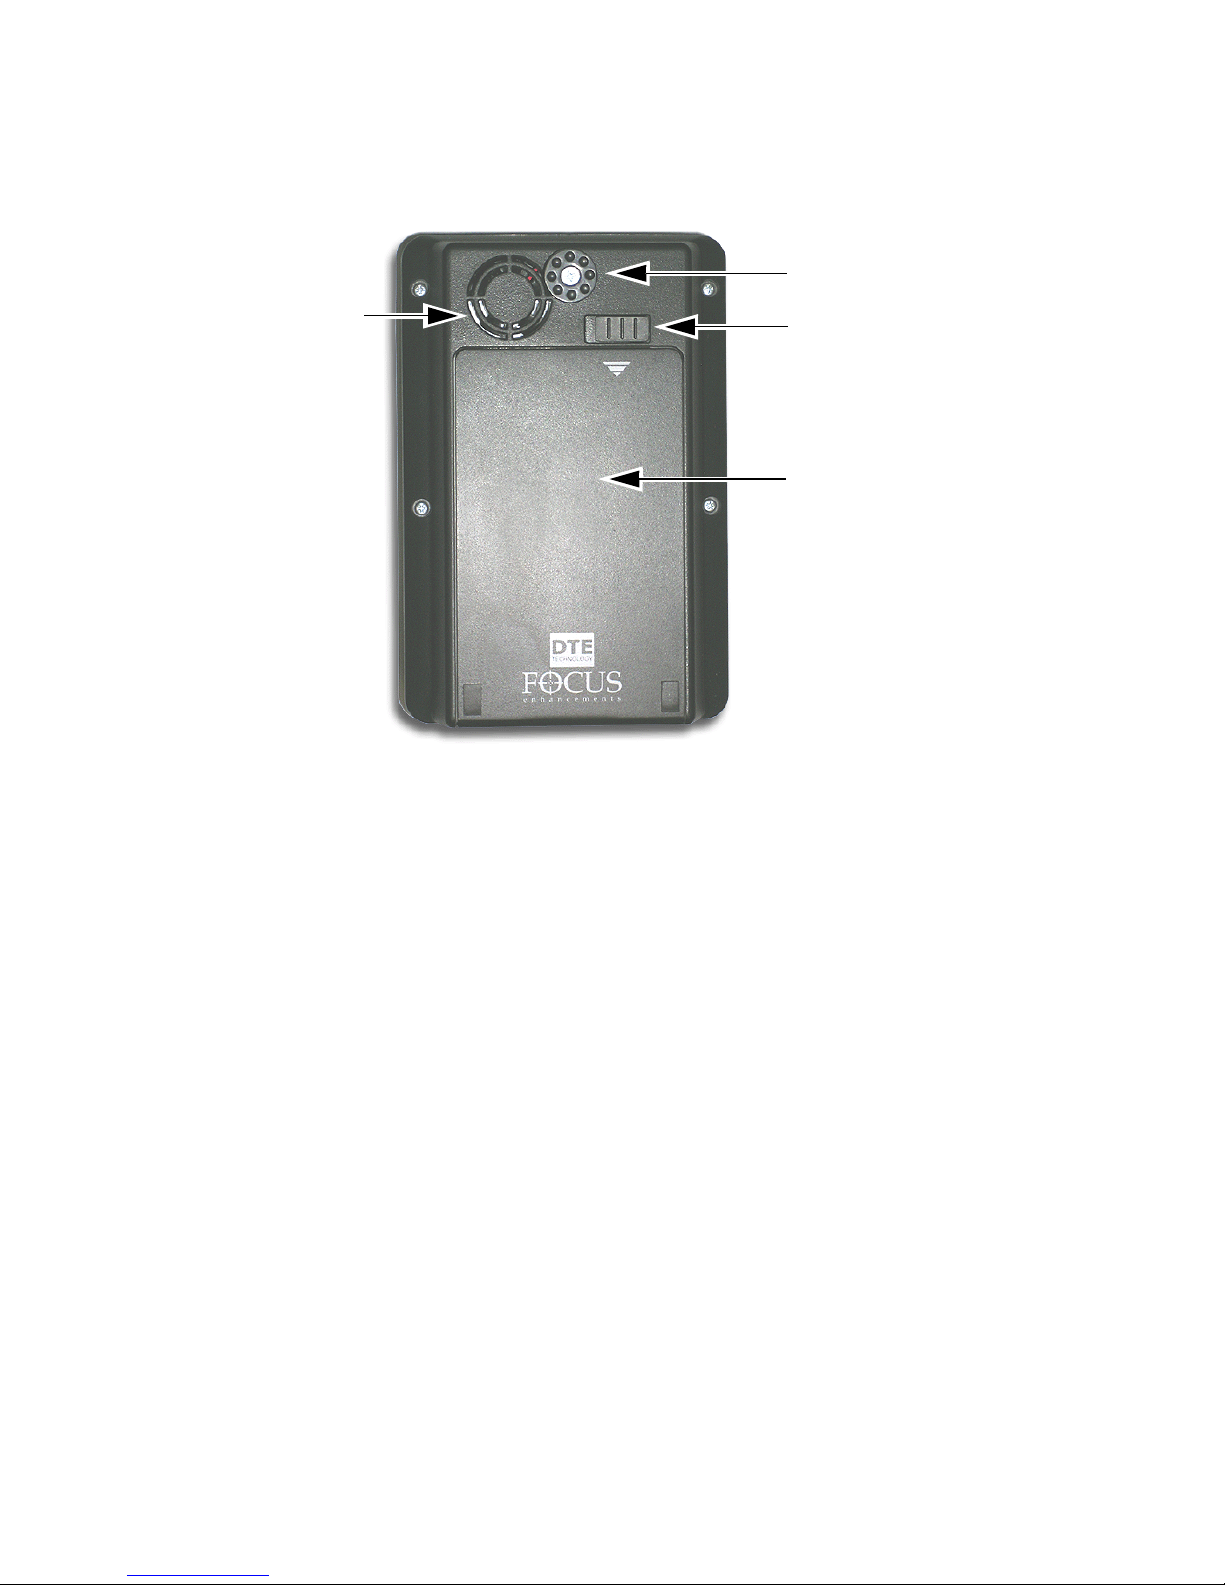
Rear Panel
The rear panel contains the following important items:
Fan Intake
Vent
Do Not
Block
Battery
Compartment
Belt Clip Post
Battery
Compartment Latch
Page 32
Quickstart
FS-100 Portable DTE Recorder
14
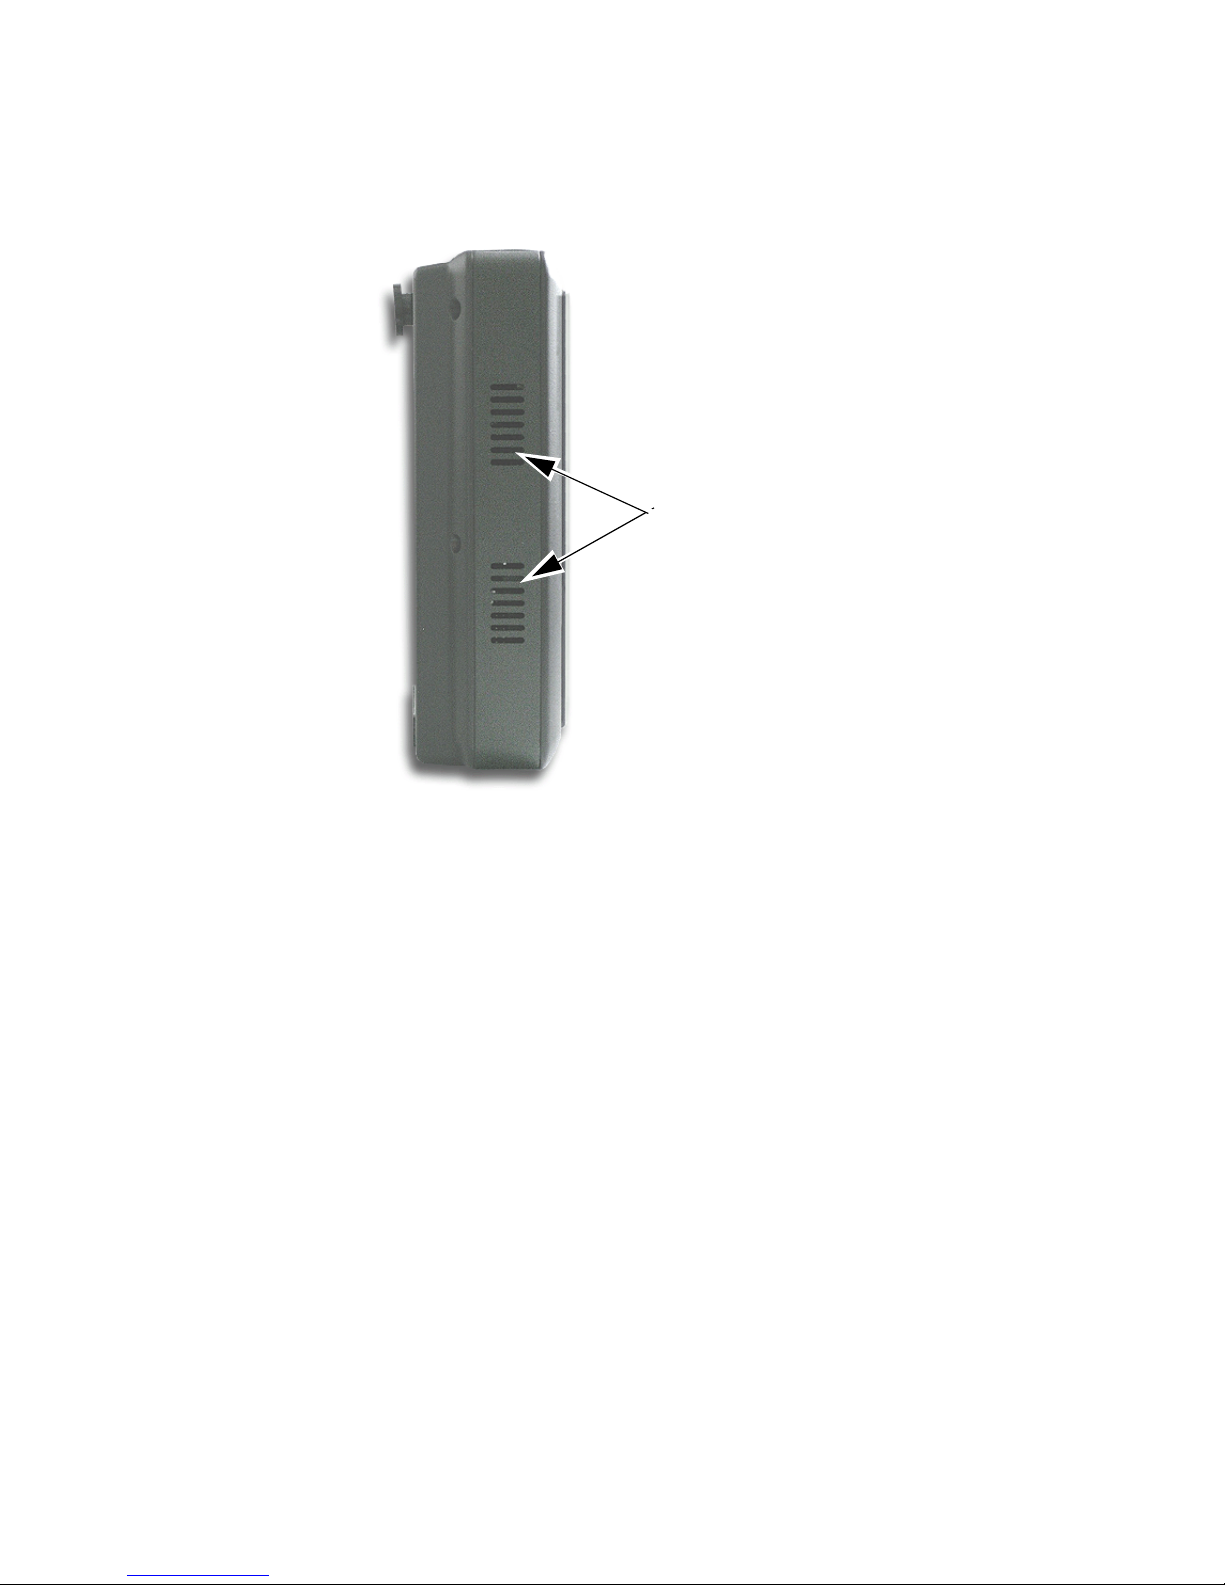
Side Panel
The side panel contains cooling vents as illustrated below.
Cooling Vents
Do Not
Block
Page 33
Quickstart
FS-100 Portable DTE Recorder
15
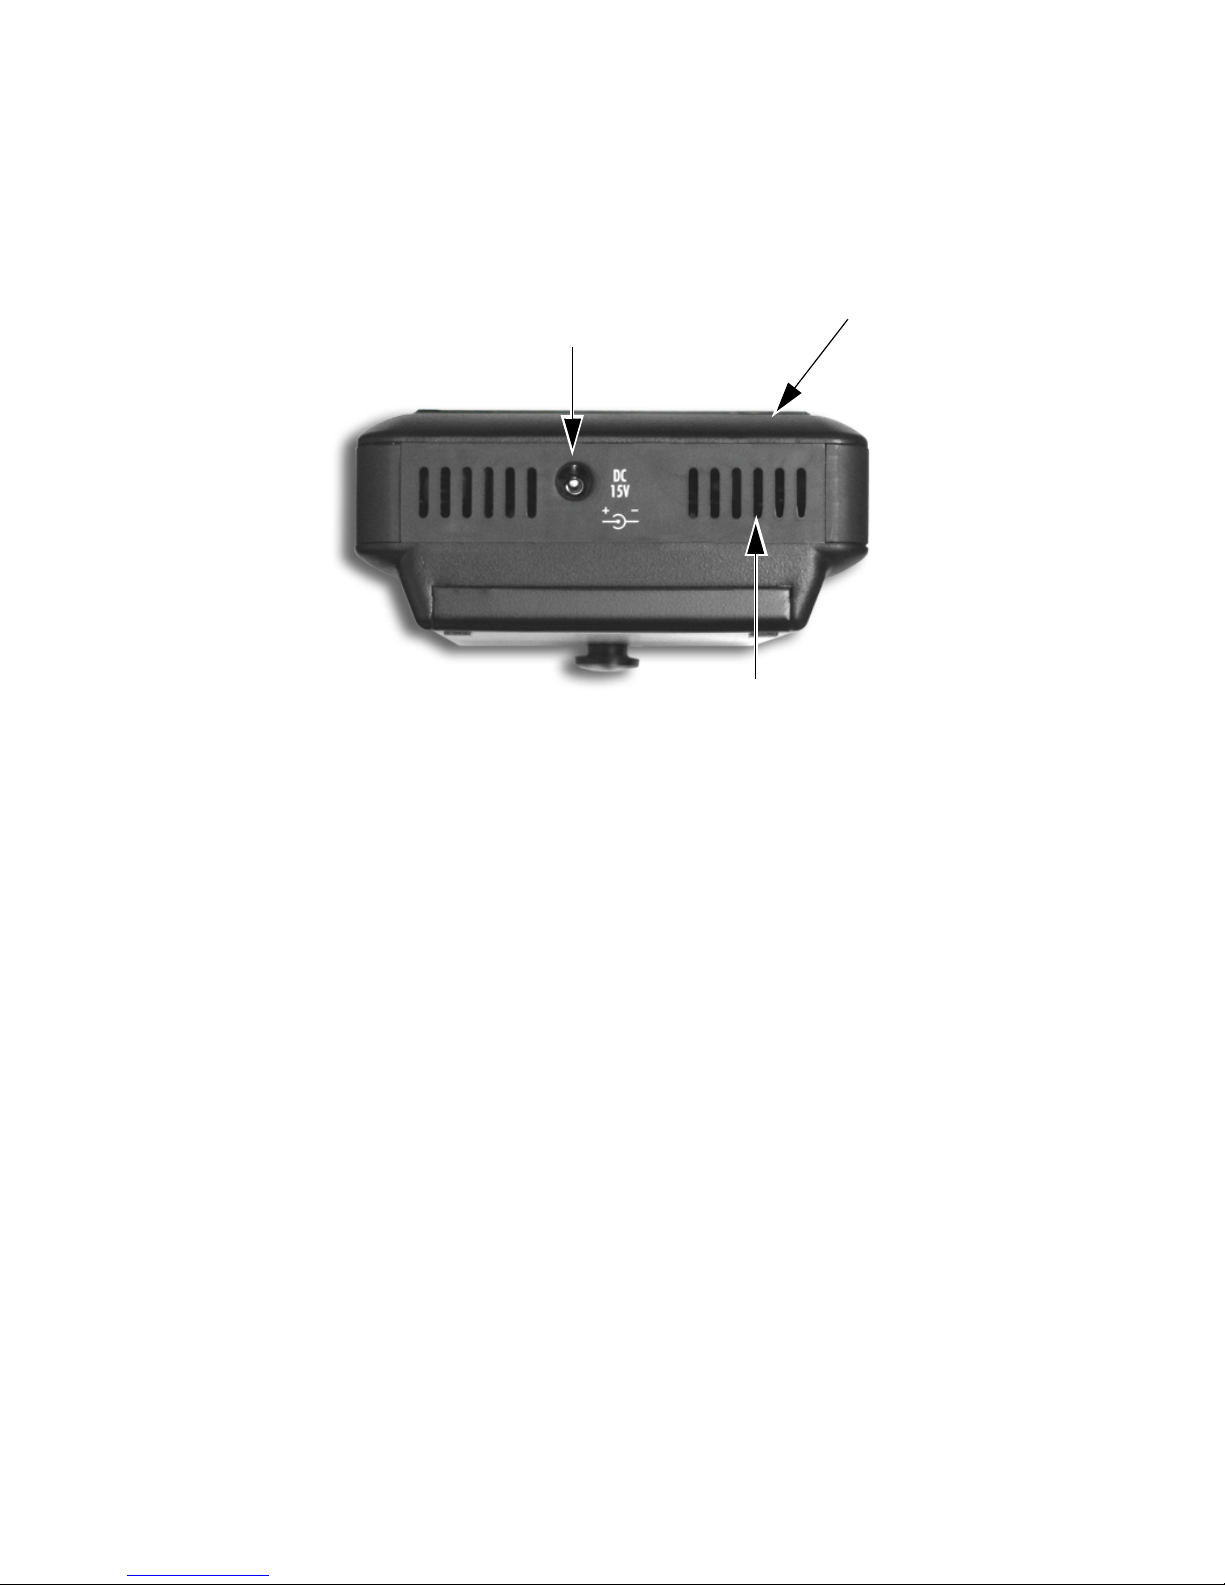
Bottom Panel
The FS-100 bottom panel features a single 2-pin DC power
connector. Connect the supplied AC power adapter here.
Internal Speaker
An internal speaker provides alarms and audible feedback.
• To disable the audible feedback, go to the Settings menu
and select
ALARM OFF. However, the power, temperature,
and disk capacity alarms are always active.
Cooling Vent
Do Not
Block
DC
Power
Connector
Internal
Speaker
Page 34
Quickstart
FS-100 Portable DTE Recorder
16
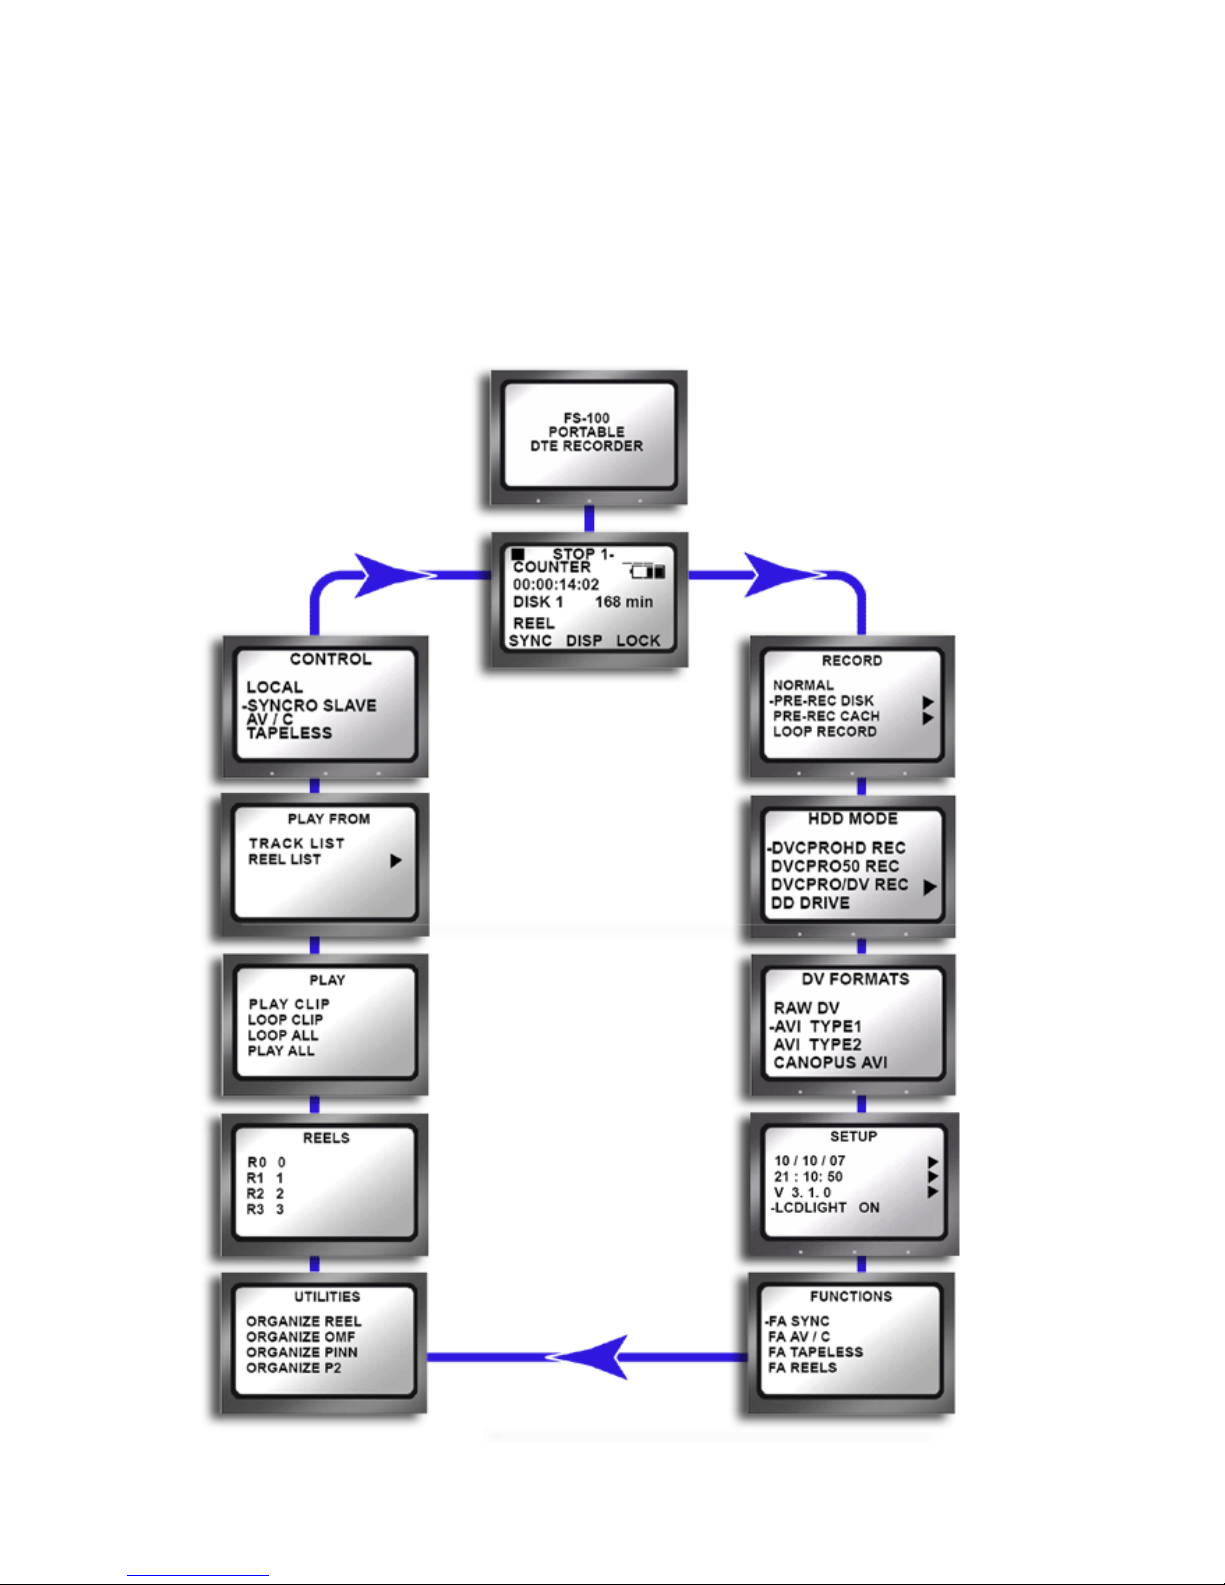
The FS-100 Menu System
The FS-100 menu system provides access to all the functions available
in the unit. Each of the screens below (except the Welcome and Home
screens which come up automatically when the unit starts) are
accessed by pressing the
Left or Right navigation buttons.
Welcome Screen
Home Screen
Page 35

Quickstart
FS-100 Portable DTE Recorder
17
Outline of Menu and Option Screens
The functions of each of the selections on these screens is explained
in more detail in
FS-100 Functions on page 41.
•
Welcome
Only appears for several seconds upon power up.
•
Home
Gateway screen for all functions, it displays disk and
operational status.
•
Control
Contains the following selections:
Local
Syncro Slave
AV/C
Tapeless
•
Play From
Provides lists to select play material from:
Track List
Reel List
•
Play
Contains the following Play selections:
Play Clip
Loop Clip
Loop All
Play All
•
Reels Screen
Allows selected clips to be marked for placement in particular
Reels Folders.
Returning to the Top of Menu or Home screen
To get to the top of any menu, press the Left button. To get back to the
Home screen:
• Highlight the screen title at the top of the screen.
• Press the Select button.
Page 36

Quickstart
FS-100 Portable DTE Recorder
18
•
Utilities
Contains the following disk and clip functions:
Organize Reel
Organize OMF DVCPRO/DV only
Organize P2
Organize PINN DVCPRO/DV only
Make Ref MOV version 4.X only
Delete Clip
Format
Repair Disk
Repair Clip
File Name
Upgrade
System Reset
Diagnostic
Status
•
Functions
Contains user definable function button selections. Changing
a setting with a Function button is identical to changing the
setting in its corresponding menu. Refer to
Functions Screen
on page 71 for more information.
•
Setup
Contains the controls for setting and reviewing the
FS-100 configuration:
Set Date (MM/DD/YY)
Set Time (XX:XX:XX)
View Firmware Version
LCDLight ON
LCDLight OFF
LCDLight AUTO
Alarm ON
Alarm OFF
Stop Frame
Stop No Video
EXT CTL OFF
EXT CTL PAUSE
Page 37

Quickstart
FS-100 Portable DTE Recorder
19
EXT CTL FRAME
EXT CTL FILE
TC EXT (external)
TC REC RUN
TC FREE RUN
TC REGEN (regenerate)
TC SET
UB SET
TC DROP NTSC only
TC NON-DROP NTSC only
VFR MODE 4.X only
LCD Contrast
•
DV Formats
Following HDD mode is a menu of formats available for the
type recorder selected in HDD mode.
When selecting
DVCPRO/DV REC the following formats are
shown:
RAW DV
AVI TYPE 1
AVI TYPE 2
CANOPUS AVI
MATROX AVI
QUICKTIME
AVID OMF
QUICKTIME 24P NTSC only
AVI TYPE 2 24P NTSC only
PINNACLE
P2
•
HDD Mode
Contains the following hard drive selections:
DVCPROHD REC
DVCPRO50 REC
DVCPRO/DV REC
DD Drive
USE EXT FS-100
Page 38

Quickstart
FS-100 Portable DTE Recorder
20
•
Record
Contains the following recording functions:
NORMAL REC
PRE REC Disk
PRE REC Cach
LOOP RECORD
SNAP
TIME LAPSE
Page 39
Quickstart
FS-100 Portable DTE Recorder
21
Powering the FS-100
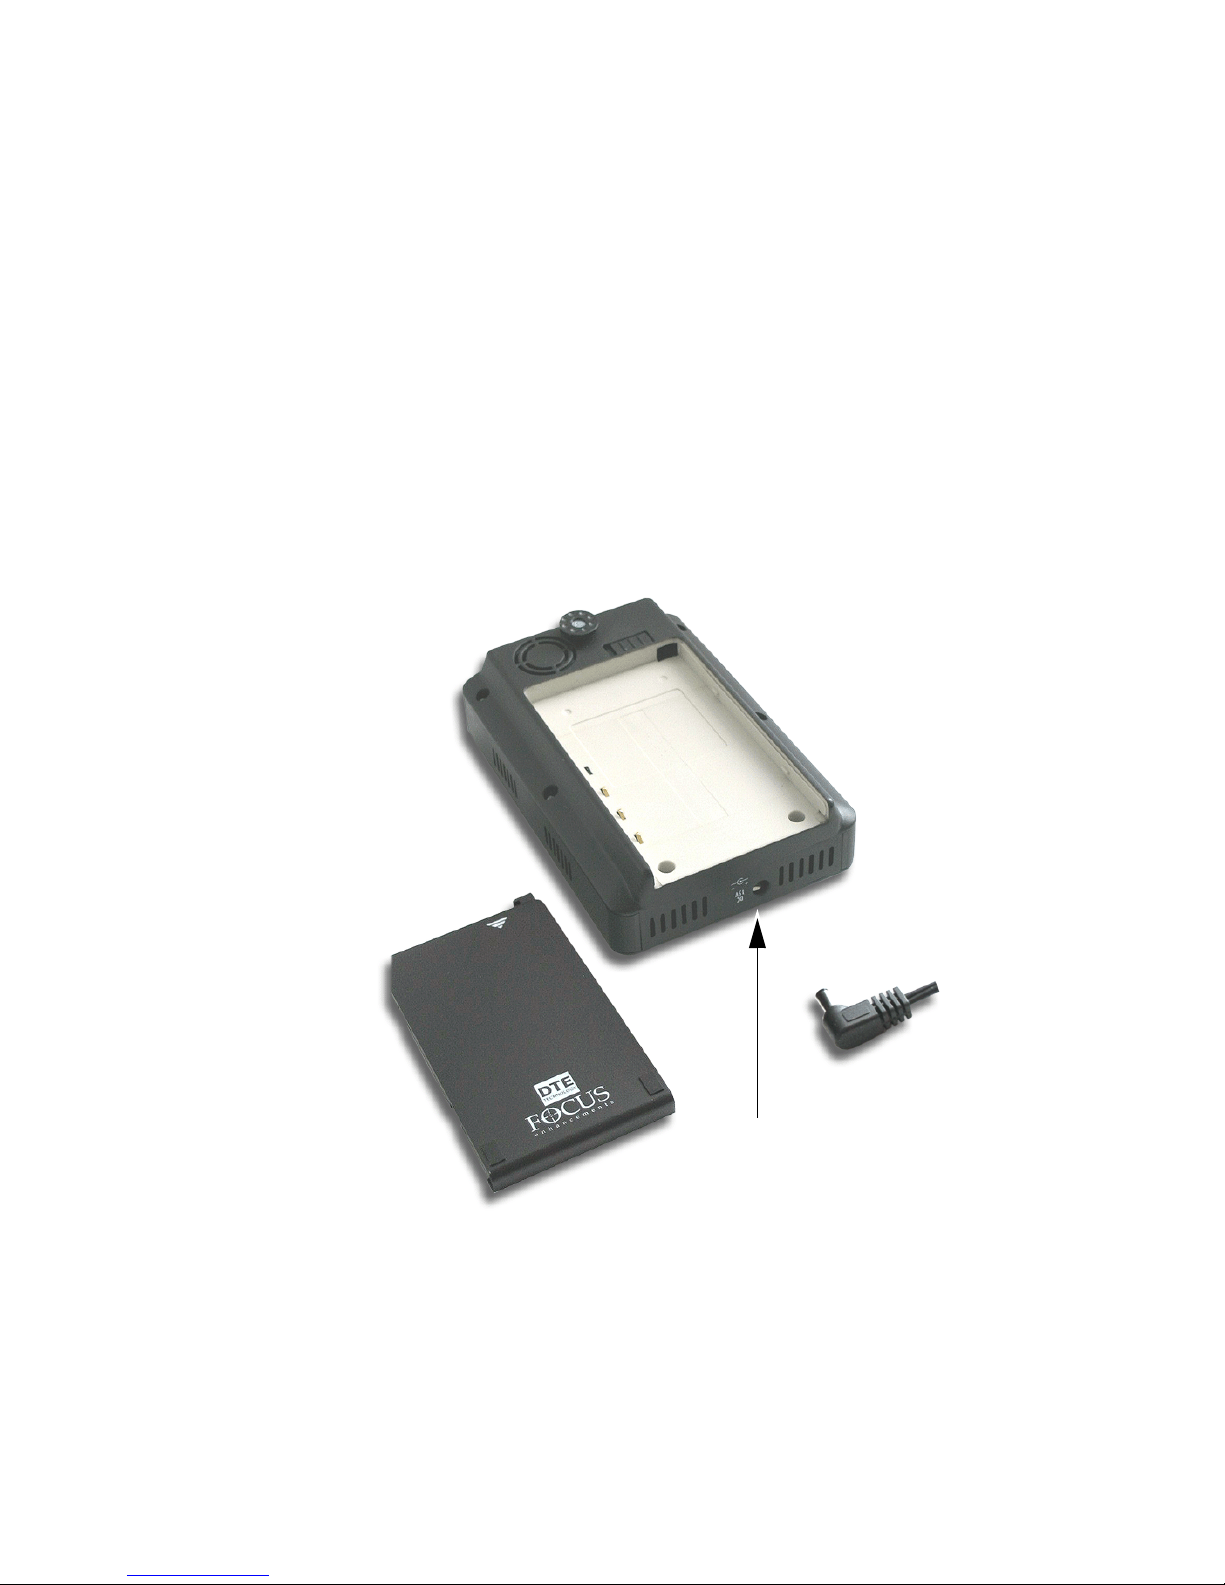
• FS-100 operation without a battery installed.
To operate the FS-100 without a battery installed, connect the
unit to an AC power source.
• FS-100 operation with battery power.
It is first necessary to fully charge the battery. An uncharged
battery, typically takes 2-3 hours to charge.
Connecting the FS-100 to AC Power
Attach the AC power cord to the FS-100 (with or without battery
installed). The FS-100 is immediately ready for operation.
To do this, connect the AC power as follows:
1. Plug the cord from the power supply into the bottom of the
FS-100.
2. Connect the line cord to the rectangular power supply.
3. Plug the line cord into an electric outlet.
Battery Pack
DC Power Port
DC Cable
Page 40
Quickstart
FS-100 Portable DTE Recorder
22
Installing / Removing the Battery Pack
Installing a Battery
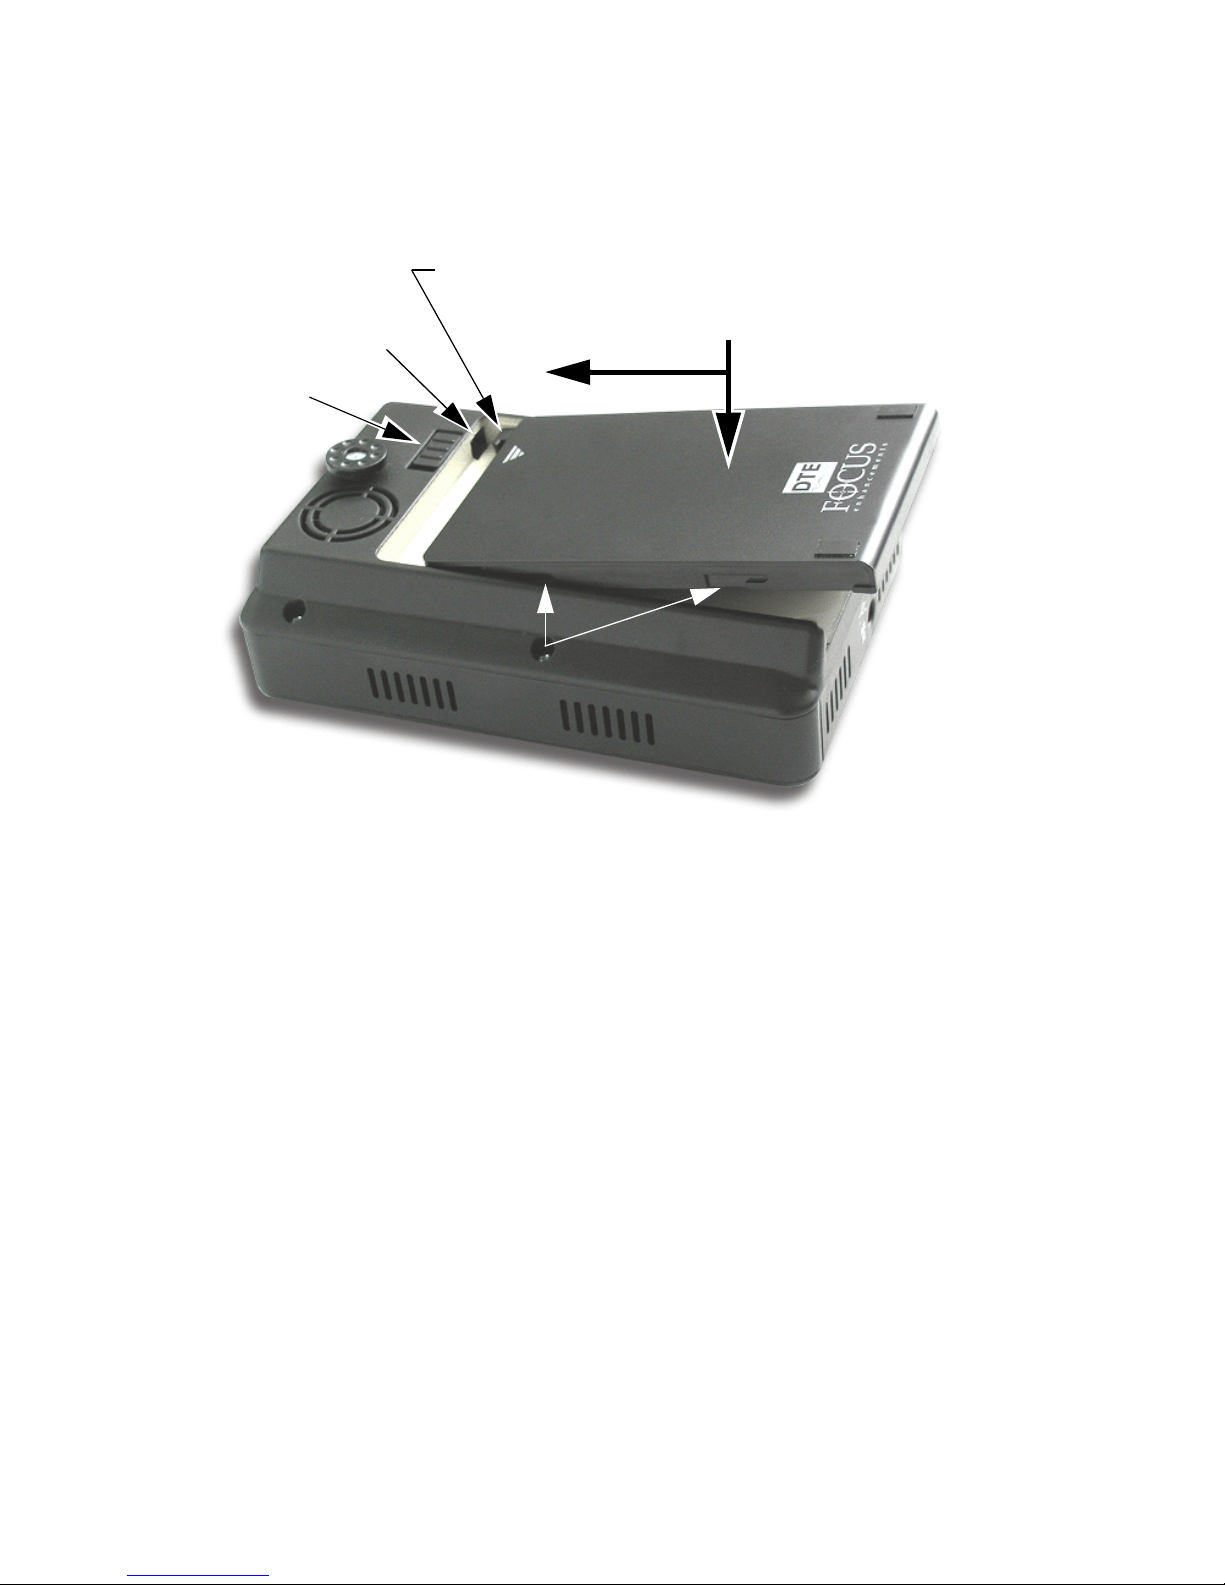
1. Place the unit, so that the battery compartment is up.
2. Position the battery pack, as shown above, so that the
latch hook is almost in the latch slot, and touching the
floor of the battery compartment.
3. Slide the battery forward while gently pressing down.
4. Feel the battery slide along guides and seat itself.
5. When seated, the battery latch clicks into place.
Removing a Battery
1. Slide the battery latch to the left and hold.
2. Apply backward pressure to the battery pack at the
triangle/arrow and gently slide the pack back about 1cm
or 3/8 in.
3. This is the reverse motion of inserting the battery.
4. Remove the battery pack.
Battery
Latch Hook
Gently press DOWN
while sliding battery pack
FORWARD
Battery Pack Guides
Latch Slot
Latch
Page 41

Quickstart
FS-100 Portable DTE Recorder
23
Charging the Battery
The battery begins charging anytime it is connected to AC
power using the AC adapter supplied with the FS-100. The
charge LED lights when the FS-100 is charging. For information
on the charge LED, refer to the subsection
Top Pa nel on page 10.
Before the battery can be used it must charge until the battery
status LED indicates the unit is fully charged (green).
• The Charge LED on the top of the FS-100 lights to show the
battery is charging.
• An uncharged battery takes 2-3 hours to charge with the
unit powered off.
• The battery provided with the FS-100 can supply power to
the unit for about 90 minutes while in continuous Record or
Playback mode.
• An optional high capacity battery (
BATT-0009-01) capable of
providing power for almost three hours of continuous
recording is available from Focus Enhancements.
Using FireWire to Charge FS-100
It is possible to charge the FS-100 battery through the 1394 port on a
computer provided that the computer outputs at least 15V through the
port. To determine if this is possible, consult the computer’s
specifications.
Page 42

Quickstart
FS-100 Portable DTE Recorder
24
Battery Use
Misuse can cause property damage and/or bodily injury such as
burns if a conductive material such as jewelry, buttons, or beaded
chains touch exposed terminals. The conductive material may
complete an electrical circuit (short circuit) and become quite hot.
Exercise care in handling a charged battery, particularly when
placing it inside a pocket, purse, or other container with metal
objects.
Warning: Do Not Use Unapproved Battery Chargers
Use of battery chargers not approved by Focus Enhancements
could cause the battery to catch fire or explode.
Use Only Original Focus Enhancements FS-BC Battery
Chargers
There are four versions of the optional FS-BC battery charger for
use in various parts of the world.
ASYF-0940-01 USA
ASYF-0941-01 Europe
ASYF-0943-01 United Kingdom
ASYF-0944-01 Australia
These optional battery chargers are available from either
your local dealer or online at the Focus Enhancements web
store, www.focusinfo.com/sales/store.
Page 43
Quickstart
FS-100 Portable DTE Recorder
25
Connecting a FS-100 to a DV/HD Camcorder
Before performing this procedure, make sure you have installed and
charged the battery, see
Installing / Removing the Battery Pack on page
22.
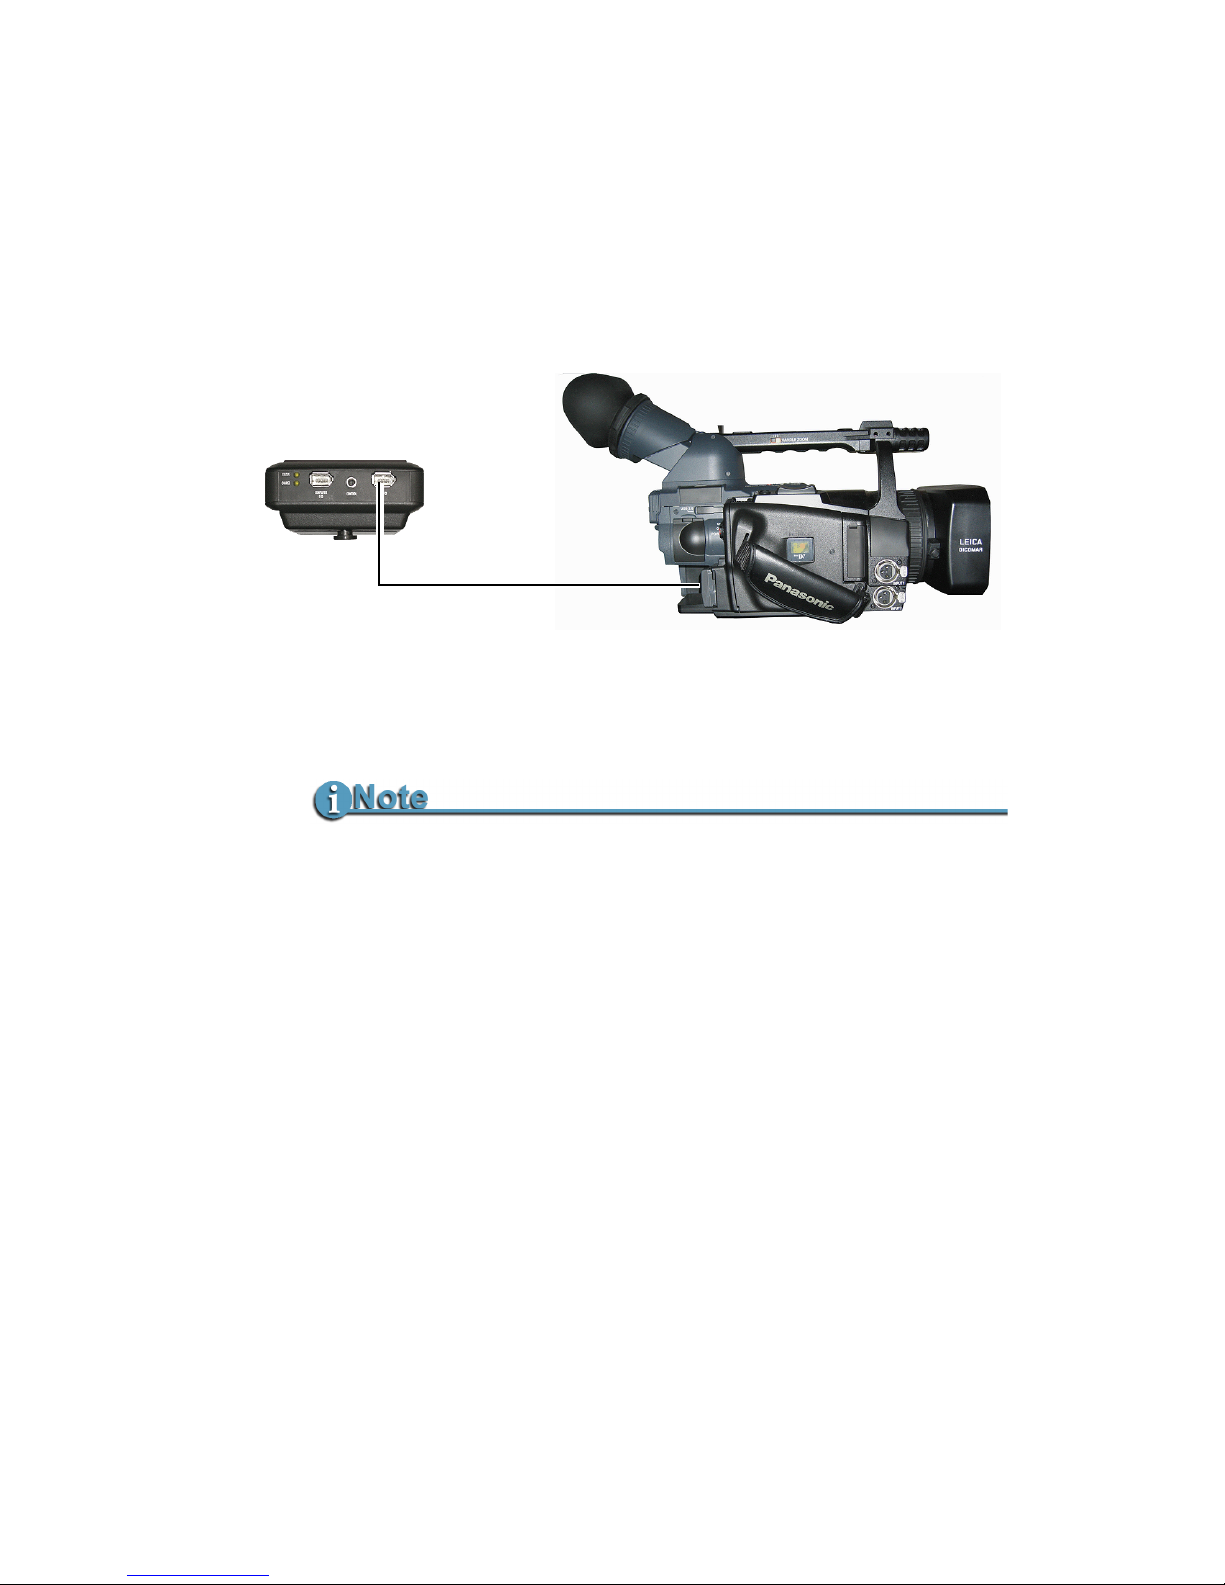
1. Connect the supplied Firewire cable to the
DV I/O connector on
the top of the FS-100.
2. Locate the FireWire/DV/iLink (or similar) connector on your
video camera. It is located in different places depending upon
the brand of camera. If you are unclear of its location, consult
your video camera manual.
3. Connect the other end of the FireWire, 1394, cable to your
video camera.
4. Turn on the video camera.
5. Turn on the FS-100.
FS-100 Supplied with 4-pin to 6-pin FireWire Cable
A 4-pin to 6-pin FireWire, 1394, cable is provided with the
FS-100.
HVX200 FireWire Connector
The FireWire connector on the HVX200 is located on the right side of the
camera, behind the tape transport. For more information, refer to the
HVX200 documentation.
Page 44

Quickstart
FS-100 Portable DTE Recorder
26
Record and Playback with the FS-100
Before using the FS-100, set up the unit as outlined in the following
sections:
Power On the FS-100 27
Select HDD Recorder Mode 28
Select a DV File Format 29
Set Time and Date 30
Record With the FS-100 32
Manual Recording 34
Syncro Slave 35
Tapeless 36
Playback on the FS-100 40
The values set in these procedures are fixed and persist through
power cycles. To change them, repeat the steps outlined above.
FS-100 Automatically Detects Input Stream from AG-HVX200
FS-100 automatically detects the stream type input from the AG-HVX200
camcorder and, in addition, selects the appropriate HDD MODE and DV
FORMAT menu options.
Test Recording
The settings of cameras, NLEs, and the FS-100 are numerous and many
are critical. It is recommended that a test recording be done when a setting
change is made. This test recording should be played back to the camera
and tested with the target NLE.
Page 45
Quickstart
FS-100 Portable DTE Recorder
27
Power On the FS-100
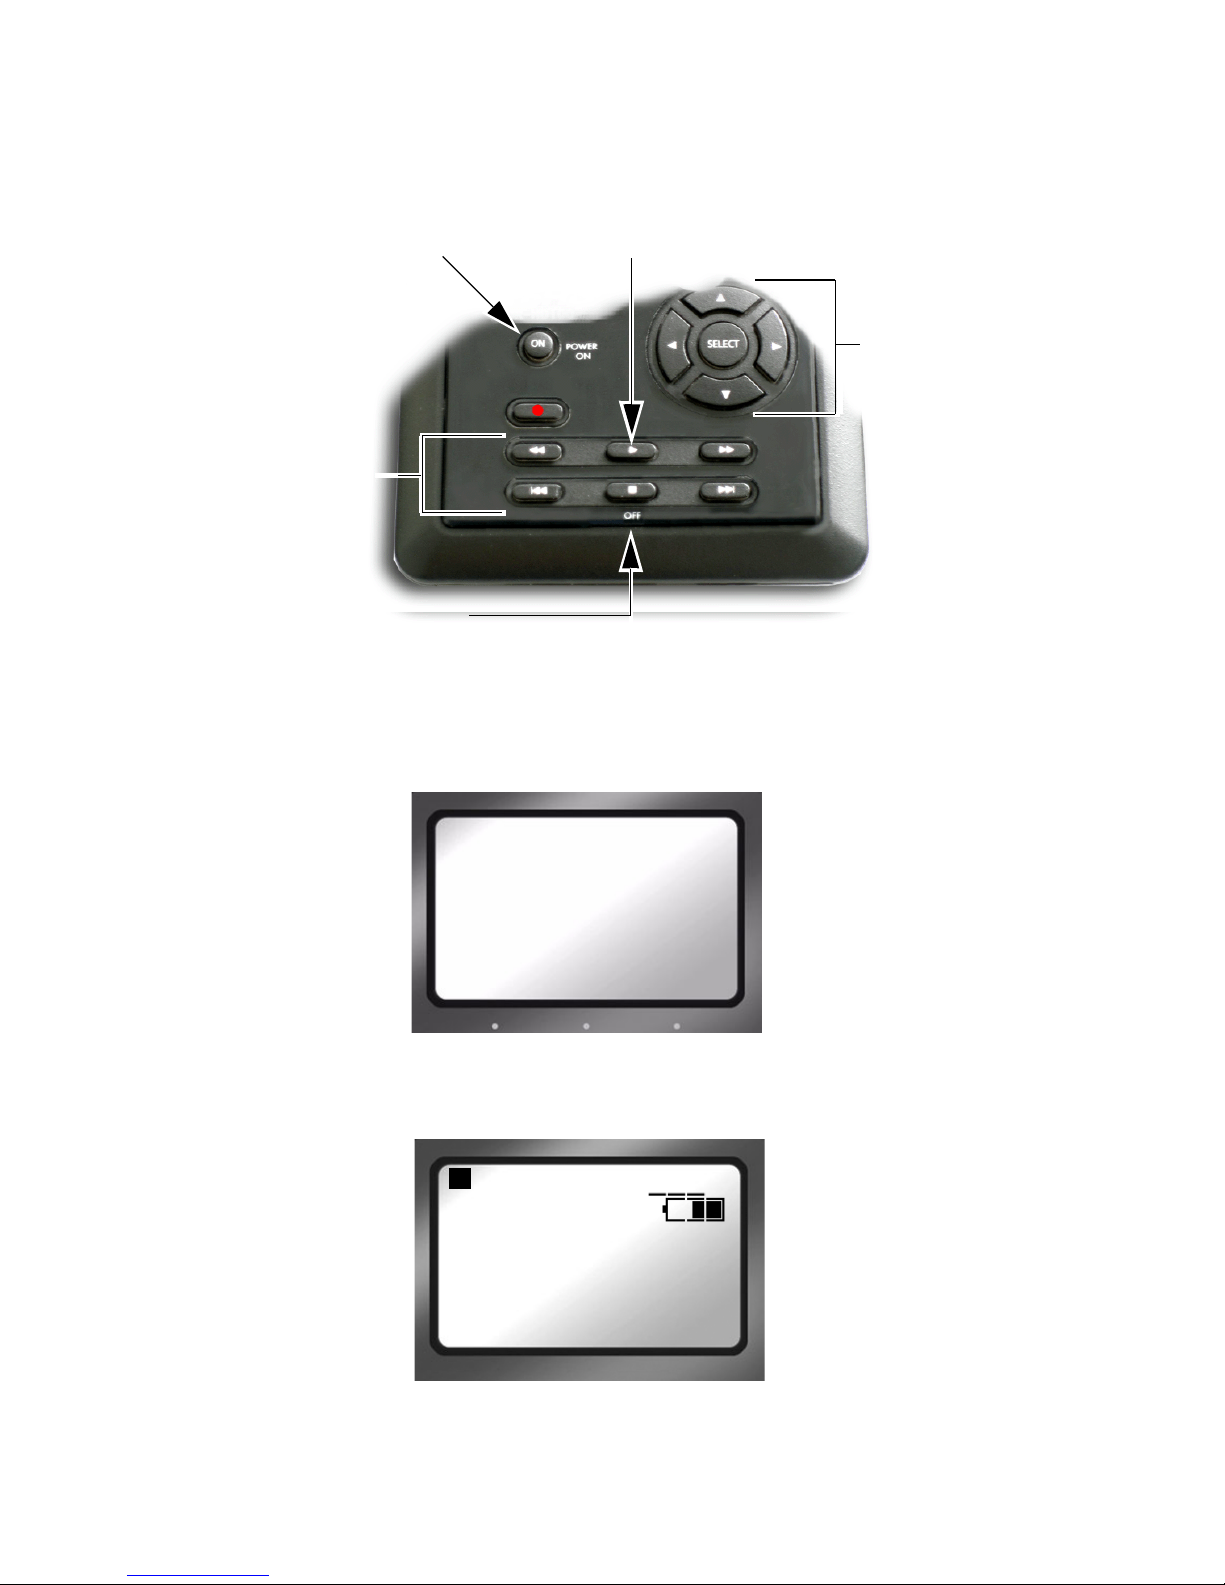
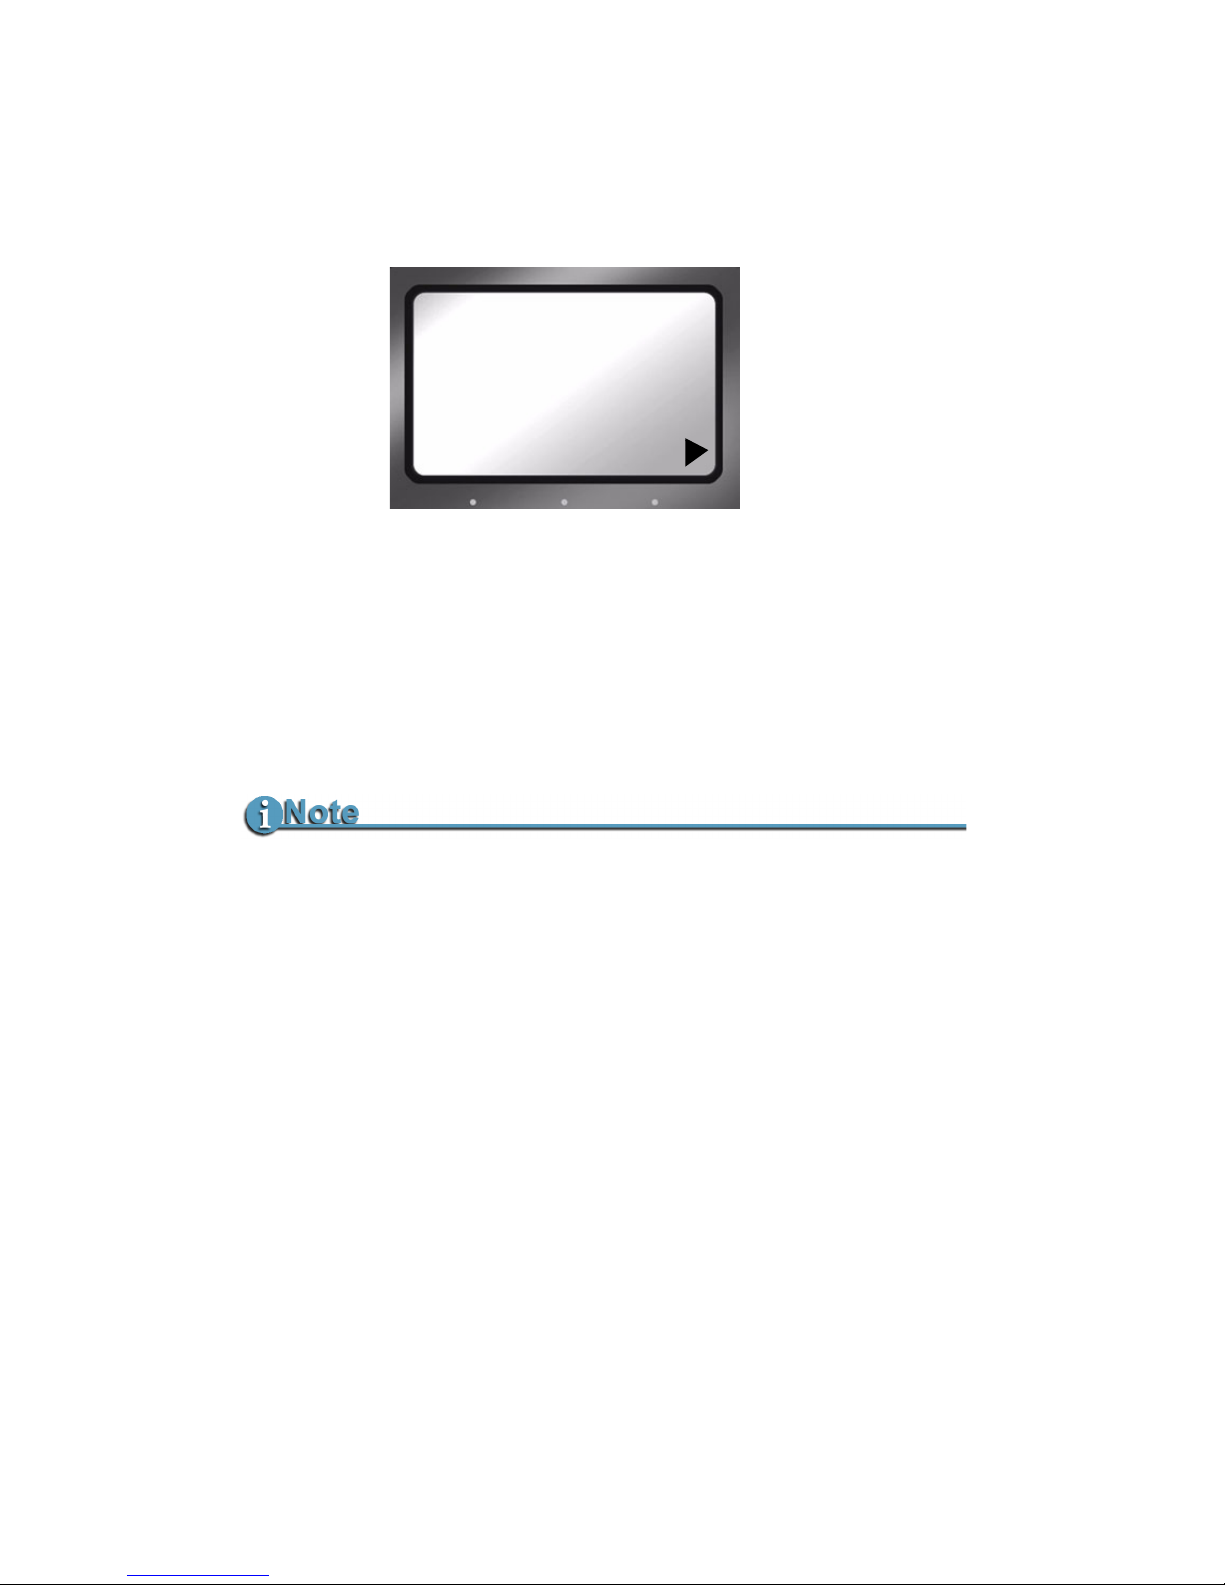
1. Press the Power ON button for two seconds and release it.
2. The
Welcome screen appears and displays while the
The home screen appears when the FS-100 initializes.
3. The
Home screen appears when the FS-100 first powers up.
For more details about this screen,
Home Screen on page 43.
Power ON
(Reset)
OFF (STOP)
To po w er OFF,
hold down for 3-5 seconds.
Navigation
Buttons
Play
Transport
Buttons
FS-100
PORTABLE
DTE RECORDER
STOP 1 COUNTER
00:00:14:02
DISK 1 168 min
REEL
TAPE DISP LOCK
Page 46
Quickstart
FS-100 Portable DTE Recorder
28
Select HDD Recorder Mode
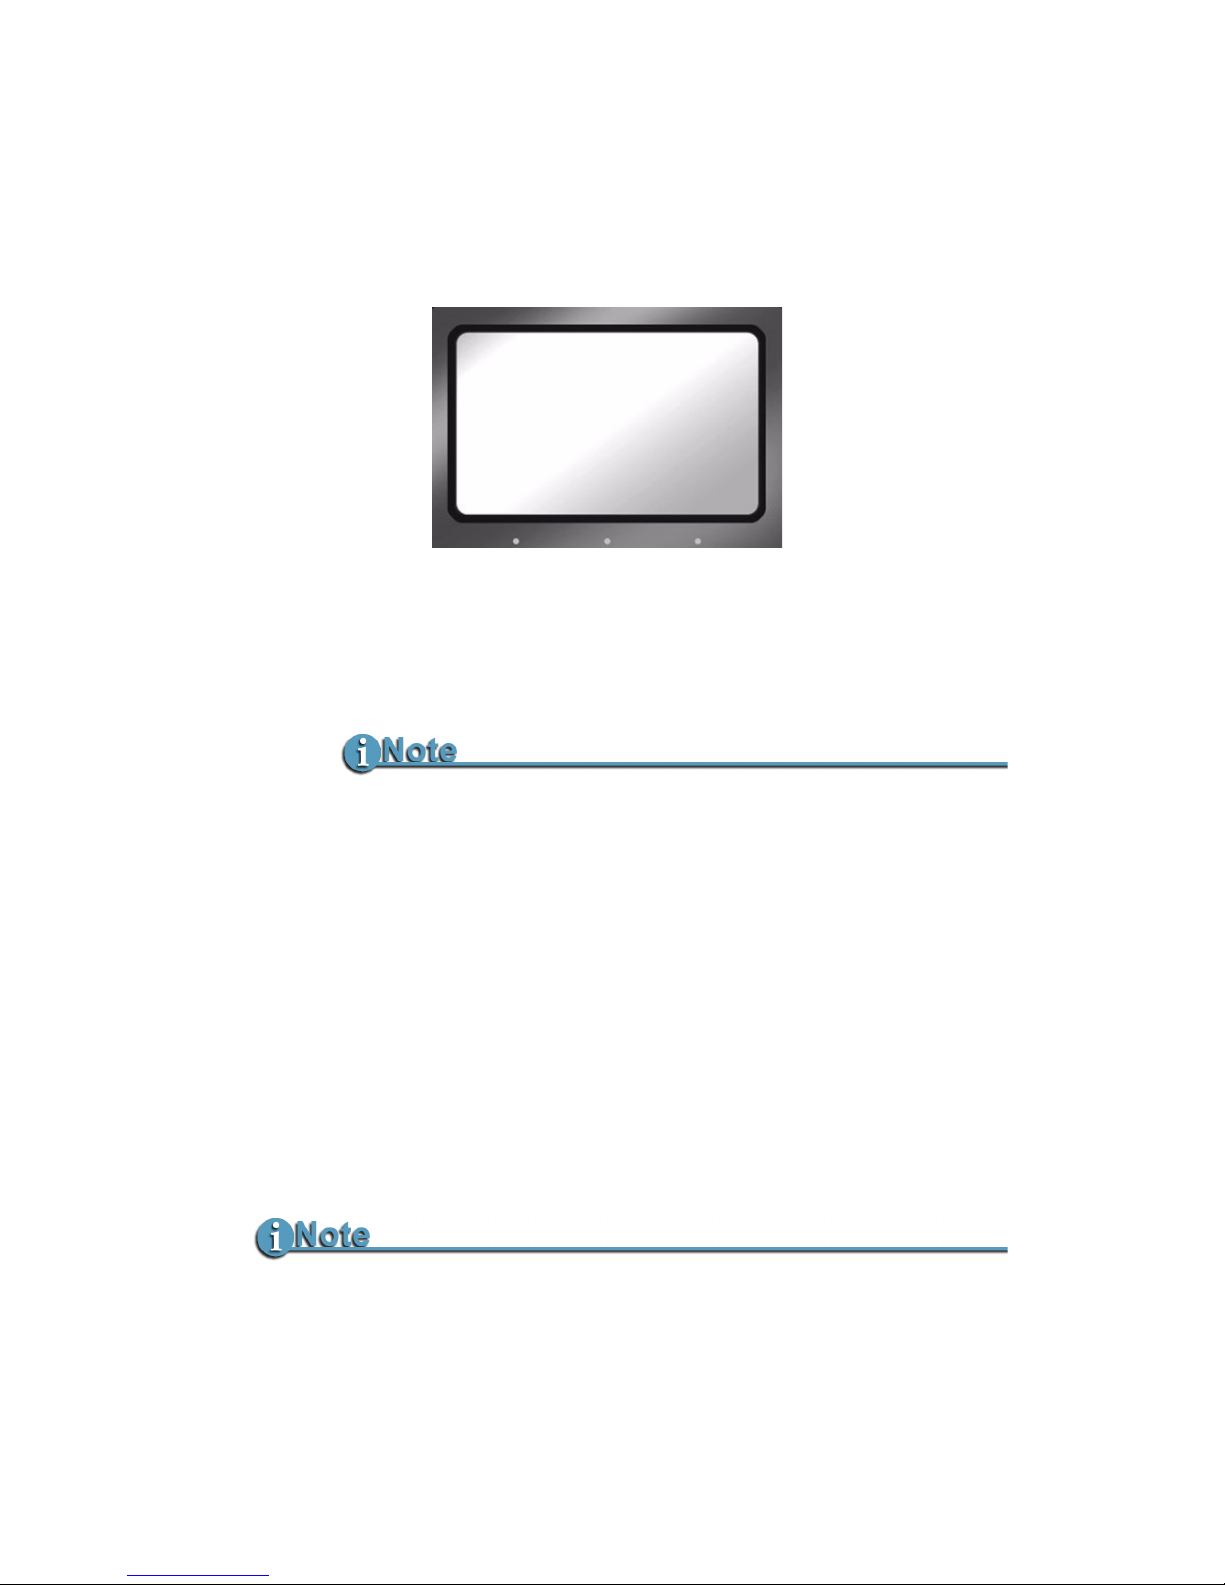
1. Press the Right navigation button two times until the HDD
Mode display appears.
2. Use the
Down navigation button to highlight the recorder
mode,
DVCPROHD REC, DVCPRO50 REC, or DVCPRO/DV
REC
.
3. Press the
Select button on the navigation buttons.
4. Press the
Left button to return to the menu title.
5. Press the
Right button once and advance to the FORMAT
screen.
The HDD MODE changes automatically when an appropriate stream
type is recorded.
HDD MODE
-DVCPROHD REC
DVCPRO50 REC
DVCPRO/DV REC
DD DRIVE
Page 47
Quickstart
FS-100 Portable DTE Recorder
29
Select a DV File Format
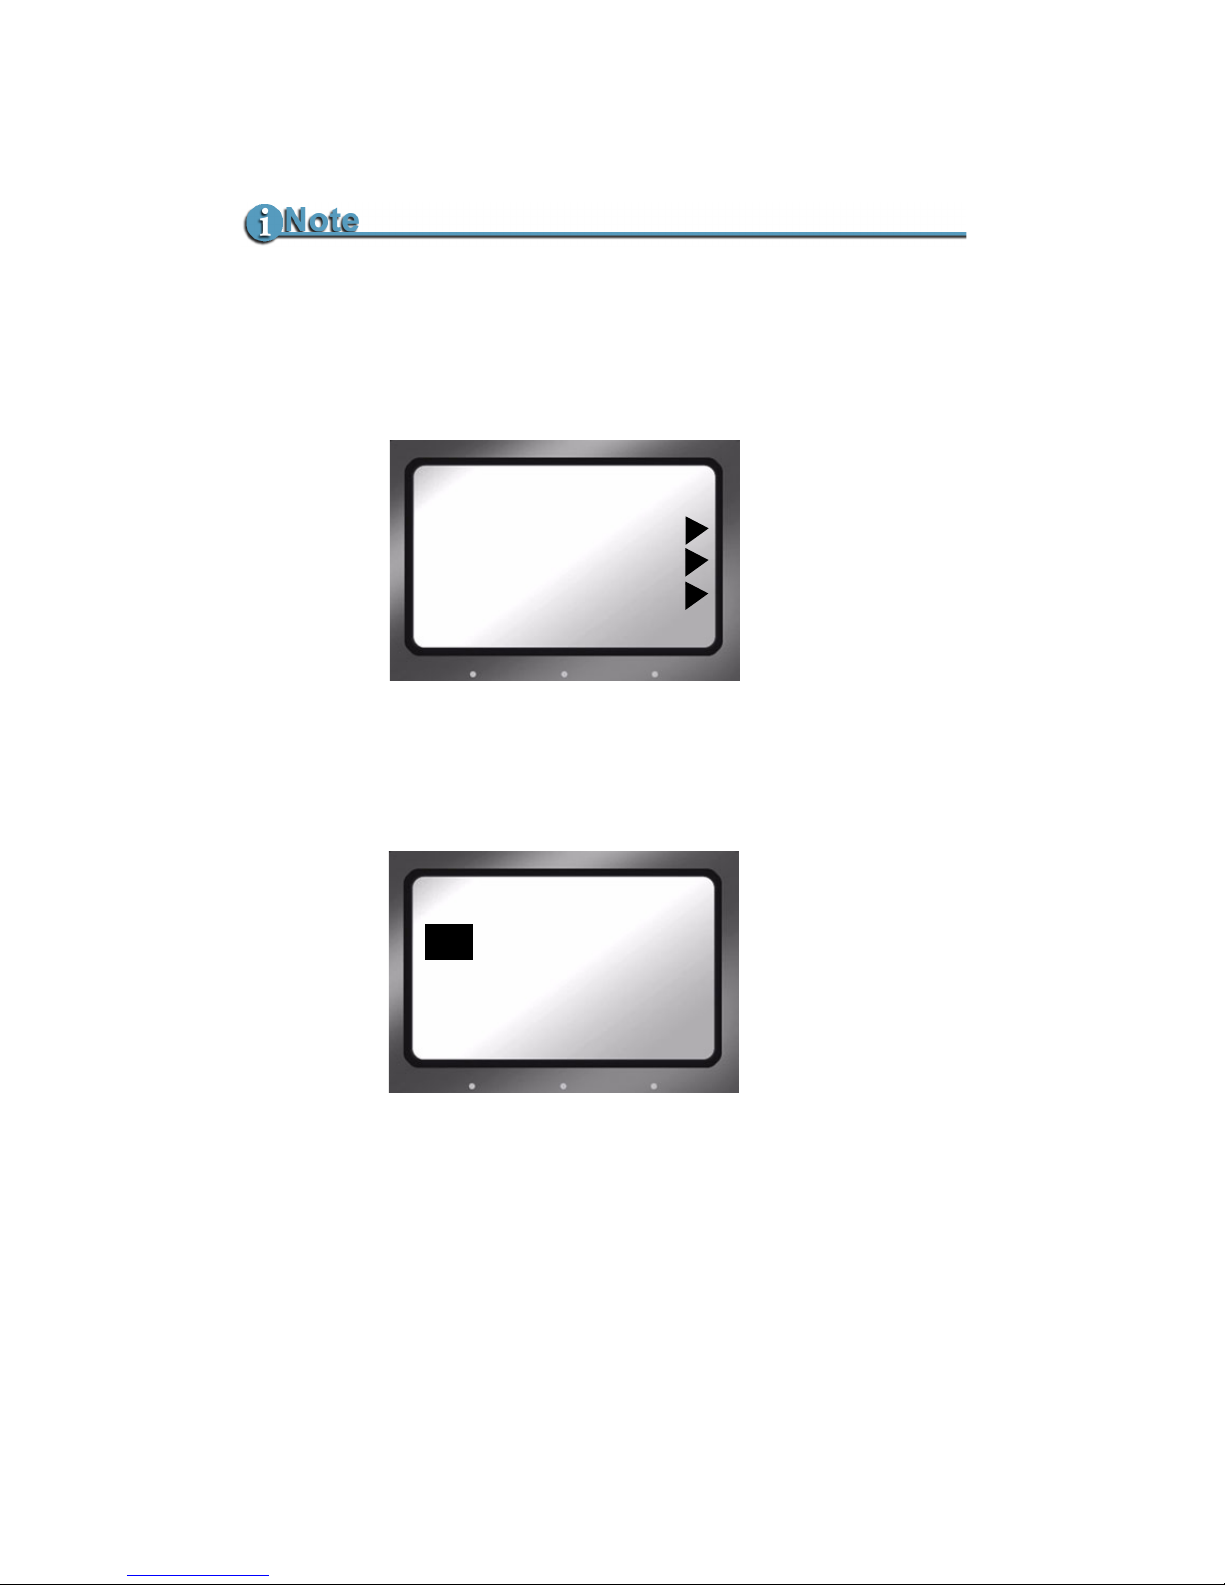
The DV file formats displayed depend on the recorder mode
selected in the previous step, for example
DVCPRO/DV REC results
in the following:
1. Use the
Up and Down navigation buttons to select the DV file
format that supports the preferred NLE system. A dash
mark to the left of a list item indicates that it is the current
selection. The default value is AVI Type 2.
2. Press the center
Select button on the navigation buttons.
3. Press the
Left button to return to the menu title.
4. Press the
Right button once and advance to the SETUP
screen.
DV24p and PAL 25P Modes
24p modes are only for use with camcorder's that are capable of DV24p Advanced mode.
PAL 25P camcorders require no special 25P DV format
Check www.focusinfo.com for supported Applications
For a complete and up-to-date list of supported applications and their
associated formats, visit the website:
http://www.focusinfo.com
FS-100 Stores Multiple Recorder Mode/DV File Format Combinations
FS-100 stores a unique file format setting for each recorder mode in the HDD
MODE menu. This makes it possible to record different file types on a stream
by stream basis; as an example, for DVCPROHD REC mode the DV FORMAT
could be P2, while for DVCPRO/DV REC mode the DV FORMAT is AVI TYPE2.
DV FORMATS
RAW DV
-AVI TYPE1
AVI TYPE2
CANOPUS AVI
Page 48
Quickstart
FS-100 Portable DTE Recorder
30
Set Time and Date
1. Press the Right navigation button several times until the
Setup display appears on the screen as shown below:
2. Use the
Down navigation button to highlight the date and
press the
Right navigation button to access the Set Date
screen.
3. Use the
Up and Down navigation buttons to change the
highlighted value. Use the
Right and Left navigation buttons
to highlight the Month, Day, and Year.
4. When complete, press the right-most Function button
indicated as
BACK on the screen. The new date will be
indicated on the Setup Screen.
Date and Time Must Be Set
The date and time must be set because they are used in the FS-100 file
naming function.
SETUP
09 / 15 / 05
11 : 21 : 13
V 3 . 1. 0
-LCDLIGHT ON
SET DATE
09 / 15 / 05
MM / DD / YY
BACK
Page 49

Quickstart
FS-100 Portable DTE Recorder
31
5. Use the
Down navigation button to select the time and press
the
Right navigation button. The following screen appears:
6. Use the
Up and Down navigation buttons to change the
highlighted value. Use the
Right and Left navigation buttons
to highlight the Hour, Minute, and Second. (Time is
indicated in 24hr. mode.)
7. Press the right-most Function button indicated as
BACK on
the screen. The new date appears on the Setup Screen.
8. The Time and Date are now set.
9. Press the
Left navigation button followed by the Select
button to return to the beginning screen.
10. For more information on the Setup function, refer to the
section,
Setup Screens on page 57.
SET TIME
11 : 21 : 13
HH : MM : SS
BACK
Page 50

FS-100 Portable DTE Recorder
32
Record With the FS-100
There are four modes of recording with the FS-100.
•Local
Control with the FS-100 transport buttons.
• Syncro Slave
Use this mode with camcorders that do not have FS-100
compatible external control or tapeless trigger functionality.
In this mode, the FS-100 watches the record status of the
camcorder and replicates its actions. A tape must be in the
camcorder for this mode to function.
•AV/C
AV/C is utilized in
PLAYBACK and other situations where the
FS-100 is controlled by an external FireWire device, such as a
DV NLE system.
• Tapeless
This is the recommended control mode for use with
companion camcorder, the Panasonic AG-HVX200. Control
recording with camcorders that have FS-100 compatible
external control or tapeless trigger capabilities.
Before beginning recording, verify that:
1. Time and date are set.
2. Recording format is set.
3. The FS-100 is connected to the video camera according to the
explanation in
Connecting a FS-100 to a DV/HD Camcorder on
page 25.
4. Camera and FS-100 are powered on.
5. Tape is loaded in the camera.
Do Not Use AV/C In FS-100 RECORD MODES.
Tapeless Control
If the camcorder supports Tapeless control function, tapeless
recording is possible. Otherwise, the FS-100 control panel keys must
be used to control recording in LOCAL control mode when there is no
tape in the camcorder. For a list of compatible camcorders, go to
Focus Enhancements website at http://www.focusinfo.com.
Page 51
Quickstart
FS-100 Portable DTE Recorder
33
Do Not Disconnect Power or FireWire Cable
Never disconnect the power or the FireWire cable during a
recording. This will cause file corruption.
Loss of Power During Recording
If power is lost during recording it is possible to repair the
damaged file or files, refer
Repair Disk on page 82 to and
Repair Clip on page 83.
Troubleshooting: Counter Not Incrementing
If the Counter does not increment while recording from the camera, it
is an indication that there is no active connection between the FS-100
and the camera.
• Verify that the FS-100 1394 DV I/O and the camera connections
are secure. It may be necessary to unplug and then reconnect
them.
When a good connection is made, the Counter increments and
recording starts.
Verify FS-100 and Camcorder are the Same Video Standard
For example, a NTSC or PAL DV source records only on a matching
NTSC or PAL unit.
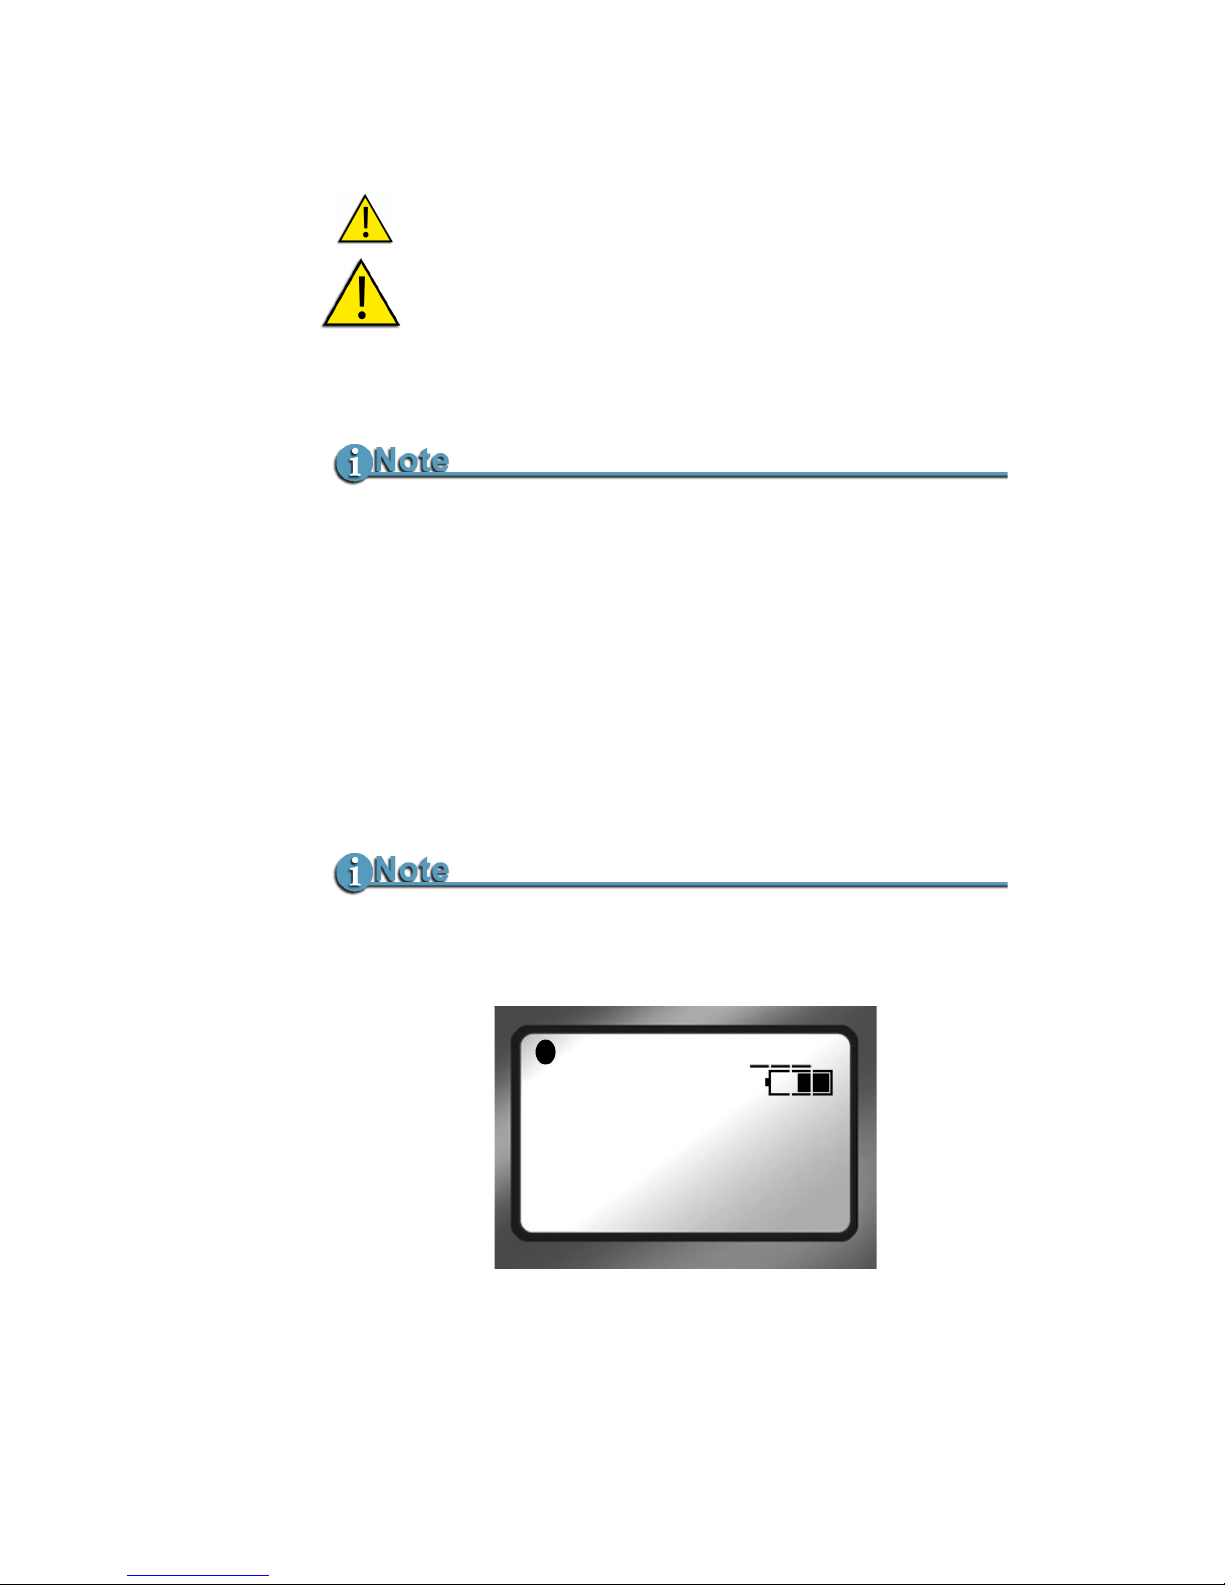
Audio is Muted During Recording when VF MODE is set to 24, 25,
or 30 for the PN DTE formats (QUICKTIME PN and P2 PN).
The LCD’s screen displays AUDIO MUTE.
E REC 1-001
COUNTER
00:00:14:02 PN
DISK 1 168 min
AUDIO MUTE
TAPE DISP LOCK
Page 52
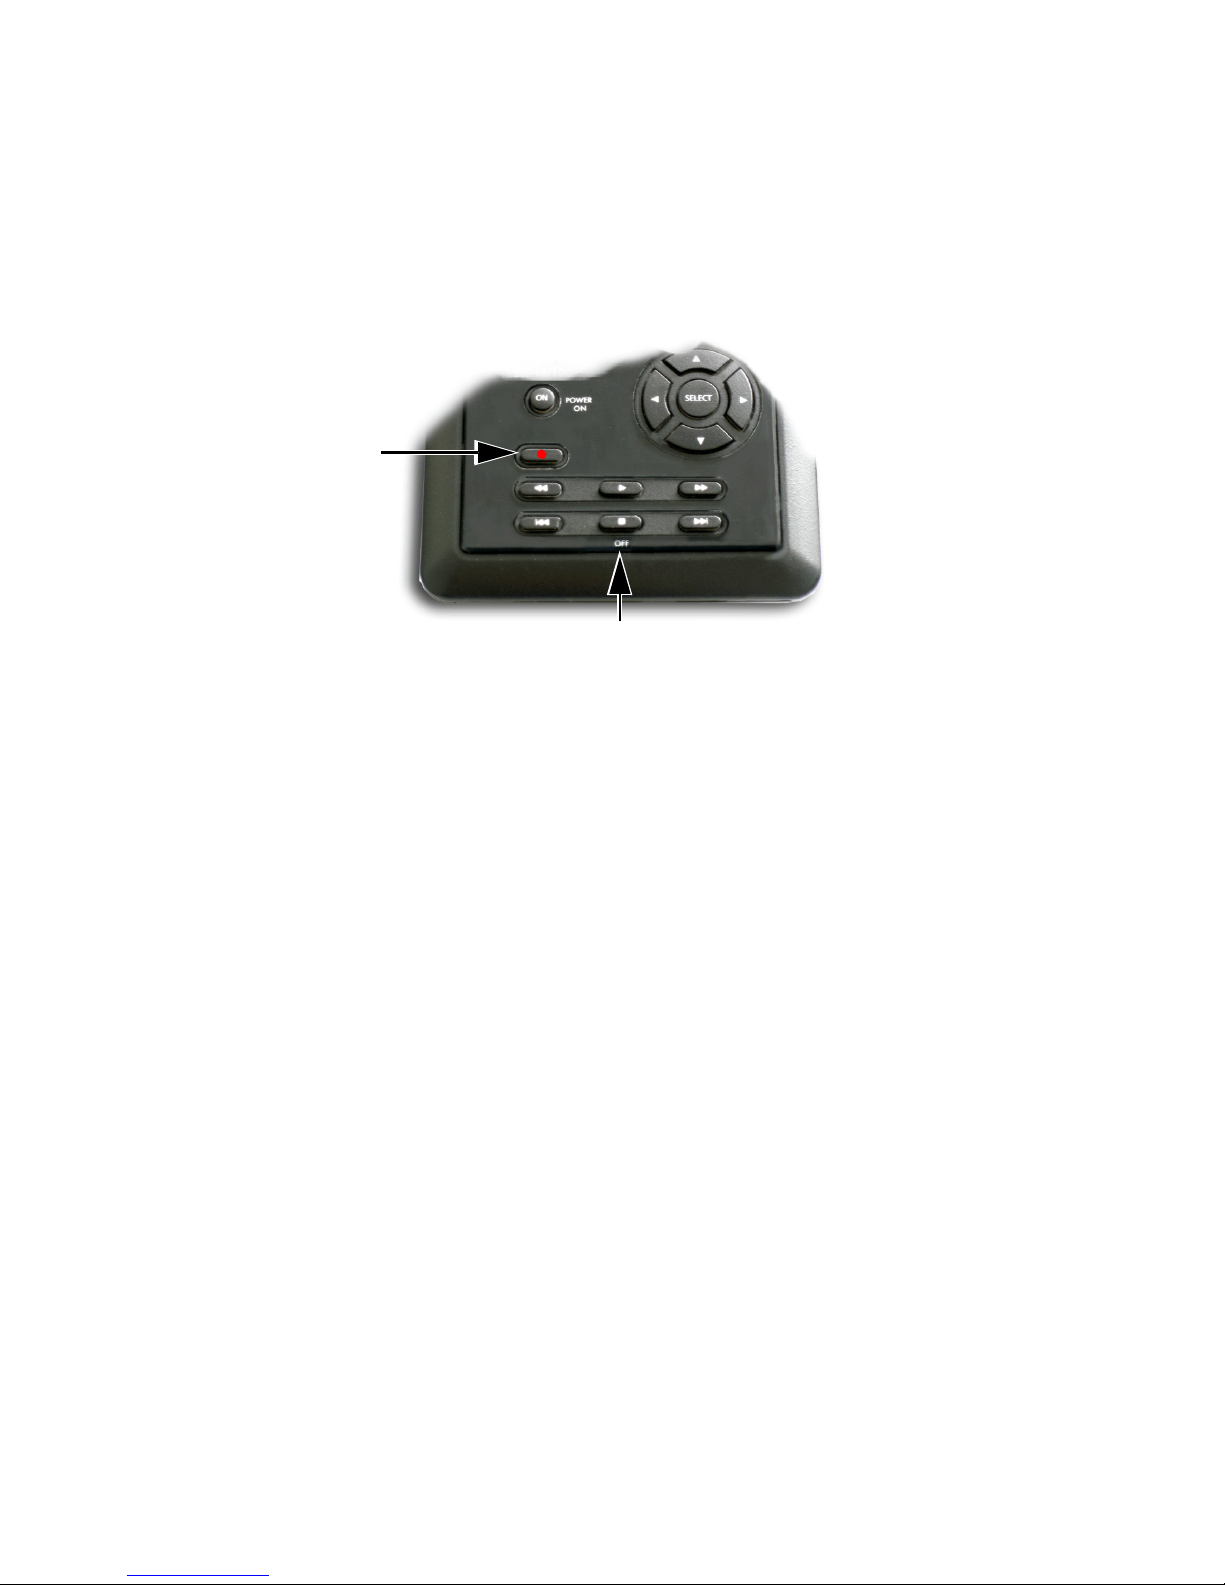
Quickstart
FS-100 Portable DTE Recorder
34
Manual Recording
1. Set the video camera to Camera or Cam mode.
2. Verify that an image appears in the viewfinder.
3. On the FS-100, press Record
once.
This sets the FS-100 to
Record-Pause mode.
4. On the FS-100, press Record
button a second time. The
FS-100 begins to record. The timecode value is displayed
on the screen.
5. Press
Stop (OFF) once to return the FS-100 to
Record-Pause mode.
6. Press
Record and the FS-100 begins to record again on
the same clip.
7. Press
Stop (OFF) twice to stop the recording.
8. Press
Record twice to begin recording a new clip.
Creating a New File without Dropping Frames
When in record mode, it is possible to break the recording into
a separate, new file without dropping frames.
Press
Record and the FS-100 automatically creates a new
clip.
Record
Stop (OFF)
Page 53

Quickstart
FS-100 Portable DTE Recorder
35
Syncro Slave
This mode is for camcorders that do not have external control or
the tapeless control functionality compatible with the FS-100.
• Syncro Slave mode requires that a tape be in the camcorder
for operation.
• The FS-100 must be set to
Syncro Slave control mode.
• In this mode, the FS-100 watches the record state of the
camcorder and follows its actions.
When Synchro Slave mode is entered from the menu, the Home
screen appears with the Pause indicator displayed in the upper
left-hand corner along with a
Y that indicates that the FS-100 is
following the camcorder’s record state.
1. Verify that the FS-100 is in
STOP mode.
2. From the FS-100 Home screen, press the
Right navigation
button several times until the Control screen appears:
3. Use the
Down navigation button to select Syncro Slave.
The dash on the left side of an item indicates it is the
current selection. The default value is
Local.
4. Press the
Select navigation button.
5. The beginning screen returns and a
Pause indicator
appears in the upper left-hand corner. Next to this
symbol, is a
Y indicating that FS-100 is now following the
record state of the connected camcorder.
6. Now the FS-100 will record at the same time the
camcorder records to tape.
CONTROL
LOCAL
-SYNCRO SLAVE
AV / C
TAPELESS
Page 54

Quickstart
FS-100 Portable DTE Recorder
36
Tapeless
Use the Tapeless control mode with camcorders that are
compatible with FS-100 external control or tapeless operation
capabilities.
• When the FS-100 is in
Tapele s s mode, an E displays along
with the tape state, indicating that the unit is in
External
mode.
• Use the camcorder’s
REC button to Start and Stop the FS-
100 tapeless recording.
• The camcorder’s External control or tapeless trigger function must be enabled for this mode to work.
Refer to the following section, Configuring AG-HVX200 and
Recording, for more details.
CONTROL
LOCAL
SYNCRO SLAVE
AV / C
-TAPELESS
Page 55
Quickstart
FS-100 Portable DTE Recorder
37
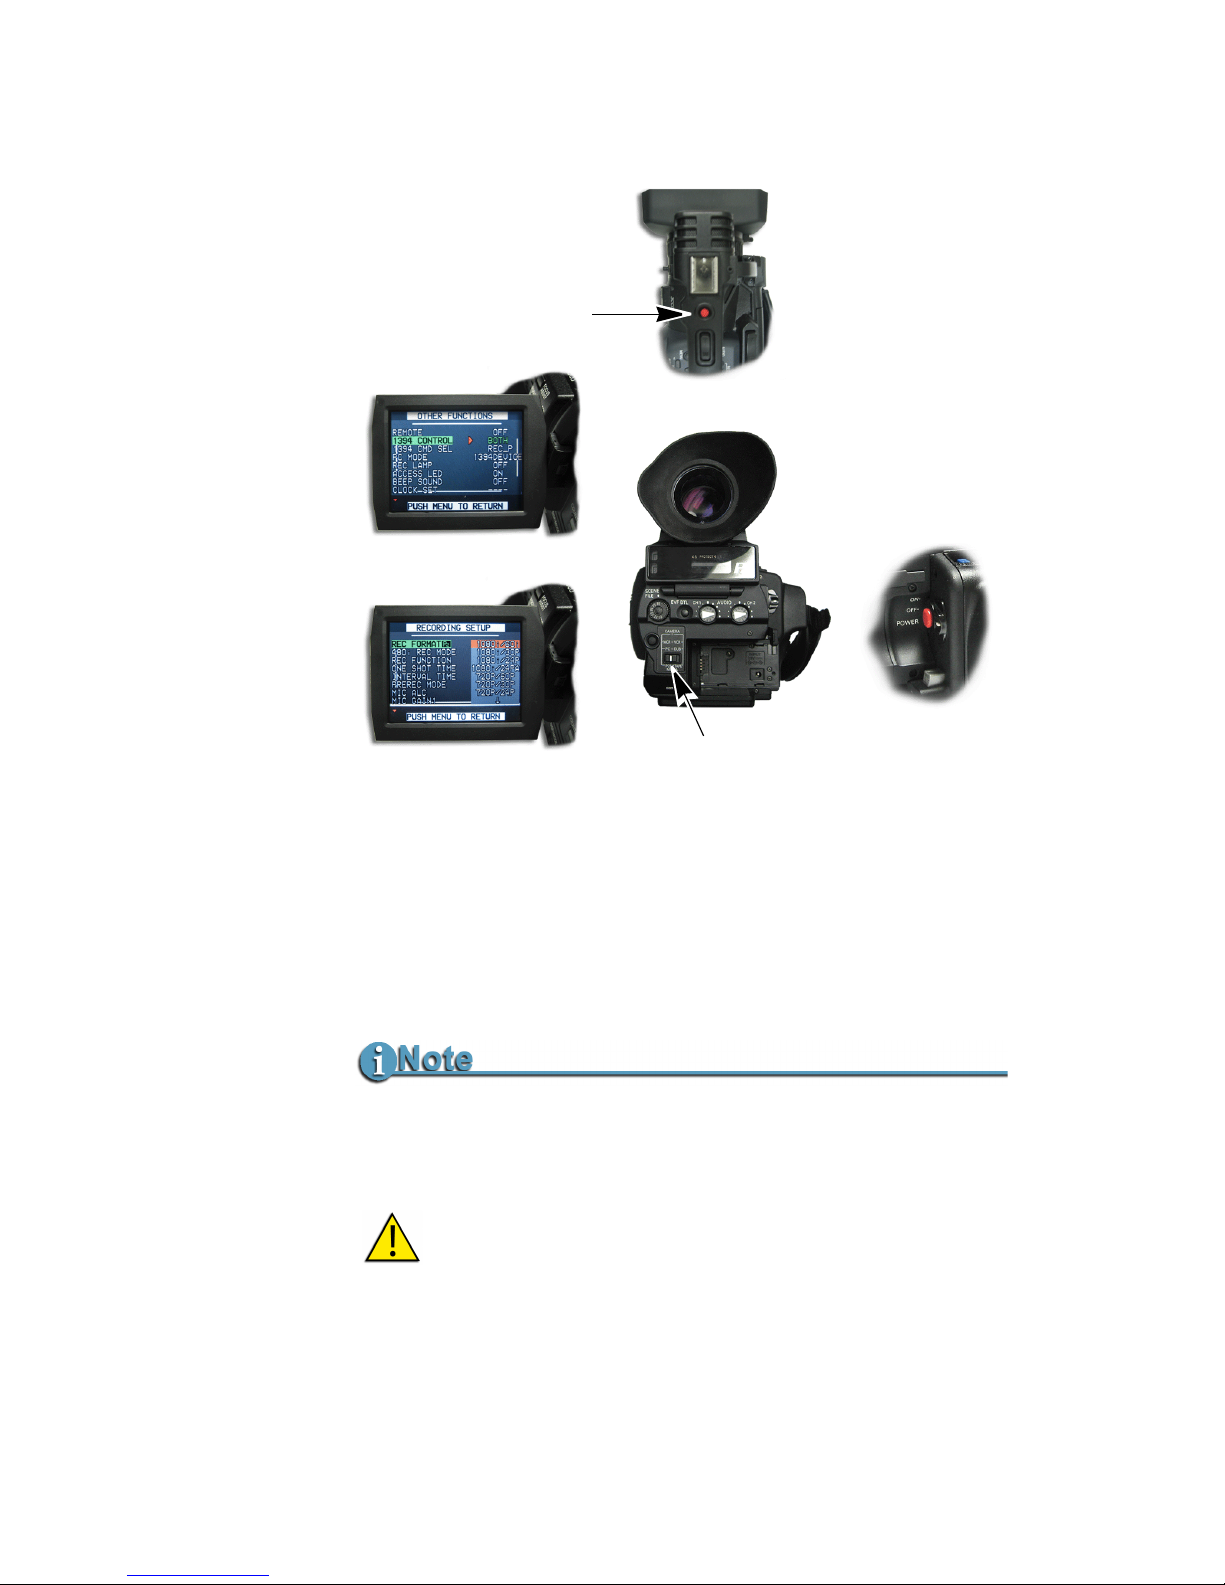
Configuring AG-HVX200 and Recording
1. Power on the camera.
2. Set the
TAPE/P2 switch to P2.
3. Press the
MENU button on the top of the AG-HVX200
camera. Select the
RECORDING SETUP option.
• Set the
REC FORMAT P2 to the desired DVCPRO
format and resolution.
• Set
UB MODE to FRM. RATE.
4. Under the
OTHER FUNCTIONS menu, set the 1394
CONTROL
to BOTH.
AG-HVX200 PN Modes (3.x or 4.x only) Not Supported as Inputs
The FS-100 generates the PN stream from the camera’s full frame
stream (720 24P/25P/30P).
Recording In 720/PN Formats
In order for the 720/PN formats to record properly, the
camcorder's RECORDING SETUP > UB MODE must be
set to FRM.RATE. See the camcorder's user manual for
more information.
1
3
4
5
2
Page 56

Quickstart
FS-100 Portable DTE Recorder
38
5. Press
REC trigger button on the top or side (Step 1) of the
camera.
Variable Frame Rate (VFR) Settings
Audio is not recorded in VFR recording modes.
VFR settings are supported in the 4.x versions only.
AG-HVX200 Camera Settings
1. Set SCENE FILE > OPERATION TYPE is set to FILM CAM.
2. Set
SCENE FILE > FRAME RATE to the appropriate FPS.
3. Set
RECORDING SETUP > UB MODE to FRM.RATE.
4. Set
RECORDING SETUP > RECORD FORMAT to:
NTSC:
720/24P or 720/30P.
PAL:
720/25P.
See the camera's documentation for more details.
AJ-HDX900 Camera Recording Settings
The following recording settings are required for the AJ-HDX900 camera:
MAIN MENU > SYSTEM SETTING > SYSTEM MODE: 720-59.94P *
MAIN MENU >SYSTEM SETTING > CAMERA MODE: 24P **
OPTION MENU > OPTION > FRAME RATE UB: MENU
MAIN MENU >VTR MENU > TC/UB > UB MODE: FRAME RATE
MAIN MENU >VTR MENU > TC/UB > VITC UB MODE: FRAME RATE
TCG switch must be set to F-RUN
* For 720-25P/PN, this must be set to 720-50P.
** For 720-30P/PN, this is set to 30P and for 720-25P/PN, this is set to 25P.
Non-VFR on AG-HVX-200
For non-VFR recordings set the AG-HVX-200 to VIDEO CAM.
Page 57

Quickstart
FS-100 Portable DTE Recorder
39
FS-100 Settings
1. Set DV FORMAT to QUICKTIME PN or P2 PN.
2. Set
SETUP-->VFR MODE to the appropriate base frame
rate:
While recording in VFR mode,
VF is displayed on the HOME
screen below the battery indicator. If the
VF is not displayed
there is a setup issue: please, review the settings shown above.
For more information, see
VFR MODE on page 66.
Preparing P2 File for NLE
Run the utility Organize P2 before using the recorded P2 file in a
NLE. Refer to
Organize P2 on page 76.
Recording Timecode in the File
Select EXT TC in the Setup menu. This option records the video
camera timecode in the file. There are other timecode options
available, refer to
TIME CODE EXT, REC RUN, FREE RUN, REGEN
on page 62.
Input Stream VFR MODE
720/24P 24
720/25P 25
720/30P 30
Run the Organize P2 Utility or the files are not usable by a NLE.
Function buttons
The tasks discussed above are available for programming into the function
buttons. For information on setting up function buttons, refer to the section,
Functions Screen on page 71.
Page 58
Quickstart
FS-100 Portable DTE Recorder
40
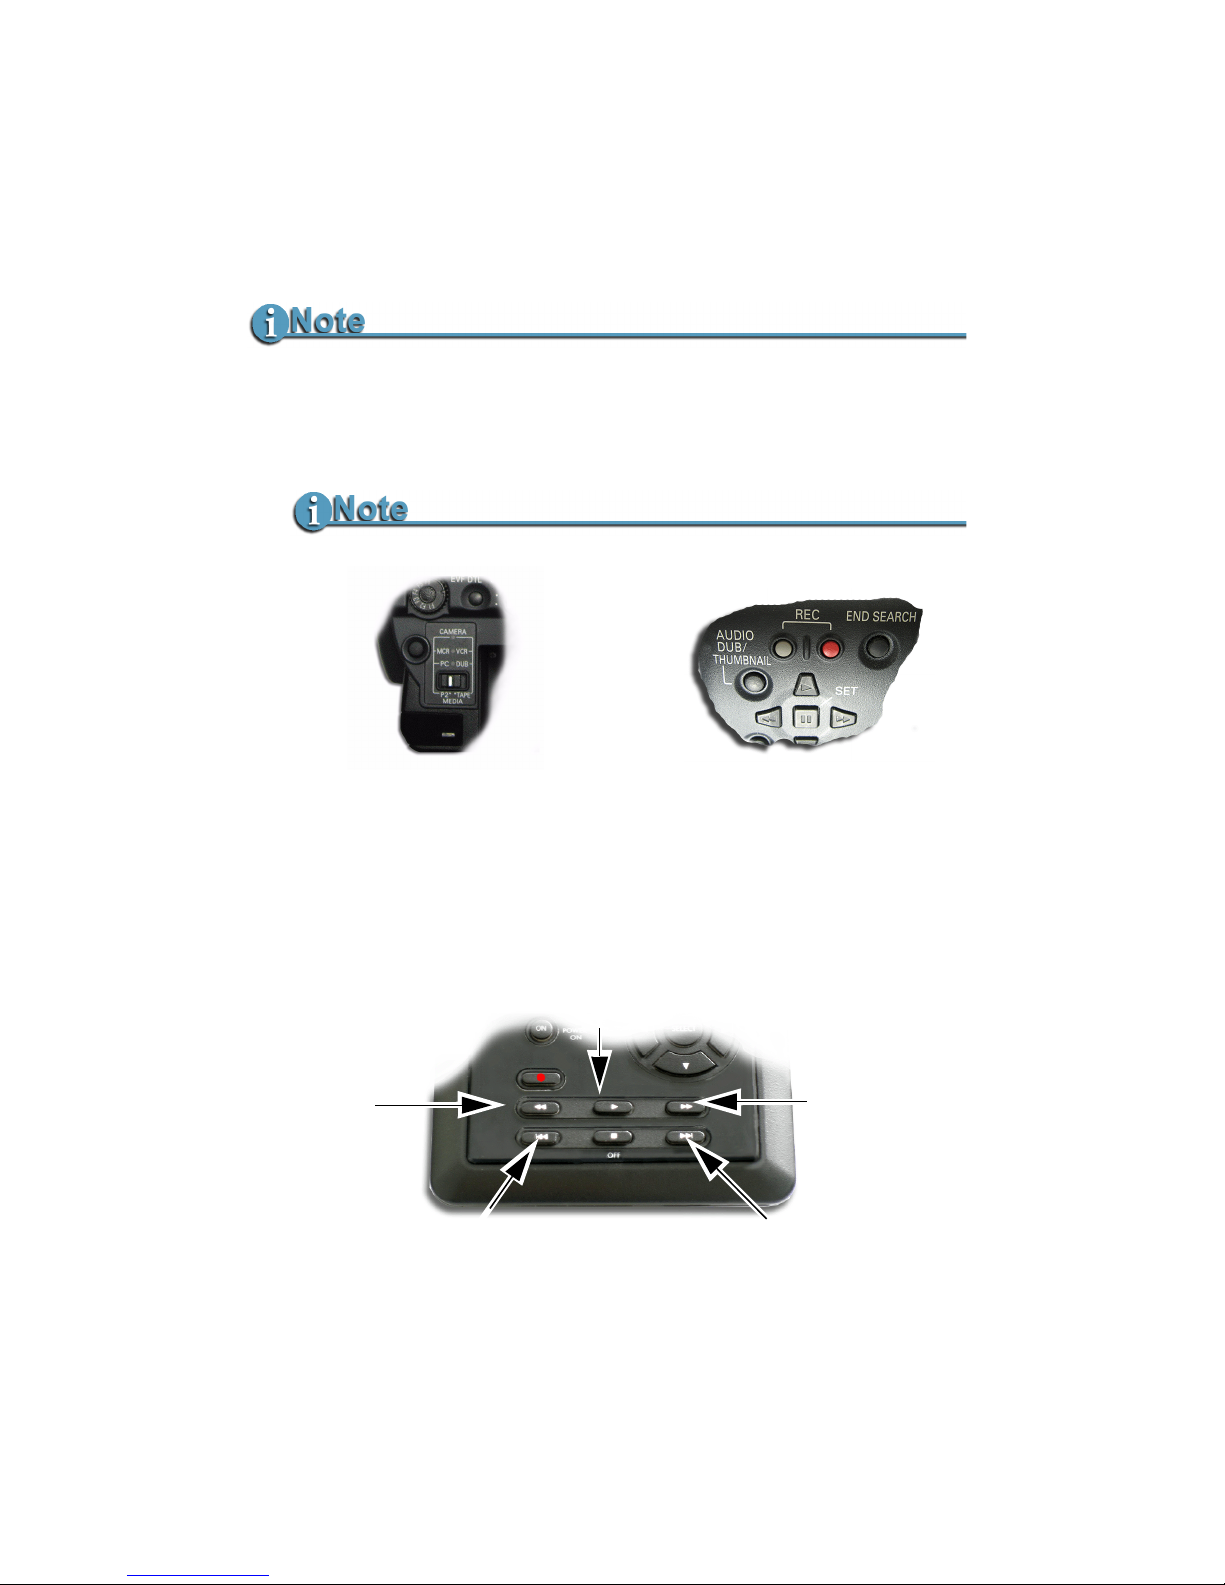
Playback on the FS-100
Verify that both the video camera and the FS-100 are powered on
and that they are connected together with the FireWire cable from
the FS-100 DV/IO port to the camcorder 1394 port.
1. Set the video camera to
VCR or playback mode.
2. Navigate to the video clip to preview, using the FS-100
Left
and
Right transport control buttons.
3. Press the FS-100
Play button.
4. Search through the clips using the FS-100
Forward Search,
Forward Index, Backward Index, or Backward Search buttons.
Refer to
Navigation Buttons on page 7 for more information
on the function of these buttons.
Feature Availability on PAL Cameras
This feature is not available on some PAL cameras.
Setting the AG-HVX200
1. Set the AG-HVX200 to VCR by pressing the MCR/VCR button
located on the back of the camera, under the viewfinder.
A thumbnail screen appears in the camera’s LCD.
2. To turn off thumbnail display, press THUMBNAIL button
located on the top of the camera, under the handle.
1
2
Left Transport
Back
Search
Forward
Search
(Back Index)
Play
Right Transport
(Forward Index)
Page 59

FS-100 Portable DTE Recorder
41
FS-100 Functions
This section contains information on the following LCD screens:
General Screen Information 42
Record Screens 47
Format Screen 52
Setup Screens 57
Functions Screen 71
Utilities Screen 75
Control Screen 94
FS-100 screens are organized in a flat hierarchy. Every screen has a
unique name, and it is possible to cycle continuously through the
screens using the
Left and Right navigation buttons.
Use the
Up and Down navigation buttons to cycle through screen
items (selections).
Use the
Select Navigation button to make a choice.
Navigation Tip: Jump to Top of Display Using the Left Button
When navigating through the LCD displays and scrolling down into the menu,
press the Left navigation button on the front panel and immediately return to
the top of the display, which allows navigating to other displays.
Jump to Home display Using Select Button
To return immediately to the Home Screen, navigate to the menu title at the top
of the screen and press the Select button.
Page 60
FS-100 Functions
FS-100 Portable DTE Recorder
42
General Screen Information
The FS-100 LCD screens are organized by function with each screen
displaying a list of items. An item can be:
• A value that can be set, such as the date.
• A switch similar to a check box, that can be enabled along with
other options in the display.
• A switch similar to a radio button, that belongs to a family of
options, in which only one can be active at any time.
• A link to another display, which is indicated by a .
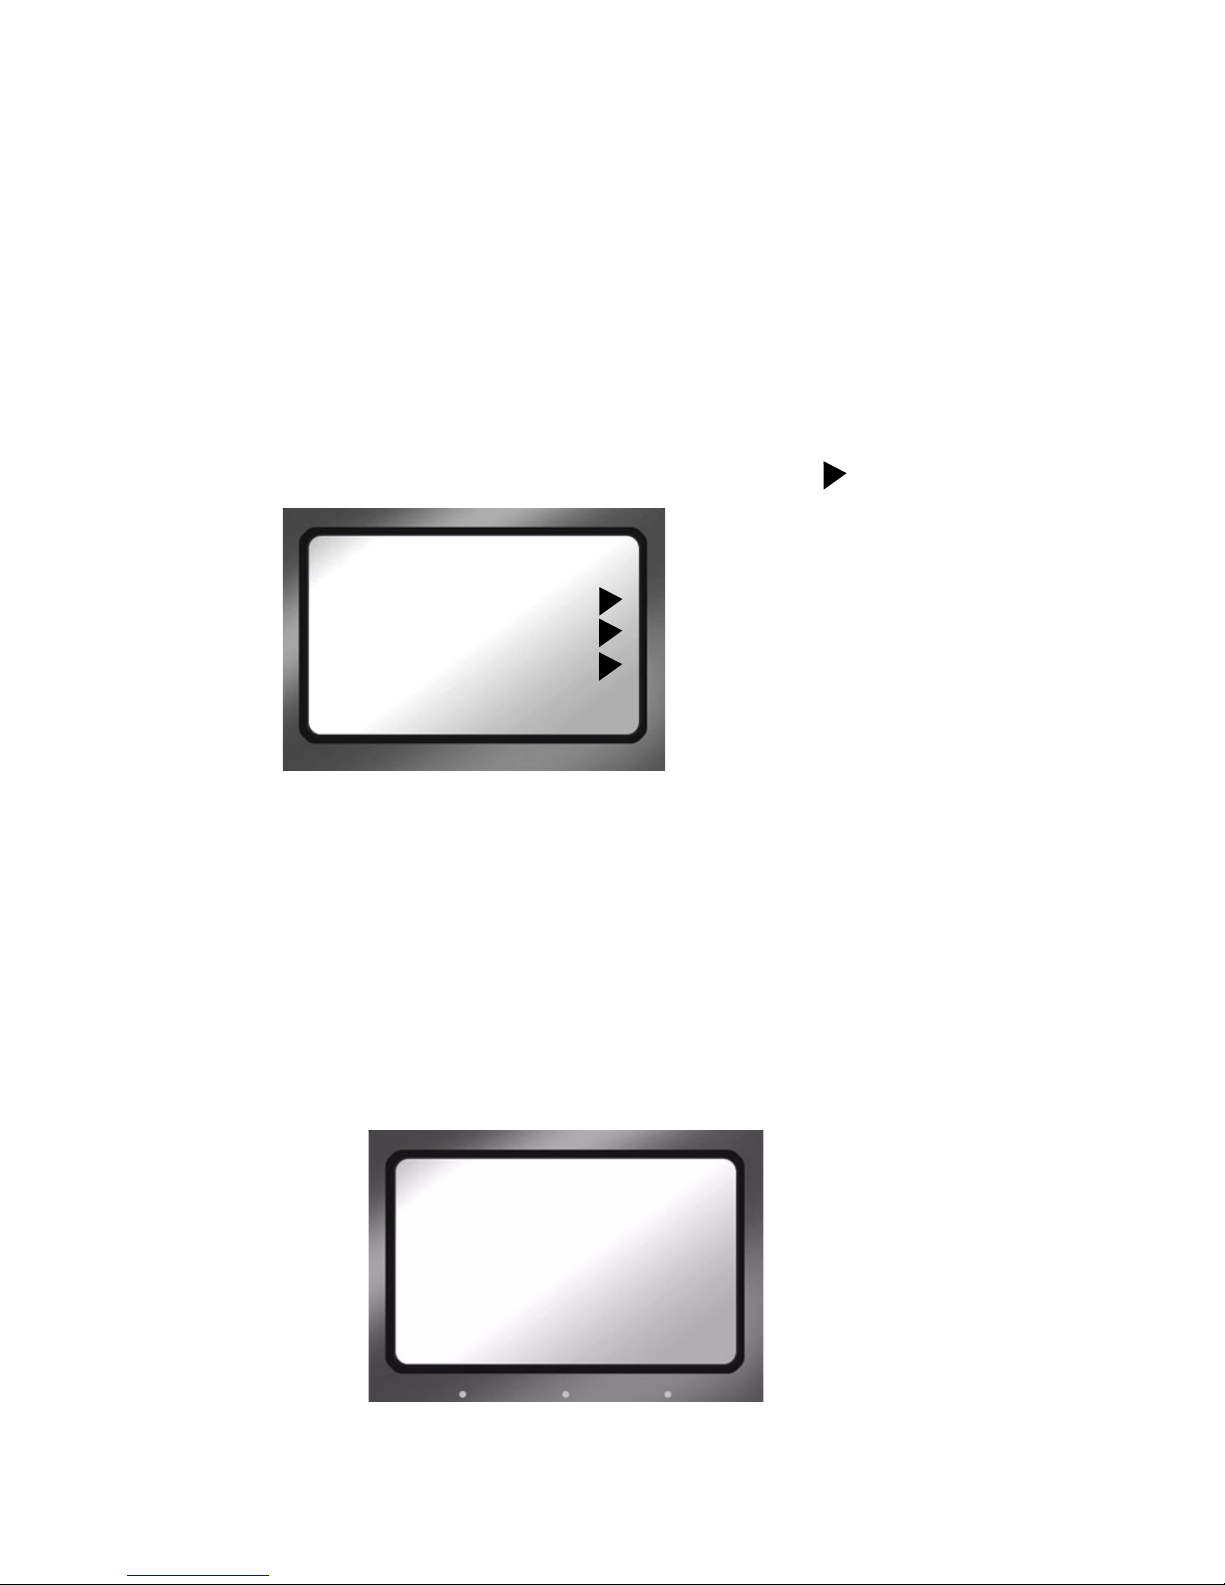
Welcome Screen
The Welcome screen appears briefly after boot-up, and
automatically switches to the Home screen when the FS-100 is
ready for operation.
Menu Title
Appears at the top of the
display and identifies its
topic or function.
Navigation
Use the Left or Right
navigation buttons to
move to the previous or
next display.
Use the Up and Down
navigation buttons to
move between the items
in the display.
SETUP
01 / 16 / 06
09 : 30 : 19
V 4 . 0. 0
-LCDLIGHT ON
FS-100
PORTABLE
DTE RECORDER
Page 61
FS-100 Functions
FS-100 Portable DTE Recorder
43
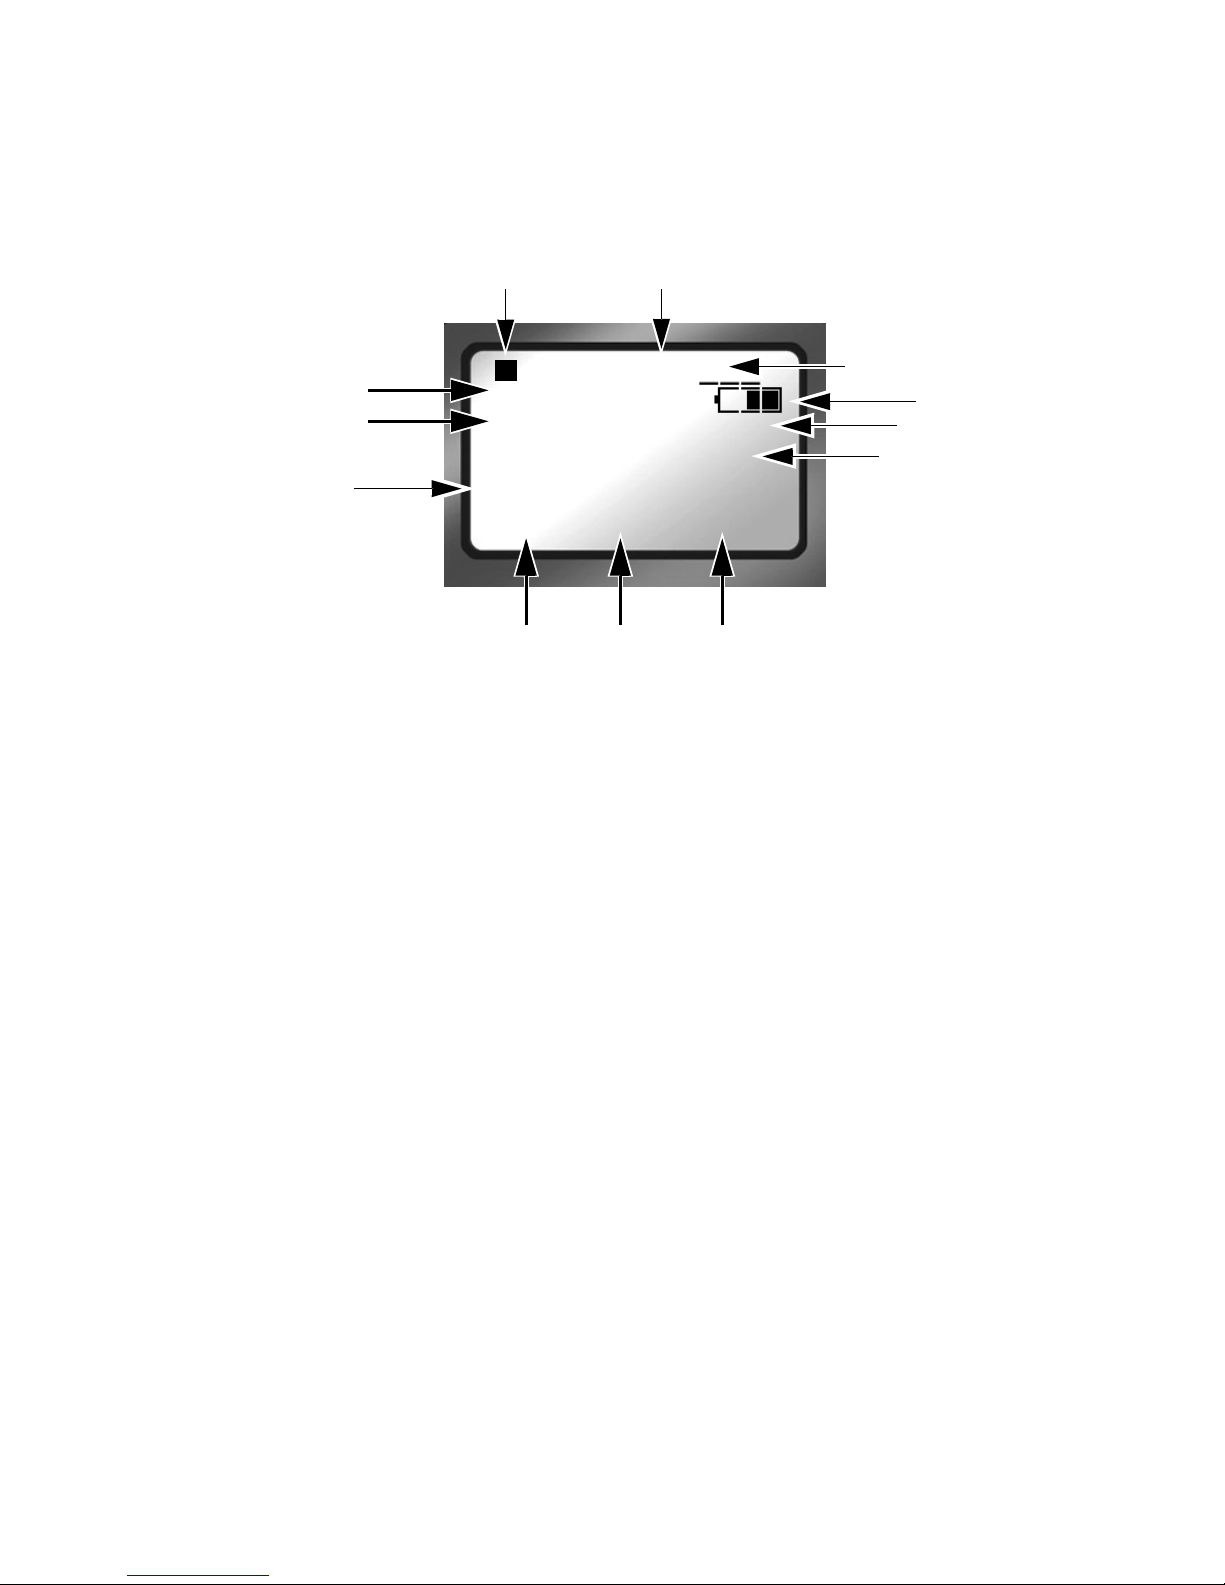
Home Screen
The Home screen is read only and has no navigable items. To leave
the Home screen use either the
Left or Right Navigation button.
1.
Current Function: symbol and description
Refer to
LCD Display Symbols and Text on page 97.
2.
Volume Disk Number
The volume number is always 1 unless multiple FS-100’s are
connected.
3.
Clip Number
Number of the current video clip, i.e. 001 for clip 1.
4.
Battery Life Gauge
This gauge is accurate only when the unit is powered
exclusively from the battery.
5.
PN/VF Mode Indicator
Versions 3.x and 4.x support PN DTE file formats. VFR
record modes are supported by 4.x versions only.
6.
Time Remaining on the disk.
7. FA Functions with
TAPE as the default, refer to Functions
Screen
on page 71 for more information.
8. FB Functions with
DISP as the default, refer to Functions
Screen
on page 71 for more information.
9. FC Functions with
LOCK as the default, refer to Functions
Screen
on page 71 for more information.
STOP 1 COUNTER
00:00:14:02 PN
DISK 1 168 min
REEL
TAPE DISP LOCK
10
3
2
4
11
12
6
5
1
7
8
9
Page 62

FS-100 Functions
FS-100 Portable DTE Recorder
44
10.
Reel Display
In
Record or Playback modes, this item displays the
particular REEL that a clip is located in or, has been marked
to. If in
PLAY FROM > REEL LIST mode, the REEL appears in
brackets for example, [REEL]. This area is blank if
NO REEL
has been selected.
11.
DISP information field that displays data type.
12.
DISP information field that displays current data.
DISP (display) Information Fields
Use the DISP function button to display current operation
information fields 11 and 12. The data shown depends on the
mode of operation, i.e.
DVCPROHD, DVCPRO50, DVCPRO/DV.
Pressing the
DISP button advances the display to the next
category of information. Below is a table of the data types and
data available with
DISP.
Field
Number
Data Type /
Data Description
11 COUNTER
12 Shows frame count of current video clip during record or
playback.
11 REMAINING
12 Record: counts down number of available frames
remaining, as time, on a specific disk.
Playback: displays time remaining of the current clip.
11 DV (NTSC or PAL) or HD (see note following table)
12 Record: displays the external timecode value being
generated by a camcorder or other device during a
recording session. Timecode mode must be set to EXT TC
for this function to operate, refer to TIME CODE EXT, REC
RUN, FREE RUN, REGEN on page 62.
Playback: displays the embedded DV timecode value in a
particular track.
In VF record mode, this displays the Base Frame Rate.
11 UB NTSC (In VF record mode, this displays the Frames
Per Second of input stream or
Incoming Frame Rate.)
Page 63

FS-100 Functions
FS-100 Portable DTE Recorder
45
12 Displays the set user bit value in a particular clip. A user
bit value must be added for this to display, refer to UB SET
on page 64.
11 ABSOLUTE
12 Displays an absolute timecode value for the particular
session: the sum of all COUNTER timecodes on
connected volumes.
Absolute is primarily used when setting the FS-100 to AV/
C mode and controlling it with an external FireWire device,
such as a computer.
DV (NTSC or PAL) and HD
The information displayed in fields 11 and 12 depends, in part, on which
Recorder Mode is set.
DVCPRO/DV REC
Line 11 displays the Standard Definition (SD) video format. It can not be
changed.
DVCPROHD REC and DVCPRO50 REC
Line 11 displays the HD resolution of the current track which depends on
the camcorder in use with the FS-100 HD unit. Possible values are:
• 1080/50i TC
• 1080/60i TC
• 720/60p TC
• 720/50p TC
• 720/30p TC
• 720/25p TC
• 720/24p TC
Refer to the camcorder manual for supported resolutions.
Page 64

FS-100 Functions
FS-100 Portable DTE Recorder
46
FS-100 System Information Screens
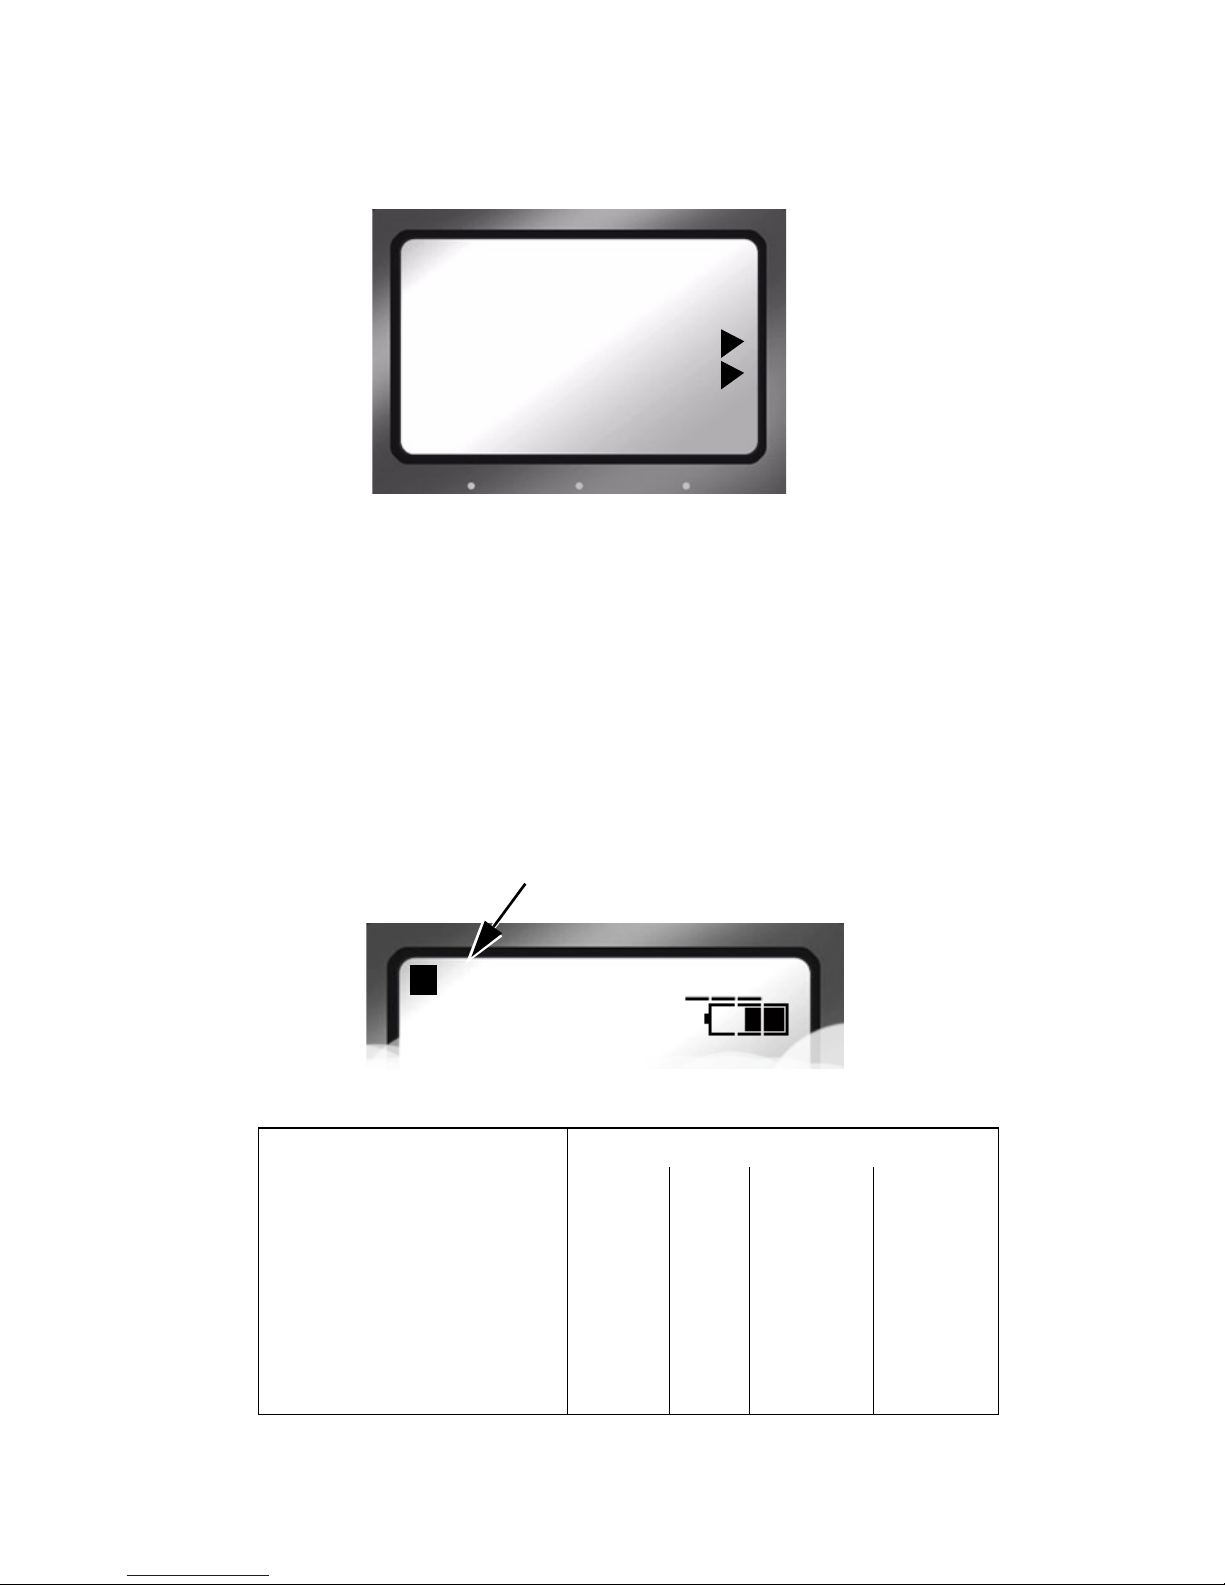
The FS-100 automatically creates information screens to indicate
conditions such as high temperature, power remaining, or drive
capacity remaining.
Press
OK to clear the screen and return to the last screen.
WARNING
5%
POWER
REMAINING
OK
Page 65
FS-100 Functions
FS-100 Portable DTE Recorder
47
Record Screens
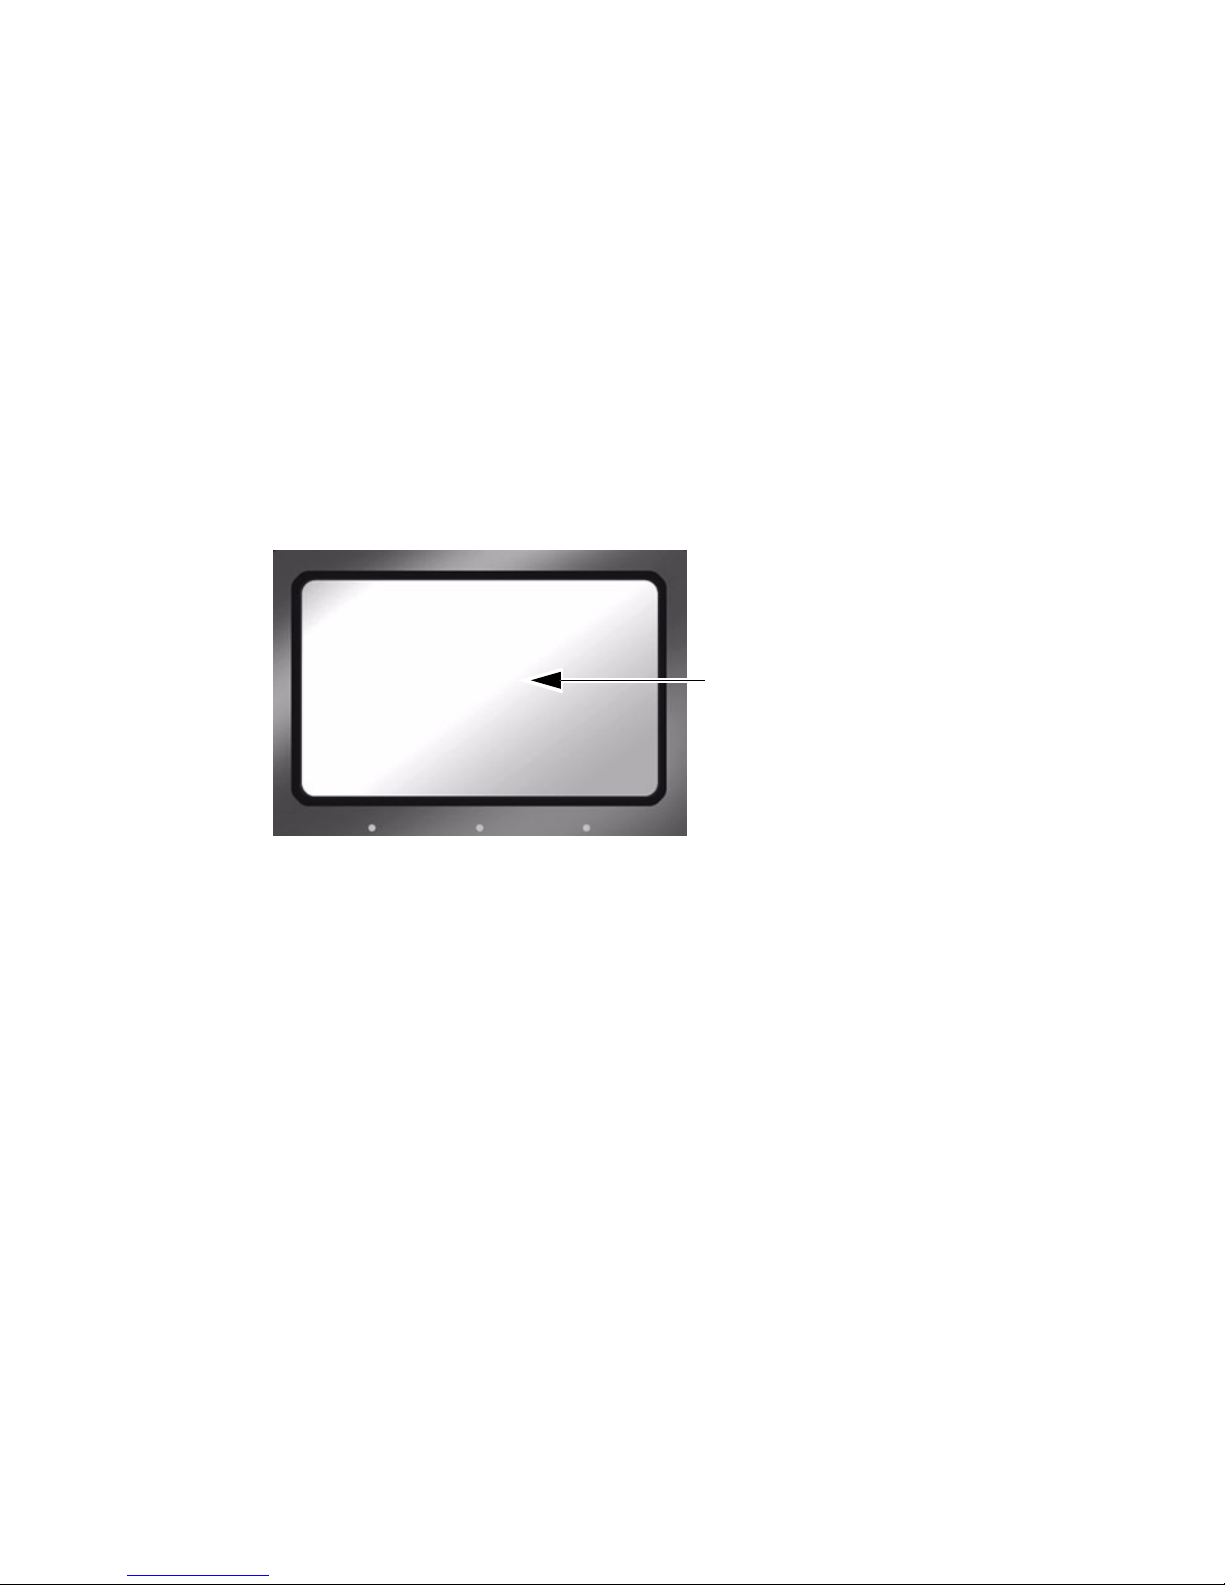
The Record screen permits setting the FS-100 to various recording
modes, depending on the model, see Table ‚ Record Modes with
Home Screen Indicators.
Once a record mode is selected, the recorder remains in that mode
until a different mode is chosen. Exiting the
Record screen and
returning to
Home, enables the selected recording mode.
To verify that the digital recorder is set to the correct recording mode,
refer to the upper left-hand of the Home screen where the recorder
mode is displayed.
Record Modes with Home Screen Indicators
Mode Top Line Displayed In Home Screen
NORMAL
Q STOP 1-001
PRE-REC DISK
Q P STOP 1-001
PRE-REC CACH
Q C STOP 1-001
LOOP RECORD
Q L STOP 1-001
SNAP DV
Q SNAP 1-001
TIME LAPSE
Q T STOP 1-001
RECORD
NORMAL
-PRE-REC DISK
PRE-REC CACH
LOOP RECORD
C STOP 1 -
Record Mode Indicator
(PRE-REC CACH)
Page 66
FS-100 Functions
FS-100 Portable DTE Recorder
48
For more about LCD display symbols and text, see
LCD Display
Symbols and Text
on page 97.
Normal Record
This is the standard recording mode.
• All control is from the FS-100 front panel.
Initially, the
Home screen displays STOP.
• Pressing Record
puts the FS-100 into II REC PAUSE mode.
• Pressing Record
a second time puts the FS-100 into REC mode.
PRE-REC Record Mode
The PRE-REC CACHe mode insures that important material at the
very start of a recording session is captured. PRE-REC stores in the
on board memory a continuous loop of video captured by video
camera during pauses. Pressing Record
begins active recording
at the last frame stored in the cache. The resulting video clip has
the cached video at the beginning.
PRE-REC CACHe is available in
Local, Syncro Slave, and Tapeless
control modes.
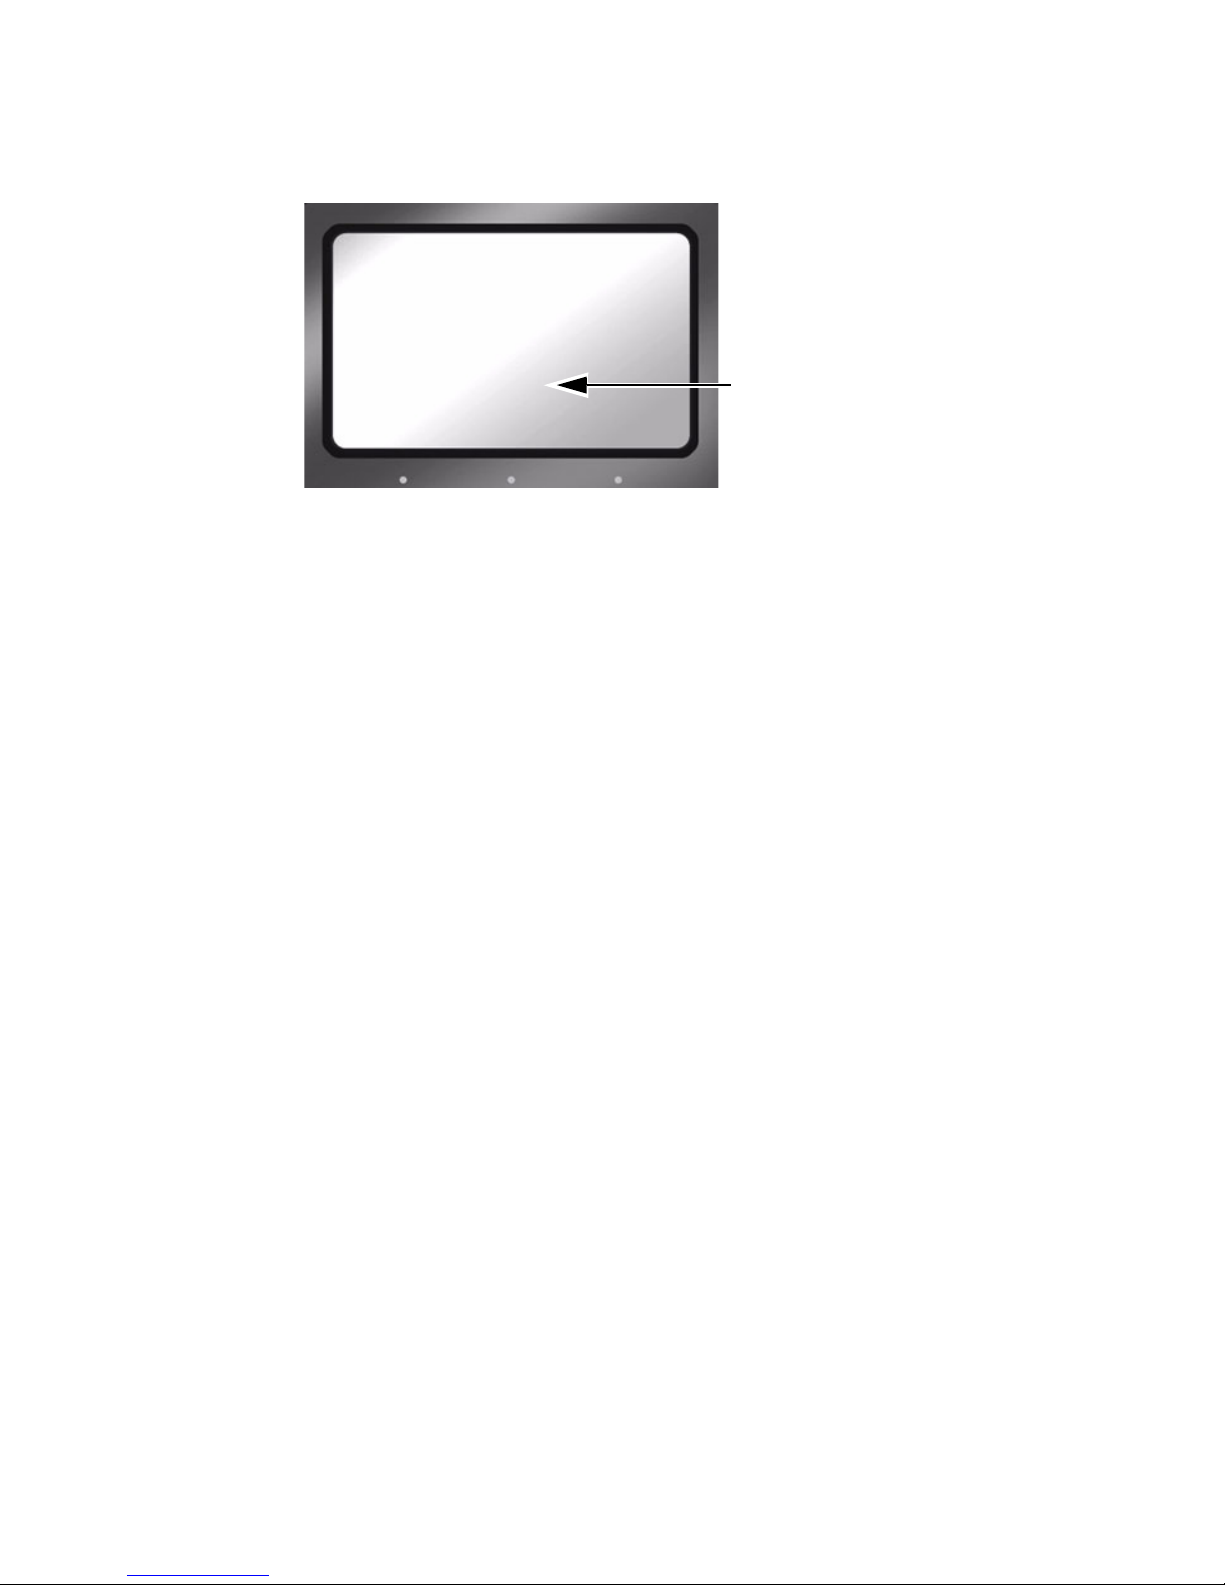
Set the length of video in 1-second increments from 0. The
maximum time allowed depends on the model:
• 6 seconds, DVCPROHD,
• 12 seconds, DVCPRO50,
• 24 seconds, DVCPRO/DV25,
Tens and ones digits are set separately.
PRE-REC CACHE
:00
:SS
BACK
This line is not active:
reference only.
Page 67
FS-100 Functions
FS-100 Portable DTE Recorder
49
PRE-REC Disk Record Mode
The PRE-REC Disk mode records video in a continuous loop to a
user-defined portion of disk space. Pressing
Record seamlessly
begins active recording. The PRE-REC Disk session is appended to
the beginning of the new clip. The result is a set of clips beginning
with the cached video and continuing with the newly recorded
video.
• When calculating the amount of hard disk space needed for a
PRE-REC Disk record session, always include additional
space beyond the recording requirements. The added space
depends on the length of the loop.
Loops less than 60 minutes in need an additional 1 minute
of unused disk space.
Loops 60 minutes and greater require an additional 2GB of
unused disk space.
• When looping less than one hour PRE-REC Disk records the
loop in a series of 1 minute clips.
• Otherwise, the FS-100 creates:
DVCPRO/DV: 9 minute, 13 second clips (2GB clips on disk),
DVCPRO 50: 4 minute, 36 second clips (2GB clips on disk),
DVCPRO HD: 2 minute, 18 second clips (2GB on disk),
• PRE-REC Disk is available in
Local, Syncro Slave, and
Tapeless control modes.
• When PRE-REC Disk is set, the symbols
P (Record and P)
appear in the FS-100 display.
PRE-REC Disk
HDD AVAIL:
176 min
PRE-REC TIME:
010 min
BACK
This is the only editable line on screen.
Page 68

FS-100 Functions
FS-100 Portable DTE Recorder
50
Loop Record
Loop Record is similar to PRE-REC Disk.
Loop Record continuously records a series of video clips to
available disk space. When all available disk space is used, Loop
Record begins sequentially replacing the earliest clip with the
most recent.
• The size of the video clip depends on the length of the loop or
record mode.
Loops of 60 minutes or less are recorded in one-minute
clips.
Otherwise, loops are recorded in 2GB clips.
When the capacity of the disk is reached, one additional
clip is created. The size of the last clip depends on the
length of the loop i.e., one-minute or 2GB. The disk must
have at least 30 minutes of disk space available for this
functionality.
Saving Loop Record Clips
Press STOP during a record session.
The FS-100 stops recording and saves the current LOOP
RECORD session clips to a folder on the disk.
Snap Record
Use Snap to record individual frames. In Snap mode, pressing
Record
captures individual frames. All the frames recorded in
the same session are stored in a single file.
• To start a new
SNAP record session, place the unit in STOP
between
SNAP records.
• Use Snap in
Local, Syncro Slave, and Tapeless control modes.
• Removing power from the FS-100 in the midst of a
Snap
recording session causes the unit to return to
Normal
recording mode when it powers back up.
Another Method to Capture Single Frames
An alternative to Snap is EXT CTL FRAME. For more information see
EXT CTL OFF, Pause, Frame, File on page 61.
Page 69
FS-100 Functions
FS-100 Portable DTE Recorder
51
Time Lapse Record
Time lapse provides the ability to record a single frame at specific
time intervals, for example one frame per minute, 00:01:00:00. Time
lapse applications can include capturing the traffic on city streets,
the growth of a plant from seed to maturity, and construction
projects.
Features of the Time Lapse function include:
• All the captured frames are recorded in a single clip.
• The time between recording periods can be set in frames,
seconds, minutes, and hours.
• The maximum time between recorded frames is 24 hours.
TIME LAPSE
00:00:00:00
HH:MM:SS:FF
BACK
This line is not active:
reference only.
Page 70

FS-100 Functions
FS-100 Portable DTE Recorder
52
Format Screen
DV Formats
The number of options available in this menu depends on the
recorded bit rate. If recording
DVCPROHD REC (100 Mb/s) or
DVCPRO50 REC modes (50 Mb/s) there are only two options:
•
P2
•
P2 PN DVCPROHD with 3.x or 4.x only
•
QUICKTIME 3.x or 4.x only
•
QUICKTIME PN DVCPROHD with 3.x or 4.x only
•
RAW DV
If recording in
DVCPRO/DV REC mode, there are a dozen file
format options, including:
•
RAW DV
•
AVI TYPE1
•
AVI TYPE2
• CANOPUS AVI
DV FORMATS
-P2
P2 PN
QUICKTIME
QUICKTIME PN
DV FORMATS
RAW DV
AVI TYPE 2 24P
PINNACLE
-P2
Page 71

FS-100 Functions
FS-100 Portable DTE Recorder
53
•
MATROX AVI
•
QUICKTIME
•
AVID OMF
•
QUICKTIME 24P NTSC only
•
AVI TYPE2 24P NTSC only
•
PINNACLE
•
P2
The latest DTE supported applications and file formats are listed
on the Focus Enhancements website:
www.focusinfo.com.
Formats for 25P Applications
Use standard file formats for all 25P applications except AVID OM F. OMF is
not compatible with 25P DV streams.
FS-100 Automatically Detects Input Stream from AG-HVX200
FS-100 automatically detects the stream type input from the AG-HVX200
camcorder. This also selects the appropriate HDD MODE and DV FORMAT
menu selections.
Page 72
FS-100 Functions
FS-100 Portable DTE Recorder
54
HDD Mode Screen
This screen displays the following items:
•
DVCPROHD
Supports 100 Mb/s streams from the Panasonic AG-HVX200
companion camcorder (1080i and 720p).
Versions 3.x and 4.x support 720 PN.
In addition, 4.x supports VFR modes. The PN/VF record
processing is performed on the FS-100. The camera must be in
the corresponding non-PN mode (720 24P/25P/30P). The FS-100
does not support the PN streams as a valid input.
Other DVCPROHD compatible input devices also supported.
•
DVCPRO50
Supports 50 Mb/s streams from the Panasonic AG-HVX200
companion camcorder and other DVCPRO 50 input devices.
•
DVCPRO/DV
Supports 25 Mb/s streams from the Panasonic AG-HVX200
companion camcorder and other DVCPRO/DV input devices.
AG-HVX200 Setup for PN/VFR
In PN/VFR record modes, the AG-HVX200's RECORDING SETUP -> UB
MODE must be set to FRM. RATE. For VFR mode, see Variable Frame
Rate ( VFR) Settings on page 38.
VFR Mutes Audio
The audio is muted on all VFR recordings.
FS-100 Automatically Detects Input Stream from AG-HVX200
FS-100 automatically detects the stream type input from the AG-HVX200
camcorder and, in addition, selects the appropriate HDD MODE.
HDD MODE
-DVCPROHD REC
DVCPRO50 REC
D VC PR O/ DV RE C
DD DRIVE
Page 73

FS-100 Functions
FS-100 Portable DTE Recorder
55
•
DD DRIVE
Use this option when connecting the FS-100 to a computer. The
FS-100 functions as a volume visible to the computer. In
addition, this setting permits the connecting of multiple FS-100s
together to increase recording space.
•
USE EXT FS-100
Use this option when longer recording times are needed.
USE
EXT FS-100
permits the connecting of two FS-100 together to
provide more disk storage for longer recording. One unit acts as
the master with the other as a slave: the master records to itself
until full and then continues recording on the slave unit.
Identifying Master/Slave Volumes During Record/Playback
When two FS-100s are in combined via USE EXT FS-100 and in either
Record or Playback mode, the volume on the Home screen will display 1-
xxx when the master unit is recording or playing back and 2-xx if it is the
slave.
Page 74
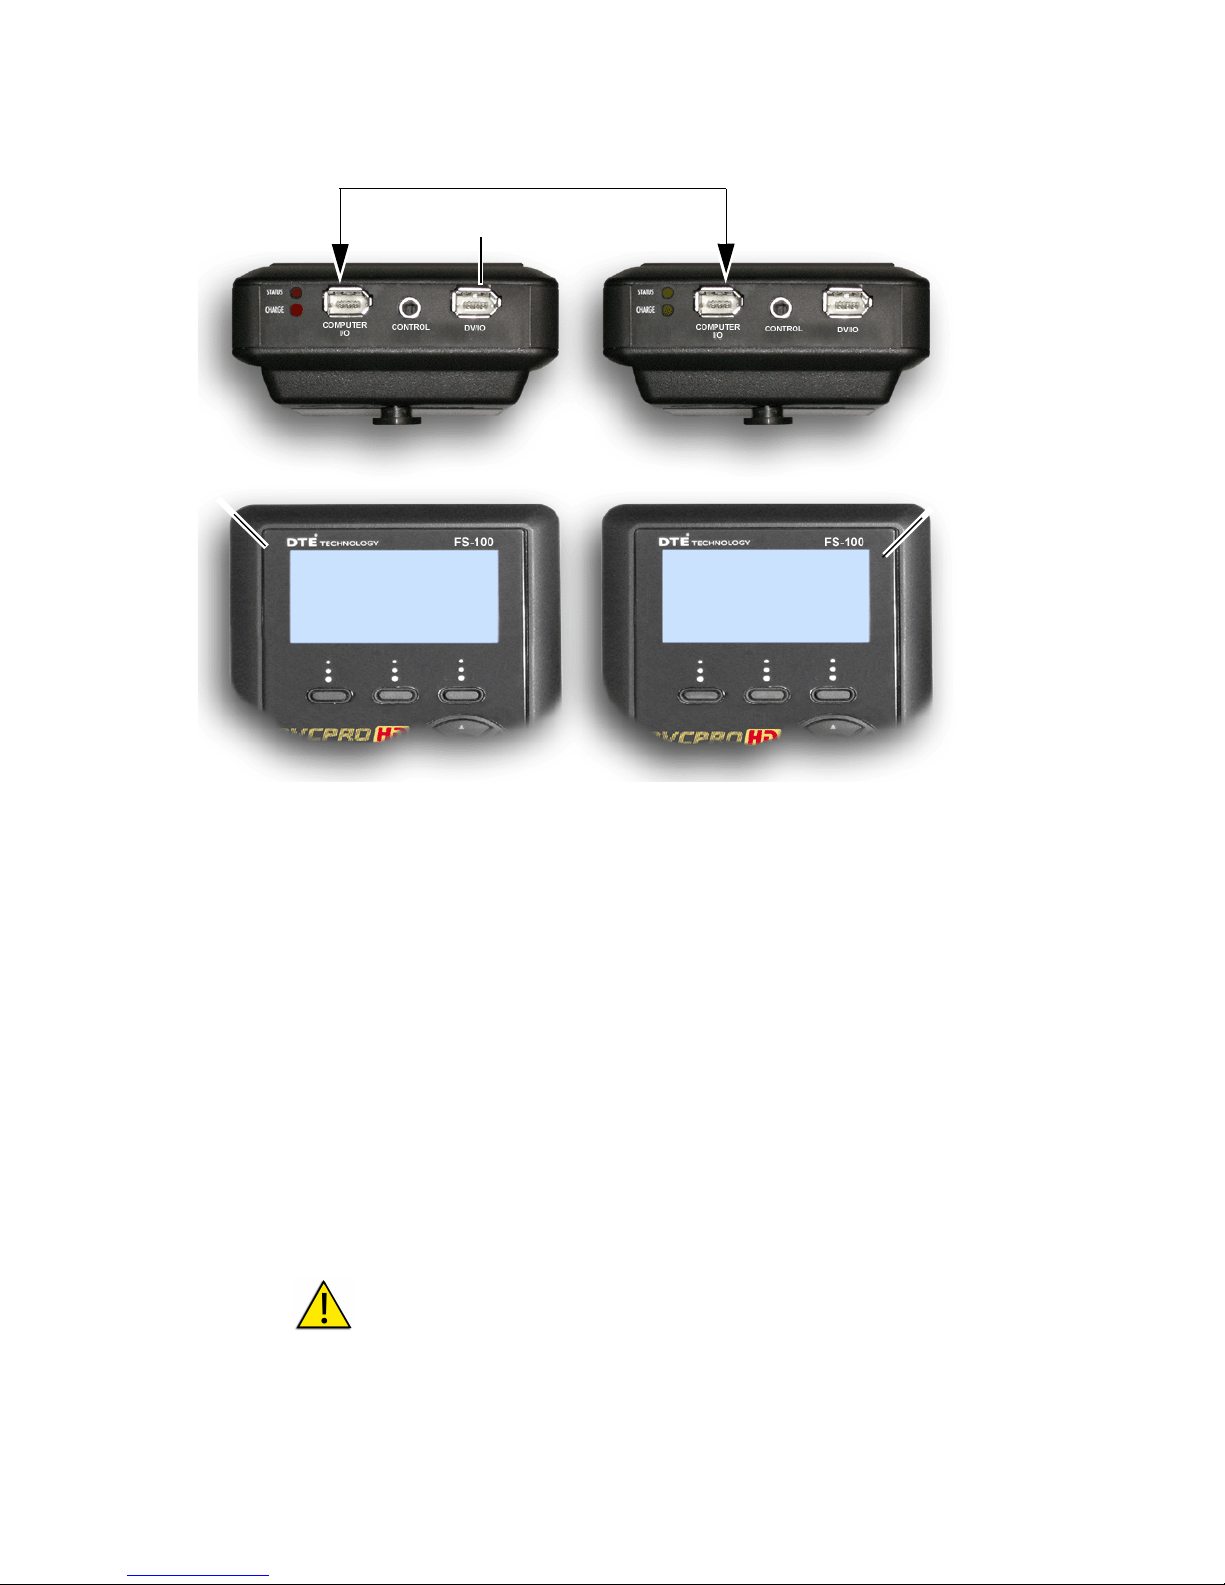
FS-100 Functions
FS-100 Portable DTE Recorder
56
Setting Up Master and Slave FS-100
1. Connect the camcorder to the master FS-100, DV I/O
connector using the supplied FireWire cable.
2.
Master
Power on unit.
Go to the
HDD Mode menu screen and enable
USE EXT FS-100.
3. Connect the FS-100s through the units
Computer I/O
connectors using a 6-pin to 6-pin FireWire cable.
4.
Slave
Power on the unit
Go to the
HDD Mode screen and enable DD DRIVE.
5.
Master
Begin recording or playback using the master FS-100.
Use DD Drive Mode when Connecting to a PC
It is important to take the master FS-100 out of USE EXT FS-100
mode before attempting to connect to a computer.
To do this, select DD DRIVE from the HDD Mode screen.
This returns use of the unit to hard disk mode.
STOP 1 - 001
COUNTER
00 : 00 : 00 : 00
CONNECT
COMPUTER THEN
ENABLE BYPASS
4
3
2
1
Master FS-100 Slave FS-100
Page 75
FS-100 Functions
FS-100 Portable DTE Recorder
57
Setup Screens
The items on the Setup Screen are grouped by function. Within the
function the items act like radio buttons, i.e. when one is active the
others are not.
In some cases, such as the Date, a settings screen appears. To return
from a settings screen, use the
BACK function button.
The items displayed on the Setup screen include:
•
DATE Displayed
•
TIME Displayed
•
VERSION model: NTSC/PAL Displayed
•
LCDLIGHT ON Group Default
•
LCDLIGHT OFF
•
LCDLIGHT AUTO
•
ALARM ON Group Default
•
ALARM OFF
•
STOP FRAME; (1st frame of current clip)
•
STOP NO VIDEO Group Default
•
EXT CTL OFF Group Default
•
EXT CTL PAUSE
SETUP
10 / 10 / 07
21 : 10: 50
V 4. 0. 0
-LCDLIGHT ON
Page 76

FS-100 Functions
FS-100 Portable DTE Recorder
58
•
EXT CTL FRAME
•
EXT CTL FILE
•
TC EXT Group Default
• TC REC RUN
•
TC FREE RUN
•
TC REGEN
•
TC SET
•
UB SET
•
TC DROP NTSC only
• TC NON-DROP Default, NTSC only
• VFR MODE
• LCD CONTRAST
Date and Time Must Be Set
The date and time must be set. They are used in the FS-100 file naming
function. Refer to
Set Time and Date on page 30.
Page 77

FS-100 Functions
FS-100 Portable DTE Recorder
59
Date
Time
SET DATE
09 / 18 / 07
MM / DD / YY
BACK
SET TIME
10 : 50 : 40
HH : MM : SS
BACK
Page 78

FS-100 Functions
FS-100 Portable DTE Recorder
60
Version
This screen displays:
• FS-100 Firmware version
• SD video of the unit.
• FS-100 model
LCD Light On, Off, Auto
These items enable or disable the FS-100's LCD's backlight.
•
LCDLIGHT ON Group Default
Keeps the backlight on permanently.
•
LCDLIGHT OFF
Keeps the backlight off permanently.
•
LCDLIGHT AUTO
Turns off the backlight after one minute, pressing any button
pad button turns the backlight back on.
Any information screen turns the backlight on.
Alarm On, Off
Default is On.
• When the alarm is enabled, pressing any button on the FS-100
produces audio feedback.
• The FS-100 alarm triggers when conditions such as low
battery charge, low disk space, or over heating occur.
• When Alarm is set to
Off, the audio feedback for the buttons is
disabled, however the alarm will still sound for low power,
high heat, or low disk space conditions.
VERSION
4.0.0.04071507
NTSC
FS-100
BACK
Page 79

FS-100 Functions
FS-100 Portable DTE Recorder
61
Stop Frame, No Video
These settings determine the FS-100 video output when it is in
STOP mode.
•
STOP FRAME
Displays the first frame of the clip.
•
STOP NO VIDEO Group Default
Video output is Off.
EXT CTL OFF, Pause, Frame, File
These options permit the use of an external device to control the
FS-100 through the optional RS-232 cable.
•
EXT CTL OFF Group Default
Use this option when connecting an external device using an
RS232C cable.
This requires the use of a a 3.5mm-to-DB9 adapter cable,
plugged into FS-100
Control port.
In Local mode, select this item to control the FS-100 with the
optional wired remote control unit.
The following options permit control functions to occur from a
simple contact closure.
•
EXT CTL PAUSE
Controls
Pause and Resume during a record or playback
session.
•
EXT CTL FRAME
Captures a single frame of video and records it to a file. Each
time this function is triggered, it sequentially adds another
frame to the same file until stopped.
•
EXT CTL FILE
Creates a new file during a record session without losing
frames.
RS-232 Cable Available from Focus Online Store
The RS-232 cable required to connect the FS-100 to an external control
device is Focus part number CBLA-0113-01. It and other accessories
mentioned in this manual are available at https://www.focusinfo.com/sales/
store.
Page 80

FS-100 Functions
FS-100 Portable DTE Recorder
62
TIME CODE EXT, REC RUN, FREE RUN, REGEN
The following are timecode (TC) functions.
•
TC EXT Group Default
Records the incoming source timecode. If the timecode is not
running, the FS-100 records the same timecode number in
each recorded frame. Choose
TC EXT mode to clear any stored
number.
•
TC REC RUN
In this mode, after a power cycle, the FS-100 starts its TC
record count using the
TC SET value. Later recordings add to
the last value recorded. A power cycle resets the TC record
value to the
TC SET value.
•
TC FREE RUN
This function causes the FS-100 to begin counting from the
value stored by
TC SET.
A number entered through
TC SET is not stored and
available to the FS-100 until exiting
TC SET. Only then does
the FS-100 begin counting using that number.
•
TC REGEN
When the FS-100 powers up in
TC REGEN mode, it:
Reads the timecode of the last track recorded.
Adds 1 to the number.
Stores the new timecode as the number that will be
assigned to the first frame of the next recording session.
If the drive is empty, i.e. no existing recordings with, the
FS-100 uses the
TC SET value.
TC SET and UB SET Can Be Set at the Same Time
Both parameters, TC SET and UB SET, may be set and are not mutually
exclusive as in some groups, i.e. LCDLIGHT.
TC EXT Recommended for Pull-down Applications
If the recording signal contains pull-down information in 720/60p format,
the frame flag information contained is preserved in TC EXT mode and
is required for the editing process.
Page 81

FS-100 Functions
FS-100 Portable DTE Recorder
63
TC SET
The Timecode Set parameter stores a user defined timecode in the
FS-100’s non-volatile memory. This value is available for use by the
FS-100 immediately after exiting
TC SET.
•
TC FREE RUN
The FS-100 uses this value on the next recording after it is set
in
TC SET.
•
TC REGEN
This is the starting value when using an empty hard disk
drive for recording.
•
TC REC RUN
This is the value used to begin every recording session after a
power cycle.
TC SET
00 : 00 : 00 : 00
HH : MM : SS : FF
BACK
Page 82

FS-100 Functions
FS-100 Portable DTE Recorder
64
UB SET
The User Bit Set function provides the ability to change the user
bits in the timecode recorded in the video files.
• Timecode values are not set when in
TC EXT mode.
Professional applications employ user bits to add metadata to
recordings to assist in post production. For example, multiple
cameras are used during a shoot. Each FS-100 has a unique UB
setting that identifies it and the camera it serves. Later, the user bits
are used to determine from which camera station the footage was
recorded.
UB SET
FF : FF : FF : FF
BACK
Page 83

FS-100 Functions
FS-100 Portable DTE Recorder
65
TC DROP, NON-DROP NTSC only
These parameters are only available for NTSC and only one may
be enabled at a time. Drop and non-drop enable and disable the
drop-frame function that modifies how the timecode is calculated
during recording.
•
TC DROP
Enables the drop-frame function:
Frames 00 and 01 are dropped from each minute of video
recorded, except for those minutes evenly divisible by ten.
•
TC NON-DROP Group Default
Disables drop-frame. No frames are dropped during
recording and the timecode reflects the actual time during
recording.
Use with TC FREE RUN or TC REGEN
TC DROP and TC NON-DROP may only be set when using the TC FREE
RUN or TC REGEN settings.
Type of Separator Indicates TC DROP or NON-DROP
The timecode displayed on the LCD indicates the TC DROP/NON-DROP
mode by using either a semi-colon or a colon as a separator between hours,
minutes, seconds and frames:
• DROP HH
;MM;SS;FF
• NON-DROP HH
:MM:SS:FF
Page 84
FS-100 Functions
FS-100 Portable DTE Recorder
66
VFR MODE
Use this setting to enable or disable Variable Frame Rate (VFR)
support for the AG-HVX200 VFR mode. This setting also
designates the input stream
type*:
• 720/24P or 720/30P on 60 Hz NTSC systems.
• 720/25P on 50 Hz PAL systems.
* The input stream type is also called the Base Frame Rate.
NTSC Menu
PAL Menu
WAR NING:
It is critical that the VFR MODE is set properly prior to doing a
VFR mode record. This setting is set to OFF whenever the
unit is powered down or the DV FORMAT value is changed.
When VFR MODE is set to a value other than OFF, all PN
recordings will have the audio MUTED.
VFR MODE
OFF
24P
30P
BACK
VFR MODE
OFF
25P
BACK
Page 85

FS-100 Functions
FS-100 Portable DTE Recorder
67
In addition to setting VFR MODE to the
Base Frame Rate, a PN DTE
format must be selected from the
FS-100 DV FORMAT menu, see DV
Formats
on page 52.
VFR MODE is inactive for non-PN DV FORMATS.
Set AG-HVX200 to Standard Record Mode
The Panasonic AG-HVX200 must be set to standard record
mode or 720P mode but not 720PN.
FS-100 VFR MODE supports three stream types:
• 720/24P and 720/30P on 60 Hz systems.
• 720/30P on 50 Hz systems.
On the AG-HVX200:
1. Set
SCENE FILE > OPERATION TYPE to FILM CAM.
2. Set
RECORD SETUP > UB MODE to FRM. RATE.
3. Set
SCENE FILE > FRAME RATE to the desired Incoming
Frame Rate
.
See the AG-HVX200 manual for more information.
When recording, the FS-100 Home screen displays
VF on the
right, below the battery level indicator.
During playback, the
VF indicator is not available and PN is
displayed.
REC
COUNTER
00:00:14:02 VF
DISK 1 168 min
REEL
TAPE DISP LOCK
Page 86

FS-100 Functions
FS-100 Portable DTE Recorder
68
Undercranking and Overcranking
Undercranking, also called fast motion, is setting the Incoming
Frame Rate
lower than the Base Frame Rate (24, 30, or 25 fps)
which results in video playback that appears faster than the
Base Frame Rate.
For example, if the
Base Frame Rate is set to 24 fps (720/24P
input stream), set the
Incoming Frame Rate to 12. When the file
is played back at the base rate (24 fps) the result is video
playback at twice normal speed.
Overcranking, also called slow motion, is setting the frame rate
higher than the
Base Frame Rate which results in video playback
that appears slower than the
Base Frame Rate.
For example, if the
Base Frame Rate is set to 24 fps (720/24P
input stream), set the
Incoming Frame Rate to 48. When the file
is played back at the base rate (24 fps) the result is a video
playback at half normal speed.
During playback on the FS-100 the video will display at full
frame rate. Video on overcranked recordings will playback
slower than normal video speed and undercranked video will
playback faster.
VFR Mode Setting Not Saved
The VFR MODE setting is automatically set to OFF upon power-down.
This setting must be changed for VFR recordings for every power-cycle.
Page 87

FS-100 Functions
FS-100 Portable DTE Recorder
69
Using VFR recordings in NLEs
Use the Base Frame Rate for the NLE’s timeline setting.
For example, if the
Base Frame Rate is 720/24P and the
Incoming Frame Rate is set to 48 or 12, the timeline preset to
use is 720/24P.
A real-time recording has an equivalent
Base Frame Rate and
Incoming Frame Rate.
When using VFR recordings in editing, the real-time recordings
must match the VFR recording's DV FORMAT and
Base Frame
Rate
.
For example, when editing with VFR recordings that have the
DV FORMAT of
QUICKTIME PN and a Base Frame Rate of 720/
24P
, then the real-time recordings must be made with
QUICKTIME PN as the DV FORMAT and a Base Frame Rate of
720/24P and the VFR MODE set to OFF.
This insures that the VF and real-time recordings can be used
in the same timeline without rendering.
Camera Resolution must be set to 720P mode:
The camera resolution must to set to the corresponding 720P mode and
NOT the 720PN mode for VFR recordings.
Page 88

FS-100 Functions
FS-100 Portable DTE Recorder
70
LCD CONTRAST
Use this function to adjust the contrast of the LCD display for
easier viewing.
1. Use the
Right navigation button to go to the SET CONTRAST
submenu.
2. Use the
Up and Down navigation buttons to increase and
decrease the contrast number.
3. Press
BACK when done.
SET CONTRAST
VALUE: 00
BACK
Page 89
FS-100 Functions
FS-100 Portable DTE Recorder
71
Functions Screen
The Functions buttons FA, FB, and FC provide convenient Home
screen shortcuts by acting as toggle switches for specific system
settings. The Home screen below is an example of the information
displayed.
Function settings are user-assignable and available in the Functions
screen. Changing a setting with a Function button has the same effect
as manually changing the setting.
• There are three groups of functions FA, FB, and FC displayed
via the Functions screen.
• The function groups are independent of each other.
• In each group only one selection is active at a time.
STOP 1-
COUNTER
00 : 00 : 20 : 15
DISK 1 168 min
R1
DISP DD
Reel receiving
clips.
Function Keys
FA FB FC
Function Groups
FUNCTIONS
-FA SYNC
FA AV / C
FA TAPELESS
FA REELS
Page 90
FS-100 Functions
FS-100 Portable DTE Recorder
72
Functions List
A list of the Function button menu is below. In each group, the
default selection is listed first.
MENU Appears on LCD as…
FA SYNC SYNC
(Toggles between SYNCRO and LOCAL record
control.)
FA AV/C AV/C (Toggles between AV/C and LOCAL control)
FA TAPELESS TAPE (Toggles between TAPELESS and LOCAL
control) Default
FA REELS REEL Increments current reel number
FA R0-0 R0 Marks Current Clip to Reel 0,
FA R1-1 R1 Marks Current Clip to Reel 1,
FA R2-2 R2 Marks Current Clip to Reel 2,
FA R3-3 R3 Marks Current Clip to Reel 3,
FA R4-4 R4 Marks Current Clip to Reel 4,
FA R5-5 R5 Marks Current Clip to Reel 5,
FA R6-6 R6 Marks Current Clip to Reel 6,
FA R7-7 R7 Marks Current Clip to Reel 7,
FA R8-8 R8 Marks Current Clip to Reel 8,
FA R9-9 R9 Marks Current Clip to Reel 9,
FA LCD ON/OFF LCD1/LCD0 LCD On/Off Toggle
FA LCD AUTO LCDA/LCD0 LCD Auto On/Off Toggle
FA BLANK No Function.
FB DISP DISP (Toggles the different TC display modes)
(Default)
FB ALARM ALRM/MUTE (Turns the FS-100 alarm on or off.)
FB FILE FILE (Toggles between normal and display of the file
name)
FB REELS REEL Increments current reel number
FB R0-0 R0 Marks Current Clip to Reel 0,
FB R1-1 R1 Marks Current Clip to Reel 1,
Page 91
FS-100 Functions
FS-100 Portable DTE Recorder
73
MENU Appears on LCD as…
FB R2-2 R2 Marks Current Clip to Reel 2,
FB R3-3 R3 Marks Current Clip to Reel 3,
FB R4-4 R4 Marks Current Clip to Reel 4,
FB R5-5 R5 Marks Current Clip to Reel 5,
FB R6-6 R6 Marks Current Clip to Reel 6,
FB R7-7 R7 Marks Current Clip to Reel 7,
FB R8-8 R8 Marks Current Clip to Reel 8,
FB R9-9 R9 Marks Current Clip to Reel 9,
FB BLANK No Function.
FC LOCK LOCK/UNLK Locks the buttonpad (Default)
(Toggles between LOCK and UNLK <Unlock>)
FC DV/DD DD (Toggles FS-100 between DV/HD and HDD
Modes)
FC REELS REEL Increments current reel number
FC R0-0 R0 Marks Current Clip to Reel 0,
FC R1-1 R1 Marks Current Clip to Reel 1,
FC R2-2 R2 Marks Current Clip to Reel 2,
FCR3-3 R3 Marks Current Clip to Reel 3,
FC R4-4 R4 Marks Current Clip to Reel 4,
FC R5-5 R5 Marks Current Clip to Reel 5,
FC R6-6 R6 Marks Current Clip to Reel 6,
FC R7-7 R7 Marks Current Clip to Reel 7,
FC R8-8 R8 Marks Current Clip to Reel 8,
FC R9-9 R9 Marks Current Clip to Reel 9,
FC BLANK No Function.
Page 92
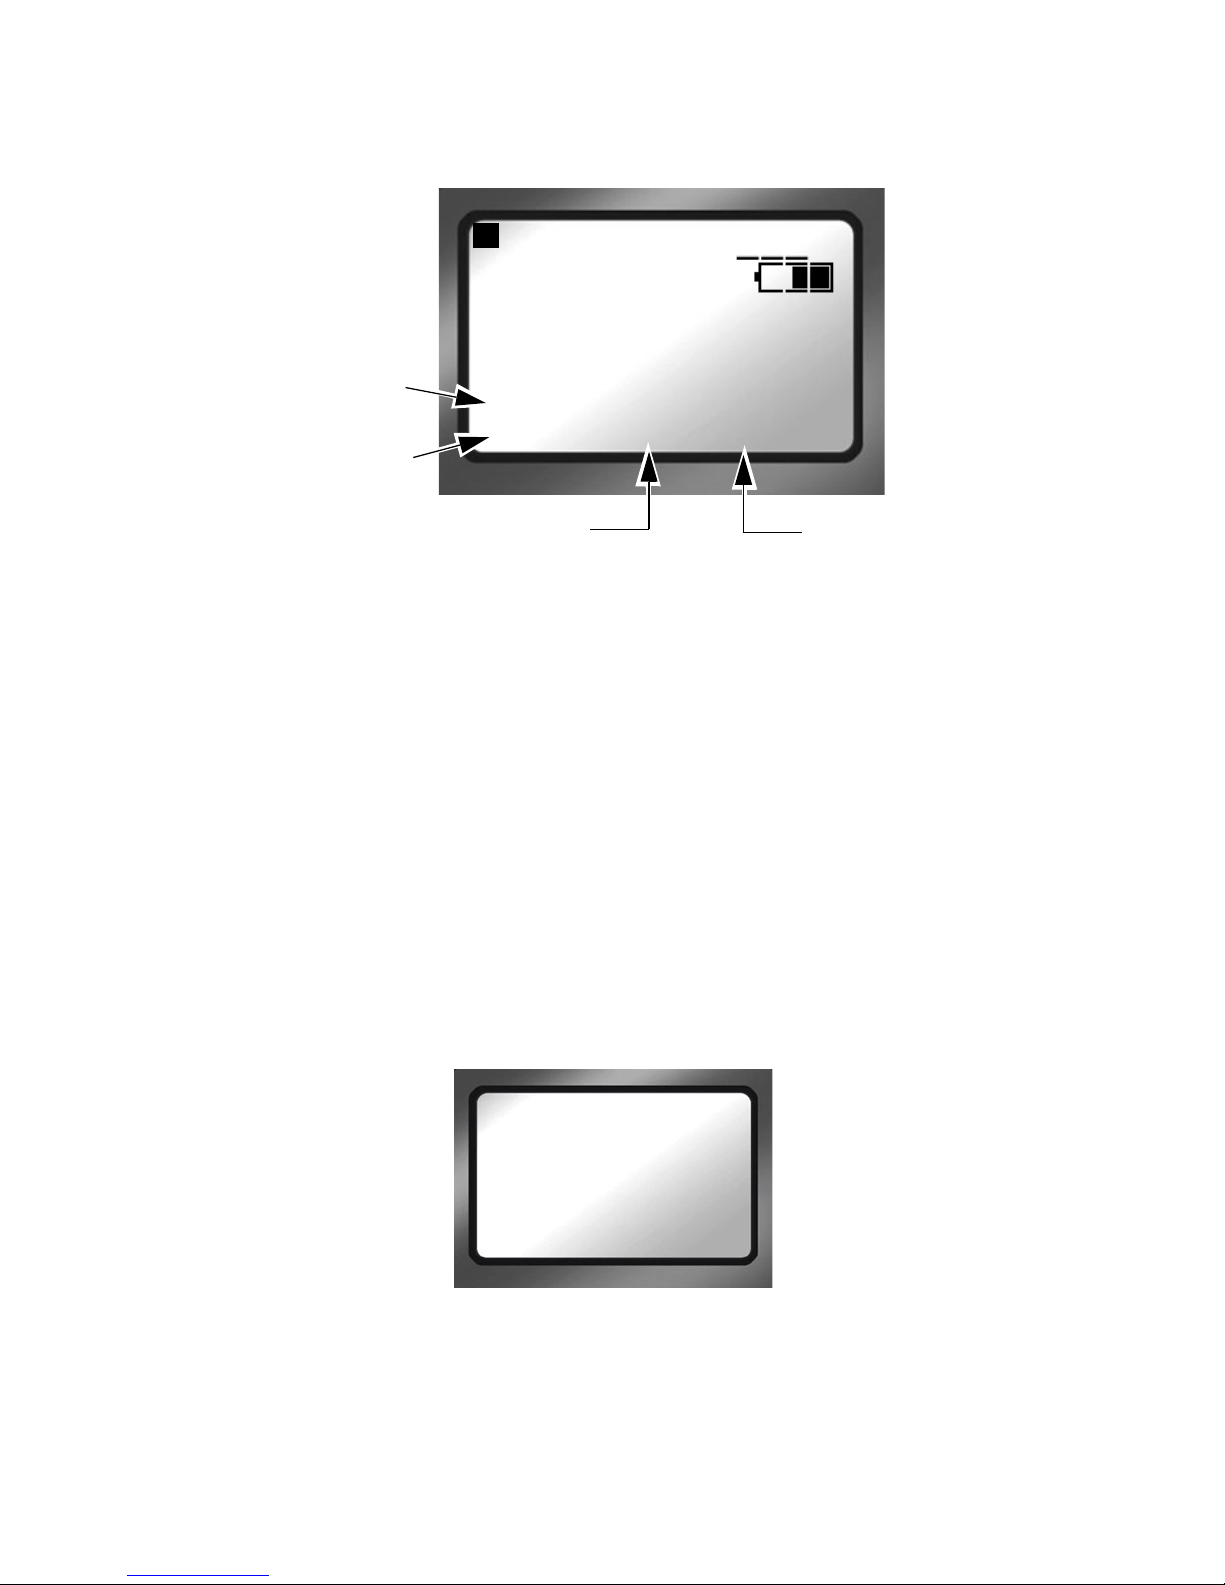
FS-100 Functions
FS-100 Portable DTE Recorder
74
Assigning Clips to Reels
The function buttons are a quick way to mark video clips during
recording. The Functions menu offers two types of markers to use,
as an example
FA REELS and FB REEL-2.
•
FA REELS
Selecting the FA REELs programs the FS-100 to mark the clips to
the currently selected reel. The current reel is indicated in the
line
above the FA function reel selection.
•
FB REEL 2
Setting a function button to this type of marker, instructs the FS100 to mark the current clip as belonging to the REEL R2.
•
LOCK/UNLK:
Selecting
LOCK or UNLK to lock or unlock the front panel keys of
the FS-100.
To prevent accidentally unlocking the front panel, there is an
unlock confirmation screen:
After pressing the
UNLK key, press SELECT.
Blank
Functions identified as Blank are inactive.
STOP 1-
COUNTER
00 : 00 : 20 : 15
DISK 1 168 min
R1
REEL R2 R1
Function FB
set to FB R2-2
Function FC
set to FC R1-1
ected REEL
UNLOCK KEYS
PRESS SELECT
TO CONFIRM
Page 93
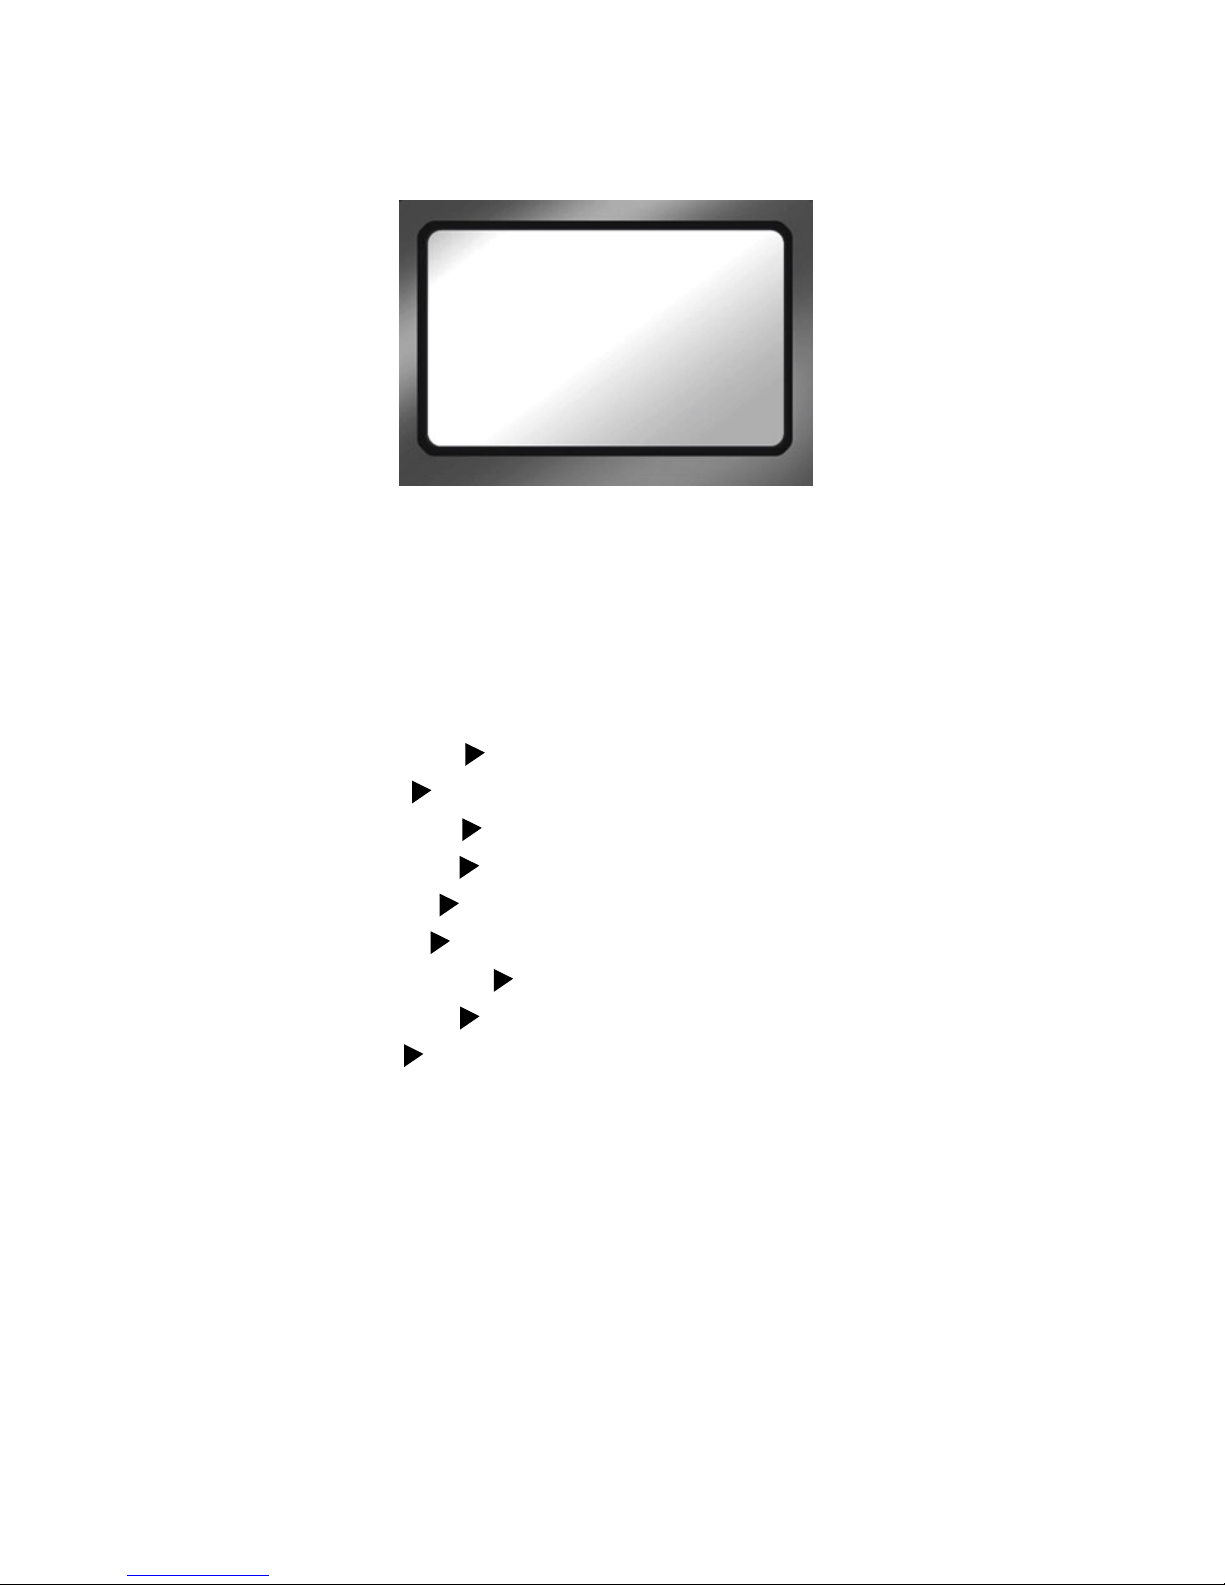
FS-100 Functions
FS-100 Portable DTE Recorder
75
Utilities Screen
The Utilities available are:
ORGANIZE REEL
ORGANIZE OMF DVCPRO/DV only
ORGANIZE P2
ORGANIZE PINN DVCPRO/DV only
MAKE REF MOV version 4.x only
DELETE CLIP
FORMAT
REPAIR DISK
REPAIR CLIP
FILE NAME
UPGRADE
SYSTEM RESET
DIAGNOSTIC
STATUS
Organize Reel
This selection places all files identified as a REEL clip during
recording or playback into the appropriate reel folder. You can
import this folder directly into most DV NLE bins.
UTILITIES
ORGANIZE REEL
ORGANIZE OMF
ORGANIZE P2
ORGANIZE PINN
Page 94

FS-100 Functions
FS-100 Portable DTE Recorder
76
Organize OMF DVCPRO/DV only
When files are recorded in the AVID OMF file format, this
selection allows you to take all the OMF and AIF audio files at the
end of a recording session and place them into a folder on the disk
drive named
OMFI MediaFiles. When the disk is connected to a
computer, this folder is recognized by Avid Editor’s Media Tool
enabling direct import of files into the Avid timeline. Refer to the
section,
Using Avid OMF Clips on page 105 for more information.
Organize P2
This option creates the file structure for P2 recording and moves
the recorded P2 files into the appropriate folders in order to
provide NLE applications with instant access to content.
The file structure consists of a main folder
CONTENTS with the
sub-directories:
•
VIDEO,
•
AUDIO,
•
CLIP,
In addition, Organize P2 moves the
• MXF video files into the VIDEO folder,
• MXF audio files into the AUDIO folder,
• MXF XML files into the CLIP folder,
After Organize P2 Copy Files to Another Disk
After performing an ORGANIZE P2 and BEFORE recording new material or
deleting existing clips, copy the recorded files to another hard disk and run the
FORMAT utility.
Page 95

FS-100 Functions
FS-100 Portable DTE Recorder
77
File Naming Conventions
The video files are then renamed to XXXXZB.mxf. where XXXX is
an incremental value,
Z is a randomly assigned character, B
represents the format of the recorded content, and AA is the
number of the audio channel.
The audio files are then renamed to
XXXXZBAA.mxf. where
XXXXZB are identical to the companion video file and AA is the
number of the audio channel.
Organize PINN DVCPRO/DV only
This selection organizes clips for use with Pinnacle Liquid series
NLE systems. Products such as the Pinnacle file format were
created for use with products such as Pinnacle Liquid Edition. The
Pinnacle file format creates three files simultaneously during a
recording; an AVI video file and two separate WAV audio files
labeled as left and right. An additional ALE file for each recording
session is also created which contains timecode data. This file must
be kept with the media.
Once clips have been imported into Liquid Edition, an Index file is
created on the disk drive for each clip. Do not delete this file since
it is required to continue work in the particular project.
Format B
DVCPRO/DV p
DVCPRO50 q
DVCPROHD w
x Audio Channel AA
L 100
R 201
A 302
B 403
Page 96

FS-100 Functions
FS-100 Portable DTE Recorder
78
Make Ref MOV Version 4.x only
This utility generates one or more QuickTime Reference Movie
files for each video clip in
QUICKTIME, QUICKTIME PN, and
QUICKTIME 24P DTE file formats.
Creating the reference movie file streamlines the workflow for FCP
users. In FCP, the reference movie file can be dragged into the
appropriate timeline and all associated video and audio files are
automatically utilized.
Number of reference movie files generated per clip depends upon
the HDD MODE and length of recording. A reference movie file is
generated for approximately every 2 hours of content in a clip. See
the following table for details:
The maximum number of Reference Movies that can be generated
at one time is 500.
Final Cut Pro Users
The MAKE REF MOV utility must be performed before mounting FS100 in Final Cut Pro (FCP). FCP modifies content files, after which they
are incompatible with the FS-100 MAKE REF MOV utility.
Moving and Copying Reference Movie Files
When moving or copying the reference movie file, make sure to move or
copy the content files to the same folder. The reference movie file must be in
same folder as the content files.
Content Referenced per Reference Movie
HDD MODE PAL Segments NTSC Segments
DV/DVCPRO 12 16
DVCPRO50 24 32
DVCPROHD 48 64
DVCPROHD (VFR) variable (variable)
Page 97
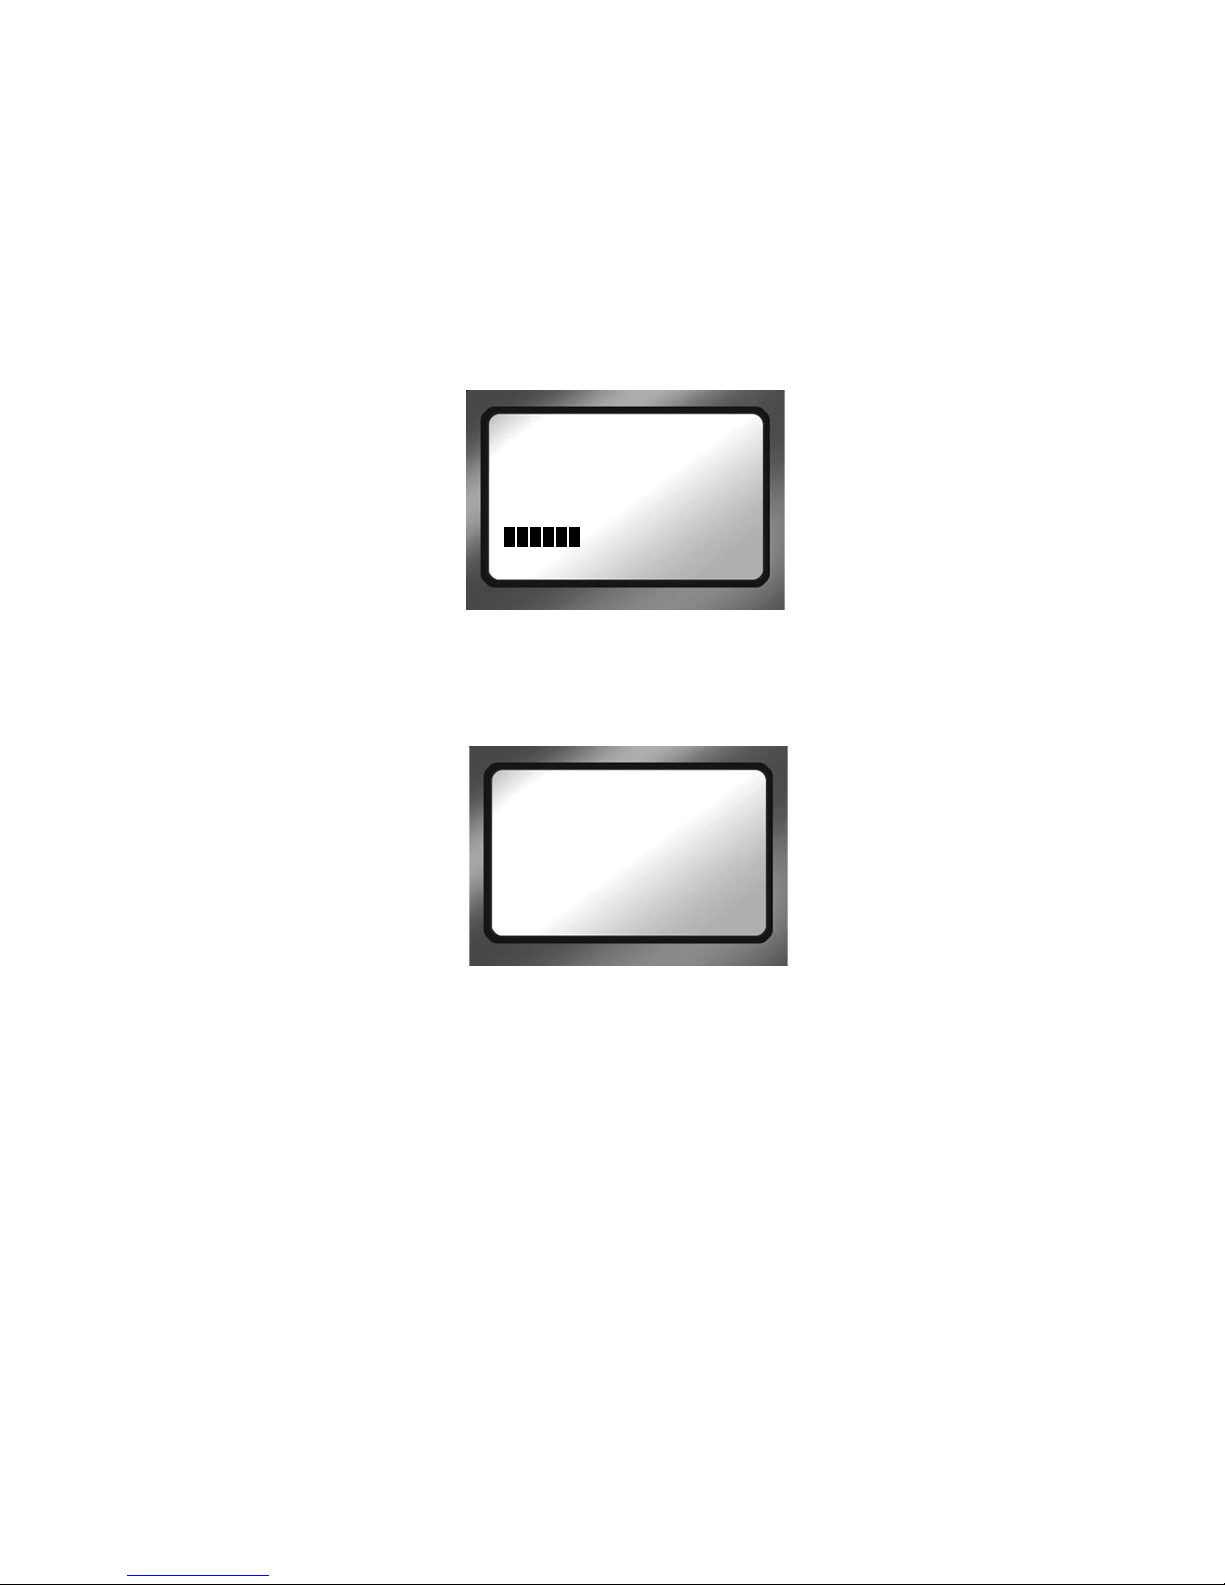
FS-100 Functions
FS-100 Portable DTE Recorder
79
File Name Convention
The file name convention for a QuickTime reference movie is:
RM-YYYYMMDD-HHMMSSrXX.MOV where the RM- denotes a
reference movie file,
YYYYMMDD-HHMMSSr matches the content
files, and the
XX denotes the reference movie file number.
When MAKE REF MOV utility starts the following screen appears:
The MAKE REF MOV utility may take several minutes to
complete. When it is complete the completion screen appears:
CREATING
QT REF ...
QT REF
COMPLETE
Page 98
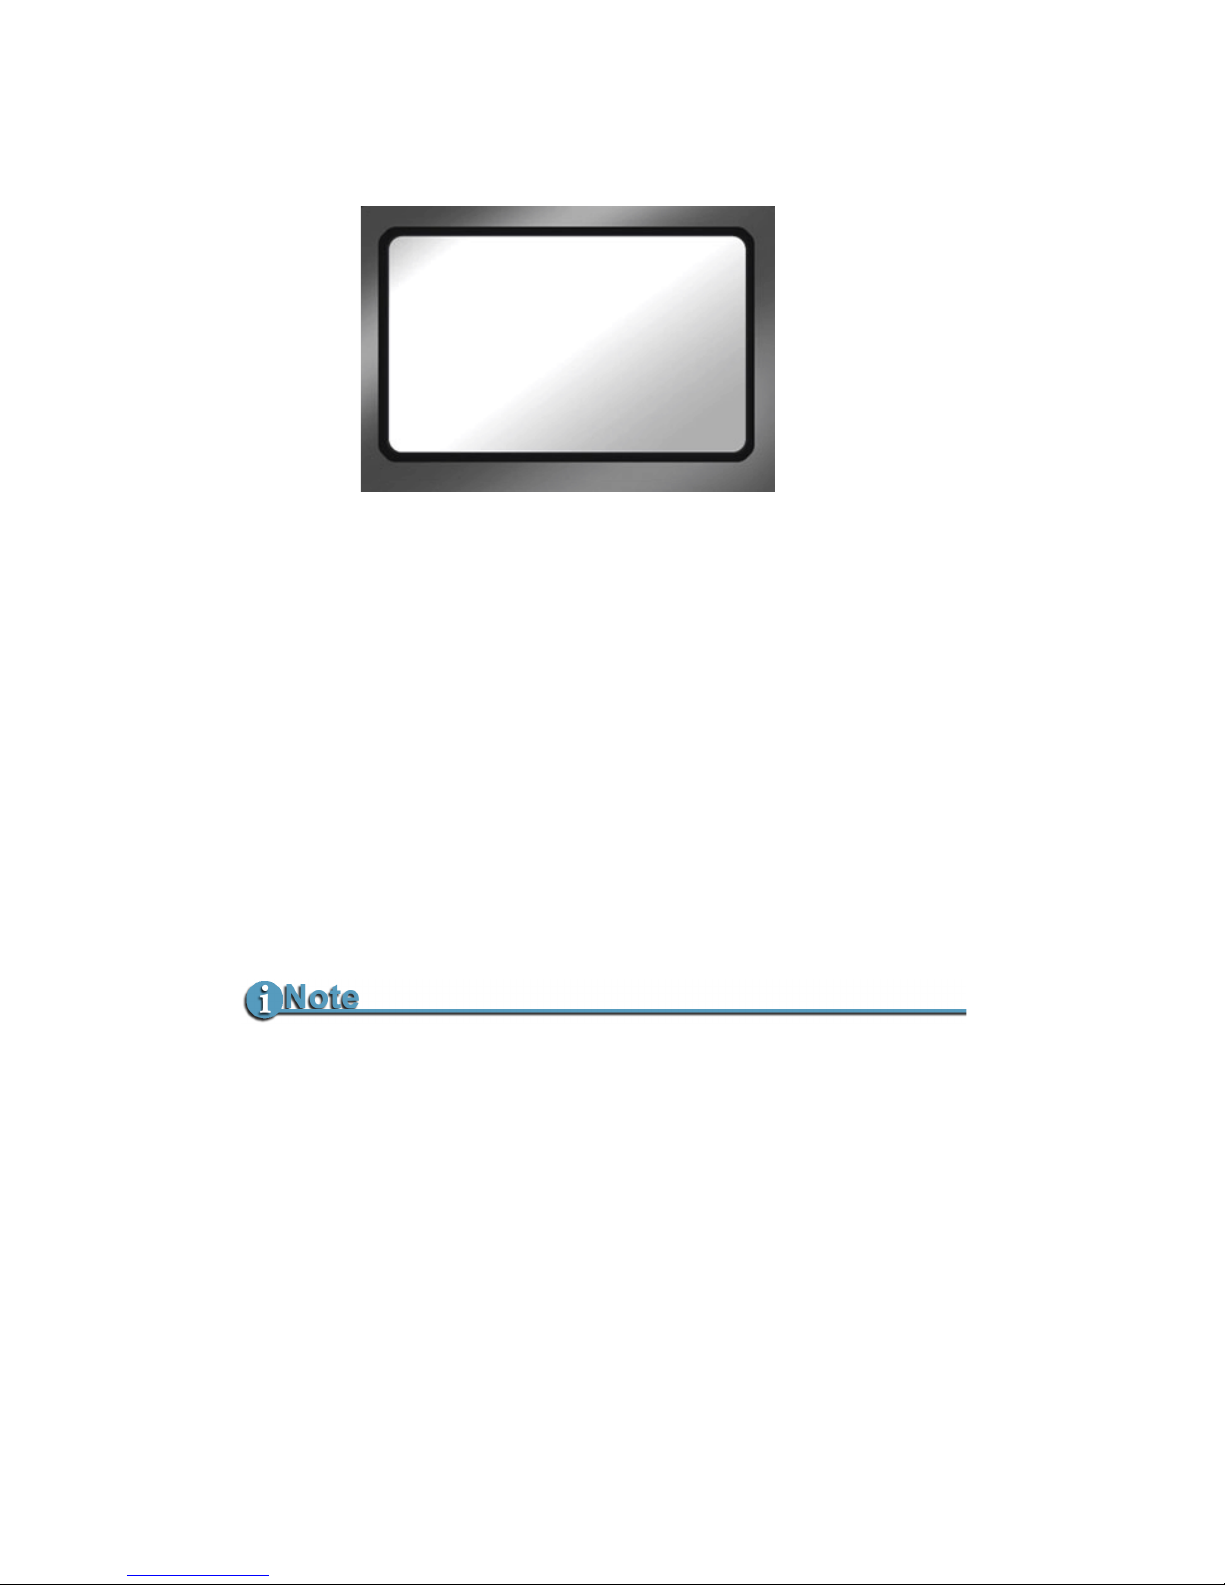
FS-100 Portable DTE Recorder
80
Delete Clip
Use this item to delete a selected clip.
1. From the Utilities screen, go to the
DELETE CLIP screen.
2. Enter the number of the clip to be deleted using the
Up and
Down navigation buttons.
3. Press the
YES function key.
The selected clip is deleted.
4. Press
BACK to return to the Utility screen.
When a clip is deleted, the FS-100 re-organizes and displays the
remaining clips in sequence. For instance, if there are three clips on
the disk: 1-001, 1-002, 1-003. If clip 1-002 is deleted, the remaining
clips are reorganized and clip 1-003 becomes clip 1-002. However
the base file names are not affected.
Use Delete Clip Sparingly
Using the delete clip can cause disk fragmentation that reduces disk drive
performance and can impact both Playback and Record. To defragment the
disk or if more disk space is needed:
• Transfer all content from the FS-100.
• Perform the FORMAT utility, see
Format Disk on page 81.
DELETE CLIP
CLIP 000
YES BACK
Page 99
FS-100 Functions
FS-100 Portable DTE Recorder
81
Format Disk
Prevent lost frames due to file fragmentation by formatting the
FS-100 before each recording session.
This selection formats the disk as follows:
1. From the Utilities screen, go to
Format Disk.
2. Select
YES to begin formatting.
A status screen displays progress of the formatting and at
completion displays the message:
•
Complete indicating Repair Disk was successful.
•
Aborted indicating that there were errors and the repair
did not complete.
3. Press
BACK to return to the Utility screen.
Save Files Before Formatting
The formatting process erases all data on the disk and is not
reversible. Backup all files and clips on the FS-100 before
formatting.
Formatting Larger Hard Disks
The FS-100 FORMAT utility automatically creates multiple partitions for
larger hard disks.
FORMAT DISK
PRESS YES TO
ERASE ALL DATA
YES BACK
Page 100
FS-100 Functions
FS-100 Portable DTE Recorder
82
Repair Disk
Use this function if a recording session does not complete properly
and there is a question that the file may be damaged. For example,
if recording terminates due to a loss of power to the FS-100.
Repair Disk scans the current partition checking for and repairing
file errors and incomplete files. When the file is repaired it can be
used in the NLE system.
The
Forward and Back Index buttons can be used to locate the
partition to repair.
To repair a disk:
1. From the Utilities screen, go to
Repair Disk.
2. Select
YES and the FS-100 begins repairing the disk.
A status screen displays the progress of disk repair and at completion displays the message:
•
Complete indicating Repair Disk was successful.
•
Aborted indicating that there were errors and the repair did
not complete.
3. Press
BACK to return to the Utility screen.
4. Move content from FS-100.
5. Use Format Disk utility before doing any further recording.
This step optimizes disk storage, see
Format Disk on page 81.
Corrupted Files May Need More Repairs
After running Repair Disk some files may still need further work to restore
them. In such a case, run the utility Repair Clip, refer to the following page.
REPAIR DISK
PRESS YES TO
REPAIR DISK
YES BACK
 Loading...