

Page 1
ERGOFOCUS
____
DESIGN INSTALLATION &
OPERATING MANUAL
Tested by OMNI-Test Laboratories, Inc. and approved to
ULC-S610-M87 (A1998), UL 737-1996 and ULC S627-00
US EPA exempt
Report Number : 304-F-04-2
This document was packed with the appliance.
KEEP THESE INSTRUCTIONS FOR FUTURE USE
Page 2

Table
of contents
Introduction
Introduction
Specifications
CHARACTERISTICS
ROOF OUTLET REQUIREMENT
CHIMNEY REQUIREMENT
STRUCTURAL REQUIREMENT
CONNECTOR
FRESH AIR INTAKE
CLEARANCES TO COMBUSTIBLES
A. FLOOR PROTECTION
B. CLEARANCES TO WALLS
C. WALL CLEARANCE WITH 360° ROTATION FIREPLACE
D. WALL CLEARANCE WITH OPTIONAL
ROTATION RESTRICTOR
Installation
INCLUDED PARTS, MATERIALS AND REQUIRED TOOLS
FOR INSTALLATION
OPTIONS
ASSEMBLY DETAILS
A. STAINLESS STEEL CHIMNEY SYSTEM
PLATE SETUP AND CONNECTION
B. FLUE ATTACHMENT TO ANCHOR PLATE
C. ORDER IN WHICH TO TIGHTENING THE PLATE SCREWS
(TO SECURE PROGRESSIVELY)
D. JUNCTION SLEEVE DETAIL
E. ROTATING MECHANISM DETAIL
2
3
3
4
4
5
5
5
6
8
8
8
8
Please read this entire manual before you install and use
your focus fireplace. Failure to follow instruction may result
in property damage, bodily injury or even death. When this
room heater is not properly installed, a house fire may result.
To reduce the risk of fire, follow the installation instructions.
Contact local building or fire officials about restrictions and
installation inspection requirements in your area.
KEEP THIS MANUAL HANDY FOR EASY REFERRAL.
All WARNING and CAUTION statements will appear in bold
font and upper case letters: THEY SHOULD BE STRICTLY
OBSERVED.
Thank you for choosing focus fireplaces.
Appliance designation: ergofocus
Manufacturer:
Focus - Atelier Dominique Imbert
Le fort – 34380 Viols le fort – France.
Operating instructions
STORAGE / USE OF FLAMMABLE LIQUIDS
GRATE
ASHES
FUEL
FIRE SCREEN
BEFORE LIGHTING YOUR FIRST FIRE
BUILDING, STARTING AND MAINTAINING THE FIRE
PROTECTIVE GLOVE
DAMPER OPERATION AND USE
Maintenance
TAKING OUT THE ASHES
CREOSOTE FORMATION AND NEED FOR REMOVAL
SWEEPING YOUR CHIMNEY
SURFACES
REPLACEMENT PARTS
Warranty
Annex
HOW TO DETERMINE IF ALTERNATE FLOOR PROTECTION
MATERIALS ARE ACCEPTABLE
ADJUSTABLE SUSPENSION PLATE
ROTATION RESTRICTOR
10
10
10
10
10
11
11
12
12
12
13
13
13
13
14
14
14
15
15
16
19
2
Page 3
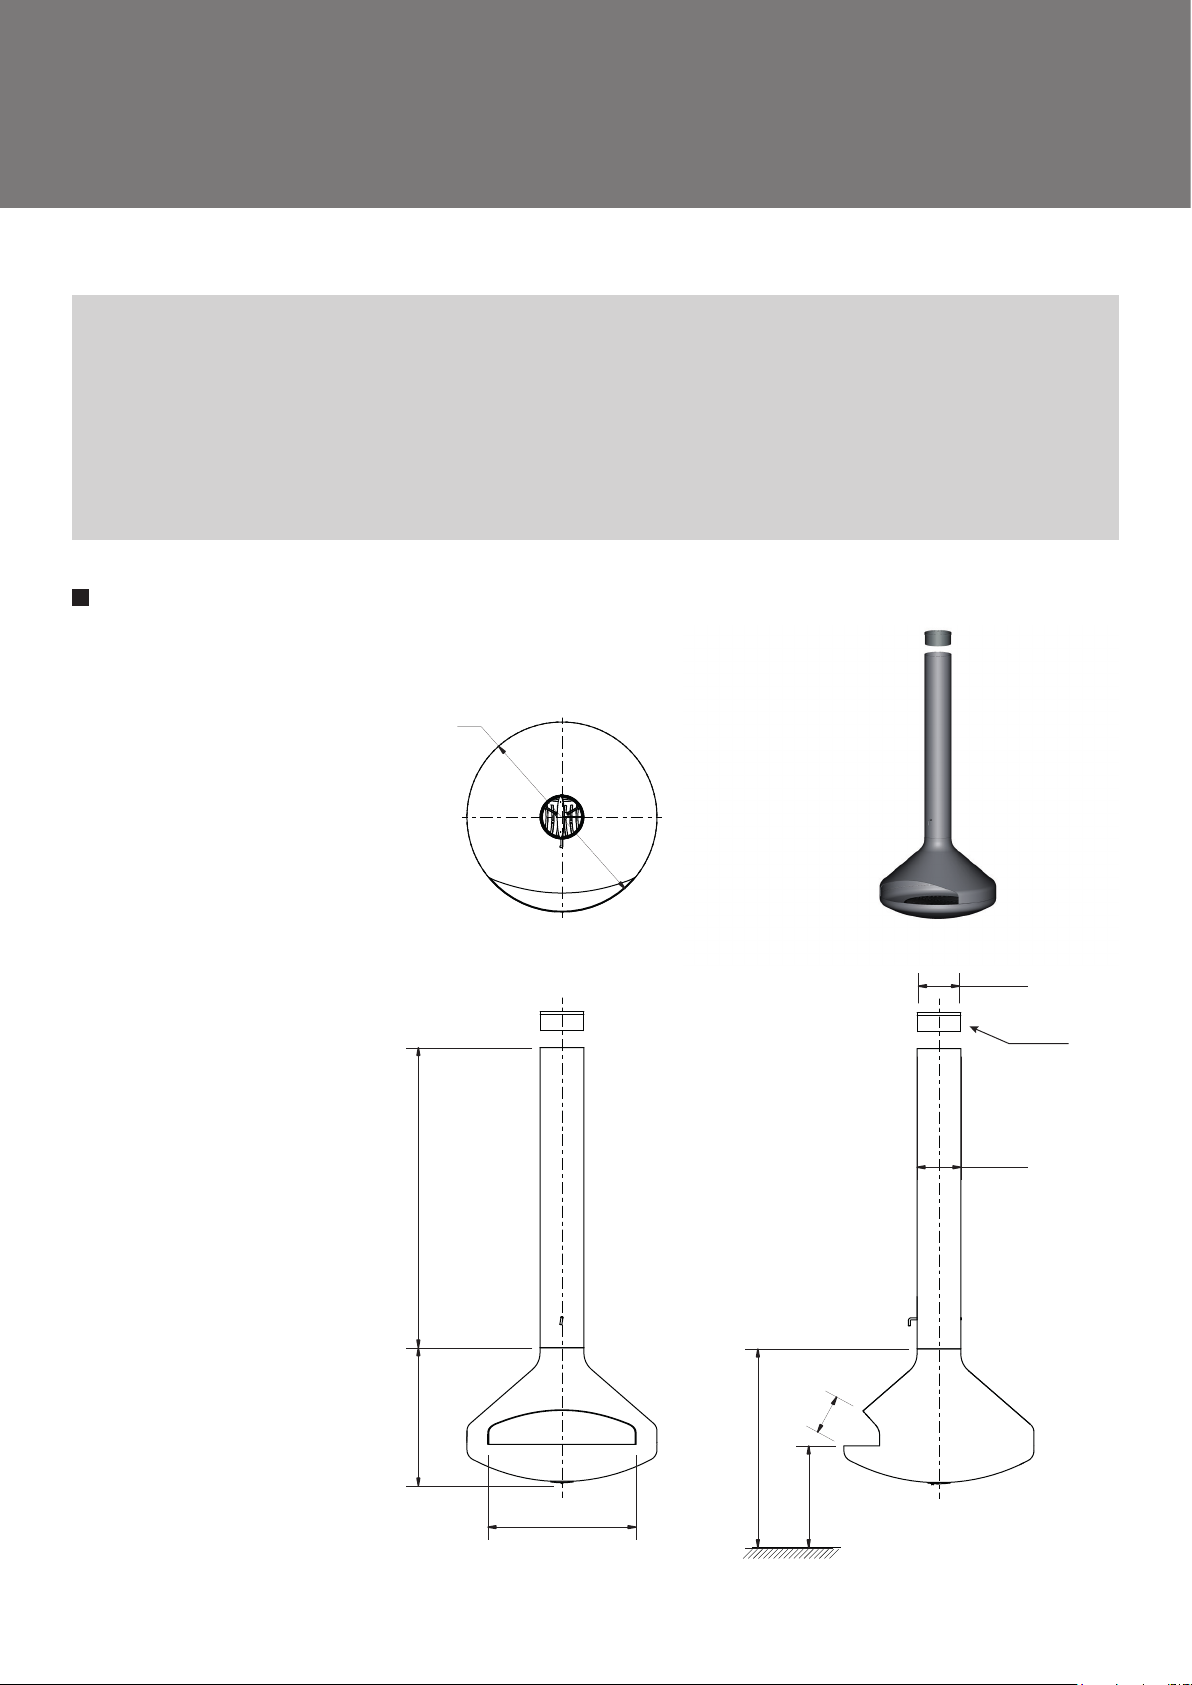
Specifications
ERGOFOCUS
Scale 1 : 20
Note : imperial are rounded from metric
• Not for mobile home installation!
• Do not connect to any air distribution duct or system!
• The authority having jurisdiction (such as municipal building department, fire department, fire prevention
bureau, etc.) Should be consulted before installation to determine the need to obtain a permit.
• Using make-shift compromises during installation can cause damage. Such installation is not covered under
focus limited warranty.
• When this room heater is not properly installed, a house fire may result. To reduce the risk of fire, follow the
installation instructions. Contact local building or fire officials about restrictions and installation inspection
requirements in your area.
CHARACTERISTICS
• Hearth 37-3/8-inch (0.95m)
diameter; weight 116 lbs
(53 kg)
• Flue diameter: 8-3/8-inch
(219mm) ;
length custom-made
Ø 37 3/8"
(Ø 950 mm)
• Flue weight: 10,6 lbs per foot
(16kg per meter)
• Standard plate weight
of 42 lbs (19 kg)
• 1/8-inch (3 mm) thick steel
• High heat resistant paint
• Stainless steel ball-bearing
revolving system
for a 360° rotation
• Fire screen
67 1/8"
(1.705 mm)
/16"
3
27
(690 mm)
40 1/2"
(1040 mm)
"
8
/
7
7
(199 mm)
Ø 8 1/16" id
(Ø 205 mm)
Ø 8 5/8" od
(Ø 219 mm)
8’’ adaptor
29 1/8"
(740 mm)
20"
(500 mm)
floor
(sol)
3
Page 4
Specifications
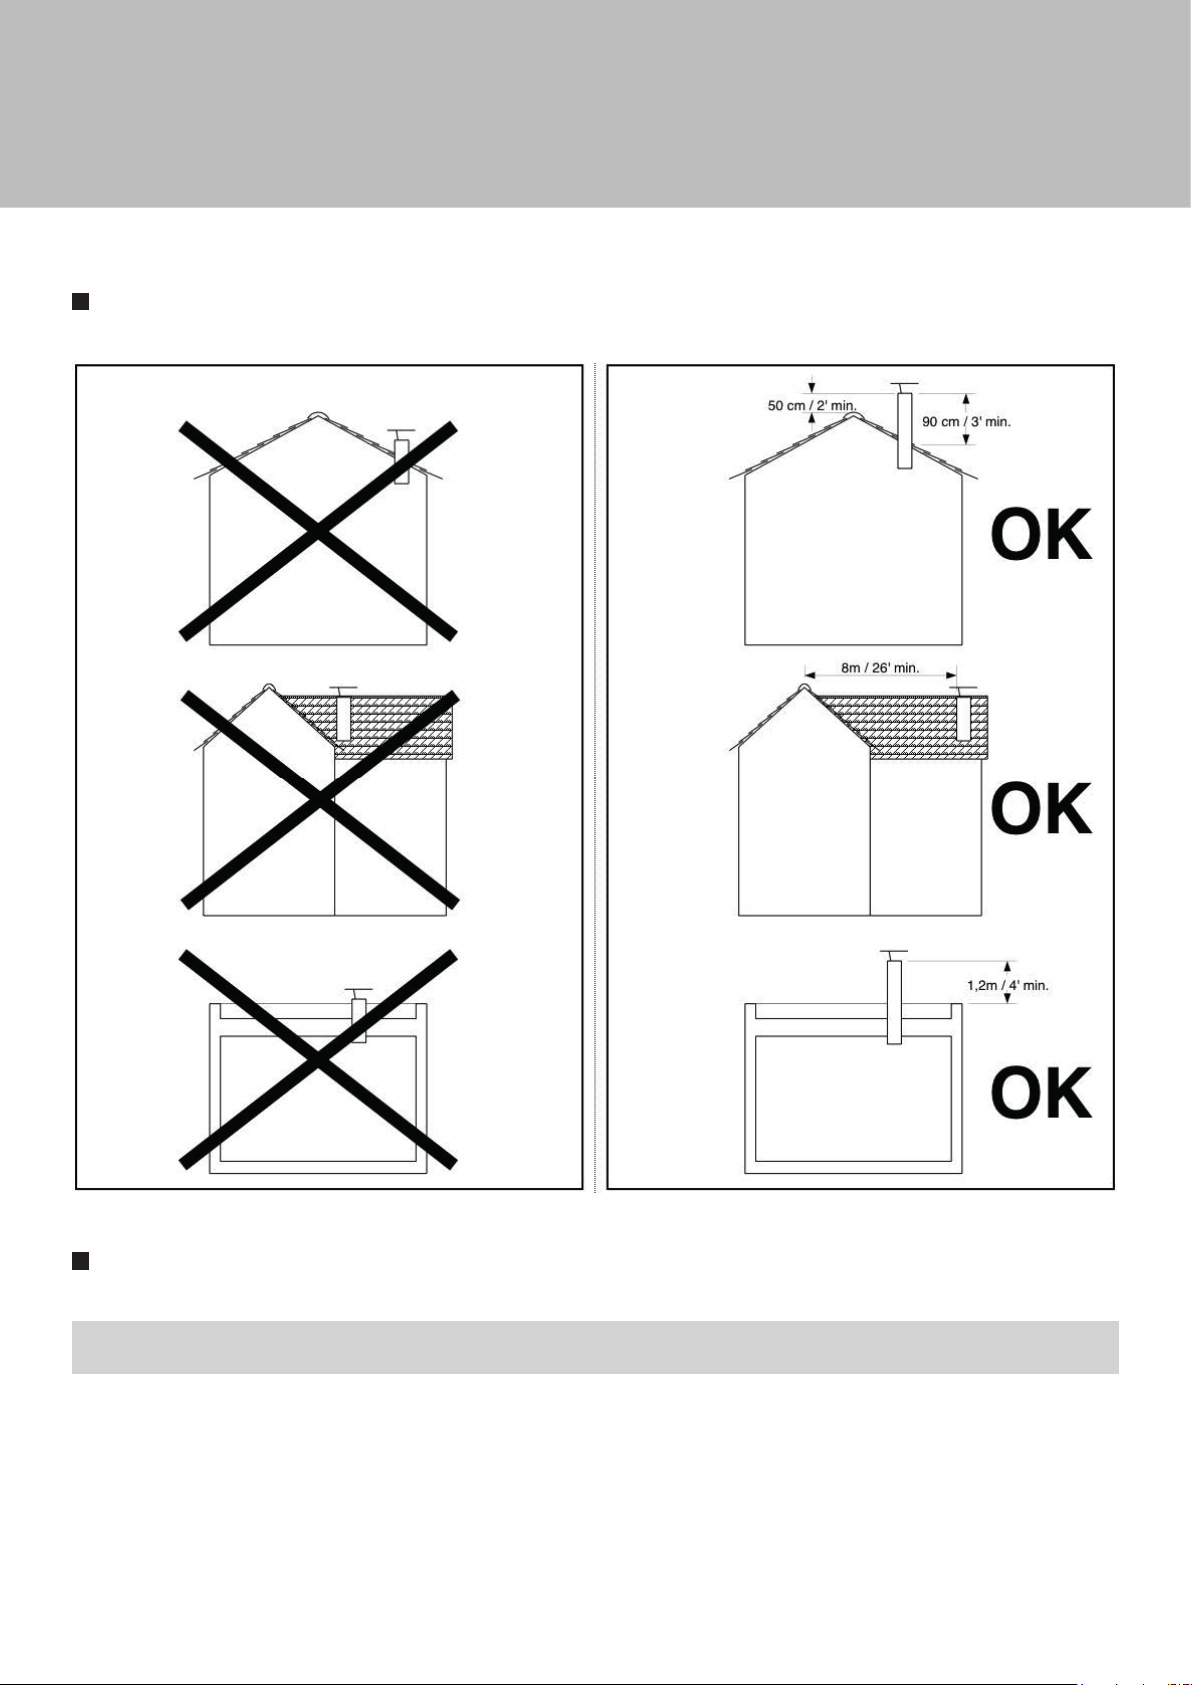
ROOF OUTLET REQUIREMENT
CHIMNEY REQUIREMENT
Do not connect this unit to a chimney flue serving another appliance!
Ergofocus requirement : the floor to top of chimney must be 14 feet minimum (5 m) or 17 feet (5,2 m) for an installation
less than 3 miles from the ocean or if a 30° elbow is necessary). Elbows should not be more inclined than 30°(USA) or 45°
(Canada) from vertical, and with maximum number of 2. Maximum inside + outside height : 30 feet.
The ergofocus must be connected to a chimney complying with the requirements for Type HT chimneys in the standard for
Chimneys, Factorybuilt, Residential Type and Building Heating Appliance, UL 103. For example, a class A insulated stainless
steel flue chimney system with an 8-inch minimum inside diameter.
4
Page 5
Specifications
STRUCTURAL REQUIREMENT
CAUTION
The support of the anchor plate (roof structure, slab, etc.) Must be sized in congruence with the fireplace static and
dynamic charges. The size calculation for the support is not the responsibility of focus or its affiliates. It is your
responsibility to consult with an engineer or architect for your project.
CONNECTOR
Connectors are all non-insulated chimney parts including focus flue, focus 8’’ universal adaptor and the chimney manufacturer
finishing collar with adapter.
To avoid heat traps the chimney connector shall not pass through an attic or roof space, closet or similar concealed space, or
a floor, or ceiling.
Passage through an attic, roof frame floor, or ceiling must be done using an insulated chimney respecting all chimney
manufacturer clearances.
CAUTION
Passage through a wall or partition of combustible construction is not an appropriate installation for this
focus fireplace.
Refractory compound must be used to seal each connection.
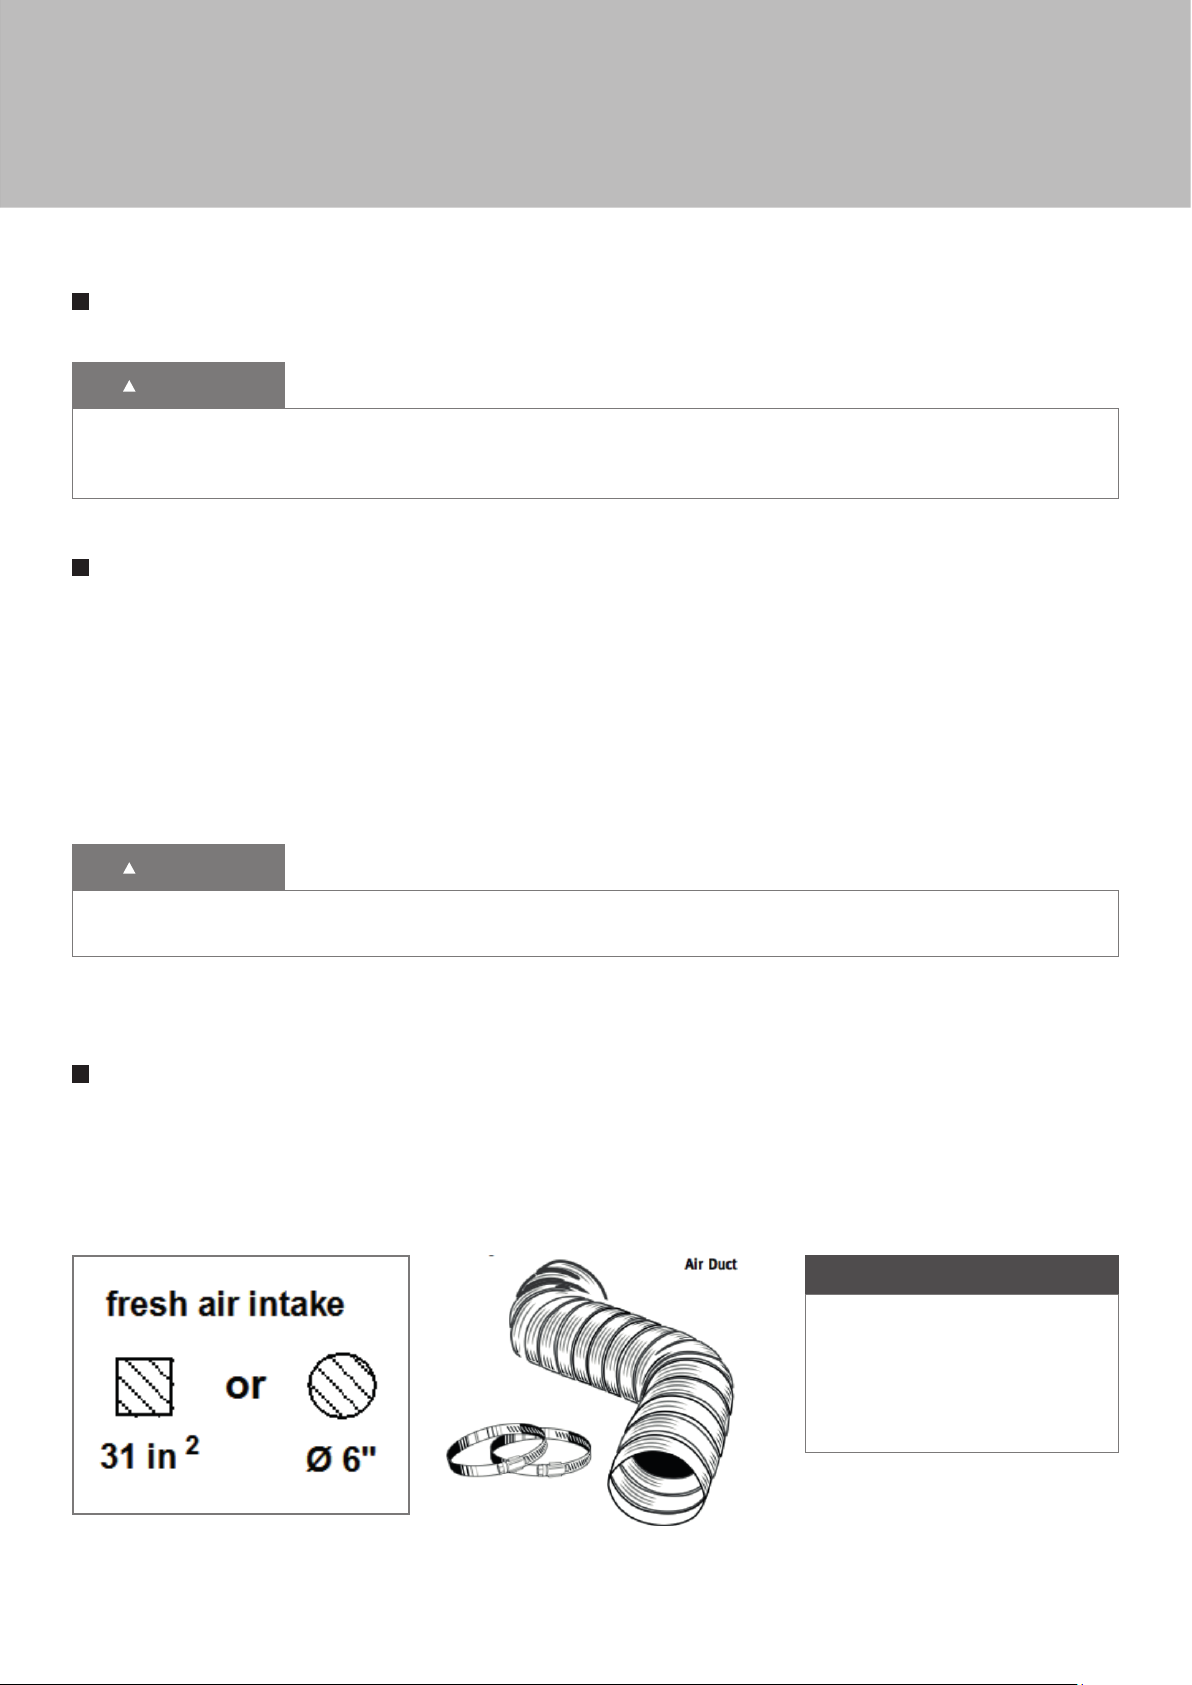
FRESH AIR INTAKE
For optimum functioning, focus recommends a fresh air intake in the room (ideally under of the fire). We recommend
deflect-O A0684 semi rigid aluminium duct.
Minimum fresh air intake size:
IMPORTANT
This fresh air intake is compulsory
when operating venting appliances
such as kitchen hoods, permanent
air extractors or any appliances
creating an air depression in the
habitation.
5
Page 6
FIXED
8''
8''
8''
PIVOTANT
Specifications
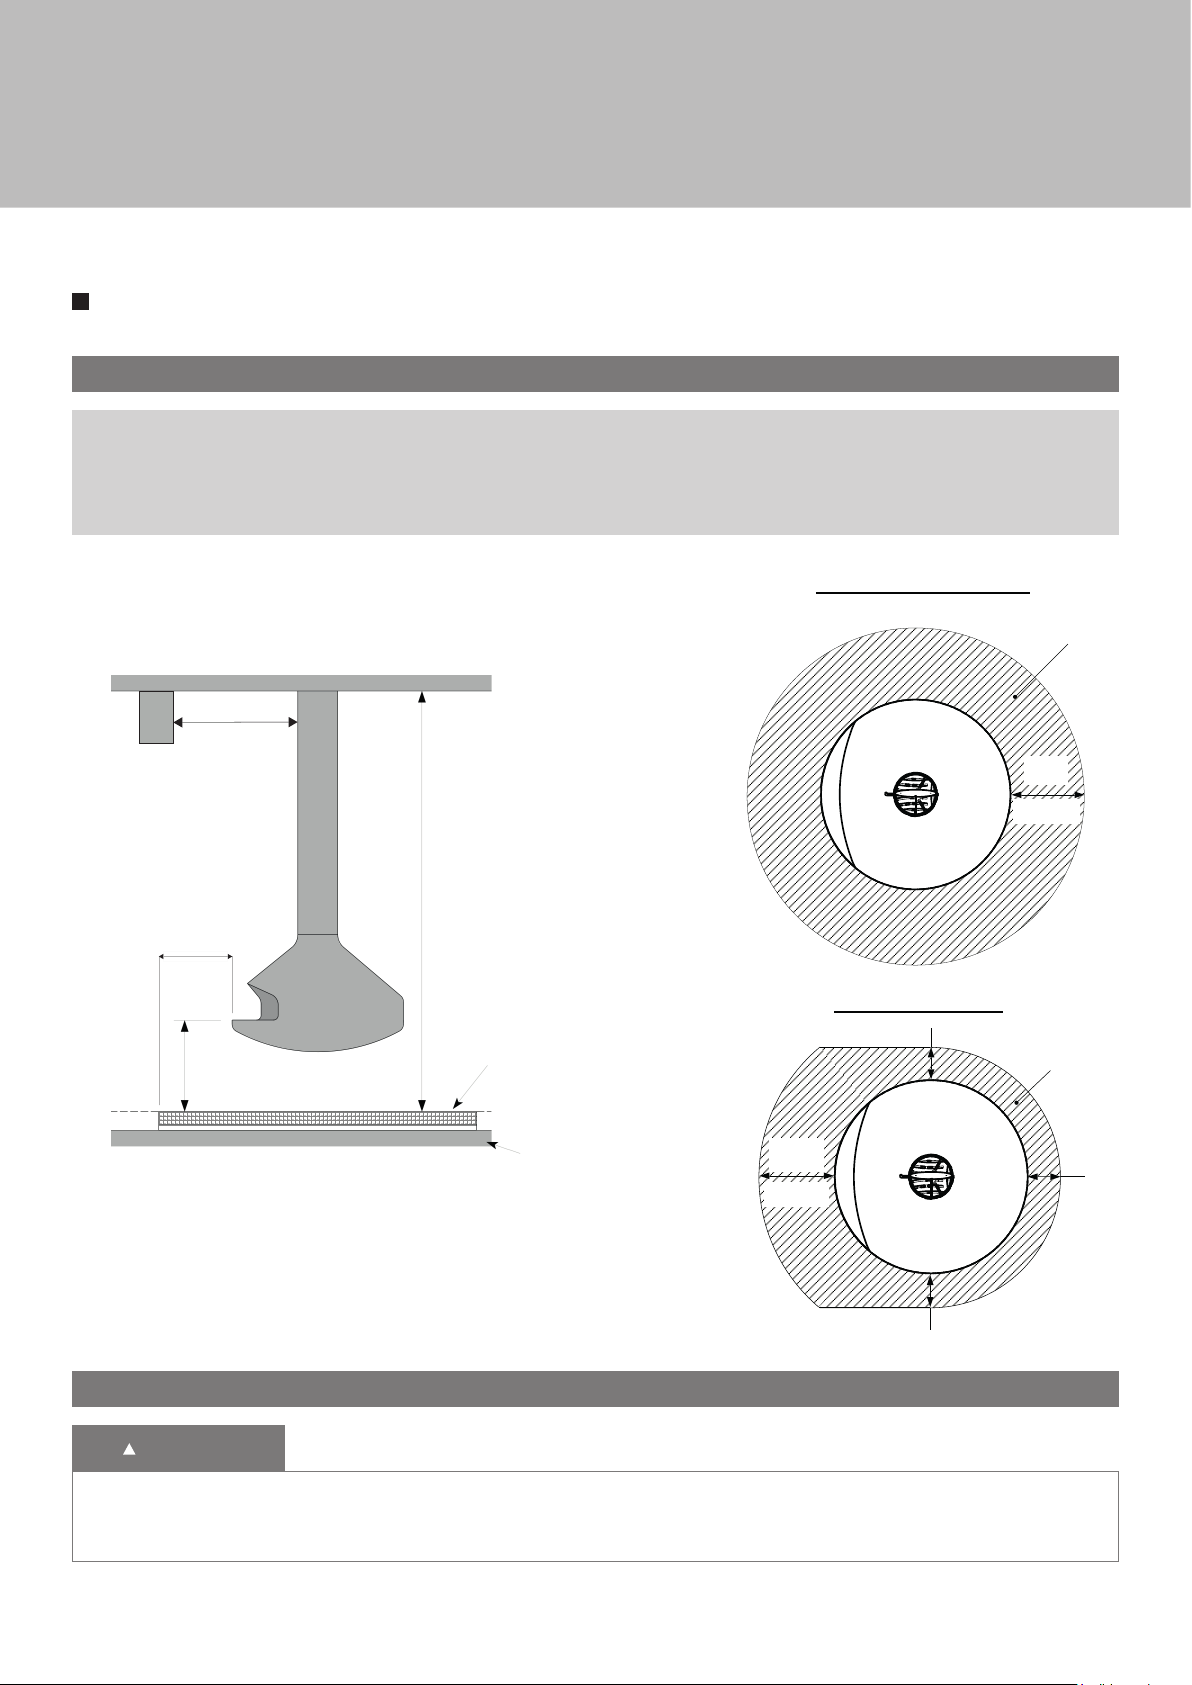
CLEARANCES TO COMBUSTIBLES
A. FLOOR PROTECTION
Rotating version require 16 inches (US) or 18 inches (Canada) of floor protection on all sides (360°).
Fixed version require 16 inches (US) or 18 inches (Canada) on the front and to extend 8 inches on the left and
right sides as well as for the back side.
Use of provided firebox insulator under the grate (vermiculite) is compulsory.
ROTATING VERSION
non-combustible
surface
R ≥ 0.6
33’’
84 cm
40 cm / 16’’ (US)
45 cm / 18’’ (Canada)
20’’
50 cm
IMPORTANT
minimum 8’
minimum 2.44 m
non combustible surface R ≥ 0.6
surface non combustible R ≥ 0.6
combustible sub floor
sol combustible
no radiant floor heating tubing under the fireplace !
pas de chauffage au sol !
16'' (US)
40 cm
45 cm
18''(Canada)
45 cm
FIXED VERSION
20 cm
16’’(US)
40 cm
18’’(Canada)
45 cm
non-combustible
surface
R ≥ 0.6
20 cm
20 cm
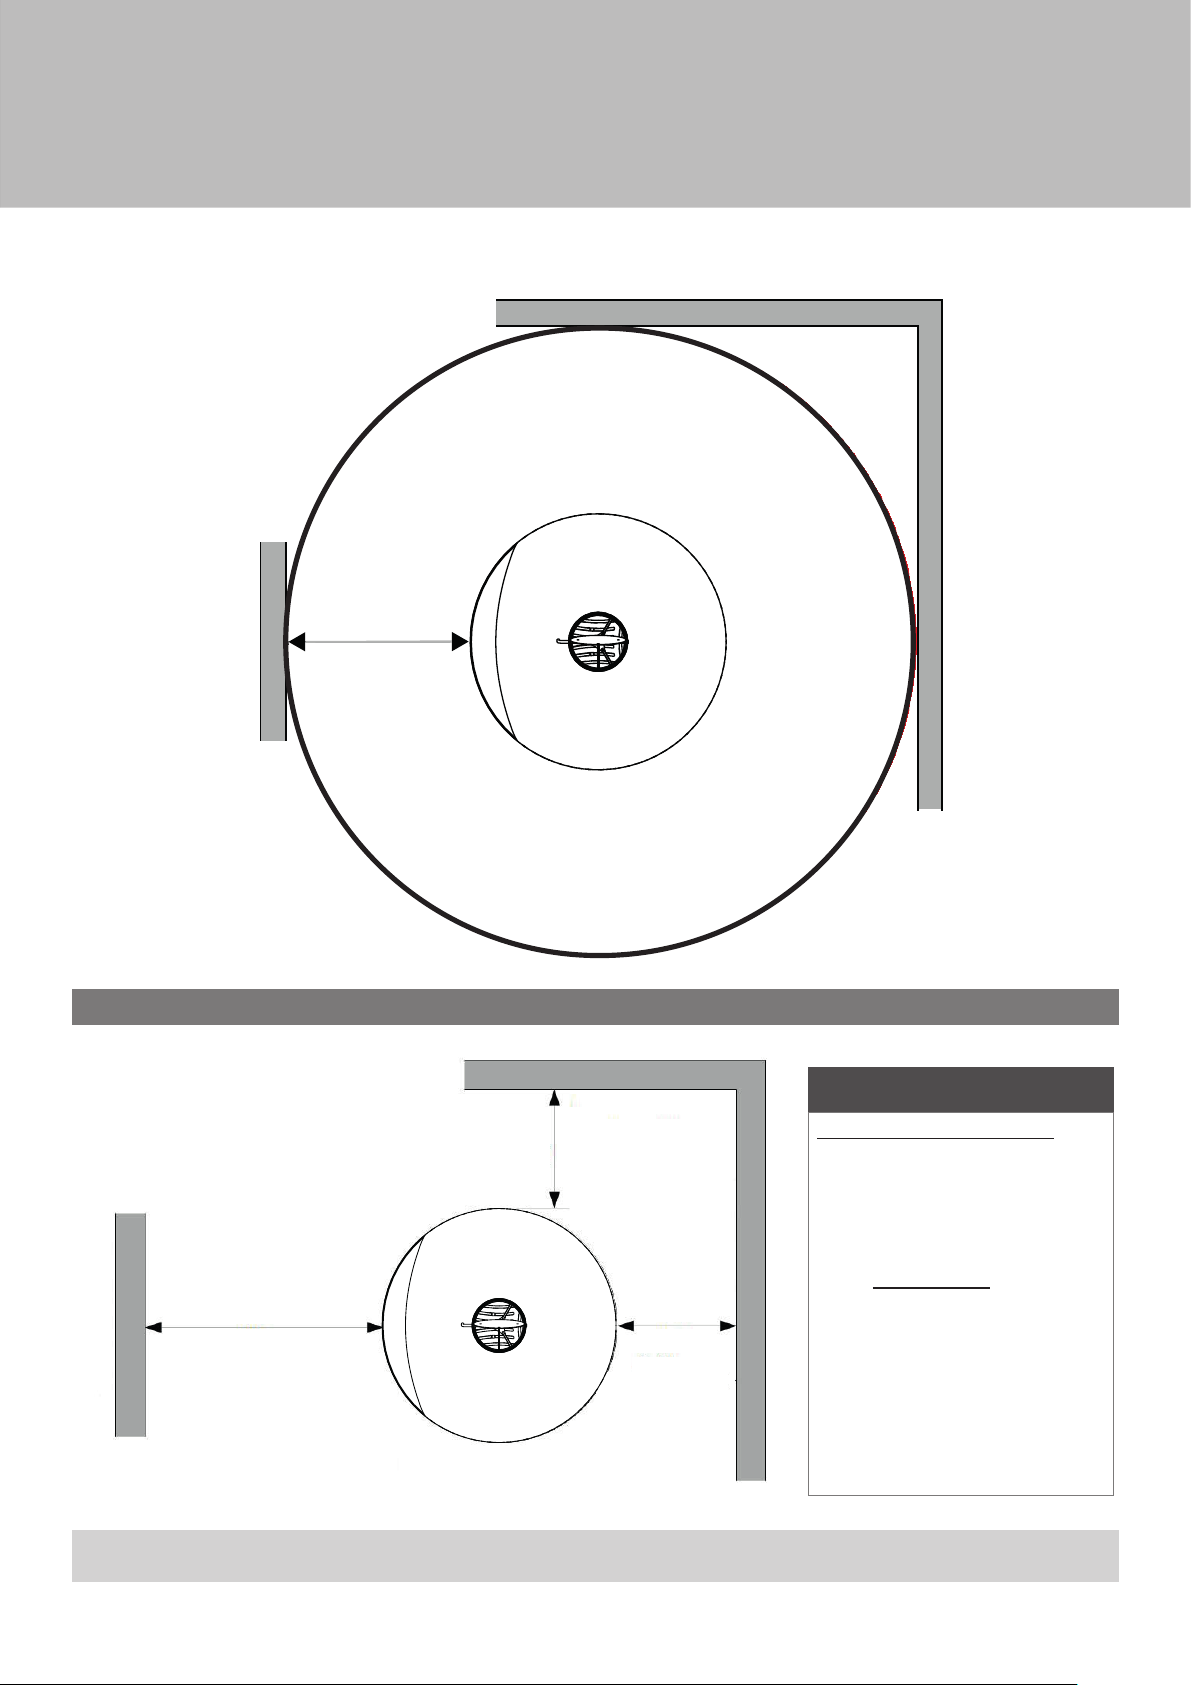
B. CLEARANCES TO WALLS
CAUTION
The distance to a combustible wall must be maintained at 38 inches. Property damage or death can occur
if this distance is not maintained. Drywall products lined with paper such as sheetrock are combustible.
Clearances as indicated further apply.
6
Page 7
Specifications
38’’
965 mm
combustible wall
mur combustible
combustible wall
mur combustible
360° rotation fireplace
Foyer pivotant à 360°
D. WALL CLEARANCE WITH OPTIONAL ROTATION RESTRICTOR
combustible wall
mur combustible
19’’
48 cm
38’’
48 cm
combustible wall
mur combustible
96 cm
non-rotating fireplace
foyer non pivotant
combustible wall
mur combustible
19’’
Manufacturer specifications:
• When placed close to a noncombustible wall leave a
minimum of 4” for proper
ventilation. To avoid premature
aging of your painted walls, only
use mineral paint. With other
paints, above clearances apply.
• Fire clearance to glass (from
hearth): 31-
• Fire clearance to tempered glass
(from hearth): 20”.
• Fire clearance to vinyl windows:
refer to window technical
specifications.
IMPORTANT
½”.
Clearances may only be reduced by means approved by the regulatory authority.
7
Page 8
Installation
INCLUDED PARTS, MATERIALS AND REQUIRED TOOLS FOR INSTALLATION
• Appliance and designated parts are the fire box, anchor plate, steel flue pipe, focus kit (protective glove, mounting
gloves, can of touch-up paint, ash removal hatch), and insulating washers.
• Required tools: drill, M8 allen key, level, screwdrivers, M12 key, scaffolding (up to underceiling height), refractory compound.
• 2 persons minimum are required for installation.
OPTIONS
• Custom ceiling cover disc (steel disc)
• Custom anchor steel plate (inclined...)
• Focus steel flue extension
ASSEMBLY DETAILS
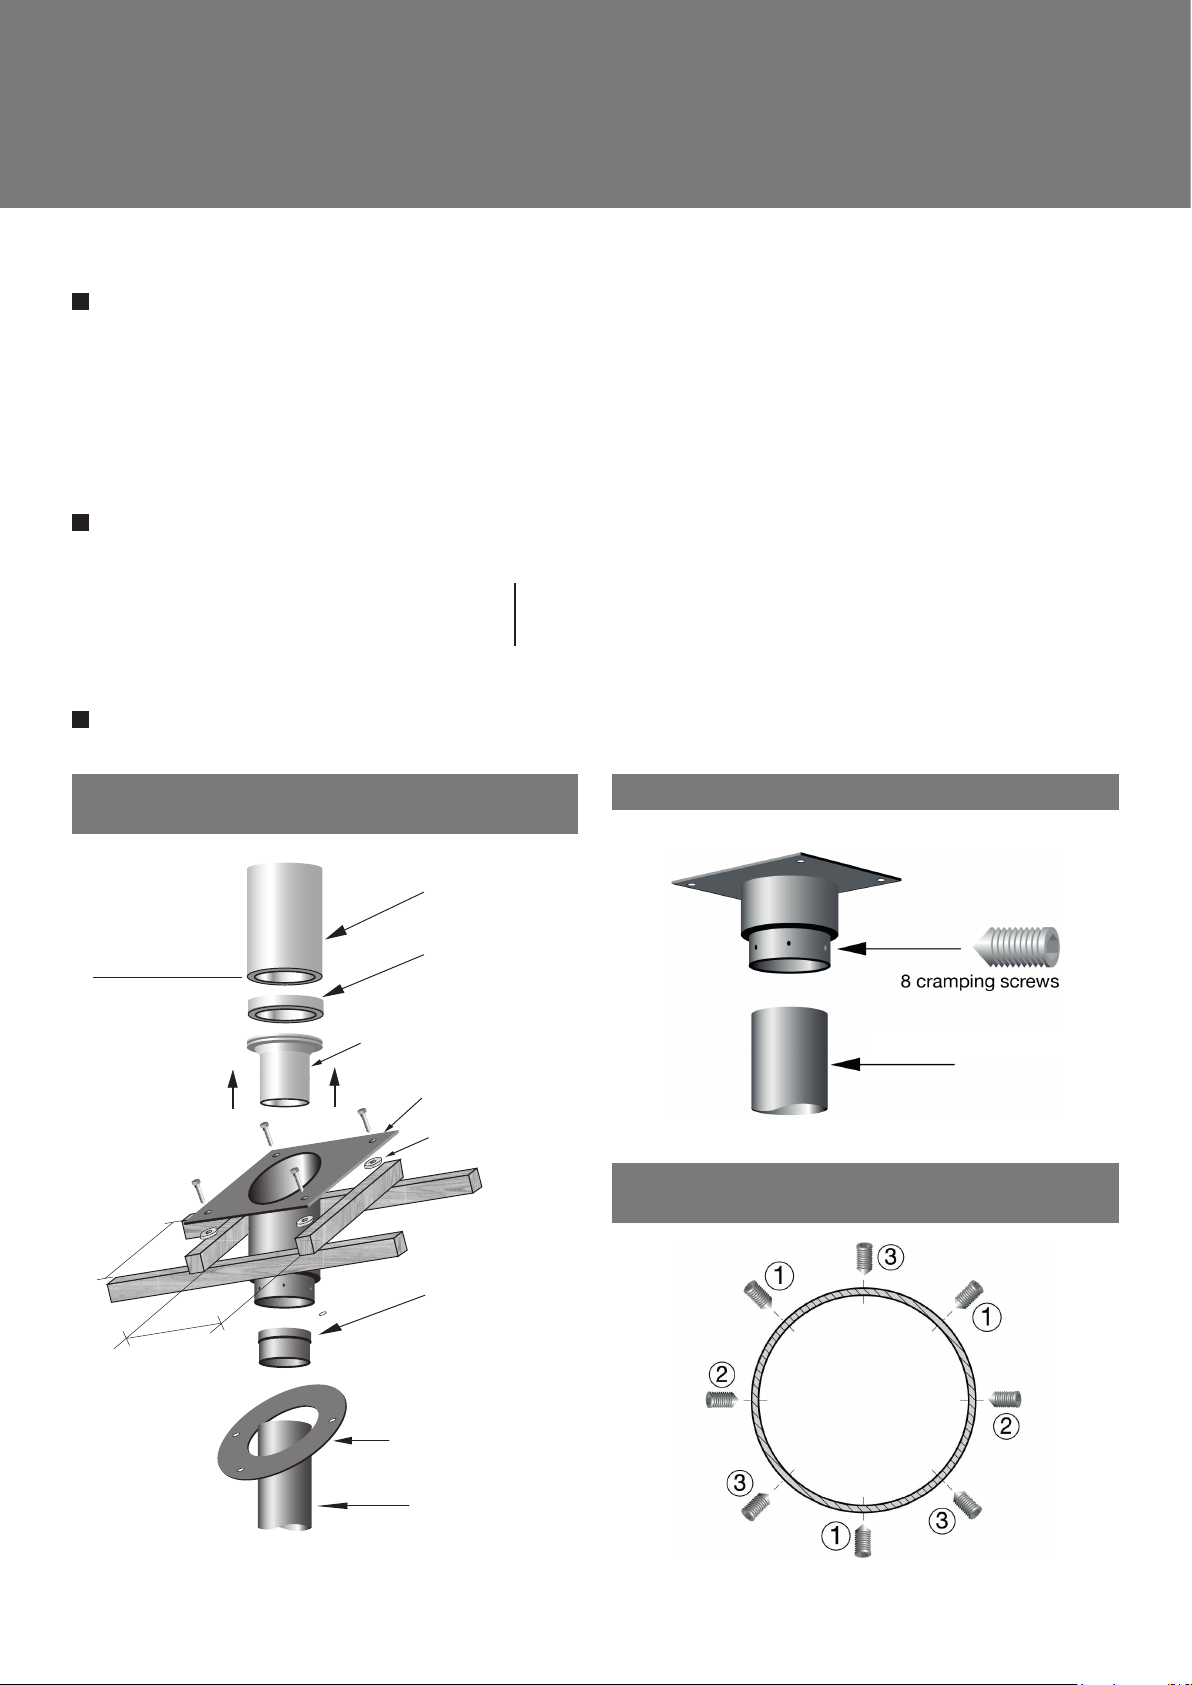
A. STAINLESS STEEL CHIMNEY SYSTEM PLATE
SETUP AND CONNECTION
this point 3" mini.
below finished ceiling.
Ce niveau doit se trouver
75mm sous le plafond fini.
class A insulated chimney pipe
as the class A insulated chimney.
adaptateur simple paroi de même
marque que la cheminée isolée
platine de suspension inclinée
8" id - 10" od
cheminée isolée:
(200 int./250 ext.)
finishing collar
collier de finition
slip connector: same brand
oblique anchor plate
anti-heat loss washers
rondelles à rupture
de pont thermique
• Adjustable suspension plate
• Rotation restrictor
B. FLUE ATTACHMENT TO ANCHOR PLATE
8 vis pointeaux
focus steel flue
conduit en acier
C. ORDER IN WHICH TO TIGHTENING THE PLATE
SCREWS (TO SECURE PROGRESSIVELY)
16 " mini.
406mm mini.
16 " mini.
406mm mini.
focus 8" universal adaptor
adaptateur focus
pour conduit en 200 mm
optional sub-ceiling
oblique cover disc
disque cache plafonnier
(optionnel)
focus steel flue
conduit en acier
8
Page 9
Installation
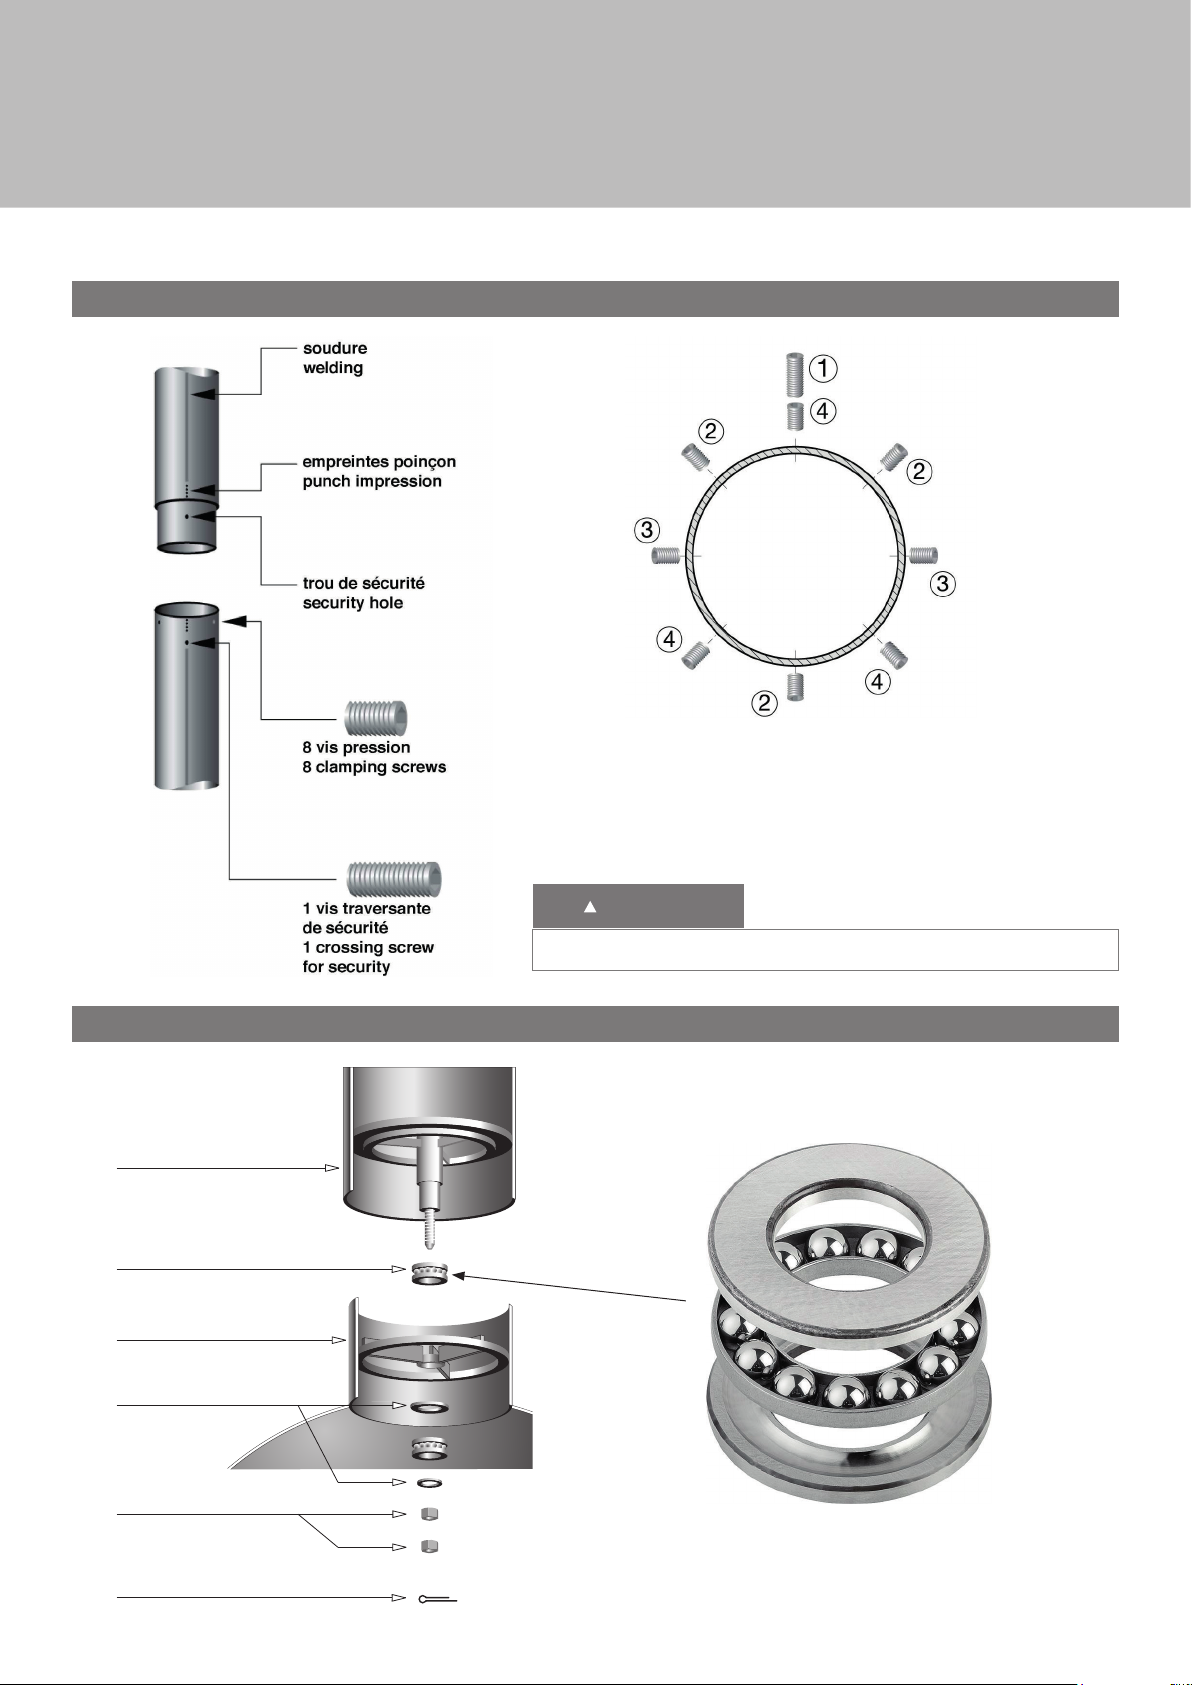
D. JUNCTION SLEEVE DETAIL
E. ROTATING MECHANISM DETAIL
low part of the steel ue
bas du conduit en acier
ball bearings
butées à billes
smoke outlet sleeve
manchon de départ de fumées
NOTE : The junction sleeves are provided only when the floor to
ceiling height in the room requires several focus pipe in
several parts.
(you may not find a junction sleeve on 9 feet or less
ceiling height)
CAUTION
Screws do not sit flush when installed.
washers
rondelles
nut M12 (Ø⁄’’)
écrou M12
cotter pin
goupille de sécurité
Ø 21/40
ep. 3mm
Ø ⁄’’ ⁄’’
thickness ⁄’’
Ø 13/27
ep. 3mm
Ø ½’’ ⁄’’
thickness ⁄’’
9
Page 10

Operating instructions
CAUTION
Hot while in operation. Keep children, clothing and furniture away. Contact may cause skin burns.
STORAGE / USE OF FLAMMABLE LIQUIDS
Never use gasoline, gasoline-type lantern fuel, kerosene, charcoal lighter fluid, or similar liquids to start or « freshen up » a fire
in this heater. Keep all such liquids well away from the heater while it is in use.
GRATE
The cast-iron grate is located inside the fireplace. It must not be removed except for cleaning, once all cinders have thoroughly
cooled. Fire must only be built on the grate.
ASHES
DISPOSAL OF ASHES
Ashes should be placed in a metal container with a tight fitting lid. The closed container of ashes should be
placed on a non-combustible floor or on the ground, well away from all combustible materials, pending final
disposal. If the ashes are disposed of by burial in soil or otherwise locally dispersed, they should be retained in
the closed container until all cinders have thoroughly cooled.
FUEL
CAUTION
Do not burn garbage or flammable fluids such as gasoline, naphtha or engine oil. Do not store the fuel within the
space heater installation clearances or within the space required for refueling and ash removal.
Only burn dry, natural, well-seasoned wood. Wood moisture content should not be more than 20%. We recommend using 2 year
dry stored wood. For the best efficiency use a covered storage.
WARNING
This fireplace has not been tested for use with doors, to reduce the risk of fire injury, do not install doors!
10
Page 11
Operating instructions
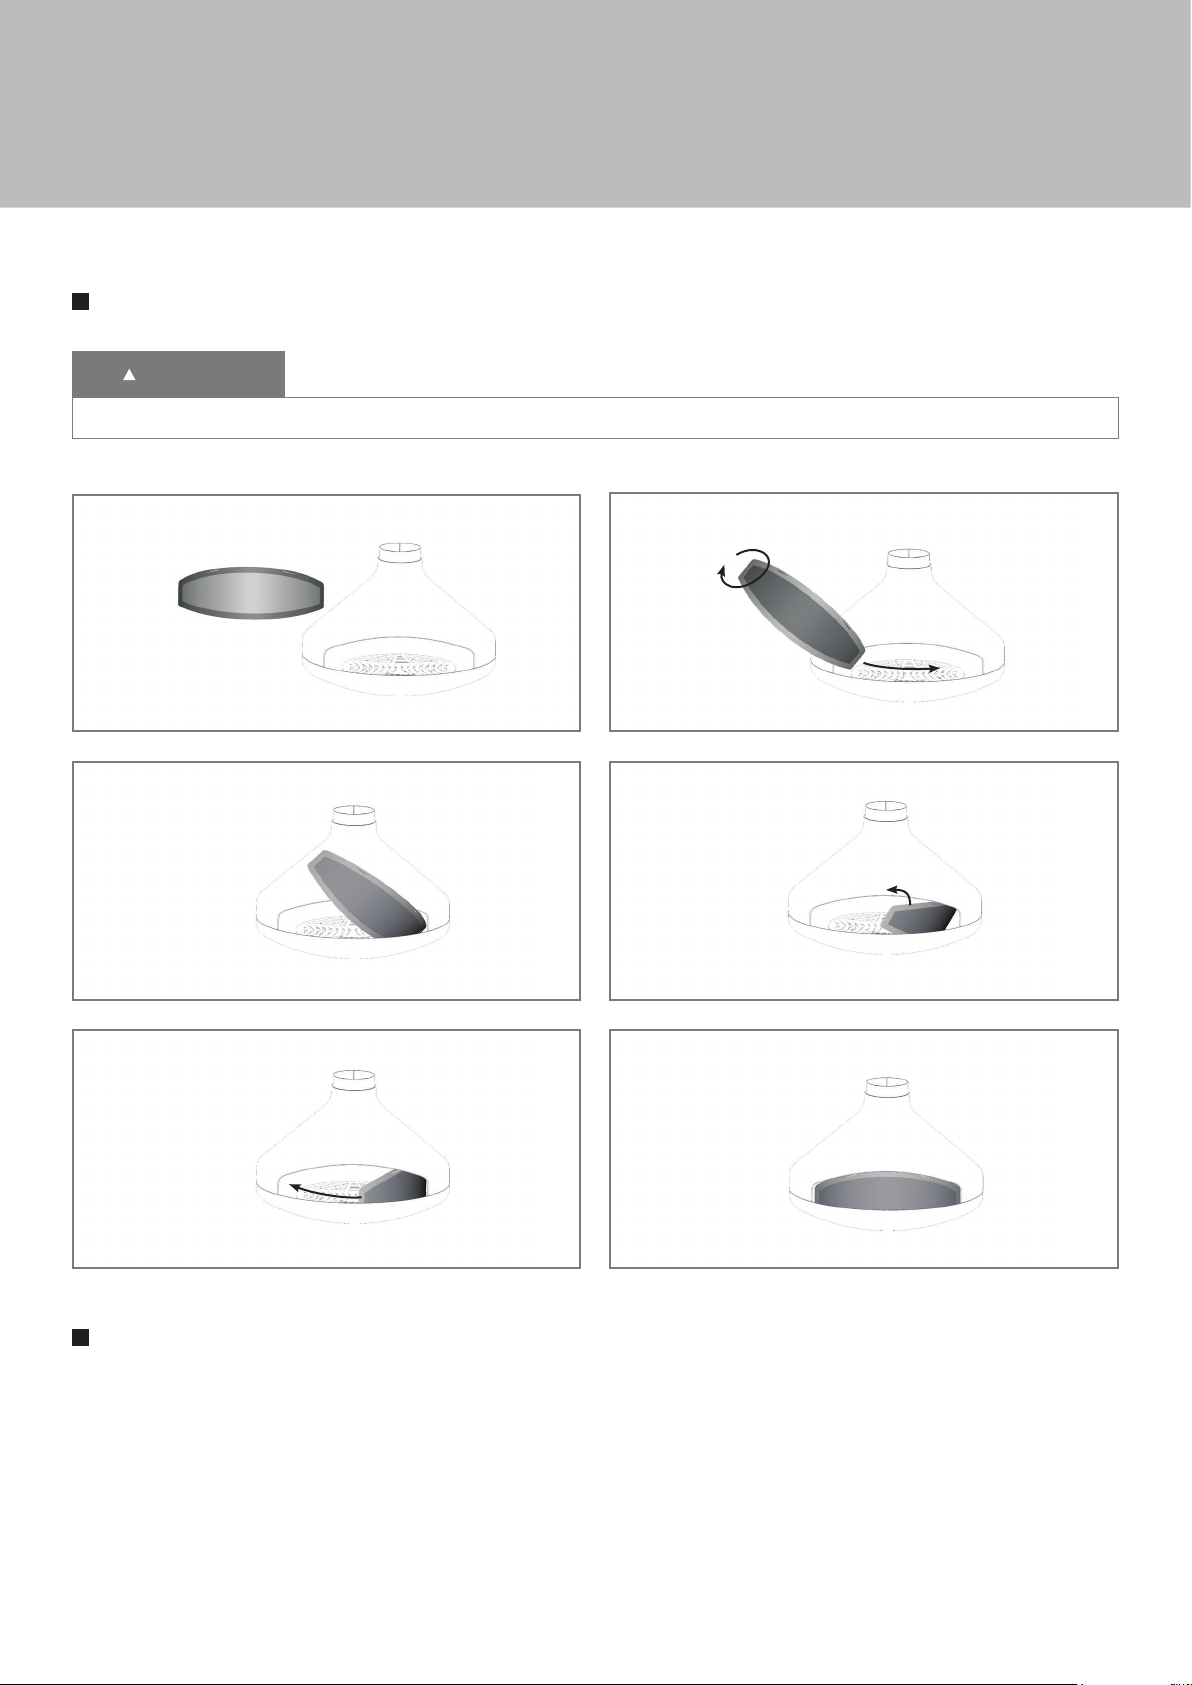
FIRE SCREEN
WARNING
Leather gloves should be worn when handing screen.
1
3
5
2
4
6
BEFORE LIGHTING YOUR FIRST FIRE
For all designs it is necessary:
• To clean off (with a damp sponge and/or a dry cloth) any dirt collected during transport or installation.
• Actual scratches on painted designs can be retouched solely with the expressly provided focus paint. If this is necessary,
ventilate the area thouroughly before lighting your fire to disperse any fumes generated in the spraying process.
The first fire should be a modest one; do not use packing material or pallet wood for fuel.
The paint finish we use, oven baked at 250°C for 30 minutes, is thermo-plastic. Because of the very gradual polymerisation of
the components, the unit may give off a light smoke the first few times the fire is lit. The painted surfaces nearest the fire may,
11
Page 12

Operating instructions
while hot, acquire a certain viscosity, or slight stickiness perceptible to the touch. We advise therefore:
• Not to be alarmed at possible smoking or residual odors. This is normal on the first fires and will rapidly subside.
• Not to touch, rub or try to clean the fireplace while it is still hot.
To avoid thermal shocks, we strongly advise against throwing buckets of water on a very vigorous fire to try to put it out.
BUILDING, STARTING AND MAINTAINING THE FIRE
Do not overload your focus fireplace to avoid over-firing.
Build the fire without elevating it, directly on the grate. For starting the fire, we recommend using a small amount of fire starter
with enough kindling (small logs or mill ends) to establish a primary fire.
After a few minutes, and making sure the primary fire is well started, add larger wood (between 3 and 7 pieces, depending on
their size), directly on top, making sure not to smother the fire. Leave some spaces between the logs for air intake.
To maintain or refuel your fire, add when needed (see note), a few larger logs.
NOTE : For the same weight of fuel, 10 logs will burn more intensely (and faster) than 3 logs, but you will get the same heat
power at the end. The log size you buy will determine the heating and refueling time.
PROTECTIVE GLOVE
The use of the focus special protective glove supplied with our models is required upon handling the damper, fresh air controls, fire
irons, etc.
DAMPER OPERATION AND USE
Use of supplied cold handle tool or protective glove is recommended to operate the damper. Do not touch the damper handle
without protection when a fire is operating.
The ergofocus damper has four positions. The damper is in the same direction as the handle: when the handle is vertical, the
damper is fully open. Handle can rotate at 30°, 60° and 90° (horizontal : closed). In closed position the damper obturates by
75% the flue section.
To modify the damper position, first pull the handle, then rotate and push again the handle in order to lock on a preset position.
Caution: Never adjust the damper handle on an intermediate position !
The damper position must be adapted to the fire intensity: during the lighting it must be fully open. Then it must be adjusted in
order to reduce the smoke flow, so the heat efficiency will be optimal. If smoke spills out it means the damper is too obstructive:
re-open the damper at the first signs of spillage.
12
Page 13
Maintenance
TAKING OUT THE ASHES
CAUTION
Be sure the fire is out and the fireplace body cold before removing ashes!
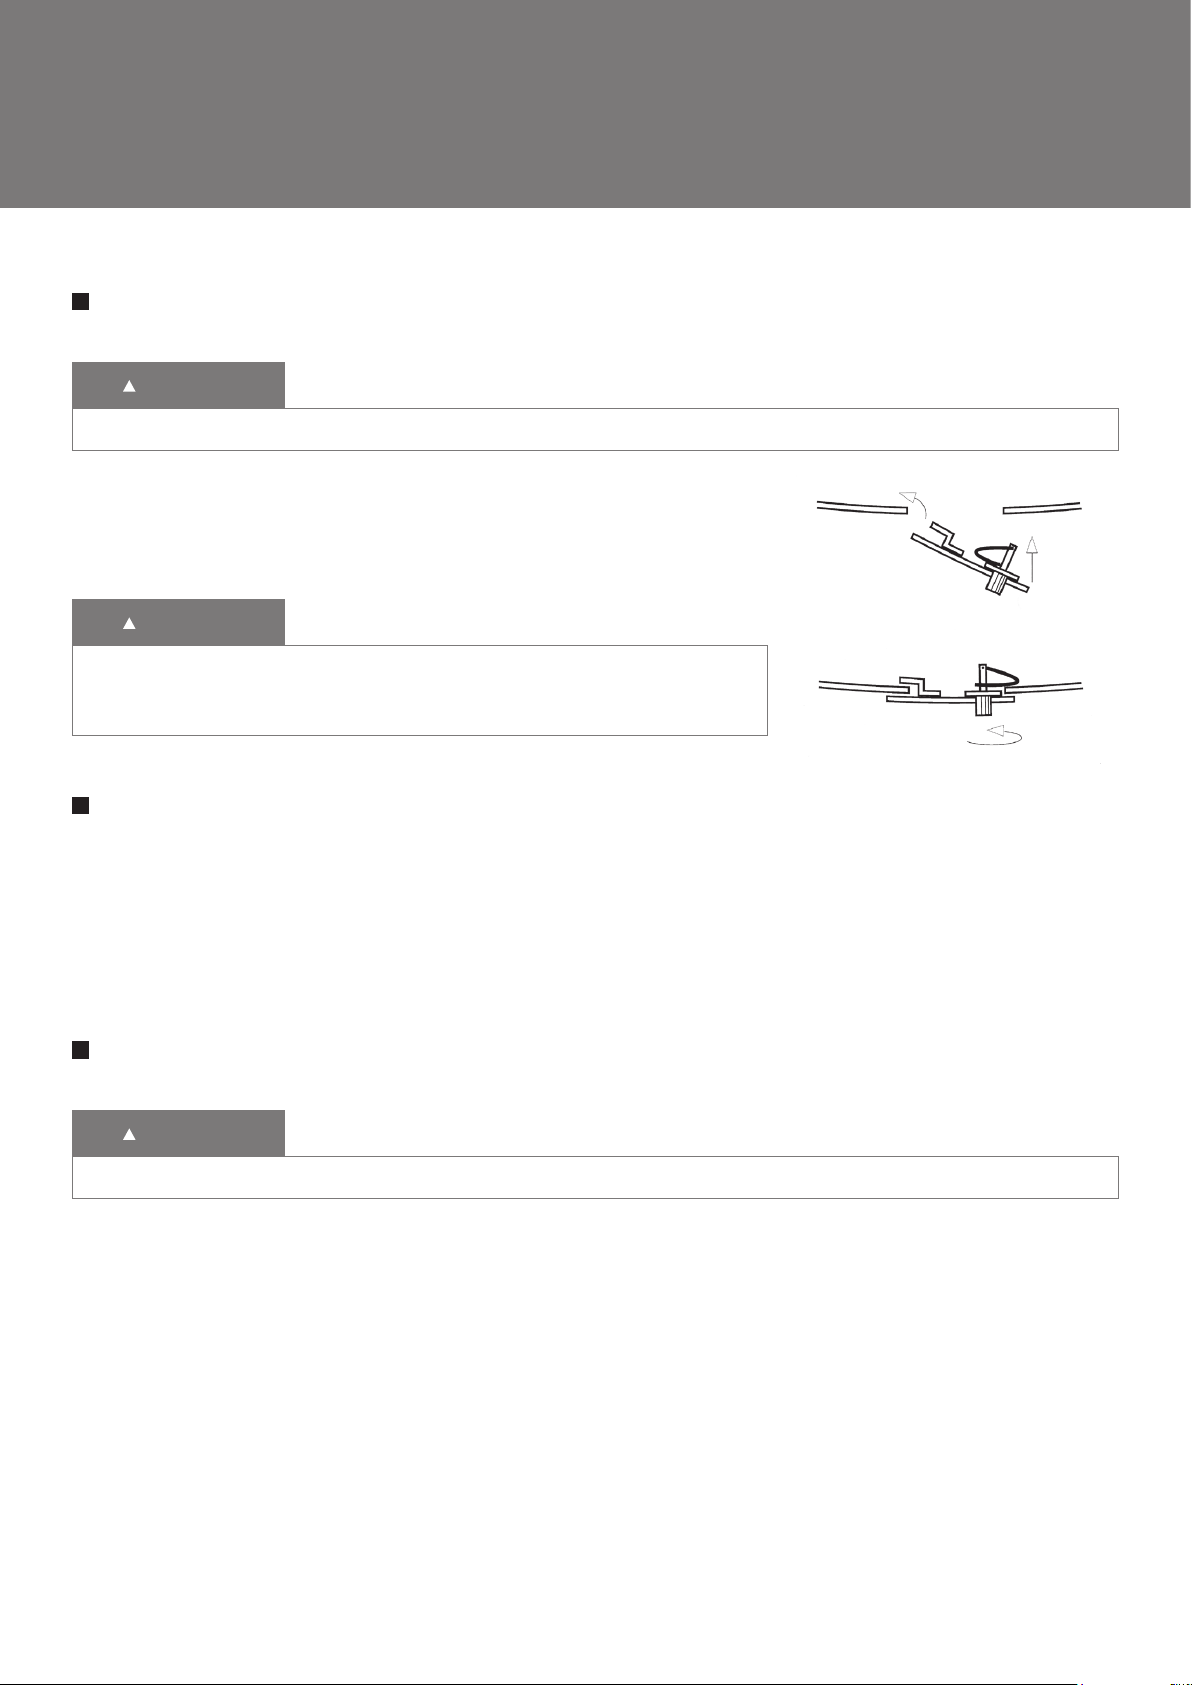
The ash removal hatch located below the grate is designed to make cleaning
easier. Dispose of ashes in an appropriate ash container (not supplied). The hatch
is removed by turning the handle. After cleaning, be sure to secure the hatch back
properly!
CAUTION
Do not light a fire with ash removal hatch removed, as this will produce
over-firing or house fire. Damage caused from non-observance of this
caution is not covered under focus limited warranty.
CREOSOTE FORMATION AND NEED FOR REMOVAL
When wood is burned slowly, it produces tar and other organic vapors, which combine with expelled moisture to form
creosote. The creosote vapors condense in the relatively cool chimney flue of a slow-burning fire. As a result, creosote residue
accumulates on the flue lining. When ignited, this creosote makes an extremely hot fire. The chimney and chimney connector
should be inspected at least once every two months during the heating season to determine if a creosote buildup has occurred.
If a significant layer of creosote has accumulated (3mm or more) it should be removed to reduce the risk of a chimney fire.
SWEEPING YOUR CHIMNEY
CAUTION
Chemical sweep not permitted: only mechanical sweep allowed.
The focus steel flue, stainless steel flue liner or insulated flue chimney system absolutly must be swept with a nylon head
sweeper. Never use metal head sweepers! Damage caused from non-observance of this caution is not covered under focus
limited warranty..
13
Page 14
Maintenance
SURFACES
CAUTION
Do not scrub !
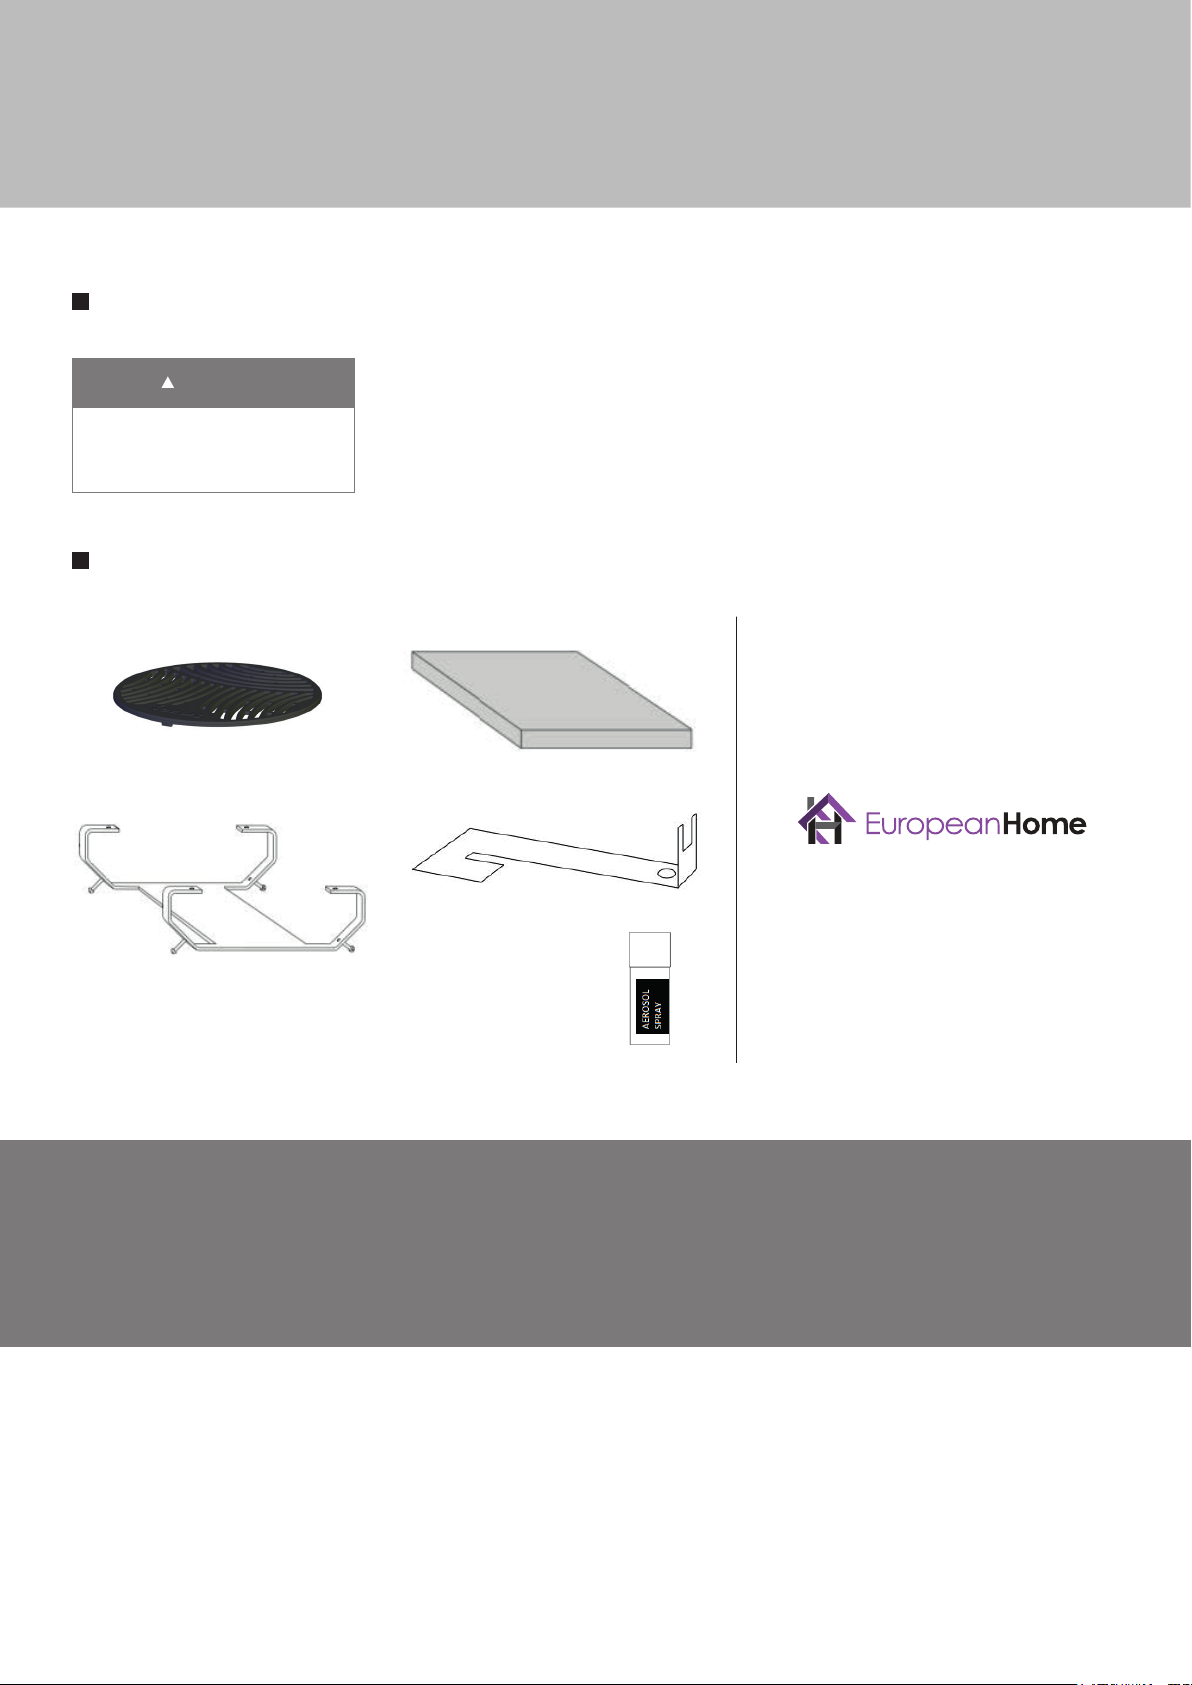
REPLACEMENT PARTS
Cast iron grate
Spacer
The outer surfaces can be wiped with a soft, dry rag (making sure the metal is cool).
For continued use of the touch-up paint can following its initial usage, invert the focus
can (spray head down) and spray into a balled up newspaper until the can sprays clear.
Clean the spray can bottom with a dry rag and store out of the reach of children.
Vermiculite part
For ordering replacement parts,
please contact the Focus North
American exclusive importer:
Cold handle
30 Log Bridge Road
Building 300 – Suite 303
Middleton, MA 01949
T: 781-324-8383
Touch-up paint
www.europeanhome.com
Warranty
All of our focus models are guaranteed against any defect in design, construction, or manufacture, and guaranteed to
function properly for 5 years from date of order. Our product guarantees are applicable only when our fireplaces have been
installed with respect to all local building codes and with strict attention to the technical details outlined in our Plan Study
as well as our installation, maintenance, and userʼs manuals. Our guarantees exclude accidental damages such as those
occuring during transport without written notification upon receipt, damages incurred during installation, and damages
resulting from improper use.
14
Page 15
Annex
78
⁄"
(2.000)
16
⁄"
(416)
2’’
(50)
3
⁄"
(80)
Ø 8 ⁄" OD
(Ø 225 OD)
4’
(1.220)
4’’
(100)
Ø 12 ⁄" OD
(Ø 324 OD)
0 ≤ ß ≤ ⁄
(0 ≤ ß ≤ 45°)
Ø 13 ¼’’
(Ø 330/338)
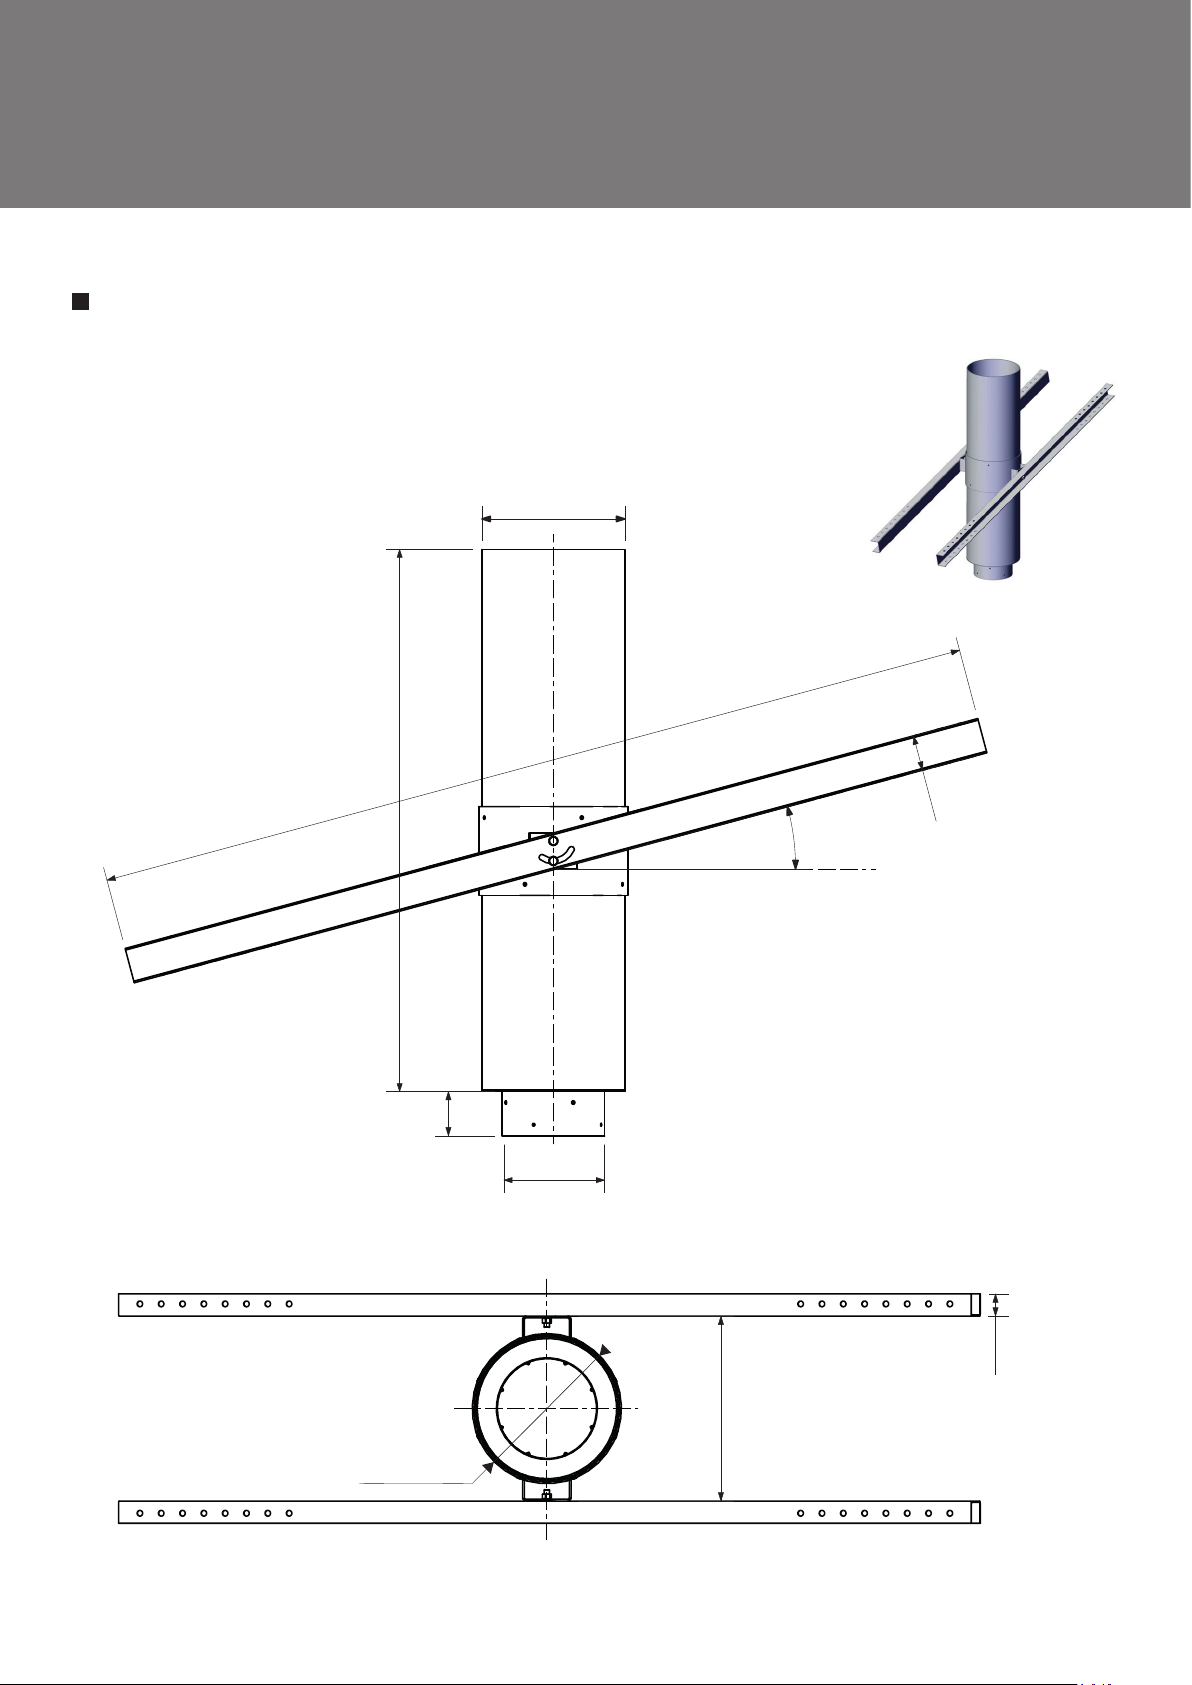
ADJUSTABLE SUSPENSION PLATE
15
Page 16

Annex
The Focus adjustable suspension plate is designed to be used on rafters/structures with a pitch between zero and
forty-ve degrees.
8’’ inside diameter / 10’’ outside diameter Class A insulated chimney ue sits inside the 12’’ wide portion of the drum.
Keeping a 2’’ overall air gap between the Class A insulated chimney ue and the 12’’ wide portion of the drum prevents
the transfer of heat to surrounding building materials.
The wide portion of the drum is 8’’ wide to accept the Focus single wall interior ue.
The adjustable suspension plate is for use with Gyrofocus, Ergofocus, Filiofocus Central 1600, Filiofocus Central
2000, Bathyscafocus, Meijifocus and Agorafocus 630 models only.
The adjustable suspension plate consists of:
(x2) Mounting bars
(x1) Support collar
(x1) Drum
(x8) Cramping screws M8x10
The drum is designed to be eld cut as needed.
The mounting bars may be cut to length and must be attached securely to the rafter/structure using lag bolts (wood
installation) or throught bolts (wood or metal installation) to support the weight of the replace and ue.
Components :
La plaque de suspension réglable Focus est conçue pour être utilisée sur des chevrons ou des structures ayant une inclinaison
comprise entre zéro et quarante-cinq degrés.
Le conduit de fumée isolé de classe A et de diamètre interieur 8’’ (225mm)/ diamètre extérieur 10’’(254mm) s’installe dans la portion
de fourreu de largeur 12’’ (324mm). Maintenir un espace d’air de 2’’ (50mm) entre le conduit de fumée isolé de classe A et la portion
de fourreau de largeur 12’’ (324mm) an d’éviter le transfert de chaleur aux matériaux de construction environnants.
La partie inferieure du fourreau est de 8’’ (225mm) pour accepter le conduit simple paroi Focus.
La plaque de suspension réglable est utilisable avec les modèles Gyrofocus, Ergofocus, Filiofocus Central 1600, Bathyscafocus,
Meijifocus et Agorafocus 630.
La plaque de suspension réglable se compose de :
(x2) Barres de montage
(x1) Collier de soutien
(x1) Fourreau
(x8) Vis de serrage M8x10
Le fourreau est conçu pour être coupé sur le terrain au besoin.
Les barres de montage peuvent être coupées à la longueur et doivent être xées solidement aux chevrons/structures en utilisant
des xations telles que des tirefonds (structures bois) ou des boulons (structures métallique) pour soutenir le poids de la cheminée
et du conduit.
Composants :
Cramping screws M8x10 (x8)
Vis de serrage M8x10
Mounting Bars (x2)
Barres de montage
Drum (x1)
Fourreau
Support Collar (x1)
Collier de soutien
16
Page 17
Annex
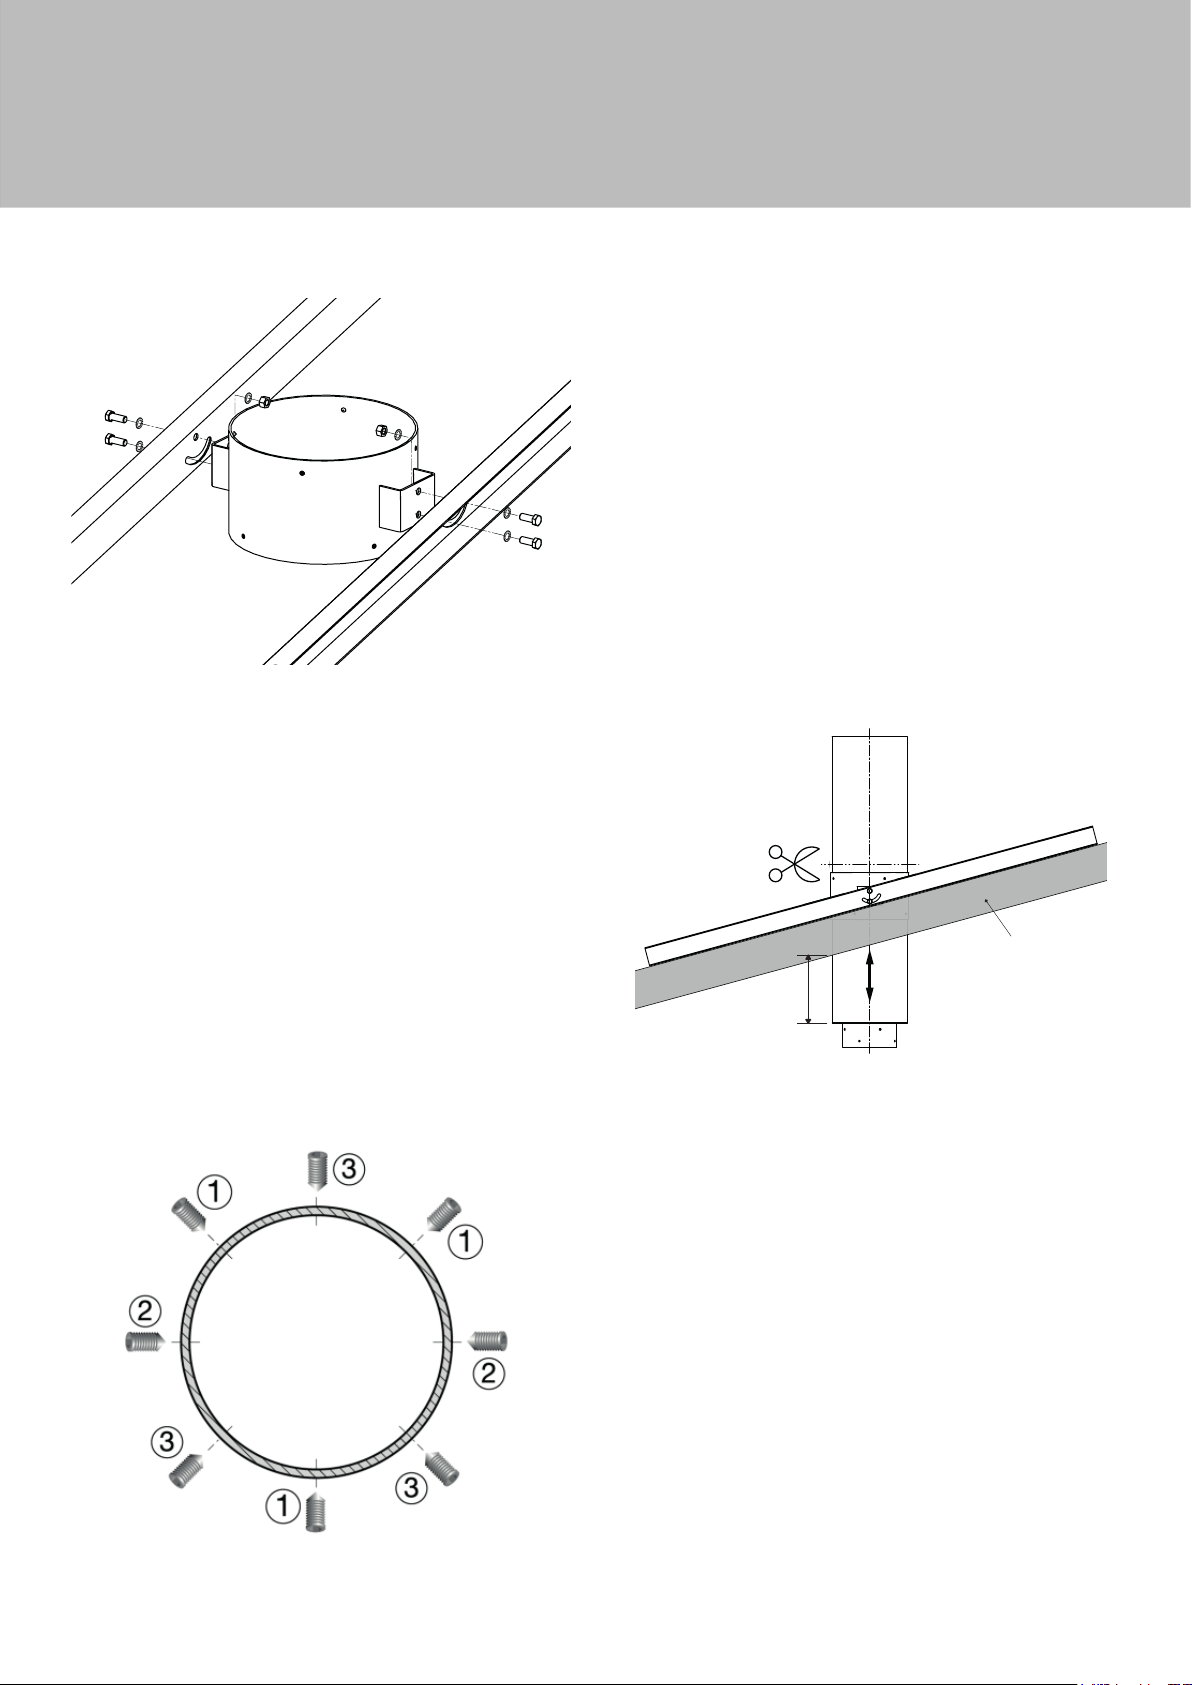
The steps of installation and cutting of the adjustable suspension plate are as follows:
1 - Place support collar between the mounting bars.
Tighten bolts using supplied nuts and lock washers.
2 - Mount this assembly in the ceiling or roof.
3 - Install the drum inside the support collar from below.
Les étapes d’installations et de coupe de la platine de suspension
ajustable sont les suivantes:
1 - Placer le collier de soutien entre les barres de montage. Serrer les boulons à l’aide des écrous et des rondelles frein fournis.
2 - Monter l’ensemble sur/sous le plafond ou toit.
3 - Installer le fourreau dans le collier de soutien par dessous.
4 - Adjust drum to desired length. The large portion of the
drum must be a minimum 3’’ below ceiling nish.
5 - If drum is to be cut, mark the drum above the support
collar with a pencil using the support collar as a guide.
6 - Remove the drum from the support collar and apply
tape around pencil marks. Use as cutting guide.
4 - Ajuster le fourreau à la longueur désirée, minimum de 3’’
(76mm). Mesure à prendre depuis la base du fourreau.
5 - Si le fourreau doit être coupé, marquer le fourreau au-dessus du collier de soutien avec un crayon en utilisant le collier de
soutien comme guide.
6 - Retirez le fourreau du collier de soutien et appliquez du ruban
adhésif autour des marques de crayon. Utiliser comme guide de
coupe.
3’ minimum
(76 mm minimum)
ceiling
(plafond)
7 - Cut the drum with an angle grinder outtted with cutting
wheel following the tape.
8 - Install the drum again into the support collar. Using a
level, conrm and tighten rmly cramping screws following
the pattern below.
Screw 1 – Install rst x 3
Screw 2 – Install next x 2
Screw 3 – Install last x 3
Note: Screws are not designed to sit ush with support
collar.
7 - Couper le fourreau à l’aide d’une meuleuse d’angle munie
d’un disque de coupe suivant le ruban.
8 - Remonter le fourreau dans le collier de soutien. À l’aide d’un
niveau, conrmez et serrez fermement les vis de serrage en
suivant le modèle ci-dessous.
Vis 1 - A installer en premier x 3
Vis 2 - A installer ensuite x 2
Vis 3 - A installer en dernier x 3
Remarque : Les vis ne sont pas prévues pour être à eur du
collier de soutien.
17
Page 18
Annex
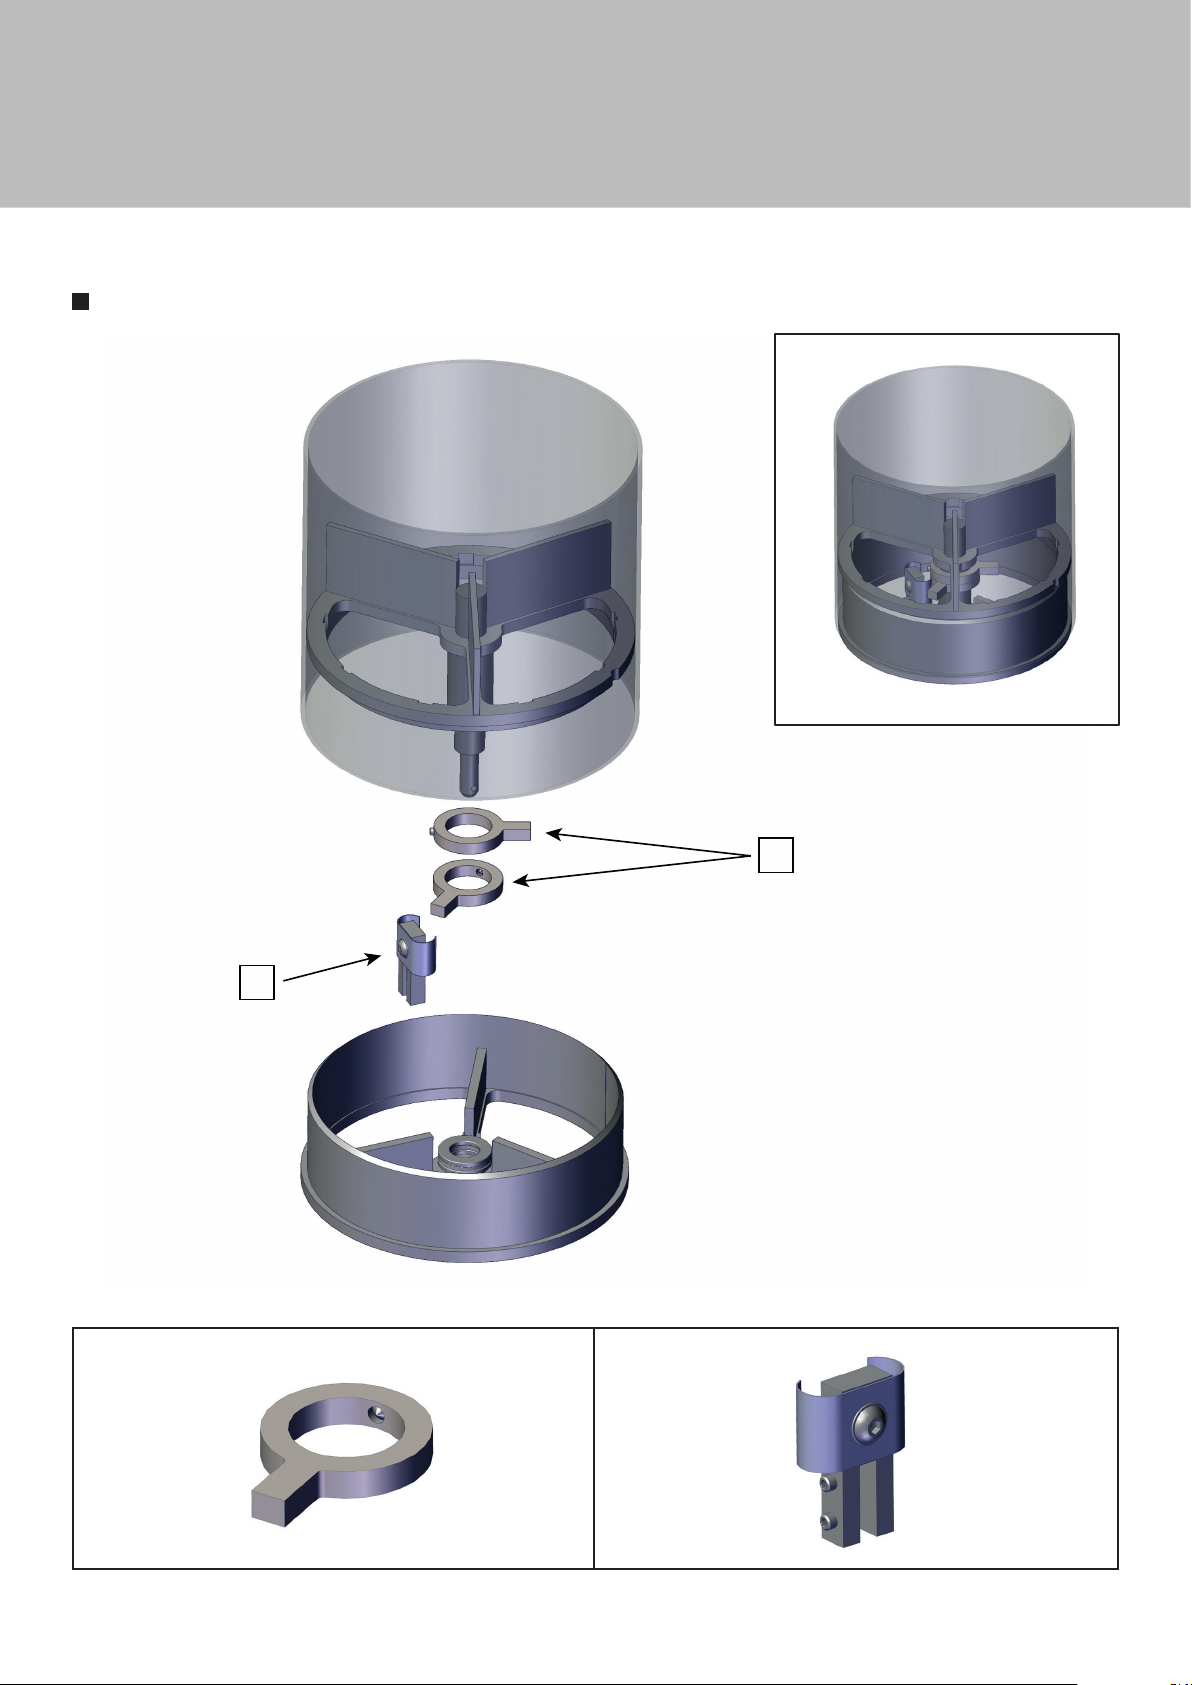
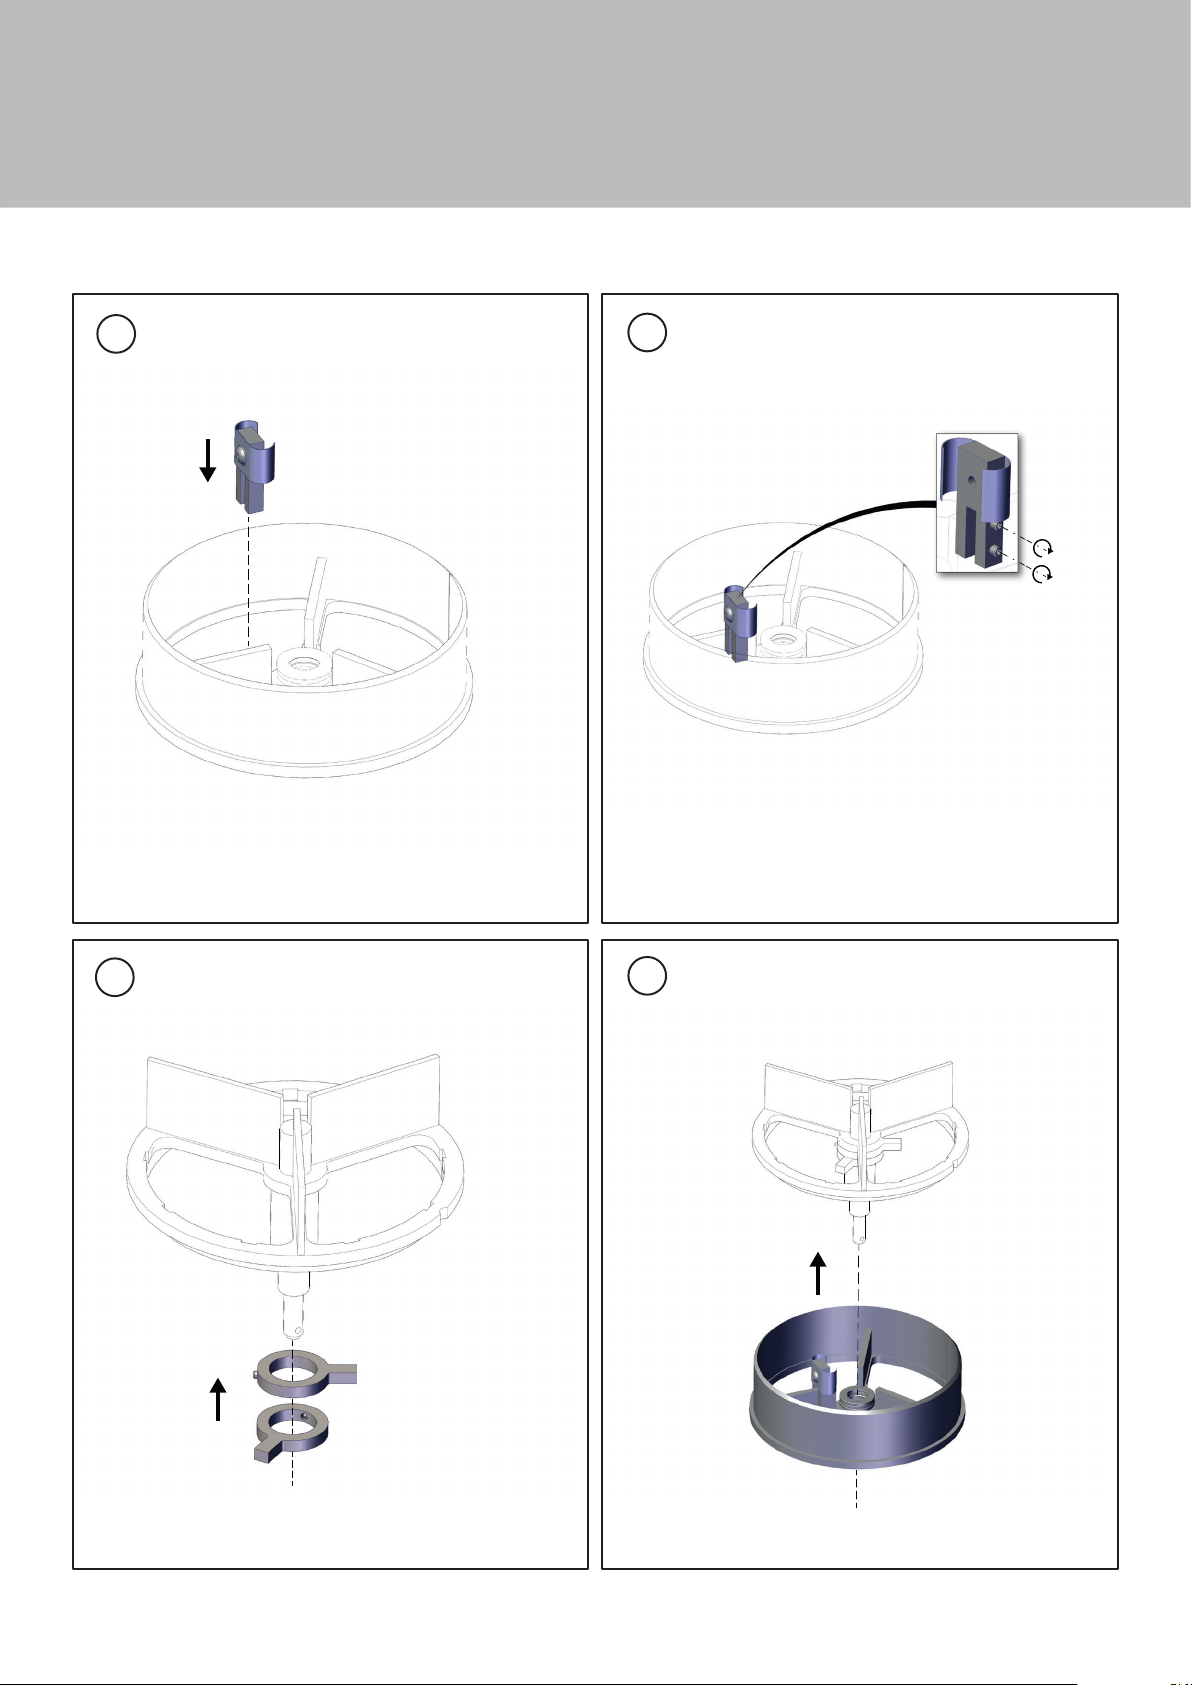
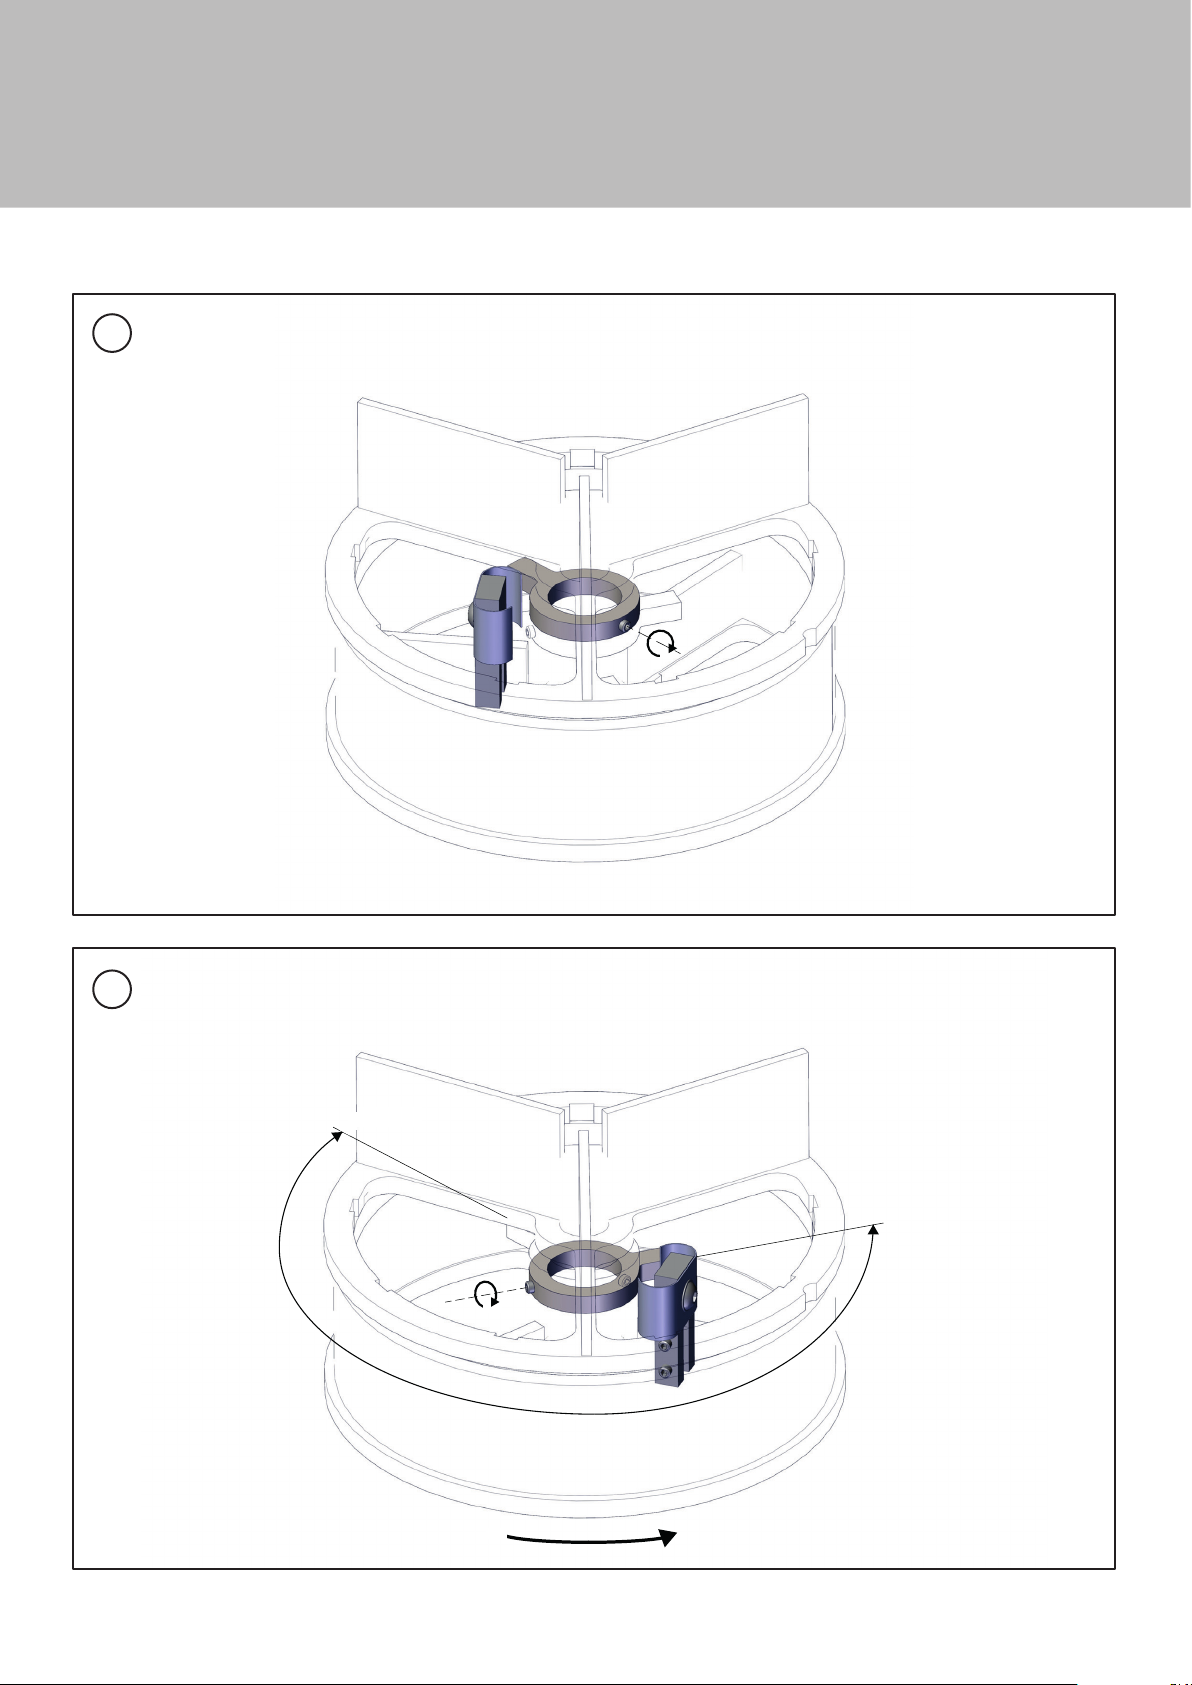
ROTATION RESTRICTOR
flue
conduit
B
fireplace
foyer
A
A (x2) B (x1)
18
Page 19
Annex
2 1
3
4
19
Page 20
Annex
5
6
0° > ∞ > 360°
20
Page 21

Note
21
Page 22

Note
22
Page 23

Note
23
Page 24

cheminées contemporaines
V. 2 - July 2019
 Loading...