

Page 1
INSTALLATION & USER INSTRUCTIONS
All instructions must be handed to the user
for safekeeping.
HIGH EFFICIENCY GAS FIRE
Revision H - 01/14
© 2014 Focal Point Fires plc
The products covered by this booklet are protected under patent GB2356698B
GB IE
BS7977-1 : 2009
KM579168
1
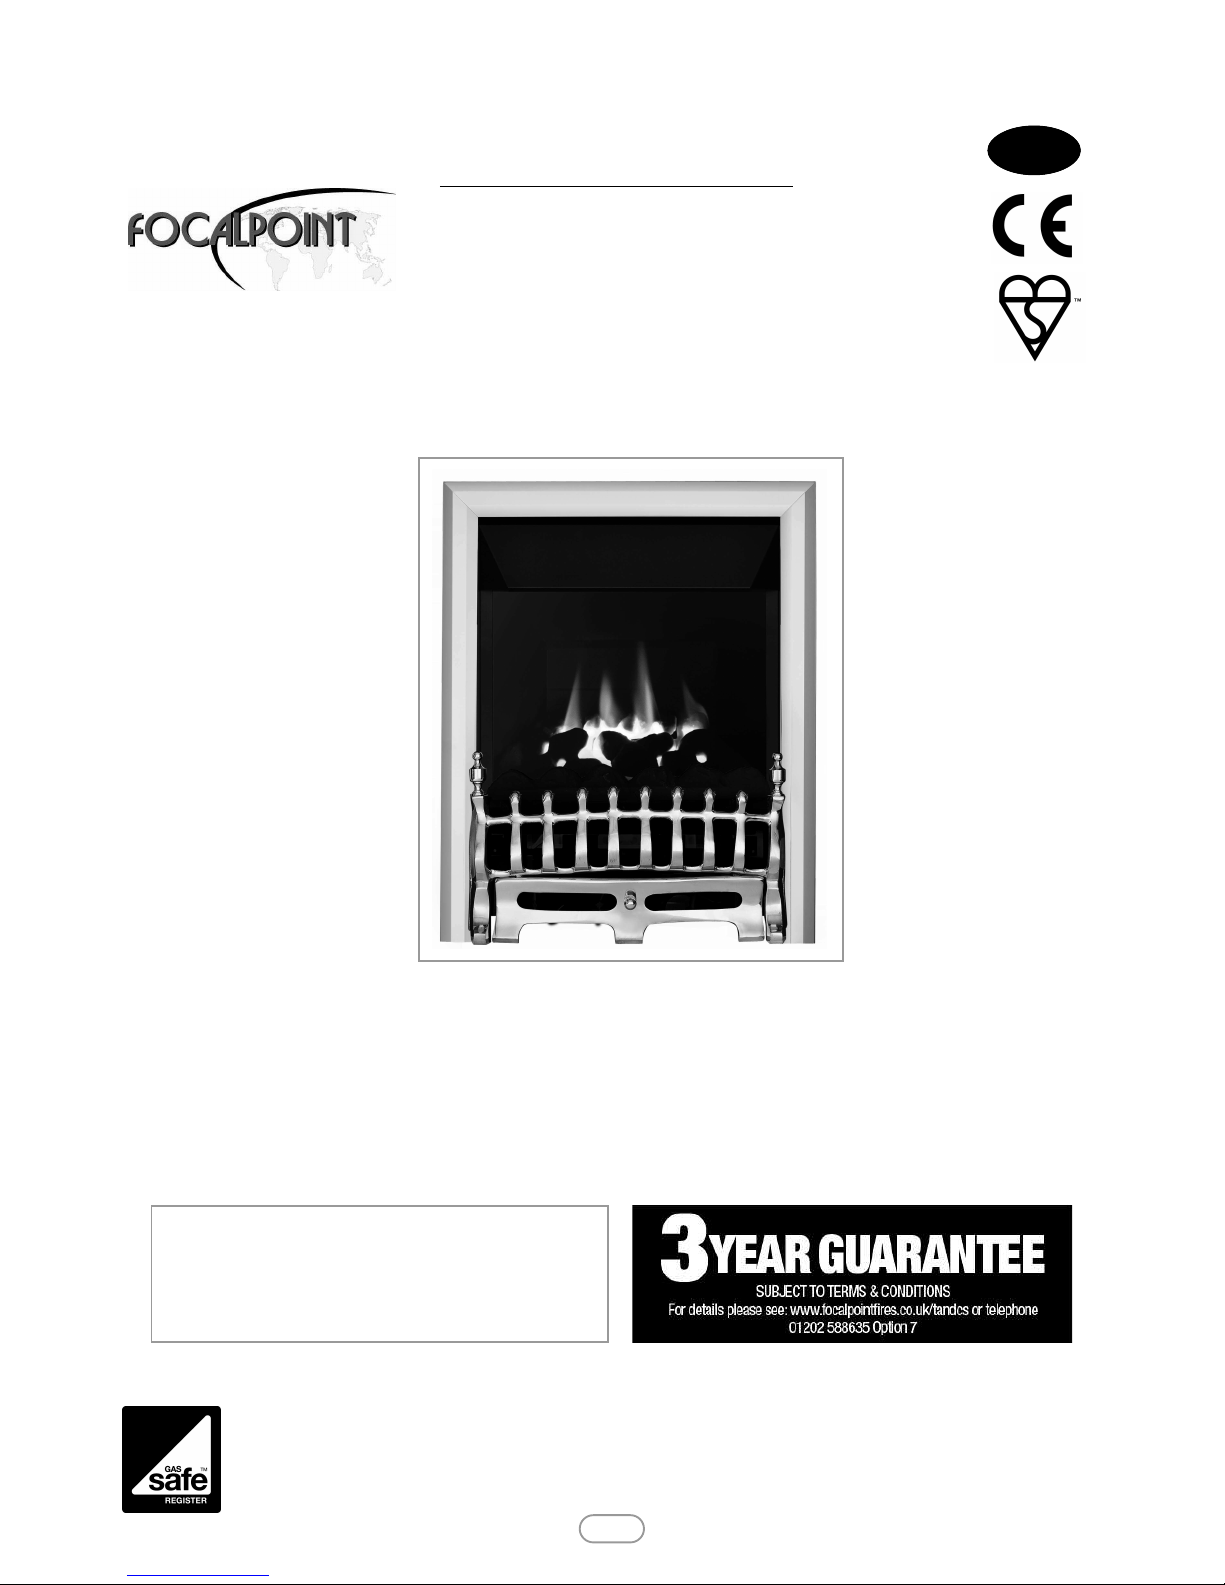
MO DEL SHOWN: BLEN HEIM HE G AS FIRE
Please note : Except where otherwise stated, all rights,
including copyright in the text, images and layout of this
booklet is owned by Focal Point Fires plc. You are not permitted to copy or adapt any of the content without the
prior written permission of Focal Point Fires plc.
IN THE UK ALWAYS USE A GAS SAFE REGISTERED ENGINEER TO INSTALL, REPAIR OR SERVICE THIS APPLIANCE
Focal Point Fires plc.
Christchurch, Dorset BH23 2BT
Tel: 01202 499330
Fax: 01202 499326
www.focalpointfires.co.uk
Questions or problems with your appliance?
Don’t take it back to the store
just give us a call on 01202 588601 we’re here to help
lines open between 9am and 5pm, Monday to Friday
MODELS COVERED BY THESE INSTRUCTIONS
BLENHEIM HE GAS FIRE
HORIZON HE GAS FIRE
LULWORTH HE GAS FIRE
* AVAILABLE I N MANUAL O R FINGERS LIDE
Page 2

2
• This fire is an Inset Live Fuel Effect Gas Fire providing radiant warmth. It is designed to operate on Natural Gas only at the pressure stated on the appliance data plate.
• The appliance incorporates a combustion monitoring system (Oxygen Depletion System). It must not be adjusted or put out of
operation. If replaced then manufacturer’s original parts must be used.
• It is the LAW that all gas appliances and fittings are installed by a GAS SAFE registered person and in accordance with the Gas Safety
(Installation and Use) Regulations 1998, the relevant British Standards for Installation, Codes of Practice and in accordance with the
Manufacturers’ Instructions.
• In the event of gas leakage from the appliance, the gas supply must be turned off at the nearest isolating valve.
• The appliance must be installed in accordance with the following:
• Failure to comply with the above could lead to prosecution and deem the manufacturer’s warranty invalid.
• This appliance must be installed in accordance with the rules in force and used only in a sufficiently ventilated space. The appliance is
designed to fit various types of situations as described in sections 3.0 and 4.0.
• It should be noted that heaters create warm air currents. These currents move heat to surfaces next to the heater. Operating the
heater where impurities in the air (such as tobacco smoke, candle smoke etc.) exist, may cause surfaces to become discoloured.
• On first light up of a new appliance, burning off of high temperature paint and lubricants may occur for the first few hours of operation. During this period some smoke may be emitted, this should be no cause for concern. Accordingly, the room should be well ventilated with all windows and doors open during this period. During this period the appliance may cause smoke alarms to sound. If this
happens, reset the alarms, but do not remove the batteries.
• WARNING: Due to the nature of this product the area around the top of the appliance (i.e. the hood) gets very hot. Care should
be taken when operating the appliance. The manufacturer of this appliance considers all surfaces as working surfaces with the exception of the control knob. The guard (glass front) is to prevent risk of fire or injury from burns and no part of it should be permanently
removed.
• As with any gas fire, a fire guard complying with BS 8423 must be used in presence of pets, children, and the eld-
erly or infirm.
• Consult ALL instructions before installation and use of this appliance.
• This appliance is free from any asbestos material.
• Manufacturers' Instructions.
• The Building Regulations issued by the Department for Communities and Local Government, the Building Standards
(Scotland) (Consolidation) Regulations issued by the Scottish Development Department.
• Relevant British standards :
• BS 5871 part 2
• BS 5440 part 1, part 2
• BS 1251
• BS 6891
• BS 6461 part 1
• BS EN 1806
• BS EN 1856 part 1
• BS EN 1858
• For Republic of Ireland, reference should be made to the relevant standards governing installation, particularly
in regard to flue sizing and ventilation. See IS813, ICP3, IS327 and any other relevant rules in force.
1.0 IMPORTANT NOTES
© 2014 Focal Point Fires plc
I N S T A L L A T I O N I N S T R U C T I O N S
Section
1.0
2.0
3.0
4.0
4.1
5.0
6.0
7.0
7.1
8.0
8.1
8.2
8.3
Contents
Important Notes
Appliance Data
Installation Requirements
Site Requirements
Debris Collection Space
Ventilation
Prefabricated Flue Boxes
Unpacking the Appliance
Component Checklist
Preparing the Appliance
Preparing the Opening
Gas Supply
Cable Fixing
Page No.
2
3
3
3
4
5
5
5
5
6
6
6
7
Section
8.4
9.0
9.1
9.2
9.3
9.4
9.5
9.6
9.7
9.8
10.0
11.0
12.0
12.0
Contents
Fitting the Burner
Final Assembly, Testing and Commissioning
Spark Gap
Fuel Bed Layout
Final Assembly
Operating the Appliance - Manual control
Operating the Appliance - Slide control
Setting Pressure
Flue Spillage Monitoring System
Testing for Spillage
Briefing the customer
Servicing
Troubleshooting Guide
Troubleshooting Guide (continued)
Page No.
7
7
7
7
8
8
9
9
9
10
10
10
11
12
GB IE
Page 3
3
The efficiency of this appliance has been measured as specified in BS 7977-1:2002 and the result is 81%. The gross calorific value of the
fuel has been used for this efficiency calculation. The test data from which it has been calculated has been certified by GL Industrial
Services (0087). The efficiency value may be used in the UK Government’s Standard Assessment Procedure (SAP) for energy rating of
dwellings.
This appliance MUST NOT be installed into a room containing a bath or shower, or where steam may be present. The fire has been
designed to fit into a builders’ opening or fireplace conforming to BS 1251 or BS EN 1858 (and meeting certain dimensional requirements), or a suitable flue box complying with the constructional requirements of BS 715. The flue box must be installed onto a suitable
non-combustible insulating surface at least 12mm thick, covering the entire base area of the box.
A natural draught flue system is required, and if previously used for solid fuel or oil burning, the flue and chimney must be swept prior
to appliance installation. The flue must be checked before installation by using a smoke pellet or similar to ensure proper draw and that
leakage is not evident at any joints. Repair and re-test as necessary before the appliance is installed. The flue must have an effective height
of at least three metres, as measured from the hearth to the top of the flue. Any flue damper plates or restrictors should be removed
and no other restriction fitted to the flue. Where removal is not practical, the restriction must be fixed in the fully open position. The
flue must be connected to only one fireplace, and the flue must not vent more than one appliance (i.e. not shared with a gas back boiler). There must be no opening in the flue apart from the one that the appliance is installed into, and the one venting the gases into the
air. A suitable terminal may be fitted, such as class GC1, as regulations allow.
This appliance has been tested for use in a pre-cast block flue complying with BS 1289 or BS EN 1858. In accordance with BS 1289 part
1, pre-cast flues built with directly plastered faces (front or rear) are not correctly installed as to ensure proper operation with any type
of gas fire. In some instances of this flue construction, temperature cracking of the surface plaster may occur through no fault of the
appliance. An air gap or some form of insulation material should be installed to prevent normal flue temperatures from damaging wall
surfaces. Pre-cast flues must be checked for mortar fangs and correct installation of joints, flue sections in loft space and terminals.
This appliance has been tested for use with circular flues of a minimum internal diameter of 125mm.
This appliance MUST be installed into a non combustible back panel capable of withstanding 150
o
C.
The fireplace opening should be inspected and repairs made where necessary. Any chair brick or fireback may be left in situ, providing
that the dimensional requirements for debris collection space and spigot clearances are met. See figure 1. The opening WIDTH and
HEIGHT dimensions should be between 400mm and 440mm wide, and 550mm to 575mm high.
Opening DEPTH should be 145mm or greater for a clay/cement lined or pre-cast flue which is new, unused or previously only used
with a gas fire. DEPTH should be 185mm or greater for a flue which has previously been used for a solid fuel or oil burning appliance.
Opening DEPTHS include any plaster or infill panels which form part of the installation. Any existing under grate draught device must
be sealed off. WARNING This fire is designed to get very hot! The fireplace opening wall or back panel must be non-combustible and
rated to withstand 150
o
C.
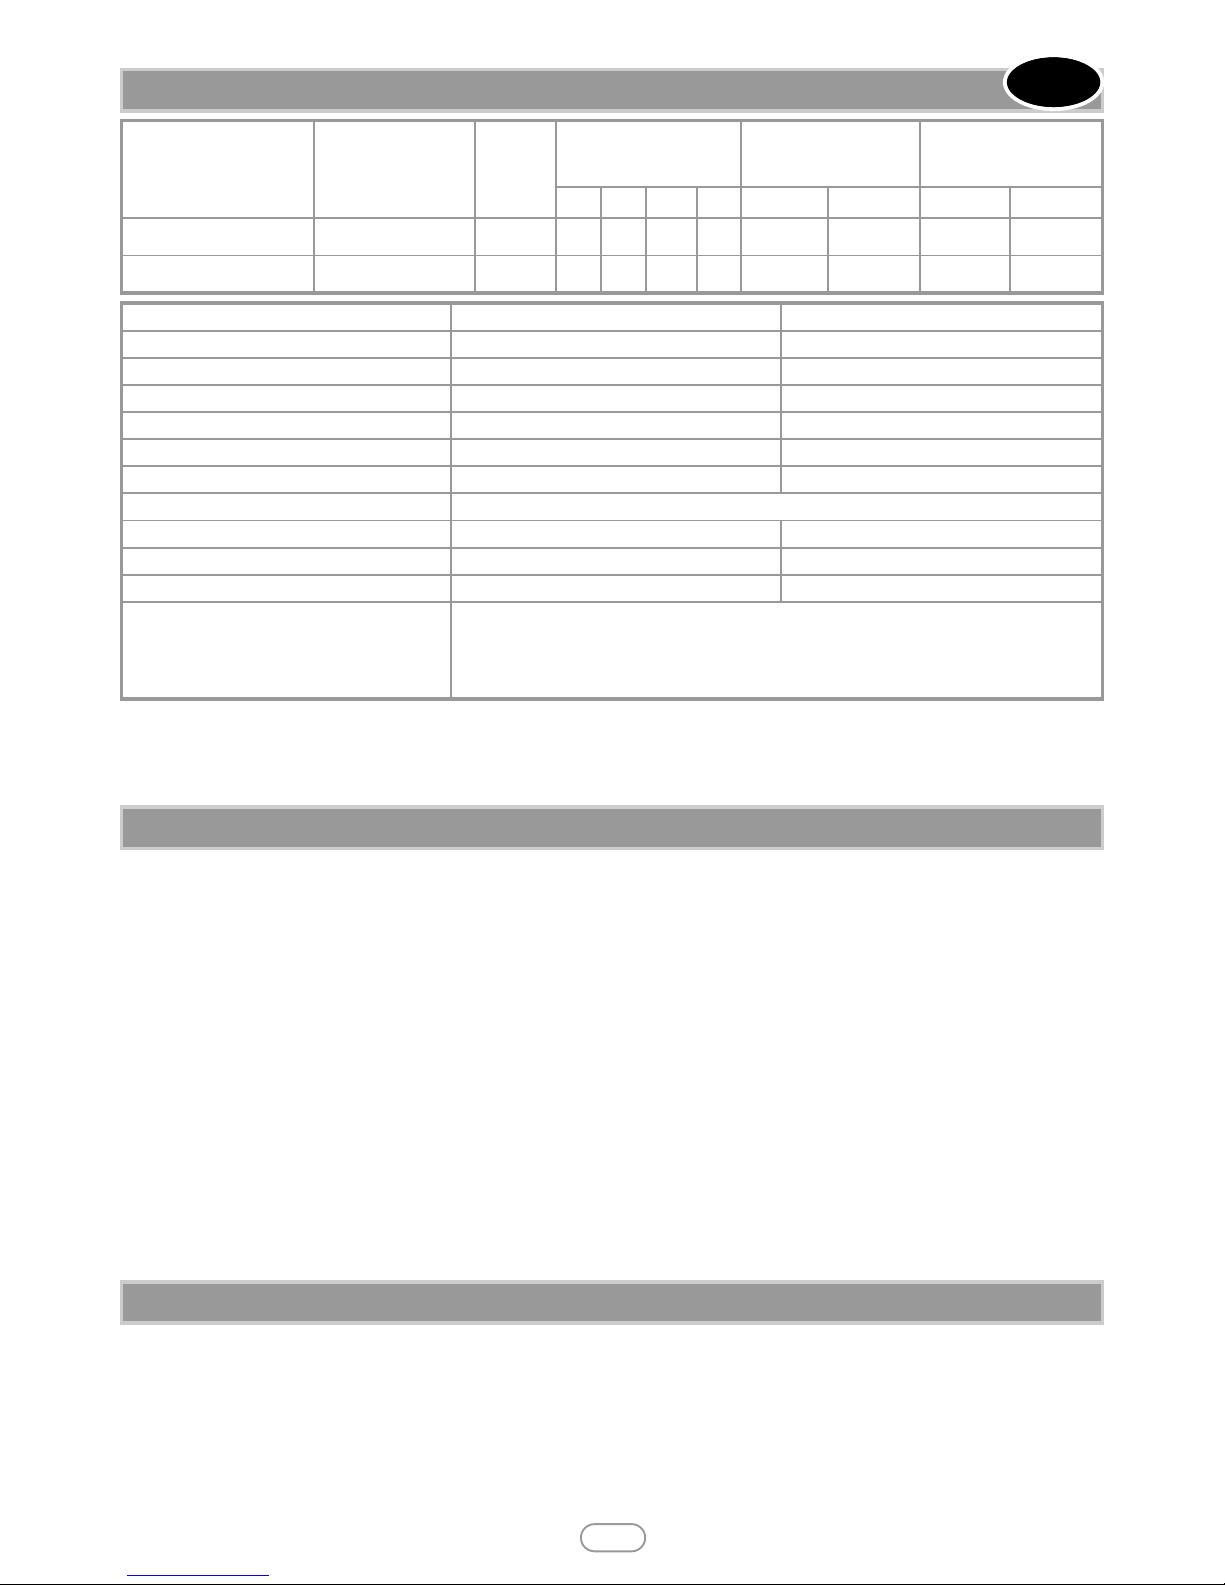
2.0 APPLIANCE DATA
3.0 INSTALLATION REQUIREMENTS
4.0 SITE REQUIREMENTS
Control Type
Destination
Countries
Cat
Inlet/Operating
Pressure (±2.0 mbar)
Max Energy Input
(kW)
Min Energy Input
(kW)
G20 G25
G30 G31 Gross Net Gross Net
Manual GB/IE I2H 20 - - - 5.0 4.5 3.5 3.15
Slide GB/IE I2H 20 - - - 5.0 4.5 3.5 3.15
Specifications Manual Control Models Slide Control Models
Efficiency 90% (net), 81% (gross) 90% (net), 81% (gross)
NOx Class 2 2
Pilot Energy Input 166W (gross) 166W (gross)
Main burner injector Stereo size 65 Stereo size 66
Oxypilot SIT 9082/ SIT 9081 SIT 9082/ SIT 9081
Gas Control Copreci 21400 Series Teddington TESA 3173/011
Gas Inlet All models - 8mm compression - Inlet restrictor elbow
Ignition Double-action piezo Spark Battery Spark
Spark Gap 3.5 - 4.5mm 3.5 - 4.5mm
Weight 20Kg 20.5Kg
Flue specification
All models - 225mm x 225mm (9in x 9in) brick or stone.
125mm (5in) minimum diameter lined brick or stone.
125mm (5in) minimum diameter twin wall flue conforming to BS 715.
Pre-cast block flue complying with BS 1289 or BS EN 1858.
GB IE
© 2014 Focal Point Fires plc.
Page 4
4
This appliance requires a natural draught flue system which may be one of the following;
225mm x 225mm (9in x 9in) brick or stone.
125mm (5in) minimum diameter lined brick or stone.
125mm (5in) minimum diameter twin wall flue conforming to BS 715.
Pre-cast block flue complying with BS 1289 or BS EN 1858.
The appliance requires a hearth with non-combustible surface of at least 12mm thick. The top surface must be at least 50mm above the
surrounding floor level, or be surrounded by a raised edge or fender 50mm high.
To enable the products of combustion to be cleared properly up the flue, the outlet at the back of the appliance must have a 50mm minimum clearance between it and the back wall of the opening or any other obstruction. The area immediately above the outlet must form
a smooth path into the flue.
Any type of fire surround used with this appliance must be adequately sealed to the wall and floor.
A combustible shelf may be fixed to the wall above the fire, providing that it complies with the dimensions given below.
A non-combustible shelf may be fitted to within 10mm of the top edge of the fireframe. Combustible materials, such as wood, may be
fitted to within 100mm (4in) of either side of the fireplace opening, providing the forward projection does not exceed 100mm (4in).
Any combustible side walls must be at least 500mm to the side of the radiant heat source. As with all heating appliances, any decorations, soft furnishings, and wall coverings (i.e. flock, blown vinyl and embossed paper) positioned too close to the appliance may discolour or scorch.
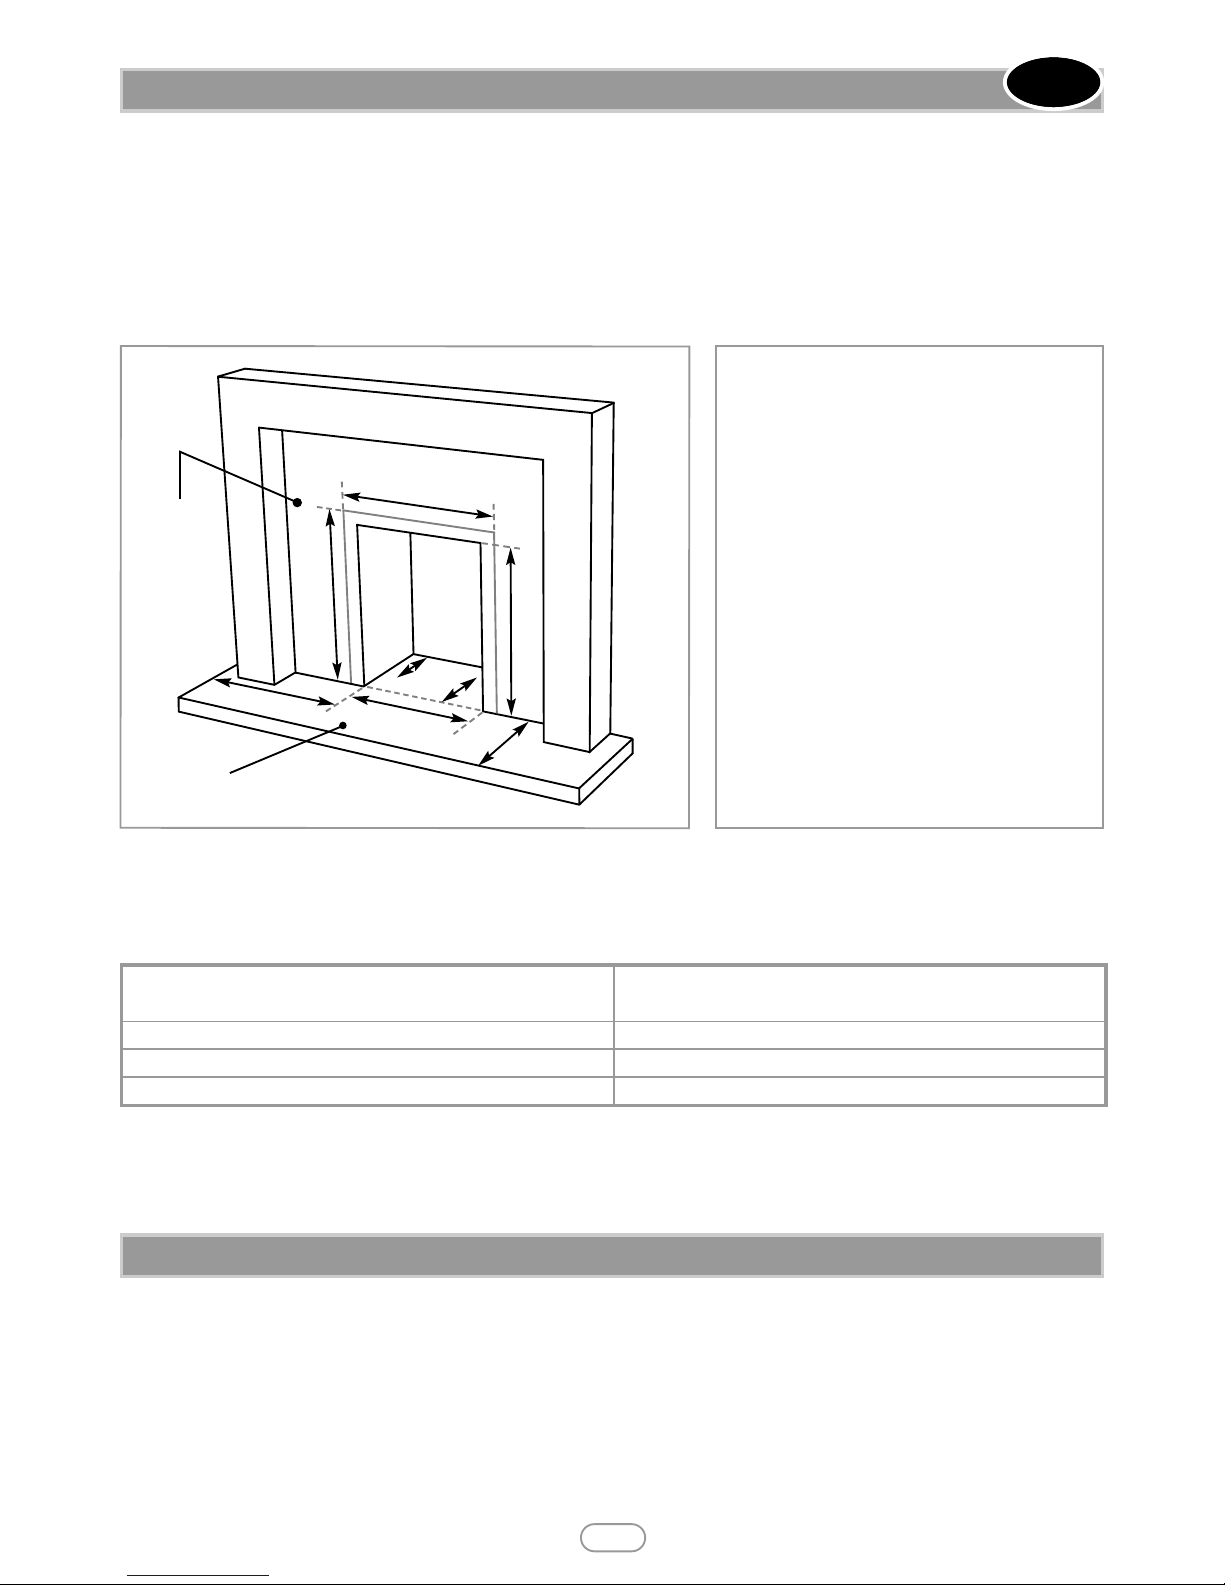
The mounting depth of this appliance is 125mm. In accordance with BS 5871 part 2, minimum debris collection volumes are required
behind the installed appliance. These are as follows and shown as dimension X in figure 1.
CLAY/CEMENT LINES OR BLOCK FLUE WHICH IS NEW, UNUSED, OR PREVIOUSLY ONLY USED WITH A GAS FIRE
X Dimension = 20mm
UNLINED FLUE OR CHIMNEY WHICH HAS BEEN PREVIOUSLY USED FOR A SOLID FUEL OR OIL BURNING APPLIANCE
X Dimension = 60mm
4.0 SITE REQUIREMENTS (continued)
A. Opening height: 550mm min/575mm max.
B. Opening width: 400mm min/440mm max.
C. Mounting depth: 125mm
D. Hearth must extend minimum of 150mm either
side of the opening.
E. Hearth must extend minimum of 300mm in front
of the fuelbed.
F. Non-combustible hearth must be a minimum of
50mm in height, or be surrounded by 50mm high
fender.
G. 470mm: This area must be flat and vertical to allow
good frame sealing.
H. 585mm: This area must be flat and vertical to allow
good frame sealing.
X. See section 4.1.
4.1 DEBRIS COLLECTION SPACE
© 2014 Focal Point Fires plc
‘A’
‘C’
‘B
’
‘E’
‘F
’
‘G’
‘H
’
‘X’
‘D’
F
igure 1
N
on-combustible
back panel
c
apable of
withstanding
150
o
C.
GB IE
Maximum depth of shelf
Minimum distance from finished
hearth surface to underside of shelf
100mm (4in) 745mm (29
1/4
in)
150mm (6in) 845mm (33
1/4
in)
203mm (8in) 895mm (35
1/4
in)
Page 5
5
No purpose provided ventilation is normally required for this appliance. The requirements of other appliances operating in the
same room or space must be taken into consideration when assessing ventilation.
If spillage is detected when commissioning the appliance, then amongst other problems there may be insufficient natural ventilation for
correct operation of the flue. If the appliance does not spill with the windows open, but spillage is detected with the windows closed,
this demonstrates a lack of natural ventilation. If spillage is still detected with the windows open, the flue is at fault. Installation of an air
brick is the best solution to lack of ventilation. Any ventilation fitted must comply with BS 5871 part 2 and BS 5440 part 2. Vents fitted
under or within the immediate vicinity (1 metre) of the appliance must not be used as adverse effects to the operation of the ODS may
occur. Spillage detected during commissioning is almost always a result of poor flue performance that cannot be corrected by any amount
of ventilation.
For Republic of Ireland ventilation may be required, see IS 813, ICP3, IS 327, and any other rules in force.
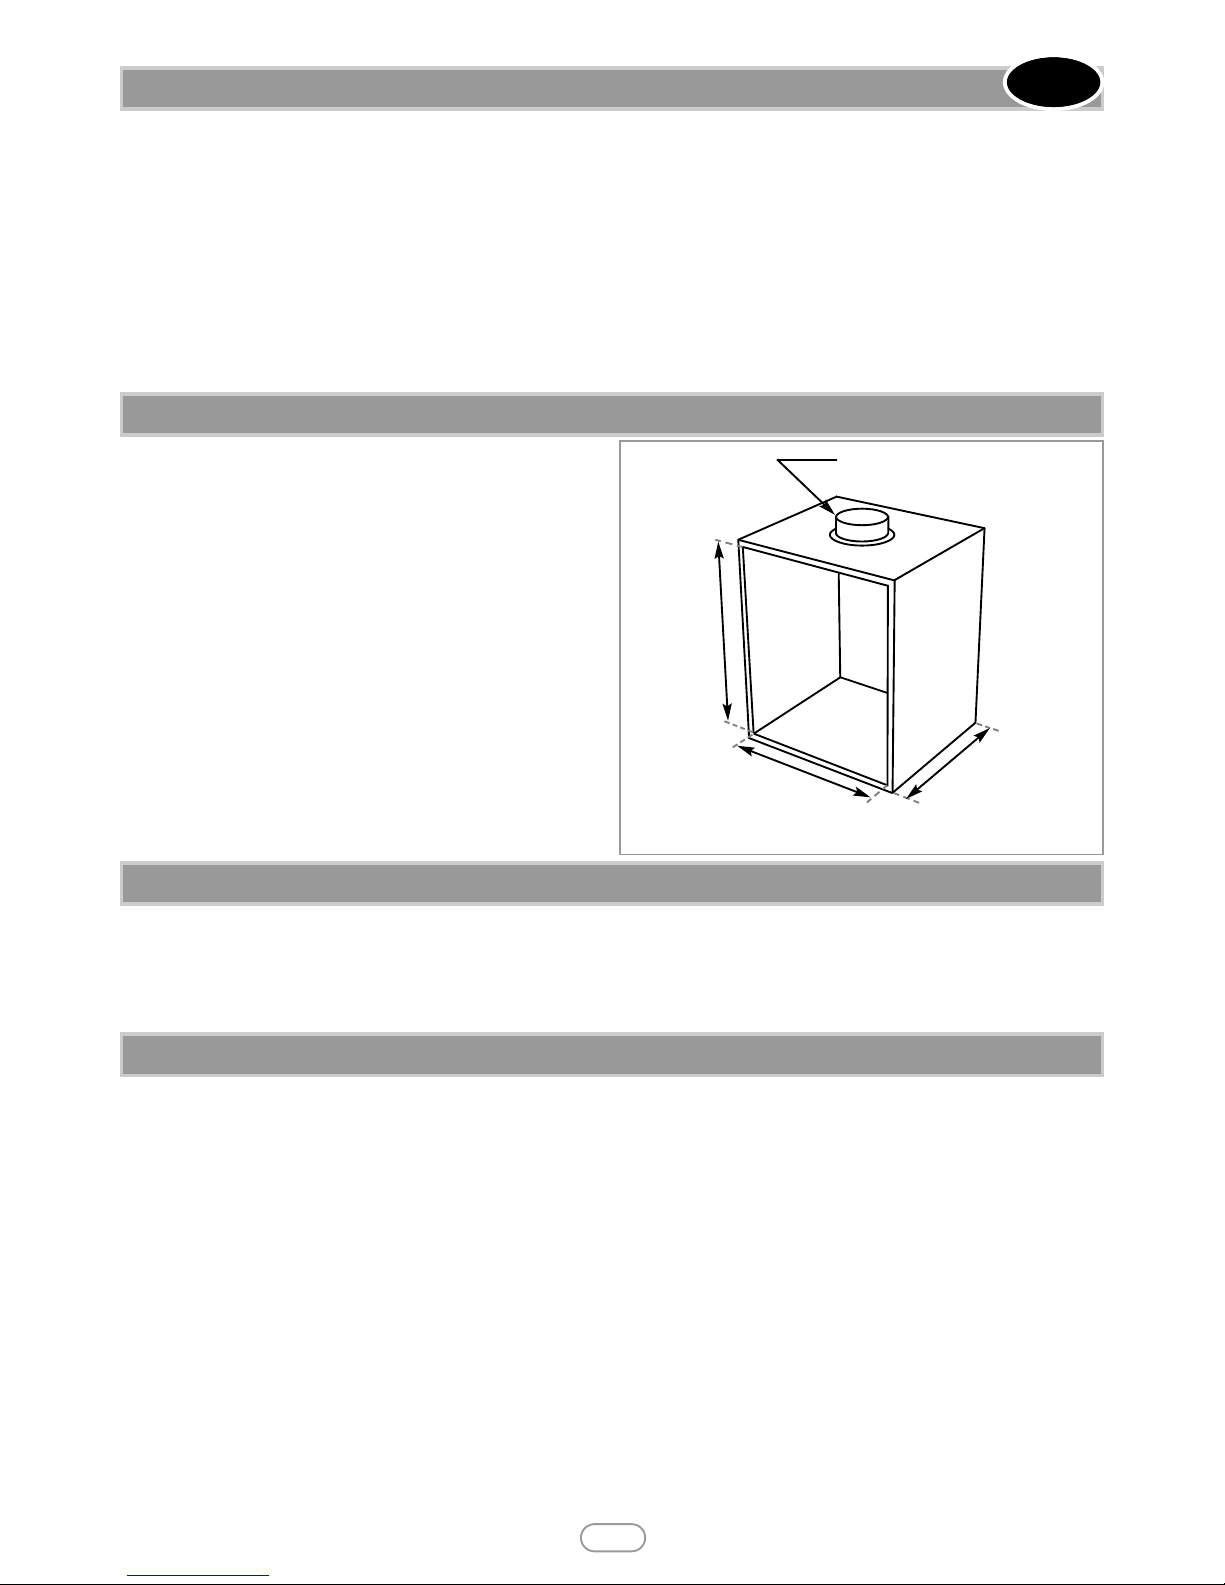
This appliance can be fitted into a number of proprietary flue boxes provided that the minimum dimensions given in figure 2 are complied with.
Constructional Note: The frame of the fire, any back panel or
other infill panels, and the flue box must be sealed together so that
there is no possibility of leakage between them. Adequate clearances to combustible materials (e.g. false chimney breast construction) must be maintained.
The manufacturers’ instructions for fitting the prefabricated box shall be complied with at all times. To fit the fire
using the cable fixing kit, some minor adaption may be necessary
for certain flue boxes. A check should be made to ensure the firebox does not obscure the flue box outlet. The firebox, base of the
flue box, and hearth below may be drilled to allow plugs and
screws to secure installation. It is important that the sealing
requirements of the appliance are met at all times and that the flue
box is well sealed to any back or infill panel. Note: The DEPTH
dimension is inclusive of any back or infill panel.
Stand the carton the right way up, cut the strapping bands and
remove the top endcap.
Read all the instructions before continuing to unpack or install this appliance.Remove the box containing the firefront, and the bags containing the ceramic components. Remove the cardboard packing pieces, and any other bags or boxes containing fittings or other parts.
When all loose parts have been removed, the outer sleeve may be lifted off to reveal the appliance. Check that the components supplied correlate with the component checklist given in section 7.1. Please dispose of all the packaging materials at your local recycling
centre.
QUANTITY DESCRIPTION
1 Firebox and burner assembly
1 Decorative frame : three-piece frame or a one-piece frame (fingerslide models only)
1 Firefront
1 Black moulded ceramic fibre combustion matrix
4 Moulded ceramic coal pieces
1 Front ceramic decorative strip (dependent on model)
1 Ceramic rear panel
1 Cable fixing kit; 2 cables, 2 tensioners, 2 cable clamps, 4 fixing eyes
1 Sealing grommet
1 Screw pack : 7 x No8 x 5/16 Self tapping type, 2 x M4x12 Machine screw type
1 Spigot restrictor
1 Deflector baffle/burner heatshield (shown in fig.11)
1 Smoke match tube
1 Set of manufacturers instructions
4 Wall Plugs
1 Slide control models only : Slide control position marking sticker
1 Slide control models only : Slide control knob and M4 Nyloc nut
5.0 VENTILATION
6.0 PREFABRICATED FLUE BOXES
7.0 UNPACKING THE APPLIANCE
7.1 COMPONENT CHECKLIST
© 2014 Focal Point Fires plc
125mm min internal
dia twin wall flue
140mm min depth
400mm min opening width
550mm min
height
Figure 2
GB IE
Page 6
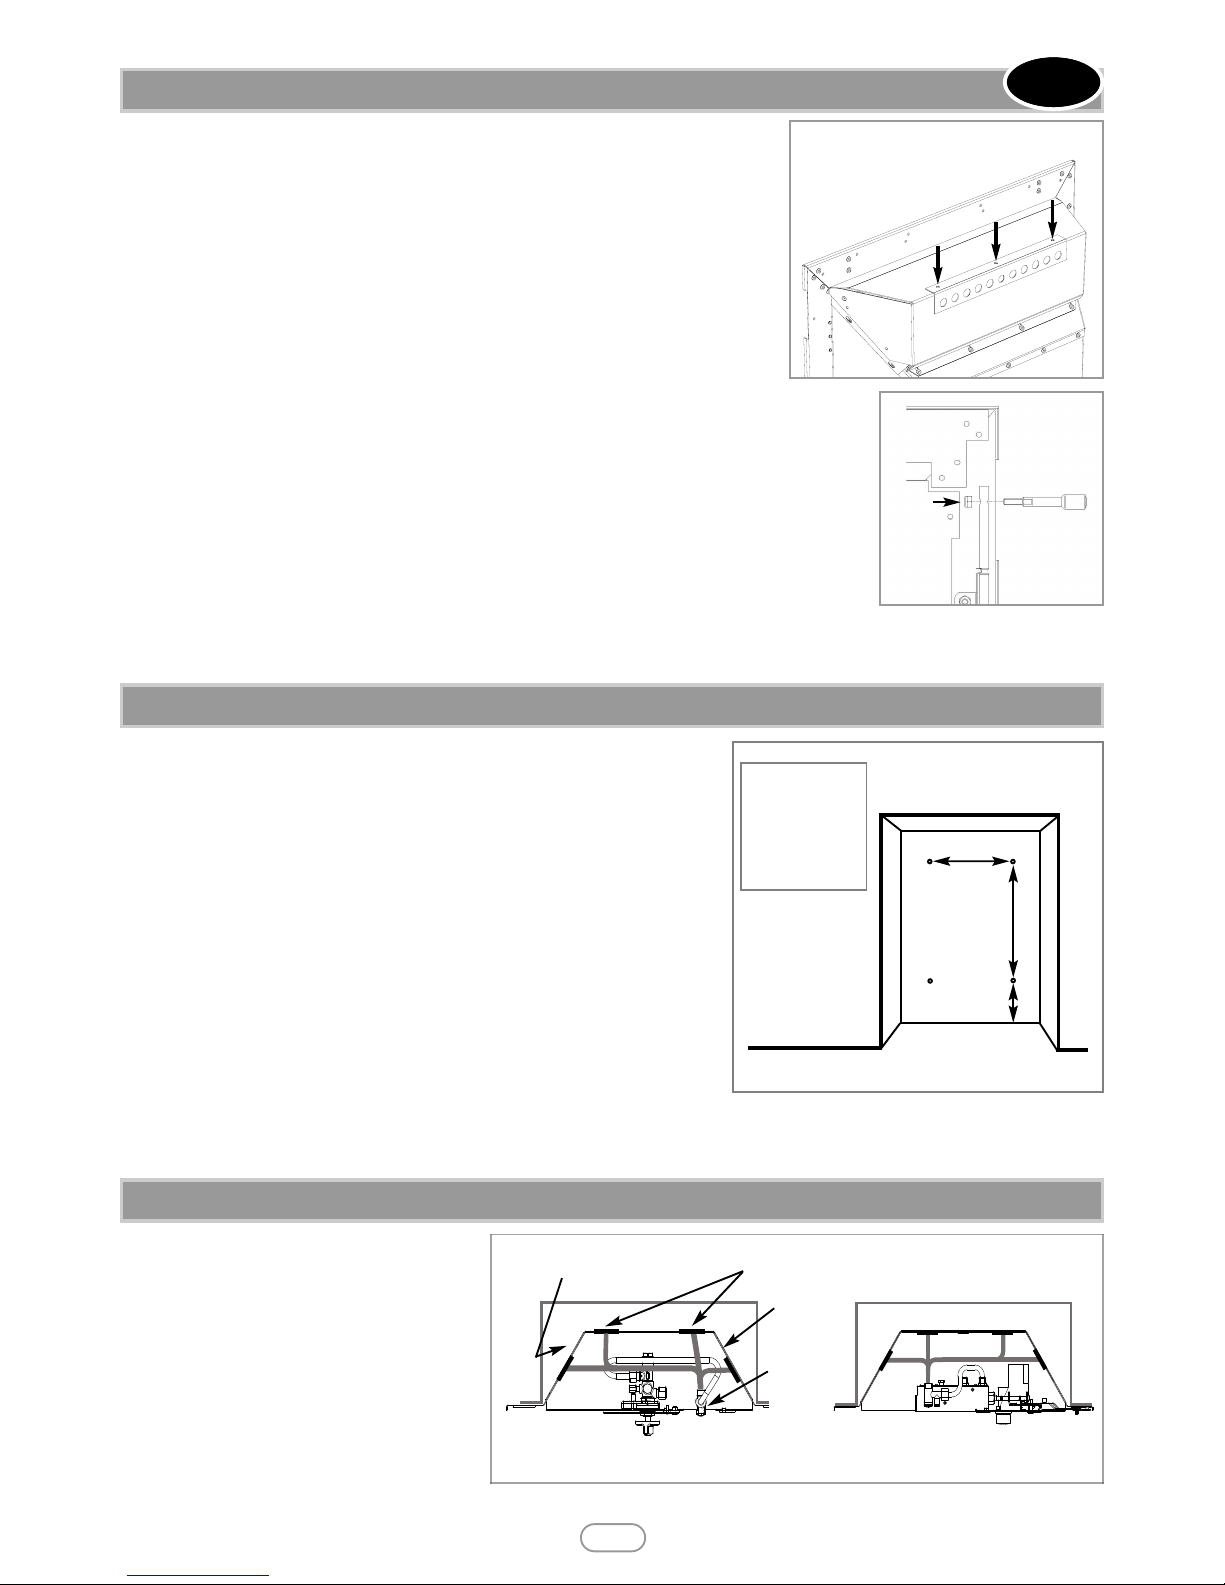
The fireplace opening and environment must be in compliance with specifications laid
down in the appropriate sections of these instructions. Remove the appliance from it’s carton as described previously and stand upon a dust sheet or similar. Place the decorative
frame, coals, ceramics and fixings safely to one side. Remove the glass panel assembly by
removing the retaining screws. Remove the burner from the assembly by removing the
retaining screws (slide control models only - disconnect the slide mechanism by removing
one M4 nut from the assembly). The tray is now free, and may be lifted away.
Spigot restrictor : The appliance is supplied with an optional spigot restrictor.
The spigot restrictor may be fitted when the fire is to be installed in a good class 1 flue, a
conventional brick chimney, or a 175mm (7”) circular flue. The spigot restrictor is not recommended for pre-cast and 125mm (5”) circular flues as it may cause spillage. If required,
fit the spigot restrictor using three No8 x 5/16 Self tapping screws (supplied loose) as
shown in figure 3.
If spillage is detected during the commissioning of the appliance, the spigot restrictor should be
removed immediately.
Slide controls models : The control knob is supplied as a loose part. Insert the control knob into
the hole in the top of the slide control spindle (Figure 4). Secure the control knob in position using the
M4 nyloc nut provided. Affix the Slide control position marking sticker on the trim next to the control
knob as shown if figure 16.
Supply pipe entry : Knockout holes are provided in the rear and sides of the firebox for use where
concealed pipework is required. Where necessary, knock out the appropriate hole with a sharp tap
from a hammer, and fit the rubber grommet supplied. A small incision can now be made in the rubber
to slip snugly around the outside of the pipe and sleeving. Do not install or use the appliance without the seal in place. If a hole
is inadvertently opened, reseal with an intact grommet. Failure to fit the seal correctly will cause flue suction to act upon the area under
the burner, resulting in poor performance and intermittent cutting out of the burner. Some possible pipe routes are shown in figure 6.
The appliance is supplied with a high temperature rope sealing strip factory fitted
to the firebox.
Before installing the fire, check the flue for correct operation using a smoke pellet. All of the smoke should be drawn up the flue and exit correctly from the terminal. If problems are found DO NOT fit the fire until corrective action is completed.
Protect the decorative hearth whilst pushing the convector box in and out of the
opening. Part of the packaging is an ideal hearth saver pad.
Before running the gas supply into the opening, offer up the convector box to the
fireplace to check the fit is good. Ensure that it slides in correctly, the sealing face
sits flat and square to the wall or infill panel, and that the base is firm in the floor
of the opening as no leaks are permissible here. At this stage it is essential to
ensure that the spigot outlet of the fire is not obstructed in any way. Remove the
convector box and take any necessary measurements before making good and
preparing for final installation.
Cable fixing : Drill four holes as shown in figure 5 and fit the wall plugs. If the
fireplace does not allow for the exact layout shown, the eyebolts should be fixed
to give a similar configuration as possible. To complete the cable fixing of the convector box, refer to section 8.3.
Fixing by screw : Mark and drill the fireframe or base, and relevant points in the opening or on the wall. Additional screws will be
required for this method of fixing.
When the opening is ready for installation of the
fire, the gas supply can be routed. Some possible
supply pipe routes are shown in figure 6. Select
the supply route most relevant to the entry point
of the gas supply into the fireplace opening. The
gas pipe must be suitably protected where it passes through fireplace openings. Any sleeving should
be sealed to the pipe at its ends.
The open end of the gas supply pipe should be
temporarily sealed to prevent ingress of dust and
dirt during installation.
6
8.0 PREPARING THE APPLIANCE
Figure 3
8.1 PREPARING THE OPENING
A
B
C
A. 250 mm
B. 330 mm
C. 70 mm
All dims
+/-10mm
Figure 5
8.2 GAS SUPPLY
© 2014 Focal Point Fires plc
Figure 4
Slide control
Figure 6
Not to scale
Manual control
Fireplace opening
Grommets
Firebox
Inlet
restrictor
elbow
GB IE
Page 7
7
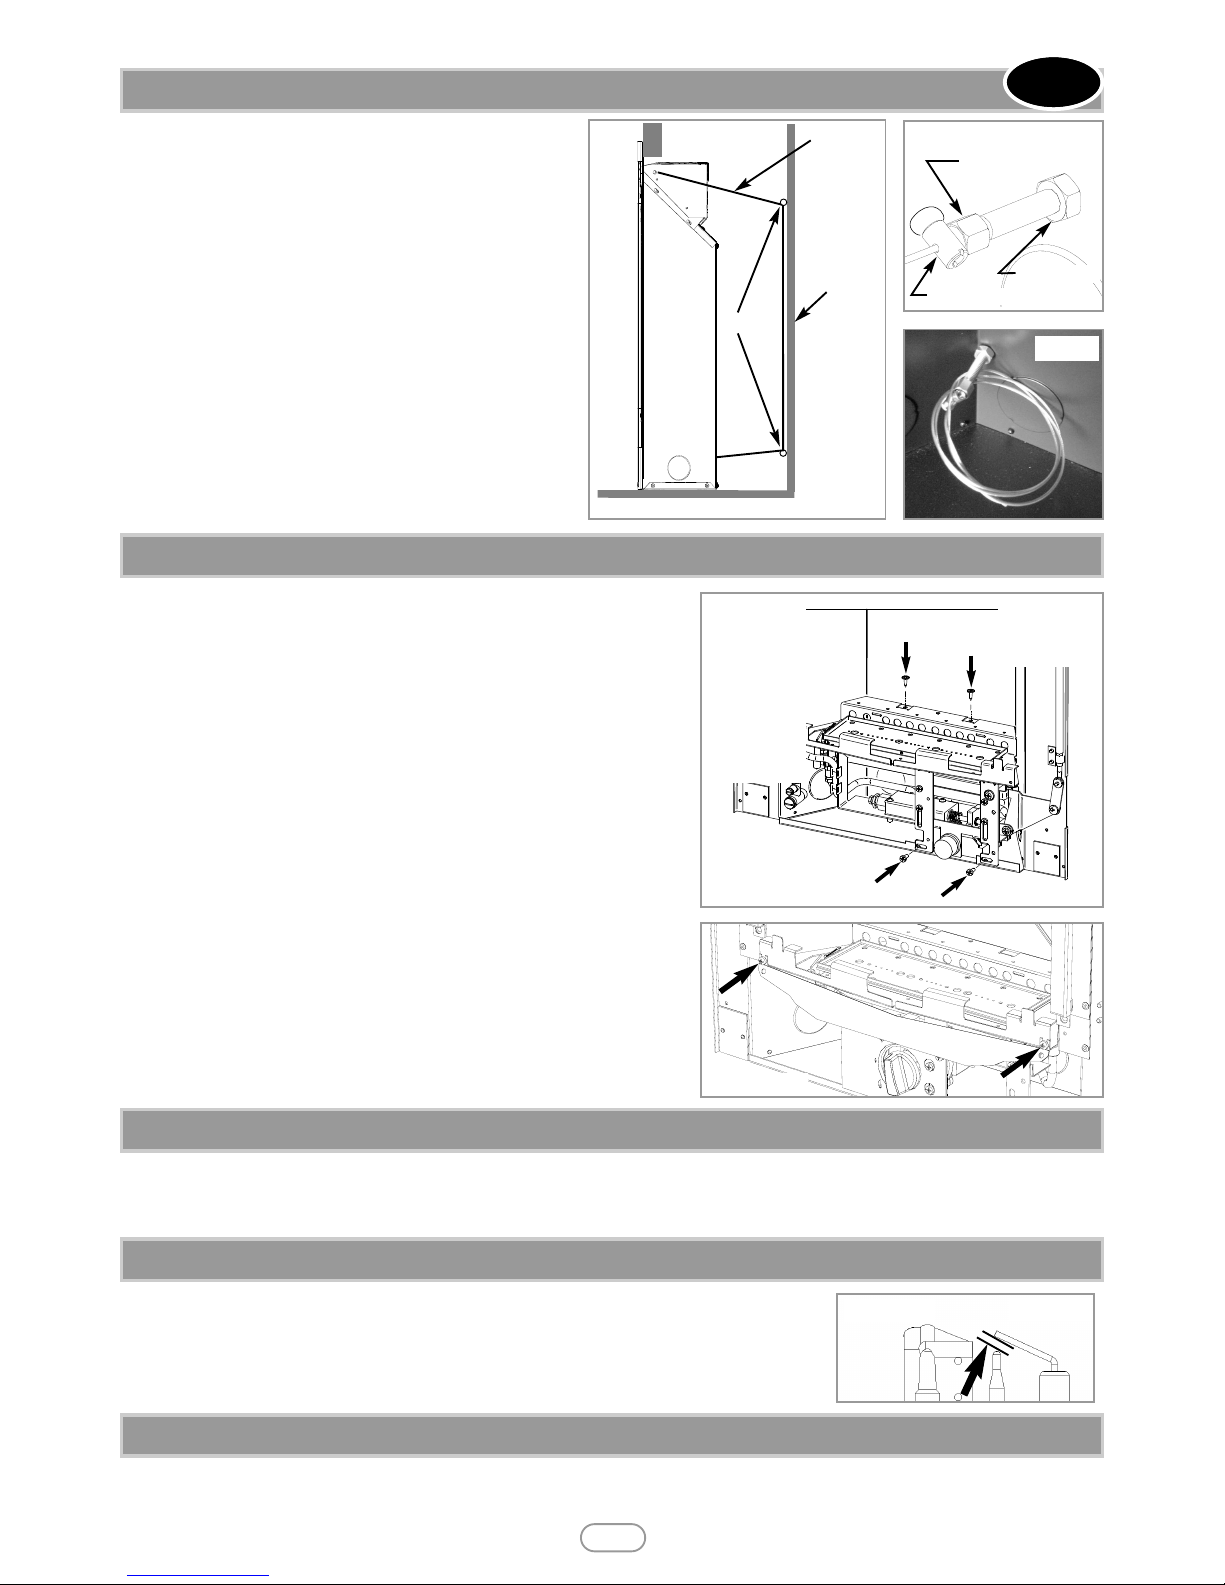
Thread both tensioning cables through the holes at the top of
the firebox, both eyelets, and back through the lower holes in
the firebox in the positions indicated in figure 7. Push the
appliance back into the fireplace, centralise and pull the loose
cables through the holes into the firebox.
Thread the cable tensioners onto the cables as shown, with
the nuts screwed down close to the tensioner head. Slide the
screwed nipple onto the cable, pull cable taut and tighten nipple. Adjust tensioner using suitable spanners to pull the appliance back into position, to allow an even seal around the fireplace opening. See figure 8. Visually inspect the seal and reseat
if necessary.
Surplus tension cable MUST NOT be cut off as this will prevent proper installation after servicing. Coil up the surplus
cable as shown in figure 9.
Temporarily fit the burner tray and ensure a suitable gas route can be
achieved. Place the burner tray into the firebox making sure that the rear lugs
locate properly on to the ledge in the firebox.
Manual control models : Fit the two securing screws through the tray legs
to secure the assembly.
Slide control models : Fit the four securing screws - two through the
tray rear first and then two through the legs of the tray to secure the assem-
bly - see figure 10. Reconnect the slide mechanism by replacing the M4 nut
and serrated washer on the assembly.
All models : Connect the gas supply and tighten the gas connections. Fit the
deflector baffle to the two locations on the front face of the firetray as shown
in figure 11. Screws are provided for this purpose. The baffle should be level
with the lower edge of the tray. Place contemporary firefront in front of the
fire temporarily to check the angle of the baffle. The front should fit well and
the control devices beneath should not be visible to the eye. Realign the baffle slightly if necessary to achieve the correct fit.
Purge the gas supply thoroughly to remove air and dirt/debris BEFORE connection. Now disconnect the inlet restrictor elbow from the inlet pipe.
Connect the previously installed gas supply to inlet restrictor elbow, and refit the restrictor elbow to the inlet pipe of the appliance.
Turn on and test the gas supply up to the fire for any leaks, in accordance with current edition of BS6891.
When the appliance is first used, protective oils coating the firebox may burn off. It is advisable to ventilate the room during this period
for at least one hour.
The spark gap between the spark electrode and the thermocouple should be 3.5 - 4.5mm to produce a good spark. There should be no need to adjust this.
For fuel bed layout instructions, refer to section 10.0 of the user instructions.
8.3 CABLE FIXING
C
able Route
Fireplace
opening
Eyebolts
Figure 7
1
. Tighten nipple onto cable
2. Hold tensioner steady
3
. Tighten nut
Figure 8
Figure 9
8.4 FITTING THE BURNER
9.0 FINAL ASSEMBLY, TESTING AND COMMISSIONING
Figure 11
© 2014 Focal Point Fires plc
9.1 SPARK GAP
Figure 12
Spark gap
GB IE
9.2 FUEL BED LAYOUT
Figure 10
Rotary control
m
odels : The
burner is secured
by two screws
t
hrough the tray
l
egs only.
Slide control
models : The
b
urner is secured
by four screws as
shown here.
IMPORTANT :
S
lide control
models - Fit the
rear screws first.
Page 8
8
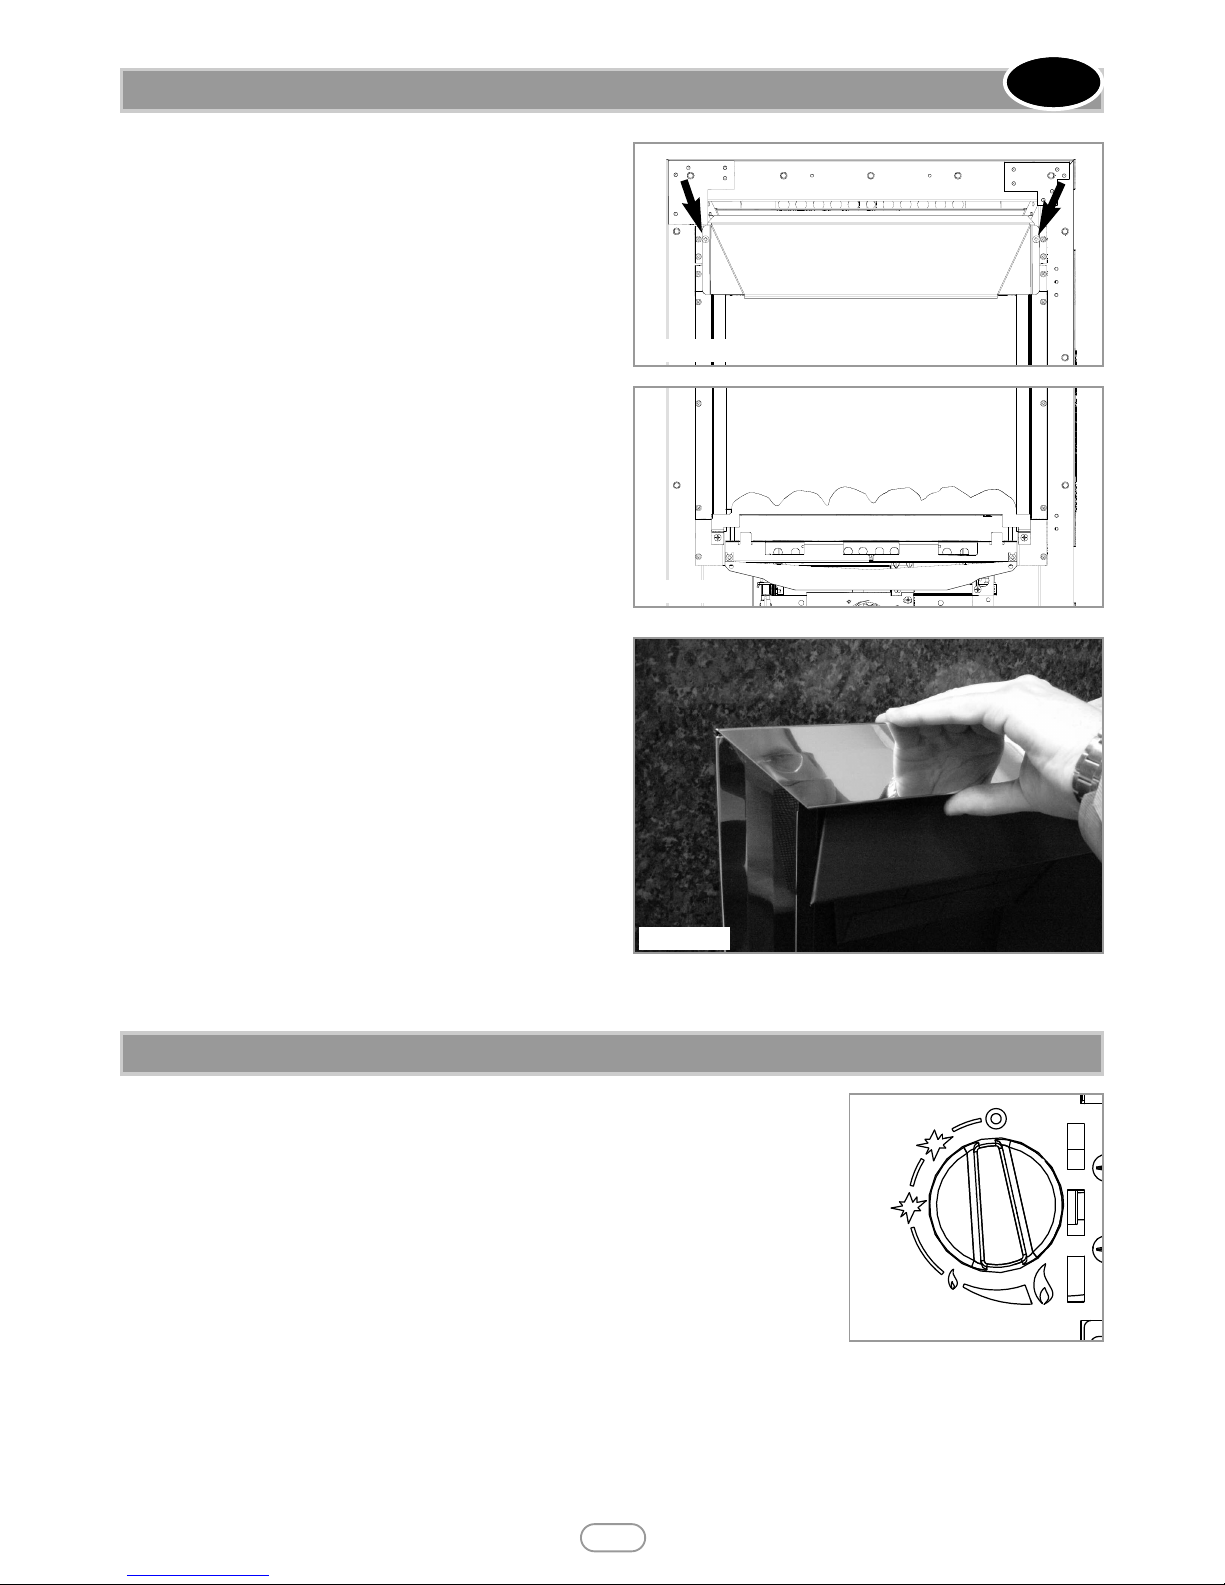
Glass Panel : Refit the glass panel ensuring that the unsupported
edge of the glass is facing downwards. Take care not to damage the
ceramic fuel bed when fitting. Secure using four M6 screws previously removed.
Hood : Now fit the hood. This is provided separately. Remove all protective packaging materials. Carefully attach using two No8 x 5/16 self
tapping screws (also provided within loose parts) in the positions
shown in figure 13. Do not overtighten.
Front coal piece (dependent on model) : Now fit the decorative
front coal piece. This is intended to sit flush in front of the glass panel
in order to complete the realistic coal fuel effect.
Attach the strip using two M4 screws in the positions shown in figure
14. Take care not to damage the ceramic part of the component.
The appliance is supplied either with a one piece or three piece decorative frame.
For one piece frames (fingerslide models only) : The appliance
is supplied with a one piece decorative frame that is attached to the
front of the firebox with the magnets provided.
Place the decorative firefront in front of the fire and slide the ashpan
door into place. The firefront shown in these instructions may be different to the one supplied with the appliance.
For three piece frames : The side pieces of the clip on assembly
should be pushed into position first, followed by the top bar (shown
in figure 15), which should overlap the sides.
IMPORTANT NOTE: Due to the possibility of sharp edges, care
should be taken when handling the three piece frame components.
The use of protective gloves is recommended. Place the firefront
into position in front of the fire and slide the ashpan door into place. Do not use any other firefront other than the one supplied with
this appliance. The firefront shown in these instructions may differ from the one supplied with the appliance.
The pilot is visible through the viewing hole which is located at the lower left hand side of the fuel
bed. The fire features a ‘twin spark’ ignition system to aid lighting, Push the control knob in fully
and turn anti-clockwise through both of the SPARK positions, keeping fully depressed, hold there
for a few seconds. If the fire has not been used for some time, hold the knob in this position for
longer, to allow any air in the pipes to be purged. Continue turning anti-clockwise through the
spark clicks to the nine o’clock position, ensuring the pilot has lit. If not, return the knob clockwise, and repeat.
When the pilot lights after one of the two sparks, keep the knob depressed in the nine o’clock
position for approximately ten seconds. Now release the knob and the pilot should stay alight. If
the pilot is extinguished during use, wait three minutes before repeating the ignition procedure. To
achieve the HIGH setting, push the control knob in slightly and continue turning anti-clockwise to
the high position. The main burner should light after a few seconds. To decrease the setting to LOW, push the knob in slightly and turn
the control knob clockwise to the low setting. To turn to the pilot only position from the HIGH or LOW positions, press the control
knob in, and return to the nine o’clock position and release. To turn the fire OFF, keep the knob pressed in, return to the off position
and release.
© 2014 Focal Point Fires plc
9.3 FINAL ASSEMBLY
GB IE
Figure 13
Figure 14
Figure 15
9.4 OPERATING THE APPLIANCE - MANUAL CONTROL MODELS
Figure 16
Page 9
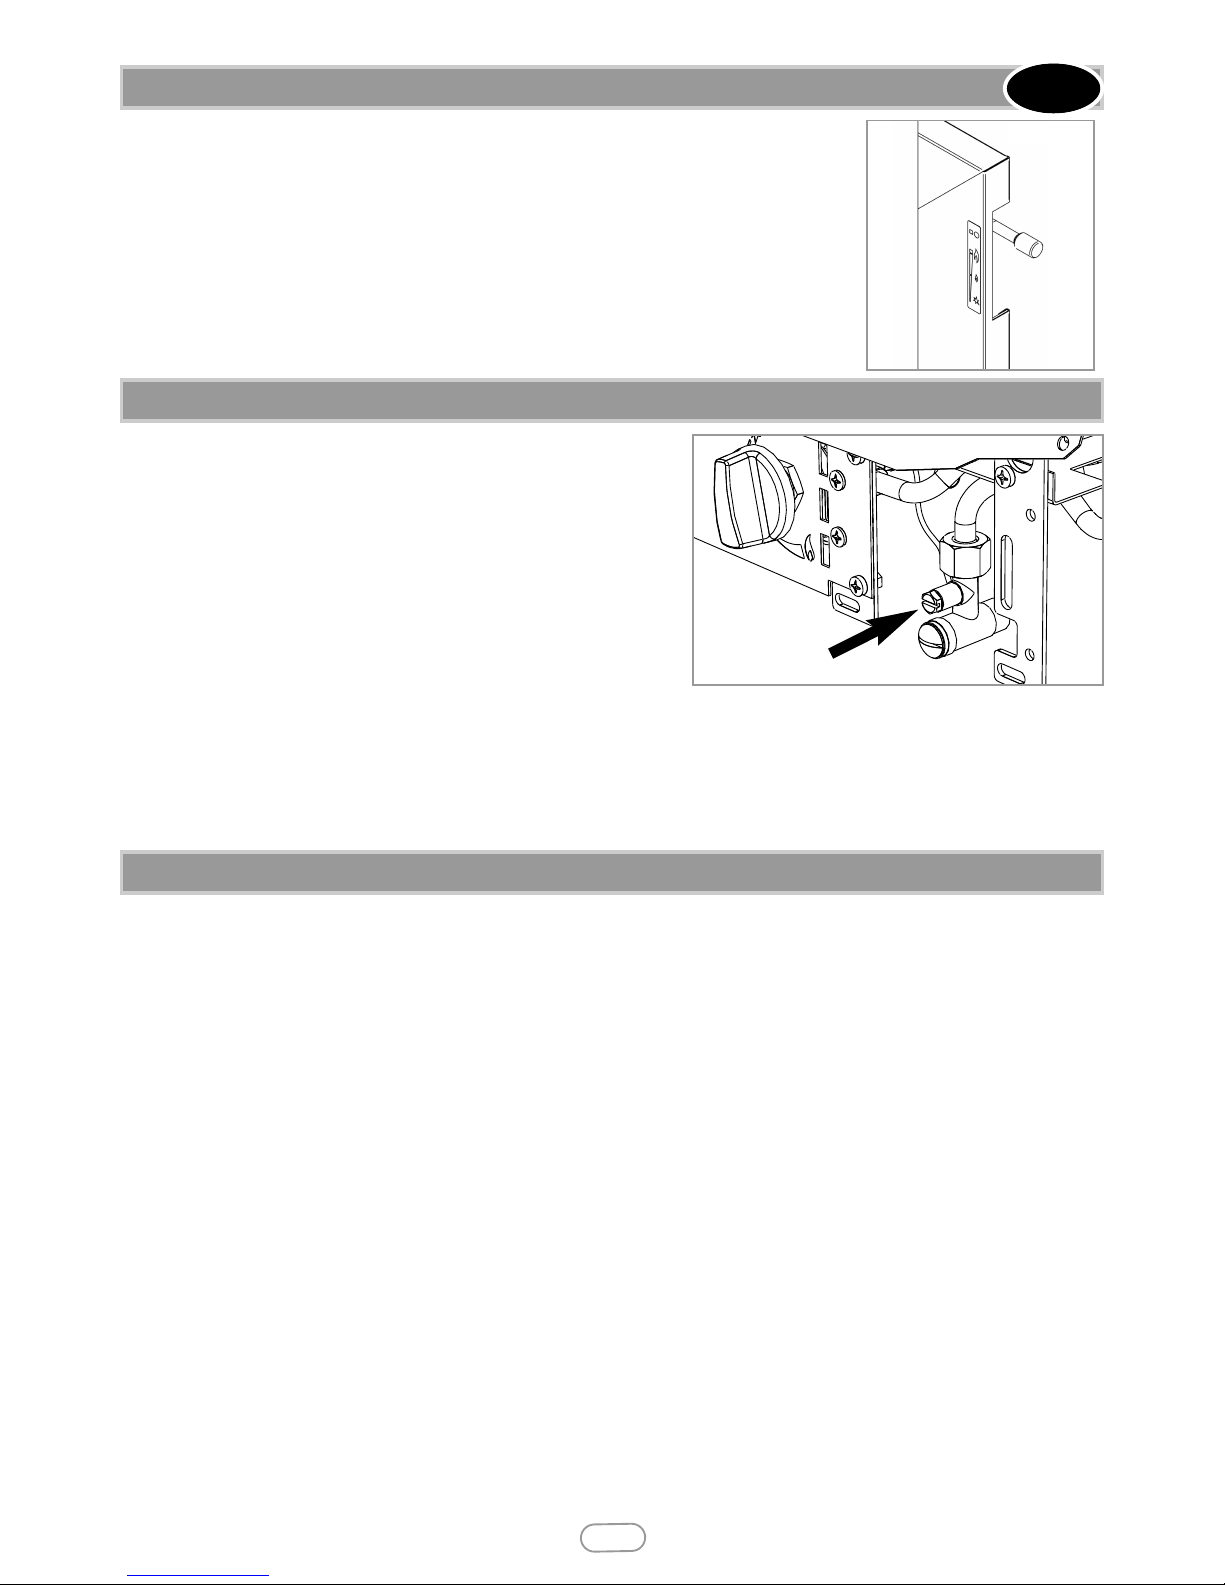
The pilot is visible through the viewing hole which is located at the lower left hand side of the fuel
bed.
Push the slide control knob fully downwards to the SPARK position, and hold there for approximately
ten seconds. Now release the knob and the pilot should stay alight. When the pilot light has established, move the slide control knob upwards to the LOW flame setting. If the pilot is extinguished
during use, wait three minutes before repeating the ignition procedure.To achieve the HIGH setting,
move the slide control knob upwards to the HIGH flame setting. The fire can also be set to operate
anywhere between HIGH and LOW by moving the control knob to an intermediate position.
To turn the fire OFF, move the slide control knob upwards fully to the position marked ‘O’.
Remove the screw from the pressure test point.
Release the pressure test point screw, and attach a pressure gauge. Light the
fire on the HIGH setting. To commission the appliance, the operating pressure must be in accordance with the figures stated in section 2.0 of these
instructions. The fire is factory set to achieve the correct flow rates at the
specified operating pressure. Any significant variation in the operating pressure could indicate
a supply problem. If the operating pressure is too high, the gas supply
meter/governor may be set incorrectly. This should be checked with the fire
running and if necessary reset by the gas supplier. If the operating pressure
is too low, then check the meter/governor pressure with the appliance running. If this is less than the inlet pressure stated in section 2.0 of these
instructions it will need to be reset by the gas supplier. If the inlet pressure is too low, but the meter/governor pressure is acceptable,
then a problem in the supply pipework is to be suspected. Upon satisfactory checking of the inlet pressure, turn the fire off, disconnect
the pressure gauge and refit the test point screw. Light the fire and check for gas soundness. In the event that the inlet pressure is not
in accordance with the figures stated in the data section of these instructions, the appliance must not be commissioned, and the problem investigated and rectified.
This fire is fitted with a flue spillage safety device (ODS).
If the fire shuts down during use for no apparent reason then several things may be suspected. If a door or window has been opened
creating a draught, then pilot disturbance is the problem, and removal of the draught should resolve this. Re-check the gas pressure to
ensure it is adequate (see section 2.0). The thermocouple connection into the back of the gas control valve may also have worked loose
during installation, in this case re-tighten.
If pilot disturbance is not the cause, then the ODS safety system may be in operation. Switch the appliance OFF, check the flue and carry
out any remedial work required. Relight the fire and carry out a spillage test. DO NOT allow the appliance to be used if it continues to
fail a spillage test.
The aeration hole of the pilot must be carefully cleaned out on each annual service to ensure continued function of the ODS.The spillage
monitoring system shall not be adjusted, modified, or put out of operation by the installer. Any spare parts fitted MUST be of a type supplied for the purpose by the appliance manufacturer. If the fire is not spilling, then further guidance should be sought, using the
Troubleshooting section as a guide.
9.5 OPERATING THE APPLIANCE - SLIDE CONTROL MODELS
Figure 17
9
9.6 SETTING PRESSURE
Figure 18
9.7 FLUE SPILLAGE MONITORING SYSTEM
© 2014 Focal Point Fires plc
GB IE
Page 10
10
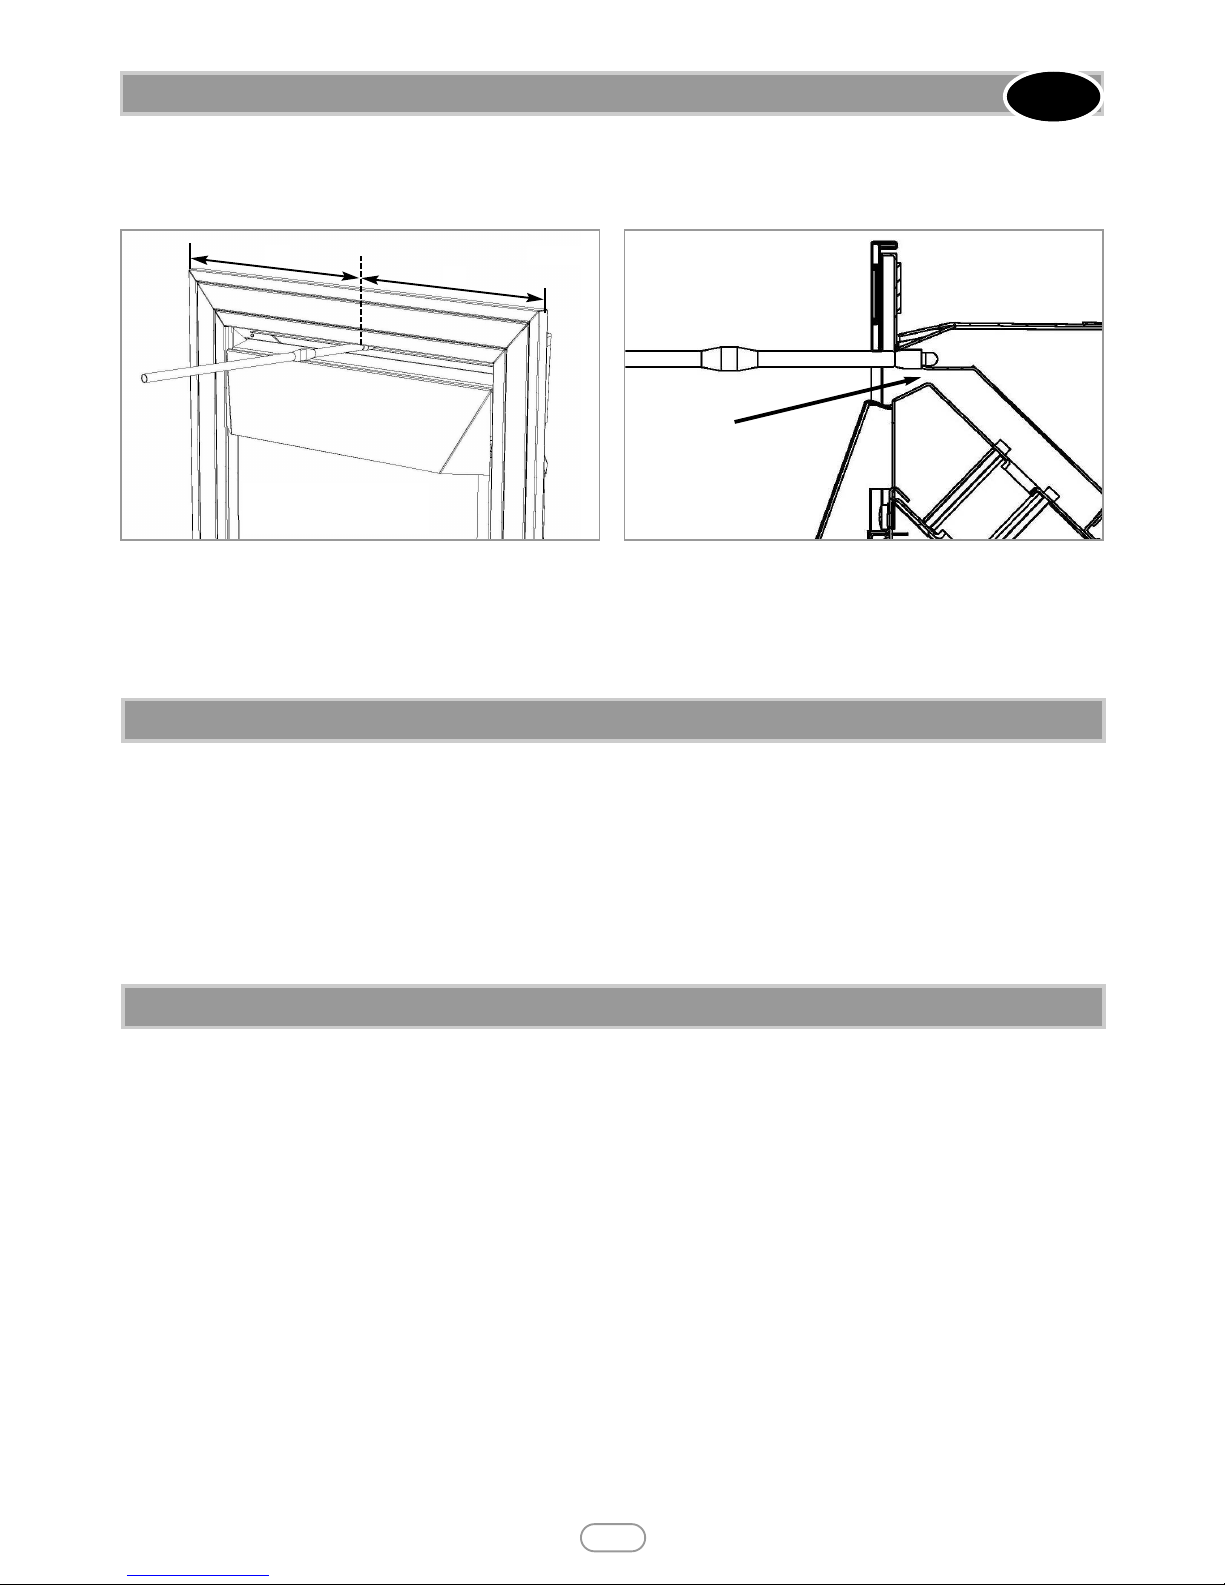
Close all doors and windows to the room containing the appliance. Let the fire run on HIGH for five minutes. Take a smoke match and
put in the smoke match tube provided. Light the smoke match and position the end of the smoke match tube centrally next to the
draught diverter as shown in figures 19 and 20.
All the smoke should be drawn away up the flue.
Any smoke returning into the room indicates that spillage is occurring.
If the spillage test fails and the spigot restrictor is fitted, remove the spigot restrictor, re-fit and re-test. If the initial spillage test fails, run
the fire for a further 10 minutes and repeat the test. When the test has been completed satisfactorily, repeat with any extractor fans in
the premises running on the highest setting, and any communicating doors open. Finally, repeat with all doors open.
DO NOT allow the fire to be used until the test is satisfactorily passed.
All instructions must be handed to the user for safekeeping. Show the customer how to light and control the fire. After commissioning
the appliance, the customer should be instructed on the safe use of the appliance and the need for regular servicing. Frequency of service depends on usage, but MUST be carried out at least once annually. Advise that cleaning of the fire may be achieved when the fire is
cold using a damp cloth and mild detergent on most surfaces.
Scratched and other superficial damage to the matt black paintwork of the appliance can be covered with matching heatproof spray. Use
only the manufacturers’ recommended spray paint. Paint only when the fire is OFF and cold. Always mask off the surrounding area to
prevent contamination with overspray. Ventilate the room during the use of the spray. DO NOT attempt to spray paint the coals or
ceramics, or wash them in water.
Advise that the fire will emit a “newness” smell for a time after initial commissioning and that extra ventilation may be needed during
this time. Advise that the fire is fitted with a spillage safety device (O.D.S.). If the fire shuts down, this system may be in operation. If
spillage is suspected, SWITCH APPLIANCE OFF and call in the installer to investigate any problems.
Isolate the fire from the gas supply. Ensure that the fire is fully cold before attempting service. A suggested procedure for servicing is
detailed below.
© 2014 Focal Point Fires plc
Figure 20
Section view of draft diverter
Figure 19
Note : insert smoke match tube
until end of tube touches draft
d
iverter baffle
=
=
Note : insert smoke match tube
centrally
9.8 TESTING FOR SPILLAGE
10.0 BRIEFING THE CUSTOMER
GB IE
11.0 SERVICING
1. Lay out the dust sheet and tools.
2. Remove the hood, glass panel, and remove the ceramic components.
3. Remove the firefront and decorative trim.
4. Disconnect the gas supply, and remove the burner securing screws (refer to section 11.2)
5. Remove the burner tray.
6. Remove firebox as described.
7. Check the fireplace opening for rubble accumulation and remove. If debris is excessive, initiate remedial work on the flue.
8. Check the flue with smoke pellet for correct operation.
9. Vacuum clean inside of firebox removing all dust. Refit firebox.
10. Strip off the burner pipes and clean thoroughly. Refer to section 11.3.
11. Clean out the injector, pilot assembly and burner tube. DO NOT remove the pilot injector.
12. Vacuum clean tray, especially around the injector/venturi tube removing all dust. Re-assemble and re-fit the burner tray.
13. Clean the ceramic components - see section 11.1.
14. Turn on the gas supply, and leak test.
15. Refit the ceramic components, glass panel, hood, decorative frame and cast firefront as detailed in sections 9.2 and 9.3.
16. Light the fire and carry out a spillage test.
17. Check setting pressure and safe operation of the appliance.
For specific servicing instructions, see the relevant sections.
Page 11

Remove the firefront and place to one side. Remove the ceramic components. Gently clean in the open air. Be careful not to create dust from
the coals. Where necessary replace damaged components with genuine spares. Seal scrap ceramic components in plastic bags and dispose at
proper refuse sites as directed. Re-fit the coals by referring to section 10.0 of the user instructions.
Remove the firefront. Remove the hood, glass panel and ceramics and place safely aside.
Manual control models : Remove the two screws securing the tray legs to the firebox. Pull tray forward slightly and lift away.
Slide control models : Remove the four screws securing the tray to the firebox (two in the tray legs and two in the rear of the tray.
Remove the M4 nut from the slide control linkage. Pull tray forward slightly and lift away. When re-fitting replace the rear retaining screws
first, followed by the front (leg) retaining screws.
All models : Be sure to engage the tray location lugs on the shelf at the rear of the firebox.
Remove the tray as previously described. The pilot unit can be removed by withdrawing the tubing nut, the thermocouple nut on the
valve, and the two securing screws, and lifting away. Remove the tubing nut from the valve end of the pilot pipe, and blow through to dislodge any debris. Remove the two tubing nuts on the ends of the gas pipe to the injector elbow and blow clear. Remove the two tubing nuts on the ends of the inlet pipe and blow clear.
Manual control models : The valve is not field serviceable.
Slide control models : The valve contains a gauze filter on the inlet manifold. Check that this is free from debris/obstruction.
Remove the burner tray as in relevant section and pilot unit as described. Clean the pilot assembly with a soft brush and blow through.
Remove the lint cage and clean. Check the aeration holes are free of any dirt or lint. Clean thoroughly internally, the connection can be
removed from the base of the pilot unit using two spanners to make cleaning easier. Do not damage or try to remove the pilot injector. The unit is factory set and the only check necessary is to ensure the spark gap is correct. See section 2.0 Appliance data for gap setting. See section 9.1 for full details of the pilot assembly.
Remove the burner tray as described in section 11.2.
Protect the hearth from potential damage. Unroll the coiled tensioner cables from the rear of the firebox. Remove the securing nipples and tensioner adjusters. The firebox is now released from the opening and can be slid outward onto the hearth. Inspect the fireplace opening for debris and if excessive rectify the flue before proceeding further. Check the seal around the fireframe and if necessary replace. Refitting of the firebox is as described in the fitting section of these instructions.
Fire sparks but pilot does not light • No gas to fire, check isolators are open and gas supply is on.
• Pipework blockage, clean out.
• Air not fully purged, re purge supply or wait longer.
• Spark earthing to metalwork, reset gap correctly.
• Blocked pilot, clean out internally.
Pilot lights but then goes out • Severe restriction in gas supply: clear obstruction.
• Faulty thermocouple, replace pilot unit.
• Blocked pilot, clean out.
• Blocked lint gauze, clean.
• Hold control knob in/down for longer.
• Slide control models only : Ensure that the slide control knob is pushed down fully.
• If the pilot will not stay lit there could be a problem with contamination of the
gas supply, drafts, room size and/or ventilation or the thermocouple needs
replacement.
Modifications are dangerous and can have a serious unseen effect on safety.
NEVER MODIFY OR BEND THE THERMOCOUPLE TO MAKE THE PILOT STAY
ALIGHT.
Fire does not spark at pilot • HT lead detached, refit.
• Slide control models only - replace battery. See section 11.0 of the user instructions.
• Check the spark gap (see section 9.1).
• Faulty piezo unit, replace.
• Debris shorting out electrode, clean.
• Spark shorting to metalwork under tray, check routing of HT lead under burner.
11.1 CLEANING THE CERAMIC PARTS
GB IE
© 2014 Focal Point Fires plc
11.2 REMOVING THE BURNER
11.3 DISMANTLING THE BURNER
11.4 PILOT ASSEMBLY
11
11.5 REMOVING THE FIREBOX
12.0 TROUBLESHOOTING GUIDE
Page 12

12
Fire runs for a time • Loose or faulty thermocouple, rectify.
and then cuts off • Blocked pilot, clean out.
• Excessive drafts in the room.
• Excessive flue pull.
• Fire is too close to an air vent.
• Dirt or lint in pilot aeration hole or on the lint gauze, clean thoroughly.
• If the pilot will not stay lit there could be a problem with contamination of the
gas supply, drafts, room size and/or ventilation or the thermocouple needs
replacement.
Modifications are dangerous and can have a serious unseen effect on safety.
NEVER MODIFY OR BEND THE THERMOCOUPLE TO MAKE THE PILOT STAY
ALIGHT.
Pilot flame shrinks when • Poor gas flow to fire, check pressure with fire on high.
fire is on high • If pressure is low, remove any restriction in pipework or valve.
• Check all isolators are adequately sized and fully open.
• Check meter pressure is adequate.
• Firebox grommet seal missing, rectify.
• If the pilot will not stay lit there could be a problem with contamination of the
gas supply, drafts, room size and/or ventilation or the thermocouple needs
replacement.
Modifications are dangerous and can have a serious unseen effect on safety.
NEVER MODIFY OR BEND THE THERMOCOUPLE TO MAKE THE PILOT STAY
ALIGHT.
Fire smells when first lit or in use • Newness smell from brand new appliance.
• Spillage occurring. Carry out Spillage test and rectify any problems.
• Combustible materials used in incorrect positions.
• Firebox grommet seal missing, rectify.
• Other airborne contaminants such as dust, tobacco smoke, paint vapours.
© 2014 Focal Point Fires plc
12.0 TROUBLESHOOTING GUIDE (continued)
GB IE
Page 13

1
This fire is supplied with a particular style of firefront. Use of the firefront will ensure an adequate airflow under the firebed for the correct
functioning of this appliance. Compliance with safety standards cannot be guaranteed if another style of front is used.
A combustible shelf may be fixed to the wall above the fire, providing that it complies with the dimensions given below.
A non-combustible shelf may be fitted to within 10mm of the top edge of the fireframe. Combustible materials, such as wood, may be fitted to
within 100mm (4in) of either side of the frame of the appliance, providing the forward projection does not exceed 100mm (4in). Any combustible side walls must be at least 500mm to the side of the radiant heat source. As with all heating appliances, any decorations, soft furnishings, and wall coverings (i.e. flock, blown vinyl and embossed paper) positioned too close to the appliance may discolour or scorch.
Section
1.0
2.0
3.0
4.0
5.0
6.0
7.0
7.1
8.0
9.0
10.0
11.0
12.0
13.0
14.0
15.0
16.0
Contents
Important Notes
Firefront
Clearances To Combustibles
Fire Guards
Servicing
Ventilation
Operating The Appliance - Manual Control Models
Operating The Appliance - Slide Control Models
Flue Spillage Monitoring System
Cleaning
Fuel Bed Layout
Changing The Battery (Slide Control Models)
Cleaning The Ceramic Parts
Shortlist Of Spares
Installation Details
Service History
Guarantee - Terms and Conditions
Page No.
1
1
1
2
2
2
2
3
3
3
4
4
4
4
5
5
6
U S E R S I N S T R U C T I O N S
1.0 IMPORTANT NOTES
2.0 FIREFRONT
© 2014 Focal Point Fires plc
3.0 CLEARANCE TO COMBUSTIBLES
GB IE
• The Installation and Servicing of this fire MUST only be carried out by a GAS SAFE registered person in accordance with local Codes and/or
Regulations, Building Regulations and the manufacturer's instructions. Failure to comply with these could lead to prosecution and invalidate
the appliance warranty. In the event of gas leakage from the appliance, the gas supply must be turned off at the nearest isolating valve. This
appliance is only suitable for the gas type for which it is supplied.
• Keep a note of the installer's name and address, the original purchase receipt and the date of installation. Failure to produce this information may invalidate the warranty. The appliance should be serviced regularly to ensure continued safe operation. See the servicing section
for further reference. Frequency of service will depend on use, but MUST be carried out at least once annually.
• Parts of this appliance become naturally hot during use. It is recommended that a suitable fireguard is used, especially where young children,
pets, the elderly or infirm are concerned. The manufacturer of this appliance considers all surfaces as working surfaces with the exception of
the control knob and control panel.
• As with any gas fire, a fire guard complying with BS 8423 must be used in presence of pets, children, and the elderly or
infirm.
• The appliance should be serviced regularly to ensure continued safe operation. Frequency of service will depend on use, but MUST be car-
ried out at least once annually.
• Combustible items, such as flooring and furniture and soft wall coverings (such as blown vinyl or embossed paper), low temperature surrounds etc may discolour if fitted too close to the fire. See relevant section for further details on clearances to combustibles. No combustible
materials or flooring should protrude onto the hearth.
• This appliance incorporates a combustion monitoring system (ODS).
• DO NOT burn any foreign material on this fire, the ceramic fuel effect components must be of the correct type and laid out in accordance
with the relevant section of these instructions.
• Failure to do so could create a hazard or lead to sooting.
• Before the appliance is installed, the chimney should be swept. All flues should be checked by the installer to ensure there are no defects
or obstructions that may prevent the flow of combustion products.
• This appliance is fitted with a flue blockage safety device which will shut down the fire if abnormal flue conditions occur. It is NOT a substitute for an independently mounted Carbon Monoxide detector.
• Should any home improvements be carried out to the property after the fire is installed, such as installation of extractor fans for example,
the fire should be re-checked by a competent person for safe operation.
Maximum depth of shelf
Minimum distance from finished
hearth surface to underside of shelf
100mm (4in) 745mm (29
1/4
in)
150mm (6in) 845mm (33
1/4
in)
203mm (8in) 895mm (35
1/4
in)
Page 14
The fireguards specified in BS 8423 are intended to protect people from falling into a fire, prevent burns and reduce the risk of injury,
particularly to young children and the infirm. In addition it is intended to reduce the risk of fire resulting from clothing and/or other flammable materials coming into contact with, or in proximity to, burning fuel and/or hot surfaces.
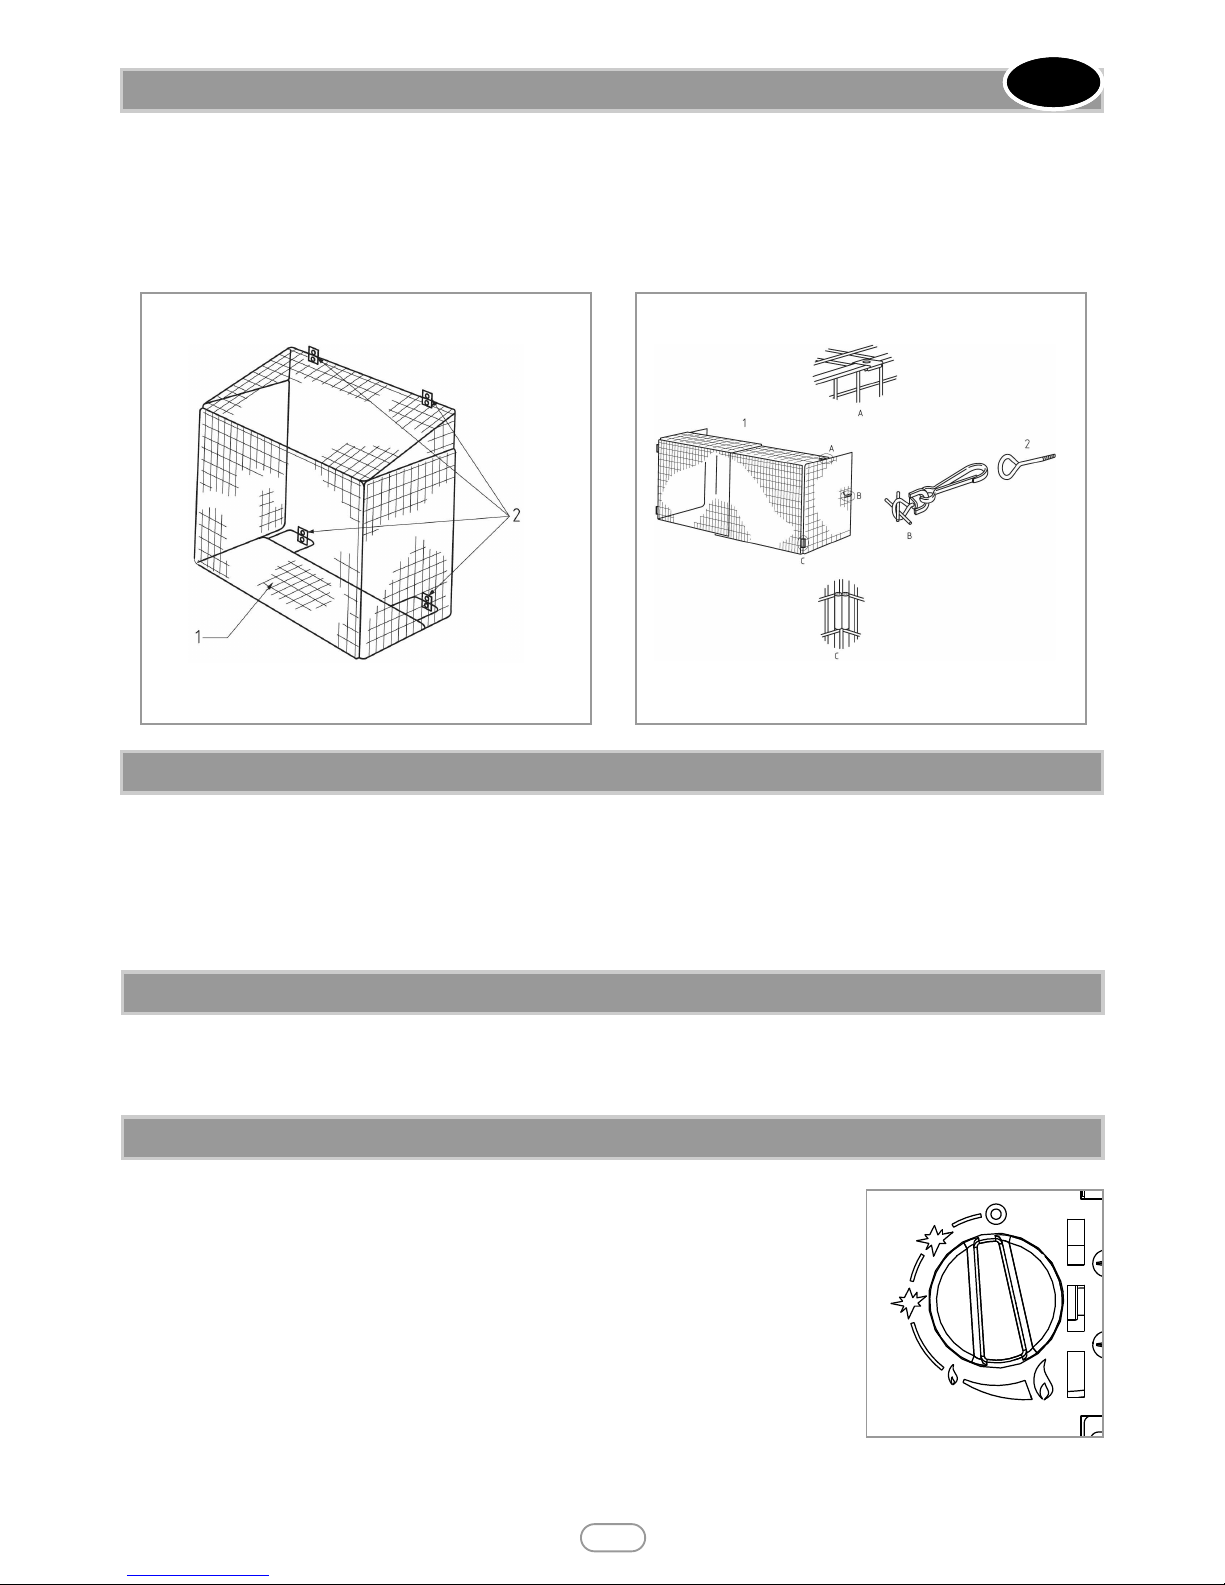
Fireguards can be permanently fixed in position or can be moveable, and can incorporate open fires including combination grates, or
closed fires, including room heaters and stoves. See figures 1 & 2 for fireguard examples.
The fireguards specified are not intended to reduce the risk of fires caused by flying particles, which are covered by BS 3248.
The fire and flue should be checked on an annual basis to ensure all of the product of combustion are entering the flue and that there
is no excessive build up of soot. The frequency of service will depend on usage, but MUST be carried out at least once annually. Servicing
must be carried out by a GAS SAFE registered person.
Cleaning of the coals may be carried out by following the instructions given in the Installation section. The Installation instructions carry
full servicing details for the use of the installer.
If debris from the flue or other foreign matter is found on the fire it may indicate a need for servicing. Do not use the fire until the
source of the debris has been found and rectified. Air vents (where fitted) should be checked periodically to ensure they are free from
obstruction.
No purpose provided ventilation is normally required for this appliance. The requirements of other appliances operating in
the same space or room, and the results of a spillage test must be taken into consideration when assessing ventilation requirements, this
will have been carried out by your registered installer. For Republic of Ireland, ventilation may be required, see IS 813, ICP3, IS 327, and
any other rules in force
The pilot is visible through the viewing hole which is located at the lower left hand side of the fuel
bed. The fire features a ‘twin spark’ ignition system to aid lighting, Push the control knob in fully and
turn anti-clockwise through both of the SPARK positions, keeping fully depressed, hold there for a
few seconds. If the fire has not been used for some time, hold the knob in this position for longer, to
allow any air in the pipes to be purged. Continue turning anti-clockwise through the spark clicks to
the nine o’clock position, ensuring the pilot has lit. If not, return the knob clockwise, and repeat.
When the pilot lights after one of the two sparks, keep the knob depressed in the nine o’clock position for approximately ten seconds. Now release the knob and the pilot should stay alight. If the pilot
is extinguished during use, wait three minutes before repeating the ignition procedure.
To achieve the HIGH setting, push the control knob in slightly and continue turning anti-clockwise to
the high position. The main burner should light after a few seconds. To decrease the setting to LOW,
push the knob in slightly and turn the control knob clockwise to the low setting. To turn to the pilot
only position from the HIGH or LOW positions, press the control knob in, and return to the nine
o’clock position and release. To turn the fire OFF, keep the knob pressed in, return to the off position and release.
4.0 FIRE GUARDS
2
GB IE
© 2014 Focal Point Fires plc
Figure 1
Example of moveable fireguard for portable heating appliances
Key
1. Optional base section for total enclosure of a wall mounted appliance
2. Points for attachment to a wall.
Figure 2
Example of detachable fireguard
Key
1. Detachable fireguard
2. Screw eye
5.0 SERVICING
6.0 VENTILATION
7.0 OPERATING THE APPLIANCE
Figure 3
Page 15
The pilot is visible through the viewing hole which is located at the lower left hand side of the fuel bed.
Push the slide control knob fully downwards to the SPARK position, and hold there for approximately ten
seconds. Now release the knob and the pilot should stay alight. When the pilot light has established, move
the slide control knob upwards to the LOW flame setting. If the pilot is extinguished during use, wait three
minutes before repeating the ignition procedure.To achieve the HIGH setting, move the slide control knob
upwards to the HIGH flame setting. The fire can also be set to operate anywhere between HIGH and LOW
by moving the control knob to an intermediate position.
To turn the fire OFF, move the slide control knob upwards fully to the position marked ‘O’.
This fire is fitted with a flue spillage safety device (ODS). If the fire shuts down during use for no apparent reason then several reasons may be suspected. If a door or window has been opened creating a draught, then pilot disturbance could be the problem, and removal of the draught should resolve
this. The fire can then be re-lit in accordance with the previous section. A grommet seal may also be missing from the firebox causing abnormal draught
to shut down the pilot. Call your installer to check seals are properly fitted. If pilot disturbance is not the cause, then the ODS safety system may be in
operation. Switch the appliance OFF, call in your installer to check the flue and ventilation and carry out any remedial work required. DO NOT allow the
appliance to be used until the flue system is passed as safe.
Before carrying out any of the following operations, ensure that the fire is OFF and completely cold. Debris that may form on the firebed should be periodically removed by a competent person. Large deposits could indicate deterioration of the flue. This should be repaired by a competent person, and the
fire serviced before further use.
FIREFRONT - Any dust accumulating in the firefront may be removed using a vacuum cleaner or dry cloth. Heavy stains may be removed by using a damp
cloth and mild household detergent. Brass parts of the firefront may be cleaned using a suitable brass cleaner. Replace the front centrally against the fire
after cleaning.
PAINTED AREAS - These can be cleaned using a dry cloth.
3
8.0 FLUE SPILLAGE MONITORING SYSTEM
9.0 CLEANING
7.1 OPERATING THE APPLIANCE - SLIDE CONTROL MODELS
© 2014 Focal Point Fires plc
GB IE
10.0 FUEL BED LAYOUT
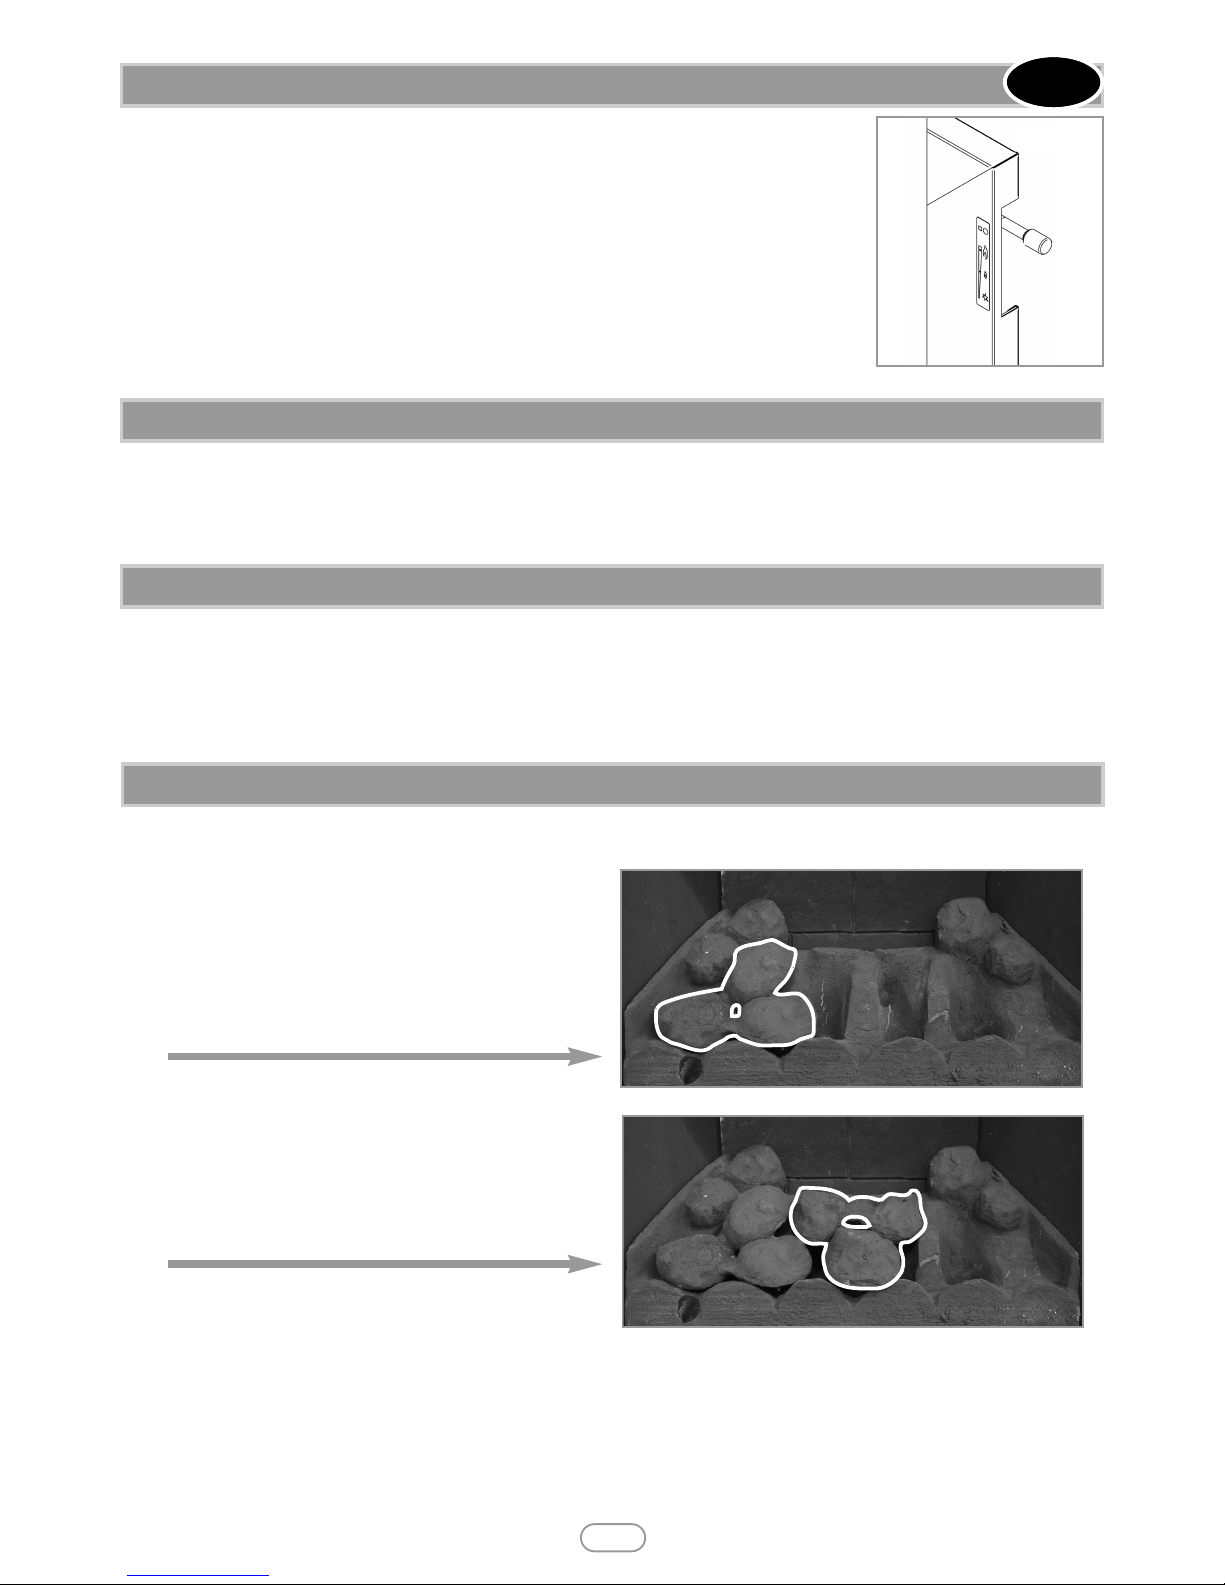
2. Place the moulded coal piece marked on the underside
‘A’ onto the matrix as shown in figure 5.
1. Remove the ceramic components from their protective
packaging, and place the brick panel against the rear of the
firebox.Place the ceramic combustion matrix onto the
burner.
Figure 5
3. Place the moulded coal piece marked on the underside
‘B’ onto the matrix as shown in figure 6.
Figure 6
Figure 4
Page 16
4
Ensure appliance is off and cool. The battery is located in the front of the ignition unit, on
the right hand side of the burner (shown in figure 8). Unscrew the battery holder cap. Insert 1
x ‘AA’ (1.5 volt) battery. Replace cap.
In the unlikely event that the ceramic parts need to be cleaned, remove the firefront casting and place to one side and then refer to sections 9.2 and 9.3 of the installation instructions and follow in reverse order. Remove the glass panel assembly by removing the four retaining screws. Remove the ceramic components. Gently clean in the open air using only a soft, dry brush. Be careful not to create dust from
the ceramics. Where necessary replace damaged components with genuine spares. Seal scrap ceramic components in plastic bags and
dispose at proper refuse sites as directed. Re-fit the ceramic parts by referring to sections 9.0 of these instructions.
PART NO.
ITEM PART NO. ITEM
F550324 Pack of coal pieces ‘A, B, C, D’ F960021 Glass panel assembly
F780105 Ceramic combustion matrix - coal F730067 Gas Valve (slide control)
F550208 Ceramic rear pad F730023 ODS Oxypilot 9082
F730080 Injector (size 65) TRAY100C Burner assembly (manual control)
F730083 Injector (size 66) F730085 Gas Valve (manual control)
TRAY154 Burner assembly (slide control)
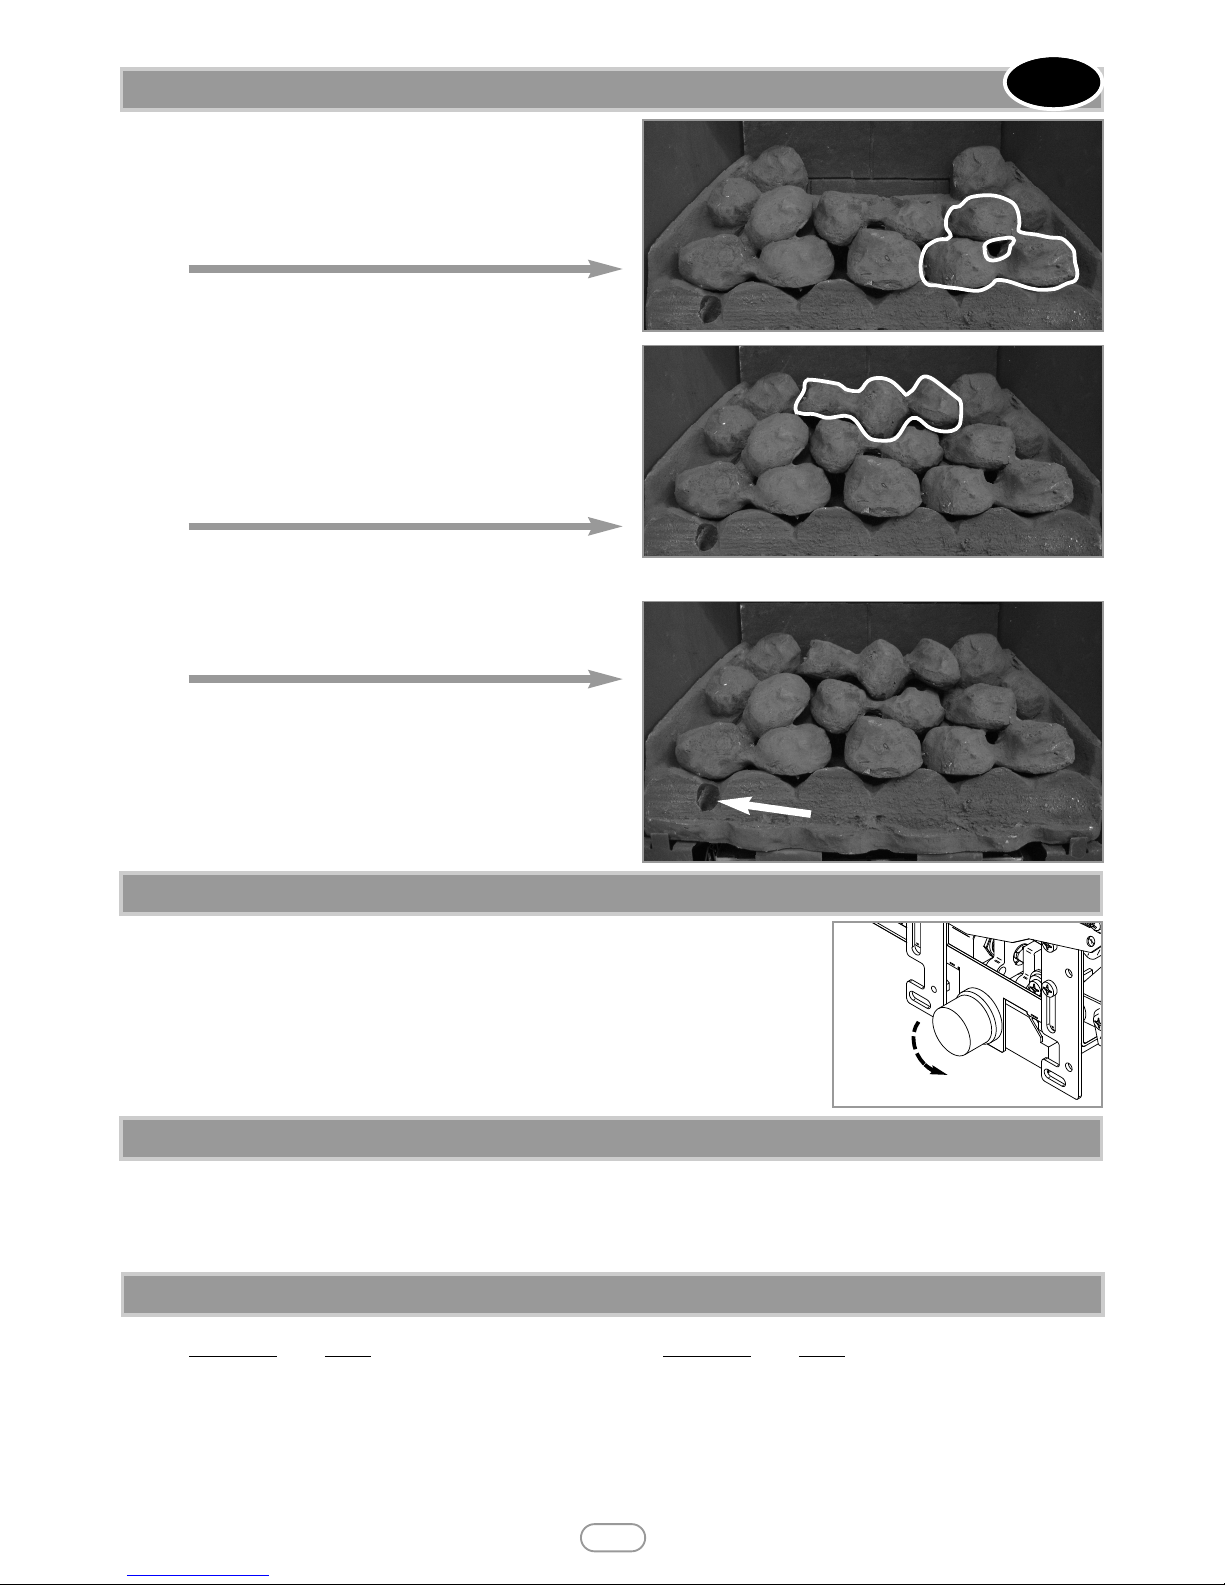
4. Place the moulded coal piece marked on the underside
‘C’ onto the matrix as shown in figure 5
.
5. Place the moulded coal piece marked on the underside
‘D’ onto the matrix as shown in figure 6.
6. With pieces ‘A’ to ‘D’ correctly in position, the fuel bed
should appear as shown in figure 7.
Note : The fire is designed to operate correctly with only
the ceramic coal pieces supplied when assembled according
to these instructions. Never add extra ceramics, or change
them for a different type. Never throw rubbish or other
matter onto the fuelbed.
10.0 FUEL BED LAYOUT - CONTINUED
GB IE
Figure 5
Figure 6
Figure 7
Note: Pilot viewing hole
© 2014 Focal Point Fires plc
11.0 CHANGING THE BATTERY (SLIDE CONTROL MODELS)
Figure 8
12.0 CLEANING THE CERAMIC PARTS
13.0 SHORTLIST OF SPARES
Page 17
Model :
Date installed :
Name & contact details of installer :
5
© 2014 Focal Point Fires plc
14.0 INSTALLATION DETAILS
Fire serial No. :
Supplied by :
15.0 SERVICE HISTORY
Date of service Serviced by (name): GAS SAFE No. : Contact details of Engineer
Installer GAS SAFE registration no. :
GB IE
Page 18

The 3 year guarantee only covers products purchased on or after 1st February 2009. For all gas fires purchased the 3 year guarantee
commences from the date of purchase, provided that the following 3 terms and conditions are adhered to:
Registration is not required.
1. For any claim to be made within the 3 years from date of purchase you will be required to provide and supply us with your proof
of purchase.
2. Your gas fire must have been commissioned by a CORGI/Gas Safe* registered installer, evidence of which you must provide together
with the CORGI/Gas Safe* registration number.
3. Your appliance must have been serviced annually, irrespective of use, by a CORGI/Gas Safe* registered installer, evidence of which
must be provided, such as the receipt.
Please note all consumable items such as any ceramics including; coals, pebbles, the matrix, front strips, side cheeks, rear panels and
tapered rear panels are not covered by the 3 year guarantee. For all Electric fires purchased the 3 year guarantee commences from
the date of purchase, providing that you can supply the proof of purchase. This does not cover consumable items such as pebbles,
coals or light bulbs.
Making a claim is easy.
If you wish to make a claim under our 3 year guarantee and all the terms and conditions for your product have been met then please
submit the following information for the attention of the 3G Service Department to the address below. Alternatively, you can email or
fax.Please note that this does not affect your statutory rights.
Focal Point Fires plc, 3G Service Department, Reid Street, Christchurch, Dorset, BH23 2BT.
Alternatively email: [email protected] or fax. 01202 499326.
Details required:
1. Name, full address including post code and contact telephone number.
2. Receipt of purchase or credit card statement.
3. Original installers CORGI/Gas Safe* registration number (gas fires only).
4. Annual service receipt for every 12 months (gas fires only).
*Gas Safe Register replaced CORGI as the gas registration body in Great Britain and the Isle of Man on 1st April 2009.
16.0 GUARANTEE - TERMS AND CONDITIONS
GB IE
6
As our policy is one of continuous improvement and development , we hope therefore you will understand we must retain the right to amend details and/or specifications without prior notice.
© 2014 Focal Point Fires plc
F860947
 Loading...