

Page 1
DIMENSION
User manual / Bedienungsanleitung / руководство пользователя
English : page 5
Deutsch : página 30
Русский стр. 54
Page 2
READ FIRST !
IMPORTANT SAFETY INSTRUCTIONS !
This device complies with part 15 of the FCC Rules. operation is subject to the following two conditions:
- This device may not cause harmful interference.
- This device must accept any interference received, including interference that may cause undesired operation.
GB
GB
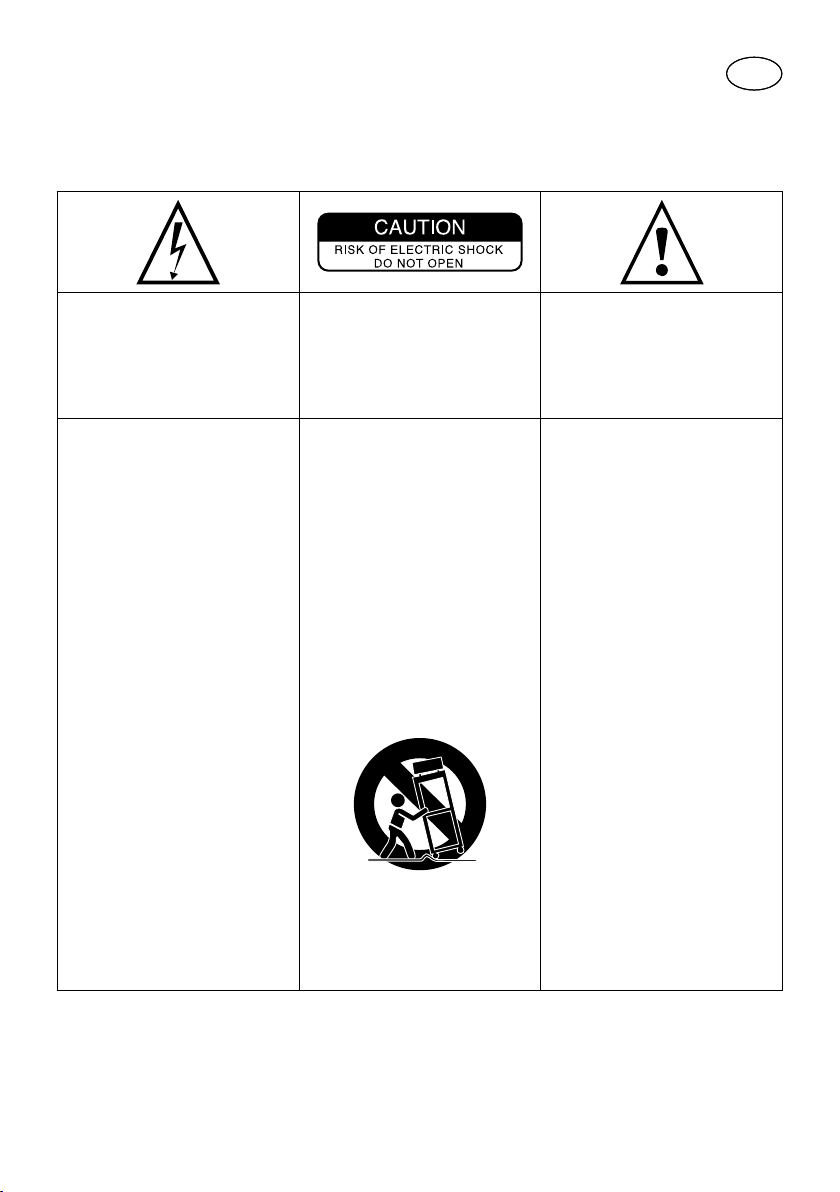
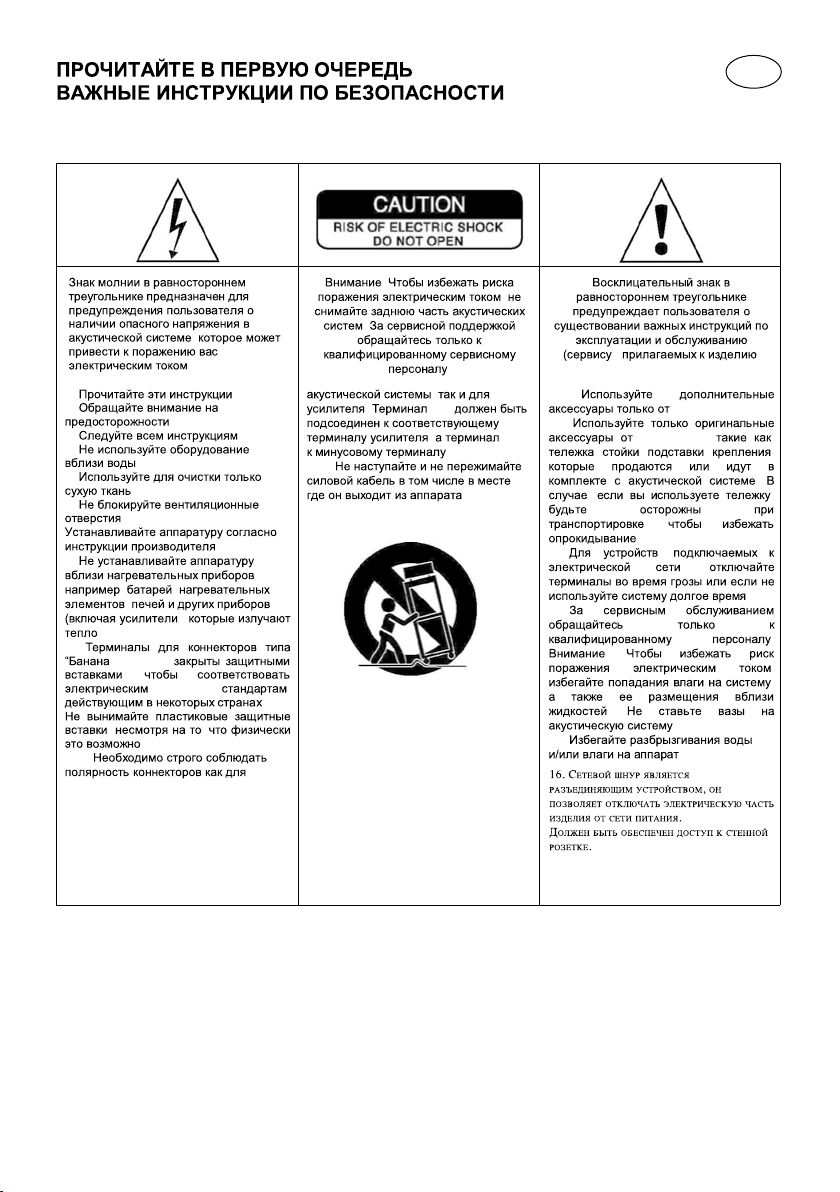
The lightning flash with arrowhead
symbol within an equilateral triangle, is
intended to alert the user to the presence
of uninsulated “dangerous voltage” within
the product’s enclosure that may be of
sufficient
magnitude to constitute a risk of electric
shock to persons.
1. Read these instructions.
2. Keep these instructions.
3. Take these warnings into consideration.
4. Follow all the instructions.
5. Do not use this equipment around water.
6. Only clean with a dry cloth.
7. Do not cover ventilation outlets. Follow
manufacturer’s instructions when
installing the equipment.
8. Do not install the equipment near a
source of heat, a cooker, a heating duct
or other equipment (including amplifiers)
which gives off heat.
9. Respect safety instructions for power
cable. The power cable has two prongs,
one of which is larger than the other. A
grounded cable has two prongs as well
as a third which is the grounding prong.
The largest or third prong is there for
your safety. If the power cable doesn’t
fit your power socket, seek the advice of
an electrician and replace the old power
socket.
10. Make sure the cable cannot be stepped
on, crushed or pinched. Extreme care must
be paid to the plug and the connection of
the cable to the equipment.
11. Only use accessories recommended by
the manufacturer.
12. Only use handling equipment, legs,
tripods, supports or tables recommended
by the manufacturer or those sold with the
equipment. When using a cart, take extra
care when moving the cart and equipment
to avoid injury in case something falls.
13. Disconnect the equipment in case of a
thunderstorm or if left unused for extended
periods of time.
Caution : to prevent the risk of electric
shock, do not remove cover (or back). No
user-serviceable parts inside. Refer servicing to qualified service personnel.
14. All maintenance must be carried out
by a qualified professional. Maintenance
is required following any damage caused
to the equipment such as deterioration
of the power cable or plug, spillage of
liquid or insertion of objects inside the
equipment, exposure to rain or humidity,
poor functioning or physical damage.
15. Do not use any accessories which
aren’t recommended by the manufacturer
to avoid any risk.
16. This product should only be connected
to the type of power supply as indicated
on the label on the equipment. In case
of uncertainty as to the type of power
supply of your electrical installation,
consult the manufacturer of the product
or your electricity provider. For equipment
requiring a battery or another power
source, consult the user manual.
The exclamation point within an equilateral triangle is intended to alert the user
to the presence of important operating and
maintenance (servicing) instructions in the
literature accompanying the product.
17. Do not overload power sockets, extension cables or power strips. This could lead
to fire or electric shock.
18. Never insert objects in the ventilation
outlets of the equipment. The object may
come in contact with components exposed
to high voltages or cause short-circuiting
and lead to fire or electric shock. Never
spill liquid on the equipment.
19. Never try to repair this equipment yourself; opening the equipment may expose
you to high voltages or other risks. For all
maintenance, consult a qualified professional.
20. In case a replacement part is required,
make sure the maintenance technician
uses parts specified by the manufacturer
or which have identical specifications to
the original part. Non-compliant parts may
lead to fire or have other risks.
21. Following any intervention or repair to
the equipment, ask the technician to carry
out tests to verify the product works safely.
22. The equipment must not be mounted to
the wall or ceiling unless the manufacturer
has intended it to, and only depending on
antenna cables.
23. Do not expose to dripping water or
splashing.
24. CAUTION : May cause an explosion if
battery is incorrectly replaced. Replace
only with the same or equivalent type.
Page 3

BITTE ZUERST LESEN!
WICHTIGE SICHERHEITSMASSNAHMEN!
D
Das Blitzsymbolin einem Dreieckweist den
Nutzer darauf hin, dass eine Berührungsgefahr mit nicht isolierten Teilen
im Geräteinneren, die einegefährliche
Spannung führen, besteht. Die Spannung
kann so hoch sein dass sie die Gefahr eines
elektrischen Schlags bei Personen birgt
1.Bitte lesen Sie diese Bedienungsanleitung
aufmerksam durch. Sie sollten wirklich
alle Hinweise zum Betrieb und zu Ihrer
Sicherheit lesen, bevor Sie das Produkt in
Betrieb nehmen.
2.Alle Warnhinweise auf dem(n) Produkt(en)
oder in der Bedienungsanleitung müssen
unbedingt beachtet werden.
3.Beachten Sie die Anleitung. Befolgen
Sie bitte unbedingt alle Bedien- und
Gebrauchshinweise.
5. Benutzen Sie dieses Produkt nicht in der
Nähe von Wasser.
6. Verwenden Sie zur Reinigung keine
flüssigen Reinigungsmittel oder solche aus
der Sprühdose, sondern nur ein weiches
Tuch.
7. Schlitze und Öffnungen im Gehäuse
dienen der Entlüftung und sorgen für
zuverlässigen Betrieb. Daher dürfen sie
nicht verstellt oder abgedeckt werden.
Stellen Sie dieses Produkt so auf, wie vom
Hersteller empfohlen.
8. Stellen Sie das Produkt nicht in der
Nähe von Wärmequellen auf (Heizstrahler,
Heizkörper, Öfen usw.). Sollten Sie es in
unmittelbarer Nähe eines Verstärkers
aufstellen, klären Sie mit dem Hersteller,
ob das zulässig ist.
9. Netzleitungen sollte man immer so
verlegen, dass niemand auf sie steigt
und dass sie nicht durch irgendwelche
Gegenstände eingeklemmt werden.
Besonders vorsichtig sollte man
mit Netzkabeln an Steckern und
Mehrfachdosen umgehen und an der
Stelle, wo das Kabel aus dem Gerät kommt
(Knick-Gefahr!).
10. Verwenden Sie ausschließlich Zubehör,
das der Hersteller empfiehlt.
11. Benutzen Sie ausschließlich fahrbare
oder sonstige Untergestelle, dreibeinige
Standfüße, Untersetzbügel oder Tische,
die der Hersteller empfiehlt oder die
mit den Lautsprechern gekauft wurden.
Verwenden Sie ein fahrbares Untergestellt,
müssen Sie darauf achten, das dieses
samt Lautsprecher nicht umkippt und
Verletzungen verursacht.
Achtung: um sich nicht der gefahr eines
elektrischen schlags, auszusetzen, dürfen
sie nicht den deckel (oder die rückseite)
entfernen. Im geräteinneren befinden sich
keine vom nutzer reparierbare teile. Überlassen sie reparaturen dem qualifizierten
kundendienst
12. Sie sollten dieses Produkt während
eines Gewitters oder einer längeren
Zeitspanne, in der es nicht verwendet
wird (z.B. während des Urlaub), vom
Stromnetz trennen.13. Überlassen Sie
bitte Reparaturen unbedingt qualifizierten
Servicetechnikern. Bei den folgenden
Beschädigungen trennen Sie bitte das
Gerät vom Stromnetz und suchen Sie
eine autorisierte Werkstatt auf: defektes
Netzkabel oder Netzstecker, Ins Gehäuse
sind Gegenstände oder Flüssigkeiten
eingedrungen, das Gerät wurde Regen oder
Wasser ausgesetzt, das Gerät arbeitet nicht
einwandfrei oder fiel herunter.
14. Verwenden Sie kein Zubehör, dass vom
Hersteller nicht ausdrücklich freigegeben
wurde, sonst riskieren Sie einen
Kurzschluss oder andere Schäden.
15. Dieses Produkt darf nur mit derjenigen
Netzspannung betrieben werden, die
auf dem Hinweisschild angegeben ist.
Sollten Sie nicht genau wissen, welche
Netzspannung in Ihrem Haus vorhanden
ist, fragen Sie Ihren Händler. Hinweise
zur Handhabung von Produkte, die von
Batterien, Akkus oder einer anderen
Energiequelle gespeist werden finden Sie in
der entsprechenden Bedienungsanleitung.
16. Vermeiden Sie eine Überlastung von
Steckdosen, Verlängerungskabeln oder
Mehrfachdosen, weil das zu Brandgefahr
und Stromschlagrisiko führen können.
Ein Ausrufungszeichen in einemDreieck
weist den Nutzer auf wichtige Bedienungs- und Wartungsanweisungenin den
Dokumenten hin, die dem Gerät beiliegen.
17. Achten Sie darauf, dass niemals
irgendwelche Fremdkörper durch die
Öffnungen ins Geräteinnere fallen.
Diese könnten mit Spannung führenden
Teilen in Berührung kommen oder
einen Kurzschluss auslösen. Dadurch
entsteht möglicherweise die Gefahr eines
Stromschlags oder dass ein Gerät in
Brand gerät. Verschütten Sie auch niemals
irgendwelche Flüssigkeiten über dem
Gerät.
18. Versuchen Sie niemals das Gerät selbst
zu reparieren. Wenn Sie die Abdeckung
abnehmen oder entfernen, können Sie sich
gefährlichen Spannungen oder anderen
Gefahrenquellen aussetzen. Überlassen Sie
bitte Reparaturen unbedingt qualifizierten
Servicetechnikern.
19. Wurden Ersatzteile benötigt,
vergewissern Sie sich, dass der
Servicetechniker Originalteile des
Herstellers verwendet hat oder dass
die verwendeten Ersatzteile die
gleichen technischen Werte besitzen
wie die Originalteile. Der Einbau von
ungeeigneten Ersatzteilen kann zu Brand,
Stromschlaggefahr oder anderen Schäden
führen.
20. Bitten Sie nach allen Service- oder
Reparaturarbeiten den Servicetechniker
einen Sicherheitstechniker einen
Sicherheitstest durchzuführen, um zu
gewährleisten, dass das Gerät in einem
ordnungsgemäßen Betriebszustand
befindet.
21. Montieren Sie die Lautsprecher nur
dann an einer Wand oder an der Decke,
wenn es der Hersteller empfiehlt und
folgen Sie dabei seinen Anweisungen.
Page 4
!
R
!
,
.
1. .
2.
3.
4.
5.
6.
.
7.
.
8.
( ,
9.
: ,
,
” (Banana)
,
).
.
),
!
.
. «+»
10.
,
,
.
,
, «—»
,
.
11.
12.
.
,
.
13. ,
14.
15.
16. Се тевой шну р являетС я
разъед иняющим у СтройСтв ом, он
позвол яет отклю чать элек тричеСкую чаСть
издели я от Сети питания.
должен быть обе Спечен до Ступ к С тенной
розетк е.
), .
Focal-JMlab.
Focal-JMlab, :
, , , ,
, ,
,
.
,
!
.
.
.
.
.
.
,
,
Page 5

DIMENSION
User manual
SUMMARY
1. Safety instructions 3
2. Summary 6
3. Package contents 7
4. Presentation 8
4.1. Multichannel surround sound 8
4.2. User interface 8
4.3. Connections panel 9
4.4. Remote control 10
5. Positioning and installation 11
5.1. Positioning Dimension 11
5.2. Installation on a TV cabinet 12
5.3. Mounting to a wall 13
6. Settings selectors 14
6.1. "DISTANCE" selector 14
6.2. "POSITION" selector 15
6.3. Adaptation to the room's acoustic 16
6.4. "SUBWOOFER" selection 17
7. Connections 18
7.1. Connecting Dimension to your TV 18
7.2. Connecting the HDMI
7.3. Examples of connections 20
7.3.1. Connection example 1 20
7.3.2. Connection example 2 21
7.3.3. Connection example 3 22
7.3.4. Connection example 4 23
7.4. Connecting a subwoofer 24
™
In input 19
page
English - page 6
8. Use and functions 25
8.1. CEC function
(Consumer Electronics Control)
8.2. Power mode 25
8.3. Setting TV audio format
and Audio-Video source
8.4. Volume control 25
8.5. Input selector 26
8.6. Night mode 26
8.7. Bass level settings 26
8.8. Audio-Video synchronisation
(lip-sink)
8.9. Light function 27
9. Troubleshooting 27-28
10. Technical specifications 29
5
25
25
26
Page 6
DIMENSION
User manual
You have just purchased a Focal product. We would like to thank you and welcome you to our world of high-fidelity.
Focal has been designing, developing and manufacturing high-end speaker drivers and loudspeakers for more than
30 years. More recently, the first pair of Focal headphones was launched. Innovation, tradition, performance and
pleasure are our key values which characterise the "Spirit of Sound". Wherever you may be, we have one goal: to
unite people around a common passion for rich and authentic sound.
The Dimension soundbar was designed with this philosophy in mind, and our goal is to apply our expertise in the field
of acoustics to other uses other than traditional hi-fi loudspeakers in order to give cinephiles something to be excited
about: natural, dynamic and high-definition audio which takes you right to the heart of the action.
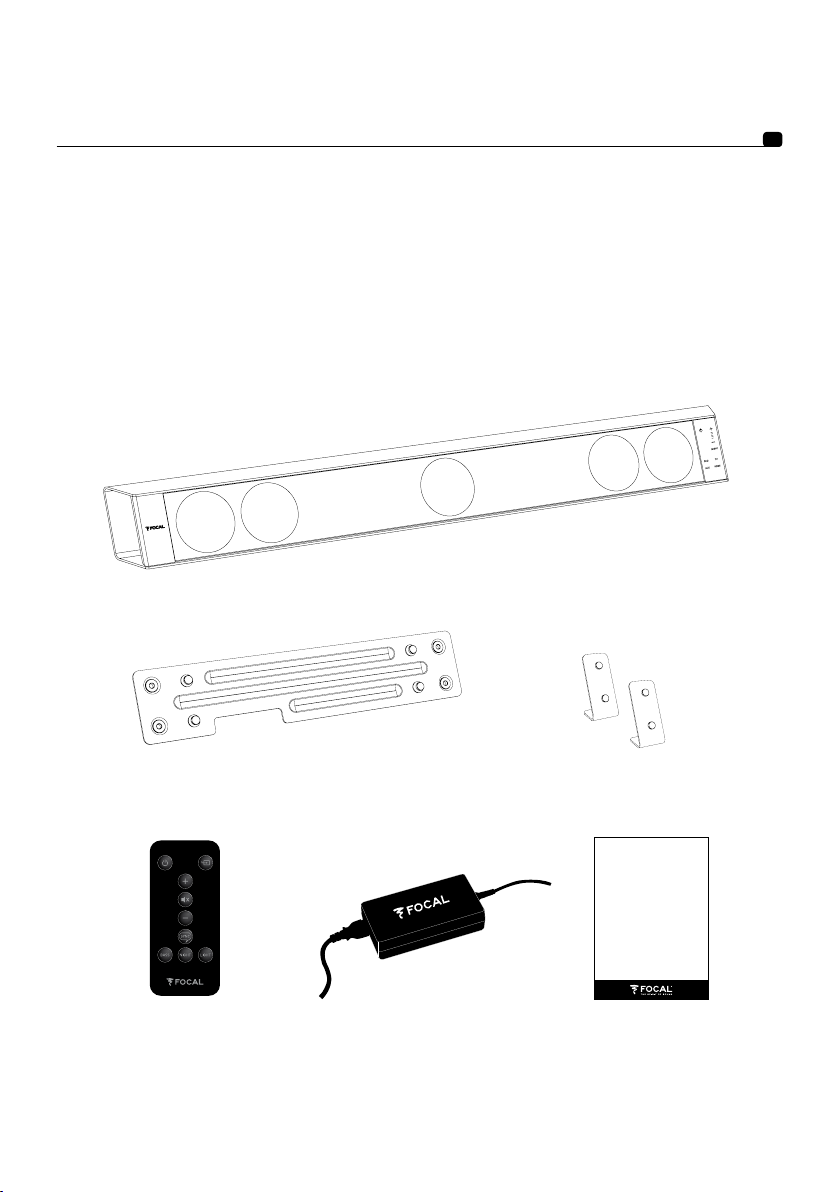
3. Package contents
1 x Dimension soundbar
6
1 x Wall mount
1 x Remote control 1 x user manual
1 x Power unit
2 x Stands
DIMENSION
1
Manuel d’utilisation
®
1 x Power cable
Page 7
DIMENSION
User manual
4. Presentation
4.1. Multichannel surround sound
Dimension is compatible with multichannel protocols Dolby Digital
in virtualisation algorithm which transforms stereo signals into real multichannel audio.
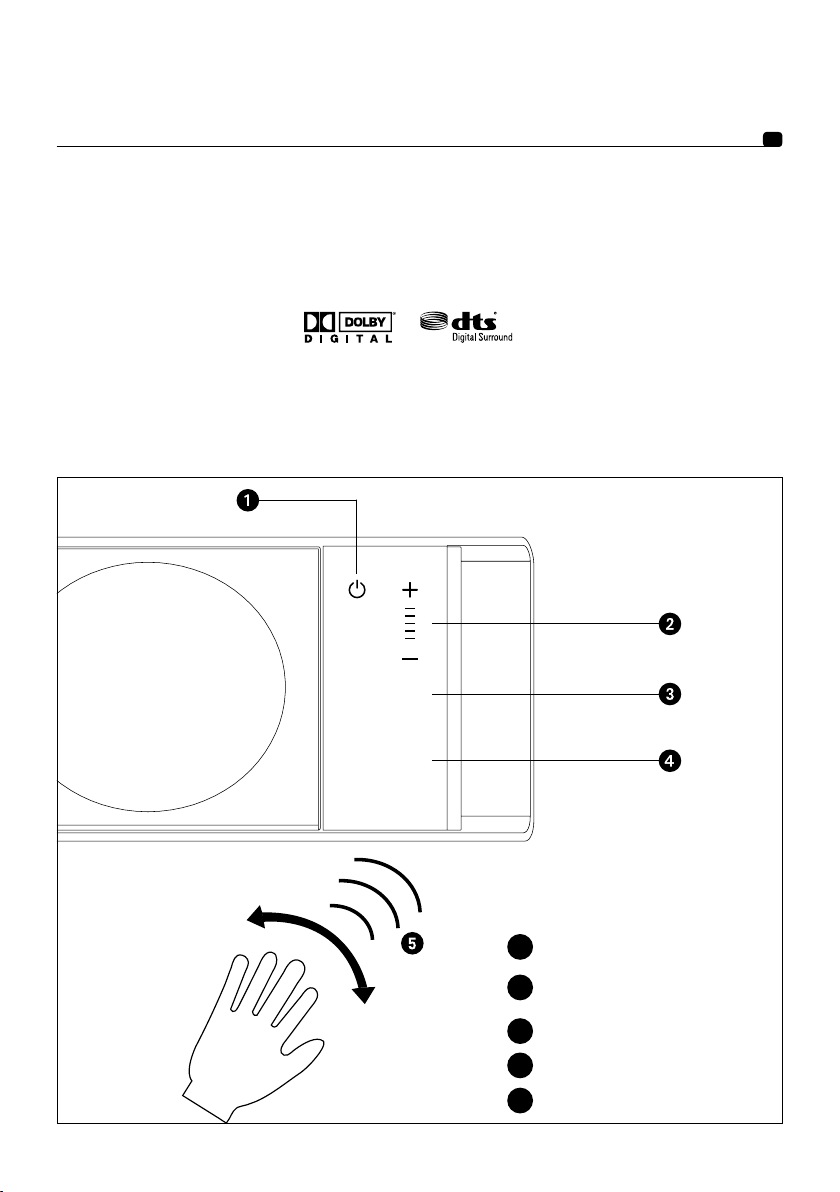
4.2. User interface
Dimension features a touch screen display for controlling volume, inputs and listening mode. The display stays off
during the viewing. Equipped with a proximity sensor, Dimension automatically turns on when you’re nearby or when
you use the remote control.
®
and DTS®. What’s more, Dimension uses a built-
7
NIGHT
DIGI TV
HDMI
AUX
Functions:
Standby / On
1
Volume control and volume indicator
2
(5 bars)
Night mode on / off
3
Input selector
4
Proximity sensor
5
Page 8
DIMENSION
User manual
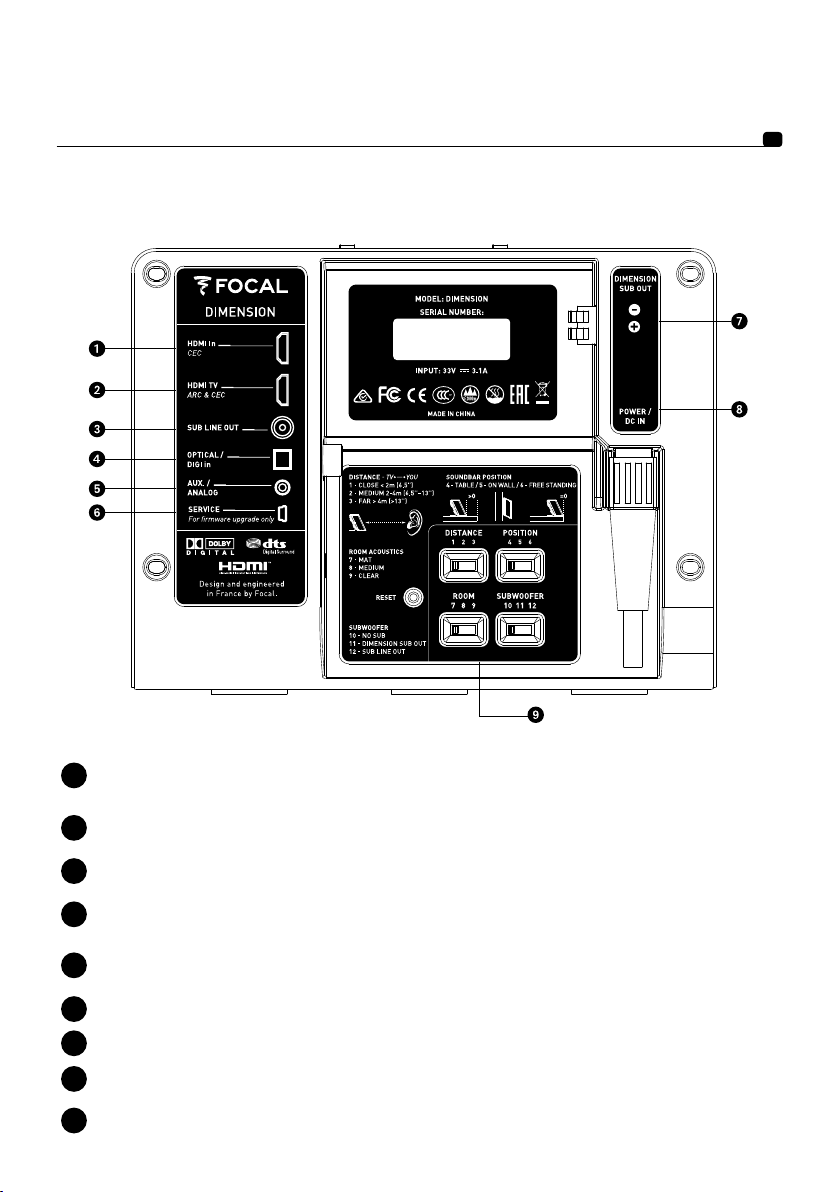
4.3. Connections panel
8
HDMI™ In: for connecting devices equipped with a HDMI™ interface: Blu-ray player / DVD player / games
1
console / set-top box.
HDMI™ TV: for connecting a TV. Equipped with the ARC (Audio Return Channel) function,
2
this bi-directional connexion receives audio signals from a TV or sends video signals to a TV.
SUB LINE OUT: RCA analogue output for connecting an external active subwoofer.
3
OPTICAL/DIGI In: for connecting to an optical audio output on a TV not equipped with a HDMI™ ARC.
4
You can connect all other players equipped with digital optical outputs.
AUX / ANALOG: for connecting devices equipped with an analogue output: digital music players, tablets,
5
computers...
SERVICE: this input is only used by the After Sales Service in case system updates are required.
6
7
DIMENSION SUB OUT: output solely dedicated to the Dimension Subwoofer.
POWER / DC IN: for connecting Dimension to a power supply.
8
SETTINGS SELECTORS: these 4 selectors enable you to adjust Dimension’s audio according to your installation
9
and to the acoustics of the room. See "Settings selectors" section (page 14) to make adjustments.
Page 9

DIMENSION
User manual
4.4. Remote control
Dimension is equipped with the CEC (Consumer Electronics Control) protocol. If your TV is equipped with this
function, enabling this function will allow you to control your soundbar with your TV’s remote control. The name used
for the CEC protocol may vary from one TV manufacturer to another.
Universal and learning remote controls can be programmed to control Dimension. If required, you can find the
infrared command codes on the Dimension soundbar webpage on Focal’s website: www.focal.com.
If your TV isn’t equipped with the CEC function, or if you don’t use a universal remote control, a remote control is
supplied with Dimension. The remote control uses the same layout as the touchscreen on the soundbar.
9
Standby/ON
Volume control
Bass level setting
Input selector
Audio-Video Synchronisation
(Lip-sync)
NIGHT mode
Turns on
display light
Before using the remote control, remove the plastic tab from the remote control’s battery compartment. To change
the batteries on your remote control, open the battery compartment and replace with an identical battery type:
CR2025.
Page 10
DIMENSION
User manual
5. Positioning and installation
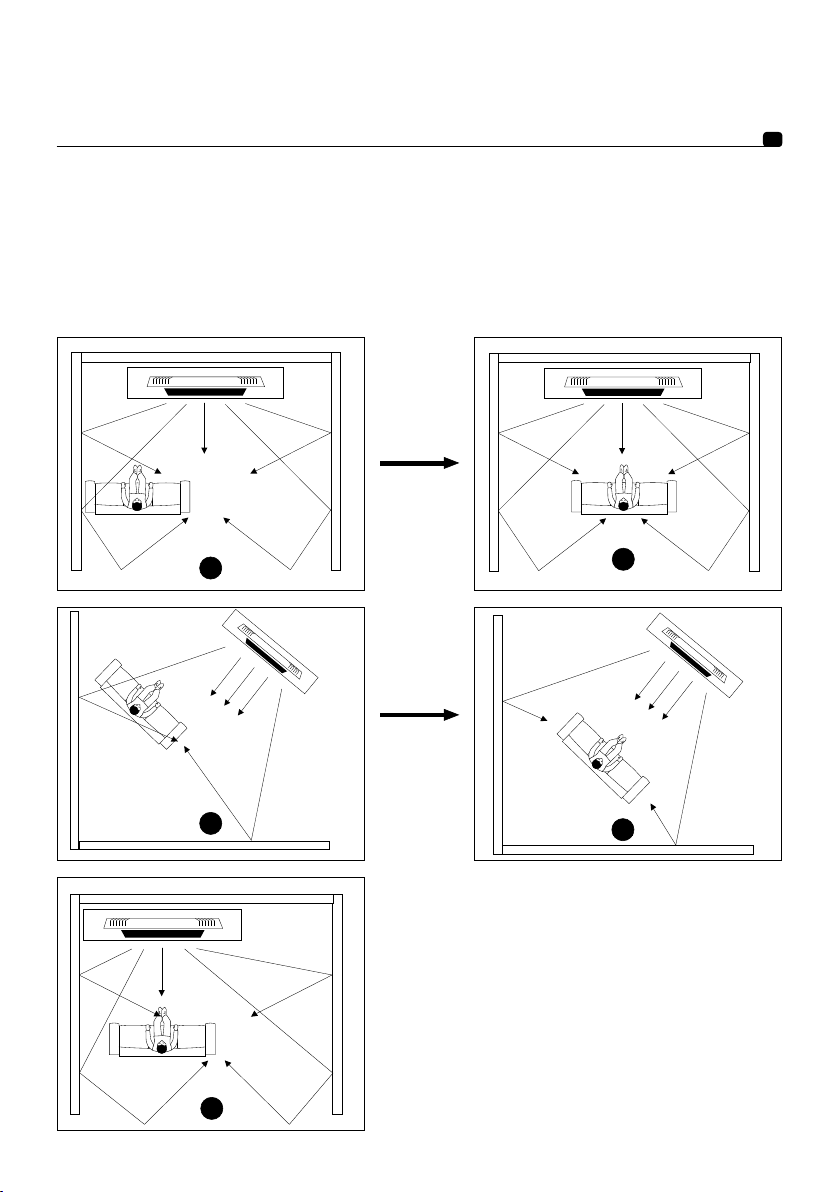
5.1. Positioning Dimension
For the best surround sound, it is recommended to position your soundbar opposite the listening position in symmetry
with the room’s walls. The following diagrams show several recommended positions.
10
X
X
X
OK
OK
Page 11
DIMENSION
User manual
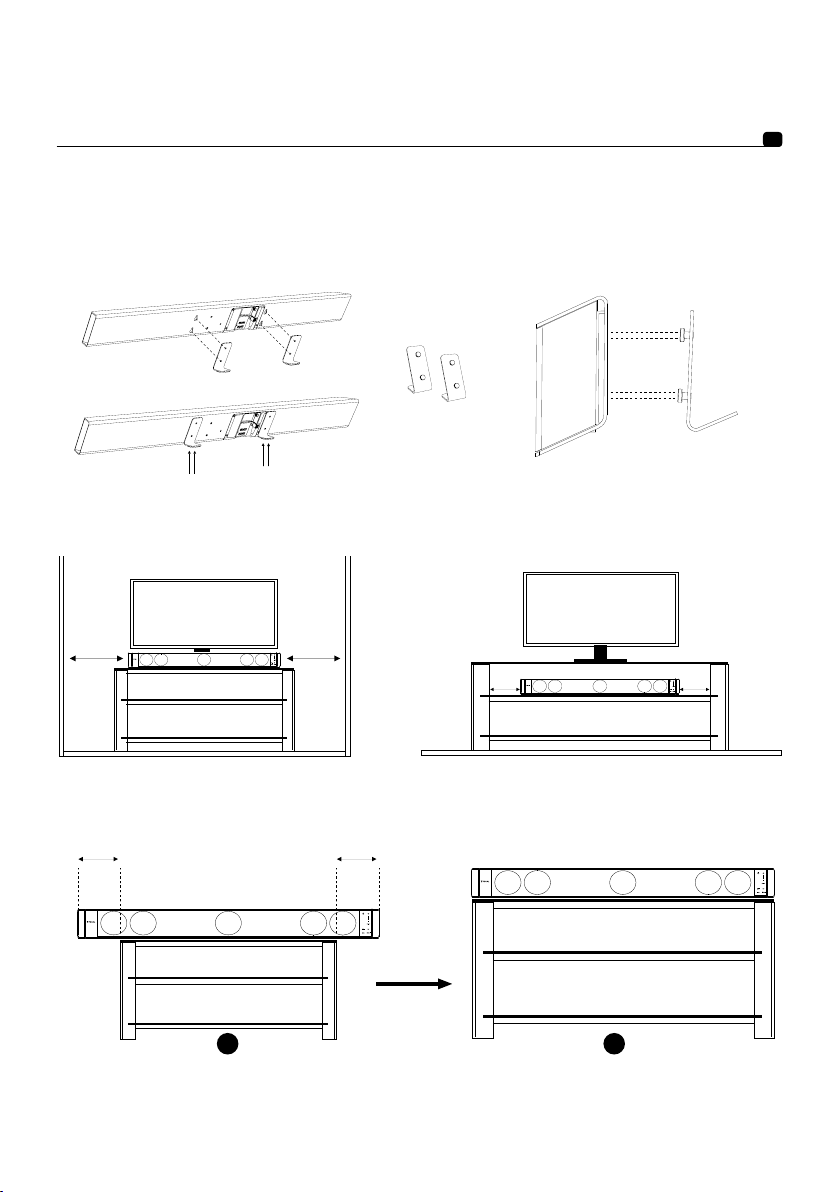
5.2. Installation on a TV cabinet
Before installing on a TV cabinet, the two stands provided must be assembled to Dimension as shown in the following
diagram:
2 x stands
Neither end of the Dimension soundbar should be within 5cm of an obstacle (wall, furniture or other surfaces).
11
Minimum
5cm
To give the soundbar more stability and to avoid it falling, we recommend positioning Dimension so it rests entirely
on the TV cabinet.
Make sure the settings selector on the back panel is on the appropriate setting.
If Dimension is very close to the edge of your TV cabinet, set the "POSITION" selector to 6 – FREE STANDING.
In case of the contrary, set the "POSITION" selector to 4 – TABLE.
For more information on settings selectors, see "Settings selectors" section (page 14).
Minimum
5cm
Minimum
5cm
>0>0
X
TV
TV
Minimum
5cm
OK
Page 12
DIMENSION
User manual
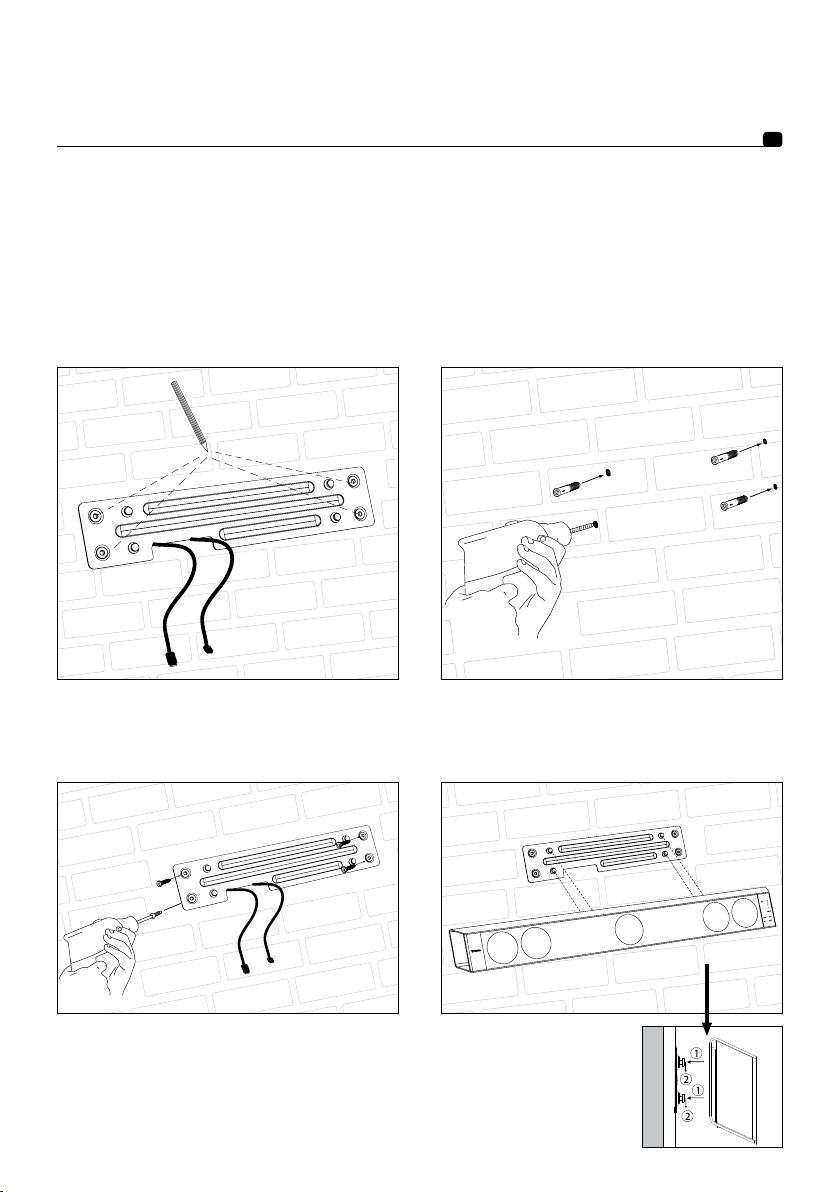
5.3. Mounting to a wall
Neither end of the Dimension soundbar should be within 5cm of an obstacle (wall, furniture or other surfaces).
Dimension can be installed above or below your TV according to its height.
Make sure the settings selector on the back panel is on the appropriate setting:
"POSITION" on 5 – ON WALL.
For more information on settings selectors, see "Settings selectors" section (page 14).
Dimension is supplied with a wall-mounting kit. Follow the installation procedure below.
12
1) Determine and mark the locations of the fixing
holes. Use a spirit level to make sure Dimension is
horizontal. Pass cables through the intended space on
the wall mount.
3) Fix the wall mount to the wall.
2) Drill holes at the marked locations and insert dowel
pins. Caution: use appropriate dowel pins for the type
of wall. The wall, dowel pins and screws must be able
to support the weight of Dimension: 12lbs (5,5kg).
4) Connect the cables, then
bring your soundbar up
to the support, mounting
Dimension to the 4 pins on
the wall mount.
Page 13
DIMENSION
User manual
6. Settings selectors
Use the 4 selectors on the back panel to adjust Dimension’s sound according to your listening room and your needs.
These settings selectors must be set before installing your soundbar permanently.
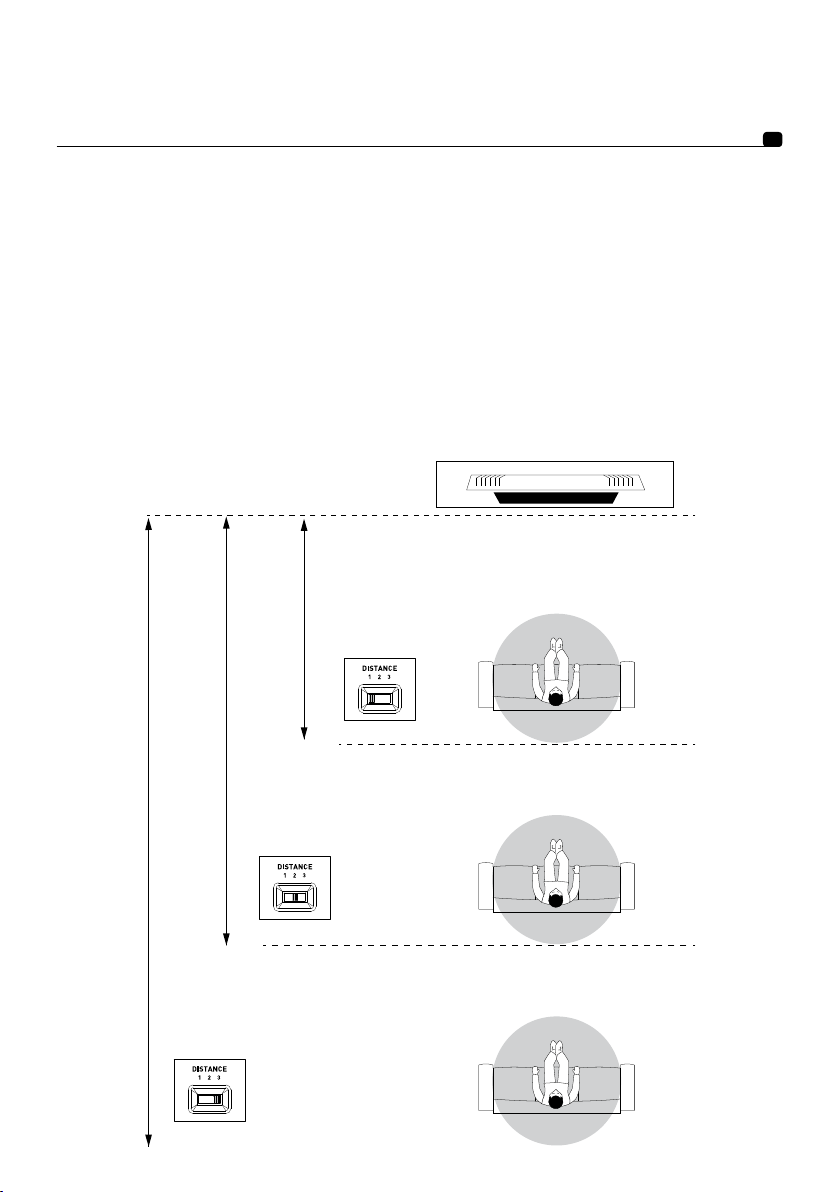
6.1. "DISTANCE" selector
This selector enables you to adjust the sound rendering according to the distance between the listening position and
the soundbar.
If Dimension is positioned less than 2 metres from the listening position, set the "DISTANCE" selector to 1 – CLOSE.
If Dimension is positioned between 2 and 4 metres from the listening position, set the "DISTANCE" selector
to 2 – MEDIUM.
If Dimension is positioned 4 metres or more from the listening position, set the "DISTANCE" selector to 3 – FAR.
Less
than 2 metres
13
More
than 4 metres
FAR
Between
2 and 4 metres
MEDIUM
CLOSE
Page 14
DIMENSION
User manual
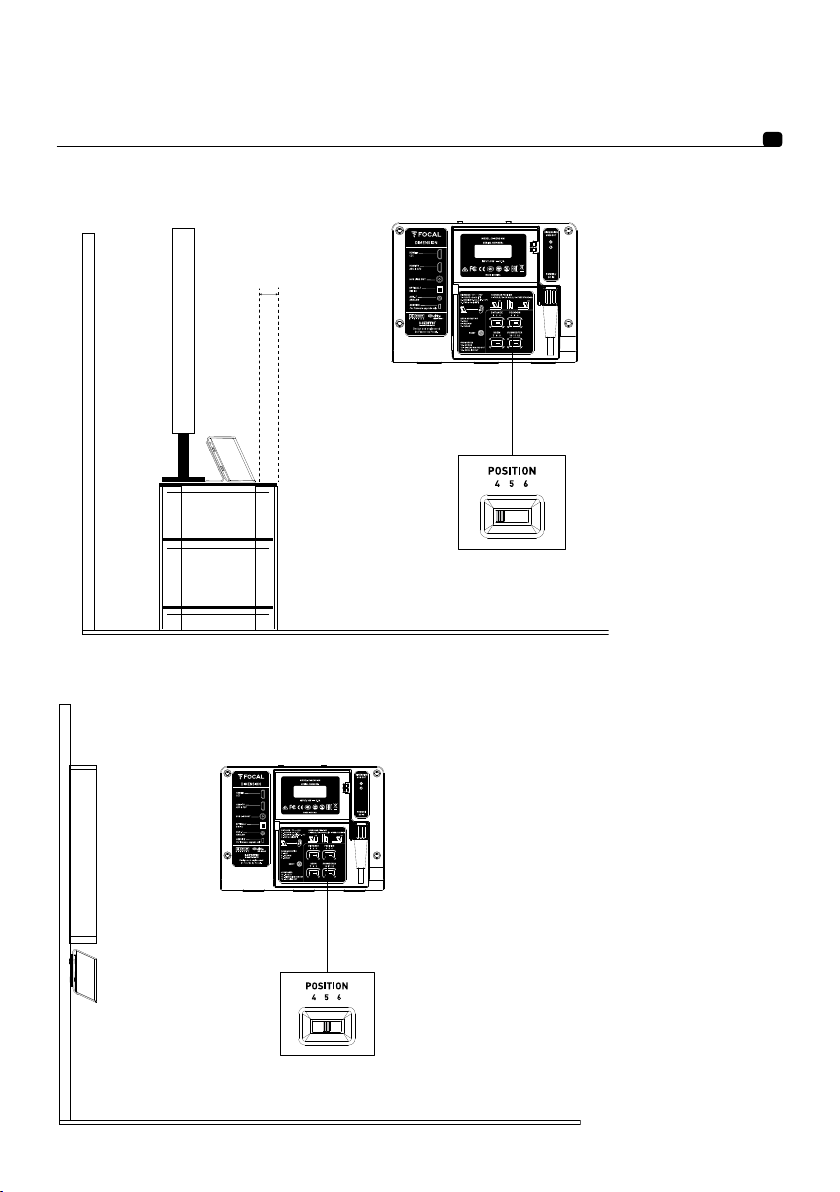
6.2. "POSITION" selector
>0
TABLE
If Dimension is positioned on a piece of furniture without its face being flush with the edge of the piece of furniture,
set the "POSITION" selector to 4 – TABLE.
14
WALL
If Dimension is mounted to a wall, set the "POSITION" selector to 5 – ON WALL.
Page 15
DIMENSION
User manual
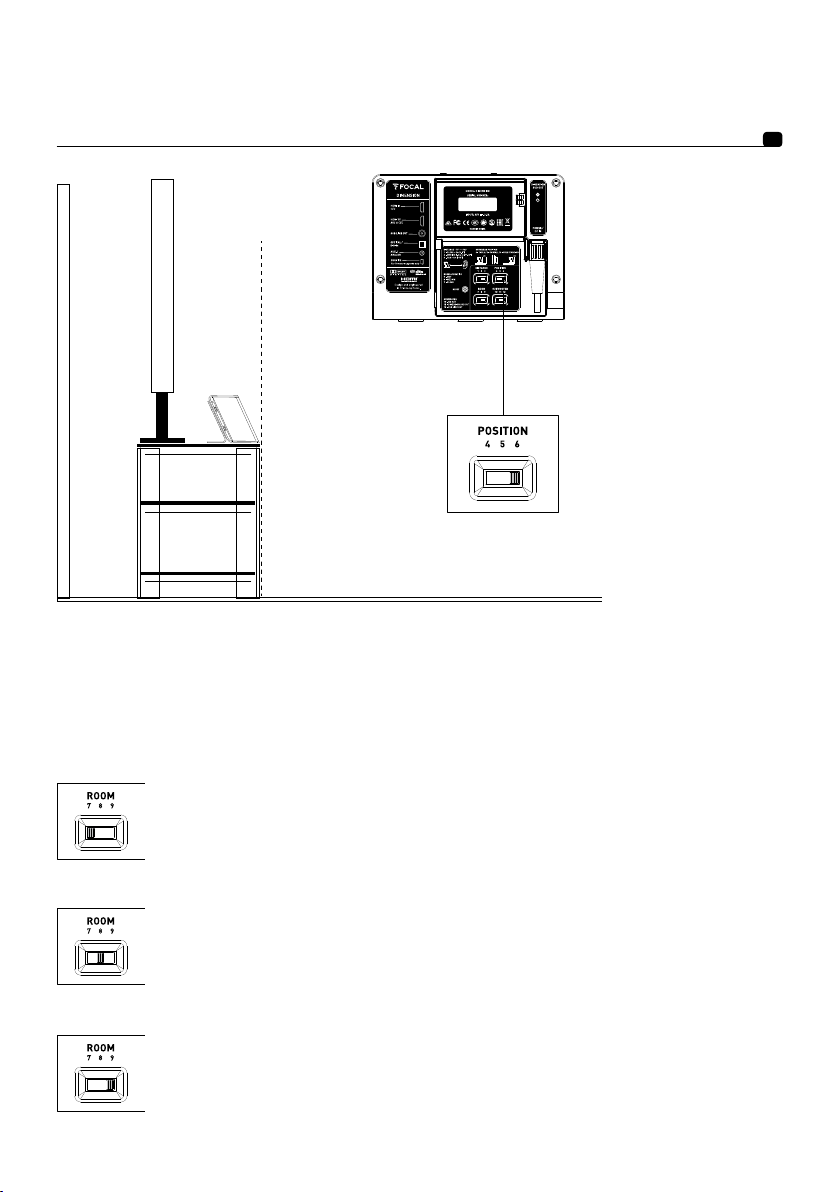
FREE
STANDING
If Dimension is positioned on a piece of furniture with its face flush with the edge of the piece of furniture, set the
"POSITION" selector to 6 – FREE STANDING.
15
6.3. Adaptation to the room’s acoustics
The quality of the surround sound depends on the room’s acoustics and on the acoustic properties of the room’s
materials.
If your room has low reflecting acoustic properties: walls covered with fabric, curtains, carpets or
rugs, set the "ROOM" selector to 7 – MAT.
MAT
If your room has average reflecting acoustic properties: adjacent walls made out of plaster or
hollow bricks, if you have various pieces of furniture, uncovered parquet, set the "ROOM" selector
to 8 – MEDIUM.
MEDIUM
If your room has high reflecting acoustic properties: walls with large glass surfaces, solid bricks,
tiled floors, set the "ROOM" selector to 9 – CLEAR.
CLEAR
Page 16

DIMENSION
TV
User manual
6.4. "SUBWOOFER" selector
TV
16
If Dimension is used alone without
a subwoofer, set the "SUBWOOFER"
selector to 10 – NO SUB.
If Dimension is used with the
dedicated Dimension Subwoofer,
set the "SUBWOOFER" selector to
11 – DIMENSION SUBWOOFER OUT.
TV
If Dimension is used with an
active subwoofer connected to
the SUB LINE OUT output, set the
"SUBWOOFER" selector to
12 – SUB LINE OUT.
Page 17
DIMENSION
User manual
7. Connections
Dimension is equipped with the HDMI™ ARC (Audio Return Channel) function. This function allows you to receive the
audio signal from your TV if the TV is equipped with a HDMI™ ARC (Audio Return Channel) output. When both HDMI™
ARC inputs are connected, Dimension reproduces the sound from the TV or any other source connected to it: Bluray, DVD, set-top box. Make sure the Audio Return Channel function is enabled in your TV’s set-up menu. Dimension
also has a standard HDMI™ input. This is used for devices using multichannel audio encoding (5.1, Dolby digital, DTS
Surround). Thus, you can take full advantage of the quality of your Audio/Video player. The following section explains
Dimension’s possible connexions in more detail.
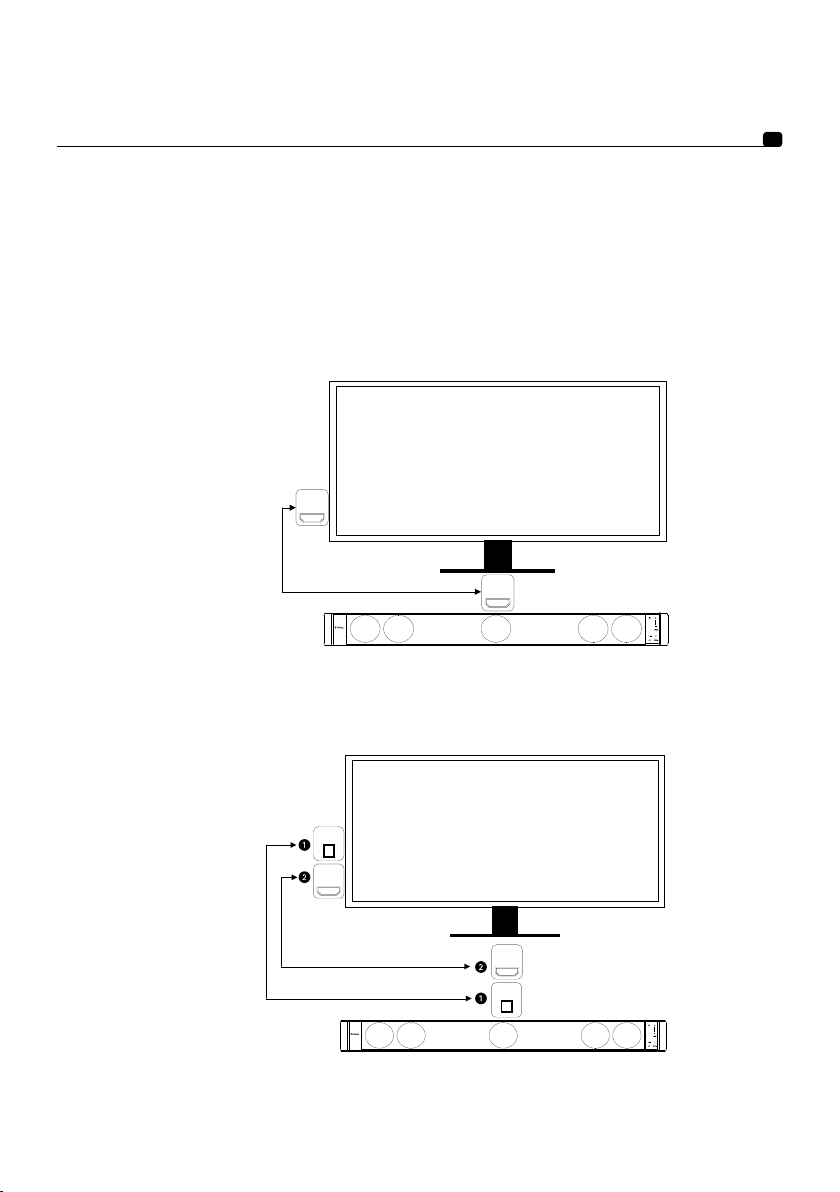
7.1. Connecting Dimension to your TV
17
HDMI
TV
ARC
HDMI TV
ARC & CEC
Connect the HDMI™ TV input on Dimension to your TV’s HDMI™ input.
If your TV is equipped with the ARC (Audio Return Channel) function, use your TV’s HDMI™ ARC output. The ARC
(Audio Return Channel) function allows you to transmit audio signals to Dimension from your TV and all other devices
connected to your TV.
TOSLINK
HDMI
TV
HDMI
ARC & CEC
OPTICAL
DIGI in
If your TV is not equipped with the ARC (Audio Return Channel) function, connect the TV’s digital optical output
(Toslink) to Dimension’s OPTICAL/DIGI In input. In any case, make sure Dimension’s HDMI™ TV input is connected to
a HDMI™ input on your TV. This connection will transmit the video signal from Dimension to your TV via Dimension’s
HDMI™ In input.
Page 18
DIMENSION
User manual
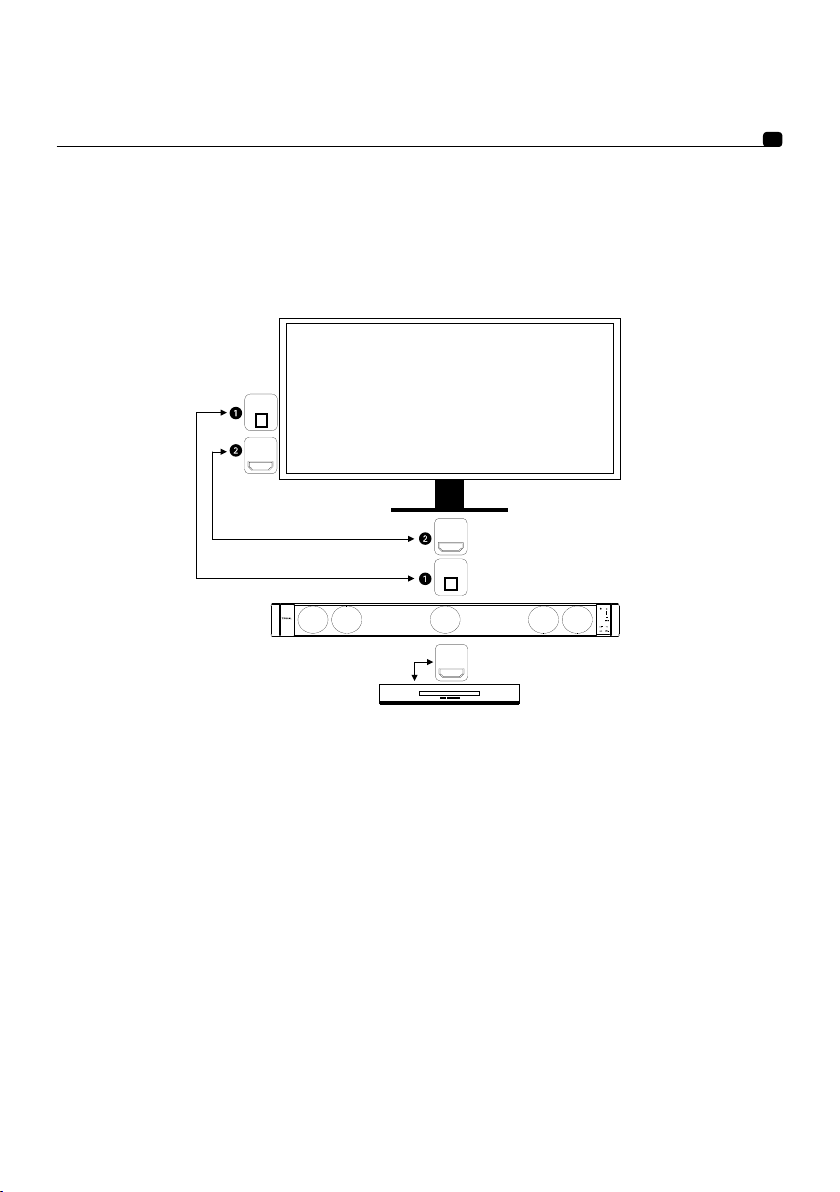
7.2. Connecting the HDMI™ In input
Connect the HDMI™ In input to the source used for playing films encoded in 5.1 and, in general, the source generally
used for playing Blu-ray disks and/or DVDs. This input receives the audio signals directly from your Audio/Video
player without going through your TV, thus, there’s no loss in quality.
18
TOSLINK
HDMI
If you wish to connect more than one audio/video source directly to Dimension, you can purchase a HDMI™ hub. A
HDMI™ hub has several HDMI™ inputs and one HDMI™ output which you connect to Dimension.
TV
HDMI
ARC & CEC
OPTICAL
DIGI in
HDMI
DVD / BLU-RAY
Page 19
DIMENSION
User manual
7.3.Examples of connections
The following section provides examples of the most common connections. For the best surround sound, it is
important to connect the player you want to use for playing multichannel content to the HDMI™ In output (5.1 or
over). These examples are based on TVs equipped with the HDMI™ ARC (Audio Return Channel) function. If your TV
does not support this function, in addition to the HDMI™ cable, also connect your TV’s optical audio cable (Toslink)
to Dimension’s DIGI In input.
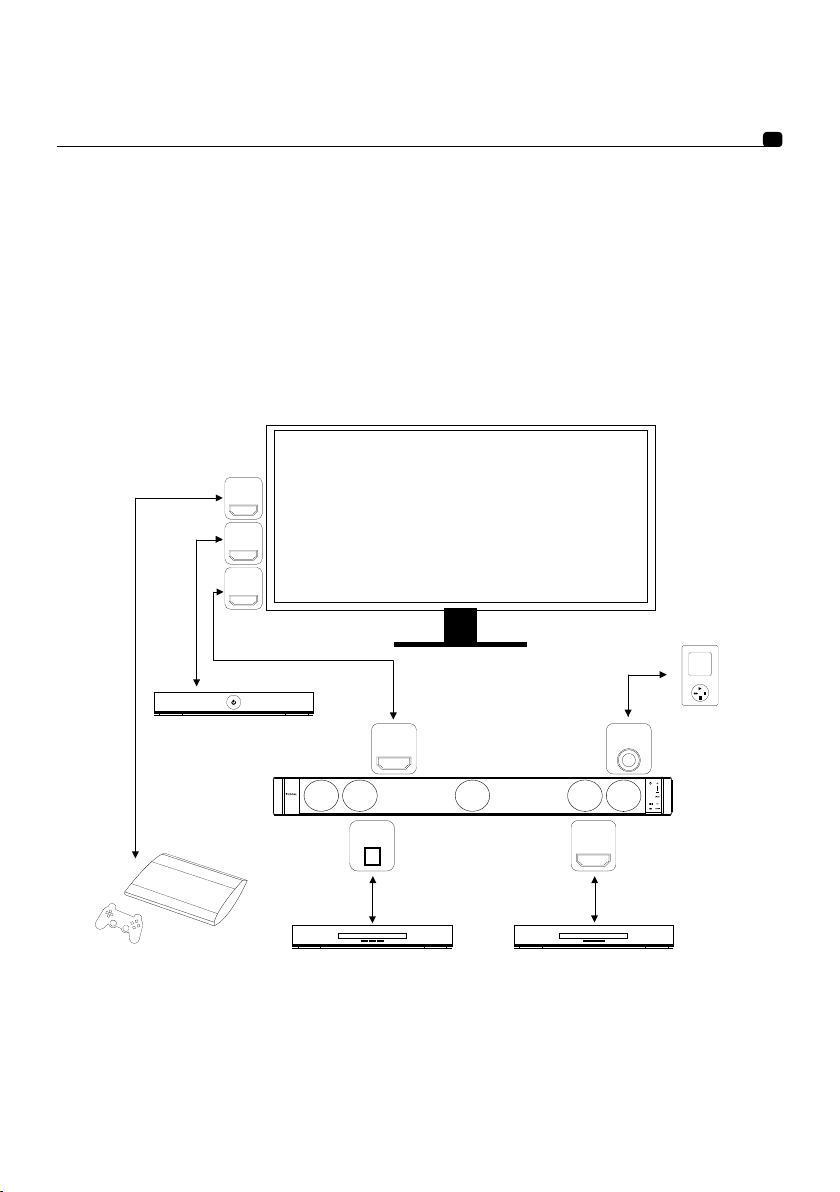
7.3.1. Connection example 1
If you mainly use a Blu-ray player for your multichannel audio/video content: connect your Blu-ray player to
Dimension's HDMI™ In input. Other devices are depicted to complete the example and to show the other options
possible with Dimension.
HDMI 3
19
TUNER TV
HDMI TV
ARC & CEC
OPTICAL
DIG in
CD
DVD / BLU-RAY
HDMI In
CEC
AUX. /
ANALOG
MP3
GAME CONSOLE
HDMI 2
HDMI 1
ARC
TV BOX
To play audio from a TV tuner, set-top box or games console, select Dimension’s TV input. To play audio from a Bluray player, select Dimension’s HDMI™ In input.
To play audio from a CD player, select Dimension’s DIGI In input. Likewise, to play audio from a digital media player,
select the AUX input.
Page 20
DIMENSION
User manual
7.3.2. Connection example 2
If you mainly use a set-top box for your multichannel audio/video content: connect your set-top box to Dimension's
HDMI™ In input. Other devices are depicted to complete the example and to show the other options possible with
Dimension.
20
HDMI 2
HDMI 1
ARC
HDMI TV
ARC & CEC
GAME CONSOLE
To play audio from a games console, select Dimension’s TV input.
To play audio from a set-top box, select Dimension’s HDMI™ In input.
Likewise, to play audio a computer, select the AUX input.
TV
HDMI In
CEC
TV BOX
AUX. /
ANALOG
COMPUTER
Page 21
DIMENSION
User manual
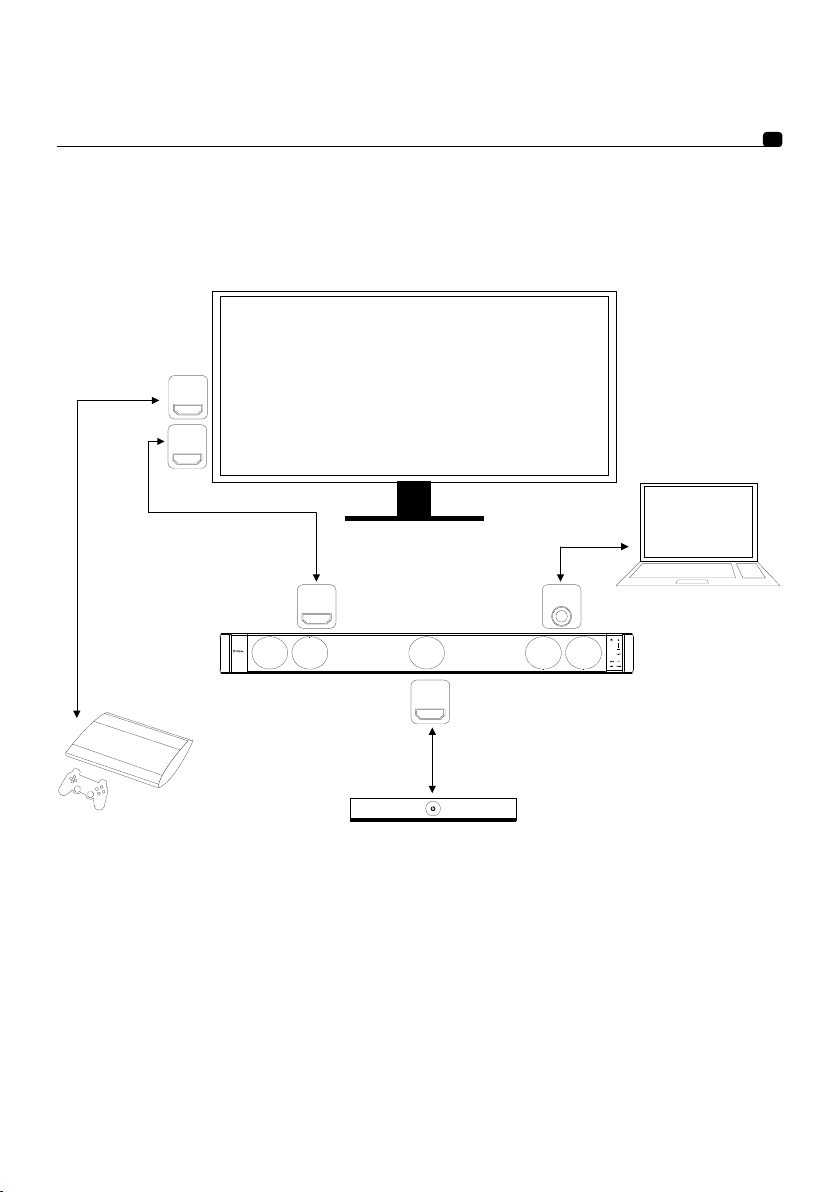
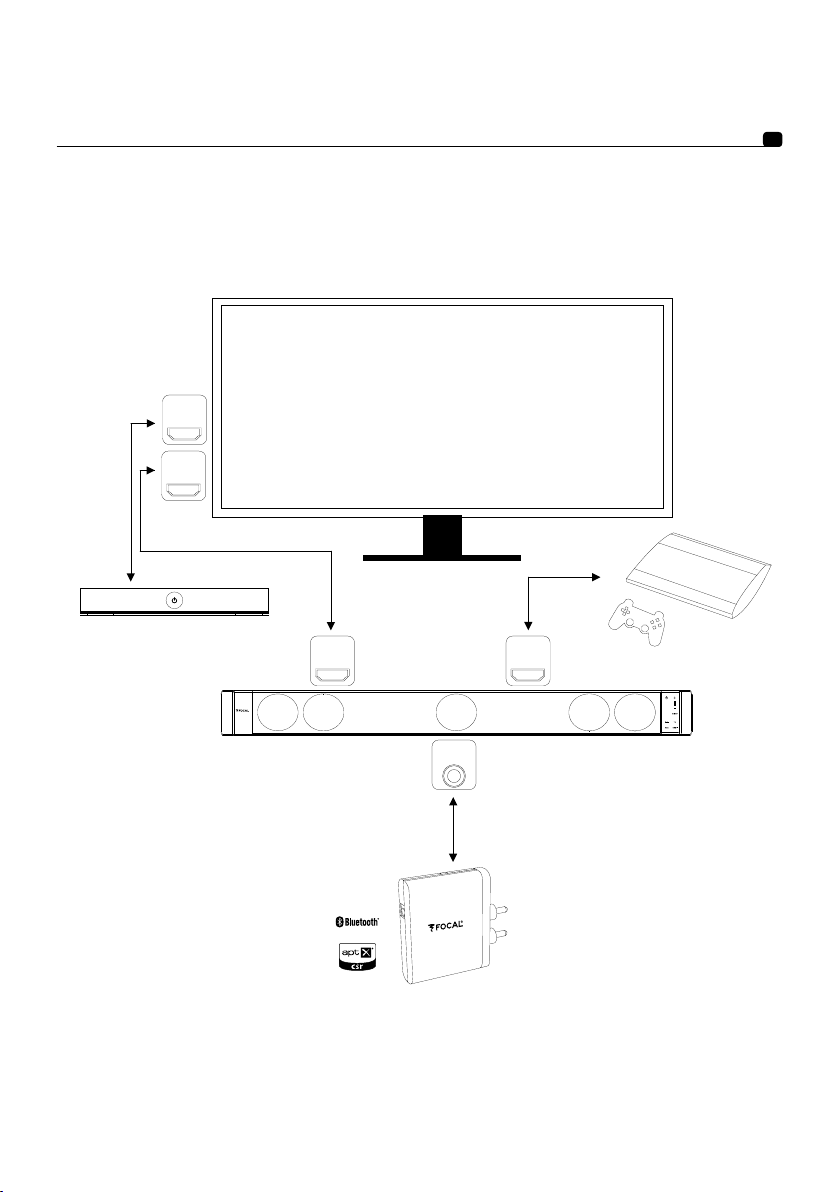
7.3.3. Connection example 3
If you mainly use a games console for your multichannel audio/video content: connect your games console to
Dimension's HDMI™ In input. Other devices are depicted to complete the example and to show the other options
possible with Dimension.
21
HDMI 2
HDMI 1
ARC
TV BOX
HDMI TV
ARC & CEC
TV
AUX. /
ANALOG
HDMI In
CEC
GAME CONSOLE
WIRELESS RECEIVER
To play audio from a set-top box, select Dimension’s TV input.
To play audio from a games console, select Dimension’s HDMI™ In input.
To play audio from a wireless receiver, select Dimension’s AUX input.
Focal’s Universal Wireless Receiver is used in this example. Focal’s Universal Wireless Receiver uses Bluetooth
aptX® technology.
Page 22
DIMENSION
User manual
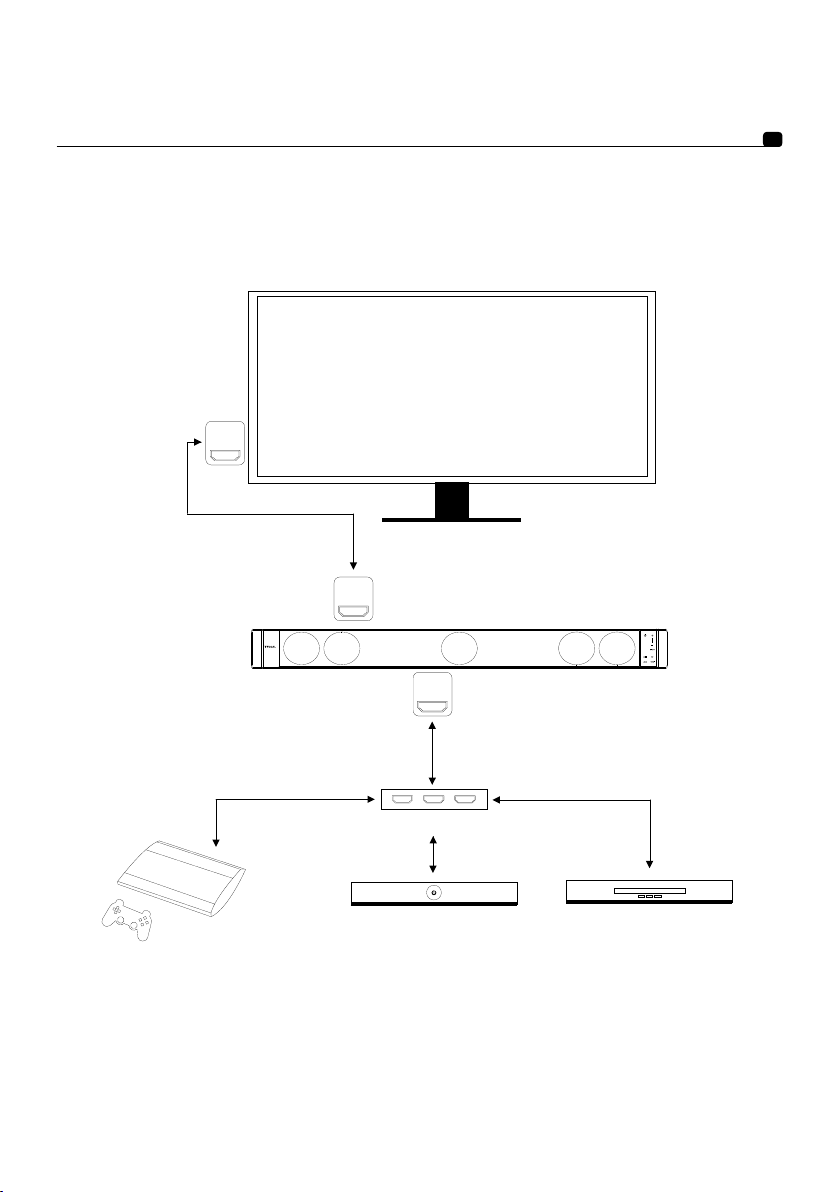
7.3.4. Connection example 4
If you wish to connect all your devices using a HDMI™ cable connected to Dimension’s HDMI™ In input, you can
purchase a HDMI™ hub. These splitters have several HDMI™ inputs and one output.
22
TUNER TV
HDMI 1
ARC
HDMI TV
ARC & CEC
HDMI In
CEC
HUB HDMI
TV BOX
GAME CONSOLE
Select Dimension’s TV input to play audio from the TV tuner.
Select Dimension’s HDMI™ In input to play audio from all devices connected to the HDMI Hub.
DVD / BLU-RAY
Page 23
DIMENSION
User manual
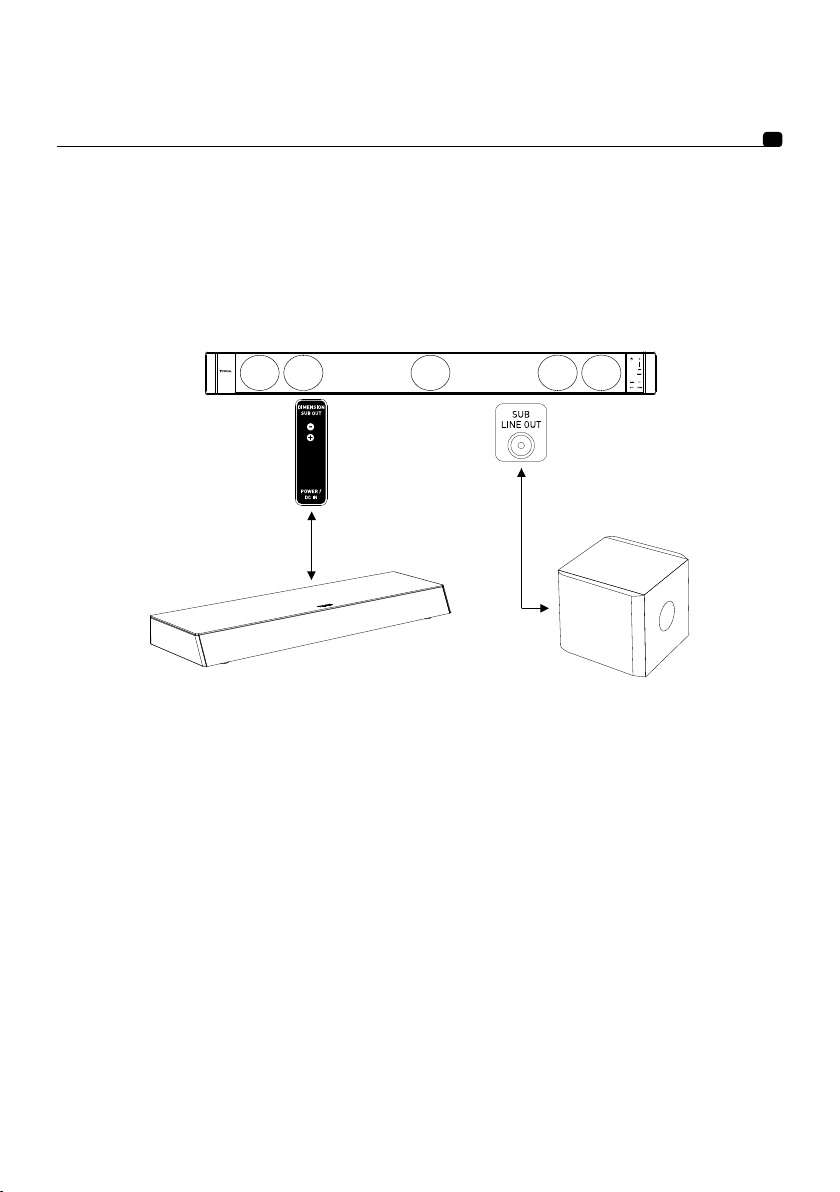
7.4. Connecting a subwoofer
There are two subwoofer outputs on Dimension’s back panel. The first, SUB LINE OUT, is used for connecting
any amplified subwoofer. The second, DIMENSION SUB OUT, is an amplified output exclusively reserved for the
Dimension Subwoofer.
Consult the Dimension Subwoofer user manual to help with installation.
23
OR
Page 24

DIMENSION
User manual
8. Use and functions
8.1. CEC (Consumer Electronics Control) function
Dimension is equipped with the CEC (Consumer Electronics Control) function. If your TV and some of your other
devices (set-top box, Blu-ray player,...) support this technology, you can control Dimension using your TV’s remote
control. Functions controlled:
- Volume: when using your TV’s remote control to adjust the volume, your TV will transmit this information to
Dimension which will adjust its volume.
- Power on: as soon as you turn on your TV, Dimension will turn on selecting the HDMI™ TV input.
- Input selector: as soon as you turn on a device connected to the HDMI™ In input, Dimension will select this input.
To use the CEC function, enable this function on your TV. Caution: the CEC function may have a different name
depending on the TV manufacturer.
8.2. Power mode
Dimension has 3 different power modes:
- Power on mode: Dimension plays audio from the device selected.
- Eco mode: Reduced power consumption, the automatic detection of signals from the HDMI™ CEC and DIGI In
inputs is activated.
- Standby mode: minimum power consumption (< 0.5 Watts).
Dimension will automatically switch from power-on mode to Eco mode when no audio signal has been detected for
20 minutes. When Dimension is in Eco mode, detection of CEC commands and signals is activated on the HDMI™
and DIGI In inputs respectively:
- When a signal is detected from the DIGI In input, Dimension automatically switches to power-on mode and activates
the DIGI In input.
- When a CEC command is detected on the HDMI™ In or HDMI™ TV inputs, Dimension automatically switches to
power-on mode and activates the HDMI™ In or HDMI™ TV inputs.
Note: If your TV is not equipped with the CEC function, the HDMI™ inputs will not detect any commands. In this case,
use the remote control supplied for turning on the device, controlling volume, and selecting input. Standby mode is
only available when no HDMI™ cable is connected to Dimension. This mode is activated after 6 hours of inactivity, or
by pressing and holding down the button for more than 2 seconds on Dimension’s user interface. Press the
button on the remote control or on the user interface to turn Dimension on.
24
8.3. Setting TV audio format and Audio-Video source
For the best 5.1 experience, make sure you configure the audio output formats of your TV or other devices. Depending
on the brand and the quality of the device, numerous audio settings may be available which may diminish the audio
experience with Dimension.
Consult the user manuals for your devices and navigate to the audio settings. In the menu, prioritise these two
following audio formats:
- Dolby Digital: 48kHz, up to 5.1 channels.
- DTS Surround: 48kHz, up to 5.1 channels.
If these formats are not indicated, your device may have an "automatic" setting. In this case, use this setting. Your
device will adapt the audio output format to Dimension using the best quality available.
8.4. Volume control
As well as using the CEC function, you can adjust Dimension’s volume by pressing the + and - buttons on your remote
control or directly on Dimension’s display.
The volume will be shown on Dimension’s volume indicator.
The sound can be muted by pressing the button on your remote control.
When Dimension is muted, the volume indicator will glow. Press the button on your remote control again to
reactivate the sound, or press the button or the button.
Page 25
DIMENSION
User manual
8.5. Input selector
You can select your desired input by pressing the button on the remote control or by
selecting the input type directly on Dimension’s user interface.
8.6. Night mode
Dimension features a Night mode for discretion. When using this mode, Dimension reduces the peak volume and the
dynamic range of a film’s soundtrack. This mode is only available for Dolby Digital encoded content.
To activate this mode:
- press the Night button on the remote control OR
- press "Night" directly on Dimension’s user interface.
Night mode display is activated on the user interface.
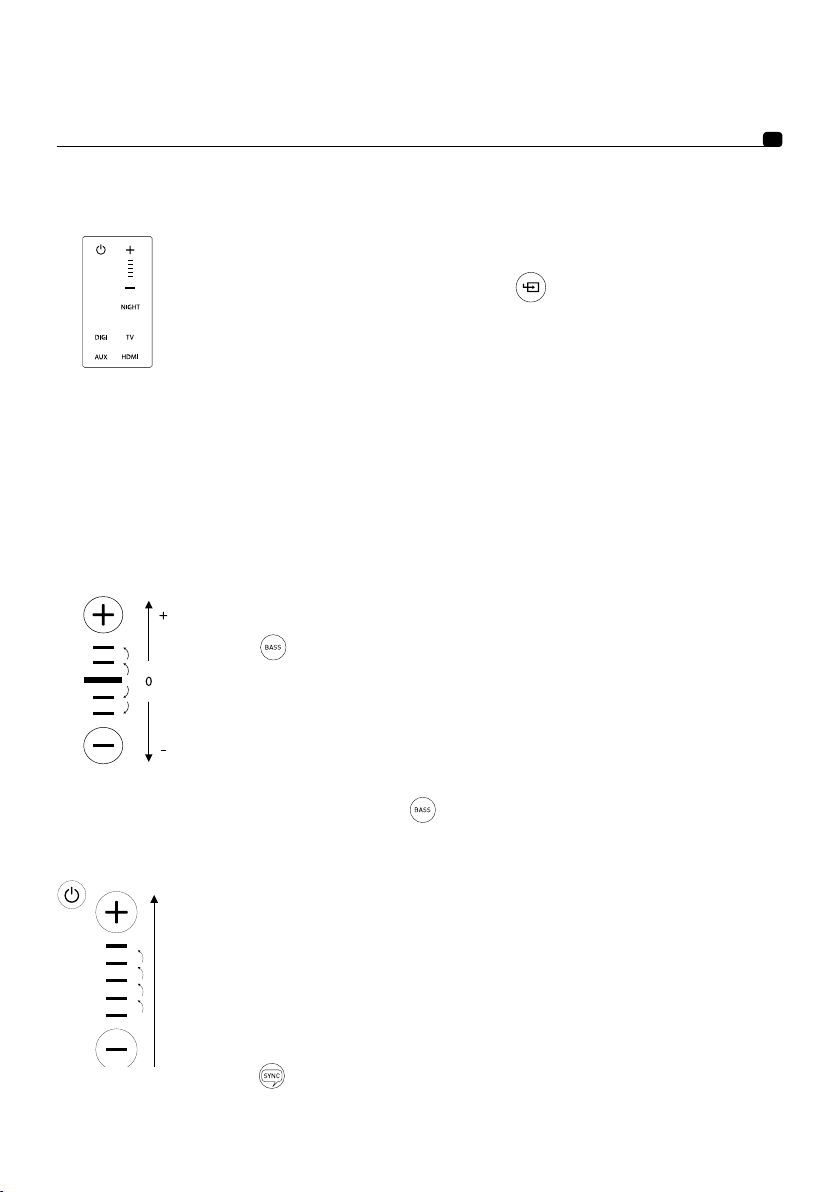
8.7. Bass level setting
You can adjust the bass level on Dimension or on the actual subwoofer.
To adjust the bass level:
- press the button on your remote control.
- adjust bass level by pressing the + or - buttons on the remote control or on the user interface.
25
Once the bass is adjusted to the desired level, press the button on your remote control again or wait a few
seconds until Dimension returns to the standard display mode.
8.8. Audio-Video synchronisation (lip-sync)
The quality of your various devices (media players, flat-screens, consoles,...), the flow of
information exchanged with them and how your TV treats video signals can all affect audio/
video synchronisation.
To overcome this, Dimensions offers two solutions:
- HDMI™ In input: features automatic lip sync for synchronising audio and video.
- HDMI™ TV, Digi In and AUX inputs: audio and video synchronisation can be adjusted manually.
In case of synchronisation problems on the HDMI™ In input, audio and video synchronisation
can also be adjusted manually. Follow these steps to synchronise the audio and video manually:
- Select the source which you wish to synchronise.
- Press the button on your remote control. The selected source will flash.
- Adjust the delay between the audio and video signals using the + and - buttons on the remote
control or directly on the user interface.
Page 26

DIMENSION
User manual
When the signals have been synchronised, exit the synchronisation mode by pressing the button on your remote
control again. Synchronisation adjustments vary depending on the input. You can adjust the synchronisation of the
audio and video differently for the various inputs, thus for your different devices.
Note: If you want to restore the programmed delay default (factory settings) or automatic synchronisation on HDMI™
In, press the button on the remote control or user interface until the bar display volume are all extinct.
8.9. Light function
The user interface light is normally off. You can turn it on for a few seconds by pressing the "Light" button on your
remote control.
9. Troubleshooting
Refer to the table below if you encounter any problems with Dimension. If the problem persists, or if none of the
solutions proposed solve the problem, turn Dimension off and contact your dealer or Focal’s authorised After Sales
Service.
26
Page 27

DIMENSION
User manual
27
Problem Possible causes Possible solutions
No sound is coming from
Dimension, the Standby
button is flashing and the
volume + button is lit.
No sound is coming from
Dimension, the Standby button is flashing and the HDMI™
TV button is lit.
No sound is coming from
Dimension, the Standby
button is flashing and one or
two other buttons are lit.
No sound
The overheating protection
has been activated due
to excessive amplifier
temperature.
The overheating protection
has been activated due to
overcurrent.
Dimension’s microprocessor
has stopped working due to
a considerable electric shock.
The cables have not been
connected correctly or there
is a fault with one or more
cables.
The desired source has not
been selected.
The volume is set to
minimum or the Mute
function has been activated.
Your audio-video source is
transmitting an audio format
not recognised by Dimension.
Unplug the system, wait for
an hour until it cools down,
then turn Dimension back on.
Unplug the system, wait for
an hour until it cools down,
then turn Dimension back on.
Unplug the system, wait
for five minutes, then turn
Dimension back on.
Check connections.
If the problem persists,
interchange the cables.
Select the desired source
using the remote control
(input button) or the user
interface.
Adjust the volume according
to the desired level using the
+ or - buttons, or deactivate
the Mute function.
In the source settings, select
an audio format supported by
Dimension.
More
information
/
/
/
Page 18
Page 8 & 10
Page 10
Page 25
No sound is coming from your
Dimension Sub subwoofer.
The HDMI™ devices
connected to Dimension do
not support HDCP
(High-Bandwidth Digital
Content Protection).
The cable has not been
connected correctly or there’s
a fault with the cable.
The "SUBWOOFER" selector
setting is positioned
incorrectly.
Connect an audio-video
device which supports HDCP.
Check the cable
is connected correctly.
Check that the
"SUBWOOFER" selector
is set to 11 - "DIMENSION
SUBWOOFER OUT".
/
Dimension
Sub user
manual
Page 17
Page 28

DIMENSION
User manual
28
Problem Possible causes Possible solutions
No sound is coming from the
subwoofer connected to the
SUB LINE OUT output.
The CEC via the HDMI™
connections are not working
correctly.
The audio and the video are
not synchronised.
The remote control is not
working.
The cable has not been
connected correctly or there’s
a fault with the cable.
The "SUBWOOFER" selector
setting is positioned
incorrectly.
The subwoofer used is
set to OFF, Standby or is
malfunctioning.
The CEC command via
HDMI™ is deactivated on your
audio-video devices.
At least one of your devices is
not equipped with this control
function.
Your TV is not equipped with
an automatic synchronisation
function.
Dimension is not within reach
of your remote control or the
angle is too extreme.
Check the cable
is connected correctly.
Check that the
"SUBWOOFER" selector is
set to 12 - SUB LINE OUT.
Check your active subwoofer
is working correctly.
Enable this function on
the audio-video devices
connected to Dimension.
/ /
Use Dimension’s manual
"SYNC" function.
The reach of the remote
control is approximately
7 metres. The maximum
angle is 20°.
More
information
Page 24
Page 17
/
Page 25
Page 26
/
Your TV is equipped with
the Audio Return Channel
function but there’s no sound
when Dimension’s TV input is
selected.
The battery in your remote
control is low.
The Audio Return Channel
function on your TV is
deactivated.
The HDMI™ cable has not
been connected incorrectly or
a there’s a fault
with the cable.
Replace the battery. Page 10
Refer to your TV’s user
manual and enable the
TV’s Audio Return Channel
function.
Check connections are
correct. If the problem
persists, try another HDMI™
cable.
Page 18
Page 18
Page 29

DIMENSION
User manual
10. Technical specifications
Type 5-channel sound bar
Speaker drivers 5 ultra-flat speaker-drivers made of paper cones - 3
Nom power 6-channel 320Watts
Integrated amplification 6-channel 450Watts
Frequency response (+/- 6 dB) 50Hz - 25Khz
Inputs
Subwoofer outputs
Modes
Soundbar on furniture
(Width x Depth x Height)
Wall mounted Soundbar
(Width x Depth x Height)
Weight 12lbs (5,5kg)
2 x HDMI™ (OUT/IN)
Digital Optical Toslink
Analogue 3.5 mm Jack
Dimension Sub Out: Powered output dedicated to Dimension Sub
Sub Line Out: Low-Level output compatible with all amplified
subwoofers
HDMI ARC™ (Audio Return Channel)
HDMI CEC™ (Consumer Electronics Control)
Auto Power on HDMI™ inputs
Adjustable bass
Adjustable Sound and Picture synchronisation
Night mode
Room acoustics
1/4
1/2x41/2
45
x4
" (115.5 x11.5 x11.5cm)
1/4
9/16x515/16
45
x2
" (115.5 x 6.5 x14.7cm)
15/16
29
" (10cm)
Conditions of guarantee
All Focal loudspeakers are covered by guarantee drawn up by the official Focal distributor in your country. Your
distributor can provide all details concerning the conditions of guarantee. Guarantee cover extends at least to that
granted by the legal guarantee in force in the country where the original purchase invoice was issued.
Your Focal-JMlab product was developed and manufactured with high-quality materials and
components which can be recycled and/or re-used. This symbol indicates that electrical and electronic
equipment must be disposed of separately from normal garbage at the end of its operational lifetime.
Please dispose of this product by bringing it to your local collection point or recycling centre for such
equipment. This will help to protect the environment in which we all live.
Page 30

DIMENSION
Bedienungsanleitung
INHALTSVERZEICHNIS
1. Sicherheitshinweise 4
2. Inhaltsverzeichnis 30
3. Lieferumfang 31
4. Einführung 32
4.1. Mehrkanal-Heimkinoklang 32
4.2. Bedienfeld 32
4.3. Anschlussfeld 33
4.4. Fernbedienung 34
5. Aufstellungsort und Montage 35
5.1. Aufstellungsort der Dimension 35
5.2. Aufstellung auf einem TV-Möbel 36
5.3. Wandmontage 37
6. Einstellung der Konfigurationsschalter 38
6.1. Einstellung der Hörposition 38
6.2. Einstellung des Aufstellungsortes 39
6.3. Anpassung an die Raumakustik 40
6.4. Einstellung des Subwoofers 41
7. Anschluss 42
7.1. Anschluss der Dimension
an Ihr Fernsehgerät
7.2. Anschluss an HDMI™ In 43
7.3. Anschlussbeispiele 44
7.3.1. Anschlussbeispiel 1 44
7.3.2. Anschlussbeispiel 2 45
7.3.3. Anschlussbeispiel 3 46
7.3.4. Anschlussbeispiel 4 47
7.4. Anschluss eines Subwoofers 48
Seite
42
Deutsch - Seite 30
8. Verwendung und Funktionen 49
(Consumer Electronics Control)
8.1. Funktion CEC
8.2. Stromaufnahme 49
8.3. Einstellung der Audioformate
für TV und Audio-/Videoquellen
8.4. Lautstärkeregelung 49
8.5. Wahl der Eingänge 50
8.6. Nachtmodus (Night) 50
8.7. Einstellung der Basslautstärke 50
8.8. Audio und Video
synchronisieren (Lip Sync)
8.9. Funktion Light 51
9. Hilfe bei Störungen 51 -52
10. Technische Daten 53
49
49
50
30
Page 31

DIMENSION
Bedienungsanleitung
Wir danken Ihnen, dass Sie sich für ein Produkt von Focal entschieden haben und heißen Sie in unserer High-FidelityWelt willkommen. Seit über 30 Jahren konzipiert, entwickelt und produziert Focal hochkarätige Lautsprecher, Boxen
und inzwischen auch Kopfhörer. Innovation, Tradition, Leistung und Spaß sind unsere Werte, die den „Spirit of Sound“
auszeichnen. Wo auch immer Sie Ihre Musik hören, ist unser einziges Ziel, Sie für unsere gemeinsame Leidenschaft
zu begeistern: großartigen, wirklichkeitsgetreuen Klang.
Aus genau dieser Philosophie heraus entstand auch die Soundbar Dimension. Sie spiegelt unseren Willen wider,
unser akustisches Know-how auf Anwendungen zu übertragen, die über traditionelle Hi-Fi-Boxen hinausgehen und
Kinofreaks ein aufregendes Erlebnis bieten: einen naturgetreuen, dynamischen, hochauflösenden Klang, der Sie
mitten ins Geschehen eintauchen lässt.
3. Lieferumfang
1 x Soundbar Dimension
31
1 x Wandhalterung
1 x Fernbedienung 1 x Bedienungsanleitung
1 x Netzteil
2 x Standfüße
DIMENSION
Manuel d’utilisation
1
®
1 x Netzanschlusskabel
Page 32

DIMENSION
Bedienungsanleitung
4. Einführung
4.1. Mehrkanal-Heimkinoklang
Die Lautsprecherleiste Dimension ist kompatibel zu den Mehrkanalprotokollen Dolby Digital
enthält die Dimension einen Virtualisierungsalgorithmus, der Stereosignale in echten Mehrkanalsound umwandelt.
4.2. Bedienfeld
Das Display auf der Frontseite der Dimension verfügt über ein Touchfeld, mit dem die Lautstärke verstellt und
die Ein- und Ausgänge gewählt werden können. Während Ihrer Heimkinositzung ist das Display ausgeschaltet. Es
ist mit einem Näherungssensor ausgestattet und schaltet sich ein, wenn Sie sich der Soundbar nähern oder die
Fernbedienung verwenden.
NIGHT
®
und DTS®. Außerdem
32
DIGI TV
HDMI
AUX
Funktionen:
Standby / On
1
Lautstärke und Lautstärkeanzeige
2
(5 Striche)
Nachtfunktion einschalten / ausschalten
3
Wahl der Eingänge
4
Näherungssensor
5
Page 33

DIMENSION
Bedienungsanleitung
4.3. Anschlussfeld
33
HDMI™ In: Möglichkeit zum Anschluss eines Players mit HDMI™-Anschluss: Blu-ray-Player / DVD-Player /
1
Spielekonsole / TV Box.
HDMI™ TV: Zum Anschluss des Fernsehgeräts. Mit ARC-Funktion (Audiorückkanal) besteht diese Verbindung
2
in zwei Richtungen: Sie empfängt den Ton des Fernsehers oder sendet das Videosignal zum Fernseher.
SUB LINE OUT: Analoger RCA-Ausgang zum Anschluss eines externen aktiven Subwoofers.
3
OPTICAL/DIGI In: Ermöglicht den Anschluss des optischen Audioausgangs eines Fernsehers ohne HDMI™-
4
oder RCA-Buchse. Es lassen sich beliebige andere Player mit optischem digitalem Ausgang anschließen.
AUX / ANALOG: Zum Anschluss des analogen Ausgangs eines Players mit analogem Ausgang: digitaler
5
Musikplayer, Tablet-PC, Computer…
SERVICE: Dieser Eingang wird lediglich vom Kundendienst bei erforderlichen Aktualisierungen des Systems
6
verwendet.
DIMENSION SUB OUT: Spezifischer Ausgang für den Subwoofer Dimension.
7
POWER / DC IN: Zum Anschluss der Stromversorgung der Dimension.
8
KONFIGURATIONSSCHALTER: Mit den 4 Wahlschaltern kann der Klang der Dimension je nach Ihrer
9
Installation und der Raumakustik eingestellt werden. Zur Ausführung dieser Einstellungen siehe Abschnitt
„Einstellungen der Konfigurationsschalter“ (Seite 38).
Page 34

DIMENSION
Bedienungsanleitung
4.4. Fernbedienung
Die Dimension unterstützt das Befehlsprotokoll CEC (Consumer Electronics Control). Falls Ihr Fernsehgerät diese
Funktion enthält, können Sie diese aktivieren und dann die Funktionen Ihrer Soundbar direkt über die Fernbedienung
Ihres Fernsehers steuern. Die Bezeichnung des CEC-Protokolls kann je nach Hersteller Ihres Fernsehers variieren.
Eine Universal- oder programmierbare Fernbedienung kann zur Steuerung der Dimension eingerichtet werden.
Falls erforderlich finden Sie Codes der Infrarotbefehle auf der spezifischen Seite der Soundbar Dimension auf der
Focal-Website. www.focal.com.
Wenn Ihr Fernseher die CEC-Funktion nicht unterstützt oder Sie keine Universalfernbedienung verwenden, steht
Ihnen die Fernbedienung der Dimension zur Verfügung. Auf dieser befinden sich dieselben Befehle wie auf dem
Touchdisplay der Soundbar.
34
Standby/ON
Lautstärkeregelung
Lautstärkeregelung
für die Bässe
Wahl des Eingangs
Bild-Ton-Synchronisation
(Lip-sync)
NACHT-Modus
Schaltet das
Dimension-Display ein
Ziehen Sie bitte vor Gebrauch der Fernbedienung die Plastikfolie aus dem Batteriefach. Um die Batterie Ihrer
Fernbedienung zu wechseln, öffnen Sie die Abdeckung des Batteriefachs und tauschen Sie die Batterie gegen eine
neue Batterie desselben Typs aus: CR2025 (Flachbatterie).
Page 35

DIMENSION
Bedienungsanleitung
5. Aufstellungsort und Montage
5.1. Aufstellungsort der Dimension
Um den Surround-Sound optimal wiederzugeben, sollten sich Ihre Hörposition mittig vor der Lautsprecherleiste und
das Gerät in symmetrischem Abstand zu den Seitenwänden des Raums befinden. Nachstehende Abbildungen zeigen
einige am besten geeignete Aufstellungsorte.
35
X
X
X
OK
OK
Page 36

DIMENSION
Bedienungsanleitung
5.2. Aufstellung auf einem TV-Möbel
Vor dem Aufstellen müssen die beiden Standfüße an die Soundbar Dimension gesteckt werden, wie in folgender
Abbildung zu sehen:
2 x Standfüße
Es sind 5 cm Mindestabstand zwischen den Enden der Dimension und den Seitenteilen des Möbels, den Wänden des
Raumes oder anderen Hindernissen einzuhalten.
36
Mindestens
5cm
Zwecks besserer Stabilität und um ein Herunterfallen der Soundbar zu vermeiden, empfehlen wir Ihnen, die
Dimension so aufzustellen, dass sie vollständig auf dem Möbel aufliegt.
Stellen Sie den Konfigurationsschalter auf der Geräterückseite auf die richtige Position ein.
Steht die Dimension bündig zur Möbelkante, stellen Sie den Wahlschalter „POSITION“ auf 6 – FREE STANDING
(Freistehend). Andernfalls stellen Sie den Wahlschalter „POSITION“ auf 4 – TABLE (Tisch).
Weitere Informationen zum besseren Verständnis der Wahlschalterkonfiguration finden Sie im Abschnitt „Einstellung
der Konfigurationsschalter“ (Seite 38).
TV
X
Mindestens
5cm
Mindestens
5cm
>0>0
TV
Mindestens
5cm
OK
Page 37

DIMENSION
Bedienungsanleitung
5.3. Wandmontage
Es sind 5 cm Mindestabstand zwischen den Enden der Dimension und den Seitenteilen des Möbels, den Wänden
des Raumes oder anderen Hindernissen einzuhalten. Die Dimension kann je nach Höhe Ihres Fernsehgeräts über
oder unter dem Fernseher montiert werden.Stellen Sie den Konfigurationsschalter auf der Geräterückseite auf die
richtige Position ein: „POSITION“ auf 5 – ON WALL (An der Wand).
Weitere Informationen über die Wahlschalterkonfiguration finden Sie im Abschnitt „Einstellung der
Konfigurationsschalter“ (Seite 38). Dimension is supplied with a wall-mounting kit. Im Lieferumfang der Dimension
ist ein Wandmontagesatz enthalten. Zur Wandmontage gehen Sie wie folgt vor:
37
1) Zeichnen Sie die Position der Befestigungslöcher
an der Wand an. Verwenden Sie eine Wasserwaage,
um die Halterung waagrecht anzubringen. Führen Sie
die Kabel an der dafür vorgesehenen Stelle durch die
Halterung.
3) Schrauben Sie die Wandhalterung an die Wand.
2) Bohren Sie die Löcher an den markierten Stellen
und stecken Sie die Dübel ein. Achten Sie darauf, dass
die Dübel für die betreffende Wand geeignet sind.
Wand, Dübel und Schrauben müssen dem Gewicht der
Dimension standhalten: 5.5 kg.
4) Schließen Sie die
Kabel an, richten Sie Ihre
Soundbar auf die Halterung
aus und stecken Sie sie auf
die 4 Stifte.
Page 38

DIMENSION
Bedienungsanleitung
6. Einstellung der Konfigurationsschalter
Auf dem Anschlussfeld finden Sie 4 Wahlschalter, mit denen die Klangwiedergabe der Dimension an Ihren Raum und
Ihre Nutzung angepasst werden kann. Diese Einstellungen müssen vor der endgültigen Aufstellung Ihrer Soundbar
vorgenommen werden.
6.1. Einstellung der Hörposition
Mit diesem Wahlschalter lässt sich die Klangwiedergabe je nach Entfernung zwischen Ihrer üblichen Hörposition
und Ihrer Soundbar anpassen.
Befindet sich die Dimension in weniger als 2 Metern Abstand von Ihrer Hörposition, stellen Sie den Wahlschalter
„DISTANCE“ (Abstand) auf 1 – CLOSE (Nah).
Befindet sich die Dimension zwischen 2 und 4 Metern Abstand von Ihrer Hörposition, stellen Sie den Wahlschalter
„DISTANCE“ (Abstand) auf 2 – MEDIUM (Mittel).
Befindet sich die Dimension in mindestens 4 Metern Abstand von Ihrer Hörposition, stellen Sie den Wahlschalter
„DISTANCE“ (Abstand) auf 3 – FAR (Weit).
Weniger
als 2 Meter
38
Mehr
als 4 Meter
FAR
Zwischen
2 und 4 Metern
MEDIUM
CLOSE
Page 39

DIMENSION
Bedienungsanleitung
6.2. Einstellung des Aufstellungsortes
>0
TABLE
Steht die Dimension auf einem Möbel und befindet sich ihre Vorderseite in einem gewissen Abstand von der
Möbelkante, stellen Sie den Wahlschalter „POSITION“ auf 4 – TABLE (Tisch).
39
WALL
Ist die Dimension an der Wand montiert, stellen Sie den Wahlschalter „POSITION“ auf 5 – ON WALL (An der Wand).
Page 40

DIMENSION
Bedienungsanleitung
FREISTEHEND
Steht die Dimension auf einem Möbel und ist ihre Vorderseite bündig zur Möbelkante, stellen Sie den Wahlschalter
„POSITION“ auf 6 – FREE STANDING (Freistehend).
40
6.3. Anpassung an die Raumakustik
Die Wiedergabe des Surround-Sounds ist von der Akustik Ihres Raums und den Reflexionseigenschaften seiner
Materialien abhängig.
Wenn Ihr Raum aus wenig reflektierenden Wänden und Böden besteht, wie stoffbespannten
Wänden, Vorhängen, Teppichböden oder Teppichen, stellen Sie den Wahlschalter „ROOM
ACOUSTICS“ (Raumakustik) auf 7 – MAT (Gedämpft).
MAT
Wenn Ihr Raum aus durchschnittlich reflektierenden Wänden und Böden besteht, wie Gipswänden,
Hohlziegelwänden, Möbeln und Parkettböden ohne Teppiche, stellen Sie den Wahlschalter „ROOM
ACOUSTICS“ (Raumakustik) auf 8 – MEDIUM (Mittel).
MEDIUM
Wenn Ihr Raum aus stark reflektierenden Wänden und Böden besteht, wie Wänden mit großen
Fenstern, Vollsteinwänden oder Fliesenböden, stellen Sie den Wahlschalter „ROOM ACOUSTICS“
(Raumakustik) auf 9 – CLEAR (Klar).
CLEAR
Page 41

DIMENSION
TV
Bedienungsanleitung
6.4. Einstellung des Subwoofers
TV
41
Wenn die Dimension ohne Subwoofer
verwendet wird, stellen Sie den
Wahlschalter „SUBWOOFER“ auf
10 – NO SUB (Kein Subwoofer).
Wenn die Dimension mit ihrem
zugehörigen Dimension-Subwoofer
verwendet wird, stellen Sie den
Wahlschalter „SUBWOOFER“ auf
11 – DIMENSION SUBWOOFER OUT.
Wenn die Dimension mit einem
an den Ausgang SUB LINE OUT
angeschlossenen aktiven Subwoofer
verwendet wird, stellen Sie den
Wahlschalter „SUBWOOFER“ auf
12 – SUB LINE OUT.
TV
Page 42

DIMENSION
Bedienungsanleitung
7. Anschluss
Die Soundbar Dimension ist mit der Funktion HDMI™ ARC (Audiorückkanal) ausgestattet. Mit dieser Funktion kann
das Audiosignal Ihres Fernsehers empfangen werden, wenn dieser einen HDMI™ ARC-Ausgang hat (Audiorückkanal).
Wenn die beiden HDMI™ ARC-Buchsen verbunden sind, gibt die Dimension den Ton Ihres Fernsehers und anderer
daran angeschlossener Klangquellen, wie Blu-ray-Player, DVD-Player oder TV BOX wieder. Achten Sie allerdings
darauf, dass die Audiorückkanal-Funktion (Audio Return Channel) im Konfigurationsmenü Ihres Fernsehers
aktiviert ist. Auf der Dimension haben wir einen Standard-HDMI™-Eingang hinzugefügt. Daran können Sie die zur
Wiedergabe von Mehrkanalfilmen (5.1, Dolby Digital, DTS Surround) verwendete Quelle anschließen. Auf diese Weise
genießen Sie die uneingeschränkte Audio-/Videoqualität Ihres Players. Nachstehender Abschnitt erläutert Ihnen
ausführlicher, wie Sie die Soundbar Dimension anschließen.
7.1. Anschluss der Dimension an Ihr Fernsehgerät
42
HDMI
TV
ARC
HDMI TV
ARC & CEC
Schließen Sie die Buchse HDMI™ TV der Dimension an eine HDMI™-Buchse Ihres Fernsehgeräts an.
Falls Ihr Fernseher die ARC-Funktion (Audiorückkanal) unterstützt, wählen Sie die Buchse HDMI™ ARC
Ihres Fernsehgeräts aus. Die ARC-Funktion ermöglicht die Tonübertragung vom Fernseher und allen daran
angeschlossenen Klangquellen an die Dimension.
TOSLINK
HDMI
Falls Ihr Fernseher die ARC-Funktion (Audiorückkanal) nicht unterstützt, schließen Sie den optischen digitalen
Audioausgang (Toslink) des Fernsehers an den Eingang OPTICAL/DIGI In der Dimension an. In beiden Fällen
ist darauf zu achten, dass der Eingang HDMI™ TV der Dimension an einem HDMI™-Eingang Ihres Fernsehers
anzuschließen ist. Diese Verbindung überträgt über den Eingang HDMI™ In der Dimension das Videosignal.
TV
HDMI
ARC & CEC
OPTICAL
DIGI in
Page 43

DIMENSION
Bedienungsanleitung
7.2. Anschluss an HDMI™ In
Schließen Sie an den Eingang HDMI™ In die zur Wiedergabe Ihrer Filme in 5.1 und allgemein die zur Wiedergabe von
Blu-rays und/oder DVDs verwendete Quelle an. Dieser Eingang empfängt den Ton ohne Umweg über den Fernseher
und somit ohne Qualitätsverluste direkt aus Ihrem Audio-/Videoplayer.
43
TOSLINK
HDMI
Wenn Sie mehr als eine Audio-/Videoquelle direkt an die Dimension anschließen möchten, können Sie dazu einen
handelsüblichen HDMI™-Verteiler verwenden. Ein solcher Verteiler oder Hub hat mehrere HDMI™-Eingänge und
einen HDMI™-Ausgang, der an die Dimension angeschlossen wird.
TV
HDMI
ARC & CEC
OPTICAL
DIGI in
HDMI
DVD / BLU-RAY
Page 44

DIMENSION
Bedienungsanleitung
7.3. Anschlussbeispiele
In diesem Abschnitt finden Sie die gängigsten Anschlussbeispiele. Um die Qualität der Surround-Effekte
uneingeschränkt zu genießen, ist es wichtig, den von Ihnen zur Wiedergabe der Mehrkanalinhalte (5.1 oder höher)
verwendeten Player an den Eingang HDMI™ In anzuschließen. Diese Beispiele gelten für ein Fernsehgerät mit der
Funktion HDMI™ ARC (Audiorückkanal). Falls Ihr Fernseher diese Funktion nicht unterstützt, müssen Sie neben
dem HDMI™-Kabel den digitalen optischen Audioausgang (Toslink) Ihres Fernsehgeräts an den Eingang DIGI In an
der Dimension anschließen.
7.3.1. Anschlussbeispiel 1
Sie sehen Ihre Mehrkanal-Audio-/Videoinhalte überwiegend vom Blu-ray-Player: schließen Sie diesen an den
Eingang HDMI™ In der Dimension an. Die anderen Quellen sind dargestellt, um das Beispiel zu vervollständigen und
die von der Dimension gebotenen Möglichkeiten aufzuzeigen.
HDMI 3
44
HDMI 2
HDMI 1
TV BOX
VIDEOSPIELKONSOLE
ARC
TUNER TV
HDMI TV
ARC & CEC
OPTICAL
DIG in
CD
DVD / BLU-RAY
HDMI In
CEC
AUX. /
ANALOG
MP3
Der Ton vom Fernsehempfänger, von der TV Box oder der Spielekonsole wird durch Auswahl des TV-Eingangs der
Dimension wiedergegeben. Der Ton vom Blu-ray-Player wird von der Dimension nach Auswahl des Eingangs HDMI™
In abgespielt.
Der Ton des CD-Players wird durch Auswahl des Eingangs DIGI In der Dimension wiedergegeben. Des Weiteren
geschieht die Wiedergabe des Tons vom MP3-Player durch Auswahl des Eingangs AUX.
Page 45

DIMENSION
Bedienungsanleitung
7.3.2. Anschlussbeispiel 2
Sie sehen Ihre Mehrkanal-Audio-/Videoinhalte überwiegend von einer TV BOX. Schließen Sie diese an den Eingang
HDMI™ In der Dimension an. Die anderen Quellen sind dargestellt, um das Beispiel zu vervollständigen und die von
der Dimension gebotenen Möglichkeiten aufzuzeigen.
45
HDMI 2
HDMI 1
ARC
HDMI TV
ARC & CEC
VIDEOSPIELKONSOLE
Der Ton der Spielekonsole wird durch Auswahl des TV-Eingangs der Dimension wiedergegeben.
Der Ton der TV BOX wird von der Dimension nach Auswahl des Eingangs HDMI™ In abgespielt.
Des Weiteren geschieht die Wiedergabe des Tons vom PC durch Auswahl des Eingangs AUX.
TV
HDMI In
CEC
TV BOX
AUX. /
ANALOG
COMPUTER
Page 46

DIMENSION
Bedienungsanleitung
7.3.3. Anschlussbeispiel 3
Sie sehen Ihre Mehrkanal-Audio-/Videoinhalte überwiegend von Ihrer Spielekonsole. Schließen Sie diese an den
Eingang HDMI™ In der Dimension an. Die anderen Quellen sind dargestellt, um das Beispiel zu vervollständigen und
die von der Dimension gebotenen Möglichkeiten aufzuzeigen.
46
HDMI 2
HDMI 1
ARC
TV BOX
HDMI TV
ARC & CEC
TV
AUX. /
ANALOG
HDMI In
CEC
VIDEOSPIELKONSOLE
WIRELESS RECEIVER
Der Ton der TV BOX wird durch Auswahl des TV-Eingangs der Dimension wiedergegeben.
Der Ton der Videospielkonsole wird von der Dimension nach Auswahl des Eingangs HDMI™ In abgespielt.
Der Ton vom Wireless Receiver (Schnurlos-Empfänger) wird durch Auswahl des Eingangs AUX der Dimension
wiedergegeben.
In diesem Beispiel ist der Universal Wireless Receiver von Focal dargestellt. Dieser verwendet die Technologie
Bluetooth aptX®.
Page 47

DIMENSION
Bedienungsanleitungl
7.3.4. Anschlussbeispiel 4
Wenn Sie alle Ihre Klangquellen mit HDMI™-Kabeln an den Eingang HDMI™ In der Dimension anschließen möchten,
benötigen Sie einen handelsüblichen HDMI™-Verteiler. Ein solcher Verteiler (Hub) hat mehrere HDMI™-Eingänge
und einen Ausgang.
47
TUNER TV
HDMI 1
ARC
HDMI TV
ARC & CEC
HDMI In
CEC
HUB HDMI
TV BOX
VIDEOSPIELKONSOLE
Der Ton vom Fernsehempfänger wird von der Dimension durch Auswahl des TV-Eingangs der Dimension
wiedergegeben.
Der Ton vom HDMI™-Verteiler und sämtlichen daran angeschlossenen Klangquellen wird von der Dimension durch
Auswahl des Eingangs HDMI™ In wiedergegeben.
DVD / BLU-RAY
Page 48

DIMENSION
Bedienungsanleitung
7.4. Anschluss eines Subwoofers
Auf der Rückseite der Dimension befinden sich zwei Subwoofer-Ausgänge. Am ersten Ausgang SUB LINE OUT
kann ein beliebiger verstärkter Subwoofer angeschlossen werden. Der zweite Ausgang DIMENSION SUB OUT ist ein
verstärkter Ausgang, der ausschließlich dem Dimension-Subwoofer vorbehalten ist.
Die Aufstellung und Montage des Dimension Subwoofers können Sie in dessen Bedienungsanleitung nachlesen.
48
ODER
Page 49

DIMENSION
Bedienungsanleitung
8. Verwendung und Funktionen
8.1. Funktion CEC (Consumer Electronics Control)
Die Soundbar Dimension ist mit der CEC-Funktion (Consumer Electronics Control) ausgestattet. Wenn Ihr
Fernsehgerät und eine Ihrer Quellen (TV BOX, Blu-ray-Player, …) diese Technologie unterstützen, können Sie die
Dimension über die Fernbedienung Ihres Fernsehers steuern. Gesteuerte Funktionen:
- Lautstärke: Wenn Sie die Lautstärke mit der Fernbedienung Ihres Fernsehers ändern, leitet dieser den Befehl an
die Dimension weiter, die dann ihre Lautstärke anpasst.
- Inbetriebnahme: Sobald Sie Ihr Fernsehgerät einschalten, wird die Dimension direkt am Eingang HDMI™ TV in
Betrieb genommen.
- Wahl der Eingänge: Wenn Sie die an HDMI™ In angeschlossene Quelle einschalten, springt die Dimension auf
diesen Eingang.
Um dieses Steuerungsprotokoll zu nutzen, müssen Sie diesen Modus im Menü Ihres Fernsehgeräts aktivieren.
Beachten Sie, dass der Hersteller Ihres Fernsehers unter Umständen eine andere Bezeichnung für das CECSteuerungsprotokoll verwendet.
8.2. Stromaufnahme
Die Dimension verfügt über 3 verschiedene Modi mit unterschiedlicher Stromaufnahme:
- Betriebsmodus: Die Dimension gibt den Ton der ausgewählten Quelle wieder.
- Sparmodus: Verringerter Stromverbrauch, automatische Erkennung der Signale HDMI™ CEC und DIGI In ist aktiv.
- Standby-Modus: Minimaler Stromverbrauch (< 0,5 Watt).
Die Dimension springt automatisch vom Betriebsmodus in den Sparmodus, wenn 20 Minuten lang kein Tonsignal
wiedergegeben wird. Im Sparmodus ist die Erkennung von CEC-Steuerbefehlen und Signalen an den Eingängen
HDMI™ und DIGI In aktiviert:
- Wird am Eingang DIGI In ein Signal erkannt, wechselt die Dimension automatisch in den Betriebsmodus und
aktiviert den Eingang DIGI In.
- Wenn am Eingang HDMI™ In oder HDMI™ TV ein CEC-Befehl erkannt wird, wechselt die Dimension automatisch in
den Betriebsmodus und aktiviert den Eingang HDMI™ In oder HDMI™ TV.
Anmerkung: Wenn Ihr Fernsehgerät die CEC-Funktion nicht unterstützt, werden keine Befehle an den HDMI™Eingängen erkannt. In diesem Fall werden die Lautstärkeregelung, die Inbetriebnahme und die Auswahl des
Eingangs mit der mitgelieferten Fernbedienung vorgenommen. Der Standby-Modus steht nur zur Verfügung, wenn
kein HDMI™-Kabel an die Dimension angeschlossen ist. Die Soundbar wird nach 6 Stunden ohne Aktivität oder durch
längeres Drücken (> 2 Sekunden) auf die Taste des Bedienfeldes der Dimension in den Standby-Modus versetzt.
Umgekehrt wird die Dimension durch Drücken der Taste auf der Fernbedienung oder auf dem Bedienfeld wieder
in den Betriebsmodus geschaltet.
49
8.3. Einstellung der Audioformate für TV und Audio-/Videoquellen
Um ein optimales 5.1-Klangerlebnis zu genießen, müssen die Parameter der Audio-Ausgangsformate Ihrer
Fernsehgeräte und Audio-/Videoquellen eingestellt werden. Die Geräte bieten nämlich je nach Marke und Qualität
eine Vielzahl unterschiedlicher Toneinstellungen, die das von der Dimension wiedergegebene Klangerlebnis
schmälern können. Sehen Sie deshalb in den Bedienungsanleitungen Ihrer Geräte nach und rufen Sie das Menü
zur Audiokonfiguration auf. In diesem Menü sind vorzugsweise die beiden nachstehenden Formate auszuwählen:
- Dolby Digital: 48 kHz, bis zu 5.1 Kanälen.
- DTS Surround: 48 kHz, bis zu 5.1 Kanälen.
Falls diese Formate nicht angegeben sind, kann Ihr Gerät auch eine „automatische“ Einstellung vorschlagen.
Behalten Sie in diesem Fall die vorgeschlagene Einstellung bei, damit Ihr Gerät das Format des Audioausgangs zur
Dimension mit der besten verfügbaren Qualität anpasst.
8.4. Volume control
Neben der Nutzung der CEC-Funktion können Sie die Lautstärke der Tonwiedergabe der Dimension durch Drücken
der Tasten + und – Ihrer Fernbedienung oder direktes Drücken der Tasten + und – auf dem Display regeln.
Die Lautstärke wird auf der Dimension durch die Lautstärkeanzeige angegeben.
Die Tonwiedergabe kann durch Drücken der Taste Ihrer Fernbedienung stummgeschaltet werden.
Dieser Lautlos-Modus wird auf dem Dimension-Display durch Blinken der Lautstärkeanzeige signalisiert. Durch
erneutes Drücken der Taste Ihrer Fernbedienung wird der Ton wieder eingeschaltet.
Page 50

DIMENSION
Bedienungsanleitung
8.5. Wahl der Eingänge
Sie können den Eingang mit der Taste auf Ihrer Fernbedienung oder mit dem Bedienfeld
der Dimension durch direktes Drücken auf den gewünschten Eingang auswählen.
8.6. Nachtmodus (Night)
Die Dimension verfügt über den diskreten Hörmodus „Night“. In diesem Modus werden die Lautstärke der lauten
Stellen und die Dynamik Ihrer Filmmusik abgesenkt. Dieser Modus ist nur für Inhalte in Dolby Digital verfügbar.
Aktivierung des Nachtmodus:
- Drücken Sie die Taste Night auf der Fernbedienung ODER
- Drücken Sie direkt am Bedienfeld der Dimension auf „Night“.
Auf dem Bedienfeld ist die Anzeige des Nachtmodus aktiviert.
8.7. Einstellung der Basslautstärke
Sie können die Lautstärke der von der Dimension und dem angeschlossenen Subwoofer
wiedergegebenen Bässe regeln.
Zur Einstellung der Basslautstärke gehen Sie wie folgt vor:
- Drücken Sie die Taste auf Ihrer Fernbedienung.
- Regeln Sie die Basslautstärke mit den Tasten + und – der Fernbedienung oder direkt auf dem
Bedienfeld.
50
Nach Einstellen der gewünschten Basslautstärke drücken Sie erneut auf die Taste Ihrer Fernbedienung oder
warten Sie einige Sekunden, bis die Dimension von selbst in den normalen Anzeigemodus zurückspringt.
8.8. Audio und Video synchronisieren (Lip Sync)
Die Qualität Ihrer verschiedenen AV-Geräte (Player, Flachbildfernseher, Konsole…), die von
diesen Geräten ausgetauschten Datenströme und die Verarbeitung des Videosignals durch
Ihren Fernseher können zu einer Verzögerung zwischen Bild und Ton führen.
Um diesen Effekt zu beheben, enthält die Dimension zwei Funktionen:
- Am Eingang HDMI™ In: automatische Synchronisation von Bild und Ton.
- An den Eingängen HDMI™ TV, Digi In und Aux: manuelle Synchronisation von Bild und Ton.
Bei fehlerhafter Synchronisation am Eingang HDMI™ In können Sie dessen manuelle
Einstellung wie nachstehend beschrieben erzwingen.
Manuelle Synchronisation von Bild und Ton:
- Wählen Sie die zu synchronisierende Quelle aus.
- Drücken Sie die Taste auf Ihrer Fernbedienung. Die ausgewählte Quelle blinkt.
- Stellen Sie die Verzögerung zwischen Bild und Ton mit den Tasten + und – der Fernbedienung
oder direkt auf dem Bedienfeld ein, bis Bild und Ton synchronisiert sind.
Page 51

DIMENSION
Bedienungsanleitung
Drücken Sie erneut auf die Taste Ihrer Fernbedienung, um den Synchronisationsmodus wieder zu verlassen.
Die Synchronisationseinstellung der einzelnen Eingänge ist unterschiedlich. So können Sie die Synchronisation von
Bild und Ton für alle Eingänge und somit an die zugeordneten Quellen unterschiedlich anpassen.
Hinweis: Wenn Sie die programmierten Verzögerung default (Werkseinstellung) oder die automatische
Synchronisation auf HDMI ™ In wiederherstellen möchten, drücken Sie die Taste auf der Fernbedienung oder
die Benutzerschnittstelle, bis der Balken Anzeige Volumen sind alle ausgestorben.
8.9. Funktion Light
Im Normalbetrieb ist das Display des Bedienfeldes ausgeschaltet. Nach Drücken der Taste „Light“ auf Ihrer
Fernbedienung leuchtet das Display einige Sekunden lang auf.
9 Hilfe bei Störungen
Sollten Sie beim Betrieb der Dimension auf ein Problem stoßen, überprüfen Sie bitte die Hinweise in unten stehender
Tabelle. Falls die vorgefundene Störung nicht in dieser Tabelle genannt ist oder die Störung mit den vorgeschlagenen
Lösungen nicht beseitigt werden kann, schalten Sie die Dimension aus, ziehen Sie den Netzstecker und wenden Sie
sich an Ihren Händler oder den zugelassenen Focal-Kundendienst.
51
Störungen Mögliche Ursachen Lösungsvorschläge
Die Dimension bleibt stumm,
die Standby-Taste blinkt und
die Lautstärketaste + leuchtet.
Die Dimension bleibt stumm,
die Standby-Taste blinkt und
die Taste HDMI™ TV leuchtet.
Die Dimension bleibt stumm,
die Standby-Taste blinkt und
eine oder zwei andere Tasten
leuchten.
Keine Tonausgabe.
Die Temperatur der
Verstärker ist zu hoch und
der Überhitzungsschutz hat
ausgelöst.
Die Temperatur der
Stromversorgung ist zu hoch
und der Überhitzungsschutz
hat ausgelöst.
Der Mikroprozessor der
Dimension funktioniert nach
einem Stromstoß nicht mehr.
Die Kabel sind falsch
angeschlossen oder ein oder
mehrere Kabel sind defekt.
Die gewünschte Quelle ist
nicht ausgewählt.
Die Lautstärke ist auf das
Minimum eingestellt oder die
Lautlos-Funktion (Mute) ist
aktiviert.
Ihre AV-Quelle sendet ein
von der Dimension nicht
unterstütztes Audioformat.
Die an der Dimension
angeschlossenen HDMI™Geräte unterstützen den
Kopierschutzstandard HDCP
nicht.
Ziehen Sie den Netzstecker
und lassen Sie die Anlage
eine Stunde lang abkühlen.
Schalten Sie die Dimension
dann wieder ein.
Ziehen Sie den Netzstecker
und lassen Sie die Anlage
eine Stunde lang abkühlen.
Schalten Sie die Dimension
dann wieder ein.
Ziehen Sie den Netzstecker,
warten Sie fünf Minuten und
schalten Sie die Dimension
dann wieder ein.
Überprüfen Sie, ob
die Anschlüsse richtig
ausgeführt sind. Wenn das
Problem weiterhin auftritt,
vertauschen Sie die Kabel.
Wählen Sie mit der
Fernbedienung (Input-Taste)
oder auf dem Bedienfeld die
gewünschte Quelle aus.
Stellen Sie mit den Tasten
+ / - die Lautstärke
wunschgemäß ein oder
deaktivieren Sie die LautlosFunktion (Mute).
Wählen Sie in den
Einstellungen Ihrer Quelle ein
von der Dimension erkanntes
Audioformat aus.
Schließen Sie AV-Geräte an,
die den HDCP-Kopierschutz
unterstützen.
Mehr
Informationen
/
/
/
Seite 42
Seite 32 & 34
Seite 34
Seite 49
/
Page 52

DIMENSION
Bedienungsanleitung
52
Anomalies Mögliche Ursachen Lösungsvorschläge
Ihr Subwoofer Dimension Sub
bleibt stumm.
Ihr an SUB LINE OUT
angeschlossener Subwoofer
bleibt stumm.
Die CEC-Befehle über
die HDMI™-Anschlüsse
funktionieren nicht richtig.
Sie bemerken, dass Bild und
Ton nicht synchron sind.
Die Fernbedienung
funktioniert nicht.
Der Anschluss ist falsch
ausgeführt oder das Kabel
ist defekt.
Der Konfigurationsschalter
„SUBWOOFER“ steht nicht in
der richtigen Stellung.
Der Anschluss ist falsch
ausgeführt oder das Kabel
ist defekt.
Der Konfigurationsschalter
„SUBWOOFER“ steht nicht in
der richtigen Stellung.
Der verwendete Subwoofer
steht auf AUS oder Standby
oder ist defekt.
Die CEC-Steuerfunktion
über HDMI ist auf Ihren AVGeräten deaktiviert.
Ihre Geräte unterstützen
diese Steuerfunktion nicht.
Ihr Fernsehgerät unterstützt
keine automatische
Synchronisation.
Die Dimension befindet sich
außerhalb der Reichweite
Ihrer Fernbedienung oder der
Zielwinkel ist zu groß.
Überprüfen Sie, ob das Kabel
richtig angeschlossen ist.
Überprüfen Sie, ob der Konfigurationsschalter „SUBWOOFER“ auf der Position 11
– „SUB LINE OUT“ steht.
Überprüfen Sie, ob das Kabel
richtig angeschlossen ist.
Überprüfen Sie, ob der
Konfigurationsschalter
„SUBWOOFER“ auf der
Position 12 – „SUB LINE
OUT“ steht.
Überprüfen Sie den Zustand
Ihres aktiven Subwoofers.
Aktivieren Sie diese Funktion
auf den an der Dimension
angeschlossenen AVGeräten.
/ /
Verwenden Sie die manuelle
Einstellung „SYNC“ der
Dimension.
Die Reichweite der
Fernbedienung beträgt etwa
7 Meter und der maximale
Zielwinkel 20°.
Mehr
Informationen
Dimension
Sub
Bedienunsanleitung
Seite 41
Seite 48
Seite 41
/
Seite 49
Seite 50
/
Ihr Fernsehgerät ist
mit der ARC-Funktion
(Audiorückkanal) ausgestattet,
aber bei Auswahl des TVEingangs an der Dimension
wird kein Ton wiedergegeben.
Die Batterie Ihrer
Fernbedienung ist leer.
Die ARC-Funktion
(Audiorückkanal) Ihres
Fernsehers ist deaktiviert.
Das HDMI™-Kabel ist falsch
angeschlossen oder defekt.
Legen Sie eine neue
Batterie ein.
Sehen Sie in der
Bedienungsanleitung Ihres
Fernsehgeräts nach und
aktivieren Sie seine ARCFunktion (Audiorückkanal).
Überprüfen Sie, ob
die Anschlüsse richtig
ausgeführt sind. Falls das
Problem weiterhin besteht,
testen Sie ein anderes
HDMI™-Kabel.
Seite 34
Seite 42
Seite 42
Page 53

DIMENSION
Bedienungsanleitung
10. Technische Daten
Typ 5-Kanal sound bar
Lautsprecher 5 ultra-flache Lautsprecher-Treiber von Papier Kegeln - 10 cm
Nennleistung 6-Kanal 320 Watts
Integrierte Verstärkung 6-Kanal 450 Watts
Frequenzbereich (+/- 6 dB) 50 Hz - 25 Khz
Eingänge
Subwoofer Ausgänge
Funktionen
Soundbar auf Möbel
(Weite x Dicke x Höhe)
Wand-Soundbar
(Weite x Dicke x Höhe)
Gewicht 5,5 kg
2 x HDMI™ (OUT/IN)
Digital Optical Toslink
Analogon 3.5 mm Jack
Dimension Sub Ausgang: Powered Ausgabe gewidmet Sub Dimension
Sub Line Ausgang: Low-Level-Ausgang zusammen mit allen aktiven
Subwoofer kompatibel
HDMI ARC™ (Audio Return Channel)
HDMI CEC™ (Consumer Electronics Control)
Auto Power on HDMI™ inputs
Einstellbare Bass
Einstellbarer Ton und Bild Synchronisation
Nacht mode (Night)
Die Anpassung an den Hörraum
115.5 x11.5 x11.5 cm
115.5 x 6.5 x14.7 cm
53
Garantiebedingungen
Alle Focal-Lautsprecher sind durch eine Garantie abgedeckt, die vom offiziellen Focal-Händler in Ihrem Land
erstellt wurde. Ihr Händler kann alle Details in Bezug auf die Garantiebedingungen vorlegen. Die Garantieabdeckung
erstreckt sich mindestens auf die Abdeckung durch die gesetzliche Garantie in dem Land, in dem die Originalrechnung
für den Kauf ausgestellt wurde.
Ihr Focal-JMlab-Produkt wurde mit hochwertigen Materialien und Komponenten entworfen und
hergestellt, die recycelbar sind und wieder verwendet werden können. Dieses Symbol bedeutet, dass
elektrische und elektronische. Geräte am Ende ihrer Nutzungsdauer vom Hausmüll getrennt entsorgt
werden müssen. Bitte entsorgen Sie dieses Gerät bei Ihrer örtlichen kommunalen Sammelstelle oder im
Recycling Centre. Bitte helfen Sie mit, die Umwelt in der wir leben, zu erhalten.
Page 54

DIMENSION
руководство пользователя
Содержание
1. Инструкция по технике безопасности 5
2. Содержание 54
3. Комплект поставки 55
4. Презентация 56
4.1 Многоканальное объемное
звучание домашнего кинотеатра
4.2. Пользовательский интерфейс 56
4.3. Панель подключений 57
4.4. Пульт дистанционного управления 58
5. Позиционирование и монтаж 59
5.1. Позиционирование
звуковой панели Dimension
5.2. Установка на телевизионную подставку 60
5.3. Монтаж на стену 61
6.1. Настройка расстояния
до места прослушивания
6.2. Настройка положения 63
6.3. Настройка в зависимости
от акустики помещения
6.4. Настройка сабвуфера 65
7. Коммутация 66
7.1. Подключение звуковой панели
Dimension к телевизору
7.2. Подключение к входу HDMI™ In 67
7.3. Примеры соединений 68
7.3.1. Пример соединения 1 68
7.3.2. Пример соединения 2 69
7.3.3. Пример соединения 3 70
7.3.4. Пример соединения 4 71
7.4. Подключение сабвуфера 72
стр
56
59
62
64
66
Русскtая версия стр. 54
8. Эксплуатация и функции 73
8.1. Функция CEC (Consumer Electronics
Control, управление
потребительской электроникой)
8.2. Режим питания 73
8.3. Настройка аудиоформата телевизора и
источника аудио/видеосигналов
8.4. Регулировка громкости 73
8.5. Переключатель входных сигналов 74
8.6. Ночной режим (Night) 74
8.7. Установка уровня
низких частот
8.8. Синхронизация аудио/видеосигналов
(синхронизация изображения
и звукового сопровождения)
8.9. Функция подсветки 75
9. Поиск и устранение
неисправностей
10. технические характеристики 77
54
73
73
74
74
75-76
Focal® является зарегистрированной торговой маркой Focal-JMlab – TCHERNOV AUDIO 3-MAGISTRALNAYA
STR. 30, BLDG 2 123007 MOSCOW - www.tchernovaudio.com - Téléphone 74 95 72 11 381 - Fax : 74 95 72 11 381
Page 55

DIMENSION
руководство пользователя
Вы приобрели продукцию марки Focal. Благодарим вас за покупку и желаем вам наслаждаться высокой
точностью воспроизведения. Марка Focal занимается проектированием, разработкой и производством
высококачественных динамиков и колонок на протяжении более 30 лет. С недавних пор Focal также производит
наушники. Инновационный подход, поддержание традиции, технологическое совершенство и удовольствие
— вот наши ключевые ценности, характеризующие направление Spirit of Sound ≪Дух Звука≪. Где бы вы ни
находились, мы преследуем одну-единственную цель: объединить людей вокруг общей страсти к богатому,
аутентичному звучанию.
Звуковая панель Dimension была разработана на основе такой философии. Мы стремимся к тому, чтобы
использовать наш опыт работы, накопленный при создании акустических систем, к другим областям, помимо
традиционных динамиков Hi-Fi, чтобы доставить истинное удовольствие любителям кино: естественный,
динамический звук высокой четкости перенесет вас в самую гущу событий.
3. Комплект поставки
Звуковая панель Dimension — 1 шт.
55
Кронштейн для настенного крепления — 1 шт.
Пульт дистанционного
управления — 1 шт.
Блок питания — 1 шт.
Кабель питания — 1 шт.
Стойки — 2 шт.
®
DIMENSION
Manuel d’utilisation
1
руководство
пользователя — 1 шт.
Page 56

DIMENSION
руководство пользователя
4. Презентация
4.1 Многоканальное объемное звучание домашнего кинотеатра
Звуковая панель Dimension совместима с форматами многоканального звука Dolby Digital® и DTS®. Более
того, Dimension использует встроенный алгоритм виртуализации, который преобразует стереосигналы в
реальный многоканальный звук.
4.2. Пользовательский интерфейс
Звуковая панель Dimension имеет сенсорный экран для управления громкостью, вводом данных и режимами
прослушивания. Сенсорный дисплей отключается во время видеопросмотра. Будучи оснащена датчиком
близости физических объектов, панель Dimension автоматически включается при вашем приближении или
при использовании пульта дистанционного управления.
56
NIGHT
DIGI TV
HDMI
AUX
Функции:
Режим ожидания / вкл.
1
Регулировка громкости и индикатор
2
уровня громкости (5 столбиков)
Ночной режим вкл. / выкл.
3
Переключатель входных сигналов
4
Датчик близости физических
5
объектов
Page 57

DIMENSION
руководство пользователя
4.3. Панель подключений
57
HDMI™ In : для подключения устройств, оснащенных интерфейсом HDMI™, таких как проигрыватель
1
Blu-Ray / DVD-плеер / игровая приставка / телевизионная приставка.
HDMI™ TV : для подключения телевизора. Канал возврата аудиосигнала ARC (Audio Return Channel)
обеспечивает двунаправленный обмен данными: передачу аудиосигналов от телевизора и
2
видеосигналов к телевизору.
3
SUB LINE OUT : аналоговый выход RCA для подключения внешнего активного сабвуфера.
OPTICAL/DIGI In : для подключения к оптическому аудиовыходу на телевизоре, не оснащенном HDMI™
4
ARC. Можно также подключать другие плееры, оснащенные цифровыми оптическими выходами.
AUX / ANALOG : для подключения устройств, оснащенных аналоговым выходом: цифровых музыкальных
5
плееров, планшетных и настольных компьютеров...
SERVICE : этот вход используется только сотрудниками сервисного центра в случае необходимости
6
обновления системы.
7
DIMENSION SUB OUT : выход, предназначенный исключительно для сабвуфера Dimension.
POWER / DC IN : для подключения Dimension к источнику питания.
8
SETTINGS SELECTORS: эти 4 переключателя позволяют настроить звук Dimension в соответствии
с условиями установки и акустикой помещения. Для регулирования переключателей см. раздел
9
«Настройка переключателей» (стр. 62).
Page 58

DIMENSION
руководство пользователя
4.4. Пульт дистанционного управления
Звуковая панель Dimension оснащена протоколом CEC (Consumer Electronics Control, управление
потребительской электроникой). Если ваш телевизор оснащен этой функцией, то ее включение позволит вам
управлять звуковой панелью с помощью пульта дистанционного управления телевизора. Название протокола
CEC может быть разным у различных производителей телевизоров.
Универсальные и обучаемые пульты дистанционного управления можно запрограммировать на управление
панелью Dimension. При необходимости инфракрасные коды команд звуковой панели Dimension можно найти
на веб-сайте Focal: www.focal.com.
Если ваш телевизор не оснащен функцией CEC, или если вы не используете универсальный пульт
дистанционного управления, то вы можете воспользоваться пультом дистанционного управления Dimension,
входящим в комплект поставки. Пульт дистанционного управления имеет такое же расположение функций, как
и сенсорный экран на звуковой панели.
58
Standby/ON
Регулировка
громкости
Настройка уровня НЧ
(низких частот)
Переключатель
входных сигналов
Синхронизация
аудио-видео сигналов
НОЧНОЙ
режим
Включает
подсветку дисплея
Перед использованием пульта дистанционного управления снимите пластиковый фиксатор с батарейного
отсека пульта. Для замены батареек на пульте дистанционного управления откройте батарейный отсек и
замените старые батарейки на новые аналогичного типа: CR2025.
Page 59

DIMENSION
руководство пользователя
5. Позиционирование и монтаж
5.1. Позиционирование звуковой панели Dimension
Для обеспечения наилучшего объемного звучания рекомендуется устанавливать звуковую панель напротив
места прослушивания симметрично по отношению к стенам помещения. На приведенных ниже диаграммах
показано несколько рекомендуемых позиций.
59
X
X
X
OK
OK
Page 60

DIMENSION
руководство пользователя
5.2. Установка на телевизионную подставку
Перед установкой на телевизионную подставку используйте две стойки для крепления к панели Dimension, как
показано на следующей диаграмме:
2 x bases
Расстояние от панели Dimension до ближайших объектов (стен, мебели и других поверхностей), должно
составлять не менее 5 см.
60
минимальные
5см
Для придания звуковой панели большей стабильности и во избежание ее падения мы рекомендуем
устанавливать Dimension таким образом, чтобы она полностью опиралась на телевизионную подставку.
Убедитесь в том, что переключатель настроек, расположенный на задней панели, отрегулирован
соответствующим образом. Если звуковая панель Dimension установлена очень близко к краю телевизионной
подставки, то поставьте переключатель «ПОЛОЖЕНИЕ» (POSITION) в позицию 6 «СВОБОДНОЕ ПОЛОЖЕНИЕ»
(FREE STANDING). Если это не так, поставьте переключатель «ПОЛОЖЕНИЕ» (POSITION) в позицию 4 «СТОЛ»
(TABLE). Дополнительная информация о настройках переключателей приведена в разделе «Настройка
переключателей» (стр. 62).
TV
X
минимальные
5см
>0>0
минимальные
5см
TV
OK
минимальные
5см
Page 61

DIMENSION
руководство пользователя
5.3. Монтаж на стену
Расстояние от панели Dimension до ближайших объектов (стен, мебели и других поверхностей), должно
составлять не менее 5 см. Звуковую панель Dimension можно устанавливать над или под
телевизором, в зависимости от его высоты. Убедитесь в том, что селектор настроек, расположенный на задней
панели, отрегулирован соответствующим образом: переключатель «ПОЛОЖЕНИЕ» (POSITION) в позиции 5
«НА СТЕНЕ» (ON WALL). Дополнительная информация о настройках переключателей приведена в разделе
«Настройка переключателей» (стр. 62). Звуковая панель Dimension поставляется с комплектом для настенного
монтажа. Установку следует осуществлять в приведенном ниже порядке:
61
1) Определите и отметьте расположение крепежных
отверстий. Используйте спиртовой уровень для
приведения Dimension точно в горизонтальное
положение. Проведите кабели через специально
предусмотренные отверстия на кронштейне для
настенного крепления.
3) Прикрепите кронштейн к стене.
2) Просверлите отверстия в отмеченных местах и
вставьте дюбели. Предупреждение: в зависимости
от типа стены используйте соответствующие дюбели.
Стена, дюбели и шурупы должны выдерживать вес
звуковой панели Dimension: 5.5 кг.
4) Подсоедините кабели,
а затем установите
звуковую панель
Dimension, закрепив ее на
кронштейне с помощью
4-х штырей.
Page 62

DIMENSION
руководство пользователя
6. Настройка переключателей
Отрегулируйте звучание Dimension с помощью 4-х переключателей, расположенных на задней панели, в
соответствии с акустикой в вашем помещении и своих личных предпочтений. Переключатели необходимо
настроить до окончательной установки звуковой панели.
6.1. Настройка расстояния до места прослушивания
Этот переключатель позволяет настроить уровень звучания в зависимости от расстояния между точкой
прослушивания и звуковой панелью.
Если Dimension расположена менее чем в 2-х метрах от слушателя, поставьте переключатель «РАССТОЯНИЕ»
(DISTANCE) в позицию 1 «БЛИЗКОЕ» (CLOSE).
Если Dimension находится на расстоянии 2–4 метра от слушателя, поставьте переключатель «РАССТОЯНИЕ»
(DISTANCE) в позицию 2 «СРЕДНЕЕ» (MEDIUM).
Если Dimension находится на расстоянии более 4-х метров от слушателя, поставьте переключатель
«РАССТОЯНИЕ» (DISTANCE) в позицию 3 «ДАЛЕКОЕ» (FAR).
Меньше 2-х
метров
62
Больше 4
метров
FAR
От 2-х до 4-х
метров
MEDIUM
CLOSE
Page 63

DIMENSION
руководство пользователя
6.2. Настройка положения
>0
TABLE
Если панель Dimension установлена на каком-либо предмете мебели, и при этом ее передняя часть не
выступает за край мебели, поставьте переключатель «ПОЛОЖЕНИЕ» (POSITION) в позицию 4 «СТОЛ» (TABLE).
63
WALL
Если Dimension крепится к стене, поставьте переключатель «ПОЛОЖЕНИЕ» (POSITION) в позицию 5 «НА
СТЕНЕ» (ON WALL).
Page 64

DIMENSION
руководство пользователя
FREE
STANDING
Если панель Dimension установлена на каком-либо предмете мебели, и при этом ее передняя часть
выступает за край мебели, поставьте переключатель «ПОЛОЖЕНИЕ» (POSITION) в позицию 6 «СВОБОДНОЕ
ПОЛОЖЕНИЕ» (FREE STANDING).
6.3. Настройка в зависимости от акустики помещения
64
Качество объемного звучания зависит от акустики помещения и акустических свойств материалов отделки
помещения.
Если в вашем помещении плохая акустика: на стенах имеются шторы, занавески, ковры или
коврики, поставьте переключатель «АКУСТИКА ПОМЕЩЕНИЯ» (ROOM ACOUSTICS) в позицию
7 «КОВЕР» (MAT).
MAT
Если в вашем помещении средняя акустика: смежные стены изготовлены из гипса или
пустотелого кирпича, в комнате имеются различные предметы мебели, непокрытый паркет,
то поставьте переключатель «АКУСТИКА ПОМЕЩЕНИЯ» (ROOM ACOUSTICS) в позицию 8
«СРЕДНИЙ УРОВЕНЬ» (MEDIUM).
MEDIUM
Если в вашем помещении хорошая акустика: стены с большими стеклянными поверхностями,
или изготовлены из полнотелого кирпича, или полы выложены плиткой, то поставьте
переключатель «АКУСТИКА ПОМЕЩЕНИЯ» (ROOM ACOUSTICS) в позицию 9 «ОТКРЫТОЕ
ПРОСТРАНСТВО» (CLEAR).
CLEAR
Page 65

DIMENSION
TV
руководство пользователя
6.4. Настройка сабвуфера
TV
65
Если звуковая панель Dimension
используется отдельно
без сабвуфера, поставьте
переключатель «САБВУФЕР»
(SUBWOOFER) в позицию 10 «БЕЗ
САБВУФЕРА» (NO SUB).
Если Dimension используется с
сабвуфером Dimension, поставьте
переключатель «САБВУФЕР»
(SUBWOOFER) в позицию 11
«САБВУФЕР DIMENSION»
(DIMENSION SUBWOOFER OUT).
Если Dimension используется
с активным сабвуфером,
подключенным к выходу SUB LINE
OUT, поставьте переключатель
«САБВУФЕР» (SUBWOOFER) в
позицию 12 «SUB LINE OUT».
TV
Page 66

DIMENSION
руководство пользователя
7. Коммутация
Звуковая панель Dimension оснащена функцией HDMI™ ARC (Audio Return Channel). Эта функция позволяет
получать аудиосигнал от телевизора, если у телевизора имеется выход HDMI™ ARC (Audio Return Channel). При
соединении обоих входов HDMI™ ARC звуковая панель Dimension воспроизводит звук с телевизора или любого
другого источника, подсоединенного к нему: проигрывателя Blu-Ray, DVD-плеера, телевизионной приставки.
Проверьте, чтобы в меню настроек вашего телевизора был включен канал возврата аудиосигнала. На звуковой
панели Dimension также имеется стандартный ввод HDMI™. Он предназначен для устройств, использующих
кодирование многоканального звука (5.1, Dolby Digital, DTS Surround). Таким образом, вы можете в полной
мере насладиться качеством звука своего аудио/видео плеера. В следующем разделе возможные соединения
Dimension представлены более подробно.
7.1. Подключение звуковой панели Dimension к телевизору
66
HDMI
ARC
Соедините вход HDMI™ TV на звуковой панели Dimension с входом телевизора HDMI™.
Если у вашего телевизора имеется канал возврата аудиосигнала ARC (Audio Return Channel), то используйте
выход HDMI™ ARC телевизора. Функция ARC позволяет передавать аудиосигналы с телевизора и любых
других устройств, подключенных к телевизору, на звуковую панель Dimension.
TOSLINK
HDMI
Если у вашего телевизора нет канала возврата аудиосигнала ARC (Audio Return Channel), то подсоедините
цифровой оптический выход телевизора (Toslink) к оптическому входу OPTICAL/DIGI In на звуковой панели
Dimension. В любом случае убедитесь, что вход HDMI™ TV на звуковой панели Dimension подключен к входу
HDMI™ на телевизоре. По этому соединению будет передаваться видеосигнал от звуковой панели Dimension
к телевизору через вход HDMI™ In на звуковой панели Dimension.
TV
HDMI TV
ARC & CEC
TV
HDMI
ARC & CEC
OPTICAL
DIGI in
Page 67

DIMENSION
руководство пользователя
7.2. Подключение к входу HDMI™ In
Соедините вход HDMI™ In с источником звука, используемого для воспроизведения фильмов, закодированных
в формате 5.1, или к источнику звука, который обычно используется для воспроизведения дисков Blu-ray и/или
DVD. Этот вход принимает аудиосигналы непосредственно с вашего аудио/видео плеера, обходя телевизор,
тем самым не происходит никакой потери качества.
67
TOSLINK
HDMI
Если вы хотели бы подсоединить более одного аудио/видео источника напрямую к звуковой панели Dimension,
то вы можете приобрести концентратор HDMI™. Концентратор HDMI™ имеет несколько входов HDMI™ и один
выход HDMI™, который нужно будет использовать для соединения с Dimension.
TV
HDMI
ARC & CEC
OPTICAL
DIGI in
HDMI
DVD / BLU-RAY
Page 68

DIMENSION
руководство пользователя
7.3. Примеры соединений
В следующем разделе приведены примеры наиболее распространенных соединений. Для обеспечения
наилучшего объемного звучания важно подсоединить плеер, предназначенный для воспроизведения
многоканального звука, к выходу HDMI™ In (5.1 или выше). Примеры предусматривают, что телевизоры
оснащены функцией HDMI™ ARC (Audio Return Channel). Если ваш телевизор не поддерживает эту функцию,
то помимо кабеля HDMI™, также подключите оптический аудиокабель телевизора (Toslink) к входу DIGI In на
звуковой панели Dimension.
7.3.1. Пример соединения 1
Если вы в основном пользуетесь плеером Blu-Ray для воспроизведения многоканального аудио/видео
контента: подсоедините плеер Blu-Ray к входу HDMI™ In на звуковой панели Dimension. Другие устройства
изображены для более полной демонстрации данного примера и возможных вариантов подсоединения к
звуковой панели Dimension.
HDMI 3
68
HDMI 2
HDMI 1
ARC
TV BOX
консольные видеоигры
TUNER TV
HDMI TV
ARC & CEC
OPTICAL
DIG in
CD
DVD / BLU-RAY
HDMI In
CEC
AUX. /
ANALOG
MP3
Для воспроизведения звука с телевизионного тюнера, телевизионной или игровой приставки используйте вход
TV на звуковой панели Dimension. Для воспроизведения звука с плеера Blu-Ray используйте вход HDMI™ In.
Для воспроизведения звука с проигрывателя компакт-дисков используйте вход DIGI In на звуковой панели
Dimension. Для воспроизведения звука с цифрового медиаплеера используйте вход AUX.
Page 69

DIMENSION
руководство пользователя
7.3.2. Пример соединения 2
Если вы в основном пользуетесь телевизионной приставкой для воспроизведения многоканального аудио/
видео контента: подсоедините телевизионную приставку к входу HDMI™ In на звуковой панели Dimension.
Другие устройства изображены для более полной демонстрации данного примера и возможных вариантов
подсоединения к звуковой панели Dimension.
69
HDMI 2
HDMI 1
ARC
HDMI TV
ARC & CEC
консольные видеоигры
Для воспроизведения звука с игровой приставки используйте вход TV на звуковой панели Dimension.
Для воспроизведения звука с телевизионной приставки используйте вход HDMI™ In на звуковой панели
Dimension.
А для воспроизведения звука с компьютера используйте вход AUX
TV
HDMI In
CEC
TV BOX
AUX. /
ANALOG
компьютер
Page 70

DIMENSION
руководство пользователя
7.3.3. Пример соединения 3
Если вы в основном пользуетесь игровой приставкой для воспроизведения многоканального аудио/видео
контента: подсоедините игровую приставку к входу HDMI™ In на звуковой панели Dimension. Другие устройства
изображены для более полной демонстрации данного примера и возможных вариантов подсоединения к
звуковой панели Dimension.
70
HDMI 2
HDMI 1
ARC
TV BOX
HDMI TV
ARC & CEC
WIRELESS RECEIVER
TV
AUX. /
ANALOG
HDMI In
CEC
консольные видеоигры
Для воспроизведения звука с телевизионной приставки используйте вход TV на звуковой панели Dimension.
Для воспроизведения звука с игровой приставки используйте вход HDMI™ In на звуковой панели Dimension.
Для воспроизведения звука с беспроводного приемника используйте вход AUX на звуковой панели Dimension.
В этом примере использован универсальный беспроводной приемник Focal. Универсальный беспроводной
приемник Focal работает на основе технологии Bluetooth aptX®.
Page 71

DIMENSION
руководство пользователя
7.3.4. Пример соединения 4
Если вы хотели бы подключить все свои устройства с помощью кабеля HDMI™, подсоединенного к входу
HDMI™ In на звуковой панели Dimension, то вы можете приобрести концентратор HDMI™. Такие разветвители
имеют несколько входов HDMI™ и один выход.
71
TUNER TV
HDMI 1
ARC
HDMI TV
ARC & CEC
HDMI In
CEC
HUB HDMI
TV BOX
консольные видеоигры
Для воспроизведения звука с телевизионного тюнера используйте вход TV на звуковой панели Dimension.
Для воспроизведения звука со всех устройств, подключенных к концентратору HDMI™, используйте вход
HDMI™ In на звуковой панели Dimension.
DVD / BLU-RAY
Page 72

DIMENSION
руководство пользователя
7.4. Подключение сабвуфера
На задней панели Dimension имеется два выхода для сабвуфера. Первый выход SUB LINE OUT используется
для подключения любых сабвуферов. Второй выход DIMENSION SUB OUT является выходом, предназначенным
исключительно для сабвуфера Dimension.
Описание по установке приведено в руководстве пользователя сабвуфера Dimension.
72
или
Page 73

DIMENSION
руководство пользователя
8. Эксплуатация и функции
8.1. Функция CEC (Consumer Electronics Control, управление потребительской электроникой)
Звуковая панель Dimension оснащена функцией CEC (Consumer Electronics Control, управление
потребительской электроникой). Если ваш телевизор и некоторые из ваших других устройств (ресивер
цифрового телевидения, Blu-Ray плеер...) поддерживают данную технологию, вы сможете управлять звуковой
панелью Dimension при помощи пульта дистанционного управления телевизора. Регулируемые функции:
- Громкость: при использовании пульта дистанционного управления телевизора для регулировки громкости,
ваш телевизор передаст эту информацию на звуковую панель Dimension, которая отрегулирует свою громкость.
- Питание включено: как только вы включите свой телевизор, включится звуковая панель Dimension, выбрав
вход HDMI™ TV.
- Переключатель входных сигналов: как только вы включите устройство, подключенное к входу HDMI™ In,
звуковая панель Dimension выберет этот вход.
Чтобы использовать функцию CEC, включите ее в своем телевизоре. Внимание: функция CEC может называться
по-другому, в зависимости от производителя телевизор.
8.2. Режим питания
Звуковая панель Dimension работает в 3 различных режимах питания:
-Режим питания: звуковая панель Dimension проигрывает аудио из выбранного устройства.
-Эко-режим: пониженное энергопотребление, включается автоматическое обнаружение сигналов от входов
HDMI™ CEC и DIGI In.
-Режим ожидания: минимальное энергопотребление (< 0,5 Вт).
В случае отсутствия аудиосигнала в течение 20 минут, звуковая панель Dimension автоматически переключится
из режима питания в эко-режим. Когда звуковая панель Dimension находится в эко-режиме, обнаружение
команд CEC и сигналов активируется на входах HDMI™ и DIGI In соответственно:
-В случае обнаружения сигнала с входа DIGI In, звуковая панель Dimension автоматически переключается в
режим питания и активирует вход DIGI In.
-В случае обнаружения команды CEC на входах HDMI™ In или HDMI™ TV, звуковая панель Dimension
автоматически переключается в режим питания и активирует вход HDMI™ In или HDMI™ TV.
Примечание: Если ваш телевизор не оснащен функцией CEC, входы HDMI™ не будут обнаруживать команды.
В таком случае, для включения устройства, регулировки громкости и переключения входных сигналов
используйте пульт дистанционного управления, входящий в комплект поставки. Режим ожидания доступен
только в случае, когда к звуковой панели Dimension не подсоединен кабель HDMI™. Данный режим включается
после 6 часов бездеятельности или путем нажатия и удерживания кнопки в течение более 2 секунд на
пользовательском интерфейсе звуковой панели Dimension. Чтобы включить звуковую панель Dimension,
нажмите кнопку на пульте дистанционного управления или на пользовательском интерфейсе.
73
8.3. Настройка аудиоформата телевизора и источника аудио/видеосигналов
Для обеспечения наиболее эффективной работы интерфейса 5.1, убедитесь в том, что вы осуществили
конфигурацию форматов вывода аудио вашего телевизора или других устройств. В зависимости от марки и
качества устройства, могут быть доступны многочисленные аудио настройки, которые могут снизить качество
работы звуковой панели Dimension.
Обратитесь к руководствам по эксплуатации своих устройств и перейдите к аудио настройкам. В меню
установите приоритетность двух следующих аудиоформатов:
- Dolby Digital: 48 кГц, до каналов 5.1.
- DTS Surround: 48 кГц, до каналов 5.1.
Если эти форматы не указаны, ваше устройство может иметь функцию «автоматической» настройки. В таком
случае, используйте эту настройку. Ваше устройство приспособит формат вывода аудио к звуковой панели
Dimension, используя наилучшее доступное качество.
Page 74

DIMENSION
руководство пользователя
8.4. Регулировка громкости
Также как и с помощью функции CEC, вы можете регулировать громкость звуковой панели Dimension нажатием
кнопок + и - на пульте дистанционного управления или непосредственно на дисплее звуковой панели
Dimension. Уровень громкости будет показан на индикаторе уровня громкости звуковой панели Dimension.
Звук можно отключить нажатием кнопки на пульте дистанционного управления.
Когда звук панели Dimension будет отключен, начнет мигать индикатор уровня громкости. Чтобы включить
звук, еще раз нажмите кнопку на пульте дистанционного управления.
8.5. Переключатель входных сигналов
Вы можете выбрать нужный входной сигнал нажатием кнопки на пульте дистанционного
управления или выбрав тип входного сигнала непосредственно на пользовательском
интерфейсе звуковой панели Dimension.
8.6. Ночной режим (Night)
Звуковая панель Dimension также может работать в ночном режиме. При использовании данного режима,
звуковая панель Dimension уменьшает пиковую громкость и динамический диапазон саундтрека фильма.
Данный режим доступен только для контента, закодированного в Dolby Digital.
Чтобы включить данный режим:
- нажмите кнопку «Ночной режим» (Night) на пульте дистанционного управления ИЛИ
- нажмите «Ночной режим» (Night) непосредственно на пользовательском интерфейсе звуковой панели
Dimension.
На пользовательском интерфейсе активируется дисплей ночного режима.
74
8.7. Установка уровня низких частот
Вы можете настроить уровень низких частот на звуковой панели Dimension или на активном
сабвуфере.
Чтобы настроить уровень низких частот:
- нажмите кнопку на пульте дистанционного управления;
- отрегулируйте уровень низких частот нажатием кнопок + или - на пульте дистанционного
управления или на пользовательском интерфейсе.
После того, как уровень низких частот будет настроен, еще раз нажмите кнопку на пульте
дистанционного управления или подождите несколько секунд, пока звуковая панель Dimension
не вернется в стандартный режим отображения.
Page 75

DIMENSION
руководство пользователя
8.8. Синхронизация аудио/видеосигналов (синхронизация изображения и речевых сигналов)
Качество работы ваших аудио-видео устройств (медиаплееров, плоскоэкранных
телевизоров, пультов оператора...), поток информации, обмениваемой с ними, и то,
как ваш телевизор обрабатывает видеосигналы, могут повлиять на синхронизацию
аудио/видеосигналов.
Для устранения этой проблемы звуковые панели Dimension предлагают два решения:
-При использовании входа HDMI™ In: автоматическая синхронизация аудио/
видеосигналов.
-При использовании входов HDMI™ TV, Digi In и Aux: ручная синхронизация аудио/
видеосигналов.
Если вы столкнулись с проблемой асинхронного звука на входе HDMI™ In, вы можете
осуществить синхронизацию аудио- и видеосигналов вручную.
Чтобы осуществить синхронизацию аудио- и видеосигналов вручную:
- Выберите источник, синхронизацию которого вы хотите осуществить.
- Нажмите кнопку «Синхронизировать» на пульте дистанционного управления.
Выбранный вами источник начнет мигать.
- Для достижения синхронизации установите время задержки аудио- и видеосигналов
при помощи кнопок + и - на пульте дистанционного управления или непосредственно
на пользовательском интерфейсе.
Для выхода из режима синхронизации снова нажмите кнопку «Синхронизировать» на пульте
дистанционного управления.
Синхронизации времени может отличаться при использовании разных входов. Поэтому вы можете настроить
синхронизацию аудио- и видеосигналов по отдельности для каждого источника входного сигнала.
75
Примечание: Если вы хотите восстановить запрограммированы задержки умолчанию (заводские настройки)
или автоматической синхронизации на HDMI ™ в систему, нажимайте кнопку на пульте дистанционного
или пользовательского интерфейса до баров объем дисплей все вымерли.
8.9. Функция подсветки
Как правило, подсветка пользовательского интерфейса отключена. Вы можете включить ее, нажав в течение
нескольких секунд кнопку «Подсветка» (Light) на пульте дистанционного управления.
9. Поиск и устранение неисправностей
В случае возникновения каких-либо неисправностей в звуковой панели Dimension, обратитесь к приведенной
ниже таблице. В случае если неисправность не устраняется или если ни одно из предлагаемых решений не
решает проблему, выключите звуковую панель Dimension и обратитесь к своему дилеру или в авторизованный
сервисный центр компании Focal.
Page 76

DIMENSION
руководство пользователя
76
Неисправность Возможные причины Возможные решения
Звуковая панель Dimension
не издает никаких звуков,
кнопка «Режим ожидания»
(Standby) мигает, и горит
кнопка регулировки
громкости +.
Звуковая панель Dimension
не издает никаких звуков,
кнопка «Режим ожидания»
(Standby) мигает, и горит
кнопка HDMI™ TV.
Звуковая панель Dimension
не издает никаких звуков,
кнопка «Режим ожидания»
(Standby) мигает, и горит
одна или несколько других
кнопок.
Нет звука
Из-за повышенной
температуры усилителя
включилась защита от
перегрева.
Температура подачи
является чрезмерным,
защита от перегрева
активен.
Из-за значительного
поражения электрическим
током перестал работать
микропроцессор звуковой
панели Dimension.
Кабели не были
подсоединены правильно
или возникла неполадка
с одним или несколькими
кабелями.
Не был выбран нужный
источник.
Установлен минимальный
уровень громкости или
включена функция
отключения звука (Mute).
Ваш аудио-видео источник
передает аудиоформат,
нераспознаваемый
звуковой панелью
Dimension.
Отключите систему от
сети питания, подождите
в течение часа, пока она
не остынет, затем опять
включите звуковую панель
Dimension.
Отключите систему от
сети питания, подождите
в течение часа, пока она
не остынет, затем опять
включите звуковую панель
Dimension.
Отключите систему от
сети питания, подождите
пять минут, затем опять
включите звуковую панель
Dimension.
Проверьте подсоединения.
Если неисправность не
устраняется, замените
кабели.
Выберите нужный
источник с помощью
пульта дистанционного
управления (кнопка ввода)
или пользовательского
интерфейса.
Установите желаемый
уровень громкости при
помощи кнопки + или либо отключите функцию
отключения звука (Mute).
В настройках источника
выберите аудиоформат,
поддерживаемый звуковой
панелью Dimension.
больше
инвалидации
/
/
/
стр. 66
стр.
56 и 58
стр. 58
стр. 73
Page 77

DIMENSION
руководство пользователя
77
Неисправность Возможные причины Возможные решения
Устройства HDMI™,
подключенные к звуковой
Ваш сабвуфер Dimension не
издает никаких звуков.
Сабвуфер, подключенный
к выходу SUB LINE OUT, не
издает никаких звуков.
Неисправно работает
функция CEC через
соединения HDMI™.
Аудио- и видеосигналы не
синхронизированы.
Не работает пульт
дистанционного управления.
панели Dimension, не
поддерживают HDCP
(High-Bandwidth Digital
Content Protection, защита
цифрового широкополосного
контента).
Кабель не был подсоединен
правильно или возникла
неполадка с кабелем.
Переключатель
«САБВУФЕР» (SUBWOOFER)
поставлен в неправильную
позицию.
Кабель не был подсоединен
правильно или возникла
неполадка с кабелем.
Переключатель
«САБВУФЕР» (SUBWOOFER)
поставлен в неправильную
позицию.
Используемый сабвуфер
поставлен в позицию
«Выкл.» (OFF), «Режим
ожидания» (Standby) или
работает неисправно
На ваших аудио-видео
устройствах отключена
команда CEC через HDMI™.
По крайней мере одно
из ваших устройств не
оснащено данной функцией
управления.
Ваш телевизор не оснащен
функцией автоматической
синхронизации.
Звуковая панель Dimension
находится за пределами
досягаемости пульта
дистанционного управления
или под слишком большим
углом.
Подсоедините аудиовидео устройство, которое
поддерживает HDCP.
Проверьте правильность
подсоединения кабеля.
Проверьте, поставлен ли
переключатель «САБВУФЕР»
(SUBWOOFER) в позицию
11 –
«SUB LINE OUT».
Проверьте правильность
подсоединения кабеля.
Проверьте, поставлен ли
переключатель «САБВУФЕР»
(SUBWOOFER) в позицию
12 –
«SUB LINE OUT».
Проверьте исправность
работы активного сабвуфера.
Включите данную функцию
на аудио-видео устройстве,
подключенном к звуковой
панели Dimension.
/ /
Воспользуйтесь функцией
ручной синхронизации
(SYNC) звуковой панели
Dimension.
Радиус охвата пульта
дистанционного управления
составляет около 7 метров.
Максимальный угол
составляет 20°.
больше
инвалидации
/
руководство
пользователя
Dimension
Sub
стр. 65
стр. 72
стр. 65
/
стр. 73
стр. 74
/
Page 78

DIMENSION
руководство пользователя
78
Неисправность Возможные причины Возможные решения
Ваш телевизор оснащен
функцией Audio Return
Channel, но он не издает
никаких звуков при выборе
телевизионного входа
звуковой панели Dimension.
Садится батарейка пульта
дистанционного управления.
Функция Audio Return
Channel в телевизоре
отключена.
Кабель HDMI™ не был
подсоединен правильно или
с ним возникла неполадка.
Замените батарейку. стр. 58
Обратитесь к руководству
по эксплуатации вашего
телевизора и включите в
телевизоре функцию Audio
Return Channel.
Проверьте правильность
подсоединений. В случае
если неисправность не
устраняется, используйте
другой кабель HDMI™.
больше
инвалидации
стр. 66
стр. 66
Page 79

DIMENSION
руководство пользователя
10. технические характеристики
тип 5-канальный звуковой панели
Выступающие Колонки 5 Выступающие конуса суперплоский бумаги - 10 см
Номинальная мощность 320 W более 6 каналов
Максимальная мощность 450 W более 6 каналов
Частотный диапазон (+/-6dB) 50 Hz - 25 kHz
затраты
Выход на сабвуфер
Функции
2 x HDMI™ (OUT/IN)
Optical Toslink Digital
Аналоговый Jack 3,5 mm
Dimension Sub saída : Выделенный выход Sub Размеры
Sub Line saída : Низкий уровень выходного согласуется все
усиливается сабвуфер
HDMI ARC™ (Audio Return Channel)
HDMI CEC™ (Consumer Electronics Control)
Auto Power Входы HDMI™
Регулировка уровня НЧРегулировка синхронизации аудио и
видеосигналовФункция подсветки
Адаптация к комнате для прослушивания
79
Звуковая панель на мебель
(Ширина х глубина х высота)
Звуковая панель стены
(Ширина х глубина х высота)
бремя 5.5 кг
Условия гарантии
Все громкоговорители Focal имеют гарантию в соответствии с действующим законодательством в Вашей
стране. Гарантийный срок составляет 1 (один) год с момента приобретения, срок службы для акустических
систем и динамических головок составляет 3 (три) года. Гарантийное и послегарантийное обслуживание
осуществляется официальным дистрибьютором в вашей стране. Гарантия недействительна в следующих
случаях:
- Механические повреждения изделия и повреждения, вызванные попаданием внутрь изделия посторонних
предметов, веществ и жидкостей.
- Не соблюдение норм эксплуатации изделия и превышение эксплуатационных характеристик.
- В случае установки и подключения изделия не сертифицированными установочными центрами.
- Гарантия не распространяется на изделия, приобретенные в другой стране у другого дистрибьютора.
Продукция Focal-JMlab была разработана и произведена из материалов и компонентов, которые
могут быть переработаны и/или использованы повторно. Этот символ означает, что электрические
компоненты в конце эксплуатационного периода должны быть утилизированы отдельно от бытового
мусора. Это поможет защитить окружающую среду, в которой мы все живем.
115,5 cm x 11,5 cm x 11,5 cm
115,5 cm x 6,5 cm x 14,7 cm
Page 80

DIMENSION
User manual / Bedienungsanleitung / руководство пользователя
Su producto Focal-JMlab ha sido concebido y fabricado con materiales y componentes de alta calidad, que pueden
ser reciclados y reutilizados. Este símbolo signifi ca que los aparatos eléctricos y electrónicos, al final de su vida
útil, deberán ser separados de los residuos domésticos y reciclados. Rogamos llevar este aparato al punto de
recogida de su municipio o a un centro de reciclaje. Por favor, contribuya Vd. también en la conservación del
ambiente en que vivimos.
E
Il vostro prodotto Focal-JMlab è stato progettato e realizzato con materiali e componenti pregiati che possono
essere riciclati e riutilizzati. Questo simbolo signifi ca che gli apparecchi elettrici ed elettronici devono essere
smaltiti separatamente dai rifi uti domestici alla fine del loro utilizzo. Vi preghiamo di smaltire questo apparecchio
negli appositi punti di raccolta locali o nei centri preposti al riciclaggio. Contribuite anche voi a tutelare l’ambiente
nel quale viviamo.
I
O seu produto Focal-Jmlab foi concebido e fabricado, utilizando materiais e componentes de alta qualidade que,
podem ser reciclados e reutilizados. Este símbolo significa que, no fim da sua vida útil, equipamentos eléctricos
e electrónicos devem ser eliminados separadamente dos resíduos sólidos domésticos. Por favor, entregue este
equipamento ao respectivo ecoponto local ou comunal ou ao centro de reciclagem competente. Por favor, ajudenos a preservar o meio ambiente em que vivemos.
P
Tämä Focal-JMlab-tuote on suunniteltu ja valmistettu korkealaatuisista materiaaleista ja komponenteista,
joita voidaan kierrättää ja käyttää uudelleen. Tämä symboli tarkoittaa, että sähkölaitteet ja elektroniset laitteet
tulee hävittää erillään kotitalousjätteestä, kun niitä ei enää käytetä. Jätä tämä laite paikkakuntasi kunnalliseen
keräyspisteeseen tai kierrätyskeskukseen. Auta meitä säästämään luontoa, jossa elämme.
FIN
Uw Focal-JMlab-Product is ontworpen voor en gebouwd uit hoogwaardige materialen en componenten die
gerecycled kunnen worden en dus geschikt zijn voor hergebruik. Dit symbool betekent, dat elektrische en
elektronische apparatuur aan het einde van zijn levensduur gescheiden van het huisvuil apart moet worden
ingeleverd. Breng dit apparaat naar een van de plaatselijke verzamelpunten of naar een kringloopwinkel. Help
s.v.p. mee, het milieu waarin we leve te beschermen.
NL
Teie Focal-JMlab toode on välja töötatud ning toodetud kõrgkvaliteetsest materjalist ning osades, mida on võimalik
ümber töödelda ning/või korduvkasutada. Antud märgis näitab, et elektri- ja elektroonikaseadmeid peab nende
kasutusaja lõppemisel kõrvaldama lahus muudest jäätmetest. Palun viige toode kõrvaldamiseks teie kohalikku
jäätmete kogumiskohta või antud seadme ümbertöötamiskeskusesse. See aitab kaitsta meid ümbritsevat
keskkonda.
SE
Produkt Focal-JMlab został zaprojektowany i wykonany z materiałów i elementów wysokiej jakości, nadających się do
recyklingu i ponownego wykorzystania. Symbol ten oznacza, że sprzęt elektryczny i elektroniczny należy utylizować po
zakończeniu użytkowania odrębnie od odpadów domowych. Sprzęt należy utylizować w komunalnym punkcie zbiórki lub w
punkcie recyklingu. Pomóżcie i Wy chronić środowisko, w którym żyjemy.
PL
Deres Focal-JMlab-produkt er designet og fremstillet med materialer og komponenter af høj kvalitet, som kan
recycles og genbruges. Dette symbol betyder, at elektriske og elektroniske apparater skal bortskaffes adskilt fra
det almindelige husholdningsaffald, når de ikke længere bruges. Aflever dette apparat på Deres lokale kommunale
genbrugsstation eller på genbrugscentret. Hjælp med at passe på det miljø, vi lever i.
DK
80
Page 81

DIMENSION
User manual / Bedienungsanleitung / руководство пользователя
Šis Focal-Jmlab produkts ir izstradats un ražots, izmantojot augstas kvalitates materialus un komponentus,
kurus var otrreizeji parstradat un/vai lietot atkartoti. Šis simbols norada, ka elektriskas un elektroniskas
ierices pec to kalpošanas laika beigam jalikvide atseviški no parastajiem atkritumiem. Ludzu, likvidejiet šo
produktu, tikai nododot vieteja savakšanas punkta vai parstrades centra, kas paredzeti šadai technikai. Šadi
jus palidzesiet aizsargat vidi, kura mes visi dzivojam.
LV
Vaš Focal-JMlab proizvod je zasnovan in izdelan iz visoko kakovostnih materialov in komponent, ki so obnovljive in
jih je mogoce ponovno uporabiti. Ta simbol pomeni, da je potrebno električhe in elektronske naprave po izteku njihove
uporabne dobe, odvesti ločeno od gospodinjjskih odpadkov. Naprošamo vas, da napravo oddate na vašem lokalnem
komunalmen zbirnem mestu ali v reciklaznem centru. Naprošamo vas za sodelovanje pri pomoči ohranjanja našega
življenjskega prostora.
SLO
Váš vỷrobek Focal-JMlab byl navržen a vyroben z vysoce kvalitních materiálů a komponent, ktéré lze recyklovat
a znovu použit. Tento symbol znamena, že se elektrické a elektronicke přístroje po uplynutí své životnosti musejí
likvidovat odděleně od domácího odpadu. Odevzdejte proto prosim tento přístroj k likvidaci v místně příslušném
komunálním sběrném dvoře nebo k recyklaci v příslušnem recyklačnim středisku. Pomozte nám prosím při ochraně
životního prostředí.
CZ
Το Focal-JMlab προϊόν σας αναπτύχθηκε και κατασκευάστηκε με υψηλής ποιότητας υλικά και συστατικά τα οποία μπορούν να
ανακυκλωθούν ή να ξαναχρησιμοποιηθούν. Αυτό το σύμβολο δηλώνει ότι οι ηλεκτρικές και ελεκτρονικές συσκευές πρέπει να
πετιούνται ξεχωριστά από τα κανονικά σας σκουπίδια στο τέλος του χρόνου λειτουργίας τους.
Παρακαλείστε να πετάτε αυτό το προϊόν με το να το φέρετε το οικείο σας σημείο ή κέντρο ανακύκλωσης για κάθε συσκευή. Αυτό
θα σας βοηθήσει να προστατέψετε το περιβάλλον στο οποίο όλοι ζούμε.
GR
Jūsų Focal-JMlab gaminys buvo sukurtas ir pagamintas panaudojant aukštos kokybès medžiagas ir komponentus,
kuriuos galima perdirbti ir/arba panaudoti pakartotinai. Šis simbolis nurodo, kad elektroninius įtaisus, pasibaigus jų
eksploatavimo laikotarpiui, reikia utilizuoti atskirai nuo įprastinių buitinių atliekų. Jeigu šio gaminio tarnavimo laikas
baigesi, tai prašome perduoti jį specialių atliekų surinkimo arba perdirbimo omonei. Tai padès apsaugoti aplinką,
kurioje mes visi gyvename.
LT
Váš výrobok Focal-JMlab bol navrhnutý a vyrobený z vysoko kvalitných materiálov a komponentov, ktoré je možné
recyklovat' a znovu použit'. Tento symbol znamená, že sa elektrické a elektronické pristroje po uplynutí svojej
životnosti musia likvidovat' oddelene od domáceho odpadu. Odovzdajte preto prosim tento prístroj k likvidácii v
miestne príslušnom komunalnom zbernom dvore alebo k recyklácii v prislušnom recyklačnom stredisku. Pomôžte nám
prosím pri ochrane životného prostredia.
SK
81
Page 82

NOTES
User manual / Bedienungsanleitung / руководство пользователя
82
Page 83

International Guarantee
The Focal guarantee only applies if this page is returned to us within 10 days of
purchase, to the following address:
Focal-JMlab - BP 374 - 108, rue de l’Avenir - 42353 La Talaudière cedex - FRANCE
Now it's possible to register on line : www.focal.com/warranty
Model: Serial number:
Name of dealer: Town:
Date of purchase: Purchase price:
Your name: Age: Occupation:
Your complete address:
Your email address:
Details of your installation (brand, model):
iPod, iPad, iPhone®: Other music players:
Tuner / Web Radio: DVD:
Blu Ray: CD / SACD:
Satellite / TNT: Flat screen:
Amplifier: Others:
Your decision for purchasing this Focal model was made according to:
Dealer’s advice Friend’s advice
Visit to an exhibition, show Press article
Listening in auditorium Already own Focal products
Reliability / Quality Documentation
Reputation French produce
Guarantee Quality / Price ratio
Design / Finishes Other
Sound
In case of purchase of new equipment, what were your former speakers ?
Explain in a few words why you choose Focal...
Further comments:
The information given on this page will remain confidential.
Due to constant technological advances, Focal reserves its right to modify specifications without notice. Images may not conform exactly to specific product.
Page 84

Focal-JMlab® - BP 374 - 108, rue de l'Avenir - 42353 La Talaudière cedex - France - www.focal.com
Tel. (+33) 04 77 43 57 00 - Fax (+33) 04 77 43 57 04 - SCFG-140328/1 - codo1420
 Loading...