

Page 1
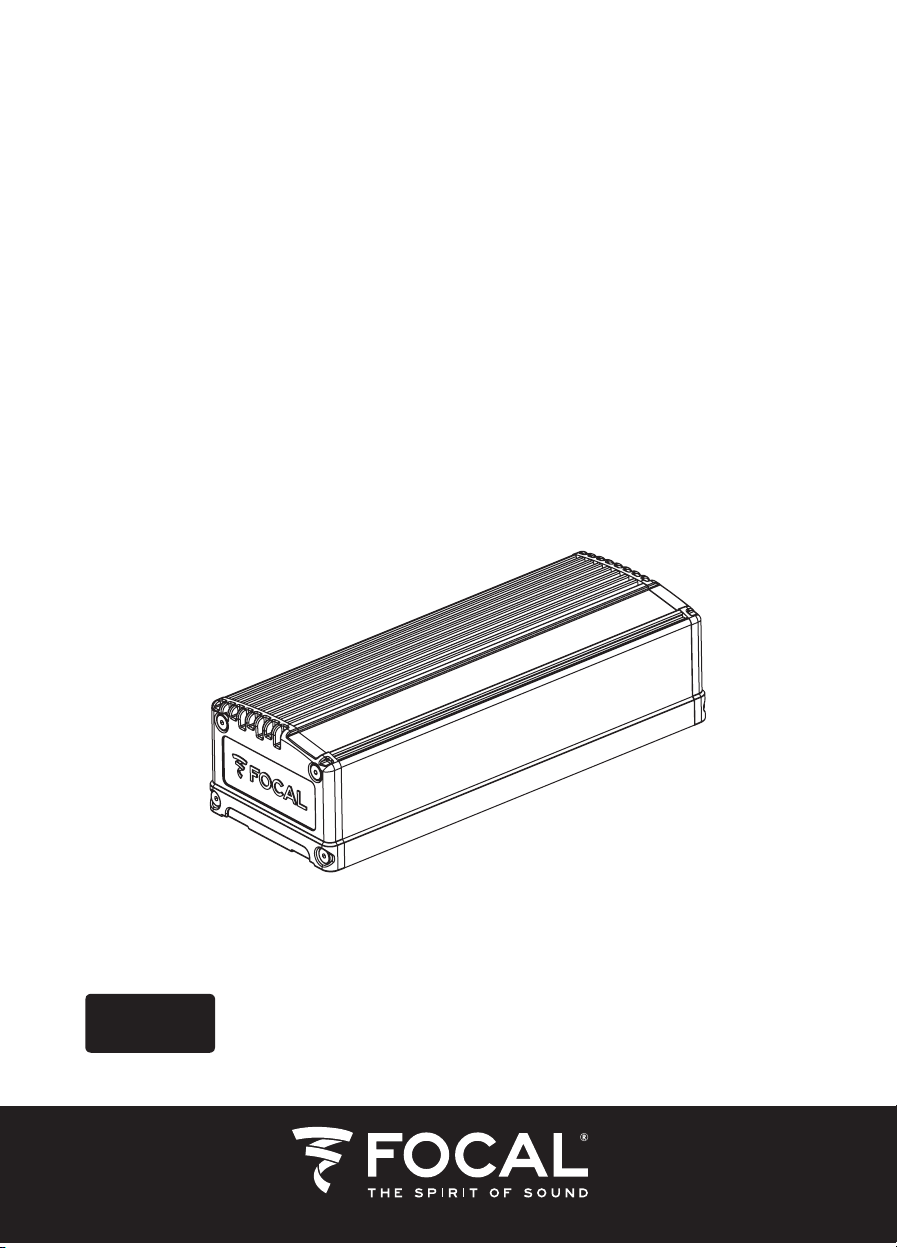
IMPULSE 4.320
Ultra-compact D-class amplifier
User manual / Manuel d'utilisation
English page 3
Français page 15
Deutch seite 27
Page 2

Page 3
IMPULSE 4.320 AMPLIFIER
User manual
Thank you for choosing Focal amplifiers for your Car Audio system and for sharing our philosophy: “the Spirit of
Sound”. This product offers the best of Focal technology in terms of compact D-class amplifiers.
In order to obtain the best results, we highly recommend you have your IMPULSE 4.320 amplifier installed by
your local Focal dealer. To maximise the use of all the functionalities of your amplifier and to fully enjoy its
performance, we recommend you thoroughly read all the instructions in this manual and keep it for future
reference. Any problems due to the non-compliance of these rules may void the warranty.
English version
The Focal guarantee only applies if the enclosed guarantee card
CAUTION
This symbol indicates important instructions. Failure to comply with these instructions may result in
injury or material damage.
Contents
- IMPULSE 4.320 amplifier
- User manual
- Set of accessories
Accessory available (sold separately):
- 1 ISO Plug and Play cable for connecting up to compatible head units
CAUTION
• Do not operate any functions which may distract you while driving. Functions or settings requiring sustained
attention must only be used when the vehicle is at a complete standstill. Always make sure to stop your vehicle in
a safe place before operating these functions. Failure to do so may cause an accident.
• Keep the volume at a low level to be able to hear outside noises while driving the vehicle. Failure to do so may
cause an accident.
is returned to us within 10 days of purchase.
• Never open your IMPULSE 4.320 amplifier and never make any modifications to the product. Failure to do so may
cause an accident, a fire or an electric shock.
Your Focal-JMlab product was developed and manufactured with high-quality materials and components
which can be recycled and/or re-used. This symbol indicates that electrical and electronic equipment
must be disposed of separately from normal garbage at the end of its operational lifetime.Please dispose
of this product by bringing it to your local collection point or recycling centre for such equipment. This will
help to protect the environment in which we all live.
Page 4
IMPULSE 4.320 aMPLIfIEr
User manual
CAUTION
• Only use your IMPULSE 4.320 amplifier with 12V mobile applications. Any use other than the intended use may
cause a fire, an electric shock or injury.
• Use fuses with the adequate amperage. Failure to do so may cause a fire or an electric shock.
• Do not obstruct the heat sink on your IMPULSE 4.320 amplifier. Internal overheating may occur and cause a fire.
• Wire the connections correctly. Make sure you use the appropriate wire gauge and type of cable. Failure to do so
may cause a fire, injury and/or material damage.
• Do not use nuts or bolts on steering or breaking systems, tanks, seat-belt anchor points or other safety
elements for connecting the ground. Use of these parts as ground may deactivate the vehicle’s control system
and cause a fire or other technical problems.
• Keep all small objects which could be swallowed, such as fasteners, screws and accessories, out of the reach of
children. Swallowing such objects may cause serious injuries. If swallowed, seek medical advice.
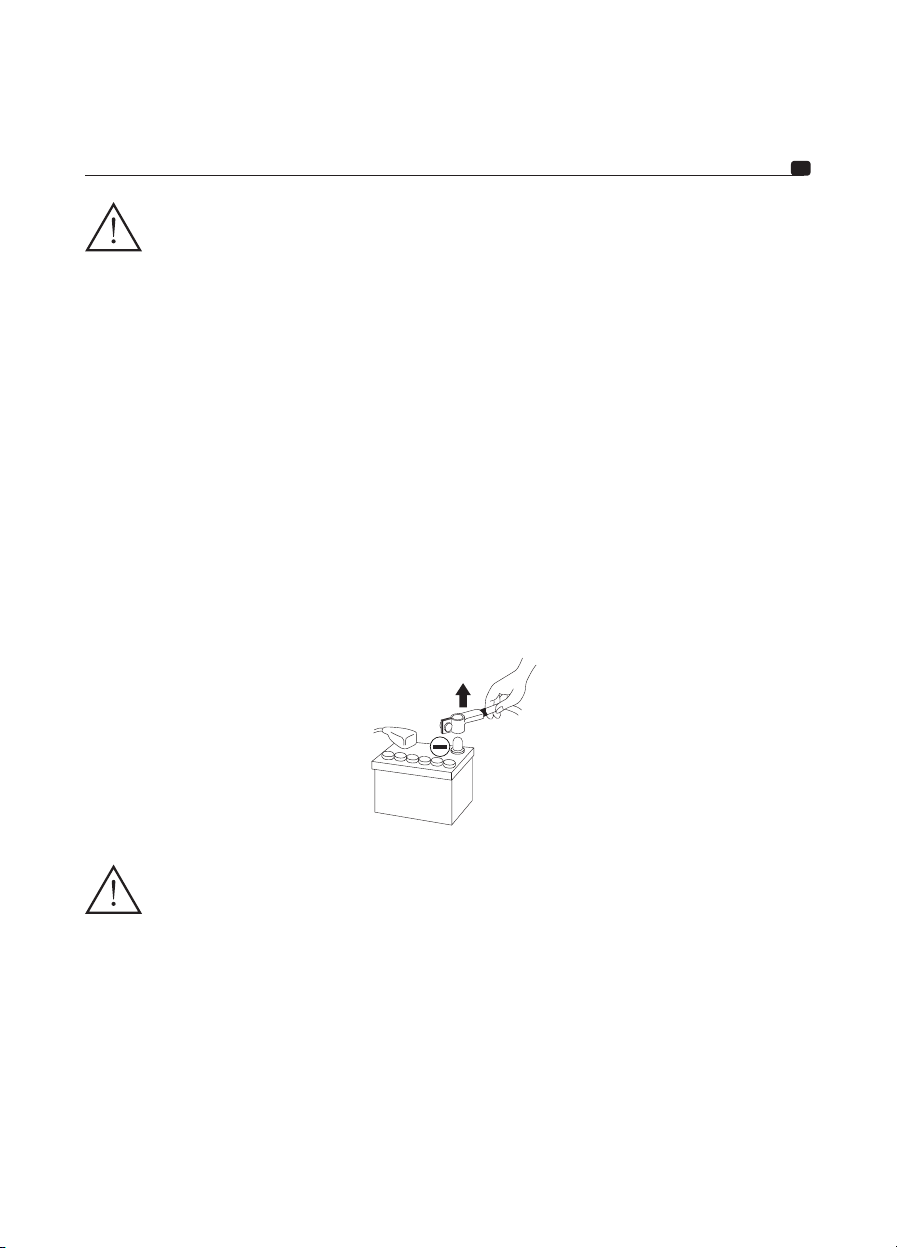
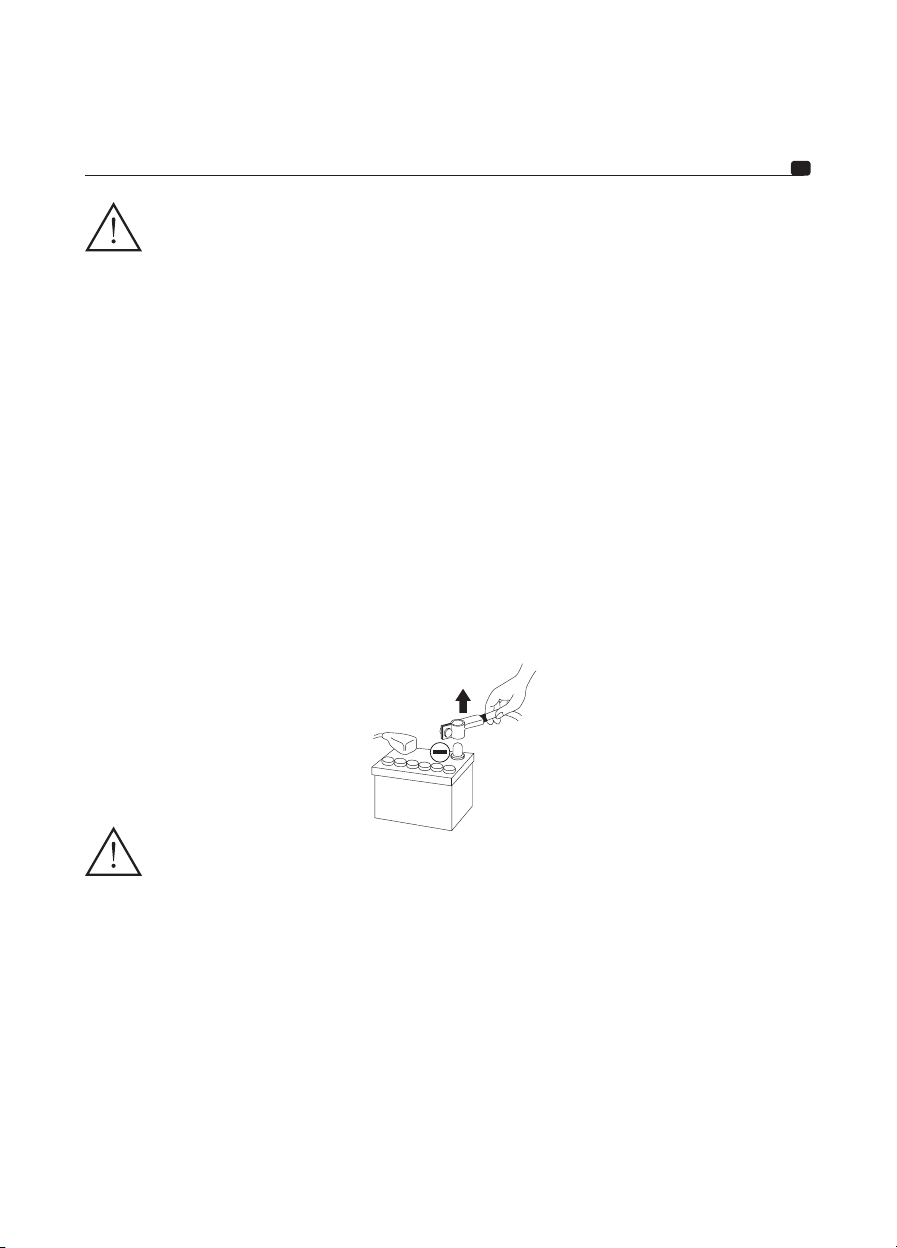
• Before beginning installation, disconnect the negative terminal of the battery to avoid any risk of injury, fire or
material damage (fig. 1).
4
fig. 1
WARNING
Prolonged listening at high volumes, over 110dB, can cause long-term damage to your hearing. Listening at
volumes over 130dB, even for short periods of time, can cause permanent damage to your hearing.
Stop operation in the event of a problem. Failure to comply with this precaution may cause injury or material
damage. If a malfunction persists, return the equipment to your Focal dealer for repair.
Use the specified accessories and be sure to install them correctly. Only use the accessories specified in the user
manual and those which are supplied in the packaging. The use of other components could cause internal damage
to the equipment, or it may not be correctly installed. The parts used may become loose and cause damage or a
technical malfunction of the equipment. Failure to do so may cause an accident, a fire or an electric shock.
Do not install this product in very humid or dusty places. Avoid installing the equipment in places with high levels of
humidity or with an excessive presence of dust. Humidity or dust getting inside the product may cause a technical fault.
Page 5

IMPULSE 4.320 aMPLIfIEr
User manual
Installing your IMPULSE 4.320 amplifier
Installation of this product requires technical knowledge and experience. If you are uncertain of your ability to
correctly install the amplifier, we strongly recommend you contact your Focal dealer who will install it for you, so
that you will be able to take full advantage of the full capabilities of your IMPULSE 4.320 amplifier.
Wiring your IMPULSE 4.320 amplifier
Only use the wiring harnesses recommended in this manual and the accessories supplied.
Use the ISO cable (sold separately) to facilitate wiring. The speaker driver cable must ONLY be used for connecting
the amplifier to the speaker drivers. The wire gauge of power cables must correspond with those indicated in the
table (paragraph 3.1) and depends on the power of your amplifier and the length of cable required. Use double or
triple shielded RCA cables to avoid any interference of the low-level signal.
Operating time of your IMPULSE 4.320 amplifier
Avoid using the amplifier for extended periods of time without starting the vehicle. This may cause the battery to run
flat prematurely.
Cooling system
Do not cover the top of your IMPULSE 4.320 amplifier as this may cause overheating.
Materials required for installation (in addition to accessories supplied)
• 2 sheaths of adequate cross-section (1 sheath for the power cable, 1 sheath for the speaker driver, REMOTE and
RCA modulator cables)
• Multimetre (voltage/amperage)
• Soldering iron + solder
• Crimpers
• Wire stripper
• Wire cutter
• Battery terminal spanner
• Hand drill and assorted drill bits
• Heat-shrink tubing of adequate diameter for the different cables
• Power cable of adequate length and wire gauge
• Remote turn-on cable (REM input on amplifier) of adequate length and wire gauge
• Ground cable of suitable length and wire gauge
• Fuse holder and suitable fuse
• Spade terminal for connecting to positive (+) battery terminal
• Spade terminal for connecting to the chassis of the vehicle (-).
• Screw with minimum 0
15⁄64
" (6mm) screw head and its nut for ground connection to the chassis of the vehicle
5
Installation
The following section deals with issues related to the vehicle which must be considered for before installing your
amplifier. You will save time by planning the layout of the system and wiring in advance.
During this preparatory time, please ensure that all the settings remain accessible once the installation is complete.
Page 6

IMPULSE 4.320 aMPLIfIEr
User manual
Before beginning the installation, please follow these rules carefully:
1 - After thoroughly reading the user manual, make sure you have understood all the instructions before installing
your amplifier.
2 - Disconnect the battery’s negative wire before installation (fig.1).
3 - To facilitate assembly, we strongly recommend you unwind all the wires before installing your amplifier.
4 - Route all RCA, speaker driver and REM cables, away from the power cables in order to avoid any signal interference.
5 - Use quality connectors/splicing or good soldering for connecting the amplifier in order to ensure a reliable
installation and to minimise any loss of signal or power.
6 – Before carrying out any operations, be extremely careful not to cut or drill through the fuel tank, fuel, brake,
hydraulic or vacuum lines, any electrical wiring or safety devices.
7 - Never route a wire under the vehicle. Wiring must be installed inside the vehicle. When routing the cables, make
sure they do not impede your driving. Cables obstructing or routing through areas such as the steering wheel,
pedals (brake, accelerator and clutch, etc.) may be extremely dangerous.
8 - Avoid routing wires over or through sharp edges. Any wire routed through metal must be protected with a
grommet. Route the cables well away from mobile parts (seat rails,…) and from sharp or pointed edges. This will
avoid getting the cables caught or damaging the cables which may cause a short circuit.
9 - Always protect the battery and electric circuit from potential damage using fuses. Install a fuse holder and
adequate fuses on the 12V positive (+) power cable less than 15" (40cm) away from the battery terminal. Ideally,
this above-mentioned distance should be as short as possible (fig.10).
10 - Prepare the chassis ground by scraping off any traces of paint on the metal surface in order to ensure proper
grounding. The grounding connections should also be as short as possible and ALWAYS be connected to metal
welded to the body or the chassis of the vehicle (fig.2). The ground point which is generally chosen is the one
connecting the negative terminal of the battery to the chassis of the vehicle.
11 - NEVER INSTALL this product in the engine compartment of the vehicle. This will void the warranty.
1 – Positioning of your IMPULSE 4.320 amplifier
6
Where to install your IMPULSE 4.320 amplifier?
Due to the power of the amplifier, heat dissipation is required for correct operation. For this reason, the amplifier,
particularly the top, must be installed in a well-ventilated area. Avoid covering or embedding the amplifier in its
installed location.
2 – Mounting your IMPULSE 4.320 amplifier
Position your amplifier at the desired location and make matchmarks.
Locate the attachment points on your support using the mounting bracket supplied.
Use screws suitable for your type of support.
3 – Wiring your IMPULSE 4.320 amplifier
CAUTION
If you are uncertain of your ability to correctly install the amplifier and to wire the system up properly, get
a Focal dealer/installer to do it for you.
Page 7
IMPULSE 4.320 aMPLIfIEr
User manual
WARNING
Avoid routing power cables close to low-level input cables (LOW-LEVEL INPUTS) and high-level input
cables (HIGH-LEVEL INPUTS), close to the car aerial or close to sensitive equipment and harnesses.
High-current power supply cables can cause static/interference that affects audio signals.
WARNING
Keep the cables as short as possible to optimise the quality of the installation. This will also limit signal
loss.
WARNING
Before beginning the connection phase, remove the negative (-) terminal from the battery of the vehicle
(fig.1).
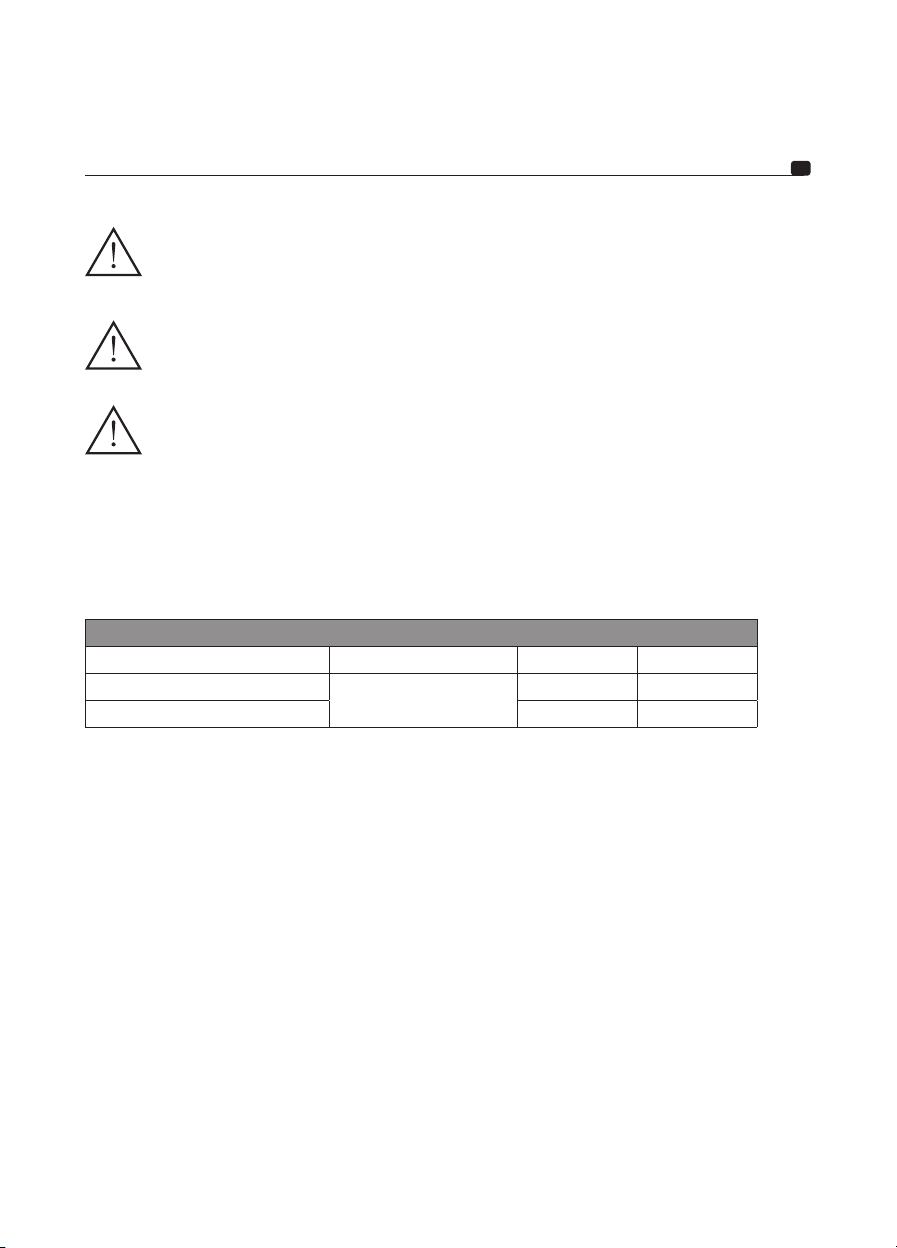
3.1 - What wire gauge should I use for the power cable?
Your IMPULSE 4.320 amplifier requires a power supply of adequate amperage.
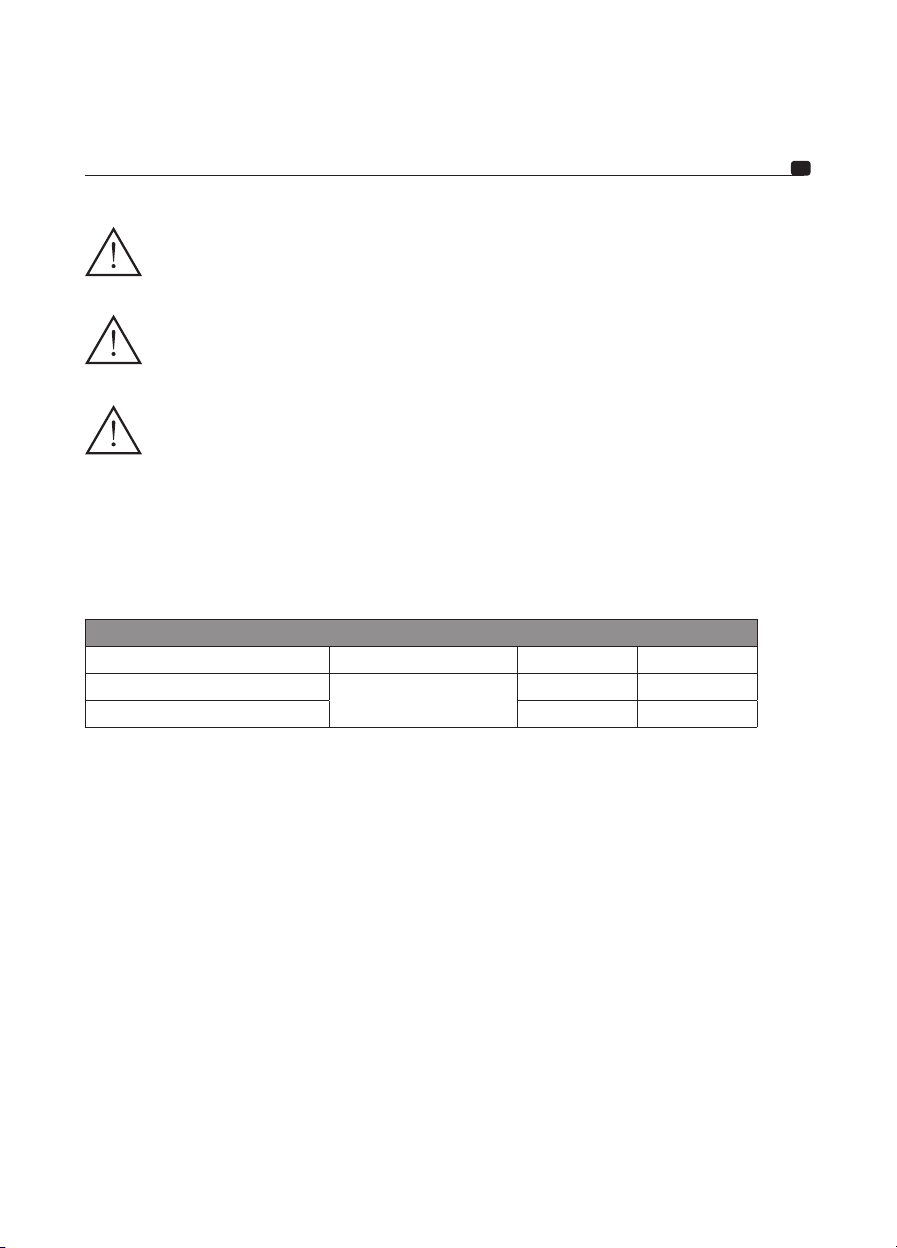
The required wire gauge of power cables depends on the length of cabling to the battery. See recommended wire
gauge in the table below:
Length of cable to the battery in feet (metres)
Length < 3ft (1m) < 10ft (3m) < 13ft (4m)
Cross sectional area in mm
AWG 12 AWG < 12 AWG
2
ISO cable recommended
3.3mm
2
> 3.3mm
2
7
Compliance with these wiring rules is essential for the safety of your electrical installation, and important for
maintaining maximum performance of your IMPULSE 4.320 amplifier.
3.2 – Wiring the input and output signals on your IMPULSE 4.320 amplifier
3.2.1 – Your head unit is equipped with RCA outputs
Route the modulator cables (RCA), the speaker driver cables and the REM cable together, ensuring to isolate them
from other powerful automobile accessories, particularly electric motors (windscreen wipers,…). Keep the whole
length of the cables, which will be adjusted later on.
3.2.2 – Your head unit is only equipped with amplified outputs (speaker driver outputs).
Route the modulator cables coming from the head unit, and the speaker driver cables together, ensuring to isolate
them from other powerful automobile accessories, particularly electric motors (windscreen wipers,…). Keep the
whole length of the cables, which will be adjusted later on.
3.3 – Wiring the power supply to your IMPULSE 4.320 amplifier
3.3.1 – Route the positive power cable (+) making sure when doing so to route the cable to the opposite side of the
cables that you have previously installed to avoid any interference. DO NOT CONNECT THE CABLE YET.
Page 8
IMPULSE 4.320 aMPLIfIEr
User manual
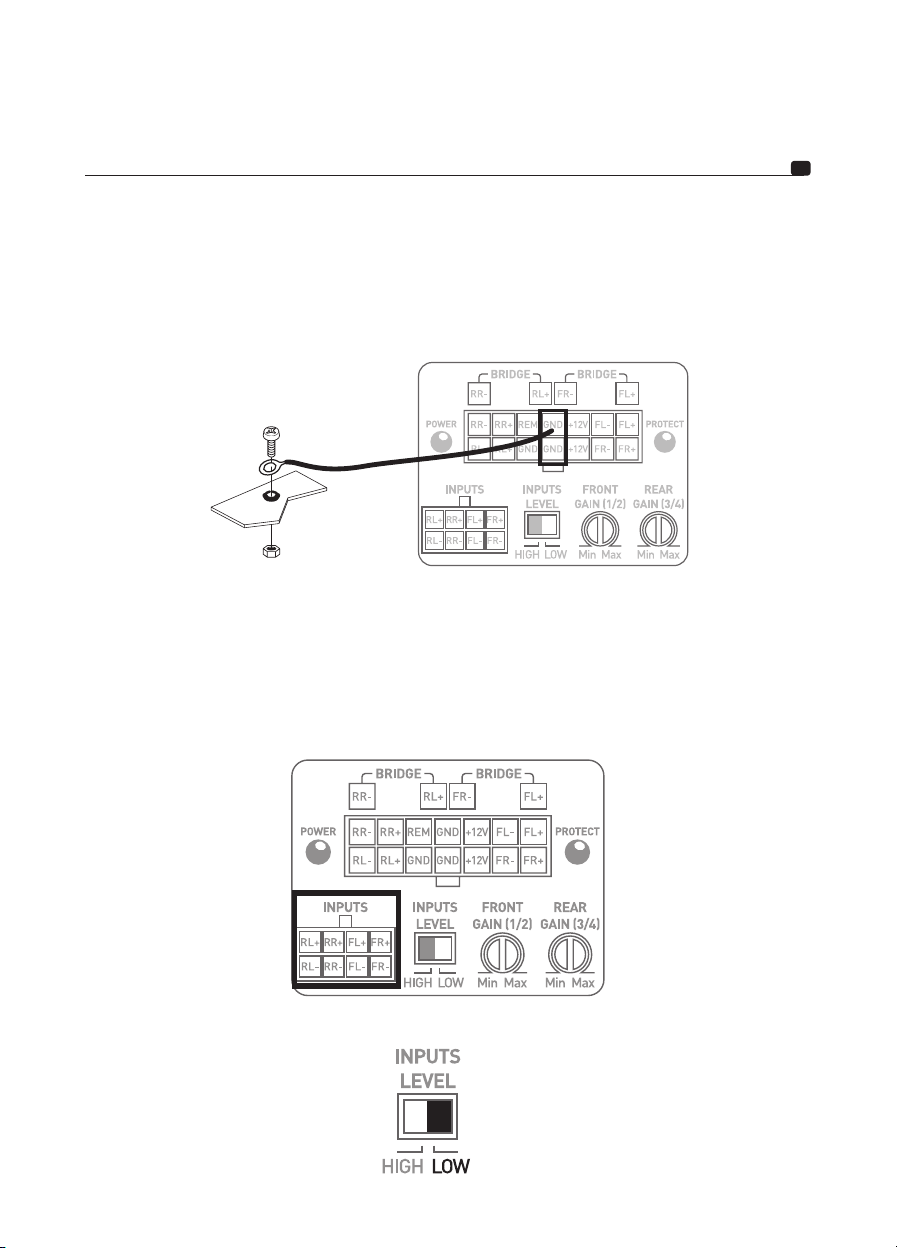
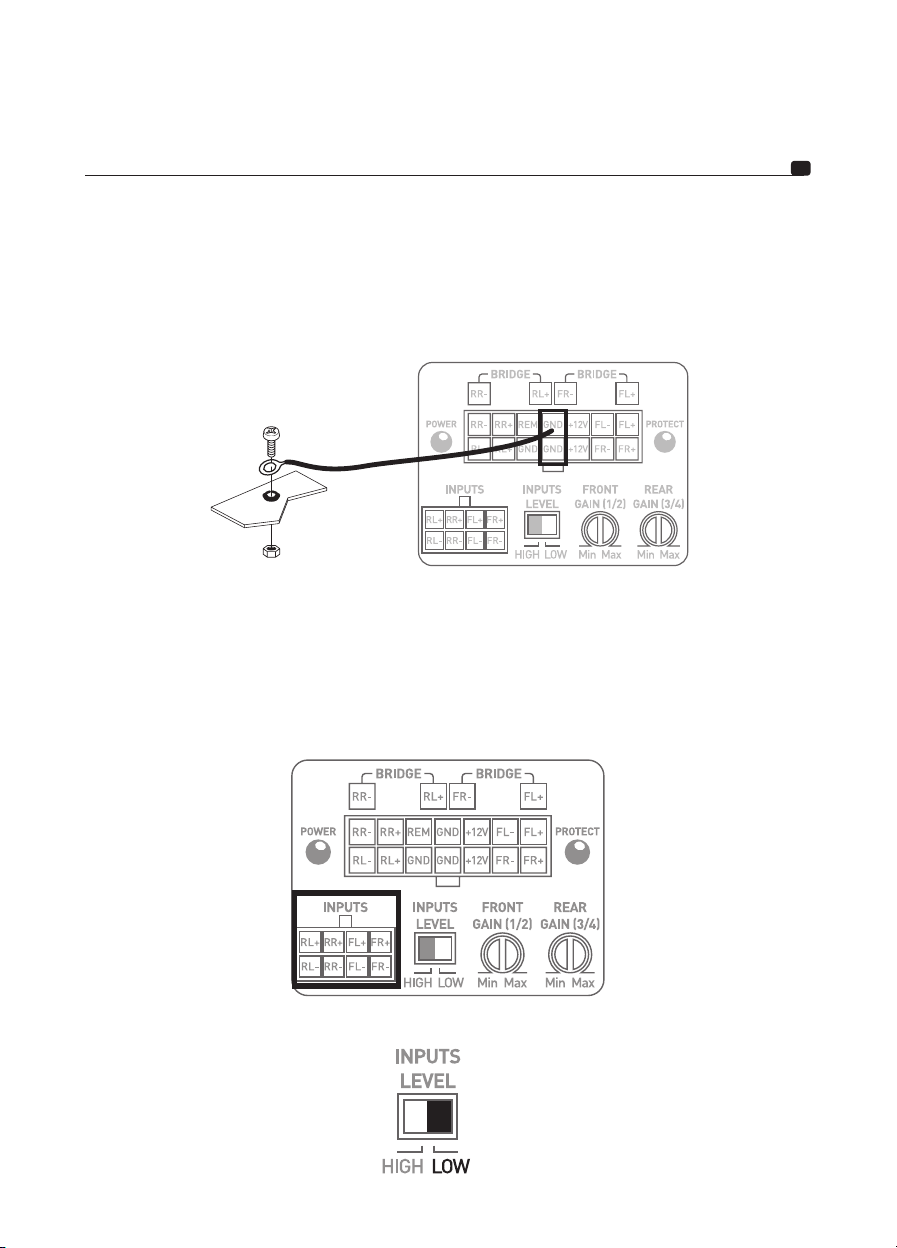
3.3.2 – Get the negative power cable (-). This cable should be as short as possible and ideally shouldn’t be any longer
than 3ft (1m), to ensure a perfect connection between the amplifier and the chassis of the vehicle. The cable and wire
gauge must comply with the table in section 3.1. Find a suitable grounding point, then sand it to remove any traces
of paint or other coating in order to optimise the quality of the contact point. Drill a hole in the metal that you have
previously sanded, making a hole the same diameter as the screw you are using, making sure that there are no fuel
lines, cables or any other sensitive vehicle devices nearby. Solder the ground cable to the wiring harness supplied for
your IMPULSE 4.320 amplifier and isolate using heat-shrink tubing (fig. 2).
fig. 2
3.4 – Connecting the input signals to your IMPULSE 4.320 amplifier
You can now start connecting the input/output cables.
3.4.1 – Your head unit is equipped with RCA outputs
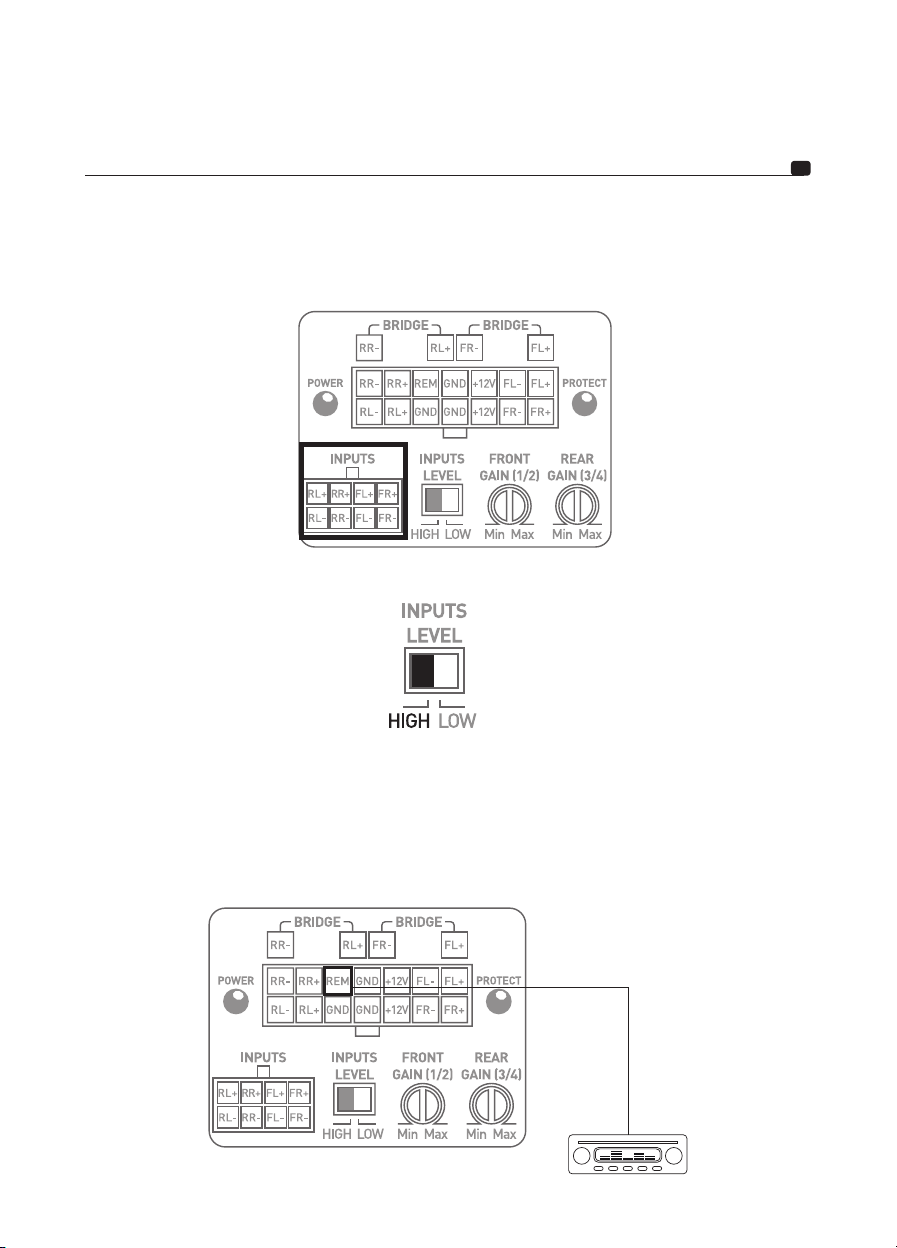
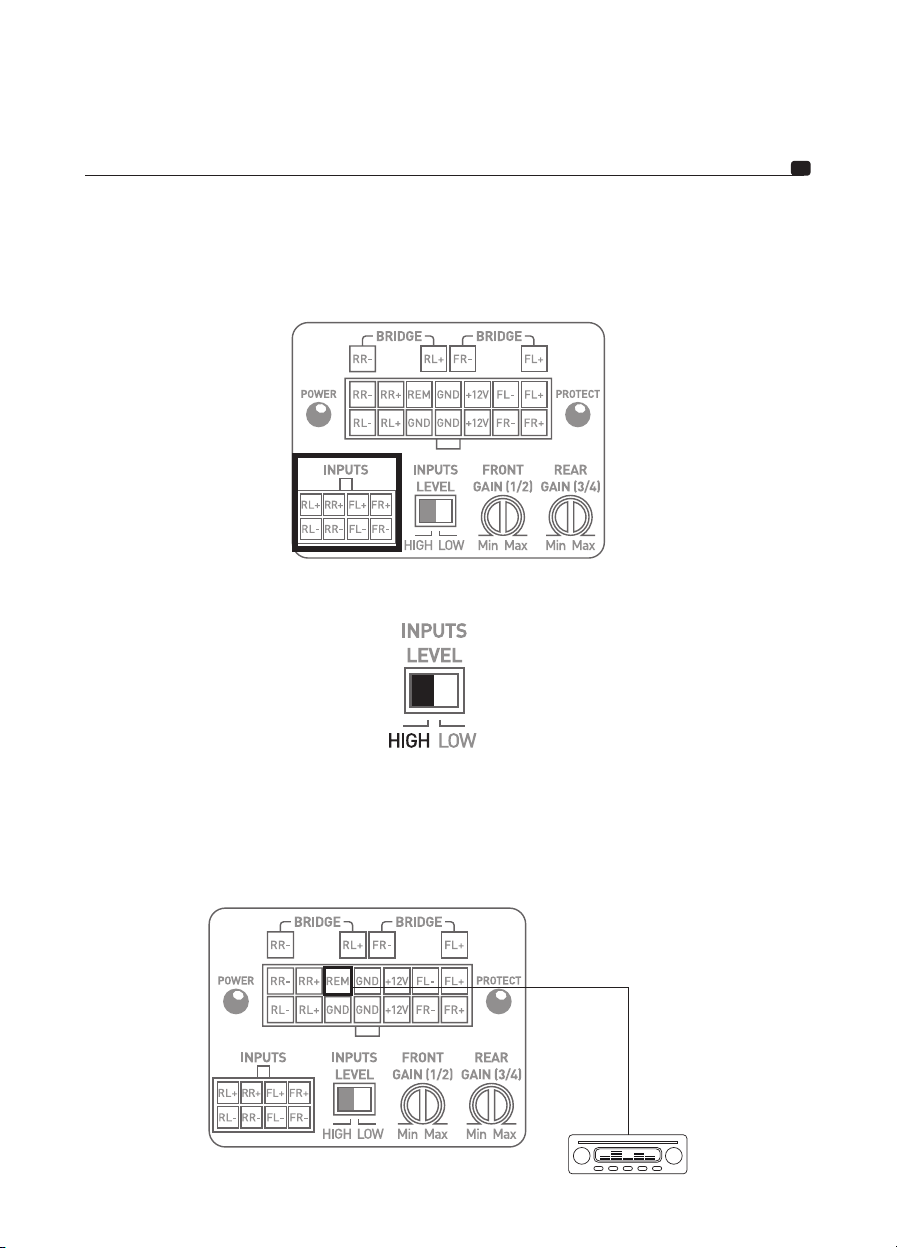
Connect the RCAs to the RCA adapter cable supplied (fig. 3). Be careful to respect the polarities (INPUT Left = red, INPUT
Right = black or white) and distribution (F=FRONT, R=REAR). Connect the other end to the amplifier’s INPUTS panel.
8
fig. 3
Switch the INPUTS LEVEL to LOW (fig. 4).
fig. 4
Page 9
IMPULSE 4.320 aMPLIfIEr
User manual
3.4.2 – Your head unit is only equipped with amplified outputs (speaker driver outputs).
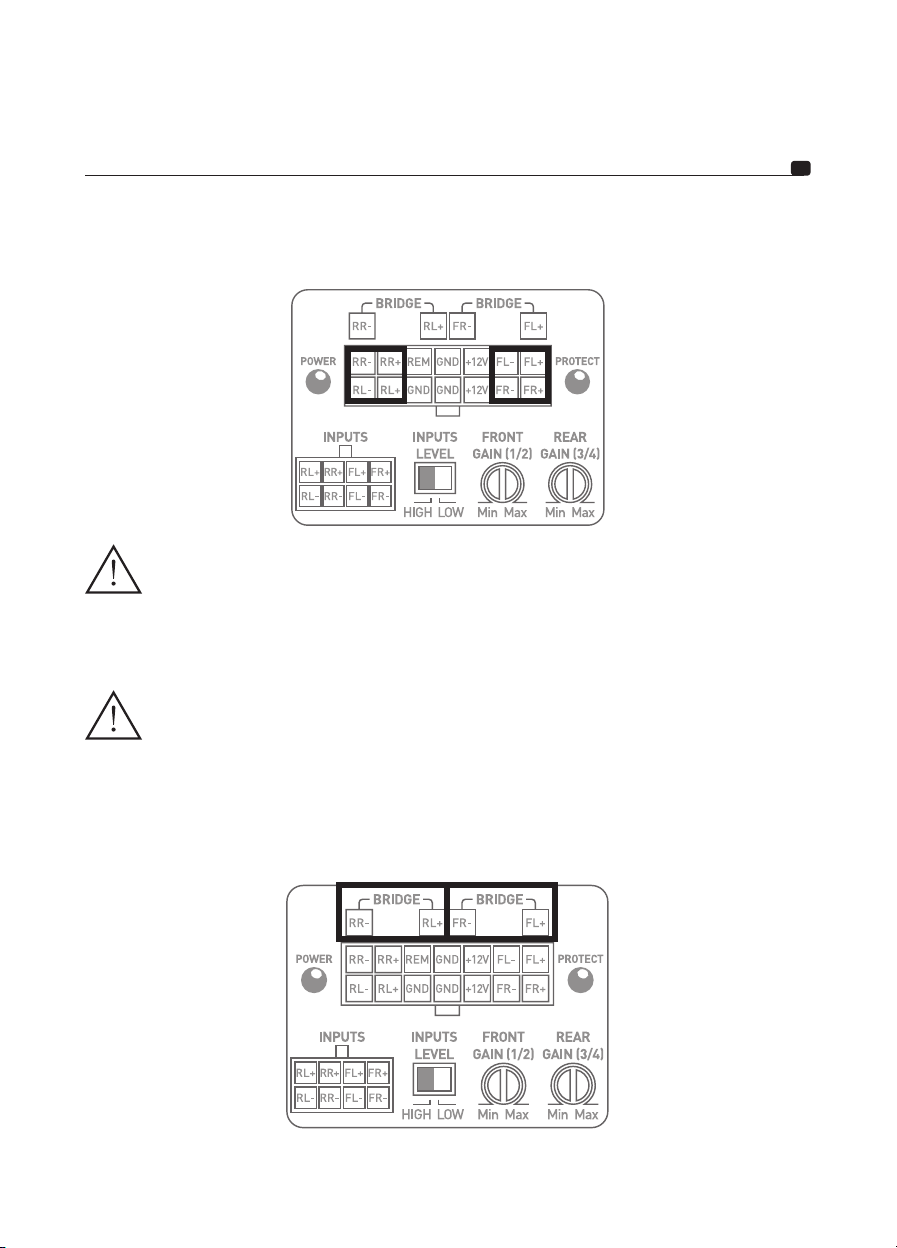
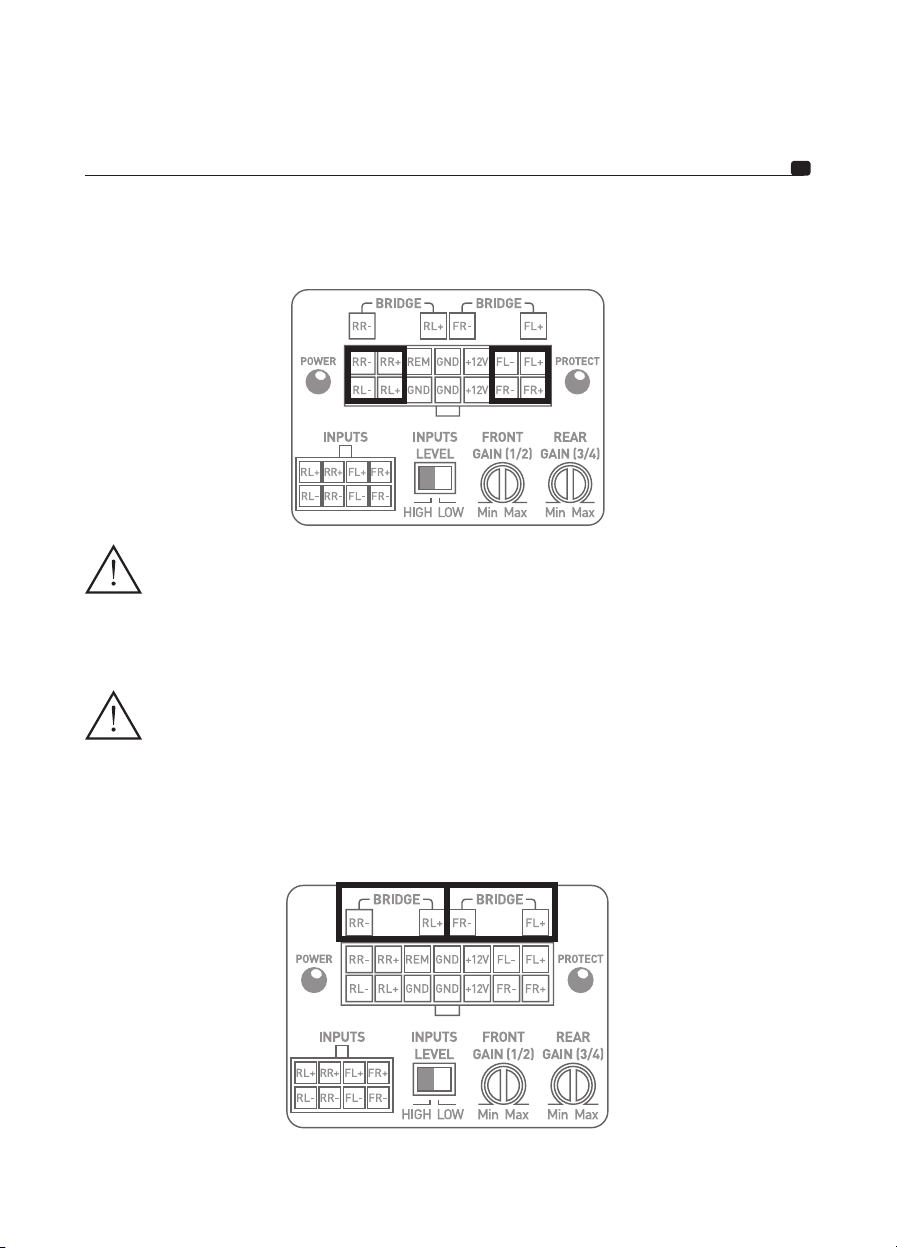
Connect the speaker driver outputs of the head unit directly to the adapter cable supplied (fig. 5) ensuring the polarities are respected. Connect the other end to the amplifier’s INPUTS panel.
fig. 5
Switch the INPUTS LEVEL to HIGH (fig. 6).
9
fig. 6
3.5 – Connecting the speaker drivers and remote to your IMPULSE 4.320 amplifier
Solder the REMOTE cable to the wiring harness supplied and isolate using heat-shrink tubing (fig. 7).
Connect the other end of the REMOTE cable to the car radio REMOTE terminal.
fig. 7
Page 10
IMPULSE 4.320 aMPLIfIEr
User manual
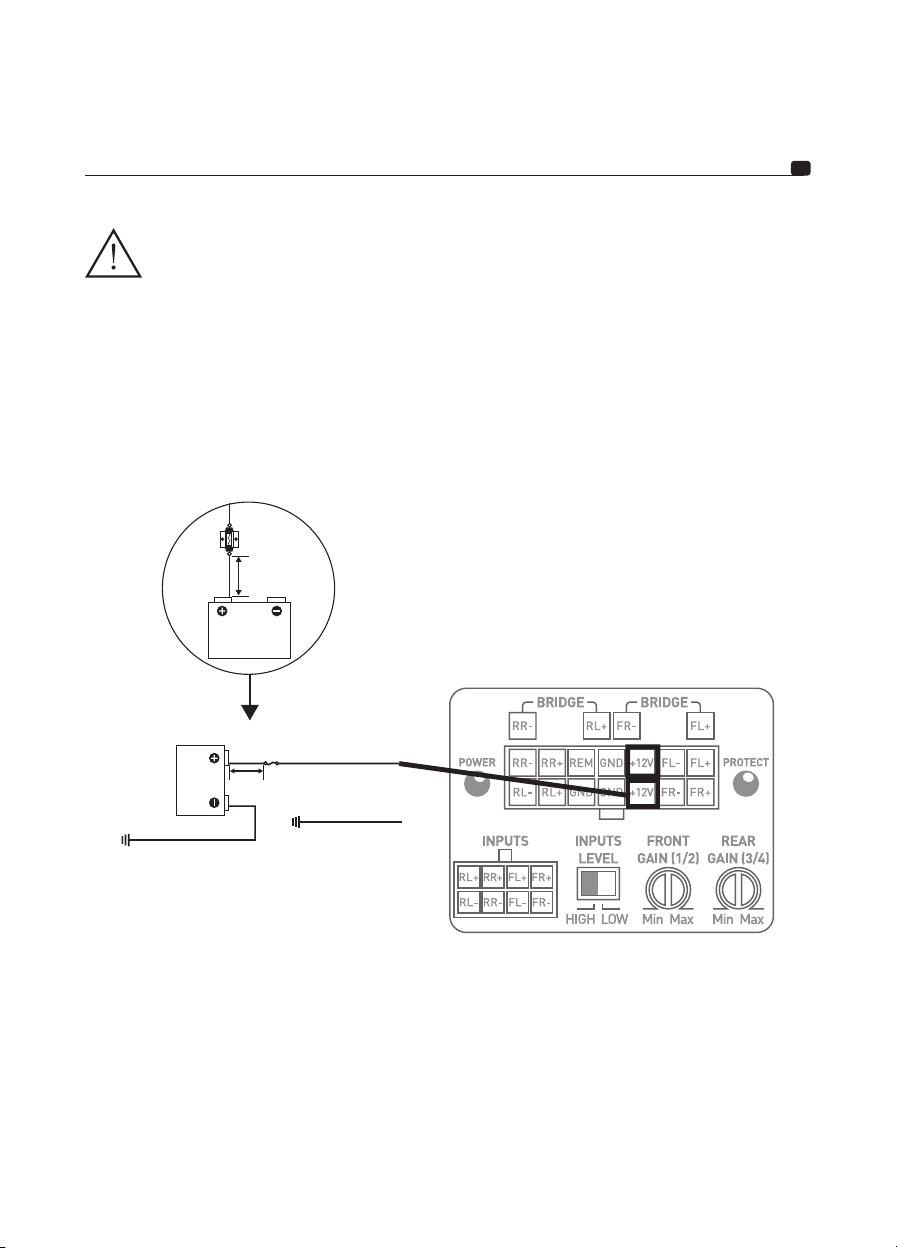
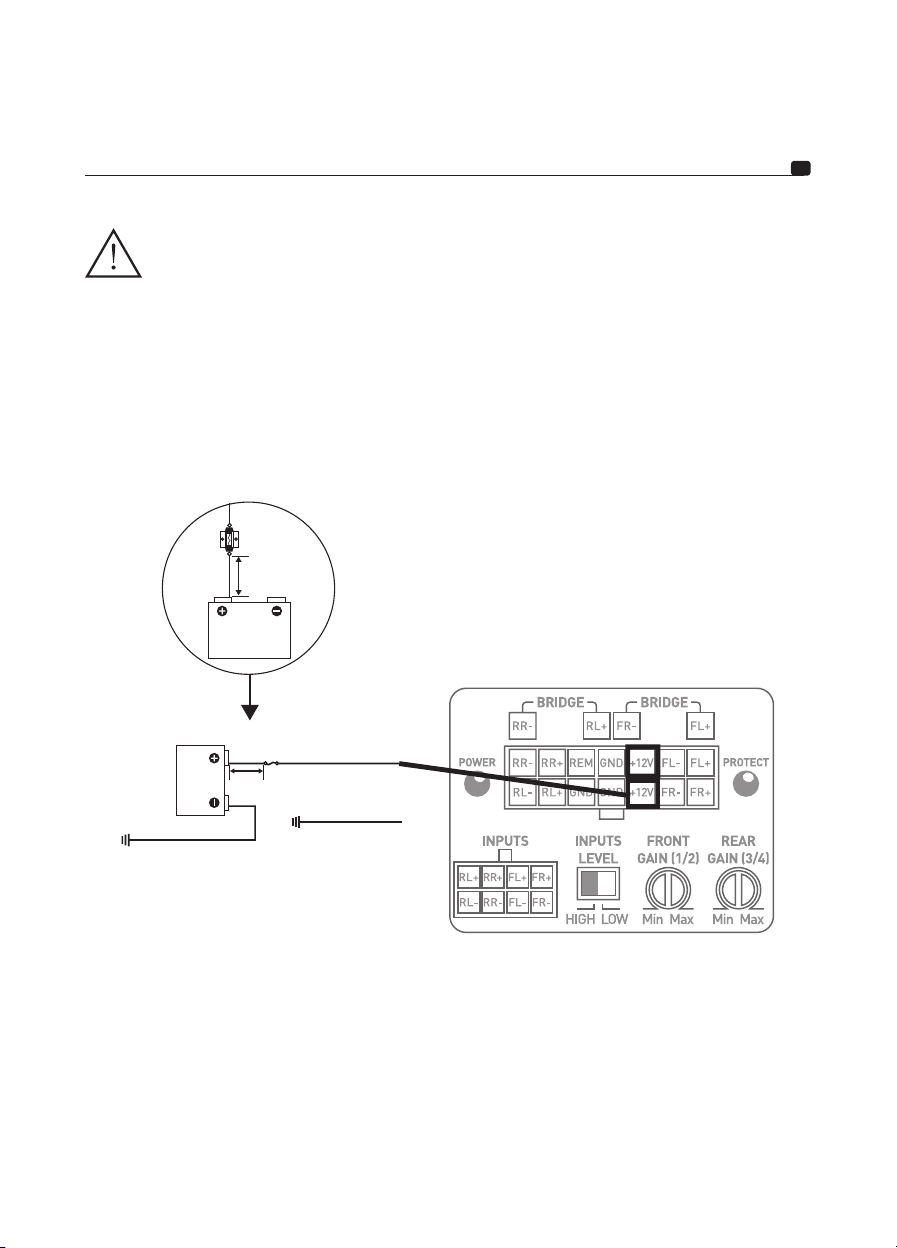
Finally, connect the speaker driver cables to the amplifier, making sure the polarities on the wiring harness supplied
are respected (+ with +; - with -) (fig. 8).
fig. 8
WARNING
The speaker drivers or speaker driver kits wired to your IMPULSE 4.320 amplifier must systematically have a minimum impedance of 2 Ohms.
10
WARNING
In bridged mode, the speaker drivers or speaker driver kits wired to your IMPULSE 4.320 amplifier must systematically have a minimum impedance of 4 Ohms.
The use of equipment with a lower impedance will void the warranty.
To use the IMPULSE 4.320 in bridged mode, and thus double the power available, make sure that connections and
polarities are respected as shown below (fig. 9)
fig. 9
Page 11
IMPULSE 4.320 aMPLIfIEr
User manual
WARNING
The cable connecting the positive (+) terminal of the battery to the “+ BATT” terminal on the amplifier MUST be fused
(ampere rating: 25 amperes) at less than 15" (40cm) away from the battery of the vehicle.
The connections on the fuse-holder must be fully insulated.
Open the fuse holder, removing the fuse with care. Fix the fuse holder’s base.
Cut a length of power cable measuring between 4" and 15" maximum (10 and 40cm). Strip 0
Screw the cable to the terminal of the fuse holder (battery side). Crimp the power cable to the intended spade
terminal and screw to battery terminal.
25/64
Strip 0
" (1cm) from the remaining length of cable, then tin. Screw the cable to the other fuse holder terminal.
40cm max
25/64
" (1cm), then tin.
11
fig. 10
Solder the positive (+) power cable to the wiring harness supplied for your IMPULSE 4.320 amplifier (fig. 10)
3.6 – Start-up and checks.
The connection phase is now complete. You must now check that the power supply is correct and that everything
is working correctly (head unit/amplifier/speaker drivers). Set the source gain to its minimum. Set the gain on
your amplifier to 1/3 of the way. Turn on the various devices. Once all the devices have been turned on, test your
installation at low volume.
.
Page 12
IMPULSE 4.320 aMPLIfIEr
User manual
4 - Control panel and connections
fig. 11
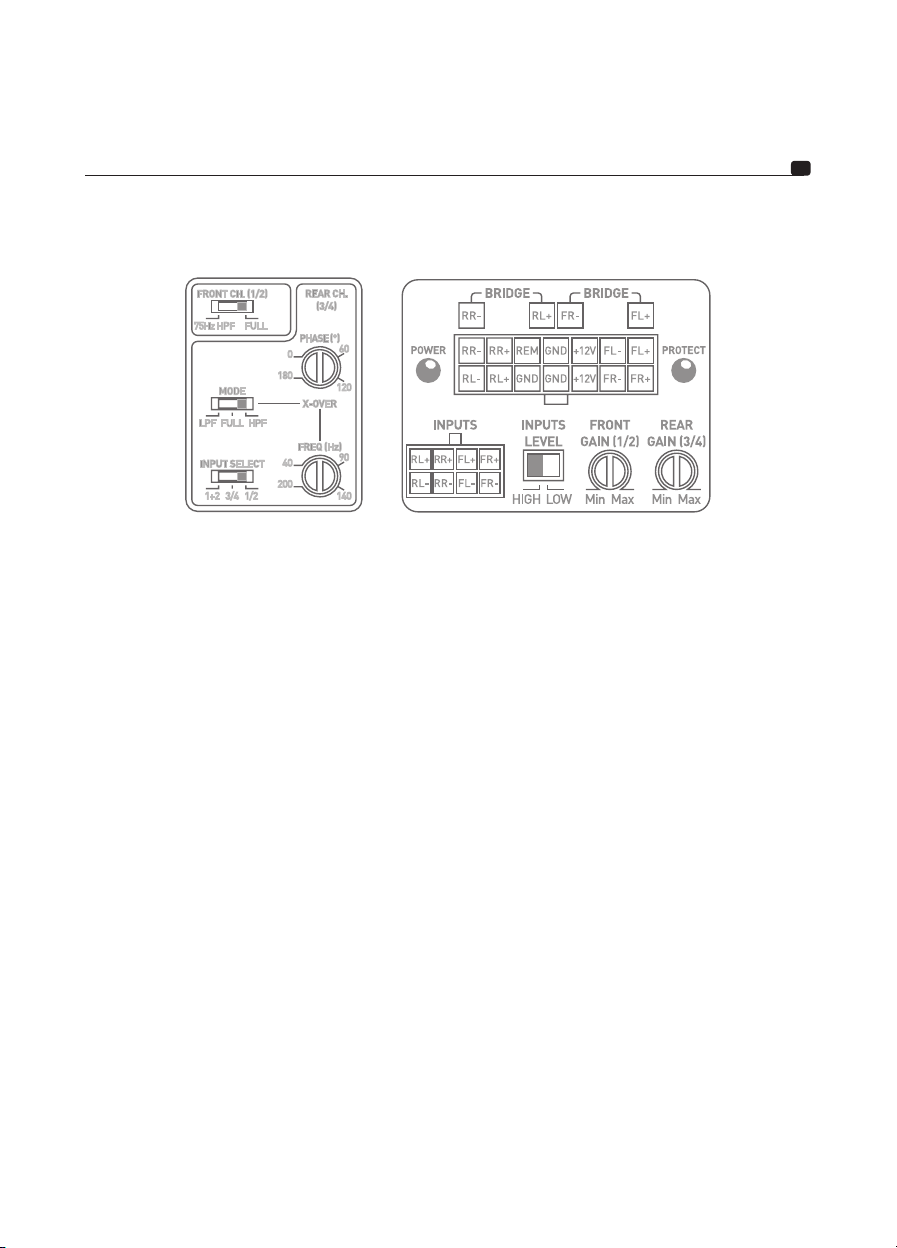
INPUTS: These connectors are dedicated to the low-level and high-level signal inputs.
GAIN (FRONT AND REAR): The GAIN knob allows you to adjust the incoming signal to the amplifier. The voltage gain
varies between 0.2V and 5V. To optimise the performance of your sound system, you need to apply a maximum of gain
as early as possible in the stereo system, and then a minimum of gain afterwards.
This knob must be set according to the source volume (line output level).
Start by setting the amplifier gain to its lowest level. Gradually increase the level of the source volume up to 3/4
of the way. Then increase the amplifier gain to the desired maximum listening volume. Turn the volume down if
distortion occurs. The FRONT knob controls the front speaker drivers. The REAR knob controls the rear speaker
drivers.
12
+12V: the “+BATT” power connector is dedicated to the power cable connecting the amplifier to the positive (+)
terminal of the battery.
GND: the GND (ground) power connector is dedicated to the negative (-) power cable connecting the amplifier and
the vehicle’s chassis.
REM: the REM connector connects the amplifier to the source (head unit) via a REM or REMOTE output on the head
unit. This enables the amplifier’s automatic power on function when the source (head unit) is turned on.
POWER and PROTECT: these LEDs enable you to check if the amplifier is working correctly.
A continuously lit POWER LED means the equipment is working correctly.
If the PROTECT LED is continuously or intermittently lit, the equipment is not working correctly. See troubleshooting
section paragraph 5.
INPUTS LEVEL: this switch selects the type of input level (HIGH: high-level / LOW: low-level RCA)
Page 13

IMPULSE 4.320 aMPLIfIEr
User manual
INPUT SELECT: this switch enables channels 1 and 2 to be played through channels 3 and 4.
If you only have one output (one right and one left), you can still amplify the four channels by activating the 1/2 mode.
If you want to use the IMPULSE 4.320 with its independent 4-channel input configuration, select mode 3/4.
If you want to use the IMPULSE 4.320 with a 3-channel configuration, select mode 1+2. Channels 3/4 will then receive
the mono signal from channels 1 and 2 to drive your subwoofer.
PHASE (°): the PHASE knob enables you to adjust the channel phase according to the rest of the installation.
Adjusting the phase of the subwoofer enables the subwoofer output to be in phase with the other speaker drivers. On
a theoretical period of a signal, one of the sources can be delayed slightly so that the phase will be perfectly balanced
at the listening point.
X-OVER MODE: the crossover mode switch enables you to choose to activate the high-pass filter mode (HPF), the
low-pass filter mode (LPF) or the full range mode (FULL) for channels 3/4 or rear channels.
X-OVER FREQ (Hz): this knob controls the cut-off frequency by adjusting the low-pass and high-pass filter levels. The
selected value determines the frequency up to which or from which the signal will be cut off.
FRONT CH. (1/2): this switch activates a high-pass filter set at 75Hz for the front channels. Use this setting for solving
issues related to door vibrations in vehicles not equipped with vibration dampeners.
5 – Troubleshooting
The state of the various LEDs indicates a malfunction or the source of a malfunction.
Check the possible causes shown below. If, despite these checks, the equipment is still not working correctly, contact
your IMPULSE 4.320 amplifier installer or dealer.
13
State of LEDs Presence of
PROTECT
lit red
Off NO No power or
Off NO Overheating Turn off the sound system.
Off NO No REM signal Turn on the sound system.
Off NO Fuse
POWER
flashing green
sound
NO Output short
YES/NO
Or intermittent
Possible cause Action
circuit
poor
connection
malfunction
Grounding
defect
Check the speaker drivers, their minimal impedance,
their connections and the speaker driver cables.
Wait for your amplifier to cool down before resuming use.
Turn off the sound system.
Turn off the sound system.
Check power source is 12V.
Check the power cables and their polarity.
Check the fuses.
Check there’s power on the REM terminal.
Turn off the sound system.
Check and replace the fuses if necessary.
Turn off the sound system.
Check the connection from the GND terminal
to the chassis of the vehicle.
Page 14

IMPULSE 4.320 aMPLIfIEr
User manual
6 – Technical specifications
IMPULSE 4.320
4/3/2-channel class D amplifier
High-level input / RCA low-level input
CEA power (4 Ohms) 4 x 55Wrms
Power max (2 Ohms) 4 x 80Wrms
Power max (4 Ohms bridged) 2 x 160Wrms
Bandwidth 10Hz – 20KHz (+/- 1dB)
Total harmonic distortion
Total minimum harmonic distortion 0.02 %
Cross-talk (1KHz) > 65dB (Ref. 10 Vout)
SNR (1W/A) > 80dBA
High-pass filter Activatable/deactivatable fixed at 75Hz on channels 1/2
High-pass/low-pass filter configurable from 40Hz - 200Hz on channels 3/4
Phase Adjustable 0/180° on channels 3/4
Full range mode on channels 1/2 and 3/4
Standby consumption – (Remote ON) 750mA
Fuse ratings 25A (15A if ISO harness)
Protection Short circuit/over-current/reverse polarity/ DC/voltage drop/
Dimensions (LxHxW) 6
Weight (1.2 lbs) 550g
√
THD+N < 0.05 % from 0.5 to 50Wrms 4Ω (1 kHz, 22kHz LPF)
heat protection
7/8
5/8
" x 1
7/8
"
" x 2
(175mm x 66.5mm x 47mm)
14
Conditions of guarantee
All Focal loudspeakers are covered by guarantee drawn up by the official Focal distributor in your country. Your
distributor can provide all details concerning the conditions of guarantee. Guarantee cover extends at least to that
granted by the legal guarantee in force in the country where the original purchase invoice was issued.
Page 15
amplifiCaTEUR impUlSE 4.320
Manuel d'installation
Sound”. Ce produit intègre le meilleur de la technologie Focal en matière d’amplification compacte classe D.
Pour obtenir les meilleurs résultats, nous vous recommandons de faire installer votre amplificateur IMPULSE
4.320 par votre revendeur Focal. Afin d’en exploiter l’ensemble des fonctionnalités et ainsi de profiter
pleinement de ses performances, nous vous conseillons de lire attentivement les instructions de ce livret, puis
de le conserver pour vous y référer ultérieurement. Tout problème dû au non-respect des règles d’utilisation
peut entraîner une invalidation de la garantie.
Pour validation de la garantie, merci de retourner,
dans les 10 jours suivant l’acte d’achat.
AVERTISSEMENT
Version Française
15
graves blessures ou des dommages matériels.
Contenu de l’emballage :
- 1 amplificateur IMPULSE 4.320
- 1 manuel d’utilisation
- 1 set d’accessoires
Accessoire disponible (vendu séparément) :
- 1 câble Plug and Play format ISO pour une connexion directe sur les autoradios compatibles
• N’activez aucune fonction susceptible de détourner votre attention lors de la conduite du véhicule. Les fonctions
• Gardez le volume à faible niveau de façon à pouvoir entendre les bruits extérieurs lors de la conduite du
• N’ouvrez pas votre amplificateur IMPULSE 4.320 et n’opérez pas de modifications sur le produit. Il y a risque
Ce symbole désigne les instructions importantes. Le non-respect de ces instructions peut entrainer de
AVERTISSEMENT
ou réglages qui requièrent une attention prolongée ne doivent être exploités qu’à l’arrêt complet du véhicule.
Veillez à toujours stopper le véhicule dans un endroit sûr avant d’activer ces fonctions. Il y a risque de provoquer
un accident.
véhicule. Il y a risque de provoquer un accident.
d’accident, d’incendie ou de choc électrique.
Votre produit Focal-JMlab a été conçu et fabriqué avec des matériaux et composants de haute qualité,
susceptibles d’être recyclés et réutilisés. Ce symbole signifie que les appareils électriques et électroniques,
lorsqu’ils sont arrivés en fin de vie, doivent être éliminés séparément des ordures ménagères. Veuillez
rapporter cet appareil à la déchetterie communale ou à un centre de recyclage. Vous contribuez ainsi à la
préservation de l’environnement.
Page 16
amplifiCaTEUR impUlSE 4.320
Manuel d'installation
ATTENTION
• Utilisez votre amplificateur IMPULSE 4.320 sur des applications mobiles de 12 volts uniquement. Toute
utilisation autre que l’application désignée comporte un risque d’incendie, de choc électrique ou de blessure.
• Utilisez des fusibles d’ampérage approprié. Il y a risque d’incendie ou de décharge électrique.
• N’obstruez pas le radiateur de votre amplificateur IMPULSE 4.320. Une surchauffe interne peut se produire et
provoquer un incendie.
• Effectuez correctement les connexions. Vérifiez la section du câble et le type de câble. Il y a risque d’incendie,
de blessures et/ou d’endommagement de l’appareil.
• N’utilisez pas d’écrous ni de boulons du circuit de direction ou de freinage, des réservoirs, des ceintures ou
autres éléments de sécurité pour la connexion de la masse. L’utilisation de ces organes comme masse peut
désactiver le système de contrôle du véhicule et causer un incendie ou autre avarie.
• Gardez les petits objets susceptibles d’être ingérés, comme les boulons, accessoires ou les vis, hors de portée des
enfants. L’ingestion de tels objets peut entraîner de graves blessures. En cas d’ingestion, consultez un médecin.
• Avant d’entamer l’installation, déconnectez la borne négative de la batterie pour éviter tout risque de blessure,
d’incendie ou d’endommagement du matériel. (fig. 1)
16
fig. 1
ATTENTION
L’écoute prolongée à fort niveau, au-delà de 110 dB, peut détériorer durablement l’audition. Des écoutes, même
brèves, au-delà de 130 dB, peuvent provoquer des lésions auditives irrémédiables.
Interrompez toute utilisation en cas de problème. Le non-respect de cette précaution peut entrainer des blessures
ou endommager l’appareil. Si un dysfonctionnement persiste, retournez l’appareil auprès de votre revendeur Focal
en vue de sa réparation.
Utilisez les accessoires spécifiés et installez-les correctement. Utilisez uniquement les accessoires mentionnés
dans le manuel d’utilisation, ainsi que ceux qui sont fournis dans l’emballage. L’utilisation d’autres composants
peut causer des dommages internes au produit, ou son installation risque de ne pas être effectuée correctement.
Les pièces utilisées risquent de se desserrer et de provoquer des dommages ou une défaillance technique du
produit. Il y a risque d’accident, d’incendie ou de choc électrique.
N’installez pas le produit dans des zones fortement humides ou poussiéreuses. Evitez d’installer l’appareil dans
des zones du véhicule soumises à une forte humidité ou à une présence excessive de poussière. La pénétration
d’humidité ou de poussière à l’intérieur du produit risque de provoquer une défaillance.
Page 17

amplifiCaTEUR impUlSE 4.320
Manuel d'installation
Installation de votre amplificateur IMPULSE 4.320
L’installation de ce produit requiert des compétences techniques et de l’expérience. En cas d’incertitude sur
l’aptitude à installer l’amplificateur, confiez cette tâche à un revendeur Focal afin de profiter pleinement de
l’ensemble des possibilités de votre amplificateur IMPULSE 4.320.
Câblage de votre amplificateur IMPULSE 4.320
Utilisez uniquement les départs de câbles préconisés dans le manuel d’utilisation et les accessoires fournis.
Utilisez éventuellement le câble ISO vendu séparément pour une mise en œuvre facilitée.
Le câble haut-parleur doit être UNIQUEMENT utilisez pour relier l’amplificateur aux haut-parleurs. La section des
câbles d’alimentation doit correspondre à celle mentionnée dans le tableau (paragraphe 3.1) et est fonction de
la puissance de l’amplificateur et de la longueur de câble nécessaire. Utilisez des câbles RCA à double ou triple
blindage pour éviter tout parasitage du signal bas niveau.
Durée de fonctionnement de votre amplificateur IMPULSE 4.320
Evitez de faire fonctionner l’amplificateur durant une longue période sans démarrer le véhicule. Ceci peut entraîner
la décharge prématurée de la batterie.
Ventilation
Il est impératif de ne pas couvrir la zone supérieure de votre amplificateur IMPULSE 4.320 afin de ne pas créer de
surchauffe.
Matériel requis pour effectuer l’installation (en dehors des accessoires fournis):
• 2 gaines de section adéquates (1 gaine pour le câble d’alimentation, 1 gaine pour le lot de câbles haut-parleurs,
REMOTE, modulation RCA)
• Multimètre (voltage/ampérage)
• Fer à souder + étain
• Pince à sertir
• Pince à dénuder
• Coupe-fils
• Clé de borne de batterie
• Perceuse à main et mèches assorties
• Gaines thermo-rétractables de diamètres appropriés aux différents câbles
• Câble d’alimentation de longueur et de section adéquates
• Câble d’allumage à distance (entrée REM de l’amplificateur) de longueur et de section adéquates
• Câble de masse de longueur et de section adéquates
• Porte-fusible et fusible adéquat
• Cosse de liaison à la borne positive (+) de la batterie
• Cosse de liaison au châssis du véhicule (-)
• Vis avec tête de vis de 6 mm au minimum et son écrou pour mise à la masse sur le châssis du véhicule
17
Installation
La section ci-dessous traite de points relatifs au véhicule dont il faut tenir compte pour l’installation de votre
amplificateur. Vous gagnerez du temps en planifiant à l’avance la disposition du système et du câblage.
Assurez-vous, durant cette étape préparatoire, que l’ensemble des réglages resteront accessibles une fois
l’installation terminée.
Page 18

amplifiCaTEUR impUlSE 4.320
Manuel d'installation
Avant de commencer l’installation, merci de suivre scrupuleusement les règles suivantes :
1 - Apres lecture intégrale du manuel d’utilisation, assurez-vous d’avoir compris l’ensemble des instructions avant
d’installer votre amplificateur.
2 - Débranchez le fil négatif de la batterie avant de commencer l’installation (fig.1).
3 - Pour faciliter le montage, nous suggérons de dérouler tous les fils avant d’installer votre amplificateur.
4 - Acheminez l’ensemble des câbles RCA, haut-parleur et REM à l’écart des câbles d’alimentation afin d’éviter
tout parasitage du signal.
5 - Utilisez des connecteurs/raccords ou des soudures de qualité pour relier l’amplificateur afin d’assurer une
fiabilité d’installation et minimiser les pertes de signal ou de puissance.
6 – Vérifiez avant de réaliser quelque opération de ne pas couper ou percer le réservoir d’essence, les conduites de
carburant, de frein, hydrauliques ou de dépression, ainsi que le câblage électrique ou tout élément sécuritaire.
7 - Ne faites jamais passer de fil sous le véhicule. Il faut impérativement les installer à l’intérieur de celui-ci. Lors
du passage des câbles, vérifiez que ceux-ci ne gêneront pas la conduite du véhicule. Les câbles qui obstruent
ou dépassent à des endroits tels que le volant, les pédales (frein, accélérateur et embrayage, etc…), peuvent
s’avérer extrêmement dangereux.
8 - Evitez de faire passer des fils par-dessus ou à travers des bords tranchants. Tout fil acheminé à travers du métal
doit être protégé par des passe-fils. Acheminez les câbles à l’écart des pièces mobiles (rails d’un siège, …) et
des arêtes acérées ou pointues. Cela évitera ainsi de coincer ou d’endommager les câbles et d’engendrer un
court-circuit électrique.
9 - Protégez toujours la batterie et le circuit électrique de dommages potentiels à l’aide de fusibles. Installez un
porte-fusible et un fusible appropriés sur le câble d’alimentation 12 V positif (+) a moins de 40 cm de la borne
de la batterie. Idéalement, cette distance doit être la plus courte possible (fig.5).
10 - Préparez la masse du châssis en grattant toute trace de peinture sur la surface métallique afin d’assurer
une bonne mise à la masse. Les connexions de masse doivent être aussi courtes que possible et TOUJOURS
connectées à du métal soudé à la carrosserie ou au châssis du véhicule (fig. 2). Le point de masse généralement
retenu est celui assurant la liaison entre la borne négative de la batterie et le châssis du véhicule.
11 - NE MONTEZ JAMAIS ce produit dans le compartiment moteur du véhicule. Ceci entraînerait l’annulation de la
garantie.
18
I - Mise en place de votre amplificateur IMPULSE 4.320
Où installer votre amplificateur IMPULSE 4.320 ?
En raison de la puissance de l’amplificateur, une dissipation thermique est nécessaire au fonctionnement. Pour cette
raison, l’amplificateur doit être monté dans un endroit permettant une ventilation, tout spécialement sur le dessus.
Evitez tout encastrement ou recouvrement de l’amplificateur dans sa zone proche d’installation.
2 - Fixation de votre amplificateur IMPULSE 4.320
Positionnez votre amplificateur à l’emplacement souhaité et repérez-le.
Repérez les points de fixation dans votre support grâce aux pattes de fixation fournies.
Utilisez des vis de fixation adaptées à un vissage dans votre support.
3 – Câblage de votre amplificateur IMPULSE 4.320
AVERTISSEMENT
En cas de doute sur l’aptitude à installer l’amplificateur et câbler le système de façon adéquate, confiez
cette tâche a un revendeur/installateur Focal.
Page 19
amplifiCaTEUR impUlSE 4.320
Manuel d'installation
ATTENTION
Evitez de faire passer les câbles d’alimentation près des câbles d’entrée bas niveau (LOW LEVEL INPUTS)
et haut niveau (HI LEVEL INPUTS), de l’antenne, des équipements et faisceaux sensibles. Les fils
d’alimentation transportent un courant élevé pouvant produire un parasitage du signal audio.
ATTENTION
Réduisez au maximum la longueur des câbles afin d’optimiser la qualité de l’installation et limiter ainsi
les pertes de signal.
ATTENTION
Avant de débuter la phase de connexion, retirez la borne négative (-) de la batterie du véhicule (fig. 1)
3.1 - Quelle section de câble d’alimentation choisir ?
Votre amplificateur IMPULSE 4.320 nécessite une alimentation d’ampérage approprié.
Les sections des câbles d’alimentation à utiliser dépendent de la distance de câblage à la batterie. Ils sont préconisés
dans le tableau suivant :
Longueur du câble en mètres jusqu’à la batterie
Longueur < 1 m < 3 m < 4 m
Section mm
Section AWG 12 AWG < 12 AWG
2
Câble accessoire ISO
recommandé
3,3 mm
2
> 3,3 mm
2
19
Le respect de ces règles de câblage est indispensable à l’aspect sécuritaire de votre installation électrique, il est
également important pour maintenir les performances maximales de votre amplificateur IMPULSE 4.320.
3.2 – Câblage des signaux d’entrée et sortie sur votre amplificateur IMPULSE 4.320
3.2.1 – Votre autoradio est équipé de sorties RCA
Acheminez ensemble les câbles de modulation (RCA), les câbles haut-parleurs, le câble REM en les isolant des
autres accessoires automobiles de forte puissance, particulièrement les moteurs électriques (essuie-glace, ...).
Conservez toute la longueur des câbles, elle sera ajustée plus tard.
3.2.2 – Votre autoradio est uniquement équipé de sorties amplifiées (sorties haut-parleurs)
Acheminez ensemble les câbles de modulation en provenance des sorties de l’autoradio, les câbles haut-parleur
en les isolant des autres accessoires automobiles de forte puissance, particulièrement les moteurs électriques
(essuie-glace, ...). Conservez toute la longueur des câbles, elle sera ajustée plus tard.
3.3 – Câblage de l’alimentation de votre amplificateur IMPULSE 4.320
3.3.1 – Acheminez le câble d’alimentation positif (+) en prenant soin de le faire passer à l’opposé des câbles
précédemment tirés pour éviter tout parasitage. NE CONNECTEZ PAS LE CABLE POUR L’INSTANT.
Page 20
amplifiCaTEUR impUlSE 4.320
Manuel d'installation
3.3.2 – Munissez-vous du câble d’alimentation négatif (-). Ce câble doit être le plus court possible et ne doit
idéalement pas dépasser 1 mètre afin d’assurer une parfaite liaison entre l’amplificateur et le châssis du véhicule.
Le câble et sa section doivent être conformes au tableau mentionné en 3.1. Trouver un point de masse adéquat,
puis poncez-le pour enlever toute trace de peinture ou autre verni et ainsi optimiser la qualité du contact. Percez la
tôle préalablement poncée au diamètre correspondant à la vis choisie en s’assurant qu’aucun passage de câbles
réservoir ou autre organe sensible du véhicule ne soit à proximité. Soudez et isolez (grâce à de la gaine thermo-rétractable) le câble de masse sur le départ de câble fourni vers votre amplificateur IMPULSE 4.320 (fig. 2).
fig. 2
3.4 – Connexion des signaux d’entrée sur votre amplificateur IMPULSE 4.320
La phase de connexion des câbles d’entrée/sortie peut débuter.
3.4.1 – Votre autoradio est équipé de sorties RCA
Connectez les RCA au câble d’adaptation RCA fourni (fig. 3) en respectant les polarités (INPUT Left = noir ou blanc,
INPUT Right = rouge) et répartition (F=FRONT=AVANT, R=REAR=ARRIERE). Connectez l’autre extrémité au panneau
de connexion INPUTS de l’amplificateur.
20
fig. 3
Positionnez le sélecteur d’entrées ( INPUTS LEVEL) sur LOW (faible niveau). (fig. 4)
fig. 4
Page 21
amplifiCaTEUR impUlSE 4.320
Manuel d'installation
3.4.2 – Votre autoradio est uniquement équipé de sorties amplifiées (sorties haut-parleurs)
Connectez directement les sorties haut-parleur de l’autoradio au câble d’adaptation fourni (fig. 5) en respectant les
polarités (INPUT Left = noir ou blanc, INPUT Right = rouge). Connectez l’autre extrémité au panneau de connexion
INPUTS de l’amplificateur.
fig. 5
Positionnez le sélecteur d’entrées (INPUTS LEVEL) sur HIGH (haut-niveau). (fig. 6)
21
fig. 6
3.5 – Connexion des haut-parleurs et de la remote sur votre amplificateur IMPULSE 4.320
Soudez et isolez (à l’aide de gaine thermo-rétractable) le câble REMOTE sur le départ de câble fourni (fig. 7).
Connectez l’autre extrémité du câble REMOTE à la borne REMOTE de l’autoradio.
fig. 7
Page 22
amplifiCaTEUR impUlSE 4.320
Manuel d'installation
Enfin, connectez les câbles haut-parleurs à l’amplificateur en respectant les polarités (+ sur + ; - sur -) sur le départ
de câble fourni (fig. 8)
fig. 8
MISE EN GARDE
Les haut-parleurs ou kits de haut-parleurs câblés sur votre amplificateur IMPULSE 4.320 doivent systématiquement
présenter une impédance supérieure à 2 ohms.
22
MISE EN GARDE
En mode bridgé, les haut-parleurs ou kits de haut-parleurs câblés sur votre amplificateur IMPULSE 4.320 doivent
systématiquement présenter une impédance supérieure à 4 ohms.
Toute utilisation à des impédances inférieures entraînerait une annulation de la garantie.
Pour utiliser le IMPULSE 4.320 en mode bridgé et ainsi doubler la puissance disponible, respectez les connexions et
polarités indiquées ci-dessous (fig. 9)
fig. 9
Page 23
amplifiCaTEUR impUlSE 4.320
Manuel d'installation
MISE EN GARDE
Le câble reliant la borne positive (+) de la batterie au bornier "+ BATT" de l’amplificateur doit IMPERATIVEMENT
comporter un fusible (valeur de l’ampérage : 25 ampères) à 40 cm ou moins de la batterie du véhicule.
Les connexions du porte-fusible doivent être étanches.
Démontez le porte-fusible en prenant soin d’ôter le fusible. Fixez le socle du porte-fusible.
Coupez une longueur de câble d’alimentation entre 10 et 40 cm (maximum). Dénudez 1 cm puis étamez. Vissez le
câble dans le bornier du porte-fusible coté batterie. Sertissez votre câble d’alimentation dans une cosse prévue à cet
effet et vissez cette dernière sur un point d’alimentation batterie.
Sur la longueur de câble restante, dénudez 1 cm puis étamez. Vissez le câble dans l’autre bornier du porte-fusible.
40cm max
23
fig. 10
Soudez et isolez (à l’aide de gaine thermo-rétractable) le câble d’alimentation positif (+) sur le départ de câble fourni
vers votre amplificateur IMPULSE 4.320 (fig. 10)
3.6 – Démarrage et vérifications
La phase de connexion est maintenant terminée. Il reste à vérifier la bonne alimentation ainsi que le bon fonctionnement
d’ensemble (autoradio / amplificateur / haut-parleurs). Mettez le gain de la source au minimum. Positionnez le gain
de votre amplificateur sur 1/3 de la course totale. Mettez sous tension les différents éléments. Une fois l’ensemble
des éléments sous tension, effectuez un test à faible volume sonore.
.
Page 24
amplifiCaTEUR impUlSE 4.320
Manuel d'installation
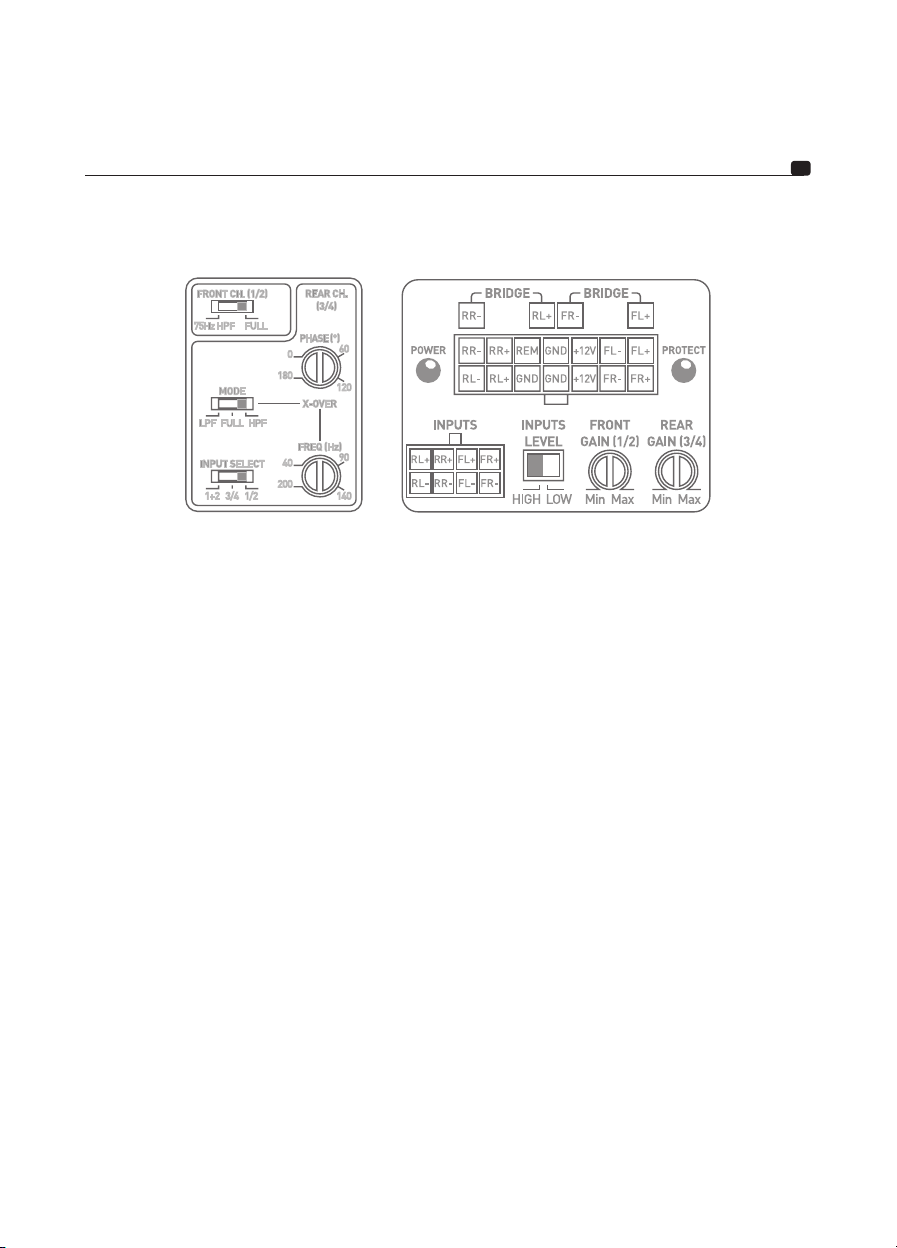
4 – Panneaux de contrôle et connexions
fig. 11
INPUTS : Ce connecteur est dédié à l'entrée du signal haut et bas niveau.
GAIN (FRONT AND REAR) : le potentiomètre rotatif GAIN permet d'ajuster le niveau du signal entrant dans
l'amplificateur. ATTENTION : augmenter le gain d'entrée ne signifie pas plus de puissance, mais plus de bruit. Le
gain en tension varie de 0,2 V à 5 V. L’optimisation des performances de la chaîne audio consiste à appliquer les gains
maximums au plus tôt en amont dans la chaîne audio, et les gains minimums en aval.
Ce potentiomètre doit être réglé en fonction du niveau de la source (niveau de sortie ligne).
Débutez en mettant le gain de l’amplificateur à son niveau le plus bas. Montez progressivement le niveau (volume)
de la source jusqu’au 3/4. Augmentez le niveau du gain de l’amplificateur jusqu’au niveau d’écoute maximum
souhaité. Baisser le niveau en cas de distorsion. Le potentiomètre FRONT permet de régler le niveau des voies avant.
Le potentiomètre REAR permet de régler le niveau des voies arrière.
24
+ 12 V : le connecteur d’alimentation + BATT est dédié à recevoir le câble d’alimentation assurant la liaison entre
l’amplificateur et la borne positive (+) de la batterie.
GND : le connecteur d’alimentation GND (ground) est dédié à recevoir le câble d’alimentation négatif (-) assurant la
liaison entre l’amplificateur et le châssis du véhicule.
REM : le connecteur REM assure la liaison entre l’amplificateur et la source (autoradio) via une sortie REM ou
REMOTE de l’autoradio. Cela permet la mise sous tension automatique de l’amplificateur dès la mise sous tension
de la source (autoradio).
POWER et PROTECT : les témoins lumineux permettent de vérifier le bon fonctionnement de l’amplificateur.
Une LED POWER continuellement allumée indique un fonctionnement correct du produit.
Une LED PROTECT continuellement ou temporairement allumée indique un fonctionnement anormal du produit, se
reporter aux dépannages en 5.
INPUTS LEVEL : ce sélecteur permet la sélection du type de niveau d’entrée (Haut niveau : HIGH / RCA Bas niveau : LOW).
Page 25

amplifiCaTEUR impUlSE 4.320
Manuel d'installation
INPUT SELECT : le commutateur permet aux canaux 3 et 4 de recopier éventuellement les signaux du canal 1 et 2.
Ainsi, si vous ne disposez que d'une sortie (une droite et une gauche), il vous est possible d'amplifier les quatre
canaux en activant le mode 1/2.
Si vous souhaitez utiliser le IMPULSE 4.320 dans sa configuration 4 canaux indépendants en entrée, sélectionnez
le mode 3 / 4.
Si vous souhaitez utiliser le IMPULSE 4.320 en mode 3 canaux, sélectionnez le mode 1+2. Vos canaux 3/4 reçoivent
alors le signal mono sommation des voies 1 et 2 pour adresser votre subwoofer.
PHASE (°) : le potentiomètre rotatif PHASE permet d’ajuster la mise en phase du canal avec le reste du système.
Un réajustement de la phase du subwoofer permet de faire en sorte qu’à la fréquence de raccord, le subwoofer et
le reste des haut-parleurs jouent simultanément. Sur une période théorique de signal, on vient décaler légèrement
l’une des sources pour qu’au point d’écoute la mise en phase soit parfaite.
X-OVER MODE : ce commutateur permet d’activer pour les voies 3/4 ou arrière, au choix, un filtre passe-haut (HPF),
un filtre passe-bas (LPF) ou le mode non filtré (FULL).
X-OVER FREQ (Hz) : réglage de la fréquence de coupure du filtre : ce potentiomètre rotatif permet de régler la valeur
du filtre passe-bas ou passe-haut. La valeur sélectionnée définit la fréquence jusqu’à laquelle ou à partir de laquelle
le signal sera coupé.
FRONT CH. (1/2) : ce commutateur permet d’activer un filtre passe-haut fixe à 75 Hz sur les voies avant. Ce réglage
permet de résoudre les problèmes de vibrations de portières dans des véhicules non traités.
5 – Dépannage
L’état des différents témoins lumineux signifie certains modes de défaillance ou origines de pannes.
Vérifiez l’ensemble des cas possibles ci-dessous. Si malgré ces vérifications, le fonctionnement normal n’est pas
récupéré, adressez-vous à l’installateur ou revendeur de votre amplificateur IMPULSE 4.320.
25
Etat LEDs
Témoins
PROTECT
rouge
Off NON Absence ou
Off NON Surchauffe Eteignez le système audio.
Off NON Absence de
Off NON Défaillance
POWER
verte
Présence de
son
NON Court-circuit
en alternatif
OUI/NON
Origine
possible
en sortie
mauvaise
alimentation
signal REM
Fusibles
Problème de
masse
Dépannage
Eteignez le système audio.
Vérifiez les haut-parleurs, leur impédance minimale,
leurs connexions, les câbles haut-parleur.
Eteignez le système audio.
Vérifiez la présence du 12 V.
Vérifiez les câbles d’alimentation, leur polarité.
Vérifiez les fusibles
Attendez le refroidissement de votre amplificateur avant de
reprendre son utilisation.
Allumez le système audio.
Vérifiez la présence d’une tension sur la borne REM.
Eteignez le système audio.
Vérifiez les fusibles, les remplacez les si nécessaire.
Eteignez le système audio.
Vérifiez la continuité de votre connexion de la borne GND
avec le châssis du véhicule.
Page 26

amplifiCaTEUR impUlSE 4.320
Manuel d'installation
6 – Spécifications techniques
26
Amplificateur Classe D 4/3/2 canaux
Entrées haut-niveau / RCA bas niveau √
Puissance CEA (4 ohms) 4 x 55 Wrms
Puissance max (2 ohms) 4 x 80 Wrms
Puissance max (bridgé 4 ohms) 2 x 160 Wrms
Bande Passante 10 Hz – 20 KHz (+/- 1 dB)
Distorsion Harmonique totale THD + N < 0,05 % de 0.5 à 50 Wrms 4Ω (1 kHz, 22 kHz LPF)
Distorsion Harmonique totale minimum 0,02 %
Diaphonie (1 KHz) > 65 dB (Ref. 10 Vout)
SNR (1 W/A) > 80 dBA
Filtre Passe-Haut Activable / désactivable fixe 75 Hz sur voies 1/2
Filtre Passe-Haut/Passe-Bas Configurable 40 Hz-200 Hz sur voies 3/4
Phase Réglable 0 / 180° sur voies 3/4
Fonction Full range Sur voies 1/2 et 3/4
Courant de repos – (remote ON) 750 mA
Fusibles 25 A (15 A si faisceau ISO)
Protections Court-circuit / surintensité /inversion de polarité /DC
Chute de tension/Protection thermique
Dimensions (L x l x h) 175 mm x 66,5 mm x 47 mm
Poids 550 g
IMPULSE 4.320
Conditions de garantie
En cas de problème, adressez-vous en premier lieu à votre revendeur Focal. La garantie pour la France sur tout
matériel Focal est de 2 ans. En cas de matériel défectueux, celui-ci doit être expédié à vos frais, dans son emballage d’origine auprès du revendeur, lequel analysera le matériel et déterminera la nature de la panne. Si celui-ci
est sous garantie, le matériel vous sera rendu ou remplacé en “franco de port”. Dans le cas contraire, un devis de
réparation vous sera proposé. La garantie ne couvre pas les dommages résultant d’une mauvaise utilisation ou d’un
branchement incorrect.
En dehors de la France, le matériel Focal est couvert par une garantie dont les conditions sont fixées localement
par le distributeur officiel Focal de chaque pays, en accord avec les lois en vigueur sur le territoire concerné.
Page 27
IMPULSE 4.320 AMPLIFIER
Gebrauchsanleitung
Wir danken Ihnen, dass Sie Focal in Ihrem Car-Audio-System gewählt haben und unsere Philosophie „the Spirit of
Sound“ teilen. Dieses Produkt enthält das Beste aus der Focal-Technologie im Bereich Kompaktverstärkung Klasse D.
Um die besten Ergebnisse zu erzielen, empfehlen wir Ihnen, Ihren Verstärker IMPULSE 4.320 von Ihrem
Focal-Händler installieren zu lassen. Um alle Funktionen zu nutzen und so seine Leistungen voll zu genießen,
raten wir Ihnen, die Anweisungen dieses Hefts aufmerksam zu lesen und es dann aufzubewahren, um es später
zu Rate zu ziehen. Jedes Problem aufgrund der Nichteinhaltung der Gebrauchsvorschriften kann zu einer
Ungültigkeit der Garantie führen.
Zur Validierung der Garantie, ich danke Ihnen,
innerhalb von 10 Tagen nach dem Kauf zurück.
WARNUNG
Dieses Symbol bezeichnet die wichtigen Anweisungen. Die Nichteinhaltung dieser Anweisungen kann zu
schweren Verletzungen oder Sachschäden führen.
Verpackungsinhalt
- 1 Verstärker IMPULSE 4.320
- 1 Gebrauchsanleitung
- 1 Zubehörsatz
Verfügbares Zubehör (separat verkauft):
Deutsch version
- 1 Plug-and-Play-Kabel im ISO-Format zum direkten Anschluss an kompatible Autoradios
WARNUNG
• Schalten Sie keine Funktion ein, die Ihre Aufmerksamkeit ablenken kann, während Sie das Fahrzeug steuern.
Die Funktionen oder Einstellungen, die eine längere Aufmerksamkeit erfordern, dürfen nur bei vollständigem
Stillstand des Fahrzeugs genutzt werden. Achten Sie darauf, das Fahrzeug immer an einem sicheren Ort
anzuhalten, bevor Sie diese Funktionen einschalten. Es besteht das Risiko, einen Unfall zu verursachen.
• Halten Sie die Lautstärke niedrig, um beim Steuern des Fahrzeugs Außengeräusche hören zu können.
Es besteht das Risiko, einen Unfall zu verursachen.
• Öffnen Sie nicht Ihren Verstärker IMPULSE 4.320 und nehmen Sie keine Veränderungen an dem Produkt vor.
Es besteht das Risiko eines Unfalls, eines Brandes oder eines Stromschlags.
Ihr Focal-JMlab-Produkt wurde mit hochwertigen Materialien und Komponenten entworfen und hergestellt,
die recycelbar sind und wieder verwendet werden können. Dieses Symbol bedeutet, dass elektrische und
elektronische. Geräte am Ende ihrer Nutzungsdauer vom Hausmüll getrennt entsorgt werden müssen. Bitte
entsorgen Sie dieses Gerät bei Ihrer örtlichen kommunalen Sammelstelle oder im Recycling Centre. Bitte
helfen Sie mit, die Umwelt in der wir leben, zu erhalten.
Page 28
IMPULSE 4.320 AMPLIFIER
Gebrauchsanleitung
ACHTUNG
• Verwenden Sie Ihren Verstärker IMPULSE 4.320 ausschließlich an mobilen Geräten mit 12 Volt. Jede andere
Verwendung als die beabsichtigte Anwendung bringt ein Brand-, Stromschlags- oder Verletzungsrisiko mit sich.
• Verwenden Sie Sicherungen mit geeigneter Stromstärke. Es besteht das Risiko eines Brandes oder einer
Stromschlags.
• Verstopfen Sie nicht den Heizkörper Ihres Verstärkers IMPULSE 4.320. Eine innere Überhitzung kann entstehen
und einen Brand verursachen.
• Stellen Sie die Anschlüsse richtig her. Überprüfen Sie den Kabelquerschnitt und den Kabeltyp. Es besteht das
Risiko eines Brandes, von Verletzungen und/oder einer Beschädigung des Gerätes.
• Verwenden Sie keine Muttern oder Schrauben des Steuer- oder Bremsschaltkreises, Behälter, Gurte oder
andere Sicherheitselemente für den Erdanschluss. Die Verwendung dieser Elemente als Erdung kann das
Steuersystem des Fahrzeugs abschalten und einen Brand oder eine andere Beschädigung verursachen.
• Halten Sie kleine Gegenstände, die verschluckt werden können, wie Bolzen, Zubehör oder Schrauben, von
Kindern fern. Das Verschlucken solcher Gegenstände kann zu schweren Verletzungen führen. Suchen Sie bei
Verschlucken einen Arzt auf.
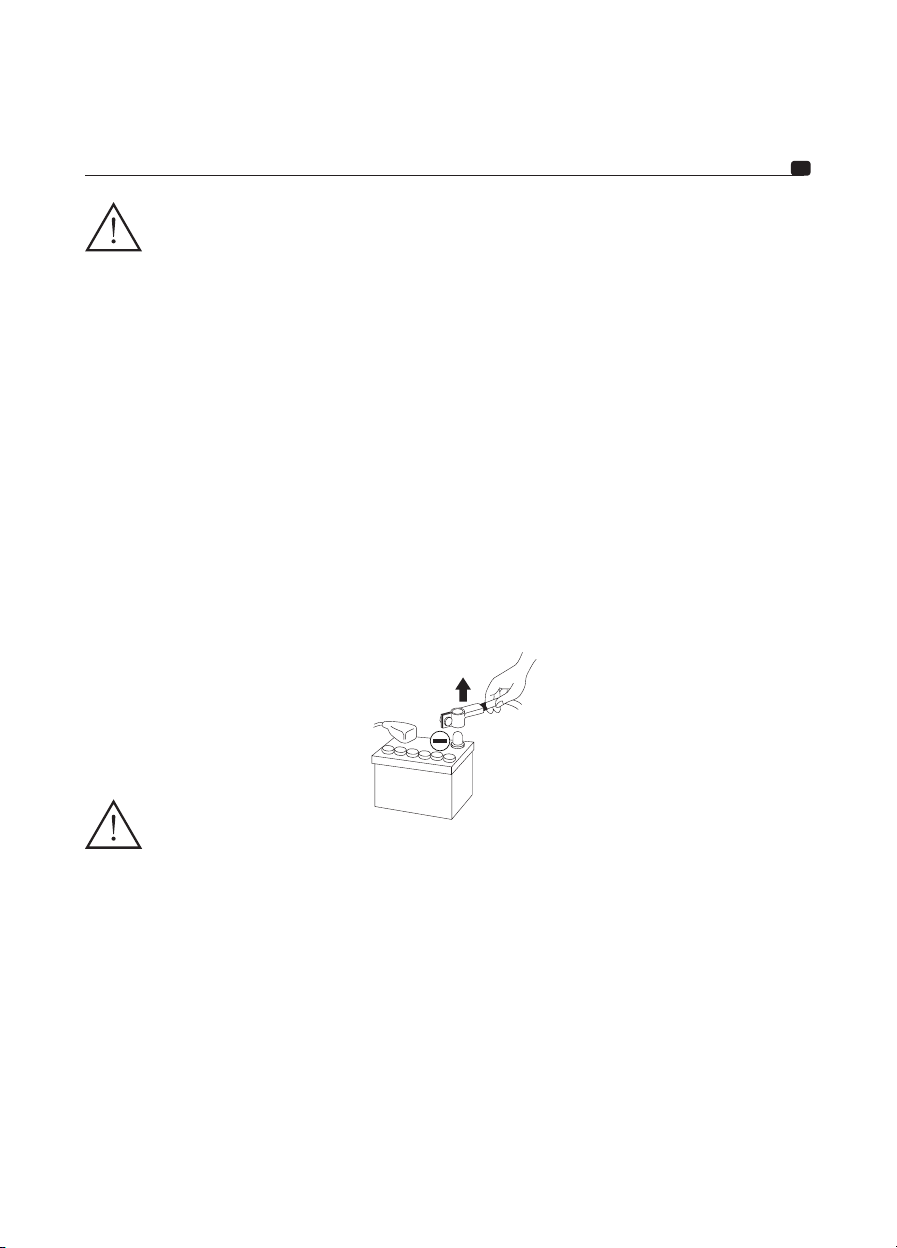
• Bevor Sie mit der Installation beginnen, trennen Sie den Minuspol der Batterie ab, um jedes Risiko einer
Verletzung, eines Brandes oder einer Beschädigung des Gerätes zu vermeiden (Abb. 1)
28
Abb. 1
ACHTUNG
Längeres Hören bei hoher Lautstärke, über 110 dB, kann das Gehör dauerhaft schädigen. Auch kurzes Hören
über 130 dB kann unheilbare Gehörverletzungen verursachen.
Unterbrechen Sie jede Verwendung bei Problemen. Die Nichteinhaltung dieser Vorsichtsmaßnahme kann zu
Verletzungen führen oder das Gerät beschädigen. Wenn eine Funktionsstörung dauerhaft besteht, geben Sie das
Gerät bei Ihrem Focal-Händler zur Reparatur ab.
Verwenden Sie das angegebene Zubehör und installieren Sie es korrekt. Verwenden Sie ausschließlich das in
der Gebrauchsanleitung genannte Zubehör sowie das in der Verpackung mitgelieferte. Die Verwendung anderer
Komponenten kann Beschädigungen im Inneren des Produkts verursachen, oder es besteht das Risiko, dass seine
Installation nicht korrekt durchgeführt wird. Bei abgenutzten Teilen besteht das Risiko, dass sie sich lösen und
Beschädigungen oder einen technischen Ausfall des Produkts verursachen. Es besteht das Risiko eines Unfalls,
eines Brandes oder eines Stromschlags.
Installieren Sie das Produkt nicht in sehr feuchten oder staubigen Bereichen. Vermeiden Sie, das Gerät in
Bereichen des Fahrzeugs zu installieren, die einer starken Feuchtigkeit oder übermäßigem Staub ausgesetzt
sind. Bei Eindringen von Feuchtigkeit oder Staub in das Innere des Produkts besteht das Risiko, dass ein Ausfall
verursacht wird.
Page 29

IMPULSE 4.320 AMPLIFIER
Gebrauchsanleitung
Installation Ihres Verstärkers IMPULSE 4.320
Die Installation dieses Produkts erfordert technische Fähigkeiten und Erfahrung. Falls Sie über Ihre Eignung
zur Installation des Verstärkers im Zweifel sind, vertrauen Sie diese Aufgabe einem Focal-Händler an, um alle
Möglichkeiten Ihres Verstärkers IMPULSE 4.320 voll nutzen zu können.
Verkabelung Ihres Verstärkers IMPULSE 4.320
Verwenden Sie ausschließlich die in der Gebrauchsanleitung empfohlenen Kabelausgänge und das mitgelieferte
Zubehör.
Verwenden Sie eventuell das separat verkaufte ISO-Kabel zur erleichterten Einrichtung.
Das Lautsprecherkabel darf NUR verwendet werden, um den Verstärker an die Lautsprecher anzuschließen.
Der Querschnitt der Stromkabel muss dem in der Tabelle (Abschnitt 3.1) genannten entsprechen und hängt von der
Leistung des Verstärkers und der nötigen Kabellänge ab. Verwenden Sie Cinch-Kabel mit doppelter oder dreifacher
Abschirmung, um jede Störung des leisen Signals zu vermeiden.
Betriebsdauer Ihres Verstärkers IMPULSE 4.320
Vermeiden Sie, den Verstärker über längere Zeit laufen zu lassen, ohne das Fahrzeug zu starten. Dies kann zur
vorzeitigen Entladung der Batterie führen.
Lüftung
Der obere Bereich Ihres Verstärkers IMPULSE 4.320 darf auf keinen Fall abgedeckt werden, um keine Überhitzung
zu erzeugen.
Zur Durchführung der Installation erforderliches Gerät (über das mitgelieferte Zubehör hinaus):
• 2 Kanäle mit geeignetem Querschnitt (1 Kanal für das Stromkabel, 1 Kabel für alle Lautsprecherkabel, REMOTE,
Cinch-Modulation)
• Multimeter (Spannung/Stromstärke)
• Lötkolben + Zinn
• Drahtkripper
• Abisolierzange
• Drahtschere
• Batteriestützenschlüssel
• Handbohrer und verschiedene Bohrerspitzen
• Schrumpfschläuche mit für verschiedene Kabel geeigneten Durchmessern
• Stromkabel geeigneter Länge und geeigneten Querschnitts
• Fernzündungskabel (REM-Eingang des Verstärkers) geeigneter Länge und geeigneten Querschnitts
• Erdungskabel geeigneter Länge und geeigneten Querschnitts
• Geeigneter Sicherungshalter und geeignete Sicherung
• Anschlusshülse an den Pluspol (+) der Batterie
• Anschlusshülse an das Fahrzeuggestell (-)
• Schraube mit mindestens 6 mm Schraubkopf und deren Mutter zur Erdung am Fahrzeuggestell
29
Installation:
Der nachstehende Abschnitt behandelt Punkte in Bezug auf das Fahrzeug, die zur Installation Ihres Verstärkers
zu berücksichtigen sind. Sie werden Zeit gewinnen, indem Sie im Voraus die Verteilung des Systems und der
Verkabelung planen.
Vergewissern Sie sich während dieser Vorbereitungsstufe, dass alle Einstellungen zugänglich bleiben, wenn die
Installation abgeschlossen ist.
Page 30

IMPULSE 4.320 AMPLIFIER
Gebrauchsanleitung
Bevor Sie mit der Installation beginnen, befolgen Sie bitte gewissenhaft folgende Regeln:
1 - Nachdem Sie die Gebrauchsanleitung vollständig durchgelesen haben, vergewissern Sie sich, dass Sie alle
Anweisungen verstanden haben, bevor Sie Ihren Verstärker installieren.
2 - Trennen Sie den Minuspol der Batterie vom Strom, bevor Sie mit der Installation beginnen (Abb. 1).
3 - Zur Erleichterung der Montage schlagen wir vor, alle Drähte zu entrollen, bevor Sie Ihren Verstärker installieren.
4 - Führen Sie alle Cinch-Kabel, den Lautsprecher und die Fernbedienung fern von den Stromkabeln, um jede
Signalstörung zu vermeiden.
5 - Verwenden Sie Stecker/Anschlüsse oder Schweißnähte hoher Qualität, um den Verstärker anzuschließen, um die
Zuverlässigkeit der Anlage sicherzustellen und Signal- oder Leistungsverluste zu minimieren.
6 – Überprüfen Sie, bevor Sie einen Eingriff durchführen, dass Sie den Benzintank, die Treibstoff-, Brems-,
Hydraulikleitungen oder Unterdruckschläuche sowie die Stromverkabelung oder irgendein Sicherheitselement
nicht abtrennen oder durchstechen.
7 - Lassen Sie niemals einen Draht unter dem Fahrzeug durchlaufen. Sie müssen unbedingt im Inneren desselben
installiert werden. Überprüfen Sie beim Durchlauf der Kabel, dass diese die Steuerung des Fahrzeugs nicht
beeinträchtigen. Die Kabel, die an Stellen wie dem Lenkrad, den Pedalen (Bremse, Gas und Kupplung usw.) ein
Hindernis bilden oder über diese laufen, können sich als äußerst gefährlich erweisen.
8 - Vermeiden Sie, Drähte über oder durch Schnittkanten zu führen. Jeder über Metall geführte Draht muss mit
Tüllen geschützt werden. Führen Sie die Kabel fern von beweglichen Teilen (Sitzschienen usw.) und scharfen
und spitzen Kanten. So wird vermieden, die Kabel einzuklemmen oder zu beschädigen und einen elektrischen
Kurzschluss zu erzeugen.
9 - Schützen Sie immer die Batterie und den Stromkreis mit Sicherungen vor möglichen Schäden. Installieren Sie
einen geeigneten Sicherungshalter und eine geeignete Sicherung am Stromkabel mit 12 V positiv (+) mindestens
40 cm vom Batterieanschluss entfernt. Idealerweise sollte dieser Abstand so kurz wie möglich sein (Abb. 10).
10 - Bereiten Sie die Erdung des Gestells vor, indem Sie jede Farbspur auf der Metalloberfläche abkratzen, um
eine gute Erdung sicherzustellen. Die Erdungsanschlüsse müssen so kurz wie möglich sein und IMMER an
geschweißtes Metall an der Karosserie oder am Gestell des Fahrzeugs angeschlossen werden (Abb. 2). Der
allgemein gewählte Erdungspunkt ist derjenige, der die Verbindung zwischen dem Minuspol der Batterie und
dem Gestell des Fahrzeugs sicherstellt.
11 - BEFESTIGEN SIE NIEMALS dieses Produkt im Motorraum des Fahrzeugs. Dies würde zur Unwirksamkeit der
Garantie führen.v
30
I - Anbringung Ihres Verstärkers IMPULSE 4.320
Wo sollten Sie Ihren Verstärker IMPULSE 4.320 installieren?
Aufgrund der Leistung des Verstärkers ist eine Wärmeableitung für den Betrieb notwendig. Aus diesem Grund
muss der Verstärker an einem Ort befestigt werden, der eine Lüftung ermöglicht, ganz besonders an der Oberseite.
Vermeiden Sie jeden Einbau oder jede Abdeckung des Verstärkers in der Nähe seines Installationsbereichs.
2 - Befestigung Ihres Verstärkers IMPULSE 4.320
Stellen Sie Ihren Verstärker an den gewünschten Platz und markieren Sie ihn.
Markieren Sie die Befestigungspunkte an Ihrem Halter mit den mitgelieferten Befestigungsfüßen.
Verwenden Sie geeignete Befestigungsschrauben zum Anschrauben an Ihren Halter.
3 – Verkabelung Ihres Verstärkers IMPULSE 4.320
WARNUNG
Falls Sie über Ihre Eignung zur Installation des Verstärkers und Verkabelung des Systems in geeigneter
Weise im Zweifel sind, vertrauen Sie diese Aufgabe einem Focal-Händler/Installateur an.
Page 31
IMPULSE 4.320 AMPLIFIER
Gebrauchsanleitung
ACHTUNG
Vermeiden Sie, die Stromkabel neben den Niedrigpegeleingängen (LOW LEVEL INPUTS) und
Hochpegeleingängen (HI LEVEL INPUTS) der Antenne, der Anlagen und empfindlichen Strahlen
durchlaufen zu lassen. Die Stromkabeldrähte befördern eine hohe Stromstärke, die eine Störung des
Audiosignals verursachen können.
ACHTUNG
Verringern Sie so weit wie möglich die Länge der Kabel, um die Qualität der Installation zu optimieren und
so die Signalverluste zu begrenzen.
ACHTUNG
Bevor Sie mit der Anschlussphase beginnen, entfernen Sie den Minuspol (-) von der Fahrzeugbatterie
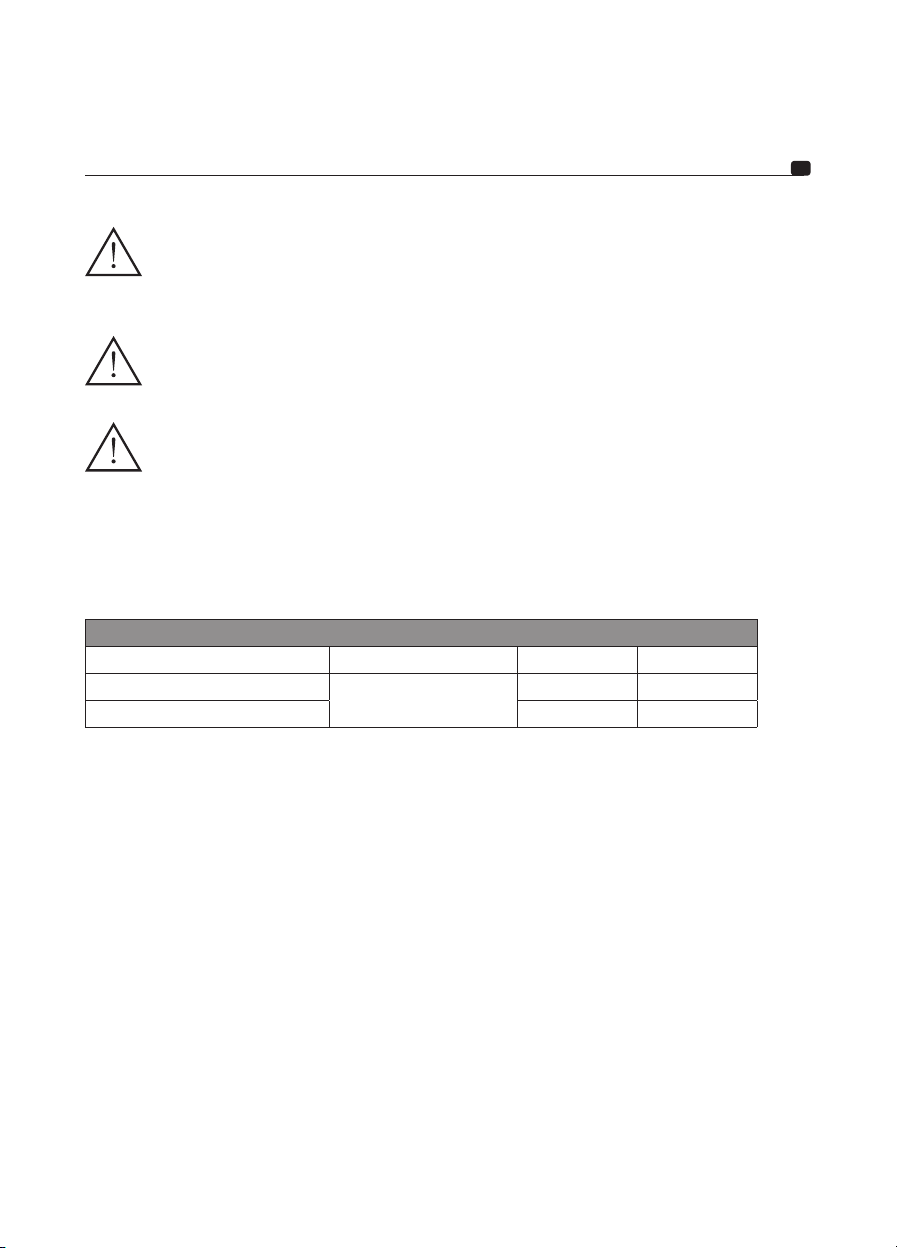
3.1 - Welchen Querschnitt des Stromkabels soll man wählen?
Ihr Verstärker IMPULSE 4.320 benötigt eine Stromzufuhr mit geeigneter Stromstärke.
Die zu verwendenden Querschnitte der Stromkabel hängen von der Entfernung der Verkabelung zur Batterie ab.
Sie werden in folgender Tabelle empfohlen:
Kabellänge in Metern bis zur Batterie
Length < 1 m < 3 m < 4 m
Querschnitt mm²
AWG-Querschnitt 12 AWG < 12 AWG
Empfohlenes ISO-
Zubehörkabel
3,3 mm
2
> 3,3 mm
2
31
Die Einhaltung dieser Verkabelungsregeln ist unverzichtbar für den Sicherheitsaspekt Ihrer elektrischen Anlage;
er ist ebenso wichtig, um die maximale Leistung Ihres Verstärkers IMPULSE 4.320 aufrechtzuerhalten.
3.2 – Verkabelung der Ein- und Ausgangssignale an Ihrem Verstärker IMPULSE 4.320
3.2.1 – Ihr Autoradio ist mit Cinch-Ausgängen ausgestattet
Führen Sie die Modulationskabel (Cinch), die Lautsprecherkabel, das REM-Kabel zusammen, indem Sie sie von
dem anderen Hochleistungs-Autozubehör isolieren, insbesondere den Elektromotoren (Scheibenwischer usw.).
Bewahren Sie die gesamte Kabellänge; sie wird später angepasst.
3.2.2 – Ihr Autoradio ist nur mit verstärkten Ausgängen (Lautsprecherausgängen) ausgestattet
Führen Sie die Modulationskabel aus den Ausgängen des Autoradios, die Lautsprecherkabel zusammen, indem Sie
sie von dem anderen Hochleistungs-Autozubehör isolieren, insbesondere den Elektromotoren (Scheibenwischer
usw.). Bewahren Sie die gesamte Kabellänge; sie wird später angepasst.
3.3 – Stromverkabelung Ihres Verstärkers IMPULSE 4.320
3.3.1 – Führen Sie das positive (+) Stromkabel so, dass Sie darauf achten, es entgegengesetzt zu den zuvor
gezogenen Kabeln durchlaufen zu lassen, um jede Störung zu vermeiden. SCHLIESSEN SIE DAS KABEL
VORLÄUFIG NICHT AN.
Page 32
IMPULSE 4.320 AMPLIFIER
Gebrauchsanleitung
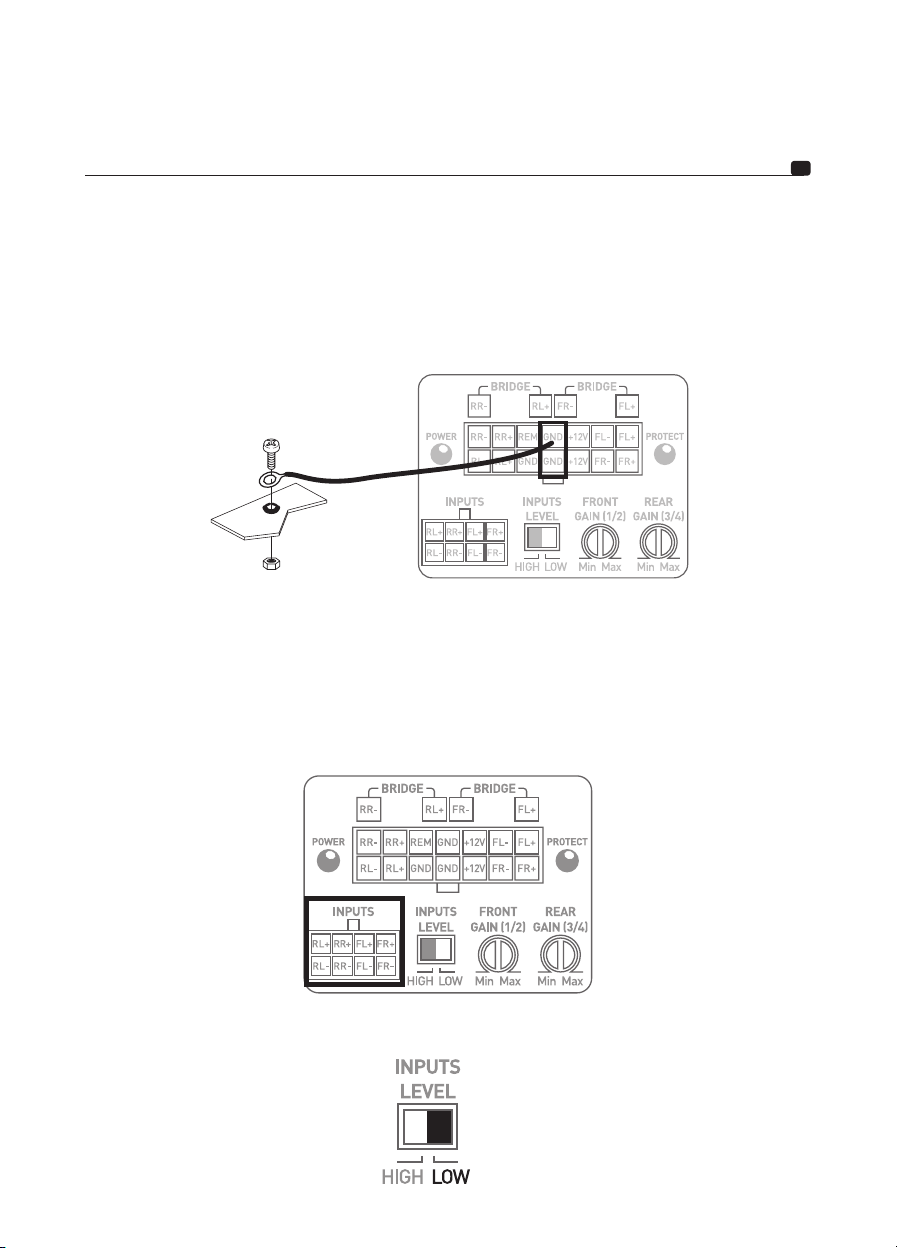
3.3.2 – Nehmen Sie das negative (-) Stromkabel. Dieses Kabel muss so kurz wie möglich sein und sollte idealerweise
1 Meter nicht überschreiten, um eine perfekte Verbindung zwischen dem Verstärker und dem Fahrzeuggestell
sicherzustellen. Das Kabel und sein Querschnitt müssen der in 3.1 genannten Tabelle entsprechen. Finden Sie einen
geeigneten Erdungspunkt und schleifen Sie ihn dann ab, um jede Spur von Farbe oder anderem Lack zu entfernen
und so die Kontaktqualität zu optimieren. Durchbohren Sie das zuvor geschliffene Blech im Durchmesser, der der
gewählten Schraube entspricht, und vergewissern Sie sich, dass kein Durchlauf von Tankkabeln oder einem anderen
empfindlichen Element des Fahrzeugs in der Nähe ist. Schweißen und isolieren Sie (mit dem Schrumpfschlauch)
das Erdungskabel am mitgelieferten Kabelausgang zu Ihrem Verstärker IMPULSE 4.320 (Abb. 2).
Abb. 2
3.4 – Anschluss der Eingangssignale an Ihren Verstärker IMPULSE 4.320
Die Anschlussphase der Ein-/Ausgangskabel kann beginnen.
3.4.1 – Ihr Autoradio ist mit Cinch-Ausgängen ausgestattet
32
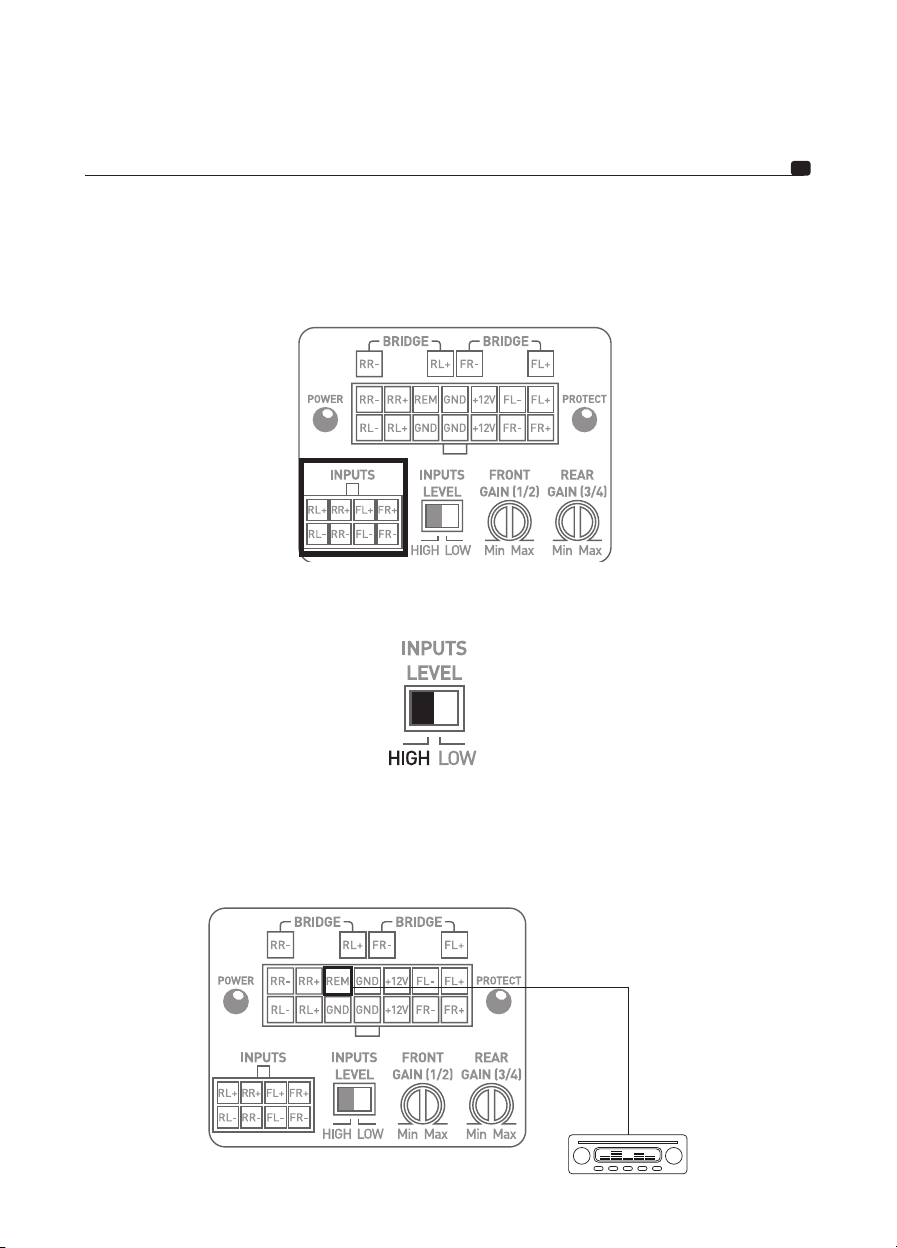
Schließen Sie die Cinch-Ausgänge an das mitgelieferte Cinch-Adapterkabel an (Abb. 3) und beachten Sie die Polari-
täten (INPUT Left = schwarz oder weiß, INPUT Right = rot) und die Verteilung (F=FRONT=VORNE, R=REAR=HINTEN).
Schließen Sie das andere Ende an die Anschlussleiste INPUTS des Verstärkers an.(Abb. 3)
Abb. 3
DRAHTMODELL auf der Basis sauberer Dateien wiederherzustellen
Abb. 4
Page 33
IMPULSE 4.320 AMPLIFIER
Gebrauchsanleitung
3.4.2 – Ihr Autoradio ist nur mit verstärkten Ausgängen (Lautsprecherausgängen) ausgestattet
Schließen Sie die Lautsprecherausgänge des Autoradios direkt an das mitgelieferte Adapterkabel an (Abb. 5) und
beachten Sie die Polaritäten (INPUT Left = schwarz oder weiß, INPUT Right = rot). Schließen Sie das andere Ende an
die Anschlussleiste INPUTS des Verstärkers an.
Abb. 5
Stellen Sie den Eingangswahlschalter ( INPUTS LEVEL) auf HIGH (hoch) (Abb. 6).
33
Abb. 6
3.5 – Anschluss der Lautsprecher und der Fernbedienung an Ihren Verstärker IMPULSE 4.320
Schweißen und isolieren Sie (mit dem Schrumpfschlauch) das REMOTE-Kabel am mitgelieferten Kabelausgang
(Abb. 7).
Schließen Sie das andere Ende des REMOTE-Kabels an den REMOTE-Anschluss des Autoradios an.
Abb. 7
Page 34
IMPULSE 4.320 AMPLIFIER
Gebrauchsanleitung
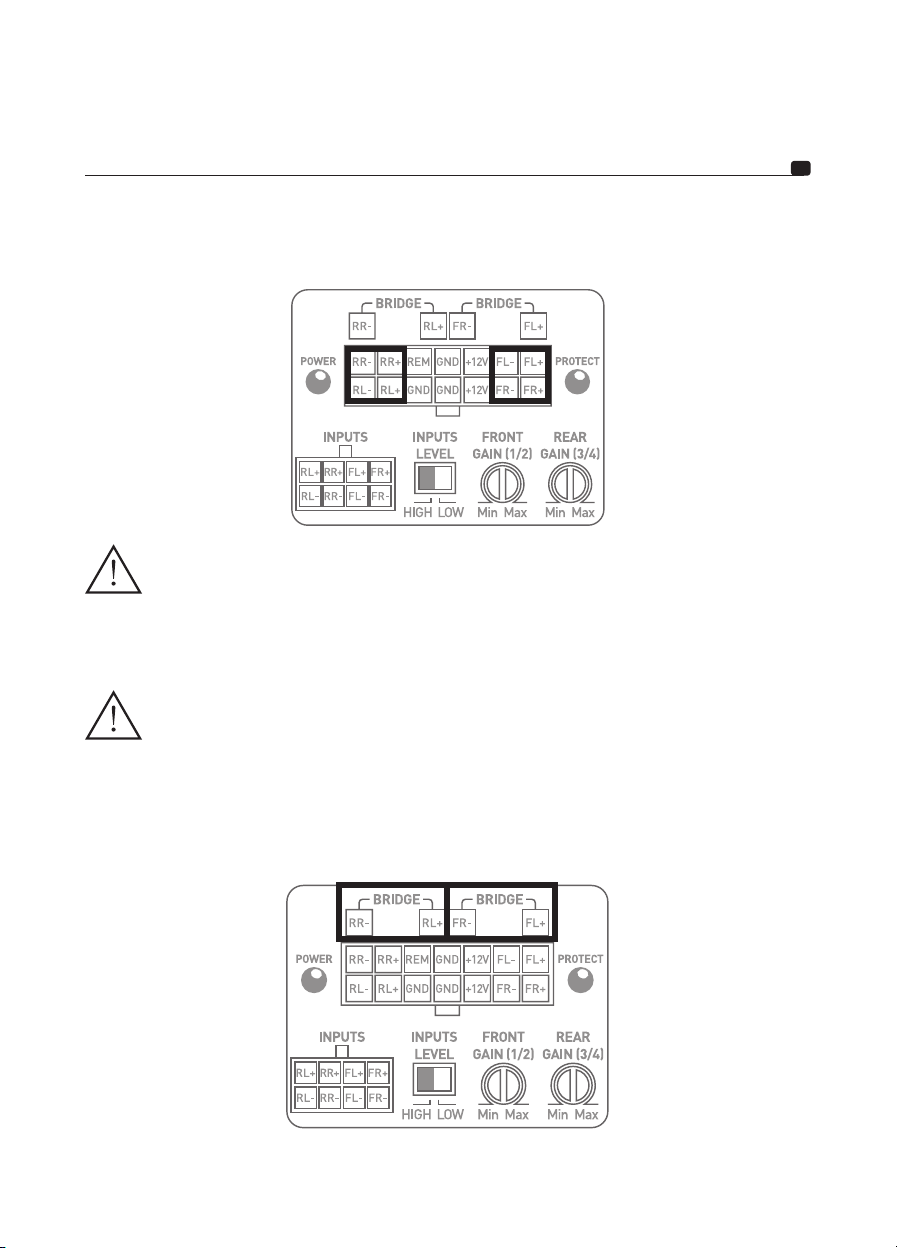
Schließen Sie am Ende die Lautsprecherkabel an den Verstärker an und beachten Sie die Polaritäten (+ an +; - an -)
am Ausgang des mitgelieferten Kabels (Abb. 8).
Abb. 8
ACHTUNG
Die verkabelten Lautsprecher oder Lautsprechersätze an Ihrem Verstärker IMPULSE 4.320 müssen durchgängig
eine Impedanz über 2 Ohm aufweisen.
34
ACHTUNG
In Brückenschaltung müssen die verkabelten Lautsprecher oder Lautsprechersätze an Ihrem Verstärker IMPULSE
4.320 durchgängig eine Impedanz über 4 Ohm aufweisen.
Jede Verwendung bei niedrigeren Impedanzen würde zur Unwirksamkeit der Garantie führen.
Um den IMPULSE 4.320 in Brückenschaltung zu verwenden und so die verfügbare Leistung zu verdoppeln, halten Sie
bitte die nachstehend angegebenen Anschlüsse und Polaritäten ein (Abb. 9):
Abb. 9
Page 35
IMPULSE 4.320 AMPLIFIER
Gebrauchsanleitung
ACHTUNG
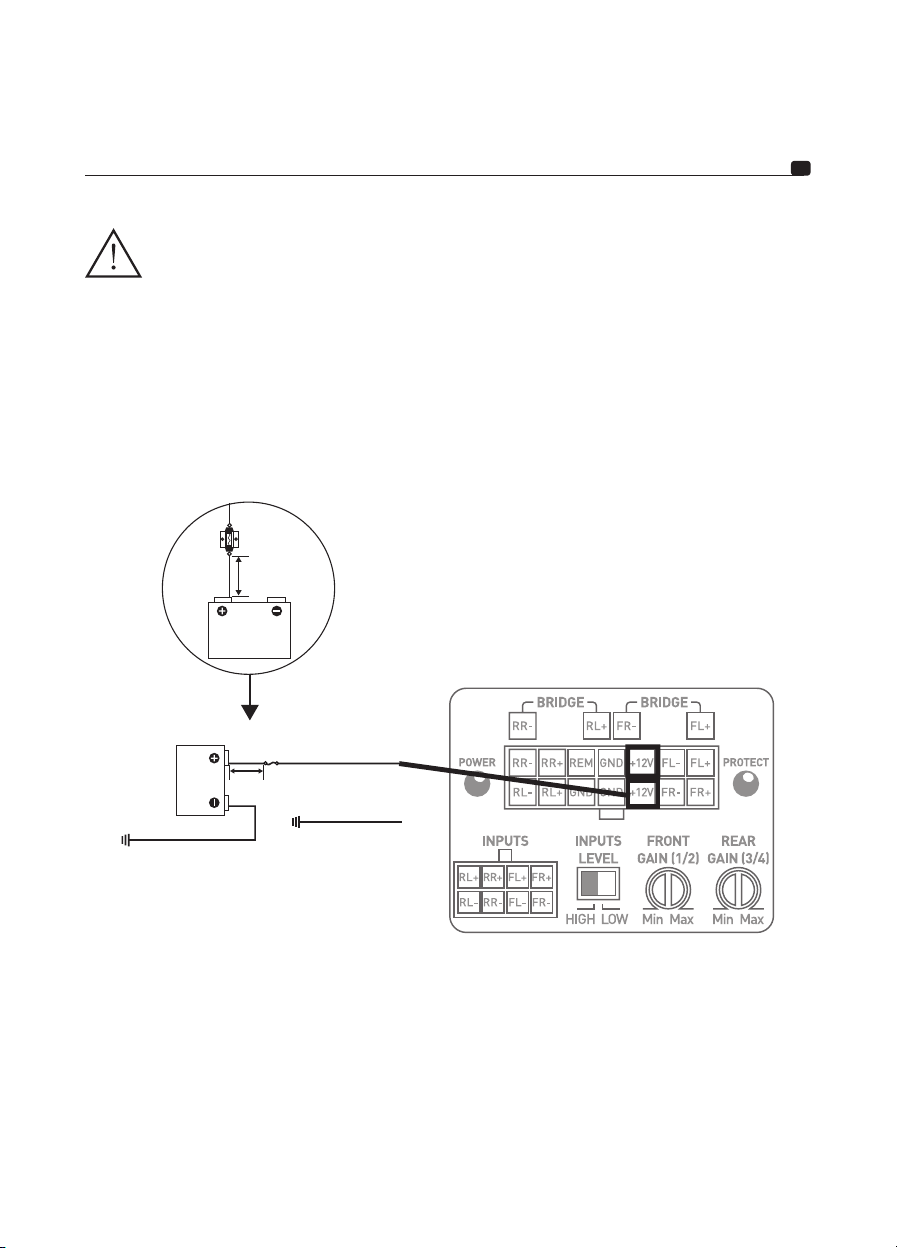
Das Kabel, das den Pluspol (+) der Batterie mit der Leiste „+ BATT“ des Verstärkers verbindet, muss UNBEDINGT
eine Sicherung (Wert der Stromstärke: 25 Ampère) in 40 cm oder weniger von der Fahrzeugbatterie aufweisen.
Die Anschlüsse des Sicherungshalters müssen dicht sein.
Montieren Sie den Sicherungshalter ab und achten Sie darauf, die Sicherung abzunehmen. Befestigen Sie den Sockel des Sicherungshalters.
Schneiden Sie eine Stromkabellänge von 10 bis (höchstens) 40 cm ab. Legen Sie 1 cm frei und belegen Sie es mit
einer Folie. Schrauben Sie das Kabel auf der Batterieseite an die Leiste des Sicherungshalters. Fassen Sie Ihr
Stromkabel in eine zu diesem Zweck vorgesehene Hülse ein und schrauben Sie diese an einen Batteriespeisepunkt.
Legen Sie an der verbleibenden Kabellänge 1 cm frei und belegen Sie es mit einer Folie. Schrauben Sie das Kabel
an die andere Leiste des Sicherungshalters.
40cm max
35
Abb. 10
Schweißen und isolieren Sie (mit dem Schrumpfschlauch) das positive Stromkabel (+) am mitgelieferten Kabelausgang zu Ihrem Verstärker IMPULSE 4.320 (Abb. 10).
3.6 – Start und Überprüfungen
Die Anschlussphase ist jetzt abgeschlossen. Die ordnungsgemäße Stromzufuhr sowie die Funktion der Anlage
(Autoradio / Verstärker / Lautsprecher) muss noch überprüft werden. Stellen Sie die Verstärkung der Quelle auf den
Mindestwert. Stellen Sie die Verstärkung Ihres Verstärkers auf 1/3 der Gesamthöhe. Setzen Sie die verschiedenen
Elemente unter Spannung. Sobald alle Elemente unter Spannung stehen, führen Sie bei niedriger Lautstärke einen
Test durch.
Page 36
IMPULSE 4.320 AMPLIFIER
Gebrauchsanleitung
4 – Steuerpulte und Anschlüsse
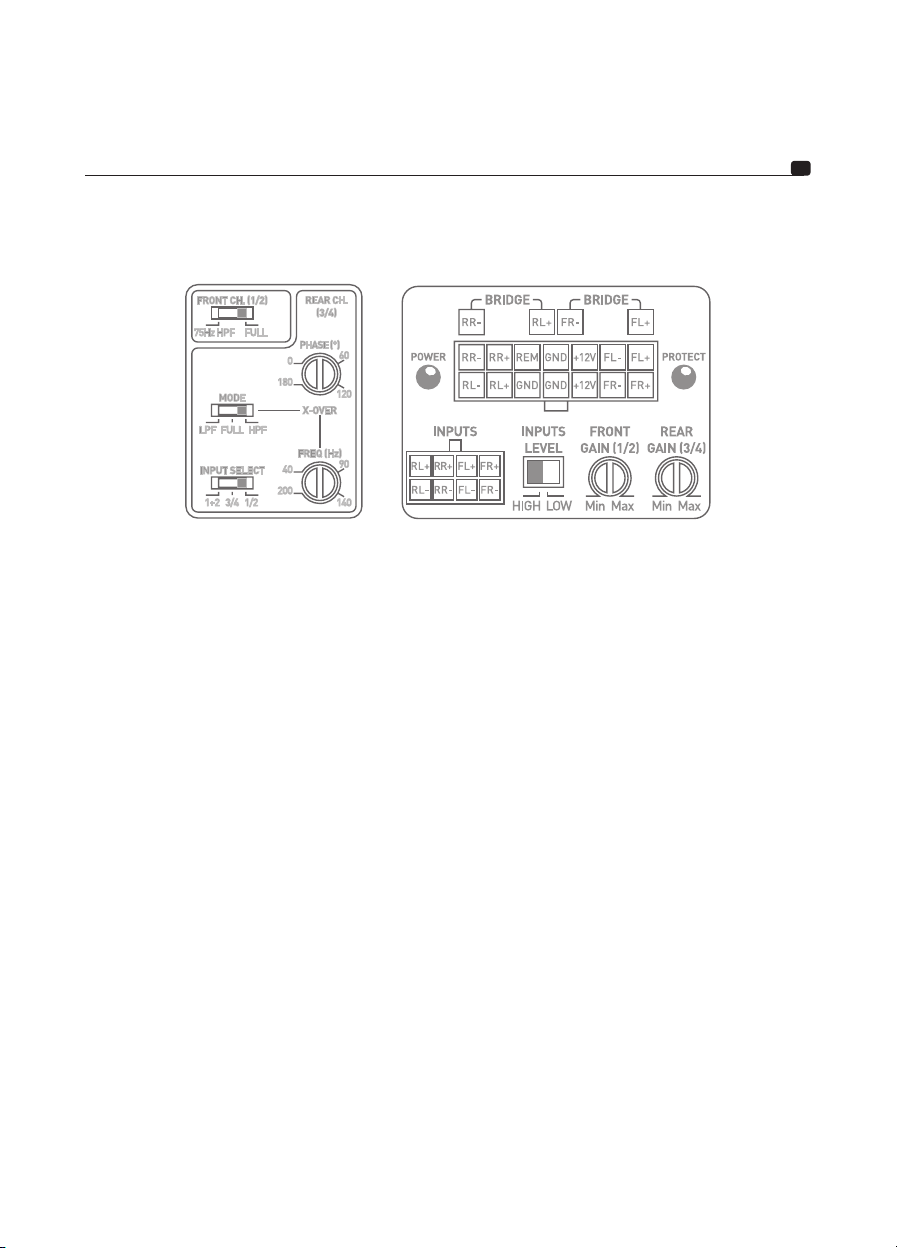
Abb. 11
INPUTS: Diese Steckverbindung ist für den Eingang des hohen und niedrigen Signals gedacht.
GAIN (FRONT AND REAR): das Drehpotentiometer GAIN ermöglicht, die Stärke des Eingangssignals in den
Verstärker einzustellen. ACHTUNG: die Eingangsverstärkung zu erhöhen, bedeutet nicht mehr Leistung, sondern
mehr Lautstärke. Die Spannungsverstärkung schwankt zwischen 0,2 V und 5 V. Die Leistungsoptimierung der
Audiokette besteht darin, die maximalen Verstärkungen frühestens vorne in der Audiokette und die minimalen
Verstärkungen hinten anzuwenden.
Dieses Potentiometer muss je nach Stärke der Quelle eingestellt werden (Bandausgangsstärke).
Beginnen Sie, indem Sie die Verstärkung des Verstärkers auf seine niedrigste Stufe setzen. Erhöhen Sie fortlaufend
die Stufe (Lautstärke) der Quelle bis zu 3/4. Erhöhen Sie die Verstärkungsstufe des Verstärkers bis zur gewünschten
maximalen Hörstufe. Senken Sie die Stufe bei Verzerrung. Das Potentiometer FRONT ermöglicht, die Stufe der
vorderen Kanäle einzustellen. Das Potentiometer REAR ermöglicht, die Stufe der hinteren Kanäle einzustellen.
36
+ 12 V: der Stromanschluss +BATT dient dazu, das Stromkabel aufzunehmen, das die Verbindung zwischen dem
Verstärker und dem Pluspol (+) der Batterie sicherstellt.
GND: der Stromanschluss GND (ground) dient dazu, das negative Stromkabel (-) aufzunehmen, das die Verbindung
zwischen dem Verstärker und dem Fahrzeuggestell sicherstellt.
REM: der REM-Anschluss stellt die Verbindung zwischen dem Verstärker und der Quelle (Autoradio) über einen
REM- oder REMOTE-Ausgang des Autoradios sicher. Dies ermöglicht die automatische Spannungszufuhr des
Verstärkers nach der Spannungszufuhr der Quelle (Autoradio).
POWER und PROTECT: die Kontrollleuchten ermöglichen, die ordnungsgemäße Funktion des Verstärkers zu
überprüfen.
Eine fortlaufend eingeschaltete LED POWER zeigt die korrekte Funktion des Produkts an.
Eine fortlaufend oder zeitweilig eingeschaltete LED PROTECT zeigt eine anormale Funktion des Produkts an; bitte
sehen Sie in den Störungsbehebungen unter 6 nach.
INPUTS LEVEL: dieser Wahlschalter ermöglicht die Auswahl des Eingangsstärketyps (hohe Stärke: HIGH / RCA,
niedrige Stärke: LOW)
Page 37

IMPULSE 4.320 AMPLIFIER
Gebrauchsanleitung
INPUT SELECT: der Schalter ermöglicht den Kanälen 3 und 4, eventuell die Signale des Kanals 1 und 2 zu übertragen.
Wenn Sie also nur über einen Ausgang verfügen (einen rechts und einen links), ist es Ihnen möglich, die vier Kanäle zu
verstärken, indem Sie den Modus 1/2 einschalten.
Wenn Sie den IMPULSE 4.320 in seiner Konfiguration mit 4 eigenständigen Kanälen am Eingang verwenden möchten,
wählen Sie den Modus 3 / 4.
Wenn Sie den IMPULSE 4.320 im 3-Kanal-Modus verwenden möchten, wählen Sie den Modus 1+2. Ihre Kanäle 3 / 4
empfangen dann das Mono-Summensignal der Kanäle 1 und 2, um Ihren Subwoofer anzusprechen.
PHASE (°): das Drehpotentiometer PHASE ermöglicht, die Synchronisierung des Kanals mit dem übrigen System einzustellen.
Eine Neueinstellung der Subwooferphase ermöglicht, dass bei der Anschlussfrequenz der Subwoofer und die übrigen
Lautsprecher gleichzeitig spielen. In einer theoretischen Signalzeit verschiebt man leicht eine der Quellen, damit zum
Zeitpunkt des Hörens die Synchronisierung perfekt ist.
X-OVER MODE: dieser Schalter ermöglicht, für die Kanäle 3 / 4 oder hinten nach Wahl einen Hochpassfilter (HPF),
einen Tiefpassfilter (LPF) oder den ungefilterten Modus (FULL) einzuschalten.
X-OVER FREQ (Hz): Einstellung der Grenzfrequenz des Filters: dieses Drehpotentiometer ermöglicht, den Wert des
Tiefpass- oder Hochpassfilters einzustellen. Der gewählte Wert legt die Frequenz fest, bis zu der oder von der ab das
Signal unterbrochen wird.
FRONT CH. (1/2): dieser Schalter ermöglicht, einen festen Hochpassfilter bei 75 Hz an den vorderen Kanälen
einzuschalten. Diese Einstellung ermöglicht, Schwingungsprobleme der Türen bei unbehandelten Fahrzeugen zu
lösen.
5 – Störungsbehebung
Der Status der verschiedenen Kontrollleuchten bezeichnet bestimmte Ausfallsarten oder Störungsursachen.
Überprüfen Sie alle nachstehenden möglichen Fälle. Wenn trotz dieser Überprüfungen der normale Betrieb nicht
wiederaufgenommen wird, wenden Sie sich an den Installateur oder Händler Ihres Verstärkers IMPULSE 4.320.
37
Status LED-
Kontroll-
leuchten
PROTECT rot NEIN Kurzschluss am
Ausgeschaltet NEIN Stromzufuhr
Ausgeschaltet NEIN Überhitzung Schalten Sie das Audiosystem ab.
Ausgeschaltet NEIN Fehlendes
Ausgeschaltet NEIN Ausfall Siche-
POWER grün
abwechselnd
Ton
vorhanden
JA/NEIN
oder
abwechselnd
Mögliche
Ursache
Ausgang
fehlt oder
schlecht
REM-Signal
rungen
Erdungspro-
blem
Störungsbehebung
Schalten Sie das Audiosystem ab.
Überprüfen Sie die Lautsprecher, ihre minimale Impedanz,
ihre Anschlüsse, die Lautsprecherkabel.
Schalten Sie das Audiosystem ab.
Vergewissern Sie sich, dass ein 12-V-Anschluss vorhanden ist.
Überprüfen Sie die Stromkabel, ihre Polarität.
Überprüfen Sie die Sicherungen.
Warten Sie, bis Ihr Verstärker sich abgekühlt hat,
bevor Sie seine Verwendung wiederaufnehmen.
Schalten Sie das Audiosystem ein.
Vergewissern Sie sich, dass eine Spannung am
REM-Anschluss vorhanden ist.
Schalten Sie das Audiosystem ab.
Überprüfen Sie die Sicherungen; ersetzen Sie sie, falls nötig.
Schalten Sie das Audiosystem ab.
Überprüfen Sie die Beständigkeit Ihrer Verbindung
des GND-Anschlusses mit dem Fahrzeuggestell.
Page 38

IMPULSE 4.320 AMPLIFIER
Gebrauchsanleitung
6 – Technical specifications
IMPULSE 4.320
4/3/2-channel class D amplifier
Eingänge hoher Stärke / Cinch niedriger Stärke
Leistung CEA (4 Ohm) 4 x 55 W RMS
Leistung max. (2 Ohm) 4 x 80 W RMS
Leistung max. (mit Brückenschaltung 4 Ohm) 2 x 160 W RMS
Bandbreite 10 Hz – 20 kHz (+/- 1 dB)
Harmonische Verzerrung insgesamt mindestens THD+N < 0,05 % von 0,5 bis 50 W RMS 4 Ω (1 kHz, 22 kHz LPF)
Harmonische Verzerrung insgesamt mindestens 0.02 %
Übersprechen (1 kHz) > 65 dB (Nr. 10 Ua)
SRV (1 W/A) > 80 dBA
Hochpassfilter Ein-/ausschaltbar fest 75 Hz auf Kanälen 1/2
Hoch-/Tiefpassfilter konfigurierbar 40 Hz-200 Hz auf Kanälen 3/4
Phase Einstellbar 0/180° auf Kanälen 3/4
Funktion Full range auf Kanälen 1/2 und 3/4
Ruhestrom – (remote ON) 750 mA
Sicherungen 25 A (15 A bei ISO-Bündel)
Schutzvorrichtungen Kurzschluss / Überstärke /Polaritätsumkehrung
/Gleichstrom/Spannungsabfall/Wärmeschutz
Maße (L x B x H)
Weight (g) 550
√
175 mm x 66,5 mm x 47 mm
38
Garantiebedingungen
Wenden Sie sich bei Problemen zunächst an Ihren Focal-Händler. Die Garantie auf alle Focal-Geräte in Frankreich
gilt 2 Jahre. Bei einem fehlerhaften Gerät muss dieses auf Ihre Kosten in seiner Originalverpackung an den Händler
gesendet werden, der das Gerät analysiert und die Art der Störung feststellt. Wenn dieses einer Garantie unterliegt,
wird das Gerät Ihnen portofrei zurückgesendet oder ersetzt. Anderenfalls wird Ihnen ein Kostenvoranschlag für die
Reparatur angeboten. Die Garantie deckt keine Schäden ab, die durch missbräuchliche Verwendung oder falschen
Anschluss entstehen.
Außerhalb Frankreichs ist das Focal-Gerät mit einer Garantie abgedeckt, deren Bedingungen vor Ort vom offiziellen
Focal-Vertriebshändler in jedem Land in Übereinstimmung mit den im betreffenden Gebiet geltenden Gesetzen
festgelegt werden.
Page 39
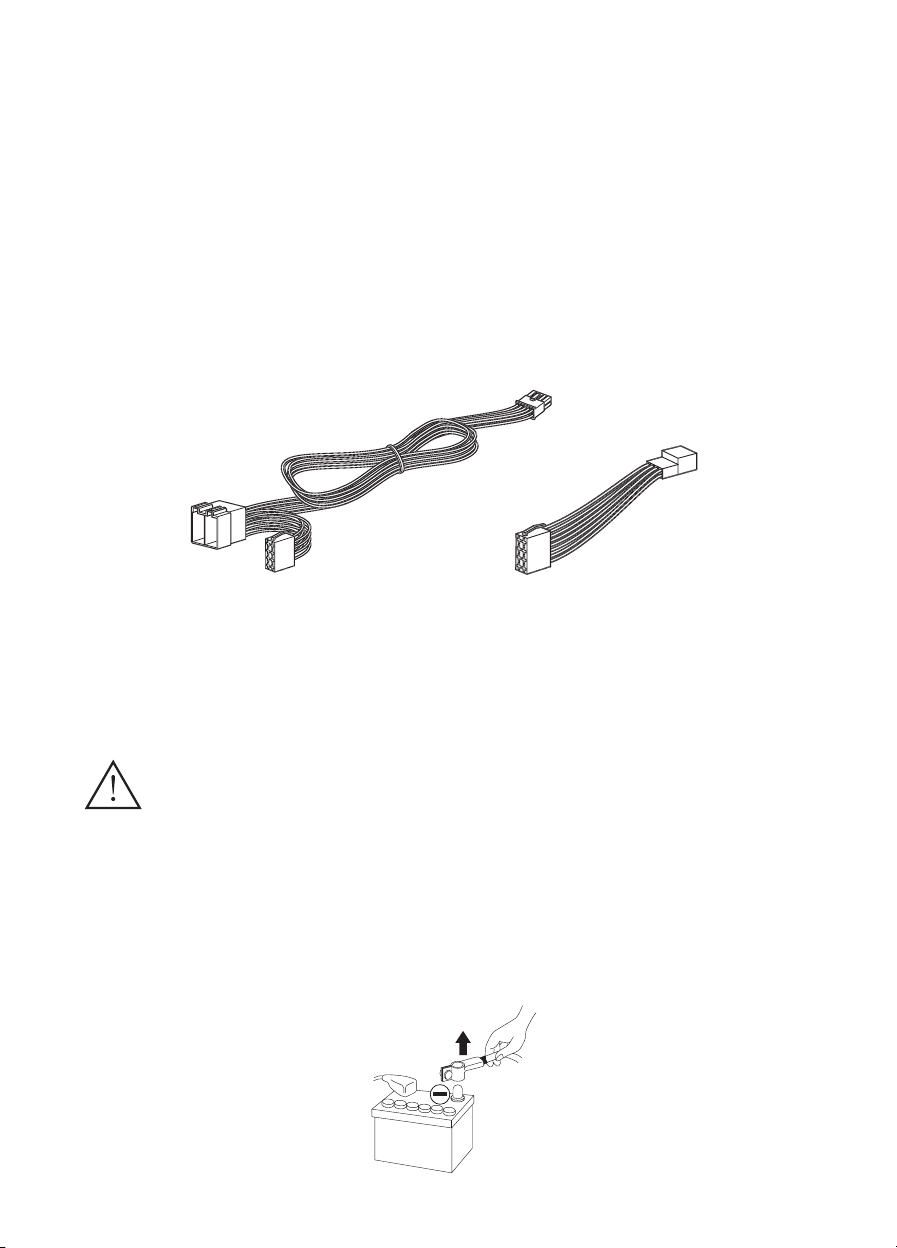
IY - AC IMPULSE 4.320
Y ISO ADAPTATION CABLE
Accessory sold separately
Accessoire vendu séparément
Contents / Contenu de l’emballage :
- 1 x Y ISO Cable / câble Y format ISO
- 1 x Input signal harness / rallonge signaux d’entrée
Before beginning installation, disconnect the negative terminal of the battery to avoid any risk of injury, fire or
material damage. (fig. 1). IY - AC IMPULSE 4.320 is only compatible with FOCAL IMPULSE 4.320. It allows a
quicker installation of your amplifier thanks to ISO compatibility.
Avant d’entamer l’installation, déconnectez la borne négative de la batterie pour éviter tout risque de blessure,
d’incendie ou d’endommagement du matériel. (fig. 1). Le câble IY - AC IMPULSE 4.320 est uniquement compatible avec le
FOCAL IMPULSE 4.320. Il permet une connexion facilitée de votre amplificateur grâce à la compatibilité ISO.
fig. 1
Page 40
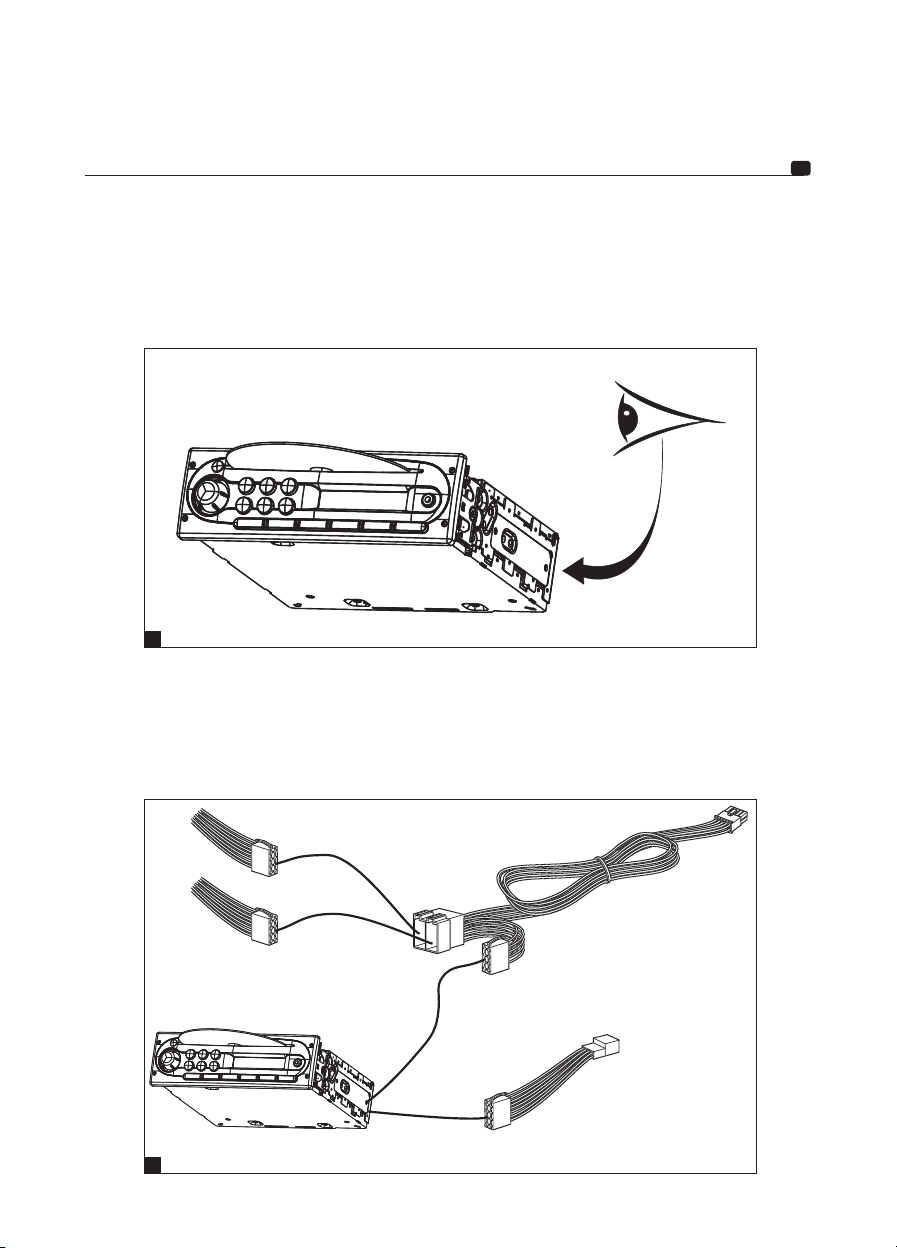
Y ISO ADAPTATION CABLE
User manual/Manuel d'installation
Remove the head unit to get access to the connection panel. Depending of your car model, a complementary
adaptive cable could be necessary to upgrade to ISO standard. Ask your FOCAL dealer some advice.
Accédez au panneau de connexion de votre autoradio. En fonction de votre véhicule, un adaptateur supplémentaire
peut être nécessaire pour le rendre compatible ISO, demandez conseil à votre revendeur FOCAL.
1
Remove the head unit to get access to the connection panel. Depending of your car model, a complementary
adaptive cable could be necessary to upgrade to ISO standard. Ask your FOCAL dealer some advice.
40
Accédez au panneau de connexion de votre autoradio. En fonction de votre véhicule, un adaptateur supplémentaire
peut-être nécessaire pour le rendre compatible ISO, demandez conseil à votre revendeur FOCAL.
2
Page 41
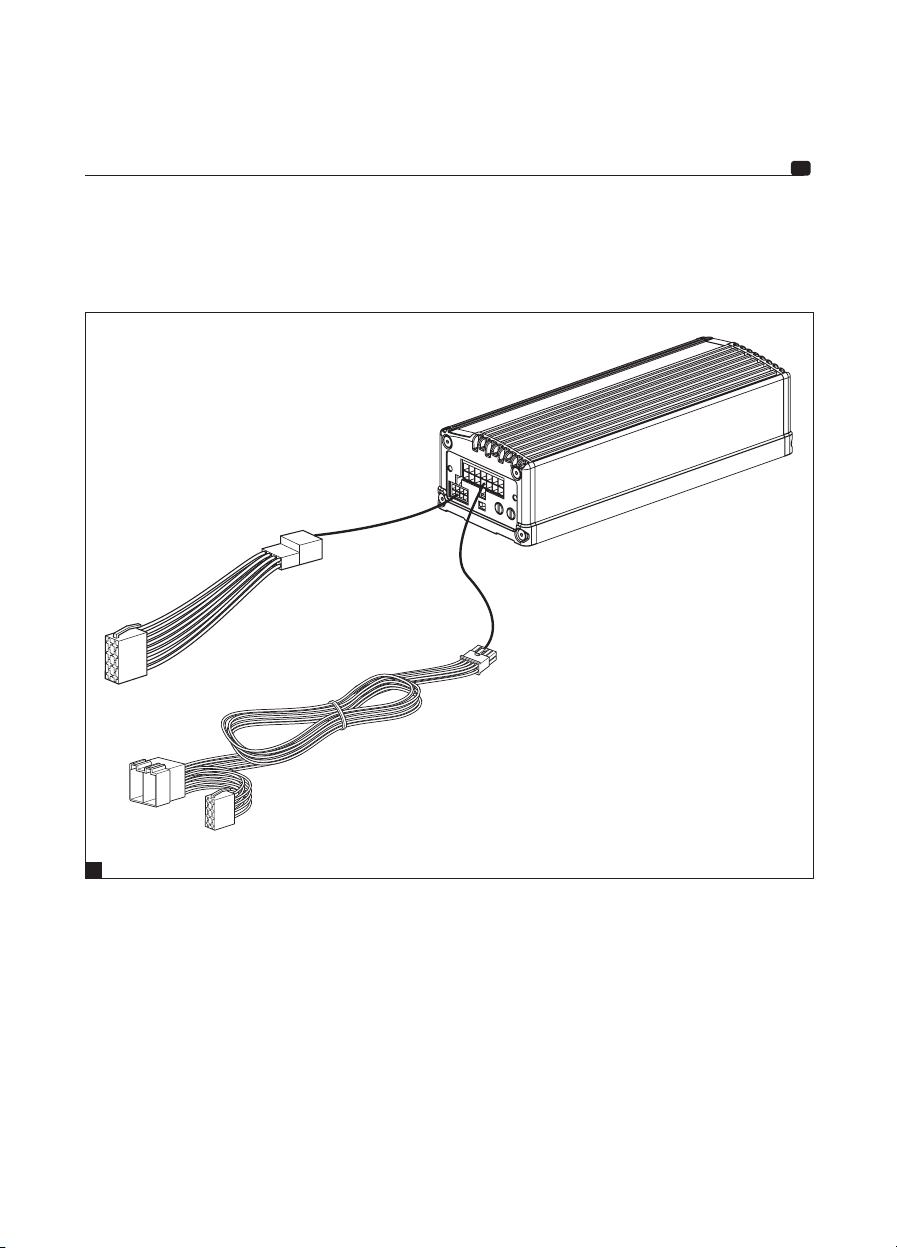
Y ISO ADAPTATION CABLE
User manual/Manuel d'installation
Plug the terminals to your IMPULSE 4.320 corresponding slots.
Reliez le câble Y et la rallonge d’entrées aux borniers correspondants du IMPULSE 4.320.
41
3
Start-up and checks / Démarrage et vérifications.
The connection phase is now complete. You must now check the power supply is correct and that everything is
working correctly (head unit/amplifier/speaker). Set the source gain to its minimum. Set the gain on your amplifier
to 1/3 of the way. Turn on the audio system. Once all the elements are on, carry out a test at low volume.
La phase de connexion est maintenant terminée. Il reste à vérifier la bonne alimentation ainsi que le bon fonctionnement
d’ensemble (autoradio / amplificateur / haut-parleurs). Mettez le gain de la source au minimum. Positionnez le gain
de votre amplificateur sur 1/3 de la course totale. Mettez sous tension les différents éléments. Une fois l’ensemble des
éléments sous tension, effectuez un test à faible volume sonore.
Page 42

Su producto Focal-JMlab ha sido concebido y fabricado con materiales y componentes de alta calidad, que
pueden ser reciclados y reutilizados. Este símbolo signifi ca que los aparatos eléctricos y electrónicos, al
final de su vida útil, deberán ser separados de los residuos domésticos y reciclados. Rogamos llevar este
aparato al punto de recogida de su municipio o a un centro de reciclaje. Por favor, contribuya Vd. también en
la conservación del ambiente en que vivimos.
E
Il vostro prodotto Focal-JMlab è stato progettato e realizzato con materiali e componenti pregiati che possono
essere riciclati e riutilizzati. Questo simbolo signifi ca che gli apparecchi elettrici ed elettronici devono essere
smaltiti separatamente dai rifi uti domestici alla fine del loro utilizzo. Vi preghiamo di smaltire questo
apparecchio negli appositi punti di raccolta locali o nei centri preposti al riciclaggio. Contribuite anche voi a
tutelare l’ambiente nel quale viviamo.
I
O seu produto Focal-Jmlab foi concebido e fabricado, utilizando materiais e componentes de alta qualidade
que, podem ser reciclados e reutilizados. Este símbolo significa que, no fim da sua vida útil, equipamentos
eléctricos e electrónicos devem ser eliminados separadamente dos resíduos sólidos domésticos. Por favor,
entregue este equipamento ao respectivo ecoponto local ou comunal ou ao centro de reciclagem competente.
Por favor, ajude-nos a preservar o meio ambiente em que vivemos.
P
Tämä Focal-JMlab-tuote on suunniteltu ja valmistettu korkealaatuisista materiaaleista ja komponenteista,
joita voidaan kierrättää ja käyttää uudelleen. Tämä symboli tarkoittaa, että sähkölaitteet ja elektroniset
laitteet tulee hävittää erillään kotitalousjätteestä, kun niitä ei enää käytetä. Jätä tämä laite paikkakuntasi
kunnalliseen keräyspisteeseen tai kierrätyskeskukseen. Auta meitä säästämään luontoa, jossa elämme.
FIN
Продукция Focal-JMlab была разработана и произведена из материалов высокого качества, а также компонентов,
которые могут быть переработаны и/или использованы повторно. Этот символ означает, что электрические и
электронные части в конце эксплуатационного периода продукта должны быть утилизированы отдельно от
бытового мусора. Пожалуйста, утилизируйте этот продукт в специально предназначенных и оборудованных
для этого местах. Это поможет защитить окружающую среду, в которой мы все живем.
RU
Uw Focal-JMlab-Product is ontworpen voor en gebouwd uit hoogwaardige materialen en componenten die
gerecycled kunnen worden en dus geschikt zijn voor hergebruik. Dit symbool betekent, dat elektrische en
elektronische apparatuur aan het einde van zijn levensduur gescheiden van het huisvuil apart moet worden
ingeleverd. Breng dit apparaat naar een van de plaatselijke verzamelpunten of naar een kringloopwinkel.
Help s.v.p. mee, het milieu waarin we leve te beschermen.
NL
Teie Focal-JMlab toode on välja töötatud ning toodetud kõrgkvaliteetsest materjalist ning osades, mida on
võimalik ümber töödelda ning/või korduvkasutada. Antud märgis näitab, et elektri- ja elektroonikaseadmeid
peab nende kasutusaja lõppemisel kõrvaldama lahus muudest jäätmetest. Palun viige toode kõrvaldamiseks
teie kohalikku jäätmete kogumiskohta või antud seadme ümbertöötamiskeskusesse. See aitab kaitsta meid
ümbritsevat keskkonda.
SE
Produkt Focal-JMlab został zaprojektowany i wykonany z materiałów i elementów wysokiej jakości, nadających się do
recyklingu i ponownego wykorzystania. Symbol ten oznacza, że sprzęt elektryczny i elektroniczny należy utylizować
po zakończeniu użytkowania odrębnie od odpadów domowych. Sprzęt należy utylizować w komunalnym punkcie
zbiórki lub w punkcie recyklingu. Pomóżcie i Wy chronić środowisko, w którym żyjemy.
PL
Deres Focal-JMlab-produkt er designet og fremstillet med materialer og komponenter af høj kvalitet, som
kan recycles og genbruges. Dette symbol betyder, at elektriske og elektroniske apparater skal bortskaffes
adskilt fra det almindelige husholdningsaffald, når de ikke længere bruges. Aflever dette apparat på Deres
lokale kommunale genbrugsstation eller på genbrugscentret. Hjælp med at passe på det miljø, vi lever i.
DK
Focal-JMlabs produkter har konstruerats och tillverkats av högkvalitativa material och komponenter som
kan återvinnas och återanvändas. Symbolen innebär att uttjänade elektriska och elektroniska apparater
måste tas om hand separerat från hushållsavfallet. Lämna apparaten på kommunens insamlingsställen
eller återvinningscentraler. Hjälp oss att skydda vår miljö.
SE
Az Ön által vásárolt Focal-JMlab termék kiváló minőségű, újrahasznosítható és/vagy újra felhasználható anyagok és
komponensek felhasználásával készült. Ez a szimbólum azt jelzi, hogy az elektromos és elektronikus készüléket a
normális hulladéktól elkülönítetten kell kidobni, amikor élettartama végére ért. A termék kidobásakor kérjük, vigye
azt a helyi gyűjtőponthoz, vagy az ilyen készülékek számára fenntartott újrahasznosító központba! Ezzel hozzájárulhat
környezetünk megóvásához, amelyben mindannyian élünk.
H
Page 43
Šis Focal-Jmlab produkts ir izstradats un ražots, izmantojot augstas kvalitates materialus un komponentus,
kurus var otrreizeji parstradat un/vai lietot atkartoti. Šis simbols norada, ka elektriskas un elektroniskas
ierices pec to kalpošanas laika beigam jalikvide atseviški no parastajiem atkritumiem. Ludzu, likvidejiet šo
produktu, tikai nododot vieteja savakšanas punkta vai parstrades centra, kas paredzeti šadai technikai. Šadi
jus palidzesiet aizsargat vidi, kura mes visi dzivojam.
LV
Vaš Focal-JMlab proizvod je zasnovan in izdelan iz visoko kakovostnih materialov in komponent, ki so obnovljive in
jih je mogoce ponovno uporabiti. Ta simbol pomeni, da je potrebno električhe in elektronske naprave po izteku njihove
uporabne dobe, odvesti ločeno od gospodinjjskih odpadkov. Naprošamo vas, da napravo oddate na vašem lokalnem
komunalmen zbirnem mestu ali v reciklaznem centru. Naprošamo vas za sodelovanje pri pomoči ohranjanja našega
življenjskega prostora.
SLO
Váš vỷrobek Focal-JMlab byl navržen a vyroben z vysoce kvalitních materiálů a komponent, ktéré lze recyklovat
a znovu použit. Tento symbol znamena, že se elektrické a elektronicke přístroje po uplynutí své životnosti musejí
likvidovat odděleně od domácího odpadu. Odevzdejte proto prosim tento přístroj k likvidaci v místně příslušném
komunálním sběrném dvoře nebo k recyklaci v příslušnem recyklačnim středisku. Pomozte nám prosím při ochraně
životního prostředí.
CZ
GR
Jūsų Focal-JMlab gaminys buvo sukurtas ir pagamintas panaudojant aukštos kokybès medžiagas ir komponentus,
kuriuos galima perdirbti ir/arba panaudoti pakartotinai. Šis simbolis nurodo, kad elektroninius įtaisus, pasibaigus jų
eksploatavimo laikotarpiui, reikia utilizuoti atskirai nuo įprastinių buitinių atliekų. Jeigu šio gaminio tarnavimo laikas
baigesi, tai prašome perduoti jį specialių atliekų surinkimo arba perdirbimo omonei. Tai padès apsaugoti aplinką,
kurioje mes visi gyvename.
LT
Váš výrobok Focal-JMlab bol navrhnutý a vyrobený z vysoko kvalitných materiálov a komponentov, ktoré je možné
recyklovat' a znovu použit'. Tento symbol znamená, že sa elektrické a elektronické pristroje po uplynutí svojej
životnosti musia likvidovat' oddelene od domáceho odpadu. Odovzdajte preto prosim tento prístroj k likvidácii v
miestne príslušnom komunalnom zbernom dvore alebo k recyklácii v prislušnom recyklačnom stredisku. Pomôžte nám
prosím pri ochrane životného prostredia.
SK
Page 44

ГАРАНТИЯ FOCAL
Продавец продает Покупателю товар, одновременно предоставляя полную информацию
о данном товаре в месте приобретения товара в полном соответствии с Законом РФ
«О ЗАЩИТЕ ПРАВ ПОТРЕБИТЕЛЕЙ», в чем Покупатель расписался под настоящим
гарантийным обязательством.
Продавец гарантирует, что купленный товар является работоспособным, не содержит
выявленных механических повреждений и полностью пригоден для использования по
назначению на момент осуществления продажи.
В случае обнаружения Покупателем скрытых недостатков товара, Продавец обязуется
устранить выявленные недостатки или заменить дефектный товар, в течение 15 дней с
момента предъявления претензий Покупателем. При отсутствии у Продавца на момент
предъявления соответствующего требования необходимого для замены товара, он
обязуется заменить его в течение 45 календарных дней.
Комплектность товара проверяется Покупателем при получении товара в присутствии
персонала Продавца. Послепродажные претензии по комплектации товара не
принимаются.
Данный гарантийный талон является единственным документом, подтверждающим
право на гарантийное обслуживание сервисным центром Продавца приобретенного
Покупателем товара. Без предъявления гарантийного талона Продавец претензий к
купленному товару не принимает.
Претензии к приобретенному товару принимаются Продавцом только в течение
гарантийного срока, указанного в талоне.
Срок службы для акустических систем и динамических головок составляет три года, для
усилителей мощности пять лет.
Гарантийный срок товара исчисляется с даты продажи товара Покупателю, указанной в
гарантийном талоне.
В случае обнаружения неисправности, изделие доставляется в сервисный центр для
проверки. По результатам проверки при обоснованности претензии производится
ремонт или замена изделия. Неисправные детали и узлы, которые были заменены в
ходе ремонта, являются собственностью сервисного центра.
Продавец гарантирует бесплатное устранение технических неисправностей товара или
его замену в течение гарантийного срока, который составляет 1 (один) год в случае
соблюдения Покупателем правил и условий гарантийного обслуживания.
Гарантия не действует в следующих случаях:
Не соблюдение норм эксплуатации изделия, превышение эксплуатационных параметров,
небрежное обращение, не правильное подключение и т.д.
Механические повреждения изделия и повреждения вызванные попаданием внутрь
изделия посторонних предметов, веществ, жидкостей и т.д.Повреждения вызванные
природными явлениями, стихийными бедствиями, пожаром и т.д.
Изделие подвергалось вмешательству или ремонту не уполномоченными на то лицами
или сервисными центрами.
Page 45

ГАРАНТИЯ FOCAL
В случае установки и подключения изделия не сертифицированными установочными
центрами.
Продавец (название компании, телефон)
Продавец (название компании, телеф
он)__________________________________________________________________
Дата продажи товара “___”__________20__г.
Серийный номер изделия
Подпись уполномоченного лица продавца___________________________________
С техническими характеристиками приобретенных изделий, правилами и условиями
гарантийного обслуживания
ознакомлен и согласен, комплектность и состояние изделий проверены:
Покупатель ____________________/Ф.И
.О._______________________________________________________________
BP 374 – 108, rue de l’Avenir – 42353 La Talaudière cedex – France – Tel. (+33) 04 77 43 57 00
Focal® является зарегистрированной торговой маркой Focal-JMlab
Fax (+33) 04 77 43 57 04 – www.focal.com, www.focal-audio.ru
Page 46

Garantie France
Pour validation de la garantie Focal, nous renvoyer cette page dans les 10 jours, à l’adresse suivante :
Focal-JMlab - BP 374 - 108, rue de l’Avenir - 42353 La Talaudière cedex - FRANCE
Il est maintenant possible d’enregistrer son produit en ligne : www.focal.com/garantie
Vous :
Votre nom : Âge : Profession :
Votre adresse complète :
Votre adresse e-mail :
Vos centres d’intérêts :
Chez vous, possédez-vous des enceintes haute-fidélité ?
Si oui, précisez la marque :
Lisez-vous la presse écrite ?
Si oui, quel(s) titre(s) :
Votre équipement audio/vidéo (marques et modèles) avant l’acquisition du produit Focal :
Lecteur CD /tuner : Lecteur multimédia :
Système de navigation : Amplificateur :
Kit haut-parleur : Caisson de grave / subwoofer :
Autres éléments :
- Oui - Non
- Oui - Non
Votre choix pour l’achat de ce modèle Focal s’est fait en fonction de :
- Conseil du revendeur - Conseil d’un ami, relation
- Visite d’un salon, d’une exposition - Rapport qualité / prix
- Qualité sonore, écoute en auditorium - Possède déjà des produits Focal
- Fiabilité / qualité de fabrication - Catalogues
- Esthétique / finition - Matériel français
- Article de presse écrite (si oui, précisez le
titre du magazine) :
- Autre :
Votre Produit Focal :
Modèle : N° de série :
Nom du revendeur : Ville :
Date de l’achat : Prix de l’achat :
Avez-vous confié l’installation du produit à votre revendeur ?
Si non, pourquoi : Modèle de voiture :
Ces informations sont necessaires à notre société pour traiter votre demande. Elles sont enregistrées dans notre fichier de clients et
peuvent donner lieu à l’exercice du droit d’accès et de rectification auprès de notre service clientele (04 77 43 57 00).
Si vous ne souhaitez pas que vos données soient utilisées par nos partenaires à des fins de prospection, veuillez cocher la case ci-contre.
Si vous ne souhaitez pas recevoir des propositions commerciales de nos partenaires par voie électronique, merci de cocher la case cicontre.
Vous êtes susceptibles de recevoir des offers commerciales de notre société pour des produits analogues à ceux que vous avez achetés.
Si vous ne le souhaitez pas, cochez la case ci-contre. Nous garantissons la confidentialité de ces informations.
- Oui - Non
Page 47

International Guarantee
For the validation of the Focal guarantee, send back this sheet within 10 days to the following address:
Focal-JMlab - BP 374 - 108, rue de l’Avenir - 42353 La Talaudière cedex - FRANCE
Now it's possible to register on line : www.focal.com/warranty
About yourself:
Your name: Your age: Your job:
Your full address:
Your e-mail address:
Your hobbies:
At home, do you own Hi-Fi loudspeakers?
If yes, specify the brand:
Do you read the press?
If yes, which magazine(s)?
Your audio/video equipment (brands and models) before the acquisition of Focal products:
CD player/tuner: Multimedia player:
Navigation system: Amplifier:
Speakers: Enclosure/subwoofer:
Other elements:
- Yes - No
- Yes - No
Your choice for the purchase of this Focal model was made according to:
- Dealer‘s advice - Friend’s or family’s advice
- Visiting an exhibition/a show - Quality-price ratio
- Sound quality/listening room - Already own Focal products
- Reliability/manufacturing quality - Catalogues
- Design/Finish - French product
- Article in the press (if yes, specify the title of
the magazine)
- Other :
Your Focal product:
Model: Serial number:
Dealer’s name: City:
Date of your purchase: Price of your purchase:
Did you leave the product installation to your dealer’s care?
If not, why? Car model:
This information is necessary to our company to deal with your request. It is registered in our customer file and can give you the right to have
access to and correct the information that concerns you through our customer service (+33 477 435 700).
If you do not wish to have your data used by our partners on commercial purpose, tick this box.
If you do not wish to receive commercial propositions from our partners by e-mail, please tick this box.
You may receive commercial offers from our company for products similar to those you have bought.
If you do not wish to, tick that box. The information given on this page will remain confidential.
- Yes - No
Page 48

Focal-JMlab® - BP 374 - 108, rue de l'Avenir - 42353 La Talaudière cedex - France - www.focal.com
Tel. (+33) 04 77 43 57 00 - Fax (+33) 04 77 43 57 04 - SCAB-160112/2 - codo1473
 Loading...