

Page 1
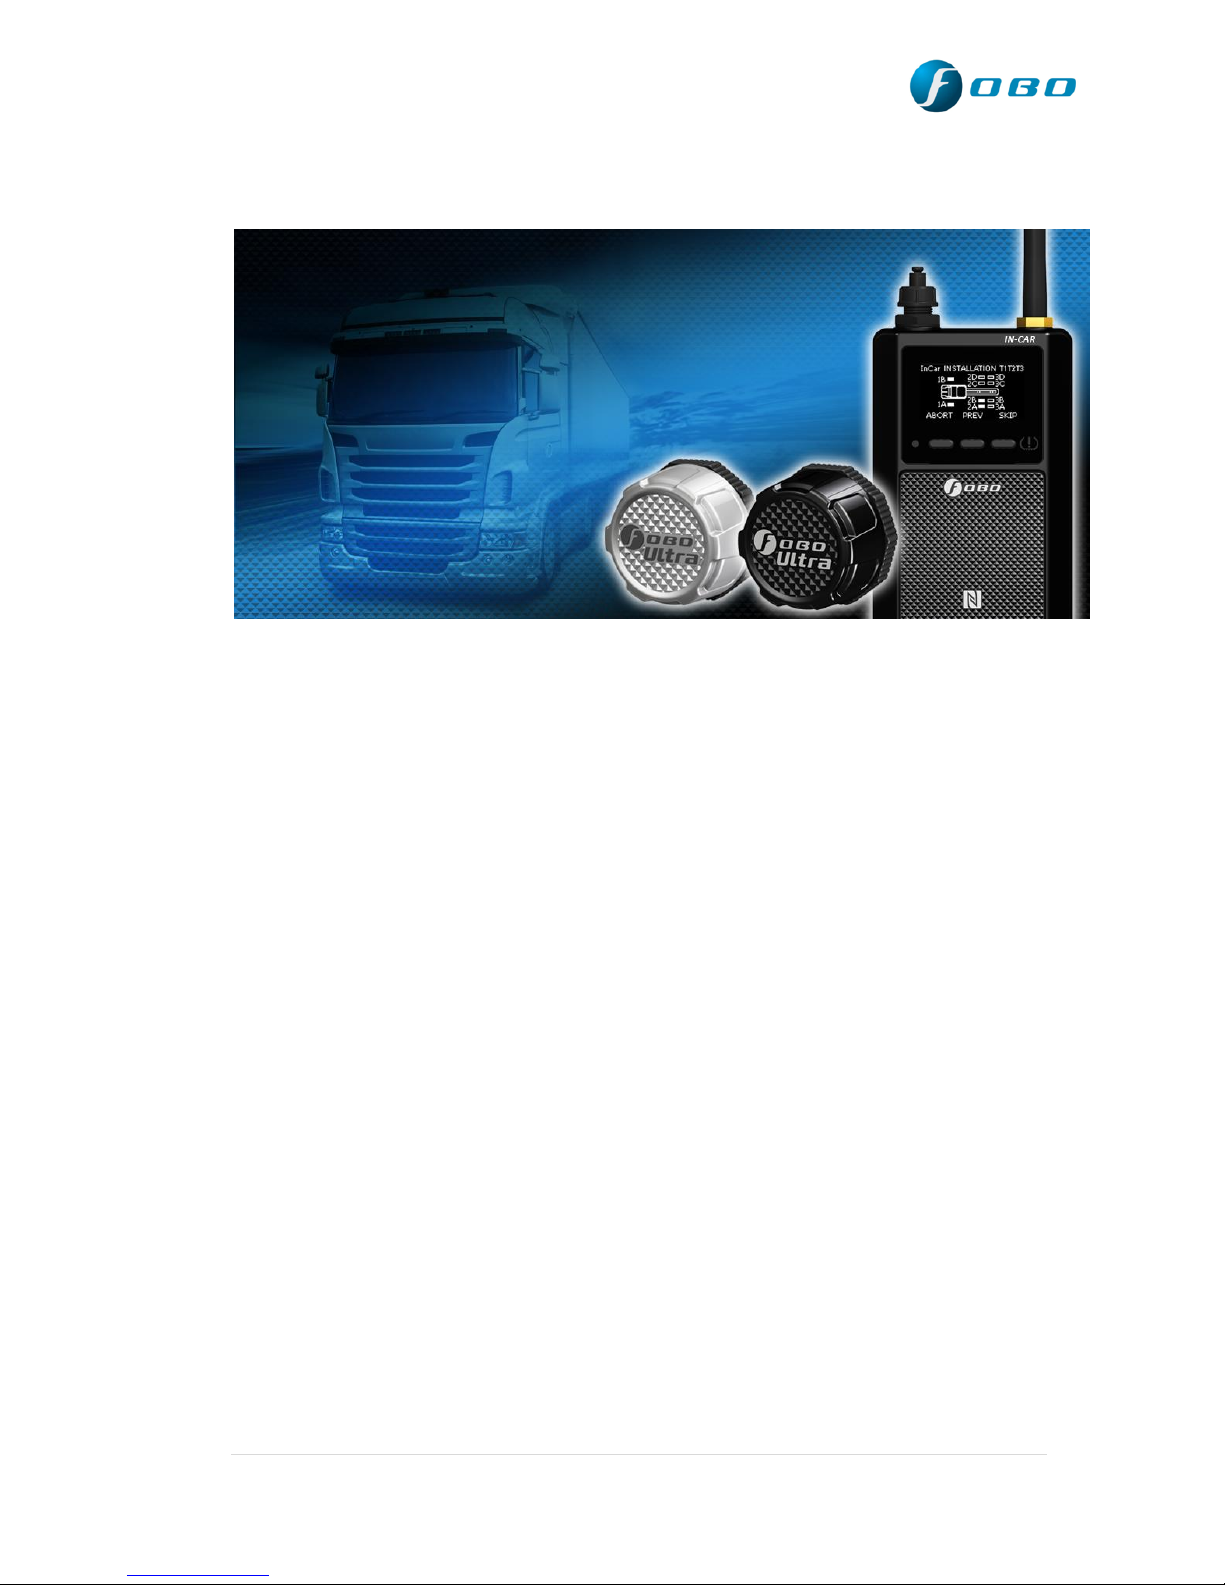
FOBO ULTRA
User Manual
Version 1.1
(For iOS7.1 and Android 4.30 or later)
1 | P a g e
Page 2

Contents
1 Introduction
2 About FOBO Ultra
3 Importance of Tire Care
4 Product Description of FOBO Ultra
4.1 In-Car unit/Repeater (TU1601)
4.2 Tire Sensor unit (TU1602)
4.3 Sensor lock nut & wrench
4.4 Extension Valve & Screw on T-valve
4.5 In-Car unit mounting and proposed location
4.6 Repeater mounting and proposed location
5 Using FOBO Ultra
5.1 Description of FOBO Ultra App (for iOS)
5.2 Description of FOBO Ultra App (For Android)
5.3 Installing FOBO Ultra App
5.4 Installing FOBO Ultra In-Car unit and sensors
5.5 Sensor rotation
5.6 Disable sensor and Replace new sensor
5.7 Release (Total/Sensor)
5.8 Tire Inflation/Deflation
5.9 Drop & Hook
6 In-Car unit audio & LED alerts
7 Replacing Battery – Sensor, In-car and repeater
8 Trouble Shooting Guide
9 FOBO Ultra Specifications
10 Warning
11 Regulatory Information
12 Intellectual Properties
13 Limited Warranty and Disclaimer
2 | P a g e
Page 3

1 Introduction
FOBO Ultra is the world‟s most advanced Tire Pressure Monitoring System
(TPMS) using Bluetooth Smart (Bluetooth 4.1 or later) technology to monitor your
Truck, RV, Caravan tire pressure and temperature. Bluetooth Smart is a very low
power wireless technology that could operate on a single coin cell battery for up to
twelve months (NOTE: Battery life may vary according to usage and climatic
temperature. Operating under extreme cold may drastically reduce battery
life.)
Please ensure that your smartphone has Bluetooth Smart Ready (Bluetooth 4.1 or
later) capability in order to use FOBO Ultra. Currently FOBO Ultra works best with
iOS 7.1 and Android 4.30 or above.
Before starting to use FOBO Ultra, please download the free FOBO Ultra App to
your smartphone from Google Play Store or Apple AppStore.
FOBO Ultra is a product designed and produced by Salutica Allied Solutions Sdn.
Bhd. (“Salutica”), a Malaysian company with its address at No. 3, Jalan Zarib 6,
Kawasan Perindustrian Zarib, 31500 Lahat, Ipoh, and Perak, Malaysia.
2 About FOBO Ultra
FOBO Ultra monitors your vehicle tires non-stop around the clock. Most drivers
have encountered situations where they need to rush for an urgent delivery only to
be stranded by a flat tire. Conventional Tire Pressure Monitoring Systems (TPMS)
could not alert you in advance because it stops operating as soon as the Vehicle
ignition is switched-off. With FOBO Ultra, you will get an alert as soon as the tire
pressure drops below a certain pre-set level, even when the Vehicle ignition is
switched off as long as you are within Bluetooth range(up to 30 meter with line of
sight; but the range may reduce by obstacles in between). This alert gives you time
to get the flat tire fixed before you need to use it.
FOBO Ultra can monitor up to 20 vehicle profiles on each smartphone. You can
receive data from the tire pressure sensors from all your vehicles without switching
on the ignition. FOBO Ultra allows you to monitor your Vehicle tires conveniently
at any time you want. NOTE: Under certain conditions the signals from FOBO
Ultra sensors may be blocked by surrounding objects or structures. If this
occurs, please move around the vehicle in order to capture signals from all the
tire sensors.
If you are sharing your vehicle with others, you (FOBO Sharer) can authorize
others (FOBO Sharee) to use your FOBO Ultra through the FoboShare function.
After adding them through FoboShare, FOBO Sharees who use your vehicle will
3 | P a g e
Page 4

receive alerts and data from your FOBO Ultra on their respective smart phone
which is installed with FOBO Ultra App. Refer Details at Section 5.3
FOBO Ultra packaging consists of 4 wireless tire sensors, 1 wireless In-Car unit or
Repeater and a 24V 10 feet power cable with connector to In-Car or Repeater.
Replace your vehicle tire valve caps with the sensors and place the In-Car unit
inside the cab. The sensors will measure tire pressure of each tire and transmit via
Bluetooth to the In-Car unit and your smartphone. In case of a breach of pre-set
threshold of tire pressure, the In-Car unit will produce an audible alert to notify you.
An alert will also pop up on your smartphone if it is within Bluetooth range.
FOBO Ultra system requires a qualified smartphone and FOBO Ultra App for
installation. In addition to being able to view information regarding your vehicle
tire pressure and temperature, the FOBO Ultra App will also produce an alert when
your tire has a problem.
DISCLAIMER: FOBO ULTRA IS NOT A DEVICE THAT PREVENTS
ACCIDENTS. IT IS ALSO NOT A DEVICE THAT PREVENTS TIRES
FROM BECOMING DEFLATED OR OVERINFLATED. FOBO ULTRA IS
NOT A SUBSTITUTE FOR SAFE TIRE MAINTENANCE PRACTICES.
PLEASE CONTINUE TO TAKE PRECAUTIONARY MEASURES WHILE
DRIVING AND TAKE FULL RESPONSIBILITY OF YOUR VEHICLE’S
TIRE CONDITION TO ENSURE SAFETY WHILE DRIVING. YOU
SHOULD CONTINUE TO PRACTICE PROPER TIRE CARE AND
SCHEDULED TIRE MAINTENANCE.
3 Importance of tire care
It is extremely important to ensure vehicle tires are properly inflated for safety
while driving. However, many drivers tend to neglect proper tire care and
maintenance. The vehicle tires are the only contact points between the vehicle and
the road. The weight of the vehicle and passengers are supported by the air pressure
inside the tires. Improperly inflated vehicle tires may cause serious accidents on the
road.
When tires are underinflated, the additional rolling resistance may cause buildup of
heat which may lead to the de-lamination of the tire materials as well as damage to
the tire‟s sidewall, which in turn increases the chances of a tire blow-out.
Underinflated tires will also cause accelerated wear on the tire shoulders thereby
causing uneven tire wear. Gas mileage will also be affected due to additional rolling
resistance when driving with underinflated tires. You would also experience a
significant loss of steering precision and cornering stability. Significantly underinflated tires will also be less effective in resisting hydroplaning.
4 | P a g e
Page 5

On the other hand, an overinflated tire will cause accelerated wear on the center
portion of the tire resulting in uneven tire wear. It would also result in a harsher ride
and makes the tire more susceptible to damage when going over potholes or debris
on the road..
What is the optimum tire pressure? There are a lot of information about this subject
in internet forums and web articles. A quick guide for better understanding of tire
pressure below:-
1) Vehicle manufacturers recommend the optimum tire pressure for their
vehicle models. The information is usually available on a sticker at the door
jam (side of the driver‟s door) or in the owner‟s manual. For some vehicle
models, the information sticker may be on the trunk lid or on the fuel door.
Vehicle manufacturers usually recommend different tire pressure for front
and rear axles. This pressure is usually recommended for comfort driving
and optimum performance of the vehicle. It is not advisable to go below this
recommended pressure level.
2) The vehicle manufacturer recommended tire pressure is “cold pressure”.
When you drive your vehicle to the gas station, the friction on the road will
heat up your vehicle tires within a few minutes. Typically there will 1 psi
(~7kPa) increase in air pressure for every 10 deg F (5.6 deg C) rise in
temperature. It is advisable to inflate the tire pressure with this compensated
pressure above the recommended pressure.
3) Air pressure in tires is affected by changes in temperature. Check and adjust
your tire pressure whenever there is a drastic change in environment
temperature, e.g. Change of season.
4) A tire will normally lose its pressure through natural causes unless
accelerated by a puncture, faulty valve or damaged wheels. It is advisable to
change the tire valves or at least check the valves condition every time you
change a new set of tires. Under normal condition, a set of tires could
deflate at a rate of up to 2psi per month. It is good practice to check your tire
pressure regularly and top up to the optimum pressure.
5) Every vehicle tire has a maximum inflation pressure. It is not advisable to
inflate to the maximum inflation pressure of the tire. Follow the vehicle
manufacturer‟s recommended tire pressure instead.
5 | P a g e
Page 6
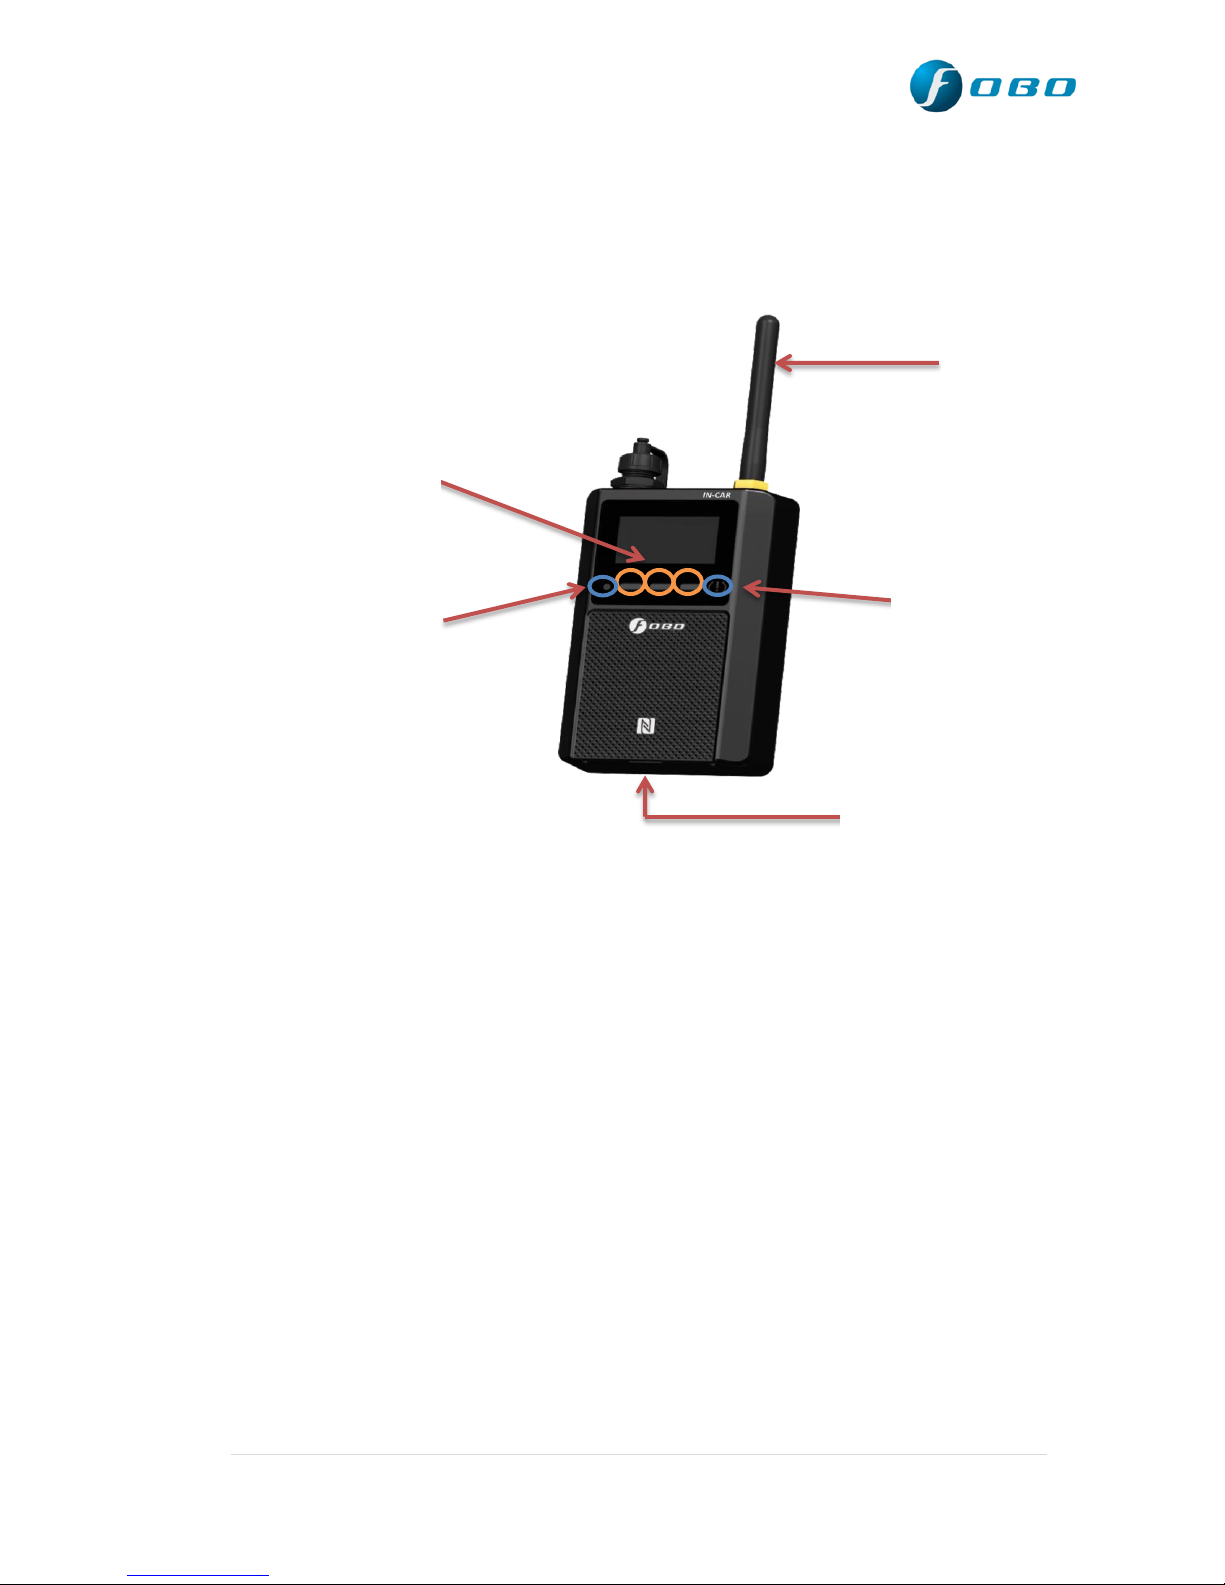
4 Product Description of FOBO Ultra
Battery cover
Red LED
Amber LED
4.1 In-Car Unit (TU1601)
Action Buttons
Antenna
The functions of three action buttons are to correspond with the instruction that
appears on the screen.
NOTE: Excessive frequent pressing on the buttons will drain the In-Car unit
battery.
Status indicator - Red LED will blink to show startup mode or
battery low status.
- Amber LED will blink to show alerts, low sensor
battery and missing sensor.
Alert buzzer - buzzer to alert when there is problem with tire
AA batteries - In-car unit/Repeater operates with 5AA size
batteries.
The FOBO Ultra In-Car unit/Repeater is a complex device that performs multiple
functions. Due to the shielding effect of the vehicle chassis, some drivers may face
difficulty in receiving the tire sensor signals on their smartphone when sitting inside
6 | P a g e
Page 7
the cab. This problem may be further aggravated when the driver places the
smartphone in positions that are not optimal such as trouser pocket or waist pouch.
The In-Car unit is designed with an efficient antenna that can pick up sensor signals
better than a usual smartphone, enabling good signal reception from the tire sensors. Keep the In-Car unit in the cab and fix the Repeater in the center of the Trailer
for optimal functioning of FOBO Ultra. You may remove it for other sensor
operation purposes, such as sensor position rotation and sensor disabling but place it
back once the sensor operation is completed. Note that In-Car unit is not water-
proof.
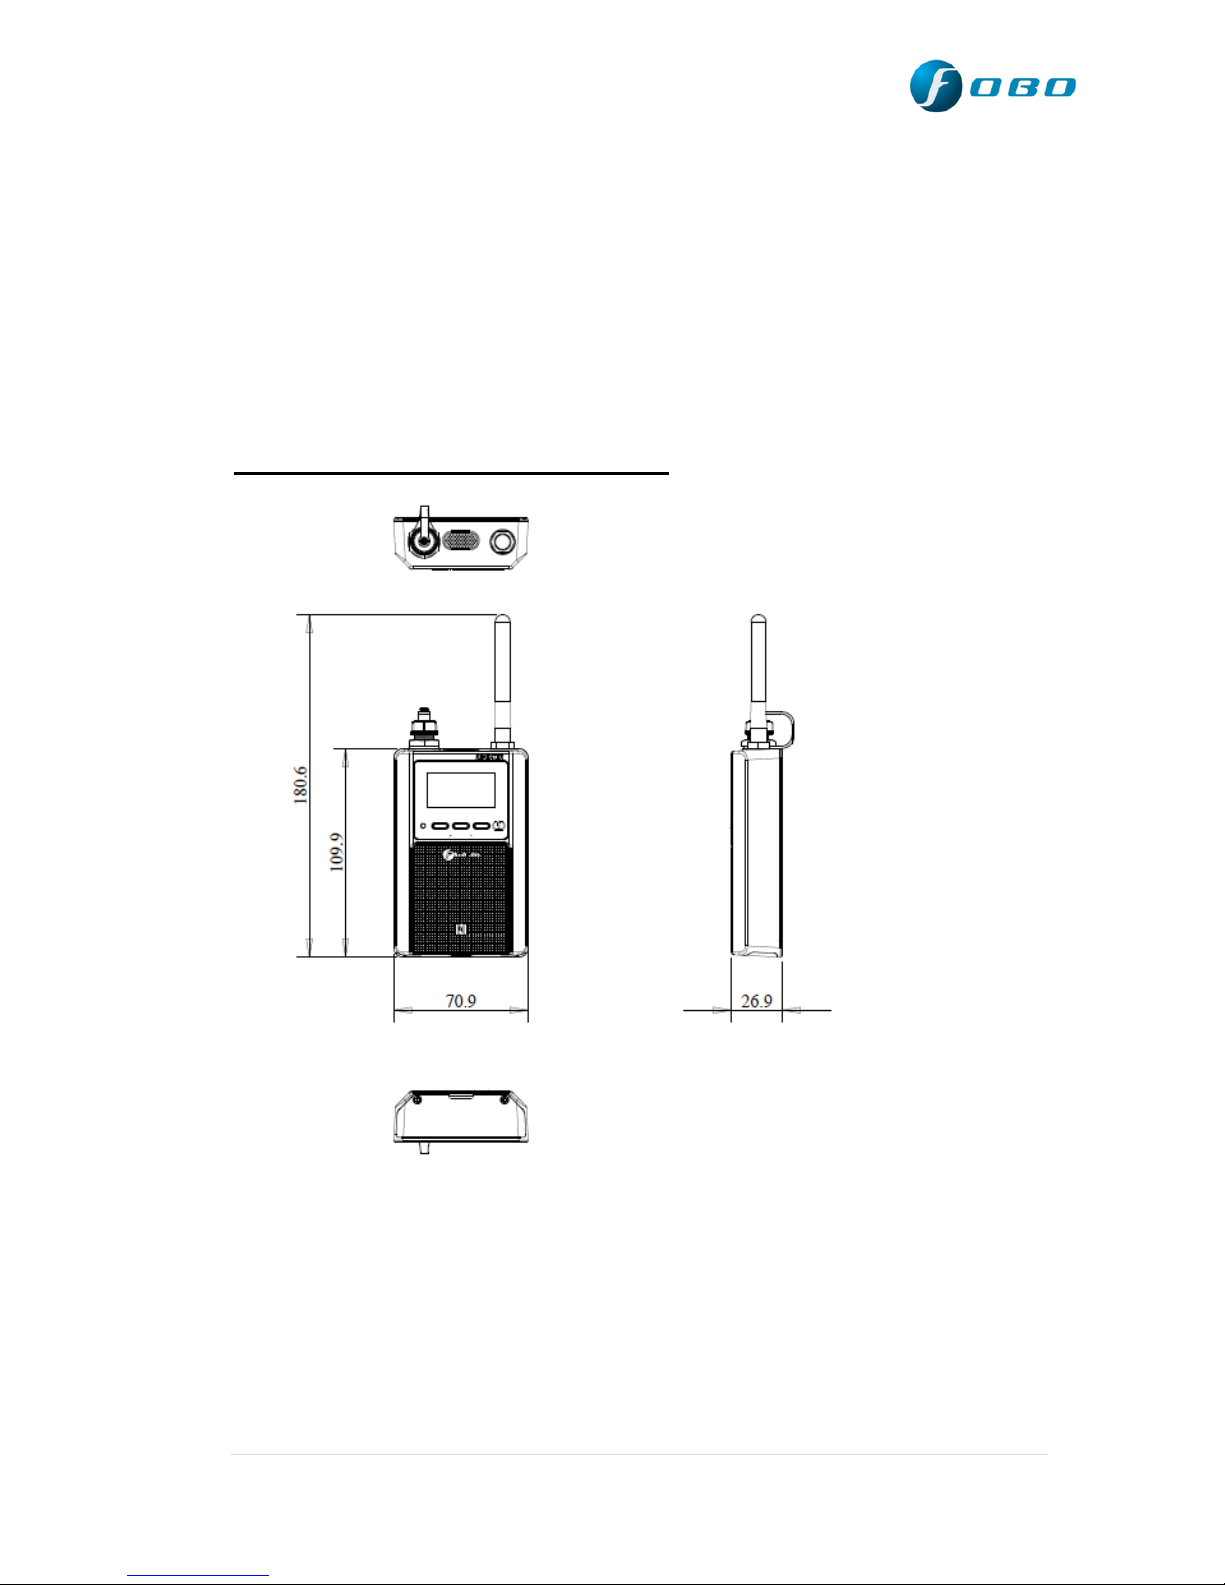
Fobo Ultra In-car unit Dimensions in mm:
7 | P a g e
Page 8
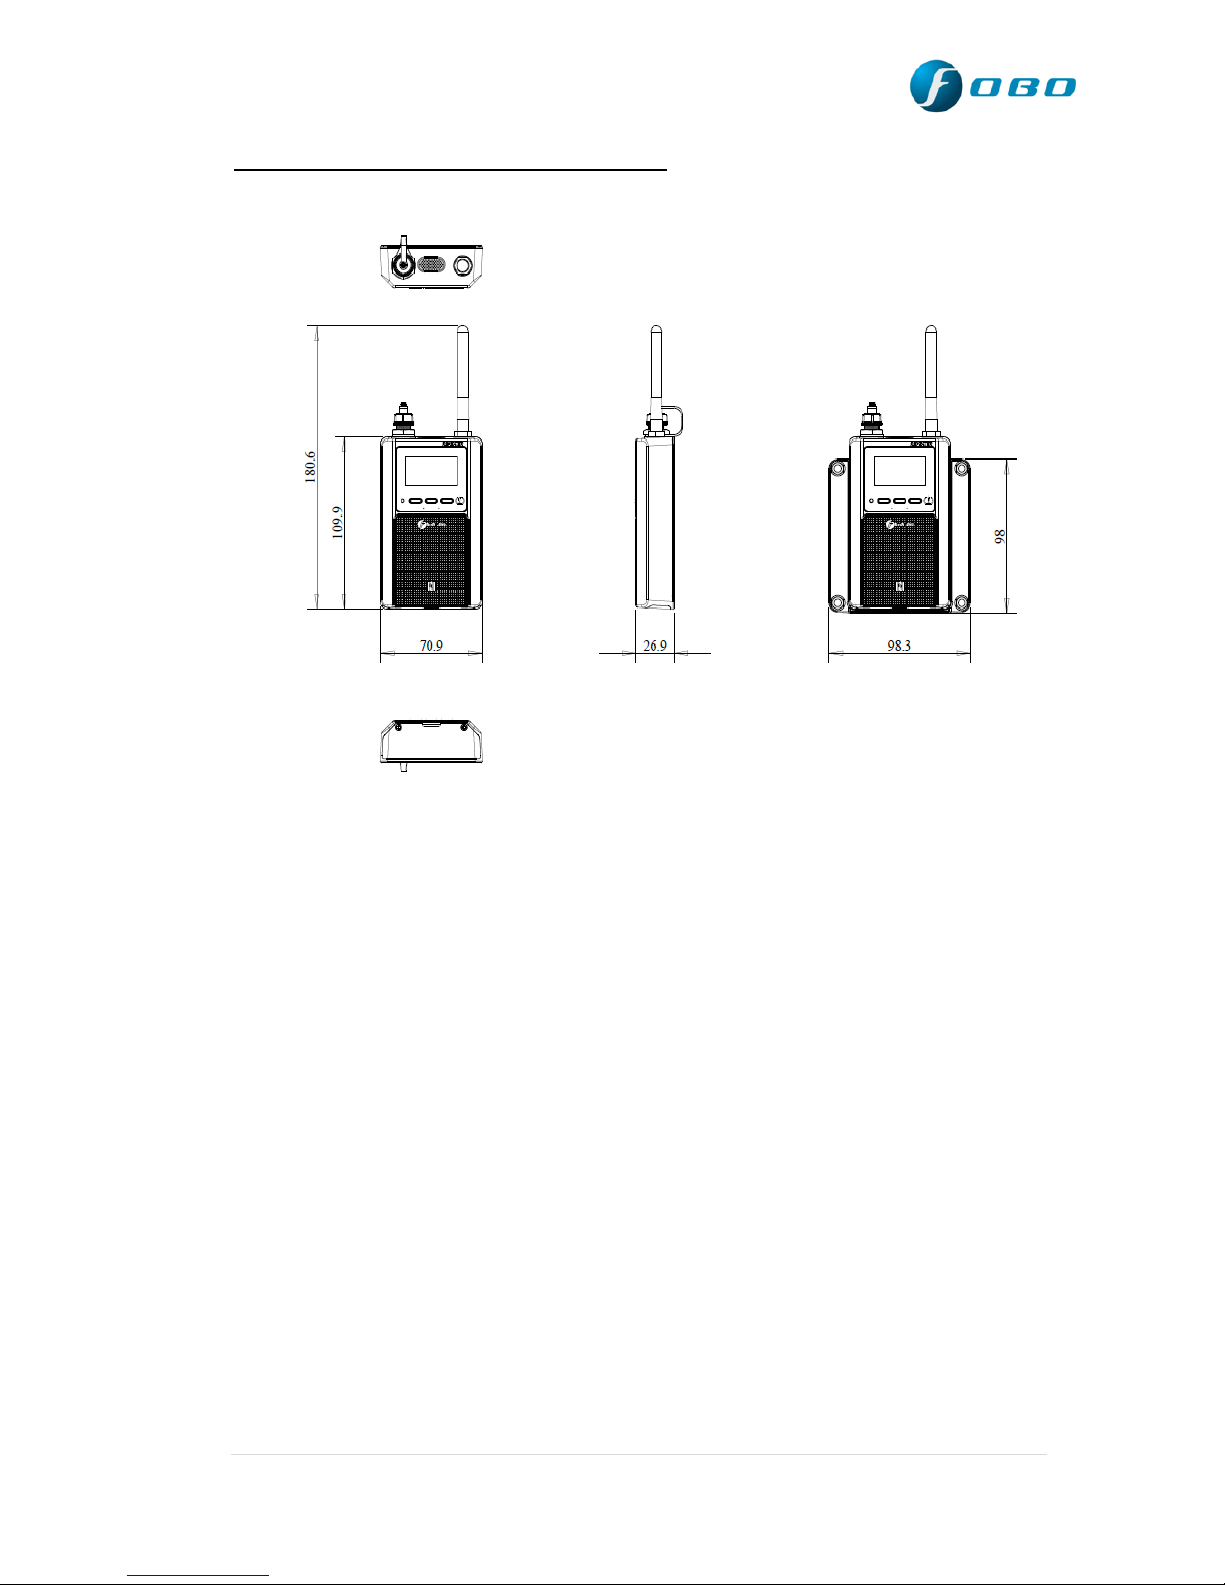
FOBO Ultra Repeater Dimensions in mm:
To conserve battery life, the In-Car unit/Repeater will go into „sleep‟ mode after it
detects that the vehicle has been stationary for more than 15 minutes. It will „wake
up‟ once it detects that the vehicle moves. You can still receive your tire pressure
and temperature data by accessing the FOBO Ultra App on the smartphone, even
when the In-Car unit is asleep. This is due to FOBO Ultra sensor‟s continuous
operation of 24 x 7 which allows you to receive an alert even when the vehicle‟s
ignition is switched off.
The In-Car unit/Repeater is also designed to be a secondary alert device in the
event of a deflated tire. This is to cover situations when you do not have your
smartphone with you while driving or if your smartphone‟s battery is dead. When
there is a tire pressure alert, the In-Car unit/Repeater will produce an audible and
visual LED alerts to inform you of a tire pressure problem.
Note: In the scenario if user planning not to use the vehicle which is installed with
FOBO Ultra In-car unit/ Repeater unit for more than 1 week then it is advisable to
remove the in-car unit/Repeater battery.
User have choice to choose the power source to power up the in-car unit/Repeater
unit, they can choose to use Batteries (using 5AA Batteries) which are pre-installed
in the In-car/Repeater or they can choose to use external power source by using
8 | P a g e
Page 9
Rf4f4
f4f4f
power cable which is provided in the FOBO Ultra packaging box. It is
recommended to use In-car /Repeater with external power source.
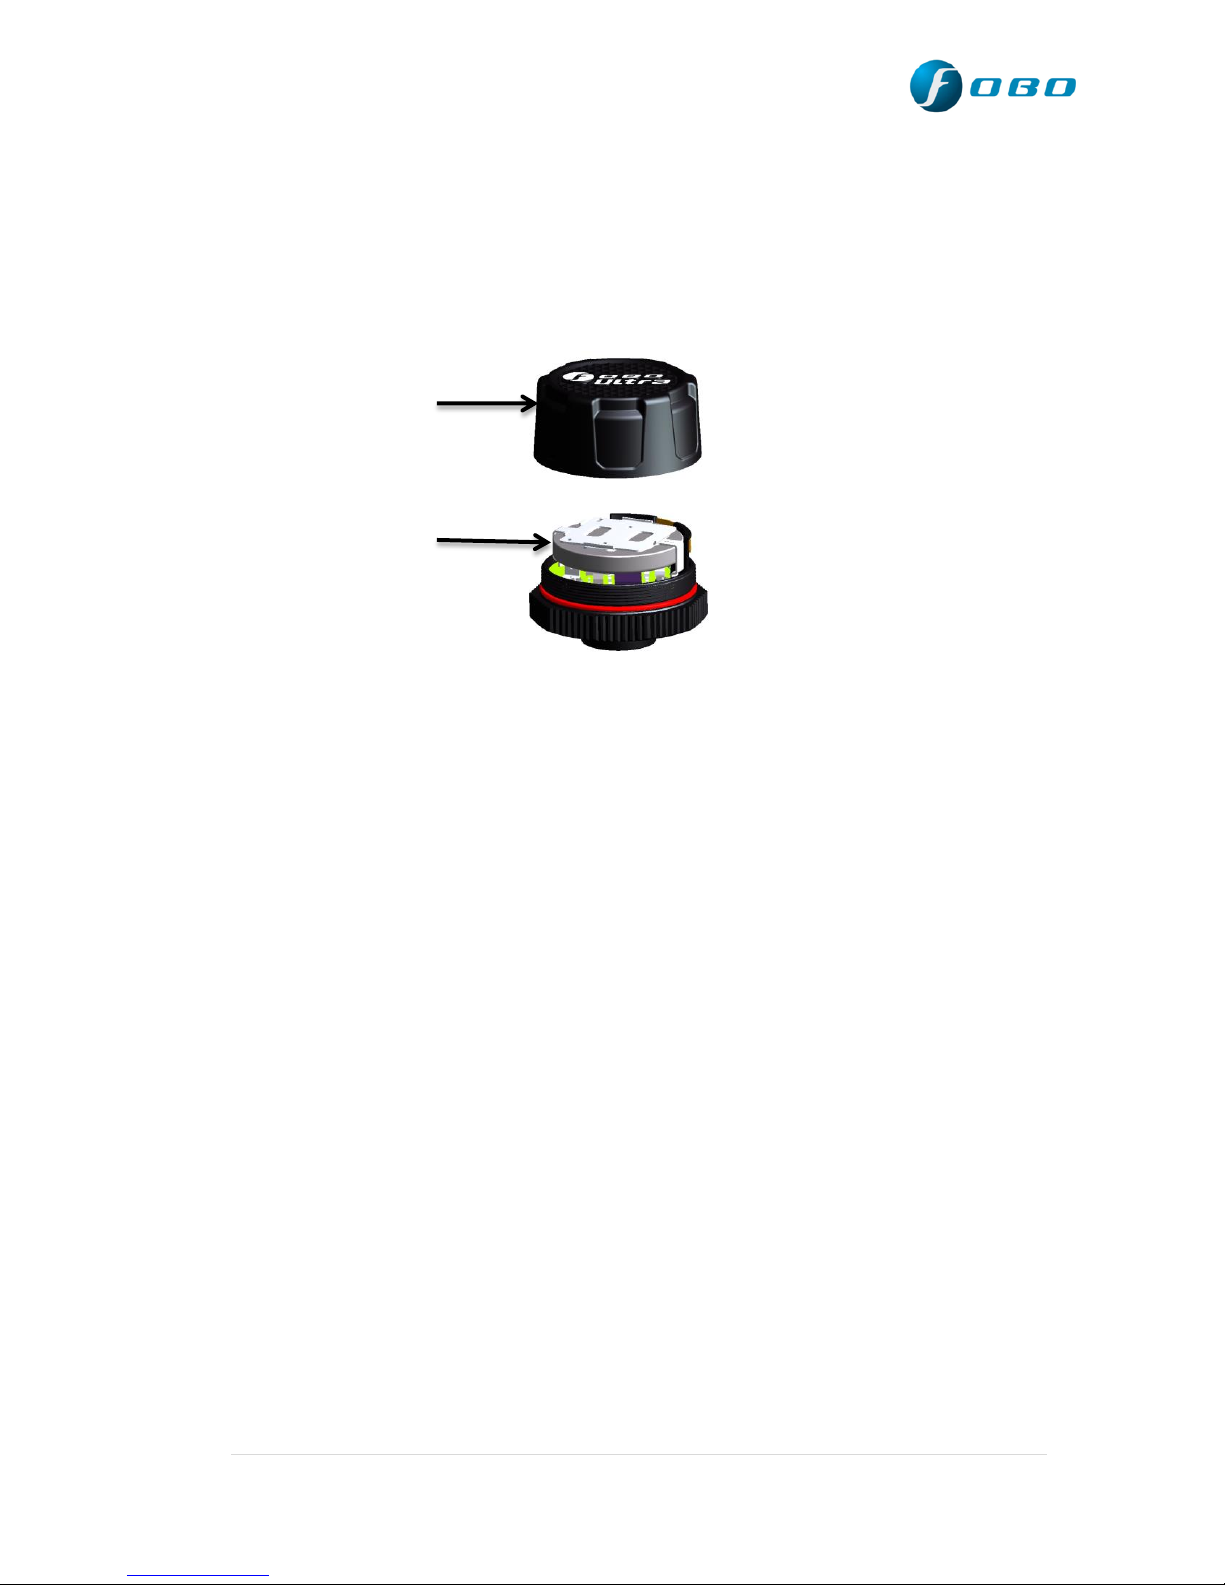
4.2 Tire Sensor Unit (TU1602)
Knob cover
Single Internal Battery
Knob cover – waterproof cover. Please ensure the red silicon ring
is intact to prevent water from getting into
electronics compartment.
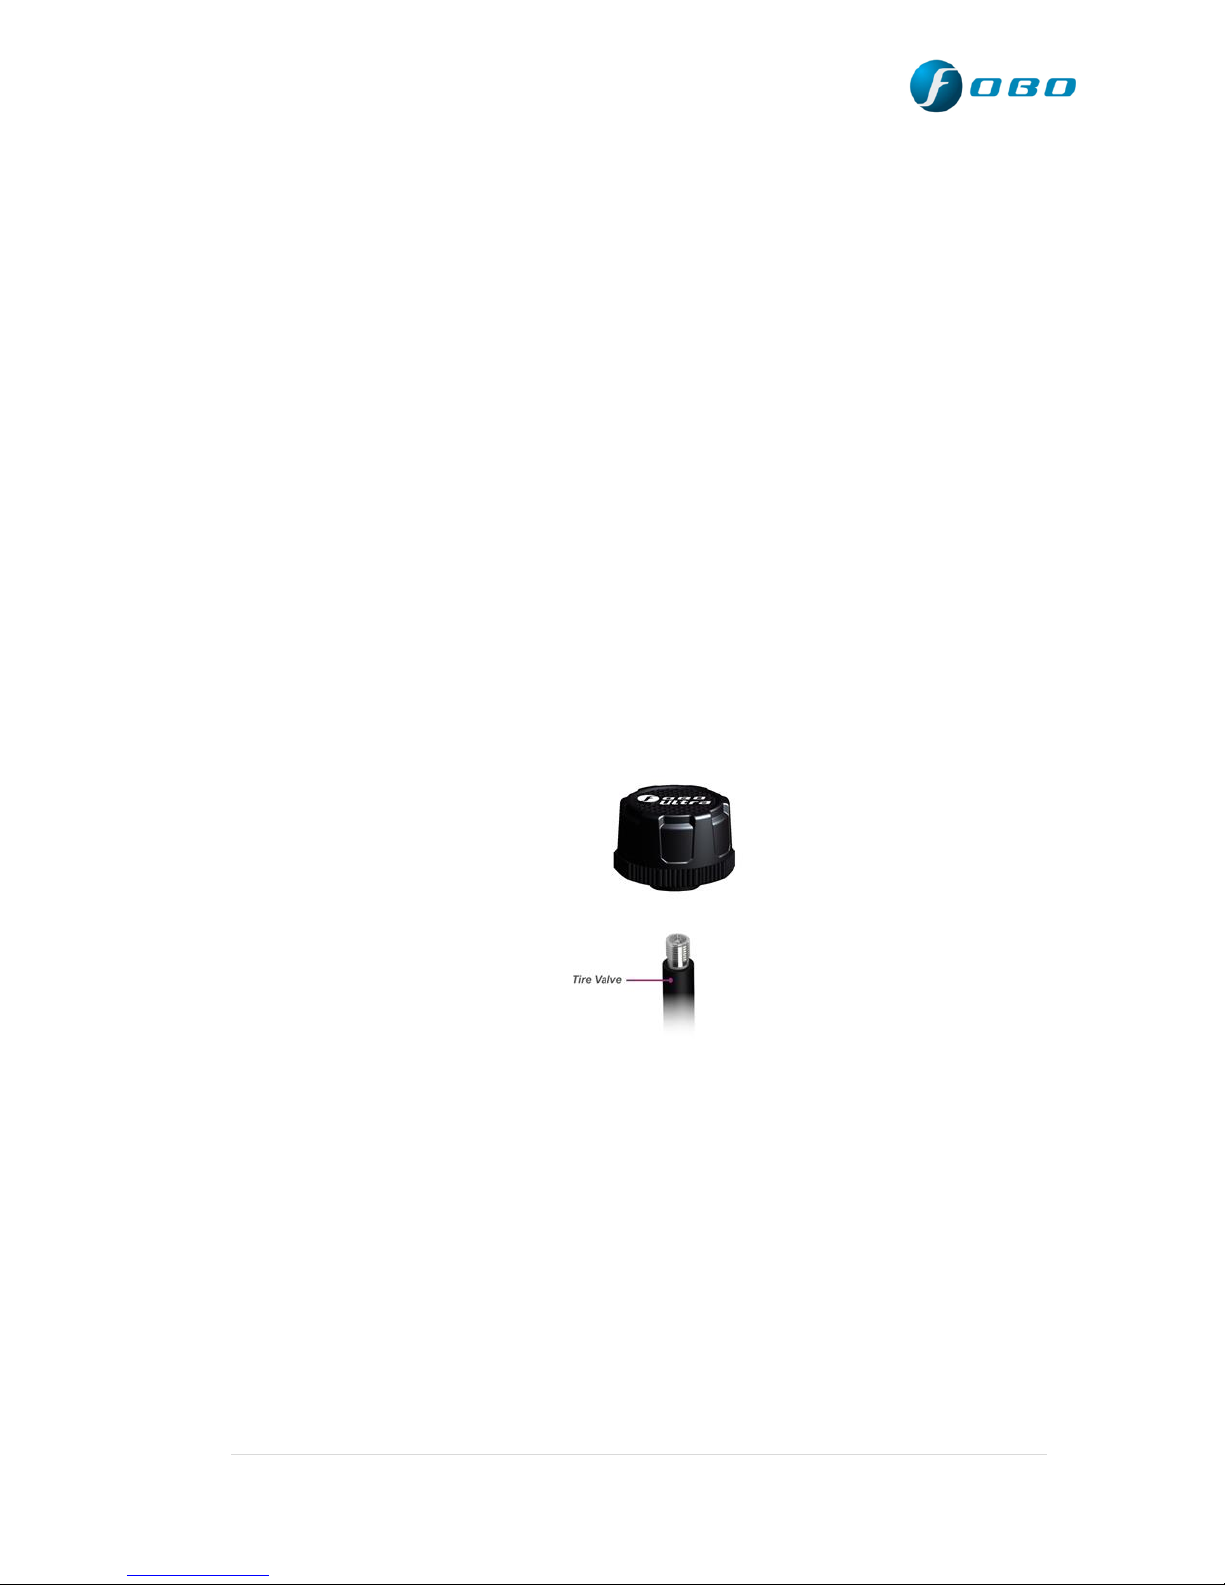
Single internal battery - CR2032 coin cell battery. When replacing battery,
please ensure the “+” sign of the battery is facing up,
away from PCB.
Internal PCB - internal electronics circuit (The pressure sensor chip
is mounted within this PCBA, and it senses the tire
pressure against a built-in vacuum, resulting in an
Absolute Pressure reading. The internal firmware
will then subtract the sea-level pressure of 101.3
Kpa (14.7 psi) from this reading. This final reading
which will be shown in the App can be termed as i)
Tire Absolute Pressure minus sea level pressure,
or ii) Gage Pressure reference to sea-level altitude.
With this formulation, Fobo Ultra sensor will read
the same pressure value for any given time,
irrespective of altitude (assuming a constant
temperature). This will ensure the correct tire
footprint per vehicle manufacturer‟s pressure
9 | P a g e
Page 10

recommendation, for all altitude above sea-level,
given a constant temperature.
As a corollary, a tire with a Fobo reading of, say 40
psi at an altitude of 5000ft, will read the same 40
psi when driven to sea-level, given a constant
temperature. In reality, it will read higher due to the
warmer temperature at sea-level, and may need
some air release if the temperature difference is
great. Tire pressure generally will increase 1 psi
(~7kPa) for every 10 deg F (5.6 deg C) rise in
temperature.
FOBO wishes to highlight the above formulation is
for usage at sea-level and above, and will not be
accurate for use otherwise. In practice, this should
not be an issue as the lowest area on earth will
result in an insignificant error of 0.3 psi (~2 Kpa).
For users who wish to retain „Gage Pressure
Reading‟, the FOBO Ultra App has a Gage Pressure,
adjusted to local altitude using cell towers or
individual phone barometer if available. This Gage
Pressure button can be accessed from the App
(Kindly refers to Section 5.10 of this user manual).
FOBO Ultra sensor units are designed to be robust and operate reliably 24x7
to provide tire information around the clock. It is designed to be water proof
and by our special use of custom engineering plastics, it will be able to
withstand road salts or other common automotive chemicals (petrol, engine
oil, wash shampoo, etc.).
Our designers have designed the sensors to ensure that there is no air leakage
as it replaces the tire‟s original valve cap. There is no need to screw on the
sensor extremely tight. Apply a reasonable hand twist force to ensure the
sensor is securely installed and should be able to be removed by hand with
ease.
When installing the sensors, please follow the on-screen prompt of the In-car
unit. After installation, in the event the tire sensors positions are mixed up,
usually after performing a tire rotation maintenance, you can easily reposition the sensors to their correct position by selecting „sensor rotation‟ on
the in-car unit and follow the on-screen instructions. This eliminates the need
to remove the tire sensors physically.
10 | P a g e
Page 11
A missing or damaged tire sensor can be replaced easily through the In-car
unit. You will need to purchase a replacement sensor which you can do so
online at www.my-fobo.com. To replace the sensor, first select „Disable
Sensor‟ on the In-car unit under sensor Management system and the pop-up
will prompt you to tap on the tire position that you want to disable. Then,
select „Replace sensor‟, upon selecting the app will blink at the first disabled
position and the App will prompt you to install the replacement sensor.
Follow the on-screen instruction and the replacement sensor will be paired
and be ready to use.
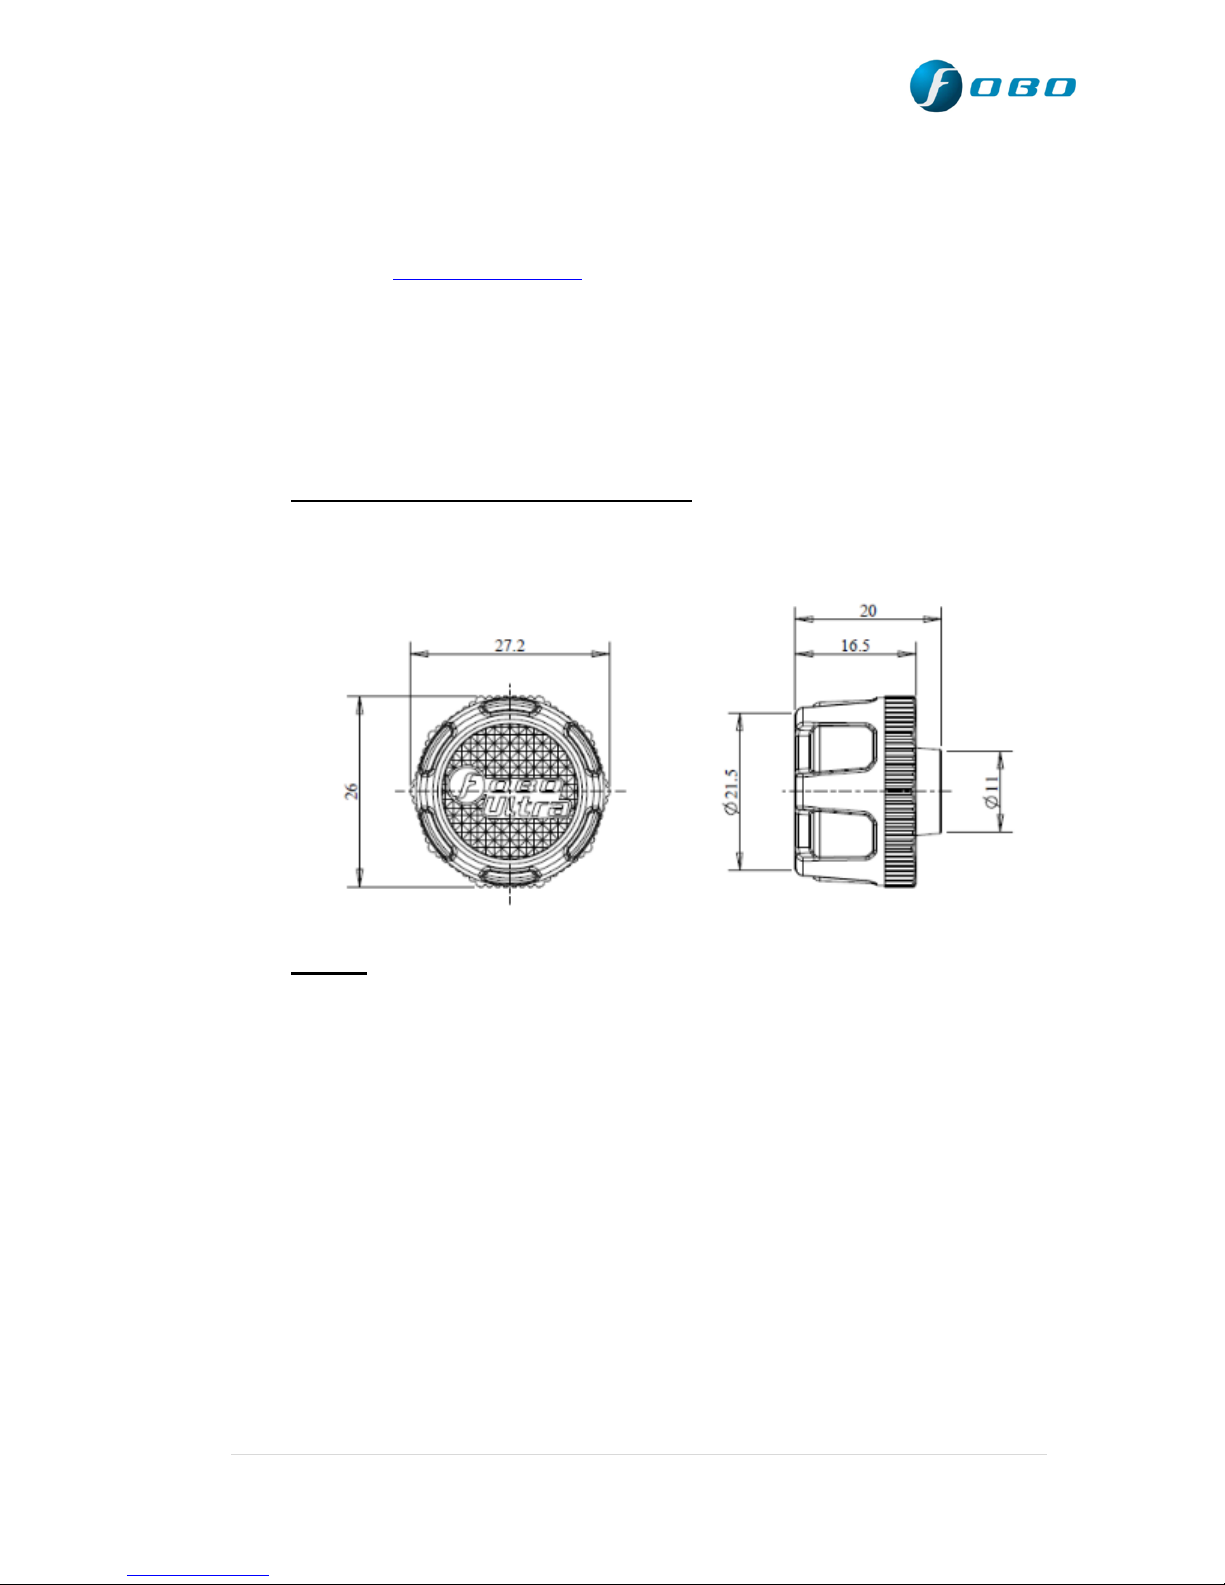
FOBO Ultra sensor dimensions in mm:
NOTE: Battery life span up to Twelve months is an estimate based on
normal use at 23 °C. Battery life may vary according to usage and
climatic temperature.
Battery life span will change due to the following reasons:
1) Frequent change of pressure threshold setting in the App.
2) Disabling & enabling of sensors.
3) Release & pairing.
4) Removal & screw-on of sensors.
5) Operating under extreme cold/hot temperature.
6) Testing of product.
7) Rotation (refer section 5.4 of this user manual)
8) Trigger alert or let activated alerts unattended.
9) Multiple removal and screw-on of sensors for equalizing all tire
pressures.
11 | P a g e
Page 12
All these activities will drain a battery very fast and affect the battery life
span.
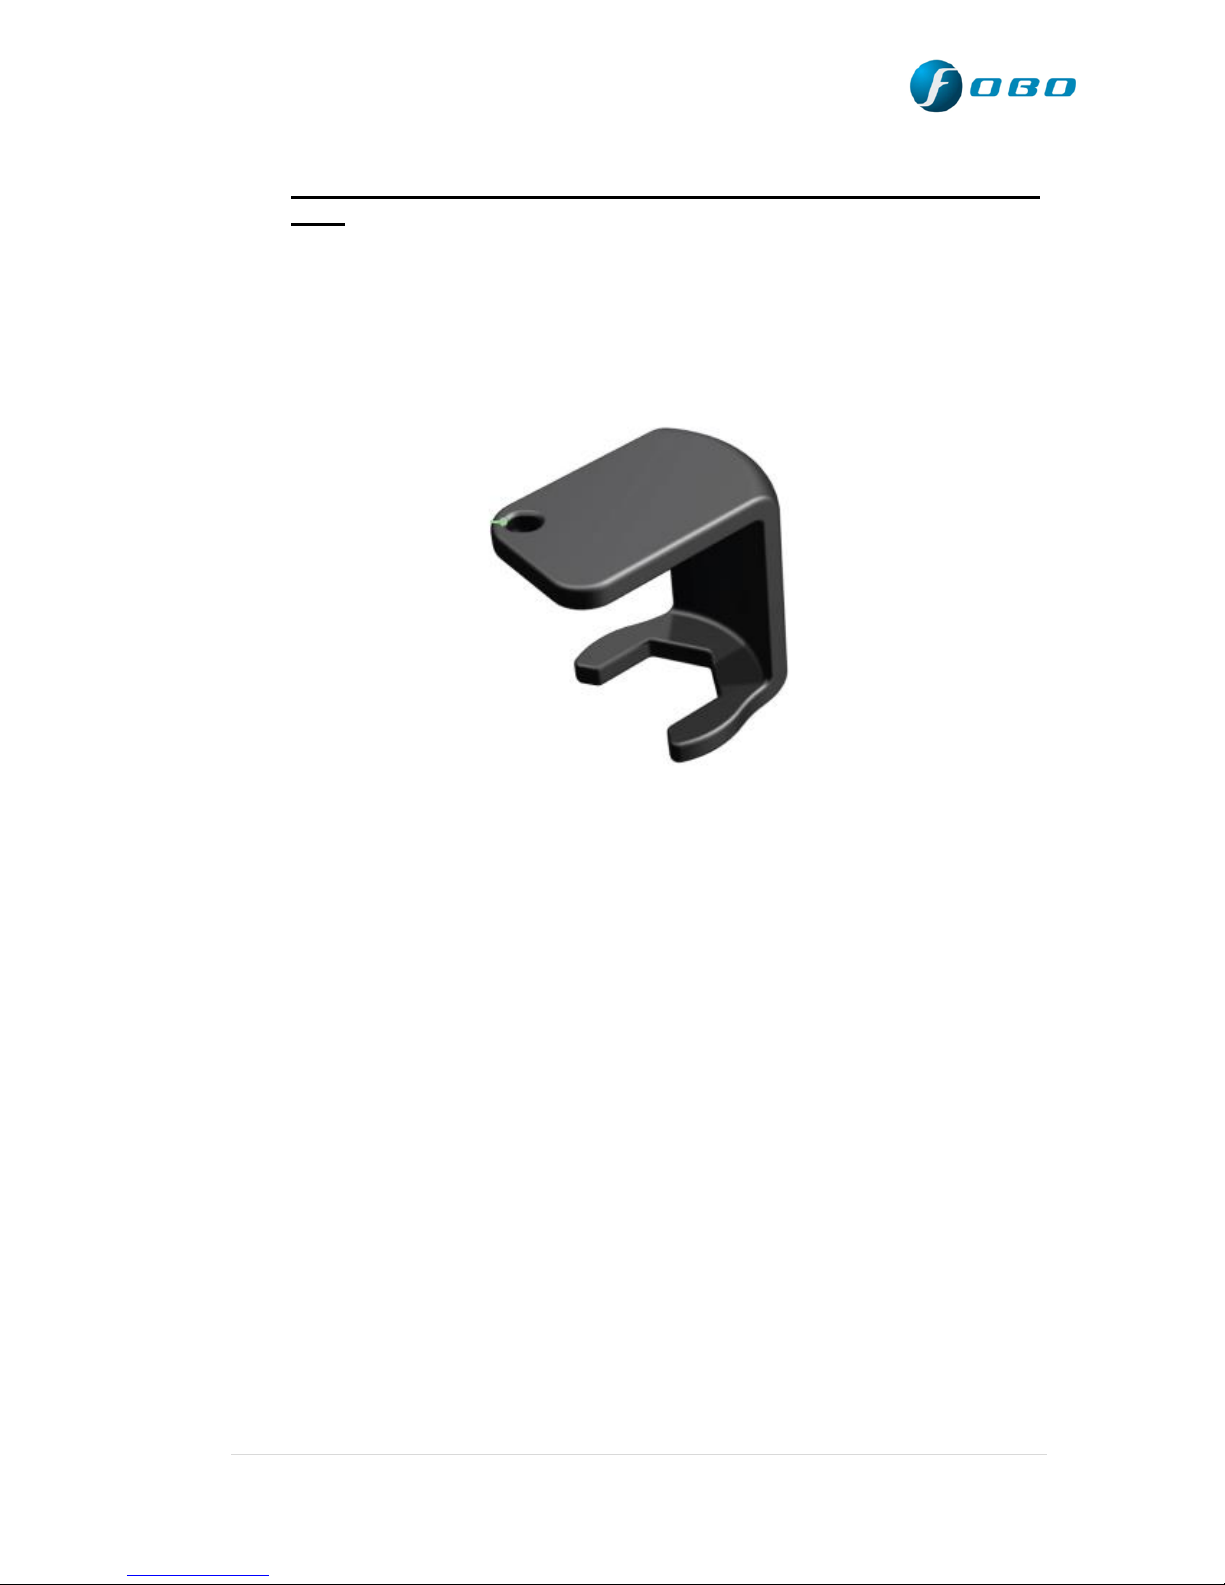
4.3 Sensor Lock nut and wrench
FOBO Ultra sensors and In-Car unit are tied to a FOBO account after
installation. They are not re-usable or transferable without the owner releasing
them from his/her FOBO account. This is a theft deterrent feature to
discourage theft.
As an additional anti-theft feature, all FOBO Ultra package comes with locknuts and special wrench. FOBO Ultra functionality is not affected if you do
not use the lock-nuts.
The lock nuts and wrench are made of custom engineering plastics that can
withstand road salts and common automotive chemicals (gasoline, engine oil,
wash shampoo, etc.).
In order to use the lock nuts, you must first install the lock nut to the tire valve
(with the bump facing tire rim). Screw in the lock nut all the way down and
ensure that there is still a minimum of 5 thread count on the tire valve for
the sensor unit to be screwed on. If there is insufficient thread for the tire
sensor, it may lead to air leakage. A solution for this would be to change the
tire valve to one with a longer thread. Next, screw in the tire sensor unit until
it is reasonably tight. Then use your finger to unscrew the lock nut outwards
(i.e. anti-clockwise) until it pushes against the bottom of the sensor unit. Use
12 | P a g e
Page 13

the wrench to tighten the lock nut. The resultant friction force will make it
difficult to remove the sensor unit without loosening the lock nut. For rubber
valves, hold the valve stem with one hand and tighten the lock nut with the
wrench on another hand. This is to avoid the rubber valve from twisting
making it unable to tighten the lock nut.
WARNING: Do not apply too much force to tighten the lock-nut. You
may face difficulty to loosen the lock nut later on especially for rubber
valves that typically doesn’t stay firm on the tire rims.
NOTE: If your tire valve is too short, you shouldn’t use the lock nut as
this will block the sensors from being completely screwed on the tire
valve and causes air leak. Our sensors are designed to work on a tire
valve with a minimum of 5 thread counts.
13 | P a g e
Page 14
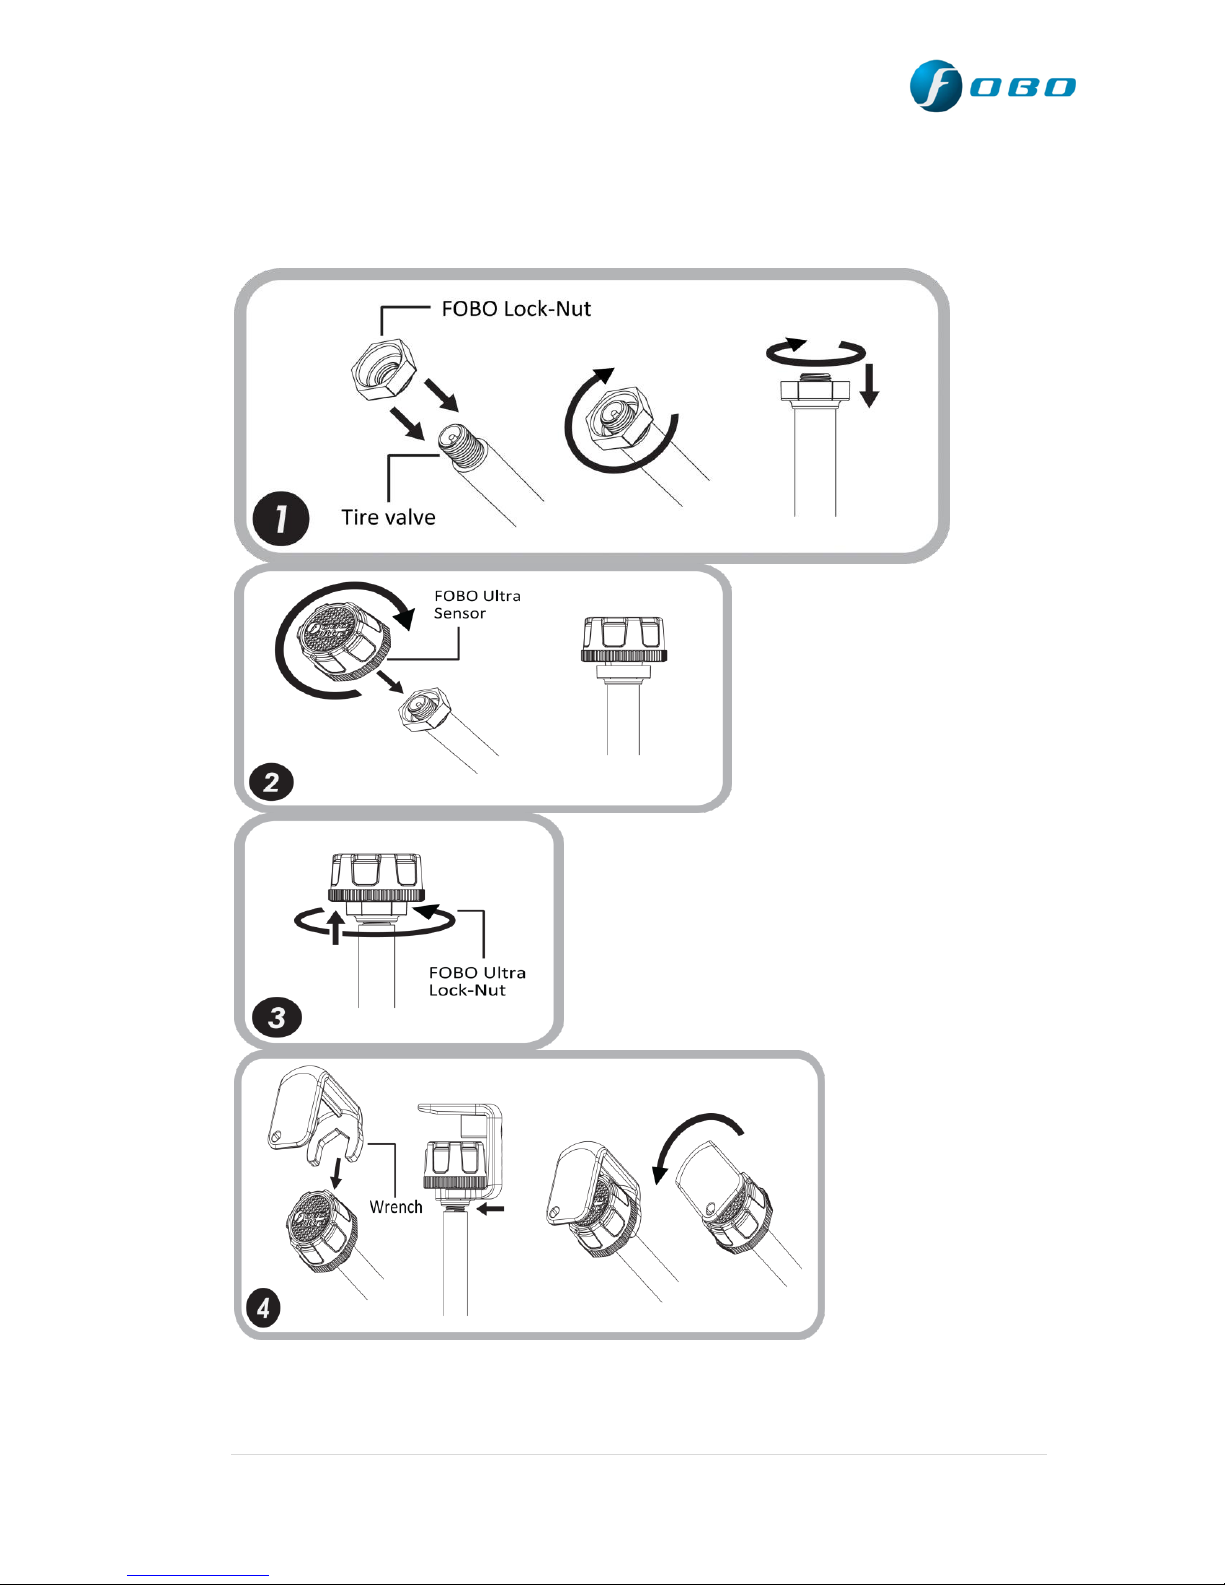
Step by step diagram to use FOBO Ultra Lock Nut and wrench
14 | P a g e
Page 15
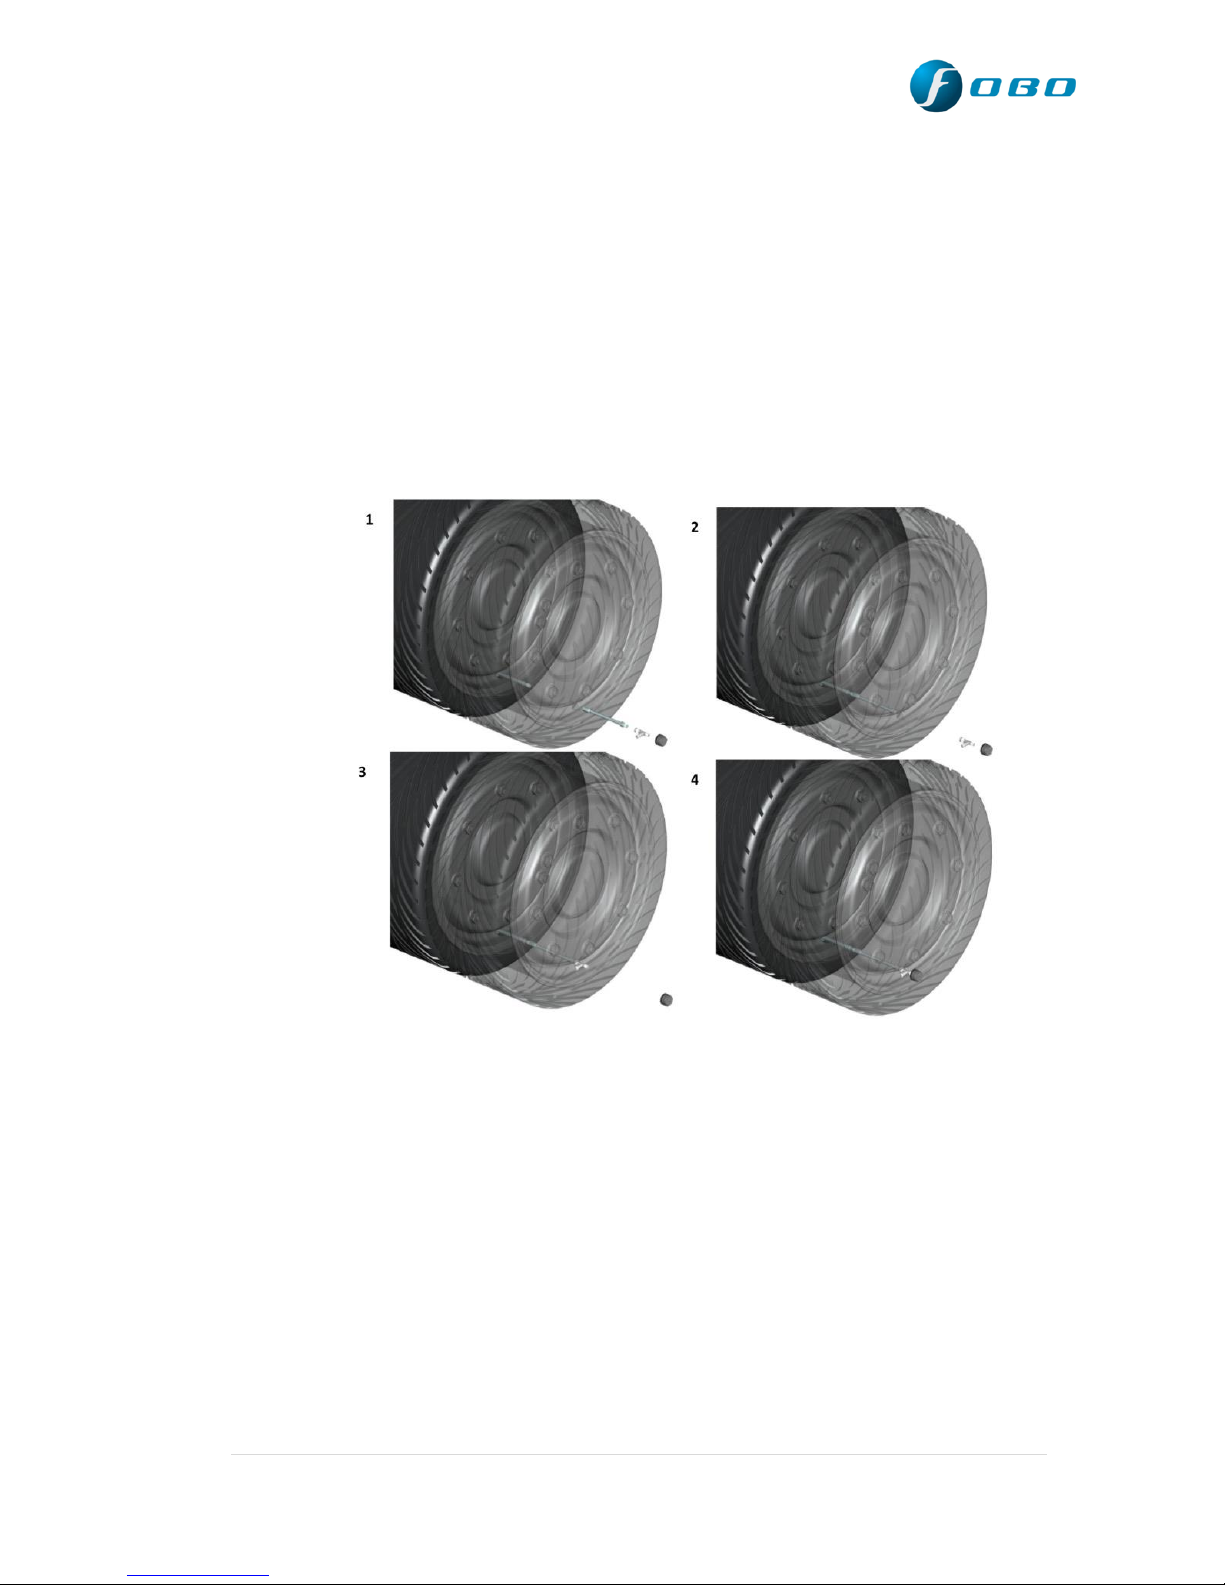
4.4 Extension Valve & Screw-on T-valve
Extension Valves are helpful when inflating wheels fitted with short or
difficult to reach tire valves. Extension valve is suitable for inner tire valve
stem in axles with 4 wheels. The ends of these extensions are easily accessible
with plenty of clearance.
Step by step pictures to use Extension Valve & Screw on T-valve
15 | P a g e
Page 16
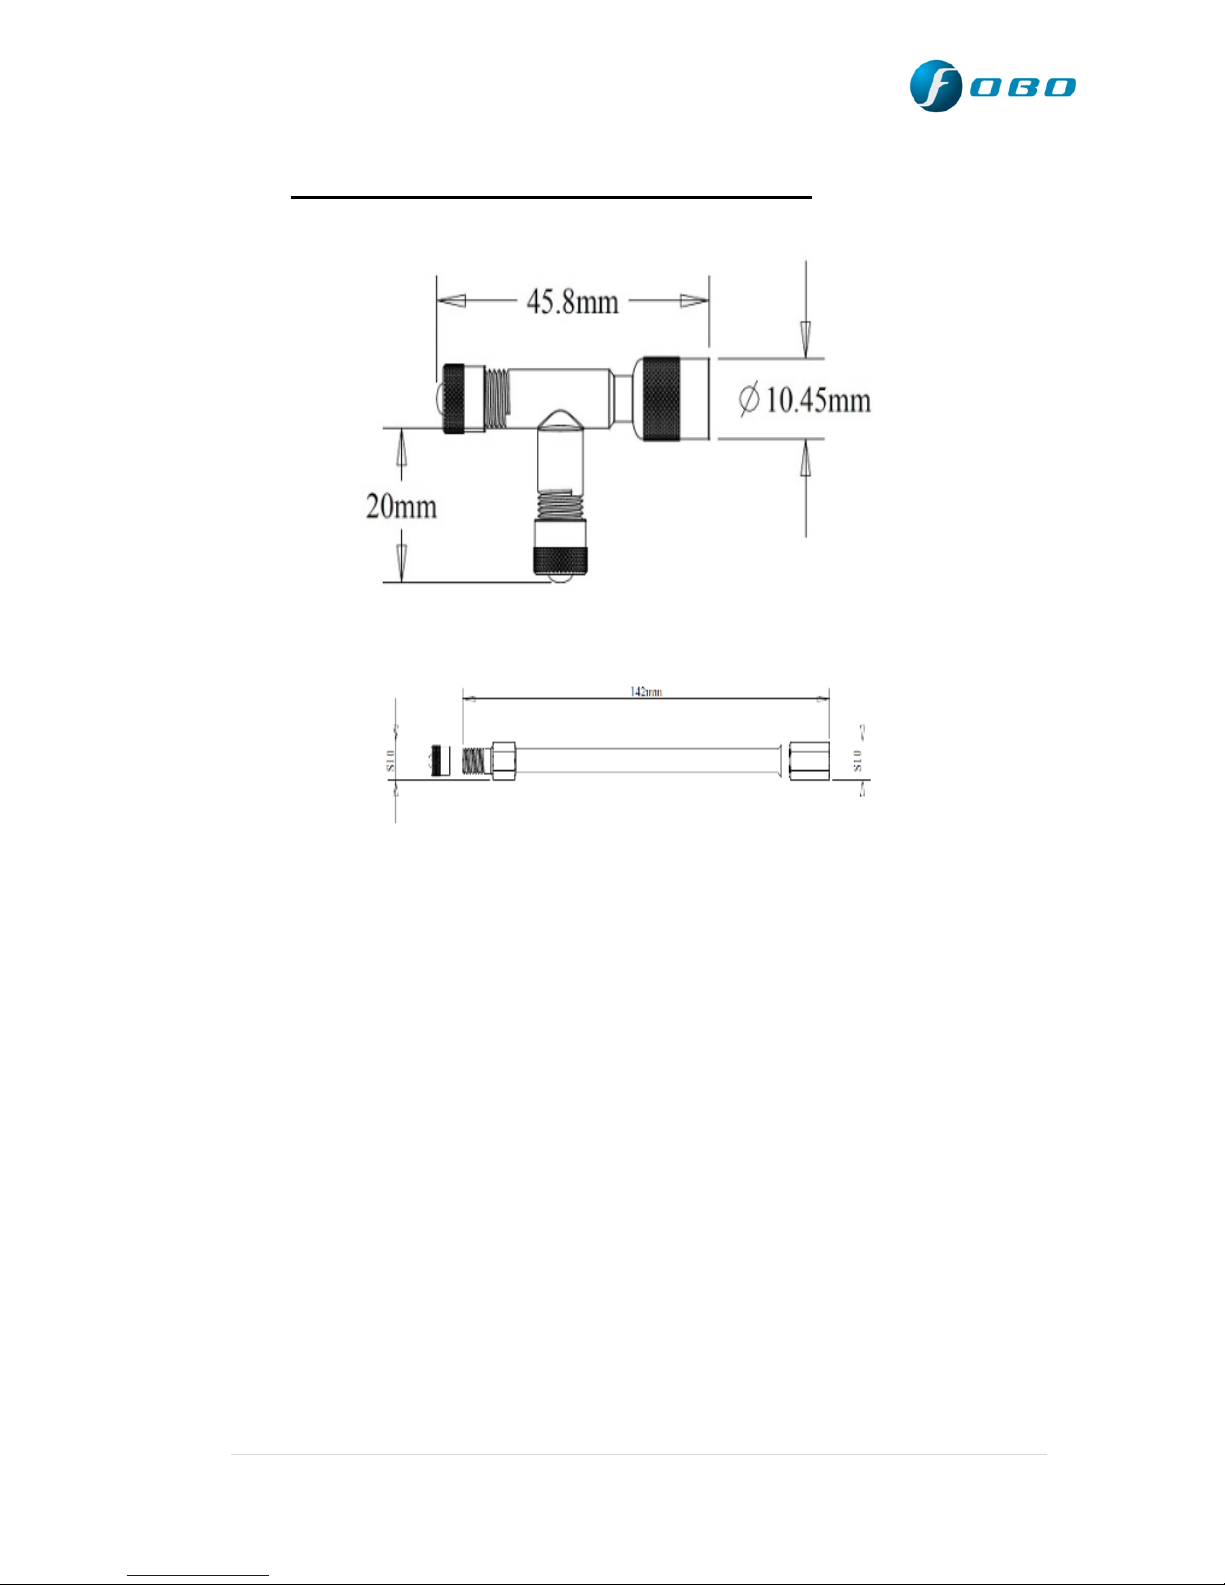
Screw on T-valve and Extension valve Dimensions:
To purchase Extension Valve & Screw-on T-Valve you can write in at
[email protected].
16 | P a g e
Page 17
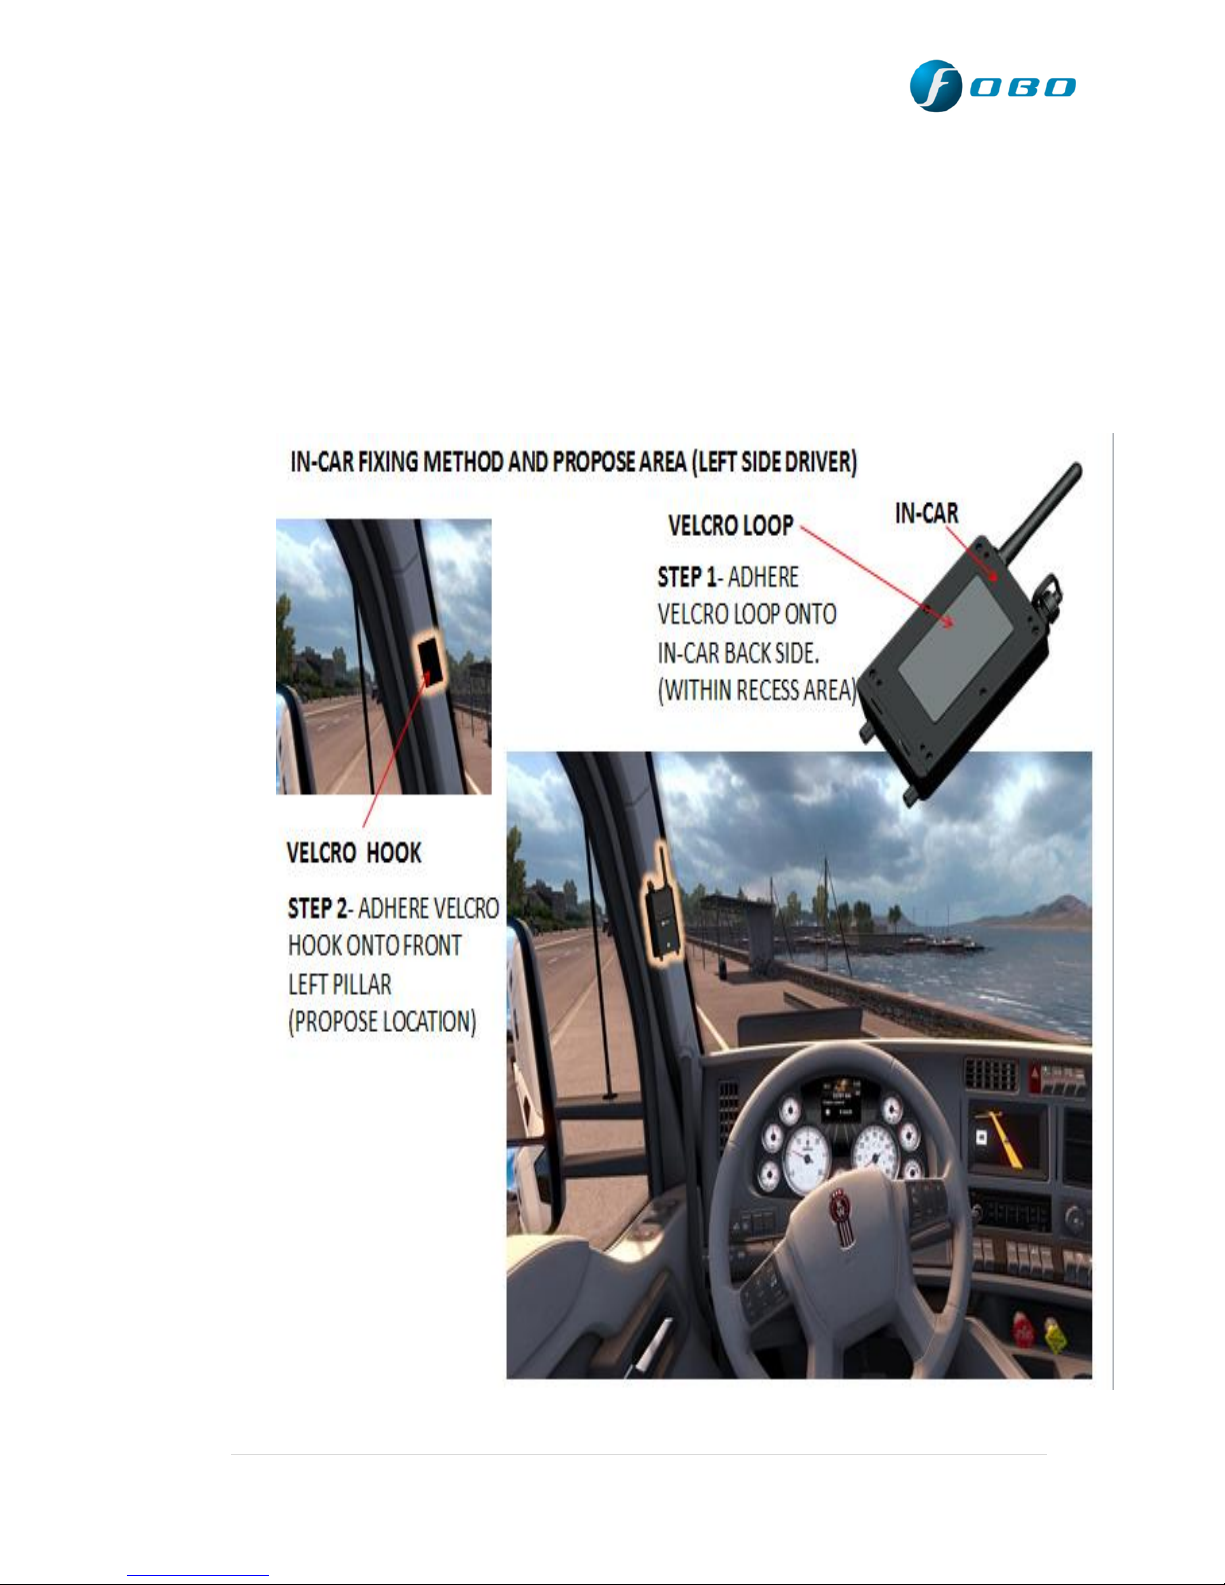
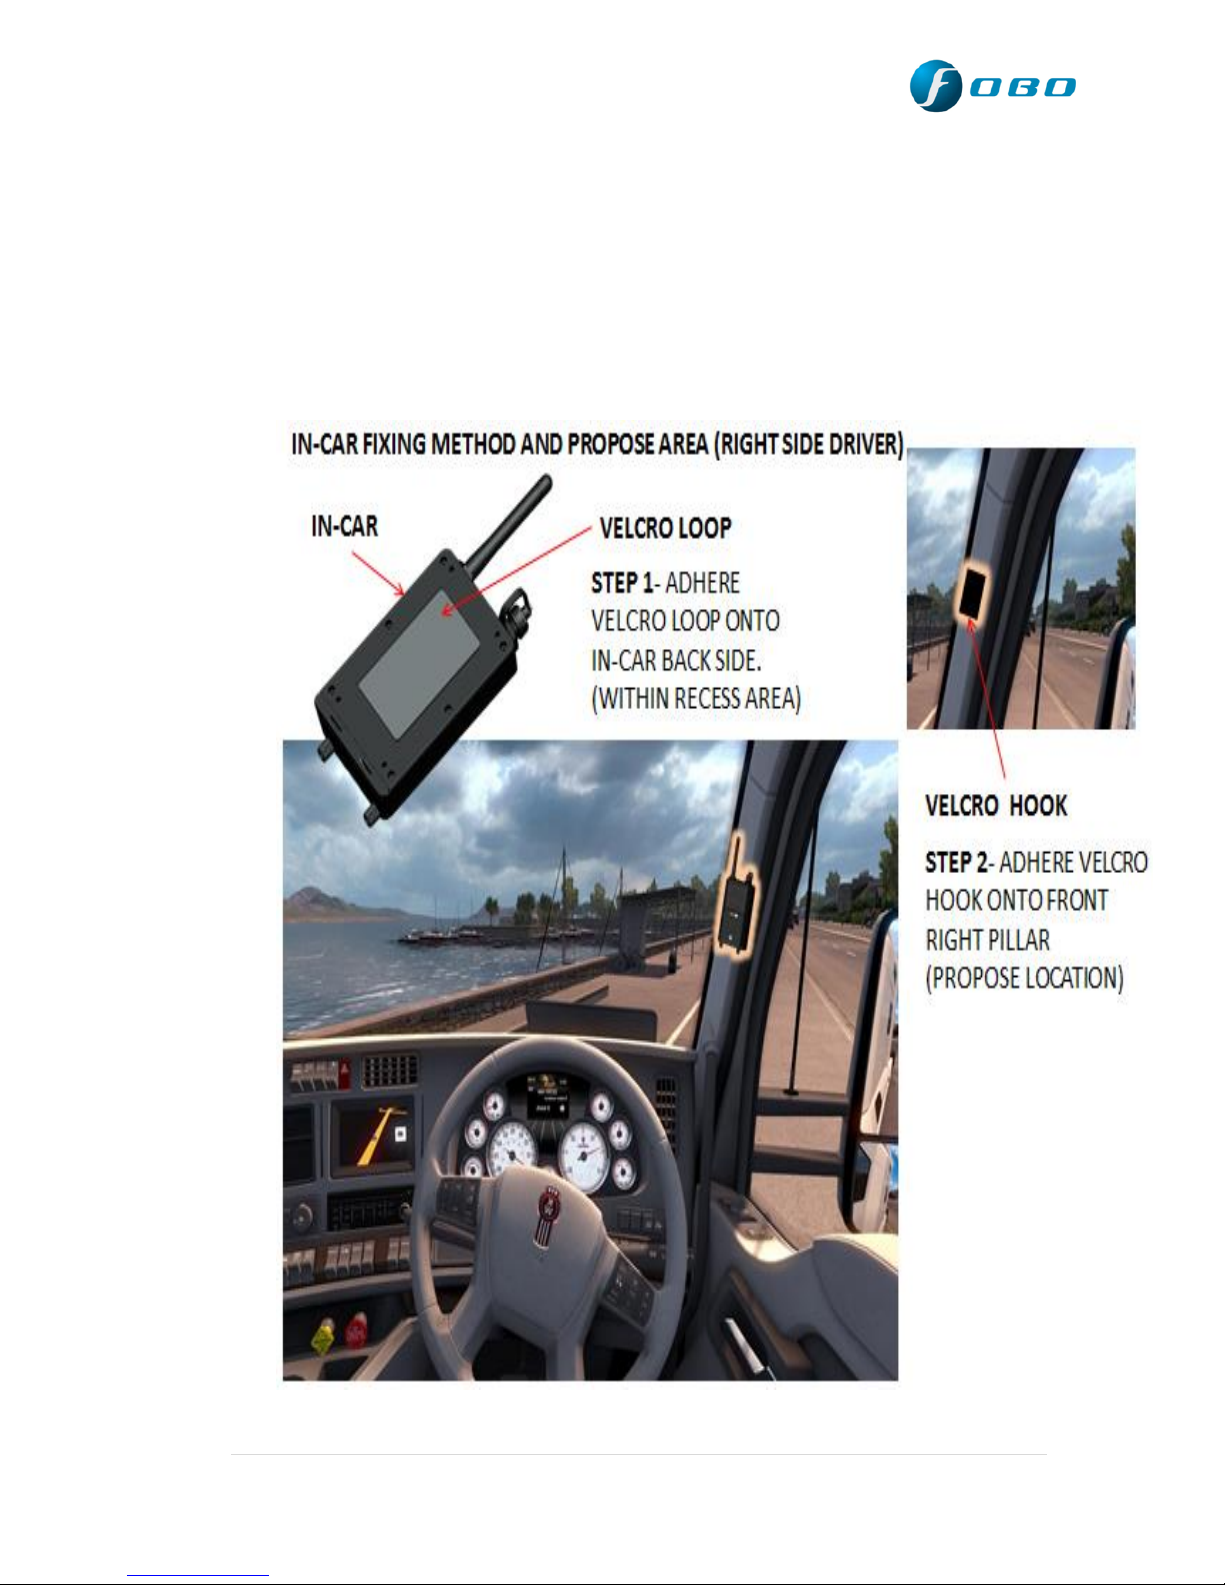
4.5 In- Car unit mounting and proposed location
It is advisable to mount the In-Car unit at the proposed location in the cab for
better signal reception. This proposed in-car unit location will ensure the
maximum signal reception from all the sensors. Refer to the illustration below
showing mounting and proposed location:
17 | P a g e
Page 18
18 | P a g e
Page 19
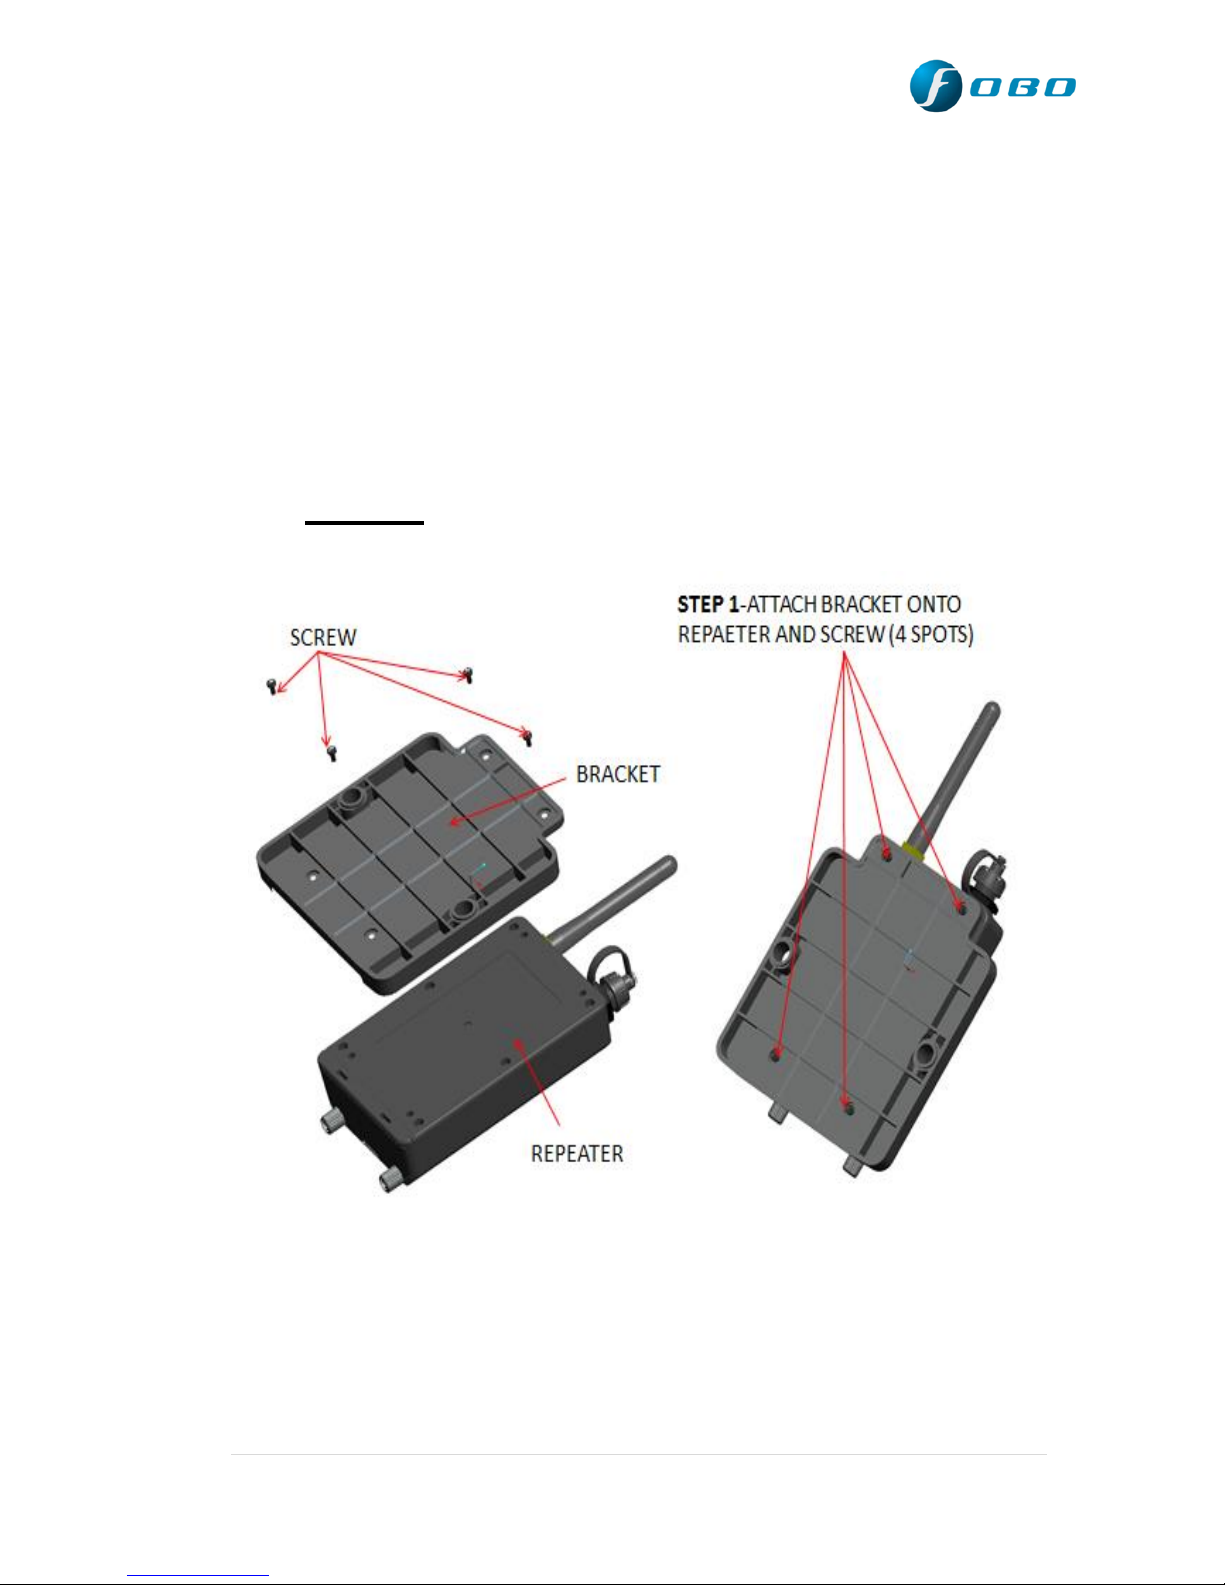
4.6 Repeater mounting and proposed location
Refer to the illustration below, showing repeater mounting and proposed
location:
Step 1:
19 | P a g e
Page 20
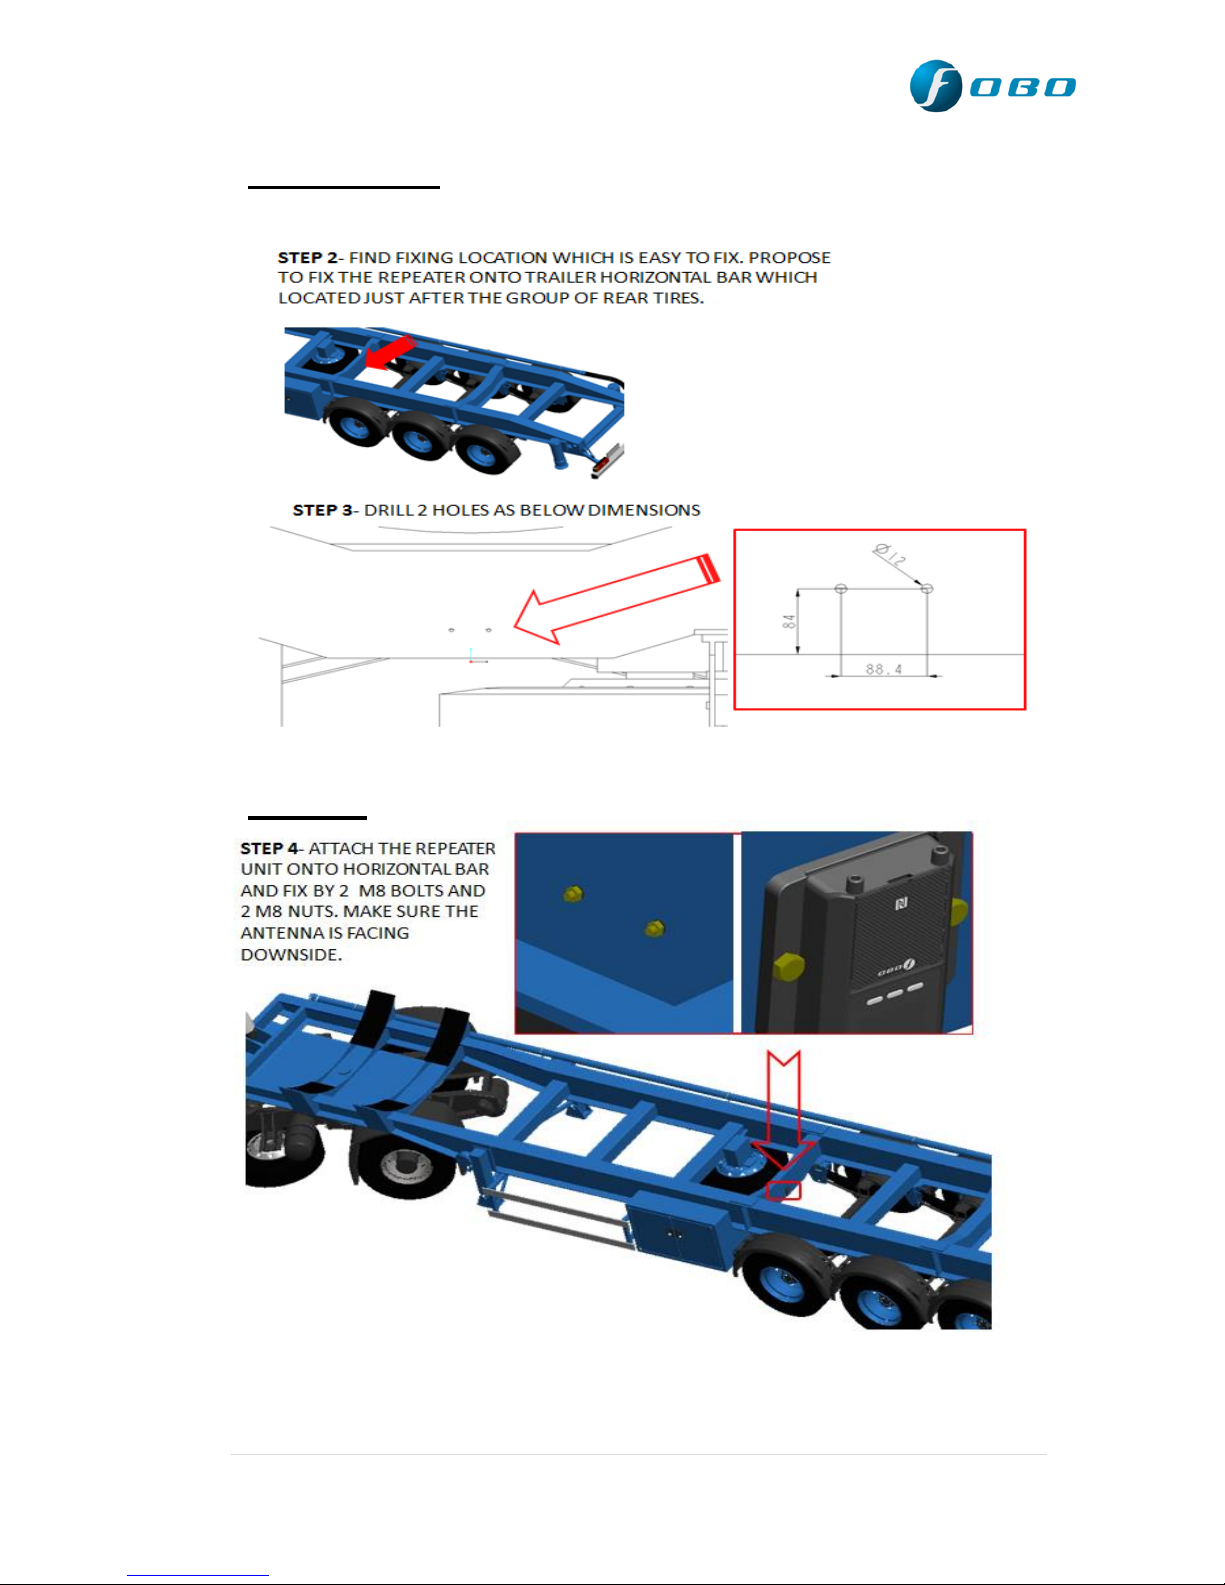
Step 2 & 3:
Step 4:
20 | P a g e
Page 21
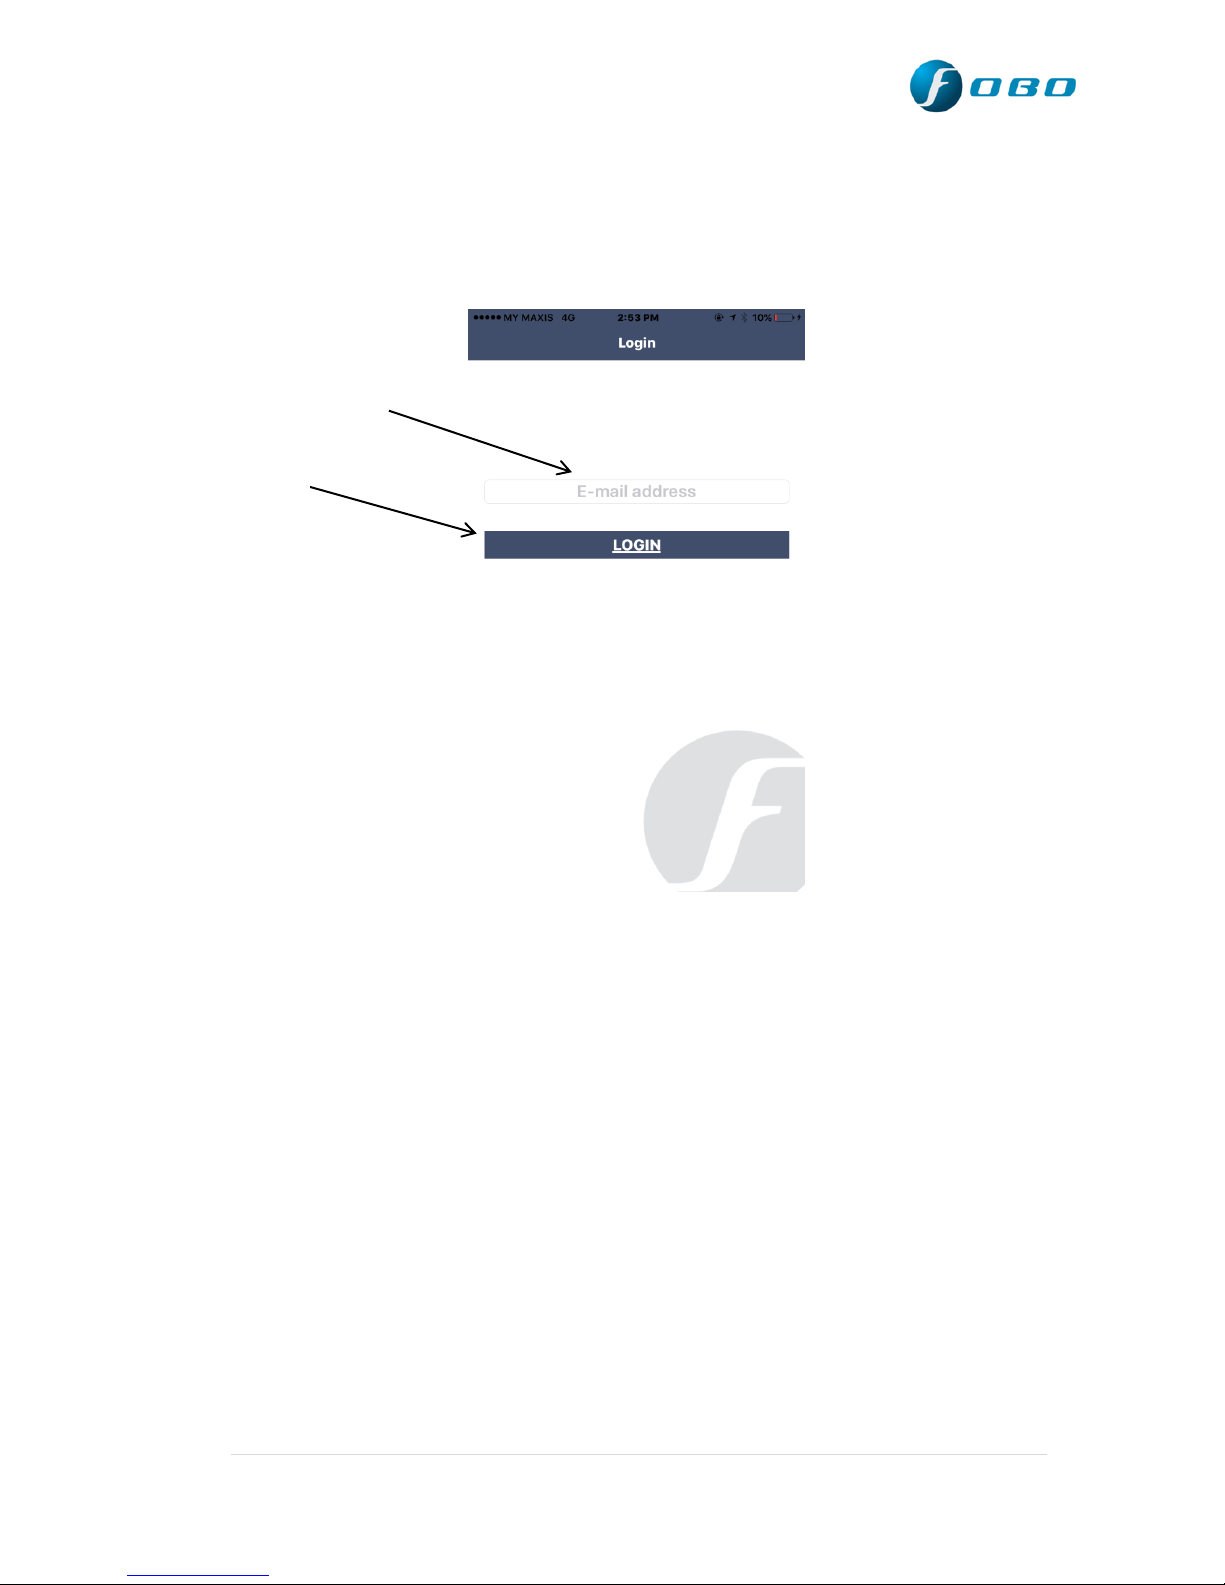
5.1 Description of FOBO Ultra App (For iOS)
Email address
Login Button
5.1.1 FOBO Ultra App login page (For iOS)
E-mail address - Your FOBO account and vehicle profile
information will be referenced to this e-mail address. Please use a
valid e-mail address.
Login button - click here to login after you have registered and
activated an account.
21 | P a g e
Page 22
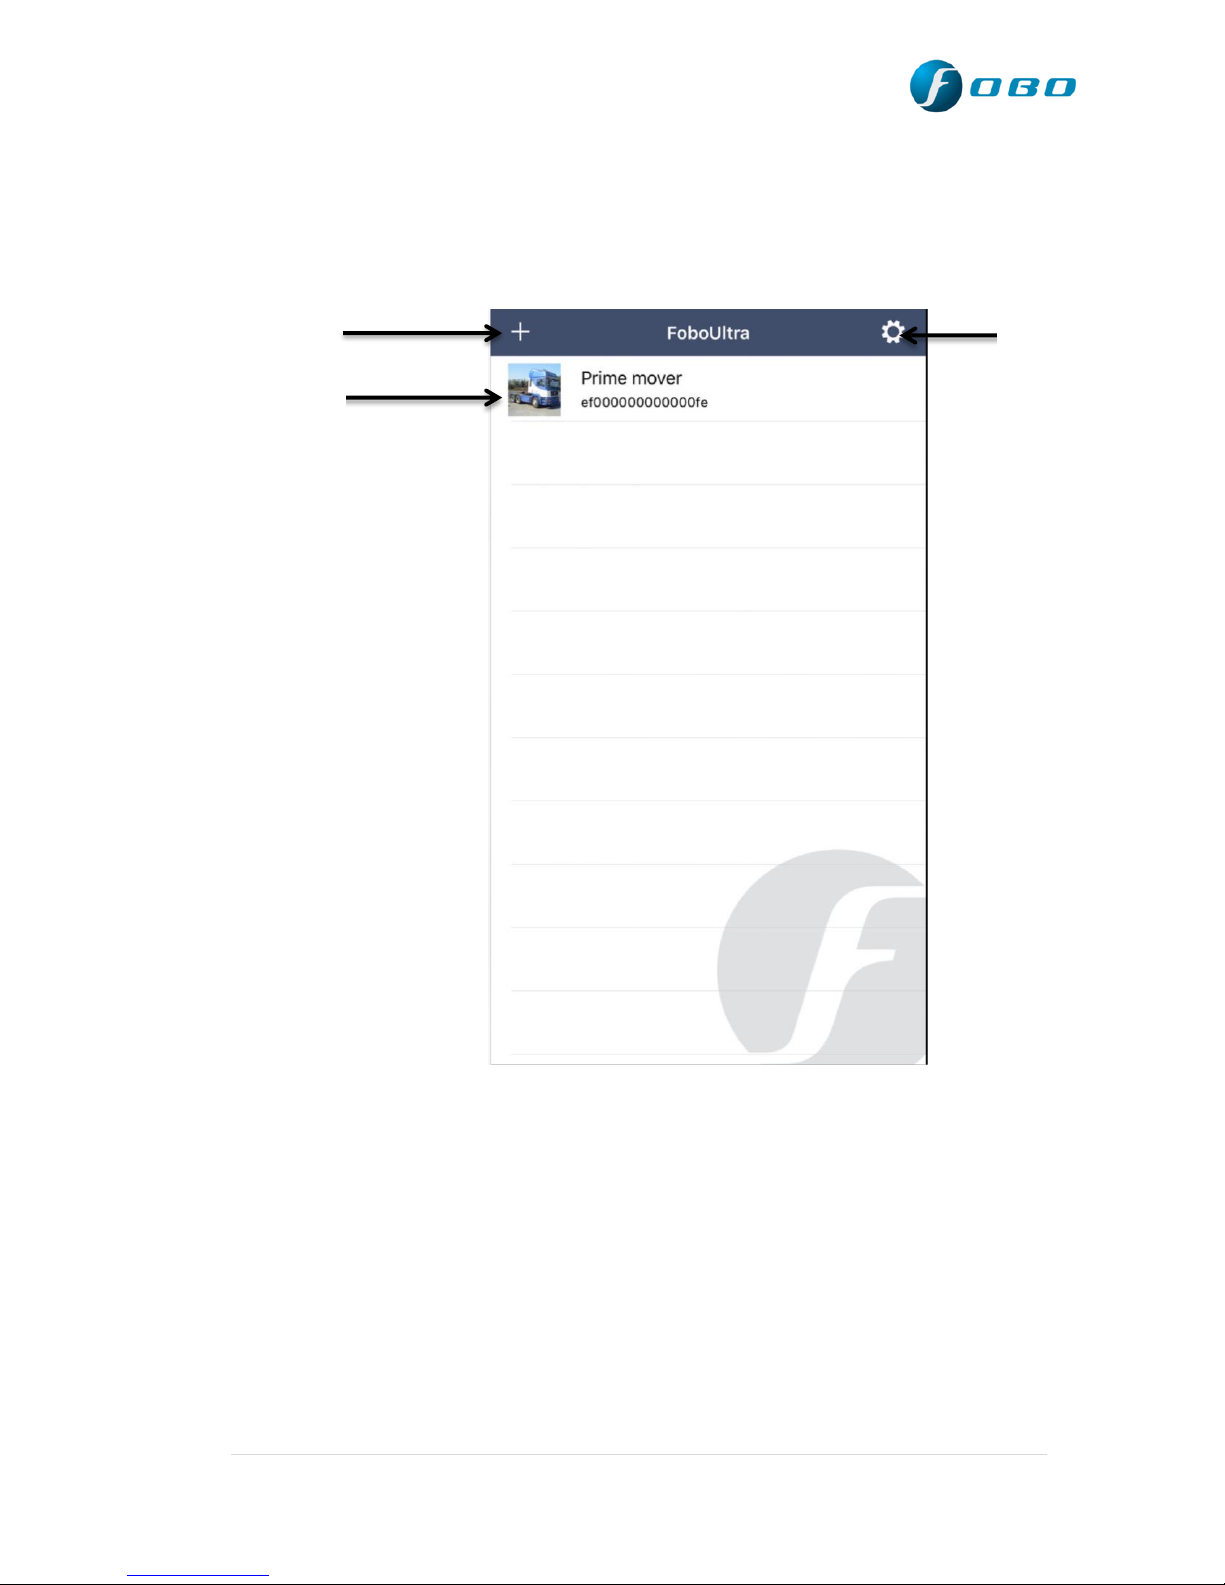
Add in-car
unit/Repeater button
General settings
button
Vehicle profile
5.1.2 FOBO Ultra App home page (for iOS)
Add Tag button – Click here to add new in-car unit/Repeater to
your FOBO account.
General settings button – Click here to get to general settings
screen.
Vehicle Profile – Click here to get to detail page/Vehicle status
page.
22 | P a g e
Page 23
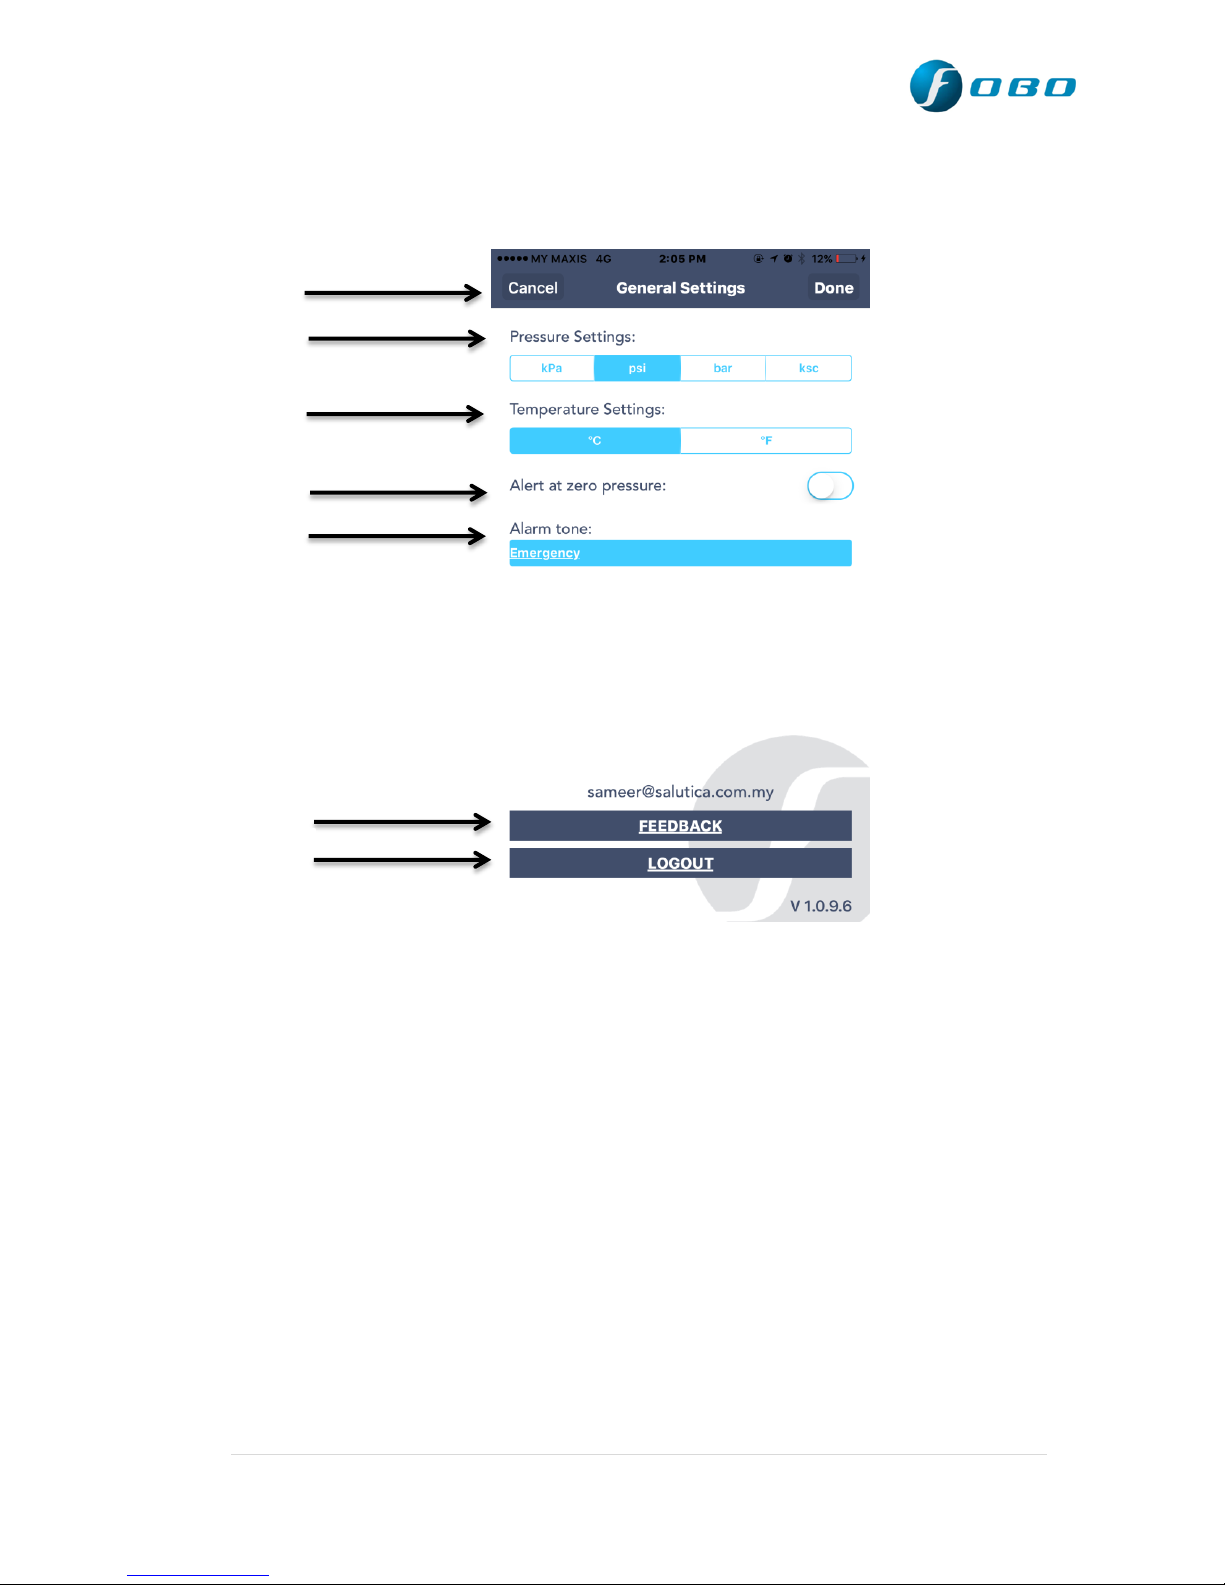
Cancel
Pressure settings
Temperature Settings
Alert at Zero Pressure
Alarm Tone
Feedback
Log out
5.1.3 General Settings page (for iOS)
Cancel – Click here to get back to FOBO Ultra App home page.
Pressure settings – To choose preferred pressure units.
Temperature settings: To choose preferred temperature units.
Alert at Zero pressure – Turn on to receive alert at zero pressure.
Alarm Tone – To choose type of alarm tone.
Feedback – To contact FOBO Customer service.
Logout – To log out from the App.
23 | P a g e
Page 24
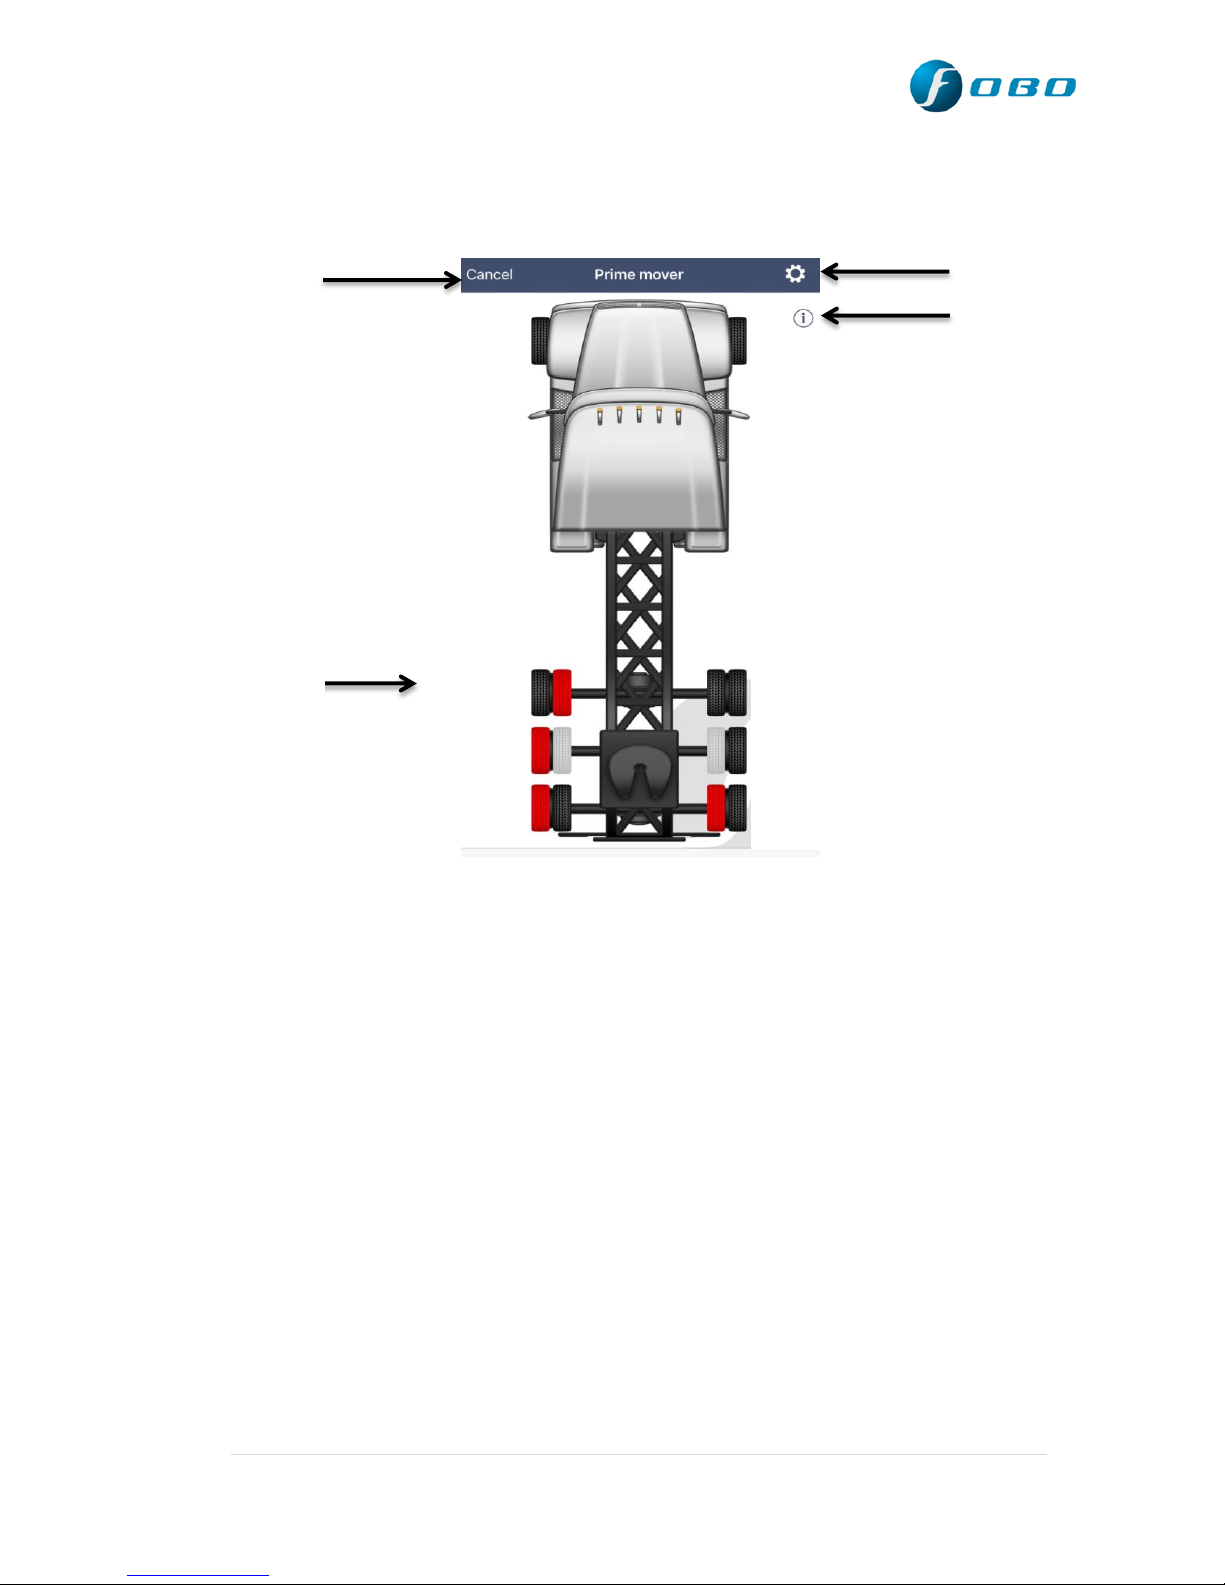
Cancel
Tire position
11B
2A/2B
3A/3B
4A/4B
Information
Settings
5.1.4 FOBO Ultra App detail page (For iOS):
11A
1
1
1
12C/2D
13C/3D
14C/4D
Cancel - Click here to get back to FOBO Ultra App home page.
Tire Position – Click on the tire position to get Pressure and
temperature readings.
24 | P a g e
Page 25
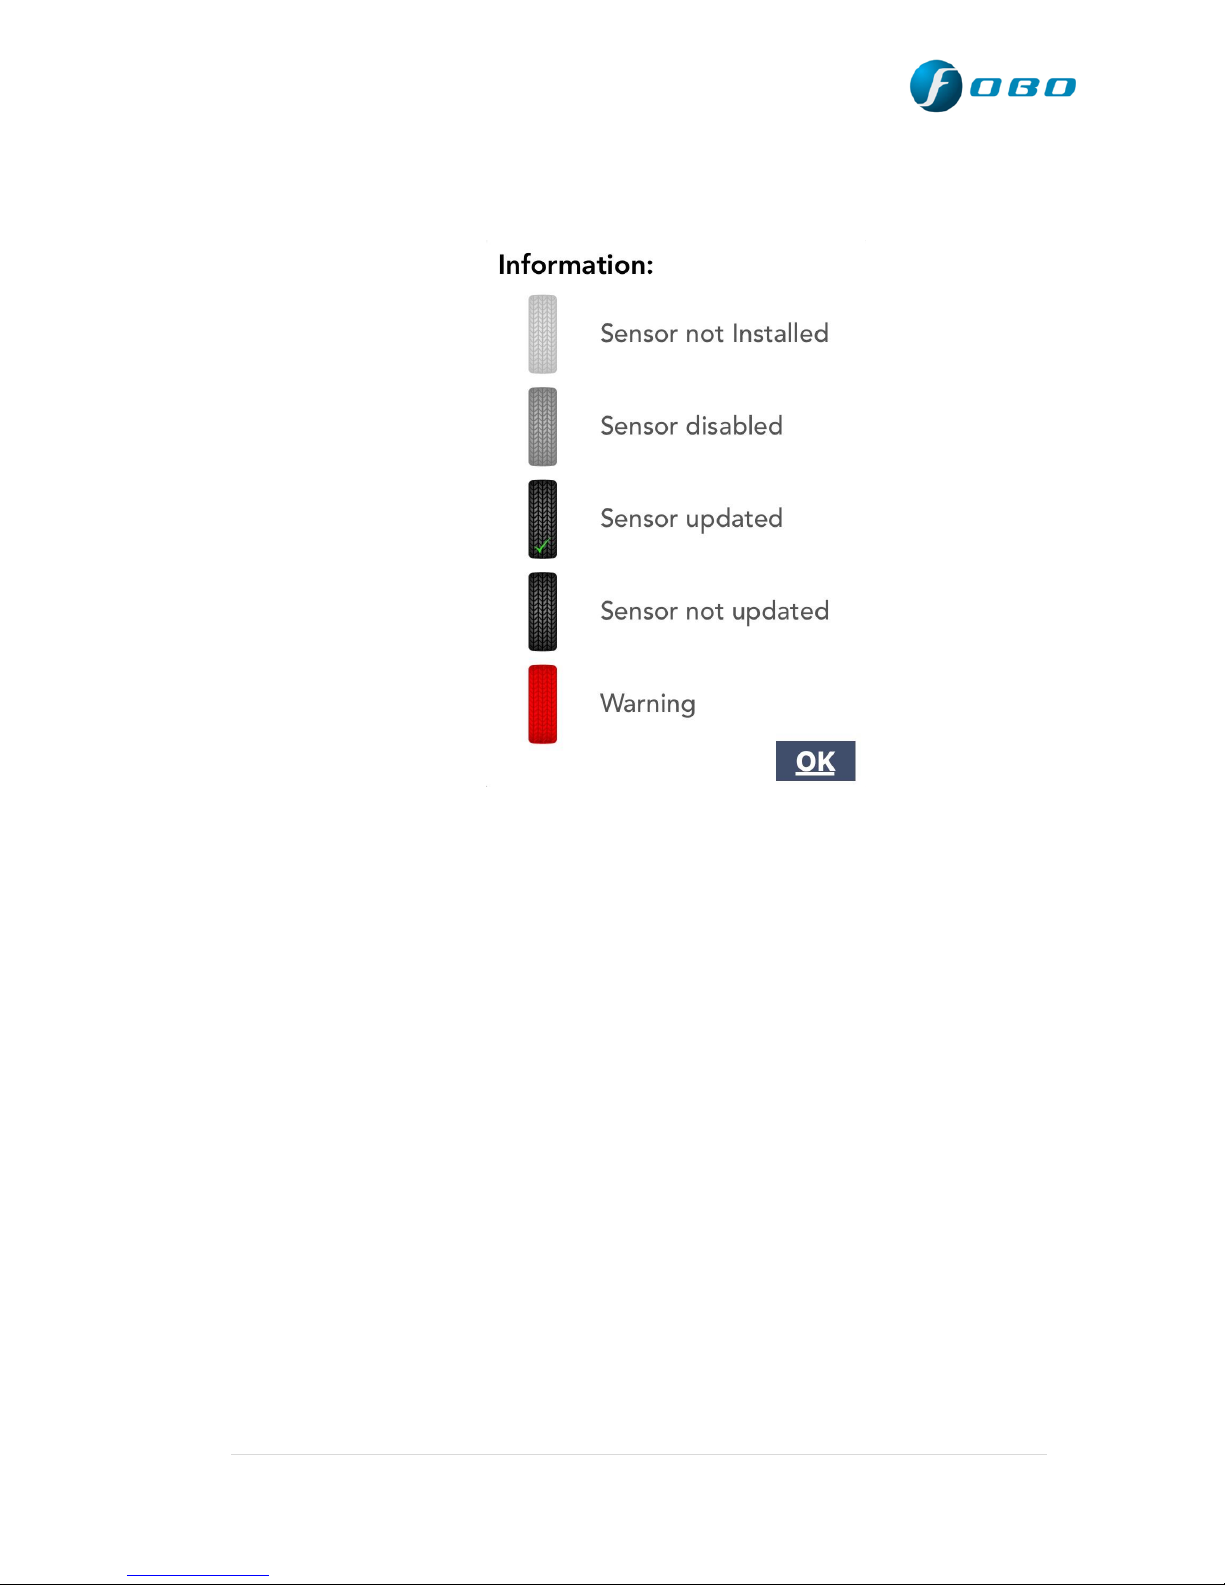
Information – Click here to get details of what each color tire
represents.
Settings – Click here to set Pressure thresholds, change picture,
FOBO Share, Type of vehicle, Vehicle name.
Note: Sensor positions shown above are meant for illustration of
the concept.
25 | P a g e
Page 26
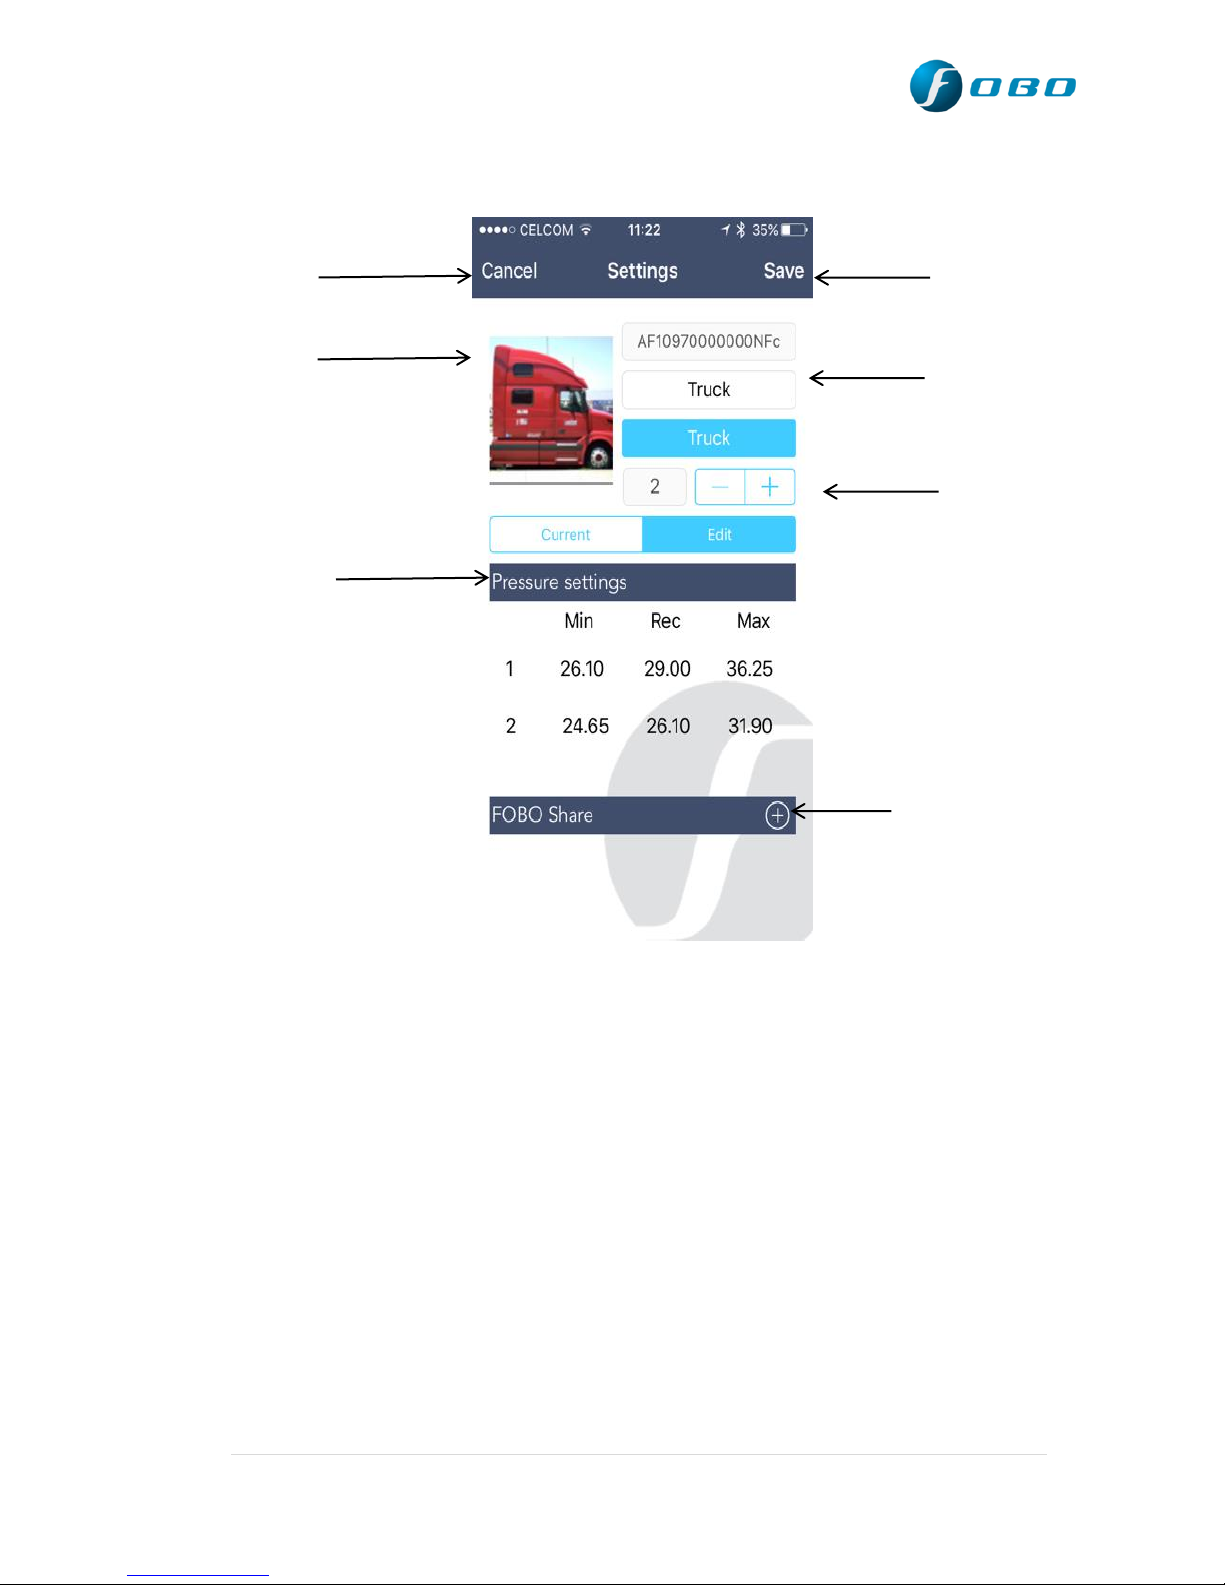
5.1.5 FOBO Ultra App Settings page (For iOS):
Cancel
Vehicle Image
Pressure Settings
Add Sharee button
Save
Vehicle name
Number of Axles
Cancel – Click here to get back to FOBO Ultra App detail page.
Vehicle image – Click here to capture vehicle image.
Pressure settings – Click here to set Min/Rec/Max pressure
thresholds.
Add sharee button – Click here to add sharee.
Vehicle Name- Click here to key in vehicle name.
Save – Click here to save the settings.
Number of Axles – Click here to choose number of Axles.
26 | P a g e
Page 27
Add in-car unit/Repeater
Button
5.2 Description of FOBO Ultra App (For Android)
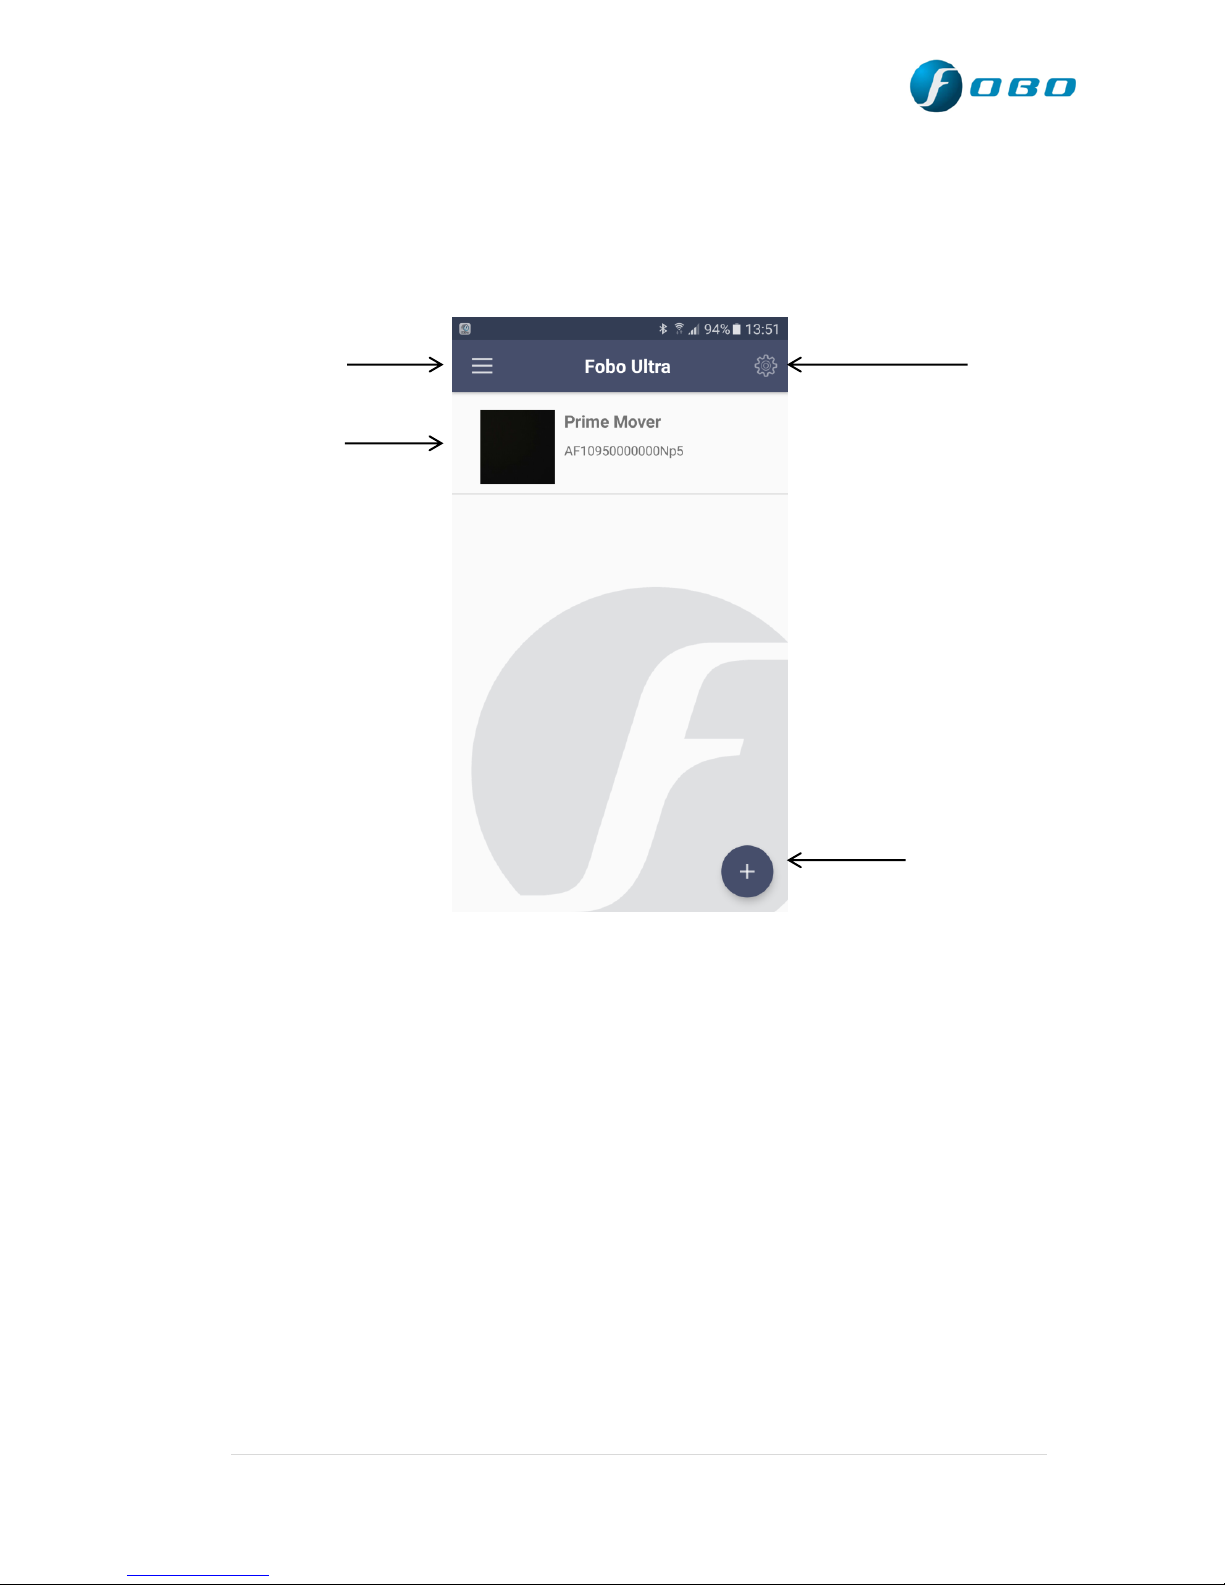
5.2.1 FOBO Ultra App Home page (For Android)
Drawer
Vehicle Profile
General Settings
Vehicle profile – Click here to get to detail page/Vehicle status page.
Add in-car unit/ Repeater Button - Click here to add new in-
Car unit/Repeater to your FOBO account.
General Settings - Click here to get to general settings screen.
27 | P a g e
Page 28
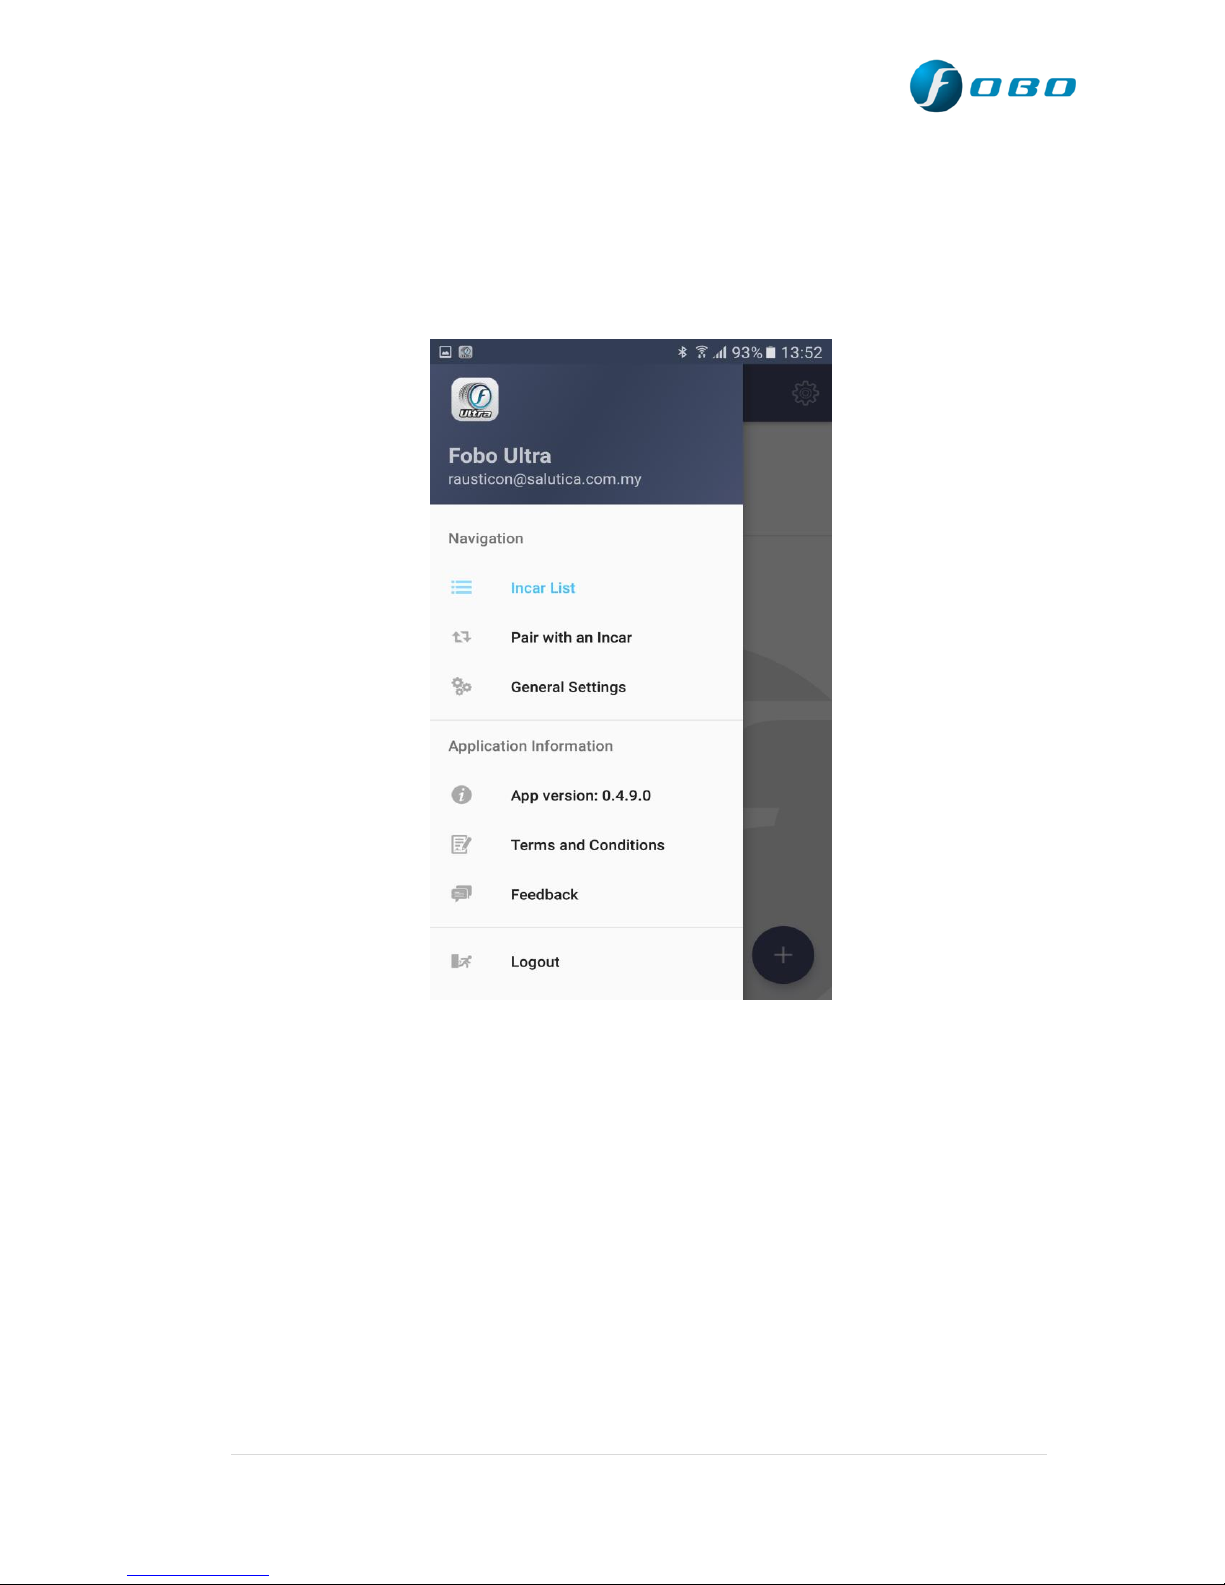
Drawer – Click here to get In-car list, Pair with an in-car, General
Settings, Application information, Log out and Feedback.
28 | P a g e
Page 29
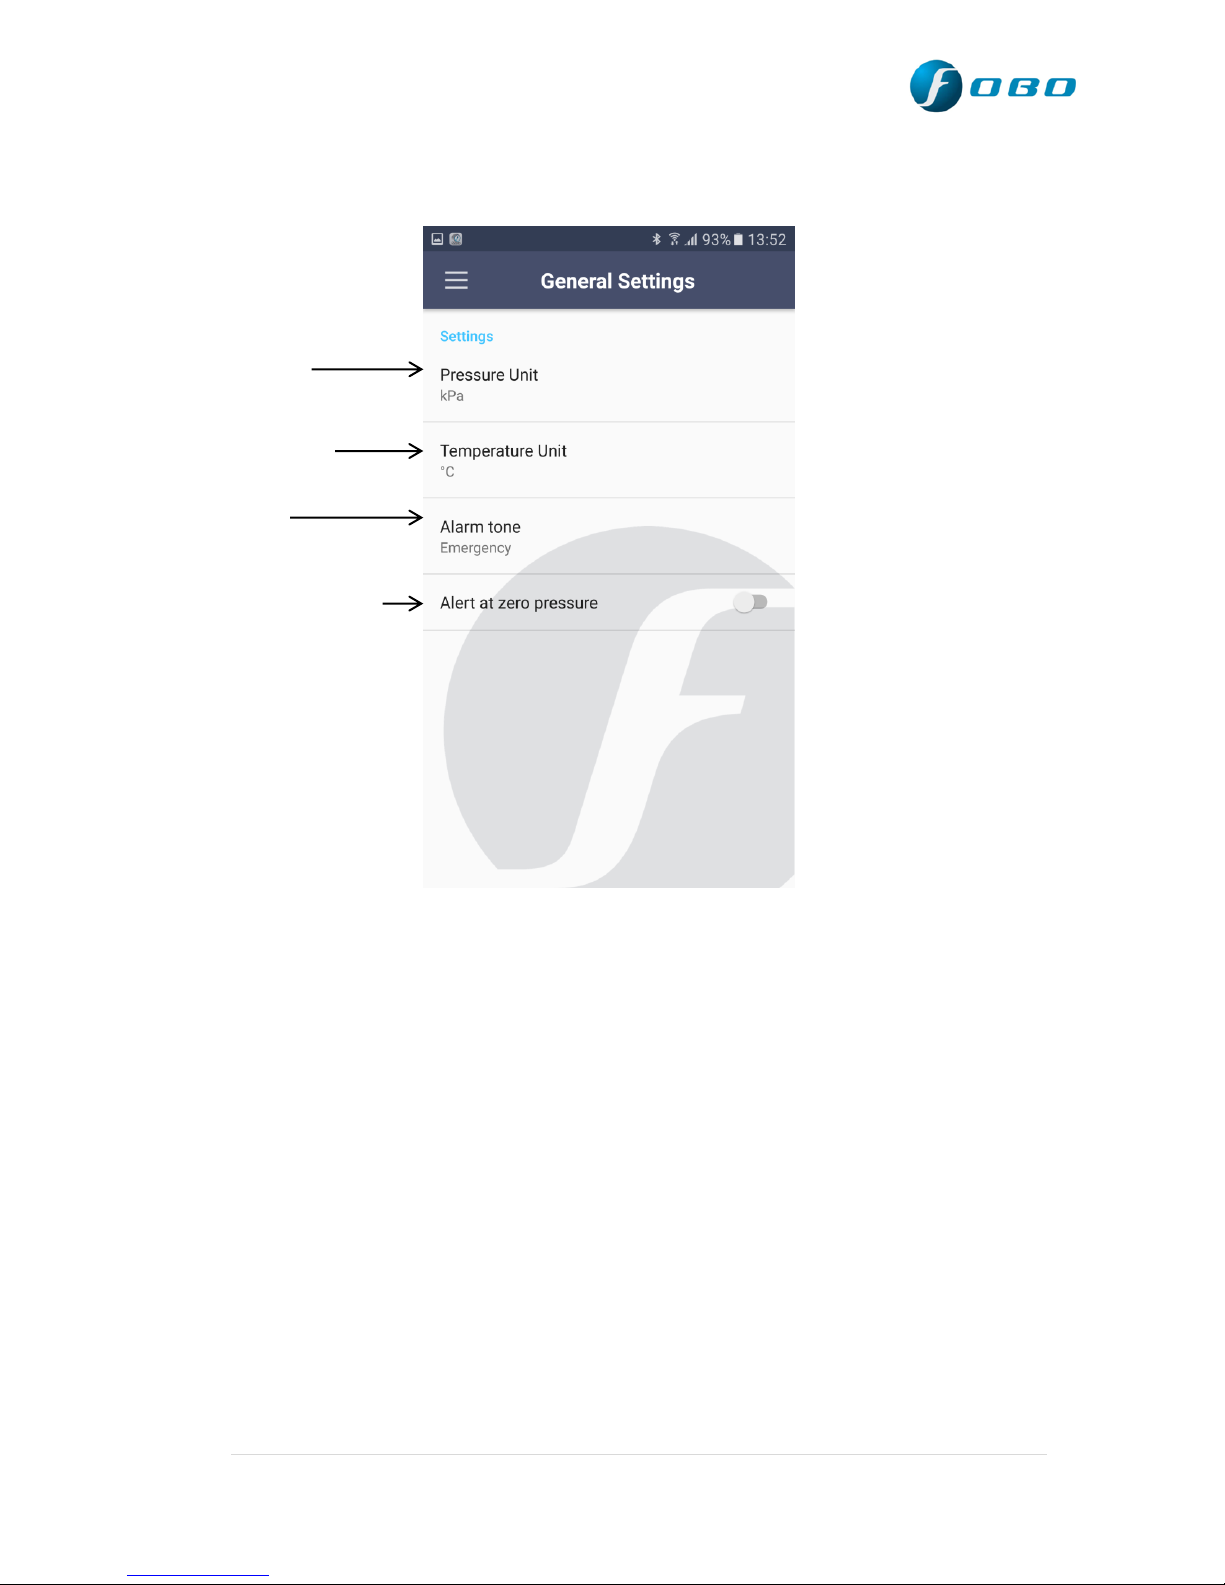
5.2.2 General Settings page (for Android)
Pressure Unit
Alert at Zero Pressure
Temperature Unit
Alarm Tone
Pressure Unit – To choose preferred pressure units.
Temperature Unit: To choose preferred temperature units.
Alarm Tone – To choose type of alarm tone.
Alert at Zero pressure – Turn on to receive alert at zero pressure.
29 | P a g e
Page 30
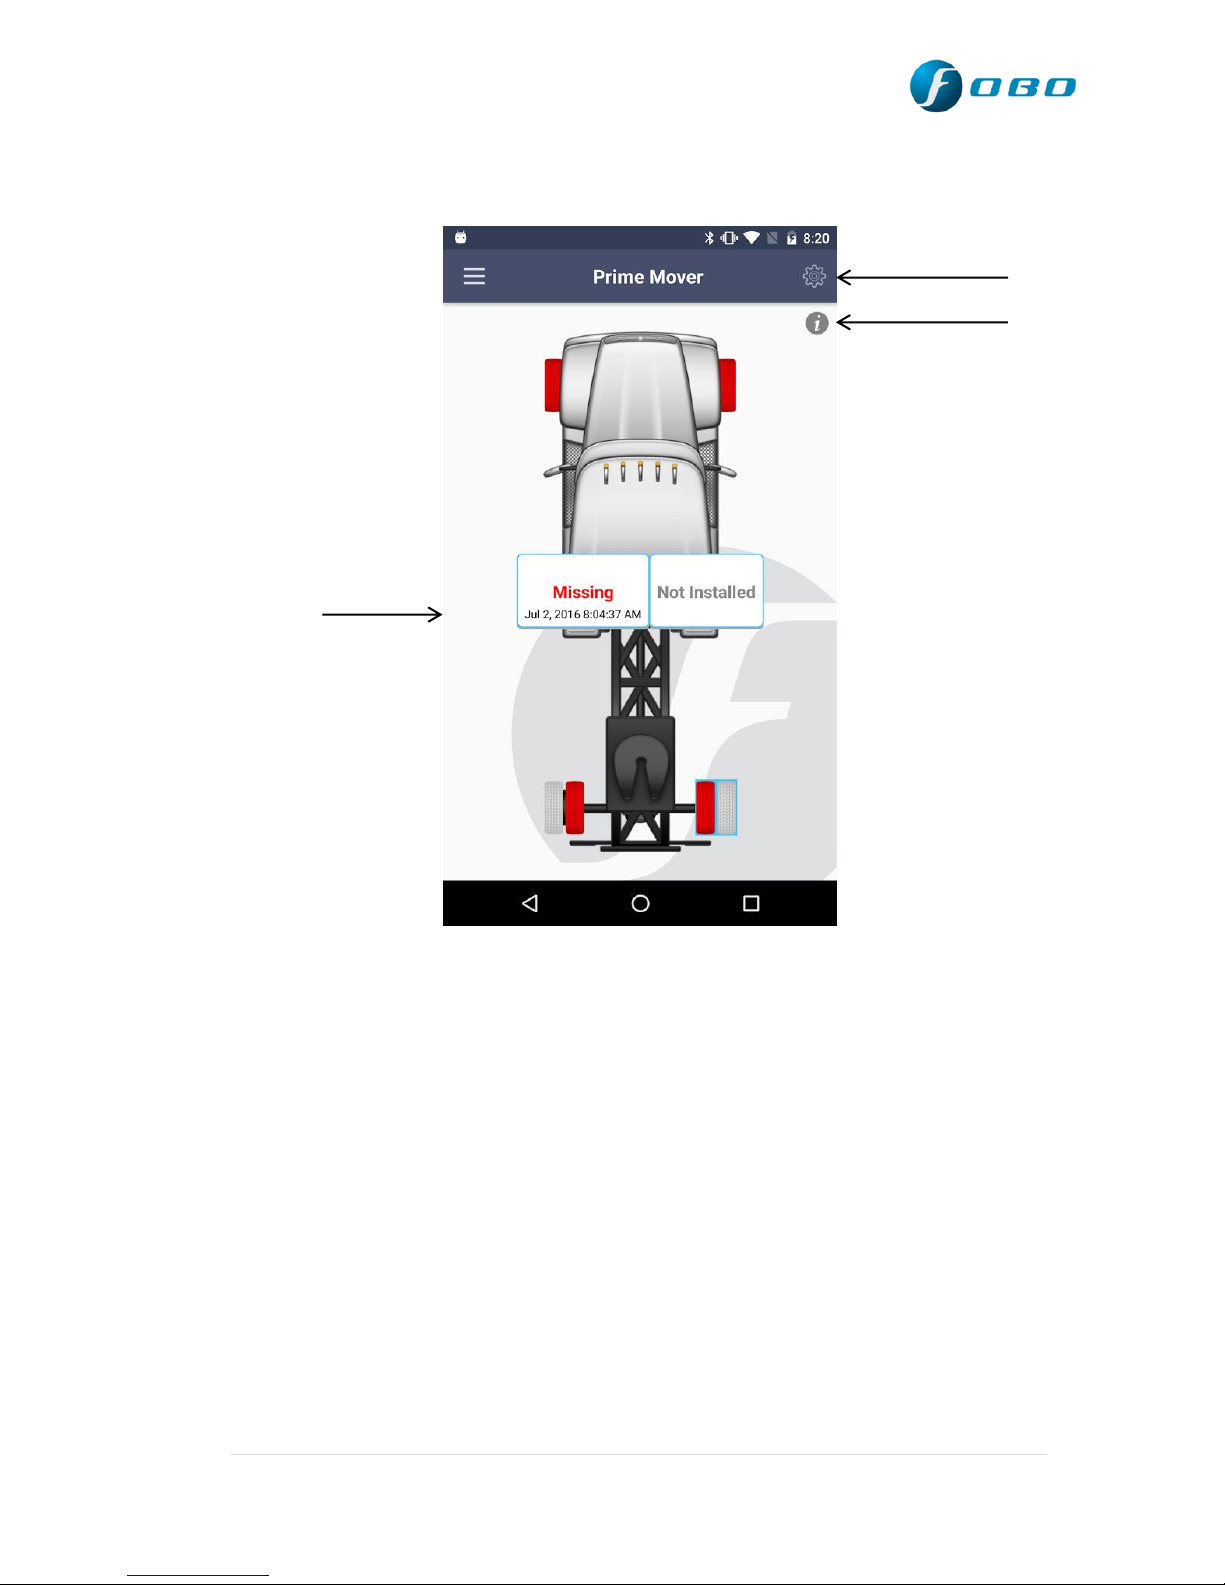
5.2.3 FOBO Ultra App detail page (For Android):
Settings
Information
Tire Position
Tire Position – Click on the tire position to get Pressure and
temperature readings.
Information – Click here to get details of what each color tire
represents.
Settings – Click here to set Pressure thresholds, change picture,
FOBO Share, Type of vehicle, Vehicle name.
30 | P a g e
Page 31
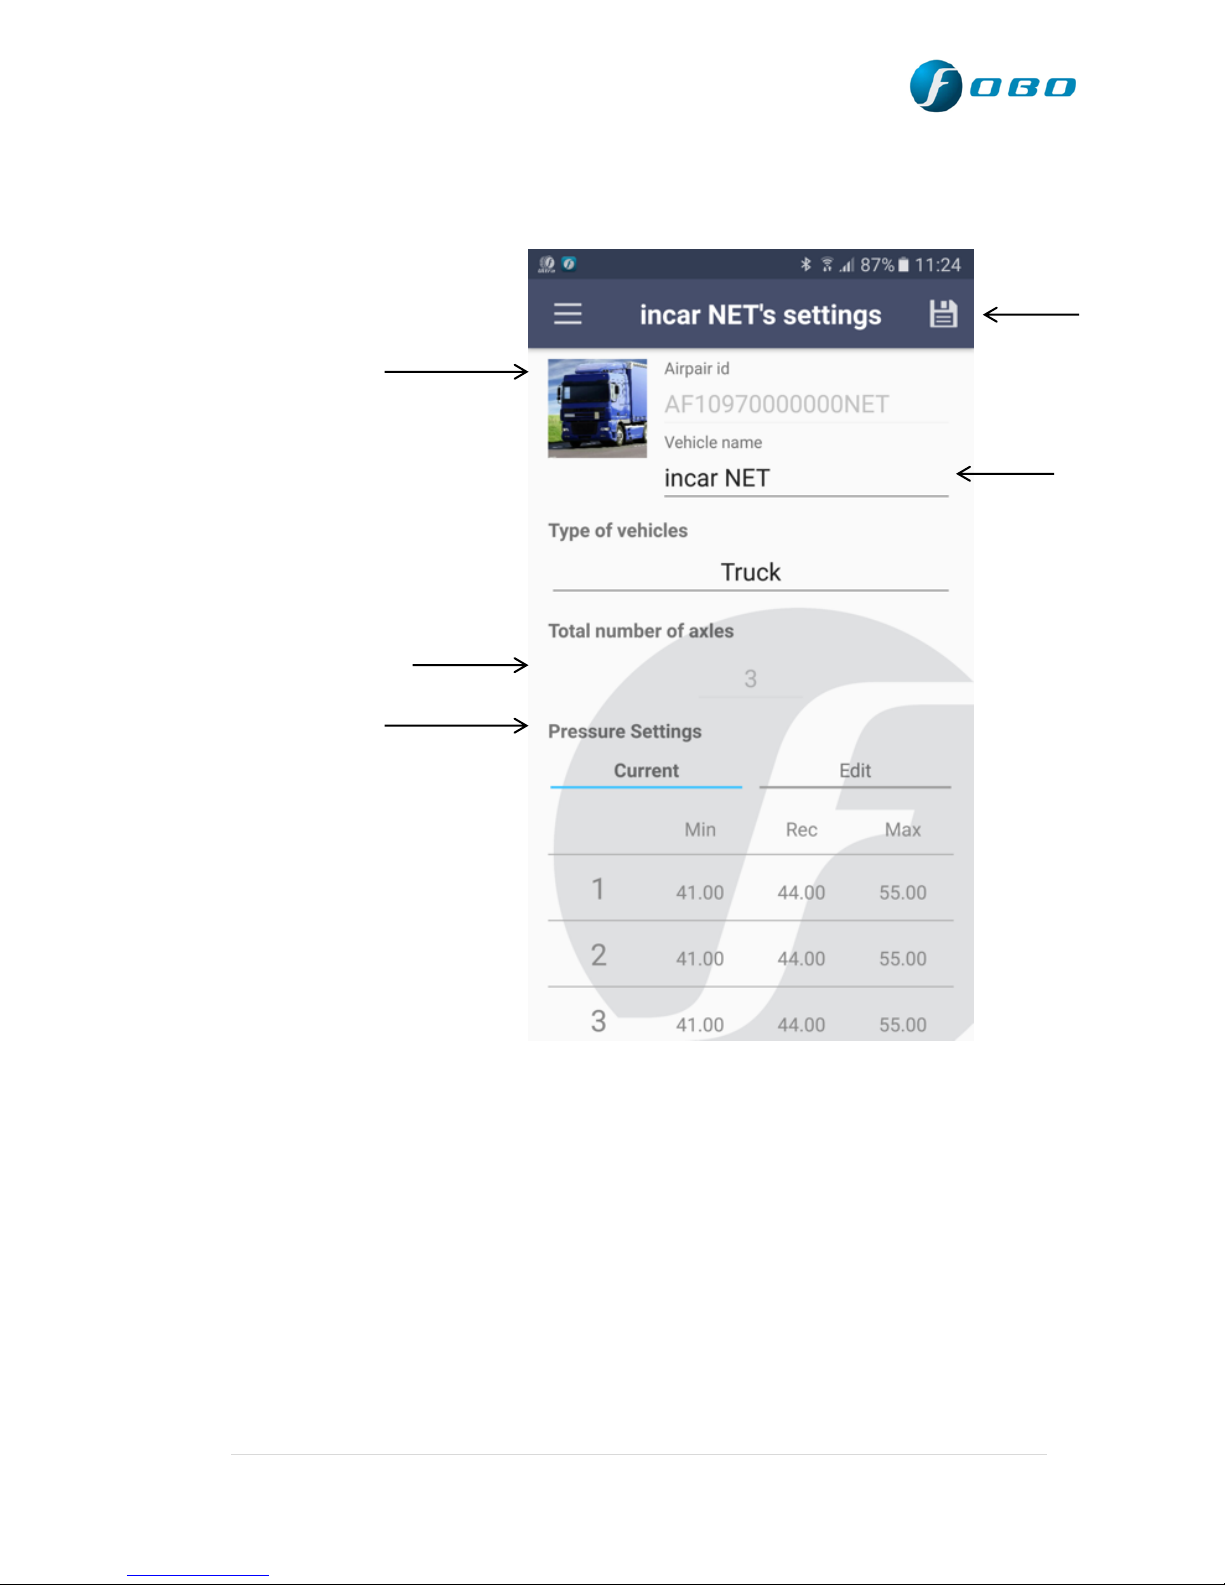
5.2.4 FOBO Ultra App Settings page (For Android):
Vehicle Image
Total Number of Axles
Pressure Settings
Save
Vehicle Name
Vehicle image – Click here to capture vehicle image.
Total Number of Axles – Click here to choose total number of
Axles.
Pressure settings – Click here to set Min/Rec/Max pressure
thresholds.
Vehicle Name- Click here to key in vehicle name.
Save – Click here to save settings.
31 | P a g e
Page 32

5.3 Installing FOBO Ultra App
You are required to have a smartphone with Bluetooth 4.0 (Bluetooth Smart)
capability in order to use FOBO Ultra. The smartphone must also be running
on iOS 7.1 or Android 4.3 or later. Follow the steps below to install your
FOBO Ultra:
Step 1: Download the FOBO Ultra App onto your smartphone
For iPhone users, download from Apple‟s AppStore. For Android
users, download from Google Play. Search for “FOBO Ultra”.
Step 2: Launch the FOBO Ultra App & key in your email address
For new users, key in your email address and click login.
You will receive an email from FOBO with an activation link.
Click on the activation link that you receive in your email.
Once activated, go back to the FOBO Ultra App and click on login
again.
You be brought to the App‟s Home screen.
Note:-
An activation e-mail message will be sent to your e-mail address when you
click on login as a first time user.
If you do not receive this activation e-mail from FOBO Admin, please
check your e-mail address entry to ensure it is valid without typo error.
This e-mail may also be filtered by some e-mail servers. Please check your
Spam mailbox.
If you still do not receive any message from FOBO Admin after 15
minutes (with a good internet connection), please write in to
[email protected] with your sign-in email.
IMPORTANT:
The email activation is to ensure that your account signup is done
securely. FOBO Ultra is locked to your FOBO account as an anti-theft
deterrent. Stolen sensors cannot be used by anyone else other than the
FOBO account owner.
Location service is required to be enabled for the FOBO Ultra App
(FOBO Ultra does not use the GPS function to track your location). The
location service on the iOS/Android system has other functionality that
the FOBO Ultra App uses to operate properly and to sync with the InCar unit. It will ensure FOBO Ultra functions as designed, mainly for
alert functions, and also the gauge pressure feature as required by users
32 | P a g e
Page 33

living at high altitudes. FOBO Ultra is designed to be a low energy system
and does not drain your smartphone battery excessively.
By submitting your information to sign up a new user account, you
acknowledge your acceptance to the terms and conditions of our Software
Licensing Agreement and Privacy Policy.
5.4 Installing FOBO Ultra In-Car unit/Repeater
& sensors
TO REDUCE THE RISK OF AN ELECTROSTATIC DISCHARGE
(ESD) PLEASE TOUCH THE WHEEL WHEN SCREWING ON THE
TIRE SENSOR ON TO THE TIRE VALVE. THIS IS TO MINIMIZE
POTENTIAL ESD ATTACK WHICH MAY CAUSE DAMAGE TO
THE TIRE SENSOR AND ITS FUNCTION.
INSTALLING FOBO ULTRA SETS ON MORE THAN ONE VEHICLE
WHICH ARE PARKED CLOSELY TOGETHER MAY CAUSE CROSS
INTERFERENCE TO THE BLUETOOTH SIGNALS. PLEASE
INSTALL FOBO ULTRA ON ONE VEHICLE AT A TIME.
To begin using FOBO Ultra, firstly ensure that the FOBO Ultra App is
downloaded and you have already login to the App (see section 5.1 above for
installation and login).
Follow the steps below to pair FOBO Ultra to your smartphone:-
1) Turn on your smartphone‟s Bluetooth connection.
2) Open FOBO Ultra App.
3) Open the battery cover and remove the battery tab to power up the
InCar/Repeater unit (refer to page #38 for details).
4) Set the FOBO Ultra‟s In-Car unit/Repeater into „pairing mode‟ by long
press “SELECT” to start pairing.
5) Click on “+” (Top left for iOS (Refer to section 5.1.2) and Bottom right
for Android (Refer to section 5.2.1) to create profile and to start pairing.
Upon successful pairing with In-car unit Air-pair ID will appear on the
smartphone in the Air-pair Box.
6) Key in the name you would like to identify your Vehicle. (Refer to
section 5.1.5 (for iOS) & 5.2.4 (for Android).
33 | P a g e
Page 34
7) Choose number of Axles. (Refer to section 5.1.5 (for iOS) & 5.2.4 (for
Android).
8) Tap on the profile picture box and take a picture of your vehicle (Refer
to section 5.1.5 (for iOS) & 5.2.4 (for Android).
9) Select the vehicle manufacturer recommended tire pressure (Refer to
section 5.1.5 (for iOS) & 5.2.4 (for Android) for all the axles (Choose
number of axles). The information is usually available on a sticker at the
door jamb (side of the driver‟s door) or in the owner‟s manual. For
certain vehicle models, the information sticker may be on the trunk lid
or on the fuel door. You cannot proceed with the pairing without the
input of this information into the FOBO Ultra App.
10) Click “Done” on the top right corner of the screen.
11) Upon successfully creating the profile on smartphone, Select
“Installation” under Main Menu of In-Car unit and follow the
instructions on screen of the In-Car unit.
12) You will be prompted that installation is completed and you are now
ready to use FOBO Ultra.
CAUTION:
Motor vehicles of all kinds (caravan, trucks, RV and Trucks) come with a
very wide variety of rims, wheels, and tires, with an even larger choice of
aftermarket products. It is impossible for us to test every combination and
check the fitment of the FOBO Ultra sensor. In some instances, when the
FOBO sensor is screwed onto the valve stem, it might extend slightly beyond
the face of the rim/wheel. If the rim/wheel comes close to or strikes an object,
such as a curb, a pothole, the guide rail for an automatic vehicle wash, or a
component on the vehicle, the FOBO sensor or the valve stem itself might
34 | P a g e
Page 35

become damaged. This can cause the FOBO to provide improper readings, or
might cause a loss of air pressure. We recommend that you carefully assess
the fitment of your rims, wheels, tires and the FOBO on your vehicle. If you
have any concerns, consult with your tire shop or auto mechanic.
5.5 Sensor rotation
It is good practice to rotate your tire positions regularly to balance the thread
wear of your tires, usually swapping the front tires with the rear tires. FOBO
Ultra is designed to conveniently set the sensors to their correct tire position in
the in-car unit after you have swapped your tires on your vehicle. You do not
need to physically remove the sensors. To correct the position of the sensors
in the in-car unit/Repeater, please select “Tire Rotation” under Main Menu on
in-car unit/Repeater. You will be prompted by the in-car unit/Repeater to:
1) Select the sensor position to rotate. Move to the desired position to
select the sensor by using the arrow key which is in the middle of the incar unit/Repeater.
2) Upon selection, you will be prompted to touch the sensor at the in-car
unit /Repeater NFC location -
3) There will be a message to indicate successful registration of new
position.
4) Choose NEXT to go to another tire position to rotate.
5) Choose END to complete the rotation process.
You are now ready to use FOBO Ultra with the new tire positions. You can
perform tire rotation as often as you want.
5.6 Disable sensor and Replace new sensor
You may want to disable a sensor due to a missing sensor or damaged sensor
or to install a replacement sensor. Disabling a missing or damaged sensor will
remove future missing sensor alerts.
To disable a tire sensor:-
1. Go to Sensor Management in the Menu of In-Car/Repeater, select
“Disable sensor”.
2. Select the tire position in the screen to disable.
35 | P a g e
Page 36

3. Once disabled You will see “Sensor Disabled” message will appear on the
screen. Take note that FOBO Ultra will stop monitoring the disabled
sensor position.
To install a replacement tire sensor:-
1. Select “Replace sensor” under Sensor Management in the Menu of In-
Car/Repeater.
2. Move to the desired position to assign a replacement sensor.
3. Select the tire position to replace.
4. You will be prompted to touch the sensor to the in-car unit.
5. Once replaced you will see “Sensor is successfully replaced...” Please
mount the sensor to the physical tire position in accord with the screen
message.
NOTE: You can only install a replacement sensor after the tire position has
been “Disabled”. You can purchase replacement sensors online from
www.my-fobo.com.
5.7 Release (Total/Sensor)
Release Total System:
Before passing on your FOBO Ultra set to another user, you will have to
release the Total system from your FOBO account. Select “Release (Total/
sensor)” under Main Menu on in-car unit then “Release total system”.
Make sure your In-Car unit and smartphone are with you. You will be
prompted with a message to “Select PROCEED to continue and concurrently,
on the smartphone you need to long-press onto the profile that you want to
release and follow the instruction on the phone App”. Upon selecting
PROCEED the In-Car unit will connect to the smartphone to initiate the
release process. You will hear an audible sound upon successful release and a
“System Released” message will appear on in-car unit screen.
Do note that after you have done “Release Total System” the sensors are still
paired to the InCar unit. To release all the paired sensors you need to follow
the “Release Sensor” section below.
Note: Return InCar unit or Repeater unit together with all the sensors have to
be released from the mobile app in order to claim for warranty.
36 | P a g e
Page 37

Release Sensor:
You may want to release paired sensors prior to passing the sensors to another
user or return the sensors for replacement purpose. Select “Release
(Total/sensor)” under Main Menu on in-car unit and then select “Release
sensor”. Follow the steps as indicated by the InCar unit.
Note: Return sensors have to be released in order to claim for warranty.
5.8 Tire Inflation/Deflation
To Inflate/Deflate the tire user just need to unscrew the sensor, inflate/deflate
the tire then screw back the sensor on tire valve. Users do not need to release
or disable the sensor.
5.9 Drop & Hook
FOBO Ultra System offers Drop & Hook for easy attachment to and
detachment from the trailers of prime mover. It enables harvesting of sensor
data by clusters of individual sensors and then transmits the data amongst
inter-connected cluster to the In-Car unit. FOBO Ultra system can display up
to 46 wheel positions with a combination of 1 In-Car + 1 Repeater cluster.
For example, for a prime mover that hauls 1 trailer, FOBO Ultra allows 1 InCar unit for the prime mover and 1 repeater unit for the Trailer. 1 In-Car unit
can monitor up to a cluster of 22 sensors while Repeater unit can monitor up
to a cluster of 24 sensors. Each Repeater unit can be independently controlled,
programmed and monitored.
To HOOK a trailer:
1. Select “Drop & Hook” in the Main Menu of In-Car unit.
2. Select “Hook a trailer”.
3. Upon selecting, the in-car unit will scan for available trailers nearby in
Bluetooth range.
4. List of available trailers will be displayed on the in-car unit screen.
5. Select the desired trailer from the list which you would like to Hook.
6. To confirm press “Yes”.
7. Once hooked you will see “Hook successful” message will appear on
the screen.
37 | P a g e
Page 38

To DROP a trailer:
1. Select “Drop & Hook” in the Main Menu of In-Car unit..
2. Select “Drop a trailer”.
3. List of hooked trailer will be displayed on the screen.
4. Select the desired trailer from the list which you would like to Drop.
5. To confirm press “Yes”.
6. Once dropped you will see “Drop successful” message will appear on
Note: To Drop a Trailer it‟s not necessary for the repeater to be available.
User can drop a trailer using in-car unit.
the screen.
6 In-Car unit/Repeater audio & LED alerts
The In-Car/Repeater unit will produce different tones and LED flashes for different
situations. For repetitive alerts, you can stop the alerts by long press the In-Car
unit/Repeater button once, however LED will continue to flash until user solve the
issue.
Wake up – unit will produce “two tones (High- low)”, this shows that In-Car unit is
awake and operational.
Sleep – unit will produce “one long tone (Low)” once, No LED will blink. This
shows In-Car/Repeater unit is going to sleep and not operational. In-Car/Repeater
unit goes to sleep to conserve battery when vehicle is not moving for 15 minutes.
However the sensors will still be operational 24x7 and continue to monitor and alert
to your smartphone in case of flat tire.
WARNING: FOBO Ultra IS A MONITORING DEVICE TO
ALERTS THE USER WHEN IT DETECTS SIGNALS THAT IS
OUT OF PRE-SET CONDITIONS BASED ON THE SETTING
BY THE USER. THE USER OR DRIVER IS SOLELY
RESPONSIBLE TO FIND OUT THE ACTUAL CONDITION OF
THE TIRE AND TO ENSURE PROPER TIRE MAINTENANCE.
FOBO Ultra IS NOT RESPONSIBLE FOR WRONG
DIAGNOSTICS OR FALSE ALERTS THAT MAY CAUSE
INCONVENIENCE.
38 | P a g e
Page 39

Summary of alerts:
Definition
LED
Audio Alerts
In-car unit /Repeater
STARTUP
All LEDs on
- 2 Tones (Low-High) will occur
once
L1 ALERT
(8% below or 25 % above
recommended tire pressure)
Amber LED will Blinks
5 times for once
- 5 tones (High) will occur once.
- Alert will re-occur when in-
unit/Repeater wakes up, provided
tire condition remains the same.
L2 ALERT
( 15 % below or 35% above
recommended tire pressure)
L3 ALERT
(25% below or 45% above
recommended tire pressure)
Amber LED will blink 3
times non-stop until enter
sleep mode or measure
data back to normal.
- 3 times high-low tone will occur
continuously every 5s.
- It can be cancelled by long press
on LEFT button. It will stop if incar unit enter sleep mode or
measure data back to normal.
- Alert will re-occur when in-car
unit/Repeater wakes up, provided
tire condition remains the same.
Low Battery (In-car)
Red LED will blink once
every 5 minutes
In- Car unit will check the battery
during start-up. After start-up, InCar
will regularly check battery for every
1 hour. No alert tone for low in-car
unit battery
Low Battery (Sensor)
Amber LED will blink
once every 5 minutes
InCar will scan the sensors battery
during start up. After start up, InCar
unit will scan the sensors battery
during Normal operation Mode.
1 low tone alert will occur every 5
min repeatedly.
Missing sensor
Amber LED, 5 quick
blinks non-stop until the
sensor found
5 low tones will occur continuously
every 5s until user mute the alert or
found the sensor.
39 | P a g e
Page 40
7 Replacing Battery – Sensor, In-car & Repeater
Sensor Battery Replacement:
The coin cell battery (CR2032) used in the FOBO Ultra sensors could last up to
Twelve months based on normal operating condition. Operating in extreme cold or
hot temperatures may reduce battery operating life for both the tire sensors and the
In-Car unit.
You will receive an alert on the smartphone and In-Car unit/Repeater when the
sensor or In-Car unit/Repeater battery levels are low. You will be alerted every
time you start to drive your vehicle until the battery is replaced. It is advisable to
change the battery once you receive this battery alert to ensure proper performance
of FOBO Ultra. Do not wait until the battery is fully drained as it will cause FOBO
Ultra to stop working properly.
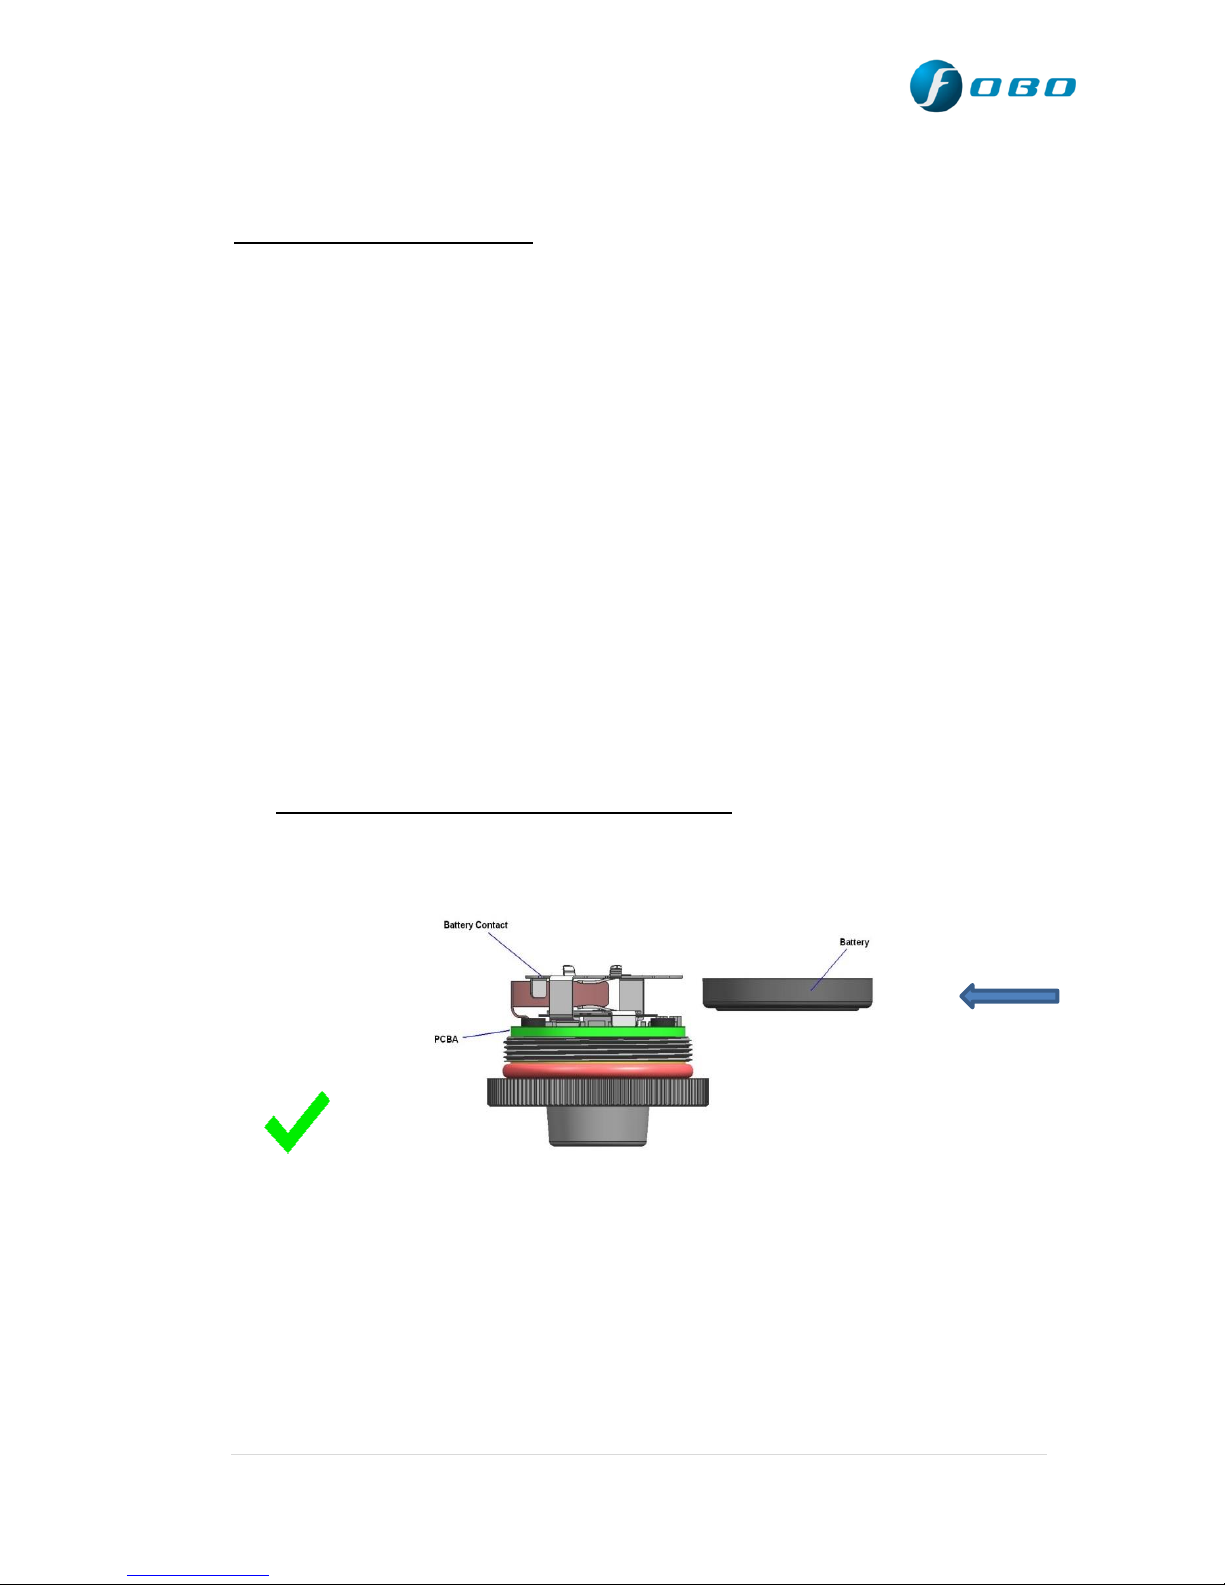
To replace the battery of sensor unit, unscrew the top cover. Be careful not to
damage the rubber gasket as it may affect water resistance of the sensor unit. Ensure
the battery (CR2032) is inserted with the “+” sign facing up, away from the PCB.
A) Correct Way to Insert Battery
40 | P a g e
Page 41
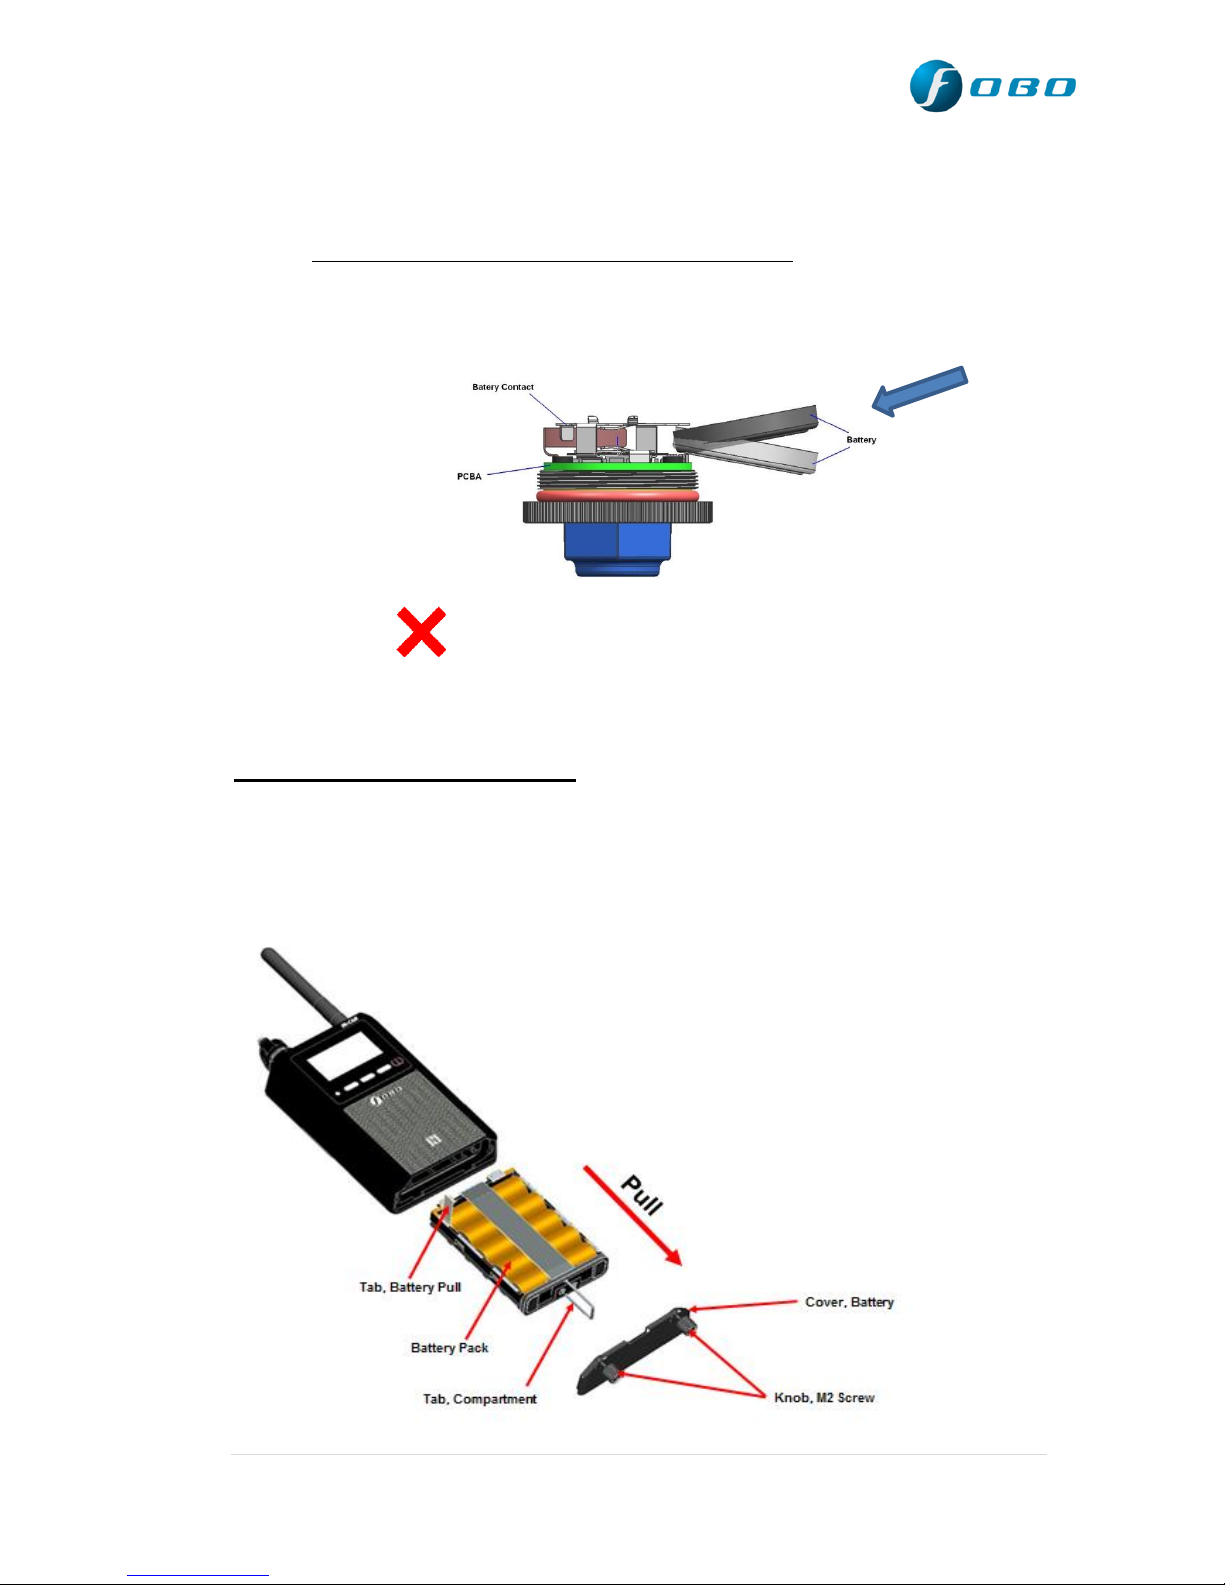
B) Incorrect Way to Insert Battery
In-car unit Battery Replacement:
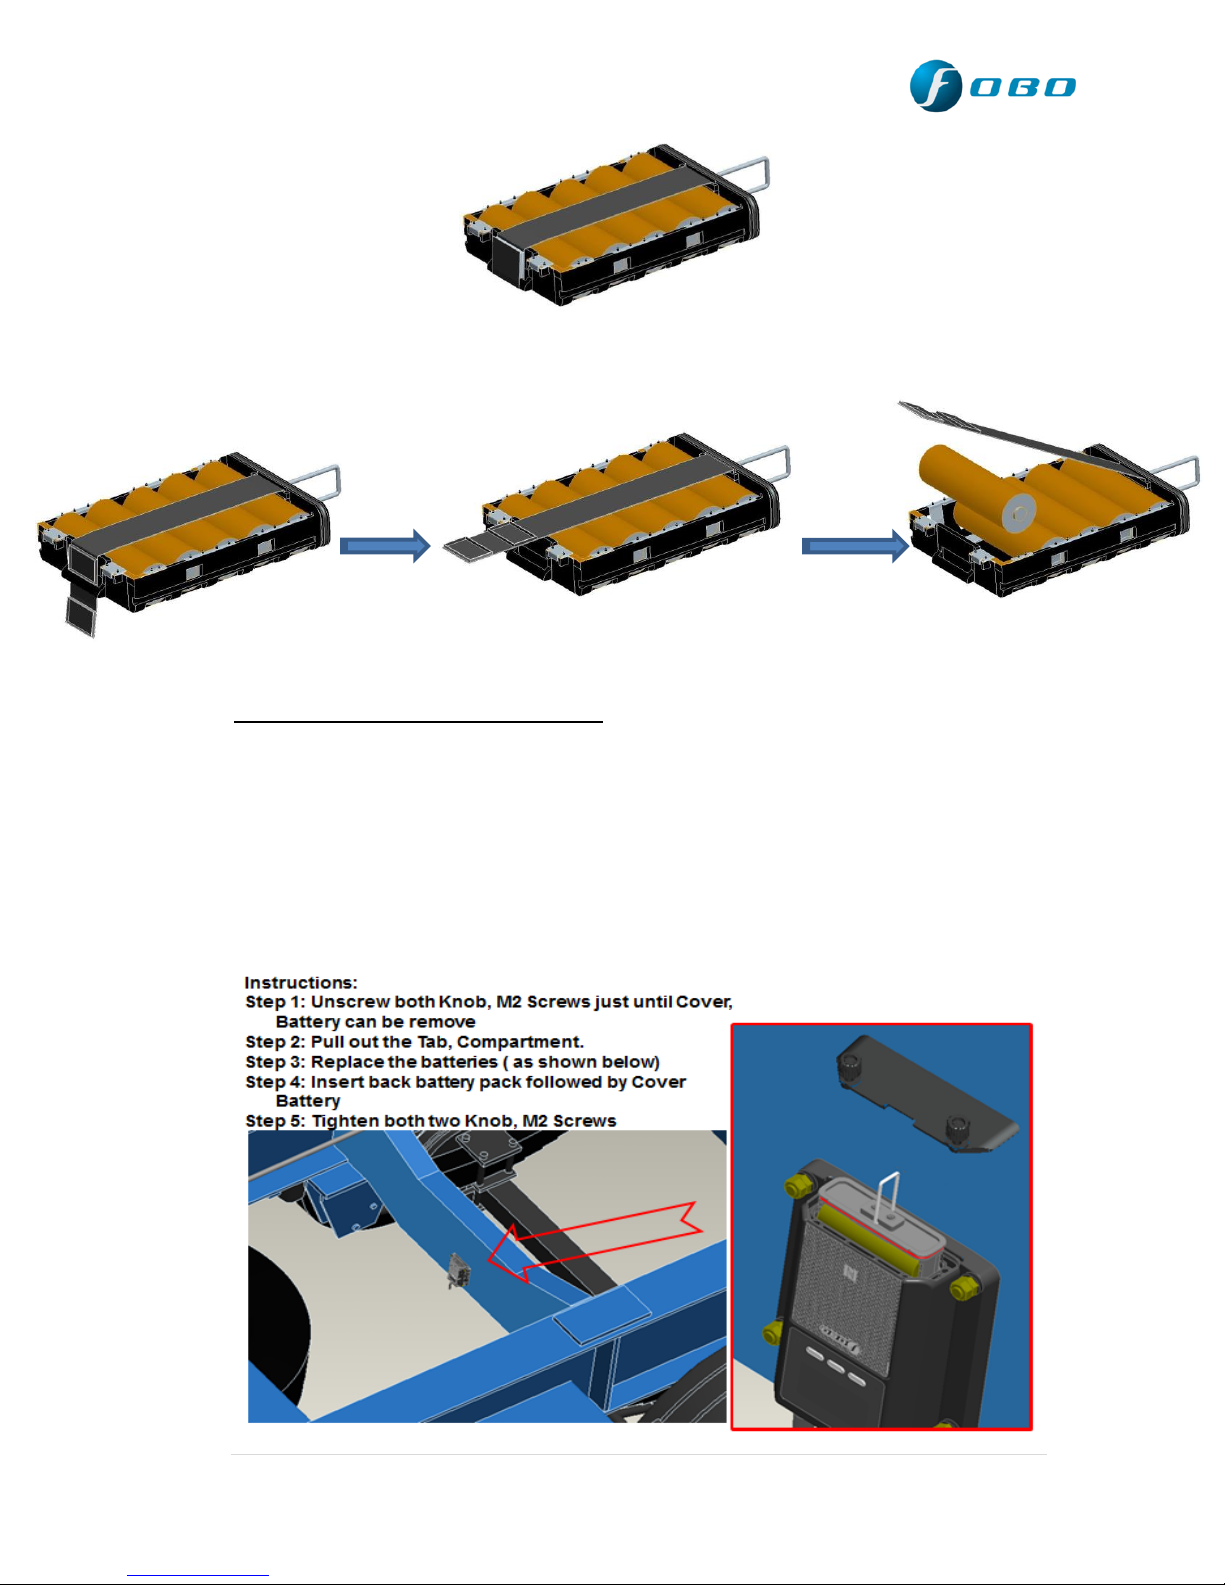
To replace battery for the In-Car unit, open the battery cover and take out the
battery pack. Ensure the battery (AA) is inserted in the correct orientation. It is
advisable to use good quality AA batteries (recommended Lithium or Alkaline) for
long lasting performance of In-Car unit.
41 | P a g e
Page 42
3
Step 1:
pull out the strap.
Battery pack condition
Step 2:
Replace the battery.
Detach the Velcro and
Repeater Unit Battery replacement:
To replace battery for the Repeater unit, open the battery cover and take out the
battery pack. Ensure the battery (AA) is inserted in the correct orientation. It is
advisable to use good quality AA batteries (recommended Lithium or Alkaline) for
long lasting performance of In-Car unit. User does not need to remove the whole
repeater unit while replacing the battery. Refer to the illustration below showing
repeater unit battery replacement.
42 | P a g e
Page 43
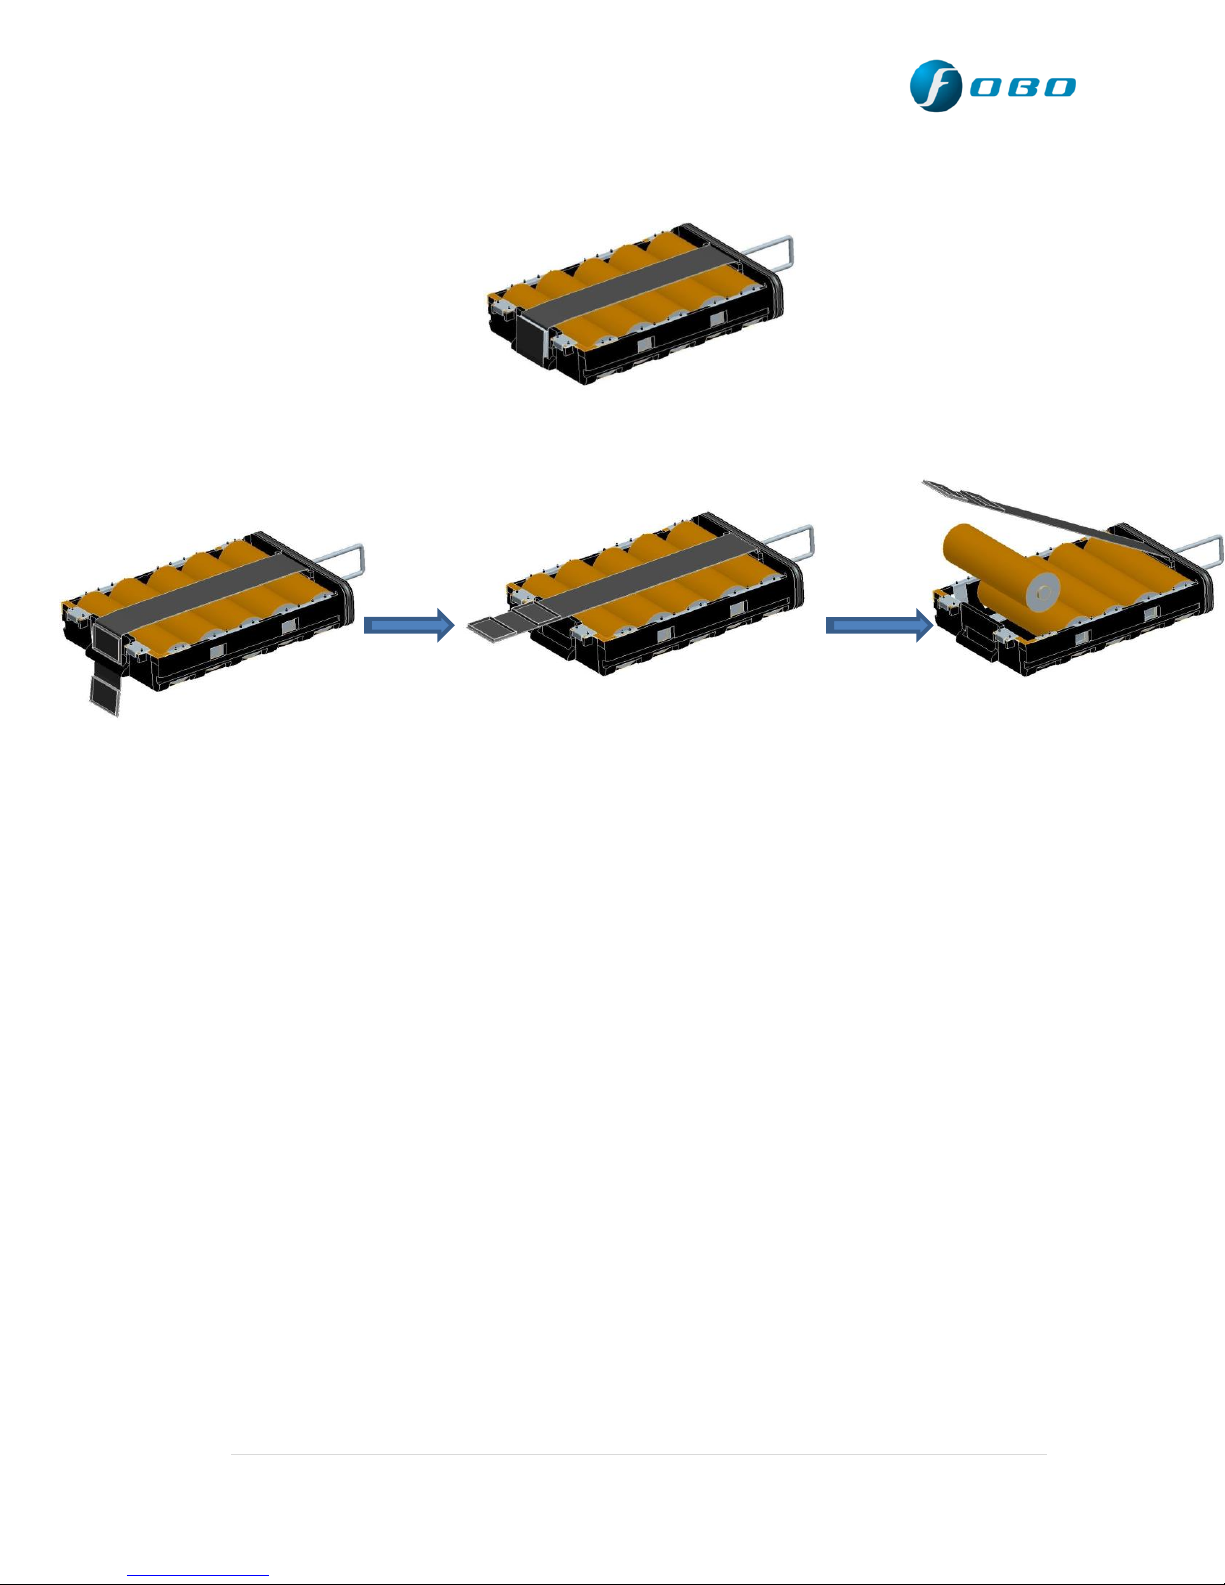
Step 1:
pull out the strap.
Step 2:
Replace the battery.
Battery pack condition
Detach the Velcro and
WARNING: RE-USING OLD BATTERIES OR MIXING OLD AND NEW
BATTERIES IN THE IN-CAR UNIT MAY DAMAGE THE ELECTRONICS.
8 Trouble Shooting Guide
Could not sign up a new FOBO account (did not receive activation e-
mail)
o Check the e-mail address entry is typed correctly
o Check the Spam mailbox, in case the e-mail was filtered by the e-
mail server
o Check the smartphone is connected to internet and able to receive
e-mail
Could not sign up a new FOBO account (received activation e-mail)
o Make sure to click on the “Activation” link of the latest e-mail, in
case there are multiple authentication e-mails
o You should be directed to web page that clearly displayed “FOBO
account is activated”.
Unable to Login after signing up to FOBO App
o Make sure your e-mail address is typed correctly
o A verification mail will be sent to your e-mail address
43 | P a g e
Page 44

o Follow the instruction in the mail to activate your account before
you can Login
o Check if internet connection is available on your smartphone
Unable to pair FOBO Ultra In-Car unit/Repeater
o Make sure the battery is installed correctly and battery tab is
removed.
o Make sure your smartphone has Bluetooth 4.0 or later (Smart
Ready) capability. NOTE: BLUETOOTH 2.0 OR 3.0 WILL
NOT WORK WITH THIS DEVICE.
o Please check if the FOBO Ultra has been paired before to another
FOBO account. You‟ll need to “Release” the FOBO Ultra set from
the FOBO account that it is paired to, before using on your account.
The FOBO Ultra is designed to pair with one FOBO account only
for theft deterrent feature.
o Try to reset the Bluetooth manager of your smartphone (for iOS:
Settings-> Bluetooth-> OFF->ON). At times the Bluetooth manager
may be disrupted which may require manual reset.
o Try to do a hard reset on the phone.
44 | P a g e
Page 45

9 FOBO Ultra Specifications
Sensor Specifications (Model - TU1602):
• Maximum Pressure 1296 Kpa (188 psi)
• Pressure Accuracy:
1 σ = +/- 0.79 psi (0 to + 50 °C)
1 σ = +/- 1.06 psi (-40 to + 85°C)
• Temperature Accuracy:
1 σ = +/- 1 °C (0 to + 50 °C)
1 σ = +1.33 / - 1°C (-40 to + 85°C)
• Operational temperature range: -40 to 85°C
• Up to 12 months battery life CR2032
• Dust protected & Waterproof : IP57
• Light weight sensors. Only 12.6 g each
• Certification: FCC, CE, BQB and RoHS
• Mechanical & Environmental Reliability Testing Standards: IEC 60068-2-2,
IEC 60068-2-1, IEC 60068-2-29, IEC 60068-2-5, IEC 60068-2-32, ISO
15184, ISO 2409, SAE J2848 , SAE J1455
• Bluetooth 4.1 (Compatible with Bluetooth 4.0 or later)
• Compatible with iOS 7.1 or Android 4.3 or later.
• Input Rating : 3.0 Vdc, 30uA
In-Car / Repeater Specifications (Model - TU1601):
• Operational temperature range: -40 to 85°C
• Battery life: up to 2 months
• Power source: Battery AA x 5 pcs or 12V to 24V external supply
• Operating Temperature
- With vehicle power source: -40°C ~ +85°C
- With Alkaline batteries: -18°C ~ +50°C
• Storage Temperature:
Without Alkaline battery: -40°C ~ +85°C
With Alkaline battery: -30°C ~ +45°C
• Weight : 100g (without battery)
220g with 5x alkaline batteries
• Dust protected & Waterproof : IP57 (Repeater only)
• Certification: FCC, CE, BQB and RoHS
45 | P a g e
Page 46

• Mechanical & Environmental Reliability Testing Standards: IEC 60068-2-2,
IEC 60068-2-1, IEC 60068-2-29, IEC 60068-2-5, IEC 60068-2-32, ISO
15184, ISO 2409, SAE J2848 , SAE J1455
• Bluetooth 4.1 (Compatible with Bluetooth 4.0 or later)
• Compatible with iOS 7.1 or Android 4.3 or later
• NFC
• Input Rating : 7.5Vdc or 12-24Vdc, 65mA
10 Warning
Take note that FOBO Ultra is not meant to function as anti-accident or
anti-injury device. FOBO Ultra is not a substitute for safe tire
maintenance practices. Please take full responsibility of your own safety
while driving. And continue to send your car for regular tire check and
maintenance.
Please take extra precaution to acoustics safety when operating the
FOBO Ultra In-Car unit. Note that placing the FOBO Ultra In-Car unit
beeper close to your ear may result in injury to the ear or permanent loss
of hearing.
You shall not use the FOBO Ultra in any unlawful way that violates any
laws.
Avoid exposing the FOBO Ultra In-Car unit and sensors to solvent, fire
or extreme temperatures.
FOBO Ultra may fail to function properly if the battery is below
optimum level. Replace the battery immediately to continue enjoying
full features of FOBO Ultra.
CAUTION
THERE MAY BE A RISK OF EXPLOSION IF BATTERY IS
REPLACED BY AN INCORRECT TYPE. DISPOSE ALL USED
BATTERIES PROPERLY.
46 | P a g e
Page 47

11 Regulatory Information
Federal Communication Commission Interference
Statement
This device (PTP-TU1601) complies with Part 15 of the FCC Rules.
Operation is subject to the following two conditions: (1) This device may
not cause harmful interference, and (2) this device must accept any
interference received, including interference that may cause undesired
operation.
This equipment has been tested and found to comply with the limits for a
Class B digital device, pursuant to Part 15 of the FCC Rules. These limits
are designed to provide reasonable protection against harmful interference in
a residential installation. This equipment generates, uses and can radiate
radio frequency energy and, if not installed and used in accordance with the
instructions, may cause harmful interference to radio communications.
However, there is no guarantee that interference will not occur in a
particular installation. If this equipment does cause harmful interference to
radio or television reception, which can be determined by turning the
equipment off and on, the user is encouraged to try to correct the
interference by one of the following measures:
- Reorient or relocate the receiving antenna.
- Increase the separation between the equipment and receiver.
- Connect the equipment into an outlet on a circuit different from that
to which the receiver is connected.
- Consult the dealer or an experienced radio/TV technician for help.
FCC Caution: Any changes or modifications not expressly approved by the
party responsible for compliance could void the user's authority to operate
this equipment.
This transmitter must not be co-located or operating in conjunction with any
other antenna or transmitter.
Radiation Exposure Statement:
The product (PTP-TU1601) comply with the FCC portable RF exposure
limit set forth for an uncontrolled environment and are safe for intended
operation as described in this manual. The further RF exposure reduction
can be achieved if the product can be kept as far as possible from the user
body or set the device to lower output power if such function is available.
47 | P a g e
Page 48

Industry Canada statement:
This device (10617A-TU1601) complies with ISED‟s licence-exempt RSSs.
Operation is subject to the following two conditions: (1) This device may
not cause harmful interference, and (2) this device must accept any
interference received, including interference that may cause undesired
operation.
Le présent appareil est conforme aux CNR d‟ ISED applicables aux
appareils radio exempts de licence. L‟exploitation est autorisée aux deux
conditions suivantes : (1) le dispositif ne doit pas produire de brouillage
préjudiciable, et (2) ce dispositif doit accepter tout brouillage reçu, y
compris un brouillage susceptible de provoquer un fonctionnement
indésirable.
Radiation Exposure Statement:
The product (10617A-TU1601) comply with the Canada portable RF
exposure limit set forth for an uncontrolled environment and are safe for
intended operation as described in this manual. The further RF exposure
reduction can be achieved if the product can be kept as far as possible from
the user body or set the device to lower output power if such function is
available.
Déclaration d'exposition aux radiations:
Le produit est conforme aux limites d'exposition pour les appareils portables
RF pour les Etats-Unis et le Canada établies pour un environnement non
contrôlé.
Le produit est sûr pour un fonctionnement tel que décrit dans ce manuel. La
réduction aux expositions RF peut être augmentée si l'appareil peut être
conservé aussi loin que possible du corps de l'utilisateur ou que le dispositif
est réglé sur la puissance de sortie la plus faible si une telle fonction est
disponible.
Federal Communication Commission Interference
Statement
This device (PTP-TU1602) complies with Part 15 of the FCC Rules.
Operation is subject to the following two conditions: (1) This device may
not cause harmful interference, and (2) this device must accept any
48 | P a g e
Page 49

interference received, including interference that may cause undesired
operation.
This equipment has been tested and found to comply with the limits for a
Class B digital device, pursuant to Part 15 of the FCC Rules. These limits
are designed to provide reasonable protection against harmful interference in
a residential installation. This equipment generates, uses and can radiate
radio frequency energy and, if not installed and used in accordance with the
instructions, may cause harmful interference to radio communications.
However, there is no guarantee that interference will not occur in a
particular installation. If this equipment does cause harmful interference to
radio or television reception, which can be determined by turning the
equipment off and on, the user is encouraged to try to correct the
interference by one of the following measures:
- Reorient or relocate the receiving antenna.
- Increase the separation between the equipment and receiver.
- Connect the equipment into an outlet on a circuit different from that
To which the receiver is connected.
- Consult the dealer or an experienced radio/TV technician for help.
FCC Caution: Any changes or modifications not expressly approved by the
party responsible for compliance could void the user's authority to operate
this equipment.
This transmitter must not be co-located or operating in conjunction with any
other antenna or transmitter.
Radiation Exposure Statement:
This equipment (PTP-TU1602) complies with FCC radiation exposure limits
set forth for an uncontrolled environment. This equipment should be
installed and operated with minimum distance 20cm between the radiator &
your body.
Industry Canada statement:
This device (10617A-TU1602) complies with ISED‟s licence-exempt RSSs.
Operation is subject to the following two conditions: (1) This device may
not cause harmful interference, and (2) this device must accept any
interference received, including interference that may cause undesired
operation.
49 | P a g e
Page 50

Le présent appareil est conforme aux CNR d‟ ISED applicables aux
appareils radio exempts de licence. L‟exploitation est autorisée aux deux
conditions suivantes : (1) le dispositif ne doit pas produire de brouillage
préjudiciable, et (2) ce dispositif doit accepter tout brouillage reçu, y
compris un brouillage susceptible de provoquer un fonctionnement
indésirable.
Radiation Exposure Statement:
This equipment (10617A-TU1602) complies with ISED radiation exposure
limits set forth for an uncontrolled environment. This equipment should be
installed and operated with minimum distance 20cm between the radiator &
your body.
Déclaration d'exposition aux radiations:
Cet équipement est conforme aux limites d'exposition aux rayonnements
ISED établies pour un environnement non contrôlé. Cet équipement doit être
installé et utilisé avec un minimum de 20 cm de distance entre la source de
rayonnement et votre corps.
European Union Regulatory Conformance
This equipment is CE marked according to the provisions of the R&TTE
Directive (99/5/EC) and is in compliance with the essential requirements
and other relevant provisions of the Directive 1999/5/EC. This equipment
meets the following conformance standards:
EN 300 328, EN62479, EN 301 489-1&17, EN 60950-1
EU Declaration of Conformity
Hereby, Salutica Allied Solutions Sdn. Bhd. declares that this Bluetooth
device is in compliance with the essential requirements and other relevant
provision of Directive 1999/5/EC.
Caution: Changes or modifications to this FOBO device not expressly
Approved by the party responsible for compliance could void the user‟s
authority to operate it.
50 | P a g e
Page 51

Bluetooth Wireless Compatibility:
This FOBO device supports the following Bluetooth wireless protocols and
profiles:
Bluetooth core technology v4.0
Battery Profile (BAS)
Proximity (PXP)
Device Information Service (DIS)
Bluetooth Wireless Interoperability:
This FOBO device is designed to be interoperating with all Bluetooth wireless
products that support compatible profiles and roles including:
Bluetooth core technology v4.0
Bluetooth master and slave roles
NCC Statement [警語內容]
低功率電波輻射性電機管理辦法
第十二條 經型式認證合格之低功率射頻電機,非經許可,公司、
商號或使用者均不得擅自變更頻率、加大功率或變更原
設計之特性及功能。
第十四條 低功率射頻電機之使用不得影響飛航安全及干擾合法
通信;經發現有干擾現象時,應立即停用,並改善至無
干擾時方得繼續使用。
前項合法通信,指依電信法規定作業之無線電通信。
低功率射頻電機須忍受合法通信或工業、科學及醫療用
電波輻射性電機設備之干擾。
12 Intellectual Properties
FOBO™ is a trademark of Salutica Allied Solutions Sdn Bhd. All rights
reserved.
FOBO™ Ultra incorporates a few patent pending technologies solely
owned by Salutica Allied Solutions Sdn Bhd.
51 | P a g e
Page 52

Bluetooth® is a registered trademark owned by Bluetooth SIG Inc.
IPhone® is a registered trademark of Apple Inc.
13 Limited Warranty & Disclaimer
13.4 Warranty
FOBO Ultra comes with a 12 months limited warranty. This Limited
Warranty does not cover: 1) products purchased from an unauthorized
reseller; 2) products purchased through online auctions; 3) products that are
operated in combination with software, peripheral or ancillary equipment such
as but not limited to batteries, chargers, adapters, headsets, connector cables,
and power supplies ("Ancillary Equipment") not furnished or otherwise
certified by Salutica for use with the FOBO products or any damage to the
FOBO products or ancillary equipment as a result of such use; 4) damage
caused by (a) accident, fire, misuse, neglect, unusual physical or electrical
stress, or modification; (b) improper or unauthorized installation, wiring,
repair, testing or (c) use of the product outside Salutica‟s published
guidelines; 5) instances in which someone other than Salutica (or its
authorized service centers) tests, alters, modifies or services the products in
any way; 6) products that have (a) serial numbers or date tags that have been
removed or altered, or (b) nonconforming or non-FOBO housings or parts;
and 7) consumable spare parts and accessories (unless they are found to be
non-functional or broken upon purchase of product).
In order to obtain any warranty service, you agree to bear all shipping charges
of the FOBO Ultra device to Salutica‟ s address.
13.5 Disclaimer
SALUTICA MAKES NO OTHER EXPRESS WARRANTY WHETHER
WRITTEN OR ORAL AND SALUTICA EXPRESSLY DISCLAIMS ALL
WARRANTIES AND CONDITIONS NOT STATED IN THIS LIMITED
WARRANTY. TO THE EXTENT ALLOWED BY THE LOCAL LAW OF
JURISDICTIONS OUTSIDE MALAYSIA, SALUTICA DISCLAIMS ALL
IMPLIED WARRANTIES OR CONDITIONS, INCLUDING ANY
IMPLIED WARRANTIES OF MERCHANTABILITY AND FITNESS FOR
A PARTICULAR PURPOSE. FOR ALL TRANSACTIONS OCCURRING
IN MALAYSIA, ANY IMPLIED WARRANTY OR CONDITION OF
MERCHANTABILITY, SATISFACTORY QUALITY, OR FITNESS FOR
A PARTICULAR PURPOSE IS LIMITED TO THE WARRANTY PERIOD
52 | P a g e
Page 53

AS PROVIDED BY SALUTICA IN THE MATERIALS RECEIVED AT
THE TIME OF PURCHASE.
No warranty is made that the software provided by Salutica will meet your
requirements or will work in combination with any hardware or Applications
software products provided by third parties, that the operation of the software
products will be uninterrupted or error free, or that all defects in the software
products will be corrected.
13.6 Limitation of Liability
THE MAXIMUM LIABILITY OF SALUTICA UNDER THIS LIMITED
WARRANTY IS EXPRESSLY LIMITED TO THE LESSER OF THE
PRICE YOU HAVE PAID FOR THE PRODUCT OR THE COST OF
REPAIR OR REPLACEMENT OF THAT PRODUCT OR ANY
COMPONENT OR PART THAT MALFUNCTION IN CONDITIONS OF
NORMAL USE. EXCEPT AS INDICATED ABOVE, IN NO EVENT WILL
SALUTICA BE LIABLE FOR ANY DAMAGES CAUSED BY THE FOBO
ULTRA PRODUCT OR THE FAILURE OF THE PRODUCT TO
PERFORM, INCLUDING ANY LOST PROFITS OR SAVINGS OR
SPECIAL, INCIDENTAL, OR CONSEQUENTIAL DAMAGES.
SALUTICA IS NOT LIABLE FOR ANY CLAIM MADE BY A THIRD
PARTY OR MADE BY YOU FOR A THIRD PARTY. THIS LIMITATION
OF LIABILITY APPLIES WHETHER DAMAGES ARE SOUGHT, OR A
CLAIM MADE, UNDER THIS LIMITED WARRANTY OR AS A TORT
CLAIM (INCLUDING NEGLIGENCE AND STRICT PRODUCT
LIABILITY), A CONTRACT CLAIM, OR ANY OTHER CLAIM. THIS
LIMITATION OF LIABILITY CANNOT BE WAIVED OR AMENDED BY
ANY PERSON. THIS LIMITATION OF LIABILITY WILL BE
EFFECTIVE EVEN IF YOU HAVE ADVISED SALUTICA OR AN
AUTHORIZED REPRESENTATIVE OF SALUTICA OF THE
POSSIBILITY OF ANY SUCH DAMAGES. THIS LIMITATION OF
LIABILITY, HOWEVER, WILL NOT APPLY TO CLAIMS FOR
PERSONAL INJURY.
13.7 What Law Governs This Warranty
THIS LIMITED WARRANTY IS GOVERNED BY AND CONSTRUED
UNDER THE LAWS OF MALAYSIA.
53 | P a g e
 Loading...