

Page 1
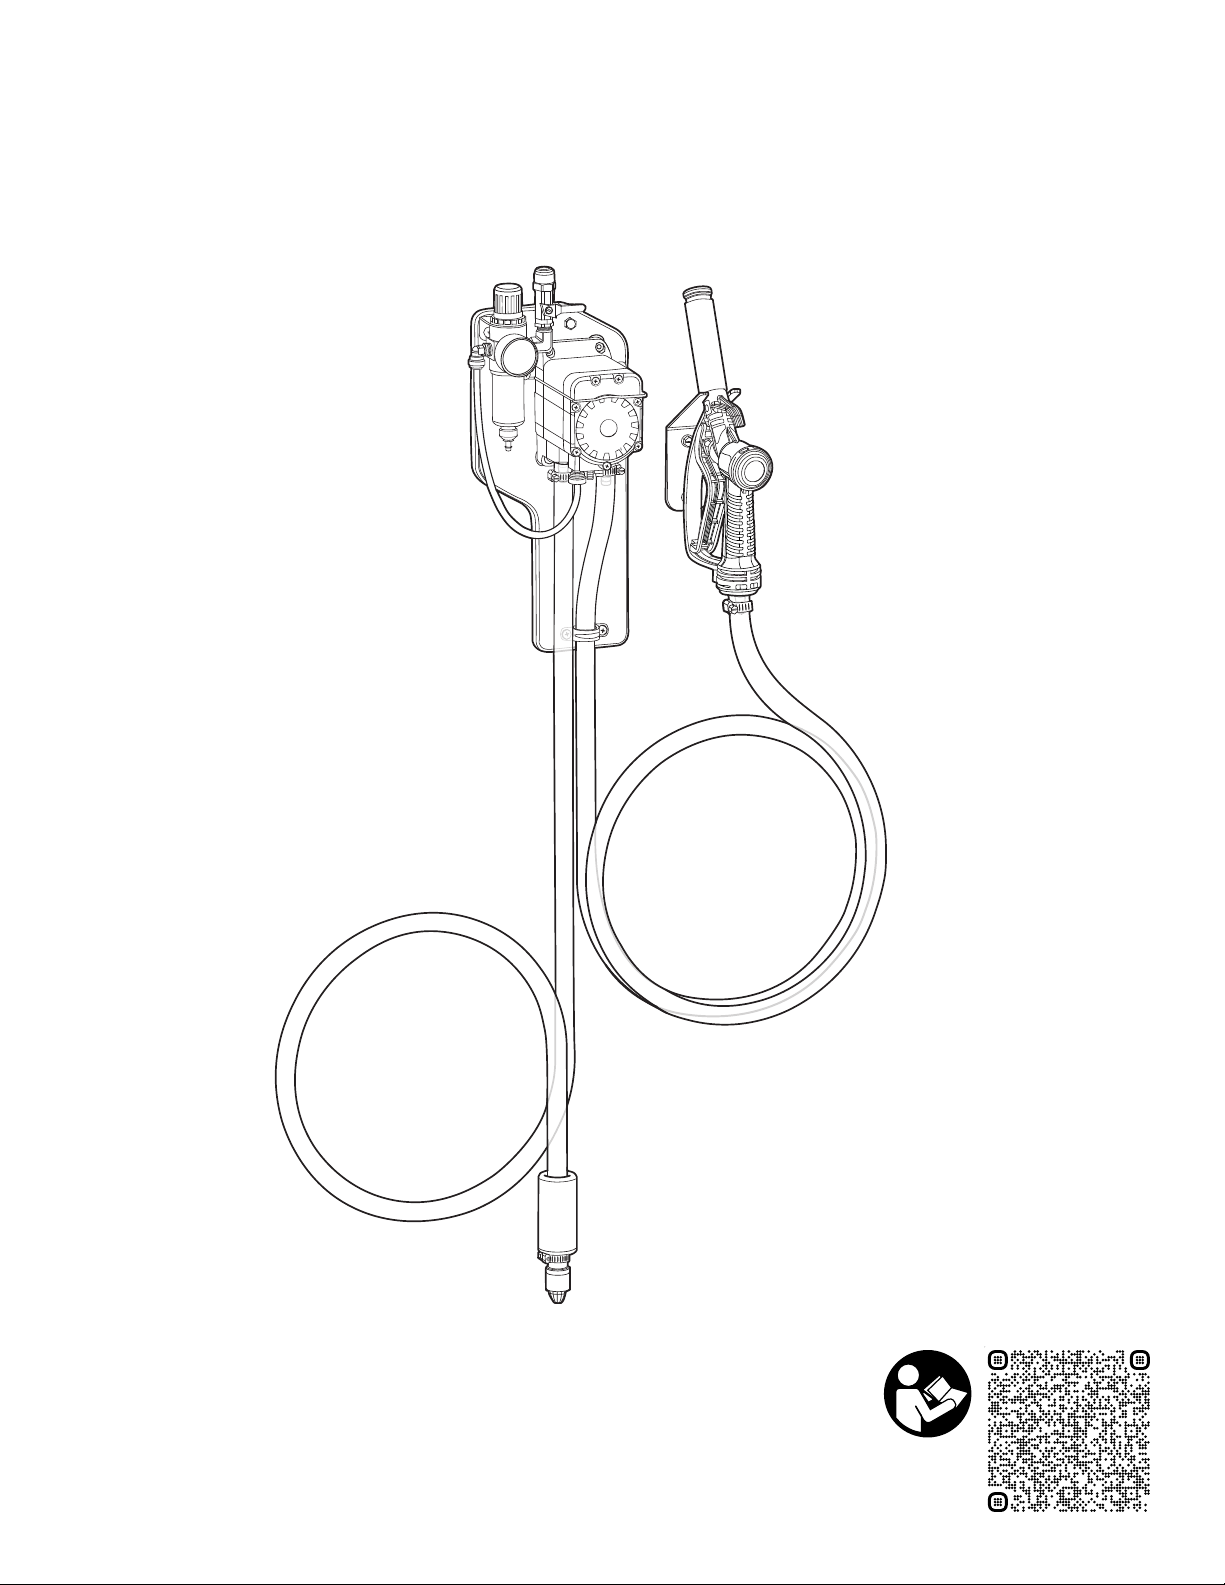
Chemical Transfer Unit
Operation Manual
CTX1 - CTX5
READ ALL INSTRUCTIONS BEFORE USING OR
SERVICING THIS UNIT. KEEP THIS MANUAL IN A
LOCATION THAT IS READILY AVAILABLE TO USERS
AND SERVICE TECHNICIANS.
English (Original Instructions)
Scan this code for
operation manual
Page 2
Safety
WARNING
PEOPLE OR OBJECTS CAN BE HURT OR DAMAGED IF THIS UNIT IS NOT USED CORRECTLY!
Failure to read all the instructions before operating the unit may result in personal injury or death from
the improper use or the chemical solution. Anyone handling, operating or using the unit must read and
understand the instructions in the manual. The buyer assumes all responsibility for safety and proper
use in accordance with the instructions.
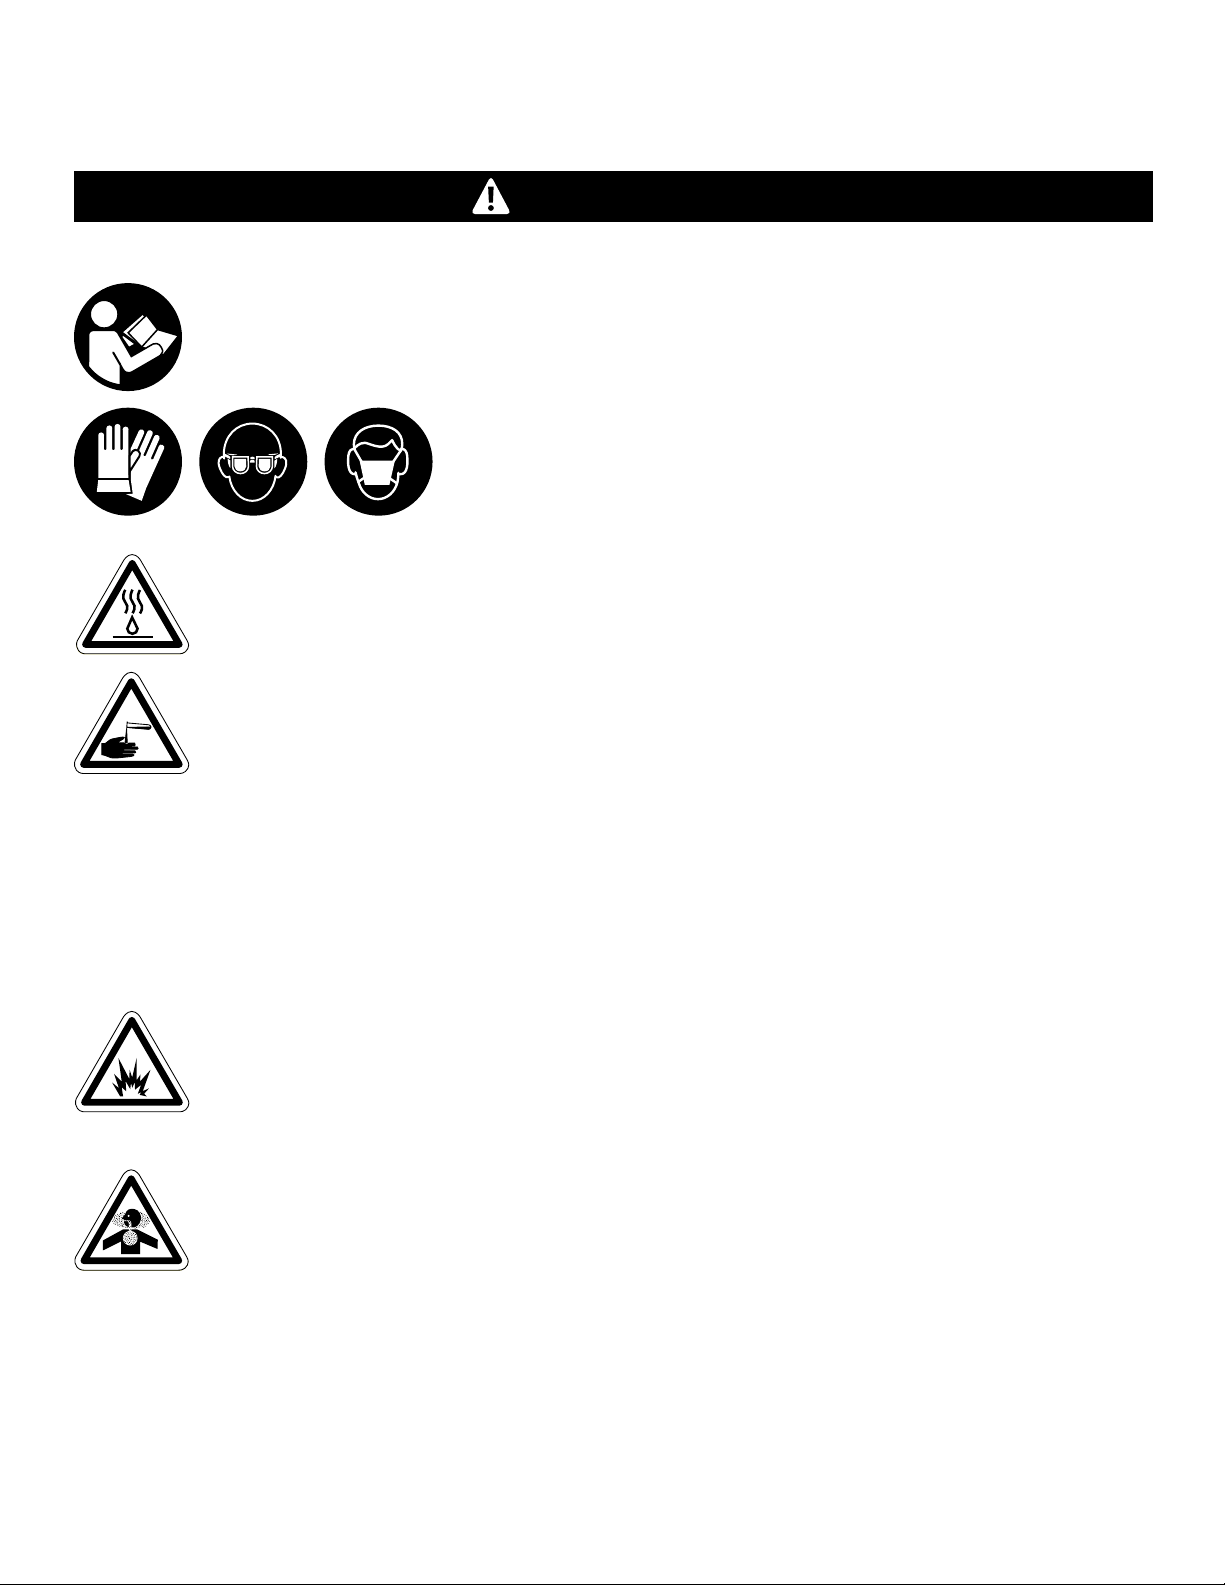
Using or servicing the unit without appropriate personal protective
equipment (PPE) may result in serious injury such as burns, rashes, eye,
throat or lung damage and death. Always wear PPE as indicated in the
Safety Data Sheet (SDS) when using or servicing the unit. Protect eyes, skin,
and lungs against drifting spray.
Chemical solutions may pose a health risk and death if they contact the skin or eyes, are inhaled
or swallowed. Always read and follow all chemical safety precautions and handling instructions
provided by the chemical manufacturer and the SDS associated with the chemical solution before
using the unit.
Pressure within the equipment may cause an unexpected release of the chemical solution and
cause serious injury such as burns, rashes, eye damage, throat or lung damage and death.
Always depressurize and clean the unit after each use. Release any remaining air pressure by opening
the discharge ball valve. Never leave the unit unattended while pressurized.
Using the unit with fluid temperatures above 100°F (37.77°C) may result in scalding, burns, serious
injury or death. DO NOT use a solution with a temperature above 100°F (37.77°C).
Operating the unit when damaged or leaking may result in exposure to chemical solutions, serious
injury or death. Never use the unit if it is damaged or leaking.
Never point the discharge wand at yourself, another person, or any object you do not want covered
in chemical.
Using incoming air pressure exceeding 100 psi (6.9 bar) may result in pressure buildup, explosion,
serious injury or death. DO NOT exceed 100 psi (6.9 bar) incoming air pressure when operating
the unit.
Use of hydrocarbons and flammable products may result in explosions, fire and serious injury or death.
Never use hydrocarbons or flammable products with the unit.
Mixing an alkaline with an acid may result in a chemical reaction. Overheating of the mixture may
cause it to splatter caustic compounds or release hazardous fumes, gas and vapors. Always flush
the unit with fresh water thoroughly when switching from an alkaline to an acid or an acid to
an alkaline.
V20230814 • Page 2 of 9Model: CTX1 - CTX5
Page 3

NOTICE
Servicing or modifying this unit with parts not listed in this manual may cause the unit to operate improperly. Do not
use unauthorized parts when servicing the unit.
Use of an air lubricator before the unit may result in diminished performance and damage to the unit. Do not use an
air lubricator before the unit.
Moisture in the air lines will damage the pump and diminish the pump life. The air must be filtered, clean, dry and
free of moisture. If needed, install an air dryer before the unit.
PROTECT THE ENVIRONMENT
Please dispose of packaging materials, old machine components, and hazardous fluids in an
environmentally safe way according to local waste disposal regulations
V20230814 • Page 3 of 9Model: CTX1 - CTX5
Page 4

Product Overview
Options
Number of Pumps Pump Seal Material
One (1) Santoprene (S)
Two (2) Viton (V)
CTX
Three (3) Kalrez (K)
Four (4)
Five (5)
Add the bolded option codes to item number as shown. For Santoprene only units, no option code is needed.
Examples:
• CTX1K - One pump with Kalrez pump seals
• CTX2VK - One pump with Viton pump seals, and one pump with Kalrez pump seals
• CTX3V - All three pumps with Viton pump seals
• CTX4SSKK - Two pumps with Santorpene pump seals, two pumps with Kalrez pump seals
• CTX5 - All five pumps with Santoprene pump seals
Requirements
Compressed air requirements 20-80 psi (1.4-5.5 bar) with 2 cfm (56.6 l/min)
Liquid temperature range 40-100˚F (4.4-37˚C)
Chemical products used with this equipment must be formulated for this
Chemical compatibility
type of application and compatible with unit materials and pump seals.
For more information on chemical compatibility, consult the manufacturer
or SDS for your product or contact our customer service department.
Specifications
Power type Compressed air
Number of products unit can draw from One product per pump
Suction line length/diameter 8 ft. (2.4 m) hose with ⁄ in. (12.7 mm) inside diameter
Discharge hose length/diameter 8 ft. (2.4 m) hose, with ⁄ in. (12.7 mm) inside diameter
Discharge wand/tip type Polypropylene fill gun with ⁄ in. hose barb and Hastelloy spring
Flow rate* 3.5 gal/min (13.2 l/min) per pump
Pump seals Santoprene, Viton, or Kalrez
*Flow rates given are based on chemical with viscosity of water and factory air pressure settings.
V20230814 • Page 4 of 9Model: CTX1 - CTX5
Page 5
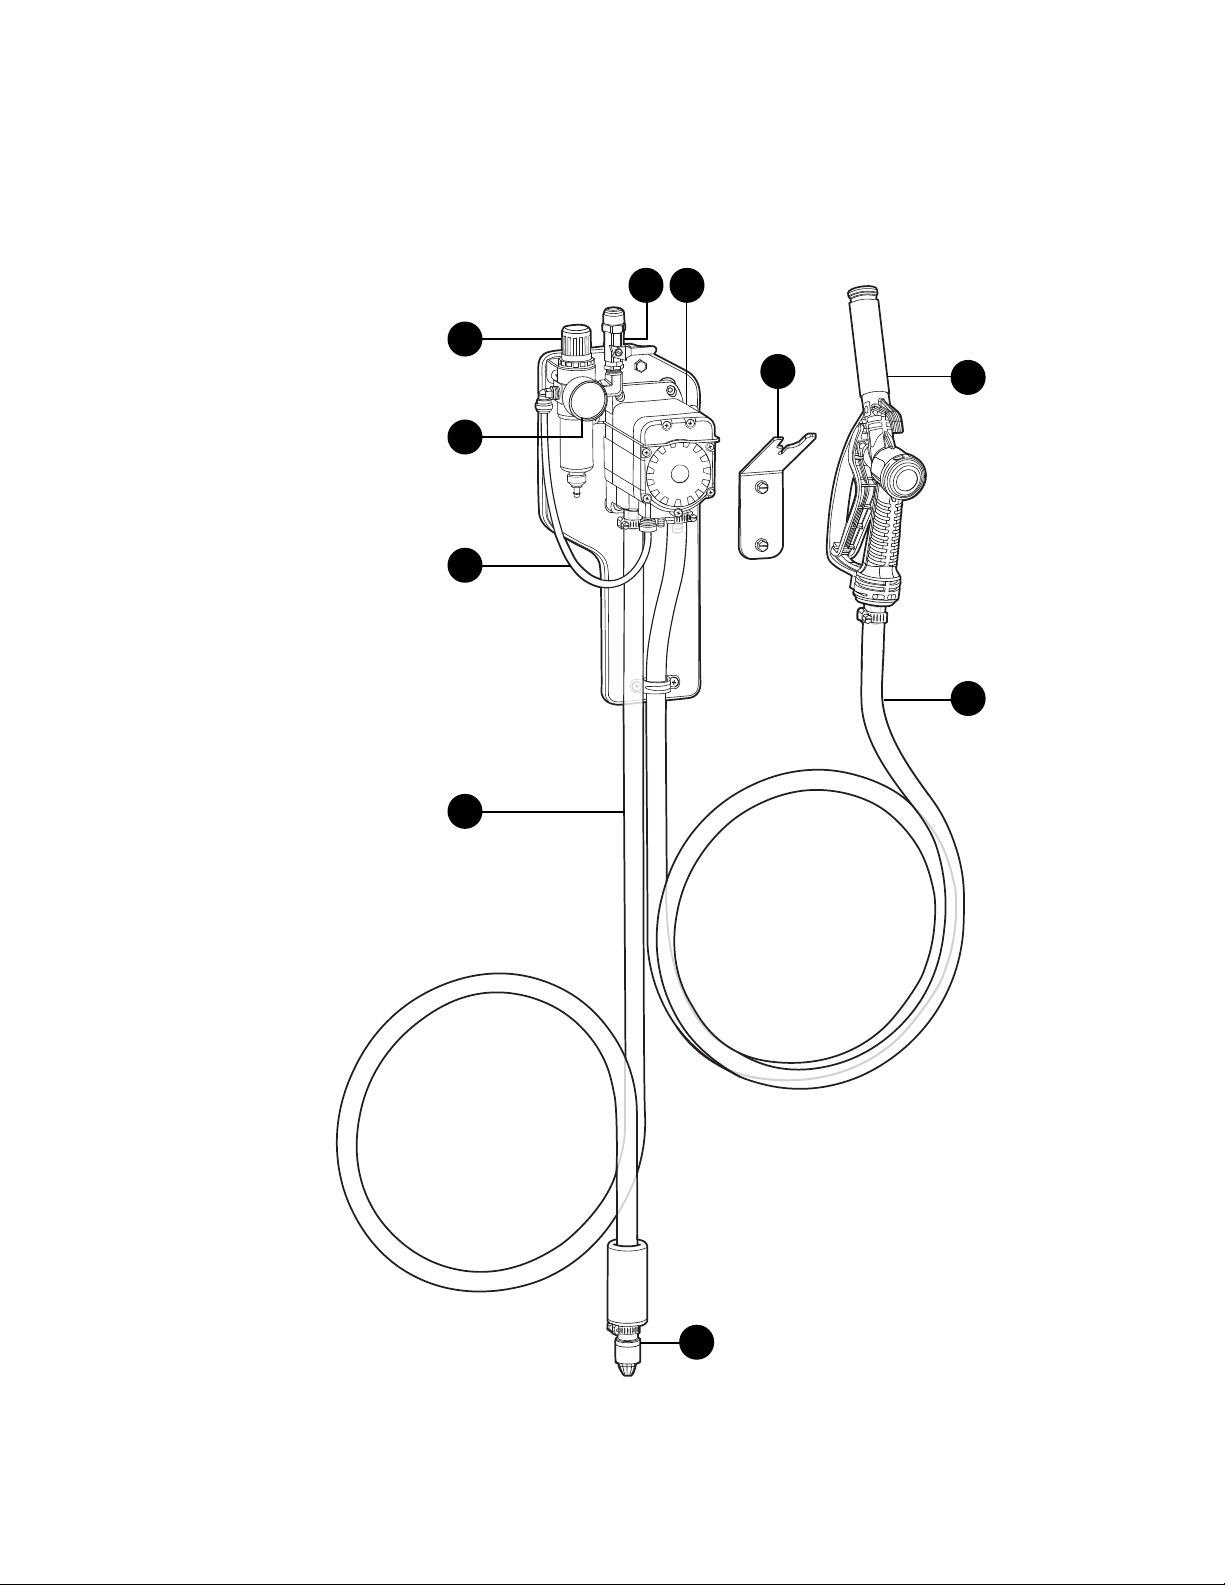
Product Components
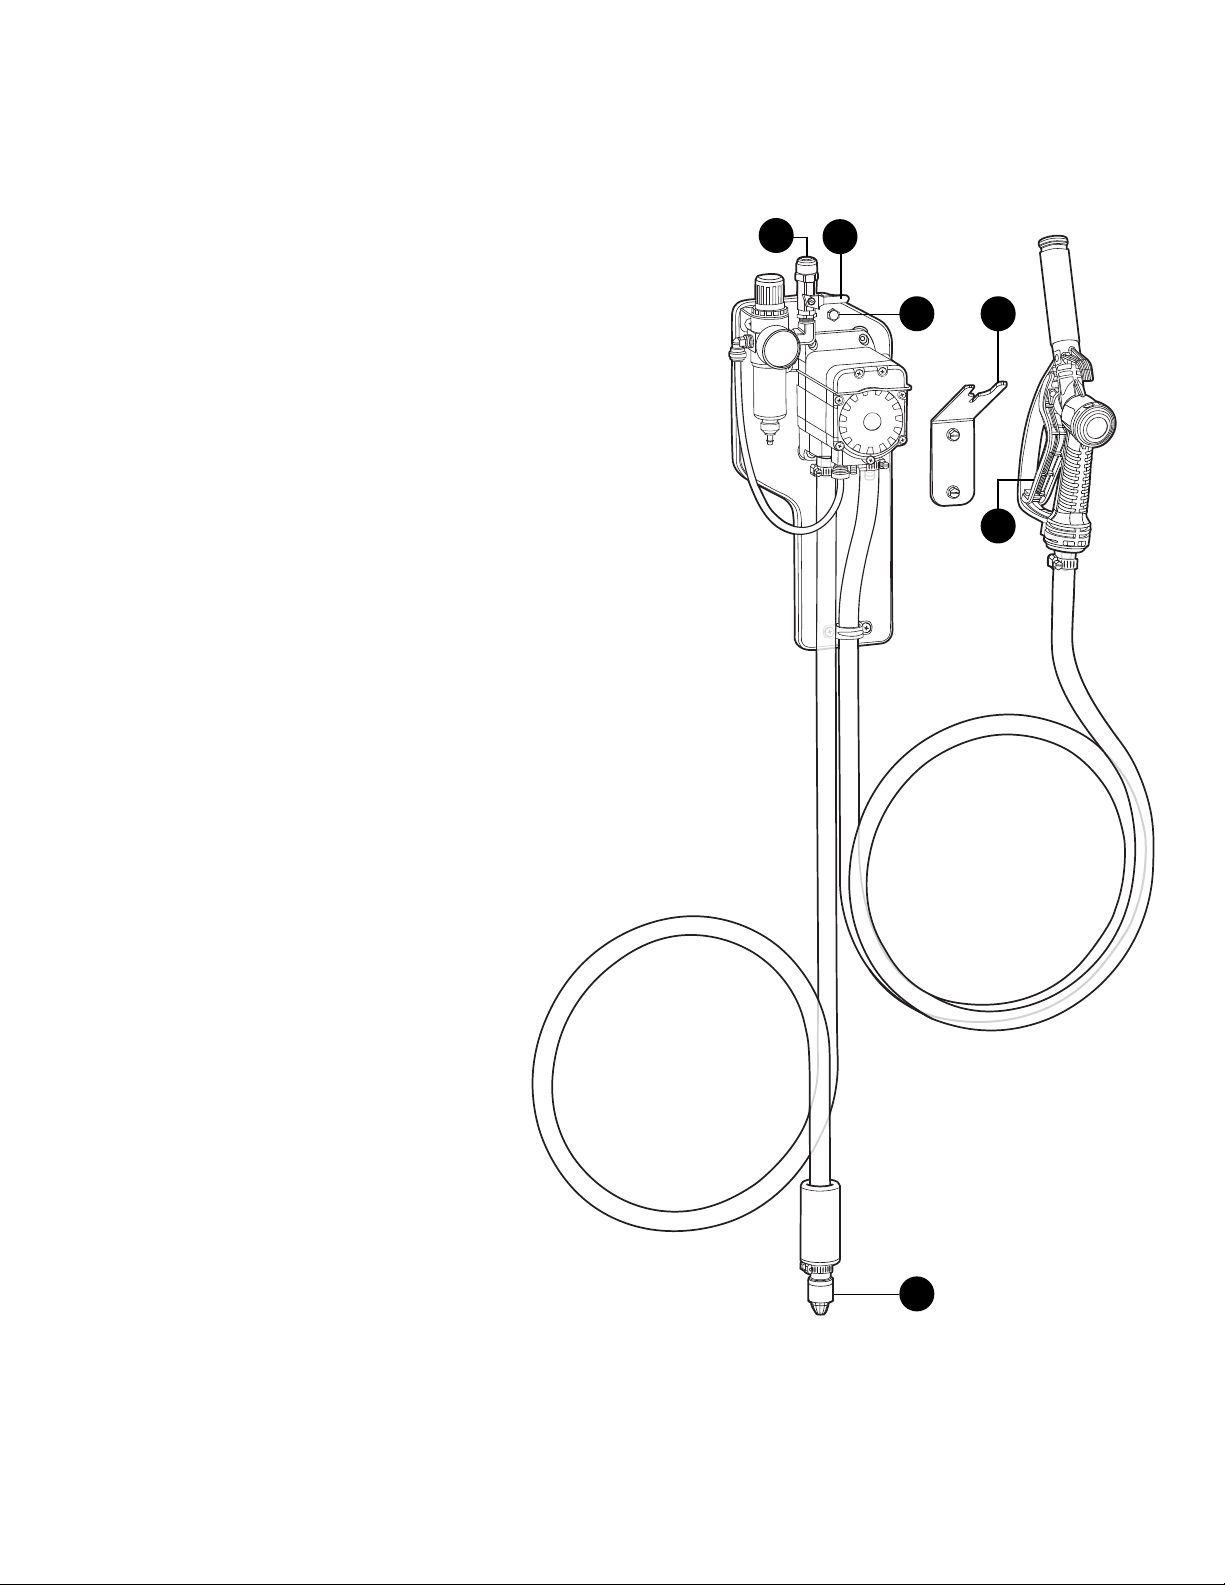
Get to know the CTX1 components that you will need to use, adjust or assemble.
Chemical Transfer Unit • One pump
65
1
7
2
3
8
1. Air regulator
2. Air pressure gauge
3. Air line
4. Suction Hose
5. Air inlet valve
6. Quick-change pump
7. Wand bracket
8. Poly fill gun
9. Discharge hose
10. Suction valve
9
4
CTX1
10
V20230814 • Page 5 of 9Model: CTX1 - CTX5
Page 6
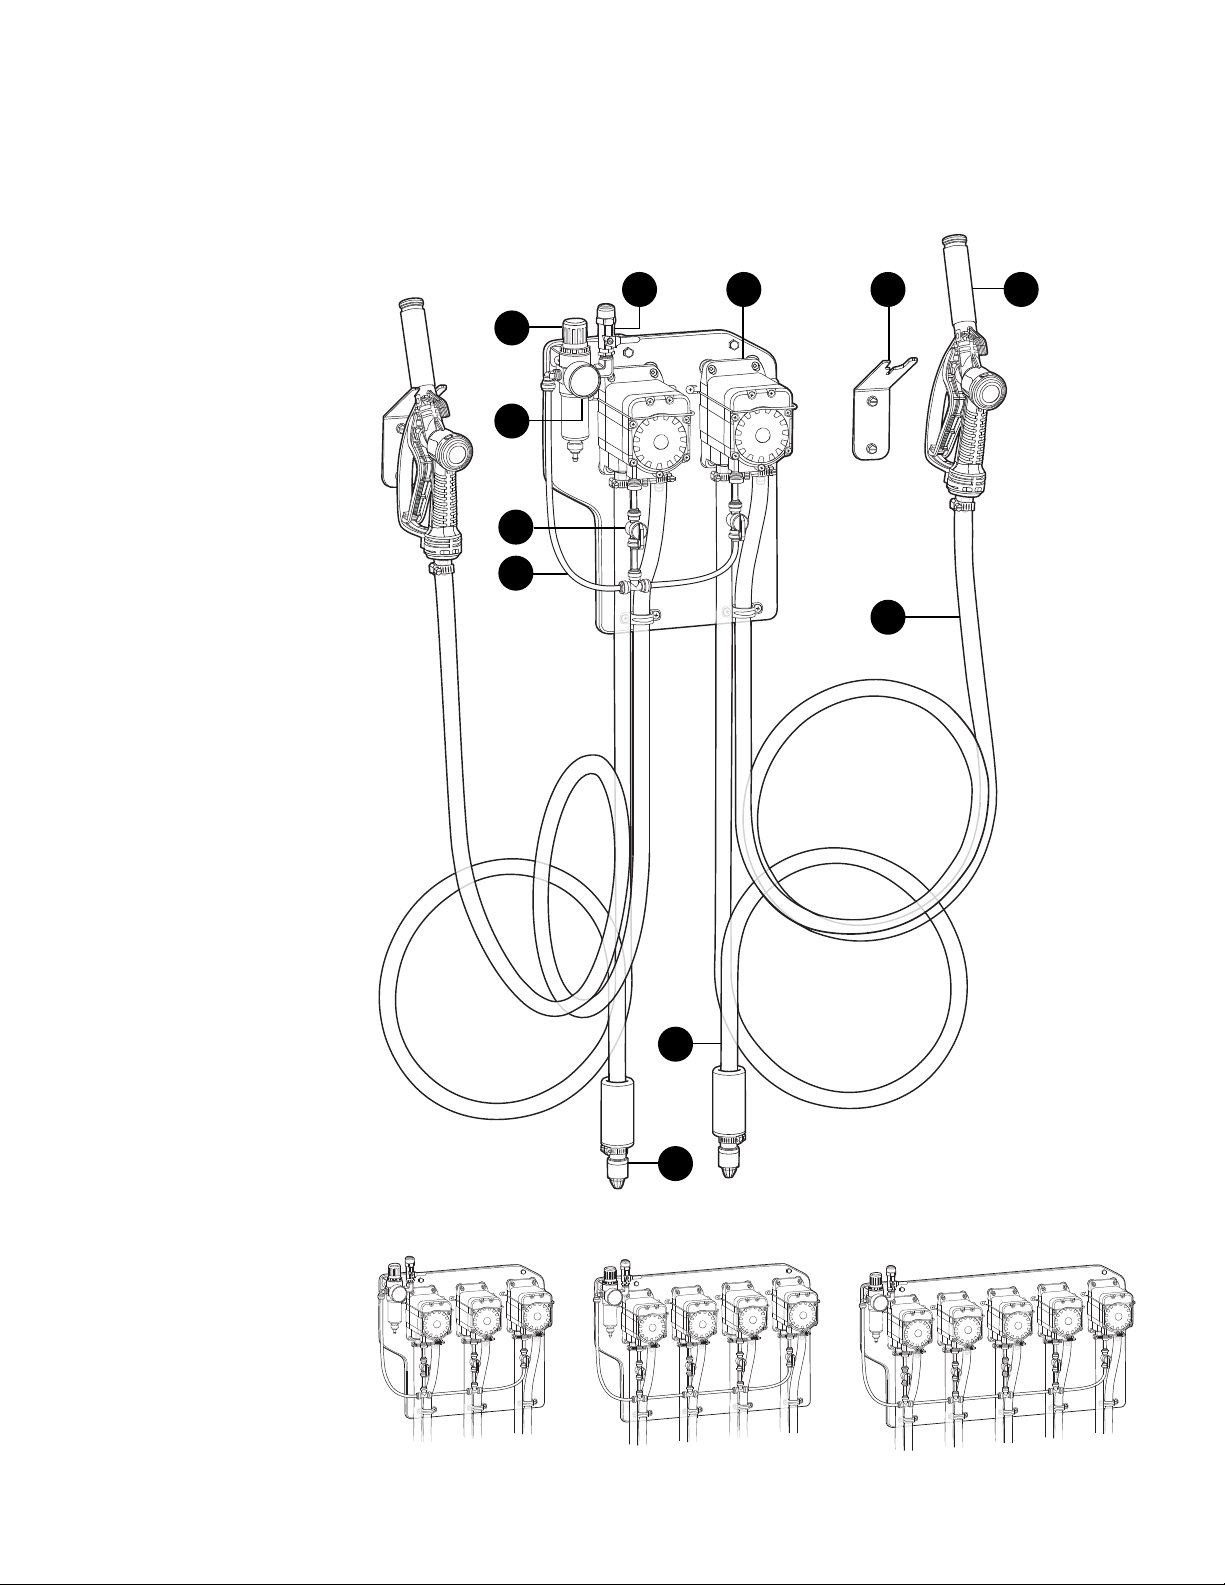
Product Components
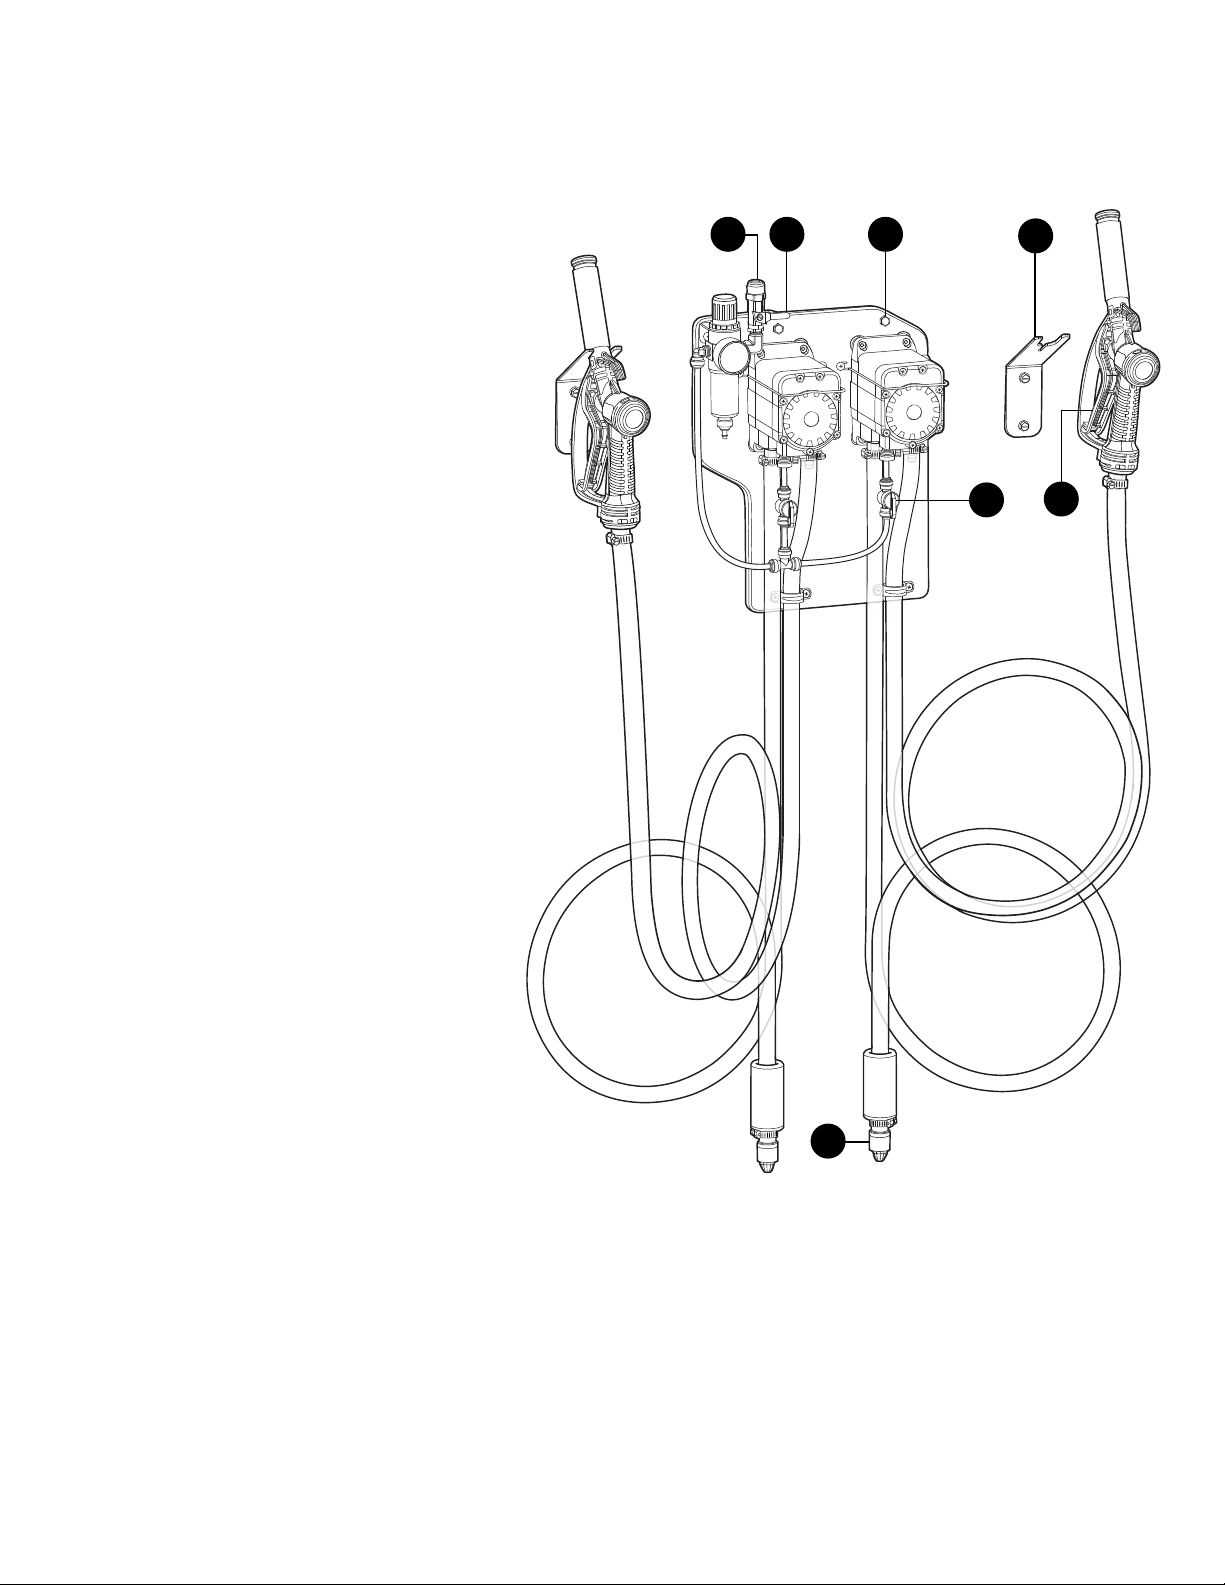
Get to know the CTX2 - CTX5 components that you will need to use, adjust or assemble.
Chemical Transfer Unit • Two pump - Five pump
5
6
7 8
1
2
3
4
9
1. Air regulator
2. Air pressure gauge
3. Quick-fit shut o valve
4. Air line
5. Air inlet valve
6. Quick-change pump
7. Wand bracket
8. Poly fill gun
9. Discharge hose
10. Suction hose
11. Suction valve
CTX3
10
11
CTX4
CTX2
CTX5
V20230814 • Page 6 of 9Model: CTX1 - CTX5
Page 7
Using your unit
Installation Instructions
CTX1
1. Remove components from packaging.
2. Select desired area to mount the unit.
3. Mount the unit to the wall using the longer screws
and plastic anchors provided in the parts package.
NOTE: To drill holes for the plastic anchors, use a
⁄ inch drill bit.
4. If desired, mount the wand bracket using the screws
and plastic anchors provided in the parts package.
Operating Instructions
5. With the air inlet valve in the closed position, connect
⁄ inch tubing air line to the air inlet quick-fit.
6. Following all instructions from chemical manufacturer,
place the chemical suction line into a container of
chemical solution.
7. Open the air inlet valve to allow air flow.
8. Place the poly fill gun into an approved container.
9. Activate unit by pulling the trigger handle on the
poly fill gun. Release trigger to stop the flow of
product.
5
7
3
4
9
10. Close the air inlet valve to stop air flow.
After Use Instructions
NOTE: To ensure safety, always depressurize the
unit when not in use and prior to
disassemby or maintenance.
11. Shut o the air supply to the unit by closing
the air inlet valve, and removing air line.
12. Pull the trigger handle on the fill gun to
relieve any pressure remaining in the unit.
13. Release trigger handle after all pressure has
been relieved from the unit.
CTX1
6
V20230814 • Page 7 of 9Model: CTX1 - CTX5
Page 8
Using your unit
Installation Instructions
CTX2 - CTX5
1. Remove components from packaging.
2. Select desired area to mount the unit.
3. Mount the unit to the wall using the longer
screws and plastic anchors provided in the
parts package.
NOTE: To drill holes for the plastic anchors,
use a ⁄ inch drill bit.
4. If desired, mount the wand brackets using
the screws and plastic anchors provided in
the parts package.
Operating Instructions
5. With the air inlet valve in the closed position,
connect ⁄ inch tubing air line to the air inlet
quick-fit.
6. Following all instructions from chemical
manufacturer, place the chemical suction line into
a container of chemical solution.
7. Open the air inlet valve to allow air flow.
7
5 3
4
8
10
8. For units with 2 or more pumps, verify the quick-fit
shut o valves are open.
9. Place poly fill gun into an approved container.
10. Activate the unit by pulling the trigger
handle on the poly fill gun. Release the
trigger to stop the flow of product.
NOTE: For safe and eective operation, it is
recommended to only activate one
pump at a time.
11. Close the air inlet valve to stop air flow.
After Use Instructions
NOTE: To ensure safety, always depressurize the unit
when not in use and prior to disassemby or
maintenance.
12. Shut o the air supply to the unit by closing the air
inlet valve and removing air line.
13. Pull the trigger handle on the poly fill guns to relieve
any pressure remaining in the unit.
6
CTX2
14. Release trigger handle after all pressure has been
relieved from the unit.
V20230814 • Page 8 of 9Model: CTX1 - CTX5
Page 9
Maintenance
WARNING
Performing any maintenance with the unit pressurized, and connected to the air supply may result in serious injury or
death. Always ensure that the unit has been depressurized, and disconnected from the air supply before conducting
any maintenance. Servicing or modifying this unit with parts not listed in this manual may cause the unit to operate
improperly. Do not use unauthorized parts when servicing the unit.
Maintaining Your Unit
To keep your unit operating properly, periodically perform the following maintenance procedures:
• Inspect the pump for wear and leaks.
• Inspect all hoses for leaks or excessive wear.
Make sure all hose clamps are in good condition and
properly secured.
• Replace the filter located within the air regulator as
needed. Clean by unthreading the air regulator bowl
from the air regulator.
• Check the suction line and strainer for debris.
Clean as needed.
• Drain your air compressor tank on a regular basis
to help extend pump life. An air source with a high
moisture content will accelerate pump wear.
Note: If your air source has a high moisture content,
install a water separator.
Servicing Your Unit
To service your unit, refer to the service manual which includes:
• Troubleshooting procedures.
• Detailed parts breakdowns and illustrations.
• Part numbers of serviceable components and assemblies.
Scan this code for
service manual
V20230814 • Page 9 of 9Model: CTX1 - CTX5
Page 10
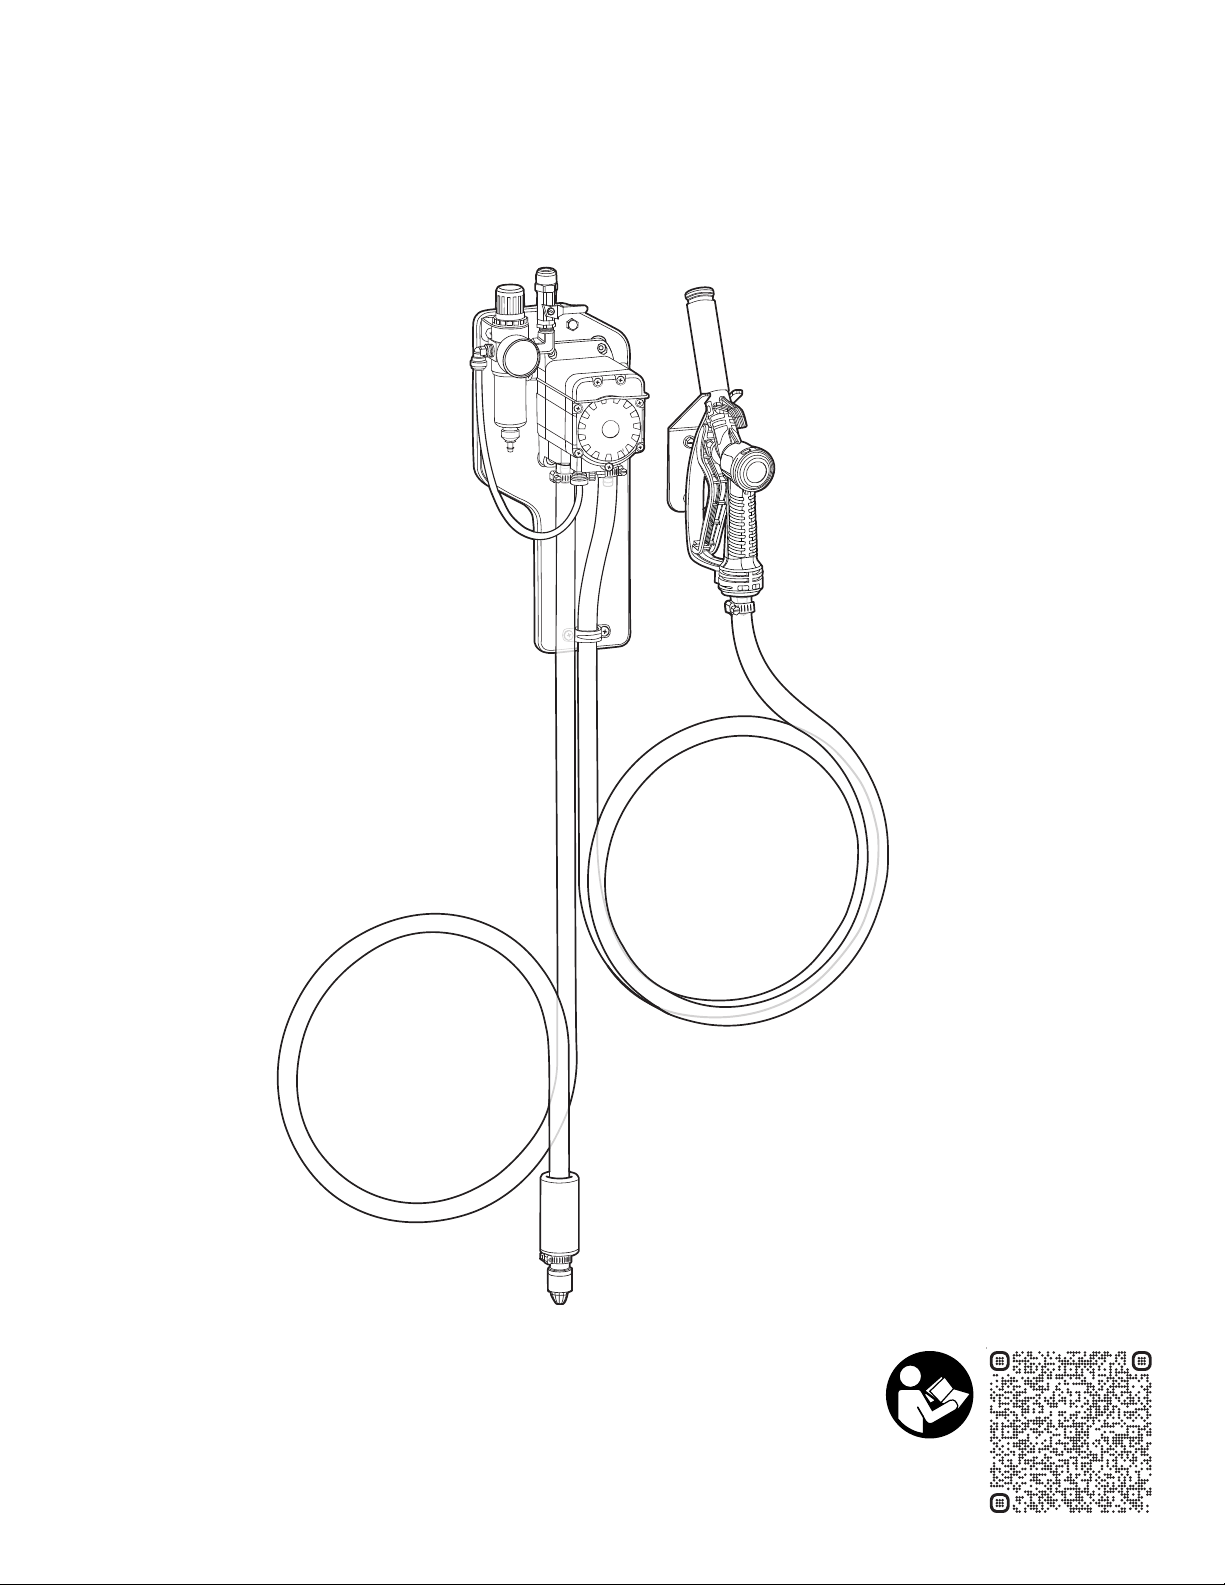
Chemical Transfer Unit
Service Manual
CTX1 - CTX5
READ ALL INSTRUCTIONS BEFORE USING OR
SERVICING THIS UNIT. KEEP THIS MANUAL IN A
LOCATION THAT IS READILY AVAILABLE TO USERS
AND SERVICE TECHNICIANS.
English (Original Instructions)
Scan this code for
service manual
Page 11
Safety
WARNING
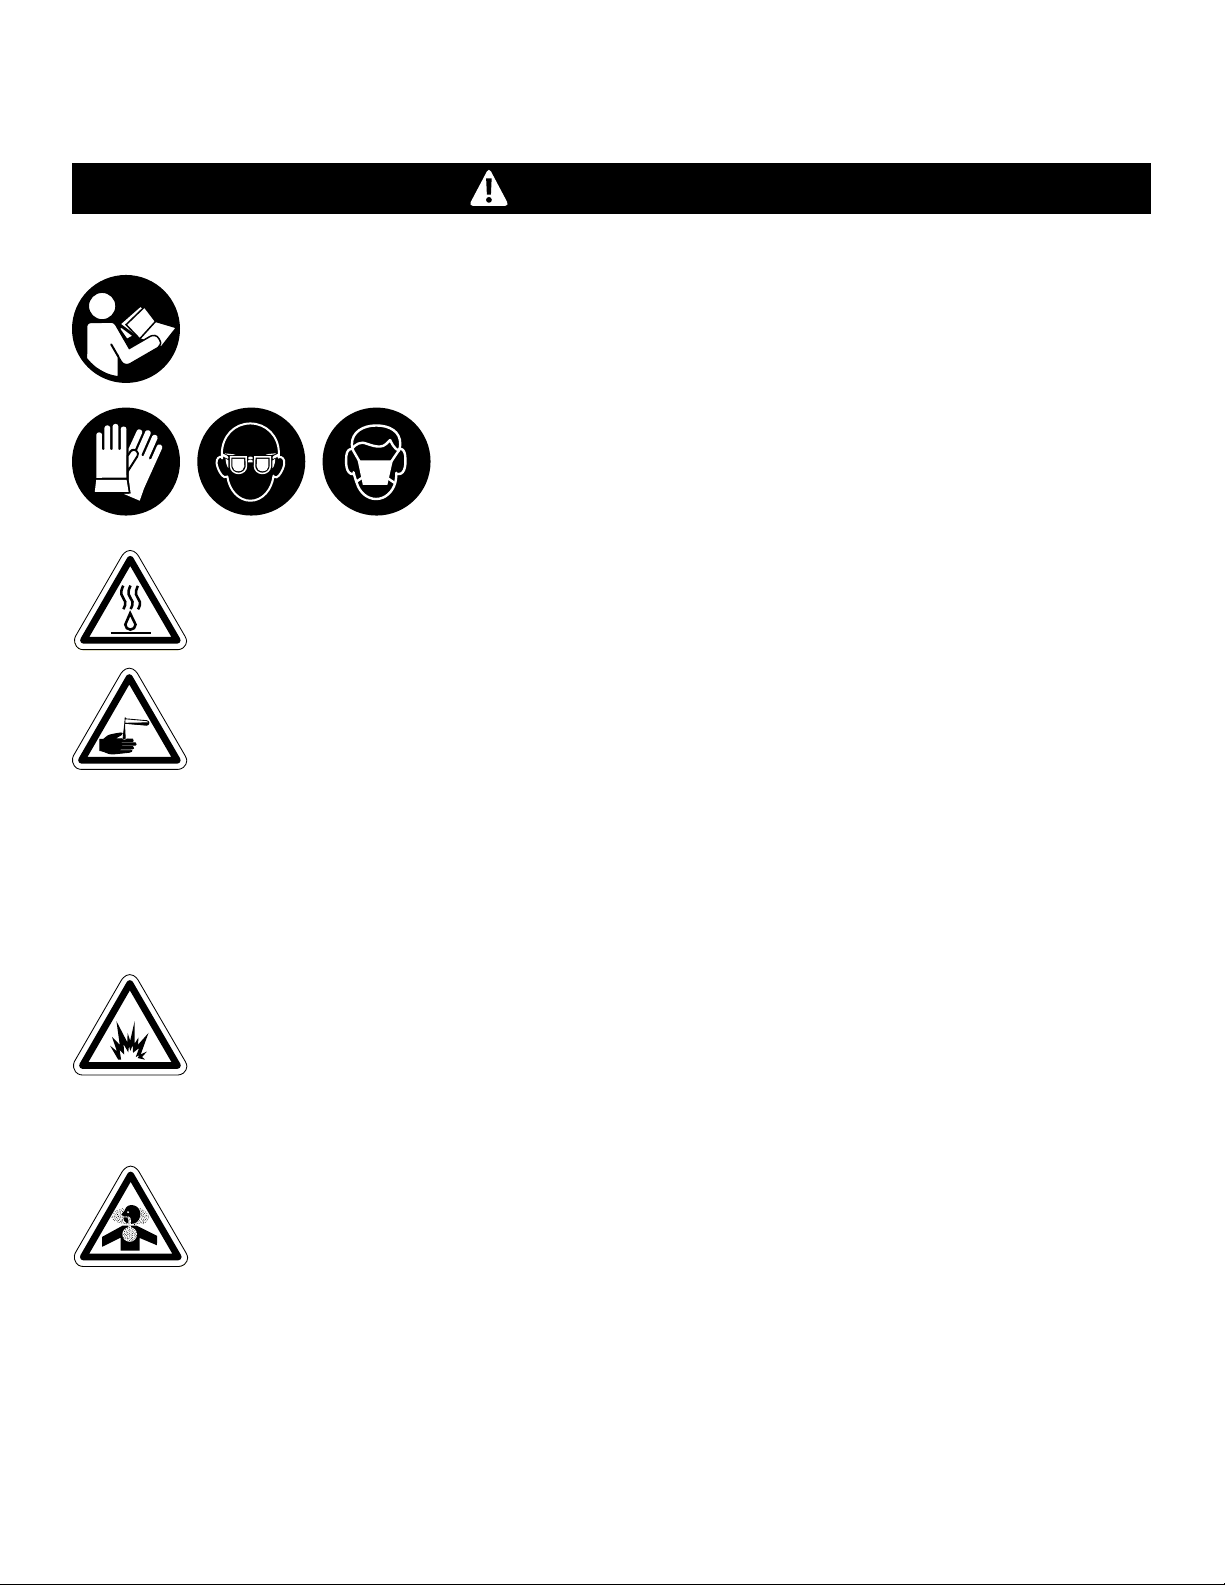
PEOPLE OR OBJECTS CAN BE HURT OR DAMAGED IF THIS UNIT IS NOT USED CORRECTLY!
Failure to read all the instructions before operating the unit may result in personal injury or death from
the improper use or the chemical solution. Anyone handling, operating or using the unit must read and
understand the instructions in the manual. The buyer assumes all responsibility for safety and proper
use in accordance with the instructions.
Using or servicing the unit without appropriate personal protective
equipment (PPE) may result in serious injury such as burns, rashes, eye,
throat or lung damage and death. Always wear PPE as indicated in the
Safety Data Sheet (SDS) when using or servicing the unit. Protect eyes, skin,
and lungs against drifting spray.
Chemical solutions may pose a health risk and death if they contact the skin or eyes, are inhaled
or swallowed. Always read and follow all chemical safety precautions and handling instructions
provided by the chemical manufacturer and the SDS associated with the chemical solution before
using the unit.
Pressure within the equipment may cause an unexpected release of the chemical solution and
cause serious injury such as burns, rashes, eye damage, throat or lung damage and death.
Always depressurize and clean the unit after each use. Release any remaining air pressure by opening
the discharge ball valve. Never leave the unit unattended while pressurized.
Using the unit with fluid temperatures above 100°F (37.77°C) may result in scalding, burns, serious
injury or death. DO NOT use a solution with a temperature above 100°F (37.77°C).
Operating the unit when damaged or leaking may result in exposure to chemical solutions, serious
injury or death. Never use the unit if it is damaged or leaking.
Never point the discharge wand at yourself, another person, or any object you do not want covered
in chemical.
Using incoming air pressure exceeding 100 psi (6.9 bar) may result in pressure buildup, explosion,
serious injury or death. DO NOT exceed 100 psi (6.9 bar) incoming air pressure when operating
the unit.
Use of hydrocarbons and flammable products may result in explosions, fire and serious injury or death.
Never use hydrocarbons or flammable products with the unit.
Mixing an alkaline with an acid may result in a chemical reaction. Overheating of the mixture may
cause it to splatter caustic compounds or release hazardous fumes, gas and vapors. Always flush
the unit with fresh water thoroughly when switching from an alkaline to an acid or an acid to
an alkaline.
V20230814 • Page 2 of 9Model: CTX1 - CTX5
Page 12
NOTICE
Servicing or modifying this unit with parts not listed in this manual may cause the unit to operate improperly. Do not
use unauthorized parts when servicing the unit.
Use of an air lubricator before the unit may result in diminished performance and damage to the unit. Do not use an
air lubricator before the unit.
Moisture in the air lines will damage the pump and diminish the pump life. The air must be filtered, clean, dry and
free of moisture. If needed, install an air dryer before the unit.
PROTECT THE ENVIRONMENT
Please dispose of packaging materials, old machine components, and hazardous fluids in an
environmentally safe way according to local waste disposal regulations.
Service Guide
WARNING
Performing any maintenance with the unit pressurized and connected to the air supply may result in serious injury or
death. Always ensure that the unit has been depressurized and disconnected from the air supply before conducting
any maintenance. Servicing or modifying this unit with parts not listed in this manual may cause the unit to operate
improperly. Do not use unauthorized parts when servicing the unit.
Maintaining Your Unit
To keep your unit operating properly, periodically perform the following maintenance procedures:
• Inspect the pump for wear and leaks.
• Inspect all hoses for leaks or excessive wear.
Make sure all hose clamps are in good condition
and properly secured.
• Replace the filter located within the air regulator as
needed. Clean by unthreading the air regulator bowl
from the air regulator.
• Check the suction line and strainer for debris.
Clean as needed.
• Drain your air compressor tank on a regular basis
to help extend pump life. An air source with a high
moisture content will accelerate pump wear.
Note: If your air source has a high moisture content,
install a water separator to the air fitting.
Servicing Your Unit
Most repairs on the unit can be performed with the following tools:
• Crescent wrench
• / in. (11 mm) open-ended wrench
• Flat head screwdriver
• #2 Phillips head screwdriver
• Thread seal tape
• Hose cutters
• Knife
V20230814 • Page 3 of 9Model: CTX1 - CTX5
Page 13

Troubleshooting Your Unit
If your unit is not operating properly, try using these troubleshooting tips:
Issue Solution
Air regulator bowl or air filter
has debris such as water, oil, or
rust particles
Pump is cycling faster than
normal
Pump is cycling slower than
normal
Air passes through the pump
without cycling
The unit operates at a
reduced pressure
• Clean by unthreading the air regulator bowl from the air regulator.
• Verify product is getting to the pump with these steps:
1. Inspect suction line foot valve for buildup.
2. Examine the suction hose for holes or cracks.
3. Ensure chemical suction line is fully submerged in the chemical jug.
• If these items are confirmed, the pump may need to be replaced.
• Verify that the unit is receiving proper air supply. Air supply should read at 50
psi (3.4 bar).
• Restriction on the outlet side of the unit may cause issues. Inspect outlet hose
and fittings for build up. Clean or replace as needed.
• Confirm air inlet valve is open completely.
• Pump may need to be replaced.
• The pump needs to be replaced.
• Check suction line and strainer for debris or damage. Clean or replace as
needed. To prevent damage to the unit, the strainer must always be used.
• Check the air compressor supplying the unit. If the pressure is less than 40 psi
(2.8 bar), turn o the unit until the compressor can catch up.
• If the air supply is 50 psi (3.4 bar) or above, check the air gauge, which should
read near 50 psi (3.4 bar). If the air gauge reads more or less than 50 psi (3.4
bar), adjust the pressure by turning the knob on the top of the air regulator.
V20230814 • Page 4 of 9Model: CTX1 - CTX5
Page 14
Chemical Transfer Unit
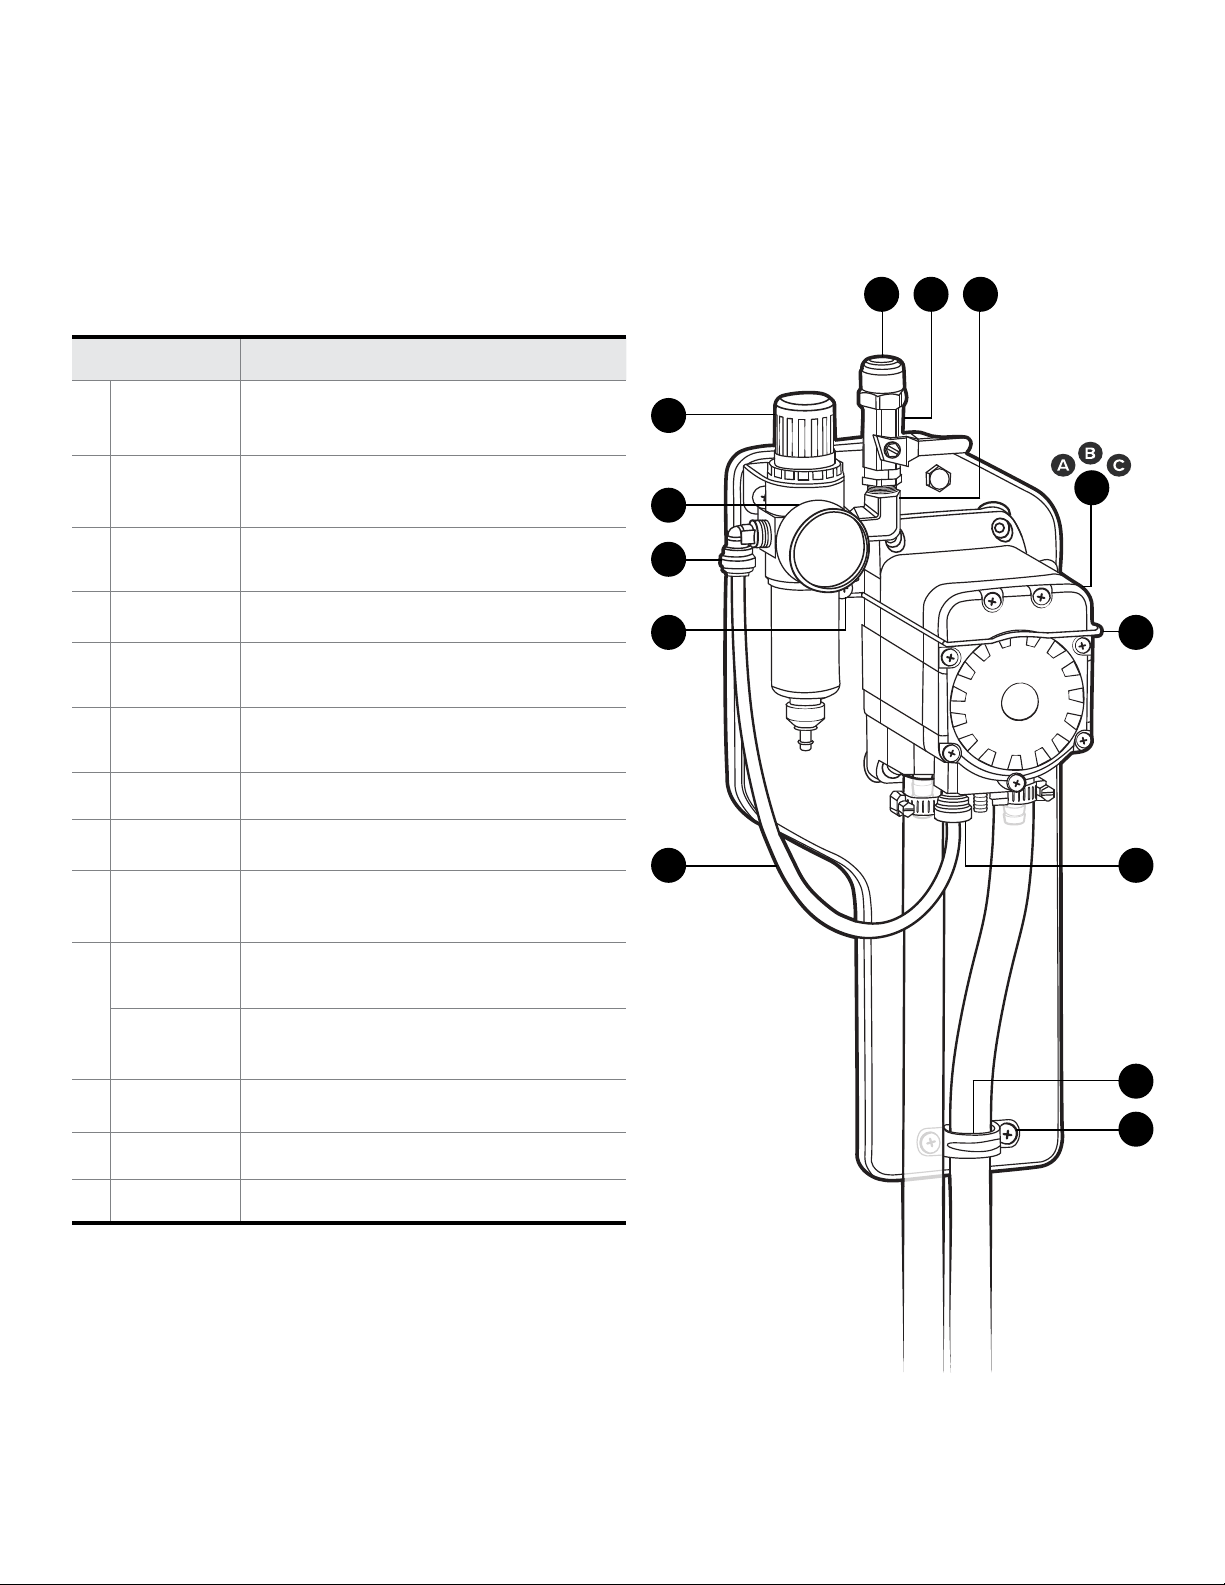
CTX1:
Chemical transfer unit - exposed pump - one product -
Santoprene pump
Additional pump options:
CTX1K: Kalrez pump
CTX1V: Viton pump
Item number Description
CTX1
76
8
1 R25
2 AG100
3 QFEL14P
4 S1012-HL 10-16 x ⁄ in. screw - stainless - hi lo
5 TB14BL-PU
6 QF1438
7 BVB14 Air inlet valve - ⁄ in. FPT x ⁄ in. FPT
8 SEL14M Stainless elbow ⁄ in. MPT x ⁄ in. MPT
9 A P56
B P56K
Air regulator - two ¼ in. FPT ports - two
⅛ in. FPT ports - includes filter and bowl
Air gauge - ⅛ in. NPT - 100 PSI dry
model
Fixed elbow ⁄ in. tube x ⁄ in. MPT polypropylene
⁄ in. od blue polyurethane tubing available per ft.
Quick fit - ⁄ MPT x ⁄ od tube polypropylene
Pump with Santoprene seals - includes
hose barbs, air fitting, and exhaust barb
Pump with Kalrez seals - includes hose
barbs, air fitting, and exhaust barb
1
9
2
3
4
10
5 11
C P56V
10 BRKT-P56 Pump bracket - stainless steel
11 QF14PAF Quick fit - ⁄ MPT pump air fitting
12 CLMP12 Clamp for ⁄ in. hose - PVC
Pump with Viton seals - includes hose
barbs, air fitting, and exhaust barb
12
4
V20230814 • Page 5 of 9Model: CTX1 - CTX5
Page 15
Chemical Transfer Unit
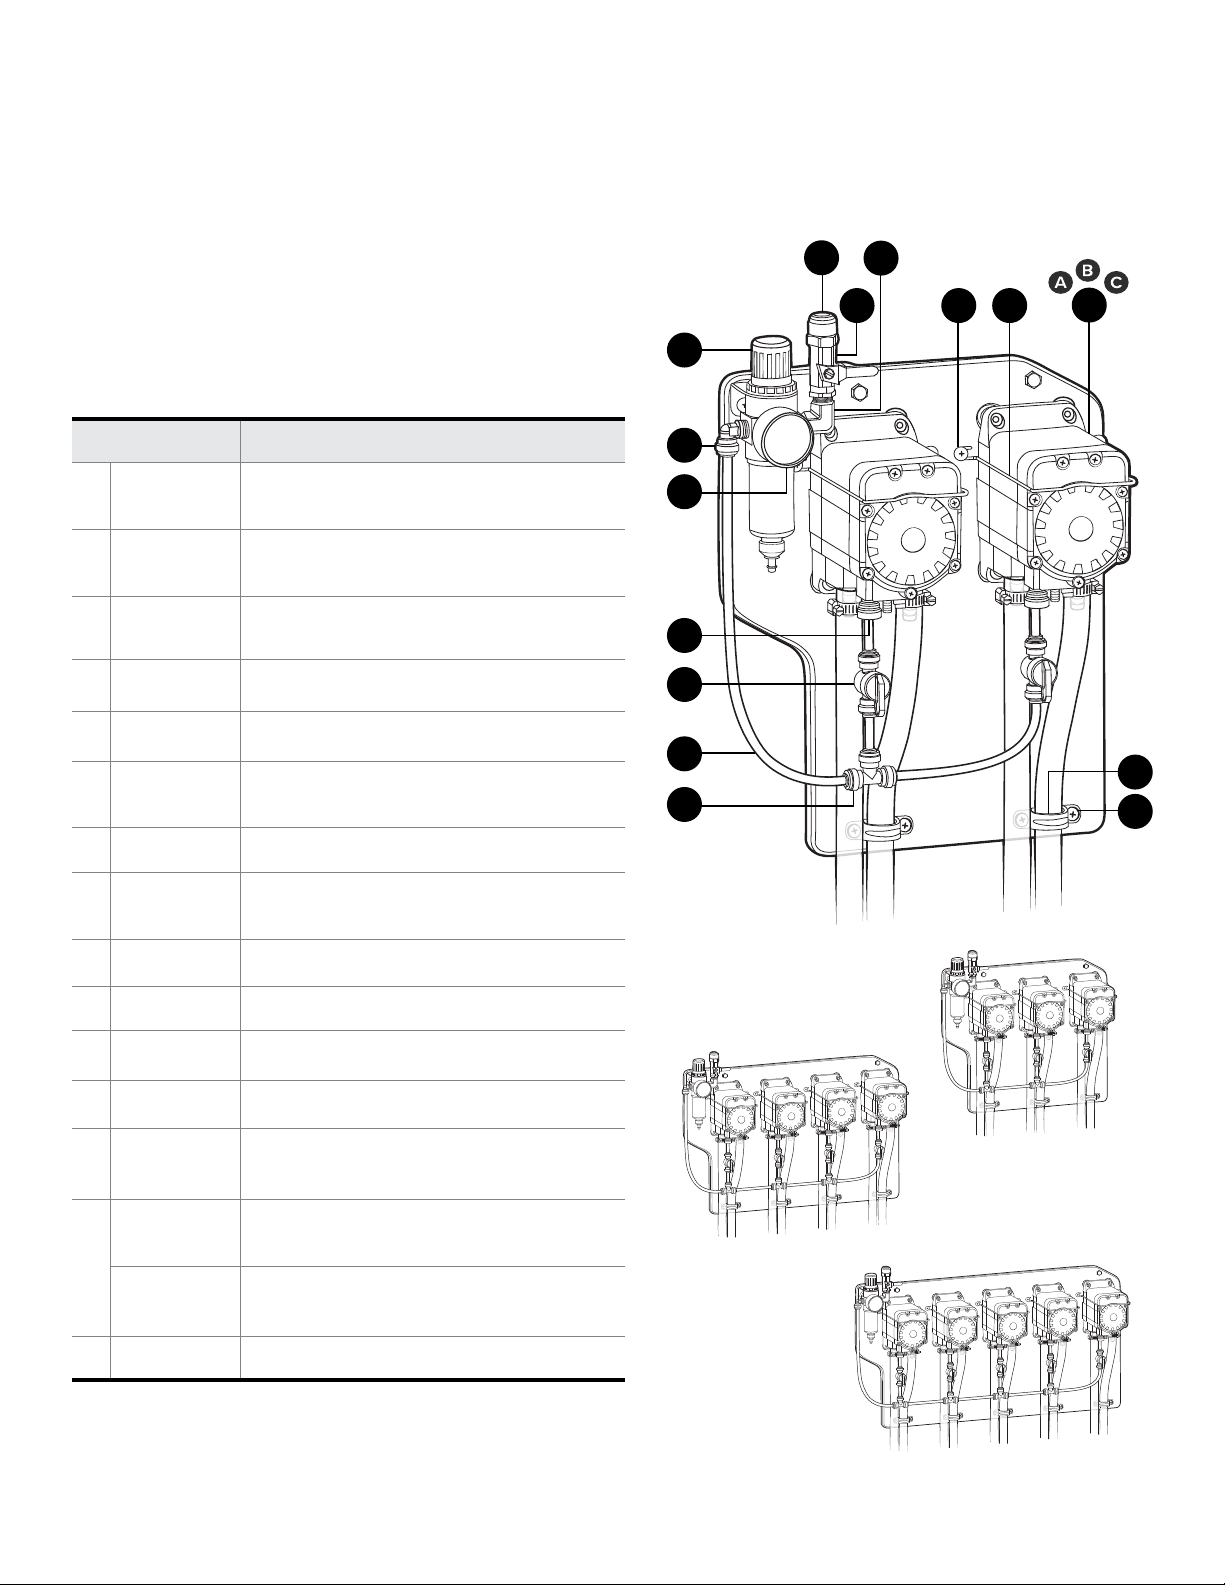
CTX2:
Chemical transfer unit - exposed pump - two product -
Santoprene pumps
Additional pump variation examples:
CTX2VK: One pump Viton, one pump Kalrez pump seals
CTX3V: Three pumps with Viton pump seals
CTX4SSKK: Two pumps Santopene, two pumps Kalrez
CTX5: Five pumps with Santoprene pump seals
Note: No option code needed for Santoprene only units
CTX2
1
CTX2 - CTX5
8
10
9
11
12
13
Item number Description
1 R25
2 QFEL14P
3 AG100
4 QF14PAF Quick fit - ⁄ MPT pump air fitting
5 QFSOV14 Shut o valve ⁄ in. tube - polypropylene
6 TB14BL-PU
7 QFT14 Union tee ⁄ in. tube - polypropylene
8 QF1438
9 BVB14 Air inlet valve - ⁄ in. FPT x ⁄ in. FPT
10 SEL14M Stainless elbow ⁄ in. MPT x ⁄ in. MPT
Air regulator - two ¼ in. FPT ports - two
⅛ in. FPT ports - includes filter and bowl
Fixed elbow ⁄ in. tube x ⁄ in. MPT polypropylene
Air gauge - ⅛ in. NPT - 100 PSI dry
model
⁄ in. od blue polyurethane tubing available per ft.
Quick fit - ⁄ MPT x ⁄ od tube polypropylene
2
3
4
5
6
14
7
11
11 S1012-HL 10-16 x ⁄ in. screw - stainless - hi lo
12 BRKT-P56 Pump bracket - stainless steel
13 A P56
B P56K
C P56V
14 CLMP12 Clamp for ⁄ in. hose - PVC
Pump with Santoprene seals - includes
hose barbs, air fitting, and exhaust barb
Pump with Kalrez seals - includes hose
barbs, air fitting, and exhaust barb
Pump with Viton seals - includes hose
barbs, air fitting, and exhaust barb
CTX3
CTX4
CTX5
V20230814 • Page 6 of 9Model: CTX1 - CTX5
Page 16
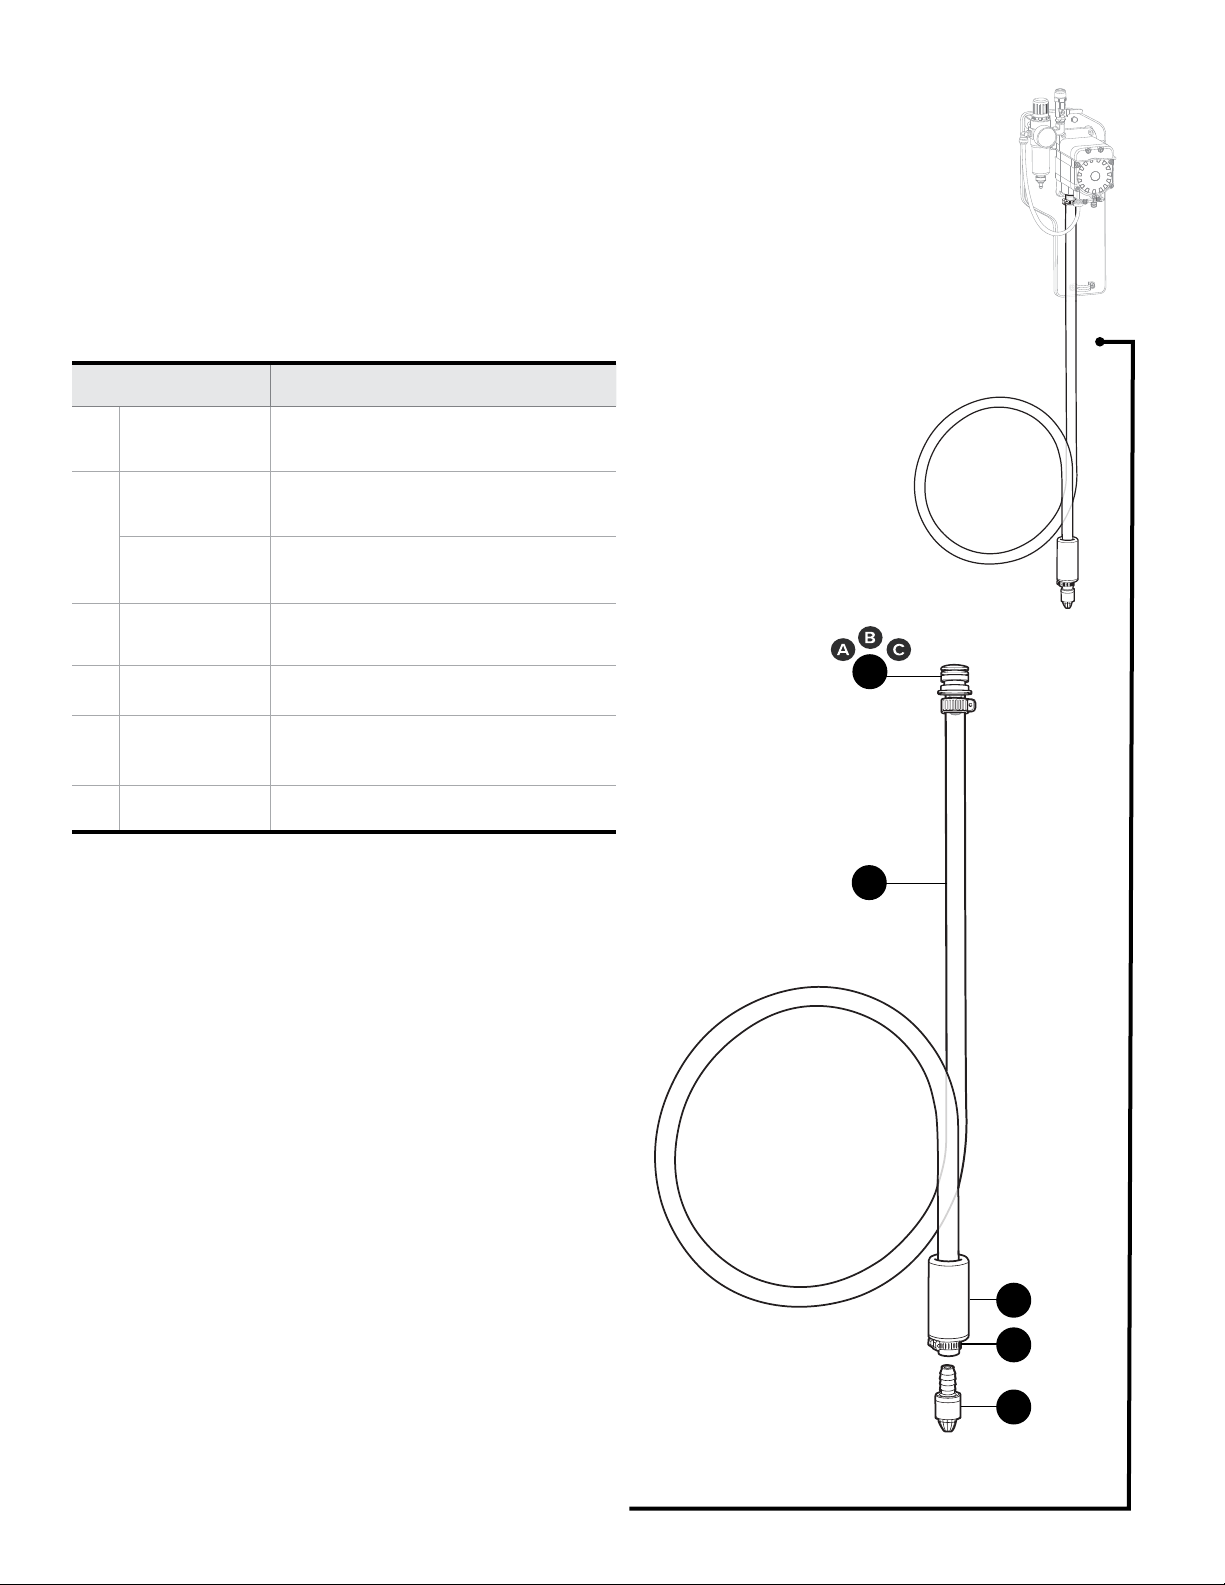
Suction Assembly
SHA12CL-8-CB:
Suction assembly for chemical transfer units - includes
suction valve, hose, weight, and pump hose barb - for
Santoprene pump
Additional suction assembly options:
SHA12CL-8-CBK: Kalrez pump
SHA12CL-8-CBV: Viton pump
Item number Description
1 A HB5638
B HB5638K
C HB5638V
2 H12CL-CB
3 SHW3 3 in. long coated weight
4 SSC12
5 FV2 Foot valve - Viton - black
Hose barb for P56 pump - EPDM
o-ring
Hose barb for P56K pump - Kalrez
o-ring
Hose barb for P56V pump - Viton
o-ring
⁄ in. id clear braid hose - PVC available per ft.
Stainless screw band clamp for ⁄ in.
hose
1
2
SHA12CL-8-CB
3
4
5
V20230814 • Page 7 of 9Model: CTX1 - CTX5
Page 17
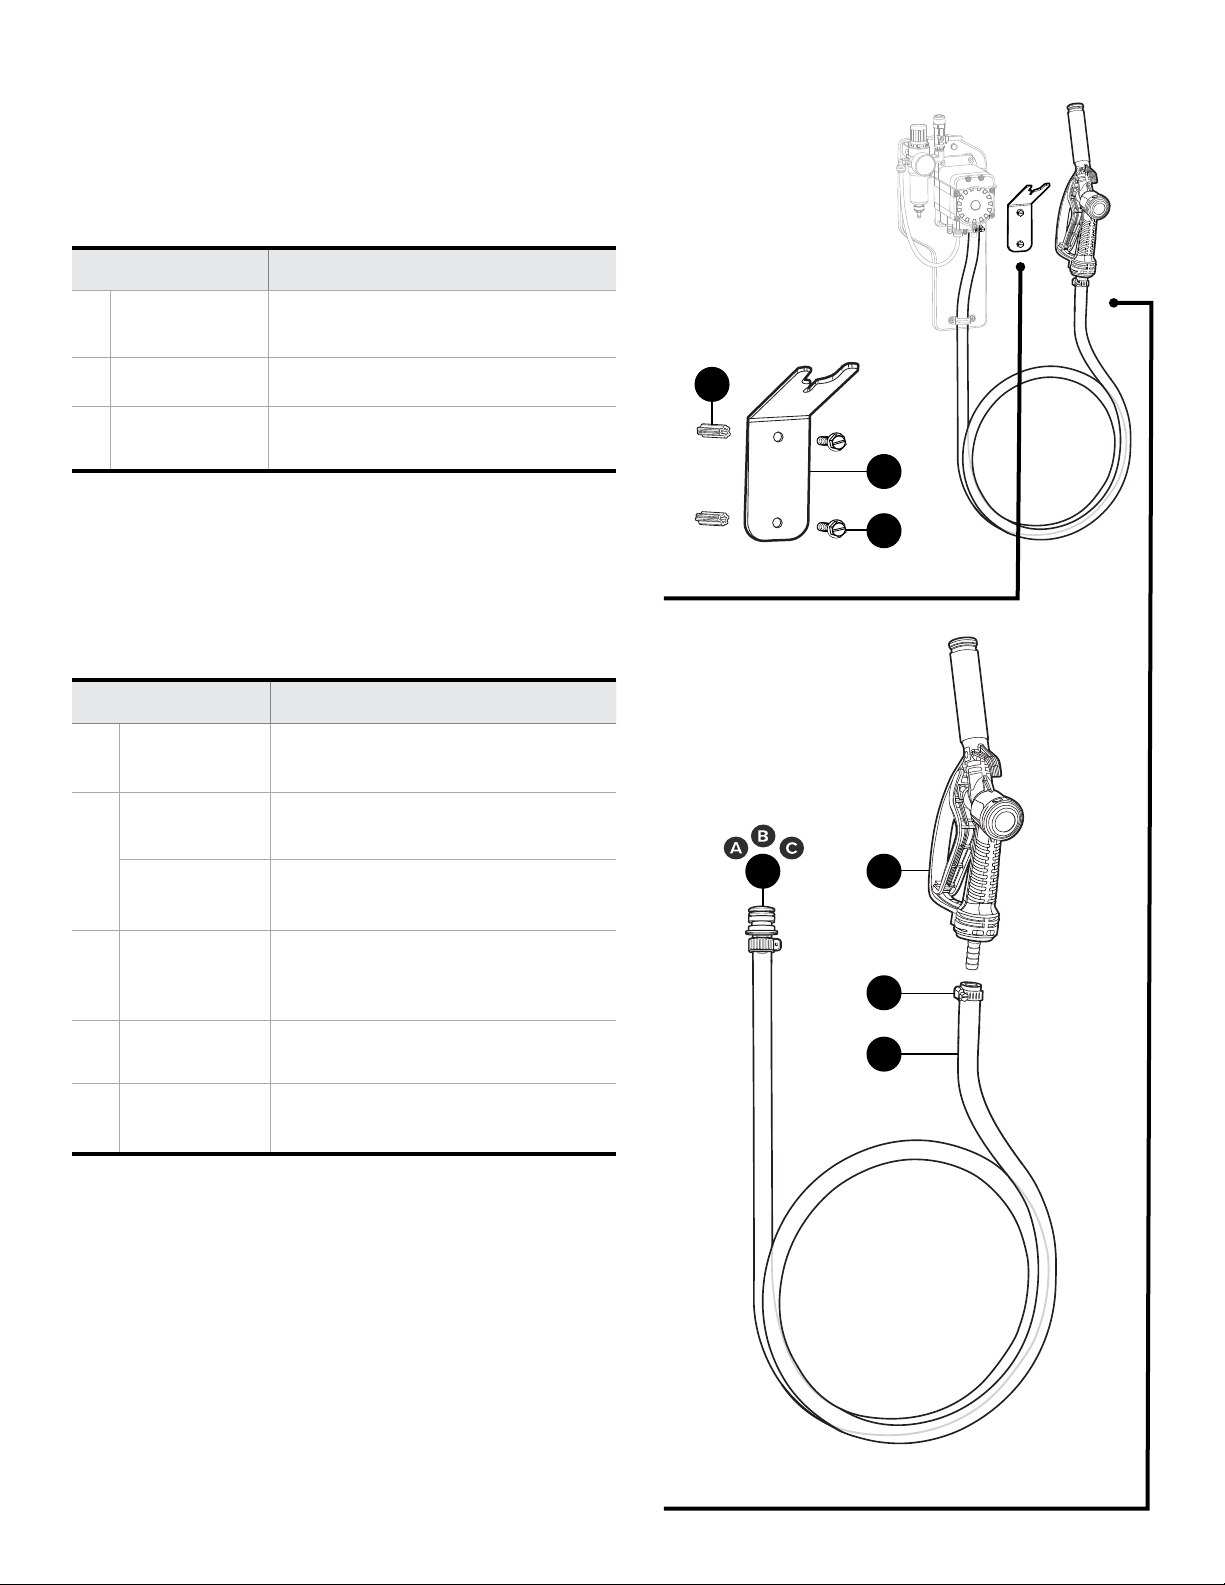
Discharge Assembly
BRK TA -PFG:
Bracket assembly for poly fill gun - inlcludes bolt, anchor,
and bracket
Item number Description
1 WMS14A
2 BRKT- PFG Mounting bracket for poly fill gun
3 WMS14
PFGA-WH-H12CL-8-CB-HB56:
Discharge assembly - includes fill gun, hose, hose barb,
and screw band clamps - for Santoprene pump
Additional discharge assembly options:
PFGA-WH-H12CL-8-CB-HB56K: Kalrez pump
PFGA-WH-H12CL-8-CB-HB56V: Viton pump
Item number Description
4 A HB5638
B HB5638K
C HB5638V
#14 x 1 ⁄ in. wall mount screw
anchor - plastic - ⁄ in. drill size
#14 x 1 ⁄ in. wall mount screw stainless - hex head slotted
Hose barb for P56 pump - EPDM
o-ring
Hose barb for P56K pump - Kalrez
o-ring
Hose barb for P56V pump - Viton
o-ring
1
BRK TA -PFG
4
2
3
5
5 PFG12HB
6 SSC12
7 H12CL-CB
White fill gun - polypropylene - ⁄
in. hose barb - Hastelloy spring Viton seals
Stainless screw band clamp for ⁄ in.
hose
⁄ in. id clear braid hose - PVC available per ft.
6
7
PFGA-WH-H12CL-8-CB-HB56
V20230814 • Page 8 of 9Model: CTX1 - CTX5
Page 18
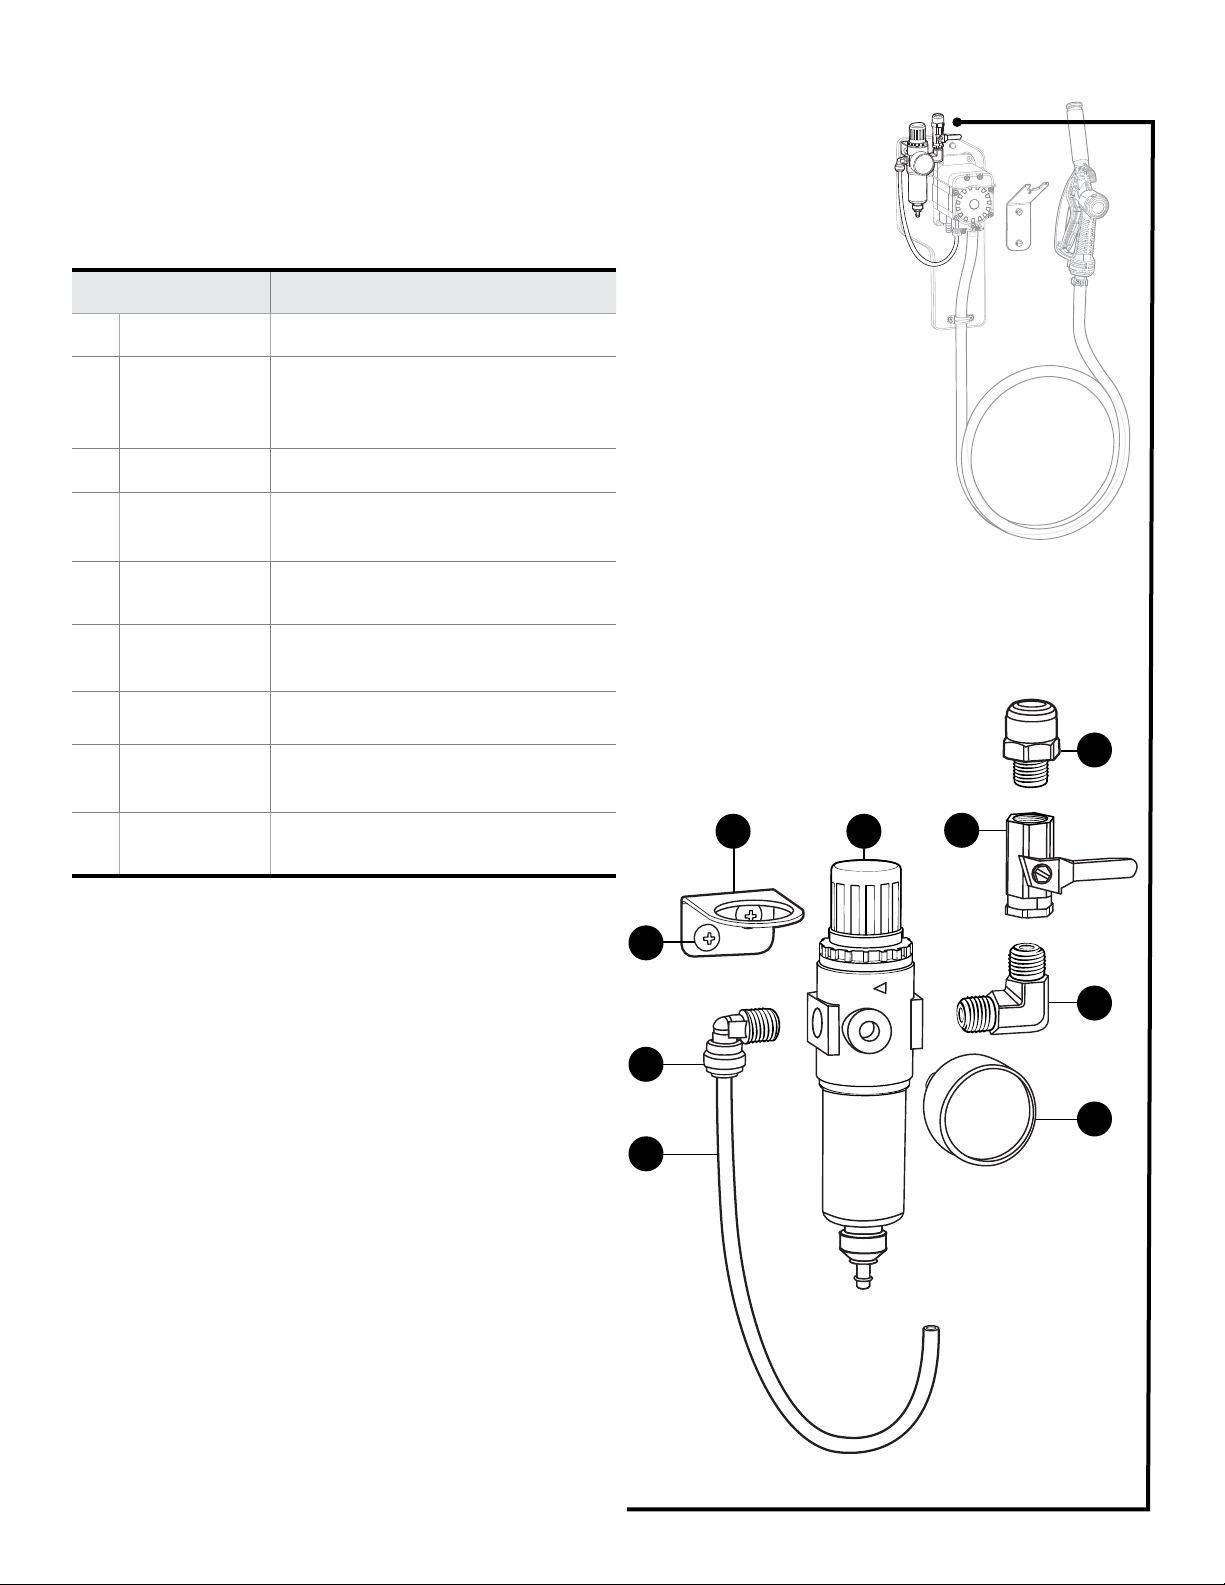
Regulator Assembly
RGA-R25-CTX:
Air regulator assembly for chemical transfer units - includes
air gauge, quick fit, hose, air inlet valve, bracket, and
elbows
Item number Description
1 REGBRKT A33-82 bracket, MTG
Air regulator - two ¼ in. FPT ports -
2 R25
3 BVB14 Air inlet valve - ⁄ in. FPT x ⁄ in. FPT
two ⅛ in. FPT ports - includes filter
and bowl
4 QF1438
5 SEL14M
6 AG100
7 S1012-HL 10-16 x ⁄ in. screw - stainless - hi lo
8 QFEL14P
TB14BL-PU
9
Quick fit - ⁄ MPT x ⁄ od tube polypropylene
Stainless elbow ⁄ in. MPT x ⁄ in.
MPT
Air gauge - ⅛ in. NPT - 100 PSI dry
model
Fixed elbow ⁄ in. tube x ⁄ in. MPT polypropylene
⁄ in. od blue polyurethane tubing available per ft.
4
1
2
3
7
5
8
9
RGA-R25-CTX
6
V20230814 • Page 9 of 9Model: CTX1 - CTX5
 Loading...