

Page 1
HS-01
智能电烙铁使用说明书
Intelligent Electric Soldering Iron user Manual
Page 2

Page 3

目 录
用户须知
一、产品介绍
二、仪器说明
三、产品参数
四、电源选择
五、产品使用状态
01
01
02
02
03
04
六、操作说明
七、固件升级
八、维护保养
九、安全须知
十、保修条款
十一、生产信息
05
07
08
08
09
09
Page 4

CATALOG
User Notice
1.Products Overview
2.Instrument Description
3.Parameter
4.Power selection
5.Product Usage
10
10
11
11
12
13
6.Operating Instructions
7.Firmware upgrade
8.Maintenance
9.Safety Instructions
10.Warranty terms
11.Contact US
15
17
18
18
19
19
Page 5

СОДЕРЖАНИЕ
УВЕДОМЛЕНИЕ ПОЛЬЗОВАТЕЛЯ
1. ОБЗОР ПРОДУКТА
2. ОПИСАНИЕ ИНСТРУМЕНТА
3. ХАРАКТЕРИСТИКИ
4. ВЫБОР ПИТАНИЯ
5. ИСПОЛЬЗОВАНИЕ ПРОДУКТА
20
20
21
21
22
23
6. ИНСТРУКЦИЯ ПО ЭКСПЛУАТАЦИИ
7. ОБНОВЛЕНИЕ ПРОШИВКИ
8. ОБСЛУЖИВАНИЕ
9. ТЕХНИКА БЕЗОПАСНОСТИ
10. УСЛОВИЯ ГАРАНТИИ
11.СВЯЗАТЬСЯ С НАМИ
25
28
29
30
30
31
Page 6

ÍNDICE
Aviso ao utilizador
1.Visão geral do produto
2.Descrição do produto
3.Parâmetros
4.Seleção de potência
5.Utilização do produto
32
32
33
33
34
36
6.Instruções de funcionamento
7.Atualização do firmware
8.Manutenção
9.Instruções de segurança
10.Termos da garantia
11.Contate-nos
37
41
42
43
43
44
Page 7

用户须知
●请详细读完本使用说明书以及操作指示,并且要确实遵守文中的规定。
●请妥善保存本使用手册。
●报废的仪器不可与生活垃圾一同处理,请按国家或者当地的相关法律规定处理。
●当仪器出现任何质量问题或者对使用仪器有疑问时,可联系“菲尼瑞斯-FNIRSI”在线客服或厂家,我们将在
第一时间为您解决。
●感谢您购买此产品,为了您能更加方便的使用本产品在使用时请按说明书操作。
一、产品简介
HS-01是本公司推出的一款便携式屏显智能电烙铁。该电烙铁具有以下特点:
●小巧便捷,携带方便
●控温精准
●回温快,升温迅速
●9-20V工作电压
●自带OLED屏显
●Type-c接口供电
1
●人体工学设计,握感舒适
Page 8
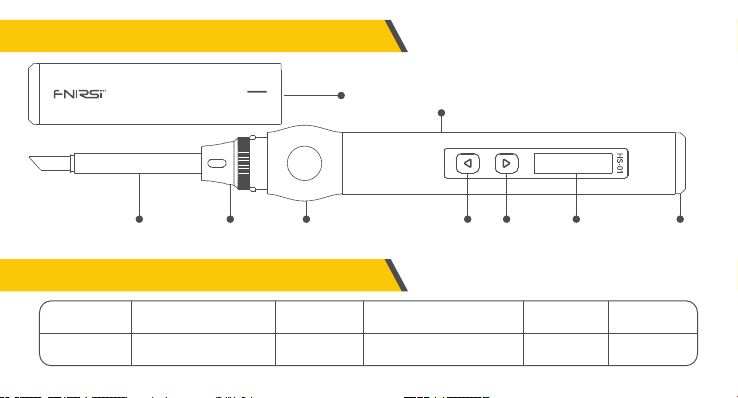
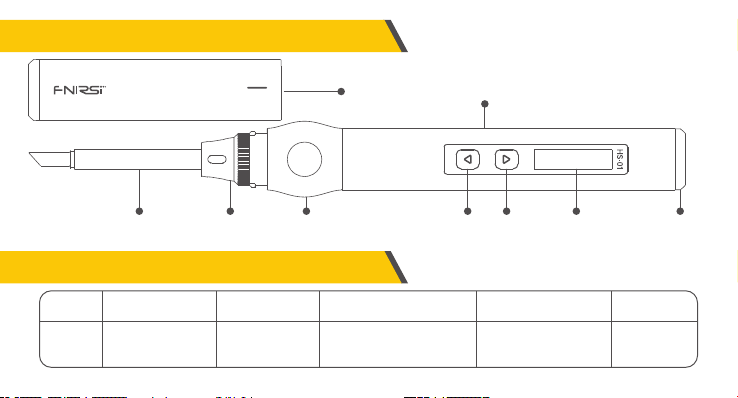
二、仪器说明
烙铁头 锁紧螺母 硅胶
三、产品参数
功率
供电
65W
USB Type-c接口
屏幕
温度范围
笔盖
2
笔身
0.87寸OLED屏
80-420℃(180-780℉)
左键 右键 OLED屏幕 Type-c
供电接口
工作电压
快充协议
DC9-20V
PD触发
Page 9
四、电源选择
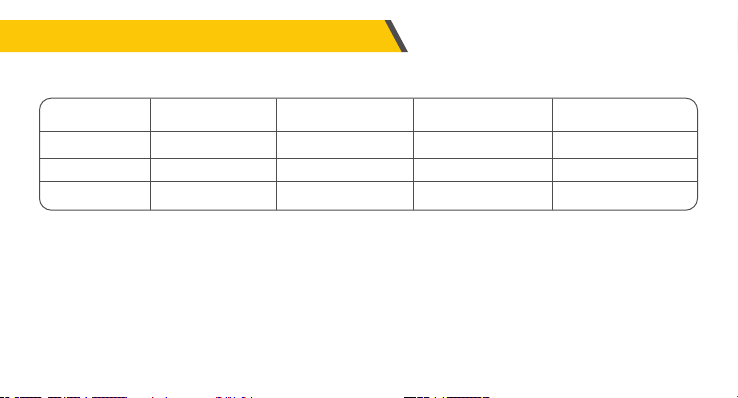
使用PD快充协议的电源适配器,烙铁可以设置向适配器获取9V\12V\15\20V中任意一档的工作电压(默认设置20V)。不同的工作
电压下,工作电流、功率及化锡时间参考如下:
工作电压
工作电流
功 率
化锡时间
注意:
●智能烙铁默认获取工作电压为20V,如果您的适配器输出最高电压小于20V,则获取输出的最高电压。如您的适配器最高输出12V,则获取
12V。
●当使用不带PD快充协议的电源适配器时,智能烙铁工作电压则为输入的电压。注意:接入适配器,进入主界面后加热就重启,说明适配器
输出功率不足以正常工作,请更换其他适配器!
●如果您的适配器输出 20V,但输出电流小于 3.25A 时(即输出功率小于烙铁所需功率),进入主界面后加热,适配器可能会断电重启,导致屏
幕重启!(其他工 作电压也是一样)。
●出现加热就重启的情况,说明您的适配器当前电压的输出功率不足以正常工作,请根据适配器输出功率选择设置更低的工作电压。如您的
适配器输出:12V/2.5A, 15V/2A, 20/1.5A,输出总功率 30W。则选择设置工作电压为 12V。
20V
≥3.25A
65W
8秒
15V
≥2.5A
37.5w
12秒
12V
≥2A
24w
17秒
3
9V
1.5A
13.5w
30秒
※低于9V会屏幕会显示电压低。
Page 10
五、产品使用状态
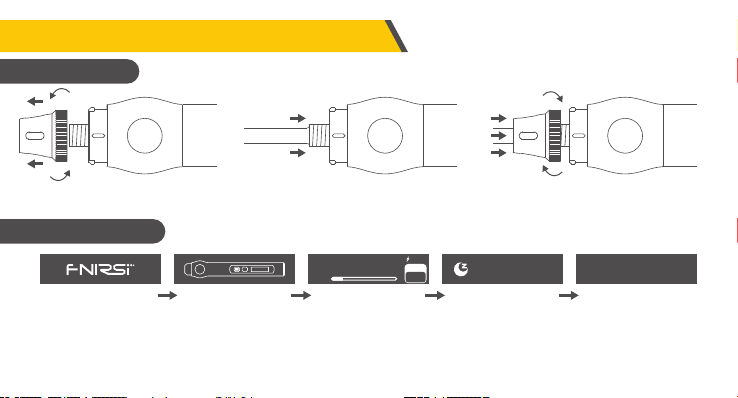
1.安装说明
※插入烙铁头时发现卡顿可以尝试旋转一下再插入。
①拆开螺母 ②插入烙铁头 ③锁紧螺母
2.工作流程说明
20V
280
开机LOGO 开机加热 主页面 休眠 关机
10%
HS-01智能烙铁工作流程如上图所示,上电后显示logo,短按一次对应闪烁的实体按键进行加热,当童锁模式
开启时短按三下对应的实体按键进行加热。进入主界面,烙铁处于正常工作状态,分为以下三种:
●工作状态:烙铁处于加热或已加热完成可以使用状态,切勿触碰高温部位。
SET
℃
280
4
200
℃
关机
Page 11
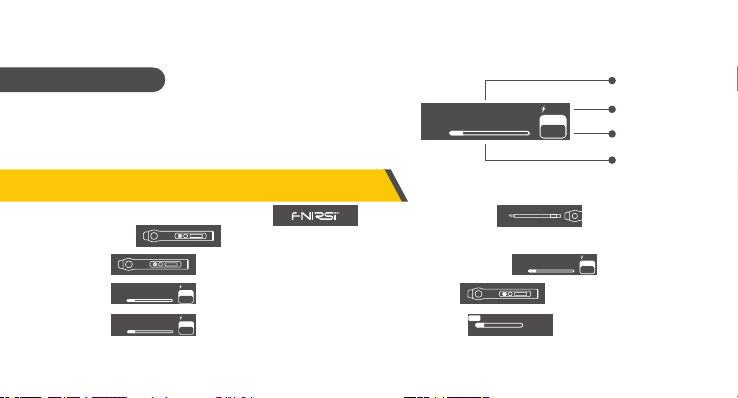
●休眠状态:烙铁已处于加热使用状态下,静止未使用超过设定休眠时间进入休眠,使用即解除。
●关机状态:断电即关机。
3.主界面说明
主页面如右图所示,右下角显示的是用户设定的目标温度,
中间显示烙铁实时温度。底下显示的是加热功率,右上角显
示的是工作电压。
10%
280
20V
SET
℃
280
烙铁头温度
工作电压
设定温度
加热功率条
六、操作说明
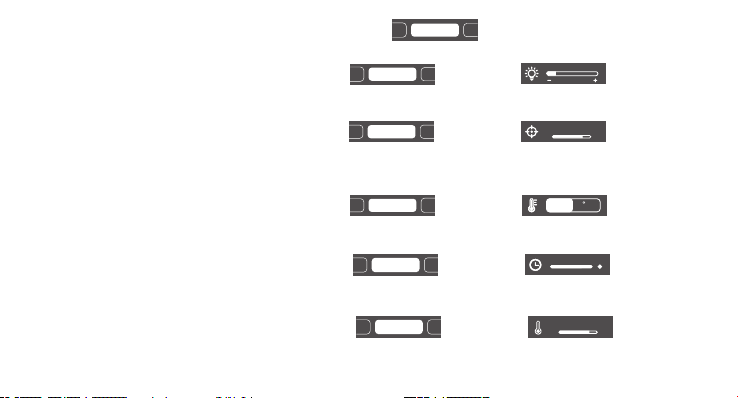
●开 机:上电即开机,屏幕显示开机图标 随后显示提示插入烙铁头 ,烙铁头插好后显示
界面 。
●加 热: 中的图标按键会闪,这时短按对应的实体按键进入加热页面 ,烙铁加热。
20V
SET
280
●一键待机: 在加热页面长按右键一键关闭加热,回到待机页面 。
●温度设置: 在加热的页面状态下按左右键可进入温度设置页面 ,进行温度设置,
℃
280
280
20V
SET
℃
280
10%
10%
SET
80 420
10%
短按右键加一个步进数值,短按左键减一个步进数值。长按快加或快减,步进为10℃或20℉。
5
280
280
20V
SET
℃
280
℃
Page 12
温度单位
休眠时间
休眠单位
童锁模式
●设置模式:在非设置温度的页面下,同时长按左右键进入设置模式 。
温度校准
温度校准
屏幕亮度
●屏幕亮度:进入到设置模式下短按左右键切换到屏幕亮度 ,长按右键进入 ,左右键调节,调
屏幕亮度
节完成长按任意键退出。
30
●温度校准:进入到设置模式下短按左右键切换到温度校准 ,长按右键进入 ,左右键调节,调
温度校准
℃
-50 50
节完成长按任意键退出。在主页面下,设定目标温度为350℃,温度稳定后使用烙铁测温仪测量实际温度,记录目标
温度减去实际温度的差值(值可正可负),在进入菜单将差值填入此项。
●温度单位:进入到设置模式下短按左右键切换到温度单位 ,长按右键进入 ,左右键切换,切
温度单位
℃
F
换完成长按任意键退出。
●休眠时间:进入到设置模式下短按左右键切换到休眠时间 ,长按右键进入 ,左右键调节,调
节完成长按任意键退出。休眠时间默认20分钟,设置范围为1-20分钟,设置到最大时再短按一下可以关闭休眠。
●休眠温度:进入到设置模式下短按左右键切换到休眠温度, 长按右键进入, 左右键调节,调
休眠时间
休眠温度
1 20
150
℃
80 200
关
节完成长按任意键退出。当工作温度低于休眠温度时,休眠状态下保持工作温度,当工作温度高于休眠温度时,休眠
状态时温度会降到休眠温度。
6
Page 13
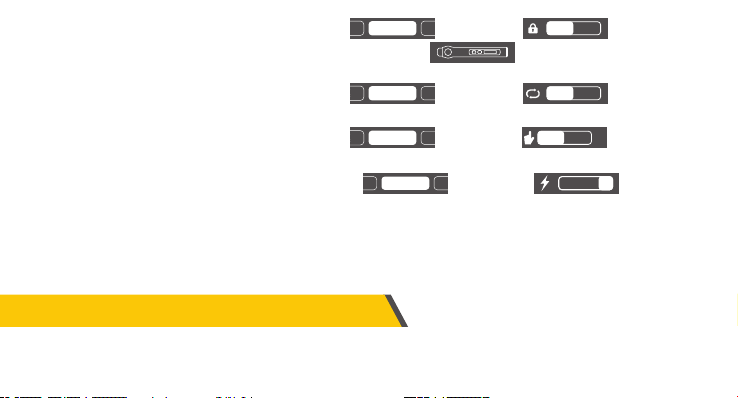
●童锁模式:进入到设置模式下短按左右键切换到童锁模式 ,长按右键进入 ,左右切换,切换
语言选择
手幕亮度
屏幕亮度
屏幕亮度
童锁模式
开
关
完成长按任意键退出。开启童锁模式后再次上电使用时会显示 图标按键有个锁的图标,这时要连
续短按3下左键才能加热。
English
●语言选择:进入到设置模式下短按左右键切换到语言选择 ,长按右键进入 ,左右切换,切换
语言选择
中文
完成长按任意键退出。
手持模式
●手持模式:进入到设置模式下短按左右键切换到手持模式 ,长按右键进入 ,左右切换,切换
择
左手
右手
完成长按任意键退出。产品默认右手,客户可凭自己的使用习惯和喜好设置。切换到左手后按键的操作逻辑相反。
●电压档位:进入到设置模式下短按左右按键切换到电压档位 ,长按右键进入 ,进入后左右切
电压挡位
91215 20
换9V/12V/15V/20V四个电压档位,切换完成后长按任意按键退出,默认20V,客户可根据自己的充电器功率参数进行
设置,以避免出现功率不足导致充电器启动过流保护,设备强制关机黑屏现象。当出现此现象的时候,只需待充电器
恢复后,在不加热或者无烙铁头的时候进入设置页面重新选择合适的档位。
●产品在休眠的状态下无操作30分钟后会自动关机
七、固件升级
●设备断电,按住左键,再使用USB Type-c数据线连接电脑给设备上电,进入Bootloader界面进行固件升级。
●选择相应的串口号,左边显示就绪时打开选择文件,点击烧录即可。
7
Page 14

八、维护保养
●新的烙铁头第一次使用时需要先加热至250℃上锡,防止干烧氧化。
●新的烙铁第一次使用会存在温度乱跳的问题,反复使用几次后会稳定。
●烙铁使用完后请在烙铁头上涂上适量的焊锡,防止氧化。
●烙铁头的正常工作温度约为300-380℃,不宜长时间温度过高使用影响烙铁头寿命。
●焊接工作时避免暴力敲击烙铁头。
●使用湿海绵切勿有明水,半干状态最佳。
●不要使用含氯或酸过高的助焊剂,避免腐蚀表面。
●如果烙铁头表面氧化不沾锡,可用纱布或其他工具小心擦除表面层,然后上电加热至250℃,立即上锡黏住表面,以防再次氧化。
九、安全须知
●烙铁头工作时温度可达80-420℃,切勿触碰烙铁头。
●请放置于儿童接触不到的地方。
●切勿弄湿本产品,或在潮湿环境中使用。
●长时间不使用时,请断开电源。
●正常工作时,手柄处会有一定的温度,属于正常现象,请放心使用!
8
Page 15

十、保修条款
●服务期限
深圳市菲尼瑞斯科技有限公司承诺产品的良好品质,产品自售出之日起 7 天内正常使用 情况下机器出现故障,客户可以选择退
货或者保修(不影响二次销售才可以退货),正常使用一年内出现故障可以免费保修。
●购买日期以销售商开出的购机发票或收据日期为准,网购可以以交易截图为准。
●对于以下的情况,不提供免费保修服务
(1)一切人为损坏、私自改装、维修造成机器损坏的。
(2)烙铁头属于易耗品,不支持保修。
十一、生产信息
产品名称:HS-01智能电烙铁
品牌/型号:FNIRSI/HS-01
服务电话:0755-83242477
生产商:深圳市菲尼瑞斯科技有限公司
网址:www.fnirsi.cn
地址:广东省深圳市龙华区大浪街道伟达工业园C栋西边8楼
执行标准:GB/T 7157-2019
9
Page 16

User Notice
●Please read this user manual and operating instructions carefully, and be sure to abide by the stipulations in the text.
●Please keep this manual properly.
●Discarded instruments cannot be disposed of together with household waste,please dispose according to relevant
national or local laws and regulations.
●When there are any quality problems or questions about the use of the instrument,you can contact the online
customer service of "Fnirsi-FNIRSI" or the manufacturer,and we will solve them as soon as possible.
●Thank you for purchasing this product. In order to make it more convenient for you to use this product, please operate
follow this instructions.
1.Products Overview
HS-01 is a portable screen display intelligent electric soldering iron launched by our company.The electric soldering iron
has the following characteristics:
● Small and convenient,
easy to carry.
● Precise temperature control
● Fast temperature recovery
and rapid temperature rise
● 9-20V operating voltage
10
● Built-in OLED screen display ● Ergonomic design,
● Type-c interface power supply
comfortable grip.
Page 17
2.Instrument Description
soldering
iron tip
locking
nut
3.Parameter
silica
gel
Pen cover pen body
Left
Right
OLED
screen
Type-c interface
power supply
Power
Power
supply
65W Screen 0.87 inch OLED screen operating voltage DC9-20V
USB Typr-c port 80-420℃(180-780℉) PD trigger
Temperature
range
11
Fast charging
protocol
Page 18
4.Power selection
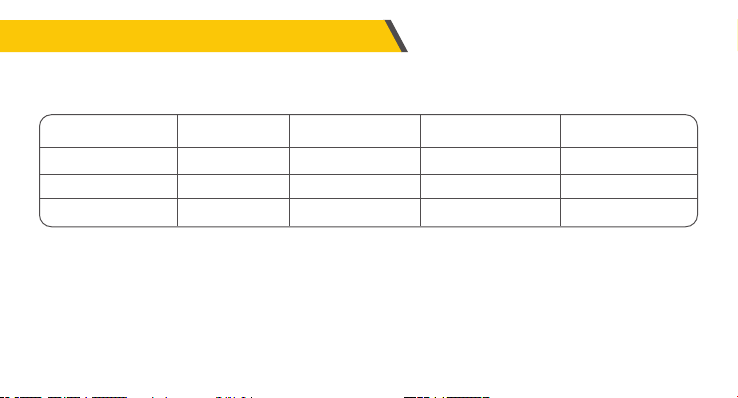
Using the power adapter of the PD fast charging protocol, the intelligent electric soldering iron can be set to obtain any
operating voltage of 9V\12V\15\20V from the adapter.(The defualt seting is 20V).Under different operating voltages, the
working current, power and tinning time are as follows:
Operating voltage
Operating current
Power
Tin melting time
Notice:
●The default operating voltage of the Intelligent soldering iron is 20V. If the maximum output voltage of your adapter is
less than 20V, the maximum output voltage will NOT be obtained. If your adapter outputs up to 12v, get 12V.
●When the power adapter without PD fast charging protocol is used, the operating voltage of the intelligent soldering
iron is the input voltage.It is noted that when the adapter is connected and the heating will restart after entering the
home page.This indicates that the output power of the adapter is not sufficient for adapter, please replace another
adapter.
20V
≥3.25A
65W
8s
15V
≥2.5A
37.5w
12s
※If the voltage is lower than 9V, the screen will display low voltage.
12
12V
≥2A
24w
17s
9V
1.5A
13.5w
30s
Page 19
● If output voltage of your adapter is 20V, but the ouput current is less than 3.25A(That is to say, the output power is less
than the power required by the soldering iron),after entering the main interface and heating,the adapter may be powered
off and restarted, which will cause the screen to restart!(Other operating voltages are the same)
● If it restarts after heating, it means that the output power of the current voltage of your adapter is not enough to work
normally,Please select a lower working voltage according to the output power of the adapter.If your adapter output is
12V/2.5A, 15V/2A or 20/1.5A, the total output power is 30W,set the operating voltage to 12V.
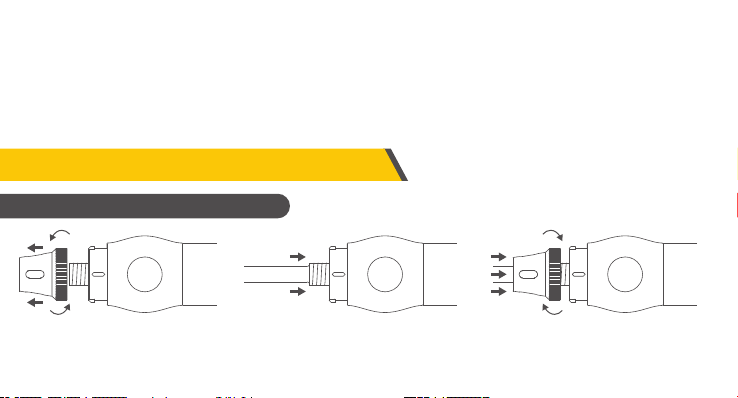
5.Product Usage
Installation Instructions
①Remove the nut ②Insert the soldering iron tip ③Lock nut
※If it is found that the soldering iron is stuck when inserting, you can try to rotate it and insert it again.
13
Page 20
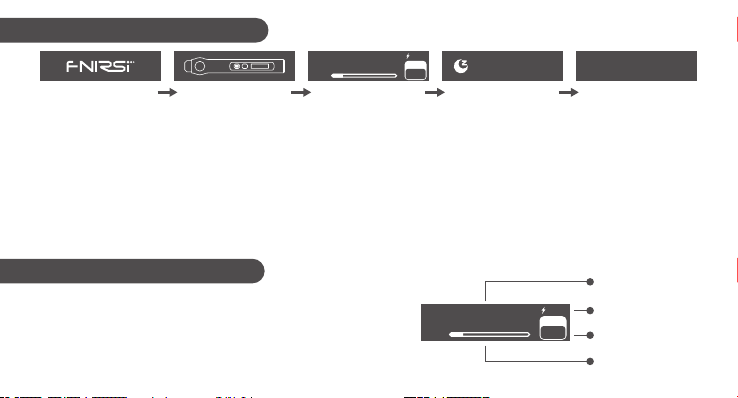
Workflow Description
20V
280
Boot Logo Turn on heating Home page Hibernate Shutdown
The working process of HS-01 intelligent soldering iron is shown in the figure above.After power-on, the logo is displayed.
Short press the corresponding flashing physical button once to heat up.When the child lock mode is turned on, short
press the corresponding physical button three times to heat. Entering the main interface, you can choose between 3
main working states of the soldering iron:
●Working state:The soldering iron is in a heated or ready-to-use state, please do not touch the high temperature parts.
●Sleep state: The soldering iron is already in the state of heating and use, and it will enter into sleep state if it is not used
for more than the sleep time, and it will be released after use.
●Shutdown state: It will shut down when the power is disconnected.
10%
Home page description
The home page is shown on the right, the lower right corner shows
the target temperature set by the user,and the middle is the
real-time temperature of the soldering iron. The bottom shows the
heating power, and the upper right shows the operating voltage.
SET
℃
280
10%
14
200
280
℃
℃
20V
SET
280
Shutdown
Soldering iron tip
temperature
operating voltage
set temperature
Heating power bar
Page 21
6.Operating Instructions
Calibrate
Calibrate
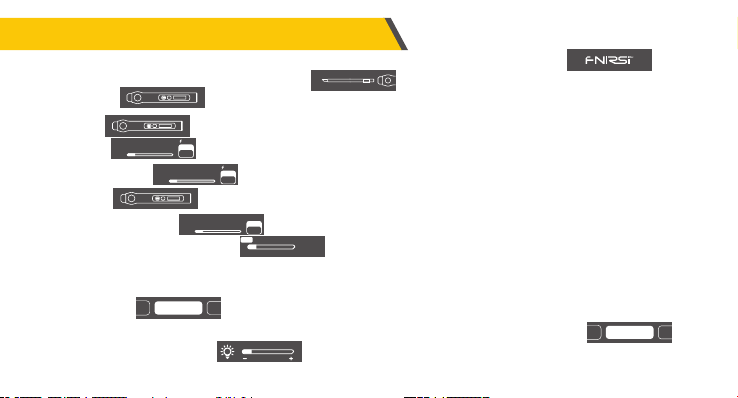
●Power on:Power on when connected to the power supply, the screen displays the boot icon, and then
displays a prompt to insert the soldering iron tip , The interface will be displayed after the soldering iron
tip is inserted .
●Heating: The icon button will flash, then short press the corresponding physical button to enter the
heating page , and the soldering iron will heat up.
10%
●One-key standby: Long press the right button on the heating page to turn off the heating and return to the
standby page .
●Temperature setting: In the heating page state, press the left and right keys to enter the temperature
setting page to set the temperature, short press the right button to add a step value, short press the left
button to decrease a step value. Long press to increase or decrease quickly, the step is 10°C or 20°F.
●Setting mode:In the non-temperature setting page, press and hold the left and right keys at the same time to enter
the setting mode .
●Screen brightness:In the setting mode, short press the left and right keys to switch to brightness ,
long press the right key to enter , and the left and right keys adjust, and long press any key to exit.
280
℃
280
10%
Birghtness
20V
SET
280
20V
SET
℃
280
280
℃
10%
280
SET
80 420
280
℃
Birghtness
15
Page 22
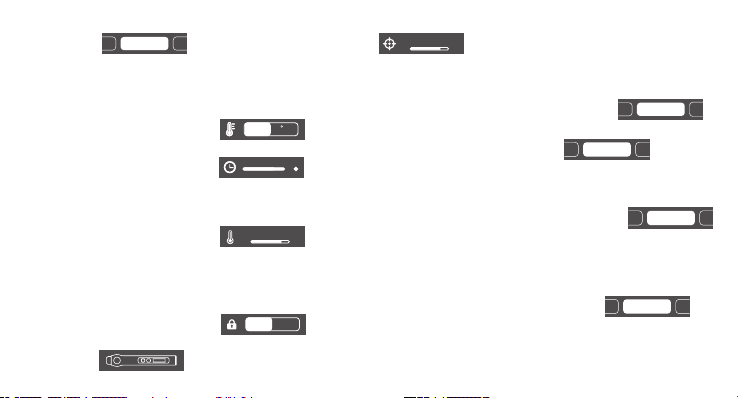
Child Lock
Sleep Time
Language
Sleep Temp
● Temperature calibration: When entering the setting mode, short press the left and right keys to switch to the temperature
Temp Unit
calibration , long press the right keys to enter , the left and right keys to adjust, long press
Calibrate
any key to exit. Under the home page, set the target temperature as 350 ℃. After the temperature is stable, use the soldering
30
℃
-50 50
iron thermometer to measure the actual temperature, record the difference between the target temperature and the actual
temperature (positive or negative), and fill the difference into this item in the menu.
●Temperature unit: In the setting mode, short press the left and right keys to switch to the temperature unit ,
long press the right key to enter, and the left and right keys switch, and long press any key to exit.
℃
F
●Sleep time: In the setting mode, short press the left and right keys to switch to the sleep time , and
long press the right key to enter ,Left and right keys to adjust,after the adjustment is completed, long
press any key to exit. The default sleep time is 20 minutes, and the setting range is 1-20 minutes. When it is set to the
maximum, short press to turn off the sleep.
●Sleep temperature:In the setting mode, short press the left and right keys to switch to the sleep temperature ,
long press the right key to enter, and adjust the left and right keys. After the adjustment is completed, long
press any key to exit. When the working temperature is lower than the sleep temperature, the working temperature is
1 20
150
℃
80 200
OFF
Temp Unit
Sleep Time
Sleep Temp
maintained in the sleep state, and when the working temperature is higher than the sleep temperature, the temperature will
drop to the sleep temperature in the sleep state.
●Child lock mode: In the setting mode, short press the left and right keys to switch to the child lock mode ,
Open
long press the right key to enter , switch left and right , and long press any key to exit after the switch is
Close
Child Lock
completed. After the child lock mode is turned on, when the power is turned on again, the button with a lock icon will be
displayed .At this time, it is necessary to press the left button 3 times continuously to heat up.
16
Page 23
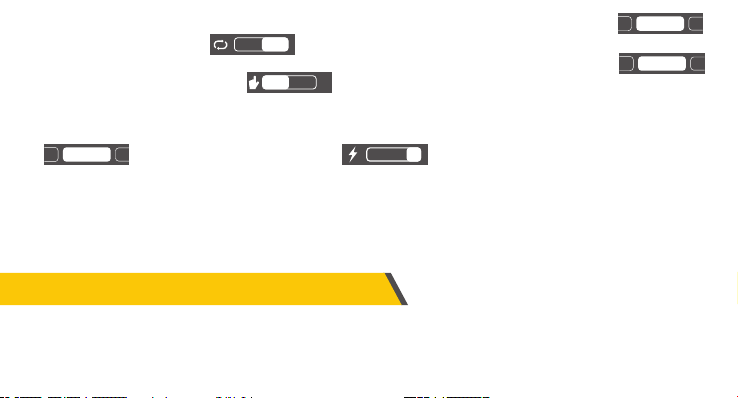
Vol Select
Birghtness
●Language selection:In the setting mode, short press the left and right keys to switch to language selection ,
Hand Held
English
long press the right key to enter, switch left and right, and long press any key to exit when the switch is complete.
中文
●Handheld mode:In the setting mode, short press the left and right buttons to switch to the handheld mode ,
Right
long press the right button to enter ,switch left and right, long press any key to exit after switching is
Left
Language
Hand Held
complete.The product is right-handed by default and can be set according to your own usage habits. The logic of switching
to the left hand is reversed.
●Voltage gear: In the setting mode, short press the left and right buttons to switch to the voltage gear type
, long press the right button to enter ,after entering, switch left and right to the four
Vol Select
91215 20
voltage gears of 9V/12V/15V/20V, after the switch is completed, the long press any button to exit, the default is 20V, and
the customer can set it according to the power parameters of the charger to avoid the phenomenon that the charger starts
over-current protection due to insufficient power, and the device is forced to shut down with a black screen. When this
phenomenon occurs, just wait for the charger to recover, and enter the setting page to re-select the appropriate gear when
there is no heating or no soldering iron tip.
●The product will automatically shut down after 30 minutes of inactivity in the dormant state
7.Firmware upgrade
●The device is powered off, press the left button, use the USB Type-c data cable to connect the computer to power on the
device, and enter the Bootloader interface to upgrade the firmware.
●Choose the corresponding serial port number, open the selected file when ready is displayed on the left, and click to burn.
17
Page 24

8.Maintenance
●When a new soldering iron tip is used for the first time, it needs to be heated to 250°C and tinned to prevent dry burning oxidation.
●The new soldering iron has the problem of the temperature jumping for the first time, and it will be stable after several times of use.
●After using the soldering iron, please apply an appropriate amount of solder to the tip of the soldering iron to prevent oxidation.
●The normal working temperature of the soldering iron tip is about 300-380°C, please don't use it for a long time if the temperature
is too high to affect its life.
●Avoid hitting the soldering iron head violently during welding.
●Do not use wet sponge with clear water, semi-dry state is best.
●Do not use scaling powder with high chlorine or acid to avoid corroding the surface.
●If the surface of the soldering iron tip is oxidized and does not stick to tin, use gauze or other tools to carefully wipe the surface layer,
then heat it up to 250 ℃, immediately apply tin to stick the surface to prevent re-oxidation.
9.Safety Instructions
●The temperature of the soldering iron tip can reach 80-420°C, please do not touch the soldering iron tip.
●Please keep out of reach of children.
●Please do not get this product wet, or use it in a humid environment.
●When not in use for a long time, please disconnect the power.
●When working normally, there will be a certain temperature at the handle, which is a normal phenomenon, please use it with
confidence!
18
Page 25

10.Warranty terms
●Service period
Shenzhen Finiris Technology Co., Ltd. promises the good quality of the product. If the product fails under normal use within 7 days
from the date of sale,the customer can choose to return or warranty (it can only be returned without affecting the second sale).There
is a free warranty for failures within the year.
●The date of purchase is subject to the date of purchase invoice or receipt issued by the seller. For online purchases, the screenshot
of the transaction shall prevail.
●For the following cases, no free warranty service is provided
(1) All damage to the machine caused by man-made damage, unauthorized modification or maintenance.
(2) Soldering iron tips are consumables and do not support warranty.
11.Contact US
Any FNIRSI'users with anyquestions who comes to contact us wiil have our promise to get asatisfactory solution
+ an Extra 6-Month Warranty to thanks for yoursupport!
By the way, We have created an interesting community, welcome to contact FNIRSI staff to join our community.
Shenzhen FNIRSI Technology Co.,LTD.
Add.: West of Building C,Weida Industrial Park,Dalang Street,Longhua District,Shenzhen,Guangdong
E-mail: fnirsioffi[email protected] (Business) / fnirsioffi[email protected](Equipment service)
Tel: 0755-83242477 / +8613536884686
19
Page 26

УВЕДОМЛЕНИЕ ПОЛЬЗОВАТЕЛЯ
●Пожалуйста, внимательно прочтите данное руководство, и придерживайтесь инструкций.
●Сохраните данное руководство.
●Использованное устройство не может быть выброшено вместе с домашним мусором. Пожалуйста, следуйте
местным законам и правилам.
●Если у вас возникли проблемы или вопросы связанные с инструментом, вы можете связаться с нашей онлайн
поддержкой покупателя "Fnirsi-FNlRSI", и мы решим их как можно быстрее.
●Спасибо, что выбрали наш продукт. Чтобы использование было удобным, пожалуйста, следуйте приведенным
инструкциям.
1. ОБЗОР ПРОДУКТА
HS-01 это портативный умный паяльник с дисплеем выпущенный нашей компанией. Электрический паяльник
имеет следующие характеристики:
●Маленький и удобный,
легко держать.
●Точный контроль
температуры
●Быстрый нагрев и
восстановление температуры
●9-20V рабочее
напряжение
20
●Встроенный OLED дисплей
●Type-С интерфейс питания
●Эргономичный
дизайн,
удобная ручка.
Page 27
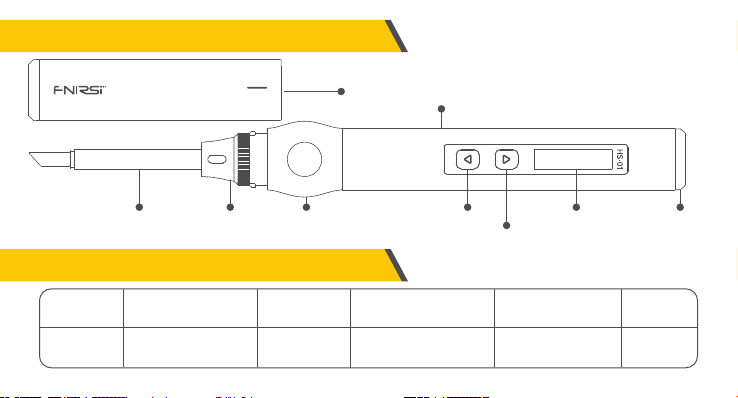
2. ОПИСАНИЕ ИНСТРУМЕНТА
ЖАЛО
ПАЯЛЬНИКА
ГАЙКА
3. ХАРАКТЕРИСТИКИ
Мощность
Источник
питания
65W Экран OLED экран 0.87 дюйма
65W USB порт Type-C 80-420℃(180-780℉) PD триггер
РЕЗИНОВАЯ
РУЧКА
Диапазон
температуры
ЧЕХОЛ
21
КОРПУС
ВЛЕВО
OLED
ВПРАВО
ДИСПЛЕЙ
Диапазон
напряжения
Протокол быстрой
зарядки
Type-c
РАЗЪЕМ
ПИТАНИЯ
DC 9-20 V
Page 28
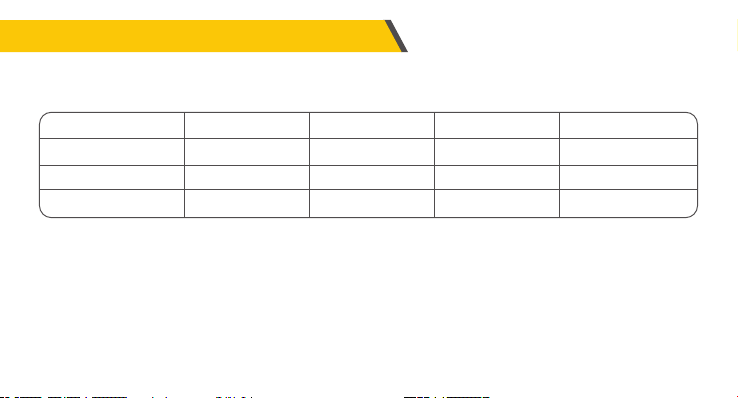
4. ВЫБОР ПИТАНИЯ
При использовании источника питания с протоколом быстрой зарядки PD, умный паяльник может выбрать
рабочее напряжение 9V / 12V / 15V / 20V от адаптера. (По умолчанию 20 V). В зависимости от напряжения,
будет следующий ток, мощность и время плавки припоя:
Рабочее напряжение
Ток
Мощность
Время плавки (с)
●По умолчанию рабочее напряжение умного паяльника 20 V. Если максимальное напряжение вашего источника
питания меньше 20 V, максимальное напряжение НЕ будет установлено. Если ваш адаптер выдает 12 V, будет
получено 12 V.
●Если используется адаптер без под держки протокола быстрой зарядки PD, напряжение паяльника будет
равно выходному напряжению адаптера. Если вы заметите, что после подключения и нагрева паяльника
происходит перезапуск паяльника, это означает нехватку мощности адаптера питания. Пожалуйста, замените
источник питания.
20V
≥3.25A
65W
8
15V
≥2.5A
37.5w
12
※При напряжении менее 9V, на экране появится low voltage
22
12V
≥2A
24w
17
9V
1.5A
13.5w
30
Page 29
●Если напряжение вашего адаптера 20 V, но ток менее 3.25 А, мощности питания паяльника будет недостаточно.
После входа в основной интерфейс и нагрева, паяльник может отключиться и перезагрузиться, экран
перезапустится! То же самое касается и других напряжений.
●Если происходит перезапуск пос ле нагрева, мощность вашего источника питания на этом напряжении
недостаточна для нормальной работы. Пожалуйста, выберите меньшее рабочее напряжение, соответствующее
вашему адаптеру питания. Если ваш адаптер питания имеет характеристики 12V/2.5A, 15V/2A, или 20V/1.5A,
общая выходная мощность равна 30W, установите рабочее напряжение 12V.
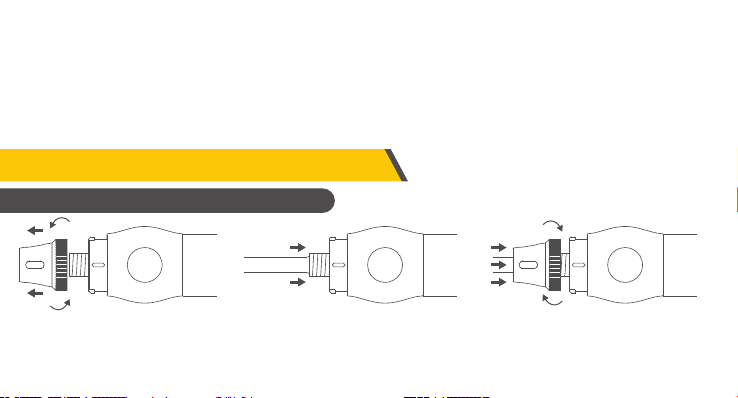
5. ИСПОЛЬЗОВАНИЕ ПРОДУКТА
ИНСТРУКЦИЯ ПО СБОРКЕ
①Открутите гайку ②Вставьте жало паяльника ③Зажмите гайку
※Если жало паяльника вставляется с трудом, попробуйте вращать его и вставить снова.
23
Page 30
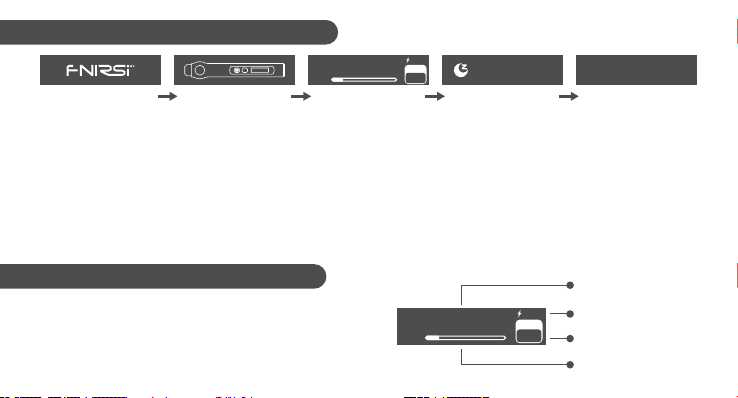
ОПИСАНИЕ РАБОЧЕГО ПРОЦЕССА
20V
280
Логотип загрузки Включение нагрева Основной экран Сон Выключение
10%
Рабочий процесс умного электрического паяльника HS-01 показан на схеме выше. После включения, появляется
загрузочный логотип. Коротко нажмите на мигающую физическую кнопку один раз д ля включения нагрева.
Если включен режим защиты от детей, коротко нажмите на физическую кнопку три раза для включения нагрева.
После входа в основной интерфейс, вы можете выбрать три основных рабочих режима паяльника:
●РАБОЧИЙ РЕЖИМ: Жало паяльника нагрета и готово к работе. Пожалуйста, не касайтесь горячих деталей.
●РЕЖИМ СНА: Когда паяльник в рабочем режиме, и не используется дольше установленного времени перехода
в режим сна, паяльник уснет, и затем выйдет из этого режима.
●ВЫКЛЮЧЕНИЕ: Паяльник отключится после выключение питания.
ОПИСАНИЕ ГЛАВНОГО ЭКРАНА
На картинке справа показан основной рабочий экран. В
правом нижнем углу отображается температура заданная
пользователем. По центру реальная температура паяльника.
Снизу мощность нагрева. Справа сверху рабочее напряжение.
SET
℃
280
280
10%
24
200
℃
℃
20V
SET
280
Shutdown
Температура жала
паяльника
Рабочее напряжение
Заданная
температура
Мощность нагрева
Page 31
Calibrate
6. ИНСТРУКЦИЯ ПО ЭКСПЛУАТАЦИИ
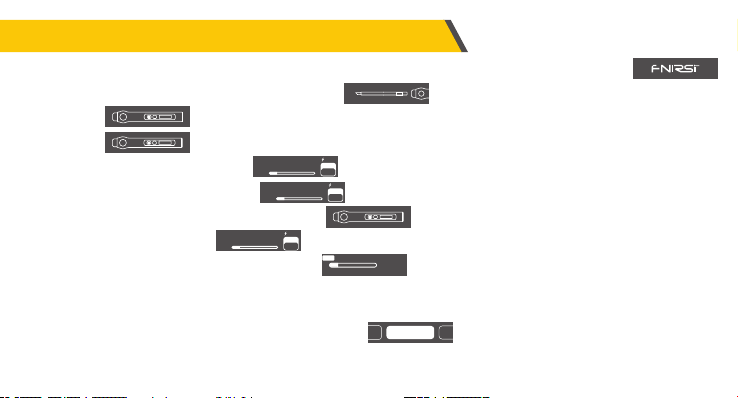
●Включение: Подключите питание и включите паяльник, на экране появится загрузочный логотип
и на дисплее появится предложение вставить жало . Интерфейс появится после установки жала
паяльника .
●Нагрев: После того как замигает кнопка с иконкой нажмите физическую кнопку для включения
паяльника. Появится экран нагрева , начнется нагрев паяльника.
●Ждущий режим одной кнопкой: Длинное нажатие правой кнопки на экране нагрева для
10%
10%
выключения нагрева и возврат в ждущий режим .
●Настройка температуры: Когда паяльник отображает экран нагрева, нажимайте левую и
280
℃
10%
правую кнопки установки нужной температуры ,короткое нажатие на левую кнопку для уменьшения
температуры, правую кнопку для увеличения.
●Режим настроек: В режиме экрана не температурных настроек нажмите и удерживайте левую и правую кнопки
одновременно. Будет выполнен вход в режим настроек .
280
280
20V
SET
280
℃
℃
20V
SET
280
20V
SET
280
SET
80 420
280
Birghtness
℃
25
Page 32
Sleep Time
Sleep Temp
Temp Unit
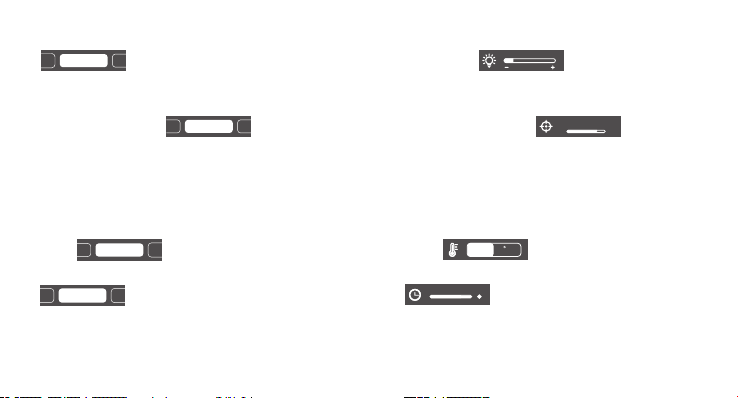
●Яркость экрана: В режиме настроек коротко нажмите левую и правую кнопки для переключения на экран
Calibrate
Birghtness
. Нажмите и удерживайте правую кнопку для входа в экран . Левая и права кнопки
изменяют настройку, длинное нажатие для выхода.
●Калибровка температуры: В режиме настроек коротко нажмите левую и правую кнопки для переключения
30
на экран калибровки . Нажмите и держите вправо для входа на экран . Левая и правая
Calibrate
℃
-50 50
кнопки изменяют настройку, длинное нажатие для выхода. В главном экране установите целевую температуру
350°C. После стабилизации температуры используйте термометр паяльника для измерения действительной
температуры, запишите разницу целевой и измеренной температуры, и введите разницу (положительную или
отрицательную) в этом меню.
●Единицы температуры: В режиме настроек коротко нажмите левую и правую кнопки для переключения на
экран Нажмите и держите вправо для входа на экран .
Temp Unit
℃
F
●Режим сна: В режиме настроек коротко нажмите левую и правую кнопки для переключения на экран .
Sleep Time
Нажмите и держите вправо для входа на экран .Левая и правая кнопки изменяют
настройку, после установки значения выполните длинное нажатие на любую кнопку для выхода. Значение по
1 20
关
умолчанию 20 минут.Диапазон значений 1-20 минут. Когда установлено максимальное время, короткое нажатие
отключает режим сна.
26
Page 33
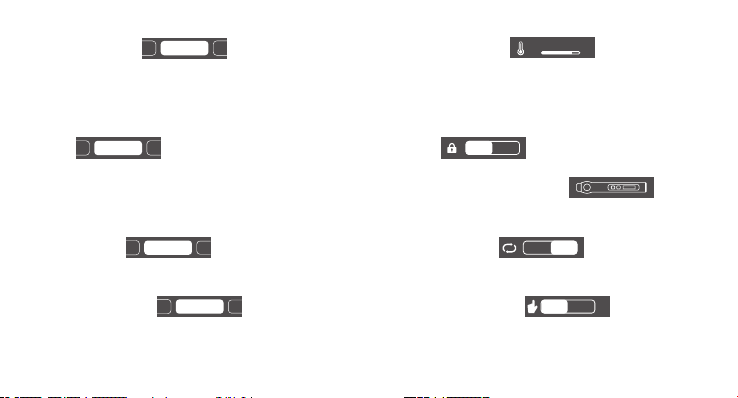
●Температура сна: В режиме настроек коротко нажмите левую и правую кнопки для переключения на экран
Child Lock
Language
Hand Held
Vol Select
150
температуры сна Нажмите и держите вправо для входа на экран . Левая и правая
Sleep Temp
кнопки изменяют настройку, после установки значения выполните длинное нажатие на любую кнопку для выхода.
℃
80 200
Когда рабочая температура меньше температуры сна, рабочая температура поддерживается в состоянии сна.
Когда рабочая температура выше температуры сна, температура упадет до температуры сна в режиме сна.
●Режим защиты от детей: В режиме настроек коротко нажмите левую и правую кнопки для переключения на
Open
экран Нажмите и держите вправо для входа на экран . Левая и правая кнопки
Child Lock
Close
переключают настройку, после установки выполните длинное нажатие на любую кнопку для выхода. Когда режим
защиты от детей включен, при следующем включении питания появится иконка с замком .В этом
режиме необходимо последовательно нажать левую кнопку три раза для включения нагрева.
●Выбор языка: В режиме настроек коротко нажмите левую и правую кнопки для переключения на экран
English
выбора языка . Нажмите и держите вправо для входа на экран .Левая и правая
Language
中文
кнопки переключают настройку, после установки выполните длинное нажатие на любую кнопку для выхода.
●Выбор руки: В режиме настроек коротко нажмите левую и правую кнопки для переключения на экран выбора
Right
используемой руки Нажмите и держите вправо для входа на экран .Левая и правая
Hand Held
Left
кнопки переключают настройку, после установки выполните длинное нажатие на любую кнопку для выхода. Этот
продукт по умолчанию настроен для правши, но может быть изменен под ваши привычки. Логика переключений
для левши обратная.
27
Page 34
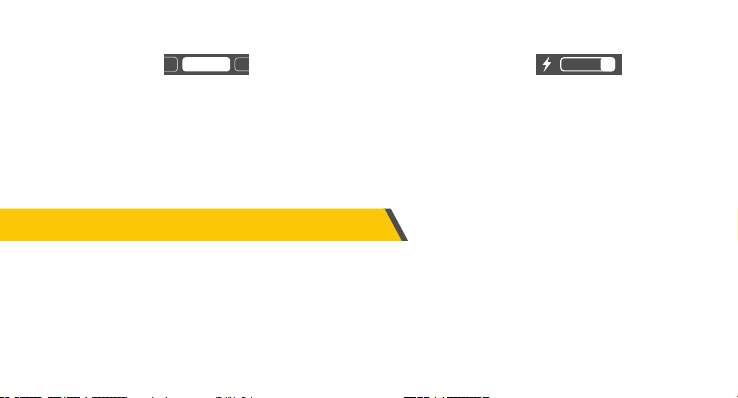
●Выбор напряжения: В режиме настроек коротко нажмите левую и правую кнопки для переключения на экран
Birghtness
выбора напряжения . Нажмите и держите вправо для входа на экран . Левая и
правая кнопки переключают настройку напряжения 9V/12V/15V/20V, после установки напряжения выполните
длинное нажатие на любую кнопку для выхода. По умолчанию установка 20V. Пользователь может выбрать другое
напряжение, это позволяет избежать срабатывания защиты от перегрузки по току на источнике питания, и
перезапуска паяльника с черным экраном. Если паяльник не греет или припой не плавится, дождитесь
восстановления питания и войдите на экран настроек для выбора подходящего напряжения питания.
●Паяльник автоматически выключится после 30 минут без активности.
Vol Select
91215 20
7. ОБНОВЛЕНИЕ ПРОШИВКИ
●Выключите устройство, нажмите левую кнопку, с помощью кабеля USB Type-C подключите паяльник к
компьютеру, и войдите в интерфейс
загрузки прошивки для обновления программного обеспечения.
●Выберите соответствующий последовательный порт. Когда слева появится готовность, откройте выбранный
файл, и нажмите прошить.
28
Page 35

8. ОБСЛУЖИВАНИЕ
●Когда жало паяльника используется первый раз, оно должно быть нагрето до 250°C и покрыто припоем для
защиты от окисления.
●Новый паяльник имеет проблему скачкообразного нагрева первый раз. Это стабилизируется после нескольких
использований.
●После использования паяльника, пожалуйста, нанесите достаточное количество припоя на жало д ля
предотвращения окисления.
●Нормальная рабочая температура жала паяльника 300-380°C. Пожалуйста, не используйте паяльник
длительное время с высокой температурой, это уменьшит его ресурс.
●Избегайте сильных ударов во время пайки.
●Не используйте мокрую губку с чистой водой, лучше использовать полу-сухое состояние.
●Не используйте порошок для удаления накипи с высоким содержанием хлора или кислоту для избежания
коррозии поверхности.
●Если поверхность жала паяльника окислилась и не покрывается припоем, используйте марлю или другие
инструменты д ля мягкой очистки поверхности, затем нагрейте до 250°C, и сразу залудите жало для защиты от
повторного окисления.
29
Page 36

9. ТЕХНИКА БЕЗОПАСНОСТИ
●Температура жала паяльник может достигать 80-420°C, пожалуйста, не касайтесь кончика паяльника.
●Пожалуйста, держите вне доступа детей.
●Не допускайте намачивания паяльника. Не используйте во влажной окружающей среде.
●Если паяльник длительное время не используется, отключите кабель питания.
●При нормальной работе, на ручке паяльника будет определенная температура, это нормально. Пожалуйста,
пользуйтесь устройством уверенно.
10. УСЛОВИЯ ГАРАНТИИ
●Сервисный период
Shenzhen Fnirsi Technology Co., Ltd гарантирует хорошее качество продукта. Если продукт сломался от
нормальной эксплуатации в течении 7 дней с момента продажи, пользователь может выбрать возврат или
гарантийный ремонт (возврат возможен только при отсутствии перепродажи). Бесплатная гарантия от поломки
один год.
●Датой продажи считается дата на чеке или платежном поручении выданном продавцом. Для онлайн продаж
используется снимок экрана с
транзакцией.
30
Page 37

●Гарантия не распространяется в следующих случаях:
(1) Все повреждения вызванные действиями человека, самостоятельное изменение продукта или
обслуживание.
(2) Жало паяльника является расходным элементом, гарантия на него не распространяется.
11.СВЯЗАТЬСЯ С НАМИ
Всем пользователям FNIRSI связавшимся с нами, мы обещаем удовлетворительное
решение + дополнительно 6 месяцев гарантии в
награду за вашу поддержку!
Между прочим, мы создали интересное сообщество, и приглашаем присоединиться к
команде работников FNIRSI.
Shenzhen Fnirsi Technology Co., Ltd.
Адрес: West of Building C, Weida Industrial Park, Dalang Street, Longhua District, Shenzhen, Guangdong
E-mail: fnirsioffi[email protected] (бизнес) / fnirsioffi[email protected] (поддержка)
Телефон: 0755-83242477 / +8613536884686
31
Page 38

Aviso ao utilizador
●Leia atentamente este manual do utilizador e as instruções de funcionamento e certifique-se que segue as indicações
no texto.
●Por favor, guarde este manual, acondicionando corretamente.
●Os equipamentos sem utilidade não podem ser descartados juntamente com o lixo doméstico, por favor, descarte-os
de acordo com leis e regulamentos nacionais ou locais.
●Se houver algum problema de qualidade ou dúvidas sobre o uso do produto, pode entrar em contato com o
atendimento on-line de apoio ao cliente da "FNIRSI" ou do fabricante, e resolveremos o problema o mais rápido possível.
●Obrigado por adquirir este produto. A fim de tornar mais conveniente para si a utilização deste produto, por favor, siga
estas instruções de funcionamento.
1.Visão geral do produto
HS-01 é um ferro de soldar elétrico inteligente com ecrã e portátil, lançado pela nossa empresa. O ferro de soldar elétrico
tem as seguintes características:
● Pequeno e conveniente,
fácil de transportar.
● Voltagem de funcionamento
de 9-20V
● Controle de temperatura
preciso
● Alimentado por fonte de
alimentação USB Tipo-C
32
● Rápida a aquecer e com
recuperação de temperatura rápida
● Design ergonômico, aderência e
utilização confortável.
● Ecrã OLED
integrado
Page 39
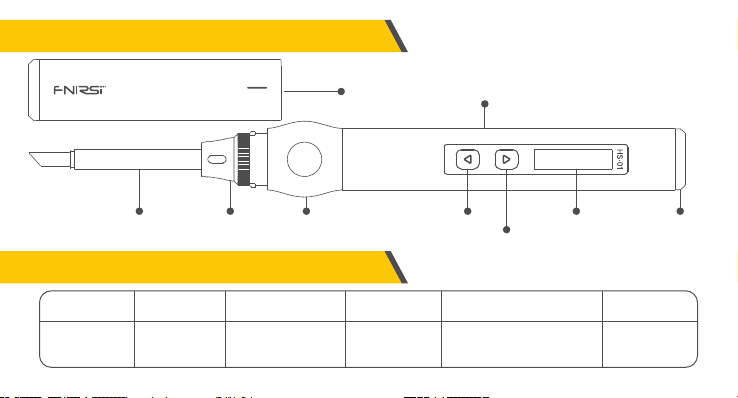
2.Descrição do produto
Tampa Corpo
Ponta de
solda
3.Parâmetros
Potência
Fonte de
alimentação
Porta USB
Tipo-C
Porca de
fixação
65W Ecrã OLED 0.87” Voltagem de operação DC9-20V
Gel de
sílica
Intervalo da
temperatura
80-420º C
(180-780ºF)
33
Esquerda
Direita
Protocolo de
carregamento rápido
Ecrã OLED
Interface Tipo-C
para alimentação
PD trigger
Page 40
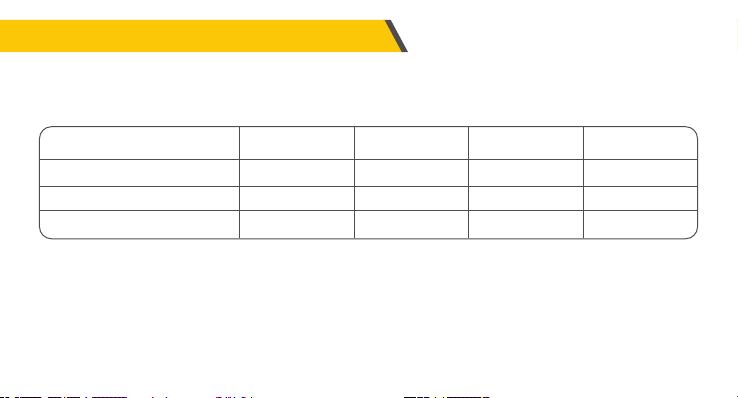
4.Seleção de potência
Utilizando um adaptador de energia com o protocolo de carregamento rápido PD, o ferro de soldar elétrico inteligente
pode ser configurado para obter qualquer tensão de funcionamento entre 9V\12V\15\20V (a configuração padrão é 20V).
Sob diferentes tensões de funcionamento, o corrente de trabalho, potência e tempo de estanhagem são os seguintes:
Voltagem de funcionamento
Corrente de funcionamento
Potência
Tempo de estanhagem
20V
≥3.25A
65W
8s
15V
≥2.5A
37.5w
12s
※Se a tensão for inferior a 9V, a ecrã irá exibir a mensagem de baixa tensão.
12V
≥2A
24w
17s
9V
1.5A
13.5w
30s
AVISO:
●A tensão funcionamento padrão do ferro de soldar inteligente é 20V. Se a tensão máxima de saída do seu adaptador
for menos de 20V, a tensão de saída máxima será obtida. Se o seu adaptador produzir um máximo até 12 V, esse é o
máximo que irá obter.
34
Page 41

●Quando utilizar um adaptador de energia sem protocolo de carregamento rápido PD, a tensão de funcionamento do
ferro de soldar inteligente ferro é a tensão de entrada. Note que quando o adaptador está conectado e o aquecimento
volte a ser reiniciado após entrar na página inicial. Isso indica que a potência de saída do adaptador não é suficiente,
substitua por outro adaptador.
●Se a tensão de saída do seu adaptador for 20V, mas a corrente de saída for inferior a 3,25A (ou seja, a potência de saída
é menor do que a energia exigida pelo ferro de soldar), depois de entrar na interface principal e aquecimento, o
adaptador de alimentação pode desligar-se e reiniciar, o que fará com que o ecrã seja reiniciado! (Noutras tensões de
funcionamento poderá acontecer o mesmo)
●Se após o aquecimento, o ferro de soldar reiniciar, significa que a potência de saída da tensão atual do seu adaptador
não é suficiente para funcionar normalmente, selecione uma tensão de trabalho mais baixa de acordo com a potência de
saída do adaptador. Se a saída do adaptador for 12V/2,5A, 15V/2A ou 20/1,5A, a potência total de saída é 30W, defina a
tensão de operação para 12V.
34
Page 42
5.Utilização do produto
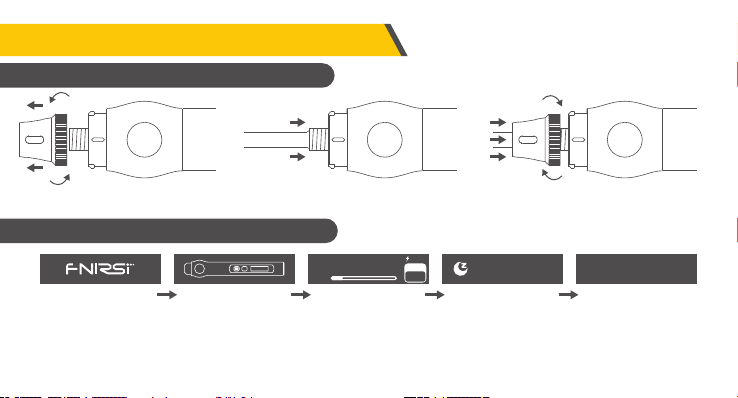
ИНСТРУКЦИЯ ПО СБОРКЕ
①Remova a porca de fixação ②Insira a ponta de solda ③Aperte a porca de fixação
※Se a ponta de solda estiver presa quando tentar inserir no ferro de soldar, faça uma pequena rotação e tente inserir novamente.
Descrição do fluxo de trabalho
20V
280
Logo de arranque Aquecimento Página de entrada Hibernar Desligar
O processo de trabalho do ferro de soldar inteligente HS-01 é mostrado na figura acima. Após ligar, o logotipo é exibido.
Para aquecer, pressione brevemente o botão físico intermitente correspondente uma vez. Quando o modo de bloqueio
infantil estiver ativado, para aquecer, pressione rapidamente o botão físico correspondente três vezes. Na entrada da
interface principal, o ferro de soldar está em estado normal de trabalho, mas pode selecionar 3 estados de trabalho
diferentes:
10%
SET
℃
280
36
200
℃
Shutdown
Page 43
●Estado de trabalho: O ferro de soldar está num estado quente ou pronto para uso, por favor, não toque nas partes de alta
temperatura.
●Estado de suspensão: o ferro de soldar já está em estado de aquecimento e uso e irá entrar estado de suspensão se não for
usado por um período de tempo superior ao definido no “tempo de sono”, e será liberado após o uso.
●Estado de desligamento: Ele irá ser desligado quando a energia for desconectada.
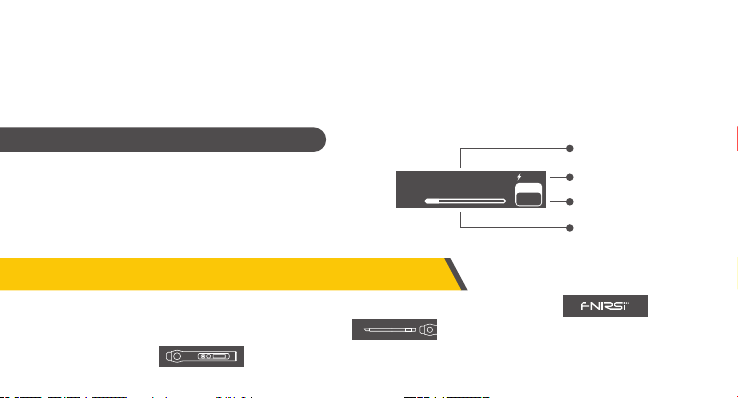
Descrição da página de entrada
A página inicial mostrada na figura à direita, o canto inferior
direito mostra a temperatura alvo definida pelo utilizador, no
meio é mostrada a temperatura em tempo real do ferro de soldar.
A parte inferior mostra a potência de aquecimento, e o canto
superior direito mostra a tensão de operação.
10%
280
SET
℃
280
20V
Soldering iron tip
temperature
Operating voltage
Set temperature
Heating power bar
6.Instruções de funcionamento
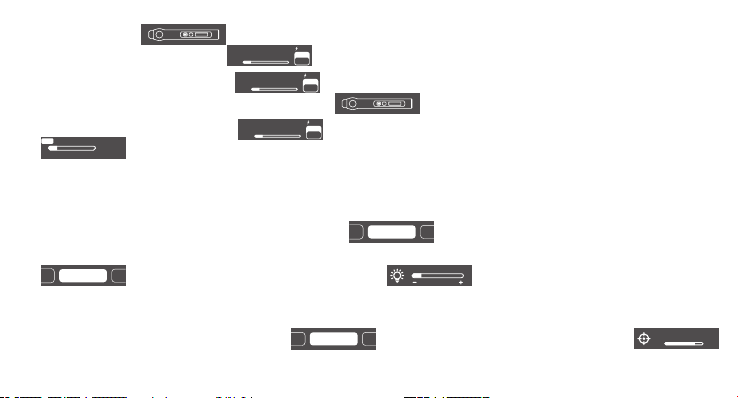
●Ligar: Ligue quando conectado à fonte de alimentação, o ecrã exibe o ícone de inicialização e, em
seguida, exibe uma prompt para inserir a ponta de solda . A interface será exibida após a ponta do ferro
de solda ser inserida .
37
Page 44
Calibrate
Calibrate
●Aquecimento: O ícone do botão irá piscar, pressione rapidamente o botão físico correspondente para
Temp Unit
entrar na página de aquecimento , e o ferro de soldar irá aquecer.
●Modo de espera de uma tecla: pressione e segure o botão direito na página de aquecimento para
10%
10%
280
280
20V
SET
℃
280
20V
SET
℃
280
desligar o aquecimento e retornar à página de espera .
20V
SET
●Configuração de temperatura: Na página do estado de aquecimento, para definir a temperatura,
SET
280
pressione as teclas esquerda e direita para entrar na página de configuração e pressione rapidamente o
80 420
botão direito para aumentar e para diminuir pressione rapidamente o botão esquerdo. Pressione demoradamente para
℃
280
℃
10%
280
poder definir a temperatura em cada passo, tendo as opções de 10°C ou 20°F.
●Modo de configuração: Na página de configuração sem temperatura, pressione e segure as teclas esquerda e direita
ao mesmo tempo para entrar no modo de configuração .
Birghtness
●Brilho do ecrã: No modo de configuração, pressione rapidamente as teclas esquerda e direita para alternar para brilho
Birghtness
, pressione e segure a tecla direita para entrar e as teclas esquerda e direita ajustam o
valor. Pressione e segure qualquer tecla para sair.
●Calibração de temperatura: Ao entrar no modo de configuração, pressione rapidamente as teclas esquerda e direita
30
para alternar para calibração de temperatura , pressione e segure a tecla direita para entrar ,
Calibrate
℃
-50 50
38
Page 45
Sleep Time
Sleep Temp
Child Lock
utilize as teclas esquerda e direita para ajustar, pressione e segure qualquer tecla para sair. Na página inicial, defina a
temperatura alvo como 350 ℃. Depois que a temperatura estiver estável, use um termômetro para ferros de soldar para
medir a temperatura real, registre a diferença entre a temperatura alvo e a temperatura real (positiva ou negativa) e
preencha a diferença neste item do menu.
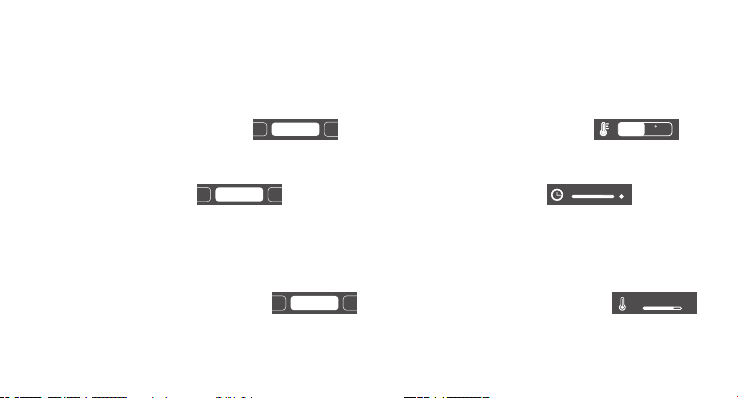
●Unidade de temperatura: No modo de configuração, pressione rapidamente as teclas esquerda e direita para
alternar até à unidade de temperatura , pressione e segure a tecla direita para entrar ,
Temp Unit
℃
F
e as teclas esquerda e direita alternam o valor. Pressione e segure qualquer tecla para sair.
●Tempo de suspensão: No modo de configuração, pressione rapidamente as teclas esquerda e direita para alternar
para o tempo de suspensão e pressione e segure a tecla direita para entrar , utilize as
Sleep Time
1 20
关
teclas esquerda e direita para ajustar e após a conclusão do ajuste, pressione e segure qualquer tecla para sair . O tempo
de suspensão p adrão é de 20 minutos e o intervalo de configuração é de 1 a 20 minutos. Quando estiver definido para o
máximo, pressione rapidamente para desligar o modo de hibernação.
●Temperatura de suspensão: No modo de configuração, pressione rapidamente as teclas esquerda e direita para
150
alternar para a temperatura de suspensão , pressione e segure a tecla direita para entrar
Sleep Temp
℃
80 200
e utilize as teclas esquerda e direita para ajustar. Quando o ajuste estiver concluído, pressione e segure qualquer tecla
para sair. Quando a temperatura de trabalho é menor que a temperatura de suspensão, a temperatura de trabalho é
39
Page 46
Language
mantida no estado de suspensão, e quando a temperatura de trabalho é maior que a temperatura de suspensão, a
Hand Held
Vol Select
temperatura cai para a temperatura de suspensão e entra no estado de suspensão.
●Modo de bloqueio para crianças: No modo de configuração, pressione rapidamente as teclas esquerda e direita
para alternar para o modo de bloqueio para crianças , pressione e segure a tecla direita para entrar
Open
Close
, utilize as teclas esquerda e direita para alterar e pressione e segure qualquer tecla para sair após a
Child Lock
conclusão da alteração. Depois da ativação do modo de bloqueio para crianças, sempre que a energia seja ligada, o
botão com um ícone de cadeado será exibido . Nesse momento, é necessário pressionar o botão
esquerdo 3 vezes continuamente para aquecer.
●Seleção de idioma: No modo de configuração, pressione rapidamente as teclas esquerda e direita para alternar para
English
a seleção de idioma , pressione e segure a tecla direita para entrar , alterne para a
Language
中文
esquerda e para a direita e pressione e segure qualquer tecla para sair quando a alteração estiver concluída.
●Modo da mão: No modo de configuração, pressione rapidamente as teclas esquerda e direita para alternar para o
modo de mão , pressione e segure o botão direito para entrar , alterne para a
Hand Held
Left
Right
esquerda e para a direita, pressione e segure qualquer tecla para sair após a conclusão da alteração. Por definição o
produto vem configurado para destros, mas pode ser alterado para esquerdinos, de acordo com os seus hábitos de
utilização. A lógica da comutação para a mão esquerda é invertida.
40
Page 47
●Seleção de tensão: No modo de configuração, pressione rapidamente os botões esquerdo e direito para alternar
Birghtness
para a seleção de tipo de tensão , pressione e segure o botão direito para entrar ,
depois de entrar,alterne para a esquerda e direita para as quatro opções de tensão de 9V/12V/ 15V/20V. Após a conclusão
da alteração, pressione e segure qualquer botão para sair. O padrão é 20V, e o pode configurá-lo de acordo com os
parâmetros de energia do carregador para evitar o fenômeno de que o carregador inicia a proteção contra sobrecorrente
devido a energia insuficiente e o dispositivo é forçado a desligar com um ecrã preto. Quando esse fenômeno ocorrer,
aguarde a recuperação do carregador e entre na página de configuração para selecionar novamente a tensão apropriada.
●O produto desligará automaticamente após 30 minutos de inatividade.
Vol Select
91215 20
7.Atualização do firmware
●Com o dispositivo desligado, pressione o botão esquerdo e use o cabo de dados USB Tipo-C para conectar ao
computador e ligue o dispositivo, irá entrar na interface do Bootloader para atualizar o firmware.
●No computador, escolha o número da porta de série correspondente, abra o arquivo selecionado, quando pronto for
exibido à esquerda, clique para gravar.
41
Page 48

8.Manutenção
●Quando uma nova ponta de solda é usada pela primeira vez, ela precisa ser aquecida a 250°C e estanhada para evitar a
oxidação a seco.
●O novo ferro de solda tem o problema de oscilação de temperatura na sua primeira utilização, mas ficará estável após
utilizado várias vezes.
●Depois de usar o ferro de soldar, aplique uma quantidade adequada de solda na ponta do ferro de solda para evitar a
oxidação.
●A temperatura normal de trabalho da ponta de solda é de cerca de 300-380°C, não use por muito tempo esta temperatu-
ra, porque temperaturas muito altas por períodos longos pode afetar o tempo de vida.
●Evite bater violentamente na cabeça do ferro de soldar durante a soldagem.
●Não use esponja molhada, o estado semi-seco é o melhor.
●Não use pó de descamação com alto teor de cloro ou ácido para evitar a corrosão da superfície.
●Se a superfície da ponta de solda estiver oxidada e não agarra o estanho, use gaze ou outras ferramentas para limpar
cuidadosamente a superfície, e de seguida, aqueça até 250 ℃, aplique imediatamente estanho para revestir a superfície
para evitar a reoxidação.
42
Page 49

9.Instruções de segurança
●A temperatura da ponta de solda pode atingir entre 80-420°C, por favor, não toque na ponta do ferro de soldar.
●Por favor, mantenha fora do alcance das crianças.
●Por favor, não molhe este produto ou use-o em um ambiente húmido.
●Quando não estiver em uso por muito tempo, desconecte a energia.
●Ao trabalhar normalmente, haverá uma certa temperatura na pega, o que é um fenômeno normal, use-o com confiança!
10.Termos da garantia
●Período de serviço
Shenzhen Finiris Technology Co., Ltd. promete a boa qualidade do produto. Se o produto falhar sob uso normal dentro
de 7 dias a partir da data da venda, o cliente pode optar pela devolução ou garantia (só pode ser devolvido sem prejuízo
da segunda venda). É uma garantia gratuita para falhas dentro de um ano.
●A data de compra está sujeita à data da fatura ou recibo de compra emitido pelo vendedor. Para compras online, a
captura do ecrã da transação prevalecerá.
43
Page 50

●Para os seguintes casos, nenhum ser viço de garantia gratuito é fornecido:
(1)oTodos os danos à máquina causados por danos causados pelo homem, modificação ou manutenção não
autorizada.
(2) oAs pontas de solda são consumíveis e não oferecem garantia.
11.Contate-nos
Qualquer utilizador da FNIRSI com questões que nos contate, tem a nossa promessa que terá
uma solução satisfatória e 6 meses de garantia extra como agradecimento do seu suporte!
Já agora, criámos uma comunidade interessante, esteja à vontade para contatar a equipa da
FNIRSI na nossa comunidade.
Shenzhen Fnirsi Technology Co., Ltd.
Endereço: West of Building C, Weida Industrial Park, Dalang Street, Longhua District, Shenzhen, Guangdong
E-mail: fnirsioffi[email protected] (Business) fnirsioffi[email protected] (Equipment service)
Tel: 0755-83242477 / +8613536884686
44
Page 51

Page 52
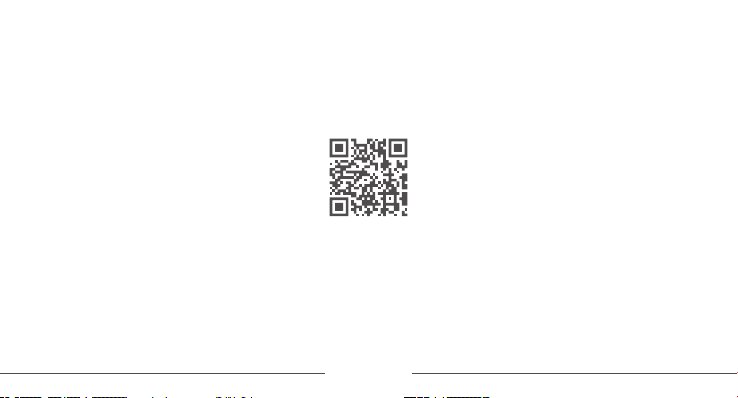
下载用户手册&应用软件
Download User manual&APP&Software
www.fnirsi.cn
 Loading...