

Page 1
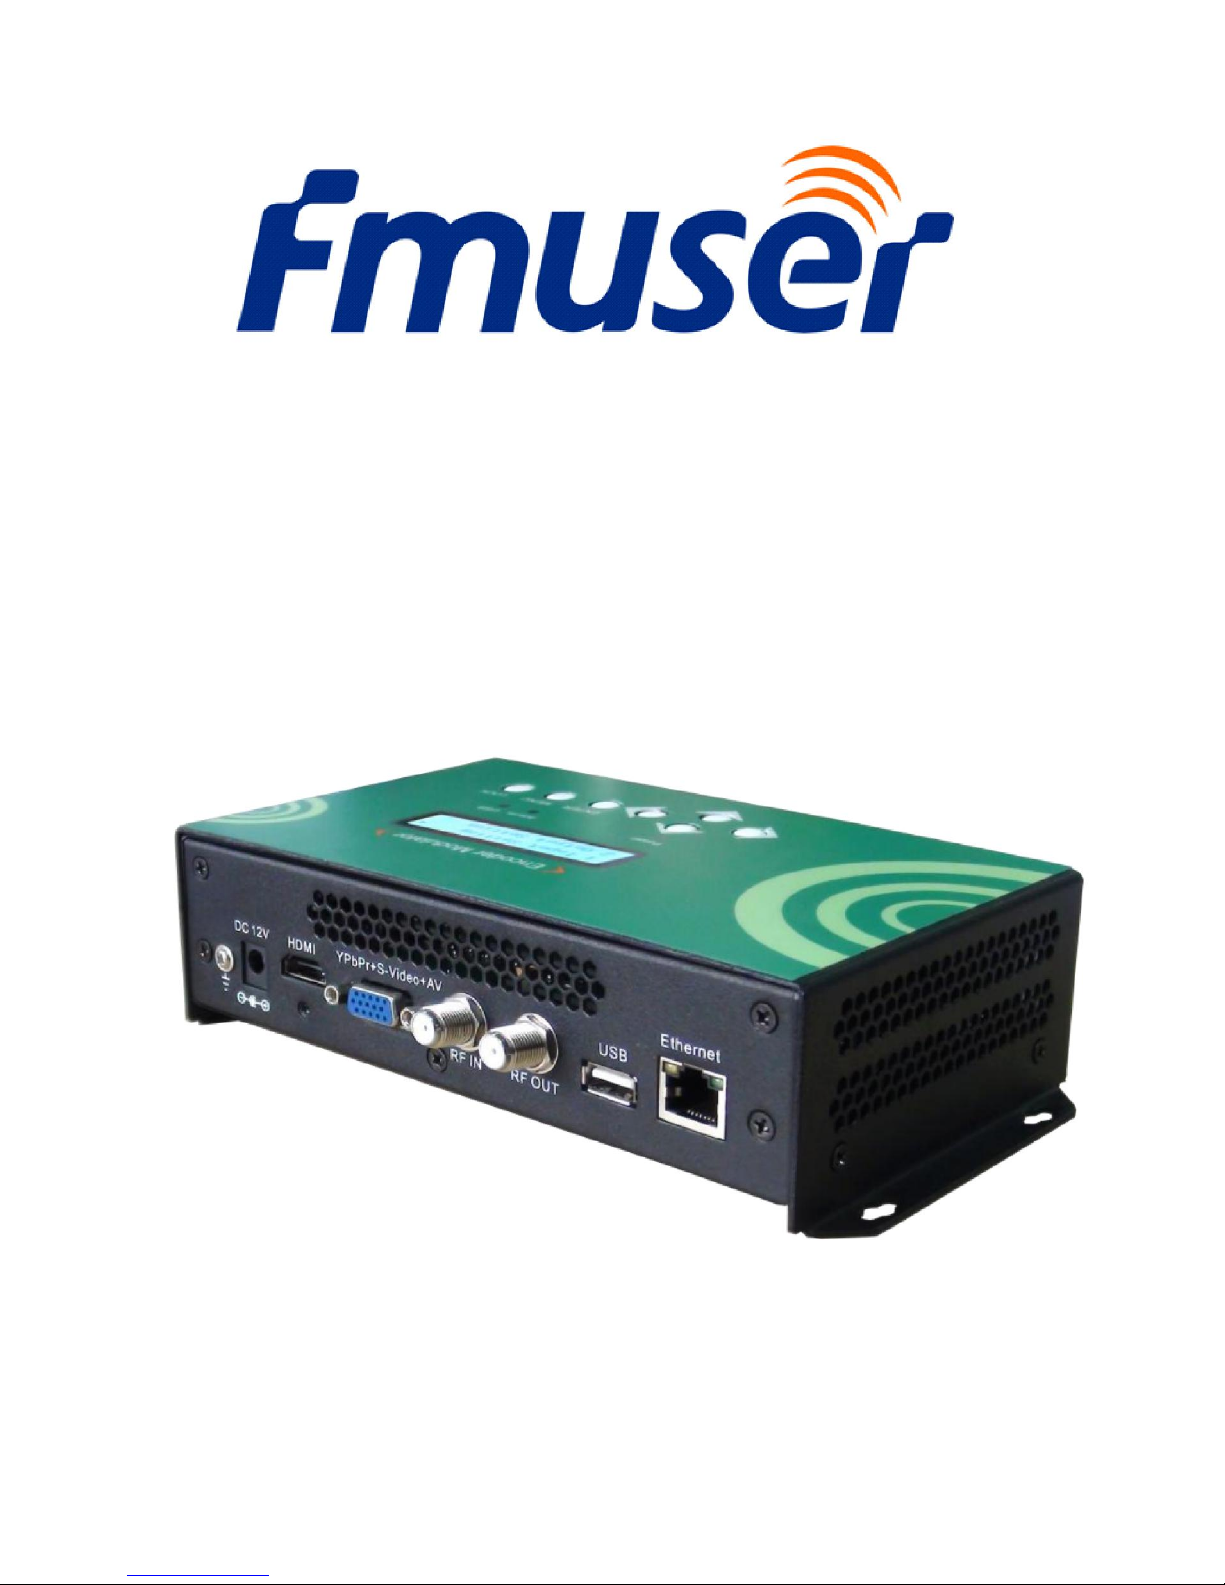
FUTV4658 HD/SD Encoder & Modulator
HDMI/YPbPr/S-Video/AV to DVB-T Digital RF
--- Home Use
User Manual
Page 2

Thank you for choosing our encoder modulator.
Please read this manual carefully to install, use and maintain the encoder modulator in the best conditions of
performance. Keep this manual for future reference.
Directory
CHAPTER 1 Product Introductions..............................................................1
General Description ................................................................................................1
System Connection Chart ........................................................................................2
Technical Specifications ...........................................................................................2
CHAPTER 2 Safety Instruction and Installations ......................................................4
Safety Instructions ...................................................................................................4
Installations .............................................................................................................4
Cascade Installation ................................................................................................ 5
Download path: English→Tool→
TS Creator xxx.rar ............................6
Chapter 3 Operations of TS Creator Software .........................................................7
Installation ...............................................................................................................7
Operations of “Creator” ..........................................................................................7
File Management .................................................................................................... 9
CHAPTER 4 Devices Operations and Management ............................................... 10
Chapter 5 Operations of Record TS and Play TS through USB Disk ....................... 15
Chapter 6 Operations of Web-server .................................................................... 18
Login ...................................................................................................................... 18
Operation .............................................................................................................. 19
Appendix ............................................................................................................... 28
Page 3
CHAPTER 1 Product Introductions
General Description
FUTV4658 series encoder & modulator is FMUSER’s consumer electronics which allow audio/video signal input in
TV distributions with applications in home entertainment, surveillance control, hotel Digital Signage, shops etc.
It is an all-in-one device integrating MPEG-4 AVC/H.264 encoding and modulating to convert
audio/video
signals into DVB-T RF out.
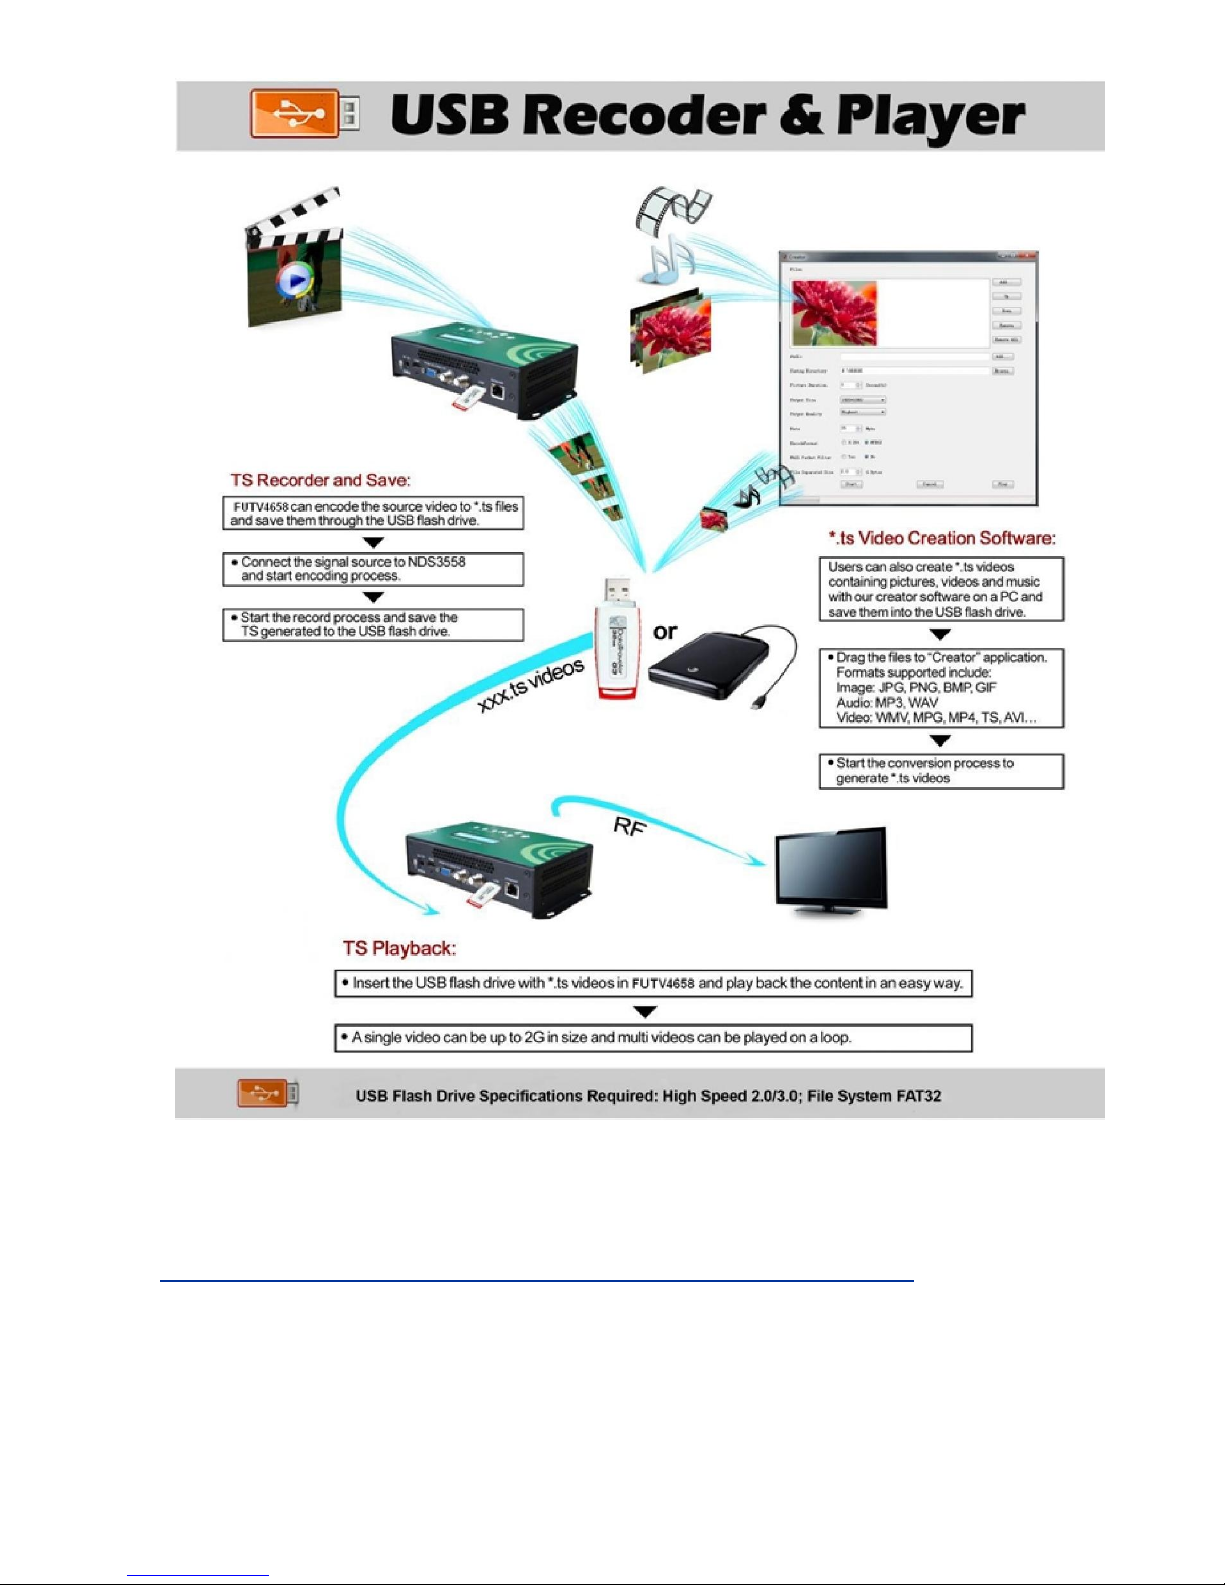
The USB port is designed to record encoded video (TS) and save it in ts files in the USB Keys or Hard Disks, and
then the ts files can be playback through the USB port. The ts files can be also generated on a computer with
FMUSER’s TS Creator.exe program.
The signals source could be from satellite receivers, closed-circuit television cameras, Blue-ray players, antenna
and a USB key or Hard Disk etc. Its output signal is to be received by TV sets or STBs etc.
Page 4
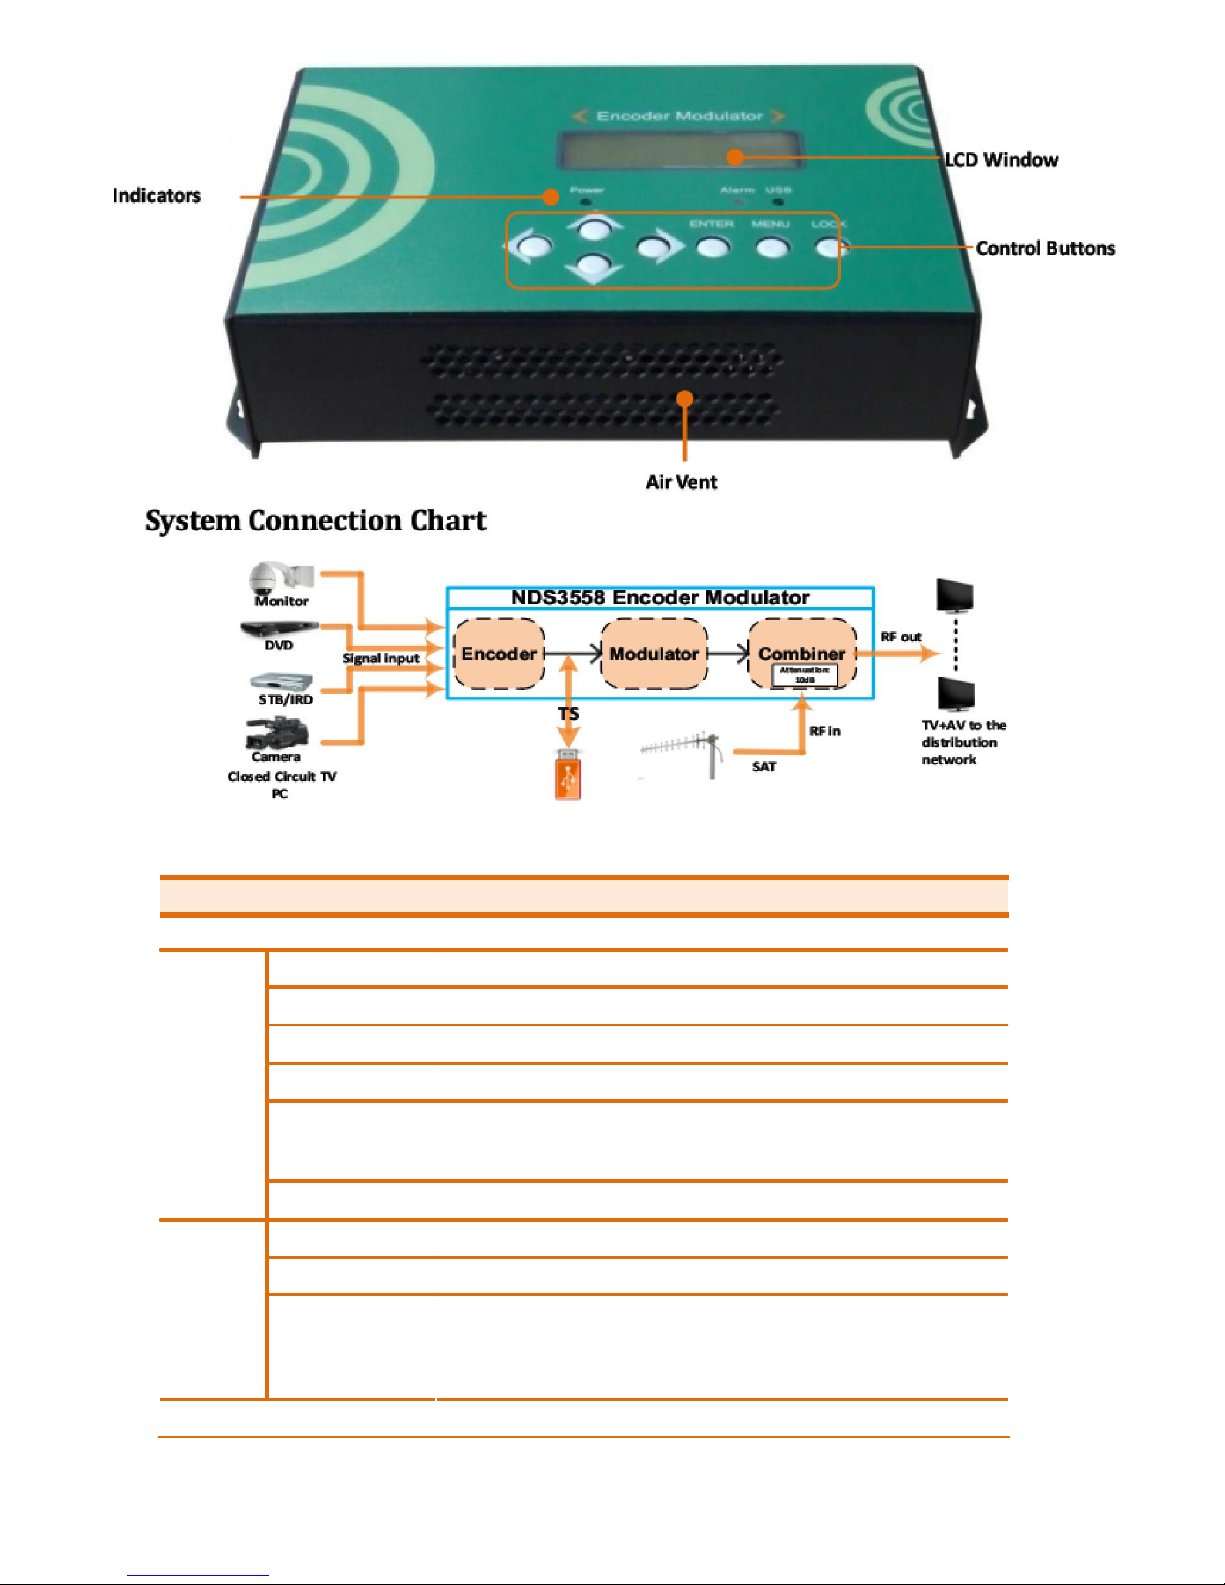
Indicators
System Connection Chart
Monitor
DVD
Air Vent
FUTV4658 Encoder Modulator
RF out
LCD Window
Control Buttons
Signal input
Encoder
TS
Modulator Combiner
Attenuation:
10dB
RF in
SAT
TV+AV to the
dis
Technical Specifications
Encoding Section
HDMI
Video
Audio
Encoding
H.264 Profile
H.264 Level
Interface
Resolution
Bit rate
Encoding
Sample rate
Bit rate
MPEG-4 AVC/H.264
High profile, main profile
Level 3.0/3.1/ 3.2/ 4.0/4.1/4.2
HDMI*1
1920*1080_60P, 1920*1080_50P; 1920*1080_60i,
1920*1080_50i; 1280*720_60p, 1280*720_50P
0.500~19.500 Mbps
MPEG1 Layer II, MPEG2-AAC, MPEG4-AAC
48KHz
MPEG1 Layer II:
64, 96,128, 192, 256, 320, 384kbps
MPEG2-AAC:
128, 192, 256, 320, 384kbps
MPEG4-AAC:
64, 96,128, 192, 256kbps
YPbPr/CVBS/S-Video (with an adapter to VGA)
2
Page 5

Video
Encoding
Interface
Resolution
Bit rate
Encoding
Interface
MPEG-4 AVC/H.264
CVBS *1, YPbPr*1, S-Video*1
CVBS & S-Video:
720x576_50i (PAL); 720x480_60i (NTSC)
YPbPr:1920*1080_60i, 1920*1080_50i; 1280*720_60p,
1280*720_50P
0.500~19.500 Mbps
MPEG1 Layer II, MPEG2-AAC, MPEG4-AAC
1*Stereo /2*mono
Audio
Sample rate
48KHz
MPEG1 Layer II:
64, 96,128, 192, 256, 320, 384kbps
Bit rate
MPEG2-AAC:
128, 192, 256, 320, 384kbps
MPEG4-AAC:
64, 96,128, 192, 256kbps
DVB-T Modulator Section
Standard
Bandwidth
Constellation
Code rate
Guard Interval
Transmission Mode:
MER
RF frequency
RF output level
System
Management
Language
LCN Insert
RF Combine in ATT
Upgrade
General
Power supply
Dimensions
Weight
Operation temperature
DVB-T COFDM
6M, 7M, 8M
QPSK, 16QAM, 64QAM,
1/2, 2/3, 3/4, 5/6, 7/8.
1/32, 1/16, 1/8, 1/4
2K, 8K
≥42dB
30~1000MHz, 1KHz step
-16~ -36dBm (71~91dbµV), 0.1db step
Local control: LCD + control buttons
Remote control: web NMS
English
support
10dB
USB/Web-server
DC 12V
183*110*45mm
< 1kg
0~45℃
3
Page 6
CHAPTER 2 Safety Instruction and Installations
Safety Instructions
WARNING: Hot plug is not allowed since it may cause system halted.
To prevent fire or electrical shock, do not expose the device to rain or moisture.
The encoder modulator is powered with a voltage of 12V DC. The power supply voltage
must not exceed the recommended voltage, which otherwise may cause irreparable damage
to the device and the invalidation of the warranty. Therefore:
lDo not replace power supply with a voltage greater than 12V DC.
lDo not connect the device to the power if the power cord is damaged.
lDo not plug the device into mains supply until all cables have been connected correctly.
lDo not cut the cord.
Avoid placing the device next to central heating components and in areas
of high
humidity.
Do not cover the device with elements that obstruct the ventilation slots.
If the encoder modulator has been kept in cold conditions for a long time, keep it in a warm
room minimum 2 hours before plugging into the mains.
Mount the device in vertical position with the connectors located on the top side.
When replacement parts are required, be sure the service technician has used replacement
parts specified by the manufacturer or have the same characteristics as the original part.
Unauthorized substitutes may result in fire, electric shock or other hazards.
Safety check- Upon completion of any service or repairs to this device, ask the service
technician to perform safety checks to determine that the device is in proper condition.
Installations
RISK OF damage to the unit
Mechanically handling the unit may result in damage. Do not connect the unit to the power
supply before or during assembly. Connect the unit as below instructed.
4
Page 7
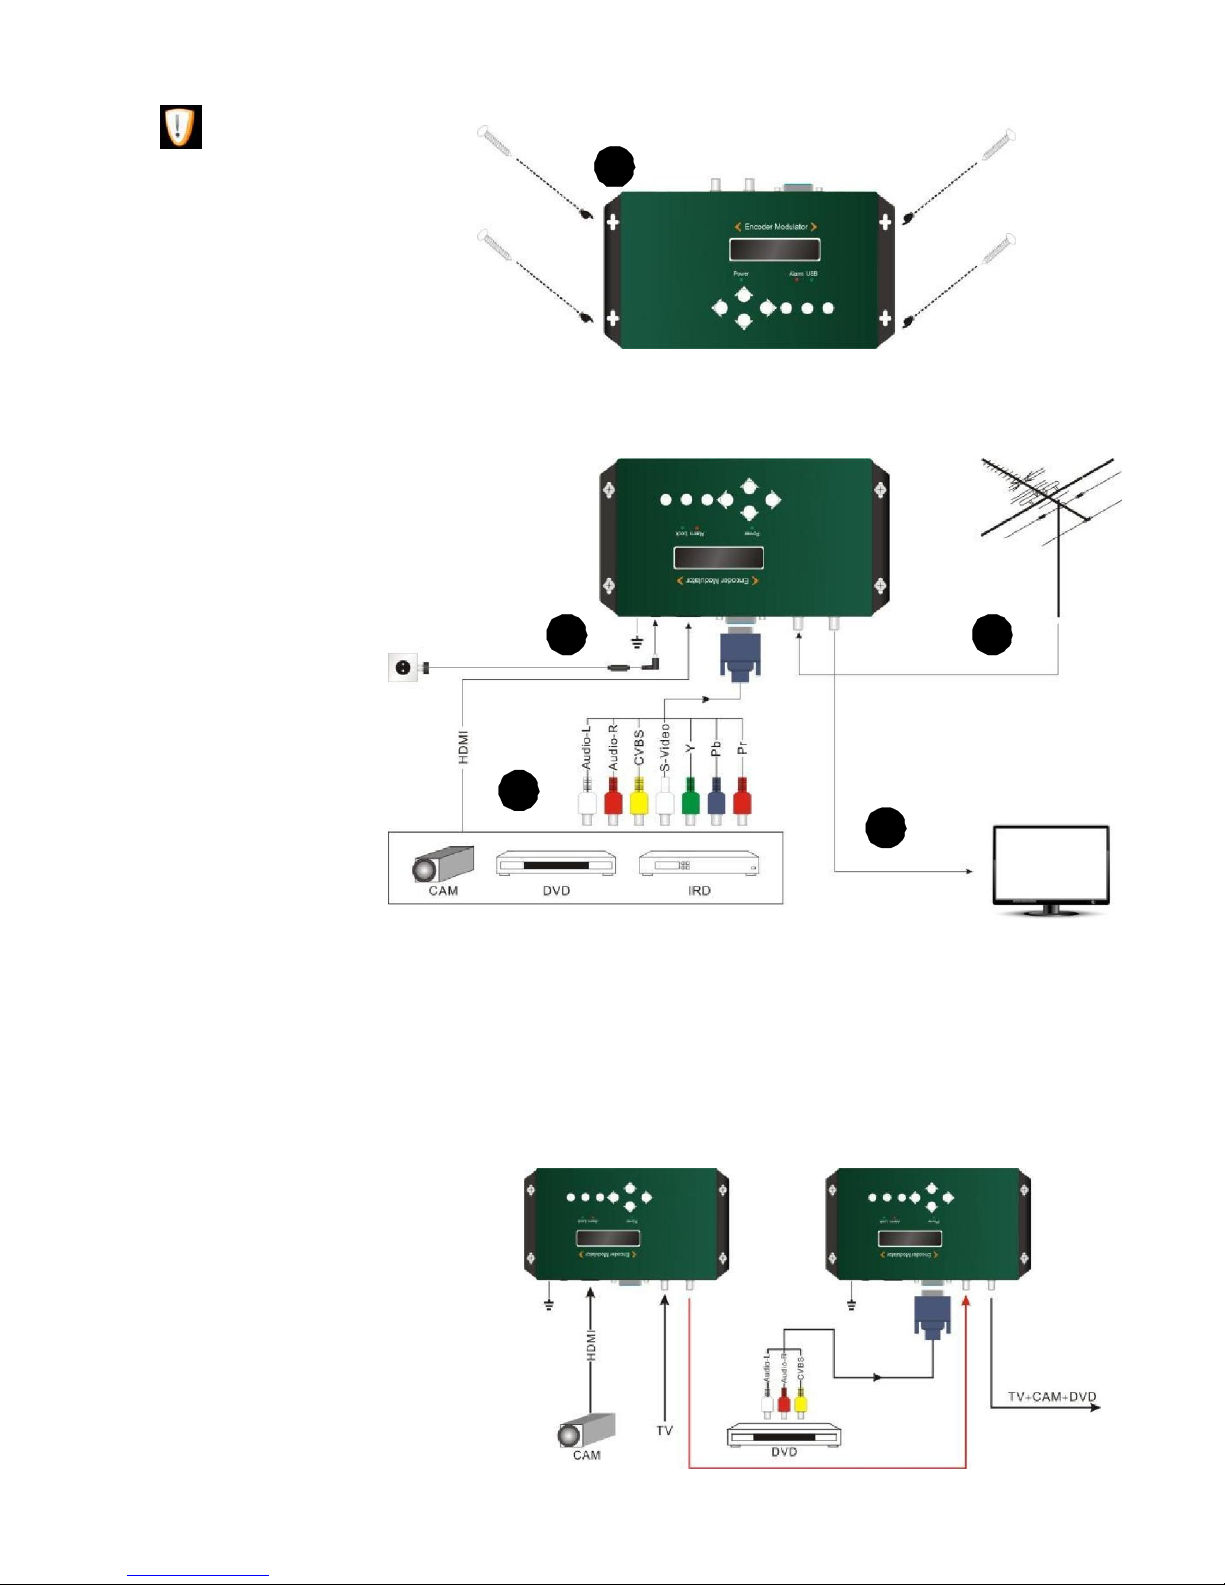
NO HOT PLUG!
1.
Mount and tighten the
screws and plugs to secure
the unit to the wall. Left 10
cm of free space around
from each unit.
1
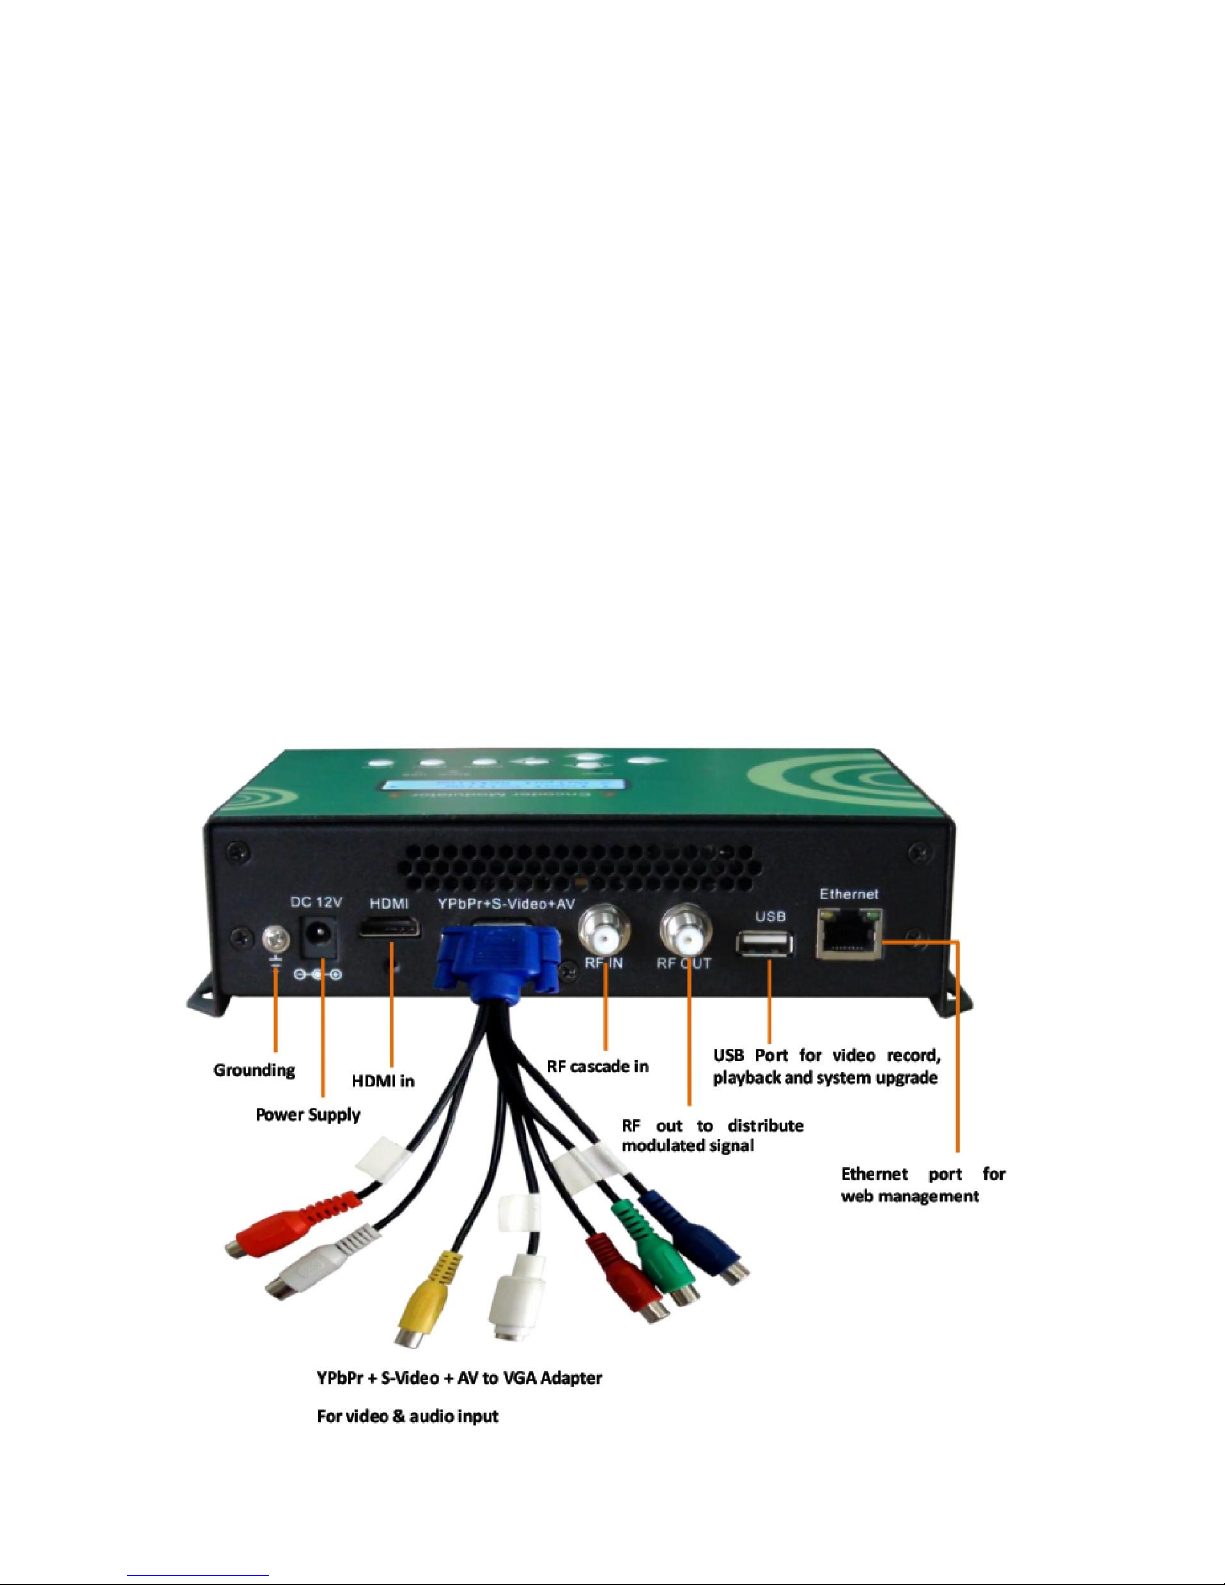
2. Connect the signal input in the respective connectors. The signal source can be from a
surveillance
monitor, DVD, set-top box, CCTV and etc.
3. Optionally,
connect the
loop-through RF
input coaxial
cable.
4. Connect cable to
RF output to
STB/TV.
2
5
4
3
5.
Power supply connection: a) Connect the earth cable; b) Connect the power plug to the unit mains
connector; c) Connect the power plug to the mains socket.
Cascade Installation
FUTV4658 unit has 1 TV signal to RF output encoded as DVB-T Digital TV signal.
Several FUTV4658 units can be cascaded
in order to increase the capacity. The
maximum capacity of a series of N
units is 1xN incorporated TV signals. To
cascade 2 or more units, connect the
RF output of the preceding unit to the
TV input (loop-through) of the next
unit (see right illustration)
5
Page 8
TS Creator.exe Download link:
http://pan.baidu.com/share/link?shareid=2908902623&uk=4230600371
Download path: English→Tool→TS Creator xxx.rar
6
Page 9
Chapter 3 Operations of TS Creator Software
FUTV4658 encoder modulator has a function to create TS videos with the software supplied
with the product. Users can create *.ts files containing images, videos and audios in a simple
and intuitive way, and play them on a television through FUTV4658’s USB port.
File format supported include:
Image: JPG, PNG, BMP, GIF/Video: MP4, WMV, AVI, MPG, TS, MKV /Audio: MP3, WAV
Installation
1. Download our “TS Creator” software package on your PC to get the installer and its
auxiliary routine.
2. Occasionally, if your PC hasn’t installed “Net Frame 2.0” yet, double-click
“NetFx20SP2_x86.exe” until complete the installation.
3. Double-click “Setup.exe” application to install the “Creator” and generate a
desktop shortcut.
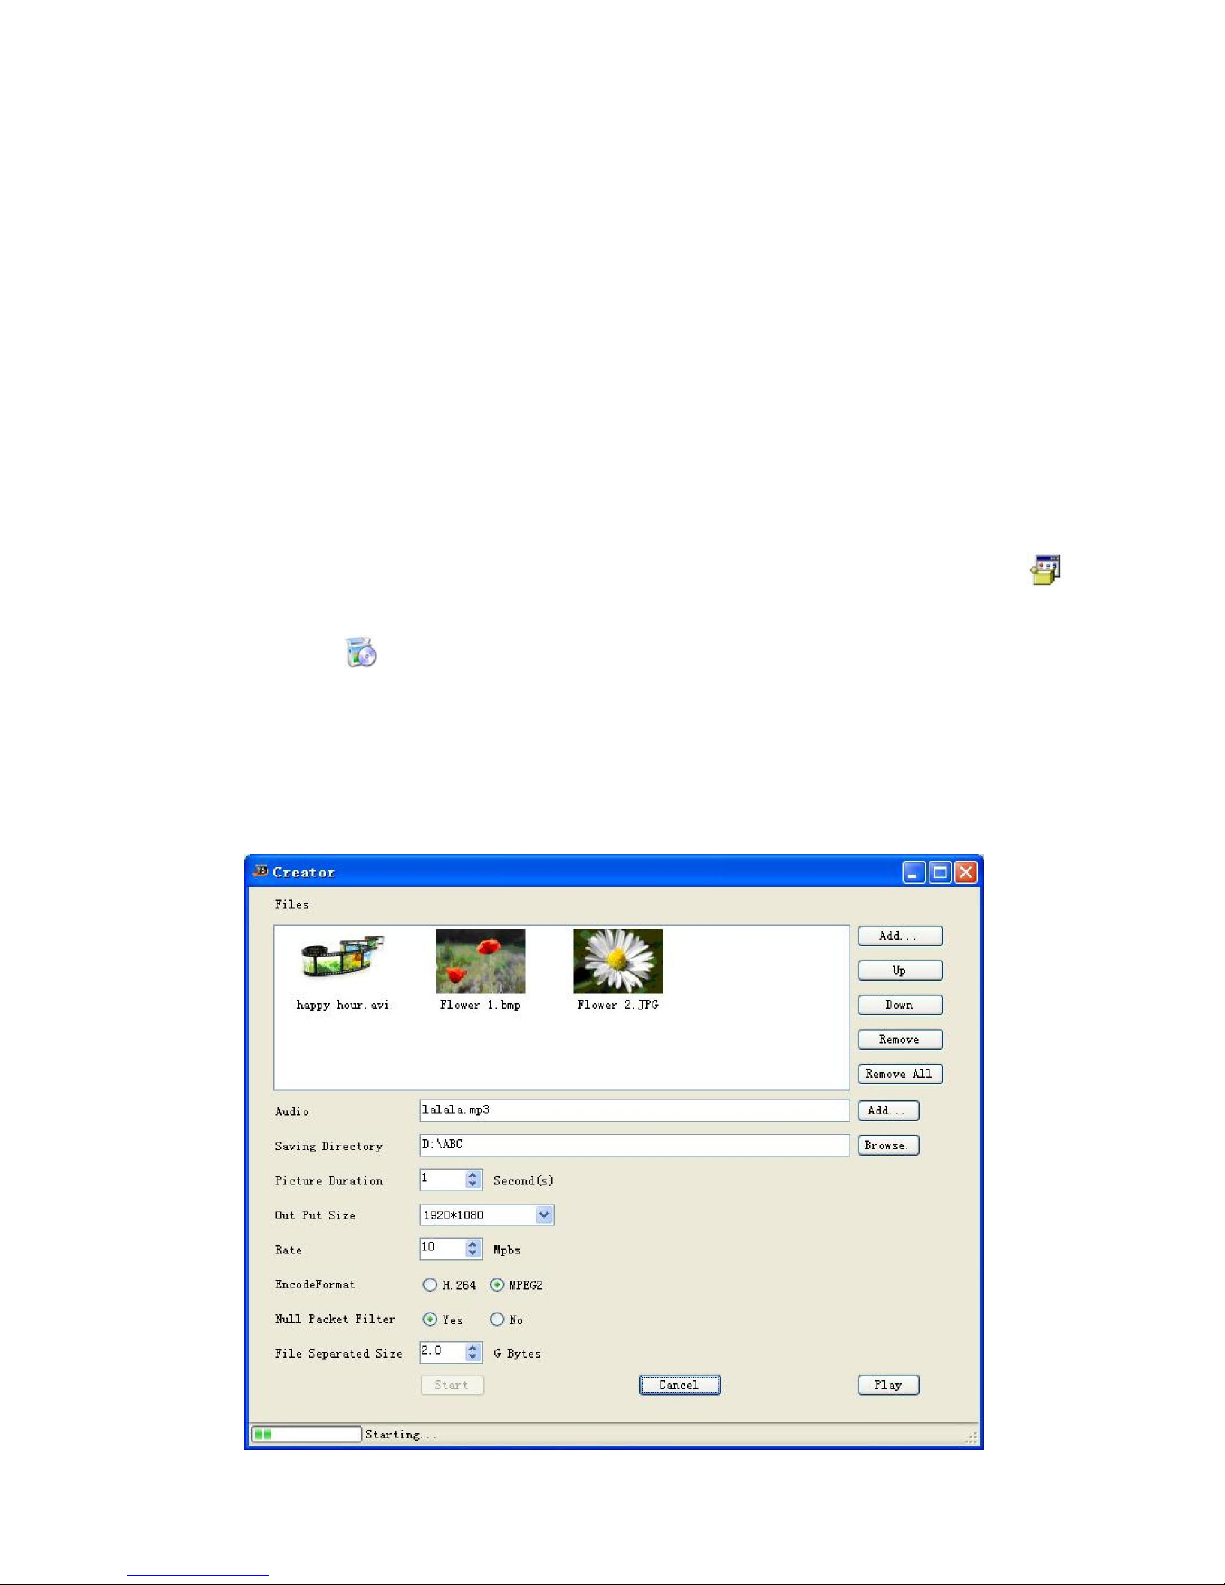
Operations of “Creator”
Double-click the “Creator” shortcut icon, it will trigger an operation interface like below:
7
Page 10
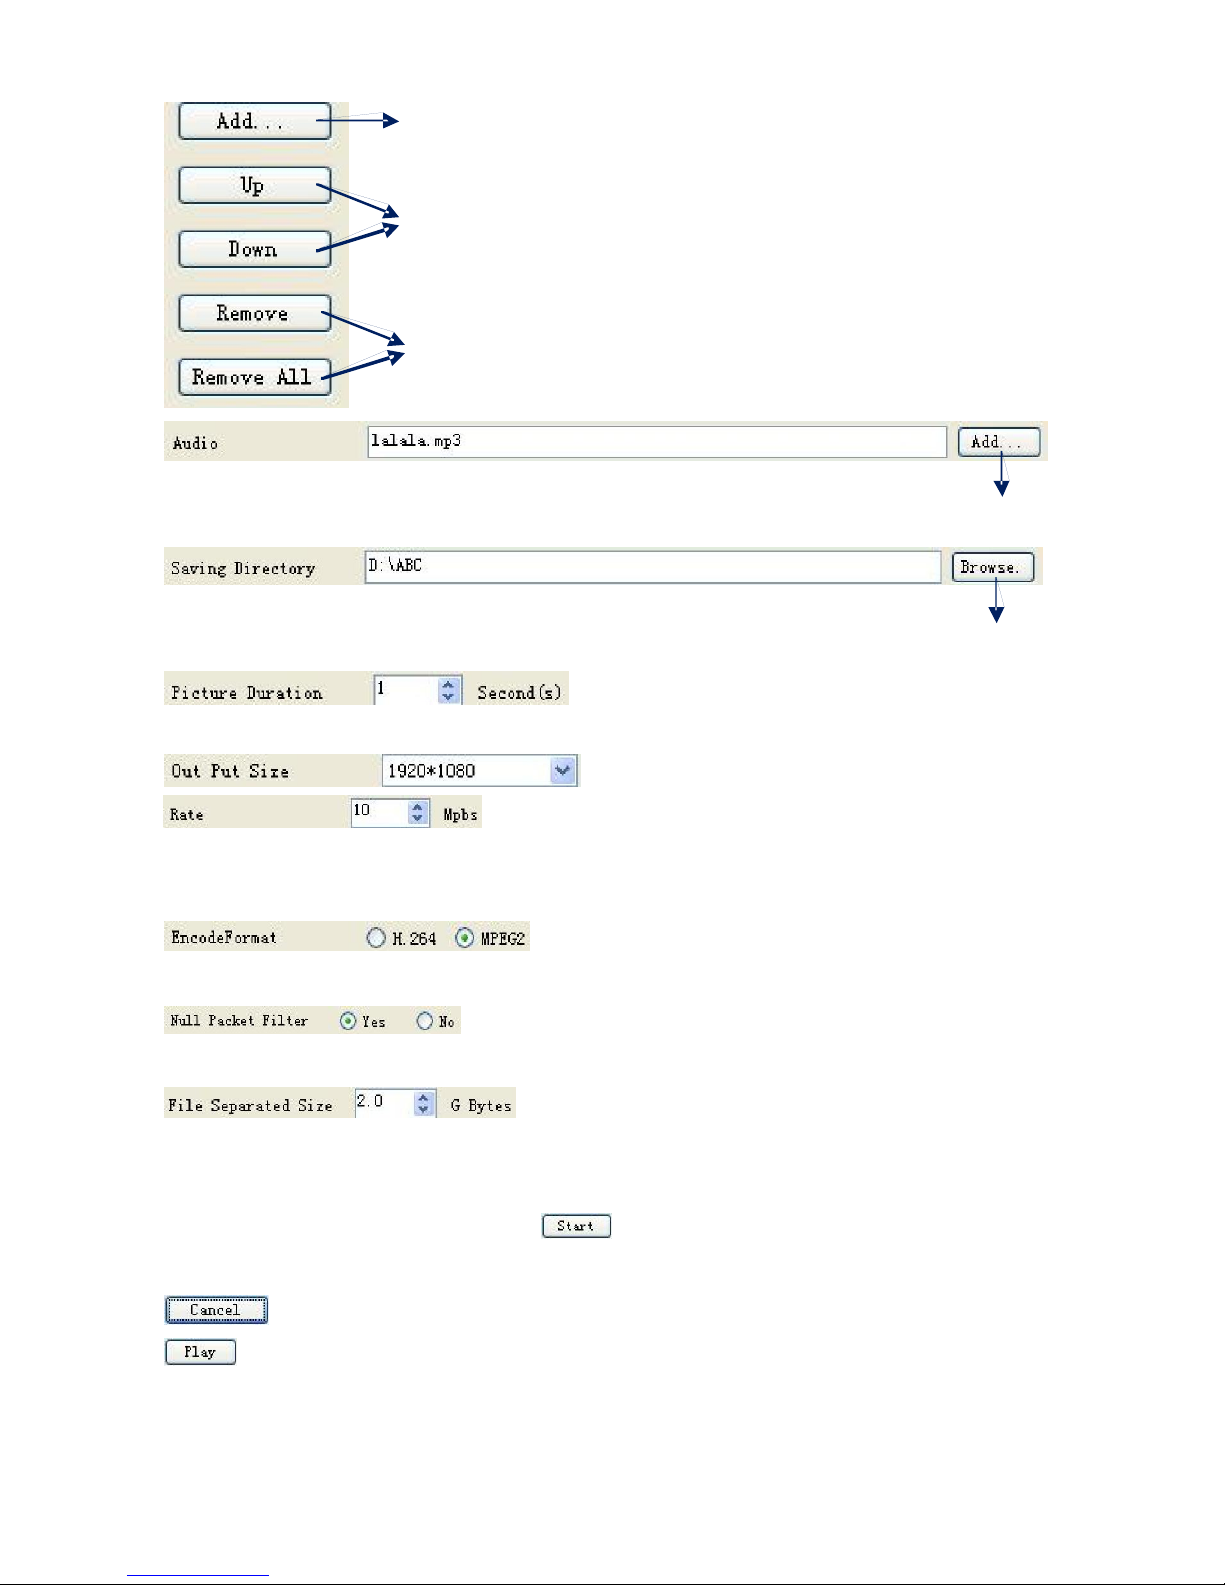
Click to add Images and videos
Click to adjust the order of Images/videos
Click to delete the Images/videos
Click to add audios
playing the video
Click to set a save path for the TS video to be created.
To set time duration for every picture when
To set the resolution for the output video
The video is transformed based on VBR (Variable Bit
Rate). The number set here represents the highest bit rate for the output video and bit rate
will varies under the number.
Users can select a encode format here according to
the standard of receiving terminal.
Users can filter the null packet to boost the video’s effect bit
rate.
A single video can be maximum 2.0 GB in size.
(FUTV4658 cannot play a video bigger than 2GB.)
After setting all the parameters, click
to start the transformation. Click “OK” when
it prompts “The operation completed normally.”
Click this button to stop the transformation before the operation completed.
After finishing the transform operation, users can click this button to play the
generated TS video.
8
Page 11
File Management
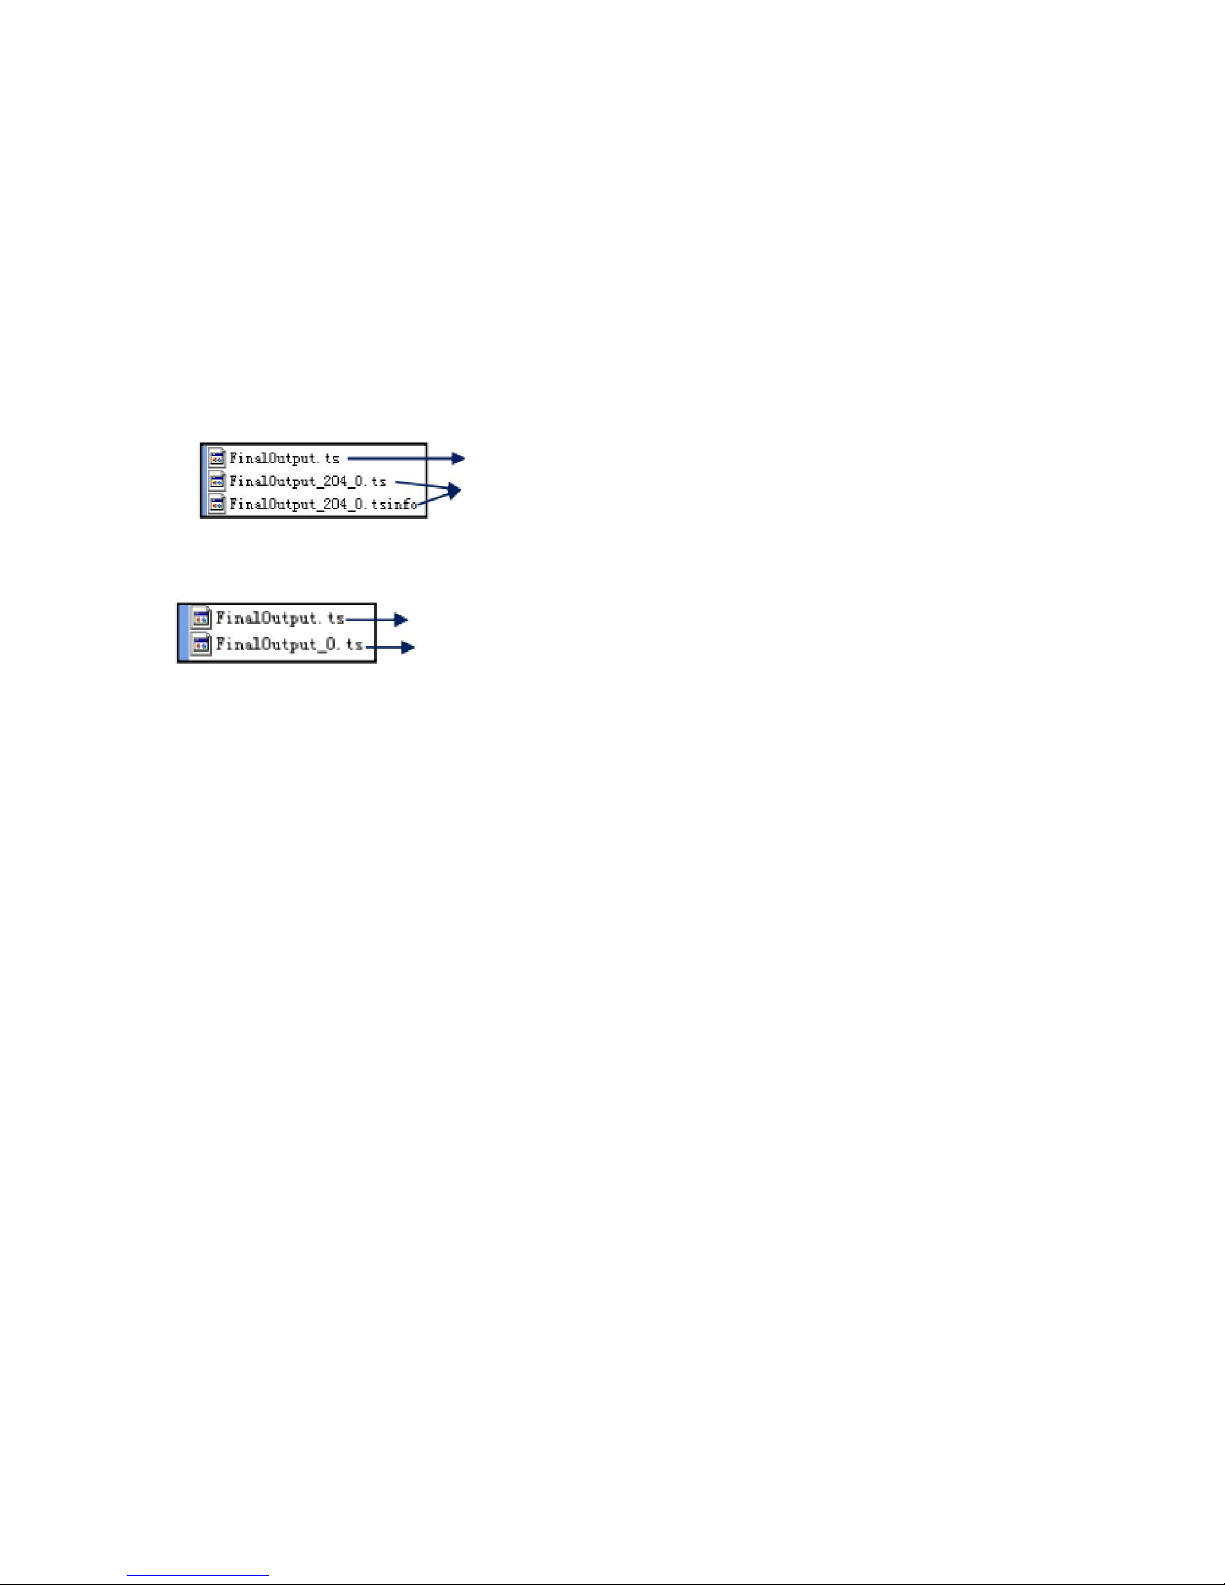
After finishing the transformation, users can find out the videos files generated according the
Saving Directory. For example, we save the video in “D:\ABC” so we can find
it in Disk
D\Folder ABC.
Management:
1. Three files will be generated if the Null Packet has been filtered.
TS video for preview through the “Creator” interface by clicking “Play” button
TS video and information files: Users need to save the two files together in
the USB memory, and then FUTV4658 can read them and play the video.
2. Two files will be generated if the Null Packet has not been filtered.
TS video for preview through the “Creator” interface by clicking “Play” button
TS video: Users need to save it in the USB memory, and then FUTV4658 can
read it and play the video.
Remarks:
l All the file names are automatically generated.
l Rename the files before creating a new video to avoid covering the previous files.
l If you rename “FinalOutput-204-0.ts” or “FinalOutput-204-0.tsinfo”, always keep the
names the same (Extension excluded) and then FUTV4658 can read them and play the
video.
9
Page 12
CHAPTER 4 Devices Operations and Management
FUTV4658 is controlled and managed through the key board and LCD display.
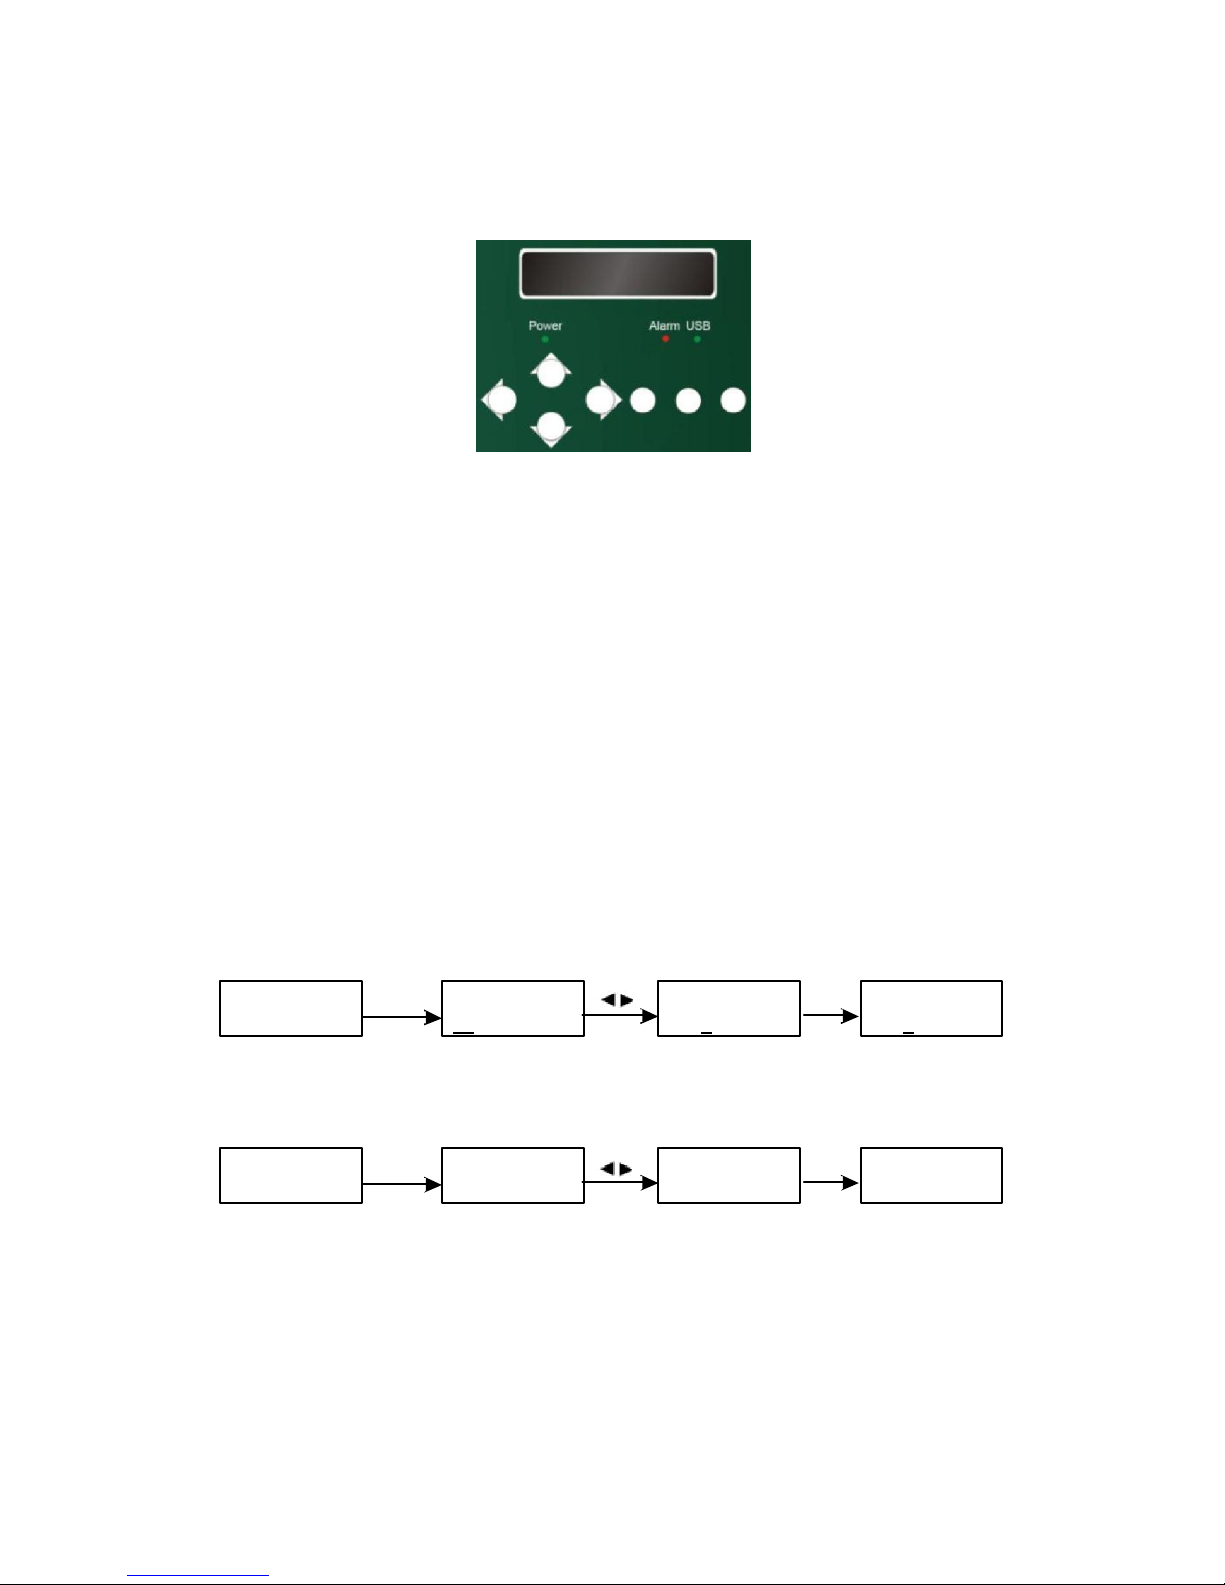
LCD Display – It presents the selected menu and the parameter settings. The backlight in the
display is on when the power is applied.
LED Indicators – These lights indicate the working status
l Power: It lights on when the power supply is connected.
l Alarm: It lights on when the there is error, such as the signal source loss.
l USB: It lights on when the USB device is properly connected and blocks out when the
USB device get removed.
Left/Right/Up/Down buttons – Use these buttons to turn the screen pages, shift the target
items by moving the triangle, or change the parameter settings in the program mode.
Enter – Use this button to enter a submenu or save a new setting after adjustment; press it
to start adjusting the value of certain items when the corresponding underline flash with Up
and Down buttons;
Hue
1
Enter Hue
+0
01
Hue
+001
Hue
+002
Press it to activate the hidden selections and change the setting with Up and Down (or Left
and Right) buttons.
Constellation
64QAM
Enter
Constellation
[64QAM]
Constellation
[128QAM]
Enter
Constellation
128QAM
Menu – Press this button to step back
Lock – Locking the screen / cancelling the lock state, and entering the main menu after the
initialization of the device. After pressing lock key, the system will question the users to save
present setting or not. If not, the LCD will display the current configuration state.
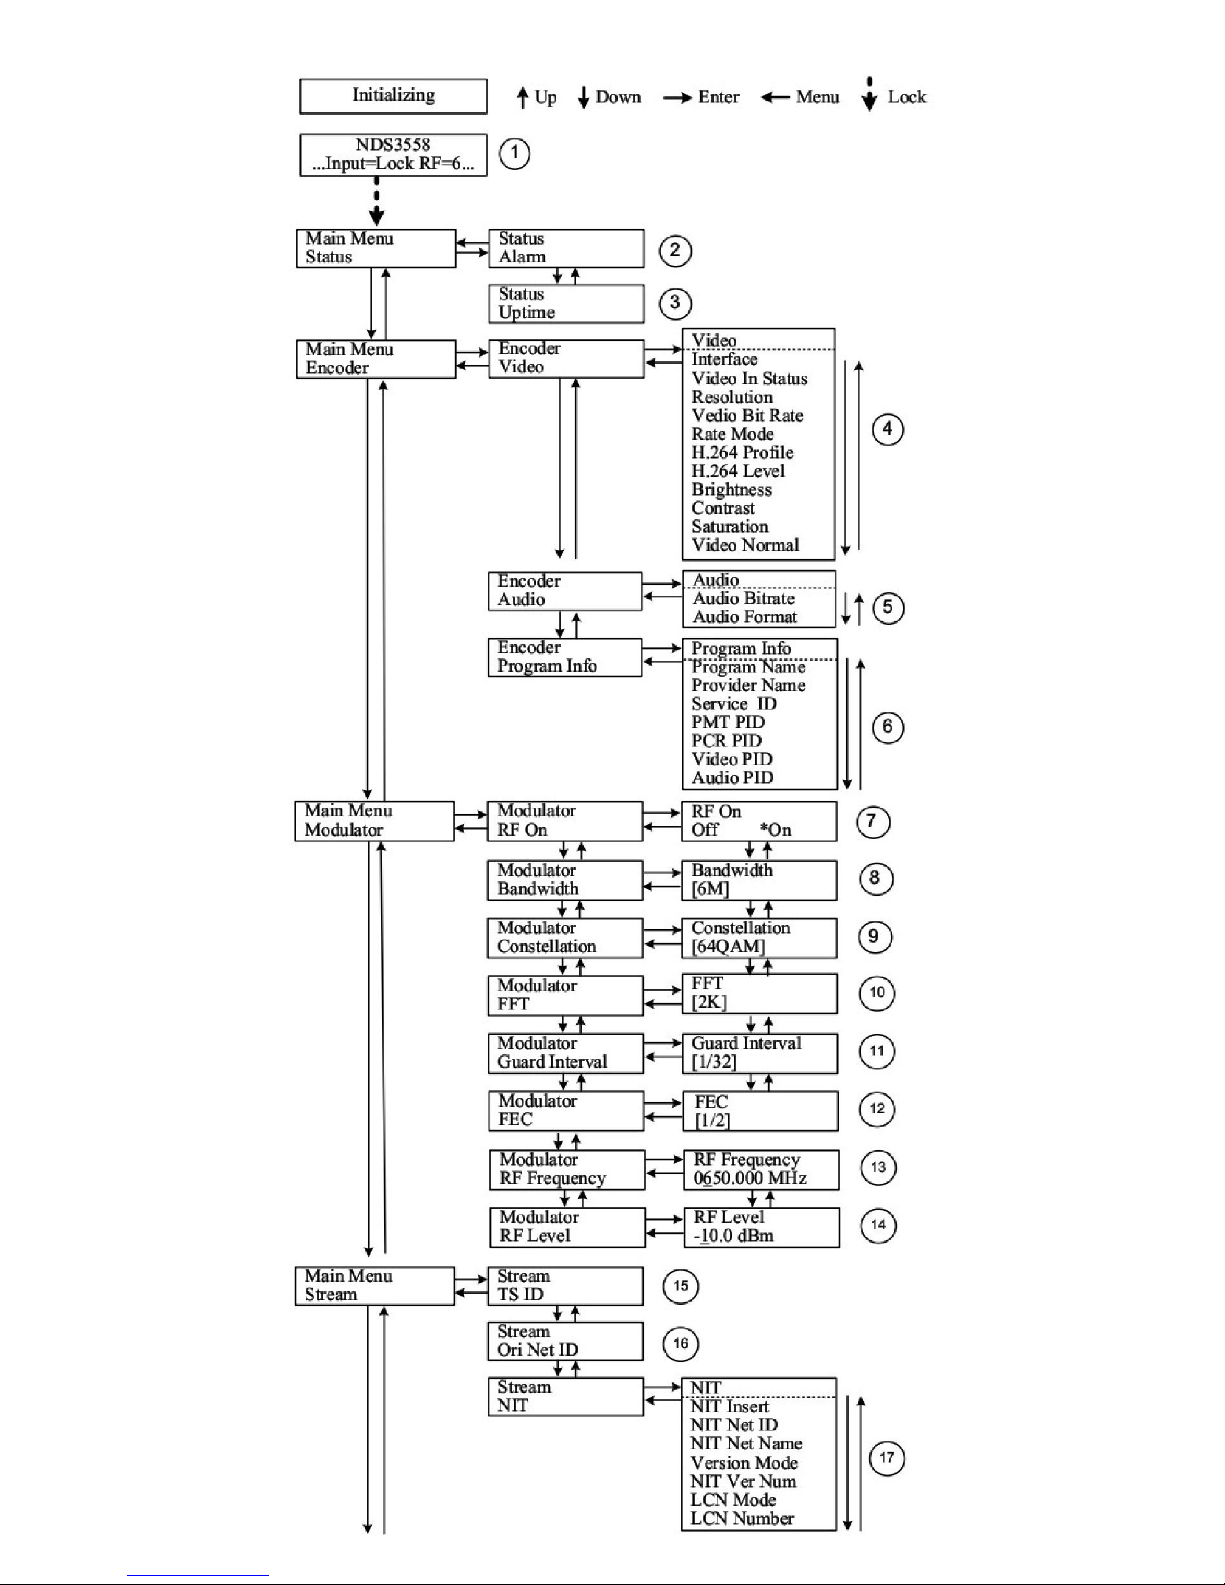
When the power is connected, the LCD will start to initialize the program. The LCD menu
goes as below chart.
10
►
►
Page 13
Page 14
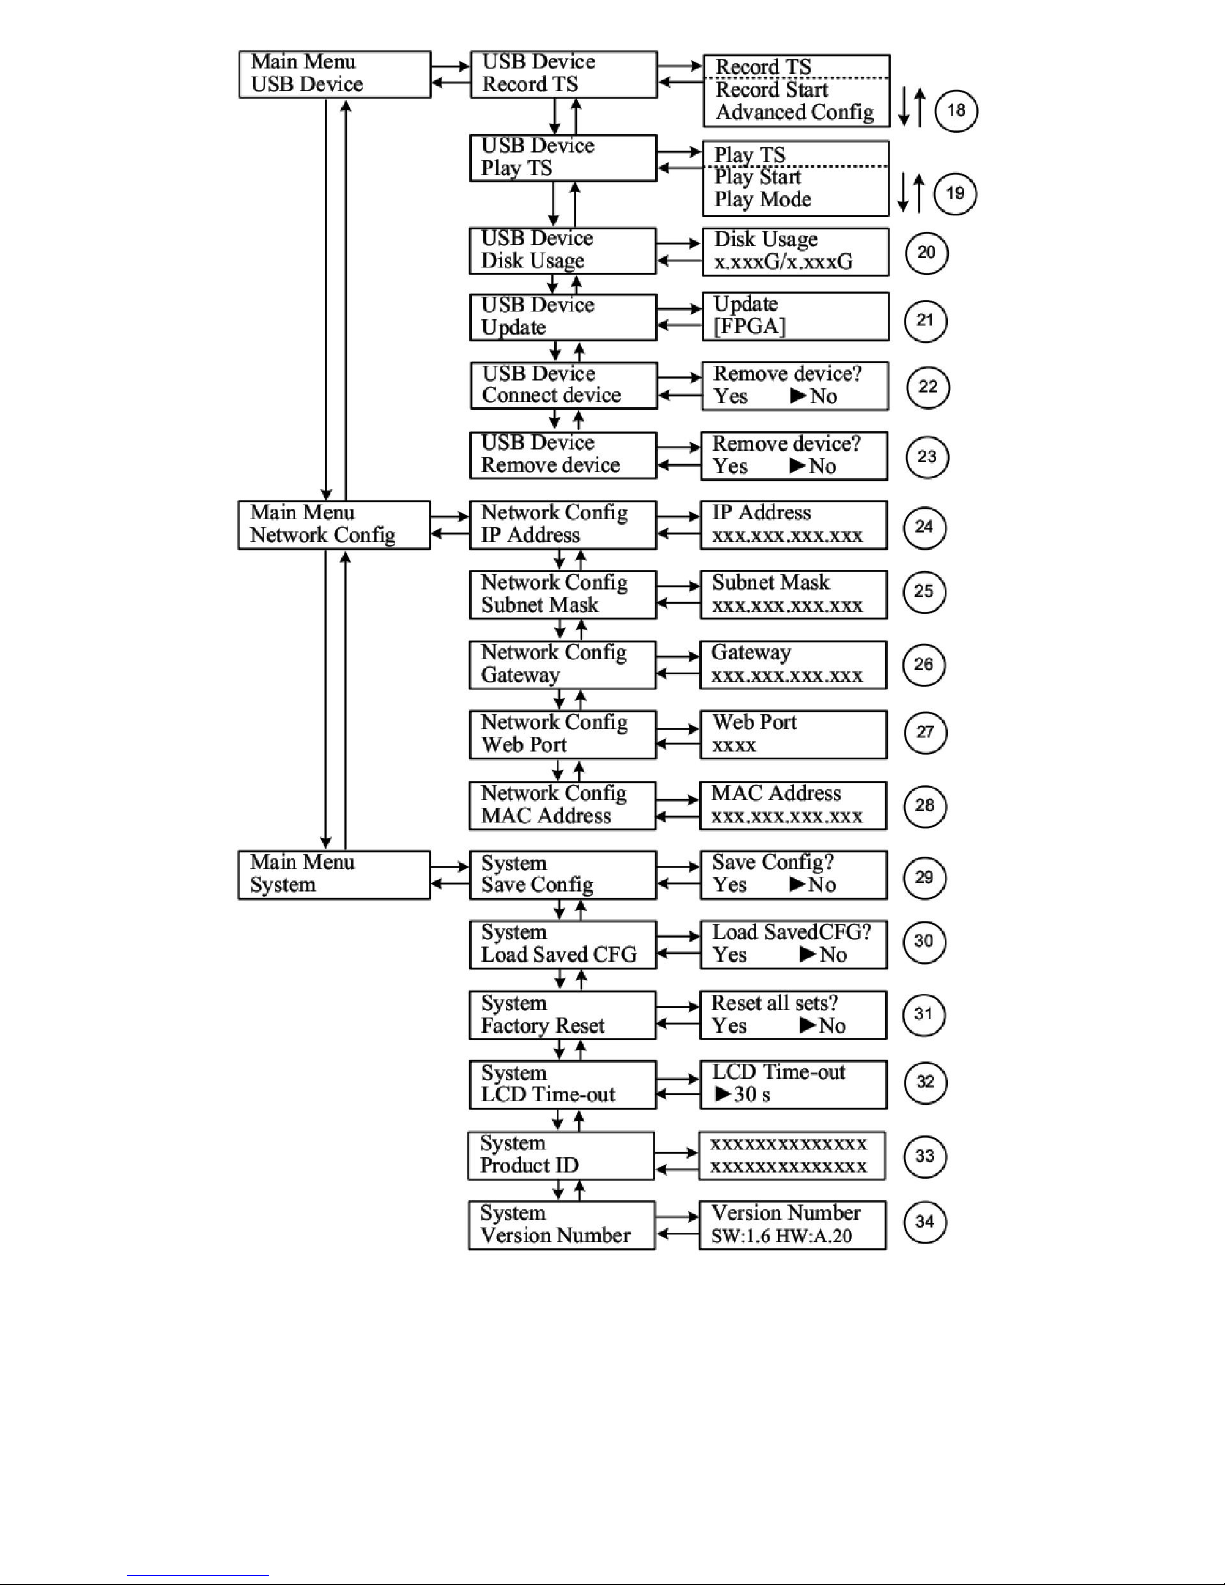
1) FUTV4658: Model number; Input=Lock: Signal has been collected.
2) Alarm Status: For example, if the signal cable disconnected, it will display Video 1 Not Lock
under this menu.
3) Uptime: It displays the working time duration of the device. It times upon power on.
4) Video Parameters: User can enter the items respectively to set video parameters.
12
Page 15

Interface: select a right interface type from the options provided. The device then can
automatically search the signal and starts to encode.
Resolution: signal source resolution,
read-only. Video Bit rate: adjust in range of 1.000~19.000 Mbps. Rate Mode: this unit user
can choose CBR or VBR. User can also adjust values of rest items (H.264 profile, H.264 level,
Brightness: 0-128 & Contrast: 0-255 & Saturation: 0-128; Hue: -128 - +127)
5) Audio Bit rate: Select audio bit rate from the options provided. Different audio format has
different bit-rate range. See specification table for details.
Audio Format: Select audio format among MPEG2, MPEG2-AAC and MPEG4-AAC.
6) Program Information: User can enter the sub-menus to edit the Program Name, Provider
Name, Service ID, and PIDs of
PMT, PCR
, Video and Audio.
7) RF On: User can choose to turn on or turn off the RF under this menu.
8) Bandwidth: Choose between 6M, 7M and 8M.
9) Constellation: DVB-T modulator contains 3 constellation modes: 64 QAM, QPSK and 16
QAM.
10) FFT (Transmission Mode): Select between 2K and 8K.
11) Guard Interval: Select among 1/32, 1/16, 1/8 and 1/4.
12) FEC: It refers to Forward Error Correction rate. It contains 1/2, 2/3, 3/4, 5/6 and 7/8.
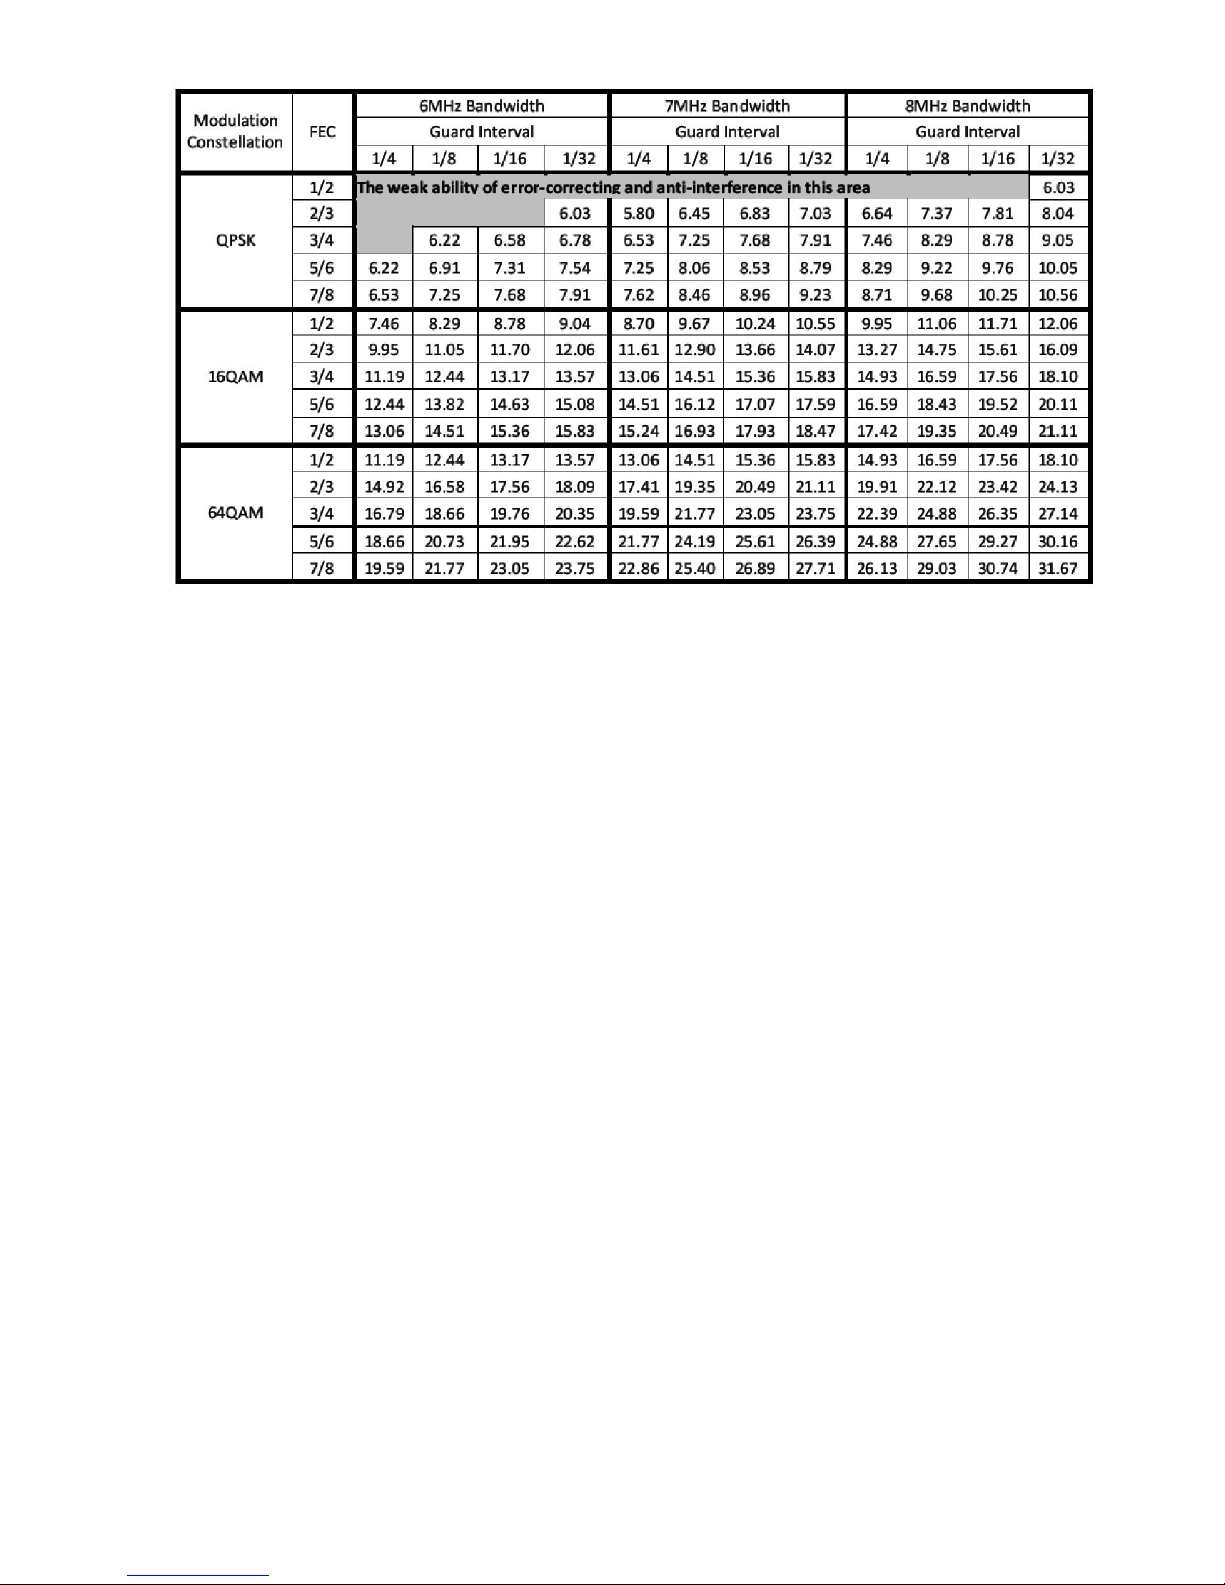
Ø NOTE: The different combination of bandwidth, constellation, guard interval and code
rate (FEC) will form a different output code rate. Please refer to appendix table 2.
13) RF Frequency: Adjust it at range of 30 to 999 MHz. Set it according your regional situation
or inquire your local services.
14) RF Level: Adjust it at range of -16~ -36dBm.
15) TSID: (Transport Stream ID) User can view or adjust after enter this menu.
16) ONID: (Original Network ID)-User can view or adjust after enter this menu.
17) NIT: (Network Information Table) NIT table is a very important table for describing
the
network and TS. User can enter the submenus displayed and edit the values or select modes.
18) – 23) Please refer to Chapter 5 for details.
24) IP Address: To configure IP address here.
25) Subnet Mask: To configure subnet mask here.
26) Gateway: To configure gateway here.
27) Web Port: To configure web port here.
28) MAC Address: To view MAC address here.
13
Page 16

29) Save Config: Yes/No-to save/give up the adjustment of setting.
30) Load Saved CFG: Yes/No-to load/ not to load the saved configuration.
31) Reset all sets: Yes/No-choose/not choose the factory’s default configuration.
32) LCD Time out: A time limit that LCD will light off. Choose among 5s, 10s, 45s, 60s, 90s and
120s (seconds).
33) Product ID: User can view the serial number of this device. It is read-only and unique
34
) Version: It displays the version information of this device.
14
Page 17
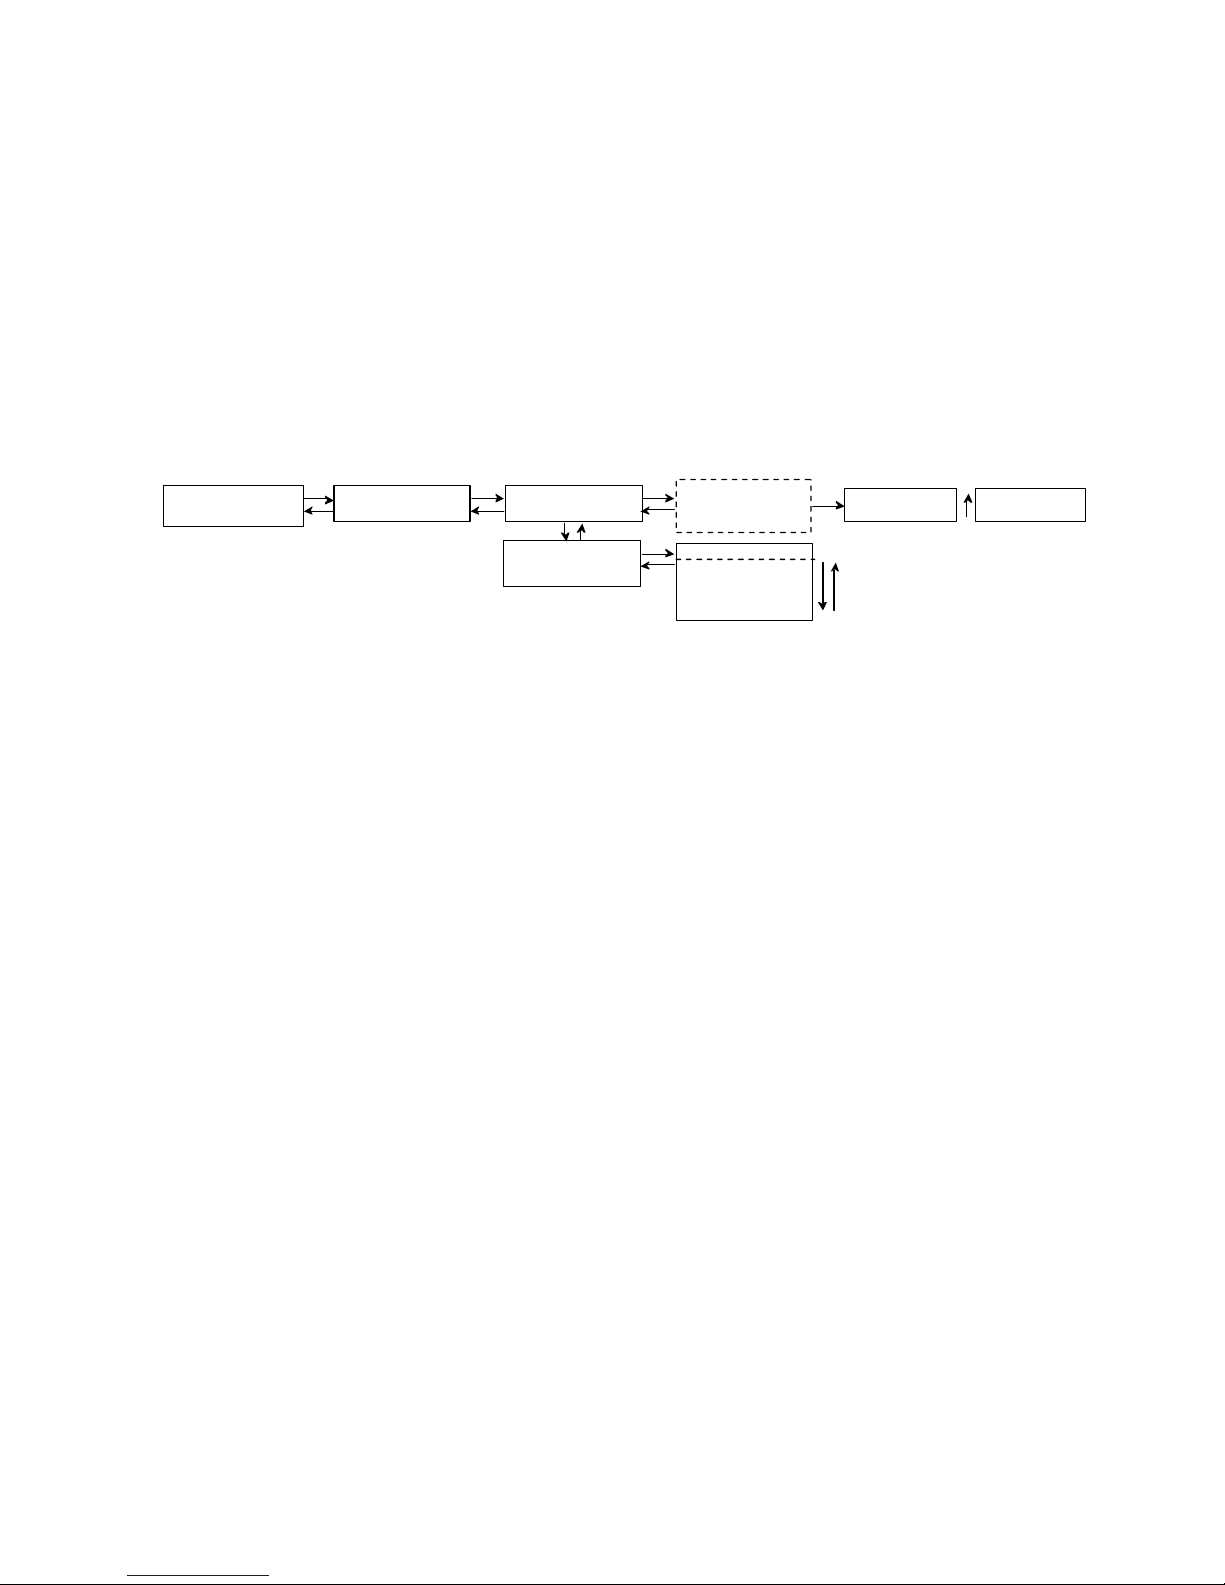
Chapter 5 Operations of Record TS and Play TS
through USB Disk
The FUTV4658 encoder modulator has functions of:
1. *.ts Video Creation
See Chapter 3.
2. TS Record and Save
Record mode select
▼
Main Menu
USB Device
USB Device
Record TS
Record TS
Record Start
Record TS
Advanced Config
►Single File
Segment File
Loop Record
Advanced Config
File name
File size
Data Mode
Start Record
Stop Record
1) Connect the signal source, enter “Record Start” and then choose one record
mode to start recording the encoded TS. And, press UP key and then Enter key to stop recording.
There are 3 record modes provided:
l “Single file”: For example, when the file size is set as 1000M and the *.ts is recorded
up to 1000M, it automatically stops recording TS.
l “Segment file”: For example, when the file size is set as 1000M and the *.ts is recorded up
to 1000M, it automatically saves the files and continues to record TS and
save it to next file until the USB memory is full.
l “Loop record”: It automatically saves the files and continues to record TS and save it
to next file. When the USB memory is full, it replaces the previous file.
2) Advanced Config:
File Name: Users can enter this menu to edit name for the *.ts files to be recorded. For
example, if users name it “Record-”, it will give name to the saved *.ts files
“Record-001.ts”, “Record-002.ts” “Record-00N.ts”.
File Size: users can set the file size for the *.ts to be recorded. A single file can be
maximum 2047M in size.
Data Mode: There are 3 data modes:
15
Page 18
l Mode 1 (The ts files will be saved in 188-byte packages with null packet embedded.);
l Mode 2 (The ts files will be saved in 188-byte packages with null
packet filtered.
However, such ts files cannot be normally played with FUTV4658, but can be played
on PC with some media player such as VLC.);
l Mode 3 (The ts files will be saved in 204-byte packages with null packet filtered.).
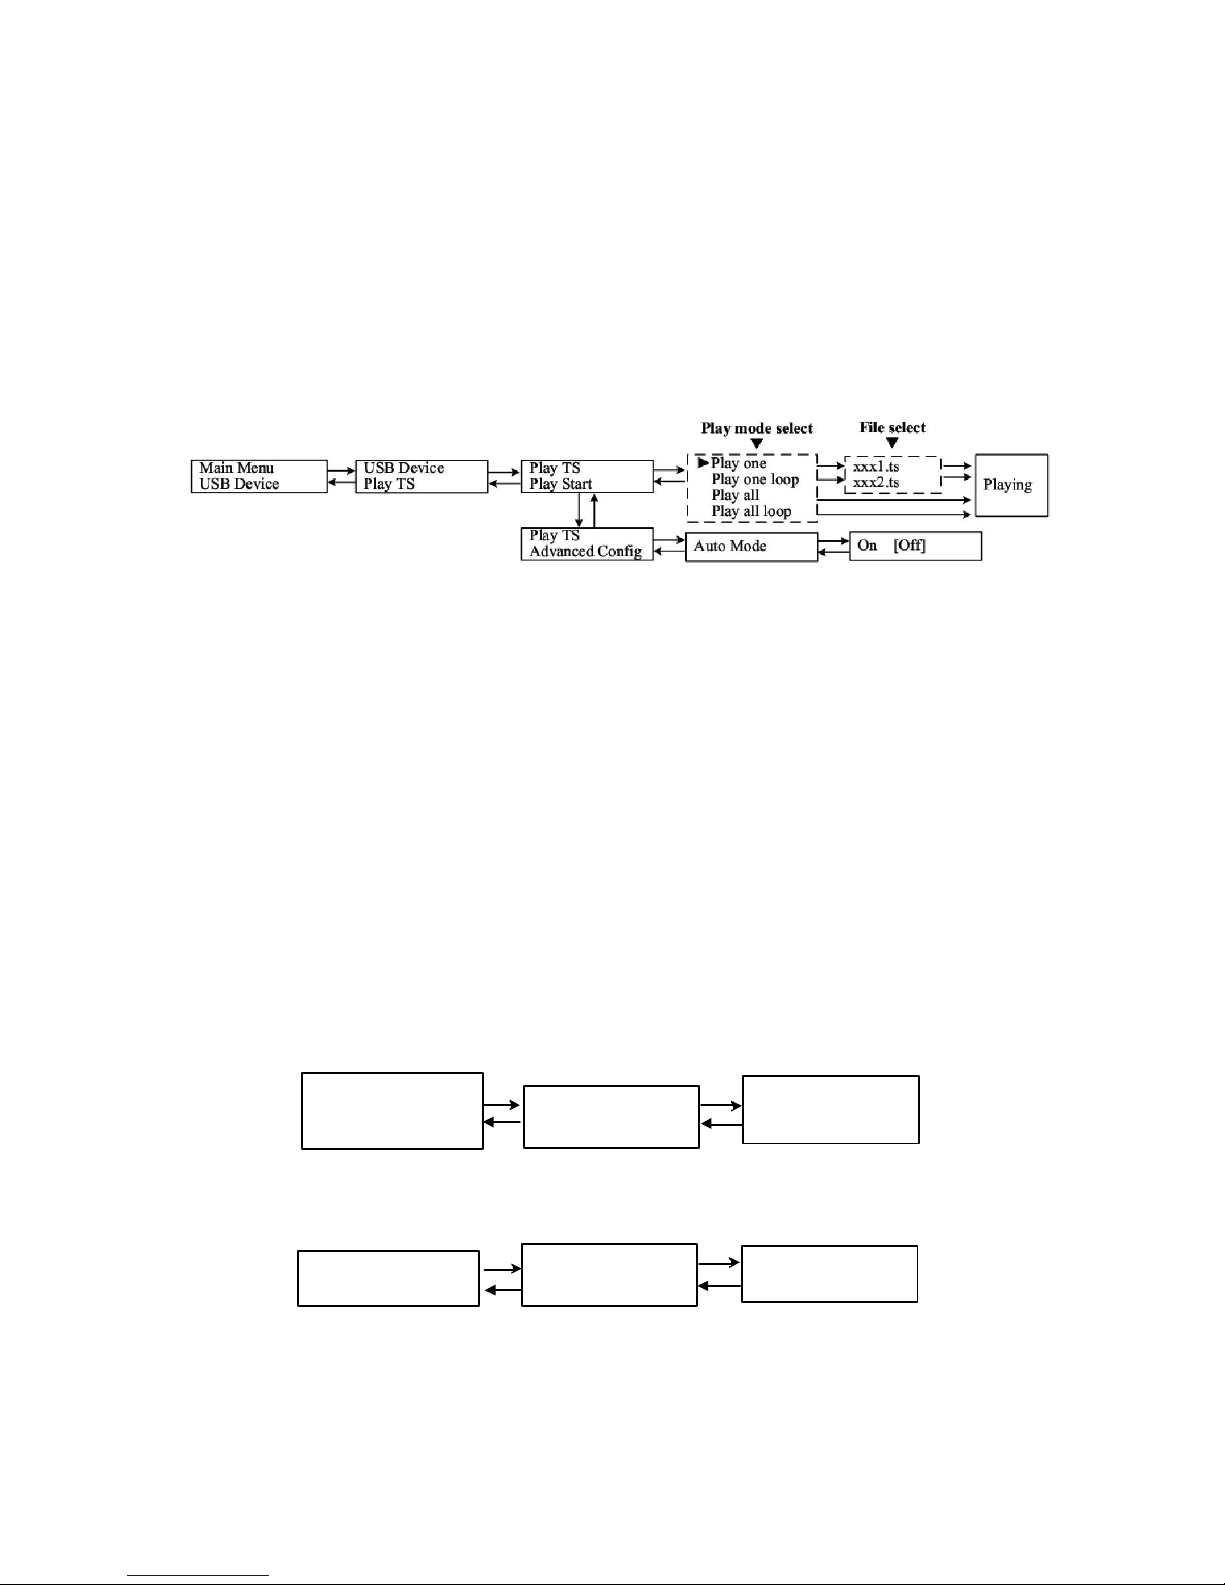
3. TS Playback
1) Play Start:
User can select a play mode for the *.ts files as needed before playing the *.ts file and
specify a video under ‘Play one’ / ‘Play one loop’ mode and press “Enter” button to
start play. While under ‘Play all’ / ‘Play all loop’ mode, it automatically plays files from
first to end.
2) Advanced Config:
Auto Mode is for saving the play mode for the device. When the auto mode is enabled,
the device will automatically apply the play mode set before the power cut off and
output ts files stored in the USB device through RF. While the auto mode is off, FUTV4658
will play the encoded TS through RF when the power is connected.
4. Disk Usage
Main Menu
USB Device
USB Device
Disk Usage
Disk Usage
xx.xxG/x.xxG
Users can enter this menu to view the USB disk’s capacity left.
5. Update
Main Menu
USB Device
USB Device
Update
Updatee
►PFGA
Choose one item to be updated and press Enter to confirm. Keep the update file stored in
the USB device in *.dxf format.
6. Connect Device
16
Page 19

Main Menu
USB Device
Press Enter key to re-connect the USB disk.
7. Remove Device
Main Menu
USB Device
USB Device
Connect device
USB Device
Remove device
Press Enter key to safely remove the USB disk. FUTV4658 will then automatically resume
encoding process and playing the program input from the encoder module.
17
Page 20
Chapter 6 Operations of Web-server
In addition to using front buttons to control the encoder modulator and USB device, users
can also perform the same operation in an easier way with the web Brower in the PC
(Personal Computer).
Login
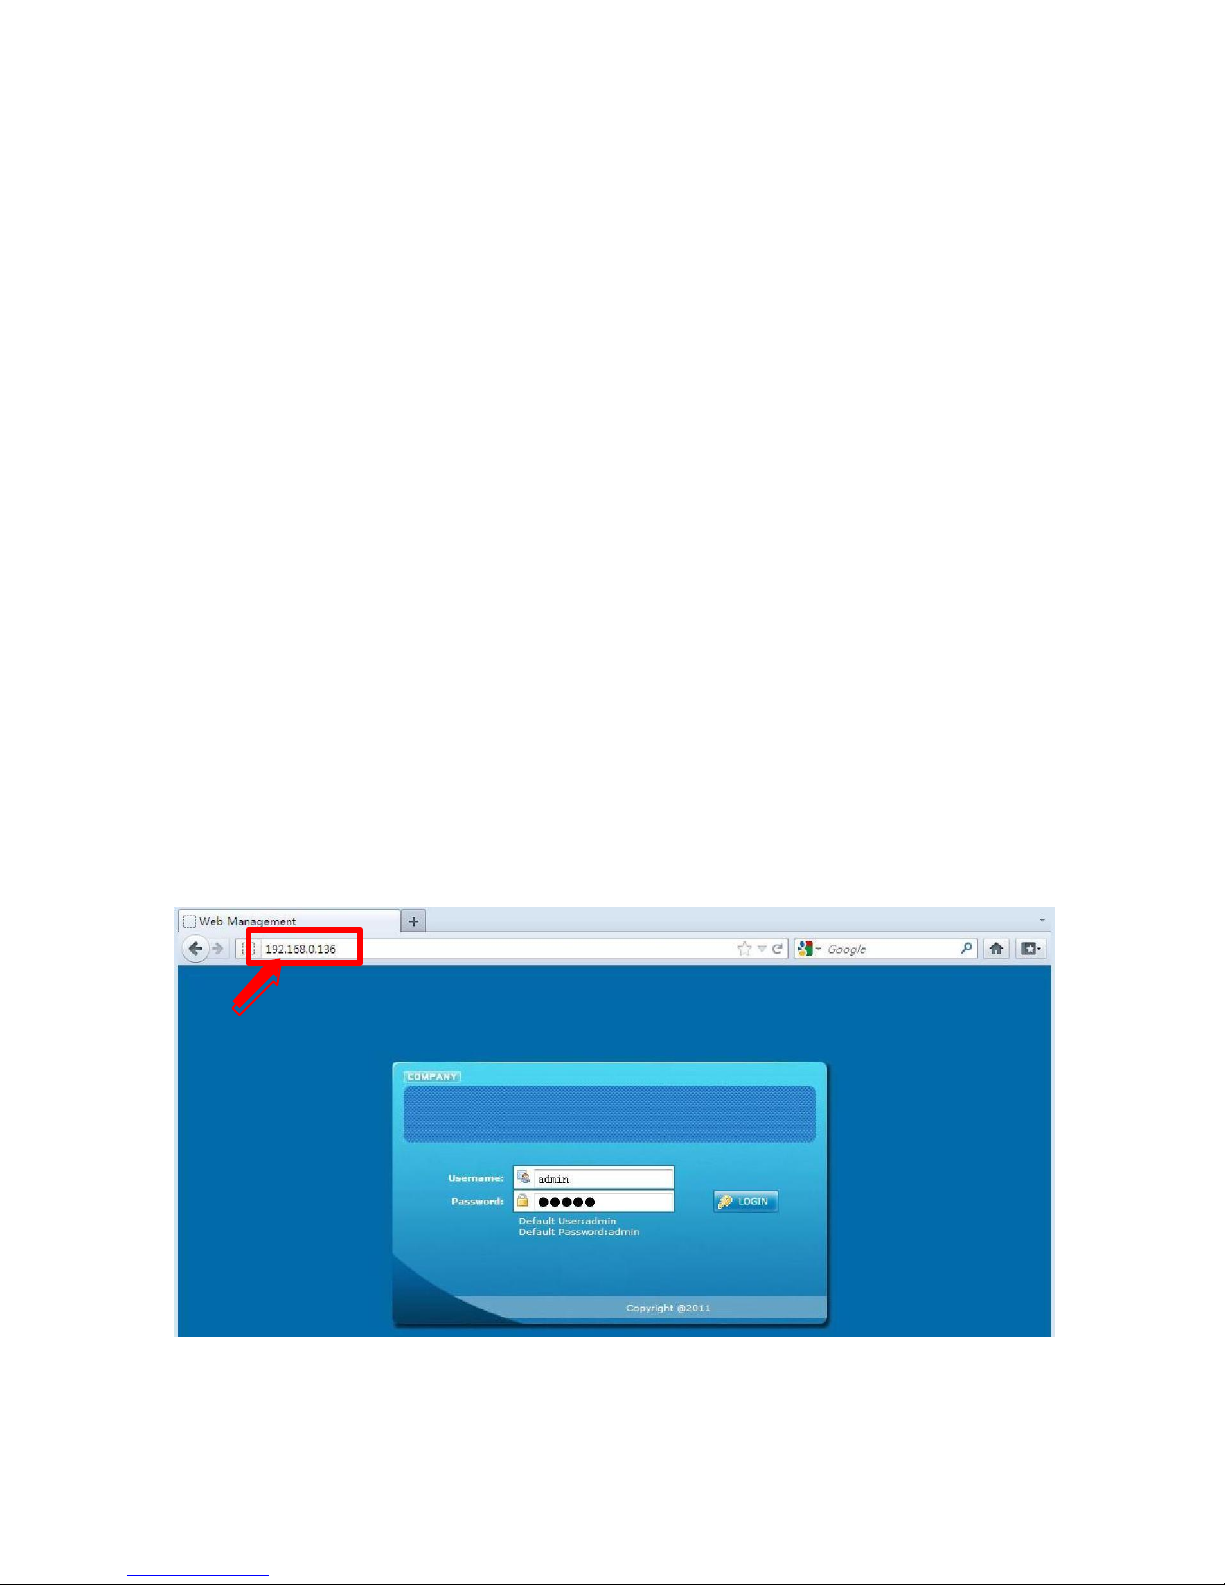
The default IP address of this device is 192.168.0.136. (We can modify the IP through the
Front panel.)
Connect the PC and the encoder modulator with a net cable, and use ping command to
confirm they are on the same network segment.
I.G. the PC IP address is 192.168.99.252, we then change the device IP to 192.168.99.xxx (xxx
can be 1 to 254 except 252 to avoid IP conflict).
Use web browser to connect the device with PC by inputting the device’s IP address in the
browser’s address bar and press Enter
It will display the Login interface as Figure-1. Input the Username and Password (Both the
default Username and Password are “admin” ) and then click “LOGIN” to start the device
setting.
Figure-1
Page 21
Operation
Summary:
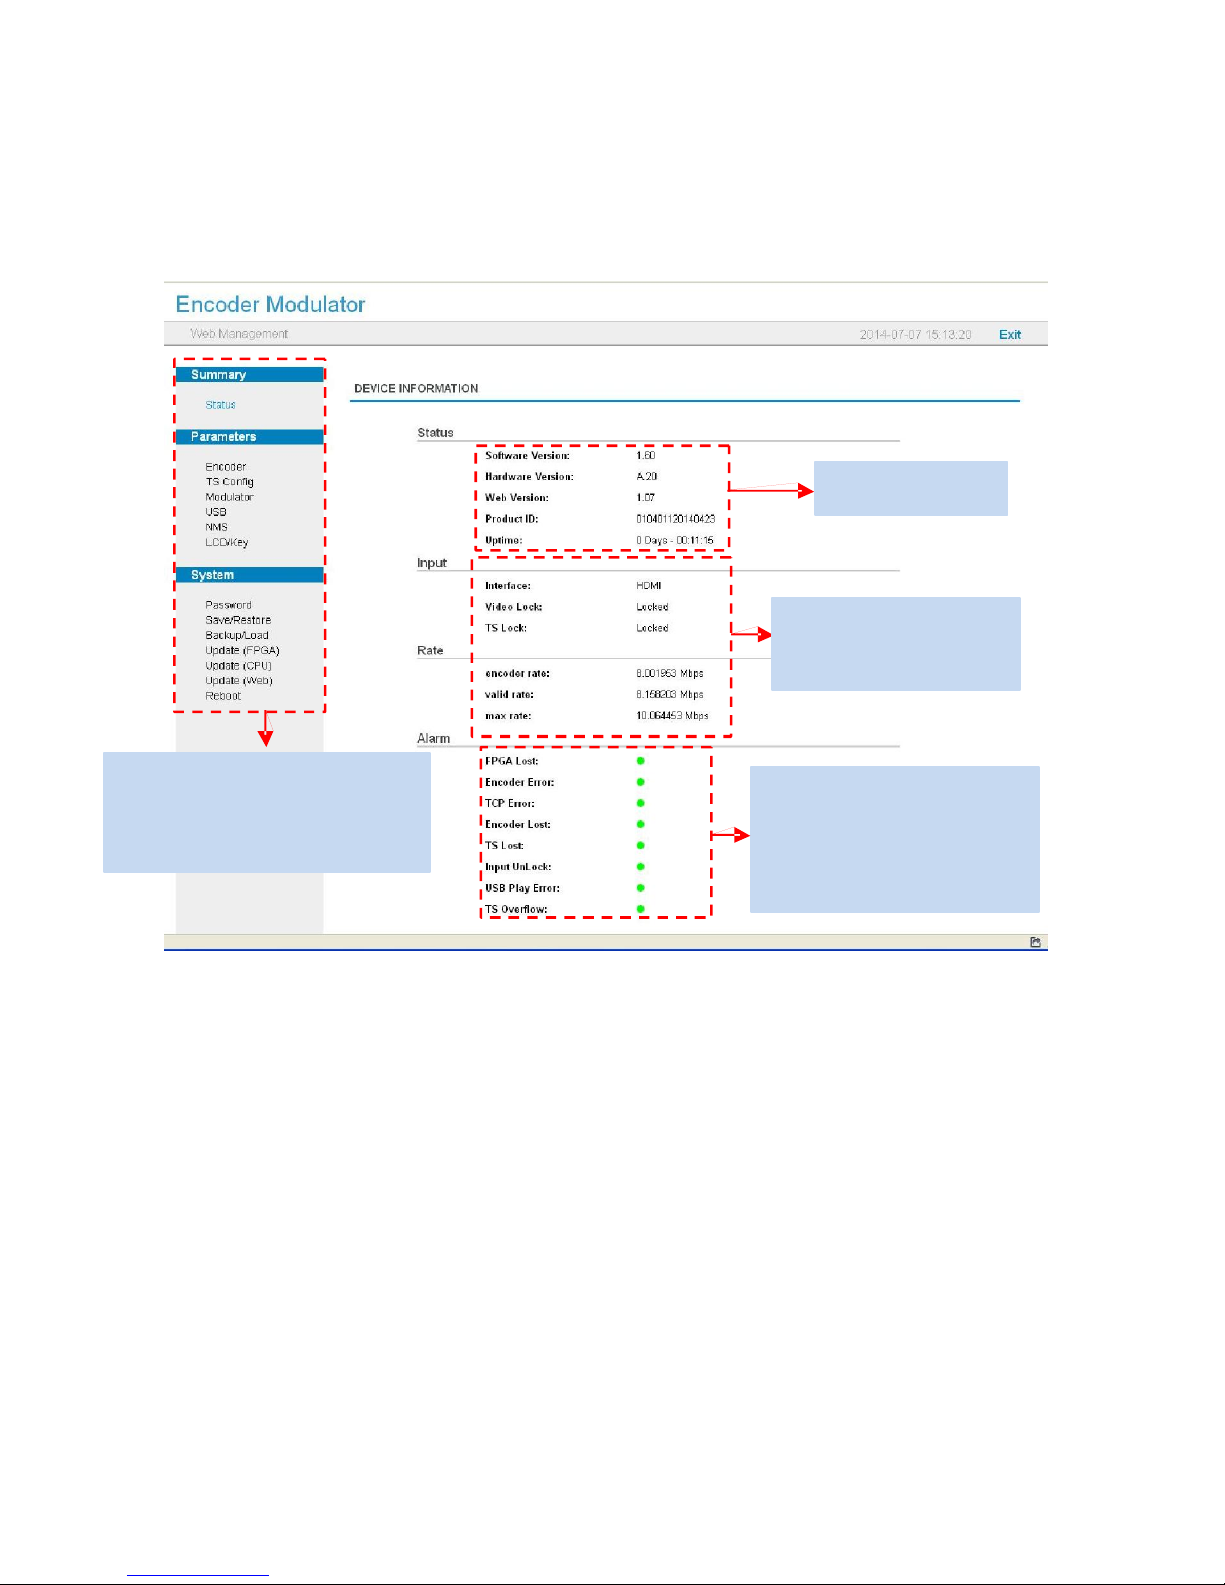
When we confirm the login, it displays the WELCOME interface as Figure-2 where users can
have an overview of the device’s system information and working status.
System information
Input information and
encoding working status.
User can click any item here to enter
Alarm Area: Green light indicates
the corresponding interface to check
information or set the parameters.
Parameters → Encoder:
Figure-2
the corresponding item is in
normal status. Otherwise the light
is red.
From the menu on left side of the webpage, clicking “Encoder”, it displays the
interface
where users can configure the encoding parameters for the input video/audio. (Figure-3)
19
Page 22
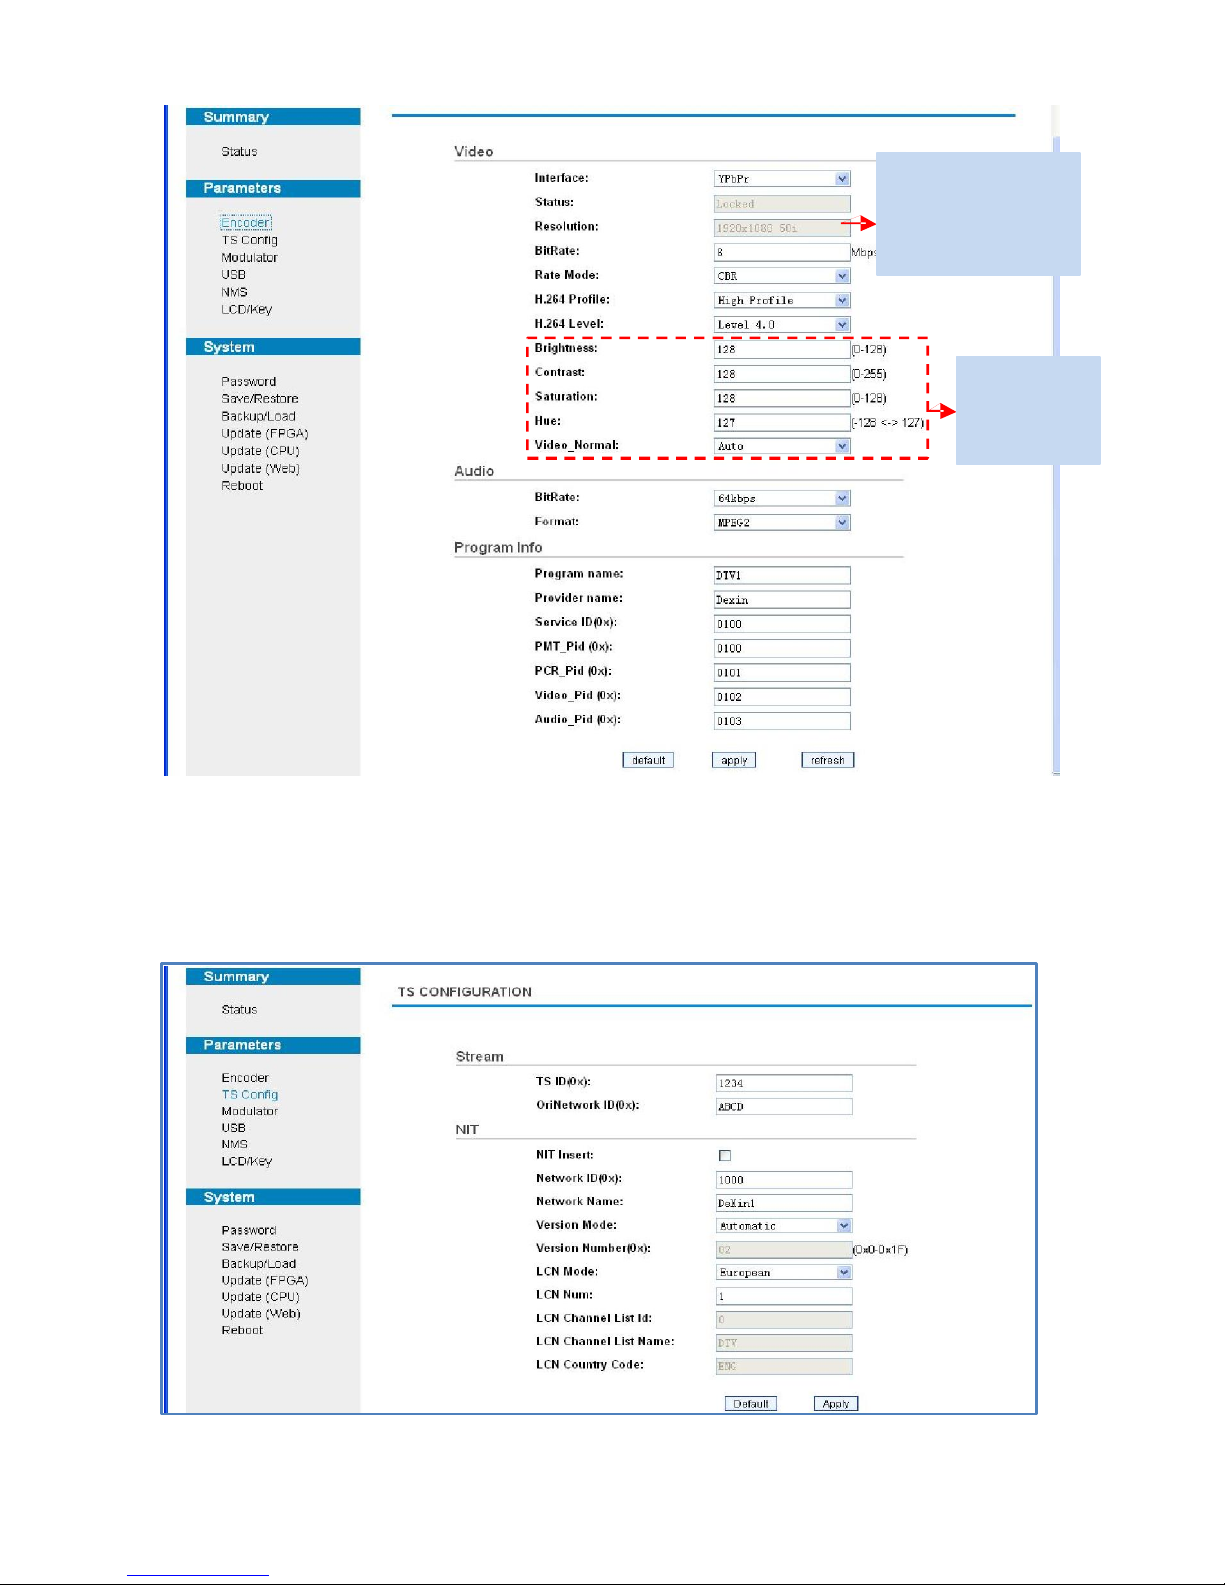
Parameters → TS Config:
Figure-3
Select an interface
according to the signal
source user connects
and intends to encode.
For configuring
CVBS/S-video
signal only
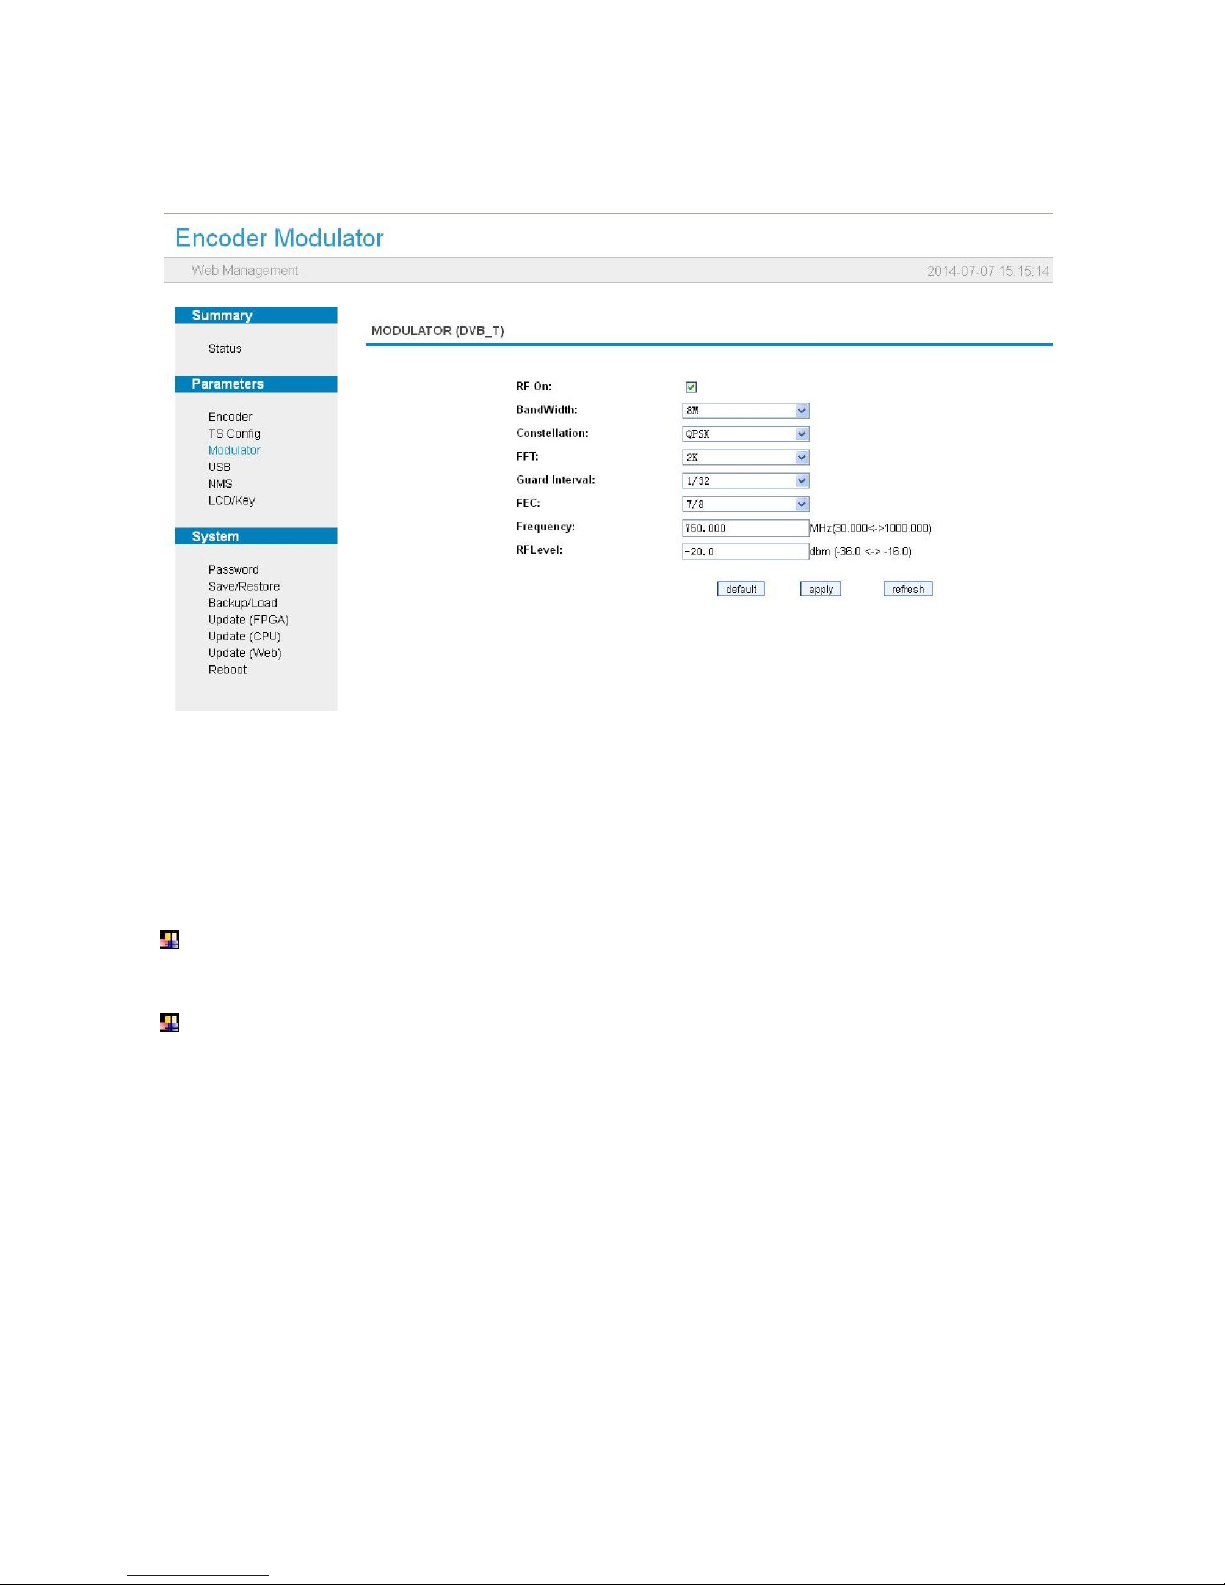
From the menu on left side of the webpage, clicking “TS Config”, it displays the
interface where users can configure the parameters for the transport stream as prompt. (Figure-4)
Figure-4
20
Page 23
Parameters → Modulator:
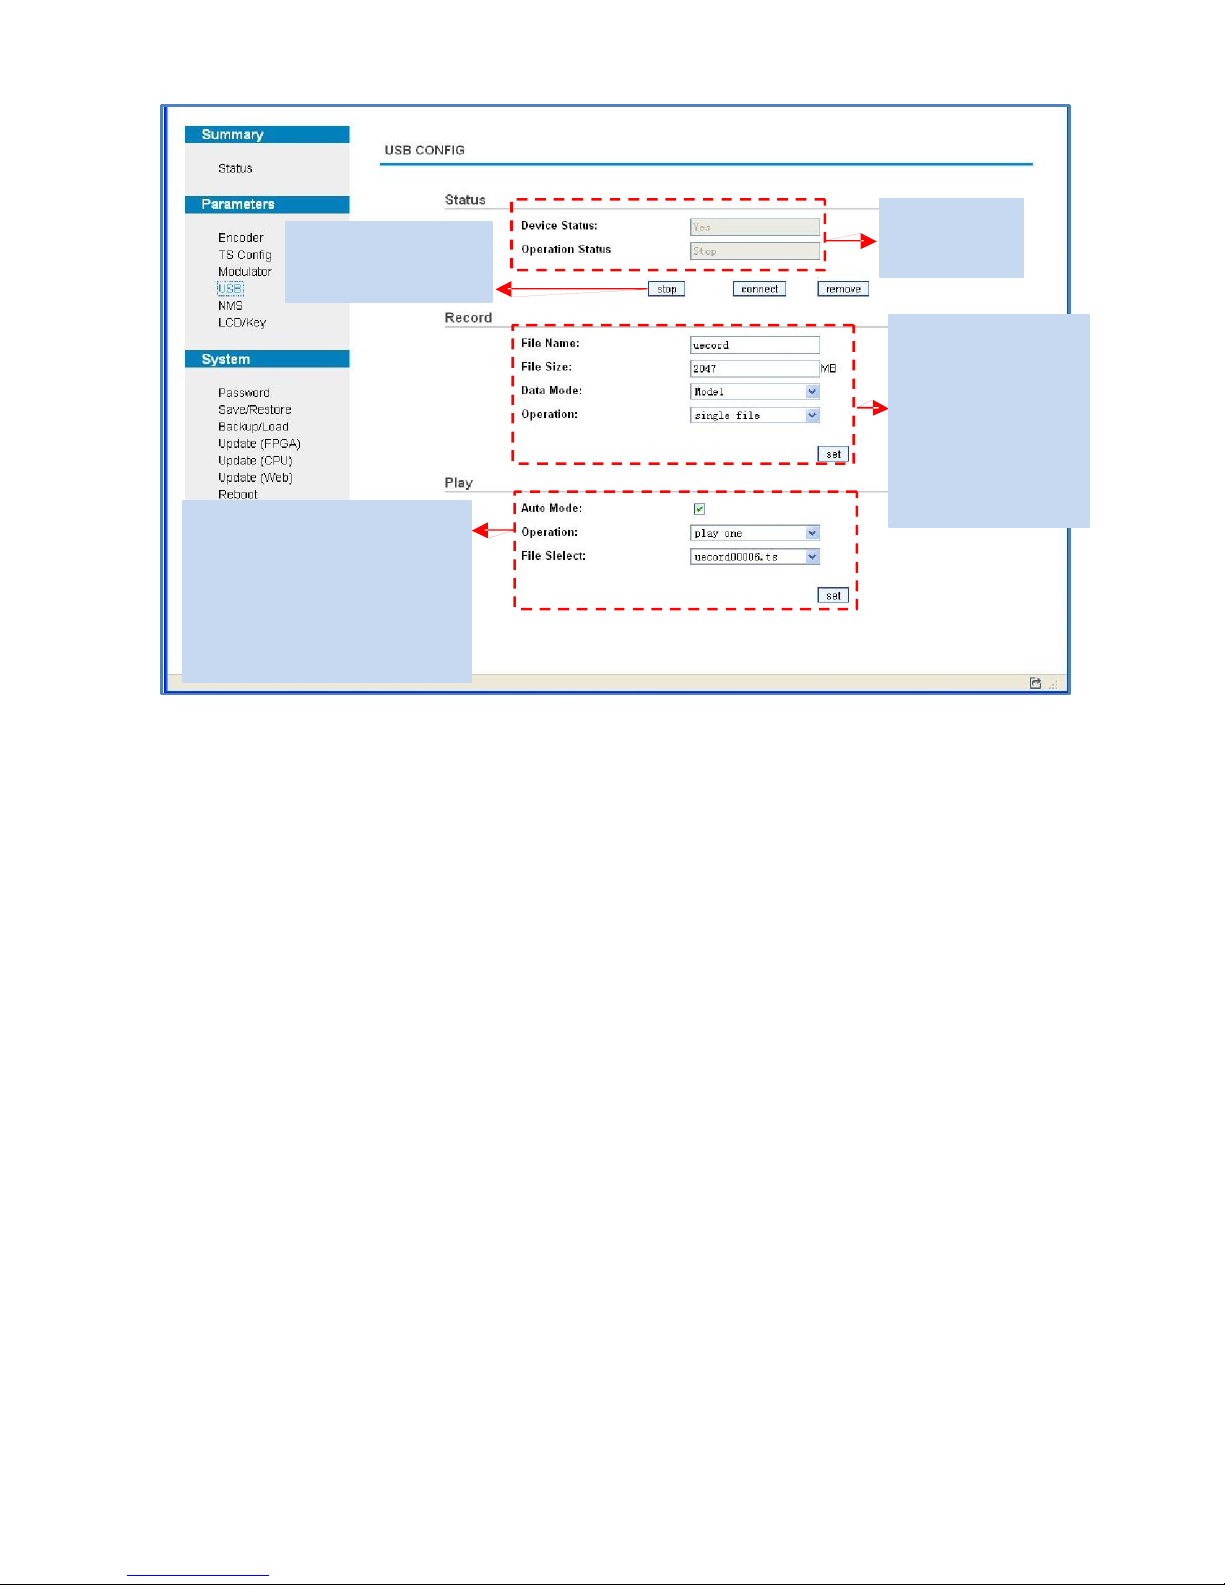
From the menu on left side of the webpage, clicking “Modulator”, it displays the
interface where users can configure the modulating parameters for the RF output. (Figure-5)
Figure-5
Parameters → USB:
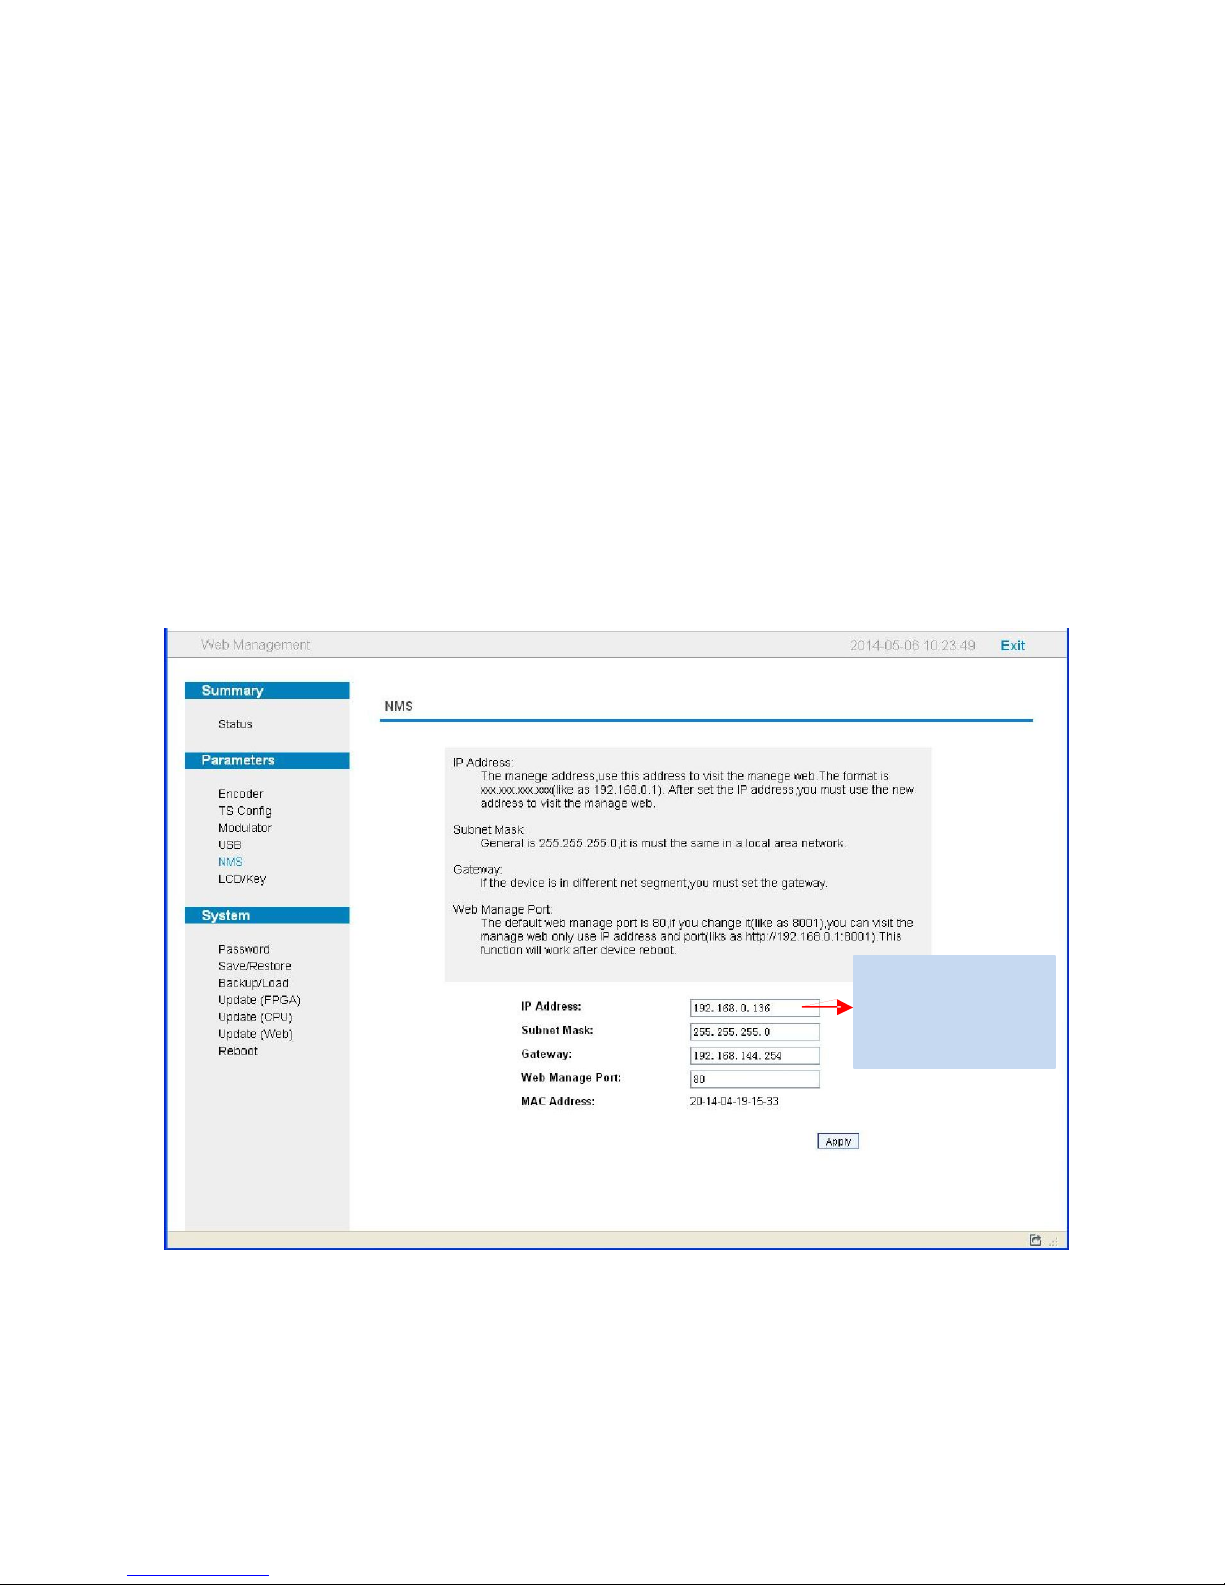
From the menu on left side of the webpage, clicking “USB”, it displays the interface where
users can operate USB device. (Figure-6)
NOTE: It is necessary to connect USB device and signal source and activate encoding to
operate TS recording.
NOTE: It is necessary to connect USB device when operate TS playing.
21
Page 24
To stop USB device
recording or playing TS
1 Configure TS playing
parameters and click ‘set’ to start
playing TS files.
2 Click ‘stop’ to stop playing TS
and the recording section above
is available to operate.
Detailed Explanation:
There are 3 record modes provided: s
Figure-6
For reading USB
device status
1. Configure TS file
parameters and click
‘set’ to start recording.
2 Click ‘stop’ to stop
recording TS and the
playing section below
is available to operate.
l “Single file”: For example, when the file size is set as 1000M and the *.ts is recorded up
to 1000M, it automatically stops recording TS.
l “Segment file”: For example, when the file size is set as 1000M and the *.ts is recorded
up to 1000M, it automatically saves the files and continues to record TS and save it to
next file until the USB memory is full.
l “Loop record”: It automatically saves the files and continues to record TS and save it to
next file. When the USB memory is full, it replaces the previous file.
Advanced Config:
File Name: Users can enter this menu to edit name for the *.ts files to be recorded. For
e
xample, if users name it “Record-”, it will give name to the saved *.ts files
“Record-001.ts”, “Record-002.ts” “Record-00N.ts”.
File Size: users can set the file size for the *.ts to be recorded. A single file can be
maximum 2047M in size.
Data Mode: There are 3 data modes:
l Mode 1 (The ts files will be saved in 188-byte packages with null packet embedded.);
22
Page 25
l Mode 2 (The ts files will be saved in 188-byte packages with null packet filtered.
However, such ts files cannot be normally played with FUTV4658, but can be played
on PC with some media player such as VLC.);
l Mode 3 (The ts files will be saved in 204-byte packages with null packet filtered.).
Playing Auto Mode:
Auto Mode is for saving the play mode for the device. When the auto mode is enabled,
the device will automatically apply the play mode set before the power cut off and
output ts files stored in the USB device through RF. While the auto mode is off, FUTV4658
will play the encoded TS through RF when the power is connected.
Parameters → NMS:
From the menu on left side of the webpage, clicking “NMS”, it displays the interface where
users set the network configuration for the device. (Figure-7)
Input this address in
the browser to connect
the device and PC.
Figure-7
Parameters → LCD/Key:
From the menu on left side of the webpage, clicking “LCD/Key”, it displays the interface
where users can set the time out for the LCD. (Figure-8)
23
Page 26
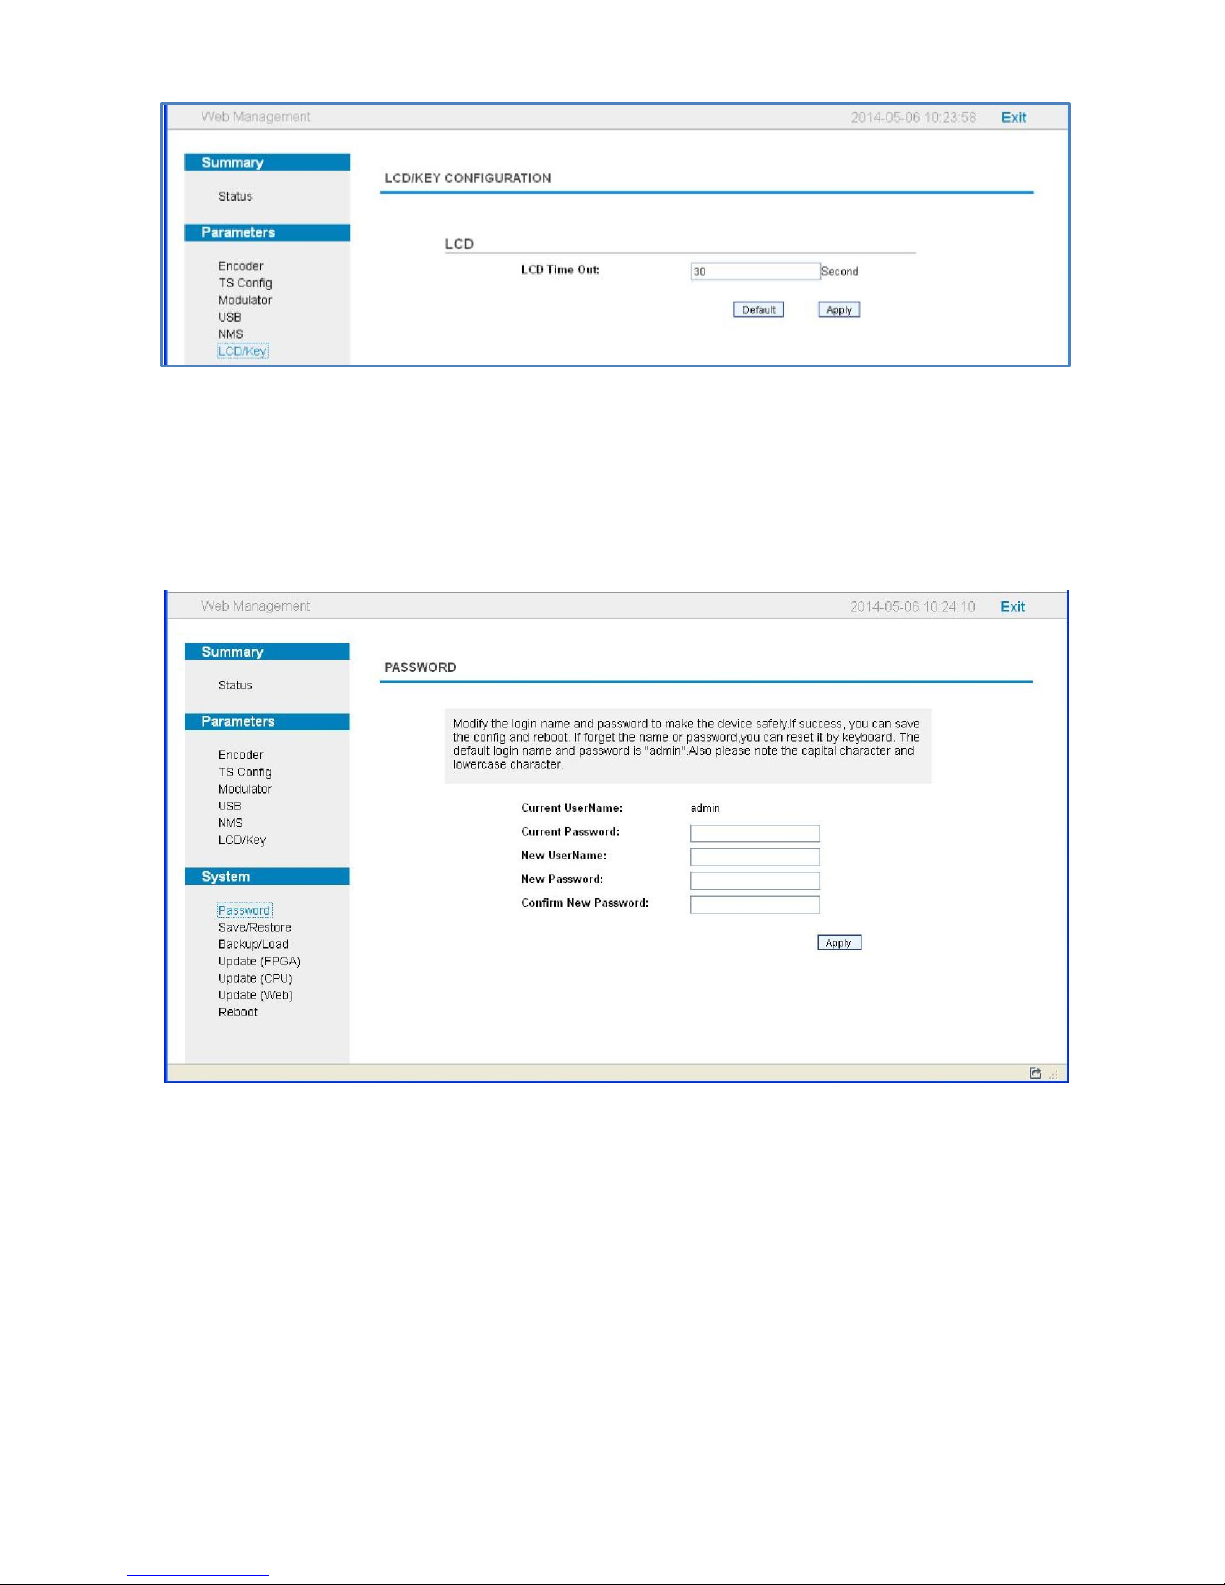
System → Password:
Figure-8
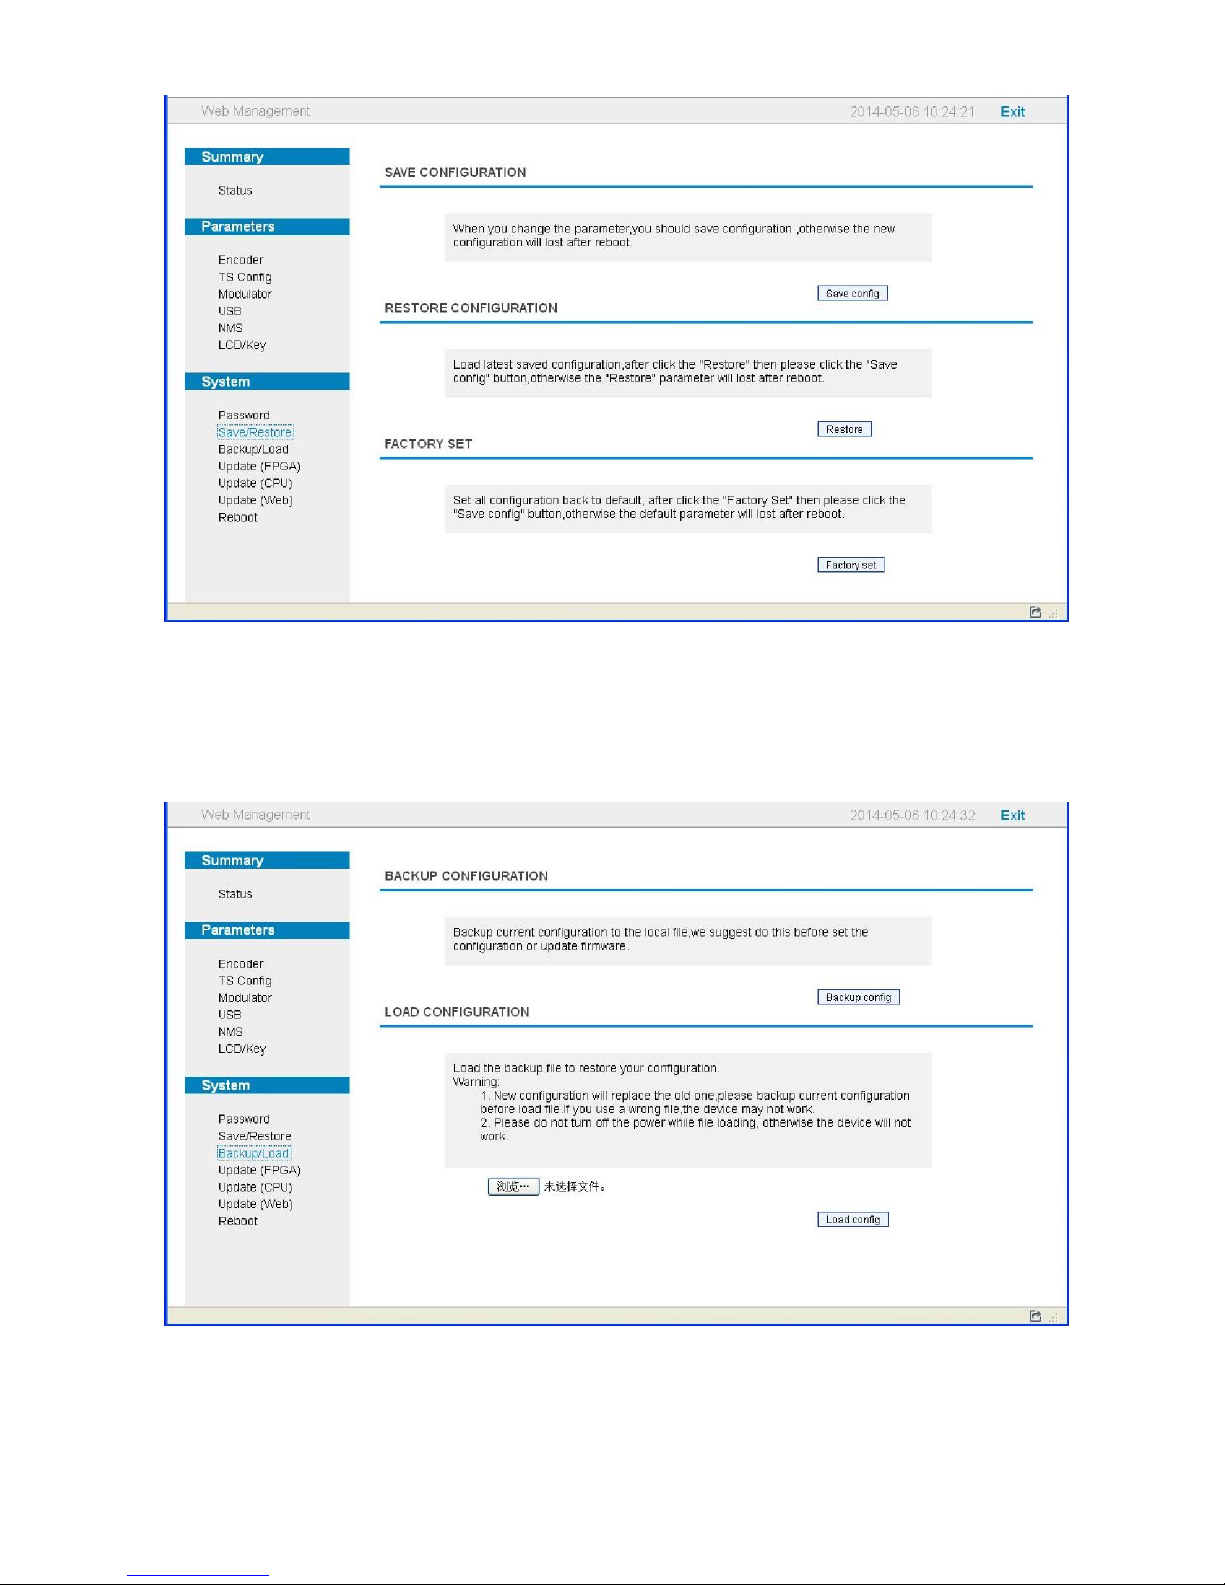
From the menu on left side of the webpage, clicking “Password”, it will display the screen as
Figure-9 where to set the login account and password for the web NMS. (Figure-9)
Figure-9
System → Save/Restore:
From the menu on left side of the webpage, clicking “Save/Restore”, it will display the screen
as Figure-10 where to save or restore your configurations.
24
Page 27
System → Backup/Load:
Figure-10
From the menu on left side of the webpage, clicking “Backup/Load”, it will display the screen
as Figure-11 where to backup or load your configurations.
Figure-11
System → Update (FPGA)/(CPU)/(Web):
From the menu on left side of the webpage, clicking “Update”, it will display the screen as
25
Page 28
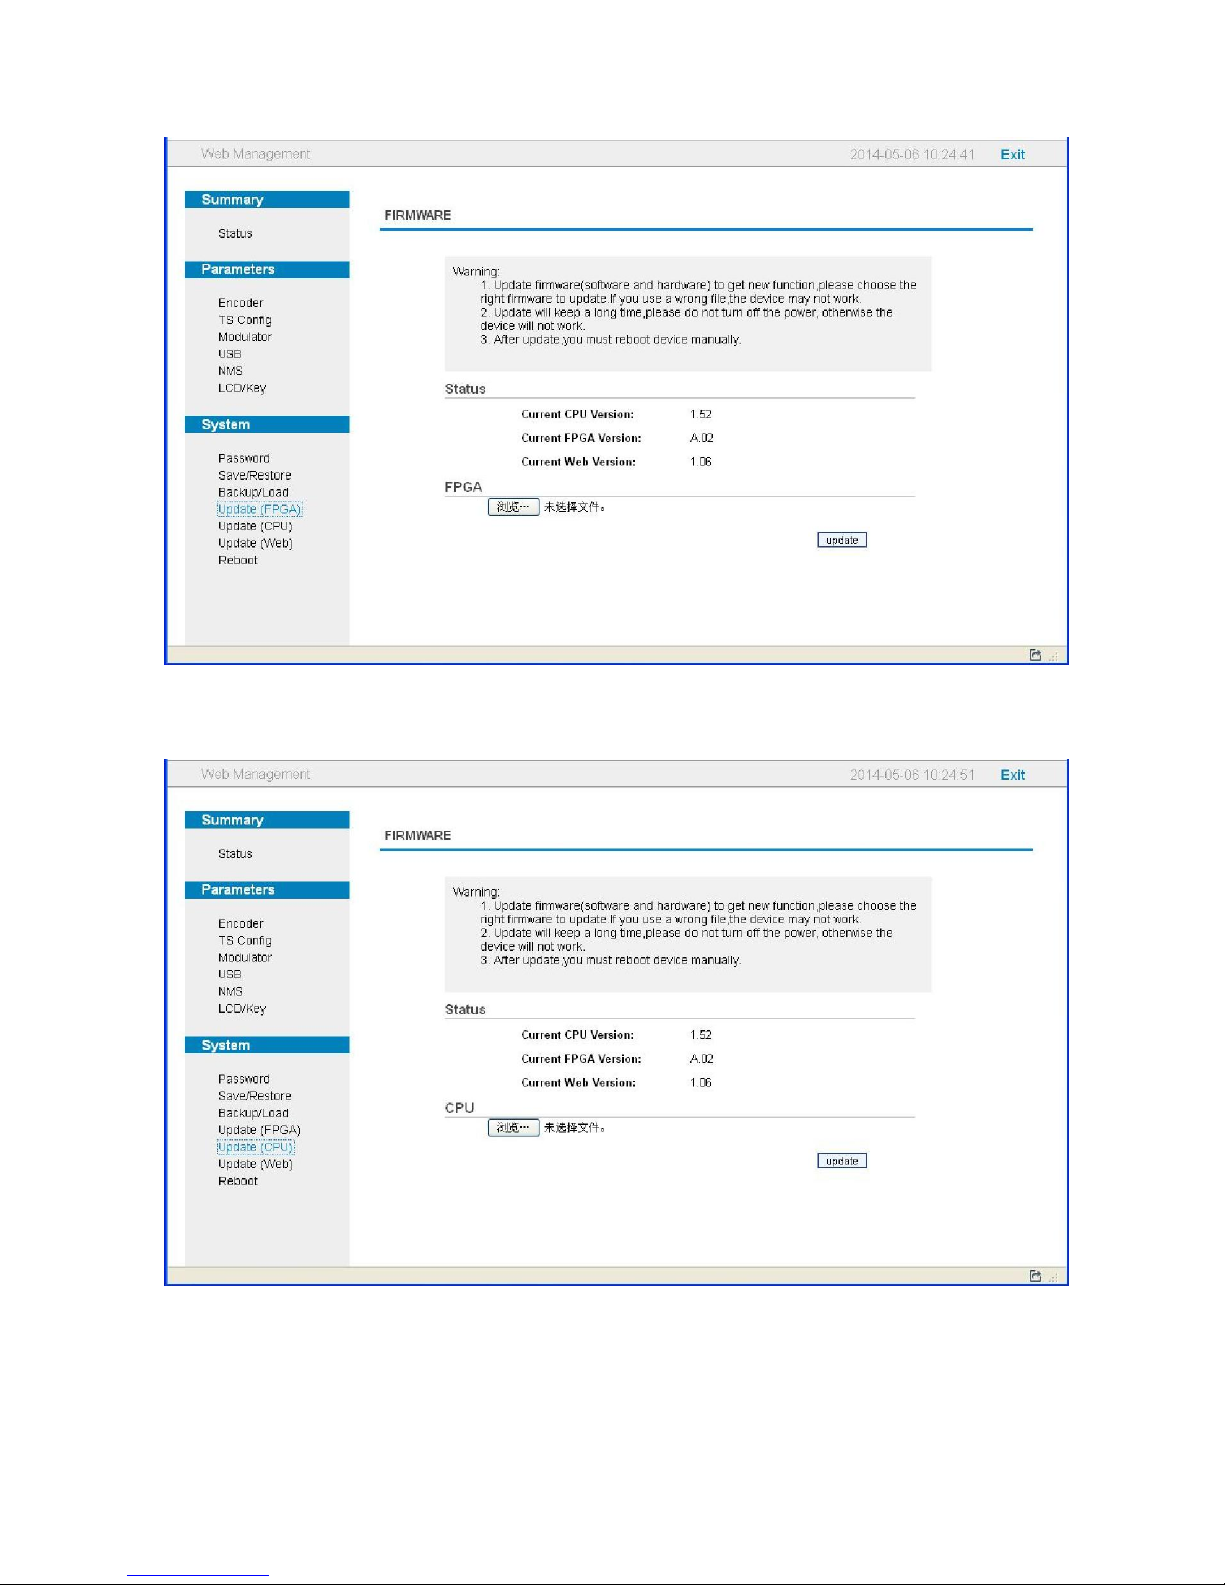
Figure-12-14 where to update the corresponding part for the device.
Figure-12
Figure-13
26
Page 29
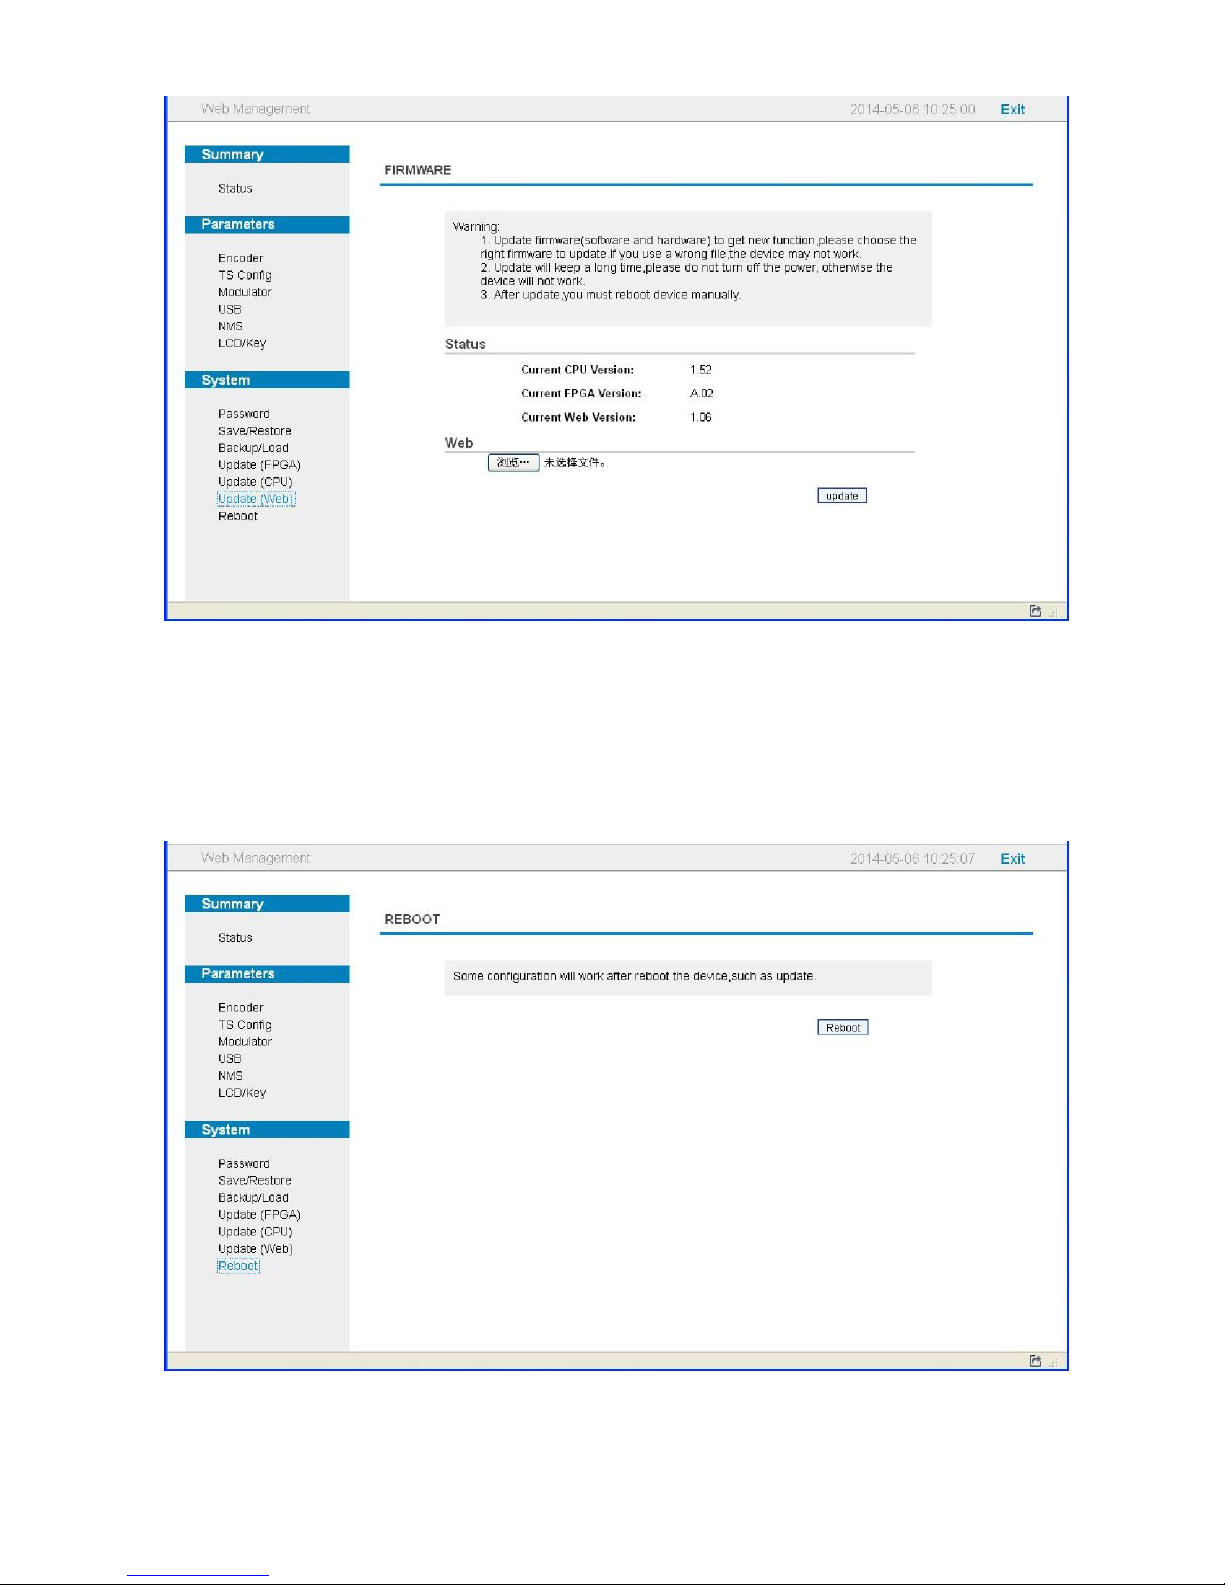
System → Reboot:
Figure-14
From the menu on left side of the webpage, clicking “Reboot”, it will display the screen as
Figure-15 where to restart the device manually.
Figure-15
27
Page 30
Ch.
Australia Air Channels
Frequency
Appendix
Ch.
Australia Air Channels
Frequency
Start Center End
VHF
C00 45 48.5 52
C01 56
59.5 63
C02 63
66.5 70
C03 85
88.5 92
C04 94 97.5 101
C05 101
104.5
108
C5A 137
140.5
144
C06 174
177.5
181
C07 181
184.5
188
C08 188
191.5
195
C09 195
198.5
202
C9A 202
205.5
209
C10 209
212.5
216
C11 216
219.5
223
C12 223
226.5
230
UHF
C20 470
473.5
477
C21 477 480.5 484
C22 484
487.5
491
C23 491
494.5
498
C24 498
501.5
505
C25 505
508.5
512
C26 512
515.5
519
C27 519
522.5
526
C28 526
529.5
533
C29 533
536.5
540
C30 540
543.5
547
C31 547
550.5
554
C32 554
557.5
561
C33 561
564.5
568
C34 568
571.5
575
C35 575
578.5
582
C36 582
585.5
589
C37 589
592.5
596
Start Center
End
C38 596
599.5
603
C39 603
606.5
610
C40 610
613.5
617
C41 617
620.5
624
C42 624
627.5
631
C43 631
634.5
638
C44 638
641.5
645
C45 645
648.5
652
C46 652
655.5
659
C47 659
662.5
666
C48 666
669.5
673
C49 673
676.5
680
C50 680
683.5
687
C51 687
690.5
694
C52 694
697.5
701
C53 701
704.5
708
C54 708
711.5
715
C55 715
718.5
722
C56 722 725.5 729
C57 729
732.5
736
C58 736
739.5
743
C59 743
746.5
750
C60 750
753.5
757
C61 757
760.5
764
C62 764
767.5
771
C63 771
774.5
778
C64 778
781.5
785
C65 785
788.5
792
C66 792
795.5
799
C67 799
802.5
806
C68 806
809.5
813
C69 813 816.5 820
C70 820
823.5
827
C71 827
830.5
834
C72 834
837.5
841
C73 841
844.5
848
C74 848
851.5
855
C75 855
858.5
862
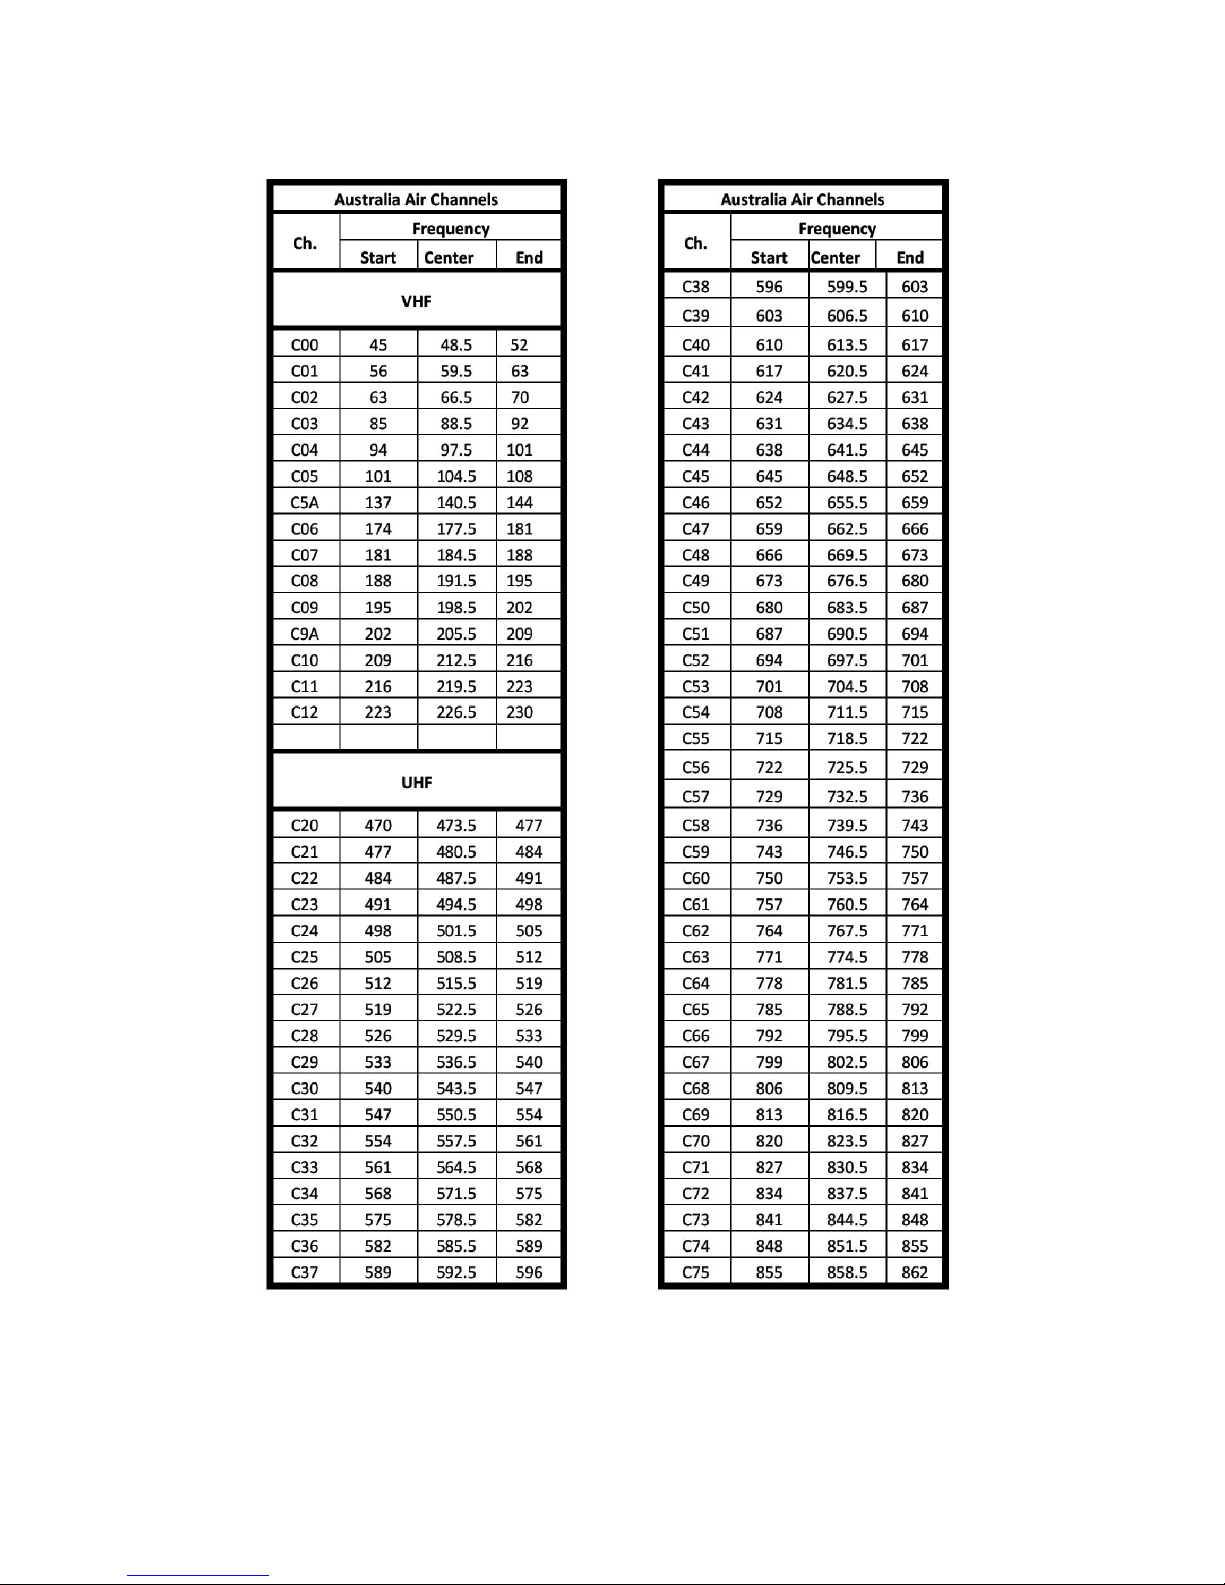
Table 1 Australia Television Frequency/Channels (MHz)
28
Page 31
Modulation
Constellation
FEC
6MHz Bandwidth
Guard Interval
7MHz Bandwidth
Guard Interval
8MHz Bandwidth
Guard Interval
1/4 1/8 1/16 1/32 1/4 1/8 1/16 1/32 1/4 1/8 1/16 1/32
1/2
The weak ability of error-correcting and anti-interference in this area
6.03
QPSK
2/3
3/4
6.03 5.80 6.45 6.83 7.03 6.64 7.37 7.81 8.04
6.22 6.58 6.78 6.53 7.25 7.68 7.91 7.46 8.29 8.78 9.05
16QAM
64QAM
5/6 6.22 6.91 7.31 7.54 7.25 8.06 8.53 8.79 8.29 9.22 9.76
10.05
7/8 6.53 7.25 7.68 7.91 7.62 8.46 8.96 9.23 8.71 9.68 10.25 10.56
1/2 7.46 8.29 8.78 9.04 8.70 9.67 10.24 10.55 9.95 11.06 11.71 12.06
2/3 9.95
11.05 11.70 12.06
11.61 12.90 13.66 14.07 13.27 14.75 15.61 16.09
3/4 11.19 12.44
13.17 13.57
13.06 14.51 15.36 15.83 14.93 16.59 17.56 18.10
5/6 12.44 13.82
14.63 15.08
14.51 16.12 17.07 17.59 16.59 18.43 19.52 20.11
7/8 13.06 14.51
15.36 15.83
15.24 16.93 17.93 18.47 17.42 19.35 20.49 21.11
1/2 11.19 12.44
13.17 13.57
13.06 14.51 15.36 15.83 14.93 16.59 17.56 18.10
2/3 14.92 16.58
17.56 18.09
17.41 19.35 20.49 21.11 19.91 22.12 23.42 24.13
3/4 16.79 18.66
19.76 20.35
19.59 21.77 23.05 23.75 22.39 24.88 26.35 27.14
5/6 18.66 20.73
21.95 22.62
21.77 24.19 25.61 26.39 24.88 27.65 29.27 30.16
7/8 19.59 21.77
23.05 23.75
22.86 25.40 26.89 27.71 26.13 29.03 30.74 31.67
Table 2 Recommended MPEG-2 Code Rate
Page 32
FMUSER INTERNATIONAL GROUP INC. 广州市汉婷生物技术开发有限公司
32 / 32
 Loading...